Table of Contents HOL-SDC-1307
|
|
|
- Reginald Harry Nichols
- 5 years ago
- Views:
Transcription
1 Table of Contents Lab Overview vcloud Automation Solutions... 4 Module 1 - Enable Rapid Host Provisioning and Centralized Management with vsphere Auto Deploy... 6 Module Overview... 7 Case Study, Introduction, and Lab Basics... 8 Verify the size of Auto Deploy repository Verify PowerCLI Launches Verify that the Auto Deploy service is running on vcenter Verify DHCP Manager is Working Verify DNS Verify TFTP Server Verify vsphere Web Client Access Obtain MAC and Configure DHCP, DNS, TFTP Download TFTP Boot Zip File Prepare the TFTP Server to receive the Boot files Create host profile Configure host profile / host customization Prepare the ESXi Depot Image Create deploy rules Rebooting the ESXi host and applying host configuration Verifying The Installation of ESXi Image Summary Module 2 - Introduction and new features in PowerCLI Module Overview Getting Started With PowerShell and PowerCLI Executing commands Using PowerCLI for reporting Assigning tag to a VM Introduction to vcloud Director PowerCLI Importing a vapp from vcenter Server to vcloud Director Opening a console to a VM Further Reading Module 3 - VDS automation with PowerCLI Module Overview Getting Started With PowerShell and PowerCLI Adding ESX to the vcenter Server Backing up a VDS Adding an ESX host to a virtual distributed switch and migrating host networking Creating new distributed portgroup and configuring its vlan settings Migrating VM networking to the vds Page 1
2 Configuring traffic shaping policy of the portgroup Configuring security policy of the portgroup Migrating networking back to the standard switch Restoring VDS from backup Further Reading Module 4 - Active Directory Automation with vco vco Active Directory Plug-in Overview Discover the vco Active Directory Plug-in Add User to Group with the vco Plug-in Disable a User with the vco Plug-in Destroy a User with the vco Plug-in Create Computer Object with the vco Plug-in Destroy Computer Object with the vco Plug-in Page 2
3 Lab Overview Page 3
4 - vcloud Automation Solutions VMware vcloud Automation Solutions accelerate the journey to a lights-out, fully automated, and efficient Software-Defined Datacenter. vcenter Server, Orchestrator, PowerCLI, and AutoDeploy - working together to solve real-world problems. There are considerable benefits to be gained by understanding and leveraging these tools to improve efficiency in datacenter operations. This lab's modules will focus on integration with vcenter Server. Orchestration and automation integrations with vcloud Automation Center are explored in HOL-SDC This lab is broken up into 4 individual use case modules with lengths varying from 30 to 60 minutes. Use the "Modules" list to determine which use case you want to complete. You may choose to complete any or all modules, keeping in mind you have 90 minutes available per session. Modules do not depend on each other, so you can take them in random order. Use the "Table of Contents" button in the menu bar for quick access to the module content. Modules Module 1 - Enable Rapid Host Provisioning and Centralized Management with vsphere Auto Deploy (60 min) Module 2 - Introduction and new features in PowerCLI 5.5 (45 min) Module 3 - VDS automation with PowerCLI (45 min) Module 4 - Active Directory Automation with vco (30 min) Module 1 Overview In this module, we will demonstrate the technologies and the steps required to implement Auto Deploy to support stateless ESXi hosts for upgrading hosts or rapidly deploying new hosts. This module will take you through the process of preparing the infrastructure, preparing the Boot Image and Rules, steps to configure servers and finish with an upgrade to one ESXi host from version 5.1 to version 5.5. You will need about 60 minutes to complete the module. Module 2 Overview This module will introduce you to VMware vsphere PowerCLI - the administrator's choice for automating vsphere and vcloud Director. Novice users will easily learn to use the tool and more advanced users will get familiar with the new functionality available in the latest release of the product like vsphere tags management and opening a VM console. We will demonstrate how to perform common administrator tasks in both vsphere and vcloud and how easy it is to migrate to and manage the vcloud. You will walk away with a better understanding of PowerCLI and how it can help you in your day- Page 4
5 to-day work. You will need about 45 minutes to complete the module. Module 3 Overview This module will introduce you to the new VMware vsphere PowerCLI cmdlets for virtual distributed switch (vds) automation. We will demonstrate how to perform common VDS related tasks with PowerCLI. You will walk away with better understanding of PowerCLI and how it can help you in your day-to-day work. You will need about 45 minutes to complete the module. Module 4 Overview In this module we will demonstrate how the vcenter Orchestrator Active Directory plugin allows organizations to automate the management of directory services tasks, particularly as they pertain to cloud provisioning use cases. For instance, the plug-in enables the automatic provisioning of vcloud Director organizations based on data retrieved from Active Directory. The plug-in also includes many administrative actions related to computers, organizations, user groups, and users, such as resetting passwords or adding users to a user group. The drag-and-drop workflow designer of vcenter Orchestrator allows you to easily assemble these actions into higher-level workflows to automate repetitive Active Directory administrative tasks. You will need about 30 minutes to complete the module. Page 5
6 Module 1 - Enable Rapid Host Provisioning and Centralized Management with vsphere Auto Deploy Page 6
7 Module Overview In this lab, we will demonstrate the technologies and the steps required to implement Auto Deploy to support stateless ESXi hosts for upgrading hosts or rapidly deploying new hosts. This lab will take you through the process of preparing the infrastructure, preparing the Boot Image and Rules, steps to configure servers and finish with the deploy to one new ESXi host version 5.5. This lab will take approximately 60 minutes. Each Lesson builds on the previous lesson, so make sure to complete each lesson before moving to the next lesson. Page 7
8 Case Study, Introduction, and Lab Basics This introduction gives you a little background about our company scenario and lab architecture. Case Study The CIO of BigTelco has decided to implement a cloud-enabled datacenter to accommodate the agility and scalability requirements of their customers. He is in the final stage of closing an agreement with the CIO of Rainpole Systems, a software development firm that is interested in having BigTelco host their cloud infrastructure. For Rainpole Systems, this new cloud initiative will help redefine their development model and radically improve time to market for a wave of new customer facing applications. RainPole has asked for the ability to rapidly deploy and maintain hundreds of servers within hours to meet potential demand. In an effort to prepare for the cloud computing partnership, the infrastructure teams at BigTelco have committed to spinning up VMware vsphere Servers on demand to host RainPole System's new projects. To streamline the numerous server deployments, the CIO has asked you and your team of engineers to find the best way to adapt BigTelcos cloud environment for this new challenge. You and your team have decided to leverage VMware vsphere Auto-Deploy and Stateless ESXi features. What is Auto Deploy? Auto Deploy was first introduced with vsphere 5.0 as a new way to rapidly deploy vsphere hosts. With Auto Deploy the vsphere host loads the ESXi software image over the network directly into the vsphere host's memory. Auto Deploy uses a PXE boot infrastructure in conjunction with vsphere Host Profiles to provision and customize the host. vcenter Server manages the state information for each host configured to use Auto Deploy. For this reason Auto Deployed vsphere hosts are often referred to as being "stateless". The Auto Deploy server stores the ESXi Image Profiles and vcenter Host Profiles that are used to provision and configure vsphere Hosts in a local cache. Rules are configured on the Auto Deploy server (using PowerCLI) that use pattern matching to dynamically map booting vsphere hosts to the appropriate image profiles and host profiles. Environment Overview The diagram above shows the high-level architecture for the Auto Deploy lab. Page 8

9 Auto Deploy Components Auto Deploy Server - Serves images and host profiles to ESXi hosts. The Auto Deploy server is at the heart of the Auto Deploy infrastructure. The Auto Deploy server is made up of a rules engine and web server. Auto Deploy Rules Engine - Tells the Auto Deploy server which image profile and host profile to serve to each host and where to place the host in the vcenter inventory. Administrators use the Auto Deploy cmdlets provided with PowerCLI to define the rules that assign image and host profiles to hosts. Auto Deploy Web Server - Used to boot hosts and deploy the ESXi Image Profile. The web server uses HTTPS for both the host boot and Image Profile exchange. Image Profiles - Collection of VIBs that make up the ESXi image installed on vsphere hosts. Image profiles are created using the Image Builder CLI cmdlets provided with PowerCLI. Software Depot - VMware and its partners make image profiles and VIBs available in public depots. Use the Image Builder PowerCLI to customise image profiles and upload them to the Auto Deploy Server. VMware customers can create a custom image profile based on the public image profiles and VIBs in the depot and apply that image profile to the host. Host Profiles - Define machine-specific configuration such as networking or storage setup. Administrators create host profiles by using the host profile UI. You can create a host profile for a reference host and apply that host profile to other hosts in your environment for a consistent configuration. Host Customization - Stores information that the user provides when host profiles are applied to the host. Host customisation might contain an IP address or other information that the user supplied for that host. Page 9

10 Auto Deploy and PowerCLI The table above describes the deployment information stored by the Auto Deploy Server. The Auto Deploy server stores the ESXi Image Profiles and vcenter Host Profiles that are used to provision and configure vsphere Hosts in a local cache. Rules are configured on the Auto Deploy server (using PowerCLI) that use pattern matching to dynamically map booting vsphere hosts to the appropriate image profiles and host profiles. Hosts deployed using Auto Deploy run in memory and do not require local storage. This helps reduce costs and simplify storage architectures by eliminating the need for a dedicated boot disk (SAN Boot, local hard disks, SD Cards or USB keys). Page 10
11 Control Center Desktop When you start the lab, the system you first access is referred to as the ControlCenter. On the ControlCenter Desktop you will find shortcuts to applications you will use throughout the lab. **Note: depending on screen resolutions of the Lab, your icons may reposition themselves and not be arranged as in the image above. Logins and Passwords Rainpole has established default logins and passwords for all personnel. Since you will be the administrator for these servers, you will be using your domain administrator account for much of the installs. Unless otherwise noted, the default Login ID and Passwords for this lab are: User Name: administrator Domain: corp.local Password: VMware1! Backup File During this lab we will have to enter some long commands on the command line and also take note of some information so we can use it later. To make this easier, you will find a file named cheatsheet.txt on the desktop. This file has all the passwords, Page 11
12 command line entries, and information that we will need for this lab. Feel free to open this file and copy/paste from it. Page 12
13 Verify the size of Auto Deploy repository We'll now verify that the size reserved for the Auto Deploy repository is big enough to handle our ESXi image. Page 13
 3.")
14 Login to the vcenter Server Appliance 1. Launch Internet Explorer from the Windows Quick Launch bar 2. Login as username: root and password: VMware1! Hint: Copy and paste key-ins from the cheatsheet.txt file on the desktop or use the "Send Text" button in the HOL browser user interface just under the VM console. (OSK.exe can also assist non-qwerty keyboard users.) 3. Click the Login button Services Tab 1. Click on the Services tab Page 14

15 2. Make sure the vsphere Auto Deploy repository max size is set to Logout of the vcenter Server Appliance. Click Logout user root. Close Internet Explorer Page 15

16 Verify PowerCLI Launches We will use PowerCLI to create some rules that will make Auto Deploy install ESXi on the fly just on the machines that meet those rules. This will avoid Auto Deploy to try to install ESXi on every server that boots up. We should verify that PowerCLI is running as it is used to upload the ESXi images we will be pushing out and is also used by vcenter Auto Deploy to execute a set of user-defined rules that guide the configuration of the ESXi instance. Launching PowerCLI In order to save time in this lab, PowerCLI has been preinstalled and configured. You will need to check that it launches correctly. From the ControlCenter desktop launch the VMware vsphere PowerCLI as Administrator: 1. Right-Click the "VMware vsphere PowerCLI" Shortcut 2. From the pop-up menu, select Run As Administrator. Note: PowerCLI could take up to 90 seconds to load Page 16

17 Connect to vcenter We will connect to the vcenter Server Appliance using the corp\administrator account. Please type the following commands (Please watch out for the spaces): 1. Type: cd \ 2. Connect to vcenter, type: connect-viserver vc-l-01a.corp.local -user corp\administrator -password VMware1 ** Note: It will take up to 15 or 20 seconds to connect to the vcenter Server Appliance. **Note: you might receive a certificate warning. This is because we are using a self signed certificate, please ignore it. Minimize the PowerCLI command prompt Page 17

18 Connected Successfully You should receive verfication that you were able to connect to vcenter. Page 18
19 Verify that the Auto Deploy service is running on vcenter The first thing we need to do is to check that Auto Deploy service is up and running with the vcenter. This is the heart of the solution. To verify that the Auto Deploy Service is running on vcenter Server 1. Launch Internet Explorer and connect to or Click Site A vcenter Admin UI in the favorites bar. 2. Login to the vcenter Server Appliance with the following account: Username root Password: VMware1! Page 19

20 Login Image Auto Deploy Service Once logged in you will be on the Summary screen, towards the bottom of the screen you can see the vcenter services that are running, check that the 'vsphere Auto Deploy' service is running, if it's not running you can click Start to the right of the vsphere Auto Deploy service. Page 20

21 Auto Deploy Service Running Image If the Auto Deploy service is not running, start it by clicking on the start button next to the vsphere Auto Deploy under services. We need the Auto Deploy Service running because this is the main service responsable for the installation of the ESXi image on the fly. Page 21
22 Verify DHCP Manager is Working Now we will begin verifying that the basic systems that form the foundation of the solution are working. Auto Deploy uses theses services to boot and configure the host images. The first system that we will check is the DHCP Server.We need the DHCP Server working so it can assign the right IP address to the machine that we are going to install ESXi on. Page 22

23 Launching DHCP Server Console 1. From the ControlCenter desktop, Launch the DHCP Manager 2. Expand the controlcenter.corp.local scope 3. Make sure the IPv4 scope is active and shows a checkmark 4. Expand Scope [ ] Rainpole Minimize DHCP Page 23

24 Verify DNS Next, we will need to check the DNS Server and the Forward Lookup Zone "corp.local" to ensure there are entries for our hosts. DNS resolution is critical, because after our host receives an IP address, vcenter will be attempting to communicate with it by fully qualified domain name. We also need to check the Forward Lookup zones and see if there are entries for our hosts. Launching DNS Server Console We want to ensure that our ESXi Hosts names and IP addresses are recorded in the appropriate DNS zones. We require a Forward and Reverse lookup entry for ESXi hosts. 1. From the ControlCenter desktop, Launch DNS by double-clicking the shortcut. 2. Expand "Forward Lookup Zone" 3. Expand the zone "corp.local" 4. Verify DNS entries as shown above. Specifically look for the ESX-01a and ESX-02a entries. Minimize DNS Page 24

25 Verify TFTP Server Now we'll check on the TFTP Server. The TFTP Server will be used to hold the boot file with the configuration information to be used by the deployed ESXi host. The TFTP Server's address will be specified in a future step as a DHCP Scope Option. For now, let's just ensure we can connect to it. Launch TFTP Server Manager 1. From the ControlCenter desktop, Launch TFTP Server Manager by double-clicking the shortcut. 2. Connect to the Local Server as the current Windows user. 3. Click OK. 3. Verify you can have connected to the TFTP folder (the folder is currently empty and you should just see \ ) Minimize TFTP Server Manager Page 25
26 Verify vsphere Web Client Access The last part of the basic systems check is to see if our vcenter Web Console is up and running. We can do that by simply logging into it. The vcenter Web Client is a major part of our lab. It is here that we will add our new ESXi host once it gets installed. Page 26

27 Launch vsphere Web Client 1. From the ControlCenter desktop, Launch Internet Explorer by double-clicking the shortcut. 2. On the Favorites bar click on "Site A vsphere Web Client". 3. Enter the following username and password: Username: corp\administrator Password: VMware1! 4. Click Login. Once you've successfully logged in, minimize the vsphere Web Client Page 27
28 Obtain MAC and Configure DHCP, DNS, TFTP Now that we have verified that our DHCP, DNS, and TFTP Services are running, we will configure them in preparation for use with Auto Deploy. Before our new host boots and attempts to connect to services, we want to obtain it's MAC address from vcenter and configure a DHCP reservation. DHCP reservations are permanent lease assignments that ensure a machine will always be assigned the same IP Address and the machine's unique MAC address is used as an identifier in this process. Address consistency is important because there are DNS records associated with the IP and these are used to identify our host when it connects to vcenter and to ensure we push the correct profile each time. Page 28
 1. Click on the Home Tab. 2.")
29 Obtaining the MAC Address: Open the vsphere Web Client Maximize the vsphere Web Client (If you closed the IE or Chrome browser, open it again and go to the URL log in using the user: corp\administrator password: VMware1!) 1. Click on the Home Tab. 2. Click on Hosts and Clusters Page 29
 3.")
30 Obtaining the MAC Address: Select the ESX Nested Host Next 1. Expand the inventory tree on the left (vc-l-01a -> Datacenter Site A -> Cluster Site A) 2. Click on the esx-03a VM (For this lab we are using a nested ESXi, which means that our ESXi server is virtualized, this is used only in labs and should not be used in production) 3. Click on the Summary Tab 4. Expand Network Adapter 1 5. Note the assigned MAC Address 00:50:56:82:f1:d8 Configuring a New DHCP Reservation Maximize the DHCP server window (If you closed the DHCP Server window open it again using the shortcut on your desktop) Page 30

31 1. Expand the scope 2. Right click on Reservations and select New Reservation DHCP Reservation Details 1. Enter the details for the ESXi Host: Reservation name = esx-03a.corp.local IP address = MAC address = f1d8 Page 31

32 Description = AutoDeploy Reservation 2. For support types select Both 3. Click Add Note that the MAC address entered in step 1 is the one obtained earlier from vcenter for esx-03a Page 32

33 Configure DHCP Reservation Scope Options Next, we need to set the Scope Options for the DHCP server. To do this, specify the TFTP Server and the default image it will use to boot. 1. If the Scope is not expanded, expand Scope [ ] Rainpole 2. Right Click on the reservation you just created 3. Select Configure Options Page 33

34 Edit DHCP Scope Option 66 You are now presented with a DHCP Scope Configuration Dialog window. 1. Scroll down to the "066 Boot Server Host Name" and select it. 2. Edit the values. Enter in the String Value box. 3. Select Apply Page 34

35 Edit DHCP Scope Option Scroll down to the "067 Bootfile Name" and select it. 2. Edit the string value. Enter undionly.kpxe.vmw-hardwired in the string value box 3. Click Apply 4. Click OK. ** Note: we will be adding this file in a later step. This file is generated by the vcenter Auto Deploy as the boot file. You can now close or minimize DHCP Manager. Edit DNS Reopen or maximize the DNS management console to edit the DNS Entry for our host esx-03a.corp.local 1. Expand the DNS tree 2. Expand Forward Lookup Zones> Corp.local zone. Page 35

36 3. Find the ESX-03a entry, Right Click it and select Properties Page 36

37 Create a DNS Entry Fill the DNS Entry details for our host esxi-03a.corp.local 1. If needed, edit the IP address to match the IP address used on our reservation, Enable "Update associated pointer (PTR) record" 3. Click OK Page 37

38 Verify DNS Entry is Working 1. Click Start 2. Select Command Prompt Page 38

39 Verify Name Resolution Using NSLOOKUP At the command prompt, type the following command: nslookup NSLOOKUP should return the valid name for the host we added to DNS in the previous step. Close the command prompt window. Page 39
. If you closed the browser, please open IE again and access the following URL: https://vc-l-01a.corp.")
40 Download TFTP Boot Zip File Now that we already configured all the basic systems, we need to download the boot file from the vcenter server. Access The vsphere Web Client Maximize the vsphere Web Client (IE). If you closed the browser, please open IE again and access the following URL: or click on the shortcut in IE named Site A vsphere Web Clientand re-authenticate to vcenter. Within the vcenter Web Client: 1. Select Home 2. Select vcenter Page 40

41 Select the vcenter Inventory List 1. Select vcenter Servers from Inventory Lists Page 41

42 Download the TFTP Boot 1. Select vc-l-01a 2. Select Manage tab 3. Select Autodeploy from the list under Settings 4. Click on Download TFTP Boot Zip Page 42
.")

43 Accept the Certificate Click Continue to this website (not recommended). You are receiving this warning because in this lab we are using a self generated certificate. Save the TFTP Boot File 1. At the bottom select the arrow next to the save button and select Save as Page 43
 Folder 3.")
44 Save as Window 1. When the Save As window appears, Save the file to the folder: C:\TFTP_Root 2. Ensure the file name is "deploy-tftp", Save as type: Compressed (zipped) Folder 3. Click Save button Page 44

45 Extract The TFTP Boot File Open the Windows Explorer, then: 1. Navigate to C:\TFTP_Root. Right click on the file deploy-tftp.zip 2. Select Extract All... Page 45

46 Save the Extraction 1. Extract the files to C:\TFTP_Root 2. Click on Extract Page 46

47 Verify File You should then see the extracted files in the C:\TFTP_Root. ** Note: The file name "undionly.kpxe.vmw-hardwired" matches the filename we specified when DHCP Scope options were configured in an earlier step. Minimize Windows Explorer Page 47

48 Prepare the TFTP Server to receive the Boot files After we've downloaded the file, we'll unzip it and verify that all of the files that we need are within the unzipped folder. After that, we will configure the TFTP Server to point to the location of the unzipped files. Login to TFTP Server Manager Maximize the TFTP Server Manager. If you closed it, open it again using the shortcut on your desktop named TFTP Server Manager. 1. Make sure you are connected to thelocal server. 2. Click OK Manage Virtual Repository We will now change the default location of the Virtual TFTP Folders. Page 48

49 1. Click Server from the drop down menu 2. Click Virtual TFTP Folders 3. Select Manage Repositories Changing the Virtual Repository We will now Edit the virtual folder default location to match the folder where we extracted the TFTP boot file. 1. Select the Virtual folder named "\". 2. Click Edit 3. Click "..." located next to the Local path text box 4. Select C:\TFTP_Root 5. Click OK. 6. Click OK again. Page 49

50 7. Click Close. You will now see the files show up in the WinAgents TFTP Server Manager. For simplicity of the path, we chose to put the files in the root of the C: Drive. Minimize WinAgents TFTP Server Manager. Page 50
51 Create host profile Now we are going to start the Auto Deploy configuration part. For this part what we need to do first is to configure a host the way that we want. This host is what we call a reference host. After that we need to extract a host profile from this host. This host profile is a configuration file with the configuration that will be used to boot the ESXi. Page 51

52 Select Host Profile Next we will need to create a host profile for AutoDeploy to use to configure the ESXi hosts after the software has been installed. Maximize the vsphere Web Client (IE). If you close it, you can open the IE and access the following URL: or use the IE URL shortcut named Site A vsphere Web Client on your IE (username: corp\administrator password: VMware1!). 1. Click on the Home button 2. Click on Host Profiles icon Page 52

53 Open The Host Profile Wizard The Host Profiles page opens 1. Click the icon to create a new host profile Page 53

54 Select The Host we will use as Template The Extract Host Profile Wizard opens. Now we will create a host profile based on one host that we configured exactly the way we wanted. 1. Select the first host in the list 2. Click Next Page 54

55 Name The Host Profile Give the Host Profile a name and description. 1. Enter Rainpole as the name and optionally add a description for other users who will use the Host Profile 2. Click Next Review the details then Click Finish Note: After you click finish, the creation of the profile can take up to 3 minutes Page 55

56 Create Host Profile You can review the task's progress on the right hand side under Recent Tasks. Once completed you will see the Host Profile in the objects lists Minimize the vsphere Web Client. Page 56
57 Configure host profile / host customization Now that we have created a Host Profile this will serve as the common or GOLD profile for the rest of our hosts (Named Rainpole). Each host will be associated with a common host profile, and in many cases will require an associated Answer File. The Answer file will provide the ability to input Host specific information that cannot be "answered" in the common profile. As an example, if a VMKernel port was setup; specifically for VMotion or storage, the port information for these IP Addresses will need to be indicated in the Answer file. Another common need for the Answer file would be for iscsi information. At the time of this writing, a host has to be part of the inventory and have a profile applied to it prior to having the ability to adding or updating an answer file. Remember, the profile is Global, while each host must have its own answer file. Page 57
 1. Click on the Home button 2.")
58 Select Host Profiles Next we will need to create a host profile for AutoDeploy to use to configure the ESXi hosts after the software has been installed. Maximize the vsphere Web Client (IE) 1. Click on the Home button 2. Click on Host Profiles icon Page 58

59 Attach Host Profile to Cluster First we need to attach the GOLD Profile (Rainpole) to the Cluster. 1. Select the Rainpole Host profile 2. Click on the Actions drop down and select Attach/Detach Hosts and Clusters Page 59

60 Attach Host Profile Wizard The Attach/Detach Host and Cluster wizard opens 1. Next select Cluster Site A 2. Click on Attach, you will see the Cluster move to the right hand box. 3. Click Next Page 60

61 Review On the Next Screen you will see the individual customizable option for each host, including IP addresses for each VMKernel port group. These are unique to each host Feel free to review these items and then click Finish Page 61
62 Prepare the ESXi Depot Image The ESXi software depot is the location in which a group of binaries and software packages in the form of "Images" (used to run ESXi) are stored. The images themselves can be either provided by VMware from the download page, or a customer could potentially modify (customise) an image with custom drivers or software (such as vendor specific CIM providers) by adding/removing "VIBs". For the purposes of this exercise, we are using the VMware provided depot with one of the default Image Profiles. For the sake of time in the lab, the Software Depot has already been downloaded to a local folder that we will configure Auto Deploy to use. The next few steps in this document will give specific commands to run from the PowerCLI with brief explanations. If you would like further details on each command, at the PowerCLI prompt type: help <cmdlet> The key components of the software architecture are VIBs, Image Profile and Software Depots. The VIB is a software package that can be installed on an ESXi host. Image Profiles are a collection of VIBs that represent a full ESXi Image. A Software Depot is a repository of VIBs used to create Image Profiles. Software depots can be accessed online via HTTP as well as offline using a.zip archive. The image profile defines each of the ESXi images and consists of multiple VIBs. The Software Depot location has to be accessible from the location you run the PowerCLI commands (Local drive or Mapped network drive). For this lab we have placed the depot package on the control center. Page 62

63 Verify the Depot Image Location As mentioned the vsphere Software Depot that you will be using to create your Image Profile has already been download to the Control Center VM and is located in C:\Software\ folder under the name of VMware-ESXi depot.zip. We will use this depot image to create our image profile. Please open the Windows Explorer and verify that the file really exists. Connect to The vcenter Now we will need to open the PowerCLI console. If you already have it open and minimised, just maximise it and skip step one below. 1. Click on the VMware PowerCLI shortcut on your desktop. 2. Enter the following command: connect-viserver vc-l-01a.corp.local Page 63


64 NOTE: You might see an certificate warning. This is because we are using a self generated certificate for this lab, please ignore the warning. Verify That You Are Connected Check that you successfully connect to the vcenter NOTE: On your lab the user may be different that the one in the screenshot Page 64
65 Adding The ESXi Depot Now you will will add the ESXi image to the software repository 1. In the PowerCLI console type the following command: Add-ESXSoftwareDepot 'C:\software\VMware-ESXi depot.zip' 2. Verify that you got the Depot URL as response ** TIP - use TAB to auto complete. Our Depot Image from VMware containing our VIB is contained within C:\software\ESXi Images\VMware-ESXi depot.zip. VIB Depot images can be downloaded from the VMware Website as part of the vsphere downloads or created by you with Image Builder. Verify That The Image Profile Was Added Verify the image profile was added to the repository. 1. Check by typing the following command: Get-EsxImageProfile Page 65

66 Clone Image Profile To Help us with the Deploy rule creation we will clone the ESXi standard image to an easier to remember profile name. We will call the image profile 'RainpoleImage' 1. Type the following command: New-EsxImageProfile -CloneProfile ESXi standard -name RainpoleImag 2. Answer "VMware" as the vendor Adding HA Agent Depot Now we will need to add the HA Agent Depot image. vcenter needs to install this agent on the host before it can join a cluster. As we will need our new host to be added to a cluster, lets also prepare to install this agent. We can do this by getting the agent directly from the vcenter via http. 1. To do this, please execute the following command: Add-ESXSoftwareDepot 2. Verify that you received the Depot URL as a response NOTE: This command is case sensitive. Add HA Depot to The Image Profile Now we will add the HA Depot to our Image Profile, so we will have everything we need to install into our new ESXi host in one image profile. Page 66

67 1. In the PowerCLI console type the following command: Add-EsxSoftwarePackage -imageprofile 'RainpoleImage' -SoftwarePackage vmware-fd Page 67
68 Create deploy rules Now we need to create a rule that specifies the hosts, on which the Host Profile will be applied. In this case we will specify just the new host in our Cluster, however we can specify server vendor (HP,Dell etc) or, as we will do, we can specify by IPv4 range. Page 68
69 Create Deploy Rule Now we need to create a rule will be used to configure the host. In this case we will specify just the the new host, however we can specify server vendor (HP,Dell etc) or, as we will do, we can specify by IPv4 range. 1. For our Lab type the command: $DeployNoSignatureCheck=$true 2. Then type (Please watch out for the spaces): New-DeployRule -Name "RainpoleBoot" -Item "RainpoleImage" -Pattern "ipv4= The following explains the parameters. RainpoleBoot is the name given to the rule. RainpoleImage is the ESXi Image Profile, ipv4= is the IP Address to be used for the ESXi Host Once you execute the command you'll see the ESXi Image being uploaded to the Auto Deploy Server. NOTE: This can take a few minutes to complete. If the images are not already uploaded you may see PowerCli uploading them. Page 69


70 Add Deploy Rule Now we need to make the rule active in our rule sets. Type the following command: Add-DeployRule RainpoleBoot We are now almost ready to reboot our ESXi server! In the next few steps we are going to reboot our empty virtual machine that we are going to use as our new host and watch it as Auto Deploy installs the ESXi host on it. Page 70
71 Verify Deploy Rule Just to verify that our deploy rule is set, lets execute the following command: Get-DeployRule Page 71

72 Rebooting the ESXi host and applying host configuration Now that the infrastructure has been setup and the hosts are ready for PXe boot, we will reboot ESX-03a. Then during the boot the Auto Deploy will deploy the ESXi image to the host and configure it accordingly Open vsphere Web Client Now we will Open the IE and access our vsphere Web Client to be able to boot our ESXi server. If you did not close the IE, just maximize it and move to the next step. Page 72

73 Logging in vsphere Web Client After you accepted the certificate warning, log in to the vsphere Web Client. If you already had the IE open and logged in, please go to the next step. To login you should use the following credentials: username: corp\administrator password: VMware1! Note: It can take up to 3 minutes for you to login. This is due to the fact that this lab is done using an nested environment where we virtualised ESXi hosts on top of ESXi hosts. This kind of environment is very good for labs because of it's flexibility but is not supported as a production environment as you do not have a lot of performance on it. Access Hosts and Clusters Now that you are logged in, we will open the hosts and cluster view to boot our machine Page 73

74 1. Click on home tab 2. Click on the hosts and Cluster icon Page 74

75 esx-03a For this lab, we are using a nested ESXi host. This means that for the purpose of this lab, we create a virtual machine and we will install the ESXi on this virtual machine. This will leave us with an ESXi running inside a ESXi which is not a supported environment as we do not have performance. But for the purpose of the lab it will work fine. Please find the virtual machine named esxi-03a on the left of the console. In the next step we will power it on and open it's console. NOTE: There is no action or command to be done on this step. The intention of this step is just to clarify the fact that we are using a nested environment as explained above. Please proceed to the next step. Page 75

76 Powering on Esxi-03a Execute the following commands on the vsphere Web Client 1. Right click on the esxi-03a virtual machine 2. click on the power on menu option Note: It may take some minutes for the esx-03a to power on. Open Esx-03a Console Execute the following commands on the vsphere Web Client 1. Right click on the esxi-03a virtual machine 2. click on the Open Console menu option Page 76

77 Note: If the option Open Console is not available, this means that the esx-03a did not finish powering on. Please wait a Couple of seconds and try again. You can follow the powering on process on the upper right part of the console. On the recent tasks section. Page 77
78 Checking That esx-03a is empty After the bios loads you will see a message saying that this machine does not have any OS installed. This is because this machine is not connected to the network yet, and we did this step to assure you that the machine was really empty. After you receive the Operating System not found message, please execute the following command on the Browser: 1. Go back to the vsphere Web Client that is open on the previous tab Edit The esx-03a Settings Let's edit the settings of our esx-03a machine and connect it to the network: 1. Right Click the esx-03a. 2. Click on the Edit Settings option. Now go to the next step where we connect our esx-03a to the network Page 78
79 NOTE: As mentioned before, for the purpose of this lab we are using a Virtual Machine as our esx-03a host. This is called a nested environment and it is not supported for production, but for our lab it fits its purpose. Connect esx-03a to The Network A new window pops up with the settings of our esx-03a. We will now connect it to the network. As you can see both network cards are not marked as connected. We ll connect those two network adapters to their corresponding networks. Please execute the following commands 1. Check the connected checkbox on the first network adapter. 2. Check the connected checkbox on the second network adapter. 3. Click the OK button. You will return to the previous screen. Page 79

80 Note: Please do not change the networks, just connect them to the networks already selected. The first Network adapter should be on the Management Network and the second one on the Storage Network. Page 80

81 Return to The Console Now we will need to return to the Console of the esx-03a. Please execute the following command: 1. Click on the browser tab named esx-03a Reboot esx-03a Now with our esx-03a machine properly connected to the network, we will reboot it and see the esxi being installed on the fly upon boot. Please execute the following command: 1. Click on the send Ctrl-Alt-Del button. This will reboot the machine. Page 81
82 Please go to the next step where we will see the esxi being installed. Page 82

83 Auto Deploy Loading Note that the machine will boot up, try to find an image locally, it will not find it. Than it will reboot again. On the second time it boots up, you will see that we have a different message from the bios. Now with network connection the machine booted up using our PXE boot server, grab a DHCP address from our reservation, and is downloading the esxi image from our TFTP Server. After that it will apply the configurations that we set on the PowerCLI earlier on this lab. Please go to the next step Page 83
84 Booting esx-03a After the esxi image is downloaded to the esx-03a machine, it start to load itself. you can follow all the modules being installed and loaded on the fly. Note: This installation and loading can take up to 10 minutes. Page 84

85 Verifying The Installation of ESXi Image Now we will watch the Auto Deploy do its work as the host boots up. During the PXE boot Auto Deploy will download the ESXi image and configuration files needed to prepare host and make it compliant with the reference host used to create the profile. ESXi Installed and Functional As you can see, now we have a brand new ESXi installed and ready to be used. You can also check that our esx-03a host received the right ipv4 address from our DHCP server. Now, please perform the following: 1. Click on the vsphere Web Client browser tab to return to the vsphere client Page 85
86 Refreshing the vsphere Web Client Now we will see our esx-03a machine appear on the vcenter as a new host. This process can take up to 3 minutes, to accelerate the process do the following: Please execute the following command: 1. Click on the refresh button Please go to the next step Page 86

87 New Host Appears 1) After you click on the refresh button, we can see that the host esx-03a.corp.local now appears as an available host to be used. Please feel free to inspect our new esx-03a host settings. For the purpose of this lab we will not automatically add the ESXi on the cluster in the intrest of time, but you can configure Auto Deploy to do so. Please check the Auto Deploy documentation to see how to configure the Auto Deploy to accomplish this. Page 87
88 Summary This completes the Auto Deploy lab. VMware thanks you for taking time to explore how you can utilize Auto Deploy to quickly scale up a cloud infrastructure! Auto Deploy Possibilities: Auto Deploy now has two options that we can choose from. On this lab we just used the Auto Deploy Stateless Caching Auto Deploy Stateless Caching This feature allows you to cache the host's image locally on the host or on a network drive and continue to provision the host with Auto Deploy Auto Deploy Stateful Installs This feature allows you to install hosts over the network without setting up a complete PXE boot infrastructure. After the initial network boot, these hosts boot like other hosts on which ESXi is installed. Thanks for again for taking this lab and enjoy VMworld 2013! Page 88
89 Module 2 - Introduction and new features in PowerCLI 5.5 Page 89
90 Module Overview This lab will introduce you to VMware vsphere PowerCLI - the administrator's choice for automating vsphere and vcloud Director. Novice users will easily learn to use the tool and more advanced users will get familiar with the new functionality available in the latest release of the product like vsphere tags management and opening a VM console. We will demonstrate how to perform common administrator tasks in both vsphere and vcloud and how easy it is to migrate to and manage the vcloud. You will walk away with a better understanding of PowerCLI and how it can help you in your day-to-day work. You will need about 45 minutes to complete the lab. What's in this module You will learn how to add new ESX host to vcenter Server and assign a license key to it, as well as how to effectively use PowerCLI for reporting of your virtual infrastructure. Using PowerCLI you will connect to a vcenter Server where you will add tags to several VMs. You will then import these VMs into a vapp in vcloud Director. Then you will power on one of the cloud VMs and open a console to it. What is PowerCLI VMware vsphere PowerCLI is a powerful command-line tool that lets you automate all aspects of vsphere management, including network, storage, VM, guest OS and more. PowerCLI is distributed as a Windows PowerShell snapin, and includes over 370 PowerShell cmdlets for managing and automating vsphere and vcloud, along with documentation and samples. What Can PowerCLI Do For You Using PowerCLI you will be able to do large scale deployments of VMs with a single line of script. You will be able to automate tedious repetitive tasks to save time. You will be able to manage thousands of objects just as easily as you would manage a single one. You can schedule scripts to run on a daily basis and monitor the performance of your environment. PowerCLI will enable you to easily prepare reports on your virtual environment by reusing hundreds of already available scripts in our community. Free Download VMware vsphere PowerCLI is a completely free product which takes less than 5 minutes to setup. You can download it from here: Page 90
91 The product can be installed on any Windows machine that has.net Framework 2.0 and Microsoft PowerShell 2.0 or above installed. For your convenience we have already installed it for this lab. Note: The lab does not have internet connectivity, so you should explore these sites after the lab. Active Community PowerCLI has a very active community where users share scripts and ideas, ask questions and get answers. This is a great place to find help if you are new to the product. It is very likely that the script you need is already available there: Page 91
92 Getting Started With PowerShell and PowerCLI In this lesson you'll learn the basics of PowerShell and PowerCLI. You'll learn how to start the PowerCLI console and PowerGUI, how to list available commands and view their help. Starting PowerCLI After installation, PowerCLI can be started by double clicking the desktop icon labeled "VMware vsphere PowerCLI". This will open the PowerShell console and load all PowerCLI snapins. Using PowerGUI Editor As an alternative to the simple console, you can use a variety of script editors that provide a better user experience to the PowerCLI users. For this lab we will use the PowerGUI script editor. You can start the editor by double clicking its icon on the desktop (1). The upper pane is for viewing/editing script files, and the lower pane (2) (labeled "PowerShell Console") is for running individual commands and displaying their output (an analog of the standard PowerShell console). Page 92
93 During this lab you will execute various PowerCLI commands in the "Powershell Console" window (2) of PowerGUI. You can either type the commands yourself or copy-paste them from the "Module 2 HelpScript" file located on the desktop. Note that after you open the script in PowerGUI you can select commands line by line and execute selection with Ctrl+F7. Before typing a new command make sure the previous one is completed - you will see "Script execution completed" message at the bottom of the console (2). The right pane (3) is the variables window. There you can see all variables defined in the current session and their respective values. Listing Available Commands Let's explore what we can do with PowerCLI. PowerCLI's Core snapin provides over 270 commands (called cmdlets in PowerShell) for managing vsphere. You can view the available PowerCLI commands by typing: Get-Command -PSSnapin VMware.VimAutomation.Core This will list all commands for managing vsphere. As the list is quite large, you may want to narrow it down to something more specific, for example all commands for managing VMs: Page 93

94 Get-Command -PSSnapin VMware.VimAutomation.Core -Noun VM Hint: You can use the autocomplete for faster typing - just start typing the beginning of the command/parameter and press "Tab". Page 94
95 Connecting to vsphere The first thing we need to do in order to manage our vcenter Server is to connect to it. This is done by using the Connect-VIServer command. Our vcenter is named "vc-l-01a" and here's how to connect to it: Connect-VIServer vc-l-01a -User corp\administrator -Password VMware1! The command will connect to the vcenter with the specified user's credentials. Getting Help If you are unsure how to use a specific cmdlet, you can easily view its help by typing Get-Help (or for short - just "help") and the name of the cmdlet: help Connect-VIServer If you want to see the full help with example usages of the cmdlet and parameters description you should open the full help of the cmdlet: help Connect-VIServer -Full If you want to see the examples only you can use -examples switch like this: help Connect-VIServer -Examples Page 95
96 You can also search for a specific word in the entire help. Let's try searching for a cmdlet that vmotions VMs: help vmotion The third result is the cmdlet we need - Move-VM. We'll use it later in this module. Feel free to check the help of any cmdlet we demonstrate in this lab. Page 96
97 Executing commands In this lesson you will learn some of the most common PowerCLI commands and try them out for yourself. Retrieving VMs One of the most common things to do is list the VMs in your vcenter Server. That is useful for browsing the inventory, reporting as well as for further processing of specific VMs (e.g. batch modification of VMs). You can retrieve all VMs with: Get-VM You can also retrieve one or more VMs by name. Try out the following: Get-VM sales-dpt-db Get-VM sales* Creating VM from scratch Creating a VM from scratch is also quite easy. To create a basic VM you just need to choose a name and a place where you want to create it. For this exercise we'll also specify the size of the hard disk of the VM and set it to 4 MB since this is just a sample environment. First let's find a place where to place the VM. Type Get-Cluster to see what clusters are available in the environment: Get-Cluster We can see that there is a single cluster called "Cluster Site A". Let's retrieve this cluster and store it in a variable so that we can use it later. Variables in PowerShell are placeholders for objects (such as our cluster) and are denoted by $ sign and a name: Page 97
, or just print its value to the screen by typing its name like this: $cluster Now let's create the VM. The cmdlet for creating a VM is called New-VM.")
98 $cluster = Get-Cluster "Cluster Site A" Tip: Since when you assign the result of a cmdlet call to a variable no output is produced you can check variable's value in the variables panel of PowerGUI (1), or just print its value to the screen by typing its name like this: $cluster Now let's create the VM. The cmdlet for creating a VM is called New-VM. We specify the VM's name, the cluster where we want to create it and the size of its hard disk: New-VM -Name testvm -ResourcePool $cluster -DiskMB 4 Configuring VM Creating a VM was easy. Now let's see how to modify an existing VM. Let's change the memory of the newly created VM to 512 MB. Modifying a VM is done through Set-VM cmdlet. We need to retrieve our VM and then pipe it to this cmdlet in order to change its memory: Get-VM testvm Set-VM -MemoryMB 512 Page 98
99 Note: Here we use a PowerShell functionality called "pipeline" (or "piping"). Set-VM cmdlet actually has a parameter called "VM" that accepts VM objects. Instead of retrieving our VM, storing it in a variable and passing it to that parameter of Set-VM, we simply "pipe" the output of Get-VM to Set-VM. This way the output of the first cmdlet becomes the input of the second. When you are prompted for confirmation - click yes. Hint: Prompting for confirmation is good for interactive usage, however it is undesired in scripts since it will halt them. You can automatically confirm the operation by appending "-Confirm:$false" parameter to your cmdlet call. Page 99
100 Power on VM Power operations of VMs (e.g. power on, power off, suspend) are done through dedicated cmdlets. Here's how to power on our VM: Start-VM testvm Adding an ESX Host Another task, which you can easily automate with PowerCLI is adding a new ESX host to vcenter Server. To add the ESX host we need the datacenter to add it to. To get the datacenter we'll use Get-Datacenter cmdlet: $datacenter = Get-Datacenter -Name 'Datacenter Site A' Now we'll use the Add-VMHost cmdlet to add ESX host to the vcenter Server: $vmhost = Add-VMHost -Name esx-03a -Location $datacenter -User root -Password V NOTE: This call might fail if you have already added the ESX host to the VC while completing Module 1 or Module 3. If the host is already available make sure that you have it in the $vmhost variable. To retrieve the ESX host, use the Get-VMhost cmdlet: $vmhost = Get-VMhost 'esx-03a.corp.local' Page 100
101 If you already have your ESX added to the VC and properly licensed you can skip the next step as well. Page 101
102 Assigning a license key to the Host Now when the ESX host has been added we need to assign it a license. We'll use the - LicenseKey parameter of Set-VMHost to do that: Set-VMHost -VMHost $vmhost -LicenseKey 'H168K-N900K-Q895T-0G1R4-3181J' -Confirm Now our ESX host is fully functional and is ready to accommodate some VMs. vmotioning virtual machine to the host After we have our new ESX host fully functional it's time to start using it. Let's move the VM we created in the previous steps to this host, so that we can free up some resources on the cluster it's currently on. Since the VM is currently started, we'll have to vmotion it from one host to another, and since the hosts don't have shared storage we'll have to make full vmotion (changing both host and storage). To do that we'll have to specify the new datastore, that we want to move the VM to. We'll retrieve it with Get-Datastore cmdlet: $newdatastore = Get-Datastore -VMHost $vmhost Now we're ready to move the VM to the new host Move-VM testvm -Destination $vmhost -Datastore $newdatastore Note: Since Move-VM operation could take significantly long time, you may want to move the VMs asynchronously and continue your work in the meantime. You can do that Page 102
103 by specifying -RunAsync parameter of Move-VM. Many other cmdlets that may take long time to complete also support -RunAsync. Page 103
104 Using PowerCLI for reporting With more than 100 Get-* cmdlets PowerCLI is also a powerful reporting tool. In this lesson you'll learn more about this usage of PowerCLI Page 104
 have you can use Get-Member cmdlet like this: Get-VM Get-Member This will list all the available properties of the VM object.")
105 Retrieving specific properties of an object When you call a cmdlet (like Get-VM) the result you get is an object or array of objects (in the case of Get-VM that's VM objects). To see what properties the object(s) have you can use Get-Member cmdlet like this: Get-VM Get-Member This will list all the available properties of the VM object. Then you can use powershell's 'select' command to retrieve only the properties you need from resulting object: Get-VM Select Name, NumCPU, MemoryMB, PowerState, VMHost Page 105
106 Filtering report results When the Get-* cmdlet has no parameter to filter the objects by the property you need, you can use powershell's 'where' command like this to filter the results from a cmdlet call: Get-VM Where {$_.Powerstate -eq "PoweredOn"} Select Name, NumCPU, MemoryMB, Hint: $_ is a reserved powershell variable that holds the current object from the pipeline Page 106
107 Exporting results to HTML page To present the data to your manager or another team you need them formatted in some way. You can export the data in HTML format by using ConvertTo-Html cmdlet. Since this command just formats the data in HTML you also need Set-Content cmdlet to write formatted data to file: Get-VM Select Name, NumCPU, MemoryMB, PowerState, VMHost ConvertTo-Html S Now go to 'c:\' folder and open the report. Hint: You can also export you data to CSV format with Export-CSV cmdlet and if you look on the internet you'll also find third-party implementations for Export-XLS cmdlet, which exports your data in excel format. Making the report look better If we want to make our report look a bit better we can apply some styles on it like this: $a = "<style>" $a = $a + "BODY{background-color:Gainsboro;}" $a = $a + "TABLE{border-width: 1px;border-style: solid;border-color: black;bord $a = $a + "TH{border-width: 1px;padding: 5px;border-style: solid;border-color: Page 107

108 $a = $a + "TD{border-width: 1px;padding: 5px;border-style: solid;border-color: $a = $a + "</style>" Get-VM Select Name, NumCPU, MemoryMB, PowerState, VMHost ConvertTo-Html -he If you open the report now you'll see that it looks much better Page 108
109 Assigning tag to a VM In this lesson you'll learn how to assign tag to a VM. Later in the module we'll use this tag to filter VMs that will be imported to vcloud Getting defined tags Tags that are already defined in vsphere can be retrieved with Get-Tag cmdlet: Get-Tag Note: The first execution of Get-Tag could take longer to complete. We want to get a tag named "vcloud" and tag all the VMs that we'll migrate to vcloud director with it. Let's retrieve this specific tag and save it into a variable: $vcloudtag = Get-Tag -Name vcloud Page 109
110 Assigning tag to VMs Assigning tag to different types of objects (VM, VApp, ResourcePool, Datastore, Folder, DistributedSwitch, etc. ) is done with New-TagAssignment cmdlet. Let's assign vcloud tag to the VMs that we will migrate to vcloud director. These are all the VMs of the sales department: $vms = Get-VM sales-dpt* $vms New-TagAssignment -Tag $vcloudtag Page 110
111 Introduction to vcloud Director PowerCLI In this lesson you'll get familiar with PowerCLI's vcloud Director Snap-in. The vcloud Director Snap-in PowerCLI 5.5 offers a snap-in with over 60 commands for managing vcloud Director. Using those you can easily create reports for your cloud environment and perform common administrative tasks. The snap-in is automatically loaded when you start PowerCLI (either from the desktop shortcut or from PowerGUI editor). Note: While performing operations through PowerCLI you can open the vcloud Director UI and observe the result of your actions. In order to start the UI open Firefox browser and use "vcloud -> vcloud Hybrid Service" bookmark from the bookmarks toolbar. Skip the invalid certificate warning by selecting "I understand the risks -> Add exception... -> Confirm security exception". Then login with user "administrator" and password "VMware1!". Page 111
112 Connecting to vcloud Similar to the way we connected to the vcenter Server, we'll now connect to the vcloud Director named "vcd-l-01a". We'll use Connect-CIServer cmdlet which will connect using the specified credentials: Connect-CIServer vcd-l-01a -User administrator -Password VMware1! If confirmation dialog for the server certificate is displayed, select "Accept Permanently". It's shown when server with "invalid" certificate is being connected. You are now connected to both the vcloud Director and the vcenter Server, allowing you to perform operations on both. Page 112
113 Exploring the vcloud Snap-in Let's see what commands are available in the Cloud snapin. You can view the full list by typing: Get-Command -PSSnapin VMware.VimAutomation.Cloud Page 113
114 Retrieving objects from vcloud You can explore the vcloud Director's inventory by using the available Get-* cmdlets. Here's how to retrieve the defined Organizations, Provider VDCs and Organization VDCs: Get-Org Get-ProviderVdc Get-OrgVdc Page 114
115 Importing a vapp from vcenter Server to vcloud Director In this lesson you will learn how to import VMs from vsphere to vcloud Director vapp. The vcenter Server is already attached to vcloud Director so the process is quite simple. The most efficient approach (in terms of performance and resources) - is to register the individual VMs one-by-one. vapps and VMs in vcloud Director are called CIVApp and CIVM respectively to distinguish them from their vsphere counterparts. Getting the VMs to be imported to vcloud Director The VMs that we want to import to vcloud director have been tagged in the previous lesson with "vcloud" tag. So, let's retrieve all the VMs that are marked with this tag: $vmstoimport = Get-VM -Tag 'vcloud' $vmstoimport Importing the first VM Importing a VM from vsphere to vcloud Director is done through the Import-CIVApp cmdlet. Since VMs in vcd must always be a part of a CIVApp, importing the first VM will automatically create a CIVApp and place the CIVM inside it. We will import the remaining VMs in this CIVApp. When importing the first VM we'll need to specify an Organization VDC where to place it. This will be the "corpvdc": Page 115
116 $orgvdc = Get-OrgVdc corpvdc Now let's import the first VM and name the containing CIVApp "SalesDptInfrastructure" Import-CIVApp -VM ($vmstoimport select -first 1) -OrgVdc $orgvdc -Name SalesD Page 116
117 Importing the rest of the VMs Now we have a CIVApp in the vcloud Director named CoreInfrastructure containing a single CIVM. Let's import the rest of the VMs in that CIVApp. First we'll store the CIVApp in a variable that we'll reuse for the imports. The cmdlet for retrieving CIVApps in vcloud Director is named Get-CIVapp to distinguish it from its vsphere counterpart (Get-VApp): $civapp = Get-CIVApp SalesDptInfrastructure Now let's save the rest of the VMs from $vmstoimport array to another array and then import them: $remainingvms = $vmstoimport select -last ($vmstoimport.length-1) $remainingvms Import-CIVApp -VApp $civapp Page 117
118 Verifying the successful import Let's check the CIVApp to see that all VMs are successfully imported. The cmdlet for retrieving CIVMs from vcloud Director is Get-CIVM: $civapp Get-CIVM Note: You can also use the vcloud Director UI to verify this. Page 118
119 Opening a console to a VM In this lesson you'll learn how to open a console to a VM from PowerCLI. Starting cloud VM To open a console to a VM we need to start it first: $vm = Get-CIVM 'sales-dpt-db' -VApp SalesDptInfrastructure Start-CIVM $vm Page 119

120 Opening a console You can access a virtual machine's desktop by launching a console to the virtual machine. From the console, you can perform activities in the virtual machine such as configure operating system settings, run applications, monitor performance, and so on. Opening a console to vsphere and vcloud VMs is done with Open-VMConsoleWindow cmdlet. Let's open a console to the VM we just started: Open-VMConsoleWindow $vm This will open a console to the VM in new tab in your default browser. Page 120
121 Further Reading This lesson is for information purpose only and lists some of the more advanced features of PowerCLI as well as useful reading materials for both novice and advanced users. Feel free to experiment with these if you like. Accessing the entire vsphere API Although PowerCLI offers more than 300 cmdlets for managing vsphere they don't cover the entire functionality of the platform. Despite that you are still able to access all of the functionality by using the Get-View cmdlet. This special cmdlet is an access point to the entire vsphere API. The objects returned by the cmdlet are known as "Views" and represent an exact copy of the vsphere API objects. You can find more information about these objects in the vsphere API Reference Documentation: Using this cmdlet you will be able to write scripts directly against the API in an objectoriented manner. Project Onyx Although having the entire vsphere API at your disposal is very powerfull, it is often hard to write scripts against the API compared to using cmdlets. That's where project Onyx comes to help you. This tool acts as a proxy between the vsphere Client and the vcenter Server. The job of Onyx is to generate script based on actions you perform in the vsphere Client. This comes very handy when you know how to perform a task in the vsphere Client and want to automate it with script, but have no idea how to write this script. Onyx is distributed as a free product from VMware and you can download it from here: Note: Onyx only works with vsphere desktop client, not with vsphere Web Client. Accessing the entire vcloud Director API PowerCLI offers 60 cmdlets for vcloud Director management. This number will continue to grow in the future, but until then you can use the entire functionality through the API. Similar to the Get-View cmdlet for vsphere, there is a Get-CIView cmdlet for vcloud Director. It lets you access the vcloud Director API and create scripts based on it. You can find out more information about the API here: Page 121
122 Useful materials to get you started with advanced PowerCLI scripting If you are new to PowerCLI or want to learn more about the product then here are a few blogs you can follow. There you can find great articles and scripts about PowerCLI: The official PowerCLI blog: Alan Renouf's blog: Luc Dekens' blog: Final words Thank You for taking this lab. We hope you found the presented information helpful and will use PowerCLI in your day-to-day work. Your opinion is important to us, so please spend a minute to fill out the survey at the end of the lab. Page 122
123 Module 3 - VDS automation with PowerCLI Page 123
124 Module Overview This module will introduce you to the new VMware vsphere PowerCLI cmdlets for virtual distributed switch (vds) automation. We will demonstrate how to perform common VDS related tasks with PowerCLI. You will walk away with a better understanding of PowerCLI and how it can help you in your day-to-day work. You will need about 45 minutes to complete the lab. What's in this module Using PowerCLI you will connect to a vcenter Server where you will add a new ESX host. You'll also migrate the host's networking to an existing VDS. You'll then create a new distributed portgroup on that VDS and will migrate the host VM networking to that portgroup. You'll also see how to configure different portgroup policies as well as private vlans. At the end you'll migrate the host networking back to the standard switch and will restore the VDS to the state you've backed up in the beginning of the lab. What is PowerCLI VMware vsphere PowerCLI is a powerful command-line tool that lets you automate all aspects of vsphere management, including network, storage, VM, guest OS and more. PowerCLI is distributed as a Windows PowerShell snapin, and includes over 370 PowerShell cmdlets for managing and automating vsphere and vcloud, along with documentation and samples. What Can PowerCLI Do For You Using PowerCLI you will be able to do large scale deployments of VMs with a single line of script. You will be able to automate tedious repetative tasks to save time. You will be able to manage thousands of objects just as easily as you would manage s single one. You can schedule scripts to run on a daily basis and monitor the performance of your environment. PowerCLI will enable you to easily prepare reports on your virtual environment by reusing hundreds of already available scripts in our community. Free Download VMware vsphere PowerCLI is a completely free product which takes less than 5 minutes to setup. You can download it from here: The product can be installed on any Windows machine that has.net Framework 2.0 and Microsoft PowerShell 2.0 or above installed. For your convenience we have already installed it for this lab. Page 124
125 Note: The lab does not have internet connectivity, so you should explore these sites after the lab. Active Community PowerCLI has a very active community where users share scripts and ideas, ask questions and get answers. This is a great place to find help if you are new to the product. It is very likely that the script you need is already available there: Page 125
126 Getting Started With PowerShell and PowerCLI In this lesson you'll learn the basics of PowerShell and PowerCLI. You'll learn how to start the PowerCLI console and PowerGUI, how to list available commands and view their help. Starting PowerCLI After installation, PowerCLI can be started by double clicking the desktop icon labeled "VMware vsphere PowerCLI". This will open the PowerShell console and load all PowerCLI snapins. Using PowerGUI Editor As an alternative to the simple console, you can use a variety of script editors that provide a better user experience to the PowerCLI users. For this lab we will use the PowerGUI script editor. You can start the editor by double clicking its icon on the desktop (1). The upper pane is for viewing/editing script files, and the lower pane (2) (labeled "PowerShell Console") is for running individual commands and displaying their output (an analog of the standard PowerShell console). Page 126
127 During this lab you will execute various PowerCLI commands in the "Powershell Console" window (2) of PowerGUI. You can either type the commands yourself or copy-paste them from the "Module 3 HelpScript" file located on the desktop. Note that after you open the script in PowerGUI you can select commands line by line and execute selection with Ctrl+F7. Before typing a new command make sure the previous one is completed - you will see "Script execution completed" message at the bottom of the console (2). The right pane (3) is the variables window. There you can see all variables defined in the current session and their respective values. Listing Available Commands Let's explore what we can do with PowerCLI. PowerCLI's VDS snapin provides over 30 commands (called cmdlets in PowerShell) for managing VDS infrastructure. You can view the available PowerCLI commands by typing: Get-Command -PSSnapin VMware.VimAutomation.VDS This will list all commands for managing VDS infrastructure. As the list is quite large, you may want to narrow it down to something more specific, for example all commands for managing VDSwitches: Page 127
128 Get-Command -PSSnapin VMware.VimAutomation.VDS -Noun VDSwitch Hint: You can use the autocomplete for faster typing - just start typing the beginning of the command/parameter and press "Tab". Page 128
129 Connecting to vsphere The first thing we need to do in order to manage our vcenter Server is to connect to it. This is done by using the Connect-VIServer command. Our vcenter is named "vc-l-01a" and here's how to connect to it: Connect-VIServer vc-l-01a -User corp\administrator -Password VMware1! The command will connect to the vcenter with the specified user's credentials. Getting Help If you are unsure how to use a specific cmdlet, you can easily view its help by typing Get-Help (or for short - just "help") and the name of the cmdlet: help Connect-VIServer If you want to see the full help with example usages of the cmdlet and parameters description you should open the full help of the cmdlet: help Connect-VIServer -Full If you want to see the examples only you can use -examples switch like this: help Connect-VIServer -Examples Page 129
130 You can also search for a specific word in the entire help. Let's try searching for a cmdlet that modifies traffic shaping policy of a VDSwitch/VDPortGroup: help "traffic shaping policy" The first result is the cmdlet we need - Set-VDTrafficShapingPolicy. Feel free to check the help of any cmdlet we demonstrate in this lab. Page 130
131 Adding ESX to the vcenter Server In this lesson you will learn how to add ESX to the vcenter Server and assign the corresponding license to it. In the following lessons you'll see how to add this ESX Server to the virtual distributed switch (VDS) and how to modify the VDS configuration accordingly. Page 131

132 Adding the ESX Host To add the ESX host we need the datacenter to add it to. To get the datacenter we'll use Get-Datacenter cmdlet: $datacenter = Get-Datacenter -Name 'Datacenter Site A' Now we'll use the Add-VMHost cmdlet to add ESX host to the vcenter Server: $vmhost = Add-VMHost -Name esx-03a -Location $datacenter -User root -Password V NOTE: This call might fail if you have already added the ESX host to the VC while completing Module 1 or Module 3. If the host is already available make sure that you have it in the $vmhost variable. To retrieve the ESX host, use the Get-VMhost cmdlet: $vmhost = Get-VMhost 'esx-03a.corp.local' If you already have your ESX added to the VC and properly licensed you can skip the next step as well. Assigning a license key to the Host Now when the ESX host has been added we need to assign it a license. We'll use the - LicenseKey parameter of Set-VMHost to do that: Set-VMHost -VMHost $vmhost -LicenseKey 'H168K-N900K-Q895T-0G1R4-3181J' Page 132

133 Now our ESX host is fully functional and is ready to be added to the virtual distributed switch. Page 133

134 Backing up a VDS In this lesson you'll learn how to back up a VDS. The backup you'll make in this lesson will be applied back to the VDS in the end of the module to restore it to its current state Backing up a VDS Before we make any changes on a VDS we usually want to back it up. First lets retrieve the VDS that we want to back up. $vds = Get-VDSwitch vds-site-a Tip: Since when you assign the result of a cmdlet call to a variable no output is produced you can check variable's value in the variables panel of PowerGUI (1), or just print its value to the screen by typing its name like this: $vds We'll use Export-VDSwitch cmdlet to back up our VDS in a file called 'myvds.zip': Export-VDSwitch -VDSwitch $vds -Destination 'myvds.zip' Page 134
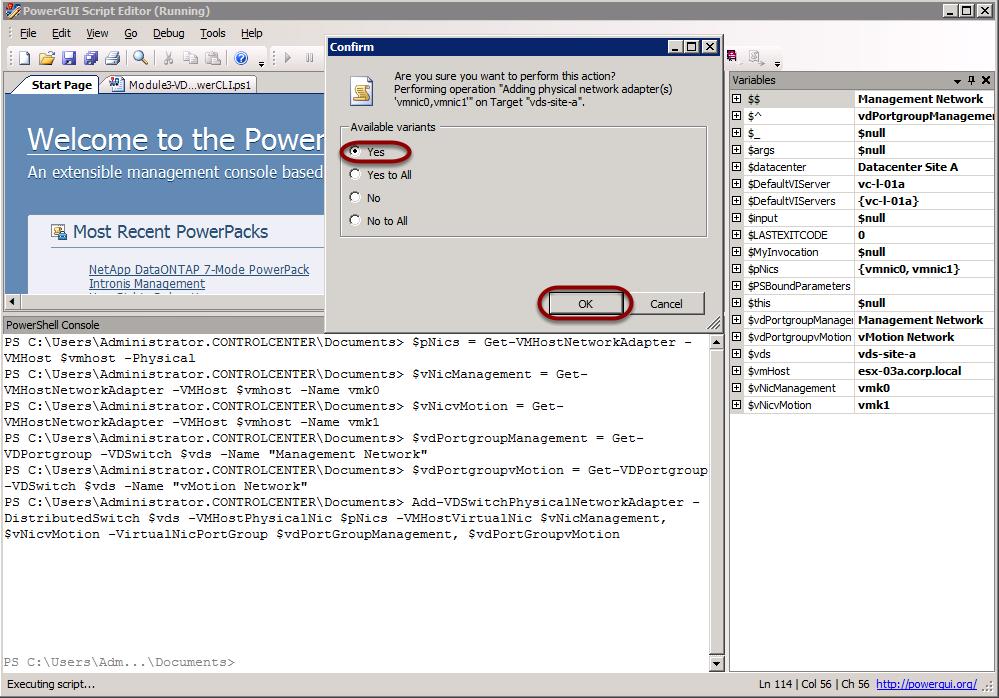
135 Adding an ESX host to a virtual distributed switch and migrating host networking In this lesson you'll learn how to migrate ESX host networking from standard to distributed switch. We'll add our new ESX host to the virtual distributed switch (VDS) and then we'll migrate its physical and VMKernel network adapters. Adding ESX host to a VDS We have both VDS and ESX host available in variables from previous lessons. We'll add the ESX host to the VDS with Add-VDSwitchVMHost cmdlet. Add-VDSwitchVMHost -VDSwitch $vds -VMHost $vmhost Migrating host networking to the VDS Add-VDSwitchVMHost only registers the ESX host on the VDS, but does not migrate the host networking. To migrate the host networking we need to use Add- VDSwitchPhysicalNetworkAdapter. In order not to lose connectivity to the host the cmdlet allows moving virtual network adapters together with the physical adapters. So first we need to get the physical network adapters that will be migrated: Page 135
136 $pnics = Get-VMHostNetworkAdapter -VMHost $vmhost -Physical Then we need to retrieve virtual network adapters that will be migrated together with physical nics. We want to migrate two virtual network adapters - management and vmotion nics: $vnicmanagement = Get-VMHostNetworkAdapter -VMHost $vmhost -Name vmk0 $vnicvmotion = Get-VMHostNetworkAdapter -VMHost $vmhost -Name vmk1 Since we want to migrate those two virtual nics to the corresponding portgroups on the VDS we need to retrieve them first as well: $vdportgroupmanagement = Get-VDPortgroup -VDSwitch $vds -Name "Management Netwo $vdportgroupvmotion = Get-VDPortgroup -VDSwitch $vds -Name "vmotion Network" Now we are ready to execute the cmdlet to migrate all these network adapters to the vds at once: Add-VDSwitchPhysicalNetworkAdapter -DistributedSwitch $vds -VMHostPhysicalNic $ When you are prompted for confirmation - click yes. Hint: Prompting for confirmation is good for interactive usage, however it is undesired in scripts since it will halt them. You can automatically confirm the operation by appending "-Confirm:$false" parameter to your cmdlet call. This will move $vnicmanagement to $vdportgroupmanagement and respectively $vnicvmotion to $vdportgroupvmotion. Page 136
137 Page 137
138 Creating new distributed portgroup and configuring its vlan settings In this lesson you'll learn how to create a new distributed portgroup and configure its vlan settings. In the next lesson we'll migrate the VM network of the ESX to this portgroup. Creating new distributed portgroup New-VDPortGroup cmdlet is used to create a distributed portgroup: $pgvmnetworkpvlan210 = New-VDPortGroup -VDSwitch $vds -Name "VM Network PVlan 2 Configuring portgroup vlan settings To assign a private VLan (PVLAN) to a portgroup we need to define the PVLAN in the VDS first. We want the VMs in our "VM Network PVlan 210" portgroup to be in a promiscuous secondary PVLAN with VlanID 210. To define it we will use New-VDSwitchPrivateVlan cmdlet: New-VDSwitchPrivateVlan -VDSwitch $vds -PrivateVlanType Promiscuous -PrimaryVla Page 138
139 Next we have to configure private vlan settings of the VDPortgroup. We'll use Set- VDVlanConfiguration to do that. With this cmdlet we can configure vlan settings to VDSwitch, VDPortgroup or VDPort: Set-VDVlanConfiguration -VDPortGroup $pgvmnetworkpvlan210 -PrivateVlanId 210 Page 139

140 Migrating VM networking to the vds In this lesson you'll learn how to migrate VM networking to the VDS Migrating VM networking First we have to get the network adapters of all the VMs on the ESX host, that we added to the VDS: $vmnetworkadapters = Get-VM -Location $vmhost Get-NetworkAdapter Next we'll migrate these network adapters to the portgroup that we created in the previous step: Set-NetworkAdapter -NetworkAdapter $vmnetworkadapters -Portgroup $pgvmnetworkpv Now the network traffic of all the VMs is going through the VDSwitch. Page 140

141 Configuring traffic shaping policy of the portgroup In this lesson you'll learn how to configure traffic shaping policy of the portgroup we created in the previous lessons. We want to limit the bandwidth of the incoming traffic used by the portgroup to 100 mbit/s, so that there is enough bandwidth for the other portgroups on the VDS. The cmdlets we'll use are Get/Set-VDTrafficShapingPolicy. Configuring traffic shaping policy First we'll retrieve the current traffic shaping policy of the portgroup: $policy = Get-VDTrafficShapingPolicy -Direction In -VDPortGroup $pgvmnetworkpvl Now we'll change this policy by setting its peak bandwidth to 100 mbit/s Set-VDTrafficShapingPolicy -Policy $policy -PeakBandwidth (100*1024*1024) -Enab Page 141

142 Configuring security policy of the portgroup In this lesson you'll learn how to configure security policy of the portgroup we created in the previous lessons. We want to enable promiscuous mode on this portgroup to allow monitoring of the traffic generated by the VMs. The cmdlets we'll use are Get/Set- VDSecurityPolicy. Configuring security policy First we'll retrieve the current security policy of the portgroup: $policy = Get-VDSecurityPolicy -VDPortGroup $pgvmnetworkpvlan210 Now we'll change this policy by enabling its promiscuous mode: Set-VDSecurityPolicy $policy -AllowPromiscuous $true Page 142
143 Migrating networking back to the standard switch You could face a scenario in which you have to migrate networking from VDS to a standard switch. In this lesson you'll learn how to do that. Page 143

144 Migrating physical and virtual nics To migrate host networking we need to use Add-VirtualSwitchPhysicalNetworkAdapter. In order not to lose connectivity to the host the cmdlet allows moving virtual network adapters together with the physical adapters. So first we need to get the physical network adapters that will be migrated: $pnics = Get-VMHostNetworkAdapter -VMHost $vmhost -Physical Then we need to retrieve virtual network adapters that will be migrated together with physical nics. We want to migrate two virtual network adapters - management and vmotion nics: $vnicmanagement = Get-VMHostNetworkAdapter -VMHost $vmhost -Name vmk0 $vnicvmotion = Get-VMHostNetworkAdapter -VMHost $vmhost -Name vmk1 We also need to retrieve the standard switch we'll move those adapters to: $vswitch = Get-VirtualSwitch -VMHost $vmhost -Name vswitch0 Now we are ready to execute the cmdlet to migrate all these network adapters to the standard switch at once: Add-VirtualSwitchPhysicalNetworkAdapter -VirtualSwitch $vswitch -VMHostPhysical Page 144

145 Migrating Virtual Machine networking After we have migrated physical and virtual nics we have to migrate virtual machine networking as well. First we have to get the network adapters of all the VMs on the ESX host: $vmnetworkadapters = Get-VM -Location $vmhost Get-NetworkAdapter Then we have to retrieve the portgroup on the standard switch we want to migrate them to: $pgvmnetwork = Get-VirtualPortgroup -VirtualSwitch $vswitch -Name 'VM Network' Next we'll migrate these network adapters to the portgroup that we created in the previous step: Set-NetworkAdapter -NetworkAdapter $vmnetworkadapters -Portgroup $pgvmnetwork - Page 145
146 Restoring VDS from backup In this lesson you'll learn how to restore VDS configuration from backup Page 146
147 Restoring VDS from backup Set-VDSwitch cmdlet is used to restore VDS from backup. To make sure that the restore is completed successfully we'll check that the private vlan we've created on the VDS is removed. Get-VDSwitchPrivateVlan -VDSwitch $vds Note that '210/210' private vlan is available. Before restoring the backup we need to remove the portgroup we've created on the VDS. The reason is that the restore process does not remove the additional portgroups found on the VDS (it restores the previously available portgroups and their configuration as well as the VDS configuration). Hence the restoring process will result in error, because it will try to remove the private vlan, which on the other side is in use by our portgroup. We'll remove the port group with the Remove-VDPortgroup cmdlet Remove-VDPortgroup $pgvmnetworkpvlan210 -Confirm:$false Then we'll remove the host from the VDS: Remove-VDSwitchVMHost -VDSwitch $vds -VMHost $vmhost -Confirm:$false Now let's restore the backup from the 'myvds.zip' file: Set-VDSwitch -VDSwitch $vds -BackupPath 'myvds.zip' And let's retrieve private vlans again: Get-VDSwitchPrivateVlan -VDSwitch $vds Note that '210/210' private vlan is gone, which means that the VDSwitch is restored to its initial configuration. Page 147

148 Page 148
149 Further Reading This lesson is for information purpose only and lists some of the more advanced features of PowerCLI as well as useful reading materials for both novice and advanced users. Feel free to experiment with these if you like. Accessing the entire vsphere API Although PowerCLI offers more than 300 cmdlets for managing vsphere they don't cover the entire functionality of the platform. Despite that you are still able to access all of the functionality by using the Get-View cmdlet. This special cmdlet is an access point to the entire vsphere API. The objects returned by the cmdlet are known as "Views" and represent an exact copy of the vsphere API objects. You can find more information about these objects in the vsphere API Reference Documentation: Using this cmdlet you will be able to write scripts directly against the API in an objectoriented manner. Project Onyx Although having the entire vsphere API at your disposal is very powerfull, it is often hard to write scripts against the API compared to using cmdlets. That's where project Onyx comes to help you. This tool acts as a proxy between the vsphere Client and the vcenter Server. The job of Onyx is to generate script based on actions you perform in the vsphere Client. This comes very handy when you know how to perform a task in the vsphere Client and want to automate it with script, but have no idea how to write this script. Onyx is distributed as a free product from VMware and you can download it from here: Note: Onyx only works with vsphere desktop client, not with vsphere Web Client. Accessing the entire vcloud Director API PowerCLI offers 60 cmdlets for vcloud Director management. This number will continue to grow in the future, but until then you can use the entire functionality through the API. Similar to the Get-View cmdlet for vsphere, there is a Get-CIView cmdlet for vcloud Director. It lets you access the vcloud Director API and create scripts based on it. You can find out more information about the API here: Page 149
150 Useful materials to get you started with advanced PowerCLI scripting If you are new to PowerCLI or want to learn more about the product then here are a few blogs you can follow. There you can find great articles and scripts about PowerCLI: The official PowerCLI blog: Alan Renouf's blog: Luc Dekens' blog: Final words Thank You for taking this lab. We hope you found the presented information helpful and will use PowerCLI in your day-to-day work. Your opinion is important to us, so please spend a minute to fill out the survey at the end of the lab. Page 150
151 Module 4 - Active Directory Automation with vco Page 151
152 vco Active Directory Plug-in Overview About this Module In this lab we will demonstrate how the vcenter Orchestrator Active Directory plug-in allows organizations to automate the management of directory services tasks, particularly as they pertain to cloud provisioning use cases. For instance, the plug-in enables the automatic provisioning of vcloud Director organizations based on data retrieved from Active Directory. The plug-in also includes many administrative actions related to computers, organizations, user groups, and users, such as resetting passwords or adding users to a user group. The drag-and-drop workflow designer of vcenter Orchestrator allows you to easily assemble these actions into higher-level workflows to automate repetitive Active Directory administrative tasks. Please Note: This lab is using pre-release Beta code so not all features are fully functional. Please follow the lab exercises as they are explained for you. The lab environment is real time and the use of features that are not fully tested may cause your lab to malfunction at which point you will need to end the lab and get in line again before starting a new one. Page 152
153 Discover the vco Active Directory Plug-in Page 153
154 Launch the vcenter Orchestrator Client From the Control Center Desktop, Double-Click the vcenter Orchestrator Client icon. Page 154
155 Login to vcenter Orchestrator Client Type in the follow fields into the vco Client Login Screen: Hostname: vcac-w8-01a Username: vcoadmin Password: vcoadmin Page 155
156 Login to vcenter Orchestrator Client Click Login. Click the Workflow Icon Page 156

157 Expand the Workflow Hierarchy Click the arrow next to the following folders until the Active Directory Folder appears Adminstrator Library Microsoft Active Directory Page 157

158 Active Directory: Computer Workflows Expand the Computer Folder, Notice the Computer related workflows Active Directory: Organizational Unit Workflows Expand the Organizational Unit Folder, Notice the Organizational Unit related workflows Active Directory: User Workflows Expand the User Folder, Notice the User related workflows Page 158

159 Active Directory: User Group Workflows Expand the User Group Folder, Notice the User Group related workflows Page 159
160 Add User to Group with the vco Plugin Launch Active Directory Users and Computers Page 160
161 In Active Directory User and Computers, Select the Users Folder, Double-Click Domain Admins Page 161
162 Click the Members Tab Page 162

163 Validate VCO Test user is not present Click OK to Close Domain Admin Windows Properties Page 163
164 Launch the vcenter Orchestrator Client From the Control Center Desktop, Double-Click the vcenter Orchestrator Client icon. Login to vcenter Orchestrator Client Type in the follow fields into the vco Client Login Screen: Page 164
165 Hostname: vcac-w8-01a Username: vcoadmin Password: vcoadmin Page 165
166 Login to vcenter Orchestrator Client Click Login. Page 166
167 Click the Start a Workflow Button Page 167
168 Type Add a User in Choose a workflow to run Window Highlight the Add a user to user group Workflow from the results list, Click Select Page 168
169 Select Group in which to put the user Click Not set Page 169
170 Type Domain in Choose AD:User Group Filter Highlight the Domain Admin User Group from the results list, Click Select Page 170
171 Select User to add to Domain Admins User Group Click Not set Page 171
172 Type VCO in Choose AD:User Filter Highlight the VCO Test User from the results list, Click Select Page 172
173 Validate Selections and Click Submit to Proceed with Workflow Click Submit Page 173

174 Notice the Workflow Steps Displayed on the Right Side of the Screen Page 174
175 Return to Active Directory Users and Computers Page 175
176 In Active Directory User and Computers, Select the Users Folder, Double-Click Domain Admins Page 176
177 Click the Members Tab Page 177
178 Validate VCO Test user is now present Click OK to Close Domain Admin Windows Properties Page 178
179 Disable a User with the vco Plug-in Launch Active Directory Users and Computers Page 179
180 In Active Directory User and Computers, Select the Users Folder, Locate and Double-Click VCO Test User Page 180

181 Click the Account Tab Page 181


182 Notice the Account options Section Scroll down until you locate Account is disabled Field Confirm Account is disabled is NOT checked Click OK to Close VCO Test Properties Windows Page 182
183 Launch the vcenter Orchestrator Client From the Control Center Desktop, Double-Click the vcenter Orchestrator Client icon. Login to vcenter Orchestrator Client Type in the follow fields into the vco Client Login Screen: Page 183
184 Hostname: vcac-w8-01a Username: vcoadmin Password: vcoadmin Page 184
185 Login to vcenter Orchestrator Client Click Login. Page 185
186 Click the Start a Workflow Button Page 186
187 Type Disable in Choose a workflow to run Window Highlight the Disable a User Workflow from the results list, Click Select Page 187
188 Select User in which to disable Click Not set Page 188
189 Using the AD Window, Filter Out until you Select VCO Test Click arrow next to Active Directory Click arrow next to Corp Click arrow next to Users Scroll down to find VCO Test user, Highlight the VCO Test user from the results list, Click Select Page 189
190 Validate Selections and Click Submit to Proceed with Workflow Click Submit Page 190

191 Notice the Workflow Steps Displayed on the Right Side of the Screen Page 191
192 Return to Active Directory Users and Computers Page 192
193 In Active Directory User and Computers, Select the Users Folder, Locate and VCO Test User Page 193
194 Validate VCO Test user is now disabled Notice the DOWN ARROW located on the User icon for VCO Test user Page 194
195 Destroy a User with the vco Plug-in Launch Active Directory Users and Computers Page 195

196 In Active Directory User and Computers, Select the Users Folder, Locate VCO Test User Confirm existence of VCO Test user Page 196
197 Launch the vcenter Orchestrator Client From the Control Center Desktop, Double-Click the vcenter Orchestrator Client icon. Login to vcenter Orchestrator Client Type in the follow fields into the vco Client Login Screen: Page 197
198 Hostname: vcac-w8-01a Username: vcoadmin Password: vcoadmin Page 198
199 Login to vcenter Orchestrator Client Click Login. Page 199

200 Click the Start a Workflow Button Page 200

201 Type Destroy in Choose a workflow to run Window Highlight the Destroy a User Workflow from the results list, Click Select Page 201
202 Select User in which to destroy Click Not set Page 202

203 Using the AD Window, Filter Out until you Select VCO Test Click arrow next to Active Directory Click arrow next to Corp Click arrow next to Users Scroll down to find VCO Test user, Highlight the VCO Test user from the results list, Click Select Page 203
204 Validate Selections and Click Submit to Proceed with Workflow Click Submit Page 204

205 Notice the Workflow Steps Displayed on the Right Side of the Screen *** The error message is ok... this lab features beta code! *** Page 205
206 Return to Active Directory Users and Computers Page 206

207 In Active Directory User and Computers, Select the Users Folder Page 207
208 Validate VCO Test user is now destroyed Scroll to the end of the user list to confirm thevco Test user is destroyed Page 208

209 Create Computer Object with the vco Plug-in Launch the vcenter Orchestrator Client From the Control Center Desktop, Double-Click the vcenter Orchestrator Client icon. Page 209
210 Login to vcenter Orchestrator Client Type in the follow fields into the vco Client Login Screen: Hostname: vcac-w8-01a Username: vcoadmin Password: vcoadmin Page 210
211 Login to vcenter Orchestrator Client Click Login. Click the Workflow Icon Page 211


212 Expand the Workflow Hierarchy Click the arrow next to the following folders until the Active Directory Folder appears Adminstrator Library Microsoft Active Directory Expand the Computer Folder, Right click on 'Create a computer in a group" and select Start workflow Page 212
213 Select parent group for the new computer by clicking 'Not set' Page 213
214 Press enter to bring up all the active directory groups Page 214

215 Highlight Computers and Click Select Page 215

216 Enter a name for the new Computer Enter: VCOrocks Click submit Page 216

217 Notice the Workflow Steps Displayed on the Right Side of the Screen Page 217
218 Launch Activer Directory Users and Computers Page 218

219 In Active Directory User and Computers, Select the Computers folder and notice VCOrocks Computer is Displayed Page 219
220 Destroy Computer Object with the vco Plug-in Launch the vcenter Orchestrator Client From the Control Center Desktop, Double-Click the vcenter Orchestrator Client icon. Page 220

221 Login to vcenter Orchestrator Client Type in the follow fields into the vco Client Login Screen: Hostname: vcac-w8-01a Username: vcoadmin Password: vcoadmin Page 221
222 Login to vcenter Orchestrator Client Click Login. Click the Workflow Icon Page 222

223 Expand the Workflow Hierarchy Click the arrow next to the following folders until the Active Directory Folder appears Adminstrator Library Microsoft Active Directory Page 223

224 Expand the Computer Folder, Right click on 'Destroy a computer" and select Start workflow Page 224
225 Select parent group for the new computer by clicking 'Not set' Page 225
226 Type VCOrocks to display the VCOrocks Computer Object Page 226
227 Highlight VCOrocks Computer Object and Click Select Page 227
228 Confirm Computer to destroy is VCOrocks and Click Submit Page 228

229 Notice the Workflow Steps Displayed on the Right Side of the Screen Page 229
VMware vsphere 5.0 Evaluation Guide
 VMware vsphere 5.0 Evaluation Guide Auto Deploy TECHNICAL WHITE PAPER Table of Contents About This Guide.... 4 System Requirements... 4 Hardware Requirements.... 4 Servers.... 4 Storage.... 4 Networking....
Installing and Configuring vcloud Connector
 Installing and Configuring vcloud Connector vcloud Connector 2.6.0 This document supports the version of each product listed and supports all subsequent versions until the document is replaced by a new
Implementing VMware vsphere 5 Auto Deploy on the Cisco Unified Computing System
 White Paper Implementing VMware vsphere 5 Auto Deploy on the Cisco Unified Computing System What You Will Learn This document provides an overview and detailed procedure for installing and configuring
Installing and Configuring vcloud Connector
 Installing and Configuring vcloud Connector vcloud Connector 2.5.0 This document supports the version of each product listed and supports all subsequent versions until the document is replaced by a new
vsphere Host Profiles 17 APR 2018 VMware vsphere 6.7 VMware ESXi 6.7 vcenter Server 6.7
 17 APR 2018 VMware vsphere 6.7 VMware ESXi 6.7 vcenter Server 6.7 You can find the most up-to-date technical documentation on the VMware website at: https://docs.vmware.com/ If you have comments about
Table of Contents HOL-HBD-1301
 Table of Contents Lab Overview... 2 - vcloud Hybrid Service Jump Start for vsphere Admins...3 Module 1 - vcloud Hybrid Service: Architecture and Consumption Principles...5 vcloud Hybrid Service... 6 vcloud
Table of Contents HOL-1710-SDC-6
 Table of Contents Lab Overview - - What's New: vsphere with Operations Management.. 2 Lab Guidance... 3 Module 1 - What's New in vsphere (90 minutes)... 9 vcenter Server Appliance (VSCA)... 10 vcenter
Table of Contents HOL-1757-MBL-6
 Table of Contents Lab Overview - - VMware AirWatch: Technology Partner Integration... 2 Lab Guidance... 3 Module 1 - F5 Integration with AirWatch (30 min)... 8 Getting Started... 9 F5 BigIP Configuration...
NetBackup 7.6 Replication Director A Hands On Experience
 NetBackup 7.6 Replication Director A Hands On Experience Description Through this hands on lab you can test drive Replication Director and experience for yourself this easy to use, powerful feature. Once
VMware Infrastructure Planner
 Thanks for participating in a assessment! Table of Contents 1. Release Notes for vsan Assessment v. 2.0.168.0... 2 2. About vsan Assessment... 34 3. Install and configure the virtual appliance... 45 2.1
Using the Horizon vcenter Orchestrator Plug-In. VMware Horizon 6 6.0
 Using the Horizon vcenter Orchestrator Plug-In VMware Horizon 6 6.0 You can find the most up-to-date technical documentation on the VMware Web site at: https://docs.vmware.com/ The VMware Web site also
Using the Horizon vrealize Orchestrator Plug-In
 Using the Horizon vrealize Orchestrator Plug-In VMware Horizon 6 version 6.2.3, VMware Horizon 7 versions 7.0.3 and later Modified on 4 JAN 2018 VMware Horizon 7 7.4 You can find the most up-to-date technical
VMware AirWatch: Directory and Certificate Authority
 Table of Contents Lab Overview - HOL-1857-06-UEM - VMware AirWatch: Directory and Certificate Authority Integration... 2 Lab Guidance... 3 Module 1 - Advanced AirWatch Configuration, AD Integration/Certificates
vsphere Host Profiles Update 1 VMware vsphere 6.5 VMware ESXi 6.5 vcenter Server 6.5
 Update 1 VMware vsphere 6.5 VMware ESXi 6.5 vcenter Server 6.5 You can find the most up-to-date technical documentation on the VMware website at: https://docs.vmware.com/ If you have comments about this
Configure RSPAN with VMware
 Configure RSPAN with VMware Published: 2018-04-19 The Remote Switched Port Analyzer (RSPAN) enables you to monitor traffic on one switch through a device on another switch and then send the monitored traffic
Table of Contents. VMware AirWatch: Technology Partner Integration
 Table of Contents Lab Overview - HOL-1857-08-UEM - Workspace ONE UEM - Technology Partner Integration... 2 Lab Guidance... 3 Module 1 - F5 Integration with Workspace ONE UEM (30 min)... 9 Introduction...
Dell Storage Compellent Integration Tools for VMware
 Dell Storage Compellent Integration Tools for VMware Version 4.0 Administrator s Guide Notes, Cautions, and Warnings NOTE: A NOTE indicates important information that helps you make better use of your
VMware vcenter Site Recovery Manager 4.1 Evaluator s Guide EVALUATOR'S GUIDE
 VMware vcenter Site Recovery Manager 4.1 EVALUATOR'S GUIDE Table of Contents. Getting Started.... 3 About VMware vcenter Site Recovery Manager.... 3 About This Guide.... 3 Intended Audience.... 3 Assumptions....
Table of Contents HOL-PRT-1467
 Table of Contents Lab Overview - - Virtual Volumes with Dell EqualLogic... 2 Lab Guidance... 3 Pre-flight Instructions... 5 Module 1 - Working with Dell EqualLogic and VVOLs (60 Mins)... 11 Creating a
OpenManage Integration for VMware vcenter Quick Install Guide for vsphere Client, Version 2.3.1
 OpenManage Integration for VMware vcenter Quick Install Guide for vsphere Client, Version 2.3.1 Notes, Cautions, and Warnings NOTE: A NOTE indicates important information that helps you make better use
Data Protection Guide
 SnapCenter Software 4.1 Data Protection Guide For VMs and Datastores using the SnapCenter Plug-in for VMware vsphere September 2018 215-13399_B0 doccomments@netapp.com Table of Contents 3 Contents Deciding
Table of Contents HOL-PRT-1305
 Table of Contents Lab Overview... 2 - Abstract... 3 Overview of Cisco Nexus 1000V series Enhanced-VXLAN... 5 vcloud Director Networking and Cisco Nexus 1000V... 7 Solution Architecture... 9 Verify Cisco
Installation of Cisco Business Edition 6000H/M
 Installation Overview, page 1 Installation Task Flow of Cisco Business Edition 6000H/M, page 2 Installation Overview This chapter describes the tasks that you must perform to install software on your Business
vsphere Installation and Setup Update 2 Modified on 10 JULY 2018 VMware vsphere 6.5 VMware ESXi 6.5 vcenter Server 6.5
 vsphere Installation and Setup Update 2 Modified on 10 JULY 2018 VMware vsphere 6.5 VMware ESXi 6.5 vcenter Server 6.5 You can find the most up-to-date technical documentation on the VMware website at:
Getting Started with ESX Server 3i Installable Update 2 and later for ESX Server 3i version 3.5 Installable and VirtualCenter 2.5
 Getting Started with ESX Server 3i Installable Update 2 and later for ESX Server 3i version 3.5 Installable and VirtualCenter 2.5 Getting Started with ESX Server 3i Installable Revision: 20090313 Item:
Configuring ApplicationHA in VMware SRM 5.1 environment
 Configuring ApplicationHA in VMware SRM 5.1 environment Windows Server 2003 and 2003 R2, Windows Server 2008 and 2008 R2 6.0 September 2013 Contents Chapter 1 About the ApplicationHA support for VMware
Hands-on Lab Manual. Introduction. Dell Storage Hands-on Lab Instructions. Estimated Completion Time: 30 minutes. Audience. What we will be doing
 Dell Storage Hands-on Lab Instructions Dell SC Series CITV Integration with VMware VASA Estimated Completion Time: 30 minutes Introduction Audience The audience for this document is technical professionals
vlab Student Hand Out - Overview
 vlab Student Hand Out - Overview This document provides remote access information for people attending VMware vsphere Install, Configure Manage [v5.5] classes. Use the information in this document to connect
OpenManage Integration for VMware vcenter Quick Installation Guide for vsphere Web Client Version 3.2
 OpenManage Integration for VMware vcenter Quick Installation Guide for vsphere Web Client Version 3.2 Notes, cautions, and warnings NOTE: A NOTE indicates important information that helps you make better
Cisco VDS Service Broker Software Installation Guide for UCS Platforms
 Cisco VDS Service Broker 1.0.1 Software Installation Guide for UCS Platforms Revised: May 2013 This document provides detailed instructions for installing the Cisco Videoscape Distribution Suite Service
Developing and Deploying vsphere Solutions, vservices, and ESX Agents. 17 APR 2018 vsphere Web Services SDK 6.7 vcenter Server 6.7 VMware ESXi 6.
 Developing and Deploying vsphere Solutions, vservices, and ESX Agents 17 APR 2018 vsphere Web Services SDK 6.7 vcenter Server 6.7 VMware ESXi 6.7 You can find the most up-to-date technical documentation
Send the Ctrl-Alt-Delete key sequence to the Guest OS one of two ways: Key sequence: Ctlr-Alt-Ins Menu Sequence: VM / Guest / Send Ctrl-Alt-Delete
 CIS 231 Windows 2008 Server Install Lab #1 (Virtual Machines) Keys to Remember when using the vsphere client. Send the Ctrl-Alt-Delete key sequence to the Guest OS one of two ways: Key sequence: Ctlr-Alt-Ins
1) Use either Chrome of Firefox to access the VMware vsphere web Client. https://vweb.bristolcc.edu. FireFox
 Use either Chrome of Firefox to access the VMware vsphere web Client. https://vweb.bristolcc.edu. FireFox") CIS 231 Windows 7 Install Lab #2 1) Use either Chrome of Firefox to access the VMware vsphere web Client. https://vweb.bristolcc.edu CHROME At the your connection is not private message, click Advanced
CIS 231 Windows 7 Install Lab #2 1) Use either Chrome of Firefox to access the VMware vsphere web Client. https://vweb.bristolcc.edu CHROME At the your connection is not private message, click Advanced
VMware vfabric Data Director Installation Guide
 VMware vfabric Data Director Installation Guide vfabric Data Director 1.0.1 This document supports the version of each product listed and supports all subsequent versions until the document is replaced
Table of Contents HOL-SDC-1422
 Table of Contents - VMware Development Tools and SDKs... 2 Lab Overview... 3 Module 1 - Developer Center, Workbench IS, and the vsphere Management SDK (30 min)... 4 Introduction... 5 Using Workbench IS
Developing and Deploying vsphere Solutions, vservices, and ESX Agents
 Developing and Deploying vsphere Solutions, vservices, and ESX Agents Modified on 27 JUL 2017 vsphere Web Services SDK 6.5 vcenter Server 6.5 VMware ESXi 6.5 Developing and Deploying vsphere Solutions,
Configure RSPAN with VMware
 Configure RSPAN with VMware Published: 2019-01-07 The Remote Switched Port Analyzer (RSPAN) enables you to monitor traffic on one switch through a device on another switch and then send the monitored traffic
Dell Storage Integration Tools for VMware
 Dell Storage Integration Tools for VMware Version 4.1 Administrator s Guide Notes, cautions, and warnings NOTE: A NOTE indicates important information that helps you make better use of your product. CAUTION:
CIS 231 Windows 7 Install Lab #2
 CIS 231 Windows 7 Install Lab #2 1) To avoid certain problems later in the lab, use Chrome as your browser: open this url: https://vweb.bristolcc.edu 2) Here again, to avoid certain problems later in the
OpenManage Integration for VMware vcenter Quick Install Guide for vsphere Client, Version 2.3
 OpenManage Integration for VMware vcenter Quick Install Guide for vsphere Client, Version 2.3 Notes, Cautions, and Warnings NOTE: A NOTE indicates important information that helps you make better use of
vcenter Server Installation and Setup Update 1 Modified on 30 OCT 2018 VMware vsphere 6.7 vcenter Server 6.7
 vcenter Server Installation and Setup Update 1 Modified on 30 OCT 2018 VMware vsphere 6.7 vcenter Server 6.7 You can find the most up-to-date technical documentation on the VMware website at: https://docs.vmware.com/
What s New in VMware vsphere 5.0 Platform
 What s New in VMware vsphere 5.0 Platform VMware vsphere 5.0 Technical WHITE PAPER v 1/Updated May 2011 Table Of Contents Introduction... 3 Virtual Machine Enhancements... 3 Virtual Machine Scalability
VMware vsphere with ESX 6 and vcenter 6
 VMware vsphere with ESX 6 and vcenter 6 Course VM-06 5 Days Instructor-led, Hands-on Course Description This class is a 5-day intense introduction to virtualization using VMware s immensely popular vsphere
How do I patch custom OEM images? Are ESXi patches cumulative? VMworld 2017 Do stateless hosts keep SSH & SSL identities after reboot? With Auto Deplo
 SER1963BE Technical Overview of VMware ESXi Host Lifecycle Management with Update Manager, Auto Deploy, and Host Profiles VMworld 2017 Content: Not for publication Eric Gray @eric_gray #VMworld #SER1963BE
NexentaStor VVOL
 NexentaStor 5.1.1 VVOL Admin Guide Date: January, 2018 Software Version: NexentaStor 5.1.1 VVOL Part Number: 3000-VVOL-5.1.1-000065-A Table of Contents Preface... 3 Intended Audience 3 References 3 Document
Data Protection Guide
 SnapCenter Software 4.0 Data Protection Guide For VMs and Datastores using the SnapCenter Plug-in for VMware vsphere March 2018 215-12931_C0 doccomments@netapp.com Table of Contents 3 Contents Deciding
vcenter Server Installation and Setup Modified on 11 MAY 2018 VMware vsphere 6.7 vcenter Server 6.7
 vcenter Server Installation and Setup Modified on 11 MAY 2018 VMware vsphere 6.7 vcenter Server 6.7 You can find the most up-to-date technical documentation on the VMware website at: https://docs.vmware.com/
VMware vfabric Data Director 2.5 EVALUATION GUIDE
 VMware vfabric Data Director 2.5 EVALUATION GUIDE Introduction... 2 Pre- requisites for completing the basic and advanced scenarios... 3 Basic Scenarios... 4 Install Data Director using Express Install...
Netwrix Auditor. Virtual Appliance and Cloud Deployment Guide. Version: /25/2017
 Netwrix Auditor Virtual Appliance and Cloud Deployment Guide Version: 9.5 10/25/2017 Legal Notice The information in this publication is furnished for information use only, and does not constitute a commitment
Installing and Upgrading Cisco Network Registrar Virtual Appliance
 CHAPTER 3 Installing and Upgrading Cisco Network Registrar Virtual Appliance The Cisco Network Registrar virtual appliance includes all the functionality available in a version of Cisco Network Registrar
Quest VROOM Quick Setup Guide for Quest Rapid Recovery for Windows and Quest Foglight vapp Installers
 Quest VROOM Quick Setup Guide for Quest Rapid Recovery for Windows and Quest Foglight vapp Installers INTRODUCTION Setup of Quest VROOM requires installation of Rapid Recovery and Foglight for Virtualization
Horizon Console Administration. 13 DEC 2018 VMware Horizon 7 7.7
 Horizon Console Administration 13 DEC 2018 VMware Horizon 7 7.7 You can find the most up-to-date technical documentation on the VMware website at: https://docs.vmware.com/ If you have comments about this
VMware vfabric Data Director Installation Guide
 VMware vfabric Data Director Installation Guide vfabric Data Director 2.5 This document supports the version of each product listed and supports all subsequent versions until the document is replaced by
OpenManage Integration for VMware vcenter Quick Installation Guide for vsphere Web Client Version 3.1
 OpenManage Integration for VMware vcenter Quick Installation Guide for vsphere Web Client Version 3.1 Notes, Cautions, and Warnings NOTE: A NOTE indicates important information that helps you make better
VMware vcloud Director Evaluator s Guide TECHNICAL WHITE PAPER
 VMware vcloud Director Evaluator s Guide TECHNICAL WHITE PAPER Table of Contents 1. Getting Started.... 4 1.1 About This Guide... 4 1.2 Intended Audience.... 4 1.3 Help and Support During the Evaluation....
Reset the Admin Password with the ExtraHop Rescue CD
 Reset the Admin Password with the ExtraHop Rescue CD Published: 2018-01-19 This guide explains how to reset the administration password on physical and virtual ExtraHop appliances with the ExtraHop Rescue
Installing the Operating System or Hypervisor
 If you purchased E-Series Server or NCE Option 1 (E-Series Server or NCE without a preinstalled operating system or hypervisor), you must install an operating system or hypervisor. This chapter includes
VMware Horizon View 5.2 Reviewer s Guide REVIEWER S GUIDE
 VMware Horizon View 5.2 Reviewer s Guide REVIEWER S GUIDE Table of Contents Introduction... 5 What Is VMware Horizon View?... 5 Simplify.... 5 Manage and Secure.... 5 Empower... 5 Architecture and Components
IT Systems Integration
 IT Systems Integration vsphere Update Manager 6.0 Patch and Upgrade Management Guide. Prepared By IT Systems Version History Version Date Notes 1.0 01/13/17 Initial Release 1 Introduction VMware Update
How to Deploy vcenter on the HX Data Platform
 First Published: 2016-07-11 Last Modified: 2019-01-08 vcenter on HyperFlex Cisco HX Data Platform deployment, including installation and cluster configuration and management, requires a vcenter server
ESXi Host Lifecycle October 17, 2017
 October 17, 2017 1 Table of Contents 1. Standalone ESXi Installation and Configuration 1.1.ESXi Console Overview 1.2.ESXi Install 1.3.vSphere Hosts Upgrade - ESXCLI Command 2. Host Profiles 2.1.Checking
FireFox. CIS 231 Windows 10 Install Lab # 3. 1) Use either Chrome of Firefox to access the VMware vsphere web Client.
 Use either Chrome of Firefox to access the VMware vsphere web Client.") CIS 231 Windows 10 Install Lab # 3 1) Use either Chrome of Firefox to access the VMware vsphere web Client. https://vweb.bristolcc.edu CHROME At the your connection is not private message, click Advanced
CIS 231 Windows 10 Install Lab # 3 1) Use either Chrome of Firefox to access the VMware vsphere web Client. https://vweb.bristolcc.edu CHROME At the your connection is not private message, click Advanced
VMware AirWatch - Workspace ONE, Single Sign-on and VMware Identity Manager
 VMware AirWatch - Workspace ONE, Single Sign-on and VMware Identity Table of Contents Lab Overview - HOL-1857-03-UEM - Workspace ONE UEM with App & Access Management... 2 Lab Guidance... 3 Module 1 - Workspace
VMware Skyline Collector Installation and Configuration Guide. VMware Skyline 1.4
 VMware Skyline Collector Installation and Configuration Guide VMware Skyline 1.4 You can find the most up-to-date technical documentation on the VMware website at: https://docs.vmware.com/ If you have
Advanced Service Design. vrealize Automation 6.2
 vrealize Automation 6.2 You can find the most up-to-date technical documentation on the VMware website at: https://docs.vmware.com/ If you have comments about this documentation, submit your feedback to
VMware Skyline Collector Installation and Configuration Guide. VMware Skyline Collector 2.0
 VMware Skyline Collector Installation and Configuration Guide VMware Skyline Collector 2.0 You can find the most up-to-date technical documentation on the VMware website at: https://docs.vmware.com/ If
Introduction to Virtualization
 Introduction to Virtualization Module 2 You Are Here Course Introduction Introduction to Virtualization Creating Virtual Machines VMware vcenter Server Configuring and Managing Virtual Networks Configuring
Version 2.3 User Guide
 V Mware vcloud Usage Meter Version 2.3 User Guide 2012 VMware, Inc. All rights reserved. This product is protected by U.S. and international copyright and intellectual property laws. This product is covered
Developing and Deploying vsphere Solutions, vservices, and ESX Agents
 Developing and Deploying vsphere Solutions, vservices, and ESX Agents vsphere 6.0 This document supports the version of each product listed and supports all subsequent versions until the document is replaced
Getting Started with ESX Server 3i Embedded ESX Server 3i version 3.5 Embedded and VirtualCenter 2.5
 Getting Started with ESX Server 3i Embedded ESX Server 3i version 3.5 Embedded and VirtualCenter 2.5 Title: Getting Started with ESX Server 3i Embedded Revision: 20071022 Item: VMW-ENG-Q407-430 You can
VMware vsphere 5.5: Install, Configure, Manage Lab Addendum. Lab 3: Configuring VMware ESXi
 VMware vsphere 5.5: Install, Configure, Manage Lab Addendum Lab 3: Configuring VMware ESXi Document Version: 2014-07-08 Copyright Network Development Group, Inc. www.netdevgroup.com NETLAB Academy Edition,
Developing and Deploying vsphere Solutions, vservices, and ESX Agents
 Developing and Deploying vsphere Solutions, vservices, and ESX Agents vsphere 5.0 This document supports the version of each product listed and supports all subsequent versions until the document is replaced
VMware vsphere: What s New Lab Manual ESXi 5.5 and vcenter Server 5.5
 VMware vsphere: What s New Lab Manual ESXi 5.5 and vcenter Server 5.5 VMware Education Services VMware, Inc. www.vmware.com/education VMware vsphere: What s New ESXi 5.5 and vcenter Server 5.5 Part Number
Migrating vrealize Automation 6.2 to 7.1
 Migrating vrealize Automation 6.2 to 7.1 vrealize Automation 7.1 This document supports the version of each product listed and supports all subsequent versions until the document is replaced by a new edition.
IaaS Integration for Multi- Machine Services. vrealize Automation 6.2
 IaaS Integration for Multi- Machine Services vrealize Automation 6.2 You can find the most up-to-date technical documentation on the VMware website at: https://docs.vmware.com/ If you have comments about
Table of Contents HOL CMP
 Table of Contents Lab Overview - - vrealize Orchestrator - Advanced... 2 Lab Guidance... 3 Module 1 - Creating Advanced vrealize Orchestrator Workflows (45 min)...9 Introduction... 10 Prompting User Input
Getting Started with ESXi Embedded
 ESXi 4.0 Embedded vcenter Server 4.0 This document supports the version of each product listed and supports all subsequent versions until the document is replaced by a new edition. To check for more recent
Table of Contents HOL-SDC-1415
 Table of Contents Lab Overview - - IT Outcomes Security Controls Native to Infrastructure. 2 Lab Guidance... 3 Module 1 - Policy-Based Compliance... 5 Introduction... 6 Manage vcenter Server Virtual Machines...
vcenter Server and Host Management
 Update 1 VMware ESXi 5.1 vcenter Server 5.1 This document supports the version of each product listed and supports all subsequent versions until the document is replaced by a new edition. To check for
Cisco UCS Director Baremetal Agent Installation and Configuration Guide, Release 5.2
 UCS Director Baremetal Agent Installation The purpose to this document is to illustrate the steps to install the UCS Director Baremetal Agent (PXE Server) which can be used to write/use workflows that
UDS Enterprise Free & Evaluation Edition. Lab UDS Enterprise + VMware vsphere + RDP/XRDP
 UDS Enterprise Free & Evaluation Edition Lab UDS Enterprise + VMware vsphere + RDP/XRDP 1 INDEX Introduction 03 Deployment of UDS Enterprise Free & Evaluation Edition 04 Upload UDS Appliances to VMware
Active System Manager Version 8.0 User s Guide
 Active System Manager Version 8.0 User s Guide Notes, Cautions, and Warnings NOTE: A NOTE indicates important information that helps you make better use of your product. CAUTION: A CAUTION indicates either
PassTest. Bessere Qualität, bessere Dienstleistungen!
 PassTest Bessere Qualität, bessere Dienstleistungen! Q&A Exam : VCP-510 Title : VMware Certified Professional on VSphere 5 Version : Demo 1 / 7 1.Which VMware solution uses the security of a vsphere implementation
Installing Cisco MSE in a VMware Virtual Machine
 Installing Cisco MSE in a VMware Virtual Machine This chapter describes how to install and deploy a Cisco Mobility Services Engine (MSE) virtual appliance. Cisco MSE is a prebuilt software solution that
Cisco Virtual Application Container Services 2.0 Lab v1
 Cisco Virtual Application Container Services 2.0 Lab v1 Last Updated: 02-SEP-2015 About This Solution Cisco Virtual Application Container Services (VACS) enables simplified deployment of Secure Application
Setting Up Cisco Prime LMS for High Availability, Live Migration, and Storage VMotion Using VMware
 CHAPTER 5 Setting Up Cisco Prime LMS for High Availability, Live Migration, and Storage VMotion Using VMware This chapter explains setting up LMS for High Availability (HA), Live migration, and, Storage
VMware Identity Manager Cloud Deployment. Modified on 01 OCT 2017 VMware Identity Manager
 VMware Identity Manager Cloud Deployment Modified on 01 OCT 2017 VMware Identity Manager You can find the most up-to-date technical documentation on the VMware Web site at: https://docs.vmware.com/ The
VMware Identity Manager Cloud Deployment. DEC 2017 VMware AirWatch 9.2 VMware Identity Manager
 VMware Identity Manager Cloud Deployment DEC 2017 VMware AirWatch 9.2 VMware Identity Manager You can find the most up-to-date technical documentation on the VMware website at: https://docs.vmware.com/
VMware vsphere: Install, Configure, and Manage v6.5 Pod. Installation and Configuration Guide
 VMware vsphere: Install, Configure, and Manage v6.5 Pod Installation and Configuration Guide Document Version: 2017-12-27 Installation of VMware vsphere: ICM v6.5 virtual pods as described in this guide
IA L16 - Hands-On Lab Hands on with Instant Backup and Recovery Features of NetBackup 7.6 for VMware
 IA L16 - Hands-On Lab Hands on with Instant Backup and Recovery Features of NetBackup 7.6 for VMware Description NetBackup 7.6 offers terrific new technologies that provide faster VMware backups and restores
vcenter Server and Host Management Update 2 Modified on 04 OCT 2017 VMware vsphere 6.0 VMware ESXi 6.0 vcenter Server 6.0
 Update 2 Modified on 04 OCT 2017 VMware vsphere 6.0 VMware ESXi 6.0 vcenter Server 6.0 You can find the most up-to-date technical documentation on the VMware Web site at: https://docs.vmware.com/ The VMware
CIS 231 Windows 10 Install Lab # 3
 CIS 231 Windows 10 Install Lab # 3 1) To avoid certain problems later in the lab, use Chrome as your browser: open this url: https://vweb.bristolcc.edu 2) Here again, to avoid certain problems later in
Virtual Appliance User s Guide
 Cast Iron Integration Appliance Virtual Appliance User s Guide Version 4.5 July 2009 Cast Iron Virtual Appliance User s Guide Version 4.5 July 2009 Copyright 2009 Cast Iron Systems. All rights reserved.
RecoverPoint for Virtual Machines
 RecoverPoint for Virtual Machines Basic Configuration Installation Guide P/N 302-004-369 Rev 01 Version 5.1.1 RecoverPoint for Virtual Machines Version 5.1.1 Basic Configuration Installation Guide Copyright
Active System Manager Version 7.5 User s Guide
 Active System Manager Version 7.5 User s Guide Notes, Cautions, and Warnings NOTE: A NOTE indicates important information that helps you make better use of your computer. CAUTION: A CAUTION indicates either
Palo Alto Networks Cybersecurity Gateway
 Palo Alto Networks Cybersecurity Gateway Installation and Configuration Guide Document Version: 2018-08-07 Installation of Palo Alto Networks Cybersecurity Gateway virtual pods as described in this guide
Virtual Storage Console, VASA Provider, and Storage Replication Adapter for VMware vsphere
 Virtual Storage Console, VASA Provider, and Storage Replication Adapter for VMware vsphere Administration Guide for 7.2 release June 2018 215-13169_A0 doccomments@netapp.com Table of Contents 3 Contents
Basic Configuration Installation Guide
 RecoverPoint for VMs 5.1 Basic Configuration Installation Guide P/N 302-003-975 REV 1 July 4, 2017 This document contains information on these topics: Revision History... 2 Overview... 3 Reference architecture...
VMware Adapter for SAP Landscape Management Installation Configuration and Administration Guide for VI Administrators
 VMware Adapter for SAP Landscape Management Installation Configuration and Administration Guide for VI Administrators Product version 1.4.1 running on vsphere 5.5 VMware Adapter for SAP Landscape Management
SOA Software API Gateway Appliance 6.3 Administration Guide
 SOA Software API Gateway Appliance 6.3 Administration Guide Trademarks SOA Software and the SOA Software logo are either trademarks or registered trademarks of SOA Software, Inc. Other product names, logos,