Geeetech Aluminum Prusa I3. User Manual
|
|
|
- Merry Webster
- 5 years ago
- Views:
Transcription

1 Geeetech Aluminum Prusa I3 User Manual 1
2 Safety Instructions Building the printer will require a certain amount of physical dexterity, common sense and a thorough understanding of what you are doing. We have provided this detailed instruction to help you assemble it easily. However ultimately we cannot be responsible for your health and safety whilst building or operating the printer, with that in mind be sure you are confident with what you are doing prior to commencing with building or buying. Read the entire manual to enable you to make an informed decision. Building and operating involves electricity, so all necessary precautions should be taken and adhered to, the printer runs on 12V supplied by a certified power supply, so you shouldn t ever have to get involved with anything over 12V but bear in mind there can still be high currents involved and even at 12V they shouldn t be taken lightly. High temperatures are involved with 3D Printing, the Extrusion nozzle of the hot end can run about 230 C, the heated bed runs 110 C and the molten plastic extruded will initially be at around 200 C, so special care and attention should be made when handling these parts of the printer during operation. Check the power input of the power supply unit. You can choose either 110V or 220V according to the Power regulation in your country. We wouldn t recommend leaving your printer running unattended, or at least until you are confident to do so. We cannot be held responsible for any loss, damage, threat, hurt or other negligent result from either building or using the printer. 2
3 1 Software resources 1.1 Printer control software Repetier-Host We use the latest Repetier host V1.6.0 as the printer control software, link for downloading: After downloading and installation, it can be used. 1

4 1.2 Driver Connect the printer to computer with USB cable; the motherboard driver installer will automatically appear. If not, you can download FT232RQ here, which is the driver of Sanguinololu: Download and install, you can find the corresponding serial port in the Windows "Device Manager": 1.3 Arduino IDE In the process of using the printer you may need to re-upload the firmware, and the software you need to use is Arduino, Arduino IDE How to upload firmware? Please refer to FAQ. 2
5 2 Connect the printer ShenZhen GETECH CO.,LTD After the above software is installed, we can connect the printer to the computer. Plug the USB into the computer, open Repetier host, click the icon in the top right corner, and the dialog box of printer settings will appear. Select corresponding COM port of the printer and baud rate 250,000 in the dialog box. Click Apply after the setting, shown as below. 3

6 After setting, click the button in the top left corner of Home Page. When the button turns green and changes into, the printer connection is successful. 4

7 3 Printer Setting 3.1 Printer speed Set the running speed of printer as 1000 in the printer settings in order to avoid collision because of high speed during the test. After follow-up tests are completed it can be changed back to the original value. (Recommend speed of Z-axis should not be too high, 1000 is OK) Travel feed rate: 1000mm/min Z-Axis feed rate: 1000mm/min 5

8 3.2 Number of Extruder and Nozzle Diameter The number of extruders is set to 1. The diameter of nozzle is set according to actual size, here is 0.4mm. 6

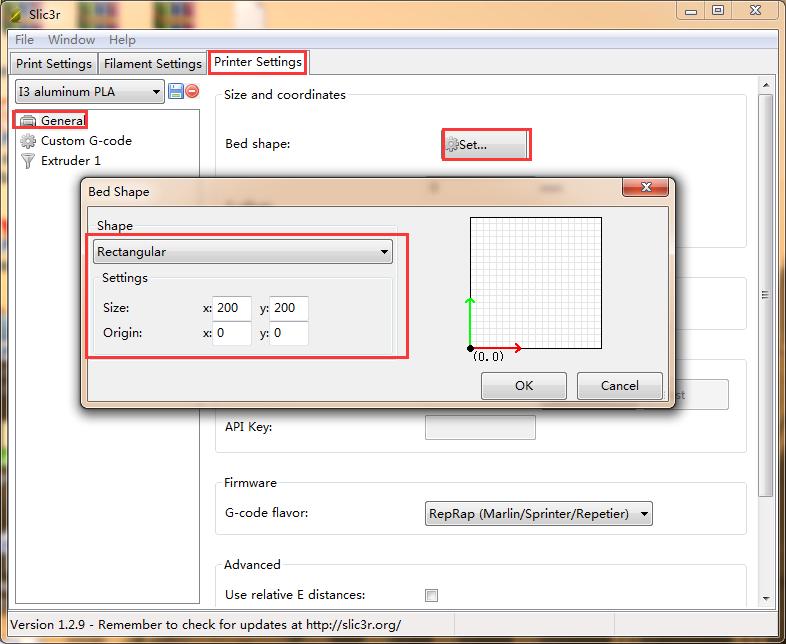
9 3.3 Printer shape Here the printer shape of I3 aluminum is Classic Printer; For home position, choose Min; The printer's maximum printing volume 200 * 200 * 180 (length / width / height) 7

10 If the object which is being printed is not in the center of the hot bed, you can adjust the following two values to compensate for the distance deviation of X / Y direction: Bed Left Bed Right 8

11 After setting, click Apply>OK The interface after setting is as following: 9

12 4 Printer Function Test When we are testing, we can test through LCD control panel or we can also do the test on Repetier Host. The methods are as followings. 4.1 Use Repetier Host to Test Motor Direction Test Before testing, please manually place the motors of X / Y / Z axis at the middle of each axis to avoid accidental collision occurring during the test. There is emergency stop button at the top right corner, or you can cut off the power. Always be prepared for emergency stop. 10

13 Open Repetier host and connect the printer. Click Home button, then all three axes will move towards the endstop. After they hit the endstop they will move back for a short distance and then stop the movement. The origin location should be in the right front corner of the printer platform. If the moving direction is reversed, you can change the motor direction in firmware. (please refer to FAQ) Heating Test 11
14 Click the heating button of the hot bed and the extruder. The slash will disappear and you will see the temperature rising up. Meanwhile you can see the temperature changing at the bottom of Repetier. If the hot bed or extruder can heat, please refer to FAQ. 12

15 4.1.3 Extruder test Please note: The extruder will not begin working until the temperature reaches above 170. Heat the extruder to 200, and then insert the filament into hotend via push-in fitting. When you are pushing the filament, press the release handle slightly with one hand and push the filament with the other hand through the feeding port. Please note that the filament must be in the slot of the idler wheel, otherwise feeding will not be fluent. 13


16 After pushing the filament into the bottom of hotend, use the feeding button on Repetier (as shown 14

17 in following picture) to do manual feeding. If the nozzle can extrude filament fluently, the extruder is working well. If not, please refer to FAQ. Note: If the moving direction of the motor is reversed, which means you found the filament going backwards when you click to feed downwards, change the motor direction of the extruder in the firmware to solve the problem. This method is the same with that for X/Y/Z axis motor. 4.2 Use LCD Control Panel to Test Motor Direction Test 15

18 Functions of the knob on LCD: 1. Press the knob: OK or enter the sub-menu 2. Turn the knob: to scroll through the options, or change parameters Note: Turn the knob during printing; you can change the Feed rate in real time. After learning about the functions of the knob on the LCD, press the knob to enter sub-menu and choose Prepare: Choose Move axis: 16
 Choose the axis that you want to move by using Move X/Y/Z options. Turning the knob can make each axis move left and right or back and forth.")
19 Choose Move 1mm: (Note: the extruder can only support two options: Move 1mm and Move 0.1mm. The 10mm option is disabled.) Choose the axis that you want to move by using Move X/Y/Z options. Turning the knob can make each axis move left and right or back and forth. After testing each axis, you can choose Prepare>Auto home in the menu to make it back to home 17
20 position. If you want to manually move the motor, you can unlock the motor. Unlocking method: Prepare>Disable steppers: 18

21 4.2.2 Heating Test In the Control menu, you can select temperature setting of hotbed and extruder. Choose control: Choose temperature: Select the temperature you want to set: After setting, you can choose Prepare> Preheat PLA to preheat hot bed and extruder. 19
22 So far, function tests of the printer are done. 5 Hotbed Leveling Before printing, we need to do hotbed leveling. Only after this step can quality of printed parts get improved. Otherwise the un-leveling gap between the hotbed and extrusion head will affect the filament adhering to the hotbed thus cause poor print quality or even not printing. 5.1 Homing Home the printer. 20
23 5.2 Coarse tuning of distance between the nozzle and the hotbed *If the nozzle is far from the surface of hotbed, loosen the M3x50mm screw to extend the bottom part. Then the printer will home at a relatively lower place, the distance between the nozzle and the hotbed will be decreased. *If the nozzle is too close to the surface of hotbed, tighten the M3x50mm screw to shorten the bottom part. Then the printer will home at a relatively higher place, the distance between the nozzle and the hotbed will be increased. You may need to calibrate for many times at this step. The recommended distance between the nozzle and the hotbed is 0.5-1mm. 21
, manually move the extruder to the four corners of the hot bed and fine-tuning the wing nut at each corner to level the distances between the extrusion head and four")
24 5.3 Fine Tuning After the initial adjustment, home the printer. Disable the stepper motors( ), manually move the extruder to the four corners of the hot bed and fine-tuning the wing nut at each corner to level the distances between the extrusion head and four corners. During adjustment, you can put a piece of A4 paper(half fold it) between the nozzle and hotbed. If you can feel a bit friction when you pull the paper back and forth, the distance is proper. After finishing the adjustment of four corners, the entire leveling process is done. You can also 22

25 move the extrusion head to the center of hotbed to verify leveling outcome. 6 Slice Settings With one more step, we can start printing,set the slice parameters such as print material diameter, the speed, the layer height, etc. to achieve better print quality. Open slic3r, which is a slice software coming with Repetier host. As shown below: You will be presented with the following interface: 23

26 6.1 Printing Setting Set layer height and the first layer height in the Print setting tab. Generally speaking, layer height can be set as mm. Considering of accuracy and speed, 0.2mm is the most appropriate layer height. The layer height is set as 0.35mm by default. 24
27 6.2 Filament Setting Set filament diameter and print temperature in the Filament setting tab. Filament we use here is 1.75mm PLA. Usually the temperature of the extrusion head is ,and the temperature of hotbed is Here we separately set them as 200 and

28 6.3 Printer Setting Set the shape and size of hotbed and the number of extruders in the Printer setting> General tab. 26
29 27

30 Meanwhile set the extrusion head diameter as 0.4mm (input the actual diameter of your own printer): 28

31 6.4 Other Settings In addition to the above parameter settings, parameters like the speed of the printer are also very important to print quality. It requires user s long-term using experience and exploration. Here we d like to give you a setting for reference, please download the attachment config.ini. You can import it into slic3r to view it through the following steps. Open slic3r>file>load Config: 29

32 Find I3 aluminum PLA config.ini file in the dialog box and open it. 30

33 Then you can successfully import the config.ini file. Click the Save button to rename and save it. 31

34 7 Begin Printing So far, all the preparatory work is completed. The next step is to import the model file for slicing and printing. For 3D printer, the file format of the model is generally.stl file. We can download for free and print those models which are shared online, and you can also design your own creative objects for printing. Here we print a simple plate. You can download the model file here: plate.stl. 32

35 7.1 Load print model In the main interface of Repetier host, click the Load button downloaded and open it.. Choose the file you have 33

36 7.2 Model Slicing After the file is loaded, you can use the following buttons to enlarge, shrink or rotate it. 34

37 After the size setting, choose the slicing parameters which were imported previously in the drop- down menu, and click slice with slic3r. 35

38 In this way,.gcode file which can be recognized by the printer is generated. 36
39 Last step, click button to print. 37

40 7.3 Stand-alone print with SD Card If you want to print Stand-alone, you can save the.gcode file in SD card for printing. Note: The printer only recognizes.gcode file in the SD card, and the file can not be placed in any folder! Steps are as follows: Save Click Save for SD Print, and select the save button in the dialog box. 38

41 7.3.2 Generate file Choose a save path to save the generated.gcode file which can be used for SD card printing. 39

42 7.3.3 Print Insert the SD card into the SD card slot at the back of the LCD control panel, and choose the corresponding.gcode to print. Press the knob on LCD, rotate the knob to enter the main menu and choose Print from SD option. Choose corresponding.gcode file to begin printing. 40

43 Heating When heating is completed, it begins printing automatically. 41

44 8 FAQ If you encounter any problems during use, you can come to our forum: and there are detailed solutions answer in the forum. Common problems are as follows: 8.1 How to upload firmware? The motherboard of the printer is already burned with firmware when it leaves the factory. If you have firmware problem when you are using the product and need to upload firmware, you need to use the Arduino IDE to burn. Arduino1.0.1 is recommended, and the download address is: 42

45 The way of uploading firmware, please refer to: Firmware download address, please refer to: Common parameters settings of firmware, please refer to: How to change the motor direction in firmware? In the configuration.h tab of firmware, find the following codes. Change the true of corresponding axis into false or false into true, and save the firmware and burn into the printer. ( Because you don t 43
 #define INVERT_X_DIR true #define INVERT_Y_DIR false #define INVERT_Z_DIR true #define INVERT_E0_DIR false 8.")
46 know the firmware which has been burned by mother board is true or false, it may be necessary to burn both of the two parameters.) #define INVERT_X_DIR true #define INVERT_Y_DIR false #define INVERT_Z_DIR true #define INVERT_E0_DIR false 8.3 User manual of Repetier Host For detailed user manual of Repetier Host, please refer to Wiki: 44
47 8.4 Possible causes for motor s non-action Extruder does not work normally The hotbed or extruder can not be heated LCD error: MAX/MIN TEMP error No information or displaying black square on LCD Time.h/endstop hit or other abnormalities 45
Geeetech Duplicator 5 3D printer. User Manual
 Geeetech Duplicator 5 3D printer User Manual Contents Safety Instructions... 4 1.Software Resources... 5 1.1 Repetier-Host... 5 1.2 Driver... 5 1.3 Arduino IDE... 6 2.Connect the Printer... 6 3.Printer
Geeetech A10. Desktop 3D Printer USER MANUAL
 Geeetech A10 Desktop 3D Printer USER MANUAL Terms Please be advised of the following terms (the Terms ) regarding this User Manual (this Manual ): All information in this Manual is subject to change at
Geeetech A10M. Desktop 3D Printer USER MANUAL
 Geeetech A10M Desktop 3D Printer USER MANUAL Terms Please be advised of the following terms (the Terms ) regarding this User Manual (this Manual ): All information in this Manual is subject to change at
Geeetech Rostock mini G2 & G2s pro Quick Starter Manual
 Geeetech Rostock mini G2 & G2s pro Quick Starter Manual Please DO NOT rush to start your first printing after assembly, as this is a DIY kit, some parameters of the printer may be different from each other,
Documentation version Prusa i3 Rework USER GUIDE REV 1.5. Document Version 1.1.8
 Documentation version 1.1.8 Prusa i3 Rework USER GUIDE REV 1.5 2 INTRODUCTION Target : Prupose a visual guide of the differents steps to build and use a Prusa i3 Rework. Authors of this document : emotion
SHENZHEN GETECH TECHNOLOGY CO., LTD. Geeetech A10 3D Printer. User Manual (V2.0)
") Geeetech A10 3D Printer User Manual (V2.0) 1 Content 1 Attention... 3 1.1 Safety instruction... 3 1.2 Factory test before delivery... 3 2 Printer display... 4 3 Assembling... 7 3.1 Assembling the main
Geeetech A10 3D Printer User Manual (V2.0) 1 Content 1 Attention... 3 1.1 Safety instruction... 3 1.2 Factory test before delivery... 3 2 Printer display... 4 3 Assembling... 7 3.1 Assembling the main
SHENZHEN GETECH TECHNOLOGY CO LTD. Geeetech A10M 3D Printer. User Manual (v2.0)
") Geeetech A10M 3D Printer User Manual (v2.0) 1 Content 1 Attention... 3 1.1 Safety instructions... 3 1.2 Factory test before delivery... 3 2 Printer display... 4 3 Assembling... 7 3.1 Assembling the main
Geeetech A10M 3D Printer User Manual (v2.0) 1 Content 1 Attention... 3 1.1 Safety instructions... 3 1.2 Factory test before delivery... 3 2 Printer display... 4 3 Assembling... 7 3.1 Assembling the main
think big, print huge
 think big, print huge quick start guide Table of Contents a Receiving and uncrating 5 b bed level & z home 11 c Loading filament 19 d SOFTWARE 23 e Setup 23 f preparing a print 26 g printing on gigabot
Easy use of Repetier-Host software
 Easy use of Repetier-Host software Examples base on version Repetier-Host 1.06 1. Repetier-Host overview Repetier Host is an easy to use software for 3D printing. The main functions include manual debugging
M2 3D Printer V4 M2 3D Printer
 M2 3D Printer V4 Contents 2 Important Safeguards 3 Welcome 4 M2 Features 6 Other products included with your printer 7 Set up 9 Slicing.STL or.obj files 10 Maintenance and Support 11 Warranty 12 About
SeeMeCNC Guides 2 INTO 1 DUAL FILAMENT FEED ADAPTER INSTALL
 SeeMeCNC Guides 2 INTO 1 DUAL FILAMENT FEED ADAPTER INSTALL These are still in development - Be ready to troubleshoot firmware/software configuration for your setup when purchasing these adapters. Written
3d Printing with the Prusa I3 Operation & Printing via a USB Cable
 3d Printing with the Prusa I3 Operation & Printing via a USB Cable Instructions for: Prusa I3 Printer Set-up Slic3r Software Use Pronterface Software Use Prusa I3 - Parts Identification Prusa I3 Printer
USING YOUR BIGBOT. 1/18/2017 V0.1
 USING YOUR BIGBOT www.bigbot-3d.com 1/18/2017 V0.1 FOREWORD: YOUR PRINTER IS REPRAP, WHICH STANDS FOR "REPLICATING RAPID PROTOTYPERS". THIS MEANS IT CAN PRINT THE PARTS THAT ARE CUSTOM FOR THIS MACHINE,
Quickstart Guide Kora Pro 3D PC Printer
 Quickstart Guide Kora Pro 3D PC Printer 1 Rev001/01/2018 Kora Pro PC General Precautions and Advice Only use original accessories from or approved by the manufacturer Always read the manual before initial
Technical Support: CUBE USER MANUAL
 CUBE THE DESKTOP 3D PRINTER USER MANUAL 2012-12-05 1 Contents 1 Installing software...3 1.1 Installing Python... 3 1.2 Installing ReplicatorG... 5 2 Pre-print checks...9 2.1 Power up...9 2.2 Connect to
Titan Aero Repetier Configuration
 Titan Aero Repetier Configuration Set up your Repetier Firmware to support your new Titan Aero. Written By: Gabe S. 2017 e3d-online.dozuki.com/ Page 1 of 12 Step 1 Download Marlin First things first: you're
Panowin F1. User Manual
 Panowin F1 User Manual 1 PANOWIN TECHNOLOGIES CO.,LTD. WARNING power outlet. CAUTION: In case of emergency unplug the Panowin F1 from the WARNING: Carefully monitor the Panowin F1 during operation. Do
Operation Instruction
 JGAURORA 3D Printer Model:Z-603S Operation Instruction www.jgaurora3d.com Read it carefully before printing and keep it properly. - 0 - - 1 - Z- 603S model is designed FDM 3d printer by Shenzhen Aurora
ENJOY Introduction. Software Installation* Hardware. Calibration Settings. Print test. Appendex. Install print S/W Driver Install
 Quick Start Manual 1 ENJOY Introduction C O N T E N T S 6 5 Appendex 4 Print test 3 2 Hardware Calibration Settings Software Installation* Install print S/W Driver Install Hardware Intro Cable installation
Software Manual. Revision 1.3
 Software Manual Revision 1.3 Copyright 2015 by Kudo3D. This material may be distributed only subject to the terms and conditions set forth in the Creative Commons Attribution-NonCommercial-NoDerivatives
Repetier-Host Documentation for use with Kora Pro 3D PC
 Repetier-Host Documentation for use with Kora Pro 3D PC Installation Prerequisites Before you start with the installation, you should check if your computer meets the requirements. Currently available
Ender 3 Series 3D Printer Quick Start Guide
 Ender 3 Series 3D Printer Quick Start Guide This guide is for the Ender 3 Series of 3D printers. Select the correct input voltage to match your local mains (220V or 110V) Because of software/hardware upgrades
M2 3D Printer V4 Rev. D
 M2 3D Printer V4 Rev. D Contents 2 Important Safeguards 3 Welcome 4 M2 Features 6 Other products included with your printer 7 Set up 9 Slicing.STL or.obj files 10 Maintenance and Support 11 Warranty 12
USER S GUIDE. Documentation Version 1.2.6
 Documentation version 1.2.6 USER S GUIDE INTRODUCTION 2 INTRODUCTION INTRODUCTION / 3 INTRODUCTION Objective: Provide a visual guide of the different steps to set-up and get started using the MicroDelta
Dreamer Series User Manual
 Dreamer Series User Manual Welcome to the world of the Dreamer. To ensure that you have the best possible user experience, it s important that you follow this user manual. Let s get started! In Parts I
Repetier-Host Documentation
 Repetier-Host Documentation Installation Prerequisites Before you start with the installation, you should check if your computer meets the requirements. Currently available computers should have no problems
Users Manual of GT2560
 Users Manual of GT2560 Rev A+ Compiler: kris.mao Date: Jan04, 2016 Reviewer: Alina, Le mon Date: Jan04, 2016 Approver: Linda.Fan Date: Jan13, 2016-1 - Contents Copyright Declaration... 3 Technical Support...
Repetier-Host Documentation
 Repetier-Host Documentation Installation Prerequisites Before you start with the installation, you should check if your computer meets the requirements. Currently available computers should have no problems
User Guide ADIMLab-gantry 3D printer
 User Guide ADIMLab-gantry 3D printer Version V1.3.2 1 Contents 一 Overview... 4 二 Thanks and Commitment... 6 三 What is 3D Printer... 7 3.1 3D printing steps... 7 3.2 3D Modeling... 7 3.3 Slice output 3D
Cura - DUET Dual Extrusion Setup
 SeeMeCNC Guides Written By: SeeMeCNC 2018 seemecnc.dozuki.com/ Page 1 of 15 INTRODUCTION Please note that dual extrusion is for advanced users. You should have some advanced knowledge on some G-Code and
GEEETECH. Me Creator2 printers contain heated moving parts. Never reach inside the printer while it is in operation or before it has cooled down.
 ME CREATOR 2 SAFETY INSTRUCTION Do read all the instructions and cautionary markings in this manual before operating your Me Creator. Me Creator2 printers contain heated moving parts. Never reach inside
PowerSpec Ultra 3D Printer Start-up Guide Table of Contents
 PowerSpec Ultra 3D Printer Start-up Guide Table of Contents 1 What's Included in the Box?...Page 3 2 Un-boxing.Page 4 3 Initial Hardware Installation Page 6 4 Software Instruction.Page 8 5 Filament Page
Written By: Josef Prusa
 6. Preflight check The last things you should check before the first print Written By: Josef Prusa 2018 manual.prusa3d.com/ Page 1 of 13 Step 1 P.I.N.D.A. adjustment, phase 1 Ensure the printer is turned
3D Printing Getting Started!
 ARCHITECTURE & LANDSCAPE ARCHITECTURE 3D Printing Getting Started! White filament is free to students for academic use. Where do I buy filament? NORTH DAKOTA STATE UNIVERSITY www.makerbot.com/store www.ultimachine.com/pla
DIY PRINTER INSTALLATION AND OPERATION INSTRUCTION
 CTC DIY I3 PRINTER INSTALLATION AND OPERATION INSTRUCTIONS Thank you for buying and using DIY 3D printer produced by CTC Please read the installation and operation instruction carefully before use Company
Portabee GO. Mobile 3D Printer. Portabee 3D. Romscraj. Software & Support. Manufacturing & Engineering.
 Portabee GO Mobile 3D Printer Portabee 3D Software & Support http://portabee3d.com support@portabee3d.com Romscraj Manufacturing & Engineering http://romscraj.com contact@romscraj.com A. Software Package
BASIC MARLIN FIRMWARE CONFIGURATION USER GUIDE FOR THE SMARTRAP 3D PRINTER WITH LCD
 INTRODUCTION: This is a basic user guide on how to verify and/or modify the settings in the Marlin firmware for use with the RepRap SmartRap 3D printer. There are several settings not covered in this manual
USER MANUAL Resolution 0.02mm Speed 300mm/second Software: Wanhao Maker
 1 Duplicator 5S & 5S MINI Desktop 3D Printers USER MANUAL Resolution 0.02mm Speed 300mm/second Software: Wanhao Maker 2014/2015 Wanhao USA 3 Table of Contents Welcome 1 Printer Specifications 2 Unboxing
Troubleshooting Manual
 Troubleshooting Manual Please be aware of these options as follows : 1. Mainboard is sensitive to static electricity. Please Touch a grounded object to release static electricity before operation. 2. Please
TROUBLESHOOTING GUIDE
 TROUBLESHOOTING GUIDE YOU SHOULDN'T ENCOUNTER many problems when using your Vector 3 printer, however, occasionally things can go wrong. Before contacting Customer Services, please consult this list of
GiantArm D200 User Manual
 GiantArm D200 User Manual Version 1 1 Contents 1. Introduction... 3 1.1 Terms... 3 1.2 Safety and Compliance... 4 1.3 About GiantArm D200... 6 2. Unpacking GiantArm D200... 9 2.1 Un-box... 9 2.2 Accessory
SOFTWARE SETUP Pronterface...2 Cura BED CALIBRATION Using Pronterface...11 Using LCD...13
 USER MANUAL TABLE OF CONTENTS SOFTWARE SETUP Pronterface...2 Cura 15.04...3 BED CALIBRATION Using Pronterface...11 Using LCD...13 LOAD/UNLOAD FILAMENT Using LCD (extruder 0 only)...14 Using PRONTERFACE...15
ZHEJIANG FLASHFORGE 3D TECHNOLOGY CO., LTD. Creator Pro Start-up Guide
 www.ff3dp.com ZHEJIANG FLASHFORGE 3D TECHNOLOGY CO., LTD. Creator Pro Start-up Guide www.ff3dp.com Contents 1 What's Included in the Box? 2 2 Un-boxing 2 3 Initial Hardware Installation 6 4 Software Installation
English. Quick Guide
 English Quick Guide Specification Product Overview Button and Indicator light Unpacking Accessory Checklist Important Safety Notes Extruder module installation Accessory installation XYZware operation
A GUIDE TO GETTING STARTED
 Florida Public Library Printing A GUIDE TO GETTING STARTED Prepared for the Florida Public Library by Robert Persing Table of Contents Section-A. Download the software... 3 Section-B. Install the software...
JGAURORA 3D PRINTER MODEL: A-4 USER GUIDE
 JGAURORA 3D PRINTER MODEL: A-4 USER GUIDE 1 Contents 1. Preface...3 1.1 Introduction...3 1.2 Safety matters... 3 1.3 Filament requirements...3 1.4 Environmental requirements...3 2. About A-4... 4 2.1 Basic
GEEETECH 3D Printer E180 User Manual
 GEEETECH 3D Printer E180 User Manual Contents Terms... 2 Safety and Compliance... 4 1. About E180... 6 2. Software Resources... 8 3. USB Driver... 8 4. Introduction to the Menu of the Control Panel...
Agenda. Breaking the Ice Physical Setup Walkthrough of REPETREL First Print
 T1 Training Session Agenda Breaking the Ice Physical Setup Walkthrough of REPETREL First Print Breaking the Ice SYSTEM 30M ENGINE Breaking the Ice Protected build environment Slightly larger build area
Written By: Jakub Dolezal
 5. Preflight check Written By: Jakub Dolezal 2018 manual.prusa3d.com/ Page 1 of 17 Step 1 P.I.N.D.A. adjustment (part 1) Ensure the printer is turned off and not plugged in. Note your extruder is slightly
Slic3r User Guide. By Lorenzo Cantini (Kent s Strapper) and Ivan Bortolin Translation by Linda Anticoli 10/08/2012
 and Ivan Bortolin Translation by Linda Anticoli 10/08/2012") Slic3r User Guide By Lorenzo Cantini (Kent s Strapper) and Ivan Bortolin Translation by Linda Anticoli 10/08/2012 2 Contents Overview i 1 Installation and first run 1 1.1 Installation........................................
Slic3r User Guide By Lorenzo Cantini (Kent s Strapper) and Ivan Bortolin Translation by Linda Anticoli 10/08/2012 2 Contents Overview i 1 Installation and first run 1 1.1 Installation........................................
3-7. Set Materials (Touch Screen) Set Materials (Software) Material Weight adjustment (grams) Current material weight. Increase.
 Set Materials (Software) Material Weight adjustment (grams) Current material weight. Increase.") Set Materials (Touch Screen) 3-7 Decrease Material Weight adjustment (grams) Increase Current material weight Save current settings Stop extrusion and heating Back withdraw material change material extrude
Set Materials (Touch Screen) 3-7 Decrease Material Weight adjustment (grams) Increase Current material weight Save current settings Stop extrusion and heating Back withdraw material change material extrude
Cura (Documentation for version )
") Cura (Documentation for version 15.04.06) Getting Started Installation To start the installation of Cura, download it first. After downloading, open the installer and run the installation wizard to complete
Cura (Documentation for version 15.04.06) Getting Started Installation To start the installation of Cura, download it first. After downloading, open the installer and run the installation wizard to complete
Product User Manual. IdeaWerk 3D Printer WT150
 Product User Manual IdeaWerk 3D Printer WT150 Contents Contents 1. Unpack and checking... 1 1.1 Check the Machine... 1 1.2 Check the Accessories... 3 2. Brief Introduction... 3 2.1 Precautions and Safety...
4. Using Cura to Set Up Your Auto-Leveling Probe and Create Your First Print
 4. Using Cura to Set Up Your Auto-Leveling Probe and Create Your First Print Give a short summary. Written By: Printrbot Support INTRODUCTION Outline what you are going to teach someone how to do. 2015
USER S GUIDE. Documentation Version 1.0.0
 Documentation version 1.0.0 tt USER S GUIDE INTRODUCTION 2 INTRODUCTION INTRODUCTION / 3 INTRODUCTION Target : Provide a visual guide of the different steps required to use an I3 Metal Motion 3D printer.
da Vinci Jr.1.0 April 2016 da Vinci Junior 1.0w 3D Printer da Vinci Jr.1.0w Quick Guide HD23F1JW0N1
 da Vinci Junior 1.0w 3D Printer w Quick Guide P 1 Product Overview A: Filament movement area B: Feed module C: Detector D: Extruder E: Filament F: Print bed G G: SD card port (Storage format: FAT32) H:
da Vinci 1.0 Pro Quick Guide
 US da Vinci 1.0 Pro Quick Guide Product Description Print Parameters Description Support Details Product Model: da Vinci 1.0 Professional da Vinci 1.0 Pro Product Description Product Overview Cartridge
Bondtech QR Installation guide for the BCN3D Sigma
 Bondtech QR Installation guide for the BCN3D Sigma 1 Contents Introduction... 3 List of tool required... 3 Mechanical & Electrical Installation... 4 Adjustment of steps/mm...12 Change Log: 1) Added comment
USER GUIDE RADDS. December 2014 Version Max3dshop
 USER GUIDE RADDS December 2014 Version 1.01 Max3dshop http://max3dshop.org USER GUIDE ATTRIBUTION-NONCOMMERCIAL-SHAREALIKE 3.0 UNPORTED (CC BY-NC-SA 3.0) 2 1 TABLE OF CONTENTS USER GUIDE 2 Introduction...
DIY PRINTER INSTALLATION AND OPERATION INSTRUCTION
 CTC DIY PRINTER INSTALLATION AND OPERATION INSTRUCTION Thank you for buying and using DIY 3D printer produced by CTC Please read the installation and operation instruction carefully before use Company
300 DIY 3D PRINTER KIT
 300 DIY 3D PRINTER KIT 1. VERSIONS...2 2. FIRST CHECKS BEFORE TURNING B2X300 ON...3 2.1 PARALLELISM BETWEEN LINEAR GUIDES IN Z...3 2.2 PARALLELISM BETWEEN LINEAR GUIDES IN Z AND TRAPEZOIDAL THREADED RODS...4
May Project Plan v2
 May 14-06 Project Plan v2 ANDREW SPEER CHENG SONG KYLE LICHTENBERG ROSS FRIEDMAN JAKE MEYER 10/10/2013 May 14-06 Page 1 Problem Statement Our client, Dr. Tom Daniels, wants to repurpose an old 3-axis positioning
Instruction Manual. RS 3D Printer
 Instruction Manual RS 3D Printer 1) GENERAL This instruction manual contains important information regarding the installation, operation, maintenance and storage for RS 3D Printer. Please read these instructions
Please carefully read the safety instructions before get started.
 Safety Instructions Please carefully read the safety instructions before get started. ANYCUBIC 3D printer generates high temperature. Do not reach inside of the printer during operation. Allow time for
ideamaker Manual
 ideamaker Manual Using ideamaker... 2 Basic information... 2 What is ideamaker?... 2 Where to download ideamaker?... 2 Install ideamaker... 3 Let s Print!... 6 How to use ideamaker?... 23 Interface...
- Software KISSlicer Guide - [Z] ArrayZ C4C 3D Printer
![- Software KISSlicer Guide - [Z] ArrayZ C4C 3D Printer](/thumbs/92/108197208.jpg "- Software KISSlicer Guide - [Z] ArrayZ C4C 3D Printer") - Software KISSlicer Guide - ArrayZ C4C 3D Printer Software KISSlicer Guide We are suggesting customers using Kisslicer software as a 3D model slicing program, ArrayZ C4C 3D Printer has many feature is
- Software KISSlicer Guide - ArrayZ C4C 3D Printer Software KISSlicer Guide We are suggesting customers using Kisslicer software as a 3D model slicing program, ArrayZ C4C 3D Printer has many feature is
da Vinci Super Quick Guide da Vinci Super Safety Precautions Product instructions Unboxing and Installation Product specification
 September. 2017 da Vinci Super Quick Guide ENG Safety Precautions Product instructions Unboxing and Installation Product specification Function Operation and Instructions Setting Print Supporting information
ideamaker Manual
 ideamaker Manual www.raise3d.com 1 Using ideamaker... 3 1.1 What is ideamaker?... 3 1.2 Where to download ideamaker?... 3 2 Install ideamaker... 4 3 Let s Print!... 9 3.1 Import.STL files... 9 3.2 Slice
UP! Quick Start Guide
 Personal Portable 3D Printer UP! www.pp3dp.com 1. Assemble Printer Open the box, take out the printer and accessories. Assemble the parts contained in the box as following procedure: 1. Unscrew the M4
User Guide Dreamer Desktop 3D Printer
 User Guide Dreamer Desktop 3D Printer Dreamer User Guide www.ff3dp.com 1 Dreamer User Guide www.ff3dp.com 2 CONTENTS WELCOME TO FLASHFORGE DREAMER A. How to use this manual B. The FlashForge Experience
D300 Professional Desktop 3D Printer
 D300 Professional Desktop 3D Printer - Multiple hotend options - Advanced software - Enclosed chamber - Built to order AUTOMATION READY Automatic calibration Multiple hotend options Controlled chamber
Titan Smoothieware Configuration
 Set up your Smoothieware Firmware to support your new Titan Written By: Gabe S. 2018 e3d-online.dozuki.com/ Page 1 of 8 Step 1 Download Smoothieware First things first: you're going to need a copy of Smoothieware.
SeeMeCNC Guides. RAMBo Control Firmware. This guide will show you how to install the firmware on your SeeMeCNC 3D printer.
 SeeMeCNC Guides RAMBo Control Firmware This guide will show you how to install the firmware on your SeeMeCNC 3D printer. Written By: geneb 2018 seemecnc.dozuki.com/ Page 1 of 10 Step 1 Download and Install
Model: 3-Axis High Quality Self-Assembled 3D Printer Kit. Panowin F1
 ESTIMATE No.: Client: Telephone: E-mail: Address: City, State: Contact: Cell-Phone: Fax: Zip Code: Country: Panowin Technologies Co., Ltd. Model: 3-Axis High Quality Self-Assembled 3D Printer Kit Panowin
USER GUIDE. RRD Silencioso. August Version 1. User Guide Created Reprapdiscount
 USER GUIDE RRD Silencioso August 2014 Version 1 User Guide Created by @mundsen Reprapdiscount http://reprapdiscount.com USER GUIDE Copyright and third-party information as required ii USER GUIDE Table
SIMPLEST Bltouch/3Dtouch guide for Creality CR-10/CR- 10s/Ender 2/Ender 3 printers created by Danny Walmsley.
 SIMPLEST Bltouch/3Dtouch guide for Creality CR-10/CR- 10s/Ender 2/Ender 3 printers created by Danny Walmsley. The aim of this guide is to bring auto bed leveling to the masses by making it simple and affordable
MEGATRONICS V3.0 QUICK START GUIDE
 MEGATRONICS V3.0 QUICK START GUIDE Thank you for purchasing the Megatronics v3.0! This small guide will answer the basic questions on how to connect the board to your 3D printer. For more information visit
DeltaMaker 3D Printer Getting Started
 DeltaMaker 3D Printer Getting Started Last Updated: December 2014 Table of Contents TABLE OF CONTENTS 2 WELCOME 3 SECTION 1: UNPACKING/SETUP 4 REMOVING THE PRINTER FROM THE BOX 4 INSTALLING THE FILAMENT
Assembly & Installation Guide ULTIMAKER 2.85/3.0
 Assembly & Installation Guide ULTIMAKER 2.85/3.0 The Bondtech QR Extruder for 2.85/3.0 mm filament for use as a Bowden or a direct Extruder. The extruder uses high-quality industrial pneumatic push-fit
3D BIO-PRINTER. USER MANUAL Version D Cultures
 3D BIO-PRINTER 3D Cultures USER MANUAL Version 2.0 Product pictures are for reference only. Color(s), size, parts, and interface may vary. Preheating is not recommend with the use of cells. This manual
Makeblock Constructor I 3D Printer Kit. 2. 3D Printer Wiring Guide
 2. 3D Printer Wiring Guide 1 Content 2.1. Parts Required... 3 2.2 preparation... 7 2.2.1 Add heat sinks on the top of stepper motor driver chip... 7 2.2.2 Plug the jumper cap into corresponding position...
Portable Qi Charger. Created by Ruiz Brothers. Last updated on :20:38 AM UTC
 Portable Qi Charger Created by Ruiz Brothers Last updated on 2017-12-05 01:20:38 AM UTC Guide Contents Guide Contents Overview Prerequisite Guides Parts, Tool & Supplies Universal Qi Wireless Charging
INSTALLING THE WINDOWS-BASED DRIVER NOTICE!
 INSTALLING THE WINDOWS-BASED DRIVER NOTICE! Keep the machine and the computer unconnected until you carry out this installation operation. Failure to follow the correct procedure may make installation
Portal Delta Pro 3D printer
 Portal Delta Pro 3D printer User s Manual v1.0 Welcome to the world of 3D printing! Thank you for your purchase of the Mass Portal 3D printer we hope that it will serve you well and even exceed your expectations.
3D Prototyping X1 3D Printer. User Manual V1.3
 3D Printer User Manual V1.3 COPYRIGHT This document is copyrighted and contains proprietary information that is the property of 3D Prototyping Pty Ltd. The user does not have the right to copy, reproduce,
3D SYSTEMS University CubeX 3D Printer
 3D SYSTEMS University CubeX 3D Printer Lesson Leveling the Print Pad and Print Tips, Setting the Z-Gap Revision date: 10/22/13 1 1 2016 年 6 月 14 日 Objectives After completing this lesson you will: Be able
Printing via the SD Card. SeeMeCNC Guides. Written By: JJ Johnson seemecnc.dozuki.com Page 1 of 7
 SeeMeCNC Guides Printing via the SD Card Written By: JJ Johnson 2017 seemecnc.dozuki.com Page 1 of 7 INTRODUCTION Printing via the SD card reader on your printer is a much more stable solution compared
SeeMeCNC Guides. Configuring Artemis
 SeeMeCNC Guides Configuring Artemis Configuring your Artemis printer. Connecting it to your network and getting everything dialed in for successful printing. Written By: SeeMeCNC 2018 seemecnc.dozuki.com/
SIMPLEST Bltouch/3Dtouch guide for Creality CR-10/CR- 10s/Ender 2/Ender 3 printers V2 created by Danny Walmsley.
 SIMPLEST Bltouch/3Dtouch guide for Creality CR-10/CR- 10s/Ender 2/Ender 3 printers V2 created by Danny Walmsley. The aim of this guide is to bring auto bed leveling to the masses by making it simple and
MostFun Sail Getting Started V Chengdu MostFun S&T Co.,Ltd.
 MostFun Sail Getting Started V0.96.3 Chengdu MostFun S&T Co.,Ltd. Catalog Product introduction... 2 Parameter...2 The first use of the machine...3 Unboxing... 3 Driver installation... 5 Installing driver
ideamaker Manual
 ideamaker Manual www.raise3d.com 1 Using ideamaker... 3 1.1 What is ideamaker?... 3 1.2 Where to download ideamaker?... 3 2 Install ideamaker... 4 3 Let s Print!... 9 3.1 Import.STL files... 9 3.2 Slice
Select Mini 3D Printer V2
 Select Mini 3D Printer V2 P/N 15365, 21711, 21872, 24166 User's Manual CONTENTS SAFETY WARNINGS AND GUIDELINES... 3 INTRODUCTION... 4 FEATURES... 4 CUSTOMER SERVICE... 5 PACKAGE CONTENTS... 5 PRODUCT OVERVIEW...
Complete kit assembly step
 BQ 3D printer Prusa i3 Hephestos Complete kit assembly step Prusa present an evolution of i3, the most popular 3D printer RepRap community. In our advanced version, Hephestos Find significant improvements:
MAKERGEAR USER GUIDE. V4 Rev. E Made in the USA since 2009
 MAKERGEAR USER GUIDE M2 V4 Rev. E Made in the USA since 2009 Contents 1 - Welcome 2 - Warning & Important Safeguards 4 - What's Included 5 - Set Up 8 - Slicing.STL or.obj Files 10 - Changing Filament 11
Einstart 3D Printer. User Manual V2.1
 Einstart 3D Printer User Manual V2.1 1 COPYRIGHT This document is copyrighted and contains proprietary information that is the property of Hangzhou Shining 3D Tech Co., Ltd.The user does not have the right
Contents. Ⅵ. Maintenance Ⅶ. Maintenance Service Provision... 69
 0 Contents INTRODUCTION... 2 A. Security Considerations... 3 B. Product Details... 4 1.Specifications... 4 2.Machine parts... 4 3.Exploded drawing... 5 4.Tool List... 6 C. Cura Software... 9 1.Installation
3 Indexer Installation For PRSalpha Tools
 888-680-4466 ShopBotTools.com 3 Indexer Installation For PRSalpha Tools Copyright 2016 ShopBot Tools, Inc. page 1 Copyright 2016 ShopBot Tools, Inc. page 2 Table of Contents General Safety and Precautions...5
Micro USB Dock for Circuit Playground
 Micro USB Dock for Circuit Playground Created by Ruiz Brothers Last updated on 2017-12-07 04:25:47 AM UTC Guide Contents Guide Contents Overview Parts, Tools & Components USB DIY Connector Shell - Type
MIDI SPACE TO CREATE QUICK START GUIDE. Safety & Components. STEP 1 Unpacking & Setup. STEP 2 Loading & Unloading Filament
 WWW.KORA.CO.UK SPACE TO CREATE MIDI QUICK START GUIDE Safety & Components STEP 1 Unpacking & Setup STEP 2 Loading & Unloading Filament STEP 3 Preparation & Printing STEP 4 Switching the Printer Off STEP
USER S GUIDE. Documentation Version 1.2.7
 Documentation version 1.2.7 USER S GUIDE INTRODUCTION 2 INTRODUCTION INTRODUCTION / 3 INTRODUCTION Objective : Provide a visual guide of the different steps to set-up and get started using the MicroDelta