TOUCH CONTROLLER CUWIN
|
|
|
- Harold Anderson
- 5 years ago
- Views:
Transcription

1 TOUCH CONTROLLER CUWIN User Manual 1
2 1.0 Introduction The CUWIN combines a graphic display and touch interface with a high efficiency industrial controller. It is equipped with Microsoft Windows CE 5.0 Embedded, a stable operating system used in many industrial touchscreen applications. Windows CE supports applications developed in Microsoft Visual Studio 2005 or 2008 and other development tools able to create Windows CE ARM executables. It can also run NSBasic scripts. Developing for the CUWIN is similar to normal PC program development; anyone with previous PC programming experience can develop CUWIN applications without difficulty. The CUWIN supports the.net Compact Framework (1.0, 2.0) that reduces development and testing time by allowing the use of cross-platform.net functions. If developing for the.net Framework, Visual Studio 2005 Standard and higher, or Visual Studio 2008 Professional and higher must be used as these editions include the Smart Device Development Kit. The CUWIN can also operate in IntelliLCD Mode, which allows the CUWIN to emulate an IntelliLCD as a drop-in replacement. Existing IntelliLCD applications can upgrade to a CUWIN today, and not lose functionality while the CUWIN native applications are developed. The CUWIN offers RS232, RS485, and Ethernet for external communication. It can even browse web sites using the internal browser, which is useful for displaying diagnostic data or even remote control panels through a web interface. Depending on which CUWIN features you choose to access, it can be used for anything from a user interface panel to the main controller for your automation equipment. 2

3 1.1 Overview 3

4 The CUWIN has 3 RS-232 Ports (COM1~COM3) and 1 RS-485 port(com1), and COM1 is can be switched to RS-485 or RS-232. There are 4 terminals for RS-485 Port. The first one if for plus, and the last one is for minus. The second and third one is not used. 4
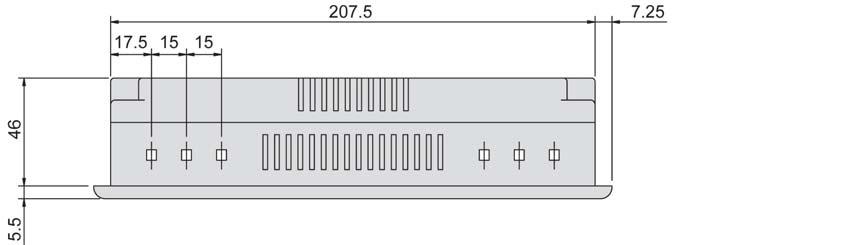
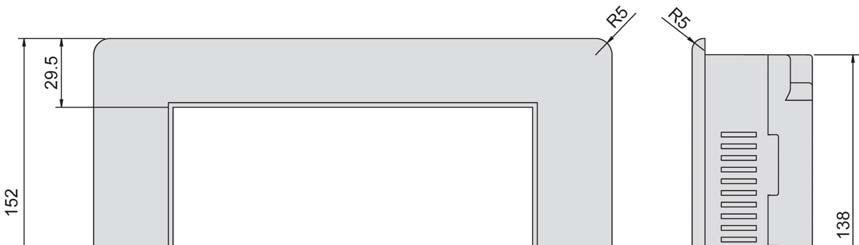
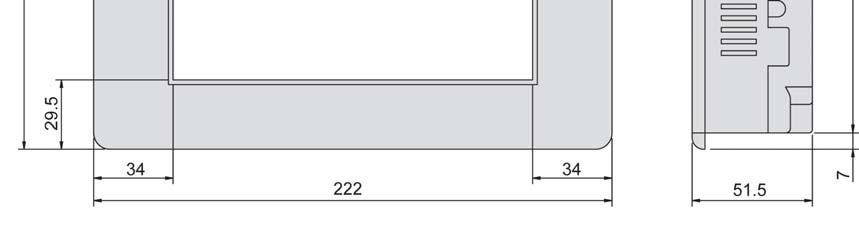
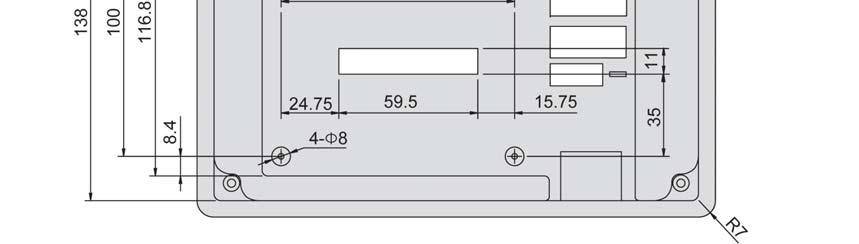
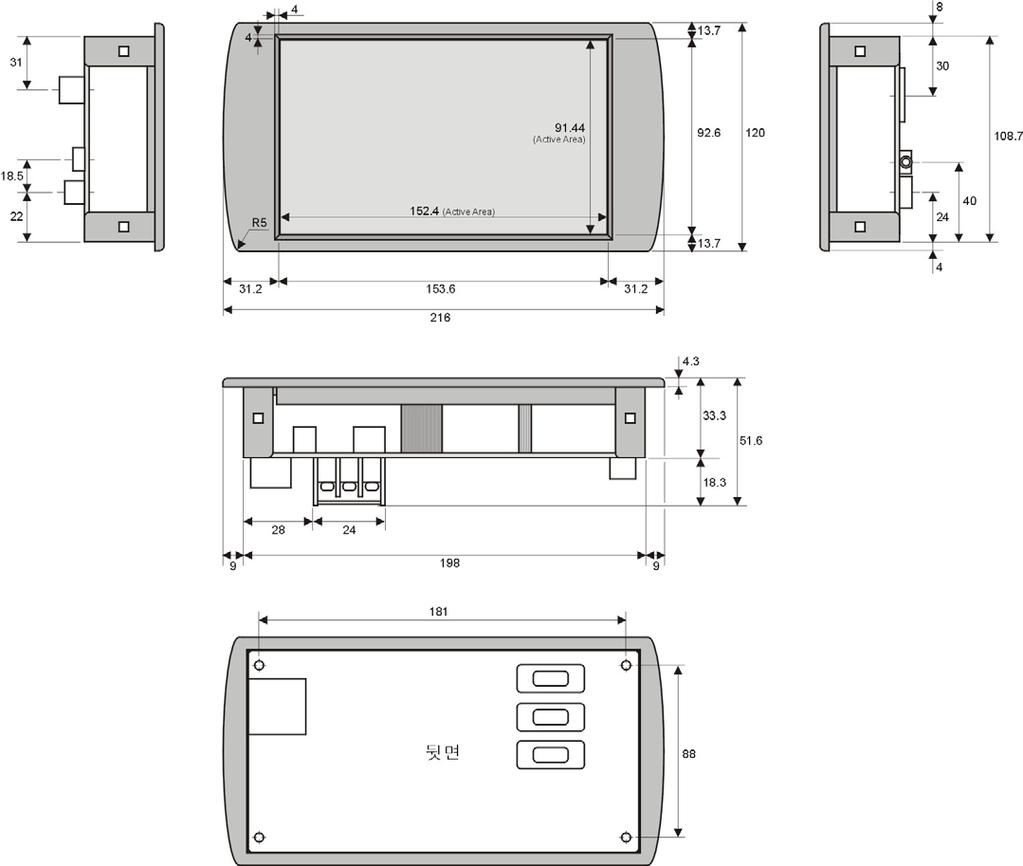
5 1.2 Dimensions [CUWIN3500] 5
6 [CUWIN3200] 6
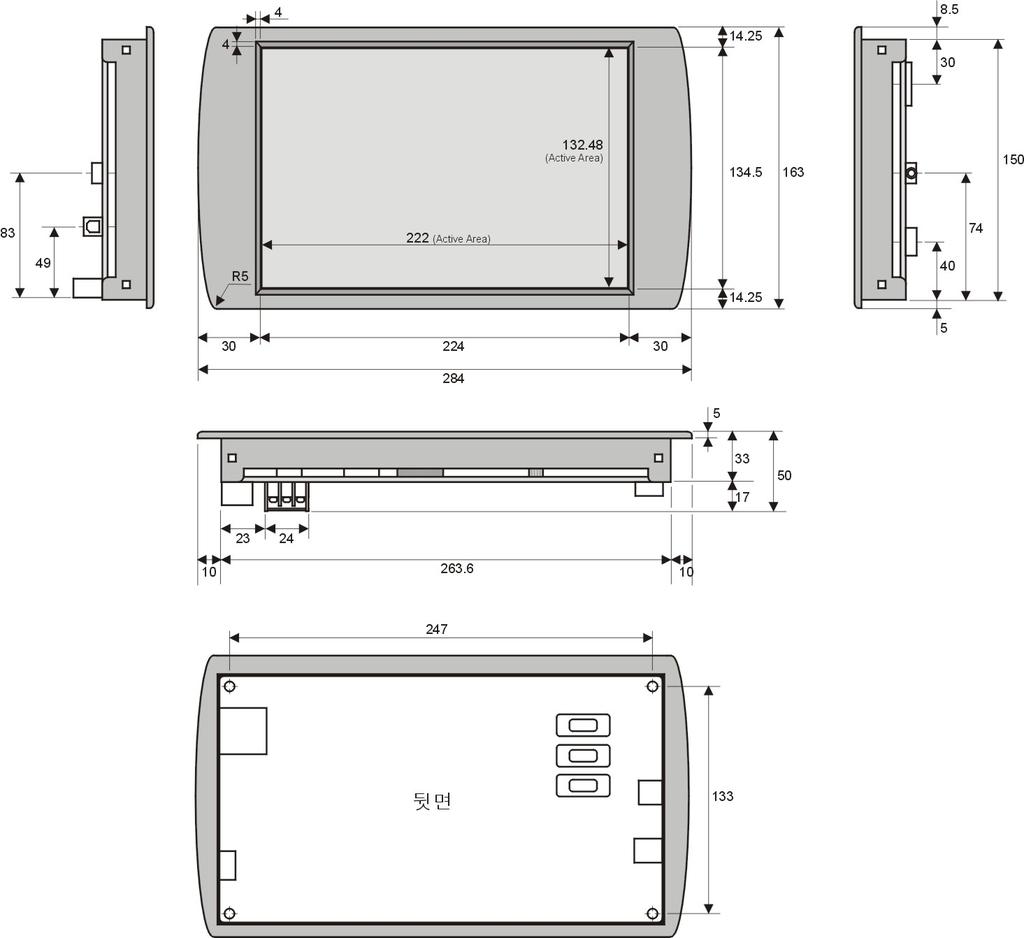
7 [CUWIN4300] 7
8 1.4 Panel Mounting Mounting screws and brackets are provided with each CUWIN. They are designed to clamp the CUWIN bezel against a front panel, with the rear portion of the device extending through a panel cutout. After assembling the brackets as shown below, insert the side hooks into the appropriate mounting holes on the top and bottom of the device. Then tighten the screws enough to hold the CUWIN securely against the front panel. Do not over tighten, or you will risk damaging the CUWIN. 8
9 1.5 Hardware Specifications Processor Memory LCD Touch Serial USB Storage Sound Clock Power 32-bit RISC (ARM920T Core) - 266MHz RAM: 64MB, NAND Flash: 64MB, NOR Flash: 1MB CUWIN3200/3500 : 7 TFT, CUWIN4300 : 10.2 TFT 18-bit / 260k colors, 800 x 480 pixels, LED backlight Four wire resistive panel (2) RS232-only, (1) RS232/RS485 switchable (1) host interface, (1) device interface SD card Flash memory slot (up to 2GB) Internal mono speaker, external 3.5mm stereo jack Internal realtime clock DC 9V to 24V, 500mA The Start Kit for each model includes a manual, CD, cables, and 1 GB SD Flash card. We recommend a Start Kit for your initial development purchase, and the bare devices for later production quantities. 9


10 2.0 Boot Modes The CUWIN supports various boot modes which are selected with DIP switch settings. Position Setting 1 Reserved 2 IntelliLCD Mode Boot Mode Auto-Run Mode 3 Desktop Mode 4 Drag and drop feature Enable Disable RS232 Speed ON 3 ON 2 ON 3 OFF 2 OFF 3 OFF OFF ON 5 ON 6 ON 5 ON 6 OFF 5 OFF 6 ON 5 OFF 6 OFF * Caution : If the drag-and-drop feature is enabled and the serial communication status is busy, the touch-screen feature can suffer some troubles. We recommend that you disable the drag-and-drop feature in normal situations.(put the DIP Switch 4 to 'ON' position to disable the feature) 10
11 IntelliLCD Mode Graphics and text can be displayed on the LCD in response to commands received over the RS232 port, and touchscreen events can be output through the RS232 port. In this mode, the CUWIN precisely emulates an IntelliLCD. For more details, please refer to the IntelliLCD product manual. Auto-Run Mode The CUWIN will boot and then automatically run a specific program immediately on startup. The Windows CE desktop will not be displayed. This mode would be used in production, when your application should be the only program executed by the device. If no auto-run program is found in auto-run mode, the CUWIN will start in development mode. 2.1 Loading an Auto-run Application 1. Connect the CUWIN USB Device port (square B-style plug) to the development PC (with ActiveSync installed), or insert an SD card into a reader on your development PC. 2. Copy the desired executable file to one of the locations below: Flash Disk SD Card \Flash Disk\AutoRun\ Copy the executable to the folder using ActiveSync. There should be only one *.EXE in the folder. The Flash storage area is restricted to a total of 30MB, but actual available space is under 3MB due to included fonts and other files. If you require extra space, you may delete the font folder if those fonts will never be used. Rather than delete the font folder, we encourage the use of an SD memory card for application storage. \Storage Card\AutoRun\ If using ActiveSync, copy the executable to the folder. If using an SD card reader on the PC, copy to the AutoRun folder on the SD Card. If the AutoRun folder does not exist on the SD Card, create it. There should be only one *.EXE in the folder. The SD Card should be FAT formatted, up to 2GB storage (no SDHC cards). If there are executable files in both locations, only the program in the Flash Disk is executed. 3. Make sure the boot mode DIP switches are set correctly to enable auto-run mode. 4. Cycle the CUWIN power supply. After the device has booted, the program in the autorun folder will be executed. 11
12 3.0 Development Environment The CUWIN can execute Windows CE applications developed with Microsoft Visual Studio Developing for the CUWIN is similar to PC development. Managed Code (.NET Compact Framework) The CUWIN supports code developed for the.net Compact Framework. Managed code can be generated in Visual Basic.NET, Visual C#, etc. Native Code Application performance can be increased by developing native code instead of managed code. However, the.net Compact Framework supplies a wide range of useful functions, so native code may require more time to develop. Developing native code requires installing the correct SDK for the target hardware, in this case the CUWIN. Please refer to chapter 4-4 for details regarding the installation of the correct SDK for developing native code. Native code can be developed with tools such as Embedded Visual C++ 4.0, Visual Studio 2005 C++ and Basic, etc. 12
13 3.1 Setting Up Visual Studio 2005 The following instructions are a guide to setting up Visual Studio 2005 and other necessary files for CUWIN development. Please be aware that only Visual Studio 2005 Standard or higher supports Smart Device Development. Visual Studio 2008 Professional and higher can also be used, but this section will only show the procedures for Visual Studio Getting Visual Studio Visual Studio 2005 is a software development platform provided by Microsoft. If you wish to use Visual Studio to develop native and managed code applications for the CUWIN, you will need to purchase Visual Studio from Microsoft. Files you will need Visual Studio 2005 Standard or higher If you do not have Visual Studio 2005 standard or higher, an evaluation copy of Visual Studio 2005 Professional Edition is available for download from Microsoft. This version can be installed and used for a period of 90 days, which should provide enough time to test several application concepts on the CUWIN and determine whether to purchase a full Visual Studio license. Visual Studio 2005 Service Pack 1 This should be installed before developing applications for the CUWIN. If your version of Visual Studio 2005 does not have Service Pack 1 installed, locate the Service Pack on Microsoft's web site and install..net Compact Framework 2.0 Service Pack 2 If you intend to develop managed code (.NET) applications for the CUWIN, you should also locate and install the.net Compact Framework 2.0 Service Pack 2. CUWIN SDK for Visual Studio 2005 and EVC The CUWIN SDK provides target platform settings in order to compile programs for the CUWIN. This is available from the Comfile website at If you have any difficulty locating files on Microsoft's website, you can search for them using the URL below: 13
14 Setting up the Development Environment If you have not purchased Visual Studio, you can install and test the 90-day trial version described above. 1 Locate and run the Visual Studio 2005 setup program, following all installation prompts. Default options should be adequate, unless your system has special requirements. 2 Locate and run the Visual Studio 2005 Service Pack 1 setup program, following all installation prompts. 3 Locate and run the.net Compact Framework 2.0 Service Pack 2 installation file, following all installation prompts. 4 Locate and run the CUWIN SDK installation file, following all installation prompts. If the above installations completed successfully, you should now have a working development environment for the CUWIN. To easily access the CUWIN during development for program testing and debugging, you should also install ActiveSync, though it is not strictly required. If you do not wish to install ActiveSync, your application can be placed in the AutoRun folder on an SD card using an external reader, and it will be executed on startup if the DIP switch settings are correct. If you wish to install ActiveSync, please refer to section 5.0 for installation instructions. 14

15 3.2 Example Visual Basic project This example uses Visual Studio's automatic download and run feature over ActiveSync. If you do not wish to use ActiveSync, the resulting executable files can be transferred to the CUWIN using an SD card. 1. Run Microsoft Visual Studio Choose New Project from the File menu. 3. Select Windows CE 5.0 and Windows Application. Type the name of project ( TestProgram1 in this example) and click OK. 15

16 4. A new blank project is created as shown below. 5. Drag a Button control from the toolbox to the middle of Form1. 16


17 6. Select the new button. Change the Text attribute from Button1 to Hello. 7. Double-click the Hello button. Visual Studio will open a window to edit the code that handles Hello button click events. Type 'MsgBox("Hello!!!")' 17
 Select Target Device and a list of possible devices will be displayed.")
18 8. Set the target device. (1) In the Solution Explorer, select the top-level item. (2) Select Target Device and a list of possible devices will be displayed. Choose Windows CE
.")
19 9. Click the Start Debugging icon as indicated below. This will build and publish the program in debugging mode. 10. After a short delay, the program is transferred to the CUWIN and executed (assuming a working ActiveSync connection). 19

20 Start Without Debugging If you click the Start Debugging button, you can set breakpoints in the code and step through the program. This will start up the debugging interface in Visual Studio, which adds some overhead to the execution of the program. If you simply want to compile and execute the program on the CUWIN for testing without starting the debugger, it is possible to configure Visual Studio to do so with one click. A Start without debugging button is not in the toolbar by default. You can add the button as shown below: 1. Click Tools > Customize... on the menu bar. 20

21 2. Click the Commands tab, then the Debug category. Find Start without debugging and drag it to a convenient location on the toolbar. 21

22 Debug and Release Mode Visual Studio projects are compiled with debugging routines by default. This adds to the final program size and reduces performance. Once your program has been fully tested, it should be compiled without debugging routines. It is possible to switch between Release and Debug modes by right-clicking on the project name in the Solution Explorer. However, it is more convenient to add a button to the toolbar. 1. Click Tools > Customize... on the menu bar. 2. In the Build section, find Solution Configurations and drag to the toolbar. 22

23 3. Though the Solution Configurations item should now be on a toolbar, it is probably disabled. To enable, click Tools > Options in the menu bar 4. Choose the General section, and check the box for Show advanced build configurations. 23


24 5. The Solution Configurations listbox should now be enabled. Debug and Release modes can now be selected easily. 24

25 3.3 Visual C++ Development Notes Visual C++ development may be preferred by advanced developers. The following is a quick startup guide to allow developers to ensure the CUWIN environment is working correctly. 1. Click File > New Project on the menu bar. 2. Choose Smart Device in the Project types box. Then choose MFC Smart Device Application from the Templates box. Type the desired name in the Name box. 25

26 3. Click OK. The Application Wizard will be displayed as below, and will guide the process of selecting desired overall program behavior. After the Application Wizard completes, a framework application will be created for MFC application development. The MFC Library included in Windows CE is contains a subset of the functions available on a Windows PC environment. For additional information regarding the targeting of applications to a Windows CE 5.0 device, and for application developments in general, please refer to the MSDN library and other available program development literature. 26

27 4.0 Device Features and Settings 4.1 Sound The CUWIN contains a built-in 0.8W speaker for mono sound. For stereo sound, headphones or external speakers can be connected to the CUWIN using the 3.5mm audio jack. Volume can be controlled by double-clicking on the Volume & Sounds icon in the Control Panel on the CUWIN. Note: if Control Panel settings are changed, the registry must be saved in order to allow the changes to persist over a power loss. Please refer to Section 4.9, Saving the Registry. 4.2 USB Ports The CUWIN has one USB Host port and one USB Device port, both capable of USB Low and Full speed operation. The USB Host port (rectangular USB A-style connector) can be used to connect USB mice, keyboards, and Flash drives. Using more than one USB device at a time will require the use of an external USB hub. The USB Device port (square USB B-style connector) is used to connect to a desktop computer for device access over ActiveSync. Please refer to the ActiveSync section
28 4.3 SD Flash Memory The CUWIN SD memory slot supports cards up to 2 Gigabytes in capacity. SD Flash memory can be used in the following ways: Application storage; images, sounds, log files etc.,. for use with native Windows CE programs or with the IntelliLCD-mode DrawImage, Sound, FCreate and other commands. Custom Truetype fonts. Additional fonts can be placed in a \Fonts directory on the storage card. On the next reboot, the fonts will be recognized automatically. Convenient storage for large programs. The Auto-Run feature can execute a program in an \AutoRun folder on the storage card. Please refer to section 2.0 for details on automatic execution of programs on startup. Note: SD cards use FAT filestructure and may become fragmented with frequent use. This may reduce performance and increase the time required for the CUWIN to recognize the card. In this case, the SD card can be formatted on a PC with an SD slot. 4.4 Managing TrueType Fonts TrueType fonts can be added and removed depending on user requirements. Fonts can be placed in the following locations: \Storage Card\Fonts (or \Fonts folder on SD card) \Flash Disk\Fonts (must use ActiveSync) Acceptable file extensions for fonts are.ttf or.ttc. After copying a font to one of the above locations, it will be detected automatically after the device is power cycled. Built-in fonts: Tahoma, Courier New, Gulimche, Gulim, Dotumche, Dotum, Batangche, Batang Note: The Batang and Gulim fonts are located in the \Flash Disk\Fonts folder. TrueType fonts can use a significant amount of space. Unneeded fonts may be deleted to free up space on the internal storage for user applications. Active fonts in \Flash Disk\Fonts cannot be deleted unless the procedure below is followed: 1. Change the name of the \Flash Disk\Fonts folder to a temporary name such as Fonts2 2. Power cycle the CUWIN 3. Delete the unneeded fonts in the renamed folder 4. Rename the folder back to Fonts 5. Power cycle the CUWIN 28


29 4.5 Internet Connection Settings 1. Double-click Network and Dial-Up Connections in the Control Panel. 2. Double-click the CS89001 icon. A window will appear that allows selecting either DHCP or manual entry of DNS and IP settings. Note: if Control Panel settings are changed, the registry must be saved in order to allow the changes to persist over a power loss. Please refer to Section 4.9, Saving the Registry. 29
30 4.6 Screen Saver Enabling a power-saving screensaver can reduce the power drain of the CUWIN significantly during idle periods. This can also improve the life of the backlight and LCD. 1. Double-click Display in the Control Panel. 2. Click the Backlight tab. Since the CUWIN has no battery power option, check the box for Automatically turn off backlight while on external power and select the desired delay. Alternately, clear this check box if no display timeout is desired. 3. Click on the Advanced button and check the box that enables the backlight to be enabled while on external power. If this option is not selected, the CUWIN will not return to an active display mode when the screen is touched. The warning about reduced battery life does not apply to the CUWIN. Note: if Control Panel settings are changed, the registry must be saved in order to allow the changes to persist over a power loss. Please refer to Section 4.9, Saving the Registry. 30

31 4.7 Touch panel calibration Note: Initial calibration is performed at the factory. If the screen needs to be recalibrated due to wear, using a stylus instead of a finger will result in a more accurate calibration. 1. Double-click on the Stylus Control Panel icon. 2. Click the "Calibrate" tab, then click the Recalibrate button. The utility will position crosshairs on different areas of the screen, which should be pressed with a stylus as accurately as possible. If the initial calibration fails, repeat carefully. Note: if Control Panel settings are changed, the registry must be saved in order to allow the changes to persist over a power loss. Please refer to Section 4.9, Saving the Registry. 31


32 4.8 Memory settings 1. Double-click the System icon in the Control Panel and click the Memory tab. 2. Move the slider bar to adjust the memory available to programs. Note: if Control Panel settings are changed, the registry must be saved in order to allow the changes to persist over a power loss. Please refer to Section 4.9, Saving the Registry. 4.9 Saving the Registry If changes are made to the system registry (including most settings made in the Control Panel), they will disappear after the next power cycle. To prevent this, click the SaveRegs icon on the Desktop after a configuration change has been made. 32

33 4.10 Changing the MAC address The Cuwin has the default MAC address of factory setting, but it is desirable to modify it when you use many Cuwins under the same network. You can configure MAC address following these steps: 1. Click [Start] -> [Programs] -> [Command Prompt] 2. Use MACADDR command with the address parameters. i.e) macaddr 0x11 0x22 0x33 0x44 0x55 0x66 3. Save the Registry. (See 4.9) 33

34 5.0 ActiveSync ActiveSync uses the USB Device (square B-style plug) port to connect the CUWIN to a desktop computer for easy file transfer and application development/debugging. Visual Studio 2005, EVC++ 4.0, and NS Basic integrate with ActiveSync to provide one-click installation and execution of programs on the CUWIN, as well as remote configuration and debugging tools. 5.1 Installing ActiveSync The version of ActiveSync described here is 4.5. It can be downloaded from Microsoft at the following location (URL is subject to change): If the link above does not work, perform a search on Microsoft's web site for the download. 1. Do not connect the CUWIN to the PC before installing ActiveSync. 2. Locate and double-click the ActiveSync 4.5 installation file. Click Next when the screen below appears. 34


35 3. A license agreement screen will appear. Click the radio button to accept the terms and click Next. 4. Type in some customer information. Click Next. 35


36 5. If a different install location is required, adjust as necessary; otherwise, click Next. 6. ActiveSync will install as shown below. 36

37 7. If the installation was successful, the following screen will be displayed. Click Finish to exit the installation program. 37

38 5.2 Using the CUWIN with ActiveSync 1. Connect the CUWIN Device port to a USB port on a desktop PC with ActiveSync installed. USB CABLE PC CUWIN 2. The first time the CUWIN is connected, ActiveSync will ask to set up a partnership. This is typically intended for mobile phones and PDAs, so select No and click Next. 38


39 3. ActiveSync should connect to the CUWIN and display the following window: If ActiveSync does not automatically connect when the CUWIN is plugged into the PC, rightclick on the ActiveSync system tray icon and click Connection Settings. Make sure the settings are as below: 39

40 5.3 Accessing CUWIN Storage with ActiveSync With the CUWIN connected, click the Explore icon. User-accessible folders: Flash Disk: Contains non-volatile device storage that will persist between reboots, can contain user applications and data while power is off. This memory area has an upper limit on write cycles as all Flash memory does; avoid unnecessary writes to this area. Storage Card: Contains the filesystem of an SD Flash card, if one is present. Can be used for applications and data storage up to 2 Gigabytes. Other folders: User-inaccessible or volatile folders stored in RAM. Any writes to this area will disappear on the next reboot. 40
EZ Touchscreen CE Computer. User Manual
 EZ Touchscreen CE Computer User Manual Page 1 of 27 7/22/2005 Using EZ Touchscreen CE Computer The EZ Touchscreen CE Computer (or EZ-CE for short) can be used by any one who is familiar with using of Windows
CUWIN. Hardware Manual (3200A, 3500A, 4300A) [Version 2.0]
![CUWIN. Hardware Manual (3200A, 3500A, 4300A) [Version 2.0]](/thumbs/87/96209017.jpg "CUWIN. Hardware Manual (3200A, 3500A, 4300A) [Version 2.0]") CUWIN Hardware Manual (3200A, 3500A, 4300A) [Version 2.0] 1. Hardware Specification ITEM MCU Memory MODEL CUWIN3200A CUWIN3500A CUWIN4300A 32Bit RISC CPU(ARM920T Core) 266MHz SDRAM : 64MB (OS Image: 32MB
CUWIN Hardware Manual (3200A, 3500A, 4300A) [Version 2.0] 1. Hardware Specification ITEM MCU Memory MODEL CUWIN3200A CUWIN3500A CUWIN4300A 32Bit RISC CPU(ARM920T Core) 266MHz SDRAM : 64MB (OS Image: 32MB
NP-700WX 7 Wide Screen 16 bit Color Touch Screen Open HMI Intel XScale PXA270 CPU
 NP-700WX 7 Wide Screen 16 bit Color Touch Screen Open HMI Intel XScale PXA270 CPU Software User s Manual www.ivcdisplays.com - i - Copyright This document is copyrighted April, 2008, by IVC Displays, Inc.
User Manual. cmt-iv5 Startup Guide
 User Manual cmt-iv5 Startup Guide v 2.2 JAN 8, 2016 Table of Contents Chapter1. Overview... 1 1.1. Specification... 1 1.2. Dimensions... 2 1.3. Ethernet port... 3 1.4. CR1225 battery... 3 1.5. Power connection...
CncGcoder Models HD & HDx Manual
 CncGcoder Models HD & HDx Manual Table of Contents WELCOME... 3 IN THE BOX... 4 Optional Accessories...4 HANDHELD OVERVIEW... 5 Overview...5 Charging the Battery...6 Turning On and Off...6 Plugging in
2 Mega-Pixel H.264 Box IP Camera ICA-HM125. Quick Installation Guide. Version 1.0
 2 Mega-Pixel H.264 Box IP Camera ICA-HM125 Quick Installation Guide Version 1.0 Table of Contents Chapter 1. Introduction... 3 1.1 Before Installation... 3 1.2 System Requirements... 3 Chapter 2. Physical
Sound Card Installation for Windows 95/98
 Sound Card Installation for Windows 95/98 Hardware Installation 1. Shut down Windows and power down system. Unplug power cable from the system. 2. Remove screws and open system enclosure. 3. Remove static
TQ2440 Development Platform Manual
 TQ2440 Development Platform Manual 0 Directory Directory... 1 Chapter 1 Introduction... 7 11Appearance of TQ2440 development platform... 7 12Hardware resource of TQ2440... 7 13Software introduction of
RC-SV Configuration Guide (Rev 4)
") Kramer Electronics, Ltd. RC-SV Configuration Guide (Rev 4) Software Version 2.1.2.69 Intended for Kramer Technical Personnel or external System Integrators. To check that you have the latest version, go
Kramer Electronics, Ltd. RC-SV Configuration Guide (Rev 4) Software Version 2.1.2.69 Intended for Kramer Technical Personnel or external System Integrators. To check that you have the latest version, go
CMOS/Mega-Pixel CMOS/CCD Internet Camera ICA-230 / ICA-M230 / ICA-501. Quick Installation Guide
 CMOS/Mega-Pixel CMOS/CCD Internet Camera ICA-230 / ICA-M230 / ICA-501 Quick Installation Guide Table of Contents Chapter 1. Introduction... 3 1.1 Before Installation... 3 1.2 System Requirements... 3 1.3
Quick Installation Guide
 Quick Installation Guide Full HD WDR Day & Night Outdoor Network Camera This document will guide you through the basic installation process for your new D-Link Network Camera. DCS-7513 Documentation also
MicroTrack 24/96. Quick Start Guide. Professional 2-Channel Mobile Digital Recorder
 MicroTrack 24/96 Professional 2-Channel Mobile Digital Recorder Quick Start Guide This guide is intended to help get you started quickly. In order to achieve optimal usage of your new MicroTrack, we recommend
ipanel CONTROL TECHNOLOGY CORPORATION ipanel Installation Guide and Specifications ipanel Installation Guide
 ipanel CONTROL TECHNOLOGY CORPORATION ipanel Installation Guide and Specifications ipanel Installation Guide CONTROL TECHNOLOGY CORPORATION ipanel Installation Guide and Specifications 2003 Control Technology
& Technical Specifications
 User Manual & Technical Specifications User manual Contents Pidion BM-170 Technical specifications... 2 Micro Rolltalk basic package... 3 Micro Rolltalk functions and buttons... 3 Preparing Micro Rolltalk...
700TSU INSTALLATION MANUAL
 M 700TSU INSTALLATION MANUAL 2 Table of Contents Features...03 Specifications...04 Quick-Start...05 Remote Control...07 Hardware Installation...10 Software Installation...14 Touch Screen Driver Installation
Getting Started. Overview of the Splash G3535
 Getting Started This Getting Started explains how to unpack, install, and connect the Splash G3535 Color Server. After completing the tasks outlined in this guide, you can explore the features of the Splash
M-606 Linux ARM9 Single Board Computer User Guide
 M-606 Linux ARM9 Single Board Computer User Guide Version 1.0 Copyright Artila Electronics Co., Ltd. All Rights Reserved. Table of Contents 1. Introduction... 1 1.1 Features... 1 1.2 Packing List... 1
RC-SV Configuration Guide Revision 3
 Kramer Electronics, Ltd. RC-SV Configuration Guide Revision 3 Software Version 2.1.2.32 Intended for Kramer Technical Personnel or external System Integrators. To check that you have the latest version,
Industrial PoE Plus Outdoor IR IP Camera ICA-2250VT
 Industrial PoE Plus Outdoor IR IP Camera ICA-2250VT Quick Installation Guide Table of Contents Chapter 1. Introduction... 3 1.1 Before Installation... 3 1.2 System Requirements... 3 Chapter 2. Physical
GV-IP Decoder Box Plus User s Manual
 GV-IP Decoder Box Plus User s Manual Before attempting to connect or operate this product, please read these instructions carefully and save this manual for future use. DBPV10-UM-A 2015 GeoVision, Inc.
hp l1619a smart attachment module
 hp l1619a smart attachment module user s guide Smart Attachment Module 1 Notice This manual and any examples contained herein are provided as is and are subject to change without notice. Hewlett-Packard
USB2.0 LAN DISK User s Manual
 1.0 Product overview USB2.0 LAN DISK User s Manual Thank you for purchasing USB2.0 LANDISK the network storage device. Now you can easily add USB2.0 LANDISK into your Network. Before using this device
Using GIGABYTE Notebook for the First Time
 Congratulations on your purchase of the GIGABYTE Notebook. This manual will help you to get started with setting up your notebook. The final product configuration depends on the model at the point of your
Dolphin ebase. Communication Cradle for the Dolphin 9700 Mobile Computer. User s Guide
 Dolphin ebase Communication Cradle for the Dolphin 9700 Mobile Computer User s Guide Introduction The Ethernet Base (ebase) enables a single Dolphin 9700 computer to communicate with a host device over
User s Manual ITR-CS15D
 User s Manual ITR-CS15D Copyrights 2012 TALOS INTEGRATED TECHNOLGIES. All rights reserved. The information in this document is subject to change without prior notice in order to improve reliability, design
EZ CE Panel Getting Started
 EZ CE Panel Getting Started CE Panels MANUFACTURED and MARKETED by AUTOTECH TECHNOLOGY, L. P. 4140 Utica Ridge Rd. Bettendorf, IA 52722-1327 Phone: 1-877-774-3279 Fax: 1-563-359-9094 www.uticor.net WARNING!
AT91SAM9G45-EVK WinCE User Manual
 AT91SAM9G45-EVK WinCE User Manual Revision History Rev Date Description 1.0 2011-05-20 Initial version Windows CE User Manual 1. How to use the WinCE image in the CD-ROM...- 1-2. How to use the image compiled
Vvisto. User Manual. & Installation Guide. USB 2.0 Hard Drive with Multi Card Reader, featuring easy file backup!
 Vvisto USB 2.0 Hard Drive with Multi Card Reader, featuring easy file backup! User Manual & Installation Guide Table of Contents CHAPTER 1 - INTRODUCTION - 1 - CHAPTER 3-10 - ICON KEY - 1 - VVISTO - 1
Using GIGABYTE Notebook for the First Time
 Congratulations on your purchase of the GIGABYTE Notebook P7! This Manual will help you to get started with setting up your notebook. For more detailed information, please visit our website at http://www.gigabyte.com.
Grayhill 3Dxx Display Products. Setup and Usage with CoDeSys Development Software
 Grayhill 3Dxx Display Products Setup and Usage with CoDeSys Development Software Revision History Revision Date Description A 09/14/2016 Original Release B 05/02/2017 Added support for Model 3D70 (Seven
Touch International Universal Drivers Manual Windows XP, 2000
 Touch International Universal Drivers Manual Windows XP, 2000 INSTALLING THE DRIVER:... 2 TOUCH INTERNATIONAL END USER LICENSE AGREEMENT:... 2 SELECT CONTROLLER TYPE:... 2 AUTOMATICALLY DETECT A SERIAL
User s Manual. Touch Panel Setting Tool. Important
 User s Manual Touch Panel Setting Tool Important Please read the Precautions and this User s Manual carefully to familiarize yourself with safe and effective usage. The software described in this document
THREE-AXIS HALL MAGNETOMETER THM1176 TECHNICAL SPECIFICATIONS
 Measurement Ranges: Data Units: output: Sample rate: 100 mt, 500 mt, 3T, 20T ( automatic or manual ranging) - Bx, B y, B z (ASCII or binary, single point or array, calibrated or not) - Temperature (uncalibrated)
APP-108 Firmware, Calibration SD Card Rev. 1.4 APPLICATION NOTE MCS-TOUCH OPERATING SYSTEM UPDATE
 APP-108 Firmware, Calibration SD Card Rev. 1.4 APPLICATION NOTE Revision History APP-108- Rev 1.4 MCS-TOUCH OPERATING SYSTEM UPDATE Date Author Revision Description 10-12/14-15 DEW Rev. 1.3 SD Card, Firmware,
SERVICE PACK 5 SOMO 655. Release Notes and Installation Guide. Version: SP5 (build 12863)
") SERVICE PACK 5 SOMO 655 Release Notes and Installation Guide Version: 1.00.05 SP5 (build 12863) Copyright Notice Copyright 2012-2015 Socket Mobile, Inc. All rights reserved. Socket Mobile, the Socket Mobile
SERVICE PACK 5 SOMO 655 Release Notes and Installation Guide Version: 1.00.05 SP5 (build 12863) Copyright Notice Copyright 2012-2015 Socket Mobile, Inc. All rights reserved. Socket Mobile, the Socket Mobile
TouchKit TouchScreen Controller User Manual for Windows NT4 Version: 3.4.0
 TouchKit TouchScreen Controller User Manual for Windows NT4 Version: 3.4.0 1 CONTENT CHAPTER 1. TOUCH PANEL CONTROLLER 2 1.1 Controller 2 1.2 Specifications and Features 3 CHAPTER 2. INSTALLING TOUCHKIT
CameraMate. Hi-Speed 10 in 1 Digital Media Reader/Writer User s Guide
 CameraMate Hi-Speed 10 in 1 Digital Media Reader/Writer User s Guide www.ziocorp.com Copyright Zio Corporation. All rights reserved. Trademarks are used for informational purposes, and remain the property
ZOTAC ZBOX nano. User s Manual
 User s Manual ZOTAC ZBOX nano No part of this manual, including the products and software described in it, may be reproduced, transmitted, transcribed, stored in a retrieval system, or translated into
USB 3.0 Docking Station
 USB 3.0 Docking Station Dual Display DVI+HDMI - 6 PORT USB HUB - LAN - AUDIO User Manual HDOCKS300 www.hamletcom.com Index 1. INTRODUCTION... 5 2. PRODUCT OVERVIEW... 6 2.1 PORTS AND CONNECTORS... 6 3.
ZOTAC ZBOX User s Manual
 ZOTAC ZBOX User s Manual No part of this manual, including the products and software described in it, may be reproduced, transmitted, transcribed, stored in a retrieval system, or translated into any language
mobile QUICK START GUIDE SoMo 655 Handheld Computer
 mobile QUICK START GUIDE SoMo 655 Handheld Computer This document pertains to the following family of SoMo 655 models: SoMo 655 Standard SoMo 655Rx (Antimicrobial white) SoMo 655DXS (Security: No wireless
TouchKit TouchScreen Controller User Guide for Windows NT4 Version: 3.2.1
 TouchKit TouchScreen Controller User Guide for Windows NT4 Version: 3.2.1 TouchKit Guide for WinNT4 v3.2.1 0 CONTENT CHAPTER 1. TOUCH PANEL CONTROLLER... 2 1.1 CONTROLLER... 2 1.2 SPECIFICATIONS AND FEATURES...
System concept. Hardware DATA SHEET VECTRON POS TOUCH 12 LIGHT
 System concept The Vectron POS Touch 12 Light has been developed for the highest demands. Thanks to its outstanding features, Vectron POS Touch 12 Light is particularly suitable for use in difficult environments
SWP-0036 AFHCAN Telehealth Cart Imaging and Software Configuration. Revision: 1. Effective Date: 1/4/2011
 Software Procedure SWP-0036 AFHCAN Telehealth Cart Imaging and Software Configuration Revision: 1 Effective Date: 1/4/2011 Alaska Native Tribal Health Consortium Division of Health Information & Technology
Dominion KX III User Station
 Dominion KX III User Station Quick Setup Guide Thank you for purchasing Raritan's Dominion KX III User Station, a high-performance appliance dedicated to access Raritan's enterprise-class Dominion KX III
A-307. Mobile Data Terminal. Android OS Platform Datasheet
 A-307 Mobile Data Terminal Android OS Platform Datasheet Revision 1.2 March, 2014 A-307 Platform Overview A-307 Platform Overview The A-307 provides Original Equipment Manufacturers (OEMs) and Telematics
TouchKit Touch Panel User manual for WindowsNT4 Version: 3.1.4
 TouchKit Touch Panel User manual for WindowsNT4 Version: 3.1.4 TouchKit Touch Panel v3.1.4 0 CONTENT CHAPTER 1. TOUCH PANEL CONTROLLER...2 1.1 CONTROLLER...2 1.2 SPECIFICATIONS AND FEATURES...3 CHAPTER
Firmware, Database, & PC Application Update Installation Instructions
 Firmware, Database, & PC Application Update Installation Instructions IMPORTANT Please read before you begin the installation. To avoid possible errors, it is recommended to install the updates as described
Machine TV Interface. mtv-100. Memory Processor. I/O Port RTC. Power. Specification. Certificate Software
 Machine TV Interface Features HD 720p High Resolution HDMI Output One Gigabit Ethernet Port Compact Design and DIN-rail Mountable Built-in 256MB Flash Memory SD Card Slot for Extension of Storage One USB
TouchKit Touch Panel User manual for WindowsNT4 Version: 3.1.4
 TouchKit Touch Panel User manual for WindowsNT4 Version: 3.1.4 TouchKit Touch Panel v3.1.4 0 CONTENT CHAPTER 1. TOUCH PANEL CONTROLLER... 2 1.1 CONTROLLER... 2 1.2 SPECIFICATIONS AND FEATURES... 3 CHAPTER
Dell Rugged Control Center. Version 2.3 User s Guide
 Dell Rugged Control Center Version 2.3 User s Guide Notes, cautions, and warnings NOTE: A NOTE indicates important information that helps you make better use of your product. CAUTION: A CAUTION indicates
HP Travel Phone User s Guide
 HP Travel Phone User s Guide Version 1.0 Copyright 2007 Hewlett-Packard Development Company, L.P. The information contained herein is subject to change without notice. The only warranties for HP products
Touch Tool user manual for Windows 9x/2k/XP Version: 1.05
 Touch Tool user manual for Windows 9x/2k/XP Version: 1.05 This touch panel controller provides the optimum performance of analog resistive touch panels for 5 wire models. It communicates with PC system
WinClient Remote Manager USER S MANUAL. Revision: WRM /10/22
 WinClient Remote Manager USER S MANUAL Revision: WRM 2.1 2002/10/22 Copyright This manual and any accompanying software and firmware are copyrighted. No parts of this publication may be reproduced, stored
Overview 1. Foreword 2. Warnings
 Overview 1. Foreword Thank you for choosing our product. Please read this manual carefully before using the product. Specifications and software updates may be subject to change without notice. Some pictures
PowerView Model PV485. Installation Manual Section 78
 PowerView Model PV485 Installation Manual 00-02-1018 2017-05-23 Section 78 In order to consistently bring you the highest quality, full-featured products, we reserve the right to change our specifications
CommPortal Communicator Desktop End User Guide 19 Feb 2014
 End User Guide 19 Feb 2014 Integra Hosted Voice Service PC Communicator Desktop End User Guide 19 Feb 2014 21 Feb 20134 End User Guide Contents 1 Introduction... 1-1 1.1 Using this End User Guide... 1-2
Instructions to Upgrade Your UME-36 Pro
 Instructions to Upgrade Your UME-36 Pro 1. HTTP Upgrade Instructions 2. Application Upgrade Instructions using USB Disk Drive or SD Card 3. Application Upgrade Instructions using PC with data cable 4.
User s Manual. Touch Panel Setting Tool. Important
 User s Manual Touch Panel Setting Tool Important Please read the Precautions and this User s Manual carefully to familiarize yourself with safe and effective usage. The software described in this document
EziNav G3 User Manual
 EziNav G3 User Manual 4.3 Touchscreen GPS with Bluetooth About this User Manual Congratulations on your purchase of your Kogan EziNav G3 GPS. This user manual provides information regarding the various
Sun VirtualBox Installation Tutorial
 Sun VirtualBox Installation Tutorial Installing Linux Mint 5 LTS Guest OS By Dennis Berry Welcome to the world of virtualization and Linux. This tutorial is intended to help users who are new to the world
PanelView Component HMI Terminals
 User Manual PanelView Component HMI Terminals Catalog Numbers 2711C-F2M, 2711C-K2M, 2711C-T3M, 2711C-K3M, 2711C-T4T, 2711C-T6M, 2711C-T6C, 2711C-T6T, 2711C - T10C Important User Information Solid state
IT Essentials v6.0 Windows 10 Software Labs
 IT Essentials v6.0 Windows 10 Software Labs 5.2.1.7 Install Windows 10... 1 5.2.1.10 Check for Updates in Windows 10... 10 5.2.4.7 Create a Partition in Windows 10... 16 6.1.1.5 Task Manager in Windows
Using GIGABYTE Notebook for the First Time
 V. 0 Congratulations on your purchase of the GIGABYTE Notebook. This manual will help you to get started with setting up your notebook. The final product configuration depends on the model at the point
PointWrite User Manual
 PointWrite User Manual Table of contents Shipping contents... 3 Attaching the PointWrite to the projector... 4 Connecting the PointWrite to PC... 5 Pen action... 5 Exchanging the pen tip...5 Driver Installation...
Using GIGABYTE Notebook for the First Time
 Congratulations on your purchase of the GIGABYTE Notebook! This Manual will help you to get started with setting up your notebook. For more detailed information, please visit our website at http://www.gigabyte.com.
K9 Series Firmware Update Guide
 K9 Series Firmware Update Guide This Guide provides how to download and install a new version of the firmware (operating software) for K9 Series DVR. 제품사진 Requirements To update the firmware on the K9
TeamBoard Quick Start #1
 www.touchboards.com 205 Westwood Ave.Long Branch, NJ 07740 1-866-942-6273 Sales@touchboards.com Quick Start #1 Welcome to! These Quick Start Cards address some basics, from installation steps to creating
GeoExplorer 6000 Series Quick Start Guide
 GeoExplorer 6000 Series Quick Start Guide Four simple steps to get started: This guide provides an overview of the important features and instructions for how to set up and operate your Trimble GeoExplorer
Installation and Operation Manual Model 9A02 Software Version 2.0
 Installation and Operation Manual Model 9A02 Software Version 2.0 AccessPCHT Installation and Operation Welcome to the AccessPCHT installation and operation guide. This guide will help you install and
TouchKit TouchScreen Controller User Guide for Windows 2000 / XP Version: 3.2.4
 TouchKit TouchScreen Controller User Guide for Windows 2000 / XP Version: 3.2.4 TouchKit Guide for Win2000/XP v3.2.4 0 CONTENT CHAPTER 1. TOUCH PANEL CONTROLLER...2 1.1 CONTROLLER...2 1.2 SPECIFICATIONS
QUICK START. DevCom2000 User Manual
 QUICK START DevCom2000 uses Device Descriptions (DDs) to access data stored in the memory of the smart field device. These DDs are developed by the manufacturer for their products and, in turn, distributed
For Auto Locksmith Association only!!! Emergency Service Manual.
 For Auto Locksmith Association only!!! Emergency Service Manual = OBD Key Programmer + OBD Alarm Disarming tool = ====================================================================== Models: AUDI A4
Using memory cards (not supplied)
") Chapter 1. Getting to know your computer Using memory cards (not supplied) Your computer supports the following types of memory cards: Secure Digital (SD) card Secure Digital High Capacity (SDHC) card
Chapter 1. Getting to know your computer Using memory cards (not supplied) Your computer supports the following types of memory cards: Secure Digital (SD) card Secure Digital High Capacity (SDHC) card
Embedded Automation, Inc. Suite #104, th Street Surrey, BC V3W 1H8 Phone: (604) Fax: (604)
 Fax: (604)") Embedded Automation, Inc. Suite #104, 7485 130 th Street Surrey, BC V3W 1H8 Phone: (604) 596-4999 Fax: (604) 596-4933 www.embeddedautomation.com User Manual Page 1 Table of Contents REVISION HISTORY...
Embedded Automation, Inc. Suite #104, 7485 130 th Street Surrey, BC V3W 1H8 Phone: (604) 596-4999 Fax: (604) 596-4933 www.embeddedautomation.com User Manual Page 1 Table of Contents REVISION HISTORY...
Edexcel GCSE 2009 e-spec Introduction 2 Minimum requirements 2 Hardware 2 Software 2 How do I install the e-spec? 3 Installing e-spec on a network 3
 Edexcel GCSE 2009 e-spec Introduction 2 Minimum requirements 2 Hardware 2 Software 2 How do I install the e-spec? 3 Installing e-spec on a network 3 Running e-spec 4 PC users 4 To start e-spec when installed
Operating Instructions. Windows. Video Wall Adjustment & Calibration Software. Video Wall Manager Ver. 1.8
 Operating Instructions Video Wall Adjustment & Calibration Software Windows Video Wall Manager Ver. 1.8 Thank you for purchasing this Panasonic product. Before using this software, please read the instructions
EX-96XX6A HMI User Manual
 EX-96XX6A HMI User Manual Release Date Revision Nov 2011 V1.0 2011 All Rights Reserved. Published in Taiwan EX-96XX6A User Manual 1 Warning! This equipment generates, uses and can radiate radio frequency
User Manual. cmt-iv5 Startup Guide
 User Manual cmt-iv5 Startup Guide Table of Contents Chapter1. Overview... 1 1.1. Specification... 1 1.2. Dimensions... 2 1.3. Ethernet port... 3 1.4. CR1225 battery... 3 1.5. Power connection... 3 1.6.
1. Introduction 1.1.Product Overview
 1. Introduction 1.1.Product Overview The multi-function panel is a new extreme 3-module product comes with multi-slot card reader, thermal indicator and multi I/O panel, user able to install in standard
Quick Installation Guide HD Day & Night Network Camera
 Quick Installation Guide HD Day & Night Network Camera This document will guide you through the basic installation process for your new D-Link Network Camera. DCS-3112 Documentation also available on CD
Dominion KX III User Station
 Dominion KX III User Station Quick Setup Guide Thank you for purchasing Raritan's Dominion KX III User Station, a high-performance appliance dedicated to access Raritan's enterprise-class Dominion KX III
READ ME FIRST Windows 98/ME/2000
 READ ME FIRST Windows 98/ME/2000 *DSL Equipment Installation Guide: Alcatel Speed Touch PC *Digital Subscriber Line Part Number: AlcatelPC9x02A Version 1.2-A Table of Contents Follow Steps 1 through 7
Models Affected: Matrix T7xe/7xe consoles
 Effective Date: June 12, 2015 Prepared by: Eric Chen Models Affected: Service Bulletin Matrix T7xe/7xe consoles troubleshooting Matrix T7xe/7xe consoles Bulletin Num. NB-1507008 Ver.2 DESCRIPTION Troubleshooting
BRIGHTSIGN QUICK START GUIDE. BrightSign, LLC Lark Ave., Suite 200 Los Gatos, CA
 BRIGHTSIGN QUICK START GUIDE BrightSign, LLC. 16795 Lark Ave., Suite 200 Los Gatos, CA 95032 408-852-9263 www.brightsign.biz 1 TABLE OF CONTENTS What s in the box? 1 What is BrightSign? 2 Benefits 2 Capabilities
ZOTAC ZBOX User s Manual
 User s Manual No part of this manual, including the products and software described in it, may be reproduced, transmitted, transcribed, stored in a retrieval system, or translated into any language in
CP MultiTouch Controller
 CP450-010 MultiTouch Controller Welcome! We greatly appreciate your purchase of the CP450. We are sure you will find it reliable and simple to use. Superior performance for the right price, backed by solid
Cisco CRM Communications Connector for Cisco CallManager Express
 Cisco CRM Communications Connector for Cisco CallManager Express Cisco CRM Communications Connector (Cisco CCC) integrates Microsoft Customer Relationship Management (CRM) with Cisco CallManager Express
ZOTAC ZBOX nano. User s Manual
 User s Manual ZOTAC ZBOX nano No part of this manual, including the products and software described in it, may be reproduced, transmitted, transcribed, stored in a retrieval system, or translated into
Reference Guide User s Guide User s Guide
 Reference Guide ULTRA-RUGGED FIELD PC Reference Guide ActiveSync, Excel, Hotmail, Internet Explorer, Microsoft, MSN, Outlook, PowerPoint, Visual Studio, Windows, Windows Media, Windows Mobile, Windows
User Manual. Tellus smart
 User Manual Tellus smart Content Introduction 3 How to turn on the Tellus smart. 4 Connectors and buttons.. 5 Touch screen. 8 On-screen keyboard. 9 Battery and charging 10 How to create a communication
Basic PC: How do you turn on this darn thing?
 Basic PC: How do you turn on this darn thing? What is the computer? Basic PC: How do you turn on this darn thing? A computer is a device that accepts information and manipulates it for some result. It
User Manual. Open platform E Line. Part Number: Version: 1. Date:
 User Manual E Line Part Number: 80860.850 Version: 1 Date: 2014-01-27 Valid for: SB7ECS-OPENPLATL-0007 Version Date Modifications 1 2014-01-27 First edition This manual, including all illustrations contained
AbraScan Test Strip Reader Digital Reading of Test Strips for the Determination of Cyanotoxins in Contaminated Water Samples
 AbraScan Test Strip Reader Digital Reading of Test Strips for the Determination of Cyanotoxins in Contaminated Water Samples Product No. 475025 1. General Description The AbraScan RDS-1500 Test Strip Reader
Hi-Res 8 Wi-Fi Digital Picture Frame with MP3 player Table of Contents
 Hi-Res 8 Wi-Fi Digital Picture Frame with MP3 player Table of Contents Before Using the Digital Picture Frame...3 Introduction...3 Features and Specs...3 Package contents...4 Digital Picture Frame Layout...5
Print Server. User s Manual. Rev. 01 (April, 2004) Made In Taiwan
 Made In Taiwan") Print Server User s Manual Rev. 01 (April, 2004) Made In Taiwan TABLE OF CONTENTS ABOUT THIS GUIDE... 4 INTRODUCTION... 5 PACKAGE CONTENTS... 6 SYSTEM REQUIREMENTS... 6 GENERAL FEATURES... 7 PRODUCT VIEW...
Print Server User s Manual Rev. 01 (April, 2004) Made In Taiwan TABLE OF CONTENTS ABOUT THIS GUIDE... 4 INTRODUCTION... 5 PACKAGE CONTENTS... 6 SYSTEM REQUIREMENTS... 6 GENERAL FEATURES... 7 PRODUCT VIEW...
Dell Rugged Control Center. Version 2.0 User s Guide
 Dell Rugged Control Center Version 2.0 User s Guide Notes, cautions, and warnings NOTE: A NOTE indicates important information that helps you make better use of your product. CAUTION: A CAUTION indicates
5.25 Bay Multi-Port Panel with a 6-in-1 Flash Card Reader/Writer
 USB 2.0 FLASH CARD READER 5.25 Bay Multi-Port Panel with a 6-in-1 Flash Card Reader/Writer 525FCREAD 525FCREADBK Instruction Guide * Actual product may vary from photo * 525FCREADBK shown The Professionals
TouchKit Touch Panel User manual for Windows9X/ME Version: 3.1.4
 TouchKit Touch Panel User manual for Windows9X/ME Version: 3.1.4 TouchKit Touch Panel v3.1.4 0 CONTENT CHAPTER 1. TOUCH PANEL CONTROLLER... 2 1.1 CONTROLLER... 2 1.2 SPECIFICATIONS AND FEATURES... 3 CHAPTER
VP-x231-CE7 Series User Manual
 VP-x231-CE7 Series User Manual Version 1.0.1 May 2016 Service and usage information for VP-1231-CE7/VP-4231-CE7/VP-6231-CE7 Written by Tunglu Yu Edited by Anna Huang Warranty All products manufactured