End User Manual. December 2014 V1.0
|
|
|
- Georgia Garrison
- 5 years ago
- Views:
Transcription

1 End User Manual December 2014 V1.0
2 Contents Getting Started... 4 How to Log into the Web Portal... 5 How to Manage Account Settings... 6 The Web Portal... 8 How to Upload Files in the Web Portal... 9 How to Manage Files and Folders in the Web Portal A Note about Excluded Extensions Mobile Apps How to Download Mobile Apps How to Use the Android App How to Use the ios App How to Use the Windows Phone App Filecloud for Windows and Mac Machines How to Download Filecloud How to Register Filecloud How to Upload Files in Filecloud How to Pause a Sync Process Sharing Files How to Create a New Team Share How to Share with Third Parties in the Web Portal How to Share with Third Parties in Filelcoud How to Manage Guest Accounts How to Manage Shared Items Locking Files and Folders How to Lock Files and Folders in the Web Portal How to Lock Files and Folders in Filecloud How to Resolve Collisions Revisions How to View and Restore a Revision
3 Outlook Plugin How to Install the Outlook Plugin How to Configure the Outlook Plugin How to Use the Outlook Plugin Backups How to Create Backups in the Web Portal How to Create Backups on your Local Machine How to Manage Backups in the Web Portal File Report and Activity Log How to View File Reports How to Track Activity WebDAV How to Map a Network Drive on a Windows Machine How to Map a Network Drive on a Mac OS X Machine Help and Support
4 Getting Started Filecloud is a secure file sharing tool that will sync files and folders across your devices, and help you collaborate and share content with others. Using the system, you can: Collaborate with members of your organisation, as well as with people outside of your organisation; Manage file revisions and versioning; Audit and track your files; Share files and folders through with the Outlook plugin; and Backup and restore important files. This User Guide will help you set up and use the system, and will provide you with the information you need to incorporate the system s toolset into your daily work activities. This section will explain how to get started with Filecloud, including: How to Log into the Web Portal; and How to Manage Account Settings. 4
5 How to Log into the Web Portal When a user account is first created for you, you will receive a Welcome from your administrator, providing you with important information to help you get started using the system. For example, your might include a link to the web portal, a username (or a login address), and a password. 1. Navigate to 2. Use the credentials provided by your administrator to log into the web portal. 3. Click the Log In button. You now have access to the system. 5
6 How to Manage Account Settings In the web portal, you can update your account settings, including your name, address, and password. You can also set up advanced settings, such as two-step authentication, quota alerts, and WebDAV access. To manage account settings: 1. Click the Logged In As button in the web portal. The Account Settings page displays. 2. In the Account Settings page, you can update account information, including: a. Use the First Name field to update your first name. b. Use the Last Name field to update your last name. c. Use the field to update your address. d. Click the Change Password link to change your password. e. Use the Mobile Phone Number field to change your mobile phone number. 3. In the Account Settings page, you can optionally use the Me When I Reach checkbox fields to configure alerts when you reach a certain percentage of quota. 6
7 4. Optionally, click the WebDAV Access checkbox to enable WebDAV access. 5. Click the Save button when you are finished making changes to your account. 7
8 The Web Portal After you have an account, you can begin to create and upload content into the web portal. In the web portal, you can access your personal dashboard and manage your files, folders, shares, and more. For example, you can: Click the Files tab to access your files and folders. Click the Shares tab to access team shares, items shared by you, and items shared with you. Click the Guests tab to collaborate and share with people outside of your organisation. Click the Backups tab to create and manage your backups. Click the File Report tab to view or export a list of your files. Click the Activity Log tab to review your activity within the system. This section will explain how to use the web portal, including: How to Upload Files in the Web Portal; How to Manage Files and Folders in the Web Portal; and A Note about Excluded Extensions. 8
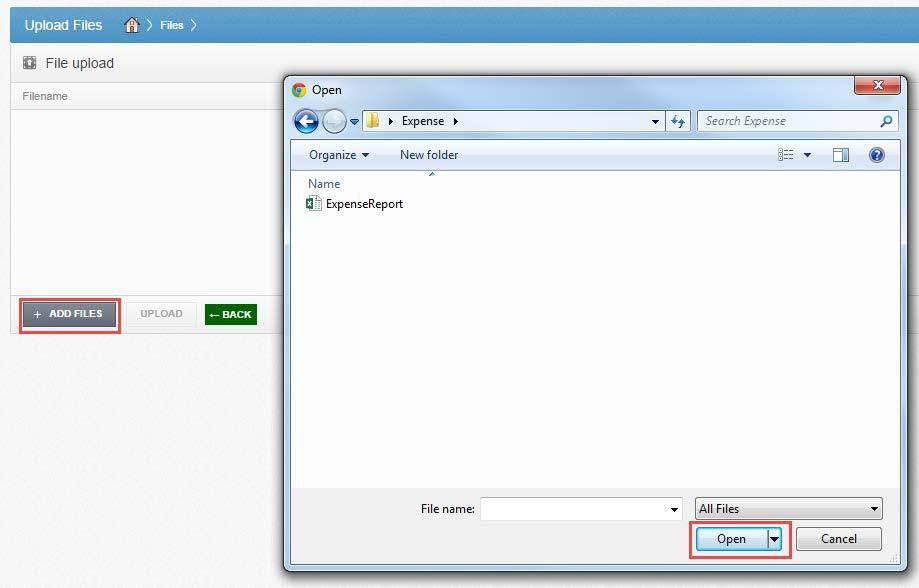
9 How to Upload Files in the Web Portal When you create folders and upload files in the web portal, all of these items will propagate down to any of your connected devices, such as your mobile phone or your local machine. You can also access your uploaded content from any computer that has a supported web browser and an Internet connection. To upload files in the web portal: 1. In the web portal, click the Files tab. The Browse Files page displays. 2. While inside the appropriate folder, click the Upload Files button. The Upload Files page displays. 3. In the Upload Files page, you can drag and drop files onto the page and click the Upload button. The files will upload. 4. Alternatively, click the Add Files button to manually search for files on your local machine. You will be presented with an Open dialog box that will allow you to select files from your machine. Click the Upload button when you are ready to upload the selected file. 9
10 10

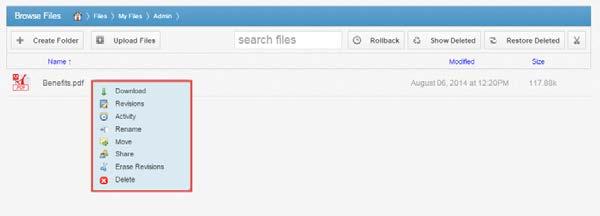
11 How to Manage Files and Folders in the Web Portal You can manage all of your files and folders in the Browse Files page of the web portal. In this page, you can create folders, upload files, and manage revisions. You can also manage individual folders and files. To manage items in the web portal: 1. In the web portal, click the Files tab. The Browse Files page displays. 2. In the Browse Files page, you will see a list of all of your files, folders, and team shares. 3. You can use the toolbar buttons to manage content in the selected folder. a. Click the Create Folder button to create a new folder inside the web portal. b. Click the Upload Files button to add files to the web portal. c. Click the Rollback button to restore the selected item to a previous version. d. Click the Show Deleted button to show files that have been deleted. e. Click the Restore Deleted button to return any deleted files to their original location. f. Click the Erase all Revisions button to erase previous revisions. 4. Alternatively, you can use the folder menu to manage individual folders. a. Right-click a folder. A menu displays. b. In the menu, you can: i. Click the Download ZIP link to download the entire folder as a ZIP file to your local machine. ii. Click the Rename link to rename the title of the folder. iii. Click the Move link to change the path of the folder. iv. Click the Share link to share an individual link to the folder. v. Click the Trim Revisions link to remove previous version of the folder from the system. 11

12 vi. Click the Delete link to delete the folder from the system. Note: When you delete an item, it is still stored in the system for a pre-determined number of days. Within this timeframe, you can restore a deleted file. Please contact your administrator for more information. 5. Alternatively, you can use the file menu to manage individual files. a. Right-click a file. A menu displays. b. In the menu, you can: i. Click the Download link to download the file to your local machine. ii. Click the Revisions link to view a list of revisions to the file, and optionally restore a previous version. iii. Click the Activity link to review activity or events for the selected file. iv. Click the Rename link to rename the selected file. v. Click the Move link to change the path of the selected file. vi. Click the Share link to share an individual link to the file. vii. Click the Erase Revisions link to remove previous version of the file from the system. viii. Click the Delete link to delete the file from the system. Note: When you delete an item, it is still stored in the system for a pre-determined number of days. Within this timeframe, you can restore a deleted file. Please contact your administrator for more information. 12
13 13
14 A Note about Excluded Extensions While most of your files and folders will easily sync across all of your devices, certain system files and folders, as well as temporary application files, will not sync. Your administrator may have also configured other file extension types such as application or video files to be excluded from the syncing process. You can add files with excluded extensions to Filecloud, but they will not display in the web portal or in your mobile apps. If you upload a file with an excluded extension through the web portal, you will receive a notification that the file is on the exclusion list. This file will not appear in the web portal or in your mobile apps. 14
15 Mobile Apps In addition to using the web portal, you can manage files and folders from all of your devices by downloading and installing an agent on your computer (local machine), or an app on your mobile device. Mobile app versions include Android, ios, and Windows Phone. This section will explain how to install and use apps on your mobile device, including: How to Download Mobile Apps; How to Use the Android App; How to Use the ios App; and How to Use the Windows Phone App. 15
 in itunes.")
16 How to Download Mobile Apps You can manage your files and folders from various mobile apps, including the Android app, the ios app, or the Windows Phone app. You can find and download your device-specific app in the following locations: Find and download the Android app in Google Play. Find and download the ios app (for your iphone or ipad) in itunes. Find and download the Windows Phone app in the Windows Phone site. Alternatively, you can access a direct link to your device-specific app in the web portal. To find your device-specific app: 1. Click the Download App button in the web portal. The Download page displays. 2. In the Download page, select either the Android App, ios App, or Windows Phone App button. You will be redirected to the page that will allow you to download and install your device s app. 16

17 How to Use the Android App If you use an Android device, you can download the Filecloud Android app in Google Play. The Filecloud app allows you to open, browse, manage, and upload your files and folders. Some of the features include: Open and view your files; Upload content from your Android device, such as photos, music, and documents; Rename, delete, and move your files; Make files available for offline viewing; and Pin files for offline viewing. To use the Filecloud Android app: 1. In your Android device, press the Filecloud app icon to launch the Filecloud app. The Filecloud Login window displays, prompting you to enter your login credentials, including: a. In the Host field, enter the host name of the system (for example, filecloud.co.nz). b. In the User field, enter your username (for example, c. In the Password field, enter your password. d. Press the Sign in button when you are finished. 2. When you have access to your account, you can use the app to open and view files, manage files, and upload content. For example: a. Press the My Files link to view and manage your files, including renaming a file, moving a file, or pinning a file. b. Press the Recent Files link to view your most recent files. c. Press the Offline Files link to view a list of pinned files that are offline. d. Press the Backups link to view a list of your backups. 17

18 3. To view and edit files: a. Press the My Files link. The My Files screen displays. b. Optionally, press the Pin icon to save the file for offline viewing or editing. The pinned file will appear in the Offline Files screen. c. In the My Files screen, select the file you want to edit. A pop-up window displays, prompting you to select a third party document editing application. 18

19 d. When you are finished making edits, press the Save button. Your saved file will be synced to the server. 19

20 How to Use the ios App If you use an ios device, such as an iphone or an ipad, you can download the Filecloud ios app in itunes. The Filecloud app allows you to open, browse, manage, and upload content, such as photos. To use the Filecloud ios app: 1. In your ios device, press the Filecloud app icon to launch the Filecloud app. The Filecloud Login window displays, prompting you to enter your login credentials, including: a. In the Host field, enter the host of the system (for example, filecloud.co.nz). b. In the User field, enter your username (for example, c. In the Password field, enter your password. d. Press the Login button when you are finished. 2. When you have access to your account, you can use the app to open and view files, manage files, and upload content. For example: a. Press the Files link to view and manage your files, such as renaming a file, moving a file, or marking a file as a favorite. b. Press the Backups link to view a list of your backups. c. Press the Favorites link to view a list of items that you have marked as favorites. d. Press the Upload link to upload content from your phone to the server, such as images. e. Press the Settings link to view your account settings, such as space usage and local storage settings. 3. To view and edit files: a. Press the Files link. The Files screen displays. 20

21 b. In the Files screen, select the file you want to edit. c. While inside the file, press the Share button at the bottom of the screen. d. In the Share menu, press the Open In link and select a third party document editing application. e. When you are finished making edits, press the Save button. Your saved file will be synced to the server. 21

22 How to Use the Windows Phone App If you use a Windows Phone, you can download the Filecloud Windows Phone app in the Windows Phone store. The Filecloud app allows you to: View dozens of file types; Generate share links to include in s; Save files for offline viewing; and Upload photos and videos from your camera roll and photo stream. To use the Filecloud Windows Phone app: 1. In your Windows Phone, press the Filecloud app icon to launch the Filecloud app. The Filecloud login window displays, prompting you to enter your login credentials, including: a. In the Host field, enter the host of the system (for example, filecloud.co.nz). b. In the User field, enter your username (for example, user@mail.com). c. In the Password field, enter your password. 2. When you have access to your account, you can use the app to open and view files, manage files, and upload content. For example: a. Press the Files link to view and manage your files. b. Press the Favorites link to view a list of your favorite items. c. Press the Backups link to view a list of your backups. 22
23 Filecloud for Windows and Mac Machines In addition to using the web portal and mobile apps, you can also manage files and folders from your computer (local machine) using Filecloud. Filecloud includes a folder, which stores your files and folders on your local machine. Files and folders that are added to Filecloud will automatically sync to the web portal and any other devices you have connected to your account. You can use Filecloud on both Windows and Mac machines. This section will explain how to install and use Filecloud on your Windows and Mac machines, including: How to Download Filecloud; How to Register Filecloud; How to Upload Files in Filecloud; and How to Pause a Sync Process. 23
24 How to Download Filecloud When you download and install Filecloud, you can access your files and folders directly on your computer (local machine). To download Filecloud on a Windows or Mac machine: 1. Click the Download App button in the web portal. The Download page displays. 2. In the Download page, select either the Windows Agent or Mac Agent button. The selected file will start to download, or you will be prompted to save the file, depending on your browser type. 3. When the file finishes downloading, click the installation file to launch the Setup Wizard. 4. Click the Next button to start the Setup Wizard. 24
25 5. In the License Agreement screen, click the I accept the agreement radio button if you accept the license. Then, click the Next button to continue. 6. In the Installation Directory screen, select the location where you want the installation files to reside on your local machine. In most instances, you can accept the default location. Click the Next button to continue. 25
26 7. In the Ready to Install screen, click the Next button to begin the installation process. 8. When the Setup Wizard completes, you can optionally click the Create a Desktop Shortcut checkbox. Then, click the Finish button. 26
27 How to Register Filecloud After Filecloud is installed, it must be registered to your user account so that it can recognize the files and folders that belong to you. To register Filecloud on a Windows or Mac machine: 1. After the Setup Wizard completes, the Registration Wizard will automatically launch. Alternatively, click the Filecloud icon on your computer s system tray or menu bar, and select Register. The Registration Wizard displays. Note: On a Windows machine, the Filecloud icon is located in the lower right-hand corner of the screen; on a Mac machine, the Filecloud icon is located in the upper right-hand corner of the screen. 2. Click the Next button to continue. 3. In the Log into Filecloud screen, enter your login credentials as provided by your administrator. Click the Next button to continue. 27

28 4. In the Choose Setup Type screen, select either a typical or advanced installation path for synced documents, where all files, folders, and shares can be accessed on your local machine. When you select a typical path, Filelcloud can be accessed in the following location: C:\Users\[User Name]\Filecloud. In most instances, you can select the Typical radio button. Click the Next button to continue. a. Alternatively, you can choose an advanced installation path, and specify a custom area where Filecloud can be accessed. If you want to specify a custom area where Filecloud can be accessed, click the Advanced radio button, and then click the Next button to continue. 28

29 b. In the Choose your Filecloud location screen, click the Change button to specify another location on your local machine. Click the Next button when you are finished. Note: A folder named Filecloud will automatically be created within the location you select. You do not need to manually create a folder titled, Filecloud 5. In some cases, if you have previously installed Filelcoud using the same settings, you will receive a warning message indicating that a folder already exists. Click the OK button to merge with the existing folder, and then continue with the Registration Wizard. 29
30 6. Click the Finish button when the Registration Wizard completes. 30

31 How to Upload Files in Filecloud When files and folders are added to the web portal, they automatically propagate down to your local machine; you can then find these files and folders inside your Filecloud. In the same way, files and folders that are added to Filecloud will automatically sync to the web portal and any other devices you have connected to your account. You can use Filecloud on both Windows and Mac machines. To upload files in Filecloud on a Windows or Mac machine: 1. On your computer (local machine), open Filecloud in an explorer window. Filecloud displays. 2. Drag files or folders into Filecloud. Alternatively, you can save files to Filecloud directly from the application in which you are working (for example, Microsoft Word). 3. Use the icons to understand when your files are syncing. For example: A blue icon on a file indicates that the file or folder is currently syncing. 31

32 A green icon means that the file or folder has successfully synchronized, and is available in the web portal and on your mobile devices. 32

33 How to Pause a Sync Process Filecloud continually works on your local machine to sync files to the web portal. You may find times, however, when you would like to pause the sync process, such as when you are getting on a plane, when you want to conserve bandwidth, or if you would like to work in isolation. To pause a sync process on a Windows or Mac machine: 1. Click the Filecloud icon on your computer s system tray or menu bar, and select Pause Sync. Note: On a Windows machine, the Filecloud icon is located in the lower right-hand corner of the screen; on a Mac machine, the Filecloud icon is located in the upper right-hand corner of the screen. The Pause Sync option will appear with a checkmark next to it, and will remain paused until this setting is unchecked. 2. To resume the sync process, click the Filecloud icon on your computer s system tray or menu bar, and select Pause Sync again. The Pause Sync option will no longer display a checkmark, and the sync process will resume. 33
34 Sharing Files You can collaborate and share files in many ways, including: Team shares, which is a shared folder that can be accessed by groups of users. Team shares can be configured for users in your organisation. Individual shares, which allow you to share a direct link to a file or folder, rather than sharing an entire area. Individual shares can be configured for users in your organisation and outside of your organisation. You can send a public share to recipients inside or outside of your organisation; alternately, you can send a secure share, which requires login credentials. If you send a secure share to a recipient outside of your organisation, the system will create a guest account for that user. With both team shares and individual shares, you can share files and folders in the web portal or in Filecloud. This section will explain how to share files, including: How to Create a Team Share; How to Work in Team Shares; How to Share with third parties in the Web Portal; How to Share with third parties in Filecloud; How to Manage Guest Accounts; and How to Manage Shared Items. 34


35 How to Create a New Team Share Your administrator might have created team shares for you when the system was first configured, but you can also create your own team shares. You can create a team share if you are collaborating with another person, or group, on a specific set of content. You add files to team shares the same way you add files to standard folders. When you or another user in your team share adds or edits a file or folder, changes synchronise across all subscribed accounts. In both the web portal and in Filecloud, team share folders can be recognised by icons with two people on it. Team shares in the web portal: Team shares in Filelcloud: To create a new team share: 1. In the web portal, click the Shares tab. The Team Shares page displays. 2. In the Team Shares page, click the Create Team Share button. 35


36 The Create Team Share page displays. 3. In the Create Team Share page, type a descriptive name for the team share in the Team Share Name field. 4. Click the Create button when you are finished. You will be redirected to the Team Share Subscribers page. 5. In the Team Share Subscribers page, select a name from the Select a User drop-down menu, and click the Add to Share button. The selected user will now be added to the team share. 36

37 How to Share with Third Parties in the Web Portal You can share links to files directly with third parties, without using team shares. You can share files with users in your organisation and outside of your organisation. To share a file with a third party from the web portal: 1. Right-click the file or folder and select Share. A Share Access dialog box displays. 37
38 2. In the Share Access dialog box, configure settings for sharing the link, including: The Secure Share option, which sends password-protected share links to items. The Public Share option, which sends standard share links to items. The Share Options settings, which allow you to select whether the share link will expire after a certain date, and if each recipient should be limited to the number of times the item can be downloaded. The Share With settings, which allow you to your items directly from within the Share Access dialog box. The Permissions settings, which allow you to specify permissions for the recipient, including whether he or she can upload or delete content. 38

39 How to Share with Third Parties in Filelcoud In addition to sharing files and folders with third parties in the web portal, you can also share items directly from your local machine. To share an item with a third party on a Windows or Mac machine: 1. Right-click on the file or folder, point to Filecloud, and select Share link. The Share Access dialog box displays, allowing you to configure settings the same way as you would from the web portal. 39
40 2. In the Share Access dialog box, configure settings for sharing the link, including: The Secure Share option, which sends password-protected share links to items. The Public Share option, which sends standard share links to items. The Share Options settings, which allow you to select whether the share link will expire after a certain date, and if each recipient should be limited to the number of times the item can be downloaded. The Share With settings, which allow you to your items directly from within the Share Access dialog box. The Permissions settings, which allow you to specify permissions for the recipient, including whether he or she can upload or delete content. 40

41 How to Manage Guest Accounts Guests are special accounts that are created for individuals outside of your organisation. You can manually create a guest account and give that guest account access to content. Alternatively, if you send a private individual share invitation to a person outside of your organisation, you are automatically creating a guest within the system. You can manage your guest accounts using the Guests tab inside the web portal. To manage guest accounts: 1. In the web portal, click the Guests tab. The Guests page displays, listing all of your existing guests. 2. Use the tools in the Guests tab to manage guests, including: The Create Guest button, which allows you to manually add a new guest. The Remove button, which allows you to delete an existing guest. 41


42 How to Manage Shared Items You might find it useful to keep track of items in team shares, as well as items you have shared with third parties. Using the Shares tab in the web portal, you can generate and view reports that allow you to manage these shared items. To track shared items: 1. In the web portal dashboard, click the Shares tab to manage your shares. You can: a. Click the Team Shares button to access controls that allow you to create, view and edit team shares. b. Click the Items Shared By You button to track how many times an item you shared has been viewed, downloaded, and whether or not it is set to expire on a certain date. c. Click the Items Shared With You button to view files that were shared with you by others in your organisation, as well as information about who shared the file and what access rights you were given (including read, write, and delete). 42
43 Locking Files and Folders File locking allows users to place locks on files and folders. This feature is useful when you want to prevent other user accounts from accessing your items when you are making changes, preventing sync collisions from occurring. You can place locks on a whole team share, a subfolder in a team share, or a file in a team share. When an item is locked, a lock icon will be placed over the file or folder, and it will become read-only for others subscribed to the team share. If you forget to lock a file or folder before you begin making changes, you might encounter instances where another user has made changes to the same item at the same time. This is called a collision. When a collision occurs, the system will notify you of the conflict, and will help you resolve the collision. Your administrator can configure a team share so that all team share files automatically lock each time they are opened. This section will explain how to lock files, including: How to Lock Files and Folders in the Web Portal; How to Lock Files and Folders in Filecloud; and How to Resolve Collisions. 43

44 How to Lock Files and Folders in the Web Portal In the web portal, you can place locks on a whole team share, a subfolder in a team share, or a file in a team share. When an item is locked, a lock icon will be placed over the file or folder, and it will become read-only for others subscribed to the team share. To place a lock on a file or folder in the web portal: 1. In the web portal, right-click the item, and select lock. The item is now locked, and is read-only for everyone else in the share. 2. When you are finished editing, you must unlock the item. To unlock the item, right-click the file or folder again, and select unlock. 44

45 How to Lock Files and Folders in Filecloud In Filecloud, you can place locks on a whole team share, a subfolder in a team share, or a file in a team share. When an item is locked, it will become read-only for others subscribed to the team share. To place a lock on a file or folder on a Windows or Mac machine: 1. In Filecloud, right-click on a team share or file, point to the Filecloud menu item, and select Lock. 2. Alternatively, to lock the folder or file for a specific amount of time, point to Lock for, and select a time period, including: 30 minutes, 1 hour, 3 hours, 6 hours, or 1 day. 45

46 How to Resolve Collisions If you forget to lock a file or folder before you begin making changes, you might encounter instances where another user account has made changes to the same item at the same time. This is called a collision. When a collision occurs, the system will notify you of the conflict with a Need User Action message, allowing you to resolve the collision in one of the following ways: Rename My Version: Your copy is renamed to include the term collision appended to the end. When this option is selected, you will see two files: the original_file_name file and the original_file_name_collsion file. Discard My Version: Your copy will be discarded without its changes being saved. Open Folder: This option will open the location of the file, allowing you to view the file before making a decision. To resolve a collision on a Windows or Mac machine: 1. When a collision occurs, you will see a Need User Action icon. 2. Click the Filecloud icon on your computer s system tray or menu bar. Note: On a Windows machine, the Filecloud icon is located in the lower right-hand corner of the screen; on a Mac machine, the Filecloud icon is located in the upper right-hand corner of the screen. 46


47 The Need User Actions message displays in the menu. 3. In the menu, click the Need User Action link. The Action dialog box displays. 4. In the Actions dialog box, decide how you want to resolve the collision, including: Click the Rename My Version button to rename your copy to include the term collision appended to the end. When this option is selected, you will see two files: the original_file_name file and the original_file_name_collsion file. Click the Discard My Version button to discard your copy without saving changes. Click the Open Folder button to open the location of the file, allowing you to view the file before making a decision. Alternatively, click the Resolve Later button to resolve the collision at a later time. 47
48 Revisions When you edit a file, the system keeps track of each revision. Using the revisions feature in the web portal, you can view and optionally restore older versions of files. This feature is useful when you make a mistake editing and saving a file, or if you want to see revisions made by other members of your team share. This section will explain how to manage revisions, including: How to View and Restore a Revision. 48


49 How to View and Restore a Revision When working in the system, you might find it useful to view a list of revisions to a file. In certain circumstances, you might even want to restore an older version of a file. To view and restore revisions in the web portal: 1. In the web portal, right-click on a file and select Revisions. The Browse File Revisions page displays, listing all revisions of the file. 2. In the Browse File Revisions page, click the Download Revision link to download a previous revision. The file will download, and you can review the previous version. 3. Alternatively, click the Restore Revision link to overwrite the current file with the previous version. 49
50 Outlook Plugin With the Outlook plugin, you can a link to files and folders from your Microsoft Outlook application. This feature is useful when you need to share large files or folders with recipients, and you don t want to send them as standard attachments. Note: This feature is only supported for Microsoft Outlook installed on Windows operating systems; Microsoft Outlook installed on Mac operating systems does not support third-party plugins. This section will explain how to share files using the Outlook plugin, including: How to Install the Outlook Plugin; How to Configure the Outlook Plugin; and How to Use the Outlook Plugin. 50
51 How to Install the Outlook Plugin Before you can use the Outlook plugin, you must first download it from the web portal. To download the Outlook plugin: 1. Click the Download App button in the web portal. The Download page displays. 2. In the Download page, click the Outlook Plugin for PC button. The file will start to download, or you will be prompted to save the file, depending on your browser type. 3. When the file finishes downloading, make sure Microsoft Outlook is closed, and click the installation file. The Setup Wizard opens. 4. Click the Next button to start the Setup Wizard. 51
52 5. In the License Agreement screen, click the I accept the agreement radio button if you accept the license. Then, click the Next button to continue. 6. In the Installation Directory screen, select the location where you want the installation files to reside on your local machine. In most instances, you can accept the default location. Click the Next button to continue. 52

53 7. In the Ready to Install screen, click the Next button to begin the installation process. 8. When the Setup Wizard completes, click the Finish button. 53

54 How to Configure the Outlook Plugin After you install the Outlook plugin, you can configure default share settings and attachment policies. 1. When you launch Microsoft Outlook for the first time after installing the Outlook plugin, the Filecloud Wizard displays, prompting you for login credentials. Enter your username and password, and then click the Next button. 2. In the Choose your Default Share Settings screen, set default settings for how you share links, including: a. Click the Notify on download checkbox to send notifications when the share is downloaded; b. Click the Download limit checkbox, and enter a download limit number, to limit the number of times the share is downloaded by each recipient; and c. Click the Expire share after checkbox, and enter a number of days, to set a share to expire after the specified number of days. d. Click the Next button to continue. 54


55 3. In the next screen, set default attachment policies, including: a. Click the Automatic radio button to automatically use Filecloud for attachments over a certain size; b. Click the Always use Filecloud for attachments radio button to automatically use Filecloud for all attachments; c. Click the Advanced radio button to only use Filecloud when selected; and d. Click the Use default folder checkbox to use the default location for storing shares configured from Outlook. If you uncheck this checkbox, you will be prompted to select another location on your local machine. e. Click the Next button to continue. 55
56 4. When the Filecloud Wizard completes, click the Finish button. 56
57 How to Use the Outlook Plugin When you compose a message in Microsoft Outlook, you can use the Filecloud ribbon buttons to attach content in a variety of ways, including: Attach a file or folder stored in Filecloud; Attach a local file from a local machine; and Convert an attached file to a Filecloud share link. To use the Outlook plugin: 1. In Microsoft Outlook, create a new message. The ribbon will display a group of buttons. a. To attach a file or folder stored in Filecloud, click the Attach from Filecloud button. The Account Browser dialog box displays, allowing you to browse Filecloud and select the appropriate item. You can also change your default share settings using the Change Share Settings checkbox. b. To send a file from your local machine, click the Send Local File button. An Open dialog box displays, allowing you to browse and select a file on your computer. c. To convert a standard Outlook attachment to a share link, click the Convert to Filecloud File button. When you convert an attached file, the item will be stored in your default share location in Filecloud. 57
58 Backups You can create backups of files and folders that exist on your local machine. You might want to create a backup of a file or folder that you want to protect, but do not want to sync. Backups do not reside in Filelcloud, and cannot be shared with another user account. To create a backup, you can use the Backups tab in the web portal, where you can also manage and restore backups. Alternatively, you can create backups directly on your local machine. This section will explain how to create backups, including: How to Create Backups in the Web Portal; How to Create Backups on your Local Machine; and How to Manage Backups in the Web Portal. 58

59 How to Create Backups in the Web Portal When you back up a folder, you can access your backups from the web portal and from mobile apps. All new changes are continuously backed up. Additionally, backups include revisions to files. To back up a folder from the web portal: 1. In the web portal, click the Backups tab. The Backups page displays, listing all of your existing backups. 2. In the Backups page, click the Create Backups button. The page refreshes to allow you to navigate your local machine and select the folder you want to back up. 3. Click the Save button when you are finished. The page refreshes to show you all backups that have been configured. 59


60 How to Create Backups on your Local Machine In addition to backing up folders in the web portal, you can also back up your folders directly from your local machine. Like backups configured in the web portal, backups configured on your local machine continuously back up new changes, and will keep revisions. To back up a folder from your Windows or Mac machine: 1. Right-click the folder you want to back up. A menu displays. 2. Point to the Filecloud menu item, and select Back up this folder. Your browser opens, displaying the newly created backup. 60


61 How to Manage Backups in the Web Portal You can manage all backups by clicking the Backups tab in the web portal. In the Backups page, you can manage the content of backups, browse the content of backups, delete backups, or restore backups. To manage backups: 1. In the web portal, click the Backups tab. The Backups page displays, showing a list of all existing backups. 2. In the Backups page, you can browse the contents of the backup. a. Click the Browse button. The backup opens, allowing you to browse its content. b. Inside the backup, you can also: i. Click the Create Folder button to create a new folder inside the backup. ii. Click the Upload Files button to add files to the backup. iii. Click the Rollback button to restore to a previous version of the backup. iv. Click the Show Deleted button to show files that have been deleted within the backup v. Click the Restore Deleted button to return any deleted files to the backup. vi. Click the Erase All Revisions button to erase previous revisions to files in the backup. 3. In the Backups page, you can restore a backup to a specific location. a. Click the Restore button. A Restore Backup page displays. 61
62 b. In the Restore Backup page, browse to select a restore point. Optionally, click the New Folder button to create a new folder as a restore point. c. Click the Save button when you are finished. 4. Optionally, in the Backups page, click the Delete button to delete a backup. The backup will delete. 62
63 File Report and Activity Log In addition to managing and sharing files and folders, you can also keep track of file listings and activity directly from the web portal. With the file report, you can generate reports for all of your files, and export the report to your local machine. Use the File Report page in the web portal to generate these reports. With the activity log, you can track all usage across the system, view audit trails, and track activity on team share users and guest accounts. Use the Activity Log page in the web portal to filter activity based on a set of criteria. This section will explain how to view reports and logs, including: How to view File Reports; and How to Track Activity. 63

64 How to View File Reports The File Reports page allows you to keep track of all of your content in the system from one central location. In the File Reports page, you can filter by a specific folder or team share. You can then view the files within the folder, the date that each file was modified, and the size of the file. You can even export the report to your local machine. To view file reports: 1. In the web portal, click the File Reports tab. The File Reports page displays. 2. In the File Reports page, use the Show Reports For drop-down menu to filter files within a specific folder or team share. The page refreshes to show files based on your selection. The information displayed for each file includes: Found In the folder in which the file is located; File the path and the file name; Modified the date the file was modified; and Size the size of the file. 3. Optionally, click the CSV button to export the report to your local machine. 64
65 How to Track Activity The Activity Log page allows you to track activity across the system from one central location. Using the Activity Log page, you can track usage, view audit trails, and follow activity on team share users and guest accounts. To track activity: 1. In the web portal, click the Activity Log tab. The Activity Log page displays. 2. In the Activity Log page, use the drop-down menus to filter activity based on a set of criteria, including: The Show Activity In drop-down menu, where you can select which folder or team share you want to track. The with activity type of drop-down menu, where you can select the type of activity you want to track. The between date fields, where you can enter the date on which the activity occurred. The Show Activity By drop-down menu, where you can select the user who performed the activity. The filename contains textbox, where you can enter at a set of characters that should be included in the search. 3. When you are finished entering criteria, click the Submit button. You will be presented with a list of activities that meet your selected criteria. 65
66 WebDAV WebDAV allows you to map a network drive to your files in the cloud. With WebDAV, you will not have to download files or install Filecloud. Before configuring WebDAV, you should check with your administrator to ensure that this option is enabled in your system. This section will explain how to set up WebDAV, including: How to Map a Network Drive on a Windows Machine; and How to Map a Network Drive on a Mac OS X Machine. 66


67 How to Map a Network Drive on a Windows Machine To map a drive on a Windows machine: 1. In your start menu, click Computer. The Computer dialog box displays. 2. In the Computer dialog box, click the Map Network Drive button. The Map Network Drive dialog box displays. 3. In the Map Network Drive dialog box, configure the appropriate drive and folder. a. In the Drive drop-down menu, select a drive letter. b. In the Folder field, enter the location of the folder (for example, c. When you are finished, click the Finish button. 67


68 4. Enter your username and password when prompted and click the OK button. 5. Your personal folders and team shares will now display. You will be able to access the WebDAV folder in My Computer/This PC. 68
, and click the Connect button. 3. When prompted, enter your username and password.")
69 How to Map a Network Drive on a Mac OS X Machine To map a drive on a Mac Machine: 1. In Finder, click the Go menu and select Connect to Server. The Connect to Server window displays. 2. In the Connect to Server window, enter your server address (for example, and click the Connect button. 3. When prompted, enter your username and password. Active Directory users must enter credentials as domain\username. 4. When you are finished, click the Connect button. 69
70 Help and Support For help and support, please contact: Layer3 Support Team Phone: 0508 Layer3 70
DSS User Guide. End User Guide. - i -
 DSS User Guide End User Guide - i - DSS User Guide Table of Contents End User Guide... 1 Table of Contents... 2 Part 1: Getting Started... 1 How to Log in to the Web Portal... 1 How to Manage Account Settings...
Sync User Guide. Powered by Axient Anchor
 Sync Powered by Axient Anchor TABLE OF CONTENTS End... Error! Bookmark not defined. Last Revised: Wednesday, October 10, 2018... Error! Bookmark not defined. Table of Contents... 2 Getting Started... 7
Anchor User Guide. Presented by: Last Revised: August 07, 2017
 Anchor User Guide Presented by: Last Revised: August 07, 2017 TABLE OF CONTENTS GETTING STARTED... 1 How to Log In to the Web Portal... 1 How to Manage Account Settings... 2 How to Configure Two-Step Authentication...
GRS Enterprise Synchronization Tool
 GRS Enterprise Synchronization Tool Last Revised: Thursday, April 05, 2018 Page i TABLE OF CONTENTS Anchor End User Guide... Error! Bookmark not defined. Last Revised: Monday, March 12, 2018... 1 Table
ShareSync Get Started Guide for Windows
 WHAT IS SHARESYNC? ShareSync Get Started Guide for Windows ShareSync is an enterprise-class cloud file backup and sharing service. ShareSync allows you to back up your files in real-time to protect against
SecuriSync Get Started Guide for Windows
 SecuriSync Get Started Guide for Windows Intermedia Backup and File Sharing - SecuriSync SecuriSync is a file backup and sharing service. It allows you to: Back up your files in real-time to protect against
Nextiva Drive The Setup Process Mobility & Storage Option
 Nextiva Drive The Setup Process The Setup Process Adding Users 1. Login to your account and click on the Account icon at the top of the page (this is only visible to the administrator). 2. Click Create
SecuriSync Get Started Guide for Mac
 SecuriSync Get Started Guide for Mac WHAT IS SECURISYNC? SecuriSync is a cloud backup and file sharing service. SecuriSync allows you to easily backup and sync files between multiple computers, the SecuriSync
ShareSync Get Started Guide for Mac
 ShareSync Get Started Guide for Mac ShareSync Overview ShareSync is a file backup and sharing service. It allows you to: Back up your files in real-time to protect against data loss from ransomware, accidental
EasiShare Desktop User Guide
 Copyright 2016 by Inspire-Tech Pte Ltd. All rights reserved. All trademarks or registered trademarks mentioned in this document are properties of their respective owners. No part of this document may be
Workshare Desktop App. User Guide
 Workshare Desktop App User Guide February 2018 Workshare Desktop App User Guide Table of Contents Introducing the Workshare Desktop App...4 What is the Desktop App?... 5 Key features of the Workshare desktop
Getting Started with Soonr
 WWW.SOONR.COM Getting Started with Soonr A Quick Start Guide for New Users Soonr Inc. 12/19/2012 Revision 1.1 Copyright 2012, Soonr Inc., all rights reserved. Table of Contents 1 How Soonr Workplace Works...
User Guide. BlackBerry Workspaces for Windows. Version 5.5
 User Guide BlackBerry Workspaces for Windows Version 5.5 Published: 2017-03-30 SWD-20170330110027321 Contents Introducing BlackBerry Workspaces for Windows... 6 Getting Started... 7 Setting up and installing
Codebook. Codebook for OS X Introduction and Usage
 Codebook Codebook for OS X Introduction and Usage What is Codebook Encrypted Data Vault Guards passwords and private data Keeps sensitive information organized Enables quick recall of secrets Syncs data
OneDrive for Business User Guide
 Contents OneDrive for Business User Guide About OneDrive for Business and Office 365... 2 Storing university information in the Cloud... 2 Signing in... 2 The Office 365 interface... 3 The OneDrive for
SharePoint General Instructions
 SharePoint General Instructions Table of Content What is GC Drive?... 2 Access GC Drive... 2 Navigate GC Drive... 2 View and Edit My Profile... 3 OneDrive for Business... 3 What is OneDrive for Business...
HCP Anywhere. By Storage & Cloud Services. Quick Start Guide Nov 2017 HCP ANYWHERE
 HCP Anywhere By Storage & Cloud Services Quick Start Guide Nov 2017!1 Getting Connected HCP Anywhere - Update Password Step 1 Login to A*CRC Storage and Cloud Service website to update your password. https://profiler.acrc.a-star.edu.sg/admin/passwd.php!2
This Quick Start describes how to use Bocconi Cloud Service, called Filr in the rest of the document, from your Windows desktop.
 Quick Start Bocconi Cloud Service, based on Novell Filr, allows you to easily access all your files and folders from your desktop, browser, or a mobile device. In addition, you can promote collaboration
Microsoft Office 365 for Education
 Microsoft Office 365 for Education Microsoft Office 365 for Education is the online version of Microsoft Office, which allows storage and true collaboration on the Cloud. Works on any device i.e. iphone,
Storebox User Guide. Swisscom (Switzerland) Ltd.
 Ltd.") Storebox User Guide Swisscom (Switzerland) Ltd. Contents (/). Basics/Settings 4. What is Storebox? 5. File Structure 6.3 System Prerequisites 7.4 Logging in to the team portal 8.5 Logging out of the team
Storebox User Guide Swisscom (Switzerland) Ltd. Contents (/). Basics/Settings 4. What is Storebox? 5. File Structure 6.3 System Prerequisites 7.4 Logging in to the team portal 8.5 Logging out of the team
Files.Kennesaw.Edu. Kennesaw State University Information Technology Services. Introduces. Presented by the ITS Technology Outreach Team
 Kennesaw State University Information Technology Services Introduces Files.Kennesaw.Edu Presented by the ITS Technology Outreach Team Last Updated 08/12/13 Powered by Xythos Copyright 2006, Xythos Software
BE Share. Microsoft Office SharePoint Server 2010 Basic Training Guide
 BE Share Microsoft Office SharePoint Server 2010 Basic Training Guide Site Contributor Table of Contents Table of Contents Connecting From Home... 2 Introduction to BE Share Sites... 3 Navigating SharePoint
From using an External Harddrive, to a Google Cloud Drive; there is no one way to backup data.
 Mac (OS X): Data Backup Guide 6/14/2016 Why: Backing up data should be done on a regular basis, not just when you think it is necessary, as a failure can happen at any time. While there are no set intervals
In January, 2018, we are implementing only the file storage portion that includes:
 OneDrive for Business 1 TB of file storage for faculty and staff OneDrive for Business is the place to keep your work documents and other files. When you store your files on OneDrive for Business only
Source Control: Subversion
 USER GUIDE MADCAP FLARE 2018 Source Control: Subversion Copyright 2018 MadCap Software. All rights reserved. Information in this document is subject to change without notice. The software described in
Contents. Getting Started...1. Managing Your Drives...9. Backing Up & Restoring Folders Synchronizing Folders...52
 Contents Getting Started.....................................................1 Installing the Software...........................................1 Using the Maxtor System Tray Icon................................6
Installation Guide. Research Computing Team V2.0 RESTRICTED
 Installation Guide Research Computing Team V2.0 RESTRICTED Document History This document relates to the BEAR DataShare service which is based on the product Power Folder, version 10.3.232 ( some screenshots
User Guide Version 2.0 December 2015
 User Guide Version 2.0 December 2015 Biscom, Inc. 321 Billerica Rd. Chelmsford, MA 01824 tel 978-250-1800 fax 978-250-4449 Copyright 2015 Biscom, Inc. All rights reserved worldwide. Reproduction or translation
Colligo Administrator 1.3. User Guide
 1.3 User Guide Contents Introduction... 2 Key Features... 2 Benefits... 2 Technical Requirements... 2 Connecting Colligo Administrator with Colligo Applications... 3 Configuring Contributor Pro 6.0...
Colligo Engage Outlook App 7.1. Offline Mode - User Guide
 Colligo Engage Outlook App 7.1 Offline Mode - User Guide Contents Colligo Engage Outlook App 1 Benefits 1 Key Features 1 Platforms Supported 1 Installing and Activating Colligo Engage Outlook App 3 Checking
Workplace Online Using a standard web browser, simply login at us.awp.autotask.net using the credentials you ve been given.
 Quick Start Guide WELCOME Thank you for taking the time to evaluate Autotask Workplace. This guide will help you quickly see how Workplace can benefit your business, especially for collaboration and working
SharePoint. Team Site End User Guide. Table of Contents
 Table of Contents Introduction... 1 Logging in for the First Time:... 1 Areas of the team site:... 2 Navigating the team site:... 3 Adding Content to the team site:... 3 The Ribbon:... 3 Adding a Link:...
Source Control: Perforce
 USER GUIDE MADCAP FLARE 2018 Source Control: Perforce Copyright 2018 MadCap Software. All rights reserved. Information in this document is subject to change without notice. The software described in this
bla bla Groupware User Guide
 bla bla Groupware User Guide Groupware Groupware: User Guide Publication date Tuesday, 25. July 2017 Version 7.8.3 Copyright 2016-2017 OX Software GmbH, This document is the intellectual property of OX
Welcome to ncrypted Cloud!... 4 Getting Started Register for ncrypted Cloud Getting Started Download ncrypted Cloud...
 Windows User Manual Welcome to ncrypted Cloud!... 4 Getting Started 1.1... 5 Register for ncrypted Cloud... 5 Getting Started 1.2... 7 Download ncrypted Cloud... 7 Getting Started 1.3... 9 Access ncrypted
VSkyBox User Guide. Document Revision: v1.01 April 10, VSkyBox User Portal Guide i
 VSkyBox User Guide Document Revision: v1.01 April 10, 2017 VSkyBox User Portal Guide i Table of Contents 1 Getting Started with VSkyBox... 1 1.1 Setting Up VSkyBox... 1 1.2 Opening VSkyBox... 3 1.3 Logging
Apptix Online Backup by Mozy User Guide
 Apptix Online Backup by Mozy User Guide 1.10.1.2 Contents Chapter 1: Overview...5 Chapter 2: Installing Apptix Online Backup by Mozy...7 Downloading the Apptix Online Backup by Mozy Client...7 Installing
Startup Guide for Windows. Intralinks VIA Version 3.7M5
 Intralinks VIA Version 3.7M5 Startup Guide for Windows Intralinks 24/7/365 support US: 212 543 7800 UK: +44 (0) 20 7623 8500 See the Intralinks login page for international numbers support@intralinks.com
Colligo Contributor Pro 4.4 SP2. User Guide
 4.4 SP2 User Guide CONTENTS Introduction... 3 Benefits... 3 System Requirements... 3 Software Requirements... 3 Client Software Requirements... 3 Server Software Requirements... 3 Installing Colligo Contributor...
SharePoint 2010 Instructions for Users
 SharePoint 2010 Instructions for Users 1. Access your SharePoint Web site...2 2. Work with folders and documents in a Shared Documents Library...3 2.1 Edit a document...3 2.2 Create a New Document...3
Multi-Sponsor Environment. SAS Clinical Trial Data Transparency User Guide
 Multi-Sponsor Environment SAS Clinical Trial Data Transparency User Guide Version 6.0 01 December 2017 Contents Contents 1 Overview...1 2 Setting up Your Account...3 2.1 Completing the Initial Email and
DOCUMENTUM D2. User Guide
 DOCUMENTUM D2 User Guide Contents 1. Groups... 6 2. Introduction to D2... 7 Access D2... 7 Recommended browsers... 7 Login... 7 First-time login... 7 Installing the Content Transfer Extension... 8 Logout...
Novell Filr Desktop Application for Mac Quick Start
 Novell Filr 1.0.2 Desktop Application for Mac Quick Start April 2014 Novell Quick Start Novell Filr allows you to easily access all your files and folders from your desktop, browser, or a mobile device.
Center for Faculty Development and Support. Google Docs Tutorial
 Center for Faculty Development and Support Google Docs Tutorial Table of Contents Overview... 3 Learning Objectives... 3 Access Google Drive... 3 Introduction... 4 Create a Google Document... 4 Upload
IT Support Documentation
 Table of Contents Introduction to OneDrive... 2 Accessing OneDrive via Office 365... 3 Uploading a File to OneDrive... 7 Sharing a File Within OneDrive... 10 Working with the OneDrive Desktop App... 15
User Guide: Windows Mac Android ios
 1 TM Laplink Software, Inc. For technical support issues or questions, please visit: http://www.laplink.com/contact For other inquiries, please see contact details below: E-mail: CustomerService@laplink.com
Introduction Secure Message Center (Webmail, Mobile & Visually Impaired) Webmail... 2 Mobile & Tablet... 4 Visually Impaired...
 Webmail... 2 Mobile & Tablet... 4 Visually Impaired...") WEB MESSAGE CENTER END USER GUIDE The Secure Web Message Center allows users to access and send and receive secure messages via any browser on a computer, tablet or other mobile devices. Introduction...
WEB MESSAGE CENTER END USER GUIDE The Secure Web Message Center allows users to access and send and receive secure messages via any browser on a computer, tablet or other mobile devices. Introduction...
Recipient USER GUIDE
 Recipient USER GUIDE General Information What is smartmail? smartmail is smartview s proprietary email encryption system used to protect your personal and transaction related information. What is smartportal?
CCH Client Axcess User Guide
 CCH Client Axcess User Guide Green Hasson Janks Tips Best practice tips and shortcuts Icon Legend Notes Warning Informational notes about functions Important warnings about a function CCH Client Axcess
AgentWorks Administrator and Manager User Guide - Release 12.5
 AgentWorks Administrator and Manager User Guide - Release 12.5 March 21, 2013 2012 MoneyGram InternationalAll rights reserved. Table of Contents Registration Overview... 2 1. Initial Log In AgentWorks
Remote Access Resources
 Remote Access Resources Windows 7 Windows 10 Firm Laptop Windows Windows Mac Computer Apple ipad Mac Computer Android Devices Apple ipad Remote Access Remote Access for Personal Computer (Windows) Quick
Key Features: Learning Objectives: Table of Contents:
 Key Features: Skype for Business is a communications platform available on Windows, Mac, and mobile devices. Skype for Business is designed to allow user interaction between colleagues and external contacts.
Amazon WorkDocs. User Guide
 Amazon WorkDocs User Guide Amazon WorkDocs: User Guide Copyright 2017 Amazon Web Services, Inc. and/or its affiliates. All rights reserved. Amazon's trademarks and trade dress may not be used in connection
GigaCentral macos App User Guide V2.0. For GigaCentral User
 V2.0 For GigaCentral User Copyright 2018 by Inspire-Tech Pte Ltd. All rights reserved. All trademarks or registered trademarks mentioned in this document are properties of their respective owners. No part
Fairfield University Using Xythos for File Storage
 Fairfield University Using Xythos for File Storage Version 7.0 Table of Contents I: Accessing your Account...2 II: Uploading Files via the Web...2 III: Manage your Folders and Files via the Web...4 IV:
Microsoft Office SharePoint. Reference Guide for Contributors
 Microsoft Office SharePoint Reference Guide for Contributors SharePoint: Reference Guide for Contributors Table of Contents INTRODUCTION... 3 FOLLOWING A SITE... 3 NAVIGATION... 4 LISTS AND LIBRARIES...
PDF Expert for ipad User guide
 PDF Expert for ipad User guide 2011 Readdle Inc. 2 Contents Introduction Chapter 1: Copying documents to PDF Expert USB file transfer using itunes File Sharing Saving attachments from Mail and other ipad
Click on OneDrive on the menu bar at the top to display your Documents home page.
 Getting started with OneDrive Information Services Getting started with OneDrive What is OneDrive @ University of Edinburgh? OneDrive @ University of Edinburgh is a cloud storage area you can use to share
Presidential Transition Taskforce
 Presidential Transition Taskforce Office 365 OneDrive for Business Sharepoint Online University Information Technology Services Learning Technologies, Training & Audiovisual Outreach Introduction This
Microsoft SharePoint is provided by Information Services for staff in Aberystwyth University.
 USING SHAREPOINT E-Services and Communications, Information Services, Aberystwyth University OBJECTIVES By the end of this training course you will be able to: Access SharePoint Customise a document library
Salesforce Classic Guide for iphone
 Salesforce Classic Guide for iphone Version 35.0, Winter 16 @salesforcedocs Last updated: October 27, 2015 Copyright 2000 2015 salesforce.com, inc. All rights reserved. Salesforce is a registered trademark
AvePoint Online Services 2
 2 User Guide Service Pack 7 Issued August 2017 Table of Contents What s New in this Guide...6 About...7 Versions: Commercial and U.S. Government Public Sector...7 Submitting Documentation Feedback to AvePoint...8
Briefcase for Android. User Guide
 Briefcase for Android User Guide Contents Introduction... 4 About this Guide... 4 Installation and First Launch... 5 Technical Requirements... 5 Installation... 5 First launch... 5 Managing SharePoint
owncloud Android App Manual
 owncloud Android App Manual Release 2.7.0 The owncloud developers October 30, 2018 CONTENTS 1 Release Notes 1 1.1 Changes in 2.7.0............................................. 1 1.2 Changes in 2.6.0.............................................
Workspace ONE Content for Android User Guide. VMware Workspace ONE UEM
 Workspace ONE Content for Android User Guide VMware Workspace ONE UEM Workspace ONE Content for Android User Guide You can find the most up-to-date technical documentation on the VMware website at: https://docs.vmware.com/
Storgrid web client manual
 Storgrid web client manual 2015 Byelex Data Solutions BV. This document is created with the utmost care. To prevent unjustified usage of this document we would like to give you notice that nothing mentioned
Wholesale Lockbox User Guide
 Wholesale Lockbox User Guide August 2017 Copyright 2017 City National Bank City National Bank Member FDIC For Client Use Only Table of Contents Introduction... 3 Getting Started... 4 System Requirements...
Deployment User Guide
 Deployment User Guide Version: 010319-2 Contents STEP 1: (Windows Users Only): Determine if your PC is running the 32-bit or 64-bit version of Windows. If you are not a PC user, please proceed to step
Amazon WorkDocs. User Guide
 Amazon WorkDocs User Guide Amazon WorkDocs: User Guide Copyright 2018 Amazon Web Services, Inc. and/or its affiliates. All rights reserved. Amazon's trademarks and trade dress may not be used in connection
How to Transfer Your Contact Information Into Microsoft Outlook 2010
 How to Transfer Your Contact Information Into Microsoft Outlook 2010 Your Contacts Exported To an Excel Spreadsheet (CSV Format ) Now Located on a Device or Computer Then To Outlook 2010 on an L&F Computer
QUICK START GUIDE NTS HOSTED PBX CALL MANAGER. Welcome. Getting Oriented
 QUICK START GUIDE NTS HOSTED PBX Welcome Welcome to NTS Hosted PBX! This guide is intended to get you up and running with the basic features associated with the product. For more in-depth information,
USER GUIDE GigaCentral Android User Guide
 USER GUIDE GigaCentral Android User Guide Copyright 2016 by Inspire-Tech Pte Ltd. All rights reserved. All trademarks or registered trademarks mentioned in this document are properties of their respective
ForumPass Familiarization Participant Workbook June 2018
 ForumPass Familiarization Participant Workbook June 2018 1 F O R U M P A S S DOCUMENT OBJECTIVES... 3 FORUMPASS PRODUCT SUMMARY... 3 MICROSOFT SHAREPOINT PLATFORM... 3 FORUMPASS EXCLUSIVE FEATURES... 4
Salesforce Classic Mobile Guide for iphone
 Salesforce Classic Mobile Guide for iphone Version 41.0, Winter 18 @salesforcedocs Last updated: November 30, 2017 Copyright 2000 2017 salesforce.com, inc. All rights reserved. Salesforce is a registered
CCH Client Axcess Portal User Guide
 CCH Client Axcess Portal User Guide Last Updated: October 2017 Client Portal Access or paste the below link into your web browser https://www.clientaxcess.com/#/login Please call our office at 212.245.5900
ncrypted Cloud works on desktops and laptop computers, mobile devices, and the web.
 OS X User Manual Welcome to ncrypted Cloud! ncrypted Cloud is a Security Collaboration application that uses Industry Standard Encryption Technology (AES-256 bit encryption) to secure files stored in the
Microsoft OneDrive. How to login to OneDrive:
 Microsoft OneDrive The beauty of OneDrive is that is accessible from anywhere you have an Internet connection. You can access it from a Mac or Windows computer. You can even access it on your SmartPhone
Windows user guide for version 3.3
 1 Windows user guide for version 3.3 2 Contents 1. Installation...4 1.1. How to install BABEL on your Windows desktop...4 2. Getting started...5 2.1. First run...5 2.2. Password setup...5 2.3. Key import...5
Workshare imanage Integration File Sharing & DMS Mobility. Getting Started Guide
 Workshare imanage Integration File Sharing & DMS Mobility Getting Started Guide R Work s about to get smarter We have one goal to give you a simpler, faster way to work on documents. We help you work outside
Contents Release Notes System Requirements Using Jive for Office
 Jive for Office TOC 2 Contents Release Notes...3 System Requirements... 4 Using Jive for Office... 5 What is Jive for Office?...5 Working with Shared Office Documents... 5 Get set up...6 Get connected
Using the OneDrive Sync Client
 Using the OneDrive Sync Client PC Office of the Chief Information Officer Learning Technologies, Training, Audiovisual and Outreach Copyright 2018 Kennesaw State University Office of the Chief Information
Computer Based Training (CBT) Sample Work
 Sample Work") Computer Based Training (CBT) Sample Work Important Note: Typically, Articulate Studio would be used to publish these slides into a format suitable for web or LMS elearning, similar to the image shown
Computer Based Training (CBT) Sample Work Important Note: Typically, Articulate Studio would be used to publish these slides into a format suitable for web or LMS elearning, similar to the image shown
My Phone. My Phone - Overview. Signing In
 My Phone - Overview The Optus Loop My Phone portal gives you full access to your personal phone service settings, allowing you to customise and manage your service to suit your specific requirements. Within
bla bla Groupware User Guide
 bla bla Groupware User Guide Groupware Groupware: User Guide Publication date Friday, 01. June 2018 Version 7.10.0 Copyright 2016-2018 OX Software GmbH, This document is the intellectual property of OX
Qbox User Manual. Version 7.1
 Qbox User Manual Version 7.1 Index Page 3 Page 6 Page 8 Page 9 Page 10 Page 12 Page 14 Page 15 Introduction Setup instructions: users creating their own account Setup instructions: invited users and team
GLOBALMEET USER GUIDE
 GLOBALMEET USER GUIDE Release 3.8.1 July 2016 TABLE OF CONTENTS GlobalMeet Overview 4 Get the GlobalMeet Desktop Tools 5 Download and Install GlobalMeet 5 System Requirements 5 Getting Started 6 Sign in
Colligo Briefcase for Mac. Release Notes
 Colligo Briefcase for Mac Release Notes Contents Technical Requirements... 3 Release 7.5 06 Oct0ber 2017... 4 New in this Release... 4 Release 7.5 18 May 2017... 4 New in 7.5... 4 Issues 7.5... 5 Known
Enterprise 3.4 RC1. Managing Alfresco Content from within Microsoft Office
 Enterprise 3.4 RC1 Managing Alfresco Content from within Microsoft Office Contents Copyright... 3 Typographic conventions...4 Introduction... 5 System requirements and prerequisites...5 Get started...6
Level 3 XpressMeet SM Solutions
 Level 3 XpressMeet SM Solutions User Guide January 2017 1 Table of Contents Level 3 SM XpressMeet Outlook... 3 Add-In Overview... 3 Features... 3 Download and install instructions... 5 Customize your Level
JCCC Virtual Labs. Click the link for more information on installing on that device type. Windows PC/laptop Apple imac or MacBook ipad Android Linux
 JCCC Virtual Labs Revision 9/21/2017 http://ats.web. Welcome to the JCCC Virtual Lab Environment. This system allows students to access campus software titles on their personal computers from almost anywhere.
ipass Open Mobile 3.0.x for Android Quick Start Guide
 ipass Open Mobile 3.0.x for Android Quick Start Guide V E R S I O N 1. 0, O C T O B E R 2 0 1 4 Corporate Headquarters ipass Inc. 3800 Bridge Parkway Redwood Shores, CA 94065 USA www.ipass.com +1 650-232-4100
BBVA Compass Spend Net Payables
 User Guide BBVA Compass Spend Net Payables User Guide Vault Services Table of Contents Introduction 2 Technical Requirements 2 Getting started 3 Sign In 3 General Navigation 4 Upload/Create Payment 5
Colligo Engage Outlook App 7.1. Connected Mode - User Guide
 7.1 Connected Mode - User Guide Contents Colligo Engage Outlook App 1 Benefits 1 Key Features 1 Platforms Supported 1 Installing and Activating Colligo Engage Outlook App 2 Checking for Updates 3 Updating
WorksPad. User Guide
 Version 3.0.6 January 2017 MobilityLab, LLC. 2011-2017 MobilityLab, LLC. All rights reserved. MobilityLab,, the logo are trademarks or registered trademarks of MobilityLab, LLC. in the U.S., Russia and
Colligo Console. Administrator Guide
 Colligo Console Administrator Guide Contents About this guide... 6 Audience... 6 Requirements... 6 Colligo Technical Support... 6 Introduction... 7 Colligo Console Overview... 8 Colligo Console Home Page...
bla bla Groupware Compact Guide
 bla bla Groupware Compact Guide Groupware Groupware: Compact Guide Publication date Friday, 01. June 2018 Version 7.10.0 Copyright 2016-2018 This document is the intellectual property of OX Software GmbH
owncloud Android App Manual
 owncloud Android App Manual Release 2.0.0 The owncloud developers December 14, 2017 CONTENTS 1 Using the owncloud Android App 1 1.1 Getting the owncloud Android App...................................
CCH Client Axcess Portal User Guide
 CCH Client Axcess Portal User Guide Tips Best practice tips and shortcuts Icon Legend Notes Warning Informational notes about functions Important warnings about a function CCH Client Axcess https://www.clientaxcess.com
Citrix Desktop for Home Computers Mac OS Instructions
 Citrix Desktop for Home Computers Mac OS Instructions You can use Citrix to create and access a virtual work desktop from your home computer. Step 1 Uninstall: To install the newest version of Citrix on
Using the OneDrive Sync Client
 Using the OneDrive Sync Client Mac Office of the Chief Information Officer Learning Technologies, Training, Audiovisual and Outreach Copyright 2018 Kennesaw State University Office of the Chief Information