LabelStation Pro XL THERMAL TRANSFER / DIRECT THERMAL BAR CODE PRINTER USER MANUAL
|
|
|
- Clarissa King
- 5 years ago
- Views:
Transcription
1 LabelStation Pro XL THERMAL TRANSFER / DIRECT THERMAL BAR CODE PRINTER USER MANUAL 1
2 Contents 1. Introduction Product Introduction 1.2 Compliances 2. Operations Overview Unpacking and Inspection 2.2 Printer Overview Front View Interior views Rear View (and SD Card specifications) Operator Controls Front Panel Display LED Indicators Front Panel Keys 2.4 Setting Up the Printer Loading Ribbon 2.6 Loading Media Menu Function Setup Menu Overview Printer Setup Sensor Serial Comm Ethernet File Manager File List Avail. Memory Del. All Files 3.3 Diagnostics Print Config Dump Mode Rotate Cutter Language Service Initialization Mileage Info Diagnostic Tool Start the Diagnostic Tool 4.2 Printer Function (Calibrate sensor, Ethernet setup, RTC setup) Setting Ethernet by Diagnostic Utility Using USB interface to setup Ethernet interface Using RS-232 interface to setup Ethernet interface Using Ethernet interface to setup Ethernet interface Troubleshooting Common Problems Mechanism Fine Adjustment to Avoid Ribbon Wrinkles Maintenance

3 1. Introduction 1.1 Product Introduction This printer is designed with die-cast aluminum chassis and print mechanism, metal cover with large clear media view window, which ensuring to work for the extreme and heavy duty industrial environment and applications. With back-lit graphic LCD display, printer status can be managed easier and operated more user friendly. The moveable sensor design can accept wide range of label media. All of the most frequently used bar code formats are included. Fonts and bar codes can be printed in any one of the four directions. This printer is built-in the high quality, high performance MONOTYPE IMAGING True Type font engine and one CG Triumvirate Bold Condensed smooth font. With flexible firmware design, user can also download the True Type Font from PC into printer memory for printing labels. Besides the scalable font, it also provides a choice of five different sizes of alphanumeric bitmap font, OCR-A and OCR-B fonts. By integrating rich features, it is the most cost-effective and high performance printer in its class! 1.2 Compliances CE Class A: EN55022:1998+A1:2000+A2:2003: EN55024:1998+A1:2001+A2:2003: EN SERIES REQULATIONS ETSI EN :V1.2.1( ) FCC: CFR 47, Part 15/CISPR 22 3RD EDITION:1997, Class A UL, CUL UL rd TÜV/ Safety: EN60950: 2000 CAUTION 1. HAZARDOUS MOVING PARTS IN CUTTER MODULE. KEEP FINGER AND OTHER BODY PARTS AWAY. 2. THE MAIN BOARD INCLUDES REAL TIME CLOCK FEATURE HAS LITHIUM BATTERY CR2032 INSTALLED. RISK OF EXPLOSION IF BATTERY IS REPLACED BY AN INCORRECT TYPE. 3. DISPOSE OF USED BATTERIES ACCORDING TO THE MANUFACTURER INSTRUCTIONS. CAUTION 3

4 2. Operations Overview 2.1 Unpacking and Inspection This printer has been specially packaged to withstand damage during shipping. Please carefully inspect the packaging and printer upon receiving the bar code printer. Please retain the packaging materials in case you need to reship the printer. Unpacking the printer, the following items are included in the carton. 1. Printer 2. Windows labelling software/windows driver and user manual on CD 3. Power cord 4. USB interface cable 2.2 Printer Overview Front View LED INDICATORS LCD DISPLAY FRONT PANEL BUTTONS PAPER EXIT CHUTE PRINTER COVER CUTTER MODULE (OPTIONAL) 4


5 2.2.2 Interior view RIBBON SUPPLY SPINDLE RIBBON REWIND SPINDLE PRINT-HEAD LABEL SUPPLY SPINDLE LABEL ROLLGUARD RIBBON SENSOR MEDIA GUIDE BAR MEDIA SENSOR PLATEN ROLLER LABEL GUIDE PRINT-HEAD RELEASE LEVER Rear View FANFOLD PAPER ENTRANCE CHUTE CENTRONICS PARALLEL INTERFACE USB INTERFACE RS-232C INTERFACE POWER JACK SOCKET SD CARD SLOT ETHERNET INTERFACE PS/2 INTERFACE POWER SWITCH 5

6 SD card spec SD card capacity Approved SD card manufacturer V1.0, V MB SanDisk, Transcend V1.0, V MB SanDisk, Transcend, Panasonic V1.0, V MB SanDisk, Transcend, Panasonic V1.0, V1.1 1 GB SanDisk, Transcend, Panasonic V2.0 SDHC CLASS 4 4 GB V2.0 SDHC CLASS 6 4 GB SanDisk, Transcend, Panasonic V1.0, V1.1 microsd 128 MB Transcend, Panasonic V1.0, V1.1 microsd 256 MB Transcend, Panasonic V1.0, V1.1 microsd 512 MB Panasonic V1.0, V1.1 microsd 1 GB Transcend, Panasonic V2.0 SDHC CLASS 4 microsd 4 GB Panasonic V2.0 SDHC CLASS 6 microsd 4 GB Transcend V1.0, V1.1 minisd 128 MB Transcend, Panasonic V1.0, V1.1 minisd 256 MB Transcend, Panasonic V1.0, V1.1 minisd 512 MB Transcend, Panasonic V1.0, V1.1 minisd 1 GB Transcend, Panasonic V2.0 SDHC CLASS 4 minisd 4 GB Transcend V2.0 SDHC CLASS 6 minisd 4 GB - The DOS FAT file system is supported for the SD card. - Folders/files stored in the SD card should be in the 8.3 filename format - The minisd/microsd card to SD card slot adapter is required. 2.3 Operator Controls Front Panel Display LED INDICATORS LCD DISPLAY FRONT PANEL BUTTONS 6
7 2.3.2 LED Indicators Front Panel Keys 2.4 Setting Up the Printer 1. Place the printer on a flat, secure surface. 2. Make sure the power switch is off. 3. Connect the printer to the computer with the provided USB cable. 4. Plug the power cord into the AC power cord socket at the rear of the printer, and then plug the power cord into a properly grounded power outlet. 1. Lift printer cover open. 2. Push the print-head release lever to open the print-head mechanism. PRINT-HEAD RELEASE LEVER 7


8 3. Install the ribbon onto the ribbon supply spindle. Note: Make sure the ribbon is set at the centre of the spindle. 4. Install the paper core onto the ribbon rewind spindle. Note: Make sure the paper core is set at the centre of the spindle. 5. Thread the ribbon through the ribbon sensor slot and print-head. RIBBON RIBBON SENSOR 6. Stick ribbon onto ribbon rewind paper core, keeping the ribbon flat and wrinkle-free. 7. Wind the ribbon rewind spindle clockwise roughly 3~5 circles until ribbon is smooth, properly stretched and wrinkle-free. 8


9 7. Close the print-head mechanism, making sure the latches are engaged properly. Loading path for ribbon 9


 SENSOR MEDIA GUIDE BAR LABEL GUIDE 7.")
10 2.6 Loading Media 1. Lift printer cover open. 2. Push the print-head release lever to open the print-head mechanism. PRINT-HEAD RELEASE LEVER 3. Remove ONE label roll-guard. 4. Place media roll on label supply spindle. 5. Replace label roll-guard. Note: Make sure the media is set at the centre of the spindle. LABEL ROLL-GUARDS 6. Pull the leading edge of the label forward through the media guide bar past media sensor, and place the leading edge onto the platen roller. MEDIA (LABEL) SENSOR MEDIA GUIDE BAR LABEL GUIDE 7. Adjust the label guide to fit label width. 8. Close print head mechanism, making sure the latches are engaged properly. 10


11 9. Using the front display panel, set media sensor type and calibrate the selected sensor. Note: Re-calibrate the gap/black-mark sensors when changing media. Loading path for roll labels 3. Menu Function Main Menu Overview 11
12 Notice: * Ethernet function is available on the LCD display when Ethernet card is installed. 3.1 Setup Menu Overview Notice: * Ethernet function is available on the LCD display when Ethernet card is installed Printer Setup 12


13 Speed: Use this option to setup print speed. Each increment/decrement is 1 ips. Press key to raise the print speed, and press key to decrease print speed. Press key to set it into printer. Press key to cancel the setting and return to the previous menu. Note: The printer driver may send out the SPEED command which will overwrite the setting set from the front panel. Density: Use this option to setup printing darkness. The available setting is from 0 to 15, and the step is 1. Printer default density is 8. You may need to adjust your density dependent on the media in use. Press and to increase/decrease the printing darkness. Press key to enable the setting. Press key to cancel the setting and return to the previous menu. Note: The printer driver may send out the DENSITY command which will overwrite the setting set from the front panel. Direction: The direction setting value is either 1 or 0. Use this option to setup the print-out direction. Printer default print-out direction is: DIRECTION 0. Press key to set the direction as 1, and to set it as 0, and key to enable the setting. Press key to cancel the setting and return to the previous menu. 13
 This option is used to set the print mode. Printer default setting is Batch Mode.")
14 The following two figures are the printouts of DIRECTION 0 and 1. Note: The printer driver may overwrite the setting set from the front panel. Print Mode: (None/Batch Mode/Peeler Mode/Cutter Mode/Cutter Batch) This option is used to set the print mode. Printer default setting is Batch Mode. When entering this list, the print mode to the right side of the " >" icon is the printer current setting. Press and to select a different print mode and press button to enable the setting. Press key to cancel the setting and return to the previous menu. Printer Mode None Batch Mode Peeler Mode Cutter Mode Cutter Batch Description Next label top of form is aligned to the print head burn line location. (Tear Off Mode) Once image is printed completely, label gap/black mark will be fed to the tear plate location for tear away. Enables the label peel off mode. Enables the label cutter. Cuts the label once only, at the end of the printing job. Note: The printer driver may overwrite the setting set from the front panel. Offset: This option is used to fine tune the media stop location. Press the button to move the cursor from left digit to right digit, and press the button to set the value from + to - or 0 to 9. Press the button to set the value into printer. Press key to cancel the setting and return to the previous menu. The default value is


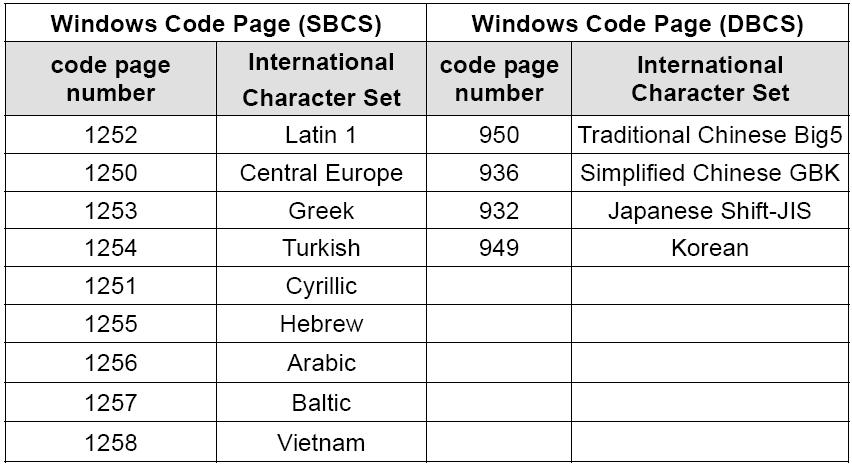
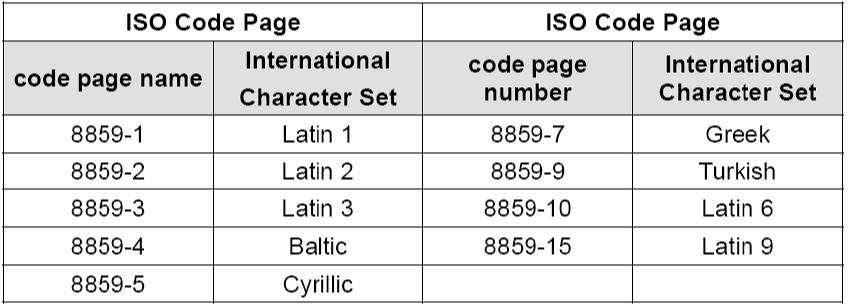
15 Note: The printer driver may send out the OFFSET command which will overwrite the setting set from the front panel. Shift X & Shift Y: This option is used to fine tune print position. Press the button to move the cursor from left digit to right digit, and press the button to set the value from + to - or 0 to 9. Press the button to set the value into printer. Press key to cancel the setting and return to the previous menu. The default value is Note: The printer driver may send out the SHIFT command which will overwrite the setting set from the front panel. Reference X & Reference Y: This option is used to set the origin of printer s horizontal and vertical coordinates system. Press the button to move the cursor from left digit to right digit, and press the button to set the value from 0 to 9. Press the button to set the value into printer. Press key to cancel the setting and return to the previous menu. The default value is 000. Note: The printer driver may send out the REFERENCE command which will overwrite the setting set from the front panel. Code Page: Use this option to set the code page of the international character set. For more information about the code page, refer to the programming manual. When entering the code page list, the code page to the right side of ">" icon is the printer current setting. Press the and to select the code page, and press the button to enable the setting. Press key to cancel the setting and return to the previous menu. Note: The printer driver may overwrite the setting set from the front panel. 15
16 16


17 Country: Use this option to set the country code for the LCD display. Press the and to select the country code, and press the button to set the value into printer. When entering this list, the country code to the right side of ">" icon is the printer current setting. Press key to cancel the setting and return to the previous menu Sensor Status This function is available to check the printer s sensor status. When enter the [Status] option, you will see following message. Calibration This option is used to set the media sensor type and calibrate the selected sensor. We recommend to calibrate the sensor before printing when changing the media. 17


18 Gap Mode Press the and buttons to scroll the cursor to the media type and press the button to enter the sensor calibration mode. Note: The printer driver may send out the GAP or BLINE command which will overwrite the sensor type setting set from the front panel. A-1 Automatic When enter the [Automatic] option, you will see following message, and the printer will feed 2 to 3 labels to calibrate the sensor sensitivity automatically. When calibration is completed, the LCD screen will return to the previous menu. 18


19 Gap Mode: Manual In case Automatic sensor calibration cannot apply to the media, please use Manual function to calibrate the gap sensor manually. When enter [Manual] option, you will see following message. Please complete there steps: Gap Mode: Pre-Printed This function can set the paper length and gap size before auto-calibrate the sensor sensitivity. It can to get the sensor sensitivity accurately. When enter [Pre-Printed] option, you will see following message. Please complete there steps: 19


20 Calibration: Bline Mode Press the and buttons to scroll the cursor to the sensor type. Press the button to enter the black-mark sensor calibration mode. Automatic When entering the [Automatic] option, you will see the following message and printer will feed the label to calibrate the sensor sensitivity automatically. When the calibration process is completed, the LCD screen will return to the previous menu. Manual In case Automatic sensor calibration cannot apply to the media, please use the Manual function to calibrate the bline sensor manually. 20
![When entering [Manual] option, you will](/docs-images/92/110294421/images/21-0.jpg "see following message.")


21 When entering [Manual] option, you will see following message. Please complete these steps: Pre-Printed This function can set the paper length and gap size before auto-calibrating the sensor sensitivity. It can to set the sensor sensitivity accurately. 21


![Automatic When entering the [Automatic] option, you will see](/docs-images/92/110294421/images/22-2.jpg "following message and the printer will calibrate the sensor")
22 Calibration: Cont. Mode Press the and buttons to scroll the cursor to the sensor type. Press the button to enter the black-mark sensor calibration mode. Automatic When entering the [Automatic] option, you will see following message and the printer will calibrate the sensor sensitivity automatically. When calibration process is complete, the LCD screen will return to the previous menu. 22


23 Manual In case Automatic sensor calibration cannot be applied to the media, please use the Manual function to calibrate the sensor manually. When entering [Manual] option, you will see following message. Please complete these steps: 23


24 3.1.3 Serial Comm. Serial Comm: Baud Rate This option is used to set the RS-232 baud rate. The default setting is 9600 bps. Press and buttons to select the different baud rate and press button to set the value into printer. When you enter this list, the baud rate value to the right side of ">" icon is the current setting in the printer. Press key to cancel the setting and return to the previous menu. Serial Comm: Parity 24


25 This option is used to set the RS-232 parity. The default setting is None. Press and buttons to select the different parity and press button to set the value into printer. When you enter this list, the parity in the right side of ">" is the printer current setting. Press key to cancel the setting and return to the previous menu. Serial Comm: Data Bits: This option is used to set the RS-232 Data Bits. The default setting is 8 data bits. Press and buttons to select the different Data Bits and press button to set the value into printer. When you enter this list, the Data Bits in the right side of ">" icon is the printer current setting. Press key to cancel the setting and return to the previous menu. Serial Comm: Stop Bit/Bits: This option is used to set the RS-232 Stop Bits. The default setting is 1 stop bit. Press and buttons to select the different Stop Bits and press button to set the value into printer. When you enter this list, the option to the right side of ">" icon is the printer current setting. Press key to cancel the setting and return to the previous menu. 25

 Use this menu to check the Ethernet setting status.")
26 3.1.4 Ethernet Use this menu to configure the internal Ethernet configuration, check the printer s Ethernet module status, and reset the Ethernet module. This function is available on the LCD display when the Ethernet card is installed. Press and buttons to select the different options and press button to enter the option. Press key to cancel the setting and return to the previous menu. Note: This function is optional for the LabelStation Industrial. Ethernet: Status: (IP Address / MAC) Use this menu to check the Ethernet setting status. IP Address The IP address information will be shown on the LCD display. Press or button to return to the previous menu. MAC 26


27 The MAC address information will be shown on the LCD display. Press or button to return to the previous menu. Ethernet: Configure: (DHCP / Static IP) Use this menu to set the printer's DHCP and Static IP. DHCP Press and buttons to select the DHCP function and press to enter. Press key to cancel the setting and return to the previous menu. Press button the printer will set DHCP and restart to reset the setting. Press button to return to the previous menu. Ethernet: Static IP Use this menu to set the printer's IP address, subnet mask and gateway. Press and buttons to select the different options and press button to enter the option. Press key to cancel the setting and return to the previous menu. Press button to move the cursor from left to right digits and press the button to scroll the value from 0 to 9. Press button to next setting. 27


 saved in the printer DRAM/Flash/Card memory.")
28 Press the Press button and the printer will restart to reset the Ethernet module. key to cancel the setting. 3.2 File Manager This feature is used to check the printer available memory and file list File List Use this menu to show, delete and run the.bas files (labels) saved in the printer DRAM/Flash/Card memory. To show the files: To delete the file: Please press buttons in the following order. 28


29 To run the.bas file: Please press buttons in the following order Avail. Memory Use this menu to show available memory space Del. All Files Use this menu to delete all files. Press button to delete all files in the device. Press to cancel deleting files and go back to previous menu. 3.3 Diagnostics Print Config. This feature is used to print current printer configuration to the label. On the configuration printout, there is a print head test pattern, which is useful for checking if there is any pixel (dot) damage on the print head heater element. 29

30 3.3.2 Dump Mode Captures the data from the communications port and prints out the data received by the printer. In the dump mode, all characters will be printed in 2 columns as following. The left side characters are received from your system and right side data are the corresponding hexadecimal value of the characters. It allows users or engineers to verify and debug the program. Note: 1. Dump mode requires 4 wide paper width. 2. Turn off / on the power to resume printer for normal printing. 3. Press FEED button to return to the previous menu. 30

31 3.3.3 Rotate Cutter In case paper is jammed in the cutter, this feature can rotate the cutter blade forward or reverse direction, which is helpful to remove jammed paper from the cutter. 3.4 Language This option is used to setup the language on the LCD display. Press and buttons to scroll the curser to desire language and press button to select this option. Press key to cancel the setting and return to the previous menu. The default language setting is English. 31

32 3.5 Service This feature is used to restore printer settings to defaults and display printer mileage information Initialization The printer settings are restored to defaults as below once printer is initialized. Note : When printer initialization is done, please calibrate the gap or black mark sensor before printing. 32

33 3.5.2 Mileage Info. Use this option to check the printed mileage (displayed in metres). 4. Diagnostic Tool The Diagnostic Utility is a toolbox that allows users to explore the printer's settings and status; change printer settings; download graphics, fonts, and firmware; create printer bitmap fonts; and to send additional commands to the printer. Using this convenient tool, you can explore the printer status and settings and troubleshoot the printer. Note: This utility works with printer firmware V6.00 and later versions. 4.1 Start the Diagnostic Tool 1. Double click on the Diagnostic tool icon to start the software. 2. There are four features (Printer Configuration, File Manager, Bitmap Font Manager, Command Tool) included in the Diagnostic utility. 33

34 Features Tab Interface Printer Functions Printer Setup Printer Status 4.2 Printer Function (Calibrate sensor, Ethernet setup, RTC setup ) 1. Select the PC interface connected to the printer. 2. Click the Function button to the required setting. 3. The detail functions in the Printer Function Group are listed as below. Function Calibrate Sensor Ethernet Setup RTC Time Print Test Page Reset Printer Factory Default Dump Text Ignore AUTO.BAS Configuration Page Description Calibrate the sensor specified in the Printer Setup group media sensor field Setup the IP address subnet mask gateway for the on board Ethernet (Please refer to next section) Synchronize printer Real Time Clock with PC Print a test page Reboot printer Initialize the printer and restore the settings to factory default To activate the printer dump mode. Ignore the downloaded AUTO.BAS program Print printer configuration details Note: For more information about Diagnostic Tool, please refer to the diagnostic utility quick start guide in the CD disk \ Support directory. 5 Setting Ethernet by Diagnostic Utility (Optional for LabelStation Industrial) The Diagnostic Utility is found on the CD Support directory. Users can use the Diagnostic Tool to setup the Ethernet by RS-232, USB and Ethernet interfaces. The following contents will instruct users how to configure the Ethernet by these three interfaces. 34

35 5.1 Using USB interface to setup Ethernet interface 1. Connect the USB cable between the computer and the printer. 2. Turn on the printer power. 3. Start the Diagnostic Utility by double clicking on the icon. Note: This utility works with printer firmware V6.00 and later versions. 4. The Diagnostic Utility default interface setting is USB interface. If USB interface is connected with printer, no other settings need to be changed in the interface field. 5. Click on the Ethernet Setup button from Printer Function group in Printer Configuration tab to setup the IP address, subnet mask and gateway for the on board Ethernet. 5.2 Using RS-232 interface to setup Ethernet interface 1. Connect the computer and the printer with a RS-232 cable. 2. Turn on the printer power. 3. Start the Diagnostic Utility by double clicks on the icon. Note: This utility works with printer firmware V6.00 and later versions. 35

36 4. Select COM as interface then click on the Setup button to setup the serial port baud rate, parity check, data bits, stop bit and flow control parameters. 5. Click on the Ethernet Setup button from printer function of Printer Configuration tab to setup the IP address, subnet mask and the gateway for the on board Ethernet. 36


37 5.3 Using Ethernet interface to setup Ethernet interface 1. Connect the computer and the printer to the LAN. 2. Turn on the printer power. 3. Start the Diagnostic Utility by double clicks on the icon. Note: This utility works with printer firmware V6.00 and later versions. 4. Select Ethernet as the interface then click on the Setup button to setup the IP address, subnet mask and gateway for the on board Ethernet. 5. Click the Discover Device button to explore the printers that exist on the network. 6. Select the printer in the left side of listed printers, the corresponding IP address will be shown in the right side IP address/printer Name field. 7. Click Change IP Address to configure the IP address obtained by DHCP or static. The default IP address is obtained by DHCP. To change the setting to static IP address, click Static IP radio button then enter the IP address, subnet mask and gateway. Click Set IP to take effect the settings. Users can also change the Printer Name by another model name in this fields then click Set Printer Name to effect this change. Note: After clicking the Set Printer Name or Set IP button, printer will reset to take effect the settings. 37

38 8. Click Exit button to exit the Ethernet interface setup and go back to Diagnostic Tool main screen. Factory Default button This function will reset the IP, subnet mask, gateway parameters obtained by DHCP and reset the printer name. Web setup button Except to use the Diagnostic Utility to setup the printer, you can also explore and configure the printer settings and status or update the firmware with the IE or Firefox web browser. This feature provides a user friendly setup interface and the capability to manage the printer remotely over a network. 6. Troubleshooting 6.1 Common Problems The following guide lists the most common problems that may be encountered when operating this bar code printer. If the printer still does not function after all suggested solutions have been invoked, please contact Advanced Labelling Ltd for assistance. Problem Possible Cause Remedy Power indicator does Power cord not properly connected. Restore good connection. not illuminate Printer carriage open. Fully close printer carriage. Running out of ribbon. Ribbon installed incorrectly. Load with new ribbon. Check ribbon path through printer. Running out of label. Label installed incorrectly. Gap/black mark sensor out of calibration. Gap/black mark sensor out of calibration. Paper size does not match software setting. Label stuck inside printer mechanism. Peel function enabled. Load with new label. Check label path through printer. Recalibrate gap/black mark sensor. Recalibrate gap/black mark sensor. Review measurements specified in labelling software. Inspect printer mechanism and clear blockage. If peeler module installed, remove label. If no peeler module installed, disable peel function. Check connections to peeler module. continued 38
. Print head contaminated. Print density set too low.")
39 Not printing Cutter jammed. No cutter installed. Cutter or cutter PCB damaged. Interface cable (USB or parallel) not securely connected. Serial port cable not pin-for-pin compatible. Ribbon and media incompatible. Ribbon incorrectly loaded (inked side facing upwards instead of down). Print head contaminated. Print density set too low. Print-head harness cable and/or connector faulty. Stepping motor plugged into wrong connector. Printer command error. If cutter module installed, press Up or Down key to rotate cutter blade to correct position. Remove label. continued Make sure thickness of label is less than 200 g/m 2 (for regular cutter) or 300 g/m 2 for heavy duty cutter). Replace cutter PCB. Check security of interface cable. If using serial cable, replace with correct type. Check baud rate setting. The default baud rate of this printer is 9600,n,8,1. If using Ethernet cable, check following Ethernet RJ-45 connector LEDs Green continuously on. Amber blinking. Check printer gets IP address when using DHCP mode. Check IP address is correct when using static IP address. Wait a few seconds while printer establishes communication with server then re-check IP address. Replace cable. Re-install ribbon as described in this manual. Clean print-head. Increase print density setting. Re-seat print head cable connector (with power switched off). Check stepping motor connections. Check program command for PRINT at end of file and CRLF at end of each command line. continued 39
40 Memory full (Flash/DRAM) SD card unusable PS/2 port not working Flash or DRAM memory full. SD card damaged or inserted incorrectly. Non-approved SD card. Did not turn off power prior to plugging in PS/2 keyboard. PS/2 keyboard damaged. PS/2 keyboard not plugged in correctly. No BAS file (label template) downloaded to printer. Delete unused files in FLASH/DRAM. NOTES: Max. number of DRAM files is 50 (LabelStation Industrial) Max. user addressable DRAM space is 256KB (LabelStation Industrial) Max. number of Flash files is 256. Max. user addressable Flash space is 2560KB (LabelStation Industrial) Use supported SD card. Re-insert SD card correctly. For supported/approved SD cards, refer to relevant section in this manual. Plug in PS/2 keyboard with printer switched off. Check keyboard is not damaged. Check required file has been downloaded to printer. continued 40
41 Poor print quality Ribbon and/or label media loaded incorrectly Print head contaminated. Print density not set appropriately. Print head elements damaged. Ribbon and label type incompatible. Print head pressure not set correctly. Reload media in accordance with instructions. Clean print head. Clean platen roller. Adjust print density and speed. Run printer self-test to check for failed print head pixels. Change ribbon/label combination to compatible type. Adjust print head pressure as follows: Left side printout too light: set left side pressure adjustment knob to higher index (higher pressure). If pressure adjustment knob already set to 5 and poor print quality on left side persists, adjust pressure adjustment knob to 1 and rotate Z-axis adjustment knob to fine tune pressure. If right side printout too light: set right side pressure adjustment knob to higher index (higher pressure). If label thickness is more than 0.22mm then required print quality might never be achieved unless heater line adjustment screw is rotated counter clockwise. Release lever not latching print head. LCD dead and keys Cable between main PCB and LCD Check security of cable. not working loose. LCD dead but LEDs working Printer initialization unsuccessful. Switch printer off and on again. Initialize printer. LCD dead, LEDs LCD panel cable/connector loose or Reconnect cable. working, but label feeding out plugged in upside down. Ribbon Encoder Ribbon Encoder sensor cable/connector Reconnect cable. sensor not working loose. Ribbon End sensor not working Connector loose. Ribbon sensor hole blocked. Refit connector. Clear sensor hole of debris. Peel sensor not working Peel sensor not seeing label media. Connector loose. Reload media so that it passes through Peel sensor. Refit connector. Cutter not working Connector loose. Refit connector. continued 41

42 Label skews during feed out Labels skipped when printing Vertical printing position of objects on small label incorrect Media guide not engaged with media. Label size is not specified correctly in labelling software. Sensor sensitivity incorrect. Media sensor fouled with dust/debris. Media sensor sensitivity not set correctly. Label size does not match software settings. Shift Y parameter in LCD menu incorrect. Vertical offset setting in printer driver incorrect. If label drifting to right side, move label guide left. If label drifting to left side, move label guide right. Re-specify software settings or change label to match. Recalibrate sensor. Clear Gap/Black Mark sensor of blockage. Re-calibrate sensor sensitivity. Set to correct label size and gap size in labelling software. Press [MENU] > [SELECT] x 3 > [DOWN] x 6 > [SELECT] to fine tune Shift Y. LabelStation Pro XL Horizontal printing position of objects on label incorrect Missing print on left or right side of label RTC (real-time clock) incorrect after printer reboot Multi interface board not working Power and Error LEDs blinking rapidly Label or ribbon wrinkling Gray line throughout all Labels printed Wrong label size specified in labelling software. Shift X parameter in LCD menu incorrect Wrong label size specified in labelling software. Backup battery expired. Installation incorrect. Printer power switched off and on too quickly. Print head pressure incorrect. Ribbon installation incorrect. Label media installation incorrect. Print density incorrect. Media feeding incorrectly. Print head dirty. Platen roller dirty. 42 Set to correct label size and gap size in labelling software. Press [MENU] > [SELECT] x 3 > [DOWN] x 5 > [SELECT] to fine tune Shift X. Set to correct label size and gap size in labelling software. Check presence and condition of battery on main PCB (main printed circuit board). Check PCB plugged into right connector. Switch off printer and wait until all LEDs are off before switching printer on again. Set print density and speed for optimum print quality. Ensure label is engaging with media guide. All these settings are described throughout this manual. Clean printer parts as appropriate. continued
43 Irregular printing Printer in Hex Dump mode. RS-232 setting incorrect. Switch printer off and on to exit dump mode. Reset RS-232 setting. 6.2 Mechanism Fine Adjustment to Avoid Ribbon Wrinkles This printer has been fully tested before delivery. There should be no ribbon wrinkle presented on the media for general-purpose printing application. Ribbon wrinkle is related to the media thickness, print head pressure balance, ribbon film characteristics, print darkness setting etc. In case the ribbon wrinkle happens, please follow the instructions below to adjust the printer parts. continued 43

 2. The cleaning process is described as following: Print Head 1.")
44 7. Maintenance This section presents the tools and methods required to maintain your printer. 1. Please use a combination of the following materials to clean the printer. Cotton swab or head cleaning pen (the latter is recommended) Lint-free cloth Vacuum / Blower brush Ethanol (100% pure) 2. The cleaning process is described as following: Print Head 1. Turn printer off and allow print head to cool for one minute. 44
45 2. Remove the ribbon to expose the print head. 3. Use a cotton swab and ethanol (or head cleaning pen) to clean the print head surface. Platen Roller 1. Turn printer off and allow print head to cool for one minute. 2. Remove the label stock to expose the roller. 3. Wipe the platen roller while manually rotating it. Use ethanol and lint-free cloth. Tear Bar/Peel Bar Use lint-free cloth with ethanol to wipe it as needed. Sensor Gently blast with compressed air periodically to remove fluff and dust. Exterior Wipe with damp cloth as necessary. Interior Brush or carefully vacuum clean as needed to prevent build-up of dust and debris. Notes: 1. Do not touch print head by hand. You will contaminate it and possibly burn yourself. 2. Always use 100% Ethenol. DO NOT use medical alcohol, which may damage the print head. 45
TT230SM THERMAL TRANSFER PRINTER USER S MANUAL
 TT230SM THERMAL TRANSFER PRINTER USER S MANUAL Operations Overview Unpacking and Inspection This printer has been specially packaged to withstand damage during shipping. Please carefully inspect the packaging
M7 SERIES Thermal Printer Service Manual 4. PART LIST. 4.1 Main Printer Assemblies
 4. PART LIST 4.1 Main Printer Assemblies 31 No. Part No. Description Remark Spare Requirement 1 120732 Electronics cover 1 pc 2 N/A Mainframe 1 pc 3 120733 Cover, front 1 pc 4 120734 Top right side cover
LabelMax SP2 User Manual
 LabelMax SP2 User Manual 1 GENERAL... 3 1.1 COPYRIGHT DECLARATION... 3 1.2 COMPLIANCES... 3 1.3 INTRODUCTION... 3 2 GETTING STARTED... 4 2.1 UNPACKING AND INSPECTION... 4 2.2 EQUIPMENT CHECKLIST... 4 2.3
Cub CB-724e / CB-534e
 Cub CB-724e / CB-534e THERMAL TRANSFER / DIRECT THERMAL BAR CODE PRINTER USER S MANUAL Contents 1. Introduction...1 2. Getting Started...1 2.1 Unpacking and Inspection...1 2.2 Equipment Checklist...1 2.3
WAVECOM INSTRUMENTS PTY LTD
 WAVECOM INSTRUMENTS PTY LTD www.wavecom.com.au WAVECOM TT040-50 THERMAL TRANSFER BAR CODE PRINTER USER MANUAL 1 Table of Contents Copyright Declaration 3 Introduction 3-4 Product Introduction Compliances
Table of Contents. Unpacking and Inspection Setup Loading the Media Mount the Printer on the Wall... 16
 WPL25/WHC25 Table of Contents Unpacking and Inspection... 1 Setup... 5 Loading the Media... 6 Mount the Printer on the Wall... 16 LED and Button Functions... 17 Troubleshooting... 18 Unpacking and Inspection
TTP-384M THERMAL TRANSFER / DIRECT THERMAL BAR CODE PRINTER SERVICE MANUAL
 THERMAL TRANSFER / DIRECT THERMAL BAR CODE PRINTER SERVICE MANUAL TABLE OF CONTENT 1. FUNDAMENTAL OF THE SYSTEM... 1 1.1. Overview... 1 2. ELECTRONICS... 5 2.1 Summary of Board Connectors... 5 2.2 Pin
TTP-244 / TTP-244 Plus THERMAL TRANSFER / DIRECT THERMAL BAR CODE PRINTER USER S MANUAL
 TTP-244 / TTP-244 Plus THERMAL TRANSFER / DIRECT THERMAL BAR CODE PRINTER USER S MANUAL CONTENTS 1. PRODUCT INTRODUCTION... 2 1.1 Compliances... 2 2. GETTING STARTED... 3 2.1 Unpacking and Inspection...
TTP-244 / TTP-244 Plus THERMAL TRANSFER / DIRECT THERMAL BAR CODE PRINTER USER S MANUAL
 TTP-244 / TTP-244 Plus THERMAL TRANSFER / DIRECT THERMAL BAR CODE PRINTER USER S MANUAL CONTENTS 1. PRODUCT INTRODUCTION... 2 1.1 Compliances... 2 2. GETTING STARTED... 3 2.1 Unpacking and Inspection...
TTP-268M/ TTP-366M THERMAL TRANSFER / DIRECT THERMAL BAR CODE PRINTER SERVICE MANUAL
 THERMAL TRANSFER / DIRECT THERMAL BAR CODE PRINTER SERVICE MANUAL TABLE OF CONTENT 1. FUNDAMENTAL OF THE SYSTEM... 1 1.1. Overview... 1 2. ELECTRONICS... 5 2.1 Summary of Board Connectors... 5 2.2 Pin
TTP-245 Plus/TTP-245E Plus TTP-343 Plus/TTP-343E Plus
 TTP-245 Plus/TTP-245E Plus TTP-343 Plus/TTP-343E Plus THERMAL TRANSFER / DIRECT THERMAL BAR CODE PRINTER USER S MANUAL Contents 1. Introduction... 1 2. Getting Started... 2 2.1 Unpacking and Inspection...
TTP-245C / TTP-343C / TTP-244CE THERMAL TRANSFER / DIRECT THERMAL BAR CODE PRINTER USER S MANUAL
 TTP-245C / TTP-343C / TTP-244CE THERMAL TRANSFER / DIRECT THERMAL BAR CODE PRINTER USER S MANUAL Contents Copyright Declaration... i 1. Introduction... ii 1.1 Product Introduction... ii 1.2 Compliances...
TDP-225/ TDP-225W/ TDP-324/ TDP-324W Series DIRECT THERMAL BAR CODE PRINTER USER S MANUAL
 TDP-225/ TDP-225W/ TDP-324/ TDP-324W Series DIRECT THERMAL BAR CODE PRINTER USER S MANUAL Contents Copyright Declaration... i 1. Introduction... iv 1.1 Product Introduction... iv 2. Operations Overview...
TX200/ TX300/ TX600 Series
 Series THERMAL TRANSFER / DIRECT THERMAL BAR CODE PRINTER SERVICE MANUAL TABLE OF CONTENT 1. OVERVIEW... 3 1.1 Front View... 3 1.2 Interior View... 4 1.3 Rear View... 5 2. ELECTRONICS... 7 2.1 Summary
THERMAL TRANSFER/ DIRECT THERMAL BARCODE PRINTER USER S MANUAL
 ITPP075 THERMAL TRANSFER/ DIRECT THERMAL BARCODE PRINTER USER S MANUAL i Copyright Information 2016 Zhuhai Hengquan Barcode equipment Co., Ltd. The copyright in this manual, the software and firmware in
TTP-2410MU/ TTP-346MU/ TTP-644MU/ TTP-2410MT/ TTP-346MT/ TTP-644MT Series THERMAL TRANSFER / DIRECT THERMAL BAR CODE PRINTER SERVICE MANUAL
 TTP-2410MU/ TTP-346MU/ TTP-644MU/ TTP-2410MT/ TTP-346MT/ TTP-644MT Series THERMAL TRANSFER / DIRECT THERMAL BAR CODE PRINTER SERVICE MANUAL TABLE OF CONTENT 1. FUNDAMENTAL OF THE SYSTEM... 2 1.1. Overview...
MX240/ MX340/ MX640 Series
 Series THERMAL TRANSFER / DIRECT THERMAL BAR CODE PRINTER SERVICE MANUAL TABLE OF CONTENT 1. FUNDAMENTAL OF THE SYSTEM... 1 1.1. Overview... 1 2. ELECTRONICS... 5 2.1 Summary of Board Connectors... 5 2.2
Thermal Transfer / Direct Thermal Bar Code Printer. User s Manual
 Thermal Transfer / Direct Thermal Bar Code Printer User s Manual This page is intentionally left blank. Copyright Information 2012 Brady Worldwide, Inc. All Rights Reserved This manual is copyrighted with
T4 series user s manual. Version: 1.1
 Version: 1.1 Table of contents 1. Introduction...1 1.1 In the box...1 1.2 Printer Features...2 1.2.1 Front view...2 1.2.2 Rear view...2 1.2.3 Interior view...3 2. Getting start...4 2.1 Loading the ribbon...4
Alpha-3R. Direct Thermal Portable Printer SERVICE MANUAL
 Alpha-3R Direct Thermal Portable Printer SERVICE MANUAL i Contents 1. FUNDAMENTAL OF THE SYSTEM... 2 1.1 Overview... 2 2. ELECTRONICS... 3 2.1 Summary of Board Connectors... 3 3. MECHANISM... 7 3.1 Replacing
Quick Installation Guide Direct and Transfer Thermal Printer
 Quick Installation Guide Direct and Transfer Thermal Printer Overview The enclosed printer is currently comprised of two models: 203dpi (dots per inch) model 300dpi (dots per inch) model Unpacking 1. Remove
Trademark Acknowledgements
 T2N User s Manual 1 This document contains proprietary information protected by copyright. No part of this document may be reproduced, copied, translated, or incorporated in any other material in any form
MVPplus Quick Reference Guide
 MVPplus Quick Reference Guide Use this guide to operate your printer on a daily basis. For more detailed information, refer to the User Guide. Contents External View...........................................................
THERMAL TRANSFER / DIRECT THERMAL BAR CODE PRINTER ITT4100B USER S MANUAL
 THERMAL TRANSFER / DIRECT THERMAL BAR CODE PRINTER ITT4100B USER S MANUAL Copyright Information 2011 POSline S.A. de C.V. The copyright in this manual, the software and firmware in the printer described
MONARCH 9416 XL QUICK REFERENCE
 MONARCH 9416 XL QUICK REFERENCE This Quick Reference contains ribbon loading, supply loading, and general care, maintenance, and troubleshooting procedures for the 9416 XL Thermal Direct and 9416 XL Thermal
TTP-246M/344M THERMAL TRANSFER / DIRECT THERMAL BAR CODE PRINTER USER S MANUAL
 TTP-246M/344M THERMAL TRANSFER / DIRECT THERMAL BAR CODE PRINTER USER S MANUAL CONTENTS 1. PRODUCT INTRODUCTION... 1 1.1 Compliances... 1 2. GETTING STARTED... 2 2.1 Unpacking and Inspection... 2 2.2
TA200/ TA210/ TA300/ TA310 Series THERMAL TRANSFER / DIRECT THERMAL BAR CODE PRINTER USER S MANUAL
 TA200/ TA210/ TA300/ TA310 Series THERMAL TRANSFER / DIRECT THERMAL BAR CODE PRINTER USER S MANUAL i Copyright Information 2011 TSC Auto ID Technology Co., Ltd, The copyright in this manual, the software
Setting up an Intermec PM43 printer with InterDriver version M-0 or newer
 Setting up an Intermec PM43 printer with InterDriver version 7.3.5 M-0 or newer Setting up a bar code printer with 7.3.5 M-0 Intermec drivers or newer 1 INITIAL PRINTER CONFIGURATION When the printer is
Zebra XiII-Series Printer Quick Reference Guide
 Zebra XiII-Series Printer Quick Reference Guide Contents Media and Ribbon Loading...67 Media Loading...67 Ribbon Loading...70 Operator Controls...72 Front Panel Keys...72 Front Panel Lights...72 Calibration...74
Fastmark M6 PLUS Series. Thermal Transfer Barcode Printer. User s Guide. February i 2012 Document #120650
 Fastmark M6 PLUS Series Thermal Transfer Barcode Printer User s Guide February i 2012 Document #120650 Copyright Information 2012 AMT Datasouth Corporation The copyright in this manual, the software and
Fastmark M1. Thermal Transfer Barcode Printer. User s Guide. Document #120103
 Fastmark M1 Thermal Transfer Barcode Printer User s Guide 0 Document #120103 Contents Copyright Declaration... i 1. Introduction... i 1.1 Product Introduction...i 1.2 Compliances...i 2. Operations Overview...
Copyright Information: Firmware (Software) Agreement:
 Agreement:") Maintenance Manual Copyright Information: CG Triumvirate is a trademark of Agfa Corporation. CG Times based upon Times New Roman under license from the Monotype Corporation. Windows is a registered trademark
Maintenance Manual Copyright Information: CG Triumvirate is a trademark of Agfa Corporation. CG Times based upon Times New Roman under license from the Monotype Corporation. Windows is a registered trademark
WPL 406 User Manual WPL406
 WPL406 Copyright Information 2013 by Wasp Technologies. All rights reserved. No part of this publication may be reproduced or used in any form, or by any electrical or mechanical means, without permission
Specification PM SER IES T h erm al B a rcodep rinters
 Specification PM SER IES T h erm al B a rcodep rinters P M 3120 Proficient in Commercial POS Receipt printers 1. Introduction...2 1.1 Safety Warning...2 1.2 Note...2 2. General Information...3 2.1 Introduction...3
ALTEC TTP 245 Series/343 Series
 ALTEC TTP 245 Series/343 Series THERMAL TRANSFER / DIRECT THERMAL BAR CODE PRINTER USER S MANUAL Contents COPYRIGHT DECLARATION...1 COMPLIANCES...1 1. Introduction...1 2. Getting Started...1 2.1 Unpacking
DP-1 THERMAL TRANSFER / DIRECT THERMAL BAR CODE PRINTER USER S MANUAL
 DP-1 THERMAL TRANSFER / DIRECT THERMAL BAR CODE PRINTER USER S MANUAL Contents Copyright Declaration... i 1. Introduction... ii 1.1 Product Introduction... ii 1.2 Compliances... ii 2. Operations Overview...
User's Manual. Metapace L-22D. Label Printer Rev. 1.00
 User's Manual Metapace L-22D Label Printer Rev. 1.00 Table of Contents MANUAL INFORMATION & USAGE PRECAUTIONS... 3 1. CONTENT CONFIRMATION... 6 2. PRODUCT PARTS... 7 3. INSTALLATION & USAGE... 9 3-1 POWER
TTP-384M THERMAL TRANSFER / DIRECT THERMAL BAR CODE PRINTER USER S MANUAL
 TTP-384M THERMAL TRANSFER / DIRECT THERMAL BAR CODE PRINTER USER S MANUAL Contents 1. Introduction...1 1.1 Product Introduction...1 1.2 Compliances...1 2. Operations Overview...3 2.1 Unpacking and Inspection...3
TDP-225 / TDP-225W DIRECT THERMAL BAR CODE PRINTER USER S MANUAL
 TDP-225 / TDP-225W DIRECT THERMAL BAR CODE PRINTER USER S MANUAL Contents Copyright Declaration...i 1. Introduction...ii 1.1 Product Introduction...ii 1.2 Compliances...ii 2. Operations Overview...1 2.1
TC200/ TC210/ TC300/ TC310 Series THERMAL TRANSFER / DIRECT THERMAL BAR CODE PRINTER USER S MANUAL
 TC200/ TC210/ TC300/ TC310 Series THERMAL TRANSFER / DIRECT THERMAL BAR CODE PRINTER USER S MANUAL Copyright Information 2015 TSC Auto ID Technology Co., Ltd. The copyright in this manual, the software
TA200/ TA210/ TA300/ TA310 Series THERMAL TRANSFER / DIRECT THERMAL BAR CODE PRINTER USER S MANUAL
 TA200/ TA210/ TA300/ TA310 Series THERMAL TRANSFER / DIRECT THERMAL BAR CODE PRINTER USER S MANUAL i Copyright Information 2011 TSC Auto ID Technology Co., Ltd, The copyright in this manual, the software
Q8 Barcode Label Printer User s Manual
 Q8 Barcode Label Printer User s Manual Q8 User s Manual Contents Preface... 1 Important Notice, Read Me First!... 1 Chapter 1 Introduction... 2 Specifications... 2 Specifications for Printer... 2 Specifications
QUICK REFERENCE. Connecting the Cables
 QUICK REFERENCE This Quick Reference contains supply loading and general care and maintenance procedures for the Monarch 9860 printer. For more detailed information, refer to the Operator s Handbook available
TTP-2410M Pro/346M Pro/644M Pro TTP-246M Pro/344M Pro THERMAL TRANSFER / DIRECT THERMAL BAR CODE PRINTER USER S MANUAL
 TTP-2410M Pro/346M Pro/644M Pro TTP-246M Pro/344M Pro THERMAL TRANSFER / DIRECT THERMAL BAR CODE PRINTER USER S MANUAL Copyright Information 2011 TSC Auto ID Technology Co., Ltd, The copyright in this
QUICK REFERENCE. RFID Overview
 QUICK REFERENCE This Quick Reference contains supply loading and general maintenance procedures for the Monarch 9855 RFID printer. Additional RFID documents are available on the Monarch Printer s Documentation
π H-6323 ZEBRA ZD410 DIRECT THERMAL PRINTER PARTS EXTERNAL PARTS DIAGRAM uline.com
 π H-6323 ZEBRA ZD410 DIRECT THERMAL PRINTER 1-800-295-5510 uline.com PARTS NOTE: Save the carton and all packing materials for storage or in case the printer needs to be returned to the manufacturer. Documentation
TDP-225 / TDP-225W DIRECT THERMAL BAR CODE PRINTER USER S MANUAL
 TDP-225 / TDP-225W DIRECT THERMAL BAR CODE PRINTER USER S MANUAL Contents Copyright Declaration... i 1. Introduction... ii 1.1 Product Introduction... ii 1.2 Compliances... ii 2. Operations Overview...
TDP-244/ TDP-245/ TDP-245 Plus/ TDP-247/ TDP-345 Series DIRECT THERMAL BAR CODE PRINTER USER S MANUAL
 TDP-244/ TDP-245/ TDP-245 Plus/ TDP-247/ TDP-345 Series DIRECT THERMAL BAR CODE PRINTER USER S MANUAL Contents COPYRIGHT DECLARATION... 1 COMPLIANCES... 1 1. Introduction... 3 2. Getting Started... 3 2.1
DOT MATRIX PRINTER SP6000 SERIES
 DOT MATRIX PRINTER SP6000 SERIES Hardware Manual < Approval: CEL > Trademark acknowledgments SP6000 : Star Micronics Co., Ltd. Notice All rights reserved. Reproduction of any part of this manual in any
TTP-245C / TTP-343C / TTP-244CE THERMAL TRANSFER / DIRECT THERMAL BAR CODE PRINTER USER S MANUAL
 TTP-245C / TTP-343C / TTP-244CE THERMAL TRANSFER / DIRECT THERMAL BAR CODE PRINTER USER S MANUAL Contents Copyright Declaration... i 1. Introduction... ii 1.1 Product Introduction... ii 1.2 Compliances...
TTP-245 Plus / TTP-343 Plus TTP-247 / TTP-345 THERMAL TRANSFER / DIRECT THERMAL BAR CODE PRINTER USER S MANUAL
 TTP-245 Plus / TTP-343 Plus TTP-247 / TTP-345 THERMAL TRANSFER / DIRECT THERMAL BAR CODE PRINTER USER S MANUAL Contents COPYRIGHT DECLARATION... 1 COMPLIANCES... 1 1. Introduction... 1 2. Getting Started...
TTP-245C / TTP-343C / TTP-244CE THERMAL TRANSFER / DIRECT THERMAL BAR CODE PRINTER USER S MANUAL
 TTP-245C / TTP-343C / TTP-244CE THERMAL TRANSFER / DIRECT THERMAL BAR CODE PRINTER USER S MANUAL Contents Copyright Declaration... i 1. Introduction... ii 1.1 Product Introduction... ii 1.2 Compliances...
Xi4 Quick Reference Guide
 Xi4 Quick Reference Guide Use this guide to operate your printer on a daily basis. For more detailed information, refer to the User Guide. Printer Components Figure shows the components inside the media
MX240P/ MX340P/ MX640P Series THERMAL TRANSFER / DIRECT THERMAL BAR CODE PRINTER USER S MANUAL
 MX240P/ MX340P/ MX640P Series THERMAL TRANSFER / DIRECT THERMAL BAR CODE PRINTER USER S MANUAL Copyright Information 2016 TSC Auto ID Technology Co., Ltd, The copyright in this manual, the software and
RJ-2030/2050/2140/2150
 LBF85700 Unpacking Your Printer Check that the package contains the following before using your printer: RJ-030/050/40/50 Quick Setup Guide English Printer Rechargeable Li-ion Battery Belt Clip Thank you
TT042-50/ T-452/ M-2405/ T-5402E/ M-2405D/
 TT042-50/ T-452/ M-2405/ T-5402E/ M-2405D/ LP-5402E/ BP-542E/ CN-5402E/ B-200E/ AM308e/ TT042 TT042-60/ T-433/ M-3403/ T-5403E/ M-3405D/ LP-5403E/ BP-543E/ CN-5403E/ B-300E Series THERMAL TRANSFER / DIRECT
TTP-384M THERMAL TRANSFER / DIRECT THERMAL BAR CODE PRINTER USER S MANUAL
 TTP-384M THERMAL TRANSFER / DIRECT THERMAL BAR CODE PRINTER USER S MANUAL Contents 1. Introduction...1 1.1 Product Introduction...1 1.2 Compliances...1 2. Operations Overview...3 2.1 Unpacking and Inspection...3
LED
 Contents 1. Introduction... 1 1.1 Product Introduction... 1 1.2 Compliances... 1 2. Operations Overview... 3 2.1 Unpacking and Inspection... 3 2.2 Printer Overview... 4 2.2.1 Front View... 4 2.2.2 Interior
TTP-2410M/346M/644M TTP-246M Plus/344M Plus THERMAL TRANSFER / DIRECT THERMAL BAR CODE PRINTER USER S MANUAL
 TTP-2410M/346M/644M TTP-246M Plus/344M Plus THERMAL TRANSFER / DIRECT THERMAL BAR CODE PRINTER USER S MANUAL Contents 1. Introduction...1 1.1 Product Introduction...1 1.2 Compliances...1 2. Operations
User's Guide QL-700. ENG ver.a.
 User's Guide QL-700 Be sure to read and understand this guide before using the machine. We recommend that you keep this guide nearby for future reference. www.brother.com ENG ver.a Thank you for purchasing
Printer Management. Quick Start Guide
 Printer Management Quick Start Guide Contents 1. Getting started with Printer Management... 1 2. Printer Configuration... 2 3. File Manager... 9 4. Command Tool... 11 5. RTC Setup... 12 6. Printer Function...
CANADIAN D.O.C. WARNING
 Each product and program carries a respective written warranty, the only warranty on which the customer can rely. Avery Dennison Corp. reserves the right to make changes in the product, the programs, and
Reference Guide for the KODAK Picture Kiosk GS Compact. Software Version 2.0
 Reference Guide for the KODAK Picture Kiosk GS Compact Software Version 2.0 Eastman Kodak Company, 2008 Contents Product Overview... 4 Console... 4 605 Photo Printer... 5 Product Choices... 6 Startup and
English. Copyright Brady Worldwide, Inc. All rights reserved. (US and Canada)
") Copyright This manual is copyrighted with all rights reserved. No portion of this manual may be copied or reproduced by any means without the prior consent of Brady Worldwide, Inc. While every precaution
Copyright This manual is copyrighted with all rights reserved. No portion of this manual may be copied or reproduced by any means without the prior consent of Brady Worldwide, Inc. While every precaution
H-1148 PAGE 1 OF IH-1148
 PAGE 1 OF 57 Printer Overview Depending on the options you have selected, your printer may look slightly different. Transmissive sensor Media supply guide Front housing assembly Printhead assembly Ribbon
CANADIAN D.O.C. WARNING
 Each product and program carries a respective written warranty, the only warranty on which the customer can rely. Avery Dennison Corp. reserves the right to make changes in the product, the programs, and
HD830i BARCODE PRINTER USER MANUAL. User Manual Version Issue Date P/N. : HD830i : Rev.A : :
 HD830i BARCODE PRINTER USER MANUAL User Manual Version Issue Date P/N : HD830i : Rev.A : 2017.03 : 920-016611-00 1 Barcode Printer 1 1-1 Package Contains... 1 1-2 Barcode Printer Introduction... 2 2 Barcode
EQUIPMENT MANUAL. Avery Dennison Monarch 9419 Printer. TC9419EM Rev. AA 9/ Avery Dennison Corp. All rights reserved.
 EQUIPMENT MANUAL Avery Dennison Monarch 9419 Printer TC9419EM Rev. AA 9/16 2016 Avery Dennison Corp. All rights reserved. Each product and program carries a respective written warranty, the only warranty
Xellent Series Industrial Barcode Printer User s Manual
 X-1000VL / X-2000V / X-2000V Zip X-2300 / X-2300Z X-2300E / X-2300ZE X-3200 / X-3200Z X-3200E / X-3200ZE Xellent Series Industrial Barcode Printer User s Manual V1.0-11-12-2017 Argox website: http://www.argox.com
Nexa PX700IIS Thermal Receipt Printer. User Manual. P a g e 1
 Nexa PX700IIS Thermal Receipt Printer User Manual P a g e 1 Table of Contents Safety Notice... 3 Available Functions... 3 Main Features... 4 Technical Specifications... 4 Unpacking the Printer... 5 Connection
Load the Media. To load media, complete these steps: Use the instructions in this section for loading roll or fanfold media in any print mode.
 60 Printer Setup Use the instructions in this section for loading roll or fanfold media in any print mode. Caution While performing any tasks near an open printhead, remove all rings, watches, hanging
FASTMARK 4600 PLUS CONTROL PANEL OPERATION. Front Panel
 FASTMARK 4600 PLUS CONTROL PANEL OPERATION Front Panel The front panel includes - LCD display - 3 LED status indicators (READY, MEDIA and RIBBON) - 3 control buttons (FEED, PAUSE and CANCEL) LCD display
RJ-2030/2050/2140/2150
 Printed in China LBF85400 Package Contents Check that the package contains the following before using your printer: RJ-030/050/40/50 Quick Setup Guide English Printer Rechargeable Li-ion Battery Belt Clip
π H-7978 LOW PROFILE FLOOR SCALE LABEL PRINTER OVERVIEW OF CONTROLS uline.com PARTS # DESCRIPTION
 π H-7978 LOW PROFILE FLOOR SCALE LABEL PRINTER 1-800-295-5510 uline.com OVERVIEW OF CONTROLS 7 6 8 9 1 PARTS # DESCRIPTION 1 Top Cover 2 Base Housing 3 Top Cover Open Button 4 Backing Paper Opening 5 Label
Zebra XiIII-Series Printer Safety and Quick Reference Guide
 Zebra XiIII-Series Printer Safety and Quick Reference Guide GB Contents Specifications...75 Electrical...75 Environmental Range...75 Fuses...75 Warnings...76 Installation...76 Use of Shielded Data Cables...76
TOSHIBA Potable Printer B-EP4DL SERIES. Maintenance Manual. Document No. EO Original Sep., 2008 (Revised ) PRINTED IN JAPAN
 PRINTED IN JAPAN") TOSHIBA Potable Printer B-EP4DL SERIES Maintenance Manual Original Sep., 2008 (Revised ) Document No. EO18-33023 PRINTED IN JAPAN WARNING! Follow all manual instructions. Failure to do so could create
TOSHIBA Potable Printer B-EP4DL SERIES Maintenance Manual Original Sep., 2008 (Revised ) Document No. EO18-33023 PRINTED IN JAPAN WARNING! Follow all manual instructions. Failure to do so could create
Datacard CR500 Instant Issuance System. User Reference Guide. July Rev B
 Datacard CR500 Instant Issuance System User Reference Guide July 2015 527495-001 Rev B Datacard CR500 User Reference Guide The CR500 Instant Issuance System Contents The CR500 Instant Issuance System The
IMPRESS Scan Setting up an Intermec printer with InterDriver version 7.21 or newer. Setting up a bar code printer with Intermec drivers or newer
 Setting up a bar code printer with 7.1.3 Intermec drivers or newer 0 INSTALL PRINTER DRIVERS InterDriver 7.1.3 (this may require Administrator rights within Windows) PLEASE NOTE: If you have an older version
TTP-2410M/346M TTP-246M Plus/344M Plus THERMAL TRANSFER / DIRECT THERMAL BAR CODE PRINTER USER S MANUAL
 TTP-2410M/346M TTP-246M Plus/344M Plus THERMAL TRANSFER / DIRECT THERMAL BAR CODE PRINTER USER S MANUAL Contents 1. Introduction...1 1.1 Product Introduction...1 1.2 Compliances...1 2. Operations Overview...3
FCC COMPLIANCE STATEMENT FOR AMERICAN USERS
 FCC COMPLIANCE STATEMENT FOR AMERICAN USERS This equipment has been tested and found to comply with the limits for a CLASS A digital device, pursuant to Part 15 of the FCC Rules. These limits are designed
Region USA & Canada Latin America Brasil Europe Asia Pacific Japan Australia. Telephone. panduit.com panduit.
 TDP43HE, TDP43HE E/E, TDP46HE and TDP46HE/E Thermal Transfer Printerr Panduit Corp. 2013 USER MANUAL B20730 Rev..: 01 8-2013 NOTE: In the interestt of higher quality and value, Panduit products are continually
QUICK REFERENCE. Using the Battery
 QUICK REFERENCE This Quick Reference contains supply loading information and general care and maintenance procedures for the Monarch Sierra Sport4 9493 printer. For more detailed information, refer to
User's Manual SRP-770II. Label Printer Rev
 User's Manual Label Printer Rev. 1.12 http://www.samsungminiprinters.com Table of Contents Manual Information & Usage Precautions 3 1. Content Confirmation 7 2. Product Part Names 8 3. Installation & Usage
1. Review the printer safety information in the Regulatory Compliance document provided with your printer.
 QUICK REFERENCE This Quick Reference contains supply loading information and general care and maintenance procedures for the Monarch Pathfinder Ultra Platinum 6039 printer. For more detailed information,
T4+ series user s manual. Version: 1.1
 Version: 1.1 Table of contents 1. Introduction... 1 1.1 In the box... 1 1.2 T4+ Printer Features... 2 1.2.1 Front view... 2 1.2.2 Rear view... 2 1.2.3 Interior view... 3 1.3 T4e+ Printer Features... 4
Removal and Installation8
 8 Screw Types 8-4 Top Cover Assembly 8-5 Left Hand Cover 8-6 Right Hand Cover 8-10 Front Panel Assembly 8-14 Left Rear Cover 8-15 Right Rear Cover 8-16 Extension Cover (60" Model only) 8-17 Media Lever
X Series Label Printer. User s Manual ZMIN TECHNOLOGIES Version 1.3. Part Number:
 X Series Label Printer User s Manual ZMIN TECHNOLOGIES 2012-9-17 Version 1.3 Part Number: 2012 Shenzhen ZMIN Technologies Co.,Ltd. All rights reserved. ZMIN is a registered trademark of Shenzhen ZMIN Technologies
1 Platen Roller 2. Bar Sensor 3. Media Support Latch 5. Latch Release Button D Ring 7. Control Panel 8. QuickLink Module 9.
 Thank you for choosing one of our Zebra QL Plus Series Mobile s. These rugged printers will become productive and efficient additions to your workplace thanks to their innovative design. Because they are
UPS. Quick Start. Unpack Your Printer. Quick Start. Printer. Power Cord. USB Cable. Parallel Cable
 UPS 2348+ Thermal Printer Quick Start Unpack Your Printer Printer Quick Start UPS 2348+ Thermal Printer Quick Start Power Cord Parallel Cable USB Cable Note: Ethernet option printers do not include any
MODEL : LK-B24 LABEL PRINTER
 J. STEPHEN Lab., Ltd. 28-6, Gajangsaneopdong-ro, Osan-si, Gyeonggi-do,18103, Republic of Korea TEL : +82-31-8077-5000 FAX : +82-31-459-8880 www.miniprinter.com MODEL : LK-B24 LABEL PRINTER B24 Rev.E 09/17
Diagnostic Utility. Quick Start Guide
 Diagnostic Utility Quick Start Guide Contents 1. Getting started with Diagnostic Utility...1 1.1 Start the Diagnostic Utility...1 1.2 Select the PC interface connected with bar code printer...2 2. Configure
KeepnTrack Badge Printer Installation Guide Fort Union Blvd, Salt Lake City, Utah 84121! !
 KeepnTrack Badge Printer Installation Guide 1831 Fort Union Blvd, Salt Lake City, Utah 84121 800-347-6439 801-943-7277 www.companioncorp.com Copyright 2013 Evelyn Manufacturing, All Rights Reserved. Distributed
Monarch 9825 Printer
 Monarch 9825 Printer TC9825QR Rev. AA 2/02 2002 Paxar Corporation. All rights reserved. This Quick Reference contains supply loading and general care and maintenance procedures. For more detailed information,
MODEL : AP-8220 U Receipt Printer User s Manual
 MODEL : AP-8220 U Receipt Printer User s Manual AP-8220 U Rev.A 10/14 All specifications are subject to change without notice Table of Contents 1. Parts Identifications 1. Parts Identifications 3 2. Setting
MODEL : SLK-TE20X Series Receipt Printer User s Manual
 MODEL : SLK-TE20X Series Receipt Printer User s Manual TE20X Series Rev.F 03/16 All specifications are subject to change without notice Table of Contents 1. Parts Identifications 1. Parts Identifications
MICROLINE 320/390FB User Manual (English)
") MICROLINE 320/390FB User Manual (English) MICROLINE 320/390FB User Manual (English) English Table of Contents Note to Customers... E-2 Important Safety Instructions... E-3 Important Wiring Instructions...
MICROLINE 320/390FB User Manual (English) MICROLINE 320/390FB User Manual (English) English Table of Contents Note to Customers... E-2 Important Safety Instructions... E-3 Important Wiring Instructions...
FCC Notice. Trademarks. Copyright. Disclaimer
 FCC Notice This device complies with Part 15 of the FCC Rules. Operation is subject to the following two conditions: (1) this device may not cause harmful interference, and (2) this device must accept
uline.com OVERVIEW OF CONTROLS
 π H-5135 1-800-295-5510 uline.com BROTHER P-TOUCH D400AD DESKTOP PRINTER OVERVIEW OF CONTROLS LCD DISPLAY AND KEYBOARD 1 3 2 4 5 6 12 CONTROL PANEL PARTS 7 # DESCRIPTION # DESCRIPTION 1 Caps Mode 20 Clear
MODEL : SLK-TS400EB. Receipt Printer User s Manual. TS400EB Rev. B 07/16. All specifications are subject to change without notice
 MODEL : SLK-TS400EB Receipt Printer User s Manual TS400EB Rev. B 07/16 All specifications are subject to change without notice Table of Contents 1. Parts Identifications 1. Parts Identifications 3 2.