USER GUIDE. BrightAuthor software version 3.4/3.2. BrightSign, LLC Lark Ave., Suite 200 Los Gatos, CA
|
|
|
- Chastity French
- 5 years ago
- Views:
Transcription
1 USER GUIDE BrightAuthor software version 3.4/3.2 BrightSign, LLC Lark Ave., Suite 200 Los Gatos, CA
2 TABLE OF CONTENTS Chapter 1 Getting Started... 1 What is BrightAuthor?... 1 What kind of presentations can I create?... 1 What type of screen layouts can I use?... 2 Step 1: Get the hardware you need... 2 Step 2: Install the BrightAuthor software... 4 Step 3: Launch BrightAuthor... 5 Step 4: Set up your BrightSign player... 5 Step 5: Add your content... 5 Step 6: Create your presentations... 6 Step 7: Publish your presentations... 6
3 Chapter 2 Setting Up Units... 7 Adding BrightSign players to your BrightSign Network... 7 Adding BrightSign players to your Local Network Adding BrightSign players to your Simple File Network Setting up BrightSign players for standalone use Chapter 3 Creating Presentations Creating a full-screen presentation Creating a multi-zone presentation Adding RSS, Text, and Media RSS Feeds Adding Live Video and SignChannel Adding and creating Dynamic Playlists Adding and creating Local Playlists... 29
4 Adding Video and Mjpeg Streams Making a presentation interactive Adding Interactive Events Adding Media Lists and Play Files Adding Live Text Adding Interactive Menus Adding User Defined Events Adding Event Handlers Adding Commands Adding Conditional Targets Changing User Variables Chapter 4 The TD
5 Chapter 5 BP900 and BP200 Button Boards Chapter 6 Publishing Presentations Publishing with Local Storage Publishing with BrightSign Network Publishing with Simple File Networking Publishing with Local Networking Chapter 7 Customizing Presentations Setting zone properties Editing Video Only and Video or Images Zones Editing Ticker Zones Editing Other Zones Customizing template layouts... 86
6 Setting presentation properties Setting default properties Chapter 8 Managing Your Network Permissions Viewing unit statuses Managing groups Viewing presentations Viewing your library Viewing dynamic playlists Using advanced tools Chapter 9 Frequently Asked Questions Appendix A Remote Control Protocols
7 CHAPTER 1 GETTING STARTED What is BrightAuthor? BrightAuthor is a software application that helps you create presentations for your digital sign or kiosk. You can play your BrightAuthor presentations on the following BrightSign models: HD110, HD120, HD210, HD210w, HD220, HD410, HD810, HD1010, HD1010w, HD1020, and TD1012. Your presentations can include any of the following types of content: Images Pre-recorded videos Live videos (supported on HD810, HD1010, and HD1010w in conjunction with the Live Video Module accessory) Audio RSS and Twitter feeds Dynamic playlists SignChannel (supported on HD210, HD210w, HD220, HD1010, HD1010w, HD1020, and TD1012) Note: Subscription is required. Go to for details. Text Date or time What kind of presentations can I create? You can create two types of presentations with BrightAuthor: Non-Interactive: A slideshow of media that plays in a continuous loop. You can play non-interactive presentations on all BrightSign models. Interactive: A presentation that transitions between media based on input from a user via a button board, remote control, or a similar input device. All models except the HD110 support at least one type of interactive event. 1
8 What type of screen layouts can I use? You can choose from a variety of ready-to-use layout templates or create your own template. Layout templates fall into two basic categories: Full Screen: A slide show of media that occupies the full screen. Multi-Zone: A presentation with different types of content in separate regions of the screen. The screen can include one video or background image zone, and multiple Clock, Text, Ticker, and Image zones. Step 1: Get the hardware you need To create and play presentations with BrightAuthor, you need the following: Windows PC BrightSign player Display Storage card Card reader/writer (optional if using USB storage) Input device (optional) Windows PC Any Windows PC that meets or exceeds the following minimum requirements: 2.3 GHz CPU 2 GB RAM required (4 GB recommended) 100 MB available hard disk space for program files (additional disk space required if storing content and/or presentations on your hard disk) One of the following operating systems: o Windows Vista 32 or 64 bit o Windows 7 32 or 64 bit BrightSign Any of the following models with firmware version or later: HD110 2
9 HD210 and HD210w HD410 HD810 HD1010 and HD1010w TD1012 Any of the following models with firmware version or later: HD120 HD220 HD1020 Display Any monitor, TV, or Elo touch screen with one of the following types of inputs: VGA Component (supported on HD810, HD1010, HD1010w) HDMI Storage for Media Either of the following: USB Flash Drive (supported on HD810, HD1010, HD1010w, HD1020) SD card SDHC card SDXC card (supported on HD120, HD220, HD1020) Card Reader/Writer Not required if using a USB flash drive. The card reader/writer must be connected to your PC and must be compatible with your storage card. 3
10 Input Device All models except HD110. One or more of the following types of input devices: Touch screen equipped with a touch controller that supports the standard HID specification. See this link for a list of all supported touch controllers (HD810, HD1010, HD1010w, and HD1020). BrightSign s BP200 and BP900 USB button panels (HD810, HD1010, HD1010w, and HD1020) Many brands of USB Keyboards (HD810, HD1010, HD1010w, and HD1020) Many brands of USB Mouse or Trackballs (HD810, HD1010, HD1010w, and HD1020) Many brands of USB Bar Code Scanners. (supported on HD810, HD1010, HD1010w, and HD1020) Quadravox Serial Button Board AMX, Crestron, and similar control devices (serial & Ethernet) Any GPIO (open/close contact switch) button, signal, or LED (your custom board or LED display) PC (via serial port) IR remote control using the NEC Remote Control Protocols (HD810, HD1010, HD1010w, and HD1020 only). You can purchase a compatible remote from BrightSign (see Appendix A for remote control codes). Step 2: Install the BrightAuthor software Download the latest software and install it on your PC. 1. Go to the BrightSign web site: 2. Click the BrightAuthor Downloads link. 3. Follow the onscreen instructions to install the software on your PC. Note: BrightAuthor requires the latest version of Microsoft.Net Framework. If this component is not already on your PC, BrightAuthor installs it during the installation. However, if BrightAuthor needs to install Microsoft.Net Framework, the installation may take up to 45 minutes to complete and you may need to restart your PC to complete the installation process. 4
11 Step 3: Launch BrightAuthor 1. Double-click the BrightAuthor icon on your desktop. 2. (Optional) If prompted, sign in to BrightSign Network (account required). See Publishing with BrightSign Network. Step 4: Set up your BrightSign player 1. Depending on how you want to publish your presentations, create the appropriate setup files for your BrightSign units. 2. Insert the SD card or USB flash drive that contains the setup files into the BrightSign. 3. Connect your BrightSign to a display. Step 5: Add your content Your BrightAuthor presentations can include the following types of media files: Video files - BrightSign players support the following video file encodings/compressions: MPEG-2 (can be saved as an.mpg,.ts, or.vob container) MPEG-1 (can be saved as an.mpg container) H.264 (MPEG-4, Part 10) (can be saved as a.mp4,.mov, or.ts container) For further details on video file encoding and support, see the support page on the BrightSign website. Audio files BrightSign players support the following audio formats: AAC (LC - Low complexity profile) at Constant Bit Rate, as part of a video file (.mp4,.mov, or.ts) at 44.1 KHz, 48 KHz MP2 (MPEG-1 Layer 2) at Constant Bit Rate, as part of a video file (.mpg, or.ts) at 44.1 KHz, 48 KHz MP3 at Constant Bit Rate, 44.1 KHz, 48 KHz, 32 KHz at up to 224 Kbps bitrate, as a standalone file (i.e. not encoded as an audio track in a video file) AC3 5.1 passed through (un-decoded, RAW data) HDMI. Audio streams in this format are supported by BrightSign players, but will require an AC3 decoder (HDMI AV receiver). 5
12 WAV Image files - For still images, use BMP, PNG, or JPEG files. The maximum supported resolution is 1920x1080. Note: BrightSign players do not support JPEG image files with CMYK color profiles. You can convert your CMYK JPEGs to RGB JPEGs using this free web-based converter. Step 6: Create your presentations Now you re ready to start using BrightAuthor to create presentations. Just add your content and follow the directions in the next chapter of this guide to create your presentations. Step 7: Publish your presentations After creating presentations, use the publishing feature to deliver them to your BrightSign players. See Publishing Presentations for details. 6
13 CHAPTER 2 SETTING UP UNITS Before you can create and publish presentations, you must first set up your BrightSign players. How you set up your units will depend on how you want to publish presentations to the players. If you re using BrightSign Network, Local Networking, or Simple File Networking to publish your presentations, you must set up your BrightSign units by adding them to your network. Alternatively, you can set up BrightSigns for use as standalone units that are not connected to a network. With this option, you would have to manually update the BrightSign player s storage (SD card or USB flash drive) each time you want to update presentations. For more details on each of the publishing methods, see Publishing Presentations. To set up a player, you need to create setup files in BrightAuthor and add those files to a storage device (SD card or USB flash drive). Next, insert the storage into the BrightSign player. Keep in mind that this storage must remain inside the BrightSign. BrightSign units have no internal storage and therefore cannot receive content without a storage device connected. Once the storage is inserted (typically an SD card), your BrightSign is ready to receive and play presentations. Adding BrightSign players to your BrightSign Network To publish and manage presentations using BrightSign Network, you must first contact BrightSign to obtain an account name, user name, and password. After you obtain your account credentials, you can create the setup files for each unit. After you obtain your account credentials, you can create the setup files for each unit. The setup files provide details about what your network and BrightSign Network connections are, where the presentations associated with the selected group are stored, and when the presentations are scheduled. 1. Sign in to your BrightSign Network account. a. In the BrightAuthor menu bar, click Tools > Sign in to BrightSign Network. b. If prompted, enter your Account, User name, and Password, and then click Sign In. 7
14 2. On the menu bar, click Tools > Setup BrightSign Unit. 8
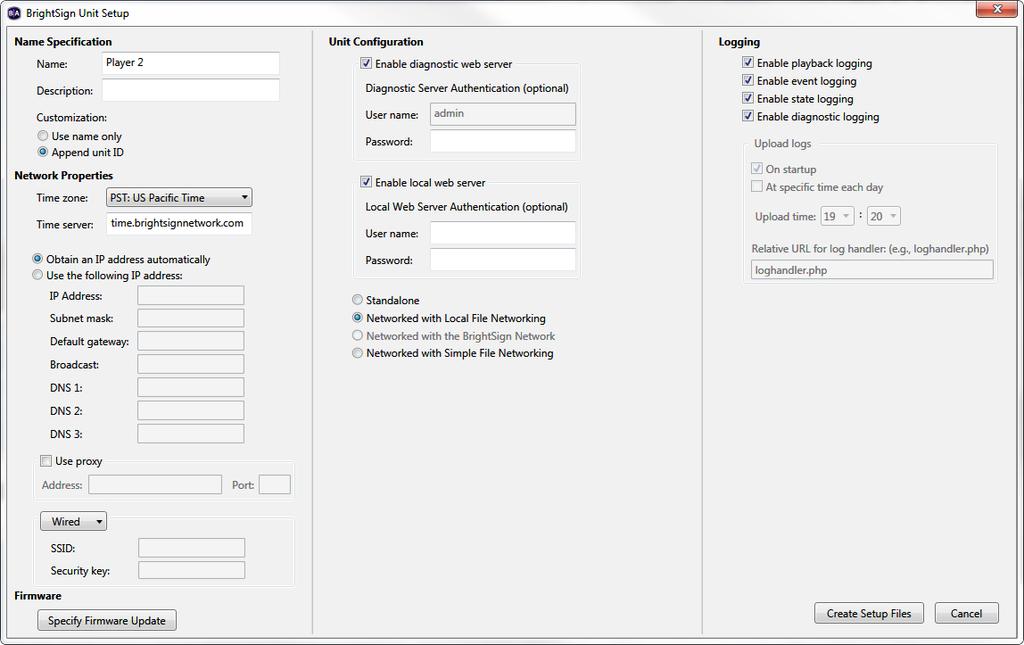
15 3. Under Name Specification, do the following: a. Enter a Name and Description for this unit. b. Select whether you want to append the unit ID to the name or use only the name. 4. Under Network Properties, set the following: Time zone: Select the time zone where the unit is located. Time server: Select the clock for this unit. IP address: Indicate whether the IP address is auto-generated or static. If you re using a static IP address, enter the parameters in the fields below. Use proxy: Check the checkbox if you want to use a proxy server. Type the address and port number in the fields below. Wired/Wireless: Indicate whether the network is wired or wireless. Enter the SSID and Security Key if the network is secured. 5. Click Specify Firmware Update to indicate whether you want to update the firmware and to which version. The Firmware Update window is divided by BrightSign model. In the section that corresponds to your BrightSign unit, select a firmware version or select Do not update, and then click OK. 9
16 6. Under Unit Configuration, click Networked with BrightSign Network, and then specify the following: (Optional) Enable diagnostic web server: Check the checkbox to enable the diagnostic web server. You can include a username and password in the text fields below for added security. (Optional) Enable local web server: Check the checkbox to enable the local web server. You can include a username and password in the text fields below for added security. Group: Use the dropdown list to select a group for the unit. Groups allow you to publish presentation schedules to multiple units simultaneously. See Managing groups and Publishing with BrightSign Network for details. Network connection frequency: Set how often you want the unit to check the server for updates. Limit content downloads: Set a time frame during which downloads can take place. Copy content from the current published schedule: Check this checkbox if you are setting up a unit but already have presentations scheduled. This will copy the current schedule to the storage device and thereby reduce initial download time when setting up the unit. 7. Under Logging, check any of the following checkboxes to enable/disable logs, and specify upload settings: Enable playback logging: Creates a log that specifies when a playlist was used. Enable event logging: Creates a log that specifies when events are triggered. Enable state logging: Enable diagnostic logging: Creates a log that provides troubleshooting information. On startup: Uploads log files each time you start the unit. At specific time each day: Uploads log files daily, at the specified time. Use the dropdown lists to pick a time. 8. (Optional) Under Rate Limit Network Download Traffic, set parameters for downloading media traffic. The options are divided into Outside content download window, During content download window, and During initial downloads. Click Unlimited download rate to set no limit. Click Default limit to use the default limit on downloads. Click Specify limit to enter a customized limit on downloads in the text field (in Kbits/second). 9. Create and install the setup files: 10
17 a. Click Create Setup Files. b. Browse to and select an SD card (recommended) or USB flash drive (HD810, HD1010, HD1010w, and HD1020 only) to store the setup files. c. Click OK. d. Turn off the BrightSign unit by unplugging the power adapter. Insert the card or flash drive into the unit. e. Turn on the BrightSign unit by reconnecting the power adapter. Important: Do not remove the SD card or flash drive from the player. Adding BrightSign players to your Local Network With local networking, the setup files provide details about where presentations are stored and whether logging options are enabled. 1. In the BrightAuthor menu bar, click Tools > Setup BrightSign Unit. 2. Under Name Specification, do the following: a. Enter a Name and Description for this unit. b. Select whether you want to append the unit ID to the name or use only the name. 3. Under Network Properties, set the following: Time zone: Select the time zone where the unit is located. Time server: Select the clock for this unit. IP address: Indicate whether the IP address is auto-generated or static. If you re using a static IP address, enter the parameters in the fields below. Use proxy: Check the checkbox if you want to use a proxy server. Type the address and port number in the fields below. Wired/Wireless: Indicate whether the network is wired or wireless. Enter the SSID and Security key if the network is secured. 11
18 12
19 4. Click Specify Firmware Update to indicate whether you want to update the firmware and to which version. The Firmware Update window is divided by BrightSign model. In the section that corresponds to your BrightSign unit, select a firmware version or Do not update, and then click OK. 5. Under Unit Configuration, click Networked with Local File Networking, and then specify the following: (Optional) Enable diagnostic web server: Check the checkbox to enable the diagnostic web server. You can include a username and password in the text fields below for added security. (Optional) Enable local web server: Check the checkbox to enable the local web server. You can include a username and password in the text fields below for added security. 6. Under Logging, check any of the following checkboxes to enable/disable logs: Enable playback logging: Creates a log that specifies when a playlist was used. Enable event logging: Creates a log that specifies when events are triggered. Enable state logging Enable diagnostic logging: Creates a log that provides troubleshooting information. 7. Create and install the setup files: a. Click Create Setup Files. 13
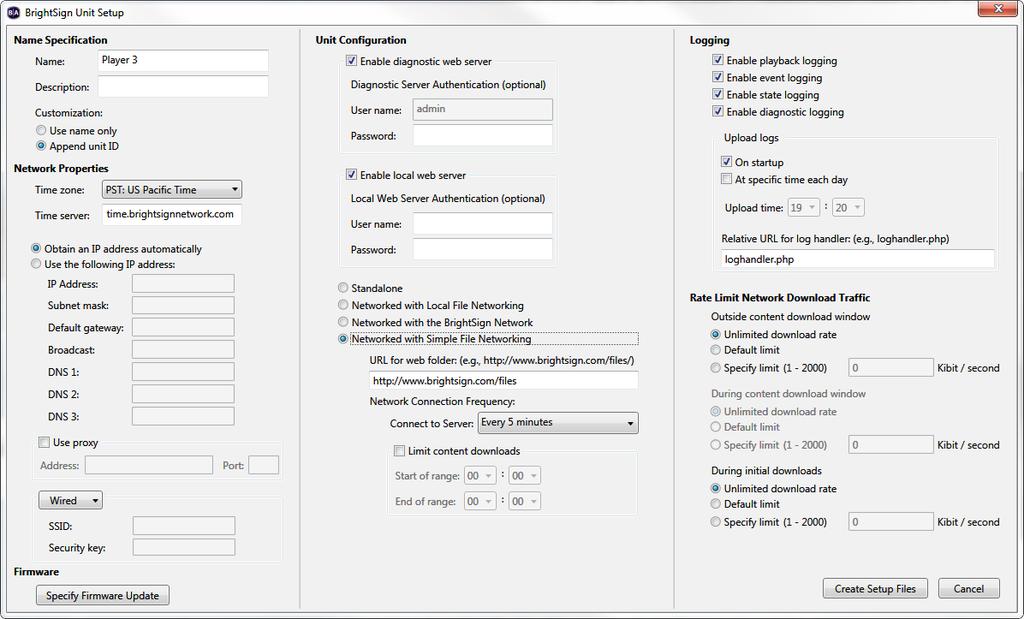
20 b. Browse to and select an SD card (recommended) or USB flash drive (supported on HD810, HD1010, HD1010w, and HD1020) to store the setup files. c. Click OK. d. Turn off the BrightSign unit by unplugging the power adapter. Insert the card or flash drive into the unit. e. Turn on the BrightSign unit by reconnecting the power adapter. Important: Do not remove the SD card or flash drive from the player. Adding BrightSign players to your Simple File Network With simple file networking, the setup file provides details about your network, the web folder associated with a unit, where presentations are stored, and when to check for updates. 1. In the BrightAuthor menu bar, click Tools > Setup BrightSign Unit. 2. Under Name Specification, do the following: a. Enter a Name and Description for this unit. b. Select whether you want to append the unit ID to the name or use only the name. 3. Under Network Properties, set the following: Time zone: Select the time zone where the unit is located. Time server: Select the clock for this unit. IP address: Indicate whether the IP address is auto-generated or static. If you re using a static IP address, enter the parameters in the fields below. Use proxy: Check the checkbox if you want to use a proxy server. Type the address and port number in the fields below. Wired/Wireless: Indicate whether the network is wired or wireless. Enter the SSID and Security key if the network is secured. 14
21 15
22 4. Click Specify Firmware Update to indicate whether you want to update the firmware and to which version. The Firmware Update window is divided by BrightSign model. In the section that corresponds to your BrightSign unit, select a firmware version or Do not update, and then click OK. 5. Under Unit Configuration, click Networked with Simple File Networking, and then specify the following: (Optional) Enable diagnostic web server: Check the checkbox to enable the diagnostic web server. You can include a username and password in the text fields below for added security. (Optional) Enable local web server: Check the checkbox to enable the local web server. You can include a username and password in the text fields below for added security. URL for the web folder: Set the location from which the player will download presentations. Do not use trailing slashes in your URL; some web servers do not support trailing slashes. Important: The URL for the web folder must be identical to the web folder URL you enter when publishing presentations. See Publishing with Simple File Networking for details. Network connection frequency: Set how often you want the unit to check the server for updates. Limit content downloads: Set a time frame during which downloads can take place. 6. Under Logging, check any of the following checkboxes to enable/disable logs, and specify upload settings: Enable playback logging: Creates logs that specify when a playlist was used. 16
23 Enable event logging: Creates logs that specify when events are triggered. Enable state logging Enable diagnostic logging: Creates logs that provide troubleshooting information. On startup: Uploads log files each time you start the unit. At specific time each day: Uploads log files daily, at the specified time. Use the dropdown lists to pick a time. Relative URL for log handler: Type the location where you want logs to be uploaded. 7. (Optional) Under Rate Limit Network Download Traffic, set parameters for download traffic. The options are divided into Outside content download window, During content download window, and During initial downloads. Click Unlimited download rate to set no limit. Click Default limit to use the default limit on downloads. Click Specify limit to enter a customized limit on downloads in the text field (in Kbits/seconds). 8. Create and install the setup files: a. Click Create Setup Files. b. Browse to and select an SD card (recommended) or USB flash drive (supported on HD810, HD1010, HD1010w, and HD1020) to store the setup files. c. Click OK. d. Turn off the BrightSign unit by unplugging the power adapter. Insert the card or flash drive into the unit. e. Turn on the BrightSign unit by reconnecting the power adapter. Important: Do not remove the SD card or flash drive from the player. Setting up BrightSign players for standalone use Standalone players are not connected to a network and must be updated manually. To change presentations/schedules, you must remove the storage card (or USB flash drive), update it on your computer, and reinsert it into the player. 17
24 18
25 Updating standalone units is the only case in which you should remove the storage card after setting up the unit. If your player has a USB flash drive slot, it is recommended that you use an SD card when setting up the unit, and keep it in the player as the internal storage. You can update the content on the SD card via a USB flash drive. See Publishing with Local Storage for details. With standalone units, the setup files provide details about where presentations are stored and whether logging options are enabled. 1. In the BrightAuthor menu bar, click Tools > Setup BrightSign Unit. 2. Under Name Specification, do the following: a. Enter a Name and Description for this unit. b. Select whether you want to append the unit ID to the name or use only the name. 3. Under Network Properties, set the following: Time zone: Select the time zone where the unit is located. Time server: Select the clock for this unit. IP address: You can still set an IP address for players that are not networked. Indicate whether the IP address is auto-generated or static. If you re using a static IP address, enter the parameters in the fields below. Use proxy: Check the checkbox if you want to use a proxy server. Type the address and port number in the fields below. 4. Click Specify Firmware Update to indicate whether you want to update the firmware and to which version. 19
26 The Firmware Update window is divided by BrightSign model. In the section that corresponds to your BrightSign unit, select a firmware version or Do not update, and then click OK. 5. Under Unit Configuration, click Standalone, and then specify the following: (Optional) Enable diagnostic web server: Check the checkbox to enable the diagnostic web server. You can include a username and password in the text fields below for added security. (Optional) Enable local web server: Check the checkbox to enable the local web server. You can include a username and password in the text fields below for added security. 6. Under Logging, check any of the following checkboxes to enable/disable logs: Enable playback logging: Creates a log that specifies when a playlist was used. Enable event logging: Creates a log that specifies when events are triggered. Enable state logging Enable diagnostic logging: Creates a log that provides troubleshooting information. 7. Create and install the setup files: a. Click Create Setup Files. b. Browse to and select an SD card (recommended) or USB flash drive (supported on HD810, HD1010, HD1010w, and HD1020 ) to store the setup files. c. Click OK. d. Turn off the BrightSign unit by unplugging the power adapter. Insert the card or flash drive into the unit. e. Turn on the BrightSign unit by reconnecting the power adapter. Important: Unless you are updating content, do not remove the SD card or flash drive from the player. See Publishing with Local Storage for details. 20

27 CHAPTER 3 CREATING PRESENTATIONS Creating a full-screen presentation In a full-screen presentation, your images or videos occupy the entire screen. 1. Create a new presentation project: a. Double-click the BrightAuthor icon on your desktop. b. Click File > New Presentation TIP: If you don t see New Presentation under File, make sure you have the Edit, Publish, or Manage tab selected in the upper-left portion of the screen. c. In the New Project window, enter a name for the presentation in the Save as field. d. In the Where field, enter the folder where you want to store the presentation. Click Browse to navigate to the desired folder. e. Select your BrightSign model, Connector type, Screen resolution, and Monitor orientation. You can view all available screen resolutions on the Support Section of the BrightSign website. Note: Additional screen resolutions are made available when you select HDMI in the Connector type field. f. Select a Monitor overscan setting to control how the image fills the display screen. No overscan: Displays images all the way to the edge of the video signal. Overscan - action safe: Restricts the image display to an area that is compatible with most displays. 21
28 Overscan title safe: Restricts the image display to an area that is much smaller than the image generated by the video signal. Tip: Experiment to find the overscan setting that works best with your display. g. Click Create. 2. Click the Full screen template, and then click Choose. 3. Add media to your Library: a. In the left portion of the screen, under the File tab, click Browse. b. Navigate to the folder where your content is stored. c. Click OK. Note: If you have a lot of large files in your content folder, it may take a while for the thumbnail images to appear. 4. Add media files to your presentation by dragging files from the Media Library folders to the playlist area. Make sure you have the Files tab selected under Media Library. a. To select a series of adjacent media files, press Shift+Click as you select the files. b. To select a group of non-adjacent files, press Ctrl+Click as you select the files. c. To set the order in which the files play, drag them to the Playlist area in the proper order. You can change the order of files already in the playlist by clicking a file and dragging it to a new position. d. To refresh the Media Library folders, click the refresh icon (next to the Browse button). e. To remove an item from a playlist, click it in the playlist area and press Delete on your keyboard. f. To change media files in the playlist without individually deleting and dragging, click File > Replace media files. In the Replace Media Files window, click Browse to select the folder that contains the files you want to add. This can be the same folder used in your Media Library or a new folder. A list of all files currently added to the playlist is displayed below Presentation Media Files. For each file you want to replace, select a new file using the dropdown lists beneath Replacement Media File. g. To create interactive events, see Making a presentation interactive. 2. (Optional) Rename the playlist: a. Click Edit in the upper-right corner of the playlist area. b. Enter a new name for the playlist. 22

29 c. Click OK. 6. (Optional) Set playback options: a. To edit settings for a single item, right-click the thumbnail in the playlist area, select Edit, and then choose the settings you want to apply to the selected item. b. To edit settings for multiple items, press Ctrl+Click to select the items in the playlist area. On the menu bar, click Edit > Selected Items, and then choose the settings you want to apply to the selected items. 7. On the menu bar, click File > Save to store your presentation. Note: Make sure you have the Edit tab selected in the upper-left portion of the screen. To save the presentation with a different name or in a different folder, select File > Save As. To export the presentation and associated content, select File > Export. Creating a multi-zone presentation In a multi-zone presentation, BrightAuthor divides the screen into rectangles called zones. You can play different content in each zone, and each zone supports a specific type of content. BrightAuthor provides a handful of multi-zone templates. You can choose one of the existing templates, or create your own (see Customizing presentations). When using a multi-zone template, you need to know which type of content you can include in each zone. The colorcoded key at the bottom of the template screen shows the available content types, and the color-coded templates indicate which type of content you can include in each zone of the templates. The following list describes the available content types: Images : Plays images. You can include multiple Images zones. Ticker : Plays an RSS feed or pre-defined text strings. You can include multiple Ticker zones. Clock : Displays the time or date. You can include multiple Clock zones. Video or Images : Plays videos and images. Video Only : Plays videos. 23
30 Audio Only : Plays audio. You can include multiple Audio Only zones. Background Image : Places an image in the background of your presentation. All other zones appear on top of the background image. When using a background image, you cannot include a Video Only zone or a Video or Images zone. You can include only one Background Image zone. Note: If you are using the HD product line, you can include one video zone per presentation. Therefore, you must choose between a Video or Images zone, a Video Only zone, or a Background Image zone. The HD series cannot display more than one of these zone types in the same presentation. 1. Create a new presentation project: a. Double-click the BrightAuthor icon on your desktop. b. Click File > New Presentation Tip: If you don t see New Presentation under File, make sure you have the Edit, Publish, or Manage tab selected in the upper-left portion of the screen. c. In the New Project window, enter a name for the presentation in the Save as field. d. In the Where field, enter the folder where you want to store the presentation. Click Browse to navigate to the desired folder. e. Select your BrightSign model, Connector type, Screen resolution, and Monitor orientation. f. Select a Monitor overscan setting to control how the image fills the display screen. No overscan: Displays images all the way to the edge of the video signal. Overscan - action safe: Restricts the image display to an area that is compatible with most displays. Overscan title safe: Restricts the image display to an area that is much smaller than the image generated by the video signal. Tip: Experiment to find the overscan setting that works best with your display. g. Click Create. 2. Click the multi-zone template you want to use, and then click Choose. 3. Add media to your Library: a. In the left portion of the screen, under the File tab, click Browse. b. Navigate to the folder where your content is stored. 24

31 c. Click OK. Note: If you have a lot of large files in your content folder, it may take a while for the thumbnail images to appear. 25
32 4. Add content to the zone playlist: a. Click the zone you want to populate. Note: Each zone has its own playlist. b. Under the File tab, drag items from the Media Library folders to the playlist area. Click Browse to change the Media Library folder. To select a series of adjacent media files, press Shift+Click as you select the files. To select a group of non-adjacent files, press Ctrl+Click as you select the files. To set the order in which the files play, drag them to the Playlist area in the proper order. You can change the order of files already in the playlist by clicking a file and dragging it to a new position. To refresh the Media Library folders, click the refresh icon (next to the Browse button). To remove an item from a playlist, click it in the playlist area and press Delete on your keyboard. To change media files in the playlist without individually deleting and dragging, click File > Replace media files. In the Replace Media Files window, click Browse to select the folder that contains the files you want to add. This can be the same folder used in your Media Library or a new folder. A list of all files currently added to the playlist is displayed below Presentation Media Files. For each file you want to replace, select a new file using the dropdown lists beneath Replacement Media File. To create interactive events, see Making a presentation interactive. 5. Repeat step 4 for each zone in the presentation. 6. Click the Layout tab to add new zones or adjust the position of your zones. To add a new zone, click the Add Zone button. In the New Zone window, type a name for the zone in the Zone name text field, and select a zone type. Click OK. To adjust the position and size of zones, drag and resize in the preview in the right portion of the screen. See Customizing template layouts for further details. 7. (Optional) Rename the playlist: a. Click Edit in the upper-right corner of the playlist area. b. Enter a new name for the playlist. c. Click OK. 8. (Optional) Set playback options: a. To edit settings for a single item, right-click the thumbnail in 26
33 the playlist area, select Edit, and then choose the settings you want to apply to the selected item. b. To edit settings for multile items, press Ctrl+Click to select the items in the playlist area. On the menu bar, click Edit >Selected Items, and then choose the settings you want to apply to the selected items. 9. (Optional) Set zone properties. See Setting zone properties for details. 10. On the menu bar, click File > Save to store your presentation. Note: Make sure you have the Edit tab selected in the upper-left portion of the screen. To save the presentation with a different name or in a different folder, select File > Save As. To export the presentation and associated content, select File > Export. Adding RSS, Text, and Media RSS Feeds Networked BrightSigns can include RSS feeds. These can include RSS feeds (text) or Media RSS (feeds that contain videos or images). Alternatively, you can create your own text feeds and add them to a Ticker zone like an RSS feed. Note: Text feeds are static, whereas RSS and Media RSS feeds are updated each time the BrightSign connects to the server. This is ideal for instant updates from sources such as Twitter. Text Feeds To add a text feed, create a text file that contains the text. Insert a line break between each text item in the text file. Save the text file and place it in your Media Library folder. Select a Ticker zone in your presentation, click the Text tab, and then drag the text file into the playlist. Repeat this step to add additional text files. RSS Feeds To add an RSS feed, select a Ticker zone in your presentation, click the RSS tab and drag the New RSS Feed icon into the playlist. When prompted, enter the URL for the RSS feed and click OK. If you want to add a Twitter feed, drag the Twitter icon into the playlist. When prompted, enter the Twitter User Name and click OK. Media RSS To add a Media RSS feed, click the Other tab below Media Library. Drag the to the playlist area. When prompted, type the URL for the feed and click OK. Media RSS Feed icon 27
34 Note: You can include multiple Ticker zones in your presentations. To adjust the update frequency for RSS feeds, click File > Presentation Properties. Under the Main tab, use the dropdown list beside RSS Update Frequency. Adding Live Video and SignChannel BrightSign models HD810, HD1010, and HD1010w support Live Videos. All networked players support SignChannel content. A subscription is required to use SignChannel. Live Video Select a Video or Images or Video Only zone. Under the Other tab, drag the Live Video icon to the playlist area. To edit the video volume and time on screen, double-click the thumbnail in the playlist area. When prompted, make the desired edits. SignChannel Under the Other tab, drag the SignChannel icon to the playlist area. Note: SignChannel content can only be in one zone of your presentation. Adding and creating Dynamic Playlists A Dynamic Playlist enables you to easily update and share content in multiple presentations. For example, if you need to add daily announcements to your presentations and you don t want to update each presentation separately, you can add a Dynamic Playlist to all of your presentations and insert a new video announcement in the Dynamic Playlist each day. When you upload the revised Dynamic Playlist to the network, every presentation that includes the Dynamic Playlist receives the new content, so a single update reaches multiple presentations. To use Dynamic Playlists, you must have a BrightSign Network account. Creating a Dynamic Playlist: 1. Click the Create tab in the upper-left portion of the screen. 2. On the menu bar, click File > New Dynamic Playlist. You can also open previously created Dynamic Playlists by clicking File > Open Dynamic Playlist. You can then make edits to the playlist. 28
35 3. Add files to your Media Library by clicking the Browse button and selecting a folder that contains the files you want to include in your Dynamic Playlist. 4. Drag the files to the playlist area. 5. Click the Upload to Network button in the upper-right portion of the screen. 6. You will be prompted to save the playlist. Click Yes. The Save As window will open. Type a name for your playlist and click Save. The Save Complete window will open. Click OK. The playlist will now upload onto the BrightSign Network. Click OK. Now, all presentations that contain the Dynamic Playlist will automatically receive the new content. You can change the content of the Dynamic playlist at any point by opening the playlist (File > Open Dynamic Playlist) and dragging new media files into the playlist area. Adding Dynamic Playlists: 1. Open a presentation project. Note: If you don t see Open Presentation under File, make sure you have the Edit, Publish, or Manage tab selected in the upper-left portion of the screen. 2. Click the Edit tab. 3. Under the Other tab, drag the Dynamic Playlist icon to the playlist area. 4. The Add Dynamic Playlist window will open. From the drop-down list, select which Dynamic Playlist you want to link to the current presentation. Click OK. Adding and creating Local Playlists A Local Playlist allows you to customize which Dynamic Playlist is used in a presentation depending on the player. For example, if you are using BrightSign players at a dozen different locations, and the presentations are the same except for variations in the content of the Dynamic Playlists, you only need to create and update one presentation that uses a Local Playlist rather than a dozen that use different Dynamic Playlists. 1. Click the Other tab in the Media Library. 2. Drag and drop a Local Playlist where you would normally add a Dynamic Playlist. 29
36 3. Enter a unique State name. 4. Select a desired Default playlist. If no Dynamic Playlist is assigned to a player in a Local Playlist, then the player will automatically use the Default playlist instead. Note: If a player is not assigned a Dynamic Playlist and no default is set for the Local Playlist, then the player will skip to the next item in the presentation. Adding Video and Mjpeg Streams All networked players can play Video and Mjpeg streams. State Name: Specify the unique name for the stream state. URL for video stream: Enter a valid URL for the stream. Rotation (Mjpeg only): Specify the clockwise rotation of the streaming video. Time on screen: Specify the duration (in seconds) that the stream will be played. This option is only available in non-interactive presentations. To customize the duration in an interactive presentation, use a Timeout or Media End event. Making a presentation interactive You can use BrightAuthor to create interactive presentations. Interactive presentations respond to interactive events, such as input from buttons or other GPIO devices, or from devices connected to a BrightSign communication port. The supported communication methods vary by BrightSign model. RS232 serial devices: HD410, HD810, HD1010, HD1010w, and HD1020 USB devices (such as touch screens, mice, keyboards, barcode scanners, IR remote controls): HD810, HD1010, HD1010w, and HD1020 (see Appendix A for remote control codes) Ethernet devices: HD210, HD210w, HD220, HD1010, HD1010w, and HD
37 To make your presentation interactive, complete the following steps: 1. Open a presentation project. If you haven t already created a presentation, see Creating Presentations for details. 2. Add files to your Media Library by clicking the Browse button and selecting a folder that contains the files you want to include in your presentation. 3. Click a zone you want to make interactive. Note: Multi-zone presentations can include both non-interactive and interactive zones. 4. Make the zone interactive. In the upper-right portion of the screen beside Playlist type, click Interactive. 5. Drag the desired content into the playlist area. 6. Choose a Home Screen. The Home Screen is the first media file in the playlist. It is where the interactive presentation begins (within a particular zone). Home Screens usually include one of the following: An attract video that loops until the user provides input A list of options from which the user can choose the next action (e.g. an Interactive Menu) By default, the first item you drag into an interactive playlist will become the Home Screen. It is identified by the Home icon. You can change the Home Screen at any time by double-clicking the desired file in the playlist and checking the Set as initial state box. 7. Define Interactive Events. Interactive events link files in the playlist and determine what must occur before a file transitions to another file. In the user interface, files are referred to as states, where the current file is the current state, and the file transitioned to is the next state. In this guide, creating and linking interactive events between files will be referred to as defining events : a. In the Event Toolbar, click the interactive event icon that corresponds to the type of event you want to define. For example, to define what happens when a user presses button 1 on a button board, click. b. Click (and hold) the file name below the thumbnail image of the current state. This media file is what the user sees before performing the interactive event you are about to define. 31
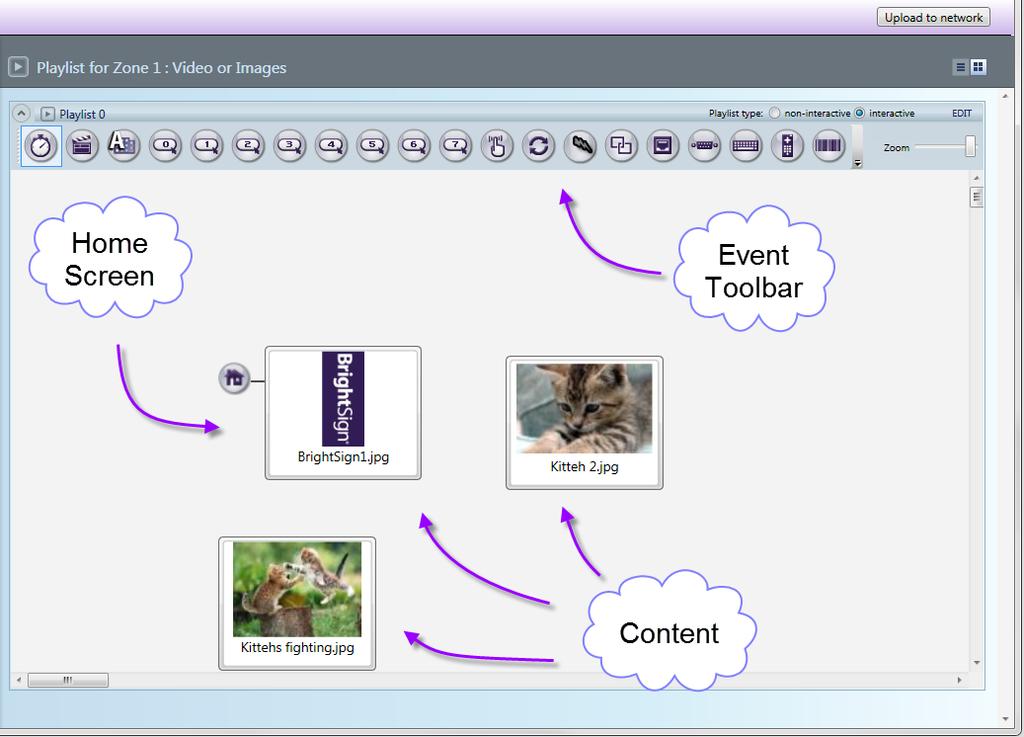
38 32
. d.")
39 Note: The first interactive event must begin with the Home Screen. c. Drag the hand pointer to the thumbnail image of the media file you want to play next (the next state). d. Repeat steps a c to define the remaining interactive events. 33

40 Subsequent interactive events can start with any item and correspond to any other item in the playlist. For example, you can set the first interaction to display an image when the user presses button 1 from the Home screen. By defining a new event with the same event icon, you can set a second interaction to display another media file when the user presses button 1 again. Note: Make sure your defined events work in a loop. In the above screenshot, a user can transition from the Home Screen to the other images by pressing button 1 or button 2. After a set period of time (indicated by the timeout events), the presentation will return to the Home Screen. Multiple interactive events can be utilized to transition from state to state. You can also apply events to multiple items. Click and drag in the playlist area to create a selection box. Then, define the interactive event from one media file and it will be created for all selected files. To select non-consecutive files, press and hold Ctrl while clicking items. In the upper-right portion of the screen, you can use the Zoom control to adjust your view of the playlist area. When you switch between multiple interactive zones, BrightAuthor will remember the zoom setting last used for each zone. If you don t see the event you want in the playlist toolbar, click the arrow to the left of the Zoom control. Here, you can add or remove event icon buttons from your toolbar. You can also access Event icons by clicking the Events tab under Media Library. When creating an event with an Event icon from the Events tab, drag the Event icon onto the thumbnail of the media file you want to be the current state. An Event window will automatically open. Here, you can specify which media file you want to be the next state. See below step (e) for details. e. (Optional) Edit transitions. You can further adjust how your media files transition from state to state by double-clicking the Event icons (or right-clicking and then clicking Edit). 34
41 For example, if you create an event with the Timeout Event icon, the media file displayed in your presentation will transition to the next state after a certain period of time. You can adjust this time period by double-clicking the Timeout Event icon between the two media files and changing the duration in the Timeout Event window. The Event window that opens when double-clicking a created Event icon is the same window that automatically opens when you drag an event icon from the Events tab. The window always presents options specific to the type of interactive event chosen. However, every Event window displays the following options: Transition to new state: Use the dropdown list to specify which file in the playlist will be the next state. Return to prior state: If you select this option, the presentation will revert to the previous media file when the interactive event is performed. Remain on current state: If you select this option, the state will not change when the interactive event is performed. This option is useful for creating changes within one media file. You can create these changes by adding commands. See Adding Commands for details. Advanced: Click the Advanced arrow to reveal the display options and commands section. Here you can set how you view the interactive events between states in the playlist area. Show line draws a line between the media files. Show label creates a label either to the Right or Bottom of the media file, indicating transitions from states. See Adding Commands for details on commands. f. (Optional) Edit files. You can edit individual files in the playlist by right-clicking and then clicking Edit. The Media Properties window will open. 35

42 Here, you can view/change the State name and Current file. Use the dropdown list beside Select different file to swap the file with another in the playlist area. This is convenient for keeping the interactive events you have defined with the original file. You can also replace media files under File > Replace Media Files. See Creating Presentations for details. Use the dropdown list beside Transition to create a special transition effect when the file appears on the display. Check the Set as initial state checkbox to change the file to make the file the Home Screen. Use the dropdown list beside Transition (image files only) to create a special effect for the image. Click the Advanced arrow to store the image in a cache, set display mode for video files (2D, 3D side-by-side, 3D top-over-bottom), or add commands. See Adding Commands for details. g. You can delete a defined event (or file) at any time by clicking the icon/thumbnail and pressing Delete on your keyboard. 36

 field, enter the number of seconds you want the item to display, and then click OK. Sets the action that occurs after a video or audio file finishes playing.")
43 Adding Interactive Events Interactive events can include any of the following. For each, make sure you define the next state after dragging the icon onto the current state: Event Icon Description Displays an item for a predetermined period of time before the next action occurs automatically. To define the length of the timeout interval, double-click the Timeout icon in the playlist area. In the Specify timeout (seconds) field, enter the number of seconds you want the item to display, and then click OK. Sets the action that occurs after a video or audio file finishes playing. Sets the action that occurs when a specific GPIO button/input is pressed or activated. By default, the playlist toolbar includes several GPIO buttons that you can use to define interactions. Sets the action that occurs when a specific BP900 or BP200 button is pressed. There are six icons: BP900A, BP900B, BP900C, BP200A, BP200B, and BP200C. See BP900 and BP200 Button Boards for details. 37

44 Event Icon Description Synchronizes content with another BrightSign on the same network. To define the connection, drag the Synchronize icon onto the current state. When the Synchronize Event window opens, enter a trigger in the Specify synchronization keyword field, and then click OK. Note: The same event/trigger must be defined for each transition you want synchronized. Sets the action that occurs when a BrightSign player receives input from a network device. Use this event when you want an external device to control BrightSign players using UDP (User Datagram Protocol or Universal Datagram Protocol). To define the trigger, drag the UDP Input icon onto the current state. When the UDP Input Event window opens, enter the network address for the external device in the Specify UDP input field, and then click OK. Sets the action that occurs when a BrightSign player receives specific input from a device connected to the serial port. To define the input, drag the Serial Input icon onto the current state. When the Serial Input Event window opens, enter the serial string that triggers the next event in the Specify serial input field. You can also specify whether you want to assign input to a User Variable under the Advanced options. Select Input specifies variable if the name of the User Variable will be specified in the serial-input string or Specify fixed variable if you want to choose the User Variable in BrightAuthor. Sets the action that occurs when the user touches the specified rectangular area on a touch screen. To define the area, drag the Rectangular Touch icon onto the current state. When the Add Touch Event window opens, drag the box to resize the touch area (or enter the exact Size and Position). To add additional touch regions to the selected item, click Add Touch Region, define the parameters, and then click OK. 38


45 Event Icon Description Sets the action that occurs when a BrightSign player receives specific input from a keyboard. To define the keyboard input, drag the Keyboard Input icon onto the current state. When the Keyboard Input Event window opens, enter the keyboard input that triggers the next event in the Specify keyboard input field, and then click OK. Sets the action that occurs when a BrightSign player receives input from a device connected to the USB port. To define the trigger, drag the USB Input icon onto the current state. When the USB Input Event window opens, enter the USB input that triggers the next event in the Specify USB input field, and then click OK. Sets the action that occurs when BrightSign receives specific input from a remote control (IguanaWorks USB transceiver required). To define the remote input, drag the Remote Input icon onto the current state. When the Remote Input Event window opens, enter the remote character that triggers the next event in the Specify remote input field, and then click OK. See Appendix A for remote control codes. When combined with Sync Events, synchronizes multiple zones across separate displays. To define the zone message, drag the Zone Message icon onto the current state. When the Zone Message Event window opens, specify the zone message trigger. Use this event with multi-zone video walls. For synchronizing multi-zones in one display, use a Link Zones event. Note: The same event/trigger must be defined for each transition you want synchronized. Synchronizes content in another zone. To define the link, drag the Link Zones icon onto the current state. When the Link Zones Event window opens, enter the trigger in the Specify link keyword field, and then click OK. Note: The same event/trigger must be defined for each transition you want synchronized. 39
46 Event Icon Description Sets the action that occurs when a BrightSign unit, connected to a compatable USB GPS device, enters or exits a defined geographical region. Set the center of the region by entering the Latitude and Longitude. Then define the circular size of the region by entering the Radius in Miles or Kilometers. Note: You can create more than one enter or exit region from a single state. Performs commands at specific times during video playback. To define the commands and times, drag the Video Time Code icon onto the current state (video file). When the Video Time Code Events window opens, click Add Time Code, enter the Timeout interval, select the Command and Parameters from the corresponding lists, and then click OK. For more details, see Adding Commands. Adding Media Lists and Play Files Media Lists and Play Files are convenient tools for defining interactive events with many files. They allow you to compile your files into one big group that appears as a single thumbnail in your playlist area. Only files of the same type can be gathered in a Media List or Play File. Therefore, both are divided into three categories for each media type: Media Lists - Image List, Audio List, and Video List. Play Files - Image Play File, Audio Play File, and Video Play File. Under the Other tab, there is an icon for each List and File type. To create a Media List or Play File, drag the appropriate icon into the playlist area of a corresponding zone. Media List By default, each time an item transitions to a Media List, the next file in the list will play and exit the list after a timeout (images) or when the file finishes playing (video and audio). Alternatively, you can set the list to shuffle files or cycle through every file in the list before exiting and transitioning to the next state. 40
47 41
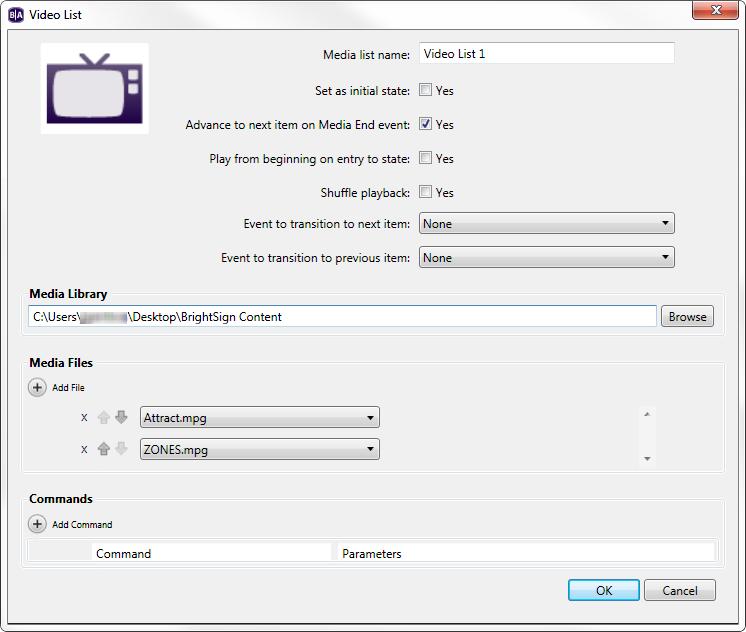
48 After you set your zone to Interactive and drag a Media List icon into the playlist area, the List window will automatically open. Here you can set the following parameters for your List: Media list name: Create a unique name for the list. Set as initial state: Check this checkbox to make the list your Home Screen. Advance to next item on media end event: Check this checkbox to set the list to cycle to the next file in the list after a timeout or media end event. If you leave this box unchecked, the list will play one file each time it is transitioned to and select the next file in the list upon subsequent transitions. Note: If you are creating an Image List, this parameter will say Advance to next item on Image Timeout instead. Image Timeout (seconds): This option is only available if you are creating an Image List. You can specify the length of time each image remains on screen. You can also use decimal values to specify the image timeout in milliseconds (for example, = 1500msec). Play from beginning on entry to state: Check this checkbox to set the list to play from the beginning upon entry into the list. This box is only enabled if you have checked the above Advance to next item on media end event. If you leave this box unchecked, subsequent transitions to the list will play the next file in the cycle after a user exits the list (e.g. via a command). Shuffle playback: Check this checkbox to randomize the order in which files are played from the list. Event to transition to next item: Select an interactive event that allows the user to transition to the next file in the list. After selecting the event type, you must specify a trigger. Event to transition to previous item: Select an interactive event that allows the user to transition to the next file in the list. After selecting the event type, you must specify a trigger. Note: If you leave event transitions on the default, timeouts and media end events will automatically cause transitions. Media Library: Click Browse to select the folder that contains all the files you want to include in the list. Media Files: Add individual files to the list by clicking the Add File button and using the dropdown list. Only files contained in the folder you selected above will be available in the dropdown list. Commands: Add commands to the list. See Adding Commands for details. You can edit properties of your Media Lists under File > Presentation Properties > Media List. See Setting presentation properties for details. 42

49 Play File Play Files also combine files into a list you can view in one window (or as one thumbnail in the playlist area). However, Play Files function quite differently. They allow transitions to specific files within the group. In addition, any type of interactive event can cause a transition to a Media List. Play Files, on the other hand, can only be transitioned to via input from BP900/BP200, UDP, Serial, Keyboard, or USB. However, any type of event can transition out of Play File and to a new state. Make sure you use zones that match the Play File type you want to use. 43

50 After setting your zone to Interactive and dragging a Play File icon to the playlist area, the Play File window will automatically open. Here you can set the following parameters for your List: State name: Create a unique name for the Play File. This name will show up in the thumbnail in the playlist area. Transition (Image Play Files only): Use the dropdown list to create a special effect when a user transitions to an item in the Play File list. Files: This list displays files added to your Play File. Each file has a Key and File Path. o Key: The key is the specific interactive event that will cause a transition to a particular file. Because you define the interactive events with the keys in the Play File, you do not need to specify the events again when creating a transition to the Play File. For example, if you define a USB Input event that links an item to the Play File, the option to Specify USB Input will be disabled and replaced with <any>. When a user performs an event via USB that matches a key, the corresponding file will play. o File Path: This is the location of the file on your computer. o Display Mode: Only Video Play Files have a display mode. By default, files are set to 2D, but if you are using a 3D video, you can select 3D side-by-side or 3D top-over-bottom when adding your files. Add File: Click this button to add items to the Play File. Here, you can specify the Key, File Path (use the Browse button to navigate to the desired file), and Display Mode if using a video file (use the dropdown list to select a display mode). Click OK when finished. 44
51 Import Table: Click this button to import a previously created list of files. Navigate to your saved table and click Open to add the files to your Play File list. This table must have the Key, File Path, File Name, and Video Display Mode (if applicable) properly outlined. For a detailed explanation on importing a table for a Play File state, read the article on our website. Commands: Add commands to your Play File here. See Adding Commands for details. Click OK when you are finished. Adding Live Text These two features allow you to customize content for more engaging presentations. Live Text is an image laced with various text fields. With Live Text, you can layer both static and updateable RSS text on top of images or videos and customize the position/size of the text in relation to the background. Interactive Menus are DVD-style menus that users can navigate across with interactive events. By linking separate media to items in the Interactive Menu, you can allow users to interactively transition to a new state of their choice. Because they can serve as a bridge to many items and outline everything available to the user, Interactive Menus make great Home Screens. Live Text To use Live Text, drag the Live Text icon from the Other tab to the playlist area and set the following parameters: State name: Type a unique name for the Live Text file. Set as initial state: Check the checkbox to make the Live Text your Home Screen. Background Image: Click Browse to locate and select a background image for your Live Text. Update Live Text Data: Click this button to immediately update all RSS feeds. 45

52 Size: Adjust the size of your text fields. W corresponds to the width of the text field, and H corresponds to the height of the text field. Position: Adjust the position of your text fields. X corresponds to the position of the text on a horizontal axis. Y corresponds to the position on a vertical axis. 46
53 Note: Input numbers in the Size and Position fields for more precise results. Alternatively, you can click and drag the text fields in the preview to adjust size/position. Offset next: Check this box to automatically set a position for subsequent text items (in relation to the most recent text item). Input the distance for the next text item in the X and Y fields. Text type: Use the dropdown list to select Fixed Text, System Variable, Live Text Data, Media Counter, or User Variable. o Fixed text: Select this option if you want to enter your own text. A text field will appear below Text Type where you can type your customized text. As you type, you can view the text in the preview image. o System variable: This can include the device serial number, firmware version, or script version. Use the dropdown list to select one for your text field. o Live Text data: Select this option if you want an updateable RSS feed in your text field. Select the desired RSS feed from the dropdown list in the Live Data Feed Name field Note: RSS feeds that appear in this dropdown list must first be created in the Data Feeds tab, which can be accessed through File > Presentation Properties. For more details on creating and customizing RSS feeds, see Setting Presentation Properties. If you know the exact title for the content you want, input it in the Item title field. Or, if you know the index number, input it in the Item index field. When using the Item index, subsequent RSS text fields will automatically contain the next item in the index (i.e. the previous index number + 1). o Media counter: Media Counters display how many times a file in the presentation has played. Each Media Counter field must correspond to a specific file. Use the dropdown list to pair the Media Counter field with a file in the presentation. To use this feature, Media Counters must first be enabled. Under File > Presentation Properties > Variables tab, check the Automatically create media counter variables checkbox. o User variable: User Variables are customizable values that can be used in commands. User Variables in Live Text display the current value of the specified User Variable. Use the dropdown list to specify a User Variable for the text field. To use this feature, you must first create your User Variable(s). For more details, see Setting presentation properties. Validate Live Text Data: Click this button to verify a valid source (URL) for your feed. 47

54 Set Text Parameters: Click an individual text field, and then click this button to edit parameters for that text field. Subsequent text fields will automatically contain the text parameters of the previous text field. You can edit the Number of lines, Rotation, Alignment, Foreground text color, Background text color (this appears behind each text field), Transparency (for background text colors), Font, and, under the Advanced arrow, the Background bitmap and Safe text region. See Setting zone properties for details on text parameters. Note: BrightAuthor 2.5 and earlier versions required a Background Text Color for each text field. Now, you can use the checkbox beside Background Text Color to decide whether you want to include a Background Text Color. If you choose to include one, the Transparency setting will become enabled and you can edit the Transparency of the Background Text Color. If you choose not to include a Background Text color, the letters/numbers of the text fields will appear directly over the background image. 48
55 Add Text Item: Click to add a new text field. Select the text field in the preview image and edit the parameters as explained above. Previous/Next: Click these buttons to quickly switch between text fields. Advanced: Click to add commands. See Adding Commands for details. As mentioned earlier, Live Text can be layered over images or videos. Live Text Images: If you want to use a still image behind your Live Text, you should add the Live Text to an Images zone. Complete the following steps for each zone you want to contain Live Text: a. Select an Images zone. Make the zone Interactive. Drag the Live Text icon from the Other tab. b. In the Add Live Text window, type a State name and then click Browse beside Background Image. Locate and select your desired background image file. c. Click Add Text Item. Adjust the Size and Position of your text field by clicking and dragging over the preview image, or inputting exact numbers in the corresponding fields. d. Select your Text Type and input the desired text. e. Click Set Text Parameters and edit text parameters as desired. See Setting zone properties for details on each parameter. Click OK when finished. f. Repeat steps c through f for each text field. g. Click OK. Live Text Videos: Layering Live Text over a video requires two zones because it is not possible to add Live Text to a Video Only zone. Instead, you can add Live Text to an Image zone and place it on top of a Video Only zone. To help you position text over the video, you should get an image file cut from the video you want to use. Complete the following steps: a. Under Layout, click Add Zone. Add a Video Only zone. b. Click Add Zone again and add an Images zone. Resize the Images zone so that it completely covers the Video Only zone. c. Click Playlist, and use the Zone dropdown list to select your Video Only zone. Drag the desired video file from the Media Library to the playlist area. Make the zone Interactive. 49
56 d. Use the Zone dropdown list to select the Images zone. Make the zone Interactive. Drag the Live Text icon from the Other tab. e. In the Add Live Text window, click Browse beside Background Image. Locate and select an image file taken from the video file used in the Video Only zone. f. Click Add Text Item. Adjust the Size and Position of your text field by clicking and dragging over the preview image or inputting exact numbers in the corresponding fields. g. Select your Text Type and input the desired text. h. Click Set Text Parameters and edit text parameters as desired. See Setting zone properties for details on each parameter. Click OK when finished. i. Repeat steps f through h for each text field. j. When all text fields are in place, click Clear beside Background Image. k. Click OK. Clearing the Background Image removes the image from the Image zone. The text fields will appear directly over the video. By temporarily including a Background Image taken from the video, you can better position the text fields in relation to the video playing behind the Image zone. Adding Interactive Menus To create an Interactive Menu, add a Video or Images zone to your presentation. Set the zone to Interactive and drag the Interactive Menu icon from the Other tab to the playlist area. The Add Interactive Menu window is divided into two tabs, General and Menu Items. General: In this tab, you will select an image for your Interactive Menu and define how a user navigates across it. State name: Create a unique name for your Interactive Menu. Background Image: Click Browse to select an image you want to act as your menu display. Important: The background image is not simply a background for the actual menu items. It must contain all images and text you want displayed in the menu. 50
57 Set as initial state: Check this checkbox to set the Interactive Menu as the Home Screen. The Navigation section is where you define how a user navigates across the menu. Click the dropdown menu for each option (Up, Down, Left, Right, Enter, Back, Next clip, Previous clip) and select the type of event you want to utilize (GPIO Event, Serial input, etc.). A second dropdown menu or text field will appear. Specify the button or input you want to correspond to the action you are defining. Let s say you want to define how to move Up in the menu, and you want to use a keyboard event. In the dropdown list across Up, select Keyboard Input. A text field will appear below where you can specify a button. Type U here. Now, when a user presses U on a keyboard, the cursor will move up along the menu items. You don t need to define every possible action. You can simply leave the dropdown list on the default None. However, to create a more intuitive experience between the user and menu, it might be best to define each possible action. The following actions can be defined in the Navigation section: Up, Down, Left, Right: These are the primary actions a user will perform to navigate from one menu item to the next. Enter: With this button, a user can select a menu item and transition to a state associated with that menu item. Back: Once a user presses the defined input for Enter on a menu item, a state you have chosen in the Menu Items tab will play. However, if you define a Back button/input, the user can return to the menu at any point. Next clip: If a user is viewing a media file associated with a menu item, pressing the defined input for Next clip will play the media file that corresponds to the next menu item. Previous clip: Pressing the defined input for Previous clip will stop the media file currently playing, and play the media file associated with the previous menu item. Advanced: Click this arrow to add commands to your Interactive Menu. See Adding Commands for details. Here you can also store the background image in a cache. Check the checkbox to save the background image for faster loading in the future. 51
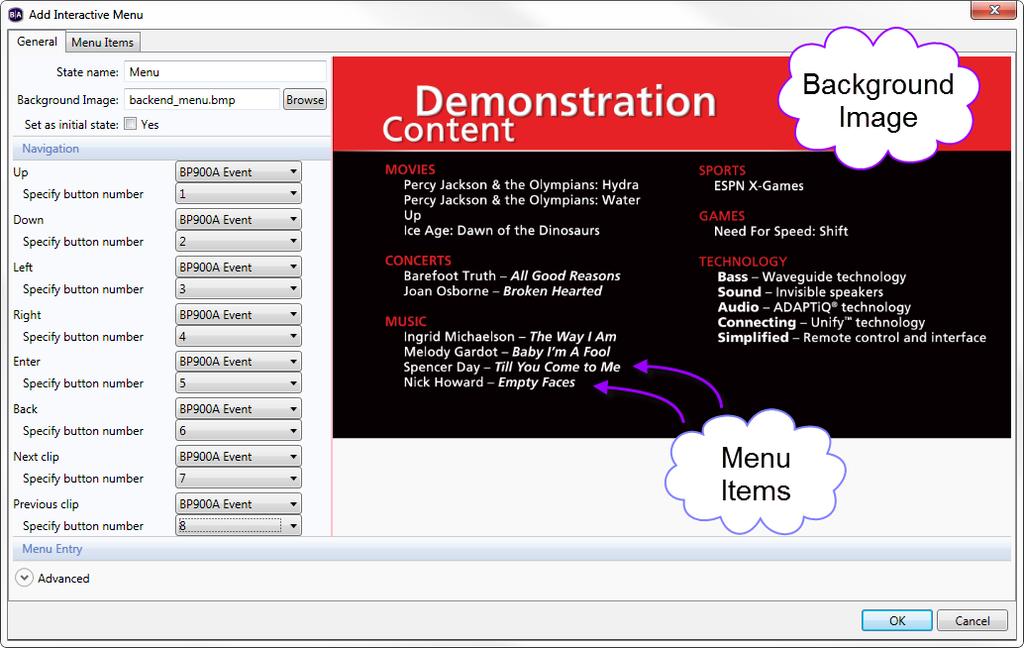
58 52
59 Menu Items: In this tab, you will create the menu items and further specify how a user navigates across the menu. Menu Item Number: Every Menu item has a unique Menu item number. The first you create is 1, the second is 2, and so on. Here, you can navigate between the Menu items you have created by clicking the Previous and Next buttons. Everything else in the window corresponds to the Menu item you have selected here. The Menu Items section is where you can create and adjust individual menu items. Add Menu Item: Press this button to create a Menu item. The Add Menu Item window will open. There are two items, Active Image and Inactive Image. The Active image serves as a cursor that tells the user what Menu item they are on. The Inactive image is what will appear beside the current Menu item when the user navigates to a different Menu item. Use the Browse buttons to select each image. Click OK to create the menu item. By default, subsequent Menu Items you create will contain the same Active and Inactive Images. Tip: If you want nothing to appear beside a Menu item when it is not selected, choose an Inactive image that matches the color of the background. Position: Adjust the position of your Menu item by inputting specific numbers. The X field corresponds to the position of the Menu item on a horizontal axis. The Y field corresponds to the position of the Menu item on a vertical axis. Alternatively, you can click the Active image in the preview image and drag it to the desired position. The Inactive Image will appear in the same spot when the Menu Item is not selected. Offset next: Check this checkbox to specify a position for subsequent Menu items in relation to the previous one. Input the data in the X and Y fields. Selected Image: This is the Active image you selected when creating the Menu item. Click Browse to change the image at any point. Unselected Image: This is the Inactive image you selected when creating the Menu item. Click Browse to change the image at any point. Store image in cache: This checkbox is beneath the Selected and Unselected image. Check the box to save the corresponding image in a cache so that you can use it more readily in the future. 53
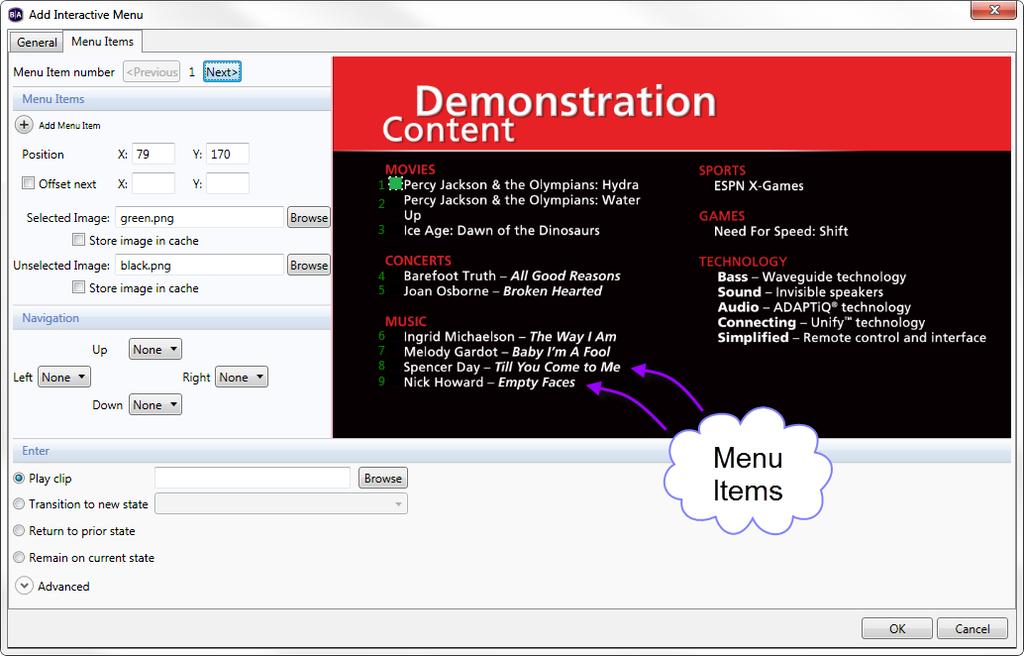
60 54
61 The Navigation section is where you determine how a user moves from one Menu item to the next. Although the actions were previously defined in the General tab, this is where you specify which Menu Item a specific action brings a user to. The possible actions are Up, Down, Left, and Right. In this section, each action has a dropdown list that displays the Menu item number for each created Menu item. By default, None is selected for each. Selecting a number in the dropdown list will allow the user to navigate from the current Menu item to the specified Menu item by performing the corresponding action. Let s say you are adjusting the features of Menu item number 1, meaning 1 is displayed between the Previous and Next buttons at the top of the window. If you click the dropdown list for the Down action and select 2, the user can now navigate from Menu item 1 to Menu item 2 by pressing the Down button (remember, this button is whatever you previously defined in the Navigation section of the General tab). The Enter section is where you can determine what happens when a user presses the Enter button on a particular Menu item. Set the following parameters: Play clip: Click the Browse button to select a file you want to play when the user presses the Enter button. If you select an image, the option to specify a timeout period will appear. Transition to new state: Here a dropdown list contains all the media files previously placed in the playlist area of your zone. Select a file to allow the user to transition to that state after pressing Enter. Return to prior state: If you select this option, the presentation will display the previous state when a user presses Enter. Remain on current state: If you select this option, the state will not change when a user presses Enter. However, you can add commands to create changes that occur while remaining on the Interactive Menu. Click the Advanced arrow to reveal the commands section. See Adding Commands for details. Click OK when you are finished. Keep in mind that if you choose Transition to new state instead of Play clip, the state will not return to the Interactive Menu. 55

62 Adding User Defined Events This feature allows you to save interactive events you use often so that you can use them more readily in the future. Of course, all individual events can be added to your toolbar for immediate use. But with User Defined Events, the parameters for your event are saved. For example, if you frequently use a 5 second Timeout Event, you can create a User Defined Event with this specification. In the future, instead of using the Time Event icon and setting it to 5 seconds each time, you can use your previously created User Defined Event. In addition, you can group multiple events into your custom event. When defining an interaction with it, any interactive event within the User Defined Event will cause a transition to the next state. This will save you time by eliminating the need for defining each individual event. Simply create a list of events, save it as a User Defined Event, and define the event between the two states. Click the User Events tab under Media Library. To create/edit User Defined Events, click Manage. The Manage User Events window will open. This window contains a list of all previously created User Defined Events. Complete any of the following: Create a User Defined Event: Click Add User Event. When prompted, type a unique name for your User Defined Event. Click Add Event and use the dropdown list to select an interactive event. Repeat for each event you want included in the User Defined Event. Click OK when you are finished. 56
63 Edit a User Defined Event: Click the appropriate name from the list in the Manage User Events window. Make the desired changes in the User Event window. Organize User Defined Events: Click the arrows to arrange the order of the list by moving a User Defined Event up or down. Delete User Defined Events: Click the X beside a name from the list. Or, click Delete All to erase the entire list. To use a User Defined Event in a playlist: Click the User Events tab under the Media Library. All previously created User Defined Events will be listed here. Drag the appropriate icon from the list onto the current state. In the Events window, specify which media file you want to be the Next State. Follow the usual steps for defining the event (see Making a presentation interactive for details). You can also import previously created User Defined Events into BrightAuthor, or export them from BrightAuthor. Click File > Import User Events / Export User Events. If you are importing, browse to the location where the events are stored. If you are exporting, browse to a location where you want to export all User Defined Events currently saved in BrightAuthor. Adding Event Handlers There are a variety of cases in which you might want your presentation to sit at a blank screen. The Event Handler fills this role as an empty place holder in your presentation. Here are a few examples of cases in which adding an Event Handler would be convenient: You want a blank screen for a Home Screen so no content will play until the presentation is activated You want to add a command that is performed before the first file in the presentation plays You want the presentation to sit at a blank screen when finished instead of looping You want a video file to remain on the final frame upon finishing instead of looping Although Event Handlers contain no content, you can add commands and interactive events into and out of them. For example, if you set the Event Handler as the Home Screen and define a BP900 event linked to the first file, the display will 57
64 sit at a blank screen until a user presses the BP900 button, and then the first file will begin playing. Or, if you set the Event Handler as the Home Screen and add a Sync command to it, you can synchronize your presentations/displays before the first files begin playing. To use an Event Handler, click the Other tab under Media Library and drag the icon into the playlist area. Double-click the thumbnail in the playlist area to give a State Name, Set as initial state (Home Screen), and add commands. Click the Advanced arrow to add commands. See Adding Commands for details. Define interactive events into and out of the Event Handler as you would with any other state. See Making a presentation interactive for details. If you define a Media End event after a video and link it to an Event Handler, the video will remain on the last frame when finished. For other file types such as images or audio, the display will sit at a blank screen when the files finish playing. Adding Commands Adding commands to your playlist allows you to add extended functions to your presentations. Commands can help control displays and devices (Display On, GPIO On, etc.) or perform additional actions when interactive events are performed (Pause Video, Set Volume, etc.). You can add commands in two distinct ways. If you add a command to the interactive event, the command will be performed when that event occurs. When adding to an interactive event, you can either select a Next State or choose to Remain on current state. If you add a command to a media file, the command will be performed when the file plays (regardless of which state/event transitions to it). Adding Commands to an Interactive Event Double-click the event icon in the playlist area and click the Advanced arrow. Click Add Command and use the dropdown list to specify a command. Use further dropdown lists and fields to set additional parameters for the command. By default, Next State will be selected. You change the Next State by using the dropdown list and selecting a different file 58
65 in the playlist area. Or, if you want the command to occur within the original file and create no state transition (e.g. increase volume of the video playing), select Remain on current state. Adding Commands to a Media File Double-click the media file s thumbnail in the playlist area and click the Advanced arrow. Click Add Command and use the dropdown list to specify a command. Use further dropdown lists and fields to set additional parameters for the command. Note: There are a few other options under the Advanced arrow. They will depend on the type of file you have selected. For image files, you will see a Store Image in Cache checkbox. Check this box to save the file in a cache and more readily use it in the future. For video files, you will see Video Display Mode. Depending on the type of video file, you can use the dropdown list to select 2D, 3D side-by-side, or 3D top-over-bottom. By default, 2D is selected. Here is the list of commands you can add to your presentations: BP900A, BP900B, BP900C - Set output: Turns on and off different LED lights; sets LED lights to slow, medium, or fast blink when a button is pressed on the BP900 button board(s). BP200A, BP200B, BP200C - Set output: Turns on and off different LED lights; sets LED lights to slow, medium, or fast blink when a button is pressed on the BP200 button board(s). Set audio output: Specifies the type of audio you want to use for this item. Note: If you set a command to change the audio output or audio mode of a media file while it is playing, then the change will not go into effect until the media is restarted or is played through again. Set volume: Specifies the volume level. Enter a value between 0 and 100. Increment volume: Specifies how much the volume level increases with each interaction. Decrement volume: Specifies how much the volume level decreases with each interaction. Mute/Unmute digital audio: Turns digital audio output on or off. Mute/Unmute analog audio: Turns analog audio output on or off. Mute/Unmute HDMI audio: Turns HDMI audio output on or off. Send UDP: Sends a command to the device using UDP protocols. 59
66 Serial-send string (EOL): Sends the specified string to the specified serial port. This command adds a carrier return at the end of the string. Serial-send string (no EOL): Sends the specified string to the specified serial port. This command does not add a carrier return at the end of the string. Serial-send byte: Sends the specified byte to the specified serial port. Serial-send bytes (comma separated): Sends the specified bytes to the specified serial port in comma separated format. Synchronize: Specifies the synchronization trigger. Send zone message: Specifies the zone message trigger. Link zones: Specifies the link zones trigger. GPIO on: Turns on the specified GPIO output. Other GPIO outputs are not affected. GPIO off: Turns off the specified GPIO output. GPIO set state: Enables you to turn each GPIO line on or off. Pause video: Pauses video playback. Resume video: Resumes video playback. Enable monitor power save mode: Turns the monitor's power saving mode on. Disable monitor power save mode: Turns the motor's power saving mode off. BrightControl - Display on: Turns the display on. BrightControl - Display off: Turns the display off. BrightControl - Send Ascii string: Sends a CEC command. BrightControl - Philips set volume: Sets Philips TV volume. Pause: Pauses presentation playback for a specified number of milliseconds. Reboot: Restarts the BrightSign unit. Set variable: Sets a specified value for a previously created User Variable. In the Variable field, type the exact name of the variable in between two dollar signs on each side. For example, $$variable1$$. BrightAuthor will not recognize the variable without the dollar signs. In the Value field, specify a new value for the variable. For more details on variables, see Setting presentation properties. 60
67 Reset variables: Resets all User Variables to their original values and all Media Counters to 0. For more details on variables, see Setting presentation properties. Switch to Presentation: Switches to a different presentation. The parameters set when creating the second presentation must match the first presentation. This includes: BrightSign Model, Connector Type, Screen Resolution, Monitor Orientation, and Monitor Overscan. In addition, make sure you type the exact name for the second presentation when creating the command. Adding Conditional Targets Conditional targets allow you to change the settings of an event transition depending on the value of a User Variable. You can set multiple conditional targets for a single event. 1. Expand the Advanced options while creating or editing an event. 2. Click the Set Conditional Targets button. 3. Click Add Additional Target in the Conditional Targets window, or click a preexisting Conditional Target to edit. 4. Select the User Variable that will trigger the Conditional Target. 5. Enter the value of the User Variable in the Equals field. The Conditional Target will only take effect when the value of the User Variable is equal to the number in this field. 6. Select Transition to new state if you want to use the dropdown list to specify which file in the playlist will be the next state. 7. Select Return to prior state if you want the presentation to revert to the previous media file when the interactive event is performed. 8. Select Remain on current state if you want the state to remain unchanged when the interactive event is performed. 9. Expand the Advanced options if you want to add Commands to the Conditional Target. See Adding Commands for more information. 10. Press OK to save the conditional target. 61
68 Changing User Variables There are several ways you can change the values of User Variables in a BrightSign presentation. See Setting Presentation Properties for more information about creating User Variables and setting default values. Web Browser You can view and update User Variables using a web browser. To do this, your computer must be connected to the same local network as the BrightSign player(s) you are using: 1. Navigate to Tools > Setup BrightSign Unit. 2. Check the Enable local web server box. 3. Enter a user name and password for the web server if desired. 4. Set the rest of the options in the BrightSign Unit Setup window and complete the unit configuration process (see Chapter 2 for more information on setting up units). 5. Wait for the player to complete the entire boot process. 6. Use the address bar of a web browser to navigate to device ip port For example, if the ip address of your BrightSign player is , then you would enter :8080. You will be provided with a web page that lists all User Variables and allows you to modify them. UDP or Serial Input Event You can change the value of User Variables using input from UDP or serial ports: 1. Create a new UDP Event or Serial Input Event, or edit an existing one. 2. Type <any> into the Specify UDP input field. If you are using a serial port, type <*> into the Specify serial input field. 3. Expand the Advanced options and check the box labeled Assign input to variable. 4. Select Specify fixed variable if you want to choose a fixed User Variable in the BrightAuthor software. Use the dropdown list to choose which User Variable you want to be modified The UDP/serial string must be input as <variable value>. 62
69 5. Select Input specifies variable if you want the UDP/serial input string to dynamically specify which User Variable is being modified. The UDP/serial string must be input as <variable name> : <variable value>. 6. Press OK to save the settings. Note: If you select Input specifies variable, you can modify more than one User Variable with a single UDP Input Event or Serial Input Event. Use the following UDP/Serial string: <variable name> : <variable value>!! <variable name> : <variable value> 63
70 CHAPTER 4 THE TD1012 The TD1012 is a freestanding, all-inclusive, digital signage solution that you can easily place on tables, counters, or wherever signage is most needed. The TD1012 s high resolution screen and BrightSign player are built into a durable steel casing and can be powered for approximately 12 hours by the rechargeable battery. Creating presentations for your TD1012 is fundamentally similar to creating presentations for any other BrightSign player. See Creating Presentations for details. However, the following details are unique to the TD1012: In the New Project window, the Screen resolution dropdown list only contains 1360x768x60p. This is the only resolution supported by the TD1012. The TD1012 does not support Audio. You may include videos in your TD1012 presentations, but no audio associated with the videos will play. Note: When creating presentations for your TD1012 unit, you may encounter audio settings. For example, the Audio Only zone is still available when you click Add Zone. None of these audio options apply to the TD1012. The TD1012 only supports wireless network connectivity. There are only two System templates included in the Template window (after clicking Create). However, you can still add/adjust zones and save your own custom templates. See Customizing template layouts for details. The TD1012 only supports interactivity through network commands. Use the UDP Input icon to define interactive events. See Making a presentation interactive for details. Note: You can also use Timeout, Media End, Synchronize, Zone Message, Link Zones, and Video Time Code events. As usual, clicking the Layout tab allows you to adjust the position and size of your zones. However, the preview image in the right portion of the screen is actually rotated 90 degrees. This is because the preview image is always landscape oriented, but the TD1012 s screen is actually a portrait display. Therefore, when adjusting zones for your TD1012 presentation, refer to the image on the left side of the screen. This will show you how the zones will appear to a viewer when the presentation is playing. 64

71 Publishing and customizing TD1012 presentations is no different from other BrightSign units. See Publishing Presentations and Customizing Presentations for details. 65
72 CHAPTER 5 BP900 AND BP200 BUTTON BOARDS The BP900 and BP200 button panels are LED-based touch devices that allow you to add interactivity to your BrightAuthor presentations. These button panels are compatible with any BrightSign device that has a USB port: HD810, HD1010, HD1010w, and HD1020. There are a total of six event icons in BrightAuthor: BP900A, BP900B, BP900C, BP200A, BP200B, and BP200C. The letters A, B, and C correspond to USB ports. If the event you are defining is for a button pad connected to USB port 1, use A. If it is for a button pad connected to the second port, use B. Let s say you have two available USB ports. If you want to connect two button boards, a BP900 and a BP200, you would use the BP900A and BP200B icons to define events for each. Using BP900 and BP200 Events 1. Make your presentation interactive by clicking Interactive in the upper-right side of the playlist area. 2. Define the BP900 or BP200 interactive event: a. Choose the proper event icon based on what kind of button pad you are using (BP900 or BP200), and how many button pads you are connecting. b. Define the BP900 or BP200 event as you would any other event. See Making a presentation interactive for details. Note: If the icon you need is not in the toolbar, click the toolbar arrow in the upper-right portion of the screen to add it to your toolbar. Or, you can click the Events tab and drag the icon to the playlist area. c. The BP900 Event or BP200 Event window will automatically open. Specify the following parameters for your event: Specify Button Number: Select a button on the button pad that you want the user to press to transition to the next state. 66
. Transition to new state: Click to specify which media file in your playlist will be the next state when the specified button is pushed.")
73 Press (First Touch): Determine whether you want the transition to occur after one push of the button. Press Continuous: Determine whether you want the user to continually press the button. Specify a repeat interval in the text field (in milliseconds). Transition to new state: Click to specify which media file in your playlist will be the next state when the specified button is pushed. Return to prior state: Click to revert the presentation to the previous media file when the specified button is pushed. Remain on current state: If you select this option, the state will not change when the interactive event is performed. This option is useful for creating changes within one media file. You can create these changes by adding commands. See Adding Commands for details. 67
74 Advanced: Click the Advanced arrow to reveal the display options and commands section. Here you can set how you view the interactive events between states in the playlist area. Show line draws a line between the media files. Show label creates a label either to the Right or Bottom of the media file that indicates transitions from states. See Adding Commands for details on commands. d. Click OK. Repeat steps a. through c. to define the remaining button pad events. 68
75 CHAPTER 6 PUBLISHING PRESENTATIONS After you create and save a presentation, you re ready to publish it to your BrightSign player or players. There are four ways to publish a presentation: Local Storage BrightSign Network Local Networking Simple File Networking The method you use to publish should depend on several factors, such as whether your player is networked, what kind of network you have access to, and how many players you have. Publishing with Local Storage Publishing a presentation using Local Storage lets you copy your presentations to an SD card or USB flash drive. When you want to update your scheduled presentations, you must save the updated content on the SD card or USB flash drive and insert it into your BrightSign player. Unless you are updating content, an SD card or flash drive should always remain connected to the BrightSign player. However, if your BrightSign has a USB port, it is recommended that you create setup files with an SD card, leave it permanently in the player as internal storage, and use a USB flash drive whenever you need to update content. You can publish updated content to the USB flash drive, insert it into the BrightSign to update the SD card, and then remove the flash drive. To publish via Local Storage, complete the following steps: 1. In BrightAuthor, save the presentations you want to publish by clicking File > Save As. 2. Add the presentations you want to publish: a. Click the Publish tab on the upper-left side of the screen. b. Click Local Storage (below the Publish tab). 69
76 c. Under Presentations, click Browse to navigate to and select the folder where your presentations are stored. 3. Create schedules for each presentation you want to publish: a. From the list under Presentations, select a presentation. b. Drag the presentation to a time slot during which you want it to play. c. Click and drag the selection handles to adjust playing time within one day. d. If you want the presentation to be a recurring event, double-click the highlighted presentation name in the calendar. In the Schedule Presentation window, set the following parameters: Presentation: Specify which presentation you want to schedule. Active all day, every day: Check this checkbox if you want the presentation to play 24 hours a day. Event time: Specify the time during the day when you want the presentation to play by using the dropdown lists beside Start and End. Recurring Event: Check this checkbox if you want the presentation to recur during specified times. Recurring pattern: Specify the frequency for the recurrence. If you click Daily, you can specify Every day, Every weekday, or Every weekend. If you click Weekly, you can view a checklist of every day of the week. Specify the individual days of the week when you want the presentation to play. Range of recurrence: Use the calendar beside Start to specify the first day you want the presentation to play. If you want the event to stop recurring at some point, click End by and use the calendar to specify the date. If you don t want it to stop, click No end date. e. Click OK. The adjustments made will be represented in the calendar. f. If prompted, indicate whether you want to replace the existing schedule and then click OK. g. Repeat steps b through e for each presentation you want to schedule. 70

77 4. (Optional) Specify debugging, logging, and firmware preferences: a. Under Debugging, use the checkboxes to enable/disable serial debugging and system log debugging. b. Click Specify Logging and use the checkboxes in the Logging window to enable/disable playback, event, and diagnostic logging. 71
78 c. Click Specify Firmware Update and indicate whether you want to update the firmware and to which version. The Firmware Update window is divided by BrightSign generation. In the section that corresponds to your BrightSign unit, select a firmware version or Do not update, and then click OK. 5. Publish the presentation to your storage device: a. Insert a storage device into your computer (SD card or USB flash drive). b. Under Publish to, click Browse to navigate to and select the drive where your storage device is located. c. If updating the SD card in the BrightSign via a USB flash drive, check the Publish zip file for USB upgrade checkbox. Leave unchecked if updating to an SD card or USB flash drive that will remain in the BrightSign. d. Click Publish. When the Publish complete window opens, click OK. 6. Update your BrightSign player: a. Turn off the BrightSign player by unplugging the power adapter. b. Insert the storage device from step 4 into the player. c. Turn on the player by reconnecting the power adapter. d. Leave the storage device in the player. Note: If an SD card is already in the player and you are updating it via USB, you don t need to turn off the player. Insert the USB flash drive into the player, wait until the Update Complete message appears on the display, and then remove the flash drive. Publishing with BrightSign Network Publishing with BrightSign Network enables you to distribute your presentation to your BrightSign players via an Internet connection. BrightSign Network requires a subscription, so you must first contact BrightSign to obtain an account name, user name, and password. Once your BrightSign players are set up with BrightSign Network (see Adding BrightSign units to your BrightSign Network), you can upload your presentations to the BrightSign Network server and publish schedules. Your players will update their content automatically whenever they connect to the server. 72

79 Publishing with BrightSign Network sends presentations and schedules to groups instead of players. Groups can contain any number of players, and you can move BrightSign players from one group to another at any point. See Managing your Network for details. To publish with BrightSign Network, complete the following steps: 73
80 1. In BrightAuthor, sign into BrightSign network by clicking Tools > Sign in to BrightSign network. 2. Open the presentation you want to publish by clicking File > Open presentation. 3. Click Upload to network (in the upper-right portion of the screen) to upload the presentation to the server. 4. Specify which group you want to publish to: a. Click the Publish tab in the upper-left portion of the screen. b. Click BrightSign Network (above the calendar). c. Under Selected Group to Schedule, use the dropdown list to specify the group you want to publish to. 5. Create schedules for each presentation you want to publish: a. From the list under Presentations, select a presentation. b. Drag the presentation to a time slot during which you want it to play. c. Click and drag the selection handles to adjust playing time within one day. d. If you want the presentation to be a recurring event, double-click the highlighted presentation name in the calendar. In the Schedule Presentation window, set the following parameters: Presentation: Specify which presentation you want to schedule. Active all day, every day: Check this checkbox if you want the presentation to play 24 hours a day. Event time: Specify the time during the day when you want the presentation to play by using the dropdown lists beside Start and End. Recurring Event: Check this checkbox if you want the presentation to recur during specified times. Recurring pattern: Specify the frequency for the recurrence. If you click Daily, you can specify Every day, Every weekday, or Every weekend. If you click Weekly, you can view a checklist of every day of the week. Specify the individual days of the week when you want the presentation to play. 74
81 Range of recurrence: Use the calendar beside Start to specify the first day you want the presentation to play. If you want the event to stop recurring at some point, click End by and use the calendar to specify the date. If you don t want it to stop, click No end date. e. Click OK. The adjustments made will be represented in the calendar. f. If prompted, indicate whether you want to replace the existing schedule and then click OK. g. Repeat steps b through e for each presentation you want to schedule. 6. (Optional) Specify debugging, and firmware preferences: a. Under Debugging, use the checkboxes to enable/disable serial debugging and system log debugging. b. Click Specify Firmware Update and indicate whether you want to update the firmware and to which version. The Firmware Update window is divided by BrightSign generation. In the section that corresponds to your BrightSign player, select a firmware version or Do not update, and then click OK. 7. Publish the presentation: a. Click Publish Schedule. When the Publish Complete window opens, click OK. Publishing with Simple File Networking Publishing with Simple File Networking enables you to distribute your presentation to your BrightSign players via a web folder. Your player must be set up for Simple File Networking and with the correct URL for web folder used during setup. See Adding BrightSign units to your Simple File Network for details. 1. In BrightAuthor, save the presentations you want to publish by clicking File > Save As 2. Add the presentations you want to publish: a. Click the Publish tab in the upper-left side of the screen. b. Click Simple File Network (above the Calendar). c. Under Presentations, click Browse to navigate to and select the folder where your presentations are stored. 3. Create schedules for each presentation you want to publish: a. From the list under Presentations, select a presentation. 75

82 b. Drag the presentation to a time slot during which you want it to play. c. Click and drag the selection handles to adjust playing time within one day. d. If you want the presentation to be a recurring event, double-click the highlighted presentation name in the 76
83 calendar. In the Schedule Presentation window, set the following parameters: Presentation: Specify which presentation you want to schedule. Active all day, every day: Check this checkbox if you want the presentation to play 24 hours a day. Event time: Specify the time during the day when you want the presentation to play by using the dropdown lists beside Start and End. Recurring Event: Check this checkbox if you want the presentation to recur during specified times. Recurring pattern: Specify the frequency for the recurrence. If you click Daily, you can specify Every day, Every weekday, or Every weekend. If you click Weekly, you can view a checklist of every day of the week. Specify the individual days of the week when you want the presentation to play. Range of recurrence: Use the calendar beside Start to specify the first day you want the presentation to play. If you want the event to stop recurring at some point, click End by and use the calendar to specify the date. If you don t want it to stop, click No end date. e. Click OK. The adjustments made will be represented in the calendar. f. If prompted, indicate whether you want to replace the existing schedule and then click OK. g. Repeat steps b through e for each presentation you want to schedule. 4. (Optional) Specify debugging and firmware preferences: a. Under Debugging, use the checkboxes to enable/disable serial debugging and system log debugging. b. Click Specify Firmware Update and indicate whether you want to update the firmware and to which version. The Firmware Update window is divided by BrightSign generation. In the section that corresponds to your BrightSign unit, select a firmware version or Do not update, and then click OK. 5. Publish the presentation: a. Under Simple File Networking Parameters, click Set Parameters. b. Under Unit Configuration: Type the URL for your web folder. This must match the URL you entered when setting up your device for Simple File Networking. (Optional) Connect to server: Use the dropdown list to specify how often you want the player to connect to the server. 77

84 (Optional) Limit content downloads: Click Yes or No to determine whether you want to place a time limit on downloads. If you click Yes, use the dropdown lists beside Start of range and End of range to specify the times during the day when content can be download. 78
85 c. (Optional) Under Logging, check any of the following checkboxes to enable the corresponding logs and specify upload settings: Enable playback logging: Creates logs that specify when a playlist was used. Enable event logging: Creates logs that specify when events were triggered. Enable diagnostic logging: Creates logs that provide troubleshooting information. On startup: Uploads log files each time you start the unit. At specific time each day: Uploads log files daily, at the specified time. Use the dropdown lists to pick a time. Relative URL for log handler: Type the location where you want logs to be uploaded. d. (Optional) Under Rate Limit Network Download Traffic, set parameters for download traffic. The options are divided into Outside content download window, During content download window, and During initial downloads. Click Unlimited download rate to set no limit. Click Default limit to use the default limit on downloads. Click Specify limit to enter a customized limit on downloads in the text field (in Kbits/seconds). e. Click OK. f. Under Publish to, click Browse to navigate to and select the location where you want to store the files. If you have a mapped drive or shortcut that points to your web folder, publish to that location. If you use FTP to transfer files to your web folder, publish to a folder on your computer and then use FTP software to copy the files to your web folder. g. Click Publish. When the Publish Complete window opens, click OK. Publishing with Local Networking Publishing a presentation using a Local Network lets you distribute your presentation to your BrightSign units without using an Internet connection. This is convenient if you only have a small number of BrightSign units and are on a local network. With a Local Network, the BrightSign player does not need to wait until it polls the web server to receive updates. 79

86 You can simply select a BrightSign unit on BrightAuthor and publish a presentation directly to it, sending updates immediately. 80
. c. Under Presentations, click Browse to navigate to and select the folder where your presentations are stored. 3.")
87 1. In BrightAuthor, save the presentations you want to publish by clicking File > Save As 2. Add the presentations you want to publish: a. Click the Publish tab in the upper-left side of the screen. b. Click Local Network (above the Calendar). c. Under Presentations, click Browse to navigate to and select the folder where your presentations are stored. 3. Create schedules for each presentation you want to publish: a. From the list under Presentations, select a presentation. b. Drag the presentation to a time slot during which you want it to play. c. Click and drag the selection handles to adjust playing time within one day. d. If you want the presentation to be a recurring event, double-click the highlighted presentation name in the calendar. In the Schedule Presentation window, set the following parameters: Presentation: Specify which presentation you want to schedule. Active all day, every day: Check this checkbox if you want the presentation to play 24 hours a day. Event time: Specify the time during the day when you want the presentation to play by using the dropdown lists beside Start and End. Recurring Event: Check this checkbox if you want the presentation to recur during specified times. Recurring pattern: Specify the frequency for the recurrence. If you click Daily, you can specify Every day, Every weekday, or Every weekend. If you click Weekly, you can view a checklist of every day of the week. Specify the individual days of the week when you want the presentation to play. 81
88 Range of recurrence: Use the calendar beside Start to specify the first day you want the presentation to play. If you want the event to stop recurring at some point, click End by and use the calendar to specify the date. If you don t want it to stop, click No end date. e. Click OK. The adjustments made will be represented in the calendar. f. If prompted, indicate whether you want to replace the existing schedule and then click OK. g. Repeat steps b through e for each presentation you want to schedule. 4. (Optional) Specify debugging and firmware preferences: a. Under Debugging, use the checkboxes to enable/disable serial debugging and system log debugging. b. Click Specify Firmware Update and indicate whether you want to update the firmware and to which version. The Firmware Update window is divided by BrightSign generation. In the section that corresponds to your BrightSign player, select a firmware version or Do not update, and then click OK. 5. Publish the presentation: a. Under Publish, select a BrightSign player. If publishing to a new player, click New unit. Then click the button. The Add BrightSign Unit window will open. Type the IP address of the new BrightSign unit, and click OK. If you want to publish to a previously added BrightSign player, click Networked units. Select a unit from the list of all networked units. Click to refresh the list. b. Click Publish. When the Publish Complete window opens, click OK. Note: When publishing to a new player, the BrightSign Unit Setup window will open after you click Publish. See Adding BrightSign Players to your Local Network for details. 82

89 CHAPTER 7 CUSTOMIZING PRESENTATIONS This chapter will teach you all the different ways you can customize your presentations. Setting zone properties Whether you re creating a single-zone or a multi-zone presentation, you can customize the settings for each zone. 1. Open a presentation project by clicking File > Open Presentation. 2. Click on the Edit tab and then the Playlist subgroup. 3. Below Zone in the upper-left portion of the screen, click the zone whose properties you want to change. 4. Click Zone Properties. Set any of the following in the Edit Zone window: Editing Video Only and Video or Images Zones View mode: Use the dropdown list to specify a setting for videos. Scale to fit: Scales the video to fill the screen without maintaining the aspect ratio. The video may appear stretched. Letterboxed and centered: Centers the video and adds black borders on the top and bottom. The aspect ratio is maintained. Fill screen and centered: Centers the video and fills the screen. The aspect ratio is maintained. Audio settings: Use the dropdown list to specify the type of audio you want to use in the zone. You can select Analog audio, Digital Audio (Stereo PCM), Digital Audio (Raw Multichannel), or Analog audio with HDMI Raw Multichannel. 83
90 Image mode: Use the dropdown list to specify a setting for images. Note: This option also appears when editing Images zones, but not when Video Only zones. Center image: Centers the image without scaling (may result in cropping if the image is too large). Scale to fit: Scales the image to fit the zone. The image is displayed as large as possible with the correct aspect ratio. Scale to fill and crop: Scales the image to completely fill the zone while maintaining the aspect ratio. Scale to fill: Scales the image to fill the zone without maintaining the aspect ratio. Initial volume (Video): Set the initial volume for video files (0-100). Initial volume (Audio): Set the initial volume for audio files (0-100). Live video: Set attributes for live video feeds. Use the dropdown lists to select the Input and Video Standard types. In the text fields, enter parameters for Brightness, Contrast, Saturation, and Hue. Editing Ticker Zones Number of lines: Set the number of lines of text in the Ticker zone. Time to display each line: Set how long each line displays in the Ticker zone (in seconds). Rotation: Use the dropdown list to select the angle of text in the Ticker zone. Alignment: Use the dropdown list to set whether text is left aligned, right aligned, or centered in the Ticker zone. Text appearance: Set whether text is animated or static in the Ticker zone. 84

91 Foreground text color: Click Choose and select a color for text in Ticker or Clock zones. Background text color: Click Choose and select the color behind text in Ticker or Clock zones. Transparency: Set the transparency of the Background text color in Ticker or Clock zones. 85
92 Font: Click Browse and set a font for text in Ticker or Clock zones. You can use any TrueType font. Click Reset to System Font to reset the font. Advanced: Click the Advanced arrow to reveal the following options: Background bitmap: Click Browse to navigate to and select a file for a background image. Click Yes or No to determine whether you want to stretch the image to fill the zone. You can add a background bitmap to Ticker or Clock zones. Safe text region: Define the location (X,Y fields) and size (Width, Height fields) of the text region within the zone. Editing Other Zones The settings in the Edit Zone window correspond to the type of zone you have selected. Here is a list of all the settings you can edit for other types of zones: Images zone: Image mode. Audio Only zone: Audio settings, initial volume (audio) Clock zone: Rotation, foreground text color, background text color, transparency, font, background bitmap, and safe text region. Background Image zone: You cannot click Zone Properties for a Background Image zone. Choose a background image by selecting the Background Image Zone and dragging a file to the playlist area. If you only want a background color (instead of an image), do not add a Background Image zone. The background screen color can be changed in the Presentation Properties window. See Setting presentation properties for details. 5. Click OK. 6. Repeat steps 2 4 for each zone you want to edit in your presentation. Customizing template layouts If the predefined zone template layouts do not meet your needs, you can create your own templates. Complete the following steps: 86
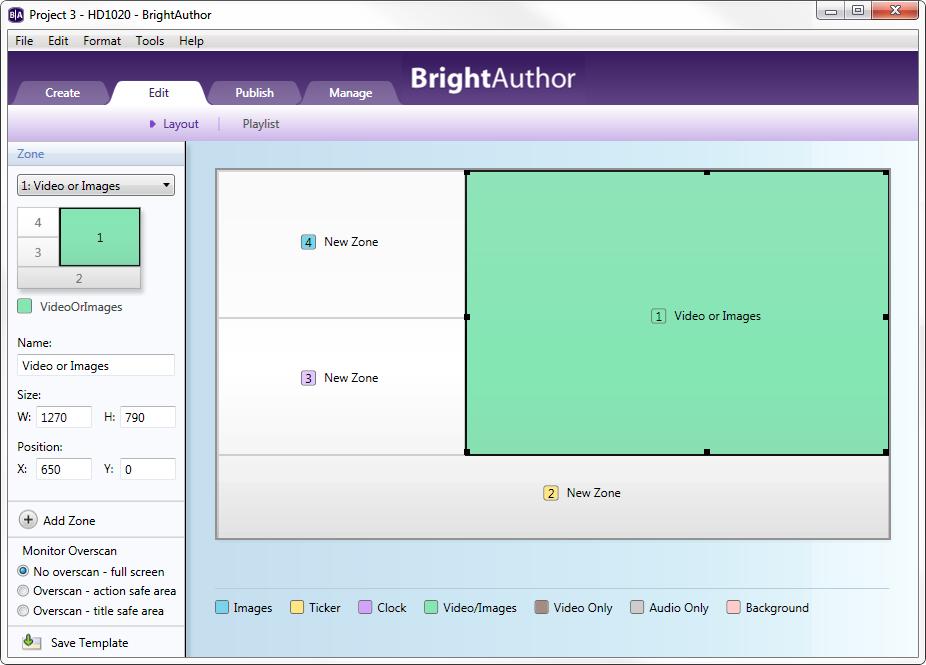
93 87
94 1. Create a presentation project by clicking File > New Presentation and select a template that is most similar to the layout you want to use. 2. Click Layout (below the Edit tab) and create a template by doing any of the following: Change the position of a zone by clicking the zone and dragging it to the desired position. Alternatively, you can enter the Position information in the left side of the screen. X corresponds to the position on a horizontal axis, and Y corresponds to the position on a vertical axis. Add a zone by clicking Add zone, typing a Zone name, selecting the Zone type, and then clicking OK. Make two or more zones the same size by pressing Ctrl+Click to select the zones you want to resize. On the menu bar, click Format > Make same size and select a resize option. Align two or more zones by pressing Ctrl+Click to select the zones you want to align. On the menu bar, click Format > Align and then select an alignment option. Center two or more zones by pressing Ctrl+Click to select the zones you want to center. On the menu bar, click Format > Center in form and then select Horizontally or Vertically. Tip: You can layer zones on top of each other. For example, you can place a Ticker or Clock zone on top of a Video Only zone, and then edit the transparency in the Ticker or Clock zone to control how much of the underlying video is visible. Remove an unwanted zone by clicking it in the preview image and then pressing Delete on your keyboard. Rename a zone by clicking it in the preview image, and then typing in the Name text field on the left side of the screen. Note: The preview image is always displayed as a landscape. If your display is a portrait and you have selected this monitor orientation when creating the project, refer to the portrait image in the left side of the screen to see how your zones will appear to a viewer. 3. Click Save Template (in the lower-left portion of the screen). Enter a name for the template, and then click OK. 4. To use a custom template in a new presentation, click the View dropdown list in the upper-right corner of the Template window. Select User Defined Templates to view your templates. Click a template and then click Choose to use it in the presentation. 88

95 Setting presentation properties You can edit properties that apply to an entire presentation. These are based on your current default property settings. To change the default settings, see Setting default properties. To edit presentation properties, complete the following steps: Open a presentation project by clicking File > Open Presentation; on the menu bar, click File > Presentation Properties. Main Set any of the following: Connector type: Use the dropdown list to indicate the type of connector you are using for your display (HDMI, VGA, or Component). Screen resolution: Use the dropdown list to set a resolution supported by your display. 89
96 RSS update frequency: Use the dropdown list to set how often you want the BrightSign to check for RSS feed updates. Background screen color: Click Choose to select a background color that appears behind your zones. Language: Use the dropdown list to select a language for your presentation. I/O Click Input or Output next to each GPIO port to indicate whether the port is sending or receiving information. Interactive Set any of the following: Serial: For each serial port: Port (number), Baud rate, Data bits, Parity, and Stop bits. Toggle between Binary and ASCII mode (Protocol), and set EOL characters (CR, LF, LF + CR) for Send and Receive EOL. Check the Invert Signals checkbox to invert the send pin and receive pin of the serial port. Note: the standard part is port 0 and the 5V TTL port is port 1. UDP: The UDP destination address (type below Specific IP Address in dotted quad form, or click All devices on the local subnet), and the UDP Destination and Receiver ports. Touch: Click a Cursor option to set whether the cursor is always hidden, always visible, or present only if there is more than one touch region on the screen (auto display cursor). Check the Flip coordinates checkbox to reverse the coordinates of the check screen. Use this option only if the touch screen coordinates appear to be reversed. Buttons Use the dropdown list to select the type of button panel you are connecting to your BrightSign. Click Automatically configure which buttons are enabled or Specify which buttons are enabled and check the checkboxes to manually enable buttons. Repeat for each button panel you are connecting. Audio Set any of the following: 90

: If you clicked Yes above, type a number in the text field to specify how long Media Lists will wait through a")
97 Audio Minimum and Maximum Volume (0 100). HDMI Minimum and Maximum Volume (0 100). Media List Set any of the following: Return to start after inactivity: Click Yes to set Media Lists to return to the start of the list after a period of inactivity. Inactivity timeout (seconds): If you clicked Yes above, type a number in the text field to specify how long Media Lists will wait through a period of inactivity before returning to the start Autorun Click Standard Autorun or Select custom Autorun to specify a different autorun file for the presentation. Click Browse 91
98 to locate and select the autorun file. Image Cache A list of all media files in your playlist is displayed here. Check the checkboxes to store certain files in an image cache for faster loading. Variables Use this tab to create User Variables and enable Media Counters. Media Counter: A value that records how many times a file in the presentation has played. They can be viewed in Live Text or extracted from the BrightSign via USB. Media Counters are not recorded unless you check the Automatically create media counter variables checkbox in the Variables tab. When enabled, Media Counters are recorded for every file in the presentation. However, in Live Text, only the Media Counters individually added can be viewed. For details on retrieving all Media Counters via USB, see Using advanced tools. User Variable: Customizable values that can be used in commands or displayed in Live Text. When used in Live Text, User Variables display the current value of the variable. This value can continually change throughout a presentation. The value of a User Variable can be changed during a presentation by using the Set Variable or Reset Variable command. User Variables can be used in the following commands: Set Volume, Increment Volume, Decrement Volume, Send UDP, Serial-send string (EOL), Serial-send string (no EOL), Serial-send byte, Serial-send bytes (comma separated), Synchronize, Send Zone Message, Link Zones, GPIO On, GPIO Off, GPIO Set State, BrightControl Send Ascii String, BrightControl Philips Set Volume, Pause. 92
99 For example, if you add a Set Volume command to your presentation and use a static value like 50, the volume will always be set to 50 when the command occurs. If you use a User Variable instead, the volume will be set to the current value of the variable, which could be any number of values based on your Set Variable commands and when the User Variable is used. To utilize a User Variable in a command, add the desired command as you normally would. See Adding Commands for details. In the Parameters field, type the exact name of the variable in between two dollar signs on each side (e.g. $$variable1$$ ) BrightAuthor will not recognize the variable without the dollar signs. To create a User Variable, click the Add Variable button in the Variables tab. Name: Enter a unique name for the User Variable. 93
100 Default Value: This is the value of the User Variable if it is not modified. Whenever a User Variable is reset (via the Reset Variable command), it will return to this default value. Networked: Check this box if you would like the User Variable to be updatable via a Data Feed. Url: Enter the web address of the RSS text feed in this field. Every RSS entry has <title> and <description> tags. Use the <title> tag to designate the name of the User Variable being modified. Use the <description> tag to change the value of the User Variable. Note: The BrightSign Network provides a simple way to create and host RSS text feeds. In the Web UI, use the Title field to designate the name of the User Variable and the Value field to change the value of the User Variable. Validate: Press this button to ping the web address you entered in the Url field. Use this feature to check whether you entered the address of your RSS feed correctly. To delete a User Variable, click the X beside the appropriate variable. Data Feeds Create and edit data feeds, which you can use when creating Live Text elements and networked User Variables. Click the button next to Add Live Data Feed to bring up the feed-creation window: Feed Name: Give the data feed a name. You will be able to locate the data feed by this name when you are creating a Live Text element with an RSS feed. Url: Paste the web address of the RSS feed into this field. BrightSign Network Data Feed: If you have a BrightSign Network subscription, you can easily publish RSS feeds to the web. See the Live Text FAQ for instructions on creating RSS feeds in the BrightSign Network Web UI and using them in BrightAuthor. Validate: Press this button to ping the web address you entered in the Url field. Use this feature to check whether you entered the address of your RSS feed correctly. Update Interval: Use the dropdown list to specify how often you want the content of an RSS feed to be refreshed using the provided URL. Plugin Script: This is an advanced feature: You may optionally choose to have the RSS feed parsed by a piece of customized BrightScript code. This occurs after the feed is retrieved from the network and before it 94
101 is provided to the Live Text object. To add a plugin, specify the location of the file that contains the BrightScript code by clicking the Browse button. Note: The parser file must have a.brs extension. Parser Function Name: Enter the name of the subroutine that parses the RSS feed. The following parameters can be used with the subroutine: o xmlfilename$ The name of the xml file. This information is provided by the autorun. o itemsbyindex An array of the descriptions. The script should fill in this array if the Live Text object is using the item index to display items from this feed. o itemsbytitle An associative array of titles and descriptions. The script should fill in this array if the Live Text object is using the item title to display items from this feed. o uservariables An associative array of current User Variables (which are provided by autorun). This is provided in case you want to analyze or modify the User Variables. The following piece of example code can be used to parse RSS text: 95


102 Setting default properties Whenever you create a presentation project, the presentation settings are based on the default settings. If you often use the same set of properties, you can save time by changing the default property settings to what you use most often. Keep in mind that changing the default settings does not adjust the current project. Changes will apply to new presentations. To edit default settings, complete the following steps: 1. On the menu bar, click Edit > Preferences. 2. Click the Video tab and set the following video settings: Volume: Specify a value between 0 and 100. Live video time on screen: Set a default period for live videos to remain on screen (in seconds). 3. Click the Images tab and set the following: Slide transition: Use the dropdown list to set an effect for image transitions. Slide delay interval: Set how long each image displays (in seconds). 4. Click the Interactive tab and set a default timeout period for media files (in seconds). 5. Click the Clock tab and use the dropdown list to set a language and use its predefined date and time format. To customize the format, click Customize, enter the settings you want to use, and then click OK. 6. Click the Live Text tab and set the following: Alignment: Use the dropdown list to set 96
103 whether Live Text is left aligned, right aligned, or centered. Foreground text color: Click Choose and select a color for Live Text (the letters). Background text color: Use the checkbox to determine whether you want to include a background text color for text fields. Click Choose and set a default color for the backgrounds. Transparency: Drag the bar to set the transparency for background text colors. Note: Transparency does not appear in the Live Text image preview. You will need to publish the presentation to a BrightSign player to view the level of transparency. Font: Click Browse and set a font for Live Text. You can use any TrueType font. Click Reset to System Font to reset the font. Font size: Click Automatic or Fixed point size to enter a value for Live Text font size (1-500). 7. Click the Networking tab and check the checkboxes to enable/disable the following: BrightSign Network, Local Networking, Bonjour, and Simple File Networking. Note: if you are publishing with Local Networking but are not seeing your BrightSign players on the network, disabling Bonjour can help. 8. Click the UI tab and set the following: Publishing: Check the checkboxes to indicate whether you want to Show file overwrite dialog and Copy and replace duplicate files when publishing locally. Save properties: Check the checkbox to Show save properties dialog. Transitions: Set the display mode for transitions in your interactive playlist. You can select Automatic, Always display line, or Always display label. You can set whether you want labels to be on the Right or Bottom of files in your playlist area. 9. Click OK. 97
104 CHAPTER 8 MANAGING YOUR NETWORK You can manage your BrightSign and Local networks through BrightAuthor. Permissions Administrators of BrightSign Network accounts can create separate accounts with access to their BrightSign Networks. These accounts (called User Accounts) can be assigned to roles with various sets of permissions in both the web user interface and BrightAuthor. Access to the BrightSign Network features in BrightAuthor will depend on permissions that were determined by the Account Administrator. Regardless of permissions, BrightAuthor appears the same to all users. However, attempting to use blocked features will result in an error message. If you are an Account Administrator, you must use the web UI to change a User Account s permissions in BrightAuthor. Viewing unit statuses You can view the status of all units on your BrightSign Network or Local Network in BrightAuthor. A range of colors (green, yellow, red) are used to indicate the status of a BrightSign player. Please see this help article for more information on what each color means. Local Network Viewing unit status on your Local Network lets you view all units and their info, view active presentations for units, specify a username and password for units, and remove units from the network. 1. Sign in to BrightSign Network by clicking Tools > Sign in to BrightSign Network. 2. Click the Manage tab. 3. Click Local Network (below the Manage tab). Here, a list of all units on the Local Network is displayed. The list contains all unit names, descriptions, uptimes, and current active presentations. 98
105 4. Right-click a unit to Remove the unit, Show all units, Specify a username and password, or view Info. Clicking Info opens the Unit Properties window. Here, you can view the unit ID, IP address, BrightSign model, firmware version, and autorun version. 99
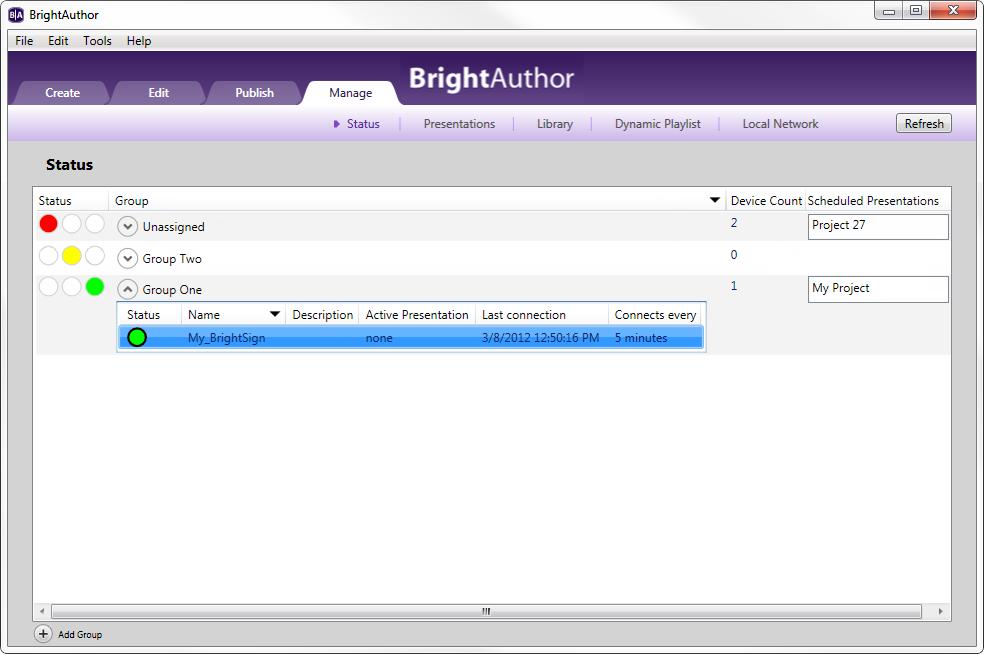
106 100
107 BrightSign Network You can view the activity status of all units in your BrightSign Network, the groups to which units are assigned, the scheduled presentations for each group, the last connection time for each unit, and the frequency with which each unit connects to the network. 1. Sign in to BrightSign Network by clicking Tools > Sign in to BrightSign Network. 2. Click the Manage tab. 3. Click Status (below the Manage tab). 4. Click the arrow beside a group to view details: the devices in a group, their activity status, etc. 5. Right-click a device in a group to Edit, Delete, check Info, or check Download progress. 6. (Optional) Sort the list by clicking the column you want to use as the sorting criteria. For example, to sort by status, click the status column. Click again to switch between ascending and descending order. Managing groups Groups let you distribute presentations to a specific set of BrightSign players. Publishing a presentation to a group delivers it to all BrightSign players within that group. BrightAuthor includes two default groups: Default and LocalTest. However, you can create as many groups as you need. 1. Sign in to BrightSign Network by clicking Tools > Sign in to BrightSign Network. 2. Click the Manage tab. 3. Click Status (below the Manage tab). 4. Do any of the following: To create a group, click Add Groups (in the lower-left corner of the screen). Type a name for the group, and then click OK. To delete a group, right-click a group, and then click Delete. To move a device to a different group, click the arrow for the group that contains the device. Then click the device and drag it to the desired new group. 101

108 Viewing presentations Viewing BrightSign Network presentations lets you see all presentations uploaded to the network, as well as which groups they belong to, which presentations are active, and when they were last modified. 1. Sign in to BrightSign Network by clicking Tools > Sign in to BrightSign Network. 2. Click the Manage tab. 102
109 3. Click Presentations (below the Manage tab). 4. Click the arrow beside a presentation to view which groups are currently using the presentation. 5. (Optional) Sort the list of presentations by clicking the column you want to use as the sort criteria. For example, to sort by name, click the name column. Click again to switch between ascending and descending order. Viewing your library Viewing your library lets you see all the content you ve uploaded to your BrightSign Network. 1. Sign in to BrightSign Network by clicking Tools > Sign in to BrightSign Network. 2. Click the Manage tab. 3. Click Library (below the Manage tab). Here, all files uploaded to the network are displayed. Files with a green check mark are currently active. Do any of the following: Switch between thumbnail and list view: Click the icons in the upper-right portion of the screen. View item info: Right-click an item and click Info. Here you can view file size, type, date modified, date uploaded, all presentations using the file, and all dynamic playlists using the file. Delete an item: Right-click a file and click Delete. Keep in mind that you can only delete files that aren t currently active. Refresh the library: Click Refresh in the upper-right portion of the screen. Viewing dynamic playlists You can view all dynamic playlists, the presentations that contain dynamic playlists, and the time/date when playlists were last modified. 1. Sign in to BrightSign Network by clicking Tools > Sign in to BrightSign Network. 2. Click the Manage tab. 3. Click Dynamic Playlist (below the Manage tab). Here, a list of all dynamic playlists is displayed. Playlists with a green checkmark are currently part of a presentation. Do any of the following: Delete a playlist: Right-click a dynamic playlist and then click Delete to erase it. 103

110 View info: Right-click a dynamic playlist and then click Info to see when the dynamic playlist was last modified and a list of all presentations that contain the dynamic playlist. Sort the list: You can adjust the list of dynamic playlists by clicking the column you want to use as the sort 104

111 criteria. For example, to sort by name, click the name column. Click again to switch between ascending and descending order. Using advanced tools Advanced tools let you remotely control units on your BrightSign Network or set up a USB flash drive to retrieve device data and perform device actions. After you set up a USB flash drive, inserting it in a BrightSign player will extract the specified data or perform the specified actions (e.g. reboot the player). The Advanced Tools window is divided into three tabs: the Setup USB Drive tab, and the Update Autorun and Unit Control tabs, which are only available if you have a BrightSign Network account. Complete the following steps to set up a USB flash drive: 1. Click Tools > Advanced. 2. Click the Setup USB Drive tab. 3. Click any of the following checkboxes to determine what actions you want to occur when inserting the USB flash drive into the player: Copy variables database: Extracts the data for all User Variables and Media Counters. Copy log files: Extracts all log files. Delete log files: Deletes all log files on the BrightSign player. Reboot: Reboots the BrightSign. Display status on screen during data capture: Displays the status on the display while the USB flash drive is inside the BrightSign player. 4. Click Setup drive and navigate to the location of the USB flash drive on your computer. 5. When the Setup Complete window opens, click OK. 6. Remove the USB flash drive from your computer and insert it in the player. 7. If you are extracting data from the player, reinsert the USB flash drive into your computer to retrieve the data. 105

112 Complete the following steps to control units on your BrightSign Network: 1. Sign in to BrightSign Network by clicking Tools > Sign in to BrightSign Network. 2. Click Tools > Advanced. 3. Click the Update Autorun tab. A list of all your groups is displayed here. Check the checkboxes and then click Update now to update the Autorun version for those groups. 4. Click the Unit Control tab. 5. In the Serial Number field, type the serial number of the unit you want to control. 6. Click the Action dropdown list to select the action you want to perform: Reboot unit: Restarts the BrightSign. Upload logs: Uploads log files based on the upload logs setting you selected when setting up the unit. Recover reformat: Puts the unit in recovery mode and reformats the unit s storage card. Recover don t reformat: Puts the unit in recovery mode and downloads the latest Autorun script to the storage card without reformatting it. 7. (Optional) Click Add action to add another action, or remove an action by clicking Remove action. 8. Click Close. 106
BRIGHTAUTHOR USER GUIDE
 BRIGHTAUTHOR USER GUIDE Software Version 3.5 BrightSign, LLC. 16795 Lark Ave., Suite 200 Los Gatos, CA 95032 408-852-9263 www.brightsign.biz TABLE OF CONTENTS Chapter 1 Getting Started... 1 What is BrightAuthor?...
USER GUIDE. BrightAuthor 3.7. BrightSign, LLC Lark Ave., Suite 200 Los Gatos, CA
 USER GUIDE BrightAuthor 3.7 BrightSign, LLC. 16795 Lark Ave., Suite 200 Los Gatos, CA 95032 408-852-9263 www.brightsign.biz TABLE OF CONTENTS Chapter 1 Getting Started... 1 What is BrightAuthor?... 1 What
USER GUIDE. BrightAuthor 3.8. BrightSign, LLC Lark Ave., Suite 200 Los Gatos, CA
 USER GUIDE BrightAuthor 3.8 BrightSign, LLC. 16795 Lark Ave., Suite 200 Los Gatos, CA 95032 408-852-9263 www.brightsign.biz TABLE OF CONTENTS Chapter 1 Getting Started... 1 What is BrightAuthor?... 1 What
User Guide. BrightAuthor Release 2.0. BrightSign HD110, HD210, HD210w, HD410, HD810, HD1010, and HD1010w. COMPATIBLE WITH
 User Guide BrightAuthor Release 2.0 COMPATIBLE WITH BrightSign HD110, HD210, HD210w, HD410, HD810, HD1010, and HD1010w www.brightsign.biz Copyright Copyright 2010 by BrightSign, LLC. All rights reserved.
USER GUIDE. BrightAuthor 4.3. BrightSign, LLC Lark Ave., Suite B Los Gatos, CA
 USER GUIDE BrightAuthor 4.3 BrightSign, LLC. 16780 Lark Ave., Suite B Los Gatos, CA 95032 408-852-9263 www.brightsign.biz TABLE OF CONTENTS Chapter 1 Getting Started... 1 What is BrightAuthor?... 1 What
BRIGHTSIGN QUICK START GUIDE. BrightSign, LLC Lark Ave., Suite 200 Los Gatos, CA
 BRIGHTSIGN QUICK START GUIDE BrightSign, LLC. 16795 Lark Ave., Suite 200 Los Gatos, CA 95032 408-852-9263 www.brightsign.biz 1 TABLE OF CONTENTS What s in the box? 1 What is BrightSign? 2 Benefits 2 Capabilities
BRIGHTSIGN QUICK START GUIDE FOR HD110, HD210, HD410, HD810, HD1010
 BRIGHTSIGN QUICK START GUIDE FOR HD110, HD210, HD410, HD810, HD1010 BrightSign, LLC. 16795 Lark Ave., Suite 200 Los Gatos, CA 95032 408-852-9263 www.brightsign.biz TABLE OF CONTENTS What s in the box?
BRIGHTSIGN QUICK START GUIDE FOR HD120, HD220, HD1020, XD230, XD1030, XD1230
 BRIGHTSIGN QUICK START GUIDE FOR HD120, HD220, HD1020, XD230, XD1030, XD1230 BrightSign, LLC. 16795 Lark Ave., Suite 200 Los Gatos, CA 95032 408-852-9263 www.brightsign.biz TABLE OF CONTENTS What s in
USER GUIDE. BrightSign Network Enterprise Edition WebUI Version 3.5
 USER GUIDE BrightSign Network Enterprise Edition WebUI Version 3.5 BrightSign, LLC. 16795 Lark Ave., Suite 200 Los Gatos, CA 95032 408-852-9263 www.brightsign.biz TABLE OF CONTENTS Introduction 1 What
BRIGHTAUTHOR RELEASE NOTES
 Release Notes April 7, 2013 BRIGHTAUTHOR RELEASE NOTES BrightSign, LLC. 16795 Lark Ave., Suite 200 Los Gatos, CA 95032 408-852-9263 www.brightsign.biz BrightAuthor Requirements PC with Windows Vista or
USER GUIDE. BrightSign Network WebUI Version 3.1. BrightSign, LLC Lark Ave., Suite 200 Los Gatos, CA
 USER GUIDE BrightSign Network WebUI Version 3.1 BrightSign, LLC. 16795 Lark Ave., Suite 200 Los Gatos, CA 95032 408-852-9263 www.brightsign.biz TABLE OF CONTENTS Introduction 1 What Can I Do with the WebUI?
BRIGHTSIGN APP USER GUIDE
 BRIGHTSIGN APP USER GUIDE ios App Version 1.1.x BrightSign, LLC. 16780 Lark Ave., Suite B Los Gatos, CA 95032 408-852-9263 www.brightsign.biz 1 TABLE OF CONTENTS Introduction 1 Using the BrightSign App
USER GUIDE. BrightSign Network Enterprise Edition WebUI Version 4.2
 USER GUIDE BrightSign Network Enterprise Edition WebUI Version 4.2 BrightSign, LLC. 16780 Lark Ave., Suite B Los Gatos, CA 95032 408-852-9263 www.brightsign.biz 1 TABLE OF CONTENTS Introduction 1 What
BRIGHTSIGN APP USER GUIDE
 BRIGHTSIGN APP USER GUIDE ios App Version 1.0.1 BrightSign, LLC. 16795 Lark Ave., Suite 200 Los Gatos, CA 95032 408-852-9263 www.brightsign.biz TABLE OF CONTENTS Introduction 1 Using the BrightSign App
The Device Setup feature is supported on Series 4 (XTx44, XDx34, HDx24, LS424) and Series 3 (XTx43, XDx33, HDx23, LS423) mode
 and Series 3 (XTx43, XDx33, HDx23, LS423) mode") Device Setup ON THIS PAGE Introduction Network Setup Ethernet Settings Change Ethernet Settings Wireless Setup Advanced Wireless Setup Network Diagnostics Publishing Options BrightSign Network Sign-In
Device Setup ON THIS PAGE Introduction Network Setup Ethernet Settings Change Ethernet Settings Wireless Setup Advanced Wireless Setup Network Diagnostics Publishing Options BrightSign Network Sign-In
HD110, HD210, HD410, HD810, and HD1010 QUICK START GUIDE
 HD110, HD210, HD410, HD810, and HD1010 QUICK START GUIDE Contents What s in the box?........................................................... 1 What is BrightSign?..........................................................
Standalone Setup. Name Specification. BrightAuthor Version 4.7. Version 4.6 Version 4.4 Previous Versions ON THIS PAGE
 Standalone Setup BrightAuthor Version 4.7 Version 4.6 Version 4.4 Previous Versions ON THIS PAGE Network Properties Wired/Wireless Creating and Installing the Setup Files Network Properties Wired/Wireless
BrightSign Wireless Model User Guide
 BrightSign Wireless Model User Guide support@brightsign.biz www.brightsign.biz 12/7/2010 Rev 1.0 Table of Contents 1. Overview... 3 1.1 Wireless Specifications... 3 1.2 Software Requirements... 3 2. Getting
Mimo Vue with BrightSign Built-in
 Mimo Vue with BrightSign Built-in Manual and Specifications MBS-1080C / MBS-1080C-POE MBS-1080 / MBS-1080-POE - Touch - - Non-Touch - MBS-1080C-OF / MBS-1080C-OF-POE MBS-1080-OF / MBS-1080-OF-POE Please
1. BSN WebUI New Network Setup User Account Roles Create Tab Edit Tab Library Tab
 1. BSN WebUI......................................................................................... 2 1.1 New Network Setup..............................................................................
Brightsign 2.2 Update BrightAuthor 2.2 includes a large number of new features and updates.
 Brightsign 2.2 Update BrightAuthor 2.2 includes a large number of new features and updates. To use BrightAuthor 2.2, you must install firmware 3.3.78 or later. All new BrightSigns are shipping with 3.3.69
Welcome to Playlist, the world s easiest to use digital signage software
 http://www.viewtv.co.nz/playlist Playlist User Guide V2.1 Welcome to Playlist, the world s easiest to use digital signage software CONTENTS 1.0 LOGIN 1.1 ViewTV NZ Server 1.2 ViewTV Playlist PC Server
Hi-Res 8 Wi-Fi Digital Picture Frame with MP3 player Table of Contents
 Hi-Res 8 Wi-Fi Digital Picture Frame with MP3 player Table of Contents Before Using the Digital Picture Frame...3 Introduction...3 Features and Specs...3 Package contents...4 Digital Picture Frame Layout...5
THE GLOBAL MARKET LEADER IN DIGITAL SIGNAGE PLAYERS
 THE GLOBAL MARKET LEADER IN DIGITAL SIGNAGE PLAYERS EVERYTHING YOU NEED FOR SOPHISTICATED DIGITAL SIGNAGE Powerful Performance And Reliability Designed exclusively for digital signage, BrightSign s slim
TD1012, BrightSign HD110 / HD210 / HD210w / HD410 / HD810 / HD1010 / HD1010w ("Compact") Software April 6, 2012
 Software April 6, 2012") TD1012, BrightSign HD110 / HD210 / HD210w / HD410 / HD810 / HD1010 / HD1010w ("Compact") Software 3.8.34 April 6, 2012 This release includes bug fixes and performance improvements. Fixed: Factory reset
TD1012, BrightSign HD110 / HD210 / HD210w / HD410 / HD810 / HD1010 / HD1010w ("Compact") Software 3.8.34 April 6, 2012 This release includes bug fixes and performance improvements. Fixed: Factory reset
Intelli-Signage Signage Designer Software
 Intelli-Signage (User Manual V1.0) version: V3.0.0.0 Contents 1. Introduction... 1 2. System requirement... 1 2.1 Signage Player Software... 1 2.2... 1 3. Installation/Uninstallation of... 2 4. interface...
Aimetis Thin Client 2.7. User Guide
 Aimetis Thin Client 2.7 User Guide Disclaimers and Legal Information Copyright 2016 Aimetis Inc. All rights reserved. This material is for informational purposes only. AIMETIS MAKES NO WARRANTIES, EXPRESS,
TOPAZ CMS. Software User Manual. Design Led Solutions Driven TOPAZ CMS
 Our Full Product Range Full details of all TOPAZ products available can be found by visiting our web site www.topazdigital.com Small Format POS 10 TOPAZ POS 10 TOPAZ HDMI 23 TOPAZ POS Your NOT so silent
ContentSmart 3.0 Software User Manual
 ContentSmart 3.0 Software User Manual Copyright 01/01/2017 by Planar Systems, Inc. All rights reserved. Contents of this publication may not be reproduced in any form without permission of Planar Systems,
Projector Operation Guide
 Projector Operation Guide Contents 2 Introduction Making effective use of your projector... 6 Sending Images Via a Network (EMP NS Connection) (EB-826W/825/85).......... 6 Monitor, configure, and control
MagicInfo VideoWall Author
 MagicInfo VideoWall Author MagicInfo VideoWall Author User Guide MagicInfo VideoWall Author is a program designed to construct a VideoWall layout and create VideoWall content by adding various elements
Aimetis A10D Thin Client 2.1
 Aimetis A10D Thin Client 2.1 Disclaimers and Legal Information Copyright 2016 Aimetis Inc. All rights reserved. This material is for informational purposes only. AIMETIS MAKES NO WARRANTIES, EXPRESS,
High Definition AD Players. Universal User s Manual. L Series and PF Series
 High Definition AD Players Universal User s Manual L Series and PF Series Cautions 1. Do not install and use the unit in moisture, high temperature, outdoor, and closed environment. 2. Please turn off
THE GLOBAL MARKET LEADER IN DIGITAL SIGNAGE PLAYERS
 THE GLOBAL MARKET LEADER IN DIGITAL SIGNAGE PLAYERS EVERYTHING YOU NEED FOR SOPHISTICATED DIGITAL SIGNAGE Powerful Performance And Reliability Designed exclusively for digital signage, BrightSign s slim
FIRMWARE RELEASE NOTES
 Release Notes June 16, 2014 FIRMWARE RELEASE NOTES (BrightSign XD230, XD1030, XD1230) BrightSign, LLC. 16795 Lark Ave., Suite 200 Los Gatos, CA 95032 408-852-9263 www.brightsign.biz Updating your BrightSign
Ultra-High Definition Digital Signage Player
 User s Manual Ultra-High Definition Digital Signage Player User s Manual DS200 Series Version 2.0 Copyright 2016 DELTA Electronics, Inc. All rights reserved. Table of Contents 1. GETTING STARTED... 4 1.1
XD Series. Faster HTML p60 dual decode. Mini-SATA Interface. Fastest HTML5. Remote Snapshot. 4K Upscaling. Live Feeds
 BRIGHTSIGN FEATURES BRIGHTSIGN FEATURES Sophisticated capabilities. Infinite possibilities. 4K Series XD Series Native 4K Fastest HTML5 H.265 Mini-SATA Interface 1080p60 dual decode Faster HTML5 Power
5.2. Click these tabs to jump to the Table of Contents, Index or start of each chapter.
 5.2 Click these tabs to jump to the, or start of each chapter. Click this button to advance to the next page. Click this button to return to the previous page. (Since this is the starting page, the [Back]
Multi-NVR Manager. Quick Start Configuration Usage
 Multi-NVR Manager Quick Start Configuration Usage 2014. All rights are reserved. No portion of this document may be reproduced without permission. All trademarks and brand names mentioned in this publication
THE MARKET LEADER IN DIGITAL SIGNAGE MEDIA PLAYERS
 THE MARKET LEADER IN DIGITAL SIGNAGE MEDIA PLAYERS EVERYTHING YOU NEED FOR SOPHISTICATED DIGITAL SIGNAGE Easy To Use, Sophisticated Features Dual decode of Full HD 1080p60 video, Live HDTV and Live Text,
UPGRADE GUIDE BrightSign Network Enterprise Edition 4.2 BrightSign, LLC Lark Ave. Suite B, Los Gatos, CA
 UPGRADE GUIDE BrightSign Network Enterprise Edition 4.2 BrightSign, LLC. 16780 Lark Ave. Suite B, Los Gatos, CA 95032 408-852-9263 www.brightsign.biz TABLE OF CONTENTS Introduction... 1 What s New in BSNEE
BrightSign User Manual
 BrightSign User Manual Table of Contents BrightSign Product Support BrightSign Setup Requirements BrightSign First Time Setup Loading Content onto SD Cards Resetting The BrightSign Player Legacy BrightSign
FIRMWARE RELEASE NOTES
 Release Notes September 19, 2013 FIRMWARE RELEASE NOTES (BrightSign XD230, XD1030, XD1230) BrightSign, LLC. 16795 Lark Ave., Suite 200 Los Gatos, CA 95032 408-852-9263 www.brightsign.biz Updating your
MPX Server Software User Manual
 MPX Server Software User Manual Contents 1 Server Software Installation... - 3 - Initial Setup... - 6-2 Software Interface... - 10 - Login Page:... - 10-2.1 Homepage... - 12-2.2 Resources... - 13-2.3 Composer...
W-E
 Signage Suite V2.20 User Guide 605220-02-01-W-E-051613-02 Trademarks Windows XP, Windows Vista, Windows 7, and Microsoft are registered trademarks of Microsoft Corporation. All other trademarks are the
Contents. Setting the EMP NS Connection Operation. Connecting with EMP NS Connection. Using a Computer to Set Up, Monitor and Control Projectors
 Operation Guide 1 Contents 2 EasyMP Summary...4 Installing the Software...5 Software Supplied...5 Installing...5 Connecting with EMP NS Connection Overview of EMP NS Connection...8 Two Connection Modes
EasyMP Operation Guide. Multimedia Projector. PowerLite 826W PowerLite 825 PowerLite 85
 EasyMP Operation Guide Multimedia Projector PowerLite 826W PowerLite 825 PowerLite 85 Contents 2 Introduction Making effective use of your projector......................... 6 Sending Images Via a Network
SaviSign Manager User Manual
 SaviSign Manager User Manual Digital Signage Management Software For The P100 Signage Player For use with Windows 7 or Higher Easy-to-use, powerful software Perfect for crafting digital signage displays!
COMMAND STATION PC SOFTWARE
 COMMAND STATION PC SOFTWARE MULTI-SITE MANAGEMENT SOFTWARE USER MANUAL Version 1.6 OpenEye Command Station Software Manual V 1.6 Manual Edition 34863AI - June 2018 2018, OPENEYE All Rights Reserved No
APPLICATION ADMINISTRATOR GUIDE
 APPLICATION ADMINISTRATOR GUIDE BrightSign Network Enterprise Edition Version 4.2 BrightSign, LLC. 16780 Lark Ave., Suite B Los Gatos, CA 95032 408-852-9263 www.brightsign.biz TABLE OF CONTENTS Introduction
High Definition LCD Digital Signage Display
 High Definition LCD Digital Signage Display User Manual Applicable Models L/PFxxH7(Android Version) MxxSA Cautions 1. Do Not install and use the unit in moisture, high temperature, outdoor and closed environment.
User Manual Version 1.0
 User Manual Version 1.0 Copyright 2013 DELTA Electronics, Inc. All rights reserved. Page 1 Table of Contents 1. GETTING STARTED... 3 1.1 Key features... 3 1.2 Modes of operation... 3 1.2.1 Stand-alone
X-Sign 2.0 User Manual
 X-Sign 2.0 User Manual Copyright Copyright 2018 by BenQ Corporation. All rights reserved. No part of this publication may be reproduced, transmitted, transcribed, stored in a retrieval system or translated
1 ZoomBrowser EX Software User Guide 5.0
 1 ZoomBrowser EX Software User Guide 5.0 Table of Contents (1/2) Chapter 1 Chapter 2 Chapter 3 What is ZoomBrowser EX? What Can ZoomBrowser EX Do?... 4 Guide to the ZoomBrowser EX Windows... 5 Task Buttons
Manual Version: V1.15. Video Management Software Guard Station User Manual
 Manual Version: V1.15 Video Management Software Guard Station User Manual Thank you for purchasing our product. If there are any questions, or requests, please do not hesitate to contact the dealer. Disclaimer
Copyright. Disclaimer
 X-Sign User Manual Copyright Copyright 2017 by BenQ Corporation. All rights reserved. No part of this publication may be reproduced, transmitted, transcribed, stored in a retrieval system or translated
LIMITLESS POSSIBILITIES FOR EXCEPTIONAL DIGITAL SIGNS. COMPLETE PRODUCT LINE
 BrightSign Digital Sign & Kiosk Controllers LIMITLESS POSSIBILITIES FOR ECEPTIONAL DIGITAL SIGNS. COMPLETE PRODUCT LINE The new BrightSign product line offers a wide range of solutions and prices, each
PIVOT CMS CLIENT SOFTWARE USER MANUAL
 PIVOT CMS CLIENT SOFTWARE USER MANUAL 1 CMS USER GUIDE 1.1 PC REQUIREMENT Recommended PC Requirement OS CPU VGA RAM HDD Graphics Card OS CPU VGA RAM HDD Windows Vista, 7 or higher Intel Core2Quad Q9400
FIRMWARE RELEASE NOTES
 Release Notes February 26, 2016 FIRMWARE RELEASE NOTES Version 6.1.37 (BrightSign 4Kx42, XDx32, XDx30, HDx22) BrightSign, LLC. 16780 Lark Ave., Suite B Los Gatos, CA 95032 408-852-9263 www.brightsign.biz
Luminis AiO Dedicated Support Line: T: User Guide
 Luminis AiO Dedicated Support Line: T: 0844 561 0514 User Guide Contents Rear Connection Diagram 2 Introduction 3 Normal Usage 3 Manage my Media 4 Edit my Templates and Media 5 Manage Multimedia Playlist
USER MANUAL. LG Simple Editor.
 USER MANUAL LG Simple Editor http://partner.lge.com 2 CONTENTS LG SIMPLE EDITOR...3 --System Requirements...3 --Install and Delete LG Simple Editor...4 Installation Deletion --Running LG Simple Editor...7
Central Management Software. Cam Viewer 3 Lite. User Manual
 Central Management Software Cam Viewer 3 Lite User Manual Version 1.0.0 Table of Contents 1. System Requirement...4 2. Software Installation...5 3. Configuration Wizard...9 3.1 Channel...10 3.1.1 Adding
Display Screen User Guide. Last Updated: October 28, 2016
 Display Screen User Guide Last Updated: October 28, 2016 Table of Contents Before you Begin... 2 Create content in Microsoft PowerPoint... 2 Convert your content in Microsoft PowerPoint to images... 3
MultiQ DSMS 3.6 User Guide Media monitors 5 & 7 operated in centrally managed mode
 MultiQ DSMS 3.6 User Guide Media monitors 5 & 7 operated in centrally managed mode 2011 MultiQ are registered trademarks or trademark applications of MultiQ International AB in various jurisdictions. All
PN400, PN300 & SQP133
 PN400, PN300 & SQP133 User s Manual PN400V100-A-EN 2016 GeoVision, Inc. All rights reserved. Under the copyright laws, this manual may not be copied, in whole or in part, without the written consent of
User Manual Portable Laptop Console Crash Cart Adapter
 User Manual Portable Laptop Console Crash Cart Adapter GUC211V PART NO. M1458 www.iogear.com 2017 IOGEAR. All Rights Reserved. Part No. M1458. IOGEAR, the IOGEAR logo is trademarks of IOGEAR. Microsoft
Copyright. Disclaimer
 X-Sign User Manual Copyright Copyright 2017 by BenQ Corporation. All rights reserved. No part of this publication may be reproduced, transmitted, transcribed, stored in a retrieval system or translated
QUICK START GUIDE FOR AVSIGNCLOUD
 Control Your Video VIDEO WALLS VIDEO PROCESSORS VIDEO MATRIX SWITCHES EXTENDERS SPLITTERS WIRELESS CABLES & ACCESSORIES QUICK START GUIDE FOR AVSIGNCLOUD QUICK START GUIDE FOR AVSIGNCLOUD ABOUT THIS DOCUMENT
Ultra High Brightness Professional Monitor User Manual
 Manual Version UHBA1.0 Safety Instructions Please keep the display away from any heat sources. Place the display in a stable and well-ventilated place. Please handle with care as product contains glass.
Table of Contents. Encoder to Decoder... Audio & Antenna Connections... Encoder to Software Decoder... Encoder to Internet...
 Table of Contents Introduction... 4 Video Manual... 5 Mounting Options... 6 Power Connection... 7 Encoder & Decoder LEDs... 8 Audio & Antenna Connections... 8 Encoder to Software Decoder... 9 Encoder to
TECHNICAL NOTES. Player Security Statement. BrightSign, LLC Lark Ave., Suite 200 Los Gatos, CA
 TECHNICAL NOTES Player Security Statement BrightSign, LLC. 16795 Lark Ave., Suite 200 Los Gatos, CA 95032 408-852-9263 www.brightsign.biz INTRODUCTION The network settings of a BrightSign player are highly
Photo Application. Version 34. Instruction Manual. English
 Photo Application Instruction Manual Version 34 English Contents Read This First... 4 Checking Supplied Accessories... 4 System Requirements... 5 What is Photo Application?... 6... 7 CameraWindow... 7
*Note that LL Studio can also work in Stand-alone mode with an SD card.
 PC System requirements: Operating System : Microsoft Windows XP / Windows Vista / Windows 7 / Windows 8 C.P.U : Intel Pentium IV at 2.0 GHz (or higher) Video Card : 128 MB VRAM Memory : 1 GB RAM Hard Disk
 Register your product and get support at www.philips.com/welcome HMP3000 EN User manual Contents 1 Trademark notice 5 English 2 Connect and play 7 3 Control and play 11 4 Options 13 Video options 13 Audio
UPGRADE GUIDE BrightSign Network Enterprise Edition 3.9 BrightSign, LLC Lark Ave. Suite B, Los Gatos, CA
 UPGRADE GUIDE BrightSign Network Enterprise Edition 3.9 BrightSign, LLC. 16780 Lark Ave. Suite B, Los Gatos, CA 95032 408-852-9263 www.brightsign.biz TABLE OF CONTENTS Introduction... 1 What s New in BSNEE
LIGHTCAST V1.2 Software Guide for projectors
 LIGHTCAST V1.2 Software Guide for projectors 009-1683-01 CONTENTS Introduction...3 Registration when using a LightCast Key...4 Basic Navigation... 7 Using the remote and projector keypad... 7 Using the
DTC-320. StreamXpert MPEG-2 Transport-Stream Analyser
 StreamXpert MPEG-2 Transport-Stream Analyser 2005 DekTec Digital Video BV www.dektec.com Manual for DTC-320 StreamXpert Software Table of Contents 1. Introduction...3 2. Specifications and Minimum Requirements...4
Movavi PDF Editor User Guide. Quick start guide Opening files Editing documents Saving files
 Movavi PDF Editor User Guide Quick start guide Opening files Editing documents Saving files Table of Contents Quick start guide...2 Removing trial restrictions...3 Getting an activation key...4 Activating
SignApps Express User Manual
 SignApps Express 3.0.3 User Manual Contents SignApps Express 3.0.3... 1 User Manual... 1 1 Overview... 4 2 Installation... 5 2.1 Minimum system requirements...5 3 Setup process... 5 4 UI Overview... 6
FIRMWARE RELEASE NOTES
 Release Notes June 16, 2014 FIRMWARE RELEASE NOTES (BrightSign HD120, HD220, HD1020) BrightSign, LLC. 16795 Lark Ave., Suite 200 Los Gatos, CA 95032 408-852-9263 www.brightsign.biz Updating your BrightSign
5.2. Click these tabs to jump to the Table of Contents, Index or start of each chapter.
 5.2 Click this button to advance to the next page. Click this button to return to the previous page. (Since this is the starting page, the [Back] button cannot be used.) Click these tabs to jump to the,
Users Guide for Orb Control Panel Orb Networks, Inc.
 Users Guide for Orb Control Panel Orb Networks, Inc. Orb Networks, Inc. 1 Contents Introduction... 3 Where is Orb Control Panel?... 3 General Tab... 5 Adding Libraries... 8 Adding a Password...10 Adding
Digital Video Software
 Digital Video Software Instruction Manual Version 27 English Contents Read This First... 4 Checking Supplied Accessories... 4 System Requirements... 5 What is Digital Video Software?... 6... 7 CameraWindow...
VNNOX Cloud-Based Publishing Service XI'AN NOVASTAR TECH CO.,L Quick Start Guide Product Version: Document Number: V6.5.0 NS
 VNNOX Cloud-Based Publishing Service XI'AN NOVASTAR TECH CO.,L Product Version: Document Number: V6.5.0 NS170100150 Copyright 2018 Xi an NovaStar Tech Co., Ltd. All Rights Reserved. No part of this document
Videon Product Manual
 Videon Product Manual Greylock and Sorona Encoders/Decoders Document Number 10004134-R06 Copyright 2018 Videon Central, Inc. All rights reserved. No part of this publication may be reproduced, distributed,
Digital Advertising Tag. DT-124 User Manual
 Digital Advertising Tag DT-124 User Manual DT (Digital Advertising Tag) is a wearable media player with a 2.4 LCD screen. DT displays 640x480 still images and 320x240 video. FREE software is provided for
Solution Composer. User's Guide
 Solution Composer User's Guide January 2014 www.lexmark.com Contents 2 Contents Overview...4 Understanding the basics...4 System recommendations...5 Building custom solutions...6 Getting started...6 Step
A Guide to App Studio 9.1
 A Guide to App Studio 9.1 CONTENTS Contents App Studio...4 Understanding App Studio...5 Understanding the AVE-Mag and AVE-Doc formats...6 Understanding layout families...7 Understanding App Studio publishing...8
The information, instructions and examples provided in this document are categorized in 3 different levels:
 MANUAL BRIGHTSIGN NEXMOSPHERE SETUP 1. General s digital signal media players and s Xperience platform can seamlessly integrate to create a robust and reliable setup in which digital content and real-life
APPLICATION ADMINISTRATOR GUIDE
 APPLICATION ADMINISTRATOR GUIDE BrightSign Network Enterprise Edition Version 3.5 BrightSign, LLC. 16795 Lark Ave., Suite 200 Los Gatos, CA 95032 408-852-9263 www.brightsign.biz TABLE OF CONTENTS Introduction
Point of View SmartTV-500 Center - Android 4.2. General notices for use...2 Disclaimer...2 Box Contents...2
 Point of View SmartTV-500 Center - Android 4.2 English Table of Contents General notices for use...2 Disclaimer...2 Box Contents...2 1.0 Product basics...3 1.1 Buttons and connections... 3 1.2 Connecting
MagicInfo-i Premium Edition Author Quick Start Guide
 MagicInfo-i Premium Edition Author Quick Start Guide This guide has been written so that users can use the software more easily and quickly. For more information, refer to the MagicInfo-i Premium Edition
MP75. HD Media Player
 INSTRUCTION MANUAL MP75 HD Media Player TABLE OF CONTENTS 1. Caution 2 2. Features and Specifications 3 3. Unit and Accessories 4 4. Functions of Buttons on the Remote Control 4 5. Media Player s Connections
Viewer for Luma Fisheye IP Surveillance Camera. Software Manual
 Viewer for Luma Fisheye IP Surveillance Camera Software Manual Important Notes This software is a third-party program that allows you to view, in a normal view, surveillance recordings that were made in
Using These Manuals. How to Use the Software User Guide. Display examples: 1. Understanding How to Use Your Camera.
 Software User Guide Read all safety precautions thoroughly to ensure safe use. Types of software installed on your computer varies depending on the method of installation from the Software CD-ROM. For
EasyMP Network Projection Operation Guide
 EasyMP Network Projection Operation Guide Contents 2 About EasyMP Network Projection Functions of EasyMP Network Projection....................... 5 Various Screen Transfer Functions.......................................
Quick Start Guide. State of the art hyper-optimized video management platform designed for ease, speed and efficiency.
 Quick Start Guide State of the art hyper-optimized video management platform designed for ease, speed and efficiency. Blackjack Cube Up to 16 (Cube-LX) and 64 (Cube) 2.1MP Cameras (1080p True HD Resolution)
Network Digital Signage Player. Users Manual
 Network Digital Signage Player Users Manual Table of Contents I. Introduction II. Specifications III. Signage Player Kit IV. Playlist Operation V. Client Device Setup 1. Client Installation 2. Client Main
DVS-200 Configuration Guide
 DVS-200 Configuration Guide Contents Web UI Overview... 2 Creating a live channel... 2 Inputs... 3 Outputs... 6 Access Control... 7 Recording... 7 Managing recordings... 9 General... 10 Transcoding and
My Signage Portal Touch Software User Manual (Content Management System)
") My Signage Portal Touch Software User Manual (Content Management System) Manual Version TCMS1.0s Contents: 1. Introduction... 2 1.1 Logging In... 2 2. System Operation... 4 2.1 Touch (Top Menu)... 4 2.1.1
My Signage Portal Touch Software User Manual (Content Management System) Manual Version TCMS1.0s Contents: 1. Introduction... 2 1.1 Logging In... 2 2. System Operation... 4 2.1 Touch (Top Menu)... 4 2.1.1