TABLE OF CONTENTS ABOUT THIS GUIDE... 4
|
|
|
- Joseph Stevens
- 5 years ago
- Views:
Transcription


1
2 TABLE OF CONTENTS ABOUT THIS GUIDE... 4 INTRODUCTION... 5 PACKAGE CONTENTS... 6 SYSTEM REQUIREMENTS... 6 GENERAL FEATURES... 7 PRODUCT VIEW... 8 HARDWARE INSTALLATION NETWORKING APPLICATION INSTALLING THE PRINT SERVER USING THE UTILITIES AUTO-RUN INSTALLATION PS-UTILITY Installing PS-Utility Using PS-Utility PS WIZARD PSM SETUP UTILITY INSTALLATION GUIDE INSTALLATION PROCESS OF HP LASERJET Installation Process of HP LaserJet 1000 in Win Installation Process of HP LaserJet 1000 in Win Installation Process of HP LaserJet 1000 in Win XP WEB CONFIGURATION WEB CONFIGURATION UTILITY MANAGEMENT Management System Management Wireless Management Network Management User CONFIGURATION Configuration System Configuration Wireless Configuration Network
3 Configuration User Configuration Configuration SNMP TOOLS Tool Print Test Tool Tool Reset Tool Factory Reset Tool Firmware Upgrade Tool Backup HELP PRINTING IN WINDOWS 95/98/ME INSTALLING THE LPR FOR TCP/IP PRINTING CLIENT ADDING LPR PRINTER PORTS PRINTING FROM WINDOWS 95/98/ME SETTING TCP/IP PRINTING SETTINGS PRINTING IN WINDOWS 2000/XP SETTING UP WINDOWS 2000 TCP/IP PRINTING SETTING UP WINDOWS XP TCP/IP PRINTING PRINTING IN MAC OS RENDEZVOUS USES IN MAC OS SETTING UP APPLE TALK/LPR PRINTING For MAC OS X User For MAC OS 9 User For MAC OS 9 User PRODUCT SPECIFICATIONS Printer Connection Network Connection Network Protocol Support Hardware Operating System Support Management LEDs Environmental and Physical
4 ABOUT THIS GUIDE This manual provides instructions and illustrations on how to use your Wireless USB Print Server, including: Chapter 1, Introduction, provides the general information on the product. Chapter 2, Hardware Installation, describes the hardware installation procedure for the product. Chapter 3, Using the Utilities, helps you to install and use the software. Chapter 4, Web Configuration, completes the configuration using the web browser. Chapter 5, Printing in Windows 95/98/ME, complete the printing TCP/IP Setting in Windows 95/98/ME environment Chapter 6, Printing in Windows 2000/XP, complete the printing TCP/IP Setting in Windows 2000/XP environment Chapter 7, Printing in MAC OS, lets you complete printing task through your print server in MAC OS environment. Chapter 8, Product Specification. Please note that the illustrations or setting values in this manual are FOR YOUR REFERENCE ONLY. The actual settings and values depend on your system and network. If you are not sure about the respective information, please ask your network administrator or MIS staff for help
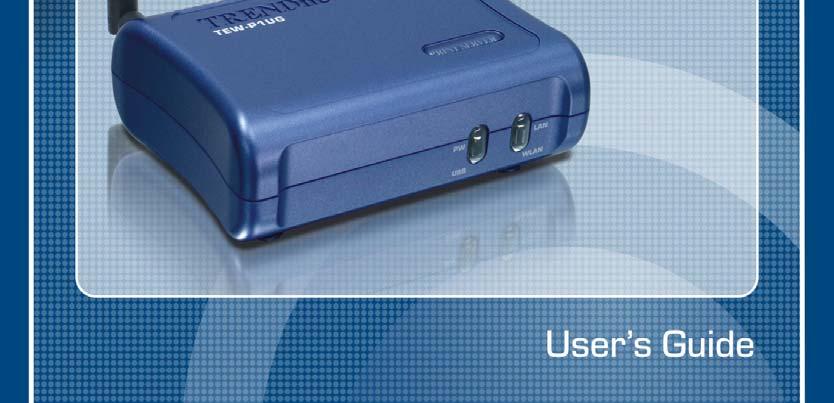
5 1 INTRODUCTION Congratulations on purchasing your TEW-P1UG Wireless 1-Port USB 2.0 Print Server, the easiest and fastest way to deploy printers on your network. This compact print server can connect your network through an Access Point under the infrastructure mode, or can be used in ad-hoc mode for direct communication between PC/Notebook and print server anywhere you wish to locate wireless printer services. It manages the flow of print files from your workstation or file server to its connected printers, delivering print jobs to high-performance printers much faster than a file server or a PC acting as a print server can. The Wireless USB Print Server features a Web-based Configuration Utility, which allows you to set up the print server through the web browser easily and quickly. It also includes a powerful software utility PS-Utility, a user-friendly program that allows you to complete further settings for the print server
6 Package Contents Unpack the package and check all the items carefully, and be certain that you have: One TEW-P1UG Wireless 1-Port USB2.0 Print Server. One AC Power Adapter suitable for your country s electric power service. One Multi-language Quick Installation Guide. One Installation CD-ROM containing the PS-Utility program and the User s Guide. If any item contained is damaged or missing, please contact your local dealer immediately. Also, keep the box and packing materials in case you need to ship the unit in the future. System Requirements Operating System: Microsoft Windows 95/98/ME/NT/2000/XP/2003. Apple Mac OS (with Apple Talk support). For Web Configuration: Java-enabled web browser, such as Microsoft Internet Explorer 5.0 and Netscape Navigator
7 General Features Compact pocket size. Compliant with USB 2.0 high-speed printing. Fast 54Mbps WLAN connectivity based on IEEE g wireless high-speed standard. Multi protocol support is ideal for shared printing in mixed-lan environments. Windows-based administrative program makes it possible to set up in a few steps. Latest MIB-II (RFC 1213) for SNMP standard management. Offer LPR program for TCP/IP printing in Windows 95/98/ME. IP assignment support for DHCP, BOOTP and RARP. Support Web configuration. Provide Flash memory for easy firmware upgrade. Auto fallback data rate under noisy environment or longer range distance. Printing Access control and display. notification for printer error messages; Support printing and FTP printing. Ability to save print server configuration into hard drive for easy access and backup without the hassle to reconfigure if setting is altered. Support IPP printing for Windows 2000/XP. Support second http port for remote web configuration and IPP printing. Support UPnP (Universal Plug and Play) for Windows XP/2003. Support Mac OS 10.2 Rendezvous Zero-configuration feature


8 Product View This section describes the externally visible features of the print server. Front View Antenna LEDs* Rear View DC Power Input plug the AC Power Adapter to this jack. Reset Button** USB Port connect the print server to a USB printer. LAN Connector plug your LAN cable to this connector
9 * There are four green LED indicators on the front panel: LEDs Power USB LAN WLAN Description Steady light confirms that the Print Server is powered on. When it blinks, the printer connected is printing. Steady light confirms that the print server has a good connection to your network. When it blinks (briefly dark), the print server is receiving/ transmitting data from/to the network. Steady light confirms that the print server has a good connection to your wireless network. When it blinks (briefly dark), the print server is receiving/ transmitting data from/to the wireless network. ** 1) Press and release this button to reset the print server; or 2) Press and hold this button for three seconds (the USB LED on the front panel lights up) and then release it, the print server will resume the factory default settings

10 2 HARDWARE INSTALLATION Networking Application The following diagram explains the application of your print server
11 Installing the Print Server Follow these steps for a trouble-free start of print server operations with your Wireless USB Print Server. 1. Confirm proper operation of the printer to be connected to the print server. 2. When you have confirmed proper operation of the printer, turn off the power. 3. Confirm that your network is operating normally. 4. Connect the print server to the network (through the RJ-45 connector of the print server). 5. While the printer is powered off, connect the print server to the printer s USB port. 6. Turn on the printer s power. 7. Connect the DC end of the AC Power adapter to the DC power input socket of the print server and the AC end to the wall outlet. This will supply power to the print server immediately. NOTE: This print server is built with a default IP Address. To prevent from any conflict in your network, it is recommended to use the PS-Utility program to change the IP setting when there is some other device s IP Address is the same as the print server s default IP Address

12 3 USING THE UTILITIES This chapter describes the software utilities for the print server, including how to set up your print server with these utility. The PS- Utility and PS Wizard are designed with a user-friendly interface that allows you to set up and administer the print server easily. Auto-Run Installation Insert the Installation CD-ROM into your computer s CD-ROM drive to initiate the Auto-Run program. User's Guide click to preview the User's Guide in PDF format for detailed information of the Wireless Print Server
13 Install Utility click to install PS-Utility. Please refer to the next section for detailed information on installing the utility. PS Wizard click to launch the Printer Wizard program, which is helpful to set up the printer configuration easily and quickly. PS Monitor click to install PS Monitor program into your system. Browse CD-ROM if you want to browse the contents of the Installation CD-ROM, click this button and the contents of the CD will be available for preview. Exit click to close the Auto-Run program


14 PS-Utility To avoid the conflict in your network, you can use PS-Utility to change the related settings of your print server (such as the IP address) after finishing the installation. Installing PS-Utility 1. Click Install Utility from the Auto-Run menu screen. Once executed, the Setup program will extract files to launch the InstallShield Wizard; then, click Next > in the welcome screen of InstallShield Wizard. 2. Choose the destination location. If no specific requirement, leave the default setting and click Next >. 3. The InstallShield Wizard starts to install the software, and the Progress bar indicates the installation is proceeding


15 4. When completed, click Finish. After installing the utility, the application program for the print server is automatically installed to your computer, and creates a folder in Start\Programs\PS-Utility. Using PS-Utility This section describes the operation of PS-Utility. To launch PS- Utility: 1. Click Start -> Programs -> PS-Utility, and then click the PS- Utility v2.00 item. 2. The main screen will appear as below, and it starts to search the connected print server within the network


16 Your print server Component Features: 1. Device List: Display the connected print server within the network. 2. Control Buttons - Change IP Address: Click this button to bring up the following dialog box, allowing you to change the IP Address. In this dialog box, you can select either Manually Assign or DHCP Assign Automatically. When completed, click OK. - Update Firmware: Click this button to update the firmware of the selected print server. - Show Web Setup: Click this button to open your web browser and launch the Configuration Utility. Alternately, you can double-click the print server in the Device List to launch the Configuration Utility
17 - Factory Reset: Click this button to reload the factory settings of the print server. - Discover Device: Click this button to search the connected print server again. - About: Click this button to bring up a window containing the basic information of PS-Utility. - Close: Click this button to exit PS-Utility. 3. Information Field: Display the basic information of the selected print server in the Device List. 4. Status Bar: Display the system status

18 PS Wizard PS Wizard is a convenient utility that allows you to set up the print server s port connection. To launch PS Wizard: 1. Insert the Installation CD-ROM into your computer s CD-ROM drive, and click PS Wizard from the Auto-Run menu screen. The welcome screen appears as below. Click Next >. NOTE: For some specific printers, you may need to connect the printer to the computer and install the driver. In this case, connect it to the computer and install the driver first, and then connect it to the print server. 2. In the following window, select one printer in the Printer List to set up port connection, and then click Next >


19 Choose one connected printer within the network. 3. Select one printer port in the Print Server List, and click Next >. Your print server name Your printer port name Choose one connected printer port. 4. The configuration is completed, click Reboot and then Yes to restart the system

20 After rebooting, PS Wizard will help you to complete the port connection automatically. You can start your printing task without any complex configuration. TIP: If you use Windows 2000/XP, the system will not restart to complete the installation. PSM Setup Utility Installation Guide PS Monitor will lend the print server to support HP GDI printers. 1. Run the PSMSetup program from the shipped accessory CD-ROM. This program will lead you to finish the installation process of the PS Monitor step by step


21 2. Choose the Language of your Windows system and click the OK button to the next step. 3. Click the Next button and start to install the PS Monitor


22 4. Specified the directory for of the PS Monitor to be installed inside and then click the Next button. 5. Click the Finish button to complete the installation

23 6. The installation is completed. Click the Start -> Program - > PS Monitor -> PS Monitor 1.30 to launch the PS Monitor. 7. To verify if the PS Monitor is executed successfully, please check that the icon of PS Monitor is shown in the taskbar under your Windows system
24 Installation Process of HP LaserJet 1000 Installation Process of HP LaserJet 1000 in Win Open the Printers window of your Windows 2000 system and click the Add Printer function. The following window will be popped up. Click the Next button to the next step. 2. Select the Local printer and uncheck the Automatically detect and install my Plug and Play printer. Click Next button to the next step


25 3. Select the Create a new port and specify the type of port as Local Port. Click the Next button to the next step. 4. The following window will be popped up for you to specify the port name of the printer server. The syntax is \\Printer Server name\printer port name of the printer server as the following show. Click the OK button to the next step

26 5. Please specify the location of the driver of your HP LaserJet 1000 according to your condition. Click the Next button to the next step. 6. Name your printer if necessary. Click the Next button to the next step
27 7. Select Do not share this printer. Click the Next button to the next step. 8. Select No for printer test. Click the Next button to the next step

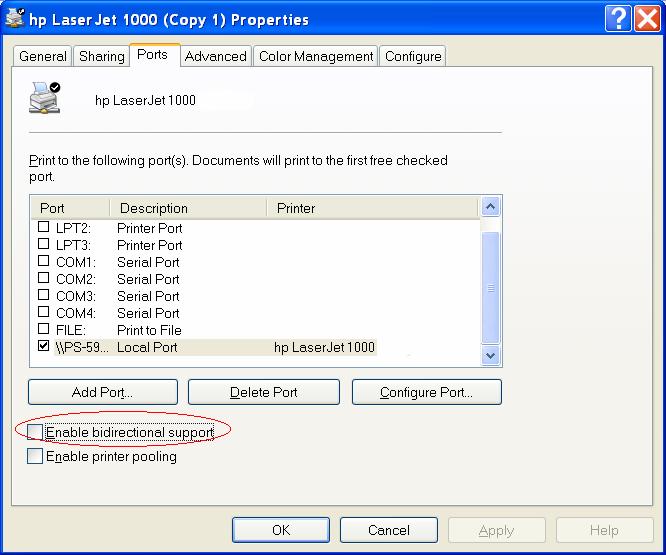
28 9. The installation is completed by clicking the Finish button. 10. Select the HP Laser Jet 1000 just been added and open the Property of it. Click the Ports menu and uncheck the Enable bidirectional support to make the printing successful

29 Installation Process of HP LaserJet 1000 in Win Open the Printers window of your Windows 98 system and click the Add Printer function. The following window will be popped up. Click the Next button to the next step

30 12. Select the Network Printer. Click Next button to the next step. 13. Specify the port name of the printer server. The syntax is \\Printer Server name\printer port name of the printer server as the following show. Click the Next button to the next step


31 14. Please specify the location of the driver of your HP LaserJet 1000 according to your condition. Click the Next button to the next step

32 15. If necessary, you could modify the name for the printer added. The installation is completed by clicking the Finish button


33 Installation Process of HP LaserJet 1000 in Win XP 16. Open the Printers and Fax window of your Windows System and click the Add Printer function. The following window will be popped up. Click the Next button to the next step. 17. Select the Local printer attached to this computer and uncheck the Automatically detect and install my Plug and Play printer. Click Next button to the next step


34 18. Select the Create a new port and specify the type of port as Local Port. Click the Next button to the next step. 19. The following window will be popped up for you to specify the port name of the printer server. The syntax is \\Printer Server name\printer port name of the printer server as the following show. Click the OK button to the next step. 20. Please specify the location of the driver of your HP LaserJet 1000 according to your condition. Click the Next button to the next step


35 21. Name your printer if necessary. Click the Next button to the next step. 22. Select No for printer test. Click the Next button to the next step


36 23. The installation is completed by clicking the Finish button. 24. Select the HP LaserJet 1000 just been added and open the Property of it. Click the Ports menu and uncheck the Enable bidirectional support to make the printing successful
37 - 37 -
38 4 WEB CONFIGURATION You can access and manage the Wireless Print Server through: 1) the enclosed software PS-Utility, and 2) a web browser. This chapter describes the second method the Web Configuration Utility, and explains how to set up your print server with the web browser. Web Configuration Utility First, launch your web browser (such as the Internet Explorer 6.0 used in this manual). Then, type (the default IP address) in the Address bar and press [Enter] to enter the Management screen of the Configuration Utility. TIP: The computer s IP address must correspond with the print server s IP address in the same segment for the two devices to communicate. Extensive knowledge of LAN will be helpful in configuring the print server
39 Management The Management Screen of the Configuration Utility The Management screen displays the basic information of the print server, including the following four categories:

40 System Wireless Network User Management System As shown above, the System displays the status of your print server, printer, and network. Clicking Refresh will update the information. Device Status The information about the print server, including the firmware version, MAC/IP address, and up time, can be found in this field. Printer Status The items in this field display the information of the printer, such as the given name for the printer, speed, printer status, and status of your printing tasks, etc

41 Ethernet Status You can monitor the networking status in this field, including the network connection, speed, and the packets status
, SSID, channel, data transfer rate, WEP")
42 Management Wireless Click the Wireless item in the left column to display the information of the wireless LAN. Clicking Refresh will update the information. Wireless Status The items in this field display the information of the wireless LAN, such as the connection mode (Infrastructure or Ad-Hoc), SSID, channel, data transfer rate, WEP encryption, and the packets status
43 Management Network Click the Network item to display the information of the LAN. Clicking Refresh will update the information


44 Auto IP This field contains the current settings of TCP/IP, including DHCP/BOOTP, UPnP, and MAC Rendezvous. The items in this field are configured in Configuration > Network > TCP/IP. TCP/IP Printing In this field, you can monitor the status of your printing tasks through TCP/IP


45 Microsoft Network Printing In this field, you can monitor the status of your printing tasks through Microsoft Network. MAC AppleTalk Printing In this field, you can monitor the status of your printing tasks through MAC AppleTalk
46 Management User Click the User item in the left column to display the user(s) information. Users Printing Log The items in this field display the user(s) information, which include the user(s) MAC address, IP address, name, and status of printing tasks
47 Configuration Configuration System System Device In this field, you can configure the basic information of your print server. - Server Name: Assign a name to the print server. - Location (optional): Assign a location for the print server - Admin Contact (optional): Assign the Admin Contact s name for the print server. - Password: Enter the Administrator password (3-8 characters). To set up the password, please enter the password in the New

 has certain job requirements that must be met to work correctly.")
48 Password box, and then enter the same one again in the Confirm Again box. Port Settings In this field, you can assign the Port Name for the print server, and the description for the USB port. It also allows you to select the PJL Printer setting (Yes or No). NOTE: PJL (Print Job Language) has certain job requirements that must be met to work correctly. For more information, please refer to your printer s manual
49 Configuration Wireless Wireless Interface - Connection Mode: Select one of the three connection modes. Infrastructure (default) - Connects to compatibly configured wireless AP or router in a WLAN. Ad-Hoc - Connect to compatibly configured wireless clients in the peer-to-peer mode
50 - SSID: Assign the SSID in this box. You can manually input the name or select one from the pull-down menu. To search the available wireless AP within the network, click the Site Survey button. - Wireless Channel: Select the channel from the pull-down menu. The default setting is Transmission Rate: Select the data transmit rate from the pulldown menu. The default setting is Fully Automatic. WEP Encryption This field allows you to configure the settings of data encryption. Please remember that the WEP key must be set before the data encryption is enforced. - WEP Encryption: This option allows you to select Disable, 64 bits, and 128 bits for the encryption setting. - WEP Key Format: You can decide the network key to be encoded by ASCII (ASCII characters) or HEX (hexadecimal digitals). Then, enter the key(s) for the network in the Key box (1~4)

51 Advanced Setting This field allows you to configure more settings, including: - Beacon Interval: Enter the number of beacon interval time in millisecond. - Preamble: This option allows you to set the length of preamble. Setting options are: Long - it is set to 144 bits; Short - it is set to 72 bits. - Authentication Type: You can set the authentication type by selecting the settings: Open System, Shared Key, and Both
52 TIP: Once you have changed the settings in each option, click Save to store the settings, or Cancel to abandon
53 Configuration Network TCP/IP This field contains three options that allow you to configure the TCP/IP setting: IP Address, UPnP, and MAC Rendezvous. - IP Address: This option allows you to set the IP address manually or automatically. When you choose Manually Assign,

54 you should enter the related information in the following boxes, including IP Address, Subnet Mask, and Default Gateway. - UPnP: This option allows you to enable or disable UPnP mode. - MAC Rendezvous: This option allows you to enable or disable MAC Rendezvous mode. Microsoft Network Enter the name of the Workgroup that you want the print server associated with in this field. AppleTalk Enter the AppleTalk Zone name in the box. In the following options, enter the related configuration, such as the printer type. - USB Chooser Name: Display the print server s Port name

55 Printer Type: Enter the printer s type in this box. PostScript Level: Select from the pull-down menu (Level 1 or Level 2). Font Group: Select from the pull-down menu. TIP: Once you have changed the settings in each option, click Save to store the settings, or Cancel to abandon
 who is not in the User List, you can also limit the access right by setting the Allow Undefined Users Printing option to Yes or No.")
56 Configuration User Printing Control By configuring the Enable User Printing Control option (Yes or No), the user in the User List is permitted to access the print server or not. For the user(s) who is not in the User List, you can also limit the access right by setting the Allow Undefined Users Printing option to Yes or No

57 Define Users You can add/delete the user(s) to/from the User List. The User List at the bottom of the screen displays the current defined user and related information for the print server. TIP: Once you have changed the settings in each option, click Save to store the settings, or Cancel to abandon
58 Configuration Account You can assign an address to the print server, so that your mail of the account can be printed out directly through the printer (ASCII text only). To enable this function, enter the account in the Print Server Address box. - Incoming (POP3) Server Address: Enter the server address that is used to receive your in this box

59 - Outgoing (SMTP) Server Address: Enter the server address that is used to send your in this box. If your mail server needs to verify the user when sending , you have to input the Account Name and Password. Notification You can set the print server to send an alter message when the printer status changes through . To enable this function, set the Enable notification for printer status changing option to Yes. Then, input the administrator s address in the Admin Address box. Printing - Printing (ASCII Text Only): Select Enable to enable the printing function

60 - Receive Interval: Enter the number in this box to set up the time (in minute) to check/receive regularly. TIP: Once you have changed the settings in each option, click Save to store the settings, or Cancel to abandon
61 Configuration SNMP SNMP Management SNMP (Simple Network Management Protocol) is a set of protocols for managing complex networks - Community 1/2/3: Enter a name in the Name box, and configure the Access Right by selecting Read Only or Read/Write from the pull-down menu. TIP: Once you have changed the settings in each option, click Save to store the settings, or Cancel to abandon
62 Tools Tool Print Test Print Test Click Test to print a test page

63 Tool Test Account Click Test to send a test to the given administrator s address. Receive Click Yes to immediately check and receive , and then print out the mail when available
64 Tool Reset Reset Click Yes to immediately reset the print server
65 Tool Factory Reset Factory Reset Click Yes to reload the factory settings of the print server
66 Tool Firmware Upgrade Firmware Upgrade When a new version of firmware is available (e.g. downloading from the manufacturer s website), you can upgrade the firmware of your print server. Click Browse to point to the firmware file, and then click Upgrade
67 Tool Backup Backup Device Configuration to File Click Backup to backup your current configuration of the print server to file and then save in the computer. Restore Device Configuration from File You can reload a configuration that you saved before. Click Browse to point to the backup file, and then click Restore
68 - 68 -
69 Help This screen displays the information of the print server
70 5 PRINTING IN WINDOWS 95/98/ME The Print Server can provide print services to TCP/IP networks using the LPR/LPD network printing protocol. Most UNIX systems are capable of supporting LPD, as is Windows NT/2000. This LPR for TCP/IP Printing client gives Windows 95/98/ME workstations the ability to print using the LPR/LPD printing protocol. Though it is possible to print to Print Servers from Windows 95/98/Me, this capability is useful if primarily administer your network from UNIX systems, or if you want to print from workstations that are only accessible through IP routing

71 Installing the LPR for TCP/IP Printing Client Before your Windows 95/98/ME workstation can print using the LPR protocol, you will need to install the client program, as follows: 1. Make sure that you have installed the TCP/IP protocol, and have properly configured the Windows 95/98/ME TCP/IP settings. You can install the protocol from the Network control panel if necessary. 2. From the Start menu, choose the Settings submenu, then the Control Panel item within it. Windows will display the Control Panel folder. 3. Double-click on the Network icon in the Control Panel folder. 4. Click on the Add... button on the Configuration tab. 5. Windows will ask for the type of component to add. Select Client and click Add... to continue
, and click OK. 8. Select the LPR for TCP/IP Printing client and click OK. 9.")
72 6. When Windows asks you to select a network client, click the Have Disk... button. 7. Insert the Print Server installation CD in your computer s CD- ROM, enter the proper pathname (for example, D:\ lpr), and click OK. 8. Select the LPR for TCP/IP Printing client and click OK. 9. Windows will copy the necessary files, and return to the Network dialog. Click OK to let Windows restart
73 - 73 -
74 Adding LPR Printer Ports Once you have installed the client, and have enabled TCP/IP printing for the Print Servers, then you need to add a printer port for each printer you will be printing to using the lpr/lpd protocol. To add a printer port, 1. From the Start menu, choose the Settings submenu, then the Control Panel item within it. Windows will display the Control Panel folder. 2. Double-click on the Network icon in the Control Panel folder. 3. Choose the LPR for TCP/IP Printing client and click the Properties button
75 4. Click the Add Port... button to add a new lpd-accessible printer port. 5. Enter the IP address of the Print Server and the name of the printer port that you will be printing to, then press OK. Hint: You can get the Port name (same as print name) from the print server s system information through web browser. Please refer page make sure the port name is correspondence to the port you connected


76 6. Click OK to leave the LPR for TCP/IP Printing Properties window
77 Printing from Windows 95/98/ME After you have added the necessary printer ports, you can add a printer device for printing to the port. To enable printing to an lpraccessible printer port from Windows 95/98/ME: 1. From the Start menu, choose the Settings submenu, then the Printers item within it. Windows will display the Printers folder. 2. Double-click on the Add Printer icon in the Printers folder. Windows will start the Add Printer Wizard. Click the Next > button to continue to the next screen. 3. Choose the Network Printer selection and click the Next > button to continue
78 4. Enter the name of the port, as displayed in the LPR for TCP/IP Printing Port List. Alternatively, you can click Browse... and locate the printer port. TCP/IP printing ports are located under the Entire Network icon, within the Print Servers - TCP/IP LPR icon

79 Press OK when you have located the proper printer port. Click Next > to continue to the next step. 5. At this point Windows will ask you to choose the correct printer driver for the printer. Choose you printer s make and model from the list, or use the driver disk included with the printer. When you have chosen the correct printer, click Next > to continue. 6. Windows will then ask for a name for the new printer, and ask whether or not you want to set the printer as the Windows default printer. Click Finish (or Next >) to continue
80 7. Windows may ask you whether or not you wish to print a test page to make sure that the printer will work correctly. When the test page is done printing, you will be asked whether or not the test page printed
81 Setting TCP/IP Printing Settings The lpr client s Properties dialog allows you to change several of the client s settings. To change these settings, 1. From the Start menu, choose the Settings submenu, then the Control Panel item within it. Windows will display the Control Panel folder. 2. Double-click on the Network icon in the Control Panel folder. 3. Choose the LPR for TCP/IP Printing client and click the Properties button
82 4. Click on the Settings tab to access the lpr client settings. Change the settings as necessary, and press OK to let the changes take effect

83 The parameters are as follows: Communication Timeout Determines how long, in seconds, the system will wait before determining that it has lost connection with lpr/lpd print servers. Retry Interval Determines how long, in seconds, the system will wait before retrying a lost connection. Retry Times Determines how many times the system will retry a lost connection with an lpr/lpd print server. If Infinite is checked, it will retry indefinitely. Spool Path Gives the directory path where the system will temporarily store lpr/lpd print server job files

84 6 PRINTING IN WINDOWS 2000/XP Setting Up Windows 2000 TCP/IP Printing Following is the correct procedure for setting up TCP/IP LPR printing under Windows Click Start > Settings > Printers. Double Click Add Printer Select Local Printer

85 Create a new Standard TCP/IP Port Click Next Input the IP Address of the Print Server, and the Port name of the Port that will be printed to, then click Next

86 Hint: You can get the port Name (same as Printer Name) from the print server s system information through web browser. Please refer page Please make sure the port name is correspondence to the port you connected. Select Custom, and click Settings

87 Select LPR, and put the Port name in the field labeled Queue Name. Then Click OK

88 Click Next

89 Click Finish The Printer Install Wizard will now prompt for drivers. Select the correct Make and Model, or click Have Disk, to provide the Manufacturer s Driver Disk


90 Click Next. Select a Printer Name


91 Sharing can be enabled here. Also, a Test Page can be printed to confirm proper configuration

92 When the Test Page has been printed, click Finish to complete the installation

93 Setting Up Windows XP TCP/IP Printing Following is the correct procedure for setting up TCP/IP LPR printing under Windows XP. Click Start > Printer and Faxes Double Click Add a Printer Click Next


94 Select Local Printer Create a new Standard TCP/IP Port
 from the print server s system information through web browser. Please refer page 39-40.")
95 Click Next Input the IP Address of the Print Server, and the Port name of the Port that will be printed to, then click Next. Hint: You can get the Port name (same as printer name) from the print server s system information through web browser. Please refer page Please make sure the port name is correspondence to the port you connected


96 Select Custom, and click Settings. Select LPR, and put the Port name in the field labeled Queue Name. Then Click OK

97 Click Next
98 Click Finish

99 The Printer Install Wizard will now prompt for drivers. Select the correct Make and Model, or click Have Disk, to provide the Manufacturer s Driver Disk. Click Next. Select a Printer Name

100 A Test Page can be printed to confirm proper configuration

101 When the test page has been printed, click Finish to complete the installation
102 7 PRINTING IN MAC OS Rendezvous Uses in MAC OS 10.2 The latest version of MAC OS provides a new feature that is called Rendezvous. Rendezvous is a revolutionary networking technology standard that lets you create an instant network of computers and devices, which can be used throughout Mac OS 10.2 to provide innovative ways to share files and printers and even contact other people on the network. For the printer connection, the Mac OS 10.2 Print Center application uses Rendezvous to discover Rendezvous-enabled printers on the network. When you add your computer to a network, Print Center automatically discovers the available printers. All you have to do is selecting the one you want to use and then start printing. You can add a new printer to the network and all the users on the network will see the new printer automatically appear in their Print Center, without any configuration. The following instructions provide a common procedure of installing the printer:


 4.")
103 1. Launch Print Center. Press and hold the Option key, click the Add button. 2. Select Rendezvous from the pop-up menu. 3. When clicking the Rendezvous item, the following window appears to display the connected Rendezvous-enabled printers. Connected printer(s) 4. Select the desired printer, and the following pop-up menu displays the printer s manufacturer. Select Generic


104 5. The printer is installed into the system successfully

105 Setting Up Apple Talk/LPR Printing For MAC OS X User With MAC OS X, you can use AppleTalk or LPR printers to print through the print server. Follow the instructions below for setting up the print server: 1. After attaching the print server to your network, change the IP Address of your Macintosh computer to access the print server s web configuration. The default I P Address of the print server is Change your IP Address to x, where x is any number between 2 and Open the System Preference window and click Network. In the Network window, select the AppleTalk tab and check the Make AppleTalk Active option. Check this option


106 3. To print, open a document and select File > Print from the menu. Select this option. 4. Select Edit Printer List from the Printer dialog box. Select this option. 5. Click Add Printer. Then, select the desired printing protocol (AppleTalk or LPR Printers using IP)

107 - AppleTalk: After selecting AppleTalk, the Port Name of the print server will be displayed. Select the Port to which the post-script printer is connected. Then, select the printer model from the dialog box. Click Add Printer to complete the Printer Port configuration. Select the Printer Port just configured in the Print window. Click Print to print your document. - LPR Printers using IP: When you select LPR Printers using IP Protocol, type the IP Address of the print server into the LPR Printer s Address field of the following window. In the Queue Name field, type in the Port Name of the post-script printer that is connected to the Print Server. Select the printer model from the dialog box, and select the printer model from the pull-down menu. Click Add to complete the process. Close all Print Center windows and select the Printer Port that was just selected. Then, click Print to print the document. Port Name of the connected printer
108 For MAC OS 9 User If you use MAC OS 9, you can use the AppleTalk network protocol for network communications over standard Ethernet or Fast Ethernet using the EtherTalk transport, or over a proprietary low-speed LocalTalk transport. Your print server can be used for network printing to PostScript printers. You can print from any MAC OS computer connected to your Ethernet network, either directly using an EtherTalk connection or indirectly through a LocalTalk-to-EtherTalk router. To set up the print server to be used for AppleTalk printing: 1. Please confirm that the AppleTalk protocol is enabled in your Macintosh computer. 2. Change the IP Address on one of the computers within your network to x (where x is any number between 2-254). 3. Type (the default IP Address) into the address field of your browser. 4. Select the Network tab and scroll to the AppleTalk protocol section. 5. If your AppleTalk network is divided into AppleTalk zones, you have to specify which zone the Print Server should be in. You should locate the print server in the same zone as most of the users who will be using it. If your network is not divided into zones, it should contain a single asterisk *

109 To print from MAC OS Client Workstations: The actual settings of selecting a PostScript printer connected to your print server may be different from the instructions provided in this section, depending on the devices and the software you are using. 1. To choose a printer connected to your print server as your MAC OS workstation s default printer, select Chooser from the Apple menu. 2. In the left column of Chooser window, select the desired item. Please confirm that AppleTalk is set to Active. A list of all networked PostScript printers will be displayed within the right column. Select Check this option. 3. Double-click the name of the Printer Port you wish to use. The Printer Ports shown are examples only

 The selected printer will become your computer s default printer.")
110 4. If you have not previously set this printer as the default, your computer will prompt you for a PostScript Printer Description file. Choose Select PPD. 5. Select the appropriate printer description file for your printer. Click Open. (If your printer is not listed, click Generic to use a generic printer description.) The selected printer will become your computer s default printer. You may need to choose Page Setup in any applications you have open
111 8 PRODUCT SPECIFICATIONS Printer Connection Printer Interface: One USB port, compliant with USB 2.0 Hi-speed standard. Network Connection Wireless Networking Network Standards: Wireless LAN standard IEEE g. Network Data Transfer Rate: 54Mbps with fallback to 48, 36, 24, 18, 12, 11, 9, 6, 5.5, 2, and 1Mbps. Network Mode: Support both Infrastructure and Ad-hoc mode. Wired Networking Network Interface: One 10/100 Fast Ethernet port (RJ-45 connector). Network Data Transfer Rate: 100Mbps. Network Protocol Support Transport Protocols: TCP/IP, SMB, NetBEUI, and AppleTalk
112 TCP/IP Protocols Support: BOOTP, SNMP, Telnet, FTP, LPD, DHCP, and IPP. Hardware SDRAM: 8MB. Flash ROM: 2MB. Operating System Support - Windows 95/98/ME, Windows NT, Windows 2000/XP/2003; - NetWare 5.x (NDPS LPR remote printing); - HP-UX Unix, Sun O.S, Solaris, SCO Unix, AIX; - Unixware and Linux; - Mac OS, AppleTalk. Management Standard: SNMP MIBs: MIB-II (RFC 1213). Utilities: PS-Utility, PS Wizard. LEDs Power, USB, LAN, WLAN. Environmental and Physical Power Supply: 5VDC. Operating Temperature: 0 C to 50 C. Storage Temperature: -25 C to 55 C. Humidity: 5% to 95%, non-condensing at 30 C


113
Fast Ethernet Print Server 1 Parallel, 2 USB
 Fast Ethernet Print Server 1 Parallel, 2 USB User s Manual Rev. 01 (Nov, 2005) Made In Taiwan TABLE OF CONTENTS ABOUT THIS GUIDE... 4 INTRODUCTION... 5 PACKAGE CONTENTS... 6 SYSTEM REQUIREMENTS... 6 GENERAL
USB 2.0 Print Server. User s Manual. Rev. 01 (Jan, 2004) Made In Taiwan
 Made In Taiwan") USB 2.0 Print Server User s Manual Rev. 01 (Jan, 2004) Made In Taiwan TABLE OF CONTENTS ABOUT THIS GUIDE... 4 INTRODUCTION... 5 PACKAGE CONTENTS... 6 SYSTEM REQUIREMENTS... 6 GENERAL FEATURES... 7 PRODUCT
USB 2.0 Print Server User s Manual Rev. 01 (Jan, 2004) Made In Taiwan TABLE OF CONTENTS ABOUT THIS GUIDE... 4 INTRODUCTION... 5 PACKAGE CONTENTS... 6 SYSTEM REQUIREMENTS... 6 GENERAL FEATURES... 7 PRODUCT
Print Server. User s Manual. Rev. 01 (April, 2004) Made In Taiwan
 Made In Taiwan") Print Server User s Manual Rev. 01 (April, 2004) Made In Taiwan TABLE OF CONTENTS ABOUT THIS GUIDE... 4 INTRODUCTION... 5 PACKAGE CONTENTS... 6 SYSTEM REQUIREMENTS... 6 GENERAL FEATURES... 7 PRODUCT VIEW...
Print Server User s Manual Rev. 01 (April, 2004) Made In Taiwan TABLE OF CONTENTS ABOUT THIS GUIDE... 4 INTRODUCTION... 5 PACKAGE CONTENTS... 6 SYSTEM REQUIREMENTS... 6 GENERAL FEATURES... 7 PRODUCT VIEW...
Downloaded from manuals search engine
 TABLE OF CONTENTS ABOUT THIS GUIDE... 5 INTRODUCTION... 6 PACKAGE CONTENTS... 7 SYSTEM REQUIREMENTS... 7 GENERAL FEATURES... 8 PRODUCT VIEW... 9 HARDWARE INSTALLATION... 11 NETWORKING APPLICATION... 11
TABLE OF CONTENTS ABOUT THIS GUIDE... 4
 TABLE OF CONTENTS ABOUT THIS GUIDE... 4 INTRODUCTION... 5 PACKAGE CONTENTS... 5 SYSTEM REQUIREMENTS... 6 GENERAL FEATURES... 7 PRODUCT VIEW... 8 HARDWARE INSTALLATION... 10 NETWORKING APPLICATION... 10
Wireless USB Port Multi-Functional Printer Server. Model # AMPS240W. User s Manual. Ver. 1A
 Wireless USB 2.0 1-Port Multi-Functional Printer Server Model # AMPS240W User s Manual Ver. 1A Table of Contents 1 Introduction...3 1.1 Package Contents... 3 1.2 System Requirements... 3 2 Multi-Functional
D-Link DPR-1020 USB 2.0 MFP Server. Manual. Rev. 01 (November, 2008)
") D-Link DPR-1020 USB 2.0 MFP Server Manual Rev. 01 (November, 2008) Table of Contents Table of Contents Package Contents...1 Contents of Package:...1 System Requirements:...2 Introduction...3 External Features...6
D-Link DPR-1020 USB 2.0 MFP Server Manual Rev. 01 (November, 2008) Table of Contents Table of Contents Package Contents...1 Contents of Package:...1 System Requirements:...2 Introduction...3 External Features...6
ABOUT THIS GUIDE... 4
 TABLE OF CONTENTS ABOUT THIS GUIDE... 4 INTRODUCTION... 6 PACKAGE CONTENTS... 7 SYSTEM REQUIREMENTS... 7 GENERAL FEATURES... 8 PRODUCT VIEW... 9 HARDWARE INSTALLATION... 11 NETWORKING APPLICATION... 11
TABLE OF CONTENTS ABOUT THIS GUIDE... 4
 TABLE OF CONTENTS ABOUT THIS GUIDE... 4 INTRODUCTION... 5 PACKAGE CONTENTS... 6 SYSTEM REQUIREMENTS... 6 GENERAL FEATURES... 7 PRODUCT VIEW... 8 HARDWARE INSTALLATION... 10 NETWORKING APPLICATION... 10
Printing with Windows 98SE/Me (continued)
") Printing with Windows 98SE/Me (continued) Select your DP-311P wireless print server 192.168.0.10 Click OK HP LaserJet Series II Click Apply > OK You have completed setting up your printer in Win 98SE/Me!
Printing with Windows 98SE/Me (continued) Select your DP-311P wireless print server 192.168.0.10 Click OK HP LaserJet Series II Click Apply > OK You have completed setting up your printer in Win 98SE/Me!
Direct Attached Fast Ethernet Print Server
 Direct Attached Fast Ethernet Print Server FPS-1001 User s Manual Copyright (C) 2004 PLANET Technology Corp. All rights reserved. The products and programs described in this User s Manual are licensed
D-Link DP-311P. Manual. Wireless Print Server. Building Networks for People
 D-Link DP-311P Wireless Print Server Manual Building Networks for People Contents Package Contents...3 Introduction...4 Getting to know the DP-311P...5 Getting Started...6 Using the Web Configuration...7
Wireless Network Video Recorder
 LD2R/LD2R500 Wireless Network Video Recorder User Guide Version 1.0 PREFACE Thank you for purchasing the Wireless Network Video Recorder, an IP based device that installed on your network, which can be
LPR for Windows 95/98/Me/2000 TCP/IP Printing User s Guide
 LPR for Windows 95/98/Me/2000 TCP/IP Printing User s Guide Rev. 02 (August, 2001) Copyright Statement Trademarks Copyright 1997 No part of this publication may be reproduced in any form or by any means
LevelOne FPS-9021/FPS User Manual. Mini Printer Server w/parallel (USB2.0) Port V
 Port V") LevelOne FPS-9021/FPS-9022 Mini Printer Server w/parallel (USB2.0) Port User Manual V1.0.0-0601 CONTENTS 1. INTRODUCTION...1 1.1 Product Introduction... 2 1.2 Product Package... 3 1.3 Network Printing
LevelOne FPS-9021/FPS-9022 Mini Printer Server w/parallel (USB2.0) Port User Manual V1.0.0-0601 CONTENTS 1. INTRODUCTION...1 1.1 Product Introduction... 2 1.2 Product Package... 3 1.3 Network Printing
LevelOne FPS-9023/WPS User Manual. Wired/Wireless Printer Server w/multi - Port V
 LevelOne FPS-9023/WPS-9123 Wired/Wireless Printer Server w/multi - Port User Manual V1.0.0-0606 CONTENTS 1. INTRODUCTION... 1 1.1 PRODUCT INTRODUCTION... 2 1.2 PRODUCT PACKAGE... 3 1.3 NETWORK PRINTING
Congratulations on purchasing Hawking s HWPS12UG 1-Port Parallel + 2 USB Ports Wireless G Print Server. The Hawking HWPS12UG is a powerful and
 Congratulations on purchasing Hawking s HWPS12UG 1-Port Parallel + 2 USB Ports Wireless G Print Server. The Hawking HWPS12UG is a powerful and convenient network printing solution that will connect your
Network Quick Install Cards Document Centre 490/480/470/460 ST
 Network Quick Install Cards Document Centre 490/480/470/460 ST This package contains Quick Install Cards that will help you connect the Document Centre to your network and install E-mail. Please read and
User Manual. Unpacking and Setup
 User Manual USB Print Server LPV2-USB-TX1 Unpacking and Setup This section provides unpacking and setup information for the USB Print Server. Unpacking Open the shipping carton of the Switch and carefully
Wireless-G. User Guide. PrintServer for USB 2.0. GHz g WPS54GU2. A Division of Cisco Systems, Inc. WIRELESS. Model No.
 A Division of Cisco Systems, Inc. GHz 2.4 802.11g WIRELESS Wireless-G PrintServer for USB 2.0 User Guide Model No. WPS54GU2 Copyright and Trademarks Specifications are subject to change without notice.
Table of Contents. Page i
 Table of Contents Chapter 1 Introduction 1 Features... 1 Safety Instructions... 2 Packaging Contents... 2 Physical Details... 2 LED Indicators... 5 Reset Button... 6 Chapter 2 LAN Installation 7 Procedure...
Multi-Function Wireless A/P Router User s Guide
 Multi-Function Wireless A/P Router User s Guide Model CNWR-811P Wireless Access Point Router W / Printer Sharing TABLE OF CONTENTS CHAPTER 1 INTRODUCTION...1 CNWR-811P Features...1 Package Contents...3
Print Server. User s Manual. Version: 1.0 (July, 2005)
") Print Server User s Manual Version: 1.0 (July, 2005) COPYRIGHT Copyright 2005/2006 by this company. All rights reserved. No part of this publication may be reproduced, transmitted, transcribed, stored
Print Server User s Manual Version: 1.0 (July, 2005) COPYRIGHT Copyright 2005/2006 by this company. All rights reserved. No part of this publication may be reproduced, transmitted, transcribed, stored
2. PRINT SERVER INSTALLATION...
 TABLE OF CONTENTS COPYRIGHT...2 1. INTRODUCTION...3 PRODUCT OVERVIEW...3 COMPONENTS AND FEATURES...3 HARDWARE INSTALLATION...4 NETWORK ENVIRONMENT...5 2. PRINT SERVER INSTALLATION...6 PREPARATION...6 CONFIGURATION
Mini-102MG ( MFP Server) Quick Installation Guide. User's Manual Version : Mini-102MG_QIG_EU-A_V1
 Quick Installation Guide. User's Manual Version : Mini-102MG_QIG_EU-A_V1") Mini-102MG ( MFP Server) Quick Installation Guide User's Manual Version : Mini-102MG_QIG_EU-A_V1 1. Product Introduction Thank you for purchasing and using our 802.11b/802.11g Wireless LAN MFP server.
Mini-102MG ( MFP Server) Quick Installation Guide User's Manual Version : Mini-102MG_QIG_EU-A_V1 1. Product Introduction Thank you for purchasing and using our 802.11b/802.11g Wireless LAN MFP server.
Wireless LAN Access Point
 Wireless LAN Access Point IEEE 802.11b 11Mbps User s Manual Table of Contents Chapter 1 Introduction... 1 1.1 Package Contents... 2 1.2 Features... 2 1.3 Specifications... 2 1.4 Physical Description...
EH-2101W. User Manual. Broadband Wireless Gateway. WiFi Compliant Wireless Access Point. Broadband Internet Access. 4-Port Switching Hub.
 EH-2101W Broadband Wireless Gateway WiFi Compliant Wireless Access Point Broadband Internet Access 4-Port Switching Hub Dial-in RAS Print Server User Manual i TABLE OF CONTENTS CHAPTER 1 INTRODUCTION...
7. Server Configuration Introduction Search for All Available MFP Server Status of MFP Server
 Copyright by Edimax Technology Co, LTD. all rights reserved. No part of this publication may be reproduced, transmitted, transcribed, stored in a retrieval system, or translated into any language or computer
Trademarks Copyright FCC Warning
 Trademarks NetWare is a registered trademark of Novell Inc and Windows 95/98/Me and Windows NT/2000/XP are registered trademarks of Microsoft Corp. All other brands and product names are trademarks of
LevelOne. User's Guide. Broadband Router FBR-1402TX FBR-1403TX
 LevelOne Broadband Router FBR-1402TX FBR-1403TX User's Guide Table of Contents CHAPTER 1 INTRODUCTION... 1 LevelOne Broadband Router Features... 1 Package Contents... 3 Physical Details...4 CHAPTER 2 INSTALLATION...
PREPARATION OVERVIEW... 63
 TABLE OF CONTENTS COPYRIGHT... 3 1. INTRODUCTION... 4 PRODUCT OVERVIEW... 4 COMPONENTS AND FEATURES... 4 HARDWARE INSTALLATION... 5 NETWORK ENVIRONMENT... 6 WIRED NETWORK WITH PRINT SERVER:... 6 2. PRINT
Print Server. User s Manual. Version: 3.0 (July, 2007)
") Print Server User s Manual Version: 3.0 (July, 2007) COPYRIGHT Copyright 2006/2007 by this company. All rights reserved. No part of this publication may be reproduced, transmitted, transcribed, stored
Print Server User s Manual Version: 3.0 (July, 2007) COPYRIGHT Copyright 2006/2007 by this company. All rights reserved. No part of this publication may be reproduced, transmitted, transcribed, stored
Print Server. User s Manual
 Print Server User s Manual 1 Contents 1. INTRODUCTION...1 1.1 Product Introduction... 2 1.2 Product Package... 3 1.3 Network Printing Architecture... 4 1.3.1 Print Server Network Functions... 5 1.3.2 Network
10/100Mbps 2Port USB2.0 MFP Server
 10/100Mbps 2Port USB2.0 MFP Server Mini-MFP Quick Installation Guide English Ver.1.0 Quick Installation Guide CONTENTS STEP 1 / Mbps Port USB MFP Server Introduction Package Contents OS Requirements Physical
Network Guide. IMPORTANT: Read this manual carefully before using your printer. Save this manual for future reference. ENG
 Network Guide IMPORTANT: Read this manual carefully before using your printer. Save this manual for future reference. ENG Network Guide How This Manual Is Organized Chapter 1 Before You Start Chapter 2
LevelOne Broadband Routers
 LevelOne Broadband Routers FBR-1100TX FBR-1400TX FBR-1401TX FBR-1700TX User's Guide TABLE OF CONTENTS CHAPTER 1 INTRODUCTION... 1 Features of your LevelOne Broadband Router... 1 Package Contents... 4
Print Server User s Manual Version: 2.0 (January, 2006)
") Print Server User s Manual Version: 2.0 (January, 2006) COPYRIGHT Copyright 2006/2007 by this company. All rights reserved. No part of this publication may be reproduced, transmitted, transcribed, stored
Print Server User s Manual Version: 2.0 (January, 2006) COPYRIGHT Copyright 2006/2007 by this company. All rights reserved. No part of this publication may be reproduced, transmitted, transcribed, stored
Trademarks Copyright FCC Warning
 Trademarks NetWare is a registered trademark of Novell Inc and Windows 95/98/Me and Windows NT/2000/XP are registered trademarks of Microsoft Corp. All other brands and product names are trademarks of
Enabling and Using EtherTalk for Mac OS 9.x. If you use EtherTalk, Macintosh computers do not require IP addresses.
 Macintosh This topic includes: "Requirements" on page 3-29 "Quick CD-ROM Install Steps" on page 3-29 "Enabling and Using EtherTalk for Mac OS 9.x" on page 3-29 "Enabling and Using TCP/IP for Mac OS 9.x"
PARALLEL PRINTER FAST ETHERNET PRINT SERVER
 PARALLEL PRINTER FAST ETHERNET PRINT SERVER User Manual DN-13001-1 TABLE OF CONTENTS COPYRIGHT... 2 1. INTRODUCTION... 3 PRODUCT OVERVIEW... 3 COMPONENTS AND FEATURES... 3 HARDWARE INSTALLATION... 4 NETWORK
Ethernet (CAT5 UTP/Straight-Through) Cable. 5V DC Power Adapter
 Cable. 5V DC Power Adapter") 1 This product can be set up using any current web browser, i.e., Internet Explorer 6 or Netscape Navigator 6.2.3. Before You Begin Check Your Package Contents DI-824VUP+ 2.4GHz Wireless VPN Router and
1 This product can be set up using any current web browser, i.e., Internet Explorer 6 or Netscape Navigator 6.2.3. Before You Begin Check Your Package Contents DI-824VUP+ 2.4GHz Wireless VPN Router and
TOSHIBA TEC Label Printer. B-SV4D Series. LAN Adapter Users Manual
 TOSHIBA TEC Label Printer B-SV4D Series LAN Adapter Users Manual First Edition: February 16, 2004 Trademarks NetWare is a registered trademark of Novell Inc and Windows 95/98/Me and Windows NT/2000/XP
Print Server. User s Manual
 Print Server User s Manual 1. INTRODUCTION...5 1.1 Product Introduction... 6 1.2 Product Models... 7 1.3 Product Package... 9 1.4 Network Printing Architecture... 11 1.4.1 Print Server Network Functions...
TABLE OF CONTENTS COPYRIGHT INTRODUCTION...4 PRODUCT OVERVIEW...4 WIRELESS SPECIFICATIONS...4 COMPONENTS AND FEATURES...
 TABLE OF CONTENTS COPYRIGHT...3 1.INTRODUCTION...4 PRODUCT OVERVIEW...4 WIRELESS SPECIFICATIONS...4 COMPONENTS AND FEATURES...5 HARDWARE INSTALLATION...6 WIRELESS NETWORK ENVIRONMENT...7 2. PRINT SERVER
FPS User Manual. Print Server w/ 1 Parallel Port. Ver
 FPS-1031 Print Server w/ 1 Parallel Port User Manual Ver. 1.00-0803 The LevelOne Support Team can not support questions or compatibility issues with the following operating systems: Windows NT/95/98/98se/Me
Computer Connections & Software Install Guide
 C5400 & C5400n Computer Connections & Software Install Guide Installation Overview: Windows Network Installation: Model C5400n Only Ethernet Connection... 2 Software: TCP/IP... 3 Software: Novell... 8
TABLE OF CONTENTS COPYRIGHT INTRODUCTION...4 PRODUCT OVERVIEW...4 COMPONENTS AND FEATURES...4 HARDWARE INSTALLATION
 TABLE OF CONTENTS COPYRIGHT...3 1. INTRODUCTION...4 PRODUCT OVERVIEW...4 COMPONENTS AND FEATURES...4 HARDWARE INSTALLATION...5 2. PRINT SERVER INSTALLATION...6 PREPARATION...6 CONFIGURATION SOLUTION TABLE...6
USER'S MANUAL. 10/100Mbps 2Port USB2.0/1Port Parallel Print Server. Mini-300PU
 USER'S MANUAL 10/100Mbps 2Port USB2.0/1Port Parallel Print Server Mini-300PU Contents 1 INTRODUCTION... PRODUCT OVERVIEW... NETWORK MANAGEMENT... NETWORK CONFIGURATION... HARDWARE INSTALLATION... 2 PRINT
Downloaded from manuals search engine
 Table of Contents CHAPTER 1 INTRODUCTION... 1 Broadband Router Features... 1 Package Contents... 3 Physical Details... 4 CHAPTER 2 INSTALLATION... 6 Requirements... 6 Procedure... 6 CHAPTER 3 SETUP...
LevelOne. User Manual. WAP Mbps PoE Wireless AP V3.0.0
 LevelOne WAP-0005 108Mbps PoE Wireless AP User Manual V3.0.0 i TABLE OF CONTENTS CHAPTER 1 INTRODUCTION... 1 FIGURE 1: WIRELESS ACCESS POINT... 1 FEATURES OF YOUR WIRELESS ACCESS POINT... 1 Security Features...
AXIS 1440 Network Print Server for EPSON Printers. Technical Specifications. Supported Protocols. Supported Printers. Mechanical.
 printer connector Supported Protocols NetWare: IPX, SAP, RIP, SPX, NCP (extended with NDS) and LIP. Windows/OS/2 : NetBIOS/NetBEUI, TCP/IP, WINS/ NBT. Ethernet 10BaseT connector test button network indicator
A Division of Cisco Systems, Inc. PrintServer for USB. with 4-Port Switch. User Guide WIRED PSUS4. Model No.
 A Division of Cisco Systems, Inc. WIRED PrintServer for USB with 4-Port Switch User Guide Model No. PSUS4 Copyright and Trademarks Specifications are subject to change without notice. Linksys is a registered
54Mbps Pocket Wireless Access Point (WL-330g)
") 54Mbps Pocket Wireless Access Point (WL-330g) Copyright 2004 ASUSTeK COMPUTER INC. All Rights Reserved. Contents Conventions... 2 Welcome!... 3 Package contents... 3 System requirements... 3 Device installation...
54Mbps Pocket Wireless Access Point (WL-330g) Copyright 2004 ASUSTeK COMPUTER INC. All Rights Reserved. Contents Conventions... 2 Welcome!... 3 Package contents... 3 System requirements... 3 Device installation...
Note For more information, go to to view Document # 2562.
 Macintosh This topic includes: "Requirements" on page 3-32 "Enabling and Using EtherTalk" on page 3-32 "Enabling and Using TCP/IP" on page 3-33 "Quick Install Steps for Mac OS 9.x" on page 3-33 "Quick
Congratulations on purchasing Hawking s HPS1P 1-Port Parallel 10/100M Print Server. The HPS1P is a powerful and convenient network printing solution
 Congratulations on purchasing Hawking s HPS1P 1-Port Parallel 10/100M Print Server. The HPS1P is a powerful and convenient network printing solution that will connect your printer to your network. The
Longshine Technologie Europe GmbH
 Longshine Technologie Europe GmbH www.longshine.de TABLE OF CONTENTS COPYRIGHT...2 1. INTRODUCTION...3 PRODUCT OVERVIEW...3 COMPONENTS AND FEATURES...3 HARDWARE INSTALLATION...3 2. MFP SERVER INSTALLATION...5
LevelOne User Manual
 LevelOne User Manual WPS-1133 3-Port USB/Parallel Wireless Printer Server Ver. 1.1 The LevelOne Support Team can not support questions or compatibility issues with the following operating systems: Windows
Internet Camera Quick Installation Guide
 Internet Camera Quick Installation Guide Rev. 01 (Dec, 2001) Q20011203 Printed In Taiwan Table of Content INTRODUCTION...2 SYSTEM REQUIREMENT...3 INTERNET CAMERA... 3 Network:...3 Recommended PC or Notebook
Wireless Bridge User Manual. Version 1.0
 Wireless Bridge 520645 User Manual Version 1.0 FCC Radiation Exposure Statement This equipment complies with FCC radiation exposure limits set forth for an uncontrolled environment. This equipment should
Executive Series 1220n Computer Connections & Software Install Guide
 Executive Series 1220n Computer Connections & Software Install Guide Installation Checklist Network Install: Hardware...2 Network Install: Software...3 TCP/IP...3 Novell...6 Local Install: Windows USB
802.11g Wireless LAN MFP Server
 802.11g Wireless LAN MFP Server Quick Installation Guide Version: 1.0 (Jun. 2009) 1. Product Introduction Thank you for purchasing and using our 802.11g Wireless LAN MFP server. This MFP server allows
FPS-3001TXU FPS-3002USB FPS-2112
 Level One Print Servers FPS-3001TXU FPS-3002USB FPS-2112 User Guide Copyright 2004. ALL RIGHTS RESERVED. Document Version: 1.2 (April, 2004) P/N: 9560MF00A0 All trademark and trade names are the properties
DocuPrint C55/C55mp Quick Network Install Guide
 DocuPrint C55/C55mp Quick Network Install Guide Windows for Workgroups / Windows 95 Peer-to-Peer Network Windows NT 3.5X Network Windows NT 4.X Network Macintosh EtherTalk/TokenTalk Network Novell NetWare
PRINT SERVER INSTALLATION...
 TABLE OF CONTENTS COPYRIGHT... 3 1. INTRODUCTION... 4 PRODUCT OVERVIEW... 4 WIRELESS SPECIFICATIONS... 4 COMPONENTS AND FEATURES... 5 HARDWARE INSTALLATION... 5 NETWORK ENVIRONMENT... 7 WIRED NETWORK WITH
USB 2.0 WIRELESS LAN PRINT SERVER
 USB 2.0 WIRELESS LAN PRINT SERVER User Manual DN-13014-3 1 TABLE OF CONTENTS COPYRIGHT... 4 1. INTRODUCTION... 5 PRODUCT OVERVIEW... 5 WIRELESS SPECIFICATIONS... 5 COMPONENTS AND FEATURES... 6 HARDWARE
DI-704P Ethernet Broadband Router. Ethernet (Straight Through) Cable. 5V DC Power Adapter
 Cable. 5V DC Power Adapter") 1 This product can be set up using any current Web browser, i.e., Internet Explorer or Netscape Navigator. DI-704P Ethernet Broadband Router and Print Server Before You Begin 1. If you purchased this router
1 This product can be set up using any current Web browser, i.e., Internet Explorer or Netscape Navigator. DI-704P Ethernet Broadband Router and Print Server Before You Begin 1. If you purchased this router
USB 2.0 Print Server FPS User s Manual
 USB 2.0 Print Server FPS-1010 User s Manual Copyright (C) 2005 PLANET Technology Corp. All rights reserved. The products and programs described in this User s Manual are licensed products of PLANET Technology,
TABLE OF CONTENTS COPYRIGHT INTRODUCTION...3 PRODUCT OVERVIEW...3 COMPONENTS AND FEATURES...3 HARDWARE INSTALLATION
 TABLE OF CONTENTS COPYRIGHT...2 1. INTRODUCTION...3 PRODUCT OVERVIEW...3 COMPONENTS AND FEATURES...3 HARDWARE INSTALLATION...3 2. MFP SERVER INSTALLATION...5 PREPARATION...5 CONFIGURATION SOLUTION TABLE...5
Contents 1 INITIAL CONFIGURATION BEFORE CHANGING THE CONFIGURATION NETWORK SETUP PROCEDURE... 3
 Network Guide Imation Matchprint Professional Server Contents 1 INITIAL CONFIGURATION... 2 2 BEFORE CHANGING THE CONFIGURATION... 2 3 NETWORK SETUP PROCEDURE... 3 4 ADDING SPOOLER AND HOT FOLDERS FOR NETWORK
LevelOne User Manual
 LevelOne User Manual FPS-1031 Parallel Print Server Ver. 1.1 The LevelOne Support Team can not support questions or compatibility issues with the following operating systems: Windows NT/95/98/98se/Me 2
Please take the time now to check the contents of your package: HPS12U Print Server One CD-ROM Quick Installation Guide One power adapter
 Congratulations on purchasing Hawking s HPS12U 1-Port Parallel + 2 USB Ports 10/100M Internet Print Server. The Hawking HPS12U is a powerful and convenient network printing solution that will connect your
CHAPTER1 INTRODUCTION...
 1 Table of Contents CHAPTER1 INTRODUCTION... 5 1.1 About 3 Models Described in this Manual... 5 1.2 Customer Support... 5 CHAPTER2 PRODUCT OVERVIEW... 6 2.1 Package Contents... 6 2.2 Product CD... 6 2.2.1
Table of Contents. Page ii
 Table of Contents Chapter 1 Introduction 1 Features... 1 Safety Instructions... 1 Package Contents... 2 Physical Details... 3 Chapter 2 Setup 5 Overview... 5 Using the Windows Wizard... 5 Chapter 3 Web-Based
LevelOne WBR User s Manual. 11g Wireless ADSL VPN Router. Ver
 LevelOne WBR-3407 11g Wireless ADSL VPN Router User s Manual Ver 1.00-0510 Table of Contents CHAPTER 1 INTRODUCTION... 1 Wireless ADSL Router Features... 1 Package Contents... 5 Physical Details... 6 CHAPTER
Longshine Technologie Europe GmbH LCS-MFP101-2 Multifunction Printserver
 Longshine Technologie Europe GmbH LCS-MFP101-2 Multifunction Printserver www.longshine.de TABLE OF CONTENTS COPYRIGHT...2 1. INTRODUCTION...3 PRODUCT OVERVIEW...3 COMPONENTS AND FEATURES...3 HARDWARE INSTALLATION...3
Mega 100WR ADSL 2+ Router - Easy Start
 Mega 100WR ADSL 2+ Router - Easy Start Mega 100WR ADSL 2+ Router - Easy Start Chapter 1 Introduction Thank you for purchasing a Mega 100WR Router. This Easy start guide is a complete guide to configuring
Chapter 1 Introduction
 Copyright Statement is the registered trademark of Zonet Technology Inc. All the products and product names mentioned herein are the trademarks or registered trademarks of their respective holders. Copyright
OkiLAN 6200e Plus. Contents
 OkiLAN 6200e Plus Contents Important Note... 11 Setting the Printer's IP Address... 12 Setting the IP Address from the Printer's Front Panel... 12 Advanced Management Features... 13 SNMP... 13 SNMP Overview...
SUPERSCRIPT 1800 NETWORK USER S GUIDE. July, A
 SUPERSCRIPT 1800 NETWORK USER S GUIDE July, 1999 808-878291-011A Proprietary Notice and Liability Disclaimer The information disclosed in this document, including all designs and related materials, is
Contents. Introduction... 3
 Contents Introduction... 3 Step 1 - Connecting your Mini Print Server... 4 Diagnostic Push Button... 5 LED Indicators... 5 Step 2 - Configuring your Mini Print Server... 6 Overview... 6 Configuration Methods...
Print Server. User s Manual
 Print Server User s Manual 1. INTRODUCTION...5 1.1 Product Introduction... 6 1.2 Product Package... 7 1.3 Network Printing Architecture... 9 1.3.1 Print Server Network Functions... 10 1.3.2 Network Printing
A Division of Cisco Systems, Inc. GHz g. Wireless-G. User Guide. Access Point WIRELESS. WAP54G v2. Model No.
 A Division of Cisco Systems, Inc. GHz 2.4 802.11g WIRELESS Wireless-G Access Point User Guide Model No. WAP54G v2 Copyright and Trademarks Specifications are subject to change without notice. Linksys is
D-Link DP-301U Fast Ethernet Print Server. Manual
 D-Link DP-301U Fast Ethernet Print Server Manual Contents Package Contents... 3 Introduction... 4 Setting up the DP-301U... 7 Getting Started... 9 Using the Web Configuration... 10 TCP/IP Printing for
D-Link DPR-1040 Wireless G Multifunction Print Server. Manual. Rev. 04 (January, 2009)
") D-Link DPR-1040 Wireless G Multifunction Print Server Manual Rev. 04 (January, 2009) Table of Contents Table of Contents Package Contents... 1 Contents of Package:... 1 System Requirements:... 1 Introduction...
D-Link DPR-1040 Wireless G Multifunction Print Server Manual Rev. 04 (January, 2009) Table of Contents Table of Contents Package Contents... 1 Contents of Package:... 1 System Requirements:... 1 Introduction...
IP806GA/GB Wireless ADSL Router
 IP806GA/GB Wireless ADSL Router 802.11g/802.11b Wireless Access Point ADSL Modem NAT Router 4-Port Switching Hub User's Guide Table of Contents CHAPTER 1 INTRODUCTION... 1 Wireless ADSL Router Features...
Installing driver over the network
 Installing driver over the network Command- line Definition Description Command- line Definition Description /a or /A /n or /N /nd or /ND Specifies
PHASER Network Guide
 PHASER 3400 PERSONAL LASER PRINTER Network Guide Phaser 3400 Personal Laser Printer Network Guide June 2001 Copyright 2001, Xerox Corporation. All Rights Reserved. Unpublished rights reserved under the
AirCruiser G Wireless Router GN-BR01G
 AirCruiser G Wireless Router GN-BR01G User s Guide i Contents Chapter 1 Introduction... 1 Overview...1 Features...1 Package Contents...2 AirCruiser G Wireless Router Rear Panel...2 AirCruiser G Wireless
Addonics T E C H N O L O G I E S. mini NAS. Model: NAS25HDU Key Features
 1.0 Key Features Addonics T E C H N O L O G I E S mini NAS Model: NAS25HDU2 Convert any 2.5 SATA drive into a Network Attached Storage device Connect a USB printer to share it over the network One Fast
LASER PRINTER. Software Setup Guide BEFORE INSTALLING THE SOFTWARE SETUP IN A WINDOWS ENVIRONMENT SETUP IN A MACINTOSH ENVIRONMENT TROUBLESHOOTING
 MODEL: MX-B400P LASER PRINTER Software Setup Guide BEFORE INSTALLING THE SOFTWARE SETUP IN A WINDOWS ENVIRONMENT SETUP IN A MACINTOSH ENVIRONMENT TROUBLESHOOTING Keep this manual close at hand for reference
Table of Contents. 1 Introduction. 2 Wireless Configurations. 3 Setting Up your LAN Administrator Station
 Table of Contents 1 Introduction About Avaya Wireless 1-1 About Avaya Wireless Tools 1-2 About Avaya Wireless Access Points 1-5 About This User s Guide 1-6 About Icons used in this Document 1-7 On-line
Print Server. Quick Configuration Guide. Network Connectivity for Printers
 Print Server Quick Configuration Guide Network Connectivity for Printers 1 Features The DPO NIC enables printers to communicate over an Ethernet network with many different network operating systems, including
Fiery EXP6000/EXP5000 Color Server SERVER & CONTROLLER SOLUTIONS. Configuration and Setup
 Fiery EXP6000/EXP5000 Color Server SERVER & CONTROLLER SOLUTIONS Configuration and Setup 2005 Electronics for Imaging, Inc. The information in this publication is covered under Legal Notices for this product.
Chapter 1 Introduction
 Copyright Statement is the registered trademark of Zonet Technology Inc. All the products and product names mentioned herein are the trademarks or registered trademarks of their respective holders. Copyright
Multi-Port Fast Ethernet Print Server FPS-3300
 Multi-Port Fast Ethernet Print Server FPS-3300 User s Manual 1 Copyright (C) 2006 PLANET Technology Corp. All rights reserved. The products and programs described in this User s Manual are licensed products
Introduction... 3 Features... 3 Minimum Requirements... 3 Package Content... 3 Note... 3 Get to know the Broadband Router... 4 Back Panel...
 Introduction... 3 Features... 3 Minimum Requirements... 3 Package Content... 3 Note... 3 Get to know the Broadband Router... 4 Back Panel... 4 Front Panel... 5 Setup Diagram... 6 Getting started... 7 Chapter
C9600 Software Installation Guide
 C9600 Software Installation Guide Table of Contents Network Installation...2 Windows...2 Novell...6 Windows Installation...7 USB Connection...7 Parallel Connection...10 Macintosh Installation...12 OS 9.1
A Division of Cisco Systems, Inc. Dual-Band. Wireless A/G g a. User Guide. Game Adapter WIRELESS WGA54AG (EU/LA/UK) Model No.
 Model No.") A Division of Cisco Systems, Inc. Dual-Band 5GHz 2, 4GHz 802.11a 802.11g WIRELESS Wireless A/G Game Adapter User Guide Model No. WGA54AG (EU/LA/UK) Copyright and Trademarks Specifications are subject to
A Division of Cisco Systems, Inc. Dual-Band 5GHz 2, 4GHz 802.11a 802.11g WIRELESS Wireless A/G Game Adapter User Guide Model No. WGA54AG (EU/LA/UK) Copyright and Trademarks Specifications are subject to
Dongle-sized Wireless Print Server. Quick Installation Guide V1.0
 Dongle-sized Wireless Print Server Quick Installation Guide V1.0 1 Before you start, you should prepare the following items: Windows-based computer with print server setup CD Printer Printer cable One