1. General Information
|
|
|
- Louise Thomas
- 5 years ago
- Views:
Transcription

1 Tenant User Manual
2 INDEX 1. General Information Introduction Logging in Forgot Password Dashboard Config ACL List Prompt List Plan Group Device Timing Time Condition Shift Weekoff Holiday Service Extension Fax Playback Queue IVR (Interactive Voice Response) Conference Ring Group DID (Direct Inward Dialing) Contacts Phone book Speed Dial Blacklist Whitelist Payment Invoice Balance Recording Reports Call Details Fax Details Features List Outgoing Rules Details Blacklist Details Bill Plan Details Rate Plan Details Invoice Details Balance Recharge Failed Transactions Billing Summary Profile Change Password Change Language About Us Log out...78
3 1. General Information This user's manual provides information on how to use SureTel effectively, in a way that is easy to understand. 1.1 Introduction SureTel provides great flexibility, by offering data, voice, video and multimedia using a single network. This PBX software helps users to connect anytime, from anywhere as it helps bridge the remote networks. It is scalable, reliable and secure PBX software. It revolves around the requirements of dynamic enterprises. With the help of virtual Private Branch Exchange system, all remote collaboration and telephone communication needs of businesses are fulfilled in a trenchant way. 1.2 Logging in Select the type of Login from the drop down menu. There are two types of login. Web Login Extension Login To login as a tenant, login with web login. Select 'Web Login' Enter username and password Click on 'SIGN IN'


4 1.3 Forgot Password In case if password is forgotten, following steps will set a new password. Click on the link named 'Forgot Password?'


5 Fill in the username or e mail address. If only is entered and it is not unique then username will be required. Select 'Web Login'. Click on 'Submit' After this, an e mail will be sent at the specified e mail address. Click the link given in the mail, and it will open SureTel platform. Fill in the new password Click on 'SUBMIT'
6 1.4 Dashboard Dashboard has the following parts. The first two tabs show the balance and bill details. The first tab shows the balance details of the tenant account as follows Credit/Available Balance: This shows the amount available in tenant's account. If the account is prepaid, it will show available balance. If it is postpaid, it will show credit balance. Alert Balance: This shows the amount at which the tenant admin will be sent a notification regarding the low amount. The second tab shows the billing details as follows Amount If there are any unpaid bills then the amount which is shown is the sum of all the unpaid bills. If all the bills are paid then the amount shows the bill amount of the last paid bill. Last Bill Date or Last Paid Date: If there are any pending unpaid bills, then it will show last bill date of the bills pending. If all the bills are paid then it will show the date of last bill that has been paid. Due Date or Paid Date: If there are any unpaid bills, it will show the show the due date of the latest unpaid bill. If all the bills are paid, it will show the date at which the latest bill was paid. Adjust Balance: The difference between available balance and the total bill amount to be paid is the adjust balance. It is displayed only if it is a positive number. Bill Amount: If there are any unpaid bills, this will show the sum of all the unpaid bills amounts. If all the bills are paid, it will show the bill amount of the latest paid bill. Call Amount: If there are any unpaid bills, this will show the sum of all the unpaid bills' call amounts. If all the bills are paid, it will show the call amount of the latest paid bill.


7 Previous Balance: If there are any unpaid bills, this will show the sum of all the unpaid bills' previous amounts. If all the bills are paid, it will show the call amount of the latest paid bill. The counters display the number of extensions, conferences, IVRs, queues, DIDs, video call extensions, playbacks, ring groups and voic extensions. Only the counters of those services will be shown which are assigned to that particular tenant. Same is with the main menu on the left side of portal. It will show only those services. The extension status chart displays the status of all non deleted extensions of the tenant. If the extension is registered, it will be green as shown in the snapshot below for 1575, otherwise it will be red. The calls per hour chart displays the number of calls per every hour on the selected date for that particular tenant. The date can be changed from the datepicker.
8 Live calls of this Tenant along with call start time. Extension status is having different colors based on the status. Green Extension is registered. Red Extension is not registered. Blue Extension is busy. Black Extension is on DND mode. Orange Extension is on hold.
 which are allowed to access SureTel platform are specified by Admin through this page. It will show a list of all the IP Nodes that have already been added.")
9 2. Config 2.1 ACL List SureTel will accept calls from only those IP Node(or Addresses) which are specified in ACL list. IP Node(or Addresses) which are allowed to access SureTel platform are specified by Admin through this page. It will show a list of all the IP Nodes that have already been added. Adding ACL- If a new address has to be added, click on the 'Add ACL' button and a popup will appear as shown below. Enter the required details and click on 'Create' to add the address to the list.
10 Deleting ACL- If a particular IP node has to be deleted, click the little red icon for that node in the grid. It will delete the node. 2.2 Prompt List This page lists out the prompts that can be used in the tenant for different purposes such as IVR's prompts, playback prompts or MOHs. The page it divided into two sections. Search It is for searching the prompts by name, language and type. Language filter will be enabled only when the type id prompt. Prompt List This section lists out the prompts that have been created till date. Adding a prompt To add a new prompt, click on the 'Add Prompt' button above the grid. It will open a create form as shown below.
11 Type To select whether the uploaded file will be used in prompts or MOH. If the type is 'Prompt', then the file will not be listed as an option for MOH, and same goes for MOH. If ' MOH' is selected then the file will not be displayed in list for selecting prompts. Upload File Click on 'Select File', it will open a dialog box to upload your prompt file. Language Select the language of the prompt. Editing a prompt To edit the details of a particular prompt, click the little blue icon for that prompt in the grid. It will open an update form which is the same as create form. However, the name and language of a prompt cannot be edited. Deleting a prompt To delete a particular prompt, click the little red icon for that prompt in the grid. It will delete the prompt. 2.3 Plan This page lists out all the plans that would be available for extensions of that particular tenant. A plan describes what call features are available for the extension, and which are not. The page it divided into two sections. Search It is for searching the plans by name.
12 Plan List This section lists out the plans that have been created till date. Adding a plan If a new plan has to be added, click on the 'Add Plan' button above the grid. It will open the create form. Enable the features that are needed in the plan and click on 'Create'.
13 Editing a Plan If the details of a particular plan needs to be edited, click the little blue icon for that plan in the grid. It will open an update form which is the same as create form. Deleting a Plan If a particular plan needs to be deleted, click the little red icon for that particular plan in the grid. It will delete the plan. 2.4 Group This page lists all the call groups that have been defined till date. This group will be assigned to extension in extension creation process. The extensions that are in the same group can answer calls for each other remotely.

14 The page it divided into two sections. Search It is for searching the groups by name. Group List This section lists out the groups that have been created till date. Adding a group To add a new group, click on the 'Add Group' button above the grid. A popup will open. Fill in the details and click 'Create'.
15 Editing a group To edit a group, click on the editable field in the grid itself that has to be edited. Make the required changes and click on the check mark button to save the changes. Deleting a group To delete a group, click the little red icon for that group in the grid. It will delete the group. 2.5 Device This page lists all the devices that have been provisioned. It also gives an option to add devices. The page it divided into two sections.
16 Search It is for searching the devices by MAC Address. Device List This section lists out the entries that have been created till date. To see the details of any particular device, click on the little gray plus icon in the first column of that device. It will display the details as shown below. Adding a device To add a new device, click on the 'Add Device' button above the grid. It will open a create form as shown below. The fields in the form are as follows MAC Address The MAC address of that device. Brand The brand of device. Select from the available options. Model The model of device. Line Number of lines that are available for that device. Extension Select the extension which will be registered with that device.
17 Fill the required details and click on Create to add the new device. Editing device To edit the line and extension details of a device, click on the little blue icon in the first column of that device. A form shown as below will open. Only the line and extension can be edited. To add a new line and extension, select the required values from respective drop downs and click Assign. To delete any line, click on the little red icon in the first column of that line. Deleting a device To delete a device, click on the little red icon in the first column of that device.
18 3. Timing 3.1 Time Condition This page lists out the shifts that have been created till date. These shifts will be assigned to extension in the extension creation process. The page it divided into two sections. Search It is for searching the plans by name. Shift List This section lists out the plans that have been created till date. Adding a Time Condition If a new shift has to be added, click on the 'Add Shift' button above the grid. It will open a popup as below. Fill in the details and click on 'Submit' to add the new shift.
19 Editing a Time Condition If a shift needs to be edited, click on the editable field in the grid itself that has to be edited. Make the required changes and click on the check mark button to save the changes. Deleting a Time Condition If a particular shift has to be deleted, click the little red icon for that shift in the grid. It will delete the shift. 3.2 Shift This page lists out the shifts that have been created till date. These shifts will be assigned to extension in the extension creation process. The page it divided into two sections. Search It is for searching the plans by name. Shift List This section lists out the plans that have been created till date.

20 Adding a shift If a new shift has to be added, click on the 'Add Shift' button above the grid. It will open a popup as below. Fill in the details and click on 'Submit' to add the new shift. Editing a shift

21 If a shift needs to be edited, click on the editable field in the grid itself that has to be edited. Make the required changes and click on the check mark button to save the changes. Deleting a shift If a particular shift has to be deleted, click the little red icon for that shift in the grid. It will delete the shift. 3.3 Weekoff This page lists the week offs for that particular tenant. When there is a week off, the extensions would not be able to make an outbound call, and the incoming calls will be handled as per the settings of individual extensions. If there is no setting in an extension, then call would go to that extension. This page has just one section listing the days which are declared as week offs.


22 Adding a week off To add a new week off, click on the 'Add weekoff' button above the grid. It will open a pop up form as shown below. Editing a week off To edit a week off, it can be edited by clicking the field, which will open a pop up. Make required changes and click on the check mark button to save the changes. Deleting a week off To delete a particular week off, click the little red icon for that week off in the grid. It will delete the week off. 3.4 Holiday This page lists out the holidays that are declared for that particular tenant. When there is a holiday, the extensions would not be able to make an
23 outbound call, and the incoming calls will be handled as per the settings of individual extensions. If there is no setting in an extension, then call would go to that extension. The page it divided into two sections. Search Holidays can be searched by group name, group extension and type. Holiday List This section lists out the holidays that have been created till date. Adding a holiday To add a new holiday, click on the 'Add Holiday' button above the grid. It will open a pop up form as shown below. Repeat is to tell whether the holiday would be repeated again or not.

24 Editing a holiday To edit a holiday, it can be edited by clicking the field, which will open a pop up. Make the required changes and click on the check mark button to save the changes. Deleting a holiday To delete a particular holiday, click the little red icon for that holiday in the grid. It will delete the holiday.
25 4. Service 4.1 Extension This page lists out the extensions of that particular tenant. The page it divided into two sections. Search It is for searching the extensions by extension name, extension number, plan, status, shift and group. Extension List This section lists out the extensions that have been created till date. Adding an extension To add an extension/extensions, click on the 'Add Extension' button above the grid. It opens a create form as shown below.
26 Other than the self explanatory fields. The fields are as follows Plan A plan has to be selected from the available plans. It will decide what features will be available to the extension according to the features that have been set in that particular plan. Status Select whether the extension will be active or not. Type This field gives an option to enter a single extension or a range of extensions. Extension Number If the type is just number, enter a single number. If it it a range, it will give two text fields to specify the start and end of the consecutive number range. Shift Specifies the shift that will be applicable to the particular extension. The extension would be available only for the time specified in the particular shift. After that, all incoming call to that extension will be processed based on setting done in that extension. If there is no setting for Shift Forward then call will go to that extension. Extension will not be able to do outbound call if its
27 shift is over even if it has access to outbound calls. Extension Name This field is by default set the same as the extension number, but a specific name or number can be inserted in case it is needed. Group The call group to which the extension would belong has to be selected in this field. Members of the same call group can answer each others calls remotely. Extension Password This password is used to register sip account. Language System will play prompts to this extension in selected language. Web Password This password is used for logging in the extension portal. Caller ID name This is the name that would be displayed as a caller id name to the person who the caller will be calling via this extension. It will get least priority which means if extension number is not saved in any phone book then and only then this name will be displayed as caller id name. For outbound calls this Caller ID will get third priority, if caller id is not set in extension configuration and tenant profile then this will be set as External Caller ID Number. VM Password User will be prompted to enter this password when he wants to listen to the voice mails from phone call. This field is compulsory only if voic is enabled for this extension/s. External Caller ID Name When an extension will make an outbound call, it will first be matched with a specified rule and through that the number will be dialed. If the rule will have a set caller ID, then the callee will be displayed that ID, but if it does not have a set caller ID then the caller ID that will be entered here will be shown. Another important point to note is that whether the caller ID will be displayed on the other end or not mainly depends on the carrier. This Caller ID is having Highest, if this is set then system will not consider any other External Caller ID settings (Tenant Profile, Main Extension Name and Outgoing Rule). The id specified here will be used in case of a forgotten password and whenever anyone leaves voice mails to this extension, system will that recorded message to mentioned address.
28 Voic Specify whether voic will be activated for this/these extension/s or not. Video Calling Specify whether video calling will be activated for this/these extension/s or not. External Caller ID Number When an extension will make an outbound call, this number will be displayed to the callee. If a it will first be matched with a specified rule and through that the number will be dialed. If the rule will have a set caller ID, then the callee will be displayed that ID, but if it does not have a set caller ID then the caller ID that will be entered here will be shown. Another important point to note is that whether the caller ID will be displayed on the other end or not mainly depends on the carrier. Note : This option only will be available if Admin has enabled it for this Tenant. If Admin has enabled DID then only the DID which are available for this Tenant can be set as Caller ID Number, If Admin has enabled Any then any number can be set as Caller ID Number. Audio and Video codecs Tenant will have selected codecs, and only the codecs that have been selected by extension's tenant will be listed here. The option to select video codecs will be shown only if video calling is enabled. Dial out Specify whether outbound calls will be activated for this/these extension/s or not. Extension Auto Recording Choose which calls should be recorded automatically. All calls, external or internal. Timeout Specify whether outbound calls will be activated for this/these extension/s or not. Editing extension/s To edit a particular extension, click the little blue icon for that extension in the grid. It will open an update form which is the same as create form. To edit multiple extensions simultaneously Select the extensions that are to be edited by checking the checkbox in the first column of that extension. To select all that extensions, click on the checkbox in the first row. It will

29 select all the extensions. After selecting the required extensions, click on the Select Action button. It will give a drop down with an option Update All. Clicking on that will open an update form. Check the field/fields that has to be edited. Make the required changes and click Update. The changes will be made in all the selected extensions. To cancel the edits, click on Cancel.
30 Deleting extension/s To delete a particular extension, click the little red icon for that extension in the grid. It will delete the extension. To delete multiple extensions, select the required ones by clicking on the check box in the first column of their row. To select all of them together, check the check box in first row of the table. After selecting the required extensions Click on the Select Action button. It will show a drop down menu as shown above. Select Delete All. It will delete the selected extensions. 4.2 Fax This page lists all the Fax destinations that have been created till date. This Fax destinations can be assigned to DID destinations so, if any fax comes to that DID corresponded id will receive a fax. Multiple Ids can be

31 assigned to single extension. The page it divided into two sections. Search It is for searching the groups by name. Fax List This section lists out the groups that have been created till date. Adding a fax To add a new Fax, click on the 'Add Fax' button above the grid. A popup will open, just fill up the details and click on 'Create'.

32 Editing a fax To edit a group, click on the editable field in the grid itself that has to be edited. Make the required changes and click on the check mark button to save the changes. Deleting a fax To delete a fax, click the little red icon for that fax in the grid. It will delete the fax. 4.3 Playback This is a list of all the playbacks, depicting which playback would be played for a particular extension. The playback files are selected from the prompt list of the tenant. File will be played in extension's language. If playback's extension is called externally, then it will be played in default language which is English. If it is called from IVR, then file will be played in IVR's language. The page it divided into two sections. Search Playbacks can be searched by name and extension. Playback This section lists out the playbacks that have been created till date.

33 Adding a playback To add a new playback, click on the 'Add Playback Extension' button above the grid. It will open a pop up form as shown below.

34 Editing a playback To edit any particular field of a playback, you can edit it online by clicking on that field it will open a pop up, make the required changes and click on the check mark button to save the changes. For example, the snapshot shown below shows how to edit the playback file. Deleting a playback To delete a particular playback, click the little red icon for that playback in the grid. It will delete the playback. 4.4 Queue This page lists the queues that have been created, describing the strategy that would be used for each queue. When an extension is assigned to a queue, and a call is made to the extension, the call is kept in the queue and is redirected to the agents that have been selected for the queue according to the strategy selected for it. The page it divided into two sections. Search Queues can be searched by name, extension and strategy. Queue List This section lists out the queues that have been created till date.
35 Adding a queue To add a new queue, click on the 'Add Queue' button above the grid. It will open a create form as shown below. Apart from the self explanatory fields, the fields are as follows Strategy Select the strategy by which each agent in the queue will be called. The strategies are as follows. Ring all Rings all agents simultaneously. Longest Idle Agent Rings the agent who has been idle the longest. Round Robin Rings the agent in position but remembers the last tried agent.
36 Top Down Rings the agent in order position starting from 1 for every member. Agent with least talk time Rings the agent with least talk time. Agent with fewest calls Rings the agent with fewest calls. Sequentially by agent order Rings agents sequentially by tier & order. Random Rings agents in random order. MOH(Music On Hold) The file selected here will be played as the music, when a caller is waiting in the queue to talk to an agent. Max Waiting Calls How many calls could be in waiting in this Queue. Timeout If a caller is in a queue for more that what is specified in the timeout then the call is dropped automatically. Wrap Up Time After how many seconds next call should come to the Agent. Recording If this switch is enabled, then all the calls on this queue will be recorded. Auto Answer Agent Call If this option is enabled, agent calls will be answered
37 automatically. Exit Caller If No Agent Available If this option is enabled then, then if there is no agent available in this Queue then call will be disconnected. Play Position on Enter If this option is enabled, System will play caller position when user enters in Queue. Play Position If this option is enabled, System will keep playing caller position while his call is getting answered. Play Position Duration After what time interval system should play caller position while he/she is in waiting. Agents Select the agents that will be handling this queue. On Fail Activity If this option is enabled then call can be forwarded to Another Extension, Queue, Ring Group, Voic etc when call is not answered. On Fail Activity Type Select the activity where you want to forward your call i.e Extension, IVR, Ring Group etc. On Fail Activity Number Specify the extension number for selected activity type. Display Name in Caller ID Whether to display name in Caller ID or not. Editing a queue To edit the details of a particular queue click the little blue icon for that queue in the grid. It will open an update form which is the same as create form. However, the name of a queue cannot be edited. Deleting a queue To delete a particular queue, click the little red icon for that queue in the grid. It will delete the queue.
38 4.5 IVR (Interactive Voice Response) This page lists out all the IVRs. The page it divided into two sections. Search IVRs can be searched by name, extension and language. IVR List This section lists out the IVRs that have been created till date. Adding an IVR To add a new IVR, click on the 'Add IVR' button above the grid. It will open a create form as shown below.
39 Apart from the self explanatory fields, the other fields are as follows Welcome prompt This prompt will be played when a person first enters the IVR. Repeat prompt When a person is asked to enter a digit and he fails to do so within some time then the repeat prompt will be played, which will be the prompt same as before, asking for an input from the caller. Invalid prompt This prompt is played when the digit entered by the caller is invalid. Timeout Prompt If there is no response from the caller within this time then the IVR asks for input again. The timeout would be in milliseconds. Exit prompt This prompt is played when a caller exits the IVR. Language This sets the language for the IVR. Digit Timeout(Sec) Number of seconds during which caller needs to select IVR options after that Timeout prompt will be played. Inter Digit Timeout(Sec) If Direct Extension Call is enabled then number of seconds during which caller needs to enter the Extension number. If caller fails to enter number during specified time duration then whatever number he has entered will be dialed. Max Timeout Try If caller fails to input anything in given seconds then call will be forwarded as per Max Timeout Try action. i.e call can be forwarded to Ring Group, Queue, IVR etc after specific duration of time. Note : If max timeout destination is set then call be forwarded to timeout destination on first timeout. It will not consider the number of timeout retries in this case but it will when timeout destination is not set. Max Invalid Try Maximum number of invalid try, if caller enters invalid input after specified number of tries call will be forwarded as per the Invalid Destination configuration. i.e call can be forwarded to Ring Group, Queue, IVR etc. Note : If max invalid destination is set then call be forwarded to invalid destination on first invalid try. It will not consider the number of invalid retries in this case but it will when invalid destination is not set.
40 Direct Extension Call If the caller knows which extension it needs to call and doesn't want to go through the IVR, then he can directly call that extension, if the 'Direct Extension Call' is enabled. When an IVR is successfully added, the page will be redirected to it's configuration page. Editing and Configuring an IVR To configure an IVR, that is to assign each digit with it's action, or to change it's prompts, click on the blue edit button beside the name of that IVR in the grid, it will open a page as below to help in configuring the IVR. IVR Tree The tree on the leftmost side of the page lists out the IVR and the actions each digit is assigned to in the IVR. If there is a sub menu attached to any digit, as described below, then click on that digit, it will open the settings for that sub menu. The digit which will have a sub menu will have a small folder icon besides it. Click on it to edit the sub menu. If there is no sub menu then the digit simply depicts what action it performs.
41 Settings for IVR The first part of this form is the same as create form for IVR. The prompts, max try, and timeout can be edited from here. IVR Name, Extension name and Language cannot be edited. The section below that is for setting the actions for each digit.
42 Select an action from the drop down Select the appropriate prompt for that action from the drop down in 'Value' column. The different actions that could be selected are as follows No action As the name suggests, it won't perform any action.
43 Playback To play a playback which will be selected in the drop down in 'Value' column. Queue The call will be lined in the queue that will be selected from the drop down in 'Value' column. Submenu If submenu is selected, then a new submenu needs to be created. To create a new submenu, select 'New' in value. It will give an option to create a new IVR submenu. Enter a new name and select IVR File from the available prompts. The language of submenu will be set the same as it's farthest parent i.e. root. This submenu setting can also be edited from the IVR tree as explained above. It will open a settings form for the submenu, the same way as it opens for the main IVR. Actions for each digit can be edited from there. IVR To set an existing IVR as the action on that particular digit. It could also be set in any submenu. Only the root IVRs which are listed on the main page, will be displayed as options. Previous Menu This action is used for returning to the previous menu in the IVR. But it is only available when configuring a submenu. It is not available for the main IVR. Repeat This action will repeat the current IVR again. After the IVR is configured (the same applies while configuring submenus), click on 'Save settings for..' button to save these configurations. Deleting an IVR To delete a particular IVR, click the little red icon for that queue in the grid. It will delete the IVR.
44 4.6 Conference This page lists out the conferences. When someone needs to make a conference call, they need to dial the extension for that particular conference. Now if someone wants to join that conference call, the caller should know the pin for that conference. The page it divided into two sections. Search Conferences can be searched by name, extension and pin. Conference List This section lists out the conferences that have been created till date. Adding a conference To add a new conference, click on the 'Add Conference' button above the grid. It will open a pop up form as shown below. Pin is the number by which a caller can enter the conference.

45 Editing a conference To edit any particular field of a conference, you can edit it online by clicking on that field which will open a pop up. Make the required changes and click on the check mark button to save the changes. For example, the snapshot shown below shows how to edit the extension. Deleting a conference To delete a particular conference, click the little red icon for that conference in the grid. It will delete the conference. 4.7 Ring Group This page lists out the ring group for extensions. A ring group is a group of extensions that would be called when the extension assigned to it is called. The page it divided into two sections. Search Ring groups cane be searched by name, extension and pin.
46 Ring Group List This section lists out the ring groups that have been created till date. Adding a ring group To add a new ring group, click on the 'Add Group' button above the grid. It will open a create form as shown below. Extension This is the main extension that will be dialed to call the ring group. Type This field specifies the pattern in which the extensions in the ring group will ring. It could be either 'Simultaneous' or 'Sequential'. In Simultaneous, all the extensions start ringing at once, and when one picks it up, all other extension stop ringing. And in sequential, all the extensions ring one by one.
47 Extensions Select the extensions that belong to the ring group. On Fail Activity If this option is enabled then call can be forwarded to Another Extension, Queue, Ring Group, Voic etc when call is not answered. On Fail Activity Type Select the activity where you want to forward your call i.e Extension, IVR, Ring Group etc. On Fail Activity Number Specify the extension number for selected activity type. Editing a ring group To edit the details of a particular ring group, click the little blue icon for that ring group in the grid. It will open an update form which is the same as create form. Deleting a ring group To delete a particular ring group, click the little red icon for that ring group in the grid. It will delete the ring group. 4.8 DID (Direct Inward Dialing) Direct Inward Dialing (DIDs) are the numbers which are used to access SureTel platform externally. DIDs can be added and deleted only by the admin. Tenant cannot edit a DID number, it can only edit the other configurations. Admin can edit all the configurations. You cannot add or delete a DID from tenant portal. Note: A particular DID of a particular tenant has to be first redirected to SureTel Platform. In other words, If tenant wants to add a particular DID to access platform,tenant must first purchase that DID from DID service provider, redirect it to platform and then ask Admin of platform to Add DID.
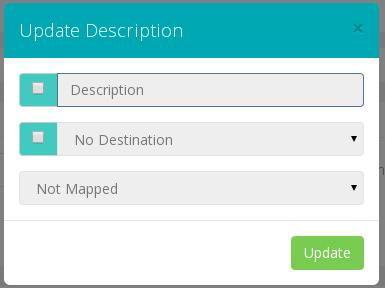
48 The page is divided in two parts as shown in the snapshot above Search It is for searching among the list of DIDs by Number and Destination. DID List This section lists all the DIDs. Also if a particular field has to be edited, click on it and a popup will open, make the required changes there. In Tenant login, DID number cannot be edited, only the other configurations can be edited. Description field is self explanatory. The other two fields are as follows Number DID Number. Description DID Description. Destination This field says what will be the destination of a call when a person dials that particular DID. For example, if a call has to be diverted to any/another/a particular extension when someone dials the DID number, select Extension in destination field and select the extension number to whom the call will be redirected in adjacent field named 'Extension'. The same is the case with other destinations. Possible selection in destination is as follows Extension Conference IVR
49 Queue Ring Group Playback FAX Extension Extension number which is mapped with this DID. It could be Queue Extension, Ring Group Extension, IVR Extension etc. Recording If you want to record calls of this DID. Editing DID To edit any field of a DID, click on that field. A pop up will open, make the required changes and click the check mark button to save the changes. To cancel the changes, click the cross button. To edit multiple DIDs simultaneously Select the DIDs that are to be edited by checking the checkbox in the first column of that DID. To select all that DIDs, click on the checkbox in the first row. It will select all the DIDs. After selecting the required DIDs, click on the Update All button. Clicking on that will open an update popup. The pop up will be as shown below. Check the field/fields that has to be edited. Make the required changes and click Update.
50
51 5. Contacts 5.1 Phone book Phone book will list all the contacts added in that particular tenant. Numbers added in the tenant will automatically get listed in all its extensions. The page it divided into two sections. Search It is for searching the extensions by phone number and display name. Import Numbers Click on Add file button to select a file to upload. After the file is selected, click on Import Numbers to import the file. It will display in a flash message how many numbers from the file were added and how many of theme were faulty numbers. To download a sample file, click on Download Sample File. Phone book This section lists out the entries that have been created till date. Adding a phone book entry
52 To add a new entry to phone book, click on the 'Add Number' button above the grid. It will open a create form as shown below. Fill in the required details and click on 'Create' to submit a new phone book entry. Editing a phone book entry To edit an entry, click the little blue icon for that entry in the grid. It will open an update form which is the same as create form. Deleting a phone book entry To delete an entry, click the little red icon for that entry in the grid. It will delete the entry. 5.2 Speed Dial This page lists out the numbers that are blacklisted. The numbers listed here will not be able to contact the extensions of this tenant. The constraints on calling will be decided by the 'Type' as explained further. This page is divided into three parts.
53 5.3 Blacklist This page lists out the numbers that are blacklisted. The numbers listed here will not be able to contact the extensions of this tenant. The constraints on calling will be decided by the 'Type' as explained further. This page is divided into three parts. Search Blacklisted numbers can be searched by number and type. Import Numbers A.csv file can be imported with a list of blacklisted numbers by using this section. When Add File is clicked, it will open a dialog box for choosing the file to be uploaded. When it is uploaded, click on Import Numbers. It will display a message saying how many numbers were successfully added and how many of them were faulty numbers. A sample file can also be downloaded to know the format of.csv file. Blacklist This list displays all the blacklisted numbers.

54 Adding a blacklisted number Click on 'Add Blacklist Number'. It will open a popup as below. Fill in the details and click on 'Create'. The use of 'Type' field, as explained above, is as follows Type There are 3 types. 'IN' means that incoming calls from that number will be blocked.
55 'OUT' means outgoing calls to that number will be blocked. 'BOTH' means both incoming and outgoing calls from and to that number will be blocked. Editing a blacklisted number To edit a field, click on it. It will open a popup to edit the content. Click on the tick mark button to save it, or on the cross button to cancel the changes. Deleting a blacklisted number To delete a particular number, click the little red icon for that number in the grid. It will delete the number. 5.4 Whitelist This page lists out the numbers that are whitelisted. If this feature is enabled, only the numbers from this list will be able to call the extensions of tenant. This page is divided into three parts. Search Whitelisted numbers can be searched by number and type. Import Numbers A.csv file can be imported with a list of whitelisted numbers by using this section. When Add File is clicked, it will open a dialog box to choose the file to be uploaded. When it is uploaded, click on Import Numbers. It will display a message saying how many numbers were successfully added and how many of them were faulty numbers. A sample file can also be downloaded to know the format of.csv file. Whitelist This list displays all the whitelisted numbers.

56 Adding a whitelisted number Click on the 'Add whitelist Number'. It will open a popup as below. Fill in the details and click on 'Create'. Editing a whitelisted number To edit a field, click on it. It will open a popup to edit the content. Click on the tick mark button to save it, or on the cross button to cancel the changes.

57 Enabling/Disabling whitelist feature To enable or disable the whitelist feature for a particular tenant, click 'Enable/Disable whitelist feature ' on the top of grid. It will open a pop up confirmation window as shown below. The button will toggle between 'Enable' and 'Disable' accordingly. Whitelist will only be enabled if there is at least one number in the list. If there are numbers, and are deleted later, then when the last number will be deleted, whitelist will be disabled by itself. Deleting a whitelisted number To delete a particular number, click the little red icon for that number in the grid. It will delete the number.
58 6. Payment 6.1 Invoice This page lists all the invoices that have been generated till date for the tenant. This page is available only is 'Payment' option is activated for the tenant. It's divided into two parts as follows Search It helps to search through the list of invoices by invoice ID, tenant name, from to that is the time interval for the invoice date and status of the invoice. Invoice List This list displays all the invoices. If the payment has been made by a tenant then the field 'Payment Details' will display the transaction ID. If it is paid by admin it will display 'Paid By Admin'.
59 Making payment for an invoice If an invoice has the status 'unpaid', payment can be made using this page. When a bill will be unpaid, the status column in the grid will provide a link to the following page through which payment can be made. All fields except remark are disabled. Enter the remark and click on next. It will go to the screen for step 2.
60 It will display the total amount to be paid. Click on 'Back' to return to the last step if any changes required. Click on 'Pay Now', which will redirect to the payment portal. 6.2 Balance This page lists out the balance details of all tenants. It also gives an option to add balance. This page is available only is 'Payment' option is activated for the tenant. It's as follows Balance List This list displays all the balances. If the payment has been made by a tenant then the field 'Payment Details' will display the transaction ID. If it is paid by admin it will display 'Added By Admin'. Adding Balance To add balance to any tenant, click on the Add Balance button above the grid. It will open a form as shown below.
61 Fill in the required details and click on 'Next' to go to step 2 as shown below. It will display the total amount to be paid. Click on 'Back' to go back to the last step if any changes required. Click on 'Pay Now', which will redirect to the payment portal.
62 7. Recording This page lists out all the recordings of this Tenant, which includes Auto Recordings, DID, Queue and Ring Group. Recording can be searched by different recording type, date, caller and callee name. To listen to the recording, play the required file. To download the file, click on the green download button.
63 8. Reports 8.1 Call Details This report gives the details of all the calls related to the tenant by which is logged in. The report could be searched as caller, callee, start date and end date. The report is divided into two parts. Search CDR Details Exporting a report Whole report can be exported in a.csv format to the device by clicking the 'EXPORT' button in the search tab. Also, the report needs to be filtered by caller, callee, start date or end date, then the criteria can be entered in the search tab. Then export the report, which will export only the filtered report.
64 8.2 Fax Details This report gives the details of all the fax which is sent or received by this tenant.. The report could be searched based on fax type (mail2fax, fax to mail) and fax status. The report is divided into two parts. Search Fax Details Exporting a report Whole report can be exported in a.csv format to the device by clicking the 'EXPORT' button in the search tab. Also, the report needs to be filtered fax type and fax status, then the criteria can be entered in the search tab. Then export the report, which will export only the filtered report.
65 8.3 Features List This is a list of all the features for the tenant, the codes used to access them and the details of the feature. 8.4 Outgoing Rules Details This report lists all the outgoing rules of the tenant. The report could be searched on rule name and rule pattern. The report is divided into two parts. Search Outgoing Rules Details
66 Exporting a report Whole report can be exported in a.csv format to the device by clicking the 'EXPORT' button in the search tab. Also the report needs to be filtered by rule name or rule pattern, the criteria can be entered in the search tab. Then export the report, which will export only the filtered report. 8.5 Blacklist Details This report lists all the blacklisted numbers. The report could be searched on number, type, and login name. The report is divided into two parts. Search Blacklist Details
67 Exporting a report Whole report can be exported in a.csv format to the device by clicking the 'EXPORT' button in the search tab. Also the report needs to be filtered by number, type or login name, the criteria can be entered in the search tab. Then export the report, which will export only the filtered report. 8.6 Bill Plan Details This report lists all the bill plans of the tenant. The report could be searched on name, type, period, currency and status of the bill plan. The report is divided into two parts
68 Search Bill Plan Details Exporting a report The whole report can be exported in a.csv format to the device by clicking the 'EXPORT' button in the search tab. Also, if the report is to be filtered by name, type, period, currency or status of a bill plan then the criteria has to be entered in the search tab and then export the report, which will export only the filtered report. 8.7 Rate Plan Details This report lists all the rate cards of the tenant. The report could be searched on name and status. The report is divided into two parts Search Rate Plan Details
69 Exporting a report The whole report can be exported in a.csv format to the device by clicking the 'EXPORT' button in the search tab. Also, if the report is to be filtered by name or status then the criteria has to be entered in the search tab and then export the report, which will export only the filtered report. Details of a Rate Plan To check the details of any particular rate plan, click on the Details link for that rate card. It will open a page displaying it's details as follows To see the details of any particular rate card, click on the Grey toggle button in the first column of that rate card.
70 To export the details of that particular rate plan, click on Export. To return to rate plan report, click on Back. 8.8 Invoice Details This report lists all the invoices of the tenant. The report could be searched by date, invoice id, status and tenant. The report is divided into two parts. Search Invoice Details If the payment has been made by tenant then the field 'Payment Details' will display the transaction ID. If it is paid by admin it will display 'Paid By Admin'. Exporting a report
71 The whole report can be exported in a.csv format to the device by clicking the 'EXPORT' button in the search tab. Also, if the report is to be filtered by date, invoice id, status or tenant then the criteria has to be entered in the search tab and then export the report, which will export only the filtered report. 8.9 Balance Recharge This report lists all the balances of the tenant. The report could be searched by date and tenant. The report is divided into two parts. Search Balance Recharge Exporting a report The whole report can be exported in a.csv format to the device by clicking the 'EXPORT' button in the search tab. Also, if the report is to be filtered by date or tenant then the criteria has to be entered in the search tab and then export the report, which will export only the filtered report.
72 8.10 Failed Transactions This is a report of all the failed transactions for balance and invoice payments for the particular tenant. The report is divided in two parts. Search Transaction Report The 'Payment Detail' section will show the additional details regarding the failed transaction. Exporting a report The whole report can be exported in a.csv format to the device by clicking the 'EXPORT' button in the search tab. Also, if the report is to be filtered by date range or entity then the criteria has to be entered in the search tab and then export the report, which will export only the filtered report Billing Summary This report lists the billing details of the tenant grouped on dates. Search Billing Summary
73 Exporting a report The whole report can be exported in a.csv format to the device by clicking the 'EXPORT' button in the search tab. Also, if the report is to be filtered by date range then the criteria has to be entered in the search tab and then export the report, which will export only the filtered report.
74 9. Profile To edit the profile of tenant, click on the drop down on the rightmost top corner of the page. It will open a small menu. Select 'Profile'. If the customization option for tenant would be enabled, then the profile will be divided in three parts 'Tenant Profile', 'Low Balance Notification' and 'About Tenant'. If the option is disabled, there will be no about us section. Tenant profile This part is for editing the details of tenant profile. Only id, MOH and profile picture of tenant can be edited from this page.

75 External Caller ID Number Caller ID to be displayed to callee when making outbound calls. Note : This option only will be available if Admin has enabled it for this Tenant. If Admin has enabled DID then only the DID which are available for this Tenant can be set as Caller ID Number, If Admin has enabled Any then any number can be set as Caller ID Number. This Caller ID is having second priority if this option is not set in Extension Settings then this caller ID will be set. Low Balance Notification This part is for viewing the low balance notifications. These settings are applied to all the extensions this tenant. The different settings are as follows Mail Alert Displays whether the mail notifications will be enabled or not. Current Balance Displays the current balance of the tenant. Alert Balance The balance at which the notifications will be sent. Call Alert If the call alert is 'Off', no file will be played to alert about the low balance. If it is 'All', the alert file will be played before the extension places any call whether it is internal or external. If 'External' is selected, then the file is played only when the extension makes an outbound call. About Tenant This part is for adding a logo and description of the tenant. The logo and description entered here will be displayed in all the extensions' 'about us' that belong to this tenant.
76 10. Change Password To change the password for tenant login, click on the 'Change Password' option in the drop down menu as shown below. In the form that opens. Enter the required details and click on 'Submit' to enable the new password settings.

77 11. Change Language To change the language of the portal click on the the language drop down menu on the top right corner, right beside the tenant id display. 12. About Us To get general information about the tenant, click on the 'About Us' button on the drop down menu of top rightmost corner as shown below.
ENTERPRISE SUBSCRIBER GUIDE
 ENTERPRISE SUBSCRIBER GUIDE Enterprise Subscriber Guide 880 Montclair Road Suite 400 Birmingham, AL 353 www. TABLE OF CONTENTS Table of Contents Introduction...6 Logging In...6 Navigation Bar, Sub-Menu
Enterprise Voice SUBSCRIBER GUIDE
 Enterprise Voice SUBSCRIBER GUIDE Conterra Networks Enterprise Voice SUBSCRIBER GUIDE 3 TABLE OF CONTENTS Table of Contents Introduction... 6 Logging in... 6 Navigation Bar, Sub-Menu and Page Layout...
Cebod Telecom. Customer Admin Manual
 Customer Admin Manual Table of Contents Contents 1. INTRODUCTION... 1 ABOUT THIS MANUAL... 1 CEBOD TELECOM OVERVIEW... 1 2. REGISTER A NEW ACCOUNT... 2 3. MY ACCOUNT... 5 4. DASHBOARD... 9 5. ACTIVITIES...
Group Administrators
 Hosted VoIP Phone System Blue Platform Admin Portal Guide for Group Administrators Table of Contents 1 About this Guide... 6 2 Accessing the Hosted VoIP Phone System Admin Portal... 7 3 Hosted VoIP Admin
Web Administration Interface. Administrator manual
 Web Administration Interface Administrator manual Version 1.0 English January 2014 Welcome! This manual gives you practical instruction on how to administrate company and user setup with help of Connect
Net2Phone Office Administrator s Guide
 Net2Phone Office Administrator s Guide May 2015 All Rights Reserved The use, disclosure, modification, transfer or transmittal of this work for any purpose, in any form, or by any means, without the written
End User Dashboard Voice Toolbar My Extension Call History My Voic My Directory
 Blue Wave Features- End User Dashboard End User Dashboard Voice Toolbar My Extension Call History My Voicemail My Directory Voice Toolbar View the status of extensions on your account, call them by selecting
1 P age NEXTIVA CALL CENTER. Supervisor User Guide. nextiva.com/support 2015 NEXTIVA, ALL RIGHTS RESERVED
 1 P age NEXTIVA CALL CENTER Supervisor User Guide nextiva.com/support 2015 NEXTIVA, ALL RIGHTS RESERVED 2 P age Creating Employees... 3 Creating an Employee... 3 Assigning Licenses to Employees... 7 Schedules...
ActivePBX Administrator s Guide
 ActivePBX Administrator s Guide CONTENTS Preface... v Document Conventions... v Glossary Conventions... v 1. Accessing the Admin Web Portal... 6 Logging in to the Web Portal... 7 Understanding the Admin
Hosted PBX Administrator s Guide. IVR DID Management CALL QUEUES. 1 Ally Communications Hosted PBX Administrator's Guide
 Hosted PBX Administrator s Guide CALL QUEUES IVR DID Management 1 CONTENTS Preface Document Conventions Glossary Conventions 1. Accessing the Admin Web Portal Logging in to the Web Portal Understanding
Call Center Administration
 Hosted VoIP Phone System Blue Platform Admin Portal Guide for Call Center Administration 1 Table of Contents 1 About this Guide... 3 2 Accessing the Hosted VoIP Phone System Administration Portal... 4
IPX-Series VoIP PBX September 11, Extension User Guide
 IPX-Series VoIP PBX 30.9.0.5 September 11, 2018 Extension User Guide Version: 30.8.0.14 Updated: September 12, 2018 Contents Extension User Guide...3 Extension User Portal...4 Log in Extension User Portal...4
Extension User Guide. S-Series Extension User Guide
 Extension User Guide Sales Tel: +86-592-5503309 E-mail: sales@yeastar.com Support Tel:+86-592-5503301 E-mail: support@yeastar.com Web: http://www.yeastar.com Version: 1.0 Revised: 2016.06 1 Contents 1.
Hosted VoIP Administrator User Guide
 Hosted VoIP Administrator User Guide Table of Contents: 1. Call Continuity..... pg 1 2. Call Groups..... pg 2 3. Call Queues... pg 5 4. Caller ID... pg 9 5. Company Call Recording... pg 12 6. Conference
Managing your PBX- Administrator
 Managing your PBX- Administrator ACCESSING YOUR PBX ACCOUNT Navigate to https://voip.ancero.com/ and log in to the Ancero Utility VoIP portal account. If you would like your web browser to keep you logged
My Phone. My Phone - Overview. Signing In
 My Phone - Overview The Optus Loop My Phone portal gives you full access to your personal phone service settings, allowing you to customise and manage your service to suit your specific requirements. Within
Grandstream Networks, Inc. UCM6xxx Series IP PBX Lightweight Call Center Guide
 Grandstream Networks, Inc. UCM6xxx Series IP PBX Lightweight Call Center Guide Table of Contents INTRODUCTION... 4 UCM CALL CENTER FEATURES LIST... 5 Call Queues... 5 Virtual Queue... 7 Position Announcement...
My Cloud Services Portal. User Guide
 My Cloud Services Portal User Guide Momentum Telecom 2018. All Rights Reserved. 888.538.3960 www.momentumtelecom.com/support 6.29.18 2 IN THIS GUIDE WELCOME... 6 INTRODUCTION... 6 MY CLOUD SERVICES PORTAL...
Solutions Reference Guide. IP TalkSM. Voic & Navigator Web Portal
 IP Talk SM Solutions Reference Guide IP TalkSM Voicemail & Navigator Web Portal Table of Contents Voicemail Accessing Your Voicemail................... 1 Voicemail Main Menu........................ 2
My Cloud Services Portal. Admin Guide
 My Cloud Services Portal Admin Guide Momentum Telecom 2018. All Rights Reserved. 888.538.3960 www.momentumtelecom.com/support 6.29.18 2 IN THIS GUIDE WELCOME... 6 INTRODUCTION... 6 ACCESS MY CLOUD SERVICES
Logging Into the Web Portal
 V0610 Logging Into the Web Portal Open your Web browser application. In the address field, enter the external WebPortal address, https://lightpathvoice.com Click Go. In the Phone Number field, enter your
1 Page. Digital Voice Services Business User Guide
 1 Page Digital Voice Services Business User Guide Feature Access Codes *62 Voice Portal *86 Direct Voice Mail Retrieval *77 Anonymous Call Rejection Activation *87 Anonymous Call Rejection Deactivation
Press8 Telecom Administrator Guide Release 3.9
 Press8 Telecom Administrator Guide Release 3.9 February 2013 Press8 Telecom Administrator Guide 1 Contents Changes in This Release... 5 1 Introduction... 6 1.1 The Purpose of this Document... 6 1.2 Features...
The TELUS Business Connect Mobile solution. Admin guide
 The TELUS Business Connect Mobile solution Admin guide Table of contents. Part Getting started 4 Introduction 5 Admin homepage 5 Main functions 5 Admin Portal 5 My Extension 6 Do Not Disturb 7 RingOut
Nuvia End-User Portal Quick Reference Guide
 Nuvia End-User Portal Quick Reference Guide This user guide illustrates Nuvia End-User Portal features and use, enabling end-users to listen to messages, manage their address book, set-up routing rules,
Hosted IP Phone System Administrator Portal Reference Manual (Polycom)
") Hosted IP Phone System Administrator Portal Reference Manual (Polycom) POPP.com, Inc. All rights reserved. Service 24x7 @ 763-797-7900 or 1-800-234-POPP Page 1 of 50 9/27/18 Table of Contents 1 Introduction
Hosted IP Phone System Administrator Portal Reference Manual (Polycom) POPP.com, Inc. All rights reserved. Service 24x7 @ 763-797-7900 or 1-800-234-POPP Page 1 of 50 9/27/18 Table of Contents 1 Introduction
SADOS VOIP Phone System User Guide
 SADOS VOIP Phone System User Guide SADOS Communications LLC. 501 North Market Street Frederick, Maryland 21701 Copyright and Trademarks Software specifications are subject to change without notice. SADOS
User Guide Business Hosted Voice DOCUMENT VERSION: 4.0
 User Guide Business Hosted Voice DOCUMENT VERSION: 4.0 DATE OF ISSUE: 30 NOVEMBER 2018 Welcome! We want to help your business connect. We re sure you will enjoy the benefits of these services. Plus our
Group Administrator Guide
 Get Started... 4 What a Group Administrator Can Do... 7 About Premier... 10 Use Premier... 11 Use the AT&T IP Flexible Reach Customer Portal... 14 Search and Listing Overview... 17 What s New in the Group
IP Centrex User Guide Release 2.1
 IP Centrex User Guide Release 2.1 2014 by Cox Communications. All rights reserved. No part of this document may be reproduced or transmitted in any form or by any means, electronic, mechanical, photocopying,
The guide is divided into sections which describe how to configure and manage different aspects of the Hosted PBX service for your business group.
 Welcome This guide is intended to help Business Group Administrators of FairPoint Communications Hosted PBX service to perform the various tasks needed to administer the system, such as: Managing lines,
AUGUST CommPortal GUIDE
 AUGUST 2018 CommPortal GUIDE 2 AirePBX CommPortal Guide Table of Contents 1 Introduction...4 1.1 About This Manual...4 2 CommPortal Overview...5 2.1 Interface overview...5 2.2 Browser and Operating System
Hosted PBX Administrator Guide
 Hosted PBX Administrator Guide Table of Contents 1 INTRODUCTION... 1-1 1.1 PURPOSE OF THIS GUIDE... 1-1 1.2 OTHER GUIDES... 1-1 2 COMMPORTAL BUSINESS GROUP ADMINISTRATOR (BG ADMIN)... 2-1 2.1 ACCESSING
AT&T IP Flexible Reach Group Administrator Guide
 AT&T IP Flexible Reach Group Administrator Guide 1 Get Started... 7 Log In... 8 What a Group Administrator Can Do... 10 About Premier... 13 Use Premier... 14 Use the AT&T IP Flexible Reach Customer Portal...
TELENOR MOBILE PBX USER GUIDE
 TELENOR MOBILE PBX USER GUIDE This document has been prepared to guide the end-user (mainly Telenor Corporate Client). Following are three main sections in this document MPBX Features and Functionalities
Syntel2 by Syntel Solutions Features
 Syntel2 by Syntel Solutions Features Interested in learning how our proven software platform can revitalize your business communications? With Syntel2 by Syntel Solutions, we give you the tools and features
Virtual Office Phone Service Setup Guide
 Setup Guide A guide for the Phone System Administrator Version 6.0, November 2010 Table of Contents Welcome to 8x8 Virtual Office!...3 8x8 Virtual Office Softphone...3 Activate Your 8x8 IP Phones...3 The
FlexIP SOLUTIONS FEATURES
 FlexIP SOLUTIONS FEATURES INTERESTED IN LEARNING HOW OUR PROVEN SOFTWARE PLATFORM CAN REVITALIZE YOUR BUSINESS COMMUNICATIONS? With FlexIP, we give you the tools and features you need to enhance your business
Contact Center. Installation, Configuration and Operation Manual
 Contact Center Installation, Configuration and Operation Manual Contents 1. Introduction... 3 2. Key Terms and Definitions... 4 3. How the Contact Center Works... 5 4. Installing the Contact Center...
COMMAND CENTRAL. Commander Smart SIP ADMINISTRATOR GUIDE
 COMMAND CENTRAL Commander Smart SIP ADMINISTRATOR GUIDE Command Central Requirements... 3 Devices... 3 Browsers... 3 How to log into your account... 4 The Command Central Dashboard... 7 Managing Enterprise
Barracuda Phone System User Portal - Communication Command Center
 Barracuda Phone System User Portal - Communication Command Center This feature was formerly called the Call Control Client. The Barracuda Phone System provides a web-based portal, the Communication Command
ACD (Automatic Call Distributor) Operation Manual
 Operation Manual") ACD (Automatic Call Distributor) Operation Manual Ver1.1.0 2018/11/13 1 Table of Contents Preface ACD (Automatic Call Distributor) is a Cloud PBX feature used in handling large volume of incoming calls.
ACD (Automatic Call Distributor) Operation Manual Ver1.1.0 2018/11/13 1 Table of Contents Preface ACD (Automatic Call Distributor) is a Cloud PBX feature used in handling large volume of incoming calls.
Virtual Office Phone Service Setup Guide
 Setup Guide A guide for the Phone System Administrator Version 4.0, July 2010 Table of Contents Welcome to 8x8 Virtual Office!...3 Activate Your 8x8 IP Phones...3 The 8x8 Self Service Portal...4 Set Up
USER MANUAL EVCOFFICE PBX. Easy Voip Call Inc.
 USER MANUAL EVCOFFICE PBX Easy Voip Call Inc. Contents 1. Admin user Sign up and your first log in to the portal... 4 2. Adding users... 5 2.1 Mobile Phone... 6 2.2 Extension numbers... 7 2.3 Branches...
LPS Hosted VoIP. Interested in learning how our proven software platform can revitalize your business communications?
 LPS Hosted VoIP Interested in learning how our proven software platform can revitalize your business communications? With -14, we give you the tools and features you need to enhance your business for improved
AT&T Collaborate glossary
 Common terms associated with the AT&T Collaborate SM service. A B C D E F G H I J K L M N O P Q R S T U V W X Y Z A account codes A feature that lets administrators track and manage outgoing calls to keep
Digital Voice Services Residential User Guide
 Digital Voice Services Residential User Guide TECH SUPPORT - 888.855.9997 734.324.7190 WYANDOTTECABLE.COM Feature Access Codes *62 Voice Portal *86 Direct Voice Mail Retrieval *77 Anonymous Call Rejection
Telax Administrator Portal
 Telax Administrator Portal Table of Contents A. Getting Started... 2 B. Home... 2 C. Executive Dashboard... 3 E. Configuration... 5 1. General Page... 5 2. Working Hours... 5 3. Contact List:... 6 4. Queues:...
Digital Voice Services Residential User Guide
 Digital Voice Services Residential User Guide 2 P a g e * Feature Access Codes *11 Broadworks Anywhere (pulling call to alternate phone) *62 Access Voicemail *72 Call Forwarding Always Activation *73 Call
SmartVoice Hospitality Portal User Guide
 SmartVoice Hospitality Portal User Guide Quick reference Record your information here: My username My password Circuit ID / BPSO SmartVoice Customer Support Phone: 1-866-244-7475 Email: ServiceAssurance@shawbusiness.ca
Manual Cellip 365 Centrex Dashboard Audio Library Recording a Sound File Auto attendant (IVR)...
...") TABLE OF CONTENTS Manual Cellip 365 Centrex... 2 1. Dashboard... 2 2. Audio Library... 2 2.1 Recording a Sound File... 3 3. Auto attendant (IVR)... 3 4. Response group... 6 4.1 Change the name of the response
TABLE OF CONTENTS Manual Cellip 365 Centrex... 2 1. Dashboard... 2 2. Audio Library... 2 2.1 Recording a Sound File... 3 3. Auto attendant (IVR)... 3 4. Response group... 6 4.1 Change the name of the response
Operating Your Phone. This section describes how to operate your Cisco IP Phone and includes information on soft keys and phone features.
 This section describes how to operate your Cisco IP Phone and includes information on soft keys and phone features. Note Because there are differences in phone and site configurations, not all features
Unified Communications My Phone Portal USER GUIDE
 Unified Communications My Phone Portal USER GUIDE Table of Contents Getting Started Guide... 3 Logging Into the DOTVOX My Phone Portal... 3 Resetting My Phone Portal Username and/or Password... 4 My Portal
Residential Voice SUBSCRIBER GUIDE
 Residential Voice SUBSCRIBER GUIDE RESIDENTIAL VOICE SUBSCRIBER GUIDE TABLE OF CONTENTS Table of Contents Getting Started... 6 Requirements... 6 First Login... 6 Features Management... 0 Basic Features...
The Complete Pegasus Communication Solutions User Guide and How-To Manual
 The Complete Pegasus Communication Solutions User Guide and How-To Manual Revised June 2012 ABOUT US ABOUT OUR SOFTWARE ACCESS USER LEVELS AND PERMISSIONS GETTING STARTED UNDERSTANDING THE SCREEN LAYOUT
Dashboard User Guide For assistance, please call
 Dashboard User Guide For assistance, please call 1-866-399-8647. With these instructions, you will: PAGE 1. Login to the Clarity site, Configure 911, and Change your Password... 2 2. Set up Mobile Connect
End User Guide Cloud PBX
 End User Guide Entrust ICT(EICT) reserves the right to change product specifications, functions, or features, at any time, without notice. Please refer to your EICT representatives for further details.
CommPortal Portal Guide
 CommPortal Portal Guide The User Portal is available at https://userportal.appiaservices.com. Please contact Appia Support at 877-277-4297, option 3, or support@appiaservices.com if you need login information.
Today we ll be demonstrating Clarity's web portal where you can access all the features of Clarity s Phone System.
 Title: Introduction to Clarity Voice Phone Service Portal Hello and welcome to Clarity s Support Portal training. At Clarity Voice, we want to help you use your phones to make more sales and improve your
3CX Phone System User Guide
 3CX Phone System User Guide 31 Gloster Court, Dartmouth, NS B3B 1X9 Canada Toll free: 1-800-675-4025 Tel: 902-468-2252 Fax: 902-468-2557 cabcosales@cabco.ca 1 cabco.ca Contents Page Quick Start Guide 3
Telstra IP Telephony Call Centre Customer Group Administrator User Guide
 Telstra IP Telephony Call Centre Customer Group Administrator User Guide Telstra Corporation Limited, 2009 Table of Contents 1. Introduction... 3 2. Logging on as a Customer Group Administrator... 3 3.
Rev
 Rev. 1.1.3 Copyright Notice Copyright 2014-2017 Telinta Inc. No part of this document may be reproduced or transmitted in any form or by any means, electronic or mechanical, for any purpose, without the
Lightpath Hosted Voice
 Lightpath Hosted Voice CONTENTS 1 Call Queuing User Guide for Business Group Administrators...1 1.1 How Call Queuing works...1 1.1.1 Multi Line Hunt Group... 1 1.1.2 Call Queuing... 2 1.1.3 Getting Started
Switchvox PBX User Manual
 Switchvox PBX User Manual Welcome to the Switchvox PBX, the worlds most powerful, yet easy to configure IP- PBX on the market today. We have tried to make all the operations you do often easy to use and
Feature List Q4 2016
 Feature List Q4 2016 PBX Model IP1100 IP1200 IP2000 IP5000 Extensions Extension Capacity 50 100* 500 500 Import Names and Email Addresses YES YES YES YES Auto Create Extensions and Voice Mail Boxes YES
TELUS Business Connect for Google User Guide
 TELUS Business Connect for Google User Guide TELUS Business Connect for Google User Guide Contents 2 Contents Introduction... 4 About TELUS Business Connect for Google... 5 About this guide... 5 Basics...
Virtual Communications Express Admin Guide: Getting Started Welcome to Verizon Virtual Communications Express!
 Welcome to Verizon Virtual Communications Express! Virtual Communications Express is an easy-to-use service designed to enhance communications with your coworkers, customers, and suppliers. It can help
SD APmax. Service Description Automated Call Distribution. Issue 01 March 2013 Proprietary
 APmax SD1335.01 Issue 01 March 2013 Proprietary APmax Publication number: SD1335 Document Version: 01 Issue date: March 2013 Security status: Proprietary Owner: B. Aughenbaugh & D. Uecker 2013 Innovative
Interested in learning how our proven software platform can revitalize your business communications?
 Jet-Dial Features Interested in learning how our proven software platform can revitalize your business communications? With Jet-Dial, we give you the tools and features you need to enhance your business
Altice Business Hosted Voice. Business Group Admin Guide. v
 Altice Business Hosted Voice Business Group Admin Guide v03-27-18 Contents 1 Introduction... 1-1 1.1 Purpose of this guide... 1-1 1.2 Other guides... 1-1 2 CommPortal Business Group Administrator (BG
MyOffice Employee. User Guide Release 4.1
 MyOffice Employee User Guide Release 4.1 Copyright 1996-2014 Sigma Systems Canada Inc. Last Revision: 2015-06-05 Sigma Systems Canada Inc., Toronto, ON, Canada The Programs (which include both the software
Table of Contents DVX-2005F IPPBX
 Table of Contents Chapter 1Feature Codes... 1 1.1 Blacklist... 1 1.2 Pickup Call... 2 1.3 Call Parking... 3 1.4 Call Transfer... 4 1.5 Conference... 5 1.6 Voicemail... 6 1.7 One Touch Recording... 7 1.8
ADMINISTRATOR PORTAL MANUAL
 ADMINISTRATOR PORTAL MANUAL TABLE OF CONTENTS SIGNING IN... 5 HOME SCREEN... 6 GENERAL SETTINGS... 7 WORKING HOURS TAB... 9 HOLIDAYS TAB... 11 Shortened hours for the Holidays... 12 Holiday Message...
Call settings administrator guide. BT One Phone
 1 Call settings administrator guide BT One Phone 2 What s in this guide 1. Welcome to the BT One Phone 3 2. An introduction to the BT One Phone portal 4 3. Getting started 5 4. Call settings overview 9
IVR Module User Guide
 IVR Module User Guide THIS WIKI HAS BEEN UPDATED FOR VERSION 13 OF YOUR PBX GUI Overview Logging In Creating a new IVRs IVR General Options IVR Name IVR Description IVR DTMF Options Announcement Enable
Digital Telephone User Guide
 Digital Telephone User Guide 1 P. O. Box 99, Conway, AR 72033 (501) 450-6000 ConwayCorp.com * Feature Access Codes *11 Broadworks Anywhere (pulling call to alternate phone) *62 Access Voicemail *72 Call
Interactive Voice Response (IVR) Extension Type Guide
 Extension Type Guide") 4PSA VoipNow 2.0.3 Interactive Voice Response (IVR) Extension Type Guide For more information about 4PSA VoipNow, check: http://www.voipnow.com Copyrights 2002-2009 Rack-Soft, LLC. VoipNow is a registered
4PSA VoipNow 2.0.3 Interactive Voice Response (IVR) Extension Type Guide For more information about 4PSA VoipNow, check: http://www.voipnow.com Copyrights 2002-2009 Rack-Soft, LLC. VoipNow is a registered
Table of Contents. IQSIP_Admin_Portal_ManageTrunks_0216rev2.doc Page 2 of 36
 CenturyLink IQ SIP Administrator Portal User Guide Table of Contents About This User Guide... 3 Trunk Administration... 4 Manage Trunks... 4 Manage Trunk Features... 11 Manage Trunk Users... 14 Group 911...
OnCall Voice. User Guide. Revision Last Updated October 18, 2017 By, Pedro Tomas 2017 TRACI.net
 OnCall Voice User Guide Revision 1.2 - Last Updated October 18, 2017 By, Pedro Tomas 2017 TRACI.net Welcome To OnCall Voice!... 3 About This User Guide... 3 Supported Devices... 3 Need More Help?... 3
exchange Call Center Agent Guide
 exchange Call Center Agent Guide Version 4.6 NBX System Release 6.5 http://www.3com.com Part Number: 900-0419-01 Published April 2009 3Com Corporation, 350 Campus Drive, Marlborough MA 01752-3064 Copyright
Business Digital Voice. Setting up your Hunt Group
 Business Digital Voice Setting up your Hunt Group Don t miss a call! With a Hunt Group, a customer will be automatically transferred from line to line until someone at your business answers the phone.
Welcome to homextend for Android
 Welcome to Everything you need to to set up and use your homextend mobile phone client This guide is for users that have subscribed to a residential service that includes the homextend client. The client
CenturyLink Ready-Access User Guide
 CenturyLink Ready-Access User Guide August 2018 TABLE OF CONTENTS Ready-Access Overview...3 Setting Up a Conference Call...3 Ready-Access Account Options...3 Helpful Hints for Using Ready-Access...3 Keeping
Service User Manual. a service of
 Service User Manual a service of 1 The following are simple instructions and suggestions on how to better utilize your Digital Phone service from Citynet. Should you need further assistance, do not hesitate
Table of Contents. HostedVoIP_End_User_Portal_0816rev4.doc Page 2 of 81
 . CenturyLink Hosted VoIP End User Portal User Guide Table of Contents Portal Navigation... 4 Home Page Navigation... 4 Call Logs... 6 Exporting Call Logs... 7 Call Settings... 8 Call Waiting... 9 Auto
How to Use Billing Addon
 Version 1.1 Date: April, 2014 Yeastar Information Technology Co. Ltd. Contents 1 How to activate Billing Addon... 3 2 How to use Billing Addon... 6 2.1 ADDONS SETTINGS... 6 2.1.1 Global... 6 2.2 BILLING
Telair Hosted Voice. Cloud Telephony Administrator Guide. Telair Pty Ltd "Committed to delivering what we promise"
 Telair Hosted Voice Cloud Telephony Administrator Guide Table of Contents Features... 4 Feature Overview... 4 User Interface Overview... 5 Offices and Users... 7 Offices... 7 Users... 8 Call Routing...
Version 1.2, 28 February Far South Networks
 COM.X IP PBX END USER GUIDE Version 1.2, 28 February 2014 Document History Version Date Description of Changes 1.0 10/01/01 First release 1.1 10/10/08 Added instructions for remote voice mailbox access,
BT CLOUD PHONE. USER GUIDE FOR MY EXTENSION.
 BT CLOUD PHONE. USER GUIDE FOR MY EXTENSION. WHAT S IN THIS GUIDE. 1. Welcome to BT Cloud Phone. 3 2. Express setup. 4 3. Accessing the BT Cloud Phone Portal. 5 4. My Extension Dashboard. 6 4.1 Overview:
C L O U D V O I C E B U S I N E S S P O R T A L
 C L O U D V O I C E B U S I N E S S P O R T A L S I T E F E A T U R E S G U I D E V E R S I O N 2. 0 Contents Introduction... 8 Overview... 8 Audience... 8 Account Codes... 9 Description... 9 Description
Group Administrators Guide The PBX Call Central Userguide
 The PBX Call Central Userguide QUICK START GUIDE Your Start Up configuration After your purchase of the Hosted Phone service, the Hosted Phone team configured a basic phone system to get you started. This
Hosted VoIP Phone System. Green Platform. Integrated ACD. Call Center Agent Guide
 Hosted VoIP Phone System Green Platform Integrated ACD Call Center Agent Guide Table of Contents 1. Integrated ACD Introduction 3 1.1. Terminology 3 1.2. How Integrated ACD works 3 2. Accessing the CommPortal
ZYCOO CooVox Series IP Phone System Operator User Guide. Software version v3.0.1
 ZYCOO CooVox Series IP Phone System Operator User Guide Software version v3.0.1 This document is subject to change without notice. The latest electronic version of this user guide is available for downloading
Rev
 Rev. 2.8.1 Copyright Notice Copyright 2010-2017 Telinta Inc. No part of this document may be reproduced or transmitted in any form or by any means, electronic or mechanical, for any purpose, without the
SoLink-Lite IP-PBX. Administrator Guide. (Version 1.0)
") SoLink-Lite IP-PBX Administrator Guide (Version 1.0) TABLE OF CONTENT 1.0 Introduction... 1 2.0 Setting Up the IP-PBX... 2 3.0 Logging On... 3 4.0 Configuring Network... 4 5.0 Configuring Hardware... 5
SoLink-Lite IP-PBX Administrator Guide (Version 1.0) TABLE OF CONTENT 1.0 Introduction... 1 2.0 Setting Up the IP-PBX... 2 3.0 Logging On... 3 4.0 Configuring Network... 4 5.0 Configuring Hardware... 5
General/Call Center. Call Queue Routing. Auto-Attendant. Call Center Stats-Home Page. Call Center Agent Settings. Call Center Reporting
 General/Call Center Auto-Attendant Dial by Name Directory Intro Greeting Post-Welcome Greeting Dial by Extension Call Center Stats-Home Page Callers Waiting Average Wait Time Average Handling Time Abandon
The Hong Kong University of Science and Technology Telephone Web Portal User Guide
 The Hong Kong University of Science and Technology Telephone Web Portal User Guide The HKUST IP phone system is enhanced to support many advanced features. This user guide walks through the most useful
FREUND SIP SW - V SIP-server setup
 FREUND SIP SW - V1.7.13 SIP-server setup Content 1. Product Setup 4 2. Log in and Home 5 3. Menu 9 3.1 Tools 9 3.1.1 Dashboard 9 3.1.2 Extensions 10 3.1.3 Trunks 14 3.1.4 Groups 18 3.1.5 Ring groups 20
RCN BUSINESS INTEGRATED ACD. Administrator s Guide
 RCN BUSINESS INTEGRATED ACD Administrator s Guide 2 Table of Contents 3-6 Integrated ACD for Business Group Administrators How Integrated ACD Works MLHGs Integrated ACD 39-42 Creating a Report Before You
User Guide. Customer Self Service (CSS) Web Application Progress Software Corporation. All rights reserved.
 Web Application Progress Software Corporation. All rights reserved.") User Guide Customer Self Service (CSS) Web Application 1993-2017 Progress Software Corporation. Version 2.1 March 2017 Table of Contents Welcome... 3 Accessing the Customer Self Service (CSS) Web Application...
User Guide Customer Self Service (CSS) Web Application 1993-2017 Progress Software Corporation. Version 2.1 March 2017 Table of Contents Welcome... 3 Accessing the Customer Self Service (CSS) Web Application...