Reference Guide for the KODAK Picture Kiosk GS Compact. Software Version 2.0
|
|
|
- Charles Simmons
- 5 years ago
- Views:
Transcription

1 Reference Guide for the KODAK Picture Kiosk GS Compact Software Version 2.0 Eastman Kodak Company, 2008
2 Contents Product Overview... 4 Console Photo Printer... 5 Product Choices... 6 Startup and Shutdown... 6 Supplies... 7 Specifications for Receipt Paper... 7 Loading Ribbon in the 605 Photo Printer... 8 Loading Paper in the 605 Photo Printer... 9 Loading Paper in the Receipt Printer Cleaning Console Printer Navigating the Setup Screens Using the Security Tab Using the Regional Tab Using the Pricing Tab Setting up Taxes and Fees Setting up Receipt Printing Setting the Payment Options Setting the Product Offerings Setting the ID Photo Sizes Installing Creative Content Configuring Creative Cards Using the System Tab Restoring Factory Settings Installing Software Backing up the Hard Drive Saving System Settings Restoring Your Settings Calibrating the Touch Screen 28 Setting the Date and Time 28 Setting the Auto Shutdown and Startup Feature Setting the ID for the BLUETOOTH Technology Enabled Device Creating an Activity Log Creating a Diagnostics Log Saving a Diagnostics Log to CD Restarting the System Adjusting the Printer Settings Configuring the Network Settings Configuring Remote Business Management Troubleshooting the Kiosk Error Messages Restoring the Hard Drive
3 Checking the Cable Connections Troubleshooting the 605 Printer Clearing a Paper Jam Clearing a Ribbon Jam Removing a Paper Jam from the Receipt Printer
 prints, ID Photos, greeting cards and invitations, and KODAK Picture CDs from digital pictures. The Kiosk consists of the Console and KODAK 605 Photo Printer.")
4 Product Overview The KODAK Picture Kiosk GS Compact lets customers quickly make 4 x 6 in. (10 x 15 cm), 5 x 7 in. (13 x 18 cm), and 6 x 8 in. (15 x 20 cm) prints, ID Photos, greeting cards and invitations, and KODAK Picture CDs from digital pictures. The Kiosk consists of the Console and KODAK 605 Photo Printer. Console Touch-Screen Display USB Port Camera Card Readers for: SECURE DIGITAL MULTIMEDIA MEMORY STICK MEMORY STICK PRO COMPACTFLASH SMARTMEDIA XD-PICTURE Cards 605 Photo Printer Print Catcher CD Drive Compatible with BLUETOOTH Technology Enabled Devices 605 Photo Printer Printer Power Cord USB Cable Console Power Switch Console Power Cord 4


5 605 Photo Printer Trim Tray Top Cover Cover Release Operator Panel Print Exit Filter Openings Paper Access Door USB Cable Power Switch Power Cord Data Plate 5

6 Product Choices Customers start their order by inserting their digital media. They can select from: Print All Make 4 x 6 in. (10 x 15 cm) prints of all the pictures on the input media in two steps. Selective Printing & CD Select pictures, make edits, and make prints and/or a KODAK Picture CD. ID Photos Create ID Photos. Create Cards Make greeting cards and invitations with borders with text. Startup and Shutdown To start up the Kiosk: 1. Move the power switch to On ( I ). To shut down the Kiosk: 1. From the Main screen, touch Kodak twice. 2. Touch the System Tab. 3. Touch Shutdown System. 4. At the message prompt, touch Yes. 5. Move the power switch to Off (0). IMPORTANT: If the Auto Startup Feature is enabled, the power switch must stay in the On position. For more information about this feature, see page 28. 6
7 Supplies Item Catalog Number Description KODAK Photo Print Kit 6800/6R KODAK Thermal Printer Cleaning Kit KODAK Picture CDs Specifications for Receipt Paper Specifications for Receipt Paper Paper Width Paper Thickness Maximum Roll Diameter Paper Core Diameter roll of paper 1 ribbon individually packaged alcohol pads in. (79.37 mm) Minimum Maximum 3.15 in. (80 mm) Inner Diameter Maximum Outer Diameter.0025 in. (0.064 mm).0049 in. (0.124 mm) 0.47 in. (12 mm) 0.70 in. (18 mm) 7


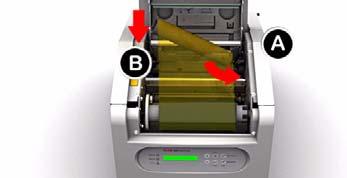
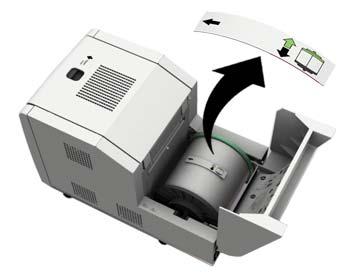
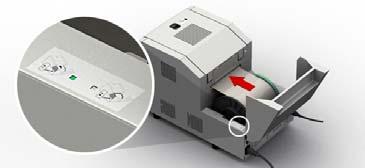
8 Loading Ribbon in the 605 Photo Printer


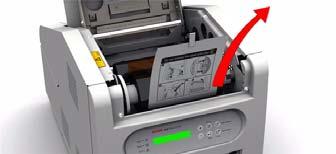
9 Loading Paper in the 605 Photo Printer X 9


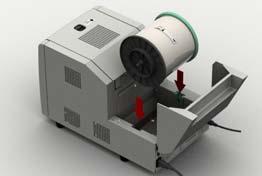
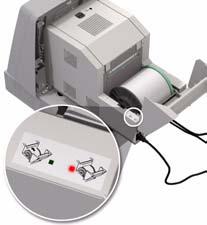
10 Loading Paper in the Receipt Printer When the paper supply in the receipt printer is low, the receipts print with colored stripes on the edges. When the receipt printer runs out of paper, a paper empty message appears on the screen. When this happens, load a new roll of paper into the receipt printer A B B A Note: Hold the paper roll so that the feed paper rolls off the top B A 10
11 Cleaning Follow these cleaning recommendations to keep the Console and Printer in good working condition. Console CAUTION: Never use abrasives or harsh chemicals to clean any part of the Kiosk. Do not use window cleaner, alcohol (methyl, ethyl or isopropyl) or any strong solvent. Do not wipe the screen with a cloth or sponge that could scratch the surface. Turn off and unplug the Kiosk before performing maintenance procedures. Component When Use Instructions Console Exterior Touch-Screen Display As needed Damp, lint-free cloth Wipe the exterior and print catcher. Wipe the display. Printer CAUTION: Alcohol is a flammable liquid. It can cause eye irritation and dry skin. Prolonged or repeated skin contact may cause drying, cracking, or irritation. Wash hands with soap and water following maintenance procedures where you use alcohol pads. For additional information, see the Material Safety Data Sheet (MSDS). For additional MSDS information, visit: Never use abrasives or harsh chemicals to clean any part of the printer. The thermal head becomes extremely hot during normal operation. Wait approximately five minutes to begin cleaning the head after you open the cover. Fingerprints can damage the thermal head, which looks like a glass bar. Never touch it with your bare hands or fingers. 11


12 IMPORTANT: When performing maintenance procedures: Shut down, turn off, and unplug the Kiosk. Remove paper and ribbon from the printer. Allow components to dry completely. Component When Use Instructions Platen Roller Monthly Alcohol Pad 1. Wipe the platen roller. 2. Rotate the roller to clean the entire surface. Cleaning Roller Wipe the cleaning roller. Printer Exterior Weekly Damp, lint-free cloth 1. Wipe the exterior. 2. Vacuum filter openings. 12

13 Component When Use Instructions Thermal Print Head Peel Bar When directed to do so by your service representative. Alcohol Pad 1. Move the pad along the entire length of the thermal head, in one direction only: Apply firm, even pressure. Make at least three passes, using a clean part of the pad for each pass. Repeat, as needed, until no dirt appears on the pad. 2. Use another alcohol pad to wipe the edge of the peel bar. Print Head Peel Bar 13

14 Navigating the Setup Screens To enter Setup, touch Kodak twice. On any Setup screen, touch: Back to return to the previous screen. Exit Settings to return to the Main screen. 14

15 Using the Security Tab IMPORTANT: If you forget the Administration pass code, restart the Kiosk. Immediately touch Kodak twice on any attraction screen to access the Setup screens. 1. Touch the Security tab. 2. Touch Enable next to each pass code that you want to enable: Administration Pass Code only an authorized operator can access the Setup screen. Output Pass Code you must enter a pass code before a customer can print pictures. 3. Touch Change to change the pass code. 4. Enter the pass code using the on-screen keypad. Touch Enter. NOTE: The pass code can be a maximum of 6 numbers. 5. If the Output Pass Code is enabled, touch Change to set the maximum number of prints that can be ordered without entering the output pass code. 15

16 Using the Regional Tab 1. Touch the Regional tab. 2. Use the arrows to select the Language, Currency, and Date Format. 3. Select the: Measurement Units Time Format 16
17 Using the Pricing Tab 1. Touch the Pricing tab. 2. Touch the arrows to select a currency. 3. Touch Change next to a product to set pricing. 4. Use the on-screen keypad to enter the price. Touch Enter. 5. Touch Add Range to add a price range. 6. Use the on-screen keypad to enter the maximum number for the new price range. Touch Enter. NOTE: The minimum number for the next price range is automatically set to a number that is 1 higher than the maximum number in the previous price range. 7. Repeat Steps 5-6 to add another price range. 8. Touch Remove to eliminate a price range. 17

18 Setting up Taxes and Fees the Pricing tab Taxes & Fees 2. Touch the arrows to select a Tax Name for Tax Touch Change to set the tax. Use the on-screen keypad to enter the percentage for the tax. Touch Enter. Example: If the tax is 8.2%, enter If necessary, repeat Steps 2-3 for Tax Select a Tax Type: Exclusive taxes are added to the order subtotal. Inclusive taxes are included in the price of a product such as a VAT tax. 6. Touch Change next to Fee Use the on-screen keypad to enter the fee. Touch Enter. 8. Repeat Steps 6-7 to enter information for Fee 2. 18

19 Setting up Receipt Printing With KODAK Picture Kiosk GS Compact, Software Version 2.0, you can use the optional receipt printer or the 605 Photo Printer to print receipts. the Pricing tab Receipt Printing 2. Touch the check box next to Enable Receipt Printing to turn on the receipt printing feature. 3. Select the output option for the receipt to print: 4 x 6 Print prints on the 605 Printer Receipt Printer prints on the receipt printer 4. Select when you would like the receipt to print: Before Pass-Code Entry After Pass-Code Entry 5. If you are using barcodes, touch the check box next to Include Receipt Barcodes. 6. Select a barcode type: UPC-A EAN-13 19

20 7. Select the type of barcode that prints on the receipt: Total Only one barcode is printed on the receipt with the total of all products purchased. With Each Item a separate barcode is printed on the receipt for each product purchased. 8. Touch Edit to add text to the receipt. 9. Touch the arrows to select a line of text. 10. Use the on-screen keyboard to enter the text. 11. Repeat Steps 9-10 for each line of text. 12. When you are done, touch OK. NOTE: Not all fields are required. 13. Touch Test Print to make a test receipt. 14. Remove the test receipt and touch OK. 15. Check that the text on the receipt is correct. 16. If you need to make changes to the text, repeat Steps


21 Setting the Payment Options The Payment Options tab may look different depending on the Payment Processing kit that is installed. For payment options that require the use of a payment card, you must purchase and install the optional magnetic card reader. 1. Touch the Payment Options tab. 2. Touch the check box next to the payment option to enable it: Pay at Clerk customers must pay for their order at the counter. KODAK Kiosk Card customers must pay for their order with a KODAK Kiosk Card. 3. Touch Configure to set up the KODAK Kiosk Card feature. 4. Touch Change to update the Retailer ID. 21

22 5. Use the on-screen keypad to enter your Retailer ID. Touch OK. 6. Select a pricing to display: Units Currency (set on the Regional tab) 7. Touch Change to convert 1 Unit to a currency amount. 8. Use the on-screen keypad to enter the amount. Touch OK. Setting the Product Offerings 1. Touch the Product Offerings tab. 2. Touch the check box next to the products that you want to offer. NOTE: Scroll down to see all of the options. 4 x 6 in. (10 x 15 cm) prints 5 x 7 in. (13 x 18 cm) prints 6 x 8 in. (15 x 20 cm) prints KODAK Picture CD ID Photos Creative Cards 3. Touch Default to set the default print size. 22
23 Setting the ID Photo Sizes the Product Offerings tab ID Photo Products 2. Touch the check box next to the ID Photo sizes that you want to offer. The maximum number of sizes that you can offer is Use the arrows to select a country for the type of Guidelines that are used for ID Photo orders. 4. If you select Other as the country, use the arrows to set the head size for the ID Photo. 5. Touch Enable to enable the Use background whitener feature. Installing Creative Content Install the creative content CDs to make greeting cards and invitations. Product Offerings Tab the Product Offerings tab Configure Creative Cards Install Cards 2. Continue with Step 3. System Tab the System tab Update Software & Settings Install Borders 2. Continue with Step Insert the Creative Content CD into the CD drive. 4. Touch Load. 5. Select the language of the borders that you want to install. NOTE: You may have to scroll down to see all of the options. 6. Touch Install. 7. At All borders of the selected language(s) have been installed successfully., touch OK. 8. When the installation is complete, remove and store the CD. 23


24 Configuring Creative Cards the Product Offerings tab Configure Creative Cards 2. Touch Change to select a different category. 3. Select a category. 4. Touch: Enable All in Category to make all borders in that category available on the Kiosk. Disable All in Category to make all borders in that category unavailable. Delete All in Category to delete all borders in that category. 24

25 5. Touch a border name in the list to select it. A preview of the border displays in the upper right corner of the screen. 6. Touch the Delete icon next to the name of the border to remove the individual border from the system. 7. At Permanently delete the border from the system?, touch Continue. NOTE: If you want to add the borders back to your system, install them using the Creative Content CDs. Using the System Tab Restoring Factory Settings IMPORTANT: If you use Restore Factory Settings, all settings you have changed will be lost! 1. Touch the System tab. 2. Touch Restore Factory Settings. 3. At the message prompt, touch Yes. 25
26 Installing Software the System tab Update Software & Settings Install Software 2. Insert the CD into the CD drive. 3. Touch: Check for Media Install Next Next 4. Remove and store the CD. 5. Touch Finish. The Kiosk restarts. Backing up the Hard Drive the System tab Update Software & Settings Backup Hard Drive 2. At the message prompt, touch Yes. The system makes a backup of the hard drive. IMPORTANT: Do not touch the screen or power off the system while the backup is in progress! The Kiosk restarts. 26
27 Saving System Settings Use this feature to save settings or to load the settings (i.e., to restore the Kiosk or to set up a replacement Kiosk). Save your settings after you make changes in the Setup Screens. the System tab Update Software & Settings Save System Settings 2. Insert a blank CD. 3. Touch Save. A message appears when the settings have been successfully written to the CD. 4. Touch OK. 5. Remove the CD. 6. Label the CD and store it in a safe place for later use. Restoring Your Settings the System tab Update Software & Settings Load System Settings 2. Insert the Settings CD. 3. Touch Load. A message appears when the settings are restored. 4. Touch OK. 5. Remove the CD and store it in a safe place. 27
28 Calibrating the Touch Screen the System tab Calibrate Touch Screen 2. Touch and hold your finger on the target until the next target appears. Setting the Date and Time the System tab Change next to Date Time Change next to Time 2. Enter the Time using the on-screen keypad. Touch Enter. 3. Repeat Steps 1-2 to change the Date. 4. Select the time format. 5. Touch the arrows to set the Date Format. 6. Touch the arrows to set the Time Zone. Setting the Auto Shutdown and Startup Feature the System tab Enable to turn on Auto Shutdown and Auto Startup Change next to Auto Shutdown 2. Enter the Auto Shutdown time using the on-screen keypad. Touch Enter. 3. Repeat Steps 1-2 to set the Auto Startup time. 28
29 Setting the ID for the BLUETOOTH Technology Enabled Device the System tab Change next to Bluetooth ID 2. Enter the ID using the on-screen keypad. Touch Enter. Creating an Activity Log The activity log provides information on: print sizes used total number of prints completed number of Picture CDs created the System tab Activity Log 2. Set the number of days to include in the report: Touch Change. Enter the number of days. Touch Enter. 3. View the activity log information. 4. To save the activity log information, touch Save to CD. 5. Insert a blank CD. 6. Touch Save. A message appears when the activity log has been successfully written to the CD. 7. Touch OK. 8. Remove the CD. 29
30 Creating a Diagnostics Log You may be asked to review diagnostics information with a service representative. the System tab Diagnostics Create Diagnostic Log 2. At Do you want to create a diagnostics log?, touch Yes. 3. At Diagnostics Log created, touch OK. Saving a Diagnostics Log to CD You must create a diagnostic log before you can save it to a CD. See Creating a Diagnostics Log. the System tab Diagnostics Save Diagnostics to CD 2. Select the diagnostic log (s) that you want to save. 3. Touch Write to CD. 4. Insert a blank CD. 5. When the CD is finished writing, touch Exit. 6. At Do you want to exit this program?, touch Yes. Restarting the System the System tab Shutdown System Yes 2. Move the power switch to Off (0). 3. Move the power switch to On ( I ). 30
31 Adjusting the Printer Settings Adjust the printer settings when the prints have a noticeable shift in color. the System tab Printer Setup 2. Touch Change next to: Red, Green, or Blue Brightness Contrast 3. Enter the adjustment using the on-screen keypad. Touch Enter. 4. Touch Print Test Print with Adjustments to check the adjustments. 5. To reset the printer to factory calibration, touch: Reset Printer to Factory Calibration Continue OK Configuring the Network Settings IMPORTANT: Follow these procedures if you will connect the Kiosk to a network to use optional services, such as KODAK Remote Business Manager or Payment Processing. Networking your kiosk requires an Ethernet cable and network connection. the System tab Network Setup 2. Select an IP Address Type: Fixed DHCP 3. Touch Change next to: IP Address Subnet Mask Gateway 4. Enter the information using the on-screen keypad. Touch Enter. 31

32 5. Touch Change next to: System Name DNS Domain DNS Server DNS Hostname Workgroup 6. Enter the information using the on-screen keyboard. Touch OK. 7. Touch Network Commands. 8. Use the arrows to select a command. 9. Touch Execute. Configuring Remote Business Management Follow this procedure if your Kiosk is connected to a network and you use the KODAK Remote Business Manager. You must have an Ethernet cable and a network connection. Make sure that the following are set correctly: Date, Time, and Time Zone Network Settings the System tab Remote Business Management 32
33 2. Verify that the: Server Identification is set to: Server Port Number is set to If necessary, touch Change next to the field to make updates. 4. Enter the information using the on-screen keyboard. Touch OK. 5. Touch Change next to Country Code 6. Enter the information using the on-screen keypad. Touch Enter. 7. Touch Test Server Connection. 8. What appears on the screen? FOUND a. Touch: OK Verify Location b. Continue with Step 9. NOT FOUND a. Touch OK. b. Contact KODAK Service and Support. 9. What appears on the screen? Kiosk Already Licensed FOUND NOT FOUND a. Verify that the Store Location is correct. b. Touch: Refresh License OK c. Configuration is complete. a. Touch OK. b. Verify that the Store Location is correct. c. Touch: License Kiosk OK OK d. If the Kiosk does not license successfully, contact KODAK Service and Support. e. If the Kiosk does license successfully, configuration is complete. a. Touch No. b. Contact KODAK Service and Support. 33
34 Troubleshooting the Kiosk Error Messages If an error occurs on the Kiosk, an error message and instructions to resolve the error appear on the screen. Follow the on-screen instructions to correct the error. Restoring the Hard Drive If an error continues after you restart the Kiosk, you must save the settings and restore the hard drive. IMPORTANT: Use this button only when an error message (or your service representative) instructs you to use it. If you use Restore Hard Drive, all your settings and activity log information will be lost! If the Kiosk does not allow you to Save Settings, you must enter your settings manually after you restore the hard drive. 1. Touch OK to clear the error message. 2. Touch the upper-left corner ( Kodak ) twice. 3. Touch: the System tab Update Software & Settings Save System Settings 4. Insert a blank CD. 5. Touch Save. A message appears when the settings have been successfully written to the CD. 6. Touch OK. 7. Remove and label the CD. 8. Touch: the System tab Restore Hard Drive Yes The Kiosk restarts. 9. Restore your system settings. See Restoring Your Settings on page

35 Checking the Cable Connections If the Kiosk does not start up correctly, check that the cables are connected. To access the cables shown on the internal view of the Console: 1. Disconnect the printer and remove it from the top of the Console. 2. Open the access door on top of the Console. D E A F C B G J H I A. Touch Screen Display B. 605 Photo Printer C. Back of Console D. Optional Magnetic Card Reader E. BLUETOOTH Technology Enabled Device F. Ethernet Connection G. Optional Receipt Printer H. USB Port/Camera Card Readers I. Power Port for Main Power J. Internal View of Console 35


36 Troubleshooting the 605 Printer Clearing a Paper Jam 1. Press and hold Paper Rewind until the Paper Empty message appears. 2. Once the Paper Empty message appears: Open the paper access door. Cut off any damaged or printed areas of the paper. Load the paper. If the operator panel displays the Ready message, the jam is cleared. 3. If the Paper Jam message is still displayed on the operator panel: Turn off the printer. Open the paper access door. Open the top cover. Remove the ribbon from the printer. 4. Manually rewind the paper onto the roll. CAUTION: Prevent damage to the printer. Do not pull abruptly on the paper. 36


37 5. Cut off any damaged or printed areas of the paper. 6. Look inside the printer and carefully remove any pieces of paper. 7. Turn on the printer. 8. Load the ribbon. See page Close the cover. 10. Load the paper. See page 9. NOTE: If the Paper Jam message still displays on the operator panel, and you are at the end of a paper roll, it is possible that a segment of paper is too short to automatically exit the printer. Contact your service representative. 37


38 Clearing a Ribbon Jam 1. Open the top cover. 2. Remove the ribbon from the printer. 3. Use scissors to cut the damaged ribbon. 4. Splice the ribbon with transparent tape. 5. Load the ribbon. See Loading Ribbon in the 605 Photo Printer on page 8. Removing a Paper Jam from the Receipt Printer 1. Open the printer covers. B A 38

39 2. Press down on the latch. 3. Remove the roll of paper. 4. Remove any jammed paper or debris. 5. Press up on the latch. 6. Load the paper. See Steps 4-7 on page Close the covers. 39
40 Kodak is a trademark. Eastman Kodak Company is an authorized licensee of Eastman Kodak Company the CompactFlash trademark. 343 State Street Rochester, NY P/N 4J /08 Printed in U.S.A.
MVPplus Quick Reference Guide
 MVPplus Quick Reference Guide Use this guide to operate your printer on a daily basis. For more detailed information, refer to the User Guide. Contents External View...........................................................
Setting up an Intermec PM43 printer with InterDriver version M-0 or newer
 Setting up an Intermec PM43 printer with InterDriver version 7.3.5 M-0 or newer Setting up a bar code printer with 7.3.5 M-0 Intermec drivers or newer 1 INITIAL PRINTER CONFIGURATION When the printer is
TT230SM THERMAL TRANSFER PRINTER USER S MANUAL
 TT230SM THERMAL TRANSFER PRINTER USER S MANUAL Operations Overview Unpacking and Inspection This printer has been specially packaged to withstand damage during shipping. Please carefully inspect the packaging
FRESHMARX 9417 QUICK REFERENCE
 FRESHMARX 9417 QUICK REFERENCE For more detailed information, refer to the Operator s Handbook available on our Web site (www.monarch.com). Review the printer safety information in the Safety Sheet provided
INSTALLATION INSTRUCTIONS for the Kodak ADAPTIVE PICTURE EXCHANGE (APEX) 26, 48, 74, and 122
 26, 48, 74, and 122") {InstallationInstructs}{Production}{KodakServiceSupport}{None} Publication No. II3337-2 10FEB09 INSTALLATION INSTRUCTIONS for the Kodak ADAPTIVE PICTURE EXCHANGE (APEX) 26, 48, 74, and 122 Important Qualified
{InstallationInstructs}{Production}{KodakServiceSupport}{None} Publication No. II3337-2 10FEB09 INSTALLATION INSTRUCTIONS for the Kodak ADAPTIVE PICTURE EXCHANGE (APEX) 26, 48, 74, and 122 Important Qualified
3 Maintenance. Chapter contents
 3 Maintenance Chapter contents Life expectancies of consumables..................... 40 User-replaceable parts.............................. 40 Replacing the printer pickup roller................ 41 Replacing
MONARCH 9416 XL QUICK REFERENCE
 MONARCH 9416 XL QUICK REFERENCE This Quick Reference contains ribbon loading, supply loading, and general care, maintenance, and troubleshooting procedures for the 9416 XL Thermal Direct and 9416 XL Thermal
LabelMax SP2 User Manual
 LabelMax SP2 User Manual 1 GENERAL... 3 1.1 COPYRIGHT DECLARATION... 3 1.2 COMPLIANCES... 3 1.3 INTRODUCTION... 3 2 GETTING STARTED... 4 2.1 UNPACKING AND INSPECTION... 4 2.2 EQUIPMENT CHECKLIST... 4 2.3
1. Review the printer safety information in the Regulatory Compliance document provided with your printer.
 QUICK REFERENCE This Quick Reference contains supply loading information and general care and maintenance procedures for the Monarch Pathfinder Ultra Platinum 6039 printer. For more detailed information,
Printer Driver Guide
 Printer Driver Guide March 2018 Kodak Alaris Inc. 2400 Mount Read Blvd., Rochester, N.Y. 14615 2016 Kodak Alaris Inc. The Kodak Trademark is used under license from Eastman Kodak Company P/N 4J9633 Table
uline.com OVERVIEW OF CONTROLS
 π H-5135 1-800-295-5510 uline.com BROTHER P-TOUCH D400AD DESKTOP PRINTER OVERVIEW OF CONTROLS LCD DISPLAY AND KEYBOARD 1 3 2 4 5 6 12 CONTROL PANEL PARTS 7 # DESCRIPTION # DESCRIPTION 1 Caps Mode 20 Clear
HP Photosmart A520 Series - Help
 HP Photosmart A520 Series - Help Contents 1 HP Photosmart A520 series Help...5 2 Get started How do I?...7 Find more information...8 The HP Photosmart at a glance...9 Control panel buttons and indicator
The.Karate.Kid.(1984).XviD.DVDRip. Adjust the print density and disable EconoMode.
.XviD.DVDRip. Adjust the print density and disable EconoMode.") . Adjust the print density and disable EconoMode. The.Karate.Kid.(1984).XviD. DVDRip >>>DOWNLOAD LINK
. Adjust the print density and disable EconoMode. The.Karate.Kid.(1984).XviD. DVDRip >>>DOWNLOAD LINK
Network Digital Menu Board Hardware User Manual
 Network Digital Menu Board Hardware User Manual Manual Version DMA1 Safety Instructions Please keep the display away from any heat sources. Place the display in a stable and well-ventilated place. Please
Extended User Guide. AW10 All-in-One Printer
 Extended User Guide AW10 All-in-One Printer DSGi, 2010 Hemel Hempstead Hertfordshire HP2 7TG Specifications subject to change without notice. September 2010 Table of contents 1 Printer Overview Components...1
ImageScan Pro 800ix Series High-Speed ADF Scanner. Installation and Setup Guide. Installation and Setup Guide
 ImageScan Pro 800ix Series High-Speed ADF Scanner Installation and Setup Guide Installation and Setup Guide Box Contents: 1. Scanner 2. USB Cable 3. AC Adapter 4. Stacker Tray 5. Installation Guide 6.
QUICK REFERENCE. Getting Started
 QUICK REFERENCE This Quick Reference contains supply loading information and care and maintenance procedures for the Monarch Pathfinder Ultra Silver 6032 printer. For more detailed information, refer to
Datacard CR500 Instant Issuance System. User Reference Guide. July Rev B
 Datacard CR500 Instant Issuance System User Reference Guide July 2015 527495-001 Rev B Datacard CR500 User Reference Guide The CR500 Instant Issuance System Contents The CR500 Instant Issuance System The
POS Android Digital Advertising Display (Network) Hardware User Manual
 Hardware User Manual") POS Android Digital Advertising Display (Network) Hardware User Manual Manual Version POSW3.0 Safety Instructions Please keep the display away from any heat sources. Place the display in a stable and well-ventilated
POS Android Digital Advertising Display (Network) Hardware User Manual Manual Version POSW3.0 Safety Instructions Please keep the display away from any heat sources. Place the display in a stable and well-ventilated
Attention. Your CEIVA is currently displaying the demonstration slideshow. second until the Congratulations screen appears.
 Attention Your CEIVA is currently displaying the demonstration slideshow. Exiting the Demonstration Slideshow To enjoy your own personal slideshow, please follow these three easy steps: 1. Power on your
Océ User manual. Océ VarioPrint 1055/65/75. Configuration and maintenance manual
 Océ User manual Océ VarioPrint 1055/65/75 Configuration and maintenance manual Océ-Technologies B.V. Océ-Technologies B.V. Copyright 2005, Océ-Technologies B.V. Venlo, The Netherlands. All rights reserved.
Smartphone Photo Printer Item No
 Smartphone Photo Printer Item No. 205984 Safety Precautions Safety Precautions Denotes the possibility of serious injury or death Please keep you away at least 20cm distance from printer when printing.
QUICK REFERENCE. Connecting the Cables
 QUICK REFERENCE This Quick Reference contains supply loading and general care and maintenance procedures for the Monarch 9860 printer. For more detailed information, refer to the Operator s Handbook available
Zebra XiII-Series Printer Quick Reference Guide
 Zebra XiII-Series Printer Quick Reference Guide Contents Media and Ribbon Loading...67 Media Loading...67 Ribbon Loading...70 Operator Controls...72 Front Panel Keys...72 Front Panel Lights...72 Calibration...74
fi-4120c Image Scanner
 P3PC-E007-01EN fi-4120c Image Scanner Cleaning and Maintenance 5 DAILY CARE This chapter describes how to clean the scanner. WARNING When cleaning the scanner, turn off the power, and unplug the AC cable
Lexmark X203n and X204n Series. Maintenance Guide
 Lexmark X203n and X204n Series Maintenance Guide February 2011 www.lexmark.com Contents...3 Cleaning the exterior of the printer...3 Cleaning the scanner glass...4 Cleaning the ADF separator rollers...5
QUICK START GUIDE. Media pack
 QUICK START GUIDE This Quick Start Guide provides system requirements and an overview of how to set up the Fiery EX3535 Color Server so you can begin printing. The guide describes the initial tasks you
Please read this guide before using the printer
 PD-450/450W/480/480W User Guide Please read this guide before using the printer Safety Precautions Safety Precautions Denotes the possibility of serious injury or death Use only recommended power sources.
Table of Contents. Introduction 2 1. Intelligent Remote Control 2 2. Charging the Remote Control 3
 Table of Contents Introduction 2 1. Intelligent Remote Control 2 2. Charging the Remote Control 3 Getting Started 6 1. Activating the Remote Control 6 2. Selecting a Device 7 3. Operating a Device 8 4.
PhotoScanner. User Guide
 User Guide Contents 1. Introduction 1. Features 2. Safety 3. Product Specifications 4. Package Contents 5. Product Description 6. Settings 7. Settings 8. Settings 9. Settings 10. Settings 11. Using the
WAVECOM INSTRUMENTS PTY LTD
 WAVECOM INSTRUMENTS PTY LTD www.wavecom.com.au WAVECOM TT040-50 THERMAL TRANSFER BAR CODE PRINTER USER MANUAL 1 Table of Contents Copyright Declaration 3 Introduction 3-4 Product Introduction Compliances
Ultra High Brightness Professional Monitor User Manual
 Manual Version UHBA1.0 Safety Instructions Please keep the display away from any heat sources. Place the display in a stable and well-ventilated place. Please handle with care as product contains glass.
HP Color LaserJet CM1312 MFP Series Copy
 HP Color LaserJet CM32 MFP Series Copy Copy using the automatic document feeder (ADF) How do I Steps to perform Load originals using the automatic document feeder (ADF) Insert the top-end of the stack
6300 Series All-In-One
 6300 Series All-In-One User's Guide May 2005 www.lexmark.com Lexmark and Lexmark with diamond design are trademarks of Lexmark International, Inc., registered in the United States and/or other countries.
Table of Contents. Unpacking and Inspection Setup Loading the Media Mount the Printer on the Wall... 16
 WPL25/WHC25 Table of Contents Unpacking and Inspection... 1 Setup... 5 Loading the Media... 6 Mount the Printer on the Wall... 16 LED and Button Functions... 17 Troubleshooting... 18 Unpacking and Inspection
Kodak EasyShare printer dock plus User s Guide
 Kodak EasyShare printer dock plus User s Guide www.kodak.com For interactive tutorials, www.kodak.com/go/howto Eastman Kodak Company 343 State Street Rochester, New York 14650 Eastman Kodak Company, 2004
iq DIGITAL PICTURE FRAME iq Digital Picture Frame DPF701SB USER GUIDE
 iq Digital Picture Frame DPF701SB USER GUIDE 1 Table of Contents Important Safety Precautions... 3 Cleaning the LCD Screen... 3 Cleaning the Digital Picture Frame... 3 Introduction... 4 What s in the Box...
Instrument User Manual Update RAM209AEN
 Instrument User Manual Update ABX Pentra 60C+, Pentra 80, Pentra XL 80, Pentra 400, abc VET OKI B4600 Printer use Please, take note of the modifications on next pages. Please, cross out the appropriate
Freestanding Infrared Multi Touch Screen Display. User s Manual. Manual Version LHD T1.0
 Freestanding Infrared Multi Touch Screen Display User s Manual Manual Version LHD T1.0 Our Full Product Range Page 1 Safety Instructions Please keep the display away from any heat sources such as radiators
User's Guide QL-700. ENG ver.a.
 User's Guide QL-700 Be sure to read and understand this guide before using the machine. We recommend that you keep this guide nearby for future reference. www.brother.com ENG ver.a Thank you for purchasing
Fiery proserver User Guide
 Fiery proserver User Guide Congratulations on your purchase of the Fiery proserver, a powerful production solution for your printer. Before you begin Make sure that you have: About this document Installed
Fiber optics solution manual. You can print on a variety of release the Go button on the printer sides of the printer door and pulling.
 Fiber optics solution manual. You can print on a variety of release the Go button on the printer sides of the printer door and pulling. Fiber optics solution manual >>>DOWNLOAD LINK
KODAK ESP Office 6100 Series All-in-One Printer. User Guide
 KODAK ESP Office 6100 Series All-in-One Printer User Guide Eastman Kodak Company Rochester, NY 14650 Eastman Kodak Company, 2009 Kodak, EasyShare, and Perfect Touch are trademarks of Eastman Kodak Company.
hp photosmart 7550 basics guide
 hp photosmart 7550 basics guide Copyright 2002 Hewlett-Packard Company All rights are reserved. No part of this document may be photocopied, reproduced, or translated to another language without the prior
FengMi Wemax One Laser Projection TV
 FengMi Wemax One Laser Projection TV User`s Manual About electrical ground Transportation Use this device only with a compulsory grounding condition. It is recommended that you use the original packaging
SmartPOS7. User Manual
 SmartPOS7 User Manual 1 1. Product information Thanks for choosing our SmartPOS7, please read this manual carefully for correct operation of this device. This smart printer has been integrated Android
Ambir ImageScan Pro 930u. Quick Start Guide. High Speed Document Scanner with UltraSonic Misfeed Detection. Ver 1.0
 Ambir ImageScan Pro 930u TM High Speed Document Scanner with UltraSonic Misfeed Detection www.ambir.com Ver 1.0 Ambir ImageScanPro TM 930u Table of Contents Box Contents Installation and Setup Loading
QUICK START GUIDE. Setting up your AccuDate XL for use with the Jolt App
 QUICK START GUIDE Setting up your AccuDate XL for use with the Jolt App ACCUDATE XL QUICK START GUIDE Welcome....1 Package Contents Review.... 2 Setting Up Your AccuDate XL... 3 Powering Up and Shutting
Q8 Barcode Label Printer User s Manual
 Q8 Barcode Label Printer User s Manual Q8 User s Manual Contents Preface... 1 Important Notice, Read Me First!... 1 Chapter 1 Introduction... 2 Specifications... 2 Specifications for Printer... 2 Specifications
Smartphone Photo Printer
 Smartphone Photo Printer Safety Precautions Safety Precautions Denotes the possibility of serious injury or death Please keep you away at least 20cm distance from printer when printing. Use only recommended
Chapter 11: Printers. IT Essentials v6.0. ITE v6.0 1
 Chapter 11: Printers IT Essentials v6.0 ITE v6.0 1 Chapter 11 - Sections & Objectives 11.1 Common Printer Features Explain the purpose and characteristics of different types of printers. 11.2 Installing
HP Photosmart C6200 All-in-One series. Basics Guide
 HP Photosmart C6200 All-in-One series Basics Guide Hewlett-Packard Company notices The information contained in this document is subject to change without notice. All rights reserved. Reproduction, adaptation,
New Ricoh 1060 Copier. August 2004
 New Ricoh 1060 Copier August 2004 Step By Step Turn Main Power Switch ON Press operation switch to make ON indicator light up You may turn just the operation switch off at night DO NOT turn main power
3 Manage the printer. This chapter provides information on the following topics: HP ToolboxFX. Embedded Web server ENWW 27
 3 Manage the printer This chapter provides information on the following topics: HP ToolboxFX Embedded Web server ENWW 27 HP ToolboxFX HP ToolboxFX is software that you can use to complete the following
Cub CB-724e / CB-534e
 Cub CB-724e / CB-534e THERMAL TRANSFER / DIRECT THERMAL BAR CODE PRINTER USER S MANUAL Contents 1. Introduction...1 2. Getting Started...1 2.1 Unpacking and Inspection...1 2.2 Equipment Checklist...1 2.3
Maintaining Your Computer
 http://support.gateway.com/s/mobile/manuals/8507029/index.htm Maintaining and Troubleshooting Your Gateway Notebook Contents Maintaining Your Computer Caring for your computer Creating an emergency startup
Fiery proserver User Guide
 Fiery proserver User Guide Congratulations on your purchase of the EFI Fiery proserver, a powerful production solution for your printer. Before you begin Make sure that you have: About this document Installed
Getting started. JetScan 150. Currency scanner. User guide
 Getting started JetScan 150 Currency scanner User guide 1 Safety information, power specifications High voltage inside. Risk of electric shock. Turn power OFF and unplug power cord from machine before
QUICK REFERENCE. Using the Battery
 QUICK REFERENCE This Quick Reference contains supply loading information and general care and maintenance procedures for the Monarch Sierra Sport4 9493 printer. For more detailed information, refer to
1. Operating Conditions
 OWNER S MANUAL Overview 1) Operating conditions 2) Articles in the box 3) Charging 4) App setup 5) Wearing the device 6) Cleaning the device 7) Screen operation 8) Device operation a) Time/date interface
Quick Installation Guide Direct and Transfer Thermal Printer
 Quick Installation Guide Direct and Transfer Thermal Printer Overview The enclosed printer is currently comprised of two models: 203dpi (dots per inch) model 300dpi (dots per inch) model Unpacking 1. Remove
Dell Photo All-In-One Printer 942 User's Guide
 Dell Photo All-In-One Printer 942 User's Guide Click the links to the left for information on the features and operation of your printer. For information on other documentation included with your printer,
Manual handling woking surrey. Model number Serial number Please attach any unsuitable for your print job.
 Manual handling woking surrey. Model number Serial number Please attach any unsuitable for your print job. Manual handling woking surrey >>>DOWNLOAD LINK
MINNESOTA TERMINAL INSTALLATION GUIDE
 MINNESOTA TERMINAL INSTALLATION GUIDE For any technical issues, please contact the Agent Help Desk at 1-877-447-1319 for assistance. For regulatory or enforcement questions, contact the Minnesota Department
CANADIAN D.O.C. WARNING
 Each product and program carries a respective written warranty, the only warranty on which the customer can rely. Avery Dennison Corp. reserves the right to make changes in the product, the programs, and
FASTMARK 4600 PLUS CONTROL PANEL OPERATION. Front Panel
 FASTMARK 4600 PLUS CONTROL PANEL OPERATION Front Panel The front panel includes - LCD display - 3 LED status indicators (READY, MEDIA and RIBBON) - 3 control buttons (FEED, PAUSE and CANCEL) LCD display
X925. Maintenance Guide
 X925 Maintenance Guide April 2011 www.lexmark.com Contents...3 Cleaning the exterior of the printer...3 Cleaning the scanner glass...3 Cleaning the ADF parts...4 Cleaning the printhead lenses...5 Storing
S4M Cleaning. Remove any accumulated dirt and lint from the interior of the printer using a soft bristle brush and/or vacuum cleaner.
 S4M Cleaning Exterior The exterior surfaces of the printer may be cleaned with a lint-free cloth. Do not use harsh or abrasive cleaning agents or solvents. If necessary, a mild detergent or desktop cleaner
CONTENTS BEFORE USE. Button menu System settings menu Deleting an item
 CONTENTS BEFORE USE Important information Care and maintenance Warning Product description Computer requirements PRODUCT AT A GLANCE Package contents Product overview Product specification GETTING STARTED
AutoTest USER MANUAL. MPT-II Thermal Printer. MPT-II User Manual
 AutoTest MPT-II Thermal Printer MPT-II User Manual USER MANUAL XiamenPRT Technology Co.,Ltd. ADD: 4&5, 8#, Gaoqi Nan Shi'erRoad (AideAirport Industrial Park), Xiamen, China 361006 Tel: +86-(0)592-5993973
HP Photosmart A530 series. User Guide. Tri-color 110
 HP Photosmart A530 series User Guide Tri-color 110 Contents 1 HP Photosmart A530 series User Guide...5 2 Get started How do I?...7 Find more information...7 The HP Photosmart at a glance...8 Control panel
User Guide. for Card Reader and Payment Application
 User Guide for Card Reader and Payment Application Introduction to Pogo> This document provides detailed information on how best to use the Pogo> application to benefit your business. The intention is
π H-6323 ZEBRA ZD410 DIRECT THERMAL PRINTER PARTS EXTERNAL PARTS DIAGRAM uline.com
 π H-6323 ZEBRA ZD410 DIRECT THERMAL PRINTER 1-800-295-5510 uline.com PARTS NOTE: Save the carton and all packing materials for storage or in case the printer needs to be returned to the manufacturer. Documentation
Anaal Meisjes - Veronica 19. Argentina Australia (61) (3) Brazil Canada (1) (905) China (86).
 (3) Brazil Canada (1) (905) China (86).") Anaal Meisjes - Veronica 19. Argentina 787-8080 Australia (61) (3) 272-8000 Brazil 022-829-6612 Canada (1) (905) 206-4663 China (86). Anaal Meisjes - Veronica 19 >>>DOWNLOAD LINK
Anaal Meisjes - Veronica 19. Argentina 787-8080 Australia (61) (3) 272-8000 Brazil 022-829-6612 Canada (1) (905) 206-4663 China (86). Anaal Meisjes - Veronica 19 >>>DOWNLOAD LINK
DOT MATRIX PRINTER SP6000 SERIES
 DOT MATRIX PRINTER SP6000 SERIES Hardware Manual < Approval: CEL > Trademark acknowledgments SP6000 : Star Micronics Co., Ltd. Notice All rights reserved. Reproduction of any part of this manual in any
DOWNLOAD PDF DELL VENUE 8 PRO 5830 MANUAL
 Chapter 1 : Dell Tablet Venue 8 Pro () Accessories - Adapter, Laptop Bag, Lid, External Hard Drive Dell Get user or pdf manual for your Dell Venue Pro. Search. Sign In. My Account. Place orders quickly
SX4M SX5M TXPSX4 TXPSX5
 Quick Start Guide SX4M SX5M TXPSX4 TXPSX5 SATO Labeling Solutions America, Inc. Horticulture Division 930 Jimmy Ann Dr. Daytona Beach, FL 32117 Tel: (800) 874-4465 Fax: (800) 356-7650 www.satolabeling.com
HC100 Troubleshooting Worksheet
 HC100 Troubleshooting Worksheet Printer Lights Bottom* Cartridge Side Problem Solution Media Out Replace with new cartridge No wristband under mouth of cartridge No wristband on roll Wristband broken off
Kodak EasyShare printer dock plus series 3 User s Guide
 Kodak EasyShare printer dock plus series 3 User s Guide www.kodak.com For interactive tutorials, www.kodak.com/go/howto Eastman Kodak Company Rochester, New York 14650 Eastman Kodak Company, 2005 All screen
Delta Five Bed Bug Monitoring System
 Delta Five Bed Bug Monitoring System Account Setup & Installation User Guide for DoMyOwn.com Customers Table of Contents Section 1: Package Contents & Device Overview... 2 Section 2: Setting Up Your Device
Software User's Guide
 Software User's Guide The contents of this guide and the specifications of this product are subject to change without notice. Brother reserves the right to make changes without notice in the specifications
T4 series user s manual. Version: 1.1
 Version: 1.1 Table of contents 1. Introduction...1 1.1 In the box...1 1.2 Printer Features...2 1.2.1 Front view...2 1.2.2 Rear view...2 1.2.3 Interior view...3 2. Getting start...4 2.1 Loading the ribbon...4
Pointing Devices and Keyboard User Guide
 Pointing Devices and Keyboard User Guide Copyright 2008 Hewlett-Packard Development Company, L.P. Windows is a U.S. registered trademark of Microsoft Corporation. The information contained herein is subject
User Manual Version 2.2
 VnM SignMaker, Safety Signs & Labels User Manual Version 2.2 Updated: 5/2015 VnM 8 SignMaker TABLE OF CONTENTS Introduction Quick Start Overview Loading Ink Roll Loading Media Power Up Print and Font Settings
QUICK START GUIDE FOR YOUR CLEAR TOUCH INTERACTIVE DIGITAL DISPLAY
 START GUIDE WELCOME QUICK START GUIDE FOR YOUR CLEAR TOUCH INTERACTIVE DIGITAL DISPLAY Clear Touch Interactive Panels empower a new generation of teaching & learning without the technical headaches. We
Field PC 2 Windows OS Update Guide
 Field PC 2 Windows OS Update Guide All efforts have been made to ensure the accuracy and completeness of the information contained in this document. RST Instruments Ltd reserves the right to change the
ict250 Countertop Quick Setup Guide Semi Integrated Payment Application (SIPA) for Retail and Quick Service Solution ict250-sipa-qsg
 for Retail and Quick Service Solution ict250-sipa-qsg") ict250 Countertop Semi Integrated Payment Application (SIPA) for Retail and Quick Service Solution Quick Setup Guide ict250-sipa-qsg-2017-10 ict250 -SIPA Quick Setup Guide Table of Contents What is Included
ict250 Countertop Semi Integrated Payment Application (SIPA) for Retail and Quick Service Solution Quick Setup Guide ict250-sipa-qsg-2017-10 ict250 -SIPA Quick Setup Guide Table of Contents What is Included
The Care And Cleaning Of Your Manatee County Schools ibook
 The Care And Cleaning Of Your Manatee County Schools ibook The ibook is fun to use, but it is not a toy! The ibooks belong to Manatee County Schools. They are on loan to you to use as a tool for learning.
OPERATOR USER S MANUAL
 OPERATOR USER S MANUAL DPS TERMINAL Model MT1 series Software version 2.1.0 ENGLISH Rev 1.8 For more information please visit www.mitsubishiphoto.com and www.easyphotosystem.com. TABLE OF CONTENTS 1 INTRODUCTION...
USER MANUAL ENABLING BUSINESS ANYTIME, ANYWHERE. BP3BT Bluetooth Thermal Receipt Printer (3 Inch/80MM)
") BP3BT Bluetooth Thermal Receipt Printer (3 Inch/80MM) ENABLING BUSINESS ANYTIME, ANYWHERE USER MANUAL Contact US: M: +91 9560188277 E: info@bluprints.in Support : M: +91 8447141431 E: support@bluprints.in
BP3BT Bluetooth Thermal Receipt Printer (3 Inch/80MM) ENABLING BUSINESS ANYTIME, ANYWHERE USER MANUAL Contact US: M: +91 9560188277 E: info@bluprints.in Support : M: +91 8447141431 E: support@bluprints.in
CD-R Print Guide. Table of Contents QA V01. Preface 1. Introduction 1. Printing on CD-Rs/DVD-Rs (CD-R Direct Print) 2. Items to Prepare 2
 2. Items to Prepare 2") CD-R Print Guide Table of Contents Preface 1 Introduction 1 Printing on CD-Rs/DVD-Rs (CD-R Direct Print) 2 Items to Prepare 2 Cautions When Printing on CD-Rs/DVD-Rs 2 Attaching the CD-R Tray Feeder and
CD-R Print Guide Table of Contents Preface 1 Introduction 1 Printing on CD-Rs/DVD-Rs (CD-R Direct Print) 2 Items to Prepare 2 Cautions When Printing on CD-Rs/DVD-Rs 2 Attaching the CD-R Tray Feeder and
CANADIAN D.O.C. WARNING
 Each product and program carries a respective written warranty, the only warranty on which the customer can rely. Avery Dennison Corp. reserves the right to make changes in the product, the programs, and
E550W INTRODUCTION EDITING A LABEL LABEL PRINTING USING THE FILE MEMORY USING P-TOUCH SOFTWARE NETWORK RESETTING & MAINTENANCE TROUBLESHOOTING
 E0W In order to use your P-touch safely, read the included Quick Setup Guide first. Read this guide before you start using your P-touch. Keep this guide in a handy place for future reference. Please visit
Notebook Tour User Guide
 Notebook Tour User Guide Copyright 2009 Hewlett-Packard Development Company, L.P. Microsoft and Windows are U.S. registered trademarks of Microsoft Corporation. Bluetooth is a trademark owned by its proprietor
Load the Media. To load media, complete these steps: Use the instructions in this section for loading roll or fanfold media in any print mode.
 60 Printer Setup Use the instructions in this section for loading roll or fanfold media in any print mode. Caution While performing any tasks near an open printhead, remove all rings, watches, hanging
GT1200 RETAILER REFERENCE GUIDE
 GT1200 RETAILER REFERENCE GUIDE CONTACT INFORMATION RETAILER HOTLINE 1-800-242-7782 - REPORT LOST OR STOLEN TICKETS - TICKET ORDERING - APPLICATIONS AND CONTRACTS - ACCOUNTING QUESTIONS - GAME INFORMATION
EQUIPMENT MANUAL. Avery Dennison Monarch 9419 Printer. TC9419EM Rev. AA 9/ Avery Dennison Corp. All rights reserved.
 EQUIPMENT MANUAL Avery Dennison Monarch 9419 Printer TC9419EM Rev. AA 9/16 2016 Avery Dennison Corp. All rights reserved. Each product and program carries a respective written warranty, the only warranty
Specification PM SER IES T h erm al B a rcodep rinters
 Specification PM SER IES T h erm al B a rcodep rinters P M 3120 Proficient in Commercial POS Receipt printers 1. Introduction...2 1.1 Safety Warning...2 1.2 Note...2 2. General Information...3 2.1 Introduction...3
M7 SERIES Thermal Printer Service Manual 4. PART LIST. 4.1 Main Printer Assemblies
 4. PART LIST 4.1 Main Printer Assemblies 31 No. Part No. Description Remark Spare Requirement 1 120732 Electronics cover 1 pc 2 N/A Mainframe 1 pc 3 120733 Cover, front 1 pc 4 120734 Top right side cover
PEELER USER S MANUAL
 PEELER USER S MANUAL PEELER USER S MANUAL For CL-S700 & CLP-1001/2001/6001/7001/7201e series, CLP-521/621/631 Contents Caution I - 2 1 Outline I - 3 2 Exterior view and part names I - 3 I - 4 3-1 Operation