CSE 101 Introduction to Computers Development / Tutorial / Lab Environment Setup
|
|
|
- Brittany Price
- 5 years ago
- Views:
Transcription

1 CSE 101 Introduction to Computers Development / Tutorial / Lab Environment Setup Purpose: The purpose of this lab is to setup software that you will be using throughout the term for learning about Python through tutorials, labs, and homework assignments. Due: Ideally you should have this work completed by the end of the lab period. If you don t complete it in the lab, you must finish it before the next class; we will be using some of this software in our next class so it is important for you to have everything installed so you do not fall behind. Please note that we have tried to make these instructions as clear as possible and test them on different operating systems, e.g., Windows 7 and 10, Mac OS X and Sierra, etc., however, some of you might encounter a problem and it might be a problem that we have not encountered before, so please work together on this lab as much as you can and help each other. Step 1: Python Setup Instructions 1. Go to: and select Downloads.

. Click the folder icon on the right.. Double click the file in the folder to start the install.")
2 This should bring you to a screen like this if you are running Windows: Click Download Python On Chrome, in the lower left corner of the browser screen, there will be a download indicator: Click the up arrow on the right and select Open. Note that Firefox indicates download with a down-pointing arrow in the top right of the browser window on the toolbar. In that case, click the down arrow, find the file python exe (which should be at the top of the list). Click the folder icon on the right.. Double click the file in the folder to start the install. Step 1(a): Python Setup [Windows] 2. On the first screen of the setup program, make sure to check Add Python 3.7 to PATH and then select Install Now


3 3. If the setup was successful you should see the following screen. If there was a problem please ask for help from your instructor, TA, or another student.
![Step 1(b): Python Setup [MacOSX] Follow the download instructions for Windows above.](/docs-images/95/123934538/images/4-0.jpg "One difference is that in Chrome on Mac OSX, you may see this warning in the download location at the lower left of the browser window: Click Keep.")
4 Step 1(b): Python Setup [MacOSX] Follow the download instructions for Windows above. One difference is that in Chrome on Mac OSX, you may see this warning in the download location at the lower left of the browser window: Click Keep. When the download is complete, you should see this in the lower right of the browser window: After downloading the python package, double click the icon to begin the install. Click Continue.


5 Click Continue on the read me page. A license agreement dialog will pop up. Click Continue to get the actual License Agreement Dialog.

6 Click Agree. Click Continue.


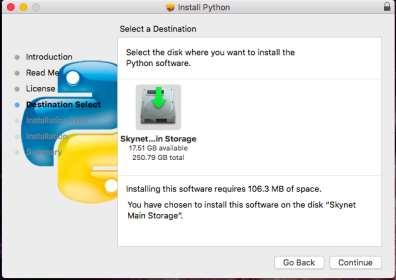
7 This dialog gives the install location and amount of required storage space. You can change the install location or click Install to accept the options shown. This dialog is prompting for an administrator password. Enter the password for your account and click Install Software.


8 After installation, this dialog should indicate a successful install of Python Click Close to complete the installation. If you wish to discard the original install package, click Move to Trash. Otherwise, click Keep if you think you may need to reinstall Python in the future.
![Step 2(a): PyCharm Community Edition [Windows] Python 3 includes a basic development environment called IDLE.](/docs-images/95/123934538/images/9-0.jpg "IDLE is good for writing simple Python programs, but it lacks a lot of \"comfort\" features like live error-checking and")


9 Step 2(a): PyCharm Community Edition [Windows] Python 3 includes a basic development environment called IDLE. IDLE is good for writing simple Python programs, but it lacks a lot of "comfort" features like live error-checking and debugging tools. As such, we recommend that you download the free, Community Edition version of the PyCharm IDE (integrated development environment) for use while completing your homework and lab assignments. 1. Go to to download the free Community Edition of PyCharm, and click on the download link. When the download completes, double-click the downloaded file to run the installer. The setup windows are shown below with options to select in red boxes:


10 2. Configure PyCharm as follows: a) On initial startup, you can set a UI theme. Select whichever you like, IntelliJ or Dracula, then select Skip Remaining and Set Defaults

11 B) PyCharm will launch. Then select "Configure" from the bottom of the window that appears and choose Settings from the pop-up menu, and then click Project Interpreter on the left side of the Default Settings window

12 c) Then click the in the upper right at the end of and select Add and then Virtualenv Environment select New environment, Inherit global site-packages and Make available to all projects The path to the Python interpreter that you just installed in Step 1 should be populated in the Base interpreter box. If it is, select OK. If not, click the button next to the interpreter path. If the newest version of Python is listed in the Base interpreter dropdown, select it:


13 If the box is blank select the and navigate to where the Python was installed, select it and then select OK as is shown below, note that your path may be different. d) After setting up correctly the Default Setting windows should look as follows: Select OK. Now PyCharm will always use the correct version of Python (Python 3) for your projects.
![Step 2(b): PyCharm Community Edition [MacOS] Python 3 includes a basic development environment called IDLE.](/docs-images/95/123934538/images/14-0.jpg "IDLE is good for writing simple Python programs, but it lacks a lot of \"comfort\" features like live error-checking and debugging tools.")

14 Step 2(b): PyCharm Community Edition [MacOS] Python 3 includes a basic development environment called IDLE. IDLE is good for writing simple Python programs, but it lacks a lot of "comfort" features like live error-checking and debugging tools. As such, we recommend that you download the free, Community Edition version of the PyCharm IDE (integrated development environment) for use while completing your homework and lab assignments. 1. Go to If there is a dark box with text in the lower right of the browser window, then click in the dark box on the lower right next to root#. Type Y Next, click Download under the description of the Community edition which is free. This will download the free Community Edition of PyCharm, and click on the download link. Depending on settings on your mac, A dialog in the lower left corner may ask if you want to continue the download. If so, click Keep. After the download completes, you should see this in the lower right. Double click on the name to start the install of Pycharm.


15 Press the left mouse button on the PyCharm icon to the left and drag the icon over the Application folder window on the right. An unpack progress bar will open up as PyCharm is copied to the Application folder and installed. If you open the Application folder after the install is complete, you should see the PyCharm icon: The first time you run PyCharm on the Mac, you will likely see a dialog indicating the application was downloaded from the network and it will ask to confirm that you want to run the application. Click Open to allow PyCharm to start. Next, PyCharm will ask if you want to import settings. Leave Do not import settings selected and click Ok.
 PyCharm will launch then select \"Configure\" from the bottom of the window that appears and choose Preferences from the pop-up menu, and then click Project Interpreter on the left side of the")
16 Next, the following dialog asks you to pick a UI theme. You can pick the default which is already selected or pick Darkula. After this, click Skip Remaining and Set Defaults. B) PyCharm will launch then select "Configure" from the bottom of the window that appears and choose Preferences from the pop-up menu, and then click Project Interpreter on the left side of the Default Settings window c) Then click the in the upper right at the end of and select Add Local and then Virtualenv Environment select New environment, Inherit global site-packages and Make available to all projects


17 The path to the Python interpreter that you just installed in Step 1 should be populated in the Base interpreter box, if it is select OK. If the box is blank select the and navigate to where the Python was installed, select it and then select OK as is shown below, note that your path may be different.

 On the Welcome to PyCharm screen select Create a New Project and in the Create Project screen replace the untitled (or it might say untitled1 or untitled2 etc.")
18 d) After setting up correctly the Default Setting windows should look as follows: Select OK. Now PyCharm will always use the correct version of Python (Python 3) for your projects. Step 3: Testing Your Development Environment To test the Python and PyCharm environment we will create a pure Python project and write our first Python program. Normally, you will create new project for homework assignments that are assigned to you, specific details will be given to you for each assignment. 1) On the Welcome to PyCharm screen select Create a New Project and in the Create Project screen replace the untitled (or it might say untitled1 or untitled2 etc.) with the name of our project HelloWorld. Then click on the Project Interpreter item and select New environment using Virtualenv as is shown below and click Create

19 2) Next we create a Python file. Select File from the menu bar, then New and then Python File and name the file helloworld as is shown in the figures below.
20
21 After you click OK you have created a Python file named helloworld.py. Python files must always have a py extension to be run by the Python interpreter. Now let s write our first Python program which is quite simple. We want it to create output that prints: This is my first python program! Hello, World! While this is a very simple program, it will ensure that we installed Python and PyCharm correctly and that they are working together. 3) The tab on the right hand side labeled here as helloworld.py is where we are going to write our Python program. Type the following exactly: print('this is my first python program!') print('hello, World!') As you type you will see that PyCharm will give you suggestions for auto completion, you can select a suggestion and autofill it in the editor window by hitting the tab key.
22 PyCharm will evaluate your program while you type it for syntax errors, i.e., errors in the way the program was typed. For example, if you forget to put a parenthesis at the end of the first line of code you will be notified by a red exclamation mark in the upper right hand corner of the editor: The red underscore shows you where the error occurred and clicking on the red exclamation mark will give you information on how many errors where found.

23 Placing your mouse pointer over the red underscore will give you more information on how to possibly fix the error. Here we see that we need to have either a comma or a parenthesis. A program that has no syntactic errors will be given a green check mark. 4) To run our program we can select Run from the menu bar and Run helloworld or you can select the green arrow in the upper right. A run window will be opened at the bottom of PyCharm window and you should see the output of the program you just wrote. The Process finished with exit code 0 tells us that our program ran and finished with no errors.
 and we will look at more ways it can be used during the course, but will not learn all of its features.")
 found")
24 Congratulations! You just wrote your first Python program! PyCharm is a very powerful IDE (Integrated Development Environment) and we will look at more ways it can be used during the course, but will not learn all of its features. If you want to learn more or have problems consider looking at the very extensive documentation at: Step 4: PyCharm Python Console Sometimes we don t want to write a full program, but rather just test some code interactively in Python similar to IDLE (Python Shell) found in the Python. In PyCharm, we use the Python Console. There are several ways to open a Python Console. The easiest is by placing your mouse pointer over the window icon in the lower left corner of the PyCharm window and selecting Python Console.

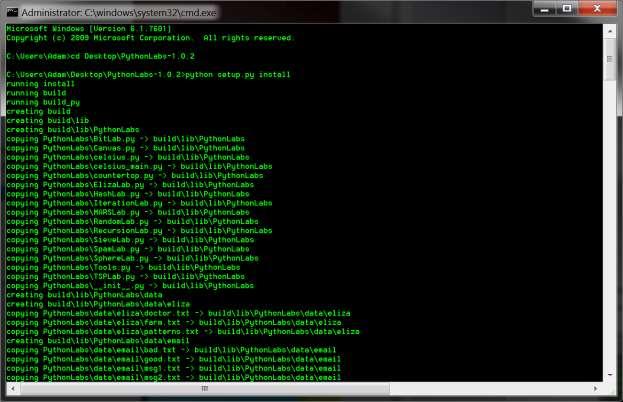
25 Here we can type expressions and they are evaluated as soon as we hit Enter as is shown below. Again, we will explore more about PyCharm as we continue the course. For now let s exit PyCharm by selecting File and then Exit and move on to installing Step 5: Installing PythonLabs The PythonLabs software is a set of Python modules written specifically for the projects in this book. Here are the specific instructions for each operating system. 1) Windows OS: a) Download and run There are no options to specify, so when the installer exits the software should be in place. If the installer fails, download zip save it in your Downloads folder. Start your File Browser. Go to the Downloads folder and find the zip file. Right-click and select Extract All. In the dialog box, click the Extract All button. You should now see a new folder with the same name, but without the.zip extension. Drag this folder to your Desktop. Next start a Command Prompt and type the following commands to install the lab modules:

26 cd Desktop\PythonLabs python setup.py install In Windows 10, one of the fastest ways to launch Command Prompt is to use search. Inside the search field from your taskbar, enter command or cmd. Then, select the Command Prompt result. In Windows 7, go to the Start Menu and search for command or cmd and then select the Command Prompt result. After running the commands above, you should see something like the following in the Command window.
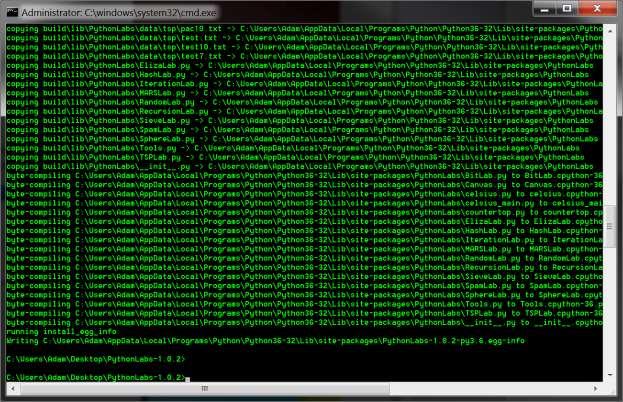
27

28 1) Mac OS: a) Download the lab modules If your browser asks you what you want to do with the file tell it you want to save it in your Downloads folder. Start Terminal and type this cd command to navigate to your Downloads folder: cd Downloads Type the following commands to unpack and install the modules: mv PythonLabs tar.gz PythonLabs tar tar xf PythonLabs tar cd PythonLabs sudo python3 setup.py install You will see a lot of messages flash by on the screen, similar to the pictures above, but you can ignore them. Step 6: Testing PythonLabs 1) Start an IDLE Python (Shell) session a) In Windows OS you should be able to launch this from the Start menu:

29 b) In Mac OS, open a terminal window and type the following command to start an interactive session with Python: python3 2) When you see Python's prompt (three greater-than symbols) type this command to load one of the PythonLabs modules: from PythonLabs.Tools import * Next type this command to test the installation: hello() If everything is working you will see a message that says "PythonLabs is installed" and a new window will pop up with the word "Hello" in it, as is shown below.
 in your web browser.")
 Windows OS: Start a Command Prompt and type the following commands to install the lab modules: python -m pip install --upgrade pip python -m pip install jupyter If you need a")
30 Step 7: Setting up IPython (Jupyter) Notebooks The tutorial exercises for the projects in each chapter of the text are available as IPython (Jupyter) Notebooks. The notebooks allow you to define and test functions and run interactive experiments (including experiments that use the PythonLabs canvas) in your web browser. To install Jupyter Notebooks we will use a program in Python called pip, a package management system used to install and manage software packages written in Python. The steps are simple: 1) Windows OS: Start a Command Prompt and type the following commands to install the lab modules: python -m pip install --upgrade pip python -m pip install jupyter If you need a review on how to start a Command Prompt in Windows review Step 5 above. Jupyter will start to install, it will take a bit of time be patient and wait!

31 1) Mac OS: Start Terminal and type the following commands to install the lab modules: python3 -m pip install --upgrade pip python3 -m pip install jupyter Jupyter should start to install. The output will look similar to the above and it will take a bit of time be patient and wait! After Jupyter installs, we want to test our installation by first downloading the notebook content for our textbook 2) Create a folder named CSE101-Notebooks 3) Download ONE of the following. Extract and move the contents to the CSE101-Notebooks you just created: 4) Next, in the Command Prompt (Windows) or the Terminal (Mac OS) type the following command: jupyter notebook This should open a webpage in your browser with a directory listing. Navigate to the CSE101- Notebooks


32 Select EIC-2.1-workbook.ipynb Follow the instructions for T1. You should get the output of 15. Make sure you use the key combination of the Ctrl (control) key and Enter if you want if you want to enter evaluate the values that you have typed.
33 Congratulations, you have the notebooks working. To end your session, go to File and select Close and Halt and then you can close the webpage. In the Command Prompt or Terminal window use Ctrl-C to end the jupyter process. Final Notes: We have installed quite a few programs and it can seem confusing right now, but as you make your way through the first set of tutorials and the first homework assignment it will become more clear on which program you should be using. Make sure you read the directions and are completely clear on what we are asking you to do and if you have questions please ask. Welcome to CSE101 and good luck!
Getting Started with Python and the PyCharm IDE
 New York University School of Continuing and Professional Studies Division of Programs in Information Technology Getting Started with Python and the PyCharm IDE Please note that if you already know how
Writing and Running Programs
 Introduction to Python Writing and Running Programs Working with Lab Files These instructions take you through the steps of writing and running your first program, as well as using the lab files in our
Setting up PyCharm Professional
 Page 1 Setting up PyCharm Professional You should have already done the following, per a previous document: 1. Install PyCharm Professional 2. Install Git 3. Create a Github account If you have not already
2 Getting Started. Getting Started (v1.8.6) 3/5/2007
 3/5/2007") 2 Getting Started Java will be used in the examples in this section; however, the information applies to all supported languages for which you have installed a compiler (e.g., Ada, C, C++, Java) unless
2 Getting Started Java will be used in the examples in this section; however, the information applies to all supported languages for which you have installed a compiler (e.g., Ada, C, C++, Java) unless
Appserv Internal Desktop Access Mac OS Device with Safari Browser. Enter your Appserv username and password to sign in to the Website
 Appserv Desktop Access Logging on from a Mac OS device Step 1. To sign in to the Appserv Desktop Access website, enter the following address into the Safari browser address bar. Please Note: This documentation
IT Essentials v6.0 Windows 10 Software Labs
 IT Essentials v6.0 Windows 10 Software Labs 5.2.1.7 Install Windows 10... 1 5.2.1.10 Check for Updates in Windows 10... 10 5.2.4.7 Create a Partition in Windows 10... 16 6.1.1.5 Task Manager in Windows
Virtual Desktop Infrastructure Setup for MacOS
 Virtual Desktop Infrastructure Setup for MacOS Virtual Desktop Infrastructure (VDI) allows you to connect to a virtual computer and use software that you don t have installed on your own computer or mobile
Virtual Desktop Infrastructure Setup for MacOS
 Virtual Desktop Infrastructure Setup for MacOS Virtual Desktop Infrastructure (VDI) allows you to connect to a virtual computer and use software that you don t have installed on your own computer or mobile
Getting started with Python
 Getting started with Python (i.e. installing and testing it) 2018 From original slides by Tony Cahill What is Python? Python is a free computer language that was created in 1991 It has many add-ons (called
Semester 2, 2018: Lab 1
 Semester 2, 2018: Lab 1 S2 2018 Lab 1 This lab has two parts. Part A is intended to help you familiarise yourself with the computing environment found on the CSIT lab computers which you will be using
JCCC Virtual Labs. Click the link for more information on installing on that device type. Windows PC/laptop Apple imac or MacBook ipad Android Linux
 JCCC Virtual Labs Revision 9/21/2017 http://ats.web. Welcome to the JCCC Virtual Lab Environment. This system allows students to access campus software titles on their personal computers from almost anywhere.
CircuitPython with Jupyter Notebooks
 CircuitPython with Jupyter Notebooks Created by Brent Rubell Last updated on 2018-08-22 04:08:47 PM UTC Guide Contents Guide Contents Overview What's a Jupyter Notebook? The Jupyter Notebook is an open-source
Getting Started (1.8.7) 9/2/2009
 9/2/2009") 2 Getting Started For the examples in this section, Microsoft Windows and Java will be used. However, much of the information applies to other operating systems and supported languages for which you have
2 Getting Started For the examples in this section, Microsoft Windows and Java will be used. However, much of the information applies to other operating systems and supported languages for which you have
Click Here to Begin OS X. Welcome to the OS X Basics Learning Module.
 OS X Welcome to the OS X Basics Learning Module. This module will teach you the basic operations of the OS X operating system, found on the Apple computers in the College of Technology computer labs. The
Join me. Make join.me your free, kick-butt, Web-based screen-sharing app! And did I mention free?
 Join me Make join.me your free, kick-butt, Web-based screen-sharing app! And did I mention free? Read additional information about join.me at https://join.me January 2013 Sharing Your Screen for Free with
menu of icons which you can select which item you want to use to startup the computer.
 To begin, insert the media that came with your computer into your CD / DVD drive. While the media is in the computer, power the computer off and restart the system. Upon restart you will need to press
Mac OSX: Citrix Workspace Setup
 Mac OSX: Citrix Workspace Setup Click on this link to download the Citrix Workspace https://www.citrix.com/downloads/workspace-app/mac/workspace-app-for-maclatest.html Once on the webpage click to begin
Introduction to Programming with Python 3, Ami Gates. Chapter 1: Creating a Programming Environment
 Introduction to Programming with Python 3, Ami Gates Chapter 1: Creating a Programming Environment 1.1: Python, IDEs, Libraries, Packages, and Platforms A first step to learning and using any new programming
CSCI 201 Lab 1 Environment Setup
 CSCI 201 Lab 1 Environment Setup "The journey of a thousand miles begins with one step." - Lao Tzu Introduction This lab document will go over the steps to install and set up Eclipse, which is a Java integrated
COP 3014: Spring 2018 A Guide to Using CLion
 COP 3014: Spring 2018 A Guide to Using CLion January 16, 2018 1 CLion CLion is a comprehensive C++ Integrated Development Environment developed and maintained by JetBrains. It is very intuitive and easy
Generes and Associates. Desktop Setup Guide LANDTECH ONLINE
 Generes and Associates Desktop Setup Guide LANDTECH ONLINE October 2011 Contents PC USER... 3 Setting up access your SaaS environment... 3 MAC USER... 9 Setting up access to your SaaS environment... 9
Cmpt 101 Lab 1 - Outline
 Cmpt 101 Lab 1 - Outline Instructions: Work through this outline completely once directed to by your Lab Instructor and fill in the Lab 1 Worksheet as indicated. Contents PART 1: GETTING STARTED... 2 PART
RESETTING MYSQL ROOT PASSWORDS
 RESETTING MYSQL ROOT PASSWORDS This document contains instructions on how to reset MySQL root passwords on a Mac. Windows instructions to follow. The summary of the procedure is this: 1. Stop the MySQL
Transitioning Teacher Websites
 Transitioning Teacher Websites Google sites is an online web building tool that can be accessed and updated from anywhere there is an internet connection. Here is a brief video introduction of Google sites.
1) Log on to the computer using your PU net ID and password.
 Log on to the computer using your PU net ID and password.") CS 150 Lab Logging on: 1) Log on to the computer using your PU net ID and password. Connecting to Winter: Winter is the computer science server where all your work will be stored. Remember, after you log
CS 150 Lab Logging on: 1) Log on to the computer using your PU net ID and password. Connecting to Winter: Winter is the computer science server where all your work will be stored. Remember, after you log
Laboratory 1: Eclipse and Karel the Robot
 Math 121: Introduction to Computing Handout #2 Laboratory 1: Eclipse and Karel the Robot Your first laboratory task is to use the Eclipse IDE framework ( integrated development environment, and the d also
EDGE, MICROSOFT S BROWSER
 EDGE, MICROSOFT S BROWSER To launch Microsoft Edge, click the Microsoft Edge button (it s the solid blue E) on the Windows Taskbar. Edge Replaces Internet Explorer Internet Explorer is no longer the default
Laboratory Exercise #0
 Laboratory Exercise #0 This assignment focuses on the mechanics of installing and using Python. The deadline for Mimir submission is 11:59 PM on Monday, January 8. 1. Complete the steps given below to
Upgrading your QuickBooks Company File Once per file only
 Username: «User» License: «License_Number» Product: «Product_Number» This document walks you through upgrading your QuickBooks company file. If your file has already been upgraded, you may skip below to
Setting up Python 3.5, numpy, and matplotlib on your Macintosh or Linux computer
 CS-1004, Introduction to Programming for Non-Majors, C-Term 2017 Setting up Python 3.5, numpy, and matplotlib on your Macintosh or Linux computer Hugh C. Lauer Adjunct Professor Worcester Polytechnic Institute
Computer Basics: Step-by-Step Guide (Session 2)
") Table of Contents Computer Basics: Step-by-Step Guide (Session 2) ABOUT PROGRAMS AND OPERATING SYSTEMS... 2 THE WINDOWS 7 DESKTOP... 3 TWO WAYS TO OPEN A PROGRAM... 4 DESKTOP ICON... 4 START MENU... 5
Table of Contents Computer Basics: Step-by-Step Guide (Session 2) ABOUT PROGRAMS AND OPERATING SYSTEMS... 2 THE WINDOWS 7 DESKTOP... 3 TWO WAYS TO OPEN A PROGRAM... 4 DESKTOP ICON... 4 START MENU... 5
Labtainer Student Guide
 Labtainer Student Guide January 18, 2018 1 Introduction This manual is intended for use by students performing labs with Labtainers. Labtainers assume you have a Linux system, e.g., a virtual machine.
Argosy University Online Programs, Version 7.0. digital bookshelf. Student User Guide
 Argosy University Online Programs, Version 7.0 digital bookshelf Student User Guide 1 Take your ebooks with you! Download the Bookshelf app. If you own an iphone, ipad, or ipod Touch, you can download
Using Karel with Eclipse
 Chris Piech Handout #3 CS 106A January 10, 2018 Using Karel with Eclipse Based on a handout by Eric Roberts and Nick Troccoli Once you have downloaded a copy of Eclipse as described on the course website,
Virtual Desktop Infrastructure Setup for Windows 7
 Virtual Desktop Infrastructure Setup for Windows 7 Virtual Desktop Infrastructure (VDI) allows you to connect to a virtual computer and use software that you don t have installed on your own computer or
Tutorial 1: Unix Basics
 Tutorial 1: Unix Basics To log in to your ece account, enter your ece username and password in the space provided in the login screen. Note that when you type your password, nothing will show up in the
Computer Essentials Session 1 Lesson Plan
 Note: Completing the Mouse Tutorial and Mousercise exercise which are available on the Class Resources webpage constitutes the first part of this lesson. ABOUT PROGRAMS AND OPERATING SYSTEMS Any time a
An Introduction to Google Chrome
 An Introduction to Google Chrome Box is an online file sharing and cloud content management service and it provides features such as: Getting Google Chrome 1. To get started with Google Chrome, you have
Blackboard Collaborate for Students
 Blackboard Collaborate for Students Participants Guide University Information Technology Services Training, Outreach, Learning Technologies and Video Production Copyright 2014 KSU Department of University
Let s begin by naming the first folder you create Pictures.
 1 Creating a Folder on Your Desktop Saving A Picture to Your Folder Creating Desktop Wallpaper from Pictures on the Internet Changing Your Home Page Creating a Shortcut to a Web Page on Your Desktop One
The Python Mini-Degree Development Environment Guide
 The Python Mini-Degree Development Environment Guide By Zenva Welcome! We are happy to welcome you to the premiere Python development program available on the web The Python Mini-Degree by Zenva. This
CST VMWare Documentation
 Login to the vsphere Web Client using a web browser by navigating to https://cstvmware.ridgewater.edu/ui/. Chrome is the best for this, but others will work. You will see a page like this: Login with your
Interlink Express Desktop Printing Service Installation Guide
 Interlink Express Desktop Printing Service Installation Guide Page 1 of 10 Introduction This guide is intended to provide guidance on how to install and configure the new Interlink Express Desktop Printing
Navigate to Cognos Cognos Analytics supports all browsers with the exception of Microsoft Edge.
 IBM Cognos Analytics Create a List The following instructions cover how to create a list report in IBM Cognos Analytics. A list is a report type in Cognos that displays a series of data columns listing
Windows XP. A Quick Tour of Windows XP Features
 Windows XP A Quick Tour of Windows XP Features Windows XP Windows XP is an operating system, which comes in several versions: Home, Media, Professional. The Windows XP computer uses a graphics-based operating
Eclipse Environment Setup
 Eclipse Environment Setup Adapted from a document from Jeffrey Miller and the CS201 team by Shiyuan Sheng. Introduction This lab document will go over the steps to install and set up Eclipse, which is
Discovering Computers & Microsoft Office Office 2010 and Windows 7: Essential Concepts and Skills
 Discovering Computers & Microsoft Office 2010 Office 2010 and Windows 7: Essential Concepts and Skills Objectives Perform basic mouse operations Start Windows and log on to the computer Identify the objects
LiveNX Upgrade Guide from v5.2.0 to v5.2.1
 LIVEACTION, INC. LiveNX Upgrade Guide from v5.2.0 to v5.2.1 UPGRADE LiveAction, Inc. 3500 Copyright WEST BAYSHORE 2016 LiveAction, ROAD Inc. All rights reserved. LiveAction, LiveNX, LiveUX, the LiveAction
The following instructions cover how to edit an existing report in IBM Cognos Analytics.
 IBM Cognos Analytics Edit a Report The following instructions cover how to edit an existing report in IBM Cognos Analytics. Navigate to Cognos Cognos Analytics supports all browsers with the exception
Using iclicker 7.9 and above on macos Sierra
 Using iclicker 7.9 and above on macos 10.12 Sierra iclicker versions 7.9 and above work with macos 10.12 Sierra, if iclicker was on the computer before it was upgraded to Sierra. If a computer has macos
Sun VirtualBox Installation Tutorial
 Sun VirtualBox Installation Tutorial Installing Linux Mint 5 LTS Guest OS By Dennis Berry Welcome to the world of virtualization and Linux. This tutorial is intended to help users who are new to the world
Tutorial How to upgrade firmware on Phison S8 controller MyDigitalSSD
 Tutorial How to upgrade firmware on Phison S8 controller MyDigitalSSD Version 1.4 This tutorial will walk you through how to create a bootable USB drive and how to apply the newest firmware 4.6 to your
dbdos PRO 2 Quick Start Guide dbase, LLC 2013 All rights reserved.
 dbdos PRO 2 Quick Start Guide 1 dbase, LLC 2013 All rights reserved. dbase, LLC may have patents and/or pending patent applications covering subject matter in this document. The furnishing of this document
HOW TO BUILD YOUR FIRST ROBOT
 Kofax Kapow TM HOW TO BUILD YOUR FIRST ROBOT INSTRUCTION GUIDE Table of Contents How to Make the Most of This Tutorial Series... 1 Part 1: Installing and Licensing Kofax Kapow... 2 Install the Software...
Guide to using Simply Web
 Guide to using Simply Web Simply Web offers high performance access to Northumbria IT facilities from a wide range of devices which have a connection to the Internet including smartphones, tablets and
CSCI 161: Introduction to Programming I Lab 1b: Hello, World (Eclipse, Java)
") Goals - to learn how to compile and execute a Java program - to modify a program to enhance it Overview This activity will introduce you to the Java programming language. You will type in the Java program
Goals - to learn how to compile and execute a Java program - to modify a program to enhance it Overview This activity will introduce you to the Java programming language. You will type in the Java program
CS 1110 SPRING 2016: GETTING STARTED (Jan 27-28) First Name: Last Name: NetID:
 First Name: Last Name: NetID:") CS 1110 SPRING 2016: GETTING STARTED (Jan 27-28) http://www.cs.cornell.edu/courses/cs1110/2016sp/labs/lab01/lab01.pdf First Name: Last Name: NetID: Goals. Learning a computer language is a lot like learning
CS 1110 SPRING 2016: GETTING STARTED (Jan 27-28) http://www.cs.cornell.edu/courses/cs1110/2016sp/labs/lab01/lab01.pdf First Name: Last Name: NetID: Goals. Learning a computer language is a lot like learning
Print Station. Point-and-Click Printing WHITE PAPER
 Print Station Point-and-Click Printing WHITE PAPER Contents Overview 3 Printing with Print Station 4 Easy-to-use Browser Interface 4 Familiar Folder Navigation 5 Search Functionality 6 Informative Display
umapps Using umapps 6/14/2017 Brought to you by: umtech & The Center for Teaching & Learning
 umapps Using umapps Center for Teaching and Learning (CTL) 100 Administration Bldg., Memphis, TN 38152 Phone: 901.678.8888 Email: itstrainers@memphis.edu Center for Teaching and Learning Website 6/14/2017
What you get When you install Python for your computer, you get a number of features:
 Lab 1 CS161 Exercise 1: In the beginning Why Python? Python is a programming language that was first conceived by Guido van Rossum in the late 1980 s and in 1990. While there are a number of programming
Installation and Upgrade Guide Zend Studio 9.x
 Installation and Upgrade Guide Zend Studio 9.x By Zend Technologies, Inc. www.zend.com Disclaimer The information in this document is subject to change without notice and does not represent a commitment
CIS 231 Windows 10 Install Lab # 3
 CIS 231 Windows 10 Install Lab # 3 1) To avoid certain problems later in the lab, use Chrome as your browser: open this url: https://vweb.bristolcc.edu 2) Here again, to avoid certain problems later in
AP Computer Science Principles Summer Assignment
 AP Computer Science Principles Summer Assignment Due date: September 2017 Instructor: Mr. Alwin Tareen Downloading and Installing the Anaconda Integrated Development Environment(IDE) The following is a
Getting Started With UNIX Lab Exercises
 Getting Started With UNIX Lab Exercises This is the lab exercise handout for the Getting Started with UNIX tutorial. The exercises provide hands-on experience with the topics discussed in the tutorial.
Using the Zoo Workstations
 Using the Zoo Workstations Version 1.86: January 16, 2014 If you ve used Linux before, you can probably skip many of these instructions, but skim just in case. Please direct corrections and suggestions
FireFox. CIS 231 Windows 10 Install Lab # 3. 1) Use either Chrome of Firefox to access the VMware vsphere web Client.
 Use either Chrome of Firefox to access the VMware vsphere web Client.") CIS 231 Windows 10 Install Lab # 3 1) Use either Chrome of Firefox to access the VMware vsphere web Client. https://vweb.bristolcc.edu CHROME At the your connection is not private message, click Advanced
CIS 231 Windows 10 Install Lab # 3 1) Use either Chrome of Firefox to access the VMware vsphere web Client. https://vweb.bristolcc.edu CHROME At the your connection is not private message, click Advanced
ARGOS Upgrade to MAPS Version 4 - Argos Version 4.2 (12/22/13)
") ARGOS Upgrade to MAPS Version 4 - Argos Version 4.2 (12/22/13) We have installed a new version of Argos (12/22/13). This new version 4.2 can be used with Internet Explorer 9 (IE9) or above, Google Chrome,
ARGOS Upgrade to MAPS Version 4 - Argos Version 4.2 (12/22/13) We have installed a new version of Argos (12/22/13). This new version 4.2 can be used with Internet Explorer 9 (IE9) or above, Google Chrome,
Installation Guide: VirtualBox, Windows 10, and Microsoft Visio (Mac OS)
") (434) 924-7988, RRH 219 helpdesk@comm.virginia.edu Installation Guide: VirtualBox, Windows 10, and Microsoft Visio (Mac OS) Prerequisites: Verify that your installation of OS X and Safari have the most
(434) 924-7988, RRH 219 helpdesk@comm.virginia.edu Installation Guide: VirtualBox, Windows 10, and Microsoft Visio (Mac OS) Prerequisites: Verify that your installation of OS X and Safari have the most
Online Access: Login to The Media Audit
 Online Access: Login to The Media Audit Using The Media Audit online has never been easier! Simply open your web browser and follow the quick instructions below. app.themediaaudit.com Open your favorite
Setting Up a Linux Operating System
 Name: Setting Up a Linux Operating System We will be using the Linux operating system for most of our practical work in this class. Knoppix is a live CD distribution of Linux, based on the Debian distribution.
Setting up Python 3.5 and numpy and matplotlib on your own Windows PC or laptop
 CS-1004, Introduction to Programming for Non-Majors, C-Term 2017 Setting up Python 3.5 and numpy and matplotlib on your own Windows PC or laptop Hugh C. Lauer Adjunct Professor Worcester Polytechnic Institute
Installation and Upgrade Guide Zend Studio 9.x
 Installation and Upgrade Guide Zend Studio 9.x By Zend Technologies, Inc. www.zend.com Disclaimer The information in this document is subject to change without notice and does not represent a commitment
Enter your Appserv username and password to sign in to the Website
 Appserv Desktop Access Logging on from a Windows 10 Device Step 1. To sign in to the Appserv Desktop Access website, either enter the following address into the Microsoft Edge browser address bar, or click
Course Folder and Files Instructions for download and use
 Course Folder and Files Instructions for download and use About course folders and files Please read this page carefully! Most, but not all of our courses, at certain points in each chapter, instruct you
Install & Configure Windows 10, Visual Studio, & MySQL Dr. Tom Hicks Trinity University
 Install & Configure Windows 10, Visual Studio, & MySQL Dr. Tom Hicks Trinity University Windows 10 Install 1] Push the Next Button. 2] Push the Install Now Button. Windows-Database-Server-Installation-1.docx
Lab 1: Setup 12:00 PM, Sep 10, 2017
 CS17 Integrated Introduction to Computer Science Hughes Lab 1: Setup 12:00 PM, Sep 10, 2017 Contents 1 Your friendly lab TAs 1 2 Pair programming 1 3 Welcome to lab 2 4 The file system 2 5 Intro to terminal
Arduino 02: Using the Arduino with Python. Jeffrey A. Meunier University of Connecticut
 Arduino 02: Using the Arduino with Python Jeffrey A. Meunier jeffm@engr.uconn.edu University of Connecticut About: How to use this document I designed this tutorial to be tall and narrow so that you can
How to set up an Amazon Work Profile for Windows 8
 How to set up an Amazon Work Profile for Windows 8 Setting up a new profile for Windows 8 requires you to navigate some screens that may lead you to create the wrong type of account. By following this
INSTALLING AN SSH / X-WINDOW ENVIRONMENT ON A WINDOWS PC. Nicholas Fitzkee Mississippi State University Updated May 19, 2017
 INSTALLING AN SSH / X-WINDOW ENVIRONMENT ON A WINDOWS PC Installing Secure Shell (SSH) Client Nicholas Fitzkee Mississippi State University Updated May 19, 2017 The first thing you will need is SSH. SSH
Getting Started Guide for Physics Students
 Access your Kinetic physics digital text Getting Started Guide for Physics Students If the product is already installed on your computer, simply click on the product icon on the desktop to launch the product.
Virtual Desktop Infrastructure Setup for Windows 10
 Virtual Desktop Infrastructure Setup for Windows 10 Virtual Desktop Infrastructure (VDI) allows you to connect to a virtual computer and use software that you don t have installed on your own computer
Copyright 2018 MakeUseOf. All Rights Reserved.
 15 Power User Tips for Tabs in Firefox 57 Quantum Written by Lori Kaufman Published March 2018. Read the original article here: https://www.makeuseof.com/tag/firefox-tabs-tips/ This ebook is the intellectual
Welcome to InSite: A GUIDE TO PROOFING ONLINE. Getting Started Viewing Job Information Uploading Files Viewing Pages Requesting Corrections
 Welcome to InSite: A GUIDE TO PROOFING ONLINE Getting Started Viewing Job Information Uploading Files Viewing Pages Requesting Corrections PROOF.REGISTERGRAPHICS.COM *NOTE: There is no www in this address.
Tutorials. Tutorials* for the jgrasp TM 1.7 Integrated Development Environment
 The Tutorials Tutorials* for the jgrasp TM 1.7 Integrated Development Environment James H. Cross II and Larry A. Barowski Copyright 2004 Auburn University All Rights Reserved June 1, 2004 DRAFT *These
Adobe Dreamweaver CS5 Tutorial
 Adobe Dreamweaver CS5 Tutorial GETTING STARTED This tutorial focuses on the basic steps involved in creating an attractive, functional website. In using this tutorial you will learn to design a site layout,
At the shell prompt, enter idlde
 IDL Workbench Quick Reference The IDL Workbench is IDL s graphical user interface and integrated development environment. The IDL Workbench is based on the Eclipse framework; if you are already familiar
Getting Started with Office 365
 Getting Started with Office 365 First Steps Welcome to Office 365! Create a Desktop Shortcut to the Office 365 Website 1. Right-click your desktop and choose New Shortcut 2. In the table below, copy the
How to Open a Free Yahoo! Account & Basics
 How to Open a Free Yahoo! Email Account & Email Basics Opening a Yahoo! Email Account Yahoo! Email is one of the many types of free email systems out there. This tutorial will teach you how to set up a
For additional information, please consult the Read-Me and Help documentation or contact Electro-Voice or Dynacord technical support.
 Quick Start Guide Hello, and welcome to IRIS-Net software. We want you to get the most from your IRIS-Net projects and encourage you to explore the additional Read-Me and Help documentation provided with
PowerTeacher 2.0 GradeBook
 1. Open the FireFox web browser. PowerTeacher 2.0 GradeBook 2. Go to the following URL address: https://ps.avondale.k12.az.us/teachers/ 3. Enter your username and password when you see the screen below:
CONTENTS... 1 OVERVIEW OF SIMNET...
 CONTENTS CONTENTS... 1 OVERVIEW OF SIMNET... 3 COMPUTER REQUIREMENTS... 3 OPTIMIZING YOUR COMPUTER TO RUN SIMNET ONLINE... 3 Changing Pop-Up Blocker Setting... 3 Changing Screen Resolution Settings...
Adobe Dreamweaver CC 17 Tutorial
 Adobe Dreamweaver CC 17 Tutorial GETTING STARTED This tutorial focuses on the basic steps involved in creating an attractive, functional website. In using this tutorial you will learn to design a site
REGISTRATION RANDOMIZATION USER S MANUAL v 2.1
 REGISTRATION RANDOMIZATION USER S MANUAL v 2.1 Cancer Center Systems Management Office Table of Contents Minimum System Requirements... 3 Installation Instructions for the Remote Registration Application...
Windows Me Navigating
 LAB PROCEDURE 11 Windows Me Navigating OBJECTIVES 1. Explore the Start menu. 2. Start an application. 3. Multi-task between applications. 4. Moving folders and files around. 5. Use Control Panel settings.
My First iphone App (for Xcode version 6.4)
") My First iphone App (for Xcode version 6.4) 1. Tutorial Overview In this tutorial, you re going to create a very simple application on the iphone or ipod Touch. It has a text field, a label, and a button
My First iphone App (for Xcode version 6.4) 1. Tutorial Overview In this tutorial, you re going to create a very simple application on the iphone or ipod Touch. It has a text field, a label, and a button
Part 1: Understanding Windows XP Basics
 542362 Ch01.qxd 9/18/03 9:54 PM Page 1 Part 1: Understanding Windows XP Basics 1: Starting Up and Logging In 2: Logging Off and Shutting Down 3: Activating Windows 4: Enabling Fast Switching between Users
Code::Blocks Student Manual
 Code::Blocks Student Manual Lawrence Goetz, Network Administrator Yedidyah Langsam, Professor and Theodore Raphan, Distinguished Professor Dept. of Computer and Information Science Brooklyn College of
Installing Thunderbird
 by Len Nasman, Bristol Village Ohio Computer Club Copyright 2018 ~may be copied with permission Introduction The thing to remember is that to send and receive email you must have three things: 1. An email
What s New in Cognos. Cognos Analytics Participant s Guide
 What s New in Cognos Cognos Analytics Participant s Guide Welcome to What s New in Cognos! Illinois State University has undergone a version upgrade of IBM Cognos to Cognos Analytics. All functionality
A computer program is a set of instructions that causes a computer to perform some kind of action. It isn t the physical parts of a computer like the
 1 Not All Snakes Slither A computer program is a set of instructions that causes a computer to perform some kind of action. It isn t the physical parts of a computer like the wires, microchips, cards,