FUJITSU Storage ETERNUS SF AdvancedCopy Manager V16.3. Operation Guide AIX
|
|
|
- Stanley Walton
- 5 years ago
- Views:
Transcription

")
1 FUJITSU Storage ETERNUS SF AdvancedCopy Manager V16.3 Operation Guide AIX B1FW ENZ0(00) October 2015
2 Preface Purpose This manual describes the functionality of FUJITSU Storage ETERNUS SF AdvancedCopy Manager of the following products: - FUJITSU Storage ETERNUS SF Express (hereafter abbreviated as "Express") - FUJITSU Storage ETERNUS SF Storage Cruiser (hereafter abbreviated as "Storage Cruiser") - FUJITSU Storage ETERNUS SF AdvancedCopy Manager (hereafter abbreviated as "AdvancedCopy Manager") Intended Readers This manual is intended for a system administrator who performs storage management using AdvancedCopy Manager. Organization This manual is composed as follows: Chapter 1 Overview of AdvancedCopy Manager This chapter provides an overview of AdvancedCopy Manager. Chapter 2 Starting and Stopping Daemons This chapter describes how to start and stop daemons provided by AdvancedCopy Manager. Chapter 3 Backup Operation This chapter describes how to backup data. Chapter 4 Backup Operation Using Suspend/Resume Function This chapter describes how to use the Suspend/Resume function in the backup operation. Chapter 5 Backup Operation Using QuickOPC Function This chapter describes how to use the QuickOPC function in the backup operation. Chapter 6 Replication This chapter describes the replication operation. Chapter 7 Operation Maintenance This chapter describes how to perform configuration and system maintenance tasks and troubleshooting on the system management information database. Chapter 8 Command References This chapter describes commands. Chapter 9 Notes on Operations This chapter describes additional operational notes on Backup and Replication. Appendix A Pre-processing and Post-processing of Backup and Restoration This appendix describes the script used for pre-processing and post-processing of backup and restore functionality. Appendix B Sample Script for Backup Operations This appendix describes some sample scripts using AdvancedCopy Manager. Appendix C Pre-processing and Post-processing of Replication This appendix describes the script used for pre-processing and post-processing replication. Appendix D Backup Operations Using Power-Saving This appendix describes backup operations using the power-saving features of disks in ETERNUS Disk storage system. - i -
3 Notation The names, abbreviations, and symbols shown below are used in this manual. Operating Systems Formal Name Microsoft(R) Windows Server(R) 2008 Standard (32-bit)(64-bit) Microsoft(R) Windows Server(R) 2008 Standard without Hyper-V(TM) (32-bit) (64-bit) Microsoft(R) Windows Server(R) 2008 Enterprise (32-bit)(64-bit) Microsoft(R) Windows Server(R) 2008 Enterprise without Hyper-V(TM) (32-bit) (64-bit) Microsoft(R) Windows Server(R) 2008 Datacenter (32-bit)(64-bit) Microsoft(R) Windows Server(R) 2008 Datacenter without Hyper-V(TM) (32-bit) (64-bit) Microsoft(R) Windows Server(R) 2008 R2 Foundation Microsoft(R) Windows Server(R) 2008 R2 Standard Microsoft(R) Windows Server(R) 2008 R2 Enterprise Microsoft(R) Windows Server(R) 2008 R2 Datacenter Microsoft(R) Windows Server(R) 2012 Standard Microsoft(R) Windows Server(R) 2012 Datacenter Microsoft(R) Windows Server(R) 2012 R2 Standard Microsoft(R) Windows Server(R) 2012 R2 Datacenter Windows Vista(R) Home Basic Windows Vista(R) Home Premium Windows Vista(R) Business Windows Vista(R) Enterprise Windows Vista(R) Ultimate Windows(R) 7 Home Basic Windows(R) 7 Home Premium Windows(R) 7 Professional Windows(R) 7 Enterprise Windows(R) 7 Ultimate Windows(R) 8 Windows(R) 8 Pro Windows(R) 8.1 Windows(R) 8.1 Pro Windows(R) 10 Home Windows(R) 10 Pro Windows(R) 10 Mobile Abbreviation Windows Server 2008 Windows Server 2008 R2 Windows Server 2012 Windows Server 2012 R2 Windows Vista Windows 7 Windows 8 Windows 8.1 Windows 10 Windows Solaris(TM) 9 Operating System Solaris 9 Solaris or Oracle Solaris 10 Solaris 10 Solaris OS Oracle Solaris 11 Solaris 11 Red Hat(R) Enterprise Linux(R) 5 (for x86) Red Hat(R) Enterprise Linux(R) 5 (for Intel64) Red Hat(R) Enterprise Linux(R) 6 (for x86) Red Hat(R) Enterprise Linux(R) 6 (for Intel64) Red Hat(R) Enterprise Linux(R) 7 (for Intel64) RHEL5 RHEL6 RHEL7 Linux - ii -
4 Formal Name SUSE(R) Linux Enterprise Server 11 for x86 SUSE(R) Linux Enterprise Server 11 for EM64T HP-UX 11i v1 HP-UX 11i v2 HP-UX 11i v3 AIX(R) V6.1 AIX(R) V7.1 Abbreviation SUSE Linux Enterprise Server 11 HP-UX AIX VMware(R) vsphere 4 VMware vsphere 4 VMware VMware(R) vsphere 5 VMware vsphere 5 VMware(R) vsphere 6 VMware vsphere 6 Oracle Solaris might be described as Solaris, Solaris Operating System, or Solaris OS. FUJITSU Storage ETERNUS Formal Name FUJITSU Storage ETERNUS DX60 FUJITSU Storage ETERNUS DX80 FUJITSU Storage ETERNUS DX90 FUJITSU Storage ETERNUS DX410 FUJITSU Storage ETERNUS DX440 FUJITSU Storage ETERNUS DX8100 FUJITSU Storage ETERNUS DX8400 FUJITSU Storage ETERNUS DX8700 FUJITSU Storage ETERNUS DX60 S2 FUJITSU Storage ETERNUS DX80 S2 FUJITSU Storage ETERNUS DX90 S2 FUJITSU Storage ETERNUS DX410 S2 FUJITSU Storage ETERNUS DX440 S2 FUJITSU Storage ETERNUS DX8100 S2 FUJITSU Storage ETERNUS DX8700 S2 FUJITSU Storage ETERNUS DX60 S3 FUJITSU Storage ETERNUS DX100 S3 FUJITSU Storage ETERNUS DX200 S3 FUJITSU Storage ETERNUS DX500 S3 FUJITSU Storage ETERNUS DX600 S3 FUJITSU Storage ETERNUS DX8700 S3 FUJITSU Storage ETERNUS DX8900 S3 Abbreviation - ETERNUS DX400 series - ETERNUS DX series or ETERNUS Disk storage system ETERNUS DX8000 series - ETERNUS DX S2 series ETERNUS DX400 S2 series ETERNUS DX8000 S2 series - ETERNUS DX S3 series - ETERNUS DX8000 S3 series FUJITSU Storage ETERNUS DX200F - FUJITSU Storage ETERNUS LT20/LT20 S2 FUJITSU Storage ETERNUS LT40/LT40 S2 FUJITSU Storage ETERNUS LT60/LT60 S2 FUJITSU Storage ETERNUS LT220 FUJITSU Storage ETERNUS LT230 FUJITSU Storage ETERNUS LT250 FUJITSU Storage ETERNUS LT270 FUJITSU Storage ETERNUS Multipath Driver ETERNUS Tape library ETERNUS Multipath Driver Each individual device name in this document is listed with "FUJITSU Storage" omitted from it. - iii -
5 Software Products Formal Name Abbreviation Windows(R) Internet Explorer(R) Mozilla(R) Firefox(R) Microsoft(R) Windows Server(R) Failover Clustering Microsoft(R) Exchange Server Microsoft(R) SQL Server(R) VMware(R) ESX(R) VMware(R) ESXi(TM) VMware(R) vcenter(tm) Server FUJITSU Software PRIMECLUSTER Global Disk Services FUJITSU Software PRIMECLUSTER Global File Services Internet Explorer Firefox WSFC Exchange Server SQL Server VMware ESX VMware ESXi VMware vcenter Server or vcenter Server GDS GFS Manuals Formal Name FUJITSU Storage ETERNUS SF Express / Storage Cruiser / AdvancedCopy Manager Quick Reference FUJITSU Storage ETERNUS SF Express / Storage Cruiser / AdvancedCopy Manager Release Notes FUJITSU Storage ETERNUS SF Express / Storage Cruiser / AdvancedCopy Manager Installation and Setup Guide FUJITSU Storage ETERNUS SF Express / Storage Cruiser / AdvancedCopy Manager Migration Guide FUJITSU Storage ETERNUS SF Express / Storage Cruiser / AdvancedCopy Manager Web Console Guide FUJITSU Storage ETERNUS SF Storage Cruiser / AdvancedCopy Manager Cluster Environment Setup Guide FUJITSU Storage ETERNUS SF Storage Cruiser / AdvancedCopy Manager Operation Guide for VMware vsphere Virtual Volumes FUJITSU Storage ETERNUS SF Express / Storage Cruiser / AdvancedCopy Manager Messages FUJITSU Storage ETERNUS SF Express / Storage Cruiser Event Guide FUJITSU Storage ETERNUS SF Express / Storage Cruiser / AdvancedCopy Manager Glossary Abbreviation ETERNUS SF Quick Reference ETERNUS SF Release Notes ETERNUS SF Installation and Setup Guide ETERNUS SF Migration Guide ETERNUS SF Web Console Guide ETERNUS SF Cluster Environment Setup Guide ETERNUS SF Operation Guide for VMware vsphere Virtual Volumes ETERNUS SF Messages ETERNUS SF Event Guide ETERNUS SF Glossary Others Besides the above-mentioned, each individual manual name in this document is listed with "FUJITSU Storage" omitted from it. - In this manual, the following products are collectively described as "Windows Server 2012 or later". - Windows Server Windows Server 2012 R2 - In this document, unless there is a special explanatory note, ETERNS Disk storage system includes ETERNUS DX200F All Flash Arrays. However, the following functions are not supported in ETERNUS DX200F All Flash Arrays: - Energy saving operation for storage device - iv -
6 - NAS operation for storage device - Automated Storage Tiering operation at multiple tiers (two or more) Export Controls Exportation/release of this document may require necessary procedures in accordance with the regulations of your resident country and/or US export control laws. Trademarks - Microsoft, Windows, Windows Server, Windows Vista, and Internet Explorer are registered trademarks of Microsoft Corporation in the United States and other countries. - UNIX is a registered trademark of The Open Group in the United States and other countries. - Oracle and Java are registered trademarks of Oracle and/or its affiliates. Other names may be trademarks of their respective owners. - Linux is a registered trademark of Linus Torvalds. - Red Hat and RPM are registered trademarks of Red Hat, Inc. in the U.S. and other countries. - SUSE is a registered trademark of Novell, Inc., in the United States and other countries. - HP-UX is a registered trademark of Hewlett-Packard Company in the United States and other countries. - AIX is a trademark or a registered trademark of International Business Machines Corporation in the United States and other countries. - VMware, VMware logo, Virtual SMP, and vmotion are the registered trademarks or trademarks of VMware, Inc. in the United States and other countries. - All other trademarks and product names are the property of their respective owners. Shipment Date and Revision History Shipment date Revision PDF Document Part Number HTML December B1FW ENZ0(00) B1FW ENZ2(00) May B1FW ENZ0(01) B1FW ENZ2(01) June B1FW ENZ0(00) B1FW ENZ2(00) January B1FW ENZ0(00) B1FW ENZ2(00) March B1FW ENZ0(01) B1FW ENZ2(01) July B1FW ENZ0(02) B1FW ENZ2(02) October B1FW ENZ0(00) B1FW ENZ2(00) Notes - No part of this manual may be reproduced without permission. - This manual is subject to change without advance notice. Copyright Copyright FUJITSU LIMITED - v -
7 Update History Content of Update Updated Section Revision The information related to ETERNUS DX200F is described. "Others" in Preface 1.1 The explanations for the Oracle Database systems are added , 1.2.2, The section regarding the transfer mode of the inter-box synchronous replication is modified. Notes regarding the number of simultaneous executions of Concurrent OPC and Concurrent Suspend processes are modified , The steps for backing up the data base are added The explanations to restore the data base are modified The explanations in regard to how to correspond to certain situations are modified. The operating environments of AdvancedCopy Manager for the swstresrst command and the swstsrsemtech command are modified. The explanations in regard to energy-saving operation (eco-mode) are altered , , Appendix D Information related to the ETERNUS DX200F is modified. "Others" in Preface 3 The explanations of preparations are modified. 4.4, 5.4 The corrective procedure when hardware failure occurs in volumes is modified. The term "VMware Virtual Volumes" is changed to "VMware vsphere Virtual Volumes" according to the terms used by VMware, Inc. Information related to VMware vsphere(r) 6 is added , Throughout this manual 3.1 "Notation" in Preface The command name of Figure 6.31 is corrected The Copyright is modified. A.2.1.1, A.2.2.1, A.3.1.1, A.3.2.1, C , C.2.2.2, C.2.3.1, C Information related to ETERNUS DX8700 S3/DX8900 S3 is added. "Notation" in Preface 3.2 Information related to Windows Server 2003 is deleted. "Notation" in Preface 4 Information related to Windows 10 is added. "Notation" in Preface A note is modified , 4.4.3, 5.4.3, Information related to troubleshooting is added. 7.2 The explanation related to the stgxfwcmmodsrv command execution is modified. The explanation related to the operating environment during a command execution is modified , 8.3 Manual Organization and Reading Suggestions Manual Organization The following table describes the Manual organization of Express, Storage Cruiser, and AdvancedCopy Manager. - vi -
8 When to Read Related Manuals (Abbreviated) Related Products (*1) Explanation EXP SC ACM Before installation Quick Reference Yes Yes Yes This manual is common for all products. Release Notes Yes Yes Yes This manual is common for all products. Overview - - Yes This manual is unique for the product. During installation Installation and Setup Guide Cluster Environment Setup Guide Yes Yes Yes This manual is common for all products. - Yes Yes This manual is common for Storage Cruiser and AdvancedCopy Manager. Migration Guide Yes Yes Yes This manual is common for all products. During operation Operation Guide Yes Yes Yes This manual is unique for each product. The following manuals are available: - Express Operation Guide - Storage Cruiser Operation Guide - Storage Cruiser Operation Guide for Optimization Function - AdvancedCopy Manager Operation Guide (for Windows) - AdvancedCopy Manager Operation Guide (for Solaris) - AdvancedCopy Manager Operation Guide (for Linux) - AdvancedCopy Manager Operation Guide (for HP-UX) - AdvancedCopy Manager Operation Guide (for AIX) - AdvancedCopy Manager Operation Guide for Copy Control Module - Storage Cruiser / AdvancedCopy Manager Operation Guide for VMware vsphere Virtual Volumes Web Console Guide Yes Yes Yes This manual is common for all products. Anytime Event Guide Yes Yes - This manual is common for Express and Storage Cruiser. Messages Yes Yes Yes This manual is common for all products. Glossary Yes Yes Yes This manual is common for all products. *1: "EXP" indicates Express, "SC" indicates Storage Cruiser, and "ACM" indicates AdvancedCopy Manager. How to Read Manuals Use the following table to find the most useful information in the Express, Storage Cruiser, and AdvancedCopy Manager manuals to answer your inquiry. Purpose Manual Main Contents How to Read Acquiring a product overview and basic operation knowledge Quick Reference - Product overview - Installation decision Read if you want to acquire a fundamental knowledge of the product and its operation in order to decide to install it or not. - vii -
9 Purpose Manual Main Contents How to Read - Overview of the necessary tasks from installation to first use AdvancedCopy Manager Overview - Main functions - Linkable applications - Procedure overview for Advanced Copy of ETERNUS Disk storage system Confirming the updated contents Release Notes - New function overview - Incompatibilities with previous version - Fixed bugs Read if you want to know the updated contents from a previous version and if you perform the upgrade. Deciding if a version upgrade is required Migration Guide - Notes and cautions about version upgrade - Version upgrade procedure Read if you want to upgrade from a previous version. Installing and correctly operating the product Installation and Setup Guide - Operating environment - Installation procedure - Setup procedure Read if you want to install and setup the product. Setting up operating environment depending on purpose Cluster Environment Setup Guide - Uninstallation procedure - Supported cluster software - Installation procedure for a clustered system Read if you want to install and setup the product on a clustered system. - Setup procedure for a clustered system - Uninstallation procedure for a clustered system Administration and operation of the installed system Express Operation Guide - Starting and stopping the software - Device monitoring - Data copy inside the storage system Read if you want to start or shutdown the system, monitor the operation status, do backup/restore operations, etc. - Necessary tasks after an architectural modification of the system as well as product maintenance Storage Cruiser Operation Guide - Starting and stopping the software - Device monitoring - Necessary tasks after an architectural modification of the system as well as product maintenance - Command reference - viii -
10 Purpose Manual Main Contents How to Read Storage Cruiser Operation Guide for Optimization Function - Operating environment construction - Operating status monitoring - Necessary tasks after an architectural modification of the system as well as product maintenance - Command reference AdvancedCopy Manager Operation Guide (for Windows) AdvancedCopy Manager Operation Guide (for Solaris) AdvancedCopy Manager Operation Guide (for Linux) AdvancedCopy Manager Operation Guide (for HP-UX) AdvancedCopy Manager Operation Guide (for AIX) - Starting and stopping the software - Data backup/restore inside the storage system - Necessary tasks after an architectural modification of the system as well as product maintenance - Command reference AdvancedCopy Manager Operation Guide for Copy Control Module Storage Cruiser / AdvancedCopy Manager Operation Guide for VMware vsphere Virtual Volumes - Operating environment construction - Virtual machine operation using a virtual volume Web Console Guide - Backup/restore of the virtual machine - Necessary tasks after an architectural modification of the system as well as product maintenance - Operating environment - Screen layout description Read if you want to understand the ETERNUS SF Web Console. Dealing with messages issued by the software Messages - Messages and their explanations - Parameter (variable information) description - System action - Countermeasures Read if you want a practical way of investigating and dealing with messages issued by the software. Dealing with events issued by the software Event Guide - Phenomenon of event - Countermeasures Read if you need to find a practical way of investigating and dealing with events. Researching the meaning of specific terms Glossary - Product specific terminology explanation Read if you want to learn the meaning of important terms, product specific terms or - ix -
11 Purpose Manual Main Contents How to Read related to the products and other important terms - Explanation of important terminology appearing in the manual - Synonyms and related terms - Proper form of abbreviated terms abbreviations used in the manuals. - x -
12 Contents Chapter 1 Overview of AdvancedCopy Manager Product Configuration of AdvancedCopy Manager Functions System Configuration Function Overview of AdvancedCopy Manager What Is Backup Function? What Is Replication Function? Web Console Copy Control Module Operating Environment of AdvancedCopy Manager Software Requirement of AdvancedCopy Manager's Agent Managing Device on AdvancedCopy Manager Normal Devices Volumes under Control of Logical Volume Manager (LVM) Backup/Replication in Units of Volume Groups Physical Disks That Constitute Volume Group Volumes under Control of VERITAS Volume Manager (VxVM) Physical Disks That Constitute Disk Group Backup to Secondary Storage Media... 9 Chapter 2 Starting and Stopping Daemons Daemons of AdvancedCopy Manager Starting Daemons Stopping Daemons Chapter 3 Backup Operation Overview Snapshot Backup Processing Snapshot Backup Processing of Volume Group Synchronized High-speed Backup Processing Synchronized High-speed Backup Processing of Volume Group Restoring Data Restoration Processing of Volume Group Operation Design Selecting Server on Which Backups Are Performed Selecting Backup Source Configuring Backup Policy Preparing Backup Volume Preparing Automatic Backup Operation Flow of Operation Preparing to Start Backup Activating Daemons Starting Web Console Registering Managed Server Fetching Device Information on Managed Server Configuring Environment for Backup Operation Server Setting Operation Type for Device Setting Backup Policy Customizing Pre-processing and Post-processing Preparing Device Map File Describing Device Map File Operation xi -
13 3.5.1 Performing Snapshot High-speed Backup Performing Synchronized High-speed Backup Restoring Data Restoring Entire Volume Restoring Individual File Managing Backup History Displaying Backup History Deleting Backup History Changing Setting Information Adding Device Deleting Device Deleting Transaction Volume Deleting Backup Volume Adding Managed Server Deleting Managed Server Stopping Operation LVM Volume Operation Backup Operation in Volume Group Units Operation Design Preparations Configuring Transaction Volume and Backup Volume Customizing Pre-processing and Post-processing Scripts Backup in Units of Volume Groups Restoration in Units of Volume Groups Backup Operation in Units of Physical Disks Operational Configuration Preparations Configuring Transaction Volume and Backup Volume Example Device Map File Backup in Units of Physical Disks Restoration in Units of Physical Disks VxVM Volume Operation Backup Operation in Units of Physical Disks Operational Configuration Preparations Confirming Disk Group Configuration Information File Setting Transaction Volume and Backup Volume Preparing Device Map File Backup Restoration Chapter 4 Backup Operation Using Suspend/Resume Function Overview Backup Operation Design Flow of Operations Preparations Activating Daemons Starting Web Console Registering Managed Server Fetching Device Information on Managed Server Configuring Environment for Backup Operation Server Setting Operation Type for Device Setting Backup Policy Customizing Pre-processing and Post-processing xii -
14 4.4.9 Preparing Device Map File Backup Operations Starting Synchronous Processing Backing Up Displaying Synchronous Processing Execution Status Cancelling Synchronous Processing History Management Restoring Chapter 5 Backup Operation Using QuickOPC Function Overview Configuring Backup Operation Operation Flow Preparation Activating Daemons Starting Web Console Registering Managed Server Fetching Device Information on Managed Server Configuring Environment for Backup Operation Server Setting Operation Type for Device Setting Backup Policy Customizing Pre-processing and Post-processing Preparing Device Map File Operation Invoking Backup History Management Restoration Cancelling Restoration Displaying Execution Status of Tracking Processing Stopping Tracking Processing...65 Chapter 6 Replication Overview Snapshot Replication Processing Types of Snapshot Replication Snap Data Volume and Snap Data Pool Synchronized Replication Processing Configuration Determining Server That Performs Replication Determining Replication Target Notes on Replication Volume Notes on Configuration of SnapOPC/SnapOPC+ Replication Notes on Session Configurations Creating Snap Data Volume and Snap Data Pool Snap Data Volume/Snap Data Pool Monitoring Flow of Operations Preparations Starting Daemon Starting Web Console Registering Managed Server Fetching Device Information on Managed Server Configuring Source Volume and Replica Volume Customizing Pre-processing and Post-processing Creating Groups xiii -
15 Conditions for Replication Volumes That Make Up Group How to Create Groups Operations Executing Snapshot Replication Concurrent OPC Functions Executing Synchronized Replication Intra-box Synchronous Replication Inter-box Synchronous Replication Initial Copy Skip Function Concurrent Suspend Function Changing Timeout Value for Concurrent Suspend Function Concurrent Suspend When REC Disk buffer Is Used Destination Access Permission Function Backup and Restoration Using Replication Function Execution of Synchronization Reversal Changing Configuration Information Changing Source Volume or Replica Volume Deleting Source Volume or Replica Volume Changing Device Information of Source or Replica Volume Stopping Operation LVM Volume Operation Replication in Units of Volume Groups Operation Design Preparations Configuring Source Volume and Replica Volume Customizing Pre-processing and Post-processing Scripts Replication in Units of Volume Groups Replication in Units of Physical Disks Operation Design Preparations Configuring Source and Replica Volumes Replication in Units of Physical Disks VxVM Volume Operation Replication Operation in Units of Physical Disks Configuration Preparations Confirming Disk Group Configuration Information File Configuring Original and Replica Volumes Replication Chapter 7 Operation Maintenance Maintenance of Database Making Individual Backups of Databases Maintaining Backup Management List Backing up Backup Management List Restoring Backup Management List Preserving Volume Configuration Information Maintaining Replication Management List Backing up Replication Management List Restoring Replication Management List Preserving Volume Configuration Information Maintaining Database Maintaining Registry Backing Up Registry xiv -
16 Restoring Registry Making Package Backup of Databases Preliminaries Backup Operations Restoration Operations Troubleshooting Collecting Troubleshooting Information Troubleshooting: Hardware Error During Backup Overview Troubleshooting Hardware Error on Transaction Volume Hardware Error on Backup Volume Troubleshooting If Bad Sector Occurred in Transaction Volume Troubleshooting: Hardware or Other Error During Replication Overview Troubleshooting Hardware Error on Replication Volume Troubleshooting If Bad Sector Occurred in Copy Source Volume Troubleshooting When Lack of Free Space Has Occurred in Snap Data Volume or Snap Data Pool Error (halt) on Remote Copy Processing Changing Operating Environment Changing IP Address of Management Server Changing IP Address of Managed Server Changing Port Number of Management Server or Managed Server Changing Server Name of Management Server or Managed Server Changing Device Configuration Backup Management Replication Management Operation on Model Upgrade for ETERNUS Disk Storage System Chapter 8 Command References Backup Management Commands Environment Definition Commands swstsvrset (Managed Server Configuration Information Setting Command) swstsvrdisp (Managed Server Configuration Information Display Command) swstdevinfoset (Device Information Setting Command) swstdevdisp (Device Usage Status Display Command) swstbkpolset (Backup Policy Setting Command) swstbkpoldisp (Backup Policy Display Command) swstbkpoldel (Backup Policy Deletion Command) Operation Commands swstbackup (Backup Execution Command) swstbackstat (Backup Execution Status Display Command) swstrestore (Restore Execution Command) swstcancelrest (Restore Cancellation Command) swstreststat (Restore Execution Status Display Command) swsthistdisp (History Information Display Command) swsthistdel (History Information Deletion Command) swststartsync (Backup Synchronous Processing Start Command) swstcancelsync (Backup Synchronous Processing Cancel Command) swstsyncstat (Backup Synchronous Processing Progress Display Command) swstexecstat (Execution Status Display Command) swstcanceltrk (Tracking Cancel Command) swsttrkstat (Tracking Status Display Command) xv -
17 8.1.3 Maintenance Commands swstsrsemtch (Resource Match Command) swstresback (Resource Backup Command) swstresrst (Resource Restore Command) Configuration Management Commands stgcmmodnode (Management Server Information Change Command) stgxfwcmaddsrv (Server Information Addition Command) stgxfwcmmodsrv (Server Information Change Command) stgxfwcmdelsrv (Server Information Deletion Command) stgxfwcmsetdev (Device Information Collection/Reflection Command) stgxfwcmdeldev (Device Information Deletion Command) stgxfwcmdispsrv (Server Information Display Command) stgxfwcmdispdev (Device Information Display Command) stgxfwcmdisppat (Partition Information Display Command) stgenvdisp (Environment Information Display Command) stgmgrinfoset (Management Information Package Backup Server Registration/Deletion Command) stgmgrinfobkup (Management Information Package Backup Command) stgmgrinfodisp (Management Information Package Backup Status Display Command) stgrepocnv (Repository Data Migration Command) Replication Management Commands Environment Definition Commands swsrpsetvol (Replication Volume Information Setting Command) swsrpvolinfo (Replication Volume Information Display Command) swsrpdelvol (Replication Volume Information Deletion Command) swsrprecbuffstat (REC Buffer Information Display Command) swsrprecbuffset (REC Buffer Settings Change Command) Operation Commands swsrpstartsync (Synchronous Processing Start Command) swsrpmake (Replication Creation Command) swsrpstat (Operation Status Display Command) swsrpcancel (Replication Cancellation Command) swsrpchsync (Synchronization Mode Change Command) swsrprevsync (Synchronization Reverse Command) Maintenance Commands swsrprecoverres (Resource Adjustment Command) Start/Stop Daemon Commands Starting and Stopping Communication Daemon Starting and Stopping AdvancedCopy Manager Daemons SnapOPC/SnapOPC+ Support Commands swstestupdate (Update Volume Measurement Command) swstsdv (Snap Data Volume Operation/Reference Command) Troubleshooting Data Collection Command acmcapture (AdvancedCopy Manager's Agent Troubleshooting Data Collection Command) Chapter 9 Notes on Operations Notes on Backup and Replication Operation General Notes Backup and Replication Exclusions Consistency of Data on Volumes Fetching Device Information Running Software Maximum Number of Simultaneously Executing Operations Notes for Multipath Configurations Mounting of Disks from Other Servers xvi -
18 Notes on Copy Operations Targeted at File Systems Notes on Executing Copy Between Different Operating Systems Notes on Executing Copy from Logical Unit (Disk) to Slice (Partition) Using Replication Function Notes When Using -m Option Notes When Using -t Option Copy Processing Performance of Advanced Copy Server Restart After Backup or Replication Notes on Snapshot High-speed Backup Notes on Synchronous High-speed Backup Notes on Restoration Use in Combination with ODX (Offloaded Data Transfer) Use in Combination with XCOPY (Extended Copy) Appendix A Pre-processing and Post-processing of Backup and Restoration A.1 Overview A.2 Pre-processing and Post-processing of Backup A.2.1 Pre-processing of Backup A Pre-processing Script for Backup A.2.2 Post-processing of Backup A Post-processing Script for Backup A.2.3 Customizing Shell Script A.3 Pre-processing and Post-processing of Restoration A.3.1 Pre-processing of Restoration A Pre-processing Script for Restoration A.3.2 Post-processing of Restoration A Post-processing Script for Restoration A.3.3 Customizing Shell Script Appendix B Sample Script for Backup Operations B.1 Backup and Restoration of Transaction Volume B.1.1 Backup Procedure B.1.2 Restoration Procedure B.2 Sample Scripts for Oracle B.2.1 Overview of Sample Scripts B Collecting DB Information B Backup B.2.2 Applying Sample Shell Scripts B DB Information Collection B Backup B.2.3 Restore Method B.2.4 Notes on Using Sample Shell Scripts B.3 Sample Scripts for DB B.3.1 Overview of Sample Shell Scripts B Collecting DB Information B Backup B.3.2 Applying Sample Shell Scripts B DB Information Collection B Backup B.3.3 Restore Method B.3.4 Notes on Using Sample Shell Scripts Appendix C Pre-processing and Post-processing of Replication C.1 Overview C.2 Pre-processing and Post-processing of Replication xvii -
19 C.2.1 Pre-processing and Post-processing for File System C.2.2 Pre-processing When Replication Is Executed C Replication Source Volume Pre-processing Sample Script (RepSrc.pre) C Replication Destination Volume Pre-processing Sample Script (RepDst.pre) C.2.3 Post-processing When Replication Is Executed C Replication Source Volume Post-processing Sample Script (RepSrc.post) C Replication Destination Volume Post-processing Sample Script (RepDst.post) C.2.4 Customizing Shell Script Appendix D Backup Operations Using Power-Saving D.1 Environment Settings D.1.1 Settings for ETERNUS Disk Storage System D.1.2 Settings for AdvancedCopy Manager D.1.3 Settings for Storage Cruiser D.2 Operation D.2.1 Start Disk Drive D.2.2 Operate AdvancedCopy Manager D.2.3 Stop Disk Drive xviii -

20 Chapter 1 Overview of AdvancedCopy Manager This chapter describes the overview of AdvancedCopy Manager. 1.1 Product Configuration of AdvancedCopy Manager Functions AdvancedCopy Manager consists of the following three functions: Table 1.1 Functions Function Name AdvancedCopy Manager's agent Description Operates on the Managed Server with which the storage device is connected. Backup management and replication management are performed. This (Agent) can be managed by AdvancedCopy Manager's manager running on Solaris, Windows or Linux operating system. ETERNUS SF Web Console Monitors and/or manages the AdvancedCopy Manager environment by connecting to the Management Server. The AdvancedCopy Manager's server type depends on the operating environment. Managed Server The Managed Server is a server which executes the backup operation and the replication operation that AdvancedCopy Manager offers. The Agent component of AdvancedCopy Manager is installed on the Managed Server. If a Managed Server is also to be used as the Management Server then the Manager, as well as the Agent, will need to be installed. The Agent installation is included as part of the Manager installation. Management Server The Management Server manages the Managed Servers and only one Management Server can be set in the system. The Management module of AdvancedCopy Manager is installed on the Management Server. Three different operating scenarios for the AdvancedCopy Manager are shown below: - When only one Managed Server is installed In this operating environment, only the Management module of AdvancedCopy Manager needs to be installed (Management module of AdvancedCopy Manager includes the Agent functions of AdvancedCopy Manager). Figure 1.1 When Only One Managed Server Is Installed - 1 -

21 - When two or more Managed Servers are installed When two or more Managed Servers are available, set only one of them up as the Management Server or set up a new server with no ETERNUS Disk storage system connected as the Management Server. Each environment is explained below. a. When a Managed Server is operated as a Management Server: One of the servers functions as a Management Server. The Management Server has a repository where the information on operating and management of all Managed Servers is stored. When many Managed Servers exist, they all compete for access to the repository. To ensure overall performance and other applications running on the same server are not adversely affected, the Management Server functionality should be installed on a dedicated server, or on a server on which the load of other applications is relatively low. The following diagram illustrates the configuration of the Managed Server when it is also operating as the Management Server. Figure 1.2 When Managed Server Is Also Operated as Management Server - 2 -

22 b. Setting up a dedicated Management Server: This setup comprises two or more Managed Servers with a dedicated Management Server. Figure 1.3 When Dedicated Management Server Manages Managed Servers System Configuration The system configuration of AdvancedCopy Manager is shown below

23 Figure 1.4 System Configuration of Management Server and Multiple Managed Servers See For the Combination that Manager and Agent can connect, refer to "Combining ETERNUS SF Agent and ETERNUS SF Manager" in the ETERNUS SF Installation and Setup Guide. 1.2 Function Overview of AdvancedCopy Manager What Is Backup Function? The backup function of AdvancedCopy Manager provides operation management for high-speed backup by using the Advanced Copy function of ETERNUS Disk storage system. The following sub-sections provide more information concerning the backup function. High-speed Backup Operation The Advanced Copy function of ETERNUS Disk storage system is used to perform high-speed backup between volumes regardless of volume capacities. This function greatly reduces the impact of a backup operation. Faster backups can be made by performing update differential copies using the Advanced Copy function. Backup Operation in Conjunction with Oracle or DB2 (Sample Shell Scripts) The sample shell scripts provide AdvancedCopy Manager commands and Oracle / DB2 operations combined together. Additionally, the following functions allow you to manage the backup operation
24 Policy Management Function The policy management function manages the number of preservation generations of backup and the number of interval days in which backup should be performed (displays the delay when displaying information for a volume to be backed up). Storage Configuration Management Function The storage configuration management function manages the configurations of volumes to be backed up and volumes to which a backup should be saved. On AdvancedCopy Manager, a volume to be backed up is called a transaction volume; a volume to which a backup should be saved is called a backup volume. Backup and Restore Functions The backup and restore functions backup and restore a specified volume. History Information Management Function The history information management function manages, out of the information that has been backed up in the past, the information in preservation generations as history What Is Replication Function? The replication function of AdvancedCopy Manager provides operation management of replications by using the Advanced Copy function of ETERNUS Disk storage system. As a result, the following replication operations become possible. High-speed Replication Operation The Advanced Copy function of ETERNUS Disk storage system is used to perform high-speed replication between volumes regardless of volume capacities. This function greatly reduces the impact of a replication operation. Faster backups can be made by using update differential copies with the Advanced Copy function. Replication Operation in Conjunction with Oracle or DB2 (Sample Shell Scripts) The sample shell scripts provide AdvancedCopy Manager commands and Oracle / DB2 operations combined together. Main Differences with Backup Function The backup function provides policy and history management. These functions are not supported by the replication function. The replication function replicates data between two volumes Web Console The ETERNUS SF Web Console (hereafter referred to as "Web Console") can be used to perform environmental setup and employment functions for AdvancedCopy Manager. The main functions are as follows. - Security management Operational restrictions of users of AdvancedCopy Manager can be performed using the GUI interface. - Backup management AdvancedCopy Manager Backup management tasks (such as definition of a server or a device, backup, restoration, etc.) can be performed using the GUI interface. - Replication management AdvancedCopy Manager replication management tasks (such as defining volumes and executing replications) can be performed using the GUI interface. Backup management and replication management can also be performed at the command line as well as the Web Console. For more information about the Web Console, refer to the ETERNUS SF Web Console Guide
25 1.2.4 Copy Control Module When the AdvancedCopy Manager Copy Control Module is used, it is possible to perform back ups from the server where the Copy Control Module is installed, using the Advanced Copy function of ETERNUS Disk storage system. As a result, the AdvancedCopy Manager's agent need not be installed. For details, refer to the ETERNUS SF AdvancedCopy Manager Operation Guide for Copy Control Module. 1.3 Operating Environment of AdvancedCopy Manager This section explains the software requirements for the operation of AdvancedCopy Manager. For the hardware requirements, refer to "Operating Environment" in the ETERNUS SF Installation and Setup Guide. For browsers on which Web Console can run, refer to "Supported Web Browsers" in the ETERNUS SF Web Console Guide. Point To perform the Advanced Copy function of ETERNUS Disk storage system, it is necessary to register the Advanced Copy license to ETERNUS Disk storage system. For details, refer to "License Management" in the ETERNUS SF Installation and Setup Guide Software Requirement of AdvancedCopy Manager's Agent The following table lists the software requirements of AdvancedCopy Manager's agent. For about the supported operating systems, refer to "Operating Environment of AdvancedCopy Manager's Agent" in the ETERNUS SF Installation and Setup Guide. Table 1.2 Software Requirements of AdvancedCopy Manager's Agent Product Name Remarks VERITAS Volume Manager 4.0 VERITAS Volume Manager 5.0 VERITAS Volume Manager 5.1 Oracle 8i later DB2(v ) When a logical volume of VERITAS Volume Manager is the target of the operation performed. It is necessary to link to Oracle. It is necessary to link to DB2. Note that the software version and level differs in accordance with the install destination system environment. Refer to the relevant software manual for details. 1.4 Managing Device on AdvancedCopy Manager When using AdvancedCopy Manager, you should register the block type devices to operate. Note Disks that are 2 TB and over cannot be used with AdvancedCopy Manager. Therefore, operate AdvancedCopy Manager with disks that are less than 2 TB Normal Devices The following devices are supported for backup and replication management: - sd driver resources - 6 -
 AdvancedCopy Manager can back up or replicate volumes under the control of LVM (referred to as LVM volumes in this document) in the following")
26 Note Disks that are 2 terabytes and over cannot be used with AdvancedCopy Manager. Therefore, operate AdvancedCopy Manager with disks that are less than 2 terabytes Volumes under Control of Logical Volume Manager (LVM) AdvancedCopy Manager can back up or replicate volumes under the control of LVM (referred to as LVM volumes in this document) in the following units: - Volume group - Physical disk that constitutes a volume group For information on the backup and replication of LVM volumes, refer to "LVM Volume Operation" in "3.8 LVM Volume Operation" and "6.8 LVM Volume Operation" Backup/Replication in Units of Volume Groups LVM volumes are volumes which are managed in units of volume groups containing logical volumes. AdvancedCopy Manager copies each physical disk that constitutes a volume group. An LVM volume that can be operated in units of logical volumes must satisfy the following conditions: - One volume group contains only one physical disk, and logical volumes are configured so that one physical disk includes <n> logical volumes. Figure 1.5 Support Configuration LVM allows multiple logical volumes to be defined on a single physical disk (a logical volume is referred to as LU: Logical Unit). The boundaries of logical volumes can be defined independently of the boundaries of the host physical disk. A configuration in which one volume group contains multiple logical volumes is also supported. For operation, note the following: - A logical volume for which a file system was constructed must be unmounted before backup or replication can be performed and remounted after the backup or replication has completed Physical Disks That Constitute Volume Group In this case, the individual physical disks that constitute a volume group in which a logical volume exists are used as management units. Use this type of operation when a volume group has a configuration that is not supported for operations in units of volume groups
 AdvancedCopy Manager can back up or replicate volumes under the control of VxVM (referred to as VxVM volumes in this document) in the")

27 Figure 1.6 Configuration That Is Not Supported for Operation in Units of Volume Groups Copying during backup or replication must be performed while maintaining the integrity of an entire volume group Volumes under Control of VERITAS Volume Manager (VxVM) AdvancedCopy Manager can back up or replicate volumes under the control of VxVM (referred to as VxVM volumes in this document) in the following units: - Physical disk that constitutes a volume group For details on backup of a subordinate volume of VxVM, refer to the section titled "3.9 VxVM Volume Operation". For details on replication of a subordinate volume of VxVM, refer to the section titled "6.9 VxVM Volume Operation." Physical Disks That Constitute Disk Group The VM disks (physical disks) on which a sub-disk used by a logical volume exists are used as the management units. Figure 1.7 Example of VxVM Configuration - 8 -
28 Since AdvancedCopy Manager copies an entire VM disk, not only the shared area that is a sub-disk but also the public region containing VxVM-internal configuration information is copied. When backup or replication is performed, therefore, the integrity of VxVM configuration information must be maintained during copying. Specify a device name as follows: - /dev/vx/dmp/hdisk# Note Operations are not supported under naming convention operations based on enclosures in VxVM. 1.5 Backup to Secondary Storage Media Combining AdvancedCopy Manager with software having the backup feature to tape media (hereinafter referred to as "Tape backup software") can back up to secondary storage media the AdvancedCopy Manager copied data in an ETERNUS Disk storage system. To back up data to secondary media, on completion of copy operation by AdvancedCopy Manager, back up the Advanced Copy destination area by the tape backup software. In backup operation in combination of AdvancedCopy Manager with tape backup software, take note of the following matter to design: - Copy operation by AdvancedCopy Manager To ensure data consistency of backups, the Advanced Copy destination area should be kept out of access from other software than AdvancedCopy Manager. If copy operation is performed by AdvancedCopy Manager while the tape backup software is accessing or backing up the data in the Advanced Copy destination area, the copy operation will fail. Do not perform copy operation by AdvancedCopy Manager before keeping the Advance Copy destination area out of access from the tape backup software or making sure of that
29 Chapter 2 Starting and Stopping Daemons This chapter explains how to activate and stop daemons provided by AdvancedCopy Manager. For more information on how to activate and stop the daemons described in this chapter, refer to "8.4 Start/Stop Daemon Commands". 2.1 Daemons of AdvancedCopy Manager The Agent is configured with the following daemon: Table 2.1 Daemons of Agent Communication daemon Daemon Type Description Communicates with the Management Server and other Managed Servers 2.2 Starting Daemons Daemons must be running on the Managed Servers. If for whatever reason daemons stop, the daemons must restarted on each server. # /opt/swstorage/bin/startacm Note - Before executing the startacm command, confirm that the SWSTGNODE environment variable is not defined. - If starting daemon fails, confirm that IP address and name of the local server in /etc/hosts file are validate. 2.3 Stopping Daemons Stop daemons from the Managed Server. Normally, they are automatically stopped on system shutdown. To stop daemons on a server, execute the following command on the server: # /opt/swstorage/bin/stopacm Note Before executing the stopacm command, confirm that the SWSTGNODE environment variable is not defined

30 Chapter 3 Backup Operation This chapter provides details of the backup operation performed by AdvancedCopy Manager.AdvancedCopy Manager backups are created in units of partitions. The AIX version of AdvancedCopy Manager's agent enables the backup operation described in this chapter by linking with AdvancedCopy Manager's Manager running under Windows, Solaris or Linux. For information on the relationships between the configurations of supported devices and the copy operation, refer to "1.4 Managing Device on AdvancedCopy Manager". 3.1 Overview AdvancedCopy Manager performs high-speed backup of volumes of ETERNUS Disk storage system, regardless of volume capacities, using the Advanced Copy functions. Backup that uses the OPC function is called "snapshot fast backup", while backup that uses the EC function is called "synchronized high-speed backup". Automatic snapshot backup can be scheduled without first estimating the time required, because it does not use synchronous backup processing. However, when the save number is 1, a state may occur in which there is no backup data because a snapshot backup deletes the history prior to copy processing. As synchronized high-speed backup deletes the history after backup processing is complete, there is no status where backup data does not exist, even though the generation number is 1, but synchronized high-speed backup does requires one more backup volume generation than is required by snapshot fast backup. Synchronized high-speed backup also requires synchronized backup processing before the backup execution command is entered. Therefore, execution of automatic synchronized high-speed backup must be scheduled to allow enough time for synchronized processing to finish first. Synchronized backup processing is then started based on the estimated time, and the backup execution command is entered after equivalency maintained status has been achieved. AdvancedCopy Manager automatically manages and selects a medium (backup volume) to be used for backup. AdvancedCopy Manager also manages the backup carriers and generations, and allows you to restore data from the latest or previous generations of backed up data. Figure 3.1 Managing Backup Volumes

31 3.1.1 Snapshot Backup Processing The OPC (One Point Copy) function of ETERNUS Disk storage system is used to copy data from a transaction volume to an unused backup volume. To perform a snapshot fast backup, take the following steps: 1. When the swstbackup command is executed ((1) in the following figure), an unused backup volume with the same size as the relevant transaction volume is selected from the unused backup volume management area. If the number of backup volumes exceeds the number of preservation generations by performing backup, the history of the oldest backup volume is deleted, and then the volume is selected as an unused backup volume. 2. Data on the transaction volume will be copied to the selected unused backup volume. The logical copy is instantly performed and the physical copy is started on the hardware ((2) to (4) in the following figure). 3. Backup carrier information will be set. Figure 3.2 Snapshot Fast Backup Processing The snapshot fast backup is completed as soon as you confirm the execution of the backup. The actual data copying will be performed internally by the OPC function of ETERNUS Disk storage system. The QuickOPC function of the snapshot high-speed backup creates a snapshot image by only copying the data updated since the start of previous backup. This reduces the time for physical copying significantly. For information on the QuickOPC function, refer to "Chapter 5 Backup Operation Using QuickOPC Function". Note If all the generations of backup volumes are being managed, and if no backup volume can be obtained from the unused region in the backup volume management area, backup copies cannot be created Snapshot Backup Processing of Volume Group When the transaction volume is a volume group, copy processing by the OPC functions of ETERNUS Disk storage system is performed for the entire physical disk comprising the volume group. Therefore, when two or more logical volumes exist in a volume group, the data contained in all logical volumes is backed up (refer to the following figure)

32 Note When using a volume group for backup operation, care needs to be taken with the following points: - When the transaction source volume is a volume group, construct a logical disk whose size matches that of the transaction volume, in a volume group different from the transaction group, and register this volume group whose physical disk size is the same as the transaction volume as the backup volume. - A "Describing Device Map File" is created to describe the pairing of matching transaction and backup volumes. For details, refer to "3.4.9 Preparing Device Map File". A "Device map" is mandatory if you are backing up using a volume group unit. - In backup processing, since the LVM configuration information on the backup volume will be rewritten for the LVM information on the transaction volume, LVM configuration information is restored in the processing after backup. For more information on this, refer to "9.1.4 Notes on Restoration". - When backing up a volume group using an account with Administrator authority for backup, modify the scripts used for backup pre-processing and post-processing to unmount/mount all logical volumes in the volume group. For more information, refer to "Appendix A Pre-processing and Post-processing of Backup and Restoration". - When two or more physical disks exist in the volume group which is registered with a transaction volume, the backup operation will results in an error. Figure 3.3 Transaction Volume and Backup Volume for Two or More Logical Disks Synchronized High-speed Backup Processing The EC function of ETERNUS Disk storage system is used to copy data from a transaction volume to an unused backup volume. To perform synchronized high-speed backup, take the following steps: 1. When the swststartsync command is executed ((1) in the following figure), an unused backup volume with the same size as the relevant transaction volume is selected from the unused backup volume management area and backup synchronous processing begins. 2. After the synchronous copy completes, the volumes enter equivalency maintain state which maintains the equivalency of the transaction volume and backup volume. ((3) in the following figure). Note that the equivalency maintain state does not guarantee equivalency of the transaction volume and backup volume. 3. When the swstbackup command is executed ((4) in the following figure), the backup synchronization processing stops and the backup history information is registered. 4. When the generation number of the newly backed up data exceeds the number of generations of backup history being kept, the oldest backup volume is treated as an unused backup volume

33 Note The swstbackup command cannot be executed before the transaction and backup volumes have become equivalency maintain state. Figure 3.4 Backup Using Synchronized High-speed Backup Function During synchronous high-speed backup using the Suspend/Resume function, the equivalency maintenance status of EC can be set to Suspend or Resume. The synchronous backup process is therefore faster because the function can create a differential copy from the Suspend state. For information on the Suspend/Resume function, refer to "Chapter 4 Backup Operation Using Suspend/Resume Function". Note If all generations of backup volumes are being managed, and if no backup volume can be obtained from the unused region in the backup volume management area, backup copies cannot be created Synchronized High-speed Backup Processing of Volume Group When the transaction volume is a volume group, copy processing by the EC function of ETERNUS Disk storage system is performed to the entire physical disk comprising the volume group. Therefore, when two or more logical volumes exist in a volume group, the data contained in all logical volumes is backed up. Note When using a volume group for backup operation, care needs to be taken with the following points: - When the transaction source volume is a volume group, construct a logical disk whose size matches that of the transaction volume, in a volume group different from the transaction group, and register this volume group whose physical disk size is the same as the transaction volume as the backup volume. - A "Describing Device Map File" is created to describe the pairing of matching transaction and backup volumes. For details, refer to "3.4.9 Preparing Device Map File". A "Device map" is mandatory if you are backing up using a volume group unit. - In backup processing, since the LVM configuration information on the backup volume will be rewritten for the LVM information on the transaction volume, LVM configuration information is restored in the processing after backup. For more information on this, refer to "9.1.4 Notes on Restoration"

34 - When backing up a volume group using an account with Administrator authority for backup, modify the scripts used for backup pre-processing and post-processing to unmount/mount all logical volumes in the volume group. For more information, refer to "Appendix A Pre-processing and Post-processing of Backup and Restoration". - When two or more physical disks exist in the volume group which is registered with a transaction volume, the backup operation will results in an error Restoring Data This section describes how data is restored in AdvancedCopy Manager. The restoration operation refers to restoring data from a backup volume to a transaction volume using backup carrier management information. Data restore from a backup volume refers to using the OPC function provided by ETERNUS Disk storage system to restore data from a backup volume to a transaction volume. If the data on a backup volume under carrier management is restored to a transaction volume, the carrier management information will not change. Note that data will be restored to a transaction volume that was the backup source. However, you can change the restore destination. Note Data updated between the last backup and a subsequent restoration will be lost as the transaction volume is overwritten by the backup volume. Figure 3.5 Notes on Restore Operations in AdvancedCopy Manager TD: Transaction volume BD: Backup volume Restoration Processing of Volume Group When a transaction volume is a volume group, copy processing by the OPC functions of ETERNUS Disk storage system is performed to the entire physical disk comprising the volume group. Therefore, when two or more logical volumes exist in a volume group, the data contained in all logical volumes is backed up

35 Note When using a volume group for backup operation, care should be taken with the following point: When restoring a volume group, using an account with Administrator authority for backup, correct the script used for backup preprocessing and post-processing to unmount/mount all logical volumes. For more information, refer to "Appendix A Pre-processing and Post-processing of Backup and Restoration". Figure 3.6 Restoration for Two or More Logical Disks 3.2 Operation Design This section describes how to configure a backup system in AdvancedCopy Manager. When configuring a backup system, you will need to consider the following issues: Selecting Server on Which Backups Are Performed Selecting Backup Source Configuring Backup Policy Preparing Backup Volume Preparing Automatic Backup Operation Selecting Server on Which Backups Are Performed The backup operation can be performed on one of the following servers: Management Server Multiple Managed Servers are unified and managed centrally. The Management Server can also operate as a Managed Server. A Management Server can also serve as a Managed Server. Note that AdvancedCopy Manager running on a Management Server must run in either Windows, Solaris or Linux OS environment. Managed Server AdvancedCopy Manager operations can be performed on the Managed Server. The AIX version of AdvancedCopy Manager can also be used to operate a Managed Server
.")
36 Figure 3.7 Configuration of Servers on Which Backup Operation Should Be Performed Selecting Backup Source The backup/restoration unit of the AIX AdvancedCopy Manager is a physical disk (LU: Logical Unit). However, in the case of the physical disk which constitutes LVM (Logical Volume Manager), it is managed and operated according to the volume group. The disk which is managed and operated is called a transaction volume. A transaction volume to be backed up must reside on the ETERNUS Disk storage system. For the supported units, refer to "1.4 Managing Device on AdvancedCopy Manager". For information on setting up a transaction volume, refer to "3.4.6 Setting Operation Type for Device". Note - Do not back up the systems disk or the disk on which AdvancedCopy Manager is installed. - The following should be noted when using a volume group as operating volume: - Do not register two or more physical disks into one volume group. - Refer to "9.1.1 General Notes" for points to consider when deciding on a candidate volume for backup. Some points to consider include but may not be limited to: Backup and Replication Exclusions Configuring Backup Policy To configure a backup policy on a transaction volume, set the following items: Number of Preservation Generations The number of preservation generations refers to the maximum number of generations of backup data that should be kept. The snapshot fast backup first releases the oldest generation from generation management. If a system failure or any other failure occurs while the backup is running, the oldest generation may have already been released and there may not be as many generations of backup data as required. Therefore, Fujitsu recommends that you re-execute backup immediately to create the required number of generations of backup data. When performing snapshot type high-speed backup using only one preservation generation, we recommend you also back up data to a tape
37 A synchronous high-speed backup operation releases the oldest generation from generation management after backup of the latest generation is completed. Therefore, the required number of backup volumes is equal to the maximum number of backup generations + 1. Interval Days Interval days refers to the time interval (in days) between successive backups. A notification that backup is overdue is displayed if a period longer than the specified interval has passed since the last backup date, but a backup will not performed automatically in this instance even if you have specified the interval days between backups. For information on setting a backup policy, refer to "3.4.7 Setting Backup Policy" Preparing Backup Volume This section describes how to prepare the backup volume. The backup unit of AdvancedCopy Manager is a disk. In AdvancedCopy Manager, the device which stores the transaction data used as the candidate for backup is called the backup volume. A destination backup volume must be placed on the same ETERNUS Disk storage system. The number of backup volumes is determined by whether snapshot fast backup or synchronized high-speed backup is performed: Table 3.1 Number of Backup Volumes Required for Backup Operations Backup Method Number of Required Backup Volumes Snapshot fast backup Number of backup generations Synchronized high-speed backup Number of backup generations + 1 When backup policies have already been set for multiple transaction volumes, the registration of a backup policy for a newly registered transaction volume requires that the following number of backup volumes be registered beforehand: Table 3.2 Number of Backup Volumes Required for Backup Operations (If Backup Policy Has Been Set) Backup Method Number of Required Backup Volumes Snapshot fast backup Synchronized high-speed backup Total number of backup generations in the registered backup policies + number of generations in the new backup policy being set Total number of backup generations in the registered backup policies + number of registered transaction volumes + number of generations in the new backup policy being set + 1 For information on configuring a backup volume, refer to "3.4.6 Setting Operation Type for Device". Note - Do not configure AdvancedCopy Manager to backup a system disk or a disk where AdvancedCopy Manager is installed. - The following should be noted when using a volume group as a backup volume: - Do not register two or more physical disks into one volume group. - Create a logical volume so that it does not span two or more physical disks. - The backup volume must be the same physical size as transaction volume. In addition, if the backup and transaction volumes are volume groups, they must be in different volume groups. However, these volume groups must have the same configuration


38 Point If the number of backup volumes that can be prepared in synchronized high-speed backup is only the number of preservation generations, the backup operation can be carried out by saving the backup volumes to secondary media, such as tapes. To do this, follow the procedure below: 1. Start backup synchronization. 2. Confirm the equivalency maintain status. 3. Execute backup. 4. Save the backup volumes to secondary media. 5. Delete history information. 6. Return to step 1. Be aware that, if any history information is deleted for any reason, the restore execution command cannot be used to restore data from the period beginning with the time of deletion until the time the next backup is completed inclusive. In this event, the data must be restored directly from the secondary media where applicable Preparing Automatic Backup Operation The backup operation of AdvancedCopy Manager can be automated by using Systemwalker Operation Manager. Automatic Snapshot Fast Backup Automatic snapshot fast backup can be executed by using one of the following two methods: - Start the backup command as part of a batch job. Figure 3.8 Start in Job Net - Start the backup command at the specified time. Figure 3.9 Start at Specified Time

39 Automatic Synchronized High-speed Backup For synchronized high-speed backup, the transaction and backup volumes must have maintained equivalency status at the scheduled time for backup. For this reason, if synchronized high-speed backup is automated, the synchronized backup processing start command and the backup execution command must be started separately, as described below. Starting Synchronized Backup Processing Start Command Estimate the expected time required for the synchronized backup processing. Execute the synchronized backup processing start command. To do this, specify the time obtained by subtracting the estimated time (or more) from the time that the backup execution command is to start. The transaction and backup volumes will then have maintained equivalency status when backup is executed. The time between the start of synchronized backup processing and the transition to maintenance equivalency status depends on the capacity of the volume to be copied. Starting Backup Execution Command Use either of the following methods to automatically execute the backup execution command: - Start the backup execution command as part of a batch job. Figure 3.10 Start in Job Net Note If there are other jobs (jobs A and B in the figure) to be executed before the backup execution command in the job net, the start time of the backup execution command cannot be determined. Assume that the start time of the backup execution command is the time obtained by adding the shortest time required for jobs A and B to the job net start time. Determine the start time of the synchronized backup processing start command by subtracting the estimated time from the start time of the backup execution command

40 - Start the backup execution command with the time specified. Figure 3.11 Start at Specified Time 3.3 Flow of Operation The following diagram shows the flow of the backup operation on a transaction volume:
41 Figure 3.12 Flow of Backup Operation on Transaction Volume 3.4 Preparing to Start Backup This section describes the preparations that are required to perform the backup operation Activating Daemons Before the backup operation is started, the daemons of AdvancedCopy Manager must be started on both the Management Server and the Managed Servers. Normally, these daemons are automatically started up when the system is started. If the startup fails the system for some reason or if a daemon has been stopped, you will need to start the daemon on each server. For information on starting a daemon, refer to "Chapter 2 Starting and Stopping Daemons" Starting Web Console Start the Web Console. For details, refer to "How to Start Web Console" in the ETERNUS SF Web Console Guide
42 3.4.3 Registering Managed Server The Management Server registers the Managed Server that is to be managed. This process is carried out using Web Console. Note Perform this task after confirming that it is possible to communicate from the Managed Server to the IP address of the Management Server. Check the Management Server IP address with the stgxfwcmdispsrv command Fetching Device Information on Managed Server This process can be carried out using either Web Console or stgxfwcmsetdev command. Note - Device information on a Managed Server must first be stored in the repository. - The time taken to add new devices is in proportion to the total number of devices defined in the selected Managed Server. For this reason, if a large number of devices have been defined, execute the process only when the CPU load on the system is low. As a guide, each operation takes about 0.5 seconds per device (ie, partition) with no load. - No information will be obtained for a volume group is inactive when the operation is executed. When a backup is in progress a volume group which is registered as a backup volume will become inactive, so it would not be detected by this operation. Do not issue an instruction to delete a volume in use Configuring Environment for Backup Operation Server This process can be executed using either Web Console or swstsvrset command. Point If the Management Server also works as a Managed Server, these environment settings are also required for the Management Server Setting Operation Type for Device Set up the volume type for a device that is connected to the Managed Server. The setting of the type is explained below. - Defining the volume to be backed up as a transaction volume. - Preparing backup volumes. Prepare the number of volumes shown below in accordance with the operation type, each volume having the same partition size as the transaction volume, and define them as backup volumes. Table 3.3 Number of Backup Volumes Required for Backup Operations Backup Method Number of Required Backup Volumes Snapshot fast backup Number of backup generations Synchronized high-speed backup Number of backup generations + 1 This process can be carried out using either Web Console or swstdevinfoset command. Note - In order to use a volume group as a transaction volume, it is necessary to create a logical disk as follows: - Do not register two or more physical disks into one volume group
43 - Create a logical disk so that one logical disk does not span two or more physical disks. - To change the configuration of a partition that has been registered as either a transaction volume or a backup volume, take the following steps: 1. Delete the registered configuration, and then change the configuration. 2. Attempt to "3.4.4 Fetching Device Information on Managed Server". 3. Execute the swstdevinfoset command to register the information. - The backup volume must be the same size (have the same number of bytes) as the transaction volume. - Backup and backup volumes are not supported for the system partition or the partition where AdvancedCopy Manager is installed. - For a volume group registered as a backup volume, manually unmount all logical volumes in the volume group before performing this operation. - When the registered contents are checked by the Web Console or by the command, the value displayed on the "Size" column is the physical disk size. When a volume group is registered, this column also displays the physical disk size of the volume group. Point The registered volumes can be confirmed using either Web Console or swstdevdisp command Setting Backup Policy For all transaction volumes registered on a Managed Server, set the following backup policy parameters: - Preservation generations This refers to how many generations of backup data should be retained. - Interval days This is the number of days until the next backup should be performed. If the specified number of days is exceeded and no backup has been performed, you will be prompted to perform a backup in the Web Console. This process can be carried out using either Web Console or swstbkpolset command. Note - Even if the number of interval days has been specified, AdvancedCopy Manager does not automatically invoke the backup when the date for the next backup is reached. This value is used only to prompt the user to perform backup when the number of backup interval days is exceeded. - When you set a backup policy, there must be as many registered backup volumes as required to perform backup according to the specified backup policy. For information on the necessary number of backup volumes, refer to "3.2.4 Preparing Backup Volume". - Even though the number of backup volumes required for the backup may not have been registered when backup policies for synchronized high-speed backup were set, this number can be set by default provided the number of backup volumes required for snapshot fast backup has been previously registered. Otherwise, it may not be possible to execute synchronized high-speed backup. Point The registered backup policy can be confirmed using either Web Console or swstbkpoldisp command
44 3.4.8 Customizing Pre-processing and Post-processing In AdvancedCopy Manager, backup or restore processing must be performed while transaction volumes are unmounted. Therefore, when backup or restore is executed, mount and unmount processing of the transaction volume is done using the pre-processing and post-processing scripts. AIX AdvancedCopy Manager implements the transaction volume unmount/mount operation by customizing pre-processing and postprocessing scripts. If a pre-processing script terminates with an error during execution of backup/restoration, backup/restore processing is not performed. Pre-processing and Post-processing scripts for Backup need to be customized in the following conditions. - The backup target is a volume group - To add special pre-processing and post-processing to the corresponding scripts. For information about the customization method, refer to "Appendix A Pre-processing and Post-processing of Backup and Restoration" for more information. Point When AdvancedCopy Manager Is Upgraded Where there has been an upgrade to existing versions of AdvancedCopy Manager or its components, any scripts used with AdvancedCopy Manager or its components should be reviewed and customized accordingly after upgrading rather than continuing to reuse scripts from previous versions Preparing Device Map File When using AdvancedCopy Manager to back up data, a backup volume with the same capacity as a transaction volume is automatically selected from the available registered backup volumes. If a specific backup volume is to be used to back up a given transaction volume, a "Device map file" must be created. A "Device map file" is a file defining the relationship between the transaction and a specific backup volume. A device map file may be created anywhere on the Managed Server that performs backup. If you specify this file while performing a backup, the relationship as defined in the device map file is automatically recognized for that backup operation. Point To manage multiple generations of backups using defined transaction volume to backup volume relationships, multiple device map files must be prepared. The device map file used when backing up or starting synchronous processing should meet either of the following requirements: - Either an unused backup volume must be specified - A backup volume detailed in the history information that was deleted by this backup must be specified. Care should taken to ensure that the device map file is configured and used correctly where the backup system uses two or more backup volumes. If the number of backup volumes prepared for synchronized high-speed backup is no more than the number of preservation generations, the backup can be performed by saving the backup volumes to secondary media, such as tape, and then deleting corresponding history information. In such cases, the device map file specified at the start of synchronous backup processing is the file specifying the backup volumes that become available for reuse when history information is deleted Describing Device Map File The following provides an example of a device map file:
45 # A comment line starts with "#". # Business volume name Output destination backup volume name # Volume Group /dev/vg01 /dev/vg03 : /dev/vg02 # A comment can be described here also. /dev/vg04 The rules for creating a device map file are as follows: - Describe a transaction volume name and a corresponding target backup volume name in one line. Separate the transaction volume name and backup volume name with one or more space or tab characters. One or more space or tab characters may be used as delimiters between the beginning of a line and a transaction volume name or between the end of a target backup volume name and the end of a line (new line character). - A blank line (Space or tab characters) may be included in a file. - Anything after the symbol '#' is a comment. If the comment uses more than a single line, then each line must be preceded by a '#' character. - You cannot specify more than one backup volume for the same transaction volume in one device map file. If you do, only the first occurrence is valid. While the device map file will still be read, subsequent occurrences will be ignored. - A device map file may include descriptions of transaction volumes other than the processing target. Refer to the description example provided in the beginning of this chapter. 3.5 Operation This section describes how to perform a backup in AdvancedCopy Manager. Before performing the backup operation, configure the environment settings that are required for the backup according to "3.4 Preparing to Start Backup". There are two kinds of backup in AdvancedCopy Manager: - Snapshot type high-speed backup - Synchronous high-speed backup Performing Snapshot High-speed Backup Snapshot high-speed backup can be carried out using either Web Console or swstbackup command. To check the backup status, use the swstbackstat command. Note When the QuickOPC function is used for snapshot high-speed backup, the command options listed below cannot be performed from the Web Console. Enter the appropriate command for each operation. - Execute the backup command with the -T option specified the swstcanceltrk command Performing Synchronized High-speed Backup This process can be carried out using either the Web Console or commands. If operating with commands, perform the backup synchronous process, then carry out the backup for the transaction volume that you need to backup. For details on commands, refer to the following: - Starting backup synchronous process: swststartsync
46 - Checking the status of backup synchronous process: swstsyncstat - Executing backup: swstbackup - Checking backup status: swstbackstat Note - The swstbackup command causes an error if it is executed before the transaction and backup volumes have entered equivalency maintain state. - The device map cannot be specified while backup is processing. - When the "Chapter 4 Backup Operation Using Suspend/Resume Function" is used for synchronous high-speed backup, the operations listed below cannot be performed from the Web Console. Enter the appropriate command for operation. - If one transaction volume has multiple synchronous processing (ie, EC sessions), specify the backup volume and cancel only the specified EC session (swstcancelsync command) Restoring Data This section describes how to restore a volume or other data that has been backed up Restoring Entire Volume All of the data from a volume that has been saved with the snapshot high-speed backup can be restored using either Web Console or swstrestore command. To check the restore status, use the swstreststat command. Note - If restoring for a general file system, stop operations. - Notes about the restoration of a volume group are available in this chapter at "Restoration processing of Volume Group". - Changing the restoration target volume to a volume other than the backup source transaction volume requires a different procedure. For more information, refer to "9.1.4 Notes on Restoration" Restoring Individual File Restore an individual file as shown below. Note that you cannot restore an individual file from the Web Console. 1. Mount the backup volume. A special procedure is necessary to place the backup volume in the mount. When the backup volume is placed in the mount, reference should be made to the normal restoration procedure. For this procedure, refer to "9.1.4 Notes on Restoration". Check the backup volume using the Web Console or swsthistdisp command. 2. Copy the individual files to be restored by using the cp command. 3. Unmount the backup volume Managing Backup History Backup history information can be displayed to check information such as the backup volume names and backup date of backup data under generation management in a specific transaction volume. Point - Backup history information is only used to manage information stored on a backup volume
47 - Any backup history information exceeding the number of preservation generations defined in a backup policy will automatically be deleted Displaying Backup History Backup history can be displayed using either Web Console or swsthistdisp command Deleting Backup History Backup history can be deleted using either Web Console or swsthistdel command. 3.6 Changing Setting Information It will be necessary to change the configuration of AdvancedCopy Manager if changes are made to the configuration of a Managed Server or a device associated with a Managed Server used in the backup. This section describes how to perform these changes Adding Device After a device is added to any Managed Server, incorporate it into the backup as described below. This process can be carried out using either the Web Console or commands. For information on adding a device using commands, refer to the following steps: 1. Execute the stgxfwcmsetdev command in the ETERNUS SF AdvancedCopy Manager Operation Guide for the OS of the Management Server to acquire information for the newly added device, and accept management information. 2. Execute the swstdevinfoset command to set up the operation type of the added device. 3. If the added device was defined as a transaction volume, execute the swstbkpolset command to set up the backup policy. Note System resources such as disk and memory resources may be insufficient when a device is added. Re-estimate the system resource requirements before adding a device. Refer to "Required Resources for Operation" in "Operating Environment of AdvancedCopy Manager's Agent" in the ETERNUS SF Installation and Setup Guide for details Deleting Device This section describes how to delete different types of devices Deleting Transaction Volume This process can be carried out using either the Web Console or commands. For information on the operation method using commands, refer to the following steps. 1. Execute the swsthistdel command to delete the backup history. 2. Execute the swstbkpoldel command to delete the backup policy. 3. Execute the swstdevinfoset command to delete the device information for the deleted transaction volume. Point Ensure that all of the steps are complete before removing the transaction volume for deletion
48 Deleting Backup Volume This process can be carried out using either the Web Console or commands. For information on the operation method using commands, refer to the following steps: 1. If deleting the backup volume, ensure that you first execute the swstbkpoldisp command to check for a previously defined backup policy. Note When a backup policy is deleted, it may result in a previously defined backup policy for an existing transaction volume no longer being valid (for example, if the number of backup volumes is less than the number of preservation generations defined in the policy). As a result, those backup operations may not be able to continue. If there is no space in the backup volume, first register an alternative backup volume to replace the volume to be deleted, and then delete the target backup volume. 2. Execute the swsthistdel command to delete the backup history, removing the relevant volume from the backup history. If there is no backup history, proceed to the next step. 3. Execute the swstdevinfoset command to delete the device information for the deleted backup volume. Point Ensure that all of the steps are complete before removing the backup volume for deletion Adding Managed Server The process of adding a Managed Server to the backup operation is carried out using Web Console. The required steps for adding a Managed Server are described below. 1. Register a Managed Server. For more information, refer to "3.4.3 Registering Managed Server". 2. Fetch all the information on the devices connected to the newly added Managed Server. For more information on this, refer to "3.4.4 Fetching Device Information on Managed Server". 3. Set the environment information for the Managed Server. For more information on this, refer to "3.4.5 Configuring Environment for Backup Operation Server". 4. Set the operation type for the device for which information has been fetched in step 2. For more information on this, refer to "3.4.6 Setting Operation Type for Device". 5. Configure a backup policy for all the transaction volumes registered in step 4. For more information on this, refer to "3.4.7 Setting Backup Policy". Note System resources such as disk and memory resources may be insufficient when a Managed Server is added. Re-estimate the system resource requirements before adding a Managed Server. Refer to "Required Resources for Operation" in "Operating Environment of ETERNUS SF Manager" in the ETERNUS SF Installation and Setup Guide for details Deleting Managed Server The process of deleting a Managed Server can be carried out using either Web Console or stgxfwcmdelsrv command. Point Ensure that all of the steps are complete before removing the Managed Server that is to be deleted
49 The required steps for deleting a Managed Server are described below. 1. Delete the backup history of all transaction volumes on the Managed Server to be deleted. For more information, refer to " Deleting Backup History". 2. Delete the backup policy of all transaction volumes on the Managed Server to be deleted. The process of deleting a backup policy can be carried out using either Web Console or swstbkpoldel command. 3. Delete the volume type that was registered using "3.4.6 Setting Operation Type for Device" for the device connected to the Managed Server. 4. Delete the Managed Server. 5. If you have deleted the Managed Server with the stgxfwcmdelsrv command, take the following actions to reflect to the Web Console depending on how the agent installed in the deleted Managed Server is used: - If both of AdvancedCopy Manager's agent and Storage Cruiser's agent are used: On the Web Console, execute [Reload Conf.] to update to the latest information. - If only AdvancedCopy Manager's agent is used: On the Web Console, delete the Managed Server that you have deleted. 3.7 Stopping Operation To stop a backup operation, stop the daemons running on the Managed Server. Normally, they are automatically stopped when the system stops. You can stop a specific daemon if you need to do so for some reason. For more information, refer to "Chapter 2 Starting and Stopping Daemons". Note - When all daemons on the Managed Server have stopped, all functions of AdvancedCopy Manager running on the Managed Server will stop. - Stop daemons on a Management Server only after ensuring that all the Managed Servers that it manages have also been stopped. 3.8 LVM Volume Operation The backup operation of LVM volumes can be classified into the following two modes, depending on the volume group configuration: - Backup operation units of volume groups - Backup operation in units of physical disks (LU: Logical Unit) Note Before starting this operation, you need to understand the basic operation of ordinary volumes Backup Operation in Volume Group Units Provided that all volume group configurations satisfy the following conditions, backup operation can be performed in units of volume groups: - One volume group has only one physical disk, and logical volumes are configured so that one physical disk includes n logical volumes. If the above conditions are not satisfied, backup operation must be performed in units of physical disks

50 Figure 3.13 Example of Configuration in Which Backup Operation Can Be Performed in Volume Group Units Operation Design Take note of the following conditions regarding volume groups when configuring volume groups for use as transaction volumes or backup volumes: - All physical disks must be the same size. - The configurations of all logical volumes must be the same

51 Figure 3.14 Transaction Volume and Backup Volume Preparations Configuring Transaction Volume and Backup Volume When configuring the transaction volume and backup volume, specify their volume groups. Example: # /opt/fjsvswsts/bin/swstdevinfoset -t /dev/vg01 swstdevinfoset completed # /opt/fjsvswsts/bin/swstdevinfoset -b /dev/vg02 swstdevinfoset completed # Customizing Pre-processing and Post-processing Scripts If a volume group is to be backed up, the pre-processing and post-processing scripts must be customized accordingly. Refer to "Appendix A Pre-processing and Post-processing of Backup and Restoration" for information on the customization procedure. Note If backup is attempted without customization of the scripts, pre-processing results in an error and backup cannot be performed Backup in Units of Volume Groups When a transaction volume is part of a volume group, copy processing covers the entire physical disk corresponding to the volume group. Therefore, if the volume group contains multiple logical volumes, data on all the logical volumes is backed up
52 Example of Snapshot Backup # /opt/fjsvswsts/bin/swstbackup /dev/vg01 /dev/vg01 swstbackup completed # Example of Synchronous Backup # /opt/fjsvswsts/bin/swststartsync /dev/vg01 /dev/vg01 swststartsync completed : (After state of equivalency upkeep) : # /opt/fjsvswsts/bin/swstbackup /dev/vg01 /dev/vg01 swstbackup completed # Note When using a volume group for backup operation, you should take note of the following: - Configure the same logical disk as the transaction volume in a volume group separate from the transaction volume, and configure a volume group with the same physical disk size as the backup volume. To perform the backup by associating transaction volumes with backup volumes, create an association file called "Device Map File" that defines the relationship between the transaction volume and the backup volume. For details, refer to "3.4.9 Preparing Device Map File". The device map specification is required when performing backup in units of volume groups. - During backup processing, the LVM configuration information for the backup volume is overwritten by the LVM information from the transaction volume. Therefore, it is critical that the original LVM configuration information for the backup volume must be restored by backup post-processing. For details, refer to "Appendix A Pre-processing and Post-processing of Backup and Restoration". - A file system may be configured on a logical volume. In this case, modify both the backup pre-processing and post-processing scripts, and execute the backup using an account with Administrator authority, so that all the logical volumes in the volume group are unmounted or mounted respectively. For details, refer to "Appendix A Pre-processing and Post-processing of Backup and Restoration". - When the backup volume is a volume group, do not deactivate the backup volume with the varyoffvg command during synchronous processing (that is, while running the EC functions). If the backup volume is deactivated during synchronous processing, not only can the backup volume not be activated again, but the functions for stopping synchronous processing (eg, the backup command and the synchronous processing cancel command) are also disabled. If the backup volume is deactivated in error, forcibly stop synchronous processing by using functions like ETERNUS Web GUI, and then reactivate the backup volume Restoration in Units of Volume Groups When a transaction volume is part of a volume group, copy processing covers the entire physical disk corresponding to the volume group. Therefore, if the volume group contains multiple logical volumes, data on all the logical volumes is restored. Example of Restoration # /opt/fjsvswsts/bin/swstrestore /dev/vg01 /dev/vg01 swstrestore completed # Note When using a volume group for restoration, note the following:

53 - A file system may be configured on a logical volume. In this case, modify the backup pre-processing and post-processing scripts, and execute the backup using an account with Administrator authority, so that all logical volumes are unmounted and mounted, respectively. - For details, refer to "Appendix A Pre-processing and Post-processing of Backup and Restoration" Backup Operation in Units of Physical Disks When the volume group configuration does not satisfy the conditions of operation in units of volume groups, backup can be performed by operation in units of physical disks. When backup is performed in units of physical disks, volume group integrity must be maintained. Therefore, all the physical disks in the volume group must be operated synchronously. Point Physical volumes that should be operated synchronously can be checked by using the Web Console or stgxfwcmdispdev command. Figure 3.15 Sample Configuration for Operation in Units of Physical Disks Operational Configuration In order to use a replica volume after replication if the original volume is a volume group, the replica volume must have the same logical volume configuration as the original volume, and must be a volume group of the same physical size

54 Figure 3.16 Transaction Volume and Backup Volume Preparations Configuring Transaction Volume and Backup Volume When configuring the transaction volume and backup volume, specify all of the disks in the volume group. Example: # /opt/fjsvswsts/bin/swstdevinfoset -t /dev/hdisk10 swstdevinfoset completed # /opt/fjsvswsts/bin/swstdevinfoset -t /dev/hdisk11 swstdevinfoset completed # /opt/fjsvswsts/bin/swstdevinfoset -b /dev/hdisk20 swstdevinfoset completed # /opt/fjsvswsts/bin/swstdevinfoset -b /dev/hdisk21 swstdevinfoset completed # Example Device Map File In the case of a backup of an LVM volume, a device map file must be created. This is because a backup volume with the same volume structure as the transaction volume must be specified. Example of Device Map File # Transaction volume Backup volume /dev/hdisk10 /dev/hdisk20 /dev/hdisk11 /dev/hdisk
55 For details on the device map file, refer to "3.4.9 Preparing Device Map File" Backup in Units of Physical Disks Perform the operation by synchronizing all physical disks in the volume group. Perform the required pre-processing or post-processing work for each volume group before and after (respectively) the backup. Disable pre-processing and post-processing when operating individual physical disks. Example of Snapshot Backup (Perform pre-processing for the transaction and backup volumes.) # /opt/fjsvswsts/bin/swstbackup /dev/hdisk10 -Xdevmap /acm/devmap.txt /dev/hdisk10 swstbackup completed # /opt/fjsvswsts/bin/swstbackup /dev/hdisk11 -Xdevmap /acm/devmap.txt /dev/hdisk11 swstbackup completed # (Perform post-processing for the transaction and backup volumes.) Example of Synchronous Backup (Perform pre-processing for the backup volume.) # /opt/fjsvswsts/bin/swststartsync /dev/hdisk10 -Xdevmap /acm/devmap.txt /dev/hdisk10 swststartsync completed # /opt/fjsvswsts/bin/swststartsync /dev/hdisk11 -Xdevmap /acm/devmap.txt /dev/hdisk11 swststartsync completed # (After state of equivalency upkeep) (Perform pre-processing for the transaction volume.) # /opt/fjsvswsts/bin/swstbackup /dev/hdisk10 /dev/hdisk10 swstbackup completed # /opt/fjsvswsts/bin/swstbackup /dev/hdisk11 /dev/hdisk11 swstbackup completed # (Perform post-processing for the transaction and backup volumes.) The table below summarizes the pre-processing and post-processing work to be performed before and after backup. Table 3.4 Backup Pre-processing and Post-processing Pre-processing Post-processing Transaction volume Backup volume 1. Ensure data integrity by preventing access to all logical volumes in the volume group. 2. If file systems are included, unmount all file systems in the volume group. 1. Prevent access to all logical volumes in the volume group. 2. If file systems are included, unmount all file systems in the volume group. 3. Deactivate the volume group. If file systems are included, remount the volumes that were unmounted by pre-processing. Post-processing is not required. Deactivate Volume Group Deactivate the volume group as follows:
56 # /usr/sbin/varyoffvg vg02 # Restoration in Units of Physical Disks Perform this operation by synchronizing all physical disks in the volume group. Perform the required pre-processing or post-processing work for each volume group before and after the restoration respectively. Disable pre-processing and post-processing when using individual physical disks. Example of Restoration (Perform pre-processing for the transaction and backup volumes.) # /opt/fjsvswsts/bin/swstrestore /dev/hdisk10 /dev/hdisk10 swstrestore completed # /opt/fjsvswsts/bin/swstrestore /dev/hdisk11 /dev/hdisk11 swstrestore completed # (Perform post-processing for the transaction and backup volumes.) The table below summarizes the pre-processing and post-processing work to be performed before and after restoration. Table 3.5 Restoration Processing Pre-processing Post-processing Backup volume Restoration destination volume Ensure data integrity by preventing access to all logical volumes in the volume group. 1. Prevent access to all logical volumes in the volume group. 2. If file systems are included, unmount all file systems in the volume group. 3. Deactivate the volume group. Post-processing is not required. 1. Activate the volume group. 2. If file systems are included, remount the volumes that were unmounted during preprocessing. Deactivate Volume Group Deactivate the volume group as follows: # /usr/sbin/varyoffvg vg01 # Activate Volume Group Activate the volume group as follows: # /usr/sbin/varyonvg vg01 # 3.9 VxVM Volume Operation This section describes the backup operation for volumes under VERITAS Volume Manager (VxVM) Backup Operation in Units of Physical Disks If a VxVM volume is the backup target, execute backup in the physical disk units that comprise the VxVM volume. When backup operation is performed in units of physical disks, disk group integrity must be maintained and, therefore, all the physical disks in the disk group must be processed synchronously
57 Point For the physical volume which should be synchronized, confirm it by using either Web Console or stgxfwcmdispdev command. Note - Before starting this operation, be sure to understand the basic operation of ordinary volumes. - Snapshot backup is recommended for backing up in units of physical disks. In the case of synchronized backup, commands that access the destination volume, such as VxVM commands cannot be used during full copy or differential copy Operational Configuration Configure disk groups that are to be used as transaction volumes or backup volumes. Observe the following conditions when configuring the disk groups: - The number, sizes, and types of VM disks must be the same. - The configurations of logical volumes must be the same. Figure 3.17 Transaction Volume and Backup Volume
58 Preparations Confirming Disk Group Configuration Information File The disk group must be reconfigured in backup post-processing. Confirm that a volume group configuration information file has been saved in the following format. /etc/vx/cbr/bk/<disk group name>.<disk group ID> Setting Transaction Volume and Backup Volume When configuring the transaction and backup volumes, all disks in the volume group must be specified. Example: # /opt/fjsvswsts/bin/swstdevinfoset -t /dev/vx/dmp/hdisk10 swstdevinfoset completed # /opt/fjsvswsts/bin/swstdevinfoset -t /dev/vx/dmp/hdisk11 swstdevinfoset completed # /opt/fjsvswsts/bin/swstdevinfoset -b /dev/vx/dmp/hdisk20 swstdevinfoset completed # /opt/fjsvswsts/bin/swstdevinfoset -b /dev/vx/dmp/hdisk21 swstdevinfoset completed # Preparing Device Map File For the backup operation of a VxVM volume, a device map file must be created because a backup volume in the same volume structure as the transaction volume must be specified. Example of Device Map File # Transaction volume Backup volume /dev/vx/dmp/hdisk10 /dev/vx/dmp/hdisk20 /dev/vx/dmp/hdisk11 /dev/vx/dmp/hdisk21 For details on the device map file, refer to "3.4.9 Preparing Device Map File" Backup Before performing backup operation, all physical disks in the disk group must be synchronized. Perform the required pre-processing and/or post-processing work for each volume group. Disable pre-processing and post-processing when operating individual physical disks. Example of Snapshot Backup (Perform pre-processing for the transaction and backup volumes.) # /opt/fjsvswsts/bin/swstbackup /dev/vx/dmp/hdisk10 -Xdevmap /acm/devmap.txt /dev/vx/dmp/hdisk10 swstbackup completed # /opt/fjsvswsts/bin/swstbackup /dev/vx/dmp/hdisk11 -Xdevmap /acm/devmap.txt /dev/vx/dmp/hdisk11 swstbackup completed # (Perform post-processing for the transaction and backup volumes.) Example of Synchronous Backup (Perform pre-processing for the backup volumes.) # /opt/fjsvswsts/bin/swststartsync /dev/vx/dmp/hdisk10 -Xdevmap /acm/devmap.txt /dev/vx/dmp/hdisk10 swststartsync completed # /opt/fjsvswsts/bin/swststartsync /dev/vx/dmp/hdisk11 -Xdevmap /acm/devmap.txt /dev/vx/dmp/hdisk11 swststartsync completed
59 # (After state of equivalency upkeep) (Perform preprocessing for the transaction volumes.) # /opt/fjsvswsts/bin/swstbackup /dev/vx/dmp/hdisk10 /dev/vx/dmp/hdisk10 swstbackup completed # /opt/fjsvswsts/bin/swstbackup /dev/vx/dmp/hdisk11 /dev/vx/dmp/hdisk11 swstbackup completed # (Perform post-processing for the transaction and backup volumes.) The table below summarizes the pre-processing and post-processing work to be performed before and after backup. Table 3.6 Pre-processing and Post-processing for Backup Volume Type Pre-processing Post-processing Transaction volume Backup volume 1. Secure data integrity by stopping access to all logical volumes in the disk group. 2. If file systems are included, unmount all file systems in the disk group. 3. Import the disk group, when the disk group is not imported. 1. Stop access to all logical volumes in the disk group. 2. If file systems are included, unmount all file systems in the disk group. 3. Deport the disk group. 4. Set the physical disks in the disk groups to offline. If file systems are included, mount the volumes that were unmounted during preprocessing. 1. Online the physical disks that were set to offline during preprocessing. 2. Reconfigure the disk group. 3. If file systems are included, remount the volumes that were unmounted during preprocessing. Reconfiguring Disk Group Reconfigure the disk group as follows: 1. Pre-commit analysis for restoration # /etc/vx/bin/vxconfigrestore -p dstdg Diskgroup dstdg configuration restoration started... Installing volume manager disk header for hdisk20... Installing volume manager disk header for hdisk dstdg's diskgroup configuration is restored (in precommit state). Diskgroup can be accessed in read only and can be examined using vxprint in this state. Run: vxconfigrestore -c dstdg ==> to commit the restoration. vxconfigrestore -d dstdg ==> to abort the restoration. # 2. Commit the change required for restoring the configuration of the copy destination disk group. # /etc/vx/bin/vxconfigrestore -c dstdg Committing configuration restoration for diskgroup dstdg
60 dstdg's diskgroup configuration restoration is committed. # Note - When performing a system disk exchange, there are cases when conflicting backup configuration information may exist. In such cases, the disk group ID needs to be reset after executing the above command. - After this operation, where the volumes within a disk group are required to be run in synchronous mode in background, synchronous processing may take some time depending on the volume configuration. It is also possible to use the volumes during this time Restoration All physical disks in the disk group must first be synchronized to perform this operation. Perform the required pre-processing or post-processing work for each disk group as necessary. Disable pre-processing and postprocessing when using individual physical disks. Example of Restoration (Perform pre-processing for the transaction and backup volumes.) # /opt/fjsvswsts/bin/swstrestore /dev/vx/dmp/hdisk10 /dev/vx/dmp/hdisk10 swstrestore completed # /opt/fjsvswsts/bin/swstrestore /dev/vx/dmp/hdisk11 /dev/vx/dmp/hdisk11 swstrestore completed # (Perform post-processing for the transaction and backup volumes.) The table below summarizes the pre-processing and post-processing work to be performed before and after restoration. Table 3.7 Pre-processing and Post-processing for Restoration Volume Type Pre-processing Post-processing Backup volume Restoration destination volume 1. Secure data integrity by stopping access to all logical volumes in the disk group. 2. Import the disk group, when the disk group is not imported. 1. Stop access to all logical volumes in the disk group. 2. If file systems are included, unmount all file systems in the disk group. 3. Deport the disk group. 4. Set the physical disks in the disk groups to offline. Post-processing is not required. 1. Online the physical disks that were set to offline during preprocessing.. 2. Reconfigure the disk group. 3. If file systems are included, remount the volumes that were unmounted by preprocessing. Reconfiguring Disk Group Reconfigure the disk group as follows: 1. Restoration pre-commit analysis # /etc/vx/bin/vxconfigrestore -p srcdg Diskgroup srcdg configuration restoration started... Installing volume manager disk header for hdisk10... Installing volume manager disk header for hdisk
61 - srcdg's diskgroup configuration is restored (in precommit state). Diskgroup can be accessed in read only and can be examined using vxprint in this state. Run: vxconfigrestore -c srcdg ==> to commit the restoration. vxconfigrestore -d srcdg ==> to abort the restoration. # 2. Commit the change required for restoring the configuration of the copy destination disk group. # /etc/vx/bin/vxconfigrestore -c srcdg Committing configuration restoration for diskgroup srcdg... srcdg's diskgroup configuration restoration is committed. # Note - When performing a system disk exchange, there are cases when conflicting backup configuration information may exist. In such cases, the disk group ID needs to be reset after executing the above command. - After this operation, where the volumes within a disk group are required to be run in synchronous mode in background, synchronous processing it may take some time depending on the volume configuration. It is also possible to use the volumes during this time
62 Chapter 4 Backup Operation Using Suspend/Resume Function This chapter provides details of the backup operation using the Suspend/Resume function. 4.1 Overview The Suspend/Resume function sets Suspend/Resume for the equivalency maintenance status using EC. Using this function for differential copying from the Suspend state enables higher-speed synchronous backup. AdvancedCopy Manager provides two backup functions: snapshot high-speed backup and synchronous high-speed backup. In snapshot high-speed backup, OPC is used to create a backup. In synchronous high-speed backup, EC is used to create a backup. The Suspend/Resume function can be thought of as a kind of synchronous high-speed backup that uses EC. With ordinary synchronous high-speed backup, the synchronous processing start command starts copying using the EC function, then keeps the equivalency after the copying is completed. The backup execution start command is then executed. This cancels EC and creates a backup. In synchronous high-speed backup using the Suspend/Resume function, when the backup execution start command is executed (with -suspend specified), EC is suspended, the backup process is completed, and the EC session status is saved. The next time that the synchronous processing start command is executed, EC resumes and only data that has been updated since the suspend state was last set is copied. As a result of this, the preparation time of the backup is shortened. A comparison between ordinary synchronous high-speed backup and synchronous high-speed backup using the Suspend/Resume function is shown below

63 Figure 4.1 Comparison Between Ordinary Synchronous High-speed Backup and Synchronous High-speed Backup Using Suspend/Resume Function 4.2 Backup Operation Design Notes about synchronous high-speed backup using the Suspend/Resume function and backup operation design are provided below, as well as information related to backup management operation design (refer to "3.2 Operation Design"). Transaction Volume Register the backup source device, used for storing transaction data, as the transaction volume
64 Backup Volume Register the backup destination device in which transaction volume data is saved as the backup volume. When the backup command with -suspend option specified is executed, the EC session between the transaction volume and backup volume is maintained in a Suspended state. In this Suspend state, the backup volume cannot be used as the backup destination of another transaction volume. Point In the backup process that uses the Suspend/Resume function, each transaction volume requires as many backup volumes as the saved generation number Flow of Operations The flow of backup operations using the Suspend/Resume function is shown below. Figure 4.2 Flow of Backup Operations Using Suspend/Resume Function
65 4.4 Preparations This section describes how to prepare the backup operation that uses the Suspend/Resume function Activating Daemons Before the backup operation is started, the daemons of AdvancedCopy Manager must be started on both the Management Server and the Managed Servers. Normally, these daemons are automatically started up when the system is started. If the startup fails the system for some reason or if a daemon has been stopped, you will need to start the daemon on each server. For information on starting a daemon, refer to "Chapter 2 Starting and Stopping Daemons" Starting Web Console Start the Web Console. For details, refer to "How to Start Web Console" in the ETERNUS SF Web Console Guide Registering Managed Server The Management Server registers the Managed Server that is to be managed. This process is carried out using Web Console. Note Perform this task after confirming that it is possible to communicate from the Managed Server to the IP address of the Management Server. Check the Management Server IP address with the stgxfwcmdispsrv command Fetching Device Information on Managed Server This process can be carried out using either Web Console or stgxfwcmsetdev command. Note - Device information on a Managed Server must first be stored in the repository. - The time taken to add new devices is in proportion to the total number of devices defined in the selected Managed Server. For this reason, if a large number of devices have been defined, execute the process only when the CPU load on the system is low. As a guide, each operation takes about 0.5 seconds per device (ie, partition) with no load. - No information will be obtained for a volume group is inactive when the operation is executed. When a backup is in progress a volume group which is registered as a backup volume will become inactive, so it would not be detected by this operation. Do not issue an instruction to delete a volume in use Configuring Environment for Backup Operation Server Set the configuration information on the Managed Server processing the backup operations. This process can be carried out using either the Web Console or swstsvrset command. In addition, once it is set, you can display the Managed Server configuration information by executing the swstsvrdisp command Setting Operation Type for Device Register a transaction volume as the backup source and a backup volume to be used as the backup destination. This process can be carried out using either the Web Console or swstdevinfoset command. In addition, to display the registered volume information, execute the swstdevdisp command
66 Note - A suspended transaction volume cannot be changed to be used for a different purpose. - A suspended backup volume cannot be changed to be used for a different purpose. Point When the device information of a suspended backup volume is displayed, "Backup (used)" is displayed in the Device-Mode column Setting Backup Policy Before a backup policy is set, you need to register as many usable backup volumes as are required to perform the operation in accordance with the specified backup policy. This process can be carried out using either the Web Console or following commands. - Backup Policy Setup: swstbkpolset - Check Backup Policy that has been set up: swstbkpoldisp - Backup Policy Deletion: swstbkpoldel Customizing Pre-processing and Post-processing In AdvancedCopy Manager, backup or restore processing must be performed while transaction volumes are unmounted. Therefore, when backup or restore is executed, mount and unmount processing of the transaction volume is done using the pre-processing and post-processing scripts. AIX AdvancedCopy Manager implements the transaction volume unmount/mount operation by customizing pre-processing and postprocessing scripts. If a pre-processing script terminates with an error during execution of backup/restoration, backup/restore processing is not performed. Pre-processing and Post-processing scripts for Backup need to be customized in the following conditions. - The backup target is a volume group - To add special pre-processing and post-processing to the corresponding scripts. For information about the customization method, refer to "Appendix A Pre-processing and Post-processing of Backup and Restoration" for more information. Point When AdvancedCopy Manager Is Upgraded Where there has been an upgrade to existing versions of AdvancedCopy Manager or its components, any scripts used with AdvancedCopy Manager or its components should be reviewed and customized accordingly after upgrading rather than continuing to reuse scripts from previous versions Preparing Device Map File In its backup operations, AdvancedCopy Manager automatically selects, from a group of devices registered as backup volumes, a device that has the same capacity as the transaction volume. It then uses the selected device as the backup destination. If there is a suspended backup volume at the time of backup destination selection and the start of the synchronous processing, its corresponding device is selected first, and is used as the backup destination. To conveniently monitor backup destination devices, create a device map file that maps transaction volumes to backup volumes in advance. Specifying this file at the start of the synchronous processing or during the backup process enables operation with the backup destination specified

67 Point To manage multiple generations of backups, multiple device map files must be prepared. 4.5 Backup Operations For synchronous high-speed backup using the Suspend/Resume function, execute the swstbackup command after the synchronous processing has started and the equivalency maintenance status has been set. Then suspend the synchronous processing. When history information is deleted because the number of generations has been exceeded or when the swsthistdel command is executed, the backup volume becomes the Suspend state without any history information. If new synchronous processing starts at this time, then the suspended backup volume without history information is selected first, and differential copying starts. Only data that has been updated since the Suspend state was last set is copied, therefore the equivalency maintenance status can be reached quickly. Note that synchronous high-speed backup using the Suspend/Resume function can also be operated from Web Console. The flow of synchronous high-speed backup operations using the Suspend/Resume function is shown below. Figure 4.3 Synchronous High-speed Backup Operations Using Suspend/Resume Function
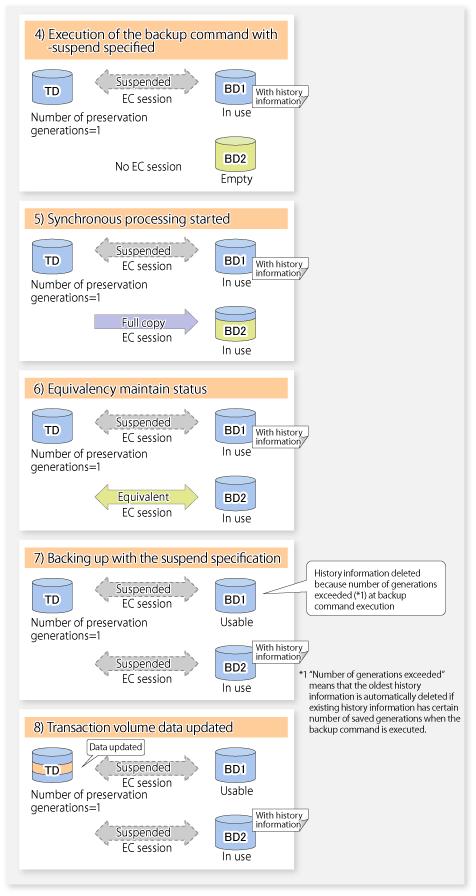
68 - 49 -
.")
69 4.5.1 Starting Synchronous Processing For synchronous high-speed backup, execute the swststartsync command to start the synchronous processing. If there is a suspended backup volume at the start of the synchronous processing, then the following devices are selected first, and EC resumes (i.e., the Resume function causes differential copying to start). - The backup volume from which history information is deleted because the number of generations has been exceeded; or - The suspended backup volume without history information. If there is no suspended backup volume at the start of the synchronous processing, EC (i.e. a full copy) starts. The process of backup volume selection at the start of the synchronous processing is shown below

70 Figure 4.4 Backup Volume Selection at Start of Synchronous Processing Note If synchronous processing is started with a device map specified, other transaction volumes and suspended backup volumes cannot be used as the backup destination. To check which transaction volumes are suspended along with their associated backup volumes, execute the swstsyncstat command Backing Up For synchronous high-speed backup using the Suspend/Resume function, start synchronous processing. Then, when the copy status of both the transaction volume and backup volume attain equivalency maintenance status, execute the swstbackup command with the suspend specification (using -suspend option). In synchronous high-speed backup, executing the backup command without the suspend specification releases the EC session. Executing it with the suspend specification suspends the EC session instead of releasing it. Ordinary backup operations and backup operations with the suspend specification are shown below

71 Figure 4.5 Ordinary Backup Operations and Backup Operations with Suspend Specification Displaying Synchronous Processing Execution Status To check the status of synchronous high-speed backup that uses the Suspend/Resume function, execute the swstsyncstat command. If one transaction volume has multiple EC sessions, then this command displays the status of all EC sessions. The statuses displayed for synchronous processing are explained below. - executing : Synchronous processing (i.e., copying) is in progress - equivalent : Equivalency maintain status - suspend : Suspended processing The command displays the synchronous processing execution status as shown below:
, execute the swstcancelsync command.")
72 Figure 4.6 Ordinary Backup Operations and Backup Operations with Suspend Specification Cancelling Synchronous Processing To cancel synchronous processing (during an EC session), execute the swstcancelsync command. The statuses of the different types of synchronous processing cancelled are explained below. - executing : Synchronous processing (i.e., copying) is in progress - equivalent : Equivalency maintain status - suspend : Suspended processing After the backup command with -suspend option specified is executed, the Suspend state is maintained even if history information is deleted. A suspended EC session cannot be released unless the synchronous processing is cancelled. If the synchronous processing is cancelled with no options specified, the EC session in the synchronous processing status or in the equivalency maintenance status is cancelled. If one transaction volume has multiple synchronous processing in progress (i.e., running multiple EC sessions), then only the EC sessions mapped to specific backup volumes can be cancelled. All of the synchronous processing of the transaction volume can be cancelled by specifying the synchronous processing. Note The backup volume and all synchronous processing cannot both be specified simultaneously
 that does not have any history information sets the backup volume to the unused")
73 Point - Cancelling the suspended synchronous processing that has history information does not delete the history information. - Cancelling synchronous processing (during copying, in the equivalency maintenance status, or in the Suspend state) that does not have any history information sets the backup volume to the unused state. - Cancelling synchronous processing (in the Suspend state) that has history information leaves the backup volume in the used state. A range of operational states when synchronous processing is cancelled are shown below: Figure 4.7 Operational States in Synchronous Processing Caused by Cancellation History Management Backup history information can be referenced using the swsthistdisp command. Backup history information can be deleted using the swsthistdel command
\" is displayed in the Device-Mode column by the swstdevdisp command.")
74 Point - Even when the history information created during backup operations with the suspend specification is deleted, an associated EC session is not released. - Deleting history information during ordinary synchronous high-speed backup releases the backup volume, and "Backup(free)" is displayed in the Device-Mode column by the swstdevdisp command. - Deleting history information during backup operations with the suspend specification does NOT release the backup volume after the information is deleted, and "Backup(used)" is displayed in the Device-Mode column by the swstdevdisp command. The process of deleting ordinary backup history information and backup history information with the suspend specification is shown below. Figure 4.8 Deleting Ordinary Backup History Information and Backup History Information with Suspend Specification Restoring Before restoration, the swstcancelsync command must be executed to release all EC sessions that are set on the transaction volume. To check EC sessions set on the transaction volume, execute the swstsyncstat command. To restore data from a backup volume, execute the swstrestore command. To cancel restoration or to delete management information associated with restoration that ended abnormally, execute the swstcancelrest command. Note - Restoration is not possible if the transaction volume has a backup volume being copied by EC, a backup volume under the equivalency maintenance status, or a suspended backup volume. - A suspended backup volume cannot be used as the restore destination volume
75 Chapter 5 Backup Operation Using QuickOPC Function This chapter provides details of the backup operation using the QuickOPC function. 5.1 Overview For a snapshot high-speed backup using OPC, the entire transaction volume must be copied to the backup volume every time the backup is started. However, as long as the same transaction volume and backup volume are being used, the entire transaction volume need not be physically copied every time OPC is run. Instead, physically copying only the data that has been modified since the start of the previous backup can create a complete snapshot image. This can greatly reduce the time taken for physical copying. The QuickOPC function achieves this by copying only the data that has been changed from the point of the previous physical copy. The snapshot high-speed backup using the QuickOPC function is referred to as the differential snapshot high-speed backup. The conventional snapshot high-speed backup and the differential snapshot high-speed backup are compared below: Point When the QuickOPC function is used, the hardware records the changes that are made to the copy source and destination after completing the OPC logical copy. The state in which the hardware keeps a record of changes is called "tracking state"

76 Figure 5.1 Comparison Between Conventional Snapshot High-speed Backup and Differential Snapshot High-speed Backup 5.2 Configuring Backup Operation Configure the differential snapshot high-speed backup using the QuickOPC function using information provided in the section relating to "3.2 Operation Design" for backup management with consideration to the following notes: Note Consider the following when making decisions on the backup policy configuration and backup volume preparation: - In a backup operation using the QuickOPC function, an OPC session remains active even after the physical copy has been completed. Operators should specify the number of preservation generations so that the maximum number of OPC sessions that can be defined for the same logical unit cannot be exceeded

77 - Operators must prepare a backup volume in the same box as the transaction volume to be backed up. 5.3 Operation Flow The flow of operation using the QuickOPC function is shown below. Figure 5.2 Flow of Backup Operations Using QuickOPC Function 5.4 Preparation This section provides details of the preparation for a backup using the QuickOPC function Activating Daemons Before the backup operation is started, the daemons of AdvancedCopy Manager must be started on both the Management Server and the Managed Servers. Normally, these daemons are automatically started up when the system is started. If the startup fails the system for some reason or if a daemon has been stopped, you will need to start the daemon on each server
78 For information on starting a daemon, refer to "Chapter 2 Starting and Stopping Daemons" Starting Web Console Start the Web Console. For details, refer to "How to Start Web Console" in the ETERNUS SF Web Console Guide Registering Managed Server The Management Server registers the Managed Server that is to be managed. This process is carried out using Web Console. Note Perform this task after confirming that it is possible to communicate from the Managed Server to the IP address of the Management Server. Check the Management Server IP address with the stgxfwcmdispsrv command Fetching Device Information on Managed Server This process can be carried out using either Web Console or stgxfwcmsetdev command. Note - Device information on a Managed Server must first be stored in the repository. - The time taken to add new devices is in proportion to the total number of devices defined in the selected Managed Server. For this reason, if a large number of devices have been defined, execute the process only when the CPU load on the system is low. As a guide, each operation takes about 0.5 seconds per device (ie, partition) with no load. - No information will be obtained for a volume group is inactive when the operation is executed. When a backup is in progress a volume group which is registered as a backup volume will become inactive, so it would not be detected by this operation. Do not issue an instruction to delete a volume in use Configuring Environment for Backup Operation Server Set the configuration information of the Managed Server processing the backup operations. This process can be carried out using either the Web Console or swstsvrset command. In addition, once it is set, you can display the Managed Server configuration information by executing the swstsvrdisp command Setting Operation Type for Device Register a transaction volume as the backup source and a backup volume to be used as the backup destination. This process can be carried out using either the Web Console or swstdevinfoset command. In addition, to display the registered volume information, execute the swstdevdisp command. The transaction volume in the tracking state can be checked with the swsttrkstat command. Note - The settings of the transaction volume in the tracking state cannot be changed. - The settings of the backup volume in the tracking state cannot be changed
79 Point The both -b and -u options can be specified in the swstdevdisp command to check for backup volumes, where relevant histories have been deleted, in the suspend or tracking state Setting Backup Policy Before a backup policy is set, you need to register as many usable backup volumes as are required to perform the operation in accordance with the specified backup policy. This process can be carried out using either the Web Console or following commands. - Backup Policy Setup: swstbkpolset - Check Backup Policy that has been set up: swstbkpoldisp - Backup Policy Deletion: swstbkpoldel Customizing Pre-processing and Post-processing In AdvancedCopy Manager, backup or restore processing must be performed while transaction volumes are unmounted. Therefore, when backup or restore is executed, mount and unmount processing of the transaction volume is done using the pre-processing and post-processing scripts. AIX AdvancedCopy Manager implements the transaction volume unmount/mount operation by customizing pre-processing and postprocessing scripts. If a pre-processing script terminates with an error during execution of backup/restoration, backup/restore processing is not performed. Pre-processing and Post-processing scripts for Backup need to be customized in the following conditions. - The backup target is a volume group - To add special pre-processing and post-processing to the corresponding scripts. For information about the customization method, refer to "Appendix A Pre-processing and Post-processing of Backup and Restoration" for more information. Point When AdvancedCopy Manager Is Upgraded Where there has been an upgrade to existing versions of AdvancedCopy Manager or its components, any scripts used with AdvancedCopy Manager or its components should be reviewed and customized accordingly after upgrading rather than continuing to reuse scripts from previous versions Preparing Device Map File In the backup, AdvancedCopy Manager automatically selects a device which has the same capacity as the target transaction volume as a backup volume from a group of registered devices. If a backup volume in the tracking state exists when AdvancedCopy Manager looks for a backup volume for the snapshot high-speed backup, it selects the backup volume in the tracking state in preference to any other and uses it as the backup destination. When it is necessary to recognize a specific backup destination device for any reason a "device map file" that defines the relationship between a transaction volume and backup volume must be created in advance. By specifying the "device map file" when starting the backup, the backup can always be performed because the backup destination has already been specified. Point If multiple generations are to be managed, multiple device map files must be prepared

80 5.5 Operation Invoking Backup Invoke the differential snapshot high-speed backup by specifying the -T option in the swstbackup command. When the QuickOPC starts, the physical copy and tracking processing begins. When the physical copy is complete, only tracking processing is active. When this backup command is executed by specifying the -T option, only new data or data which has changed from the point in time that OPC was started previously is actually copied. Note that differential snapshot high-speed backup can also be operated from Web Console. The figure below shows the conventional snapshot high-speed backup and the differential snapshot high-speed backup. Figure 5.3 Conventional Snapshot High-speed Backup and Differential Snapshot High-speed Backup After history information is deleted in a differential snapshot high-speed backup, the backup volume is put into the tracking state without history information. If a new differential snapshot high-speed backup is started under that condition, the backup volume in the tracking state without history information is selected to start the differential data copy. The physical copy can thus be completed in a short period because only the difference in data from where OPC was started previously is copied. The figure below shows a flow of a differential snapshot high-speed backup in which only one generation is preserved

81 Figure 5.4 Flow of Differential Snapshot High-speed Backup Operation History Management Backup history information can be referenced using the swsthistdisp command. Backup history information can be deleted using the swsthistdel command. Even if the history information created by the differential snapshot high-speed backup is deleted, the tracking state is not released (that is, the physical copy, if it is still being executed, is not yet completed or stopped). In the conventional snapshot high-speed backup, after the history information is deleted, the backup volume is released and "Backup (free)" is displayed in the Device-Mode column by the swstdevdisp command. In the differential snapshot high-speed backup,


82 however, the backup volume is not released even after the history information is deleted and "Backup (used)" is displayed in the Device-Mode column by the swstdevdisp command. To check for backup volumes in the tracking state, specify the -u option in the device use status display command. For a backup volume in the tracking state, "Backup (used-t)" is displayed in the Device-Mode column. The figure below shows a comparison of history deletion between the conventional snapshot high-speed backup and the differential snapshot high-speed backup. Figure 5.5 Comparison of History Deletion Between Snapshot High-speed Backup and Differential Snapshot High-speed Backup Restoration The section explains how to use the swstrestore command for restoration. In a differential snapshot high-speed backup, tracking processing from the transaction volume to the backup volume is performed. Figure 5.6 Tracking of Differential Snapshot High-speed Backup Operations When restoration is executed, normal OPC from the backup volume to the transaction volume is started while the tracking state from the transaction volume to the backup volume is maintained


83 Because OPC for restoration physically copies only the data that has been updated after the backup, the time taken for the physical copy can be reduced for the restoration, as well as for the backup. Figure 5.7 Restoration from Backup Volume to Transaction Volume While tracking processing is performed between the transaction volume and backup volume, restoration to other volumes cannot be performed. If restoration to other volumes is required, the following operational steps must be performed in advance: 1. If the OPC physical copy from the transaction volume to the backup volume is in progress, wait for the completion of the copy. 2. Stop tracking processing using the swstcanceltrk command. Figure 5.8 Restoration to Another Volume Note If tracking processing is terminated, all data in the transaction volume is physically copied by the next differential snapshot highspeed backup Cancelling Restoration Execute the swstcancelrest command to cancel the restoration
84 Point Cancelling the restoration does not release tracking from the transaction volume to the backup volume Displaying Execution Status of Tracking Processing The execution status of tracking processing by the QuickOPC function can be checked with the swsttrkstat command. Information on an OPC session that is not in a tracking state is excluded from the display. For an OPC session in tracking, the amount of data that has been updated after execution of the QuickOPC (ie, the logical copy) is displayed as a percentage in the Update column Stopping Tracking Processing Execute the swstcanceltrk command to stop tracking processing. Point If the command is issued while the physical copy and tracking are in progress, the tracking is stopped but the physical copy is not stopped
85 Chapter 6 Replication This chapter provides details of AdvancedCopy Manager replication in an AIX system. The AIX version of AdvancedCopy Manager's agent enables the replication described in this chapter by linking with AdvancedCopy Manager's manager running under the Windows, Solaris or Linux operating systems. In this chapter, the unit for backup and restoration in an AIX system is a physical disk (LU: Logical Unit), but the unit for management and operation is a volume group. 6.1 Overview Using the Advanced Copy function of ETERNUS Disk storage system, the replication function performs high-speed replication between volumes, regardless of the volume capacities. Snapshot replication is the term used for the replication function that uses the OPC function of ETERNUS Disk storage system. Synchronized Replication is where either the EC or REC functions are used. The replication function creates copies so that the information at a certain point in time can be used for different purposes. It can be used either independently of or in combination with the backup function Snapshot Replication Processing Snapshot replication copies from a source volume to a destination volume using the function of ETERNUS Disk storage system. The ordinary snapshot replication using OPC performs the following two types of processing: 1. When a copy is created, the snapshot processing (OPC) from the source volume to the replica volume is executed with the swsrpmake command. The swsrpmake command dismounts or mounts the original volume. This process determines the scope of original data (for details, refer to "Appendix C Pre-processing and Post-processing of Replication"). Refer to steps (1). and (2). in the figure below. 2. If the user wants to recreate a replica, only the swsrpmake command is required. If the previous snapshot processing is in progress, it is stopped and a new snapshot process is started

86 Figure 6.1 Ordinary Snapshot Replication Processing Snapshot replication is completed when the replication creation command is issued. During snapshot processing performed internally by the ETERNUS Disk storage system, if there is an attempt to access an area where copying is not yet complete at the replication destination, priority is given to copying the accessed area and, after it is copied, access is permitted ((a) in the figure). If there is an attempt to update the replication source data, the pre-update data at the replication source is first copied to the replication destination, and then the replication source data is updated ((b) in the figure). These operations make it seem that creation of the replica is completed almost instantly Types of Snapshot Replication The following types of snapshot replication are available, depending on the used Advanced Copy functions: - Ordinary Snapshot Replication - QuickOPC Type Replication - SnapOPC Type Replication - SnapOPC+ Type Replication Ordinary Snapshot Replication Ordinary snapshot replication copies all the data at a certain point in time (logical copy) to the copy destination disk area


87 Figure 6.2 Ordinary Snapshot Replication Point The copy destination disk must be the same size or larger than the copy source disk. The copying time is the time taken to copy all the data. QuickOPC Type Replication The initial replication copies all the data at a certain point in time (logical copy) to the copy destination disk area. Subsequent replications copy only the data that has been updated since the previous replication. This enables large reductions in the time taken for physical copying. Figure 6.3 QuickOPC Replication

 to be copied to the destination disk.")
88 Point - The copy destination disk must be the same size or larger than the copy source disk. The copying time for subsequent replications is the time taken to copy the differential data. - Hardware using the QuickOPC function records the updates made to the copy source or destination after the completion of OPC logical copying. The status in which the hardware records and displays updates is referred to as "tracking status". SnapOPC Type Replication SnapOPC is a function that enables only data that has been updated in the copy source disk after a certain point in time (a logical copy) to be copied to the destination disk. Figure 6.4 SnapOPC Replication Point The copy destination disk can be smaller than the copy source disk. The copy time is the time needed to copy data that has been updated. Information The SnapOPC copy destination disk is called "Snap Data Volume"


89 Figure 6.5 SnapOPC Mechanism In some ways, SnapOPC is superior to conventional OPC, since copy times are shorter and copy destination volumes can have a smaller capacity. However, there are problems in terms of access performance and the reliability of copy data, as explained in the following: Access Performance Since the data copy from the source to the destination occurs inside SnapOPC, the access performance of the copy source is sometimes reduced, as well as the access performance of the copy destination. Reliability of Copy Data Copy data is made up of two parts: the "copy source" and "updated part of the copy source". Therefore, a hardware fault with the copy source can cause copy data to be lost. Additionally, performing a restoration is equivalent to losing the "copy source" data, and so even if there are multiple "updated parts of the copy source", these become invalid from the point when the restoration is performed

90 These points suggest that SnapOPC should be used in temporary areas for tape backups, for systems where access performance is not an important consideration. SnapOPC+ Type Replication When data is changed, the SnapOPC+ function copies only the original data of the changed data set, and saves it in snap generation units. The following figure shows the processing flow of the SnapOPC+ function. Figure 6.6 SnapOPC+ Function Flow 1. Logical copy is performed from the copy source to the copy destination. 2. After the logical copy, a SnapOPC+ session is set between the copy source and the copy destination. 3. After the SnapOPC+ session is set, only the original data of the changed data at the copy source is copied to the copy destination (copy-on-write processing). 4. When the next copy destination volume is created, the copy-on-write processing is stopped. 5. Then, a SnapOPC+ session is set between the copy source volume and the new copy destination volume, and copy-on-write processing is performed. 6. Each time a copy destination volume is created, a snap generation number is assigned to that volume. (Snap generation numbers are assigned in sequence from 1, starting with the oldest.) Since SnapOPC+ copy-on-write processing is performed only between the copy source volume and the latest copy destination volume, there is no effect on access performance to the copy source volume even when the number of copy destination volumes increases. In addition, space at the copy destination volume is required only for the amount of original data (for data updated immediately prior) and for hardware management. Thus, use of SnapOPC+ enables the saved data area to be kept to the minimum area required. Snapshot replication that uses SnapOPC+ is called "SnapOPC+ replication". Point It is recommended to set the Snap Data Pool using the ETERNUS Web GUI when using SnapOPC+. For details, refer to " Snap Data Volume and Snap Data Pool"
 and multiple snap generations (N). Figure 6.")
91 The following figure shows use of SnapOPC+ to perform 1:N replication operations between a copy source volume (1) and multiple snap generations (N). Figure 6.7 1:3 Replication Operations Using SnapOPC
92 Due to the mechanism and features of SnapOPC+, it is assumed that it will be used as a backup to enable recovery from minor errors, such as operator mistakes and software errors. In order to be prepared for hardware errors, Fujitsu recommends that SnapOPC+ be used in conjunction with the copying of all data by means of OPC/QuickOPC/EC/REC. The following table lists the functional differences between SnapOPC and SnapOPC+. Table 6.1 List of Function Differences Between SnapOPC and SnapOPC+ Function SnapOPC SnapOPC+ Copy method Copy-on-write method Copy-on-write method Copy time (logical copy duration) Instant Instant Copy destination volume type Snap Data Volume Snap Data Volume 1:N operation Available Available (recommended): Snap generation numbers No Yes Access performance to the copy source volume is better than with SnapOPC. Also, compared with SnapOPC, less physical space is required at the copy destination volume. Restoration using the replication function Yes Yes (*1) Usefulness - Tape backup temporary area - Backup of file servers or similar that have a small amount of updates - Tape backup temporary area - Backup of file servers or similar that have a small amount of updates *1: Only available when using ETERNUS Disk storage system that supports restoration using replication Snap Data Volume and Snap Data Pool Snap Data Volume The Snap OPC/SnapOPC+ copy destination volume is called "Snap Data Volume". Regarding this copy destination volume (Snap Data Volume), the capacity that can be seen in the host is called "logical capacity", and the capacity that has been physically configured is called "physical capacity". The setting for logical capacity is equal to or greater than for the copy source capacity. Physical capacity has control information (a conversion table) for managing backup data, as well as capacity for the storage of backup data. The capacity for this control information is 0.1% that of logical capacity. Note When there is insufficient Snap Data Volume capacity, it is not possible to access source volume (Snap Data Volume). When there is insufficient capacity, refer to " Troubleshooting When Lack of Free Space Has Occurred in Snap Data Volume or Snap Data Pool". Snap Data Pool In ETERNUS Disk storage system, it is possible to set a Snap Data Pool, which is part of the Snap Data Volume group functionality. When there is insufficient Snap Data Volume capacity and a Snap Data Pool is set, some area is added from the Snap Data Pool automatically

93 Note When there is insufficient Snap Data Pool capacity, it is not possible to access the copy destination (Snap Data Volume). When there is insufficient capacity, refer to " Troubleshooting When Lack of Free Space Has Occurred in Snap Data Volume or Snap Data Pool". Figure 6.8 Image of Snap Data Volume Extension Synchronized Replication Processing Replicas are created by copying from the source volume to the replica volume using the EC or REC function of ETERNUS Disk storage system. Synchronized replication uses two methods to create a copy: full copying and incremental copying. In the case of full copying, all of the source volume is completely copied. In the case of incremental copying, only the data that has been updated since the last replication is copied. - Creating replicas with full copying Use this method to create the first copy in a replication. - Creating copies with incremental copying Use this method to create copies in the future once a previous replica exists. Copies are created by reflecting the data that has been updated after an initial copy has been made (full copying and incremental copying). The procedure for synchronized replication incorporates the following steps: 1. Full copying starts when synchronized processing that has been invoked using the swsrpstartsync command starts copying from the source volume to the replica volume. Refer to step (1) in the figure below. 2. The overall copy by synchronous processing is completed,, updates in the source volume are subsequently reflected in the replica volume, so that data equivalence is always maintained (equivalency maintain state). Refer to the states in steps (2) and (3) in the figure below. Note that, this state is not a state that guarantees the equivalence of the replication source volume and the replication destination volume. 3. Synchronized processing is temporarily stopped with the swsrpmake command to create a copy of the source volume. The swsrpmake command dismounts or mounts the original volume. This processing determines the scope of original data (for details of this, refer to "Appendix C Pre-processing and Post-processing of Replication". After execution of the replication creation command, the replica volume can be accessed (copy established status). Refer to the states in steps (3) and (4) in the figure below. 4. To create another copy, the synchronized processing that has been temporarily stopped is restarted with the swsrpstartsync command. In the case of this copy, the only data copied to the replica volume is the data on the source volume that has been updated since the previous copy was made. Refer to step (4) in the figure below
 and (6) in the figure below. 6.")
94 When the replica volume has been updated after the previous copy is made, the contents of the update of the replica volume are cleared. 5. When the incremental data has been copied, the status returns to the equivalency maintenance state. Refer to the states in steps (5) and (6) in the figure below. 6. When this status has been set, the copy is re-created with the swsrpmake command. Refer to step (6) in the figure below. Figure 6.9 Synchronized Replication Processing Note - When using the EC or REC function in synchronized replication, ETERNUS Disk storage system must support the EC or REC function. - The swsrpmake command cannot be executed unless both the source volume and replica volume are in the equivalency maintain state

95 6.2 Configuration This section explains the operation of replication. Configure replication using the following procedure: Determining Server That Performs Replication Determining Replication Target Refer to "6.2.3 Notes on Configuration of SnapOPC/SnapOPC+ Replication", when SnapOPC/SnapOPC+ snapshot replication is used Determining Server That Performs Replication Determine the server that performs replication. The following servers are used to perform replication: Management Server Multiple Managed Servers are unified and operated centrally. The Management Server can also be used as a Managed Server. However, a Management Server requires AdvancedCopy Manager to run under the Windows, Solaris or Linux operating systems. Managed Server AdvancedCopy Manager operations are performed. AdvancedCopy Manager can run under the AIX OS in this case. Figure 6.10 Configuration of Servers That Perform Replication Note - The following requirements apply when an inter-box replication is performed using the REC function of ETERNUS Disk storage system: - The REC function must be supported in both ETERNUS Disk storage systems. - Both ETERNUS Disk storage systems must already be connected to each other using an FC Remote Adapter (FCRA). This is a connection that uses an FCRA, in which data flows only from the Initiator side to the Target side. For bi-directional copying, at least two FCRA connections are required
96 6.2.2 Determining Replication Target Determine the source and replica volumes to be used in the replication. Point - The source volume is the volume on which the data to be copied is stored. - The replica volume is the volume on which a copy of the data is stored. Determine the following attributes to be assigned to source and replica volumes: - Copy direction Determine the direction of copying. Specify one of the following directions: Bi-directional Data can be copied in either direction between source volume and replica volume. Uni-directional Data can only be copied from the source volume to the replica volume. During this operation, copying from the replica to the original volume is disabled. - Operational servers (used only for server-to-server replication) In the case of server-to-server replication, you can specify whether to allow replication to be performed on either the source server or destination server, or on both servers. Original Server Sets the Managed Server with the source volume that was connected as the operational server. Replica Server Sets the Managed Server with the replica volume that was connected as the operational server. Both Servers Sets both the source and destination servers as operational servers. It is possible to create a group by arranging multiple source volumes and destination volumes. In addition, the operation for multiple source volumes and destination volumes can be performed in a group. For details, refer to "6.4.7 Creating Groups"

97 Figure 6.11 Servers Used in Performing Replication In this manual, a Managed Server used to perform replication is called the operational server. An original server or replica server is specified as the operational server. An operational server can perform all of the replication functions. In contrast, any other type of server can use only the information display function and operational release function. Note - Replication is not supported for the system disk or the disk where AdvancedCopy Manager is installed. - In order to set up a volume as a source volume, there are some points which should be taken into consideration. For details, refer to "9.1.1 General Notes", for notes on determining a replication target Backup and Replication Exclusions Notes on Replication Volume There are points to be careful of for the different combinations of source volume and replica volume that can be used for replication. Disk Size of Source Volume and Replica Volume When the size of the physical disk (or one which constitutes a logical disk when this has been specified) of a source volume differs from that of a replica volume, ensure that the replica volume is at least as large as the source volume, otherwise some data will be lost in the replication. Using Volume Group for Source Volume or Replica Volume When the source volume is a volume group, then when using the replica volume after replication, the replica volume needs to be a volume group of the same logical volume configuration as the source volume, and with the same physical disk size. In addition, when the configuration of the volume group cannot be supported by AdvancedCopy Manager, it cannot be registered with a replication management function. For details about logical disk configurations which cannot be supported, refer to "1.4 Managing Device on AdvancedCopy Manager"

98 Figure 6.12 Source Volume and Replica Volume for Multiple Logical Disks Notes on Configuration of SnapOPC/SnapOPC+ Replication Notes on Session Configurations Only one session can be set up for each Snap Data Volume, which is the copy destination disk for SnapOPC/SnapOPC

99 Figure 6.13 If One Session Is Set for Snap Data Volume Accordingly, multiple sessions cannot be set up for a single Snap Data Volume, as shown in the following figure:

100 Figure 6.14 If Multiple Sessions Are Set for Snap Data Volume Creating Snap Data Volume and Snap Data Pool Create a Snap Data Volume and a Snap Data Pool by performing the following steps: 1. Estimating the physical capacity for the Snap Data Volume and the capacity for the Snap Data Pool. 2. Creating and initializing the Snap Data Volume. 3. Creating the Snap Data Pool. Estimating Physical Capacity for Snap Data Volume and Capacity for Snap Data Pool In order to estimate the physical capacity of the Snap Data Volume and the capacity of the Snap Data Pool, measure the updated amount of the replication source volume. How to measure the update amount of the replication source volume will differ depending on operation. - In the case of one-to-one replication operation (SnapOPC/SnapOPC+) Start a session in relation to the pair, and measure the update amount that is generated in relation to the replication source volume up until the session is stopped or a new session is started. - In the case of one-to-many replication operation (SnapOPC) Start a session in relation to all of the pairs, measure the update amount that is generated in relation to the replication source volume up until the session is stopped or a new session is started, and total all of the update amounts. - In the case of one-to-many replication operation (SnapOPC+) Start a session in relation to all of the pairs, measure the update amount that is generated in relation to the replication source volume up until SnapOPC+ is performed to the next generation, and total all of the update amounts. The amount of the updated on the copy source volume can be measured using the swstestupdate command. Make this measurement using the following procedure: 1. Start measuring the update amount by configuring a monitor session on the copy source volume. # /opt/fjsvswsts/bin/swstestupdate start /dev/hdisk10 /dev/hdisk10 swstestupdate completed # 2. Start transactions. Blocks that are updated by transactions will be recorded on the hardware
101 3. After the measurement period has elapsed, check the number of blocks that have been updated. # /opt/fjsvswsts/bin/swstestupdate status /dev/hdisk10 Volume-Name Update /dev/hdisk # 4. After the measurements are complete, cancel the monitor session. # /opt/fjsvswsts/bin/swstestupdate stop /dev/hdisk10 /dev/hdisk10 swstestupdate completed # The formula for estimating the capacity is as follows: - When using only the Snap Data Volume (when the Snap Data Pool is not configured): (Updated volume of replication source volume) * (safety coefficient) < (Physical capacity of the Snap Data Volume) - When using the Snap Data Pool (when the Snap Data Pool has been configured): (Updated volume of replication source volume) * (safety coefficient) < (Physical capacity of the Snap Data Volume + Capacity of the Snap Data Pool) Point If estimation in advance is difficult, it is advised that the sum of the capacity of the Snap Data Volume and the capacity of the Snap Data Pool is 30-50% of the total capacity of the copy source. As this is an advised value, it is necessary to change the capacity of the Snap Data Pool in accordance with the operation status. Creating and Initializing Snap Data Volume Create and initialize the Snap Data Volume using ETERNUS Web GUI. Point - Configure the logical capacity of the Snap Data Volume to be of the same capacity as the replication source disk. - In order to avoid wasteful consumption of the Snap Data Volume physical capacity, keep updates after starting a SnapOPC+/ SnapOPC copy session to a minimum by performing operations such as file system creation before starting the copy session. Creating Snap Data Pool Create the Snap Data Pool using ETERNUS Web GUI. Point According to the estimation formula, specify the capacity of the Snap Data Pool Snap Data Volume/Snap Data Pool Monitoring When there is insufficient Snap Data Volume or Snap Data Pool capacity, it is not possible to access copy destination volume (i.e. Snap Data Volume). This status makes it impossible to read copy destination data or write data to the copy destination. In SnapOPC +, it is not possible to write the copy destination or copy destination generations before it
: Specify \"stat\" subcommand in the swstsdv command, and regularly monitor whether there is insufficient Snap Data")
102 For this reason, monitoring must be performed so that the Snap Data Volume or the Snap Data Pool capacity is not insufficient at the time of operations. - When using only the Snap Data Volume (when the Snap Data Pool is not configured): Specify "stat" subcommand in the swstsdv command, and regularly monitor whether there is insufficient Snap Data Volume capacity. - When using the Snap Data Pool (when the Snap Data Pool has been configured): Specify "poolstat" subcommand in the swstsdv command, and regularly monitor whether there is insufficient Snap Data Pool capacity. If there is an area in the Snap Data Pool for which the usage rate exceeds 50%, regardless of encryption, consider increasing the Snap Data Pool. Additionally, increase the Snap Data Pool monitoring frequency. If there is an area in the Snap Data Pool for which the usage rate exceeds 70%, regardless of encryption, increase the Snap Data Pool immediately. When there is insufficient Snap Data Volume or Snap Data Pool capacity, refer to " Troubleshooting When Lack of Free Space Has Occurred in Snap Data Volume or Snap Data Pool". Creating Access Volume When there is insufficient Snap Data Volume or Snap Data Pool capacity, it is not possible to access copy destination volume (i.e. Snap Data Volume). In the following cases, it is not possible to access the Snap Data Volume copy destination volume either: - Access to the Snap Data Volume after the Snap Data Volume initialization - Access to the Snap Data Volume after the Disk management information initialization For this reason, it is recommended that you reserve a volume (Access volume) that is separate from the Snap Data Volume. The volume that is used as the Access volume is created on the same ETERNUS Disk storage system as the Snap Data Volume. Since this is not used in the storage of data, there is no problem even if there is little capacity. Any size can be used for the creation of the Access volume. The following operations can be executed using the Access volume: - Snap Data Volume Initialization - Snap Data Volume Status Display - Snap Data Pool Status Display

103 6.3 Flow of Operations The following figure shows the flow of the replication. Figure 6.15 Flow of Replication Operations 6.4 Preparations This section describes the preparations that are required before performing replication Starting Daemon Before replication is started, the AdvancedCopy Manager daemon must be started on the Management Server and Managed Server. Normally, the daemon is configured to be automatically invoked at system startup. However, if a daemon fails to start for some reason or has stopped, both servers must restart their respective daemons. For information about starting daemons, refer to "Chapter 2 Starting and Stopping Daemons" Starting Web Console Start the Web Console. For details, refer to "How to Start Web Console" in the ETERNUS SF Web Console Guide
104 6.4.3 Registering Managed Server The Management Server registers the Managed Server to be managed. This process can be executed using Web Console. Note Perform this task after confirming that it is possible to communicate from the Managed Server to the IP address of the Management Server. Check the Management Server IP address with the stgxfwcmdispsrv command Fetching Device Information on Managed Server This process can be executed using either the Web Console or stgxfwcmsetdev command. Note - Device information on the Managed Server must briefly be stored in the repository. - The time required for this operation depends on the total number of devices defined on the Managed Server. If the number of devices is large, perform this operation while the CPU load and I/O load are both low. As a guideline, each operation takes about 0.5 seconds per device (or partition) under no-load conditions. - For a device that is part of an LVM, a volume group and a logical device are fetched, but the physical device which constitutes a logical device is not. - No information will be obtained for a volume group is inactive when the operation is executed. When a backup is in progress a volume group which is registered as a backup volume will become inactive, so it would not be detected by this operation. Do not issue an instruction to delete a volume in use Configuring Source Volume and Replica Volume Execute the swsrpsetvol command to set the source volume and replica volume that will be used in the replication. The information on the registered source volume and replica volume can be checked with the swsrpvolinfo command. When specifying the volume of another Managed Server in server-to-server replication, specify the volume in the format "Volume- Name@Managed-Server-name" Customizing Pre-processing and Post-processing In AdvancedCopy Manager, replication processing must be performed while volumes are unmounted. Therefore, when replication is executed, processing to mount and unmount the volume is performed by the pre-processing and post-processing scripts respectively. AIX AdvancedCopy Manager implements the transaction volume unmount/mount operation using customized pre-processing and post-processing scripts. If a pre-processing script ends with an error during execution of backup/restoration, backup/restore processing is not performed. For details of the pre-processing and post-processing, refer to "Appendix C Pre-processing and Post-processing of Replication". When the operation corresponds to either of the following, it is necessary to customize the script used for replication pre-processing and post-processing when: - When replication target is a volume group. - If you want to add special pre-processing or post-processing. Refer to "Appendix C Pre-processing and Post-processing of Replication" for information on the customization
105 Note The pre-processing and post-processing are not performed in case of replicating a group. Unmount all the volumes in the group before replication, and mount all the volumes after replication. It is also necessary to deactivate a volume group (LVM) before it is used as a replication destination. It is then necessary to reconfigure the volume group after the copy is created. Refer to "The reconfiguration of the volume group" in "6.8.2 Replication in Units of Physical Disks" for information on the reconfiguration of a volume group. It is also necessary to configure a disk group before a VxVM volume is used as a replication destination. It is necessary to reconfigure the disk group after the copy is created. Refer to "6.8.2 Replication in Units of Physical Disks" or "Reconfiguring Disk Group (for Server-to-server Replication)" of "6.9 VxVM Volume Operation" for information on the usage and the reconfiguration of a disk group. Point When AdvancedCopy Manager Is Upgraded The script may need to be updated after an upgrade of AdvancedCopy Manager. Therefore, you should check the script after any upgrade to ensure it is compatible with newer versions Creating Groups Conditions for Replication Volumes That Make Up Group The replication volumes that make up the group (the source volume and the destination volume pairs) must meet the following conditions:

106 - The copy source servers and destination servers must have matching attributes such as size and device configuration

107 - The operational servers and the copy directions must all match. The values for the operational servers and the copy directions can be checked using the Op-Server and Copy columns displayed by executing the swsrpvolinfo command


108 - The replication volume information being registered must not be registered in any other group. - Source volumes and destination volumes must not be duplicated within the group
109 How to Create Groups Groups are created using the swsrpsetvol command. Information for created groups can be displayed using the swsrpvolinfo command. Example Two groups (called GRP1) consisting of a source volume and a replica volume are created. # /opt/fjsvswsrp/bin/swsrpsetvol -Xgroup GRP1 /dev/hdisk10@src /dev/ hdisk20@targ-1 swsrpsetvol completed # /opt/fjsvswsrp/bin/swsrpsetvol -Xgroup GRP1 /dev/hdisk11@src /dev/ hdisk21@targ-1 swsrpsetvol completed # /opt/fjsvswsrp/bin/swsrpvolinfo -L Server Original-Volume Size Replica-Volume Size Copy Op-Server Group SRC /dev/hdisk10@src 4.0 Gbyte /dev/hdisk20@targ Gbyte bi-direction both GRP1 SRC /dev/hdisk11@src 4.0 Gbyte /dev/hdisk21@targ Gbyte bi-direction both GRP1 # 6.5 Operations Before performing replication, refer to "6.4 Preparations" to set up the environment required for replication. This section describes the operation by command Executing Snapshot Replication Use the swsrpmake command to perform snapshot replication. Refer to "6.1.1 Snapshot Replication Processing" for an explanation of snapshot replication. The operation status of a physical copy can be checked by executing the swsrpstat command. QuickOPC Type Replication Execute QuickOPC replication by specifying the -T option in the swsrpmake command. If no OPC session exists when the swsrpmake command is executed, the command starts snapshot processing (OPC physical copying), and tracks processing from the source volume to the destination volume
 To check the execution status of physical copying, use the swsrpstat command in the same way as for an ordinary")

110 Figure 6.16 When Replication Creation Command Is Executed (1st Time) To check the execution status of physical copying, use the swsrpstat command in the same way as for an ordinary snapshot replication. After snapshot processing (OPC physical copy) is complete, only tracking processing is active. To check the tracking status, execute the swsrpstat command with the -L option. Figure 6.17 When Snapshot Processing Is Completed Entering the swsrpmake command with the -T option specified during tracking processing performs the physical copying of only the data that has been generated since the previous snapshot processing. This means that physical copying can be accomplished in a shorter period of time
 When you want to perform a restoration while tracking processing is being executed, you need to perform a restoration by OPC (to achieve")
111 Figure 6.18 When Replication Creation Command Is Executed (2nd Time) When you want to perform a restoration while tracking processing is being executed, you need to perform a restoration by OPC (to achieve this, you need to execute the swsrpmake command without the -T option). QuickOPC cannot be executed in the reverse direction while tracking processing is being executed. The replication using QuickOPC is done as follows: [backup] swsrpmake -T <original volume name> <replica volume name> [restore] swsrpmake <replica volume name> <original volume name> Although a restoration is executed with OPC, only the data that has been updated since the previous replication (it can be obtained from the Update column of swsrpstat) is copied. Therefore, in replication using QuickOPC, not only a physical backup but also restoration is completed in a short period of time. The restore execution status can be checked by executing the swsrpstat command with the -E option specified. SnapOPC Type Replication Execute SnapOPC type replications with the -C option specified in the swsrpmake command. When the swsrpmake command is executed, a SnapOPC session will be set up between the copy source volume and the copy destination volume. Example # /opt/fjsvswsrp/bin/swsrpmake -C /dev/hdisk10 /dev/hdisk20 FROM=/dev/hdisk10@SV1,TO=/dev/hdisk20@SV1 swsrpmake completed #


112 Figure 6.19 When Replication Creation Command Is Executed Unlike normal OPCs and QuickOPCs, SnapOPCs do not copy all of the data from the source volume, but instead copy only the data that has been updated on the source or destination since SnapOPC started. This kind of copy processing is referred to as "Copy-on-Write". Figure 6.20 When Copy Source Volume Is Updated
113 Figure 6.21 When Copy Destination Volume Is Updated Note: The units for host I/O and storage device copies are different (512 bytes for host I/O and 8 kilobytes for storage device copies), and therefore data copies also occur when the copy destination is updated. The status of SnapOPC sessions can be checked using the swsrpstat command. The following example shows the execution of the swsrpstat command immediately after a SnapOPC snapshot has started. While SnapOPC is being performed, "copy-on-write" is displayed in the Status column, and the amount of data updated since the last copy was created is displayed in the Update column as a percentage. Example # /opt/fjsvswsrp/bin/swsrpstat -L /dev/hdisk10 Server Original-Volume Replica-Volume Direction Status Execute Trk Update Rcv Split Xfer Snap-Gen SV1 /dev/hdisk10@sv1 /dev/hdisk20@sv1 regular copy-on-write ---- off 0% # If the swsrpmake command is executed again during SnapOPC processing, the SnapOPC session that has already been set up will be cancelled, and a new session will be set up. Note When there is insufficient Snap Data Volume or Snap Data Pool capacity, the SnapOPC+ execution status changes to error suspend status ("failed"), and replication volume cannot be used. The SnapOPC execution status can be checked in the swsrpstat command output result Status column. Example # /opt/fjsvswsrp/bin/swsrpstat -L /dev/hdisk10 Server Original-Volume Replica-Volume Direction Status Execute Trk Update Rcv Split Xfer Snap- Gen SV1 /dev/hdisk10@sv1 /dev/hdisk20@sv1 regular failed ---- off # When the SnapOPC execution status is error suspend status ("failed"), refer to " Troubleshooting When Lack of Free Space Has Occurred in Snap Data Volume or Snap Data Pool". Perform restorations from Snap Data Volume by running an OPC using the swsrpmake command. # /opt/fjsvswsrp/bin/swsrpmake /dev/hdisk10 /dev/hdisk20 FROM=/dev/hdisk10@SV1,TO=/dev/hdisk20@SV1 swsrpmake completed #


114 When restorations are executed, the SnapOPC session from the source volume to the destination volume is maintained as is, and a normal OPC from the replication destination volume to the replication source volume is started. At this point, the time taken to restore the physical copy is reduced, because only data that has been updated since the last copy is restored. Figure 6.22 When Restoration Is Executed The execution status of restorations can be checked by specifying the -E option with the swsrpstat command. # /opt/fjsvswsrp/bin/swsrpstat -E /dev/hdisk10 Server Original-Volume Replica-Volume Direction Status Execute SV1 /dev/hdisk10@sv1 /dev/hdisk20@sv1 reverse snap 80% # Note If a SnapOPC is being performed between the source volume and the destination volume, restorations to volumes other than the source volume cannot be executed. To restore to a volume other than the source volume, operating system copy functions (such as the cp command or the copy command) must be used


115 Figure 6.23 When Restoring to Volume Other Than Copy Source Volume Additionally, if SnapOPCs are being performed to multiple copy destination volumes, restoration cannot be performed. Figure 6.24 When SnapOPC Is Performed for Multiple Copy Destination Volumes In this case, restoration using an OPC can be performed by cancelling the other SnapOPCs. However, the backup data on the copy destination volumes whose SnapOPC sessions were cancelled will be lost. Figure 6.25 When SnapOPC Session Cancelled to Perform Restoration

116 To perform a restoration while still maintaining all SnapOPC sessions, operating system copy functions (such as the cp command or the copy command) must be used for the restoration. However, if restoration is performed using operating system functions, the amount of updated data on the source volume will increase, and there is a risk that the capacity of the SnapOPC volume will be insufficient. Figure 6.26 When Performing Restoration without Cancelling SnapOPC Session SnapOPC+ Type Replication Execute the swsrpmake command using the -P option to perform SnapOPC+ replication. This sets a SnapOPC+ session between the copy source volume and the copy destination volume. After the session is set, copy-on-write is performed between the copy source volume and the copy destination volume. An execution example of the swsrpmake command with the -P option is shown below. Execution Example # /opt/fjsvswsrp/bin/swsrpmake -P /dev/vg01@sv1 /dev/vg02@sv1 FROM=/dev/vg01@SV1,TO=/dev/vg02@SV1 swsrpmake completed # At this time, the (logically copied) copy destination volume is saved as a snap generation number. The next time this command is executed with a different copy destination volume for the same copy source volume, the copy-onwrite processing being executed between the copy source volume and the previous generation of the copy destination volume is stopped. Then, a SnapOPC+ session is set between the copy source volume and the newly specified copy destination volume, and copy-on-write is performed. An execution example of the swsrpmake command with the -P option for the newly specified copy destination volume is shown below. Execution Example # /opt/fjsvswsrp/bin/swsrpmake -P /dev/vg01@sv1 /dev/vg03@sv1 FROM=/dev/vg01@SV1,TO=/dev/vg03@SV1 swsrpmake completed # This time, the (logically copied) copy destination volume is saved as snap generation number 2. Similarly, each time there is a new copy destination volume, a snap generation number is assigned. Note If an earlier snap generation (other than the oldest snap generation) is specified as the copy destination volume when the swsrpmake command is executed, the command terminates with an error. If the oldest snap generation is specified as the copy destination volume, that snap generation is automatically discarded and a replica is created as the newest snap generation. In this case,

117 subsequent snap generations (second, third) are assigned a snap generation number that is one generation prior (second generation => first generation, and third generation => second generation). Figure 6.27 When Oldest Snap Generation Number Is Specified as Replication Volume The operation status of SnapOPC+ replication can be checked by executing the swsrpstat command with the -L option. For the most recent snap generation, "copy-on-write(active)" is displayed in the Status column. For past snap generations, "copy-onwrite(inactive)" is displayed. In the Update column, the amount of data that has finished being updated after replication creation, is displayed as a percentage. In the Snap-Gen column, the snap generation number is displayed. Execution Example # /opt/fjsvswsrp/bin/swsrpstat -L /dev/vg01 Server Original-Volume Replica-Volume Direction Status Execute Trk Update Rcv Split Xfer Snap-Gen SV1 /dev/vg01@sv1 /dev/vg02@sv1 regular copy-on-write(inactive) ---- off 0% SV1 /dev/vg01@sv1 /dev/vg03@sv1 regular copy-on-write(active) ---- off 5% # Note When there is insufficient Snap Data Volume or Snap Data Pool capacity, the SnapOPC+ execution status changes to error suspend status ("failed"), and the execution status of SnapOPC+ that was executed before it will also change to error suspend status ("failed"). Replication volume of error suspend status ("failed") cannot be used. The SnapOPC+ execution status can be checked in the swsrpstat command output result Status column. Execution Example # /opt/fjsvswsrp/bin/swsrpstat -L /dev/vg01 Server Original-Volume Replica-Volume Direction Status Execute Trk Update Rcv Split Xfer Snap-Gen SV1 /dev/vg01@sv1 /dev/vg02@sv1 regular failed ---- off SV1 /dev/vg01@sv1 /dev/vg03@sv1 regular failed ---- off #
118 When the SnapOPC+ execution status is error suspend status ("failed"), refer to " Troubleshooting When Lack of Free Space Has Occurred in Snap Data Volume or Snap Data Pool". To restore from a Snap Data Volume, execute the swsrpmake command to start OPC. # /opt/fjsvswsrp/bin/swsrpmake /dev/vg03@sv1 /dev/vg01@sv1 FROM=/dev/vg03@SV1,TO=/dev/vg01@SV1 swsrpmake completed # The SnapOPC+ session from the replication source volume to the replication destination volume is maintained even if the replication creation command is executed. Execution of restoration while maintaining the SnapOPC+ session reduces the physical copying time, because physical copying is performed only for data updated after the replica creation

119 Figure 6.28 Restoration with SnapOPC+ Session Maintained To check the restoration execution status, execute the swsrpstat command with the -E option. # /opt/fjsvswsrp/bin/swsrpstat -E /dev/vg01 Server Original-Volume Replica-Volume Direction Status Execute SV1 /dev/vg01@sv1 /dev/vg02@sv SV1 /dev/vg01@sv1 /dev/vg03@sv1 reverse snap 80%
120 Note Restoration may cause a Snap Data Pool to run low on free disk space, due to updates issued to the most recent snap data generation where the copy-on-write status is active. Make sure that there is enough free space in the Snap Data Pool usage area before performing restoration. The most recent snap generation is the data written to the replication source volume by the restoration, updated by the previously existing data. The update amount to the most recent snap generation generated by the restoration is the total of the Copy usage amount for the restoration target snap generation and subsequent snap generations except for the most recent snap generation. An example of how to calculate the update amount when restoring from snap generation (Snap-Gen) 2 is displayed below. Use the procedure below to check the update amount for restoration: 1. Execute the swsrpstat command to check the device name of the restoration target and subsequent snap generations, except for the most recent snap generation (Snap-Gen 4 data in the example below). # /opt/fjsvswsrp/bin/swsrpstat -L /dev/vg01 Server Original-Volume Replica-Volume Direction Status Execute Trk Update Rcv Split Xfer Snap-Gen SV1 /dev/vg01@sv1 /dev/vg02@sv1 regular copy-on-write(inactive) ---- off 8% SV1 /dev/vg01@sv1 /dev/vg03@sv1 regular copy-on-write(inactive) ---- off 12% SV1 /dev/vg01@sv1 /dev/vg04@sv1 regular copy-on-write(inactive) ---- off 0% SV1 /dev/vg01@sv1 /dev/vg05@sv1 regular copy-on-write(active) ---- off 3% In this example, /dev/vg03 and /dev/vg04 are targeted. 2. Execute the swstsdv command with the "stat" subcommand to find the total copy usage amount for the device in the previous step. If a Snap Data Pool is used, also add the Snap Data Pool usage capacity. [/dev/vg03 disk usage] # /opt/fjsvswsts/bin/swstsdv stat /dev/vg03 BoxID = 00E4000M3#####E450S20A####KD ## LUN = 110 (0x6E) Rate Logical(sector) Physical(sector) Used(sector) Copy(sector) Host(sector) Pool(sector) 100% # [/dev/vg04 disk usage] # /opt/fjsvswsts/bin/swstsdv stat /dev/vg04 BoxID = 00E4000M3#####E450S20A####KD ## LUN = 111 (0x6F) Rate Logical(sector) Physical(sector) Used(sector) Copy(sector) Host(sector) Pool(sector) 4% In this example, the quantity updated by the restoration is ( ) sectors. To check the Snap Data Pool total capacity and the usage area capacity, execute the swstsdv command with the "poolstat" subcommand. If the Snap Data Volume is not encrypted, then check the capacity of the usage area and the total capacity where Pool-Type is Normal. Otherwise, check the capacity of the usage area and the total capacity where Pool-Type is encrypted. # /opt/fjsvswsts/bin/swstsdv poolstat -G /dev/vg01 BoxID = 00E4000M3#####E450S20A####KD ## Pool-Type Rate Total(sector) Used(sector) Copy(sector) Host(sector) Free(sector)
121 Normal 10% Encrypted 0% # The disk usage in this example is 15% =~ ( ) / x 100 If the value obtained by adding the size of the Snap Data Pool usage area to the restoration update amount is less than the total capacity, then restoration is possible. However, in order to safely perform restoration, it is recommended to extend the Snap Data Pool if the disk usage after restoration is predicted to exceed 70%. In addition, if the disk usage is expected to exceed 50%, then consider extending the Snap Data Pool after restoration and increasing the monitoring frequency of the Snap Data Pool. For details on Snap Data Pool monitoring, refer to " Snap Data Volume/Snap Data Pool Monitoring". Note If SnapOPC+ is being performed between the replication source volume and the replication destination volume, restoration cannot be performed to a volume other than the replication source volume. Point As a precaution against hardware malfunctions with SnapOPC+, it is recommended to operate it in conjunction with making full copies using OPC/QuickOPC/EC(REC). An example of performing QuickOPC on Sundays and SnapOPC+ on Mondays to Saturdays is displayed below

122 Figure 6.29 Example of Operation Using SnapOPC+ and QuickOPC Concurrent OPC Functions Concurrent OPC function is one of ETERNUS Disk Storage system's function which creates snapshots of the multiple logical volumes simultaneously. This function allows backup the replication of the database consisting of multiple volumes in a consistent state. This function is available to use in one of these replications; OPC, QuickOPC, SnapOPC, or SnapOPC+. The following diagram shows the operation in ETERNUS Disk Storage system

123 Figure 6.30 Operations in ETERNUS Disk Storage System Note - If you force-quit the swsrpcancel command with task manager or Ctrl-C, the session may remain defined Concurrent OPC. In this case, execute the command again, or stop the session with the swsrpcancel command. - The maximum number of pairs that can simultaneously implement Concurrent OPC depends on the specifications of the ETERNUS Disk storage system Executing Synchronized Replication To perform synchronized replication, use the following procedure:
124 1. Start synchronized processing using the swsrpstartsync command. To cancel synchronized processing that has already started, execute the swsrpcancel command. 2. After making sure that equivalency maintenance state has been established with the swsrpstat command, temporarily stop synchronized processing with the swsrpmake command to create a replica of the source volume. 3. To copy the updated (ie, incremental) data, restart synchronized processing with the swsrpstartsync command Intra-box Synchronous Replication Intra-box synchronous replication creates a replication from a source volume to a destination volume by using the EC function of ETERNUS Disk storage system. The EC function operates in a mode in which a copy is made to a destination volume in synchronization through a write to a source volume (ie, in synchronous mode). It is also possible to reverse the copy direction from suspend status using the EC functionality Inter-box Synchronous Replication Inter-box synchronous replication creates a replication from a source volume to a destination volume by using the REC function of ETERNUS Disk storage system. The REC function provides three copy operation modes that can be selected for operation: - Transfer mode - Recovery mode - Split mode In addition, the REC function enables the copy direction to be reversed in suspended status. Transfer Mode The transfer mode provides the REC data transfer modes described below. Table 6.2 Transfer Mode Types Transfer Method Transfer Mode Explanation Synchronous transfer method Asynchronous transfer methods Synchronous Stack Consistency In this mode, responses to write requests from the server do not return as "complete" until data has been written to the copy source volume and copied to the destination volume. Synchronizing data copies with writes to the copy source guarantees the integrity of the data on both the copy source volume and the copy destination volume when the copy completes. This mode is suitable to RECs within sites with short delay times, because it has a large impact on the performance of write accesses from the server. This mode has only a small impact on the time taken to respond to the server because it only records the position of the block that has been updated before returning "complete" to the server. The data for this block is transferred using an independent transfer engine. Copies can be executed even when there is only limited bandwidth, but in this case the amount of data that has not been transferred may build up. This mode guarantees the sequence of transfers between copy sessions for the copy destination ETERNUS Disk storage system, and is suitable for operations, such as on databases, that perform mirroring using copies that consist of multiple areas. This mode uses part of cache memory for transfer buffers. Data is transferred to the copy destination by first "storing" a block of data to be copied in a transmission transfer buffer and then using a reception transfer buffer to "expand" the data that has been transferred

125 Transfer Method Transfer Mode Explanation Through This mode is for transferring data that has not been transferred when copies in Stack mode or Consistency mode are stopped or suspended. If any data is updated on a replication volume, copy processing to transfer untransferred data may be given priority, delaying the response to Write request. Therefore, it is not recommended to use this mode during normal operations. To perform a synchronous replication in Stack mode or Consistency mode, use the swsrpstartsync, swsrpmake and swsrpchsync commands. To check the execution status, use the swsrpstat command. The figures below show how synchronous replication is performed in Stack mode or Consistency mode. Figure 6.31 Flow of Synchronous Replication (for Stack Mode / Consistency Mode)


126 Point - When changing the transfer mode from the Consistency mode to the Through mode, implement the operations for changing the mode after confirming that the execution status is equivalency maintained status. There may be cases when the execution state does not enter the equivalency maintained status immediately after changing the mode. When the transfer mode has been changed, create a replication after confirming that the execution status is equivalency maintained status. - When changing the transfer mode from the Stack mode to the Through mode, implement the operations for changing the mode after confirming that the copy progress rate is 100%. Although the mode may be changed even when not in a state where the
127 copy progress rate is 100% (a state where data that has not yet been transferred is remaining), the period of the Through mode will be longer as the data that has not yet been transferred will be transferred after the transfer mode has been changed. Recovery Mode Recovery mode consists of two methods of restarting the copying after recovery is performed from an inter-box path error (e.g., halt status). Table 6.3 Recovery Mode Types Mode Description Automatic Recovery Manual Recovery In this mode, the REC session automatically switches from halt status to regular status, and copy processing resumes when the inter-box FCRA path is recovered. In this mode, the REC session remains in halt status and copy processing does not resume even if the inter-box FCRA path is recovered. Manually resume copying. This mode is used, for example, when operating a standby database. Split Mode Split mode includes two modes for performing a write operation to the source volume when REC is used for synchronous transfer mode, and for recovery from an inter-box path error (halt status). Table 6.4 Split Mode Types Mode Description Automatic Split This split mode forcibly executes successful write operations to source volumes even if the inter-box FCRA path is fully blocked and halt status occurs. This mode enables write operations to source volumes even if the inter-box FCRA path is fully blocked, thus this mode does not affect transactions. When the inter-box FCRA path is recovered, copy processing resumes according to the recovery mode configurations. Manual Split This split mode rejects write operations to source volumes (it returns an error) if the inter-box FCRA path is fully blocked and halt status occurs. This mode enables source volumes and destination volumes to be fully synchronized even if the FCRA path is fully blocked. When the inter-box FCRA path is recovered, copy processing resumes according to the recovery mode configurations. Copy Direction Reverser The copy direction reverser allows you to smoothly switch between different sites. The following figures show an example of how to switch the copy direction:
128 1. Assume that Site A is operating and REC is operating from Site A to Site B. Figure 6.32 When REC Performed from Site A to Site B 2. To switch the sites, execute the swsrpmake command to make a replication to Site B. Then, stop operating Site A. Figure 6.33 When Replication Creation Command Used to Create Replica at Site B 3. Execute the swsrprevsync command to reverse the copy direction. Figure 6.34 When Synchronization Reverse Command Is Executed
129 4. Bring Site B into operation. At this stage, synchronization is still suspended, thus any update to the volume at Site B is not reflected at Site A. Figure 6.35 When Operation Is Started at Site B (Synchronization Suspend State) 5. Start (resume) synchronization from Site B to Site A. Updates made to the volume in Site B while synchronization is suspended are reflected in Site A with differential copies. Figure 6.36 When Operation Is Started at Site B (Synchronization Resumed) Initial Copy Skip Function The initial copy skip function is used when the initial copy cannot be executed because of insufficient line capacity. The following example shows the initial copy being skipped via tape transfer

130 1. Suppose that operations at Site A have stopped. Figure 6.37 If Operations at Site A Have Stopped 2. Next, synchronous processing begins, using the initial copy skip function. At this point, a REC session is set up, and the status is Replication Established. Data is not copied to the copy destination volume. Figure 6.38 When Synchronization Is Started by Initial Copy Skip Function


131 3. Next, the data on the copy source volume is backed up to tape. Figure 6.39 When Copy Source Data Is Backed Up to Tape 4. The tape media is sent to Site B and jobs at Site A restart. Figure 6.40 When Site A Operations Restart 5. The data on the tape media is restored to the copy destination volume. At this point, the data on the copy destination volume is the same as the data on the copy source volume that existed before operations restarted. Figure 6.41 When Data Is Restored from Tape to Copy Destination
132 6. Synchronous processing restarts in Remain mode. Restarting synchronous processing in Remain mode means that only data that has been updated on the copy source volume is reflected on the copy destination volume. If Remain mode is not used, all data on the copy source volume is copied. Figure 6.42 When Synchronization Is Restarted in Remain Mode Concurrent Suspend Function The Concurrent Suspend function simultaneously suspends multiple EC/REC sessions for ETERNUS Disk storage system. By using this function, a copy with consistency can be easily taken. For example, this is useful for a database composed of multiple volumes. The behavior that takes places within the ETERNUS Disk storage system is shown below

133 Figure 6.43 Internal Operation of ETERNUS Disk Storage System Replication using the Concurrent Suspend function is performed by specifying the -Xconcur option for the swsrpmake command. Additionally, if Concurrent Suspend is performed using the Consistency transfer mode, it is no longer necessary to make temporary mode changes during multiple creation processes. (Refer to the figure below). Accordingly, the operating procedure used when Concurrent Suspend is executed in Consistency mode is the same as the procedure for Through mode and Synchronous mode


134 Figure 6.44 When Consistency Mode Used Note The maximum number of pairs that can simultaneously implement Concurrent Suspend depends on the specifications of the ETERNUS Disk storage system Changing Timeout Value for Concurrent Suspend Function A timeout may occur before suspend is completed if there is a large quantity of data, if the communication link is poor, or if the REC Disk buffer is used for inter-box synchronous replication (REC function) in Consistency mode. If the REC Disk buffer is used, refer to " Concurrent Suspend When REC Disk buffer Is Used". The following message is shown if it timeout. swsrp2709 Concurrent suspend failed. Session ID=[-], Reason=[timeout]
135 If this message is shown, change the value of timeout by creating a file which sets the timeout value. Create a file which sets the timeout value for the Concurrent Suspend function under the following name. The file must be created on the same server that contains the source volume. /etc/opt/fjsvswsrp/data/default/check.ini Table 6.5 File Format of check.ini Section Name Key Name Value [check] ConcurCheckTimeout Set the timeout value for the Concurrent Suspend function in units of seconds. Setting range: From 1 to sec. Example Setting the timeout value for the Concurrent Suspend function to 120 seconds. If you set a value beyond this range, the default value 60 sec will be applied. [check] ConcurCheckTimeout=120 If the setting file for the Concurrent Suspend function is not created, the default value (60 seconds) will be applied Concurrent Suspend When REC Disk buffer Is Used If the REC Disk buffer is used for inter-box synchronous replication (REC function) in Consistency mode, check that no transferred data exists in the REC Disk buffer before executing the Concurrent Suspend. If you execute the Concurrent Suspend when any data to be transferred exists in the REC Disk buffer, timeout may occur. You can check the data volume of the REC Disk buffer in the DiskRate column when you execute the swsrprecbuffstat command with specifying -L option Destination Access Permission Function The Destination Access Permission function serves to inhibit user access to replication target volumes when copying is in progress and any access would therefore be inappropriate. It starts synchronization (EC/REC) from the replication source volume to the replication target volume, and when full or differential copying is complete, they are maintained in a state of equivalency. In the state of maintained equivalency, any upgrades on the replication source volume are successively reflected on the replication target volume, so that any access to the replication target volume would possibly be inappropriate. The Destination Access Permission function can be used to inhibit access from users to the replication target in such unsuitable moments


136 To set the Destination Access Permission function, execute the swsrpstartsync command with the -Xda option. Until replication processing is stopped by the swsrpcancel command neither WRITE nor READ access to the replication target volume can be performed. For changing this setting, once the replication operation has been stopped by the swsrpcancel command, execute the swsrpstartsync command again. Whether access is inhibited can be checked by performing the swsrpstat command Backup and Restoration Using Replication Function Data can be restored from the replica volume to the original volume if a volume pair has been defined with bi-directional copying by using the swsrpsetvol command


137 Restoration can be executed according to the following procedures: 1. Execute the swsrpcancel command when the target volume for restoration has an EC session. 2. Execute the swsrpmake command. The specification of an original volume and the replica volume is reversed at the time that the replication is executed. For the backup operation that uses QuickOPC/SnapOPC/SnapOPC+, execute the swsrpmake command without specifying the -T, -C and -P option. Note It is not possible to perform restoration using replication if the ETERNUS Disk storage system does not support SnapOPC+ restoration. If restoration is required, copy the data from the copy destination volume manually. Figure 6.45 Manual Restoration with SnapOPC Execution of Synchronization Reversal Using the swsrprevsync command, the physical copy amount can be greatly reduced and the AdvancedCopy time shortened for restore when there is a small amount of differential data. Additionally, it is also possible to execute restore without cancelling other copy jobs in operations that match multiple copy jobs. Therefore, there is no need for overall copy after restore, so operations can be restarted with the load on ETERNUS Disk storage system kept to a minimum. Figure 6.46 Example of EC Reversal Operation 6.6 Changing Configuration Information When a Managed Server or device required for the replication operation has been changed, the information set in AdvancedCopy Manager must also be changed. This section explains how to change this information
138 6.6.1 Changing Source Volume or Replica Volume To change the attributes (e.g., copy direction, operation servers of server-to-server replication) of the source volume and the replica volume, delete the information with the swsrpdelvol command and then execute the swsrpsetvol command again Deleting Source Volume or Replica Volume To delete the source volume or the replica volume that have been configured, use the swsrpdelvol command Changing Device Information of Source or Replica Volume When changing the device information and configuration for a source/replica volume, the device configuration is changed after deletion processing of the source/replica volume, and the configuration of the volume is then performed. Be sure to perform the following steps before changing the size of a source/replica volume or a configuration. If this is not done, the deletion of the source/replica volume after device configuration change may not be possible. 1. Perform deletion process for the device change on the source/replica volume. For details of this, refer to "6.6.2 Deleting Source Volume or Replica Volume". 2. Change the device configuration. 3. Perform any additional steps that may be required in the processing of a device. For more information on this, refer to "6.4.4 Fetching Device Information on Managed Server". 4. Configure the source/replica volume with the new information. 6.7 Stopping Operation To stop replication processing that is in progress, or to change synchronized replication into snapshot replication, use the swsrpcancel command. Note To stop replication processing by SnapOPC+, start with the oldest snap generation. To forcibly stop the second or subsequent snap generations, use the -Xforce option with the swsrpcancel command. This will stop the specified snap generation and all earlier snap generations. If the -Xforce and -Xgroup options are specified at the same time, the SnapOPC+ sessions in the group are stopped, and all the snap generations and snap generations before it in the group are also stopped. To stop replication operation, stop the daemon on the Managed Server. In general, the daemon stops when the system stops. The daemon can be stopped independently if it needs to be stopped for some reason. For more information, refer to "Chapter 2 Starting and Stopping Daemons". Note When the daemon/service on the Managed Server has stopped, all functions of AdvancedCopy Manager running on the Managed Server will stop. Before stopping the Management Server daemon/service, make sure that operations on all Managed Servers under management have been stopped. 6.8 LVM Volume Operation The replication of LVM volumes can be classified into the following two modes, depending on the volume group configuration: - Replication in units of volume groups - Replication in units of physical disks (LU: Logical Unit)

139 Note Before starting this operation, you should understand the basic operation of ordinary volumes Replication in Units of Volume Groups Provided that all volume group configurations satisfy the following conditions, the replication can be performed in units of volume groups. - One volume group has only one physical disk, and logical volumes are configured so that one physical disk includes n logical volumes. If the above conditions are not satisfied, replication must be performed in units of physical disks. Figure 6.47 Example of Configuration in Which Replication Can Be Performed in Units of Volume Groups Operation Design Ensure that the following conditions are met when designing volume groups for use as source or replica volume groups: - All physical disks must have the same size. - The configurations of all logical volumes must be the same

140 Preparations Configuring Source Volume and Replica Volume When configuring the source volume and the replica volume, specify their volume groups. Example # /opt/fjsvswsrp/bin/swsrpsetvol /dev/vg01 /dev/vg02 swsrpsetvol completed # Customizing Pre-processing and Post-processing Scripts If a volume group is to be replicated, the pre-processing and post-processing scripts must be customized. Refer to "Appendix C Pre-processing and Post-processing of Replication" for information on the customization procedure. Note If replication is attempted without customization of the scripts, pre-processing for the source volume causes an error, so that replication cannot be achieved Replication in Units of Volume Groups Execute replication with a volume group specified. Example of Snapshot Replication # /opt/fjsvswsrp/bin/swsrpmake /dev/vg01 /dev/vg02 FROM=/dev/vg01@SV1, TO=/dev/vg02@SV1 swsrpmake completed # Example of Synchronous Replication # /opt/fjsvswsrp/bin/swsrpstartsync /dev/vg01 /dev/vg02 FROM=/dev/vg01@SV1, TO=/dev/vg02@SV1 swsrpstartsync completed : (After state of equivalency upkeep) : # /opt/fjsvswsrp/bin/swsrpmake /dev/vg01 /dev/vg

141 swsrpmake completed # Replication in Units of Physical Disks When the volume group configuration does not satisfy the conditions for operation in units of volume groups, replication can be performed by operation in units of physical disks. When backup is performed in units of physical disks, volume group integrity must be maintained and, therefore, all physical disks in the volume group must be operated synchronously. Point Physical volumes that should be operated synchronously can be checked by using the Web Console or stgxfwcmdispdev command. Figure 6.48 Sample Configuration for Operation in Units of Physical Disks Operation Design To use the replica volume after replication in the situation when a source volume is a volume group, the replica volume must have the same logical volume configuration as the source volume and must be a volume group of the same physical size

142 Preparations Configuring Source and Replica Volumes When configuring the source and replica volumes, specify all of the physical disks in the volume group. Example # /opt/fjsvswsrp/bin/swsrpsetvol /dev/hdisk10 /dev/hdisk20 swsrpsetvol completed # /opt/fjsvswsrp/bin/swsrpsetvol /dev/hdisk11 /dev/hdisk21 swsrpsetvol completed # Replication in Units of Physical Disks Perform the operation by synchronizing all physical disks in the volume group. Perform the required pre-processing and post-processing work for each volume group before and after (respectively) the replication. Disable pre-processing and post-processing when operating individual physical disks. Example of Snapshot Replication (Perform pre-processing for the source and target volumes.) # /opt/fjsvswsrp/bin/swsrpmake -f -t /dev/hdisk10 /dev/hdisk20 FROM=/dev/hdisk10@SV1, TO=/dev/hdisk20@SV1 swsrpmake completed # /opt/fjsvswsrp/bin/swsrpmake -f -t /dev/hdisk11 /dev/hdisk21 FROM=/dev/hdisk11@SV1, TO=/dev/hdisk21@SV1 swsrpmake completed # (Perform post-processing for the source and target volumes.) Example of Synchronous Replication (Perform pre-processing for the target volume.) # /opt/fjsvswsrp/bin/swsrpstartsync -t /dev/hdisk10 /dev/hdisk20 FROM=/dev/hdisk10@SV1, TO=/dev/hdisk20@SV1 swsrpstartsync completed # /opt/fjsvswsrp/bin/swsrpstartsync -t /dev/hdisk11 /dev/hdisk
143 swsrpstartsync completed # (After state of equivalency upkeep) (Perform pre-processing for the source volume.) # /opt/fjsvswsrp/bin/swsrpmake -f -t /dev/hdisk10 /dev/hdisk20 FROM=/dev/hdisk10@SV1, TO=/dev/hdisk20@SV1 swsrpmake completed # /opt/fjsvswsrp/bin/swsrpmake -f -t /dev/hdisk11 /dev/hdisk21 FROM=/dev/hdisk11@SV1, TO=/dev/hdisk21@SV1 swsrpmake completed # (Perform post-processing for the source and target volumes.) The table below summarizes the pre-processing and post-processing work to be performed before and after replication. Table 6.6 Pre- and Post-processing of Replication Pre-processing Post-processing Source volume Target volume 1. Ensure data integrity by preventing access to all logical volumes in the volume group. 2. If file systems are included, unmount all file systems in the volume group. 1. Prevent access to all logical volumes in the volume group. 2. If file systems are included, unmount all file systems in the volume group. 3. Deactivate the volume group. If file systems are included, remount the volumes that were unmounted by pre-processing. 1. Reconfigure the volume group. 2. If file systems are included, remount the volumes that were unmounted by preprocessing. Deactivate Volume Group Deactivate the volume group as follows: # /usr/sbin/varyoffvg vg02 # Reconfiguring Volume Group Reconfigure the volume group as follows: 1. Use the chdev command to temporarily remove the target volume from LVM. # /usr/sbin/chdev -l hdisk20 -a pv=clear # /usr/sbin/chdev -l hdisk21 -a pv=clear 2. Use the exportvg command to export the target volume. # /usr/sbin/exportvg vg02 3. Create the logical volume list file in following format. lvol11:lvol21 loglv11:loglv21 lvol12:lvol22 loglv12:loglv22 4. Use the recreatevg command to rewrite the LVM management information in the target volume
144 # /usr/sbin/recreatevg -l <logical volume list file> -L /fs -y vg02 hdisk20 hdisk21 5. Use the chfs command to change the mount point. # /usr/sbin/chfs -m /mnt21 /fs/mnt11 # /usr/sbin/chfs -m /mnt22 /fs/mnt VxVM Volume Operation This section describes the replication operation for volumes under VERITAS Volume Manager (VxVM) Replication Operation in Units of Physical Disks If a VxVM volume is the replication target, execute replication in the physical disk units that comprise the VxVM volume. When replication operation is performed in units of physical disks, disk group integrity must be maintained and, therefore, all the physical disks in the disk group must be replicated synchronously. Point For the physical volume which should be synchronized, confirm it by using either the Web Console or stgxfwcmdispdev command. Note - Before starting this operation, be sure to understand the basic operation of ordinary volumes. - Snapshot backup is recommended for backing up in units of physical disks. In the case of synchronized backup, commands that access destination volumes, such as VxVM commands, cannot be executed during full copy or differential copy Configuration When configuring the disk groups of the original and replica volumes, you should note the following: - The number, sizes, and types of VM disks must be the same. - The configurations of logical volumes must be the same

145 Figure 6.49 Copy Source Volume and Copy Destination Volume Preparations Confirming Disk Group Configuration Information File The disk group must be reconfigured in replication post-processing. Confirm that a volume group configuration information file has been saved. /etc/vx/cbr/bk/<disk group name>.<disk group ID> Configuring Original and Replica Volumes When setting the original and replica volumes, specify all disks in the volume group. Example of Setting Original and Replica Volumes # /opt/fjsvswsrp/bin/swsrpsetvol /dev/vm/dmp/hdisk10 /dev/vm/dmp/hdisk20 swsrpsetvol completed # /opt/fjsvswsrp/bin/swsrpsetvol /dev/vm/dmp/hdisk11 /dev/vm/dmp/hdisk21 swsrpsetvol completed # Replication Perform Replication by synchronizing all physical disks in the disk group. Perform the required pre-processing or post-processing work for each volume group respectively before and after the replication operation. Disable pre-processing and post-processing when replicating individual physical disks. Example of Snapshot Backup (Perform pre-processing for the source and target volumes.) # /opt/fjsvswsrp/bin/swsrpmake -f -t /dev/vm/dmp/hdisk10 /dev/vm/dmp/hdisk20 FROM=/dev/vm/dmp/hdisk10@SV1, TO=/dev/vm/dmp/hdisk20@SV1 swsrpmake completed # /opt/fjsvswsrp/bin/swsrpmake -f -t /dev/vm/dmp/hdisk11 /dev/vm/dmp/hdisk21 FROM=/dev/vm/dmp/hdisk11@SV1, TO=/dev/vm/dmp/hdisk21@SV1 swsrpmake completed #
146 (Perform post-processing for the source and target volumes.) Example of Synchronous Replication (Perform pre-processing for the target volume.) # /opt/fjsvswsrp/bin/swsrpstartsync -t /dev/vm/dmp/hdisk10 /dev/vm/dmp/hdisk20 FROM=/dev/vm/dmp/hdisk10@SV1, TO=/dev/vm/dmp/hdisk20@SV1 swsrpstartsync completed # /opt/fjsvswsrp/bin/swsrpstartsync -t /dev/vm/dmp/hdisk11 /dev/vm/dmp/hdisk21 FROM=/dev/vm/dmp/hdisk11@SV1, TO=/dev/vm/dmp/hdisk21@SV1 swsrpstartsync completed # (After state of equivalency upkeep) (Perform preprocessing for the source volume.) # /opt/fjsvswsrp/bin/swsrpmake -f -t /dev/vm/dmp/hdisk10 /dev/vm/dmp/hdisk20 FROM=/dev/vm/dmp/hdisk10@SV1, TO=/dev/vm/dmp/hdisk20@SV1 swsrpmake completed # /opt/fjsvswsrp/bin/swsrpmake -f -t /dev/vm/dmp/hdisk11 /dev/vm/dmp/hdisk21 FROM=/dev/vm/dmp/hdisk11@SV1, TO=/dev/vm/dmp/hdisk21@SV1 swsrpmake completed # (Perform post-processing for the source and target volumes.) The table below summarizes the pre-processing and post-processing work to be performed before and after replication. Table 6.7 Replication Pre-processing and Post-processing Type Pre-processing Post-processing Source volume Target volume 1. Secure data integrity by stopping access to all logical volumes in the volume group. 2. If file systems are included, unmount all file systems in the volume group. 3. Import the disk group, when the disk group is not imported for replication on single server. 1. Stop access to all logical volumes in the volume group. 2. If file systems are included, unmount all file systems in the volume group. 3. Deport the disk group. 4. Set the disk groups subordinate physical disks to offline. If file systems are included, remount the volumes that were unmounted by pre-processing. 1. Online the physical disks that were set to offline during preprocessing. 2. Reconfigure the volume group. 3. If file systems are included, remount the volumes that were unmounted by preprocessing. Reconfiguring Disk Group (for Replication on single Server) Reconfigure the disk group as follows: 1. Pre-commit analysis for restoration # /etc/vx/bin/vxconfigrestore -p dstdg Diskgroup dstdg configuration restoration started... Installing volume manager disk header for hdisk20... Installing volume manager disk header for hdisk dstdg's diskgroup configuration is restored (in precommit state). Diskgroup can be accessed in read only and can be examined using vxprint in this state
147 Run: vxconfigrestore -c dstdg ==> to commit the restoration. vxconfigrestore -d dstdg ==> to abort the restoration. # 2. Commit the change required for restoring the configuration of the copy destination disk group. # /etc/vx/bin/vxconfigrestore -c dstdg Committing configuration restoration for diskgroup dstdg... dstdg's diskgroup configuration restoration is committed. # Reconfiguring Disk Group (for Server-to-server Replication) 1. Import the disk group "srcdg" on the master server as disk group "dstdg" on the target server. # /usr/sbin/vxdg -C -n dstdg import srcdg # Note When the disk group name is the same in the server of the source and destination, the -n option is not specified. 2. Execute recovery processing for the volume in the disk group "dstdg" on the target server. # vxrecover -g dstdg -sb # 3. Because udid of the copy destination disk is not an adjustment, this is restored. # vxdisk updateudid hdisk20 hdisk21 # Note - When performing a system disk exchange, there are cases when multiple conflicting configuration information backups may exist for one disk group. In such cases, the disk group ID displayed after executing the above command needs to be set and executed instead of the disk group. - When the volumes within a disk group are required to be run in synchronous mode in the background and depending on the volume configuration it may take some time for synchronous processing to complete after this operation. It is also possible to use the volumes during this time
148 Chapter 7 Operation Maintenance This chapter provides information on how to maintain a database, perform troubleshooting, and change the operation information. 7.1 Maintenance of Database AdvancedCopy Manager holds various repositories of management information on the usage of its functions. They are named generically and are referred to as a database in this chapter. The databases are important information and it is recommended that they be backed up periodically. Note that the databases referred to here differ from databases used for transactions, such as ORACLE databases. The following table lists instances when backup of the database is needed. Table 7.1 Databases on Managed Server Type When Backup to Be Created Backup Method (References) Size Registry A Managed Server has been added or Management Server information (server name, IP address, or port number) has changed. " Backing Up Registry" or "7.1.2 Making Package Backup of Databases" Refer to " Backing Up Registry". Backup management list A backup transaction has been completed. " Backing up Backup Management List" or "7.1.2 Making Package Backup of Databases" Refer to " Backing up Backup Management List". Volume configuration information (Backup management) When the configuration of the volume group has changed. " Preserving Volume Configuration Information" Refer to " Preserving Volume Configuration Information". Pre-processing and postprocessing scripts for backup management A pre-processing or post-processing script has changed. Saving a database by using the copy command or "7.1.2 Making Package Backup of Databases" Check the size of the preprocessing and postprocessing script files for backup management. Replication management list A replication transaction has been completed. " Backing up Replication Management List" or "7.1.2 Making Package Backup of Databases" Refer to " Backing up Replication Management List". Volume configuration information (Replication management) When the configuration of the volume group is changed. " Preserving Volume Configuration Information" Refer to " Preserving Volume Configuration Information". Pre-processing and postprocessing scripts for replication management A pre-processing or post-processing script has changed. Saving a database by using the copy command or "7.1.2 Making Package Backup of Databases" Check the size of the preprocessing and postprocessing script file for replication management. Policy file for management The policy file has changed. Saving a database by using the copy command or Check the size of the policy file for management information package backup
149 Type When Backup to Be Created Backup Method (References) information package backup "7.1.2 Making Package Backup of Databases" Size Point You can create backups of databases either individually or as a whole. If a Managed Server also operates as a Management Server, the Managed Server contains a database for the Management Server as well as for the Managed Server Making Individual Backups of Databases Maintaining Backup Management List This section provides information on the maintenance of a backup management list. A backup management list is maintained on the server that performs the backup Backing up Backup Management List Execute the swstresback command to back up a backup management list. Backup Data Size of Backup Management List Check the size of the file that the subdirectory of the following directory contains. /etc/opt/fjsvswsts/data Point When you execute the swstresback command by using the same directory used before to save data, the file system in which these directories exist should be at least three times greater than the size returned in query above. This is because the swstresback command executes backup in the state holding the data saved before Restoring Backup Management List Execute the swstresrst command to restore a backup management list Preserving Volume Configuration Information AIX AdvancedCopy Manager uses transaction volumes and backup volumes as volume groups. If LVM volume management information is lost, volumes cannot be backed up or restored correctly. When a volume group is created, it is recommended volume configuration information be backed up using the savevg command in preparation for a system crash. For information on the savevg command, refer to the AIX manuals Maintaining Replication Management List This section describes the maintenance of a replication management list Backing up Replication Management List To back up a replication management list, back up the repository of the Management Server. For information about backing up a repository, refer to "Backing up Database" in the ETERNUS SF AdvancedCopy Manager Operation Guide relevant to the OS of the Management Server
150 Point - Operational information for replication management is saved in a repository. - It is recommended that a replication management list be backed up when operation information for replication management is changed with the swsrpsetvol or swsrpdelvol command Restoring Replication Management List Perform the following steps to restore a replication management list: 1. Restore the repository to the Management Server. For information about restoring a repository, refer to "Restoring Database" in the ETERNUS SF AdvancedCopy Manager Operation Guide relevant to the OS of the Management Server. 2. On the Managed Server, execute the swsrprecoverres command with the -r option. Point - When above 2 steps are performed, operational information for replication management of a repository is copied to a Managed Server, where it is then available for use. - When this information for replication management in the repository does not need to be changed, and only the operation information for replication management on the Managed Server is incorrect (for some reason), perform only step Preserving Volume Configuration Information AIX AdvancedCopy Manager uses source and replica volumes as volume groups. If LVM volume management information is lost, correct operations cannot be achieved. When a volume group is created, it is recommended volume configuration information be backed up using the savevg command in preparation for a system crash. For information on the savevg command, refer to the AIX manuals Maintaining Database For information about maintaining a database used by a Management Server, refer to "Maintaining Database" in the ETERNUS SF AdvancedCopy Manager Operation Guide relevant to the OS of the Management Server: Maintaining Registry This section describes the maintenance of a registry. Perform this procedure on a Management Server or a Managed Server Backing Up Registry In a command prompt window, back up the following files using the copy command, etc. File Name /etc/opt/swstorage/swnode.ini Example Save it in the /backup directory. # cp /etc/opt/swstorage/swnode.ini /backup Backup Data Size of Registry Check the size of the file to be backed up

151 Restoring Registry In a command prompt window, use the copy command or another method to restore the following files. File Name /etc/opt/swstorage/swnode.ini Example Restore the following file saved in the /backup directory: # cp /backup/swnode.ini /etc/opt/swstorage Making Package Backup of Databases This section describes the function of making a backup of management information (e.g., databases) from just one Managed Server or Management Server. With a package backup of management information, you can make a backup of management information for all Managed Servers and Management Server from just one Managed Server or Management Server. Executing a package backup of management information runs backup commands (making backups of backup management resources) for the databases of other Managed Servers and Management Server, and collects the backup data and management information created by these backup commands. The server on which you can execute a package backup of management information is called the "package-backup-of-themanagement-information execution server". The servers whose data is to be backed up are called the "package-backup-of-themanagement-information target servers". Figure 7.1 Management Server and Managed Server Example Assume that the package backup of management information function has been used to back up the management information on a Management Server, Managed Server A, and Managed Server B onto Managed Server B in the diagram above. In this case, Managed Server B is the backup execution server. The Management Server, Managed Server A, and Managed Server B are the backup target servers. That is, Managed Server B operates as both the backup execution server and backup target server. The following table shows the types of management information that is handled in a package backup of management information. Table 7.2 Types of Management Information Backed Up by Package Backup of Management Information Function Type of Data Registry Backup management - Registry - Backup management list, or backup management list and recovery control file - Pre-processing and post-processing scripts - Transaction volume locking specification file for backups
152 Function Type of Data - Backup volume locking specification file for backups - Backup-restored volume locking specification file Replication management - Pre-processing and post-processing scripts - Copy-source volume locking specification file - Copy-destination volume locking specification file Package backup of management information - Policy file Preliminaries Before creating a package backup of management information, you must perform the following: 1. Determine the management information package backup target servers and the types of management information to be backed up. 2. Determine the management information package backup execution server. 3. Create a directory where the management information package backup execution server will store the backup data. The size of the directory must not be less than the total of the following sizes: - The required size for a database is the size of the database backup data multiplied by 1.2. For the backup data size, refer to "Maintaining Database" in the ETERNUS SF AdvancedCopy Manager Operation Guide for the operating system running on the Management Server. - The required size for the registries is the total of the data sizes of the registry backup data on the management information package backup target servers. For the backup data size, refer to "Maintaining Database" in the ETERNUS SF AdvancedCopy Manager Operation Guide for the operating system running on the management information package backup target server. - The required size for backup management is the total of the sizes below for each management information package backup target server: For the size of each component of backup data, refer to "Maintaining Database" in the ETERNUS SF AdvancedCopy Manager Operation Guide for the operating system running on the management information package backup target server. - Size of the backup data for the backup management lists (size of the backup data for the backup management lists plus the size of the backup data for the recovery control files) multiplied by Size of the pre-processing and post-processing scripts for backup management - Size of the transaction volume locking specification file for backups for backup management - Size of the backup volume locking specification file for backups for backup management - Size of the backup-restored volume locking specification file for backup management - The required size for replication management is the total of the following sizes for each management information package backup target server: - Size of the pre-processing and post-processing scripts for replication management - Size of the copy-source volume locking specification file for replication management - Size of the copy-destination volume locking specification file for replication management 4. Check the size of the working directory for the management information package backup target servers (or the shared disk for shared data for AdvancedCopy Manager in a clustered system). The sizes described below are needed only when a package backup of management information is being created. Use the largest value of the sizes of the databases to be backed up from the management information package backup target servers. The required sizes are as follows: - The required size for the databases is the size of the database backup data multiplied by 2.2. For the backup data size, refer to "Maintaining Database" in the ETERNUS SF AdvancedCopy Manager Operation Guide for the operating system running on the Management Server
153 - The required size for backup management is the size of the backup data for the backup management lists (size of the backup data for the backup management lists plus the size of the backup data for the recovery control files) multiplied by 2.2. For the backup data size, refer to "Maintaining Database" in the ETERNUS SF AdvancedCopy Manager Operation Guide for the operating system running on the management information package backup target server. - The working directory does not require any space for registry, replication management, and policy file backups. 5. Execute the stgmgrinfoset command on the management information package backup execution server (determined in step 2). 6. Create a policy file on the management information package backup execution server. Table 7.3 Management Information Package Backup Execution Server and Policy File Paths Management Information Package Backup Execution Server Policy File Path OS Operation Type Windows Non-cluster <Environment directory>\etc\stgmgrinfo_policy.ini Solaris, Linux, HP-UX, AIX Cluster Non-cluster Cluster <AdvancedCopy-Manager-shared-data>:\etc\opt\swstorage\etc \stgmgrinfo_policy.ini /etc/opt/fjsvswstf/stgmgrinfo_policy.ini /etc/opt/fjsvswstf/logicalnodename/stgmgrinfo_policy.ini Note - Do not specify more than one Managed Server as a management information package backup execution server. - When this server is used for executing transactions on the Managed Server in a clustered system, create a directory for storing backup data on a shared disk. - For databases and backup management, backup commands are executed on the corresponding management information package backup target servers. In addition, for database backups and backup management (ie, backup management lists) backups, a temporary capacity that is approximately 2.2 times greater than the total size of the backups is required to save the backup data in an archive log file. Table 7.4 Policy File Format Section Name Key Name Description(*) Server name BkupData Specifies whether to make a backup of the backup management. Yes: Make a backup of the backup management. No: Do not make a backup of the backup management. ReplData Specifies whether to make a backup of the replication management. Yes: Make a backup of the replication management. No: Do not make a backup of the replication management. Specifiable only when the applicable function is operating on the server (Management Server or Managed Server). *: If this key is not specified or if "Yes" is not in the form "Y" (uppercase) + "es" (lowercase), then "No" is set. Example Set up a policy file as follows: - The Management Server named ACMMGR creates backups for the backup management
154 - The Managed Server named ACMAGT1 creates backups for backup management. - The Managed Server named ACMAGT2 creates backups for replication management. [ACMMGR] BkupData=Yes [ACMAGT1] BkupData=Yes [ACMAGT2] ReplData=Yes Note - Create a policy file only if it will be used. - The policy file cannot include any settings for backups of registries and of the policy file for management information package backup Backup Operations Executing the stgmgrinfobkup command on the management information package backup execution server stores the backup data in the directory under the following structure. Table 7.5 Directory Structure for Execution of Management Information Package Backup and Data Types Directory Data Type *1 Server name RegiData - Registry BkupData FJSVswsts - Backup management list, or backup management list and recovery control file Scripts data - Pre-processing and post-processing scripts for backup management - Transaction volume locking specification file for backups, for backup management - Backup volume locking specification file for backups, for backup management - Backup-restored volume locking specification file for backups, for backup management ReplData Scripts - Pre-processing and post-processing scripts for replication management data - Copy-source volume locking specification file for replication management - Copy-destination volume locking specification file for replication management MgrInfoData - Policy file for management information package backup *1 is the backup data storage directory specified by the stgmgrinfoset command. Example When *1 is /ACMBkupData and the server name is ACMAGT1, the pre-processing and post-processing scripts for backup management are put in the following directory: /ACMBkupData/ACMAGT1/BkupData/Scripts
155 Initial Operations The policy file backup operations are described below. Backup of registries which are not included in the backup targets when a policy file is used to perform backup are also detailed. The initial operations are as follows: 1. Execute the stgmgrinfobkup command on the management information package backup execution server to make backups of the registries on all of the Managed Server. 2. Execute the stgmgrinfobkup command on the management information package backup execution server to make a backup of the policy file. 3. Refer to "Backup of Common Control and AdvancedCopy Manager Repository" in the ETERNUS SF AdvancedCopy Manager Operation Guide to back up the ETERNUS SF Manager database. Normal-use Operations Execute the stgmgrinfobkup command on the management information package backup execution server when you need to make backups of the target data. Afterwards, refer to "Backup of Common Control and AdvancedCopy Manager Repository" in the ETERNUS SF AdvancedCopy Manager Operation Guide to back up the ETERNUS SF Manager database. For the timing of the backups, refer to "Maintaining Database" in the ETERNUS SF AdvancedCopy Manager Operation Guide for the applicable operating system. Operations When Server Is Added or Deleted Operations When Server Added 1. On the management information package backup execution server, set up a policy for the added Managed Server in the policy file. 2. Execute the stgmgrinfobkup command on the management information package backup execution server to make a backup of the registry of the added Managed Server. 3. Execute the stgmgrinfobkup command on the management information package backup execution server to make a backup of the policy file. 4. Refer to "Backup of Common Control and AdvancedCopy Manager Repository" in the ETERNUS SF AdvancedCopy Manager Operation Guide to back up the ETERNUS SF Manager database. Operations When Server Deleted 1. On the management information package backup execution server, delete the information about the Managed Server that was deleted from the policy file. 2. In the backup data directory on the management information package backup execution server, delete the directory containing the name of the deleted Managed Server. 3. Execute the stgmgrinfobkup command on the management information package backup execution server to make a backup of the policy file. 4. Refer to "Backup of Common Control and AdvancedCopy Manager Repository" in the ETERNUS SF AdvancedCopy Manager Operation Guide to back up the ETERNUS SF Manager database. Operations When Server Name Is Changed 1. On the management information package backup execution server, delete the information for the Managed Server from the policy file. 2. In the backup data directory on the management information package backup execution server, delete the directory containing the name of the Managed Server. 3. On the management information package backup execution server, set up a policy for the renamed Managed Server in the policy file. 4. Execute the stgmgrinfobkup command on the management information package backup execution server to make a backup of the registry of the renamed Managed Server
156 5. Execute the stgmgrinfobkup command on the management information package backup execution server to make a backup of the policy file. 6. Refer to "Backup of Common Control and AdvancedCopy Manager Repository" in the ETERNUS SF AdvancedCopy Manager Operation Guide to back up the ETERNUS SF Manager database Restoration Operations This section describes how to use the backup data created by the stgmgrinfobkup command and "Backup of Common Control and AdvancedCopy Manager Repository" in the ETERNUS SF AdvancedCopy Manager Operation Guide to execute restoration. Perform the operations below as a root user or with an account that belongs to the Administrators group. Restoring Registry 1. Execute the stgmgrinfoset command on the management information package backup execution server to determine which directory contains the backup data. 2. On the management information package backup execution server, copy the registry backup to the following directory: For Windows: <Directory-determined-in-step1>\<server-whose-registry-to-be-restored>\RegiData For Solaris, Linux, HP-UX or AIX: <Directory-determined-in-step1>/<server-whose-registry-to-be-restored>/RegiData 3. Transfer the registry backup that was copied in step 2 to the target server in binary mode. 4. Restore the registry on the server. For details on restoring a registry, refer to "Restoring Registry" in the ETERNUS SF AdvancedCopy Manager Operation Guide for the operating system running on the target server. Restoring Database Refer to "Restore of Common Control and AdvancedCopy Manager Repository" in the ETERNUS SF AdvancedCopy Manager Operation Guide to restore the ETERNUS SF Manager database on the Management Server. Restoring Replication Management List 1. Perform the procedure of "Restoring Database" to restore a database. If you have performed it, this step is not needed. 2. On the target server, execute the swsrprecoverres command with the -r option. For details on the command, refer to "swsrprecoverres (Resource Adjustment Command)" in the ETERNUS SF AdvancedCopy Manager Operation Guide for the operating system running on the target server. Restoring Backup Management List, or Backup Management List and Recovery Control File 1. Execute the stgmgrinfoset command on the management information package backup execution server to determine which directory contains the backup data. 2. On this server, copy the backup of the backup management list or the backups of the backup management list and the recovery control file to the following directory: For Windows: <Directory-determined-in-step1>\<server-whose-list/file-to-be-restored>\BkupData\FJSVswsts For Solaris, Linux, HP-UX or AIX: <Directory-determined-in-step1>/<server-whose-list/file-to-be-restored>/BkupData/FJSVswsts 3. Transfer the backup of the backup management list or the backups of the backup management list and the recovery control file copied in step 2 to the target server in binary mode
157 4. Expand the backup of the backup management list or the backups of the backup management list and recovery control file transferred in step 3 on the target server. - On a Windows version server: Expand the backup of the backup management list using the stgarcext (Backup Data Expansion Command) in the ETERNUS SF AdvancedCopy Manager Operation Guide (for Windows). - On a Solaris/Linux/HP-UX/AIX version server: Expand the backup of the backup management list or the backups of the backup management list and recovery control file by using the tar command supported by the operating system. 5. Restore the backup management list, or the backup management list and recovery control file on the target server. For details on restoring, refer to "Restoring Backup Management List and Recovery Control File" in the ETERNUS SF AdvancedCopy Manager Operation Guide for the operating system running on the target server. The Backup-Directory specified in the resource restoration command is the directory expanded in step 4. Restoring Backup Management Pre-processing/Post-processing Scripts 1. Execute the stgmgrinfoset command on the management information package backup execution server to determine which directory contains the backup data. 2. On this server, copy the backups of the backup management pre-processing/post-processing scripts for backup management to the following directory: For Windows: <Directory-determined-in-step1>\<server-whose-scripts-to-be-restored>\BkupData\Scripts For Solaris, Linux, HP-UX or AIX: <Directory-determined-in-step1>/<server-whose-scripts-to-be-restored>/BkupData/Scripts 3. Transfer the backups of the backup management pre-processing/post-processing scripts copied in step 2 to the target server in binary mode. 4. Transfer the backups of the backup management pre-processing/post-processing scripts copied in step 3 to the directory in which the scripts will be executed on the target server in binary mode. For the directory in which the pre-processing and postprocessing scripts for backup management are executed (that is, the directory to which the scripts are to be copied), refer to "Pre-processing and Post-processing of Backup and Restoration" in the ETERNUS SF AdvancedCopy Manager Operation Guide for the operating system running on the target server. 5. On a Solaris/Linux/UP-UX/AIX-version server, change the access permission assigned to the pre-processing and post-processing scripts for backup management copied in step 4 on the target server by using the chmod command supported by the operating system. Set execution permission for the root user, which is the owner. Restoring Locking Specification Files for Backup Management 1. Execute the stgmgrinfoset command on the management information package backup execution server to determine which directory contains the backup data. 2. On this server, copy the backups of the locking specification files for backup management to the following directory: For Windows: <Directory-determined-in-step1>\<server-whose-files-to-be-restored>\BkupData\data For Solaris, Linux, HP-UX or AIX: <Directory-determined-in-step1>/<server-whose-files-to-be-restored>/BkupData/data 3. Transfer the backups of the locking specification files for backup management copied in step 2 to the target server in binary mode. 4. Copy the backups of the locking specification files for backup management transferred in step 3 to the target server. For the directory in which the locking specification files for backup management are used (that is, the directory to which the files are
158 to be copied), refer to "Pre-processing and Post-processing of Backup and Restoration" in the ETERNUS SF AdvancedCopy Manager Operation Guide (for Windows). Restoring Pre-processing and Post-processing Scripts for Replication Management 1. Execute the stgmgrinfoset command on the management information package backup execution server to determine which directory contains the backup data. 2. On this server, copy the backups of the pre-processing and post-processing scripts for replication management to the following directory: For Windows: <Directory-determined-in-step1>\<server-whose-scripts-to-be-restored>\ReplData\Scripts For Solaris, Linux, HP-UX or AIX: <Directory-determined-in-step1>/<server-whose-scripts-to-be-restored>/ReplData/Scripts 3. Transfer the backups of the pre-processing and post-processing scripts for replication management copied in step 2 to the target server in binary mode. 4. Copy the backups of the pre-processing and post-processing scripts for replication management transferred in step 3 to the directory in which the scripts will be executed on the target server. For the directory in which the pre-processing and postprocessing scripts for replication management are executed (that is, the directory to which the scripts are to be copied), refer to "Appendix C Pre-processing and Post-processing of Replication" in the ETERNUS SF AdvancedCopy Manager Operation Guide for the operating system running on the target server. 5. On a Solaris/Linux/UP-UX/AIX server, change the access permission assigned to the pre-processing and post-processing scripts copied in step 4 on the target server by using the chmod command supported by the operating system. Set execution permission for the root user, which is the owner. Restoring Locking Specification Files for Replication Management 1. Execute the stgmgrinfoset command on the management information package backup execution server to determine which directory contains the backup data. 2. On this server, copy the backups of the locking specification files for replication management to the following directory: For Windows: <Directory-determined-in-step1>\<server-whose-files-to-be-restored>\ReplData\data For Solaris, Linux, HP-UX or AIX: <Directory-determined-in-step1>/<server-whose-files-to-be-restored>/ReplData/data 3. Transfer the backups of the locking specification files for replication management copied in step 2 to the target server in binary mode. 4. Copy the backups of the locking specification files for replication management transferred in step 3 to the target server. For the directory in which the locking specification files for replication management are used (that is, the directory to which the files are to be copied), refer to "Pre-processing and Post-processing of Replication" in the ETERNUS SF AdvancedCopy Manager Operation Guide (for Windows). Restoring Policy File for Management Information Package Backup 1. Execute the stgmgrinfoset command on the management information package backup execution server to determine which directory contains the backup data. 2. On this server, copy the policy file located in the following directory to the policy file for the management information package backup command: For Windows: <Directory-determined-in-step1>\<server-whose-file-to-be-restored>\MgrInfoData
159 For Solaris, Linux, HP-UX or AIX: <Directory-determined-in-step1>/<server-whose-file-to-be-restored>/MgrInfoData For information on the directory for the policy file for the management information package backup command, refer to step 6 in " Preliminaries". 7.2 Troubleshooting Collecting Troubleshooting Information To collect error survey information on the Managed Server, login to the Managed Server and execute the acmcapture command on each server. Send the collected error survey information to Fujitsu Technical Support. Point If you changed the setting of the system log at "System Log Setting (AIX only)" in the ETERNUS SF Installation and Setup Guide, you also need to collect the output file of the system log. For collecting error survey information on the Management Server, refer to "Collecting Error Survey Information" in the ETERNUS SF AdvancedCopy Manager Operation Guide for the operating system running on the Management Server. 7.3 Troubleshooting: Hardware Error During Backup This section describes the actions to perform if a hardware error, etc. occurs during a backup using AdvancedCopy Manager Overview If a hardware error, etc. occurs during backup, the following symptoms may be displayed: - The swstbackstat command displays "failed" or "?????" in the Status column. - The swstsyncstat command displays "failed" or "?????" in the Status column. - The swstreststat command displays "failed" or "?????" in the Status column. - The swsthistdisp command displays "failed" or "?????" in the Status column. - The swstexecstat command displays "sync(failed)", "snapshop(failed)", "restore(failed)", or "?????" in the Status column. - The swsttrkstat command displays "failed" or "?????" in the Status column. - The message swst0634, swst0719, or swst0740 is displayed during command execution. If the execution status display command and history information display command display "failed" in the Status column, a hardware error has occurred during physical copying, and the copy processing has failed. If the message swst0634, swst0719, or swst0740 is displayed during command execution and the same error occurs even if the command is re-executed, a hardware error, etc. has occurred, causing Advanced Copy to fail. If any of these messages, statuses or symptoms is generated, a hardware error may have occurred in the transaction volume or backup volume. Check the hardware status, and if a hardware error is found, fix the cause of the error, then re-execute the processing Troubleshooting The following figure shows the flow of troubleshooting tasks if a hardware or similar fault occurs

160 Figure 7.2 Troubleshooting Flow (for Faults During Backup) Reference ahead 1: Hardware Error on Transaction Volume Reference ahead 2: Hardware Error on Backup Volume Reference ahead 3: Troubleshooting If Bad Sector Occurred in Transaction Volume Note - Refer to "7.3.1 Overview" for details of the Status column and "Fault location". If the Status column is "?????", check if the copy processing is in the error suspend state ("failed") or the hardware suspend state ("halt") using ETERNUS Web GUI. If the copy processing is in either of these states, take the action indicated in the above troubleshooting flow. In other cases, take the action checked in the following points. - If a device is not accessible: Check if the device exists. - If there is anything unusual with Managed Server, switches, etc.: Contact Fujitsu Technical Support. - Use ETERNUS Web GUI to check the copy process error codes. Use the following method to check the error codes: - On the [Display status] menu, click [Advanced Copy status display] in the status display. - At "Session status", click the "Number of active sessions" link for the relevant copy type. - Refer to the value in the "Error code" column of the relevant copy process. The following table shows the meanings of the error codes. Table 7.6 Meanings of Error Codes Error Code Meaning 0xBA If a) or b) below applies, a bad sector was created in the transaction volume. a. QuickOPC has not yet performed physical copying and tracking is in progress b. EC is in the suspend status (replication established status)
161 Error Code Other than 0xBA Meaning Note: If a bad sector is created in a transaction volume when a) or b) applies, the ETERNUS Disk storage system automatically changes the copy processing to the error suspend state. This prevents a restart of QuickOPC or EC resume and prevents the backup volume from being overwritten with invalid transaction volume data. An error other than the above occurred Hardware Error on Transaction Volume When a hardware fault occurs in the transaction volume, perform the repair work according to the following procedures. Note - The backup history information for which a copy failed cannot be used to perform a restoration. - If there is no normal (that is, Status is "succeeded") backup history information, restoration is not possible. 1. If an error occurred during physical copying, cancel the processing in which the error occurred, with one of the following commands: - If an error occurred during backup (OPC) physical copy: swsthistdel - If an error occurred during synchronous processing (EC): swstcancelsync - If an error occurred during restore (OPC) physical copy: swstcancelrest - If an error occurred during tracking processing (QuickOPC): swstcanceltrk 2. Execute the execution status display commands (swstbackstat, swstsyncstat, swstreststat, swsttrkstat and swsthistdisp) to verify that no other errors have occurred. 3. Fix the hardware error in the transaction volume. 4. Execute the swstrestore command to restore the transaction volume Hardware Error on Backup Volume When a hardware fault occurs in backup volume, perform repair work according to the following procedures. 1. Cancel the processing in which the error occurred, with one of the following commands: - If an error occurred during backup (OPC) physical copy: swsthistdel - If an error occurred during synchronous processing (EC): swstcancelsync - If an error occurred during restoration (OPC) physical copy: swstcancelrest - If an error occurred during tracking processing (QuickOPC): swstcanceltrk If the processing cannot be cancelled using one of the above commands, use ETERNUS Web GUI to cancel it. 2. Execute the swstsrsemtch command. 3. Cancel the processing in which the error occurred. At this point, the execution status display commands (swstbackstat, swstreststat and swsthistdisp) display "succeeded" in the Status column. However, because the copy processing is suspended, ensure that the commands are cancelled. If an error occurred in the synchronous processing (EC), the command has already been cancelled, so no response is required. - If an error occurred during backup (OPC) physical copy: swsthistdel - If an error occurred during restoration (OPC) physical copy: swstcancelrest
162 4. Execute the execution status display commands (swstbackstat, swstsyncstat, swstreststat, swsttrkstat and swsthistdisp) to verify that no other errors have occurred. 5. Execute the swstdevinfoset command to delete the backup volume in which the error occurred. 6. Execute the swstdevinfoset command to register a new backup volume. If the backup volume on which the error occurred is to be repaired and be reused, execute the swstdevinfoset command after executing the stgxfwcmsetdev command on the Management Server. 7. Re-execute the processing in which the error occurred Troubleshooting If Bad Sector Occurred in Transaction Volume If a bad sector occurred in the transaction volume, use the following procedure to restore the transaction volume: 1. Cancel the copy processing for which the bad sector occurred. - If the bad sector occurred during the suspend state of synchronous processing (EC): swstcancelsync - If the bad sector occurred during QuickOPC tracking: swstcanceltrk 2. Execute the swstbackstat, swstsyncstat, swstreststat, swsttrkstat and swsthistdisp commands to check for other errors. 3. Restoration is performed by overwriting the area containing the bad sector. Select the appropriate method, in accordance with the usage or use status of the transaction volume, from the methods below. - Restoration method 1: If the area can be reconstructed from high-level software (file system, DBMS, or similar), reconstruct the area. - Restoration method 2: If the area containing the bad sector is an area that is not being used, such as an unused area or a temporary area, use a system command (for example, the UNIX dd command or the Windows format command) to write to the area. - Restoration method 3: Execute the swstrestore command to restore the transaction volume from a backup volume. (If the backup volume for the copy processing for which the bad sector occurred contains backup history information, restoration is also possible from that backup volume.) Note The transaction volume cannot be restored by this method, if there is no backup history information. 7.4 Troubleshooting: Hardware or Other Error During Replication This section describes the corrective action to take when a hardware or other type of error occurs during AdvancedCopy Manager replication Overview If a hardware error, etc. occurs during the replication, the following symptoms are displayed: - The swsrpstat command displays "failed" or "?????" in the Status column. - The message swsrp2606 is output during command execution. - The message swsrp0634, swsrp0719, or swsrp0740 is displayed during command execution. If the operation status display command displays "failed" in the Status column and swsrp2606 is displayed during command execution, a hardware error has occurred during physical copying, and the copy processing has failed. If the message swsrp0634, swsrp0719, or swsrp0740 is displayed during command execution, and the same error occurs even if the command is re-executed, a hardware error, etc. has occurred, causing Advanced Copy to fail. If a hardware error occurs during remote copying, the following symptoms may be displayed:

163 - The swsrpstat command displays "halt" in the Status column. - The message swsrp2648 is displayed during command execution. If the operation status display command displays "halt" in the Status column, and the message swsrp2648 is displayed during command execution, a hardware error has occurred during physical copying, and the remote copy processing may have failed. If any of these messages, statuses or symptoms is generated, a hardware error or path close may have occurred in the source or replica volume. Check the hardware status, and if a hardware error is found, fix the cause of the error and re-execute the command Troubleshooting The following figure shows the troubleshooting flow when a hardware or similar fault occurs. Figure 7.3 Troubleshooting Flow (When Fault Occurs During Replication) Reference ahead 1: Hardware Error on Replication Volume Reference ahead 2: Troubleshooting If Bad Sector Occurred in Copy Source Volume Reference ahead 3: Troubleshooting When Lack of Free Space Has Occurred in Snap Data Volume or Snap Data Pool Reference ahead 4: Error (halt) on Remote Copy Processing Note - Refer to "7.4.1 Overview" for details of the Status column and "Fault location". If the Status column is "?????", check if the copy processing is in the error suspend state ("failed") or the hardware suspend state ("halt") using ETERNUS Web GUI. If the copy processing is in either of these states, take the action indicated in the above troubleshooting flow. In other cases, take the action checked in the following points. - If a device is not accessible: Check if the device exists. - If there is anything unusual with Managed Server, switches, etc.: Contact Fujitsu Technical Support
164 - Use ETERNUS Web GUI to check the error codes. Use the following two methods to check. - Checking with the swsrpstat command Execute the command with the -O option. - Checking with ETERNUS Web GUI 1. On the [Display status] menu, click [Advanced Copy status display] in the status display. 2. At "Session status", click the "Number of active sessions" link for the relevant copy type. 3. Refer to the value in the "Error code" column of the relevant copy process. The following table shows the meanings of the error codes. Table 7.7 Meanings of Error Codes Error Code Meaning 0xBA If a) or b) below applies, a bad sector was created in the transaction volume. a. QuickOPC has not yet performed physical copying and tracking is in progress b. EC/REC is in the suspend status (replication established status) Note: If a bad sector is created in a transaction volume when a) or b) applies, the ETERNUS Disk storage system automatically changes the copy processing to the error suspend state. This prevents a restart of QuickOPC or EC/REC resume and prevents the copy destination volume from being overwritten with invalid copy source volume data. 0xBB Other than 0xBA and 0xBB A lack of free space has occurred in the Snap Data Volume or Snap Data Pool. An error other than the above occurred Hardware Error on Replication Volume When a hardware error occurs in a duplicate volume, perform the repair work on the error according to the following procedures. 1. Execute the swsrpcancel command to cancel the processing in which the error occurred. If the processing cannot be cancelled from the operation server when inter-server replication is performed, cancel it from a non-operational server. If the processing cannot be cancelled by using the command, use ETERNUS Web GUI to cancel it. 2. Execute the swsrprecoverres command. 3. Execute the swsrpstat command to verify that no other errors have occurred. 4. Execute the swsrpdelvol command to delete the replication volume in which the error occurred. 5. Execute the swsrpsetvol command to register a new replication volume. If the replication volume on which the error occurred is to be repaired, execute the swsrpsetvol command after executing the stgxfwcmsetdev command on the Management Server. 6. Re-execute the processing in which the error occurred Troubleshooting If Bad Sector Occurred in Copy Source Volume If a bad sector occurred in the copy source volume, use the following procedure to restore the copy source volume: 1. Execute the swsrpcancel command to cancel processing for which the error occurred. If inter-server replication was being performed and cancellation is not possible from the active server, cancel processing from the inactive server. If processing cannot be cancelled using commands, use ETERNUS Web GUI to cancel it. 2. Execute the swsrpstat command to check for other errors
165 3. Restoration is performed by overwriting the area containing the bad sector. Select the appropriate method, in accordance with the usage or use status of the copy source volume, from the methods below. - Restoration method 1: If the area can be reconstructed from high-level software (file system, DBMS, or similar), reconstruct the area. - Restoration method 2: If the area containing the bad sector is an area that is not being used, such as an unused area or a temporary area, use a system command (for example, the UNIX dd command or the Windows format command) to write to the area. - Restoration method 3: Execute the swsrpmake command to restore the data from the copy destination volume. (Restoration is also possible from the copy destination volume of the copy process for which the bad sector occurred.) Troubleshooting When Lack of Free Space Has Occurred in Snap Data Volume or Snap Data Pool A Snap Data Volume lack of free space occurs when the Snap Data Pool is not being used, whereas a Snap Data Pool lack of free space occurs when the Snap Data Pool is being used. If a lack of free space occurs of Snap Data Volume or Snap Data Pool, refer to the following sections to recover it according to the Snap Data Pool usage condition: - When not using the Snap Data Pool : "Recovery of Insufficient Free Space in Snap Data Volume" - When using the Snap Data Pool : "Recovery of Insufficient Free Space in Snap Data Pool" Point The use status of the Snap Data Pool can be checked by specifying "poolstat" subcommand in the swstsdv command. Recovery of Insufficient Free Space in Snap Data Volume When a lack of free space has occurred in the Snap Data Volume, follow these steps to undertake recovery: - Cancel the processing in which the error occurred with the swsrpcancel command. - If inter-server replication was being performed and cancellation is not possible from the active server, cancel processing from the inactive server. - If processing cannot be cancelled using commands, use ETERNUS Web GUI to cancel it. The likely causes of a lack of free space in the Snap Data Volume are as follows: a. The estimate of the physical size of the Snap Data Volume is not accurate. b. The estimate of the physical size of the Snap Data Volume is accurate but, as a result of a large volume being updated in the Snap Data Volume when the SnapOPC/SnapOPC+ session does not exist, the physical capacity of the Snap Data Volume is being used up. The usage status of the Snap Data Volume can be checked by specifying "stat" subcommand in the swstsdv command. If "a." applies, re-estimate the physical size of the Snap Data Volume, and recreate the Snap Data Volume. If "b." applies, use ETERNUS Web GUI or, specify "init" subcommand in the swstsdv command, and then initialize the Snap Data Volume. Recreation of the partition (slice) is required after recreation/initialization of the Snap Data Volume. Recovery of Insufficient Free Space in Snap Data Pool When a lack of free space has occurred in the Snap Data Pool, follow these steps to undertake recovery: - Cancel the processing in which the error occurred with the swsrpcancel command. - If inter-server replication was being performed and cancellation is not possible from the active server, cancel processing from the inactive server
166 - If processing cannot be cancelled using commands, use ETERNUS Web GUI to cancel it. The likely causes of a lack of free space in the Snap Data Pool are as follows: a. The estimate of the size of the Snap Data Pool is not accurate. b. The estimate of the size of the Snap Data Pool is accurate but, as a result of a large volume being updated in the Snap Data Volume when the SnapOPC/SnapOPC+ session does not exist, the capacity of the Snap Data Pool is being used up. The use status of the Snap Data Pool can be checked by specifying "poolstat" subcommand in the swstsdv command. If "a." applies, re-estimate the size of the Snap Data Pool, and after increasing the size of the Snap Data Pool, recreate the Snap Data Volume. If "b." applies, use ETERNUS Web GUI or, specify "init" subcommand in the swstsdv command, then initialize the Snap Data Volume. Recreation of the partition (slice) is required after recreation/initialization of the Snap Data Pool Error (halt) on Remote Copy Processing The REC restart (Resume) method varies, depending on the halt status. Execute the swsrpstat command with the -H option specified to check the halt status, and then implement the relevant countermeasure. - For "halt(use-disk-buffer)" or "halt(use-buffer)" This status means that data is saved to the REC Disk buffer or REC buffer because data cannot be transferred due to a path closure (halt). In order to restart REC, perform path recovery before a space shortage occurs for the REC Disk buffer or REC buffer. After recovery, the ETERNUS Disk storage system restarts REC automatically. If a space shortage has already occurred for the REC Disk buffer or REC buffer, the "halt(sync) or halt (equivalent)" status shown below occurs. Implement the countermeasures for that status. - For "halt(sync) or halt(equivalent)" This status means that data transfer processing was discontinued due to a path closure (halt). The REC restart method differs for different REC Recovery modes. For Automatic Recovery Mode 1. Remove the cause that made all paths close (halt). 2. ETERNUS Disk storage system automatically restarts (Resume) REC. For Manual Recovery Mode 1. Remove the cause that made all paths close (halt). 2. Execute the swsrpmake command to forcibly suspend the REC that is in the halt status. [For volume units] swsrpmake -j < replication source volume name > <replication destination volume name > [For group units] swsrpmake -j -Xgroup <group name> 3. Execute the swsrpstartsync command to restart (Resume) the REC. The -t option must be specified if REC is being restarted after a forcible suspend. [For volume units] swsrpstartsync -t <replication source volume name > <replication destination volume name > [For group units] swsrpstartsync -t -Xgroup <group name>
167 7.5 Changing Operating Environment Server information batch change operations preserve the consistency of server information in systems managed by AdvancedCopy Manager. All Managed Server services and transactions in the systems that include a Management Server and Management Server transactions must be running when these changes are made. Note - If the stgxfwcmmodsrv command is used to change IP addresses, or similar. Do not execute backup management commands or replication management commands at the Management Server that executes the stgxfwcmmodsrv command, nor at any of the Managed Servers managed by Management Server transactions, either before or during execution of stgxfwcmmodsrv command. - If the stgxfwcmmodsrv command terminates abnormally, implement recovery in accordance with the action indicated in the error message. If backup management or replication management commands are accidentally executed either before or during execution of the server information change commands. - If the backup management and replication management commands terminate abnormally, wait until the stgxfwcmmodsrv command terminates normally, then re-execute the backup management and replication management commands Changing IP Address of Management Server For information about changing the IP address of a Management Server, refer to "Changing IP Address of Management Server" in the ETERNUS SF AdvancedCopy Manager Operation Guide relevant to the OS of the Management Server Changing IP Address of Managed Server Change the IP address of a Managed Server as follows: - When the Storage Cruiser's agent has been installed on a Managed Server 1. On the target Managed Server, stop the AdvancedCopy Manager daemons. For more information on stopping daemons, refer to "Chapter 2 Starting and Stopping Daemons". 2. On the target Managed Server, stop the Storage Cruiser's agent daemon. Refer to "Starting and Stopping Agent" in the ETERNUS SF Storage Cruiser Operation Guide for information on how to stop it. 3. On the target Managed Server, change the system IP address. 4. On the target Managed Server, restart the AdvancedCopy Manager daemons. For more information on starting a daemons, refer to "Chapter 2 Starting and Stopping Daemons". 5. Refer to "setagtip (Agent Information Change Command)" in the ETERNUS SF Storage Cruiser Operation Guide to change the Storage Cruiser agent's starting IP address. 6. On the target Managed Server, start the Storage Cruiser's agent daemon. Refer to "Starting and Stopping Agent" in the ETERNUS SF Storage Cruiser Operation Guide for information on how to start it. 7. Refer to "Change Server Information" in the ETERNUS SF Web Console Guide and change the IP address information. - When the Storage Cruiser's agent has not been installed on the Managed Server 1. On the target Managed Server, stop the AdvancedCopy Manager daemons. For more information on stopping daemons, refer to "Chapter 2 Starting and Stopping Daemons". 2. On the target Managed Server, change the system IP address. 3. On the target Managed Server, start the AdvancedCopy Manager daemons. For more information on stopping daemons, refer to "Chapter 2 Starting and Stopping Daemons". 4. When AdvancedCopy Manager is being operated using the Web Console, refer to "Change Server Information" in the ETERNUS SF Web Console Guide and change the IP address information. When AdvancedCopy Manager is being operated using only Command Line Interface, after creating a server information change instruction file with the Management Server, execute
168 the stgxfwcmmodsrv command with the -f option and change the IP address. When using the replication management function, execute the swsrprecoverres command with the -r option and the -h option on the Management Server. Specify the server name of the Managed Server running the replication operation with the -h option Changing Port Number of Management Server or Managed Server For information about changing the port number of a Management Server, refer to "Changing Port Number of Management Server or Managed Server" in the ETERNUS SF AdvancedCopy Manager Operation Guide relevant to the OS of the Management Server. Change the port number of a Managed Server as follows: 1. On the target Managed Server, change the port number of the AdvancedCopy Manager communication daemon (stgxfws) specified in /etc/services. 2. On the target Managed Server, restart the AdvancedCopy Manager daemons. For information on restarting daemons, refer to "Chapter 2 Starting and Stopping Daemons". 3. On the Management Server, create a server information change instruction file, and then execute the stgxfwcmmodsrv command with the -f option specified to change the port number. When using the replication management function, execute the swsrprecoverres command with the -r option and the -h option on the Management Server. Specify the server name of the Managed Server running the replication operation with the -h option. 4. Refer to "Reload Server Configuration Information" in the ETERNUS SF Web Console Guide, and reload the configuration information of the Management Server or Managed Server Changing Server Name of Management Server or Managed Server For information about changing the server name of a Management Server, refer to "Changing Server Name of Management Server or Managed Server" in the ETERNUS SF AdvancedCopy Manager Operation Guide relevant to the OS of the Management Server. Change the server name of a Managed Server as follows: 1. Change the system server name at the Management Server or Managed Server that is to be changed. If the server name to be changed is only that of a Management Server or Managed Server managed by AdvancedCopy Manager, this step is not required. 2. On the Management Server, create a server information change instruction file, and then execute the stgxfwcmmodsrv command with the -f option specified to change the server name. When using the replication management function, execute the swsrprecoverres command with the -r option and the -h option on the Management Server. Specify the server name of the Managed Server running the replication operation with the -h option. 3. Refer to "Reload Server Configuration Information" in the ETERNUS SF Web Console Guide and reload the configuration information of the Management Server or Managed Server Changing Device Configuration Changing the device configuration refers to any of the following: - Mount name change - Change from File System operation to RawDevice operation - Capacity change of partitions (mainly for re-creation of LUN mapping) - Start position for change of partitions (mainly for re-creation of LUN mapping) Backup Management Change the device configuration by using the following procedure. This processing is executed for all volumes on the disk containing the volume whose device configuration is to be changed. 1. Check whether there is a transaction volume on the target disk that needs to be backed up. If there is, delete the transaction volume. For information on this, refer to " Deleting Transaction Volume"
169 2. Check whether a backup volume exists in the target disk. If it does, delete the backup volume. For information on this, refer to " Deleting Backup Volume". 3. Change the device configuration. 4. Because the post-change device configuration needs to be reflected in the AdvancedCopy Manager data set, execute device information change processing. Refer to "3.4.4 Fetching Device Information on Managed Server", for details on changing the device information. 5. Reset the deleted transaction or backup volume in the backup. Refer to "3.4.6 Setting Operation Type for Device", for details on adding the transaction volume or backup volume. Point If the device configuration is changed (in step 3 above) before the transaction and backup volumes are deleted (in steps 1 and 2), history information cannot be deleted, and synchronized backup processing cannot be cancelled. This could possibly prevent the deletion of the transaction and backup volumes. In this case, set the emergency operation mode, and delete the history information or cancel synchronized backup processing. For details of the emergency operation mode, refer to "swsthistdel" and "swstcancelsync" Replication Management Change the device configuration as shown below. This processing applies to all the volumes on a disk whose device configuration is to be changed. 1. Check whether there are any replication volumes on the target disk. If there are, delete them. For information about this, refer to "6.6.2 Deleting Source Volume or Replica Volume". 2. Change the device configuration. 3. Because the post-change device configuration needs to be reflected in the AdvancedCopy Manager data set, execute device information change processing for AdvancedCopy Manager. Refer to "6.4.4 Fetching Device Information on Managed Server", for details about changing the device information. 4. Reset a deleted replica volume in the replication operation. Refer to "6.4.5 Configuring Source Volume and Replica Volume", for details about adding the replica volume. Point If the device configuration is changed (in step 2 above) before the replication volumes are deleted (in step 2), replication processing cannot be cancelled. This could possibly prevent the deletion of the replication volumes. In this case, set the emergency operation mode, and cancel replication processing. For details on the emergency operation mode, refer to "swsrpcancel" Operation on Model Upgrade for ETERNUS Disk Storage System Perform the procedure of "Operation on Model Upgrade for ETERNUS Disk Storage System" in the ETERNUS SF Web Console Guide
170 Chapter 8 Command References This chapter describes using commands. Note Set the following paths in the PATH environment variable to execute the commands. - /usr/sbin - /usr/bin 8.1 Backup Management Commands This section describes operations using Backup Management Commands. Note Only a root user can execute all the commands of backup management. When command execution is carried out by other users, a message "swst0601 This Command cannot be run. This is because the user is not a root user." is displayed, and then an error terminated. Note Operating Environment for Command Execution The table below lists the operating environment requirements for different commands. Table 8.1 Operating Environment for Executing Backup Management Commands Command Operating Environment of AdvancedCopy Manager swstbackstat The daemons or services of the Management Server and target Managed Server must be operating in order to execute this command, if the Management Server has either of the following parameter designations: - -h option specified - No -h option and device name are specified swstbackup To execute this command on a Management Server with the -h option specified, the daemons or services of the Management Server and target Managed Server must be operating. When the Managed Server runs on Windows and is in EC operation, the daemons or services of the Managed Server must be operating. swstbkpoldel To execute this command on a Managed Server, the daemons or services of the Management Server must be operating. To execute this command on a Management Server with the -h option specified, the daemons or services of the Management Server and target Managed Server must be operating. swstbkpoldisp The daemons or services of the Management Server and target Managed Server must be operating in order to execute this command, if the Management Server has either of the following parameter designations: - -h option specified - No -h option and device name are specified swstbkpolset To execute this command on a Managed Server, the daemons or services of the Management Server must be operating
171 Command swstcancelrest swstcancelsync Operating Environment of AdvancedCopy Manager To execute this command on a Management Server with the -h option specified, the daemons or services of the Management Server and target Managed Server must be operating. To execute this command on a Management Server with the -h option specified, the daemons or services of the Management Server and target Managed Server must be operating. To execute this command on a Management Server with the -h option specified, the daemons or services of the Management Server and target Managed Server must be operating. When the Managed Server runs on Windows and is in EC operation, the daemons or services of the Managed Server must be operating. swstcanceltrk swstdevdisp To execute this command on a Management Server with the -h option specified, the daemons or services of the Management Server and target Managed Server must be operating. The daemons or services of the Management Server and target Managed Server must be operating in order to execute this command, if the Management Server has either of the following parameter designations: - -h option specified - No -h option and device name are specified To execute this command with the -o option specified, the daemons or services of the Management Server must be operating. swstdevinfoset To execute this command on a Managed Server, the daemons or services of the Management Server must be operating. To execute this command on a Management Server with the -h option specified, the daemons or services of the Management Server and target Managed Server must be operating. swstexecstat The daemons or services of the Management Server and target Managed Server must be operating in order to execute this command, if the Management Server has either of the following parameter designations: - -h option specified - No -h option and device name are specified swsthistdel swsthistdisp To execute this command on a Management Server with the -h option specified, the daemons or services of the Management Server and target Managed Server must be operating. The daemons or services of the Management Server and target Managed Server must be operating in order to execute this command, if the Management Server has either of the following parameter designations: - -h option specified - No -h option and device name are specified swstresback - swstresrst The daemons or services of the Management Server must be operating. When the Managed Server runs on Windows, the daemons or services of the Managed Server must be always operating. swstrestore swstreststat To execute this command on a Management Server with the -h option specified, the daemons or services of the Management Server and target Managed Server must be operating. The daemons or services of the Management Server and target Managed Server must be operating in order to execute this command, if the Management Server has either of the following parameter designations: - -h option specified
172 Command swstsrsemtch Operating Environment of AdvancedCopy Manager - No -h option and device name are specified To execute this command on a Management Server with the -h option specified, the daemons or services of the Management Server and target Managed Server must be operating. To execute this command on a Managed Server, the daemons or services of the Management Server must be operating. When the Managed Server runs on Windows, the daemons or services of the Managed Server must be always operating. swststartsync To execute this command on a Management Server with the -h option specified, the daemons or services of the Management Server and target Managed Server must be operating. When the Managed Server runs on Windows, the daemons or services of the Managed Server must be operating. swstsvrdisp swstsvrset To execute this command on a Management Server with the -h option specified, the daemons or services of the Management Server and target Managed Server must be operating. To execute this command on a Managed Server, the daemons or services of the Management Server must be operating. To execute this command on a Management Server with the -h option specified, the daemons or services of the Management Server and target Managed Server must be operating. swstsyncstat The daemons or services of the Management Server and target Managed Server must be operating in order to execute this command, if the Management Server has either of the following parameter designations: - -h option specified - No -h option and device name are specified swsttrkstat The daemons or services of the Management Server and target Managed Server must be operating in order to execute this command, if the Management Server has either of the following parameter designations: - -h option specified - No -h option and device name are specified Note In a Management Server, when a display-type command that has 'disp' or 'stat' at the end of the command name is executed, the display contents will depend on the existence of the -h option and device name. For details, refer to the following table. Table 8.2 Display Contents of Display-type Commands in Management Server -h Option Device Name Specified Display Contents Does not exist No Displays all Managed Server information registered using the Backup management functionality. If an error occurs on any of the Managed Servers during display processing, the processing will be terminated. Yes Displays only the specified Management Server device information. Exists No Displays all Managed Server information specified using the -h option. Yes Displays only the specified device information for the Managed Server specified using the -h option
173 8.1.1 Environment Definition Commands This section describes the environment definition commands for backup management swstsvrset (Managed Server Configuration Information Setting Command) NAME swstsvrset - sets configuration information of a Managed Server SYNOPSIS To Execute on Managed Server /opt/fjsvswsts/bin/swstsvrset To Execute on Management Server /opt/fjsvswsts/bin/swstsvrset [-h servername] DESCRIPTION This command sets configuration information of a Managed Server. Execution of this command declares that the Managed Server on which the command is executed is a server that performs backup operations. OPTIONS -h servername When executing on the Management Server, specify the name of the target Managed Server. When executing on the target Managed server, it is not necessary to specify this option. For the server name, accurately specify the same letters, including upper and lower case, as the server name displayed with the stgxfwcmdispsrv command. EXIT STATUS =0: Completed successfully >0: Terminated abnormally EXAMPLES - Set the configuration information of a Managed Server: # /opt/fjsvswsts/bin/swstsvrset swstsvrset completed # - Set the configuration information of a Managed Server named job1 from a Management Server: # /opt/fjsvswsts/bin/swstsvrset -h job1 swstsvrset completed # NOTES - This command can only be executed if none of the following commands are running: - swstsvrset - swstbkpolset - swstbkpoldel - swstbackup - swstrestore
174 - swstcancelrest - swststartsync - swstcancelsync - swstdevinfoset - swsthistdel - swstcanceltrk - swstresback - swstresrst - swstsrsemtch swstsvrdisp (Managed Server Configuration Information Display Command) NAME swstsvrdisp - displays configuration information of a Managed Server SYNOPSIS To Execute on Managed Server /opt/fjsvswsts/bin/swstsvrdisp To Execute on Management Server /opt/fjsvswsts/bin/swstsvrdisp [-h servername] DESCRIPTION This command displays configuration information of a Managed Server that has been set using the swstsvrset command. The following information will be displayed: Title Description Storage-Server Displays a Managed Server name. OPTIONS -h servername When executing on the Management Server, specify the name of the target Managed Server. When executing on the target Managed server, it is not necessary to specify this option. For the server name, accurately specify the same letters, including upper and lower case, as the server name displayed with the stgxfwcmdispsrv command. EXIT STATUS =0: Completed successfully >0: Terminated abnormally EXAMPLES - Display configuration information of a Managed Server named Work1: # /opt/fjsvswsts/bin/swstsvrdisp Storage-Server = Work1 #
175 swstdevinfoset (Device Information Setting Command) NAME swstdevinfoset - sets the device information SYNOPSIS To Execute on Managed Server /opt/fjsvswsts/bin/swstdevinfoset -t -b -o devicename To Execute on Management Server /opt/fjsvswsts/bin/swstdevinfoset [-h servername] -t -b -o devicename DESCRIPTION Set a volume that has been allocated to the ETERNUS Disk storage system, as a transaction or backup volume. A transaction volume refers to a volume that stores transaction data to be backed up. A backup volume refers to a volume used to store a backup of this transaction data. OPTIONS -h servername -t -b -o When executing on the Management Server, specify the name of the target Managed Server. When executing on the target Managed server, it is not necessary to specify this option. For the server name, accurately specify the same letters, including upper and lower case, as the server name displayed with the stgxfwcmdispsrv command. Register the specified device as a transaction volume. Cannot be specified at the same time as the -b and -o options. Register the specified device as a backup volume. Cannot be specified at the same time as the -t and -o options. Deregister the specified device if it has been registered as a transaction or backup volume. Cannot be specified at the same time as the -t and -b options. OPERANDS devicename Specify an AdvancedCopy Manager device name. Refer to "1.4 Managing Device on AdvancedCopy Manager" for the devices to be specified. EXIT STATUS =0: Completed successfully >0: Terminated abnormally EXAMPLES - Register a device as a transaction volume: # /opt/fjsvswsts/bin/swstdevinfoset -t /dev/vg01 swstdevinfoset completed #
176 - Register a device as a backup volume: # /opt/fjsvswsts/bin/swstdevinfoset -b /dev/vg02 swstdevinfoset completed # - Deregister a device that has been registered as a transaction volume: # /opt/fjsvswsts/bin/swstdevinfoset -o /dev/vg04 swstdevinfoset completed # NOTES - A device cannot be registered as a transaction volume if: - Another device with the same box information (box identifier, OLU number, EXTENT starting position, and EXTENT size) has already been registered as a transaction volume. - The space of the device to be registered overlaps the space of an already registered working or backup volume. - The license for the ETERNUS Disk storage system that contains the specified transaction volume is one of the following: - The license is not registered in the license management function. - The license is expired. - A device cannot be registered as a backup volume if: - Another device with the same box information (box identifier, OLU number, EXTENT starting position, and EXTENT size) has already been registered as a backup volume. - The space of the device to be registered overlaps the space of an already registered work or backup volume. - The device to be set up is already mounted. However, when configuring a volume group as backup volume, the check of whether the logical volume in a volume group is mounted is not carried out. If you set a volume group as a backup volume, unmount the logical volume beforehand. - The device to be set up is registered as a replication destination volume in replication management. - The device to be set up is registered as a replication source volume of the duplicate volume information in which bidirectional copy is possible in replication management. - You must delete related backup history information before: - Changing a backup volume to a transaction volume - Cancelling the setting of a backup volume - You must delete a backup policy specified on a transaction volume before: - Changing a transaction volume to a backup volume - Cancelling the setting of a transaction volume - If using a volume group as a transaction volume: - Do not register two or more physical disks into one volume group. - Create a logical disk so that it does not consist of two or more physical disks. - Note: that a volume group that is not active cannot be set as a transaction volume. - If using a volume group as a backup volume: - Do not register two or more physical disks into one volume group. - Create a logical disk so that it does not consist of two or more physical disks
177 - The backup volume must be the same physical size as the transaction volume. In addition, the backup volume's logical disk must be in a different volume group to the transaction volume but it must have the same configuration as the transaction volume. - Note: a volume group that is not active cannot be set as a backup volume. - In order to make a configuration change to a transaction volume or a backup volume, delete the Configuration, and re-register. - The following changes are not possible unless the related synchronous processing (in an EC session) is cancelled: - Changing a setting in a suspended transaction volume - Changing a setting in a suspended backup volume - The related tracking processing (in an OPC session) must be cancelled in advance to perform the following changes: - Changing the settings of a transaction volume in tracking processing - Changing the settings of a backup volume in tracking processing - This command can be executed only while none of the following commands are running: - swstsvrset - swstdevinfoset - swstbkpolset - swstbkpoldel - swstbackup - swstrestore - swstcancelrest - swststartsync - swstcancelsync - swsthistdel - swstcanceltrk - swstsrsemtch - swstresback - swstresrst swstdevdisp (Device Usage Status Display Command) NAME swstdevdisp - displays the device information SYNOPSIS To Execute on Managed Server /opt/fjsvswsts/bin/swstdevdisp [-t] [-b [-u]] [-o] [devicename] To Execute on Management Server /opt/fjsvswsts/bin/swstdevdisp [-h servername] [-t] [-b [-u]] [-o] [devicename] DESCRIPTION This command displays information about a transaction or backup volume or any other definable device, which has been set using the swstdevinfoset command. The following information will be displayed:
178 Title Description Server Device Size Displays a Managed Server name. Displays the AdvancedCopy Manager device name. Displays the size of a partition allocated to a device. In the case of a volume group, the display also shows the size of the physical disk on which the logical disk is defined. Displays a character string by which a device can be identified: "Transaction" : Represents a transaction volume. "Backup" : Represents a backup volume. "Other" : Represents a device that can be registered as a working or backup volume. Device-Mode A backup volume is indicated as "Backup (used)" if it is being used or "Backup (free)" if it is not used. During the backup process with -suspend or -T option specified, the backup volume remains in use after history information is deleted. When the -u option is specified, "Backup (used-s)" is displayed for a backup volume in the suspend status for which history information was deleted, or "Backup (used-t)" is displayed for a backup volume in the tracking status for which history information was deleted. Mount-Point (Method) Backup-Engine Displays the mount point of a device. The file system type of the mount point is displayed inside the parentheses. However, AIX does not display mount points. Therefore, "---- (----)" is always displayed. Displays the operation type: "AdvancedCopy" : Backup operation using AdvancedCopy Manager OPTIONS -h servername -t -b -u -o When executing on the Management Server, specify the name of the target Managed Server. When executing on the target Managed server, it is not necessary to specify this option. For the server name, accurately specify the same letters, including upper and lower case, as the server name displayed with the stgxfwcmdispsrv command. Displays information on a device that has been set as a transaction volume. Displays device information on all the transaction volumes if the device name in an operand is omitted. Displays a device that has been set as a backup volume. Displays device information on all the backup volumes if the device name in an operand is omitted. Changes the display format of the Device-Mode column. Displays all the devices other than those set as a transaction or backup volume. Displays all the devices other than those set as a transaction or backup volume if the device name in an operand is omitted. Information on a device that has been set as a transaction volume will be displayed if all of the -t, -b and -o options are omitted. OPERANDS devicename Specify an AdvancedCopy Manager device name. Refer to "1.4 Managing Device on AdvancedCopy Manager" for the devices to be specified
179 Displays device information on all the transaction volumes if this operand and the associated options are omitted. EXIT STATUS =0: Completed successfully >0: Terminated abnormally EXAMPLES - Display the usage statuses of the registered devices: # /opt/fjsvswsts/bin/swstdevdisp -t -b Server Device Size Device-Mode Mount-Point (Method) Backup-Engine job2 /dev/vg Gbyte Transaction ---- (----) AdvancedCopy job2 /dev/vg Gbyte Transaction ---- (----) AdvancedCopy job2 /dev/vg Gbyte Backup (used) ---- (----) AdvancedCopy job2 /dev/vg Gbyte Backup (free) ---- (----) AdvancedCopy job2 /dev/vg Gbyte Backup (free) ---- (----) AdvancedCopy job2 /dev/vg Gbyte Backup (free) ---- (----) AdvancedCopy : # swstbkpolset (Backup Policy Setting Command) NAME swstbkpolset - sets a backup policy SYNOPSIS To Execute on Managed Server /opt/fjsvswsts/bin/swstbkpolset [-i intervaldays] [-s aavenumber] [devicename] To Execute on Management Server /opt/fjsvswsts/bin/swstbkpolset [-h servername] [-i intervaldays] [-s savenumber] [devicename] DESCRIPTION This command sets a backup policy (the number of preservation generations and the number of interval days). The number of preservation generations is the number of generations of backup data that should be kept at one time. The number of interval days means the number of days from the execution of one backup until the next backup should be performed. OPTIONS -h servername When executing on the Management Server, specify the name of the target Managed Server. When executing on the target Managed server, it is not necessary to specify this option. For the server name, accurately specify the same letters, including upper and lower case, as the server name displayed with the stgxfwcmdispsrv command. -i intervaldays Specifies the number of interval days. You can specify a value between 1 and 366. If this option is omitted during initial registration, 30 will be set as the default. If this option is omitted during update, the existing value will be inherited. -s savenumber Specifies the number of preservation generations. You can specify a value between 1 and 31. If this option is omitted during initial registration, 2 will be set as the default. If this option is omitted during update, the existing value will be inherited
180 OPERANDS devicename Specify an AdvancedCopy Manager device name. Refer to "1.4 Managing Device on AdvancedCopy Manager" for the devices to be specified. If the device name is omitted, the backup policy will be set for all the transaction volumes. EXIT STATUS =0: Completed successfully >0: Terminated abnormally EXAMPLES - To set 3 as the save number of a transaction volume as a backup policy: # /opt/fjsvswsts/bin/swstbkpolset -s 3 /dev/vg01 /dev/vg01 swstbkpolset completed # NOTES - Even if the number of interval days is specified, AdvancedCopy Manager does not automatically create a backup. - When you specify a backup policy, there must be as many backup volumes in operation according to the specified backup policy. To view information on the number of backup volumes required to perform the backup operation of a regular transaction volume, refer to "3.2.4 Preparing Backup Volume". - You can change the number of preservation generations as long as the "history information count at the time" is equal to or less than the "number of preservation generations to be specified". - No backup policy can be set if: - There are not as many backup volumes as the specified number of preservation generations. - An option for more than the maximum number of preservation generations is specified. - An option for more than the maximum interval days is specified. - The replication management function is executing a process for the target transaction volume. - The specified device is an LU (disk unit). - This command can only be executed while none of the following commands are running: - swstsvrset - swstdevinfoset - swstsrsemtch - swstresback - swstresrst swstbkpoldisp (Backup Policy Display Command) NAME swstbkpoldisp - displays a backup policy SYNOPSIS To Execute on Managed Server /opt/fjsvswsts/bin/swstbkpoldisp [devicename]
181 To Execute on Management Server /opt/fjsvswsts/bin/swstbkpoldisp [-h servername] [devicename] DESCRIPTION This command displays a backup policy that has been set for a transaction volume. The following information will be displayed: Title Description Server Device Interval-Days Save-Number Mount-Point (Method) Displays a Managed Server name. Displays the AdvancedCopy Manager device name. Displays a number of interval days. Displays a number of preservation generations. Displays the mount point of a device. The file system type of the mount point is displayed inside the parentheses. However, AIX does not display mount points. Therefore, "---- (----)" is always displayed. OPTIONS -h servername When executing on the Management Server, specify the name of the target Managed Server. When executing on the target Managed server, it is not necessary to specify this option. For the server name, accurately specify the same letters, including upper and lower case, as the server name displayed with the stgxfwcmdispsrv command. OPERANDS devicename Specify an AdvancedCopy Manager device name. Refer to "1.4 Managing Device on AdvancedCopy Manager" for the devices to be specified. If the device name is omitted, a backup policy for a transaction volume with a registered backup policy will be displayed. EXIT STATUS =0: Completed successfully >0: Terminated abnormally EXAMPLES - Display a backup policy of a transaction volume: # /opt/fjsvswsts/bin/swstbkpoldisp /dev/vg01 Server Device Interval-Days Save-Number Mount-Point (Method) job2 /dev/vg (----) # swstbkpoldel (Backup Policy Deletion Command) NAME swstbkpoldel - deletes the backup policy
182 SYNOPSIS To Execute on Managed Server /opt/fjsvswsts/bin/swstbkpoldel devicename To Execute on Management Server /opt/fjsvswsts/bin/swstbkpoldel [-h servername] devicename DESCRIPTION An existing backup policy can be deleted using this command. Delete the backup history information of the transaction volume prior to the execution of this command. OPTIONS -h servername When executing on the Management Server, specify the name of the target Managed Server. When executing on the target Managed server, it is not necessary to specify this option. For the server name, accurately specify the same letters, including upper and lower case, as the server name displayed with the stgxfwcmdispsrv command. OPERANDS devicename Specify an AdvancedCopy Manager device name. Refer to "1.4 Managing Device on AdvancedCopy Manager" for the devices to be specified. EXIT STATUS =0: Completed successfully >0: Terminated abnormally EXAMPLES - To delete the backup policies of a transaction volume: # /opt/fjsvswsts/bin/swstbkpoldel /dev/vg01 /dev/vg01 swstbkpoldel completed # NOTES - A backup policy cannot be deleted if: - The transaction volume to be deleted has backup history information. - A transaction volume whose backup policies are to be deleted has already started backup synchronous processing. - The replication management function is executing a process for the target transaction volume. - This command can only be executed while none of the following commands are running: - swstsvrset - swstdevinfoset - swstsrsemtch - swstresback - swstresrst
183 8.1.2 Operation Commands This section describes operation commands for backup management swstbackup (Backup Execution Command) NAME swstbackup - backup SYNOPSIS To Execute on Managed Server /opt/fjsvswsts/bin/swstbackup [-suspend -T] devicename [-Xdevmap devicemapfile] To Execute on Management Server /opt/fjsvswsts/bin/swstbackup [-h servername] [-suspend -T] devicename [-Xdevmap devicemapfile] DESCRIPTION When using this command, the operation changes according to different states of the Advanced Copy that is being executed. - When synchronous processing (EC) is not performed Snapshot processing (OPC) is performed and the processing of information, such as the TimeStamp and backup volume of a copy target, is registered into backup history information. - When synchronous processing (EC) is performed The state of synchronous processing is checked and, in the case of an equivalent maintenance state, backup synchronous processing is suspended. Information such as time and backup volume of a copy target is simultaneously registered into backup history information. A backup of this form is called synchronous high-speed backup. Note that it aborts when an equivalent maintenance state is not reached. To use the "Chapter 4 Backup Operation Using Suspend/Resume Function" for synchronous high-speed backup, execute the backup command with -suspend option specified, and suspend backup synchronous processing. In the above cases, a backup is established, and access to the backup volume is available immediately after the execution command. AdvancedCopy Manager executes backup pre-processing and post-processing scripts before and after backup. For information on customizing these scripts, refer to "Appendix A Pre-processing and Post-processing of Backup and Restoration". OPTIONS -h servername When executing on the Management Server, specify the name of the target Managed Server. When executing on the target Managed server, it is not necessary to specify this option. For the server name, accurately specify the same letters, including upper and lower case, as the server name displayed with the stgxfwcmdispsrv command. -Xdevmap devicemapfile Specifies a target backup volume to perform the snapshot fast backup. In the operand, specify a "device map file" in which a combination of a transaction volume and a target backup volume are described. If this option is not specified, the target backup volume will be automatically selected by the backup function. To execute this command on a remote basis using the -h option, specify a device map file (of a Managed Server) using an absolute pathname. A file name specified in Device-Map-File must not include any national character. -suspend -T This results in synchronous high-speed backup using the "Chapter 4 Backup Operation Using Suspend/Resume Function". Specifies that the differential snapshot high-speed backup be executed. This option cannot be specified during synchronous processing
184 This option is valid only for copying within a box when the ETERNUS Disk storage system supports the QuickOPC function. If this option is not specified, ordinary snapshot processing (ie, OPC without using the QuickOPC function) is started. This option must always be specified to perform a backup operation using differential snapshots. OPERANDS devicename Specify an AdvancedCopy Manager device name. Refer to "1.4 Managing Device on AdvancedCopy Manager" for the devices to be specified. EXIT STATUS =0: Completed successfully >0: Terminated abnormally EXAMPLES - Back up a transaction volume: # /opt/fjsvswsts/bin/swstbackup /dev/vg01 /dev/vg01 swstbackup completed # NOTES - To preserve data integrity, this command performs the backup only after inhibiting access to both transaction and backup volumes from all other processes. Thus, drive letters, logical volume names or device labels of devices are unassigned. This command terminates with an error if a drive letter, logical volume name or device label of a transaction volume is assigned or if: - The mount point has directories to which other volumes are also mounted. - The volume has a file in use. - To mount a transaction volume from a server other than the server on which this command is entered, unmount the transaction volume, using the authority of the backup administrator. - When setting a volume group as a transaction volume, and backing up or restoring it, modify the pre-processing and postprocessing script for backup (using an Administrator account) so that unmount/mount of all logical devices is carried out. - Backup cannot be executed in the following situations: - No backup policy has been specified for the specified transaction volume. - The backup that was executed one generation earlier was unsuccessful. - Restore is being performed to the transaction volume that is to be backed up. - Synchronous backup processing is performed in a transaction volume to be processed, but the state of equivalence is not reached; - Restoration is being executed using backup history information that will cause a generation overflow (this may occur when restoration is performed using the backup volume of the oldest history). - Any of the box information (box identifier, OLU number, EXTENT start position, and EXTENT size) of a transaction volume has been changed. - No unused backup volume was available for use as the copying destination. - The replication management function is executing a process for the target transaction volume. - The replication management function is executing a process for the target backup volume. - The replication management function is executing a process for backup records exceeding the number of preservation generations. - Changes have been made to the logical disk configuration which cannot be supported by AdvancedCopy Manager
185 - A volume group is inactive in the volume group specification. - You cannot perform backup if: - The backup volume specified by the device map file cannot be paired with the transaction volume. This occurs if: - The specified backup volume is in use. - The transaction volume and the backup volume are not the same partition size. - The device map file contains an error (refer to " Describing Device Map File"). - The device map file name includes a national character. - At this time, if existing backup history information satisfies the condition of the number of saved generations specified by the swstbkpolset command, then information on the oldest generation is automatically deleted from the backup history information during the backup process, and the backup volume is cleared. However, if -suspend or -T option is specified for the backup history information, then the backup volume with the Suspend or tracking state is not cleared and the backup volume remains in use. - The transaction volume on which the backup command is executed, one other transaction volume, and the suspended or tracking backup volume cannot be specified as backup destinations in the device map file. - This command can be executed only while none of the following commands are running: - swstsvrset - swstdevinfoset - swstsrsemtch - swstresback - swstresrst swstbackstat (Backup Execution Status Display Command) NAME swstbackstat - displays the completion status of a backup SYNOPSIS To be executed on Managed Server /opt/fjsvswsts/bin/swstbackstat [devicename] To be executed on Management Server /opt/fjsvswsts/bin/swstbackstat [-h servername] [devicename] DESCRIPTION This command displays the completion status of a backup that is being performed using the swstbackup command. The following information will be displayed: Title Description Server Transaction-Disk Backup-Disk Status Displays a Managed Server name. Displays the AdvancedCopy Manager device name of a transaction volume. Displays a backup volume name. If no backup has been collected, "----" will be displayed. Displays a backup completion status using one of the following character strings: "----" : No backup has been collected (ie, no history exists). "succeeded" : Backup has been completed
186 Execute Title Description "executing" : Copying using OPC is in progress. "failed" : Copying using OPC has been interrupted due to an error. "halt" : Copying using OPC is halt status. "?????" : Failed to get copy status. Displays how much has been copied in percentage terms if "executing" is displayed in the Status column. Displays "----" unless "executing" is displayed. OPTIONS -h servername When executing on the Management Server, specify the name of the target Managed Server. When executing on the target Managed server, it is not necessary to specify this option. For the server name, accurately specify the same letters, including upper and lower case, as the server name displayed with the stgxfwcmdispsrv command. OPERANDS devicename Specifies the "1.4 Managing Device on AdvancedCopy Manager" corresponding to a transaction volume. If this operand is omitted, the backup execution statuses of all the transaction volumes will be displayed. EXIT STATUS =0: Completed successfully >0: Terminated abnormally EXAMPLES - Display the actual copying execution status: # /opt/fjsvswsts/bin/swstbackstat Server Transaction-Disk Backup-Disk Status Execute job1 /dev/vg00 /dev/vg02 succeeded ---- job1 /dev/vg : # NOTES - Do not use the OPC stop function of ETERNUS Web GUI while the snapshot fast backup is in progress. If you do use the OPC stop function of ETERNUS Web GUI, it will display "succeeded" whether or not the backup has actually been successful. - If "failed", "halt", or "?????" is displayed in the Status column, a hardware error, etc. may have occurred. Refer to "7.3 Troubleshooting: Hardware Error During Backup" for information about this. - Backup execution status display cannot be executed in the following circumstances: - Changes have been made to the logical disk configuration that cannot be supported by AdvancedCopy Manager. - A volume group is inactive in the volume group specification swstrestore (Restore Execution Command) NAME swstrestore - restore SYNOPSIS
187 To Execute on Managed Server /opt/fjsvswsts/bin/swstrestore [-g generationno -v versionno] [-r restoredevicename] devicename To Execute on Management Server /opt/fjsvswsts/bin/swstrestore [-h servername] [-g generationno -v versionno][-r restoredevicename] devicename DESCRIPTION The data that exists in backup history information is restored using OPC. When this command is executed, AdvancedCopy Manager performs the restoration pre-processing and post-processing scripts before and after copying data using OPC. For more information on customizing these scripts, refer to "Appendix A Pre-processing and Postprocessing of Backup and Restoration". You can restore data to a device that is not a transaction volume. When you do so, the device must not be registered as a transaction volume and the device must have the same amount of space available as the specified transaction volume. You can restore data to a device that is not a transaction volume. When you do so, the device must not be registered as a transaction volume and must have the same size as the specified transaction volume. To restore data on a volume other than a transaction volume, refer to "9.1.4 Notes on Restoration". OPTIONS -h servername When executing on the Management Server, specify the name of the target Managed Server. When executing on the target Managed server, it is not necessary to specify this option. For the server name, accurately specify the same letters, including upper and lower case, as the server name displayed with the stgxfwcmdispsrv command. -g generationno Specifies the relative generation number of data to be restored. Check the relative generation number using the swsthistdisp command. -v versionno Specifies the absolute generation number of data to be restored. Check the absolute generation number using the swsthistdisp command. -r restoredevicename Specifies a restore destination device name to restore data to any device other than a transaction volume. Note: If neither the -g or -v option is specified, the latest information from the information history management will be restored. OPERANDS devicename Specifies the AdvancedCopy Manager device name corresponding to a transaction volume. Refer to "1.4 Managing Device on AdvancedCopy Manager" for the devices to be specified. EXIT STATUS =0: Completed successfully >0: Terminated abnormally
188 EXAMPLES - Restore data with relative generation number 2. For information on the relative generation number, refer to data displayed using the swsthistdisp command: # /opt/fjsvswsts/bin/swstrestore -g 2 /dev/vg01 /dev/vg01 swstrestore completed # - If the "Chapter 4 Backup Operation Using Suspend/Resume Function" is used for the backup operation on the transaction volume, the suspended synchronous processing is deleted and the restore command is executed. For information on the suspended synchronous processing, refer to the data displayed by the swstsyncstat command. Execute the swstcancelsync command to cancel the synchronous processing: # /opt/fjsvswsts/bin/swstsyncstat /dev/vg01 Server Transaction-Disk Backup-Disk Status Execute job2 /dev/vg01 /dev/vg02 suspend ---- job2 /dev/vg01 /dev/vg03 executing 75% # /opt/fjsvswsts/bin/swstcancelsync -all /dev/vg01 /dev/vg01 swstcancelsync completed # /opt/fjsvswsts/bin/swstsyncstat /dev/vg01 Server Transaction-Disk Backup-Disk Status Execute job2 /dev/vg # /opt/fjsvswsts/bin/swstrestore /dev/vg01 /dev/vg01 swstrestore completed # NOTES - On a transaction volume on which a file system has been constructed, restore a specific file as follows: 1. Mount a backup volume. Check the backup volume by executing the Backup History List view/swsthistdisp command. For the procedure for mounting the backup volume, refer to "9.1.4 Notes on Restoration". 2. Copy the file to be restored by executing, for example, the cp command. 3. Unmount the backup volume. - If a transaction volume is mounted from a server other than the server on which this command is entered, execute this command after unmounting the transaction volume, using the authority of the backup administrator. - Restoration or recovery cannot be executed in the following situations: - When both relative and absolute generation numbers have been specified. - When a device registered as a transaction volume has been specified in a parameter with the -r option. - When a device registered as a backup volume has been specified in a parameter with the -r option, the device has been registered in the backup registration information of a certain transaction volume. If you restore data to a backup volume without registered backup data, and the backup volume is used to back up a certain transaction volume, then data will be overwritten. It is recommended that a backup volume should NEVER be specified as a restore destination device. - When you perform restoration immediately after starting backup where the actual copying using OPC is still in progress, (except when the combination of transaction volume and backup volume is the same for backup and restoration). A restoration should always be performed after the actual copying using OPC is completed. Alternatively, on a transaction volume on which a file system has been constructed, perform restoration according to the method described in the Point "In a transaction volume on which a file system has been constructed, restore a specific file" above. - A transaction volume currently in use with synchronous backup processing is specified. - When any of the box information (box identifier, OLU number, EXTENT start position, and EXTENT size) of a transaction volume to be restored has been changed. - The replication management function is executing a process for the target transaction volume. - The replication management function is executing a process for the device specified in the -r option
189 - The mount point set at registration of a transaction volume has been changed. - Changes have been made to the logical disk configuration that cannot be supported by AdvancedCopy Manager. - A volume group is inactive in the volume group specification. - The suspended or tracking backup volume cannot be used as the restore destination volume. - The restore command cannot be executed on a transaction volume during synchronous processing (eg, during copying by EC, under the equivalency maintained status, in the Suspend state). If the following errors occur during restore processing, then execute the swstcancelsync command (with the -all option specified) to cancel all of the synchronous processing of the transaction volume, and execute the restore command: - "swst0639 This Command cannot be run. This is because a copy is currently running" - "swst0634 OPC cannot be run. Error code=26 (SCSI command busy)" - This command can only be executed while none of the following commands are running: - swstsvrset - swstdevinfoset - swstsrsemtch - swstresback - swstresrst swstcancelrest (Restore Cancellation Command) NAME swstcancelrest - cancels OPC-based restoration SYNOPSIS To Execute on Managed Server /opt/fjsvswsts/bin/swstcancelrest [-g generationno -v versionno] [-r restoredevicename] [- emergency] devicename To Execute on Management Server /opt/fjsvswsts/bin/swstcancelrest [-h servername][-g generationno -v versionno][-r restoredevicename] [-emergency] devicename DESCRIPTION This command cancels OPC-based restoration. A hardware error will be displayed when the swstrestore command is executed while data is being copied using OPC. Fix the cause of the hardware error and repeat restoration using the swstrestore command. Check whether a fault occurred using the swstreststat command. OPTIONS -h servername When executing on the Management Server, specify the name of the target Managed Server. When executing on the target Managed server, it is not necessary to specify this option. For the server name, accurately specify the same letters, including upper and lower case, as the server name displayed with the stgxfwcmdispsrv command
190 -g generationno Specifies the relative generation number of data being restored. This option cannot be specified at the same time as the -v option. Check the relative generation number using the swstreststat command. -v versionno Specifies the absolute generation number of data being restored. This option cannot be specified at the same time as the -g option. Check the absolute generation number using the swstreststat command. -r restoredevicename Specifies the device name if data is restored to any other device than a transaction volume. Check the device name using the swstreststat command. -emergency Emergency operation mode is available for operations. In such cases, OPC sessions are neither confirmed nor cancelled. Note: The restoration of the latest history information will be cancelled if neither the -g or -v option is specified. OPERANDS devicename Specify an AdvancedCopy Manager device name. Refer to "1.4 Managing Device on AdvancedCopy Manager" for the devices to be specified. EXIT STATUS =0: Completed successfully >0: Terminated abnormally EXAMPLES - Cancel restoration of the transaction volume: # /opt/fjsvswsts/bin/swstcancelrest -g 1 /dev/vg01 /dev/vg01 swstcancelrest completed. # - Restoration of the latest history information on the transaction volume is cancelled in emergency operation mode: # /opt/fjsvswsts/bin/swstcancelrest -emergency /dev/vg02 /dev/vg02 swstcancelrest completed. # NOTES - If you cancel OPC-based restoration using this command, the transaction volume will be in an incomplete state and can no longer be used because part of the data has already been overwritten by the copy process. Perform restoration again using the swstrestore command. - You cannot cancel restoration if: - The history specified in the -g or -v option does not exist. - Restoration is not performed on the device specified in the -r option. - Restoration is not performed from the specified history. In this case, processing is terminated with an information message "swst0303 Restoration for specified restoration device is not performed". The end status after this message is a normal end. - Changes have been made to the logical disk configuration that cannot be supported by AdvancedCopy Manager. - A volume group is inactive in the volume group specification
191 - The replication management function is executing a process for the target transaction volume - However, OPC sessions are neither confirmed nor cancelled by execution in emergency operation mode. If an OPC session is in the error suspended state, then unmanaged sessions remain. In this case, ETERNUS Web GUI must be used to cancel these sessions. - This command can only be executed while none of the following commands are running: - swstsvrset - swstdevinfoset - swstsrsemtch - swstresback - swstresrst swstreststat (Restore Execution Status Display Command) NAME swstreststat - displays the execution status of restoration SYNOPSIS To Execute on Managed Server /opt/fjsvswsts/bin/swstreststat [-g generationno -v versionno] [devicename] To Execute on Management Server /opt/fjsvswsts/bin/swstreststat [-h servername] [-g generationno -v versionno] [devicename] DESCRIPTION This command displays the execution status of restoration. The following information will be displayed: Title Description Server Transaction-Disk Generation Version Backup-Disk Restore-Device Displays a Managed Server name. Displays the AdvancedCopy Manager device name of a transaction volume. Displays the relative generation number of restored backup data. "----" will be displayed if no generation number is specified in the -g or -v option and no backup history exists. Displays the absolute generation number of restored backup data. "----" will be displayed if no generation number is specified in the -g or -v option and no backup history exists. Displays the name of a backup volume from which data should be copied and restored. "----" will be displayed if restoration is not in progress. Displays a restoration target device name unless data is copied and restored to a transaction volume. "----" will be displayed if restoration is not in progress, or if data is restored to a transaction volume. Displays the execution status: Status "----" : No copying using OPC is in progress. "executing" : Copying using OPC is in progress. "succeeded" : Copying using OPC has been completed. "failed" : Copying using OPC has been interrupted due to an error
192 Title "halt" : Copying using OPC is halt status. "?????" : Failed to get copy status. Description Execute Displays how much has been copied in percentage terms if "executing" is displayed in the Status column. Displays "----" unless "executing" is displayed. OPTIONS -h servername When executing on the Management Server, specify the name of the target Managed Server. When executing on the target Managed server, it is not necessary to specify this option. For the server name, accurately specify the same letters, including upper and lower case, as the server name displayed with the stgxfwcmdispsrv command. -g generationno Specifies the relative generation number of data whose restore execution status is to be displayed. -v versionno Specifies the absolute generation number of data whose restore execution status is to be displayed. Note: The restore execution statuses of all the histories will be displayed if both the -g and -v options are omitted. OPERANDS devicename Specify an AdvancedCopy Manager device name. Refer to "1.4 Managing Device on AdvancedCopy Manager" for the devices to be specified. If this operand is omitted, the restore execution statuses of all the transaction volumes will be displayed. EXIT STATUS =0: Completed successfully >0: Terminated abnormally EXAMPLES - Display the restore execution statuses of transaction volumes: # /opt/fjsvswsts/bin/swstreststat Server Transaction-Disk Generation Version Backup-Disk Restore-Device Status Execute job2 /dev/vg /dev/vg10 /dev/vg20 executing 75% job2 /dev/vg job2 /dev/vg /dev/vg succeeded ---- job2 /dev/vg /dev/vg12 /dev/vg21 executing 75% : # NOTES - Do not use the OPC stop function of ETERNUS Web GUI while the snapshot fast backup is in progress. If you use the OPC stop function of ETERNUS Web GUI, this command displays "succeeded" whether or not the restoration has actually been successful. - If "failed", "halt", or "?????" is displayed in the Status column, a hardware error, etc. may have occurred. Refer to "7.3 Troubleshooting: Hardware Error During Backup" for information about this. - If no generation number has been specified in the -v or -g option, the restore execution statuses of all the histories will be displayed. If, at this time, restoration is not in progress from any of the histories, "----" will be displayed in all the information columns other than "Server" and "Transaction-Disk"
193 - In the following cases, restore execution status display processing cannot be executed: - Changes have been made to the logical disk configuration which cannot be supported by AdvancedCopy Manager. - A volume group is in an inactive state in volume group specification swsthistdisp (History Information Display Command) NAME swsthistdisp - displays the backup history information SYNOPSIS To Execute on Managed Server /opt/fjsvswsts/bin/swsthistdisp [devicename] To Execute on Management Server /opt/fjsvswsts/bin/swsthistdisp [-h servername] [devicename] DESCRIPTION This command displays history information in relation to data that has been backed up. The following information will be displayed: Title Description Server Device Mount-Point Generation Version Backup-Date Backup-Disk Displays a Managed Server name. Displays the AdvancedCopy Manager device name. Displays the mount point of a device. The file system type of the mount point is displayed inside the parentheses. However, AIX does not display mount points. Therefore, "---- (----)" is always displayed. Displays a relative generation number. This item will not be displayed if no backup history information exists. Displays an absolute generation number. This item will not be displayed if no backup history information exists. Displays a TimeStamp reflecting when backup has been completed. This item will not be displayed if no backup history information exists. Displays the name of a backup volume to which data has been backed up. This item will not be displayed if no backup history information exists. Displays an actual copying execution status using one of the following character strings: Status "succeeded" : Copying using OPC has been completed. "executing" : Copying using OPC is in progress. "failed" : Copying using OPC has been interrupted due to an error. "halt" : Copying using OPC is halt status. "?????" : Failed to get copy status. This item will not be displayed if no backup history information exists. Execute Displays how much has been copied in percentage terms if "executing" is displayed in the Status column. Displays "----" unless "executing" is displayed. This item will not be displayed if no backup history information exists
194 OPTIONS -h servername When executing on the Management Server, specify the name of the target Managed Server. When executing on the target Managed server, it is not necessary to specify this option. For the server name, accurately specify the same letters, including upper and lower case, as the server name displayed with the stgxfwcmdispsrv command. OPERANDS devicename Specify an AdvancedCopy Manager device name. Refer to "1.4 Managing Device on AdvancedCopy Manager" for the devices to be specified. If this operand is omitted, the backup history information of all the transaction volumes will be displayed. EXIT STATUS =0: Completed successfully >0: Terminated abnormally EXAMPLES - Display the backup history information of all the transaction volumes: # /opt/fjsvswsts/bin/swsthistdisp Server=StrgSV01 Device=/dev/vg01 Mount-Point=---- (----) Generation Version Backup-Date Backup-Disk Status Execute /11/12 22:00 /dev/vg02 succeeded /11/11 22:00 /dev/vg03 succeeded ---- : # NOTES - If "failed", "halt", or "?????" is displayed in the Status column, a hardware error, etc. may have occurred. Refer to "7.3 Troubleshooting: Hardware Error During Backup" for information about this. - In the following cases, history information display processing cannot be executed: - Changes have been made to the logical disk configuration which cannot be supported by AdvancedCopy Manager. - A volume group is in an inactive state in volume group specification swsthistdel (History Information Deletion Command) NAME swsthistdel - deletes backup history information SYNOPSIS To Execute on Managed Server /opt/fjsvswsts/bin/swsthistdel -g generationno -v versionno -z [-emergency] devicename To Execute on Management Server /opt/fjsvswsts/bin/swsthistdel [-h servername] -g generationno -v versionno -z [-emergency] devicename
195 DESCRIPTION This command deletes backup history information. The backup volume of the deleted history is released and becomes an empty backup volume. OPTIONS -h servername When executing on the Management Server, specify the name of the target Managed Server. When executing on the target Managed server, it is not necessary to specify this option. For the server name, accurately specify the same letters, including upper and lower case, as the server name displayed with the stgxfwcmdispsrv command. -g generationno Specifies the relative generation number of backup history information to be deleted. This option cannot be specified at the same time as the -v or -z option. Check the relative generation number using the swsthistdisp command. -v versionno -z Specifies the absolute generation number of backup history information to be deleted. This option cannot be specified at the same time as the -g or -z option. Check the absolute generation number using the swsthistdisp command. Specifies that all the backup history information is to be deleted. This option cannot be specified at the same time as the -g or -v option. -emergency Emergency operation mode is available for operations. In such cases, OPC sessions are neither confirmed nor cancelled. OPERANDS devicename Specify an AdvancedCopy Manager device name. Refer to "1.4 Managing Device on AdvancedCopy Manager" for the devices to be specified. EXIT STATUS =0: Completed successfully >0: Terminated abnormally EXAMPLES - Delete a history with absolute generation number 10 of a transaction volume: # /opt/fjsvswsts/bin/swsthistdel -v 10 /dev/vg01 /dev/vg01 swsthistdel completed # - The history information of relative generation number 1 of the transaction volume is deleted in the emergency operation mode: # /opt/fjsvswsts/bin/swsthistdel -g 1 -emergency /dev/vg02 /dev/vg02 swsthistdel completed # NOTES - You cannot delete backup history information if: - The backup history information specified in the -g or -v option does not exist
196 - The specified backup history information is currently being used in a restoration. - Changes have been made to the logical disk configuration which cannot be supported by AdvancedCopy Manager. - A volume group is in an inactive state in volume group specification. - The replication management function is executing a process for the target transaction volume. - The replication management function is executing a process for the target backup volume. - However, OPC sessions are neither confirmed nor cancelled by execution in emergency operation mode. If an OPC session is in the error suspended state, then unmanaged sessions remain. In this case, ETERNUS Web GUI must be used to cancel these sessions. - Deleting the suspended history information does not cancel the synchronous processing (in an EC session). Deleting the tracking history information does not cancel the tracking processing (in an OPC session). - In synchronous high-speed backup with -suspend option specified, the backup volume remains in use even after the history information is deleted. In differential snapshot high-speed backup with -T option specified, the backup volume remains in use even after the history information is deleted. - If the history information is deleted while the OPC physical copy has not been completed in a backup operation mode other than the differential snapshot high-speed backup, physical copying of the deleted history is interrupted. In this case, the data in the backup volume is incomplete (ie, copy has stopped part way through). The backup volume is put in the unused state upon deletion of the history information and becomes ready for use in the next backup. In the differential snapshot high-speed backup mode, the physical copying of the deleted history is continued even after the history information on the incomplete OPC physical copy is deleted. Even after deletion of the history information, the backup volume is in the busy state and becomes ready for use in the next backup of the relevant transaction volume. - This command can be executed only while none of the following commands are running: - swstsvrset - swstdevinfoset - swstsrsemtch - swstresback - swstresrst swststartsync (Backup Synchronous Processing Start Command) NAME swststartsync - starts backup synchronous processing SYNOPSIS To Execute on Managed Server /opt/fjsvswsts/bin/swststartsync devicename [-Xdevmap devicemapfile] To Execute on Management Server /opt/fjsvswsts/bin/swststartsync [-h servername] devicename [-Xdevmap devicemapfile] DESCRIPTION This command starts backup synchronous processing (ie, it starts disk-to-disk copy using EC). Even if it is already in use, the transaction volume where the synchronous processing started s well as the suspended backup volume can be used as backup destinations. Except for the transaction volume where the synchronous processing started and the suspended backup volume, transaction volumes cannot be specified as backup destinations in the device map file
197 OPTIONS -h servername When executing on the Management Server, specify the name of the target Managed Server. When executing on the target Managed server, it is not necessary to specify this option. For the server name, accurately specify the same letters, including upper and lower case, as the server name displayed with the stgxfwcmdispsrv command. -Xdevmap devicemapfile Specifies a target backup volume to perform the backup synchronous processing. In the operand, specify a device map file in which a combination of a transaction volume and a target backup volume is described. If this option is not specified, a target backup volume will be automatically selected. To execute this command on a remote basis using the -h option, specify a device map file of a Managed Server using an absolute pathname. A file name specified in Device-Map-File must not include any national characters. OPERANDS devicename Specify an AdvancedCopy Manager device name. Refer to "1.4 Managing Device on AdvancedCopy Manager" for the devices to be specified. EXIT STATUS =0: Completed successfully >0: Terminated abnormally EXAMPLES - To start the backup synchronous processing for a transaction volume: # /opt/fjsvswsts/bin/swststartsync /dev/vg01 /dev/vg01 swststartsync completed. # NOTES - When you execute the backup synchronous processing start command for a transaction volume to which the backup synchronous processing is already being executed, the message "swst0301 Backup synchronous processing is already in progress." is output. - You cannot start backup synchronous processing in the following cases. In any of the cases below, perform the action according to the [System Administrator Corrective Action] message. - When specifying a device that does not support the EC function. - When the backup volumes required for starting the backup synchronous processing cannot be obtained. - When specifying a device that is being restored by OPC. - When mounting the backup volume to which data is copied. - Changes have been made to the logical disk configuration which cannot be supported by AdvancedCopy Manager. - A volume group is inactive in the volume group specification. - The replication management function is executing a process for the target transaction volume. - If a suspended backup volume is the transaction volume at the start of the synchronous processing, then the suspended backup volume is selected as the backup destination with the highest priority, and the synchronous processing restarts (ie, differential copy) starts. Otherwise, the synchronous processing (ie, full copy) starts. - This command cannot be executed when any of the following commands are running: - swstsvrset - swstdevinfoset
198 - swstsrsemtch - swstresback - swstresrst swstcancelsync (Backup Synchronous Processing Cancel Command) NAME swstcancelsync - cancels the backup synchronous processing SYNOPSIS To Execute on Managed Server /opt/fjsvswsts/bin/swstcancelsync [-emergency] [-bd Backup-Device-Name -all] Device-Name To Execute on Management Server /opt/fjsvswsts/bin/swstcancelsync [-h servername] [-emergency] [-bd backupdevicename -all] devicename DESCRIPTION The backup synchronous processing can be cancelled during copying by EC or under the equivalency maintained status. The synchronous processing can be cancelled with the backup volume during copying by EC, under the equivalency maintained status, or while the Suspend state is set. Specifying cancellation of all of the synchronous processing cancels all of the backup synchronous processing including those in the Suspended state. If the system detects an error while backup synchronous processing is being executed, copying in progress at that time terminates abnormally. In this case, use this command to cancel the backup synchronous processing. Use the swstsyncstat command to check for the error. OPTIONS -h servername When executing on the Management Server, specify the name of the target Managed Server. When executing on the target Managed server, it is not necessary to specify this option. For the server name, accurately specify the same letters, including upper and lower case, as the server name displayed with the stgxfwcmdispsrv command. -emergency Emergency operation mode is available for operations. In such cases, EC sessions are neither confirmed nor cancelled. -bd backupdevicename -all The synchronous processing on a specific backup volume can be cancelled. Specify the copy destination backup volume name. In the operand, specify the AdvancedCopy Manager device name for the specified device. Note that the backup volume name and the -all option cannot be specified together. All of the synchronous processing of the transaction volume can be specified to be cancelled. Note that this specification and the -bd option cannot be used together. OPERANDS devicename Specify an AdvancedCopy Manager device name. Refer to "1.4 Managing Device on AdvancedCopy Manager" for the devices to be specified
199 EXIT STATUS =0: Completed successfully >0: Terminated abnormally EXAMPLES - Cancelling backup synchronous processing to a transaction volume: # /opt/fjsvswsts/bin/swstcancelsync /dev/vg01 /dev/vg01 swstcancelsync completed. # - Cancelling backup synchronous processing of transaction volume in the emergency operation mode: # /opt/fjsvswsts/bin/swstcancelsync -emergency /dev/vg02 /dev/vg02 swstcancelsync completed. # - Cancelling backup synchronous processing of the backup volume from the transaction volume: # /opt/fjsvswsts/bin/swstsyncstat /dev/vg04 Server Transaction-Disk Backup-Disk Status Execute job2 /dev/vg04 /dev/vg05 suspend ---- job2 /dev/vg04 /dev/vg06 executing 75% # /opt/fjsvswsts/bin/swstcancelsync /dev/vg04 -bd /dev/vg06 /dev/vg04 swstcancelsync completed. # /opt/fjsvswsts/bin/swstsyncstat /dev/vg04 Server Transaction-Disk Backup-Disk Status Execute job2 /dev/vg04 /dev/vg05 suspend ---- # - Cancelling all of the backup synchronous processing of the transaction volume: # /opt/fjsvswsts/bin/swstsyncstat /dev/vg07 Server Transaction-Disk Backup-Disk Status Execute job2 /dev/vg07 /dev/vg08 suspend ---- job2 /dev/vg07 /dev/vg09 executing 75% # /opt/fjsvswsts/bin/swstcancelsync /dev/vg07 -all /dev/vg07 swstcancelsync completed. # /opt/fjsvswsts/bin/swstsyncstat /dev/vg07 Server Transaction-Disk Backup-Disk Status Execute job2 /dev/vg # NOTES - However, EC sessions are neither confirmed nor cancelled by execution in the emergency operation mode. If an EC session is in the error suspended state or the halt state, then unmanaged sessions remain. In this event, ETERNUS Web GUI must be used to cancel these sessions. - You cannot cancel synchronous backup processing in the following case: - Changes have been made to the logical disk configuration which cannot be supported by AdvancedCopy Manager. - When a volume group is inactive in the volume group specification. - The replication management function is executing a process for the target transaction volume. - This command cannot be executed when any of the following commands are running: - swstsvrset - swstdevinfoset
200 - swstsrsemtch - swstresback - swstresrst swstsyncstat (Backup Synchronous Processing Progress Display Command) NAME swstsyncstat - displays the execution status of the backup synchronous processing SYNOPSIS To Execute on Managed Server /opt/fjsvswsts/bin/swstsyncstat [devicename] To Execute on Management Server /opt/fjsvswsts/bin/swstsyncstat [-h servername] [devicename] DESCRIPTION The execution status of the backup synchronous processing is displayed (during copying, under the equivalency maintained status, or in the suspended status). If one transaction volume has multiple EC sessions, then the statuses of all of these EC sessions are displayed. The table below lists the meaning of each title. Title Description Server Transaction-Disk Backup-Disk Displays the name of the Managed Server. Displays the AdvancedCopy Manager device name of a transaction volume. Displays the name of the backup volume. When backup synchronous processing is not being executed, the system displays "----". Displays the status of backup synchronous processing: Status Execute "----" : Backup synchronous processing is not being executed. "executing" : Backup synchronous processing is being executed but equivalency maintained status has not been established. "equivalent" : Equivalency maintained status is established. "suspend" : Suspend status is established. "failed" : Backup synchronous processing was abnormally terminated. "nosession" : No session exists (eg, due to inconsistent resource information). "halt" : Backup synchronous processing is halt status. "?????" : Failed to get copy status. Displays the progress of the backup synchronous processing as a percentage (0 to 100%). "----" is displayed when the status is Suspend and at times when the backup synchronous processing is not running. OPTIONS -h servername When executing on the Management Server, specify the name of the target Managed Server. When executing on the target Managed server, it is not necessary to specify this option. For the server name, accurately specify the same letters, including upper and lower case, as the server name displayed with the stgxfwcmdispsrv command
201 OPERANDS devicename Specify an AdvancedCopy Manager device name. Refer to "1.4 Managing Device on AdvancedCopy Manager" for the devices to be specified. When you omit the device name, the system displays the status of backup synchronous processing for all of the transaction volumes. EXIT STATUS =0: Completed successfully >0: Terminated abnormally EXAMPLES - To display the status of backup synchronous processing to a transaction volume: # /opt/fjsvswsts/bin/swstsyncstat /dev/vg01 Server Transaction-Disk Backup-Disk Status Execute job1 /dev/vg01 /dev/vg02 suspend ---- job1 /dev/vg01 /dev/vg03 executing 75% # - To display the status of backup synchronous processing for all of the transaction volumes: # /opt/fjsvswsts/bin/swstsyncstat Server Transaction-Disk Backup-Disk Status Execute job1 /dev/vg01 /dev/vg05 suspend ---- job1 /dev/vg01 /dev/vg06 executing 75% job1 /dev/vg01 /dev/vg07 suspend ---- job1 /dev/vg02 /dev/vg08 equivalent 100% job1 /dev/vg03 /dev/vg09 failed ---- job1 /dev/vg # NOTES - If "failed", "halt", or "?????" is indicated as the status of the backup synchronous processing (in the Status column), a hardware failure, etc. has possibly occurred. Refer to "7.3 Troubleshooting: Hardware Error During Backup" for more information about this. - If "nosession" is indicated as the status of the backup synchronous processing (in the Status column), resource information having inconsistency is a possible cause. Use the swstsrsemtch command to remove the inconsistency from the resource information. - In the following cases, backup synchronous processing progress display command cannot be executed: - Changes have been made to the logical disk configuration which cannot be supported by AdvancedCopy Manager. - A volume group is in an inactive state in volume group specification swstexecstat (Execution Status Display Command) NAME swstexecstat - displays the execution status of other commands executed SYNOPSIS To Execute on Managed Server /opt/fjsvswsts/bin/swstexecstat [-j] [devicename] To Execute on Management Server /opt/fjsvswsts/bin/swstexecstat [-j] [-h servername] [devicename]
202 DESCRIPTION This command displays the execution status of other commands executed on a transaction volume. The execution status of OPC/EC will be displayed if OPC/EC is being executed. The following information will be displayed: Title Description Server Device Last-Backup-Date Interval Displays a Managed Server name. Displays the AdvancedCopy Manager device name. Displays the time when the last backup execution command was accepted. Displays how many days have passed after the specified number of interval days since the last backup date has been exceeded. This item will be displayed as "DELAY=number-of-days-passing". "OK" will be displayed if the number of interval days has not been exceeded. Displays whether any of the following commands is being executed on a transaction volume. If so, "EXEC" will be displayed. Otherwise, "IDLE" will be displayed. - swstbkpolset - swstbkpoldel - swstbackup Status - swstrestore - swsthistdel - swststartsync - swstcancelsync - swstcancelrest - swstcanceltrk Mount-Point (Method) Displays the mount point of a device. The file system type of the mount point is displayed inside the parentheses. However, AIX does not display mount points. Therefore, "---- (----)" is always displayed. Displays the name of the command being executed or the progress of copying. Execute "----" : Neither a command nor OPC/EC is being executed. "swststartsync" : The backup synchronous processing start command is being processed. "swstcancelsync" : The backup synchronous processing cancel command is being processed. "swstbackup" : The backup execution command is being processed. "swstrestore" : The restore execution command is being processed. "swstcancelrest" : The restore cancellation command is being processed. "swstbkpolset" : The backup policy setting command is being processed. "swstbkpoldel" : The backup policy deletion command is being processed. "swsthistdel" : The history information deletion command is being processed. "swstcanceltrk" : The tracking cancel command is being processed. "sync(xxx%)" : EC progress rate. "sync(failed)" : EC ended abnormally. "sync(halt)" : EC is halt status. "snapshot(xxx%)" : The progress of OPC backup. "snapshot(failed)" : OPC backup ended abnormally. "snapshot(halt)" : OPC backup is halt status. "restore(xxx%)" : The progress of restoration. "restore(failed)" : OPC restoration ended abnormally. "restore(halt)" : OPC restoration is halt status. "?????" : Failed to get copy status
203 Title Description During synchronous high-speed backup with -suspend specified, no operation ("----") is indicated in the Execute column. If multiple processes are performed on transaction volumes (for example, when the backup synchronous processing start command is issued while a real copy of the snapshot backup is being handled), the display in the Execute column conforms to the following rules: - The display of a command name takes priority if both copying and command executions are in progress. - When a disk copy of the snapshot backup and a disk copy of the backup synchronous processing are being handled simultaneously, the progress of the disk copy of the backup synchronous processing is displayed. A disk copy for restoration is not performed during disk copy of the snapshot backup or backup synchronous processing due to a restriction of ETERNUS Disk storage system. The following information will be displayed when -j option is specified: Title Description Server Device Execute-Date Displays a Managed Server name. Displays the AdvancedCopy Manager device name. Displays the command execution date and time (TimeStamp). Displays whether any of the following commands are being executed on a transaction volume. If so, "EXEC" will be displayed. Otherwise, "IDLE" will be displayed. - swstbkpolset - swstbkpoldel - swstbackup Status - swstrestore - swsthistdel - swststartsync - swstcancelsync - swstcancelrest - swstcanceltrk Mount-Point (Method) Displays the mount point of a device. The file system type of the mount point is displayed inside the parentheses. However, AIX does not display mount points. Therefore, "---- (----)" is always displayed. Displays the name of the command being executed or the progress of copying. Execute "----" : Neither a command nor OPC/EC is being executed. "swststartsync" : The backup synchronous processing start command is being processed. "swstcancelsync" : The backup synchronous processing cancel command is being processed. "swstbackup" : The backup execution command is being processed. "swstrestore" : The restore execution command is being processed. "swstcancelrest" : The restore cancellation command is being processed. "swstbkpolset" : The backup policy setting command is being processed. "swstbkpoldel" : The backup policy deletion command is being processed. "swsthistdel" : The history information deletion command is being processed. "swstcanceltrk" : The tracking cancel command is being processed. "sync(xxx%)" : EC progress rate. "sync(failed)" : EC ended abnormally. "snapshot(xxx%)" : The progress of OPC backup. "snapshot(failed)" : OPC backup ended abnormally
204 Title Description "restore(xxx%)" : The progress of restoration. "restore(failed)" : OPC restoration ended abnormally. "restore(halt)" : OPC restoration is halt status. "?????" : Failed to get copy status. During synchronous high-speed backup with -suspend specified, no operation ("----") is indicated in the Execute column. OPTIONS -h servername -j When executing on the Management Server, specify the name of the target Managed Server. When executing on the target Managed server, it is not necessary to specify this option. For the server name, accurately specify the same letters, including upper and lower case, as the server name displayed with the stgxfwcmdispsrv command. Specifies to display information in another format. OPERANDS devicename Specifies the AdvancedCopy Manager device name corresponding to a transaction volume. If this operand is omitted, the execution statuses of all the transaction volumes will be displayed. EXIT STATUS =0: Completed successfully >0: Terminated abnormally EXAMPLES - Display the execution statuses of transaction volumes: # /opt/fjsvswsts/bin/swstexecstat Server Device Last-Backup-Date Interval Status Mount-Point (Method) Execute job1 /dev/vg /12/11 12:20 OK IDLE ---- (----) ---- job1 /dev/vg /12/10 12:20 DELAY=1 IDLE ---- (----) sync(22%) job1 /dev/vg /12/09 12:20 DELAY=2 IDLE ---- (----) snapshot(45%) : # - An example of using the -j option is as follows: # /opt/fjsvswsts/bin/swstexecstat -j Server Device Execute-Date Status Mount-Point (Method) Execute job1 /dev/vg /12/11 12:20 IDLE ---- (----) ---- job1 /dev/vg /12/10 12:20 IDLE ---- (----) sync(22%) job1 /dev/vg /12/09 12:20 IDLE ---- (----) snapshot(45%) : # NOTES - If "sync (failed)", "snapshot(failed)", "restore(failed)", "restore(halt)", or "?????" is displayed in the Execute column, a hardware error may have occurred. Refer to "7.3 Troubleshooting: Hardware Error During Backup" for more information about this. - In the following cases, execution status display command cannot be executed: - Changes have been made to the logical disk configuration which cannot be supported by AdvancedCopy Manager
205 - A volume group is in an inactive state in volume group specification swstcanceltrk (Tracking Cancel Command) NAME swstcanceltrk - stops tracking processing SYNOPSIS To Execute on Managed Server /opt/fjsvswsts/bin/swstcanceltrk [-copy -emergency] devicename (-bd backupdevicename -all) To Execute on Management Server /opt/fjsvswsts/bin/swstcanceltrk [-h servername] [-copy -emergency] devicename (-bd backupdevicename -all) DESCRIPTION This command stops tracking processing. OPTIONS -h servername -copy When executing on the Management Server, specify the name of the target Managed Server. When executing on the target Managed server, it is not necessary to specify this option. For the server name, accurately specify the same letters, including upper and lower case, as the server name displayed with the stgxfwcmdispsrv command. Specifies that physical copying, if active, should also be stopped (the OPC session should be cancelled). This option cannot be specified for a backup volume that has already contained a backup history. For a volume whose copy destination volume has contained a backup history, delete the history information in advance using the swsthistdel command. -emergency Specifies that the command should operate in the emergency operation mode. The command does not check tracking processing and does not stop tracking processing or the OPC session. -bd backupdevicename -all Stops tracking processing for the specified backup volume. Specify the target backup volume name as an operand. This option cannot be specified at the same time as the -all option. Stops the entire tracking processing specified for the transaction volumes. This option cannot be specified at the same time as the -bd option. OPERANDS devicename Specify an AdvancedCopy Manager device name. Refer to "1.4 Managing Device on AdvancedCopy Manager" for the devices to be specified. EXIT STATUS =0: Completed successfully >0: Terminated abnormally
206 EXAMPLES - The following example stops the tracking processing that was specified for the backup volume from the transaction volume: # /opt/fjsvswsts/bin/swstcanceltrk /dev/vg03 -bd /dev/vg08 /dev/vg03 swstcanceltrk completed. # - The following example stops tracking processing and physical copying that were specified for the transaction volume: # /opt/fjsvswsts/bin/swsttrkstat /dev/vg03 Server Transaction-Disk Backup-Disk Status Execute Update job2 /dev/vg03 /dev/vg03 executing 33% # /opt/fjsvswsts/bin/swstcanceltrk -copy /dev/vg03 -bd /dev/vg08 /dev/vg03 swstcanceltrk completed. # NOTES - If the command is executed in emergency operation mode, no OPC session is cancelled. A session that is not managed remains in operation if the command is entered during tracking. The session must be cancelled using ETERNUS Web GUI. - Tracking processing cannot be stopped under the following condition. In this case, take action according to "System Administrator Corrective Action" provided for the message output. - When tracking processing is not performed for the specified copy source and destination volumes. - This command cannot be executed while one of the following commands is being executed: - swstsvrset - swstdevinfoset - swstsrsemtch - swstresback - swstresrst swsttrkstat (Tracking Status Display Command) NAME swsttrkstat - displays the status of tracking processing SYNOPSIS To Execute on Managed Server /opt/fjsvswsts/bin/swsttrkstat [devicename] To Execute on Management Server /opt/fjsvswsts/bin/swsttrkstat [-h servername] [devicename] DESCRIPTION This command displays the status of tracking processing. When multiple types of synchronous processing are running on one transaction volume, the command displays the statuses of all types of tracking processing. The displayed data is explained below. Title Description Server Transaction-Disk Displays a Managed Server name. Displays the AdvancedCopy Manager device name of a transaction volume
207 Title Backup-Disk Displays a backup volume name. Description Displays "----" when the volume is not in the tracking status. Displays the execution status. Status Execute Update "----" : Not in the process of tracking "executing" : In the process of physical copying and tracking "tracking" : In the process of tracking "failed" : Physical copying or tracking terminated abnormally "nosession" : No session exists. (eg, resource information is inconsistent.) "?????" : Failed to get copy status. Displays the progress of copying as a percentage when "executing" is displayed in the Status column. "----" is displayed when "tracking" is displayed in the Status column. Displays the amount of updated data after logical copying as a percentage when "tracking" is displayed in the Status column. "----" is displayed when "executing" is displayed in the Status column. OPTIONS -h servername When executing on the Management Server, specify the name of the target Managed Server. When executing on the target Managed server, it is not necessary to specify this option. For the server name, accurately specify the same letters, including upper and lower case, as the server name displayed with the stgxfwcmdispsrv command. OPERANDS devicename Specify an AdvancedCopy Manager device name. Refer to "1.4 Managing Device on AdvancedCopy Manager" for the devices to be specified. If this operand is omitted, the command displays the statuses of tracking processing for all transaction volumes. EXIT STATUS =0: Completed successfully >0: Terminated abnormally EXAMPLES - The following example displays the status of tracking processing of a transaction volume: # /opt/fjsvswsts/bin/swsttrkstat /dev/vg03 Server Transaction-Disk Backup-Disk Status Execute Update job1 /dev/vg03 /dev/vg08 tracking % # - The following example displays the status of tracking processing of all transaction volumes: # /opt/fjsvswsts/bin/swsttrkstat Server Transaction-Disk Backup-Disk Status Execute Update job1 /dev/vg03 /dev/vg09 nosession job1 /dev/vg04 /dev/vg10 executing 75% ---- job1 /dev/vg05 /dev/vg11 failed job1 /dev/vg06 /dev/vg12????? job1 /dev/vg07 /dev/vg13 tracking % job1 /dev/vg : #
208 NOTES - When the execution status (ie, the value displayed in the "Status" column) is "failed" or "?????", a hardware problem, etc. has occurred. Refer to "7.3 Troubleshooting: Hardware Error During Backup" for more information about this. - When the execution status (ie, the value displayed in the "Status" column) is "nosession," the resource information is probably inconsistent. Use the swstsrsemtch command to remove any inconsistencies from the resource information. - The execution status of the tracking process cannot be displayed under the following conditions: - Changes have been made to the logical disk configuration which cannot be supported by AdvancedCopy Manager. - A volume group is in an inactive state in volume group specification Maintenance Commands This section describes the backup management maintenance commands swstsrsemtch (Resource Match Command) NAME swstsrsemtch - recovers resource information SYNOPSIS To Execute on Managed Server /opt/fjsvswsts/bin/swstsrsemtch [-x] To Execute on Management Server /opt/fjsvswsts/bin/swstsrsemtch [-x] [-h servername] DESCRIPTION This command recovers resource information if a system failure, etc. has made the resource information inconsistent. OPTIONS -h servername -x When executing on the Management Server, specify the name of the target Managed Server. When executing on the target Managed server, it is not necessary to specify this option. For the server name, accurately specify the same letters, including upper and lower case, as the server name displayed with the stgxfwcmdispsrv command. Achieves consistency with a repository. Specify this option if a backup management files and a repository become inconsistent. EXIT STATUS =0: Completed successfully >0: Terminated abnormally EXAMPLES - Recover resource information: # /opt/fjsvswsts/bin/swstsrsemtch swstsrsemtch completed #
209 NOTES - This command can only be executed if none of the following commands are running: - swstsvrset - swstbkpolset - swstbkpoldel - swstbackup - swstrestore - swstcancelrest - swststartsync - swstcancelsync - swstdevinfoset - swsthistdel - swstcanceltrk - swstresback - swstresrst - swstsrsemtch swstresback (Resource Backup Command) NAME swstresback - backup of backup management file SYNOPSIS /opt/fjsvswsts/bin/swstresback backupdirectory DESCRIPTION A backup management file is backed up to the specified directory. - Backup management file Management information, such as Managed Server configuration information The information backed up by this command can be restored by the swstresrst command. OPERANDS backupdirectory Specifies the name of a directory to which the backup management file will be saved. EXIT STATUS =0: Completed successfully >0: Terminated abnormally EXAMPLES - Backup of the backup management file: # /opt/fjsvswsts/bin/swstresback /home/backup swstresback completed #
210 NOTES - You cannot perform backup if: - The specified directory does not exist. - Copying of data to the specified directory failed because of insufficient free space, etc. - This command can be executed only while none of the following commands are running: - swstsvrset - swstbkpolset - swstbkpoldel - swstbackup - swstrestore - swstcancelrest - swststartsync - swstcancelsync - swstdevinfoset - swsthistdel - swstcanceltrk - swstresback - swstresrst - swstsrsemtch swstresrst (Resource Restore Command) NAME swstresrst - restore of backup management file SYNOPSIS /opt/fjsvswsts/bin/swstresrst backupdirectory DESCRIPTION A backup management file is restored from the specified directory. - Managed resources information Management information, such as Managed Server configuration information. OPERANDS backupdirectory The backup location directory name directed by the swstresback command is specified. EXIT STATUS =0: Completed successfully >0: Terminated abnormally
211 EXAMPLES - Restore the backup management file: # /opt/fjsvswsts/bin/swstresrst /home/backup swstresrst completed # NOTES - Before the backup management file is restored by this command, the swstsvrset command must be executed. - You cannot perform restoration if: - The specified directory does not exist. - No backup management files exist in the specified directory. - Copying of data from the specified directory for restoration failed because of insufficient free space, or for some other reason. - This command can be executed only while none of the following commands are running: - swstsvrset - swstbkpolset - swstbkpoldel - swstbackup - swstrestore - swstcancelrest - swststartsync - swstcancelsync - swstdevinfoset - swsthistdel - swstcanceltrk - swstresback - swstresrst - swstsrsemtch 8.2 Configuration Management Commands This section explains the operation of the configuration management command. This manages the information on a server device which performs backup and replication, or is a candidate for being used for backup or replication. Note Operating Environment for Command Execution The table below lists the requirements for the operating environment in which to execute the different commands. Table 8.3 Operating Environment for Executing Configuration Management Commands Command Operating Environment of AdvancedCopy Manager stgcmmodnode To execute this command on a Management Server (Management Server transaction), the Management Server (Management Server transaction) must be operating
212 Command stgenvdisp stgmgrinfoset stgmgrinfobkup stgmgrinfodisp Operating Environment of AdvancedCopy Manager This command is executable when both Management Server (Management Server transaction) and Managed Server are not operating. The package-backup-of-the-management-information execution server must be operating. The Management Server (Management Server transaction), package-backup-of-themanagement-information execution server, and package-backup-of-the-managementinformation target servers must be operating. The package-backup-of-the-management-information execution server must be operating stgcmmodnode (Management Server Information Change Command) NAME stgcmmodnode - changes or displays Management Server information SYNOPSIS /opt/fjsvswstf/bin/stgcmmodnode [-i ipaddress] [-p portnumber] [-n servername] DESCRIPTION This command has the following two functions: - Displays Management Server information specified on the Managed Server on which this command is currently executed - Changes Management Server information. This command changes the following information on a Management Server: - IP address of a Management Server - PORT number used by a communication daemon that runs on a Management Server - Server name of a Management Server Refer to the following for the change procedure which uses this command: - "7.5.1 Changing IP Address of Management Server" - "7.5.3 Changing Port Number of Management Server or Managed Server" - "7.5.4 Changing Server Name of Management Server or Managed Server" OPTIONS None Displays the server information currently being managed. -i ipaddress Specifies the IP address of a Management Server, to change the IP address of the Management Server. -p portnumber Specifies the port number of a Management Server, to change the port number of the Management Server. -n servername Specifies the server name of a Management Server to change the server name of the Management Server. This option cannot be specified if this command is executed on a Management Server
213 EXIT STATUS =0: Completed successfully >0: Terminated abnormally EXAMPLES - Display server information: # /opt/fjsvswstf/bin/stgcmmodnode swstf2413 IP Address = swstf2413 PORT Number = 1226 swstf2413 Storage Management Server's Name = fujitsu-storage-management-server # - Change the IP address of a Management Server to : # /opt/fjsvswstf/bin/stgcmmodnode -i swstf2401 Storage Management Server registry updated. # NOTES - This command can be executed only by root users. - For the port number of a Management Server, you can specify a value between 1024 and With this command, you must specify the same value as the one specified on a Management Server. An error will occur in the operation if an invalid value is specified. - To execute this command, the AdvancedCopy Manager daemons must be stopped. After successful execution, you must restart the AdvancedCopy Manager daemons stgxfwcmaddsrv (Server Information Addition Command) This command is executed by the Management Server. For more information, refer to the ETERNUS SF AdvancedCopy Manager Operation Guide relevant to the OS of the Management Server stgxfwcmmodsrv (Server Information Change Command) This command is executed by the Management Server. For more information, refer to the ETERNUS SF AdvancedCopy Manager Operation Guide relevant to the OS of the Management Server stgxfwcmdelsrv (Server Information Deletion Command) This command is executed by the Management Server. For more information, refer to the ETERNUS SF AdvancedCopy Manager Operation Guide relevant to the OS of the Management Server stgxfwcmsetdev (Device Information Collection/Reflection Command) This command is executed by the Management Server. For more information, refer to the ETERNUS SF AdvancedCopy Manager Operation Guide relevant to the OS of the Management Server stgxfwcmdeldev (Device Information Deletion Command) This command is executed by the Management Server. For more information, refer to the ETERNUS SF AdvancedCopy Manager Operation Guide relevant to the OS of the Management Server
214 8.2.7 stgxfwcmdispsrv (Server Information Display Command) This command is executed by the Management Server. For more information, refer to the ETERNUS SF AdvancedCopy Manager Operation Guide relevant to the OS of the Management Server stgxfwcmdispdev (Device Information Display Command) This command is executed by the Management Server. For more information, refer to the ETERNUS SF AdvancedCopy Manager Operation Guide relevant to the OS of the Management Server stgxfwcmdisppat (Partition Information Display Command) This command is executed by the Management Server. For more information, refer to the ETERNUS SF AdvancedCopy Manager Operation Guide relevant to the OS of the Management Server stgenvdisp (Environment Information Display Command) NAME stgenvdisp - displays the values of the environment settings SYNOPSIS /opt/fjsvswstf/bin/stgenvdisp DESCRIPTION This command displays the values of the environment settings in AdvancedCopy Manager. The contents of the displayed information are described below. Title Description Server type Manager IP address Communication Program install directory Fixed configuration directory Modifying configuration directory Version Language The server type is displayed as follows: Management server : Management Server Server : Managed Server The IP address of the Management Server is displayed. However, if no server is added, then "????" is displayed. The communication service port number (the service name in the services file: stgxfws) is displayed. Displays the "Program directory" specified during installation. Displays the "Environment directory" specified during installation. Displays the "Work directory" specified during installation. Displays the version and level of AdvancedCopy Manager. Displays the AdvancedCopy Manager language type. JAPANESE : Japanese version ENGLISH : English version EXIT STATUS =0: Completed successfully >0: Terminated abnormally
215 EXAMPLES # /opt/fjsvswstf/bin/stgenvdisp Server type : Server Manager IP address : Communication : Version : V16.3 Language : ENGLISH Program install directory : /opt Fixed configuration directory : /etc/opt Modifying configuration directory : /var/opt # NOTES - This command can be executed only by root users. - "????" is displayed for any information that cannot be displayed because of an error stgmgrinfoset (Management Information Package Backup Server Registration/Deletion Command) NAME stgmgrinfoset - registers. deletes or displays the management information SYNOPSIS /opt/fjsvswstf/bin/stgmgrinfoset [-del -d directoryname -c managementserverencoding] DESCRIPTION This command can be used to register, delete or display information about the management information package backup execution server(the server on which the stgmgrinfobkup command is executed). - This command registers the management information package backup execution server. - The command deletes the management information package backup execution server. - The command displays information about the management information package backup execution server. OPTIONS None -del Displays information about the management information package backup execution server. Deletes the management information package backup execution server. -d directoryname Specify the absolute path to the directory where the backup data is to be stored. Only alphanumeric characters and underscores can be used in the directory name. -c managementserverencoding Specify the encoding designated when the Management Server was installed. Specify ASCII. EXIT STATUS =0: Completed successfully >0: Terminated abnormally
216 EXAMPLES - Register the management information package backup execution server: (assume that the path to the directory where backup data is to be stored is /stgbkupdata, and the encoding used on the Management Server is ASCII): # /opt/fjsvswstf/bin/stgmgrinfoset -d /stgbkupdata -c ASCII swstf3000 The server which performs package backup of the management information on AdvancedCopy Manager was registered. # - Delete the management information package backup execution server: # /opt/fjsvswstf/bin/stgmgrinfoset -del swstf3001 The server which performs package backup of the management information on AdvancedCopy Manager was deleted. Delete a directory. Directory=/stgbkupdata # - Display information about the management information package backup execution server: # /opt/fjsvswstf/bin/stgmgrinfoset Directory : /stgbkupdata Manager code : ASCII # NOTES - This command can be executed only by root users. - To change the backup data storage directory, first use the -del option to delete the current directory, then register a new backup data storage directory. - Register only one Managed Server as the management information package backup execution server. - Create the directory specified in the -d option in advance stgmgrinfobkup (Management Information Package Backup Command) NAME stgmgrinfobkup - backup the management information SYNOPSIS /opt/fjsvswstf/bin/stgmgrinfobkup [-n servername] [-t backuptype] DESCRIPTION This command backup the management information stored on the Managed Server and the Management Server. OPTIONS -n servername Creates backups of the management information stored on the specified server. If this option is not specified, the management information on all Managed Server (including the Management Server) is backed up. -t backuptype Specifies the types of data that are to be backed up. Specify one of the values listed below. Do not specify more than one value in the -t option: RegiData : Registry MgrInfoData : Policy file for management information package backup
217 BkupData : Backup management ReplData : Replication management If this option is not specified, backups are created as defined in the policy file. For details on the policy file, refer to the section " Preliminaries". EXIT STATUS =0: Completed successfully >0: Terminated abnormally EXAMPLES - Back up the management information on all the Managed Server as defined in the policy file: # /opt/fjsvswstf/bin/stgmgrinfobkup swstf3014 Backup of management information is started. Start time=04/07/02 11:00:00, Server name=acm01 swstf3020 Backup of management information was ended normally. End time=04/07/02 11:02:00, Server name=acm01 swstf3014 Backup of management information is started. Start time=04/07/02 11:02:00, Server name=acm02 swstf3020 Backup of management information was ended normally. End time=04/07/02 11:05:00, Server name=acm02 swstf3021 The normal end of the backup of management information was carried out by all servers. # - Back up the management information on Managed Server as defined in the policy file: # /opt/fjsvswstf/bin/stgmgrinfobkup -n acm01 swstf3014 Backup of management information is started. Start time=04/07/02 11:00:00, Server name=acm01 swstf3020 Backup of management information was ended normally. End time=04/07/02 11:02:00, Server name=acm01 swstf3021 The normal end of the backup of management information was carried out by all servers. # - Back up the registries on all of the Managed Server: # /opt/fjsvswstf/bin/stgmgrinfobkup -t RegiData swstf3014 Backup of management information is started. Start time=04/07/02 11:00:00, Server name=acm01 swstf3020 Backup of management information was ended normally. End time=04/07/02 11:02:00, Server name=acm01 swstf3014 Backup of management information is started. Start time=04/07/02 11:02:00, Server name=acm02 swstf3020 Backup of management information was ended normally. End time=04/07/02 11:05:00, Server name=acm02 swstf3021 The normal end of the backup of management information was carried out by all servers. # - Back up the backup management located on Managed Server: # /opt/fjsvswstf/bin/stgmgrinfobkup -n acm01 -t BkupData swstf3014 Backup of management information is started. Start time=04/07/02 11:00:00, Server name=acm01 swstf3020 Backup of management information was ended normally. End time=04/07/02 11:02:00, Server name=acm01 swstf3021 The normal end of the backup of management information was carried out by all servers. # NOTES - This command can be executed only by root users
218 - Be sure to check the information (ie, a message indicating completion or an error) that is output by this command. - This command can be executed only on the management information package backup execution server. - Do not execute other AdvancedCopy Manager commands or Web Console operations while this command is running. Conversely, do not execute this command while another AdvancedCopy Manager command or a Web Console operation is running. - Do not execute this command again if it is already running. - If this command was executed under one of the following circumstances from a Managed Server on which AdvancedCopy Manager Version 14.2 or earlier is installed, backup of authentication data will not be implemented. - When AuthData was specified in the -t option - When the value "YES" was specified for the AuthData key in the Management Server section of the policy file for batch backup of management data - To save backup data to a tape or similar external medium, save all files and directories under the backup data storage directory. - Registry backups are made only when RegiData is specified in the -t option. A registry backup will not be made if the -t option is not specified. - A backup of the policy file for management information package backup is made only when MgrInfoData is specified in the -t option. No backup is made when the -t option is not specified. Additionally, specify the name of the management information package backup execution server in the -n option. - If the version of Management Server is lower than that of Managed Server, back up the management information on Management Server stgmgrinfodisp (Management Information Package Backup Status Display Command) NAME stgmgrinfodisp - displays the status of execution of the stgmgrinfobkup SYNOPSIS /opt/fjsvswstf/bin/stgmgrinfodisp [-n servername] DESCRIPTION This command displays the status of execution of the stgmgrinfobkup command. The types of information listed below are output. If no backups are created when the management information package backup command is executed or if the management information package backup command ends in error, then no data is output. Item Description Server RegiData Server name Date and time at which the management information package backup command created a backup of a registry (ie, the date and time that the management information package backup command was executed) In yy/mm/dd hh:mm:ss format BkupData Date and time at which the management information package backup command created a backup of the backup management (ie, the date and time that the management information package backup command was executed) yy/mm/dd hh:mm:ss ReplData Date and time at which the management information package backup command created a backup of replication management (ie, the date and time that the management information package backup command was executed)
219 Item yy/mm/dd hh:mm:ss Description MgrInfoData Date and time at which the management information package backup command created a backup of the policy file for management information package backup (ie, the date and time that the management information package backup command was executed) yy/mm/dd hh:mm:ss OPTIONS -n servername Specifies the name of the server where the backup status is to be output. If this option is not specified, the status of backups on the Managed Server for which the management information package backup command was executed is displayed. EXIT STATUS =0: Completed successfully >0: Terminated abnormally EXAMPLES - Output the information about all the Managed Server: # /opt/fjsvswstf/bin/stgmgrinfodisp Server: acm01 RegiData: 04/08/01 09:00:00 ReplData: 04/08/02 16:32:22 Server: acm02 RegiData: 04/08/01 09:00:00 BkupData: 04/08/03 16:00:00 # - Output the information about Managed Server named acm01: # /opt/fjsvswstf/bin/stgmgrinfodisp -n acm01 Server: acm01 RegiData: 04/08/01 09:00:00 ReplData: 04/08/02 16:32:22 # NOTES - This command can be executed only by root users. - This command can be executed only on the management information package backup execution server stgrepocnv (Repository Data Migration Command) This command is executed by the Management Server. For more information, refer to the ETERNUS SF AdvancedCopy Manager Operation Guide relevant to the OS of the Management Server. 8.3 Replication Management Commands This section describes operations using Replication Management Commands
220 Note Only a root user can execute all the commands of replication management. When command execution is carried out by other users, a message "swsrp0601 This Command cannot be run. This is because the user is not a root user." is displayed, and the command aborts. Note Operating Environment for Command Execution The table below lists the requirements for the operating environment in which to execute the different commands. Table 8.4 Operating Environment When Executing Replication Management Commands Command Operating Environment of AdvancedCopy Manager swsrpcancel swsrpchsync swsrpdelvol To execute this command on a Management Server with the -h option specified, the daemons or services of the Management Server and target Managed Server must be operating. When the Managed Server runs on Windows and is in EC operation, Windows services required by the copy destination Managed Server must be running (except when the -m or -t option is specified). For inter-server replication in the equivalency maintain state, the associated server must be operating (except when the -m option is specified). To execute this command on a Management Server with the -h option specified, the daemons or services of the Management Server and target Managed Server must be operating. To execute this command on a Managed Server, the daemons or services of the Management Server must be operating. To execute this command on a Management Server with the -h option specified, the daemons or services of the Management Server and target Managed Server must be operating. For inter-server replication, the daemons or services of the Managed Server in communication must be operating. (except when the -d option is specified). swsrprecbuffstat swsrprecbuffset swsrpmake To execute this command on a Management Server with the -h option specified, the daemons or services of the Management Server and target Managed Server must be operating. To execute this command on a Management Server with the -h option specified, the daemons or services of the Management Server and target Managed Server must be operating. To execute this command on a Management Server with the -h option specified, the daemons or services of the Management Server and target Managed Server must be operating. When the Managed Server runs on Windows and is engaged in replication on single server and EC operation, Windows services required by the Managed Server must be running. For inter-server replication, the daemons or services of the Managed Server in communication must be operating. (except when the -d option is specified). swsrprecoverres swsrprevsync swsrpsetvol To execute this command on a Management Server with the -h option specified, the daemons or services of the Management Server and target Managed Server must be operating. When the Managed Server runs on Windows, Windows services required by the Managed Server must be running. To specify the -r option, Windows services required by the Management Server must be running. To execute this command on a Management Server with the -h option specified, the daemons or services of the Management Server and target Managed Server must be operating. To execute this command on a Managed Server, Windows services required by the Management Server must be running. To execute this command on a Management Server with the -h option specified, the daemons or services of the Management Server and target Managed Server must be operating
221 Command swsrpstartsync swsrpstat swsrpvolinfo Operating Environment of AdvancedCopy Manager For inter-server replication, the daemons or services of the Managed Server in communication must be operating. To execute this command on a Management Server with the -h option specified, the daemons or services of the Management Server and target Managed Server must be operating. When the Managed Server runs on Windows, Windows services required by the Managed Server must be running. For inter-server replication, the associated server must be running (except a case where the - m option is specified). To execute this command on a Management Server with the -h option specified, the daemons or services of the Management Server and target Managed Server must be operating. To execute this command on a Management Server with the -h option specified, the daemons or services of the Management Server and target Managed Server must be operating Environment Definition Commands This section describes environment definition commands for replication management swsrpsetvol (Replication Volume Information Setting Command) NAME swsrpsetvol - sets the replication source volumes and replication destination volumes SYNOPSIS To Execute on Managed Server For Replication on Single Server /opt/fjsvswsrp/bin/swsrpsetvol [-n] [-u] [-Xgroup groupname] originalvolumename replicavolumename For Server-to-server Replication /opt/fjsvswsrp/bin/swsrpsetvol [-n] [-u] -o (ORG REP BOTH) [-Xgroup groupname] originalvolumename replicavolumename To Execute on Management Server For Replication on Single Server /opt/fjsvswsrp/bin/swsrpsetvol [-h servername] [-n] [-u] [-Xgroup groupname] originalvolumename replicavolumename For Server-to-server Replication /opt/fjsvswsrp/bin/swsrpsetvol [-h servername] [-n] [-u] -o (ORG REP BOTH) [-Xgroup groupname] originalvolumename replicavolumename DESCRIPTION This command sets the replication source volumes and replication destination volumes that will be used in a replication operation. Execute this command to declare that the replication operation will performed using the specified replication volumes. OPTIONS -h servername When executing on the Management Server, specify the name of the target Managed Server. When executing on the target Managed server, it is not necessary to specify this option
222 For the server name, accurately specify the same letters, including upper and lower case, as the server name displayed with the stgxfwcmdispsrv command. -u Specifies the direction of copying. If this option is specified, copying is performed only in the direction from replication source volume to a replication destination volume. Copying from a replication destination volume to a replication source volume is prohibited. If this option is omitted, copying between the replication source and replication destination volumes is bidirectional. -o {ORG REP BOTH} -n When performing the server-to-server replication, specify the operation server(s) authorized to manage replication. Specify one of the following for this operand: ORG : Sets the replication source server as the operation server. REP : Sets the replication destination server as the operation server. BOTH : Sets both the copy-source server and copy-destination server as operation servers. When BOTH has been specified, all commands can be executed from either the replication source server or the replication destination server. When ORG or REP was specified, the non-operation server cannot issue the following commands: - swsrpdelvol - swsrpstartsync - swsrpmake - swsrpcancel - swsrpchsync - swsrprevsync However, in the following cases, the non-operation server can issue the above commands. - When specifying the -d option with the swsrpdelvol command. - When specifying the -c option with the swsrpcancel command. - When specifying the -b option with the swsrpcancel command. If this option is omitted, replication volume information cannot be set when the sizes of the replication source volume and replication destination volume are different. When this option is specified, the sizes of the replication source volume and replication destination volume are not checked. Use this option when volume sizes are different (for example, for replication between different OSs). When the volume sizes of the replication source volume and replication destination volume are different, copying is performed as follows: The address at which copying starts is the first sector of the replication destination volume. The copy data size is the size of the smaller volume. Therefore, ensure that the size of the copy destination volume is the same size or larger than the size of the copy source volume. -Xgroup groupname Specifies that the copy source and copy destination volumes will be registered in a group. If the specified group does not exist, a new group is created. Otherwise, the specified copy source and copy destination volumes are added to an existing group. The characters that can be used for the group name are single-byte alphanumeric characters, the minus sign (-), underscore (_), number sign (#) and period (.). The first character must be a single-byte alphanumeric character. Up to 64 characters can be used
223 OPERANDS originalvolumename Specifies a replication source volume name. For the volume names of other servers, use the format "Volume-Name@Managed-Server-Name". Specifies the AdvancedCopy Manager device name for the Volume-Name. replicavolumename Specifies a replication destination volume name. For the volume names of other servers, use the format "Volume-Name@Managed-Server-Name". Specifies the AdvancedCopy Manager device name for the Volume-Name. EXIT STATUS =0: Completed successfully >0: Terminated abnormally EXAMPLES - Set replication volume information by specifying volume/dev/vg01 of Managed Server SRC-SV as the replication source volume and volume /dev/vg02 of Managed Server TARG-SV as the replication destination volume. In addition, specify one-way copying for the copy direction and specify the replication source server (SRC-SV) as the operation server. The following example shows the command executed on SRC-SV: # /opt/fjsvswsrp/bin/swsrpsetvol -u -o ORG /dev/vg01 /dev/vg02@targ-sv swsrpsetvol completed # - When the same settings are made from TARG-SV, the example is as follows (be careful with the volume name): # /opt/fjsvswsrp/bin/swsrpsetvol -u -o ORG /dev/vg01@src-sv /dev/vg02 swsrpsetvol completed # NOTES - Replication volume information cannot be set if: - Replication volume information has already been set. - The specified replication source volume and replication destination volume are already set as the replication destination volume and the replication source volume respectively. - The -n option is not specified when the sizes of the replication source volume and the replication destination volume are different. - Two volumes that have the same box information (ie, box identifier, OLU number, EXTENT start position, and EXTENT size) as the box information of the specified two volumes have already been set as replication volumes. - The replication destination volume has been registered as a backup volume by the backup management function. - The replication source volume has been registered as a backup volume by the backup management function and bi-directional copying is specified as a replication volume attribute. - The specified replication destination volume and replication source volume are volumes belonging to other servers (at least one volume must be a volume on the local server). - If the replication source volume and the replication destination volume are located on another ETERNUS Disk storage system, the remote copy function of the ETERNUS Disk storage system is not correctly set. - Communication with the Management Server fails. - Communication with a destination server fails for server-to-server replication. - Changes have been made to the logical disk configuration that cannot be supported by AdvancedCopy Manager
224 - A volume group is inactive in the volume group specification. - The license for the ETERNUS Disk storage system that contains the specified replication source/target volume is one of the following: - The license is not registered in the license management function. - The license is expired. - When using a volume group as a source volume or replica volume, the following applies: - Be sure to specify the pairs of a volume group as a source volume and replica volume. Note that this does not work between platforms - The same volume group cannot be registered as a source volume and replica volume. - When registering a volume group as a source volume and replica volume, make the logical disk configuration the same. - When you change physical information on volumes (ie, partition size, drive letter, and box information on ETERNUS Disk storage system device using such functions as an OS management tool (format command etc ) or ETERNUS Web GUI provided by ETERNUS Disk storage system, you need to reset the registered replication volume information associated with the changed volumes, by following these steps: 1. Delete the replication volume information using the swsrpdelvol command. 2. Refer to "Add/Reload Device" in the ETERNUS SF Web Console Guide to reload the configuration. Otherwise the stgxfwcmsetdev command is executed in a Management Server. 3. Reset the replication volume information using the swsrpsetvol command. - When you use a replication destination volume by mounting after a replication volume is created in another partition, the size of the replication destination volume must exactly match the size of the replication destination volume to the byte. If you do not use a replication destination volume (for example, when you need copy data, you restore it to the replication source volume and then use it), the size of the replication destination volume can be larger than the size of the replication source volume. - Group configurations cannot be made in the group configuration conditions are not met. - This command cannot be executed while any of the following commands are running: - swsrpsetvol - swsrpdelvol - swsrpstartsync - swsrpmake - swsrpcancel - swsrpchsync - swsrprevsync - swsrprecoverres swsrpvolinfo (Replication Volume Information Display Command) NAME swsrpvolinfo - displays the replication volume information SYNOPSIS To Execute on Managed Server /opt/fjsvswsrp/bin/swsrpvolinfo [-L] [originalvolumename] To Execute on Management Server /opt/fjsvswsrp/bin/swsrpvolinfo [-h servername] [-L] [originalvolumename]
225 DESCRIPTION This command displays the replication volume information registered by the swsrpsetvol command. The following information will be displayed: Title Description Server Original-Volume Size Displays a Managed Server name. Displays a replication source volume name. Displays the volume size. Additionally, in the case of a volume group, displays the size of the physical disk on which the logical disk exists. Replica-Volume Copy Displays a replication destination volume name. Displays the copying direction. uni-direction : One-way copying from a replication source volume to a replication destination volume is allowed. bi-direction : Bidirectional copying is allowed. Op-Server Displays the operation server of a pair of replication volumes. original : The replication source server is the operation server. replica : The replication destination server is the operation server. both : Sets both the copy-source server and copy-destination server as operation servers. Group (Only when the -L option is specified) Displays the group name. "----"is displayed if the copy source and destination volumes are not registered in a group. OPTIONS -h servername -L When executing on the Management Server, specify the name of the target Managed Server. When executing on the target Managed server, it is not necessary to specify this option. For the server name, accurately specify the same letters, including upper and lower case, as the server name displayed with the stgxfwcmdispsrv command. Specifies that information will be displayed using the extended format. For the items displayed by this option, refer to the table in the description above. The items that are displayed may be expanded to support new functions provided by future versions. OPERANDS originalvolumename Specifies a replication source volume name. For the volume names of other servers, use the format "Volume-Name@Managed-Server-Name." Specifies the AdvancedCopy Manager device name for the volume name. Displays all the replication volume information for the specified replication source volume. If this operand is omitted, all the replication volume information existing on the Managed Server on which this command is executed is displayed. EXIT STATUS =0: Completed successfully >0: Terminated abnormally
226 EXAMPLES - Direct that all the replication volume information on a Management Server is to be displayed on Managed Server SRC-SV: # /opt/fjsvswsrp/bin/swsrpvolinfo -h SRC-SV Server Original-Volume Size Replica-Volume Size Copy Op-Server SRC-SV /dev/vg01@src-sv 4.0 Gbyte /dev/vg01@targ-sv 4.0 Gbyte uni-direction original SRC-SV /dev/vg02@src-sv 4.0 Gbyte /dev/vg02@targ-sv 5.0 Gbyte bi-direction original SRC-SV /dev/vg03@src-sv 9.1 Gbyte /dev/vg03@targ-sv 9.1 Gbyte bi-direction replica SRC-SV /dev/vg04@src-sv 7.5 Gbyte /dev/vg04@targ-sv 7.5 Gbyte bi-direction both # NOTES - Replication volume information cannot be displayed if: - The specified volume has not been set as a replication source volume - This command cannot be executed while the following command is running: - swsrprecoverres swsrpdelvol (Replication Volume Information Deletion Command) NAME swsrpdelvol - deletes the replication volume SYNOPSIS To Execute on Managed Server /opt/fjsvswsrp/bin/swsrpdelvol [-e] [-d] originalvolumename replicavolumename To Execute on Management Server /opt/fjsvswsrp/bin/swsrpdelvol [-h servername] [-e] [-d] originalvolumename replicavolumename DESCRIPTION This command deletes the replication volume information that has been set. If copy processing is being performed on a replication volume that is to be deleted, execute the command after the copy processing has stopped. OPTIONS -h servername -e -d When executing on the Management Server, specify the name of the target Managed Server. When executing on the target Managed server, it is not necessary to specify this option. When performing the server-to-server replication, specify the name of the operation server configured with the swsrpsetvol command. For the server name, accurately specify the same letters, including upper and lower case, as the server name displayed with the stgxfwcmdispsrv command. Emergency mode is available for operations. Specifies deleting replica volume information without checking the execution state of an Advanced Copy. Use this option only when it is clear that the Advanced Copy has not executed. Specifies that no communication should take place between the linked servers in server-to-server replication. When this option is specified, replication volume information is deleted without communication taking place between the linked servers. Use the option only when recovery of one of the linked servers cannot be expected
227 The option is valid only for server-to-server replication. The option can be used on the server not specified as the operation server. OPERANDS originalvolumename Specifies a replication source volume name. For the volume names of other servers, use the format "Volume-Name@Managed-Server-Name". Specifies the AdvancedCopy Manager device name for the Volume-Name. replicavolumename Specifies a replication destination volume name. For the volume names of other servers, use the format "Volume-Name@Managed-Server-Name". Specifies the AdvancedCopy Manager device name for the Volume-Name. EXIT STATUS =0: Completed successfully >0: Terminated abnormally EXAMPLES - Delete replication volume information on Managed Server SRC-SV: # /opt/fjsvswsrp/bin/swsrpdelvol /dev/vg01 /dev/vg01@targ-sv swsrpdelvol completed # NOTES - Replication volume information cannot be deleted if: - The specified replication source volume and the replication destination volume are not set as replication volumes. - The copy processing (synchronization processing and snapshot processing) is performed between replication volumes. - For server-to-server replication, the Managed Server that executed the command is not the operation server of the replication volume. - Communication with a Management Server fails. - For server-to-server replication, communication with a destination server fails. - A volume group is inactive in the volume group specification. - However, OPC sessions are neither confirmed nor cancelled by execution in emergency operation mode. If an OPC session is in the error suspended state, then unmanaged sessions remain. In this event, ETERNUS Web GUI must be used to cancel these sessions. - If a logical volume is deleted, or if changes are made to its configuration that cannot be supported by AdvancedCopy Manager, replica volume information cannot be deleted. In this case, perform processing of a or b shown below. a. Specify the -e option and execute the command, after checking that an Advanced Copy is not processing in the replica volume to be deleted (if an Advanced Copy is running, stop the Advanced Copy with ETERNUS Disk storage system, or perform b). b. Execute the command after re-creating the logical volume with a configuration that AdvancedCopy Manager can support, or after returning the logical volume configuration to its original state. - This command cannot be executed while any of the following commands are running: - swsrpsetvol - swsrpdelvol - swsrpstartsync
228 - swsrpmake - swsrpcancel - swsrpchsync - swsrprevsync - swsrprecoverres swsrprecbuffstat (REC Buffer Information Display Command) NAME swsrprecbuffstat - displays information for the REC buffer SYNOPSIS To Execute on Managed Server /opt/fjsvswsrp/bin/swsrprecbuffstat [-L] volumename To Execute on Management Server /opt/fjsvswsrp/bin/swsrprecbuffstat [-h server-name] [-L] volumename DESCRIPTION This command displays information for the REC buffer used by ETERNUS Disk storage system when REC is performed in Consistency mode. The following information will be displayed: Title Description BoxID ID Use The box identifier for the box connected to the server where the command was executed. The ID for the REC buffer. The attribute (usage) for the REC buffer. SEND : REC buffer for sending data RECV : REC buffer for receiving data Rate The usage rate of the REC buffer as a percentage. If "Use" Is SEND Displays the usage rate of the REC buffer as a percentage. This will never be 0%, even if REC is not being performed in Consistency mode. If "Use" Is RECV "0%" will always be displayed. "----" will be displayed if the REC buffer cannot be used. RemoteBoxID DiskBuff The box identifier for the box performing a remote copy. Displays the REC Disk buffer status only when -L option is specified: : REC buffer is used for receiving - active : REC Disk buffer is available for use - invalid : REC Disk buffer is not set - warning(code=xx) : REC Disk buffer is available for use but there is a disk fault - inactive(code=xx) : REC Disk buffer cannot be used
229 Title - not_support : REC Disk buffer is not supported Description The following codes are displayed at code=xx in the case of warning or inactive: - 04 : Rebuild or other recovery operation is in progress (REC Disk buffer is available for use) - 05 : RAID that comprises the REC Disk buffer has a fault - 06 : The REC Disk buffer RAID group is being formatted - 07 : Copy destination does not support REC Disk buffer - 08 : A RAID that comprises the REC Disk buffer has no redundancy DiskRate Displays the busy rate as a percentage if the REC Disk buffer state is "active" or "warning" only when -L option is specified. If the REC Disk buffer is not being used, 0% is displayed. In cases other than the above, "---" is displayed. OPTIONS -h servername -L When executing on the Management Server, specify the name of the target Managed Server. When executing on the target Managed server, it is not necessary to specify this option. For the server name, accurately specify the same letters, including upper and lower case, as the server name displayed with the stgxfwcmdispsrv command. This option specifies to display in extended format. For the items displayed by this option, refer to the table in the description above. Note that additional items corresponding to new functions in future versions might be displayed in future when this option is specified. OPERANDS volumename Specifies the name of a volume that has been registered as a replication volume. You can only specify volumes that are connected to the Managed Server where the command is executed. Specifies the AdvancedCopy Manager device name as the volume name. EXIT STATUS =0: Completed successfully >0: Terminated abnormally EXAMPLES - Display information for the REC buffer used by the REC, and replication is performed within the Managed Server "Server1": # /opt/fjsvswsrp/bin/swsrprecbuffstat /dev/hdisk10@server1 -L BoxID = AAAAAAAAAAAAAAAAAAAAAAAAAAAAAAAAAAAAAAAA ID Use Rate RemoteBoxID DiskBuff DiskRate 1 SEND 25% BBBBBBBBBBBBBBBBBBBBBBBBBBBBBBBBBBBBBBBB active 50% # /opt/fjsvswsrp/bin/swsrprecbuffstat /dev/hdisk11@server1 BoxID = BBBBBBBBBBBBBBBBBBBBBBBBBBBBBBBBBBBBBBBB ID Use Rate RemoteBoxID DiskBuff DiskRate 1 RECV 0% AAAAAAAAAAAAAAAAAAAAAAAAAAAAAAAAAAAAAAAA #
230 - Display information for the REC buffer used by the REC in an environment where replication is being performed between Managed Server "Server1" and Managed Server "Server2": [Command executed on Managed Server "Server1"] # /opt/fjsvswsrp/bin/swsrprecbuffstat /dev/hdisk10@server1 -L BoxID = AAAAAAAAAAAAAAAAAAAAAAAAAAAAAAAAAAAAAAAA ID Use Rate RemoteBoxID DiskBuff DiskRate 1 SEND 25% BBBBBBBBBBBBBBBBBBBBBBBBBBBBBBBBBBBBBBBB active 0% 2 RECV 0% BBBBBBBBBBBBBBBBBBBBBBBBBBBBBBBBBBBBBBBB # [Command executed on Managed Server "Server2"] # /opt/fjsvswsrp/bin/swsrprecbuffstat /dev/hdisk20@server2 -L BoxID = BBBBBBBBBBBBBBBBBBBBBBBBBBBBBBBBBBBBBBBB ID Use Rate RemoteBoxID DiskBuff DiskRate 1 RECV 0% AAAAAAAAAAAAAAAAAAAAAAAAAAAAAAAAAAAAAAAA SEND 12% AAAAAAAAAAAAAAAAAAAAAAAAAAAAAAAAAAAAAAAA active 0% # - Display information for the REC buffer used by the REC if a box where the copy source volume is located has been set up to make remote copies to multiple boxes, and replication is being performed between Managed Server "Server1" and Managed Server "Server2": [Command executed on Managed Server "Server1"] # /opt/fjsvswsrp/bin/swsrprecbuffstat /dev/hdisk10@server1 -L BoxID = AAAAAAAAAAAAAAAAAAAAAAAAAAAAAAAAAAAAAAAA ID Use Rate RemoteBoxID DiskBuff DiskRate 1 SEND 25% BBBBBBBBBBBBBBBBBBBBBBBBBBBBBBBBBBBBBBBB warning(code=08) 0% 2 RECV 0% BBBBBBBBBBBBBBBBBBBBBBBBBBBBBBBBBBBBBBBB SEND 12% CCCCCCCCCCCCCCCCCCCCCCCCCCCCCCCCCCCCCCCC active 50% 4 RECV 0% CCCCCCCCCCCCCCCCCCCCCCCCCCCCCCCCCCCCCCCC SEND 12% DDDDDDDDDDDDDDDDDDDDDDDDDDDDDDDDDDDDDDDD invalid RECV 0% EEEEEEEEEEEEEEEEEEEEEEEEEEEEEEEEEEEEEEEE SEND 12% FFFFFFFFFFFFFFFFFFFFFFFFFFFFFFFFFFFFFFFF inactive(code=05) SEND 12% GGGGGGGGGGGGGGGGGGGGGGGGGGGGGGGGGGGGGGGG active 0% # NOTES - Information is displayed only for boxes that contain replication volumes for the server where the command was executed. If inter-box replication is being performed between servers, then the command must be executed on both servers involved in the replication in order to check information for the REC buffers in both boxes. - It will take a short time for changes to REC buffer settings to take effect, during which time the buffer may become unusable (the Rate column will be displayed as "----"). In this case, wait about one minute and then execute the command again. - This command cannot be executed while the following command is running: - swsrprecoverres swsrprecbuffset (REC Buffer Settings Change Command) NAME swsrprecbuffset - changes the settings of the REC buffer SYNOPSIS To Execute on Managed Server /opt/fjsvswsrp/bin/swsrprecbuffset -Xbuffid buffer-id -Xbuffuse {SEND RECV} volumename
231 To Execute on Management Server /opt/fjsvswsrp/bin/swsrprecbuffset [-h servername] -Xbuffid buffer-id -Xbuffuse {SEND RECV} volumename DESCRIPTION This command changes the settings of the REC buffer used by ETERNUS Disk storage system when REC is performed in Consistency mode. For information about the setting method of REC buffer, refer to "User's Guide Setup / Maintenance" of ETERNUS Web GUI. OPTIONS -h servername When executing on the Management Server, specify the name of the target Managed Server. When executing on the target Managed server, it is not necessary to specify this option. For the server name, accurately specify the same letters, including upper and lower case, as the server name displayed with the stgxfwcmdispsrv command. -Xbuffid buffer-id Specifies the ID for the REC buffer. -Xbuffuse {SEND RECV} Specifies the usage for the REC buffer. SEND : REC buffer for sending data RECV : REC buffer for receiving data OPERANDS volumename Specifies the name of a volume that has been registered as a replication volume. You can only specify volumes that are connected to the Managed Server where the command is executed. Specifies the AdvancedCopy Manager device name as the volume name. EXIT STATUS =0: Completed successfully >0: Terminated abnormally EXAMPLES - Change the attributes for the REC buffer used by the REC, and replication is being performed within the Managed Server "Server1": # /opt/fjsvswsrp/bin/swsrprecbuffstat /dev/hdisk10@server1 BoxID = AAAAAAAAAAAAAAAAAAAAAAAAAAAAAAAAAAAAAAAA ID Use Rate RemoteBoxID 1 SEND 25% BBBBBBBBBBBBBBBBBBBBBBBBBBBBBBBBBBBBBBBB # /opt/fjsvswsrp/bin/swsrprecbuffset -Xbuffid 1 -Xbuffuse RECV /dev/hdisk10@server1 swsrprecbuffset completed # /opt/fjsvswsrp/bin/swsrprecbuffstat /dev/hdisk10@server1 BoxID = AAAAAAAAAAAAAAAAAAAAAAAAAAAAAAAAAAAAAAAA ID Use Rate RemoteBoxID 1 RECV 0% BBBBBBBBBBBBBBBBBBBBBBBBBBBBBBBBBBBBBBBB # /opt/fjsvswsrp/bin/swsrprecbuffstat /dev/hdisk11@server1 BoxID = BBBBBBBBBBBBBBBBBBBBBBBBBBBBBBBBBBBBBBBB ID Use Rate RemoteBoxID 1 RECV 0% AAAAAAAAAAAAAAAAAAAAAAAAAAAAAAAAAAAAAAAA # /opt/fjsvswsrp/bin/swsrprecbuffset -Xbuffid 1 -Xbuffuse SEND /dev/hdisk11@server1 swsrprecbuffset completed # /opt/fjsvswsrp/bin/swsrprecbuffstat /dev/hdisk11@server1 BoxID = BBBBBBBBBBBBBBBBBBBBBBBBBBBBBBBBBBBBBBBB
232 ID Use Rate RemoteBoxID 1 SEND 12% AAAAAAAAAAAAAAAAAAAAAAAAAAAAAAAAAAAAAAAA # - Change the connected box for the REC buffer of the copy source volume, and replication is being performed between Managed Server "Server1" and Managed Server "Server2": [Command executed on Managed Server "Server1"] # /opt/fjsvswsrp/bin/swsrprecbuffstat /dev/hdisk10@server1 BoxID = AAAAAAAAAAAAAAAAAAAAAAAAAAAAAAAAAAAAAAAA ID Use Rate RemoteBoxID 1 SEND 25% BBBBBBBBBBBBBBBBBBBBBBBBBBBBBBBBBBBBBBBB 2 RECV 0% BBBBBBBBBBBBBBBBBBBBBBBBBBBBBBBBBBBBBBBB # /opt/fjsvswsrp/bin/swsrprecbuffset -Xbuffid 1 -Xbuffuse SEND /dev/hdisk11@server1 swsrprecbuffset completed # /opt/fjsvswsrp/bin/swsrprecbuffset -Xbuffid 2 -Xbuffuse RECV /dev/hdisk11@server1 swsrprecbuffset completed # /opt/fjsvswsrp/bin/swsrprecbuffstat /dev/hdisk11@server1 BoxID = AAAAAAAAAAAAAAAAAAAAAAAAAAAAAAAAAAAAAAAA ID Use Rate RemoteBoxID 1 SEND 12% BBBBBBBBBBBBBBBBBBBBBBBBBBBBBBBBBBBBBBBB 2 RECV 0% BBBBBBBBBBBBBBBBBBBBBBBBBBBBBBBBBBBBBBBB # NOTES - Settings for dedicated REC buffers must be made in advance. Change the settings while there are no Consistency mode sessions in either the ACTIVE or ERROR SUSPEND state. - It will take a short time for changes to buffer settings to take effect, during which time the REC buffer will become unusable. Do not perform REC operations during this time. - This command cannot be executed while any of the following commands are running: - swsrpsetvol - swsrpdelvol - swsrpstartsync - swsrpmake - swsrpstat - swsrpcancel - swsrpchsync - swsrprevsync - swsrprecoverres Operation Commands This section describes operation commands for replication management swsrpstartsync (Synchronous Processing Start Command) NAME swsrpstartsync - starts synchronous processing
233 SYNOPSIS To Execute on Managed Server /opt/fjsvswsrp/bin/swsrpstartsync [-y [-a -v] -k -i] [-g] [-m] [-Xskip -Xremain] [-t] [-Xda] fromvolumename tovolumename To Execute on Management Server /opt/fjsvswsrp/bin/swsrpstartsync [-h Server-Name] [-y [-a -v] -k -i] [-g] [-m] [-Xskip - Xremain] [-t] [-Xda] fromvolumename tovolumename To Execute on Managed Server: Group Specification /opt/fjsvswsrp/bin/swsrpstartsync [-y [-a -v] -k -i] [-g] [-m] [-Xskip -Xremain] [-t] [-Xda] [-Xreverse] -Xgroup groupname To Execute on Management Server: Group Specification /opt/fjsvswsrp/bin/swsrpstartsync [-h servername] [-y [-a -v] -k -i] [-g] [-m] [-Xskip - Xremain] [-t] [-Xda] [-Xreverse] -Xgroup groupname DESCRIPTION Start the synchronous replication processing (copying between disks by EC and REC). It will copy all the data from the source volume to the destination volume at the start of the synchronization process, or if run as a restart of the synchronization process it will just copy updated data to the destination volume. Use this command at the start of operation or when you want to reflect updated data (differences) from the equivalency maintenance state. OPTIONS -h servername -y -a -v When executing on the Management Server, specify the name of the target Managed Server. When executing on the target Managed server, it is not necessary to specify this option. When performing the server-to-server replication, specify the name of the operation server configured with the swsrpsetvol command. For the server name, accurately specify the same letters, including upper and lower case, as the server name displayed with the stgxfwcmdispsrv command. Specifies inter-box synchronization in synchronous mode. This option is valid only when total copy is started for inter-box replication. Specify this option together with the -a option to start the split mode for inter-box synchronization in Automatic Split mode. Specify this option together with the -v option to start the mode in Manual Split mode. Specifying the -y option without the -a or -v option starts the mode in Automatic Split mode. Not specifying the -y, -k, and -i options sets Through mode. Synchronization in intra-box replication is always handled in synchronous mode. Specifies the start of split mode for inter-box synchronization in Automatic Split mode. This option is valid only when total copy is started for inter-box replication. Specify this option together with the -y option. Specifies the start of split mode for inter-box synchronization in Manual Split mode. This option is valid only when total copy is started for inter-box replication. Specify this option together with the -y option. You must specify this option when specifying synchronization mode (the -y option) on a box that does not support Automatic Split mode
234 -k Specifies the setting of transfer mode for inter-box synchronization in Stack mode. This option is valid only when total copy is started for inter-box replication. Not specifying the -y, -k, or -i option sets Through mode. -i Specifies the setting of transfer mode for inter-box synchronization in Consistency mode. This option is valid only when total copy is started for inter-box replication. Not specifying the -y, -k, or -i option sets Through mode. -g Specifies the setting of recovery mode for inter-box synchronization in Manual Recovery mode. This option is valid only when total copy is started for inter-box replication. Not specifying this option sets Automatic Recovery mode. -m For server-to-server replication, this option specifies that communication processing with non-operational servers is not performed. When this option is specified, volume status check processing and the pre-processing for the replication destination volume of a non-operational server are not performed. This option is valid only during server-to-server replication. -t Specifies that pre-processing for the replication destination volume is not performed. Use this option if any of the following conditions apply: - AdvancedCopy Manager does not perform pre-processing or post-processing for the replication destination volume, and independent pre-processes and post-processes are inserted before and after AdvancedCopy Manager commands.(*) - Replication destination pre-processing and post-processing are judged to be unnecessary (for example, for databases constructed on RAW devices).(*) - Synchronous processing (REC) between boxes is restarted after a forcible suspend. *: If you specify this option to start or resume synchronous processing, specify the -t option also when executing the swsrpmake command. -Xgroup groupname Specifies that synchronous processing must be started for each group. -Xreverse Specifies that synchronous processing must be started for each group in the reverse direction (from replica volumes to original volumes). This option is valid only when the -Xgroup option is specified. -Xskip Specifies that synchronous processing must be suspended using the initial copy skip function. This option is valid only when total copy is started for inter-box replication. -Xremain -Xda Enables data that has been updated to the copy destination during replication established status when synchronous processing is restarted. This option is valid only when inter-box replication is restarted. This option is used to reflect to the copy destination volume only those parts of the copy source volume that have been updated, after synchronous processing has been started using the -Xskip option and backup data has been copied from the tape media to the copy destination volume. Disables update (WRITE) and access (READ) to the replication destination volume from the synchronous processing start until the replication has been completed
235 This option is valid only when synchronous processing is started. If the option is omitted, only update (WRITE) to the replication destination volume is disabled. OPERANDS fromvolumename Specifies a replication source volume name. Specifies the replication source volume or the replication destination volume set with the swsrpsetvol command. Specifies the AdvancedCopy Manager device name for the volume name. tovolumename Specifies a replication destination volume name. Specifies the replication source volume or the replication destination volume set with the swsrpsetvol command. Specifies the AdvancedCopy Manager device name for the volume name. EXIT STATUS =0: Completed successfully >0: Terminated abnormally EXAMPLES - Start replication from /dev/vg01 of a Management Server to of Managed Server SRC-SV: # /opt/fjsvswsrp/bin/swsrpstartsync -h SRC-SV /dev/vg01 /dev/vg01@targ-sv FROM=/dev/vg01@SRC-SV,TO=/dev/vg01@TARG-SV swsrpstartsync completed # - Start replication from /dev/vg01 of a Management Server to /dev/vg01@targ-sv of a Managed Server SRC-SV with replication destination volume access disabled. # /opt/fjsvswsrp/bin/swsrpstartsync -h SRC-SV -Xda /dev/vg01 /dev/vg01@targ-sv FROM=/dev/vg01@SRC-SV,TO=/dev/vg01@TARG-SV swsrpstartsync completed # - Start replication for group "GRP1": # /opt/fjsvswsrp/bin/swsrpstartsync -Xgroup GRP1 GROUP=GRP1 swsrpstartsync completed # NOTES - Replication cannot be started if: - The specified source volume and destination volume have not been set as replication volumes. - A replication source volume is specified as the copy volume and a replication destination volume is specified as the copied material volume, and one-way copy is set as the copy attribute of the replication volume. - Volume information (box identifier, OLU, EXTENT start position, and EXTENT size) is changed after operation starts. In this case, the operation cannot continue for the corresponding volume. Stop the replication operation for the corresponding volume, and then delete and reset the replication volume information. - For server-to-server replication, the Managed Server on which the command is executed is not the operation server of the replication volume. - For server-to-server replication, communication with a destination server fails. - Replication cannot be started as a result of the preceding Advanced Copy function. - Changes have been made to the logical disk configuration that cannot be supported AdvancedCopy Manager. - A volume group is inactive in the volume group specification
236 - The backup management function is executing a process for a specified source/destination volume - Either the copy source volume or the copy destination volume is a Snap Data Volume. - If the -Xgroup option is specified, replication volumes are processed in order, but processing will be terminated immediately if an error occurs. - When the replication to be performed satisfies either of the following two conditions, perform unmount of the copy target volume before executing a command. - When a replication is performed between different OSs - When the sizes of replication source volume and replication destination volume differ - When the file systems of replication source volume and replication destination volume differ In the above mentioned cases, if dismount have been performed, post-processing of the copy target volume at the time of duplicate creation results in an error. - You cannot change synchronization mode when synchronization is resumed. When synchronization is resumed, you must specify the -y, -a, -v, -k, -i, and -g options as follows: - Specify only the options that match the mode of synchronization to be resumed, or - Do not specify any of the options. - The processing of this command varies according to the status of the synchronization processing of the specified replication source and replication destination volumes. Table 8.5 Differences in Processing Corresponding to Synchronization Status Status of Synchronization Processing Processing Dismount status Total or incremental copy status Equivalency maintain status Replication established status (i.e., halt status) Start of total copy Informational message (swsrp2401) is output and the command ends normally Informational message (swsrp2401) is output and the command ends normally Start of incremental copy - Before starting the replication, run the replication pre-processing script for the replication destination volume. The contents of this script can be customized. For more information about this, refer to "Appendix C Pre-processing and Post-processing of Replication". If you do not want to implement the pre-processing script, use the -t option. If replication is started with the -Xgroup option specified, the replication pre-processing script is not executed for the copy destination volume. Therefore, pre-processing must be executed for all copy destination volumes in the group before this command is executed. - To protect processing that accesses a replication destination volume, set the replication destination volume before starting replication so that other processes cannot access it. To do so, execute a dismount command. If you cannot execute dismount resulting from any of the conditions described below, this command fails and terminates. - There is a directory in which other volumes are mounted under the mount point. - A file in the volume is being used. In addition, if the replication destination volume is being used on a server other than the server on which this command is entered, the replication-operation administrator must disable access to the replication destination volume by cancellation of the share setting, unmounting, or by some other method. - When configuring a volume group which consists of two or more logical disks as a source volume, and replicating it, make all logical devices unmount/mount using the Administrator's authority. - Refer to "9.1.1 General Notes" for notes about starting replication. - An error will occur if the synchronous process is restarted with -Xda option. When changing the access permission for replication destination volume, first cancel the current replication processing with the swsrpcancel command and then restart this command
237 - This command will terminate abnormally with the following error message if the -Xda option is set for an ETERNUS Disk storage system that does not support the Destination Access Permission function. swsrp0719 EC cannot be run. Error=17(not support.) - This command cannot be executed while any of the following commands are running: - swsrpsetvol - swsrpdelvol - swsrprecoverres swsrpmake (Replication Creation Command) NAME swsrpmake - creates a replication volume SYNOPSIS To Execute on Managed Server Synchronized Replication /opt/fjsvswsrp/bin/swsrpmake [-m] [-f] [-t] ([-j -Xconcur]) fromvolumename tovolumename Snapshot Replication /opt/fjsvswsrp/bin/swsrpmake [-m] [-f] [-t] ([-T -C -P]) fromvolumename tovolumename To Execute on Management Server Synchronized Replication /opt/fjsvswsrp/bin/swsrpmake [-h servername] [-m] [-f] [-t] ([-j -Xconcur]) fromvolumename tovolumename Snapshot Replication /opt/fjsvswsrp/bin/swsrpmake [-h servername] [-m] [-f] [-t] ([-T -C -P]) fromvolumename tovolumename To Execute on Managed Server: Group Specification Synchronized Replication /opt/fjsvswsrp/bin/swsrpmake [-m] [-f] [-t] ([-j -Xconcur]) [-Xreverse] -Xgroup groupname Snapshot Replication /opt/fjsvswsrp/bin/swsrpmake [-m] [-f] [-t] ([-T -C -P]) [-Xconcur-opc] [-Xreverse] -Xgroup groupname To Execute on Management Server: Group Specification Synchronized Replication /opt/fjsvswsrp/bin/swsrpmake [-h servername] [-m] [-f] [-t] ([-j -Xconcur]) [-Xreverse] - Xgroup groupname Snapshot Replication /opt/fjsvswsrp/bin/swsrpmake [-h servername] [-m] [-f] [-t] ([-T -C -P]) [-Xconcur-opc] [- Xreverse] -Xgroup groupname
238 DESCRIPTION When synchronization processing (EC) is not performed, this command will start snapshot processing (OPC/QuickOPC/SnapOPC/ SnapOPC+) to create a replication volume. When synchronization processing is performed, check whether the status of the processing is in the equivalency maintenance state. If so, suspend the synchronization processing and create a replication volume. The status in which synchronization processing is suspended is referred to as the replication established status. After this command is executed, the replication destination volume can be accessed. This command executes the replication pre-processing and post-processing before a replication is created. For details of these processes, refer to "Appendix C Pre-processing and Post-processing of Replication". OPTIONS -h servername -m -f -t -j -T When executing on the Management Server, specify the name of the target Managed Server. When executing on the target Managed server, it is not necessary to specify this option. When performing the server-to-server replication, specify the name of the operation server configured with the swsrpsetvol command. For the server name, accurately specify the same letters, including upper and lower case, as the server name displayed with the stgxfwcmdispsrv command. For server-to-server replication, this specifies that communication processing is not performed with the non-operation server. When this option is specified, volume status check processing and pre-processing and post-processing are not performed for the non-operation server volume. This option is valid only during server-to-server replication. Specifies that the pre-processing and post-processing are not performed for a replication source volume. Use this option only when AdvancedCopy Manager does not execute pre-processing and post-processing of the copy source volume and unique pre-processing and post-processing scripts are inserted before and after (respectively) the AdvancedCopy Manager command, or when you judge that copy pre-processing and post-processing are unnecessary (e.g., for a database constructed on a raw device). Specifies that the pre-processing and post-processing are not performed for a replication destination volume. Use this option when applied to either of the following conditions: - Pre-processing and post-processing for copy destination volume is not performed by AdvancedCopy Manager but independent pre-processing and post-processing is added in before and after AdvancedCopy Manager commands. - Pre-processing and post-processing for copy destination volume is determined to be unnecessary (e.g. Database created on RAW device) If you specify the -t option to execute the swsrpstartsync command, specify the -t option also when executing this command. Specifies that copy processing will be forcibly suspended even if the execution status of copying is "sync: Total copy or incremental copy is being performed" or "halt: Hard suspend status" in synchronization processing of intra-box replication. This option can only be used for intra-box replication; if attempted for intra-box replication, an error will occur. When this option is specified, the data in the destination volume is not guaranteed. Additionally, when this option is specified, pre-processing and post-processing for the source and destination volumes are not performed. When restarting synchronous processing (REC) between boxes, execute the swsrpstartsync command with the -t option specified. Specifies that differential snapshot processing will be executed. This option cannot be specified while synchronous processing is performed. This option is valid only for a replication within the ETERNUS Disk storage system and when the ETERNUS Disk storage system
239 supports the QuickOPC function. For a snapshot replication without specifying this option, ordinary snapshot processing (OPC without using the QuickOPC function) is started. This option must be specified to perform the replication operation using differential snapshots. -Xgroup groupname Specifies that a replication will be created for each group. -Xreverse Specifies that a replication will be created for each group in the reverse direction (i.e., from replica volumes to original volumes). This option is valid only when the -Xgroup option is specified. -Xconcur Specifies that a replication will be created using the Concurrent Suspend function. Xconcur-opc -C -P Specifies that a replication will be created using the Concurrent OPC function. Specifies that SnapOPC will be started. This option is only valid for intra-box replications and for ETERNUS Disk storage system that supports the SnapOPC function. In order to execute SnapOPC, the copy destination volume must be a Snap Data Volume. Specifies to start SnapOPC+. This option is only valid with intra-box replications and for ETERNUS Disk storage system that supports the SnapOPC+ function. In order to execute SnapOPC+, the copy destination volume must be a Snap Data Volume. An error occurs in the following cases: - The same SnapOPC+ session exists at the copy source volume and the copy destination volume. OPERANDS fromvolumename Specifies a replication source volume. Specifies the replication source volume or the replication destination volume that was set with the swsrpsetvol command. Specifies the AdvancedCopy Manager device name for the volume name. tovolumename Specifies a replication destination volume. Specifies the replication source volume or the replication destination volume that was set with the swsrpsetvol command. Specifies the AdvancedCopy Manager device name for the volume name. EXIT STATUS =0: Completed successfully >0: Terminated abnormally EXAMPLES - The Management Server instructs Managed Server SRC-SV to create a copy of /dev/vg01 in /dev/vg01@targ-sv: # /opt/fjsvswsrp/bin/swsrpmake -h SRC-SV /dev/vg01 /dev/vg01@targ-sv FROM=/dev/vg01@SRC-SV,TO=/dev/vg01@TARG-SV swsrpmake completed # - Creates a copy for the group "GRP1": # /opt/fjsvswsrp/bin/swsrpmake -Xgroup GRP1 GROUP=GRP1 swsrpmake completed #
240 - Creates a copy for the group "GRP1" by using the Concurrent OPC: # /opt/fjsvswsrp/bin/swsrpmake -Xgroup GRP1 -Xconcur-opc GROUP=GRP1 swsrpmake completed # NOTES - Replication cannot be created if: - The specified replication source and replication destination volumes are not set as replication volumes. - The synchronization processing from the specified replication source volume to the replication destination volume is not in the equivalency maintenance status. - After operation starts, physical volume information (box identifier, OLU, EXTENT start position, and EXTENT size) is changed. In this case, operation for the corresponding volume cannot continue. Stop the replication operation for the volume, and then delete and reset the replication volume information. - A destination volume has multiple mount points. - For server-to-server replication, the Managed Server on which the command is executed is not the operation server of the replication volume. - For server-to-server replication, communication with a destination server fails. - Changes have been made to the logical disk configuration which cannot be supported by AdvancedCopy Manager. - A volume group is inactive in the volume group specification. - The backup management function is executing a process for a specified source or destination volume - From the copy destination server, the command was executed with both -Xconcur and -m options specified simultaneously for any of the following ETERNUS Disk storage systems: - ETERNUS DX80/DX80 S2 (for firmware version numbers before V10L30) - ETERNUS DX90/DX90 S2 (for firmware version numbers before V10L30) - ETERNUS DX400/DX400 S2 series (for firmware version numbers before V10L30) - ETERNUS DX8000/DX8000 S2 series (for firmware version numbers before V10L30) - If the -Xgroup option is specified, processing will be terminated without creating a copy if the operation statuses of the replication volumes being processed include both snapshot-type replication and synchronous-type replication. Additionally, if the -Xgroup option is specified, replication volumes are processed in order, but processing will be terminated immediately if an error occurs. - Note the following when you specify the -Xconcur-opc option: - Specify this option together with the -Xgroup option. - If an error is detected by the preliminary check for the replication volumes to be processed, processing will be terminated without creating a copy. Refer to the following table for details of the preliminary checks: Type Details of Preliminary Checks Common When the - T option is specified Check if a pair of synchronized replications is not exist in the group. Check if a pair of volumes which is in the tracking state and a pair of volumes on which the tracking is not executed are not mixed in the group. - If this command is executed during the snapshot processing, start or restart the snapshot processing. Refer to the following table for details of copy operation: OPC/SnapOPC/SnapOPC
241 Operation Status (Display by swsrpstat -L) When the operation status of the replication volume in the group is in one of the following: - The Concurrent OPC is defined. (Status is "readying".) Copy Operation 1. Copying that is in progress is terminated. 2. Define the Concurrent OPC. Snapshot processing is newly started with the Concurrent OPC specified.t QuickOPC - Copy is not executed. (Status is "----" and Trk is "----".) - Snapshot processing is in progress and tracking is not executed. (Status is "snap" and Trk is "off".) - Snapshot processing is in progress and tracking is in progress. (Status is "snap" and Trk is "on".) - Tracking is in progress. (Status is "----" and Trk is "on".) - SnapOPC is in progress. (Status is "copy-on-write".) - SnapOPC+ is in progress. (Status is "copy-on-write(active)" or "copy-onwrite(inactive)".) - Error suspend status (Status is "failed".) Operation Status (Display by swsrpstat -L) When the operation status of the replication volume in the group is in one of the following: - The Concurrent OPC is defined. (Status is "readying".) - Copy is not executed. (Status is "----" and Trk is "----".) Copy Operation 1. Copying that is in progress is terminated. 2. Define the Concurrent OPC. 3. Differential snapshot processing is newly started with the Concurrent OPC specified. - Snapshot processing is in progress and tracking is not executed. (Status is "snap" and Trk is "off".) - SnapOPC is processing (Status is "copy-on-write") - SnapOPC+ is processing (Status is "copy-on-write(active)" or "copy-onwrite(inactive)") - Error suspend status (Status is "failed".) When the operation status of the replication volume in the group is in one of the following: Differential snapshot processing is restarted with the Concurrent OPC specified
242 Operation Status (Display by swsrpstat -L) - Snapshot processing is in progress and tracking is in progress. (Status is "snap" and Trk is "on".) Copy Operation - Tracking is in progress. (Status is "----" and Trk is "on".) - When the replication to be performed satisfies either of the following conditions, perform dismount of the copy target volume before executing a command. - When a replication is performed between different OSs - When the sizes of replication source volume and replication destination volume differ - When the file systems of replication source volume and replication destination volume differ If dismount is performed in the abovementioned case, post-processing of the copy target volume at the time of duplicate creation produces an error. - In the operation mode involving activation of the replica volume group, the post-processing script for the replica volume may take longer for command processing because the LVM management information is rewritten (recreatevg). - Before a replica is created, the pre-processing for the source volume and destination volume are executed (for synchronized replication, only pre-processing is executed). After the replica has been created, the post-processing for the source volume and destination volume is executed. The contents of the script can be customized. For more information about this refer to "Appendix C Pre-processing and Post-processing of Replication". If the -f or -t option is specified, the pre-processing and post-processing are not performed. If a replica is created with the -Xgroup option specified, the replication, pre-processing and post-processing scripts are not executed for the copy source volume/copy destination volume. Therefore, execute pre-processing for all copy source volumes/copy destination volumes in the group before this command is executed. (However, for synchronous replication, pre-processing for the copy destination volume is executed when replication starts, so it need not be executed.) In addition, post-processing must be executed after this command is executed. - If this command is executed during execution of snapshot processing, stop the copy processing in progress and restart the snapshot processing. - To protect the data, this command sets the replication source volume before creating a replica so that other processes cannot access the volume. The replication source volume is unmounted in order to disable to access it. If you cannot unmount the source volume because of the situations described below, this command fails and terminates. - There is a directory in which other volumes are mounted under the mount point. - A file on the volume is being used. In addition, if the replication source volume is being used from a server other than the server on which this command is entered, the backup-operation administrator must disable access to the replication source volume by cancellation of the share setting, unmounting, or by using some other method. If for whatever reason you do not want to remove the share setting of the replication source volume, or execute unmount or use some other method, refer to "Appendix C Pre-processing and Post-processing of Replication" and note the following: - When setting a volume group which consists of two or more disks as a source volume, and replicating it, make all logical devices unmount/mount using the Administrator's authority. - For replication pre-processing, execute the UNIX sync command to synchronize volumes and the file system. - In replication post-processing, execute the <fsck> command to check the file system at the copy destination. - When the replication source volume is being used by backup management, dismount may not possible. In this case, "swsrp2613 An error occurred in the pre-processing script for creating a replica. Error Code = 2" is output. - For Snap Data Volume, only SnapOPC and SnapOPC+ can be executed. Additionally, when restoring data from a Snap Data Volume, note that there must be a SnapOPC session between the copy source volume and the copy destination volume (Snap Data Volume)
243 - If this command is executed during snapshot processing, snapshot processing is restarted. Refer to the following table for details of copy operation: Table 8.6 Copy Operation When Command Is Executed During Snapshot Processing Operation Status (Display by swsrpstat -L) -T Option Specification Copy Operation Copy is not executed. (Status is "----" and Trk also is "----".) Copy is not executed. (Status is "----" and Trk also is "----".) Snapshot processing is in progress and tracking is not executed. (Status is "snap" and Trk is "off".) Snapshot processing is in progress and tracking is not executed. (Status is "snap" and Trk is "off".) Snapshot processing is in progress and tracking is in progress. (Status is "snap" and Trk is "on".) Snapshot processing is in progress and tracking is in progress. (Status is "snap" and Trk is "on".) Tracking is in progress. (Status is "----" and Trk is "on".) Tracking is in progress. (Status is "----" and Trk is "on".) No Yes No Yes No Yes No Yes Ordinary snapshot processing is started. Differential snapshot processing is started. Copying that is in progress is terminated and ordinary snapshot processing is restarted. Copying in progress is terminated and differential snapshot processing is restarted. Copying in progress is terminated and ordinary snapshot processing is restarted. Differential snapshot processing is restarted. Tracking processing is terminated and ordinary snapshot processing is restarted. Differential snapshot processing is restarted. - Refer to "9.1.1 General Notes" for notes on creating replication. - This command cannot be executed while any of the following commands are running: - swsrpsetvol - swsrpdelvol - swsrprecoverres swsrpstat (Operation Status Display Command) NAME swsrpstat - displays the operation status SYNOPSIS To Execute on Managed Server /opt/fjsvswsrp/bin/swsrpstat [ [-L] [-Xdate] [-Xda] [-Xall] ] [-E] [-H] [-O] [originalvolumename] To Execute on Management Server /opt/fjsvswsrp/bin/swsrpstat [-h Server-Name] [ [-L] [-Xdate] [-Xda] [-Xall] ] [-E] [-H] [-O] [originalvolumename] To Execute on Managed Server: Group Specification /opt/fjsvswsrp/bin/swsrpstat [ [-L] [-Xdate] [-Xda] [-Xall] ] [-E] [-H] [-O] -Xgroup groupname
244 To Execute on Management Server: Group Specification /opt/fjsvswsrp/bin/swsrpstat [-h servername] [ [-L] [-Xdate] [-Xda] [-Xall] ] [-E] [-H] [-O] - Xgroup groupname DESCRIPTION This command displays the operation status of the specified volume. If a volume is not specified, the operation status of each replication volume is displayed. The following information will be displayed: Title Description Server Original-Volume Replica-Volume Direction Displays a Managed Server name. Displays a replication source volume name. Displays a replication destination volume name. Displays the copy direction if a copy session exists. regular : Copying from the replication source to the replication destination is being performed. reverse : Copying from the replication destination to the replication source is being performed : Copying is not being performed. Status Displays the execution status : Copying is not being performed. readying : The Concurrent OPC has been defined. sync : Total copy or incremental copy is being performed. equivalent : Equivalency maintained status. replicated : Replication established status. copy-on-write : SnapOPC processing is being performed. copy-on-write(active) : SnapOPC+ processing is being performed (most recent snap generation). copy-on-write(inactive) : SnapOPC+ processing is being performed (past snap generation). failed : Error suspend status. failed(badsector) : There is a bad sector in the copy source. failed(overflow) : There is insufficient Snap Data Volume or Snap Data Pool capacity. failed(other) : The error suspend status is neither failed(badsector) or failed(overflow). halt : Hard suspend status. halt(sync) : Hard suspend status (hard suspend status has been entered during a REC total copy or differential copy). halt(equivalent) : Hard suspend status (hard suspend status has been entered during an REC equivalency maintenance state). halt(use-buffer) : A line fault occurred and the REC buffer is in use. (*1) halt(use-disk-buffer) : A line fault occurred and the REC Disk buffer is in use. (*1) snap : OPC or QuickOPC processing is being performed.????? : Failed to get copy status. *1: "halt(use-buffer)" and "halt(use-disk-buffer)" are output when the following two conditions are fulfilled: - The -H option was specified, and - In inter-server replication, this command was executed on the replication source server of REC. Execute Trk Displays the copy progress rate as a percentage. "----" is displayed during SnapOPC or when no copying is being performed. Displays whether tracking processing is in progress. on : Tracking processing is in progress. off : Tracking processing is not in progress : Snapshot processing is not being performed
245 Title Description Update Displays the percentage of data that has been updated since the last copy was created, in the cases shown below. For SnapOPC+, this displays the percentage of data that has been updated since the previous snap generation. - When the Status column is "----" and the Trk column is "on" (that is, tracking is in progress and the physical copy is not being executed). - When the Status column is "copy-on-write" (that is, when SnapOPC processing is in progress) - When the Status column is "copy-on-write(active)" (that is, when SnapOPC+ (most recent snap generation) is being performed) - When the Status column is "copy-on-write(inactive)" (that is, when SnapOPC+ (past snap generation) is being performed) Displays "----" during physical copying or when tracking is not in progress. Rcv Split Indicates the Recovery mode for Inter-ETERNUS synchronization. auto : Automatic Recovery mode manual : Manual Recovery mode ---- : Inter-ETERNUS synchronous replication (REC) is not performed. Indicates the Split mode for Inter-ETERNUS synchronization. auto : Automatic Split mode manual : Manual Split mode ---- : Inter-ETERNUS synchronous replication (REC) is not performed using the Synchronous mode. Xfer Indicates the Transfer for Inter-ETERNUS synchronization. sync : Synchronous mode async : Through mode stack : Stack mode consist : Consistency mode ---- : Inter-ETERNUS synchronous replication (REC) is not performed. Snap-Gen Copy-DA (Copy Destination Access) When SnapOPC+ is performed, displays the snap generation number. When SnapOPC+ is not performed, "----" is displayed. 1 is the oldest snap generation, and the snap generation number increases until the most recent generation is reached. Displays the access permission for the replication destination volume. on : Access is not being permitted. off : Access is being permitted. When an ETERNUS Disk storage system does not support the Destination Access Permission function or the SDX objects is specified with the units of logical volumes, 'off' is displayed. Date If a copy session exists, a timestamp in the [yyyy/mm/dd hh:mm:ss] format is displayed for the last status transition of the copy session as described below. The timestamp is relative to the time zone settings of the specified storage system. [For the OPC and QuickOPC] - Starting the logical copy (Execution the "swsrpmake" or "swsrpmake -T") - Changing to error suspend status (The Status is "failed") [For the SnapOPC and SnapOPC+] - Starting the logical copy (Execution the "swsrpmake -C" or "swsrpmake -P") - Changing to error suspend status (The Status is "failed")
246 Title [For the EC] - Suspend (Execution the "swsrpmake") Description - Concurrent Suspend (Execution the "swsrpmake -Xconcur") - Changing to error suspend status (The Status is "failed") [For the REC] - Starting the REC by initial copy skip function (Execution the "swsrpstartsync -Xskip") - Suspend (Execution the "swsrpmake") (*1) - Concurrent Suspend (Execution the "swsrpmake -Xconcur") - Changing to error suspend status (The Status is "failed") - Changing to hard suspend status (The Status is "halt") *1: When a forced suspend is performed on a REC session in hardware suspend condition, the timestamp of the last execution is initialized as "----/--/-- --:--:--". When a forced suspend is performed while copy is executing, its timestamp is not updated. "----/--/-- --:--:--" is displayed in the following situations: - There is no copy session (Status column is "----") - Copy status could not be obtained from the storage system (Status column is "?????") - Transition between no copy session and start of a synchronous EC/REC initial copy (swsrpstartsync) is started under the condition of no copy session. - The REC session is recovered automatically from the hardware suspend status (The Status is "halt") - The storage system where last execution timestamp function is not supported - The SDX objects being set per logical volume OPTIONS -h servername -L -E When executing on the Management Server, specify the name of the target Managed Server. When executing on the target Managed server, it is not necessary to specify this option. For the server name, accurately specify the same letters, including upper and lower case, as the server name displayed with the stgxfwcmdispsrv command. Specifies that display will be in extension format. For the items displayed by this option, refer to the table in the description above. An option which when set will display the operational status in the opposite direction only (from the copy destination to the copy source). If this option is not set, the operation status will always be displayed in the normal direction (from the copy source to the copy destination) when a bi-directional OPC physical copy is taking place. In case this option is set, the operational status in the normal direction will not be displayed. Only the operational status in the opposite direction will be displayed. This option can be used to check the operational status of an OPC session performed in the opposite direction if a QuickOPC/ SnapOPC session in the normal direction exists
247 -Xgroup groupname -H -O -Xda Specifies that the operation statuses are displayed by the group. If this option is set, all the operational statuses relating to the specified group will be displayed. Changes the Status column display method used when a REC enters a hard-suspend (halt) status. If this option is specified, then "halt (sync)" will be displayed when hard-suspend status occurs during a total copy or a differential copy. "halt (equivalent)" will be displayed when hard-suspend status occurs during an equivalency maintenance state. If the transfer mode is Consistency mode and a REC Disk buffer is set, "halt(use-disk-buffer)" will be displayed when issue of a hard suspend causes transfer data to be saved to the REC Disk buffer. If the transfer mode is Consistency mode and a REC buffer is set, "halt(use-buffer)" will be displayed when issue of a hard suspend causes transfer data to be saved to the REC buffer. Changes the error suspend(failed) status Status column display method. If this option is specified, the display will be as follows: There is a bad sector: "failed(badsector)" When there is insufficient Snap Data Volume or Snap Data Pool capacity: "failed(overflow)" All other cases: "failed(other)" -Xdate -Xall Displays the access permission settings for copy destination volume. Displays the timestamp of the last copy session status transition. Displays the all information. For the items displayed by this option, refer to the example following. Note that the items displayed by this option may be subject to change in a future release. OPERANDS originalvolumename Specifies a replication source volume name. For the volume names of other servers, use the format "Volume-Name@Managed-Server-Name". Specifies the AdvancedCopy Manager device name for the Volume-Name. Displays all operation statuses for the specified replication source volume. If this operand is omitted, all the operation statuses of the Managed Server on which this command is executed are displayed. EXIT STATUS =0: Completed successfully >0: Terminated abnormally EXAMPLES - Direct that all the replication operation statuses for Managed Server (SRC-SV) be displayed on the Management Server: # /opt/fjsvswsrp/bin/swsrpstat -h SRC-SV Server Original-Volume Replica-Volume Direction Status Execute SRC-SV /dev/vg01@src-sv /dev/vg01@targ-sv regular replicated ---- SRC-SV /dev/vg02@src-sv /dev/vg02@targ-sv regular SRC-SV /dev/vg02@src-sv /dev/vg03@targ-sv reverse snap 45% SRC-SV /dev/vg01@src-sv /dev/vg01@targ-sv regular copy-on-write(inactive) ---- SRC-SV /dev/vg01@src-sv /dev/vg02@targ-sv regular copy-on-write(inactive) ---- SRC-SV /dev/vg01@src-sv /dev/vg03@targ-sv regular copy-on-write(active) ---- #
248 - Direct that all the replication operation statuses for Managed Server (SRC-SV) be displayed on the Management Server (with the -L option specified): # /opt/fjsvswsrp/bin/swsrpstat -h SRC-SV -L Server Original-Volume Replica-Volume Direction Status Execute Trk Update Rcv Split Xfer Snap-Gen SRC-SV /dev/vg01@src-sv /dev/vg01@targ-sv regular replicated auto ---- async ---- SRC-SV /dev/vg02@src-sv /dev/vg02@targ-sv regular on 6% SRC-SV /dev/vg03@src-sv /dev/vg03@targ-sv reverse snap 45% off SRC-SV /dev/vg01@src-sv /dev/vg01@targ-sv regular copy-on-write(inactive) ---- off 0% SRC-SV /dev/vg01@src-sv /dev/vg02@targ-sv regular copy-on-write(inactive) ---- off 5% SRC-SV /dev/vg01@src-sv /dev/vg03@targ-sv regular copy-on-write(active) ---- off 6% # - Direct that all the replication operation statuses for Managed Server (SRC-SV) be displayed on the Management Server (with the -Xall option specified): # /opt/fjsvswsrp/bin/swsrpstat -h SRC-SV -Xall Server Original-Volume Replica-Volume Direction Status Execute Trk Update Rcv Split Xfer Snap-Gen Copy-DA Date SRC-SV /dev/vg01@src-sv /dev/vg01@targ-sv regular replicated auto ---- async ---- on 2010/10/20 22:00:45 SRC-SV /dev/vg02@src-sv /dev/vg02@targ-sv on 6% off 2010/10/20 22:10:39 SRC-SV /dev/vg03@src-sv /dev/vg03@targ-sv reverse snap 45% off on 2010/10/21 22:00:23 # - Direct that all the replication operation statuses for Managed Server (SRC-SV) be displayed on the Management Server (with the -Xdate option specified): # /opt/fjsvswsrp/bin/swsrpstat -h SRC-SV -Xdate Server Original-Volume Replica-Volume Direction Status Execute Date SRC-SV /dev/vg01@src-sv /dev/vg01@targ-sv regular replicated /10/20 22:00:45 SRC-SV /dev/vg02@src-sv /dev/vg02@targ-sv /10/20 22:10:39 SRC-SV /dev/vg03@src-sv /dev/vg03@targ-sv reverse snap 45% 2010/10/21 22:00:23 # NOTES - When the execution status (the status displayed in the "Status" column) is "failed", "halt", or "?????", refer to "7.4 Troubleshooting: Hardware or Other Error During Replication" and take action. - The operation status cannot be displayed if: - The volumes have not been set as replication volumes. - Changes have been made to the logical disk configuration which cannot be supported by AdvancedCopy Manager. - A volume group is inactive in the volume group specification. - This command cannot be executed while the following command is running: - swsrprecoverres swsrpcancel (Replication Cancellation Command)
249 NAME swsrpcancel - stops snapshot processing and synchronization processing SYNOPSIS To Execute on Managed Server /opt/fjsvswsrp/bin/swsrpcancel [-c] {([-f] [-t] [-m] [-b]) [-T] [-Xforce]} fromvolumename tovolumename To Execute on Management Server /opt/fjsvswsrp/bin/swsrpcancel [-h servername] [-c] {([-f] [-t] [-m] [-b]) [-T] [-Xforce]} fromvolumename tovolumename To Execute on Managed Server: Group Specification /opt/fjsvswsrp/bin/swsrpcancel [-c] {([-f] [-t] [-m] [-b]) [-T] [-Xforce]} [-Xreverse] -Xgroup groupname To Execute on Management Server: Group Specification /opt/fjsvswsrp/bin/swsrpcancel [-h servername] [-c] {([-f] [-t] [-m] [-b]) [-T] [-Xforce]} [- Xreverse] -Xgroup groupname DESCRIPTION This command stops snapshot processing (OPC/QuickOPC/SnapOPC/SnapOPC+) and synchronization processing (EC) of the specified replication volume. Use this command when an error is detected during the replication operation and when you want to stop replication processing. OPTIONS -h servername -c -m -f When executing on the Management Server, specify the name of the target Managed Server. When executing on the target Managed server, it is not necessary to specify this option. When performing the server-to-server replication, specify the name of the operation server configured with the swsrpsetvol command. For the server name, accurately specify the same letters, including upper and lower case, as the server name displayed with the stgxfwcmdispsrv command. Specifies that the copy processing is forcibly stopped from a non-operation server when the operation server cannot be used because of a system failure. If this option is used, the copy processing is stopped without implementing pre-processing and postprocessing. This option cannot be specified on the operation server. For server-to-server replication, this option specifies that communication processing is not performed with non-operation servers. When this option is specified, volume status check processing and pre-processing and post-processing are not performed for the replication destination volume of a non-operation server. This option is valid only during server-to-server replication. When stopping synchronous processing under the equivalency maintained status, specify that pre-processing and post-processing for the copy source volume is not being executed. Use this option only when AdvancedCopy Manager does not execute pre-processing and post-processing of the copy source volume and unique pre-processing and post-processing scripts are inserted before and after (respectively) the AdvancedCopy Manager command, or when you judge that copy pre-processing and post-processing are unnecessary (e.g., for a database constructed on a raw device)
250 -t When stopping the synchronous processing under the equivalency maintained status, this specifies that post-processing for the copy destination volume will not be executed. Use this option only when AdvancedCopy Manager does not execute pre-processing and post-processing of the copy destination volume and unique pre-processing and post-processing scripts are inserted before and after (respectively) the AdvancedCopy Manager command, or when you judge that copy pre-processing and post-processing are unnecessary (e.g., for a database constructed on a raw device). -b Specifies that the inter-box copy operation in the halt status be stopped. For replication on single server, the copying is cancelled for both boxes. For server-to-server replication, the copying is cancelled only for the box connected to the server on which this command was executed. Use the option only for a copy operation in the halt status and whose recovery is not expected to be done successfully. The option is valid only for a copy operation in the HALT status. The option can be used on the server that is not specified as the operation server. If this option is specified together with the -Xgroup option, copy processing is only stopped for sessions in the group whose status is halt. -T Specifies that differential snapshot processing will be terminated. This option only terminates tracking processing and does not terminate snapshot processing (OPC physical copying) when it is in progress. This option releases the OPC session if snapshot processing (i.e., OPC physical copying) is complete. This option can only be used while physical copying or tracking is in progress. If this option is specified together with the -Xgroup option, only tracking processing within the group is stopped. -Xgroup groupname Specifies that copy processing will be stopped for each group. -Xreverse Specifies that copy processing that is being executed in the reverse direction (from replica volumes to original volumes) will be stopped This option is valid only when the -Xgroup option is specified. -Xforce Specification of this option forcibly stops a SnapOPC+ session. Forcibly stopping SnapOPC+ stops the specified snap generation and all earlier snap generations. This option can be specified even if there is only one snap generation. This option is a SnapOPC+ fixed option. If this option is specified at the same time as the -Xgroup option, the SnapOPC+ sessions in that group are stopped, and all the snap generations and snap generations before it in the group are also stopped. OPERANDS fromvolumename Specifies a copy source volume name. Specifies the replication source volume or the replication destination volume set with the swsrpsetvol command. Specifies the AdvancedCopy Manager device name for the volume name. tovolumename Specifies a copy destination volume name. Specifies the replication source volume or the replication destination volume set with the swsrpsetvol command. Specifies the AdvancedCopy Manager device name for the volume name
251 EXIT STATUS =0: Completed successfully >0: Terminated abnormally EXAMPLES - On the Management Server, direct that copying from /dev/vg01 to /dev/vg01@targ-sv is stopped for Managed Server SRC-SV: #/opt/fjsvswsrp/bin/swsrpcancel -h SRC-SV /dev/vg01 /dev/vg01@targ-sv FROM=/dev/vg01@SRC-SV,TO=/dev/vg01@TARG-SV swsrpcancel completed # - Stops copy processing for group "GRP1": # /opt/fjsvswsrp/bin/swsrpcancel -Xgroup GRP1 GROUP=GRP1 swsrpcancel completed # NOTES - Following execution with the -b option specified in replication on single server, the command stops normally when cancellation of the copying succeeds in either of the boxes. - Copy processing cannot be performed if: - The specified replication source volume and replication destination volume have not been set as replication volumes. - The copy processing is not performed for the specified replication source and replication destination volumes. - For server-to-server replication, the Managed Server on which the command is executed is not the operation server of the replication volume. - For server-to-server replication, communication with a destination server fails. - Changes have been made to the logical disk configuration which cannot be supported by AdvancedCopy Manager. - A volume group is inactive in the volume group specification. - The backup management function is executing a process for a specified source or destination volume - If the -Xgroup option is specified, processing will be performed for each active replication volume, but processing will be terminated without cancelling replication in the following case: - If no replication volumes have been copied - When you execute -b option specifying a nonexistent copy in the "halt" state in the group. - When you execute -T option specifying a nonexistent copy in the tracking process of QuickOPC in the group. Additionally, if the -Xgroup option is specified, replication volumes are processed in order, but processing will be terminated immediately if an error occurs. - When stopping SnapOPC+ sessions, the oldest snap generation must be stopped first. Specify the -Xforce option to forcibly stop the second and subsequent snap generations. However, note that this option stops the specified snap generation and all earlier snap generations. If the -Xforce and -Xgroup options are specified at the same time, the SnapOPC+ sessions in the group are stopped, and all the snap generations and snap generations before it in the group are also stopped. - In the operation mode involving activation of the replica volume group, the post-processing script for the replica volume may take longer to process because the LVM management information is rewritten (recreatevg). - The volume information for the specified volume is not checked (check for matching of the volume information in the management list and the actual physical information). The operation is cancelled unconditionally using the volume information in the management list. - The following processing is performed depending on the operation status of the specified replication source volume and replication destination volume
252 Table 8.7 Processing Differences in Accordance with Operating Status Operation Status Processing Reverse copy direction Not operating yet Total or incremental copy is performed Equivalency maintain status Replication established status Snapshot processing is being performed Suspends the processing. Suspends the processing. Suspends synchronization processing. The replication destination volume cannot be used. Suspends synchronization processing. The replication destination volume can be used as a copy Suspends synchronization processing. The replication destination volume can be used as a copy Stops the snapshot processing. The replication destination volume cannot be used. - Pre-processing and post-processing for a replication source and replication destination volumes are performed only when the status of synchronization processing is equivalency maintenance status. If replication is cancelled before the equivalency maintenance status is achieved, the replica volume is placed in the incomplete state and, in the case of a file system, the replica volume cannot be mounted. If the processing target is a volume group, the operation may be customized so that the pre-processing and post-processing scripts for the replica volume are used to mount and unmount the volume. If replication is cancelled before the equivalency maintenance state is achieved under these conditions, take action as follows: - To start synchronous processing Execute the swsrpstartsync command with the -t option specified. - To execute replication Execute the swsrpmake command with the -t option specified. After replication is completed, mount the replica volume. - When the -T option is not specified command processing varies depending on the operation status of the source and destination volumes. Table 8.8 Processing When -T Option Is Not Specified Operation Status (Display by swsrpstat -L) Processing Reverse copy Not in operation (Status is "----" and Trk also is "----".) Total or difference copying is in progress. (Status is "sync".) Equivalency maintained status (Status is "equivalent".) Replica created status (Status is "replicated".) Snapshot processing is in progress. (Status is "snap") Processing is interrupted. Processing is interrupted. Synchronous processing is terminated. The destination volume cannot be used. Synchronous processing is terminated. The destination volume can be used as a replica. Synchronous processing is terminated. The destination volume can be used as a replica. Synchronous processing is terminated. The destination volume cannot be used. Tracking processing, if in progress, is also terminated. Snapshot processing complete status and tracking processing in progress. (Status is "----" and Trk also is "on".) Tracking processing is terminated. The destination volume can be used as a replica. - When the -T option is specified command processing varies depending on the operation status of the source and destination volumes
253 Table 8.9 Processing When -T Option Is Specified Operation status (Display by swsrpstat -L) Processing Reverse copy Not in operation (Status is "----" and Trk also is "----".) Total or difference copying is in progress. (Status is "sync".) Equivalency maintained status (Status is "equivalent".) Replica created status (Status is "replicated".) Snapshot processing is in progress and tracking processing is not in progress. (Status is "snap" and Trk is "off") Snapshot processing is in progress and tracking processing is progress. (Status is "snap" and Trk is "on".) Snapshot processing complete status and tracking processing in progress. (Status is "----" and Trk also is "on".) Processing is interrupted. Processing is interrupted. Processing is interrupted. Processing is interrupted. Processing is interrupted. Processing is interrupted. Only tracking processing is terminated. Snapshot processing (ie, physical copying) is continued. The destination volume can be used as a replica. Tracking processing is terminated. The destination volume can be used as a replica. - This command cannot be executed while any of the following commands are running: - swsrpsetvol - swsrpdelvol - swsrprecoverres swsrpchsync (Synchronization Mode Change Command) NAME swsrpchsync - changes the operation mode SYNOPSIS To Execute on Managed Server /opt/fjsvswsrp/bin/swsrpchsync [-F {Sync Async Stack Consist}] [-R {Auto Manual}] [-S {Auto Manual}] fromvolumename tovolumename To Execute on Management Server /opt/fjsvswsrp/bin/swsrpchsync [-h servername] [-F {Sync Async Stack Consist}] [-R{Auto Manual}] [- S {Auto Manual}] fromvolumename tovolumename To Execute on Managed Server: Group Specification /opt/fjsvswsrp/bin/swsrpchsync [-F {Sync Async Stack Consist}] [-R {Auto Manual}] [-S {Auto Manual}] [-Xreverse] -Xgroup groupname To Execute on Management Server: Group Specification /opt/fjsvswsrp/bin/swsrpchsync [-h servername] [-F {Sync Async Stack Consist}] [-R {Auto Manual}] [-S {Auto Manual}] [-Xreverse] -Xgroup groupname
254 DESCRIPTION This command changes the operation mode of inter-box synchronization (transfer mode, recovery mode, or split mode). OPTIONS -h serve-name When executing on the Management Server, specify the name of the target Managed Server. When executing on the target Managed server, it is not necessary to specify this option. When performing the server-to-server replication, specify the name of the operation server configured with the swsrpsetvol command. For the server name, accurately specify the same letters, including upper and lower case, as the server name displayed with the stgxfwcmdispsrv command. -F {Sync Async Stack Consist} Changes the transfer mode. You can specify one of the following parameters in the operand: Sync : Changes to Synchronous mode. Async : Changes to Through mode. Stack : Changes to Stack mode. Consist : Changes to Consistency mode. Changing the transfer mode requires this option. You can only specify the -S option together with the -F Sync option. Specifying the -F Sync option to change the transfer mode from a non-synchronous mode to the synchronous mode without specifying the -S option sets the automatic split mode. -R {Auto Manual} Changes the recovery mode. You can specify either of the following parameters in the operand: Auto : Changes to Automatic Recovery mode. Manual : Changes to Manual Recovery mode. Changing the recovery mode requires this option. -S {Auto Manual} Changes the split mode. You can specify either of the following parameters in the operand: Auto : Changes to Automatic Split mode. Manual : Changes to Manual Split mode. Changing the split mode requires this option. To specify this option, you must also specify -F Sync, or the transfer mode of the current synchronization must be synchronous mode. -Xgroup groupname Changes the operation mode of inter-box synchronous processing for each group (transfer mode, recovery mode, or split mode). -Xreverse Specifies that the operation mode of synchronous processing that is being executed in reverse direction (from replica volumes to original volumes) will be changed. This option is valid only when the -Xgroup option is specified. OPERANDS fromvolumename Specifies a copy source volume name. Specifies the replication source volume or the replication destination volume set with the swsrpsetvol command. Specifies the AdvancedCopy Manager device name for the volume name
255 tovolumename Specifies a copy destination volume name. Specifies the replication source volume or the replication destination volume set with the swsrpsetvol command. Specifies the AdvancedCopy Manager device name for the volume name. EXIT STATUS =0: Completed successfully >0: Terminated abnormally EXAMPLES - From Management Server to Managed Server: Instruct SRC-SV to change the transfer mode for inter-box synchronization between / dev/vg03@src-sv and /dev/vg03@targ-sv from Consistency mode to Through mode: #/opt/fjsvswsrp/bin/swsrpstat -h SRC-SV -L /dev/vg03@src-sv Server Original-Volume Replica-Volume Direction Status Execute Trk Rcv Split Xfer SRC-SV /dev/vg03@src-sv /dev/vg03@targ-sv regular sync 99% ---- auto ---- consist : #/opt/fjsvswsrp/bin/swsrpchsync -h SRC-SV -F Async /dev/vg03@src-sv /dev/vg03@targ-sv FROM=/dev/vg03@SRC-SV, TO=/dev/vg03@TARG-SV swsrpchsync completed : #/opt/fjsvswsrp/bin/swsrpstat -h SRC-SV -L /dev/vg03@src-sv Server Original-Volume Replica-Volume Direction Status Execute Trk Rcv Split Xfer SRC-SV /dev/vg03@src-sv /dev/vg03@targ-sv regular equivalent 100% ---- auto ---- async # - Specify that the transfer mode of inter-box synchronous processing for group "GRP1" be changed from Consistency mode to Through mode: # /opt/fjsvswsrp/bin/swsrpchsync -F Async -Xgroup GRP1 GROUP=GRP1 swsrpchsync completed # NOTES - In any of the following cases, you cannot change the operation mode of inter-box synchronization: - The specified original/replica volume has not been configured as a replica volume. - None of the -F, -R and -S options are specified. - In inter-server replication, the Managed Server on which you execute the command is not the operation server for the replica volume. - Synchronization from the specified source volume to the destination volume is not secured. - Synchronization from the specified source volume to the destination volume is in error-suspended status (with "failed" indicated as the Status by the swsrpstat command or hard-suspended status (with "halt" indicated as the Status by the swsrpstat command. - The ETERNUS Disk storage system in which the specified original/replica volume is placed do not support the operation mode change function. - Changes have been made to the logical disk configuration which cannot be supported by AdvancedCopy Manager. - A volume group is inactive in the volume group specification. - If the -Xgroup option is specified, the synchronous processing for all replication volumes being processed is changed to the same operation mode. However, the operation mode cannot be changed if there is at least one replication volume that meets the conditions above. Additionally, if the -Xgroup option is specified, replication volumes are processed in order, but processing will be terminated immediately if an error occurs
256 - This command cannot be executed while any of the following commands are running: - swsrpsetvol - swsrpdelvol - swsrprecoverres swsrprevsync (Synchronization Reverse Command) NAME swsrprevsync - reverses the copying direction of synchronization SYNOPSIS To Execute on Managed Server /opt/fjsvswsrp/bin/swsrprevsync fromvolumename tovolumename To Execute on Management Server /opt/fjsvswsrp/bin/swsrprevsync [-h servername] fromvolumename tovolumename To Execute on Managed Server: Group Specification /opt/fjsvswsrp/bin/swsrprevsync [-Xreverse] -Xgroup groupname To Execute on Management Server: Group Specification /opt/fjsvswsrp/bin/swsrprevsync [-h servername] [-Xreverse] -Xgroup groupname DESCRIPTION This command reverses the copying direction of synchronization when in suspended status. OPTIONS -h servername When executing on the Management Server, specify the name of the target Managed Server. When executing on the target Managed server, it is not necessary to specify this option. When performing the server-to-server replication, specify the name of the operation server configured with the swsrpsetvol command. For the server name, accurately specify the same letters, including upper and lower case, as the server name displayed with the stgxfwcmdispsrv command. -Xgroup groupname Changes the direction of synchronous processing for each group. -Xreverse Specifies that the direction of synchronous processing that is being executed in reverse direction (i.e., from replica volumes to original volumes)will be inverted. This option is valid only when the -Xgroup option is specified. OPERANDS fromvolumename Specifies a copy source volume name. (as the destination in the reverse direction) Specifies the replication source volume or the replication destination volume set with the swsrpsetvol command. Specifies the AdvancedCopy Manager device name for the volume name
257 tovolumename Specifies a copy destination volume name. (as the source in the reverse direction) Specifies the replication source volume or the replication destination volume set with the swsrpsetvol command. Specifies the AdvancedCopy Manager device name for the volume name. EXIT STATUS =0: Completed successfully >0: Terminated abnormally EXAMPLES - From Management Server to Managed Server: Instruct SRC-SV to reverse the copying direction of synchronization between /dev/ vg03@src-sv and /dev/vg03@targ-sv: #/opt/fjsvswsrp/bin/swsrpstat -h SRC-SV /dev/vg03@src-sv Server Original-Volume Replica-Volume Direction Status Execute SRC-SV /dev/vg03@src-sv /dev/vg03@targ-sv reverse replicated ---- #/opt/fjsvswsrp/bin/swsrprevsync /dev/vg03@targ-sv /dev/vg03@src-sv FROM=/dev/vg03@SRC-SV,TO=/dev/vg03@TARG-SV swsrprevsync completed #/opt/fjsvswsrp/bin/swsrpstat /dev/vg03@src-sv Server Original-Volume Replica-Volume Direction Status Execute SRC-SV /dev/vg03@src-sv /dev/vg03@targ-sv regular replicated ---- # - Change the direction of synchronous processing for group "GRP1": # /opt/fjsvswsrp/bin/swsrprevsync -Xgroup GRP1 GROUP=GRP1 swsrprevsync completed # NOTES - In any of the following cases, you cannot reverse the direction of synchronization: - The specified original/replica volume has not been configured as a replica volume. - Unidirectional copying has been specified in the copying attribute for the replica volume. - In inter-server replication, the Managed Server on which you execute the command is not the operation server for the replica volume. - Replication has not been established in synchronization from the specified source volume to the destination volume. - The ETERNUS Disk storage system in which the specified original/replica volume is placed do not support the reverse function. - Changes have been made to the logical disk configuration which cannot be supported by AdvancedCopy Manager. - A volume group is inactive in the volume group specification. - If the -Xgroup option is specified, the direction of synchronous processing for all replication volumes being processed is changed. However, the direction of synchronous processing cannot be changed if there is at least one replication volume that meets the conditions above. Additionally, if the -Xgroup option is specified, replication volumes are processed in order, but processing will be terminated immediately if an error occurs. - If the -Xgroup option is specified, processing is not performed for those sessions in the group where the direction has already been changed. - This command cannot be executed while any of the following commands are running: - swsrpsetvol - swsrpdelvol - swsrprecoverres
258 8.3.3 Maintenance Commands This section describes the maintenance commands for replication management swsrprecoverres (Resource Adjustment Command) NAME swsrprecoverres - executes recovery to make replication management information SYNOPSIS To Execute on Managed Server /opt/fjsvswsrp/bin/swsrprecoverres [-r] [-p] To Execute on Management Server /opt/fjsvswsrp/bin/swsrprecoverres [-h servername] [-r] [-p] DESCRIPTION This command executes recovery to make replication management information consistent if a system failure or other problem has made the replication management information inconsistent. OPTIONS -h servername -r -p When executing on the Management Server, specify the name of the target Managed Server. When executing on the target Managed server, it is not necessary to specify this option. For the server name, accurately specify the same letters, including upper and lower case, as the server name displayed with the stgxfwcmdispsrv command. Specify this option when an incorrect status exists in the replication management files. E.g., when the swsrpsetvol or swsrpdelvol command that update the replication management files terminate suddenly because of a forced stop, a system failure or the replication management files have been deleted by mistake. When this option is specified, the following processing is performed to recreate the replication management files. Replication management information in the Management Server repository is downloaded to the Managed Server, and the replication volume information is restored. The ETERNUS Disk storage system is queried, and the execution information for the synchronization processing is restored. Specifies to not perform any post-processing that has not already been performed. This option can be used when the swsrpmake command processing terminates suddenly because of a forced stop or system failure. EXIT STATUS =0: Completed successfully >0: Terminated abnormally EXAMPLES - Perform resource adjustment: #/opt/fjsvswsrp/bin/swsrprecoverres swsrprecoverres completed #
259 NOTES - The resource adjustment processing cannot be performed if: - Communication with a Management Server fails and the -r option is specified. - The -r option is not specified when this command is executed after processing by the swsrpsetvol and swsrpdelvol commands has been forcibly terminated. - The -r option is specified and the command terminates with an error when changes have been made to the logical disk configuration that cannot be supported AdvancedCopy Manager or a volume group is inactive in the volume group specification. - The consistency of resource information is restored only for the Managed Server on which this command is executed. When a resource inconsistency occurs during processing related to server-to-server replication, this command must be executed both on the Managed Server on which the processing was performed and on the Managed Server with which communication is being made. - If this command is executed for the copy source volume and the copy destination volume in the status where the swsrpmake command is interrupted without completing its process and the remaining processing must be completed, the replication postprocessing is executed. - This command cannot be executed while any of the following commands are running: - swsrpsetvol - swsrpvolinfo - swsrpdelvol - swsrpstartsync - swsrpmake - swsrpstat - swsrpcancel - swsrpchsync - swsrprevsync - swsrprecoverres 8.4 Start/Stop Daemon Commands This section describes how to start and stop AdvancedCopy Manager daemons. Note Notes when using commands: - Confirm that the environment variable SWSTGNODE is not defined. - Execute this command using the same environment variable LANG that of the code system used by the system. - Only a root user can execute this command Starting and Stopping Communication Daemon Starting Communication Daemon Enter the following command to stop the communication daemon: # /opt/fjsvswstf/bin/stgfwcom start
260 Stopping Communication Daemon Enter the following command to stop the communication daemon: # /opt/fjsvswstf/bin/stgfwcom stop Point In order to verify if the communication daemon has been launched normally, check if the message stgxfws0060 has been generated in the syslog. If there is no output of message stgxfws0060, the daemon launch has possibly failed. Use the syslog message to determine the cause and take the necessary measures according to the ETERNUS SF Messages Starting and Stopping AdvancedCopy Manager Daemons The daemons listed below are started and stopped together: Table 8.10 Daemons Started and Stopped as Package Server Type Daemon Name Managed Server Communication daemon For details on how to start a service or daemon of a Management Server, refer to the ETERNUS SF AdvancedCopy Manager Operation Guide relevant to the OS of the Management Server. Starting AdvancedCopy Manager Daemon Enter the following command to start a AdvancedCopy Manager daemon: # /opt/swstorage/bin/startacm Stopping AdvancedCopy Manager Daemon Enter the following command to stop a AdvancedCopy Manager daemon: # /opt/swstorage/bin/stopacm 8.5 SnapOPC/SnapOPC+ Support Commands This section explains the commands can be used to execute SnapOPC/SnapOPC+. Note Operating Environment for Command Execution The table below lists the requirements for the operating environment in which to execute the respective commands. Table 8.11 Operating Environment When Executing SnapOPC/SnapOPC+ Support Commands Command Operating Environment of AdvancedCopy Manager swstestupdate - swstsdv swstestupdate (Update Volume Measurement Command) NAME swstestupdate - measures the physical capacity of a Snap Data Volume
261 SYNOPSIS To Start Update Volume Measurements (Setting Up Monitor Session) /opt/fjsvswsts/bin/swstestupdate start volumename To Look Up Update Volume (Displaying Status of Monitor Session) /opt/fjsvswsts/bin/swstestupdate status volumename To Finish Update Volume Measurements (Cancelling Monitor Session) /opt/fjsvswsts/bin/swstestupdate stop volumename DESCRIPTION This command measures the physical capacity of a Snap Data Volume. To Start Update Volume Measurements (Setting Up Monitor Session) Specify "start" as the subcommand to start measure of the physical capacity of a Snap Data Volume. To Look Up Update Volume (Displaying Status of Monitor Session) Specify "status" as the subcommand to display the physical capacity of a Snap Data Volume. The following information will be displayed: Title Description Volume-Name Update The volume name. The amount of data that has been updated since measurements started in the number of blocks (1 block = 512 bytes). Displays "----" if there is no monitor session. Displays "failed" if the monitor session is error-suspended. To Finish Update Volume Measurements (Cancelling Monitor Session) Specify "stop" as the subcommand to stop measure of the physical capacity of a Snap Data Volume OPERANDS volumename - Specifies the volume name. Specify a copy source volume that is used with SnapOPC/SnapOPC+ operations EXIT STATUS =0: Completed successfully >0: Terminated abnormally EXAMPLES - Measure the update volume: (Start taking measurements by starting a monitor SnapOPC) #/opt/fjsvswsts/bin/swstestupdate start /dev/hdisk10 /dev/hdisk10 swstestupdate completed (First measurement) #/opt/fjsvswsts/bin/swstestupdate status /dev/hdisk10 Volume-Name Update /dev/hdisk (Second measurement)
262 #/opt/fjsvswsts/bin/swstestupdate status /dev/hdisk10 Volume-Name Update /dev/hdisk (Stop taking measurements by cancelling the monitor SnapOPC) # /opt/fjsvswsts/bin/swstestupdate stop /dev/hdisk10 /dev/hdisk10 swstestupdate completed # NOTES - The amount of data updated cannot be measured in the following cases: - When the specified volume does not exist. - When the ETERNUS Disk storage system device does not support the SnapOPC/SnapOPC+ function. - When the monitor session has already been set up (i.e., when the "start" option is specified). - When the monitor session does not exist (i.e., when the "stop" option is specified) swstsdv (Snap Data Volume Operation/Reference Command) NAME swstsdv - Initialize or display the Snap Data Volume SYNOPSIS To Initialize Snap Data Volume /opt/fjsvswsts/bin/swstsdv init volumename /opt/fjsvswsts/bin/swstsdv init -G accessvolumename lunumber To Display Snap Data Volume Status /opt/fjsvswsts/bin/swstsdv stat volumename /opt/fjsvswsts/bin/swstsdv stat -G accessvolumename lunumber To Display Snap Data Pool Status /opt/fjsvswsts/bin/swstsdv poolstat -G volumename DESCRIPTION Snap Data Volume initialization/status display and Snap Data Pool status display are all possible. Specify one of the following subcommands according to the contents you want to operate on, and then execute the subcommand. Snap Data Volume Initialization Specify "init" as the subcommand to initialize the Snap Data Volume. Initialize the Snap Data Volume when SnapOPC/SnapOPC+ is not running. All the data in the Snap Data Volume is destroyed in the initialization of the Snap Data Volume. For this reason, the following procedure is recommended. (Creation of the Access volume and collection of the LU-Number must be completed before logical volume manager operations.) 1. If there is necessary data in the Snap Data Volume, back it up in advance using the relevant OS command. 2. Initialize the disk management information. Set the target Snap Data Volume (physical disk) outside logical volume manager management when there is a logical volume manager operation. 3. Initialize the Snap Data Volume using this command. Initialize the information using the Access volume when there is a logical volume manager operation
263 Snap Data Volume Status Display Specify "stat" as the subcommand to display Snap Data Volume logical capacity, physical capacity, used space capacity, and unused space capacity. The contents that are displayed are as follows: Title Description BoxID LUN Displays the Box ID. Displays the logical unit number on the ETERNUS Disk storage system. The format used for the display is "<decimal>(<hexadecimal>)". Rate Displays the Snap Data Volume usage as a percentage (%). Logical Physical Used Copy Host Pool Displays the Snap Data Volume logical capacity. The unit used for display is 'sector'. Displays the Snap Data Volume physical capacity. The unit used for display is 'sector'. Displays the amount of Snap Data Volume used space. The unit used for display is 'sector'. The capacity for both Copy usage (*1) and Host usage (*1) is displayed. For the space used in the Snap Data Volume, Copy usage (*1) is displayed. The unit used for display is 'sector'. For the space used in the Snap Data Volume, Host usage (*1) is displayed. The unit used for display is 'sector'. Displays the Snap Data Pool usage allocated to the Snap Data Volume. The unit used for display is 'sector'. *1: Copy usage: Usage in which the update occurs while SnapOPC/SnapOPC+ is running. Host usage: Update of Snap Data Volume while SnapOPC/SnapOPC+ is not running. Snap Data Pool Status Display Specify "poolstat" as the subcommand to display the Snap Data Pool total amount, used space capacity, and unused space capacity. The contents that are displayed are as follows: Title Description BoxID Pool-Type Displays the Box ID. Displays the Snap Data Pool type. Normal Encrypted Rate Displays the Snap Data Pool usage rate (%). Total Used Copy Host Free Displays the Snap Data Pool total amount. The unit used for display is 'sector'. Displays the Snap Data Pool used space capacity. The unit used for display is 'sector'. The capacity for both Copy usage (*1) and Host usage (*1) is displayed. For the space used in the Snap Data Pool, Copy usage (*1) is displayed. The unit used for display is 'sector'. For the space used in the Snap Data Pool, Host usage (*1) is displayed. The unit used for display is 'sector'. Displays the Snap Data Pool unused space capacity. The unit used for display is 'sector'. *1: Copy usage: Usage in which the update occurs while SnapOPC/SnapOPC+ is running. Host usage: Update of Snap Data Volume while SnapOPC/SnapOPC+ is not running
264 OPTIONS Specific Options of Snap Data Volume Initialization(init) -G accessvolumename Specifies the Access volume. For details on Access volume, refer to "Creating Access Volume". Specific Options of Snap Data Volume Status Display(stat) -G accessvolumename Specifies the Access volume. For details on Access volume, refer to "Creating Access Volume". Specific Options of Snap Data Pool Status Display(poolstat) -G volumename OPERANDS Specifies the ETERNUS Disk storage system volume. If a Snap Data Volume is specified with insufficient capacity however, an error occurs in the command. In this case, specify an Access volume for which there is sufficient capacity. For details on Access volume, refer to "Creating Access Volume". Specific Operands of Snap Data Volume Initialization(init) volumename Specifies the volume name (AdvancedCopy Manager device name) of the Snap Data Volume to be initialized. If a partition (slice) has been specified, the Logical Unit (disk) on which the partition (slice) exists is initialized. lunumber Specifies the logical unit number in the ETERNUS Disk storage system. This value is specified as a decimal. Specific Operands of Snap Data Volume Status Display(stat) volumename Specifies the Snap Data Volume volume name (AdvancedCopy Manager device name). If a partition (slice) has been specified, the information about the Logical Unit (disk) on which the partition (slice) exists is displayed. lunumber EXIT STATUS Specifies the logical unit number in the ETERNUS Disk storage system. This value is specified as a decimal. =0: Completed successfully >0: Terminated abnormally EXAMPLES - Snap Data Volume is initialized: # /opt/fjsvswsts/bin/swstsdv init /dev/vg51 swstsdv init completed # - The Snap Data Volume is initialized using the Access volume following insufficient capacity: # /opt/fjsvswsts/bin/swstsdv init -G /dev/vg swstsdv init completed #
265 - The Snap Data Volume status is displayed: # /opt/fjsvswsts/bin/swstsdv stat /dev/vg51 BoxID = 00E4000M3#####E450S20A####KD ## LUN = 201 (0xC9) Rate Logical(sector) Physical(sector) Used(sector) Copy(sector) Host(sector) Pool(sector) 0% # - The LU-Number (110) status is displayed using the Access volume: # /opt/fjsvswsts/bin/swstsdv stat -G /dev/vg BoxID = 00E4000M3#####E450S20A####KD ## LUN = 110 (0x6E) Rate Logical(sector) Physical(sector) Used(sector) Copy(sector) Host(sector) Pool(sector) 0% # - The Snap Data Pool status is displayed by specifying the Access volume: # /opt/fjsvswsts/bin/swstsdv poolstat -G /dev/vg31 BoxID = 00E4000M3#####E450S20A####KD ## Pool-Type Rate Total(sector) Used(sector) Copy(sector) Host(sector) Free(sector) Normal 10% Encrypted 0% # NOTES - When there is insufficient Snap Data Volume capacity, operations are possible using the Access volume and logical unit number (LU-Number) in the ETERNUS Disk storage system. When there is insufficient Snap Data Volume capacity, however, and "stat" is specified in the subcommand and an attempt is made to check the LU-Number of the Snap Data Volume with insufficient Snap Data Volume capacity, an access error occurs when the attempt to access the Snap Data Volume with insufficient Snap Data Volume capacity is made. In this case, an error occurs in the command and it is not possible to check the LU-Number. For this reason, you must check the LU-Number in advance and record it. 8.6 Troubleshooting Data Collection Command This section explains the command used to collect troubleshooting data when an AdvancedCopy Manager fault occurs acmcapture (AdvancedCopy Manager's Agent Troubleshooting Data Collection Command) NAME acmcapture - Collection of AdvancedCopy Manager's agent troubleshooting data SYNOPSIS /opt/fjsvswstf/bin/acmcapture dirname DESCRIPTION This command collects AdvancedCopy Manager's agent troubleshooting data. Data is collected for AdvancedCopy Manager's agent installed on the Managed Server where this command is executed. Only the root user can execute this command
266 Troubleshooting Data File Name The collected data is stored in a file with the "acmcapture_hostname_yyyymmdd_ttmmss.tar.z" format under the directory specified for "dirname". The name of the host where the command is executed is used for HOSTNAME. If characters other than alphanumerics and hyphens are used in the host name, then "NOHOSTNAME" is used as the host name. Values are truncated to 15 characters. - For YYYYMMDD, YYYY is the year, MM is the month, and DD is the day. - For ttmmss, tt is the hour, mm is minutes, and ss is seconds. OPERANDS dirname Directory where the troubleshooting data is stored. Specify a directory with plenty free space (500 MB or more) is recommended. Regard 500 MB as a rough guide, since the size of the troubleshooting data will vary depending on the system environment and conditions. If there is not enough free space, then this command will terminate abnormally without collecting troubleshooting data. Specify an existing directory, otherwise this command will terminate abnormally without collecting troubleshooting data. EXIT STATUS =0: Completed successfully >0: Terminated abnormally EXAMPLES - Collect data to the /tmp directory: # /opt/fjsvswstf/bin/acmcapture /tmp Executing... Completed. OUTPUT=/tmp/acmcapture_srv01_ _ tar.Z NOTES - Execute this command when other AdvancedCopy Manager commands are in the stopped state. Data collection may not be performed correctly if other AdvancedCopy Manager commands are running
267 Chapter 9 Notes on Operations This chapter provides notes on the operations of AdvancedCopy Manager. 9.1 Notes on Backup and Replication Operation This section provides notes on backup and replication General Notes This section provides general notes on backup and replication Backup and Replication Exclusions The following devices must not be backed up or replicated: - The device on which the system is stored - The device on which AdvancedCopy Manager has been installed - The device on which the management list of AdvancedCopy Manager resides Consistency of Data on Volumes Table 9.1 Consistency of Data on Volumes Data in Transaction Volume Maintenance of Data Integrity Operation File system Other than the above An AdvancedCopy Manager command unmounts the file system to maintain the integrity. The data integrity must be maintained in operations. Refer to "Appendix A Pre-processing and Postprocessing of Backup and Restoration" and "Appendix C Pre-processing and Post-processing of Replication". Take appropriate action, such as stopping transactions during execution of backup or replication Fetching Device Information Before starting either the backup or replication operation, The "3.4.4 Fetching Device Information on Managed Server" that is managed by all Managed Servers using the Web Console. The time taken to complete this operation is proportional to the total number of devices defined on the selected Managed Servers. If many devices are involved, perform this operation while the CPU or I/O load on the system is low. As a guide, about 0.5 seconds are required per device (i.e., disk) when there is no load on the system Running Software All the devices are always in use while any of the following software is running. Therefore, before performing backup, restoration, or replication, perform the following steps: Software Which Locks Disk (e.g., Antivirus Software, System Surveillance Software, etc.) When performing backup/restore operation and replication operation, to prevent software from accessing a device targeted for service, suspend the software or specify the device for services other than check or monitoring by the software. For the setting method, refer to the manuals for respective software Maximum Number of Simultaneously Executing Operations There is an upper limit (maximum value) to the number of Advanced copy sessions that can be simultaneously executed. For this reason, make an operational design so that Advanced copies exceeding the maximum number of copy sessions cannot simultaneously
268 be executed. Also, when creating partitions in one Logical Unit (LU) and running Advanced copy at the same time, be sure not to exceed the maximum number of copy sessions simultaneously executable per LU. For the upper limit to the number of copy sessions simultaneously executable, refer to the ETERNUS Disk storage system manuals Notes for Multipath Configurations When the device has a multipath configuration, a path switch is not carried out automatically, even if one of the two paths is blocked. When one of the two paths is blocked, perform the backup or replication again after taking the following steps: 1. Execute the following command on an available device to switch the path: /usr/sbin/lspv hdisk* 2. Execute the backup or replication command again Mounting of Disks from Other Servers Before backup/restoration or replication of a volume that can be mounted from multiple servers, unmount and cancel any pending mount on the other servers. For disks that need not be mounted from other servers, prevent multiple servers from detecting or accessing the same logical disk by setting up hardware, such as devices in the ETERNUS Disk storage system and Fibre Channel switches, accordingly Notes on Copy Operations Targeted at File Systems For a copy operation targeted at a file system, unmount the relevant volume to prevent data access and maintain the data integrity. If backup/restoration and replication are performed without unmounting the volume, an error occurs since a volume in use cannot be unmounted. Note the following about processing where unmounting is enabled: - Another application is not using the volume. If another application is using it, suspend the application temporarily. - Users are not using the volume. If users are using it, prohibit them from using it temporarily. - Another volume is not mounted on the volume. If it is mounted, unmount it temporarily. - The volume is not shared with NFS sharing. If it is shared, unshare it temporarily. Unmounting is required only during command execution. Normal operations can be resumed after command execution Notes on Executing Copy Between Different Operating Systems Copies can be made between different operating systems by using replication operations. Use the following combinations to execute copy between different operating systems: Table 9.2 Combinations for Executing Copy Between Different Operating Systems Copy Source Slices Copy Destination Logical Unit (Disk) slices A N/A Logical Unit (disk) A N/A (A=Available, N/A=Not Available) Notes on Executing Copy from Logical Unit (Disk) to Slice (Partition) Using Replication Function Do not create a file system on a copy destination volume (slice)
269 Notes When Using -m Option When replication occurs between servers, the -m option can be specified in the following commands in order to avoid communication processing to non-operating servers: - swsrpstartsync - swsrpmake - swsrpcancel When the -m option is specified, any one of the following conditions must apply in order to ensure that problems do not arise as a result of not performing volume pre-processing and post-processing at the non-operating server: - The non-operating server has been shut down. - Manual pre-processing and post-processing is performed for the volumes on the non-operating server. - The target volume is a RAW device (Oracle, etc., that does not need pre-processing and post-processing), rather than a file system Notes When Using -t Option When you execute the swsrpstartsync command with the -t option, volume lock fails with the swsrpmake command and the swsrp3607 message may be output. If you execute the swsrpstartsync command with the -t option to perform independent pre-processing, check whether the preprocessing has properly been done. If you determine that pre-processing and post-processing for replication destination volume is not needed and execute the swsrpstartsync command with the -t option, execute the swsrpmake command with the -t option Copy Processing Performance of Advanced Copy The Advanced Copy processing is performed by the ETERNUS Disk storage system. Therefore, direct enquiries concerning copy processing performance to the support department for the ETERNUS Disk storage system Server Restart After Backup or Replication When restart the server after executing backup or replication, the backup volume will be disabled because its status will change from "active" to "defined". Furthermore, the backup volume may be newly detected by another device name. In this case, the backup management/replication management command will become one of the following errors. - swst swst swst swsrp swsrp swsrp3606 When this occurs, the newly detected device must be deleted and the backup volume that can no longer be detected must be recovered. Follow the steps below: (The examples below explain the cases where the transaction volume is described as vg02 created in hdisk2, the backup volume is described as vg04 created in hdisk4, and the newly detected device name is described as hdisk17.) 1. Unmount all volumes in the transaction volume. # umount /mnt/vg02 2. Deactivate the volume group of the transaction volume. # varyoffvg vg
270 3. Check the disk status. # lspv hdisk0 005f74da e rootvg active hdisk1 005f74da6688a970 None hdisk2 005f74da8a1b6e2f vg02 active hdisk3 005f74da70e35fc7 vg03 active hdisk5 005f74da8af5069d None hdisk16 005f74da6fd209eb vg16 active hdisk17 005f74da8a1b6e2f vg02 active <- The backup volume detected with a new name. 4. Delete the disk definition newly detected. # rmdev -l hdisk17 -d hdisk17 is deleted 5. Activate the volume group of the transaction volume. # varyonvg vg02 6. Mount all the volumes in the transaction volume. # mount /mnt/vg02 /dev/lv00 log is recreated 7. Status of the transaction volume is activated. # mkdev -l hdisk4 hdisk4 can be used 8. Check if the backup volume can be activated for use. # lspv hdisk0 005f74da e rootvg active hdisk1 005f74da6688a970 None hdisk2 005f74da8a1b6e2f vg02 active hdisk3 005f74da70e35fc7 vg03 active hdisk4 005f74da8a2d04e0 vg04 hdisk5 005f74da8af5069d None hdisk16 005f74da6fd209eb vg16 active Notes on Snapshot High-speed Backup This section provides notes on snapshot backup operation. Number of Required Backup Volumes Snapshot high-speed backup requires as many backup volumes as the number of specified backup generations. Accordingly, snapshot backup is disabled if: - All the specified number of generations have been backed up, and - There is no new volume that can be used as a backup volume. Simultaneous Backups Performing snapshot high-speed backup simultaneously with the same transaction volume specified will perform two backups in parallel. However, performing snapshot high-speed backup simultaneously more often than the number of preservation generations will
271 cancel the backup operations starting from the oldest one. In other words, you cannot perform more simultaneous backups than the specified number of generations. Notes on Combining Cascade Copy and Concurrent OPC in Operation If you specify a volume used in cascade copy as the copy source and then execute a Concurrent OPC by the swsrpmake command, it may not be possible to preserve the sequence of data updates across multiple volumes. In this case, an error message will be displayed and the command terminates in an error. If the error cannot be resolved by responding to the message, we recommend you change the operating method of Advanced Copy or reconfigure the system. If you cannot change the operating method of Advanced Copy or reconfigure the system, create a file (check.ini) that sets the sequence of data updates across multiple volumes. Then, disable sequence preservation before you retry Concurrent OPC. The sequence of data updates will not be preserved across multiple volumes. Create check.ini in the following path of the server on which to execute the swsrpmake command: /etc/opt/fjsvswsrp/data/default Table 9.3 File Format of check.ini Section Name Key Name Value [check] ConcurOPCCascade Set preservation of the sequence of data updates across multiple volumes. By setting "No", preservation of the sequence will be disabled. By setting any value other than "No", preservation of the sequence will be enabled. [Example for disabling sequence preservation] [check] ConcurOPCCascade=No Point For any of the below ETERNUS Disk storage systems, Concurrent OPC can be executed regardless of sequence preservation of data updates. However, the sequence of data updates will not be preserved across multiple volumes. - ETERNUS DX80/DX80 S2 (for firmware version numbers before V10L30) - ETERNUS DX90/DX90 S2 (for firmware version numbers before V10L30) - ETERNUS DX400/DX400 S2 series (for firmware version numbers before V10L30) - ETERNUS DX8000/DX8000 S2 series (for firmware version numbers before V10L30) Notes on Synchronous High-speed Backup This section provides notes on synchronous high-speed backup. Processing of Backup The swstbackup command cannot be executed until the transaction and backup volumes are in the equivalency maintain state. Backup Policy Settings A backup policy can still be set up if the number of registered volumes is enough for snapshot type high-speed backup, even if the number is not enough for synchronous high-speed backup. In this case, synchronous high-speed backup cannot be performed

272 9.1.4 Notes on Restoration This section provides notes on restoring data. Timing of Restoration If data on a transaction volume has been updated since the latest backup, then if a restore is performed from the backup volume, recently updated data will be overwritten. Figure 9.1 Notes on Restoration of AdvancedCopy Manager TD: Transaction volume BD: Backup volume Procedure Which Mounts Backup Volume AIX uses LVM to manage all devices. Therefore, executing backup rewrites the LVM management information in the backup volume with that in the transaction volume. As a result, the backup volume cannot be activated and the logical volume of the backup volume cannot be mounted. To mount the backup volume, the LVM management information in the backup volume must be rewritten. However, this operation is not recommended because it results in an inability to use the normal procedure to restore the transaction volume. If circumstances require mounting of the backup volume, the procedure given below can be used to mount the backup volume. Follow the procedure very carefully; otherwise, transaction data may be destroyed. For information on each command, refer to the AIX manuals. Also, see the following section; "Restoration procedure after LVM management information in the backup volume is rewritten". 1. Using, for example, the lspv command, specify the physical volume name of the backup volume. # /usr/sbin/lspv hdisk0 0004f10aa92e686c rootvg hdisk1 0004f10a1c7879c5 vg01 In the above example, the volume group name of the backup volume is vg01, and the physical volume name is hdisk1. 2. Use the chdev command to temporarily remove the backup volume from LVM. # /usr/sbin/chdev -l hdisk1 -a pv=clear 3. Use the exportvg command to export the backup volume
273 # /usr/sbin/exportvg vg01 4. Use the recreatevg command to rewrite the LVM management information in the backup volume. # /usr/sbin/recreatevg -y vg01 hdisk1 5. Executing the recreatevg command changes the logical volume name in the volume group. Use the lsvg command to confirm the new logical volume name. # /usr/sbin/lsvg -l vg01 vg01: LV NAME TYPE LPs PPs PVs LV STATE MOUNT POINT fslv01 jfs closed/syncd N/A 6. Mount a file system by specifying the logical volume name confirmed in step 5. Unmount the logical volume before the next time that backup is performed. If the logical volume in the backup volume is mounted, backup fails. Restoration Procedure After LVM Management Information for Backup Volume Is Rewritten Rewriting the LVM management information in the backup volume makes it inconsistent with that in the transaction volume and prevents use of the normal procedure to restore the backup volume. In such cases, follow the procedure given below to restore it. Follow the procedure very carefully; otherwise, transaction data may be destroyed. For information on each command, refer to the AIX manuals. 1. Refer to "Appendix A Pre-processing and Post-processing of Backup and Restoration" and edit the post-processing script for restoration. 2. Execute restore processing. The transaction volume is now inactive because of the action taken in step Using, for example, the lspv command, display the physical volume name of the transaction volume. # /usr/sbin/lspv hdisk0 0004f10aa92e686c rootvg hdisk1 0004f10a1c7879c5 vg01 In the above example, the volume group name of the transaction volume is vg01, and the physical volume name is hdisk1. 4. Use the chdev command to temporarily remove the transaction volume from LVM. # /usr/sbin/chdev -l hdisk1 -a pv=clear 5. Use the exportvg command to export the transaction volume. # /usr/sbin/exportvg vg01 6. Use the recreatevg command to rewrite the LVM management information in the transaction volume. # /usr/sbin/recreatevg -y vg01 hdisk1 7. Executing the recreatevg command changes the logical volume name in the volume group. Use the lsvg command to confirm the new logical volume name. # /usr/sbin/lsvg -l vg01 vg01: LV NAME TYPE LPs PPs PVs LV STATE MOUNT POINT fslv01 jfs closed/syncd N/A 8. Mount a file system by specifying the logical volume name confirmed in step
274 Procedure for Restoration to Volume Other Than Transaction Volume When a backup volume is restored to a volume other than a transaction volume, the pre-processing and post-processing scripts for restoration are not executed. This operation also makes the LVM management information in the backup volume inconsistent with that in the restoration destination volume. In this case, the LVM management information must be rewritten. For these reasons, to restore a backup volume to a volume other than a transaction volume, follow the procedure given below. Follow the procedure very carefully; otherwise, transaction data may be destroyed. For information on each command, refer to the AIX manuals. 1. Unmount all logical volumes in the volume group of the restoration destination volume. 2. Use the varyoffvg command to deactivate the volume group of the restoration destination volume. The execution example shown below uses a volume group named vg01 for the restoration destination volume. # /usr/sbin/varyoffvg vg01 3. Execute restoration for the restoration destination volume. For the procedure, refer to "3.5.3 Restoring Data". 4. Using, for example, the lspv command, display the physical volume name of the restoration destination volume. # /usr/sbin/lspv hdisk0 0004f10aa92e686c rootvg hdisk1 0004f10a1c7879c5 vg01 In the above example, the volume group name of the restoration destination volume is vg01, and the physical volume name is hdisk1. 5. Use the chdev command to temporarily remove the restoration destination volume from LVM. # /usr/sbin/chdev -l hdisk1 -a pv=clear 6. Use the exportvg command to export the restoration destination volume. # /usr/sbin/exportvg vg01 7. Use the recreatevg command to rewrite the LVM management information in the restoration destination volume. # /usr/sbin/recreatevg -y vg01 hdisk1 8. Executing the recreatevg command changes the logical volume name in the volume group. Use the lsvg command to confirm the new logical volume name. # /usr/sbin/lsvg -l vg01 vg01: LV NAME TYPE LPs PPs PVs LV STATE MOUNT POINT fslv01 jfs closed/syncd N/A 9. Mount a file system by specifying the logical volume name confirmed in step Use in Combination with ODX (Offloaded Data Transfer) When using an ETERNUS Disk storage system that supports the Offloaded Data Transfer (hereinafter referred to as "ODX") function, ODX session starts within the ETERNUS Disk storage system by Windows Server 2012 or later Offloaded Data Transfer function when files are copied or transferred. However, Advanced Copy cannot be performed by AdvancedCopy Manager on the condition that a volume on which ODX session is running is taken as copy destination. For this reason, if Advanced Copy is performed by AdvancedCopy Manager on the condition that a volume containing the files or areas being copied or transferred by the Offloaded Data Transfer function is taken as copy destination, an error message is displayed and the command may terminate abnormally. If the command terminates abnormally, check on the Web Console that no ODX session exists on the copy destination volume and then re-execute the command

275 If the error is not resolved, refer to "If Error Is Not Resolved" in "Use in Combination with ODX (Offloaded Data Transfer)" in the ETERNUS SF AdvancedCopy Manager Operation Guide (for Windows). Figure 9.2 Use in Combination with ODX *1: In the following ETERNUS Disk storage systems whose firmware version number is V10L50 or earlier, Advanced Copy cannot be performed by AdvancedCopy Manager with respect to the volume on which ODX session is running. - ETERNUS DX80/DX80 S2 - ETERNUS DX90/DX90 S2 - ETERNUS DX400/DX400 S2 series - ETERNUS DX8000/DX8000 S2 series Use in Combination with XCOPY (Extended Copy) When copying data by replicating VMware vsphere virtual machines or running Storage vmotion, Extended Copy (hereinafter referred to as "XCOPY") session starts by the Full Copy function of VMware vstorage APIs for Array Integration (VMware VAAI). However, Advanced Copy cannot be performed by AdvancedCopy Manager on the condition that a volume on which XCOPY session is running is taken as copy destination. For this reason, if Advanced Copy is performed by AdvancedCopy Manager on the condition that a volume on which data is being copied by replicating a virtual machine or running Storage vmotion is taken as copy destination, an error message is displayed and the command may terminate abnormally. If the command terminates abnormally, check on the Web Console that no XCOPY session exists on the copy destination volume and then re-execute the command. Figure 9.3 Use in Combination with XCOPY
276 *1: In the following ETERNUS Disk storage systems whose firmware version number is V10L50 or earlier, Advanced Copy cannot be performed by AdvancedCopy Manager with respect to the volume on which XCOPY session is running. - ETERNUS DX80/DX80 S2 - ETERNUS DX90/DX90 S2 - ETERNUS DX400/DX400 S2 series - ETERNUS DX8000/DX8000 S2 series
277 Appendix A Pre-processing and Post-processing of Backup and Restoration This appendix provides information on pre-processing and post-processing of backup and restoration. A.1 Overview Pre-processing and post-processing of backup or restoration are started before and after backup or restoration when a backup or restore command is executed. This processing is required by AdvancedCopy Manager to back up or restore a transaction volume. A.2 Pre-processing and Post-processing of Backup Backup using AdvancedCopy Manager must be performed while other processes are prevented from accessing the transaction volume. For this reason, the transaction volume is unmounted during pre-processing. Tasks performed in the post-processing are generally determined by what has been done in the pre-processing. Table A.1 Backup Pre-processing and Post-processing Pre-processing Post-processing A transaction volume was unmounted. Take no action. Remount the transaction volume. Take no action. If special pre-processing or post-processing is required, you need to add the additional instructions to the shell script. When customizing a script, strictly observe the following rules regarding error codes: Table A.2 Error Code Rules Error Code Usage 0-99 Unusable (these are reserved for AdvancedCopy Manager) Usable Note - If pre-processing failed, execute swstsrsemtch (Resource match command) because the consistency of resource information may be incomplete. - For backing up the volume group that includes the logical volume in which the file system has been built, refer to "Backup Volume Group". The pre-processing and post-processing scripts have to be customized to execute unmount/mount processing for all logical volumes across which the file system exists. A.2.1 Pre-processing of Backup The name of a script file for pre-processing of a backup is as follows. /etc/opt/fjsvswsts/sh/opcbackup.pre A Pre-processing Script for Backup 1: #!/bin/sh 2: 3: # AdvancedCopy Manager
278 4: # All Rights Reserved, Copyright FUJITSU LIMITED, : 6: # 7: # Pre-processing of backup processing 8: # 9: # Argument: $1 Device or VG name of transaction disk 10: # $2 Reserve 11: # $3 Device or VG name of backup disk 12: # 13: # Error number 14: # 2: Argument error 15: # 10: umount error 16: # 50: varyoff error 17: # 99: Script not customize 18: 19: # Argument check 20: case $# in 21: 1) 22: ;; 23: 2) 24: ;; 25: 3) 26: ;; 27: *) 28: exit 2 29: ;; 30: esac 31: 32: device=$1 33: bk_device=$3 34: 35: if [ "$SWSTGNODE"!= "" ] 36: then 37: swstg_node="/`echo $SWSTGNODE`" 38: else 39: swstg_node="" 40: fi 41: 42: err_log_path="/var/opt/fjsvswsts"$swstg_node"/log" 43: 44: # Determination of postprocessing file name 45: if [ "`echo $device /usr/bin/grep "/dev/hdisk"`"!= "" ] 46: then 47:dev_type="lvm_pv" 48:# /dev/hdisk? -> hdisk? 49:dev="`echo $device /usr/bin/awk -F\/ '{ print $3 }'`" 50: 51: elif [ "`echo $device /usr/bin/grep "/dev/vx/dmp/"`"!= "" ] 52: then 53:dev_type="vxvm_pv" 54:# /dev/vx/dmp/device -> device 55:dev="`echo $device /usr/bin/awk -F\/ '{ print $5 }'`" 56: 57: elif [ "`echo $device /usr/bin/grep "/dev/"`"!= "" ] 58: then 59:dev_type="lvm_vg" 60:# /dev/vg_name -> VG_Name 61:dev="`echo $device /usr/bin/awk -F\/ '{ print $3 }'`" 62: 63: else 64:# Other Volume 65:exit 0 66: fi
279 67: 68: post_file="/etc/opt/fjsvswsts"$swstg_node"/data/default/"$dev".pre" 69: 70: # When the transaction disk is a volume group ############################# 71: if [ "$dev_type" = "lvm_vg" ] 72: then 73: 74: # Devices are volume group and script not customize 75: exit 99 76: 77: # When devices of volume group can be unmounted 78: # Specify the name of volume group to unmount 79: if [ "$device" = "/dev/vgxx" ] 80: then 81: echo "mount" > $post_file 82: 83: # Unmount all logical volumes of the volume group 84: mount_point="/xx" 85: /usr/sbin/umount $mount_point 2>/dev/null 86: if [ $?!= 0 ] 87: then 88: retry_count=3 89: sleep_time=1 90: result_flag=1 91: 92: while [ $retry_count -gt 0 ] 93: do 94: /usr/sbin/umount $mount_point > $err_log_path/$dev.umount 2>&1 95: if [ $?!= 0 ] 96: then 97: retry_count=`expr $retry_count - 1` 98: /usr/bin/sleep $sleep_time 99: else 100: /usr/bin/rm -f $err_log_path/$dev.umount 101: result_flag=0 102: break 103: fi 104: done 105: 106: if [ $result_flag!= 0 ] 107: then 108: /usr/sbin/fuser -cu $mount_point> $err_log_path/$dev.fuser 2>&1 109: /usr/bin/ps -ef > $err_log_path/$dev.ps 2>&1 110: 111: exit : fi 113: fi 114: 115: # mount_point="/xx" 116: # /usr/sbin/umount $mount_point 2>/dev/null 117: # if [ $?!= 0 ] 118: # then 119: # /usr/sbin/umount $mount_point > $err_log_path/$dev.umount 2>&1 120: # if [ $?!= 0 ] 121: # retry_count=3 122: # sleep_time=1 123: # result_flag=1 124: # 125: # while[ $retry_count -gt 0 ] 126: # do 127: # /usr/sbin/umount $mount_point> $err_log_path/$dev.umount 2>&1 128: # if[ $?!= 0 ] 129: # then
280 130: # retry_count=`expr $retry_count - 1` 131: # sleep $sleep_time 132: # else 133: # rm -f $err_log_path/$dev.umount 134: # result_flag=0 135: # break 136: # fi 137: # done 138: # 139: # if[ $result_flag!= 0 ] 140: # then 141: # /usr/sbin/fuser -cu $mount_point> $err_log_path/$dev.fuser 2>&1 142: # /usr/bin/ps -ef> $err_log_path/$dev.ps 2>&1 143: # 144: # exit : # fi 146: # fi 147: # fi 148: fi 149: 150: # varyoff the backup volume. 151: BKVOL=`/usr/bin/basename $bk_device` 152: ACTIVE_VGS=`/usr/sbin/lsvg -o` 153: for i in $ACTIVE_VGS 154: do 155: if[ "$BKVOL"= "$i" ] 156: then 157: /usr/sbin/varyoffvg $i 2>/dev/null 158: if[ $?!= 0 ] 159: then 160: /usr/sbin/varyoffvg $i> $err_log_path/$dev.varyoffvg 2>&1 161: if[ $?!= 0 ] 162: then 163: exit : else 165: /usr/bin/rm -f $err_log_path/$dev.varyoffvg 166: fi 167: fi 168: break 169: fi 170: done 171: 172: # When the transaction disk is a VxVM physical volume ######################### 173: elif [ "$dev_type" = "vxvm_pv" ] 174: then 175: # Nothing is done to VxVM physical volume. 176: echo "none" > $post_file 177: 178: # When the transaction disk is a LVM physical volume ########################## 179: elif [ "$dev_type" = "lvm_pv" ] 180: then 181: # Nothing is done to LVM physical volume. 182: echo "none" > $post_file 183: 184: fi 185: exit 0 A.2.2 Post-processing of Backup The name of a script file for post-processing of a backup is as follows. /etc/opt/fjsvswsts/sh/opcbackup.post
281 A Post-processing Script for Backup 1: #!/bin/sh 2: 3: # AdvancedCopy Manager 4: # All Rights Reserved, Copyright FUJITSU LIMITED, : 6: # 7: # Post-processing of backup processing 8: # 9: # Argument: $1 Device or VG name of transaction disk 10: # $2 Reserve 11: # 12: # Error number 13: # 2: Argument error 14: # 11: mount error 15: 16: # Argument check 17: case $# in 18: 1) 19: ;; 20: 2) 21: ;; 22: *) 23: exit 2 24: ;; 25: esac 26: 27: device=$1 28: 29: if [ "$SWSTGNODE"!= "" ] 30: then 31: swstg_node="/`echo $SWSTGNODE`" 32: else 33: swstg_node="" 34: fi 35: 36: err_log_path="/var/opt/fjsvswsts"$swstg_node"/log" 37: 38: # Determination of postprocessing file name 39: if [ "`echo $device /usr/bin/grep "/dev/hdisk"`"!= "" ] 40: then 41: dev_type="lvm_pv" 42: # /dev/hdisk? -> hdisk? 43: dev="`echo $device /usr/bin/awk -F\/ '{ print $3 }'`" 44: 45: elif [ "`echo $device /usr/bin/grep "/dev/vx/dmp/"`"!= "" ] 46: then 47: dev_type="vxvm_pv" 48: # /dev/vx/dmp/device -> device 49: dev="`echo $device /usr/bin/awk -F\/ '{ print $5 }'`" 50: 51: elif [ "`echo $device /usr/bin/grep "/dev/"`"!= "" ] 52: then 53: dev_type="lvm_vg" 54: # /dev/vg_name -> VG_Name 55: dev="`echo $device /usr/bin/awk -F\/ '{ print $3 }'`" 56: 57: else 58: # Other Volume 59: exit 0 60: fi 61:
282 62: post_file="/etc/opt/fjsvswsts"$swstg_node"/data/default/"$dev".pre" 63: 64: # Confirmation of postprocessing 65: if [! -r $post_file ] 66: then 67: exit 0 68: fi 69: post="`/usr/bin/cat $post_file`" 70: 71: # mount processing 72: if [ "$post" = "mount" ] 73: then 74: 75: # When devices of volume group can be unmounted 76: # Specify the name of volume group to mount 77: 78: if [ "$device" = "/dev/vgxx" ] 79: then 80: mount_error=0 81: 82: # Mount all logical volumes of the volume group 83: lvname="/dev/xxxxx" 84: lv_mount_point="/xx" 85: mount_status=`/usr/sbin/mount /usr/bin/nawk -v lv=${lvname} 'lv==$1{flag=1; exit;} END{if(flag==1) print "mounted"; else print "not_mounted";}'` 86: if [ $mount_status = "not_mounted" ] 87: then 88: /usr/sbin/mount $lvname $lv_mount_point 2> /dev/null 89: if [ $?!= 0 ] 90: then 91: retry_count=3 92: sleep_time=1 93: result_flag=1 94: 95: while [ $retry_count -gt 0 ] 96: do 97: /usr/sbin/mount $lvname $lv_mount_point > $err_log_path/$dev.mount 2>&1 98: if [ $?!= 0 ] 99: then 100: retry_count=`expr $retry_count - 1` 101: /usr/bin/sleep $sleep_time 102: else 103: /usr/bin/rm -f $err_log_path/$dev.mount 104: result_flag=0 105: break 106: fi 107: done 108: 109: if [ $result_flag!= 0 ] 110: then 111: mount_error=1 112: fi 113: fi 114: fi 115: 116: # lvname="/dev/xxxxx" 117: # lv_mount_point="/xx" 118: # mount_status=`/usr/sbin/mount /usr/bin/nawk -v lv=${lvname} 'lv==$1{flag=1; exit;} END{if(flag==1) print "mounted"; else print "not_mounted";}'` 119: # if [ $mount_status = "not_mounted" ] 120: # then 121: # /usr/sbin/mount $lvname $lv_mount_point 2> /dev/null 122: # if [ $?!= 0 ]
283 123: # then 124: # retry_count=3 125: # sleep_time=1 126: # result_flag=1 127: # 128: # while [ $retry_count -gt 0 ] 129: # do 130: # /usr/sbin/mount $lvname $lv_mount_point > $err_log_path/$dev.mount 2>&1 131: # if [ $?!= 0 ] 132: # then 133: # retry_count=`expr $retry_count - 1` 134: # /usr/bin/sleep $sleep_time 135: # else 136: # rm -f $err_log_path/$dev.mount 137: # result_flag=0 138: # break 139: # fi 140: # done 141: # 142: # if [ $result_flag!= 0 ] 143: # then 144: # mount_error=1 145: # fi 146: # fi 147: # fi 148: 149: if [ $mount_error!= 0 ] 150: then 151: exit : fi 153: fi 154: fi 155: 156: /usr/bin/rm -rf $post_file 2> /dev/null 157: exit 0 A.2.3 Customizing Shell Script The method of customizing the shell script for backup pre- and post-processing is explained below. Backup Volume Group When you are backing up the volume group containing the logical volume used to build the file system, insert a comment character ("#") into line 75 of the pre-processing script (OpcBackup.pre) to remove the exit statement. - Remove the comment from lines of the pre-processing script (OpcBackup.pre), as well as from lines of the postprocessing script (OpcBackup.post). Correct the description in a comment so that unmount/mount processing is carried out on all the logical volumes across which the file system exists. Change the parts shown as "X" to match the actual environment. If more than one logical volume is being processed, repeat lines of the pre-processing script (OpcBackup.exe) and lines of the post-processing script (PpcBackup.post) once for each additional logical volume. Note - Note that unmount/mount processing to a volume group is not carried out if the scripts have not been customized. - If the backup volume is a volume group, deactivate the backup volume during backup pre-processing. - Correct the parameters and options, of the OS commands, such as the mount command and the fsck command, appropriately for their use
284 A.3 Pre-processing and Post-processing of Restoration In AdvancedCopy Manager, restore processing must be performed while transaction volumes are unmounted, so the transaction volume is unmounted in pre-processing. Post-processing tasks will be determined by what has occurred in pre-processing. Table A.3 Pre-processing and Post-processing for Restoration Pre-processing Post-processing A transaction volume was unmounted. Take no action. Remount the transaction volume. Take no action. If special pre-processing or post-processing is required, you need to add the instructions as appropriate to the shell script. When customizing a script, strictly observe the following rules regarding error codes: Table A.4 Error Code Rules Error Code Usage 0-99 Unusable (reserved for AdvancedCopy Manager) Usable Note - If the post-processing fails, the resource information may have inconsistencies. Execute the swstsrsemtch command. - When restoring a file system in a volume group, refer to "Restore Volume Group", and customize the pre-processing and postprocessing scripts so that the unmount/mount command is carried out for all logical volumes across which a file system exists. A.3.1 Pre-processing of Restoration The name of a script file for pre-processing of a restoration is as follows. /etc/opt/fjsvswsts/sh/opcrestore.pre A Pre-processing Script for Restoration 1: #!/bin/sh 2: 3: # AdvancedCopy Manager 4: # All Rights Reserved, Copyright FUJITSU LIMITED, : 6: # 7: # Pre-processing of restoration processing 8: # 9: # Argument: $1 Device or VG name of transaction disk 10: # $2 Reserve 11: # 12: # Error number 13: # 2: Argument error 14: # 10: umount error 15: # 50: varyoff error 16: # 99: Script not customize 17: 18: # Argument check 19: case $# in 20: 1) 21: ;;
285 22: 2) 23: ;; 24: *) 25: exit 2 26: ;; 27: esac 28: 29: device=$1 30: 31: if [ "$SWSTGNODE"!= "" ] 32: then 33: swstg_node="/`echo $SWSTGNODE`" 34: else 35: swstg_node="" 36: fi 37: 38: err_log_path="/var/opt/fjsvswsts"$swstg_node"/log" 39: 40: # Determination of postprocessing file name 41: if [ "`echo $device /usr/bin/grep "/dev/hdisk"`"!= "" ] 42: then 43: dev_type="lvm_pv" 44: # /dev/hdisk? -> hdisk? 45: dev="`echo $device /usr/bin/awk -F\/ '{ print $3 }'`" 46: 47: elif [ "`echo $device /usr/bin/grep "/dev/vx/dmp/"`"!= "" ] 48: then 49: dev_type="vxvm_pv" 50: # /dev/vx/dmp/device -> device 51: dev="`echo $device /usr/bin/awk -F\/ '{ print $5 }'`" 52: 53: elif [ "`echo $device /usr/bin/grep "/dev/"`"!= "" ] 54: then 55: dev_type="lvm_vg" 56: # /dev/vg_name -> VG_Name 57: dev="`echo $device /usr/bin/awk -F\/ '{ print $3 }'`" 58: 59: else 60: # Other Volume 61:exit 0 62: fi 63: 64: post_file="/etc/opt/fjsvswsts"$swstg_node"/data/default/"$dev".pre" 65: 66: # When the transaction disk is a volume group ############################# 67: if [ "$dev_type" = "lvm_vg" ] 68: then 69: 70: # Devices are volume group and script not customize 71: exit 99 72: 73: # When devices of volume group was mounted 74: # Specify the name of volume group to unmount 75: if [ "$device" = "/dev/vgxx" ] 76: then 77: echo "mount" > $post_file 78: 79: # Unmount all logical volumes of the volume group 80: mount_point="/xx" 81: /usr/sbin/umount $mount_point 2>/dev/null 82: if [ $?!= 0 ] 83: then 84: retry_count=
286 85: sleep_time=1 86: result_flag=1 87: 88: while [ $retry_count -gt 0 ] 89: do 90: /usr/sbin/umount $mount_point > $err_log_path/$dev.umount 2>&1 91: if [ $?!= 0 ] 92: then 93: retry_count=`expr $retry_count - 1` 94: /usr/bin/sleep $sleep_time 95: else 96: /usr/bin/rm -f $err_log_path/$dev.umount 97: result_flag=0 98: break 99: fi 100: done 101: 102: if [ $result_flag!= 0 ] 103: then 104: /usr/sbin/fuser -cu $mount_point> $err_log_path/$dev.fuser 2>&1 105: /usr/bin/ps -ef > $err_log_path/$dev.ps 2>&1 106: 107: exit : fi 109: fi 110: 111: # mount_point="/xx" 112: # /usr/sbin/umount $mount_point 2>/dev/null 113: # if [ $?!= 0 ] 114: # then 115: # retry_count=3 116: # sleep_time=1 117: # result_flag=1 118: # 119: # while [ $retry_count -gt 0 ] 120: # do 121: # /usr/sbin/umount $mount_point > $err_log_path/$dev.umount 2>&1 122: # if [ $?!= 0 ] 123: # then 124: # retry_count=`expr $retry_count - 1` 125: # sleep $sleep_time 126: # else 127: # rm -f $err_log_path/$dev.umount 128: # result_flag=0 129: # break 130: # fi 131: # done 132: # 133: # if [ $result_flag!= 0 ] 134: # then 135: # /usr/sbin/fuser -cu $mount_point> $err_log_path/$dev.fuser 2>&1 136: # /usr/bin/ps -ef > $err_log_path/$dev.ps 2>&1 137: # 138: # exit : # fi 140: # fi 141: fi 142: 143: # varyoff the transaction volume. 144: ACTIVE_VGS=`/usr/sbin/lsvg -o` 145: for i in $ACTIVE_VGS 146: do 147: if [ "$dev" = "$i" ]
287 148: then 149: /usr/sbin/varyoffvg $i 2> /dev/null 150: if [ $?!= 0 ] 151: then 152: /usr/sbin/varyoffvg $i > $err_log_path/$dev.varyoffvg 2>&1 153: if [ $?!= 0 ] 154: then 155: exit : else 157: /usr/bin/rm -f $err_log_path/$dev.varyoffvg 2>&1 158: fi 159: fi 160: break 161: fi 162: done 163: 164: # When the transaction disk is a VxVM physical volume ######################### 165: elif [ "$dev_type" = "vxvm_pv" ] 166: then 167: # Nothing is done to VxVM physical volume. 168: echo "none" > $post_file 169: 170: # When the transaction disk is a LVM physical volume ########################## 171: elif [ "$dev_type" = "lvm_pv" ] 172: then 173: # Nothing is done to LVM physical volume. 174: echo "none" > $post_file 175: 176: fi 177: 178: exit 0 Restore processing is not possible on a mounted transaction volume that cannot be unmounted. Specify a device at the restore destination. A.3.2 Post-processing of Restoration The name of a script file for post-processing of a restoration is as follows. /etc/opt/fjsvswsts/sh/opcrestore.post A Post-processing Script for Restoration 1: #!/bin/sh 2: 3: # AdvancedCopy Manager 4: # All Rights Reserved, Copyright FUJITSU LIMITED, : 6: # 7: # Post-processing of restoration processing 8: # 9: # Argument: $1 Device or VG name of transaction disk 10: # $2 Reserve 11: # 12: # Error number 13: # 2: Argument error 14: # 11: mount error 15: # 51: varyon error 16: 17: # Argument check 18: case $# in 19: 1)
288 20: ;; 21: 2) 22: ;; 23: *) 24: exit 2 25: ;; 26: esac 27: 28: device=$1 29: 30: if [ "$SWSTGNODE"!= "" ] 31: then 32: swstg_node="/`echo $SWSTGNODE`" 33: else 34: swstg_node="" 35: fi 36: 37: err_log_path="/var/opt/fjsvswsts"$swstg_node"/log" 38: 39: # Determination of postprocessing file name 40: if [ "`echo $device /usr/bin/grep "/dev/hdisk"`"!= "" ] 41: then 42: dev_type="lvm_pv" 43: # /dev/hdisk? -> hdisk? 44: dev="`echo $device /usr/bin/awk -F\/ '{ print $3 }'`" 45: 46: elif [ "`echo $device /usr/bin/grep "/dev/vx/dmp/"`"!= "" ] 47: then 48: dev_type="vxvm_pv" 49: # /dev/vx/dmp/device -> device 50: dev="`echo $device /usr/bin/awk -F\/ '{ print $5 }'`" 51: 52: elif [ "`echo $device /usr/bin/grep "/dev/"`"!= "" ] 53: then 54: dev_type="lvm_vg" 55: # /dev/vg_name -> VG_Name 56: dev="`echo $device /usr/bin/awk -F\/ '{ print $3 }'`" 57: 58: else 59: # Other Volume 60: exit 0 61: fi 62: 63: post_file="/etc/opt/fjsvswsts"$swstg_node"/data/default/"$dev".pre" 64: 65: if [ "$dev_type" = "lvm_vg" ] 66: then 67: # varyon the transaction volume 68: /usr/sbin/varyonvg $dev 2> /dev/null 69: if [ $?!= 0 ] 70: then 71: /usr/sbin/varyonvg $dev > $err_log_path/$dev.varyonvg 2>&1 72: if [ $?!= 0 ] 73: then 74: exit 51 75: else 76: /usr/bin/rm -f $err_log_path/$dev.varyonvg 77: fi 78: fi 79: fi 80: 81: # Confirmation of postprocessing 82: if [! -r $post_file ]
289 83: then 84: exit 0 85: fi 86: post="`/usr/bin/cat $post_file`" 87: 88: # mount processing 89: if [ "$post" = "mount" ] 90: then 91: 92: # When devices of volume group was mounted 93: # Specify the name of volume group to mount 94: 95: if [ "$device" = "/dev/vgxx" ] 96: then 97: mount_error=0 98: 99: # Mount all logical volumes of the volume group 100: lvname="/dev/xxxxx" 101: lv_mount_point="/xx" 102: mount_status=`/usr/sbin/mount /usr/bin/nawk -v lv=${lvname} 'lv==$1{flag=1; exit;} END{if(flag==1) print "mounted"; else print "not_mounted";}'` 103: if [ $mount_status = "not_mounted" ] 104: then 105: /usr/sbin/mount $lvname $lv_mount_point 2> /dev/null 106: if [ $?!= 0 ] 107: then 108: retry_count=3 109: sleep_time=1 110: result_flag=1 111: 112: while [ $retry_count -gt 0 ] 113: do 114: /usr/sbin/mount $lvname $lv_mount_point > $err_log_path/$dev.mount 2>&1 115: if [ $?!= 0 ] 116: then 117: retry_count=`expr $retry_count - 1` 118: /usr/bin/sleep $sleep_time 119: else 120: /usr/bin/rm -f $err_log_path/$dev.mount 121: result_flag=0 122: break 123: fi 124: done 125: 126: if [ $result_flag!= 0 ] 127: then 128: mount_error=1 129: fi 130: fi 131: fi 132: 133: # lvname="/dev/xxxxx" 134: # lv_mount_point="/xx" 135: # mount_status=`/usr/sbin/mount /usr/bin/nawk -v lv=${lvname} 'lv==$1{flag=1; exit;} END{if(flag==1) print "mounted"; else print "not_mounted";}'` 136: # if [ $mount_status = "not_mounted" ] 137: # then 138: # /usr/sbin/mount $lvname $lv_mount_point 2> /dev/null 139: # if [ $?!= 0 ] 140: # then 141: # retry_count=3 142: # sleep_time=1 143: # result_flag=
290 144: # 145: # while [ $retry_count -gt 0 ] 146: # do 147: # /usr/sbin/mount $lvname $lv_mount_point > $err_log_path/$dev.mount 2>&1 148: # if [ $?!= 0 ] 149: # then 150: # retry_count=`expr $retry_count - 1` 151: # /usr/bin/sleep $sleep_time 152: # else 153: # rm -f $err_log_path/$dev.mount 154: # result_flag=0 155: # break 156: # fi 157: # done 158: # 159: # if [ $result_flag!= 0 ] 160: # then 161: # mount_error=1 162: # fi 163: # fi 164: # fi 165: 166: if [ $mount_error!= 0 ] 167: then 168: exit : fi 170: fi 171: fi 172: 173: /usr/bin/rm -rf $post_file 2> /dev/null 174: exit 0 A.3.3 Customizing Shell Script The method to customize the shell script for restore pre/post-processing is explained below. Restore Volume Group When restoring a file system that is part of a logical volume in a volume group, insert a comment character ("#") into line 70 of the pre-processing script (OpcRestore.pre) to remove the exit statement. - Remove the comment character from lines of the pre-processing script (OpcRestore.pre), and also from lines of the post-processing script (OpcRestore.post). Correct the description in the comment so that unmount/mount processing is carried out on all the logical volumes used to build the file system. Modify the parts shown as "X" to match the actual environment. If more than one logical volume is being processed, repeat lines of the pre-processing script (OpcRestore.exe) and lines of the post-processing script (OpcRestore.post) once for each additional logical volume. - When the backup volume is mounted, the LVM management information in the backup volume is rewritten and the normal procedure cannot be used to restore the volume. In such cases, convert lines 65 to 79 and 95 to 170 in the post-processing script (OpcRestore.post) into comments ("#"). Furthermore, an additional step is required after restoration is completed. Refer to "9.1.4 Notes on Restoration" for more information. Note - Note that unmount/mount processing to a volume group is not carried out if the scripts have not been customized. - Correct parameters, options, etc. of the OS command, such as the "mount" command and the "fsck" command, according to their employment

291 Appendix B Sample Script for Backup Operations This appendix provides information on sample scripts for AdvancedCopy Manager. A sample script allows you to back up data on a transaction volume with AdvancedCopy Manager. The manager of the backup operation should customize the sample scripts according to their specific requirements and apply them to the backup. Point This section explains how the sample script is created for the backup management function. By using it as a reference when creating similar scripts for the replication management function, you can copy Oracle databases. B.1 Backup and Restoration of Transaction Volume B.1.1 Backup Procedure The following is an overview of the backup procedure: 1. Check the work operation status Check whether processing is in operation or not. 2. Declare the start of online backup If processing was found to be in operation in step 1, declare the start of online backup for the database to stop updating the data files. This will make the slices that store transaction data ready for online backup. 3. Backup (copy) slices Backup (copy) the slices that store transaction data using the AdvancedCopy Manager backup function. 4. Declare the end of online backup If processing was found to be in operation in step 1, declare the end of online backup for the database to resume updating the data files. Figure B.1 Backup B.1.2 Restoration Procedure The following provides an overview of how to perform restoration from a backup volume. 1. Checking the processing stop status Check that processing has stopped. If processing is in operation, stop the processing completely. 2. Performing restoration from a backup volume Using the restoration function of AdvancedCopy Manager, restore data from a backup volume to the transaction volume
292 Figure B.2 Performing Restoration from Backup Volume B.2 Sample Scripts for Oracle Sample scripts provided for AdvancedCopy Manager are created assuming that the following version of Oracle is used. If you use any other version, correct the sample scripts as required. B Oracle 9i (V ) Overview of Sample Scripts The sample shell scripts provided are summarized below. These scripts are stored in the /etc/opt/fjsvswsts/samp directory. Table B.1 Sample Shell Script for Oracle No. Type Script Name Associated Transaction Associated Resource Type 1 Collection of DB information swst_or_iv Oracle transaction - 2 Backup swst_or_vg_bk Oracle transaction Raw device Note When a database exists on a file system, backup cannot be performed if the database is in use. B Collecting DB Information swst_or_iv outputs information about an Oracle database. The output file names and their contents are: - spdata.lst : List of table space names and storage destinations - spdata.bgn : Command in the following format: Alter tablespace Table-space-name begin backup; - spdata.end : Command in the following format: Alter tablespace Table-space-name end backup; - spcont.lst : Oracle database control file information - splog.lst : Oracle database log file information - spredolog.lst : REDO Log file information of an Oracle database Use the database information above as a reference for creating shell scripts for backup processing
293 Format swst_or_iv Usage Example # swst_or_iv swst_or_iv completed. Result Example spdata.lst TABLESPACE-NAME DEVICE-NAME ORA10 /ora1/ora0.dbf ORA20 /ora2/ora0.dbf RBS /oracle/ora/oradata/rbs01.dbf SYSTEM /oracle/ora/oradata/system01.dbf TEMP /oracle/ora/oradata/temp01.dbf TOOLS /oracle/ora/oradata/tools01.dbf USERS /oracle/ora/oradata/users01.dbf ACMTS1 /dev/rlvol36001 spdata.bgn alter tablespace ORA10 begin backup; alter tablespace ORA20 begin backup; alter tablespace RBS begin backup; alter tablespace SYSTEM begin backup; alter tablespace TEMP begin backup; alter tablespace TOOLS begin backup; alter tablespace USERS begin backup; alter tablespace ACMTS1 begin backup; spdata.end alter tablespace ORA10 end backup; alter tablespace ORA20 end backup; alter tablespace RBS end backup; alter tablespace SYSTEM end backup; alter tablespace TEMP end backup; alter tablespace TOOLS end backup; alter tablespace USERS end backup; alter tablespace ACMTS1 end backup; spcont.lst NAME TYPE VALUE control_files string /oracle/ora/oradata/control splog.lst NAME TYPE VALUE log_archive_dest string /oracle/ora/oradata/archive spredolog.lst GROUP# MEMBER /work/u01/app/oracle/oradata/acmtest1/redo03.log 2 /work/u01/app/oracle/oradata/acmtest1/redo02.log 1 /work/u01/app/oracle/oradata/acmtest1/redo01.log Processing Outline #!/bin/sh reterr() --- An error message is output before an error is returned. sqldata() { sqlplus /nolog <<! connect / as sysdba
294 SELECT --- Acquire Oracle table space information. } sqllog() { sqlplus /nolog <<! connect / as sysdba show --- Acquire Oracle log information. } sqlcont() { sqlplus /nolog <<! connect / as sysdba show --- Acquire Oracle control information. } sqlredolog() { sqlplus /nolog <<! connect / as sysdba show --- Acquire Oracle REDO log information. } # main() # 0) Environmental variable setting PATH=$PATH:/usr/bin:/usr/sbin:/opt/FJSVswsts/bin # 1) Acquisition of Oracle table space information sqldata() invocation --- Acquire Oracle table space information # 2) Acquisition of Oracle log information sqllog() invocation --- Acquire Oracle log information # 3) Acquisition of Oracle control information sqlcont() invocation --- Acquire Oracle control information # 4) Acquisition of Oracle REDO log information sqlredolog() invocation --- Acquire Oracle REDO log information exit 0 B Backup swst_or_vg_bk, run using AdvancedCopy Manager, backs up live data using an Oracle database on a raw device. Live data is copied to work disks prepared by users. These scripts correspond to steps 2 to 4 in "B DB Information Collection." Format swst_or_vg_bk {-a -i} volumegroupname Options -a -i Operands Specify when an Oracle database is online. The start of backup processing is declared to the Oracle server. Specify when an Oracle database is stopped or the file is a general file. The start of backup processing is not declared to the Oracle server. volumegroupname Specify the name of the volume group targeted for backup
295 Example Using swst_or_vg_bk While processing is active, back up /dev/vg01 in which an Oracle database is located. # swst_or_vg_bk -a /dev/vg01 swst_or_vg_bk completed. (/dev/vg01 -> /dev/vg02 at 23:01 on ) Processing Outline of swst_or_vg_bk #!/bin/sh usage() --- Command syntax is output before an error is returned. reterr() --- An error message is output before an error is returned. get_chr_blk() --- Conversion from a character device to a block device get_blk_chr() --- Conversion from a block device to a character device sqlbegin() { sqlplus /nolog <<! connect / as sysdba alter system switch logfile; alter system flush shared_pool; alter tablespace CCC begin backup; --- Notify Oracle of the start of backup. } sqlend() { sqlplus /nolog <<! connect / as sysdba alter tablespace CCC end backup; --- Notify Oracle of the stopping of backup. } getbd() --- Fetch the name of the backup (copy) destination device of AdvancedCopy Manager. getdate() --- Fetch the backup (copy) date of AdvancedCopy Manager. gettime() --- Fetch the backup (copy) time of AdvancedCopy Manager. # main() Parameter analysis and raw device check # 0) Environmental variable setting PATH=$PATH:/usr/bin:/usr/sbin:/opt/FJSVswsts/bin # 1) Notification issued to Oracle of the start of backup if [ "-a" operand specification ] then sqlbegin() invocation --- Notify Oracle of the start of backup. Error handling fi # 2) Disk backup (copy) by AdvancedCopy Manager command swstbackup $SRC --- Copy the disk. Error handling # 3) Notification issued to Oracle of the stopping of backup if [ "-a" operand specification ] then sqlend() invocation --- Notify Oracle of the stopping of backup. Error handling fi # 4) Acquisition of the backup (copy) destination of AdvancedCopy Manager DSTBLK="`getbd $SRC`" --- Fetch a backup volume. BKDATE="`getdate $SRC`" BKTIME="`gettime $SRC`" exit
296 B.2.2 Applying Sample Shell Scripts B DB Information Collection Sample Shell Script Update B Update the procedures below of swst_or_iv according to actual operations. The following numbers correspond to those in the scripts: - 0) Environmental variable setting - 1) Acquisition of Oracle table space information - 2) Acquisition of Oracle log information - 3) Acquisition of Oracle control information Procedures 1) to 3) change Oracle account information. These scripts can operate only on business servers of AdvancedCopy Manager. Backup AdvancedCopy Manager Setup Set up backup volumes so that the raw device targeted for backup is backed up correctly in AdvancedCopy Manager. The generations of the backup volumes to be managed are arbitrary. Sample Shell Script Update Update the procedures below of swst_or_vg_bk according to actual operations. The following numbers correspond to those in the scripts: - 0) Environmental variable setting - 1) Notification issued to Oracle of the start of backup - 3) Notification issued to Oracle of the stopping of backup Procedures 1) and 3) refer to spdata.lst, spdata.bgn, spdata.end, splog.lst, spredolog.lst, and spcont.lst, created by swst_or_iv. These scripts can operate only on business servers of AdvancedCopy Manager. Recording and Managing Backup Volume Name and Processing Time B.2.3 After executing a shell script, a backup volume name and the processing time are output in a message. This information is needed for restoration, so it must be recorded and managed. Restore Method Use the restore function of AdvancedCopy Manager for restore processing. B.2.4 Notes on Using Sample Shell Scripts Oracle Resource Location Store Oracle data files and files other than data files on separate disks or in separate slices. Backup of Oracle Resources Note the following when performing this function: - Initialization parameter file - Every time a change occurs, back up this file using the cp command of the OS is executed for backup. - Control files - You are recommended to use mirroring using Oracle
297 - If a change is made in the DB environment, use the following command to create a trace file. If a control file is destroyed, execute the SQL statement in the trace file to recover the control file. - Data files alter database backup control file to trace; - The recommended location of data files is on a raw device. - To store a data file on the file system, disable the automatic extended function of the data file (AUTOEXTEND OFF). Customization of the sample shell script is required to prevent unmounting during context processing. - Create backup copies in AdvancedCopy Manager. - The range of table spaces targeted for backup must be within the unit of synchronous backup processing (begin backup/ end backup) in Oracle and the unit of backup in AdvancedCopy Manager. For example, if backup copies must be created in units of LUNs in AdvancedCopy Manager, place one table space in one LUN. - Archive all of the latest logs by executing the following command after backing up all table spaces in the system: alter system archive log current; - REDO files - You are recommended to mirror the online REDO log files and archive log files using Oracle or the OS. - No online REDO log file needs to be backed up. Note For online backup operations, the target Oracle database must use an archive log. Recovery of Oracle Databases After an Oracle database has stopped, restore the database, and restart it. To recover the database to its latest state, use Oracle's recovery function. B.3 Sample Scripts for DB2 Sample scripts provided for AdvancedCopy Manager are created assuming that the following version of DB2 is used. If you use any other version, correct the sample scripts as required. B DB2 (v ) Overview of Sample Shell Scripts The sample shell scripts provided are summarized below. These scripts are stored in the /etc/opt/fjsvswsts/samp directory. Table B.2 Sample shell script for DB2 No. Type Script Name Associated Transaction Associated Resource Type 1 Collection of DB information swst_db2_iv DB2 transaction - 2 Backup swst_db2_vg_bk DB2 transaction Raw device Note When a database exists on a file system, it cannot back up during starting of the business which uses the database
298 B Collecting DB Information swst_db2_iv outputs information about an DB2 database. The output file names and their contents are: - spdata.lst: List of table space names and storage destinations - spdata.srt: Results of spdata.lst, with storage destination as the sort key Use the database information above as a reference for creating shell scripts for backup processing. Format swst_db2_iv Usage Example # swst_db2_iv swst_db2_iv completed. Result Example spdata.lst TABLESPACE-NAME DEVICE-NAME SYSCATSPACE /work/acm_db2/db2inst1/database/db2inst1/node0000/sql00001/sqlt TEMPSPACE1 /work/acm_db2/db2inst1/database/db2inst1/node0000/sql00001/sqlt USERSPACE1 /work/acm_db2/db2inst1/database/db2inst1/node0000/sql00001/sqlt ACMTS34 /dev/rlvol34001 SYSTOOLSPACE /work/acm_db2/db2inst1/database/db2inst1/node0000/sql00001/systoolspace Processing Outline #!/bin/sh reterr() --- An error message is output before an error is returned. sqldata() { db2 list tablespaces Acquisition of table space name and table space ID db2 list tablespace containers for <table space ID> --- Acquisition of device name } # main() # 0) Environmental variable setting PATH=$PATH:/usr/bin:/usr/sbin # 1) Acquisition of DB2 table space information db2 connect to acmtest1 --- Connect the DB2 sqldata db2 terminate Terminate the DB2 exit 0 B Backup swst_db2_vg_bk, run using AdvancedCopy Manager, backs up processing data using an DB2 database on a raw device. Processing data is copied to work disks prepared by users. These scripts correspond to steps 2 to 4 in "B DB Information Collection". Start swst_db2_vg_bk {-a -i} volumegroupname
299 Options -a -i Operands Specify when a DB2 database is online. The start of backup processing is declared to the Oracle server. Specify when a DB2 database is stopped or the file is a general file. The start of backup processing is not declared to the Oracle server. volumegroupname Specify the name of the volume group targeted for backup. Example of Using swst_db2_vg_bk While processing is active, back up /dev/vg01 in which an DB2 database is located. # swst_db2_vg_bk -a /dev/vg01 swst_db2_vg_bk completed. (/dev/vg01 -> /dev/vg02 at 23:01 on ) Processing Outline of swst_db2_vg_bk #!/bin/sh usage() --- Command syntax is output before an error is returned. reterr() --- An error message is output before an error is returned. sqlbegin() { db2 set write suspend for db --- Suspend the DB2 database. sync } sqlend() { db2 set write resume for db ---- Resume the DB2 database. } getbd() --- Fetch the name of the backup (copy) destination device of AdvancedCopy Manager. getdate() --- Fetch the backup (copy) date of AdvancedCopy Manager. gettime() --- Fetch the backup (copy) time of AdvancedCopy Manager. # main() Parameter analysis and raw device check # 0) Environmental variable setting PATH=$PATH:/usr/bin:/usr/sbin:/opt/FJSVswsts/bin # 1) Suspend if [ "-a" operand specification ] then db2 connect to <database name> sqlbegin() Suspend the database. fi # 2) Disk backup (copy) by AdvancedCopy Manager command swstbackup $SRC --- Copy the disk. # 3) Resume if [ "-a" operand specification ] then sqlend() --- I/O of DB2 is put into the state of suspend. db2 terminate Terminate the database. fi
300 # 4) Acquisition of the backup (copy) destination of AdvancedCopy Manager DSTBLK="`getbd $SRC`" --- Fetch a backup volume. BKDATE="`getdate $SRC`" BKTIME="`gettime $SRC`" exit 0 B.3.2 Applying Sample Shell Scripts B DB Information Collection Sample Shell Script Update B Update the procedures below of swst_db2_iv according to for actual operations. The following numbers correspond to those in the scripts: - 0) Environmental variable setting - 1) Acquisition of DB2 table space information These scripts can only operate on business servers of AdvancedCopy Manager. Backup AdvancedCopy Manager Setup Set up backup volumes so that the raw device targeted for backup is backed up correctly in AdvancedCopy Manager. The generations of the backup volumes to be managed are arbitrary. Sample Shell Script Update Update the procedures below of swst_db2_vg_bk to adjust them for actual operations. The following numbers correspond to those in the scripts. - 0) Environmental variable setting - 1) Notification issued to DB2 of the start of backup - 3) Notification issued to DB2 of the stopping of backup The above procedures 1) and 3) refer to the spdata.lst file created by swst_db2_iv. These scripts can only operate on business servers of AdvancedCopy Manager. Recording and Managing Backup Volume Name and Processing Time B.3.3 After executing a shell script, a backup volume name and the processing time are output in a message. This information is needed for restoration, so it must be recorded and managed. Restore Method Use the restore function of AdvancedCopy Manager for restore processing. B.3.4 Notes on Using Sample Shell Scripts DB2 Resource Location Store DB2 data files and files other than data files on separate disks or in separate slices. Backup Operation of DB2 Resources Note the following when performing this function: - Database Back up using the BACKUP DATABASE command of DB2. db2 => backup database DB name to target;
301 [Database structure] - Drive/directory : The drive or directory specified by the CREATE DATABASE command - DB2 instance name : The owner name of a DB2 instance - Partition number of a database - Database ID - Default log directory of a database - Catalog table space - Temporarily table space - User table space - User table space - The user table space should be created on a RAW device rather than at file system level. In the case of table space, the table space container is also a part of the backup, and hence please use the provided sample shell scripts. - The backup operation is performed using AdvancedCopy Manager. - The table spaces targeted for backup should be selected within the AdvancedCopy Manger's backup unit. For example, if the unit of backup of AdvancedCopy Manger is a LUN, then 1 table space should lie on 1 LUN. Recovery of DB2 Databases After the DB2 database has stopped, restore the database, and restart it. To recover the database to its latest state, use DB2's recovery function. Note When performing the restore, use the following order: 1. Database 2. User table space
302 Appendix C Pre-processing and Post-processing of Replication The replication explains the replication pre-processing and post-processing that are performed in AdvancedCopy Manager. C.1 Overview The replication pre-processing and post-processing scripts are started before and after the replication (i.e., the copy) processing. AdvancedCopy Manager performs the processing required for a replication source volume and replication destination volume by executing these scripts. Note If replication is performed in group units, the replication pre-processing and post-processing scripts are not started. Therefore, replication pre-processing and post-processing must be performed manually when replication is performed in group units. C.2 Pre-processing and Post-processing of Replication The pre-processing and post-processing need to be performed for both the replication source volume and the replication destination volume. The purpose of each is as follows. - Pre-processing and post-processing for a replication source volume This is intended to freeze the replication source data in a state in which consistency is temporarily ensured. In pre-processing, source data is temporarily frozen, and after the replication is complete, the frozen data is released in post-processing. - Pre-processing and post-processing for a replication destination volume This is intended to prevent applications from accessing the copy destination volume during replication. In pre-processing, replication data for the destination is given an access-disabled status. This status is released in post-processing, after the replication is complete. The specific tasks executed during the pre-processing and post-processing differ according to the data contents of the volume. The next sub section explains the pre-processing and post-processing of the file system. C.2.1 Pre-processing and Post-processing for File System The pre-processing and post-processing for a file system is typically the unmounting and remounting of the file system. (For Windows, the processing consists of allocating and cancelling a drive letter.) Pre-processing and post-processing of the replication source volume is performed in order to guarantee the replication source data by disabling access from other processes during execution of synchronous processing and snapshot copy. If no volume is mounted and inactivate, the pre-processing and post-processing are not performed. The implementation status of the pre-processing and post-processing for a file system is shown below. This table shows whether pre-processing and post-processing are performed depending on the command type. It also shows the copy status at the time of the command execution. Table C.1 Pre-processing and Post-processing for File System Command Copy Status Source/Destination Pre-processing Post-processing swsrpstartsync swsrpmake Copy not started, or replication establishment Equivalency maintenance Source X X Destination O--*1 X Source O O Destination X O--*2 swsrpcancel Equivalency maintenance Source O O
303 Command Copy Status Source/Destination Pre-processing Post-processing Destination X O--*2 swsrpmake O : Executed, X : Not executed Replication establishment Copying Copy not started Source X X Destination X X Source X X Destination X X Source O O Destination O O The post-processing for the pre-processing executed in step (*1) is executed in step (*2). In the post-processing in (2), re-mount is performed for the mount point where unmount was performed in the pre-processing in (1). The pre-processing and post-processing for a file system can be customized. The processing is started in accordance with the table above when a replication management command is executed. For server-to-server replication, these scripts are executed by remote execution using TCP/IP in the pre-processing and post-processing of a volume that is not connected. The operation image before and after processing is shown in the following figure

304 Figure C.1 Synchronized Replication Processing If processing other than the standard pre-processing and post-processing is required in the pre-processing and post-processing, customize the scripts. When customizing a script, strictly observe the following rules regarding error codes: Table C.2 Error Code Rules Error Code Usage 0-99 Unusable (reserved for AdvancedCopy Manager) Usable
305 Note - When the replication target is a volume group that includes a logical volume in which the file system has been built, refer to "When Replication Target Is Volume Group". The pre-processing and post-processing scripts have to be customized to execute unmount/mount processing for all logical volumes in which the file system has been built. - AdvancedCopy Manager does not support pre-processing and post-processing of databases.database pre-processing and postprocessing must be executed uniquely before and after (respectively) the execution of the AdvancedCopy Manager command. C.2.2 Pre-processing When Replication Is Executed The replication source volume script (RepSrc.pre) and the replication destination volume script (RepDst.pre) are prepared for a preprocessing script, and it is stored in the following directory. Customize these scripts according to the processing requirements. /etc/opt/fjsvswsrp/sh C Replication Source Volume Pre-processing Sample Script (RepSrc.pre) 1: #!/bin/sh 2: 3: # AdvancedCopy Manager 4: # All Rights Reserved, Copyright FUJITSU LIMITED, : 6: # 7: # Pre-processing of Replication(Source) processing 8: # 9: # Argument: $1 Device name of Source disk 10: # $2 Reserve 11: # 12: # Error number 13: # 2: Argument error(system error) 14: # 10: umount error 15: # 99: Script not customize 16: 17: # Argument check 18: case $# in 19: 2) 20: ;; 21: *) 22: exit 2 23: ;; 24: esac 25: 26: device=$1 27: 28: # Determination of postprocessing file name 29: if [ "`echo $device /usr/bin/grep "/dev/hdisk"`"!= "" ] 30: then 31: dev_type="lvm_pv" 32: # /dev/hdisk? -> hdisk? 33: dev="`echo $device /usr/bin/awk -F\/ '{ print $3 }'`" 34: 35: elif [ "`echo $device /usr/bin/grep "/dev/vx/dmp/"`"!= "" ] 36: then 37: dev_type="vxvm_pv" 38: # /dev/vx/dmp/device -> device 39: dev="`echo $device /usr/bin/awk -F\/ '{ print $5 }'`" 40: 41: elif [ "`echo $device /usr/bin/grep "/dev/"`"!= "" ] 42: then
306 43: dev_type="lvm_vg" 44: # /dev/vg_name -> VG_Name 45: dev="`echo $device /usr/bin/awk -F\/ '{ print $3 }'`" 46: 47: else 48: # Other Volume 49: exit 0 50: fi 51: post_file="/etc/opt/fjsvswsrp/"$swstgnode"/data/default/"$dev".spre" 52: 53: err_log_path="/var/opt/fjsvswsrp/"$swstgnode"/log" 54: 55: # When the Source disk is a volume group ################################### 56: if [ "$dev_type" = "lvm_vg" ] 57: then 58: 59: # Devices are volume group and script not customize 60: exit 99 61: 62: # When devices of volume group can be unmounted 63: # Specify the name of volume group to unmount 64: if [ "$device" = "/dev/vgxx" ] 65: then 66: echo "mount" > $post_file 67: 68: # Unmount all logical volumes of the volume group 69: mount_point="/xx" 70: /usr/sbin/umount $mount_point 2>/dev/null 71: if [ $?!= 0 ] 72: then 73: retry_count=3 74: sleep_time=1 75: result_flag=1 76: 77: while [ $retry_count -gt 0 ] 78: do 79: /usr/sbin/umount $mount_point > $err_log_path/$dev.umount 2>&1 80: if [ $?!= 0 ] 81: then 82: retry_count=`expr $retry_count - 1` 83: /usr/bin/sleep $sleep_time 84: else 85: /usr/bin/rm -f $err_log_path/$dev.umount 86: result_flag=0 87: break 88: fi 89: done 90: 91: if [ $result_flag!= 0 ] 92: then 93: /usr/sbin/fuser -cu $mount_point> $err_log_path/$dev.fuser 2>&1 94: /usr/bin/ps -ef > $err_log_path/$dev.ps 2>&1 95: exit 10 96: fi 97: fi 98: 99: # mount_point="/xx" 100: # /usr/sbin/umount $mount_point 2>/dev/null 101: # if [ $?!= 0 ] 102: # then 103: # retry_count=3 104: # sleep_time=1 105: # result_flag=
307 106: # 107: # while [ $retry_count -gt 0 ] 108: # do 109: # /usr/sbin/umount $mount_point > $err_log_path/$dev.umount 2>&1 110: # if [ $?!= 0 ] 111: # then 112: # retry_count=`expr $retry_count - 1` 113: # sleep $sleep_time 114: # else 115: # rm -f $err_log_path/$dev.umount 116: # result_flag=0 117: # break 118: # fi 119: # done 120: # 121: # if [ $result_flag!= 0 ] 122: # then 123: # /usr/sbin/fuser -cu $mount_point> $err_log_path/$dev.fuser 2>&1 124: # /usr/bin/ps -ef > $err_log_path/$dev.ps 2>&1 125: # exit : # fi 127: # fi 128: fi 129: 130: # When the Source disk is a VxVM physical volume ############################# 131: elif [ "$dev_type" = "vxvm_pv" ] 132: then 133: # Nothing is done to VxVM physical volume. 134: echo "none" > $post_file 135: 136: # When the Source disk is a LVM physical volume ############################## 137: elif [ "$dev_type" = "lvm_pv" ] 138: then 139: # Nothing is done to LVM physical volume. 140: echo "none" > $post_file 141: fi 142: 143: exit 0 C Replication Destination Volume Pre-processing Sample Script (RepDst.pre) 1: #!/bin/sh 2: 3: # AdvancedCopy Manager 4: # All Rights Reserved, Copyright FUJITSU LIMITED, : 6: # 7: # Pre-processing of Replication(Destination) processing 8: # 9: # Argument: $1 Device name of Destination disk 10: # $2 Reserve 11: # 12: # Error number 13: # 2: Argument error 14: # 10: umount error 15: # 50: varyoffvg error 16: # 99: Script not customize 17: 18: # Argument check 19: case $# in 20: 2) 21: ;; 22: *)
308 23: exit 2 24: ;; 25: esac 26: 27: device=$1 28: 29: # Determination of postprocessing file name 30: if [ "`echo $device /usr/bin/grep "/dev/hdisk"`"!= "" ] 31: then 32: dev_type="lvm_pv" 33: # /dev/hdisk? -> hdisk? 34: dev="`echo $device /usr/bin/awk -F\/ '{ print $3 }'`" 35: 36: elif [ "`echo $device /usr/bin/grep "/dev/vx/dmp/"`"!= "" ] 37: then 38: dev_type="vxvm_pv" 39: # /dev/vx/dmp/device -> device 40: dev="`echo $device /usr/bin/awk -F\/ '{ print $5 }'`" 41: 42: elif [ "`echo $device /usr/bin/grep "/dev/"`"!= "" ] 43: then 44: dev_type="lvm_vg" 45: # /dev/vg_name -> VG_Name 46: dev="`echo $device /usr/bin/awk -F\/ '{ print $3 }'`" 47: 48: else 49: # Other Volume 50: exit 0 51: fi 52: 53: post_file="/etc/opt/fjsvswsrp/"$swstgnode"/data/default/"$dev".dpre" 54: 55: /usr/bin/rm -rf $post_file 2> /dev/null 56: 57: err_log_path="/var/opt/fjsvswsrp/"$swstgnode"/log" 58: 59: # When the Destination disk is a volume group ############################# 60: if [ "$dev_type" = "lvm_vg" ] 61: then 62: 63: # Devices are volume group and script not customize 64: exit 99 65: 66: # When devices of volume group can be unmounted 67: # Specify the name of volume group to unmount 68: if [ "$device" = "/dev/vgxx" ] 69: then 70: printf "mount," > $post_file 71: 72: # Unmount all logical volumes of the volume group 73: mount_point="/xx" 74: /usr/sbin/umount $mount_point 2>/dev/null 75: if [ $?!= 0 ] 76: then 77: retry_count=3 78: sleep_time=1 79: result_flag=1 80: 81: while [ $retry_count -gt 0 ] 82: do 83: /usr/sbin/umount $mount_point > $err_log_path/$dev.umount 2>&1 84: if [ $?!= 0 ] 85: then
309 86: retry_count=`expr $retry_count - 1` 87: /usr/bin/sleep $sleep_time 88: else 89: /usr/bin/rm -f $err_log_path/$dev.umount 90: result_flag=0 91: break 92: fi 93: done 94: 95: if [ $result_flag!= 0 ] 96: then 97: /usr/sbin/fuser -cu $mount_point> $err_log_path/$dev.fuser 2>&1 98: /usr/bin/ps -ef > $err_log_path/$dev.ps 2>&1 99: exit : fi 101: fi 102: 103: # mount_point="/xx" 104: # /usr/sbin/umount $mount_point 2>/dev/null 105: # if [ $?!= 0 ] 106: # then 107: # retry_count=3 108: # sleep_time=1 109: # result_flag=1 110: # 111: # while [ $retry_count -gt 0 ] 112: # do 113: # /usr/sbin/umount $mount_point > $err_log_path/$dev.umount 2>&1 114: # if [ $?!= 0 ] 115: # then 116: # retry_count=`expr $retry_count - 1` 117: # sleep $sleep_time 118: # else 119: # rm -f $err_log_path/$dev.umount 120: # result_flag=0 121: # break 122: # fi 123: # done 124: # 125: # if [ $result_flag!= 0 ] 126: # then 127: # /usr/sbin/fuser -cu $mount_point> $err_log_path/$dev.fuser 2>&1 128: # /usr/bin/ps -ef > $err_log_path/$dev.ps 2>&1 129: # exit : # fi 131: # fi 132: 133: fi 134: 135: # varyoff destination volume group 136: ACTIVE_VGS=`/usr/sbin/lsvg -o` 137: for i in $ACTIVE_VGS 138: do 139: if [ "$dev" = "$i" ] 140: then 141: /usr/sbin/varyoffvg $i 2> /dev/null 142: if [ $?!= 0 ] 143: then 144: /usr/sbin/varyoffvg $i > $err_log_path/$dev.varyoffvg 2>&1 145: if [ $?!= 0 ] 146: then 147: exit : fi
310 149: fi 150: printf "varyon" >> $post_file 151: break 152: fi 153: done 154: 155: # When the Destination disk is a VxVM physical volume ######################### 156: elif [ "$dev_type" = "vxvm_pv" ] 157: then 158: # Nothing is done to VxVM physical volume. 159: echo "none," > $post_file 160: 161: # When the Destination disk is a LVM physical volume ########################## 162: elif [ "$dev_type" = "lvm_pv" ] 163: then 164: # Nothing is done to LVM physical volume. 165: echo "none," > $post_file 166: 167: fi 168: 169: exit 0 C.2.3 Post-processing When Replication Is Executed The replication source volume script (RepSrc.post) and the replication destination volume script (RepDst.post) are prepared for a postprocessing script, which is stored in the following directory. This script must be customized according to the processing requirements. /etc/opt/fjsvswsrp/sh C Replication Source Volume Post-processing Sample Script (RepSrc.post) 1: #!/bin/sh 2: 3: # AdvancedCopy Manager 4: # All Rights Reserved, Copyright FUJITSU LIMITED, : 6: # 7: # Post-processing of Replication(Source) processing 8: # 9: # Argument: $1 Device name of Source disk 10: # 11: # Error number 12: # 2: Argument error 13: # 11: mount error 14: 15: # Argument check 16: case $# in 17: 1) 18: ;; 19: *) 20: exit 2 21: ;; 22: esac 23: 24: device=$1 25: 26: # Determination of postprocessing file name 27: if [ "`echo $device /usr/bin/grep "/dev/hdisk"`"!= "" ] 28: then 29: dev_type="lvm_pv" 30: # /dev/hdisk? -> hdisk? 31: dev="`echo $device /usr/bin/awk -F\/ '{ print $3 }'`"
311 32: 33: elif [ "`echo $device /usr/bin/grep "/dev/vx/dmp/"`"!= "" ] 34: then 35: dev_type="vxvm_pv" 36: # /dev/vx/dmp/device -> device 37: dev="`echo $device /usr/bin/awk -F\/ '{ print $5 }'`" 38: 39: elif [ "`echo $device /usr/bin/grep "/dev/"`"!= "" ] 40: then 41: dev_type="lvm_vg" 42: # /dev/vg_name -> VG_Name 43: dev="`echo $device /usr/bin/awk -F\/ '{ print $3 }'`" 44: 45: else 46: # Other Volume 47: exit 0 48: fi 49: post_file="/etc/opt/fjsvswsrp/"$swstgnode"/data/default/"$dev".spre" 50: 51: err_log_path="/var/opt/fjsvswsrp/"$swstgnode"/log" 52: 53: # Confirmation of postprocessing 54: if [! -r $post_file ] 55: then 56: exit 0 57: fi 58: 59: post="`/usr/bin/cat $post_file`" 60: 61: # mount processing 62: if [ "$post" = "mount" ] 63: then 64: 65: # When devices of volume group can be unmounted 66: #Specify the name of volume group to mount 67: 68: if [ "$device" = "/dev/vgxx" ] 69: then 70: mount_error=0 71: # Mount all logical volumes of the volume group 72: lvname="/dev/xx" 73: lv_mount_point="/xx" 74: mount_status=`/usr/sbin/mount /usr/bin/nawk -v lv=${lvname} 'lv==$1{flag=1; exit;} END{if(flag==1) print "mounted"; else print "not_mounted";}'` 75: if [ $mount_status = "not_mounted" ] 76: then 77: /usr/sbin/mount $lvname $lv_mount_point 2> /dev/null 78: if [ $?!= 0 ] 79: then 80: retry_count=3 81: sleep_time=1 82: result_flag=1 83: 84: while [ $retry_count -gt 0 ] 85: do 86: /usr/sbin/mount $lvname $lv_mount_point > $err_log_path/$dev.mount 2>&1 87: if [ $?!= 0 ] 88: then 89: retry_count=`expr $retry_count - 1` 90: /usr/bin/sleep $sleep_time 91: else 92: /usr/bin/rm -f $err_log_path/$dev.mount 93: result_flag=
312 94: break 95: fi 96: done 97: 98: if [ $result_flag!= 0 ] 99: then 100: mount_error=1 101: fi 102: fi 103: fi 104: 105: # lvname="/dev/xx" 106: # lv_mount_point="/xx" 107: # mount_status=`/usr/sbin/mount /usr/bin/nawk -v lv=${lvname} 'lv==$1{flag=1; exit;} END{if(flag==1) print "mounted"; else print "not_mounted";}'` 108: # if [ $mount_status = "not_mounted" ] 109: # then 110: # /usr/sbin/mount $lvname $lv_mount_point 2>/dev/null 111: # if [ $?!= 0 ] 112: # then 113: # retry_count=3 114: # sleep_time=1 115: # result_flag=1 116: # 117: # while [ $retry_count -gt 0 ] 118: # do 119: # /usr/sbin/mount $lvname $lv_mount_point > $err_log_path/$dev.mount 2>&1 120: # if [ $?!= 0 ] 121: # then 122: # retry_count=`expr $retry_count - 1` 123: # /usr/bin/sleep $sleep_time 124: # else 125: # rm -f $err_log_path/$dev.mount 126: # result_flag=0 127: # break 128: # fi 129: # done 130: # 131: # if [ $result_flag!= 0 ] 132: # then 133: # mount_error=1 134: # fi 135: # fi 136: # fi 137: 138: if [ $mount_error!= 0 ] 139: then 140: exit : fi 142: fi 143: fi 144: 145: /usr/bin/rm -rf $post_file 2> /dev/null 146: exit 0 C Replication Destination Volume Post-processing Sample Script (RepDst.post) 1: #!/bin/sh 2: 3: # AdvancedCopy Manager 4: # All Rights Reserved, Copyright FUJITSU LIMITED, : 6: #
313 7: # Post-processing of Replication(Destination) processing 8: # 9: # Argument: $1 Device name of Destination disk 10: # 11: # Error number 12: # 2: Argument error 13: # 11: mount error 14: # 53: chdev error 15: # 54: exportvg error 16: # 56: recreatevg error 17: # 52: chfs error 18: 19: # Reconstruct volume group function. 20: ReconstructVG () 21: { 22: 23: # delete PV temporally. 24: /usr/sbin/chdev -l $pvname -a pv=clear > /dev/null 2>&1 25: if [ $?!= 0 ] 26: then 27: /usr/sbin/chdev -l $pvname -a pv=clear > $err_log_path/$dev.chdev 2>&1 28: if [ $?!= 0 ] 29: then 30: return 53 31: else 32: /usr/bin/rm -f $err_log_path/$dev.chdev 33: fi 34: fi 35: 36: # export destination volume group 37: /usr/sbin/exportvg $dev > /dev/null 2>&1 38: if [ $?!= 0 ] 39: then 40: /usr/sbin/exportvg $dev > $err_log_path/$dev.exportvg 2>&1 41: if [ $?!= 0 ] 42: then 43: return 54 44: else 45: /usr/bin/rm -f $err_log_path/$dev.exportvg 46: fi 47: fi 48: 49: # recreate destination volume group 50: prefix="/fs" 51: /usr/sbin/recreatevg -l $conv_file -L $prefix -y $dev $pvname > /dev/null 2>&1 52: if [ $?!= 0 ] 53: then 54: /usr/sbin/recreatevg -l $conv_file -L $prefix -y $dev $pvname > $err_log_path/ $dev.recreatevg 2>&1 55: if [ $?!= 0 ] 56: then 57: return 56 58: else 59: /usr/bin/rm -f $err_log_path/$dev.recreatevg 60: fi 61: fi 62: 63: return 0 64: } 65: 66: # Mount Logical Volume function 67: MountLV () 68: {
314 69: mount_status=`/usr/sbin/mount /usr/bin/nawk -v lv=${lvname} 'lv==$1{flag=1; exit;} END{if(flag==1) print "mounted"; else print "not_mounted";}'` 70: if [ $mount_status = "not_mounted" ] 71: then 72: /usr/sbin/mount $lvname $dst_mount_point 2> /dev/null 73: if [ $?!= 0 ] 74: then 75: retry_count=3 76: sleep_time=1 77: result_flag=1 78: 79: while [ $retry_count -gt 0 ] 80: do 81: /usr/sbin/mount $lvname $dst_mount_point > $err_log_path/$dev.mount 2>&1 82: if [ $?!= 0 ] 83: then 84: retry_count=`expr $retry_count - 1` 85: /usr/bin/sleep $sleep_time 86: else 87: /usr/bin/rm -f $err_log_path/$dev.mount 88: result_flag=0 89: break 90: fi 91: done 92: 93: if [ $result_flag!= 0 ] 94: then 95: exit 11 96: fi 97: fi 98: fi 99: } 100: 101: # Change mount point function 102: ChangeMountPoint () 103: { 104: /usr/sbin/chfs -m $dst_mount_point $prefix$src_mount_point > /dev/null 2>&1 105: if [ $?!= 0 ] 106: then 107: /usr/sbin/chfs -m $dst_mount_point $prefix$dst_mount_point > /dev/null 2>&1 108: if [ $?!= 0 ] 109: then 110: /usr/sbin/chfs -m $dst_mount_point $prefix$dst_mount_point > $err_log_path/$dev.chfs 2>&1 111: if [ $?!= 0 ] 112: then 113: exit : else 115: /usr/bin/rm -f $err_log_path/$dev.chfs 116: fi 117: fi 118: fi 119: } 120: 121: ############################### 122: # 123: # RepDst.post Main process. 124: # 125: ############################### 126: 127: # Argument check 128: case $# in 129: 1) 130: ;;
315 131: *) 132: exit 2 133: ;; 134: esac 135: 136: device=$1 137: 138: # Determination of postprocessing file name 139: if [ "`echo $device /usr/bin/grep "/dev/hdisk"`"!= "" ] 140: then 141: dev_type="lvm_pv" 142: # /dev/hdisk? -> hdisk? 143: dev="`echo $device /usr/bin/awk -F\/ '{ print $3 }'`" 144: 145: elif [ "`echo $device /usr/bin/grep "/dev/vx/dmp/"`"!= "" ] 146: then 147: dev_type="vxvm_pv" 148: # /dev/vx/dmp/device -> device 149: dev="`echo $device /usr/bin/awk -F\/ '{ print $5 }'`" 150: 151: elif [ "`echo $device /usr/bin/grep "/dev/"`"!= "" ] 152: then 153: dev_type="lvm_vg" 154: # /dev/vg_name -> VG_Name 155: dev="`echo $device /usr/bin/awk -F\/ '{ print $3 }'`" 156: 157: else 158: # Other Volume 159: exit 0 160: fi 161: post_file="/etc/opt/fjsvswsrp/"$swstgnode"/data/default/"$dev".dpre" 162: conv_file="/etc/opt/fjsvswsrp/"$swstgnode"/data/default/"$dev".tmp" 163: 164: err_log_path="/var/opt/fjsvswsrp/"$swstgnode"/log" 165: 166: # Confirmation of postprocessing 167: if [! -r $post_file ] 168: then 169: exit 0 170: fi 171: # When the Destination disk is a volume group ############################# 172: if [ "$dev_type" = "lvm_vg" ] 173: then 174: 175: post="`/usr/bin/cat $post_file /usr/bin/cut -d',' -f1`" 176: vg_status="`/usr/bin/cat $post_file /usr/bin/cut -d',' -f2`" 177: 178: if [ "$vg_status" = "varyon" ] 179: then 180: if [ "$device" = "/dev/vgxx" ] 181: then 182: pvname="hdiskxx" 183: 184: # decide conversion of LV name 185: /usr/bin/rm -rf $conv_file 2> /dev/null 186: echo "SrclvXXXX:DstlvXXXXX" >> $conv_file 187: echo "DstlvXXXX:DstlvXXXXX" >> $conv_file 188: # echo "SrclvXXXX:DstlvXXXXX" >> $conv_file 189: # echo "DstlvXXXX:DstlvXXXXX" >> $conv_file 190: 191: # Reconstruct Volume Group 192: ReconstructVG 193: result=$?
316 194: if [ $result!= 0 ] 195: then 196: exit $result 197: fi 198: 199: # delete tmpfile 200: /usr/bin/rm -rf $conv_file 2> /dev/null 201: fi 202: fi 203: 204: if [ "$device" = "/dev/vgxx" ] 205: then 206: 207: # decide new mount point 208: lvname="/dev/xx" 209: src_mount_point="/xx" 210: dst_mount_point="/xx" 211: 212: if [ "$vg_status" = "varyon" ] 213: then 214: # Change mount point 215: ChangeMountPoint 216: fi 217: 218: if [ "$post" = "mount" ] 219: then 220: # Mount all logical volumes of the volume group 221: MountLV 222: fi 223: 224: # lvname="/dev/xx" 225: # src_mount_point="/xx" 226: # dst_mount_point="/xx" 227: # 228: # if [ "$vg_status" = "varyon" ] 229: # then 230: # # Change mount point 231: # ChangeMountPoint 232: # fi 233: # 234: # if [ "$post" = "mount" ] 235: # then 236: # # Mount all logical volumes of the volume group 237: # MountLV 238: # fi 239: 240: fi 241: fi 242: 243: /usr/bin/rm -rf $post_file 2> /dev/null 244: exit 0 245: C.2.4 Customizing Shell Script The method to customize the shell script for replication pre/post-processing is explained below. When Replication Target Is Volume Group When replicating a file system which is part of a logical volume in a volume group, the processing scripts will need to be modified as follows:
317 - Modify the coding in lines 64 to 128 of the replication source volume pre-processing script and in lines 68 to 142 of the replication source volume post-processing script such that dismount and mount processing is performed for all the logical volumes comprising the file system. Change the parts marked "X" to match the actual environment. Also, remove the comment characters from lines of the source volume pre-processing script (RepSrc.pre), and from lines of the source volume post-processing script (RepSrc.post). If more than two logical volumes are being processed then repeat lines of RepSrc.pre and lines of RepSrc.post, once for each additional logical volume. - Modify the coding in lines 68 to 133 of the replication destination volume pre-processing script and in lines 180 to 201 and lines 204 to 240 of the replication destination volume post-processing script such that dismount and mount processing is performed for all the logical volumes comprising the file system. Change the parts marked "X" to match the actual environment. Also, remove the comment characters from lines of the destination volume pre-processing script (RepDst.pre), and lines and of the destination volume post-processing script (RepDst.post). If more than two logical volumes are being processed then repeat lines of RepDst.pre and lines and of RepDst.post, once for each additional logical volume. The procedure for editing the destination volume post-processing script is given below: - Specify the physical volume name of the destination volume on line Specify the correspondence between the logical volume names of the source volume and destination volume in quotation marks on line 186. Use "logical volume name of source volume:logical volume of destination volume" as the format. If the source volume includes multiple logical volumes, specify the correspondence for each logical volume. This must be specified even when the logical volume is not mounted. - Specify the logical volume name of the destination volume in quotation marks on line 187, in the format "logical volume name of destination volume:logical volume name of destination volume". If the destination volume contains multiple logical volumes, specify all of the logical volume names on line 187. This must be specified even when the logical volume is not mounted. - Specify the volume name of the destination volume on line On line 209, specify the mount point of the logical volume of the source volume specified on line On line 210, specify the mount point of the logical volume of the destination volume specified on line 208. After making the necessary corrections to the script, convert the exit statements on line 60 of the source volume pre-processing script and line 64 of the destination volume pre-processing script (RepDst.pre) into comments ("#"). If the volume group to be replicated includes a logical volume for which no file system has been built, make the above corrections and then convert the statements on lines 212 to 217 of the destination volume post-processing script (RepDst.post) into comments ("#"). Note - Note that unmount/mount processing to a volume group is not carried out if the scripts have not been customized. - Modify the parameters and options of the OS commands (such as the mount command and the fsck command), appropriately for their use. - If the operation involves activation of the destination volume group, the destination volume post-processing script rewrites (recreatevg) the LVM management information. This processing may take a long time

318 Appendix D Backup Operations Using Power-Saving Enabling Eco Mode on the ETERNUS Disk storage system can control ON/OFF of disk drive power (or spindle rotation) using the Storage Cruiser functions. For example, the Storage Cruiser commands can power ON a disk drive as backup destination at backup and power it OFF on completion of backup. It is possible to save power consumption under the following operations. - Backup management - Snapshot type high-speed backup (OPC) with no access to the backup volume for a long period of time. - Suspend/Resume functionality of synchronous type high-speed backup (EC, REC) with a long suspend time. - Replication management - Snapshot type high-speed replication (OPC) with no access to the copied volume as the backup destination for a long period of time. - Suspend/Resume functionality of synchronous type high-speed replication with a long suspend time. An overview of the system structure is as follows: Figure D.1 Overview of System Structure D.1 Environment Settings This section describes how to configure the environment. D D.1.1 Settings for ETERNUS Disk Storage System 2. D.1.2 Settings for AdvancedCopy Manager 3. D.1.3 Settings for Storage Cruiser Settings for ETERNUS Disk Storage System Settings in the Eco-mode To use the Eco-mode, it is required to set the device Eco-mode, create the Eco-mode schedule, and then set the Eco-mode scheduling for the RAID group. For more details about the settings, refer to the ETERNUS SF Storage Cruiser Operation Guide. For details on how to configure an ETERNUS Disk storage system, refer to the ETERNUS Web GUI manual
 and a RAID group that is to store the backup data (hereafter called \"backup destination RAID")
319 Creating RAID Group and Logical Unit The Eco-mode is applied and the RAID group is created. A RAID group that is to store the data to be backed up (hereafter called "backup source RAID group") and a RAID group that is to store the backup data (hereafter called "backup destination RAID group") are created. A logical Unit is allocated to each RAID group. To effectively reduce power consumption, the backup destination RAID group sets a Logical Unit for each backup that is performed simultaneously. Other Logical Units should not be included in the backup destination RAID group. The example below illustrates the procedure to simultaneously back up three Logical units (Backup operation A). There are no Logical Units other than the ones for backup operation A in the backup destination RAID group. Therefore, a disk drive can be stopped, except when a backup is running. The example below illustrates the case where Logical Units for both backup operation B and for business operations are included in the backup destination RAID group, in addition to the Logical Units for backup operation A. As a result, although backup operation A has ended, the Logical Units for backup operation B and for business applications are required to be running


320 Point A backup destination RAID group must be created at each generation if a backup over multiple generations is performed. Note A Snap Data Volume and a Snap Data Pool should not be included in a backup destination RAID group. The RAID group disk drive which includes a Snap Data Volume or a Snap Data Pool does not reach a stop status
FUJITSU Storage ETERNUS SF Express V16.3 / Storage Cruiser V16.3 / AdvancedCopy Manager V16.3. Migration Guide
 FUJITSU Storage ETERNUS SF Express V16.3 / Storage Cruiser V16.3 / AdvancedCopy Manager V16.3 Migration Guide B1FW-6000-04ENZ0(00) October 2015 Preface Purpose This manual describes how to upgrade to this
FUJITSU Storage ETERNUS SF AdvancedCopy Manager V16.6. Operation Guide. Linux
 FUJITSU Storage ETERNUS SF AdvancedCopy Manager V16.6 Operation Guide Linux B1FW-6012-07ENZ0(00) December 2017 Preface Purpose This manual describes the functionality of FUJITSU Storage ETERNUS SF AdvancedCopy
FUJITSU Storage ETERNUS SF Express V16.5 / Storage Cruiser V16.5 / AdvancedCopy Manager V16.5. Migration Guide
 FUJITSU Storage ETERNUS SF Express V16.5 / Storage Cruiser V16.5 / AdvancedCopy Manager V16.5 Migration Guide B1FW-6000-06ENZ0(01) June 2017 Preface Purpose This manual describes how to upgrade to this
FUJITSU Storage ETERNUS SF Storage Cruiser V16.3 / AdvancedCopy Manager V16.3. Cluster Environment Setup Guide
 FUJITSU Storage ETERNUS SF Storage Cruiser V16.3 / AdvancedCopy Manager V16.3 Cluster Environment Setup Guide B1FW-6006-04ENZ0(00) October 2015 Preface Purpose This manual provides information on installation
FUJITSU Storage ETERNUS SF Storage Cruiser V16.5 / AdvancedCopy Manager V16.5. Cluster Environment Setup Guide
 FUJITSU Storage ETERNUS SF Storage Cruiser V16.5 / AdvancedCopy Manager V16.5 Cluster Environment Setup Guide B1FW-6006-06ENZ0(00) May 2017 Preface Purpose This manual provides information on installation
ETERNUS SF Express V15.3/ Storage Cruiser V15.3/ AdvancedCopy Manager V15.3. Migration Guide
 ETERNUS SF Express V15.3/ Storage Cruiser V15.3/ AdvancedCopy Manager V15.3 Migration Guide B1FW-5958-06ENZ0(00) June 2013 Preface Purpose This manual describes how to upgrade to this version from the
FUJITSU Storage ETERNUS SF Express V16.2 / Storage Cruiser V16.2 / AdvancedCopy Manager V16.2. Installation and Setup Guide
 FUJITSU Storage ETERNUS SF Express V16.2 / Storage Cruiser V16.2 / AdvancedCopy Manager V16.2 Installation and Setup Guide B1FW-5999-03ENZ0(02) July 2015 Preface Purpose This manual provides information
ETERNUS SF Express V15.1/ Storage Cruiser V15.1/ AdvancedCopy Manager V15.1. Migration Guide
 ETERNUS SF Express V15.1/ Storage Cruiser V15.1/ AdvancedCopy Manager V15.1 Migration Guide B1FW-5958-03ENZ0(00) August 2012 Preface Purpose This manual describes how to upgrade to this version from the
ETERNUS SF AdvancedCopy Manager V15.0. Quick Reference
 ETERNUS SF AdvancedCopy Manager V15.0 Quick Reference B1FW-5967-02ENZ0(00) April 2012 Preface Purpose This manual describes the pre-installation requirements, installation procedure, configuration procedure,
FUJITSU Storage ETERNUS SF Express V16.5 / Storage Cruiser V16.5 / AdvancedCopy Manager V16.5. Installation and Setup Guide
 FUJITSU Storage ETERNUS SF Express V16.5 / Storage Cruiser V16.5 / AdvancedCopy Manager V16.5 Installation and Setup Guide B1FW-5999-06ENZ0(00) May 2017 Preface Purpose This manual provides information
FUJITSU Storage ETERNUS SF Express V16.1 / Storage Cruiser V16.1 / AdvancedCopy Manager V16.1. Installation and Setup Guide
 FUJITSU Storage ETERNUS SF Express V16.1 / Storage Cruiser V16.1 / AdvancedCopy Manager V16.1 Installation and Setup Guide B1FW-5999-02ENZ0(00) June 2014 Preface Purpose This manual provides information
FUJITSU Storage ETERNUS SF AdvancedCopy Manager V16.1. Overview
 FUJITSU Storage ETERNUS SF AdvancedCopy Manager V16.1 Overview B1FW-6009-02ENZ0(00) June 2014 Preface Purpose This manual provides an overview for understanding the FUJITSU Storage ETERNUS SF AdvancedCopy
FUJITSU Storage ETERNUS SF AdvancedCopy Manager V16.0. Overview
 FUJITSU Storage ETERNUS SF AdvancedCopy Manager V16.0 Overview B1FW-6009-01ENZ0(01) May 2014 Preface Purpose This manual provides an overview for understanding the FUJITSU Storage ETERNUS SF AdvancedCopy
FUJITSU Storage ETERNUS SF AdvancedCopy Manager V16.5. Overview
 FUJITSU Storage ETERNUS SF AdvancedCopy Manager V16.5 Overview B1FW-6009-06ENZ0(00) May 2017 Preface Purpose This manual provides an overview for understanding FUJITSU Storage ETERNUS SF AdvancedCopy Manager
ETERNUS SF AdvancedCopy Manager Operator's Guide for Tape Server Option
 ETERNUS SF AdvancedCopy Manager 14.0 Operator's Guide for Tape Server Option J2X1-7453-01ENZ0(00) July 2009 Preface Purpose This manual describes the functionality of ETERNUS SF AdvancedCopy Manager for
FUJITSU Storage ETERNUS SF Storage Cruiser V16.2 / AdvancedCopy Manager V16.2. Operation Guide for VMware vsphere Virtual Volumes
 FUJITSU Storage ETERNUS SF Storage Cruiser V16.2 / AdvancedCopy Manager V16.2 Operation Guide for VMware vsphere Virtual Volumes B1FW-6020-01ENZ0(02) July 2015 Preface Purpose This manual explains the
ETERNUS SF Storage Cruiser V15.0. Quick Reference
 ETERNUS SF Storage Cruiser V15.0 Quick Reference B1FW-5963-02ENZ0(00) April 2012 Preface Purpose This manual describes the pre-installation requirements, installation procedure, configuration procedure,
FUJITSU Storage ETERNUS SF Storage Cruiser V16.6 / AdvancedCopy Manager V16.6. Operation Guide for VMware vsphere Virtual Volumes
 FUJITSU Storage ETERNUS SF Storage Cruiser V16.6 / AdvancedCopy Manager V16.6 Operation Guide for VMware vsphere Virtual Volumes B1FW-6020-05ENZ0(00) December 2017 Preface Purpose This manual explains
ETERNUS SF Express V15.0/ Storage Cruiser V15.0/ AdvancedCopy Manager V15.0. Migration Guide
 ETERNUS SF Express V15.0/ Storage Cruiser V15.0/ AdvancedCopy Manager V15.0 Migration Guide B1FW-5958-02ENZ0(01) May 2012 Preface Purpose This manual describes how to upgrade to this version from the previous
Operation Guide for Optimization Function
 FUJITSU Storage ETERNUS SF Storage Cruiser V16.5 Operation Guide for Optimization Function Windows/Solaris/Linux B1FW-6008-06ENZ0(00) May 2017 Preface Purpose This manual describes the Optimization Function,
Operation Guide for Copy Control Module
 FUJITSU Storage ETERNUS SF AdvancedCopy Manager V16.2 Operation Guide for Copy Control Module Windows/Solaris/Linux B1FW-6015-03ENZ0(02) July 2015 Preface Purpose This manual describes the how to deliver
ETERNUS SF Express V15.0. Operation Guide. Windows/Linux
 ETERNUS SF Express V15.0 Operation Guide Windows/Linux B1FW-5962-01ENZ0(02) March 2012 Preface Purpose This manual gives an overview of ETERNUS SF Express. ETERNUS SF Express is part of the following Storage
ETERNUS SF AdvancedCopy Manager V13.2 Operator's Guide (Linux)
") J2UZ-8170-03ENZ0(A) ETERNUS SF AdvancedCopy Manager V13.2 Operator's Guide (Linux) ii Preface ++ Purpose This manual describes the operations available on ETERNUS SF AdvancedCopy Manager. ++ Intended Readers
J2UZ-8170-03ENZ0(A) ETERNUS SF AdvancedCopy Manager V13.2 Operator's Guide (Linux) ii Preface ++ Purpose This manual describes the operations available on ETERNUS SF AdvancedCopy Manager. ++ Intended Readers
ETERNUS SF AdvancedCopy Manager V13.2 Operator's Guide (HP-UX)
") J2SZ-0180-03ENZ0(A) ETERNUS SF AdvancedCopy Manager V13.2 Operator's Guide (HP-UX) ii Preface ++ Purpose This manual explains how to operate the Web-GUI with ETERNUS SF AdvancedCopy Manager. ++ Reader
J2SZ-0180-03ENZ0(A) ETERNUS SF AdvancedCopy Manager V13.2 Operator's Guide (HP-UX) ii Preface ++ Purpose This manual explains how to operate the Web-GUI with ETERNUS SF AdvancedCopy Manager. ++ Reader
ETERNUS SF AdvancedCopy Manager V13.1 Operator's Guide for Tape Backup Option
 J2S2-0560-02ENZ0(A) ETERNUS SF AdvancedCopy Manager V13.1 Operator's Guide for Tape Backup Option Preface ++ Purpose This manual describes the functionality of ETERNUS SF AdvancedCopy Manager for Tape
Operation Guide for Optimization Option
 ETERNUS SF Storage Cruiser V15.0 Operation Guide for Optimization Option Windows/Solaris/Linux B1FW-5965-02ENZ0(00) April 2012 Preface Purpose This manual describes Optimization Option, the optional product
Operation Guide for Copy Control Module
 ETERNUS SF Express V15.3/ AdvancedCopy Manager V15.3 Operation Guide for Copy Control Module Windows/Solaris/Linux B1FW-5959-05ENZ0(01) April 2014 Preface Purpose This manual describes the how to use the
FUJITSU Storage ETERNUS SF Express V16.3 / Storage Cruiser V16.3 / AdvancedCopy Manager V16.3. Web Console Guide. Windows
 FUJITSU Storage ETERNUS SF Express V16.3 / Storage Cruiser V16.3 / AdvancedCopy Manager V16.3 Web Console Guide Windows B1FW-6001-04ENZ0(04) June 2016 Preface Purpose This manual describes the ETERNUS
FUJITSU Storage ETERNUS SF Express V16.4 / Storage Cruiser V16.4 / AdvancedCopy Manager V16.4. Web Console Guide. Windows
 FUJITSU Storage ETERNUS SF Express V16.4 / Storage Cruiser V16.4 / AdvancedCopy Manager V16.4 Web Console Guide Windows B1FW-6001-05ENZ0(00) October 2016 Preface Purpose This manual describes the ETERNUS
ETERNUS SF AdvancedCopy Manager Overview
 ETERNUS SF AdvancedCopy Manager 14.2 Overview J2X1-7443-04ENZ0(00) June 2011 Preface Purpose This manual provides an overview of the ETERNUS SF AdvancedCopy Manager. This manual describes the ETERNUS SF
FUJITSU Storage ETERNUS SF Storage Cruiser V16.5. Operation Guide
 FUJITSU Storage ETERNUS SF Storage Cruiser V16.5 Operation Guide B1FW-6007-06ENZ0(00) May 2017 Preface Purpose This manual describes how to use FUJITSU Storage ETERNUS SF Storage Cruiser (hereafter abbreviated
FUJITSU Storage ETERNUS SF Storage Cruiser V16.1. Operation Guide
 FUJITSU Storage ETERNUS SF Storage Cruiser V16.1 Operation Guide B1FW-6007-02ENZ0(01) July 2014 Preface Purpose This manual describes the FUJITSU Storage ETERNUS SF Storage Cruiser used by the following
ETERNUS SF AdvancedCopy Manager Glossary
 ETERNUS SF AdvancedCopy Manager 14.1 Glossary J2X1-7455-02ENZ0(00) January 2010 Preface Purpose This manual describes the terminology used in the ETERNUS SF AdvancedCopy Manager manuals. Intended Readers
ETERNUS SF Express V15.2/ Storage Cruiser V15.2/ AdvancedCopy Manager V15.2. Web Console Guide. Windows
 ETERNUS SF Express V15.2/ Storage Cruiser V15.2/ AdvancedCopy Manager V15.2 Web Console Guide Windows B1FW-5955-04ENZ0(01) February 2013 Preface Purpose This Manual describes the ETERNUS SF Web Console
ETERNUS SF AdvancedCopy Manager Operator's Guide for Cluster Environment
 ETERNUS SF AdvancedCopy Manager 14.2 Operator's Guide for Cluster Environment J2X1-7452-04ENZ0(00) June 2011 Preface Purpose This manual explains the installation and customization of ETERNUS SF AdvancedCopy
FUJITSU Storage ETERNUS SF Express V16.1 / Storage Cruiser V16.1 / AdvancedCopy Manager V16.1. Web Console Guide. Windows
 FUJITSU Storage ETERNUS SF Express V16.1 / Storage Cruiser V16.1 / AdvancedCopy Manager V16.1 Web Console Guide Windows B1FW-6001-02ENZ0(01) July 2014 Preface Purpose This manual describes the ETERNUS
ETERNUS SF AdvancedCopy Manager GUI User's Guide
 ETERNUS SF AdvancedCopy Manager 14.1 GUI User's Guide J2X1-7450-02ENZ0(00) January 2010 Preface Purpose of the User's Guide The AdvancedCopy Manager GUI User's Guide provides detailed information relating
FUJITSU Storage ETERNUS SF Express V16 / Storage Cruiser V16 / AdvancedCopy Manager V16. Troubleshooting Guide
 FUJITSU Storage ETERNUS SF Express V16 / Storage Cruiser V16 / AdvancedCopy Manager V16 Guide ESF16-Troubleshoot-12EN April 2018 Preface Purpose This document describes how to deal with troubles produced
FUJITSU Software ServerView Resource Orchestrator Cloud Edition V Quick Start Guide. Windows/Linux
 FUJITSU Software ServerView Resource Orchestrator Cloud Edition V3.1.2 Quick Start Guide Windows/Linux J2X1-7622-06ENZ0(01) June 2014 Preface Purpose of This Document This manual explains the flow of installation
ETERNUS SF AdvancedCopy Manager V13.2 GUI User s Guide
 B1WW-8871-03ENZ0(00) ETERNUS SF AdvancedCopy Manager V13.2 GUI User s Guide ii Preface ++ Purpose This manual explains how to operate the Web-GUI with ETERNUS SF AdvancedCopy Manager. ++ Reader This manual
Structure and Overview of Manuals
 FUJITSU Software Systemwalker Operation Manager Structure and Overview of Manuals UNIX/Windows(R) J2X1-6900-08ENZ0(00) May 2015 Introduction Purpose of This Document Please ensure that you read this document
ETERNUS SF AdvancedCopy Manager GUI User's Guide
 ETERNUS SF AdvancedCopy Manager 14.0 GUI User's Guide J2X1-7450-01ENZ0(00) July 2009 Preface Purpose of the User's Guide The AdvancedCopy Manager GUI User's Guide provides detailed information relating
ETERNUS SF AdvancedCopy Manager V13.1 GUI User s Guide
 B1WW-8871-02ENZ0(00) ETERNUS SF AdvancedCopy Manager V13.1 GUI User s Guide Preface ++ Purpose This manual explains how to operate the Web-GUI with ETERNUS SF AdvancedCopy Manager. ++ Reader This manual
ServerView Resource Orchestrator Cloud Edition V Setup Guide. Windows/Linux
 ServerView Resource Orchestrator Cloud Edition V3.1.0 Setup Guide Windows/Linux J2X1-7610-02ENZ0(00) July 2012 Preface Resource Orchestrator Documentation Road Map The documentation road map for Resource
User's Guide for Infrastructure Administrators (Resource Management)
") ServerView Resource Orchestrator Cloud Edition V3.0.0 User's Guide for Infrastructure Administrators (Resource Management) Windows/Linux J2X1-7612-01ENZ0(05) April 2012 Preface Purpose This manual provides
ServerView Resource Orchestrator Cloud Edition V3.0.0 User's Guide for Infrastructure Administrators (Resource Management) Windows/Linux J2X1-7612-01ENZ0(05) April 2012 Preface Purpose This manual provides
User's Guide (Systemwalker User Management and Single Sign-On Edition)
") Systemwalker Service Quality Coordinator User's Guide (Systemwalker User Management and Single Sign-On Edition) Windows/Solaris/Linux J2X1-7665-02ENZ0(00) January 2013 Preface Purpose of this manual This
Systemwalker Service Quality Coordinator User's Guide (Systemwalker User Management and Single Sign-On Edition) Windows/Solaris/Linux J2X1-7665-02ENZ0(00) January 2013 Preface Purpose of this manual This
ETERNUS SF AdvancedCopy Manager V13.3 Message Guide
 B1WW-8881-05ENZ0 (00) ETERNUS SF AdvancedCopy Manager V13.3 Message Guide ii Preface About This Manual This manual explains the messages output by ETERNUS SF AdvancedCopy Manager. Intended Reader This
Solaris OE. Softek AdvancedCopy Manager User's Guide 10.2
 Solaris OE Softek AdvancedCopy Manager User's Guide 10.2 Preface ++ Purpose This manual explains how to operate Web-GUI with Softek AdvancedCopy Manager. ++ Reader This manual is intended for system managers
ETERNUS SF AdvancedCopy Manager SRA Version 2.4. User's Guide. Windows(64)
") ETERNUS SF AdvancedCopy Manager SRA Version 2.4 User's Guide Windows(64) B1WS-0994-04ENZ0(03) June 2017 Preface Purpose This manual explains how to install and customize ETERNUS SF AdvancedCopy Manager
ETERNUS SF AdvancedCopy Manager SRA Version 2.4 User's Guide Windows(64) B1WS-0994-04ENZ0(03) June 2017 Preface Purpose This manual explains how to install and customize ETERNUS SF AdvancedCopy Manager
ServerView Resource Orchestrator Cloud Edition V Quick Start Guide. Windows/Linux
 ServerView Resource Orchestrator Cloud Edition V3.1.0 Quick Start Guide Windows/Linux J2X1-7622-02ENZ0(00) July 2012 Preface QSGDocument road map The following manuals are provided with Resource Orchestrator.
FUJITSU Software Systemwalker Software Configuration Manager. Parameter Reference. Windows/Linux
 FUJITSU Software Systemwalker Software Configuration Manager Parameter Reference /Linux B1X1-0313-03ENZ0(00) November 2015 Preface Purpose of this Document This document explains the parameter information
ServerView Resource Orchestrator Virtual Edition V User's Guide. Windows/Linux
 ServerView Resource Orchestrator Virtual Edition V3.0.0 User's Guide Windows/Linux J2X1-7606-01ENZ0(05) April 2012 Preface Purpose This manual provides an outline of ServerView Resource Orchestrator (hereinafter
User's Guide for Infrastructure Administrators (Resource Management)
") FUJITSU Software ServerView Resource Orchestrator Cloud Edition V3.1.2 User's Guide for Infrastructure Administrators (Resource Management) Windows/Linux J2X1-7612-06ENZ0(05) June 2014 Preface Purpose
FUJITSU Software ServerView Resource Orchestrator Cloud Edition V3.1.2 User's Guide for Infrastructure Administrators (Resource Management) Windows/Linux J2X1-7612-06ENZ0(05) June 2014 Preface Purpose
Microsoft Windows NT Microsoft Windows Softek AdvancedCopy Manager Operator's Guide V10.0L30
 Microsoft Windows NT Microsoft Windows 2000 Softek AdvancedCopy Manager Operator's Guide V10.0L30 Preface ++ Purpose This manual describes the operations on Softek AdvancedCopy Manager. ++ Intended Readers
FUJITSU Software ServerView Resource Orchestrator Cloud Edition V Setup Guide. Windows/Linux
 FUJITSU Software ServerView Resource Orchestrator Cloud Edition V3.2.0 Setup Guide Windows/Linux J2X1-7610-07ENZ0(10) December 2016 Preface Purpose of This Document This manual provides information on
Systemwalker Service Quality Coordinator. Installation Guide. Windows/Solaris/Linux
 Systemwalker Service Quality Coordinator Installation Guide Windows/Solaris/Linux J2X1-7658-01ENZ0(01) September 2012 Preface Purpose of this manual This manual explains how to install Systemwalker Service
FUJITSU Software Systemwalker Operation Manager. Upgrade Guide. UNIX/Windows(R)
") FUJITSU Software Systemwalker Operation Manager Upgrade Guide UNIX/Windows(R) J2X1-3150-16ENZ0(00) May 2015 Preface Purpose of This Document This document describes the migration method, and notes when
FUJITSU Software Systemwalker Operation Manager Upgrade Guide UNIX/Windows(R) J2X1-3150-16ENZ0(00) May 2015 Preface Purpose of This Document This document describes the migration method, and notes when
FUJITSU Software ServerView Resource Orchestrator Virtual Edition V Operation Guide. Windows/Linux
 FUJITSU Software ServerView Resource Orchestrator Virtual Edition V3.1.2 Operation Guide Windows/Linux J2X1-7605-06ENZ0(03) June 2014 Preface Purpose of This Document This manual explains how to operate
ETERNUS SF Storage Cruiser Message Guide. Windows/Solaris/Linux
 ETERNUS SF Storage Cruiser 14.2 Message Guide Windows/Solaris/Linux J2S2-1548-03ENZ0(00) June 2010 Preface Purpose This manual explains the output messages related to storage management of ETERNUS SF Storage
FUJITSU Software Systemwalker Software Configuration Manager. Release Notes. Windows/Linux
 FUJITSU Software Systemwalker Software Configuration Manager Release Notes B1X1-0125-05ENZ0(00) August 2014 Preface Purpose of this Document This document presents an overview of the functions that have
ServerView Resource Orchestrator V User's Guide. Windows/Linux
 ServerView Resource Orchestrator V2.3.0 User's Guide Windows/Linux J2X1-7530-01ENZ0(02) July 2011 Preface Purpose This manual provides an outline of ServerView Resource Orchestrator (hereinafter Resource
User's Guide - Master Schedule Management
 FUJITSU Software Systemwalker Operation Manager User's Guide - Master Schedule Management UNIX/Windows(R) J2X1-3170-14ENZ0(00) May 2015 Preface Purpose of This Document This document describes the Master
ServerView Resource Coordinator VE. Installation Guide. Windows/Linux
 ServerView Resource Coordinator VE Installation Guide Windows/Linux J2X1-7458-03ENZ0(00) February 2010 Preface Purpose This manual explains how to install ServerView Resource Coordinator VE (hereinafter
User's Guide (Website Management Functions Edition)
") Systemwalker Service Quality Coordinator User's Guide (Website Management Functions Edition) Windows/Solaris/Linux J2X1-7664-01ENZ0(00) July 2012 Preface Purpose of this manual This manual explains how
Systemwalker Service Quality Coordinator User's Guide (Website Management Functions Edition) Windows/Solaris/Linux J2X1-7664-01ENZ0(00) July 2012 Preface Purpose of this manual This manual explains how
ServerView Resource Orchestrator Virtual Edition V User's Guide. Windows/Linux
 ServerView Resource Orchestrator Virtual Edition V3.1.1 User's Guide Windows/Linux J2X1-7606-05ENZ0(04) August 2013 Preface Purpose of This Document This manual provides an outline of the operation method
ServerView Resource Orchestrator V User's Guide. Windows/Linux
 ServerView Resource Orchestrator V2.2.1 User's Guide Windows/Linux J2X1-7526-01ENZ0(01) November 2010 Preface Purpose This manual provides an outline of ServerView Resource Orchestrator (hereinafter Resource
ETERNUS SF Storage Cruiser Message Guide. Windows/Solaris/Linux
 ETERNUS SF Storage Cruiser 14.0 Message Guide Windows/Solaris/Linux J2S2-1548-01ENZ0(00) July 2009 Preface Purpose This manual explains the output messages related to storage management of ETERNUS SF Storage
FUJITSU Software ServerView Resource Orchestrator V Overview. Windows/Linux
 FUJITSU Software ServerView Resource Orchestrator V3.2.0 Overview Windows/Linux J2X1-7770-03ENZ0(11) December 2016 Preface Purpose of This Document This manual provides an overview of FUJITSU Software
White Paper NetVault Backup Greatly Reduces the Cost of Backup Using All-Flash Arrays with the Latest LTO Ultrium Technology
 White Paper NetVault Backup Greatly Reduces the Cost of Backup Using All-Flash Arrays with the Latest LTO Ultrium Technology Unlimited Backup Capacity and Number of Generations Adoption of all-flash arrays
User's Guide (Console Edition)
") walker Service Quality Coordinator User's Guide (Console Edition) Windows/Solaris/Linux J2X1-7660-02ENZ0(00) January 2013 Preface Purpose of this manual This manual explains how to use the operation windows
walker Service Quality Coordinator User's Guide (Console Edition) Windows/Solaris/Linux J2X1-7660-02ENZ0(00) January 2013 Preface Purpose of this manual This manual explains how to use the operation windows
FUJITSU Software ServerView Resource Orchestrator Cloud Edition V Operation Guide. Windows
 FUJITSU Software ServerView Resource Orchestrator Cloud Edition V3.3.0 Operation Guide Windows J2X1-7611-08ENZ0(06) March 2018 Preface Purpose of This Document This manual explains how to operate FUJITSU
Systemwalker Service Quality Coordinator. Technical Guide. Windows/Solaris/Linux
 Systemwalker Service Quality Coordinator Technical Guide Windows/Solaris/Linux J2X1-6800-03ENZ0(00) May 2011 Preface Purpose of this manual This manual explains the functions and usage of Systemwalker
Setup Guide for Wily Introscope Integration
 Interstage Business Process Manager Analytics V11.1 Setup Guide for Wily Introscope Integration Windows/Solaris/Linux B1X1-0028-01ENZ0(00) July 2010 About this Manual This document provides how to setup
ETERNUS VSS Hardware Provider Installation Information
 ETERNUS VSS Hardware Provider Installation Information May 2017 Contents Abbreviations... 3 About ETERNUS VSS Hardware Provider... 3 Operating System Versions... 4 s... 5 ETERNUS DX60, ETERNUS DX80, ETERNUS
FUJITSU Software ServerView Resource Orchestrator V Overview. Windows/Linux
 FUJITSU Software ServerView Resource Orchestrator V3.1.2 Overview Windows/Linux J2X1-7770-02ENZ0(02) June 2014 Preface Purpose of This Document This manual provides an overview of FUJITSU Software ServerView
FUJITSU Software ServerView Resource Orchestrator Cloud Edition V Setup Guide. Windows
 FUJITSU Software ServerView Resource Orchestrator Cloud Edition V3.3.0 Setup Guide Windows J2X1-7610-08ENZ0(06) March 2018 Preface Purpose of This Document This manual provides information on the operations
ServerView Resource Orchestrator Virtual Edition V Setup Guide. Windows/Linux
 ServerView Resource Orchestrator Virtual Edition V3.0.0 Setup Guide Windows/Linux J2X1-7604-01ENZ0(06) March 2013 Preface Purpose This manual provides an outline of ServerView Resource Orchestrator (hereinafter
FUJITSU Software ServerView Resource Orchestrator Cloud Edition V Design Guide. Windows/Linux
 FUJITSU Software ServerView Resource Orchestrator Cloud Edition V3.1.2 Design Guide Windows/Linux J2X1-7673-05ENZ0(07) November 2015 Preface Purpose of This Document This manual provides an outline of
Systemwalker Service Quality Coordinator. Technical Guide. Windows/Solaris/Linux
 Systemwalker Service Quality Coordinator Technical Guide Windows/Solaris/Linux J2X1-6800-02ENZ0(00) November 2010 Preface Purpose of this manual This manual explains the functions and usage of Systemwalker
ETERNUS SF Express V14.1. User's Guide. Windows
 ETERNUS SF Express V14.1 User's Guide Windows B1FN-5955-01ENZ0(00) January 2010 Preface Purpose This manual gives an overview of the ETERNUS SF Express (hereafter referred to as Express). This manual describes
FUJITSU Software ServerView Resource Orchestrator Cloud Edition V Operation Guide. Windows/Linux
 FUJITSU Software ServerView Resource Orchestrator Cloud Edition V3.1.2 Operation Guide Windows/Linux J2X1-7611-06ENZ0(03) June 2014 Preface Purpose of This Document This manual explains how to operate
ServerView Resource Coordinator VE. Setup Guide. Windows/Linux
 ServerView Resource Coordinator VE Setup Guide Windows/Linux J2X1-7459-02ENZ0(00) November 2009 Preface Purpose This manual contains an outline of ServerView Resource Coordinator VE (hereinafter Resource
ServerView Resource Coordinator VE. Installation Guide. Windows
 ServerView Resource Coordinator VE Installation Guide Windows B1WD-2748-01ENZ0(01) August 2009 Preface Purpose This manual explains how to install ServerView Resource Coordinator VE (hereinafter Resource
FUJITSU Software ServerView Resource Orchestrator Virtual Edition V User's Guide. Windows
 FUJITSU Software ServerView Resource Orchestrator Virtual Edition V3.3.0 User's Guide Windows J2X1-7606-08ENZ0(06) March 2018 Preface Purpose of This Document This manual provides an outline of the operation
User's Guide for Infrastructure Administrators
 FUJITSU Software ServerView Resource Orchestrator Cloud Edition V3.3.0 User's Guide for Infrastructure Administrators Windows J2X1-7613-08ENZ0(06) March 2018 Preface Purpose of This Document This manual
ServerView Resource Coordinator VE V Messages. Windows/Linux
 ServerView Resource Coordinator VE V2.2.2 Messages Windows/Linux J2X1-7462-06ENZ0(04) August 2011 Preface Purpose This manual provides an explanation of messages used by ServerView Resource Coordinator
User's Guide for Tenant Administrators
 FUJITSU Software ServerView Resource Orchestrator Cloud Edition V3.3.0 User's Guide for Tenant Administrators Windows J2X1-7614-08ENZ0(06) March 2018 Preface Purpose of This Document This manual provides
White Paper Arcserve Backup Greatly Reduces the Cost of Backup Using All-Flash Arrays with the Latest LTO Ultrium Technology
 White Paper Arcserve Backup Greatly Reduces the Cost of Backup Using All-Flash Arrays with the Latest LTO Ultrium Technology Unlimited Backup Capacity and Number of Generations Adoption of all-flash arrays
User's Guide for Infrastructure Administrators
 FUJITSU Software ServerView Resource Orchestrator Cloud Edition V3.1.2 User's Guide for Infrastructure Administrators Windows/Linux J2X1-7613-06ENZ0(03) June 2014 Preface Purpose This manual provides an
Systemwalker Service Quality Coordinator. User's Guide. Windows/Solaris/Linux
 Systemwalker Service Quality Coordinator User's Guide Windows/Solaris/Linux J2X1-7659-01ENZ0(01) September 2012 Preface Purpose of this manual This manual describes the management functions provided by
User's Guide (Console Edition)
") walker Service Quality Coordinator User's Guide (Console Edition) Windows/Solaris/Linux J2X1-7660-01ENZ0(01) September 2012 Preface Purpose of this manual This manual explains how to use the operation
walker Service Quality Coordinator User's Guide (Console Edition) Windows/Solaris/Linux J2X1-7660-01ENZ0(01) September 2012 Preface Purpose of this manual This manual explains how to use the operation
ServerView Resource Orchestrator Virtual Edition V Messages. Windows/Linux
 ServerView Resource Orchestrator Virtual Edition V3.0.0 Messages Windows/Linux J2X1-7608-01ENZ0(05) April 2012 Preface Purpose This manual provides an explanation of messages used by ServerView Resource
User's Guide for Tenant Administrators
 FUJITSU Software ServerView Resource Orchestrator Cloud Edition V3.1.2 User's Guide for Tenant Administrators Windows/Linux J2X1-7614-06ENZ0(03) June 2014 Preface Purpose This manual provides an outline
FUJITSU Software Systemwalker Software Configuration Manager. Operator's Guide. Windows/Linux
 FUJITSU Software Systemwalker Software Configuration Manager Operator's Guide Windows/Linux B1X1-0129-04ENZ0(00) March 2014 Preface Purpose of this Document This document explains patch management procedures
ExpressCluster X 3.2 for Linux
 ExpressCluster X 3.2 for Linux Installation and Configuration Guide 5/23/2014 2nd Edition Revision History Edition Revised Date Description 1st 2/19/2014 New manual 2nd 5/23/2014 Corresponds to the internal
Interstage Business Process Manager Analytics V12.1. Migration Guide. Windows/Linux
 Interstage Business Process Manager Analytics V12.1 Migration Guide Windows/Linux B1X1-0160-02ENZ0(00) January 2013 Preface This chapter provides a general introduction to this user guide, describing its
ExpressCluster X 3.1 for Linux
 ExpressCluster X 3.1 for Linux Installation and Configuration Guide 10/11/2011 First Edition Revision History Edition Revised Date Description First 10/11/2011 New manual Copyright NEC Corporation 2011.
FUJITSU Software Systemwalker Operation Manager. Release Guide. UNIX/Windows(R)
") FUJITSU Software Systemwalker Operation Manager Release Guide UNIX/Windows(R) B1X1-0251-02ENZ0(00) May 2015 Preface Purpose of This Document This document describes the migration method, notes, and incompatible
FUJITSU Software Systemwalker Operation Manager Release Guide UNIX/Windows(R) B1X1-0251-02ENZ0(00) May 2015 Preface Purpose of This Document This document describes the migration method, notes, and incompatible
Data Sheet FUJITSU ETERNUS SF V16.3 Storage Management Software
 Data Sheet FUJITSU ETERNUS SF V16.3 Storage Management Software Data Sheet FUJITSU ETERNUS SF V16.3 Storage Management Software Central console and advanced management functions for ETERNUS DX disk storage
Windows PE Creation Script Guide
 FUJITSU Software ServerView Resource Orchestrator V3.4.0 Windows PE Creation Script Guide Windows/Linux J2X1-8136-02ENZ0(01) December 2018 Preface Purpose of This Document This manual explains the functional