Utility Cashier System
|
|
|
- Amanda Boyd
- 5 years ago
- Views:
Transcription
1 Utility Cashier System CASHIER MANUAL July 29, 2012 Version 1.2 1
2 System Account Overview Logging into Utili.Ca$h Logging Out of Utili.Ca$h Changing your Utili.Ca$h Password Cashier Daily Processes Cash Batch Processing Batch Navigating to the Batch Page Creating a Utili.Ca$h Batch Viewing your Batch List Editing a Utili.Ca$h Batch Verifying a Utili.Ca$h Batch Pause/Resume a Utili.Ca$h Batch Reopening a Verified Batch Voiding a Utili.Ca$h Batch Payment Navigating to the Payments Page Entering a Utili.Ca$h Bill Payment Entering a Utili.Ca$h POS Payment Viewing your Batch Payment List Voiding a Utili.Ca$h Hanging Payment Reversing a Utili.Ca$h Payment Endorsing A Cheque Reprinting a Utili.Ca$h Receipt Manual Payment Navigating to the Manual Payments Page Entering Manual Payments in File Uploading Manual Payments Inquiries & Reports Customer Account Search Archived Batches Help Downloads Icon Listing 2

3 Logging into Utili.Ca$h Accessing Utili.Ca$h Internally: On your browser, go to The screen below appears. Accessing Utili.Ca$h Externally: On your browser, go to The screen below appears. 1. Username: Enter user name in the space provided. 2. Password: Enter your password in the space provided. Forgot your password? Click on the Forgot Password? option. 3. Click the Login button. 4. The Home screen will be displayed. 4a. Main Navigation Bar 4b. Quicklinks panel. To view a list of Utili.Ca$h s Icon Listing, click here. 4c. Grid displaying your verified batches for the day 4d. Grid displaying your confirmed batches for the day 3

4 Logging Out of Utili.Ca$h 1. Click on the Logout located in the upper right corner of the application. 2. Click Ok to confirm logging out. The system will proceed to log you out. 3. The Login page will be reloaded. 4


5 Changing Your Utili.Ca$h Password 1. Click on your login name located in the upper right corner of the application. 2. A User Settings page will pop up. 5

6 3. Enter your Old Password, New Password and Confirm New Password. Click on the Set Password button. 6


7 Navigating to the Batch Page 1. On the Main Navigation Bar, click on the Batch option located on the Cash Register Processing drop down menu. Or click on the Batch icon panel on the home page. located on the Quicklinks 2. The Batch page is loaded. If the cashier has an open batch, it is loaded by default. 7


8 Creating a Utili.Ca$h Batch 1. Navigate to the Batch Page. Click here for instructions on Navigating to the Batch Page. 2. Click on the Add Batch icon. A Cashier can only have 1 Opened Batch, 1 Batch On Hold, and 1 Verified Batch at a time. 3. The form is enabled for input. 8
9 4. Input batch description typed as below example. The user s initials, current date and the agent name. Example: TZ BELHQ 5. Enter Amount for Cash Register Float (if any and must be deducted from your batch total at the end of the day). 6. Click Save on the information Toolbar (at the top). 7. A Batch Successfully Created message is displayed and your opened batch is loaded. The Batch ID number and batch status information is displayed. 9


10 Viewing your Batch List 1. Navigate to the Batch Page. Click here for instructions on Navigating to the Batch Page. 2. Click on the Batch List tab. 3. The Batch List grid is populated with all opened, voided, verified and confirmed for the day. The list will not display batches open on a previous date and confirmed for today s date. 10


11 4. To view the batch details of a specific batch, click on the Batch Name hyperlink for that batch. 5. The Batch Information form loads the batch information for the selected batch. 11

12 Editing a Utili.Ca$h Batch 1. Navigate to the Batch Page. Click here for instructions on Navigating to the Batch Page. 2. You can choose to work on your Opened batch, which is loaded by default or you can choose another batch from your Batch List. For instructions on selecting a different batch, click here. 3. Click on the Edit icon. 4. The form is enabled for editing. Only the Description and Cash Float Amount (if no payments have been entered into the Batch) can be edited. 12
13 5. Make necessary changes and click the Save icon. 6. A Cash Batch Successfully Updated message is displayed. 13

14 Verifying a Utili.Ca$h Batch 1. Navigate to the Batch Page. Click here for instructions on Navigating to the Batch Page. 2. Click on the Verify icon. A Cashier can only have 1 Opened Batch, 1 Batch On Hold, and 1 Verified Batch at a time. 3. The form is enabled for Verify. 4. Enter the Total On Hand amount and click on the Save icon. The Total on Hand which is the total cash and cheque to deposit into BEL s bank account. 14

15 5. A Cash Batch Successfully Verified message is displayed. 6. An is sent to the cashier and his/her supervisor confirming that the batch has been verified. See sample below. 15


16 Only Batches with valid payments can be verified. If an attempt is made to verify a batch that has no payments or only has voided payments the following message is displayed. Batches with hanging payments cannot be verified. If an attempt is made to verify a batch with hanging payments the following message is displayed. 16


17 Pause/Resume a Utili.Ca$h Batch 1. Navigate to the Batch Page. Click here for instructions on Navigating to the Batch Page. 2. You can choose to work on your Opened batch, which is loaded by default or you can choose another batch from your Batch List. For instructions on selecting a different batch, click here. 3. Click on the Pause/Resume icon. A Cashier can only have 1 Opened Batch, 1 Batch On Hold, and 1 Verified Batch at a time. 4. Opened batch status is changed to On-Hold. A Cash Batch Successfully changed to On-Hold is displayed. 17


18 5. On-Hold batch status is changed to Opened. A Cash Batch Successfully changed to Opened is displayed. Only batches with status Opened or On-Hold can be Paused/Resumed. Voided, Verified and Confirmed batches cannot be put On-Hold. Batches with hanging payments cannot be put On-Hold. The following message is displayed. 18


19 Reopening a Verified Batch When should a cashier reopen a Verified Batch? Reopening a batch allows a cashier to edit the batch Total On Hand and to continue entering payments. 1. Navigate to the Batch Page. Click here for instructions on Navigating to the Batch Page. 2. You can choose to work on your Opened batch, which is loaded by default or you can choose another batch from your Batch List. For instructions on selecting a different batch, click here. 3. Click on the Reopen Batch icon. A Cashier can only have 1 Opened Batch, 1 Batch On Hold, and 1 Verified Batch at a time. 4. A Cash Batch Successfully Re-Opened message is displayed. 19

20 Voiding a Utili.Ca$h Batch 1. Navigate to the Batch Page. Click here for instructions on Navigating to the Batch Page. 2. Click on the Void Batch icon. 3. A Void confirmation popup is displayed. Click Ok to Void the batch. 20


21 4. A Batch Successfully Voided message is displayed. Only batches with no payments or all voided payments can be voided. If a Batch has a valid payment (payments with status Finaled and/or Reversed ) the following message will be displayed. 21

22 Navigating to the Payments Page 1. After creating a batch, click on the Enter Payment icon located on the Batch Page. This will automatically navigate you to the Payments page. 2. The Payments page can also be accessed by: a. On the Main Navigation Bar, click on the Payment option located on the Cash Register Processing drop down menu. b. On the Home page, click on the Payment icon located on the Quicklinks panel. 22

23 3. The Payments page is loaded with the open batch of your default/preferred company. The default payment method selected is to enter a utility bill payment. 23

24 Entering a Utili.Ca$h Bill Payment 1. Navigate to the Payment Page. Click for instructions on Navigating to the Payment Page. 2. You start a payment by retrieving a customer s account. This can be done in several ways. a. To search by Customer Number: Focus is made by default on the Customer field. Enter the customer number in the textbox provided and press Enter. 24

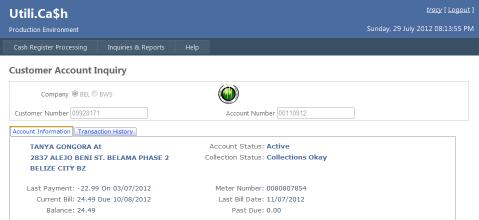
25 b. To search by an Active Account Number: Press the F2 key or click the Search Active Account icon. An Account Number search pops up. Enter the Active Account Number and press Enter or click on the Search icon. c. To search by Customer Name/Customer Number/Account Number/Meter Number: Press F3 or click on the Search Customer/Account icon. d. Scan Bill: Scan the customer s bill when the cursor focused on the Customer Number textbox. 3. The following customer information is displayed: on the Customer/Account Tab. a. On the Customer/Account Tab, an Account Number dropdown list includes all Accounts tied to the customer Number. The first Active Customer Account is selected by default. The Customer Account information displayed includes: Name, address, collection status, account status, last payment, meter number, current bill, last bill date, balance and past due. To view another account s information, select the desired Account Number on the drop down list. The 25

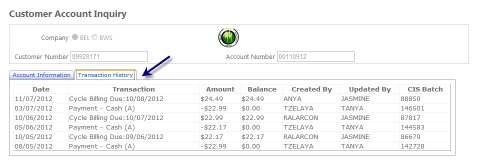
26 customer account information is updated. b. The Transaction History tab displays the selected customer account s last six transactions. c. The Today s UCS Payments tab displays all payments made for the day to the selected account. UCS will only display payments input through UCS, payments made to CIS will not be reflected here. 26

27 Did you enter the wrong customer number? If yes, click on the clear/cancel icon clear the customer and account number and start over. to 27

28 4. The Apply Amount field is automatically populated with the account s Current Due amount. To apply this payment, press Enter or click on the Apply Amount button. If the amount being applied is different than the amount displayed, type the amount in the Amount to Pay field. 5. After applying a payment: a. An official BEL receipt number is generated and the payment s status is updated to Entered. b. The payment tendered panel is displayed. This panel includes tab to pay Cash, Card & Cheque. The required amount to be tendered is displayed. c. The Transactions grid displays the Amount Applied in the previous step. The Balance in the grid is the current balance on the account, after the amount is applied. The Total Transaction Amount and Change fields are updated. 28


29 Did you apply the wrong amount? Click on the delete icon record within the transaction in the grid. next to the transaction 29

30 The transaction record is removed from the grid and the Transaction Amount, Tendered Amount and Change are updated to reflect the change. 30

31 Do you wish to cancel this payment? If yes, click on the Void icon Only payments with the status Entered can be voided. at the top. 31

32 A confirmation popup will be displayed. Click Ok to void/cancel the payment. A Payment Successfully Voided message is displayed. 32

33 You may enter multiple payments to the same customer number and print one receipt which will display the different payments. Select a different account from the account dropdown list. Apply payment to the selected account. The different payments are reflected in the transactions grid. 33

34 6. To apply the tendered amount, a cashier may enter a Cash, Card, or Cheque payment. d. Cash Payment: The Cash tab is selected by default. The Cash field is automatically populated with the total needed to be tendered. If the amount is different, type in the desired amount and press Enter or click on the Save Cash Payment icon. If the Cash tab is not selected, click on F6 to return to the Cash tab. The transactions grid is updated to reflect the Cash entry. The Cash Tendered field, Total Amount Tendered and Change fields are also update. e. Cheque Payment: Press F7 to select the Cheque tab. The Cheque field is automatically populated with the total amount applied to the amount needed to be tendered.. If the amount is different, type in the desired amount and press Enter or click on the Save Cheque Payment icon. The cheque number is mandatory. Post dated cheques are not acceptable. 34

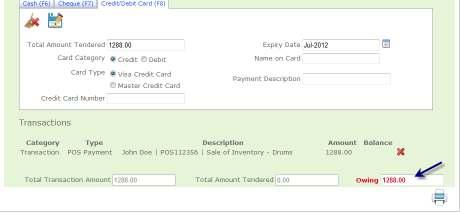
35 Cheque endorsement is required for payments made with Cheque. Read more about Endorsing A Cheque. The transactions grid is updated to reflect the Cheque entry. The Cheque Tendered field, Total Amount Tendered and Change fields are also update. f. Credit/Debit Card Payment: Press F8 to select the Card tab. The Card field is automatically populated with the total amount applied to the amount needed to be tendered.. If the amount is different, type in the desired amount and press Enter or click on the Save Card Payment icon. The card number and Name on Card are mandatory fields. 35

36 The transactions grid is updated to reflect the Card entry. The Card Tendered field, Total Amount Tendered and Change fields are also update. Did you apply the wrong payment amount? Click on the delete icon payment record within the transaction in the grid. next to the 36

 total amount tendered, the print button is activated.")
37 The transactions grid is updated to reflect the deleted entry. The Total Amount Tendered and Change fields are also update. If the customer is paying a portion in cash enter the total amount tendered for cash and then either click on cheque or Credit/Debit Card tab or simple press F7 for Cheque or F8 for Credit/Debit Card then press the enter key or click on the save icon. 7. After entering the required (or more than required) total amount tendered, the print button is activated. Press F10 or click the active Print icon located at the bottom of the form. If the Total Transaction Amount equals the Total Amount Tendered, the change reflected is set to zero,


38 If the Total Amount Tendered is greater than the Total Transaction Amount, the change reflected is the amount to be returned to the customer. This amount is displayed in Green. If the Total Amount Tendered is less than the Total Transaction Amount, the change reflected is the remaining amount needed to be paid to complete the Utili.Ca$h payment. This amount is displayed in Red. This receipt cannot be printed. The cashier needs to enter more payments to match the Total Transaction Amount. 38


39 Entering a Utili.Ca$h POS Payment 1. Navigate to the Payment Page. Click for instructions on Navigating to the Payment Page. 2. Press the F4 key on the payment screen or select the Point of Sale option on the Transaction Type radio button list. 3. The Point of Sale entry form is loaded. 39

40 4. Select the Inventory Type and Stock Code. Enter the Actual Selling Price, Quantity, Name, Invoice Number and Misc/Comment. In the Misc/Comment Field, include the name of the customer and the POS/Invoice number. 5. Press Enter or click on the Save POS icon. Actual Selling Price, Quantity, Name & Misc/Comment are required fields. Invoice Number is a required field for PFI Payments. Multiple POS can be displayed on one receipt. For example, after inputting the Paid for installation, before printing, you may go back and input the GST information and then print the receipt. 6. After the POS payment is entered: 40

41 g. An official BEL receipt number is generated and the payment s status is updated to Entered. h. The payment tendered panel is displayed. This panel includes tab to pay Cash, Card & Cheque. The required amount to be tendered is displayed. i. The Transactions grid displays the POS Payment entered in the previous step. The Total Transaction Amount and Change/Owing fields are updated. Did you apply the wrong amount? Click on the delete icon transaction record within the transaction in the grid. next to the 41


42 The transaction record is removed from the grid and the Transaction Amount, Tendered Amount and Change are updated to reflect the change. 42

43 Do you wish to cancel this payment? If yes, click on the Void icon top. Only payments with the status Entered can be voided. at the 43

44 A confirmation popup will be displayed. Click Ok to void/cancel the payment. A Payment Successfully Voided message is displayed. 8. To apply the tendered amount, a cashier may enter a Cash, Card, or Cheque payment. j. Cash Payment: The Cash tab is selected by default. The Cash field is automatically populated with the total needed to be tendered. If the amount is different, type in the desired amount and press Enter or click on the Save Cash Payment icon. If the Cash tab is not selected, click on F6 to return to the Cash tab. 44

45 The transactions grid is updated to reflect the Cash entry. The Cash Tendered field, Total Amount Tendered and Change fields are also update. k. Cheque Payment: Press F7 to select the Cheque tab. The Cheque field is automatically populated with the total amount applied to the amount needed to be tendered.. If the amount is different, type in the desired amount and press Enter or click on the Save Cheque Payment icon. The cheque number is mandatory. Post dated cheques are not acceptable. Cheque endorsement is required for payments made with Cheque. Read more about Endorsing A Cheque. The transactions grid is updated to reflect the Cheque entry. The Cheque Tendered field, Total Amount Tendered and Change fields are also update. 45

46 l. Credit/Debit Card Payment: Press F8 to select the Card tab. The Card field is automatically populated with the total amount applied to the amount needed to be tendered.. If the amount is different, type in the desired amount and press Enter or click on the Save Card Payment icon. The card number and Name on Card are mandatory fields. 46
47 The transactions grid is updated to reflect the Card entry. The Card Tendered field, Total Amount Tendered and Change fields are also update. Did you apply the wrong payment amount? Click on the delete icon payment record within the transaction in the grid. next to the 47

48 The transactions grid is updated to reflect the deleted entry. The Total Amount Tendered and Change fields are also update. If the customer is paying a portion in cash enter the total amount tendered for cash and then either click on cheque or Credit/Debit Card tab or simple press F7 for Cheque or F8 for Credit/Debit Card then press the enter key or click on the save icon. 9. After entering the required (or more than required) total amount tendered, the print button is activated. Press F10 or click the active Print icon located at the bottom of the form. If the Total Transaction Amount equals the Total Amount Tendered, the change reflected is set to zero,

49 If the Total Amount Tendered is greater than the Total Transaction Amount, the change reflected is the amount to be returned to the customer. This amount is displayed in Green. If the Total Amount Tendered is less than the Total Transaction Amount, the amount reflected is the remaining amount needed to be paid to complete the Utili.Ca$h payment. This amount is displayed in Red. This receipt cannot be printed. The cashier needs to enter more payments to match the Total Transaction Amount. 49
50 50
 entered into the selected batch. Payments with the status Entered are considered hanging payments.")
51 Viewing your Batch Payment Listing 1. Navigate to the Payment Page. Click here for instructions on Navigating to the Payment Page. 2. Click on the Payments List tab. 3. The Payment List grid is populated with all payments ( Entered, Saved, Voided & Reversed ) entered into the selected batch. Payments with the status Entered are considered hanging payments. These are payments that were not successfully saved and are considered invalid. Hanging payments are highlighted in a light blue grey shade. Voided payments are visible in red. Reversed payments are italicized. 51


52 4. Click on the Receipt # hyperlink to view the details of the payment. 5. The receipt information is reloaded and displayed on the Details lab. 52


53 Voiding a Utili.Ca$h Hanging Payment 1. Navigate to the Payment Page. Click here for instructions on Navigating to the Payment Page. 2. If your batch contains Hanging payments (payments with the status Entered ), the following message is displayed. 3. Go to your payments List and select a payment with the status Entered. For more instructions about viewing your payments list and selecting a payment click here. 53

54 4. The payment detail is loaded on the details tab of the page. Click on the Void icon at the top. Only payments with the status Entered can be voided. 54


55 5. A confirmation popup will be displayed. Click Ok to void/cancel the payment. 6. A Payment Successfully Voided message is displayed. 55

56 Reversing a Utili.Ca$h Payment 1. Navigate to the Payment Page. Click here for instructions on Navigating to the Payment Page. 2. Go to your payments List and select the payment you wish to reverse. For more instructions about viewing your payments list and selecting a payment click here. 3. The payment detail is loaded on the details tab of the page. Click on the Reverse icon at the top. Only payments with the status Saved can be reversed. 56


57 4. A confirmation popup will be displayed. Click Ok to Reverse the payment. 5. A Payment Successfully Reversed message is displayed. 57
58 If a receipt needs to be reversed the original receipt must be kept for end of day procedures and to be sent to Collections Department after reconciliation is completed. Reversed transactions are not removed from Utili.Ca$h. They are marked as Reversed and remains as entries in the batch and in the confirmation for auditing purposes. 58


59 Endorsing a Utili.Ca$h Cheque 1. A cheque must be endorsed for every cheque payment made. 2. After printing the receipt, an Endorse Cheque icon appears on the screen. 3. Place the cheque into the Generic Printer, for printing on the back of the cheque. 4. Click the Endorse Cheque icon to endorse the cheque and complete the payment. 59
60 Reprinting a Utili.Ca$h Receipt 1. Navigate to the Payment Page. Click here for instructions on Navigating to the Payment Page. 2. Go to your payments List and select the payment you wish to print. For more instructions about viewing your payments list and selecting a payment click here. The payment detail is loaded on the details tab of the page. Click on the Print icon the top. Only payments with the status Saved can be printed. at 60


61 Navigating to the Manual Payments Page 1. The Manual Payments page can be accessed by: a. On the Main Navigation Bar, click on the Manual Payments option located on the Cash Register Processing drop down menu. 2. The Manual Payments page is loaded with the open batch of your default/preferred company. 61

62 Entering Manual Payments in File 1. Enter Manual Payments Information on the selected Manual Payments spreadsheet file provided in the downloads page. a. Enter Manual Cash Payments in the Manual Payments File Cash spreadsheet. b. Enter Manual Cheque Payments in the Manual Payments File Cheque spreadsheet. c. Enter Manual Card Payments in the Manual Payments File Card spreadsheet. 62

63 Uploading Manual Payments 1. Manual Payments uploaded will be uploaded to the current user s open batch. 2. Select the Manual Payments File Type that you are uploading: a. Select Cash Payment File if the file you are uploading is for Manual Payments Cash. b. Select Cheque Payment File if the file you are uploading is for Manual Payments Cheque c. Select Card Payment File if the file you are uploading is for Manual Payments Card 3. Select Browse to find the file that you are going to upload. 4. On the Upload File Page. Select the file you wish to upload and select Open. 63


64 5. Click on the Upload Manual Payment File icon. 6. If errors exist in the file, they will be displayed on the error list on the screen and will Manual Payments will not be uploaded. 64


65 7. If no errors exist on the file, all Manual Payments will be uploaded successfully and will be displayed on the screen. 65
66 Customer Account Search 1. On the Main Navigation Bar, click on the Customer Account Search option located on the Inquiries & Reports drop down menu. Or, on the Home page, click on the Customer Account Search icon located on the Quicklinks panel. 2. The Search Customer/Account page is loaded. 3. Select company to search from the company radio button list. Your preferred company is selected by default. 66


67 4. There are various options to search by depending on the company chosen. To search by: a. Customer Name: Select the Customer Name option on the Search Options radio button list. The Search by Name/Company Name form is loaded. Enter your search criteria. Press Enter or click on the search icon. b. Account Number: Select the Account Number option on the Search Options radio button list. The Search by Account Number form is loaded. Enter the 67


68 account number to search. Press Enter or click on the search icon. c. Customer Number: Select the Customer Number option on the Search Options radio button list. The Search by Customer Number form is loaded. Enter the Customer Number to search. Press Enter or click on the search icon. d. Meter Number: Select the Meter Number option on the Search Options radio button list. The Search by Meter Number form is loaded. Enter the Meter Number to search. Press Enter or click on the search icon. 68

69 5. The search results are loaded in the results grid below. 6. Click select to make a payment to the selected customer account. The payments page will be loaded with the selected customer/account number. 7. Click View Details to view the customer account information for the selected customer/account number. 8. The Customer Account Inquiry page is loaded with the account information and transaction history. 69
70 70

71 Archived Batches 1. On the Main Navigation Bar, click on the Archived Batches option located on the Inquiries & Reports drop down menu. Or, on the Home page, click on the Archived Batches icon located on the Quicklinks panel. 2. The Archived Batches page is loaded with all batches created in the past two weeks. The Batch List tab displays your batches with the status Voided or Confirmed 3. Click on the Search Batch icon to search for batches created more than two weeks ago. 71

72 4. A Search by Date Range form appears. Enter the From Date and To Date. Click on the search icon to view all batches for the specified date range. 72

73 5. Click on the View Details hyperlink of the batch you with to view. The batch information is loaded on the Batch Information tab. 73

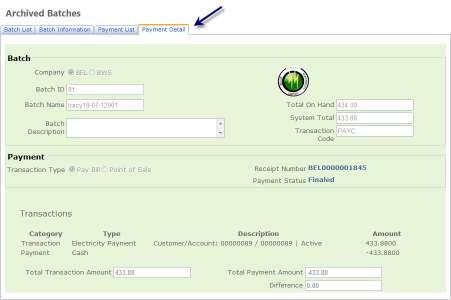
74 6. Click on the View Payments hyperlink of the batch you with to view. The Payments List for the selected batch is loaded on the Payment List tab. Click on the Export Payments List icon to export the Payments List to an excel spreadsheet. Click on the Receipt Number hyperlink to view the details of a receipt. The receipt details are loaded on the Payment Detail tab. 74
75 75


76 Downloads 1. On the Main Navigation Bar, click on the Downloads option located on the Help drop down menu. 2. The Downloads page is loaded. This page includes downloads for Manual Payments templates and drivers required to run the Utili.Ca$h application. 76
77 Icon Listing 1. On the Main Navigation Bar, click on the Icon Listing option located on the Help drop down menu. 77
78 2. The Icon Listing page is loaded. This page includes a list of all icons with description, used in Utili.Ca$h. 78
79 Cashier Daily Processes 1. Create a Utili.Ca$h Batch 2. Enter Utili.Ca$h Payments 3. Verify your Utili.Ca$h Batch. Your supervisor will verify the cash and cheque on hand and confirm your batch. 4. End of Day Reconciliation Deposits should be separated by Cash, Cheque and New Services(pink receipt forwarded to collections) What to check for when reconciling your cashiers? Deleted Transactions/Receipts Manual Receipts Cheques POS Invoices provided by BEL(where applicable) 79
Positive Pay User Guide. Positive Pay User Guide - 1 -
 - 1 - Table of Contents Positive Pay Overview... 3 User Login... 3 Transaction Processing- Submitting Issued Check File... 4 Transaction Processing Add New Issued Check... 5 Transaction Processing - Exception
Sterling Virtual Terminal. User Guide
 Sterling Virtual Terminal User Guide Version 3.1.00 August 2015 Chapter 1: Getting started Table of Contents USER GUIDE... 1 CHAPTER 1: GETTING STARTED... 5 SYSTEM REQUIREMENTS... 5 STERLING VIRTUAL TERMINAL
Express365 Accounting User Manual
 Express365 Accounting User Manual August 05 Latest Update: 9 th October 08 P a g e 46 For information about customer support, please visit our homepage at http://www.express365.com.my on the World Wide
Once you click on the Enterprise Icon found on your desktop you will be asked for your password. This Default Code Is
 Once you click on the Enterprise Icon found on your desktop you will be asked for your password. This Default Code Is You should now see the main screen which is called the main screen or menu screen.
Nexsure Training Manual - Accounting. Chapter 7
 Nexsure Training Manual - Accounting Vendor Entries In This Chapter Vendor Entries at the Organization and Territory Level Vendor Entity Definition Disbursements to Vendors Line Item Distribution Receiving
CASH MANAGEMENT HOW-TO
 Vision Municipal Solutions CASH MANAGEMENT How-To Guide Contents Set-Up... 4 Changing Your Default Period... 4 How to Change Your Default Period... 4 Payment Centers... 4 Adding a Payment Center... 4 Drawers...
My PHLY Registration Process and User Guide
 Create a new My PHLY account: From the PHLY.com home page, select one of the following methods to begin the registration process. Hover over the Log In or Register section and click Register. Or, click
Online Banking for Business WHOLESALE LOCKBOX IMAGING USER GUIDE
 Online Banking for Business WHOLESALE LOCKBOX IMAGING USER GUIDE Contents Getting Started...1 Technical Requirements...1 Contact Us...1 Overview...2 Wholesale Lockbox Web Application... 2 Features... 2
2. Type in User Name and Password [Password is case-sensitive]. 7. Type in any Additional Comments. 8. Click the Review Tab to review your order.
![2. Type in User Name and Password [Password is case-sensitive]. 7. Type in any Additional Comments. 8. Click the Review Tab to review your order.](/thumbs/72/67555501.jpg "2. Type in User Name and Password [Password is case-sensitive]. 7. Type in any Additional Comments. 8. Click the Review Tab to review your order.") Log In 1. Open your Internet web browser and type in the following address: https://www.marshfieldlabs.org/reference 2. Type in User Name and Password [Password is case-sensitive]. 3. Click Log In. NOTE:
Log In 1. Open your Internet web browser and type in the following address: https://www.marshfieldlabs.org/reference 2. Type in User Name and Password [Password is case-sensitive]. 3. Click Log In. NOTE:
OSP Quick Start Guide
 OSP Quick Start Guide Table of Contents Notes...1 Overview...1 Site Information...2 Login to Portal...2 Activity Setup...3 Add Activity...3 Activity Lookup...4 Edit Activity...4 Remove Activity...4 View
Xifin Client Portal User s Guide Version 1.0. January 2018
 Xifin Client Portal User s Guide Version 1.0 January 2018 Table of Contents Getting Started... 3 Contacting Allina Health Laboratory Billing... 3 Xifin Client Portal Information... 3 Logging in to Xifin
Table Service Daily Steps for Cashiers
 Table Service Daily Steps for Cashiers Process Sales Tasks This section provides information on processing sales from the Process Sales screen. Tasks Select menu items Steps Option 1: (single course meal)
Tables Screen. Table State Buttons: Changes the state of the selected table to one of the following: Table Open. Table Reserved Needs Bussing
 Task 1: Log on to POS 1. Select the point of service icon. 2. Choose your Name. 3. Select Keyboard on the Login screen. 4. Enter your Password. 5. Select Enter on the Keyboard screen. Task 2: Open a Serving
REPSPARK USER GUIDE 1
 REPSPARK USER GUIDE 1 TABLE OF CONTENTS INTRODUCTION 3 CREATING A LOGIN Creating a Username and Password 4 Reset Password 5 GETTING STARTED Editing Profile Information 4 PRODUCTS Product Availability 6
NCLTEC Accounting User Manual
 NCLTEC Accounting User Manual Latest Update: Feb 6, 0 For information about customer support, please visit our homepage at http://www.ncltec.com on the World Wide Web. Copyright 05 NCL Energy Technology
Nexsure Training Manual - Accounting. Chapter 13
 Tax Authority In This Chapter Tax Authority Definition Reconciling Tax Authority Payables Issuing Disbursement for Tax Authority Payables Paying the Tax Authority Prior to Reconciling Tax Authority Definition
Tobacco Products Manufacturer s and Importer s Report
 Tobacco Products Manufacturer s and Importer s Report Logging Into EDS Log in with the user id and password provided through the EDS registration process and click on the Login button. If you have not
2016 Autosoft, Inc. All rights reserved.
 Copyright 2016 Autosoft, Inc. All rights reserved. The information in this document is subject to change without notice. No part of this document may be reproduced, stored in a retrieval system, or transmitted
AccountsIQ Tips and Tricks. Updated 20/10/2008. Purpose. 1. List and describe what heading and text will be containing in each of the Tip s and tricks
 AccountsIQ Tips and Tricks Updated 20/10/2008 Purpose 1. List and describe what heading and text will be containing in each of the Tip s and tricks 2. Outline what FAQ s will be released on the System
GLOBAL TRANSPORT VT & BATCH SOLUTION
 GLOBAL TRANSPORT VT & BATCH SOLUTION USER GUIDE VERSION 17.2 NOVEMBER Global Payments Inc. 10 Glenlake Parkway, North Tower Atlanta, GA 30328-3447 COPYRIGHT 2007- GLOBAL PAYMENTS INC. ALL RIGHTS RESERVED.
Gift Card Instructions Daxko Spectrum
 Gift Cards Gift card are good to use for a variety of reason: 1. You can track the declining balance on them. 2. You can recharge them; treat it as a cash card. The cards can be attached to a recipient.
Desktop Teller User Guide
 Desktop Teller User Guide Deposit Preparation Calculate and verify your deposit total for entry. Remove all paper clips, staples, rubber bands, and other foreign items. Straighten any bent corners and
Keep It Easy Software Cloud User Manual
 Keep It Easy Software Cloud User Manual 2015 Keep It Easy Software 1 CONTENTS How to Login... 5 Functions... 5 System Preferences... 6 General... 7 Receipt Categories... 9 Expense Categories... 10 Service
Palm Beach County Palm Tran. Bus Pass Tracker User Manual
 Palm Beach County Palm Tran Bus Pass Tracker User Manual Table of Contents Log In... 3 Forgot Password... 5 Bus Pass Lookup... 6 Current Inventory... 7 Edit Profile... 8 Change Password... 9 Change Agency...
m360 creating invoices for tepsa products
 m360 creating invoices for tepsa products 1. In m360, Quick Search to search the member. 2. After m360 has located the correct member, click on the member s ACCOUNTING tab. 3. Click ADD INVOICE. 4. If
User s Guide. (Virtual Terminal Edition)
") User s Guide (Virtual Terminal Edition) Table of Contents Home Page... 4 Receivables Summary... 4 Past 30 Day Payment Summary... 4 Last 10 Customer Transactions... 4 View Payment Information... 4 Customers
User s Guide (Virtual Terminal Edition) Table of Contents Home Page... 4 Receivables Summary... 4 Past 30 Day Payment Summary... 4 Last 10 Customer Transactions... 4 View Payment Information... 4 Customers
User Guide. Customer Self Service (CSS) Web Application Progress Software Corporation. All rights reserved.
 Web Application Progress Software Corporation. All rights reserved.") User Guide Customer Self Service (CSS) Web Application 1993-2017 Progress Software Corporation. Version 2.1 March 2017 Table of Contents Welcome... 3 Accessing the Customer Self Service (CSS) Web Application...
User Guide Customer Self Service (CSS) Web Application 1993-2017 Progress Software Corporation. Version 2.1 March 2017 Table of Contents Welcome... 3 Accessing the Customer Self Service (CSS) Web Application...
AndroPay Admin Center Getting Started
 USER MANUAL AndroPay Admin Center Getting Started Introduction: The Customer Administration Center, or Admin Center, is your central site for all things AndroPay. Through the Admin Center, you can upload
MoneyGram OfficialChecks
 MoneyGram OfficialChecks Version 2.6 PrimeLink Portal System Guide This system guide contains instructional information for the general use of the PrimeLink Web Portal. If you need specific assistance
USER GUIDE. June 2012 VERSION 1.0. Supplier Portal. Kimberly-Clark. E-sourcing
 USER GUIDE June 2012 VERSION 1.0 Supplier Portal Kimberly-Clark E-sourcing Copyright 2005, Kimberly-Clark Worldwide, Inc. All rights reserved. This document and its associated training materials are proprietary
FOUR SEASONS MARKETPLACE BUYER TRAINING
 FOUR SEASONS MARKETPLACE BUYER TRAINING Table Of Contents 1. INTRODUCTION... 2 2. LOGIN SCREEN... 3 3. FRONT PAGE... 5 3.1 LOGO PANEL... 6 3.2. SEARCH PANEL... 9 3.3 FRONT PAGE TABS... 10 3.4 CATALOGS
online payment center T-Mobile user guide
 online payment center T-Mobile user guide table of contents introduction 1 features.. 1 getting started. 2 starting Qpay.. 2 login.. 2 changing your password 3 navigating... 3 processing payments 4 how
SchARP Instruction Manual
 SchARP Instruction Manual Secure Payroll Upload & Loan Dashboard ALLIANCE BENEFIT GROUP OF ILLINOIS ADMINISTRATORS, CONSULTANTS, ACTUARIES 456 FULTON STREET, STE 345, PEORIA, IL 61602 www.abgil.com Welcome
Show Instructions. For Festivals. Version 1.2
 For Festivals Version 1.2 Table of Contents Page 03 03 Section Add Shows Create a New Show, Enter Show Details 04-05 04 05 Add Artists Create a New Artist Enter Artist Details 06 06 Editing Edit Show,
Reports in MSB. Form or Screen: MSB - Reports Updated: 2/5/18 QRG Doc. #: Q.SA.014
 Form or Screen: MSB - Reports Updated: 2/5/18 QRG Doc. #: Q.SA.014 Business Use: MySchoolBucks is a system designed to streamline school payments for parents and students. Several reports yield crucial
This Job Aid covers the process of creating and closing purchase orders in the upgraded ONEPeralta system. Log on to ONEPeralta 3
 Purchase Orders Table of Contents This Job Aid covers the process of creating and closing purchase orders in the upgraded ONEPeralta system. Creation Page Log on to ONEPeralta 3 Copy a Requisition 6 Run
Rabo Supplier Finance User Manual - Suppliers -
 Rabo Supplier Finance User Manual - Suppliers - Page 2 of 33 Table of Contents 1 About This Document... 3 1.1 Objectives of This Document... 3 1.2 Inside This Document... 3 2 Rabo Supplier Finance platform...
RELEASE NOTES: FEBRUARY 23, 2016
 RELEASE NOTES: 2.16.01 FEBRUARY 23, 2016 Highlights from this release Report Criteria Favourites Change Name on WO/LOT/INV with blend Save report criteria so you can run it the same way next time. Read
User Manual Appointment System
 User Manual Appointment System Page 1 of 17 1.0 TABLE OF CONTENTS TABLE OF CONTENTS... 2 System Overview... 3 Menu Options... 3 Application Access... 3 Patient Registration... 6 Schedule Appointment...
Inventory Field Reference Guide
 DATA PLUS HOSPITALITY SOLUTIONS Inventory Field Reference Guide Version 8.0 Table of Contents Overview...4 Inventory...5 File Maintenance...6 File Maintenance/Lists...6 Parameters... 7 Issue/Adjustment
CASHNet - Departmental Deposits Instructions for Departments
 CASHNet - Departmental Deposits Instructions for Departments Getting Started... 2 Logging in to CASHNet... 2 Home Page Menu / Accessing Departmental Deposits Module... 2 Adding a New Deposit... 4 Reference
Before running the Year End
 Before running the Year End Pre-Year End Checklist To ensure that your Year End operation is successful, you are required to perform certain Pre-Year End checks. Complete the checklist below before proceeding
Q: The barcode on the item is not scanning or the product is not found, what should I do to complete the transaction for my customer?
 FAQ s Q: The barcode on the item is not scanning or the product is not found, what should I do to complete the transaction for my customer? First, scan the Scrubs and Beyond sticker ticket. If the sticker
Lockbox. Chapter 13. Lockbox Integration Setup. Nexsure Training Manual - Admin. In This Chapter
 Lockbox In This Chapter Lockbox Integration Setup Notification Setup Accounting Setup Invoice Defaults Setup Territory Level Lockbox Sestup Lockbox Exceptions Handling Lockbox Integration Setup Lockbox
Chapter Step by Step Guide for Implementing QuickBooks
 Chapter Step by Step Guide for Implementing QuickBooks It is recommended that before you make any changes to QuickBooks you do a backup so that you have the original copy in case something goes wrong during
Nexsure Training Manual - Accounting. Chapter 14
 Nexsure Training Manual - Accounting Deposits In This Chapter Handling Deposits Posting the Deposit and Printing the Deposit Handling Deposits Before adding any deposits to Nexsure, the receive payment
FirstView. Merchant User Guide. Version 1.0. FirstView Merchant User Guide
 FirstView Merchant User Guide Version 1.0 Document Control Document ID Version Author/Editor Date Original Draft 1.0 Dan Gill 7/26/2018 Copyright 2018 First American Payment Systems, L.P. All rights reserved.
Processing a Deposit via ipayments
 Processing a Deposit via ipayments Several items must be considered prior to engaging in the sale of goods or services. Does the department have written cash handling procedures? Are the persons accepting
User Guide v1.4 squid SchoolPay USER GUIDE
 User Guide v1.4 squid SchoolPay USER GUIDE June 2016 The latest version can be found at: squidcard.com/welcome/school-administrators Page 1 CONTENTS 1. Login page 4 2. Home screen 4 3. My account 5 4.
University of North Carolina User Guide
 University of North Carolina User Guide June 2006 The software described in this document is furnished under a license agreement. The software may be used or copied only in accordance with the terms of
Xpress-pay Administration Guide
 Xpress-pay Administration Guide The Xpress-pay Team endeavors to educate and inform our clients how to use all available tools to ensure that vital information is readily available and your experience
VALO Commerce. Beam Suntory User Guide
 VALO Commerce Beam Suntory User Guide Beam Suntory User Guide Access Your VALO Commerce Site through CONNECT Navigate to https://intlconnect.beamsuntory.com and click on the InnerWorkings tile to access
Simplot Order Gateway (SOG) User Instructions
 User Instructions") Simplot Order Gateway (SOG) User Instructions April 6, 2011 The Simplot Order Gateway (SOG) can be found by clicking the following link or by typing it into your web browser address bar. https://sec03.simplot.com/fos/
Simplot Order Gateway (SOG) User Instructions April 6, 2011 The Simplot Order Gateway (SOG) can be found by clicking the following link or by typing it into your web browser address bar. https://sec03.simplot.com/fos/
My PHLY Registration Process and User Guide
 Create a new My PHLY account: From the PHLY.com home page, select one of the following methods to begin the registration process: Hover over the Log In or Register section and click Register Result: The
Renewing Your Membership
 Renewing Your Membership The membership renewal process for your annual AAPC membership dues will be processed different than in years past, as it is now processed completely online. Starting 21 days before
Division of Alcoholic Beverages and Tobacco. Beer Manufacturer s Monthly Report
 Division of Alcoholic Beverages and Tobacco Beer Manufacturer s Monthly Report Logging Into EDS Log in with the user id and password provided through the EDS registration process and click on the Login
ecashiering Table Of Contents
 ecashiering Table Of Contents Overview... 2 Logging in to ecashiering... 2 ecashiering Tab... 3 Payment Management... 3 Digital Delivery Account Managment... 7 Patient Pay Online Tab... 8 Account Summary...
Internet Banking Update December 2008 New Features
 Internet Banking Update December 2008 New Features CONTENTS Pending Authorisations... 2 How it Works...2 Client Maintenance... 6 How it Works...6 External Transfer Batch Uploads... 9 How it Works...9 Enhanced
SALES REPORTING GUIDE TO MANUALLY ENTER SALES DATA IN TRADEMARX:
 SALES REPORTING GUIDE TO MANUALLY ENTER SALES DATA IN TRADEMARX: 1. Go to http://licensing.trademarxonline.com 2. Log in using your email address and password. If you don t know your password, please click
In-State Tobacco Products Wholesale Dealer s Report
 In-State Tobacco Products Wholesale Dealer s Report Logging Into EDS Log in with the user id and password provided through the EDS registration process and click on the Login button. If you have not registered,
Storefront Ordering System Demonstration Guide. Powered by
 Storefront Ordering System Demonstration Guide Powered by Welcome to CMYK s Storefront Ordering System (SOS) The following pages will guide you through our Demo Site. We will show you many options available
View Payments. User Guide. Online Merchant Services
 View Payments User Guide Online Merchant Services Copyright Statement Copyright 2010-2011 by American Express Company. All rights reserved. No part of this document may be reproduced in any form or by
//index. Chapter Content Page Part One: Bluefin Support. Part Two: Logging In Part Three: Integration Part Four: Processing. Part Five: Reporting
 MANUAL 1 //index Chapter Content Page Part One: Bluefin Support Part Two: Logging In Part Three: Integration Part Four: Processing Part Five: Reporting Part Six: Settings Part Seven: Receipts Part Eight:
NET SUPPLY VENDOR PORTAL
 NET SUPPLY VENDOR PORTAL Implementation Guide NET SUPPLY Implementation Guide Miroglio Page 1 of 21 CONTENTS PREFACE... 3 ABOUT THE FUNCTION KEYS... 4 CHAPTER 1 SYSTEM ACCESS... 5 1.1 Login... 5 1.2 Change
ezbusiness Card Management 7/1/2015
 ezbusiness Card Management 7/1/2015 Table of Contents Logging In........ 3 Out-of-Band Processing.... 5 Navigation.....5 Viewing Pages. 5 Sorting Lists.5 Accessing Online Help...6 Menu Options and Navigation...6
Re-registering and Adding a New Facility in ReposiTrak
 Re-registering and Adding a New Facility in ReposiTrak Contents Logging in to ReposiTrak... 2 Re-registering in ReposiTrak... 4 Adding and Registering a New Facility in ReposiTrak... 8 Wire Transfer Instructions
ROAMpay TM. X4 User's Guide
 ROAMpay TM X4 User's Guide Last Modified: 06/14/2013 Contents 1 Activating ROAMpay X4 2 Using the System 2 Login 2 First-time Login 2 Default Settings 3 Retrieving Your Password 3 Online Sales 4 Saved
Guidelines on Dormant Accounts Web Reporting System
 The Central Bank of The Bahamas Guidelines on Dormant Accounts Web Reporting System January, 2009 Page 1 Introduction The Central Bank of The Bahamas Dormant Accounts Reporting System (CBOB DARS) is a
Furniture Wizard Security Introduction
 Furniture Wizard Security Introduction In this section, we will introduce you to the new security features of Furniture Wizard. Furniture Wizard s security will allow you to set permissions for different
User Guidance Manual
 User Guidance Manual Table of Contents TABLE OF CONTENTS... 1 PROGRAM OVERVIEW... 3 PORTAL OVERVIEW... 3 GETTING TO THE LOGIN PAGE... 4 LOGGING INTO THE PORTAL... 5 IF YOU HAVE AN ACCOUNT... 5 YOU DO NOT
Welcome to our online Web Help for the Activity Fund Accounting System software.
 Welcome to our online Web Help for the Activity Fund Accounting System software. Version 1.2 LOCAL GOVERNMENT CORPORATION ALL RIGHTS RESERVED 2010-2018 REV. 02/06/2018 Portions copyright 1988 - Acucorp,
Check for Expired Credit Cards 2 Setup Products / Subscription 2 Setup Shipping Templates 2
 Wine Direct 4.1 Wine Club Fulfillment Quick Steps Wine Club Preparation Page Check for Expired Credit Cards 2 Setup Products / Subscription 2 Setup Shipping Templates 2 Fulfillment Processing Verify Wine
XERA POS User Manual
 2 XERA POS User Manual Copyright 1997 2017 Aldelo, LP. All Rights Reserved. 3 XERA POS User Manual PUBLISHED BY Aldelo, LP 6800 Koll Center Parkway, Suite 310 Pleasanton, CA 94566 Copyright 1997-2017 by
Lodge Step by Step Tutorial for Implementing QuickBooks
 Lodge Step by Step Tutorial for Implementing QuickBooks It is recommended that before you make any changes to QuickBooks you do a backup so that you have the original copy in case something goes wrong
Welcome to Client Access Web!
 Welcome to Client Access Web! Introduction W elcome to the Express Collections Client Access Portal. This portal has been crafted so that you, our valued client, can have convenient and secure access to
Heritage Bank Correspondent Lockbox. Lockbox. User Guide
 Heritage Bank Correspondent Lockbox Lockbox User Guide Contents Accessing Lockbox... 1 Messages... 2 Moving messages... 4 Batch messages... 5 Message administration... 6 Creating a message... 6 Recalling
Xpress-pay Administration Guide
 Xpress-pay Administration Guide The Xpress-pay Team endeavors to educate and inform our clients how to use all available tools to ensure that vital information is readily available and your experience
Regions Image Lockbox Online User Guide Options
 Regions Image Lockbox Online User Guide Options 2011 Regions Bank. Regions Lockbox Services subject to product terms and conditions. Rev. 041411. Image Lockbox Online Image Lockbox Online allows you to
CYMA IV. Accounting for Windows. CYMA IV Getting Started Guide. Training Guide Series
 CYMA IV Accounting for Windows Training Guide Series CYMA IV Getting Started Guide November 2010 CYMA Systems, Inc. 2330 West University Drive, Suite 4 Tempe, AZ 85281 (800) 292-2962 Fax: (480) 303-2969
Blue Bear/School Books Check Entry QR Guide
 Computer Check Entry Check Selection Screen review For Check Formatting instructions please see the Maintenance Quick Reference Guide. The Computer Checks Selection window displays all the checks waiting
BBVA Compass Spend Net Payables
 User Guide BBVA Compass Spend Net Payables User Guide Vault Services Table of Contents Introduction 2 Technical Requirements 2 Getting started 3 Sign In 3 General Navigation 4 Upload/Create Payment 5
10 Steps to Getting Started with Restaurant Pro Express
 One Blue Hill Plaza, 16th Floor, PO Box 1546 Pearl River, NY 10965 1-800-PC-AMERICA, 1-800-722-6374 (Voice) 845-920-0800 (Fax) 845-920-0880 10 Steps to Getting Started with Restaurant Pro Express Your
Division of Alcoholic Beverages and Tobacco. Liquor Distiller s and Rectifier s Monthly Report
 Division of Alcoholic Beverages and Tobacco Liquor Distiller s and Rectifier s Monthly Report Logging Into EDS Log in with the user id and password provided through the EDS registration process and click
Enhancements Guide. Applied Business Services, Inc. 900 Wind River Lane Suite 102 Gaithersburg, MD General Phone: (800)
") Enhancements Guide Applied Business Services, Inc. 900 Wind River Lane Suite 102 Gaithersburg, MD 20878 General Phone: (800) 451-7447 Support Telephone: (800) 451-7447 Ext. 2 Support Email: support@clientaccess.com
Enhancements Guide Applied Business Services, Inc. 900 Wind River Lane Suite 102 Gaithersburg, MD 20878 General Phone: (800) 451-7447 Support Telephone: (800) 451-7447 Ext. 2 Support Email: support@clientaccess.com
Job Aid: My Remittance Reporting. Contents. Access
 Job Aid: My Remittance Reporting The purpose of this document is to provide step-by-step instructions to select files and remit and pay in the My Remittance Reporting section of AgentNet. Contents Access...
Secure Transfer Site (STS) User Manual
 User Manual") Secure Transfer Site (STS) User Manual (Revised 3/1/12) Table of Contents Basic System Display Information... 3 Command Buttons with Text... 3 Data Entry Boxes Required / Enabled... 3 Connecting to the
Secure Transfer Site (STS) User Manual (Revised 3/1/12) Table of Contents Basic System Display Information... 3 Command Buttons with Text... 3 Data Entry Boxes Required / Enabled... 3 Connecting to the
MERCERSPECTRUM EMPLOYER USER GUIDE
 MERCERSPECTRUM EMPLOYER USER GUIDE WHAT DO YOU WANT TO DO TODAY? Getting started... 2 Day-to-day processing... 3 Linking the Choice fund to your Employer Fund List...4 Choice Fund exists but is not linked
1 Before Processing A Year End in Sage Pastel Partner 2 Processing a Year End in Sage Pastel Partner 3 After Processing a Year End in Sage Pastel
 1 Before Processing A Year End in Sage Pastel Partner 2 Processing a Year End in Sage Pastel Partner 3 After Processing a Year End in Sage Pastel Partner 4 Year End Common Errors Troubleshooting Before
HCSS Accounting Release Notes v1.2
 HCSS Accounting Release Notes v1.2 Page 1 HCSS Accounting Release Notes v1.2 1. Auto Generation of Reference Numbers This function automatically generates reference numbers for transactions. A bespoke
Introduction. Automatic gate opening no more swiping
 Introduction This user guide is intended for companies and drivers to use the functionality available in the TAMS System Manage your entire Auckland Airport access account via the internet! One simple
This Page Left Blank Intentionally
 Chapter 2 Receipts This Page Left Blank Intentionally CTAS User Manual 2-1 Receipts: Introduction Issuing the receipt is the first step in the collection of payments. This should be done immediately upon
Prepared by. December 2017
 Prepared by December 2017 About ilink ilink is the SMART Transportation Division s principal web application. It is a custom-built program that supports the membership, as well as many business processes
1 Before Processing A Year End in Sage Pastel Xpress 2 Processing a Year End in Sage Pastel Xpress 3 After Processing a Year End in Sage Pastel
 1 Before Processing A Year End in Sage Pastel Xpress 2 Processing a Year End in Sage Pastel Xpress 3 After Processing a Year End in Sage Pastel Xpress 4 Year End Common Errors Troubleshooting Before you
DieselPro User Manual
 DieselPro User Manual Getting started Download and install DieselPro 10-day Evaluation package from one of these sites: www.acctpro.net www.dieselpro.biz www.dataimagesoftware.net www.topspeedsoftware.com
Pathway Net User s Guide
 Pathway Net User s Guide TABLE OF CONTENTS 3. Logging onto Pathway Net 4. Changing Passwords 5. Transaction View 7. Viewing Transaction Detail 8. Reallocating Transactions 9. Splitting Transactions 11.
Invoice 13 Pro Outline
 Invoice 13 Pro Outline Invoice 13 Pro is a feature rich productivity tool for the small business or company from 1 to 30 users. It is notjust an Invoicing software. It is in fact an Invoicing, Accounts
CARDSPOT USER GUIDE
 2017 2017 EML Payments Europe Limited. All rights reserved 8330 Ward Parkway, 4th Floor / Kansas City, MO 64114 / 800.755.5001 / www.emlpayments.com WELCOME TO CARDSPOT A Card Activation System Built to
Sage Mobile Payments User's Guide
 Sage Mobile Payments User's Guide Last Modified: 8/4/2014 Contents 1 Activating Sage Mobile Payments 2 Using the System 2 Login 2 Multi user Login 2 First-time Login 3 Default Settings 3 Retrieving Your
User Documentation for School Activity Funds Accounting
 User Documentation for School Activity Funds Accounting By: Applied Business Services, Inc. 800 S. Frederick Avenue, Suite 101 Gaithersburg, MD 20877 1-800-451-7447 ext. 130 www.appliedbusinessservices.com
Use this procedure to submit an invoice for services provided to OPG.
 Purpose Use this procedure to submit an invoice for services provided to OPG. Helpful Hints Ariba support is available at all times to help assist when any difficulties are encountered or to answer any