Indoor Wireless/Wired IP Network Camera Model XX34A. User Manual
|
|
|
- Corey Stanley
- 6 years ago
- Views:
Transcription


1 Indoor Wireless/Wired IP Network Camera Model XX34A User Manual
2 CONTENTS 1. INTRODUCTION FEATURES PACKING LIST PRODUCT VIEWS PC SYSTEM REQUIREMENTS HARDWARE INSTALLATION SOFTWARE INSTALLATION SOFTWARE OPERATION IP CAMERA TOOL CAMERA LOGIN FOR IE BROWSER FOR SAFARI, FIREFOX, GOOGLE BROWSER FOR MOBILE PHONE ACTIVEX MODE (FOR IE BROWSER) FOR VISITOR FOR OPERATOR FOR ADMINISTRATOR SETTINGS AS ADMINISTRATOR MULTI-DEVICE SETTINGS NETWORK SETTINGS BASIC NETWORK SETTINGS WIRELESS LAN SETTINGS ADSL SETTINGS UPNP SETTINGS DDNS SERVICE SETTINGS SYSTEM SETTINGS ALIAS SETTINGS DATE &TIME SETTINGS USERS SETTINGS PAN, TILT, (PTZ) SETTINGS (NOTE, THERE IS NO ZOOM FEATURE ON THIS MODEL) INDICATOR SETTINGS BACKUP & RESTORE OTHER SETTINGS MAIL SERVICE SETTINGS FTP SERVICE SETTINGS ALARM SERVICE SETTINGS SEND ON ALARM PATH SETTINGS SERVER PUSH MODE (FOR SAFARI, FIREFOX, AND GOOGLE BROWSER) SIGN IN MOBILE PHONE APPENDIX FREQUENTLY ASKED QUESTIONS DEFAULT PARAMETERS SPECIFICATIONS OBTAINING TECHNICAL SUPPORT
3 1. INTRODUCTION This is an integrated wireless IP Camera solution. It combines a high quality digital Video Camera with network connectivity and a powerful web server to bring clear pictures to your Desktop from anywhere on your local network or over the Internet. The main function of the camera is to transmit remote video over IP network. The high quality video image can be transmitted with 30fps speed on the LAN/WAN by using MJPEG hardware compression technology. It is based on the TCP/IP standard, build-in WEB server which supports Internet Explorer. Therefore the management and maintenance of your camera becomes simple by using the network to achieve the remote configuration, start-up and to upgrade firmware. You can use your IP Camera to monitor your home or your office. Also, controlling and managing images are simple by visiting the web site. 1.1 Features Powerful high-speed video protocol processor High-sensitivity 1/4 CMOS sensor Picture total 300K pixels Supports Pan and Tilt (PT) control, Pan 270, Tilt 120 Optimized MJPEG video compression for transmission Multi-level user management and passwords definition Embedded Web Server for users to visit by IE Supports wireless network (WI-FI/802.11/b/g) Supports Dynamic IP (DDNS) and UPNP LAN and Internet (ADSL, Cable Modem) Gives an alarm in case of motion detection Supports image snapshot Supports multiple protocols:http TCP/IP UDP SMTP DDNS SNTP DHCP FTP Supports WEP/WPA/WPA2 encryption Supports 3G phone, Smart phone control and surveillance Supports IE, Firefox, Safari, and Google chrome browsers 1.2 Packing List Please check that the following items are included: IP Camera Wi-Fi Antenna User Manual & Quick Setup Guide DC Power Supply CD Network Cable Mounting bracket 3
 4 Network Indicator LED: If there is network activity, the LED will blink 5 Microphone: Build-in microphone 6 Speaker: Build-in speaker 7 Wireless Antenna: WI-FI Antenna 4")
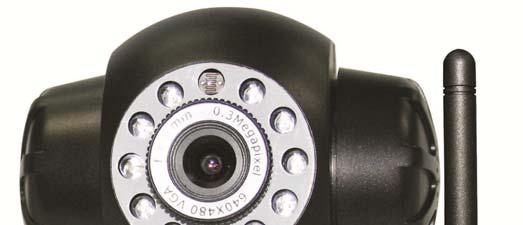
4 1.3 Product Views Front View Figure Light Sensitive Hole: For light sensitive photocell 2 Infrared LED: 10 LEDs 3 LENS: CMOS sensor with fixed focus lens. (Default is 6mm, 3.6mm optional) 4 Network Indicator LED: If there is network activity, the LED will blink 5 Microphone: Build-in microphone 6 Speaker: Build-in speaker 7 Wireless Antenna: WI-FI Antenna 4

.")
5 1.3.2 Rear Panel Figure 1.2 LAN: RJ-45/ base T Power: DC 5V/2A power supply Network Light: The green LED is on when connected to the network, the yellow LED blinks when data is transferred. Audio Output: The jack is used to connect an external speaker I/O PINS: 1: Output A 2: Output B 3: Alarm input 4: Input (GND) Bottom View Figure 1.3 Please note the unique MAC and DDNS addresses on the bottom of the camera (different for every camera). RESET BUTTON: Press and hold the RESET BUTTON for 30 Seconds to reset the camera back to the factory default settings. (Please keep the power on when doing a RESET) 5

. 5.")
6 1.4 PC System Requirements System configuration requirements: CPU: 2.06 GHZ or above. Memory: 256M or above. Network Card: 10M or above. Display Card: 64M or above memory. Recommended Operating system: Windows XP, Windows Vista, Windows Hardware Installation Follow the steps below to set up your camera hardware. 1. Install the Wi-Fi antenna. 2. Plug the power adaptor into the camera and into an AC outlet. 3. Plug the network cable into the camera and router/switch. 4. It takes approx 30 seconds to boot up the camera, then you will find the IP address from IP Camera Tool (Figure 2.1). 5. When the power is on and the network cable is connected, the green LED on the rear panel will stay on. The yellow LED will keep flashing, and the Indicator LED on the front of the camera will flash. (The indicator LED can be controlled by software). Figure Software Installation Attention: In order to make the installation correctly, we suggest that you turn off your Firewall and Antivirus software before installing ActiveX. Correct software installation is essential to the successful use of this product. Install the following software: 1. IP Camera Tool: Open the CD, double click IPCamSetup.exe then click next to complete the software installation. (Figure 1.6, 1.7, 1.8). 6


7 2. ActiveX: Double click Appinstall.exe Next Install Finish. Figure 1.5 Figure 1.6 Figure 1.7 7

8 Figure 1.8 After this is done, the icon IP Camera Tool will be displayed on your desktop. CAUTION: Before installing and using the product, please read the following precautions carefully and make sure they are fully understood. Use only the power adaptor included with the product. Use of an unauthorized power adapter may cause damage to your IP Camera. The IP Camera should be installed indoors only. Do not touch the lens of the IP Camera. The optimum focus range has been set for you. If you turn the lens, it may cause incorrect focus and blurry images. Do not turn the Pan/Tilt by force, it may cause damage to internal components of the Pan/Tilt mechanism. For firmware upgrading or connection with an external device, refer to detailed instructions contained in the CD. 8
9 2. SOFTWARE OPERATION 2.1 IP Camera Tool When the Device has been mounted properly, you can double-click the Icon IP Camera Tool and a dialog box shown in Figure 1.9 will pop up. Figure 1.9 Note: The software searches IP Servers automatically over your LAN. There are 3 cases: 1. No IP Cameras found within LAN. After about 1 minute search, the Result Field will show not found IP Server and the program shut down automatically. 2. IP Cameras have been installed within LAN. All the IP Cameras will be listed and the total number is displayed in the result field as shown in Figure The IP Cameras installed within LAN do not share the same subnet with the monitoring PC. A prompt will be shown in result field (prompt: Subnet doesn t match, double click to change!). Click the left mouse button to choose the prompt and click the right mouse button, choose Network Configuration to set the static IP address of the Camera to the same subnet as your LAN. (Figure 2.3). NOTE: If it shows Subnet doesn t match, double click to change! you can also choose Obtain IP from DHCP Server to get a dynamic IP. (Figure 2.2) Six Options Choose the IP Camera list and Click the right mouse button, there are six options: (Figure 2.0). Basic Properties, Network Configuration, Upgrade Firmware, Refresh Camera List, Flush Arp Buffer, About IP Camera Tool. 9


10 Figure Basic Properties There is some device information in the Basic Properties, such as Device ID, System Firmware Version, and Web UI Version.(Figure 2.1). The Device ID is the camera s MAC ID, which should be the same as shown on the sticker on the bottom of the camera. Every camera has a unique MAC ID. So if there are many IP addresses shown in the list, check the MAC ID on the bottom of the camera, so you can ensure which camera it is. Sometimes, if there is no IP address shown on the IP Camera tool, it could be blocked by a firewall, in this case you need to add the MAC ID to the router, and give it a fixed IP or add the MAC ID as a trusted site. There are two MAC Addresses, one is the Device MAC ID, the other is the WIFI MAC ID. WIFI MAC ID, you can find it on the sticker on the bottom of the camera, you can also login to your WIFI router, check the host status, which will show all the WIFI devices connected to your router, you can also find the IPCAM s WIFI MAC ID there. Figure Network Configuration Below shows how you can configure the Network parameters. 10
. (Figure 2.2). Figure 2.")

11 Figure 2.2 Obtain IP from DHCP server: If clicked, the device will obtain IP from DHCP server. In other words, the camera will have a dynamic IP. (Make sure the Router which the camera connects to has DHCP function and DHCP is enabled). (Figure 2.2). Figure 2.3 IP address: Fill in the IP address assigned and make sure it is in the same subnet as the Gateway, and the subnet should be the same as your computer or router. (I.e. the first three sections are the same). Subnet Mask: The default subnet mask of the equipment is: You can find the subnet mask from your PC or router. Gateway: Make sure it is in the same subnet with PC s IP address.here gateway is the LAN IP of your router. DNS Server: IP address of ISP network provider. You can also set it to the same as the Gateway. NOTE: You can find the Subnet Mask, Gateway, DNS Server from your router, or check the local connection status of your computer, to get all the parameters. Normally two DNS servers are optional. Http Port: LAN port assigned for the equipment, default is 80. You could set another port number like 81, 801, 8001 etc. User: Default administrator username is: admin (please make sure all are lowercase letters). Password: Default password is bank, i.e. no password. NOTE: If the prompt subnet doesn t match, double chick to change! appears, please set the IP Address, Subnet Mask, Gateway, DNS Server once again, or enable Obtain IP from DHCP server. 11
. Figure 2.4 Please download the firmware package for the correct type of your camera before you upgrade. Follow the upgrade document carefully to upgrade.")
12 Upgrade Firmware Enter the correct User and Password to upgrade system Firmware and Web UI. Please upgrade system firmware first and then upgrade Web UI or it may damage the camera.(figure 2.4). Figure 2.4 Please download the firmware package for the correct type of your camera before you upgrade. Follow the upgrade document carefully to upgrade. Please see readme file first before you upgrade. CAUTION: You should not upgrade the firmware unnecessarily. It is possible to damage the camera if a mistake is made during the upgrade. If your camera works well with the current firmware, we recommend that you don t upgrade it. NOTE: When doing an upgrade, remember you must keep the power on, and it s best to use wired mode, connected via the network cable Refresh Camera List Refresh camera list manually Flush Arp Buffer When cable network and wireless network of the device are fixed IP address, you may encounter a problem where you can search the camera IP but can t open the camera web page. In this case use Flush Arp Buffer About IP Camera Tool Check the IP Camera Tool Version and IP Camera ActiveX Control Version here. 2.2 Camera Login You can access the camera through IP Camera Tool or IE, Firefox, Safari, Google Chrome or other standard browser directly. 1. Double click the IP address of the IP Camera listed (Figure 1.9). The default browser you use will run automatically and go to the camera login interface. (Figure 2.6). 12


 Active Mode (For IE Browser): available in IE 6.0 or above.")
13 2. To access the camera by IE Browser directly, just type the camera s IP address, for example, if the camera s IP address is : Figure 2.5 Figure 2.6 The default user name is admin, no password (leave blank). Input the correct user name and password, the Sign In interface will pop-up. There are three models to login (figure 2.7). Figure 2.7 (1) Active Mode (For IE Browser): available in IE 6.0 or above. (2) Server Push Mode : available in Firefox, Safari, and Google Chrome browser. (3) Sign in mobile phone : available in Mobile phone. 13


14 2.3 For IE Browser Choose ActiveX Mode (For IE Browser), and sign in. Figure 2.8 Figure 2.9 The first time you login to the camera, you might get an ActiveX prompt as in the picture above, please click the prompt and choose Run Add-on, refresh and login to the camera again, then will see live video, as below. Figure


15 Note: If there is still no live video after you run ActiveX, and a red cross shows in the center of the screen, or even just a black screen, please try to enable the ActiveX options of IE security settings. Please do the following steps: 1. Close the firewall of your computer. 2. Change the ActiveX settings, IE browser > Tool > Internet Options > Security > Custom Level > ActiveX control and Plug-ins, all the ActiveX options set to be Enable : Especially: Enable: Download unsigned ActiveX controls Enable: Initialize and script ActiveX controls not marked as safe Enable: Run ActiveX controls and plug-ins Figure 3.1 You can also click Start menu-> Internet Explorer, and choose Internet attributes, or via Control Panel -> Internet Explorer, to access Security settings. If you allowed the ActiveX to run, but still cannot see live video, only a Red Cross in the center of the video, and the device status light changed to yellow color not green, please change to another port number. Don t use port 80, use another port such as 128, 1008 etc. 15

16 Figure 3.2 NOTE: Make sure that your firewall or anti-virus software doesn t block the software or ActiveX. If you couldn t see live video, please close your firewall or anti-virus software, and try again. 2.4 For Safari, Firefox, Google Browser Choose Server Push Mode (For Safari, Firefox, Google Browser), and sign in. Server Push Mode doesn t support ActiveX, so some functions are not available, such as Play, Stop, Record, Audio, Talk etc. If you want to use these functions, please use IE browser. Figure
17 2.5 For Mobile Phone Choose Sign in mobile phone, and sign in. Mobile phone doesn t support ActiveX, so only some basic functions are available in this mode. It supports iphone, Smart phone, 3G phone, etc. Normally, if the mobile phone supports network video, then it should work with your IP Camera. 2.6 ActiveX Mode (For IE Browser) Figure 3.4 Login to the camera in ActiveX mode, the main User Interface is as below: NOTE: There are 3 levels of users, Visitor, Operator, Administrator, if you login with different users, the use authority is different. (See 3.11 User Settings, Figure 8.5). 2.7 For Visitor When you login as Visitor, you can enter the IP Camera for visitor. Visitor is the lowest level with only some operation available. 17
18 Figure 3.5 Channels: The IE software supports 9 channels. Click to get different windows. Click this one to view the main channel of the camera you login to. Click this one to view 4 Channels of cameras that are connected, from CH1 to CH4. Click this one to view 9 Channels of cameras that are connected, from CH1 to CH9. NOTE: If you want to view 4/9 channels, you should set the Multi-Device first (See 3.1 Multi-Device Settings). Status of Channels: There are 9 icons at the bottom of the UI which show the status of each channel of the camera. Grey color, means there is no device connected to the main device for this channel. Green color, means the device is connected for this channel, and it works well. Red color, means the device for this channel is recording. Yellow color, means this channel is set in multi-device already, but it fails to connect to the main device. 18

.")
19 OSD Settings: Figure 3.6 OSD: Means On-Screen Display, click Audio video > OSD, set display date and time on the video. Disabled: Clicking this one means clear the OSD. Color: Can set the OSD text color as black, yellow, red, white, blue etc. Add time stamp on record: if you click this, there will be time OSD on record video files. Figure 3.7 Rate and Resolution: Rate: Set video frame here, from full-speed to 1fp/5s. (Figure 3.8). Resolution: Set the resolution to be 160*120/ VGA (640*480)/ QVGA (320*240). (Figure 3.9). NOTE: When doing recording, Rate and Resolution parameter settings is very helpful for getting smaller sized record files, lower the parameter to get a smaller file. 19


20 Figure 3.8 Figure 3.9 TOP Menu: Figure 4.0 Click to get live video. When you want to get back to live video from other menus, just click it. Only under live video, you can do the operation on the right side, such as play, stop, snapshot etc. Click to get into play mode, when you click the stop icon, the video will be stopped, then if you click the play icon, it will show the video again. Click to stop the live video. You can click the play icon if you want to see live video again. Click to get snapshot. It will show the date and time of the snapshot you get, if you save it, you will find the snapshot file named by snapshot_mac ID_date_time. Click to start recording manually, and the icon will change to red color click it again, it will stop recording. The record file will be saved to the folder you set. (Figure Figure 11.0). Click to collect the sound from the camera, you will hear the sound from the camera through the speaker in the computer which you are using. Your IP Camera has a built-in microphone, when you click it to start working, the icon will change to red color click it again, will stop the audio function. Click to start the talk function, (you ll need to plug a microphone into your computer if it doesn t have one built-in). When you talk into the microphone in your computer, the sound will come out from the built-in speaker in the camera, people beside the camera will hear the sound. If you connect an external speaker to the audio output jack on the back of the camera (Figure 1.2), you will get better sound. Click it once to start, the icon will change to red color click it again to stop the talk function. NOTE: For visitor, if you click other menus which visitors don t have the right to operate, there will be a pop-up for the login interface (Figure 2.6), please input the user name / password for at least 3 times to login again. 20

21 2.8 For Operator When you login as Operator, you can enter the IP Camera for Operator. For operator, it not only supports all the functions for Visitor, but also supports these functions below: Figure 4.1 Audio Video Settings Figure 4.2 Audio buffer: Click this icon, it will show five numbers, which means 1/2/3/4/5 seconds buffer of audio. Reversal: Click this icon to reverse (flip) the image. Click again to go back to normal. Mirror: Click this icon to see a mirror image. Click again to go back to normal. NOTE: You can choose Reversal and Mirror function when you set up the camera in a special position (upside down for example). 21


22 Mode, Bright, Contrast Settings Figure 4.3 Mode: This mode is optional, 50HZ/60HZ for the users who use 50HZ/60HZ frequency, outdoor for users who want to use the camera to monitor towards an outdoor environment. NOTE: The camera should be used in an indoor environment (unless protected from the elements). Bright: Set the parameters to adjust the image quality of the video. Click to adjust the value. Contrast: Set the parameters to adjust the image quality of the video. Click to adjust the value. Default all: Click it to set all the parameters back to the factory setting. NOTE: If you login to the camera, and there is no video displayed, or the parameter of bright/contrast is blank, you can try to click default all to set the parameters back to the factory setting to get live video. Pan/Tilt Control Figure 4.4 Click this icon, the camera will pan/tilt, and then stop at the center. Normally it will rotate 1 circle. Click this icon, camera will move up, you can click one by one or hold it to control the movement. Click this icon, camera will move down, you can click one by one or hold it to control the movement. NOTE: It is the same operation as left, right, up-left, up-right, down-left, down-right etc. Click this icon, camera will rotate up and down, i.e., vertical tilt, click Click this icon, camera will rotate left and right, i.e., horizontal pan, click to stop it. to stop it. Click this icon, IO output Switch ON. Click to set it OFF. RECOMMENDATION: Image PT function: Image Pan/Tilt (PT) function is recommended, you can control the camera direction on the live video. Double click the right mouse on the live video to enable this function, and you will see a white & transparent arrow on the live video, click left mouse to control direction, eight directions are available. This is very convenient for Pan/Tilt operation. Double click right mouse again to exit. 22
, choose the number (1-15) you want to set it to.")
23 Preset Settings Figure 4.5 Set Preset Position. It supports 15 preset positions. To control the camera s rotation to a preset position, click Set Preset Position button it will pop-up a dialog frame (Figure 4.5), choose the number (1-15) you want to set it to. NOTE: if you set different positions with the same number, the camera will record the last position setting only. Call Preset Position. It supports 15 preset positions. If you want to monitor an important area quickly and precisely, just click Call Preset Position button it will pop-up a dialog frame (Figure 4.5), choose the number, then the camera will rotate to the preset area automatically. If you want to use Call Preset Position, you have to Set Preset Position first. NOTE: For Operator, if you click other menus which operator doesn t have the right to operate, there will be a pop-up of login interface (Figure 2.6), please input the user name / password for at least 3 times to login again. 2.9 For Administrator For details see Settings as Administrator ( ).. 23


24 3. SETTINGS AS ADMINISTRATOR Administrator supports all the settings and operations of the camera. There are some special functions only for administrator as below: Figure Multi-Device Settings Multi-Device Settings This camera can support max. 9 device channels at the same time Set Multi-Device in LAN In the Multi-Device Settings page, you can see all devices searched in LAN. The 1st device is the default one. You can add more cameras listed in LAN for monitoring. This web software supports up to 9 IP Cameras online simultaneously. Click The 2nd Device and click the item in the Device List in Lan, it will fill the Alias, Host, Http Port automatically, then input the correct user name and password, click Add. Set more devices in the same way, after you re done, click Submit. 24

25 Figure 4.7 Click Live Video and then select to see four channels, or click to see nine channels. Figure


26 Figure Set Multi-Device for WAN If you want to view cameras from the internet, you have to add these devices by DDNS domain name. Make sure all these cameras you want to add have DDNS set successfully. (See 3.7 DDNS Service Settings) Login to the first camera by DDNS domain name and port, this camera will be as the host camera. Figure 5.0 Click Multi-Device, select Multi-Device Settings. Choose the 2nd Device; fill in the 2nd camera s Alias, Host, Http Port, User, Password, click Add. Set more devices in the same way, after all done, click Submit. NOTE: The Alias is optional; you can set the alias as you wish. The Host must be the camera s DDNS domain 26


27 name, and without it s not the LAN IP address. If you have several cameras, you can use the same DDNS domain name, just set different port number for each different camera. Figure 5.1 Note: Add the other camera in the same way, Click submit to add all of them. Figure
 DDNS to view all the devices via")

28 Click Live Video and then select to see four channels, or to see nine channels. In this case, you can see all the cameras from a remote position by internet, for example, if you are on a business trip, you can use the first camera s (Host camera) DDNS to view all the devices via the internet Upgrade Device Firmware Figure 5.3 If you want to upgrade the camera, please upgrade Device Firmware first, then upgrade Web UI. Click Browse and choose correct bin file, then click Submit to do upgrading. NOTE: Before doing an upgrade via Browser, please make sure the IP Camera Tool of your computer could find the camera s IP. Attention: Please keep the power on during upgrading, and it s better to use wired mode via network cable. Please don t upgrade unnecessarily, wrong operation or incorrect upgrade bin file can damage the camera. Figure


29 3.1.4 Restore Factory Settings Click Restore Factory Settings, will pop-up a prompt, select OK, all the parameter will be returned to factory settings, and the device will reboot Reboot Device Figure 5.5 Click Reboot the device, will pop-up a prompt, select OK, then the device will reboot Figure Network Settings Click Network, will pop-up the prompt as below: 3.3 Basic Network Settings Here you can set the camera s IP address; i.e., set the static IP address of the camera manually. You can also do the same settings from IP Camera Tool. (Figure 2.3). 29


30 Figure 5.7 If you don t know the Subnet Mask, Gateway, DNS Server. Please check the Local Area Connection Status of your computer; it contains all this information, steps as below: 1. Control Panel Network Connections Local Area Connections Support Details 2. Find the local connection icon from taskbar, left click it, choose Support Details Figure 5.8 Figure


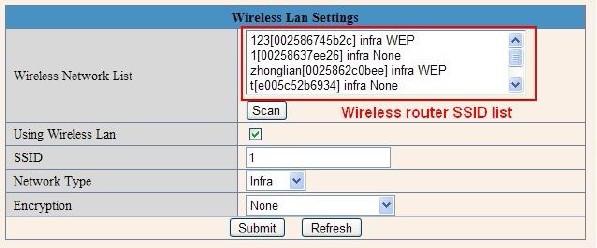
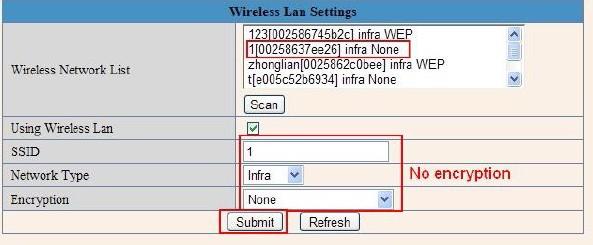
31 If you don t know the DNS Server, you can set it the same as Gateway. If the router supports DHCP function, you can choose Obtain IP from DHCP Server to get dynamic IP. Figure 6.0 Http Port: In most cases, you can leave this value as-is. However, if your Internet Service Provider blocks this port, you may change it to another port number such as Wireless LAN Settings Figure 6.1 You should set up your camera using a wired connection before you attempt to use it wirelessly. (See Hardware Installation). 1. Make sure your router is a wireless router. 2. Make sure the Wi-Fi antenna is installed on the camera. 3. Determine if your router uses encryption, (see your router s owner s manual for how to do this), if it uses encryption, note the share key. 4. Login to the camera using the IP Camera Tool, like you did when setting up with a network cable. 5. When you see the screen in Figure 6.2, click Network then Wireless Lan Settings then click on Scan, wait and then click it again, when you see your camera in the Wireless LAN settings box, click on it. 6. If there is no encryption, just click Submit, if there is encryption, input the share key, then click Submit. 7. Unplug the network cable and wait about 30 seconds while the camera reboots. 31

32 Figure 6.2 Figure 6.3 Figure


33 Figure ADSL Settings When connected to the Internet through ADSL directly, you can enter the ADSL username And password obtained from ISP. Figure 6.6 Figure UPnP Settings Click UPnP Settings to choose Using UPnP to Map Port: Figure 6.8 Select it and click Submit, then the camera will support UPnP port forwarding automatically. It s helpful for using DDNS. If your router supports UPnP, then you won t need do port forwarding in the router. 33


34 Figure 6.9 NOTE: Here UPnP is only for port forwarding. It relates to the security settings of your router, make sure the UPnP function of your router is ON. Attention: If your router doesn t support UPnP function, it may show error information. So we recommend you do port forwarding manually in your router. (For details see Figures ). 3.7 DDNS Service Settings There are 2 options: Figure 7.0 Manufacturer s DDNS: This domain is provided by the manufacturer. Third Party DDNS: This domain is provided by the third party, such as Dyndns, Oray, 3322 etc. Figure


35 Third Party DDNS If you use third party DDNS, please choose the server you use, such as 3322.org or dyndns.org as below: Figure 7.2 Figure 7.3 You have to register an account first, enter the user, password, and host. NOTE: Only one DDNS can be chosen, for example, if you use the manufacturer s DDNS, the third party one won t work, if you use the third party DDNS, the manufacturer s one won t work. To change the camera s port. The default port of camera is 80, please change 80 to any other one you like, such as 81, 100, 8091 etc. (It s best to use high numbers, like 8091 for example). Click OK, the camera will reboot, wait about 30 seconds. 35

36 Figure 7.4 Make sure the Subnet Mask, Gateway, DNS Server is the same as your router. Set Port Forwarding in the router. This is the most important step. You need to set port forwarding in your router, to refer to the IP of your camera correctly, for DDNS to work. There are so many kinds of routers, so it s difficult to show fixed steps, but here are some samples of different router s port forwarding settings, just for reference: TP-LINK: 1. Login to the router. 2. Choose Forwarding, select Virtual Servers 3. Click the Add New button, pop-up below: Figure 7.5 Fill in the service port (don t use 80), IP address of the camera, then click Save NOTE: The port and IP address should be the same as the camera. 36
 and IP address, then click save.")

37 BELKIN: 1. Login to the router. 2. Choose Firewall, select Virtual Servers 3. Input the port (don t use 80) and IP address, then click save. NOTE: The port and IP address should be the same as the camera. Figure 7.6 DLINK: 1. Login to the router. 2. Choose Advanced, select Virtual Servers 3. Input the port, IP address, Protocol, then click save. NOTE: The public port & private port should be the same as camera s port, choose the protocol to be both. Figure


38 After all these 4 steps are done, you can use DDNS, check the DDNS status from the camera as below, and get the link of DDNS for internet viewing. Step: Login > System > Device Info Figure 7.8 Figure System Settings Figure


39 3.8.1 Device Info You can find the information about Device ID, Firmware Version, Embedded Web UI Version, Alias, Alarm Status, DDNS Status, UPnP Status and MSN status. Figure Alias Settings Default device name is anonymous. You set any new name for your camera here, then click Submit. Figure Date &Time Settings Set the date and time for your camera. Choose the Clock Time zone of your country. You can choose Sync with NTP Server (Figure 8.3) or Sync with PC Time (Figure 8.4). Figure

.")
40 Figure Users Settings Eight accounts are acceptable for this system. Here you can set the user names and password as Administrator, Operator or Visitor, with permission for them as below: Visitor: In this mode, you can only view. (Details 2.7). Operator: You can control the direction of IP Camera and set some parameters. (Details 2.8). Administrator: You can setup the advanced configurations of the IP Camera. (Details ). Figure


41 3.12 Pan, Tilt, (PTZ) Settings (note, there is no Zoom feature on this model) Figure Go center on boot: The camera rotates to the center automatically when it starts. 2. PT speed: Set Pan/Tilt speed. 3. Upward patrol speed: Set the speed of cruising upward. 4. Downward patrol speed: Set the speed of cruising downward. 5. Leftward patrol speed: Set the speed of cruising leftward. 6. Rightward patrol speed: Set the speed of cruising rightward. NOTE: Value 0 means the fastest, value 10 means the slowest. In order to protect the camera s motor, we recommend that setting the speed to value Indicator Settings Figure 8.7 Set the pilot lamp mode, to one of the following three options: (1) Non-connected network out: Blinks while connected to the internet and turn off when disconnected. (2) Non-connected network with more slow-frequency flicker: Blinks while connect to the internet and more slower when disconnected. (3) Extinguished: Stays OFF Backup & Restore Figure


42 1)Backup: Backup all the IP Camera Parameters, if you want to save all the current settings that you have set already, you can click Submit, then all the parameters you set will be stored as a parameters bin file. 2)Restore: Restore all the IP Camera Parameters, if you want to change the camera s settings to a certain status which has a backup, click Browse to load the bin file, then Submit it. Log Figure 8.9 Record User information, including weekday, date, time, user name, visitor IP address etc. MSN Settings NOTE: Set the port forwarding successfully before setting MSN (Refer to port forwarding in DDNS settings). Then go to the MSN settings page, fill in the correct user name and password, add the MSN buddy, max. up to 10 friends, after submitting, the user(s) will be shown in your MSN friend list. Click System Device Info to check the MSN status. 42


43 After you run your MSN, open the chat dialog, type in the word url?, after a few seconds, you will get a reply for the remote access IP address for this IP camera Other Settings Figure 9.0 Here you can configure some additional functions such as Motion Detection, Alarm, IO Linkage, Schedule, FTP Upload, Alarm Mail Alert, Record Path, etc Mail Service Settings Set Mail Service Settings to enable the camera to send alerts when motion is detected. Figure

44 Sender: Make sure the sender mailbox server provider supports SMTP, and the mailbox should not enable SSL or TSL encryption. Receiver: Here you can set four receivers. For receiver, there is no SMTP limitation. SMTP Server: The sender s SMTP Server. SMTP Port: The sender s SMTP Port, usually is 25, some SMTP servers have their own port, such as 587. Need Authentication: If there is SMTP user & password, please select authentication. SMTP User: Input correct SMTP User here. Some SMTP User is the sender s full address, such as test@qq.com, some are without suffix, only the username, such as test. SMTP Password: Input correct SMTP password here. NOTE: Click Submit first before choosing Test. You will see the test result after you click Test. Figure 9.2 If it shows the following errors when you click Test. Please check that the information you filled in is correct and try again. 1) Cannot connect to the server. 2) Network Error. Please try later. 3) Server Error. 4) Incorrect user or password. 5) The sender is denied by the server. Maybe the server needs to authenticate the user, please check and try again. 6) The receiver is denied by the server. Maybe because of the anti-spam privacy of the server. 7) The message is denied by the server. Maybe because of the anti-spam privacy of the server. 8) The server does not support the authentication mode used by the device. Report Internet IP by Mail: If selected, you will receive s that contain the camera s internet IP. When camera is powered on or Internet IP changed, it will send the internet IP by . (For example: IPCAM's URL is 44

45 3.17 FTP Service Settings Set the FTP Service, you can upload images to your FTP server when motion is detected. Figure 9.3 Figure 9.4 FTP Server: If your FTP server is set up in LAN. You can set as Figure 9.3. If you have an FTP server that can be accessed from the Internet, you can set as Figure 9.4. FTP Port: Usually the port is 21. FTP Upload Folder: Make sure that the folder you plan to store images in exists. The camera cannot create the folder itself. Also, the folder must be erasable. FTP Mode: It supports standard (POST) mode and passive (PASV) mode. Upload Image Now: It will upload images when you selected it. Here Upload Interval refers to the time between the current image and the next image. NOTE: Here upload image now means it can upload images freely, no alarm trigger needed. Click Submit after these settings. Then click Test. You will see the following picture. 45
 Incorrect user or password. Please check the username and password is correct. 5) Cannot access the folder. Please be sure the folder exists and your account is authorized. 6) Error in PASV mode.")
 _0_20101115152525_25.jpg Please check if your FTP server supports this format of file name. 3.")
46 Figure 9.5 If it prompts error information as follows. 1) Cannot connect to the server. Please check FTP Server is correct. 2) Network Error. Please try later. 3) Server Error. 4) Incorrect user or password. Please check the username and password is correct. 5) Cannot access the folder. Please be sure the folder exists and your account is authorized. 6) Error in PASV mode. Please be sure the server supports PASV mode. 7) Error in PORT mode. PASV mode should be selected if the device is behind a NAT. 8) Cannot upload file. Please be sure your account is authorized. Please check if parameters you filled in are correct. The format of image is like 000DC5D008FA (IPCAM) _0_ _25.jpg Please check if your FTP server supports this format of file name Alarm Service Settings Figure 9.6 Enter Alarm Service Settings page to configure Motion Detection function Motion Detect Armed If you enable Motion Detect Armed, it will record and make an alarm sound when there is motion detected. 46

. 8 3.18.")

47 Figure 9.7 After you enable motion detect armed, if there is motion detected, the Alarm Status will turn to Motion Detect Alarm. (Figure 9.8). Figure Motion Detect Sensitivity You can choose level 1-10; level 10 means the most sensitive, 1 means the least sensitive. Figure
. High: When the external alarm device is close, then the alarm is triggered.")
48 Alarm Input Armed / IO Linkage on Alarm If you want to connect external alarm devices, when it s an alarm input device, choose Alarm Input Armed to enable it, when it s an output device, choose IO Linkage on Alarm to enable it. Figure 10.0 There are two options for Trigger Level. (Figure 10.1). High: When the external alarm device is close, then the alarm is triggered. Low: When the external alarm device is switching off, then the alarm is triggered. Figure 10.1 There are two options for Output Level. (Figure 10.2). High: When chosen, the IO Pins work as a switch that is closed. Low: When chosen, the IO Pins work as a switch that is switching off. Figure
 Sensor to it for motion detection.")
49 IO Pins for IO Alarm Linkage Figure 10.3 I/O PINS: 1 Output 2 Output 3 Alarm input 4 Input (GND) Input pins: The input pins can be used for 1-way external sensor input. For example, you may connect a Passive Infrared (PIR) Sensor to it for motion detection. When the external sensor is triggered, the IP camera can be programmed to send an with a picture or to control the internal relay output. If you link an external alarm device to Pins 3 and 4, when Alarm Input Armed is selected (Figure 10.0), the external alarm is enabled. Output pins: The output pins can be enable IO linkage on alarm. You can also use & to control IO output Switch ON/OFF (See Figure 4.4). NOTE: All the pins work as switch only Send on Alarm When chosen, it will send a picture to your account once alarmed. (First you should set the Service Settings. Figure 9.1). NOTE: Usually 6 snapshots will be sent by one to your mailbox for each alarm triggered. Each alarm will last for 60 seconds. Upload Image on Alarm Enable Upload Image on Alarm to set upload images to FTP once alarmed. Upload Interval: Set the upload interval (Seconds). NOTE: The total alarm time is 60 seconds. Figure 10.4 Scheduler Here you can set the camera alarm during the time you set. Choose Scheduler and set the date & time range. (Figure 10.5) From Monday to Sunday, and every day divided into 24 hours, each hour divided into 4 quarters. Left click the frame of the time range, it will turn to blue color, which means the time you choose to be armed. Click it again, it will turn back to gray, which means delete the scheduler. NOTE: Make sure the date & time settings are correct first. (Figure 8.3). ATTENTION: If you don t choose Scheduler, the camera will alarm anytime when motion triggered. 49

50 Figure 10.5 Sound on Alarm When motion is detected, there will be a beep sound during the alarm, you can control this sound here. If Enabled, there will be sound once alarmed. If Canceled, there will be no sound once alarmed. Record on Alarm If you want the camera do recording for every alarm, choose Record on Alarm to enable it. If you do not want the camera do recording once alarm triggered, cancel it here. Figure 10.6 Once an alarm has occurred, there will be indication as below: 1. The corresponding status light turns Red and keeps blinking. Figure If you set Sound on Alarm, you can hear a beep sound from your computer you use when alarmed. (Figure 10.6). 3. If you set Record on Alarm, the camera will record automatically for approx one minute. You can find the record file in the folder which you set. (Figure 10.9). 4. If you set Send Mail on Alarm, you will receive alarm alert once motion is detected. (Figure 10.0). 5. You can also set Scheduler to enable the camera to send s during a special time range you want. (Figure 10.5). 6. If you set Upload Image on Alarm, it will upload images to the FTP Server you set already, once alarmed. (Figure 10.4). NOTE: Each alarm only lasts for approx one minute, all the above functions for motion detection triggered only. REC Automatically and Save to PC When you enable motion detect and open the camera monitoring page on the PC, if there is an alarm triggered, REC will start automatically for several seconds and save to the PC. New Feature: Start the motion detection compensation and Alarm notification by Http. 50

51 3.20 Path Settings Figure 10.8 Here you can set record path and alarm record path for the camera. Figure 10.9 Record Path: Here you can set the manually record path. Click then start manual recording, the record file will be saved to the specified path you set here. Alarm Record Path: Here you can set the alarm record path. When motion is detected, and record enabled, it will start alarm record automatically, the record file will be saved to the specified path you set here. Figure 11.0 NOTE: If you couldn t set the path here in Windows 7 or Vista, please do it as below: Windows 7 or Vista s security level is higher than Windows XP, for Path Settings 1. User could add the Device IP address to the IE s Trusted sites first. The step is: IE browser Tool Internet Proper Security Trusted sites Sites Add. 2. You can also run the IE as administrator, input the IP address of the camera manually. (Figure 11.1). Figure
52 3.21 Server Push Mode (For Safari, FireFox, and Google Browser) Choose Server Push Mode, login the camera, you will see the main user interface as below: Figure 11.2 NOTE: Server Push Mode does not support ActiveX. Play, Stop, Record, Audio, Talk, Multi-device settings, Path settings functions are controlled by ActiveX, so if you use Safari, Firefox, Google chrome browser, it is not possible to use these options. The other functions are the same as for IE Browser. 52

53 3.22 Sign in mobile phone If you are using a mobile phone, choose Sign in mobile phone, login to the camera, you will see the main user interface as below: Figure 11.3 NOTE: Mobile phone Mode doesn t support ActiveX. In mobile phone mode, it only supports some simple functions, such as Resolution, Mode, Bright, Contrast, Pan/Tilt control, Snapshot, Reversal, Mirror, IO Linkage functions. 53
54 4. APPENDIX 4.1 Frequently Asked Questions Note: For most problems you might encounter, please check Network connections first. Check the working status revealed by the indicators on the network server, hub, exchange and network card. If abnormal, check the network connections I have forgotten the administrator username and/or password. To reset the administrator username and password, press and hold down the RESET BUTTON for 30p seconds. Release the power button and the username and password will be reset back to the factory default administrator username and password. Default administrator username: admin Default administrator password: None, i.e., no password Subnet doesn t match, dbclick to change If IP Camera Tool shows error information Subnet doesn t match, dbclick to change! Please choose Obtain IP from DHCP server. (Figure 2.2). If it still shows this error after obtaining IP from DHCP server, please check local area connection of your computer, change subnet, gateway of the camera. Keep them in the same subnet as your computer. (Figure 2.3) IP Address configuration Check whether IP address of the IP camera server shares the same subnet as your computer: Click My Computer >Control Panel> Network & Dial-up Connections > LAN > Attributes >Internet Protocols (TCP/IP), and check IP Address and Subnet Mask. Make sure they are in the same subnet when configuring the camera s IP address manually Can t access IP camera via the Internet Some typical reasons: 1. ActiveX controller is not installed correctly (for more details see: Figure Figure 3.1). 2. The port that the camera is using is blocked by your Firewall or Anti-virus software. Please change to another port number and try again. (Figure 3.2). 3. Port forwarding is not successful (for more details see Figure Figure 7.9). Double check these settings and make sure they are correct IP Camera Tool could not find camera s IP Make sure the camera is connected to its power supply and the power supply is plugged in. Check if the network cable is not loose. Make sure DHCP is enabled in your router, don t enable MAC address filter. Make sure that firewall or anti-virus software does not block the camera. You can add the camera as a trusted site in your firewall or anti-virus software. 54
55 4.1.6 UPnP always fails UPnP only contains port forwarding in our recent software. Sometimes, it might fail to do port forwarding automatically because of firewall or anti-virus software. It also relates to your router s security settings. So we recommend you do port forwarding manually. You can view your camera via the Internet successfully after you do port forwarding manually in your router Couldn t find the shortcut on desktop after install IP camera tool If you use Windows 7 or Vista, and you could not find the shortcut on desktop after installing the IP camera tool, please check if the path of the tool port to is correct. For example, was it was pointing to C:\Windows\System32\IPCamera.exe. Please fix this by pointing the shortcut to the correct path C:\Windows\SysWOW64\IPCamera.exe. After this you should be able to use the shortcut without any problems I can t change the record path When you use Windows 7 or Vista, you may be not able to change the record path due to the security settings of your computer. 1. Please add the camera as a trusted site to solve this issue. The step is: IE browser Tool Internet Proper Security Trusted sites Sites Add. 2. You can also run the IE as administrator; input the IP address of the camera manually I can t find multi-device settings and record icon Record and multi-device function are controlled by ActiveX controller. So if you use Safari, Firefox, or Google chrome, it is not possible to use these functions Camera cannot connect wirelessly If your camera could not connect wirelessly after you set wireless settings and unplug the Network cable: Please check whether your settings are correct. (Details: Wireless LAN settings). If the camera can t connect wirelessly it is usually because of wrong settings. Double check the SSID, Encryption share key, Channel, should be the same as your wireless router. Share key should not contain special characters, only letters and numbers. Don t enable MAC address filter I can t see other cameras in multi-device configuration by remote access If you want to view all the cameras in your WAN. Make sure that each camera you add in multi-device settings can be logged-in using DDNS name and port number. Use DDNS domain name to fill in the host checkbox, not camera s LAN IP. Double check your settings. (Details: Set Multi-Device for WAN) I only see black screen or unusual code when remotely logged in If you could access the login page in a remote place, it indicates that your DDNS settings are correct. But if you could not see live video, but only some undefined characters, it may be internet speed problems, especially if the camera works OK via Wi-Fi. 55
56 There s no picture (Problems with ActiveX Controller) If using IE browser to connect the camera for the first time, and there is no image displayed, you might need to install ActiveX. You need to change some browser settings to enable ActiveX. (See: For IE Browser) Problems with network bandwidth The image frame rate is subject to the following factors: 1. Network bandwidth. 2. PC performance, network environment and display preference setting (brightness, theme, etc). 3. The number of visitors (too many visitors will slow down the image frame rate). 4. Choice of switch or hub (use a switch for multiple IP Camera Servers rather than a HUB) How to register an account from DDNS web You can enter and register an account Pop-up the prompt Fail to connect to the device? This prompt only appears in the case of using multiple cameras. When you set multiple cameras, and the device status light changes to yellow cameras are connected to power and working correctly. please make sure the 4.2 Default Parameters Default network Parameters IP address: dynamic Subnet mask: dynamic Gateway: dynamic DHCP: Disabled DDNS: factory DDNS and third party DDNS Username and password Default administrator username: admin Default administrator password: None, i.e., leave blank. 56
57 5. SPECIFICATIONS Model XX34A Image Sensor Sensor 1/4 Color CMOS Sensor Resolution 640 x 480 Pixels (300k Pixels) IR Lens f: 6mm, F 2.0 (3.6mm lens optional) Viewing Angle 60 Degree (3.6mm lens is 90Degree) Minimum Illumination F2.0 Video/Image Setting Video Compression MJPEG Video Frame Rate 15fps (VGA), 30fps (QVGA) Resolution 640 x 480 (VGA), 320 x 240 (QVGA) Flip Mirror Images Vertical / Horizontal Light Frequency 50Hz, 60Hz or Outdoor Video Parameters Brightness, Contrast Audio talk-back Built-in Mic Communication System Interface 10Base-T/100Base-TX Ethernet Port Supported Protocols TCP/IP,DHCP,SMTP,HTTP,DDNS,UPNP,PPPoE, FTP, DNS, UDP, GPRS Wireless LAN Supports wireless networks (Wi-Fi/802.11/b/g) WEP Encryption Disable / 64 bit / 128 bit WPA/WPA2 Encryption TKIP / AES Physical / Environment Power Supply 5VDC/2A External Power Adapter Power Consumption 5W (Max.) Operate Temperature 0 C ~ 55 C (14 ~131 ) Operate Humidity 20%-85% non-condensing Storage temperature -10 C ~ 60 C (14 ~140 ) Storage Humidity 0%-90% non-condensing PC System Requirement CPU 2.0 GHZ or above Memory Size 256 MB or above Display Card 64M or above memory Supported OS Microsoft Windows 98/ME/2000/XP/Vista/7 Browser IE6.0, IE7.0, IE8.0, Firefox, Safari, Google chrome etc Certification CE, FCC, RoHS Warranty 90 Day Limited Warranty 57
IP Wireless / Wired Camera REMOTE PAN/TILT ROTATE. User Manual
 IP Wireless / Wired Camera REMOTE PAN/TILT ROTATE User Manual NTENTS 1 WELCOME...3 1.1 FEATURES... 3 1.2 PACKING LIST... 3 1.3 PRODUCT VIEWS... 4 1.4 PC SYSTEM REQUIREMENTS... 6 1.5 HARDWARE INSTRUCTION...
IP Wireless / Wired Camera. User Manual
 IP Wireless / Wired Camera User Manual Black White CONTENTS 1 WELCOME...3 1.1 FEATURES... 3 1.2 PACKING LIST... 3 1.3 PRODUCT VIEWS... 4 1.4 PC SYSTEM REQUIREMENTS... 5 1.5 HARDWARE INSTRUCTION... 5 1.6
IP Wireless / Wired Camera WATERPROOF. User Manual
 IP Wireless / Wired Camera WATERPROOF User Manual Silver Purple Black White CONTENTS 1 WELCOME...3 1.1 FEATURES... 3 1.2 PACKING LIST... 3 1.3 PRODUCT VIEWS... 4 1.4 PC SYSTEM REQUIREMENTS... 5 1.5 HARDWARE
IP Wireless / Wired Camera REMOTE PAN/TILT ROTATE. User Manual
 IP Wireless / Wired Camera REMOTE PAN/TILT ROTATE User Manual CONTENTS 1 WELCOME...3 1.1 FEATURES... 3 1.2 PACKING LIST... 3 1.3 PRODUCT VIEWS... 4 1.4 PC SYSTEM REQUIREMENTS... 5 1.5 HARDWARE INSTRUCTION...
Pan & Tilt IP Camera IPV38 / IPV38WE. User Manual
 Pan & Tilt IP Camera User Manual Index 1.0 INTRODUCTION 1.1 Features 1.2 Packing List 1.3 Product Views, Connections and Buttons 1.4 PC System Requirements 1.5 Hardware Installation 1.6 Software Installation
Outdoor IP Camera with Night Vision IPV58
 Outdoor IP Camera with Night Vision IPV58 User Manual User guide 3 Bedienungsanleitung. Gebruiksaanwijzing. Användarmanual. Guide utilisateur. Guía del usuario. Manual do utilizador. Manuale per l utente.
NIGHT VISION & REMOTE PAN / TILT ROTATE/ TWO WAY AUDIO
 Model: IPCAM IP Wireless / Wired Camera NIGHT VISION & REMOTE PAN / TILT ROTATE/ TWO WAY AUDIO User Manual Color: Black Color: White CONTENTS 1 WELCOME...1 1.1 Features...1 1.2 Packing List...2 1.3 Product
HooToo IP Camera User Manual(part two)
") HooToo Inc. HooToo IP Camera User Manual(part two) For Model: HT-IP210P Published by SunvalleyTek Group 2014/9/14 Content 1. IPCamClient (windows software)...3 Set up...3 CAM... 13 Local Setting... 13
HooToo Inc. HooToo IP Camera User Manual(part two) For Model: HT-IP210P Published by SunvalleyTek Group 2014/9/14 Content 1. IPCamClient (windows software)...3 Set up...3 CAM... 13 Local Setting... 13
NIGHT VISION & REMOTE PAN / TILT ROTATE/ TWO WAY AUDIO
 User Manual Model: FI8916W Indoor Pan/Tilt Wireless IP Camera NIGHT VISION & REMOTE PAN / TILT ROTATE/ TWO WAY AUDIO Black White CONTENTS 1 WELCOME... 1 1.1 Features... 1 1.2 Packing List... 2 1.3 Product
Wireless Pan & Tilt Camera
 User Manual Wireless Pan & Tilt Camera CIPCAMPTIWL v1.0 Index 1 INTRODUCTION... 4 1.1 THE PACKAGE INCLUDES... 4 1.2 FUNCTION AND FEATURES... 4 1.3 TECHNICAL SPECIFICATIONS... 4 2 APPEARANCE AND INTERFACE...
Model: M501W. Indoor Pan/Tilt IP Camera. -Contents- Shenzhen Dericam Technology Co., Limited
 User Manual Model: M501W Indoor Pan/Tilt IP Camera -Contents- Chapter 1. Introduction of Camera 2 Chapter 2. Package Contents 2 Chapter 3. Physical Descriptions.3 Chapter 4. Surveillance Software GUI.4
C1002 IP Camera. Quick Installation Guide. Solwise Ltd., 1
 C1002 IP Camera Quick Installation Guide Solwise Ltd., www.solwise.co.uk, sales@solwise.co.uk 1 Trademarks and/or registered trademarks are the property of their respective owners The information presented
Quick Installation Guide
 Wired/Wireless IP Camera Quick Installation Guide (IE Browser) Model: APM-J0233-WS-IR Silver Purple Black White Shenzhen Apexis Electronic Co., Ltd. Step 1: Hardware Installation. 1. Install the Wi-Fi
Model: FI8905E. Ourdoor POE Network Camera
 User Manual Model: FI8905E Ourdoor POE Network Camera Table of Contents 1 Overviews... 2 1.1 Key Features... 3 1.2 POE (Power over Ethernet)... 3 1.3 Read Before Use... 4 1.4 Packing Contents... 4 1.5
F Series Robot Model IP Camera V2.3 User Manual
 F Series Robot Model IP Camera 2010-5 V2.3 User Manual Index 1 INTRODUCTION... 4 2 FUNCTION AND FEATURES... 4 3 APPEARANCE AND INTERFACE... 5 3.1 APPEARANCE... 5 3.2 INTERFACE OF EQUIPMENT... 6 4 NETWORK
Foscam Digital Technologies LLC FI8910W User Manual IP Wired / Wireless Camera Page
 Foscam Digital Technologies LLC FI8910W User Manual IP Wired / Wireless Camera www.foscam.us support@foscam.us Page 0 1-800-930-0949 Thank You for Your Purchase! Foscam IP Cameras are designed and equipped
IP Wireless / Wired Camera. User Manual
 IP Wireless / Wired Camera REMOTE PAN/TILT ROTATE User Manual IPCAM 1: IPCAM 2: IPCAM 3: Contents 1 WELCOME...-1-1.1 Features...-1-1.2 Packing list...-2-1.3 Product view...-2-1.3.1 Front View...-2-1.3.2
IP Wireless / Wired Camera. User Manual
 IP Wireless / Wired Camera User Manual IPCAM 1: IPCAM 2: Contents 1 WELCOME...-1-1.1 Features...-1-1.2 Packing list...-2-1.3 Product view...-2-1.3.1 Front View...-2-1.3.2 Rear Panel...-3-1.4 PC System
User Manual. Model: FI8919W. Outdoor
 User Manual Model: FI8919W Outdoor Pan/Tilt Wireless IP Camera Table of Contents 1 Overviews... 2 1.1 Key Features... 3 1.2 Read Before Use... 3 1.3 Packing Contents...4 1.4 Physical Description... 4 2
Model SLW-163. Owner s Manual. Wireless Pan & Tilt IP Camera w/ IR. Customer Support
 Model SLW-163 Wireless Pan & Tilt IP Camera w/ IR Owner s Manual 15540 Herriman Blvd. Noblesville, IN 46060 - www.security-labs.com Customer Support 1-800-774-0284 PLEASE NOTE BEFORE YOU BEGIN This camera
User Manual. Model: FI8907W. Indoor Wireless IP Camera
 User Manual Model: FI8907W Indoor Wireless IP Camera Color: Black Color: White Table of Contents 1 Overviews... 1 1.1 Key Features...1 1.2 Read Before Use...2 1.3 Packing Contents... 2 1.4 Physical Description...
Dear users, the configuration for this camera is professional, so please read the user manual carefully before using the camera V4.
 Dear users, the configuration for this camera is professional, so please read the user manual carefully before using the camera. IP Camera (B series) User manual 2012-12 V4.19 Statement If the user manual
1. Introduction Overview Product Information... 3
 1. Introduction... 3 1.1 Overview... 3 1.2 Product Information... 3 2. Device Connection... 3 2.1 Connection Diagram... 3 2.2 Wi-Fi Setting... 4 2.2.1 Set up WiFi by Mobile Phone... 4 2.2.2 WPS/QSS One
Indoor Wireless/Wired IP Network Camera (with H.264 image compression) Model XX39A User Manual
 Model XX39A User Manual") Indoor Wireless/Wired IP Network Camera (with H.264 image compression) Model XX39A User Manual CONTENTS 1. INTRODUCTION... 3 1.1 Features... 4 1.2 Packing List... 4 1.3 Product Views... 5 1.4 PC System
Indoor Wireless/Wired IP Network Camera (with H.264 image compression) Model XX39A User Manual CONTENTS 1. INTRODUCTION... 3 1.1 Features... 4 1.2 Packing List... 4 1.3 Product Views... 5 1.4 PC System
IP Camera. Apr 2012 V
 H Series with Pan/Tilt Mega pixel IP Camera Apr 2012 V1.4.0.1.4 User Manual Index 1 INTRODUCTION... 4 1.1 THE PACKAGE INCLUDES... 4 1.2 FUNCTION AND FEATURES... 4 1.3 TECHNICAL PARAMETERS... 5 2 APPEARANCE
User Manual. For H.264 Cameras. Version 2.0.0
 User Manual For H.264 Cameras Version 2.0.0 Catalogue Basic Operation... 3 Camera Settings... 3 System... 3 Device Name... 4 Time... 4 User... 4 Network... 5 IP... 5 Port... 5 WiFi... 6 UPnP... 6 DDNS...
V User Manual. Model: FI8910W. Indoor Pan/Tilt Wireless IP Camera
 V50.04 User Manual Model: FI8910W Indoor Pan/Tilt Wireless IP Camera Color: Black Color: White Table of Contents Security Warning...3 1 Overviews...3 1.1 Key Features...4 1.2 Read Before Use...5 1.3 Packing
TENVIS Technology Co., Ltd. User Manual. For H.264 Cameras. Version 1.0.0
 TENVIS Technology Co., Ltd User Manual For H.264 Cameras Version 1.0.0 Catalogue Basic Operation... 3 Hardware Installation... 3 Search Camera... 3 For Internet Explorer... 6 Playback Record Files... 9
Model SLW-164. Weatherproof Wi-Fi Color Camera w/ IR. Owner s Manual Herriman Blvd. Noblesville, IN
 Model SLW-164 Weatherproof Wi-Fi Color Camera w/ IR Owner s Manual 15540 Herriman Blvd. Noblesville, IN 46060 - www.security-labs.com Customer Support 1-800-774-0284 1 Contents Features 3 Contents & Setup
M1060W Wireless Pan/Tilt IP Camera User Manual Apr-2013 V1.02
 M1060W Wireless Pan/Tilt IP Camera User Manual Apr-2013 V1.02 Avacomtech Inc. Page 2 Statement If after consulting the user manual you cannot solve the problem, please call our support center about the
Indoor Wireless/Wired HD P2P Network Camera (with H.264 image compression) Model XX59A User Manual
 Model XX59A User Manual") Indoor Wireless/Wired HD P2P Network Camera (with H.264 image compression) Model XX59A User Manual CONTENTS 1. INTRODUCTION... 3 1.1 Features... 4 1.2 Packing List... 4 1.3 Product Views... 5 1.4 PC System
Indoor Wireless/Wired HD P2P Network Camera (with H.264 image compression) Model XX59A User Manual CONTENTS 1. INTRODUCTION... 3 1.1 Features... 4 1.2 Packing List... 4 1.3 Product Views... 5 1.4 PC System
Wireless PTZ Cloud Camera TV-IP851WC (v1.0r)
") (v1.0r) TRENDnet s Wireless PTZ Cloud Camera, model, takes the work out of viewing video over the internet. Previously to view video remotely, users needed to perform many complicated and time consuming
(v1.0r) TRENDnet s Wireless PTZ Cloud Camera, model, takes the work out of viewing video over the internet. Previously to view video remotely, users needed to perform many complicated and time consuming
Quick Installation Guide
 V38.01 IP Wireless / Wired Camera Quick Installation Guide (For Windows OS) ShenZhen Foscam Intelligent Technology Co., Ltd Packing List Quick Installation Guide 1) IP CAMERA X 1 2) Wi-Fi Antenna (only
User Manual. Model: FI8905E. Outdoor PoE Network Camera V1.8
 User Manual Model: FI8905E Outdoor PoE Network Camera V1.8 Table of Contents Security Warning... 3 1 Overviews...3 1.1 Key Features...3 1.2 POE (Power over Ethernet)... 4 1.3 Read Before Use... 4 1.4 Packing
User Manual. Model: FI8919W. Wireless Outdoor Pan/Tilt IP Camera V1.8
 User Manual Model: FI8919W Wireless Outdoor Pan/Tilt IP Camera V1.8 Table of Contents Security Warning...3 1 Overviews...3 1.1 Key Features...3 1.2 Read Before Use...4 1.3 Packing Contents... 4 1.4 Physical
Model: FI8916W. Indoor Pan/Tilt Wireless IP Camera
 User Manual Model: FI8916W Indoor Pan/Tilt Wireless IP Camera Color: Black Color: White Table of Contents 1 Overviews... 2 1.1 Key Features... 3 1.2 Read Before Use... 3 1.3 Packing Contents... 4 1.4 Physical
Wireless Day / Night PTZ Cloud Camera TV-IP851WIC (v1.0r)
") (v1.0r) TRENDnet s Wireless N Day / Night PTZ Cloud Camera, model, takes the work out of viewing video over the internet. Previously to view video remotely, users needed to perform many complicated and
(v1.0r) TRENDnet s Wireless N Day / Night PTZ Cloud Camera, model, takes the work out of viewing video over the internet. Previously to view video remotely, users needed to perform many complicated and
User Manual. Model: FI8919W. Outdoor Pan/Tilt Wireless IP Camera
 User Manual Model: FI8919W Outdoor Pan/Tilt Wireless IP Camera Table of Contents Security Warning...3 1 Overviews... 3 1.1 Key Features...4 1.2 Read Before Use... 5 1.3 Packing Contents... 5 1.4 Physical
Quick Installation Guide
 V50.02 Model: FI8918W Quick Installation Guide Indoor Pan/Tilt Wireless IP Camera Black White For Windows OS ------- Page 1 For MAC OS ------- Page 14 Quick Installation Guide For Windows OS Package Contents
Wireless Day / Night Cloud Camera TV-IP751WIC (v1.0r)
") (v1.0r) TRENDnet s Wireless Day / Night Cloud Camera, model, takes the work out of viewing video over the internet. Previously to view video remotely, users needed to perform many complicated and time
(v1.0r) TRENDnet s Wireless Day / Night Cloud Camera, model, takes the work out of viewing video over the internet. Previously to view video remotely, users needed to perform many complicated and time
Wireless/Wired Network IP Camera Night Vision & Remote Operation User Manual LucidPhone WIP Series WIP001 & WIP-W02
 Wireless/Wired Network IP Camera Night Vision & Remote Operation User Manual LucidPhone WIP Series WIP001 & WIP-W02 1 Lucidphone WIP001 and WIP-W02 LucidPhone WIP Series IP Camera products are designed
IP Camera User Manual
 Statement IP Camera User Manual If the user manual cannot help you to solve the problem, please call our technology center about the solutions. We will update the content for the new functions without
Cisco WVC210 Wireless-G Pan Tilt Zoom (PTZ) Internet Video Camera: 2-Way Audio Cisco Small Business Video Surveillance Cameras
 Internet Video Camera: 2-Way Audio Cisco Small Business Video Surveillance Cameras") Cisco WVC210 Wireless-G Pan Tilt Zoom (PTZ) Internet Video Camera: 2-Way Audio Cisco Small Business Video Surveillance Cameras High-Quality, Flexible, Remote-Controlled Wireless Video Solution for Your
Cisco WVC210 Wireless-G Pan Tilt Zoom (PTZ) Internet Video Camera: 2-Way Audio Cisco Small Business Video Surveillance Cameras High-Quality, Flexible, Remote-Controlled Wireless Video Solution for Your
Wifi/IP Camera Instructions. Chapter 1 Introduction
 Wifi/IP Camera Instructions Chapter 1 Introduction This product is made from high-performance chips to achieve a m edia processor integrated with acquisition, compression and trans mission on audio and
B Series Cube Model NC546W User Manuall V1.0
 B Series Cube Model NC546W User Manual V1.0 Index 1 INTRODUCTION...4 2 FUNCTION AND FEATURES...4 3 APPEARANCE AND INTERFACE...5 3.1 APPEARANCE...5 3.2 INTERFACE OF EQUIPMENT...6 4 NETWORK CONNECTING...7
NS15WG 1080P Web App User Manual
 NS15WG 1080P Web App User Manual Table of Contents 1. Getting Started... 4 Download the Web App...4 2. Web App Top Menu... 5 Live Video...6 Video Playback...6 Settings...6 3. Device Configuration... 6
User Manual. Model: FI8904W/FI8905W. Outdoor Wireless IP Camera V1.8
 User Manual Model: FI8904W/FI8905W Outdoor Wireless IP Camera FI8904W FI8905W V1.8 Table of Contents Security Warning...3 1 Overviews... 3 1.1 Key Features...3 1.2 Read Before Use...4 1.3 Packing Contents...
HD Pan Tilt IP Camera
 IP Camera User Guide Version 1.0.0.1 HD Pan Tilt IP Camera Page 1 Content 1. Hardware installation... 4 1.1 Hardware connection... 4 1.2 Network connection...5 1.3 WPS setting...5 2. ipad, iphone App introduction...5
10X OPTICAL ZOOM & REMOTE PAN / TILT ROTATE
 User Manual Model: FI8620 IP Wired Camera 10X OPTICAL ZOOM & REMOTE PAN / TILT ROTATE CONTENTS 1 WELCOME... 1 1.1 Features... 1 1.2 Packing List... 2 1.3 Product views... 2 1.4 Preparations before use...
User Manual. Model: FI8910W. Indoor Pan/Tilt Wireless IP Camera V2.0
 User Manual Model: FI8910W Indoor Pan/Tilt Wireless IP Camera Color: Black Color: White V2.0 Table of Contents Security Warning...1 1 Overviews...1 1.1 Key Features...2 1.2 Read Before Use...3 1.3 Packing
Cisco WVC210 Wireless-G Pan Tilt Zoom (PTZ) Internet Video Camera: 2-Way Audio Cisco Small Business Video Surveillance Cameras
 Internet Video Camera: 2-Way Audio Cisco Small Business Video Surveillance Cameras") Cisco WVC210 Wireless-G Pan Tilt Zoom (PTZ) Internet Video Camera: 2-Way Audio Cisco Small Business Video Surveillance Cameras High-Quality, Flexible, Remote-Controlled Wireless Video Solution for Your
Cisco WVC210 Wireless-G Pan Tilt Zoom (PTZ) Internet Video Camera: 2-Way Audio Cisco Small Business Video Surveillance Cameras High-Quality, Flexible, Remote-Controlled Wireless Video Solution for Your
Quick Installation Guide
 Model: FI8916W Quick Installation Guide Indoor Pan/Tilt Wireless IP Camera Black White For Windows OS ------- Page 1 For MAC OS ------- Page 16 ShenZhen Foscam Intelligent Technology Co., Ltd Quick Installation
Wireless Surveillance Camera
 Wireless Surveillance Camera IP100 USER MANUAL Questions? Need some help? This guide will help you enjoy your new product or visit www.polaroidsafety.com Table of Contents Welcome 3 1 Product Overview
IP Camera. Mar 2012 V
 H Series Mega pixels Waterproof IP Camera Mar 2012 V1.2.0.1.5 User Manual Index 1 INTRODUCTION... 4 1.1 THE PACKAGE INCLUDES... 4 1.2 FUNCTION AND FEATURES... 4 1.3 TECHNICAL PARAMETERS... 5 2 APPEARANCE
HD Pan Tilt IP Camera
 IP Camera User Guide Version 1.0.0.1 HD Pan Tilt IP Camera NIP-09L2J NIP-16L2J NIP-22L2J NIP-21L2J Page 1 Content 1. Hardware installation... 4 1.1 Hardware connection... 4 1.2 Network connection...5 1.3
Indoor Wireless/Wired HD P2P Network Camera Pro. (with H.264 image compression)
") Indoor Wireless/Wired HD P2P Network Camera Pro. (with H.264 image compression) Model: S650 Instruction Manual CONTENTS 1. INTRODUCTION...4 1.1 Features...5 1.2 Packing List...5 1.3 Product Views... 6
Indoor Wireless/Wired HD P2P Network Camera Pro. (with H.264 image compression) Model: S650 Instruction Manual CONTENTS 1. INTRODUCTION...4 1.1 Features...5 1.2 Packing List...5 1.3 Product Views... 6
Wireless Network Video Recorder
 LD2R/LD2R500 Wireless Network Video Recorder User Guide Version 1.0 PREFACE Thank you for purchasing the Wireless Network Video Recorder, an IP based device that installed on your network, which can be
Wireless P2P Cellphone Camera
 Wireless P2P Cellphone Camera Chapter 1 Features NEW S5030-MP2P is the latest model developed by SIEPEM, Inc., it is suitable for family, offices and chain store monitoring. It is the latest version. P2P
User Manual. Contents 1 WELCOME Features Installation Requirements Software Installation Software Operation...
 CMS User Manual Contents 1 WELCOME... 3 1.1Features... 3 1.2Installation Requirements... 3 1.3 Software Installation...4 2 Software Operation... 5 2.1 Menu bar... 6 2.2 Camera list tree... 7 2.3 Camera
Quick Install Guide. Model: PLC-223W, PLC-233W
 Quick Install Guide Model: PLC-223W, PLC-233W This installation guide provides basic instructions for installing the PLC-213W/ PLC-223W/PLC-233W indoor wireless IP camera on your network. By following
Wanscam. HW series IP Camera PC Web User Manual
 Wanscam HW series IP Camera PC Web User Manual Packing list: IP camera Mounting bracket Antenna Adaptor CD Lan cable Installation guide Screws Note: Some models don t have a separate antenna. Installation
NFD30 Network Dome Camera MPEG4 + Motion-JPEG Dual Mode, PoE, Audio, 300k CMOS, mm vari-focal lens Part No.:
 NFD30 Network Dome Camera MPEG4 + Motion-JPEG Dual Mode, PoE, Audio, 300k CMOS, 3.7 12 mm vari-focal lens Part No.: 550987 The INTELLINET NETWORK SOLUTIONS NFD30 Network Dome Camera is designed for security
Neposmart NS14WG Indoor and NS14BG Outdoor Camera Web App User Manual
 Neposmart NS14WG Indoor and NS14BG Outdoor Camera Web App User Manual TM Contents Using the Desktop Web Interface... 3 Viewing Video Using VLC Media Player... 6 Web on Internet Explorer and Neposmart Control
IP Night/Day Camera USER MANUAL
 IP Night/Day Camera USER MANUAL Table Of Contents 1. INITIAL INSTALLATION... 4 2. IP CAMERA FINDER... 8 3. IP CAMERA MANAGER... 11 3.4 Camera Software Navigation Buttons... 12 3.5 Adding Another Camera...
H.264. (For IE Browser) User Manual
 User Manual") Megapixel IP Camera H.264 (For IE Browser) User Manual Statement Thank you for using our IP camera products. The IP camera designed for network video surveillance, adopted high performance and powerful
Megapixel IP Camera H.264 (For IE Browser) User Manual Statement Thank you for using our IP camera products. The IP camera designed for network video surveillance, adopted high performance and powerful
Zavio P5111/ P5116/ P5210 Quick Installation Guide
 86085M2000010 Zavio P5111/ P5116/ P5210 Quick Installation Guide Installation Steps Please follow the installation steps below to set up your P5111 / P5116/ P5210 Day/Night Pan/Tilt IP Camera. Check the
NSC18-WN Pan/Tilt Network Camera 1.3 Megapixel CMOS, 300 Mbps Wireless n, Motion-JPEG + MPEG4, Audio, SD Card Part No.
 NSC18-WN Pan/Tilt Network Camera 1.3 Megapixel CMOS, 300 Mbps Wireless 802.11n, Motion-JPEG + MPEG4, Audio, SD Card Part No.: 550857 The INTELLINET NETWORK SOLUTIONS SOHO Network Camera, Model NSC18-WN,
SSL Encryption Secure network connections using data encryption between the camera and the network
 NFC16-WG Megapixel HD Network Camera H.264 + MPEG4 + Motion-JPEG Multi-Streaming, Audio, 1.3 Megapixel CMOS, 720p HD, 54 Mbps Wireless 802.11g Part No.: 551083 The Intellinet Network Solutions NSC16-WG
Quick Installation Guide
 V47.01 Model: FI8909W Quick Installation Guide Indoor Wireless IP Camera Black White For Windows OS ------- Page 1 For MAC OS ------- Page 16 ShenZhen Foscam Intelligent Technology Co., Ltd Quick Installation
GRAND IP VIDEO SERVER PRO. User s Manual INDEX
 INDEX GRAND IP VIDEO SERVER PRO Video & Audio Transmission/ iphone Web Browser Support User s Manual ISSUE:Mar 16, 2010 1. Package Contents.... 1 2. Introduction.... 1 3. System Requirements...... 1 4.
QUICK START GUIDE. Wireless Pan&Tilt IP Camera FSC880. Smart Reliable Secure. Faleemi Technologies Ltd.
 Wireless Pan&Tilt IP Camera QUICK START GUIDE FSC880 Smart Reliable Secure Faleemi Technologies Ltd www.faleemi.com support@faleemi.com support@faleemi.com www.facebook.com/faleemi Apple, Apple Store,
CHAPTER 1. Welcome to Grand IP Camera III
 CHAPTER 1 Welcome to Grand IP Camera III 3. Remote view through the IE browser, simply type in the IP address. 4. 6 infrared LEDs provide imaging in the dark. 5. Many Valuable Internet services: Email,
HD Pan/Tilt Wi-Fi Camera NC450
 HD Pan/Tilt Wi-Fi Camera NC450 Highlights 720P HD Image Delivers superb image quality in high definition, enhancing visual clarity experience. Pan / Tilt See up to 360 degrees horizontally and 150 degrees
1.3 CU-720PIR. 720P PIR Passive PoE Night Vision IPCAM. All-in-One Security Solution IP Camera
 CU-720PIR 720P PIR Passive PoE Night Vision IPCAM 30fps at 1.3 MegaPixel Mode 30fps at 720P High Definition Mode 24V Passive PoE Port Built-in PIR Sensor 10 Meter IR Night Vision LED with ICR Low Lux Sensor
Wireless Pan-Tilt IP Camera: TP-Link TL-SC4171G (0.5 lx, VGA, IR, 30fps, MPEG-4, 4.3 mm)
") Wireless Pan-Tilt IP Camera: TP-Link TL-SC4171G (0.5 lx, VGA, IR, 30fps, MPEG-4, 4.3 mm) Code: K1154 View of the camera Rear view 1 The included accessories View of the packaging Distinguishing features
Wireless Pan-Tilt IP Camera: TP-Link TL-SC4171G (0.5 lx, VGA, IR, 30fps, MPEG-4, 4.3 mm) Code: K1154 View of the camera Rear view 1 The included accessories View of the packaging Distinguishing features
USER MANUAL MODELS , , MAN /551373/ UM
 EASYCAM USER MANUAL MODELS 551359, 551373, 551489 MAN- 551359/551373/551489- UM- 0714-01 Hardware Installation 1. Connect the camera to one of your router s LAN ports with the included network cable. 2.
IP Camera User Manual
 the world through my eyes R IP Camera User Manual EN App Store Google Play Version:TWS20180723 1Product description 1.1Product Feature 1.2Package Contents 1.3IP Camera Overview 1.4Operating System Requirement
Megapixel Resolution for Excellent Video Quality. Multi-Streaming: Simultaneous H MPEG4 + 3GPP + Motion-JPEG
 NFD130-IR Megapixel Night-Vision Network Dome Camera 1.3 Megapixel CMOS, 720p HD, Day/Night, H.264, MPEG4, M-JPEG, 3GPP, PoE, MicroSD/SDHC Part No.: 551229 The Intellinet Network Solutions NFD130-IR Megapixel
Dear users, the configuration for this camera is professional, so please read the user manual carefully before using the camera V1.
 Dear users, the configuration for this camera is professional, so please read the user manual carefully before using the camera. IP Camera (614W) User manual 2013-05 V1.1 Statement If the user manual can
F312A IP Camera. Firmware User Manual
 0 F312A User Manual F312A IP Camera F312A User Manual Firmware User Manual - Contents - CHAPTER 1. MINIMUM SYSTEM REQUIREMENT...2 CHAPTER 2. USING IP CAMERA VIA WEB BROWSER...3 2.1WINDOWS WEB BROWSER...3
H Series with Pan/Tilt of CMOS IP Camera Version User Manual
 H Series with Pan/Tilt of CMOS IP Camera (Version 2.2) 2010.9 User Manual Index 1 INTRODUCTION... 4 2 FUNCTION AND FEATURES... 4 3 APPEARANCE AND INTERFACE... 6 3.1 APPEARANCE... 6 3.2 INTERFACE OF EQUIPMENT...
NIGHT VISION & REMOTE PAN / TILT ROTATE/ TWO WAY AUDIO
 User Manual Model: FI9820W Indoor HD Pan/Tilt Wireless IP Camera NIGHT VISION & REMOTE PAN / TILT ROTATE/ TWO WAY AUDIO Black White CONTENTS 1 WELCOME... 1 1.1 Features... 1 1.2 Packing List... 2 1.3 Product
User Manual of P2P IP Cameras
 Updated on 20 August, 2013 User Manual of P2P IP Cameras This user manual applies to all the P2P IP Cameras as follows IPA Series: Home Pan-tilt IP Cameras IPB Series: Outdoor Waterproof IP Cameras IPC
M511E Pan/Tilt Day/Night IP Camera Firmware User Manual
 0 M511E User Manual M511E User Manual M511E Pan/Tilt Day/Night IP Camera Firmware User Manual - Contents - CHAPTER 1. MINIMUM SYSTEM REQUIREMENT... 2 CHAPTER 2. USING IP CAMERA VIA WEB BROWSER... 3 2.1WINDOWS
H.264. (For IE Browser) User Manual
 User Manual") Wireless/Wired IP Camera H.264 (For IE Browser) User Manual Statement Thank you for using our IP camera products. The IP camera designed for network video surveillance, adopted high performance and powerful
Wireless/Wired IP Camera H.264 (For IE Browser) User Manual Statement Thank you for using our IP camera products. The IP camera designed for network video surveillance, adopted high performance and powerful
Quick Installation Guide
 Model: FI8910E Quick Installation Guide Indoor Pan/Tilt POE IP Camera Black White For Windows OS ------- Page 1 For MAC OS ------- Page 14 ShenZhen Foscam Intelligent Technology Co., Ltd Quick Installation
Wireless N Day / Night Internet Camera TV-IP551WI (v1.0r)
") The, model TV- IP551WI, transmits real-time video over the Internet. Record crisp video in complete darkness for distances of up to 7.5 meters. Wireless n technology provides unsurpassed wireless coverage
The, model TV- IP551WI, transmits real-time video over the Internet. Record crisp video in complete darkness for distances of up to 7.5 meters. Wireless n technology provides unsurpassed wireless coverage
HD Pan/Tilt Wi-Fi Camera
 HD Pan/Tilt Wi-Fi Camera See up to 360 degrees horizontally and 150 degrees vertically Night Vision Motion Detection Micro SD Card Slot Highlights Stay Connected and Secure Anywhere. Anytime Access. The
Quick Installation Guide
 V4.01 Model: FI8620 Quick Installation Guide Outdoor Dome Network Camera For Windows OS ------- Page 1 For MAC OS ------- Page 17 ShenZhen Foscam Intelligent Technology Co., Ltd Quick Installation Guide
XIPLED Software User s Manual. For Firmware release V3.5.0.*
 XIPLED1080-36 Software User s Manual For Firmware release V3.5.0.* Product name: XIPLED1080-36 Release Date: 2014/10/02 Manual Revision: V02 Feature XIPLED1080-36 Live View All Series Camera/Video/Audio
Wireless N Home NetWork Camera
 anywhere & anytime monitoring Wireless N Home NetWork Camera remote monitoring remotely monitor your home or office over the internet HiGH-QUalitY ViDeo the mjpeg codec offers optimized image quality and
QRT-501 IE Operation Manual
 QRT-501 IE Operation Manual Contents Log In...5 Main Screen...6 Task Bar...7 Right Panel Control...8 Configure the Camera Settings...9 Device Basic Information... 10 View the Device Information...10 Change
Wireless IP Bird Box Camera
 Wireless IP Bird Box Camera Model: 4901-18 Operation and Installation Manual 1 WELCOME... 3 PRODUCT OVERVIEW... 4 HARDWARE INSTALLATION... 4 Attach the External Power Adapter... 4 SMARTPHONE OR TABLET
H Series IP Camera Version User Manuall
 H Series IP Camera (Version 2.1) 2009.7 User Manual Index 1 INTRODUCTION... 4 2 FUNCTION AND FEATURES... 4 3 APPEARANCE AND INTERFACE... 6 3.1 APPEARANCE... 6 3.2 INTERFACE OF EQUIPMENT... 6 4 NETWORK
Pan/Tilt IP Network Camera
 Pan/Tilt IP Network Camera Plug&Play H.264 wireless IP camera With 3GPP/ISMA support The pan/tilt IP Network Camera is designed with the user-friendly idea deep in mind. The user can install the camera
F510E BOX IP Camera. Firmware User Manual
 0 F510E User Manual F510E BOX IP Camera F510E User Manual Firmware User Manual - Contents - CHAPTER 1. MINIMUM SYSTEM REQUIREMENT... 2 CHAPTER 2. USING IP CAMERA VIA WEB BROWSER... 3 CHAPTER 3. USING IP
Quick Start Guide HGWIP-818
 TM TM Quick Start Guide HGWIP-818 GIVES PEACE OF MIND WHEREVER YOU ARE ELDERLY Relatives CHILDREN Sleeping/playing PETS Monitoring HOME Surveillance Welcome Thank you for choosing HOMEGUARD. Getting starting
Quick Start Guide HGWIP-811
 TM TM Quick Start Guide HGWIP-811 GIVES PEACE OF MIND WHEREVER YOU ARE Welcome Thank you for choosing HOMEGUARD. Getting starting is easy. ELDERLY Relatives 2 CHILDREN Sleeping/playing PETS Monitoring
Operation Guide. ismartviewplus V1.0.2 (For windows) July, 2017 Rev1.0
 July, 2017 Rev1.0") Operation Guide ismartviewplus V1.0.2 (For windows) July, 2017 Rev1.0 Statement If the user manual doesn t help you to resolve the problem, please contact us via our website for technical support. Notice
Operation Guide ismartviewplus V1.0.2 (For windows) July, 2017 Rev1.0 Statement If the user manual doesn t help you to resolve the problem, please contact us via our website for technical support. Notice
User Guide. For the latest version of the user guide go to
 User Guide For the latest version of the user guide go to www.watchbotcamera.com Please visit www.watchbotcamera.com/guide for the most up to date information on the latest features and configuring your