CDK Requisitioner. Users Manual
|
|
|
- Ralf Hodges
- 6 years ago
- Views:
Transcription
 850-8194")
1 CDK Requisitioner Users Manual January 15, CDK Systems, Inc. 444 Shades of Death Road Great Meadows, NJ Phone: (908) i
2 Table of Contents Table of Contents... ii Welcome to CDK Requisitioner... 4 Getting Started in CDK Requisitioner... 5 Logging In... 5 Navigation... 7 Entering Requisitions... 8 Requisition Header... 8 Adding Line Items Vendor Notes Requisition Messages Editing a Line Item Deleting a Line Item Voiding a Requisition Save and Print Quick Approvals Approve Now The Approvals Window Browsing Your Requisitions Copying Requisitions Show Flag Messages Reports Navigating the Reports Preview Window Exporting Reports as Excel Files Exporting Reports as PDF Files Setting Users for Reports Requisition Reports Requisitions Requiring Approver Action Approver s Action Items Approver s/originator s Normal Requisitions Approver s/originator s Converted Requisitions Approver s/originator s Requisitions (All) Approver s/originator s Flagged Requisitions Approver s/originator s Budgetary Requisitions Provisional General Ledger Report...Error! Bookmark not defined. Detailed Account Status...Error! Bookmark not defined. Utilities Change my Password Get Updated Vendor List ii
3 Get Updated Account List Send Requisitions Get Requisitions Backup Requisitions iii
4 Welcome to CDK Requisitioner Welcome to the CDK Systems Requisitioning Module, an extension to our popular CDK Systems Accounting package. CDK Requisitioner expands the capabilities of CDK Systems Accounting by adding requisitioning capability. CDK Requisitioner was developed with and is being improved in cooperation with NJ school districts, making it perfectly tailored for the real-life requisitioning needs of New Jersey schools. What are the key features of CDK Requisitioner? Multi-User: CDK Requisitioner is designed to be used in a multi-user environment with each user being assigned a set of permissions appropriate to his or her position in the organization Flexible control of the approval process from requisition inception to conversion to a purchase order Control of fund account balance visibility Seamless integration with CDK Systems Accounting Support for multiple remote locations. Approval process can be customized to reflect organizational needs Requisitions can be created against future year's budgets Flexible reporting module This system was designed with the help of people actually in the trenches. CDK Requisitioner takes your CDK Systems package to the next level, increasing the integration of your purchasing process throughout all levels of your district's organization. As with all CDK Systems software, CDK Requisitioner is so user-friendly that most users will need little or no training on the system. 4

5 Getting Started in CDK Requisitioner Any time you start or quit CDK Requisitioner, you will be told how many new/changed requisitions there are in the system and you will be asked whether or not you wish to Send Requisitions Now? Choosing Yes will send the new and updated requisitions to the server so that all other workstations can see the newest information possible. Individual approvers can set their own preferences to send updated requisition information to the server immediately upon approval. This will be discussed in more detail below. Logging In When you start the CDK Requisitioner program from your desktop, you will come to the Login Screen: Enter your User Name and Password for CDK Systems and hit enter or click OK. The system already knows your username and password from the main accounting system. Please be aware that passwords are case sensitive. You will be taken directly to the Requisition Browser. 5
 Blue = Partially Approved Green = Approved Requisitions Yellow = Flagged Requisitions Red = Voided Requisitions Dark Blue = Not Approved Requisitions You are able to adjust the size of what you are")
6 The requisitions on this window are color coded for ease of use. Gray = New/Changed Requisitions Purple = Sent Requisitions (PO Number indicates it has been converted to a PO.) Blue = Partially Approved Green = Approved Requisitions Yellow = Flagged Requisitions Red = Voided Requisitions Dark Blue = Not Approved Requisitions You are able to adjust the size of what you are viewing. Bring your mouse pointer over the line between column headings, and the pointer will change to a double arrow. Now you can click and drag to resize the columns. You can also resize the requisition browser window by clicking and dragging the edges just like you would any other window. The system will remember your column width and window size settings whenever you open the requisition browser. More features of this window will be discussed below, under Approving Requisitions. Click on the red x and the system will take you to the Main Menu. The program features available to the user will depend on the specific permissions given to the user who is logged in. Please note that the version of CDK Requisitioner currently running is displayed at the bottom of the Main Menu. If someone in the district is not running the most recent version of the program, the version number will be displayed in red and will be followed by the notation Old!. Should you see this at the bottom of your window, contact your tech support for upgrade information. 6
7 Navigation Navigation in the CDK Requisitioner program is simple. Each page in the system is actually a window. Use the available buttons in any given window to process your data, then click on the close button or the small X button in the upper right hand corner to close that window and return to the previous one. Clicking on the Quit button at the bottom of the Main Menu will cause the CDK Requisitioner program to close. 7
 The Req# has been automatically generated by the system. b) The default date is today s date. 3) Complete the top of this form. a) Use the drop down arrow to select the Ship to.")
8 Entering Requisitions Requisition Header 1) From the Main Menu click on Add New. The following window will open: 2) The Req# and Date are already filled in. a) The Req# has been automatically generated by the system. b) The default date is today s date. 3) Complete the top of this form. a) Use the drop down arrow to select the Ship to. Select Blank Ship to Fields to leave this area blank. b) Type the name of a Contact. This individual does not need to be a CDK Systems user. 8

 Select!")
9 4) Select a Vendor using the drop down arrow to the right of the field. The system will automatically provide the vendor address. i) If the vendor does not appear on the list it has not been entered into the CDK Accounting software. ii) Select!Provisional to continue entering this requisition. 9
 You should enter as much information as possible. (3) This vendor will be added if approved by the business office.")
 v)!")
10 iii) Once the requisition has been saved you will be able to double click on the words Provisional Vendor Not Found and enter the vendor information. (1) The only required field is Name. (2) You should enter as much information as possible. (3) This vendor will be added if approved by the business office. (4) When the requisition is converted to a PO the system will ask if you wish to accept this vendor and add it to CDK Accounting. iv) Select!No Vendor Preference if the vendor does not matter (i.e. ordering generic office supply.) v)!deleted Vendor should not be selected, but will appear if the business office subsequently deleted the vendor originally used for the requisition. 5) Once these steps are completed, your requisition should look like this: 10
11 Adding Line Items 1) Click on Add Line. The View/Edit Line Items window will open. 11
12 2) Enter the Quantity and Price (per unit) The Amount (total price) will be automatically calculated for you: 3) Units may be used to enter any information that makes sense for this item (books, boxes, gross, packets). You may use up to 10 characters. 4) Select an Account using the drop down arrows to the right of each field. To clear the boxes, double click on the word Account. 5) Complete the Description. 6) Your line item will look like this: 12
 Double click on the words Unencumbered Balance.")
13 a) If the user entering this requisition has permission, he/she will see the Unencumbered Balance remaining in the account he/she has selected: b) Double click on the words Unencumbered Balance. A smaller window will open displaying the expense account information: 13

 The View/Edit Line Items window will open and you will be able")
14 7) Click on Cancel Changes to exit without saving. Click on Save Req Line and this line will be added to your requisition. a) To view the line details double click on that line. b) The View/Edit Line Items window will open and you will be able to make any changes. 14
 Continue adding lines until this requisition is complete. 10) The Total for Req will be updated as you add lines. 11) Click in the Summary box to enter any text.")
15 8) The date and time of origination and the dates and times of any updates appear at the bottom left of the screen, along with the name(s) of the person originating and/or updating. 9) Continue adding lines until this requisition is complete. 10) The Total for Req will be updated as you add lines. 11) Click in the Summary box to enter any text. 12) If this requisition is for budgeting purposes only, click on that box at the lower right of the window, and information added will be available to help in budgeting for each account, but will not be converted into purchase orders. Vendor Notes 1) Click on Click to View Vendor Instructions. The following window will open: 15
16 2) Add or edit any special instructions. You may use up to 120 characters. 3) Click on Cancel to close this window without keeping your changes. Click on Enter to save. 4) To delete any existing instructions delete the text in the box and click on Enter. 5) If there are any vendor instructions on a PO the words Click to View Vendor Instructions will be displayed in red. Requisition Messages 1) Click on Click to View Requisition Messages. The following window will open: 16
 When you are finished typing your note, click Save New Note. The new note will be saved.")
17 2) Currently Stored Notes and Messages for this Requisition are displayed at the top of the window. 3) Enter New Notes to add to this Requisition to the box at the bottom of the window. If at any point you want to clear what you are typing, click Clear New Note. 4) When you are finished typing your note, click Save New Note. The new note will be saved. 5) To delete a saved requisition note, highlight that note and click on Delete Existing Note. That note will be removed. 6) If there are notes on any requisition the words Click to View Requisition Messages will appear in red. 17
18 Editing a Line Item 1) Double click on the line you wish to change. The line item editing window will open. 18
19 2) Make your changes and click on Save Req Line. Click on Cancel Changes to revert to previously stored information. Deleting a Line Item 1) Highlight the line you wish to delete in the middle of the Add/Edit Requisitions window. 2) Click on Cancel Line. 3) The system will ask you to confirm that you wish to delete the line item: 4) Click on No to cancel. Click on Yes to continue. 19
20 5) The line item will still appear on the requisition, but the description will read CANCELED. a) The Price will still appear. b) The Amount box will be zeroed out. c) The Total for Req will have the total of the cancelled item deducted. Voiding a Requisition 1) Locate the requisition you wish to void. 2) Click on Void Req. The system will confirm that you wish to void: 3) Select Yes to void the requisition, No to return to the requisition. Save and Print 1) Once your requisition is finished to your satisfaction, click on Save & Exit. 20
 The system will ask if you want requisition notes to appear on your printed requisition. Click on Yes or No as appropriate.")
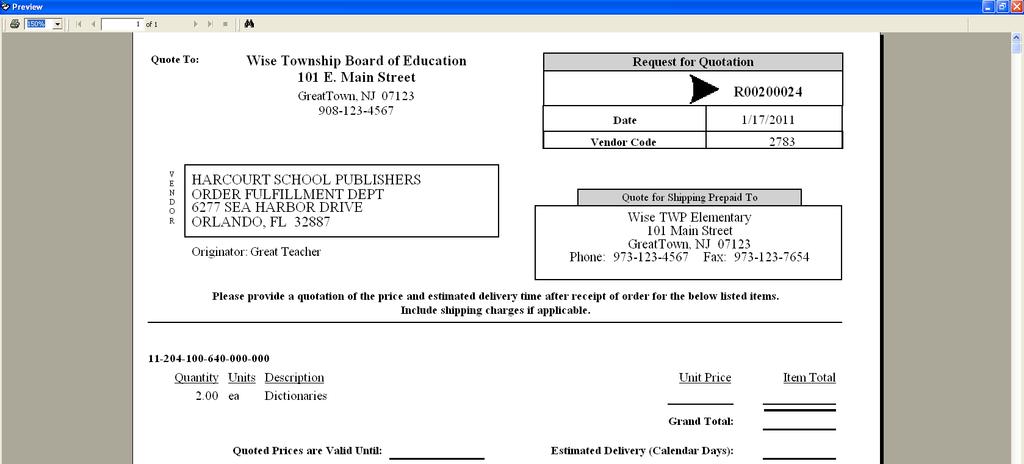
21 2) To see a preview of the printed requisition click on Print Req. a) Any vendor instructions will automatically be printed on your requisition. b) The system will ask if you want requisition notes to appear on your printed requisition. Click on Yes or No as appropriate. c) A preview of your requisition will be displayed: d) To navigate through the requisition preview use the buttons at the top of this window. i) The arrow buttons will move you through the pages of the requisition. ( first page, previous page, next page, last page) ii) The binoculars will allow you to search for a particular word of phrase in your current requisition. iii) Use the drop down arrow to make the document larger. 3) To print the requisition, click on the printer icon at the top left of your window and the requisition will be sent to your default printer. 4) From the Add/Edit Requisitions window you may also Print Quote. This will print your requisition as a Request for Quotation. You navigate this window in the same way described above. 21
22 22
23 Quick Approvals Approve Now The Approve Now button allows you to approve multiple requisitions in a row, without exiting the Add/Edit Requisitions window. 1) From the Browse Requisitions window double click on any requisition and it will open. 2) Click on Approve Now. You will be asked if you wish to send this requisition to the next approver and the originator immediately. Choose Yes or No. You may then be asked: 23
 Highlight a requisition on the Requisition Browser (you may also do this from the Add/Edit Requisitions window.")
24 3) Select Yes or No. The window will now display the next unapproved requisition. 4) For more on approvals, see below. The Approvals Window 1) Highlight a requisition on the Requisition Browser (you may also do this from the Add/Edit Requisitions window.) Click on Approvals and the View and Set Approvals window will open. a) This displays a list of the approvals the current requisition will need before it can be converted into a purchase order. b) The requisition number (created earlier by the system) appears at the top, along with the date the requisition was originally created. c) The user name shown in the uppermost line is the immediate approver for the creator of the requisition. d) Lower user names are subsequent approvers. i) The Originator of this requisition is John D. He does not have the necessary permissions to approve, disapprove or flag requisitions (the buttons do not appear at the bottom of the window.) ii) M. Principle and Smart BusAdmin need to approve this requisition. 2) This is how the same window appears to an approver. 24
 Click on Approve and the Current Status will change to approved and the approval line will be displayed in green.")
25 a) As an approver you may clear or set your own approval by clicking on the appropriate button. b) If you flag a requisition, you must enter a reason when prompted. This reason will be available to the originator once the requisitions are sent. c) Click on Approve and the Current Status will change to approved and the approval line will be displayed in green. d) To change the status back to unapproved, click on the UnApprove button. e) Clicking on Reset all Approvals will undo any approvals for the displayed requisition and rebuild the approval chain from the bottom up. i) If, for example, a new principal has taken over, he or she would then be able to re-approve the requisition. ii) Note that the Reset all Approvals button is only available and visible to the Business Administrator. 25
 The system will ask if you wish to send this requisition to the next approver and the originator immediately: a) If you choose No, the system will prompt you again whether or not you wish to send")
26 3) When complete, click on the Finished button to save any changes you have made. 4) Click on the red x to close the View and Set Approvals window and return you to the previous window. 5) The system will ask if you wish to send this requisition to the next approver and the originator immediately: a) If you choose No, the system will prompt you again whether or not you wish to send this requisition along with any new or updated requisitions when you quit the system, and again when you log on again. b) If you choose Yes, the system will send the requisition, then ask if you wish to send all new approval updates immediately upon completion: c) If you choose Yes, any time you approve a requisition, it will be automatically sent to the next approver and the originator without any of these prompts. If you choose No, you will be asked this same series of questions each time you approve a requisition. 26
27 Browsing Your Requisitions The Requisition Browser allows you to view all of the requisitions in the system. The requisitions are color coded for ease of use. Gray = New/Changed Requisitions Purple = Sent Requisitions (PO Number indicates it has been converted to a PO.) Blue = Partially Approved Green = Approved Requisitions Yellow = Flagged Requisitions Red = Voided Requisitions Dark Blue = Not Approved Requisitions You are able to adjust the size of what you are viewing. Bring your mouse pointer over the line between column headings, and the pointer will change to a double arrow. Now you can click and drag to resize the columns. You can also resize the requisition browser window by clicking and dragging the edges just like you would any other window. The system will remember your column width and window size settings whenever you open the requisition browser. 1) From the Main Menu click on Browse. The Requisition Browser will open: 27
 Requisitions to Include has Hide Prior Yr marked.")
 Check the box labeled Hide Void to hide all voided requisitions.")

28 2) The default setting is to display current year requisitions. a) Requisitions to Include has Hide Prior Yr marked. Change to Show All to display prior year requisitions. b) Check the box labeled Hide Void to hide all voided requisitions. 3) Requisition Sort Options allows you to sort your requisitions by ReqID, Last Update, PO Number, Originator or Vendor. Mark the correct circle. 4) The drop down box in the lower center of the window allows you to further narrow the requisitions displayed: 28

29 a) The dropdown box starts at the view that was selected the last time this window was exited on the workstation b) My Normal Requisitions Requisitions you originated or are in the approval chain for that are already approved/in the approval process but are not yet converted to purchase orders. c) My Flagged Requisitions Requisitions you originated or are in the approval chain for that are currently flagged. d) My Converted Requisitions Requisitions you originated that have been approved and subsequently converted into a purchase order (in CDK Accounting.) e) My Budgetary Requisitions Requisitions you originated or are in the approval chain for, that have the Requisition for Budgeting Only box marked. f) All My Non-Budgetary Requisitions Requisitions you originated or are in the approval chain for that do not have the Requisition for Budgeting Only box marked. g) All My Requisitions All requisitions you originated or are in the approval chain for. h) Need My Approval (approvers only) Requisitions you are in the approval chain for that you have not yet approved. i) My Action Items (approvers only) Requisitions that need your approval and have already been approved by anyone lower in the approval chain. 5) Click on Check for New Requisitions and the system will scan for any new requisitions that have been added to the server. 6) The Send or Resend Req button will send the currently selected requisition information to the server. Copying Requisitions 1) From the Main Menu click on Browse. The Requisition Browser will open. 2) Highlight the requisition you wish to copy and right click. 3) The system will ask if you wish to copy the requisition: 4) Click on No to cancel or Yes to make a copy. 5) The copy will be a new requisition that is the same as the old one with a few exceptions. a) The originator of the new requisition will be the user who copied it, not the user who originally created the previous requisition. b) Any cancelled lines in the old requisition will not be included in the new requisition. c) All vendor instructions and requisition messages will be copied to the new requisition. 29
30 Show Flag Messages Once you are on the requisition browser there are two ways to view flag messages. 1) Right click on the flagged requisition while you hold down the shift key. The following window will open: 2) You can also expand your window (drag on the corner) and increase your column width (expand your column heading) as described above under Browsing Your Requisitions. The Flag Info is in the far right column. 30

31 Reports To access the reports click on Reports from the Main Menu. The Reports menu will open. Navigating the Reports Preview Window All reports are first shown onscreen as a print preview. To navigate through the requisition preview use the buttons at the top of this window. The arrow buttons will move you through the pages of the requisition. ( first page, previous page, next page, last page) The binoculars will allow you to search for a particular word of phrase in your current requisition. Use the drop down arrow to make the document larger. To print the requisition, click on the printer icon at the top left of your window and the requisition will be sent to your default printer. Exporting Reports as Excel Files Some schools prefer to bring information from the accounting software into an Excel spreadsheet so that they can customize the look of their information. There will be some extra steps involved, however the procedure is not difficult. 1) From the Main Menu click on Utilities. 2) Click on Export CDK Data. 3) Click on any of the Export Data Summary Options or Export Transaction Options. 4) You will be told that export was complete and provided with the path the file was exported to (example: if you chose Expense Account Summary you will see this Finished Exporting 490 Records into C:\CDK\Export\ExpData11.CSV ). 31

 From the Main Menu click on Reports.")
32 5) Go to C:\CDK\Export. Find the file you exported into this folder and double click on that file to open it in Excel. You may then proceed to customize your data. Exporting Reports as PDF Files In CDK Accounting you have the ability to create.pdf files of any report. These files can then be electronically sent (through , for example) to anyone who needs the information. You need to have a.pdf writer installed on your computer. There are several free ones available online. If you need assistance installing a.pdf writer, please contact a CDK representative. 1) From the Main Menu click on Reports. 2) Click on the tab for the group of reports you wish to view/print from. 3) Click on the specific report you wish to print. You will see a preview of your report. Please note the header: 4) Click on Switch Toolbar. The heading will change. 5) Click on Printer Options. Select whatever.pdf writer you have installed on your computer just as you would select your printer. Click on OK. 32
 7) The Save As window will open.")
 Change the file name to the name of the report.")
33 6) Click on Print Report. Make any choices and click on OK. (Click on Cancel to exit.) 7) The Save As window will open. a) Select the location you wish to save the file to. b) Change the file name to the name of the report. You may want to use the date as part of your file name. 33

34 8) Click on Save. (Click on Cancel to exit without saving.) 9) Return to your desktop and locate the file you exported. It is now in a format that you can send electronically. Setting Users for Reports There are twelve reports accessible from the reports menu. The first two are accessible ONLY TO APPROVERS. Use the drop down arrow to select the user you wish to have active while printing reports. Mark the circle labeled either Approvers or Originators to display only that group. 34


35 Requisition Reports Requisitions Requiring Approver Action Approver s Action Items 35


36 Approver s/originator s Normal Requisitions Approver s/originator s Converted Requisitions Approver s/originator s Requisitions (All) Approver s/originator s Flagged Requisitions Approver s/originator s Budgetary Requisitions The system will ask, Do you want to hide the requisition details? Choose Yes or No. Your report will be generated. 36
 Click on Provisional General Ledger Report. 3) You will be asked to select a fund for the report to cover. Enter the fund and click on OK.")
 You will be asked whether you want to show active requisitions for all accounts. Click on Yes or No as appropriate. Detailed Account Status 1) From the Main Menu click on Reports.")
37 If you have permission to see unencumbered balances, then the other two buttons on the menu will be active: Provisional General Ledger Report 1) From the Main Menu click on Reports. 2) Click on Provisional General Ledger Report. 3) You will be asked to select a fund for the report to cover. Enter the fund and click on OK. 4) You will be asked to select a location for the report to cover. Select a location OR enter * for all locations and click on OK. 5) You will be asked whether you want to show active requisitions for all accounts. Click on Yes or No as appropriate. Detailed Account Status 1) From the Main Menu click on Reports. 2) Click on Detailed Account Status. You will be asked what fund or location to print the expenditure account details for. Select one of the following options. a) Enter the 2 or 3 fund or location code. b) Enter one of the following codes: i) Prog for program ii) Func for function iii) Obj for object 37
38 iv) Subj for subject. v) SAL for salary. c) The system will then prompt you for the specific program, function, object, etc. that you are looking for. 3) Your report will be displayed as requested. 38
 Click on Change My Password. The system will ask you to enter your old password: 3) Enter your password and click on OK. (Click on Cancel to exit.")
39 Utilities To go to the utilities menu, click on the Utilities button on the main menu. Change my Password 1) From the Main Menu click on Utilities. 2) Click on Change My Password. The system will ask you to enter your old password: 3) Enter your password and click on OK. (Click on Cancel to exit.) 4) You will be asked to enter your new password: 39
 Enter the new password again and click on OK. Click on Cancel to exit. Your password will be changed.")
40 5) Enter your new password, between 5 and 10 characters long. Click on OK to continue or Cancel to exit. 6) The system will ask you to re-enter the password to verify it. 7) Enter the new password again and click on OK. Click on Cancel to exit. Your password will be changed. 8) If the two entries of your new password do not match, or if your password is not between 5 and 10 characters in length, the system will give you an error message, and you will have to start over. Get Updated Vendor List The vendor list in the requisitioning system is kept up to date by importing the updated vendor list from the main CDK Accounting program. A vendor must be added into the CDK program in order for it to appear in the requisitioning system. 1) From the Main Menu click on Utilities. 2) Click on Get Updated Vendor List. The system will display a status bar while this action is completed. 3) When complete a window will open asking if you would like to update the vendor list in the master database. Click on Yes to continue. The system will display a status bar while this action is completed. 4) Your update is complete. Get Updated Account List The vendor list in the requisitioning system is kept up to date by importing the updated vendor list from the main CDK Accounting program. A vendor must be added into the CDK program in order for it to appear in the requisitioning system. 1) From the Main Menu click on Utilities. 2) Click on Get Account Vendor List. The system will display a status bar while this action is completed. 40
 Your update is complete.")
41 3) When complete a window will open asking if you would like to update the vendor list in the master database. Click on Yes to continue. The system will display a status bar while this action is completed. 4) Your update is complete. Send Requisitions Click on Send Requisitions to send requisitions that have been created on your workstation to the server so that they appear on other workstations. 1) From the Main Menu click on Utilities. 2) Click on Send Requisitions. 3) The system will display a message box telling you how many requisitions you have sent. Get Requisitions Clicking on the Get Requisitions button will retrieve all your requisitions from the server. This is useful if you are missing a requisition that you think you should have, or if one of your requisitions is not showing an update that it should. 1) From the Main Menu click on Utilities. 2) Click on Get Requisitions. 3) The system will display a message box telling you how many requisitions you have received. Backup Requisitions 1) From the Main Menu click on Utilities. 2) Click on Backup Requisitions. The Backup Requisitions window will open. 3) Select the location you wish to save your file to (most likely the backup folder) and click on Save. 41
42 4) Your data will be saved to the selected folder. 42
1-Step Appraisals Personal Property Appraisal Software
 User Guide for 1-Step Appraisals Personal Property Appraisal Software Home & Business Software for Windows Page Table of Contents Getting Started... Page 3 Image Preferences... Page 4 Adding Business/Company
Fund Accounting Purchasing Supplement. PowerSchool. efinanceplus. Version 1.0
 Fund Accounting Purchasing Supplement PowerSchool efinanceplus Version 1.0 Table of Contents Fund Accounting Purchasing Supplement... 1 efinanceplus Login Instructions... 3 Accessing and Searching Expenditure
New Finance Officer & Staff Training
 New Finance Officer & Staff Training Overview MUNIS includes many programs and tools to allow for the management of the District financials. As newer finance officers and staff, you are charged with understanding,
Discovering Computers & Microsoft Office Office 2010 and Windows 7: Essential Concepts and Skills
 Discovering Computers & Microsoft Office 2010 Office 2010 and Windows 7: Essential Concepts and Skills Objectives Perform basic mouse operations Start Windows and log on to the computer Identify the objects
You will need the unique URL for your site and your username and password to login to Data- Director.
 Getting Started Step 1: Login to the DataDirector website: You will need the unique URL for your site and your username and password to login to Data- Director. You may change your password after you login.
Instructor: Clara Knox. Reference:
 Instructor: Clara Knox Reference: http://www.smith.edu/tara/cognos/documents/query_studio_users_guide.pdf Reporting tool for creating simple queries and reports in COGNOS 10.1, the web-base reporting solution.
1. Understanding efinanceplus Basics
 1. Understanding efinanceplus Basics To understand the procedures described later in this guide, you will first need some background on the efinanceplus environment. Whether adding, searching for, viewing,
User Guide. Avery Dennison Web Ordering Solution for Steinmart
 User Guide Avery Dennison Web Ordering Solution for Steinmart March 2012 Copyright 2012 A very Dennison The information in this document is subject to change without notice and should not be construed
Finance Systems Finance. PowerBudget. Learner Guide for FedUni Staff
 Finance Systems Finance PowerBudget Learner Guide for FedUni Staff Prepared by: Chrissy Dunn Finance Systems Finance Chief Operating Office Status: Final Version: 1 Date: 30/11/2014 Table of Contents Introduction
vbound User Guide vbound User Guide Version Revised: 10/10/2017
 vbound User Guide Version 4.1.1 Revised: 10/10/2017 Copyright 2014-2017 FFL Solutions Inc. Page 1 of 87 Table of Contents Using vbound...5 Starting vbound... 5 Bound Book List... 6 vbound Ribbon Menu...
Working with PDF s. To open a recent file on the Start screen, double click on the file name.
 Working with PDF s Acrobat DC Start Screen (Home Tab) When Acrobat opens, the Acrobat Start screen (Home Tab) populates displaying a list of recently opened files. The search feature on the top of the
STUDY ASSISTANT. Adding a New Study & Submitting to the Review Board. Version 10.03
 STUDY ASSISTANT Adding a New Study & Submitting to the Review Board Version 10.03 Contents Introduction... 3 Add a Study... 3 Selecting an Application... 3 1.0 General Information... 3 2.0 Add Department(s)...
Entering a Purchase Order (Formerly DPO) - DO NOT USE SAFARI
 - DO NOT USE SAFARI") Entering a Purchase Order (Formerly DPO) - DO NOT USE SAFARI Select the Finance Tab at the top right of the screen. Select Purchase Orders from menu list on the left side of page. Select or to start a
Entering a Purchase Order (Formerly DPO) - DO NOT USE SAFARI Select the Finance Tab at the top right of the screen. Select Purchase Orders from menu list on the left side of page. Select or to start a
Expedient User Manual Getting Started
 Volume 1 Expedient User Manual Getting Started Gavin Millman & Associates Pty Ltd 281 Buckley Street Essendon VIC 3040 Phone 03 9331 3944 Web www.expedientsoftware.com.au Table of Contents Logging In...
In the fourth unit you will learn how to upload and add images and PDF files.
 Introduction Here at SUNY New Paltz, we use the Terminal Four (T4) web content management system (CMS). This puts the power of editing content on our college s webpage in the hands of our authorized users.
Astra Scheduling Grids
 Astra Scheduling Grids To access the grids, click on the Scheduling Grids option from the Calendars tab. A default grid will be displayed as defined by the calendar permission within your role. Choosing
Making an entry into the CIS Payments workbook
 Making an entry into the CIS Payments workbook By now you should have carried out the CIS Payments workbook Setup. If you have not done so you will need to do this before you can proceed. When you have
SharePoint: Fundamentals
 SharePoint: Fundamentals This class will introduce you to SharePoint and cover components available to end users in a typical SharePoint site. To access SharePoint, you will need to log into Office 365.
SharePoint: Fundamentals
 SharePoint: Fundamentals This class will introduce you to SharePoint and cover components available to end users in a typical SharePoint site. To access SharePoint, you will need to log into Office 365.
Administration. Training Guide. Infinite Visions Enterprise Edition phone toll free fax
 Administration Training Guide Infinite Visions Enterprise Edition 406.252.4357 phone 1.800.247.1161 toll free 406.252.7705 fax www.csavisions.com Copyright 2005 2011 Windsor Management Group, LLC Revised:
Quick & Simple Imaging. User Guide
 Quick & Simple Imaging User Guide The Quick & Simple Imaging software package provides the user with a quick and simple way to search and find their documents, then view, print, add notes, or even e- mail
Version 1.6. UDW+ Quick Start Guide to Functionality. Program Services Office & Decision Support Group
 Version 1.6 UDW+ Quick Start Guide to Functionality Program Services Office & Decision Support Group Table of Contents Access... 2 Log in/system Requirements... 2 Data Refresh... 2 00. FAME Chartfield
These materials may not be reproduced in whole or in part without the express written permission of The University of Akron.
 Table of Contents Chapter 1 : Overview...1-1 Chapter 2 : Definitions...2-1 ChartFields...2-1 Accounting and Budget Periods...2-3 Budgetary Control...2-3 Chapter 3 : Sign In and Sign Out...3-1 Sign In to
Planning User Manual
 Planning 11.1.2 User Manual Budget Office May 2011 Hyperion Planning/Workspace/Reports Hyperion Planning Overview.... 3 Logging In.... 3 Setting User Preferences.... 3 Workspace Logging In..4 Navigating
Welcome to Shopfront. Your distributor will supply your user name, password, and the website address for your login page.
 User Guide Table of Contents Login... 3 Choose a Location... 4 Home Page... 5 Header Bar... 6 My Catalog... 6 Menu Bar... 7 My Profile... 8 Contact Us... 9 Change Location... 10 Shopping Lists... 11 Quick
Web Report Library User Guide
 Web Report Library User Guide Prepared for: Finance & Administration Budget Administrators Updated On: 3/19/2015 7:55:00 AM 1 Table of Contents 1. Request Access to the Web Report Library (WRL)...... 3
Navigate to Cognos Cognos Analytics supports all browsers with the exception of Microsoft Edge.
 IBM Cognos Analytics Create a List The following instructions cover how to create a list report in IBM Cognos Analytics. A list is a report type in Cognos that displays a series of data columns listing
Introduction. Logging In. https://portal.format.co.nz/login/trt
 Introduction Welcome to the Tidd Ross Todd On-line Ordering System. This site has been created with the intention to assist users with the following: placing orders viewing work in progress searching for
Requisitioner Training Manual
 Requisitioner Training Manual Larry McWilliams Procurement Department lmcwilli@kent.edu Revised December 2018 0 Introduction The purpose of this training guide is to familiarize the user with FlashCart,
Signing on to Smartstream
 Signing on to Smartstream To access Smartstream: Open the Internet Explorer homepage. Click on Staff Applications Under Staff Applications, scroll to the "Smartstream" option. Click on that option. 1 Signing
Astra Scheduling Grids
 Astra Scheduling Grids To access the grids, click on the Scheduling Grids option from the Calendars tab. A default grid will be displayed as defined by the calendar permission within your role. Choosing
Online Demo Scheduling Tool: User Guide
 Unrestricted Internal Use - Carestream Health, 2013 1 Online Demo Scheduling Tool: User Guide This document provides step by step instructions on how to successful use the Online Demo Scheduling tool for
WebLink Manual EZ-CAMP2
 WebLink Manual EZ-CAMP2 SofterWare, Inc. WebLink March 2010 Table of Contents Table of Contents 1. WEBLINK OVERVIEW...3 Manual Overview...3 Support...3 WebLink Terminology...4 2. ADDING THE FORM TO YOUR
Crystal Reports (Custom Reports)
") Crystal Reports (Custom Reports) Getting Started The Crystal Reports Module is Option #3 in the Reports Menu. Since not everyone needs the reporting capabilities of this new module, it does not come pre-installed
Crystal Reports (Custom Reports) Getting Started The Crystal Reports Module is Option #3 in the Reports Menu. Since not everyone needs the reporting capabilities of this new module, it does not come pre-installed
Office of Instructional Technology
 Office of Instructional Technology Microsoft Excel 2016 Contact Information: 718-254-8565 ITEC@citytech.cuny.edu Contents Introduction to Excel 2016... 3 Opening Excel 2016... 3 Office 2016 Ribbon... 3
Installing the application involves several steps. Note that you must install QuickBooks on your computer prior to installing this application.
 CCRQLABEL OVERVIEW This is an overview (summary) of the CCRQLabel 4.x label printing product. Full documentation is under development INSTALLING CCRQLABEL This document provides a quick review of how to
Intro to Aeries.Net July 12, Terms Used in Aeries.Net. 2. Logon to Aeries.Net
 Intro to Aeries.Net July 12, 2013 1. Terms Used in Aeries.Net 2. Logon to Aeries.Net 3. Aeries.Net Home Page Current Version of Aeries.Net Utilizing the Navigation Tree Accessing Programs From the Navigation
Business Plus Stores September 2014
 Business Plus Stores September 2014 Stores - Sections Section Function Description 1 1 st & Last Bulleted Shortcuts enter/delete warehouse requisition print requisition copy, if desired search previous
ADOBE DREAMWEAVER CS4 BASICS
 ADOBE DREAMWEAVER CS4 BASICS Dreamweaver CS4 2 This tutorial focuses on the basic steps involved in creating an attractive, functional website. In using this tutorial you will learn to design a site layout,
QUESTION ITEM BANK MAINTENANCE PROGRAM QUICK GUIDE & ILLUSTRATED HELP
 PROJECT PHOENIX EduTrax Instructional Management Solution Phoenix/EIM ItemPlus QUESTION ITEM BANK MAINTENANCE PROGRAM QUICK GUIDE & ILLUSTRATED HELP Version 1.3.3.2 The ItemPlus Windows PC program is used
REPORT WRITER MANUAL (Version 10)
") REPORT WRITER MANUAL (Version 10) 2 Report Writer - Navigation You may access Report Writer by choosing view from your toolbar and selecting Report Writer or by choosing the Report Writer option when you
REPORT WRITER MANUAL (Version 10) 2 Report Writer - Navigation You may access Report Writer by choosing view from your toolbar and selecting Report Writer or by choosing the Report Writer option when you
Scheduling Module Client Booking Quick Guide Online-Scheduling
 Scheduling Module Last Updated: November 26, 2009 System Administration Contact: Colin Bryant Phone: 604-822-7374 E-mail: PsychIT@exchange.ubc.ca Logon to Book King Enter the following URL into your address
Welcome to Introduction to Microsoft Excel 2010
 Welcome to Introduction to Microsoft Excel 2010 2 Introduction to Excel 2010 What is Microsoft Office Excel 2010? Microsoft Office Excel is a powerful and easy-to-use spreadsheet application. If you are
Storefront Ordering System Demonstration Guide. Powered by
 Storefront Ordering System Demonstration Guide Powered by Welcome to CMYK s Storefront Ordering System (SOS) The following pages will guide you through our Demo Site. We will show you many options available
Guide for K-6 Teachers
 Guide for K-6 Teachers 2009 Houghton Mifflin Harcourt Publishing Company. All rights reserved. Houghton Mifflin Harcourt and its logo are trademarks of Houghton Mifflin Harcourt Publishing Company. Microsoft
Financial Report Guide
 Financial Report Guide 2008 Washington University All rights reserved. For RAPS Support, send an e-mail message to RAPS@wustl.edu, or call 935-3890. Last Modified: 09/16/08 This page is intentionally left
Forms/Distribution Acrobat X Professional. Using the Forms Wizard
 Forms/Distribution Acrobat X Professional Acrobat is becoming a standard tool for people and businesses to use in order to replicate forms and have them available electronically. If a form is converted
Inventory Module & Wireless Device. User Quick Start Guide
 Inventory Module & Wireless Device User Quick Start Guide Published on: 3/14/2007 Copyright and Disclaimer Copyright 2007 Pace Systems Group, Inc., 1902 2 nd Avenue North, Jacksonville Beach, Florida,
The following instructions cover how to edit an existing report in IBM Cognos Analytics.
 IBM Cognos Analytics Edit a Report The following instructions cover how to edit an existing report in IBM Cognos Analytics. Navigate to Cognos Cognos Analytics supports all browsers with the exception
Quick Start Guide - Contents. Opening Word Locating Big Lottery Fund Templates The Word 2013 Screen... 3
 Quick Start Guide - Contents Opening Word... 1 Locating Big Lottery Fund Templates... 2 The Word 2013 Screen... 3 Things You Might Be Looking For... 4 What s New On The Ribbon... 5 The Quick Access Toolbar...
Accounting Table of Contents
 Accounting Table of Contents Accounting Table of Contents 1 About Church Windows Accounting 4 Chart of Accounts Setup 6 Adding and Removing Accounts 7 Managing the Chart of Accounts 9 Detail tab 9 Balance
Microsoft Access 2013
 Microsoft Access 2013 Chapter 1 Databases and Database Objects: An Introduction Objectives Describe the features of the Access window Create a database Create tables in Datasheet and Design views Add records
DEALER RESOURCE CENTER TUTORIAL
 DEALER RESOURCE CENTER TUTORIAL Please review the General System Requirements and Navigation rules below before proceeding. System Requirements Internet Access is required; the faster, the better. It is
worksmart!-mobile User Guide Version 3.5 worksmart!-mobile User Guide 1 Copyright 2005 Mobile Workforce, Inc.
 worksmart!-mobile User Guide 1 Copyright 2005 Mobile Workforce, Inc. Copyright Notice Mobile Workforce, Inc. has copyright ownership of the Mobile Workforce-workSmart! applications and other software related
Hernando County School District
 Hernando County School District Quick User Guide for Regions Intersect Regions Intersect- Quick User Guide for Distributed Cards Page 1 ACCESSING REGIONS INTERSECT Initial access to the Regions Intersect
Getting Started with XMF Remote
 Getting Started with XMF Remote Remote R9.5 Contents Introduction......................................................... 5 How to Login........................................................ 6 The
User Manual. perfectionlearning.com/technical-support
 User Manual perfectionlearning.com/technical-support 1 User Manual Accessing Math X... 3 Login... 3 Forgotten Password... 3 Navigation Menu... 4 Logout... 4 Admin... 5 Creating Classes and Students...
Office 365: . Accessing and Logging In. Mail
 Office 365: Email This class will introduce you to Office 365 and cover the email components found in Outlook on the Web. For more information about the Microsoft Outlook desktop client, register for a
YGL 3.0 // The Basics
 YGL 3.0 // The Basics Thank you for your continued support of You ve Got Leads! The following document is intended to help with the many features of the program. Each community may have different features
Colleague UI4.3 Documentation
 Colleague UI4.3 Documentation Table of Contents Getting Started... 2 Add the Shortcuts to your Desktop... 2 Searching for and Using Forms... 3 Begin Your Form Search... 3 Form Search Results... 3 The Navigation
School Specialty New Release Manual
 School Specialty New Release Manual Version 11.1 Table of Contents: Registration Entering Orders Search Options Search by Catalog Number Search by Keyword Digital Catalogs Upload File Add to Shopping List
SAP Shopping Cart for Custodians
 BUSINESS & PRODUCTIVITY TECHNOLOGY & INFORMATION SYSTEMS SERVICES DIVISION USER SUPPORT SERVICES: EMPLOYEE BUSINESS TRAINING SAP Shopping Cart for Custodians Revised: October 2010 TABLE OF CONTENTS OVERVIEW...
ZYTO Compass User Manual Copyright 2017 All rights reserved CTC B
 ZYTO Compass User Manual Copyright 2017 All rights reserved CTC-10101.B Table of Contents Table of Contents ii Getting started 1 About the Compass 1 About the Compass software and hardware 1 Installing
MicroStrategy Quick Guide: Running the PI Report
 MicroStrategy Quick Guide: Running the PI Report ITS Business Intelligence Group Go to reporting.gmu.edu and click on Login to Microstrategy ACTION Enter User name and Password. Keep default selection
PlanWell 4.0 User Guide
 PlanWell 4.0 User Guide Contents Finding Planwell and Logging On 2 Planwell Access Portals 2 Document Selection 3 Build a Set 4 Most Current Set 4 Custom Packages 4 Issue Tree 5 Standard Order Process
IT Services Financial Services. IT Services Financial Services.
 eledgers IT Services Financial Services IT Services Financial Services http://finserv.uchicago.edu Table of Contents Logging into eledgers... 3 17BThe eledgers Workspace... 4 Basic Search using Custom
[ Getting Started with Analyzer, Interactive Reports, and Dashboards ] ]
![[ Getting Started with Analyzer, Interactive Reports, and Dashboards ] ]](/thumbs/88/117545107.jpg "[ Getting Started with Analyzer, Interactive Reports, and Dashboards ] ]") Version 5.3 [ Getting Started with Analyzer, Interactive Reports, and Dashboards ] ] https://help.pentaho.com/draft_content/version_5.3 1/30 Copyright Page This document supports Pentaho Business Analytics
Version 5.3 [ Getting Started with Analyzer, Interactive Reports, and Dashboards ] ] https://help.pentaho.com/draft_content/version_5.3 1/30 Copyright Page This document supports Pentaho Business Analytics
Software Conversion Guide
 Eagle SSE Software Conversion Guide Release 17 (Server Level 29) EL2157 This manual contains reference information about software products from Activant Solutions Inc. The software described in this manual
Collector and Dealer Software - CAD 3.1
 Collector and Dealer Software - CAD 3.1 Your Registration Number Thank you for purchasing CAD! To ensure that you can receive proper support, we have already registered your copy with the serial number
AMP User Manual Reports
 AMP User Manual Reports AMP s reporting capabilities are designed to allow you the ability to create various types of customized reports that organize data in the way you need it presented. It is worth
Enhancements Guide. Applied Business Services, Inc. 900 Wind River Lane Suite 102 Gaithersburg, MD General Phone: (800)
") Enhancements Guide Applied Business Services, Inc. 900 Wind River Lane Suite 102 Gaithersburg, MD 20878 General Phone: (800) 451-7447 Support Telephone: (800) 451-7447 Ext. 2 Support Email: support@clientaccess.com
Enhancements Guide Applied Business Services, Inc. 900 Wind River Lane Suite 102 Gaithersburg, MD 20878 General Phone: (800) 451-7447 Support Telephone: (800) 451-7447 Ext. 2 Support Email: support@clientaccess.com
Treutlen County Schools Online Purchase Requisitions
 Doc e Fill Portal Information http://tcs-softdocs/docefill/index.aspx Passwords are Case Sensitive Page 1 of 8 To Complete & Submit Forms: 1. Open (Left-Click) on the form Purchase Requisition from the
Basic Millennium INTRODUCTION
 Basic Millennium INTRODUCTION Welcome to the Basic Millennium tutorial. Navigation tools, such as the Continue button, will display as you progress through the presentation, while playback functions are
CalPlan. Creating a Unit Plan Navigating CalPlan Workbook 1/25/18
 CalPlan Creating a Unit Plan Workbook 1/25/18 Table of Contents Exercise 1: Log into the Workspace & Run a CalPlan Report... 3 Exercise 2: Launching CalPlan and Setting Your Entity... 10 Exercise 3: Actualized
Creating Interactive PDF Forms
 Creating Interactive PDF Forms Using Adobe Acrobat X Pro for the Mac University Information Technology Services Training, Outreach, Learning Technologies and Video Production Copyright 2012 KSU Department
Online Order Entry. Order Entry at Your Convenience. Your Partner Then, Now and For Years to Come. Your INSTITUTIONAL FOOD Distributor
 Your Partner Then, Now and For Years to Come Your INSTITUTIONAL FOOD Distributor Online Order Entry Order Entry at Your Convenience 309 Merchant St. PO Box D Emporia, KS 66801 (800) 279-3826 www.evcofoods.com
AGENT123. Full Q&A and Tutorials Table of Contents. Website IDX Agent Gallery Step-by-Step Tutorials
 AGENT123 Full Q&A and Tutorials Table of Contents Website IDX Agent Gallery Step-by-Step Tutorials WEBSITE General 1. How do I log into my website? 2. How do I change the Meta Tags on my website? 3. How
Welcome to our online Web Help for the Activity Fund Accounting System software.
 Welcome to our online Web Help for the Activity Fund Accounting System software. Version 1.2 LOCAL GOVERNMENT CORPORATION ALL RIGHTS RESERVED 2010-2018 REV. 02/06/2018 Portions copyright 1988 - Acucorp,
USER MANUAL. > analyze. reduce. recover
 USER MANUAL > analyze > reduce > recover Table of Contents COPY AUDIT... 1 OVERVIEW... 1 IMPORTANT NOTES FOR PRINT AUDIT 4 CUSTOMERS... 1 COMMUNICATOR TECHNICAL NOTES... 2 COPY AUDIT SOFTWARE... 2 INSTALLING
Catalogue Search & Browse
 Catalogue Search & Browse Choose "Search Catalogue" from the web menu: Searching and browsing can be done from an individual catalogue or from multiple catalogues: Catalogue Selection To browse from an
Online Requesting and Receiving. Training Manual
 Online Requesting and Receiving Training Manual 1 Table of Contents Introduction 3 Logging In.3 Creating a Profile...3 Modifying a Ship to Address...3 FOAPAL and Commodity Codes 3 Code Favorites...3 Understanding
Troubleshooting in Microsoft Excel 2002
 Page 1 of 8 Troubleshooting in Microsoft Excel 2002 Result: To understand how to work with the Excel software to enter data, navigate the page, and print materials. Tabs Look at the tabs at the bottom
Dear Race Promoter: Sincerely, John M Dains Impact Software Group, Inc.
 Dear Race Promoter: Thank you for your interest in Trackside. We are proud to present to you. If you have any questions about how the software works and can not resolve your problems using this manual,
How to Export a Report in Cognos Analytics
 IBM Cognos Analytics How to Export a Report in Cognos Analytics Reports viewed in IBM Cognos Analytics can be exported in many formats including Excel. Some of the steps for exporting are different depending
Test Information and Distribution Engine
 SC-Alt Test Information and Distribution Engine User Guide 2018 2019 Published January 14, 2019 Prepared by the American Institutes for Research Descriptions of the operation of the Test Information Distribution
User Guide. FTR Reporter For more information, visit
 FTR Reporter 5.7.1 For more information, visit www.fortherecord.com TABLE OF CONTENTS INTRODUCTION... 5 Overview... 5 About This Document... 5 GETTING STARTED... 6 Installation... 6 Starting Reporter...
MCDOUGAL LITTELL EASYPLANNER USER S GUIDE
 MCDOUGAL LITTELL EASYPLANNER USER S GUIDE 1 Introduction The McDougal Littell EasyPlanner allows you to quickly and easily access Resource materials such as tests, quizzes, books, and other supporting
The PeopleSoft Financials System
 The PeopleSoft Financials System 2 Introduction...................... 14 Signing In and Out.................... 14 Signing In to the System.............. 14 Signing Out................... 17 Navigation
Contents GENERAL OVERVIEW 3. User Profile and Permissions... 3 Regional Manager... 3 Manager... 3 User... 4 Security... 4
 SYNERGY USER GUIDE Contents GENERAL OVERVIEW 3 User Profile and Permissions... 3 Regional Manager... 3 Manager... 3 User... 4 Security... 4 Budgets... 4 Spending Limits... 5 PO Hold Review... 5 Regional
DOCUMENT IMAGING REFERENCE GUIDE
 January 25, 2017 DOCUMENT IMAGING REFERENCE GUIDE AppXtender Web Access version 7 Kent State University Division of Information Services AppXtender Web Access Help: For questions regarding AppXtender Web
Keep It Easy Software Cloud User Manual
 Keep It Easy Software Cloud User Manual 2015 Keep It Easy Software 1 CONTENTS How to Login... 5 Functions... 5 System Preferences... 6 General... 7 Receipt Categories... 9 Expense Categories... 10 Service
Introduction to SAP. Navigation Module
 Introduction to SAP Navigation Module October 2009 Contents 1 Introduction to SAP... 3 1.1 Log On... 3 1.2 Navigation Through SAP... 5 1.3 The Menu Bar... 5 1.4 The Short Cut Toolbar... 6 1.5 Display Technical
sohodox Quick Start Guide
 sohodox Quick Start Guide Starting Sohodox Click on Start > All Programs > Sohodox or double click Sohodox icon desktop to run Sohodox. Login as Superadmin. Username: superadmin Password: superadmin Sohodox
1. Login to AutoCount Accounting on the account book that user wish to install this plug-in.
 Page1 Introduction Plug-in is an add-on function for AutoCount Accounting. The purpose of this plug-in is to provide an approval platform for user to control their Sales and Purchase entries. System Requirement
MultiSite Suite: General Ledger
 MultiSite Suite: General Ledger User s Manual version 2.2.97 Copyright & Trademarks Copyright Notice and Trademarks 2003 by Brent Lawrence, LLC. All rights reserved. Reprinted and edited by MultiSite Systems,
DecisionPoint For Excel
 DecisionPoint For Excel Getting Started Guide 2015 Antivia Group Ltd Notation used in this workbook Indicates where you need to click with your mouse Indicates a drag and drop path State >= N Indicates
CheckBook Pro 2 Help
 Get started with CheckBook Pro 9 Introduction 9 Create your Accounts document 10 Name your first Account 11 Your Starting Balance 12 Currency 13 We're not done yet! 14 AutoCompletion 15 Descriptions 16
GradeConnect.com. User Manual
 GradeConnect.com User Manual Version 2.0 2003-2006, GradeConnect, Inc. Written by Bernie Salvaggio Edited by Charles Gallagher & Beth Giuliano Contents Teachers...5 Account Basics... 5 Register Your School
PowerSchool Handbook Federal Survey Form Report
 Handbook Federal Survey Form Report Version 2.1 August 22, 2018 Copyright 2018, San Diego Unified School District. All rights reserved. This document may be reproduced internally by San Diego Unified School
SMU Financials Created on April 29, 2011
 Created on April 29, 2011 Notice 2011, Southern Methodist University. All Rights Reserved. Published 2011. The information contained in this document is proprietary to Southern Methodist University. This