LevelOne WAP g Wireless AP Storage w/ STAT/IDE. Interface. User Manual V1.0
|
|
|
- Randolf Owen
- 6 years ago
- Views:
Transcription
1 LevelOne WAP g Wireless AP Storage w/ STAT/IDE Interface User Manual V1.0
2 Table of Contents CHAPTER 1: INTRODUCTION OVERVIEW FEATURES SYSTEM REQUIREMENTS PACKAGE LIST HARDWARE CONFIGURATION CHAPTER 2: GETTING STARTED HARD DISK INSTALLATION MAKING CONNECTIONS Install Necessary Communication Protocols Wired Ethernet Connection Wireless Connection FILE SHARING Accessing the Network Hard Drive via My Network Places Searching the Computers Search the Entire Network Manually Accessing Files via FTP CHAPTER 3: MAKING CONFIGURATION CONFIGURATION WIZARD NETWORK SETTINGS DHCP Setting Wireless Setting
3 CHAPTER 4: STORAGE CONFIGURATION DISK UTILITY FILE SHARING ACCESS CONTROL FILE BROWSER CHAPTER 5: ADVANCED TOOLS BACKUP CONFIGURATION RESET CONFIGURATION TO DEFAULT REBOOT FIRMWARE UPGRADE CHAPTER 6: DOWNLOAD ASSISTANT FTP HTTP ALERT CONFIGURATION DOWNLOAD STATUS CHAPTER 7: MISC TIME SETTING LOGIN SETTING SYSTEM LOG CHAPTER 8: FAQ & TROUBLE SHOOTING WHAT CAN I DO WHEN I HAVE SOME TROUBLE? HOW TO SETUP WIRELESS FUNCTION? HOW TO MAP NETWORK DRIVE IN WINDOWS?
4 8.4 HOW TO BACKUP DATA BY USING MICROSOFT BACKUP UTILITY? APPENDIX A: LICENSING INFORMATION REGULATORY APPROVALS NOTE: THE CONTENT OF THIS MANUAL WILL BE REVISED WITHOUT PRIOR NOTICE. 4
5 Chapter 1: IIntroductiion Congratulations on your purchase of this outstanding Network Storage device. This product is specifically designed for Small Office and Home Office needs. It provides a complete SOHO solution for Internet surfing, and is easy to configure and operate even for non-technical users. Instructions for installing and configuring this product can be found in this manual. Before you install and use this product, please read this manual carefully for fully exploiting the functions of this product. 1.1 Overview The product is designed for 3.5 IDE and serial-ata (SATA) hard disk drive use. It is an ideal device for small-medium companies and home users who need to backup and share files more efficiently and easily anytime and anywhere. Additionally, with its WLAN* feature which is fully compliant with IEEE b/g will also let you share files easily. The Network Storage offers WLAN mobility for home user and business people to maintain continuous network connectivity. Home users can stay connected to the network anywhere through a building without being limited by LAN cables via its AP functionality. This device also has the additional advantage of providing network storage with its 3.5 hard disk which allows you to share information and storage capacity via wireless or wired network. 5

6 The Network Storage supports the UPnP content directories and users can share the music and video files easily. Besides, the click-and-copying of files from a flash drive to the Network Storage hard disk make the user backup files efficiently. Please refer to the following application diagram. 6
7 1.2 Features Basic Functions Adapt for one 3.5 IDE or Serial-ATA(SATA) hard disk drive. Network File Storage and File Sharing via My Network Places in Windows or Samba in Linux and Mac OS. Backup files easily: compliant with Windows backup utility. Support FAT, FAT32, and Ext2 files system and can read from NTFS file system. Support security level as Guest or Authorization user for file sharing. Real time clock to synchronize the computer time setting. Easy to upgrade: using web browser or windows application to upgrade new version of firmware. Browser-based interface configuration and management: OS independent, easy-to-use for consumer installation. Support HDD sleeping mode to save power consumption. Built-in FTP server. UPnP (Universal Plug and Play) AV content directory support. Scheduling download assistant. Aluminum housing provides better effect for heat-release. (It s normal that aluminum housing getting warm when Network Storage is working.) 7
8 USB Device Built-in USB2.0 host to connect to USB mass storage device, like USB flash drive, USB hard drive, etc. Easy copy button: Offer the button to copy folders and files from USB device to internal HDD. Wireless Functions Up to 54Mbps data rate by incorporating Orthogonal Frequency Division Multiplexing (OFDM). IEEE b compatible (11Mbps): Allowing inter-operation among multiple vendors. IEEE g compatible (54Mbps): Allowing inter-operation among multiple vendors. Wireless data rate supported: 6/12/18/24/36/48/54 Mbps in g mode; 1/2/5.5/11Mbps in b mode. Support 64/128-bit WEP encryption. Support 802.1X authentication. Support WPA, WPA-PSK with TKIP and AES encryption. Support WPA2, WPA2-PSK with TKIP and AES encryption. Support Client, AP, WDS, and WDS Hybrid wireless modes. (NOTE. Only AP mode and Hybrid mode can support WPA and WPA2.) Scheduling Download Assistant Scheduling download assistant allows users to download files via FTP, HTTP without turning on computer. 8
9 1.3 System Requirements To start to use the Network Storage, your system must have the following minimum requirements: Windows 98SE / ME / 2000 / XP, or any other operating system can support Samba. An Ethernet (10BaseT or 10/100BaseT) adapter for wired client. At least one WLAN client adapter of g (54Mbps) or b (11Mbps) for wireless connection. TCP/IP and NetBIOS network protocol installed. Web browser installed. The Network Storage requires an external 12V, 4A power supply which is included in the package. For safe operation, please only use the power adapter which is provided by this product. 9
10 1.4 Package List The Network Storage package contains the following items: WAP-0008 Power Adapter Stand Dipole Antenna CD Manual/Utility Quick Installation Guide 10

11 1.5 Hardware Configuration Antenna LAN Port LED USB 2.0 Port Indicators Power Switch Power Jack Stand Shutdown Button Backup Button Reset Button 11
12 LED Indicators: LED Light Off Solid Light Blinking Power Power off Power on W.LAN No packet On transmitting LAN No device Linked On transmitting. HDD R/W Not in use HDD read/write HDD Status No HDD HDD full or error More blinking quickly, fewer available HDD capacity. USB 1 No device USB drive ready USB 2 No device USB drive ready Status (Backup) 1. Blinking once per second when device works normally. 2. Blinking quickly when Backup button is pressed. Front Buttons: Buttons Shutdown Backup Description Press the button for 4 seconds to shut down the whole system before power-off. Press the button for 4 seconds to copy data from attached USB device to HDD. 12
13 Reset Press the buttons of Shutdown and Backup simultaneously for 6 seconds to reset the system setting to factory default. Rear Ports: Ports Antenna LAN USB1 / USB2 Power Switch Power Jack Description Connect 2.4GHz dipole antenna. Automatically MDI / MDIX LAN port can sense the cable type when connecting to Ethernet-enabled computer, network of hub, switch, or router. The ports where you can connect to USB disk, digital camera, or card reader. Card reader: * Memory card must insert to card reader first before connect to the storage device. * Storage device supports one memory card at a time. Please do not insert multiple memory cards into the card reader. Switch on/off the device. 12V / 4A power inlet. 13
14 Chapter 2: Gettiing Started 2.1 Hard Disk Installation Follow the steps below to insert the 3.5 hard disk and assemble the device before using the Network Storage. WARNING: The Network Storage is not hot-swappable. Please make sure that it is turned off and not connected to the power outlet when performing the following assembly procedure. Step 1: Unfasten two screws at the rear side of device, and pull out the back cover. 14
 and")
15 Step 2: Pull out the front panel. Step 3: Put the 3.5 IDE or SATA hard disk into the slot, and connect proper data (the red cable is used for SATA hard disk and the gray one is for IDE hard disk) and power cable to the hard disk. Then fasten the screws that are included in the package to fix hard disk. 15

16 Step 4: Put the front panel back. Step 5: Put the back cover back, and assemble tightly. Finally, fasten two screws. 16

17 2.2 Making Connections In order to access the Network Storage as the network storage drive or as a wireless AP, you need to configure the TCP/IP settings correctly in advance. Either the Wired Ethernet Connection or Wireless Connection can be used to connect to Network Storage Install Necessary Communication Protocols Follow the steps below to install Client for Microsoft Networks, File and Printer Sharing for Microsoft Networks, and Internet Protocol (TCP/IP) on your computer. Step 1: Select the My Network Places on the desktop menu, and right click on the icon to choose Properties. 17


18 Step 2: You may see there are many connections in your computer. Just select one which you will use it to connect to Network Storage. Then choose the Properties of that connection. Step 3: Check the Client for Microsoft Networks, File and Printer Sharing for Microsoft Networks, and Internet Protocol (TCP/IP) are installed or not. If not, please install those communication protocols. If you use other operating system, such as Linux, X-window or Mac OS, please refer to original manual of your OS to finish the configurations of TCP/IP and other required communication protocols. 18


19 2.2.2 Wired Ethernet Connection Use one Ethernet cable to connect the Network Storage and your computer directly. Then power on the Network Storage. Ethernet cable The Network Storage will detect automatically if there is any DHCP server nearby. If yes, it will get an IP address from DHCP server. But if there is no DHCP server in your environment, the Network Storage will become a DHCP server, and assign IP address to your computer. You can get some information as below shown. Then go to command prompt mode from Start Menu->Programs-> Accessories, and type ipconfig. If the IP address and subnet mask are shown , please type ipconfig /renew to retrieve an IP address. 19

20 In addition, you can also allocate a static IP address on your computer as below: Step 1: Find the Internet Protocol (TCP/IP) Properties from My Network Places and check the Properties of Local Area Network Connection. Choose Use the following IP address, and assign one IP address which can be from to Here we use the as the IP address. The Subnet mask must be , and the Default gateway must be Then 20


21 click OK button to complete TCP/IP setup. NOTE. The IP address of default gateway must be same as IP address of Network Storage. Step 2: Then go to command prompt mode from Start Menu->Programs-> Accessories. Type ipconfig and press the Enter. Then the following message should be found. Check the IP address, Subnet Mask, and Default Gateway addresses are same as previous settings. If same, you are successful to setup the network configuration. There are three methods to configure Network Storage. Please refer to the following instructions, and choose one which is most convenient to you. 21

22 Method 1: Use Configuration Tool to Setup Before you can do this, you need to install the configuration tool from installation CD first. After that, please use the configuration tool to Query and you will see the status page and input admin to login. NOTE. The default login password is admin. If there is any DHCP server in the network, Network Storage will be as the client and get one IP address from existed DHCP server. You can also use configuration utility to Query to find the IP address that Network Storage gets. About other operating systems, such as Linux X-window or Mac OS, please use web browser to configure. 22

23 Method 2: Use Web Browser to Setup Launch any web browser, such as Internet Explorer or Netscape on your computer, and then input IP address of Network Storage in the address field. For an example, type and press Enter, then you can see the configuration page of Network Storage. NOTE. You have to know the IP address of Network Storage when you use this method. The default IP address is Method 3: Use My Network Places to Search and Setup First, go to My Network Places and search WAP NOTE. The default host name of Network Storage is WAP
24 Double click on samba server (wap-0008), and you will see two folders. Then double click the folder Configure. You can find there is a Configure.html in the folder, just double click on Configure.html directly to see configuration page Wireless Connection Follow the steps below to connect to the Network Storage in a wireless environment. We assume that there is at least one WLAN card installed on your computer, and Network Storage is powered on. Step 1: Enabling the WLAN card first, and check the Wireless Network Connection properties from My Network Places. Step 2: Select the Wireless Networks icon after entering the Wireless Network Connection Properties. You will find the WAP-0008 in the available network list, then select the WAP-0008, and click Connect button to connect. Otherwise, if you can t find WAP-0008, please refresh network list again. NOTE. The default network name (SSID) of Network Storage is WAP

25 Step 2: Then go to command prompt mode from Start Menu->Programs-> Accessories. Type ipconfig in the command prompt window and press the Enter. Then the messages of IP address, Subnet Mask, and Default Gateway should be found. Step 4: After you connect to Network Storage successfully, you can use method 1~3 that have been described in section to configure Network Storage. WARNING: We strongly recommended that you enable wireless encryption feature, or add User Access rules on Network Storage. Otherwise, everyone can connect to it wirelessly and access data which is stored in your hard drive. 25
26 2.3 File Sharing The Network Storage can be a shared network hard drive in an existing wireless or wired network environment. The users in the same network area can read or write data from the device as required. The following various steps are for users to start using the network hard drive Accessing the Network Hard Drive via My Network Places Select the My Network Places and type the address of \\WAP-0008 and press Enter. Then you will find the Storage icon. Click the Storage icon, and you will find the C folder as below. The folder C is the root directory of attached hard disk drive. NOTE. The other folder USB is the root directory of attached USB drive Searching the Computers Open My Computer on the desktop menu, and use the Search function to search the computer of WAP-0008 as below. 26

27 2.3.3 Search the Entire Network Manually Open Windows Explorer, and then click the My Network Places icon. Double click the Entire Network to view the components of the network. Select and click the Microsoft Windows Network icon, then the various network components showed in the list. The default workgroup of Network Storage is LevelOne. 27
 when the Security Level is set to Guest mode.")
28 2.3.4 Accessing Files via FTP The Network Storage offers FTP service for the clients which don t support Microsoft Windows File sharing. You can use any FTP client utility to connect to Network Storage with anonymous username and password (username: ftp, and without password) when the Security Level is set to Guest mode. But if you change to Authorization mode, the accessing permission is limited, and then users have to input specified username and password to access any permitted folders. The rule of access control would be explained in much detail in chapter 4. NOTE. The FTP service of Network Storage can be switched off. 28
29 Chapter 3: Makiing Confiiguratiion The Network Storage can be configured various settings through the proprietary Configuration Tool or general web browser. Even you don t know which IP is being used by Network Storage; the Configuration Tool will help you to find it. All you have to do is click the Query button of the Configuration Tool. NOTE. You need to know the IP address of Network Storage if you want to configure it by web browser. The default IP address of Network Storage is
30 When you enter the configuration mode, you are requested to provide the System Password to activate the configurations. The default login password is admin. After login, you could see these buttons: Press Wizard button if you want to do basic settings with simpler way. (Please check section 3.1) Press General button if you want to make some advanced settings. (Please check each item from section 3.2) Press Logout button if you don t want to do anything. 30
31 3.1 Configuration Wizard With wizard setting steps, you could configure Network Storage in a very simple way. This configuration wizard includes settings of Language, IP & DHCP, Wireless, Time, and Disk. Press Next button to start configuration. 31

32 Step 1: Select which language will be used for folder/file name in the hard disk. Incorrect language setting may cause folder/file name unreadable. 32
33 Step 2: If you don t know how to set DHCP option, just keep it as Auto. 33
34 If you choose Server/Auto/Static mode, you need to set some TCP/IP settings for Network Storage. If you are not sure about these values, please ask your network administrator or ISP. 34
35 Step 3: Choose which wireless mode that you want to use. You can also disable wireless feature of Network Storage. 35
36 If you choose AP Only Mode, in next page, you could specify the SSID and the wireless channel number for Network Storage. 36
37 If you select the Wireless Client Mode, in next page, you would have to specify the AP that you want Network Storage to connect to. 37
38 You have two ways to do this job. One is searching the available AP that Network Storage could get. 38

39 After finish searching, you could select the AP that you want Network Storage to connect to. 39
40 The other way to add an AP is setting the SSID manually. 40
41 Step 4: Next, you have three ways to set time for Network Storage. You could sync time with NTP server or your PC, or set time manually. Step 5: Here you will see three options of security level. The Guest Mode means everyone can access any data in your hard disk drive. The Authorization Mode means only authorized user can access data which is stored in their home directory. Or you can decide the security level later if you don t have any idea yet. 41
42 If you choose Decide it later, the Network Storage won t do any change to your hard disk. So you can keep all your data which has been stored in the hard disk. If you choose Guest Mode, it s not necessary to initial your hard disk drive. As a result, if you use a whole new hard disk, please select Yes. If you already have data in this hard disk, you might want to select No. This option would format your hard disk to one partition if you select Yes. NOTE. You can get better performance after disk initialization. 42

43 WARNING: The format process will erase all your data which has been stored in your hard disk drive. If you select Yes, the Network Storage would ask you one more time to confirm your decision. WARNING: Even there is only one partition in your hard disk, the Network Storage will format your hard disk again if you press OK. If you choose Authorization Mode, it s necessary to initial your hard disk drive. The public directory will store data which can be accessed by any user. But only authorized user can access data which is stored in their home directory in the private directory. Please indicate capacities for public directory and private directory separately. After you indicate capacity for one directory, the rest of capacity can be assign to the other directory automatically. NOTE. The easy copy button in the front panel is going to copy folders/files from USB drive to public directory while you activate authorization mode. 43
44 WARNING: The initialization will erase all your data which has been stored in the hard disk. Step 6: This page will show the configurations that you choose, please check your settings again before saving. Click Discard Settings, then you would return to the first page and without saving any changes. If you want to change any setting, please click Previous button to go back to previous page. Finally, if everything is okay, click Save Settings to save your new settings. 44
45 If you choose to initialize or format hard disk, please wait the progressing bar become 100%. WARNING: Do Not press any button or power off the Network Storage when the format is in progress. After everything is done, system would reboot automatically. Please wait 30 seconds at least for system restarting. 45

46 3.2 Network Settings DHCP Setting Following sections describe the various DHCP settings. General Settings: default machine IP is This IP address must be unique on your network. You can change it if necessary. This setting is only used for DHCP server mode, and Static IP mode. Host name is the identification of Network Storage when you browse it in Microsoft My Network Places. DCHP Mode: The default mode is Auto Client: If you have a DHCP server on the network, set this 46
47 option to receive an automatic IP address and subnet mask assignment. Server: The Network Storage will become a DHCP server on the network. Auto: Select this option to let Network Storage send out a DCHP request during boot up. If you have another DHCP server on the network, the Network Storage will receive an automatic IP address and subnet mask assignment. If there is no DHCP server on the network, the Network Storage will become a DHCP server on the network. Static: You can manually configure the IP address and subnet mask of Network Storage. Server Settings: (This information would be used when you choose Server mode or Static mode.) Subnet Mask: subnet mask of your network. IP Pool: decide the IP address range that DHCP server will offer. Primary DNS / Secondary DNS: This feature allows you to assign DNS Servers. You could get this information from your ISP. Gateway: The gateway IP address would be the IP address of an alternate gateway. If you do not know how to setup the gateway, please contact your network administrator or ISP. Client List: When Network Storage is as a DHCP server, here will show some information of DHCP client. 47
48 Fixed Mapping: DHCP server can assign the same IP address to a certain MAC address Wireless Setting Select the Wireless option in the Network Settings page. Following information will let you know the current wireless operation status. Basic Settings: allow you to enable or disable wireless function. Advanced Settings: the Network Storage provides four wireless modes to select. Please refer to the following section to check details of each wireless mode separately. 48
49 Choose the wireless mode you need, and click Next button to setup detail items AP Only Mode When you are in the AP Only mode, you can setup the basic wireless functions as below. 49
50 Wireless AP Setting: Channel: choose the radio channel number. The default channel of Network Storage is 1. Please DO NOT set the same channel with your existed wireless network. SSID: the SSID identifies a specific wireless LAN. Before associating with a particular wireless LAN, a station must have the same SSID as the access point. The default SSID setting is WAP Authentication: authentication ensures that digital data transmissions are delivered to the intended receiver. This option enables you to set the authentication method for various encryption schemes. WEP Encryption: select 64 or 128 bits for encryption method to protect your data by encrypting it. The WEP key can be 5(or 13) ASCII characters or 10(or 26) hexadecimal characters based on whether you select 64 bit or 128 bit WEP encryption. 50
51 802.1X: IEEE 802.1x authentication can be done by using an external RADIUS server. You need to input the IP address of RADIUS server and Shared Secret. Please refer to FAQ in chapter 8 to get more detailed information. 51
52 WPA-PSK, WPA2-PSK: AP and Client need to use identical Pre-shared key (PSK). Please choose TKIP or AES for encryption type, and then input 64 Hex key (0~F) or 8~63 ASCII characters. 52
53 WPA, WPA2: WPA applies IEEE802.1x and Extensible Authentication Protocol (EAP) to authenticate wireless clients using an external RADIUS server. Please input the IP address of RADIUS server and Shared Secret. Please refer to FAQ in chapter 8 to get more detailed information. NOTE. This device can support WPA version 1 and version 2. 53
54 54
55 Advanced Setting: Wireless mode: 11b/g mixed can let 11g or 11b computers both exist on the network, but the speed will be reduced. Select 11g only for maximum speed, but no 11b users will be allowed on the network. Beacon interval: This represents the amount of time between beacon transmissions. The interval tells receiving devices on the network how long they can wait in low-power mode before waking up to handle the beacon. Beacons are packets sent by an Access Point to synchronize a wireless network. Specify a Beacon interval value between 1 and The default value is set to 100 milliseconds. 55
56 RTS Threshold: The RTS threshold specifies the packet size of an RTS transmission. This helps control traffic flow through an access point, especially one with many clients. The setting value range is from 1 to 2347, and default value is set to Fragmentation: In a network, the maximum size or length of a fragment is determined by the protocol used to transport the data. This value should remain at its default setting of If you experience a high packet error rate, you may slightly decrease your "Fragmentation" value within the value range of 256 to 2346, even number only. Setting the Fragmentation value too low may result in poor performance. DTIM interval: A Delivery Traffic Indication Message (DTIM) is a countdown informing clients of the next window for listening to broadcast and multicast messages. When the Access Point has buffered broadcast or multicast messages for associated clients, it sends the next DTIM with a DTIM Interval value. AP clients hear the beacons and awaken to receive the broadcast and multicast messages. Enter a value from 1 to 255 for DTIM. The default value for DTIM interval is set to 3. Preamble Type: The Preamble Type defines the length of the CRC (Cyclic Redundancy Check) block for communication between the Access Point and roaming wireless adapters. SSID Broadcast: Enable or Disable a SSID broadcast. When enabled, the SSID of Network Storage is sent to wireless enabled devices on the LAN. This feature is enabled by default. Then press Next button, you could see the Wireless MAC Filtering setting. 56
57 The default setting is Disable MAC filtering, every wireless client could connect to this Network Storage. When you select ALL accept, the wireless clients with the MAC addresses you enter below will be accepted to connect to this Network Storage, the others will be rejected. When you select ALL Reject, the wireless clients with the MAC addresses you enter below will be rejected to connect to this Network Storage, the others will be accepted. After finish configuration, press Next button to review all wireless settings. If everything is correct, then press Confirm button to save and take effect new settings. 57
58 Wireless Client Mode Select the Wireless Client mode and click Next button to setup under the Wireless client mode. After entering the Wireless client mode setting, click the Scan AP to scan the existing AP in your environment. Then click the AP that you want to connect to. NOTE. If Network Storage can t find any AP in your environment, please check whether the antenna is well connected or not. 58
59 Input encryption keys if needed. Then press Connect button to connect. NOTE. The encryption method is decided by remote AP. 59
60 Then Network Storage will save configurations and reboot automatically. After that, you can check the wireless status in the status page. 60
61 Besides selecting AP from available list, you can also add AP manually. Press Advanced Setting in the wireless configuration page. 61
62 Press Add button to add a remote AP. 62
63 Input the SSID information of remote AP. You may also need to input correct encryption keys when remote AP activates encryption mechanism. Then press Save to save the configuration. 63
64 You can also modify attributes of existed AP. Go to wireless Advanced Setting page, choose the AP that you want to modify, then press Edit button. 64
65 When you finish all the modification, press Save button to save changes. 65
66 WDS Hybrid Mode Select the WDS Hybrid mode and click Next to set up. 66
67 After entering the WDS Hybrid mode setting, click Add to set up. 67
68 You can select the remote AP from AP list, or you can also input the MAC address of remote AP manually. NOTE. The channel of Network Storage and remote AP must be the same. 68
69 After indicating MAC address of remote AP, press Next to continue. 69
70 Input information of wireless channel, SSID, and encryption method of Network Storage. Press Next to continue. NOTE. The wireless channel must be same as remote AP. 70
71 You can keep the original setting of this page, and then press Next. NOTE. Please refer to to review the meanings of this page. 71

72 Edit wireless MAC Filtering setting, and then press Next. NOTE. Please refer to to review the meanings of this page. 72
73 Finally, you could see the confirm page. If every setting is correct, just press Confirm to save all configurations. 73

74 WDS Only Mode Select the WDS only mode, and click Next to set up. 74

75 After entering the WDS Only mode setting, click Add to set up. 75
76 You can select the remote AP from AP list, or you can also input the MAC address of remote AP manually. NOTE. The channel of Network Storage and remote AP must be the same. 76
77 After indicating MAC address of remote AP, press Next to continue. 77
78 Input information of wireless channel and encryption method of Network Storage. Then press Next to continue. NOTE. The wireless channel must be same as remote AP. 78
79 Finally, you could see the confirm page. If every setting is correct, just press Confirm to save all configurations. 79
80 Chapter 4: Storage Confiiguratiion In this section, you will know how to use the Disk Utility to configure the hard disk setting. Besides, this chapter will also show you how to finish configuration of File Sharing, and assign user access rules. 4.1 Disk Utility Before using the hard disk, users need to format the hard disk first. Click Format button, and the Network Storage will start to format the hard disk automatically. Once finishing the format, the Network Storage will reboot automatically, and please reconnect the network in 30 seconds. NOTE. The hard disk will be formatted as Ext2 file system. 80
81 The other option is used for file checking. If you power off Network Storage before normally shut down the system, you are recommended to do this by pressing Check button. Click Disk fdisk for entering FDisk Utility to create new partition. NOTE: Partition can only be created under Authorization mode. 81
82 Create a new partition You could also format your hard disk by using FDISK Utility. WARNING: All data in the hard disk will be ERASED after pressing format button. The hard disk is formatted to Ext2 file system. It can not be connected directly to a Microsoft Windows system without reformatting to other file system that Windows system can recognize. 82
83 4.2 File Sharing In the configuration of File Sharing, you can see the following items: Computer Name: Host name is the identification of Network Storage when you browse it in Microsoft My Network Places. WorkGroup: Indicate a workgroup name of Microsoft Network Places. Server Comment: The comment will be showed when you browse it in Microsoft My Network Places. Language: Select which language will be used for folder/file name in the hard disk. Incorrect language setting may cause folder/file name unreadable. FTP Configuration: The FTP server is enabled by default, so you can also access Network Storage by any FTP client utility. Besides, you can also set the maximum concurrent connections of FTP service. The maximum concurrent connections of FTP are limited to
84 84
85 4.3 Access Control The Network Storage can provide two security levels of access control. One is Guest mode; it means anyone can access any data which has been stored in the hard disk. With Guest mode, you don t need to edit any user configuration and start to enjoy file sharing. Note. The security level here is applied to file sharing of Microsoft Network Places and FTP service. 85
86 The other is Authorization mode, it means only authorized people can access certain folders in the hard disk. With Authorization mode, you need to edit user configuration to assign access right to privileged users. Besides, you can also assign quota limit for every user in the authorization mode. Note. The hard disk needs to be initialized when you activate authorization mode by first time. WARNING: The initialization of hard disk will ERASE all data which have been stored in the hard disk. 86

87 User Configuration With user configuration, you can add or delete user account for privileged user. After you input user name, password, and quota information, just press Add button to add user account. Note. The user information here is applied to file sharing of Microsoft Network Places and FTP service. Besides, you can also check the status of used capacity for every user by entering new quota then pressing Modify button. 87

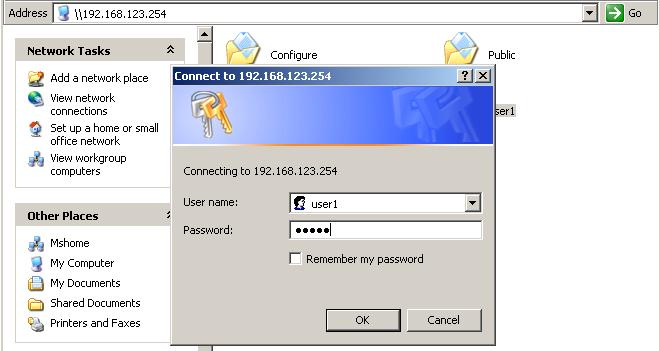
88 How to access folders in Authorization mode If you have added a user account (named user1), then you will find the following folders when you browse Network Storage by My Network Places in authorization mode. With this scenario, everyone can access data which is stored in folder Public and usb_disk. But only user1 can access data which is stored in folder user1. If you try to access folder user1, an authentication window will pop-up. 88
89 89
90 4.4 File Browser The Network Storage provides a file browser to let users rename and delete folders/files easily. Especially when users can not rename or delete folder/file via FTP or Microsoft My Network Places successfully. For an example, users may download an unrecognized file, such as $#@*2$.avi from Internet, and they can t change the file name via My Network Places or FTP. In this case, users can correct the file name with this file browser. Step 1: Select a folder/file that you want to change name or delete. Step 2: Press the Delete button if you want to delete that file. 90
91 Step 3: Or press the Rename button if you want to rename the file name. The field of Current File will become editable when pressing Rename button. After inputting a new file name, just press Confirm button to finish changing. 91
92 Chapter 5: Advanced Toolls Click the Advanced Tools option on the left panel to display its submenus. The Advanced Tools menus enable you to configure the various system settings. Refer to the following sections for more details. 92
93 5.1 Backup Configuration This option enables you to backup current settings of Network Storage. 5.2 Reset Configuration to Default This option enables you to reset the Network Storage to its default factory settings. 5.3 Reboot This option enables you to reboot the device. 93
94 5.4 Firmware Upgrade This option enables you to upgrade new firmware, or restore backup configuration to this product. 94
95 Chapter 6: Downlload Assiistant With Download Assistant, you can download files from remote server without using any computer. The one thing you need to do is adding a download task in the configuration page. Besides, you can also set a schedule rule to indicate which time the download task will start. As a result, the download task won t disturb your daily work, and can start automatically when you are sleeping. Additionally, the download assistant will send a mail to inform the receiver automatically when the file is downloaded completely. 6.1 FTP This page allows you to download files from remote FTP server. Please refer to the following description. 95
96 Job Name: Name of download task. FTP Address: IP address and file path of remote FTP server. (e.g. ftp://ftp.yahoo.com/file1.avi) Port: Port number that remote FTP server uses. Save To: Indicate which folder you will save the file in the hard disk. You can type the file path manually or press Browse button to select the destination folder. Press OK button when you finish the selection. 96
97 Login method: The login method is decided by remote FTP server. You can choose anonymous login or input authorized user name and password. Inform Receiver: This option is used for mail alert. This device will send a mail to inform the receiver when the file is downloaded completely. You need to indicate the SMTP server, and mail address of receiver. Use ; to separate different mail addresses. Start Time: The download task can be started immediately, or assign a schedule rule. You can set the start time to midnight or other time when the network bandwidth is more available. 97
98 6.2 HTTP This page allows you to download files from remote HTTP server. Please refer to the following description. Name: Name of download task. URL: IP address and file path of remote HTTP server. (e.g. Save To: Indicate which folder you will save the file in the hard disk. You can type the file path manually or press Browse button to select the destination folder. Press OK button when you finish the selection. 98
99 Inform Receiver: This option is used for mail alert. This device will send a mail to inform the receiver when the file is downloaded completely. You need to indicate the SMTP server, and mail address of receiver. Use ; to separate different mail addresses. Start Time: The download task can be started immediately, or assign a schedule rule. You can set the start time to midnight or other time when the network bandwidth is more available. 99
100 6.3 Alert Configuration Alert Configuration: You need to finish the configuration of server before mail alert function can be working properly. Admin s Address: Please enter an address that will be used as the sender of alert feature. Note. Some mail servers would refuse the mail relay service if the sender isn t on the same mail server. SMTP Server Address: Please enter the IP address or domain name of mail server that you want to use. Account Name: Please enter your login name of mail server if needed. Password: Please enter your login password of mail server if needed. 100
101 6.4 Download Status This page displays detailed status of configured download task in Network Storage. The Running page contains all download tasks that are running. The Waiting page contains download tasks that are ready to run, but the number of current connections is over the maximum limit. So these download tasks won t be started until another connection is available. The Scheduled page contains download tasks that are scheduled to run. 101

102 Chapter 7: MIISC 7.1 Time Setting The System Time provides three options for you to select. Get Date and Time by NTP Protocol: synchronize the date and time with Internet NTP server. Set Date and Time using PC s Date and Time: synchronize the date and time with the computer. Set Date and Time manually: Manually setting up the date and time. 102
103 7.2 Login Setting Administrator Timeout: If users login, and idles for a period of time (the default value is 600 seconds), then that user will be logged out automatically. Set this value to 0 to disable this feature. Change Password: To change the login password, you have to enter the old password and confirm the new password twice. 103
104 7.3 System Log Logs are useful for troubleshooting, and you can review the whole system logs here. There are four categories of logs: System Log, Wireless, Samba, and FTP. 104
105 Chapter 8: FAQ & Troublle Shootiing 8.1 What can I do when I have some trouble? 1. How do I connect to Network Storage? A: Please prepare one RJ45 cable and connect the LAN port directly. The Network Storage already supports MDI/MDIX. 2. How to Reset settings to default? A: Press the buttons of Shutdown and Backup simultaneously over 6 seconds to reset the system to the factory default setting. 3. What can I do if I forget login password? A: Please refer to question 2 above to reset setting to default. The default login password is admin. 4. When I login the storage of Network Storage via My Network Places, but I can not find any files of folders even if I have plugged HDD in Network Storage. A: First, check your HDD status LED. If the hard disk is correctly connected, the HDD status LED will flash. If the LED didn t flash, maybe you forget to format the new hard disk before using it, or maybe the hard disk is not connected correctly, or maybe the hard disk is corrupted. Note. This Network Storage supports FAT/FAT32/Ext2 file systems. If the file system of HDD is NTFS, the device just can read files and can 105
106 not copy any files to any NTFS folders. 5. No matter what I do, I can not configure Network Storage even if I setup fixed IP and can search or Ping to Network Storage. A: Please check the Status LED or HDD LED. If normal, they will be flash. Otherwise, reset the settings to factory default and try it again. 6. I can not save the file which size is large than 2GB. A: Please check the file system of your hard disk. This problem will occur if the file system is FAT or FAT32. Convert file system to Ext2 can solve this problem. The format utility of Network Storage will format HDD to ext2. 7. I can t access the shared folder with Microsoft Windows 98/Me. A: If you use Microsoft Windows 98/Me, and want to access the authorized folder, you MUST have the same account and password in the Network Storage and your computer. 8. Why do I see the wrong folder/file name in My Network Places? A: Please select the proper language as you need. 9. Why can t I access the file from My Network Places after enabling Authorization mode? A: Sometimes I can t access folders via My Network Places by using correct user name and password, such as shown below: 106


107 This is because Windows system caches the previous login records, so that user can not use another account to login this device. To solve this problem, please disconnect previous network drive first. After deleting previous record, please try to login again. 107
108 8.2 How to setup wireless function? 1. How can I use the wireless function? A: Generally speaking, there are four modes to setup in this device. The most common function is AP mode. The user can make this device as a wireless AP device as follows. AP mode: First, the wireless client sets up the same SSID with Network Storage and get IP address from another gateway router. Then the wireless client can associate the network or roam Internet via Network Storage. 108
109 Wireless Client Mode: First, you need to connect your computer to Network Storage via a RJ45 cable. Then use Scan AP feature of Network Storage to connect to another wireless router. After Network Storage connect to wireless router, your computer can communicate with LAN Host#1 via Network Storage. WDS only mode: WDS Wireless Distribution system. This device also supports this function. How to configure this in your environment? The below Figure1 is for your reference. First, check which channel you want to use. We choose channel 10 for the example. Scan other AP which channel is 10 and also supports WDS function. Second, add the wireless MAC address of Network Storage in this Wireless Router # 2. (Figure2). And use Scan AP to find the wireless which SSID is WR-2 and join it in the list. Finally, LAN-Host #1 can find Wireless Router #2 and LAN-Host #2. 109
110 Figure 1: 110
111 Figure 2: 111
112 WDS Hybrid mode: This device also supports WDS and AP mode at the same time. How to configure this in your environment? The below figure is for your reference. For the WDS setting, please refer to the above WDS only mode. For AP setting, please refer to the AP mode. 112
113 2. How to configure 802.1x or WPA with RADIUS server? NOTE. Windows 2000 RADIUS server only supports PEAP after upgrade to service pack 3 and HotFix Q (You can get more information from en-us;313664) DUT Configuration: 1. Enable DHCP server. 2. WAN setting: static IP address. 3. LAN IP address: / Set RADIUS server IP. 5. Set RADIUS server shared key. 6. Configure WEP key and 802.1X setting. 113
114 The following test will use the built-in 802.1X authentication method such as EAP_TLS, PEAP_CHAPv2 (Windows XP with SP1 only), and PEAP_TLS (Windows XP with SP1 only) using the Smart Card or other Certificate of the Windows XP Professional. DUT and Windows 2000 RADIUS Server Setup 1. Setup Windows 2000 RADIUS Server. We have to change authentication method to MD5_Challenge or using smart card or other certificate on RADIUS server according to the test condition. 2. Setup DUT Enable the 802.1X (check the Enable checkbox ). Enter the RADIUS server IP. Enter the shared key. (The key shared by the RADIUS server and DUT). We will change 802.1X encryption key length to fit the variable test condition. 3. Setup Network adapter on PC Choose the IEEE 802.1X as the authentication method. (Figure 2) NOTE. Figure 2 is a setting picture of Windows XP without service pack 1. If users upgrade to service pack 1, then they can t see MD5-Challenge from EAP type list any more, but they will get a new Protected EAP (PEAP) option. 114

115 Choose MD5-Challenge or Smart Card or other Certificate as the EAP type. If choose to use smart card or the certificate as the EAP type, we select to use certificate on this computer. We will change EAP type to fit the variable test condition. 115
116 Figure 2: Enable IEEE 802.1X access control Windows 2000 RADIUS server Authentication testing: 1. DUT authenticate PC1 using certificate. (PC2 follows the same test procedures.) 2. Download and install the certificate on PC1. (Figure 3) 3. PC1 choose the SSID of DUT as the Access Point. 4. Set authentication type of wireless client and RADIUS server both to EAP_TLS. 5. Disable the wireless connection and enable again. 6. The DUT will send the user's certificate to the RADIUS server, and then send the message of authentication result to PC1. (Figure 4) 7. Windows XP will prompt that the authentication process is success or fail and end the authentication procedure. (Figure 5) 8. Terminate the test steps when PC1 get dynamic IP and PING remote host successfully. 116


117 Figure 3: Certificate information on PC1 Figure 4: Authenticating 117
118 Figure 5: Authentication success DUT authenticate PC2 using PEAP-TLS. 1. PC2 choose the SSID of DUT as the Access Point. 2. Set authentication type of wireless client and RADIUS server both to PEAP_TLS. 3. Disable the wireless connection and enable again. 4. The DUT will send the user's certificate to the RADIUS server, and then send the message of authentication result to PC2. 5. Windows XP will prompt that the authentication process is success or fail and end the authentication procedure. 6. Terminate the test steps when PC2 get dynamic IP and PING remote host successfully. 118

119 8.3 How to map network drive in Windows? Mapping a network drive to a virtual drive in your computer can help you access that drive easily. After finishing mapping, the virtual drive will appear when you launch My Computer in Windows. Step 1: Search Network Storage in Windows My Network Places. The default host name of Network Storage is WAP Step 2: After find the Network Storage, double click on the icon. Right click on the folder which you want to map, and choose Map Network Drive. Step 3: Select the prompt of this drive that you like. Then press Finish button to close the dialogue window. If the folder can only be accessed by authorized user, then you need to click Connect using a different user name, and input authorized user name and password. 119

120 Step 4: After finish drive mapping, you can find an additional Z drive in My Computer group. Then you can access network drive via Z drive, and don t need to search network drive every time. 120

121 8.4 How to backup data by using Microsoft backup utility? The backup utility is installed and ready for use if you use Windows XP Professional edition. Otherwise, if you use Windows XP Home edition, please install Ntbackup.msi from Windows installation CD first. 121

122 Step 1: Please refer to 8.3 to map a network drive of Network Storage first. Then start Windows backup utility, and press next button to continue. 122

123 Step 2: Here we choose Back up files and settings. 123

124 Step 3: Choose Let me choose what to back up. 124

125 Step 4: Choose which folder will be backup to Network Storage. 125

126 Step 5: Choose the destination that you will save files. Here we choose drive Z, which is a network drive of Network Storage. 126

127 Step 6: Finally, press Finish button to start backup right now. Otherwise, press Advanced button to set a schedule rule for this backup task. 127
128 Appendiix A: Liicensiing IInformatiion This product includes copyrighted third-party software licensed under the terms of the GNU General Public License. Please refer to the GNU General Public License below to check the detailed terms of this license. The following parts of this product are subject to the GNU GPL, and those software packages are copyright by their respective authors. Linux system kernel busybox_1_00_rc2 bridge-utils dhcpcd-1.3 ISC DHCP V2 P5 util-linux 2.12b for fdisk application e2fsprogs 1.27 mini-lpd samba 2.2.7a syslogd spread from busybox wireless tools ntpclient of NTP client implementation RT61apd for 802.1X application vsftpd quota-tools 3.13 GNU Wget This product incorporates open source code into the software and therefore falls under the guidelines governed by the General Public License (GPL) agreement. Adhering to the GPL requirements, the open source code and open source license for the source code are available for free download at If you would like a copy of the GPL or other open source code in this software on a physical CD medium, LevelOne (Digital Data 128
129 Communications) offers to mail this CD to you upon request, for a price of US$9.99 plus the cost of shipping. 129
130 Preamble GNU GENERAL PUBLIC LICENSE Version 2, June 1991 Copyright (C) 1989, 1991 Free Software Foundation, Inc. 59 Temple Place, Suite 330, Boston, MA USA Everyone is permitted to copy and distribute verbatim copies of this license document, but changing it is not allowed. The licenses for most software are designed to take away your freedom to share and change it. By contrast, the GNU General Public License is intended to guarantee your freedom to share and change free software--to make sure the software is free for all its users. This General Public License applies to most of the Free Software Foundation's software and to any other program whose authors commit to using it. (Some other Free Software Foundation software is covered by the GNU Library General Public License instead.) You can apply it to your programs, too. When we speak of free software, we are referring to freedom, not price. Our General Public Licenses are designed to make sure that you have the freedom to distribute copies of free software (and charge for this service if you wish), that you receive source code or can get it if you want it, that you can change the software or use pieces of it in new free programs; and that you know you can do these things. To protect your rights, we need to make restrictions that forbid anyone to deny you these rights or to ask you to surrender the rights. These restrictions translate to certain responsibilities for you if you distribute copies of the software, or if you modify it. For example, if you distribute copies of such a program, whether gratis or for a fee, you must give the recipients all the rights that you have. You must make sure that they, too, receive or can get the source code. And you must show them these terms so they know their rights. We protect your rights with two steps: (1) copyright the software, and (2) offer you this license which gives you legal permission to copy, distribute and/or modify the software. Also, for each author's protection and ours, we want to make certain that
131 everyone understands that there is no warranty for this free software. If the software is modified by someone else and passed on, we want its recipients to know that what they have is not the original, so that any problems introduced by others will not reflect on the original authors' reputations. Finally, any free program is threatened constantly by software patents. We wish to avoid the danger that redistributors of a free program will individually obtain patent licenses, in effect making the program proprietary. To prevent this, we have made it clear that any patent must be licensed for everyone's free use or not licensed at all. The precise terms and conditions for copying, distribution and modification follow. GNU GENERAL PUBLIC LICENSE TERMS AND CONDITIONS FOR COPYING, DISTRIBUTION AND MODIFICATION 0. This License applies to any program or other work which contains a notice placed by the copyright holder saying it may be distributed under the terms of this General Public License. The "Program", below, refers to any 131
132 such program or work, and a "work based on the Program" means either the Program or any derivative work under copyright law: that is to say, a work containing the Program or a portion of it, either verbatim or with modifications and/or translated into another language. (Hereinafter, translation is included without limitation in the term "modification".) Each licensee is addressed as "you". Activities other than copying, distribution and modification are not covered by this License; they are outside its scope. The act of running the Program is not restricted, and the output from the Program is covered only if its contents constitute a work based on the Program (independent of having been made by running the Program). Whether that is true depends on what the Program does. 1. You may copy and distribute verbatim copies of the Program's source code as you receive it, in any medium, provided that you conspicuously and appropriately publish on each copy an appropriate copyright notice and disclaimer of warranty; keep intact all the notices that refer to this License and to the absence of any warranty; and give any other recipients of the Program a copy of this License along with the Program. You may charge a fee for the physical act of transferring a copy, and you may at your option offer warranty protection in exchange for a fee. 2. You may modify your copy or copies of the Program or any portion of it, thus forming a work based on the Program, and copy and distribute such modifications or work under the terms of Section 1 above, provided that you also meet all of these conditions: a) You must cause the modified files to carry prominent notices stating that you changed the files and the date of any change. b) You must cause any work that you distribute or publish, that in whole or in part contains or is derived from the Program or any part thereof, to be licensed as a whole at no charge to all third parties under the terms of this License. c) If the modified program normally reads commands interactively when run, you must cause it, when started running for such interactive use in the most ordinary way, to print or display an announcement including an appropriate copyright notice and a notice that there is no warranty (or else, saying that you provide a warranty) and that users may redistribute the program under these conditions, and telling the user how to view a copy of this License. (Exception: if the Program itself is 132
133 interactive but does not normally print such an announcement, your work based on the Program is not required to print an announcement.) These requirements apply to the modified work as a whole. If identifiable sections of that work are not derived from the Program, and can be reasonably considered independent and separate works in themselves, then this License, and its terms, do not apply to those sections when you distribute them as separate works. But when you distribute the same sections as part of a whole which is a work based on the Program, the distribution of the whole must be on the terms of this License, whose permissions for other licensees extend to the entire whole, and thus to each and every part regardless of who wrote it. Thus, it is not the intent of this section to claim rights or contest your rights to work written entirely by you; rather, the intent is to exercise the right to control the distribution of derivative or collective works based on the Program. In addition, mere aggregation of another work not based on the Program with the Program (or with a work based on the Program) on a volume of a storage or distribution medium does not bring the other work under the scope of this License. 3. You may copy and distribute the Program (or a work based on it, under Section 2) in object code or executable form under the terms of Sections 1 and 2 above provided that you also do one of the following: a) Accompany it with the complete corresponding machine-readable source code, which must be distributed under the terms of Sections 1 and 2 above on a medium customarily used for software interchange; or, b) Accompany it with a written offer, valid for at least three years, to give any third party, for a charge no more than your cost of physically performing source distribution, a complete machine-readable copy of the corresponding source code, to be distributed under the terms of Sections 1 and 2 above on a medium customarily used for software interchange; or, c) Accompany it with the information you received as to the offer to distribute corresponding source code. (This alternative is allowed only for noncommercial distribution and only if you received the program in object code or executable form with such an offer, in accord with Subsection b above.) 133
134 The source code for a work means the preferred form of the work for making modifications to it. For an executable work, complete source code means all the source code for all modules it contains, plus any associated interface definition files, plus the scripts used to control compilation and installation of the executable. However, as a special exception, the source code distributed need not include anything that is normally distributed (in either source or binary form) with the major components (compiler, kernel, and so on) of the operating system on which the executable runs, unless that component itself accompanies the executable. If distribution of executable or object code is made by offering access to copy from a designated place, then offering equivalent access to copy the source code from the same place counts as distribution of the source code, even though third parties are not compelled to copy the source along with the object code. 4. You may not copy, modify, sublicense, or distribute the Program except as expressly provided under this License. Any attempt otherwise to copy, modify, sublicense or distribute the Program is void, and will automatically terminate your rights under this License. However, parties who have received copies, or rights, from you under this License will not have their licenses terminated so long as such parties remain in full compliance. 5. You are not required to accept this License, since you have not signed it. However, nothing else grants you permission to modify or distribute the Program or its derivative works. These actions are prohibited by law if you do not accept this License. Therefore, by modifying or distributing the Program (or any work based on the Program), you indicate your acceptance of this License to do so, and all its terms and conditions for copying, distributing or modifying the Program or works based on it. 6. Each time you redistribute the Program (or any work based on the Program), the recipient automatically receives a license from the original licensor to copy, distribute or modify the Program subject to these terms and conditions. You may not impose any further restrictions on the recipients' exercise of the rights granted herein. You are not responsible for enforcing compliance by third parties to this License. 7. If, as a consequence of a court judgment or allegation of patent infringement or for any other reason (not limited to patent issues), conditions are imposed on you (whether by court order, agreement or otherwise) that 134
135 contradict the conditions of this License, they do not excuse you from the conditions of this License. If you cannot distribute so as to satisfy simultaneously your obligations under this License and any other pertinent obligations, then as a consequence you may not distribute the Program at all. For example, if a patent license would not permit royalty-free redistribution of the Program by all those who receive copies directly or indirectly through you, then the only way you could satisfy both it and this License would be to refrain entirely from distribution of the Program. If any portion of this section is held invalid or unenforceable under any particular circumstance, the balance of the section is intended to apply and the section as a whole is intended to apply in other circumstances. It is not the purpose of this section to induce you to infringe any patents or other property right claims or to contest validity of any such claims; this section has the sole purpose of protecting the integrity of the free software distribution system, which is implemented by public license practices. Many people have made generous contributions to the wide range of software distributed through that system in reliance on consistent application of that system; it is up to the author/donor to decide if he or she is willing to distribute software through any other system and a licensee cannot impose that choice. This section is intended to make thoroughly clear what is believed to be a consequence of the rest of this License. 8. If the distribution and/or use of the Program is restricted in certain countries either by patents or by copyrighted interfaces, the original copyright holder who places the Program under this License may add an explicit geographical distribution limitation excluding those countries, so that distribution is permitted only in or among countries not thus excluded. In such case, this License incorporates the limitation as if written in the body of this License. 9. The Free Software Foundation may publish revised and/or new versions of the General Public License from time to time. Such new versions will be similar in spirit to the present version, but may differ in detail to address new problems or concerns. Each version is given a distinguishing version number. If the Program specifies a version number of this License which applies to it and "any later 135
136 version", you have the option of following the terms and conditionseither of that version or of any later version published by the Free Software Foundation. If the Program does not specify a version number of this License, you may choose any version ever published by the Free Software Foundation. 10. If you wish to incorporate parts of the Program into other free programs whose distribution conditions are different, write to the author to ask for permission. For software which is copyrighted by the Free Software Foundation, write to the Free Software Foundation; we sometimes make exceptions for this. Our decision will be guided by the two goals of preserving the free status of all derivatives of our free software and of promoting the sharing and reuse of software generally. NO WARRANTY 11. BECAUSE THE PROGRAM IS LICENSED FREE OF CHARGE, THERE IS NO WARRANTY FOR THE PROGRAM, TO THE EXTENT PERMITTED BY APPLICABLE LAW. EXCEPT WHEN OTHERWISE STATED IN WRITING THE COPYRIGHT HOLDERS AND/OR OTHER PARTIES PROVIDE THE PROGRAM "AS IS" WITHOUT WARRANTY OF ANY KIND, EITHER EXPRESSED OR IMPLIED, INCLUDING, BUT NOT LIMITED TO, THE IMPLIED WARRANTIES OF MERCHANTABILITY AND FITNESS FOR A PARTICULAR PURPOSE. THE ENTIRE RISK AS TO THE QUALITY AND PERFORMANCE OF THE PROGRAM IS WITH YOU. SHOULD THE PROGRAM PROVE DEFECTIVE, YOU ASSUME THE COST OF ALL NECESSARY SERVICING, REPAIR OR CORRECTION. 12. IN NO EVENT UNLESS REQUIRED BY APPLICABLE LAW OR AGREED TO IN WRITING WILL ANY COPYRIGHT HOLDER, OR ANY OTHER PARTY WHO MAY MODIFY AND/OR REDISTRIBUTE THE PROGRAM AS PERMITTED ABOVE, BE LIABLE TO YOU FOR DAMAGES, INCLUDING ANY GENERAL, SPECIAL, INCIDENTAL OR CONSEQUENTIAL DAMAGES ARISING OUT OF THE USE OR INABILITY TO USE THE PROGRAM (INCLUDING BUT NOT LIMITED TO LOSS OF DATA OR DATA BEING RENDERED INACCURATE OR LOSSES SUSTAINED BY YOU OR THIRD PARTIES OR A FAILURE OF THE PROGRAM TO OPERATE WITH ANY OTHER PROGRAMS), EVEN IF SUCH HOLDER OR OTHER PARTY HAS BEEN ADVISED OF THE POSSIBILITY OF SUCH DAMAGES. 136
137 END OF TERMS AND CONDITIONS 137

 is in compliance with the essential requirements and other relevant provisions of Directive 1999/5/EC.")
138 Regulatory Approvals CE Standards This product complies with the 99/5/EEC directives, including the following safety and EMC standards: EN EN /-17 EN60950 CE Marking Warning Hereby, Digital Data Communications, declares that this (Model-no. WAP-0008) is in compliance with the essential requirements and other relevant provisions of Directive 1999/5/EC. The CE-Declaration of Conformity can be downloaded at: 138
CONCEPTRONIC CHD2WLANU
 CONCEPTRONIC CHD2WLANU Portable Wireless AP Storage (for 2.5 HDD use) USER MANUAL Ver. 1.01 Copyright The contents of this publication may not be reproduced in any part or as a whole, stored, transcribed
WMU-6000FS Portable Wireless AP Storage
 WMU-6000FS Portable Wireless AP Storage User s Manual 1 Copyright The contents of this publication may not be reproduced in any part or as a whole, stored, transcribed in an information retrieval system,
Wireless Network Video Recorder
 LD2R/LD2R500 Wireless Network Video Recorder User Guide Version 1.0 PREFACE Thank you for purchasing the Wireless Network Video Recorder, an IP based device that installed on your network, which can be
LevelOne. User Manual. WAP Mbps PoE Wireless AP V3.0.0
 LevelOne WAP-0005 108Mbps PoE Wireless AP User Manual V3.0.0 i TABLE OF CONTENTS CHAPTER 1 INTRODUCTION... 1 FIGURE 1: WIRELESS ACCESS POINT... 1 FEATURES OF YOUR WIRELESS ACCESS POINT... 1 Security Features...
Wireless USB Port Multi-Functional Printer Server. Model # AMPS240W. User s Manual. Ver. 1A
 Wireless USB 2.0 1-Port Multi-Functional Printer Server Model # AMPS240W User s Manual Ver. 1A Table of Contents 1 Introduction...3 1.1 Package Contents... 3 1.2 System Requirements... 3 2 Multi-Functional
Wireless g AP. User s Manual
 Wireless 802.11g AP User s Manual Version 1.8 User s Guide 0 Copyright Statement No part of this publication may be reproduced, stored in a retrieval system, or transmitted in any form or by any means,
Oct 2007 Version 1.01
 Oct 2007 Version 1.01 Table of Contents Introduction...4 System Requirement...4 Getting Started...4 Installing the Smart WLAN Manager...5 Discovering the Switch and AP...9 Understanding the Screen Layout...12
LevelOne FNS bay/1usb Soho NAS. User s Manual
 LevelOne FNS-1000 1- bay/1usb Soho NAS User s Manual Table of Contents Introduction... 2 The FNS-1000 NAS Server... 2 FNS-1000 Features... 2 Package Contents... 2 System Requirements... 2 Disclaimer...
Chapter 1 Introduction
 Copyright Statement is the registered trademark of Zonet Technology Inc. All the products and product names mentioned herein are the trademarks or registered trademarks of their respective holders. Copyright
Chapter 1 Introduction
 Copyright Statement is the registered trademark of Zonet Technology Inc. All the products and product names mentioned herein are the trademarks or registered trademarks of their respective holders. Copyright
Wireless LAN Access Point
 Wireless LAN Access Point IEEE 802.11b 11Mbps User s Manual Table of Contents Chapter 1 Introduction... 1 1.1 Package Contents... 2 1.2 Features... 2 1.3 Specifications... 2 1.4 Physical Description...
AirCruiser G Wireless Router GN-BR01G
 AirCruiser G Wireless Router GN-BR01G User s Guide i Contents Chapter 1 Introduction... 1 Overview...1 Features...1 Package Contents...2 AirCruiser G Wireless Router Rear Panel...2 AirCruiser G Wireless
802.11b/g Access Point WL-8000AP
 802.11b/g Access Point WL-8000AP User s Guide - FCC Certifications This equipment has been tested and found to comply with the limits for a Class B digital device, pursuant to Part 15 of the FCC Rules.
User Guide. 450Mbps/300Mbps Wireless N Access Point TL-WA901ND/TL-WA801ND REV
 User Guide 450Mbps/300Mbps Wireless N Access Point TL-WA901ND/TL-WA801ND REV4.0.0 1910011930 Contents About This Guide...1 Chapter 1. Get to Know About Your Access Point.................... 2 1. 1. Product
2 Bay 3.5 HDD SATA NAS Media Server Setting...20 Bonjour...21 TorrentFlux Maintenance...25 Disk Utility...25 RAID Setting...
 Table of contents 1. Overview of the 2 Bay NAS...3 1.1 Introduction...3 1.2 System Requirement...3 1.3 Hardware Installation...3 1.4 Setup the client PC and 2 Bay NAS...3 1.4.1 Setup network configuration
CWA-854HT 54 Mbps Wireless-G High Transmission Access Point User s Guide
 CWA-854HT 54 Mbps Wireless-G High Transmission Access Point User s Guide May 2006 Version 1.00 1 Table of Contents Table of Contents... 2 List of Figures... 4 List of Tables... 6 Chapter 1. Introduction...
Wireless Access Point
 802.11g / 802.11b / WPA Wireless Access Point User's Guide TABLE OF CONTENTS CHAPTER 1 INTRODUCTION... 1 Features of your Wireless Access Point... 1 Package Contents... 4 Physical Details... 4 CHAPTER
WL-5420AP. User s Guide
 WL-5420AP User s Guide Table of contents INTRODUCTION... 1 About the Operation Modes...2 LED Indicators...5 Solid...5 Ports on the Rear Panel...7 GETTING CONNECTED... 8 WPA AP -CONFIGURATION VIA WEB...
MIMO Wireless Broadband Route r User s Manual 1
 MIMO Wireless Broadband Router User s Manual 1 Introduction...4 Features...4 Minimum Requirements...4 Package Content...4 Note...4 Get to know the Broadband Router...5 Back Panel...5 Front Panel...6 Setup
Wireless Broadband Router
 LW6005A-R2 Wireless Broadband Router Manual 1 Introduction... 4 Features... 4 Minimum Requirements... 4 Package Content... 4 Note... 4 Get to know the Broadband Router... 5 Back Panel... 5 Front Panel...
WAP MIMO Access Point. User Manual
 WAP-0010 MIMO Access Point User Manual Ver 1.00-0604 1 Copyright The contents of this publication may not be reproduced in any part or as a whole, stored, transcribed in an information retrieval system,
D-Link AirPlus G DWL-G700AP
 TM D-Link AirPlus G DWL-G700AP 2.4GHz Wireless Access Point Manual Building Networks for People Contents Package Contents...3 Introduction...4 Wireless Basics...6 Getting Started...8 Using the Configuration
Mini-102MG ( MFP Server) Quick Installation Guide. User's Manual Version : Mini-102MG_QIG_EU-A_V1
 Quick Installation Guide. User's Manual Version : Mini-102MG_QIG_EU-A_V1") Mini-102MG ( MFP Server) Quick Installation Guide User's Manual Version : Mini-102MG_QIG_EU-A_V1 1. Product Introduction Thank you for purchasing and using our 802.11b/802.11g Wireless LAN MFP server.
Mini-102MG ( MFP Server) Quick Installation Guide User's Manual Version : Mini-102MG_QIG_EU-A_V1 1. Product Introduction Thank you for purchasing and using our 802.11b/802.11g Wireless LAN MFP server.
IP Protocol Support. Personal Server. Instruction Manual. No Page 1
 IP Protocol Support Personal Server Instruction Manual www.lindy.com No. 32454 Page 1 Contents What s in the box?... 3 Product Information... 4 IP Protocol Setup... 5 Configuring TCP/IP settings (Windows
A Division of Cisco Systems, Inc. Dual-Band. GHz g a. Dual-Band. Wireless A+G. Access Point. User Guide WIRELESS WAP55AG. Model No.
 A Division of Cisco Systems, Inc. Dual-Band 5 GHz 802.11a + GHz 2.4 802.11g WIRELESS Dual-Band Wireless A+G Access Point User Guide Model No. WAP55AG Copyright and Trademarks Specifications are subject
Table of Contents. Chapter 1Introduction Package Contents Features Specifications Physical Description...
 Table of Contents Chapter 1Introduction... 3 1.1 Package Contents... 3 1.2 Features... 3 1.3 Specifications... 3 1.4 Physical Description... 4 Chapter 2Wireless LAN Access Point Connection... 5 Chapter
AplombTech Smart Router Manual
 AplombTech Smart Router Manual (Version: 1.0) 1 Version & Purpose Version Manual version V 1.0 Explanation Corresponds to the initial version of device Purpose This manual describes the function features
Wireless Access Point
 802.11g / 802.11b / WPA Wireless Access Point User Guide TABLE OF CONTENTS CHAPTER 1 INTRODUCTION... 1 Features of your Wireless Access Point... 1 Package Contents... 4 Physical Details... 4 CHAPTER 2
Content 1 OVERVIEW HARDWARE DESCRIPTION HARDWARE INSTALLATION PC CONFIGURATION GUIDE... 5 WEB-BASED MANAGEMENT GUIDE...
 Content 1 OVERVIEW...1 1.1FEATURES...1 1.2 PACKETCONTENTS...3 1.3 SYSTEM REQUIREMENTS... 1.4 FACTORY DEFAULTS...4 1.5 WARNINGS AND CAUTIONS...4 2 HARDWARE DESCRIPTION... 6 3 HARDWARE INSTALLATION...8 4
WAP6405. User s Guide. Quick Start Guide. 5GHz AC1750 Gigabit Wireless Bridge. Default Login Details. Version 1.00 Edition 1, 06/2016
 WAP6405 5GHz AC1750 Gigabit Wireless Bridge Version 1.00 Edition 1, 06/2016 Quick Start Guide User s Guide Default Login Details LAN IP Address http://192.168.1.2 (AP Mode) http://192.168.1.5 (Repeater
Wireless-G Router User s Guide
 Wireless-G Router User s Guide 1 Table of Contents Chapter 1: Introduction Installing Your Router System Requirements Installation Instructions Chapter 2: Preparing Your Network Preparing Your Network
Light Mesh AP. User s Guide. 2009/2/20 v1.0 draft
 Light Mesh AP User s Guide 2009/2/20 v1.0 draft i FCC Certifications This equipment has been tested and found to comply with the limits for a Class B digital device, pursuant to Part 15 of the FCC Rules.
XL-PB350CA. EoC bridge slave. User manual
 XL-PB350CA EoC bridge slave User manual Content 1. Equipment Connection... 6 2. Set Accessed PC... 6 3.WIFI WEB Configuration... 8 3.1 Login WEB Interface... 8 3.2 WAN Configuration... 10 3.2.1 PPPO E
WL5041 Router User Manual
 TECOM WL5041 Router User Manual TECOM CO., LTD. March 2003 2003 by TECOM CO., LTD. All rights reserved. Printed in Taiwan Table of contents Package Contents--------------------------------------- 2 Installing
7. Server Configuration Introduction Search for All Available MFP Server Status of MFP Server
 Copyright by Edimax Technology Co, LTD. all rights reserved. No part of this publication may be reproduced, transmitted, transcribed, stored in a retrieval system, or translated into any language or computer
LevelOne. User s Manual WAP Mbps Wireless Access Point V
 LevelOne WAP-0003 54Mbps Wireless Access Point User s Manual V. 1.0-1- Manufacturer's Disclaimer Statement The information in this document is subject to change without notice and does not represent a
Table of Contents. Chapter 1 Product Overview Features Package Contents LED Indicator and Panel Description...
 Copyright Statement is the registered trademark of Monoprice. All the products and product names mentioned herein are the trademarks or registered trademarks of their respective holders. Copyright of the
IP806GA/GB Wireless ADSL Router
 IP806GA/GB Wireless ADSL Router 802.11g/802.11b Wireless Access Point ADSL Modem NAT Router 4-Port Switching Hub User's Guide Table of Contents CHAPTER 1 INTRODUCTION... 1 Wireless ADSL Router Features...
Introduction... 3 Features... 3 Minimum Requirements... 3 Package Content... 3 Note... 3 Get to know the Broadband Router... 4 Back Panel...
 Introduction... 3 Features... 3 Minimum Requirements... 3 Package Content... 3 Note... 3 Get to know the Broadband Router... 4 Back Panel... 4 Front Panel... 5 Setup Diagram... 6 Getting started... 7 Chapter
Wireless b/g/n 150Mbps AP Router
 Wireless 802.11b/g/n 150Mbps AP Router User Manual V1.2 2009-11-30 Package Contents The following items should be found in your package: One Wireless 802.11b/g/n 150Mbps Broadband Router One DC 9v power
802.11ac Wireless Access Point Model WAC104
 Point Model WAC104 User Manual October 2016 202-11698-01 350 E. Plumeria Drive San Jose, CA 95134 USA Support Thank you for purchasing this NETGEAR product. You can visit www.netgear.com/support to register
User Guide. 300Mbps Wireless N Access Point TL-WA801ND REV
 User Guide 300Mbps Wireless N Access Point TL-WA801ND REV5.0.0 1910012077 Contents About This Guide...1 Chapter 1. Get to Know About Your Access Point.................... 2 1. 1. Product Overview............................................................3
NETWORK STORAGE ADAPTER USER MANUAL
 NETWORK STORAGE ADAPTER USER MANUAL MODEL 522496 INT-522496-UM-0606-02 522496_man.dlrevL4C.indd 1 6/28/06 9:11:50 AM CONTENTS section page 1. Introduction... 3 2. Understanding the Network Storage Adapter...
Dolphin-M. User s Manual
 IEEE 802.11g 54Mbps Wireless Bridge Dolphin-M User s Manual V1.0.0 Copyright There is no any clear or implicit assurance in the user's manual of our company, including the assurance of selling or installing
WL-5450AP & WL-5460AP Wireless Access Point. User s Guide
 WL-5450AP & WL-5460AP Wireless Access Point User s Guide 1 FCC Certifications This equipment has been tested and found to comply with the limits for a Class B digital device, pursuant to Part 15 of the
High Power Wireless N. 600mW Smart Repeater LP 9698SR
 High Power Wireless N 600mW Smart Repeater LP 9698SR INTRODUCTION...4 GETTING STARTED...5 Package Contents...5 LED Indicators...6 Back Panel Description...7 SETUP GUIDE...8 Find a Setup Location...8 Connect
Wireless-G. User Guide. PrintServer for USB 2.0. GHz g WPS54GU2. A Division of Cisco Systems, Inc. WIRELESS. Model No.
 A Division of Cisco Systems, Inc. GHz 2.4 802.11g WIRELESS Wireless-G PrintServer for USB 2.0 User Guide Model No. WPS54GU2 Copyright and Trademarks Specifications are subject to change without notice.
LevelOne WBR User s Manual. 11g Wireless ADSL VPN Router. Ver
 LevelOne WBR-3407 11g Wireless ADSL VPN Router User s Manual Ver 1.00-0510 Table of Contents CHAPTER 1 INTRODUCTION... 1 Wireless ADSL Router Features... 1 Package Contents... 5 Physical Details... 6 CHAPTER
WUG2690 User s Manual
 802.11b+g Wireless LAN USB Adapter WUG2690 User s Manual Federal Communication Commission Interference Statement This equipment has been tested and found to comply with the limits for a Class B digital
WRE6606. User s Guide. Quick Start Guide. Dual-Band Wireless AC1300 Access Point. Default Login Details. Version 1.00 (ABDU.0) Edition 1, 10/2016
 Edition 1, 10/2016") WRE6606 Dual-Band Wireless AC1300 Access Point Version 1.00 (ABDU.0) Edition 1, 10/2016 Quick Start Guide User s Guide Default Login Details Web Address http://zyxelsetup http://dhcp-assigned IP www.zyxel.comhttp://192.168.1.2
WRE6606 Dual-Band Wireless AC1300 Access Point Version 1.00 (ABDU.0) Edition 1, 10/2016 Quick Start Guide User s Guide Default Login Details Web Address http://zyxelsetup http://dhcp-assigned IP www.zyxel.comhttp://192.168.1.2
AC750 Wireless Dual-Band Router CR2. User Manual
 AC750 Wireless Dual-Band Router CR2 User Manual Version 1.0 4/25/2014 Table of Content Chapter 1 Introduction... 3 1.1 Features... 3 1.2 System Requirement... 3 1.3 Package Contents... 4 Chapter 2 Hardware
A Division of Cisco Systems, Inc. GHz 2, g. Wireless-G. User Guide. Access Point WIRELESS WAP54G (EU/LA/UK) Model No.
 Model No.") A Division of Cisco Systems, Inc. GHz 2,4 802.11g WIRELESS Wireless-G Access Point User Guide Model No. WAP54G (EU/LA/UK) Copyright and Trademarks Specifications are subject to change without notice. Linksys
A Division of Cisco Systems, Inc. GHz 2,4 802.11g WIRELESS Wireless-G Access Point User Guide Model No. WAP54G (EU/LA/UK) Copyright and Trademarks Specifications are subject to change without notice. Linksys
WAP3205 v2. User s Guide. Quick Start Guide. Wireless N300 Access Point. Default Login Details. Version 1.00 Edition 2, 12/2012
 WAP3205 v2 Wireless N300 Access Point Version 1.00 Edition 2, 12/2012 Quick Start Guide User s Guide Default Login Details LAN IP Address http://192.168.1.2 Password 1234 www.zyxel.com Copyright 2012 ZyXEL
802.11a/b/g Access Point. User s Guide
 802.11a/b/g Access Point User s Guide FCC Certifications This equipment has been tested and found to comply with the limits for a Class B digital device, pursuant to Part 15 of the FCC Rules. These limits
Wireless Broadband Router User s Guide
 Copyright Statement is the registered trademark of Shenzhen Tenda Technology Co., Ltd. Other trademarks or trade names mentioned herein are the trademarks or registered trademarks of their respective holders.
802.11N Wireless Broadband Router
 802.11N Wireless Broadband Router Pre-N Wireless Access Point Broadband Internet Access WPS 4-Port Switching Hub User's Guide Table of Contents CHAPTER 1 INTRODUCTION... 1 Wireless Router Features... 1
A Division of Cisco Systems, Inc. GHz g. Wireless-G. Access Point. User Guide WIRELESS. WAP54G ver Model No.
 A Division of Cisco Systems, Inc. GHz 2.4 802.11g WIRELESS Wireless-G Access Point User Guide Model No. WAP54G ver. 3.1 Copyright and Trademarks Specifications are subject to change without notice. Linksys
PD-SATA USB/LAN Network Attached Storage Enclosure for 3.5 SATA Hard Drives
 Network Attached Storage Enclosure for 3.5 SATA Hard Drives User Manual & Installation Guide March 16, 2008 - v1.0 Table of Contents 1 INTRODUCTION...1 1.1 ICON KEY...1 1.2 THE...1 1.3 PACKAGE CONTENTS...1
Figure 35: Active Directory Screen 6. Select the Group Policy tab, choose Default Domain Policy then click Edit.
 PC and Server Configuration Figure 35: Active Directory Screen 6. Select the Group Policy tab, choose Default Domain Policy then click Edit. Figure 36: Group Policy Tab 7. Select Computer Configuration
WRE2206. User s Guide. Quick Start Guide. Wireless N300 Range Extender. Default Details. Version 1.00 Edition 1, 01/2015
 WRE2206 Wireless N300 Range Extender Version 1.00 Edition 1, 01/2015 Quick Start Guide User s Guide Default Details Web Address http://zyxelsetup OR http://192.168.1.2 www.zyxel.com User Name admin Password
APC-100. IEEE g Wireless USB Adapter. User s Guide v1.0
 APC-100 IEEE 802.11g Wireless USB Adapter User s Guide v1.0 FCC Certifications Federal Communication Commission Interference Statement This equipment has been tested and found to comply with the limits
WF-2402 Quick Installation Guide
 WF-2402 Quick Installation Guide Netis 150Mbps Wireless-N Broadband Router 1. Check Your Package Contents The following items should be found in your package: 150Mbps Wireless-N Broadband Router Power
CE MARK WARNING LIMITED WARRANTY
 CE MARK WARNING This is a Class B product. In a domestic environment, this product may cause radio interference, in which case the user may be required to take adequate measures. LIMITED WARRANTY Hawking
Wireless LAN Access Point
 Wireless LAN Access Point IEEE 802.11b/g 54Mbps 501903 User s Manual Table of Contents Chapter 1 Introduction... 1 1.1 Package Contents... 2 1.2 Features... 2 1.3 Specifications... 2 1.4 Physical Description...
Wireless b/g Portable Router. User s Guide
 Wireless 802.11b/g Portable Router User s Guide FCC Certifications This equipment has been tested and found to comply with the limits for a Class B digital device, pursuant to Part 15 of the FCC Rules.
Gigabit SATA NAS with USB User s Guide
 Gigabit SATA NAS with USB User s Guide FCC Certifications This Equipment has been tested and found to comply with the limits for a Class B digital device, pursuant to part 15 of the FCC Rules. These limits
Wireless Broadband Router User s Guide
 Copyright Statement is the registered trademark of Shenzhen Tenda Technology Co., Ltd. Other trademarks or trade names mentioned herein are the trademarks or registered trademarks of their respective holders.
User Manual. OT-1044ns
 User Manual OT-1044ns CONTENTS Chapter 1 Introduction... 3 1.1 Features... 3 1.2 Environments... 3 1.3 System Requirement... 4 Chapter 2 Hardware Installation... 4 2.1 Led indicators... 4 2.2 Back Panel
Table of Contents. Page ii
 Table of Contents Chapter 1 Introduction 1 Features... 1 Safety Instructions... 1 Package Contents... 2 Physical Details... 3 Chapter 2 Setup 5 Overview... 5 Using the Windows Wizard... 5 Chapter 3 Web-Based
AIRNET 54Mb b/g High Power USB Adapter. User s Manual
 AIRNET 54Mb 802.11b/g High Power USB Adapter User s Manual FCC Certifications Federal Communication Commission Interference Statement This equipment has been tested and found to comply with the limits
A Division of Cisco Systems, Inc. GHz g. Wireless-G. User Guide. Access Point WIRELESS. WAP54G v2. Model No.
 A Division of Cisco Systems, Inc. GHz 2.4 802.11g WIRELESS Wireless-G Access Point User Guide Model No. WAP54G v2 Copyright and Trademarks Specifications are subject to change without notice. Linksys is
XG-520 Wireless b/g Portable Router. User s Manual
 XG-520 Wireless 802.11b/g Portable Router User s Manual FCC Certifications This equipment has been tested and found to comply with the limits for a Class B digital device, pursuant to Part 15 of the FCC
TEW-211BRP. Wireless AP Router. User s Manual
 TEW-211BRP Wireless AP Router User s Manual Version 1.4 - Jan 2002 CONTENTS Introduction...3 Hardware Installation...5 General Wireless AP Router System Connection...6 Wireless AP Router Default Settings
SOHO 6 Wireless Installation Procedure Windows XP with Internet Explorer 5.x & 6.0
 SOHO 6 Wireless Installation Procedure Windows XP with Internet Explorer 5.x & 6.0 Before you Begin Before you install the SOHO 6 Wireless, you must have: A computer with a 10/100BaseT Ethernet card installed
Introduction... 3 Features... 3 Minimum Requirements... 3 Package Content... 3 Note... 3 Get to know the Broadband Router... 4 Back Panel...
 Introduction... 3 Features... 3 Minimum Requirements... 3 Package Content... 3 Note... 3 Get to know the Broadband Router... 4 Back Panel... 4 Front Panel... 5 Setup Diagram... 6 Getting started... 7 Chapter
KW5590 Wireless Router User Manual
 KW5590 Wireless Router NOTICE This document contains proprietary information protected by copyright, and this Manual and all the accompanying hardware, software, and documentation are copyrighted. All
Change NETGEAR USB Control Center Settings
 Change NETGEAR USB Control Center Settings You can stop the NETGEAR USB Control Center from starting automatically when you log in to Windows. You can also change the language and specify the time-out
WRE6505 v2. User s Guide. Quick Start Guide. Wireless AC750 Range Extender. Default Login Details. Version 1.00 Edition 1, 10/2016
 WRE6505 v2 Wireless AC750 Range Extender Version 1.00 Edition 1, 10/2016 Quick Start Guide User s Guide Default Login Details Web Address http://zyxelsetup http://dhcp-assigned IP www.zyxel.comhttp://192.168.1.2
EnGenius EAP N Multi-Function AP/Repeater
 EnGenius EAP9550 11N Multi-Function AP/Repeater Table of Content 1. Introduction...4 1.1. Features and Benefits...4 1.2. Package Contents...5 1.3. System Requirement...5 2. Understanding the Hardware...6
AnyDATA.NET Wireless Wi-Fi Router, AWR-500A
 AnyDATA.NET Wireless Wi-Fi Router, AWR-500A (User Manual) V 1.5 2008.07.25 AnyDATA CDMA Module Series Reference Design Specification Copyright 2008 AnyDATA Corp. All Rights Reserved. Any part of this document
ADDON Magic r9500 Wireless Router User Manual V1.0
 ADDON Magic r9500 Wireless Router User Manual V1.0 Contents 1 Safety Precautions... 3 2 Overview... 4 2.1 Product Introduction... 4 2.2 Packing list... 4 3 Hardware and Hardware Installation... 5 3.1 Front
RX3041. User's Manual
 RX3041 User's Manual Table of Contents 1 Introduction... 2 1.1 Features and Benefits... 3 1.2 Package Contents... 3 1.3 Finding Your Way Around... 4 1.4 System Requirements... 6 1.5 Installation Instruction...
1. Press "Speed Test" to find out your actual uplink and downlink speed.
 ASRock G10 Gaming Router 6.4 QoS Settings QoS Add Gaming Boost web page. Gaming Boost: Enable or disable the Gaming Boost. Bandwidth The router supports Gaming Boost natively, which identifies and intelligently
Print Server. User s Manual. Rev. 01 (April, 2004) Made In Taiwan
 Made In Taiwan") Print Server User s Manual Rev. 01 (April, 2004) Made In Taiwan TABLE OF CONTENTS ABOUT THIS GUIDE... 4 INTRODUCTION... 5 PACKAGE CONTENTS... 6 SYSTEM REQUIREMENTS... 6 GENERAL FEATURES... 7 PRODUCT VIEW...
Print Server User s Manual Rev. 01 (April, 2004) Made In Taiwan TABLE OF CONTENTS ABOUT THIS GUIDE... 4 INTRODUCTION... 5 PACKAGE CONTENTS... 6 SYSTEM REQUIREMENTS... 6 GENERAL FEATURES... 7 PRODUCT VIEW...
Wireless LAN Access Point
 Wireless LAN Access Point IEEE 802.11b/g 54Mbps User s Manual Table of Contents Chapter 1 Introduction... 1 1.1 Package Contents... 2 1.2 Features... 2 1.3 Specifications... 2 1.4 Physical Description...
CHAPTER 7 ADVANCED ADMINISTRATION PC
 ii Table of Contents CHAPTER 1 INTRODUCTION... 1 Broadband ADSL Router Features... 1 Package Contents... 3 Physical Details... 4 CHAPTER 2 INSTALLATION... 6 Requirements... 6 Procedure... 6 CHAPTER 3 SETUP...
LevelOne Broadband Routers
 LevelOne Broadband Routers FBR-1100TX FBR-1400TX FBR-1401TX FBR-1700TX User's Guide TABLE OF CONTENTS CHAPTER 1 INTRODUCTION... 1 Features of your LevelOne Broadband Router... 1 Package Contents... 4
A Division of Cisco Systems, Inc. GHz 2, g. Wireless-G. User Guide. PCI Adapter WIRELESS. with SpeedBooster WMP54GS (EU/UK/LA) Model No.
 Model No.") A Division of Cisco Systems, Inc. GHz 2,4 802.11g WIRELESS Wireless-G PCI Adapter with SpeedBooster User Guide Model No. WMP54GS (EU/UK/LA) Copyright and Trademarks Specifications are subject to change
A Division of Cisco Systems, Inc. GHz 2,4 802.11g WIRELESS Wireless-G PCI Adapter with SpeedBooster User Guide Model No. WMP54GS (EU/UK/LA) Copyright and Trademarks Specifications are subject to change
3GWIFIMRD. 3.5G plus WLAN Desktop Server Router. Quick Setup Guide. 1 Version 1.0
 3GWIFIMRD 3.5G plus WLAN Desktop Server Router Quick Setup Guide 1 Version 1.0 Declaration of Conformity Marking by the above symbol indicates compliance with the Essential Requirements of the R&TTE Directive
Quick Start Guide for Standalone EAP
 Quick Start Guide for Standalone EAP CHAPTERS 1. Determine the Management Method 2. Build the Network Topology 3. Log In to the EAP 4. Edit the SSID 5. Configure and Manage the EAP This guide applies to:
Prestige 660HW Series. Prestige 660H Series. Quick Start Guide
 Prestige 660HW Series ADSL 2+ 4-Port Gateway with 802.11g Wireless Prestige 660H Series ADSL 2+ 4-Port Gateway Quick Start Guide Version 3.40 01/2005 Table of Contents Introducing the Prestige... 3 1 Hardware
Security SSID Selection: Broadcast SSID:
 69 Security SSID Selection: Broadcast SSID: WMM: Encryption: Select the SSID that the security settings will apply to. If Disabled, then the device will not be broadcasting the SSID. Therefore it will
LevelOne User Manual
 LevelOne User Manual FNS-1020 1-Bay Simple Network Storage Ver. 1.0 Table of Content 1. INTRODUCTION... 3 2. UNPACKING AND SETUP... 4 FEATURES... 4 PACKAGE CONTENTS... 4 3. HARDWARE INSTALLATION... 5 FRONT
11N Wireless USB Adapter User Guide
 -- 1 -- Copyright Statement is the registered trademark of Shenzhen Tenda Technology Co., Ltd. All the products and product names mentioned herein are the trademarks or registered trademarks of their respective
802.11g Wireless High-power Broadband Router with passive PoE. User s Manual
 802.11g Wireless High-power Broadband Router with passive PoE User s Manual Table of Contents CHAPTER 1: INTRODUCTION... 2 WIRELESS ROUTER FEATURES... 2 PACKAGE CONTENTS... 4 PHYSICAL DETAILS... 5 ABOUT
Wireless-N USB Adapter User s Manual
 Wireless-N USB Adapter User s Manual Copyright 2007 EUSSO Technologies, Inc. All rights reserved. Table of Contents PREFACE... 3 WIRELESS LAN BASICS... 3 Warning... 3 INSTALLATION OVERVIEW... 4 INTRODUCTION...
Broadband Router. User s Manual
 Broadband Router User s Manual 1 Introduction... 4 Features... 4 Minimum Requirements... 4 Package Content... 4 Note... 4 Get to know the Broadband Router... 5 Back Panel... 5 Front Panel... 6 Setup Diagram...7
LevelOne User Manual. WAP-6103 Managed Ceiling Wireless Access Point, 300Mbps n, Fast Ethernet, PoE 802.3af V1.1_
 LevelOne User Manual WAP-6103 Managed Ceiling Wireless Access Point, 300Mbps 802.11n, Fast Ethernet, PoE 802.3af V1.1_20140509 Table of contents CHAPTER 1 INTRODUCTION... 5 1.1 CONTENTS LIST... 5 1.2 HARDWARE
airhaul Nexus sb3010
 u n w i r i n g o u r w o r l d TM airhaul Nexus sb3010 User Configuration Guide Version 1.3 Copyright smartbridges Pte Ltd. All Rights Reserved. About This Document This Software Configuration Guide is
USER GUIDE. Dual band Access Point a/b/g/n.
 USER GUIDE Dual band Access Point 802.11a/b/g/n www.legrand.fr Contents 1.1 / HOW TO ACCESS THE WEB-BASED INTERFACE p. 4 1.2 / ENTERING THE CONFIGURATION PASSWORD p. 5 1.3 / CONFIGURATION WIZARD p. 6 1.4