Vyapin Virtualization Management Suite
|
|
|
- Solomon Dennis
- 6 years ago
- Views:
Transcription

1 Vyapin Virtualization Management Suite Last Updated: June 2016 Copyright 2016 Vyapin Software Systems Private Limited. All rights reserved. This document is being furnished by Vyapin Software Systems Private Ltd for information purposes only to licensed users of the Hyper V Management Suite software product and is furnished on an AS IS basis, that is, without any warranties, whatsoever, express or implied. Hyper V Management Suite is a trademark of Vyapin Software Systems Private Ltd. Information in this document is subject to change without notice and does not represent any commitment on the part of Vyapin Software Systems Private Ltd. The software described in this document is furnished under a license agreement. The software may be used only in accordance with the terms of that license agreement. It is against the law to copy or use the software except as specifically allowed in that license. No part of this document may be reproduced or retransmitted in any form or by any means, whether electronically or mechanically, including, but not limited to the way of: photocopying, recording, or information recording and retrieval systems, without the express written permission of Vyapin Software Systems Private Ltd. Vyapin Software Systems Private Limited Website: Sales Contact: sales@vyapin.com Technical Support: support@vyapin.com
2 GENERAL INFORMATION... 1 About Vyapin Virtualization Management Suite... 2 System Requirements... 3 How to Purchase?... 4 How to register the software?... 5 Technical Support... 8 GETTING STARTED... 9 Database Settings Configure Host Credentials (Optional) Add a Host Edit a Host Delete a Host Configure SMTP Server User Connection profiles VM REPORTS About VM Reports How to view Summary Reports? How to view Memory Reports? How to view Networking Reports? How to view Processor Reports? How to view Replication Reports? How to view Current Status Reports? How to view Snapshots Reports? How to view Virtual Hard Disk Reports? How to view Integration Services Reports? How to view DVD Drives Reports? How to view All VM Settings Reports? SCHEDULE About Schedule Reports Schedule Task Manager How to Schedule Reports? VM PERFORMANCE ANALYZER DATA COLLECTOR About Data Collector How to configure a host and VM for data collection? LIVE PERFORMANCE DATA How to view the occurrence of configured performance counters in Data Collector?... 74
3 PERFORMANCE REPORT About Performance Reports How to generate Host Performance Summary Reports? How to generate VM Performance Summary Reports? VM PERFORMANCE MONITOR How to view the performance metrics in Live Monitor? ADDITIONAL FEATURES How to Add host? How to Customize fields? How to apply Filters? How to Refresh Data? How to Export Data? How to Data? REFERENCES Troubleshooting How to uninstall Vyapin Virtualization Management Suite
4 General Information About Vyapin Virtualization Management Suite System Requirements How to purchase? How to register the software? Technical support 1
5 About Vyapin Virtualization Management Suite Vyapin Virtualization Management Suite is a powerful solution for auditing, managing and monitoring virtual machines across your entire Windows network. The Vyapin Virtualization Management Suite consists of three modules - the VM Reports module, the VM Performance Analyzer module and the VM Performance Monitor module. VM Reports Module: With the VM Reports module you can perform a complete scan for all installed VMs in your network. You can perform an automated inventory of VMs and their configuration at regular intervals and keep a constant watch on the health of your Hyper-V Servers. The solution provides a variety of audit reports that are simple, elegant and highly customizable for System Administrators, IT infrastructure Managers and Systems Audit personnel to use and act on. VM Performance Analyzer Module: With the VM Performance Analyzer module you can analyze the performance history of Hosts and VMs in your network. You can collect performance metrics at regular intervals of time and then analyze these performance metrics over a period of time. You can perform a Trend analysis of various loads by charting the history of important performance variables related to CPU, Memory, IO and Network. The Analyzer module assists you in Capacity Planning of future workloads by letting you analyze current workloads by aggregating data from pre-defined intervals of time such as Daily, Weekly and Monthly subsets of data. VM Performance Monitor Module: VM Performance Monitor module is a resource monitoring tool that collects performance metrics for Hyper-V hosts and their VMs and lets you monitor important CPU, Memory, IO and Network resources in real time using charts and tables. Vyapin Virtualization Management Suite has been architected using the latest Microsoft.NET technology, bringing you the best-in-breed reporting solution for your entire Hyper-V Servers. Vyapin Virtualization Management Suite is highly optimized for performance (using native Windows API calls wherever appropriate), resulting in fast data collection of deeply embedded configuration data. Imagine scanning your vast network of Hyper-V servers without having to wait forever to see your reports! You can create data subsets for your network using our powerful scan options and meaningfully segment your entire network for data collection and reporting. 2
6 System Requirements For the computer running Vyapin Virtualization Management Suite Processor Disk space & Memory Intel Pentium processor 512 MB RAM and minimum of 20 MB of free disk space Operating Systems Windows 10 / Windows 8.1 / Windows 8 / Windows 7 / Windows Server 2012 R2 / Windows Server 2012 / Windows Server 2008 R2 / Windows Server 2008 / Windows Server 2003 with.net Framework 4.0 or higher with the latest service packs Database Software Microsoft SQL Server 2012 (Enterprise / Standard / Developer / Express edition) or Microsoft SQL Server 2008 (Enterprise / Standard / Developer / Express edition) or Microsoft SQL Server 2005 (Enterprise / Standard / Developer / Express edition) running in local / remote computer with latest Service Pack MDAC v2.5/2.6/2.8 For the Hyper-V Servers reported by Vyapin Virtualization Management Suite Microsoft Hyper-V Server 2012 R2 / Microsoft Hyper-V Server 2012 /Microsoft Hyper-V Server 2008 R2 / Microsoft Hyper-V Server 2008 with Microsoft Windows Management Instrumentation Service enabled. 3
7 How to Purchase? You can purchase Vyapin Virtualization Management Suite online from our website Please contact our Sales department at for sales and price related queries. 4

8 How to register the software? Once you purchase the software online or through any one of our resellers, you will receive a sale notification through from our sales department. We will send you an with the necessary instructions to activate the software. In case you do not receive an from our sales team after you purchase the software, please send the following information to our sales department at sales@vyapin.com with the sales order number: Company Name : End-user Company Name Location : City & Country for the Company Name given above Please allow 12 to 24 hours from the time of purchase for our sales department to process your orders. Register screen Perform the following steps to activate the software: 1. Download evaluation/trial copy of software from the respective product page available in our website at 2. Install the software on the desired computer. 3. You will receive a license key through as soon as the purchase process is complete. 4. Click 'Activate' in File -> About -> Activate menu to see the Activate dialog (as shown in Image 1). 5. Copy the license key sent to you through and paste it in the 'License Key' textbox. For help on how to copy the license key, click 'Click here to see how to copy and paste the license key' link in the Activate dialog (as shown in Image 2). 5


9 How to copy license key screen? Request License Key: 1. Select Help -> About Vyapin Virtualization Management Suite from File. 2. The About Vyapin Virtualization Management Suite dialog will appear as shown below: 6

10 Click Request license key... button. The Request License Key dialog will appear as shown below: Request License Key screen Enter the following details and click Submit to place the license key request through . Contact Name: End-user of the product. Company: End-user Company Name. address where the license key has to be sent. Phone: Phone number with country code and area code. Order ID: Order/Transaction ID reference. License Type: License that was purchased. 7
11 Technical Support Vyapin Virtualization Management Suite Frequently Asked Questions (FAQ) section is available online at our website Please direct all technical support questions to Include the following information to expedite a response: a) Include the version of the product you are using. b) If the problem is associated with installation, include the steps that led to the problem. c) If the problem is associated with usage, please state the series of steps you performed. d) Include the version of the OS, info about any service packs or hot-fixes and local language of the OS installed. e) Attach the Error Log File available in the common application data path of Vyapin Virtualization Management Suite (e.g., <Application Data Folder> \ Vyapin Virtualization Management Suite.Log). Note: <Application Data Folder> is the common area where Vyapin Virtualization Management Suite settings will be stored in the machine running Vyapin Virtualization Management Suite. The <Application Data Folder> can be found from the File -> About screen. The default path of <Application Data Folder> is as follows: Windows 7, Windows 8, Windows 8.1, Windows Server 2008, Windows Server 2008 R2, Windows Server 2012, Windows Server 2012 R2 - C:\Users\Public\Documents\Vyapin Virtualization Management Suite 8
12 Getting Started Configuration Settings Database Settings Configuring Host Credentials Add a host Edit a host Delete a host Configure SMTP Server User Connection Profiles 9
 to connect and create a new")
13 Database Settings Vyapin Virtualization Management Suite may be configured to use either MS-Access MDB or SQL Server database for its data storage to generate reports. If you choose SQL server Vyapin Virtualization Management Suite requires an SQL Server running SQL Server 2005 / 2008 / 2012 (Enterprise / Standard / Express editions) to connect and create a new application database. Vyapin Virtualization Management Suite will connect to the specified SQL Server based on authentication mode and user credentials to manage its own application database. You can access the Database settings by clicking Configuration -> Configuration Settings tab in the Vyapin Virtualization Management Suite main application window and choose Database settings, as shown below 10
14 User Authentication To connect to SQL Server, Vyapin Virtualization Management Suite uses the relevant user accounts based on the authentication mode as listed below: A. Windows Authentication: In this method, Vyapin Virtualization Management Suite uses the currently logged on user account while running reports B. SQL Authentication: In this method, Vyapin Virtualization Management Suite uses the specified SQL user account and password while running reports. Vyapin Virtualization Management Suite stores the SQL user name and password as a user profile in 'Stored User Names and Passwords' applet for its usage. Read User Connection Profiles for more details. Note: Vyapin Virtualization Management Suite expects the user account to have sufficient privileges to create, add to and delete database in the SQL server. Database creation Vyapin Virtualization Management Suite creates databases in SQL Server based on the following database options (whichever is selected) as outlined below: 1. Use a single central database for all instances of the application A new database will be created in the SQL server by the name Vyapin Virtualization Management Suite. Inside the Vyapin Virtualization Management Suite database, separate tables will be created for each installation of Vyapin Virtualization Management Suite. The table names will be prefixed with the computer name that is running Vyapin Virtualization Management Suite application. Thus, each installation of Vyapin Virtualization Management Suite will deploy its own tables based on the computer where Vyapin Virtualization Management Suite is installed. For example, if you install the software on 3 different computers, single database with 3 different tables will be created inside the single database and each installed application will generate reports separately independent of each other. 11
15 2. Use a separate database for each instance of the application Vyapin Virtualization Management Suite creates a single application database in the default data storage location used by the SQL Server during application launch. Vyapin Virtualization Management Suite uses the following naming convention: VyapinVirtualizationManagementSuite-<COMPUTERNAME>, where COMPUTERNAME is the name of the computer running Vyapin Virtualization Management Suite. For example, if the computer running Vyapin Virtualization Management Suite is CLIENT01, Vyapin Virtualization Management Suite creates 'Vyapin Virtualization Management Suite- CLIENT01' with data ('Vyapin Virtualization Management Suite-CLIENT01.mdf') and log (''Vyapin Virtualization Management Suite-CLIENT01_log.LDF') files stored in the default SQL data folder in the SQL server (for example, C:\Program Files\Microsoft SQL Server\MSSQL.1\MSSQL\Data). Database cleanup Vyapin Virtualization Management Suite will delete the application database while uninstalling the Vyapin Virtualization Management Suite application from the computer. 12
16 Configure Host Credentials (Optional) Manage alternate credentials for Host Servers. The application by default uses the currently logged on user context to enumerate Hyper-V Servers and its virtual machines and to collect report data. If you want to specify alternate Domain Administrator credentials you may use this option. Configuring Host Credentials (Optional) You can access the Host Credentials settings by selecting the Host Credentials (Optional) option in the Configuration Settings window. 13
17 The various operations that can be performed in the Host Credentials screen are given below: Operation Add Edit Delete Connect Description To Add a new host to the list. To Edit the properties of a host in the list. Select a host and click Edit button. To Delete a host from the list. Select a host and click Delete button. To connect to a host in the list. Select a host and click Connect button. 14
 window. 2. In the Host Credentials (Optional) window, click Add button to add a domain to the list. 3.")
18 Add a Host You may also add one single host at a time to the list of host in the credentials list by using Add Host feature. Add a domain to the list 1. Launch Host Credentials (Optional) window. 2. In the Host Credentials (Optional) window, click Add button to add a domain to the list. 3. The New Add Host dialog will be displayed as shown below: Enter the name of a host. 15
19 4. Specify user name and the corresponding password to connect to the specified host. Store the above user credential in Microsoft Windows Stored User Names and Passwords applet - Vyapin Virtualization Management Suite allows the user to enter different user credentials to connect to the host. Uncheck the checkbox 'Log on using current user' if you like to connect to the host using a different user context. Vyapin Virtualization Management Suite will store the user credential to connect to domain in the Microsoft Windows Stored User Names and Passwords applet / Credential Manager for security reasons. The stored user profile is tied to the user context (currently logged on user account) in which the profile is created. 5. Click OK to add the host to the Host Credentials list. 6. Vyapin Virtualization Management Suite will connect to the host with the newly provided connection parameters and add it to the list, upon successful connection to the Host. 16
20 7. Click Cancel to abort the add process of the host to the Host Credentials list. 17
21 Edit a Host To Edit a host in the Host Credentials (Optional), follow the steps given below: 1. Launch Host Credentials (Optional) window. 2. In the Host Credentials (Optional) window, select any row (host), Click button to Edit an existing host in the list, as shown below: 3. The host name cannot be modified during the edit operation. 4. Specify user name and the corresponding password to connect to the specified host. 5. Click OK to save and connect to the host with the newly provided connection parameters and update the host in the Host Credentials (Optional) list. 18
22 6. Vyapin Virtualization Management Suite will connect to the host with the newly provided connection parameters and modify it in the list, upon successful connection to the host. 7. Click Cancel to retain the existing connection parameters of the host in the Host Credentials list. 19
23 Delete a Host Perform the following steps to delete a host: 1. Launch Host Credentials (Optional) window. 2. In the Host Credentials (Optional) window, select any row (host), click button to delete the host from the Host Credentials list. 20

24 3. An alert message asking for confirmation to delete the host will be displayed as shown below: 4. Click Yes to delete the selected host. 5. Click No to abort the delete process of the selected host. 21
25 Configure SMTP Server Vyapin Virtualization Management Suite provides the option to the reports generated. For e- mailing reports, Vyapin Virtualization Management Suite requires SMTP Server, From Address, To Addresses (recipients separated by semicolon) and the report format. Vyapin Virtualization Management Suite maintains a single SMTP Server and a From Address for use by all reports. You can specify a separate set of To addresses (recipients), report format, subject and body of the message for each reports. You can set SMTP Server and From Address by clicking Configuration -> Configuration Settings tab in the Vyapin Virtualization Management Suite main application window, as shown below: 22
26 User Connection profiles Vyapin Virtualization Management Suite creates a user profile in Windows Stored User Names and Passwords applet / Credential Manager, in order to store the domain user context for enumerating servers using ADSI. The stored user profile will be useful for generating reports using Vyapin Virtualization Management Suite under the following scenarios: Using an alternate user account to connect to the domain to retrieve servers using ADSI. Providing credentials that have sufficient rights to enumerate shares present in computers within a domain. The stored user profile persists for all subsequent logon sessions on the same computer where Vyapin Virtualization Management Suite is installed. The stored user profiles are visible to the application under other logon sessions on the same computer. The stored user profile created by Vyapin Virtualization Management Suite is restricted to the Windows User Profile context. If the Windows User Profile is maintained locally, Vyapin Virtualization Management Suite stored user profile is accessible only by the same user in the same computer. If the user who creates Vyapin Virtualization Management Suite stored user profile, has a Roaming user account in the enterprise, the Vyapin Virtualization Management Suite stored user profile can be accessed by the same user in any computer in the Windows enterprise. The stored user profile is a generic credential of Windows Stored User Names and Passwords applet / Credential Manager and can be used by the application only. The credential information is stored securely in an 256 bit encrypted format in Windows Stored User Names and Passwords applet / Credential Manager. The stored user profile corresponding to the user account will be used by the application in order to connect to the domain, if 'Use ADSI' is selected in Vyapin Virtualization Management Suite Enumeration Settings. Using the Connection Profile dialog shown below, new profile can be created and available profiles can be removed from the profiles list. 23
27 Click Add button to add a new profile and a dialog will appear as shown below: 24

28 Click Edit button in the Connection Profile dialog to edit available profiles. Click Remove button in the Connection Profile dialog to remove available profiles. 25
29 VM Reports About VM Reports How to view Discovery Reports? How to view Memory Reports? How to view Networking Reports? How to view Processor Reports? How to view Replication Reports? How to view Current Status Reports? How to view Snapshot Reports? How to view Virtual Hard Disk Reports? How to view Integration Services Reports? How to view DVD Drive Reports How to view All VM Settings Reports? 26
30 About VM Reports Introduction VM Reports Module is used to perform a complete scan for all installed VMs in your network. You can perform an automated inventory of VMs and their configuration at regular intervals and keep a constant watch on the health of your Hyper-V Servers. Please be aware that the VM Reports Module uses WMI (Windows Management Instrumentation) to collect report data. Hence, all reports require WMI to be installed and enabled on the Hyper-V host server and its VMs. For more information, refer to "Prerequisites and Initial Configuration" section. Prerequisites and Initial Configuration The VM Reports Module uses WMI to collect report data. WMI uses DCOM protocol and is affected by Windows Firewall and DCOM security settings. In order to generate the reports both Windows Firewall and DCOM must be properly configured. Windows Firewall and DCOM, when not properly configured on your remote computers, can cause errors such as an "RPC Server Unavailable" error or an "Access is denied" error. Also, ensure that the current user context or specified user context, under which the application runs, is a local administrator on target computers. In order to generate the reports ensure the following settings are set appropriately: Remote Administration setting is enabled on Windows Firewall. By default, Windows Firewall blocks all unsolicited incoming traffic except for Group Policy. This is a common issue you might encounter while generating the reports. To resolve this issue, you need to enable the remote administration setting on the Firewall. For more information about configuring the Windows Firewall connections with a script, see WMI is installed and the Startup Type for WMI service is set to Automatic and the service is running under Local System Account. DCOM is enabled and ensure that security settings for DCOM allow remote connections 1. Run the DCOM Configuration Utility (dcomcnfg.exe) 2. In the Component Services dialog box, expand Component Services, expand Computers, and then right-click My Computer and click Properties 3. In the My Computer Properties dialog box, click the Default Properties tab 4. Select Enable Distributed COM on this computer 5. The Default Authentication Level is set to Connect and the Default Impersonation Level is set to Identify in Windows XP and later operating systems. For Windows NT, however, the Default Authentication Level is set to Connect and Default Impersonation Level is set to Impersonate 6. The default DCOM security settings for Access Permissions and Launch and Activation Permissions in the COM Security tab in the My Computer Properties dialog includes at least INTERACTIVE, SYSTEM and Administrators 27
31 In Windows XP SP2 and later operating systems the SERVICE account is granted Impersonate a client after authentication right under User Rights Assignment under Local Policies The Data Execution Prevention in Windows XP SP2 and Windows 2003 SP1 is enabled for essential windows programs only. System Info Reports The VM Reports Module provides reports on the following resource categories: Summary Memory Networking Processor Replication Current Status Snapshots Virtual Hard Disks Integration Services DVD Drives All VM Settings 28
32 How to view Summary Reports? Click on below. under VM Reports to view Summary information available under each tab as listed Click tab to view the following information: Host Name, VM Name, VM State, Created Date, Notes, Heartbeat, Number of Processors, Guest Operating System, DNS Name. Click tab to view the following information: Host Name, VM Name, Automatic Start Action, Automatic Start Delay, Automatic Stop Action, Smart Paging File Location, Snapshot File Location. 29
33 30
34 How to view Memory Reports? Click on below. under VM Reports to view Memory information available under each tab as listed Click tab to view the following information: Host Name, VM Name, State, Startup Memory (MB), Dynamic Memory Enabled, Minimum Memory (MB), Maximum Memory (MB), Assigned Memory (MB), Memory Demand (MB), Status, Memory Buffer (%), Memory Weight, Status Report as on. Click tab to view the following information: 31
35 32
36 How to view Networking Reports? Click on listed below. under VM Reports to view Networking information available under each tab as Click tab to view the following information: Host Name, VM Name, State, Adapter, Connection, Connection Type, IP Address, Status, Status Recorded as on. Click tab to view the following information: Host Name, VM Name, MAC Address Spoofing, DHCP guard, Router guard, Mirroring Mode, NIC Teaming, Status Recorded as on. 33
37 34
38 How to view Processor Reports? Click on below. under VM Reports to view Processor information available under each tab as listed Click tab to view the following information: Host Name, VM Name, State, Number of Processor, Characteristics, Status, LoadPercentage, Virtual machine reserve (Percentage), Virtual machine limit(percentage), Relative weight, Status Recorded as on. Click tab to view the following information: Host Name, VM Name, State, MaxProcessorPerNumaNode, MaxMemoryPerNumaNode, MaxNumaNodesPerSocket, Status Recorded as on. 35
39 Click tab to view the following information: Host Name, VM Name, State, Number of Processor, Number of NUMA nodes, Number of Sockets, Processor Compatibility, Status Recorded as on. 36
40 37
41 How to view Replication Reports? Click on listed below. under VM Reports to view Replication information available under each tab as Click tab to view the following information: Host Name, VM Name, State, Replication Type, Replication State, Replication Health, Current Primary Server, Current Replica Server, Last synchronized at, Status Recorded as on. 38
42 How to view Current Status Reports? Click on listed below. under VM Reports to view Current Status information available under each tab as Click tab to view the following information: Host Name, VM Name, State, CPU Usage (%), Memory Usage (MB), Up Time, Replication Health, Currently Logged on User, User Logged on Since, Status Recorded as on. 39

43 Click tab to view the following information: 40
44 How to view Snapshots Reports? Click on below. under VM Reports to view Snapshot information available under each tab as listed Click tab to view the following information: Host Name, VM Name, State, Snapshot Name, Creation Time, Snapshot Path, Status Recorded as on. Click tab to view the following information: Host Name, VM Name, Snapshot Name, Startup Memory, Dynamic Memory Enabled, Minimum Memory, Maximum Memory, Memory Buffer, Memory Weight, Status Recorded as on. 41
45 Click tab to view the following information: Host Name, VM Name, Snapshot Name, Number of Processors, Virtual machine reserve (Percentage), Virtual machine limit (Percentage), Relative weight, Status Recorded as on. 42
46 Click tab to view the following information: Host Name, VM Name, Snapshot Name, Number of Processors, Virtual machine reserve (Percentage), Virtual machine limit (Percentage), Relative weight, Status Recorded as on. 43
47 Click tab to view the following information: Host Name, VM Name, Snapshot Name, Number of Processors, Virtual machine reserve (Percentage), Virtual machine limit (Percentage), Relative weight, Status Recorded as on. 44
48 Click tab to view the following information: Host Name, VM Name, Snapshot Name, Number of Processors, Virtual machine reserve (Percentage), Virtual machine limit (Percentage), Relative weight, Status Recorded as on. 45

, Relative weight, Status Recorded")
49 Click tab to view the following information: Host Name, VM Name, Snapshot Name, Number of Processors, Virtual machine reserve (Percentage), Virtual machine limit (Percentage), Relative weight, Status Recorded as on. 46
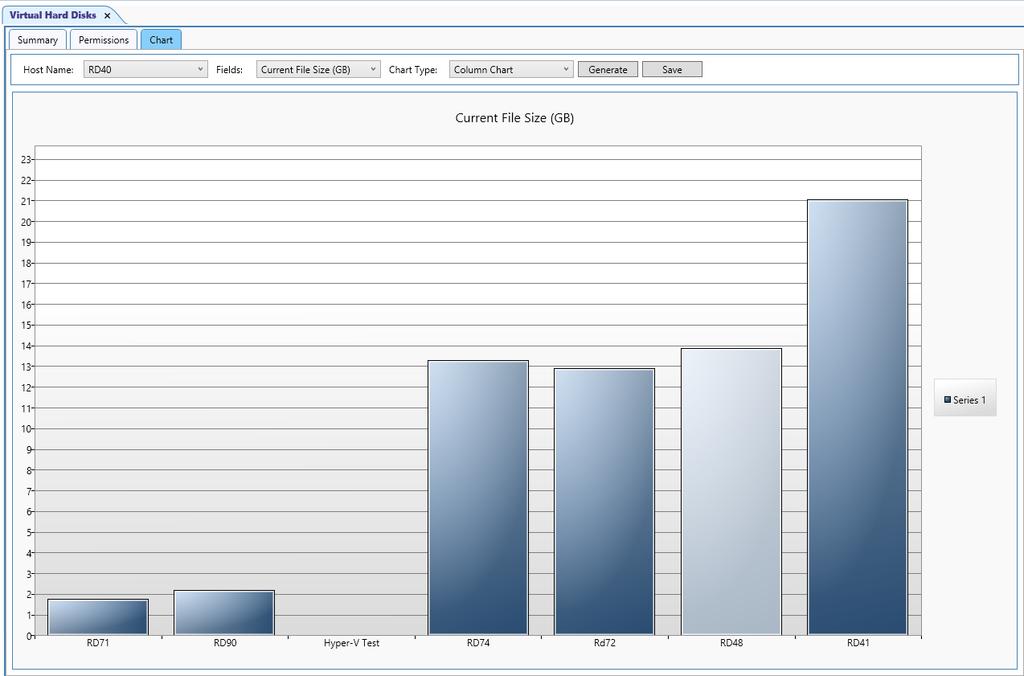
50 How to view Virtual Hard Disk Reports? Click on as listed below. under VM Reports to view Virtual Hard Disks information available under each tab Click tab to view the following information: Host Name, VM Name, State, Hard Disk Name, Format, Type, Location, Maximum Disk Size (GB), Current File Size (GB), Parent Path. Click tab to view the following information: VM Name, State, Hard Disk Name, Location, User Name, Access Type, Permission, Is Inherited, Status Recorded as on. 47

51 Click tab to view the following information: 48
52 49
53 How to view Integration Services Reports? Click on under VM Reports to view Integration Services information available under each tab as listed below. Click tab to view the following information: Host Name, VM Name, State, Operating system shutdown, Time synchronization, Data Exchange, Heartbeat, Backup (Volume snapshot), Status Recorded as on. 50
54 How to view DVD Drives Reports? Click on under VM Reports to view DVD Drives information available under each tab as listed below. Click tab to view the following information: Host Name, VM Name, State, Mounted Media, Controller, Location, Status Recorded as on. 51

55 How to view All VM Settings Reports? Click on under VM Reports to view All VM Settings available under each tab as listed below. 52
56 Schedule About Schedule Reports Task Manager How to Schedule Reports? 53
57 About Schedule Reports Vyapin Virtualization Management Suite provides a powerful offline report generation feature called Schedule Report. Schedule Report allows the user to select multiple reports to be run for several hosts and VMs across the enterprise at scheduled intervals. The Schedule Report feature has the ability to export and/or the reports in different file formats. Please note the following while using the Schedule Report Wizard: a) Scheduled reports will be created as a "task" in Windows Task Scheduler. b) The scheduled job will generate and export/ the reports in different file formats (HTML, CSV and XLSX) to the desired folder path/printer. c) By default, for each task, a sub-folder with the task name will be created under the specified export path. All selected Reports will be exported to a time-stamped sub-folder, in the format "yyyy-mm-dd hh.mm.ss", under the task name folder. Therefore, the full folder path for all the exported reports refers to the following directory: <Export path><task name><time stamp>. d) A separate file will be created for each report in the desired file format. For example, in the HTML file format, each report will be created as a.html file. Note: Schedule Report Wizard will help you create and store the settings for a task, which you may view or modify later using the Scheduled Tasks Manager. The task will be created with the settings (Schedule Type and Run As parameter) provided using the Schedule Report Wizard. A valid password must be specified for the Run As parameter of the task. 54
58 Schedule Task Manager The Scheduled Tasks Manager allows you to perform the following operations: View summary information for the tasks created View exported files of the task Edit an existing task Delete a task View summary information of a task The pane on the left hand side in the Scheduled Tasks Manager window lists the tasks maintained in Vyapin Virtualization Management Suite. To view summary information of a task, select the desired task on the left pane. The summary information of the selected task will be displayed in the right pane as shown below: The task summary includes information about the task information, reports selected, export/ settings. View exported files To view the reports generated and exported by the task, perform either one of the following steps: Select Scheduled Tasks node on the left pane, and then click on the hyperlink in the Exported Files column in the right pane for the desired task. 55
59 View Details To view the details of the reports generated and exported folder path by the task, perform either one of the following steps: Select Scheduled Tasks node on the left pane, and then click on the View Details hyperlink in the right pane for the desired task. OR Select the desired task on the left pane, and then click on the hyperlink next to Exported Files. Edit Task 1. Select a task from the Scheduled Tasks Manager Window and Click Edit Task. 2. Perform the steps as in How to Schedule reports? While proceeding through the wizard, you may change the settings, add a new report, delete a report, edit a report, change the export path etc. 3. The new settings will be used when the task runs the next time. Delete Task To delete a task from the Scheduled Tasks Window, select the task and click Delete Task. The deleted task will be removed permanently from the Windows Task Scheduler. 56
60 How to Schedule Reports? Select option under Reports. This will bring up the Schedule Report Wizard. Step 1: Report Selection 1. Select the report(s) using the checkboxes to the left of the reports. You may select any number of reports to run in a single task. 2. Click Next to proceed to the next step. 57
61 Step 2: Host/VM Selection 1. Select the Hosts and VMs for which you wish to run the reports selected in Step Click Next to proceed to the Next step. 58
62 Step 3: Delivery Options 1. Change the Export or settings as necessary. 2. Use Browse button to change the export path. Click Additional Settings button to specify optional settings as shown below. 59
63 60
64 Step 4: Schedule Settings 1. Enter a unique name for the task. 2. Change the Run as parameter, if necessary and set the password for the specified user. 3. Change the task schedule settings as required. 4. Click Next to proceed to the next and final step. 61

65 Step 5: Summary 1. This step displays the summary information of the task. 2. Click Finish to save the task details. 3. The task will be added to Windows Scheduled Tasks and will be displayed in the Scheduled Tasks Manager Window as shown below: 62
66 63
67 VM Performance Analyzer Data Collector Live Performance Data Performance Reports 64
68 Data Collector About Data Collector How to configure a host and VM for data collection? 65
69 About Data Collector The Data Collector feature provides the option to configure hosts and virtual machines for collecting their performance counter data at regular interval of time. Based on the setting, it collects the performance counter data to report any changes made to the host/virtual machine. Data Collector feature allows you to create a schedule task for a host and its virtual machines in a single task. For more information about data collector, follow the links given below: How to configure a host and VM for data collection? 66
70 How to configure a host and VM for data collection? Click under VM Performance Analyzer module. This will bring up the New Data Collector Task Wizard as displayed below: Step 1: Select Host and configure counters To configure a host for analysis, click Click here to Add Host... menu. Select a host from the list of Configured Hosts drop-down. The list of VMs in the selected host will be displayed in the Select Host/VM drop-down, as shown below: 67
71 1. Select a host/vm. This will display the Performance counters for the selected host/vm in the tree view. 2. Select the desired counters using the checkboxes. 3. Click to add the selected counters for the selected host/vms. 68

72 4. You may also use option to apply the selected counters to the desired VMs. 5. Use button to remove the selected counters. Click Next to proceed. 69
73 1. Enter a unique name for the data collection task and schedule it. 2. Change the data collection task schedule settings as required. 3. Select a Sample Interval time at which the selected counters have to be collected. 4. Use Run At System Startup option as required. To set this option in the scheduled task, the currently logged on user to have administrative privileges. If User Access Control (UAC) is enabled and if the currently logged on user does not have administrative privileges, UAC prompt will appear to elevate the user's privileges. 5. Click Next to proceed to the final step. Step 3: Summary 1. This step displays the summary information of the task. 70

74 2. Click Finish to save the task details. User credential dialog will appear, as shown below: Specify Run As account and password, click OK to create a Data Collector Task. 71
75 3. The task will be added to Windows Scheduled Tasks and will be displayed in the Collector Tasks window as shown below: 72
76 Live Performance Data How to view the occurrence of configured performance counters in Data Collector? 73

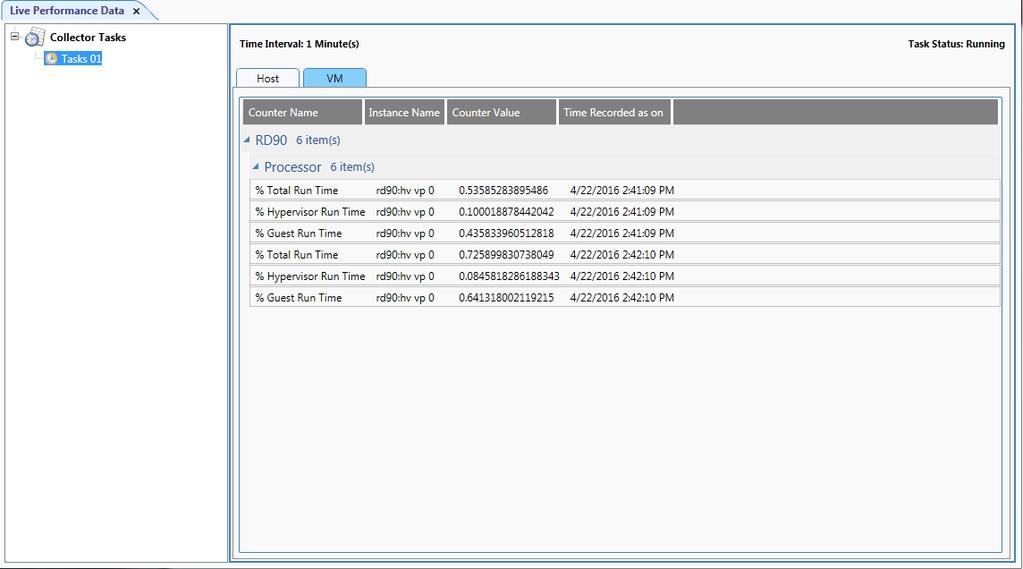
77 How to view the occurrence of configured performance counters in Data Collector? Live Performance Data feature allows you to view the occurrence of all performance counters for the host or virtual machines configured in the Data Collector Task in the application. This feature will display you the collected performance counters at the time intervals specified in the data collector task. Click under Performance Analyzer module. This will launch the Live Performance Data window as shown below. In the left pane, it will show the list of tasks configured in the Data Collector feature. Select a task and view the occurrence of the performance counters for a host and virtual machines at different times. You can also view the performance of Virtual Machines as shown below: 74
78 75
79 Performance Report About Performance Report How to generate Host Performance Summary reports? How to generate VM Performance Summary reports? 76
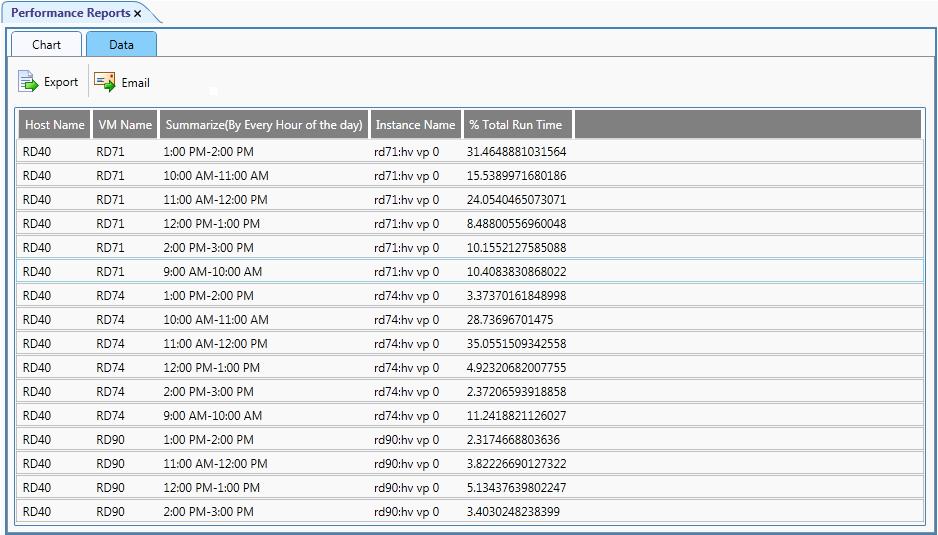
80 About Performance Reports The Performance Reports in VM Performance Analyzer module is a powerful feature that shows reports of host and virtual machine performance counters that are configured in the Data Collector feature. This feature also displays the summarized reports of performance counters such as "By Every 15 minutes of the day", "By Every Half hour of the day", "By Day" etc.,. It may be useful to analyze the workload by aggregating data from pre-defined time intervals such as Daily, Weekly and Monthly as subsets of data. See also How to generate Host Performance Summary Reports? How to generate VM Performance Summary Reports? 77
81 How to generate Host Performance Summary Reports? Click under VM Performance Analyzer module. This will bring up the Performance Reports Wizard as shown below: Step 1: Host/VMs Selection Select the hosts from the list of Host Performance Report drop-down. The hosts for which performance counter data has been collected will be displayed here. Click Next to proceed. 78
82 Step 2: Performance Counter Selection Select a Performance counter from the list of Available Host Counters. Select a Date Range and the type of summary you would like to use when aggregating multiple data points. 79
83 Available Dates shows the start and end date range value for which collected data of the selected counter is available. Summarize By option shows the following details as shown below: Every 15 minutes of the day - 'Every 15 minutes of the day' option will aggregate the selected performance counter data by every 15 minutes on the clock from the given date and time. For example, all data points between AM to AM on January 1, 2016 will be aggregated to a single data point at AM on January 1, Every Half hour of the day - 'Every Half Hour of the day' option will aggregate the selected performance counter data by every half hour on the clock from the given date and time. For example, all data points between AM to AM on January 1, 2016 will be aggregated to a single data point at AM on January 1, Every Hour of the day - 'Every Hour of the day' option will aggregate the selected performance counter data by every hour on the clock from the given date and time. For example, all data points between AM to AM on January 1, 2016 will be aggregated to a single data point at AM on January 1, Day - 'Day option will aggregate the selected performance counter by every day from the given date and time. Day of week - 'Day of week' option will aggregate the selected performance counter by every day of the week such as Monday, Tuesday and so on from the given date and time. For example, all 80

84 data points of Mondays will be collected and aggregated as a single data point called Monday. This will help you compare performance of each day of the week with the other days of the week. Week - 'Week' option will aggregate the selected performance counter by the week number from the given date and time. Month - 'Month' option will aggregate the selected performance counter by month, such as January, February and so on, from the given date and time. This will help analyze performance of workload with respect to seasonal variations such as holiday months. Do Not Summarize - 'Do Not Summarize' option will show the raw data point for selected performance counter from given date and time. Click Finish to generate the report. You can use Chart Style option to change the view of the chart style. You can use Select Instances option to filter the instances of the performance counter. 81
85 82
86 How to generate VM Performance Summary Reports? Click under VM Performance Analyzer module. This will bring up the Performance Reports Wizard as shown below: Step 1: Host/VMs Selection Select the VMs from the VM Performance Report drop-down. The VMs for which performance counter data has been collected will be displayed here. Click Next to proceed. 83

87 Step 2: Performance Counter Selection Select a Performance counter from list of Available VM counters. Specify a Date Range and Select the type of summary you would like to use when aggregating multiple data points. 84

88 Available Dates shows the start and end date range value for collected data of the selected counter Summarize By option shows the following details as shown below: Every 15 minutes of the day - 'Every 15 minutes of the day' option will aggregate the selected performance counter data by every 15 minutes on the clock from the given date and time. For example, all data points between AM to AM on January 1, 2016 will be aggregated to a single data point at AM on January 1, Every Half hour of the day - 'Every Half Hour of the day' option will aggregate the selected performance counter data by every half hour on the clock from the given date and time. For example, all data points between AM to AM on January 1, 2016 will be aggregated to a single data point at AM on January 1, Every Hour of the day - 'Every Hour of the day' option will aggregate the selected performance counter data by every hour on the clock from the given date and time. For example, all data points between AM to AM on January 1, 2016 will be aggregated to a single data point at AM on January 1, Day - 'Day option will aggregate the selected performance counter by every day from the given date and time. Day of week - 'Day of week' option will aggregate the selected performance counter by every day of the week such as Monday, Tuesday and so on from the given date and time. For example, all 85
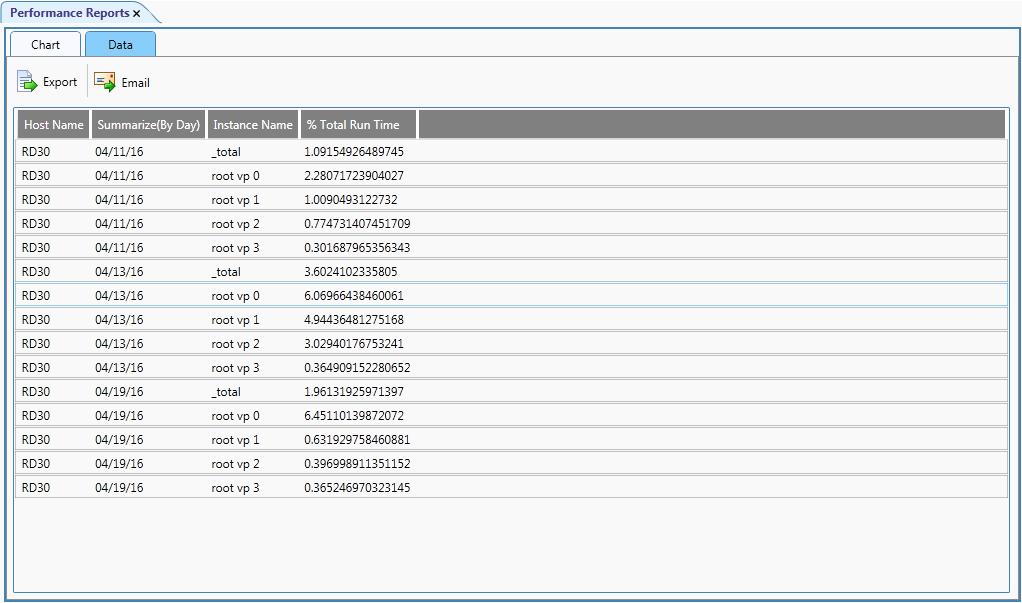
89 data points of Mondays will be collected and aggregated as a single data point called Monday. This will help you compare performance of each day of the week with the other days of the week. Week - 'Week' option will aggregate the selected performance counter by the week number from the given date and time. Month - 'Month' option will aggregate the selected performance counter by month, such as January, February and so on, from the given date and time. This will help analyze performance of workload with respect to seasonal variations such as holiday months. Do Not Summarize - 'Do Not Summarize' option will show the raw data point for selected performance counter from given date and time. Click Finish to generate the report. Once the data collection process is complete, the report would be generated in a report window as shown below: You can use Chart Style option to change the view of the chart style. 86
90 87
91 VM Performance Monitor Live Monitor How to view the performance metrics in Live Monitor? 88
92 How to view the performance metrics in Live Monitor? Live Monitor allows the administrators to keep a tab on the performance metrics of Hyper-V hosts and their VMs. It enables them to monitor important CPU, Memory, IO and Network resources using charts and tables in their environment. Click shown below: under VM Performance Monitor module. This will show the Live Monitor window as To configure a host for monitoring, click Click here to Add Host... menu. Select a host from the list of Configured Hosts drop-down. The list of VMs in the selected host will be displayed in the Host/VM drop-down, as shown below: 89

93 1. Select a host/vm. This will display the Performance counters for the selected host/vm in the tree view. 2. Select the desired counters using the checkboxes. 3. Click to add the selected counters. 90

94 4. Set a Sample Interval time to collect and display the selected counters every sample interval. 5. Use button to remove the selected counters. Click OK to proceed. Once the data collection process is complete, the report would be generated in a report window as shown below: 91

95 You can also view the performance of Virtual Machines as shown below: 92
96 Additional Features How to Add host? How to Customize Fields? How to Apply Filters? How to Refresh Data? How to Export data? How to data? 93
97 How to Add host? Click Add Host tab to enter the host details manually. Enter a valid host name. Deselect the 'Log on using current user' checkbox, if you like to connect to the host using a different user context. Specify an user name and the corresponding password to connect to the specified host. Click button to configure the specified host Click Add hosts from domain tab for enumerating hosts in your network automatically. Vyapin Virtualization Management Suite uses either Computer Browser Service or Active Directory Services to enumerate computers in a network. You may use the Use Computer Browser service option if you have a smaller network, as it may take time for the Browser service to respond to data requests on large networks. The advantage of a Browser service is that it lists only those computers that are currently active/alive on your network. You may use the Active Directory Services option if you have a large network and you need a quicker enumeration of computers in your domain. However, this option requires that the domain controller is contacted and queried by using an user account. Accordingly, the currently logged on user must have sufficient privileges to connect to a domain controller or you may specify an alternate domain user credential for a domain controller. Select an option for enumerating computers in your domain as shown below: 94
98 Expand the desired domain to enumerate the list of hosts that are available in the domain. Click to add a new domain to the domain list. Click button to add the selected host for using it across the product. 95

99 How to Customize fields? Click for customizing the information. Click for selecting all the check boxes. Click Click for clearing all the check boxes. button for confirming the changes. Click button for canceling the operation. 96
 button and clear the filter. 2. Choose a field name, an operator and a possible value from the respective dropdown options. 3. Click 4.")
100 How to apply Filters? Click for setting filter options. The Vyapin Virtualization Management Suite Filter window will be displayed. To set a filter condition, follow these steps. 1. Click (Clear All) button and clear the filter. 2. Choose a field name, an operator and a possible value from the respective dropdown options. 3. Click 4. The Add to Filter will change to AND to Filter. The OR to Filter button will be enabled. The selected condition will be set as a filter and displayed (as shown below). 97
 OR (Field C =")
101 5. Click OK to apply the filter. Note: * Use the, and to build enhanced filter condition as shown below: * (Field A = Value 1 AND Field B = Value 2) OR (Field C = Value 3 AND Field D = Value 4) * Use to remove the parenthesis * Use to delete a selected condition. 98
102 How to Refresh Data? Refresh the current report data to view the latest information. Click button in the toolbar available in the report window to refresh report data. The existing data will be cleared and latest data will be loaded in the report window. 99

103 How to Export Data? The Export feature helps the user to export report data generated by Vyapin Virtualization Management Suite to a file using various formats namely HTML/CSV/XLSX. Click for exporting the information in the desired format or select Export option to export report data to a file in the desired format. Specify a file name to export report data to or accept the default file name. Specify the export path and select a desired file format. The path refers to the destination location where the output file generated should be stored. It can be given using the Browse button. To avoid overwrite existing files, if any, in the specified export path, By default, the report will be exported to a time-stamped sub-folder, in the format 'YYYY-MM-DD HH.MM.SS', under the specified export path. In XLSX file format, the information is stored as sheets in Excel file. For each report, a XLSX file will be generated. The name of the XLSX file will be the name of the report and is stored in the specified destination path if "Export to time-stamped folder" option is cleared. The XLSX file will be stored under a sub-folder, of the form YYYY-MM-DD HH.MM.SS, under the specified export path, if "Export to timestamped folder" option is set. In CSV file format, the information is stored as comma separated values. For each report, a CSV file will be generated. The name of the CSV file will be the name of the report and is stored in the specified destination path if "Export to time-stamped folder" option is cleared or under a sub-folder, of the form YYYY-MM-DD HH.MM.SS, under the specified export path if "Export to time-stamped folder" option is set. In HTML file format, the information is stored as a html file. For each report, a HTML file will be generated. The name of the HTML file will be the name of the report and is stored in the specified destination path if "Export to time-stamped folder" option is cleared or under a sub-folder, of the form YYYY-MM-DD HH.MM.SS, under the specified export path if "Export to time-stamped folder" option is set. 100

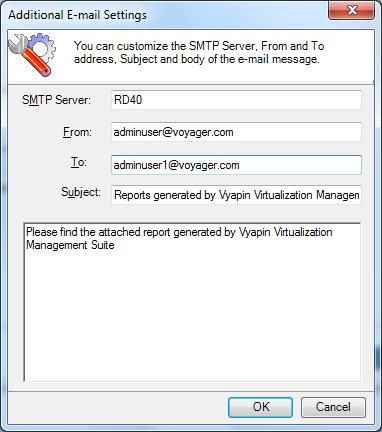
104 How to Data? Vyapin Virtualization Management Suite provides the option to the reports generated. Click button in the toolbar to the report to recipients. dialog will be displayed as shown below: For ing reports, Vyapin Virtualization Management Suite requires SMTP Server, From Address, To Addresses (recipients separated by semicolon) and the report attachment format. Specify SMTP server name, from Address, To address, mail subject, mail content, attachment format and option to compress the attachment. Click button to send the report by to the selected recipients. 101

105 Check names Vyapin Virtualization Management Suite provides check name feature to check the existence of corresponding mail-enabled recipient object in Active Directory. To check name, click button. If the entered name matches with a mail object in the Active directory / its trusted domain, name entered in From address textbox will be replaced by the corresponding active directory recipient object. If there is more than one match, a dialog which contains matching Active Directory recipients will appear as shown below. You can select one or more recipient and click OK. * To get more information about the listed recipients under Change to, select the name, and then click. 102
 will appear in red color.")
106 If there is no match for the name entered by the user in Active Directory, a dialog will appear as shown below: Select Delete option in the above dialog to remove the recipient name from To address text box. Click Cancel button to close this dialog and the unresolved recipient(s) will appear in red color. 103

107 Address Book Vyapin Virtualization Management Suite provides Address Book feature to search for any mail enabled recipient object (say, person, distribution list, contact, public folder) you want to send a message to. Click button and then use the Find Names dialog box to search for the recipient object you want to send a message to. (Note that you can't use the Find Names dialog box to search for distribution lists in your Contacts folder.) Select the object's name in the list and then click Add recipient to...to. To get more information about one of the names in the list, such as department or phone number, select the name, and then click. 104
108 References Troubleshooting How to uninstall Vyapin Virtualization Management Suite? 105
109 Troubleshooting If and when a problem arises, please forward the following information to support@vyapin.com to revert back to you with a solution. These files will be available where Vyapin Virtualization Management Suite is installed. Error Log File E.g., <Application Data Folder>\Vyapin Virtualization Management Suite.Log Note <Application Data Folder> is the common area where Vyapin Virtualization Management Suite settings will be stored in the machine running Vyapin Virtualization Management Suite. The <Application Data Folder> can be found from the Help -> About screen. The default path of <Application Data Folder> is as follows: Windows 7, Windows 8, Windows 8.1, Windows 10, Windows Server 2008, Windows Server 2008 R2 Windows Server 2012, Windows Server 2012 R2 - C:\Users\Public\Documents\Vyapin Virtualization Management Suite 106

110 How to uninstall Vyapin Virtualization Management Suite When you uninstall Vyapin Virtualization Management Suite through Control Panel - Add / Remove Programs applet, Windows Installer program will remove only the application files from your machine. But, the application related files created by Vyapin Virtualization Management Suite remain in the computer. In order to remove Vyapin Virtualization Management Suite worker files completely, the uninstall wizard provides a set of cleanup options to perform the cleanup operation based upon your selection. Use this wizard to cleanup the files that are created by Vyapin Virtualization Management Suite application selectively and uninstall Vyapin Virtualization Management Suite completely from the machine. 1. Launch the uninstall wizard by clicking Start -> Programs -> Vyapin Virtualization Management Suite -> Uninstall Hyper-V Management Suite. The Vyapin Virtualization Management Suite Uninstall Wizard dialog will be shown as below: Click Next to proceed. 2. Select required cleanup options as shown below: 107

111 Click Next to proceed. 3. Confirm the cleanup and/or uninstall process. 108

112 Click Finish to run cleanup and/or uninstall process. Click Cancel to close the wizard. 4. Once the file cleanup process is complete, the uninstall wizard will automatically run Windows Installer program to remove Vyapin Virtualization Management Suite application from the machine. 109
User Manual. Active Directory Change Tracker
 User Manual Active Directory Change Tracker Last Updated: March 2018 Copyright 2018 Vyapin Software Systems Private Ltd. All rights reserved. This document is being furnished by Vyapin Software Systems
User Manual. Admin Report Kit for Windows Enterprise (ARKWE) v.7.4
 v.7.4") User Manual Admin Report Kit for Windows Enterprise (ARKWE) v.7.4 Table of Contents 1 About Admin Report Kit for Windows Enterprise (ARKWE)... 1 1.1 System requirements... 2 1.2 Who can use ARKWE?... 2
User Manual Admin Report Kit for Windows Enterprise (ARKWE) v.7.4 Table of Contents 1 About Admin Report Kit for Windows Enterprise (ARKWE)... 1 1.1 System requirements... 2 1.2 Who can use ARKWE?... 2
External Data Connector for SharePoint
 External Data Connector for SharePoint Last Updated: August 2014 Copyright 2014 Vyapin Software Systems Private Limited. All rights reserved. This document is being furnished by Vyapin Software Systems
External Data Connector for SharePoint
 External Data Connector for SharePoint Last Updated: July 2017 Copyright 2014-2017 Vyapin Software Systems Private Limited. All rights reserved. This document is being furnished by Vyapin Software Systems
Vyapin Office 365 Management Suite
 Vyapin Office 365 Management Suite Last Updated: December 2015 Copyright 2015 Vyapin Software Systems Private Limited. All rights reserved. This document is being furnished by Vyapin Software Systems Private
User Manual. Dockit Archiver
 User Manual Dockit Archiver Last Updated: March 2018 Copyright 2018 Vyapin Software Systems Private Ltd. All rights reserved. This document is being furnished by Vyapin Software Systems Private Ltd for
User Manual. ARK for SharePoint-2007
 User Manual ARK for SharePoint-2007 Table of Contents 1 About ARKSP (Admin Report Kit for SharePoint) 1 1.1 About ARKSP 1 1.2 Who can use ARKSP? 1 1.3 System Requirements 2 1.4 How to activate the software?
User Manual. XPlica for SharePoint 2010
 User Manual XPlica for SharePoint 2010 Last Updated: December 2012 Copyright 2012 Vyapin Software Systems Private Ltd. All rights reserved. This document is being furnished by Vyapin Software Systems Private
User Manual. Admin Report Kit for IIS (ARKIIS)
") User Manual Admin Report Kit for IIS (ARKIIS) Table of Contents 1 Admin Report Kit for Internet Information Server-(ARKIIS)... 1 1.1 About ARKIIS... 1 1.2 Who can Use ARKIIS?... 1 1.3 System requirements...
User Manual Admin Report Kit for IIS (ARKIIS) Table of Contents 1 Admin Report Kit for Internet Information Server-(ARKIIS)... 1 1.1 About ARKIIS... 1 1.2 Who can Use ARKIIS?... 1 1.3 System requirements...
SPList Export for SharePoint 2007 User Manual
 SPList Export for SharePoint 2007 User Manual Last Updated: January 2009 Copyright 2008-2009 Vyapin Software Systems Private Ltd. All rights reserved. This document is being furnished by Vyapin Software
User Manual. Admin Report Kit for IIS 7 (ARKIIS)
") User Manual Admin Report Kit for IIS 7 (ARKIIS) Table of Contents 1 Admin Report Kit for IIS 7... 1 1.1 About ARKIIS... 1 1.2 Who can Use ARKIIS?... 1 1.3 System requirements... 2 1.4 Technical Support...
User Manual Admin Report Kit for IIS 7 (ARKIIS) Table of Contents 1 Admin Report Kit for IIS 7... 1 1.1 About ARKIIS... 1 1.2 Who can Use ARKIIS?... 1 1.3 System requirements... 2 1.4 Technical Support...
User Manual. Admin Report Kit for Exchange Server
 User Manual Admin Report Kit for Exchange Server Table of Contents 1 About ARKES-Admin Report Kit for Exchange Server 1 1.1 System requirements 2 1.2 How to activate the software? 3 1.3 ARKES Reports Primer
User Manual. SPListX for SharePoint
 User Manual SPListX for SharePoint Last Updated: February 2013 Copyright 2008-2013 Vyapin Software Systems Private Ltd. All rights reserved. This document is being furnished by Vyapin Software Systems
User Manual. SharePoint Farm Reporter
 User Manual SharePoint Farm Reporter Last Updated: July 2012 Copyright 2012 Vyapin Software Systems Private Ltd. All rights reserved. This document is being furnished by Vyapin Software Systems Private
User Manual. ARK for Exchange Server (ARKES)
") User Manual ARK for Exchange Server (ARKES) Last Updated: May 2018 Copyright 2018 Vyapin Software Systems Private Ltd. All rights reserved. This document is being furnished by Vyapin Software Systems Private
User Manual ARK for Exchange Server (ARKES) Last Updated: May 2018 Copyright 2018 Vyapin Software Systems Private Ltd. All rights reserved. This document is being furnished by Vyapin Software Systems Private
User Manual. Dockit Migrator for SharePoint
 User Manual Dockit Migrator for SharePoint Last Updated: November 2017 Copyright 2002-2017 Vyapin Software Systems Private Ltd. All rights reserved. This document is being furnished by Vyapin Software
SharePoint Farm Reporter Installation Guide
 Table of Contents SharePoint Farm Reporter Installation Guide I. PRODUCT DESCRIPTION II. SYSTEM REQUIREMENTS AND RECOMMENDATIONS III. INSTALLATION STEPS IV. CONFIGURING APPLICATION V. UPGRADE SHAREPOINT
User Manual. Dockit SharePoint Manager
 User Manual Dockit SharePoint Manager Last Updated: December 2017 Copyright 2017 Vyapin Software Systems Private Ltd. All rights reserved. This document is being furnished by Vyapin Software Systems Private
KYOCERA Net Admin User Guide
 KYOCERA Net Admin User Guide Legal Notes Unauthorized reproduction of all or part of this guide is prohibited. The information in this guide is subject to change without notice. We cannot be held liable
Installation Guide. EventTracker Enterprise. Install Guide Centre Park Drive Publication Date: Aug 03, U.S. Toll Free:
 EventTracker Enterprise Install Guide 8815 Centre Park Drive Publication Date: Aug 03, 2010 Columbia MD 21045 U.S. Toll Free: 877.333.1433 Abstract The purpose of this document is to help users install
Virtual Recovery Assistant user s guide
 Virtual Recovery Assistant user s guide Part number: T2558-96323 Second edition: March 2009 Copyright 2009 Hewlett-Packard Development Company, L.P. Hewlett-Packard Company makes no warranty of any kind
Print Audit 6. Print Audit 6 Documentation Apr :07. Version: Date:
 Print Audit 6 Version: Date: 37 21-Apr-2015 23:07 Table of Contents Browse Documents:..................................................... 3 Database Documentation.................................................
Altaro Hyper-V Backup User Guide
 Altaro Hyper-V Backup User Guide 1 / 144 Table of contents Introducing Altaro Hyper-V Backup... 4 Different Editions... 5 Getting Started... 6 System requirements... 6 Supported Backup Destinations...
Installation Manual. Fleet Maintenance Software. Version 6.4
 Fleet Maintenance Software Installation Manual Version 6.4 6 Terri Lane, Suite 700 Burlington, NJ 08016 (609) 747-8800 Fax (609) 747-8801 Dossier@dossiersystemsinc.com www.dossiersystemsinc.com Copyright
User Manual. DocKIT for SharePoint 2010
 User Manual DocKIT for SharePoint 2010 Last Updated: November 2012 Copyright 2002-2012 Vyapin Software Systems Private Ltd. All rights reserved. This document is being furnished by Vyapin Software Systems
User Manual. DocKIT for SharePoint
 User Manual DocKIT for SharePoint-2003 ------------------------------------------------------------------ Table of Contents 1 DocKIT Introduction 1 1.1 About DocKIT 1 1.2 DocKIT Primer 2 1.3 Who can Use
Enterprise Vault.cloud CloudLink Google Account Synchronization Guide. CloudLink to 4.0.3
 Enterprise Vault.cloud CloudLink Google Account Synchronization Guide CloudLink 4.0.1 to 4.0.3 Enterprise Vault.cloud: CloudLink Google Account Synchronization Guide Last updated: 2018-06-08. Legal Notice
NETWRIX INACTIVE USER TRACKER
 NETWRIX INACTIVE USER TRACKER QUICK-START GUIDE Product Version: 3.0.106 March 2014. Legal Notice The information in this publication is furnished for information use only, and does not constitute a commitment
NETWRIX PASSWORD EXPIRATION NOTIFIER
 NETWRIX PASSWORD EXPIRATION NOTIFIER QUICK-START GUIDE Product Version: 3.3.247 March 2014. Legal Notice The information in this publication is furnished for information use only, and does not constitute
Copyright Jetro Platforms, Ltd. All rights reserved.
 Important Notice Copyright 2001 2009 Jetro Platforms, Ltd. All rights reserved. This document is furnished by Jetro Platforms for information purposes only to licensed users of the Jetro COCKPIT product.
NetWrix VMware Change Reporter Version 3.0 Enterprise Edition Administrator s Guide
 NetWrix VMware Change Reporter Version 3.0 Enterprise Edition Administrator s Guide Table of Contents NetWrix VMware Change Reporter Concepts... 1 Product Editions... 1 How It Works... 2 Deploying Product...
Netwrix Auditor for Active Directory
 Netwrix Auditor for Active Directory Quick-Start Guide Version: 8.0 4/22/2016 Legal Notice The information in this publication is furnished for information use only, and does not constitute a commitment
Installation Guide for Pulse on Windows Server 2012
 USER GUIDE MADCAP PULSE 4 Installation Guide for Pulse on Windows Server 2012 Copyright 2018 MadCap Software. All rights reserved. Information in this document is subject to change without notice. The
Quest Collaboration Services 3.6. Installation Guide
 Quest Collaboration Services 3.6 Installation Guide 2010 Quest Software, Inc. ALL RIGHTS RESERVED. This guide contains proprietary information protected by copyright. The software described in this guide
Installation on Windows Server 2008
 USER GUIDE MADCAP PULSE 4 Installation on Windows Server 2008 Copyright 2018 MadCap Software. All rights reserved. Information in this document is subject to change without notice. The software described
Business Insights Dashboard
 Business Insights Dashboard Sage 500 ERP 2000-2013 Sage Software, Inc. All rights reserved. Sage, the Sage logos, and the Sage product and service names mentioned herein are registered trademarks or trademarks
1.0. Quest Enterprise Reporter Discovery Manager USER GUIDE
 1.0 Quest Enterprise Reporter Discovery Manager USER GUIDE 2012 Quest Software. ALL RIGHTS RESERVED. This guide contains proprietary information protected by copyright. The software described in this guide
Quest Enterprise Reporter 2.0 Report Manager USER GUIDE
 Quest Enterprise Reporter 2.0 Report Manager USER GUIDE 2014 Quest Software, Inc. ALL RIGHTS RESERVED. This guide contains proprietary information protected by copyright. The software described in this
StarWind Virtual SAN Configuring HA Shared Storage for Scale-Out File Servers in Windows Server 2016
 One Stop Virtualization Shop StarWind Virtual SAN Configuring HA Shared Storage for Scale-Out File Servers in Windows Server 2016 FEBRUARY 2018 TECHNICAL PAPER Trademarks StarWind, StarWind Software and
ZENworks 2017 Audit Management Reference. December 2016
 ZENworks 2017 Audit Management Reference December 2016 Legal Notice For information about legal notices, trademarks, disclaimers, warranties, export and other use restrictions, U.S. Government rights,
EMC SourceOne for Microsoft SharePoint Version 6.7
 EMC SourceOne for Microsoft SharePoint Version 6.7 Administration Guide P/N 300-012-746 REV A01 EMC Corporation Corporate Headquarters: Hopkinton, MA 01748-9103 1-508-435-1000 www.emc.com Copyright 2011
NTP Software File Auditor for Windows Edition
 NTP Software File Auditor for Windows Edition An NTP Software Installation Guide Abstract This guide provides a short introduction to installation and initial configuration of NTP Software File Auditor
DocAve for Salesforce 2.1
 DocAve for Salesforce 2.1 This document is intended for anyone wishing to familiarize themselves with the user interface and basic functionality of AvePoint s DocAve for Salesforce tool. System Requirements
Exchange Protection Whitepaper
 Whitepaper Contents 1. 2. 3. 4. 5. 6. 7. 8. 9. 10. Introduction... 2 Documentation... 2 Licensing... 2 Exchange Server Protection overview... 3 Supported platforms... 3 Requirements by platform... 3 Remote
TEKLYNX BACKTRACK I N S T A L L A T I O N G U I D E
 TEKLYNX BACKTRACK I N S T A L L A T I O N G U I D E Note Installation Guide The information in this manual is not binding and may be modified without prior notice. Supply of the software described in this
Veritas System Recovery 18 Management Solution Administrator's Guide
 Veritas System Recovery 18 Management Solution Administrator's Guide Documentation version: 18 Legal Notice Copyright 2018 Veritas Technologies LLC. All rights reserved. Veritas and the Veritas Logo are
Netwrix Auditor for SQL Server
 Netwrix Auditor for SQL Server Quick-Start Guide Version: 9.5 10/25/2017 Legal Notice The information in this publication is furnished for information use only, and does not constitute a commitment from
Getting Started with VMware View View 3.1
 Technical Note Getting Started with VMware View View 3.1 This guide provides an overview of how to install View Manager components and provision virtual desktops. Additional View Manager documentation
KYOCERA Net Viewer User Guide
 KYOCERA Net Viewer User Guide Legal Notes Unauthorized reproduction of all or part of this guide is prohibited. The information in this guide is subject to change without notice. We cannot be held liable
GFI WebMonitor 2009 ReportPack. Manual. By GFI Software Ltd.
 GFI WebMonitor 2009 ReportPack Manual By GFI Software Ltd. http://www.gfi.com E-mail: info@gfi.com Information in this document is subject to change without notice. Companies, names, and data used in examples
NetWrix Group Policy Change Reporter
 NetWrix Group Policy Change Reporter Version 7 Enterprise Edition Quick Start Guide Contents NetWrix Group Policy Change Reporter Quick Start Guide 1. INTRODUCTION... 3 1.1 KEY FEATURES... 4 1.2 LICENSING...
NETWRIX WINDOWS SERVER CHANGE REPORTER
 NETWRIX WINDOWS SERVER CHANGE REPORTER ADMINISTRATOR S GUIDE Product Version: 4.0 June 2013. Legal Notice The information in this publication is furnished for information use only, and does not constitute
Metasys Export Utility Installation Instructions Code No. LIT Software Release 9.0 Issued August 2017
 Code No. LIT-12011527 Software Release 9.0 Issued August 2017 Refer to the QuickLIT website for the most up-to-date version of this document. Introduction...2 Summary of Changes...2 Metasys Help Files...2
GFI EventsManager 8 ReportPack. Manual. By GFI Software Ltd.
 GFI EventsManager 8 ReportPack Manual By GFI Software Ltd. http://www.gfi.com E-Mail: info@gfi.com Information in this document is subject to change without notice. Companies, names, and data used in examples
Privileged Identity App Launcher and Session Recording
 Privileged Identity App Launcher and Session Recording 2018 Bomgar Corporation. All rights reserved worldwide. BOMGAR and the BOMGAR logo are trademarks of Bomgar Corporation; other trademarks shown are
LifeSize Control Installation Guide
 LifeSize Control Installation Guide January 2009 Copyright Notice 2005-2009 LifeSize Communications Inc, and its licensors. All rights reserved. LifeSize Communications has made every effort to ensure
Getting started with System Center Essentials 2007
 At a glance: Installing and upgrading Configuring Essentials 2007 Troubleshooting steps Getting started with System Center Essentials 2007 David Mills System Center Essentials 2007 is a new IT management
AVG Business Edition Remote Administration
 AVG Business Edition Remote Administration User Manual Document revision AVG.02 (1/7/2018) Copyright AVG Technologies CZ, s.r.o. All rights reserved. All other trademarks are the property of their respective
Diagnostic Manager Advanced Installation Guide
 Diagnostic Manager Publication Date: May 03, 2017 All Rights Reserved. This software is protected by copyright law and international treaties. Unauthorized reproduction or distribution of this software,
Published By Imanami Corporation 5099 Preston Ave. Livermore, CA 94551, United States. Copyright 2008 by Imanami Corporation.
 Installation Guide Published By Imanami Corporation 5099 Preston Ave. Livermore, CA 94551, United States Copyright 2008 by Imanami Corporation. All rights reserved. No part of the contents of this document
StarWind Virtual SAN Configuring HA Shared Storage for Scale-Out File Servers in Windows Server 2012R2
 One Stop Virtualization Shop StarWind Virtual SAN Configuring HA Shared Storage for Scale-Out File Servers in Windows Server 2012R2 DECEMBER 2017 TECHNICAL PAPER Trademarks StarWind, StarWind Software
VMware View Upgrade Guide
 View 4.0 View Manager 4.0 View Composer 2.0 This document supports the version of each product listed and supports all subsequent versions until the document is replaced by a new edition. To check for
Notices Carbonite Move for Linux User's Guide Version 8.1.1, Wednesday, January 31, 2018 If you need technical assistance, you can contact
 Notices Carbonite Move for Linux User's Guide Version 8.1.1, Wednesday, January 31, 2018 If you need technical assistance, you can contact CustomerCare. All basic configurations outlined in the online
Connect Install Guide
 Connect Install Guide Version 3.2 Publication Date: December 16, 2013 Copyright Metalogix International GmbH 2008-2013. All Rights Reserved. This software is protected by copyright law and international
DefendX Software Control-Audit for Hitachi Installation Guide
 DefendX Software Control-Audit for Hitachi Installation Guide Version 4.1 This guide details the method for the installation and initial configuration of DefendX Software Control-Audit for NAS, Hitachi
File Protection Whitepaper
 Whitepaper Contents 1. Introduction... 2 Documentation... 2 Licensing... 2 Modes of operation... 2 Single-instance store... 3 Advantages of over traditional file copy methods... 3 2. Backup considerations...
Version Installation Guide. 1 Bocada Installation Guide
 Version 19.4 Installation Guide 1 Bocada Installation Guide Copyright 2019 Bocada LLC. All Rights Reserved. Bocada and BackupReport are registered trademarks of Bocada LLC. Vision, Prism, vpconnect, and
Version Double-Take Move for Linux User's Guide
 Version 8.0.1 Double-Take Move for Linux User's Guide Notices Double-Take Move for Linux User's Guide Version 8.0.1, January 18, 2018 Check your service agreement to determine which updates and new releases
1. Initial Setting and Installation of ActiveVisor... 1
 ActiveVisor Startup Guide 1 st Edition August, 2018 Contents 1. Initial Setting and Installation of ActiveVisor... 1 1.1 System Requirements... 1 1.2 Installation of ActiveVisor... 2 1.3 Initial Settings
SYNERGY. Supervision and energy management software INSTRUCTION MANUAL
 SYNERGY Supervision and energy management software INSTRUCTION MANUAL INDEX 1 INTRODUCTION... 4 2 HARDWARE AND SOFTWARE REQUIREMENTS... 4 3 SETUP... 4 4 SYNERGY LOGIN AND USERS... 5 4.1 Users... 5 4.2
Backup Tab. User Guide
 Backup Tab User Guide Contents 1. Introduction... 2 Documentation... 2 Licensing... 2 Overview... 2 2. Create a New Backup... 3 3. Manage backup jobs... 4 Using the Edit menu... 5 Overview... 5 Destination...
Legal Notes. Regarding Trademarks KYOCERA MITA Corporation
 Legal Notes Unauthorized reproduction of all or part of this guide is prohibited. The information in this guide is subject to change without notice. We cannot be held liable for any problems arising from
Dell SupportAssist Agent User s Guide
 Dell SupportAssist Agent User s Guide Notes, Cautions, and Warnings NOTE: A NOTE indicates important information that helps you make better use of your computer. CAUTION: A CAUTION indicates either potential
Client Installation and User's Guide
 IBM Tivoli Storage Manager FastBack for Workstations Version 7.1 Client Installation and User's Guide SC27-2809-03 IBM Tivoli Storage Manager FastBack for Workstations Version 7.1 Client Installation
File Protection. Whitepaper
 Whitepaper Contents 1. Introduction... 2 Documentation... 2 Licensing... 2 Modes of operation... 2 Single-instance store... 3 Advantages of... 3 2. Backup considerations... 4 Exchange VM support... 4 Restore
Tzunami Deployer Confluence Exporter Guide
 Tzunami Deployer Confluence Exporter Guide Supports extraction of Confluence Enterprise contents and migrate to Microsoft SharePoint using Tzunami Deployer. Version 2.7 Table of Content PREFACE... I INTENDED
Stellar Phoenix Outlook PST Repair - Technician User Guide
 Stellar Phoenix Outlook PST Repair - Technician 8.0.0.0 User Guide Overview Stellar Phoenix Outlook PST Repair - Technician offers a complete solution to repair damaged Microsoft Outlook Personal Storage
Style Report Enterprise Edition
 INTRODUCTION Style Report Enterprise Edition Welcome to Style Report Enterprise Edition! Style Report is a report design and interactive analysis package that allows you to explore, analyze, monitor, report,
KYOCERA Net Viewer 5.3 User Guide
 KYOCERA Net Viewer. User Guide Legal Notes Unauthorized reproduction of all or part of this guide is prohibited. The information in this guide is subject to change without notice. We cannot be held liable
Dynamic Work Order System (DWOS) Installation Guide
 Installation Guide") Dynamic Work Order System (DWOS) Installation Guide The Future of Job Shop Software 4506 Hwy. 20 Suite 200 Niceville, FL 32578 Phone (800) 725-7304 Support@ds2corp.com www.getdwos.com Copyright Notice
Dynamic Work Order System (DWOS) Installation Guide The Future of Job Shop Software 4506 Hwy. 20 Suite 200 Niceville, FL 32578 Phone (800) 725-7304 Support@ds2corp.com www.getdwos.com Copyright Notice
ClientNet Admin Guide. Boundary Defense for
 ClientNet Admin Guide Boundary Defense for Email DOCUMENT REVISION DATE: Feb 2012 ClientNet Admin Guide / Table of Contents Page 2 of 36 Table of Contents OVERVIEW... 3 1 INTRODUCTION... 3 1.1. AUDIENCE
EventTracker v8.2. Install Guide for EventTracker Log Manager. EventTracker 8815 Centre Park Drive Columbia MD
 EventTracker v8.2 Install Guide for EventTracker Log Manager Publication Date: Jun. 10, 2016 EventTracker 8815 Centre Park Drive Columbia MD 21045 www.eventtracker.com Abstract This guide will help the
Symantec Backup Exec Quick Installation Guide
 Symantec Backup Exec 2010 Quick Installation Guide 20047221 Installing Backup Exec This document includes the following topics: System requirements Before you install About the Backup Exec service account
Tanium Asset User Guide. Version 1.3.1
 Tanium Asset User Guide Version 1.3.1 June 12, 2018 The information in this document is subject to change without notice. Further, the information provided in this document is provided as is and is believed
Symantec Desktop and Laptop Option 8.0 SP2. Symantec Desktop Agent for Mac. Getting Started Guide
 Symantec Desktop and Laptop Option 8.0 SP2 Symantec Desktop Agent for Mac Getting Started Guide Disclaimer The information contained in this publication is subject to change without notice. Symantec Corporation
Performance Dashboard Guide
 Performance Dashboard Guide v8.0 May 10, 2013 For the most recent version of this document, visit kcura's Documentation Site. Table of Contents 1 Overview 3 1.1 System requirements 3 1.2 Installation 3
NETWRIX GROUP POLICY CHANGE REPORTER
 NETWRIX GROUP POLICY CHANGE REPORTER ADMINISTRATOR S GUIDE Product Version: 7.2 November 2012. Legal Notice The information in this publication is furnished for information use only, and does not constitute
T E K L Y N X BACKTRACK
 T E K L Y N X BACKTRACK I N S T A L L A T I O N G U I D E Installation Guide The information in this manual is not binding and may be modified without prior notice. Supply of the software described in
Alchemex. Web Reporting. Learning Services Alchemex Web Module
 Alchemex Web Reporting 1 Table of Contents About The Web Module... 1 Web Module Benefits and Features... 3 Product Features... 3 Product Benefits... 3 Customer Benefits... 3 How It Works... 4 Users Guide...
5nine Manager Datacenter. Version 2.1
 5nine Manager Datacenter Version 2.1 Getting Started Guide January 2018 Contents Introduction... 2 Summary... 2 System Architecture... 2 Plugins... 3 Deployment and Configuration... 4 System requirements...
NetWrix VMware Change Reporter Version 3.0 Enterprise Edition Quick Start Guide
 NetWrix VMware Change Reporter Version 3.0 Enterprise Edition Quick Start Guide Table of Contents NetWrix VMware Change Reporter Concepts... 1 How It Works... 2 Deploying Product... 3 System Requirements...
T E KLYNX BACKTRACK V E R S I O N 6 I N S T A L L A T I O N G U I D E
 BACKTRACK 6 T E K LY NX VERSION I N S T A L L A T I O N G U I D E Note Installation Guide The information in this manual is not binding and may be modified without prior notice. Supply of the software
Legal Notes. Regarding Trademarks KYOCERA MITA Corporation
 Legal Notes Unauthorized reproduction of all or part of this guide is prohibited. The information in this guide is subject to change without notice. We cannot be held liable for any problems arising from
Last Updated: 14 February 2011 Version 6.5. Page 1
 Last Updated: 14 February 2011 Version 6.5 Page 1 1999-2011 Propalms Ltd. All rights reserved. The information contained in this document represents the current view of Propalms Ltd. on the issues discussed
Lasso Continuous Data Protection Lasso CDP Client Guide August 2005, Version Lasso CDP Client Guide Page 1 of All Rights Reserved.
 Lasso CDP Client Guide August 2005, Version 1.6.8 Lasso CDP Client Guide Page 1 of 32 Copyright Copyright 2005 Lasso Logic, LLC. All Rights Reserved. No part of this publication may be reproduced, stored
NexentaStor VVOL
 NexentaStor 5.1.1 VVOL Admin Guide Date: January, 2018 Software Version: NexentaStor 5.1.1 VVOL Part Number: 3000-VVOL-5.1.1-000065-A Table of Contents Preface... 3 Intended Audience 3 References 3 Document
StarWind Virtual SAN. HyperConverged 2-Node Scenario with Hyper-V Cluster on Windows Server 2012R2. One Stop Virtualization Shop MARCH 2018
 One Stop Virtualization Shop StarWind Virtual SAN HyperConverged 2-Node Scenario with Hyper-V Cluster on Windows Server 2012R2 MARCH 2018 TECHNICAL PAPER Trademarks StarWind, StarWind Software and the
IT Essentials v6.0 Windows 10 Software Labs
 IT Essentials v6.0 Windows 10 Software Labs 5.2.1.7 Install Windows 10... 1 5.2.1.10 Check for Updates in Windows 10... 10 5.2.4.7 Create a Partition in Windows 10... 16 6.1.1.5 Task Manager in Windows
Centrify Infrastructure Services
 Centrify Infrastructure Services License Management Administrator s Guide December 2018 (release 18.11) Centrify Corporation Legal Notice This document and the software described in this document are furnished
Dell Repository Manager Business Client Version 2.0 User s Guide
 Dell Repository Manager Business Client Version 2.0 User s Guide Notes, Cautions, and Warnings NOTE: A NOTE indicates important information that helps you make better use of your computer. CAUTION: A CAUTION