Tutorial setting up linux-port
|
|
|
- Hilda May
- 6 years ago
- Views:
Transcription
1 Tutorial setting up linux-port Tutorial for setting linux-port on the e-puck IAS Laboratory-Bristol & Supméca-Toulon Jean-Charles Antonioli The theory is when it does not work, but we know why. Practice is when it works, but we do not know why.
2 Tutorial setting up linux-port Contents 1 Introduction Presentation Where can I buy it? How can I connect my e-puck to my computer? What must be done first with windows The tool you need to download&install: SAM-BA Initialize connection with SAM-BA Sending AT91BOOTSTRAP and U-Boot Then, use linux to flash your linux-port Install ckermit Install Linux on your linux-port Set u-boot environment Install Linux on SD-card Save an already installed SD-card Prepare file-system Maintenance/restore linux on SD-card Using your Linux-port (with linux) Connect to the wi-fi Connect your computer to your e-puck linux-board Change IP of your e-puck Sending your first program to your e-puck Easy-steps Commentaries about this program Conclusion and thanks
. You should learn these first, before following these steps to use the linux-port on the e-puck.")
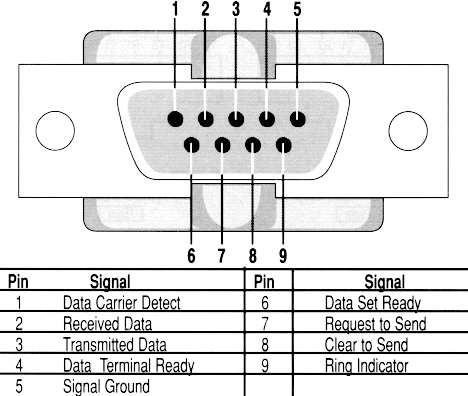
3 1 Introduction In this tutorial, using linux, programming in C, understanding the meaning of binary and how actuators and sensors work will not be explained. You should learn how-to use the e- puck too (I have written another how-to for that before). You should learn these first, before following these steps to use the linux-port on the e-puck. You will need both Windows (XP) and Linux (Ubuntu 8) to use this tutorial. This tutorial is a step-by-step document: you only need to read it entirely and follow the steps to use the linux-port. 1.1 Presentation The linux-port will permit you to use the e-puck to make stronger work than with the original e-puck. Thanks to it, you can save variables in live, communicate easier with others robots, all of that using linux! This port is based on an atmel AT81SAM9260 chip. 1.2 Where can I buy it? 1.3 How can I connect my e-puck to my computer? You will need to crate yourself a cable to connect the linux-port to your computer. So you may buy an USB-RS232 (UC232R has been used for this tutorial) adapter and create a three-links wire (2, 3 and 5) between this adapter and your e-puck, as shown on the pictures on the next page. 2


4


5 2 What must be done first with windows 2.1 The tool you need to download&install: SAM-BA Go to Click on «Products», then click on the «32-bit ARM-based Microcontrollers» link: Click on «Tools & Software», then click on «AT91 In-System Programmer» and download and install the latest Software «AT91-ISP.exe»: Once this is done, you should have at least this program on your desktop: 4


6 2.2 Initialize connection with SAM-BA Once this is done, you have all the file you will need therefore to flash your linux-port. Plug-in your linux-port to your e-puck and connect it to your computer via the cable. If a driver is asked to be installed, and is not recognized by windows, you can download it from internet and install it by selecting «choose a device from a directory» and select the folder in which you have unzipped the files. Otherwise, install the driver. Disconnect your USB cable from your computer and start SAM-BA. Choose the right chip on «Select your board». Then have a look on the list of ports available in the list «Select the connection». You should see something like: Remember the list and close SAM-BA. Now connect your USB cable, and start SAM-BA again. A new port COM should have appeared in the list. Select it and click on «Connect». If it does not work (a window appears few seconds after with «No valid processor ID found»), it is certainly because your chip is already flashed. If you still want to flash it, you can do it. Press the button 1, then, while still pressing the button 1, press the button 2. Now you can unpress the two buttons and you chip is ready to receive data to be flashed. 2 1 Once this is done, you must initialize direct connection to your chip. To do that, select «DataFlash AT56DB/DCB» tab, and select the script «Enable Dataflash (SPI0 CS1)». Then click on «Execute». If it does not work, try to enable another script to enable Dataflash like «SPI0 CS#» (where # is another number). You should see something like «-I- Applet initialization done» in the terminal. Keep this window opened. 5

: U-Boot: click on U-Boot on the left side, and download the «U-Boot» bin by Dataflash for")
 and in the window that is opened, select your «dataflash_at91sam9260ek.bin».")
7 2.3 Sending AT91BOOTSTRAP and U-Boot The on-board tools needed to prepare your e-puck to receive its linux Operating System must be flashed first. To do that, go to to download AT91BOOTSTRAP and U-Boot (you can find further informations on this same website): AT91BOOTSTRAP: click on AT91BOOTSTRAP on the left side, and download the «DataFlash» bin for at91sam9260ek (the chip used on the e-puck port): U-Boot: click on U-Boot on the left side, and download the «U-Boot» bin by Dataflash for at91sam9260ek: Now, come back to SAM-BA. Select the script «Send Boot File» (1). Click on Execute (2) and in the window that is opened, select your «dataflash_at91sam9260ek.bin». Once this is done, you should see something like «-I- 0xEFC bytes written by applet» in the terminal. Then, change the value of the Adress (3) to «0x8400», choose your «u-boot.bin» file as «Send File Name» (4) and click on «Send File» (5). Once this is done, you should see something like in the terminal. 6
8 3 Then, use linux to flash your linux-port 3.1 Install ckermit In a terminal, execute: > sudo apt-get install ckermit Then, create a configuration file, directly in your home: > nano.kermrc Inside this file, copy these lines: set line /dev/ttyusb0 set speed set carrier-watch off set handshake none set flow-control none robust set file type bin set file name lit set rec pack 1000 set send pack 1000 set window 5 Quit (ctrl+x) and save (O). You may need to change /dev/ttyusb0 to propriate name. Find the right name using: > dmesg grep "tty*" 3.2 Install Linux on your linux-port Connect the target board with host PC by using the terminal: > kermit -c Reset the target board (with the button circled on this picture on the right). Once it has finished to work, put in your terminal: > loadb Press «ctrl + \» and then press «c» to disconnect, and send the kernel file with (this file should have been enclosed at the same time than this tutorial): > send uimage.gz 7
9 Connect the board again by typing: > connect You should have something like this in your terminal: ## Total Size = 0x001377C0 = Bytes ## Start Addr = 0x Copy the binary files from mermory to flash: > cp.b 0x xD x1377C0 Note that the size of the file used at this step is retrieved from previous step (and will be used in the next step for kernelsize). 3.3 Set u-boot environment Now the linux kernel is in the flash (AT45DB321D), we need to set up some u-boot environmental variables in order to let u-boot know how to load the linux kernel into the memory. So put in your terminal: > setenv kerneladdr 0x > setenv kerneloff 0xD > setenv kernelsize 0x1377C0 > setenv bootcmd 'cp.b $(kerneloff) $(kerneladdr) $(kernelsize); bootm $(kerneladdr)' > setenv bootargs 'root=/dev/mmcblk0p2 rootdelay=10' > saveenv You can check the environmental variables using: > printenv bootdelay=3 baudrate= kerneladdr=0x kerneloff=0xc bootcmd=cp.b $(kerneloff) $(kerneladdr) $(kernelsize) ;bootm $(kerneladdr) bootargs=root=/dev/mmcblk0p2 rootdelay=10 kernelsize=0x14d21c stdin=serial stdout=serial stderr=serial 8
10 4 Install Linux on SD-card Plug-in your SD-card into your SD-card reader and connect it to your e-puck. Open a terminal and install dump: > sudo apt-get install dump 4.1 Save an already installed SD-card To know what is the media used by USB: > df Sys. de fich. 1K-blocs Occupé Disponible Capacité Monté sur /dev/sda % / tmpfs % /lib/init/rw varrun % /var/run varlock % /var/lock udev % /dev tmpfs % /dev/shm lrm % /lib/modules/ generic/volatile /dev/sda % /media/data /dev/sdc % /media/uuuuuuuuuuuuuuuu /dev/sda % /media/xp > sudo dump -0 -a -L -u -f - /dev/sdc2 >> linuxepuck.bak Then, you have to unmount your USB reader of SD-card, so you need to know which one to unplug: > df Sys. de fich. 1K-blocs Occupé Disponible Capacité Monté sur /dev/sda % / tmpfs % /lib/init/rw varrun % /var/run varlock % /var/lock udev % /dev tmpfs % /dev/shm lrm % /lib/modules/ generic/volatile /dev/sda % /media/data /dev/sdc % /media/uuuuuuuuuuuuuuuu /dev/sda % /media/xp > sudo umount /media/uuuuuuuuuuuuuuuu/ 9
11 4.2 Prepare file-system Get your SD card and a card reader ready. plug into USB. Using sudo fdisk -l to find the device, then sudo fdisk /dev/sdb You have to create one linux swap (64M) and one linux partitions: Command (m for help): n Command action e extended p primary partition (1-4) p Partition number (1-4): 1 First cylinder (1-983, default 1): Using default value 1 Last cylinder or +size or +sizem or +sizek (1-983, default 983): +64M Command (m for help): n Command action e extended p primary partition (1-4) p Partition number (1-4): 2 First cylinder (33-983, default 33): Using default value 33 Last cylinder or +size or +sizem or +sizek (33-983, default 983): Using default value 983 Command (m for help): t Partition number (1-4): 1 Hex code (type L to list codes): 82 Changed system type of partition 1 to 82 (Linux swap / Solaris) Command (m for help): p Disk /dev/sdb1: 2031 MB, bytes 64 heads, 63 sectors/track, 983 cylinders Units = cylinders of 4032 * 512 = bytes Disk identifier: 0x Device Boot Start End Blocks Id System /dev/sdb1p Linux swap / Solaris /dev/sdb1p Linux Command (m for help): w The partition table has been altered! Calling ioctl() to re-read partition table. WARNING: Re-reading the partition table failed with error 22: Invalid argument. The kernel still uses the old table. The new table will be used at the next reboot. Syncing disks. 10
12 Finally, close this terminal and open a new one. Do: > fdisk -l You should find /dev/sdc2. If it is, check again with: > dir /dev/sd <TAB><TAB> If it SDC2 appears correctly (or at another name for your own device), then: > sudo mount /dev/sda3 on / type ext3 (rw,relatime,errors=remount-ro) tmpfs on /lib/init/rw type tmpfs (rw,nosuid,mode=0755) proc on /proc type proc (rw,noexec,nosuid,nodev) sysfs on /sys type sysfs (rw,noexec,nosuid,nodev) varrun on /var/run type tmpfs (rw,nosuid,mode=0755) varlock on /var/lock type tmpfs (rw,noexec,nosuid,nodev,mode=1777) udev on /dev type tmpfs (rw,mode=0755) tmpfs on /dev/shm type tmpfs (rw,nosuid,nodev) devpts on /dev/pts type devpts (rw,noexec,nosuid,gid=5,mode=620) fusectl on /sys/fs/fuse/connections type fusectl (rw) lrm on /lib/modules/ generic/volatile type tmpfs (rw,mode=755) securityfs on /sys/kernel/security type securityfs (rw) binfmt_misc on /proc/sys/fs/binfmt_misc type binfmt_misc (rw,noexec,nosuid,nodev) gvfs-fuse-daemon on /home/jc/.gvfs type fuse.gvfs-fuse-daemon (rw,nosuid,nodev,user=jc) /dev/sda5 on /media/data type fuseblk (rw,nosuid,nodev,allow_other,blksize=4096) /dev/sda1 on /media/xp type vfat (rw,nosuid,nodev,uhelper=hal,shortname=mixed,uid=1000,utf8,umask=077,flush) /dev/sdc1 on /media/disk type vfat (rw,nosuid,nodev,uhelper=hal,shortname=mixed,uid=1000,utf8,umask=077,flush) > sudo umount /media/disk/ Now, you can unplug and plug again USB-reader. > dir /dev/sd <TAB><TAB> sda sda1 sda2 sda3 sda5 sda6 sdb sdc sdc1 sdc2 sdd sde > sudo mkfs.ext3 /dev/sdc2 > sudo mkswap /dev/sdc1 4.3 Maintenance/restore linux on SD-card > sudo mkdir temp > sudo mount /dev/sdc2 temp > cd temp > sudo restore -ruf - < /home/jc/linuxepuck.bak 11
13 5 Using your Linux-port (with linux) Open two terminals (one will be called «A» and the other one will be called «B»). 5.1 Connect to the wi-fi Connect the wi-fi of your computer to «swarm-lab» (password is robotswarm). 5.2 Connect your computer to your e-puck linuxboard Follow these steps on the right terminal: «A» : ~$ ssh root@ (ip address of your robot then wait a while) «A» : root@ s password: robot (this is the password asked and will not be prompted will writing) «A» : epuck:~# cd epuck_linux_mod/linux_side/playerplugin/ «A» : in# modprobe po0630 (this will load drivers for the camera on the board) «A» : in# player lpuck.cfg (this will start the player server: now you can send your code to the epuck thanks to terminal B threw the wi-fi) 5.3 Change IP of your e-puck > cd /etc/network > vim interfaces You can find the IP configuration of your epuck inside, so change it as you want. Then, you have to reboot the network of the e-puck, and reconnect your computer to your epuck using the right IP (section 5.2). > /etc/init.d/networking restart 5.4 Sending your first program to your e-puck Easy-steps «B» : create a file (for example0.cc) in which you put this code: #include <iostream> #include <libplayerc++/playerc++.h> int main (int argc, char *argv[]) 12
14 { using namespace PlayerCc ; PlayerClient robot(" "); // change the IP into the one of your e-puck IrProxy ir(&robot,0); //Position2dProxy pp(&robot,0); for(;;) { double turnrate, speed; robot.read(); // read from proxies std::cout << ir << std::endl; //pp.setspeed(speed,turnrate); //command the motors } } «B» :.../example0_folder$ g++ -o example0 `pkg-config cflags playerc++` example0 `pkg-config libs playerc++` Be careful on this previous code. You can not use «'» nor but only «`». This code is made to compile your example0.cc into a script example0, and this is this script that you will direcly execute to send your program to your e-puck thanks to player. «B» :.../example0_folder$./example Commentaries about this program PlayerClient, IrProxy and Position2dProxy are all C++ classes created by player. You can find all of them on that page: in section Docs on the left banner, click on «Manuals» > «HTML» Link for Player > «Client Libraries» in section User > «libplayerc++» on the drawing > «Proxies» on the drawing. But not all of them are used on the e-puck. To know which ones you can use, have a look on ~/epuck_linux_mod/linux_side/support.c on your e-puck. 13
15 6 Conclusion and thanks Now, you can use all the fonctions you have to make your robot move and use its skills much more easily. I would want to thank some people for the help I have received from them: - Alan Winfield, professor and my master in the UWE - Gilles Richard and Cedric Anthierens for their help - Wenguo who has created the linux-port and helped me a lot to write this tutorial (some things are directly taken from parts of what he had written himself). - Bristol Robotics Laboratory - Supméca Toulon 14
How To Resize ext3 Partitions Without Losing Data
 By Falko Timme Published: 2007-01-07 17:12 How To Resize ext3 Partitions Without Losing Data Version 1.0 Author: Falko Timme Last edited 12/31/2006 This article is about
Getting Started with BeagleBoard xm
 Getting Started with BeagleBoard xm by Getting Started with BeagleBoard-xM 1. Beagleboard-xM BeagleBoard.org ก Texas Instruments DM3730 1 GHz ก ARM Cortex-A8 (DSP) (PowerVR) (RAM) 512 MB Serial Port, USB
Recover Deleted Files With Scalpel
 By Falko Timme Published: 2009-03-24 12:49 Recover Deleted Files With Scalpel Version 1.0 Author: Falko Timme Last edited 12/03/2009 Scalpel is a fast file carver that reads
400AP Application Note Uploading Firmware Images to 400AP NAND Flash Models
 June 2014 400AP Application Note Uploading Firmware Images to 400AP NAND Flash Models Author: Thomas W. Heck, Sr. Design Engineer Janus Remote Communications Table of Contents Overview..................................................................................
Using iscsi On Debian Lenny (Initiator And Target)
") By Falko Timme Published: 2009-03-10 20:05 Using iscsi On Debian Lenny (Initiator And Target) Version 1.0 Author: Falko Timme Last edited 02/24/2009 This guide explains how
By Falko Timme Published: 2009-03-10 20:05 Using iscsi On Debian Lenny (Initiator And Target) Version 1.0 Author: Falko Timme Last edited 02/24/2009 This guide explains how
Linux Howtos. Fedora 9 Install (114) CIS Fall Fedora 9 Install (114) Fedora 9 installation with custom partitions.
 CIS Fall Fedora 9 Install (114) Fedora 9 installation with custom partitions.") Linux Howtos Fedora 9 Install (114) CIS 191 - Fall 2008 Fedora 9 Install (114) Fedora 9 installation with custom partitions. Requirements: Fedora 9 DVD ISO files http://iso.linuxquestions.org/ VMWare Server
Linux Howtos Fedora 9 Install (114) CIS 191 - Fall 2008 Fedora 9 Install (114) Fedora 9 installation with custom partitions. Requirements: Fedora 9 DVD ISO files http://iso.linuxquestions.org/ VMWare Server
CST8207: GNU/Linux Operating Systems I Lab Nine Disks, Partitions, and File Systems Part 2. Disks, Partitions, and File Systems - Part 2 of 2
 Student Name: Lab Section: Disks, Partitions, and File Systems - Part 2 of 2 1 Due Date - Upload to Blackboard by 8:30am Monday April 9, 2012 Submit the completed lab to Blackboard following the Rules
1. Set up the storage to allow access to the LD(s) by the server following the NEC storage user guides.
 by the server following the NEC storage user guides.") Overview Server running Red Hat Enterprise Linux (RHEL) must be configured to recognize and work with NEC storage systems. The following procedure demonstrates the steps necessary to configure multipath
Overview Server running Red Hat Enterprise Linux (RHEL) must be configured to recognize and work with NEC storage systems. The following procedure demonstrates the steps necessary to configure multipath
This is Worksheet and Assignment 12. Disks, Partitions, and File Systems
 This is Worksheet and Assignment 12 This is a combined Worksheet and Assignment.. Quizzes and tests may refer to work done in this Worksheet and Assignment; save your answers. You will use a checking program
Windows Method Using Linux Live CD and Gparted
 Contents 1 Formatting and Partitioning USB Storage for DD-WRT 2 Windows Method Using Linux Live CD and Gparted 2.1 Linux Command Line Method 3 Formatting the /opt, /jffs and Data Partitions, and preparing
By: Yushi Wang Partners: Shen Yue and Yubing Xu Group 6. How to Setup Pandaboard ES Software Environment for UAV Project
 Application Notes By: Yushi Wang Partners: Shen Yue and Yubing Xu Group 6 How to Setup Pandaboard ES Software Environment for UAV Project Installation of Ubuntu Official tutorial can be found: http://omappedia.org/wiki/ubuntu_pre-built_binaries_guide
Providing Traditional Computational Facility through TV SetTop Box (PROTRACTS)
") Providing Traditional Computational Facility through TV SetTop Box (PROTRACTS) Mr. PydalaBhasha #1, Mr.K. Muni Chandra Sekhar #2 1 Assistant Professor, Department of I.T, Sree Vidyanikethan Engineering
Providing Traditional Computational Facility through TV SetTop Box (PROTRACTS) Mr. PydalaBhasha #1, Mr.K. Muni Chandra Sekhar #2 1 Assistant Professor, Department of I.T, Sree Vidyanikethan Engineering
Operating System. Hanyang University. Hyunmin Yoon Operating System Hanyang University
 Hyunmin Yoon (fulcanelli86@gmail.com) 2 ubuntu Linux Download https://www.ubuntu.com/download/desktop http://gofile.me/3qiyp/pj6fzmojf 2 3 VMware Workstation Player (optional) Download https://www.vmware.com/products/workstation-player/workstation-player-evaluation.html
USB 2.0 Multi-Plus Card Reader/Writer. User s Manual
 USB 2.0 Multi-Plus Card Reader/Writer User s Manual Copyright Statement No part of this publication may be reproduced in any form by any means without the prior written permission. Other trademarks or
GadgetPC Single Board Computer. System Restore Guide. Document Revision: 1.04 Date: 31 January, 2010
 GadgetPC Single Board Computer System Restore Guide Document Revision: 1.04 Date: 31 January, 2010 BiPOM Electronics, Inc. 16301 Blue Ridge Road, Missouri City, Texas 77489 Telephone: 1-713-283-9970 Fax:
Chapter 6. Linux File System
 Chapter 6 Linux File System 1 File System File System management how to store informations on storage devices The Hierarchical Structure Types of file Common File system Tasks 2 The Hierarchical Structure
OPS235. Linux File Systems Partitioning Mounting File Systems
 OPS235 Linux File Systems Partitioning Mounting File Systems 1 Lab 4 Part 1 Topics Linux File Systems (ext2 / ext3 / ext4) Linux Partitioning / Formatting Mounting Linux File Systems 2 Linux File Systems
Idea6410 Ubuntu User Manual V 0.19
 V 0.19 Version: Ubuntu-9.04_v0.19 Linux PC environment: Ubuntu-9.04 1 1. Install Cross-compile 1.1 Open Linux-ubuntu_v0.19\cross_compile\ folder, and copy Arm-none-lunux-gnueabi-arm-2008q3-72-for-linux.tar.bz2
ELE409 SPRING2018 LAB0
 ELE409 SPRING2018 LAB0 Getting familiar with the LXDE system Objectives: Pre-Lab: 1. Burn the linux system onto a micro-sd card 2. Get familiar with basic linux commands 3. Be able to communicate with
Manually Mount Usb Flash Drive Linux Command Line Redhat
 Manually Mount Usb Flash Drive Linux Command Line Redhat How to Format USB in Linux using Command Line. This article will help you to format USB Flash drive in Ubuntu systems via Command line. So first
Week 10 Project 3: An Introduction to File Systems. Classes COP4610 / CGS5765 Florida State University
 Week 10 Project 3: An Introduction to File Systems Classes COP4610 / CGS5765 Florida State University 1 Introduction The goal of project 3 is to understand basic file system design and implementation file
Lab E2: bypassing authentication and resetting passwords
 Lab E2: bypassing authentication and resetting passwords TTM4175 September 7, 2015 The purpose of this lab is to learn about techniques for bypassing the authentication and access control of Windows and
imx6 Rex EMC testing Content
 imx6 Rex EMC testing (including the script examples) Here you can find the setup, scripts and results of imx6 Rex EMC testing. Content 1. Hardware configuration 2. Test description 3. Test results Radiated
Project 3: An Introduction to File Systems. COP 4610 / CGS 5765 Principles of Operating Systems
 Project 3: An Introduction to File Systems COP 4610 / CGS 5765 Principles of Operating Systems Introduction Project 3 learning objectives File system design and implementation File system testing Data
Adafruit's Raspberry Pi Lesson 1. Preparing an SD Card for your Raspberry Pi
 Adafruit's Raspberry Pi Lesson 1. Preparing an SD Card for your Raspberry Pi Created by Simon Monk Last updated on 2016-12-03 03:20:15 AM UTC Guide Contents Guide Contents Overview You Will Need Downloading
Mars ZX3 Android manual. Antmicro
 Mars ZX3 Android manual Antmicro Sep 27, 2017 Contents 1 Introduction 1 1.1 Acknowledgements..................................... 1 1.2 Version information..................................... 1 2 Compiling
LTIB for i.mx28, a step-by-step guide
 LTIB for i.mx28, a step-by-step guide Note: This guide shows how to get a target system building and running on an i.mx28 EVK board. Install LTIB Configure and build First time configuration LTIB configuration
Project 3: An Introduction to File Systems. COP4610 Florida State University
 Project 3: An Introduction to File Systems COP4610 Florida State University 1 Introduction The goal of project 3 is to understand basic file system design and implementation file system testing data serialization/de-serialization
How to Back-Up a fit-pc2 Using Only a USB Stick (and some creative partitioning)
") This process allows you to back up your fit-pc2 workstation (or any USB-bootable computer) so you can quickly and easily restore your computer to its original state in the event of a hard drive failure,
This process allows you to back up your fit-pc2 workstation (or any USB-bootable computer) so you can quickly and easily restore your computer to its original state in the event of a hard drive failure,
Downloaded from: justpaste.it/o09s
 Downloaded from: justpaste.it/o09s Pogoplug:~$ cat /proc/cpuinfo Processor : ARM926EJ-S rev 1 (v5l) BogoMIPS : 1192.75 Features : swp half thumb fastmult edsp CPU implementer : 0x56 CPU architecture: 5TE
Q7M EVK (Q7M120
 Q7M120-120-EVK (Q7M120 and Q7B120) BSP Linux User s Manual Disclaimers This manual has been carefully checked and believed to contain accurate information. Axiomtek Co., Ltd. assumes no responsibility
CST8207 GNU/Linux O/S I Disks and Partitions
 CST8207 GNU/Linux O/S I Disks and Partitions Topics Disk Partition Table Identifying Partitions Linux Partitions fdisk CST8207 - Algonquin College 2 Associated Readings Chapter 3: pages 71 82 You ve already
SparkGate7 Quick startup guide
 SparkGate7 Quick startup guide Thank you for buying a SparkGate and SPARK-501 SOM. More information on both can be found at www.shiratech.com. The Shiratech team. In the box: The evaluation kit you have
Embedded Linux Systems. Bin Li Assistant Professor Dept. of Electrical, Computer and Biomedical Engineering University of Rhode Island
 Embedded Linux Systems Bin Li Assistant Professor Dept. of Electrical, Computer and Biomedical Engineering University of Rhode Island Generic Embedded Systems Structure User Sensors ADC microcontroller
Disks, Filesystems, Booting Todd Kelley CST8177 Todd Kelley 1
 Disks, Filesystems, Booting Todd Kelley kelleyt@algonquincollege.com CST8177 Todd Kelley 1 sudo and PATH (environment) disks partitioning formatting file systems: mkfs command checking file system integrity:
SAMA5D3x-CM Instruction to program images with PEEDI
 SAMA5D3x-CM Instruction to program images with PEEDI 1) To begin programing with PEEDI you need to prepare some cables and install a terminal emulation software 1.1 First ensure that you have installed
First Five Minutes on a System. What to do and why
 First Five Minutes on a System What to do and why Guidelines and Ideas No hard rules Started writing at 4:21pm Jan 21 Please feel free to POLITELY comment ** means a real life example with names removed
Upgrade Cisco Interface Module for LoRaWAN IXM using the Console
 Upgrade Cisco Interface Module for LoRaWAN IXM using the Console Contents Introduction Prerequisites Requirements Components Used Background Information Configure Step 1. Prepare the firmware images (and
Development Environment Embedded Linux Primer Ch 1&2
 Development Environment Embedded Linux Primer Ch 1&2 Topics 1) Systems: Host and Target 2) Host setup 3) Host-Target communication CMPT 433 Slides #3 Dr. B. Fraser 18-05-05 2 18-05-05 1 Host & Target Host
Linux. For BCT RE2G2. User Guide. Document Reference: BCTRE2G2 Linux User Guide. Document Issue: Associated SDK release: 1.
 Linux For BCT RE2G2 User Guide Document Reference: BCTRE2G2 Linux User Guide Document Issue: 1.05 Associated SDK release: 1.04 Author: D Robinson Contents Introduction... 3 Environment Setup... 3 Required
Disks, Filesystems Todd Kelley CST8177 Todd Kelley 1
 Disks, Filesystems Todd Kelley kelleyt@algonquincollege.com CST8177 Todd Kelley 1 sudo and PATH (environment) disks partitioning formatting file systems: mkfs command checking file system integrity: fsck
Cross-compilation with Buildroot
 Instituto Superior de Engenharia do Porto Mestrado em Engenharia Eletrotécnica e de Computadores Arquitetura de Computadores Cross-compilation with Buildroot Introduction Buildroot is a tool that can be
Installing VMware ESXi and vcenter for Cisco RMS
 Installing VMware ESXi and vcenter for Cisco RMS This chapter explains how to install the VMware ESXi and vcenter for the Cisco RAN Management System. The following topics are covered in this chapter:
Linux Manually Mount External Hard Drive Ntfs-3g Could Not
 Linux Manually Mount External Hard Drive Ntfs-3g Could Not Manually mounting the drives does not work. Installing the ntfs-3g driver also did not work (I was using this to write to the NTFS drives until
SCSI RDMA Protocol. Introduction. Configuring SRP CHAPTER
 4 CHAPTER This chapter describes SCSI RDMA protocol and includes the following sections: Introduction, page 4-1 Configuring SRP, page 4-1 Verifying SRP, page 4-7 See the Root and Non-root Conventions in
Partitioning and Formatting Guide
 Partitioning and Formatting Guide Version 1.2 Date 05-15-2006 Partitioning and Formatting Guide This guide is designed to explain how to setup your drive with the correct partition and format for your
phycore -XScale/PXA270 Development Kit (KPCM-027) Loading a Linux Image (demo.img)
 Loading a Linux Image (demo.img)") phycore -XScale/PXA270 Development Kit (KPCM-027) Loading a Linux Image (demo.img) This Application Note provides instructions on how to start-up the phycore-pxa270, download U-Boot to the phycore-pxa270
phycore -XScale/PXA270 Development Kit (KPCM-027) Loading a Linux Image (demo.img) This Application Note provides instructions on how to start-up the phycore-pxa270, download U-Boot to the phycore-pxa270
Disks, Filesystems 1
 Disks, Filesystems 1 sudo and PATH (environment) disks partitioning formatting file systems: mkfs command checking file system integrity: fsck command /etc/fstab mounting file systems: mount command unmounting
Learn Linux, 101: Control mounting and unmounting of
 Getting to your data Ian Shields January 27, 2016 (First published October 20, 2010) Learn to mount your Linux ; configure and use removable USB, IEE 1394, or other devices; and properly access floppy
Linux and Network Administra3on. Lorenzo Bracciale Marco Bonola
 Linux and Network Administra3on Lorenzo Bracciale Marco Bonola What is Linux? Outline Who is this guy? Who is this guy? Compiler Editor Human Interface Filesystem Networking OS Kernel Scheduler Device
Section 1. A zseries Linux file system test script
 Section 1. A zseries Linux file tem test script 1.1 Overview I was presented with a question regarding disk space efficiency, small files and block sizes with ext3 file tems on zseries Linux. I decided
Galileo Documentation
 Galileo Documentation Release C Architech Mar 16, 2017 Contents 1 Notations 3 2 Chapters 5 2.1 Unboxing................................................. 5 2.2 Quick start guide.............................................
LotOS Framework. Getting Started Guide for Banana Pi. Copyright (C) 2015 ilbers GmbH Revision 1.1,
 2015 ilbers GmbH Revision 1.1,") LotOS Framework Getting Started Guide for Banana Pi Copyright (C) 2015 ilbers GmbH Revision 1.1, 2015-10-20 Mango hypervisor and LotOS framework are copyright (C) 2014 2015 ilbers GmbH. All rights reserved.
LotOS Framework Getting Started Guide for Banana Pi Copyright (C) 2015 ilbers GmbH Revision 1.1, 2015-10-20 Mango hypervisor and LotOS framework are copyright (C) 2014 2015 ilbers GmbH. All rights reserved.
Installing VMware ESXi and vcenter for Cisco RMS
 Installing VMware ESXi and vcenter for Cisco RMS This chapter explains how to install the VMware ESXi and vcenter for the Cisco RAN Management System. The following topics are covered in this chapter:
Back Up (And Restore) LVM Partitions With LVM Snapshots
 LVM Partitions With LVM Snapshots") By Falko Timme Published: 2007-04-15 13:24 Back Up (And Restore) LVM Partitions With LVM Snapshots Version 1.0 Author: Falko Timme Last edited 04/11/2007 This tutorial shows
By Falko Timme Published: 2007-04-15 13:24 Back Up (And Restore) LVM Partitions With LVM Snapshots Version 1.0 Author: Falko Timme Last edited 04/11/2007 This tutorial shows
Upgrading Prime Optical
 CHAPTER 6 You cannot perform a full upgrade from an earlier Cisco Transport Manager (CTM) or Prime Optical release. This section describes how to use the Cisco Prime Optical 9.8 Data Migrator wizard to
Linux Manually Mount External Hard Drive Ntfs 3g Could Not
 Linux Manually Mount External Hard Drive Ntfs 3g Could Not Per-user mounting does not require root access, it's just automating the so if your computer changes the same command could mount a different
Installing Prime Optical
 5 CHAPTER This section describes how to install Cisco Prime Optical 9.8 with an Oracle 11g database. To ensure a successful installation, use the checklist provided in the Installation Scenarios and Checklists,
Once your USB drive is formatted for the FAT32 file system it can be mounted and tested on the GESBC To do this, use the following command:
 GESBC-9302 Development With a USB Drive Paul H. Muller - Documatrix www.documatrix-usa.com ulx@linuxmail.org Disclaimer: The programs and procedures described here have been tested and are thought to be
Setting Up a Linux Operating System
 Name: Setting Up a Linux Operating System We will be using the Linux operating system for most of our practical work in this class. Knoppix is a live CD distribution of Linux, based on the Debian distribution.
TS-7350 Single Board Computer Documentation
 TS-7350 Single Board Computer Documentation Brigham Young University Idaho For Idaho National Laboratories Revised: July 18, 2009 Contents 1 Overview of Single Board Computer (SBC) 2 1.1 Technologic Systems
Manually Mount Usb Device Linux Command Line Ubuntu 12.04
 Manually Mount Usb Device Linux Command Line Ubuntu 12.04 4 answers, How to access a usb flash drive from the terminal? (How can I mount a flash drive manually?) Can't mount external usb driver on Ubuntu
Tutorial : Confguring a micro SD memory card as both swap and storage area for the DragonBoard 410c (DB410C)
") Tutorial : Confguring a micro SD memory card as both swap and storage area for the DragonBoard 410c (DB410C) [1] Introduction The unboxing experience of the DragonBoard 410c is very enjoyable and straightforward.
Tutorial : Confguring a micro SD memory card as both swap and storage area for the DragonBoard 410c (DB410C) [1] Introduction The unboxing experience of the DragonBoard 410c is very enjoyable and straightforward.
AT91SAM9RL64 Hands-on 03: Deploy an application thanks to the AT91SAM9RL64 BootROM loaders and at91bootstrap
 AT91SAM9RL64 Hands-on 03: Deploy an application thanks to the AT91SAM9RL64 BootROM loaders and at91bootstrap Prerequisites Hands-On - AT91SAM9RL64 Hands-on 01: Getting Started with the AT91LIB - AT91SAM9RL64
SCM EVK (SCM120
 SCM120-120-EVK (SCM120 and SCB120) BSP Linux User s Manual Disclaimers This manual has been carefully checked and believed to contain accurate information. Axiomtek Co., Ltd. assumes no responsibility
Blueprints. Securing Sensitive Files With TPM Keys
 Blueprints Securing Sensitive Files With TPM Keys Blueprints Securing Sensitive Files With TPM Keys Note Before using this information and the product it supports, read the information in Notices on page
Changing user login password on templates
 Changing user login password on templates 1. Attach an ISO via the cloudstack interface and boot the VM to rescue mode. Click on attach iso icon highlighted below: A popup window appears from which select
ECE590 Enterprise Storage Architecture Homework #2: Drives and RAID
 ECE590 Enterprise Storage Architecture Homework #2: Drives and RAID Updated 2017-09-13: Added software RAID reliability tasks. Updated 2017-09-15: Fix command with full hostname of storemaster: storemaster.egr.duke.edu
EM210 Linux User Manual
 EM210 Linux User Manual V1.2 Date:2014-10-10 www.armdesigner.com EM210 Linux User Manual Index 1. Features...3 2. Hardware Introduction...3 2.1 Hardware interface...4 2.2 Set boot mode...4 3. Software
Red Hat Enterprise Linux 6 Server Instruction Guide for Creating Volume in Free Disk Space
 Red Hat Enterprise Linux 6 Server Instruction Guide for Creating Volume in Free Disk Space NEC Express Servers NEC Express5800/ft Series 1st Edition 03-2013 Introduction This document is intended as a
INSTALLATION. Security of Information and Communication Systems
 Security of Information and Communication Systems INSTALLATION Table of contents 1.Introduction...2 2.Installation...3 2.1.Hardware requirement...3 2.2.Installation of the system...3 2.3.Installation of
Installing Linux (Chapter 8) Note packet # 4. CSN 115 Operating Systems Ken Mead Genesee Community College. Objectives
 Note packet # 4. CSN 115 Operating Systems Ken Mead Genesee Community College. Objectives") Installing Linux (Chapter 8) Note packet # 4 CSN 115 Operating Systems Ken Mead Genesee Community College Objectives Learn about the hardware components of your computer system Configure hard disk space
Installing Linux (Chapter 8) Note packet # 4 CSN 115 Operating Systems Ken Mead Genesee Community College Objectives Learn about the hardware components of your computer system Configure hard disk space
In this video, I will be covering DM385 IPNC RDK out of box demo-- Here, I'll be showing flashing the uboot using prebuilt binaries available in RDK--
 MANISHA AGRAWAL: Hi. My name is Manisha Agrawal. I am with Texas Instruments Video Security team. In this video, I will be covering DM385 IPNC RDK out of box demo-- Part 3. Here, I'll be showing flashing
Pengwyn Documentation
 Pengwyn Documentation Release 1.0 Silica October 03, 2016 Contents 1 Introduction 3 1.1 Platforms................................................. 3 1.2 Hardware requirements.........................................
How to Recover Data with Linux
 How to Recover Data with Linux Data recovery with Linux distributions. Table of Contents Overview Difficulty Level Part I - Obtaining Linux What is Linux? Downloading Knoppix Downloading Knoppix - Alternative
iscsi storage is used as shared storage in Redhat cluster, VMware vsphere, Redhat Enterprise Virtualization Manager, Ovirt, etc.
 Configure iscsi Target & Initiator on CentOS 7 / RHEL7 iscsi stands for Internet Small Computer Systems Interface, IP-based storage, works on top of internet protocol by carrying SCSI commands over IP
Practical 5. Linux Commands: Working with Files
 Practical 5 Linux Commands: Working with Files 1. Ps The ps command on linux is one of the most basic commands for viewing the processes running on the system. It provides a snapshot of the current processes
Adding a block devices and extending file systems in Linux environments
 Adding a block devices and extending file systems in Linux environments In this exercise we simulate situation where user files partition /home fills up and needs to be extended. Also we migrate from static
05. 5GB 7. cmd. VM E:\. ASM1.vdi 5GB Fixed / Shareable Data (shareable) Fixed Size. ASM2.vdi 5GB Fixed / Shareable. ASM3.vdi 5GB Fixed / Shareable
 Fixed Size. ASM2.vdi 5GB Fixed / Shareable. ASM3.vdi 5GB Fixed / Shareable") 05. 5GB 7. ASM1.vdi 5GB Fixed / Shareable Data (shareable) Fixed Size. ASM2.vdi 5GB Fixed / Shareable ASM3.vdi 5GB Fixed / Shareable ASM4.vdi 5GB Fixed / Shareable ASM5.vdi 5GB Fixed / Shareable FRA1.vdi
05. 5GB 7. ASM1.vdi 5GB Fixed / Shareable Data (shareable) Fixed Size. ASM2.vdi 5GB Fixed / Shareable ASM3.vdi 5GB Fixed / Shareable ASM4.vdi 5GB Fixed / Shareable ASM5.vdi 5GB Fixed / Shareable FRA1.vdi
LAB #7 Linux Tutorial
 Gathering information: LAB #7 Linux Tutorial Find the password file on a Linux box Scenario You have access to a Linux computer. You must find the password file on the computer. Objective Get a listing
part Optimizing Your System COPYRIGHTED MATERIAL in this part Chapter 1 Hacking the Installation Chapter 2 Making Ubuntu Usable
 Optimizing Your System COPYRIGHTED MATERIAL part in this part Chapter 1 Hacking the Installation Chapter 2 Making Ubuntu Usable Chapter 3 Configuring Devices Hacking the Installation chapter This chapter
CPSC 457 OPERATING SYSTEMS FINAL EXAM
 CPSC 457 OPERATING SYSTEMS FINAL EXAM Department of Computer Science University of Calgary Professor: Carey Williamson December 10, 2008 This is a CLOSED BOOK exam. Textbooks, notes, laptops, calculators,
Manage Directories and Files in Linux. Objectives. Understand the Filesystem Hierarchy Standard (FHS)
") Manage Directories and Files in Linux Objectives Understand the Filesystem Hierarchy Standard (FHS) Identify File Types in the Linux System Change Directories and List Directory Contents Create and View
Manage Directories and Files in Linux Objectives Understand the Filesystem Hierarchy Standard (FHS) Identify File Types in the Linux System Change Directories and List Directory Contents Create and View
Building the Perfect Backtrack 4 USB Thumb Drive
 Building the Perfect Backtrack 4 USB Thumb Drive This how-to will show you a method for building a USB thumb drive with the following features: Persistent Changes Files saved and changes made will be kept
Adding SD card to WRT54GL
 1 of 7 04/08/2012 06:57 AM Adding SD card to WRT54GL From ivc wiki The WRT54GL is a cool little router based on Linux (GPL) and Open Source, thus allowing for extension of the core functions via software
How to Dual-Boot OS X and Ubuntu
 How to Dual-Boot OS X and Ubuntu Nailen Matschke - nailen@caltech.edu 10/3/2015 What you need: 1. A USB drive with at least 2 GB of space, that you don t mind wiping 2. A copy of Ubuntu (available here),
Tizen.IoTivity.Init. Tizen IoTivity 를시작하기위한환경설정. Geunsun Lee
 Tizen.IoTivity.Init Tizen IoTivity 를시작하기위한환경설정 Geunsun Lee 1 Installing Tizen Platform How to install IoT Headless image on RPi3(for Ubuntu) 2 Booting The RPi3 Connecting a Host PC to RPi3 via UART 3 Building
CHAPTER 7. Astlinux and Asterisk Installation on Embedded System
 CHAPTER 7 Astlinux and Asterisk Installation on Embedded System Introduction 1. Asterisk can be installed on number of operating systems but keeping embedded system in mind the operating system chosen
BeBot - Software Installation Guide
 HEINZ NIXDORF INSTITUTE University of Paderborn BeBot - Software Installation Guide Version 1.4 BeBot - Software Installation Guide Markus Koester, Stefan Herbrechtsmeier Copyright c 2009-2011 HEINZ NIXDORF
This section describes the procedures needed to add a new disk to a VM. vmkfstools -c 4g /vmfs/volumes/datastore_name/vmname/xxxx.
 Adding a New Disk, page 1 Mounting the Replication Set from Disk to tmpfs After Deployment, page 3 Manage Disks to Accommodate Increased Subscriber Load, page 5 Adding a New Disk This section describes
As this method focuses on working with LVM, we will first confirm that our partition type is actually Linux LVM by running the below command.
 How to Increase the size of a Linux LVM by adding a new disk This post will cover how to increase the disk space for a VMware virtual machine running Linux that is using logical volume manager (LVM). First
Matrix 500 Quick Installation Guide
 Overview Matrix 500 features four serial ports, 10/100 Mbps Ethernet, USB port and SD socket for flash disk expansion. The preinstall Linux OS and GNU tool chain make Matrix 500 ready for your application
Getting Started with Pentaho and Cloudera QuickStart VM
 Getting Started with Pentaho and Cloudera QuickStart VM This page intentionally left blank. Contents Overview... 1 Before You Begin... 1 Prerequisites... 1 Use Case: Development Sandbox for Pentaho and
Replacing a RazorSafe Hard Drive
 Replacing a RazorSafe Hard Drive Replacement Part # XRS-750, S-RSHD-01, S-RSHD-02, S-RSHD-03, S-RSHD-04, S-RSHD-05 October 2010 Part Number: 010-00490g This document supports RazorSafe RS150, RS200, RS370,
Overview for Axxia 5600 and Axxia 6700
 Overview for Axxia 5600 and Axxia 6700 Axxia Systems use a 3 stage boot process to initialize the system and allow an operating system to be loaded. 1. The first stage is part of the asic and loads the
How to securely isolate Damn Vulnerable Linux with VirtualBox
 How to securely isolate Damn Vulnerable Linux with VirtualBox Motivation I have this vision of going through and testing software inside of a closed lab that allows me to understand exploits and vulnerabilities
CompTIA Linux+/LPIC-1 COPYRIGHTED MATERIAL
 CompTIA Linux+/LPIC-1 COPYRIGHTED MATERIAL Chapter System Architecture (Domain 101) THE FOLLOWING COMPTIA LINUX+/LPIC-1 EXAM OBJECTIVES ARE COVERED IN THIS CHAPTER: 101.1 Determine and Configure hardware
Zephyr Kernel Installation & Setup Manual
 Zephyr Kernel Installation & Setup Manual Zephyr kernel is a small footprint Single address space OS, i.e, it combines application specific code with a custom kernel to create a monolithic image that gets
It is recommended to complete the tutorial using a web browser from the same operating system as your Putty or SSH client (e.g. Ubuntu terminal).
.") TCSS 562: Software Engineering Institute of Technology for Cloud Computing University of Washington Tacoma Spring 2017 http://faculty.washington.edu/wlloyd/courses/tcss562 Tutorial 1 Benchmarking Amazon
TCSS 562: Software Engineering Institute of Technology for Cloud Computing University of Washington Tacoma Spring 2017 http://faculty.washington.edu/wlloyd/courses/tcss562 Tutorial 1 Benchmarking Amazon
Soma s Installation Notes
 For Details, Contact: Thay Soma sundaram Telephone: 850-644-6448 E-mail: soma@sb.fsu.edu Soma s Installation Notes Kasha Laboratory of Biophysics Institute of Molecular Biophysics Florida State University