TRAINING GUIDE FOR OPC SYSTEMS.NET. Simple steps to successful development and deployment. Step by Step Guide
|
|
|
- Marsha Nelson
- 6 years ago
- Views:
Transcription
1 TRAINING GUIDE FOR OPC SYSTEMS.NET Simple steps to successful development and deployment. Step by Step Guide
2 SOFTWARE DEVELOPMENT TRAINING OPC Systems.NET Training Guide Open Automation Software Evergreen, Colorado, US
3 Table of Contents Chapter 1 - Overview and Installation 1 OPC Systems Service 1 Client Components 1 Installation 2 Service Start 3 Service LogOn 5 Chapter 2 - Tags 11 Configure Tags 11 Tag CSV Export and Import 17 Tags Programmatic Interface 17 Chapter 3 - Data Logging 19 Configure Data Logging 19 Data Logging CSV Export and Import 26 Data Loging Programmatic Interface 26 Chapter 4 - Trending 27 Trending Components 27 OPC Systems HMI 28 Configure Trend 29 Running the Trend Window 35 Add Trend to Visual Studio Application 43 Add Trend to ASP.NET Web Application 52 Add Alarm Window to Visual Studio Application 84 Add Alarm Window to ASP.NET Web Application 93 Add Alarm ActiveX to Legacy Application 103 Chapter 6 - Human Machine Interface 107 HMI Components 107 Add HMI Controls to Visual Studio Application 108 Add HMI Controls to ASP.NET Web Application 116 Add Data Control to Visual Studio Application 124 Chapter 7 - Reports 133 Configure Reports 133 Chapter 8 - Default Settings 147 Configure Options 147 Chapter 9 - Smart Client Deployment 149 Example Smart Client 150 Smart Client Click Once Deployment 150 Add Trend ActiveX to Legacy Application 62 Chapter 5 - Alarming 71 Configure Alarm Logging 71 Alarming Components 76 OPC Systems HMI 77 Configure Alarm Window 78 Running the Alarm Window 80
4
5 Chapter 1 Chapter 1 - Overview and Installation OPC Systems Service The OPC Systems.NET software uses a central real-time database as its data source for all client applications. This real-time database runs as a Windows Service and can be deployed on multiple computers to create a company or global networked database. The information stored each in service can include a collection of Tags that represent live data, data logging groups, alarm logging groups, recipes, reports, and system options. These configurations in the service can be configured locally or remote using 3 basic methods. 1. OPC Systems Configure Application. 2. CSV Export and Import. 3. Programmatic interface using OPC Systems.NET Component Once the configurations are created they can then be stored to binary files local to the service. Using Configure-Options the default configuration files to load when the service starts can be defined. The Tags can have a data sources from OPC Servers, OPC Clients,.NET applications, or databases like SQL Server, Oracle, Access, and mysql. Client Components Each client component for real-time visualization, data access, trending, alarming, and historical access is configured directly with the component. All components use.net communications to talk to the OPC Systems Services. This implementation makes it possible to display and control live data over the Internet without the need for DCOM configuration. All.NET components are 100% managed so they can be used in Smart Client and ASP.NET web applications without introducing any COM or ActiveX legacy technologies. There are trend and alarm ActiveX controls provided for integration into legacy ActiveX containers. 1


6 Installation From the OPC Systems.NET product CD or from the download installation from run the setup for OPC Systems.NET. Note During the installation if prompted that Internet Information Server is not installed you can select Ignore if you do not plan to use OPC Mobile.NET, OPC Web Controls.NET, OPC Web Trend.NET, or OPC Web Alarm.NET. 2

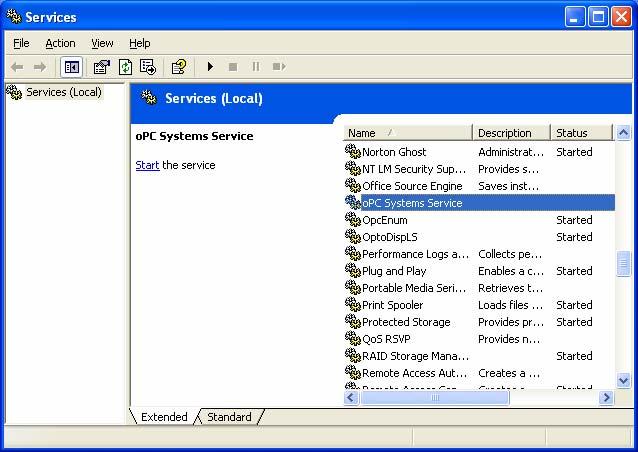
7 Select Typical installation to install all product features or if you are not sure which components to install. Select Custom if you know the specific product features you wish to install selectively. Service Start The OPC Systems Service will need to be started after the installation is completed. The OPC System Service Manager will appear after the installation is completed. Select the Start Service button to start the service. When finished you can Hide the service manager or exit the application. This application can be restored at any time from the OPC Systems.NET program group as the Service icon or from the lower right tray applications as the blue circle. You can also use the Service Control Manager that is built into the operating system to start and stop the OPC Systems Service. This can be brought up by selecting Control Panel- Administrative Tools-Services. From the list of Services select the OPC Systems service. 3
8 4
9 Service LogOn The OPC Systems Service can be configured to Logon as a LocalSystem account or a User account. To correctly launch OPC Servers in the same window space it is recommended to set the OPC Systems Service to Logon with the User Account of the logged on user. Use the Service Control Manager to modify the service s Logon Account. If you are receiving bad data quality from the OPC Server it is most likely due to a security logon restriction in the operating system. To correct this it is recommend to set the OPC Systems Service LogOn to a valid user account. If the OPC Server is running as a Service you can often leave the Service LogOn to the Local System account, but check the box for allow service to interact with desktop. To start the Service Control Manager you must first have Administrative rights to the system. Select Start-Control Panel-Administrative Tools-Services to view all Services installed on the system. 5

10 Select OPC Systems and right click to select Properties. Select the Log On Tab to view the current Logon Account. 6


11 Select This account radio button and use the Browse button to Select User. 7

12 Use the Advanced button in the lower left, and then the Find Now button to select the desired Logon User Account. Select OK twice to return to the Log On Tab dialog. 8
13 Enter the Password for the User Account and select OK. If the Service is already started it must be Stopped and Started for the changes to take effect. 9
14 10
15 Chapter 2 Chapter 2 - Tags Configure Tags Step Task 1 Start Configure OPC Systems application. 2 Select Configure-Tags. 11


16 3 Select the Local OPC Systems Service. Note The Configure application can be used to connect to remote systems using the network node name or IP address of the remote node the OPC Systems Service is running on. Note When selecting a service if you receive a warning dialog that the service cannot be retrieved make sure the OPC Systems Service is started as described in Chapter 1. 4 Right-Click on the Local OPC Systems Service and select Add Tag. Note You can also add organizational Groups as many levels deep as you prefer and add tags to groups. 12

17 5 Enter the Tag name Ramp in the Add Tag dialog box. 6 Repeat Steps 5 and 6 with Tag name Sine. 7 Repeat Steps 5 and 6 with Tag name Random. 8 Select Tag Ramp. 9 For the Value Parameter select the Data Source OPC Item. 10 Use the OPC Browse button to browse OPC Servers. 13

18 11 Expand Local to expand EEI.OPCSimulator and select SimDevice. 12 Select Ramp from the list of OPC Items and select OK to enter the OPC Item EEI.OPCSimulator\SimDevice.Ramp. 13 Enable the Trend Point option. 14 Set the Description field to Ramp. 15 Select the High High Parameter and set the Value field to 80 and enable the High High alarm. 16 Select the High Parameter and set the Value field to 60 and enable the High alarm. 17 Select the Low Parameter and set the Value field to 40 and enable the Low alarm. 18 Select the Low Low Parameter and set the Value field to 20 and enable the Low Low alarm. 19 Select the Apply Changes button in the lower right corner. 14

19 20 Select Tag Random and the Value Parameter. Repeat steps 8 though 14 and step 19 substituting Ramp for Random as Tag name and OPC Item name. EEI.OPCSimulator\SimDevice.Random. 21 Select Tag Sine and the Value Parameter. Repeat steps 9 though 19 substituting Ramp for Sine as Tag name and OPC Item name. Use 0.9 for High High Value, 0.8 for High Value, 0.2 for Low Value, and 0.1 for Low Low Value. EEI.OPCSimulator\SimDevice.Sine. 22 Right click on the Local OPC Systems Service and select Save Tags. 15
20 23 Create a directory on the local C:\ drive with the name OPCSystemsDemo. Save the file DemoTags.tags in the directory C:\OPCSystemsDemo. Refer to the OPC Systems.NET help file under OPC Systems Configuration- Tags-Parameter Properties for a description of each property. 16

21 Tag CSV Export and Import Tags can be exported to CSV files to be modified using Microsoft Excel. Simply right click on the Local Service and select Export CSV. When you have finished the modifications use Import CSV to load all modifications back to the tag configuration and then save the changes to a tag configuration file as shown in Step 22 of Configure Tags. Note You cannot have Excel open with the CSV file during the import as Excel will lock the file for exclusive use. First close the file in Excel, and then proceed with the import. Tags Programmatic Interface Use the OPC Systems component in your Visual Studio application to programmatic modify tags. Refer to the Configure Tags Form in the VB.NET example for an example. Refer to the OPC Systems Component help file for all of the method syntax. 17
22 18

23 Chapter 3 Chapter 3 - Data Logging Configure Data Logging Step Task 1 Start Configure OPC Systems application. 2 Select Configure-Data Logging. 3 Select the Local OPC Systems Service. 4 Enter the Logging Group Name of Simulation in the field in the upper right. 5 Check Logging Active in the Common Properties Tab. 6 Select the Tags Tab. 19

24 7 Select the Add Field button. 8 Select the Tag Parameter browse button to select the Tag Parameter Ramp.Value. 20

25 9 Repeat steps 7 and 8 for the Tag Parameter Random.Value. Repeat steps 7 and 8 for the Tag Parameter Sine.Value. 10 Select the Database Tab. 21

26 11 Use the following configuration for SQL Server Desktop. The Database and Table will automatically be created for you. 22

27 Use the following configuration for Microsoft Access. The Database and Table will be automatically created for you. 23

28 Use the following configuration for CSV text logging. 12 Select the Add button to add the Data Logging group. 24
29 13 Right click on the Local OPC Systems Service and select Save. 14 Save the file DemoLogging.DataLog in the directory C:\OPCSystemsDemo. Refer to the OPC Systems.NET help file under OPC Systems Configuration- Data Logging for a description of each property. 25


30 Data Logging CSV Export and Import All logging groups can be exported to a CSV file along with all database field names to individual sub files by right clicking on the Local service and select Export CSV. You can also export just the individual fields for a logging group by right clicking in the Tags field list. Note You cannot have Excel open with the CSV file during the import as Excel will lock the file for exclusive use. First close the file in Excel, and then proceed with the import. Data Loging Programmatic Interface Use the OPC Systems component in your Visual Studio application to programmatic modify data logging groups. Refer to the Configure Data Logging Form in the VB.NET example for an example. Refer to the OPC Systems Component help file for all of the method syntax. 26
31 Chapter 4 Chapter 4 - Trending Trending Components There are 3 trending components that can be used to trend real-time data from the tag configuration. 1. OPC Trend.NET 100% managed component for WinForm applications. 2. OPC Web Trend.NET 100% managed ASP.NET component for Web applications. 3. OPC Trend ActiveX control for legacy applications. All 3 types of components can be run locally or remotely for live data from any service containing an OPC Trend.NET license or OPC Web Trend.NET license. All 3 types of components also support historical replay from any service containing an OPC Database.NET license with logging groups defined as in Chapter 3. 27
32 OPC Systems HMI The OPC Systems HMI container allows you to use the OPC Trend.NET and OPC Alarm.NET components directly without using Visual Studio. Step Task 1 Start OPC Systems HMI application. 2 Select File-New and save the file OPCSystemsDemo in the C:\OPCSystemsDemo\ directory. 28

33 Configure Trend Step Task 1 Start OPC Systems HMI application if it is not already running. 2 Select the Add button under the Trends Navigator bar on the left. 3 Change the Trend Window Name to OPC Systems Demo. 4 Select the Modify Trend Window button and select Pens. 5 Select the Local OPC Systems Service in the Trend Point Tags dialog. *Note: if you desire to setup the Trend Window to work on remote application select the Network browse to select the appropriate network name of the local or remote OPC Systems Service. 6 Expand the Ramp Tag and select the Value Parameter and right click to Add Trend Point. Only Parameters that have been enabled as Trend Point in the Tag configuration will appear for trending. 29

34 7 Expand the Sine Tag and select the Value Parameter and right click to Add Trend Point. 8 Set the LineBorderColor of Sine.Value Pen to Red. 9 Set the YAxisRangeHigh to 1 and YAxisRangeLow to -1 of Sine.Value Pen. 10 Select OK in the lower left of the Trend Point Tags dialog. 30
35 11 Select the Modify Trend Window button and select Update Rates. 12 Set the TimeFrame to 60 seconds. 13 Select the Modify Trend Window button and select View. 14 Set the Lighting to MetallicLustre 15 Select the Modify Trend Window button and select Walls. 31


36 16 Set the BackWallColor to LightCoral. 17 The Trend Window should appear as below. 32

37 18 Click OK in the lower left corner. 19 Select File Save This is only necessary when you Add or Delete a Trend Window, Alarm Window, or View Window. Modifications to a Trend or Alarm Window will automatically be saved in its own configuration file. 20 Select Configure-Options and enable the 3D Render Mode to Window. Select Yes to Save the Render Mode when prompted. 33
38 21 Select the OPC Systems Demo Trend Window and select the Modify button. If the Window appears correctly without the OPC Systems HMI application halting your systems supports 3D rendering to Window and no further action is required except to Cancel the Trend Window modification. If the OPC Systems HMI application halts be sure to select Configure-Options once again and uncheck the 3D Render Mode to Window. Option and select OK. 22 Your Trend Window is now ready to Run Trend Window in OPC Systems HMI. 34
39 Running the Trend Window Step Task 1 Start OPC Systems HMI application if it is not already running. 2 Select the Trends button in the lower left of the Navigator bar and select the OPC Systems Demo Trend Window and select the Add Trend To Window button. 3 If data does not appear within a few seconds make sure to open up the Firewall for port Then restart the OPC Systems Service and try again. Contact Open Automation Software for OPC setup for XP document and help setting up OPC Systems.NET. 35

40 4 The Trend Window should appear as below with real time update from the OPC Systems Service. 36


41 5 Select the hand icon on the toolbar and move the mouse to change the view perspective to see the 3D trending. 6 Right Click on the Trend Window and select Modify Pens. 37
42 7 Select the Local OPC Systems Service and expand the Random Tag and select the Value Parameter and right click to Add Trend Point. 8 Select Random.Value in the lower left Pen list and set the ShowValue attribute to True. 9 Select OK in the lower left of the Trend Point Tags dialog. 38

43 10 Notice that the values for the Random Pen have been buffered by the OPC Systems Service even though it had not previously been added to a Trend Window. You can remove Pens by simply selecting Modify Pens and delete the Pen from Pen list and select OK. 39


44 11 Right Click on the Trend Window and select Modify Chart-Update Rates. 12 Set the TimeFrame to
45 13 This will cause a new Time Frame in the OPC Systems Service for all Trend Points with a 1 second Sample Rate. The Trend Window Update Rate is set to 6 seconds as more samples will take more CPU load with fast update rates in 3D mode. 14 Select File Save if you wish to save the on-line Window name and arrangement retentive. All modifications to the Trend Window properties will be retentive after this even if you do not select Save again. Only when a Window is added or removed do you need to select Save. 41

46 15 If you setup Data Logging in this example right click on the Trend Window and select History to retrieve historical data. 16 Explore the Trend Window Toolbar buttons and other features of the Trend Window. Please note that some printer drivers do not reserve enough memory for the 3D rendering and may halt the system. 42
47 Add Trend to Visual Studio Application The following steps can be used to add a trend window to a C#, C++, or Visual Basic.NET application. Refer to the VB.NET example for programmatic interface of adding and removing pens. All properties are programmatically accessible. The following example demonstrates the trend window with no code required. The trend window can also be used with Visual Studio Note: When using Visual Studio 2005 in debug mode the application will not run on some systems. Instead compile the application in Release mode and run the application separate from Visual Studio Or you can disable the LoaderLock exception by selecting Debug- >Exceptions menu, expand Managed Debugging Assistants, look for LoaderLock and uncheck the Thrown column. Step Task 1 Start Visual Studio 2005 and select File->New->Project to create a new C#, C++, or VB. 43
48 2 Select Windows Application as the project type. 44
49 3 From the Toolbox if OPCTrendControl is not available right click in the Toolbox and select Choose Items. If it is available to step 4. 45

50 From the.net Framework Components select OPCTrendControl and then select OK. 46

51 4 Add the OPCTrendControl component onto the Form. Resize both the form and trend window to the desired size. 47
52 5 Right click on the trend window and select Properties. 6 Set the Anchor property to Top, Bottom, Left, Right. 7 Expand the ChartRates property and set the TimeFrame to 60 seconds. 8 Select the Pens property and click on the small grey square with the 3 dots at the right. 48
53 9 Select the Local OPC Systems Service to display a list of available Tags to Note: If you do not see the desired Tag in this list go back to Configure-Tags and enable the Trend Point property for the Tags you wish to trend. Note: If you want the application to be deployed across a network to remote PCs select the Network Node or enter an IP Address in the NetworkNode field and use the Select button to include the network node or IP Address of the OPC Systems Service source. 10 Expand the Ramp Tag and select Value. Select the Add Pen button or right click on Value and select Add Pen. 11 The pen Ramp.Value will appear in the lower left list of pens. You can select the pen to change of the pen properties that appear to the right. The YAxisRangeHigh and YAxisRangeLow properties are important when the trend windows YAxis.ScaleMode property is set to PercentOfPenRanges. 12 Select OK from the Pens dialog. 13 If the PC(s) that will run this have a video card that can support OpenGL rendering set the RenderMode3D property to True. If you are unsure leave this property to False for now. 49
54 14 Expand the Views property and set the trend window Lighting and PerspectiveView to the desired settings. 15 If you desire for the operators changes to the trend window during runtime to remain set the ConfgiurationFile property to a valid file path. Make sure each system the application will run on that the directory path is valid. Note: If you set this property to a file make sure you deploy the file with the application in the directory you specify.. Leave this property blank if you wish to have the default properties set during configuration remain on the application restarting. 16 If you plan to run this application to connect to an Internet server or other system that has blocking firewall to asynchronous communications set the SyncConnection property to True. If you are unsure set the value to True. 17 Set the compile mode on the Visual Studio toolbar to Release. 50

55 18 Select Build from the VS menu and select to Build the application. 19 Use Windows Explorer to browse for the application located in the bin\release directory and run the application. 20 To deploy the application to remote nodes first make sure the Pen selection as described in step 9 is set to a Network Node or IP Address. Then simply copy the files in the bin\release directory to the target systems or follow the Smart Client deployment section in this help file to deploy your application using Click Once Deployment. 51
56 Add Trend to ASP.NET Web Application The following steps can be used to add a trend window to a C#, C++, or Visual Basic.NET web application. All properties are programmatically accessible. The following example demonstrates the trend window with no code required. The trend window can also be used with Visual Studio 2003 web applications. Step Task 1 Start Visual Studio 2005 and select File->New->Web Site to create a new C#, J#, or VB ASP.NET web application. 52
57 2 Select ASP.NET Web Site and specify your desired Language in the lower right. 3 Expand the Default.aspx web page in the Solution Explorer and select View Designer. Note: If you do not see the Solution Explorer select View->Solution Explorer. 53
58 4 From the VS menu select Layout->Position->Auto-position Options. 5 Under the HTML Designer set the CSS Positioning to Absolutely positioned. Note: You are welcome to use any positioning style you desire, this simply pointed out for new web developers. 54
59 6 From the Toolbox if OPCWebTrend and OPCWebRefresh is not available right click in the Toolbox and select Choose Items. If it is available to step 4. From the.net Framework Components select OPCWebTrend and OPCWebRefresh and then select OK. 55
60 7 Add one OPCWebRefresh control to the WebForm. 8 Add the OPCWebTrend component onto the WebForm. Resize the trend window to the desired size. 56

61 9 Right click on the trend window and select Properties. 57

62 10 Set the Layout style to the desired setting. 11 Set the SampleRate and TimeFrame properties to the desired settings. The default is 60 seconds at a 1 second sample rate.. 12 Select the Pens property and click on the small grey square with the 3 dots at the right. 13 Select the Local OPC Systems Service to display a list of available Tags to Note: If you do not see the desired Tag in this list go back to Configure-Tags and enable the Trend Point property for the Tags you wish to trend. Note: If you want the web application to be deployed across a network to remote PCs select the Network Node or enter an IP Address in the NetworkNode field and use the Select button to include the network node or IP Address of the OPC Systems Service source. If the web application will be running on the local system and simply need access to the web application through remote browsers use the Local service. 58


63 14 Expand the Ramp Tag and select Value. Select the Add Pen button or right click on Value and select Add Pen. 15 The pen Ramp.Value will appear in the lower left list of pens. You can select the pen to change of the pen properties that appear to the right. The YAxisRangeHigh and YAxisRangeLow properties are important when the trend windows YAxis.ScaleMode property is set to PercentOfPenRanges. 16 Select OK from the Pens dialog. 17 Set the TrendType property to the desired setting. 59
64 18 Right click on the WebForm and select View in Browser. 60

65 19 Set the application for Release mode and build your application. Typically the application files are under the Inetpub\wwwroot directory. Refer to the OPC Web Trend.NET section in the OPC Systems.NET help file for Special considerations and Deployment steps if you encounter any issues. 61
66 Add Trend ActiveX to Legacy Application The OPC Trend ActiveX control can be integrated directly into any ActiveX container, most commonly HMI graphic applications or Visual Studio 6.0. Below is an example of using the OPC Trend ActiveX Control integrated into Visual Basic 6.0 or other ActiveX container of your choice. Step Task 1 Start Visual Basic 6.0 with a new or existing Project or other ActiveX container application of your choice. If using other ActiveX container than Visual Studio simply select the appropriate method of the application to add an ActiveX control and select OPCTrendActiveX.OPCTrend and skip to Step 6. 62
67 2 To add the OPC Trend.ActiveX Control to your Visual Studio 6.0 development system select View-Toolbox from within Visual Studio. 3 Right-Click on the Toolbox and select Components. 63

68 4 Select OPC Trend ActiveX Control from the list of Controls 5 From the ToolBox select the OPC Trend ActiveX Control icon and add the trend to any Form. 6 Resize the Trend Window to any size your desire. Please note that some of the Runtime Properties will not be available for modifying during runtime if the Trend Window is too small. 64
69 7 Select Properties of Trend Window and select Pens. 8 Select Add Pen. Select the Local OPC Systems Service in the Trend Point Tags dialog. *Note: if you desire to setup the Trend Window to work on remote application select the Network browse to select the appropriate network name of the local or remote OPC Systems Service. 65

70 6 Expand the Ramp Tag and select the Value Parameter and select OK in the lower left of the dialog. Only Parameters that have been enabled as Trend Point in the Tag configuration will appear for trending. 7 Select Add Pen and expand the Sine Tag and select the Value Parameter and select OK in the lower left of the dialog. 66
71 8 Select Ramp.Value from the Pen list and set the Pen Color to Blue, then select Apply button for the Pen. 67

72 9 Select Sine.Value from the Pen list and set the High Range to 1 and Low Range to - 1, then select the Apply button for the Pen.. 10 Select the Rates Property Tab and set the set the TimeFrame to 60 seconds. 11 Select OK at the bottom of the Property Page. 68
73 12 Save your application and compile if needed and you are now ready to run the application. 69
74 70

75 Chapter 5 Chapter 5 - Alarming Configure Alarm Logging Step Task 1 Start Configure OPC Systems application. 2 Select Configure-Alarm Logging. 3 Select the Local OPC Systems Service. 4 Enter the Logging Group Name of Simulation in the field in the upper right. 5 Check Logging Active in the Common Properties Tab. 6 Select the Database Tab. 71
76 7 Use the following configuration for SQL Server Desktop. The Database and Table will automatically be created for you. 72

77 Use the following configuration for Microsoft Access. The Database and Table will be automatically created for you. 73

78 Use the following configuration for CSV text logging. Note: There is no historical replay to alarm windows with CSV logging. 8 Select the Add button to add the Alarm Logging group. 74
79 9 Right click on the Local OPC Systems Service and select Save. 10 Save the file DemoAlarmLogging.AlarmLog in the directory C:\OPCSystemsDemo. 75
80 Alarming Components There are 3 alarming components that can be used to view real-time alarms from the tag configuration. 4. OPC Alarm.NET 100% managed component for WinForm applications. 5. OPC Web Alarm.NET 100% managed ASP.NET component for Web applications. 6. OPC Alarm ActiveX control for legacy applications. All 3 types of components can be run locally or remotely for live data from any service containing an OPC Alarm.NET license or OPC Web Trend.NET license. All 3 types of components also support historical replay from any service containing an OPC Alarm.NET or OPC Web Alarm.NET license with alarm logging groups defined as in this chapter under Configure Alarm Logging. 76

81 OPC Systems HMI The OPC Systems HMI container allows you to use the OPC Trend.NET and OPC Alarm.NET components directly without using Visual Studio. Step Task 1 Start OPC Systems HMI application. 2 Select File-New and save the file OPCSystemsDemo in the C:\OPCSystemsDemo\ directory. 77
82 Configure Alarm Window The OPC Alarm.NET component can be integrated directly into any.net container, most commonly Visual Studio.NET. or OPC Systems HMI. The OPC Alarm ActiveX control can be integrated directly into any ActiveX container, most commonly HMI graphic applications or Visual Studio 6.0. Refer to the Configure Alarm ActiveX section of Quick Start section of the OPC Systems.NET help file for an example. Below is an example of using the OPC Alarm.NET component integrated in the OPC Systems HMI.NET container. Step Task 1 Start OPC Systems HMI application if it is not already running and select the Alarms button in the lower left of the Navigator Bar. 2 Select the Add button under the Alarms Navigator bar on the left. 3 Change the Alarm Window Name to OPC Systems Demo. 4 Select the Modify Alarm Window button to see that you can add other OPC Systems Nodes, modify Filters, Colors, or other attributes. By default the localhost node is selected and Filters include all alarms except alarms that have been acknowledged and no longer active, OPC communication failures, and Tag Client communications to other OPC Systems Services. You can adjust the Filter as you desire for Priority, Alarm Groups, 78
83 and Alarm Types. *Note: if you desire to setup the Alarm Window to work on remote application select the Network Nodes to select the appropriate network names of the local or remote OPC Systems Services. 5 Click OK in the lower left corner. 6 Select File Save This is only necessary when you Add or Delete a Trend Window, Alarm Window, or View Window. Modifications to a Trend or Alarm Window will automatically be saved in its own configuration file. 7 Your Alarm Window is now ready to Run Alarm Window in OPC Systems HMI. 79
84 Running the Alarm Window Step Task 1 Start OPC Systems HMI application if it is not already running. 2 Select the Alarms button in the lower left of the Navigator bar and select the OPC Systems Demo Alarm Window and select the Add Alarm To Window button. 3 If alarm data does not appear within a few seconds make sure to open up the Firewall for port Then restart the OPC Systems Service and try again. Contact Open Automation Software for OPC setup for XP document and help setting up OPC Systems.NET. 80

85 4 The Alarm Window should appear as below with real time update from the OPC Systems Service. 81

86 5 Select the Active Column and drag it to the header to group alarms as Active and Non-Active. 6 Double Click on an Alarm Record to acknowledge. With the current filtering once an alarm is no longer active and acknowledged it will disappear from the Alarm Window. Use Ack All button to Acknowledge all alarms in the Alarm Window. 7 Select File Save if you wish to save the on-line Window name and arrangement retentive. All modifications to the Trend Window properties will be retentive after this even if you do not select Save again. Only when a Window is added or removed do you need to select Save. 82

87 8 If you setup Alarm Logging in this example right click on the Alarm Window and select History to retrieve historical alarms. 9 Explore the Alarm Window Toolbar buttons and right click on the Alarm Window to explore features. 83
88 Add Alarm Window to Visual Studio Application The following steps can be used to add an alarm window to a C#, C++, or Visual Basic.NET application. All properties are programmatically accessible. The following example demonstrates the alarm window with no code required. The alarm window can also be used with Visual Studio Step Task 1 Start Visual Studio 2005 and select File->New->Project to create a new C#, C++, or VB. 84
89 2 Select Windows Application as the project type. 85
90 3 From the Toolbox if OPCAlarmControl is not available right click in the Toolbox and select Choose Items. If it is available to step 4. From the.net Framework Components select OPCAlarmControl and then select OK. 86
91 4 Add the OPCAlarmControl component onto the Form. Resize both the form and alarm window to the desired size. 87

92 5 Right click on the alarm window and select Properties. 88

93 6 Set the Anchor property to Top, Bottom, Left, Right. 7 Expand the AlarmFilter property and set the desired filter settings for the alarm window. 8 Select the AlarmNetworkNodes property and click on the small grey square with the 3 dots at the right. 89

94 9 Select all network nodes you wish to receive alarms from to this alarm window. Note: If you want the application to be deployed across a network to remote PCs select the Network Node or enter an IP Address in the NetworkNode field and use the Select button to include the network node or IP Address of the OPC Systems Service source. 90
95 10 If you desire for the operators changes to the alarm window during runtime to remain set the ConfgiurationFile property to a valid file path. Make sure each system the application will run on that the directory path is valid. Note: If you set this property to a file make sure you deploy the file with the application in the directory you specify.. Leave this property blank if you wish to have the default properties set during configuration remain on the application restarting. 16 If you plan to run this application to connect to an Internet server or other system that has blocking firewall to asynchronous communications set the SyncConnection property to True. If you are unsure set the value to True. 17 Set the compile mode on the Visual Studio toolbar to Release. 18 Select Build from the VS menu and select to Build the application. 91

96 19 Use Windows Explorer to browse for the application located in the bin\release directory and run the application. 20 To deploy the application to remote nodes first make sure the AlarmNetworkNodes selection as described in step 9 is set to a Network Node or IP Address. Then simply copy the files in the bin\release directory to the target systems or follow the Smart Client deployment section in this help file to deploy your application using Click Once Deployment. 92
97 Add Alarm Window to ASP.NET Web Application The following steps can be used to add an alarm window to a C#, J#, or Visual Basic.NET web application. All properties are programmatically accessible. The following example demonstrates the trend window with no code required. The trend window can also be used with Visual Studio 2003 web applications. Step Task 1 Start Visual Studio 2005 and select File->New->Web Site to create a new C#, J#, or VB ASP.NET web application. 93
98 2 Select ASP.NET Web Site and specify your desired Language in the lower right. 3 Expand the Default.aspx web page in the Solution Explorer and select View Designer. Note: If you do not see the Solution Explorer select View->Solution Explorer. 94
99 4 From the VS menu select Layout->Position->Auto-position Options. 5 Under the HTML Designer set the CSS Positioning to Absolutely positioned. Note: You are welcome to use any positioning style you desire, this simply pointed out for new web developers. 95
100 6 From the Toolbox if OPCWebAlarm and OPCWebRefresh is not available right click in the Toolbox and select Choose Items. If it is available to step 4. From the.net Framework Components select OPCWebAlarm and OPCWebRefresh and then select OK. 96
101 7 Add one OPCWebRefresh control to the WebForm. 8 Add the OPCWebAlarm component onto the WebForm. Resize the alarm window to the desired size. 97

102 9 Right click on the alarm window and select Properties. 98
103 10 Specify the alarm types you desire to view in the alarm window. 11 Use the AlarmNetworkNodes property to specify all OPC Systems Services you wish to receive alarms from. 12 Specify what alarm columns you wish to see in the alarm window. 99
104 13 Use the Groups, Include, Max and Min Priority properties to filter what types of alarms will be viewed in the alarm window. 14 Set the PageEnable property to True if you desire to limit the size of the alarm window. 100
105 15 Right click on the WebForm and select View in Browser. 101

106 19 Set the application for Release mode and build your application. Typically the application files are under the Inetpub\wwwroot directory. Refer to the OPC Web Alarm.NET section in the OPC Systems.NET help file for Deployment steps if you encounter any issues. 102
107 Add Alarm ActiveX to Legacy Application The OPC Alarm ActiveX control can be integrated directly into any ActiveX container, most commonly HMI graphic applications or Visual Studio 6.0. Below is an example of using the OPC Alarm ActiveX Control integrated into Visual Basic 6.0 or other ActiveX container of your choice. Step Task 1 Start Visual Basic 6.0 with a new or existing Project or other ActiveX container application of your choice. If using other ActiveX container than Visual Studio simply select the appropriate method of the application to add an ActiveX control and select OPCAlarmActiveX.OPCAlarm and skip to Step

108 2 To add the OPC Alarm.ActiveX Control to your Visual Studio 6.0 development system select View-Toolbox from within Visual Studio. 3 Right-Click on the Toolbox and select Components. 104
109 4 Select OPC Alarm ActiveX Control from the list of Controls 5 From the ToolBox select the OPC Alarm ActiveX Control icon and add the alarm window to any Form. 6 Resize the Alarm Window to any size your desire. Please note that some of the Runtime Properties will not be available for modifying during runtime if the Alarm Window is too small. 105

110 7 Select Properties of Alarm Window and set any desired Property. By default the localhost node is selected and Filters include all alarms except alarms that have been acknowledged and no longer active, OPC communication failures, and Tag Client communications to other OPC Systems Services. You can adjust the Filter as you desire for Priority, Alarm Groups, and Alarm Types. *Note: if you desire to setup the Alarm Window to work on remote application select the Network Nodes to select the appropriate network names of the local or remote OPC Systems Services. 8 Select OK at the bottom of the Property Page. 9 Save your application and compile if needed and you are now ready to run the application. 106
111 Chapter 6 Chapter 6 - Human Machine Interface HMI Components There are 3 different types of HMI components that can be used to display and change realtime data from the tag configuration. 7. OPC Controls.NET 100% managed components for WinForm applications. 8. OPC Web Controls.NET 100% managed ASP.NET components for Web applications. 9. OPC Mobile.NET 100% managed components for pocket PC applications for Windows Mobile 2003 and 5.0. All 3 types of components can be run locally or remotely for live data from any service containing a valid license for the corresponding product. 107
112 Add HMI Controls to Visual Studio Application The following steps can be used to add visualization to a C#, C++, or Visual Basic.NET application. Refer to the VB.NET example for programmatic interface of using the OPC Controls components. All properties are programmatically accessible. The following example demonstrates the use of OPC Controls.NET with no code required. The components can also be used with Visual Studio Step Task 1 Start Visual Studio 2005 and select File->New->Project to create a new C#, C++, or VB. 108
113 2 Select Windows Application as the project type. 109
114 3 From the Toolbox if OPCControls components are not available right click in the Toolbox and select Choose Items. If it is available to step 4. From the.net Framework Components select all of the OPC Controls components and then select OK. 110
115 111
116 4 Add an OPCControlsLabel component onto the Form. Right click on the OPCControlsLabel window and select Properties. Select the TextOPCSystems_Tag property and use the browse button at the right to set the OPC Systems.NET Tag to Ramp.Value. Note: If you wish to run this application on remote PCs make sure to include the Network Node or IP Address of the OPC Systems Service source. Note: All Tag names are case sensitive. Ramp.Value is valid, ramp.value is not. 112
117 5 Add an OPCControlsButton to the Form. Set the TextOPCSystems_Tag to Pump.Value. If the Pump Tag does not exist create a Boolean Tag using Configure-Tags with the name Pump. Set the Format fields as defined below.. Set the BackColorOPCSystems_Tag to Pump.Value. Set the SetValueOPCSystems_Tag to Pump.Value. and the SetValueOPCSystems property to True. 6 Add an OPCControlsTextBox to the Form. Set the TextOPCSystems_Tag property to Pump.Value. The Format properties for Boolean to Off and On.. 113
118 7 If you plan to run this application to connect to an Internet server or other system that has blocking firewall to asynchronous communications set the SyncConnection property to True. If you are unsure set the value to True. 8 Set the compile mode on the Visual Studio toolbar to Release. 9 Select Build from the VS menu and select to Build the application. 114

119 10 Use Windows Explorer to browse for the application located in the bin\release directory and run the application. 11 To deploy the application to remote nodes first make sure the Tags as described in steps 4, 5, and 6 are set to a Network Node or IP Address. Then simply copy the files in the bin\release directory to the target systems or follow the Smart Client deployment section in this help file to deploy your application using Click Once Deployment. 12 There are many different properties to each control. ImageIndex is available in many of the controls to display different images based on analog or discrete data. Refer to the VB.NET example for demonstration example of all properties of all components. 115

120 Add HMI Controls to ASP.NET Web Application The following steps can be used to add real-time visualization and operator control to a C#, J#, or Visual Basic.NET web application. All properties are programmatically accessible. The following example demonstrates the trend window with no code required. The OPC Web Controls components can also be used with Visual Studio 2003 web applications. Step Task 1 Start Visual Studio 2005 and select File->New->Web Site to create a new C#, J#, or VB ASP.NET web application. 116

121 2 Select ASP.NET Web Site and specify your desired Language in the lower right. 3 Expand the Default.aspx web page in the Solution Explorer and select View Designer. Note: If you do not see the Solution Explorer select View->Solution Explorer. 117


122 4 From the VS menu select Layout->Position->Auto-position Options. 5 Under the HTML Designer set the CSS Positioning to Absolutely positioned. Note: You are welcome to use any positioning style you desire, this simply pointed out for new web developers. 118
123 6 From the Toolbox if OPCWebControls and OPCWebRefresh are not available right click in the Toolbox and select Choose Items. If it is available to step 4. From the.net Framework Components select all of the OPC Web Controls components and the OPCWebRefresh control and then select OK. 119
124 7 Add one OPCWebRefresh control to the WebForm. For faster updates set the RefreshRate Property of the OPCWebRefresh1 control. 120

125 8 Add an OPCWebControlsLabel onto the WebForm. Right click on the OPCWebControlsLabel window and select Properties. Select the TextOPCSystems_Tag property and use the browse button at the right to set the OPC Systems.NET Tag to Ramp.Value. Note: All Tag names are case sensitive. Ramp.Value is valid, ramp.value is not. Note: If you want the web application to be deployed across a network to remote PCs select the Network Node or enter an IP Address in the NetworkNode field and use the Select button to include the network node or IP Address of the OPC Systems Service source. If the web application will be running on the local system and simply need access to the web application through remote browsers use the Local service. 121

126 9 Add an OPCControlsButton to the Form. Set the TextOPCSystems_Tag to Pump.Value. If the Pump Tag does not exist create a Boolean Tag using Configure-Tags with the name Pump. Set the Format fields as defined below.. Set the BackColorOPCSystems_Tag to Pump.Value. Set the SetValueOPCSystems_Tag to Pump.Value. 10 Add an OPCWebControlsTextBox to the Form. Set the TextOPCSystems_Tag property to Pump.Value. The Format properties for Boolean to Off and On.. 122


127 11 Right click on the WebForm and select View in Browser. 12 Set the application for Release mode and build your application. Typically the application files are under the Inetpub\wwwroot directory. Refer to the OPC Web Controls.NET section in the OPC Systems.NET help file for a list of all controls and their properties. 123

128 Add Data Control to Visual Studio Application The following steps can be used to add real-time read and write data functions to a C#, C++, or Visual Basic.NET WinForm application. The OPC Controls.NET data component can also be used in ASP.NET Web applications. Refer to the Read Values and Write Values Forms in the VB.NET example for programmatic interface of using the OPC Controls Data component. All properties are programmatically accessible. The components can also be used with Visual Studio Step Task 1 Start Visual Studio 2005 and select File->New->Project to create a new C#, C++, or VB. 124

129 2 Select Windows Application as the project type. 125

130 3 From the Toolbox if OPCControls Data component is not available right click in the Toolbox and select Choose Items. If it is available to step 4. From the.net Framework Components select the OPC Controls Data component and then select OK. 126
131 4 Add an OPCControlsData component to the Form. 127
132 5 Add a Button component onto the Form. Change the Name of the button to buttonaddtags.. Change the Text property of the button to Add Tags. Double click on the button and enter the following code. For VB: Private Sub ButtonAddTags_Click(ByVal sender As System.Object, ByVal e As System.EventArgs) Handles ButtonAddTags.Click Dim tagstoadd(1) As String tagstoadd(0) = "Ramp.Value" tagstoadd(1) = "Pump.Value" OpcControlsData1.AddTags(tagsToAdd) End Sub For C#:. private void buttonaddtags_click(object sender, EventArgs e) { string[] tagstoadd = new string[2]; tagstoadd[0] = "Ramp.Value"; tagstoadd[1] = "Pump.Value"; opccontrolsdata1.addtags(tagstoadd); } Note: If you wish to run this application on remote PCs make sure to include the Network Node or IP Address of the OPC Systems Service source. To connect to remote tags simply include a network node name or IP address as follows. \\ \Ramp.Value Note: All Tag names are case sensitive. Ramp.Value is valid, ramp.value is not. 128
133 6 Add a Label control to the Form. Set the Name of the Label to labelramp. Add another Label control to the Form. Set the Name of the Label to labelpump. 129

134 7 For VB view the code of Form1. Select OpcControlsData1 from the object list. Select ValuesChangedWithTimeStamp from the event list. Enter the following code or your own code to do what every you desire with the data. Make sure to first check the Quality as True before using the Value as a valid value.. Private Sub OpcControlsData1_ValuesChangedWithTimeStamp(ByVal Tag As String, ByVal Value As Object, ByVal Quality As Boolean, ByVal TimeStamp As Date) Handles OpcControlsData1.ValuesChangedWithTimeStamp If Tag = "Ramp.Value" Then If Quality Then LabelRamp.Text = Value.ToString + " at " + TimeStamp.ToString("HH:mm:ss.fff") Else LabelRamp.Text = "Bad Quality" End If End If If Tag = "Pump.Value" Then If Quality Then If Value Then LabelPump.Text = "Pump is On" Else LabelPump.Text = "Pump is Off" End If Else LabelPump.Text = "Bad Quality" End If End If End Sub 130


135 8 If you plan to run this application to connect to an Internet server or other system that has blocking firewall to asynchronous communications set the SyncConnection property to True on the OPC Controls Data component.. If you are unsure set the value to True. 9 Set the compile mode on the Visual Studio toolbar to Release. 10 Select Build from the VS menu and select to Build the application. 11 Use Windows Explorer to browse for the application located in the bin\release directory and run the application. 131
136 12 To deploy the application to remote nodes first make sure the Tags as described in step 5 are set to a Network Node or IP Address. Then simply copy the files in the bin\release directory to the target systems or follow the Smart Client deployment section in this help file to deploy your application using Click Once Deployment. 13 Refer to the VB.NET example for demonstration example of all properties of all components. The Read Values Form is a good resource for programmatic interface for reading values. The Write Values Form is a good resource on how to programmatically write values. 132
137 Chapter 7 Chapter 7 - Reports Configure Reports Reports can be created to generate PDF, HTML, Word, Excel, Text, and printer reports automatically with Configure->Reports or manually with the Report Viewer. Step Task 1 First complete the Configure Data Logging example and put the OPC Systems Service in Runtime mode to log data. 2 Start the Report Designer application from Component One. 3 Select File-New to clear the current Report Designer workspace. 133

138 4 Select File-Add New Report 134
139 5 Use the Build Connection String button to specify a data source. 135

140 6 Specify the correct Provider for your database. 136

141 7 Select the proper Server with Windows NT Integrated security if using SQL Server Desktop. Select OPCSystemsDemo database. 8 Use the Test Connection button to verify proper database connection and select OK 137

142 9 Select SimulationTable from Tables and then Next 138

143 10 Move all Available fields into the Detail window. 139

144 11 Select the default of Tabular report layout, then Next. 140

145 12 Select the desired template style. The report colors, fonts, and images can be altered from these defaults. 141


146 13 Select to Modify the reports design. 14 Select the DateAndTime field in the Detail section of the report and using the Properties window in the lower left set the to set the Format Property to Time. 142


147 15 Stretch the size of the Sine_Value field in the Detail window to a larger width. 16 Select File-Save and save the file with the name ReportDemo in the directory of your choice. This creates the XML file that is selected in the Configure Reports step. 17 Start Configure OPC Systems application. 18 Select Configure-Reports. 143


148 19 Select the Local OPC Systems Service. 20 Enter the Report Name of Simulation in the field in the upper right. 21 Browse for the XML you just created with the Report Desinger. 22 Select the Report you created in the Report Designer using the Report list box. 23 Select the desired Output Type. Choose a type that you have a application to view the file with. 24 Specify the Output Path for the file. You do not need to put an extension on the file. Specify the 25 Set the Execution Type to Continuous. 144
149 26 Set the Execution Rate to 60 Seconds. 27 Specify the Filter as None for now. With large amounts of data this would be important to filter the query to only the data of interest for the Report. 28 Select the Add button to add the Report. 29 Right click on the Local OPC Systems Service and select Save. 30 Save the file DemoReport.Reports in the directory C:\OPCSystemsDemo. When you start the Service in Runtime mode reports will automatically be generated every minute. 145
150 146

151 Chapter 8 Chapter 8 - Default Settings Configure Options The OPC Systems.NET Service will automatically load the default configuration files specified under Configure Options. There is also a few adjustable parameters for the Service including enabling an OPC Server Watchdog If you enable the OPC Server Watchdog make sure every OPC Server in the Tag configuration has at least one item that changes faster than what the OPC Server Watchdog value is set to. Step Task 1 Start Configure OPC Systems application. 2 Select Configure-Options. 3 Select the Local OPC Systems Service. 4 Check the Load Default Tag Configuration On Service Start. Browse for the file C:\OPCSystemsDemo\DemoTags.tags. 147
152 5 Check the Load Default Data Logging Configuration On Service Start. Browse for the file C:\OPCSystemsDemo\DemoLogging.DataLog. 6 Check the Load Default Alarm Logging Configuration On Service Start. Browse for the file C:\OPCSystemsDemo\DemoAlarmLogging.AlarmLog. 7 Check the Load Default Report Configuration On Service Start. Browse for the file C:\OPCSystemsDemo\DemoReport.Reports. 8 Select Auto Runtime On Service Start. 9 Select the Apply Changes button to save the changes for the local OPC Systems. 148

153 Chapter 9 Chapter 9 - Smart Client Deployment Applications developed with 100% managed components can be executed on remote systems without installing the application itself on the remote systems. This makes application updates extremely simple and provides a better user experience than web applications provide. The.NET Framework provides built in security to limit remote application execution without proper authorization. Visual Studio.NET 2005 now makes Smart Client deployment even easier with a deployment wizard for the Project you wish to deploy. This wizard allows you to set version information that the remote systems will use to determine if an update is available. This deployment method requires version 2.0 of the.net Framework. Components that include COM or legacy ActiveX controls are not Smart Client compatible. 149
154 All.NET components of OPC Systems.NET are Smart Client compatible. There are a few simple steps to deploy an application as a Smart Client. The following examples walk you through a complete Smart Client execution. Example Smart Client The Example application installed with OPC Systems.NET is a Smart Client compatible application demonstrating remote connectivity to any OPC Systems.NET Service. The application includes OPC Controls.NET, OPC Trend.NET, OPC Alarm.NET, and the OPC Systems configuration component. When building your own Smart Client application make sure to include either the Network Node name or IP Address of the OPC Systems Services you wish to connect to. This would include the OPC Controls Tag properties, the OPC Trend pen Tag names, the OPC Alarm window network nodes, and any routines using the OPC Systems programmatic interface. OPC Systems.NET uses TCP port number 58723, so be sure to add your applications you deploy to any firewalls on your system with this TCP port number as an exception. Smart Client Click Once Deployment To deploy applications with Visual Studio 2005 with the.net Framework 2.0 is extremely simple. Step Task 1 Make sure IIS is installed and running on the system you wish to deploy to. 2 In Visual Studio 2005 select the Properties of the project you wish to deploy. Next select the Publish tab to view the Click Once deployment section. 150

155 3 Set the Publish Location to the local or remote system that is running IIS. 4 Set the initial Publish Version and either leave the automatic increment or disable the feature and set it manually each time you want to make an update to the application. 151

156 5 Select the Publish Wizard button to begin the steps of deploying the application. 152

157 6 Determine if the application will be installed remotely to run on each system even if the server is not reachable or if the application will only be available with the server is online. 153

158 7 Confirm that the deployment virtual directory is correct and select Finish. 8 Open port on all systems that will be communicating together that have a firewall enabled. On each OPC Systems Service system that you wish to connect to and each remote system you will be running the application from add TCP port number if a firewall is enabled. For Windows XP SP2 Select Control Panel-Windows Firewall. Select the Add Port button. Enter a Name and the Port Number


159 Use the Change scope button to limit the IP range to the systems that will be communicating together. 155

160 9 From any remote client system simply open url of the deployment server publish page using a web browser and select the Install button. With Smart Client deployment you can now easily deploy updates to one location and make updates just to the one deployment server and all remote users automatically receive the updates on the next time they run the system. When the application is installed for offline/online deployment each time it runs it connects to the deployment server to see if there is a newer version available. The user is prompted to install the update or ignore and continue to run the application. 156
TRAINING GUIDE FOR OPC SYSTEMS.NET. Simple steps to successful development and deployment. Step by Step Guide
 TRAINING GUIDE FOR OPC SYSTEMS.NET Simple steps to successful development and deployment. Step by Step Guide SOFTWARE DEVELOPMENT TRAINING OPC Systems.NET Training Guide Open Automation Software Evergreen,
OPC Systems.NET. Real-time HMI and SCADA software for.net applications.
 OPC Systems.NET Real-time HMI and SCADA software for.net applications. OPC Systems.NET central communications runs as a Windows Service. Read and write data to OPC Servers supporting Data Access 1.0a,
MX OPC Server 5.0 Help Documentation
 5.0 Help Documentation Contents 1. Introduction to MX OPC Server 1-1 2. Starting MX OPC Server Configuration 2-1 3. Address Space 3-1 4. Alarm Definitions 4-1 5. Simulation Signals 5-1 6. Runtime Operations
IGSS 13 Configuration Workshop - Exercises
 IGSS 13 Configuration Workshop - Exercises Contents IGSS 13 Configuration Workshop - Exercises... 1 Exercise 1: Working as an Operator in IGSS... 2 Exercise 2: Creating a new IGSS Project... 28 Exercise
You can also check the videos at the bottom of this page:
 This document is provided to give you an idea what R-Tag Version Control can do and how you can use it. If you decide that you need more information or you prefer to see a demo of the software please do
CX Supervisor. CX-Supervisor Features:
 CX Supervisor Affordable, Flexible, Easy To Use, and Powerful Are you looking for a Windows based HMI software package packed with features and large I/O tag counts? Omron s CX-Supervisor is it! CX-Supervisor
CST272 Getting Started Page 1
 CST272 Getting Started Page 1 1 2 3 4 5 6 8 Introduction to ASP.NET, Visual Studio and C# CST272 ASP.NET Static and Dynamic Web Applications Static Web pages Created with HTML controls renders exactly
SQL Server 2005: Reporting Services
 SQL Server 2005: Reporting Services Table of Contents SQL Server 2005: Reporting Services...3 Lab Setup...4 Exercise 1 Creating a Report Using the Wizard...5 Exercise 2 Creating a List Report...7 Exercise
Exhibitor Software User s Manual. Exhibitor Software V
 Exhibitor Software User s Manual Exhibitor Software V1.0.1 090908 1 Contents 1. Exhibitor Software 2. Installation 3. Using Exhibitor Program 3.1 Starting the Program 3.2 Logging in to the Program 3.3
Context-sensitive Help
 USER GUIDE MADCAP DOC-TO-HELP 5 Context-sensitive Help Copyright 2018 MadCap Software. All rights reserved. Information in this document is subject to change without notice. The software described in this
TOP SERVER V5 CLIENT CONNECTIVITY ROCKWELL FACTORYTALK VIEW STUDIO. Table of Contents
 ROCELL FACTORYTALK VIEW 1 (15) Table of Contents Overview and Requirements... 2 Creating a New FactoryTalk Project... 2 Adding a New Data Server to the Project... 4 Synchronizing FactoryTalk with the OPC
Legacy Client Chart (LCC) Installation Guide for Purkinje System
 Installation Guide for Purkinje System") Legacy Client Chart (LCC) Installation Guide for Purkinje System A Guide to Run and Configure the Legacy Client Chart (LCC) Solution For questions about using this guide please contact IMS@aohc.org Table
Legacy Client Chart (LCC) Installation Guide for Purkinje System A Guide to Run and Configure the Legacy Client Chart (LCC) Solution For questions about using this guide please contact IMS@aohc.org Table
How to Export a Report in Cognos Analytics
 IBM Cognos Analytics How to Export a Report in Cognos Analytics Reports viewed in IBM Cognos Analytics can be exported in many formats including Excel. Some of the steps for exporting are different depending
Chapter. Web Applications
 Chapter Web Applications 144 Essential Visual Basic.NET fast Introduction Earlier versions of Visual Basic were excellent for creating applications which ran on a Windows PC, but increasingly there is
JUN / 04 VERSION 7.1 FOUNDATION
 JUN / 04 VERSION 7.1 FOUNDATION P V I E WS MGME www.smar.com Specifications and information are subject to change without notice. Up-to-date address information is available on our website. web: www.smar.com/contactus.asp
SCADA system & HMI Programming. Pre-request: Have good knowledge with PLC Basic. Plot all variables and store the values
 SCADA system & HMI Programming Pre-request: Have good knowledge with PLC Basic Course duration: 40 Hours On completing this course you will be able to: Understand how SCADA system work How to make GUI
USER S MANUAL. - Screen Manager. Screen Manager. Screen Manager. smar. First in Fieldbus MAY / 06 VERSION 8 FOUNDATION
 - Screen Manager Screen Manager USER S MANUAL smar First in Fieldbus MAY / 06 Screen Manager VERSION 8 TM FOUNDATION P V I E WS MGME www.smar.com Specifications and information are subject to change without
USER S MANUAL. TrendWorX. - TrendWorX. TrendWorX. smar. First in Fieldbus MAY / 06 VERSION 8 FOUNDATION
 - TrendWorX TrendWorX USER S MANUAL smar First in Fieldbus MAY / 06 TrendWorX VERSION 8 TM FOUNDATION P V I E WT WK ME www.smar.com Specifications and information are subject to change without notice.
Specification Manager
 Enterprise Architect User Guide Series Specification Manager Author: Sparx Systems Date: 30/06/2017 Version: 1.0 CREATED WITH Table of Contents The Specification Manager 3 Specification Manager - Overview
Introduction to IBM Rational HATS For IBM System i (5250)
") Introduction to IBM Rational HATS For IBM System i (5250) Introduction to IBM Rational HATS 1 Lab instructions This lab teaches you how to use IBM Rational HATS to create a Web application capable of transforming
Introduction to IBM Rational HATS For IBM System i (5250) Introduction to IBM Rational HATS 1 Lab instructions This lab teaches you how to use IBM Rational HATS to create a Web application capable of transforming
SMART Recorder. Record. Pause. Stop
 SMART Recorder The recorder is used to record actions that are done on the interactive screen. If a microphone is attached to the computer, narration can be recorded. After the recording has been created,
System Platform and OPC DataHub. Basic OPC Connectivity
 System Platform and OPC DataHub Basic OPC Connectivity Page 2 of 29 Table of Contents INTRODUCTION 3 Intended Audience 3 OPC DATAHUB SETUP 4 CONFIGURING SYSTEM PLATFORM 7 System Objects Configuration 7
Job Aid. Remote Access BAIRS Printing and Saving a Report. Table of Contents
 Remote Access BAIRS Printing and Saving a Report Table of Contents Remote Access BAIRS Printing a Report PDF HTML... 2 Remote Access BAIRS Printing a Report Export to PDF Interactive Reporting... 3 Remote
CENTAUR S REAL-TIME GRAPHIC INTERFACE V4.0 OPERATOR S MANUAL
 CENTAUR S REAL-TIME GRAPHIC INTERFACE V4.0 OPERATOR S MANUAL TABLE OF CONTENTS Installation... 6 Introduction to Centaur s real-time Graphic Interface... 6 Computer Requirements... 7 Operating System
Introduction to Personal Computers Using Windows 10 and Microsoft Office 2016
 Watsonia Publishing 47 Greenaway Street Bulleen VIC 3105 Australia www.watsoniapublishing.com info@watsoniapublishing.com Introduction to Personal Computers Using Windows 10 and Microsoft Office 2016 Quick
Working with Mailbox Manager
 Working with Mailbox Manager A user guide for Mailbox Manager supporting the Message Storage Server component of the Avaya S3400 Message Server Mailbox Manager Version 5.0 February 2003 Copyright 2003
novapro Open 3.0: Wiztune User Guide Quick Guide
 novapro Open 3.0: Wiztune User Guide Quick Guide 7001062003 A 7001062003 A Printed in Switzerland Subject to changes Fr. Sauter AG Im Surinam 55 CH - 4016 Basel www.sauter-controls.com iii iv Table Of
Overview of the Adobe Dreamweaver CS5 workspace
 Adobe Dreamweaver CS5 Activity 2.1 guide Overview of the Adobe Dreamweaver CS5 workspace You can access Adobe Dreamweaver CS5 tools, commands, and features by using menus or by selecting options from one
Workstation Configuration
 Workstation Configuration December 15, 2017 - Version 9.3 - - - - - - - - - - - - - - - - - - - - - - - - - - - - - - - - - - - - - - - - - - - - - - - - - - - - - - - - - - - - - - - - - - - - - - - -
Products that are referred to in this document may be trademarks and/or registered trademarks of the respective owners.
 2018 GEOVAP, spol. s r. o. All rights reserved. GEOVAP, spol. s r. o. Cechovo nabrezi 1790 530 03 Pardubice Czech Republic +420 466 024 618 http://www.geovap.cz Products that are referred to in this document
SPARK. User Manual Ver ITLAQ Technologies
 SPARK Forms Builder for Office 365 User Manual Ver. 3.5.50.102 0 ITLAQ Technologies www.itlaq.com Table of Contents 1 The Form Designer Workspace... 3 1.1 Form Toolbox... 3 1.1.1 Hiding/ Unhiding/ Minimizing
-Table of Contents- 1. Overview Installation and removal Operation Main menu Trend graph... 13
 Thank you for buying Data Analysis Software. In order to use this software correctly and safely and to prevent trouble, please read this manual carefully. Notice 1. No part of this manual can be reproduced
Advanced Training Manual: Surveys Last Updated: October 2013
 Advanced Training Manual: Surveys Last Updated: October 2013 Advanced Training Manual: Surveys Page 1 of 28 Table of Contents Introduction Training Objective Surveys Overview Survey Table Survey Options
Discovering Computers & Microsoft Office Office 2010 and Windows 7: Essential Concepts and Skills
 Discovering Computers & Microsoft Office 2010 Office 2010 and Windows 7: Essential Concepts and Skills Objectives Perform basic mouse operations Start Windows and log on to the computer Identify the objects
Dive Into Visual C# 2008 Express
 1 2 2 Dive Into Visual C# 2008 Express OBJECTIVES In this chapter you will learn: The basics of the Visual Studio Integrated Development Environment (IDE) that assists you in writing, running and debugging
Print Manager Plus 2010 Workgroup Print Tracking and Control
 INTRODUCTION: This is intended to assist in the initial installation or evaluation of Print Manager Plus 2010 Workgroup Edition. This will guide you through tracking your printing whether your workgroup
Fairfield University Using Xythos for File Storage
 Fairfield University Using Xythos for File Storage Version 7.0 Table of Contents I: Accessing your Account...2 II: Uploading Files via the Web...2 III: Manage your Folders and Files via the Web...4 IV:
Specification Manager
 Enterprise Architect User Guide Series Specification Manager How to define model elements simply? In Sparx Systems Enterprise Architect, use the document-based Specification Manager to create elements
Table of Contents DATA MANAGEMENT TOOLS 4. IMPORT WIZARD 6 Setting Import File Format (Step 1) 7 Setting Source File Name (Step 2) 8
 7 Setting Source File Name (Step 2) 8") Data Management Tools 1 Table of Contents DATA MANAGEMENT TOOLS 4 IMPORT WIZARD 6 Setting Import File Format (Step 1) 7 Setting Source File Name (Step 2) 8 Importing ODBC Data (Step 2) 10 Importing MSSQL
Data Management Tools 1 Table of Contents DATA MANAGEMENT TOOLS 4 IMPORT WIZARD 6 Setting Import File Format (Step 1) 7 Setting Source File Name (Step 2) 8 Importing ODBC Data (Step 2) 10 Importing MSSQL
Getting started 7. Setting properties 23
 Contents 1 2 3 Getting started 7 Introduction 8 Installing Visual Basic 10 Exploring the IDE 12 Starting a new project 14 Adding a visual control 16 Adding functional code 18 Saving projects 20 Reopening
Password Memory 7 User s Guide
 C O D E : A E R O T E C H N O L O G I E S Password Memory 7 User s Guide 2007-2018 by code:aero technologies Phone: +1 (321) 285.7447 E-mail: info@codeaero.com Table of Contents How secure is Password
GlobalWare Go! Res HPM Configuration
 GlobalWare Go! Res HPM Configuration JHCain ver08042010 Page 1 The purpose of this document is to outline the steps required to configure HPM (Host Print Manager) for a GlobalWare interface connection.
Enter your Appserv username and password to sign in to the Website
 Appserv Desktop Access Logging on from a Windows 10 Device Step 1. To sign in to the Appserv Desktop Access website, either enter the following address into the Microsoft Edge browser address bar, or click
Workstation Configuration Guide
 Workstation Configuration Guide August 13, 2018 Version 9.6.134.78 For the most recent version of this document, visit our documentation website. Table of Contents 1 Workstation configuration 4 1.1 Considerations
Quickstart Guide for Khronos Replay. Welcome to Khronos, your historian companion.
 Khronos Historian Replay and Analysis Tools Quickstart Guide for Khronos Replay Welcome to Khronos, your historian companion. This Guide will take you through the basic steps required to install, setup
To get started with Visual Basic 2005, I recommend that you jump right in
 In This Chapter Chapter 1 Wading into Visual Basic Seeing where VB fits in with.net Writing your first Visual Basic 2005 program Exploiting the newfound power of VB To get started with Visual Basic 2005,
NiceForm User Guide. English Edition. Rev Euro Plus d.o.o. & Niceware International LLC All rights reserved.
 www.nicelabel.com, info@nicelabel.com English Edition Rev-0910 2009 Euro Plus d.o.o. & Niceware International LLC All rights reserved. www.nicelabel.com Head Office Euro Plus d.o.o. Ulica Lojzeta Hrovata
IQSweb Installation Instructions Version 5.0
 IQSweb Installation Instructions Version 5.0 Contents Additional References... 3 IQSweb ROSS Connection... 3 IQSweb V5.0 Install/Upgrade Scenarios... 4 IQSweb Configuration Options... 5 A. Single Computer/Server
How to use data sources with databases (part 1)
") Chapter 14 How to use data sources with databases (part 1) 423 14 How to use data sources with databases (part 1) Visual Studio 2005 makes it easier than ever to generate Windows forms that work with data
Chapter 14 How to use data sources with databases (part 1) 423 14 How to use data sources with databases (part 1) Visual Studio 2005 makes it easier than ever to generate Windows forms that work with data
BEAWebLogic. Portal. Tutorials Getting Started with WebLogic Portal
 BEAWebLogic Portal Tutorials Getting Started with WebLogic Portal Version 10.2 February 2008 Contents 1. Introduction Introduction............................................................ 1-1 2. Setting
Chapter 9. Web Applications The McGraw-Hill Companies, Inc. All rights reserved. McGraw-Hill
 Chapter 9 Web Applications McGraw-Hill 2010 The McGraw-Hill Companies, Inc. All rights reserved. Chapter Objectives - 1 Explain the functions of the server and the client in Web programming Create a Web
Lesson 1 New Presentation
 Powerpoint Lesson 1 New Presentation 1. When PowerPoint first opens, there are four choices on how to create a new presentation. You can select AutoContent wizard, Template, Blank presentation or Open
Workstation Configuration
 Workstation Configuration December 12, 2017 - Version 9.4 - - - - - - - - - - - - - - - - - - - - - - - - - - - - - - - - - - - - - - - - - - - - - - - - - - - - - - - - - - - - - - - - - - - - - - - -
DiskPulse DISK CHANGE MONITOR
 DiskPulse DISK CHANGE MONITOR User Manual Version 10.5 Feb 2018 www.diskpulse.com info@flexense.com 1 1 DiskPulse Overview...3 2 DiskPulse Product Versions...5 3 Using Desktop Product Version...6 3.1 Product
HOL159 Integrating Microsoft Technologies to Microsoft Dynamics AX 4.0. Hands-On Lab
 HOL159 Integrating Microsoft Technologies to Microsoft Dynamics AX 4.0 Hands-On Lab Integrating Microsoft Technologies to Microsoft Dynamics AX 4.0 Lab Manual Table of Contents Lab 1: Deploy Enterprise
DOCUMENT IMAGING REFERENCE GUIDE
 January 25, 2017 DOCUMENT IMAGING REFERENCE GUIDE AppXtender Web Access version 7 Kent State University Division of Information Services AppXtender Web Access Help: For questions regarding AppXtender Web
M-Password Application Actions
 Issue Date 11/01/01 TECHNICAL BULLETIN M-Password s M-Password s...3 Introduction... 3 Key Concepts... 4 M-Password s...4 Analog Profile s...5 AWX Container (M-Alarm View) s...5 AWXInd32 (M-Alarm Indicator)
WebVisit User course
 WebVisit 6.01.02 User course 1 Project creation and the user interface WebVisit User course 2 Getting started with visualization creation 3 Access to structures and fields 4 Macros in WebVisit Pro 5 Language
Part I. Integrated Development Environment. Chapter 2: The Solution Explorer, Toolbox, and Properties. Chapter 3: Options and Customizations
 Part I Integrated Development Environment Chapter 1: A Quick Tour Chapter 2: The Solution Explorer, Toolbox, and Properties Chapter 3: Options and Customizations Chapter 4: Workspace Control Chapter 5:
Viewing Reports in Vista. Version: 7.3
 Viewing Reports in Vista Version: 7.3 Copyright 2015 Intellicus Technologies This document and its content is copyrighted material of Intellicus Technologies. The content may not be copied or derived from,
OPC-UA Tutorial. A Guide to Configuring the TOP Server for OPC-UA
 OPC-UA Tutorial A Guide to Configuring the TOP Server for OPC-UA Page 2 of 40 Table of Contents INTRODUCTION 4 Introduction to OPC UA 4 Introduction to TOP Server 5 Intended Audience 5 Prerequisites 6
Navigator Software User s Manual. User Manual. Navigator Software. Monarch Instrument Rev 0.98 May Page 1 of 17
 User Manual Navigator Software Monarch Instrument Rev 0.98 May 2006 Page 1 of 17 Contents 1. NAVIGATOR SOFTWARE 2. INSTALLATION 3. USING NAVIGATOR SOFTWARE 3.1 STARTING THE PROGRAM 3.2 SYSTEM SET UP 3.3
Orchestrator. Version Release Information. Version 4.0 of the Orchestrator Software has now been released.
 Orchestrator Version 4.0.0 Release Information Version 4.0 of the Orchestrator Software has now been released. Version 4.0 contains the following fixes/changes from V3.3 Operating System: Supports Windows
To login using ViewX: 1. From the File menu, select the Log On option. 2. In the Username field, enter the username Eng. 3. Click the OK button.
 4 A First Configuration For the following chapters, you will need to be logged onto the system to perform configuration action. Ensure you are logged on by following these steps: To login using ViewX:
Server Edition USER MANUAL. For Microsoft Windows
 Server Edition USER MANUAL For Microsoft Windows Copyright Notice & Proprietary Information Redstor Limited, 2016. All rights reserved. Trademarks - Microsoft, Windows, Microsoft Windows, Microsoft Windows
Workstation Configuration
 Workstation Configuration September 22, 2015 - Version 9 & 9.1 - - - - - - - - - - - - - - - - - - - - - - - - - - - - - - - - - - - - - - - - - - - - - - - - - - - - - - - - - - - - - - - - - - - - -
WebStudio User Guide. OpenL Tablets BRMS Release 5.18
 WebStudio User Guide OpenL Tablets BRMS Release 5.18 Document number: TP_OpenL_WS_UG_3.2_LSh Revised: 07-12-2017 OpenL Tablets Documentation is licensed under a Creative Commons Attribution 3.0 United
USER GUIDE. Rockwell Automation Publication RSSQL-UM001I-EN-P-June 2014
 USER GUIDE Rockwell Automation Publication RSSQL-UM001I-EN-P-June 2014 Supersedes Publication RSSQL-UM001H-EN-P-April 2011 Contacting Rockwell Copyright Notice Trademark Notices Other Trademarks Warranty
Quick Start Guide. Cole-Parmer USB-based Data Acquisition Software
 Quick Start Guide Cole-Parmer USB-based Data Acquisition Software Cole-Parmer Instrument Company 625 East Bunker Court Vernon Hills, Illinois 60061-1844 (847) 549-7600 (847) 247-2929 (Fax) 800-323-4340
Ektron Advanced. Learning Objectives. Getting Started
 Ektron Advanced 1 Learning Objectives This workshop introduces you beyond the basics of Ektron, the USF web content management system that is being used to modify department web pages. This workshop focuses
Quick Start Guide. Kaseya 2
 LiveConnect Quick Start Guide Kaseya 2 February 13, 2010 About Kaseya Kaseya is a global provider of IT automation software for IT Solution Providers and Public and Private Sector IT organizations. Kaseya's
Advantech Studio Quick Start Manual
 Advantech Studio Quick Start Manual Advantech Studio Quick Start Manual Initial Setup The WebOIT offers an easy setup feature: It takes three easy steps for your initial setup before use. Take out the
WA2592 Applied Data Science and Big Data Analytics. Classroom Setup Guide. Web Age Solutions Inc. Copyright Web Age Solutions Inc.
 WA2592 Applied Data Science and Big Data Analytics Classroom Setup Guide Web Age Solutions Inc. Copyright Web Age Solutions Inc. 1 Table of Contents Part 1 - Class Setup...3 Part 2 - Minimum Software Requirements
Server Edition. V8 Peregrine User Manual. for Microsoft Windows
 Server Edition V8 Peregrine User Manual for Microsoft Windows Copyright Notice and Proprietary Information All rights reserved. Attix5, 2015 Trademarks - Microsoft, Windows, Microsoft Windows, Microsoft
Online Help StruxureWare Data Center Expert
 Online Help StruxureWare Data Center Expert Version 7.2.7 What's New in StruxureWare Data Center Expert 7.2.x Learn more about the new features available in the StruxureWare Data Center Expert 7.2.x release.
JMobile Suite User Manual
 JMobile Suite User Manual This document contains information for JMobile Suite on-line help, accessible from JMobile Studio\Help command Sitek S.p.A. PTn343 Ver. 1.26 Copyright 2011 Sitek S.p.A. Verona,
Content Author's Reference and Cookbook
 Sitecore CMS 7.2 Content Author's Reference and Cookbook Rev. 140225 Sitecore CMS 7.2 Content Author's Reference and Cookbook A Conceptual Overview and Practical Guide to Using Sitecore Table of Contents
Admissions & Intro to Report Editing Participants Guide
 IBM Cognos Analytics Admissions & Intro to Report Editing Participants Guide Welcome to Cognos - Admissions and Introduction to Report Editing! Today s objectives include: Gain a Basic Understanding of
Reporting Center. Primary (Stand-Alone) Interface
 Interface") Reporting Center The Reporting Center is where you will go to run or create reports on projects. It can be accessed in any of the follow ways, each with a slightly different user interface and functionality.
Reporting Center The Reporting Center is where you will go to run or create reports on projects. It can be accessed in any of the follow ways, each with a slightly different user interface and functionality.
At the shell prompt, enter idlde
 IDL Workbench Quick Reference The IDL Workbench is IDL s graphical user interface and integrated development environment. The IDL Workbench is based on the Eclipse framework; if you are already familiar
NovaBACKUP CMon v19.0
 June 2017 NovaBACKUP CMon v19.0 User Manual Features and specifications are subject to change without notice. The information provided herein is provided for informational and planning purposes only. 2017
Introduction to Qualtrics ITSC
 Introduction to Qualtrics ITSC August 2015 Contents A. General Information... 4 B. Login... 5 New Qualtrics User... 5 Existing Qualtrics User... 7 C. Navigating Qualtrics... 9 D. Create Survey... 10 Quick
Creating Dashboard. Version: 7.3
 Creating Dashboard Version: 7.3 Copyright 2015 Intellicus Technologies This document and its content is copyrighted material of Intellicus Technologies. The content may not be copied or derived from, through
You might think of Windows XP as a set of cool accessories, such as
 Controlling Applications under Windows You might think of Windows XP as a set of cool accessories, such as games, a calculator, and an address book, but Windows is first and foremost an operating system.
Introduction to TOP Server 5 Troubleshooting and Best Practices
 Introduction to TOP Server 5 Troubleshooting and Best Practices Page 2 of 17 Table of Contents INTRODUCTION 3 Overview 3 TROUBLESHOOTING FEATURES 5 Event Log 5 Help Files 7 OPC Quick Client 8 System Tags
Telerik Corp. Test Studio Standalone & Visual Studio Plug-In Quick-Start Guide
 Test Studio Standalone & Visual Studio Plug-In Quick-Start Guide Contents Create your First Test... 3 Standalone Web Test... 3 Standalone WPF Test... 6 Standalone Silverlight Test... 8 Visual Studio Plug-In
FrontPage 2000 Tutorial -- Advanced
 FrontPage 2000 Tutorial -- Advanced Shared Borders Shared Borders are parts of the web page that share content with the other pages in the web. They are located at the top, bottom, left side, or right
SelectSurvey.NET Developers Manual
 Developers Manual (Last updated: 5/6/2016) SelectSurvey.NET Developers Manual Table of Contents: SelectSurvey.NET Developers Manual... 1 Overview... 2 Before Starting - Is your software up to date?...
Installation Manual. Fleet Maintenance Software. Version 6.4
 Fleet Maintenance Software Installation Manual Version 6.4 6 Terri Lane, Suite 700 Burlington, NJ 08016 (609) 747-8800 Fax (609) 747-8801 Dossier@dossiersystemsinc.com www.dossiersystemsinc.com Copyright
Desktop & Laptop Edition
 Desktop & Laptop Edition USER MANUAL For Mac OS X Copyright Notice & Proprietary Information Redstor Limited, 2016. All rights reserved. Trademarks - Mac, Leopard, Snow Leopard, Lion and Mountain Lion
RAM JAYAM VIDYAA MANDIR MATRIC HR SEC SCHOOL. Cumbum. Theni district. 1 D.EASWARAN M.Sc B.Ed Computer Instructor RJMS_SCHOOL.
 RAM JAYAM VIDYAA MANDIR MATRIC HR SEC SCHOOL. Cumbum. Theni district. D.Easwaran M.sc B.ed Computer Instructor RJMS School. Cumbum THENI DISTRICT. CELL : 8760324704 1 Higher Secondary First Year Study
Getting started 7. Setting properties 23
 Contents 1 2 3 Getting started 7 Introducing Visual Basic 8 Installing Visual Studio 10 Exploring the IDE 12 Starting a new project 14 Adding a visual control 16 Adding functional code 18 Saving projects
CLIQ Web Manager. User Manual. The global leader in door opening solutions V 6.1
 CLIQ Web Manager User Manual V 6.1 The global leader in door opening solutions Program version: 6.1 Document number: ST-003478 Date published: 2016-03-31 Language: en-gb Table of contents 1 Overview...9
SAS Web Report Studio 3.1
 SAS Web Report Studio 3.1 User s Guide SAS Documentation The correct bibliographic citation for this manual is as follows: SAS Institute Inc. 2006. SAS Web Report Studio 3.1: User s Guide. Cary, NC: SAS
IGSS Configuration Workshop - Exercises
 IGSS Configuration Workshop - Contents Exercise 1: Working as an Operator in IGSS... 2 Exercise 2: Creating a New IGSS Project... 18 Exercise 3: Create Areas and Diagrams in Definition... 23 Exercise 4:
Dreamweaver MX The Basics
 Chapter 1 Dreamweaver MX 2004 - The Basics COPYRIGHTED MATERIAL Welcome to Dreamweaver MX 2004! Dreamweaver is a powerful Web page creation program created by Macromedia. It s included in the Macromedia
5 Creating a Form Using Excel
 5 Creating a Form Using Excel 5.1 Writing Measurement Data in a Form...5-3 5.2 Writing Date/Time in a Form...5-50 5.3 Writing Arrows in a Form...5-54 5.4 Writing Trigger Source Node Names in a Form...5-58
NEW in BLUE Open Studio SP2
 SCADA/HMI Software for Intuitive Dashboards, OEE, and the Internet of Things. NEW in BLUE Open Studio 8.0 + SP2 Import Wizards for FactoryTalk, PanelMate, and PanelView (Add-Ons) Minimize migration costs
Frequency tables Create a new Frequency Table
 Frequency tables Create a new Frequency Table Contents FREQUENCY TABLES CREATE A NEW FREQUENCY TABLE... 1 Results Table... 2 Calculate Descriptive Statistics for Frequency Tables... 6 Transfer Results
PowerPoint Basics (Office 2000 PC Version)
") PowerPoint Basics (Office 2000 PC Version) Microsoft PowerPoint is software that allows you to create custom presentations incorporating text, color, graphics, and animation. PowerPoint (PP) is available
PowerPoint Basics (Office 2000 PC Version) Microsoft PowerPoint is software that allows you to create custom presentations incorporating text, color, graphics, and animation. PowerPoint (PP) is available