Historian Getting Started Guide Version 7.0 SP5
|
|
|
- Jerome Owen
- 6 years ago
- Views:
Transcription

1 Historian Getting Started Guide Version 7.0 SP5 September 2017
2 Historian Getting Started Guide GE, the GE Monogram, and Predix are either registered trademarks or trademarks of General Electric Company. All other trademarks are the property of their respective owners. This document may contain Confidential/Proprietary information of General Electric Company and/or its suppliers or vendors. Distribution or reproduction is prohibited without permission. THIS DOCUMENT AND ITS CONTENTS ARE PROVIDED "AS IS," WITH NO REPRESENTATION OR WARRANTIES OF ANY KIND, WHETHER EPRESS OR IMPLIED, INCLUDING BUT NOT LIMITED TO WARRANTIES OF DESIGN, MERCHANTABILITY, OR FITNESS FOR A PARTICULAR PURPOSE. ALL OTHER LIABILITY ARISING FROM RELIANCE UPON ANY INFORMATION CONTAINED HEREIN IS EPRESSLY DISCLAIMED. Access to and use of the software described in this document is conditioned on acceptance of the End User License Agreement and compliance with its terms.
3 Contents Historian Overview 7 Historian Overview 7 Historian System Architecture 8 System Components 8 Related Documents 13 Standard and High-Availability Configurations 14 Standard and High-Availability Configurations 14 Standard Historian Architecture 14 Single Node Data Only System 14 Data Collection from SCADA Systems and other Programs 15 Integration with Client Programs 15 High-Availability Architecture 16 Historian Data Mirroring 17 Historian in a Cluster Environment 19 Setting Up the Historian Environment 20 Setting Up the Historian Environment 20 Historian Licenses 20 Hardware Requirements 22 Historian Server Sizing Recommendations 24 Sustained Event Rate Example System 26 Historian Collector Configuration Recommendations 26 Optimizing Virtual Memory 27 Software Requirements 28 Historian and Microsoft Windows 29 VMWare Support 30 Compatibility with Other GE Products 32 Additional Setup Information 33 Regional Settings Support 33 Time and Date Formatting 33 Datatype Support 33 Enabling Trust for a Self-signed Certificate on Chrome 34 Installing Historian 35 Historian Installation 35 Historian Startup Procedure Overview 35 Historian Installation Limitations 36 Installing a Single Server Historian 36 Single Server Historian Architecture 38 Historian Getting Started Guide iii
4 About Historian Log Files 38 Installing Historian using the Command Line 39 Install Command-Line Syntax 39 Install Command Examples 41 Installing Historian in a Mirrored Environment 42 Installing Historian Mirror Primary Server 42 Installing Historian Mirror Node 44 Installing Historian Mirror Node using the Command Line 46 Archive Duration Property Change in a Mirrored Environment 46 Mirroring FAQs 46 Installing Historian with LDAP Integration 48 Configuring Historian to use LDAP via SSL 53 Method 1: Add the Certificate to the UAA Server Keystore and Refer to It 53 Method 2: Skip Certificate Verification (less secure) 54 Installing Historian in a Cluster Environment 55 Installing Historian in a Cluster Environment 55 Configuring Historian Cluster Service on Windows Server Adding User-defined Resource Types to the Cluster Instance 55 Adding Historian Service to the Cluster 56 Adding Alarm Archiver Resource to the Cluster 58 Configuring Generic Services 59 Installing Historian Components 62 Installing Historian Components 62 Installing Historian Client Tools 62 Installing Historian Data Collectors 64 Installing a Collector Silently using the Command Line 65 Configure OPC Collector Support for Remote OPC Servers 67 Searching for a Remote OPC Server ProgID 68 Offline Configuration for Collectors 68 Configuring Collector and Tag Properties 69 Collector Interface Properties 70 Tag List and Tag Properties 72 Installing the Historian Excel Add-in 75 Activating the Add-In for Excel 2016/2013/ Activating the Add-In for Excel Activating the Add-In for Excel Installing Alarms and Events 79 Using a Remote SQL Server to Store Alarms 80 Installing the Historian Administrator 80 Starting the Historian Administrator 81 Installing the Historian HDA Server 81 Installing Historian SDK 82 iv Historian Getting Started Guide
5 Installing the Historian Client Access API 82 Migrating Historian Data 83 Migrating the Alarms and Events Database from 4.5 to Backing Up Alarm and Event Data 83 Migrating Historical Alarm and Event Data after Upgrade from Uninstalling Historian 84 Using the Migration Tool 84 Migrating Historical Data 85 Configuring Migration Options 85 Data Migration Scenarios 87 Migrating a Tag and its Data 88 Merging a Historian Server 88 Migration Tool Command-Line Syntax 89 Creating a Batch File to Migrate Multiple IHA Files 90 Interoperability of Historian Versions 91 Implementing Historian Security 92 Implementing Historian Security 92 About Protecting Your Process 92 Strict Authentication 93 Security Strategy Guidelines 94 Setting Historian Login Security 94 Historian Security Groups 95 Security Setup Example 97 Setting Up Historian Security Groups 98 Using the UAA Config Tool 100 Adding a UAA User 102 About Domain Security Groups 103 Configuring Data Archiver to use Active Directory Service Interface 105 Establishing Your Security Rights 107 Implementing Tag Level Security 109 Retrieving Data from Historian 110 About Retrieving Data from Historian 110 Sampling Modes 110 Calculation Modes 113 Query Modifiers 115 Filtered Data Queries 117 Filter Parameters for Data Queries 118 Filtered Queries in the Excel Add-in Example 120 Filtering Data Queries in the Excel Add-in 120 UAA LDAP Integration Configuration Tool 122 Troubleshooting 127 Managing Historian Log Files 127 v
6 Troubleshooting Historian 129 Troubleshooting Strict Authentication Issues 129 Troubleshooting Historian Server Components 129 Troubleshooting a Historian Cluster 130 Troubleshooting ifi and Historian 130 Troubleshooting OPC Data Collectors 131 Troubleshooting Historian 7.0 with PHA/PKC vi Historian Getting Started Guide
7 Historian Overview Historian Overview Historian is a high-performance data archiving system designed to collect, store, and retrieve time-based information at extremely high speed. The system architecture consists of the following: Historian Server Collectors The Historian server is the central point for managing all of the client and collector interfaces, storing and (optionally) compressing data and retrieving data. All tag data (numbers, strings, BLOBs) are stored in a proprietary format in Data Archives. Each Data Archive represents a specific time period of historical data. You can further segregate your tags and archives into Data Stores. A Data Store is a logical collection of tags used to store, organize, and manage tags according to the data source and storage requirements. A Data Store can have multiple data archives, and includes logical and physical storage definitions. The primary use of data stores is segregating tags by data collection intervals. For example, you can put name plate or static tags where the value rarely changes in one data store, and put process tags in another data store. This can improve query performance. Historian data archives are data files with the extension *.iha, each of which contains data gathered during a specific period of time. Archives are generally time-based, such as daily archives. The Historian Data Archiver is a service that indexes all information by Tagname and Timestamp and stores the result in an *.iha file. The Tagname is a unique identifier for a specific measurement attribute. For ifi users, an Historian Tagname normally represents a Node.Tag.Field (NTF). Searching by Tagname and Time Range is a common and convenient way to retrieve data from Historian. If you use this technique to retrieve data from the Archiver, you do not need to know which archive file on the Historian server contains the data. You can also retrieve data using a filter tag. Historian is capable of storing many different data types, such as Float, Integer, Strings, Byte, Boolean, Scaled, and BLOB (binary large object data type). The source of the data defines the ability of Historian to collect specific data types. If licensed for the Alarm and Event option, then the server also manages the storage and retrieval of OPC alarms and events in a SQL Server Express. The Historian includes several types of data collectors for collecting data from a wide variety of applications including: ifi, OPC, OPC HDA, OPC UA Data Access (Windows), OPCUA (Linux), OPC Alarms & Events, Text Files (.csv or.xml), and OSI PI. Note: To collect data from CIMPLICITY, you must use the Historian OPC collector with the CIMPLICITY OPC Server. The Calculation collector is designed to perform math and analysis on Historian data and store the results in tags, on the server. The Server-to-Server collector has the same calculation capabilities as the Calculation collector, but it stores the results in tags, on a remote server. Most collectors are capable of performing first-order deadband compression as well as a browse and add configuration, and store and forward buffering. 7

8 Note: Standard Collectors that are included as part of the product will not consume a CAL (Client Access License). Other interfaces developed by customers or system integrators using the Collector Toolkit or APIs will consume a CAL for each instance or connection. Clients All client applications retrieve archived data through the Historian API. The Historian API is a client/server programming interface that maintains connectivity to the Historian Server and provides functions for data storage and retrieval in a distributed network environment. Historian System Architecture This diagram illustrates the Historian system architecture: System Components A typical Historian system contains several components: One or more Historian Data or Alarm Collectors to data sources One or more Historian Servers for data or alarms One or more Historian Administrators One or more Historian Admin Consoles Historian OLE DB provider One or more Historian HDA Servers One or more Historian Diagnostic Manager One or more Historian Client Manager (Mirror systems only) 8
9 Historian Configuration Manager (Mirror systems only) Historian Embedded PostgreSQL Database Historian Embedded Tomcat Container Historian Indexing Service One or more Excel Add-In packages, installed on any client node Programs using Historian User API Programs using Historian Web REST API Programs using Software Development Kit (SDK) All clients communicate with the Server through the Historian API. This list describes the functions performed by each component: Historian Alarms and Events Historian Data Collectors Historian File Collector Historian Administrator Historian Alarms and Events provides tools to collect, archive, and retrieve alarm and event data in Historian. Refer to the Historian Alarms and Events e-book for more information. Data Collectors gather data from a data source on a schedule or event basis, process it, and forward it to the Historian Server or a Web socket for archiving. The following collector functions are common across all types of collectors (except the File Collector): Maintaining a local cache of tag information to sustain collection while the server connection is down. Automatically discovering available tags from a data source and presenting them to the Historian Administrator. Buffering data during loss of connection to the server and forwarding it to the server when the connection is restored. Optionally, automatically adjusting timestamps for synchronizing collector and archiver timestamps. Supporting both collector and device time stamping, where applicable. Scheduling data polling for polled collection. Performing a first level of data compression (collector compression). Responding to control requests, such as requests to pause or resume collection. Options to send data to Historian or Cloud service through a Web socket connection For mission-critical data collection, redundant collectors are possible. Historian includes a mirroring option for high availability and load balancing, so the data is available for the organization all the time. Refer to the Historian Data Collectors e-book for more information. File Collectors import.csv or.ml files into Historian. The files can contain data, alarms, tagnames, or other configuration information, and messages that you can import with a File Collector. Refer to the Historian Data Collectors manual for more information. A Historian Administrator provides a graphical user interface for performing Historian maintenance functions in a Windows environment including: Tag addition, deletion, and configuration. Maintaining and backing up archive files. Data collector configuration. 9
10 Security configuration. Searching and analyzing system alerts and messages. A Calculation Collector with the ability to create a new tag based on calculations, and stores the result as time series data available with the Historian Administrator only. Setting up your OPC HDA Server available with the Historian Administrator only. Refer to the Using the Historian Administrator manual for more information. Historian Web Admin Console Historian Server The Historian Web Admin now operates in a web-based environment. The Historian Web Admin Console provides an enhanced Dashboard that displays the health of the system in one convenient location. The Dashboard is available in the Web Admin Console only. You can view the following diagnostics details: Data Node Diagnostics Displays the Historian servers connected to the system. Collector Diagnostics Displays the details of the faulty collectors. Client Diagnostics Displays the top five busiest clients connected to the system. The Dashboard provides Interactive Configuration management, which helps you configure mirror nodes (available in the Web Admin Console only), Tags, Collectors, Data Stores and Archives. The functionality of the Calculation Collector and the ability to configure your OPC HDA Web server are not included in the Web Administrator. The Historian Admin Console uses a client-access license (CAL). Historian Server performs the following tasks: Manages all system configuration information. Manages system security, audit trails, and messaging. Services write and read requests from distributed clients. Performs final data compression. Manages archive files. Historian Diagnostics Manager The Historian Diagnostics Manager monitors the health of the Historian system and executes a few rules on the nodes, collectors, and clients, and generates the appropriate fault record. The details of these faults are displayed in the Admin Console Dashboard. The following are the faults and their severity level: Fault Type Collector Status Fault Collector Overrun Fault Collector OutOfOrder Fault Fault Description Generated when the collector goes to the Unknown or Stopped state. Generated when at least one overrun occurs on a collector in last 24 hours. Generated when at least one OutOfOrder occurs on a collector in last 24 hours. Fault Level Error Warning Information 10
11 Fault Type Collector StoreForward Fault Collector ConnectDisconnect Fault Service DiskSpace Fault Client InActive Fault Client BusyRead Fault Client BusyWrite Fault Client TimedOutRead Fault Fault Description Generated when the collector Last Data Sample Time Stamp is delayed by more than an hour. Generated when the collector is Disconnected and connected at least once in last 24 hours. Generated when a node disk space is about to reach its free space limit. Generated when a client is not active for the last one hour. Generated when the client makes relatively more number of reads per minute. Generated when the client makes relatively more number of writes per minute. Generated when the client makes a timed out read query. Fault Level Information Information Warning Information Information Information Warning Historian Client Manager Historian Configuration Manager The Historian Client Manager acts as the client connection manager and message router for the system. The Client Manager will examine messages and forward them to the correct Data Archiver or to the Configuration Manager. This service is deployed only for mirrored systems. The Historian Configuration Manager maintains and distributes the entire System configuration. There can be multiple Historian nodes but only one Configuration Manager. This Configuration Manager node is used to store system configuration, such as tag names, collector names and Historian Node names. This service is deployed only for mirrored systems. Historian Embedded Tomcat Container An instance of Tomcat is used exclusively by Historian as an open source Java-based Web server to support the Historian Web Administrator and Trend tool. It supports SSL and the use of certificates for enhanced security. Historian Embedded PostgreSQL Database An instance of PostgreSQL is used exclusively by Historian to store tag names to improve searching for tags in the Trend tool and Web Admin Console. Historian Indexing Service This is an indexing service that periodically runs against the Historian tag database, creates a tag index, and stores information in the PostgreSQL database instance, a preferred method to allow for quick search results. Excel Add-In The Historian Excel Add-In is a very useful tool for presenting and analyzing data stored in archive files. Using this tool, you can design custom reports of selected data, 11
12 automatically process the information, and analyze the results. You can also use it for performing tag maintenance functions in Historian, such as adding tags, importing or exporting tags, or editing tag parameters. For more information, refer to the Using the Historian Excel Add-In e-book. Historian OPC HDA Server The Historian OPC HDA Server reads the raw data stored in Historian and sends it to the connected OPC HDA clients. The Historian OPC HDA Server is in compliance with OPC Server HDA 1.20 standards. Refer to the Historian OPC HDA Server manual for more information. Historian User API The Historian User API is intended to provide high speed read/write access to Historian data and read access to Historian tags. There is no access to alarms, events, or messages. Use the API to develop applications in C or C++, which read and write data to the Historian server when the Historian SDK and Historian OLEDB do not meet your project requirements for performance or programming language. Historian allows you to develop both 32-bit and 64-bit User API programs. Note: If you want to build a 32-bit User API program on a 64-bit operating system, then you need to rename the ihuapi32.lib to ihuapi.lib and include it in your program. Refer to the ihuserapi Help system for more information. Historian Web REST API Historian SDK Historian Client Access API Collector Toolkit Historian Migration Tools Historian includes a REST API to connect your Java Web Client with Historian data. Refer to the Historian REST API Reference Manual in the /Additional Documentation folder of your installation directory for more information. The Software Development Kit (SDK) is designed for writing Visual Basic (VB) or Visual Basic for Applications (VBA) Scripts. Using the SDK, you can develop your own scripts to perform selected repetitive or complex tasks or to make your own custom user interface. To use the SDK, create a VB/VBA project with the SDK as a project reference. Refer to the SDK Help system for more information. Most applications today rely on.net based development platforms from Microsoft. To enable easier integration with Historian, a.net API is provided. The Client Access API supports both 32-bit and 64-bit Windows Operating Systems. The Collector Toolkit allows you to write programs that integrate tightly with Historian and leverage the same configuration tools, redundancy schemes, and health monitoring as collectors that ship with Historian. A custom collector is a collector developed using the Collector Toolkit. It collects data and messages from a data source and writes them to a Data Archiver. Each deployment of a Collector developed on the Collector Toolkit consumes a CAL. Historian provides migration tools to allow you to migrate your existing Classic Historian configurations and data and your ifi Alarm and Event data into the Historian environment. Tags, collection rates, and dead bands for tags configured in Classic Historian can be transferred into Historian by the migration tools. 12
13 For more information, refer to the Migrating Advanced and Classic Historian Data e-book. Related Documents For additional information about Historian, see the following documents: Historian Getting Started Guide Historian Important Product Information (IPI) Using the Historian Administrator Historian Data Collectors Using the Historian Excel Add-In Historian Alarms and Events Migrating Advanced and Classic Historian Data Using the Historian OLE DB Provider Historian Software Development Kit (SDK) Online Help System Historian REST APIs Reference Manual 13
14 Standard and High-Availability Configurations Standard and High-Availability Configurations You have wide flexibility in configuring the Historian system. Since Historian can support a fully distributed architecture, you can spread the data collection, server, administration, and client data retrieval functions across many different nodes in a network, or you can install all components on a single computer. Since the Historian API is the basic building block for connectivity, all Historian functions, including data collection, administration, and data retrieval, use the Historian API. You can connect the Historian API to a local Historian Server in the same manner as to a remote Historian Server by simply providing the name of the server. This name must be the Computer Name or IP Address of the target Historian Server, and the server must have TCP/IP connectivity. If you use the Computer Name of the server rather than the IP Address, the IP Address must be available to the client through DNS, a WINS server, or through the local host table. It is recommended that you install the Historian Server on a central dedicated server, as shown in the Typical Historian System figure. Next, install data collectors on each data source, and point them back to the central Historian Server by specifying the appropriate server Computer Name. Install a separate data collector for each type of collection interface used in your system. You can also have mirroring of stored data on multiple nodes to provide high levels of data reliability. Data Mirroring also involves the simultaneous action of every insert, update and delete operations that occurs on any node. You can install various types of collectors on a single computer, subject to constraints detailed in Installing Historian Data Collectors on page 64. Standard Historian Architecture Standard Historian offers unique capabilities and benefits for a sustainable competitive advantage: Built-in Data Collection Fast Read/Write Performance speed Enhanced Data Security Robust Redundancy and High Availability The following topics give you a quick insight to different use cases to consider when deploying your Historian architecture. Single Node Data Only System In a typical single node system, OPC Server or HMI is responsible for the collection of data. This data is used for trending and analyzing as illustrated in the following figure: 14


15 Figure 1: Single Node Data Only System Data Collection from SCADA Systems and other Programs This diagram represents how data is collected from SCADA systems and other custom programs. The collected data is used for calculations and analysis. Figure 2: Enterprise Data Collection Examples Integration with Client Programs This diagram represents the integration with external client programs. 15

16 Figure 3: Data Collection and Client Connection Examples High-Availability Architecture This diagram shows a high-availability system with collector redundancy and Mirrored Historians: 16

17 Figure 4: High Availability Example You can mirror stored data on multiple nodes to provide high levels of data reliability. Data Mirroring involves the simultaneous action of every insert, update, and delete operation that occurs on any node. Historian allows you to have up to three mirrors, a primary and two additional mirrors. Historian Data Mirroring If you have purchased an Enterprise-level license for Historian and your license entitlement includes mirror nodes, you have the option of setting up to three mirrors (primary server + two mirrors). Historian Data Mirroring provides continuous data read and write functionality. In a typical data mirroring scenario one server acts as a primary server to which the clients connect. To create a mirror, you add mirror nodes and establish a data mirroring session relationship between the server instances. All communication goes through the Client Manager, and each Client Manager knows about the others. Mirrors must be set up in a single domain. 17

18 Figure 5: Mirroring Example Client Connections in Mirrored Environments When a client (either a writing collector or reading client), connects to the Client Manager, it gathers information about each client Manager along with all archive, tag, and collector configuration information from the Configuration Manager, and stores this information locally in its Windows Registry. A relationship is then established between each remote client and a single Client Manager, which directs read and write requests across the other mirrors. If that relationship is broken, it will establish a new relationship with the next available Client Manager, which assumes the same responsibilities. This bond is maintained until that Client Manager is unavailable, and then the process of establishing a relationship with another Client Manager is repeated. When more than one node is running, the Client Manager uses a "round robin" method between the good nodes to balance read loads. Each read request is handled by a node as a complete request. Writes are sent independently but nearly simultaneously to any available Data Archiver so that the same tag shares a common GUID, name, timestamp, value, and quality as passed to it by the Collector. 18

19 Read and Write Client with Mirroring Historian in a Cluster Environment Historian works with the Microsoft Cluster Service Manager to ensure high availability of the Historian server. If the primary Historian node in the cluster experiences difficulties, Historian is automatically started on another node to take over. Server high availability is managed through the Microsoft Cluster Service Manager. Read the Important Product Information document and verify that all the prerequisites are properly installed. Configure a failover cluster in Windows Server 2008 R2. See Installing Historian in a Cluster Environment on page 55. See also Configuring Clusters section in the Using Historian Administrator ebook. To use Historian Alarms and Events in a cluster environment, select the appropriate SQL Server for both the Cluster Nodes. 19
20 Setting Up the Historian Environment Setting Up the Historian Environment Before you start setting up your Historian environment, identify the computers that will function as your clients, data collectors, administration workstations, and archiver. 1. Set up each computer. See Hardware Requirements on page 22, and refer to the user manual that accompanies each component for detailed setup information. 2. Use a login account with administrator rights so that you can install Historian later. See Software Requirements on page 28, and refer to the user manual that accompanies each software product for more detailed setup information 3. Activate the License Key on your Historian Server node. Additional licenses may be required on other nodes (such as mirroring and collector nodes) depending on your configuration requirements. See Historian Licenses on page Disable the Guest account in Windows security if you want to limit authentication to known Windows users only. Historian Licenses Historian Product License Management Advantage Licensing is the software system for activating and managing product licenses. Using the tools in Licensing and our Customer Center web site you can view, activate, and manage licenses at your site. With Advantage Licensing you can: View current licenses for the products residing on a computer Choose a licensing method (Internet, local intranet, or file-based) Change licenses (Activate, Return, Refresh) Note: If you received an containing an activation code, you must migrate to Advantage Licensing. Get the newest licensing software at If you did not receive an activation code, follow the instructions about M4 keys at Historian License Editions Historian is available in three license types: Essentials, Standard, and Enterprise. The Essentials edition is included as the on-board Historian with the purchase of some ifi and CIMPLICITY licenses, and cannot be licensed or sold outside of those packages. Essentials edition customers who require options available in the Standard or Enterprise editions or require more than a 1000 tags must purchase either a Standard or Enterprise License with the appropriate tag count. 20
21 You can install all components using the single install media, but the use of specific components and functionality are controlled by the GE license you purchase and install. The Historian components and functionality supported by each license type are shown in the table below: Component Essentials Standard Enterprise Allow Data Modification Digital / Enumerated / Array Tags Excel Add-in Fault Tolerant Computer Support Historian Server ifi Collector ME Collector OLE DB Provider OPC DA Collector OPC HDA Server SCADA Buffer (2500 tags, 200 days) Server to Server Distributer Windows Admin Console Cluster Support Collector Redundancy Collector Toolkit SDK GE Data Collector for OPC HDA w/cloud Option GE Data Collector for OPC UA (DA) w/cloud Option GE Data Collector for OPC UA Linux (x86) w/cloud Option GE Data Collector for OSI PI w/cloud Option GE Data Collector for Wonderware w/cloud Option Microsecond Support Multiple Data Stores User Defined Multi-Field Tags Web Admin Console Web Trend Client Windows PerMon Collector Calculation Collector Optional OPC Alarms Optional 21
22 Component Essentials Standard Enterprise Server to Server Collector w/cloud Option Optional Data Mirroring - up to 3 (Primary +2) Expression Support Electronic Signatures Optional Optional Maximum Data Stores (200) Optional Historian Client Access Licenses (CALs) Data Stores Max Historical Tags 1,000 50,000 20,000,000 Note: Historian HD is a separately sold and licensed component from Historian. Historian HD provides the Historian user a standard method to move Historian tag configuration and historical archive data from a Windows environment to a Hadoop Distributed File System (HDFS). HDFS is the primary distribution storage used by Hadoop applications. A component that is used only by the Historian HD license is installed with your Historian installation: the Historian Archive Ingestion Service. This service is reserved for use only with the Historian HD big data analytics platform and is listed as Manual under Startup Type. Stopping this service does not impact Historian functionality. Unless you are licensed to use Historian HD, do not attempt to start or monitor this service, as it may impact the ability to run the Historian Data Archiver service. For more information regarding Historian HD, please visit Hardware Requirements This topic describes the Historian hardware requirements. Historian Server For Historian Servers, the minimum hardware requirements are: A 2.4 GHz clock-speed Intel Core i3 or i5 or i7 CPU or equivalent AMD Phenom CPU with 8 GB RAM for a 64-bit Historian Server. A DVD-ROM drive. 80 GB free hard-drive space for the data archives, message files, buffer files, and log files used by the system. 100 Mbps TCP/IP-compatible network interface adapter for network communication and certain I/O drivers. Data Collector Node For Data Collector nodes, the recommended minimum hardware requirements are: A 2.0 GHz clock-speed Intel Core i3 or i5 or i7 CPU or equivalent AMD Phenom CPU with 2 GB RAM. 40 GB of free hard-drive space to store buffered data. 22
23 A DVD-ROM drive. TCP/IP-compatible network interface adapter for network communication and certain I/O drivers. Microsoft Windows Server Many desktop-class computers are not certified to run Windows Server. Check the Microsoft web site and your computer hardware vendor web site for possible conflicts between your hardware and Windows Server 2008 R2 SP1. These specifications are sufficient to meet the needs of a small pilot application. However, production system requirements may be significantly different depending on many application-specific factors. Please contact the Product Manager to review the requirements of your application. Microsoft Cluster Service For the Microsoft Cluster service, the minimum hardware requirements are: A 2.6 GHz clock-speed Intel Core i3 or i5 or i7 or eon or equivalent AMD Opteron CPU with minimum 8 GB RAM. 80 GB of local, free hard-drive space. 40 GB shared SCSI hard-drive (RAID preferred). Two 100Mbit TCP/IP-compatible network interface adapters for network communication and certain I/O drivers (One for public network, another for private network). Note: The configuration of each server added to the cluster must be identical to the other servers in the cluster. Data Mirroring and Redundancy Service For the Data Mirroring and Redundancy service, the minimum hardware requirements are: Minimum 8 GB RAM. Dual Core Processor. 64-Bit Operating System. Note: If you are using single node setup, then it is recommended to use 32 GB RAM. Ensure that you are using the same hardware requirement for the mirror node as well. Network Speed For a large Enterprise Historian setup, it is recommended that network speed is 1 GBPS. Notes If you are using single node setup, then it is recommended to use 32 GB RAM. Ensure that you are using the same hardware requirement for the mirror node as well. You must have a minimum of 10 GB free space available for the Data Archiver to start. Many Desktop-class computers are not certified to run Windows Server. Check the Microsoft web site and your computer hardware vendor web site for possible conflicts between your hardware and Windows Server 2008 R2 SP1. These specifications are sufficient to meet the needs of a small pilot application. However, production system requirements may be significantly different depending on many application-specific factors. Please contact the Product Manager to review the requirements of your application. 23
24 Historian Server Sizing Recommendations You determine the size of an Historian Server as a function of the number of tags from which data is collected, the rate of alarm and event collection, and how often you intend to collect the data and how much data you want to keep online. The number of tags is an indicator of the number of concurrent users likely to access the system. The primary factor is server memory requirements; CPU load is a secondary factor. If the number of concurrent users is significantly different from the suggested guidelines, adjust server memory size accordingly. The following recommended configurations may vary based on years of data online, update rate, data compression setting, and other tag configuration parameters. Notes Historian Server runs only on 64-bit versions of Windows. When possible, for performance reasons, consider using computers with multiple disk drives so that archives and buffers can be given their own drive. Or, multiple data stores can each have their own drive. Sustained event rate is 18 million per minute. Historian supports Intel Core i3, i5, i7 Duo based processors as long as they are compatible with the operating system. Historian does not support Itanium processors. The recommended configurations may vary based on years of data online, update rate, data compression setting, and other tag configuration parameters. Recommended Historian Standard Edition Server with <10K Tags on page 24 Recommended Historian Standard Edition Server with 10K - 50K Tags on page 25 Recommended Historian Standard Edition Server with 100K to 1 Million Tags on page 25 Recommended Historian Standard Edition Server with 1 Million to 2 Million Tags on page 25 Recommended Historian Standard Edition Server with 2 Million to 5 Million Tags on page 26 Recommended Historian Standard Edition Server with <10K Tags Tags RAM (GB) Disk Size Required Processor Type CPU CPU Speed (GHz) Recommended CPU clock in Giga Hz Operating System Storage Type Years of data online <10K 8 GB/16GB (recommended for Single node setup) 100 GB/250 GB (recommended) Intel Core-i5, i7 family, or equivalent Dual/Quad cores Windows 7 (64-bit) or Windows Server 2008 (64-bit) or Windows 2012 Server R2 or Windows 2016 Server. SAS SSD with RAID Level 0 Configured 1 year 24
25 Recommended Historian Standard Edition Server with 10K - 50K Tags Tags RAM (GB) Disk Size Required Processor Type CPU CPU Speed (GHz) Recommended CPU clock in Giga Hz Operating System Storage Type Years of data online 10K to 50K 16 GB / 32 GB (recommended) 250 GB Intel Core-i5, i7 family, or equivalent Dual/Quad cores Windows 7 (64-bit) or Windows Server 2008 (64-bit) or Windows 2012 Server R2 or Windows 2016 Server. SAS SSD with RAID Level 0 Configured 1 year Recommended Historian Standard Edition Server with 100K to 1 Million Tags Tags RAM (GB) Disk Size Required Processor Type CPU CPU Speed (GHz) Recommended CPU clock in Giga Hz Operating System Storage Type Years of data online 100K to 1 Million 16 GB / 32 GB (recommended) 250 GB Intel eon (56xx, E5 family or AMD Opteron 42xx/62xx family) Dual/Quad cores Windows Server 2008 R2 or Windows 2012 standard (64-bit) or Windows 2012 Server R2 or Windows 2016 Server. Direct attached or shared storage with SAS enterprise class drives. Hardware RAID controller with cache memory. SAN recommended over NAS 1 year Recommended Historian Standard Edition Server with 1 Million to 2 Million Tags Tags RAM (GB) Disk Size Required Processor Type CPU 1 Million to 2 Million 16 GB / 32 GB (recommended) 500 GB Intel eon (56xx, E5 family or AMD Opteron 42xx/62xx family) 2-Socket 25
26 CPU Speed (GHz) Recommended CPU clock in Giga Hz Operating System Storage Type Years of data online Windows Server 2008 R2 or Windows 2012 standard (64-bit) or Windows 2012 Server R2 or Windows 2016 Server. Direct attached or shared storage with SAS enterprise class drives. Hardware RAID controller with cache memory. SAN recommended over NAS 1 year Recommended Historian Standard Edition Server with 2 Million to 5 Million Tags Tags RAM (GB) Disk Size Required Processor Type CPU CPU Speed (GHz) Recommended CPU clock in Giga Hz Operating System Storage Type Years of data online 2 Million to 5 Million 32 GB / 64GB 500 GB Intel eon (56xx, E5 family or AMD Opteron 42xx/62xx family) 2-socket or 4-socket Windows Server 2008 R2 or Windows 2012 standard (64-bit) or Windows 2012 Server R2 or Windows 2016 Server. High speed shared storage with SAS or SSD drive types. Hardware RAID controller with cache memory. SAN recommended over NAS. 1 year Sustained Event Rate Example System System performance may vary depending on the hardware specifications, operating system, and tuning parameters. These hardware specifications are provided as a reference only. Specification Processor Type CPU CPU Speed (GHz) RAM (GB) Medium Size Server Intel eon 5540 Dual socket Large Size Server Intel eon E or E Dual socket or quad-socket Historian Collector Configuration Recommendations Configuration Item Recommendation 26
27 RAM (GB) Disk Size required Historian Collectors Operating System 8 GB 80 GB 32-bit or 64-bit (GE Data Collector for Wonderware support 64-bit only) Microsoft Windows 7 Professional (32-bit or 64-bit) Microsoft Windows 8.1 Professional (32-bit or 64-bit) Microsoft Windows 10 Microsoft Windows Server 2012 Standard (64-bit) Microsoft Windows Server 2008 R2 (64-bit) Microsoft Windows Server 2008 R2 Microsoft Windows Server 2012 R2 Notes Historian Collectors work as 32-bit applications on a 64-bit Windows operating systems using WoW64 mode (Windows-on-Windows 64-bit). However, you can read and write data from a 64-bit Historian Server. RAM and Disk Size required may vary based on the collectors available on the system. Recommended number of tags per collector is 20 to 30K. For ifi systems, count each Node.Tag.Field (NTF) as a separate tag when you determine the size of the system. For example, FI.FIC101.F_CV and FI.FIC101.B_CUALM (current alarm) both count as tags, even though they are derived from the same ifi tag. Optimizing Virtual Memory Through the use of paging files, Windows allocates space on your hard drive for use as if it were actually memory. This space is known as virtual memory. Be sure to optimize the virtual memory on the Historian archiver computer. Note: If the paging file is set to grow dynamically, your system may experience severe performance problems during run time. To ensure optimal performance, be sure that the Initial Size and Maximum Size of the paging file are the same so that the paging file does not grow dynamically. For more information on creation and sizing of Windows paging files, refer to the Microsoft Windows Help. To optimize the virtual memory paging file for Historian in Windows: 1. Double-click the System icon in the Windows Control Panel. 2. Open the Performance Options dialog box: a) On Windows 7, or Windows 8, or Windows Server 2008, click Advanced System Settings in the left pane. b) In the Advanced tab, under Performance, click Settings. c) In the Performance Options dialog box, click the Advanced tab. 3. In the Virtual Memory group box, select Change. 4. In the Initial Size field, enter a value equal to three times your physical memory. 5. In the Maximum Size field, enter a value equal to three times your physical memory. 6. Select Set. 27
28 7. Click OK. Software Requirements This topic describes the minimum Historian software requirements. Microsoft Windows Operating Systems Historian requires one of the following operating systems, with latest service packs or revisions: Microsoft Windows Server 2016 (64-bit) Microsoft Windows Server 2012 R2 (64-bit) Microsoft Windows Server 2008 R2 (64-bit) Microsoft Windows 7 Professional (32-bit or 64-bit) Microsoft Windows 8.1 Professional (32-bit or 64-bit) Microsoft Windows 10 (32-bit or 64-bit) Note: Historian bit components such as Collectors, Excel Add-in 32-bit, Interactive SQL 32-bit, APIs, and Non-Web Administrator work as 32-bit application on 64-bit Windows operating systems using WoW64 mode (Windows-on-Windows 64-bit). However, you can read and write data from a 64-bit Historian Server. If you use Historian 6.0 or later on Windows Server 2008 (32-bit or 64-bit) or Windows Server 2008 R2, you must go for a Full Installation and not Core Installation of Windows. Network Interface Software The TCP/IP network protocol is required. Microsoft.NET Framework 4.5 The installation of.net 4.5 is a prerequisite to the Historian install. You can install it manually or you will be prompted to download and install it via the Historian install. In order to have.net 4.5 downloaded and installed as part of the Historian install, your Proxy must be configured for internet access. Microsoft SQL Server One of the following 32-bit or 64-bit SQL Server systems to configure alarm and event archiving or to use Historian as a linked server: Microsoft SQL Server 2008 R2 SP2, Standard, or Enterprise Edition Microsoft SQL Server 2008 Express Microsoft SQL Server 2008 R2 Microsoft SQL Server 2012 SP3 Microsoft SQL Server 2014 SP1 Express, Standard, or Professional Microsoft SQL Server 2016 Express, Standard, or Professional Note: The collation for your Alarm and Event database needs to match the collation of your SQL Server. This happens automatically by default but can become different if the Alarm and Event Database is moved to another SQL Server. 28
29 Microsoft Excel The Historian Excel Add-In requires one of the following Excel 2007 Excel 2010 Excel 2013 Excel 2016 Web Server Web server requirements are as follows. Microsoft.NET Framework Microsoft Internet Information Services (IIS) 7.5 or 8.0 Historian Client Tools 7.0 or greater OLE DB, User API, and Historian Client Access Assembly Historian Server Microsoft Windows Server 2016 (64-bit) Microsoft Windows Server 2012 R2 (64-bit) Microsoft Windows Server 2008 R2 SP2 (64-bit) Microsoft Windows 10 (32-bit or 64-bit) Microsoft Windows 8.1 Professional (32-bit or 64-bit) Microsoft Windows 7 Professional (32-bit or 64-bit) Microsoft.NET Framework 3.5 Historian and Microsoft Windows Optimizing Server Settings If you are running Historian on a Windows computer, do not set your File and Printer Sharing for the Server optimization options to Maximum Data Throughput for File Sharing. The Maximize Data Throughput for File Sharing setting in File and Printer Sharing for Microsoft Networks Properties controls the system cache size and allows the cache to grow very large. This could cause excessive paging when dealing with large files and might interfere with applications like Historian. It is recommended that you select the Maximum Data Throughput for Network Applications option. To view or change your Server Optimization settings on Windows servers: 1. Open the Control Panel. 2. Double-click the Network and Dial-Up Connections icon. The Network and Dial-up Connections dialog box appears. 3. Right-click the Local Area Connection Properties icon and select Properties. 4. Select the File and Printer Sharing for Microsoft Networks component and click the Properties button. 5. Ensure that the Maximize Data Throughput for Network Applications option is selected. 6. Click OK. For more information on changing the Server Service properties, refer to the Microsoft Knowledge Base article Q
30 Archiver Obtaining List of Domain Controllers If the archiver is configured to use domain group security, the data archiver obtains the list of primary and backup domain controllers at archiver startup. If a domain controller is not available at that time or if you add new domain controllers, they are not seen by the archiver until the next time the archiver is restarted. For example, if your backup domain controller was not available on archiver startup, the archiver will not fail over to the backup domain controller for user authentication. For more information, refer to the Working with Security section in Online Help. Windows Firewall Enabled by Default Windows Firewall is enabled by default in Vista, Server 2003, Server 2008, and Server If you install Historian on any of the given systems, you will be prompted to allow Historian to reconfigure the Windows Firewall. If you answer Yes, Historian is added to the firewall's exception list and set to Enabled. If you answer No, Historian is added to the list and set to Disabled. You can change this setting through the Windows Firewall control panel at any time. VMWare Support Historian provides support for VMware ESi Server version 5.0 and above. The virtualization capability provided by VMware lets you run multiple virtual machines on a single physical machine, with each virtual machine sharing the resources of that one physical computer. Please be aware that while we have tested VMware ESi 5.0 and above, issues with the VMware software or the virtualized environment are outside the scope of GE Digital's responsibility. You must use VMWare Compatibility Hardware and Software before installing Historian 7.0 or greater Data Archiver on a Virtual Machine. For the current release, the only supported type of Proficy licensing for use with VMware is keyless (software) licensing. Note: VMware Player is not supported. Important: Advanced features of ESi Server (such as VMotion, High Availability, and Clustering support) have not been tested with Historian. For information regarding VMWare compatibility and its supported software and hardware environments, please visit: VMWare Best Practices and Limitations Disk Growth To prevent disk growth during run time, make sure you pre-allocate the hard disk in your VMware image. Important: If the VMware disk needs to grow at runtime because of IHA growth or creation, the Data Archiver will be slowed. If there is not enough disk space on the host machine to grow the VMware disk, the archiver may lose data. Suspended Images/Power Metered Images ESi servers have power meter functions and options as well as the ability to suspend images to conserve power. We do not recommend or support these functions due to the potential effects on the Guest operating system, specifically in regards to polling I/O and timely updates. 30
31 I/O Devices and Connections and VMware USB Controller Limitations There are a multitude of devices and methods of communications on the market. These devices may be used if you can successfully connect them from the virtual machine through the physical HOST, but we do not support the setup of that connection. Be aware that device drivers used to write to proprietary cards for the ESi HOSTS as part of virtual device setup can cause issues. The USB controller has these limitations when using Historian and VMware: Minimum virtual hardware version 7 is required. Only one USB controller of each type can be added to a virtual machine. The USB arbitrator can monitor a maximum of 15 USB controllers. If your system includes an additional number of controllers and you connect USB devices to these controllers, the devices are not available to be passed through to a virtual machine. You must add a USB controller to a virtual machine before you can add a USB device. You must remove all USB devices from a virtual machine before you can remove the controller USB Device Limitations USB devices have these limitations when using Historian and VMware: A virtual machine may have up to 20 USB devices attached to it; however, each unique USB device can only be attached to one virtual machine at a time. Unsupported USB devices may not interact as expected with other ESi features. Additional VMware Notes GE Digital cannot guarantee the performance of the Historian software in a virtualized environment due to the wide range of parameters associated with the hardware, configuration, memory settings, third-party software installations, and the number of virtual machines running; all of which can affect performance. Therefore, GE Digital cannot provide support related to the performance of the Historian software running on a virtual machine if it is determined that the issue is related to the virtual environment. Also, GE Digital does not provide support or troubleshoot a customer's virtual machine infrastructure. It is the responsibility of you, the customer, to ensure that the performance of the Historian software and any third-party applications (especially those not recommended by GE Digital) are adequate to meet the needs of your run mode environment. GE Digital does not support issues related to functionality that is not available as a result of running in a virtual machine infrastructure. Examples include the functionality of card level drivers such as those for the Genius family of drivers, the Allen-Bradley DH/DH+ drivers, the Cyberlogic's MB Driver for the SA85 card, as well as functions requiring direct video access. Check with the vendor of your third-party application for support statements regarding that third-party product's ability to run in a virtualized environment. For more detailed information regarding VMware specifications and requirements, visit the VMware web site: 31
32 Compatibility with Other GE Products Several GE products work with Historian. The following is a general set of required versions to work with Historian 7.0. Important: If you want to enable the Strict Authentication feature in Historian 7.0, be aware that you will need to apply the latest SIMs that support this feature for all Proficy clients that connect to the Archiver, including the ones listed in this table. In addition, there may be SIMS to allow pre-5.0 collectors and client applications such as Excel Add-In to connect. Refer to the SIM download page for update for Historian and other Proficy products. Product Proficy Portal Machine Edition View CIMPLICITY ifi Plant Apps Smart Signal CSense Proficy Historian Analysis Proficy Knowledge Center Minimum Required Version 3.5 SP2, 3.5 SP R2, SP1* or greater 6.2, 6.3** SP1 SIM5 or greater 6.0 SP1 SIM5 or greater * For customers using ifi, there was a change in the HKEY_CURRENT_USER registry values for WebSpace and it will no longer work with the existing SIM. Ensure that you get the latest ifi SIMs. The following article provides additional instructions: * For customers using ifi 5.1 and 5.0 with Historian 7.0, there was a change in the registry entry that has to be updated. This article provides additional instructions. ** For Plant Apps customers using the Historian Type = GE Proficy Historian 3.0 to connect to Historian 7.0, both the Enabled and Disabled options for Enforce Strict Client Authentication selection are supported. ** For Plant Apps customers using the Historian Type = GE Proficy Historian to connect to Proficy Historian 7.0, only the Disabled option for Enforce Strict Client Authentication selection is supported. In Historian 5.0, the Historian HKEY_CURRENT_USER registry key values were changed. The programs accessing the server collection through the SDK are unaffected. Any program or script that directly accesses the registry keys or any Terminal Server login scripts that try to configure a list of servers by importing registry keys directly will no longer work. Such programs need to access the server collection via SDK calls, not directly. 32
33 Additional Setup Information See the topics below for additional setup information. Regional Settings Support Historian supports the following regional settings available in the Windows Control Panel: Decimal symbol - one character Digit grouping symbol List separator - one character Time style Time separator Short date style Date separator Time and Date Formatting Avoid changing the time style or short date style in regional settings to values that are outside of the standard styles provided. Changing these values to non-standard styles may result in improperly formatted times and dates. Historian supports the following short date formats, some of which may not be available in certain language versions of Windows: dd/mm/yy dd/yy/mm mm/dd/yy mm/yy/dd yy/dd/mm yy/mm/dd Datatype Support The following table lists the supported Historian data types and their sizes: Data Type Single Float Double Float Single Integer Double Integer Quad Integer Unsigned Quad Integer Unsigned Single Integer Unsigned Double Integer Size 4 bytes 8 bytes 2 bytes 4 bytes 8 bytes 8 bytes 2 bytes 4 bytes 33
34 Data Type Byte Boolean Fixed String Variable String Binary Object Scaled Size 1 byte 1 byte Configured by user. No fixed size. No fixed size. Historian does not support the use of the Binary Object data type with the Data Collectors. Refer to the SDK online Help for more information on working with BLOB data types. 2 bytes Enabling Trust for a Self-signed Certificate on Chrome At install time, a self-signed certificate is generated that you use with Historian web applications. A self-signed certificate is a certificate that is signed by itself rather than signed by a trusted authority. Therefore, a warning in the browser appears when connecting to a server that uses a self-signed certificate until it is permanently stored in your certificate store. 1. In the Google Chrome browser go the site to which you want to connect. A warning box appears to inform you that that the certificate is not trusted by the computer or browser. Click the gray lock to the left of the URL, and then select the Details link. The Security Overview screen appears. 2. Click the gray lock to the left of the URL, and then select the Details link. The Security Overview dialog appears. 3. Click the View certificate button. The Certificate window appears with three tabs: General, Details, and Certification Path. 4. Select the Details tab and click the Copy to Files button. 5. Follow the wizard to save the certificate to a local file. Use the default format: DER encoded binary.509 (.CER). 6. Right-click the.cer file, and select Install Certificate. 7. Select Trusted Root Certificate Authorities and click OK. Note: Do not let the wizard select the store for you. A Security Warning dialog may appear. If it does, disregard this dialog by clicking the Yes button to install the certificate. 8. Restart the browser and connect to the server. 9. Open the URL authenticated by the certificate. If error messages do not appear, the certificate was successfully imported. 34
35 Installing Historian Historian Installation Historian provides a single install program on a DVD or ISO with options that install each system component. Historian Startup Procedure Overview This topic contains general instructions about how to install and start up Historian: 1. Design your system architecture. Decide what collectors to install on which nodes, what computers to designate as the Historian Server and the Historian Administrators, whether or not they will be web-based, and how much memory and disk space you can assign to buffers and archives. Record the computer names of each node. 2. Ensure that data sources are installed. 3. Set up your Historian environment. Refer to Setting Up the Historian Environment on page At the server node, insert the Historian DVD and select Install Historian. Follow the prompts for the installation process, selecting either Single Server or Historian Mirror for installation. 5. Activate your product using the latest Licensing Software at Note: To add a component, re-run the install and select that component. Do not deselect previously installed components as they will be uninstalled. 6. Once you have installed Historian, re-run the installation to install collectors where needed. ifi Select the Historian ifi Collector to collect data and the ifi AE Collector to collect alarms and events. When prompted, type in the name of the Historian server as the destination for archived data. OPC Alarms & Events To collect data from an OPC AE server, select the OPC AE collector and when prompted select the name of the OPC AE server. OPC Data To collect data from an OPC v1.0 or v2.0 server, select the OPC Data collector and when prompted, select the OPC data collector from the list provided. Calculation To install a calculation collector, select it from the list of options and when prompted, type in the name of the Historian server as the destination for the calculated values. Server-to-Server Select the Server-to-Server collector to collect data from one Historian server ( r;source ) and store it on another ( r;destination ). When prompted, type in the name of both the source and destination Historians. Server-to-Server Distributor Select the Server-to-Server Distributor to configure tags at the source archiver and send the tags to a destination archiver. When prompted, type in the name of both the source and destination Historians. OSI PI Select the OSI PI Collector to collect data from an OSI PI node and store it in the Historian. Select the OSI PI Distributor to collect data from the Historian server and store it on an OSI PI node. When prompted, type in the name of the OSI PI and Historian servers. 7. Restart your computer if prompted to do so. 35
36 If your collector services are not configured for automatic start up, manually start them. 8. For the Windows-based Historian Administrator clients, start the Administrator from the Historian Startup Group. When the Historian Administrator's main screen appears, you are ready to set up archives, collectors, and tags in the Data Store Maintenance, Collector Maintenance, and Tag Maintenance screens. Refer to the Using the Historian Administrator manual for details. Note: Collectors will not appear in the Historian Administrator until they are started. Historian Installation Limitations With a Historian install, you are limited to the Simulation Collector. If you want to install other collectors, use a collectors-only install. With a Historian install, you are limited to the Historian Administrator, Historian Web Admin Console, and the Historian Trend Client. If you want to install other clients, use a client-specific install. You cannot close your current archive with a Historian Mirror Primary Server and Historian Mirror Node installation. This is because closing the current archive introduces archive synchronization risks in a mirrored environment. The restriction is enforced on all Historians, even those not using mirroring. You cannot use size-based archives with a Historian Mirror Primary Server and Historian Mirror Node installation. This is because having archives of different sizes introduces archive synchronization risks in a mirrored environment. The restriction is enforced on all Historians, even those not using mirroring. Installing a Single Server Historian If you are changing the role of a Historian Server that was previously a Mirror Node in any other configuration (Single Server or Mirror Primary Server), you must uninstall Historian first. See Uninstalling Historian on page 84. Important: The number of alarms in the Historian Alarm and Events database, and the frequency of new events being added during the installation affects how long the install takes to complete. For example, an install for a system with 1.5 million alarms can take up to three hours to complete. To install a single server Historian: 1. Log in to the Windows Server as an administrator. 2. Start the Historian installation by double-clicking the InstallLauncher.exe file. This file is found on your ISO or DVD. 3. Click the Install Historian link to start the Historian installation. The Historian Welcome splash screen appears. 4. Click Next. The End User License Agreement appears. 5. Read the license agreement and check Accept. 6. Click Next. 36

37 The Where do you want to install Historian? prompt appears. 7. To install on the default disk C:\, click Next. The Override the default Historian data path screen appears. 8. Click Next to use the default path. The default Historian Data Path is C:\Proficy Historian Data. 9. On the Choose the type of install you want to perform screen, select Historian Single Server and click Next. The Choose a Password for Built-in Admin account screen appears. 10. Enter the Admin Password and the re-enter the password in the second field to confirm, and then click Next. Note: The Password must be at least 6 characters, contain at least 2 numeric characters (0-9), and at least 3 alphabetic characters (a-z, A-Z). The LDAP server as the identity provider screen appears. 11. Select No (default) and click Next. The Ready to Install screen appears. 12. Click Install. The Installing progress bar appears and the installation proceeds. During the install, a Historian screen briefly appears, and then the InstallShield wizard appears. A progress bar appears while the software is prepared for installation and configuration. The installation process may take some time. Note: If you are upgrading from either Historian 6.0 Enterprise or previous releases of Historian 7.0 including any of the service packs, this installation option will remove both Client Manager and Configuration Manager. This will have no impact on your data or use of Historian unless you intend to run a mirrored system. You will be prompted by the system and asked if you want to continue with the install. Choosing Yes will remove Client Manager and Configuration Manager and install a single server architecture. Choosing No will terminate the installation program. 37

38 The Installing Proficy Common Licensing screen appears. A progress bar appears while the license is installed. This may take several minutes. The Historian Installing screen with the progress meter reappears. The Historian Trend Client and Historian Web Admin icons appear on the desktop, as well as the Historian SDK Help and Historian Electronic Book help icons. 13. Click Exit when the Installation Successful screen appears. The Reboot Required dialog appears. 14. Click Yes to restart your computer. This may take several minutes. Single Server Historian Architecture This diagram shows the components of a single-server Historian system. About Historian Log Files Log files are created after you start historian for the first time. When you start collection, the Historian server creates an archive. It places archive files in the Archives folder specified during installation. By default, this is C:\Historian Data\Archives on Windows operating systems. All files with the.iha extension are Archive data files. The file with the.ihc extension contains configuration information. 38
39 The Archiver and collectors place log files in the Logfiles folder. By default, this is C:\Historian Data\LogFiles on Windows operating systems. The Archiver produces two log files, a DATA ARCHIVER-.LOG file and a DATA ARCHIVER.SHW file. Each collector also produces two log files. For example, the Simulation Collector produces these files: SimulationCollector-01.log and SimulationCollector.shw. You can view log files using Notepad or any other text editor. The.LOG file shows events, warnings, and errors produced by the Archiver during operation; the.shw file shows current configuration information that applies to the Historian Server. Installing Historian using the Command Line You can install Historian using the command line. The command-line install functionality allows you to generate an output template/answer file. This file contains all the necessary properties for an installation. The generated file can then be consumed as an input file for further installations requiring the same properties. (The input file consumed should never be generated from scratch.) Input template/answer files can be used in conjunction with silent or passive install flags. For example, if you want to produce a template/answer file for a Historian Server installation with specific options, you can do the following: Invoke the installer, specifying that an output template be generated. Go through the installer UI, selecting all your desired options, up until the last screen before installation (the screen that reads You are ready to install.). At this point, the template/answer file is generated, whether you proceed with the software install or not. Use the generated file as an input template/answer file for another Historian Server installation where you want to use the same specified options. To run the installer from the command line: 1. Open the command-line tool and locate install.exe in the Historian folder on your install disk. 2. Run install.exe using flags and arguments, as described in Install Command-Line Syntax on page 39. install.exe <argument>=<value> [-q] [-quiet] [-s] [-silent] [-passive] Install Command-Line Syntax Command-line Syntax install.exe <argument>=<value> [-q] [-quiet] [-s] [-silent] [-passive] Arguments Argument RootDrive DataPath Description The drive letter where the Historian Server binary files will be installed. The disk path where the Historian data files will be stored. 39
40 Argument HistAdministrator Password AutoMethod LdapServerUrl Ldap_Authentica tionmethod LdapSearchBindSer viceaccountpass word LdapSearchBindSer viceaccountdn LdapSearchBind SearchBase LdapSearchBind SearchFilter LdapGroups_Histori anvizadmin LdapGroups_Histori anvizuser LdapGroups_Histori anrestapiread LdapGroupSearch Base LdapGroupSearchFil ter LdapGroup MaxSearchDepth LdapGroupSearchSub tree LdapMailAttribute Name Description The password for the built-in admin account. This can be either LDAP or UAA. ldap://{ldap Server hostname or IP address}:389 The LDAP Authentication Method is only SearchAndBind enabled. The password for the LDAP Search And Bind account being used. The LDAP Search And Bind Distinguished Name. The LDAP Search And Bind Search Base. The LDAP Search And Bind Search Filter. The Distinguished Names of LDAP groups members of which will have histo rian_visualization.admin scope. The Distinguished Names of LDAP groups wgise members will have histori an_visualization.user scope. The Distinguished Names of LDAP groups whose members will have histo rian_rest_api.read scope. Defines the part of the directory tree under which group searches should be performed. An LDAP Groups Search Filter, which defines the matching criterion for group membership search for user. Use {0} to denote user name. An LDAP Groups Maximum Search Depth, which determines how many levels deep the UAA searches for nested groups to determine user s group membership. The LDAP Groups Search Subtree flag, which determines whether UAA searches the sub-tree of the LDAP base. The LDAP attribute that contains a user s primary address. The default is mail. Output Template Flags and Arguments The /t flag directs the install to generate a template/answer file. This is a human-readable ML file with the desired configuration options. It is populated with user information. The file is always placed in the temp directory, defined by the %temp% environment variable. The TemplateOutputDirectory argument is optional. If it is used, then the file is also deposited at the specified location, in addition to the temp directory. The template file is named template_historian.xml. 40
41 Syntax: /t TemplateOutputDirectory=<template-output-file-location> Input Template Flags and Arguments The /c flag directs the install to consume a template/answer file at the specified location. This is a human-readable ML file with the desired configuration options. It is populated with user information. Command-line parameters always supersede or override template-provided parameters. Syntax: /c TemplateInputFile=<template-input-file-location> Silent and Passive Flags -q, -quiet, -s, -silent Using either of these flags directs the install to progress silently, with no UI whatsoever. -passive This flag directs the install to show progress via the UI and then disappear upon install completion, regardless of whether the install has succeeded or failed. Install Command Examples Install Historian with an LDAP Authentication Configuration This example shows how to install Historian with an LDAP Authentication configuration: Install.exe -s HistAdministratorPassword=HistAdmin AuthMethod=LDAP LdapServerUrl=ldap:// :389 LdapSearchBindServiceAccountPassword=ldapPass Ldap_AuthenticationMethod=SearchAndBind LdapSearchBindServiceAccountDn="CN=AdminUser,CN=Users,DN=ge,DN=com" LdapSearchBindSearchBase="DC=test,DC=ge,DC=com" LdapSearchBindSearchFilter="CN={0}" historian_dbpwd=ge LdapGroups_HistorianVizAdmin="CN=testuser1,CN=Users,DN=ge,DN=com" LdapGroups_HistorianVizUser="CN=testuser2,CN=Users,DN=ge,DN=com" LdapGroups_HistorianRestApiRead="CN=testuser3,CN=Users,DN=ge,DN=com" LdapGroupSearchBase="DC=test,DC=ge,DC=com" LdapGroupSearchFilter="member={0}" LdapGroupMaxSearchDepth="1" LdapGroupSearchSubtree="true" Generate a Template File This example shows how to generate a template file: Install.exe /t TemplateOutputDirectory="C:\Users\User1\Desktop" HistAdministratorPassword=HistAdmin AuthMethod=LDAP 41
42 LdapServerUrl=ldap:// :389 LdapSearchBindServiceAccountPassword=ldapPass Ldap_AuthenticationMethod=SearchAndBind LdapSearchBindServiceAccountDn="CN=AdminUser,CN=Users,DN=ge,DN=com" LdapSearchBindSearchBase="DC=test,DC=ge,DC=com" LdapSearchBindSearchFilter="CN={0}" historian_dbpwd=ge LdapGroups_HistorianVizAdmin="CN=testuser1,CN=Users,DN=ge,DN=com" LdapGroups_HistorianVizUser="CN=testuser2,CN=Users,DN=ge,DN=com" LdapGroups_HistorianRestApiRead="CN=testuser3,CN=Users,DN=ge,DN=com" LdapGroupSearchBase="DC=test,DC=ge,DC=com" LdapGroupSearchFilter="member={0}" LdapGroupMaxSearchDepth="1" LdapGroupSearchSubtree="true" Install with a Generated Template File The example shows how to install Historian using a generated template file: Install.exe /c TemplateInputFile="C:\Users\User1\Desktop\template_Historian.xml" Installing Historian in a Mirrored Environment 1. See Installing Historian Mirror Primary Server on page See Installing Historian Mirror Node on page 44 or Installing Historian Mirror Node using the Command Line on page 46. Installing Historian Mirror Primary Server To install Historian in a mirrored environment, first install the primary server: 1. Log in to the Windows Server as an administrator. 2. Start the Historian installation by double-clicking the InstallLauncher.exe file. This file is found on your ISO or DVD. 3. Click the Install Historian link to start the Historian installation. The Historian Welcome splash screen appears. 4. Click Next. The End User License Agreement appears. 5. Read the license agreement and check Accept. 6. Click Next. The Where do you want to install Historian? prompt appears. 42
43 7. To install on the default disk C:\, click Next. The Override the default Historian data path screen appears. 8. Click Next to use the default path. The default Historian Data Path is C:\Proficy Historian Data. 9. On the Choose the type of install you want to perform screen, select Historian Mirror Primary Server and click Next. The Choose a Password for Built-in Admin account screen appears. 10. Enter the Admin Password and the re-enter the password in the second field to confirm, and then click Next. Note: The Password must be at least 6 characters, contain at least 2 numeric characters (0-9), and at least 3 alphabetic characters (a-z, A-Z). The LDAP server as the identity provider screen appears. 11. Select No (default) and click Next. The Ready to Install screen appears. 12. Click Install. The Installing progress bar appears and the installation proceeds. During the install, a Historian screen briefly appears, and then the InstallShield wizard appears. A progress bar appears while the software is prepared for installation and configuration. The installation process may take some time. The Installing Proficy Common Licensing screen appears. A progress bar appears while the license is installed. This may take several minutes. The Historian Installing screen with the progress meter reappears. The Historian Trend Client and Historian Web Admin icons appear on the desktop, as well as the Historian SDK Help and Historian Electronic Book help icons. 13. Click Exit when the Installation Successful screen appears. The Reboot Required dialog appears. 43
44 14. Click Yes to restart your computer. This may take several minutes. Installing Historian Mirror Node See Installing Historian Mirror Primary Server on page 42. Install your Historian Mirror Primary Server before you install the Mirror node. After installing your Mirror, the Mirror node will not have a Configuration Manager or the Embedded Web Services. These are only included on the Primary node and are shared by Mirror nodes. The configuration setting of the mirror node should be the same as the primary node. This includes activating the same License Key on the mirror node as the primary node. Primary and secondary nodes should be in a domain. This setup will not work on the work group. Historian Global Security (strict client and collector authentication) should be disabled. If the primary node is down, new tags cannot be added using the secondary node because the Configuration Manager is down. Ensure that the mirror node has the same drive name as that of the primary node for the archive files, buffer files, and the log files. For more information on how to configure a mirror node, refer to the web-based Historian Administrator Console e-book. To install the Historian Mirror node: 1. Log in to the Windows Server as an administrator. 2. Start the Historian installation by double-clicking the InstallLauncher.exe file. This file is found on your ISO or DVD. 3. Click the Install Historian link to start the Historian installation. The Historian Welcome splash screen appears. 4. Click Next. The End User License Agreement appears. 5. Read the license agreement and check Accept. 6. Click Next. The Where do you want to install Historian? prompt appears. 44

45 7. To install on the default disk C:\, click Next. The Override the default Historian data path screen appears. 8. Click Next to use the default path. The default Historian Data Path is C:\Proficy Historian Data. 9. On the Choose the type of install you want to perform screen, select Historian Mirror Node and click Next. The Choose a Password for Built-in Admin account screen appears. 10. Enter the Admin Password and the re-enter the password in the second field to confirm, and then click Next. Note: The Password must be at least 6 characters, contain at least 2 numeric characters (0-9), and at least 3 alphabetic characters (a-z, A-Z). The LDAP server as the identity provider screen appears. 11. Select No (default) and click Next. The Ready to Install screen appears. 12. Click Install. The Installing progress bar appears and the installation proceeds. During the install, a Historian screen briefly appears, and then the InstallShield wizard appears. A progress bar appears while the software is prepared for installation and configuration. The installation process may take some time. The Installing Proficy Common Licensing screen appears. A progress bar appears while the license is installed. This may take several minutes. The Historian Installing screen with the progress meter reappears. The Historian Trend Client and Historian Web Admin icons appear on the desktop, as well as the Historian SDK Help and Historian Electronic Book help icons. 13. Click Exit when the Installation Successful screen appears. The Reboot Required dialog appears. 45
46 14. Click Yes to restart your computer. This may take several minutes. Installing Historian Mirror Node using the Command Line You can install a Historian Mirror node using the command line. This allows you to install silently or passively. To run the installer from the command line: 1. Open the command-line tool and locate install.exe in the Historian folder on your install disk. 2. Run install.exe using flags and arguments, as described in Install Command-Line Syntax on page 39. install.exe [-q] [-quiet] [-s] [-silent] [-passive] historian_cmd=mirror Archive Duration Property Change in a Mirrored Environment When the Archive Duration property is changed in a mirrored environment, the changes will take effect after a time gap of 15 minutes. Mirroring FAQs What happens when a node that was down comes back? Does the data written to one get synched to the other? There is no automatic synching. If a node is down, the information to be written is buffered by the Client Manager, or if the Client Manager is down, it is buffered by the collector. When the node comes back, data is written to the data archiver. There is only one Configuration Manager on the primary node. Can I still do configurations if the primary node goes down? No. If the Configuration Manager is not available, you can read configurations, as the collectors know about the tag information, but you cannot edit or modify configurations. Is the Configuration Manager a single point of failure? Yes. If the primary node goes down, you cannot edit configurations but, since information about the configuration is stored in the registry of each client, the information is still available for reads and writes in the event of a primary node failure. What happens if one mirror crashes in the middle of a read/write request? This operation continues to function in the same way as in prior releases. The Client Manager holds a copy of the message request; once the node comes back, the write operation resumes. Any read request that is sent will fail if the node goes down during the read. The server where my primary node is installed is down. What is the expected behavior? The Web Admin and Web Trend Tool will not be available; you can look up tag configuration on the Historian Administrator (Windows), but you will not be able to edit tag configuration information. All other clients should continue to work as expected, with the ability to collect and store data, search for tags, trend and report on tag information. The Client Manager on the primary node is down, but the server is running. What is the expected behavior? 46
47 The Web Admin and the Web Trend Tool will not be available; however, you can still do tag configuration on the Historian Administrator (Windows). All other clients should continue to work as expected, with the ability to collect and store data, search for tags, trend and report on tag information. One of the data archivers is down, but at least one is active. What is the expected behavior? The system should continue to function as designed. The Web Admin, Web Trend Tool, and Historian Administrator (Windows), as well as other clients should continue to work as expected, with the ability to collect and store data, search for tags, trend and report on tag information. If there are calculated tags on a multi-node system, are the calculations done on all nodes? Yes. Are Historian tag stats created independently? Can they be different between different nodes? Yes. These are queries, not tags, to a specific Data Archiver. As writes are independent, one Data Archiver may be ahead of another, so the stats may vary slightly. How do we ensure that the data is consistent across data archivers? Tag information is consistent; there is only one tag. The time stamp and value are sent to all mirrors. Are there specific log files that I should be looking for to help diagnose issues with mirror failure modes? No changes were made to the logs for data archiver; however, there are new log files for Client Manager and Config Manager. There are now two *.ihc files: *config.ihc and *CentralConfig.ihc. What is the difference between the two? *CentralConfig.ihc is the overall master config used by the Configuration Manager. The *config.ihc is used by the Data Archiver and is generated from *CentralConfig.ihc. This was done to maintain consistency between Historian versions. To maintain configurations between versions or Historians, refer to Reusing an archive configuration file in the Historian ebooks. With mirroring, is Microsoft Cluster Server still supported? What is the recommended approach? Mirroring is offered as a Microsoft Cluster Server replacement as an HA offering for Enterprise Historian. Running in MCS has not been tested nor validated to date with mirrored Historian systems. Must SQL Server be installed in a system with mirrors? No. SQL Server is only required for AEDB. How does mirroring work with SQL AE logging? There is still an alarm archiver; it doesn't go through the Client Manager, so it talks to SQL as before. How does AE fit with their synching? There is one database, so everyone talks to the same SQL database. You can cluster the database, but that is separate from mirroring. How does mirroring work in a workgroup environment or non-domain? Mirroring is not supported in Workgroups. Are there any issues when making changes in the Historian Administrator and a mirrored system? You must establish a mirror using the Historian Web Admin Console, but compatibility with all APIs has been maintained. Therefore, you can make tag changes in either the Web Admin or the VB Windows Admin, and those changes will show up in both Admins. Are there any plans to add more than three mirrors? No performance benefits have been seen beyond three mirrors. Do redundant collectors behave differently in mirrors? 47
48 No, there should not be any difference in behavior. Are there any conflicts when using Port for Historian to Historian communications? For example, Site to Corporate? No. Client Manager is now on Port 14000, Data Archiver is on Port 14001, and the Configuration Manager is on Port If load balancing uses round robin reads, does the cache need to be loaded separately on both machines, and will it decrease performance? It does require more memory. The Client Manager makes the decision on where to send the messages, and it knows about configuration. There is some overhead, but it is overcome by having multiple data archivers to service multiple requests. That is why there is a 1.5 improvement with two mirrors, instead of 2. Are there any additional considerations if Mirroring is being used with other GE apps like Workflow or Plant Apps? No, it still looks like one Historian to other outside systems. Is the store and forward feature also used in mirroring? Yes. This is a feature of the Collector and is independent of mirroring. Once the message is given to the Client Manager, it is done. If the Client Manager can't reach one of the Data Archivers, it buffers the request until the Archiver is available. In a mirrored environment, do existing queries and reports work the same? Yes. Everything works the same as it did before. It sees it as a single Historian and communicates over the same ports through the same API. Does the Historian OPC HDA server still work in a mirrored environment? Yes. If data is being written to two Data Archivers, does this double the traffic from the collector? No. It does not double traffic from the collector; it sends a single message to the Client Manager. The traffic is doubled between the Client Manager and the two Data Archivers. Installing Historian with LDAP Integration Before installing Historian with LDAP integration, make sure you have an LDAP server set up. For Historian, this is a Windows domain controller or an Active Directory server. On your domain (or Active Directory), create users and groups as usual. In order for Historian s User Authentication and Authorization server to log users in, you also need to identify an attribute in your LDAP schema that can be used as the user name in Historian. This attribute needs to be able to uniquely identify each user. In addition, as Historian user names cannot contain space, values of this attribute should not contain space either. Typically, samaccountname or userprincipalname meet these conditions in an LDAP directory backed by Windows Active Directory. By default, the samaccountname is used in the Search Filter, but this can be modified during your Historian installation. 1. Log in to the Windows Server as an administrator. 2. Start the Historian installation by double-clicking the InstallLauncher.exe file. This file is found on your ISO or DVD. 3. Click the Install Historian link to start the Historian installation. 48
49 The Historian Welcome splash screen appears. 4. Click Next. The End User License Agreement appears. 5. Read the license agreement and check Accept. 6. Click Next. The Where do you want to install Historian? prompt appears. 7. To install on the default disk C:\, click Next. The Override the default Historian data path screen appears. 8. Click Next to use the default path. The default Historian Data Path is C:\Proficy Historian Data. 9. On the Choose the type of install you want to perform screen, select Single Server and click Next. The Choose a Password for Built-in Admin account screen appears. 10. Enter the Admin Password and the re-enter the password in the second field to confirm, and then click Next. Note: The Password must be at least 6 characters, contain at least 2 numeric characters (0-9), and at least 3 alphabetic characters (a-z, A-Z). The LDAP server as the identity provider screen appears. 11. Select Yes and click Next. The Provide the URL for the LDAP server screen appears. 12. Type the URL in the LDAP Server URL text box The URL should begin with ldap:// or ldaps://. Note: Be sure to append the port number (configured for your LDAP protocol) to the IP address (for example, ldap:// :389). 13. Click Next. The Please enter details for search and bind authentication screen appears. 49

50 Search and Bind means to search for users with a filter, typically "samaccountname={0}" for Windows Active Directory. Note that the default value for Search Filter is set to "samaccountname={0}" and "Mail Attribute Name" defaults to "mail", which you can leave as is. As an alternative to samaccountname, you may choose to use userprincipalname instead. 14. Type the appropriate entries in the Service Account DN, Service Account Password, Confirm Password, and Search Base text fields, and click Next. The Specify Distinguished Names of LDAP Groups mapped to each UAA scope screen appears. 50

51 In this screen, you configure how LDAP groups are mapped to three UAA scopes that you create. You can use tools such as ADExplorer from Microsoft to find out the full DN of a group. You can assign a scope to multiple LDAP groups; enter them together, separately by semicolon, in the field corresponding to the scope. If you leave any of them blank, it means that you are not associating any LDAP groups to the corresponding scope. 15. Type the appropriate entries in the historian_visualization.admin, historian_visualization.user, and historian_rest_api.read scope fields and click Next. The Specify how searches for users' LDAP group membership should be conducted screen appears. 51

52 This screen determines how a LDAP user account's LDAP group membership is determined. In the example shown in the screen, you are finding groups with the member attribute, which contains the user's common name. If Max Search Depth is set to 1, there is no search for nested groups. If Max Search Depth is set to a value greater than 1, then searching in nested groups is enabled. Note: Use semicolons to separate DNs. If you leave any of them blank, then you are not associating any LDAP groups to the corresponding scope. 16. Type the appropriate entries in the Search Base, Search Filter, and Max Search Depth text fields, and make sure the Search Subtree box is checked, and click Next. The Ready to Install screen appears. 17. Click Install. The Installing progress bar appears and the installation proceeds. During the install, a Historian screen briefly appears, and then the InstallShield wizard appears. A progress bar appears while the software is prepared for installation and configuration. The installation process may take some time. Note: If you are upgrading from either Historian 6.0 Enterprise or previous releases of Historian 7.0 including any of the service packs, this installation option will remove both Client Manager and Configuration Manager. This will have no impact on your data or use of Historian unless you intend to run a mirrored system. You will be prompted by the system and asked if you want to continue with the install. Choosing Yes will remove Client Manager and Configuration Manager and install a single server architecture. Choosing No will terminate the installation program. The Installing Proficy Common Licensing screen appears. A progress bar appears while the license is installed. This may take several minutes. 52
53 The Historian Installing screen with the progress meter reappears. The Historian Trend Client and Historian Web Admin icons appear on the desktop, as well as the Historian SDK Help and Historian Electronic Book help icons. 18. Click Exit when the Installation Successful screen appears. The Reboot Required dialog appears. 19. Click Yes to restart your computer. This may take several minutes. Configuring Historian to use LDAP via SSL When you log into either the Web Trend Client or Web Admin of Historian 7.0, a username and password are entered and need to be validated by the LDAP server. Historian needs to send the username and password entered on the login page to the LDAP server. This must be done securely by encrypting those credentials and sending to the intended LDAP server. The following two methods configure the UAA server to communicate via LDAPs (LDAP via SSL). In both methods, after the install you must manually change the UAA.yml file to complete the configuration. Important: Do not change any other aspects of this file unless instructed by GE. Unauthorized modifications may impact the operation of your software and violate the terms of your GE Support Agreement. The following methods assume: You have an LDAP server that is listening for LDAPs communications. You entered the URL to reach the server. The UAA server, like any LDAPs client, gets a certificate when it connects to an LDAP server via SSL. The following two configuration methods differ in what happens at that point. Although you know the URL that you used to reach the server, to prove you are connected to the intended server, compare the certificate received against the expected certificate. Each LDAP server has a unique certificate containing its name and public key. Method 1: Add the Certificate to the UAA Server Keystore and Refer to It This method is the most secure because it gives both encryption of network traffic and the highest assurance of communicating with the LDAP server you desire. You store the expected server certificate in a password protected binary keystore file. The ability to change the keystore is password protected. This prevents someone from modifying the expected server certificate to match a malicious imposter LDAPs server. 1. Export the server certificate in DER format. The exact steps differ depending on what LDAP server you are using. For the Active directory, use the Certificates Snap In. In this example, assume you exported to ldaps-public-der.cer 2. Import the certificate into the keystore file used by the UAA server: a) At the command prompt, change the directory to the location of the keystore file. Typically, this is: c:\program files\ge Digital\Historian Embedded Web Server\conf 53
54 When prompted for a password, enter the word password. When asked, Do you want to trust this certificate? press y (to enter yes). b) Locate the keytool.exe file on the machine with the Historian Embedded Tomcat Container service. Use that full path name in this command line: C:\Program Files\Java\%JAVA_HOME%\bin\keytool.exe" -import -alias ldaps -file ldaps-public-der.cer -keystore keystore c) When prompted for a password, enter the word password. d) When asked Do you want to trust this certificate?, type the letter y (to enter yes). 3. Configure the UAA.YML file (typically found in C:\Program Files\GE Digital\UAA) to refer to that certificate by the alias name you gave during import. The following example, uses ldaps: ldap: ssl: skipverification: false sslcertificatealias: ldaps 4. Restart the Historian Embedded Tomcat Container service and try logging into the Trend client Method 2: Skip Certificate Verification (less secure) If you do not have access to the certificate for the LDAP server, this method still provides you with encrypted communications. You must ensure that you are communicating with the intended LDAP server, which you provided in your URL. If that gets maliciously redirected, then you could be talking to a different server. 1. In the UAA.YML file (typically found in C:\Program Files\GE Digital\UAA), set the skipverification to true as shown in the following example: ldap: ssl: skipverification: true 2. Restart the Historian Embedded Tomcat Container service and log in to the Trend Client or Web Admin. 54
55 Installing Historian in a Cluster Environment Installing Historian in a Cluster Environment Historian works with the Microsoft Cluster Service Manager to ensure high availability of the Historian server. If the primary Historian node in the cluster experiences difficulties, Historian is automatically started on another node to take over. Server high availability is managed through the Microsoft Cluster Service Manager. Read the Important Product Information document and verify that all the prerequisites are properly installed. Configure a failover cluster in Windows Server 2008 R2. For more information, refer to Configuring Clusters section in the Using Historian Administrator ebook. To use Historian Alarms and Events in a cluster environment, select the appropriate SQL Server for both the Cluster Nodes. 1. In Windows, go to All Programs > Administrative Tools > Failover Cluster Manager on any of the cluster nodes and make it the primary node. 2. Install Historian on that node. 3. Change the Historian Data path to the Cluster Shared Disk. 4. Enter valid SQL Server details. 5. Complete the Historian installation. 6. After installing Historian on Cluster Node1, repeat steps from 1 to 5 for Node 2. Configuring Historian Cluster Service on Windows Server 2008 Complete all of the following tasks to configure Historian Cluster Service. Adding User-defined Resource Types to the Cluster Instance If Failover Clustering is enabled on a machine, the Historian install will register two user-defined resource types in the cluster. To ensure that the user-defined resource types are added to the cluster instance: 1. In Windows, go to All Programs > Administrative Tools > Failover Cluster Manager. 2. Right click the cluster instance and select Properties: 55
![3. If the Historian User defined resource types are not available, click the Add button. Select [HistorianInstallDir]/x64/Server/Historian.](/docs-images/73/68376991/images/56-0.jpg "dll as the resource DLL with Historian and AlarmArchiver as both the resource type names and display names. Adding Historian Service to the Cluster 1.")
56 3. If the Historian User defined resource types are not available, click the Add button. Select [HistorianInstallDir]/x64/Server/Historian.dll as the resource DLL with Historian and AlarmArchiver as both the resource type names and display names. Adding Historian Service to the Cluster 1. In the Failover Cluster Manager, right-click the cluster instance, and choose More Actions > Create Empty Service or Application.. 56

57 2. Rename the newly created, empty service. For example: Historian. 3. Right-click the Historian empty service and choose Add a resource > More resources > 3 - Add Historian. 4. Right-click the Historian empty service and choose Add a storage. 5. Create the IP address and network name that allow access to a clustered Historian instance regardless of the actual node the Historian server resides on. a) Right-click the Historian empty service and choose Add a resource > 1 - Client Access Point. b) Enter the IP Address that will be used for clustered Historian. 6. Add Historian resource dependencies: a) Right-click Properties on the New Historian resource in the Historian service summary list. b) Click the Dependencies tab and add all three resources as dependencies to New Historian. 57


58 You can now bring the Historian service online. Adding Alarm Archiver Resource to the Cluster 1. Right-click the Historian empty service and choose Add a resource > More resources > 1 - Add Alarm Archiver. 2. Right-click Properties on the New Alarm Archiver resource in the Historian service summary list. 3. Click the Dependencies tab and add New Historian as a dependency. It should now be possible to bring the Alarm Archiver service online. Note: he Alarm Archiver resource does not require other dependencies like Cluster Disk and IP Address. 58


59 Configuring Generic Services To configure Client Manager, Configuration Manager, Diagnostic Manager, Historian Embedded PostgreSQL Database, Historian Embedded Tomcat Container, and Historian Indexing Service, you must configure them as Generic Services in the Failover cluster as shown below: Begin with configuring the Client Manager Resource Dependency, and then repeat the steps for the Configuration Manager, Diagnostic Manager, Historian Embedded PostgreSQL Database, Historian Embedded Tomcat Container and Historian Indexing Service. 1. Right-click Properties on the Client Manager resource in the Historian service summary list. 2. Click the Dependencies tab and add the IP Address dependency: 3. Click Apply and click OK. 4. Right-click Properties on the Client Manager resource in the Historian service summary list. 5. Click the General tab and select the Use Network Name for Computer Name option: 59

60 6. Click OK. 7. Repeat the steps in this procedure for the Configuration Manager, Diagnostic Manager, Historian Embedded PostgreSQL Database, Historian Embedded Tomcat Container and Historian Indexing Service. You can now bring the Historian service online: 60
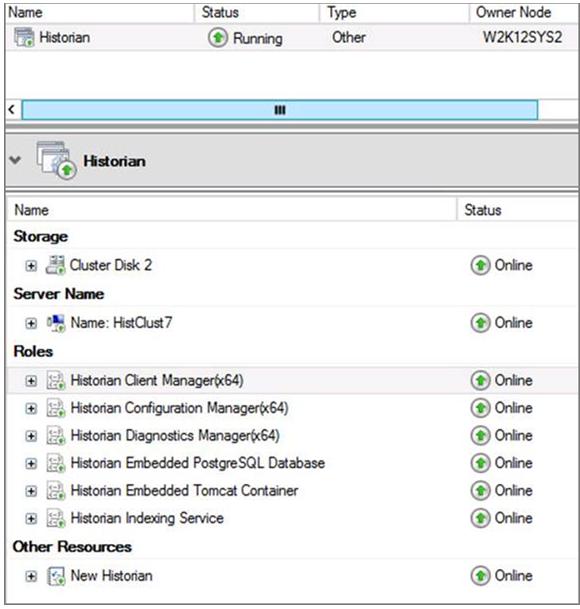
61 61
62 Installing Historian Components Installing Historian Components After you have installed the Historian server and restarted your system, you can install additional components, such as Client Tools, Excel Add-in, Data Collectors, and Alarms and Events. Unlike earlier versions of Historian, the Historian Administrator and HDA Server are now installed as part of the Client Tools installation, which means you do not need to run a separate installation for each of those components. Installing Historian Client Tools The Historian Client Tools installation installs the following components by default: Historian Client Tools Historian Administrator Historian Documentation and Help OLE DB Driver and Samples HDA Server User API and SDK Historian Client Access Assembly Collector Toolkit The Historian Excel Add-in 64-bit component is not selected in the Client Tools Select Features screen. 62

63 You can select the check box for the Excel Add-in to install it at the same time as the Historian Client Tools. Otherwise, you can install it in a separate installation using the Install Historian screen. Note: You can deselect the check boxes for all the components except the Historian Client Tools and Historian Client Access Assembly. However, if you deselect any of the components to install them at a later time, such as the Historian Administrator or HDA Server, when you re-run the installation, make sure you select all of the previously installed components in addition to the ones that you are installing, because any component that you do not select that was previously installed will be uninstalled during the later installation. 1. Run the Historian install. The Historian Splash screen appears. If this screen does not appear, double-click the InstallLauncher.exe file on the ISO or DVD to display it. 2. Click the Historian Client Tools link. The Select Features screen appears with the check box for Historian Client Tools selected. By default, the check boxes for Historian Administrator, HDA Server, Historian Documentation & Help, OLE DB, and User API and SDK are also selected. If you do not want to install them at this time, deselect the check box(es) before continuing with the installation process. 3. Select the Proficy Historian Client Tools check box and click Next. The Historian Server Security screen appears. 4. Select All Users to give all local and domain users full access to the Historian server. Or, select Specific User to add one user with full access to the Historian server. 5. Click Next. The OPC Core Components screen appears briefly, and the installation proceeds. 63
64 6. Click Yes if you want to start the Historian services now, or click No if you want to apply software updates (SIMS) before starting Data Archiver. 7. Select Yes, I want to restart my computer now, and click Finish. Installing Historian Data Collectors Use the Historian install media (.iso disk image file) to install data collectors. Consider the following information as it may applicable to the collector you are installing. All collectors, except the ifi and Machine Edition View collectors, can run as Windows services. If so configured, they will continue to run after you log out, and can be configured to start automatically when you start your computer. The OSI PI SDK is required for the OSI PI Collector installation; however, the OSI PI SDK does not ship with Historian. If the OSI PI SDK is not installed, the OSI PI Collector will not start. If you install the OSI PI Collector on a machine that does not contain your PI Server, be sure to install the OSI PI SDK on the machine with the OSI PI Collector. If you install the Wonderware Collector on a machine that does not contain your Wonderware server, be sure to install the ODBC Driver for SQL on the Wonderware Collector machine. If the ODBC Driver for SQL is not installed, the Wonderware Collector cannot connect to the Wonderware server. If you plan to select Predix Cloud for your destination server and you are not using Historian Configuration, see Offline Configuration for Collectors on page 68 To install Historian Data Collectors: 1. Launch the.iso disk image file and run InstallLauncher.exe. The Install Historian splash screen appears. 2. Click Install Collectors. The Historian Collectors Welcome screen appears. 3. Click Next. The License Agreement screen appears. 4. Click Accept and click Next. 5. Select an installation drive letter and click Next. 6. Enter the Data Directory and click Next. The Choose Collectors screen appears. 7. Choose the Collector(s) that you want to install. 8. Click Next. 9. Follow the instructions on the configuration screens that appear to configure parameters for each collector selected for installation. When you are done, you may be prompted to start Historian services. If so, click Yes, or click No to apply software updates before starting the Historian services. 10. Click Exit. The Install Historian screen appears. 11. Click Exit. 64
65 You may be prompted to restart your computer to complete the installation. If so, click Yes to restart or No to restart later. The collectors do not appear in the Historian Administrator until after the collectors have been started. Installing a Collector Silently using the Command Line Several Historian collectors can be installed silently. A silent install is a method of installing the application software and requires little or no user interaction. This method allows you to perform an unattended installation as it is not necessary for you to direct the installation process. This command line install applies to the following collectors: Server-to-Server OSI PI Wonderware File Collector ifix Collector Calculation Collector ifix Alarm and Event collector OSI Pi Distributor collector OSI S2S Distributor collector Command-Line Syntax Command Collectors_Install.exe Argument -s, -silent Using either of these flags directs the install to progress silently, with no user interaction. Parameters <CollectorName>_AddLocal (1=install and 0= uninstall) <CollectorName>_sourceservername <CollectorName>_destinationservername Note: destinationservername and cloud parameters do not apply to the File Collector, ifi Collector, or Calculation Collector. For a Historian destination, use the machine name. For a Predix Cloud destination, use "Cloud". <CollectorName>_clientsecret <CollectorName>_clouddestaddress <CollectorName>_clouddestaddress <CollectorName>_configserver Note: If using offline configuration, set this parameter equal to none. For example: HistorianS2SCollector_configserver=none 65
66 <CollectorName>_identityissuer <CollectorName>_clientid <CollectorName>_zoneid <CollectorName>_proxy <CollectorName>_datapointattributekey1 <CollectorName>_datapointattributevalue1 <CollectorName>_datapointattributekey2 <CollectorName>_datapointattributevalue2 <CollectorName>_datapointattributekey3 <CollectorName>_datapointattributevalue3 <CollectorName>_datapointattributekey4 <CollectorName>_datapointattributevalue4 <CollectorName>_datapointattributekey5 <CollectorName>_datapointattributevalue5 Installing a Collector Silently Note: Installing a collector can potentially remove a collector that is already installed. For example, if you already installed the OSI PI Collector and then run the silent install for the Server 2 Server Collector, the OSI PI Collector can be uninstalled. If you are installing a new collector on a machine where there is an existing collector that you want to retain, you must use command line parameters for the existing collector as well. 1. Navigate to the Collectors folder on the install media. 2. At a command prompt, enter: Collectors_Install.exe -s 3. Add parameters as appropriate and assign the correct values to the parameters using the equal sign (=). Be sure to replace <CollectorName> with the name of your collector. For example, you might replace <CollectorName> with HistorianS2SCollector: HistorianS2SCollector_AddLocal=1 If the parameters are not assigned a value, then the default values are used. 1 This command installs the Historian Server 2 Server collector and sets the source server to be PC1 and destination server to be PC2. >Collectors_Install.exe -s HistorianS2SCollector_AddLocal=1 HistorianS2SCollector_sourceservername=PC1 HistorianS2SCollector_destinationservername=PC2 66
67 2 This command installs the Historian File Collector and sets the destination server name to be PC1. >Collectors_Install.exe -s HistorianFileCollector_AddLocal=1 HistorianFileCollector_destinationservername=PC1 3 This command installs the ifi Collector and sets the destination server name to be PC1. >Collectors_Install.exe -s HistorianiFICollector_AddLocal=1 HistorianFileCollector_destinationservername=PC1 This command installs the ifi A&E Collector and sets the destination server name to be PC2. >Collectors_Install.exe -s HistorianiFixAECollector_AddLocal=1 HistorianiFixAECollector_destinationservername=PC2) 4 This command installs the OSI Pi Distributor collector and sets the source server name to be PC1. >Collectors_Install.exe -s HistorianPiDistributor_AddLocal=1 HistorianPiDistributor_sourceservername=PC1 5 This command installs the Historian S2S Distributor collector and sets the destination server name to be PC2. >Collectors_Install.exe -s HistorianS2SDistributor_AddLocal=1 HistorianS2SDistributor_HistorianS2SDistributor_destinationservername=PC2 After your Historian collector silent install, be sure to reboot; otherwise subsequent installs will fail. Configure OPC Collector Support for Remote OPC Servers After you have installed the Historian Data Collectors, you can configure OPC Collector support for remote OPC Servers using DCOM. 1. Enter the remote OPC Server details (machine name or the IP address of the server). 2. Enter the ProgID. For example, for remote ifi OPC server, enter Intellution.OPCiFI.1. 67

68 NOTE: Ensure that the remote OPC server has DCOM configuration enabled. 3. Optionally, click Add Additional Remote OPC Server. Configure DCOM settings after the installation is complete. Searching for a Remote OPC Server ProgID You can use any OPC client to find the ProgID of the OPC Server. Alternately, you can search from the Registry. 1. Click Start, enter regedit, and click regedit.exe. 2. Search for the CLSID of the OPC Server under My Computer\HKEY_CLASSES_ROOT\VendorName.OPC.Name Use the CLSID value for the ProgID. Offline Configuration for Collectors Offline Configuration helps you to define the configuration properties of a collector (Taglist, Tag properties, and collector interface properties) in ML format. This feature is particularly useful when collectors connect to the Predix Cloud. When collectors connect to the Historian server, the Historian Web Admin Console (VB admin or Historian Web admin) provides you the opportunity to add tags, set tag configuration properties, and collector interface properties. However, when collectors connect to the Predix Cloud, there is no admin console available. Therefore, to add and configure tags when the collector connects to the cloud, you need to use offline configuration. 68
69 Configuring Collector and Tag Properties It is recommended that you add the Collector property section above the Tag property section in your configuration ML file. To enable offline configuration: 1. During the collector installation process, select the option for Offline Configuration. This creates a sample configuration ML file in the path C:\Program Files\GE Digital\<Collector name>\config. 2. Add the following collector interface properties to the top of your configuration ML file. The following is an example for the Server to Server Collector interface properties: <Import> <Collectors> <Collector Name="<Collector Name>"> <InterfaceType>ServerToServer</InterfaceType> <InterfaceGeneral1>10</InterfaceGeneral1>... </Collector> </Collectors> 3. Add your TagList and Tag properties to your ML file. <Collectors>... </Collectors> <TagList Version="1.0.71"> <Tag> <Tagname>simCollector1</Tagname> <SourceAddress>Result = CurrentValue("SJC1GEIP05.Simulation00002")</SourceAddress>... </Tag> <Tag> <Tagname>simCollector2</Tagname> <SourceAddress>Result = CurrentValue("SJC1GEIP05.Simulation00002")</SourceAddress>... </Tag>... </TagList> </Import> 4. Add the closing </Import> tag to the end of your ML file. 5. Save your ML file and copy it to the appropriate directory. For example, copy the Server to Server Collector file to C:\Program Files\GE Digital\Historian Server to Server Collector\Config. If you have an existing S2S_Offline_Config.xml file, you can rename it S2S_Offline_Con fig_old.xml and then rename your new ML file S2S_Offline_Config.xml. 69
70 Collector Interface Properties The collector interface properties are written in the following formal in the ML file. <Import> <Collectors> <Collector Name="<Collector Name>"> <InterfaceType>ServerToServer</InterfaceType> <InterfaceGeneral1>10</InterfaceGeneral1>... </Collector> </Collectors> </Import> where <Collector Name> is the collector name found in the ServerToServerCollector.shw file. You can configure the following properties: Property Name InterfaceType DefaultTagPrefix CanBrowseSource CanSourceTimestamp MinimumDiskFreeBufferSize MaximumMemoryBufferSize ShouldAdjustTime ShouldQueueWrites SourceTimeInLocalTime CollectionDelay DefaultCollectionInterval Possible Values ServerToServer, PI, Custom Any tag prefix name Yes, No Yes, No Size in MB Size in MB Yes, No Yes, No Yes, No Time in seconds Time in milliseconds Example <InterfaceType>Server ToServer</InterfaceType> <DefaultTagPrefix>OfflineCloud</DefaultTagPrefix> <CanBrows esource>yes</canbrows esource> <CanSourceTimes tamp>yes</cansourcetimes tamp> <MinimumDiskFreeBuffer Size>150</MinimumDisk FreeBufferSize> <MaximumMemoryBuffer Size>200</MaximumMemory BufferSize> <ShouldAdjust Time>Yes</ShouldAdjust Time> <ShouldQueueWrites>No</ShouldQueueWrites> <SourceTimeInLocal Time>No</SourceTimeInLo caltime> <CollectionDelay>2</Col lectiondelay> <DefaultCollectionInter val>1000</defaultcollec tioninterval> 70
71 Property Name DefaultCollectionType DefaultTimeStampType DefaultLoadBalancing DefaultCollectorCompression DefaultCollectorCompressionDeadband DisableOnTheFlyTagChange DefaultCollectorCompressionTimeout DefaultSpikeLogic DefaultSpikeMultiplier DefaultSpikeInterval DataRecoveryQueueEnabled DefaultAbsoluteDeadbanding DefaultAbsoluteDeadband Possible Values Polled, Unsolicited Source, Collector Yes, No Yes, No Double type value Yes, No Time in milliseconds Yes, No Any numeric value Any numeric value Yes, No Yes, No Double type value Example <DefaultCollection Type>Unsolicited</De faultcollectiontype> <DefaultTimeStamp Type>Source</Default TimeStampType> <DefaultLoadBalanc ing>no</defaultloadbal ancing> <DefaultCollectorCompres sion>no</defaultcollec torcompression> <DefaultCollectorCompres siondeadband> </de faultcollectorcompres siondeadband> <DisableOnTheFly TagChange>No</DisableOn TheFlyTagChange> <DefaultCollectorCompres siontimeout>0</default CollectorCompressionTime out> <DefaultSpikeLog ic>yes</defaultspikelog ic> <DefaultSpikeMultipli er>4</defaultspikemulti plier> <DefaultSpikeInter val>5</defaultspikeinter val> <DataRecoveryQueueEn abled>no</datarecov eryqueueenabled> <DefaultAbsoluteDeadband ing></defaultabsolut edeadbanding> <DefaultAbsoluteDead band> </defaultab solutedeadband> 71
72 Property Name RedundancyEnabled RedundancyPrincipalCollector RedundancyIsActiveCollector InterfaceGeneral1 InterfaceGeneral2 InterfaceGeneral3 InterfaceGeneral4 InterfaceGeneral5 Possible Values Yes, No Yes, No Customized for each collector Customized for each collector Customized for each collector Customized for each collector Customized for each collector Example <RedundancyEn abled>no</redundancyen abled> <RedundancyPrincipalCol lector></redundancyprin cipalcollector> <RedundancyIsActiveCol lector>no</redundancyis ActiveCollector> <InterfaceGener al1>10</interfacegener al1> <InterfaceGeneral2>4</In terfacegeneral2> <InterfaceGener al3> </inter facegeneral3> <InterfaceGeneral4></In terfacegeneral4> <InterfaceGeneral5></In terfacegeneral5> Tag List and Tag Properties The Tag List and Tag properties are written in the following format in the ML file: <Import> <Collectors> </Collectors> <TagList Version="1.0.71"> <Tag> <Tagname>simCollector1</Tagname> <SourceAddress>Result = CurrentValue("SJC1GEIP05.Simulation00002")</SourceAddress>... </Tag> <Tag> <Tagname>simCollector2</Tagname> <SourceAddress>Result = CurrentValue("SJC1GEIP05.Simulation00002")</SourceAddress>... </Tag>... </TagList> </Import> 72
73 You can configure the following properties: Property Name Tagname Description EngineeringUnits Comment Possible Values Any name Description of tag Unit of value Comment of tag Example <Tagname>simTag1</Tag name> <Description>simTag1</De scription> <EngineeringUnits>Centi grade</engineeringunits> <Comment>simTag1</Com ment> DataType FixedStringLength InterfaceName SingleFloat, SingleInteger, DoubleFloat, FixedString, VariableString, Scaled, Byte, Boolean, DoubleInteger, UnsignedSingleInteger, UnsignedDoubleInteger, QuadInteger, UnsignedQuadInteger, Blob, Time, Array, MultiField <DataType>Single Float</DataType> <Fixed StringLength></Fixed StringLength> <InterfaceName></Inter facename> SourceAddress CollectionType CollectionInterval CollectionOffset LoadBalancing TimeStampType Tag source address Polled, Unsolicited Interval of collection. Unit depends on TimeResolution. Time in seconds Yes, No Source, Collector <SourceAddress>Result = CurrentVal ue("sjc1geip05.simula tion00002")</sourcead dress> <CollectionType>Unso licited</collectiontype> <CollectionInter val>2</collectioninter val> <CollectionOffset>0</Col lectionoffset> <LoadBalancing>No</Load Balancing> <TimeStamp Type>Source</TimeStamp Type> 73
74 Property Name HiEngineeringUnits LoEngineeringUnits InputScaling HiScale LoScale SpikeLogic SpikeLogicOverride InterfaceCompression InterfaceDeadbandPercentRange InterfaceCompressionTimeout InterfaceAbsoluteDeadband InterfaceAbsoluteDeadbanding ConditionCollectionEnabled ConditionCollectionTriggerTag Possible Values Any numeric value Any numeric value Yes, No Any numeric value Any numeric value Yes, No Yes, No Yes, No Any double type value Time in milliseconds Any double type value Yes, No Yes, No Name of tag Example <HiEngineeringU nits> </hiengi neeringunits> <LoEngineeringU nits>0</loengineeringu nits <InputScaling>Yes</In putscaling> <HiScale> </HiS cale> <LoScale>0</LoScale> <SpikeLogic>Yes</SpikeL ogic> <SpikeLogicOver ride>yes</spikelogicover ride> <InterfaceCompres sion>yes</interfacecom pression> <InterfaceDeadbandPer centrange>0</inter facedeadbandper centrange> <InterfaceCompression Timeout>0</InterfaceCom pressiontimeout> <InterfaceAbsoluteDead band>0</interfaceabsolut edeadband> <InterfaceAbsoluteDead banding>no</interfaceab solutedeadbanding> <ConditionCollectionEn abled>no</conditioncol lectionenabled> <ConditionCollectionTrig gertag>simtag1</condi tioncollectiontrig gertag> 74
75 Property Name ConditionCollectionComparison ConditionCollectionCompareValue ConditionCollectionMarkers NumberOfElements UserDefinedTypeName CalcType TimeResolution InterfaceGeneral1 InterfaceGeneral2 InterfaceGeneral3 InterfaceGeneral4 InterfaceGeneral5 Possible Values =, EQ, <, LT, <=, LE, >, GT, >=, GE,!=, NE Any numeric value Yes, No Raw, Analytic, PythonExpr Seconds, Milliseconds, Microseconds Customized for each collector Customized for each collector Customized for each collector Customized for each collector Customized for each collector Example <ConditionCollectionCom parison>eq</conditioncol lectioncomparison> <ConditionCollectionCom parevalue>0</condition CollectionCompareValue> <ConditionCollectionMark ers>no</conditioncollec tionmarkers> <NumberOfElements></Num berofelements> <UserDefinedType Name></UserDefinedType Name> <CalcType>Raw</CalcType> <TimeResolution>Sec onds</timeresolution> <InterfaceGener al1>10</interfacegener al1> <InterfaceGeneral2>4</In terfacegeneral2> <InterfaceGener al3> </inter facegeneral3> <InterfaceGeneral4></InterfaceGeneral4> <InterfaceGeneral5></In terfacegeneral5> Installing the Historian Excel Add-in You must have Microsoft Excel installed on your computer. You can install the Excel Add-In on any client or server on which the API has been installed. 1. Run the Historian install. The Historian splash screen appears. 2. Click Historian Excel Add-in. The installation runs and completes. 75
76 Note: On a 64-bit Windows operating system, the default destination folder for all 32-bit components (such as collectors and APIs) is C:\Program Files\Historian\x86. Similarly, for all 64-bit components (such as Excel Add-in 64-bit and SQL Server 64-bit), they are installed in C:\Program Files\Historian\x If asked to restart your system, click Yes. Once the restart is completed, you can activate the Excel Add-in. Activating the Add-In for Excel 2016/2013/ Open a new Excel 2016/Excel 2013/Excel 2010 worksheet. 2. Select File > Options. The Excel Options dialog box appears. 3. Click Add-Ins. 4. In the Manage drop-down list, click Excel Add-ins and click Go. The Add-Ins dialog box appears. 5. Select Historian Add-In and Proficy_Historian_Helper and click OK. The Add-In is now ready to use and the Historian menu is now available in the Microsoft Excel toolbar as shown in the following image. 5. Select Historian Add-In and Proficy_Historian_Helper and click OK. The Add-In is now ready to use and the Historian menu is now available in the Microsoft Excel toolbar. 76
77 If the Historian Add-In is not listed, click the Browse button to locate the Historian.xla file. If you install the Excel Add-In prior to installing Microsoft Excel, the install program copies the Historian.xla file to your Historian folder (typically, C:\Program Files\Proficy\Historian or C:\Program Files (x86)\proficy\historian). If you decide to add the Excel Add-In after installing Excel, open Excel and on the Tools menu, select Add-Ins and then from the dialog box that appears, click Browse to locate the Historian.xla file. If you uninstall Historian after installing the Excel Add-In as described, ensure that you clear the Historian check box in the Microsoft Excel Add-Ins dialog box. If you do not clear this option, you will receive an error each time you open Microsoft Excel. Activating the Add-In for Excel Open a new Excel 2007 worksheet. 2. Click the Microsoft Office button and click Excel Options. The Excel Options dialog box appears. 3. Click Add-Ins. 4. In the Manage drop-down list, click Excel Add-ins and click Go. The Add-Ins dialog box appears. 77

78 5. Select Historian Add-In and Proficy_Historian_Helper and click OK. The Add-In is now ready to use and the Historian menu is now available in the Microsoft Excel toolbar. Activating the Add-In for Excel Open a new Excel 2003 worksheet. 2. Select Tools > Add-Ins. The Add-Ins dialog box appears. 78

79 5. The Add-In is now ready to use and the Historian menu is now available in the Microsoft Excel toolbar as shown in the following image. 3. Select Proficy Historian Add-Inand click OK. The Add-In is now ready to use and the Historian menu is now available in the Microsoft Excel toolbar. Installing Alarms and Events Selecting the Install Alarms and Events option in the Install Historian screen installs the Historian Alarm Archiver. You must specify the SQL Server database details for the archiver, as the archiver requires access to SQL Server. Important: If you have the Alarms and Events component installed on a pre-7.0 version of Historian, then after you upgrade to Historian Server 7.0, you must install the Alarms and Events component separately. The Alarms and Events component must be installed on the same machine as the Data Archiver. When upgrading from 4.5 to 7.0 Alarms and Events, since the DB Schema for 4.5 is different, if you select the same database name that is pre-populated by default, you will get an error message: Later or Higher version of Alarms and Events database is already in stalled. Hence, you cannot proceed further. You need to enter a different database name and then proceed with the upgrade. To install Alarms and Events: 1. Run the Historian install. The Historian splash screen appears. If this screen does not automatically appear, double-click the InstallLauncher.exe file on the ISO or DVD to display it. 2. Click Install Alarms and Events. The Alarm and Event Archiver screen appears. The Server Name and Database Name fields might be auto-populated with default values. 79
80 3. To change either of these fields, type a different entry in the respective text box. The Server Name is where SQL Server is installed and the Database Name is for the database where the alarms and events are archived. 4. Select the box for Use SQL path as data and log path and enter the SQL Server login credentials in the Admin User and Password fields. If you choose to use Windows Authentication, select the box for Use Windows Authentication and enter your Windows admin credentials in the Admin User and Password fields. 5. Click Next. It may take several minutes for the installation to complete. 6. If asked to restart your system, click Yes. 7. To verify that the Alarms service has started, go to the Services window and look for the Historian Alarm Archiver. Startup Type is Automatic, meaning it is started automatically when the system is started or restarted. Historian's Alarm and Event (A&E) archiving offers the ability to collect A&E data from any OPC-compliant A&E server and store it in an integrated relational database. Historian Alarm and Event data is associated with the related process data from its source to allow for quick analysis. For more information, refer to Historian Alarms and Events. Using a Remote SQL Server to Store Alarms If you have chosen to connect Historian to a remote SQL Server, you must ensure the following conditions are met: The Historian Alarm Archiver service must be run on a user account that has privileges to log into the SQL Server using Windows Authentication. The Default Backup Path, found on the Archive screen, must be a shared directory that is accessible to both the Historian Data Archiver and the remote SQL Server. It is recommended that this shared directory be placed on the same computer as the Historian Data Archiver service. Installing the Historian Administrator You must to run the Client Tools install before installing the Historian Administrator. In addition, when you choose to run the Installing Historian Client Tools on page 62, Historian Administrator is selected by default and is installed along with the Client Tools. If you want to install the Historian Administrator at a later time, deselect the check box before continuing with the Client Tools installation. You can install a Historian Administrator on any node that connects to the Server through a Historian API. 1. Run the Historian install. The Historian Splash screen appears. If this screen does not appear, double-click the InstallLauncher.exe file on the ISO or DVD to display it. 2. Click the Install Client Tools link. The Select Features screen appears. 3. Click Run. 80
81 The Welcome screen appears. 4. When the Install Wizard appears, select the Historian Administrator option in addition to any previously installed Historian components, and then click Next. The program installs the Historian Administrator and any other components associated with it, including the API. If you prefer, you can install the Historian Administrator at the same time you install other options, by selecting all desired options at once. Note: If you intend to run all components (Historian Server, Collectors, and Client tools) on a single computer, choose Install Historian on the splash screen and proceed with the installation wizard. Starting the Historian Administrator 1. Select Start > Program Files > Historian. 2. Select Historian Administrator to open the application. You can create a shortcut to start Historian from a desktop icon. 3. Optionally: Click on the Main link. The Login dialog box appears. Select the server from the drop-down menu, enter your username, password, and domain, if any, and then click OK. If you leave the UserName, Password, and Domain fields blank and click OK, then the login information of the currently logged in Windows user is used. The Historian System Statistics screen appears. You can now proceed with all Historian Administrator functions. Installing the Historian HDA Server Both the Historian Administrator and Historian HDA Server are installed by default when you install the Client Tools. It is recommended that you keep the default selections when you are installing Client Tools, because if you deselect them during the initial Client Tools installation, and then go back to install them, any check box that you deselect during the second install will uninstall the deselected component. Note: If you choose to install the HDA server at a later time, make sure that Historian Administrator is installed before you install the HDA server, or select them together in the Select Features screen. You can install the Historian OPC HDA Server on any server on which the Historian Server has been installed. 1. Run the Historian install. The Historian Splash screen appears. If this screen does not appear, double-click the InstallLauncher.exe file on the ISO or DVD to display it. 2. Click the Historian Client Tools link. The Select Features screen appears. 3. Select HDA Server and click Next. 81
82 4. Click Run. The Welcome screen appears. 5. Click Next. The License Agreement screen appears. 6. Click Yes. The Select Features screen appears. 7. Select the component (HDA Server) that you want to install, and click Next. The Choose the Program Folder screen appears. 8. Accept the default destination folder or browse for a new location, and click Next. The Historian Server Name screen appears. Note: On a 64-bit Windows operating system, the default destination folder for all 32-bit components (such as collectors and APIs) is C:\Program Files\Historian\x86. Similarly, for all 64-bit components (such as Excel Add-in 64-bit and SQL Server 64-bit), they are installed in C:\Program Files\Historian\x64. NOTE: When the HDA Server option is selected, then the Historian install wizard will install Microsoft.NET Framework 4.5 and the OPC Core Components 3.00 redistributable during the installation process. 9. Enter the Historian Server name and click Next. 10. Read the Configuration Review screen and click Next. 11. Select Yes, I want to restart my computer now, and click Finish to complete the installation. Installing Historian SDK If you need to create customized programming for the Historian Server, use the Historian Software Development Kit (SDK) with Visual Basic or any application that provides a VBA programming interface, such as ifi, Microsoft Excel or Microsoft Word. The Install Wizard places the Historian SDK in the System32 directory and automatically registers it. To use the SDK, set up a project reference with the Historian SDK. Installing the Historian Client Access API The Historian Client Access API is a.net assembly that interacts with Historian from any.net applications. It is installed automatically when the Historian Client Tools are installed. For Microsoft.NET-based application development, use the Historian Client Access API with C#, VB.NET, or any.net compliant application. By default, the Install Wizard places both the API and Client Access.dlls in GAC (Global Assembly Cache). If you want to reference it to any client application, you can refer the following file path: INSTALLPATH\Assembly\Historian.ClientAccess.API.dll. Important: It is recommended that you add Historian Client Access API references from the INSTALLPATH directory since global assembly cache is part of the run-time environment. 82
83 Migrating Historian Data Migrating the Alarms and Events Database from 4.5 to 7.0 Before migrating alarm and event data, ensure that you have backed up the data. If you are upgrading to Historian 7.0 and you have already collected alarms, you can migrate the Historical Alarm and Event data after upgrading to Historian 7.0. Alarms are not available for retrieval until they are migrated. New alarms collected will be available immediately. To migrate your alarms into the new alarm database, you must do a backup of the old alarms and restore them into the new database. The backup can be done before upgrade using the old Historian Administrator or it can be done after upgrade using the Proficy Alarm Database Migration Tool. To launch this tool, go to \Program Files (x86)\proficy\proficy DataBase folder and launch Proficy.Historian.AandE.Migration.exe. Backing Up Alarm and Event Data To back up the Alarm and Event data: 1. Click the Backup Existing Alarms and Events tab. 2. In the Time Range section, in the From and To fields, set the start time and end time. You may need to migrate small time periods if you have many alarms. If you need to migrate the alarms in blocks of time, do the oldest alarms first. 3. In the Database Name field, enter the name of the database you are backing up. Typically, this will be the same as the SQL Server you are currently using. 4. Select either Use Windows Authentication or Use SQL Authentication. 5. In the User Id and Password fields, enter the login credentials. Be sure to use a user name with permission to connect and backup alarms. 6. In Backup Folder Path field, give the absolute path, including file name, to store the backed up alarms. For example, c:\temp\march2010.bak. Provide the path to place the backup folder on the local computer, and if your SQL server is running on a remote computer, enter a path that exists on the remote computer. 7. Click Test Connection to check if the source database is active and the information is accurate. The Begin Backup button is activated. 8. Click Begin Backup. When the backup is complete, a count of rows backed up is displayed. Migrating Historical Alarm and Event Data after Upgrade from 4.5 If you are upgrading to this version of Historian and you have already collected alarms, you can migrate the Historical Alarm and Event data after upgrading. Alarms are not available for retrieval until they are migrated. New alarms collected will be available immediately. Before migrating alarm and event data, ensure that you have backed up the data. 83
84 To migrate your alarms into the new alarm database, you must do a backup of the old alarms and restore them into the new database. The backup can be done before upgrade using the old Historian Administrator or it can be done after upgrade using the Proficy Alarm Database Migration Tool. To launch this tool, go to \Program Files (x86)\proficy\proficy DataBase folder and run Proficy.Historian.AandE.Migration.exe. Uninstalling Historian Uninstalling Historian removes all saved Favorites from your Trend Client and all Users and Scopes you created. To keep these and other configurations on an upgrade, do not uninstall Historian unless you are changing server roles as previously described. If you must uninstall Historian on an upgrade, you can Export your favorites and save your data and tag configuration files for future use. For information on uninstalling OPC Data Collectors, refer to the Modifying and Uninstalling OPC Collectors section of the Historian Data Collectors manual. 1. To uninstall Historian from your computer: a) Double-click the Programs / Uninstall a Program link in the Control Panel. b) Select Historian and click Uninstall. Note: Historian archives are not removed by default. If you need to remove them, delete the folder manually. A progress meter appears, showing that the software is being uninstalled. This may take some time. To abort the uninstall, click Cancel. 2. To remove all related software from your computer: a) Double-click the Programs / Uninstall a Program link in the Control Panel. b) Select Proficy Common Licensing, and click Uninstall. Using the Migration Tool The IHA Migration Tool (MigrateIHA.exe for 32 bit or MigrateIHA_x64.exe for 64 bit) allows you to migrate data up to 30 years old if the data is already stored in IHA files from any version of Historian. Use the Migration Tool to move data from one archiver to another when you cannot simply restore the IHA in the Historian Administrator. The Migration Tool opens an IHA file as a binary data file and reads the raw samples from it. Those raw samples are then written to a destination archiver, in a similar way to how an OPC collector or File Collector would write data. Any errors returned from the data archiver are reported in the main window and repeated in the log file. Note: You can migrate UserDefined types, MultiField tags, and Array tags. When you are migrating the Data Stores, the source data store is created in the destination. 84
85 Using this Migration Tool, you can upgrade from two previous versions of Historian to the latest version. The performance of this tool is impacted with the addition of Client Manager and Configuration Manager. For best performance, use this on a Single Server install only. Migrating Historical Data You need to run this tool as an administrator to migrate and create the log files in the C:\ directory. To migrate historical data stored in IHA files from any version of Historian: 1. In the Historian folder, double-click the Migration Tool executable (MigrateIHA.exe for 32-bit or MigrateIHA_x64.exe for 64-bit) to open the IHA Migration Utility. The icon for the executable looks as follows:. 2. Select Configure Options from the Options menu. 3. Enter or modify any specific configuration information. When choosing an IHC file, do not specify one currently in use by the Data Archiver. (For more information, see Configuring Migration Options on page 85.) 4. Select File > Migrate Historical Data. The Select Historical Data File(s) dialog box appears. 5. Select a historical file and click Open. Refer to the IHA Migration Utility main screen for information on the progress of the migration and any encountered errors. Note: The IHA Migration Utility screen only displays the most recent lines of the log file. For the full set of logged messages, refer to the log file, typically located in C:\IHAMigration.Log. 6. Optionally, perform these steps: a) You can upgrade the older version's archive files to the latest version by selecting the bulk upgrade option. Stop the Data Archiver service and select File > Bulk Upgrade Historical Data. If you do a bulk upgrade of historical data immediately after you install the latest version on Historian, then save on upgrading while the system reboots. b) To clear the log messages displayed in the screen, select File > Clear Display. c) To view the logs saved in the IHAMigration.log file, select File > View Log File >.. Configuring Migration Options 1. In the Migration tool (MigrateIHA.exe for 32 bit or MigrateIHA_x64.exe for 64-bit)., select Options > Configure Options. The Migration Options dialog box appears showing the default server information and the default migration options. 85

86 2. Enter options the following options. Server Pane Field Server Username and Password Description The default server (set during installation). If you do not want to write data to the default server, enter the desired server in this field. If you have created and established Security Groups in your Historian Security Environment, you may need to enter the user name and password here. By default, if you do not supply any information, the current logged in user will be used in security checking. For more information about Historian Security, please refer to the Implementing Historian Security chapter. Options Pane Field Throttle Output Migrate Messages Log File Full Name Description Select this option to throttle any part of the migration process. Optionally, you can remove this option as required. By default, throttling is rated at 5000 events per second. If you select this option, the migration might be a bit slow. Select this option to migrate the messages into the newly created archive. Using this option may or may not reduce the size of your archives, depending on the number of messages stored in the archive. By default, messages are migrated. Modify the location of the IHAMigration.log. 86
87 Field Config File Description The configuration (*.IHC) file that you want to migrate. You must provide the IHC file before selecting an IHA file. Do not specify an IHC file currently in use by the Data Archiver. Tip: It is always advisable to take a copy of the configuration file and work on the copy rather than working on the original file. Tags to Migrate Pane Option Migrate All Tags Migrate only tags that exist in destination Migrate using tag mask Migrate only tags that exist in source config file Description Select this option to migrate all the tags from the selected archiver. Select this option to migrate all the tags that exists in the source destination. Select this option to migrate tags with the mask specified. You can specify an exact tag name to migrate that tag only. To migrate the tags that are present only with the source config file. Time to Migrate Pane Option Use IHA TimeFrame Use Below TimeFrame Description Select this option to migrate all the tags which has the IHA time frame. Select this option to migrate all the tags in the specified time frame. You need to specify the Start Date/Time and End Date/Time if you select this option. Data Migration Scenarios You can migrate tags and their data on the same Historian Server or between servers. When migrating your data, consider the following guidelines: Get new collection working first When the data is collected from the collectors or the API programs, then you should consider adding the tag definitions into the destination server and directing data to be written there before you start migration, because migration may take several hours or days. Migrate data from oldest to newest It is advisable to migrate the oldest data first and then the newest, to make the optimal use of archive space. Pay attention to TagID Every tag in Historian 4.5 and above has a property called TagID, that uniquely identifies it and allows data retrieval to locate the data. Even if you have a tag of with the same name in another archiver, that 87
88 tag has a different TagID and is considered as a different tag. You can see the TagID of a tag in the Excel Tag Export. Preserve that number when moving a tag from one system to another. The following are commonly used scenarios while migrating data on the same Historian server or between servers. Migrating a Tag and its data from one data store into another data store. See Merging a Historian Server into an existing data store on another machine. See Merging a Historian Server on page 88. Migrating a Tag and its Data If you want to separate a single large user data store of tag into multiple smaller data stores on the same machine, and if your software license allows it, then you should assign the tag to the new data store and then migrate the data. Consider when data is collected for the year 2009 in Tag1. The collected data is archived in the default User data store. If you want to move Tag1 residing in the User data store to another data store, (for example, the Motor data store), then you must create the Motor data store if it does not already exist and if your license allows it. The next step is to change the data store of the tag. You can change the data store of the tag either using Historian Administrator or using Excel Tag Import. The new incoming data gets collected in the Motor data store. If you do a raw data query, you will get only the latest data and the previous data will not be available. To get the old data, you must migrate the data residing in the User data store to the Motor data store. To migrate a tag and its data from one data store to another data store on the same server: 1. Use iharchivebackup -c to make a backup of the.ihc file. The backup of the Config file is automatically created in the Archives folder. 2. In the Historian Administrator, back up each archive from oldest to newest. 3. Launch the Migration Tool (MigrateIHA.exe for 32-bit or MigrateIHA_x64.exe for 64-bit) using Administrator privileges. 4. Select Options > Configure Options. 5. In the Server pane, enter the Server name. 6. In the Options pane, enter the IHC File path in the Config File path field, using the browse button. This is the path to the IHC backup that you made in step In the Tags to Migrate pane, select the Migrate Using Tag Mask option and enter the Tag Name you moved to the new data store. 8. In the Time to Migrate pane, ensure the Use IHA TimeFrame option is selected. 9. Select File > Migrate Historical Data. 10. Select the archive file that you backed up in Step 2 and monitor the progress of the migration. When the migration is complete, query the data to see the migrated data can be queried. Repeat with the remaining archives from oldest to newest. Merging a Historian Server A typical scenario is to merge a Historian Server into an existing data store on another machine. If your system architecture has evolved from multiple smaller servers into fewer large archives, you can eliminate the smaller machines while preserving all your tag configuration and collected data. 88
89 Consider the following example. You have two machines, Machine A and Machine B. Machine A is running current or any earlier version of Historian and has 100 tags and 10 archive files. The data of these tags are collected from the collector and is being queried by users. Machine B is running the current version of Historian. Note: This example does not include Alarm migration. If Machine A was being used to store alarms, then you need to migrate those before eliminating Machine A. You cannot migrate tags with Enumerated Data Sets. If you want to migrate data for Enumerated Data Sets, then you must create the Enumerated Data Sets in Historian Administrator or Microsoft Excel and then migrate the tags. To migrate tags which are condition based triggers, then you must create the condition-based triggers for that tag in Historian Administrator or Microsoft Excel and then migrate the tags. You can migrate data only if the file format of the archive files format is.iha. If the back-up archive is in.zip format, extract the zip files and copy all the.iha files separately in a folder. 1. Before migrating, copy the.ihc and all the.iha files from Machine A to Machine B. 2. Launch the Migration Tool (MigrateIHA.exe for 32-bit or MigrateIHA_x64.exe for 64-bit) with Administrator privileges. 3. Select Options > Configure Options. 4. In the Server pane, enter the Server name. 5. In the Tags to Migrate pane, ensure that the Migrate All Tags option is selected 6. In the Options pane, enter the IHC File path in the Config File path field, using the browse button. he path you enter is the path to the.ihc file brought over from Machine A. 7. In the Time to Migrate pane, ensure the Use IHA TimeFrame option is selected. 8. Ensure Throttle Output is selected. 9. To migrate the data, select File > Migrate Historical Data and select the archive file that has the oldest data. The tags and data are migrated to the default data store in time slices. The MigrateIHA window displays the progress and any Tag Add or Data Add errors are displayed in the log file. You can estimate the remaining time by watching the progress. 10. Repeat the previous steps for each of the remaining archives, from oldest to newest data. 11. Add the collector to the Historian Server on Machine B. See the Adding a Data Collector to an Historian Server topic in Data Collectors - General ebook Migration Tool Command-Line Syntax Command Syntax For 32-bit: MigrateIHA.exe "<IHA file name with full path>" "<IHC filename with full path>" 89
90 For 64-bit: MigrateIHA_x64.exe "<IHA file name with full path>" "<IHC filename with full path>" Command-line Options Option /NOTHROTTLE /NOMESSAGES /EISTINGTAGS /b /wait Description This does not throttle any part of the migration process, but may impact resources on the server. Optionally, you can remove this switch as required. By default, throttling is rated at 5000 events per second. This does not migrate messages into the newly created archive. Using this switch may or may not reduce the size of your archives, depending on the number of messages stored in the archive. By default, messages are migrated if this switch is not used. This will migrate data for only those tags that exist in the destination archiver. This option of the start.exe file allows the IHA Migration tool to start without opening a new window for each instance. If you are migrating a pre 4.5 IHA file you will need to have the IHC file for that IHA and specify the IHC file in the Options dialog or on the command line. Otherwise, you will get a warning message. This option of the start.exe file allows each instance of the IHA Migration tool to complete the migration before starting the next migration in the sequence. Notes If you are migrating from a command line using Historian 6.0 or above, you need to pass the IHC file. If you do not have the IHC or you are not sure you have the correct IHC then you should use the pre-4.5 version of MigrateIHA to migrate the IHA. Otherwise, the data will not migrate correctly. You should keep a copy of the original IHA file. The IHC must contain all the tags that are in the IHA file, so use the most current IHC you have. You must use double quotes when you enter the IHA and IHC file even if you do not have spaces in your file path or file name. Migrating an IHA will upgrade it to 4.5 format. If you are migrating a 4.5 IHA you should provide the IHC file in the Options dialog but if you do not have the IHC you can safely continue past the warning message. Creating a Batch File to Migrate Multiple IHA Files The IHA Migration utility migrates only one archive at a time by design. However, if you need to add more than one archive at a time, you can create a batch file to automate multiple archive merges. When creating a batch file you need to provide the batch file with a logical name and save the batch (.bat) file in a location that can be easily accessed using the command prompt. Note: When migrating any archive, you should start with the archive with the oldest data first, followed by newer data, in sequence, to minimize the amount of disk space used in the Data Archiver. 90
91 For example: cd c:\program Files\Historian start /b /wait migrateiha /NOTHROTTLE /NOMESSAGES "c:\historian Data\Backups\server_Archive001.iha" "c:\historian Data\Backups\server_Config.ihc". Interoperability of Historian Versions Interoperability guidelines for Historian versions include: Historian Collectors below v6.0 can write to Historian v7.0 Archivers; however, since the earlier collector versions cannot automatically connect to a mirror, users need to point those collectors to the mirror system. Historian Clients below v6.0 can retrieve data from Historian v7.0 Archivers. Historian v7.0 or later Clients can retrieve data from a single Historian Data Archiver below v6.0. Historian v7.0 or later Collectors can write to a single Historian Data Archiver below v6.0. An SDK program built on an Historian v7.0 or later node does not run on an Historian below v6.0. An SDK program that you created in Historian below v7.0 must be rebuilt on a computer with Historian v7.0 or later if you want to run it on that version. It is recommended that you use consistent versions of client and server applications. If you do use different client and server versions of the Historian, regularly back up all archives and tag configurations. Note: To determine the version of the server, client, and SDK, click the About link in the Historian Administrator. The version of the Historian installer can be seen in the Control Panel / Uninstall programs; this version is different from the Historian core version seen in the Historian Administrator About link. 91
92 Implementing Historian Security Implementing Historian Security Historian is a high performance data archiving system designed to collect, store, and retrieve time-based information efficiently. By default, access to these Historian archives, tags, and data files is available to any valid operating system user account. In this default environment, all users are allowed to read, write, change, and delete archives, tags, or data files in the Historian Administrator, SDK, Migration Tools, and Excel Add-In. However, you may find that you want to make these functions and data available only to authorized personnel. You can do this by creating and defining Historian Security Groups in your Windows Security. Historian includes an Electronic Signature and Electronic Records security feature. This option provides installations concerned with the FDA's 21 CFR Part 11 regulation or any site interested in added security or tracking the ability to require a signature and password every time a change in data or configuration is requested. For more information on the Electronic Signature and Electronic Records feature, refer to the Using Historian in a Regulated Environment section of the Using the Historian Administrator manual. To ensure a secure environment when using Historian security, do not create any local user accounts unless Historian is set up on a standalone machine. Whether or not you use Historian security, make sure that you disable Guest accounts on your computer to limit access to valid Windows user accounts. There are two ways in which the UAA commands can be executed. You can select one of the two for adding users and clients to the UAA server: Using the UAA Config Tool on page 100 Adding a UAA User on page 102 About Protecting Your Process If you want to restrict access to Historian archives, files, and tags, or protect your data files from unauthorized changes, you can enable Historian security. Using security is optional and is disabled by default. By enabling security, you can restrict access to the following: Modifying data using the Excel Add-In Updating security for individual tags or groups of tags Creating, modifying, and removing tags Tag protection (adding, modifying, removing, and so on) can be applied at a global level to all tags or at the individual tag level. Refer to Implementing Tag Level Security for more information. Reading data in the ifi Chart object, Excel Add-In, and Migration Utilities Writing data Starting and stopping collectors Creating and deleting collectors Creating, modifying, and deleting archives Historian uses the operating system security groups to create a security structure. You enable security for a particular set of functions by adding specific Historian Security Groups to your groups. You can also add security groups to your domain controller. Refer to the Security Tab section in the Historian Administrator Manual for information on selecting local or domain security groups. 92
93 By defining one or all of the groups, you begin to set up a security structure. Refer to the Historian Security Groups section for more information on the Historian Security Groups available. Strict Authentication With Historian's strict user account authentication features, Enforce Strict Client Authentica tion and Enforce Strict Collector Authentication, you can control access to the Historian server and safeguard user account credentials. With strict authentication enabled, only known user accounts configured on the Data Archiver server computer will be able to access a Historian server. Similarly, enabling strict collector authentication enforces the same requirement for incoming collector connections. For an account to be known at the Data Archiver, it has to exist on that archiver as a local account or exist on a Domain Controller available to the data archiver. Historian will access the local accounts or Domain Controller via Microsoft s Security Support Provider Interface (SSPI) and this involves having a Kerberos server setup optionally to assist in account validation. By default, strict client and collector authentication is enabled on new installations to maximize security. When upgrading from a previous version of Historian, strict client and collector authentication is disabled to allow compatibility with older clients or collectors that cannot be upgraded concurrently. It is recommended that all clients and collectors receive timely upgrade to the latest version, which permits enabling both strict client and collector authentication on the server for the highest security configuration. By treating clients and collectors separately, it is possible to accommodate new and legacy authentication during the upgrade process. However, upgrading all clients and collectors to the latest version immediately will achieve a high level of security. The two options, Enforce Strict Client Authentication and Enforce Strict Collector Authentication, permit flexibility during the upgrade process by selectively accommodating legacy clients and collectors. Strict Authentication Options This table provides guidelines about the different combinations of strict client and collector authentication options and their use: Strict Client Authentication Enabled Enabled Disabled Disabled Strict Collector Authentication Enabled Disabled Enabled Disabled Comment Use this for highest available security. You will need to install SIMs, if available on all pre-6.0 collectors and clients. Clients can refer to any program that connects to the Data Archiver. This includes Historian Administrator, Microsoft Excel, any OLEDB program, user written programs, or any other Proficy software. Use this if you are unable to upgrade collectors to the latest version if there is no SIM update for your collector. Use this if you have to support legacy clients and you are unable to install the SIM update on all clients. Use this for maximum compatibility with existing systems. For more information, refer to the product IPI (Important Product Information) ebook or SIM release notes. 93
94 Disabling Strict Client and Collector Authentication To permit older versions of clients and collectors to access a Historian 7.0 (or later) server, disable strict client and collector authentication. 1. Open the screen and click the DataStore MaintenanceSecurity tab. 2. In the Global Security section: Select the Disabled option button for Enforce Strict Client Authentication. Select the Disabled option button for Enforce Strict Collector Authentication. Trusted Connections in Distributed Historian Service Environment This trusted connection works only in the Domain environment and it is enabled by default. Note: If you are adding a mirror copy to an existing node, make sure that both the nodes are in the same domain. If you want to work in the workgroup setup, contact Online technical support & GlobalCare: Security Strategy Guidelines When you begin to implement security, you should first define a clear strategy. Consider the following when beginning to set up your security strategy: If you disabled the Guest account, a user must provide a valid username and password even if no groups are created. Protection is only provided for the functional areas for which you have built the associated Historian Security Groups. If you only choose to define some of the security groups, all users still have all access to any uncreated groups. All users are still assumed to be a member of a group unless that group has been created, with the exception of ih Audited Writers group. You must add the ih Audited Writers group to the Windows security groups so that a user can become a member of this group. For example, if you elect to define the ih Security Admins group and ih Archive Admins group, both the members associated with those defined groups and all other valid users still have access to such functions as creating and modifying tags until you create the ih Tag Admins security group. If you implement any Historian Security groups, you must first add and define the ih Security Admins group. Note: If you do not create and define the ih Security Admins group, all valid users are assumed to be members of this group. This membership overrides any other security group that you set. See also Historian Security Groups on page 95. Setting Historian Login Security Use Historian Login Security settings if you want to validate users at the Data Archiver, instead of at the client. By applying these settings, users and applications are forced to provide a user name and password at connect time so that the archiver can validate them. For example, users in the security group such as ih Security Admins will be checked by the Archiver. 94
95 For Historian Login Security settings, you can view and set the property from the HistorianSDKsample server properties. The current setting is shown in the data archiver SHW file. Historian Login Security property is available only in Historian SDK. To set login security using the Historian SDK: 1. Run the SDK sample. 2. Connect to a server. 3. Select the server in the list box. The Server Properties dialog box appears. 4. On the right side of the dialog box, locate the AllowClientValidation setting. By default, this value is set to TRUE. Click to set to FALSE, and click OK. Historian Security Groups Historian provides the following security groups: ih Security Admins ih Collector Admins ih Tag Admins ih Archive Admins ih UnAudited Writers ih UnAudited Logins ih Audited Writers ih Readers Historian power security users. Security Administrators have rights to all Historian functions. This group also has the ability to change tag level security, archive security, and modify the Electronic Records and Signatures option. This is the only Historian security group that overrides tag level security. Allowed to start and stop collectors, browse collectors, configure collectors, and add new collectors. Allowed to create, modify, and remove tags. Tag level security can override rights given to other Historian security groups. Tag Admins can also browse collectors. ih Tag Admins are not responsible for setting Tag Level Security. This task can only be performed by an ih Security Admins. For more information on setting Tag Level Security, refer to the Implementing Tag Level Security section. Allowed to create, modify, remove, backup, and restore archives. Allowed to write data without creating any messages. Allowed to connect the DataArchiver without creating login successful audit messages. Allowed to write data and to produce a message each time a data value is added or changed. Tag, archive, and collector changes log messages regardless of whether the user is a member of the ih Audited Writers Group. Allowed to read data and system statistics. Also allowed access to Historian Administrator. 95
96 Historian Security Group Rights Use this table to identify the types of user groups you need to create and define in your security system. Function Create Tags: Excel Add-In SDK Historian Admins File Collector ih Security Admins ih UnAudited Writers ih UnAudited Login ih Audited Writers ih Readers ih Archive Admins ih Tag Admins ih Collector Admins Remove Tags: Historian Admins SDK Modify Tags: Historian Admins Excel Add-In SDK File Collector Modify Archive Security: Historian Admins SDK Backup Archive: Historian Admins SDK Restore Backup: Historian Admins SDK Create Archive: Historian Admins SDK Start/Stop Collector: Historian Admins SDK 96
97 Function Mission Control (ifi) ih Security Admins ih UnAudited Writers ih UnAudited Login ih Audited Writers ih Readers ih Archive Admins ih Tag Admins ih Collector Admins Browse Collector: Historian Admins Read Data: Chart Object Excel Add-In SDK Write Data (UnAudited): Excel Add-In SDK Write Data (Audited): Excel Add-In SDK Modify Data: Excel Add-In SDK Update Security for Tag: Excel Add-In SDK Historian Admins Migrate Migration Tools Login Connection Messages Security Setup Example The following example takes you through the process of establishing your security needs and defining and setting up the levels of security. For this example, assume the following user needs in a plant of 14 users: User USER1 Needs Power user. Needs total access to security. Added to Security Group ih Security Admins 97
98 User Needs Added to Security Group USER2 Read/Write Data (no messages). ih UnAudited Writers USER3 Create, modify, and delete tags. ih Tag Admins USER5 Backup, restore, and create archives. ih Archive Admins Connect to Data Archiver without creating login ih UnAudited Logins USER6 successful audit messages USER8 USER4 iread/write Data (no messages). ih UnAudited Writers USER7 icreate, modify, and delete tags. ih Tag Admins istart/stop Collectors. ih Collector Admins ibackup, restore, and create archives. ih Archive Admins USER9-14 Read Data. ih Readers 1. Establish the needs of your users. For this example, assume the user needs in a plant of 14 users, as described in the previous table. 2. Add and define the ih Security Admins Group. Once you determine that you want to establish a security structure, you must create and define the ih Security Admins group. This group of users is typically the "power users" of the Historian. Security Administrator rights allow them to manage configuration and give them free rein to the entire system. For this example, only USER1 would be added to the ih Security Admins group. 3. Establish and create any other Historian Security Groups as needed. Note: Any user with Windows administrative permissions can add or remove Windows groups and users. As such, an administrator on a Windows computer, can add himself to any Historian security group. Set up the functional security groups as needed. For this example, Write, Tag, Archive, and Collector security is required, so the groups associated with those functions should be added and defined. There is no need for Audited Writers and all valid users can read data, so neither the ih Audited Writers Group nor the ih Readers Group need to be added. 4. Define any individual Tag Level security. In addition to defining ih Tag Admins that have the power to create, modify, and remove tags, you can also define individual tag level security to restrict access to sensitive tags. You can grant read, write, or administrative privileges per tag. For more information on setting Tag Level security, refer to the Implementing Tag Level Security section. Setting Up Historian Security Groups This section describes how to add the Historian Security Groups to your local and domain Windows security systems. You can choose whether Historian uses LOCAL or DOMAIN security by selecting an option on the Security tab of the Data Store Maintenance screen in the Historian Administrator. If you select the local security option, the groups are defined as local groups on the Historian server. If you select the Domain security option, the groups are defined as global groups in the primary domain controller of the Historian server. With domain security, Historian locates the Primary Domain Controller (PDC), if available, or a Backup Domain 98
99 Controller (BDC) in order to establish groups. If the PDC and all BDCs are unavailable, the system locks all users out until rights can be established with a valid PDC or BDC. Note: If you change this setting, you must stop and re-start the Historian server for this change to take effect. Creating a Local Group on Windows This procedure applies to Windows 7, Windows 8.1, Windows 10, Windows Server 2008 R2, or Windows 2012 R2. To create a new local group: 1. Open the Control Panel. 2. Double-click the Administrative Tools. 3. Double-click the Computer Management icon. The Computer Management console opens. 4. Select Groups from the Local Users and Groups folder in the system tree. 5. From the Action menu, select New Group. The New Group dialog box appears. 6. Enter the Historian Security Group name in the Group Name field. For a list of available Historian Security Groups and their functions, see Historian Security Groups on page 95. Note: You must enter the Historian Security Group name exactly as it appears. The security groups are case sensitive. 7. Optionally, enter a description of the Historian Security Group in the Description field. 8. Click Create. 9. Click Close. Adding Users to Windows Security Group This procedure applies to Windows 7, Windows 8.1, Windows 10, Windows Server 2008 R2, or Windows 2012 R2. Before adding users to your group, you must first add your users to the Windows system. To add a user to a group: 1. Open the Control Panel. 2. Double-click the Administrative Tools. 3. Double-click the Computer Management icon. The Computer Management console opens. 4. Select Groups from the Local Users and Groups folder in the system tree. 5. Select the group to which you want to add users. 6. From the Action menu, select Properties. The Users Properties dialog box appears. 7. Click Add. 99
100 8. Select the users or groups to add from the listed users or enter the names of the users or groups you want to add in the bottom field. 9. Click Add. Note: To validate the user or group names that you are adding, click Check Names. 10. When you have added all users to the group, click OK. Adding a Local User 1. Verify object type is Users or Groups. 2. Verify the From This Location setting is your local machine. (Click Locations to specify the local machine, if required.) 3. Click Advanced. The Advanced dialog box appears. 4. Click Find Now. 5. From the list of users, select the users or groups to add or enter the names of the users or groups you want to add in the bottom field. 6. In the Advanced dialog box, click OK. 7. In the Select Users dialog box, click OK. 8. In the Group Properties dialog box, click OK. Adding a Domain User 1. Verify object type is Users or Groups. 2. Verify the From This Location setting is your Windows domain: a) Click Locations to specify the domain, if required. b) Select Entire Directory or the specific domain underneath Entire Directory. c) Click OK. 3. Click Advanced. The Advanced dialog box appears. 4. Click Find Now. 5. From the list of users, select the users or groups to add or enter the names of the users or groups you want to add in the bottom field. 6. In the Advanced dialog box, click OK. 7. In the Select Users dialog box, click OK. 8. In the Group Properties dialog box, click OK. Using the UAA Config Tool Use the UAA Config tool to perform the following tasks: Add a local UAA user. Here a local UAA user means a user defined by UAA, not by an external identity provider such as LDAP. Remove a local UAA user. 100
101 Reset the password for a local UAA user. Add a local UAA user to an existing UAA group. Since OAuth2 scopes are implemented as UAA groups, this means the same as adding a scope to a user. Remove a local UAA user from an existing UAA group. A user who performs these functions is acting as the admin client and needs to know the secret of the admin client. The tool does provide a way for the user to cache the secret safely to be used later. The tool is installed in the UAA subdirectory of the Historian installation directory, typically C:\Program Files\GE Digital\UAA. Run the tool from a Windows command prompt window. Syntax The tool s syntax follows this format: uaa_config_tool verb [options] where verb is one fo the following: add_user remove_user set_user_password add_user_to_group remove_user_from_group clear_secret Run the tool without a verb or any other options to view the help screen. Options can be specified in the form of single dash followed by a short name, or double dash followed by a long name, followed by the value of the option, if any. For example, you can specify the user name Alice by either or -u Alice --UserName Alice Options The options are as follows: Short name -t -n Long name --Target --ClientId Remark URL of the UAA instance that the command should be performed on. Typically, the URL is which is the default value. This option is optional and is only needed when the user wants to run the command against a remote UAA instance (which is not recommended due to security concerns). ID of the client that the user is acting as. By default, it is admin. This option is optional and is only needed when the admin has set up the UAA to delegate certain operations to others. 101
102 -s -c -u -p -g --ClientSecret --CacheSecret --UserName --UserPassword --Group This is the secret used to authenticate the user for acting as the admin client (or an alternative client given in a --ClientId option). If the user has elected to cache the secret previously, then this option can be omitted. Otherwise, it has to be provided. This option is not followed by a value and is optional. If specified, the tool will cache the client secret so when the next time this tool is invoked the secret does not have to be specified. Note that the secret is encrypted and only the current Windows logon user can access and decrypt. Name of the user that the tool is being invoked for. For example, the user that is being added or removed. The password for the user being added or whose password is being reset. The option is only needed for the add_user and set_user_password commands. Name of the UAA group (scope) that the user is being added to or removed from. The option is only needed for the add_us er_to_group and remove_user_from_group commands. Examples To add a new user named bob with the password bobcat2 (with the admin client secret MyNotSoSe cret specified on the command line, to be cached and used later): uaa_config_tool add_user -u bob -p bobcat2 -s MyNotSoSecret -c To add user bob to the group historian_visualization.user, using the previously cached admin secret: uaa_config_tool add_user_to_group -u bob -g historian_visualization.user To remove user alice from a remote instance of UAA as an alternative client (that is, other than admin) useradmin: uaa_config_tool remove_user -u alice -t -n useradmin -s MyOtherNonSecret To clear any cached client secret: uaa_config_tool clear_secret Note: If the Windows logon account is not shared, it is not necessary to clear cached secret, since the cache is encrypted and only the same Windows user account can decrypt. Adding a UAA User These instructions are for adding users and clients to the UAA server after a non-domain or non-ldap Historian installation. You must have Internet access on the machine on which you are performing these steps. 102
103 1. Download the Ruby installer and devkit from 2. Run the Ruby installer. 3. Copy the devkit to the Ruby directory and extract the files. 4. Open the Start command prompt with Ruby and change the directory to the Ruby install location. cd C:\Ruby22 5. Enter the following commands: >Ruby dk.rb init >Ruby dk.rb install >gem install cf-uaac If your network has a proxy, you may need to add --http-proxy.<yourproxy> to the command line. For example >gem install cf-uaac --http-proxy.<yourproxy> 6. Enter the following commands: >uaac target >uaac token client get admin 7. Enter the following command to see all the uaac commands you can use to add, edit, and remove a client or user. >uaac help The user is the actual person, while the client is the application. 8. Add a user: >uaac user add <username> -- s " " You are prompted to add the password for the user. This will add the user you want; you can edit it later for scope. 9. Add scopes to the newly created user: >uaac member add historian_visualization.admin <username> >uaac member add historian_visualization.user <username> >uaac member add historian_rest_api.read <username> >uaac member add historian_rest_api.write <username> About Domain Security Groups When you configure Historian to use Domain security groups, the Data Archiver attempts to locate the groups on the Primary Domain Controller (PDC) or one of the Backup Domain Controllers (BDC). If you don't have a primary domain controller or if it is slow to access, you can have the Data Archiver access the nearest domain controller via the UseADSICalls registry key. When using a PDC, if a Primary or Backup Domain 103
104 Controller cannot be located when the Historian Data Archiver service starts, access to Historian is denied to all users. For troubleshooting, the data archiver show (.SHW) file lists all PDCs and BDCs available at the time of archiver startup. Use this list to verify that the Historian Server has visibility into the appropriate domain. When using a PDC, after the list of Domain Controllers has been established, the Historian Server will use that list to query for Security Group Membership on an as needed basis. If at any time a request for Group Membership information is made and the Primary Domain Controller is not available, Historian selects the first Backup Domain Controller and attempts the same request. If a Backup Domain Controller successfully responds to the request, the process of querying for Group Membership can stop. Otherwise, Historian will attempt to query Group Membership information from the next available Backup Domain Controller. If no Backup Domain Controller successfully responds, access to the system is denied. When using the UseADSICalls registry key, Historian does not connect to a specific domain controller and lets the operating system contact the most available one. Changing security group configuration from Local to Domain or vice versa requires that the Historian Data Archiver service be restarted for the change to take effect. Creating a Global Security Group in a Windows 2003 Domain 1. In the Control Panel, double-click Administrative Tools. The Administrative Tools dialog box appears. 2. Double-click the Active Directory Users and Computer icon. The Active Directory dialog box appears. 3. In the Active Directory Tree display, select the required Domain and select Users. 4. Right-click Users and select New > Group. The New Object - Group dialog box appears. 5. In the Group name field, enter the name of the new Historian group exactly as you have defined it. Leave the other default options unchanged. 6. Click OK to create the new group. Creating a Security Group in a Windows 2008 Domain 1. In the Control Panel, double-click Administrative Tools. The Administrative Tools dialog box appears. 2. Double-click the Active Directory Users and Computer icon. The Active Directory dialog box appears. 3. In the Active Directory Tree display, select Users. 4. Right-click Users and select New > Group. The New Object - Group dialog box appears. 5. In the Group name field, enter the name of the new Historian group exactly as you have defined it. Leave the other default options unchanged. 6. Click OK to create the new group. 104
105 Using a Windows 2003 Domain Controller with a Windows 2008 Historian Server When you use domain security with a Windows 2008 Historian Server and the domain controller is a Windows 2003 controller, you must configure the Historian Data Archiver service to log on as a valid domain account and you must add the user right Act as a Part of the Operating System to its list of rights. 1. Set up the log-on of the Historian data archiver service: a) In Control Panel > Administrative Tools, double-click Services. The Services dialog box appears. b) Double-click Historian Data Archiver. The Service dialog appears. c) In the Log On As pane, click This Account and select a domain user account. d) Click OK. 2. Add the Act As Part of Operating System right to the domain account: a) In Administrative Tools, double-click Domain Security Policy. The Default Domain Security Settings dialog box appears. b) In the Security Settings tree, select User Rights Assessment from Local Policies. c) Double-click Act as a part of the operating system policy. d) Select Define these policy settings check box, and click Add User or Group. The Add Users and Groups dialog box appears. e) Select your domain user name. f) Click Add and click OK g) In Services, restart Historian Data Archiver. You should now be able to log on to Historian Administrator using Domain Security. If you attempt to log on to the Historian Data Archiver as a Local System Account, you may be denied access because the System Account in Windows 2008 is not privileged to access the Windows 2003 Domain Administrator. A valid domain user account, however, is privileged to access the Windows 2003 Domain Administrator if it has also been granted the Act as a Part of the Operating System right. Configuring Data Archiver to use Active Directory Service Interface By default, the Data Archiver tries to enumerate all the available domain controllers during startup. If a Primary or Backup Domain Controller cannot be located when the Historian Data Archiver service starts, access to Historian is denied to all users. Also, when you have domain controller machines spread across a wide area network (WAN), you may find that logins are successful but slow. With the Active Directory Support feature, you can configure the Data Archiver to use a different set of Windows calls called Active Directory Services Interface (ADSI) when using Historian security. Configuring the Data Archiver to use Active Directory Services Interface (ADSI) allows you to: Log in to the Historian even if the Data Archiver is unable to enumerate any domain controllers during the Data Archiver startup. Access a Backup Domain Controller if a Primary Domain Controller is not available temporarily or permanently. You should configure the Data Archiver to use Active Directory Services Interface (ADSI) only when the Data Archiver fails to enumerate domain controllers. 105
106 You can determine whether or not the Data Archiver is able to locate a domain controller by viewing the data archiver.shw log file. In the data archiver.shw log file If "Group Server #01:" is empty, then the Data Archiver is unable to locate a domain controller. Security Settings ================= Group Mode : GLOBAL Use Client Windows User for Logon : TRUE Security Domain : <your domain> Group Server #01 : The following procedures provide guidelines for configuring the Data Archiver to use Active Directory Services Interface (ADSI) calls. Creating a Registry Key and Turning On UseADSICalls 1. On the Start menu, click Run. For Windows 7, Windows 8.1, Windows Server 2008 R2, and Windows Server 2012 R2, click the Windows Start button and click inside the Start Search field 2. Type Regedit and click OK. The Registry Editor dialog box appears. 3. Open the following key folder: HKEY_LOCAL_MACHINE\SOFTWARE\Intellution, Inc.\Historian\Services\DataArchiver\ 4. Add a new DWORD value: Enter the name UseADSICalls, and select Base as Decimal. 5. In the Value data field, type Click OK. 7. Close the Registry Editor and configure the Data Archiver service to run as domain administrator. Configuring Data Archiver to use Active Directory Service Interface By default, the Data Archiver tries to enumerate all the available domain controllers during startup. If a Primary or Backup Domain Controller cannot be located when the Historian Data Archiver service starts, access to Historian is denied to all users. Also, when you have domain controller machines spread across a wide area network (WAN), you may find that logins are successful but slow. With the Active Directory Support feature, you can configure the Data Archiver to use a different set of Windows calls called Active Directory Services Interface (ADSI) when using Historian security. Configuring the Data Archiver to use Active Directory Services Interface (ADSI) allows you to: Log in to the Historian even if the Data Archiver is unable to enumerate any domain controllers during the Data Archiver startup. Access a Backup Domain Controller if a Primary Domain Controller is not available temporarily or permanently. You should configure the Data Archiver to use Active Directory Services Interface (ADSI) only when the Data Archiver fails to enumerate domain controllers. 106
107 You can determine whether or not the Data Archiver is able to locate a domain controller by viewing the data archiver.shw log file. In the data archiver.shw log file If "Group Server #01:" is empty, then the Data Archiver is unable to locate a domain controller. Security Settings ================= Group Mode : GLOBAL Use Client Windows User for Logon : TRUE Security Domain : <your domain> Group Server #01 : The following procedures provide guidelines for configuring the Data Archiver to use Active Directory Services Interface (ADSI) calls. Restarting the Data Archiver Service 1. On the Start menu, click Run. For Windows 7, Windows 8.1, Windows Server 2008 R2, and Windows Server 2012 R2, click the Windows Start button and click inside the Start Search field 2. Type services.msc and click OK. The Services dialog box appears. 3. Right-click the Historian Data Archiver service and click Restart. Establishing Your Security Rights Your security identity is established upon connecting to the server. This occurs through the following steps: 1. Specifying a user name and password of an account. Upon connection, the system checks to see if you have a valid Windows 2003 account. If you have supplied a username and password (through the Excel Add-In for example), security checks that user. If username and password are not supplied and you are on a Windows 2003 or Windows 2008 machine or higher, security checks the currently logged in user. Note: If you do not pass a domain name the account will be checked locally in the same way a mapped drive attempt happens. You have to specify a username and password that exists on the server. 2. Determining group membership of that account. Once the account is validated, the server determines group membership. For more information on the process and hierarchy of the groups, refer to the Security Checking Process diagram below. 3. Caching membership profile. Once the group and tag membership are determined, it is cached for the connection and not looked up again. If users are added to or deleted from a group, the cache is not updated. Note: The cache information is per connection, and not per IP address. In other words, it is cached per application and not per system. 107
108 Figure 6: Security Checking Process 108
109 Implementing Tag Level Security In addition to defining the ih Tag Admins who have the power to create, modify, and remove tags, you can also define individual tag level security to protect sensitive tags. Set tag level security in the Historian Administrator. You do not need to use the Historian Security Groups for this security setting. You can use a Windows pre-defined group (power users, for example) or create your own separate group specifically for this function. For more information on creating and adding groups, refer to Setting Up Historian Security Groups on page 98. Users must have ih Security Admins rights to set individual tag level security, browse, or query tags in the Historian Administrator. Note: Tag security is not enforced in the Trend Client when it comes to browsing the full list of tags. Security, however, is enforced when it comes to trending data for tags for which you have permission. For example, if you are logged into the Trend Client as a user that is a member of the User Group assigned to a tag's security Read Group, you will still be able to browse all Historian tags. However, you are only allowed to trend the tags for which the user is a member of the User Group assigned to the tag's security Read Group, 1. Open the Historian Administrator. 2. Click the Tags link. The Tag Maintenance screen appears. 3. Select a tag (or group of tags) from the Tag Name section of the Tag Maintenance screen. 4. Click on the Advanced tab to display the advanced tag options. 5. In the Read Group, Write Group, or Administer Group field, select the security group that you wish to assign to the tag from the drop-down list. The drop-down list automatically lists all security groups that are defined in your Windows security environment. For example, if an ih Security Admins user selects a tag and chooses power users from the Read Group drop-down list, in addition to members of the ih Security Admins group, only a member of the power users group will be able to read data for that tag. Even a member of the ih Readers group will not be able to access data for that tag, unless they are also defined as a member of the power users group. 109
110 Retrieving Data from Historian About Retrieving Data from Historian After data collection, the Historian Server compresses and stores the information in a Data Archive or a *.iha file. Any client application can retrieve archived data through the Historian API. The Historian API is a client/server programming interface that maintains connectivity to the Historian Server and provides functions for data storage and retrieval in a distributed network environment. You can retrieve data from Historian using any number of clients, including but not limited to: Historian Analysis Knowledge Center ifi CIMPLICITY Real-Time Information Portal Dream Reports Excel Add-In Custom SDK Applications OLE DB Historian exposes various sampling and calculation modes that are used on retrieval of data that has already been collected to the archive. These modes do not effect data collection. Some sampling modes are suited to compressed data and should be used when collector compression or archive compression is used. Sampling Modes Sampling modes are used to specify how the data will be retrieved from Historian. Several modes are available, such as CurrentValue, Interpolated, Calculated and RawByTime. Sampling modes are specified in the client you use to retrieve data from Historian. For more information, refer to the Advanced Topics section in the online help. Sampling Mode CurrentValue RawByTime Results Retrieves the most recent data sample value received by the archiver, of any data quality. This does not necessarily produce the most recent raw data sample, as archive compression may not have stored the most recent raw sample. The sample has a time stamp, a value, and a quality. The time stamp returned is not typically the current time; it is the time stamp as sent by the collector. If you have a slow poll rate or if collector compression is enabled, the time stamp may be much earlier than the current time. Returns all raw samples of all qualities with a time stamp greater than a specified start time, and less than or equal to a specified end time. The RawByTime sampling mode will not return a sample equal to the start time. 110
111 Sampling Mode RawByNumber Interpolated InterpolatedtoRaw Lab LabtoRaw Results Returns a specified number of samples of all qualities with a time stamp greater than or equal to the start time. The RawByNumber sampling mode will return a sample with a time stamp equal to the start time if one exists You must also specify a direction and number of samples when using this sampling mode. When archive or collector compression is used, a minimal number of actual data samples are stored in the archive. When this data is retrieved, interpolation can be performed to create an evenly spaced list of most likely real-world values (since the actual values have been removed from the archive through the compression algorithm). The Interpolated sampling mode is also useful for data samples that haven't undergone archive compression. For example, you may want to plot data along an interval that doesn't match the collected raw samples. Using the Interpolated sampling mode would give you the most likely real-world values for the specified period. Typically, you use the interpolated sampling mode when data is not collected on a set time schedule, or if you want to see the results returned in an interval that is slower than the collection rate. For example, these instances show when you can use interpolated mode to make evenly spaced values: A tag is collected as unsolicited. In this case, we do not know what the time interval is between collected values. The dead band or archive compression for a tag results in unevenly spaced collection intervals. A tag is collected once per 8-hour shift, but you want to see it displayed in one hour intervals with a linear slope between points. When you request interpolated data, you specify an interval or number of samples. If the actual stored number of raw samples is greater than required, you will get interpolated data as described above. If the actual number of stored samples are less than the required, then you will get the raw samples. In this way, the needs of trending detail and application load are balanced. This mode is best used when querying compressed data because the Data Archiver can switch to the more efficient raw data query. The Lab sampling mode only returns the collected values, without any interpolation of the value. The collected value is repeated for each interval until there is a change in the raw data sample's value. Lab sampling is most often used to create a step chart rather than a smooth curve. Use Lab sampling instead of interpolated if you only want true collected values returned. The Lab sampling mode is generally not useful on highly compressed data. Use interpolated sampling instead. LabtoRaw is an extension to Lab mode of sampling and similar to InterpolatedtoRaw mode where you will be switched to raw data or lab when the actual data samples are fewer than the requested samples. 111
112 Sampling Mode Trend TrendtoRaw Trend2 Results The Trend sampling mode was designed to produce maximum performance when retrieving data for plotting, particularly over long time periods. The trend sampling mode returns the maximum and minimum value collected during each interval. When plotted, this makes it possible to display an accurate representation of the data that won t miss any extrema, by only retrieving a minimum of points. For example, a trend of one year of data with a one-day interval will return 730 values consisting of the 365 minimums and 365 maximums for each day of the year. The TrendtoRaw sampling mode almost always produces the same results as the Trend sampling mode. The exception is that, when more samples are requested than there are raw data points, the TrendtoRaw sampling mode returns all of the available raw data points with no further processing. TrendtoRaw is used when the number of actual data samples are fewer than the requested number of samples. In that case, TrendtoRaw retrieves raw data in a given interval (between a selected raw minimum and raw maximum). The Trend2 sampling mode is a modified version of the Trend sampling mode. Trend2 sampling splits up a given time period into a number of intervals (using either a specified number of samples or specified interval length), and returns the minimum and maximum data values that occur within the range of each interval, together with the timestamps of the raw values. The key differences between Trend and Trend2 sampling modes are in: How they treat a sampling period that does not evenly divide by the interval length: For the Trend sampling mode, Historian ignores any leftover values at the end, rather than putting them into a smaller interval. For the Trend2 sampling mode, Historian creates as many intervals of the interval length as will fit into the sampling period, and then creates a remainder interval from whatever time is left. Spacing of timestamps returned: For the Trend sampling mode, Historian returns evenly-spaced interval timestamps. For the Trend2 sampling mode, Historian returns raw sample timestamps. These timestamps can be unevenly spaced, since raw data can be unevenly spaced. Inclusion of start and end times entered: The Trend sampling mode is start time exclusive and end time inclusive. The Trend2 sampling mode is start time inclusive and end time inclusive. Trend sampling mode is more suitable for plotting applications that prefer evenly-spaced data. Trend2 sampling mode is more suitable for analysis of mins and maxes and for plotting programs that can handle unevenly spaced data. 112
113 Sampling Mode TrendtoRaw2 Calculated RawByFilterToggle Results The TrendtoRaw2 sampling mode is a modified version of the TrendtoRaw sampling mode. The TrendtoRaw2 sampling mode almost always produces the same results as the Trend2 sampling mode. The exception is that, when more samples are requested than there are raw data points, the TrendtoRaw2 sampling mode returns all of the available raw data points with no further processing. Returns samples based on a selected Calculation mode. Refer to Calculation Modes for more information. RawByFilterToggle returns filtered time ranges. The values returned are 0 and 1. If the value is 1, then the condition is true and 0 means false. This sampling mode is used with the time range and filter tag conditions. The result starts with a starting time stamp and ends with an ending timestamp Calculation Modes Calculation modes are used when the sampling mode is set to Calculated. The data type of all calculated values will be DoubleFloat except for MinimumTime, MaximumTime, FirstRawTime and LastRawTime which will be a Date. The datatype of the values of FirstRawValue and LastRawValue will be the same as that of the selected tag. Calculation Mode Count State Count State Time Minimum Results Displays the number of raw samples in the specified interval. This only indicates the count and does not display the actual values or qualities of the samples. The Count calculation mode is useful for analyzing the distribution of raw data samples. If you have a higher number of raw samples than expected, you may decide to implement collector or archive compression. If samples are missing, then you may want to slow your collection rates. Displays the number of times a tag has transitioned to another state from a previous state. A state transition is counted when the previous good sample is not equal to the state value and the next good sample is equal to state value. Displays the duration that a tag was in a given state within an interval. Displays the minimum value in a specified interval with good data quality. This value may be raw or interpolated. Note: The Minimum and MinimumTime calculation retrieve two additional samples per interval; one is interpolated at the interval start time and the other is interpolated at the interval end time. These samples are used to determine the min or max just like any raw value. MinimumTime Displays the time stamp of the minimum value in a specified interval. See the note in Minimum for additional information. 113
114 Calculation Mode Maximum Results Displays the maximum value in a specified interval. Note: The Maximum and MaximumTime calculation internally retrieve two additional samples per interval; one is interpolated at the interval start time and the other is interpolated at the interval end time. These samples are used in the min or max just like any raw or interpolated value. MaximumTime RawAverage Average OPCQOr and OPCQAnd Total RawTotal StandardDeviation RawStandardDeviation TimeGood FirstRawValue FirstRawTime LastRawValue LastRawTime TagStats Displays the time stamp of the maximum value in a specified interval. See the note in Maximum for additional information. Displays the arithmetic average of the raw values in a specified interval with good data quality. This is useful only when a sufficient number of raw data values are collected. Similar to RawAverage, but performs a special logic for time weighting and for computing the value at the start of the interval. This is useful for computing an average on compressed data. The OPCQOr is a bit wise OR operation of all the 16 bit OPC qualities of the raw samples stored in the specified interval. The OPCQAnd is a bit wise AND operation of all the 16 bit OPC qualities of the raw samples stored in the specified interval. Retrieves the time-weighted total of raw and interpolated values for each calculation interval. The collected value must be a rate per 24 hours. This calculation mode determines a count from the collected rate. Displays the arithmetic sum of raw values in a specified interval. Displays the time-weighted standard deviation of raw values for a specified interval. Displays the arithmetic standard deviation of raw values for a specified interval. Displays the amount of time (in milliseconds) during an interval when the data is of good quality and matches filter conditions if the filter tag is used. Returns the first good raw value for a specified time interval. Returns the timestamp of the first good raw for a specified time interval. Returns the last good raw value for a specified time interval. Returns the timestamp of the last good raw for a specified time interval. Allows you to return multiple calculation modes for a tag in a single query. Note: You can also use INCLUDEBAD or FILTERINCLUDEBAD as query modifiers to include bad quality data. For more information, refer INLUDEBAD and FILTERINCLUDEBAD sections in Advanced Topics. 114
115 Query Modifiers Query Modifiers are used for retrieving data that has been stored in the archive. They are used along with sampling and calculation modes to get a specific set of data. Query Modifier ONLYGOOD INCLUDEREPLACED INCLUDEDELETED ONLYIFCONNECTED ONLYIFUPTODATE ONLYRAW Results The ONLYGOOD modifier excludes bad and uncertain data quality values from retrieval and calculations. Use this modifier with any sampling or calculation mode but it is most useful with Raw and CurrentValue queries. All the calculation modes such as minimum or average exclude bad values by default, so this modifier is not required with those. Normally, when you query raw data from Proficy Historian, any values that have been replaced with a different value for the same timestamp are not returned. The INCLUDEREPLACED modifier helps you to indicate that you want replaced values to be returned, in addition to the currently retrievable data. However, you cannot query only the replaced data and the retrievable values that have replaced the other values. You can query all currently visible data and get the data that has been replaced. This modifier is only useful with rawbytime or rawbynumber retrieval. Do not use it with any other sampling or calculation mode. The INCLUDEDELETED modifier retrieves the value that was previously deleted. Data that has been deleted from the archiver is never actually removed but is marked as hidden. Use the INCLUDEDELETED modifier to retrieve the values that were deleted, in addition to any non-deleted values during the query time period. This modifier is only useful with rawbytime or rawbynumber retrieval. Do not use it with any other sampling or calculation mode. The ONLYIFCONNECTED and ONLYIFUPTODATE modifiers can be used on any sampling or calculation mode to retrieve bad data if the collector is not currently connected and sending data to the archiver. The bad data is not stored in the IHA file but is only returned in the query. If the collector reconnects and flushes data and you run the query again, the actual stored data is returned in the following situations: Collector loses connection to the archiver Collector crashes Collector compression is used and no value exceeds the dead band The ONLYRAW modifier retrieves only the raw stored samples. It does not add interpolated or lab sampled values at the beginning of each interval during calculated retrieval such as average or minimum or maximum. Normally, a data query for minimum value will interpolate a value at the start of each interval and use that together with any raw samples to determine the minimum value in the interval. Interpolation is necessary because some intervals may not have any raw samples stored. Use this query modifier with calculation modes only, not with raw or sampled retrieval like interpolated modes. 115
116 Query Modifier LABSAMPLING ENUMNATIVEVALUE INCLUDEBAD FILTERINCLUDEBAD USEMASTERFIELDTIME HONORENDTIME EAMINEFEW Results The LABSAMPLING modifier affects the calculation modes that interpolate a value at the start of each interval. Instead of using interpolation, lab sampling is used. When querying highly compressed data, you may have intervals with no raw samples stored. An average from 2 PM to 6 PM on a one-hour interval will interpolate a value at 2 PM, 3 PM, 4 PM, and 5 PM and use those in addition to any stored samples to compute averages. When you specify LABSAMPLING, then lab sampling mode is used instead of interpolated sampling mode to determine the 2 PM, 3 PM, 4 PM, and 5 PM values. A lab sampled average would be used when querying a tag that never ramps but changes in a step pattern such as a state value or setpoint. Use this query modifier with calculation modes only, not raw or sampled retrieval like interpolated modes. The ENUMNATIVEVALUE modifier retrieves the native, numeric values such as 1 or 2 instead of string values such as on/off for the data that has enumerated states associated with it. You can use ENUMNATIVEVALUE with any sampling or calculation mode. Normally, when you query calculated data from Historian, only good data quality raw samples are considered. INCLUDEBAD modifier includes bad data quality values in calculations. You can use INCLUDEBAD with any sampling or calculation mode. Typically, while filtering we use only good data quality values. When we use FILTERINCLUDEBAD, the bad data quality values are considered when filtering to determine time ranges. This query modifier is not always recommended. The USEMASTERFIELDTIME query modifier is used only for the MultiField tags. It returns the value of all the fields at the same timestamp of the master field time, in each interval returned. Normally, a query keeps searching through archives until the desired number of samples has been located, or until it gets to the first or last archive. However, there are cases where you would want to specify a time limit as well. For example, you may want to output the returned data for a RawByNumber query in a trend screen, in which case there is no need to return data that would be offscreen. In cases where you want to specify a time limit, you can do this by specifying an end time in your RawByNumber query and including the HONORENDTIME query modifier. Since RawByNumber has direction (backward or forward), the end time must be older than the start time for a backward direction or newer than the start time for a forward direction. Use this query modifier only with the RawByNumber sampling mode. Queries using calculation modes normally loop through every raw sample, between the given start time and end time, to compute the calculated values. When using FirstRawValue, FirstRawTime, LastRawValue, and LastRawTime calculation modes, we can use only the raw sample near each interval boundary and achieve the same result. The EAMINEFEW query modifier enables this. If you are using one 116
117 Query Modifier ECLUDESTALE Results of these calculation modes, you may experience better read performance using the EAMINEFEW query modifier. Using this query modifier is recommended when: The time interval is great than 1 minute. The collection interval is greater than 1 second. The data node size is greater than the default 1400 bytes. The data type of the tags is String or Blob. Query performance varies depending on all of the above factors. Use this query modifier only with FirstRawValue, FirstRawTime, LastRawValue, and LastRawTime calculation modes. Stale tags are tags that have no new data samples within a specified period of time, and which have the potential to add to system overhead and slow down user queries. The ECLUDESTALE query modifier allows for exclusion of stale tags in data queries. Unless permanently deleted, stale tags from the archiver are not removed but are simply marked as stale. Use the query without this query modifier to retrieve the sample values. Data is not returned for stale tags. An ihstatus_staled_tag error is returned instead. Filtered Data Queries Filtered data queries enhance Historian by adding filter tags and additional filtering criteria to standard queries. Unfiltered data queries in Historian allow you to specify a start and end time for the query, then return all data samples within that interval. A filtered data query, however, will allow you to specify a condition to filter the results by, as well as calculation modes to perform on the returned data. Filtered data queries are performed on the Historian server. For example, a filtered data query is useful when trying to retrieve all data for a specific Batch ID, Lot Number, or Product Code and for filtering data where certain limits were exceeded, such as all data where a temperature exceeded a certain value. Rather than filtering a full day's worth of process data in the client application, you can filter data in the Historian archiver, and only return the matching results to the client application. The result is a smaller, more relevant data set. You can use filter criteria with raw, interpolated, and calculated sampling modes. You cannot use it with current value sampling. The logic of selecting intervals is always interpolated, even when the data retrieval is raw or calculated. The value that triggers a transition from false to true can be a raw value or interpolated value. You cannot use a filtered data query in an ifi chart. For more information, refer to Advanced Topics section in the online help. 117
118 Filter Parameters for Data Queries Use of filter parameters with a data query is optional. Parameter Filter Tag Filter Expression Filter Mode Description The single tag name used when applying the filter criteria. You can enter your filter conditions using Filter tag, Filter Comparison Mode, and Filter Comparison Value or you can put that all that information in a single FilterExpression. An expression which includes one or more filter conditions. The type of conditions used are: AND Condition OR Condition Combination of both AND and OR Filter Expression can be used instead of FilterTag, FilterComparisonMode and FilterValue parameters. While using FilterExpression, the expression is passed within single quotes and for complex expressions we write the conditions within a parenthesis. There is no maximum length for a filter expression, but if it is called using OLEDB or Excel, they may have their own limitations. The type of time filter. The Filter Mode defines how time periods before and after transitions in the filter condition should be handled. For example, AfterTime indicates that the filter condition should be True starting at the timestamp of the archive value that triggered the True condition and leading up to the timestamp of the archive value that triggered the False condition. ExactTime BeforeTime AfterTime BeforeAndAfterTime Retrieves data for the exact times that the filter condition is True (only True). Retrieves data from the time of the last False filter condition up until the time of the True condition (False until True). Retrieves data from the time of the True filter condition up until the time of next False condition (True until False). Retrieves data from the time of the last False filter condition up until the time of next False condition (While True). Filter Comparison Mode Filter Comparison Mode is only used if Filter Tag is filled in. The Filter Comparison Mode defines how archive values for the Filter Tag should be compared to the Filter Value to establish the state of the filter condition. If a Filter Tag and Filter Comparison Value are supplied, time periods are filtered from the results where the filter condition is False. The type of comparison to be made on the filter comparison value: 118
119 Parameter Description Equal EqualFirst EqualLast NotEqual LessThan GreaterThan LessThanEqual GreaterThanEqual Filter condition is True when the Filter Tag is equal to the comparison value. Filter condition is True when the Filter Tag is equal to the first comparison value. Filter condition is True when the Filter Tag is equal to the last comparison value. Filter condition is True when the Filter Tag is NOT equal to the comparison value. Filter condition is True when the Filter Tag is less than the comparison value. Filter condition is True when the Filter Tag is greater than the comparison value. Filter condition is True when the Filter Tag is less than or equal to the comparison value. Filter condition is True when the Filter Tag is greater than or equal to the comparison value. AllBitsSet AnyBitSet AnyBitNotSet AllBitsNotSet Alarm Condition Filter condition is True when the binary value of the Filter Tag is equal to all the bits in the condition. It is represented as ^ to be used in Filter Expression. Filter condition is True when the binary value of the Filter Tag is equal to any of the bits in the condition. It is represented as ~ to be used in Filter Expression. Filter condition is True when the binary value of the Filter Tag is not equal to any one of the bits in the condition. It is represented as!~ to be used in Filter Expression. Filter condition is True when the binary value of the Filter Tag is not equal to all the bits in the condition. It is represented as!^ to be used in Filter Expression. Specifies an alarm condition to filter data by. For example, Level. Alarm SubCondition Specifies an alarm sub-condition to filter data by. For example, HIHI. Filter Comparison Value Filter Comparison Value is only used if Filter Tag is filled in. The value to compare the filter tag with when applying the appropriate filter to the data record set query (to determine the appropriate filter times). 119
120 Filtered Queries in the Excel Add-in Example This example shows how a filtered data query returns specific data from the Historian archive. The example uses two tags: batchid and ramp. The batchid tag is updated before a new batch is produced with the new batch's ID. The ramp tag contains raw data sent by a device in the process. In this example, it is requested that Historian return data samples at ten second intervals for the ramp tag during the period that the batchid tag is set to B1. A standard query in Historian for the ramp tag's values between 08:00 and 08:01, at ten second intervals, would look like this: Time Stamp 07/30/ :00:10 07/30/ :00:20 07/30/ :00:30 07/30/ :00:40 07/30/ :00:50 07/30/ :01:00 Value Data Quality Good Good Good Good Good Good If we perform a query against the batchid tag for the same time interval, we would receive the following results: Time Stamp 07/30/ :00:00 07/30/ :00:20 07/30/ :00:45 Value B0 B1 B2 Data Quality Good Good Good Filtering Data Queries in the Excel Add-in You can enter your filter conditions using Filter tag, Filter Comparison Mode, and Filter Comparison Value or you can put that all that information in a single FilterExpression. You can enter the filter conditions in the FilterExpression field of the Historian Data Query dialog box. The filter conditions are passed within single quotes. To find the values of the ramp tag for the B1 batch, enter the following values into the Historian Filtered Data Query dialog box: 1. In the Tag Name(s) field, enter the tag you want to receive results from - the ramp tag in this example. 2. Select a start and end time for your query. 3. In the Filter Tag field, enter the tag you want to enable filtering with - batchid in this example. 4. In the Filter Comparison field, select your comparison condition. 5. n the Include Data Where Value Is field, enter your filter condition value. 6. In the Include Times field, select your filter mode. 7. In the Sampling Type field, select your sampling mode. 120
121 8. In the Calculation field, select your calculation mode. 9. Select your Sampling Interval. 10. In the Output Display field, select the tag values you want to display. 121

122 UAA LDAP Integration Configuration Tool The UAA LDAP Integration Configuration Tool is a GUI based tool that helps users easily configure or reconfigure the various aspects of LDAP integration with UAA after Historian has been installed. In the following sections, we describe how this tool should be used. This tool is located under C:\Program Files\GE Digital\UAA\ folder. Find uaa-ldap-config-tool.exe and run it with the administrator s privilege (right-click and select Run as Administrator). The first screen should look similar to the following: Note that on this screen most of the fields are read-only and meant only for informational purposes. They identify the URL of the Historian UAA instance to configure, the yml file that this UAA instance uses as the primary configuration file (and that the tool will modify), and a trust store file that the tool will place a server certificate into, when the user selects LDAPS protocol and provides a certificate file. The tool does ask for the secret of the admin client for UAA, if the user wants to view and/or change mappings from LDAP groups to the pre-defined UAA scopes related to Historian functions. Do note, however, that this field is optional if the user doesn t need to view or change the mappings. Click the Next button to view the next screen, which should be something similar to the following: 122

123 First the user can elect to enable or disable LDAP as an identity provider for UAA by checking or clearing the checkbox at the top labelled Enable LDAP as an Identity Provider for UAA. If LDAP integration is enabled as an identity provider for UAA, then the following fields should be configured/re-configured: Field Name LDAP Server URL Service Account DN Remarks URL of the LDAP server, starting with ldap:// or ldaps://. Note that the port number should be specified if a non-standard port is used. Distinguished name of a service account used to search for users and retrieve users group information. 123
124 Service Account Password Search Base Search Filter Password of the service account. Leave it blank, if it does not have to be updated. Base of the LDAP directory where search begins. Matching criterion used to identify user. It should match user's input, denoted as {0}, against an LDAP attribute. The bottom section only applies when LDAPS (i.e., LDAP on SSL) protocol is used. The fields inside this section grey out when the protocol specified in the LDAP Server URL field is not LDAPS. Otherwise, the user can choose between two options: Skip LDAP server s certificate verification. While still encrypting all communications between UAA and the LDAP server, this is a less secure option as UAA will not attempt to verify the specified LDAP server s identity and thus is vulnerable to identity-spoof attacks. With this option, the user doesn t need to provide the LDAP server s certification if this option is selected. This option is generally useful during initial provisioning or troubleshooting. Enable the use of LDAP server s SSL certificate to verify its identity. In this case, the user should: (i) select a certificate alias, which is solely used for uniquely identifying the certificate in the trust store file used by UAA, and (ii) provide the LDAP server s certificate in either binary or base 64-encoded form, typically in a file with extension.cer,.crt,.der, or.pem. Use the [ ] button to open a dialog box to select the certificate file. Later the tool will import the certificate into the trust store used by UAA and configure the UAA to use this certificate for the purpose of protecting LDAP communications. IMPORTANT NOTES: Selecting and importing the certificate only needs to take place once. When the user re-runs the tool to reconfigure something else, the alias in step (i) above should remain unchanged, and step (ii) doesn t have to be repeated. If the user has erroneously selected a certificate file and now wants to cancel the importing, click the Clear button to clear out the file path displayed. Once the basic LDAP settings have been provided or updated, the user can click on the Next button to move onto the next screen, which has the settings related to how the UAA user accounts group member search is conducted and how LDAP groups map to UAA scopes. It should look similar to the screen below: 124

125 The fields displayed/editable are as follows: Field Name Search Base Search Filter Max Search Depth Search Subtree Remarks Specifies the part of the directory tree under which group searches should be performed. Matching criterion for group membership search for user. How many levels deep nested LDAP groups should be searched for to determine user s group membership. Whether the sub-tree of the search base in the LDAP directory should be searched as well. The bottom section allows the user to view and edit the group mappings from LDAP groups to each of the pre-defined Historian scopes in UAA. Each row requires the distinguished names of the LDAP groups mapped to the scope. When there are multiple distinguished names for a scope, separate them by a semicolon. 125
126 Once this screen is populated, the user can click the Commit button to commit all the changes to the system. A result screen will appear, which should report whether the committing has been successful or not. If for some reason committing failed, it is possible to click the Prev button to change the settings and commit again. Otherwise, the user can click the Close button to close the tool. Note: Usually it requires a restart of the Historian Embedded Tomcat Container service for updated configurations to take effect. Therefore, use Services Control Console to stop and restart the service once this tool finishes running. 126

127 Troubleshooting Managing Historian Log Files Use the Historian LogTool to view, generate, or compress log files to use for troubleshooting. Logtool.exe is located in the historian installation directory, for example: C:\Program Files\Proficy\Proficy Historian\ Go to your installation directory and execute the Logtool.exe file. The LogTool opens, displaying the View Log tab. 2. Select a component from the left panel to see the available log files, and click View Log. 3. Click Generate Logs to enable or disable the debug logging mode for Historian components: This tool will enable/disable the debug mode for Historian components. However, leaving the debug mode enabled for longer time consume the disk space 1.Select the component 2.Choose enable/disable option 3.Click apply 127
 Click Apply.")

128 a) Select a Historian Component and click Enable or Disable. b) Click Apply. Note: Leaving debug mode enabled for a component consumes disk space. 4. Click Gather Logs and click Zip the log files to compress the log files and click Open zip file location to view the zip files. 128
Getting Started Guide. Version 7.1.
 Getting Started Guide Version 7.1. Contents Historian Overview 1 Historian Overview 1 Standard and High-Availability Configurations 8 Standard and High-Availability Configurations 8 Standard Historian
Proficy* Historian G ETTING S TARTED G UIDE
 Proficy* Historian G ETTING S TARTED G UIDE Version 6.0 April 2015 Disclaimer of Warranties and Liability The information contained in this manual is believed to be accurate and reliable. However, GE Intelligent
Proficy* Historian G ETTING S TARTED G UIDE. Version 6.0 June 2015
 Proficy* Historian G ETTING S TARTED G UIDE Version 6.0 June 2015 Disclaimer of Warranties and Liability The information contained in this manual is believed to be accurate and reliable. However, GE Intelligent
GE Historian. Getting Started. Version 7.0. July 2016
 GE Historian Getting Started Version 7.0 July 2016 Disclaimer of Warranties and Liability The information contained in this manual is believed to be accurate and reliable. However, GE Intelligent Platforms,
Proficy * Workflow 2.2
 GE Intelligent Platforms Proficy * Workflow 2.2 GETTING STARTED GUIDE Proficy* Workflow Powered by Proficy SOA GETTING STARTED Version 2.2 November 2013 Disclaimer of Warranties and Liability The information
Installation Guide. EventTracker Enterprise. Install Guide Centre Park Drive Publication Date: Aug 03, U.S. Toll Free:
 EventTracker Enterprise Install Guide 8815 Centre Park Drive Publication Date: Aug 03, 2010 Columbia MD 21045 U.S. Toll Free: 877.333.1433 Abstract The purpose of this document is to help users install
Proficy* Workflow. Powered by Proficy SOA GETTING STARTED
 Proficy* Workflow Powered by Proficy SOA GETTING STARTED Version 2.1 April 2013 All rights reserved. No part of this publication may be reproduced in any form or by any electronic or mechanical means,
Netwrix Auditor for Active Directory
 Netwrix Auditor for Active Directory Quick-Start Guide Version: 8.0 4/22/2016 Legal Notice The information in this publication is furnished for information use only, and does not constitute a commitment
Proficy* Workflow. Powered by Proficy SOA GETTING STARTED
 Proficy* Workflow Powered by Proficy SOA GETTING STARTED Version 2.00 August 2012 All rights reserved. No part of this publication may be reproduced in any form or by any electronic or mechanical means,
INSTALLATION AND SET UP GUIDE
 INSTALLATION AND SET UP GUIDE This guide will help IT administrators to install and set up NVivo Server. It provides step by step instructions for installing the software, configuring user permissions
Getting Started with ESXi Embedded
 ESXi 4.0 Embedded vcenter Server 4.0 This document supports the version of each product listed and supports all subsequent versions until the document is replaced by a new edition. To check for more recent
Quick Start Guide TABLE OF CONTENTS COMMCELL ARCHITECTURE OVERVIEW COMMCELL SOFTWARE DEPLOYMENT INSTALL THE COMMSERVE SOFTWARE
 Page 1 of 35 Quick Start Guide TABLE OF CONTENTS This Quick Start Guide is designed to help you install and use a CommCell configuration to which you can later add other components. COMMCELL ARCHITECTURE
Getting Started with ESX Server 3i Installable Update 2 and later for ESX Server 3i version 3.5 Installable and VirtualCenter 2.5
 Getting Started with ESX Server 3i Installable Update 2 and later for ESX Server 3i version 3.5 Installable and VirtualCenter 2.5 Getting Started with ESX Server 3i Installable Revision: 20090313 Item:
KYOCERA Net Admin Installation Guide
 KYOCERA Net Admin Guide Legal Notes Unauthorized reproduction of all or part of this guide is prohibited. The information in this guide is subject to change without notice. We cannot be held liable for
Proficy* Workflow. Powered by Proficy SOA GETTING STARTED
 Proficy* Workflow Powered by Proficy SOA GETTING STARTED Version 1.5 SP4 February 2012 All rights reserved. No part of this publication may be reproduced in any form or by any electronic or mechanical
Reliable High-Speed Connection to Publication Database for Synchronization
 PCS Axis v1.9 Client/Server New Installation with Replication May 2015 Introduction American Innovations (AI) is pleased to announce version 1.9 of our Pipeline Compliance System Axis software (PCS Axis
VMware View Upgrade Guide
 View 4.0 View Manager 4.0 View Composer 2.0 This document supports the version of each product listed and supports all subsequent versions until the document is replaced by a new edition. To check for
1.0. Quest Enterprise Reporter Discovery Manager USER GUIDE
 1.0 Quest Enterprise Reporter Discovery Manager USER GUIDE 2012 Quest Software. ALL RIGHTS RESERVED. This guide contains proprietary information protected by copyright. The software described in this guide
INSTALLATION AND SET UP GUIDE
 INSTALLATION AND SET UP GUIDE This guide will help IT administrators to install and set up NVivo Server. It provides step by step instructions for installing the software, configuring user permissions
EMC SourceOne for Microsoft SharePoint Version 7.1
 EMC SourceOne for Microsoft SharePoint Version 7.1 Installation Guide 302-000-151 REV 01 EMC Corporation Corporate Headquarters: Hopkinton, MA 01748-9103 1-508-435-1000 www.emc.com Copyright 2009-2013
DeltaV Continuous Historian
 Frequently Asked Questions Data Analysis Integrated Configuration Scalable Flexible Architecture Contents 1. Introduction 1.1. What is the DeltaV Continuous Historian? 5 1.2. What features are available
Senstar Symphony. 7.2 Installation Guide
 Senstar Symphony 7.2 Installation Guide Contents Contents Introduction... 3 Symphony Server...3 Symphony Client... 3 Xnet... 3... 4 Symphony Server requirements...4 Symphony Client requirements...4 Symphony
vcenter CapacityIQ Installation Guide
 vcenter CapacityIQ 1.0 This document supports the version of each product listed and supports all subsequent versions until the document is replaced by a new edition. To check for more recent editions
SIMATIC. Process Historian 2014 SP2 SIMATIC Process Historian. Process Historian - Installation Notes 1. Process Historian - Release Notes
 Process Historian - Installation Notes 1 Process Historian - Release Notes 2 SIMATIC Process Historian - Administration 3 Process Historian 2014 SP2 System Manual 05/2017 A5E38560565-AB Legal information
 Trend Micro Incorporated reserves the right to make changes to this document and to the products described herein without notice. Before installing and using the product, please review the readme files,
Deployment and User Guide Installing and Configuring WhatsUp Gold Failover Manager
 Deployment and User Guide Installing and Configuring WhatsUp Gold Failover Manager This guide provides information about installing and configuring WhatsUp Gold Failover Manager. Contents CHAPTER 1 Using
UC for Enterprise (UCE) NEC Centralized Authentication Service (NEC CAS)
 NEC Centralized Authentication Service (NEC CAS)") UC for Enterprise (UCE) NEC Centralized Authentication Service (NEC CAS) Installation Guide NEC NEC Corporation October 2010 NDA-30362, Revision 15 Liability Disclaimer NEC Corporation reserves the right
UC for Enterprise (UCE) NEC Centralized Authentication Service (NEC CAS) Installation Guide NEC NEC Corporation October 2010 NDA-30362, Revision 15 Liability Disclaimer NEC Corporation reserves the right
IBM Proventia Management SiteProtector Installation Guide
 IBM Internet Security Systems IBM Proventia Management SiteProtector Installation Guide Version2.0,ServicePack8.1 Note Before using this information and the product it supports, read the information in
Proficy* Historian OPC C OLLECTOR G UIDE. Version 6.0 June 2015
 Proficy* Historian OPC C OLLECTOR G UIDE Version 6.0 June 2015 Disclaimer of Warranties and Liability The information contained in this manual is believed to be accurate and reliable. However, GE Intelligent
Privileged Identity App Launcher and Session Recording
 Privileged Identity App Launcher and Session Recording 2018 Bomgar Corporation. All rights reserved worldwide. BOMGAR and the BOMGAR logo are trademarks of Bomgar Corporation; other trademarks shown are
Patch Manager INSTALLATION GUIDE. Version Last Updated: September 25, 2017
 INSTALLATION GUIDE Patch Manager Version 2.1.5 Last Updated: September 25, 2017 Retrieve the latest version from: https://support.solarwinds.com/success_center/patch_manager/patch_manager_documentation
Upgrade to Webtrends Analytics 8.5: Best Practices
 Technical Best Practices 8.5 Software Upgrade Upgrade to Webtrends Analytics 8.5: Best Practices Version 4 Webtrends Analytics is a powerful application that must be installed on a dedicated computer.
Virtualization And High Availability. Howard Chow Microsoft MVP
 Virtualization And High Availability Howard Chow Microsoft MVP Session Objectives And Agenda Virtualization and High Availability Types of high availability enabled by virtualization Enabling a highly
DefendX Software Control-Audit for Hitachi Installation Guide
 DefendX Software Control-Audit for Hitachi Installation Guide Version 4.1 This guide details the method for the installation and initial configuration of DefendX Software Control-Audit for NAS, Hitachi
Getting started with System Center Essentials 2007
 At a glance: Installing and upgrading Configuring Essentials 2007 Troubleshooting steps Getting started with System Center Essentials 2007 David Mills System Center Essentials 2007 is a new IT management
System recommendations for version 17.1
 System recommendations for version 17.1 This article contains information about recommended hardware resources and network environments for version 17.1 of Sage 300 Construction and Real Estate. NOTE:
Configuration Guide. Installation and. BlackBerry Enterprise Server for Novell GroupWise. Version: 5.0 Service Pack: 4
 BlackBerry Enterprise Server for Novell GroupWise Version: 5.0 Service Pack: 4 Installation and Configuration Guide Published: 2014-01-14 SWD-20140114171550404 Contents 1 Overview: BlackBerry Enterprise
Virtual Recovery Assistant user s guide
 Virtual Recovery Assistant user s guide Part number: T2558-96323 Second edition: March 2009 Copyright 2009 Hewlett-Packard Development Company, L.P. Hewlett-Packard Company makes no warranty of any kind
PI Connector for Ping 1.0. User Guide
 PI Connector for Ping 1.0 User Guide OSIsoft, LLC 777 Davis St., Suite 250 San Leandro, CA 94577 USA Tel: (01) 510-297-5800 Fax: (01) 510-357-8136 Web: http://www.osisoft.com PI Connector for Ping 1.0
Proficy* HMI/SCADA - ifix V IEWING P ICTURES FROM A W EB B ROWSER
 Proficy* HMI/SCADA - ifix V IEWING P ICTURES FROM A W EB B ROWSER Version 5.5 January 2012 All rights reserved. No part of this publication may be reproduced in any form or by any electronic or mechanical
Scribe Insight Installation Guide. Version August 10, 2011
 Scribe Insight Installation Guide Version 7.0.2 August 10, 2011 www.scribesoft.com Important Notice No part of this publication may be reproduced, stored in a retrieval system, or transmitted in any form
Getting Started with ESX Server 3i Embedded ESX Server 3i version 3.5 Embedded and VirtualCenter 2.5
 Getting Started with ESX Server 3i Embedded ESX Server 3i version 3.5 Embedded and VirtualCenter 2.5 Title: Getting Started with ESX Server 3i Embedded Revision: 20071022 Item: VMW-ENG-Q407-430 You can
LifeSize Control Installation Guide
 LifeSize Control Installation Guide January 2009 Copyright Notice 2005-2009 LifeSize Communications Inc, and its licensors. All rights reserved. LifeSize Communications has made every effort to ensure
 Trend Micro Incorporated reserves the right to make changes to this document and to the products described herein without notice. Before installing and using the product, please review the readme files,
Creating and Managing a Content Server Cluster
 CHAPTER 10 This chapter describes the main features, system requirements, setup, and management of a Cisco TelePresence Content Server (TCS) cluster. To a user, a Content Server Cluster behaves exactly
NTP Software File Auditor for Windows Edition
 NTP Software File Auditor for Windows Edition An NTP Software Installation Guide Abstract This guide provides a short introduction to installation and initial configuration of NTP Software File Auditor
 Trend Micro Incorporated reserves the right to make changes to this document and to the products described herein without notice. Before installing and using the product, please review the readme files,
Centrix WorkSpace IQ Installation Guide. Version 4.5
 Centrix WorkSpace IQ Installation Guide Version 4.5 If you have any feedback about the product or documentation, please submit to: enquiries@centrixsoftware.com 2010 Centrix Software Ltd. All rights reserved.
VMware vsphere Storage Appliance Installation and Configuration
 VMware vsphere Storage Appliance Installation and Configuration vsphere Storage Appliance 1.0 vsphere 5.0 This document supports the version of each product listed and supports all subsequent versions
Siebel Installation Guide for Microsoft Windows
 Siebel Installation Guide for Microsoft Windows Siebel 2018 (Applies to Siebel CRM Updates 18.4 through 18.9) September 2018 Copyright 2005, 2018 Oracle and/or its affiliates. All rights reserved. This
Installing and Configuring VMware Identity Manager Connector (Windows) OCT 2018 VMware Identity Manager VMware Identity Manager 3.
 OCT 2018 VMware Identity Manager VMware Identity Manager 3.") Installing and Configuring VMware Identity Manager Connector 2018.8.1.0 (Windows) OCT 2018 VMware Identity Manager VMware Identity Manager 3.3 You can find the most up-to-date technical documentation on
Installing and Configuring VMware Identity Manager Connector 2018.8.1.0 (Windows) OCT 2018 VMware Identity Manager VMware Identity Manager 3.3 You can find the most up-to-date technical documentation on
OnCommand Unified Manager Installation and Setup Guide for Use with Core Package 5.2 and Host Package 1.3
 IBM System Storage N series OnCommand Unified Manager Installation and Setup Guide for Use with Core Package 5.2 and Host Package 1.3 GA32-1020-03 Table of Contents 3 Contents Preface... 10 Supported
Splashtop Enterprise for IoT Devices - Quick Start Guide v1.0
 Introduction For information about different deployment choices, please see chapter 3 of the full Splashtop Center Administrator s Guide. Splashtop Enterprise for IoT Devices is comprised of three components:
Cisco Unified Serviceability
 Cisco Unified Serviceability Introduction, page 1 Installation, page 5 Introduction This document uses the following abbreviations to identify administration differences for these Cisco products: Unified
PROMISE ARRAY MANAGEMENT ( PAM) FOR FastTrak S150 TX2plus, S150 TX4 and TX4000. User Manual. Version 1.3
 FOR FastTrak S150 TX2plus, S150 TX4 and TX4000. User Manual. Version 1.3") PROMISE ARRAY MANAGEMENT ( PAM) FOR FastTrak S150 TX2plus, S150 TX4 and TX4000 User Manual Version 1.3 Promise Array Management Copyright 2003 Promise Technology, Inc. All Rights Reserved. Copyright by
PROMISE ARRAY MANAGEMENT ( PAM) FOR FastTrak S150 TX2plus, S150 TX4 and TX4000 User Manual Version 1.3 Promise Array Management Copyright 2003 Promise Technology, Inc. All Rights Reserved. Copyright by
vsphere Installation and Setup Update 2 Modified on 10 JULY 2018 VMware vsphere 6.5 VMware ESXi 6.5 vcenter Server 6.5
 vsphere Installation and Setup Update 2 Modified on 10 JULY 2018 VMware vsphere 6.5 VMware ESXi 6.5 vcenter Server 6.5 You can find the most up-to-date technical documentation on the VMware website at:
AssetCentre. Asset Management INSTALLATION GUIDE INTEGRATED PRODUCTION & PERFORMANCE SUITE
 INTEGRATED PRODUCTION & PERFORMANCE SUITE AssetCentre Asset Management INSTALLATION GUIDE PUBLICATION FTAC-IN002D-EN-E November 2008 Supersedes Publication FTAC-IN002C-EN-E Contact Rockwell Customer Support
VMware Horizon FLEX Client User Guide
 Horizon FLEX 1.10 This document supports the version of each product listed and supports all subsequent versions until the document is replaced by a new edition. To check for more recent editions of this
Getting Started with ifix
 GE ifix Getting Started with ifix Version 5.9 JUNE 2017 Disclaimer of Warranties and Liability The information contained in this manual is believed to be accurate and reliable. However, GE assumes no responsibilities
Process Historian Administration SIMATIC. Process Historian V8.0 Update 1 Process Historian Administration. Basics 1. Hardware configuration 2
 Basics 1 Hardware configuration 2 SIMATIC Process Historian V8.0 Update 1 Management console 3 Process control messages 4 System Manual 04/2012 A5E03916798-02 Legal information Legal information Warning
Storage Center. Enterprise Manager 5.5. Installation and Setup Guide
 Storage Center Enterprise Manager 5.5 Installation and Setup Guide Enterprise Manager 5.5 Installation and Setup Guide 680-028-010 Revision Date Description A March 2011 Initial release. B April 2011 Updated
Getting Started with VMware View View 3.1
 Technical Note Getting Started with VMware View View 3.1 This guide provides an overview of how to install View Manager components and provision virtual desktops. Additional View Manager documentation
NTP Software File Auditor for Hitachi
 NTP Software File Auditor for Hitachi Installation Guide Version 3.3 This guide details the method for the installation and initial configuration of NTP Software File Auditor for NAS, Hitachi Edition,
Backup and Recovery FAQs
 Backup and Recovery FAQs Introduction The Backup and Recovery application is an easy to use, easy to manage data backup and disaster recovery solution for your DeltaV Distributed Control System (DCS),
Microsoft Office SharePoint Server 2007
 Microsoft Office SharePoint Server 2007 Enabled by EMC Celerra Unified Storage and Microsoft Hyper-V Reference Architecture Copyright 2010 EMC Corporation. All rights reserved. Published May, 2010 EMC
Netwrix Auditor for Active Directory
 Netwrix Auditor for Active Directory Quick-Start Guide Version: 6.5 9/26/2014 Legal Notice The information in this publication is furnished for information use only, and does not constitute a commitment
Manual Sql Server 2012 Express Limit Cpu
 Manual Sql Server 2012 Express Limit Cpu SQL Server 2014 Reporting Services Standard and Enterprise supports a maximum of SQL Server 2014 Express resources Windows Server 2012 resources For more information
Product Documentation. ER/Studio Portal. Installation Guide. Version 1.5 Published October 8, 2009
 Product Documentation ER/Studio Portal Installation Guide Version 1.5 Published October 8, 2009 2nd Edition Copyright 1994-2009 Embarcadero Technologies, Inc. Embarcadero Technologies, Inc. 100 California
vcenter Chargeback User s Guide
 vcenter Chargeback 1.5 This document supports the version of each product listed and supports all subsequent versions until the document is replaced by a new edition. To check for more recent editions
dctrack Quick Setup Guide (Recommended) Obtain a dctrack Support Website Username and Password
 Obtain a dctrack Support Website Username and Password") dctrack 5.0.0 Quick Setup Guide This guide walks you through installing dctrack for the first time. In other words, this is a clean install - it is not an integration of dctrack and Power IQ, and it is
dctrack 5.0.0 Quick Setup Guide This guide walks you through installing dctrack for the first time. In other words, this is a clean install - it is not an integration of dctrack and Power IQ, and it is
CloudShell 7.1 GA. Installation Guide. Release Date: September Document Version: 2.0
 CloudShell 7.1 GA Installation Guide Release Date: September 2016 Document Version: 2.0 Legal notice Information in this document is subject to change without notice. Without limiting the rights under
Getting Results Guide. FactoryTalk Gateway
 Getting Results Guide FactoryTalk Gateway Important user information Read this document and the documents listed in the additional resources section about installation, configuration, and operation of
Proficy Plant Applications 7.0 Quick Install Guide (And Best Practices)
") Proficy Plant Applications 7.0 Quick Install Guide (And Best Practices) Installation Instructions Based on: Windows Server 2016 x64 Operating System SQL Server 2016 Standard (where applicable) Microsoft
Proficy Plant Applications 7.0 Quick Install Guide (And Best Practices) Installation Instructions Based on: Windows Server 2016 x64 Operating System SQL Server 2016 Standard (where applicable) Microsoft
ER/Studio Enterprise Portal 1.1 Installation Guide
 ER/Studio Enterprise Portal 1.1 Installation Guide 2nd Edition, April 16/2009 Copyright 1994-2009 Embarcadero Technologies, Inc. Embarcadero Technologies, Inc. 100 California Street, 12th Floor San Francisco,
Sage SQL Gateway Installation and Reference Guide
 Sage SQL Gateway Installation and Reference Guide IMPORTANT NOTICE This document and the Sage 300 Construction and Real Estate software may be used only in accordance with the Sage 300 Construction and
vsphere Update Manager Installation and Administration Guide 17 APR 2018 VMware vsphere 6.7 vsphere Update Manager 6.7
 vsphere Update Manager Installation and Administration Guide 17 APR 2018 VMware vsphere 6.7 vsphere Update Manager 6.7 You can find the most up-to-date technical documentation on the VMware website at:
dctrack Quick Setup Guide Virtual Machine Requirements Requirements Requirements Preparing to Install dctrack
 dctrack Quick Setup Guide This Quick Setup Guide explains how to install and configure dctrack. For additional information on any aspect of dctrack, see the accompanying dctrack Help in other its online
AMS Device View Installation Guide. Version 2.0 Installation Guide May 2018
 AMS Device View Installation Guide Version 2.0 Installation Guide May 2018 Disclaimer The contents of this publication are presented for informational purposes only, and while every effort has been made
NTP Software Defendex (formerly known as NTP Software File Auditor) for NetApp
 for NetApp") NTP Software Defendex (formerly known as NTP Software File Auditor) for NetApp Installation Guide This guide provides a short introduction to the installation and initial configuration of NTP Software
NTP Software Defendex (formerly known as NTP Software File Auditor) for NetApp Installation Guide This guide provides a short introduction to the installation and initial configuration of NTP Software
Proficy* Workflow. Powered by Proficy SOA. Getting Started V ERSION 1.2 N OVEMBER 2009
 Proficy* Workflow Powered by Proficy SOA Getting Started V ERSION 1.2 N OVEMBER 2009 All rights reserved. No part of this publication may be reproduced in any form or by any electronic or mechanical means,
Hitachi File Services Manager Release Notes
 Hitachi File Services Manager 6.1.2-00 Release Notes Copyright 2011, 2016, Hitachi, Ltd., Hitachi Data Systems Corporation, ALL RIGHTS RESERVED Notice: No part of this publication may be reproduced or
Proficy * Workflow 2.5
 GE Intelligent Platforms Proficy * Workflow 2.5 GETTING STARTED GUIDE Proficy* Workflow GETTING STARTED Version 2.5 March 2015 Disclaimer of Warranties and Liability The information contained in this manual
HP LeftHand SAN Solutions
 HP LeftHand SAN Solutions Support Document Installation Manuals VSA 8.0 Quick Start - Demo Version Legal Notices Warranty The only warranties for HP products and services are set forth in the express warranty
StarWind Virtual SAN Installing and Configuring SQL Server 2017 Failover Cluster Instance on Windows Server 2016
 One Stop Virtualization Shop Installing and Configuring SQL Server 2017 Failover Cluster Instance on Windows Server 2016 OCTOBER 2018 TECHNICAL PAPER Trademarks StarWind, StarWind Software and the StarWind
NetIQ Secure Configuration Manager Installation Guide. October 2016
 NetIQ Secure Configuration Manager Installation Guide October 2016 Legal Notice For information about NetIQ legal notices, disclaimers, warranties, export and other use restrictions, U.S. Government restricted
Getting Started Guide. This document provides step-by-step instructions for installing Max Secure Anti-Virus and its prerequisite software.
 Getting Started Guide This document provides step-by-step instructions for installing Max Secure Anti-Virus and its prerequisite software. Contents 2 Contents Introduction... 3 System Requirements... 4
800xA History. Installation. Power and productivity for a better world TM. System Version 6.0
 800xA History Installation System Version 6.0 Power and productivity for a better world TM 800xA History Installation System Version 6.0 NOTICE This document contains information about one or more ABB
Administering Cloud Pod Architecture in Horizon 7. Modified on 4 JAN 2018 VMware Horizon 7 7.4
 Administering Cloud Pod Architecture in Horizon 7 Modified on 4 JAN 2018 VMware Horizon 7 7.4 You can find the most up-to-date technical documentation on the VMware website at: https://docs.vmware.com/
The following logos and products are trademarks of OSIsoft, Inc.: PI System, Sequencia, Sigmafine, grecipe, srecipe, and RLINK.
 Contact Rockwell Customer Support Telephone 1.440.646.3434 Online Support http://support.rockwellautomation.com Copyright Notice 2007 Rockwell Automation Technologies, Inc. All rights reserved. Printed
vrealize Operations Management Pack for NSX for vsphere 3.0
 vrealize Operations Management Pack for NSX for vsphere 3.0 This document supports the version of each product listed and supports all subsequent versions until the document is replaced by a new edition.
Installation on Windows Server 2008
 USER GUIDE MADCAP PULSE 4 Installation on Windows Server 2008 Copyright 2018 MadCap Software. All rights reserved. Information in this document is subject to change without notice. The software described
Veritas Storage Foundation and High Availability Solutions Microsoft Clustering Solutions Guide for Microsoft SQL 2008
 Veritas Storage Foundation and High Availability Solutions Microsoft Clustering Solutions Guide for Microsoft SQL 2008 Windows Server 2003 Windows Server 2008 5.1 Application Pack 1 Veritas Storage Foundation
Deltek Time & Expense with Employee Self Service Version New Installation for Microsoft SQL Sever
 Deltek Time & Expense with Employee Self Service Version 9.0.1 New Installation for Microsoft SQL Sever July 31, 2013 While Deltek has attempted to verify that the information in this document is accurate
Microsoft Dynamics GP Web Client Installation and Administration Guide For Service Pack 1
 Microsoft Dynamics GP 2013 Web Client Installation and Administration Guide For Service Pack 1 Copyright Copyright 2013 Microsoft. All rights reserved. Limitation of liability This document is provided
vcenter CapacityIQ Installation Guide
 vcenter CapacityIQ 1.0.1 This document supports the version of each product listed and supports all subsequent versions until the document is replaced by a new edition. To check for more recent editions
Hitachi File Services Manager Release Notes
 Hitachi File Services Manager 6.1.1-00 Release Notes Copyright 2011, 2016, Hitachi, Ltd., Hitachi Data Systems Corporation, ALL RIGHTS RESERVED Notice: No part of this publication may be reproduced or
Microsoft SQL Server Fix Pack 15. Reference IBM
 Microsoft SQL Server 6.3.1 Fix Pack 15 Reference IBM Microsoft SQL Server 6.3.1 Fix Pack 15 Reference IBM Note Before using this information and the product it supports, read the information in Notices
InventoryControl Quick Start Guide
 InventoryControl Quick Start Guide Copyright 2013 Wasp Barcode Technologies 1400 10 th St. Plano, TX 75074 All Rights Reserved STATEMENTS IN THIS DOCUMENT REGARDING THIRD PARTY PRODUCTS OR SERVICES ARE
vsphere Replication for Disaster Recovery to Cloud
 vsphere Replication for Disaster Recovery to Cloud vsphere Replication 6.0 This document supports the version of each product listed and supports all subsequent versions until the document is replaced
Virtual Server Agent for VMware VMware VADP Virtualization Architecture
 Virtual Server Agent for VMware VMware VADP Virtualization Architecture Published On: 11/19/2013 V10 Service Pack 4A Page 1 of 18 VMware VADP Virtualization Architecture - Virtual Server Agent for VMware