BrightSign Users Guide
|
|
|
- Alban Kerry Hawkins
- 6 years ago
- Views:
Transcription

1 BrightSign Users Guide Matches: BrightSign HD2000 Version: AutoPlay Script Version: 1.2 California, USA
2 INTRODUCTION... 4 BRIGHTSIGN FEATURES... 5 EXAMPLE BRIGHTSIGN SETUPS... 7 EXAMPLES... 8 TRY THE DEMO... 8 SOFTWARE VERSIONS... 9 BRIGHTSIGN DOCUMENTATION GETTING STARTED MEDIA TYPES SUPPORTED PLAYING MEDIA WITH BRIGHTSIGN AUTO PLAYING A VIDEO UPON POWER-UP AUTO PLAYING A PLAYLIST UPON POWER-UP AUTO EXECUTING A.CSV FILE UPON POWER-UP AUTO EXECUTING A SCRIPT UPON POWER-UP CREATING A SCHEDULE FOR AUTO PLAYING VIDEOS, STILL IMAGES, PLAYLISTS, OR CSV FILES PLAYLISTS GETTING STARTED PLAYLIST COMMANDS CREATING INTERACTIVE DISPLAYS USING EXCEL TO CREATE INTERACTIVE SIGNS STATE FILE (CSV) EXAMPLES ROLLOVER REGIONS USING STATE FILES (CSV) SCHEDULING PLAYBACK (HD2000 ONLY) SCRIPTS HELLO WORLD ROKU OBJECTS EXAMPLES REGISTRY (HD2000 ONLY) GPIO CONTROL PORT LEARNING MORE AND SUPPORT TROUBLESHOOTING AUTOPLAY & GENERAL TROUBLESHOOTING PLAYLISTS STATE FILES (CSV) BRIGHTSIGN AND ACCESSORIES APPENDIX SELECTING COMPACT FLASH CARDS WHEN DEPLOYING A GROUP OF BRIGHTSIGNS INTO THE FIELD, ROKU STRONGLY RECOMMENDS THAT YOU TEST THE CF CARD WITH THE BRIGHTSIGN SOFTWARE VERSION YOU WILL USE BEFORE DEPLOYMENT, AND INSIST YOUR CF CARD DUPLICATOR NOT CHANGE CF BRANDS OR MODEL NUMBERS FROM THE MODEL NUMBER YOU HAVE APPROVED.DEVICE SOFTWARE (FIRMWARE) AND UPGRADING43 DEVICE SOFTWARE (FIRMWARE) AND UPGRADING BRIGHTSIGN SHELL LINUX SHELL (HD2000 ONLY)
3 SETTING THE DATE/TIME ON BRIGHTSIGN (HD2000 ONLY) WRITING BOOT SCRIPT & LOGO TO ROM WIDESCREEN VS. 4X3 DISCUSSION SUPPORTED INPUT DEVICES HD600 CONNECTORS (PORTS) HD2000 CONNECTORS (PORTS)
4 Introduction The Roku BrightSigns are complete standalone Digital Sign or Kiosk Controllers that can play content from standard Flash memory cards. BrightSigns have uniquely high quality video playback. This is achieved via professional quality decoders and a scaler that can produce crisp clean 1920x1080 interlaced video from high definition mpeg sources on an HD2000, and 1024x768 video on a VGA monitor from standard definition mpeg sources on an HD600. Still video/pictures can be displayed natively in high definition modes. The BrightSign can be used in looping or interactive modes while displaying video and images on almost any standard or high definition display. It has no moving parts, is completely digital, is compatible with standard media authoring software, and is very reliable. It is intended as a key component of a kiosk, tradeshow display or retail display, and can often be used to replace a PC. Reliability, durability, and flexibility in playing video, audio, and photos make it ideal for other applications as well. 4
5 BrightSign Features BrightSign BrightSign HD2000 HD600 Display Resolutions NTSC * PAL * S-Video (requires adaptor) * 640x480 (VGA out) * 800x600 (VGA out) * 1024x768 (VGA out) * * 480p (Component out) * * 480p (HDMI out) * 576p (Component out) * 576p (HDMI out) * 720p (Component out) * * 720p (HDMI out) * 1080i (Component out) * 1080i (HDMI out) * Video Compression Standards MPEG-1 * * MPEG-2 * * Picture Formats BMP * * PNG * JPEG Coming Audio Formats AC3 pass through * * MP3 decode out to analog and SPDIF * * MP3 decode out to USB * * 5.1 Dolby digital decode (analog * Coming soon output) 5.1 Dolby digital decode (USB * Coming soon output) USB Device Support Touchscreen * * Speakers * * Mouse * * Keyboard * * Trackball * * Barcode scanner * * USB hub support * * Front Panel Power LED * * IR receiver * * 5
6 Compact Flash card slot * * SD/MMC flash card slot * Video mode select button * * LEDs: connector activity and video * * mode Back Panel Connectors Power * * 3 audio out stereo 1/8 mini plugs * * VGA (also supports XVGA) * * Component out * * 3 RCA jacks: Y-Pr-Pb HDMI out * 2 High Speed USB host ports * * 10/100 Ethernet jack * * DB25 control port (for buttons & * * LEDs) RS-232 serial port * * Optical SPDIF audio out * * 1/8 5V serial port * 8 position dip switch * Power Typical power consumption 5 watts 10.5 watts Features Auto play and looping video support * * Playlists * *.csv file support * * Scripting * * Real time clock * Single files larger than 4GB * Upgradable software * * Customer configurable DIP switches * Scheduling playback * Persistent data storage via eeprom * USB mass storage device support * 6
, or even connecting to a standard definition display.")
7 Example BrightSign Setups Probably the simplest way to use BrightSign is to put a video or set of still images on a CompactFlash card, and use a VGA cable to connect the BrightSign to a flat panel monitor. Variations on this setup include using the component out to connect to a High Definition display (like a Plasma TV), or even connecting to a standard definition display. On the HD2000, HDMI out can be used to connect to a display. As well as looping video or slide shows, you can add audio by connecting powered speakers and you can add interactivity. In the example below, an off-the-shelf USB keyboard is connected to the BrightSign. You can also connect touch screens, buttons and LEDs to the BrightSign for a more custom solution. 7

8 Examples Here are some examples of what you can do with a BrightSign: Display a looping video with DVD+ quality on a variety of monitor types. Display a looping slide show in high definition. Play looping music. Combine any of the above. Create interactive displays that play video, photos, or audio in response to customers using touch screens, mouse, keyboard, remote, or a custom button board you have created. Create a playlist with Audio, Video, and Images that calls other playlists Try the Demo Roku has created a BrightSign demo that shows an example interactive digital sign that uses still slides, video clips, and responds to button, touch screen, or mouse events. It s easy to try if you have a BrightSign. Follow these steps: 1. Upgrade your BrightSign software if needed (see Software Versions section) 2. Download the BrightSignDemo.zip file at 3. Unzip it and copy the contents into the root directory of a Compact Flash card. 4. Connect your BrightSign to an Elo touch screen, or connect it to a standard monitor and to a USB Mouse or the Roku Button Board. 5. Insert the CF card. 6. Turn on the power. 7. Touch/Click one of the four hot spots, or press button 0 through 3 on the Roku Button Board. The demo can also be used to try BrightSign on different monitor types and modes. Connect your BrightSign via VGA, the component connection, or HDMI if using the HD2000. Then with the demo running, use the front panel video mode button to try the different video modes (480p, 720p, VGA 1024x768, NTSC or PAL). After you put your BrightSign in a specific mode, make sure your monitor/tv supports the mode and verify 8
9 your monitor is configured to the correct input type and is connected using the correct cable. You should now see the demo in various video modes, and see how it auto scales and supports widescreen or 4x3. Note that the front panel video mode button is not currently supported on the HD2000. Software Versions The version of the BrightSign device software that matches this manual can be found on the cover of the Manual. This version of the software may not have been installed on your BrightSign at the factory (depending on when you purchased it). You should download the latest software from the Roku web site and upgrade your unit by following the steps in this manual in the section Device Software and Upgrading. To check your current software version, connect the video and start up the BrightSign without any flash cards inserted. The version number is listed below the Roku logo you ll see on your display. If there s no software version below the logo, your software is older than version 1.1. You can also check which software version is installed on your BrightSign using the shell. See the section in this manual BrightSign Shell. In addition to software that resides inside your BrightSign, you will often use Roku s AutoPlay Script. This script, which you will place on your CF card with your content, is described later in the manual. It also has a version number, and can be downloaded at the same URL as the on device software: Roku plans more software updates to add new functions for existing BrightSigns. Watch our web site for more information. 9
10 BrightSign Documentation The complete set of BrightSign documentation is available at It includes: BrightSign Installation and Regulatory Guide BrightSign User Guide (this document) BrightSign HD600 Hardware Guide BrightSign HD2000 Hardware Guide BrightSign BrightScript Reference BrightSign Object Reference BrightSign Specifications Example Scripts 10
11 Getting Started Step 1: Get Hardware You Need To start using the BrightSign, you ll need the following hardware. Display Any monitor, TV, or Elo touch screen with a VGA, Component, Composite (HD600 only), or HDMI (HD2000 only) inputs. CF Card Reader/Writer o A Compact Flash card to store the demo or your content. Read Selecting Compact Flash Cards o A USB card reader for your PC or Macintosh that supports compact flash cards. You can get one for less then $20. SD Card Reader / Writer o Note SD cards are supported on the HD2000 only. An SD card can be used on the HD2000 in any situation where this document describes CF card usage. Optional Accessories o USB keyboard o USB mouse - You need a USB mouse to use the BrightSign demo if you don t have a GPIO button board or an ELO touch screen. o Null Modem cable You can use this cable to access the BrightSign shell, and to troubleshoot scripts by connecting the BrightSign to your computer s serial port. This is not required to use the BrightSign. o SoundBridge Remote Step 2: Get Latest Software & Autoplay Script To get the most out of your BrightSign, keep it updated. You can get more information in the Software versions section. Please visit and download the latest updates by clicking on the links in the Downloads section: NOTE: For step by step directions updating your BrightSign software, read the Device Software and Upgrading section. Step 3: Get the Results You Want Now you re ready to start using the BrightSign. Just add your content and follow the step by step directions in the Playing Media with BrightSign section. 11
12 Media Types Supported The following media types are supported: MPEG-2 Video Files (aka VOB or MPG files) - These are the same types of files that are found on DVDs. They can be authored using any video editing software such as Pinnacle Studio or imovie. Video sizes up to 1080i (1920x1080 interlaced) are supported with bit rates up to 25Mbps on the HD2000, and sizes up to D1 (720 x 480) are supported with bit rates up to 9 mbps on the HD600. When a video is played, it will be scaled in real time to the output resolution (which can be much higher definition). The files must contain program streams (transport streams are not supported. Files for the HD600 must have an audio track, and the sampling rate for the audio must be 48K. An audio track is not required in files for the HD , 24, 32 bit.bmp files - These can be authored using almost any paint software such as Adobe PhotoShop, Macromedia Firefly, or even Paint, which comes with Windows. Any digital camera image can be saved in or converted to this format. A variety of resolutions are supported, up to 1024x768 if outputting via VGA, or 1280x720 (720p) if outputting via Component. PNG files (HD2000 only) MP3 audio files Currently these must be stereo or mono. The HD600 supports files sampled at 48KHZ, while the HD2000 supports files sampled at either 44.1KHZ or 48KHZ. BrightSign has no sample rate conversion. Certain USB speakers only support 48KHz sample rate when using a USB speaker with this characteristic, all audio will be output at this rate regardless of the sample rate it was recorded at. Dolby Digital (AC3) 5.1 audio in a video file o BrightSign supports 5.1 AC3 audio playback out of USB (HD600 only), SPDIF, HDMI (HD2000 only) and analog outputs (HD600 only). For the USB and analog outputs, the AC3 audio is decoded to PCM within BrightSign. This results in 6 tracks over a single USB connector, or three stereo analog connectors. For SPDIF the AC3 audio is sent in its compressed state to the SPDIF receiver. There is also an option within the script control to automatically mix-down the AC3 5.1 audio to stereo PCM. 12
13 Playing Media with BrightSign Media can autoplay from a CompactFlash card upon power-up, play via a script on a CompactFlash card, or be tested using the serial shell commands. NOTE: On an HD600, video will come out the VGA connector, and the resolution will be 1024x768 unless you have changed this in your.csv, Playlist, or Script, or by using the front panel video mode button. On an HD2000, video will come out the Component and HDMI connectors and the default video resolution is 720p. If your still image file resolution does not exactly match the display resolution (videomode), then they will be scaled to fit or centered/cropped, depending on the imagemode you have selected see other sections of this manual. Video files will always be scaled to fit. The following types of media can autoplay: 1. a single MPEG-2 video file (loops) 2. a playlist (also loops). A play list is a simple text file that contains the file names of still slides, video clips, or audio files to play. More information can be found later in this manual under Playlists. 3. a.csv (comma separated values) file that you create using Microsoft Excel (or any csv editor such as OpenOffice or the editor hosted at BrightSign can use this file format as a description of an interactive sign that responds to buttons, touch screen, mouse, track balls, etc. These are very powerful and easy to create without any scripting. The BrightSign Demo, which is available to download from our web site, uses this method. 4. a custom BrightScript file for arbitrarily complex interactive media sequences. Mpeg Video - Files must be must be MPEG-2. Files for the HD600 must contain an audio track - if you don t need audio, use silence. MP3 Audio - Any audio (in a video or mp3 file) should have a sample rate of 48KHZ (or 44.1KHZ on the HD2000) Bitmap files - For still images, use 8-bit, 24-bit, or 32-bit.BMP file format, 1024x768 (or other resolution that matches the video mode you plan to use). Additionally, PNG files can be used on the HD2000. NOTE: 8-bit bitmap files are only supported under HD600 software version 1.1 or later and HD2000 software version or later. Beginning with Autorun.bas v1.1 and later, Autoplaying a list of images on startup requires the use of a Playlist or.csv file. Auto Playing a Video upon Power-up To autoplay a video file on power-up or reset, do the following: 1. Copy the video file onto the root directory of a CompactFlash card and name it autoplay.vob or autoplay.mpg. 13
14 2. Go to and download the autoplay.zip file. This contains a script named autorun.bas. Copy autorun.bas into the root directory of your CF card. 3. Insert the CF card into the BrightSign, apply power, and after a few moments, the video should play and auto loop. Auto Playing a Playlist upon Power-up A playlist is a text file that describes a sequence of still images, or video clips, or audio clips to play, and the order they should play. See the playlist section of the manual for more detail. To autoplay a playlist file on power-up or reset, do the following: 1. Copy the playlist file onto the root directory of a CompactFlash card and name it autoplay.bsp. Copy any still graphics, mp3 audio files, or video files referred to by the playlist to the root of the CF card as well. 2. Go to and download the autoplay.zip file. This contains a script named autorun.bas. Copy autorun.bas into the root directory of your CF card. 3. Insert the CF card into the BrightSign and apply power. After a few moments, the playlist should play and auto loop. Auto Executing a.csv File Upon Power-Up BrightSign has a powerful mode whereby it can play a sophisticated sign that is described in a.csv file. CSV stands for comma separated values, and is a simple text file that contains a table of information. Using Microsoft Excel you can easily create a CSV file that describes a sophisticated interactive sign using a text table. The table describes which media to play, and which media to play when a user presses a button or triggers other events. To autoplay media described by a.csv file on power-up or reset, do the following: 1. Create your CSV file using Microsoft Excel as described in this manual s section Using Excel to Create Interactive Signs. 2. Copy your media files and your csv file onto the root directory of a CompactFlash card. Name the file autoplay.csv. 3. Go to and download the autoplay.zip file. This contains a script named autorun.bas. Copy autorun.bas into the root directory of your CF card. 4. Insert the CF card into the BrightSign and apply power. After a few moments, the content from the CSV file will play. Auto Executing a Script Upon Power-Up Creating a BrightScript file allows you the most control over your interactive digital sign application. To autorun a script: 14
15 1. Create the script using a text editor (see the script section of this manual for more information) 2. Save it to the root directory of your CompactFlash card with the name autorun.bas Creating a Schedule for Auto Playing Videos, Still Images, Playlists, or CSV Files To play videos, still images, playlists, or CSV files at scheduled times, do the following: 1. Create the scheduling file autoschedule.txt using a text editor. See the scheduling section of the manual for more detail. 2. Copy autoschedule.txt onto the root directory of a CompactFlash card. 3. Copy all video, still image, playlist, and CSV files listed in the autoschedule.txt file onto the root directory of a CompactFlash card. 4. Go to and download the autoplay.zip file. This contains a script named autorun.bas. Copy autorun.bas into the root directory of your CF card. 5. Insert the CF card into the BrightSign, apply power, and after a few moments, the appropriate content will play. 15
16 Playlists A BrightSign playlist is a text file that ends in.bsp (BrightSign Playlist). It contains the names of the files to play, in the order they should play. Files are played in sequence, one after the next. This means that it is not currently possible to have a playlist that plays audio and a video at the same time, for example. Getting Started To play a playlist, you must have your content, the playlist, and the Roku autoplay script (autorun.bas) on your CF card. Playlists can be played automatically on startup (see the Autoplaying a Playlist section above), or scheduled for playback (see the Creating a Schedule for Auto Playing Videos, Still Images, Playlists, or CSV Files section above). A simple playlist might contain just these lines: slide1.bmp slide2.bmp slide3.bmp This will play the file slide1.bmp, then slide2.bmp, then slide3.bmp, then it will loop. The files don t have to be bitmaps: they can also be video or audio files. You can also mix media types in a single playlist, and trigger GPIO pins in a playlist. As well as filenames, there is a set of about 16 commands that can be in a BrightSign playlist. For example, the slideshow playlist above could be modified like this: slideinterval 5 slide1.bmp slide2.bmp slide3.bmp Now the playlist will pause 5 seconds between bmp displays. slideinterval 5 slide1.bmp slide2.bmp slideinterval 2 slide3.bmp slide4.bmp Now, the playlist will pause five seconds between slides 1 and 2, and two seconds between slides 3 and 4. An example/demo playlist can be downloaded from our website: 16
17 Playlist Commands Here is the list of commands that can appear in a playlist:.bmp,.mp3,.mpg,.vob,.png (HD2000 only) Any line that is a file name that ends in one of these extensions is played. Names may contain spaces..bsp You can call another playlist from within a playlist putting the playlist filename on a line by itself. For example: mysubplaylist.bsp. This sub playlist will complete one loop and then return control to the main playlist. debug Turns on debug information that appears on the console (serial port) rem <comment> Any line starting with rem is ignored. Rem is short for remark print <line to print to console> Prints a line to the console. This is useful for debugging. audiomode # (default is 1 ) Sets the Audio Mode. BrightSign has 5.1 audio decode and is controlled via the audiomode. If your audio source is a video file, you can use the "audiomode" commands: audiomode surround sound decode (via USB or all six analog outs) audiomode is mixed down to stereo audiomode 2 mute audio audiooutput # (default is 0 ) BrightSign has 5 different audio outputs. If none are selected the default is analog audio 1 in stereo. Of the 5 outputs, there are five audiooutput modes. The mode is set with the "audiooutput" command. It can have one of these values: 0 - Analog audio 1 - USB audio 2 - SPDIF audio, stereo PCM 3 - SPDIF audio, raw AC3 4 - analog audio with SPDIF mirroring raw AC3 17
18 audiochan # (default is 2 ) Since there are three analog outs, if analog is selected you must also use the "audiochan" cmd: audiochan 2 -- output 1 (this is not a typo) audiochan 1 -- output 2 audiochan 0 -- output 3 volume # (default is 100 ) Sets the volume to a value between 0 and 100. For example: volume 100 videomode <mode> (default is 1024x768x60p ) Set the output framebuffer format. The options are: VGA: 1024x768x60p 640x480x60p HD600 only 800x600x60p HD600 only Component: 720x480x60p 720x576x50p HD2000 only 1280x720x60p 1280x720x50p HD2000 only 1920x1080x60i HD2000 only Composite: NTSC HD600 only PAL HD600 only imagemode # (default is 0 ) imagemode 0 Display the image centered without scaling (may result in cropping if the image is larger than the current videomode resolution). imagemode 1 - Scaled to fit. The whole image is displayed as large as possible with correct aspect ratio. imagemode 2 - Scaled to fill. Image is scaled to fill screen whilst maintaining aspect ratio imagemode 3 - Scaled to fill without maintaining aspect ratio slideinterval # (default is 3 ) Sets the number of seconds between slides. Must be an integer. For example: slideinterval 3 18
19 lighton # lightoff # These two commands are used to set or clear one of the GPIO outputs. The number can be any integer between 17 and 22. For example: lighton 17 sets LED 0 on the button board. waitbuttonany This will pause until any of the GPIO buttons is pressed. pause # This will pause for the specified number of seconds. The number must be an integer. For example: pause 5 displayregistry <registry section name> (default is null) This will cause the contents of the registry to be displayed on the attached monitor. The optional registry section name parameter displays the specified subset of the registry. See the Registry section for more information. stop Stops the playlist playback. An example where this might be used is when displaying the contents of the registry. 19
20 Creating Interactive Displays With BrightSign you can create displays that respond to user input. For example, give the customer options of watching different videos depending on which button is pressed. To accomplish this with BrightSign, you need to decide what the input device will be, and you will need to either (a) use Microsoft Excel to create a control table and use BrightSign s autoplay.csv files mode, or (b) create a custom control script. Using Excel to Create Interactive Signs This mode is implemented using the autoplay script available on Roku s web site. See the prior section Auto Executing a.csv File Upon Power-Up for more information. BrightSign has a powerful mode whereby it can play a sophisticated sign that is described in a.csv file. CSV stands for comma separated values, and is a simple text file that contains a table of information. Using Microsoft Excel you can create a CSV file that describes a sophisticated interactive sign using a text table. The table describes which media to play, and which media to play when a user presses a button or triggers other events. A good example of a CSV file is the one used in the Roku BrightSign demo. Run the demo as described in the introduction. Then find the file autoplay.csv in the zip file. Copy it out of the zip file onto your desktop, then double click it to load it into Microsoft Excel (you must have Excel installed on your computer. If not, you can load it into any text editor, but it won t be displayed in the nice tabular format). After you edit the file, you can save it with Save As and select CSV as the file format to save as. Below is a section of the autoplay.csv file from the Roku demo. Due to space limitations on the page, it does not include all the columns. The extra columns (not seen below) to the right are similar to the elo columns, and describe what happens when buttons are pressed, or when a video finishes or a slide times out. VIDEOMODE 1024x768x60p IMAGEMODE 1 EVENTS elo:110:18 0:350:200 elo:510:180:350:2 00 elo:110:400:350:2 00 elo:510:400: 350:200 elo:0:0:1024:768 STATE demo_menu.bmp Dalmations.mpg art1.bmp cars.mpg bs1.bmp STATE Dalmations.mpg demo_menu.bmp STATE Cars.mpg demo_menu.bmp STATE art1.bmp demo_menu.bmp STATE art2.bmp demo_menu.bmp STATE art3.bmp demo_menu.bmp STATE art4.bmp demo_menu.bmp STATE bs1.bmp bs2.bmp STATE bs2.bmp bs3.bmp STATE bs3.bmp bs4.bmp STATE bs4.bmp bs5.bmp 20
21 STATE bs5.bmp bs6.bmp STATE bs6.bmp bs7.bmp STATE bs7.bmp bs8.bmp STATE bs8.bmp bs9.bmp STATE bs9.bmp bs10.bmp STATE bs10.bmp demo_menu.bmp Keywords The first two lines use the optional videomode and imagemode keywords. These items are optional, but if used, can have these parameters (in the column after the keyword VIDEOMODE or IMAGEMODE). VIDEOMODE HD600 1) ntsc 2) pal 3) 640x480x60p 4) 800x600x60p 5) 1024x768x60p 6) 720x480x60p 7) 1280x720x60p Note: If you set the VIDEOMODE, the front panel button will be locked out. If you leave this option off, the BrightSign will default to 1024x768 VGA, and you can use the front panel button to dynamically change the video mode. VIDEOMODE HD2000 1) 720x480x60p 2) 720x576x50p 3) 1024x768x60p 4) 1280x720x60p 5) 1280x720x50p 6) 1920x1080x60i Note: The front panel button is not currently read on the HD2000. If a video mode different from the current video mode is set in a script, the unit will reboot, setting the new video mode to what was specified in the script. IMAGEMODE 0 - Center image. No scaling takes place, only cropping if the image is bigger than the screen. 1 - Scale to fit. The image is scaled so that it is fully viewable with its aspect ratio maintained. NOTE: In the software there is an issue that causes this to fail on large images. 2 - Scale to fill and crop. The image is scaled so that it totally fills the screen, though with its aspect ratio maintained. 21
22 3 - Scale to fill. The image is stretched so that it fills the screen and the whole image is viewable. This means that the aspect ratio will not be maintained if it is different to that of the current screen resolution. FLIPELO This keyword isn t used in the example above. The FLIPELO keyword should only be used with a touch screen if the touch screen coordinates appear to be reversed. FLIPELO IMAGEMODE 2 EVENTS elo:110:180:355:210 REGISTRYSECTION <registry section name> (HD2000 only) Directs that any writes to the registry in this CSV file will be written to the specified registry section. If the registry section name is not specified in the CSV file, registry writes will occur in the default registry section named User. See the Registry section later in the document. DELETEREGSECTION <registry section name> (HD2000 only) Deletes the specified registry section and all registry keys and values within this section. DELETEREGISTRYKEY <registry key> (HD2000 only) Deletes the specified registry key from the current registry section. The corresponding registry value is also deleted. EVENTS The first line of the CSV file is the EVENTS row. For every event type you want to respond to, you must make an entry in this row. You do not need to enter events you don t use. The following event types are supported: elo - USB Mouse or Elo Touch Screen presses. You define a rectangular touch area using this format: o elo:x:y:width:height based on a 1024 x 768 resolution o x:y - represents the starting position, where 0,0 is in the upper left o width:height represent the width and height of the area in pixels You can have as many elo events as you wish. Events can overlap touch areas, but in this case, you should only use one at a time (see the demo example and how it uses a touch area that covers the entire screen when not in the main menu). Note: You can also use elor instead of elo. They are interchangeable. eloc - USB Mouse or Elo Touch Screen presses. You define a circular touch area using this format: o eloc:x:y:radius o x:y represents the center of the circular region o radius radius of the circular region, in pixels 22
23 button - Triggers on a GPIO Control Port button press. The format is: button:number, where number is between 0 and 12. timeout - When a video or slide is displaying, you can use a timeout event. The format is: timeout:seconds where seconds is the number of seconds after the video/image starts that the event will trigger. This event can be used to advance a slide show to the next slide, or exit a looping video after a certain number of seconds of playback. videoend - This event triggers when a video finishes playing. It can be used to move on to another state after the video ends. The format is: videoend. There are no parameters. audioend This event triggers when an mp3 file finishes playing. It can be used to move on to another state after the audio ends. The format is: audioend. There are no parameters. NOTE: See the Rollover Regions section for two additional events you can use with CSV files. STATE After the EVENTS row, there are one or more STATE rows. These begin with the keyword STATE. The first cell after the STATE keyword is the name of the video or image file to display, or audio file to play. When the state is entered, this file starts playing. The remaining cells describe what state to jump to when the corresponding event happens. For example, in the above example, the first state is demo_menu.bmp. This is the main menu for the demo, and is displayed when the demo starts. While in this state (the demo_menu.bmp is showing), if the user presses the elo touch screen or clicks the mouse in the right spot to trigger the elo:110:180:350:400 event, then the new state cars.mpg is jumped to. If you look at the STATE rows, you will find one that starts with cars.mpg (there can be only one state with a particular file). To understand this better, look at the actual demo autoplay.csv file in Excel while playing the demo on your BrightSign. As you select options on the BrightSign, see how the.csv file is telling the BrightSign what to do. You can then edit the autoplay.csv file in Excel and Save As a CSV file to create your own applications. Writing to the Registry and Displaying Registry Contents from a CSV file (HD2000 only) When using CSV files on the HD2000, it is possible to track the number of times that the system transitions from one state to another using the registry (see the Registry section later in the document). To do this, append the following to the state name specified in an event column: :counter(<registry key name>) 23
24 In the example above, the state cars.mpg is in the elo:110:180:350:400 event column. To track the number of times that the user activates this transition, enter cars.mpg:counter(touchtodemomenu) in place of cars.mpg. The value in the registry corresponding to the TouchToDemoMenu key is incremented when the corresponding event is triggered. To display the contents of the registry from a CSV file, use the reserved state name DisplayRegistry. That is, add a row to the table with the word DisplayRegistry in the column to the right of the keyword STATE. The remainder of the row is like any other row in the table it contains other states to transition to when events occur. Elsewhere in the table, add the state DisplayRegistry in the column for the event intended to cause the registry to be displayed. When the system transitions to this state, playback from the prior state is stopped and the contents of the registry are displayed on the monitor attached to the BrightSign. To display only a subset of the registry, use the following syntax: DisplayRegistry-<registry section name> Controlling GPIO Outputs from a CSV File (HD2000 only) When using CSV files on the HD2000, it is possible to control the GPIO outputs from a CSV file. GPIO s can be set by appending a GPIO command to the state specifications in the second column of CSV files. The GPIO s are set based on the appended command when the state is entered. The general syntax is: <state name>:<gpio command>(<gpio_num>;<gpio_num>;gpio_num) That is, the state name followed by a colon, then the gpio command, then a list of semicolon separated gpio s inside of parentheses. Gpio 0 corresponds to the first LED on the button board The GPIO commands are gpioson turns on the specified GPIO s; unspecified GPIO s are unchanged. gpiosoff turns off the specified GPIO s; unspecified GPIO s are unchanged. gpios turns on the specified GPIO s; unspecified GPIO s are turned off. Examples Demo_menu.bmp:gpios(1;3;5) o LED s 1, 3, and 5 are turned on; the other LED s are turned off when the demo_menu.bmp state is entered aq.mpg:gpioson(2) o LED 2 is turned on; other LED s are unaffected when the aq.mpg state is entered 24
25 ppt10.bmp:gpiosoff(0;2;4) o LED s 0, 2, and 4 are turned off; other LED s are unaffected when the ppt10.bmp state is entered product1.bmp:gpios() o All LED s are turned off when the product1.bmp state is entered Preloading Images The autoplay script tries to be smart about preloading still images so that when a user triggers their display, they pop up immediately. Here are the rules that are used to preload an image: 1. If a state (row in the table) only has one possible next bmp state, then it is preloaded. 2. If a state has more than one possible next bmp state, but one of them is the next row in the state table, then it (next state row s file) is preloaded. So if you have a sequence of images that display one after the other, put them in sequential rows in the state table to trigger preloading. As an example of this, see the bs1.bmp, bs2.bmp, etc states (rows) in the prior table. 25

26 State File (CSV) Examples The BrightSign Demo described above shows that you can design powerful interactive signs using easy to understand CSV files. The following examples further illustrate how easy CSV files are to use. Example 1: Slideshow that advances automatically after the first slide plays Example 1 contains two events, an elo event (used for ELO touch screens or any Mouse input) and a timeout event. The clickable/touch area is defined as the whole screen. One touch or click starts the slideshow. When this demo starts, menu.bmp is displayed since it s in the first STATE position. There s no timeout entry for menu.bmp. If there s no mouse click or touch, menu.bmp will remain onscreen forever. There s one touch / click event listed for menu.bmp. If menu.bmp is currently being displayed, and there s a mouse click or touch anywhere onscreen, pic1.bmp will be displayed. Pictures 1 6 all have timeout entries. Each image is displayed for 5 seconds before the next image plays. The timeout entry for the last image is menu.bmp. There s no elo entry for pictures 1 6. So, if there s a mouse or touch event while the images are being displayed, nothing happens until the timeout is reached. 26

27 Example 2: slideshow that advances only when a click / touch occurs Example 2 has only 1 event, the same elo event as Example 1. There s an elo event entry for each image that plays next image when there s a click or touch anywhere onscreen. There are no timeout events in this demo. Because example 2 only has an elo event, and no timeout events, you must click or touch the screen to advance the slideshow. 27

28 Example 3: Video and Slide playback, using button input Example 3 contains five events, three button events and a timeout and videoend event. This demo plays two videos and 3 images. When this demo starts, menu.bmp is displayed since it s in the first STATE position. If the menu is being displayed, pressing button 1 starts the attract video; pressing button 2 starts the showcase video; pressing button 3 starts the slideshow. If no button is pressed, the attract video starts automatically after 10 seconds. If the attract or showcase video is playing, pressing button 1 restarts it. If the attract or showcase video is playing, pressing button 3 returns to the menu. Since there s no entry under button 2 for either video, button 2 is ignored. When either the attract or showcase video ends, the menu is displayed, as indicated under the videoend event. For the slideshow, button 2 advances to the next slide, and button 1 goes back to the previous slide. Button 3 returns to the menu. Rollover Regions using State Files (CSV) In the previous section, Using Excel to Create Interactive Signs, you learned that you can create touchable (clickable) areas on the screen using elo (elor) and eloc keywords in the EVENTS row of a CSV file. You can then use these regions like buttons to playback content. Any touch region can be setup as a rollover region. Rollover regions allow you to create more dynamic and interactive displays that accept mouse and touch input. A rollover region has an ON and an OFF image. This allows your display to not only respond to clicks or touch input, but also to the movement of the cursor. Whenever the mouse cursor is within that region the ON image is displayed and the rest of the time the 28
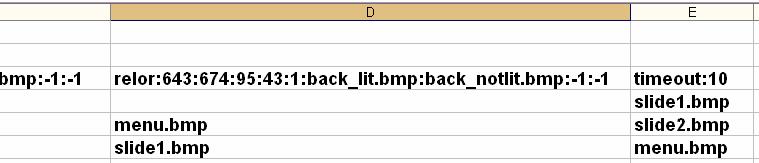
29 OFF image is displayed. This allows buttons to highlight as the mouse cursor moves over them. Rollover Events Use either of the following keywords in the events row to setup a rollover region: Relor you define a rectangular rollover region using this format: o relor:x:y:width:height:enable_rollover:on_bitmap:off_bitmap:x_origin:y_ origin o x:y - represents the starting position, where 0,0 is in the upper left o width, height: width and height of the touch area in pixels o enable_rollover: 1 to enable rollovers, 0 to disable rollovers o on_bitmap: bitmap image name. Bitmap displayed when the mouse is within the defined region o off_bitmap: bitmap image name. Bitmap displayed when the mouse is not within the defined region. o x_origin,y_origin: rollover origin - the starting coordinates for the rollover image. Set to -1, -1 to keep the default origin (same as the touch area). Reloc you define a circular rollover region using this format: o reloc:x:y:radius:enable_rollover:on_bitmap:off_bitmap:x_origin:y_origin o x, y: center of the touch area o radius: radius of the touch area in pixels o enable_rollover: 1 to enable rollovers, 0 to disable rollovers o on_bitmap: bitmap image name. Bitmap displayed when the mouse is within the defined region o off_bitmap: bitmap image name. Bitmap displayed when the mouse is not within the defined region. o x_origin,y_origin: rollover origin - the coordinates for the center of the rollover image. Set to -1, -1 to keep the default origin (same as the touch area). Example 4: rectangular rollover region Starting x and y Rollover Enabled Rollover origin Width and Height On and Off image This is an example of what you would enter in the CSV file to define a rollover region. In this example: 29
30 Starting position is: 765, 674 The touch region is 96 pixels wide and 43 pixels high The rollover region is enabled The on and off images are: next_on.bmp and next_off.bmp. The rollover images are displayed in the same location as the touch region Normally, the on and off image have the same dimensions as touch region (width, height), and the same starting position (x,y). The rollover origin (x_origin, y_origin) allows you to specify a different starting position. You can use this feature if your on and off images are larger than the touch region you use to activate the on and off images. Or, you may have a menu with thumbnail images on the left side, and you want a larger image to be displayed on the right side of the screen when the cursor is over a thumbnail. The following CSV example plays a simple slideshow with 3 images. It has two rectangular rollover region events and one timeout event. Examples 5.1 and 5.2 are the same as Example 5, but expanded so it s easier to read. If nothing is clicked or touched, the slide show will start automatically after the 10 second timeout, and then return to the menu. Similar to a standard elo entry, you ll notice that clicking in the first touch area, advances to the next slide until you reach menu.bmp. Clicking in the second touch area takes you back to the previous slide. In example 5.1, we see clearly that each of the 3 images has a section that s 96 pixels long by 43 pixels tall that s defined as a rollover region. o When the pointer isn t over this area, next_notlit.bmp is diplayed o When the point is over this area, next_lit.bmp is displayed In example 5.2, we see that each of the 3 images has a section that s 95 pixels long by 43 pixels tall that s defined as a rollover region. o When the pointer isn t over this area, back_notlit.bmp is displayed o When the pointer is over this area, back_lit.bmp is displayed Example 5: slideshow, with next and back buttons that light up when the mouse is over them 30

31 Example 5.1: Example 5.2: 31
32 Scheduling Playback (HD2000 only) Videos, still images, playlists, and CSV files can be played back at scheduled times using the autoschedule.txt file. This file contains a series of date/time specifications, followed by a specification of what to play when the date/time event occurs. The syntax of the date/time specification is as follows: Year / Month / Day - Day of Week - Hour : Minutes For example, a date/time specification for December 23, 2007 at 3:20 PM is defined as: 2007/12/23-*-15:20 In this example, the Day of Week specification parameter is a wildcard defined with an asterisk. All date/time parameters not used must be defined as wildcards using an asterisk (*). Valid syntax for Date/Time parameters: Year: (4 digit integer from 2000 to 2038) Month: (2 digit integer from 01 to 12) Day: (2 digit integer from 01 to 31) Day of Week: Sun Mon Tue Wed Thu Fri Sat Hour: (2 digit integer from 00 to 23) Minute: (2 digit integer from 00 to 59) In the autoschedule.txt file, the line following a date/time specifications must be a csv file, playlist file, video file or image file. The following is an example autoschedule.txt file: 2007/12/15-*-15:20 image.png 2007/12/25-*-16:16 music.bsp 2008/1/*-WED-16:00 video.mpg 2008/1/*-*-07:00 breakfast.bsp 2008/1/*-*-14:00 demo.csv In this example, the image image.png will be displayed starting on December 15, 2007 at 3:20 PM. On December 25, at 4:16 PM, the playlist music.bsp will start. The next 32
33 specification indicates that video.mpg will start playing at 4:00 PM every Wednesday in January, The playlist breakfast.bsp will start playing at 7:00 AM during January, Finally, demo.csv will be launched everyday in January, 2008, at 2:00 PM. Note that blank lines can be added (as above) to autoschedule.txt files to improve readability. Additionally, REM lines can be added to annotate these files. Scripts BrightSign can be used without any knowledge of scripts to accomplish common goals such as playing looping video or playing a slideshow (see the prior section in this manual Playing Media ). It s easy to control your digital signs or kiosks with a USB keyboard or remote using a simple script. In addition, using CSV files you can create more sophisticated signs. But by adding scripts, you can create the most interactive digital signs or kiosks. For a fee, Roku can help you write scripts. Contact brightsignsales@rokulabs.com for more information. A script is a simple program that controls behaviors, like video playback, based on events such as button presses. Scripts are also commonly used on PCs and Web Sites. For example, Microsoft Office macros are often Basic Scripts. Adobe Flash apps often rely on ActionScripts for their logic, and web pages are often driven by scripts written in PHP, Perl, or JavaScript. If you don t have scripting skills in-house, IT and Web developers can be contracted to write scripts for you. Roku can also be contracted to develop custom scripts and applications (contact brightsignsales@rokulabs.com). BrightSign has a built in scripting language (called BrightScript), similar in many ways to the Basic found in Microsoft Office, or Windows XP Windows Script Hosting VBScript. Scripts can be as simple as one or two lines, and as complicated as thousands of lines. Hello world Here is how to create your first, very simple script 1. Using a text editor create a file called hello.bas with this line: print hello world 2. Save hello.bas into the root directory of a CF card 3. Insert the CF card into BrightSign 4. Connect the serial port of BrightSign to you PC using a null modem cable, and run hyperterminal (see the Shell section of this manual for more details). 5. Power up BrightSign. 6. Wait for it to boot, and for the Roku> shell prompt to appear 7. type: script /hello.bas 8. You should see hello world on your terminal window. 33
34 9. If you want the script to autorun upon boot, rename it autorun.bas Roku Objects As well as the BrightScript language itself, BrightSign relies upon a library of Roku Objects to expose the hardware to the scripting language. Each Roku Object provides access to certain capabilities. For example, there is a rovideoplayer object and a rotouchscreen object. To create an object in a script, the CreateObject() function is used. Refer to the following two manuals when writing scripts: Roku BrightScript Reference -- this describes the actual scripting language Roku Object Reference -- this describes the Roku Objects, such as rovideoplayer Examples A good way to learn BrightScript is to look at or modify existing scripts. You can find links to example scripts at The BrightSign Demo autorun.bas is an example of a more sophisticated script. You can also test BrightScript commands using the shell. Here is an example: Welcome to the Roku Shell version Release Type '?' for help or 'help <command>' for help on <command>. Roku> script BrightScript Micro Debugger. Enter any BrightScript statement, debug commands, or HELP. BrightScript> print "hello" hello BrightScript>? "hello" hello BrightScript>? BrightScript>?type(5) rotint32 BrightScript> if 1=1 then print"1 does equal 1!" else print "strange!" 1 does equal 1! BrightScript>?right("abcdef",3) def BrightScript> exit Roku> 34
35 Registry (HD2000 only) The BrightSign has an I2CROM with 2K bytes of memory that supports the storage of persistent settings. The purpose of the registry is to enable customers to persist usage statistics and other small amounts of information that may change regularly. Individual items are stored in the registry through the use of registry keys and values. For example, there might be a registry key named NumberOfButtonPresses ; the corresponding registry value would be used to count the number of times a button is pressed. Registry data can be organized into different registry sections if desired. CSV files support writing to the registry, deleting from the registry, and displaying the contents of the registry see the Using Excel to Create Interactive Signs section earlier in the document. The contents of the registry can also be displayed from a playlist see the Playlist Commands section earlier in the document. The number of registry keys and values that can be used is dependent on a number of factors, including the number of sections, the number of keys/values per section, and the size of the keys and values. In typical usage, there s room in the registry for about 50 keys. GPIO Control Port The BrightSign has a DB25 General Purpose Input Output (GPIO) Port. This port has 12 inputs that can be directly connected to buttons or switches, and 6 outputs that can directly drive LEDs. To use this port you must create a simple but custom cable that connects a DB25 connector to your buttons or LEDs. See the BrightSign Hardware Manual for more information and example circuits. Roku has a test button/led board that you can purchase to evaluate the GPIO port and test your scripts that read the buttons or set the LEDs. Here is an example script that will flash an LED for half a second each time a button is pressed on the BrightSign button/led board. print "BrightSign Button-LED Test Running" p = CreateObject("roMessagePort") tmr = CreateObject("roMessagePort") gpio = CreateObject("roGpioControlPort") gpio.setport(p) event_loop: msg=wait(0, p) if type(msg)<>"rogpiobutton" then event_loop butn = msg.getint() if butn > 5 then event_loop gpio.setoutputstate(butn+17,1) print "Button Pressed: ";butn msg = wait (500, tmr) gpio.setoutputstate(butn+17,0) clear_events: 35
36 msg=p.getmessage():if type(msg)<>"rotint32" then clear_events goto event_loop Learning More and Support The following resources can help you get the most from your BrightSign: 1. Visit 2. Refer to each of the different BrightSign documents available (listed at the start of this manual). 3. Visit the BrightSign community Forums to discuss projects with other customers and Roku engineers: 4. Contact for help with custom projects 36
User Guide. HD600 and HD2000. BrightSign Software Version: (HD600); (HD2000) AutoPlay Script Version: 1.1.7b (HD600);
; (HD2000) AutoPlay Script Version: 1.1.7b (HD600);") TM User Guide HD600 and HD2000 MATCHES: BrightSign Software Version: 1.1.28 (HD600); 2.0.94 (HD2000) AutoPlay Script Version: 1.1.7b (HD600); 2.0.0.43 (HD2000) www.brightsign.biz Copyright Copyright 2008
TM User Guide HD600 and HD2000 MATCHES: BrightSign Software Version: 1.1.28 (HD600); 2.0.94 (HD2000) AutoPlay Script Version: 1.1.7b (HD600); 2.0.0.43 (HD2000) www.brightsign.biz Copyright Copyright 2008
HD110, HD210, HD410, HD810, and HD1010 QUICK START GUIDE
 HD110, HD210, HD410, HD810, and HD1010 QUICK START GUIDE Contents What s in the box?........................................................... 1 What is BrightSign?..........................................................
User Guide. BrightAuthor Release 2.0. BrightSign HD110, HD210, HD210w, HD410, HD810, HD1010, and HD1010w. COMPATIBLE WITH
 User Guide BrightAuthor Release 2.0 COMPATIBLE WITH BrightSign HD110, HD210, HD210w, HD410, HD810, HD1010, and HD1010w www.brightsign.biz Copyright Copyright 2010 by BrightSign, LLC. All rights reserved.
TD1012, BrightSign HD110 / HD210 / HD210w / HD410 / HD810 / HD1010 / HD1010w ("Compact") Software April 6, 2012
 Software April 6, 2012") TD1012, BrightSign HD110 / HD210 / HD210w / HD410 / HD810 / HD1010 / HD1010w ("Compact") Software 3.8.34 April 6, 2012 This release includes bug fixes and performance improvements. Fixed: Factory reset
TD1012, BrightSign HD110 / HD210 / HD210w / HD410 / HD810 / HD1010 / HD1010w ("Compact") Software 3.8.34 April 6, 2012 This release includes bug fixes and performance improvements. Fixed: Factory reset
USER GUIDE. BrightAuthor software version 3.4/3.2. BrightSign, LLC Lark Ave., Suite 200 Los Gatos, CA
 USER GUIDE BrightAuthor software version 3.4/3.2 BrightSign, LLC. 16795 Lark Ave., Suite 200 Los Gatos, CA 95032 408-852-9263 www.brightsign.biz TABLE OF CONTENTS Chapter 1 Getting Started... 1 What is
BRIGHTSIGN QUICK START GUIDE. BrightSign, LLC Lark Ave., Suite 200 Los Gatos, CA
 BRIGHTSIGN QUICK START GUIDE BrightSign, LLC. 16795 Lark Ave., Suite 200 Los Gatos, CA 95032 408-852-9263 www.brightsign.biz 1 TABLE OF CONTENTS What s in the box? 1 What is BrightSign? 2 Benefits 2 Capabilities
BRIGHTSIGN QUICK START GUIDE FOR HD110, HD210, HD410, HD810, HD1010
 BRIGHTSIGN QUICK START GUIDE FOR HD110, HD210, HD410, HD810, HD1010 BrightSign, LLC. 16795 Lark Ave., Suite 200 Los Gatos, CA 95032 408-852-9263 www.brightsign.biz TABLE OF CONTENTS What s in the box?
BRIGHTSIGN QUICK START GUIDE FOR HD120, HD220, HD1020, XD230, XD1030, XD1230
 BRIGHTSIGN QUICK START GUIDE FOR HD120, HD220, HD1020, XD230, XD1030, XD1230 BrightSign, LLC. 16795 Lark Ave., Suite 200 Los Gatos, CA 95032 408-852-9263 www.brightsign.biz TABLE OF CONTENTS What s in
MONITOR TYPES: VR4 has a complete set of video output to drive different types of monitor as follows:
 VR4 Video player Manual Version 1.2 INTRODUCTION: The VR4 is a self-contained Solid State video player housed in a small aluminum enclosure. The VR4 utilizes the latest development in DVD single chip technology
USER GUIDE. BrightAuthor 3.7. BrightSign, LLC Lark Ave., Suite 200 Los Gatos, CA
 USER GUIDE BrightAuthor 3.7 BrightSign, LLC. 16795 Lark Ave., Suite 200 Los Gatos, CA 95032 408-852-9263 www.brightsign.biz TABLE OF CONTENTS Chapter 1 Getting Started... 1 What is BrightAuthor?... 1 What
BRIGHTAUTHOR USER GUIDE
 BRIGHTAUTHOR USER GUIDE Software Version 3.5 BrightSign, LLC. 16795 Lark Ave., Suite 200 Los Gatos, CA 95032 408-852-9263 www.brightsign.biz TABLE OF CONTENTS Chapter 1 Getting Started... 1 What is BrightAuthor?...
MICRO 2+ USER MANUAL
 MICRO2+ USER MANUAL Wintal MICRO2+ USER MANUAL Contents BRIEF INTRODUCTION... 1 FEATURE... 1 BASIC PERFORMANCE... 1 PRODUCT DETAILS... 2 PACKING LIST... 2 FRONT VIEW... 2 BACK VIEW... 3 REMOTE CONTROL...
Roku Object Reference
 Roku Object Reference Matches HD600 Software Version: 1.1.28 Matches HD2000 Software Version: 1.1.20 California, USA www.rokulabs.com 1 Table of Contents INTRODUCTION... 3 ROKU OBJECT INTERFACES AND METHODS...
 Register your product and get support at www.philips.com/welcome HMP3000 EN User manual Contents 1 Trademark notice 5 English 2 Connect and play 7 3 Control and play 11 4 Options 13 Video options 13 Audio
Ultra High Brightness Professional Monitor User Manual
 Manual Version UHBA1.0 Safety Instructions Please keep the display away from any heat sources. Place the display in a stable and well-ventilated place. Please handle with care as product contains glass.
FIRMWARE RELEASE NOTES
 Release Notes June 16, 2014 FIRMWARE RELEASE NOTES (BrightSign XD230, XD1030, XD1230) BrightSign, LLC. 16795 Lark Ave., Suite 200 Los Gatos, CA 95032 408-852-9263 www.brightsign.biz Updating your BrightSign
EYEZONE B1080PAM. User Manual CONTENTS. Feb 24, 11
 EYEZONE B1080PAM User Manual CONTENTS 1. Package Contents...... 1 2. Introduction...... 1 3. Features 1 4. Hardware Overview..... 2 5. Remote Control.... 3 6. Using the B1080PAM...... 4 6.1 Start the B1080PAM.....
MP75. HD Media Player
 INSTRUCTION MANUAL MP75 HD Media Player TABLE OF CONTENTS 1. Caution 2 2. Features and Specifications 3 3. Unit and Accessories 4 4. Functions of Buttons on the Remote Control 4 5. Media Player s Connections
SD CARD DVD/VCD/CD/MP3/DIVX/MPEG-4 XO1525 USB MOD D200P. User s Manual
 USB SD CARD DVD/VCD/CD/MP3/DIVX/MPEG-4 XO1525 MOD D200P User s Manual 9.1 Rear Panel Connections: 19 BEFORE USING: To ensure the safety of the products during transportation, The internal mechanism was
Multi Analog Video To HDMI UHD. 4Kx2K Scaler. With USB Media Player
 Multi Analog Video To HDMI UHD 4Kx2K Scaler With USB Media Player User Manual 1. Introduction ALL TO HDMI 4K CONVERTER BOX converts CVBS, YPbPr, VGA, HDMI and USB media to 720p and 1080p high definition
VC-HD8 Manual v2 July 2016
 VC-HD8 Manual v2 July 2016 Contents 1. What is the VC-HD8?... 4 2. Supported Media Formats... 4 3. In the Box... 5 4. Setup Instructions... 6 5. Remote Control... 8 6. Settings Options... 9 7. Additional
Blackbird 4K Multi Format HDMI Converter with 4K Scaler
 Blackbird 4K Multi Format HDMI Converter with 4K Scaler P/N 30918 User's Manual SAFETY WARNINGS AND GUIDELINES Please read this entire manual before using this device, paying extra attention to these safety
SecureShot HC Quick Start Instruction Page
 SecureShot HC Quick Start Instruction Page Your new SecurShot HC has been factory pre-programmed and tested to fit most applications. It is ready-to-go right out of the box. An SD card is installed, and
Always there to help you. Register your product and get support at HMP5000. Question? Contact Philips.
 Always there to help you Register your product and get support at www.philips.com/welcome Question? Contact Philips HMP5000 User manual Contents 1 Control and play 2 11 Troubleshooting 20 12 Specification
DVR 528 Digital Video Camera
 DVR 528 Digital Video Camera User Manual 2010 Sakar International, Inc. All rights reserved. Windows and the Windows logo are registered trademarks of Microsoft Corporation. All other trademarks are the
USER GUIDE. BrightAuthor 3.8. BrightSign, LLC Lark Ave., Suite 200 Los Gatos, CA
 USER GUIDE BrightAuthor 3.8 BrightSign, LLC. 16795 Lark Ave., Suite 200 Los Gatos, CA 95032 408-852-9263 www.brightsign.biz TABLE OF CONTENTS Chapter 1 Getting Started... 1 What is BrightAuthor?... 1 What
700TSU INSTALLATION MANUAL
 M 700TSU INSTALLATION MANUAL 2 Table of Contents Features...03 Specifications...04 Quick-Start...05 Remote Control...07 Hardware Installation...10 Software Installation...14 Touch Screen Driver Installation
DATA PROJECTOR XJ-H1650/XJ-H1750 XJ-ST145/XJ-ST155
 DATA PROJECTOR XJ-H1650/XJ-H1750 XJ-ST145/XJ-ST155 E Data Projector USB Function Guide Be sure to read the precautions in the separate Setup Guide. Be sure to keep all user documentation handy for future
Network Digital Signage Player. Users Manual
 Network Digital Signage Player Users Manual Table of Contents I. Introduction II. Specifications III. Signage Player Kit IV. Playlist Operation V. Client Device Setup 1. Client Installation 2. Client Main
XMP-120/130 User s Manual
 XMP-120/130 User s Manual Notes about model variants The XMP-120 and XMP-130 models are based on XMP-320 with the following additional features: XMP-120 Ethernet only XMP-130 Ethernet + Wi-Fi All other
Contents V1.0. ONE Introduction TWO Installation and Instructions...06 THREE FAQ...14
 Contents V1.0 ONE Introduction...02 1.1 Features...02 1.2 Specification...03 1.3 Package Contents...03 1.4 Remote Control Guide...04 1.5 Connection Chart...05 TWO Installation and Instructions...06 2.1
LIMITLESS POSSIBILITIES FOR EXCEPTIONAL DIGITAL SIGNS. COMPLETE PRODUCT LINE
 BrightSign Digital Sign & Kiosk Controllers LIMITLESS POSSIBILITIES FOR ECEPTIONAL DIGITAL SIGNS. COMPLETE PRODUCT LINE The new BrightSign product line offers a wide range of solutions and prices, each
IAdea Player Firmware User Manual
 IAdea Player Firmware User Manual Firmware version 4.6 Media players : XMP-2200 XMP-2300 XMP-2400 Signboards : XDS-1060 XDS-1062 XDS-1068 Contents IAdea Player Firmware User Manual 0 1. Introduction 1
TV1 Digital Player User s Manual
 TV1 Digital Player User s Manual Note: Screen shots taken in this manual may appear different on the player itself. Table of Content: Computer System requirements... 1 Notes... 2 Product Introduction...
Brightsign 2.2 Update BrightAuthor 2.2 includes a large number of new features and updates.
 Brightsign 2.2 Update BrightAuthor 2.2 includes a large number of new features and updates. To use BrightAuthor 2.2, you must install firmware 3.3.78 or later. All new BrightSigns are shipping with 3.3.69
Manual v2.1 July 2017
 VC-HD6 Manual v2.1 July 2017 Contents Contents... 3 1. What is the VC-HD?... 4 2. Supported Media Formats... 4 3. In the Box... 5 4. Setup Instructions... 6 5. Remote Control... 9 6. Settings Options...
Hi-Res 8 Wi-Fi Digital Picture Frame with MP3 player Table of Contents
 Hi-Res 8 Wi-Fi Digital Picture Frame with MP3 player Table of Contents Before Using the Digital Picture Frame...3 Introduction...3 Features and Specs...3 Package contents...4 Digital Picture Frame Layout...5
ContentSmart 3.0 Software User Manual
 ContentSmart 3.0 Software User Manual Copyright 01/01/2017 by Planar Systems, Inc. All rights reserved. Contents of this publication may not be reproduced in any form without permission of Planar Systems,
10.1 HD Memory View Instruction Manual
 10.1 HD Memory View Instruction Manual Cautions Precautions and maintenance For indoor use only To avoid risk of fire or electric shock, do not expose the unit to moisture or condensation. To avoid overheating,
ADPF10XN Instruction Manual
 ADPF10XN Instruction Manual 1 ADPF10XN Digital Photo Frame User Guide Thank you for purchasing the ADPF10XN 10.4 digital photo frame (DPF). Before operating your new digital photo frame please carefully
User s Manual. HD Multi-format Video Encoder. Model Name: Z3-MVE-02
 Z 3 Technology User s Manual HD Multi-format Video Encoder Model Name: Z3-MVE-02 Version 1.04.16 July 17, 2012 Before attempting to connect or operate this product, please read these instructions carefully
PRV-LX1 - Frequently Asked Questions 1. What is the PRV-LX1? 2. How is the PRV-LX1 different from your previous industrial DVD Video recorder? 3.
 PRV-LX1 - Frequently Asked Questions 1. What is the PRV-LX1? 2. How is the PRV-LX1 different from your previous industrial DVD Video recorder? 3. What are the primary features of the PRV-LX1? 4. What inputs
Archives About ARCHOS TV+ General Questions I have installed a firmware/plug-in/game file on my Archos TV+ but it is not recognized by the device. You
 About ARCHOS TV+ General Questions I have installed a firmware/plug-in/game file on my Archos TV+ but it is not recognized by the device. You may have not correctly copied your file on the device. If it
RS-232 / TCP/IP Port Hardware. RS-232 / TCP/IP Port Hardware. TCP/IP Overview
 RS-232 / TCP/IP Port Hardware RS-232 / TCP/IP Port Hardware TCP/IP Overview The Serial and TCP/IP port share the same protocol. The TCP/IP connection is a very simple socket, sometimes referred to as Raw
700/702 INSTALLATION MANUAL
 700/702 INSTALLATION MANUAL 2 Table of Contents Features 03 Specifications 04 Quick Start..05 Remote Control.07 Capacitive Touch..10 Hardware Installation 11 700CSH / 702CSH / 700TSH / 702TSH / 700YH /
Quick Start Guide EX-9686U/A-L(A9) Copyright TOPSCCC Technology CO., LTD. All rights reserved
 Copyright TOPSCCC Technology CO., LTD. All rights reserved") Quick Start Guide Copyright 2000 2014 TOPSCCC Technology CO., LTD. All rights reserved Release Notes Version Release Date Notes 1.0 June 2013 Initial release 2.0 October 2013 Correct some typo errors 3.1
Quick Start Guide Copyright 2000 2014 TOPSCCC Technology CO., LTD. All rights reserved Release Notes Version Release Date Notes 1.0 June 2013 Initial release 2.0 October 2013 Correct some typo errors 3.1
IMPECCA DFM-1512 USER S MANUAL
 IMPECCA DFM-1512 USER S MANUAL Table of Contents Introduction... 3 Installing your Unit... 3 Connecting to a computer... 4 Using Your Remote Control... 5 Using Your Digital Photo Frame... 6 Browsing Images...
MEDIA CONTROL SERVER 2.0
 MEDIA CONTROL SERVER 2.0 Version 2.0 Getting Started Guide This getting started guide will help you install and configure the Autonomic Controls Media Control Server and Mirage client. Contents OVERVIEW...
INTRODUCTION. i-tech Company LLC TOLL FREE: (888) WEB:
 WEB:") Table of Contents 1. Introduction 1 1.1. About the Product...1 1.2. Features...2 1.3. Notice...3 1.4. Check List...3 2. Playing System...5 2.1. Install Battery in the Remote Control...5 2.3. To Insert
Table of Contents 1. Introduction 1 1.1. About the Product...1 1.2. Features...2 1.3. Notice...3 1.4. Check List...3 2. Playing System...5 2.1. Install Battery in the Remote Control...5 2.3. To Insert
VC2100 / VC MB Digital Event Recorder
 VC2100 / VC2100 32MB Digital Event Recorder Product Description: This system includes one VS2100 single channel digital event recorder and one color camera. It will automatically have image capture or
15 Video Screen. Manual v1.3
 15 Video Screen Manual v1.3 Nov 2017 Contents 1. What is the 15VS... 4 2. Features... 4 3. In the Box... 6 4. Setup Instructions... 7 4.1 Connect Speakers... 8 4.2 Connect Buttons... 8 4.3 Insert SD Card...
IP65 Rated Freestanding Outdoor Monitor User s Manual
 IP65 Rated Freestanding Outdoor Monitor User s Manual Manual Version OTA1.0 Safety Instructions Please handle with care so as to not damage the LCD panel. The holes or openings on the display are designed
High Definition Freestanding Digital Poster. Universal User s Manual
 High Definition Freestanding Digital Poster Universal User s Manual L Series Version LHD1.0 Our Full Product Range Page 1 Safety Instructions Please keep the display away from any heat sources. and well-ventilated
40 High Definition Digital Advertising Display User s Manual
 40 High Definition Digital Advertising Display User s Manual Manual Version PF40HD1.0 Our Full Product Range Page 1 Safety Instructions Please keep the display away from any heat sources. a stable and
VSP-NS7. Digital Signage Player
 VSP-NS7 Digital Signage Player Getting Started in Digital Signage Just Got Easier - Thanks to the VSP-NS7 Digital Signage Player In recent years, the growing popularity of digital signage has led to an
Copyright Information
 Copyright Information All rights reserved. No part of this publication may be reproduced, transmitted, stored in a retrieval system, or translated into any language in any form by any means, optical, electronic,
Archives About ARCHOS 405 General Questions Why is it impossible to copy files larger than 2 GB to my ARCHOS? You cannot copy files larger than 2 GB i
 About ARCHOS 405 General Questions Why is it impossible to copy files larger than 2 GB to my ARCHOS? You cannot copy files larger than 2 GB in the default USB mode to your ARCHOS due to the FAT 32 file
49BDL5055P/11 V User Manual (English)
") /11 V1.10 www.philips.com/welcome User Manual (English) Safety Instructions Safety precautions and maintenance shock, electrical hazards and/or mechanical hazards. Read and follow these instructions when
/11 V1.10 www.philips.com/welcome User Manual (English) Safety Instructions Safety precautions and maintenance shock, electrical hazards and/or mechanical hazards. Read and follow these instructions when
USER GUIDE. BrightAuthor 4.3. BrightSign, LLC Lark Ave., Suite B Los Gatos, CA
 USER GUIDE BrightAuthor 4.3 BrightSign, LLC. 16780 Lark Ave., Suite B Los Gatos, CA 95032 408-852-9263 www.brightsign.biz TABLE OF CONTENTS Chapter 1 Getting Started... 1 What is BrightAuthor?... 1 What
WARNINGS. *Do not operate the Projector in direct sunlight or near heat sources such as heaters, fires, and stoves as this may cause a fire hazard.
 WARNINGS *Do not operate the Projector in direct sunlight or near heat sources such as heaters, fires, and stoves as this may cause a fire hazard. *Do not operate the projector close to sources of steam
705 INSTALLATION MANUAL
 705 INSTALLATION MANUAL 2 Table of Contents Features...03 Specifications...04 Quick - Start...05 Remote Control...07 Hardware Installation...10 705 Models Additional Info...14 Owner s Record...15 3 Features
Domino-Pro Product Manual. Domino-Pro Ad/Program Insertion System. PART 1 of 2. Version 4.2 December 15, 2014
 Domino-Pro Product Manual Domino-Pro Ad/Program Insertion System PART 1 of 2 Version 4.2 December 15, 2014 Media Control Systems 1050 Pioneer Way, Ste Q El Cajon, CA 92020 619-599-1050 www.mediacontrolsystems.com
Using AORUS Notebook for the First Time
 Congratulations on your purchase of the AORUS Notebook! This Manual will help you to get started with setting up your notebook. For more detailed information, please visit our website at http://www.aorus.com.
Quick Start Guide SBC21/NSD21/EC 21 SBC21 / EC21 / NSD21. Quick Start Guide. Copyright IC Nexus Corporation. All rights reserved
 SBC21 / EC21 / NSD21 Quick Start Guide Copyright 2000 2013 IC Nexus Corporation. All rights reserved Release Notes Version Release Date Notes 1.0 June 2013 Initial release 2.0 October 2013 Correct some
ZOTAC ZBOX User s Manual
 ZOTAC ZBOX User s Manual No part of this manual, including the products and software described in it, may be reproduced, transmitted, transcribed, stored in a retrieval system, or translated into any language
For Powerful Digital Marketing and Total Multimedia Solution DV-66. User s Guide
 For Powerful Digital Marketing and Total Multimedia Solution DV-66 User s Guide Acknowledgements The MedeaWiz logo and DV-66 are trademarks of MedeaWiz Corporation. All other trademarks or registered trademarks
Rapid deployment surveillance system
 Rapid deployment surveillance system Table of contents Camera Kit Contents... 2 System Requirements and Compatibility... 3 General Information... 3 Battery Life... 3 Quick Start Guide... 4 Camera Overview...
Preface. Statement & Disclaimer
 Preface Thank you very much for choosing our Smart TV Box. For your convenience, and reference, please refer to the provided manual for setup and operation instructions. Statement & Disclaimer We have
TOUCH CONTROLLER CUWIN
 TOUCH CONTROLLER CUWIN User Manual 1 1.0 Introduction The CUWIN combines a graphic display and touch interface with a high efficiency industrial controller. It is equipped with Microsoft Windows CE 5.0
Bringing memories to life!
 The moment keeps going Jackie on holidays - Great ocean road, Melbourne 15" Mirage Series Bringing memories to life! Product User Manual (Model No's: DF-F1504b & F1506t) 1. Welcome! Congratulations on
User manual. P4K-HUL4E1 4K UHD HDMI & USB Over IP Extender P4K-HUL4E1-P 4K UDH HDMI & USB Over IP Extender with PoE
 User manual P4K-HUL4E1 4K UHD HDMI & USB Over IP Extender P4K-HUL4E1-P 4K UDH HDMI & USB Over IP Extender with PoE P4K-HRSUL4E1 / P4K- LHRSU1E4 P4K-HRSUL4E1-P/ P4K-LHRSU1E4-P Partilink Technology Co.,
All your entertainment in one place
 Quick Start Guide What s inside Step 1. Unpack the box Important Tips Step 2. Connect to your Broadband Modem Step 3. Connect to your TV Antenna Step 4. Connect to your TV Step 5. Power up your Fetch Mighty
Flagship entertainment notebook with real wide screen and Blu-ray Disc drive
 VGN-FW31ZJ Ultimate screen experience Flagship entertainment notebook with real wide screen and Blu-ray Disc drive KEY FEATURES Full HD 16.4" X-black LCD display with double lamp and super realistic 100%
SC1720 (720P Black Box)
") SC1720 (720P Black Box) - HD Stealth Camcorder - User Manual Ver. 1.0.0 F40708000 04.11.2013 Table of Contents Quick Start Guide...- 3 - Diagram...- 4 - LED Indicator Status...- 5 - How to Charge The Battery...-
SC1720 (720P Black Box) - HD Stealth Camcorder - User Manual Ver. 1.0.0 F40708000 04.11.2013 Table of Contents Quick Start Guide...- 3 - Diagram...- 4 - LED Indicator Status...- 5 - How to Charge The Battery...-
Overview 1. Foreword 2. Warnings
 Overview 1. Foreword Thank you for choosing our product. Please read this manual carefully before using the product. Specifications and software updates may be subject to change without notice. Some pictures
ZOTAC ZBOX User s Manual
 User s Manual No part of this manual, including the products and software described in it, may be reproduced, transmitted, transcribed, stored in a retrieval system, or translated into any language in
User manual MODEL: STB266. For ongoing product improvement, this manual will be modified without prior notice.
 User manual In order to ease users to select video programs, other logos and/or trademarks may appear on the Cloud TV Box. All other logos and/or trademarks are the property of their respective owners.
Slimline Digital Advertising Display - Standalone (ANDROID) Hardware User Manual
 Hardware User Manual") Slimline Digital Advertising Display - Standalone (ANDROID) Hardware User Manual Manual Version PFHD5.3 Safety Instructions Please keep the display away from any heat sources. Place the display in a stable
Slimline Digital Advertising Display - Standalone (ANDROID) Hardware User Manual Manual Version PFHD5.3 Safety Instructions Please keep the display away from any heat sources. Place the display in a stable
User s Manual BeamPod User Manual
 User s Manual BeamPod General Safety Information 1. Keep the device and packaging materials out of reach of infants and children. 2. Keep the power adapter and other contacts from water, Dry your hands
XMP-2200/2300/2400 Hardware User Manual
 XMP-2200/2300/2400 Hardware User Manual Notes about model variants The XMP-2300 and XMP-2400 models are based on XMP-2200 with the following differences: XMP-2200 Ethernet only 1 AV-out XMP-2300 Ethernet
PRESTIGIO LIBRETTO. e-book Reader PER307.
 PRESTIGIO LIBRETTO e-book Reader PER307 www.prestigio.com Table of Contents Disclaimer 3 Introduction 3 Package Content 3 Getting Started 4 Charging the Reader 5 Power On/Off, Reset Device, Insert MicroSD
1020 / 1022 INSTALLATION MANUAL
 1020 / 1022 INSTALLATION MANUAL 2 Table of Contents Features...03 Specifications...04 Quick - Start...05 Remote Control...07 Hardware Installation...10 1020TSV, 1022TSV, 1020YV, 1022YV, 1020TSH, 1022TSH
Chapter 1: Introduction. Chapter 2: Getting Started
 Chapter 1: Introduction Media Player 200 is a Digital Media Player that includes a connector for a USB storage device and card reader. The Media Player 200 connects to your home entertainment center allowing
Windows Embedded Compact Test Kit User Guide
 Windows Embedded Compact Test Kit User Guide Writers: Randy Ocheltree, John Hughes Published: October 2011 Applies To: Windows Embedded Compact 7 Abstract The Windows Embedded Compact Test Kit (CTK) is
Experimental Procedure. Frequently Asked Questions (FAQ) Kit General Questions. Setting Up and Using Your Raspberry Pi Projects Kit
 Kit General Questions. Setting Up and Using Your Raspberry Pi Projects Kit") 1 of 11 9/13/2018, 2:31 PM https://www.sciencebuddies.org/science-fair-projects/project-ideas/compsci_p059/computer-science/design-your-own-video-game (http://www.sciencebuddies.org/science-fairprojects/project-ideas/compsci_p059/computer-science/design-your-own-video-game)
1 of 11 9/13/2018, 2:31 PM https://www.sciencebuddies.org/science-fair-projects/project-ideas/compsci_p059/computer-science/design-your-own-video-game (http://www.sciencebuddies.org/science-fairprojects/project-ideas/compsci_p059/computer-science/design-your-own-video-game)
enjoy pure digital perfection USB host HDMI out 1080P Up-scaling Full HD (1080) up-scaling
 up-scaling") BD-P1600 - Blu-ray enjoy pure digital perfection USB host HDMI out 1080P Up-scaling Full HD (1080) up-scaling With good looks, this Full HD 1080p Blue-ray Player, This means you can now watch your DVD
BD-P1600 - Blu-ray enjoy pure digital perfection USB host HDMI out 1080P Up-scaling Full HD (1080) up-scaling With good looks, this Full HD 1080p Blue-ray Player, This means you can now watch your DVD
And you thought we were famous
 And you thought we were famous for our cassette recorders! Pro-Installation Solid-State Recorder PMD570 For years, Marantz Professional has led the industry in the recording and gathering of audio for
Axon HD Content Management Application (CMA)
") [ ] Axon HD Content Management Application (CMA) A Content Management Application (CMA) running on an Axon HD media server or a computer connected through an Ethernet network gives you remote control of
[ ] Axon HD Content Management Application (CMA) A Content Management Application (CMA) running on an Axon HD media server or a computer connected through an Ethernet network gives you remote control of
Branor Systems HD Camera Trucks "CamTruck" Hornby CTHD002
 Branor Systems HD Camera Trucks "CamTruck" Hornby CTHD002 Last update 11-2-2012: Thank you buying this Branor Systems CamTruck. We hope you get as much enjoyment out of this novel device as we had developing
Using GIGABYTE Notebook for the First Time
 Congratulations on your purchase of the GIGABYTE Notebook P7! This Manual will help you to get started with setting up your notebook. For more detailed information, please visit our website at http://www.gigabyte.com.
USB 3.0 Docking Station
 USB 3.0 Docking Station Dual Display DVI+HDMI - 6 PORT USB HUB - LAN - AUDIO User Manual HDOCKS300 www.hamletcom.com Index 1. INTRODUCTION... 5 2. PRODUCT OVERVIEW... 6 2.1 PORTS AND CONNECTORS... 6 3.
MP3 HARD DISK. User Manual V1.0
 User Manual V1.0 Contents Before Using the Product 1 Introduction 1 System Requirements 1 Charging the Battery 2 Transferring Music Files 3 Music File Transferring Example 4 Basic Functions 5 Components
BRIGHTSIGN XT1143 PROMOTIONAL TOUCH PRESENTATION DEMO GUIDE
 BRIGHTSIGN XT1143 PROMOTIONAL TOUCH PRESENTATION DEMO GUIDE Setup and Use Instructions This BrightSign XT1143 Promotional Touch Presentation is interactive via a touch screen or a USB mouse. It tells the
Table of Contents 1.SAFETY INSTRUCTIONS BOXED CONTENTS PRODUCT REVIEW HARDWARE SPECIFICATIONS BASIC SETUP...
 User Manual VER1.0 Table of Contents 1.SAFETY INSTRUCTIONS...4 2.BOXED CONTENTS...5 3.PRODUCT REVIEW...5 4.HARDWARE SPECIFICATIONS...8 5.BASIC SETUP...9 5.1 AV CABLE...10 5.2 HD CABLE... 11 5.3 NETWORK/RJ45/
Media 1000 Product Guide
 Agenda Chapter 1 Media 1000... 2 1.1. Introduction... 2 1.2. Specifications... 2 1.3. Media 1000 Features... 4 1.4. Remote Controller... 5 Chapter 2 Media 1000 Setup... 7 Chapter 3 Software Setup... 9
VIDEO PLAYER FOR RASPBERRY PI (update 2018/12/25)
") VIDEO PLAYER FOR RASPBERRY PI (update 2018/12/25) Introduction Welcome to our new Video Player for Raspberry Pi (RPi) B+, 2 and 3. This player up to the latest update 2018/12/25, is able to play H.264
VIDEO PLAYER FOR RASPBERRY PI (update 2018/12/25) Introduction Welcome to our new Video Player for Raspberry Pi (RPi) B+, 2 and 3. This player up to the latest update 2018/12/25, is able to play H.264
S-Vision. The Digital Video Surveillance System of Shuttle for Home and Office Applications
 The Digital Video Surveillance System of Shuttle for Home and Office Applications Product Description The NVS-System is an innovative digital networking video system which belongs to the S-Vision product
N2300 Series N2312 4K Encoder NMX-ENC-N2312 (FGN2312-SA), Stand Alone NMX-ENC-N2312 -C (FGN2312-CD), Card
, Stand Alone NMX-ENC-N2312 -C (FGN2312-CD), Card") DATA SHEET N2300 Series N2312 4K Encoder NMX-ENC-N2312 (FGN2312-SA), Stand Alone NMX-ENC-N2312 -C (FGN2312-CD), Card Overview The NMX-ENC-N2312 Encoder and NMX-DEC-N2322 Decoder provide a flexible, feature-rich,
DATA SHEET N2300 Series N2312 4K Encoder NMX-ENC-N2312 (FGN2312-SA), Stand Alone NMX-ENC-N2312 -C (FGN2312-CD), Card Overview The NMX-ENC-N2312 Encoder and NMX-DEC-N2322 Decoder provide a flexible, feature-rich,
INSTRUCTION MANUAL Kingfisher Micro DVR w/ Button Cam SB-MSDVR660
 INSTRUCTION MANUAL Kingfisher Micro DVR w/ Button Cam SB-MSDVR660 Revised: March 15, 2013 Thank you for purchasing from SafetyBasement.com! We appreciate your business. We made this simple manual to help
User Manual Version 1.0
 User Manual Version 1.0 Copyright 2013 DELTA Electronics, Inc. All rights reserved. Page 1 Table of Contents 1. GETTING STARTED... 3 1.1 Key features... 3 1.2 Modes of operation... 3 1.2.1 Stand-alone