Waves. MultiRack SoundGrid V9. Outboard Processing Host for Your DiGiCo Console
|
|
|
- Russell Bradley
- 6 years ago
- Views:
Transcription


1 Waves MultiRack SoundGrid V9 Outboard Processing Host for Your DiGiCo Console
2 Contents The Rack in Detail... 3 Adding Plugins to a Rack... 6 Rack View: Controlling Your Plug-ins... 7 WaveSystem Toolbar Buttons... 9 Inserting a Rack into a channel Group Properties: Organization & Latency Alignment Snapshot Pane: Automating Your Racks Global Paste and Recall Safe modes Saving in MultiRack SoundGrid Overview Window: Viewing the Status of All of Your Racks Show Mode Automatic Recovery Rescan Present Licenses Restructuring a DiGiCo session to 96 khz System Monitor Window MultiRack SoundGrid Keyboard Shortcuts For information about upgrading software, setup and hardware connections, please refer to our DiGiCo Full Install manual:
3 The Rack in Detail The Rack Control Strip At the top of each Rack there is a control strip allowing you to control the Rack and assign it to processing groups. The control strip has the following windows and buttons: In/Out Mute Rack Name Disables the Rack s plug-ins and passes the signal directly from Rack input to Rack output. Typically used for before and after comparison or to bypass processing. Silences the Rack, but doesn t remove it from CPU processing. Muting is performed on the Rack s input to allow reverb tails and delay taps to fade gracefully. Displays the Rack s name given by matching I/ /O Port. Touch Setup > Audio I/O. Select Waves in the left column, all available I/O ports will show on the right, rename a waves port to change the name of the matching rack. Group Name ( Drums in this example) Refers to a latency alignment group to which the Rack may have been assigned. Use the pull-down menu to assign the Rack to another latency group.

4 Active(On) Bypass Mute Global Paste Rack Recall Safe Selecting Racks and Using Keystroke Commands: Using a mouse, right click on the top part of a selected Rack and you willl see a pull- down menu that offers several functions: The Rack is always active. Disables the Rack s plug-in processing and passes the signal from the Rack input to the Rack output. Mutes the entire Rack but doesn t remove plug-ins from CPU. Copies the Rack s parameters from the recalled Snapshot and pastes them into the selected Snapshots where Global Paste is selected in the Snapshot Pane. For example, if your singer has a cold and you need to EQ the vocals differently, Global Paste allows you to change specific settings, then embed these parameter changes into all of the Snapshots you ve made, rather than having to adjust each Snapshot separately. The Global Paste function is discussed in detail in the Snapshots section of this manual. Places the selected Rack or plug-in into a safe mode which protects it from Snapshot recalls. "Recalled Safe" racks or plug-ins are unaffected by all Snapshot recalls, even if a Snapshot has parameters that "should" be changed on Snapshot recall. This command is allowed only when "Recall Safe" Mode is selected in the Snapshots menu.
 Displays the Rack s CPU consumption (usage) on the SoundGrid Server and the core it runs on Input")
5 Assign the Rack to a latency alignment group Presents a list of available latency alignment groups from which you can assign a latency group/s to a rack/s. Latency CPU Consumption Displays the Rack s overall latency (accumulated inserted plug-in latencies) Displays the Rack s CPU consumption (usage) on the SoundGrid Server and the core it runs on Input and Output Sections To the right of the Input Rail is the Input Audio Fader, with a range of ±18dB. On the far right side of each Rack are the Output Rail and the Output Audio Fader. Rack audio input and output levels are stored within Snapshots.
6 Adding Plugins to a Rack To add a plug-in to a Rack, touch the plus (+) sign to the right of the Input Fader. Select a plug-in from the pull-down menu. An icon representing the plug-in will appear on the Rack, along with a new plus (+) sign that you can touch to add a new plug-in to the right of the existing one. Signal flow within a Rack is always from left-to-right. While in the Main view (or Rack view), you can always change the plug-in sequence within a Rack by grabbing a plug-in and dragging it to the desired location. Each plug-in icon has an "In" switch that bypasses the processor without disengaging it from the Rack. There is also a level meter on the icon that shows plug-in output level.
7 Rack View: Controlling Your Plug-ins Double touch a plug-in's s icon to open its interface and enter MultiRack SoundGrid s Rack View. Here you can adjust each plug-in parameter by selecting the parameter on screen and using the Touch-n-Turn Turn knob or toggle to set the selected parameter. Some controls on selected plugins might appear too small for touch selection - please use Digico's keyboard with mouse for more precise operation. If you re already familiar with Waves plug-ins, this window will be very easy to use. At the top of each plug-in window is a WaveSystem Toolbar,, used to load, save, and compare processor settings. The layout of the WaveSystem Toolbar may vary from one plug-in to another. Use this toolbar to save plug-in or Rack-specific presets.
8 There are several quick ways to move from one plug-in to another within a Rack: Use your keyboard s left and right arrows. This will move you through the list of plug-ins in the Rack, opening each plug-in interface as it is selected. Note: If you have selected a parameter for editing on the current plug-in, this will not work, and may change the parameter value instead. Touch another plug-in icon. This will move you directly to the new plug-in and open its window.
9 WaveSystem Toolbar Buttons Setup A (Setup B) A B; B A Load Save Toggles between two setups, allowing you to compare different settings. This facilitates quick A/B comparisons and lets you determine which of two settings works best without having to save a preset. An asterisk (*) on the button indicates that changes have been made since a preset was loaded. Copies the current settings to the second setup register. The direction of copying is from the currently shown setup to the one not shown. Here you load factory presets, user presets, and other preset files. Factory presets are permanent elements of the Load popup menu, created by Waves. They cannot be changed or deleted. You can turn the current settings of the plug-in you re using into a user preset by clicking the Save button. User presets can be changed and deleted, and the preset files you save through the toolbar will appear as Load menu presets until you close the preset file or close the plug-in. Some plug-ins have a very large library of presets, too large to display on the main pull-down menu. To load these library files or load presets from external files, select Open Preset File. Waves preset files are saved with an.xps extension Save your plug-in presets here. You can save the current parameters as a user preset in the Preset menu, or create a new file. If you choose to save the preset as a new file outside the plug-in s Preset menu WaveSystem will ask you where you want to put it. Clicking on the Waves logo will bring up the About This Plug-in page, providing information about the plug-in.


10 Inserting a Rack into a channel Below are two generic examples of how you can use Waves plug-ins in your session, as an Insert and through an Aux. Example 1: Assigning Waves Plugins to a Channel Insert. Open Channel view by pressing the console's Screen Assign Left or Right button. Select the desired channel, then touch Insert area to open sub-menu. Touch Insert A to open routing. > > > Set Routing: In the Ports column, choose Waves. Choose the desired Signal Group. Under Signals, choose the desired Waves I/O.


11 Example 2: Setting Rack as Parallel FX a) FX SEND. Open Master channel view by pressing the "Screen Assign" on the console s center section. Select the desired Master channel. In the below example we will set Mono Aux 1. Touch Outputs to open the routing panel. > > > Set Routing: In the Ports column, choose Waves. Choose the desired Signal Group. Under Signals, choose the desired Waves I/O.
12 b) FX RETURN Open Channel view by pressing the console's Screen Assign Left or Right button. Select the desired input channel for FX RETURN, then touch Input area to open subbeen assigned menu. In the Ports column, choose Waves. Choose the desired Signal Group. Under Signals, choose the desired Waves I/O (the same Rack that has for the FX SEND). > >
13 Rack types: Stereo, Mono, Mono to Stereo. Similar to outboard gear, the Waves Racks are configured to work in different modes: Stereo processing: Stereo Channel Insert, Master Channel, Stereo Groups, Stereo In- Ears etc Mono processing: individual Mono Channels, Mono Aux EQ s etc Mono to Stereo: Reverbs, Delays etc Waves Racks types and names are set via the Console s routing: Depending on type of input (mono or stereo) Waves will automatically load the correct Rack type. For Mono to Stereo configuration (Reverb etc ) turn on mono>stereo button
14 Group Properties: Organization & Latency Alignment This window allows you to group several Racks together. Racks often have something in common, and it may make sense to assign all of these similar Racks to a latency group. Grouping all of the channels of your brass section, or drums, or audience, then assigning these groups a color; helps you to keep track of racks in concert situations. Also, each track will display the name of the group, further aiding quick visual organization. Plug-ins may impose a delay (known as latency ) as signal passes through them. Often, this is not a problem. However, there are times you will want to time-align all of the Racks in a group, to compensate for different processor latencies that may cause phase-related problems.
15 Use the Group Properties window to create groups of racks and align their latencies. Open this window from the pull-down menu located at the top of a rack or from the Window menu. In the Group Properties window, you can create up to 16 processing groups, each of which can contain any number of Racks. Create a group by double clicking on a Group Name cell and typing the name you want to assign the group (using the external keyboard). Now, decide how you want to align the processors within the group.
16 None Auto A group is created, but there is no latency alignment. The group is delayed to match the latency of the rack in the group with the greatest total latency. Manual Manually delay the group by a specific value by entering it in the Latency field. The value is displayed in samples, milliseconds, meters or feet, depending on your choice in the pull-down window. The minimal value allowed for this setting matches the latency of the rack in the group with the greatest total latency. Groups are color-coded for easier identification. Color selection is based on placement in the list, and is not user-definable. At the bottom of the Group Properties page is the Align All section. Here you can align all of the groups of Racks in order to create a unified timing for all channels. The Auto setting will offset all of the groups to match the timing of the group with the greatest latency, while Manual will delay all groups by a specific value. Below the Align All section is the Speed of Sound setting. This parameter control, expressed in meters per second, allows you to calibrate MultiRack SoundGrid s latency controls to match measured speed of sound. The speed of sound at sea level, at a temperature of 20 degrees Celsius and dry air, is 343 meters per second.

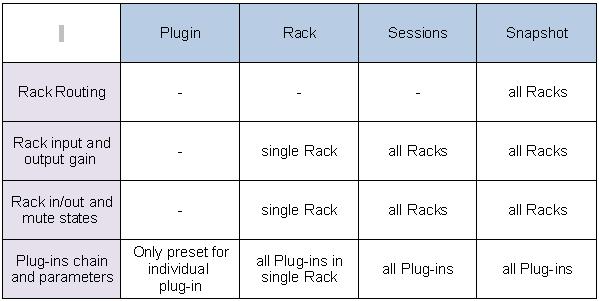
17 Snapshot Pane: Automating Your Racks Snapshots contain the following parameters: 1. Rack input and output gain 2. Rack in/out, mute and on/off states 3. Current plug-in parameters Snapshots are contained and saved as part of the Session file and are displayed as a vertical playlist. Use Snapshots to change the state of racks (Mute/In/Off), levels, and, most importantly, the settings for the plug-ins. Snapshots do not change the physical configuration of a Session, so you cannot use a snapshot to change the audio I/O, the rack order or the plug-ins embedded in a rack. To open the Snapshot Pane (fig. a), select Open Snapshot Pane from the Window menu (Ctrl+Shift+O). a b

18 To save a Snapshot of your existing rack environment, use the console s snapshot management window (fig. b) (add Waves to the snapshot s scope). MultiRack s snapshots are given the name of their corresponding SD snapshot. Note that selected snapshots are highlighted and the currently recalled snapshot s name appears in boldface and its number is highlighted in green. At the bottom of the pane is an area where you can write notes about the selected Snapshot.
19 Global Paste and Recall Safe modes There are times when you don t want certain racks or specific plug-ins to be affected by Snapshot changes and there are times that you wish to apply a setting of a plug-in or rack across several snapshots. The Global Paste and Recalll Safe are the tools that provide you that ability. Global Paste "Global Paste" enables you to copy a plug-in s or rack s parameters into one or more other snapshots. This is useful when you ve set up several racks filled with plug-ins and you decide to change plug-inss settings across several Snapshots. 1. Recall the snapshot from which you want to copy settings. 2. Touch the Global Paste On button. >
20 3. Select the target snapshot/s that you want to modify. To select multiple snapshots, Ctrl+Click on the desired target snapshots, or Shift+Click to select several contiguous snapshots (using a mouse). 4. In the rack windows, select the plug-in or rack to which want to copy to the selected snapshots to. Right-click on the plug-in and choose Global Paste Plug- each of the in/rack from the menu or touch the Apply button. Repeat this for plug-ins or Racks whose settings you want to Global Paste. 5. Touch the Global Paste button On in the snapshot Pane once again to turn this mode off and end the process. Recall Safe "Recall Safe" Mode allows you to select the racks and/or plug-ins that won t be affected as you change snapshots that would normally affect them. The recall-safe option applies within the session (not a specific snapshot). Turn Recall Safe Mode On in the Snapshots Pane >
21 Racks: Select a Rack or multiple racks you want to set to Recall Safe. Touch the Set button or Right click on any of the selected Racks and choose Recall Safe from the pull-down menu. "Recall Safe" racks glow blue: Plug-ins: Select the plug-in you want to set to Recall Safe. Touch the Set button or Right click on any of the selected plug-ins and choose Recall Safe from the pull-down menu. "Recall Safe" plug-ins glow blue: To remove a rack or plug-in from "Recall Safe" mode, select the respective rack or plugclick pull-down in and touch the Unset button or de-select "Recall Safe" from the right menu in Recall Safe mode. Plug-ins or racks that are set to "Recall Safe" can be edited. However, their "Recall Safe" status can be viewed only while in "Recall Safe" mode. Selecting "Recall Safe" in the Snapshots menu does not activate or de-activate "Recall Safe". Rather, it only allows you to see plug-ins and racks, and set them to "Recall Safe". When you turn "Recall Safe" mode off, racks and plug-ins which have been "Recall Safe" remain so; they just don t glow blue. When a rack is "Recall Safe", all the plug-ins within that rack are affected, i.e. are effectively "Recall Safe" as well.
22 Saving in MultiRack SoundGrid MultiRack SoundGrid offers four different levels of Save, enabling you to quickly and confidently store and recall needed Session information. From most specific to most general, here are your options for saving information: Per Plug-in: Each plug-in has its own WaveSystem Toolbar, so you can load and save your favorite plug-in settings without affecting the rest of the processing environment. Say you have a C4 preset that you d like to use for the bass. Simply load the preset from the C4 s WaveSystem Toolbar s Load menu. Plug-in settings can be saved to an external USB key and loaded on to another console, given that the same plug-ins are installed and authorized on both consoles. Per Rack: There s a WaveSystem Toolbar at the top of each rack, so you can load and save settings for an entire Rack, independent of the Snapshots. Plug-in settings can be saved to an external USB key and loaded into another console, given that the same plug-ins are installed and authorized on both consoles. Sessions hold the settings for every plug-in and all racks. MultiRack Sessions are saved alongside the console s Session file; both files are named identically and are loaded in synchronization when the corresponding console Session file is loaded. Snapshots hold the settings for every plug-in and rack, and contain the information about the architecture and signal flow for the entire setup. Snapshots are created and stored on the console main Snapshot window. The chart below illustrates the relationship between Functions and Snapshots/Presets/Session management within the Waves MultiRack and DigiCo system.
23

24 Overview Window: Viewing the Status of All of Your Racks Once you ve filled several racks, you ll want a convenient way to keep track of everything happening within your processing environment. To get an overview of your racks, select Overview from the View menu. This will reveal the Overview Window, where you ll see a condensed view of each Rack. The Overview Window tells you if a rack or an individual plug-in is functioning, and it enables you to turn on or off, bypass, or mute a Rack. Clipping is also indicated for each Rack. Use the Overview Window when you want to keep an eye on the entire processing setup. Since each mini-rack in the Overview Window displays clipping information, you can easily watch out for over-level clipping across your entire setup.

25 Show Mode Show Mode is a safe mode, used during performances, that lets you adjust parameters within plugins, but not change routing, configuration, and other settings that could cause problems in a live situation. When Show is selected you re locked out from much of the interface. > To Switch between Setup and Show modes, go to the Master view->system tab- >Security and switch between Setup and Live. When choosing Setup, MultiRack will switch to Setup mode, when choosing Live, MultiRack will switch to Show Mode.
26 Automatic Recovery As MultiRack SoundGrid is an application for live shows, it is equipped with an automatic recovery mechanism. This means that if MultiRack SoundGrid quits unexpectedly, it will automatically re-launch and re-open the same session file it was running when it crashed, with the same snapshot that was recalled when the crash occurred (if applicable). While MultiRack SoundGrid re-launches itself, streaming and processing audio continues without interruption; only user control is lost until MultiRack SoundGrid re-loads its Session. Rescan Present Licenses If you are preparing a setup and routing without licenses (i.e. without a connected USB flash drive or ilok key); the plug-ins will load in a disabled state. While the plug-ins won t process audio you can still assign inserts, FX, load plug-ins and presets. To enable a disabled plug-in or plugins: Connect your USB Flash Drive (V9) and/or ilok key (V8). Go to Advanced Menu and select the Rescan Present Licenses. All disabled plugins will be enabled. You can re-enable plugins individually by right clicking on disabledd plug-in and choosing enable option from the menu.
27 Restructuring a DiGiCo session to 96 khz Prior to restructuring a DiGiCo session to 96 khz, you must disconnect your SoundGrid Server. System Monitor Window Open this window from the Window menu. This window displays real time status info on your SoundGrid network, I/O devices, and Servers. Redundancy Displays redundancy status. Network Displays network transport load. High loads may result in audio drops. Processing/Redundant Server Device Device name Status Server statuss (online or offline) CPU Peak and averagee loads (AVR) Displays the load on the processing server. High loads may result in audio drops. I/O Device 1 and 2 (if available) Device Device name Status Device statuss
28 MultiRack SoundGrid Keyboard Shortcuts If you are using an external keyboard you may want to get familiar with MultiRack s keyboard shortcuts. Session Item Definition Keyboard shortcut Import session Opens explorer window, import session Ctrl+Alt+I Export session Opens explorer, export session Ctrl+Alt+E Window Item Definition Keyboard shortcut Open Snapshot Pane Opens/closes the Snapshot Pane in MultiRack F7 SoundGrid window. SoundGrid Inventory Opens the SoundGrid Inventory Window F2 SoundGrid Opens the SoundGrid Connections Window F3 Connections Group Properties Opens the Group Properties window Ctrl+G System Monitor Opens the System Monitor window Ctrl+M Preferences Opens the Preferences window Ctrl+P Menu Item Definition Keyboard shortcut Main view Mode Opens the main application view (multiple Racks) F4 Overview Mode Opens the overview view F5 Rack view Mode Opens the Rack view F6 Advanced Item Definition Keyboard shortcut Enable Verbose mode Creates Log file for troubleshooting. Rescan Present Licenses Starts rescan of licenses on connected ilok (v8) and/or USB Flash Drive (V9). Ctrl + L
Contents Introduction... 4
 Contents Introduction... 4 Welcome... 4 What s New in MultiRack v9... 4 Product Overview... 5 Quickstart Guide... 5 Installing Waves Software... 6 Now it s time to authorize your plugins :... 6 Connect
TABLE OF CONTENTS CHAPTER 1 INTRODUCTION...3 CHAPTER 2 QUICKSTART GUIDE...4 CHAPTER 3 MULTIRACK SOUNDGRID WINDOWS AND CONTROLS EXPLAINED...
 TABLE OF CONTENTS CHAPTER 1 INTRODUCTION...3 1.1 WELCOME...3 1.2 PRODUCT OVERVIEW...3 CHAPTER 2 QUICKSTART GUIDE...4 2.1 CONNECT YOUR CONSOLE TO THE SOUNDGRID NETWORK...5 2.2 CREATE A NEW SESSION AND SET
Table of Contents. Chapter 4 MultiRack Menus File Menu MultiRack Menu (OS X only) Edit Menu...50
 Edit Menu...50") Table of Contents Chapter 1 Introduction...4 1.1 Welcome...4 1.2 Product Overview...4 Chapter 2 Quickstart Guide...5 2.1 Connect Your Console to the Sound Card or External I/O...6 2.2 Create a New Session
Table of Contents Chapter 1 Introduction...4 1.1 Welcome...4 1.2 Product Overview...4 Chapter 2 Quickstart Guide...5 2.1 Connect Your Console to the Sound Card or External I/O...6 2.2 Create a New Session
WAVES JJP GUITARS User Guide
 WAVES JJP GUITARS TABLE OF CONTENTS CHAPTER 1 INTRODUCTION...3 1.1 WELCOME...3 1.2 PRODUCT OVERVIEW...3 1.3 COMPONENTS...4 1.4 A FEW WORDS FROM JJP...4 CHAPTER 2 QUICKSTART GUIDE...5 CHAPTER 3 CONTROLS,
WAVES. MultiRack SETUP GUIDE V9.80
 WAVES MultiRack SETUP GUIDE V9.80 1 Table of Contents 1. Overview... 3 2. Basic Requirements... 3 3. Software... 4 4. Required Waves Licenses... 4 5. Installing MultiRack... 5 MultiRack Native/SoundGrid
WAVES. MultiRack SETUP GUIDE V9.7
 WAVES MultiRack SETUP GUIDE V9.7 1 Table of Contents 1. Overview... 3 2. Basic Requirements... 3 3. Software... 4 4. Required Waves Licenses... 4 5. Installing MultiRack... 5 MultiRack Native/SoundGrid
DMI Waves. User Guide
 DMI Waves User Guide TABLE OF CONTENTS Introduction... 3 About SoundGrid and the DMI Waves Audio Interface... 3 Typical Uses... 4 Native/SoundGrid Comparison Table... 6 1. Hardware and Connectors... 7
Introduction About SoundGrid for VENUE... 3 What You Need to Get Started... 4 Quick Start Installation... 6
 Table of Contents Introduction... 3 About SoundGrid for VENUE... 3 What You Need to Get Started... 4 Quick Start... 5 Installation... 6 Hardware Installation... 6 Software Installation... 7 Register SoundGrid
WAVES CLA UNPLUGGED USER GUIDE
 WAVES CLA UNPLUGGED USER GUIDE Table of Contents Chapter 1 Introduction...3 1.1 Welcome...3 1.2 Product Overview...3 1.3 Concepts and Terminology...4 1.4 A Few Words from CLA...4 1.5 Components...5 Chapter
WAVES JJP CYMBALS & PERCUSSION User Guide
 WAVES JJP CYMBALS & PERCUSSION TABLE OF CONTENTS CHAPTER 1 INTRODUCTION...3 1.1 WELCOME...3 1.2 PRODUCT OVERVIEW...3 1.3 COMPONENTS...4 1.4 A FEW WORDS FROM JJP...4 CHAPTER 2 QUICKSTART GUIDE...5 CHAPTER
System Requirements. SD7 Console/Dual Engine Setup. SD11, SD10, SD9, SD8, SD5 Setup
 System Requirements 1. Waves-enabled DiGiCo console comes with a Waves I/O built into the console and with Waves plugins and the Waves MultiRack plugin host pre-installed. 2. Waves-qualified DSP SoundGrid
WAVES NS1 NOISE SUPPRESSOR USER GUIDE
 WAVES NS1 NOISE SUPPRESSOR USER GUIDE Table of Contents Chapter 1 Introduction... 3 1.1 Welcome... 3 1.2 Product Overview... 3 1.3 Components... 4 Chapter 2 Quick Start Guide... 5 Chapter 3 Interface and
WAVES CLA BASS USER GUIDE
 WAVES CLA BASS USER GUIDE Table of Contents Chapter 1 Introduction...3 1.1 Welcome...3 1.2 Product Overview...3 1.3 Concepts and Terminology...4 1.4 A Few Words from Chris...4 1.5 Components...5 Chapter
Upgrade & Setup Waves SoundGrid V9.5 for DiGiCo
 Upgrade & Setup Waves SoundGrid V9.5 for DiGiCo 1 Table of Contents 1. What Do I Need... 3 2. Connecting Your Console to the SoundGrid Network... 4 3. Disabling ReadyOn... 6 4. Extracting to USB Flash
USER S GUIDE TC FX II. Renowned M2000 Reverb Algorithms. Plug-in for Mackie Digital Mixers
 USER S GUIDE TC FX II Renowned M2000 Reverb Algorithms Plug-in for Mackie Digital Mixers Iconography This icon identifies a description of how to perform an action with the mouse. This icon identifies
Waves. LoAir. User Guide
 Waves LoAir User Guide Table of Contents Chapter 1 Introduction... 3 1.1 Welcome...3 1.2 Product Overview...3 1.3 Concepts and Terminology...4 1.4 Components...5 1.5 Block Diagram...6 Chapter 2 Quick Start
4.1.3 Viewing Quick Keys Assignments Assigning Plugin Parameters to a MIDI Controller Assigning Plugin Parameters to an Avid Controller
 1 Table of Contents Introduction 4 About SoundGrid 4 1. StudioRack Integration and Components 6 1.1 Installation 8 1.2 Inserting StudioRack 8 1.3 File Locations 9 1.4 StudioRack Interfaces 10 2. Controls
Version 4 Software. Version 4 - Supplement. Issue A, August 2007 for Version 4.0+ Software. D5 V4 Supp 1-1
 Version 4 - Supplement Issue A, August 2007 for Version 4.0+ Software D5 V4 Supp 1-1 D5 V4 Supp 1-2 Contents 1.0 Introduction... 1-4 1.1 Hardware Configuration Options... 1-4 1.2 Audio Sync Options...
Table of Contents GETTING STARTED...4 RECORDING...11 PLAYING BACK...14
 USER GUIDE Table of Contents GETTING STARTED...4 Main Window Essentials...5 Operation Modes...7 Setup...8 RECORDING...11 Tracks... 11 > Track Names... 11 > Adding Tracks... 11 > Master Bus... 11 > Track
Waves API 560 User Manual
 Waves API 560 User Manual TABLE OF CONTENTS CHAPTER 1 INTRODUCTION...3 1.1 WELCOME...3 1.2 PRODUCT OVERVIEW...4 1.3 CONCEPTS AND TERMINOLOGY... ERROR! BOOKMARK NOT DEFINED. 1.4 COMPONENTS...5 CHAPTER 2
WAVES MASERATI B72 User Guide
 WAVES MASERATI B72 TABLE OF CONTENTS CHAPTER 1 INTRODUCTION...3 1.1 WELCOME...3 1.2 PRODUCT OVERVIEW...3 1.3 A FEW WORDS FROM TONY MASERATI...4 1.4 COMPONENTS...4 CHAPTER 2 QUICKSTART GUIDE...5 CHAPTER
MDW Hi-Res Parametric EQ Plug-In Guide
 MDW Hi-Res Parametric EQ Plug-In Guide Version 1.0 for Macintosh Digidesign 2001 Junipero Serra Boulevard Daly City, CA 94014-3886 USA tel: 650 731 6300 fax: 650 731 6399 Technical Support (USA) tel: 650
TouchMix. Self-Guided Tour WELCOME TO TOUCHMIX! CHAPTER. 1. Navigation. 2. Simple & Advanced Mode. 3. Presets. 4. Scenes 5. FX. 6. Wizards. 7.
 TouchMix Self-Guided Tour WELCOME TO TOUCHMIX! This guide will introduce you to many commonly used features of TouchMix. Click on a chapter title below, or follow the guide from start to finish for the
LiveProfessor 2. User Manual. Rev audiostrom.com
 LiveProfessor 2 User Manual Rev 1.0 - audiostrom.com Contents Introduction 4 System Requirements 4 License files 4 First Run 5 Installing Plugins Plugin Manager Audio Settings MIDI Inputs 7 Replacing A
Waves PuigTec EQP-1A
 Waves PuigTec EQP-1A User Manual TABLE OF CONTENTS CHAPTER 1 INTRODUCTION...3 1.1 WELCOME...3 1.2 PRODUCT OVERVIEW...4 1.3 ABOUT THE MODELING...5 1.4 COMPONENTS...7 CHAPTER 2 QUICKSTART GUIDE...8 CHAPTER
WNS Waves Noise Suppressor
 WNS Waves Noise Suppressor Table of Contents Chapter 1 Introduction... 3 1.1 Welcome...3 1.2 Product Overview...3 1.3 Concepts and Terminology...4 1.4 Components...5 Chapter 2 Quick Start Guide... 6 Chapter
WAVES BASS RIDER USER GUIDE
 WAVES BASS RIDER USER GUIDE TABLE OF CONTENTS Chapter 1 Introduction...3 1.1 Welcome...3 1.2 Product Overview...3 1.3 Concepts and Terminology...4 1.4 Components...5 Chapter 2 Quick Start Guide...6 Chapter
WAVES. OneKnob PUMPER USER GUIDE
 WAVES OneKnob PUMPER USER GUIDE TABLE OF CONTENTS CHAPTER 1: INTRODUCTION... 3 1.1 Welcome... 3 1.2 Product Overview... 3 1.3 Concepts and Terminology... 4 CHAPTER 2: INTERFACE AND CONTROLS... 5 CHAPTER
MV360 User Manual. MV360 User Manual 1
 MV360 User Manual MV360 User Manual 1 Table of Contents Chapter 1 Introduction... 3 1.1 Welcome...3 1.2 Product Overview...3 1.3 Concepts and Terminology...3 High Level Compressor...4 Link Modes...4 Dither...5
MainStage 2. Exploring MainStage
 MainStage 2 Exploring MainStage KKApple Inc. Copyright 2011 Apple Inc. All rights reserved. Your rights to the software are governed by the accompanying software license agreement. The owner or authorized
D IGIGRID MG B / MG O 1 1
 1 1 Table of Contents Introduction 3 About SoundGrid and the DiGiGrid MGB and MGO Audio Interfaces 3 Using DiGiGrid MGB/MGO with a Console 6 1. Hardware and Connectors 7 2. Installation and Configuration
KARMIX PROFESSIONAL MIXER FOR LAPTOP KARAOKE. Overview
 Overview Karmix is an Audio mixer designed for Karaoke systems run on Computer. Karmix is powered by USB and controlled by Software, with Hands on volume faders for Vocal Mix, Reverb Effect, Music, and
DIGIGRID MGR. Table of Contents
 1 1 Table of Contents Introduction 3 About SoundGrid and the DiGiGrid MGR Audio Interface 3 Using DiGiGrid MGR with a Console 6 1. Hardware and Connectors 7 2. Installation and Configuration Overview 9
WAVES MASERATI DRM User Guide
 WAVES MASERATI DRM TABLE OF CONTENTS CHAPTER 1 INTRODUCTION...3 1.1 WELCOME...3 1.2 PRODUCT OVERVIEW...3 1.3 A FEW WORDS FROM TONY MASERATI...4 1.4 COMPONENTS...4 CHAPTER 2 QUICKSTART GUIDE...5 CHAPTER
01V96 Editor. Owner s Manual. Special Notices. Contents. Yamaha Pro Audio Global Site
 01V96 Editor Owner s Manual Special Notices The software and this owner s manual are the exclusive copyrights of Yamaha Corporation. Copying of the software or reproduction of this manual in whole or in
soothe audio processor
 soothe audio processor Manual Thank you for using soothe! soothe is a spectral processor for suppressing resonances in the mid and high frequencies. It works by automatically detecting the resonances in
WAVES: ABBEY ROAD REDD USER GUIDE
 WAVES: ABBEY ROAD REDD.37-.51 USER GUIDE Table of Contents Chapter 1 Introduction...2 1.1 Welcome...3 1.2 Product Overview...3 1.3 About REDD...4 1.4 Components...5 Chapter 2 Quick Start Guide...5 Chapter
M-480 RCS. User s Guide
 M-480 RCS User s Guide Roland corporation and its affiliates assume no responsibility for any loss or damage (loss of profits, loss of data or other economical losses) caused by use of this software. This
Operating Manual. Genelec Loudspeaker Manager GLM 2.0 System
 Operating Manual Genelec Loudspeaker Manager GLM 2.0 System 1 Genelec SAM GLM 2.0 System Operating Manual page 2 of 39 Table of Contents Introduction... 4 Glossary... 5 System Components... 6 SAM Monitors...
MOTIF XS Editor VST Owner s Manual
 MOTIF XS Editor VST Owner s Manual Contents What is the MOTIF XS Editor VST?...2 Data Structure of the MOTIF XS Editor VST...3 Starting the MOTIF XS Editor VST...4 An Example of MOTIF XS Editor VST in
and close the various Traktor Panels. Setup: click on the setup icon to open the setup dialog. Close: clicking this icon will close TRAKTOR DJ Studio.
 Welcome... TRAKTOR DJ Studio 2 Quick Reference...to TRAKTOR DJ Studio 2, the latest and most advanced version of the software that changed the way DJs think about computers. We ve introduced a number of
M-WAVES AUDIO INTERFACE ALLEN & HEATH M-WAVES CARD USER GUIDE
 ALLEN & HEATH M-WAVES CARD USER GUIDE 1 1 Table of Contents Introduction 3 1. Hardware and Connectors 7 2. Installation and Configuration Overview 8 2.1 Installing the M-Waves Card 8 2.2 Configuring the
WAVES MASERATI GTi User Guide
 WAVES MASERATI GTi TABLE OF CONTENTS CHAPTER 1 INTRODUCTION... 3 1.1 WELCOME... 3 1.2 PRODUCT OVERVIEW... 3 1.3 A FEW WORDS FROM TONY MASERATI... 4 1.4 COMPONENTS... 4 CHAPTER 2 QUICKSTART GUIDE...5 CHAPTER
User Guide V1023+ October 2018
 User Guide V1023+ October 2018 This guide is intended to be read in conjunction with the: SD Software Reference Manual and SD Software Reference Appendix available at: https://www.digico.biz/docs/about/manuals_1.shtml
Waves GTR3 ToolRack Manual
 Waves GTR3 ToolRack Manual Waves GTR ToolRack Manual 1 TABLE OF CONTENTS CHAPTER 1 INTRODUCTION...3 1.1 WELCOME...3 1.2 PRODUCT OVERVIEW...3 1.3 COMPONENTS...4 1.4 AUTOMATION...4 MIDI Automation...4 CHAPTER
Welcome! GRAND FINALE. Authorizing. Audio Finalizer
 GRAND FINALE Audio Finalizer Welcome! Grand Finale is a multi effect plug-in designed for finalizing complete mixes, stems, buses and/or individual audio tracks. It comes as an Audio Unit, VST & AAX for
MOX6/MOX8 Editor VST Owner s Manual
 MOX6/MOX8 Editor VST Owner s Manual Contents What is the MOX6/MOX8 Editor VST?...2 Data Structure of the MOX6/MOX8 Editor VST...3 Starting the MOX6/MOX8 Editor VST...4 An Example of MOX6/MOX8 Editor VST
Eventide Inc. One Alsan Way Little Ferry, NJ
 Copyright 2017, Eventide Inc. P/N: 141254, Rev 4 Eventide is a registered trademark of Eventide Inc. AAX and Pro Tools are trademarks of Avid Technology. Names and logos are used with permission. Audio
Premiere Pro Desktop Layout (NeaseTV 2015 Layout)
") Premiere Pro 2015 1. Contextually Sensitive Windows - Must be on the correct window in order to do some tasks 2. Contextually Sensitive Menus 3. 1 zillion ways to do something. No 2 people will do everything
Premiere Pro 2015 1. Contextually Sensitive Windows - Must be on the correct window in order to do some tasks 2. Contextually Sensitive Menus 3. 1 zillion ways to do something. No 2 people will do everything
Operating Manual. Genelec Loudspeaker Manager GLM 2.0 System
 Operating Manual Genelec Loudspeaker Manager GLM 2.0 System Genelec Loudspeaker Manager (GLM) 2.0 - System Operating Manual page 2 of 55 Table of Contents Introduction... 4 Glossary... 5 System Components...
EDITING GUIDE (EDIT SUITES)
") PREMIERE PRO CC (VERSION 2015.2) EDITING GUIDE (EDIT SUITES) Version 3.3 (FEB 2016) PREMIERE PRO CC EDIT GUIDE - La Trobe University 2015 latrobe.edu.au 2 What do you want to do? 3 1. Back up SD card footage
PREMIERE PRO CC (VERSION 2015.2) EDITING GUIDE (EDIT SUITES) Version 3.3 (FEB 2016) PREMIERE PRO CC EDIT GUIDE - La Trobe University 2015 latrobe.edu.au 2 What do you want to do? 3 1. Back up SD card footage
For additional information, please consult the Read-Me and Help documentation or contact Electro-Voice or Dynacord technical support.
 Quick Start Guide Hello, and welcome to IRIS-Net software. We want you to get the most from your IRIS-Net projects and encourage you to explore the additional Read-Me and Help documentation provided with
Application Note. Introduction. Going on-line for the first time
 Application Note icore - Quick Start Guide icore - Quick Start Guide Introduction icore is the software package used to monitor, configure and control all Ti Series components. This application note assumes
User Guide FFFA
 User Guide FFFA001508-01 www.focusrite.com Contents Introduction... 3 About this User Guide...3 System Requirements........................................................ 4 Software Installation... 4
Waves MultiRack SoundGrid V9.5 For DiGiCo Troubleshooting Guide
 Waves MultiRack SoundGrid V9.5 For DiGiCo Troubleshooting Guide 1 Table of Contents 1. Introduction... 3 2. Components Required for Establishing a MultiRack SoundGrid System... 3 3. Proper System Configuration...
APAD User Guide V1.0
 APAD User Guide V1.0 This Guide refers to APAD software V1.0+ Before starting please check www.digico.biz for details of the latest APAD software and documentation. 1. IMPORTANT - Read before starting
twisted wave twisted wave [an introduction]
![twisted wave twisted wave [an introduction]](/thumbs/86/94307689.jpg "twisted wave twisted wave [an introduction]") twisted wave information www.twistedwave.com $80 free 30 day trial mac only updated frequently 2 versions available (OSX [more powerful] & ios [more portable]) OSX & ios are different purchases [different
twisted wave information www.twistedwave.com $80 free 30 day trial mac only updated frequently 2 versions available (OSX [more powerful] & ios [more portable]) OSX & ios are different purchases [different
USER GUIDE 1 of 26 STAGEGRID 4000 User Guide rev.01 abr-18
 USER GUIDE 1 of 26 STAGEGRID 4000 User Guide rev.01 abr-18 SUMÁRIO About... 2 STAGEGRID 4000... 2 SoundGrid... 3 System Requirements... 3 Hardware... 4 Package Contents... 4 Rack Installation... 5 Setups...
-You will need to provide 2 AA batteries and an SD card to use the recorder.
 ZOOM H4N - USER GUIDE SETTING UP: -You will need to provide 2 AA batteries and an SD card to use the recorder. -The batteries go into the compartment on the back of the recorder. If you turn the switch
User Guide FFFA
 User Guide FFFA001508-02 www.focusrite.com Contents INTRODUCTION... 3 About this User Guide...3 SYSTEM REQUIREMENTS........................................................ 4 SOFTWARE INSTALLATION... 4
minidsp Balanced 2x4
 minidsp Balanced 2x4 USER MANUAL V1.0 Revision Description Date V1.0 User manual Initial version 24-12-2010 Table of content 1 System setup...3 2 minidsp Basics...4 2.1 What is a minidsp?...4 2.2 minidsp
MOTIF XF Editor Owner s Manual
 MOTIF XF Editor Owner s Manual Contents What is the MOTIF XF Editor?...2 Studio Manager...2 Studio Connections...2 About Open Plug-in Technology...3 Data Structure of the MOTIF XF Editor...4 Starting the
MAnalyzer. Presets button. Left arrow button. Right arrow button. Randomize button. Save button. Panic button. Settings button
 MAnalyzer Presets button Presets button shows a window with all available presets. A preset can be loaded from the preset window by double-clicking on it, using the arrow buttons or by using a combination
3. Suggested Use and Configurations Multiple Computers with a Single DiGiGrid M... 11
 D Table of Contents Introduction...4 1. GETTING STARTED...5 1.1 System Requirements...5 1.2 Registration...5 1.3 Software Installation...5 1.4 Licenses...6 2. Hardware...7 3. Suggested Use and Configurations...8
Blue Cat's PatchWork User Manual
 "The virtual patchbay for audio plug- ins" 1 Table Of Content Introduction Description Features System Requirements Installation First Launch Using Blue Cat's PatchWork Introduction The User Interface
3. Suggested Uses And Configurations Adding More I/Os to Your System Multiple Computers with a Single DiGiGrid Q...
 Table of Contents Introduction...4 1. Getting Started...5 1.1 System Requirements...5 1.2 Registration...5 1.3 Software Installation...5 1.4 Licenses...6 2. HARDWARE...7 2.1 Monitoring options...8 3. Suggested
What s New in Pro Tools LE 6.4
 For LE Systems on Windows and Macintosh Digidesign 2001 Junipero Serra Boulevard Daly City, CA 94014-3886 USA tel: 650 731 6300 fax: 650 731 6399 Technical Support (USA) tel: 650 731 6100 fax: 650 731
Studio Manager. for. Owner s Manual
 Studio Manager for Owner s Manual E i Important Information Exclusion of Certain Liability Trademarks Copyright Manufacturer, importer, or dealer shall not be liable for any incidental damages including
What s New in Pro Tools 5.1
 What s New in Pro Tools 5.1 Digidesign Inc. 3401-A Hillview Avenue Palo Alto, CA 94304 USA tel: 650 842 7900 fax: 650 842 7999 Technical Support (USA) 650 842 6699 650 856 4275 Product Information (USA)
Table of Contents pg " Display pg Cruise Mode pg Map Screen pg Stereo Screen pg Depth Screen pg.
 USER GUIDE TABLE OF CONTENTS Table of Contents pg. 2 12.3" Display pg. 3-4 Cruise Mode pg. 5-6 Map Screen pg. 6-13 Stereo Screen pg. 14-17 Depth Screen pg. 17 Settings Screen pg. 18-24 Media Screen pg.
SD Operation Manual. Appendix 2: Version 3 (April 2014) Theatre Software Operation
 Theatre Software Operation") SD Operation Manual Appendix 2: Version 3 (April 2014) Theatre Software Operation For Software Build 680+ A2-1 Contents A2.1 Features Specific to Theatre Option Software...A2-3 A2.1.1 Auto Update Explained......A2-3
SD Operation Manual Appendix 2: Version 3 (April 2014) Theatre Software Operation For Software Build 680+ A2-1 Contents A2.1 Features Specific to Theatre Option Software...A2-3 A2.1.1 Auto Update Explained......A2-3
2003 Yamaha Corporation. All rights reserved.
 Contents What is the Multi Part Editor?... 2 Starting the Multi Part Editor... 3 An Example of Multi Part Editor in Use... 5 When Using With a Sequencer Other than SQ01... 6 Receiving the Preset voices...
minidsp Kit USER MANUAL V1.5 Revision Description Date V1.0 User manual Initial version
 minidsp Kit USER MANUAL V1.5 Revision Description Date V1.0 User manual Initial version 15-12-2009 V1.1 Layout re-organization Modification on synchronization process Added section about PEQ 10-02-2010
SOUND DEVICES MIXPRE-6 QUICKSTART
 F V T E C H D O C SOUND DEVICES MIXPRE-6 QUICKSTART LAST UPDATED 2017Sep20 The MixPre-6 is the new sound recorder/field mixer by Sound Devices and is compact, lightweight, and without compromise in terms
What s New in VENUE D-Show Software
 What s New in VENUE D-Show 2.8.1 Software For All VENUE Systems Digidesign 2001 Junipero Serra Boulevard Daly City, CA 94014-3886 USA Technical Support (USA) Visit the Digidesign Online Support Center
HDx TDM Record/Playback Option Guide
 HDx TDM Record/Playback Option Guide Version 1.0 for D-Show Digidesign 2001 Junipero Serra Boulevard Daly City, CA 94014-3886 USA tel: 650 731 6300 fax: 650 731 6399 Technical Support (USA) tel: 650 731
Emote 1.0 Users Manual
 Emote 1.0 Users Manual Part No: 141318 Rev A 2018 Eventide Inc., One Alsan Way, Little Ferry, NJ, 07643 USA 1 Table of Contents Introduction... 3 Downloading the Installer... 3 Making Sure Your H9000 Hardware
Figure 3.3 Click+drag the right edge of the main Live screen to access Help View.
 Figure 3.3 Click+drag the right edge of the main Live screen to access Help View. things basic. Use the Session View to construct your musical ideas by importing and recording audio and MIDI into tracks.
minidsp Kit USER MANUAL V1.6 Revision Description Date V1.5 minidsp PCB revision - Rev V1.6 New minidsp PCB revision Rev
 minidsp Kit USER MANUAL V1.6 Revision Description Date V1.5 minidsp PCB revision - Rev1 31-05-2010 V1.6 New minidsp PCB revision Rev2 16-12-2010 V1.7 Jumper for RevA & B 26-03-2012 Table of content 1 System
TRAKTOR DJ Studio 2 Quick Reference. Welcome... The TRAKTOR Panels
 Welcome... TRAKTOR DJ Studio 2 Quick Reference...to TRAKTOR DJ Studio 2, the latest and most advanced version of the software that changed the way DJs think about computers. We ve introduced a number of
Basic notions for voice recording on an arrangement. Introduction to Reaper by Ambrogio Riva
 Basic notions for voice recording on an arrangement. Introduction to Reaper by Ambrogio Riva www.ambrogioriva.com 1 Premise On various singing forums I have seen a lot of enthusiasm and listened to talented
Preliminary USER MANUAL mymix CONTROL. Version 1.51
 Preliminary USER MANUAL mymix CONTROL Version 1.51 Remote Configuration and Editing Software mymix CONTROL operates on web browsers and allows you to control individual parameters of mymix devices as well
Eventide Inc. One Alsan Way Little Ferry, NJ
 Copyright 2017, Eventide Inc. P/N 141306, Rev 1 Eventide is a registered trademark of Eventide Inc. AAX and Pro Tools are trademarks of Avid Technology. Names and logos are used with permission. Audio
Contact Details Alternatively, you may contact the TC Electronic distributor in your area, or write to:
 MANUAL TC Support Interactive The TC Support Interactive website www.tcsupport.tc is designed as an online support and information center. At the site you can find answers to specific questions regarding
SonicCell. Using SonicCell with SONAR LE. Workshop ÂØÒňÎ. Expandable Synthesizer Module and Audio Interface SCWS03 1
 ÂØÒňΠWorkshop SonicCell Expandable Synthesizer Module and Audio Interface Using SonicCell with SONAR LE 2008 Roland Corporation U.S. All rights reserved. No part of this publication may be reproduced
Audio for Video Pro Tools Skills Test Guide
 This document is to help you step-by-step through the Pro Tools Skills Test on a self-study basis. There is no substitute for attending class where we go over every step in great detail while answering
Pro Tools M-Powered 7.1 on Macintosh
 Read Me Pro Tools M-Powered 7.1 on Macintosh Introduction This Read Me documents compatibility details, known issues, error codes, and corrections to the guides for Pro Tools M-Powered 7.1 on Digidesign-qualified
Recording. The Mixing Desk. Overview the Soundtrack Pro workspace
 Drama Sound Studios Using Soundtrack Pro 3 (v.03 updated 18 November 2010) You cannot use this system without training and a username. These notes are designed to remind you what you were shown in training.
MixView 3.0 Overview
 MixView 3.0 Overview Product Bulletin Revision 1 Publish Date: March 1997 Euphonix Product Bulletin: 001 Worldwide Sales, Euphonix Inc. 11112 Ventura Blvd. #301, Studio City, CA 91604 Voice: (818) 766-1666
 ... 3... 4... 4... 4... 6... 6... 7... 7... 8... 11... 11... 13... 13... 14... 17... 17... 18... 18... 20... 20... 21... 21... 21 Version history: Known issues and solutions Page 2 Steinberg Media Technologies
SOUND BROWSER SYSTEM PROTOTYPES SOUND FILE WINDOW. Click to update the list when files or directories have been added or removed by other programs.
 Each Sound in the list that is preceded by a cyan arrow (->) performs processing on an input (the replaceable input). These Sounds come with a default input, but a replacement input can be substituted
How to edit audio tracks
 How to edit audio tracks Although at times you will use Adobe Audition to record new audio, you will often use it to edit, clean up, or add effects to an existing audio file such as an audio file recorded
DiGiCo Optocore V221 For SD Rack Optocore Operation
 DiGiCo Optocore V221 For SD Rack Optocore Operation Issue C - July 2011 1-1 1-2 Contents 1.1 Introduction......4 1.1.1 System Overview......4 1.1.2 Opto V220 (DiGiRacks) and Opto V221 (SD Racks)......5
Using the 01X with Cubase SX 3. To all 01X users thank you for your continued use of the Yamaha 01X Digital Mixing Studio!
 Supplementary Manual Using the 01X with Cubase SX 3 To all 01X users thank you for your continued use of the Yamaha 01X Digital Mixing Studio! Since the 01X was first released, software programs that can
Pro Tools M-Powered 7.0 on Macintosh
 Read Me Pro Tools M-Powered 7.0 on Macintosh Introduction This Read Me documents compatibility details, known issues, error codes, and corrections to the guides for Pro Tools M-Powered 7.0 on Digidesign-qualified
Studio One Standard Mat rix Profile Setup and Quick Start Guide
 Document Version 1.0 Studio One Standard Mat rix Profile Setup and Quick Start Guide Introduction The first part of this tutorial details how to setup Studio One with your SSL Matrix. The second part details
Multi Amplifier Remote Control (MARC) Software QUICK START GUIDE 1.0.0
 Software QUICK START GUIDE 1.0.0") Multi Amplifier Remote Control (MARC) Software QUICK START GUIDE 1.0.0 Welcome to Dynacord s Multi Amplifier Remote Control (MARC) Quick Start Guide. We want you to get the most from your Dynacord amplifiers
Multi Amplifier Remote Control (MARC) Software QUICK START GUIDE 1.0.0 Welcome to Dynacord s Multi Amplifier Remote Control (MARC) Quick Start Guide. We want you to get the most from your Dynacord amplifiers
Blue Cat's MB-7 Mixer User Manual
 "The multiband mixing console and VST/ AU host with built- in effects." 1 Table Of Content Introduction Description Features System Requirements Installation First Launch Using Blue Cat's MB-7 Mixer Introduction
D C. TASCAM PCM Recorder. iphone/ipad/ipod touch Application USER'S GUIDE
 D01167420C TASCAM PCM Recorder iphone/ipad/ipod touch Application USER'S GUIDE Contents Introduction...3 Trademarks... 3 What's in the Main Window...4 What's in the Settings Window...6 The Sharing Window...7
Copyright JAVS
 1 Copyright JAVS 2013 2 Contents Introduction... 4 Set Up... 5 Interface Overview... 6 Application Settings... 7 General Tab... 7 Audio Device Tab... 8 Custom Fields Tab... 9 Quick Notes Tab... 10 Starting