Reborn Card NET. User s Manual. Ver /01/20
|
|
|
- Cordelia Jones
- 6 years ago
- Views:
Transcription
1 Reborn Card NET User s Manual Ver /01/20
2 Table of Contents Notice Before Installation:... 2 System Requirements First Installation Hardware Setup Express Installation How to setup FDISK Attribution Name Size File System: Restore Period Buffer: Install Operating System Boot Menu: Option Menu Password Tools Settings Disk Info FDISK Net Clone SETUP HDD Clone Net COPY running steps Net Clone Logon Menu SEND DATA SEND COMMAND Upgrade Uninstall About Hotkey
3 Notice Before Installation: 1. Please backup important data and uninstall other similar recovery program. 2. A standard partition format is necessary. (Using other Multi-boot partition program will cause install failure.) 3. Please enable built-in Network Card in BIOS and activate Boot ROM option to support PXE function. 4. To optimize the NET card, please adjust the following Windows settings before installing Install.exe. 4.1 Make sure there is no virus in Windows. 4.2 Make sure Windows has completed all update and then turn off Windows Auto Updating. 4.3 Disable Anti-virus program before installation. Enable Anti-virus program again after installation completed. 4.4 Run Windows Scandisk and Defrag. 4.5 Setup Computer Name and Network IP or DHCP. 4.6 Disable Windows Power Sleep option. System Requirements 1. Pentium III and above compatible PC GB and above Hard Disk. 3. Minimum 20G of free hard disk space, recommended 32G. 4. BIOS must be able to support Hard Disk size over 8.4GB MB of Memory 6. One free PCI Express slot. 7. Color monitor Operating System Support Instant Restore Mode Support Windows XP/Win7/Win8/Win10 Backup Restore Mode Support XP/Win7/Win8/ Win10/LINUX No Restore Mode Support XP/Win7/Win8/ Win10/LINUX 2
4 1. First Installation The Reborn Card NET version may be installed three different ways. Express Installation: Supplies an instant restore for Windows XP/Win7/Win8 operating systems. All of the original data on the hard disk may be preserved. The default setting after Express install is Instant Restoration by every reboot. Express Installation can only be used when a Windows operating system has been pre-installed on the hard drive. Custom Installation: Supports multi-boot functions by using the built-in FDISK utility. Each partition may be setup with the preferred restore type and restore interval. When choosing this installation type, all data and partitions will be destroyed and the hard disk will need to be repartitioned and formatted. Keep C: By selecting this installation, only data on partition C will be kept. All other partitions will be deleted. Note that this installation does not support Win7 and Win8. Note! Before using Express installation, remember to run SCANDISK and DISK DEFRAGMENTER utilities provided by Windows for best performance. Also disable any anti-virus programs to avoid any possible conflicts. 2. Hardware Setup Turn off the computer and remove the casing. Insert the Reborn Card into PCI Express slot. Be careful to plug in correct direction. Secure the computer casing. Turn the Power on. As the computer boots, you will see [Reborn Card NET Hardware version:vx.x ][Press CTRL+H to hardware setup] on the screen. Next you will see the first time installation menu. If the screen does not show the first time installation menu, 3
![please reboot your system and press [Ctrl+H] to go into the Reborn Card hardware settings and change hardware mode. 2.](/docs-images/74/70501727/images/5-0.jpg "1 Hardware Password: Setting hardware password to avoid unauthorized access and change. The default password is NET. (Password can be setup up to 10 charactors.) 2.")
5 please reboot your system and press [Ctrl+H] to go into the Reborn Card hardware settings and change hardware mode. 2.1 Hardware Password: Setting hardware password to avoid unauthorized access and change. The default password is NET. (Password can be setup up to 10 charactors.) 2.2 Hardware executing mode: The different hardware modes are to meet different types of computers. Adjust hardware mode once the Reborn Card is not active. Mode A ~ E: Adjust a suitable hardware mode to meet Card s activation sequence in BIOS PXE(Server): An additional function created for those PC which cannot support Network PXE. NetPXE program is needed to run in windows on another PC in order to proceed NETCOPY. PXE ROM must also be setup as the first booting device. PXE + Mode A ~ D: Apply built-in PXE ROM to proceed NETCOPY. PXE ROM must appear and setup as the last booting device. Please make sure the Network is in good connection. Unconnected Network will cause the program failure. PXE+Mode A is the default setting. 2.3 Hotkey hint : (Disable/Enable) Enable this option will see Ctrl+H message on bootup 2.4 Auto Installation : (Disable/Enable) Enable this option will auto Enter NETCOPY or Windows, depends on your settings. 2.5 Mouse Driver : (Mouse 1/Mouse 2 /Disable) 4
 When all hardware modes have been tried and still cannot run NETCOPY. Adjust another PXE Driver might help. 2.7 Hardware Detection : (Disable/Enable/Wait 20sec.")
6 This option allows you to enchance Motherboard compatibility. Some motherboard cannot allow Mouse to run in DOS and thus cause PC hang. By disable Mouse in DOS can help installation. 2.6 PXE driver : (Driver1 / Driver 2) When all hardware modes have been tried and still cannot run NETCOPY. Adjust another PXE Driver might help. 2.7 Hardware Detection : (Disable/Enable/Wait 20sec.) Enable this will check your hardware in every booting, such as CPU, Motherboard, RAM. If there is a change on these items, a warning will be given. 3. Express Installation 1) Turn off the computer and remove the casing. Insert the Reborn Card into PCI Express slot. Secure the computer casing. Turn on the computer and insert the Reborn Card install CD to start install. 2) Next you will see the menu of Install Setup. Select [Express Installation] [Custom Installation] or [Keep C] to start. 5
 When [Install completed] shows up, remove the install CD and press Enter key to restart the computer.")
![5) If you install by [Express Installation], you will only have three seconds to press F10 to enter Setup menu and change the preferred settings.](/docs-images/74/70501727/images/7-1.jpg "After save the preferred settings, reboot and press [Ctrl+Enter], enter the Supervisor Password to enter Windows by Supervisor Mode.")
7 3) During the installation, please do not restart or power off your computer. 4) When [Install completed] shows up, remove the install CD and press Enter key to restart the computer. 5) If you install by [Express Installation], you will only have three seconds to press F10 to enter Setup menu and change the preferred settings. After save the preferred settings, reboot and press [Ctrl+Enter], enter the Supervisor Password to enter Windows by Supervisor Mode. The default password is [ENTER] key. Once operating system is up, insert Reborn Card install CD into the CD drive. Double click install.exe to install Reborn Card setup. 6
![6) If install by [Custom Installation], the system will reboot into FDISK setup menu.](/docs-images/74/70501727/images/8-0.jpg "Please refer Section 4: How to setup FDISK to complete the hard disk partitioning and press [ESC] key to save and exit. Then you can start to install Operating System and execute Install.")
8 6) If install by [Custom Installation], the system will reboot into FDISK setup menu. Please refer Section 4: How to setup FDISK to complete the hard disk partitioning and press [ESC] key to save and exit. Then you can start to install Operating System and execute Install.exe in every partition. Please refer Section.5: Install Operating System) 7) After executing install.exe, you will see the following menu. 8) Enable the check box of install kernel driver, and click Next to continue. 9) After executing Install.exe, a [Shadow Space] tray icon will display in the Windows taskbar. This Buffer Monitor utility installed enables the user to receive status of buffer left for use by the card until a restart operation is needed. 7

9 When the free space is less than 200MB or less than a pre-set space in advanced setting, the system will warn you with a beeping sound. Please save all files and restart the computer immediately or operate Restore function to release the new buffer zone. 10) When you are in Supervisor Mode, the system will pop up the following figure to warn you when Windows is up. Supervisor Mode The Supervisor Mode is where the Reborn Card is not active and is allowing full Read/Write access to all partitions on the hard disk drive. All of the changes are permanent. This Mode is only accessible from MIS or administrators. To enter Supervisor Mode, press [Ctrl+Enter] when you are at the boot menu of Reborn Card. The supervisor Password will be required to enter in this mode. The default supervisor password is [ENTER] key. User Mode: The User Mode is where the Reborn Card is active and is governing the access writes to the partitions on the disk drive. Any changes under this mode will be restored to its original settings after the PC is re-booted by the preset schedule. Note! The relativity of Supervisor Mode and User mode is only existed when the attribution of boot partition is set to (A): system partition for instant recovery. 8
10 4. How to setup FDISK The Reborn Card supports multiple operating systems installed on one hard drive when using [Custom Installation]. Each operating system is in a different physical partition, allowing multi-booting up to 40 partitions. 4.1 Attribution (1) A: System Partition for Instant Restoration: Within this partition type, all changes will be instantly restored to its original state with a simple reboot. Various restore schedules are provided, including every reboot, daily, weekly, monthly, a given date and manually. Supports Windows XP/Win7/Win8/Win10. (2) B: System Partition for Backup Restoration: Setup this partition type, you can backup data manually, or restore the original data with preset schedules. It supports almost all operating systems in the market. (3) C: System Partition for No Restoration: No protection or backup function is provided for this 9
11 partition type. Any changes done in this partition are permanent and will remain. It supports almost all operating system in the market. It is mainly for networking environments. (4) S: Shared Data Partition: This partition type will be visible with every partition you choose to boot from. It is Excellent for sharing data between different operating systems. (5) P: Private Data Partition: This partition type will only be visible for the boot partition with the same name in the setup menu. It will be invisible when booting from any other partitions. This is excellent for constantly changing data that is exclusive to one operating system. For example, if the name of boot partition is [WinXP], then the name of its private data partition must be [WinXP] as well. 4.2 Name Identify of the partition in Reborn Card boot menu. Maximum length is 10 characters 4.3 Size Setup preferred partition size. Enter the preferred size or press [PageUp/PageDown] to adjust. 4.4 File System: Choose appropriate file system for each operating system FAT32: Support WinXP/Win7/Win8/Win10 NTFS/HPFS: Supports WinXP/Vista/Win7/Win8/Win10. LINUX: Supports LINUX file system. LINUX/SW: Supports LINUX Swap file system. 10
12 4.5 Restore Period Set up restore time for System / data recovery. Disable: Shuts down Instant Restore function Every: The system will be instantly restored to its original state with every reboot. Daily: The system will be instantly restored to its original state at the first boot of every day. Weekly: The system will be auto restored to its original status at the first boot of every Sunday. Monthly: The system will be auto restored to its original state at the first boot of date 1 st every month. Manually: Every access writes to the hard disk will be kept temporarily. The system will be restored to its original status by pressing [Ctrl+R] and the restore or supervisor password. A Given date(1 st ~31 st ): The system will be auto restored to its original status at the first boot of a specified date. Auto-Clear: Data partition will be auto cleared with every re-boot. Only supports FAT16 and FAT32 file systems. With System: Private data partition will follow the restore period of its boot partition. 4.6 Buffer: For Instant Restoration type: Maximum buffer size is 8000MB and Minimum is 50MB. Default value is 6000MB. Move the cursor to the selected option and adjust the size by PageUP/PageDown. For Backup Restoration type: It requires a buffer zone that is equal in size to the protected partition. The buffer zone will be automatically reserved within the remaining unpartitioned hard disk space. For No Restoration type or Data partition: No buffer is required. 11

13 Note! When the settings in the FDISK are saved, the partition size will not be able to change. Please think twice before saving and exiting. 5. Install Operating System 5.1 Boot Menu: After completed FDISK setup, press [ESC] key to save and exit. PC will automatically restart and will show the Reborn Card boot menu as follow How to Install for DOS and Windows Move the light bar to the selected partition and follow the steps below to start OS installation. Note! Please prepare a boot CD or Diskette and format all system and data partitions. 12
14 5.1.2 For boot partition set to attribution (A) Windows Operating System installation steps for [Instant Restoration Partition]: After rebooting your computer, the Reborn Card boot menu will appear showing all the partitions you setup. At that time you can choose a partition and install the operating System. Follow the steps listed below: Step 1. Start PC with boot CD. Step 2. Select the desired partition with [Ctrl+Enter] and login using the Supervisor Password (default Password is [ENTER] key). Step 3. Format C: Step 4. Start installing desired operating system. Note! During installation, windows will reboot several times. Make sure all the install procedures are done in the Supervisor Mode. Step 5. Install Reborn Card Setup Driver in Windows. Make sure you are in Supervisor Mode first. Step 6. Insert Reborn Card install CD in CD drive. Step 7. Double click Install.exe to start installation. Buffer Monitor utility installed enables the user to receive status about the amount of free resources left for use by the card until a restart operation is needed. Installing other applications and programs: To install other applications and programs (Office etc.), please press [Ctrl+Enter] to go into desired partition under Supervisor Mode to begin installation For boot partition set to attribution (B) Operating System installation steps for <Backup Restoration Partition> Step 1. Start PC with boot CD. Step 2. Select the desired partition with [Enter] key. Step 3. Format C: Step 4. Start installing OS. 13
15 Step 5. Reboot computer. Step 6. Select the same partition again with [Ctrl+B] keys and login with Supervisor Password (default Password is ENTER key) to backup the current partition s data Done Note! To restore the Backup Restoration partition, please select the partition with [Ctrl+R] keys and login with Supervisor Password. It will restore the system to its current backup For boot partition set to attribution (C) Attribution C is no Restoration Partition. In this partition, the operating system installing procedure is same as if no card were installed. No protection is provided under this partition. Step 1. Start PC with boot CD. Step 2. Select this partition with [Enter] key Step 3. Format C: Step 4. Start installing OS. Step 5. Reboot computer. 14
![6 Option Menu After complete Reborn Card installation, press [F10] key at the boot menu to enter Option Menu.](/docs-images/74/70501727/images/16-1.jpg "Supervisor password will be asked to enter Option Menu.")
16 6 Option Menu After complete Reborn Card installation, press [F10] key at the boot menu to enter Option Menu. Supervisor password will be asked to enter Option Menu. All the settings in this menu go into effect after saving the changes and restarting the computer. 6.1 Password 15
![The default Supervisor Password is [ENTER] key. UP to 10 characters are available. Press F1 will display the password.](/docs-images/74/70501727/images/17-0.jpg "The supervisor password will be used to enter <Option Menu>, <Supervisor Mode>, or executing <Keep> <Backup> and <Restore> functions.")
17 The default Supervisor Password is [ENTER] key. UP to 10 characters are available. Press F1 will display the password. The supervisor password will be used to enter <Option Menu>, <Supervisor Mode>, or executing <Keep> <Backup> and <Restore> functions. Please REMEMBER to write this Password down and NEVER lost it or you will need to reinstall everything! 6.2 Tools Settings 1. Boot Menu: Show/Hide(default) Show: Show boot menu Hide: Do not show boot menu 2. Logon Hotkey Hint: Show(default)/Hide Show: Show hotkeys on boot menu 16
18 Hide: Do not show hotkey. 3. Loading Timeout: Disable/3-99 seconds/3second(default) Disable: Do not auto enter the boot partition. Setup the waiting time at the boot menu. After the waiting time, system will auto boot to the partition that the light-bar is on. 4. Default Select: Disable / boot partition name Disable: Do not assign a default boot partition. Boot Partition Name: When booting, the light-bar will automatically select the desired partition. This function can apply with Loading Timeout to auto enter the boot partition. 5. Assign Bootup Partition: Disable / boot partition name Disable: Do not assign a boot partition. Boot partition name: Pre-set a desired partition to boot. The light-bar will not be able to move when a boot partition is assigned. 6. Instant Restoration Keep Mode: Enable(Default)/Disable Disable: Shuts down Keep mode function Enable: Enable Keep Mode allows users to save the changes temporarily in the next boot by pressing Ctrl+K. This function can only be used when the restore type is set to instant Restoration and when restore interval is set to Every time. 7. Bootup option: BIOS / C only BIOS: the boot sequence will follow the setting in the BIOS. C only: Computer boots from C. Enabling this setting will protect your hard disk information from being destroyed in case the Reborn Card is removed without going through the formal uninstall procedure first. If the card is removed or undetected for some reason, the system will warn you by beeping and the computer will be unbootable. 8. Keyboard lock on Boot Menu: Enable/Disable(Default) Disable: Do not lock keyboard Enable: Keyboard is locked on Boot Menu. This function can be used when operating Remote Control. 9. Auto Power Off: Disable(default)/1~60 minutes Disable: Do not auto power off computer. 17

19 1 to 60 minutes: Setup the idle time of the boot menu. When the boot menu reaches the predetermined time without entering any boot partition, the computer will be shut down automatically Disk Info Please refer to Section 4. How to setup FDISK FDISK 18

20 To change the partition size requires you to use FDISK again in Tools menu. All data in hard disk will be destroyed if FDISK is used Net Clone SETUP A. Auto Standby: Disable / Enable Disable:Disable auto connect. Enable:Reborn Card auto detects the connection and allows card to search for sending or receiving computers when powering on the machine. B. Computer Name: Computer Name after NET COPY. If you leave it blank, the LOGIN NAME will show [?] while running NET COPY. C. Group name: NET COPY Group name used during login. Only computers in this selected group can login. Many groups can be set for separation purposes. (similar to a VLAN) D. IP Address: Local IP Address setting E. IPv6 Address: Reserved for future setup 19
21 7 HDD Clone Net Clone allows you to maintain 200 PCs at the same time. You can use this function to transfer hard drive data through a master computer to the rest computer over network. 7.1 Net CLONE running steps Step 1. [F10] For Sending computer, get to Reborn Card Boot menu, enter [option] menu by pressing [F10]. Step 2. [F10]> [HDD CLONE]> [Net CLONE] For Sending computer, run [Net Clone]. Select [Sending], then refer to section 7.2 Net Clone Logon. Step 3. For receiving computers, run [Net Clone]. Select [receiving]. Then refer to section 7.2 Net Clone Logon. 7.2 Net Clone Logon Menu For Sending computer, press [F10] and get into Option menu. Run [NET CLONE] and you will see the following figure. 20


22 7.2.1 Receiving: Target computer for receiving data from Sending Computer Sending: Source Computer used to send data to receiving computers. 21

23 7.3 SEND DATA 22

24 7.3.1 Parameter data and all Partition: Copies and sends all data and the Reborn Card information to receiving Computers. Highly recommended for first time installation Parameter data: Copies only Reborn Card information to receiving computers. Recommend usage: Reborn Card software version upgrades Partition: Copy selected Partition to receiving computers. Recommended usage: When data of the selected Partition been updated (Time saving). Time saving feature: Run Disk Defragmenter before transmitting. Screen will show the disk information while transmitting. Press F5 can abort transmitting. 23

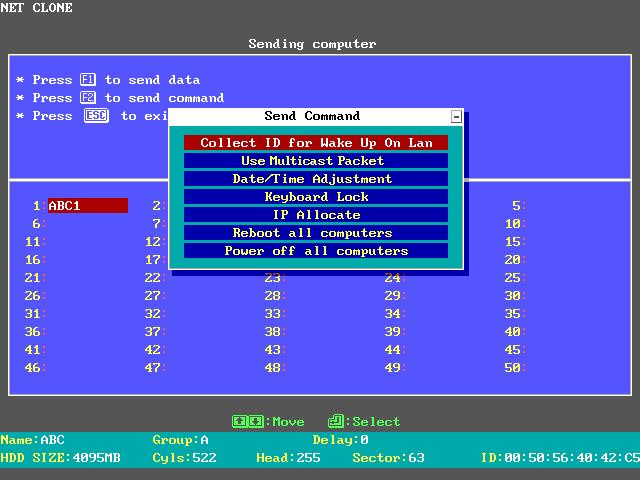
25 7.4 SEND COMMAND 24
26 7.4.1 Collect ID for Wake up on LAN: Record the Ethernet LAN Card ID of standby receiving computers. This function is for the following two purposes: (1) Auto IP utility (2) Wake up On Lan by remote control Use Multicast Packet Multicast Packet is recommended to use when the network surrounding supports Data/Time adjustment: Match the receiving computers data and time as the sending computer Keyboard Lock: Lock keyboards of all the receiving computers so nobody can access them during transmission IP Allocate Setup Computer Name, IP Address, and NET COPY Group. The following settings can be setup one by one manually or auto allocated. After completed the following settings, press ESC and select [Complete Setup & Exit] or select [Auto Allocate] to start IP allocating. A. User ID: Send / Receive Identify the target and source machine B. Computer Name: Computer Name after NET COPY Setup the sending computer name and the receiving computer name. If setup the Computer Name of the sending computer to be ABC, the receiving computer will be ABC1, ABC2, ABC3 after using [Auto Allocate] option. C. IP Address: Setup the IP address of the sending computer and receiving computers. If setup the IP address of the sending computer to be , the receiving computer will be , , , after using [Auto Allocate] option. D. NET COPY Group: 25

27 Group name used during login. Only computers in this selected group can login. Many groups can be set for separation purposes. If setup the NET COPY Group to be A, the receiving computer will be in the same group A after using [Auto Allocate] option. 26
28 7.4.6 All computer Restart: Restart the standby receiving computers along with the sending computer All computer Power off: Power off the standby receiving computers along with the sending computers. 8 Upgrade 1. Get to the Reborn Card boot Menu. 2. Place new installation CD into CD Rom. 3. Press [F10]>[Upgrade] 4. After it is finished, the system will reboot. 5. Go into Windows in Supervisor Mode. 6. Place previous installation CD into CD Rom. Run Install.exe to uninstall the previous setup in Windows. 7. The system will reboot. 8. Go into Windows in Supervisor Mode again. 9. Put new installation CD in CD Rom. Run Install.exe to install the new driver into Windows. 27

29 10. The system will reboot one more time. 11. Finished upgrading to the new version. 9 Uninstall To uninstall Reborn Card functions from this computer. 1. Place Reborn Card Installation CD into CD ROM. 2. In Windows, double click Install.exe in Supervisor Mode 3. System reboots. Press [F10] during booting. Input Supervisor password and select [Uninstall]. 4. Uninstall completed. You can now power off the system. 28
30 10 About Information about Reborn Card NET version. 11 Hotkey (1) F10 Enters the Option Menu (2) Ctrl+Enter Enters Supervisor Mode (3) Enter Enters User Mode (4) Ctrl+B Executes the partition s Backup Function. (5) Ctrl+R Executes the partition s Restore Function. (6) Ctrl+K Enters Keep Mode and saves the changes temporarily in the next boot. 29
Magic Card NET. User s Manual
 Magic Card NET User s Manual Table of Contents Notice Before Installation:... 2 System Requirements... 3 1. First Installation... 4 2. Hardware Setup... 4 3. Express Installation... 6 4. How to setup FDISK...
Magic Card Extra III. Table of Contents. User s Manual TUSystem RequirementsUT... 2 InstallationUT TU1.1UT TUInstallation Steps:UT...
 TU1.UT TUStart TU2.UT TUHow TU3.UT TUInstall TU4.UT TUOption TU5.UT TUNet TU6.UT TUpgradeUT... TU7.UT TUninstallUT... TU8.UT TUAboutUT TU9.UT TUHotkeyUT... Table of Contents Magic Card Extra III User s
Reborn Plus Card User s Manual V2
 Copyright Copyright 2004-2007 Lenten Technology Co., Ltd. All rights Reserved. Lenten, Lenten logo, and other Lenten marks are owned by Lenten Technology Co., Ltd. and registered. All other trademarks
Lenten Reborn Card. User s Manual. Lenten Technology Co., Ltd. (Max Plus version for VISTA)
") Lenten Reborn Card User s Manual (Max Plus version for VISTA) Lenten Technology Co., Ltd. Http://www.lenten.com E-mail: sales@lenten.com Copyright LENTEN REBORN CARD USER'S MANUAL Copyright 2004-2007 Lenten
Lenten Reborn Card User s Manual (Max Plus version for VISTA) Lenten Technology Co., Ltd. Http://www.lenten.com E-mail: sales@lenten.com Copyright LENTEN REBORN CARD USER'S MANUAL Copyright 2004-2007 Lenten
Lenten Reborn Card. Copyright. User s Manual. Lenten Technology Co., Ltd.
 Copyright Lenten Reborn Card User s Manual Copyright 2004-2007 Lenten Technology Co., Ltd. All rights Reserved. Lenten, Lenten logo, and other Lenten marks are owned by Lenten Technology Co., Ltd. and
Lenten Reborn Card. Copyright. User s Manual. Lenten Technology Co., Ltd.
 Copyright Lenten Reborn Card User s Manual Copyright 2004-2006 Lenten Technology Co., Ltd. All rights Reserved. Lenten, Lenten logo, and other Lenten marks are owned by Lenten Technology Co., Ltd. and
Magic Card Professional
 Magic Card Professional User Manual Table of Contents System Requirements... 2 1. Installation... 3 2. Magic Card Settings... 5 2.1 Set Protection... 6 2.2 Set Parameters... 8 2.3 Password... 10 2.4 CMOS
Magic Card User Manual
 Table of Contents Magic Card User Manual Magic Card Introduction 2 What is Magic card? 2 Magic Card Features 2 Working Modes 3 Magic card editions 3 Installation 4 System Requirements 4 Pre-installation
Additionally, this User s Guide and all product specifications herein may also be revised from time to time and subject to change without notice.
 This User s Guide contains important instructions regarding the installation of Juzt-Reboot. Please read it completely before attempting to install the Card. DISCLAIMER FOR JUZT-REBOOT PRODUCTS To ensure
Instant System/Data Recovery. User s Manual. Applicable for Models: PCIe PCI SW
 Juzt-Reboot User s Manual Applicable for Models: PCIe PCI SW JR-PCIe-W7 JR-PCI-W7 JR-SW-W7 JR-PCIe-VT JR-PCI-VT JR-SW-VT JR-PCIe-WOL JR-PCI-NT JR-SW-PRO http://www.juzt-reboot.com support@juzt-reboot.com
User s Manual. JR-PCIe JR-PCIe-WOL JR-PCI-NT JR-PCI-VT JR-SW-PRO JR-SW-VT
 Juzt-Reboot User s Manual Applicable for Versions: JR-PCIe JR-PCIe-WOL JR-PCI-NT JR-PCI-VT JR-SW-PRO JR-SW-VT http://www.juzt-reboot.com support@juzt-reboot.com Copyright Juzt-Reboot. All Rights Reserved.
Juzt-Reboot. User s Manual JR-PCI-NT JR-PCI-VT JR-SW-PRO JR-SW-VT
 User s Manual Applicable for Versions: JR-PCI-NT JR-PCI-VT JR-SW-PRO JR-SW-VT http://www.juzt-reboot.com support@juzt-reboot.com Copyright Juzt-Reboot. All Rights Reserved. This User s Manual contains
NET Control & NET User. User Manual. Rogev computers
 NET Control & NET User User Manual Rogev computers http://www.rogev.co.il Content 1. System Requirement... 3 1-1 Magic card... 3 1-2 Windows operating system... 3 1-3 Client computers... 3 1-4 Master computer...
CONTENTS. SysReturn_Manaual Updata 06/4/24. Chapter1 Introducing SysReturn Introduction to SysReturn Features and Functions...
 CONTENTS Chapter1 Introducing SysReturn... 3 Introduction to SysReturn... 3 Features and Functions... 3 Chapter2 Glossary... 5 Chapter3 System Requirement... 6 Hardware Requirement... 6 Software Requirement...
CONTENTS. Features and Functions...3. Preparation...7. Proceed Installation (Hardware Version)...7. Proceed Installation (Software Version)...
...7. Proceed Installation (Software Version)...") CONTENTS Chapter1 Introducing to SysReturn...3 Introduction to SysReturn...3 Features and Functions...3 Chapter2 Chapter3 Glossary...5 System Requirement...6 Hardware Requirement...6 Software Requirement...6
CONTENTS Chapter1 Introducing to SysReturn...3 Introduction to SysReturn...3 Features and Functions...3 Chapter2 Chapter3 Glossary...5 System Requirement...6 Hardware Requirement...6 Software Requirement...6
Reborn software ADV 9.01 installation guide custom installation
 Reborn software ADV 9.01 installation guide custom installation 1. Firstly, make sure that there is operating system installed inside the machine (in our example, windows 7). Then, in the windows environment,
BIOS Setup DESKPOWER 6000
 BIOS Setup DESKPOWER 6000 1 Preface What is BIOS setup? BIOS setup is a program that helps the user set up a hardware environment, including memory, hard disks, and floppy disk drives. Minimum setup has
BIOS Setup DESKPOWER 5000
 BIOS Setup DESKPOWER 5000 1 Preface What is BIOS setup? BIOS setup is a program that helps the user set up a hardware environment, including memory, hard disks, and floppy disk drives. Minimum setup has
JetFlash User s Manual
 JetFlash User s Manual ( Version 1.0 ) Table of Contents INTRODUCTION...1 PACKAGE CONTENTS...1 FEATURES...1 SYSTEM REQUIREMENTS...1 DRIVER INSTALLATION...2 DRIVER INSTALLATION FOR WINDOWS 98SE...2 DRIVER
Fujitsu LifeBook A Series
 Fujitsu LifeBook A Series BIOS Guide LifeBook A Series Model: A1010 Document Date: 05/20/02 Document Part Number: FPC58-0681-01 FUJITSU PC CORPORATION 1 LifeBook A Series Notebook BIOS A Series BIOS SYSTEM
Fujitsu LifeBook A Series
 Fujitsu LifeBook A Series BIOS Guide LifeBook A Series Model: AH530 Document Date: 06/09/2010 Document Part Number: FPC58-2714-01 FUJITSU AMERICA, INC. 1 LifeBook PH520 BIOS A Series BIOS BIOS SETUP UTILITY
Fujitsu LifeBook T Series
 Fujitsu LifeBook T Series BIOS Guide LifeBook T Series Model: T1010 with UMTS Document Date: 01/15/2009 Document Part Number: FPC58-2038-01 FUJITSU COMPUTER SYSTEMS CORPORATION 1 LifeBook T Series BIOS
Recovery Card V10.0 User Manual
 Recovery Card V10.0 User Manual Chapter 1 Introduction Recovery Cards have the following functions: 1. Supports almost all present motherboards (including Intel 915, 925) and other branded computers. 2.
N Series BIOS BIOS SETUP UTILITY
 BIOS SECTION N3530 LifeBook N Series Notebook BIOS N Series BIOS BIOS SETUP UTILITY The BIOS Setup Utility is a program that sets up the operating environment for your notebook. Your BIOS is set at the
BIOS SECTION S6210/6220
 BIOS SECTION S6210/6220 LifeBook S Series Notebook BIOS S Series BIOS BIOS SETUP UTILITY The BIOS Setup Utility is a program that sets up the operating environment for your notebook. Your BIOS is set at
Super USB. User Manual. 2007, March
 Super USB User Manual 2007, March Windows98 Driver Install/Uninstall Driver Install: 1. Execute Win 98 UFD driver, then restart PC. 2. Plug Super USB into an available USB port. A new Removable Disk drive
Fujitsu STYLISTIC Q Series
 Fujitsu STYLISTIC Q Series BIOS Guide STYLISTIC Q Series Model: Q552 Document Date: 5252012 Document Part Number: FPC58-3061-01 FUJITSU AMERICA, INC. 1 STYLISTIC Q552 BIOS Q Series BIOS BIOS SETUP UTILITY
Fiery proserver User Guide
 Fiery proserver User Guide Congratulations on your purchase of the Fiery proserver, a powerful production solution for your printer. Before you begin Make sure that you have: About this document Installed
Fujitsu LifeBook U Series
 Fujitsu LifeBook U Series BIOS Guide LifeBook U Series Model: UH900 Document Date: 01/07/2010 Document Part Number: FPC58-2547-01 FUJITSU AMERICA, INC. 1 LifeBook U Series BIOS U Series BIOS BIOS SETUP
Fiery proserver User Guide
 Fiery proserver User Guide Congratulations on your purchase of the EFI Fiery proserver, a powerful production solution for your printer. Before you begin Make sure that you have: About this document Installed
Since August 2005 the DELL Optiplex GX-280 is end of live. So we replace this machine with a new model of DELL Optiplex-PC s, it s the GX 520.
 Seite 1 von 13 Documentation 27. September 2005 Object: DELL Optiplex GX-520 Since August 2005 the DELL Optiplex GX-280 is end of live. So we replace this machine with a new model of DELL Optiplex-PC s,
Fujitsu LifeBook N Series
 Fujitsu LifeBook N Series BIOS Guide LifeBook N Series Models: NH570 Document Date: 02/01/2010 Document Part Number: FPC58-2649-01 FUJITSU AMERICA, INC. 1 LifeBook N Series BIOS N Series BIOS BIOS SETUP
Fujitsu LifeBook T Series
 Fujitsu LifeBook T Series BIOS Guide LifeBook T Series Model: T580 Document Date: 12/10/2010 Document Part Number: FPC58-2801-01 FUJITSU AMERICA, INCORPORATED 1 LIFEBOOK T580 BIOS T Series BIOS BIOS SETUP
Fujitsu LifeBook N Series
 Fujitsu LifeBook N Series BIOS Guide LifeBook N Series Models: N6400 Document Date: 07/16/2007 Document Part Number: FPC58-1702-01 FUJITSU COMPUTER SYSTEMS CORPORATION 1 LifeBook N Series BIOS N Series
A Series BIOS BIOS SETUP UTILITY
 BIOS SECTION A3110 LifeBook A Series BIOS A Series BIOS BIOS SETUP UTILITY The is a program that sets up the operating environment for your notebook. Your BIOS is set at the factory for normal operating
Kaseya 2. User Guide. Version 1.0
 Kaseya 2 Imaging & Deployment User Guide Version 1.0 August 16, 2011 About Kaseya Kaseya is a global provider of IT automation software for IT Solution Providers and Public and Private Sector IT organizations.
Fujitsu LifeBook A Series
 Fujitsu LifeBook A Series BIOS Guide LifeBook A Series Model: A3130 Document Date: 06/20/2007 Document Part Number: FPC58-1706-01 FUJITSU COMPUTER SYSTEMS CORPORATION 1 LifeBook A Series BIOS A Series
Fujitsu LifeBook B Series
 Fujitsu LifeBook B Series BIOS Guide LifeBook B Series Model: B6210 Document Date: 06/12/2006 Document Part Number: FPC58-1519-01 FUJITSU COMPUTER SYSTEMS LifeBook B Series Notebook BIOS B Series BIOS
Fujitsu LifeBook A & V Series
 Fujitsu LifeBook A & V Series BIOS Guide LifeBook A & V Series Models: A1110/A1120 V1030 Document Date: 10/01/2008 Document Part Number: FPC65-4363-01 FUJITSU COMPUTER SYSTEMS CORPORATION 1 LifeBook A1110/V1030
Fujitsu LifeBook B Series
 Fujitsu LifeBook B Series BIOS Guide LifeBook B Series Model: B6230 Document Date: 02/05/2008 Document Part Number: FPC58-1827-01 FUJITSU COMPUTER SYSTEMS CORPORATION LifeBook B6200 Notebook BIOS LifeBook
IT Essentials v6.0 Windows 10 Software Labs
 IT Essentials v6.0 Windows 10 Software Labs 5.2.1.7 Install Windows 10... 1 5.2.1.10 Check for Updates in Windows 10... 10 5.2.4.7 Create a Partition in Windows 10... 16 6.1.1.5 Task Manager in Windows
Fujitsu LifeBook A Series
 Fujitsu LifeBook A Series BIOS Guide LifeBook A Series Model: A6030 Document Date: 06/06/2007 Document Part Number: FPC58-1698-01 FUJITSU COMPUTER SYSTEMS CORPORATION 1 LifeBook A Series BIOS A Series
Fujitsu LifeBook A Series
 Fujitsu LifeBook A Series BIOS Guide LifeBook A Series Models: A3040 Document Date: 2/10/06 Document Part Number: FPC58-1482-01 F U J I T S U C O M P U T E R S Y S T E M S 1 LifeBook A Series Notebook
LifeBook P Series Notebook BIOS
 BIOS SECTION P1610 LifeBook P1600 Notebook BIOS LifeBook P Series Notebook BIOS BIOS SETUP UTILITY The BIOS Setup Utility is a program that sets up the operating environment for your notebook. Your BIOS
PhoenixBIOS 4.0 Revision 6
 Phoenix Technologies Ltd. PhoenixBIOS 4.0 Revision 6 User's Manual Phoenix Technologies Ltd., 411 E. Plumeria, San Jose, CA 95134 Copyright Disclaimer Purpose of Document PhoenixBIOS 4.0 User's Manual
Fujitsu LifeBook T Series
 Fujitsu LifeBook T Series BIOS Guide LifeBook T Series Model: T5010 - UMTS Model Document Date: 02/18/2009 Document Part Number: FPC58-2036-01 FUJITSU COMPUTER SYSTEMS CORPORATION 1 LifeBook T Series BIOS
VI-CENTER EXTENDED ENTERPRISE EDITION GETTING STARTED GUIDE. Version: 4.5
 VI-CENTER EXTENDED ENTERPRISE EDITION GETTING STARTED GUIDE This manual provides a quick introduction to Virtual Iron software, and explains how to use Virtual Iron VI-Center to configure and manage virtual
The Lecture's aim A preparation for the installation party: Prepare your computer for the installation Know what's going to happen Understand what's g
 Linux Installation Eli Billauer eli@billauer.co.il November 12, 2000 Linux Installation Slide 1 The Lecture's aim A preparation for the installation party: Prepare your computer for the installation Know
Upgrading the Fiery CS IC-310 to system software version 2.0
 Upgrading the Fiery CS IC-310 to system software version 2.0 Overview This document describes how to upgrade the Fiery CS IC-310 to system software, version 2.0. Notify the site administrator that some
Fujitsu LifeBook P Series
 Fujitsu LifeBook P Series BIOS Guide LifeBook P Series Model: P7120/P7120D Document Date: 11/3/2005 Document Part Number: FPC58-1425-01 FUJITSU COMPUTER SYSTEMS CORPORATION LifeBook P7000 Notebook BIOS
Fujitsu LifeBook P Series
 Fujitsu LifeBook P Series BIOS Guide LifeBook P Series Model: P1620 Document Date: 1/29/2008 Document Part Number: FPC58-1817-01 FUJITSU COMPUTER SYSTEMS CORPORATION LifeBook P1600 Notebook BIOS LifeBook
Fujitsu Stylistic ST6000 Series
 Fujitsu Stylistic ST6000 Series BIOS Guide Stylistic Series Model: ST6012 Document Date: 12/01/2008 Document Part Number: FPC65-4369-01 FUJITSU COMPUTER SYSTEMS CORPORATION 1 Stylistic ST Series BIOS ST
NEC Versa LX (AGP Video) Important Information
 Important Information") NEC Versa LX (AGP Video) Important Information Congratulations on purchasing an NEC Versa LX (AGP Video) notebook computer! Before using your system, complete the installation process and read the important
NEC Versa LX (AGP Video) Important Information Congratulations on purchasing an NEC Versa LX (AGP Video) notebook computer! Before using your system, complete the installation process and read the important
Fujitsu LifeBook T Series
 Fujitsu LifeBook T Series BIOS Guide LifeBook T Series Model: T3010/T3010D Document Date: 09/16/03 Document Part Number: FPC58-0992-01 FUJITSU PC CORPORATION 1 LifeBook T Series Tablet PC T Series BIOS
S Series BIOS BIOS SETUP UTILITY
 BIOS SECTION S2110 LifeBook S Series Notebook BIOS S Series BIOS BIOS SETUP UTILITY The BIOS Setup Utility is a program that sets up the operating environment for your notebook. Your BIOS is set at the
This is a learning module for a specific Learning Outcome as stipulated in the HSP that is :
 1. What is it? This is a learning module for a specific Learning Outcome as stipulated in the HSP that is : Ä Ä Ä 2.4.1 Personal Computer (PC) Assembling 2.4.2 Hard disk partitioning and formatting 2.4.3
INFORMATION AND COMMUNICATION TECHNOLOGY
 INFORMATION AND COMMUNICATION TECHNOLOGY LEARNING MODULE COMPUTER SYSTEM MODULE 2.4 Pusat Perkembangan Kurikulum Kementerian Pelajaran Malaysia 2006 1. What is it? This is a learning module for a specific
Lionstracs Groove X-R
 Lionstracs Groove X-R Groove OS version 5.3 Installation & Upgrade Guide 31 October 2011 English Language documentation prepared by Corcyra Global in consultation with Lionstracs Table of Contents Warning
Chapter 8 Operating Systems and Utility Programs أ.أمل زهران
 Chapter 8 Operating Systems and Utility Programs Chapter 8 Objectives Identify the types of system software Summarize the startup process on a personal computer Summarize the features of several stand-alone
Using GIGABYTE Notebook for the First Time
 V. 0 Congratulations on your purchase of the GIGABYTE Notebook. This manual will help you to get started with setting up your notebook. The final product configuration depends on the model at the point
SNMP Web Management. User s Manual
 SNMP Web Management User s Manual Suitable Product: SNMP Web Card SNMP Web Box Management Software for Uninterruptible Power Supply Systems Table of Contents 1. Overview... 1 1.1 Introduction... 1 1.2
T Series BIOS BIOS SETUP UTILITY
 BIOS SECTION T4010 LifeBook T Series Tablet PC T Series BIOS BIOS SETUP UTILITY The BIOS Setup Utility is a program that sets up the operating environment for your tablet. Your BIOS is set at the factory
Fujitsu LifeBook S Series
 Fujitsu LifeBook S Series BIOS Guide LifeBook S Series Model: S2020 Document Date: 10/30/03 Document Part Number: FPC58-1035-01 FUJITSU COMPUTER SYSTEMS 1 LifeBook S Series Notebook BIOS S Series BIOS
Windows 2000 Flavors Windows 200 ws 0 Profess 0 P ional Windows 2000 Server Windows 200 ws 0 Advan 0 A ced Server Windows 2000 Datacen ter Server 2
 Copyright 2006 Heathkit Company, Inc. All Rights Reserved Lab 9-3 Windows 2000 Pre-Installation Windows 2000 Flavors Windows 2000 Professional Windows 2000 Server Windows 2000 Advanced Server Windows 2000
System CMOS/BIOS Configuration PC Diagnostics
 System CMOS/BIOS Configuration PC Diagnostics (POST; Error Messages and Error Codes) CMOS/BIOS Complementary Metal Oxide Substrate (CMOS) A part of the motherboard that maintains system variables in static
FASTTRAK TX4000 QUICK START GUIDE. Version 1.2
 FASTTRAK TX4000 QUICK START GUIDE Version 1.2 FastTrak TX4000 Copyright 2002 Promise Technology, Inc. Copyright by Promise Technology, Inc. (Promise Technology). No part of this manual may be reproduced
E Series BIOS BIOS SETUP UTILITY. Entering the BIOS Setup Utility. Entering the Setup Utility After a Configuration Change or System Failure
 BIOS SECTION E8020 LifeBook E Series BIOS E Series BIOS BIOS SETUP UTILITY The BIOS Setup Utility is a program that sets up the operating environment for your notebook. Your BIOS is set at the factory
NEC PowerMate 2000 Series Release Notes. Contents
 NEC PowerMate 2000 Series Release Notes Contents Applications... 3 Installing Applications in the Correct Order... 3 Installing NEC SNMP Agent... 3 Uninstalling the NEC SNMP Agent or LANDesk Client Manager...
Fujitsu LifeBook N Series
 Fujitsu LifeBook N Series BIOS Guide LifeBook N Series Models: N6000 Document Date: 11/11/04 Document Part Number: FPC58-1268-01 F U J I T S U C O M P U T E R S Y S T E M S 1 LifeBook N Series Notebook
1. S Series BIOS BIOS SETUP UTILITY
 BIOS SECTION S6010 1. S Series BIOS BIOS SETUP UTILITY The BIOS Setup Utility is a program that sets up the operating environment for your notebook. Your BIOS is set at the factory for normal operating
S Series BIOS BIOS SETUP UTILITY. Entering the BIOS Setup Utility. Entering the Setup Utility After a Configuration Change or System Failure
 BIOS SECTION S6130 LifeBook S Series Notebook BIOS S Series BIOS BIOS SETUP UTILITY The BIOS Setup Utility is a program that sets up the operating environment for your notebook. Your BIOS is set at the
Fujitsu LifeBook E Series
 Fujitsu LifeBook E Series BIOS Guide LifeBook E Series Models: E2010 Document Date: 02/05/03 Document Part Number: FPC58-0881-01 F U J I T S U P C C O R P O R A T I O N 1 LifeBook E Series BIOS E Series
DVD Duplication Towers
 DVD Duplication Towers User s Manual CONTENTS 1. Introduction..2 2. Features..2 3. Specifications..3 4. LCD Front Control Panel..3 5. Menu Overview..4 1. Copy..6 2. Test..6 3. Copy & Verify..7 4. Copy
Fujitsu LifeBook T Series
 Fujitsu LifeBook T Series BIOS Guide LifeBook T Series Model: T4020/T4020D Document Date: 08/08/2005 Document Part Number: FPC58-1407-01 FUJITSU COMPUTER SYSTEMS 1 LifeBook T Series Tablet PC T Series
Fujitsu LifeBook E Series
 Fujitsu LifeBook E Series BIOS Guide LifeBook E Series Model: E8110 (Vista OS) Document Date: 03/30/2007 Document Part Number: FPC58-1643-01 FUJITSU COMPUTER SYSTEMS CORPORATION 1 LifeBook E Series BIOS
Fujitsu LifeBook P Series
 Fujitsu LifeBook P Series BIOS Guide LifeBook P Series Model: P771 Document Date: 2/18/2011 Document Part Number: FPC58-2855-01 FUJITSU AMERICA, INCORPORATED 1 LIFEBOOK P771 BIOS P Series BIOS BIOS SETUP
A+ Guide to Software: Managing, Maintaining, and Troubleshooting, 5e. Chapter 7 Fixing Windows Problems
 : Managing, Maintaining, and Troubleshooting, 5e Chapter 7 Fixing Windows Problems Objectives Learn what to do when a hardware device, application, or Windows component gives a problem Learn what to do
Owner s Manual Version 1.0e
 Owner s Manual Version 1.0e Gold Premier Series & Pro Premier Series CONTENTS 1. INTRODUCTION..2 2. Features..2 3. Specifications..3 4. LCD Front Control Panel..3 5. Menu Overview..4 1. Copy..6 2. Test..6
1 Introduction What is QSAN Xreplicator? System requirements and supported media... 4
 QSAN XReplicator Table of contents 1 Introduction...4 1.1 What is QSAN Xreplicator?... 4 1.2 System requirements and supported media... 4 1.2.1 Minimum system requirements... 4 1.2.2 Supported operating
LevelOne FNS bay/1usb Soho NAS. User s Manual
 LevelOne FNS-1000 1- bay/1usb Soho NAS User s Manual Table of Contents Introduction... 2 The FNS-1000 NAS Server... 2 FNS-1000 Features... 2 Package Contents... 2 System Requirements... 2 Disclaimer...
Fujitsu LifeBook T Series
 Fujitsu LifeBook T Series BIOS Guide LifeBook T Series Models: T900 Document Date: 02/03/2010 Document Part Number: FPC58-2643-01 FUJITSU AMERICA, INCORPORATED 1 LifeBook T Series BIOS T Series BIOS BIOS
5907-VL CD / DVD Tower Operator s Guide
 5907-VL CD / DVD Tower Operator s Guide CONTENTS 1. INTRODUCTION..2 2. Features..2 3. Specifications..3 4. LCD Front Control Panel..3 5. Menu Overview..4 1. Copy..6 2. Test..6 3. Copy & Verify..7 4. Copy
This chapter tells how to configure the system by setting the BIOS parameters. 3.1 Entering the AMI BIOS Setup
 Chapter 3 AMI BIOS This chapter tells how to configure the system by setting the BIOS parameters. 3.1 Entering the AMI BIOS Setup To enter the AMI BIOS Setup, press appears as shown below.. The AMI BIOS
Advanced Computer Skills and Hardware Instructor: Jonathan Barkand ( )
") Advanced Computer Skills and Hardware Instructor: Jonathan Barkand (412-655-8447) There are 2 types of systems: Intel and AMD All desktop computers are not created equal. They have significantly different
Advanced Computer Skills and Hardware Instructor: Jonathan Barkand (412-655-8447) There are 2 types of systems: Intel and AMD All desktop computers are not created equal. They have significantly different
BIOS User Guide RACING P1A
 BIOS User Guide RACING P1A BIOS Update... 2 UEFI BIOS Setup... 6 1. Main Menu... 7 2. Advanced Menu... 8 3. Chipset Menu...14 4. Security Menu...20 5. Boot Menu...23 6. Exit Menu...25 BIOS Update The BIOS
Fujitsu LifeBook C Series
 Fujitsu LifeBook C Series BIOS Guide LifeBook C Series Model: C1320D Document Date: 09/06/2005 Document Part Number: FPC58-1401-01 FUJITSU COMPUTER SYSTEMS LifeBook C Series Notebook BIOS C Series BIOS
How to install the software of ZNS8022
 How to install the software of ZNS8022 1. Please connect ZNS8022 to your PC after finished assembly. 2. Insert Installation CD to your CD-ROM drive and initiate the auto-run program. The wizard will run
1. BIOS setup BIOS SETUP UTILITY. Critical Point
 BIOS SECTION P2040 1. BIOS setup BIOS SETUP UTILITY The BIOS Setup Utility is a program that sets up the operating environment for your notebook. Your BIOS is set at the factory for normal operating conditions,
OPERATING SYSTEMS & UTILITY PROGRAMS
 OPERATING SYSTEMS & UTILITY PROGRAMS System Software System software consists of the programs that control the operations of the computer and its devices. Functions that system software performs include:
Fujitsu LifeBook E Series
 Fujitsu LifeBook E Series BIOS Guide LifeBook E Series Model: E8420 Document Date: 07/10/2008 Document Part Number: FPC58-1911-01 FUJITSU COMPUTER SYSTEMS CORPORATION 1 LifeBook E Series BIOS E Series
Fujitsu LifeBook P Series
 Fujitsu LifeBook P Series BIOS Guide LifeBook P Series Model: P1120 Document Date: 10/30/02 Document Part Number: FPC58-0796-01 FUJITSU PC CORPORATION LifeBook P Series Notebook BIOS P Series BIOS BIOS
Using AORUS Notebook for the First Time
 Congratulations on your purchase of the AORUS Notebook! This Manual will help you to get started with setting up your notebook. For more detailed information, please visit our website at http://www.aorus.com.
Fujitsu LifeBook E Series
 Fujitsu LifeBook E Series BIOS Guide LifeBook E Series Model: E8410 Document Date: 05/25/2007 Document Part Number: FPC58-1690-01 FUJITSU COMPUTER SYSTEMS CORPORATION 1 LifeBook E Series BIOS E Series
Fujitsu LifeBook B Series
 Fujitsu LifeBook B Series BIOS Guide LifeBook B Series Model: B2620 Document Date: 10/30/02 Document Part Number: FPC58-0792-01 FUJITSU PC CORPORATION LifeBook B Series Notebook BIOS B Series BIOS BIOS
N Series BIOS BIOS SETUP UTILITY
 BIOS SECTION N6220 LifeBook N Series Notebook BIOS N Series BIOS BIOS SETUP UTILITY The BIOS Setup Utility is a program that sets up the operating environment for your notebook. Your BIOS is set at the
User s Manual. Rev July 29,
 User s Manual Rev. 3.3.0.75 July 29, 2009 www.comsol.com.au Contents 1. Introduction...2 1.1 System Requirements... 2 1.2 Multilingual Support... 2 1.3 Disk Partitioning... 2 1.4 Note... 3 2. Icon Descriptions...4
A+ Guide to Managing and Maintaining Your PC, 7e. Chapter 16 Fixing Windows Problems
 A+ Guide to Managing and Maintaining Your PC, 7e Chapter 16 Fixing Windows Problems Objectives Learn what to do when a hardware device, application, or Windows component gives a problem Learn what to do
3 INSTALLING WINDOWS XP PROFESSIONAL
 INSTALLING WINDOWS XP PROFESSIONAL.1 Preparing for installation Objectives.1.1 Windows XP Professional Hardware Requirements.1.2 Hardware Compatibility List (HCL) check.1. Hard Disk Partition.1.4 Required
M9-LAN. User Manual. & Installation Guide. Network Drive for 3.5 IDE HDD. v1.1
 M9-LAN Network Drive for 3.5 IDE HDD User Manual & Installation Guide v1.1 Table of Contents CHAPTER 1 - INTRODUCTION - 1 - CHAPTER 4 LAN DISK SETUP - 10 - ICON KEY - 1 - NETWORK INSTALLATION ON A PC -
SANOG VI IP Services Workshop: FreeBSD Install
 SANOG VI IP Services Workshop: FreeBSD Install FreeBSD is designed to be a server operating system. This becomes apparent during the installation process. The FreeBSD installer is a console-based (not