R Series Configuration Manual
|
|
|
- Horace Poole
- 6 years ago
- Views:
Transcription
1 R Series Configuration Manual
2 The issue date for the R Series Configuration Manual (REF Rev. C) is June, If more than 3 years have elapsed since the issue date, contact ZOLL Medical Corporation to determine if additional product information updates are available. Copyright 2012 ZOLL Medical Corporation. All rights reserved. R Series, pedi-padz, Real CPR Help, See-Thru CPR, CPR Index, CPR Dashboard, Code-Ready, and OneStep are trademarks or registered trademarks of ZOLL Medical Corporation in the United States and/or other countries. Masimo is a registered trademark of Masimo Corporation in the United States and/or other countries. All other trademarks are the property of their respective owners. ZOLL Medical Corporation 269 Mill Road Chelmsford, MA USA ZOLL International Holding B.V. Newtonweg PV ELST The Netherlands 0123
3 Table of Contents Chapter 1 Introduction Entering Mode... 2 Printing Configuration Settings and Activity Logs... 3 Uploading Data from a Compact Flash Card... 6 Saving Configuration to a Compact Flash Card... 8 Restoring Default Values... 9 Accessing and Changing Configuration Settings Leaving Configuration Mode...11 Chapter 2 Configuration Settings General Settings Device Identifier Configuration Mode Passcode Code Markers ECG Settings Notch Filter Display Lead on Power-Up Frequency Response Gain on Power Up Enable Leads Off Enable Pacer Detection Audio Settings QRS Volume on Power-Up Low Battery Tone Enable Corrective Voice Prompts Basic Defibrillation Settings Defib Default to Pads Basic Auto Energy Escalation Retain Sync After Defib Defib Ready Hold Time Enable Remote Sync Rev. C ZOLL R Series Configuration Manual i
4 TABLE OF CONTENTS Advisory Defib Energy Level: Shock Energy Level: Shock Energy Level: Shock Ped Energy Level Shock Ped Energy Level Shock Ped Energy Level Shock Auto Analyze Enable Check Pulse Prompt Check Patient Prompt Auto Charge in Advisory Mode Enable Voice in Advisory Mode Display DO CPR Message CPR Message After No Shock Advised CPR Message After Shock Stacked Shocks Restart Analysis After CPR CPR Interval CPR Settings Enable CPR Voice Prompts Enable CPR Display Enable CPR Dashboard Display Release Bar Enable CPR Metronome Target CPR Depth CPR Depth Units Display Fully Release Prompt Display Filtered ECG on Trace Pace Settings Pace Rate Setting on Power-Up Async Softkey in Pace Mode Alarms Settings Alarm Limits at Power Up Alarms Active at Power Up Display Settings Display Time Select Trace 2 At Power Up Select Trace 3 At Power Up ECG Color SpO 2 Color CPR Color EtCO 2 Color NIBP Color SPO 2 at Power Up ii Rev. C
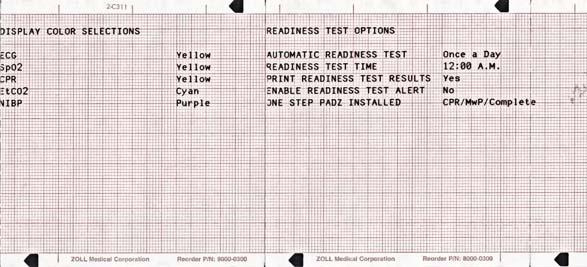
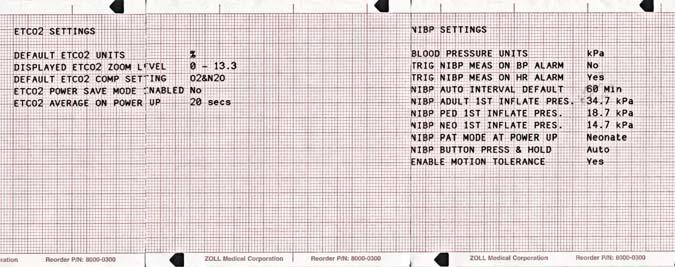
5 NIBP Settings (Optional) Blood Pressure Units Trigger NIBP Meas on BP Alarm Trigger NIBP Meas on HR Alarm NIBP Auto Interval Default Adult Initial Cuff Inflation Pediatric Initial Cuff Inflation Neonatal Initial Cuff Inflation NIBP Patient Mode at Power Up NIBP Button Press & Hold Enable Motion Tolerance EtCO 2 Settings (Optional) Default EtCO 2 Units Displayed Zoom Level Default EtCO 2 Comp Setting Power Save Mode at Power Up EtCO 2 Average On Power Up Printer & Report Settings Set Report Restart Delays Auto Generate Strips Print 3 Leads When Leads Sel Readiness Test Settings Automatic Readiness Test Readiness Test Time Print Readiness Test Results Enable Readiness Test Audible Alert (Future Use) One Step Padz Installed AED Mode Display ECG in AED Mode Display HR in AED Mode Manual Confirm Enable Extra CPR Interval Before 1st Analysis Duration of Extra CPR Interval Display Remaining CPR Timer Rev. C ZOLL R Series Configuration Manual iii
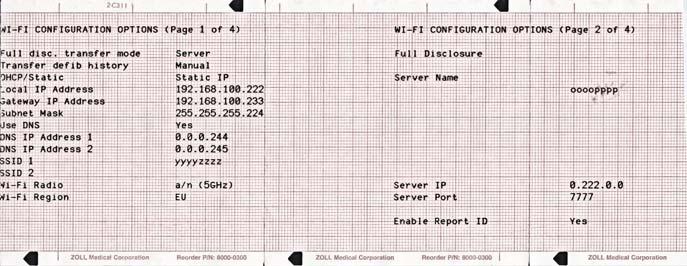
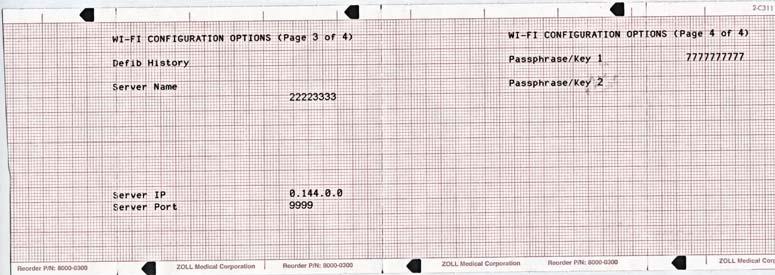
6 TABLE OF CONTENTS Wi-Fi Settings (Optional) Full Disclosure Transfer Mode Defib History Transfer Mode Infrastructure Mode Options DHCP/Static IP Local IP Address Gateway IP Address Subnet Mask Use DNS Primary/Secondary DNS IP Address SSID Names (up to 2 entries) Server Name (Full Disclosure) Server IP (Full Disclosure) Server Port (Full Disclosure) Server Name (Defib History) Server IP (Defib History) Server Port (Defib History) Passphrase/Keys (up to 2 entries) Wi-Fi Transmission Mode Options Enable Report ID Wi-Fi Region Wi-Fi Radio iv Rev. C
7 Chapter 1 Introduction The R Series is designed with several user selectable features that allow operators to configure the device according to their protocols and local requirements. This manual describes the configuration settings (options and defaults) and how to change them for ALS, Plus, and BLS models. References to AED settings are for Plus and BLS models only. Note: Your unit may not contain all features listed. For BLS/Plus units, some features are available in manual mode operation only. For more information, see the following sections: Entering Mode on page 2 Printing Configuration Settings and Activity Logs on page 3 Uploading Data from a Compact Flash Card on page 6 Saving Configuration to a Compact Flash Card on page 8 Restoring Default Values on page 9 Accessing and Changing Configuration Settings on page 10 Leaving Configuration Mode on page Rev. C 1
8 Chapter 1 Introduction Entering Mode In order to make any changes to unit configuration, you must first power on the unit in System Configuration mode. Procedure Follow these steps to power on the unit in mode: Step Action 1. Turn the selector switch to OFF, and wait 10 seconds. Simultaneously press and hold the right-most and left-most softkeys (below the monitor) while turning the selector switch to MONITOR (for ALS models) or ON (for Plus and BLS models), and hold the softkeys for approximately 4 seconds. The unit powers on in mode. 2. Enter the passcode using the appropriate softkeys. Note: When you enter for the first time, enter the default pass code of To change a digit, use the Delete softkey to highlight the entry and re-enter the digit. When all 8 digits have been entered, the unit automatically advances to the Select Language screen. 3. Use the Prev Value and Next Value softkeys to toggle the highlighted area between the language options. Set Configuration Passcode or Power Off to Exit ???? Delete Enter Configuration Passcode or Power Off to Exit 0 0 0????? Delete Select Language ENGLISH FRANCAIS Prev Value Next Value Enter Exit Config 4. Press the Enter softkey to select the highlighted language. All subsequent configuration menus will be in the selected language. The unit automatically advances to the Main Configuration menu. Print Restore Defaults Read From Card Change Config Exit Config Rev. C


9 Printing Configuration Settings and Activity Logs Printing Configuration Settings and Activity Logs To print the current configuration or activity log of your unit while the unit is in the System Configuration mode, press the Print softkey from the Main menu. For instructions on putting the unit in mode, refer to the previous section, Entering Mode. Printing Configuration Settings In mode, press the Print softkey, then the Print Config softkey to print a stripchart of all the unit s configuration settings. See a copy of a sample Configuration Report below. Note: In normal operation, you can print the configuration by pressing the following softkeys: Options, More, then Print Config Rev. C 3
10 Chapter 1 Introduction Rev. C


11 Printing Configuration Settings and Activity Logs Printing the Activity Log In mode, press the Print softkey, then the Print Activity Log softkey to print a stripchart of the unit s activity log. The log consists of the last 1,024 user entries or system prompts. See a copy of a sample Activity Log report below Rev. C 5
12 Chapter 1 Introduction Uploading Data from a Compact Flash Card You can upload data from a compact flash card to perform the following tasks: Copy the configuration of one unit to any number of units Install new software to the unit Copy a second language to the unit Procedure Follow these steps to load a configuration, another language, or software from a compact flash card: Step Action 1. Install the compact flash card in the R Series unit, and power on the unit in mode as described in Entering Mode on page 2. Print Restore Defaults Read From Card Change Config Exit Config 2. Press the Read From Card softkey to display the Read Card screen. Use the Prev Value and Next Value softkeys to toggle the highlighted area between the following options: LANGUAGE - allows you to upload a second language to the unit. English is always on the unit as default, and one other language can be added. CONFIGURATION -allows you to read the configuration data from a card, thereby configuring this unit. PROGRAM - allows you to install new software in either the PD processor or the ECG processor. Note: Do not install an older version of software over a newer version because it will cause software problems. 3. Press the Enter softkey to initiate reading and storing the information from the installed compact flash card. Once the card has been read and loaded, the unit displays the CARD READ message (for a language card) or the CARD READ and PRESS CHANGE CONFIG TO VIEW messages (for a configuration card). Read Which Type of Card? LANGUAGE CONFIGURATION PROGRAM Prev Value Next Value Enter Card Read Press Change Config to View Print Restore Defaults Read From Card Change Config Exit Config If you want to review configuration settings, press the Change Config softkey. See Accessing and Changing Configuration Settings on page 10 for more information. If you want to leave Rev. C
13 Uploading Data from a Compact Flash Card mode, press the Exit Config softkey. See Leaving Configuration Mode on page 11 for more information. If the unit encounters an error reading the memory card, one of the following error messages is displayed: Error Message CARD READ FAILED BAD CARD NO CARD INSERTED Description No response is detected from the card reader. The unit cannot read the card. The card is not installed in the data card slot Rev. C 7
14 Chapter 1 Introduction Saving Configuration to a Compact Flash Card Whenever you exit configuration mode, you can optionally save the configuration to a compact flash card. This allows you to copy the configuration from one unit to any number of units. Procedure Follow these steps to save configuration data to a compact flash card: Step Action 1. Power on the unit in mode as described in Entering Mode on page 2. Print Restore Defaults Read From Card Change Config Exit Config 2. Press the Exit Config softkey to display the Exit Configuration screen, and then install the flash card in the R Series unit. Save Changes and Exit Discard Changes and Exit Return to Main Menu Prev Next Enter 3. Press the Enter softkey to save the configuration changes and exit. The unit displays the SAVING CONFIGURATION and DO NOT POWER OFF messages and then the Save Changes To Card screen appears. Save Changes to Card? NO YES Prev Next Enter 4. Press the Next softkey to highlight YES, then press the Enter softkey. The unit displays the SAVING TO CARD message and then the POWER OFF TO EXIT CONFIGURATION message Rev. C
15 Restoring Default Values Restoring Default Values You can restore all configuration settings to their factory default settings. Only the display language, if different from the default, does not change. Procedure Follow these steps to restore all configuration settings to default values: Step Action 1. Power on the unit in mode as described in Entering Mode on page 2. Print Restore Defaults Read From Card Change Config Exit Config 2. Press the Restore Defaults softkey to reconfigure settings to their default settings. Once default settings are restored, the unit displays the DEFAULTS RESTORED and PRESS CHANGE CONFIG TO VIEW messages. Defaults Restored Press Change Config to View Print Restore Defaults Read From Card Change Config Exit Config If you want to review configuration settings, press the Change Config softkey. See Accessing and Changing Configuration Settings on page 10 for more information. If you want to leave mode, press the Exit Config softkey. See Leaving Configuration Mode on page 11 for more information Rev. C 9
16 Chapter 1 Introduction Accessing and Changing Configuration Settings You can change the current value for any configuration setting. You access most of the settings in the same way as described below. Additional steps are required to access and modify several settings. For those settings, the additional steps are provided with the setting description in the next chapter. Procedure Follow these steps to access the settings. Step Action 1. Press the Change Config softkey from the Main screen. The unit advances to the Select Configuration Category screen. Select Configuration Category General ECG Audio Basic Defib Advisory Defib CPR Pace Set/Review Alarms Display Printer & Report Page 1 of 2 Enter Main Menu Select Configuration Category Readiness Test AED Mode NIBP EtCO2 Wi-Fi Page 2 of 2 Enter Main Menu 2. Use the softkeys on the screen to move through the list and select a category, or to exit as follows: moves the highlight up, down, left, and right through the list of categories. Enter provides you access to the options of the highlighted category. Press this softkey once you have highlighted the appropriate category. Main Menu returns you to the Main screen. 3. Once you select and access the options for a category, you can highlight the specific setting you want to change, then press the Change Value softkey until the appropriate value is displayed. Note: Some options require and evoke an additional screen to set the value (for example, setting the Device Identifier). Specific instructions for those options are provided in the next chapter Rev. C
17 Leaving Configuration Mode Step Action 4. When you are finished, you can either press the Category List softkey to return to the Category screen, or press the Prev or Next softkey to move to another option whose settings you want to modify. Leaving Configuration Mode Procedure Follow the step below to leave mode: Step Action 1. Press the Exit Config softkey from the Main System Configuration screen to display the Exit Configuration screen. Use the Prev and Next softkeys to toggle the highlighted area between the following options: SAVE CHANGES AND EXIT - saves all configuration changes you made and prompts you to Save to Card. If you specify Yes, the configuration information is saved to the installed Compact Flash card. Lastly, the message POWER OFF TO EXIT CONFIG is displayed. Power off the unit. DISCARD CHANGES AND EXIT-disregards the changes you made and displays the message POWER OFF TO EXIT CONFIG. Power off the unit. RETURN TO MAIN MENU- returns you to the Main screen, where you can make more changes by selecting the Change Config softkey. You do not have to reenter the passcode. Note: No changes are made if you turn the unit off without saving the configuration. Save Changes and Exit Discard Changes and Exit Return to Main Menu Prev Next Enter Rev. C 11
18 Chapter 1 Introduction Rev. C
19 Chapter 2 Configuration Settings This chapter describes all of the configuration settings on the R Series and includes the following sections. General Settings on page 14 ECG Settings on page 19 Basic Defibrillation Settings on page 22 Advisory Defib on page 24 CPR Settings on page 31 Pace Settings on page 34 Alarms Settings on page 35 Display Settings on page 41 NIBP Settings (Optional) on page 44 EtCO2 Settings (Optional) on page 47 Printer & Report Settings on page 49 Readiness Test Settings on page 50 AED Mode on page 52 Wi-Fi Settings (Optional) on page 54 Note: The instructions in this chapter assume that you powered on the unit in System Configuration mode as described in Entering Mode on page 2, and are familiar with how to access the settings, see Accessing and Changing Configuration Settings on page Rev. C 13
20 Chapter 2 Configuration Settings General Settings General settings are attributes that affect the unit s basic operation and accessibility and include: Device Identifier Configuration Mode Passcode Code Markers Device Identifier The Device Identifier feature allows you to set an 11-digit device identifier code. This code is divided into two sub codes: the site ID (consisting of eight alphanumeric characters) and the device ID (consisting of three alphanumeric characters). The device identifier is printed on the summary report and fax printouts through 9, A through Z, blank and underscore inclusive for each digit. Procedure Follow these steps to set up a device identifier. Step Action 1. From the Select Configuration Categories screen, select General, then press the Enter softkey. The General Settings screen appears. General Settings DEVICE IDENTIFIER ABCDEFGH 777 Set/Review CONFIGURATION MODE PASSCODE CODE MARKERS Config/Review Page 1 of 1 Change Value Prev Next Category List Main Menu Exit Config 2. Select DEVICE IDENTIFIER and press the Change Value softkey. The Device Identifier screen appears. Set Site ID Set Device ID A J S 1 B K T 2 C D E F G H I Cancel L M N O P Q R Del U V W X Y, Z 0 < > _ Enter Char Return Rev. C
21 General Settings Step Action 3. In the character selection table: lets you move to the next or previous characters. Use the softkeys as follows: moves the highlight up, down, left, and right through the character selection table. Enter Char enters the highlighted character for 8 digits of the Site ID and the 3 digits of the Device ID. Return returns you to the General Settings screen. Press the Return softkey when you are finished entering the IDs. Note that selecting Enter also returns you to the General Settings screen Rev. C 15
22 Chapter 2 Configuration Settings Configuration Mode Passcode This feature allows you to set an 8-digit system configuration passcode. Once set, only those people who know the passcode can access the configuration mode and modify settings through 3 inclusive for each digit Procedure Follow these steps to set up a configuration mode passcode: Step Action 1. From the Select Configuration Categories screen, select General, then press the Enter softkey. The General Settings screen appears. General Settings DEVICE IDENTIFIER ABCDEFGH 777 Set/Review CONFIGURATION MODE PASSCODE CODE MARKERS Config/Review Page 1 of 1 Change Value Prev Next Category List Main Menu Exit Config 2. Select CONFIGURATION MODE PASSCODE and press the Change Value softkey. The Set Configuration Passcode screen appears. Set Configuration Passcode Prev Digit Inc Digit Dec Digit Next Digit Enter 3. Use the softkeys as follows: Prev Digit moves the highlight left to the previous digit. Inc Digit or Dec Digit increments or decrements the value of the selected digit. Next Digit moves the highlight right to the next digit to be entered. Enter saves the values that you entered and returns the unit to the General Configuration menu Rev. C
23 General Settings Code Markers This setting allows you to review and change the preconfigured list of Code Markers for use in DEFIB, MONITOR, and PACE modes. Code Marker settings are language dependent. You can specify up to three groups (MONITOR, DEFIB, and PACE) of 20 entries each. Procedure Follow these steps to review, change, or reset code marker settings: Step Action 1. From the Select Configuration Categories screen, select General, then press the Enter softkey. The General Settings screen appears. General Settings DEVICE IDENTIFIER ABCDEFGH 777 Set/Review CONFIGURATION MODE PASSCODE CODE MARKERS Config/Review Page 1 of 1 Change Value Prev Next Category List Main Menu Exit Config 2. Select CODE MARKERS and press the Change Value softkey. The Select Code markers screen appears. 3. Select either DEFIB CODE MARKERS, MONITOR CODE MARKERS, or PACE CODE MARKERS, then press the Change Value softkey to toggle between Change/Review or Set to Defaults. If you select Set to Defaults, press the Enter softkey to set the chosen code markers to their default values. If you select Change/Review, press the Enter softkey to access the screen that allows you to change the marker, as shown. Note: This example shows the screen that allows you to change DEFIB CODE MARKERS. Change Value DEFIB CODE MARKERS MONITOR CODE MARKERS PACE CODE MARKERS Page 1 of 1 Prev Prev General Settings Config/Review Set/Review Config/Review Next Next Config/Review Enter Defib Markers 1: CPR 2: Intubate 3: EPI 4: LIDO 5: Narcan 6: B-block 7: Atrovent 8: Mag Sulf Change Value Markers List CPR EPI Atrop DOPA PHEN Bicarb Aspirin Oxygen Delete to End Return Return Only 8 items are displayed on the screen at one time. When you get to the last item on the screen and press the Next softkey, you see the next 8 items. When you get to the last item on that screen and press the Next softkey, you see the remaining 4 items Rev. C 17
24 Chapter 2 Configuration Settings Step Action 4. Use the softkeys as described to modify code marker items as needed: Prev and Next scrolls the highlight to the next or previous code marker item. Change Value allows you to pick a new marker for the selected item number. When you press the Change Value softkey, three new softkeys become available that allow you to highlight and select the code marker treatment for this item. They are: Prev Marker and Next Marker allow you to scroll through the Markers List and highlight the appropriate treatment. Enter Marker set the highlighted treatment for this code marker item. Delete to End delete all configured markers from the highlighted item number to the end of the list. You can then enter new clinical actions for each item. Return returns you to the previous menu Rev. C
25 ECG Settings ECG Settings ECG monitoring settings are attributes associated with using the R Series unit for ECG monitoring, and include: Notch Filter Display Lead on Power-Up Frequency Response Gain on Power Up Enable Leads Off Enable Pacer Detection Notch Filter This setting allows you to select the ECG Notch Filter frequency for proper ac mains interference rejection. 50 Hz, 60 Hz 60 Hz Display Lead on Power-Up This setting allows you to select the lead to be displayed when you power on the unit. Paddles/Pads, Lead I, Lead II, Lead III Paddles/Pads Frequency Response This setting allows you to select the ECG filter bandwidth to be used during ECG monitoring. You can set the unit s frequency to either help reduce noise, help with the diagnostic response, or set it as a default response Hz, Hz, Hz Hz Rev. C 19
26 Chapter 2 Configuration Settings Gain on Power Up This setting allows you to select the default size of the displayed ECG signal when you power on the unit. 0.5 cm/mv, 1.0 cm/mv, 1.5 cm/mv, and 2.0 cm/mv 1.0 cm/mv for Manual mode Enable Leads Off This setting specifies whether the unit displays the ECG LEADS OFF message and a flat dashed ECG waveform when the unit detects that ECG leads do not have proper contact with the patient or the cable is not properly attached to the R Series unit. When set to No, the unit displays the POOR LEAD CONTACT message and the detected ECG signals when the cable or ECG leads are not properly attached to the patient or unit. When set to Yes, the unit displays the ECG LEADS OFF message and a flat dashed ECG waveform when the cable or ECG leads are not properly connected. Caution Use care when interpreting ECG waveforms when the POOR LEAD CONTACT message displays; the ECG waveform may include a significant amount of artifact. Whenever possible, re-attach the leads before interpreting the waveform. Yes, No Yes Note: When in Pacer mode, the R Series unit functions as if this configuration is set to Yes. Enable Pacer Detection This setting allows you to specify whether the unit should detect pacemaker signals from a patient with an implantable pacemaker and indicate those signals on the display. When you set this setting to Yes, a pacemaker marker is displayed on the ECG trace whenever the unit detects implanted pacer stimuli. You can override this setting during normal operations. This setting simply indicates the default setting when you power on the unit. Yes, No Yes Rev. C
27 Audio Settings Audio Settings The Tone settings control audio functions on the R Series unit, and include: QRS Volume on Power-Up Low Battery Tone Enable Corrective Voice Prompts QRS Volume on Power-Up This setting allows you to select the default QRS beeper volume when you power on the unit. If you set this setting to Off, the unit does not beep during ECG monitoring. On, Off On Low Battery Tone This setting allows you to select the interval between Low Battery warning beeps. The Low Battery warning message is displayed once per minute, regardless of this setting. 1 Min, 5 Min 5 Min Enable Corrective Voice Prompts This setting allows you to specify whether voice prompts accompany the following corrective messages: Press Charge Select Defib Mode Remove Sync Release Shock Use Paddle Discharge Yes, No Yes Rev. C 21
28 Chapter 2 Configuration Settings Basic Defibrillation Settings The Basic Defibrillation settings control functions related to performing defibrillation with the R Series unit in Manual mode and include: Defib Default to Pads Basic Auto Energy Escalation Retain Sync After Defib Defib Ready Hold Time Enable Remote Sync Defib Default to Pads This setting allows you to override the Display Lead on Power-Up setting and use Pads/ Paddles whenever the unit is switched to DEFIB mode. Yes, No Yes Basic Auto Energy Escalation This setting allows you to configure the unit to automatically increment defibrillation energy to pre-specified levels after each of the first two shocks in Manual mode (see Energy Level: Shock 1 on page 24, Energy Level: Shock 2 on page 25, and Energy Level: Shock 3 on page 25). When set to Yes, the ENERGY INCREMENTED message is displayed whenever the unit automatically increments the selected defibrillator energy after delivery of a shock with paddles or MFE pads. Note: Manually changing the energy level outside the pre-programmed sequence and delivering a shock disables the auto energy escalation function until the unit is turned off for more than 10 seconds, then turned back on. This option increments the energy level regardless of Shock Advisory activation or status. Yes, No Yes Retain Sync After Defib This setting allows you to configure the unit to remain in SYNC mode after a synchronized cardioversion shock. SYNC mode remains on until the Sync On/Off softkey is pressed again or the unit is switched out of DEFIB mode. Yes, No No Rev. C
29 Basic Defibrillation Settings Defib Ready Hold Time This setting allows you to specify the amount of time that the R Series unit will hold a charge before disarming. 60 secs, 120 secs 60 secs Enable Remote Sync This setting allows you to enable and disable the Remote Sync feature. If disabled (No), you can perform synchronized cardioversion using only the R Series ECG signal. If enabled (Yes), you can press the Sync On/Off softkey to select either Remote Sync or Sync. Yes, No No Rev. C 23
30 Chapter 2 Configuration Settings Advisory Defib The Advisory Defibrillation settings control functions related to performing defibrillation with an R Series unit in Advisory mode and include: Energy Level: Shock 1 Energy Level: Shock 2 Energy Level: Shock 3 Ped Energy Level Shock 1 Ped Energy Level Shock 2 Ped Energy Level Shock 3 Auto Analyze Enable Check Pulse Prompt Check Patient Prompt Auto Charge in Advisory Mode Enable Voice in Advisory Mode Display DO CPR Message CPR Message After No Shock Advised CPR Message After Shock Stacked Shocks Restart Analysis After CPR CPR Interval Energy Level: Shock 1 This setting allows you to select the energy level used for the first shock delivered by the defibrillator when the unit is: in AED mode or Advisory mode and using pads in Manual mode, using external paddles or pads Energy Level: Shock 1 is the energy level to which the unit defaults when you power on the unit with external paddles or pads connected. Adult: 1-10, 15, 20, 30, 50, 75, 100, 120, 150, and 200 J Adult: 120 J Rev. C
31 Advisory Defib Energy Level: Shock 2 This setting allows you to select the energy level used for the second shock delivered by the defibrillator when the unit is: in AED mode or Advisory mode and using pads in Manual mode, using external paddles or pads, and Basic Auto Energy Escalation is set to Yes Adult: 1-10, 15, 20, 30, 50, 75, 100, 120, 150, and 200 J Adult: 150 J Energy Level: Shock 3 This setting allows you to select the energy level used for the third and all subsequent shocks delivered by the defibrillator when the unit is: in AED mode or Advisory mode and using pads in Manual mode, using external paddles or pads, and Basic Auto Energy Escalation is set to Yes Adult: 1-10, 15, 20, 30, 50, 75, 100, 120, 150, and 200 J Adult: 200 J Ped Energy Level Shock 1 This setting allows you to select the energy level used for the first pediatric shock delivered by the defibrillator when the unit is: in Advisory mode and using OneStep Pediatric electrodes. in Manual mode, using OneStep Pediatric electrodes Ped Energy Level: Shock 1 is the energy level to which the unit defaults when you power on the unit with pediatric electrode pads. Pediatric: 1-10, 15, 20, 30, 50, 70, 85, 100, 120, 150, and 200 J Pediatric: 50 J Warning! The R Series will default to pediatric Shock 1, 2, and 3 energies only when ZOLL OneStep pediatric electrodes are used. With pedi-padz and pedi-padz II (or other non- ZOLL pediatric electrodes), you are required to manually set the selected energy to pediatric levels, per institutional protocols Rev. C 25
32 Chapter 2 Configuration Settings Ped Energy Level Shock 2 This setting allows you to select the energy level used for the second pediatric shock delivered by the defibrillator when the unit is: in Advisory mode and using OneStep Pediatric electrodes. in Manual mode, using OneStep Pediatric electrodes and Basic Auto Energy Escalation is set to Yes Pediatric: 1-10, 15, 20, 30, 50, 70, 85, 100, 120, 150, and 200 J Pediatric: 70 J Ped Energy Level Shock 3 This setting allows you to select the energy level used for the third and all subsequent shocks delivered by the defibrillator when the unit is: in Advisory mode and using OneStep Pediatric electrodes. in Manual mode, using OneStep Pediatric electrodes and Basic Auto Energy Escalation is set to Yes. Pediatric: 1-10, 15, 20, 30, 50, 70, 85, 100, 120, 150, and 200 J Pediatric: 85 J Auto Analyze This setting allows you to specify whether the unit automatically repeats ECG rhythm analyses after the delivery of shocks in Advisory mode and works in conjunction with the Stacked Shocks setting described on page 30. Enabling this setting also enables the occurrence of postshock prompting to DO CPR and PRESS ANALYZE. When set to No, which is the Manual mode default, the unit does not perform analysis automatically (with the exception of Smart Alarms and the first analysis when you power on the unit in AED mode, if the unit is configured to analyze when you power on the unit). When set to Yes and the Stacked Shocks options is set to 3, the unit automatically reanalyzes the patient s ECG rhythm after the first and second shocks in each three-shock sequence. Following delivery of the final shock, the unit stops automatic reanalysis and either displays a CHECK PULSE prompt, or immediately begins a CPR interval, depending on additional settings. This function operates only when the Auto Charge in Advisory Mode is set to Yes. Yes, No Yes Rev. C
33 Advisory Defib Enable Check Pulse Prompt This setting works in conjunction with the Auto Analyze function and determines whether the unit displays the prompt CHECK PULSE for 10 seconds immediately after delivery of the final shock in a stacked shock sequence, after each No Shock Advised analysis result, or both. After CHECK PULSE clears, the CPR interval begins. When set to No, the unit immediately begins the CPR interval following delivery of the final shock or after each No Shock Advised analysis result. Yes, No, After No Shock Only, After Shock Only No Check Patient Prompt This setting allows you to change the display message and the voice prompt issued when a shockable rhythm has been detected by background ECG analysis and Heart Rate Alarms are enabled. CHECK PATIENT, PRESS ANALYZE CHECK PATIENT Auto Charge in Advisory Mode This setting allows you to specify whether the unit automatically charges the defibrillator to the configured or user-selected energy setting after detection of a shockable rhythm by ECG analysis. When set to Yes, the unit automatically charges the defibrillator to the configured or user-selected energy setting. When set to No, it does not. Yes, No Yes Rev. C 27
34 Chapter 2 Configuration Settings Enable Voice in Advisory Mode This setting allows you to enable or disable voice prompts when using shock advisory functions (ECG analysis) in Manual mode. If enabled, the voice prompts sound at the appropriate time. If disabled, the unit emits two beeps instead of the voice prompts in Manual mode. Voice prompts are in the language specified by the Language option. Yes/No Yes Display DO CPR Message This setting allows you to specify whether the unit displays the configured CPR prompt (described in CPR Text Message) for the configured CPR time interval after each set of stacked shocks, even if a perfusing rhythm is present. The unit behaves differently depending on this particular setting value. Note: This setting is always set to Yes in AED mode. When set to No (the Manual mode default), the unit behaves as follows: At the end of any analysis with an outcome of no shock advised, the unit displays the NO SHOCK ADVISED message. The unit then remains idle for the configured CPR interval duration. After the CPR interval, if the ANALYZE softkey has not been pressed, the PRESS ANALYZE message is displayed and remains until a new analysis is started or the mode is changed. At the end of a stacked shock sequence (assuming the final shock is delivered) and when the optional 10 second CHECK PULSE message disappears, the CPR interval begins. The unit remains idle for the duration of the CPR interval. After the CPR interval, if the ANALYZE softkey has not been pressed, the PRESS ANALYZE prompt is displayed and remains until a new analysis is started or the mode is changed. If the defibrillator disarms itself after it was charged (because the Defib Ready time elapsed before a shock was delivered), the unit displays the PRESS ANALYZE prompt until the ANALYZE softkey is pressed. When set to Yes, the unit behaves as follows: At the end of any analysis with an outcome of no shock advised, the unit displays the NO SHOCK ADVISED message for 10 seconds, after which the message is cleared and the configured CPR prompt is displayed for the duration of the CPR interval. After the CPR interval, the PRESS ANALYZE prompt is displayed until a new analysis is started or a mode change occurs. You can start a new analysis during the CPR interval by pressing the ANALYZE softkey. At the end of a stacked shock sequence (assuming the final shock is delivered) and when the optional 10 second CHECK PULSE message disappears, the CPR interval begins. The configured CPR prompt is displayed for the duration of the CPR interval. After the CPR interval, the CPR prompt is cleared and a new analysis starts automatically Rev. C
35 Advisory Defib If the defibrillator disarms itself after it was charged (because the Defib Ready time elapsed before a shock was delivered), the unit displays the PRESS ANALYZE prompt until the ANALYZE softkey is pressed. Note: The Display DO CPR Message feature is operational only when the Auto Charge in Advisory Mode and Auto Analyze options are both set to Yes. Yes, No Yes CPR Message After No Shock Advised This parameter determines which CPR message/voice prompt is issued during the CPR interval after a No Shock Advised analysis result. The selected message is displayed throughout the entire CPR interval. If No Pulse, Perform CPR, Perform CPR Perform CPR CPR Message After Shock This parameter determines which CPR message/voice prompt is issued during the CPR interval after the delivery of the final shock in a stacked shock sequence. The selected message is displayed throughout the entire CPR interval. If No Pulse, Perform CPR, Perform CPR Perform CPR Rev. C 29
36 Chapter 2 Configuration Settings Stacked Shocks The setting specifies the number of stacked shocks that must be administered prior to the activation of a CPR interval and works in conjunction with the Auto Analyze setting. If set to 3, the unit will auto analyze 3 times before prompting the user. If set to 1, the unit will auto analyze once. 1, 3 1 Restart Analysis After CPR When this parameter is set to Yes, the analysis starts automatically after the CPR interval following each stacked shock sequence. Analyses do not automatically restart after a CPR interval following No Shock Advised results. When this parameter is set to No, the PRESS ANALYZE message is displayed, but the analysis does not restart. Note: This setting is always set to Yes in mode. Yes, No No CPR Interval This setting allows you to specify the duration of the CPR interval as described in the Display DO CPR Message setting. 1, 1.5, 2, 2.5, 3, 3.5, or 4 minutes 2 minutes Rev. C
37 CPR Settings CPR Settings The CPR settings control functions related to Real CPR Help function: Enable CPR Voice Prompts Enable CPR Display Enable CPR Dashboard Display Release Bar Enable CPR Metronome Target CPR Depth CPR Depth Units Display Fully Release Prompt Display Filtered ECG on Trace1 Enable CPR Voice Prompts This setting allows you to enable (Yes) or disable (No) voice prompts during CPR. Voice prompts are in the language specified by the Language option. Note: This setting is always set to Yes in AED mode. Yes, No Yes Enable CPR Display This setting allows you to enable (Yes) or disable (No) the display of the CPR indicator on the monitor. Yes, No Yes Enable CPR Dashboard If Enable CPR Display is set to Yes, this setting allows you to enable (Yes) or disable (No) the display of the CPR Dashboard at the top of the screen. The CPR Dashboard consists of the CPR Rate and Depth numeric values, the optional Compression Release Bar, and the CPR Index. Yes, No No Rev. C 31
38 Chapter 2 Configuration Settings Display Release Bar If Enable CPR Dashboard is set to Yes, this setting allows you to enable (Yes) or disable (No) the display of the Compression Release Bar in the CPR Dashboard. Yes, No No Enable CPR Metronome This setting allows you to enable (Yes) or disable (No) the audible CPR metronome. Note: This setting is always set to Yes in AED mode. Yes, No Yes Target CPR Depth This parameter allows you to select the minimum compression depth required for Good Compressions: 1.5 inches (3.8 cm) or 2.0 inches (5.0 cm). If this parameter is set to 1.5 inches, the reference markers on the CPR bar graph are displayed at 1.5 and 2.0 inches. If this parameter is set to 2.0 inches, the reference markers on the CPR bar graph are displayed at 2.0 and 2.4 inches. 1.5 inches, 2.0 inches 1.5 inches CPR Depth Units This setting allows you to display the numeric depth value in inches (in) or centimeters (cm). in, cm in Display Fully Release Prompt This parameter, when set to Yes, specifies that the FULLY RELEASE prompt will be displayed every 45 seconds during CPR. If this parameter is set to No, the prompt is not displayed Rev. C
39 CPR Settings Yes, No No Display Filtered ECG on Trace1 If Display CPR Dashboard is set to Yes, this setting allows you to display the See-Thru CPR filtered waveform on the top trace. Yes, No No Rev. C 33
40 Chapter 2 Configuration Settings Pace Settings The Pace settings are attributes that control functions related to performing pacing with an R Series unit and include: Pace Rate Setting on Power-Up Async Softkey in Pace Mode Pace Rate Setting on Power-Up This setting allows you to set the default pace rate, pulses per minute (ppm), of the R Series when you power on the unit. 30 ppm to 102 ppm (inclusive in increments of 4 ppm) 70 ppm Async Softkey in Pace Mode This setting allows you to set the unit to display the Async Pacing On/Off softkey when the unit is in Pace mode. For information about Asynchronous Pacing, refer to the R Series Operator s Guide. Yes, No Yes Rev. C
41 Alarms Settings Alarms Settings Alarm settings are attributes associated with Alarm states and thresholds for the R Series unit and include: Alarm Limits at Power Up Alarms Active at Power Up Rev. C 35
42 Chapter 2 Configuration Settings Alarm Limits at Power Up This option allows you to enable or disable, and set high and low threshold values for the ECG Heart Rate, and the SpO 2 alarms on the R Series unit. All alarms listed below (Heart Rate and optional devices SpO 2, EtCO 2, NIBP) are enabled by default. Heart Rate: High: beats per minute (BPM) inclusive in 5 BPM increments Low: beats per minute (BPM) inclusive in 5 BPM increments Optional Devices: SpO 2 : High: % in 1% increments Low: 70-98% in 1% increments EtCO 2 : High: mmhg in increments of kpa in increments of % in increments of.66 Low: 0-95 mmhg in increments of kpa in increments of % in increments of 0.66 Resp Rate: High: breaths per minute in increments of 5 Low: breaths per minute in increments of 5 NIBP Sys: Adult: High: mmhg in increments of kpa in increments of 0.67 Low: mmhg in increments of kpa in increments of 0.67 Pediatric: High: mmhg in increments of kpa in increments of 0.67 Low: mmhg in increments of kpa in increments of 0.67 Neonatal: High: mmhg in increments of kpa in increments of 0.67 Low: mmhg in increments of kpa in increments of Rev. C
43 Alarms Settings NIBP Dia: Adult: High: mmhg in increments of kpa in increments of 0.67 Low: mmhg in increments of kpa in increments of 0.67 Pediatric: High: mmhg in increments of kpa in increments of 0.67 Low: mmhg in increments of kpa in increments of 0.67 Neonatal: High: mmhg in increments of kpa in increments of 0.67 Low: mmhg in increments of kpa in increments of 0.67 NIBP Mean: Adult: High: mmhg in increments of kpa in increments of 0.67 Low: mmhg in increments of kpa in increments of 0.67 Pediatric: High: mmhg in increments of kpa in increments of 0.67 Low: mmhg in increments of kpa in increments of 0.67 Neonatal: High: mmhg in increments of kpa in increments of 0.67 Low: mmhg in increments of kpa in increments of Rev. C 37
44 Chapter 2 Configuration Settings Heart Rate: High: 150 BPM Low: 30 BPM Optional Devices: SpO 2 : High: 100% Low: 85% EtCO 2 : High: 55 mmhg 7.3 kpa 7.2% Low: 25 mmhg 3.3 kpa 3.2% Resp Rate: High: 120 Low: 5 NIBP Sys: Adult: High: 160 mmhg 21.3 kpa Low: 90 mmhg 12.0 kpa Pediatric: High: 145 mmhg 19.3 kpa Low: 75 mmhg 10.0 kpa Neonatal: High: 100 mmhg 13.3 kpa Low: 50 mmhg 6.7 kpa Rev. C
45 Alarms Settings Default NIBP Dia: Adult: High: 110 mmhg 14.7 kpa Low: 50 mmhg 6.7 kpa Pediatric: High: 100 mmhg 13.3 kpa Low: 35 mmhg 4.7 kpa Neonatal: High: 70 mmhg 9.3 kpa Low: 30 mmhg 4.0 kpa NIBP Mean: Adult: High: 130 mmhg 17.3 kpa Low: 60 mmhg 8.0 kpa Pediatric: High: 110 mmhg 14.7 kpa Low: 50 mmhg 6.7 kpa Neonatal: High: 80 mmhg 10.7 kpa Low: 35 mmhg 4.7 kpa Rev. C 39
46 Chapter 2 Configuration Settings Procedure Follow these steps to change the state or value of the ECG Heart Rate alarms: Step Action 1. From the Select Configuration Categories screen, select Alarms, then press the Enter softkey. The Alarms Setting screen appears. Alarm Settings ALARM LIMITS AT POWER UP ALARMS ACTIVE AT POWER UP Set/Review Set/Review No Page 1 of 1 Change Value Prev Next Category List Main Menu Exit Config 2. Select Alarm Limits at Power Up, and press the Change Value softkey. The Set Alarm Defaults screen appears. Set Alarm Defaults Parameter State Low High ECG HR SpO2 EtCO2 RESP RATE NIBP SYS NIBP DIA NIBP MEAN NIBP p SYS Page 1 of 2 ENABLE ENABLE ENABLE ENABLE ENABLE ENABLE ENABLE ENABLE Next Param Prev Param Next Field Change Value Return 3. Modify alarms using the softkeys as follows: Next Param and Prev Param moves the highlight through the various physiological settings. Next Field moves highlight to the next field to the right. Use this key to change the High and Low settings. Change Value allows you to change the value of the highlighted field. When you press this softkey, the following softkeys become available: Inc > and Dec < increases and decreases the value of the field. Enter applies the value you specified for this field. Cancel returns you to the previous screen without applying any changes. Return enters the values you specified, and returns you to the previous screen. Alarms Active at Power Up This setting allows you to specify whether alarms are automatically active when you power on the unit. This setting applies to all alarms enabled by the Alarm Limits At Power Up setting Rev. C
47 Display Settings Yes, No No Display Settings The Display settings are attributes that control what and how things appear on the R Series monitor and include: Display Time Select Trace 2 At Power Up Select Trace 3 At Power Up ECG Color SpO2 Color CPR Color EtCO2 Color NIBP Color SPO2 at Power Up Display Time This setting specifies whether to display the elapsed time since the unit was turned on (Elapsed Time), or the real time (Real Time), or not to display the time (Off). The elapsed time continues to be counted for up to 10 seconds after you power off the unit. This gives the operator adequate time to change the battery without resetting the elapsed timer. Elapsed time is reset to zero (00:00) whenever the unit has been off for more than 10 seconds. Real Time, Off, Elapsed Time Off Select Trace 2 At Power Up This setting allows you to set which waveform will appear in the Trace 2 position on the display when you turn on the R Series unit. Off, 3 Lead ECG, CPR, Filtered ECG, SpO2, EtCO2 Filtered ECG Note: When you set this setting to 3 Lead ECG, the Select Trace 3 At Power Up setting automatically defaults to 3 Lead ECG Rev. C 41
48 Chapter 2 Configuration Settings Select Trace 3 At Power Up This setting allows you to select which waveform will appear in the Trace 3 position on the display when you turn on the R Series unit. Off, 3 Lead ECG, CPR, Filtered ECG, SpO2, EtCO2 Off Note: When you select 3 Lead ECG, the Select Trace 2 At Power Up setting automatically defaults to 3 Lead ECG. ECG Color This setting allows you to set the display color for the ECG waveform and information displayed on the R Series monitor. Red, Cyan, Purple, Blue, Green, Yellow, White Green SpO 2 Color This setting allows you to specify the color of the SpO 2 information displayed (if installed) on the R Series monitor. Cyan, Red, Purple, Yellow, White, Blue, Green Cyan CPR Color This setting allows you to specify the color of the CPR indicator and waveform on the R Series monitor. Red, Cyan, Purple, Blue, Green, Yellow, White Purple Rev. C
49 Display Settings EtCO 2 Color This setting allows you to specify the color of the CO 2 indicator and waveform (if installed) on the R Series monitor. Blue, Green, Cyan, Red, Purple, Yellow, White Yellow NIBP Color This setting allows you to specify the color of the NIBP indicator (if installed) on the R Series monitor. White, Blue, Green, Cyan, Red, Purple, Yellow White SPO 2 at Power Up This setting allows you to control whether the SPO 2 box appears on the R Series monitor (if installed). If set to Yes, the box will be displayed regardless of whether the SPO 2 sensor is connected to the unit. If set to No, the box will not appear until the sensor is connected to the unit. Yes, No No Rev. C 43
50 Chapter 2 Configuration Settings NIBP Settings (Optional) NIBP configuration parameters are available for update only if the NIBP monitoring option is installed on the unit, and include: Blood Pressure Units Trigger NIBP Meas on BP Alarm Trigger NIBP Meas on HR Alarm NIBP Auto Interval Default Adult Initial Cuff Inflation Pediatric Initial Cuff Inflation Neonatal Initial Cuff Inflation NIBP Patient Mode at Power Up NIBP Button Press & Hold Enable Motion Tolerance Blood Pressure Units This parameter allows you to set the NIBP unit of measurement. mmhg (millimeters of mercury), kpa (kilopascals) mmhg Trigger NIBP Meas on BP Alarm This parameter allows you to specify whether or not the R Series unit initiates a single additional blood pressure measurement when any of the NIBP alarms trigger. Yes, No Yes Trigger NIBP Meas on HR Alarm This parameter allows you to specify whether or not the R Series unit initiates a single blood pressure measurement when the heart rate/pulse rate alarm triggers. Yes, No No Rev. C
M Series AHA/ERC Guidelines 2005 Software Configuration Overview
 M Series AHA/ERC Guidelines 2005 Software Configuration Overview This page provides a summary of configuration options that have been added to support the American Heart Association and European Resuscitation
Cardiostart. Biphasic Defibrillator Monitor
 Cardiostart Biphasic Defibrillator Monitor Standard Accessories Carrying Case Rechargeable lithium ion battery Set of accessories Other accessories upon request Internal Pads Adult / Pediatric / Neonatal
LEGAL NOTICE INVITATION TO SUBMIT BIDS
 LEGAL NOTICE INVITATION TO SUBMIT BIDS The City of Dry Ridge is accepting bids for ALS Cardiac Monitors/Defibrillators. Bidders shall submit sealed bids in the format specified in the Invitation to Submit
Product Specifications
 Product Specifications Physical Defibrillator Model HeartStart MRx (M3536A) Dimensions Without external paddles: 12.4 in. (W) x 7.7 in. (D) x 11.7 in. (H) (313 mm x 195 mm x 295 mm). With external paddles:
Defibtech DDU-100 Semi-Automatic External Defibrillator
 Defibtech DDU-100 Semi-Automatic External Defibrillator User Manual AHA /ERC 2010 U S E O N LY I F PA T I E N T I S : U N C O N S C I O U S U N R E S P O N S I V E N O T B R E A T H I N G 1 PUSH "ON" BUTTON
MONITOR/DEFIBRILLATOR CONTROLS, CONNECTIONS AND INDICATORS
 MONITOR/DEFIBRILLATOR CONTROLS, CONNECTIONS AND INDICATORS Adult Dose 100 120 70 170 50 200 30 20 15 1-10 CONTROLS, CONNECTIONS AND INDICATORS External Power SYNC Mark Event Lead Select Alarm Pause Event
Argentine Manufacturer of Hospital Equipment. Electrocardiograph Pulse Oximeters Vital Signs Monitors
 Electrocardiograph Pulse Oximeters Vital Signs Monitors ELECTROCARDIOGRAPH Model: RG-401plus Model: RG-401 ELECTROCARDIOGRAPH Model: RG-401 Technical Specifications Accessories Carrying bag Patient cable
Philips HeartStart XL Defibrillator Manual
 Philips HeartStart XL Defibrillator Manual Get an original copy of the Philips HeartStart XL Defibrillator Operators Guide for manufacturer information about service, available accessories and how to use
X SeriesTM. Xtremely. Small, Light, and Powerful
 X SeriesTM Xtremely Small, Light, and Powerful Amazing Capabilities in a Lightweight Package From the minute you see it, you ll know. The X Series TM is not like other monitor/defibrillators. You can
Bluetooth/RS-232 Enhanced Data Communication
 Bluetooth/RS-232 Enhanced Data Communication 9650-0307-01 Rev. E The issue date or revision level for this operation guide is shown on the front cover. ZOLL, and M Series are registered trademarks, and
Saver EVO TM. User Manual USER MANUAL
 USER MANUAL Saver EVO TM User Manual The information in this document is subject to change without notice and does not represent a commitment on behalf of HeartSine Technologies LLC. No part of this manual
MONITOR/DEFIBRILLATOR CONTROLS, CONNECTIONS AND INDICATORS
 MONITOR/DEFIBRILLATOR CONTROLS, CONNECTIONS AND INDICATORS 1-10 Adult Dose CONTROLS, CONNECTIONS AND INDICATORS External Power SYNC Mark Event Lead Select Alarm Pause Event Summary Soft Keys Soft Keys
MDLINK MANUAL PART NUMBER A Cardiac Science Corporation
 MDLINK MANUAL PART NUMBER 70-00080-01 A 2007 Cardiac Science Corporation Notice of Rights 2007 Cardiac Science Corporation. All rights reserved. No part of this documentation may be reproduced or transmitted
Defibrillation made simple
 Defibrillation made simple Product Description: M4735A HeartStart XL Defibrillator/Monitor Philips Healthcare s M4735A HeartStart XL offers advanced and basic life-support clinicians a compact, lightweight,
Operating Instructions. Panorama. Web Viewer
 Operating Instructions Panorama Web Viewer Mindray is a U.S. registered trademark of Mindray DS USA, Inc. Panorama is a U.S. registered trademark of Mindray DS USA, Inc. Microsoft is a U.S. registered
DEFRIBILLATORS PARAMEDIC CU-ER1
 DEFRIBILLATORS PARAMEDIC CU-ER1 (Automated External Defibrillator) Someone goes down in cardiac arrest, resuscitation is just a hand away Patented e-cube Biphasic measure impedance and deliver efficient
Chapter5 Camera Settings and Other Functions
 Chapter5 Camera Settings and Other Functions Changing Camera Settings.. 116 Keep Settings... 116 Beep Sound Setting... 117 Auto Power Off Setting... 117 Changing the Display Language... 119 Changing the
ZOLL Data Retriever Version and newer
 ZOLL Data Retriever Version 6.5.6 and newer Document updated: August 14, 2018 ZOLL Data Retriever: Contents ii 2018 by ZOLL Data Systems. All rights reserved. ZOLL Data Systems is a subsidiary of ZOLL
For Internal Use Only. Product Guide
 For Internal Use Only Product Guide CONTENT 1. Key Features 2. Questions to Ask a Customer 3. PlusTrac TM Registration and Setup 4. ZOLL Online CaseReview Setup 5. Benchmark Demo Script 2 1 KEY FEATURES
PW 406. Features &Benefits: Multi parameters Patient monitor
 PW 406 Multi parameters Patient monitor Features &Benefits: 1. 12.1 color TFT display, high resolution 800 600 dpi; 2. Separated para board: ECG, NIBP, SpO2 board; 3. Full touch screen enables intuitive
BeneVision DMS Workstation Default Settings
 Hospital, City, ST: Unit: Clinical/Sales: Service/CSS: SW Version: 03.02 Date: Signature/Title: System Setup General Alm Vol (1-10) High: Alm Vol + 0 1 2 Reminder Vol (1-10) Display (Password protected)
samaritan PAD Saver EVO User Instructions
 samaritan PAD Saver EVO User Instructions The information in this document is subject to change without notice and does not represent a commitment on behalf of HeartSine Technologies Inc. No part of this
BeneVision DMS Server Default Settings
 Hospital, City, ST: Unit: Clinical/Sales: Service/CSS: SW Version: 03.02 Date: Signature/Title: System Information/Configuration # Devices: # Arr/ST/QT Licenses: System Setup General Alm Vol (1-10) High:
IntelliVue Patient Monitor. MP20/30/40/50/60/70/90 For monitor release B.1 with software revision B.10.xx. IntelliVue MP20/30/40/50/60/70/90
 IntelliVue MP20/30/40/50/60/70/90 CONFIGURATION GUIDE IntelliVue Patient Monitor MP20/30/40/50/60/70/90 For monitor release B.1 with software revision B.10.xx Patient Monitoring Philips Medizin Systeme
Defibtech DDU-2300 Semi-Automatic External Defibrillator
 Defibtech DDU-2300 Semi-Automatic External Defibrillator User Manual PRESS ON BUTTON 1 APPLY PADS FOLLOW AED INSTRUCTIONS 2 IF INSTRUCTED, PRESS SHOCK BUTTON 3 B Notices Defibtech shall not be liable for
EC-12RT Resting ECG Machine. Technical Specification
 2017 ECG input Input impedance Input bias current Input dynamic range 10 MOhm 0,1μА from 0,03mV up to 10mV (peak-to-peak amplitude) Nonlinearity ±2% Electrode offset tolerance Common-mode rejection Internal
*M C* Philips A1 and A3 Patient Monitors M3926A M3923A M3924A M3927A M3928A M3929A. Service Guide. Part Number M C
 Philips A1 and A3 Patient Monitors A1 Models: A3 Models: M3921A M3922A M3923A M3924A M3926A M3927A M3928A M3929A Service Guide Part Number M3921-9000C Printed in the U.S.A. February 2002 First Edition
Defibtech DDU-2000 Series Automated External Defibrillator DDU-2300 DDU-2400 DDU-2450
 Defibtech DDU-2000 Series Automated External Defibrillator DDU-2300 DDU-2400 DDU-2450 User Manual For comprehensive training on set-up, use and maintenance; source for complete technical specifications
Quick Guide #5D: ZOLL E Series Configuration and Operation with Rosetta-DS (Bluetooth Connection)
") Quick Guide #5D: ZOLL E Series Configuration and Operation with Rosetta-DS (Bluetooth Connection) I. Configuration instructions for ZOLL E Series for use with Rosetta-DS via Bluetooth Note: It is recommended
Quick Guide #5D: ZOLL E Series Configuration and Operation with Rosetta-DS (Bluetooth Connection) I. Configuration instructions for ZOLL E Series for use with Rosetta-DS via Bluetooth Note: It is recommended
ARGUS PRO LifeCare 2. Patient monitor, 12-channel ECG, defibrillator and pacemaker in a compact format F A C T U R M A N U A N D I N E D E U R O I G N
 D I N A N D M A N U F A C T U R E D E D I G N S E E P E U R O Patient monitor, 12-channel ECG, defibrillator and pacemaker in a compact format Only 4.4 kg with Leading-edge technology is the key SCHILLER
Defibtech DDU-2300 Semi-Automatic External Defibrillator
 Defibtech DDU-2300 Semi-Automatic External Defibrillator User Manual ELECTRONIC DISTRIBUTION PRESS ON BUTTON 1 APPLY PADS FOLLOW AED INSTRUCTIONS 2 IF INSTRUCTED, PRESS SHOCK BUTTON 3 B ii Notices Defibtech
Making Simulation Easier. Laerdal Simulation Solutions. laerdal.com. laerdal.com. TM SimPad PLUS
 Making Simulation Easier TM SimPad PLUS Laerdal Simulation Solutions SimPad PLUS When simulation tools are easy to use, training becomes more effective SimPad PLUS allows instructors, new or experienced,
Cardiac Monitoring Catalog USA
 CM Cardiac Monitoring Catalog CRITICARE MONITORS Basic vital signs monitoring in a simple-to-use, lightweight and portable design. This comprehensive cost-effective solutions is perfect for the bedside
TRANQUILITY VS VERSATILITY IN VITAL SIGNS A M E R I C A S TRANQUILITY VS A M E R I C A S
 VERSATILITY IN VITAL SIGNS PORTABLE weighs less than 6lbs TOUCHSCREEN easy and intuitive to use MOBILE backup battery powered The Tranquility VS is a new and intuitive approach to patient vital signs measurement.
URGENT Field Safety Notice Philips HeartStart MRx Monitor/Defibrillator
 Philips Healthcare - 1/5 - FSN86100160A Dear Customer, Philips has identified issues that could impact the safety and/or performance of certain MRx monitor/defibrillators. These issues are further detailed
Defibtech DDU-2400 and DDU-2450 Automated External Defibrillator
 Defibtech DDU-2400 and DDU-2450 Automated External Defibrillator User Manual AHA/ERC 2010 ELECTRONIC DISTRIBUTION PRESS ON BUTTON 1 APPLY PADS FOLLOW AED INSTRUCTIONS 2 IF INSTRUCTED, PRESS SHOCK BUTTON
CU-SP1 INTELLIGENT PUBLIC ACCESS DEFIBRILLATOR. Medical and Surgical Requisites Pty Ltd
 INTELLIGENT PUBLIC ACCESS DEFIBRILLATOR CU-SP1 Advanced Performance CU-SP1 AUTO VOLUME ADJUST Public places can often be noisy. Crowded stations, airports with constant announcements and streets filled
Vmed Technology. PC-Display Wireless Monitoring Software. For all Vmed Wireless Monitors. Installation, Setup and User Instructions Version 2.
 Vmed Technology PC-Display Wireless Monitoring Software For all Vmed Wireless Monitors Installation, Setup and User Instructions Version 2.5 Table of Contents Table of Contents... 1 Chapter 1 Installation
Patient Monitoring Systems. Patient Monitor Vital Sign Monitor Pulse Oximeter
 Patient Monitoring Systems Patient Monitor Vital Sign Monitor Pulse Oximeter Patient Monitor Patient Monitor BT- 770 12.1 color TFT touch screen ECG, Resp., SpO2, NIBP, Temp., CO2, IBP, Multi- gas, C.O.,
Infusion Pumps. Website: Kizlon Medical
 Infusion Pumps Email: info@kizlonmedical.com Website: www.kizlonmedical.com Infusion Pump KIP-A100 KIP-A100 is a portable infusion pump suitable for any brand of disposable IV set and has automatic calibration
INTRODUCTION The Monitor, interchangeable modules and storage batteries are described below. Refer to the table below for specifications.
 PRODUCT DESCRIPTION INTRODUCTION The Monitor, interchangeable modules and storage batteries are described below. Refer to the table below for specifications. DINAMAP MPS Select Portable Monitor General
URGENT - Medical Device Correction IntelliVue MX40 Missing Warnings in IFU
 Dear Customer, A problem has been found with the Philips IntelliVue MX40 Instructions for Use (IFU) for software revisions B.05, B.06 and B.06.5X. Your IntelliVue MX40 remains safe to use. These IFUs are
Patient Simulator Series
 7 Multi-Parameter Simulators Features - PS-2200 Series ± Simple to Operate ± Independent Lead Outputs produce a true 12 Lead ECG Signal ± 1, 2 or 4 Invasive BP Channels ± All BP Waveforms Available on
ipad SP2 Automatic External Defibrillator
 ipad SP2 Automatic External Defibrillator www.ipad-aed.com #creatinglifesavers www.ipad-aed.com Key Features Compact. Robust. Lightweight. The ipad SP2 is designed for durability. It is drop tested from
Ansur ProSim 6/8. Users Manual. Software Plug-In
 Ansur ProSim 6/8 Software Plug-In Users Manual FBC-0002 April 2011, Rev. 2, 8/11 2011 Fluke Corporation. All rights reserved. All product names are trademarks of their respective companies. Table of Contents
Connex Spot Monitor (CSM) 1.x Software Version
 1.x Software Version") Connex Spot Monitor (CSM) 1.x Software Version Clinical Inservice Presentation MC12694 1 Table of Contents Device Overview & Intended Use Accessory Power Management (APM) Stand CSM Exterior Power ON Power
Connex Spot Monitor (CSM) 1.x Software Version Clinical Inservice Presentation MC12694 1 Table of Contents Device Overview & Intended Use Accessory Power Management (APM) Stand CSM Exterior Power ON Power
Global 400mp User Manual
 Global 400mp User Manual v4.0 17 August 2016 Table of Contents Quick Start... 4 Chapter 1: Overview... 9 Warnings... 10 Cautions... 10 Unit Overview... 11 Compatible Tools... 11 Chapter 2: Using the unit...
Service Manual. M4735A HeartStart XL Defibrillator/Monitor
 Service Manual M4735A HeartStart XL Defibrillator/Monitor Notice About This Edition Edition 6 Printed in the USA Publication number M4735-90900 The information in this manual applies to the M4735A HeartStart
NO COMPROMISE IN AN EMERGENCY CASE
 NO COMPROMISE IN AN EMERGENCY CASE PROFESSIONAL DEFIBRILLATORS FOR EMERGENCY MEDICINE. HeartSave AED-M HeartSave 6 DefiMonitor XD www.primedic.com KAPITEL XY 2 NO COMPROMISE IN AN EMERGENCY CASE REAL PROFESSIONALS
Saver EVO TM User Manual
 USER MANUAL Saver EVO TM User Manual The information in this document is subject to change without notice and does not represent a commitment on behalf of HeartSine Technologies LLC. No part of this manual
Delta 1600 User Manual
 Delta 1600 User Manual Intended Use: Delta 1600 AED Tester is a precision instrument that simulates various cardiac waveforms and measures discharged energy. It assures AEDs detect the waveforms, audibly
etco 2 SpO 2 IBP medlab 2017/2018 OEM Modules for Patient Monitoring medizinische Diagnosegeräte GmbH
 etco 2 SpO 2 IBP OEM Modules for Patient Monitoring 2017/2018 medlab medizinische Diagnosegeräte GmbH 5 Contents Pulse Oximetry EG00352 Digital Miniaturized SpO 2 -Module 5 PEARL100 SpO 2 -Module with
Defibtech DDU-100 Semi-Automatic External Defibrillator User Manual
 Defibtech DDU-100 Semi-Automatic External Defibrillator User Manual Software V2.0 DAC-510E Rev. F U S E O N LY I F PA T I E N T I S : U N C O N S C I O U S U N R E S P O N S I V E N O T B R E A T H I
SimPad with SkillReporter
 EN SimPad with SkillReporter User Guide www.laerdal.com Contents Intended Use 4 Important Information 4 Items Included 5 SimPad Overview 6 SimPad PLUS Overview 7 Charge Battery 8 Setup 9 Manikin Setup
SimPad with SkillReporter
 EN SimPad with SkillReporter User Guide www.laerdal.com Contents Intended Use 4 Important Information 4 Items Included 5 SimPad Overview 6 SimPad PLUS Overview 7 Charge Battery 8 Setup 9 Manikin Setup
ACCESSORY GUIDE REV D
 ACCESSORY GUIDE REV D *989803171721* 989803171721 Model 865214 April 2011 Frequently Ordered Items Part Number Description Page QTY ECG Accessories 989803152291 Prep Gel 4 989803152321 Standard Quadtrode
 29th NPP Price List November 2014 E Series Option Fields 1 2 3 4 5 6 7 8 9 10 11 12 13 14 15 16 17 List Price NPP 5 0 1 0 0 0 1 0 0 1 0 0 6 4 0 1 3 E Series AED E Series AED with Manual Override,
 29th NPP Price List November 2014 E Series Option Fields 1 2 3 4 5 6 7 8 9 10 11 12 13 14 15 16 17 List Price NPP 5 0 1 0 0 0 1 0 0 1 0 0 6 4 0 1 3 E Series AED E Series AED with Manual Override,
FOCUS - ON - PATIENTS. corpuls aed
 FOCUS - ON - PATIENTS corpuls aed FOCUS - ON - PATIENTS corpuls aed Advanced early defibrillation for specialists and non-specialists The new corpuls aed safely guides experts and non-experts through life-saving
Introducing Lifeline PRO
 THE ART AND SCIENCE OF DEFIBRILLATION Introducing Lifeline PRO Advanced technology Professional capabilities Award-winning design Robust and durable Fully featured Easy-to-use and maintain Fully configurable
Control Panels D9412GV4/D7412GV4. en Owner's Manual
 Control Panels D9412GV4/D7412GV4 en Owner's Manual Control Panels Table of Contents en 3 Table of contents 1 Introduction 8 1.1 About documentation 9 2 Keypads overview 11 2.1 Identify your keypad style
The LifeVest Network Patient Data Management System Quick Start Guide. Information for Healthcare Professionals
 The LifeVest Network Patient Data Management System Quick Start Guide Information for Healthcare Professionals Monitor and prioritize your patient s needs anywhere, anytime. The LifeVest Network is ZOLL
All Products of Mediana
 All because of you, Mediana will be better... All Products of Mediana Healthcare Solutions You Can Trust Healthcare Solutions You Can Trust Mediana Co, Ltd. since 1993 Mediana is rapidly expanding into
SUPERPLEX. User s Manual. High performance, simplified wireless home security controller. Products that work. Software Release: V2.
 SUPERPLEX User s Manual Products that work Software Release: V2.5 KE-MOBILEHQ-12- High performance, simplified wireless home security controller Thank you for purchasing this Kingdom Electronics product.
Philips PageWriter Touch ECG
 Philips PageWriter Touch ECG Easy, Fast, 12-Lead ECGs for Large or Small Hospitals Designed for high volume High resolution touch screen Preview reports before printing Wireless communication Typical Manufacturer
Freelink Remote Control
 Freelink Remote Control Directions for Use CAUTION: Federal law restricts this device to sale, distribution and use by or on the order of a physician. 91171771-02 Content ID: 92089552 REV A Guarantees
WVSM wireless vital signs monitor
 WVSM wireless vital signs monitor Non-Invasive Blood Pressure Pulse Oximetry Electrocardiogram Service Manual 1 of 60 CAUTION: Federal law (USA) restricts this device to sale by or on the order of a licensed
INTELLIGENT PUBLIC ACCESS DEFIBRILLATOR CU-SP1
 INTELLIGENT PUBLIC ACCESS DEFIBRILLATOR CU-SP1 Advanced Performance CU-SP1 AUTO VOLUME ADJUST Public places can often be noisy. Crowded stations, airports with constant announcements and streets filled
IS35 Color Display. User Manual ENGLISH. simrad-yachting.com
 IS35 Color Display User Manual ENGLISH simrad-yachting.com Preface Navico is continuously improving this product, therefore we retain the right to make changes to the product at any time which may not
Product: ST-Win Basic
 1 / 5 ST- Win Basic is a Windows based Stress Test System. It enables accurate computation of ST measurements, complying full frequency response of 0.05 Hz to 150 Hz Technical 1. Environmental Operating
VTC. 200/300 Series. VTC elock controller. VTC elock Instructions. Network VTC elock has three components:
 200/300 Series VTC elock Instructions VTC Thank you for purchasing the VTC elock. The information contained in these instructions is intended to serve as a guide so as to allow the elock to be quickly
Defibtech DDU-100 Series Automated External Defibrillator DDU-100 DDU-120
 Defibtech DDU-100 Series Automated External Defibrillator DDU-100 DDU-120 User Manual For comprehensive training on set-up, use and maintenance; source for complete technical specifications ELECTRONIC
Remotely Accessible Healthcare at Home. User Guide for Devices
 RAH@H A Patient Centric 24/7 Connected Health Model to Improve Healthcare Outcomes through Technology for Education, Engagement, Empowerment, Monitoring & Treatment of Patients Virtually User Guide for
Defibtech Automated External Defibrillator Lifeline/ReviveR DDU-100 Lifeline/ReviveR AUTO DDU-120
 Defibtech Automated External Defibrillator Lifeline/ReviveR DDU-100 Lifeline/ReviveR AUTO DDU-120 check pads do not touch patient analyzing check pads do not touch patient analyzing User Manual For comprehensive
No Yes Yes Memory 30 / average 2 x 30 / average 2 x 60 / average Yes (AM/PM & 24hr. Interchangeable at production line) Date & Time No Yes
 Date & Time No Yes") DS-400 DS-500 DS-800 (BM 60) Irregular heart beat detection No Yes Yes Memory 30 / average 2 x 30 / average 2 x 60 / average Yes (AM/PM & 24hr. Interchangeable at production line) Date & Time No Yes *only
DS-400 DS-500 DS-800 (BM 60) Irregular heart beat detection No Yes Yes Memory 30 / average 2 x 30 / average 2 x 60 / average Yes (AM/PM & 24hr. Interchangeable at production line) Date & Time No Yes *only
SimPad SkillReporter. User Guide.
 SimPad SkillReporter User Guide www.laerdal.com 1 Introduction INTRODUCTION SimPad is a wireless touchscreen device for use with Laerdal manikins. This version is installed with SkillReporter software
ECG100S. General Information. Product Code
 General Information Product Name General Name Product Code 80508096 Manufacturer Device Description Intended Use Cardioline Spa Registered Office and Factory: Via Linz, 19-20-21 Zona Ind. Spini di Gardolo
Control Panels B9512G/B8512G/B6512/B5512/B4512/B3512. en Owner's Manual
 Control Panels B9512G/B8512G/B6512/B5512/B4512/B3512 en Owner's Manual Control Panels Table of Contents en 3 Table of contents 1 Introduction 8 1.1 About documentation 9 2 Keypads overview 11 2.1 Identify
The LifeVest Network Patient Data Management System Quick Start Guide. Information for Healthcare Professionals
 The LifeVest Network Patient Data Management System Quick Start Guide Information for Healthcare Professionals Monitor and prioritize your patient s needs anywhere, anytime. The LifeVest Network is ZOLL
SECTION 5 HSLRT6 WINDOWS BASED SETUP PROGRAM REFERENCE
 The Windows based set-up program is menu driven, allowing the user to easily view data, alter setup variables or set machine timing (machine offset, timing signal locations, etc.), using a PC running the
K-Mobile User Manual for Smartphones
 K-Mobile User Manual for Smartphones Issue: 1 Rev A 8/17/2017 Legal Notices K-MATIC Blundellsands House, 34-44 Mersey View, Brighton le Sands, Liverpool, L22 6QB, UK www.k-matic.com Copyright and trademarks
corpuls 3 Any Emergency under control
 corpuls 3 Any Emergency under control corpuls 3 The corpuls 3 offers an entirely new and revolutionary design concept compared with traditional compact defibrillator/ monitoring devices. It is designed
Device Equivalence Evaluation Form
 Comparison of the Andon MD 534 with the Andon KD 5915 Devices Andon MD 534 Andon KD 5915 Pictures Display Validation ESH Device 1 Criteria Same Criteria Buttons/Switches Analysis Average (T3 Label) 10
QUICK REFERENCE GUIDE
 QUICK REFERENCE GUIDE the portable respiratory monitor in the procedural sedation suite Overview Overview The portable respiratory monitor combines Microstream capnography and Nellcor pulse oximetry technologies
Settings51. Settings. Bluetooth Settings 52 Other Settings 62 Clock Settings
 Settings Bluetooth Settings 52 Other Settings 62 Clock Settings Registering A Bluetooth Phone/ Device For The First Time Profiles Bluetooth Settings Registering A Bluetooth Phone/Device Connecting Or Disconnecting
FG-7000 Digital Force Gauge Operation Manual
 FG-7000 Digital Force Gauge Operation Manual Operators should wear protection such as a mask and gloves in case pieces or components break away from the unit under test. Whether the unit is ON or OFF,
Always in touch. IntelliVue Telemetry System with Smart-hopping technology, surveillance of ambulatory cardiac patients
 Always in touch with Smart-hopping technology, surveillance of ambulatory cardiac patients Real clinical network strength includes flexibility When you have mobile cardiac patients who need constant monitoring,
Version 4 User Guide
 Version 4 User Guide Contents Facilitator Screen overview... 4 Monitor Screen overview... 5 Defibrillator Screen Overview... 6 Basic Screen with Waveform Overview... 7 Basic Screen Overview... 8 AED Screen
Quick reference guide. MyLab50
 Quick reference guide MyLab50 Quick reference guide MyLab50 Introduction This Quick Guide describes only the basic operating procedures for the diagnostic ultrasound MyLab50 Family, named in the following
International User Guide
 Software International User Guide English Version QRS Diagnostic Release Date: 04/12 6901 E. Fish Lake Road, Suite 188 Maple Grove, MN, USA 55369 Advena Ltd 800.465.8408 +1.763.559.8492 Fax +1.763.559.2961
Control Panel ICP-SOL2-P/ICP-SOL3-P. en Quick Reference Guide
 Control Panel ICP-SOL2-P/ICP-SOL3-P en Quick Reference Guide Control Panel Table of Contents en 3 Table of contents 1 Introduction 6 2 Programming 7 2.1 ICON LCD Codepad Programming 7 2.2 TEXT LCD Codepad
TIP CARD MODEL TEMPORARY EXTERNAL PACEMAKER. Model Single Chamber Temporary Pacemaker
 TIP CARD MODEL 53401 TEMPORARY EXTERNAL PACEMAKER Model 53401 Single Chamber Temporary Pacemaker PRE-USE What to do... What NOT to do... Battery Replace the battery for each new patient. Do NOT reuse battery.
Control Panel Solution 2000 / 3000
 Control Panel Solution 2000 / 3000 en Quick Reference Guide Control Panel Table of contents en 3 Table of contents 1 Introduction 6 2 Programming 7 2.1 Alphanumeric Codepad Menu Programming 7 2.2 ICON
SECULIFE NIBP NON-INVASIVE BLOOD PRESSURE SIMULATOR
 Operating Manual SECULIFE NIBP NON-INVASIVE BLOOD PRESSURE SIMULATOR 3-349-626-03 1/3.11 Contents WARNINGS, CAUTIONS, NOTICES...4 DESCRIPTION... 9 OVERVIEW... 11 KEYS... 12 SCREENS... 13 SETUP... 18 OPERATIONS...
Section 1 General Description. Section 3 How to Program Keypad. Section 2 Installation. CM-120TX Wireless Digital Keypads Installation Instructions
 CM-120TX Wireless Digital Keypads Installation Instructions Package Contents - (1) Keypad and faceplate assembly - (1) Foam gasket (CM-120W only) - (2) #6-32 x 1 S/S Phillips screws - (2) #6-32 x 1 Tamperproof
AUTOMATION. Operator s Manual PG-7. Full Access. Doc Part Rev B, 07/18. Automation Products Group, Inc.
 AUTOMATION P R O D U C T S GROUP, INC. Operator s Manual PG-7 Full Access Doc. 9003312 Part 200180 Rev B, 07/18 Tel: 1/888/525-7300 Fax: 1/435/753-7490 www.apgsensors.com E-mail: sales@apgsensors.com PG7
Mindray North America. Patient Monitoring FAQ s
 Mindray North America Patient Monitoring FAQ s Product Passport V 1) Q.) Can the Passport V interface to an EMR system? 2) In most cases, yes. The Passport V features two serial ports, either of which
Safecom Solution-16 Quick Reference Guide ISSUE 1.10
 Safecom Solution-16 Quick Reference Guide ISSUE 1.10 2 Solution-16 Safecom Quick Reference Guide Safecom Solution-16 Quick Reference Guide Copyright 1998 by, SYDNEY, AUSTRALIA Document Part Number MA8016Q
IntelliVue Information Center
 IntelliVue Information Center Demo Application User Guide Part Number 4535 642 63741 Printed in the U.S.A. June 2011 First Edition *453564263741* Notice Notice Proprietary Information Published by Philips
STEP 6: USING THE VITALSBRIDGE WITH A STANDARDIZED PATIENT VITALSBRIDGE AND 100
 STEP 6: USING THE VITALSBRIDGE WITH A STANDARDIZED PATIENT VITALSBRIDGE 300 200 AND 100 Overview: Before beginning this segment make sure the following have been completed: o The VitalsBridge has been