Implementing Linux Software RAID1 on HPE ProLiant Servers with RHEL 6, RHEL 7, SLES 11, or SLES 12
|
|
|
- Alan Clark
- 6 years ago
- Views:
Transcription
, which uses in-distro opensource")

1 Implementing Linux Software RAID1 on HPE ProLiant Servers with RHEL 6, RHEL 7, SLES 11, or SLES 12 Abstract This document describes how to use HPE LSRRB (Linux Software RAID - Redundant Boot), which uses in-distro opensource tools, to configure and build a two-disk RAID1 redundant boot volume in UEFI mode for major operating systems including: Red Hat Enterprise Linux 6, 7; SuSE Linux Enterprise Server 11 and 12. Part Number: October 2017 Edition: 2
2 Copyright 2017 Hewlett Packard Enterprise Development LP The information contained herein is subject to change without notice. The only warranties for Hewlett Packard Enterprise products and services are set forth in the express warranty statements accompanying such products and services. Nothing herein should be construed as constituting an additional warranty. Hewlett Packard Enterprise shall not be liable for technical or editorial errors or omissions contained herein. Microsoft, Windows, and Windows Server are either registered trademarks or trademarks of Microsoft Corporation in the United States and/or other countries. Linux is the registered trademark of Linus Torvalds in the U.S. and other countries. Red Hat is a registered trademark of Red Hat, Inc. in the United States and other countries. SUSE is a registered trademark or a trademark of SUSE LLC in the United States and other countries. Ubuntu and Canonical are registered trademarks of Canonical Ltd. Page 2
3 Table of Contents Table of Contents... 3 Introduction... 5 Prerequisites... 5 LSRRB Software... 7 OS specific installation scripts... 7 LSRRB Value Added software... 7 OS Deployment... 9 Single machine deployment... 9 Checking system status LSRRB Service Status Hard drive thermal information Checking RAID status Faulty disk replacement Verification Known Issues and Limitations Appendix A: Creating redundant boot strategy for software RAID1 in Linux Basic configuration Red Hat Enterprise Linux (RHEL) Red Hat Enterprise Linux (RHEL) SuSE Linux Enterprise Server (SLES) SuSE Linux Enterprise Server (SLES) Appendix B: Example server configurations PXE server configuration TFTP server configuration DHCP server configuration Appendix C: Example OS-specific installation scripts KickStart Script for RHEL KickStart Script for RHEL AutoYast Script for SLES AutoYast Script for SLES Page 3
4 Appendix D Support for Gen10 and AMD Platform AMD Platform with AMD FCH AHCI Controller SATA-based PCI-e M.2 SSD NVMe PCI-e Disk Support and other resources Accessing Hewlett Packard Enterprise Support Accessing updates Regulatory information Documentation feedback Page 4
5 Introduction LSRRB (Linux Software RAID - Redundant Boot) is a solution that uses in-distro open-source software to build and create a two-disk RAID1 redundant boot volume in UEFI mode. This document describes how to create, manage, and recover the RAID system using the LSRRB valueadded software provided by Hewlett Packard Enterprise. Appendix A shows the manual steps to create a redundant boot system without our value-added software. LSRRB provides: Installation Scripts: For deployment on a single or multiple servers including basic RAID1 configurations and system setup. Boot Auto-Failover: If the first drive fails, the system can boot to the second drive automatically RAID Auto-Recovery: When a faulty driver is replaced by the new one, the system will rebuild the RAID automatically. Advanced Hard Drive Thermal information: The system reports the thermal information of the hard drive on the RAID system. LSRRB is now an open-source project on GitHub. You can find the latest code and scripts on Errata to this document or other supplementary materials can be found on the GitHub link as well. Prerequisites These tasks must be performed before moving to the OS installation procedures. In the included example, the services are installed on a CentOS 7.2 machine. Prepare a PXE server. Prepare a TFTP server. Prepare a DHCP server. PXE server information The PXE server in this example is xinetd v You can use a different version or different software, but you must note the differences accordingly. For instructions on how to install PXE/TFTP server on the server, see For an example PXE server configuration, see PXE server configuration. Page 5
6 TFTP server information In this example, TFTP v5.2 is installed on the CentOS 7.2 system. You can use a different version of or different software, but you must note the differences accordingly. Reference to For instructions on how to install PXE/TFTP server on the server, see For example configuration, see TFTP server configuration. DHCP server information The DHCP server in this example uses DHCPv v You can use a different version of or different software, but you must note the differences accordingly. For an example DHCP server configuration, see DHCP server configuration. Page 6
7 LSRRB Software OS specific installation scripts The BootScripts repository contains the boot scripts for KickStart, AutoYast, and Preseed. The boot scripts were designed to perform integrated installation for all steps described in this document. They can be found at File Name RHEL6_RAID1_ks.cfg RHEL7_RAID1_ks.cfg RHEL7_RAID1_ks_nvme.cfg SLES11_RAID1_autoinst.xml SLES12_RAID1_autoinst.xml SLES12_RAID1_autoinst_nvme.xml Description Installation script for RHEL 6 unattended mode Installation script for RHEL 7 unattended mode Installation script for RHEL 7 unattended mode (with NVMe disks) Installation script for SLES 11 unattended mode Installation script for SLES 12 unattended mode Installation script for SLES 12 unattended mode (with NVMe disks) LSRRB Value Added software The automated scripts are packed in the rpm package for RHEL and SLES. Once installation is complete, the following files will be available on the system: File Name Location Description 10-lsrrb.rules /etc/udev/rules.d The udev rule file that directs the udev subsystem to invoke LSRRB md_auto_resync.py script when a replacement disk is inserted. lsrrb.service /etc/systemd/system LSRRB systemd service for RHEL 7 and SLES 12 lsrrbd /etc/init.d LSRRB init service for RHEL 6 Page 7
8 File Name Location Description HPEsdtemplog /etc/logrotate.d The logrotate config file for advanced thermal reporting HPEtemp.sh /opt/hpe/lsrrb/bin Script for advanced thermal reporting md_auto_resync.py /opt/hpe/lsrrb/bin The script that periodically checks the existence of the recovery key file. If there is a key file, the recovery process will be executed. md_resync_trigger.py /opt/hpe/lsrrb/bin Invoked by udev when a new disk is inserted to the system, this script checks whether the conditions (e.g. disk size) satisfy the criteria for the RAID1 recover. If all conditions were met, a key file will be generated as a signal for the auto recovery script to take recovery process. lsrrb.sh /opt/hpe/lsrrb/bin Script for executing LSRRB scripts Page 8

9 OS Deployment Single machine deployment This section describes the integrated workflow for the RAID1 Redundant Boot Strategy for Software RAID in Linux solution. The integrated flow starts with the pre-installation RAID setup, followed by the OS installation. It ends with the post-installation setup. Existing installation facilities offered by the OS are leveraged to perform an unattended mode installation to deploy the solution KickStart in RHEL AutoYast in SLES Figure 1 illustrates the single machine deployment scenario. In the system, we provide installation script for each OS we support: RHEL and SLES. Figure 1 Single Machine Deployment Scenario Before deploying LSRRB, enable the AHCI hard drive controller. For instructions, see Setting AHCI mode in Appendix A. Single machine deployments for RHEL 6/7 and SUSE 11/12 are described below. Page 9
10 RHEL 7 To begin with the install, upload the KickStart file to the TFTP server and add an entry to the PXE server: Example PXE entry: # For RHEL7 single machine deploy image=/rhel/rhel-7.4server-x86_64/vmlinuz label=rhel-7server-x86_64_ks description = "RHEL 7 Server RAID1 kickstart" initrd=/rhel/rhel-7.4server-x86_64/initrd.img append="ipv6.disable=1 inst.ks= #The place to change file path. In the above example, the RHEL7_RAID1_ks.cfg file is placed on the TFTP server ( ), in the folder answer. The RHEL 7.4 installation files are in the mrepo/rhel-7.4server-x86_64 folder on the same server. The installation begins when boot from the PXE entry. The detail of the KickStart script can be found in Appendix C-1. RHEL 6 To begin with the install, upload the KickStart file to the TFTP server and add an entry to the PXE server: Example PXE entry: # For RHEL6 single machine deploy image=/rhel/rhel-6.8server-x86_64/vmlinuz label=rhel-6server-x86_64_ks description = "RHEL 6 Server RAID1 kickstart" initrd=/rhel/rhel-6.9server-x86_64/initrd.img append="ipv6.disable=1 inst.ks= #The place to change file path. In the above example, the RHEL6_RAID1_ks.cfg file is placed on the TFTP server ( ), in the folder answer. The RHEL 6.9 installation files are in the mrepo/rhel-6.9server-x86_64 folder on the same server. The installation begins when boot from the PXE entry. The detail of the KickStart script can be found in Appendix C-2. Page 10
11 SLES 12 To begin the installation, upload the AutoYast file to the TFTP server and add an entry to the PXE server. Example PXE entry: # For SLES 12 single machine deploy image=/sle/sle-12-sp3-server-x86_64/linux label=sle-12-server-x86_64_ks description = "SLES 12 RAID1 AutoYast" initrd=/sle/sle-12-sp3-server-x86_64/initrd append="vga=normal netdev=eth1 autoyast= install= #The place to change file path. In the above example, the SLES12_RAID1_autoinst.xml file is placed on the TFTP server ( ), in the folder answer. The SLES12 installation files are in the mrepo/sle-12-sp3-serverx86_64/disc1 folder on the same server. The installation begins when boot from the PXE entry. The detail of the AutoYast script can be found in Appendix C-3. SLES 11 To begin the installation, upload the AutoYast file to the TFTP server and add an entry to the PXE server. Example PXE entry: # For SLES 11 single machine deploy image=/sle/sles-11-sp4-x86_64/linux label=sle-11-server-x86_64_ks description = "SLES 11 RAID1 AutoYast" initrd=/sle/sles-11-sp4-x86_64/initrd append="vga=normal netdev=eth1 autoyast= install= #The place to change file path. In the above example, the SLES11_RAID1_autoinst.xml file is placed on the TFTP server ( ), in the folder answer. The SLES12SP2 installation files are in the mrepo/sles-11-sp4- x86_64/disc1 folder on the same server. The installation begins when boot from the PXE entry. The detail of the AutoYast script can be found in Appendix C-4. Page 11
 of the LSRRB service can only be done when the RAID status is clean. For more information, see Known Issues and Limitations.")
12 Checking system status LSRRB Service Status LSRRB is a systemd service on RHEL7 and SLES 12. Therefore, it can be used to check, start, stop, and restart the service. Any operations (except status) of the LSRRB service can only be done when the RAID status is clean. For more information, see Known Issues and Limitations. Checking system status On RHEL 7 and SLES 12 Use the following command to check the LSRRB service status: systemctl status lsrrb.service Two processes will be running: one is the auto-resync process (md_auto_resync.py), and the other is the hard drive temperature reporting process (HPEtemp.sh). Example service status: On RHEL 6 or SLES 11 Use to following command to check the LSRRB service status: ps -ef grep lsrrb If you see both md_auto_resync.py and HPEtemp.sh running, the service works fine. LSRRB service start, stop, and restart commands On RHEL7 or SLES 12 Use the following command to start the service. systemctl start lsrrb.service Page 12

13 Use the following command to stop the service. systemctl stop lsrrb.service Use the following command to restart the service. On RHEL 6 or SLES 11 systemctl restart lsrrb.service Use the following command to start the service. /etc/init.d/lsrrbd start Use the following command to stop the service. /etc/init.d/lsrrbd stop Hard drive thermal information The LSRRB service captures drive temperatures for all SATA disks on the system every 10 minutes and adds reported temperatures to the /var/log/hpesdtemp.log file. It also reports URGENT messages in the same log if any disk temperature passes 60 o C, which is considered critical point. For log recycling, it uses the Linux logrotate utility set in /etc/logrotate.d/hpesdtemplog config file on the system. This log (/var/log/hpesdtemp.log) will rotate every 4 weeks, similar to other system logs to avoid filesystem becoming full. To find the drive thermal information, type the command: cat /var/log/hpesdtemp.log Checking RAID status To check the RAID device on the system, type the command: cat /proc/mdstat The above screenshot indicates there is only one RAID device in the system. To check the RAID status for md0, type the command: mdadm --detail /dev/md0 Here /dev/md0 is the RAID device on the system. Page 13

14 The above screenshot reports the State as clean. This is the normal state of the RAID system. If State reports as degraded, the RAID system is degraded, and one of the disk became faulty. Faulty disk replacement To replace a faulty drive, use either the hot-swap method or the cold-swap method. Replacing a faulty disk using the hot-swap method In the hot-swap method, the system doesn t need to shut down. Simply unplug the faulty drive and replace it with a new one. The system will automatically rebuild the RAID system with the new hard drive. Type the following command to check the rebuild program. mdadm detail /dev/md0 Page 14
15 Here md0 is the RAID device on the system. The screenshot indicates the progress of the rebuild, which is 1%. The time to complete a rebuild depends on the size of the hard drive. Once it reaches 100%, the rebuild process completes and the State indicates clean. Replacing a faulty disk using the cold-swap method In the cold-swap method, the system will be shut down. After the machine is completely shut down, replace the faulty drive with the new one. During the next boot, the RAID rebuild process is triggered. Type the following command to check the rebuild progress: mdadm detail /dev/md0 Here md0 is the RAID device on the system. Page 15

16 The screenshot indicates the progress of the rebuild, which is 1%. The time to complete a rebuild depends on the size of the hard drive. Once it reaches 100%, the rebuild process completes and the State indicates clean. Verification Type the following command to verify the RAID system: mdadm detail /dev/md0 Here md0 is the RAID device on the system. Page 16

17 The above screenshot shows State reporting clean. It is the normal state of the RAID system. Known Issues and Limitations The LED on the hard drive tray doesn t work The LED on the hard driver tray doesn t work in this version. The LED indicates the health state of the drive. To examine the health state of the hard drive, refer to Checking RAID status section. Only RAID1 with two hard drives in the AHCI controller is supported, other AHCI/SATA ports cannot be used Only two hard drive boot volumes are currently supported. Other AHCI/SATA ports cannot be used. The replacement hard drive should not contain any MD metadata or partition information The RAID metadata or partition information on the replacement hard drive should be wiped before inserting to the system. Page 17
18 LSRRB service should not be stopped or restarted before RAID is fully recovered and status is clean When the RAID is degraded and the recovery is in progress, the LSRRB service should not be stopped or restarted. For the RAID auto-recovery, the space of replacement disk must be the same as the faulty one; replacement disks with greater capacity are not supported Only auto-recovery with same size hard drive replacement is supported for RAID recovery. If the /boot/efi is empty after auto-recovery, reboot the system before making any changes to the ESP (such as upgrading kernel, modify grub settings, etc) To check if the /boot/efi folder is empty, type the following command: ls -la /boot/efi With NVMe disks, the hot-swap feature is not supported Hot-swap of failure NVMe disk is currently not supported. Page 18
19 Appendix A: Creating redundant boot strategy for software RAID1 in Linux Introduction The Redundant Boot Strategy for Software RAID1 in Linux operates with the UEFI mode only. This document describes the process to configure Software RAID in major Linux operating systems including: Red Hat Enterprise Linux SuSE Linux Enterprise Server It covers the following topics: Installation Configuration Recovery steps when a disk fails Basic configuration This procedure will be completed using HPE ilo. For more information, see the HPE ilo 5 User Guide in the Hewlett Packard Enterprise Information Library ( Setting AHCI mode in Gen9 a. In RBSU > System Options > SATA Controller Options > Embedded SATA Configuration. b. Make sure that Enable SATA AHCI Support is enabled. Page 19

20 Setting AHCI mode in Gen10 AHCI mode is a default setting in Gen10. UEFI partitioning scheme The following partition scheme is used throughout this document to describe the process. Name Size File System Type Mount Point First disk /dev/sda1 200MB FAT /boot/efi Page 20
21 Name Size File System Type Mount Point /dev/sda2 16GB Swap Swap /dev/sda3 Rest of the disk Ext4 None Second Disk /dev/sdb1 200MB FAT None /dev/sdb2 16GB Swap None /dev/sdb3 Rest of the disk Ext4 None * In the outlined configuration, the disk size is 500GB. The partition size for sda3 and sdb3 is roughly 460GB. Red Hat Enterprise Linux (RHEL) 7 Manually Partitioning through Rescue mode Partition the disk manually in Rescue mode before proceeding to the normal installation process. Do not use the RHEL GUI installer. 1. Boot from the RHEL 7.4 DVD image. a. Select Troubleshooting > Rescue a Red Hat Enterprise Linux system from the GRUB boot menu. b. Select 1) Continue. The following prompt is displayed: Page 21

22 a. To create partitions on the first disk (/dev/sda), type the following commands. 1. parted /dev/sda mklabel gpt a. Type Yes to confirm changes are made to the existing disk label. 2. The following is displayed: 3. parted /dev/sda mkpart primary fat MiB a. Type Ignore to ignore the size mismatch. 4. The following is displayed: 5. parted /dev/sda mkpart primary ext2 200MiB 16GiB 6. parted /dev/sda print a. Refer to the screenshot for detail partitioning instruction and information for /dev/sda. Page 22


23 b. Repeat step 5 for the second disk (/dev/sdb). 7. Refer to the screenshot for detail partitioning instruction and information for /dev/sdb. a. Reboot to proceed with Red Hat installation. Normal Installation Process The software RAID installation differs from the normal installation process only in the Installation Destination step. In the Installation Destination, specify the ESP, swap, and root partition respectively. In the Installation Destination step, make sure both disks are selected, and I will configure partitioning is selected. Page 23

24 Specifying the ESP The ESP is the partition that contains the boot loaders used by the UEFI firmware. 1. Select sda1 under Unknown in the left pane. 2. Under File System, select EFI System Partition and check Reformat. 3. In the Mount Point field, enter /boot/efi. 4. Click Update Settings. Page 24

25 Specifying the swap directory 1. Select sda2 in the Unknown section. 2. In the File System dropdown, select swap and check Reformat. 3. Click Update Settings. Page 25

26 Creating root disk as RAID1 1. Click To choose the root directory, enter / as mount point. 3. Enter 1000GB in Desired Capacity. 4. The system will calculate the correct size. 5. Click Add mount point. Create a RAID1 root partition 8. Select / rhel-root in the left pane. 9. Select RAID in Device Type. 10. Choose xfs or other desired file system. 11. Make sure RAID1 (Redundancy) in RAID Level is selected. 12. Click Update Settings. 13. The system will calculate the final size for the RAID partition. 14. The system will create a new md device in /dev/md/root. 15. In the Name field, type root. Page 26


27 16. Continue the installation by clicking Done. 17. The system will show a warning message. 18. This message can be ignored. Creating the Redundant ESP 1. Log in to Red Hat. 2. To clone the ESP partition from /dev/sda1 to /dev/sdb1, enter the following command. dd if=/dev/sda1 of=/dev/sdb1 if means the input and of is the output. Creating a New Entry in UEFI Boot Manager Before creating a new entry for the Redundant ESP for /dev/sdb1, examine the current EFI boot manager. Make sure the contents of the new entry match the existing entry for RHEL. Page 27


28 1. To list the entries in the EFI boot manager, type the following command. efibootmgr v The screenshot shows that entry Boot000C is the RHEL entry created by the installer. 2. Create a new entry and name it rhel-redundant using the following command. efibootmgr c d /dev/sdb p 1 l \\EFI\\redhat\\shimx64.efi -L rhel-redundant 3. The rhel-redundant entry is created as Boot0013. It is selected as the first boot option. It should be moved to second boot option. efibootmgr o 000C,0013,000A,000B,000D,000E,000F,0011,0010,0012,0009,0000,0001,000 2,000,0004,0005,0006,0007, The actual number for entries depends on the system configuration. 5. Check the system configuration by typing: efibootmgr v 6. Verify the boot entry by rebooting the system. a. Press F11 to go to the boot menu. Page 28
29 b. Choose rhel-redundant from the boot menu. 7. Log in to the system. Recovering a failed disk and repairing Software RAID In the event of a failed disk, it is necessary to recover the failed partition and restore the software RAID. Logging in to the system through the second disk is possible when the EFI boot entries are set properly. 1. Examine the status of the RAID configuration using the following command. mdadm --detail /dev/md/root Total Devices report 1. State reports as clean, degraded. /dev/sdb3 has become /dev/sda3 It is the only available disk. Page 29

30 Recover the RAID system 1. Prepare a new disk, partitioned as previously described. 2. From the boot menu, choose rhel-redundant. 3. The new disk is shown as /dev/sda. 4. The original second disk will appear as /dev/sdb. 5. Type the following command to add the new /dev/sda3 to rebuild the RAID. mdadm --add /dev/md/root /dev/sda3 6. Enter the following command: mdadm --detail /dev/md/root 7. The State will change to clean, degraded, recovering and the Rebuild Status will report 75% complete (or other progress number). 8. Once the rebuild has completed, State will report as clean. 9. The recovery is complete. Page 30

31 Complete the recovery process Repeat the process described in Creating the Redundant ESP to make a redundant copy of the ESP, and add a new entry to EFI Boot Manager to complete the recovery process. 1. To replicate the ESP from /dev/sdb1 back to /dev/sda1, enter the following command. dd if=/dev/sdb1 of=/dev/sda1 2. To remove the existing RHEL boot entry, enter the following command. efibootmgr b 0C B Page 31


32 3. Create new entry for the replicated ESP by entering the following command: efibootmgr c d /dev/sda p 1 l \\EFI\\redhat\\shimx64.efi -L rhel-redundant2 4. Reorder boot sequence by entering the following command: efibootmgr o 00013,000C,000A,000B,000D,000E,000F,0011,0010,0012,0009,0000,0001,00 02,0004,0005,0006,0007,0008,0003 Page 32

33 Red Hat Enterprise Linux (RHEL) 6 Manually Partitioning through Rescue mode Partition the disk manually in Rescue mode before proceeding to the normal installation process. Do not use the RHEL GUI installer. 1. Boot from the RHEL 6.9 DVD image. a. Select rescue from the GRUB boot menu. After the Language, Keyboard and Media selection, the following prompt is displayed: Select Continue, then start the shell. b. To create partitions on the first disk (/dev/sda), type the following commands. parted /dev/sda mklabel gpt c. Type Yes to confirm changes are made to the existing disk label. 8. The following is displayed: 9. parted /dev/sda mkpart primary fat MiB a. Type Ignore to ignore the size mismatch. 10. The following is displayed: 11. parted /dev/sda mkpart primary ext2 200MiB 16GiB 12. parted /dev/sda print a. Refer to the screenshot for detail partitioning instruction and information for /dev/sda. Page 33


34 b. Repeat step 5 for the second disk (/dev/sdb). 13. Refer to the screenshot for detail partitioning instruction and information for /dev/sdb. c. Reboot to proceed with Red Hat installation. Normal Installation Process The software RAID installation differs from the normal installation process only in the Create Custom Layout step. In Create Custom Layout, specify the ESP, swap, and root partition respectively. 1. Select Basic Storage Device in the installation device selection menu: Page 34


35 2. Select Create Custom Layout in the installation type selection menu: The following is displayed: Page 35

36 Specifying the ESP The ESP is the partition that contains the boot loaders used by the UEFI firmware. 1. Select sda1 under sda, then click Edit. 2. Check Format as: and select EFI System Partition. 3. In the Mount Point field, enter /boot/efi. 4. Click OK. Specifying the swap directory 1. Select sda2 under sda, then click Edit. 2. Click Format as: and select swap. 3. Click OK. Page 36
37 Creating root disk as RAID1 1. Select Free under sda, then click Create. 2. Click RAID Partition. Page 37

38 3. Check sda in the Add Partition screen, then click Fill to maximum allowable size in Additional Size Options. Then click OK. Page 38

39 4. Repeat step 1, 2 and 3 for sdb. Create a RAID1 root partition 1. Click Create in the device selection screen. 2. Click RAID Device in the Create Storage screen, then click Create. Page 39

40 3. In the Make RAID Device screen, enter / as mount point. File System Type is ext4, RAID Device is md0 and RAID Level is RAID1. Check sda and sdb, then click OK. Page 40
41 4. The following is displayed: Page 41

42 5. Click Next. Format ESP and swap partition and confirm changes to disk. 6. Continue normal installation. Creating the Redundant ESP 1. Log in to Red Hat. 2. To clone the ESP partition from /dev/sda1 to /dev/sdb1, enter the following command. dd if=/dev/sda1 of=/dev/sdb1 if means the input and of is the output. Page 42


43 Creating a New Entry in UEFI Boot Manager Before creating a new entry for the Redundant ESP for /dev/sdb1, examine the current EFI boot manager. Make sure the contents of the new entry match the existing entry for RHEL. 1. To list the entries in the EFI boot manager, type the following command efibootmgr v 2. The screenshot shows that entry Boot000C is the RHEL entry created by the installer. 3. Create a new entry and name it rhel-redundant using the following command. efibootmgr c d /dev/sdb p 1 l \\EFI\\redhat\\grub.efi -L rhel-redundant 4. The rhel-redundant entry is created as Boot It is selected as the first boot option. It should be moved to second boot option. efibootmgr o 000C,0017,0000,0001,0003,0004,0005,0006,0007,0008,0009,000A,000B,000D,000E,000F,0010,0011,0012,0013,0014,0015,0016 Page 43

44 6. The actual number for entries depends on the system configuration. 7. Check the system configuration by typing: efibootmgr v 8. Verify the boot entry by rebooting the system. 9. Press F11 to go to the boot menu. 10. Choose rhel-redundant from the boot menu. 11. Log in to the system. Recovering a failed disk and repairing Software RAID In the event of a failed disk, it is necessary to recover the failed partition and restore the software RAID. Logging in to the system through the second disk is possible when the EFI boot entries are set properly. Page 44
45 Examine the status of the RAID configuration using the following command. mdadm --detail /dev/md/root Total Devices report 1. State reports as clean, degraded. /dev/sdb3 has become /dev/sda3 It is the only available disk. Recover the RAID system 1. Prepare a new disk, partitioned as previously described. 2. From the boot menu, choose rhel-redundant. The new disk is shown as /dev/sda. The original second disk will appear as /dev/sdb. 3. Type the following command to add the new /dev/sda3 to rebuild the RAID. mdadm --add /dev/md/root /dev/sda3 4. Enter the following command: mdadm --detail /dev/md/root The State will change to clean, degraded, recovering and the Rebuild Status will report 75% complete (or other progress number). 5. Once the rebuild has completed, State will report as clean. 6. The recovery is complete. Page 45

46 Complete the recovery process Repeat the process described in Creating the Redundant ESP to make a redundant copy of the ESP, and add a new entry to EFI Boot Manager to complete the recovery process. 1. To replicate the ESP from /dev/sdb1 back to /dev/sda1, enter the following command. dd if=/dev/sdb1 of=/dev/sda1 2. To remove the existing RHEL boot entry, enter the following command. efibootmgr b 0C B 3. Create new entry for the replicated ESP by entering the following command: efibootmgr c d /dev/sda p 1 l \\EFI\\redhat\\grub.efi -L rhelredundant2 Page 46
 12 Installation process Only the partition scheme is different in the Software RAID installation process compare to the standard installation process.")
47 19. Reorder boot sequence by entering the following command: efibootmgr o 0017,000C,0000,0001,0002,0003,0004,0005,0006,0007,0008,0009,000A,000 B,000D,000E,000F,0010,0012,0013,0014,0015,0016 SuSE Linux Enterprise Server (SLES) 12 Installation process Only the partition scheme is different in the Software RAID installation process compare to the standard installation process. Partitioning drives for SLES 1. From the Suggested Partitioning screen, select Expert Partitioner Page 47


48 2. Delete the Expert Partitioner default partition scheme. 3. Partition /dev/sda as follows: /dev/sda1, size = 200MB, mount point = /boot/efi, format as FAT /dev/sda2, size = 16GB, format as Swap /dev/sda3, size = rest of the disk space. 4. After successfully partitioning the first disk, use Expert > Clone this disk function to clone the partition scheme to the second disk. Page 48
. c. Select each partition and click Add to move them to Selected Devices.")
49 5. In the RAID section, create a RAID1 that includes /dev/sda3 and /dev/sdb3: a. Click RAID. b. Choose RAID1 (mirroring). c. Select each partition and click Add to move them to Selected Devices. Page 49


50 6. Accept default setting such as 4KB Chunk Size, format as XFS and mount it to / (root). 7. Click Finish. Examine the Device Graph. It should match the screenshot. Page 50
51 8. Examine the Mount Graph. It should match the screenshot. 9. Proceed to finish the installation Creating the Redundant ESP 1. Log in to SLES. 2. To clone the ESP partition from /dev/sda1 to /dev/sdb1, type the following command. dd if=/dev/sda1 of=/dev/sdb1 3. If means the input, and of is the output. Creating a New Entry in the UEFI Boot Manager Before creating a new entry for the Redundant ESP for /dev/sdb1, examine the current EFI boot manager. Make sure the contents of the new entry match the existing entry for SLES. 1. To list the entries in the EFI boot manager, type the following command. efibootmgr v 2. The following screenshot shows that entry Boot0011 is the SLES entry created by the installer. Page 51

52 3. Create a new entry and name it sles-secureboot2. efibootmgr c d /dev/sdb p 1 l \\EFI\\sles\\shim.efi -L slessecureboot2 Page 52
53 4. The sles-secureboot2 entry will be created as Boot0012. This process will place it as the first boot option. Move it to the second boot option. efibootmgr o 0011,0012,0002,0000,0003,0004,0005,0006,0007,0008, 0009, 000C,0001,000A,000B,000D 5. The actual number of entries depends on the system configuration. Check the entries by entering: efibootmgr v 6. Verify the boot entry by rebooting the system, press F11 to the boot menu. sles-secureboot2 should be in the boot menu. 7. Boot in to the system to verify it works. 8. Log in the system. Page 53
54 Recovering a failed disk and repairing Software RAID In the event of a failed disk, it is necessary to recover the failed partition and restore the software RAID. Logging in to the system through the second disk is possible when the EFI boot entries are set properly. Examine the RAID status 1. To examine the status of the RAID configuration, enter the following: mdadm --detail /dev/md0 Total Devices became 1. State changed to clean, degraded. Disk /dev/sdb3 has become /dev/sda3. 2. It is the only available disk. Page 54
55 Add two additional kernel parameters to allow booting from the second disk In SLES, if the first disk fails two additional kernel parameters must be added to allow the system to successfully boot from the second disk. 1. From the GRUB menu, press the e key to edit the kernel parameter. 2. Find the line ending with crashkerel=72m,low 3. Append rd.shell rd.debug 4. Press Ctrl-x or F10 to boot with the new setting. 5. This is a one-time setting only. It will not impact subsequent boots. 6. After a few minutes, the screen will enter a rescue shell. Page 55
56 Recovering the failed partition 1. Prepare a new disk portioned as described in Partitioning a drive for SLES. 2. Boot from the sles-secureboot2. 3. Make sure proper kernel parameters (rd.shell rd.debug) were added to enter the rescue shell. 4. The new disk will be shown as /dev/sda, and the original second disk will appear as /dev/sdb. 5. To add the new /dev/sda3 to rebuild the RAID, type the following command in the rescue shell. mdadm --add /dev/md0 /dev/sda3 6. Enter the following command. mdadm --detail /dev/md0 7. The State will change to clean, degraded, recovering and the Rebuild Status 75% complete (or other progress number). 8. Once the rebuild has completed, the State will change to clean, 9. The recovery is complete. Page 56
57 Complete the recovery process To make a redundant copy of the ESP, repeat the process described in Creating a redundant ESP. Add a new entry to EFI Boot Manager to complete the recovery process. 1. Replicate the ESP from /dev/sdb1 back to /dev/sda1. 2. dd if=/dev/sdb1 of=/dev/sda1 3. Remove the existing SLES boot entry: 4. efibootmgr b 11 B 1. Create new entry for the replicated ESP: efibootmgr c d /dev/sda p 1 l \\EFI\\sles\\shim.efi -L slessecureboot2 2. Reorder the boot sequence: efibootmgr o 0012,0011,0002,0000,0003,0004,0005,0006,0007,0008,0009,0001,0001,000 A,000B,000D,000C Page 57
58 SuSE Linux Enterprise Server (SLES) 11 Installation process Only the partition scheme is different in the Software RAID installation process compare to the standard installation process. Partitioning drives for SLES 1. From the Installation Settings screen, select Partitioning Page 58

59 2. In the Preparing Hard Disk screen, select Custom Partitioning (for experts) 3. Delete the Expert Partitioner default partition scheme. 4. Partition /dev/sda as follows: /dev/sda1, size = 200MB, mount point = /boot/efi, format as FAT /dev/sda2, size = 16GB, format as Swap /dev/sda3, size = rest of the disk space. Page 59

60 5. After successfully partitioning the first disk, use Expert > Clone this disk function to clone the partition scheme to the second disk. Page 60


61 6. In the RAID section, create a RAID1 that includes /dev/sda3 and /dev/sdb3: a. Click RAID. b. Choose RAID1 (mirroring). c. Select each partition and click Add to move them to Selected Devices. 7. Format as XFS and mount it to / (root). Page 61
62 8. Click Finish. 9. Proceed to finish the installation Creating the Redundant ESP 1. Log in to SLES. 2. To clone the ESP partition from /dev/sda1 to /dev/sdb1, type the following command. dd if=/dev/sda1 of=/dev/sdb1 3. If means the input, and of is the output. Creating a New Entry in the UEFI Boot Manager Before creating a new entry for the Redundant ESP for /dev/sdb1, examine the current EFI boot manager. Make sure the contents of the new entry match the existing entry for SLES. 1. To list the entries in the EFI boot manager, type the following command. efibootmgr v 2. The following screenshot shows that entry Boot0013 is the SLES entry created by the installer. Page 62


63 3. Create a new entry and name it sles-secureboot2. efibootmgr c d /dev/sdb p 1 l \\efi\\suse\\elilo.efi -L slessecureboot2 4. The sles-secureboot2 entry will be created as Boot000C. 5. This process will place it as the first boot option. Move it to the second boot option. efibootmgr o 0013,000C,000A,000B,000D,000E,0011,0010,0012,0009,0000,0001,0002,000 4,0005,0006,0007,0008,0003 Page 63

64 6. The actual number of entries depends on the system configuration. Check the entries by entering: efibootmgr v 7. Verify the boot entry by rebooting the system, press F11 to the boot menu. sles-secureboot2 should be in the boot menu. 8. Boot in to the system to verify it works. 9. Log in the system. Recovering a failed disk and repairing Software RAID In the event of a failed disk, it is necessary to recover the failed partition and restore the software RAID. Logging in to the system through the second disk is possible when the EFI boot entries are set properly. Page 64
65 Examine the RAID status 1. To examine the status of the RAID configuration, enter the following: mdadm --detail /dev/md0 Total Devices became 1. State changed to clean, degraded. Disk /dev/sdb3 has become /dev/sda3. It is the only available disk. Recovering the failed partition 1. Prepare a new disk portioned as described in Partitioning a drive for SLES. 2. Boot from the sles-secureboot2. 3. Make sure proper kernel parameters (rd.shell rd.debug) were added to enter the rescue shell. 4. The new disk will be shown as /dev/sda, and the original second disk will appear as /dev/sdb. 5. To add the new /dev/sda3 to rebuild the RAID, type the following command in the rescue shell. mdadm --add /dev/md0 /dev/sda3 6. Enter the following command. mdadm --detail /dev/md0 7. The State will change to clean, degraded, recovering and the Rebuild Status 75% complete (or other progress number). 8. Once the rebuild has completed, the State will change to clean, 9. The recovery is complete. Page 65
66 Complete the recovery process To make a redundant copy of the ESP, repeat the process described in Creating a redundant ESP. Add a new entry to EFI Boot Manager to complete the recovery process. 1. Replicate the ESP from /dev/sdb1 back to /dev/sda1. dd if=/dev/sdb1 of=/dev/sda1 2. Remove the existing SLES boot entry: efibootmgr b 11 B 3. Create new entry for the replicated ESP: efibootmgr c d /dev/sda p 1 l \\efi\\suse\\elilo.efi -L slessecureboot3 4. Reorder the boot sequence: efibootmgr o 0012,0011,0002,0000,0003,0004,0005,0006,0007,0008,0009,0001,0001,000 A,000B,000D,000C Page 66
67 Page 67
68 Appendix B: Example server configurations PXE server configuration The PXE configuration file is located in /data/tftpboot/efi/elilo.cfg. It may be in a different location in your environment. The following sample configuration shows how to specify the default entry, timeout, etc. As you proceed, you will create additional PXE entries in this file. chooser=simple #This setting will directly boot into default entry for mass deployment use. If you want to manually select, you can modify to textmenu. #message=textmenu-message.msg prompt delay=0 timeout=10 #Time out (second) default=rhel-7server-x86_64_ks #The default boot entry. # For RHEL 7.4 Single Machine Deployment image=/rhel/rhel-7.4server-x86_64/vmlinuz label=rhel-7server-x86_64_ks description = "RHEL 7.x Server RAID1 kickstart" initrd=/rhel/rhel-7.4server-x86_64/initrd.img append="ipv6.disable=1 inst.ks= #The place to change file path. # For RHEL 6.9 Single Machine Deployment image=/rhel/rhel-6.9server-x86_64/vmlinuz label=rhel-6server-x86_64_ks description = "RHEL 6.x Server RAID1 kickstart" initrd=/rhel/rhel-6.9server-x86_64/initrd.img append="ipv6.disable=1 inst.ks= #The place to change file path. # For SLES 12 SP3 Single Machine Deployment Page 68
69 image=/sle/sle-12-sp3-server-x86_64/linux label=sle-12-sp3-server-x86_64 description = "SLES 12 RAID1 AutoYast" initrd=/sle/sle-12-sp3-server-x86_64/initrd append="vga=normal netdev=eth1 autoyast= instal l= #The place to change file path. # For SLES 11 SP4 Single Machine Deployment image=/sle/sles-11-sp4-x86_64/linux label=sles-11-sp4-x86_64 description = "SLES 11 RAID1 AutoYast" initrd=/sle/sles-11-sp4-x86_64/initrd append="vga=normal netdev=eth1 autoyast= instal l= #The place to change file path. TFTP server configuration The TFTP configuration file is located in /etc/xinetd.d/tftp. # default: off # description: The tftp server serves files using the trivial file transfer \ # protocol. The tftp protocol is often used to boot diskless \ # workstations, download configuration files to network-aware printers, \ # and to start the installation process for some operating systems. service tftp { socket_type = dgram protocol = udp wait = yes user = root server = /usr/sbin/in.tftpd server_args = -s /data/tftpboot #Where your tftp root directory path Page 69
70 } disable = no per_source = 11 cps = flags = IPv4 DHCP server configuration The DHCP configuration file can be found in: # # DHCP Server Configuration file. # see /usr/share/doc/dhcp*/dhcpd.conf.example # see dhcpd.conf(5) man page # ddns-update-style none; ignore client-updates; default-lease-time ; max-lease-time ; option routers ; #Where you DHCP server IP option domain-name "tw.linux.rdlab"; option space PXE; option PXE.mtftp-ip code 1 = ip-address; option PXE.mtftp-cport code 2 = unsigned integer 16; option PXE.mtftp-sport code 3 = unsigned integer 16; option PXE.mtftp-tmout code 4 = unsigned integer 8; option PXE.mtftp-delay code 5 = unsigned integer 8; option arch code 93 = unsigned integer 16; # RFC4578 allow booting; allow bootp; authoritative; #option option-128 code 128 = string; #option option-129 code 129 = text; #next-server ; #filename "pxelinux.0"; class "pxe-clients" { Page 70
71 match if substring (option vendor-class-identifier, 0, 9) = "PXEClient"; } next-server ; #Where you tftp server IP if option arch = 00:07 { filename "EFI/bootx64.efi"; } else { } filename "pxelinux.0"; subnet netmask { } range ; #Where you DHCP IP range. Page 71
72 Appendix C: Example OS-specific installation scripts KickStart Script for RHEL 7 For the example KickStart script, see Place the script in your local TFTP server where your PXE installation can connect to it. In RHEL 7, you will need one extra package, which is can be downloaded from: Download it from the above URL and place on your local TFTP server, and specify them in the installation script. Modifying the KickStart script for RHEL 7 In the KickStart script, there are configurable parameters that user should adjust to fit the deployment environments. Parameter Name url rootpw %packages %end Description and Example The URL for the RHEL installation media url url The password for the root user rootpw plaintext Passw0rd Packages to wget net-tools dhcp mdadm gdisk Page 72
73 smartmontools %end part raid %post wget Disk partition information. This example creates a 256 MB ESP partition, a 16384RAID MB swap partition, and a raid volume that takes the remaining space. (For NVMe disks, replace sda with nvme0n1p1 and sdb with nvme1n1p1) part /boot/efi --fstype=efi --ondisk=sda --size=256 part swap --fstype=swap --ondisk=sda size=16384 part raid.01 --fstype=raid --ondisk=sda --size=1 --grow part none.01 --fstype=efi --ondisk=sdb --size=256 part none.02 --fstype=vfat --ondisk=sdb --size=16384 part raid.02 --fstype=raid RAID configuration raid / --device=md0 --fstype=xfs --level=1 raid.01 raid.02 Specify the log path for the post-install scripts %post --interpreter /bin/bah --log /var/log/ks.cfg.log The path to get the RPM package wget -P /tmp KickStart Script for RHEL 6 For the example KickStart script, see Place the script in your local TFTP server where your PXE installation can connect to it. In RHEL 6, you will need one extra package, which is can be downloaded from: Download it from the above URL and place on your local TFTP server, and specify them in the installation script. Modifying the KickStart script for RHEL 6 In the KickStart script, there are configurable parameters that user should adjust to fit the deployment environments. Page 73
74 Parameter Name url rootpw %packages %end part raid %post Description and Example The URL for the RHEL installation media url url The password for the root user rootpw plaintext Passw0rd Packages to wget net-tools dhcp mdadm gdisk smartmontools %end Disk partition information. This example creates a 256 MB ESP partition, a 16384RAID MB swap partition, and a raid volume that takes the remaining space. (For NVMe disks, replace sda with nvme0n1p1 and sdb with nvme1n1p1) part /boot/efi --fstype=efi --ondisk=sda --size=256 part swap --fstype=swap --ondisk=sda size=16384 part raid.01 --fstype=raid --ondisk=sda --size=1 --grow part none.01 --fstype=efi --ondisk=sdb --size=256 part none.02 --fstype=vfat --ondisk=sdb --size=16384 part raid.02 --fstype=raid RAID configuration raid / --device=md0 --fstype=xfs --level=1 raid.01 raid.02 Specify the log path for the post-install scripts %post --interpreter /bin/bah --log /var/log/ks.cfg.log Page 74
75 Parameter Name wget Description and Example The path to get the RPM package wget -P /tmp AutoYast Script for SLES 12 For the example AutoYast script, see (use wget to retrieve the file) Place the script in your local TFTP server where your PXE installation can connect to it. In SLES 12, you will need one extra package, which can be downloaded from: Download it from the above URL and place it on your local TFTP server. Specify it in the installation script. Modifying the AutoYast script for SLES 12 In the AutoYast script, there are configurable parameters that user should adjust to fit the deployment environments. Parameter Name wget Description and Example The path to get the RPM package. wget -P /tmp Page 75
76 <drive> </drive> Hard drive configuration. Check the AutoYast file. This example is for two identical 500GB hard drives. Each drive is partitioned as 1) 187 MB ESP partition; 2) 16 GB of swap partition; 3) remaining 482 GB for data. (For NVMe disks, replace sda with nvme0n1p1 and sdb with nvme1n1p1) The RAID device /dev/md0 will be create to include /dev/sda3 and /dev/sdb3. <drive> # Where to modify HD partitions. Default is for the two 500G HDs. <device>/dev/md</device> <disklabel>msdos</disklabel> <enable_snapshots config:type="boolean">true</enable_snapshots> <initialize config:type="boolean">true</initialize> <partitions config:type="list"> <partition> <create config:type="boolean">true</create> <crypt_fs config:type="boolean">false</crypt_fs> <filesystem config:type="symbol">xfs</filesystem> <format config:type="boolean">true</format> <loop_fs config:type="boolean">false</loop_fs> <mount>/</mount> <mountby config:type="symbol">uuid</mountby> <partition_nr config:type="integer">0</partition_nr> <raid_options> <device_order config:type="list"> <device>/dev/sda3</device> <device>/dev/sdb3</device> </device_order> <persistent_superblock config:type="boolean">false</persistent_s uperblock> <raid_type>raid1</raid_type> </raid_options> <resize config:type="boolean">false</resize> </partition> </partitions> <pesize/> <type config:type="symbol">ct_md</type> <use>all</use> </drive> <drive> <device>/dev/sda</device> <disklabel>gpt</disklabel> <enable_snapshots config:type="boolean">true</enable_snapshots> <initialize config:type="boolean">true</initialize> <partitions config:type="list"> <partition> <create config:type="boolean">true</create> <crypt_fs config:type="boolean">false</crypt_fs> <filesystem config:type="symbol">vfat</filesystem> <format config:type="boolean">true</format> <fstopt>umask=0002,utf8=true</fstopt> <loop_fs config:type="boolean">false</loop_fs> <mount>/boot/efi</mount> Page 76
77 <mountby config:type="symbol">uuid</mountby> <partition_id config:type="integer">259</partition_id> <partition_nr config:type="integer">1</partition_nr> <resize config:type="boolean">false</resize> <size> </size> </partition> <partition> <create config:type="boolean">true</create> <crypt_fs config:type="boolean">false</crypt_fs> <filesystem config:type="symbol">swap</filesystem> <format config:type="boolean">true</format> <loop_fs config:type="boolean">false</loop_fs> <mount>swap</mount> <mountby config:type="symbol">uuid</mountby> <partition_id config:type="integer">130</partition_id> <partition_nr config:type="integer">2</partition_nr> <resize config:type="boolean">false</resize> <size> </size> </partition> <partition> <create config:type="boolean">true</create> <crypt_fs config:type="boolean">false</crypt_fs> <format config:type="boolean">false</format> <loop_fs config:type="boolean">false</loop_fs> <mountby config:type="symbol">device</mountby> <partition_id config:type="integer">253</partition_id> <partition_nr config:type="integer">3</partition_nr> <raid_name>/dev/md0</raid_name> <resize config:type="boolean">false</resize> <size> </size> </partition> </partitions> <pesize/> <type config:type="symbol">ct_disk</type> <use>all</use> </drive> <drive> <device>/dev/sdb</device> <disklabel>gpt</disklabel> <enable_snapshots config:type="boolean">true</enable_snapshots> <initialize config:type="boolean">true</initialize> <partitions config:type="list"> <partition> <create config:type="boolean">true</create> <crypt_fs config:type="boolean">false</crypt_fs> <filesystem config:type="symbol">vfat</filesystem> <format config:type="boolean">true</format> <fstopt>umask=0002,utf8=true</fstopt> <loop_fs config:type="boolean">false</loop_fs> <mount>/boot/efi</mount> <mountby config:type="symbol">uuid</mountby> <partition_id config:type="integer">259</partition_id> <partition_nr config:type="integer">1</partition_nr> <resize config:type="boolean">false</resize> Page 77
78 Parameter Name Description and Example <size> </size> </partition> <partition> <create config:type="boolean">true</create> <crypt_fs config:type="boolean">false</crypt_fs> <filesystem config:type="symbol">swap</filesystem> <format config:type="boolean">true</format> <loop_fs config:type="boolean">false</loop_fs> <mount>swap</mount> <mountby config:type="symbol">uuid</mountby> <partition_id config:type="integer">130</partition_id> <partition_nr config:type="integer">2</partition_nr> <resize config:type="boolean">false</resize> <size> </size> </partition> <partition> <create config:type="boolean">true</create> <crypt_fs config:type="boolean">false</crypt_fs> <format config:type="boolean">false</format> <loop_fs config:type="boolean">false</loop_fs> <mountby config:type="symbol">device</mountby> <partition_id config:type="integer">253</partition_id> <partition_nr config:type="integer">3</partition_nr> <raid_name>/dev/md0</raid_name> <resize config:type="boolean">false</resize> <size> </size> </partition> </partitions> <pesize/> <type config:type="symbol">ct_disk</type> <use>all</use> </drive> <http_proxy>... </http_proxy > The http proxy used in the deployment environment. <http_proxy> Page 78
79 Parameter Name <software> </software> <users>.. </users> Description and Example The software packages to install. <software> <image/> <instsource/> <packages config:type="list"> <package>xfsprogs</package> <package>sles-release</package> <package>shim</package> <package>mokutil</package> <package>mdadm</package> <package>numactl</package> <package>kexec-tools</package> <package>kdump</package> <package>irqbalance</package> <package>grub2-x86_64-efi</package> <package>glibc</package> <package>efibootmgr</package> <package>dosfstools</package> <package>perl-bootloader-yaml</package> </packages> <patterns config:type="list"> <pattern>apparmor</pattern> <pattern>x11</pattern> <pattern>documentation</pattern> <pattern>base</pattern> <pattern>gnome-basic</pattern> <pattern>minimal</pattern> <pattern>32bit</pattern> </patterns> </software> The users described in this section will be created. In the example, user hpe will be created with password Passw0rd. AutoYast Script for SLES 11 For the example AutoYast script, see (use wget to retrieve the file) Place the script in your local TFTP server where your PXE installation can connect to it. In SLES 11, you will need one extra package, which can be downloaded from: Download it from the above URL and place it on your local TFTP server. Specify it in the installation script. Page 79
80 Modifying the AutoYast script for SLES 12 In the AutoYast script, there are configurable parameters that user should adjust to fit the deployment environments. Parameter Name wget <drive> </drive> Description and Example The path to get the RPM package. wget -P /tmp Hard drive configuration. Check the AutoYast file. This example is for two identical 500GB hard drives. Each drive is partitioned as 1) 187 MB ESP partition; 2) 16 GB of swap partition; 3) remaining 482 GB for data. (For NVMe disks, replace sda with nvme0n1p1 and sdb with nvme1n1p1) The RAID device /dev/md0 will be create to include /dev/sda3 and /dev/sdb3. <drive> # Where to modify HD partitions. Default is for the two 500G HDs. <device>/dev/md</device> <disklabel>msdos</disklabel> <enable_snapshots config:type="boolean">true</enable_snapshots> <initialize config:type="boolean">true</initialize> <partitions config:type="list"> <partition> <create config:type="boolean">true</create> <crypt_fs config:type="boolean">false</crypt_fs> <filesystem config:type="symbol">xfs</filesystem> <format config:type="boolean">true</format> <loop_fs config:type="boolean">false</loop_fs> <mount>/</mount> <mountby config:type="symbol">uuid</mountby> <partition_nr config:type="integer">0</partition_nr> <raid_options> <device_order config:type="list"> <device>/dev/sda3</device> <device>/dev/sdb3</device> </device_order> <persistent_superblock config:type="boolean">false</persistent_s uperblock> <raid_type>raid1</raid_type> </raid_options> <resize config:type="boolean">false</resize> </partition> </partitions> <pesize/> <type config:type="symbol">ct_md</type> <use>all</use> </drive> Page 80
81 <drive> <device>/dev/sda</device> <disklabel>gpt</disklabel> <enable_snapshots config:type="boolean">true</enable_snapshots> <initialize config:type="boolean">true</initialize> <partitions config:type="list"> <partition> <create config:type="boolean">true</create> <crypt_fs config:type="boolean">false</crypt_fs> <filesystem config:type="symbol">vfat</filesystem> <format config:type="boolean">true</format> <fstopt>umask=0002,utf8=true</fstopt> <loop_fs config:type="boolean">false</loop_fs> <mount>/boot/efi</mount> <mountby config:type="symbol">uuid</mountby> <partition_id config:type="integer">259</partition_id> <partition_nr config:type="integer">1</partition_nr> <resize config:type="boolean">false</resize> <size> </size> </partition> <partition> <create config:type="boolean">true</create> <crypt_fs config:type="boolean">false</crypt_fs> <filesystem config:type="symbol">swap</filesystem> <format config:type="boolean">true</format> <loop_fs config:type="boolean">false</loop_fs> <mount>swap</mount> <mountby config:type="symbol">uuid</mountby> <partition_id config:type="integer">130</partition_id> <partition_nr config:type="integer">2</partition_nr> <resize config:type="boolean">false</resize> <size> </size> </partition> <partition> <create config:type="boolean">true</create> <crypt_fs config:type="boolean">false</crypt_fs> <format config:type="boolean">false</format> <loop_fs config:type="boolean">false</loop_fs> <mountby config:type="symbol">device</mountby> <partition_id config:type="integer">253</partition_id> <partition_nr config:type="integer">3</partition_nr> <raid_name>/dev/md0</raid_name> <resize config:type="boolean">false</resize> <size> </size> </partition> </partitions> <pesize/> <type config:type="symbol">ct_disk</type> <use>all</use> </drive> <drive> <device>/dev/sdb</device> <disklabel>gpt</disklabel> <enable_snapshots config:type="boolean">true</enable_snapshots> Page 81
82 <initialize config:type="boolean">true</initialize> <partitions config:type="list"> <partition> <create config:type="boolean">true</create> <crypt_fs config:type="boolean">false</crypt_fs> <filesystem config:type="symbol">vfat</filesystem> <format config:type="boolean">true</format> <fstopt>umask=0002,utf8=true</fstopt> <loop_fs config:type="boolean">false</loop_fs> <mount>/boot/efi</mount> <mountby config:type="symbol">uuid</mountby> <partition_id config:type="integer">259</partition_id> <partition_nr config:type="integer">1</partition_nr> <resize config:type="boolean">false</resize> <size> </size> </partition> <partition> <create config:type="boolean">true</create> <crypt_fs config:type="boolean">false</crypt_fs> <filesystem config:type="symbol">swap</filesystem> <format config:type="boolean">true</format> <loop_fs config:type="boolean">false</loop_fs> <mount>swap</mount> <mountby config:type="symbol">uuid</mountby> <partition_id config:type="integer">130</partition_id> <partition_nr config:type="integer">2</partition_nr> <resize config:type="boolean">false</resize> <size> </size> </partition> <partition> <create config:type="boolean">true</create> <crypt_fs config:type="boolean">false</crypt_fs> <format config:type="boolean">false</format> <loop_fs config:type="boolean">false</loop_fs> <mountby config:type="symbol">device</mountby> <partition_id config:type="integer">253</partition_id> <partition_nr config:type="integer">3</partition_nr> <raid_name>/dev/md0</raid_name> <resize config:type="boolean">false</resize> <size> </size> </partition> </partitions> <pesize/> <type config:type="symbol">ct_disk</type> <use>all</use> </drive> <http_proxy>... </http_proxy > The http proxy used in the deployment environment. <http_proxy> Page 82
83 <software> </software> <users>.. </users> The software packages to install. <software> <image/> <instsource/> <packages config:type="list"> <package>xfsprogs</package> <package>sles-release</package> <package>shim</package> <package>mokutil</package> <package>mdadm</package> <package>numactl</package> <package>kexec-tools</package> <package>kdump</package> <package>irqbalance</package> <package>grub2-x86_64-efi</package> <package>glibc</package> <package>efibootmgr</package> <package>dosfstools</package> <package>perl-bootloader-yaml</package> </packages> <patterns config:type="list"> <pattern>apparmor</pattern> <pattern>x11</pattern> <pattern>documentation</pattern> <pattern>base</pattern> <pattern>gnome-basic</pattern> <pattern>minimal</pattern> <pattern>32bit</pattern> </patterns> </software> The users described in this section will be created. In the example, user hpe will be created with password Passw0rd. Page 83
84 Appendix D Support for Gen10 and AMD Platform This section outlines procedures for configuring Software RAID for HPE ProLiant Gen10 servers and ProLiant servers utilizing AMD processors. The following platforms are covered: AMD Platform with AMD s FCH AHCI controller, with two traditional hard drives. Gen10 Platform with two M.2 SSD drives. Gen10 Platform with two NVMe drives. The operating systems covered in this section are: Red Hat Enterprise Linux 7 SuSE Linux Enterprise Server 12 AMD Platform with AMD FCH AHCI Controller Red Hat Enterprise Linux (RHEL) 7 Manually Partitioning through Rescue mode Partition the disk manually in Rescue mode before proceeding to the normal installation process. Do not use the RHEL GUI installer. 1. Boot from the RHEL 7.4 DVD image. a. Select Troubleshooting > Rescue a Red Hat Enterprise Linux system. b. Select 1) Continue. The following prompt is displayed: Page 84
 parted /dev/sdb mklabel gpt d.")
85 c. To create partitions on the first disk (/dev/sdb), type the following commands. (In this setup, we use external USB driver as the installation media, which will occupy /dev/sda, but it won t affect our settings) parted /dev/sdb mklabel gpt d. Type Yes to confirm changes are made to the existing disk label. The following is displayed: parted /dev/sdb mkpart primary fat MB e. Type Ignore to ignore the size mismatch. The following is displayed: parted /dev/sdb mkpart primary ext2 200MB 16GB parted /dev/sdb print Refer to the screenshot for detail partitioning instruction and information for /dev/sdb. Page 85


86 f. Repeat step 5 for the second disk (/dev/sdc). Refer to the screenshot for detail partitioning instruction and information for /dev/sdc. g. Reboot to proceed with Red Hat installation. Normal Installation Process The software RAID installation differs from the normal installation process only in the Installation Destination step. In the Installation Destination, specify the ESP, swap and root partition respectively. In the Installation Destination step, make sure both disks are selected, and I will configure partitioning is selected. Page 86


87 Specifying the ESP The ESP is the partition that contains the boot loaders used by the UEFI firmware. 1. Select sda1 under Unknown in the left pane. 2. Under File System, select EFI System Partition and check Reformat. 3. In the Mount Point field, enter /boot/efi. 4. Click Update Settings. Specifying the swap directory 1. Select sda2 in the Unknown section. 2. In the File System dropdown, select swap and check Reformat. 3. Click Update Settings. Page 87

88 Creating root disk as RAID1 1. Click To choose the root directory, enter / as mount point. 3. Enter 1000GB in Desired Capacity. The system will calculate the correct size. 4. Click Add mount point. Create a RAID1 root partition 1. Select / rhel-root in the left pane. 2. Select RAID in Device Type. 3. Choose xfs or other desired file system. 4. Make sure RAID1 (Redundancy) in RAID Level is selected. 5. In the Name field, type root. 6. Click Update Settings. The system will calculate the final size for the RAID partition. The system will create a new md device in /dev/md/root. Page 88

89 7. Continue the installation by clicking Done. The system will show a warning message. This message can be ignored. Creating the Redundant ESP 1. Log in to Red Hat Enterprise Linux To clone the ESP partition from /dev/sda1 to /dev/sdb1, enter the following command. dd if=/dev/sda1 of=/dev/sdb1 where if is the input file, and of is the output file. 3. For example output, see the following screenshot. Creating a New Entry in UEFI Boot Manager Before creating a new entry for the Redundant ESP for /dev/sdb1, examine the current EFI boot manager. Make sure the contents of the new entry match the existing entry for RHEL. 20. To list the entries in the EFI boot manager, type the following command. efibootmgr v Page 89


90 21. The screenshot shows that entry Boot0000 is the Red Hat Enterprise Linux entry created by the installer. 22. Create a new entry and name it Red Hat Enterprise Linux-redundant using the following command. efibootmgr c d /dev/sdb p 1 l \\EFI\\redhat\\shim.efi -L Red Hat Enterprise Linux-redundant 23. The Red Hat Enterprise Linux-redundant entry is created as Boot0002. It is selected as the first boot option. It should be moved to second boot option. efibootmgr o 0000,0002,0003,0004,0005, The actual number for entries depends on the system configuration. Check the system configuration by typing: efibootmgr v 25. Verify the boot entry by rebooting the system. a. Press F11 to go to the boot menu. b. Choose Red Hat Enterprise Linux-redundant from the boot menu. 26. Log in to the system. Page 90


91 Recovering a failed disk and repairing Software RAID In the event of a failed disk, it is necessary to recover the failed partition and restore the software RAID. Logging in to the system through the second disk is possible when the EFI boot entries are set properly. 1. Examine the status of the RAID configuration using the following command. mdadm --detail /dev/md/root Total Devices report 1. State reports as clean, degraded. /dev/sdb3 has become /dev/sda3 It is the only available disk. Recover the RAID system 1. Prepare a new disk, partitioned as previously described. 2. From the boot menu, choose Red Hat Enterprise Linux-redundant. The new disk is shown as /dev/sda. Page 91
.")
92 The original second disk will appear as /dev/sdb. 3. Type the following command to add the new /dev/sda3 to rebuild the RAID. mdadm --add /dev/md/root /dev/sda3 4. Enter mdadm --detail /dev/md/root The State will change to clean, degraded, recovering and the Rebuild Status will report 75% complete (or other progress number). Once the rebuild has completed, State will report as clean. 5. The recovery is complete. Complete the recovery process Repeat the process described in Creating the Redundant ESP to make a redundant copy of the ESP, and add a new entry to EFI Boot Manager to complete the recovery process. 1. To replicate the ESP from /dev/sdb1 back to /dev/sda1, enter the following command. dd if=/dev/sdb1 of=/dev/sda1 2. Create new entry for the replicated ESP by entering the following command: efibootmgr c d /dev/sda p 1 l \\EFI\\redhat\\shim.efi -L Red Hat Enterprise Linux-redundant2 3. Reorder the boot sequence by entering the following command: efibootmgr o 0002,0000,0004,0005,0001 Page 92


93 SuSE Linux Enterprise Server (SLES) 12 SP3 Installation process Only the partition scheme is different in the Software RAID installation process compare to the standard installation process. Partitioning drives for SLES 1. From the Suggested Partitioning screen, select Expert Partitioner 2. Delete the Expert Partitioner default partition scheme. 3. Partition /dev/sda as follows: /dev/sda1, size = 200MB, role as EFI Boot Partition, mount point = /boot/efi, format as FAT /dev/sda2, size = 16GB, role as Swap /dev/sda3, size = Maximum Size (rest of the disk space), role as Raw Volume. Page 93
94 4. After successfully partitioning the first disk, use Expert > Clone this disk function to clone the partition scheme to the second disk. 5. In the RAID section, create a RAID1 that includes /dev/sda3 and /dev/sdb3: Page 94

. 7. Click Finish. Examine the Device Graph.")
95 a. Click RAID. b. Choose RAID1 (mirroring). c. Select each partition and click Add to move them to Selected Devices. 6. Set the following options: 4KB Chunk Size, role as Operating System, format as XFS and mount it to / (root). 7. Click Finish. Examine the Device Graph. It should match the screenshot. Page 95

96 8. Examine the Mount Graph. It should match the screenshot. 9. Proceed to finish the installation Creating the Redundant ESP 1. Log in to SLES 12 SP3 and open a Terminal. 2. To clone the ESP partition from /dev/sda1 to /dev/sdb1, type the following command. dd if=/dev/sda1 of=/dev/sdb1 where If is the input file, and of is the output file. 3. You should see something like below screenshot: Page 96


97 Creating a New Entry in the UEFI Boot Manager Before creating a new entry for the Redundant ESP for /dev/sdb1, examine the current EFI boot manager. Make sure the contents of the new entry match the existing entry for Ubuntu. 1. To list the entries in the EFI boot manager, type the following command. efibootmgr v 2. The following screenshot shows that entry Boot0011 is the SLES entry created by the installer. 3. Create a new entry and name it sles-secureboot-redundant. efibootmgr c d /dev/sdb p 1 l \\EFI\\sles\\shim.efi -L slessecureboot-redundant 4. The sles-secureboot-redundant entry will be created as Boot0002. This process will place it as the first boot option. Move it to the second boot option. efibootmgr o 0000,0002,0003,0004, The actual number of entries depends on the system configuration. Check the entries by entering: efibootmgr v Page 97


98 6. Verify the boot entry by rebooting the system, press F11 to the boot menu. sles-securebootredundant should be in the boot menu. 7. Boot in to the system to verify it works. 8. Log in the system. Recovering a failed disk and repairing Software RAID In the event of a failed disk, it is necessary to recover the failed partition and restore the software RAID. Logging in to the system through the second disk is possible when the EFI boot entries are set properly. Examine the RAID status 1. To examine the status of the RAID configuration, enter the following: mdadm --detail /dev/md0 Total Devices became 1. State changed to clean, degraded. Disk /dev/sdb3 has become /dev/sda3. It is the only available disk. Add two additional kernel parameters to allow booting from the second disk In SLES, if the first disk fails two additional kernel parameters must be added to allow the system to successfully boot from the second disk. Page 98
99 1. From the GRUB menu, press the e key to edit the kernel parameter. 2. Find the line ending with crashkerel=72m,low 3. Append rd.shell rd.debug 4. Press Ctrl-x or F10 to boot with the new setting. This is a one-time setting only. It will not impact subsequent boots. After a few minutes, the screen will enter a rescue shell. Page 99
100 Recovering the failed partition 1. Prepare a new disk portioned as described in Partitioning a drive for SLES. 2. Boot from sles-secureboot-redunant. 3. Make sure the proper kernel parameters (rd.shell rd.debug) were added to enter the rescue shell. 4. The new disk will be shown as /dev/sda, and the original second disk will appear as /dev/sdb. 5. To add the new /dev/sda3 to rebuild the RAID, type the following command in the rescue shell. mdadm --add /dev/md0 /dev/sda3 6. Enter mdadm --detail /dev/md0 The State will change to clean, degraded, recovering and the Rebuild Status 75% complete (or other progress number). Once the rebuild has completed, the State will change to clean, 7. The recovery is complete. Page 100


101 Complete the recovery process To make a redundant copy of the ESP, repeat the process described in Creating a redundant ESP. Add a new entry to EFI Boot Manager to complete the recovery process. 1. Replicate the ESP from /dev/sdb1 back to /dev/sda1. dd if=/dev/sdb1 of=/dev/sda1 2. Remove the existing SLES boot entry: efibootmgr b 0000 B 3. Create new entry for the replicated ESP: efibootmgr c d /dev/sda p 1 l \\EFI\\sles\\shim.efi -L slessecureboot-redundant2 4. Reorder the boot sequence: efibootmgr o 0002,0000,0004,0005,0001 Page 101
 Continue.")
102 SATA-based PCI-e M.2 SSD Red Hat Enterprise Linux (RHEL) 7 Manually Partitioning through Rescue mode Partition the disk manually in Rescue mode before proceeding to the normal installation process. Do not use the RHEL GUI installer. 1. Boot from the RHEL 7.4 DVD image. a. Select Troubleshooting > Rescue a Red Hat Enterprise Linux system. b. Select 1) Continue. The following prompt is displayed: c. To create partitions on the first disk (/dev/sda), type the following commands. parted /dev/sda mklabel gpt d. Type Yes to confirm changes are made to the disk label. The following is displayed: parted /dev/sda mkpart primary fat MB e. Type Ignore to ignore the size mismatch. The following is displayed: parted /dev/sda mkpart primary ext2 200MB 16GB parted /dev/sda print Page 102


103 f. Refer to the screenshot for detail partitioning instruction and information for /dev/sda. g. Repeat step 5 for the second disk (/dev/sdb). h. Refer to the screenshot for detail partitioning instruction and information for /dev/sdb. i. Reboot to proceed with Red Hat installation. Normal Installation Process The software RAID installation differs from the normal installation process only in the Installation Destination step. In the Installation Destination, specify the ESP, swap and root partition respectively. In the Installation Destination step, make sure both disks are selected, and I will configure partitioning is selected. Page 103

104 Specifying the ESP 7. The ESP is the partition that contains the boot loaders used by the UEFI firmware. 8. Select sda1 under Unknown in the left pane. 9. Under File System, select EFI System Partition and check Reformat. 10. In the Mount Point field, enter /boot/efi. 11. Click Update Settings. Page 104

105 Specifying the swap directory 1. Select sda2 in the Unknown section. 2. In the File System dropdown, select swap and check Reformat. 3. Click Update Settings. Page 105


106 Creating root disk as RAID1 1. Click To choose the root directory, enter / as mount point. 3. Enter 1000GB in Desired Capacity. The system will calculate the correct size. 4. Click Add mount point. Page 106
 in RAID Level is selected. 31. In the Name field, type root. 32. Click Update Settings. 33. The system will calculate the final size for the RAID partition. 34.")
107 Create a RAID1 root partition 27. Select / rhel-root in the left pane. 28. Select RAID in Device Type. 29. Choose xfs or other desired file system. 30. Make sure RAID1 (Redundancy) in RAID Level is selected. 31. In the Name field, type root. 32. Click Update Settings. 33. The system will calculate the final size for the RAID partition. 34. The system will create a new md device in /dev/md/root. 35. Continue the installation by clicking Done. 36. The system will show a warning message. 37. This message can be ignored. Page 107

108 Creating the Redundant ESP 1. Log in to Red Hat Enterprise Linux To clone the ESP partition from /dev/sda1 to /dev/sdb1, enter the following command. dd if=/dev/sda1 of=/dev/sdb1 If is the input file, and of is the output file. Creating a New Entry in UEFI Boot Manager Before creating a new entry for the Redundant ESP for /dev/sdb1, examine the current EFI boot manager. Make sure the contents of the new entry match the existing entry for RHEL. 1. To list the entries in the EFI boot manager, type the following command. efibootmgr v The screenshot shows that entry Boot0014 is the Red Hat Enterprise Linux entry created by the installer. Page 108

109 2. Create a new entry and name it Red Hat Enterprise Linux-redundant using the following command. efibootmgr c d /dev/sdb p 1 l \\EFI\\redhat\\shim.efi -L Red Hat Enterprise Linux-redundant 3. The Red Hat Enterprise Linux-redundant entry is created as Boot0000. It is selected as the first boot option. It should be moved to second boot option. efibootmgr o 0014,0000,0001,000A,000D,000F,000E,0010,0012,0011,000B,000C,0016,001 8,0017,0002,0003,0004,0005,0006,0007,0008,0009,0013 Page 109


110 The actual number for entries depends on the system configuration. 4. Check the system configuration by typing: efibootmgr v 5. Verify the boot entry by rebooting the system. a. Press F11 to go to the boot menu. b. Choose Red Hat Enterprise Linux-redundant from the boot menu. 6. Log in to the system. Page 110
111 Recovering a failed disk and repairing Software RAID In the event of a failed disk, it is necessary to recover the failed partition and restore the software RAID. Logging in to the system through the second disk is possible when the EFI boot entries are set properly. 1. Examine the status of the RAID configuration using the following command. mdadm --detail /dev/md/root Total Devices report 1. State reports as clean, degraded. /dev/sdb3 has become /dev/sda3 It is the only available disk. Page 111
112 Recover the RAID system 1. Prepare a new disk, partitioned as previously described. 2. From the boot menu, choose Red Hat Enterprise Linux-redundant. The new disk is shown as /dev/sda. The original second disk will appear as /dev/sdb. 3. Type the following command to add the new /dev/sda3 to rebuild the RAID. mdadm --add /dev/md/root /dev/sda3 4. Enter mdadm --detail /dev/md/root The State will change to clean, degraded, recovering and the Rebuild Status will report 75% complete (or other progress number). Once the rebuild has completed, State will report as clean. 5. The recovery is complete. Complete the recovery process Repeat the process described in Creating the Redundant ESP to make a redundant copy of the ESP, and add a new entry to EFI Boot Manager to complete the recovery process. Page 112
113 1. To replicate the ESP from /dev/sdb1 back to /dev/sda1, enter the following command. dd if=/dev/sdb1 of=/dev/sda1 2. To remove the existing RHEL boot entry, enter the following command. efibootmgr b 11 B 3. Create new entry for the replicated ESP by entering the following command: efibootmgr c d /dev/sda p 1 l \\EFI\\redhat\\shim.efi -L Red Hat Enterprise Linux-redundant2 4. Reorder boot sequence by entering the following command: efibootmgr o 0012,0011,0002,0000,0001,0003,0004,0005,0006,0007,0008,000A,0009,000 C,000B Page 113
114 SuSE Linux Enterprise Server (SLES) 12 SP3 Installation process Only the partition scheme is different in the Software RAID installation process compare to the standard installation process. Partitioning drives for SLES 1. From the Suggested Partitioning screen, select Expert Partitioner Page 114


115 2. Delete the Expert Partitioner default partition scheme. 3. Partition /dev/sda as follows: /dev/sda1, size = 200MB, role as EFI Boot Partition, mount point = /boot/efi, format as FAT /dev/sda2, size = 16GB, role as Swap /dev/sda3, size = Maximum Size (rest of the disk space), role as Raw Volume. 4. After successfully partitioning the first disk, use Expert > Clone this disk function to clone the partition scheme to the second disk. Page 115


116 5. In the RAID section, create a RAID1 that includes /dev/sda3 and /dev/sdb3: a. Click RAID. b. Choose RAID1 (mirroring). c. Select each partition and click Add to move them to Selected Devices. Page 116
. 7. Click Finish. Examine the Device Graph. It should match the screenshot.")
117 6. Set the following options: 4KB Chunk Size, role as Operating System, format as XFS and mount it to / (root). 7. Click Finish. Examine the Device Graph. It should match the screenshot. Page 117
118 8. Examine the Mount Graph. It should match the screenshot. Page 118
119 9. Proceed to finish the installation Creating the Redundant ESP 1. Log in to SLES 12 SP3 and open a Terminal. 2. To clone the ESP partition from /dev/sda1 to /dev/sdb1, type the following command. dd if=/dev/sda1 of=/dev/sdb1 where If is the input file, and of is the output file. 3. You should see something like below screenshot: Creating a New Entry in the UEFI Boot Manager Before creating a new entry for the Redundant ESP for /dev/sdb1, examine the current EFI boot manager. Make sure the contents of the new entry match the existing entry for SLES. 1. To list the entries in the EFI boot manager, type the following command. efibootmgr v Page 119

120 2. The following screenshot shows that entry Boot0011 is the SLES entry created by the installer. 3. Create a new entry and name it sles-secureboot-redundant. efibootmgr c d /dev/sdb p 1 l \\EFI\\sles\\shim.efi -L slessecureboot-redundant 4. The sles-secureboot-redundant entry will be created as Boot0015. This process will place it as the first boot option. Move it to the second boot option. Page 120
121 efibootmgr o 0014,0015,0000,000A,000D,000F,000E,0010,0012,0011,000B,000C,0001,000 2,0003,0004,0005,0006,0007,0008, The actual number of entries depends on the system configuration. Check the entries by entering: efibootmgr v 6. Verify the boot entry by rebooting the system, press F11 to the boot menu. sles-securebootredundant should be in the boot menu. 7. Boot in to the system to verify it works. 8. Log in the system. Page 121
122 Recovering a failed disk and repairing Software RAID In the event of a failed disk, it is necessary to recover the failed partition and restore the software RAID. Logging in to the system through the second disk is possible when the EFI boot entries are set properly. Examine the RAID status 1. To examine the status of the RAID configuration, enter the following: mdadm --detail /dev/md0 Total Devices became 1. State changed to clean, degraded. Disk /dev/sdb3 has become /dev/sda3. It is the only available disk. Page 122
123 Add two additional kernel parameters to allow booting from the second disk In SLES, if the first disk fails two additional kernel parameters must be added to allow the system to successfully boot from the second disk. 1. From the GRUB menu, press the e key to edit the kernel parameter. 2. Find the line ending with crashkerel=72m,low 3. Append rd.shell rd.debug 4. Press Ctrl-x or F10 to boot with the new setting. This is a one-time setting only. It will not impact subsequent boots. After a few minutes, the screen will enter a rescue shell. Page 123
124 Recovering the failed partition 1. Prepare a new disk portioned as described in Partitioning a drive for SLES. 2. Boot from the sles-secureboot2. Make sure proper kernel parameters (rd.shell rd.debug) were added to enter the rescue shell. 3. The new disk will be shown as /dev/sda, and the original second disk will appear as /dev/sdb. 4. To add the new /dev/sda3 to rebuild the RAID, type the following command in the rescue shell. mdadm --add /dev/md0 /dev/sda3 5. Enter mdadm --detail /dev/md0 The State will change to clean, degraded, recovering and the Rebuild Status 75% complete (or other progress number). Once the rebuild has completed, the State will change to clean, 6. The recovery is complete. Page 124
125 Complete the recovery process To make a redundant copy of the ESP, repeat the process described in Creating a redundant ESP. Add a new entry to EFI Boot Manager to complete the recovery process. 1. Replicate the ESP from /dev/sdb1 back to /dev/sda1. dd if=/dev/sdb1 of=/dev/sda1 2. Remove the existing SLES boot entry: efibootmgr b 11 B 3. Create new entry for the replicated ESP: efibootmgr c d /dev/sda p 1 l \\EFI\\sles\\shim.efi -L slessecureboot-redundant 4. Reorder the boot sequence: efibootmgr o 0012,0011,0002,0000,0003,0004,0005,0006,0007,0008,0009,0001,0001,000 A,000B,000D,000C Page 125
126 NVMe PCI-e Disk Red Hat Enterprise Linux (RHEL) 7 Manually Partitioning through Rescue mode Partition the disk manually in Rescue mode before proceeding to the normal installation process. Do not use the RHEL GUI installer. 1. Boot from the RHEL 7.4 DVD image. a. Select Troubleshooting > Rescue a Red Hat Enterprise Linux system. b. Select 1) Continue. The following prompt is displayed: Page 126


127 2. To create partitions on the first disk (/dev/nvme0n1), type the following commands. parted /dev/nvme0n1 mklabel gpt 3. Type Yes to confirm changes are made to the existing disk label. The following is displayed: parted /dev/nvme0n1 mkpart primary fat MB 4. Type Ignore to ignore the size mismatch. 5. The following is displayed: parted /dev/nvme0n1 mkpart primary ext2 200MB 16GB parted /dev/nvme0n1 print Refer to the screenshot for detail partitioning instruction and information for /dev/nvme0n1. a. Repeat step 5 for the second disk (/dev/nvme1n1). 6. Refer to the screenshot for detail partitioning instruction and information for /dev/nvme1n1. Page 127


128 7. Reboot to proceed with Red Hat installation. Normal Installation Process The software RAID installation differs from the normal installation process only in the Installation Destination step. In the Installation Destination, specify the ESP, swap and root partition respectively. In the Installation Destination step, make sure both disks are selected, and I will configure partitioning is selected. Specifying the ESP The ESP is the partition that contains the boot loaders used by the UEFI firmware. Page 128

129 8. Select nvme0n1p1 under Unknown in the left pane. 9. Under File System, select EFI System Partition and check Reformat. 10. In the Mount Point field, enter /boot/efi. 11. Click Update Settings. Specifying the swap directory 1. Select nvme0n1p2 in the Unknown section. 2. In the File System dropdown, select swap and check Reformat. 3. Click Update Settings. Page 129


130 Creating root disk as RAID1 1. Click To choose the root directory, enter / as mount point. 3. Enter 1000GB in Desired Capacity. The system will calculate the correct size. 4. Click Add mount point. Create a RAID1 root partition 1. Select / rhel-root in the left pane. 2. Select RAID in Device Type. 3. Choose xfs or other desired file system. Page 130

131 4. Make sure RAID1 (Redundancy) in RAID Level is selected. 5. Click Update Settings. The system will calculate the final size for the RAID partition. The system will create a new md device in /dev/md/root. 6. In the Name field, type root. 7. Continue the installation by clicking Done. The system will show a warning message. This message can be ignored. Creating the Redundant ESP 1. Log in to Red Hat Enterprise Linux To clone the ESP partition from /dev/nvme0n1p1 to /dev/nvme1n1p1, enter the following command. Page 131


132 dd if=/dev/nvme0n1p1 of=/dev/nvme1n1p1 where if is the input file, and of is the output file. 3. For example output, see the following screenshot. Creating a New Entry in UEFI Boot Manager Before creating a new entry for the Redundant ESP for /dev/nvme1n1p1, examine the current EFI boot manager. Make sure the contents of the new entry match the existing entry for RHEL. 1. To list the entries in the EFI boot manager, type the following command. efibootmgr v The screenshot shows that entry Boot000E is the Red Hat Enterprise Linux entry created by the installer. 2. Create a new entry and name it Red Hat Enterprise Linux-redundant using the following command. efibootmgr c d /dev/nvme1n1 p 1 l \\EFI\\redhat\\shim.efi -L Red Hat Enterprise Linux-redundant Page 132


133 3. The Red Hat Enterprise Linux-redundant entry is created as Boot0012. It is selected as the first boot option. It should be moved to second boot option. efibootmgr o 000E,0012,0000,000A,0015,0017,0016,000F,0011,0010,0001,0002,0003,000 4,0005,0006,0007,0008,0009,000D,000B,000C The actual number for entries depends on the system configuration. 4. Check the system configuration by typing: efibootmgr v 5. Verify the boot entry by rebooting the system. a. Press F11 to go to the boot menu. b. Choose Red Hat Enterprise Linux-redundant from the boot menu. 6. Log in to the system. Page 133
134 Recovering a failed disk and repairing Software RAID In the event of a failed disk, it is necessary to recover the failed partition and restore the software RAID. Logging in to the system through the second disk is possible when the EFI boot entries are set properly. 1. Examine the status of the RAID configuration using the following command. mdadm --detail /dev/md/root Total Devices report 1. State reports as clean, degraded. /dev/nvme1n1p3 has become /dev/nvme0n1p3 It is the only available disk. Page 134
135 Recover the RAID system 1. Prepare a new disk, partitioned as previously described. 2. From the boot menu, choose Red Hat Enterprise Linux-redundant The new disk is shown as /dev/nvme0n1. The original second disk will appear as /dev/nvme1n1. 3. Type the following command to add the new /dev/nvme0n1p3 to rebuild the RAID. mdadm --add /dev/md/root /dev/nvme0n1p3 4. Enter mdadm --detail /dev/md/root The State will change to clean, degraded, recovering and the Rebuild Status will report 75% complete (or other progress number). 5. Once the rebuild has completed, State will report as clean. 6. The recovery is complete. Complete the recovery process Repeat the process described in Creating the Redundant ESP to make a redundant copy of the ESP, and add a new entry to EFI Boot Manager to complete the recovery process. Page 135

136 1. To replicate the ESP from /dev/nvme1n1p1 back to /dev/nvme0n1p1, enter the following command. dd if=/dev/nvme1n1p1 of=/dev/nvme0n1p1 2. To remove the existing RHEL boot entry, enter the following command. efibootmgr b 11 B 3. Create new entry for the replicated ESP by entering the following command: efibootmgr c d /dev/nvme0n1 p 1 l \\EFI\\redhat\\shim.efi -L Red Hat Enterprise Linux-redundant2 4. Reorder boot sequence by entering the following command: efibootmgr o 0012,0011,0002,0000,0001,0003,0004,0005,0006,0007,0008,000A,0009,000 C,000B Page 136

137 SuSE Linux Enterprise Server (SLES) 12 SP3 Installation process Only the partition scheme is different in the Software RAID installation process compare to the standard installation process. Partitioning drives for SLES 1. From the Suggested Partitioning screen, select Expert Partitioner Page 137

, role as Raw Volume. 4.")
138 2. Delete the Expert Partitioner default partition scheme. 3. Partition /dev/sda as follows: /dev/nvme0n1p1, size = 200MB, role as EFI Boot Partition, mount point = /boot/efi, format as FAT /dev/nvme0n1p2, size = 16GB, role as Swap /dev/nvme0n1p3, size = Maximum Size (rest of the disk space), role as Raw Volume. 4. After successfully partitioning the first disk, use Expert > Clone this disk function to clone the partition scheme to the second disk. Page 138
139 5. In the RAID section, create a RAID1 that includes /dev/nvme0n1p3 and /dev/nvme1n1p3: a. Click RAID. b. Choose RAID1 (mirroring). c. Select each partition and click Add to move them to Selected Devices. Page 139


140 6. Set the following options: 4KB Chunk Size, role as Operating System, format as XFS and mount it to / (root). 7. Click Finish. Examine the Device Graph. It should match the screenshot. Page 140
141 8. Examine the Mount Graph. It should match the screenshot. Page 141


142 9. Proceed to finish the installation Creating the Redundant ESP 1. Log in to SLES 12 SP3 and open a Terminal. 2. To clone the ESP partition from /dev/sda1 to /dev/sdb1, type the following command. dd if=/dev/nvme0n1p1 of=/dev/nvme1n1p1 If is the input file, and of is the output file. 3. You should see something like below screenshot: Page 142

143 Creating a New Entry in the UEFI Boot Manager Before creating a new entry for the Redundant ESP for /dev/nvme1n1p1, examine the current EFI boot manager. Make sure the contents of the new entry match the existing entry for SLES. 1. To list the entries in the EFI boot manager, type the following command. efibootmgr v 2. The following screenshot shows that entry Boot000C (sles-secureboot) is the SLES entry created by the installer. 3. Create a new entry and name it sles-secureboot-redundant. efibootmgr c d /dev/nvme1n1 p 1 l \\EFI\\sles\\shim.efi -L sles-secureboot-redundant Page 143


144 4. The sles-secureboot-redundant entry will be created as Boot000D. This process will place it as the first boot option. Move it to the second boot option. efibootmgr o 000C,000D,0000,000A,0015,0017,0016,000F,0011,000B,0012,0013,0001,000 2,0003,0004,0005,0006,0007,0008, The actual number of entries depends on the system configuration. Check the entries by entering: Page 144
145 efibootmgr v 6. Verify the boot entry by rebooting the system, press F11 to the boot menu. sles-securebootredundant should be in the boot menu. 7. Boot in to the system to verify it works. 8. Log in the system. Recovering a failed disk and repairing Software RAID In the event of a failed disk, it is necessary to recover the failed partition and restore the software RAID. Logging in to the system through the second disk is possible when the EFI boot entries are set properly. Examine the RAID status 1. To examine the status of the RAID configuration, enter the following: mdadm --detail /dev/md0 Total Devices became 1. State changed to clean, degraded. Disk /dev/sdb3 has become /dev/sda3. It is the only available disk. Page 145

146 Add two additional kernel parameters to allow booting from the second disk In SLES, if the first disk fails two additional kernel parameters must be added to allow the system to successfully boot from the second disk. 1. From the GRUB menu, press the e key to edit the kernel parameter. 2. Find the line ending with crashkerel=72m,low 3. Append rd.shell rd.debug 4. Press Ctrl-x or F10 to boot with the new setting. This is a one-time setting only. It will not impact subsequent boots. After a few minutes, the screen will enter a rescue shell. Page 146
 were added to enter the rescue shell. The new disk will be shown as /dev/sda, and the original second disk will appear as /dev/sdb. 3.")
147 Recovering the failed partition 1. Prepare a new disk portioned as described in Partitioning a drive for SLES. 2. Boot from the sles-secureboot-redundant. Make sure proper kernel parameters (rd.shell rd.debug) were added to enter the rescue shell. The new disk will be shown as /dev/sda, and the original second disk will appear as /dev/sdb. 3. To add the new /dev/sda3 to rebuild the RAID, type the following command in the rescue shell. mdadm --add /dev/md0 /dev/nvme0n1p3 4. Enter mdadm --detail /dev/md0 The State will change to clean, degraded, recovering and the Rebuild Status 75% complete (or other progress number). Once the rebuild has completed, the State will change to clean, 5. The recovery is complete. Page 147


148 Complete the recovery process To make a redundant copy of the ESP, repeat the process described in Creating a redundant ESP. 1. Add a new entry to EFI Boot Manager to complete the recovery process. 2. Replicate the ESP from /dev/sdb1 back to /dev/sda1. dd if=/dev/nvme1n1p1 of=/dev/nvme0n1p1 3. Remove the existing SLES boot entry: efibootmgr b 11 B 4. Create new entry for the replicated ESP: efibootmgr c d /dev/nvme0n1 p 1 l \\EFI\\sles\\shim.efi -L sles-secureboot-redundant2 5. Reorder the boot sequence: efibootmgr o 0012,0011,0002,0000,0003,0004,0005,0006,0007,0008,0009,0001,0001,000 A,000B,000D,000C Page 148
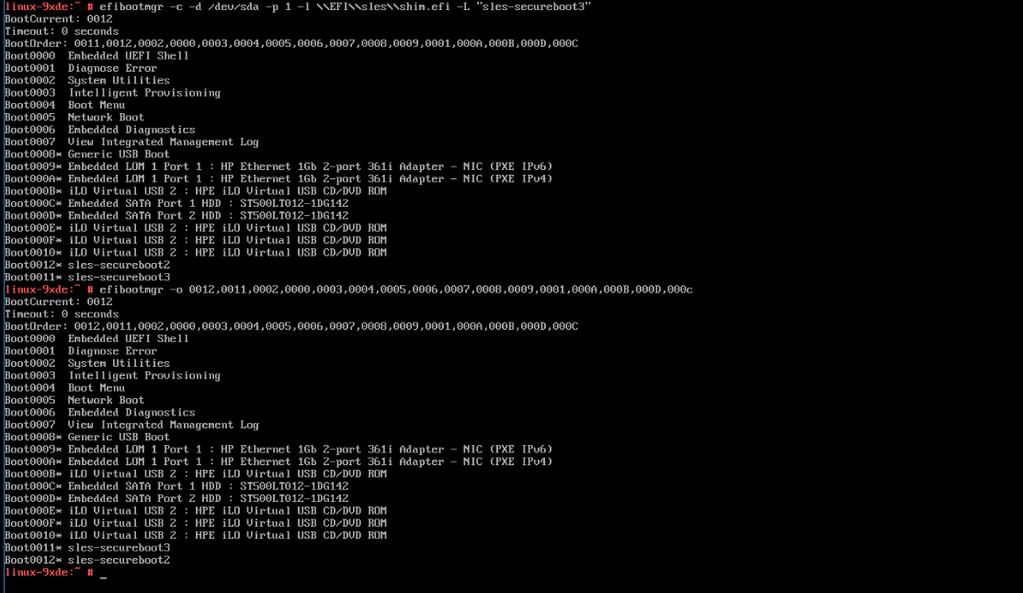
149 Page 149
Implementing Linux Software RAID1 on HPE ProLiant Servers with RHEL 7.3 and SLES 12 SP2
 Implementing Linux Software RAID1 on HPE ProLiant Servers with RHEL 7.3 and SLES 12 SP2 Abstract This document describes how to use HPE LSRRB (Linux Software RAID - Redundant Boot), which uses in-distro
Intelligent Provisioning 2.70 Release Notes
 Intelligent Provisioning 2.70 Release Notes Part Number: 794361-401a Published: December 2017 Edition: 2 Copyright 2012, 2017 Hewlett Packard Enterprise Development LP Notices The information contained
Intelligent Provisioning 3.00 Release Notes
 Intelligent Provisioning 3.00 Release Notes Part Number: 881705-001b Published: October 2017 Edition: 3 Copyright 2017 Hewlett Packard Enterprise Development LP Notices The information contained herein
Intelligent Provisioning 1.70 Release Notes
 Intelligent Provisioning 1.70 Release Notes Part Number: 680065-408 Published: October 2017 Edition: 1 Copyright 2012, 2017 Hewlett Packard Enterprise Development LP Notices The information contained herein
Intelligent Provisioning 3.10 Release Notes
 Intelligent Provisioning 3.10 Release Notes Part Number: 881705-002 Published: February 2018 Edition: 1 Copyright 2017, 2018 Hewlett Packard Enterprise Development LP Notices The information contained
Intelligent Provisioning 1.64(B) Release Notes
 Release Notes") Intelligent Provisioning 1.64(B) Release Notes Part Number: 680065-407 Published: March 2017 Edition: 1 2017 Hewlett Packard Enterprise Development LP Notices The information contained herein is subject
Intelligent Provisioning 1.64(B) Release Notes Part Number: 680065-407 Published: March 2017 Edition: 1 2017 Hewlett Packard Enterprise Development LP Notices The information contained herein is subject
Intelligent Provisioning User Guide for HPE ProLiant Gen10 Servers and HPE Synergy
 Intelligent Provisioning User Guide for HPE ProLiant Gen10 Servers and HPE Synergy Abstract This document details how to access and use the Intelligent Provisioning software, including tasks such as installing
CMU : Cluster Management Utility. CMU diskless user s guide Version 4.0, January 2009
 CMU : Cluster Management Utility CMU diskless user s guide Version 4.0, January 2009 Version 4.0 January 2009 2008 Hewlett-Packard Development Company, L.P. The information contained herein is subject
LPI201 LPIC-2 Exam Prep (Course 1) (LPI201) HL965S
 (LPI201) HL965S") Course data sheet HPE course number Course length Delivery mode View schedule, local pricing, and register View related courses HL965S 4 days ILT,VILT View now View now LPI201 LPIC-2 Exam Prep (Course
Course data sheet HPE course number Course length Delivery mode View schedule, local pricing, and register View related courses HL965S 4 days ILT,VILT View now View now LPI201 LPIC-2 Exam Prep (Course
Dell EMC OpenManage Deployment Toolkit for
 2017-09 Dell EMC OpenManage Deployment Toolkit 6.0.2 for This document describes the new features, enhancements, and fixed issues in Dell Openmanage Deployment Toolkit 6.0.2 for Embedded Linux Topics:
Lenovo XClarity Provisioning Manager User Guide
 Lenovo XClarity Provisioning Manager User Guide Fifth Edition (October 2018) Copyright Lenovo 2017, 2018. LIMITED AND RESTRICTED RIGHTS NOTICE: If data or software is delivered pursuant to a General Services
Configuring RAID with HP Z Turbo Drives
 Technical white paper Configuring RAID with HP Z Turbo Drives HP Workstations This document describes how to set up RAID on your HP Z Workstation, and the advantages of using a RAID configuration with
HPE VMware ESXi and vsphere 5.x, 6.x and Updates Getting Started Guide
 HPE VMware ESXi and vsphere 5.x, 6.x and Updates Getting Started Guide Abstract This guide is intended to provide setup information for HPE VMware ESXi and vsphere. Part Number: 818330-003 Published: April
Marvell BIOS Utility User Guide
 Marvell BIOS Utility User Guide for HPE MicroServer Gen10 Abstract This user guide provides information on how to use the embedded Marvell BIOS Utility to create and manage RAID virtual disks and arrays.
HPE Knowledge Article
 HPE Knowledge Article HPE Integrated Lights Out (ilo 5) for Gen10 Servers - What is System Recovery Set? Article Number mmr_sf-en_us000021097 Environment HPE Integrated Lights Out (ilo 5) HPE ProLiant
HPE ilo Federation User Guide for ilo 5
 HPE ilo Federation User Guide for ilo 5 Abstract This guide explains how to configure and use the HPE ilo Federation features. It is intended for system administrators, Hewlett Packard Enterprise representatives,
Integrated Smart Update Tools for Windows and Linux User Guide
 Integrated Smart Update Tools for Windows and Linux User Guide Version 2.2.0 Abstract This document describes how to use Integrated Smart Update Tools to update firmware and operating system drivers on
Introduction to HPE ProLiant Servers HE643S
 Course data sheet Introduction to HPE ProLiant Servers HE643S HPE course number Course length Delivery mode View schedule, local pricing, and register View related courses HE643S 2 Days ILT, VILT View
The devices can be set up with RAID for additional performance and redundancy using software RAID. Models HP Z Turbo Drive Quad Pro 2x512GB PCIe SSD
 Overview HP Z Turbo Quad Pro Introduction The demands on Workstations continue to increase, especially in segments like digital media or imaging, where resolutions and file sizes are increasing. SSD technology
Dell OpenManage Deployment Toolkit 5.3 for Embedded Linux Release Notes
 Dell OpenManage Deployment Toolkit 5.3 for Embedded Linux Release Notes This document describes the new features, enhancements, and fixed issues in Dell Openmanage Deployment Toolkit 5.3 for Embedded Linux
Intelligent Provisioning User Guide for HPE ProLiant Gen9 Servers and HPE Synergy
 Intelligent Provisioning User Guide for HPE ProLiant Gen9 Servers and HPE Synergy Abstract This document details how to access and use the Intelligent Provisioning software, including tasks such as installing
Dell OpenManage Deployment Toolkit 5.5 for Embedded Linux Release Notes
 Dell OpenManage Deployment Toolkit 5.5 for Embedded Linux Release Notes This document describes the new features, enhancements, and fixed issues in Dell Openmanage Deployment Toolkit 5.5 for Embedded Linux
Virtuozzo 7. PXE Installation Guide
 Virtuozzo 7 PXE Installation Guide December 05, 2017 Virtuozzo International GmbH Vordergasse 59 8200 Schaffhausen Switzerland Tel: + 41 52 632 0411 Fax: + 41 52 672 2010 https://virtuozzocom Copyright
HP ProLiant Agentless Management Pack (v 3.2) for Microsoft System Center User Guide
 for Microsoft System Center User Guide") HP ProLiant Agentless Management Pack (v 3.2) for Microsoft System Center User Guide Abstract This guide provides information on using the HP ProLiant Agentless Management Pack for System Center version
HP ProLiant Agentless Management Pack (v 3.2) for Microsoft System Center User Guide Abstract This guide provides information on using the HP ProLiant Agentless Management Pack for System Center version
Ubuntu Installation Manually Partition Windows 7 Create System Reserved
 Ubuntu Installation Manually Partition Windows 7 Create System Reserved Created a new partition and installed Windows 7. /dev/sda1 - fat32 - Recovery Partition // /dev/sda2 - ntfs - System Reserved //
HPE Synergy Image Streamer 3.1 User Guide
 HPE Synergy Image Streamer 3.1 User Guide Abstract This guide describes the HPE Synergy Image Streamer architecture, features, interfaces, and working environment. It describes the server deployment process
HP VMware ESXi and vsphere 5.x and Updates Getting Started Guide
 HP VMware ESXi and vsphere 5.x and Updates Getting Started Guide Abstract This guide is intended to provide setup information for HP VMware ESXi and vsphere. HP Part Number: 616896-409 Published: September
Achieve Patch Currency for Microsoft SQL Server Clustered Environments Using HP DMA
 Technical white paper Achieve Patch Currency for Microsoft SQL Server Clustered Environments Using HP DMA HP Database and Middleware Automation version 10.30 Table of Contents Purpose 2 Prerequisites 4
FAQs HP Z Turbo Drive Quad Pro
 FAQs HP Z Turbo Drive Quad Pro Product performance/implementation What is the HP Z Turbo Drive PCIe SSD? The HP Z Turbo Drive PCIe SSD is the family name for an M.2 PCIe connected SSD. The M.2 PCIe card
Integrating HP tools for Linux deployment (HP SIM, SSSTK, LinuxCOE, and PSP)
") Integrating HP tools for Linux deployment (HP SIM, SSSTK, LinuxCOE, and PSP) HOWTO Abstract... 2 Pre-integration tasks... 2 Pre-integration configuration... 2 Dynamic Host Configuration Protocol (DHCP)...3
Integrating HP tools for Linux deployment (HP SIM, SSSTK, LinuxCOE, and PSP) HOWTO Abstract... 2 Pre-integration tasks... 2 Pre-integration configuration... 2 Dynamic Host Configuration Protocol (DHCP)...3
HP BladeSystem c-class Virtual Connect Support Utility Version Release Notes
 HP BladeSystem c-class Virtual Connect Support Utility Version 1.9.1 Release Notes Abstract This document provides release information for the HP BladeSystem c-class Virtual Connect Support Utility Version
Parallels Server 5 Bare Metal
 Parallels Server 5 Bare Metal Installation Guide Copyright 1999-2011 Parallels Holdings, Ltd. and its affiliates. All rights reserved. Parallels Holdings, Ltd. c/o Parallels International GMbH. Parallels
HP Intelligent Provisioning User Guide for HP ProLiant Gen9 Servers
 HP Intelligent Provisioning User Guide for HP ProLiant Gen9 Servers Abstract This document details how to access and use the HP Intelligent Provisioning software, including tasks such as installing OSs,
Manually Mount Usb Flash Drive Linux Command Line Redhat
 Manually Mount Usb Flash Drive Linux Command Line Redhat How to Format USB in Linux using Command Line. This article will help you to format USB Flash drive in Ubuntu systems via Command line. So first
Support Notes for Red Hat Enterprise Linux ES v.4.6 for HP Integrity Servers
 Support Notes for Red Hat Enterprise Linux ES v.4.6 for HP Integrity Servers HP Part Number: 5992-2417 Edition: 1, E0108 Copyright 2007 Hewlett-Packard Development Company, L.P. Legal Notices Confidential
"Charting the Course... MOC B: Linux System Administration. Course Summary
 Description Course Summary This four-day instructor-led course is designed to provide students with the necessary skills and abilities to work as a professional Linux system administrator. The course covers
Partitioning Disks with parted
 Partitioning Disks with parted Author: Yogesh Babar Technical Reviewer: Chris Negus 10/6/2017 Storage devices in Linux (such as hard drives and USB drives) need to be structured in some way before use.
HP integrated Citrix XenServer Online Help
 HP integrated Citrix XenServer Online Help Part Number 486855-002 September 2008 (Second Edition) Copyright 2008 Hewlett-Packard Development Company, L.P. The information contained herein is subject to
Standardize Microsoft SQL Server Cluster Provisioning Using HP DMA
 Technical white paper Standardize Microsoft SQL Server Cluster Provisioning Using HP DMA HP Database and Middleware Automation version 10.30 Table of Contents Purpose 2 Prerequisites 4 Process Overview
GL-280: Red Hat Linux 7 Update. Course Description. Course Outline
 GL-280: Red Hat Linux 7 Update Course Description This is a differences course that focuses on the new technologies and features that made their appearance in Red Hat Enterprise Linux v7. It is intended
Linux+ Guide to Linux Certification, Third Edition. Chapter 2 Linux Installation and Usage
 Linux+ Guide to Linux Certification, Third Edition Chapter 2 Linux Installation and Usage Objectives Install Red Hat Fedora Linux using good practices Outline the structure of the Linux interface Enter
At course completion. Overview. Audience profile. Course Outline. : 55187B: Linux System Administration. Course Outline :: 55187B::
 Module Title Duration : 55187B: Linux System Administration : 4 days Overview This four-day instructor-led course is designed to provide students with the necessary skills and abilities to work as a professional
Management and Printing User Guide
 Management and Printing User Guide Copyright 2007 Hewlett-Packard Development Company, L.P. Windows is a U. S. registered trademark of Microsoft Corporation. Intel and Centrino are trademarks or registered
YaST and AutoYaST Make The Difference
 YaST and AutoYaST Make The Difference Thomas Göttlicher Project Manager tgoettlicher@suse.com Jiří Šrain Project Manager jsrain@suse.com YaST 2 Security Center and Hardening Module 3 Security Center and
Course 55187B Linux System Administration
 Course Outline Module 1: System Startup and Shutdown This module explains how to manage startup and shutdown processes in Linux. Understanding the Boot Sequence The Grand Unified Boot Loader GRUB Configuration
HP Online ROM Flash User Guide. July 2004 (Ninth Edition) Part Number
 Part Number") HP Online ROM Flash User Guide July 2004 (Ninth Edition) Part Number 216315-009 Copyright 2000, 2004 Hewlett-Packard Development Company, L.P. Confidential computer software. Valid license from HP required
HP Online ROM Flash User Guide July 2004 (Ninth Edition) Part Number 216315-009 Copyright 2000, 2004 Hewlett-Packard Development Company, L.P. Confidential computer software. Valid license from HP required
Guidelines for using Internet Information Server with HP StorageWorks Storage Mirroring
 HP StorageWorks Guidelines for using Internet Information Server with HP StorageWorks Storage Mirroring Application Note doc-number Part number: T2558-96338 First edition: June 2009 Legal and notice information
1 LINUX KERNEL & DEVICES
 GL-250: Red Hat Linux Systems Administration Course Length: 5 days Course Description: The GL250 is an in-depth course that explores installation, configuration and maintenance of Linux systems. The course
Technical white paper. HP Workstation: Intel Rapid Storage Technology (RST) remapping of PCIe storage devices
 remapping of PCIe storage devices") Technical white paper HP Workstation: Intel Rapid Storage Technology (RST) remapping of PCIe storage devices The HP Z1 G3, HP Z240, and HP Workstations with the Intel C236 chipset contain remapping hardware
Technical white paper HP Workstation: Intel Rapid Storage Technology (RST) remapping of PCIe storage devices The HP Z1 G3, HP Z240, and HP Workstations with the Intel C236 chipset contain remapping hardware
QuickSpecs. What's New HP 120GB 1.5Gb/s SATA 5400 rpm SFF HDD. HP Serial-ATA (SATA) Hard Drive Option Kits. Overview
 Hard Drive Option Kits. Overview") Overview HP offers a variety of tested, HP-qualified, SMART* capable, SATA Hard Drives offering data integrity and availability in hotpluggable models. HP 3.5" and Small Form Factor (2.5") SATA drives
Overview HP offers a variety of tested, HP-qualified, SMART* capable, SATA Hard Drives offering data integrity and availability in hotpluggable models. HP 3.5" and Small Form Factor (2.5") SATA drives
HPE Synergy Image Streamer 4.0 User Guide
 HPE Synergy Image Streamer 4.0 User Guide Abstract This guide describes the Image Streamer architecture, features, interfaces, and working environment. It describes the server deployment process using
Imaging the HP Z240 Workstation
 Technical white paper Imaging the HP Z240 Workstation with Windows 10 Pro (64-bit) and Microsoft Deployment Toolkit (MDT) 2013 v1.2 A system image enables you to automate the deployment of computers in
HPE Data Replication Solution Service for HPE Business Copy for P9000 XP Disk Array Family
 Data sheet HPE Data Replication Solution Service for HPE Business Copy for P9000 XP Disk Array Family HPE Lifecycle Event Services HPE Data Replication Solution Service provides implementation of the HPE
Configuring the HP StorageWorks Modular Smart Array 1000 and 1500cs for external boot with Novell NetWare New Installations
 Technical Note Revised October 2006 Prepared by: Network Storage Solutions Hewlett Packard Company Contents Configuring the StorageWorks MSA1000 and MSA1500cs for External Boot with NetWare Considerations...3
Disaster Recovery Guide for Windows 2008 and RHEL 5.x platforms with external disk support
 Disaster Recovery Guide for Windows 2008 and RHEL 5.x platforms with external disk support HP Data Protector 6.11 Technical white paper Table of contents 1. Assisted Manual Disaster Recovery... 2 2. Overview
CIT 470: Advanced Network and System Administration. Topics. Workstation Management. Workstations
 CIT 470: Advanced Network and System Administration Workstations CIT 470: Advanced Network and System Administration Slide #1 Topics 1. Machine Lifecycle 2. Automated Installs 3. Updates 4. Network Configuration
DUAL OS INSTALLATION
 Ex.No:15 Date: DUAL OS INSTALLATION Aim: To install and configure Ubuntu OS alongside Windows as installing dual OS. PROCEDURE: 1. Backup your Windows partition To open the Dell Backup and Recovery software
CompTIA Linux+ Guide to Linux Certification Fourth Edition. Chapter 2 Linux Installation and Usage
 CompTIA Linux+ Guide to Linux Certification Fourth Edition Chapter 2 Linux Installation and Usage Objectives Prepare for and install Fedora Linux using good practices Outline the structure of the Linux
ONTAP Select with NVMe Storage
 Technical Report ONTAP Select with NVMe Storage Architecture and Configuration Guide Arvind Jagannath, NetApp September 2017 TR-4625 Abstract This report provides an architecture overview and serves as
HP OpenView Storage Data Protector A.05.10
 HP OpenView Storage Data Protector A.05.10 ZDB for HP StorageWorks Enterprise Virtual Array (EVA) in the CA Configuration White Paper Edition: August 2004 Manufacturing Part Number: n/a August 2004 Copyright
QuickSpecs. Models SATA RAID Controller HP 6-Port SATA RAID Controller B21. HP 6-Port SATA RAID Controller. Overview.
 Overview HP 6 Port SATA RAID controller provides customers with new levels of fault tolerance for low cost storage solutions using SATA hard drive technologies. Models SATA RAID Controller 372953-B21 DA
HP Insight Control for Linux 7.1 User Guide
 HP Insight Control for Linux 7.1 User Guide Abstract This document describes how to set up and use Insight Control for Linux to monitor and manage HP ProLiant servers that were licensed with Insight Control
Z-Drive R4 and 4500 Linux Device Driver
 User Guide Driver Version 4.2 Contents Introduction............................................................................ 3 New features of driver version 4.2...........................................................
Enterprise Linux System Administration
 Enterprise Linux System Administration Course GL250, 5 Days, Hands-On, Instructor-Led Introduction The GL250 is an in-depth course that explores installation, configuration and maintenance of Linux systems.
QLogic iscsi Boot for HP FlexFabric Adapters User Guide
 QLogic iscsi Boot for HP FlexFabric Adapters User Guide Abstract This document is for the person who installs, administers, and troubleshoots servers and storage systems. HP assumes you are qualified in
HP AutoPass License Server
 HP AutoPass License Server Software Version: 9.0 Windows, Linux and CentOS operating systems Support Matrix Document Release Date: October 2015 Software Release Date: October 2015 Page 2 of 10 Legal Notices
HPE BladeSystem c-class Virtual Connect Support Utility Version Release Notes
 HPE BladeSystem c-class Virtual Connect Support Utility Version 1.12.0 Release Notes Abstract This document provides release information for the HPE BladeSystem c-class Virtual Connect Support Utility
Linux Diskless iscsi Boot HowTo ( V1.0)
") Linux Diskless iscsi Boot HowTo ( V1.0) This document describes using the Cisco Linux 3.4.2 iscsi initiator for diskless booting of Red Hat Linux 9 (RH9). EqualLogic has enhanced the initiator to provide
Linux Diskless iscsi Boot HowTo ( V1.0) This document describes using the Cisco Linux 3.4.2 iscsi initiator for diskless booting of Red Hat Linux 9 (RH9). EqualLogic has enhanced the initiator to provide
H7091S. Prerequisites
 Course data sheet Enterprise Linux System Administration (GL250) H7091S HPE course number Course length Delivery mode View schedule, local pricing, and register View related courses Why HPE Education Services?
Insight Control Server Provisioning Capturing and Installing SUSE Enterprise Linux 12 System Images
 Technical white paper Insight Control Server Provisioning Capturing and Installing SUSE Enterprise Linux 12 System Images Table of contents Summary 2 Preparing for image capture 2 Sanitizing server image
Veeam Backup & Replication
 Veeam Backup & Replication Version 9.5 Veeam Agent Management Guide December, 2017 2017 Veeam Software. All rights reserved. All trademarks are the property of their respective owners. No part of this
FUJITSU Software ServerView Suite ServerView Installation Manager
 User Guide - English FUJITSU Software ServerView Suite ServerView Installation Manager Edition June 2017 Comments Suggestions Corrections The User Documentation Department would like to know your opinion
Installation and configuration of Linux Cluster. Addisu Gezahegn University of Trieste ICTP,Trieste
 Installation and configuration of Linux Cluster Addisu Gezahegn University of Trieste ICTP,Trieste asemie@ictp.it What is Cluster computer? It is a single logical unit consisting of multiple computers
environment) and note down the last "End" sector ( as shown in the below example):
 and note down the last End sector ( as shown in the below example):") In this tutorial we'll refer to a practical example of Linux dd command that can be used by system administrators to migrate or clone a Windows Operating System or a Linux OS from a larger HDD partitioned
In this tutorial we'll refer to a practical example of Linux dd command that can be used by system administrators to migrate or clone a Windows Operating System or a Linux OS from a larger HDD partitioned
Virtuozzo 6. Installation Guide. July 19, Copyright Parallels IP Holdings GmbH and its affiliates. All rights reserved.
 Virtuozzo 6 Installation Guide July 19, 2016 Copyright 1999-2016 Parallels IP Holdings GmbH and its affiliates. All rights reserved. Parallels IP Holdings GmbH Vordergasse 59 8200 Schaffhausen Switzerland
Dell OpenManage Deployment Toolkit Version 5.3 Installation Guide
 Dell OpenManage Deployment Toolkit Version 5.3 Installation Guide Notes, cautions, and warnings NOTE: A NOTE indicates important information that helps you make better use of your computer. CAUTION: A
Vertica on Microsoft Azure HPE Vertica Analytic Database. Software Version: 7.2.x
 HPE Vertica Analytic Database Software Version: 7.2.x Document Release Date: 8/29/2016 Legal Notices Warranty The only warranties for Hewlett Packard Enterprise products and services are set forth in the
HP Intelligent Provisioning 2.20 Release Notes
 HP Intelligent Provisioning 2.20 Release Notes HP Part Number: 794361-004b Published: July 2015 Edition: 3 Copyright 2012, 2015 Hewlett-Packard Development Company, L.P. Version: 2.20 Description Supersedes
Exam LFCS/Course 55187B Linux System Administration
 Exam LFCS/Course 55187B Linux System Administration About this course This four-day instructor-led course is designed to provide students with the necessary skills and abilities to work as a professional
Applications Note iscsi Boot Setup
 pplications Note iscsi Boot Setup iscsi Boot Configuration Example Used in this Applications Note iscsi Initiator Windows Server 2003 iscsi Target Linux 1 Release Overview This applications note uses the
Dell EMC OpenManage Deployment Toolkit Version 6.1. Installation Guide
 Dell EMC OpenManage Deployment Toolkit Version 6.1 Installation Guide Notes, cautions, and warnings NOTE: A NOTE indicates important information that helps you make better use of your product. CAUTION:
Storage Profiles. Storage Profiles. Storage Profiles, page 12
 , page 1 Disk Groups and Disk Group Configuration Policies, page 2 RAID Levels, page 6 Automatic Disk Selection, page 7 Supported LUN Modifications, page 8 Unsupported LUN Modifications, page 8 Disk Insertion
System information update for system board replacement events
 System information update for system board replacement events Standard Operating Procedure (SOP) When you replace the system board on the HP Pro Tablet 608 G1, the system s EEPROM is not able to detect
HPE Basic Implementation Service for Hadoop
 Data sheet HPE Basic Implementation Service for Hadoop HPE Technology Consulting The HPE Basic Implementation Service for Hadoop configures the hardware, and implements and configures the software platform,
HP Virtual Connect Enterprise Manager
 HP Virtual Connect Enterprise Manager Data Migration Guide HP Part Number: 487488-001 Published: April 2008, first edition Copyright 2008 Hewlett-Packard Development Company, L.P. Legal Notices Confidential
HPE Intelligent Management Center
 HPE Intelligent Management Center Service Health Manager Administrator Guide Abstract This guide provides introductory, configuration, and usage information for Service Health Manager (SHM). It is for
HPE StoreVirtual OS Update Guide
 HPE StoreVirtual OS Update Guide Abstract This guide is intended for system administrators who are responsible for updating to the latest versions of software for StoreVirtual storage. Part Number: 865551-002
Integrated Smart Update Tools for Windows and Linux Release Notes
 Integrated Smart Update Tools for Windows and Linux Release Notes Version 2.2.0 Abstract This document describes release information about this version of the Integrated Smart Update Tools. This document
Dell OpenManage Deployment Toolkit Version 5.1 Installation Guide
 Dell OpenManage Deployment Toolkit Version 5.1 Installation Guide Notes, cautions, and warnings NOTE: A NOTE indicates important information that helps you make better use of your computer. CAUTION: A
HPE 3PAR OS MU3 Patch 18 Upgrade Instructions
 HPE 3PAR OS 3.1.3 MU3 Patch 18 Upgrade Instructions This upgrade instructions document is for installing Patch 18 on the HPE 3PAR Operating System Software 3.1.3.334 (MU3). This document is for Hewlett
QuickSpecs. HPE Smart Array E208i-p SR Gen10 Controller. Overview
 Overview **For latest information on this product please use HPE Smart Array Gen10 Controllers for HPE ProLiant DL, ML and Apollo Servers ** The, supporting 12Gb/s SAS and PCIe 3.0, is an ideal cost-effective
HPE OneView for Microsoft System Center Release Notes (v 8.2 and 8.2.1)
") Center Release Notes (v 8.2 and 8.2.1) Part Number: 832154-004a Published: April 2017 Edition: 2 Contents Center Release Notes (v 8.2 and 8.2.1)... 4 Description...4 Update recommendation... 4 Supersedes...
Center Release Notes (v 8.2 and 8.2.1) Part Number: 832154-004a Published: April 2017 Edition: 2 Contents Center Release Notes (v 8.2 and 8.2.1)... 4 Description...4 Update recommendation... 4 Supersedes...
HPE 3PAR OS MU3 Patch 97 Upgrade Instructions
 HPE 3PAR OS 3.2.2 MU3 Patch 97 Upgrade Instructions Abstract This upgrade instructions document is for installing Patch 97 on the HPE 3PAR Operating System Software. This document is for Hewlett Packard
Veritas System Recovery 18 Linux Edition: Quick Installation Guide
 Veritas System Recovery 18 Linux Edition: Quick Installation Guide Documentation version: 18 Legal Notice Copyright 2018 Veritas Technologies LLC. All rights reserved. Veritas and the Veritas Logo are
Acronis Storage 2.4. Installation Using PXE
 Acronis Storage 2.4 Installation Using PXE July 18, 2018 Copyright Statement Acronis International GmbH, 2002-2016. All rights reserved. Acronis and Acronis Secure Zone are registered trademarks of Acronis
PARALLELS SERVER 4.0 FOR MAC BARE METAL EDITION README
 PARALLELS SERVER 4.0 FOR MAC BARE METAL EDITION README February 18, 2010 1999-2010 Parallels Holdings, Ltd. and its affiliates. All rights reserved. This document provides the first-priority information
Best Practices When Deploying Microsoft Windows Server 2008 R2 or Microsoft Windows Server 2008 SP2 on HP ProLiant DL980 G7 Servers
 Best Practices When Deploying Microsoft Windows Server 2008 R2 or Microsoft Windows Server 2008 SP2 on HP ProLiant DL980 G7 Servers Technical white paper Table of contents Introduction... 2 OS Support
User Guide. Storage Executive. Introduction. Storage Executive User Guide. Introduction
 Introduction User Guide Storage Executive Introduction This guide describes how to install and use Storage Executive to monitor and manage Micron solid state drives (SSDs). Storage Executive provides the
Ubuntu installation alongside windows 8/8.1 and 10
 Ubuntu installation alongside windows 8/8.1 and 10 Important safety precautions in windows - Before starting the installation process NOTE:1. If you are already using Windows OS in your computer, take
HP ProLiant DL580 Generation 2 and HP ProLiant ML570 Generation 2 Server Hot-Add Memory. July 2003 (Second Edition) Part Number
 Part Number") HP ProLiant DL580 Generation 2 and HP ProLiant ML570 Generation 2 Server Hot-Add Memory July 2003 (Second Edition) Part Number 325398-002 2003 Hewlett-Packard Development Company, L.P. Microsoft and Windows
HP ProLiant DL580 Generation 2 and HP ProLiant ML570 Generation 2 Server Hot-Add Memory July 2003 (Second Edition) Part Number 325398-002 2003 Hewlett-Packard Development Company, L.P. Microsoft and Windows