Advantech Studio Quick Start Manual
|
|
|
- Eric Stevens
- 6 years ago
- Views:
Transcription
1 Advantech Studio Quick Start Manual
2 Advantech Studio Quick Start Manual
3 Initial Setup The WebOIT offers an easy setup feature: It takes three easy steps for your initial setup before use. Take out the Advantech hardware device from it s package and follow the steps below for initial setup: Step 1. Connect the power cord to the Advantech hardware device and plug the other end of the cord into the power outlet. Step 2. Turn the system power on for the first boot. Step 3. Assign a static IP address to your WebLink/WebOIT and use Advantech Studio Development to design your application. Please refer to the hardware specific User s Manual for detailed information about your Advantech hardware device. Advantech Studio Development software and eautomation Quick Start Guide are located on the Advantech eautomation CD along with the Advantech Studio Tutorial and other documentation.
4 Copyright Information Proprietary Notice The manual and software contain confidential information that represents trade secrets of Advantech and may not be copied or disclosed except as provided in the license with Advantech. The information in this manual is subject to change without notice and should not be construed as a commitment by Advantech Co., Ltd. Advantech assumes no responsibility for any errors that may be in this document , Advantech Co., LTD. All Rights Reserved. Version Trademarks Advantech is a registered trademark of Advantech, Co., Ltd. All other brand or product names are trademarks or registered trademarks of their respective holders. Published in Taiwan R.O.C. Advantech Co., LTD. FL.4, No.108-3, Ming-Chuan Rd., Shing Tien City, Taipei, Taiwan R.O.C. TEL : FAX : For more information on this and other Advantech products, please visit our websites at: For technical support and service, please visit our support website at: III
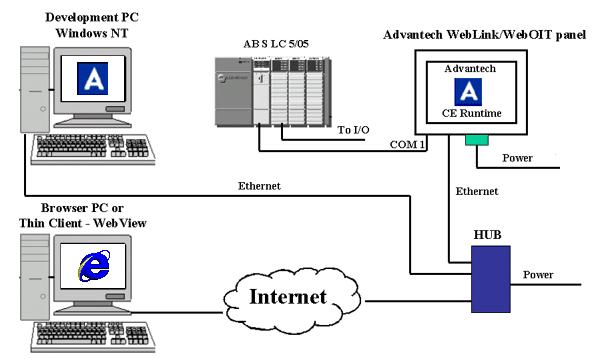
5 Introduction Advantech eautomation products offer powerful solutions to meet the needs of the industrial automation market. eautomation family products offer Webenabled business-to-device connectivity, XML data format support for easy integration with the enterprise, allow remote management and update of all stations, Internet access to the real-time data, alarms, trends, reports and recipies using just an Internet browser, message notification. Advantech WebLink is designed to provide enterprise connectivity with your plant floor systems and remote locations. WebLink can be configured to dial-up using a serial modem when network connection is not available. WebLink is an excellent solution for remote monitoring and legacy device connectivity. Advantech WebOIT is an all-in-one powerful and flexible solution for your operator panel needs. WebOIT comes with the choice of Advantech Automation 6" or 10" Color Touch Panel with pre-installed Windows CE operating system, integrated web server and Advantech Studio runtime HMI/SCADA software. On Advantech eautomation CD you will find: - Advantech Studio HMI/SCADA Software - Advantech Studio Tutorial - Advantech eautomation Quick Start Guide Advantech eautomation Quick Start Guide is intended to assist an application engineer with getting a custom application for Advantech eautomation family products up and running by providing a step-by-step example and useful hints. For detailed information about Advantech Studio please use the Advantech Studio Technical Reference and User s Manual accessible from the Help menu. If you have not done so, please install Advantech Studio software on your Windows NT/98/2000 development PC. Advantech Studio is provided on the eautomation CD along with this Quick Start Guide. IV
6 Please assign a static IP address and modify network settings on your Advantech WebLink/WebOIT target device. While designing a custom application always use the IP address assigned to your target device. </big> Advantech WebLink and WebOIT are featuring an embedded web server technology for easy access to the real-time data over the Internet. To provide such functionality, it is important to have the address of the WebLink/WebOIT static. In other words, the IP address of the device must remain unchanged. The user must obtain a static IP address and the network settings from the network administrator prior to modifying settings on the Advantech device. By default the Advantech WebLink/WebOIT is preconfigured to obtain their IP address via DHCP. Please consult your network administrator if you want to use an obtained IP address as the static IP address of the Advantech device. Please note: If you purchased Advantech WebLink, please use an external monitor and keyboard to configure your device. How to find out the IP address of the Advantech WebLink/WebOIT device? Boot your Advantech WebLink/WebOIT device. Click on the Start button, Run... and type ipconfig in the Run window. The Ipconfig window will display the HostName and Host address, which is an IP address of your device. Click OK to dismiss the window.... modify an IP address? Boot your Advantech WebLink or WebOIT CE device. Follow the steps below: - Click on the Start menu, Settings, Control Panel. - Double click on the Network icon. In the Network Configuration window click on Adapters tab, click on Properties button. - In the Ethernet Card Settings window check the Specify an IP address and enter the appropriate settings for IP addres, Subnet Mask, Default Gateway. - Click on the Name Servers tab and enter the DNS settings. - Click OK in the upper right corner of the window. V
7 - Click OK on the Adapters window. - Click OK on the Network Configuration window. - Click on the Start button, Run... and type regsave in the Run window, click OK. Wait until the regsave will execute and Run window is closed. - Reboot your Advantech WebLink/WebOIT CE device. Steps involved in WebLink/WebOIT setup process: Step 1. Create a new project and design display on Windows NT development PC Step 2. Install and configure communication driver on Windows NT development PC Step 3. Test and debug application on Windows NT development PC Step 4. Create HTML file Step 5. Download and test application on Advantech WebLink/WebOIT panel Step 6. Run Application VI
8 Contents Chapter 1 WebLink/WebOIT demo setup... 1 Chapter 2 Install and configure communication driver on Windows NT development PC Chapter 3 Test and debug application on Windows NT development PC Chapter 4 Create HTML file Chapter 5 Download and test application on Advantech WebLink/WebOIT panel Chapter 6 Run Application VII
9 Figures Figure Figure Figure Figure Figure Figure Figure Figure Figure Figure Figure Figure Figure Figure Figure Figure Figure Figure Figure Figure Figure Figure Figure Figure Figure Figure Figure Figure Figure Figure Figure Figure Figure Figure Figure Figure Figure VIII
10 Figure Figure Figure Figure Figure Figure Figure Figure Figure Figure Figure Figure Figure Figure Figure IX
11 X
12 CHAPTER 1 WebLink/WebOIT demo setup
13 WebLink/WebOIT demo setup 2

14 Step 1. Create a new project and design display on Windows NT development PC Launch Advantech Studio from the Start menu as shown in Figure 1-1. Figure 1-1 Go to the File menu, select New as shown in Figure 1-2. Figure 1-2 In the New dialog box, select Project tab and fill out your application name, select location, in the Target Platform field select WebOIT for WinCE or WebLink target platform as shown in Figure 1-3. Click OK to close the window. Figure 1-3 Advantech Studio Quick Start Manual 3


15 In the Project Wizard window check resolution 640x480, Empty Application as shown in Figure 1-4 and click OK. Figure 1-4 To modify project settings go to the Project menu and select Settings as shown in Figure 1-5. Figure 1-5 In the Project Settings window select Web tab and type an IP address of the Data Server IP address, URL as shown in Figure 1-6 and click OK. It is important to have URL format as shown: The Data Server IP address is an IP address of the computer that is connected to the PLC and where the actual tag values are coming from. It is possible to separate Data Server from the Web Server and have the web pages reside on another computer. Advantech WebLink/WebOIT use the embedded web server technology so your Data Server and web server reside on the same device and have the same IP address. 4


16 Figure 1-6 To create a new display right-click on Screens, click Insert as shown in Figure 1-7. Figure 1-7 Empty display window will appear and your screen should look as shown in Figure 1-8. Figure 1-8 Advantech Studio Quick Start Manual 5

17 Click on the Ellipse icon pointed by the arrow on the right vertical toolbar shown in Figure 1.8 to create a light indicator as shown in Figure 1-9. Rightclick on the circle to bring up its Properties. Figure 1-9 Click on the Color icon pointed by the arrow on the right vertical toolbar as shown in Figure 1-10 Figure 1-10 Now the Object Properties window looks as shown in Figure Figure


18 Click on the RED color square and select DARK BLUE color as shown in Figure Figure 1-12 Click on the GREEN square and select LIGHT BLUE color as shown in Figure Figure 1-13 Fill out Tag/Expression field with tag name BLUE as shown in Figure 1-14 and hit Enter key. Figure 1-14 Advantech Studio Quick Start Manual 7
19 Dialog box will appear as shown in Figure Click Yes. Figure 1-15 Fill out tag properties by modifying type to Boolean as shown in Figure 1-16 and click OK. Figure 1-16 Select Ellipse from the pull-down menu of the Properties window as shown in Figure Figure


20 Modify Fill Color to DARK BLUE as shown in Figure Figure 1-18 Now your display should look as shown in Figure Close Properties window. Figure 1-19 To create a push-button click on the Button icon pointed by the arrow on the right vertical toolbar as shown in Figure Figure 1-20 Advantech Studio Quick Start Manual 9


21 Paste a push-button of desired size on display as shown in Figure 1-21 Figure 1-21 Assign caption BLUE to the button as shown in Figure Figure 1-22 Click on the Command icon pointed by the arrow on the right vertical toolbar as shown in Figure Figure
22 Type tag HMI_BLUE in the Tag field as shown in Figure Click Yes in the question dialog box. Figure 1-24 Modify type of the tag to Boolean as shown in Figure 1-25 Figure 1-25 In the Expression field type NOT HMI_BLUE as shown in Figure Figure 1-26 Advantech Studio Quick Start Manual 11
23 Repeat the procedure to create light indicators for GREEN, YELLOW and RED tags starting from Figure 1-8. Repeat procedure to create push-buttons for HMI_GREEN, HMI_YELLOW and HMI_RED tags starting from Figure Your display should look as shown in Figure Select All circles and click on the Evenly space vertically icon pointed by the arrow on the right vertical toolbar as shown in Figure Select all the push-buttons and click Evenly space vertically. Figure 1-27 Select all the circles and click on the Align Left icon pointed by the arrow on the right vertical toolbar as shown in Figure Select all the pushbuttons and click Align Left. Figure
24 Go to the File menu, Save As... and save your display as Main.scr as shown in Figure Figure 1-29 Advantech Studio Quick Start Manual 13
25 14
26 2 Install and configure communication driver on Windows NT development PC CHAPTER
27 Step 2. Install and configure communication driver on Windows NT development PC In this example we used the Allen Bradley SLC5/05 preconfigured to communicate via the DF1 serial protocol with four digital inputs and four digital outputs. For detailed information on driver configuration please refer to the driver specific documentation located in the \Program Files\Advantech Studio\Drv\ directory. Click on the Comm tab in the project environment, right-click on Drivers and select Add/Remove Drivers as shown in Figure 2-1. Figure 2-1 Highlight ABKE Allen Bradley DF1 serial driver as shown in Figure 2-2 and click Select. Figure


28 Your display should look as shown in Figure 2-3. Click OK to close the window. Figure 2-3 Right click on ABKE under Drivers and select Settings as shown in as shown in Figure 2-4. Figure 2-4 Fill out ABKE communication parameters as shown in Figure 2-5. Make sure that these parameters matches with the PLC parameters. Figure 2-5 Advantech Studio Quick Start Manual 17
29 Right click on ABKE under Drivers and select Insert as shown in Figure 2-6. Figure 2-6 Fill out driver sheet as shown in Figure 2-7. Figure 2-7 Insert and fill out another driver sheet as shown in Figure 2-8. Save All. Figure
30 3 Test and debug application on Windows NT development PC CHAPTER


31 Step 3. Test and debug application on Windows NT development PC Connect Allen Bradley PLC via RS232 serial cable to your Windows NT development PC COM1. Go to the Project menu, select Settings, Runtime Desktop tab and modify Startup Screen to Main as shown in Figure 3-1. Click OK to close the window. Figure 3-1 Go to the Project menu and select Status as shown in Figure 3-2. Figure 3-2 Ensure that your Project status window has the following Execution Tasks Startup Automatically Driver Runtime, TCP/IP Client Runtime, TCP/IP Server as shown in Figure 3-3. Please modify if necessary by clicking on the Startup button and changing to Automatic. Click OK to close the window. 20


32 Figure 3-3 Go to the Project menu and select Run Application as shown in Figure 3-4. Figure 3-4 Your screen should look as shown in Figure 3-5. Figure 3-5 Advantech Studio Quick Start Manual 21

33 After ensuring that your application functions correctly, go to the Project menu and select Stop Application as shown in Figure 3-6. Figure 3-6 Make appropriate changes if necessary. Save All. 22
34 CHAPTER 4 Create HTML file


35 Step 4. Create HTML file To create HTML file, go to the File menu and select Save As HTML as shown in Figure 4-1. Save your application as Main.html. If you have multiple screens, save each screen as HTML with corresponding file name. Figure 4-1 To test your HTML page, double click Main.html under Web Pages as shown in Figure 4-2. Note: Before double clicking on the HTML file, make sure that the application is running, and that the Program Settings are correctly configured to your development station (Data Server IP Address and URL). Figure
36 5 Download and test application on Advantech WebLink/ WebOIT panel CHAPTER
37 Step 5. Download and test application on Advantech WebLink/WebOIT panel Boot the Advantech WebLink/WebOIT panel. CEWebServer and Advantech communication utility CEServer.exe will start automatically. Before starting the application download procedure, configure the Program Settings (Data Server IP Address and URL) according with the CE device characteristics. After that, go to the Tools menu and click on Verify Application. On the Windows NT development PC go to the Project, select Execution Environment as shown in Figure 5-1. Figure 5-1 In the Execution Environment window fill out IP address of the target CE device as shown in Figure 5-2 and click Connect. Figure 5-2 Your Execution Environment window should look as shown in Figure 5-3 with status reporting Connected to CEVIEW. 26

38 Figure 5-3 Select Application tab in the Execution Environment window as shown in Figure 5-4 and click on Send To Target. Figure 5-4 Your display should look as shown in Figure 5-5 while downloading application to the target CE device. Figure 5-5 When done, Execution Environment window should look as shown in Figure 5-6 with status reporting Application was updated with success. Connect Allen Bradley PLC via RS232 serial cable to the COM1 on the target CE device. Click Run button in the Execution Environment window on your Windows NT development PC to start application on the Advantech WebLink/WebOIT panel. Advantech Studio Quick Start Manual 27


39 Figure 5-6 Status should change to Application was started is shown in Figure 5-7. Figure 5-7 Server. Go to Tools, Verify application. Save all. Should you still have difficulty please contact Advantech support. Back to the top Thank you Advantech eautomation Product Team 28
40 CHAPTER 6 Run Application
41 Step 6. Run Application On desktop PC: Open Internet Explorer 5.0 and type URL Main.html as shown in Figure 6-1. Warning! To browse ActiveX controls, IE security must be set to LOW. Figure 6-1 Basic troubleshooting hints: 1. Make sure that the application itself is functioning properly. 2. Stop application. Save all the screens as HTML pages (use the Save As HTML under File menu ). 3. Open Project Settings, under the Web tab and check IP address of your server, enter the URL as The last forward slash is important. 4. Under Tools menu, verify application. 5. Restart your application. If your Internet Explorer 5.0 still can t find the page then make sure you can ping the IP address of the target device. If you can get the page but only see a large grey rectangle your system probably cannot install and register ISSymbol.ocx in your system32 file folder. Go to command prompt, change directory to system32, and run regsvr32.exe ISSymbol.ocx. System should report success. 30
42 If you can see graphics but no tag values then you need to go to the tag database in Database tab of the project, double click on Application tags, Datasheet view and change the setting in the last column from Local to Server. Go to Tools, Verify application. Save all. Should you still have difficulty please contact Advantech support. Thank you Advantech eautomation Product Team Advantech Studio Quick Start Manual 31
43 32
DSL-G624T. Wireless ADSL Router. If any of the above items is missing, please contact your reseller. This product can be set up using any
 This product can be set up using any current web browser, i.e., Internet Explorer 6x or Netscape Navigator 7x. DSL-G624T Wireless ADSL Router Before You Begin 1. If you purchased this Router to share your
READ ME FIRST. Windows NT. *DSL Equipment Installation Guide: Efficient Networks 5260
 READ ME FIRST Windows NT *DSL Equipment Installation Guide: Efficient Networks 5260 *Digital Subscriber Line Part Number: 5260NT02A Version 1.2-A. Table of Contents Follow Steps 1 through 8 to complete
Windows XP ResNet Installation Guide
 Windows XP ResNet Installation Guide 1.) Connecting Your Computer to the Network: What you need: a) An Ethernet card - Also called a network interface card (NIC). This may be already installed, or built-in
SETTING UP NETWORKING FOR LOOKOUT 4.0
 NOTE TO USER SETTING UP NETWORKING FOR LOOKOUT 4.0 Contents Testing TCP/IP Capability The purpose of this document is to help you with basic configuration of your computers in order to run Lookout 4. This
MachineShop Supplemental Installation
 MachineShop Supplemental Installation Welcome to the MachineShop Supplemental Installation. This document explains how to install network communication software for MachineShop, including TCP/IP, a modem,
Wireless PC Network Settings
 APPENDIX C This appendix provides instructions for changing the TCP/IP and radio card settings in your wireless PC. Choose the instructions appropriate for your operating system. Here is what you will
I m InTouch Installation Guide for the DSL/Cable environment with a Linksys router Models: BEFSRU31, BEFSR41 V.2, BEFSR11
 I m InTouch router configuration p. 1 I m InTouch Installation Guide for the DSL/Cable environment with a Linksys router Models: BEFSRU31, BEFSR41 V.2, BEFSR11 Note: Different models may vary slightly
Import Tool for PanelBuilder
 Contents Contents IMPORT TOOL FOR PANELBUILDER... 3 Importing a PanelBuilder application... 4 Adding a Generic / Text Only printer...4 Generating a PanelBuilder application report...5 Using the Import
MFC790CW Windows Network Connection Repair Instructions
 Difficulty printing from your PC can occur for various reasons. The most common reason a networked Brother machine may stop printing, is because the connection between the computer and the Brother machine
EDS8/16/32PR Quick Start Guide
 Quick Start Guide 2007 Copyright Lantronix is a trademark of Lantronix. All rights reserved. 900-458 Rev. B 01/07 QUICK START GUIDE CONTENTS What s In the Box..........................................................2
P964 APR 964 Cable Router with 11g AP Quick Installation Guide VER. 1.0
 P964 APR 964 Cable Router with 11g AP Quick Installation Guide VER. 1.0 CABLE POWER PORT LAN1~LAN4 Rear Panel Connections CONNECTION Connect the F-type connector to the CATV outlet using a coaxial cable.
Windows Me Plug-and-Play
 LAB PROCEDURE 18 Windows Me Plug-and-Play OBJECTIVES 1. Remove Network Adapter from the system. 2. Install Network Adapter with Plug-and-Play (PnP). 3. Remove modem. 4. Install modem with Plug-and-Play
ES1624 MFP Setup and Installation Guide
 ES1624 MFP Setup and Installation Guide Installation Overview Notes, Cautions, and Warnings...4 Select Location...4 Checking Package Contents...4 Scanning Unit... 4 Printing Unit... 4 Setting Up the Printing
Troubleshooting Can not access the router on
 Troubleshooting Can not access the router on 192.168.0.1 Please note that when accessing the router s Web interface via http://192.168.0.1 you are not accessing some web site on the Internet. The router
X Series & V5 Application Note 18:
 X Series & V5 Application Note 18: Networking Paperless Recorders & Sharing Data Background The networking of electronic data recorders provides the opportunity to share data with other users, whether
InTouch Machine Edition Import Tool for PanelMate. Users Guide.
 InTouch Machine Edition Import Tool for PanelMate Users Guide www.schneider-electric.com Page 2 of 16 InTouch Machine Edition Import Tool for PanelMate Contents Contents... 3 Introduction... 4 Import Wizard
Gateway for EIP - DF1 Allen-Bradley PLC
 1 Purpose This application note describes how to set up a remote collaboration. A remote collaboration consists in configuring, programming or monitoring a PLC from a remote location, without the need
C5100 Computer Connections & Software Install Guide
 C5100 Computer Connections & Software Install Guide Installation Checklist Network Install: Hardware...4 Connect to the Network Port...4 Network Install: Software...5 TCP/IP...5 Local Install: USB, Hardware...7
Procomm Plus Installation Guide. Prophet 21 FASPAC 4.1
 Procomm Plus Installation Guide Prophet 21 FASPAC 4.1 The documentation in this publication is provided pursuant to a Sales and Licensing Contract for the Prophet 21 System entered into by and between
AT&T Digital Subscriber Line Service
 AT&T Digital Subscriber Line Service Windows 2000 Professional PC Configuration Guide Overview Welcome to AT&T DSL Internet Service! This guide is designed to help you configure your PC to access the Internet
Getting Started with ESX Server 3i Installable Update 2 and later for ESX Server 3i version 3.5 Installable and VirtualCenter 2.5
 Getting Started with ESX Server 3i Installable Update 2 and later for ESX Server 3i version 3.5 Installable and VirtualCenter 2.5 Getting Started with ESX Server 3i Installable Revision: 20090313 Item:
READ ME FIRST Windows 98/ME/2000
 READ ME FIRST Windows 98/ME/2000 *DSL Equipment Installation Guide: Alcatel Speed Touch PC *Digital Subscriber Line Part Number: AlcatelPC9x02A Version 1.2-A Table of Contents Follow Steps 1 through 7
Xantic (Station 12) WebLink User Manual for Windows 98, Internet Explorer 5.0 and Outlook Express 5.0 Text only
 WebLink User Manual for Windows 98, Internet Explorer 5.0 and Outlook Express 5.0 Text only") Xantic (Station 12) WebLink User Manual for Windows 98, Internet Explorer 5.0 and Outlook Express 5.0 Text only 1. Introduction... 2 1.1. Getting Started... 2 1.2. Required hardware... 2 1.3. Required
Xantic (Station 12) WebLink User Manual for Windows 98, Internet Explorer 5.0 and Outlook Express 5.0 Text only 1. Introduction... 2 1.1. Getting Started... 2 1.2. Required hardware... 2 1.3. Required
DVG-2001S VoIP Terminal Adapter
 This product can be set up using any current web browser, i.e., Internet Explorer 6 or Netscape Navigator 6.2.3. DVG-2001S VoIP Terminal Adapter Before You Begin 1. If you purchased this VoIP Terminal
DCP585CW Windows Network Connection Repair Instructions
 Difficulty printing from your PC can occur for various reasons. The most common reason a networked Brother machine may stop printing, is because the connection between the computer and the Brother machine
Networking the printer
 Networking the printer General networking Networking overview A network is a collection of devices such as computers, printers, Ethernet hubs, wireless access points, and routers connected together for
The following steps will allow you to install and quickly begin using DevCom2000:
 QUICK START DevCom2000 uses Device Descriptions (DDs) to access data stored in the memory of the smart field device. These DDs are developed by the manufacturer for their products and, in turn, distributed
Galileo Print Manager Installation Guide
 Galileo Print Manager Installation Guide 24 November 2003 Copyright 2003 Galileo International. All rights reserved. Information in this document is subject to change without notice. The software described
READ ME FIRST Windows 95/98/Me/2000
 READ ME FIRST Windows 95/98/Me/2000 *DSL Equipment Installation Guide: Efficient Networks 5260 *Digital Subscriber Line Part Number: 52609X02 Version 1.2 Table of Contents Follow Steps 1 through 8 to complete
USB to Serial Converter User s Guide
 USB to Serial Converter User s Guide Important Note! In order to minimize possible installation problems and/or resource conflicts: Read Me First! About This User s Guide This User s Guide is designed
ez80190 Development Kit Quick Start Guide
 Introduction Follow this guide to install and begin using your new ez80190 Development Kit from ZiLOG. The setup procedure guides the user through: Software installation and online registration Hardware
DocuPrint C55/C55mp Quick Network Install Guide
 DocuPrint C55/C55mp Quick Network Install Guide Windows for Workgroups / Windows 95 Peer-to-Peer Network Windows NT 3.5X Network Windows NT 4.X Network Macintosh EtherTalk/TokenTalk Network Novell NetWare
Win Studio/InduSoft Web Studio Technical Reference Manual
 Win Studio/InduSoft Web Studio Technical Reference Manual Version Win Studio/InduSoft Web Studio Technical Reference Manual 2001 by Robert Bosch GmbH, All rights reserved, including applications for protective
Lab: Install a NIC in Windows XP
 11.4.1 Lab: Install a NIC in Windows XP Introduction Print and complete this lab. In this lab, you will install a NIC, verify NIC operation, and manually configure an IP address. Recommended Equipment
Part # Quick-Start Guide. SpeedStream Residential Gateway 5450 Four-Port Router
 Part # 007-6560-001 Quick-Start Guide SpeedStream Residential Gateway 5450 Four-Port Router Before you begin, Verify that the following items came with your DSL kit: 1 SpeedStream Device 2 Documentation
Hardware Installation Guide Installation (x3350)
") Title page Nortel Application Gateway 2000 Nortel Application Gateway Release 6.3 Hardware Installation Guide Installation (x3350) Document Number: NN42400-300 Document Release: Standard 04.03 Date: January
Title page Nortel Application Gateway 2000 Nortel Application Gateway Release 6.3 Hardware Installation Guide Installation (x3350) Document Number: NN42400-300 Document Release: Standard 04.03 Date: January
N30 Supervisory Controller Quick Start
 Issue Date June 30, 2004 TECHNICAL BULLETIN N30 Supervisory Controller Quick Start N30 Supervisory Controller Quick Start...2 Introduction... 2 Key Concepts... 3 Using This Document... 3 Related Information...
Quick Setup Guide Imagistics ix 2701
 Quick Setup Guide Imagistics ix 2701 Before you can use the machine, you must set up the hardware and install the driver. Please read this Quick Setup Guide for proper set up and installation instructions.
ProLiant CL380 Software User Guide. Fourth Edition (December 2000) Part Number Compaq Computer Corporation
 Part Number Compaq Computer Corporation") ProLiant CL380 Software User Guide Fourth Edition (December 2000) Part Number 157839-004 Compaq Computer Corporation Notice 2000 Compaq Computer Corporation COMPAQ and the Compaq logo, Compaq Insight Manager,
ProLiant CL380 Software User Guide Fourth Edition (December 2000) Part Number 157839-004 Compaq Computer Corporation Notice 2000 Compaq Computer Corporation COMPAQ and the Compaq logo, Compaq Insight Manager,
NetGator Quick Start Guide
 NetGator Quick Start Guide NetGator is a compact sized standalone system integrating all the real time MPEG and JPEG compression engine, as well as a number of network protocols, including IP multicasting.
ES3640e MFP Software Installation Guide
 ES3640e MFP Software Installation Guide About this Guide This guide describes the initial printer driver installation. For more detailed information, refer to the EFI User Software Installation Guide and
Windows NT 4.x. Preliminary Steps. Quick CD-ROM Install Steps. Phaser 6250 Color Laser Printer
 Windows NT 4.x This topic includes: "Preliminary Steps" on page 3-21 "Quick CD-ROM Install Steps" on page 3-21 "Other Methods of Installation" on page 3-22 "Windows NT 4.x Troubleshooting (TCP/IP)" on
Fiery Installation Instructions for the WorkCentre 7300 Series
 Fiery Installation Instructions for the WorkCentre 7300 Series This document describes how to install and set up the Fiery Network Controller for WorkCentre 7300 Series. IMPORTANT: The complete installation
Workstation Configuration
 Workstation Configuration December 15, 2017 - Version 9.3 - - - - - - - - - - - - - - - - - - - - - - - - - - - - - - - - - - - - - - - - - - - - - - - - - - - - - - - - - - - - - - - - - - - - - - - -
Bluetooth Application Note
 Bluetooth Application Note FCC Interference Statement This equipment has been tested and found to comply with the limits for a Class B digital device pursuant to Part 15 of the FCC Rules. These limits
Windows 95/98 Infoway Connection Instructions 1/4/2002; rev. 1/9/2002
 Windows 95/98 Infoway Connection Instructions 1/4/2002; rev. 1/9/2002 The following are the basic steps for setting up your computer for a PPP connection to the library s Infoway Internet service. A PPP
Lab - Connect to a Router for the First Time
 Introduction In this lab, you will configure basic settings on a wireless router. Recommended Equipment A computer with Windows installed An Ethernet NIC installed Wireless router Ethernet patch cable
BeTwin ES User Manual
 THINSOFT PTE LTD 23, Tai Seng Drive, #06-00, Singapore 535224 - Fax (65) 6289-7308 www.thinsoftinc.com BeTwin ES User Manual Document Version 2.0 1 BeTwin ES User Manual Copyright 2007-2013 ThinSoft Pte
Galileo Print Manager Installation Guide
 Galileo Print Manager Installation Guide 24 November 2003 Copyright 2003 Galileo International. All rights reserved. Information in this document is subject to change without notice. The software described
Workstation Configuration
 Workstation Configuration December 12, 2017 - Version 9.4 - - - - - - - - - - - - - - - - - - - - - - - - - - - - - - - - - - - - - - - - - - - - - - - - - - - - - - - - - - - - - - - - - - - - - - - -
edp 8.2 Info Sheet - Integrating the ediscovery Platform 8.2 & Enterprise Vault
 edp 8.2 Info Sheet - Integrating the ediscovery Platform 8.2 & Enterprise Vault 12.0.1 Date: December 2017 Author: Technical Field Enablement (II-TEC@veritas.com) Applies to: ediscovery Platform 8.x and
Notebook Network Card
 Notebook Network Card Connect your PC to a network or broadband modem network F5D5020 Table of Contents Introduction.........................................1 Installing the Hardware.................................2
TABLE OF CONTENTS. PRELIMINARY SETUP REQUIREMENTS... 1 Minimum Hardware/Software Requirements...1
 Worldspan RemoteLink Setup and Configuration Procedures for Worldspan Go! SM Static IP Address TABLE OF CONTENTS PRELIMINARY SETUP REQUIREMENTS... 1 Minimum Hardware/Software Requirements...1 REQUIRED
Network Quick Install Cards Document Centre 490/480/470/460 ST
 Network Quick Install Cards Document Centre 490/480/470/460 ST This package contains Quick Install Cards that will help you connect the Document Centre to your network and install E-mail. Please read and
Owners Manual. HF Online Data Acquisition System
 Owners Manual HF Online Data Acquisition System 3170 Metro Parkway Fort Myers, FL 33916-7597 Phone: 239-337-2116 Fax: 239-332-7643 Email: info@hfscientific.com Catalog No. 22838 (8/02) Rev 2.3 Table of
Communication Driver DCON
 Communication Driver DCON Index Driver for serial communication (RS-232) and W-8x3x embedded controller with ICP-DAS modules from the DCON (I-7000, I-8000 and I-87K) families device 1. Introduction...
Workstation Configuration Guide
 Workstation Configuration Guide August 13, 2018 Version 9.6.134.78 For the most recent version of this document, visit our documentation website. Table of Contents 1 Workstation configuration 4 1.1 Considerations
ETOR-4 Ethernet/Serial Gateway ETOR-4. Ethernet/Serial Gateway USER MANUAL
 ETOR-4 Ethernet/Serial Gateway USER MANUAL 1 TABLE OF CONTENTS SECTION 1 GENERAL INFORMATION...6 SECTION 2 INSTALLATION...9 2.1 Definitions on ETOR... 9 2.2 Configuring ETOR...10 2.3 Required Installations
CS 356 Lab #1: Basic LAN Setup & Packet capture/analysis using Ethereal
 CS 356 Lab #1: Basic LAN Setup & Packet capture/analysis using Ethereal Tasks: Time: 2:00 hrs (Task 1-6 should take 45 min; the rest of the time is for Ethereal) 1 - Verify that TCP/IP is installed on
DBT-120 Bluetooth USB Adapter
 DBT-120 Bluetooth USB Adapter Rev.2.1 (09/25/2002) 2 Contents Introduction... 5 Package Contents... 6 Installing Bluetooth Software... 6 Hardware Installation... 8 Introduction to Bluetooth Software...
Bridge Cable User s Guide
 Bridge Cable User s Guide Table of Contents Overview -------------------------------------------------------------------- 2 Driver Installation --------------------------------------------------------
8 TS4-DDH T i g e r S t o p M a n u a l D a t a D o w n l o a d i n g. May 2006 Version 3.5 ~ 4.72 Hardware
 8 TS4-DDH T i g e r S t o p M a n u a l D a t a D o w n l o a d i n g May 2006 Version 3.5 ~ 4.72 Hardware Installation & User s Guide ESC Ethernet-to-Serial Converter SX Serial Extender IMPORTANT! TigerStop
Installation Guide. Getting Started with MaxAttach NAS 6000 Rack Mount Base Unit Systems
 Installation Guide Getting Started with MaxAttach NAS 6000 Rack Mount Base Unit Systems MaxAttach NAS 6000 Getting Started Document Revision Information Document Title: Getting Started with MaxAttach NAS
ProjectorNetTM Adapter Quick Start Guide
 ProjectorNetTM Adapter Quick Start Guide Adapter networking 1. Quick Start The ProjectorNet Adapter kit contains the following items: ProjectorNet Serial to Ethernet Adapter Cable Adapter, ProjectorNet
Roger D. Secura
 Roger D. Secura rsecura@ix.netcom.com HOW TO SETUP AN AD-HOC PEER-TO-PEER NETWORK BETWEEN ONE WINDOWS XP DESKTOP COMPUTER AND ONE WINDOWS 7 LAPTOP COMPUTER USING TWO RALINK USB WIRELESS ADAPTERS NOTE:.
Connecting the DI-804V Broadband Router to your network
 Before you begin Make sure that any existing Firewall Software/Devices are disabled and/or shutdown before beginning installation of your new D-Link DI-804V Broadband Router. Contents of Package DI-804V
Windows 2000 Safe Mode
 LAB PROCEDURE 29 Windows 2000 Safe Mode OBJECTIVES 1. Restart and try various startup options. RESOURCES Troubleshooting 1. Marcraft 8000 Trainer with Windows 2000 installed 2. A PS2 mouse 3. A LAN connection
User Manual. Unpacking and Setup
 User Manual USB Print Server LPV2-USB-TX1 Unpacking and Setup This section provides unpacking and setup information for the USB Print Server. Unpacking Open the shipping carton of the Switch and carefully
Laser Printer P2500. Quick Setup Guide. Read this Setup Guide before you set up the printer.
 Laser Printer P2500 Quick Setup Guide Read this Setup Guide before you set up the printer. Before you can use the printer, you must set up the hardware and install the printer and scanner drivers. Identify
BullsEye Digital Voice Toolbar Quick Reference Guide
 This guide will help you get started using your BullsEye digital voice services, and in particular, the Digital Voice Toolbar. INTRODUCING THE DIGITAL VOICE TOOLBAR Similar to the Digital Voice Call Manager,
Setup and Configuration of the Interact 6.X Allen Bradley Ethernet Driver to a single or Multiple SLC5/05(s)
") Note: ABEN Configuration Product: Allen Bradley Ethernet Driver Application Date: 9/19/00 Note While precautions have been taken in the preparation of this note, CTC and the author assume no responsibility
Note: ABEN Configuration Product: Allen Bradley Ethernet Driver Application Date: 9/19/00 Note While precautions have been taken in the preparation of this note, CTC and the author assume no responsibility
Windows Based Open Terminal Multi-Version Installation and Setup with SAM2. With Squirrel Version 6.0+ September 18, 2012
 Windows Based Open Terminal Multi-Version Installation and Setup with SAM2 With Squirrel Version 6.0+ September 18, 2012 SAM2 Multi Version Open Terminal Record of Revisions Date Reference: Page, Paragraph
Cisco 831 Router and Cisco SOHO 91 Router Cabling and Setup Quick Start Guide
 CHAPTER 1 Cisco 831 Router and Cisco SOHO 91 Router Cabling and Setup Quick Start Guide Cisco One-Year Limited Hardware Warranty Terms Check Items Shipped with the Router Connect the Router Try to Connect
Sharing Data between Applications Connecting 2 PC s running ic/icontrol
 Sharing Data between Applications Connecting 2 PC s running ic/icontrol To connect two PC s running ic or icontrol products, you must have an Ethernet connection between them. The common situations are:
Wireless 300N 3G quick install
 Wireless 300N 3G Router quick install guide Model 524681 INT-524681-QIG-0809-01 introduction Thank you for purchasing the INTELLINET NETWORK SOLUTIONS Wireless 300N 3G Router, Model 524681. This quick
READ ME FIRST Windows 95/98/Me/2000
 READ ME FIRST Windows 95/98/Me/2000 *DSL Equipment Installation Guide: Efficient Networks 5260 *Digital Subscriber Line Part Number: 52609x02 Version 1.2-A Table of Contents Follow Steps 1 through 8 to
OKIFAX 5650 MFP Option Kit. Overview. Setup Guide
 OKIFAX 5650 MFP Option Kit Overview Setup Guide Every effort has been made to ensure that the information in this document is complete, accurate, and up-to-date. The manufacturer assumes no responsibility
If your machine is not connected to any network, you can configure the Microsoft Loopback Adapter to simulate a network connection.
 Getting Started Important notes Before you launch RPA Express, make sure to enable network connection on your machine. To use RPA Express, connection to the Internet is not needed. Though, some components
Neighborhood HiSpeed Quick Start Guide
 Neighborhood HiSpeed Quick Start Guide Before you begin: Thank you for choosing Neighborhood HiSpeed. We have set up your HiSpeed service on the phone number identified in your Neighborhood Welcome kit.
ControlLogix OPC Driver Agent Help OPC Server Driver Agent for ControlLogix Controllers
 ControlLogix OPC Driver Agent Help OPC Server Driver Agent for ControlLogix Controllers Version 9 CONTROLLOGIX OPC DRIVER AGENT HELP For ControlLogix Programmable Controllers Version 9 Copyright 1994-2017,
Lab: Install a NIC
 11.4.1 Lab: Install a NIC Introduction Print and complete this lab. In this lab, you will install a NIC, verify NIC operation, and manually configure an IP address. Recommended Equipment Computer running
WSDA User Guide
 User Guide Version 8500-0029 rev. 006 WSDA -1000 User Guide www.microstrain.com Little Sensors, Big Ideas. 2012 by 459 Hurricane Lane, Suite 102 Williston, VT 05495 Phone 802-862-6629 Fax 802-863-4093
Workstation Configuration
 Workstation Configuration September 22, 2015 - Version 9 & 9.1 - - - - - - - - - - - - - - - - - - - - - - - - - - - - - - - - - - - - - - - - - - - - - - - - - - - - - - - - - - - - - - - - - - - - -
smar Specifications and information are subject to change without notice. Up-to-date address information is available on our website.
 smar www.smar.com Specifications and information are subject to change without notice. Up-to-date address information is available on our website. web: www.smar.com/contactus.asp Introduction INTRODUCTION
Please take the time now to check the contents of your package: HPS12U Print Server One CD-ROM Quick Installation Guide One power adapter
 Congratulations on purchasing Hawking s HPS12U 1-Port Parallel + 2 USB Ports 10/100M Internet Print Server. The Hawking HPS12U is a powerful and convenient network printing solution that will connect your
PRPC Personal Edition Installation Guide 6.3 SP1
 PRPC Personal Edition Installation Guide 6.3 SP1 Copyright 2012 Pegasystems Inc., Cambridge, MA All rights reserved. This document describes products and services of Pegasystems Inc. It may contain trade
Mobile Physician Desktop
 Mobile Physician Desktop Installation and Configuration Guide Version 4.5 Copyright 2000-2004 Vianeta Communications all rights reserved This manual contains Vianeta trade secrets, and is intended solely
Installation and Upgrade Guide Zend Studio 9.x
 Installation and Upgrade Guide Zend Studio 9.x By Zend Technologies, Inc. www.zend.com Disclaimer The information in this document is subject to change without notice and does not represent a commitment
AutomaTech Application Note July 2015
 Installing Active Directory Domain Services (AD DS), Remote Desktop Services (RDS), GE Advantage Licensing, and GE Proficy SCADA Thin Clients on Windows Server 2012 R2 SUMMARY This application note provides
Windows 2000/XP Network
 This section provides installation and troubleshooting steps for Windows 2000/XP: Preliminary steps see page 23. Quick CD-ROM install steps see page 23. Other methods of installation see page 24. Quick
IP Power 9258 HP User Manual Firmware Version: 1.1 Date Released: 09/16/2009
 IP Power 9258 HP User Manual Firmware Version: 1.1 Date Released: 09/16/2009-1 - Warning: Any changes made to this equipment without permission may cause damages to the device! IMPORTANT NOTICE 1. IP Power
WL5041 Router User Manual
 TECOM WL5041 Router User Manual TECOM CO., LTD. March 2003 2003 by TECOM CO., LTD. All rights reserved. Printed in Taiwan Table of contents Package Contents--------------------------------------- 2 Installing
User Manual PDUTracker
 User Manual PDUTracker Management Software for PDU Table of Contents 1. Overview... 1 1.1. Introduction... 1 1.2. Features... 1 2. Install and Uninstall... 1 2.1. System Requirement... 1 2.2. Software
TwinCAT Remote Communication From WinCE Devices. I. Introduction. II. System Architecture. Remote PC. WinCE device. CEView. TCP/IP TwinCAT runtime
 TwinCAT Remote Communication From WinCE Devices I. Introduction The aim of this document is to describe the procedure to establish communication between an InduSoft application running under a Windows
CellSync Manager. User Manual F8V7D006-SS F8V7D008-SS. Get online and synchronize anywhere. Web Access. Phone Book Manager
 CellSync Manager Get online and synchronize anywhere Web Access Phone Book Manager User Manual F8V7D006-SS F8V7D008-SS TABLE OF CONTENTS Introduction...2 Interactive Phone Menu...3 LG 5350 CellSync Software
User's Manual V 32.0
 User's Manual V 32.0 Trademark Acknowledgements Ford is a registered trademark of Ford Motor Company. Copyright Information DBS User s Manual. 2003, 2004 Ford Motor Company All rights reserved. The information,
EtherNet/IP Configuration for a Moxa MGate 5105-MB-EIP and an Allen-Bradley CompactLogix L32E. Copyright 2013 Moxa Inc Released on July 15, 2013
 a Moxa MGate 5105-MB-EIP and an Allen-Bradley CompactLogix L32E Contents Moxa Technical Support Team support@moxa.com 1. Introduction... 2 2. Applicable products... 2 3. System requirements... 2 4. System
ELECTRONICS. Printed in Korea Code No.: GH A English. 06/2001. Rev.1.0. World Wide Web
 The Best Global Communication!... By SAMSUNG * Some of the contents in this manual may differ from your phone, depending on the software installed or your service provider. SGH-Q100 Samsung GPRS Wizard/
RoadRunner 24AP(i+) Recovering Tool Instructions
 Recovering Tool Instructions") RoadRunner 24AP(i+) Recovering Tool Instructions Ver. 1.0 Follow these instructions if your modem do not boot. If you have questions or problems using this modem build in recovering tool, please contact
RoadRunner 24AP(i+) Recovering Tool Instructions Ver. 1.0 Follow these instructions if your modem do not boot. If you have questions or problems using this modem build in recovering tool, please contact
installation manual SALES AND ADMINISTRATION (toll free)
") installation manual SALES AND ADMINISTRATION 800.637.2645 (toll free) 217.442.0611 sales@timeomatic.com TECHNICAL SUPPORT 866.637.2645 (toll free) service@timeomatic.com www.watchfiresigns.com Quick Start-Up
installation manual SALES AND ADMINISTRATION 800.637.2645 (toll free) 217.442.0611 sales@timeomatic.com TECHNICAL SUPPORT 866.637.2645 (toll free) service@timeomatic.com www.watchfiresigns.com Quick Start-Up