Print Audit 6. Print Audit 6 Documentation Apr :07. Version: Date:
|
|
|
- Marcus Blankenship
- 6 years ago
- Views:
Transcription
1 Print Audit 6 Version: Date: Apr :07
2 Table of Contents Browse Documents: Database Documentation Installation Print Audit 6 Manual Print Audit 6 Security Overview Print Audit 6 Technical Overview
3 There are a number of documents to help you with your Print Audit 6 implementation. Use the links below to find help for Installation, Database configuration, or general product use. Also remember that you can browse our Knowledge Base for additional help. 3


4 Browse Documents: Browse Other Product Documentation: Print Audit 6 Facilities Manager Print Audit Secure Rapid Assessment Key Embedded for Sharp Embedded for Kyocera Mita Embedded for Lexmark Copy Audit Touch Copy Audit Numeric 4
5 Database Documentation Browse Documents: 5
6 Moving Print Audit 6 and a SQL 2005 Express Database to a New Server Below are steps to move Print Audit 6 and a SQL Server 2005 Express database to a new server. Basic Steps Install SQL Server 2005 Express on the new server. Install Print Audit 6 on the new server without creating a new database. Move the SQL Server 2005 Express database from the old server to the new server. 4. Reconfigure the Client workstations to point to the new server. Step #1 Install SQL Server 2005 Express on the new server Follow the instructions in the link below to install SQL Server 2005 Express for Print Audit 6. The instructions include the steps to install Print Audit 6, refer to the notes below for Step #2 before proceeding with the installation. Print Audit 6 SQL Server 2005 Express Installation Guide Step #2 Install Print Audit 6 on the new server without creating a new database Refer to the instructions included in the document above to complete the installation. The only difference when you are installing Print Audit 6 on the new server is that you do not want to create a new database in Step #14. NOTE: Ensure that you download the most recent version of Print Audit 6 from the link below: Print Audit 6 Free Trial Download Step #3 Move the SQL Server 2005 Express database from the old server to the new server Use the following instructions to detach the database from the old server, move the files to the new server and then attach the database on the new server. Stop the Database Communicator on this computer by going to the services or by right clicking the icon in the system tray. To detach a database from SQL Server 2005 Express: a. Open the Microsoft SQL Server Management Studio Express program (the link to install this program is included in the SQL Server 2005 Express Installation instructions above) 6

7 b. Click the plus sign on Databases on the left side and locate the database. The database is 'SQLExpress' by default, the database in the example below is ' PRINTAUDIT'. 7
8 c. Right click on the appropriate database and then choose Tasks, Detach. You will see the following window: 8

9 d. If there are open connections, you may have to close them before you can continue. Follow the instructions below to do this: i. ii. iii. iv. v. vi. vii. Cancel the Detach Database screen. Click the plus sign beside Management. Double click the Activity Monitor and you will see the screen below: Locate the entries listed for the applicable database, PRINTAUDIT in this example. Right click the line and choose 'Kill Process' Once there are no connections open for the database, close this window and repeat Step C above Click the OK button when you are ready to proceed. There are two files created when you detach the database. By default, the database file will be named 'SQLExpress.mdf' and the log file is 'SQLExpress.log.ldf'. In our example it would be 'PRINTAUDIT.mdf' and 'PRINTAUDIT_log.ldf'. These files will be located in the following location: C:\Program Files\Microsoft SQL Server\MSSQL.2\MSSQL\Data (Please note this location may differ on your computer.) Move the files to the same folder on the new server 9

10 4. To attach a database on the new computer: a. b. c. d. Open the Microsoft SQL Server Management Studio Express program (the link to install this program is included in the SQL Server 2005 Express Installation instructions above) Right click on 'Databases' and choose 'Attach' from the menu. You will see the screen below: Click the Add button and browse the following location to find the 'SQLExpress.mdf', (' PRINTAUDIT.mdf') file and then click OK: C:\Program Files\Microsoft SQL Server\ MSSQL.2\MSSQL\Data Click the OK button to attach the database and associated log file. 5. Start the Database Communicator on the new server. You will have to enter the correct database information for the new server. Step #4 - Reconfigure the Client workstations to point to the new server There are a few different options to reconfigure the Client workstations to point to the new server. The best method would be the same method used to initially deploy the Client. You will have to create a new Network Installation package and then deploy it. Please see the following document for more information on creating a Network Installation: Print Audit 6 Network Installation Guide 10
11 You can also use the Print Audit 6 Client Status and Deployment tool to re-point the Client workstations. a. b. c. d. e. Go to the Start Menu, Programs, Print Audit Inc., Advanced Tools and choose Client Status and Deployment. Click the Query button and enter the domain or workgroup name to query the domain. You can now select multiple workstations and choose 'Change Database Communicator Location' from the Push menu. Enter the computer name or IP address of the new server and then choose Update. Either reboot the workstation or have the user logoff and log back in for the change to take effect. The last option is to update each Client manually. a. b. c. d. e. Go to a Client workstation. Open My Computer Browse to C:\Program Files\Print Audit Inc\Print Audit 6\Client and double click the ' PA6CCUTL.EXE' file. Enter the computer name or IP address of the new server and then choose OK. Either reboot the workstation or have the user logoff and log back in for the change to take effect. Moving Print Audit 6 with Access to a New Server The following are steps to move Print Audit 6 and a Microsoft Access database to a new server. Basic Steps Install Print Audit 6 on the new server without creating a new database. Move the Access database from the old server to the new server. Reconfigure the Client workstations to point to the new server. Step #1 Install Print Audit 6 on the new server (without a new database) Refer to the Step by Step Walkthrough installation instructions to complete the installation. The only difference when you are installing Print Audit 6 on the new server is that you do not want to create a new database in Step #6. NOTE: Ensure that you download the most recent version of Print Audit 6 from the Print Audit website. 11
12 Step #2 Move the database to the new server Use the following instructions to move the database files from the old server to the new server. On both the old and the new servers, stop the Database Communicators by going to Windows services or by right clicking the icon in the system tray. There are two files created when you install a Microsoft Access database. By default, the database files will be named 'PA6DB.MDB' and 'PA6DB.MDW' and are located in the My Documents folder of the user who did the install. Move the files from the old server to the same folder on the new server (you may need to create a folder if the files are located in a different location than listed above). On the new server, start the Database Communicator. You will have to browse and locate the 'PA6DB.MDB' file. Step #3 - Point the Client workstations to the new server There are a few different options to reconfigure the Client workstations to point to the new server. The best method would be the same method used to initially deploy the Client. You will have to create a new Network Installation package and then deploy it. Please see the Print Audit 6 Network Installation instruction for more information on creating a Network Installation. You can also use the Print Audit 6 Client Status and Deployment tool to re-point the Client workstations. a. b. c. d. e. Go to the Start Menu, Programs, Print Audit Inc., Advanced Tools and choose Client Status and Deployment. Click the Query button and enter the domain or work group name to query the domain. You can now select multiple workstations and choose 'Change Database Communicator Location' from the Push menu. Enter the computer name or IP address of the new server and then choose Update. Either reboot the workstation or have the user log off and log back in for the change to take effect. The last option is to update each Client manually. a. b. c. Go to a Client workstation. Open My Computer Browse to C:\Program Files\Print Audit Inc\Print Audit 6\Client and double click the ' PA6CCUTL.EXE' file. d. Enter the computer name or IP address of the new server and then choose OK. 12
13 e. Either reboot the workstation or have the user log off and log back in for the change to take effect. 13
14 SQL Server 2005 Express Installation This is a step-by-step guide to install SQL Server 2005 Express Edition. Pre-Requisites There are a few pre-requisites for installing SQL Server 2005 Express Edition. You can view more information and the system requirements for SQL Server 2005 Express Edition by going to and enter SQL Server 2005 Express Requirements. Please note that the MS.Net Framework 0 must be installed prior to installing SQL Server 2005 Express Edition. The link to download this program is available from Microsoft in the System Requirements documentation above. We also recommend ensuring that all Windows Updates have been performed prior to installing SQL Server 2005 Express Edition. Step by Step Instructions Download SQL Server 2005 Express Edition from Microsoft: a. Go to Microsoft's website ( b. Enter 'SQL Server 2005 Express Edition download' in the Search field and click the Search button. c. You will see a screen of results that match the search. Select a result that includes the download and proceed to download the file 'SQLEXPR.EXE'. Double-click the SQLEXPR.exe file to install it: a. Use the default settings for the first few screens until you get to the Authentication Mode screen. Note: You can change the location that you are installing SQL Server 2005 Express to on the Feature Selection screen below by clicking the Browse button in the lower part of the screen. 14

.")
15 b. When you get to the Authentication Mode screen, use "Mixed Mode" Authentication, as shown below: Note: The 'sa' password must pass Microsoft's complexity requirements and cannot contain illegal characters (use letters and numbers, ie. Password1234). Click "Next" and continue the installation using default selections. 15

. 6.")
16 4. Click Install. 5. Once the SQLExpress installation is complete, open the SQL Server Configuration Manager: ( Start -> Programs -> Microsoft SQL Server > Configuration Tools -> SQL Server Configuration Manager). 6. Your default server name (under SQL Server 2005 Services) is SQLExpress and it should be running as shown below. If it is stopped, right click on it and click Start. 16


17 7. Click on the plus sign beside SQL Server 2005 Network Configuration and click on Protocols for SQLEXPRESS. a. Double-click on Named Pipes and Enable it. b. Click OK.Double-click on TCP/IP and Enable it. c. Go to the IP Addresses tab on the TCP/IP Properties window and ensure that the network adapter that you wish to use is Active and Enabled. Click OK. 17


18 d. You should be left with something like the screen below: 8. Restart the SQL Server as outlined below: a. Click on SQL Server 2005 Services. b. Right-click on SQL Server (SQLEXPRESS). c. Click on Restart. d. Close the Configuration Manager. Microsoft SQL Server Management Studio Express Microsoft SQL Server Management Studio Express (SSMSE) provides a graphical management tool for SQL Server 2005 Express Edition. Installing this application is not required, but may be beneficial to maintain SQL Server 2005 Express. For more information or to download this application, go Microsoft's website ( and perform a search for 'SQL Server Management Studio Express'. The download file is 'SQLServer2005_SSMSEE.MSI'. 18

19 SQL Server 2008 Installation Step 1: Download SQL Download SQL Server from Step 2: Confirm Minimum Requirements Download and install Windows Installer 4.5 Download and install Microsoft.Net Framework 5 SP Download and install Windows PowerShell 0. Step 3: Install SQL Choose from: a. b. c. d. SQL Server with tools SQL Server with Advanced Services SQL Server Runtime only SQL Server Express 2008 with Tools Click on Installation 19

20 Select New SQL Server stand-alone installation or add features to an existing installation 4. Click OK 20


21 5. Click Next 6. Accept License Terms and Click Next 21


22 7. Click Install 8. Make sure all tests have passed. Click Next 22


23 9. Select Database Engine Service and Management Tools 10. Click Next 23

24 1 Click Next 24


25 1 Add system administrator password. Click Next Mixed Mode Authentication Add at least one user for System Adminstration. Click Next 25


26 Click Next Click Close. Launch SQL Server Configuration Manager and change Shared Memory, Named Pipes and TCP/IP to Enabled. 26

27 4. Restart SQL Server 27


28 5. Click Next 6. Address any issue. Click Next 28

29 7. Click Install SQL Server 2008 R2 Express Installation This is a step-by-step guide to install SQL Server 2008 R2 Express Edition. Pre-Requisites There are a few pre-requisites for installing SQL Server 2008 R2 Express Edition. You can view more information and the system requirements for SQL Server 2008 R2 Express Edition at the following location: Please note that Windows Installer 4.5, MS.Net Framework 5 SP1, and Windows PowerShell 0 must be installed prior to installing SQL Server 2008 R2 Express Edition. The link to download this program is available from Microsoft in the System Requirements documentation above. We also recommend ensuring that all Windows Updates have been performed prior to installing SQL Server 2008 R2 Express Edition. Downloading and Installing SQL Server 2008 R2 Express Download SQL Server 2008 R2 Express Edition from Microsoft: a. Go to Microsoft's website ( b. Enter 'SQL Server 2008 R2 Express with Tools' in the Search field and click the Search button. 29


30 c. d. Select a search result that includes the download and proceed to download the 32 bit or 64 bit 'SQLEXPRWT_xXX_ENU.EXE' version. Double click the SQLEXPRWT_xXX_ENU.EXE file to install it. Click on Installation in the left pane. Select 'New installation or add features to an existing installation'. 4. Read and accept the license terms, then click "Next". 30


31 5. Select "Database Engine Services" and "Management Tools Basic" and then click "Next". 31

, enter a SQL Server system administrator password,")
32 6. Keep the defaults, and then click "Next". 7. Select an Account Name and click "Next". 8. Select "Mixed Mode (SQL Server authentication and Windows authentication), enter a SQL Server system administrator password, specify a SQL Server administrator(s), then click " Next". 32


33 9. Click "Next" 10. Click "Close" 33
 is SQLEXPRESS and should be running. If it is stopped, right click on it and click Start. The SQL Server Browser should be running.")
34 Configuring SQL Server 2008 R2 Express Open the SQL Server Configuration Manager (Start -> Programs -> Microsoft SQL Server 2008 R2 -> Configuration Tools -> SQL Server Configuration Manager). Your default server name (under SQL Server Services) is SQLEXPRESS and should be running. If it is stopped, right click on it and click Start. The SQL Server Browser should be running. If it is stopped, right click on SQL Server Browser, and then choose Properties. Click on the Service tab and ensure the Start Mode is set to Automatic. Click the Apply button then go back to the Log On tab and click the Start button. 34


35 4. Click on the plus sign beside SQL Server Network Configuration and click on Protocols for SQLEXPRESS Restart the SQL Server by clicking on SQL Server Services, then right clicking on SQL Server (SQLEXpress), and selecting Restart. a. Double click on Named Pipes and Enable it. Click Ok. b. Double click on TCP/IP and Enable it. 35

36 c. Go to the IP Addresses tab on the TCP/IP Properties window and ensure that the network adapter that you wish to use is set to Active and Enabled. Click ok. d. The Protocols should now look the same as the picture below. 5. Close the SQL Server Configuration Manager. 36
37 SQL Server 2012 Express Installation This is a step-by-step guide to install SQL Server 2012 Express Edition to use as a database. Pre-Requisites There are a few pre-requisites for installing SQL Server 2012 Express Edition. You can view more information and the system requirements for SQL Server 2012 Express Edition at the following location: Please note that Windows Installer 4.5, MS.Net Framework 5 SP1, and Windows PowerShell 0 must be installed prior to installing SQL Server 2008 Express Edition. The link to download this program is available from Microsoft in the System Requirements documentation above. We also recommend ensuring that all Windows Updates have been performed prior to installing SQL Server 2012 Express Edition. Downloading and Installing SQL Server 2012 Express Download SQL Server 2008 Express Edition from Microsoft: a. b. c. Go to Microsoft's website ( Enter 'SQL Server 2012 Express with Tools' in the Search field and click the Search button. You will see a screen of results that match the search. Select a result that includes the download and proceed to download the 32 bit or 64 bit 'ENU\xXX\ SQLEXPRWT_xXX_ENU.EXE' version. Double click the SQLEXPRWT_xXX_ENU.EXE file to install it. Click on Installation in the left pane 37


38 4. Select 'New SQL Server stand-alone installation or add features to an existing installation'. 5. Read and accept the license terms, and then click "Next" 38


39 6. Check "Include SQL Server product updates" and then click "Next". 7. On the Features Selection keep the defaults and click "Next". 8. Enter a name for the Instance of SQL Server or choose "Default instance". Click "Next". 39

 account.")
40 9. Ensure the "Startup Type" is set to Automatic for the SQL Server Database Engine and SQL Server Browser. Click "Next". 10. Choose "Mixed Mode (SQL Server authentication and Windows authentication)". Enter a password for the SQL System Administrator (SA) account. Click "Add Current User" if there is no user showing under "Specify SQL Server administrator". Click "Next". 40

 should be running.")
41 1 Click "Next" on the Error Reporting page. 1 Once it has finished installing click "Close". Configuring SQL Server 2008 Express Open the SQL Server Configuration Manager (Start -> Programs -> Microsoft SQL Server > Configuration Tools -> SQL Server Configuration Manager). Your SQL Server (with the instance name you set) should be running. If it is stopped, right click on it and click Start. 41

42 The SQL Server Browser should be running. If it is stopped, right click on SQL Server Browser, and then choose Properties. Click on the Service tab and ensure the Start Mode is set to Automatic. Then go back to the Log On tab and click the Start button. 4. Click on the plus sign beside SQL Server Network Configuration and click on Protocols for the name of the Instance. a. Double click on Named Pipes and Enable it. Click Ok. b. Double click on TCP/IP and Enable it. 42
, and selecting Restart. 6.")
43 c. Go to the IP Addresses tab on the TCP/IP Properties window and ensure that the network adapter that you wish to use is set to Active and Enabled. Click ok. d. The Protocols should now look the same as the picture below. 5. Restart the SQL Server by click on SQL Server Services, then right clicking on SQL Server ( Instance Name), and selecting Restart. 6. Close the SQL Server Configuration Manager. 43
44 44

45 Installation IMPORTANT! Before You Install Print Audit 6 is a desktop application that you must install on every computer where you want to track printing. Users installing Print Audit must have Administrator rights, or you must use third-party tools that can install software in a locked down environment. Installing Print Audit 6 across a network requires knowledge of the network design, user rights and technologies available in your organization. Print Audit supplies various tools to aid in the network rollout of Print Audit 6 software but these tools are meant to complement your organization's current desktop software rollout procedures. If you do not have an established way to rollout software in your organization then we strongly advise that you develop a software rollout plan for all desktop software before attempting to roll out Print Audit 6 software. Key Concepts Print Audit 6 print tracking is split into three main components; Client, Database Communicator and Database. Print Audit 6 tracks print jobs directly from the computer where the print job is issued. It does so by having a Client component installed on each computer. The Client component communicates print job information with a Database Communicator component, which is usually installed on the same computer as the database. The Database Communicator receives print job information from the Client component on workstations and saves it to the database. Reporting is achieved by connecting reporting tools directly to the database and retrieving stored information from the database. 45
46 System Requirements Operating System requirements Database Communicator, Database and Administrative tools Windows 2000 Windows Server 2003 Windows XP Windows Vista Windows Server 2008 Windows Server 2008 R2 Windows 7 Windows 8 Windows Server 2012 Windows Server 2012 R2 Client Windows 98 Windows ME Windows 2000 Windows Server 2003 Windows XP Windows Vista Windows Server 2008 Windows 7 Windows 8 with the exception of Metro Apps and Surface R/T ** Contact our Support team at support@printaudit.com for more information Mac OS X 10.6 or newer. CPU and RAM requirements are the same as those of the operating system on which the solution is running. 46
47 Installation Requirements A full installation, including the Database Communicator and the database will require approximately 60 MB of disk space. A full installation, NOT including the Database Communicator and the database will require approximately 50 MB of disk space. When using a deployment method such as logon scripts or Active Directory to deploy components to workstations, only the components you choose to install with the installation wizard will be copied to each workstation. The hard drive space used is dependent on which components are installed. Note The total amount of disk space used is dependent on the method that you use to do the actual installation. The figures stated above are estimates as JET or MDAC may need to be installed as well. When using a deployment method, the network traffic created during the installation will be between 3 and 60 MB s per workstation, depending on the components you choose to install. Database Requirements Support for Access and SQL Server 2005 or newer (Full or Express) database back-ends. The amount of disk space used by the database is dependent on the type of database back-end as well as the amount of data being tracked. Approximately 1MB of disk space per 2000 print jobs will be used. Database Communicator Memory Usage The Database Communicator is a service and will use up to 10 MB of memory when running but decreases the longer it is in use. The amount of memory used decreases as certain components of the communicator are never used and eventually the memory for those components will be swapped out to other processes. Client Installation Requirements and Memory Usage The Client will require approximately 2 MB of disk space. The Client will use approximately 1 MB of memory on the system and will increase to approximately 5 MB when tracking a print job. 47
48 Networking requirements TCP/IP networking (by default, port is used for communication between the Database Communicator and the Client) Print Audit does not create any network traffic until a print job is initiated. Once a print job has been sent to the printer, 10 to 20 KB of bidirectional network traffic is created per print job, regardless of the print job size. 48
49 Installation Types The Print Audit 6 installer makes the following installation types available: Trial Install recommended install during software evaluation on a limited number of computers or when computers are not on a network. This install will create a Microsoft Access database, and install all tracking and reporting tools on a single computer. Step by Step Walkthrough recommended for advanced users or installations where multiple computers will be storing information in a shared database. Client Only Install recommended for adding extra computers to an existing Print Audit 6 installation. This setting only installs the Client component on a single computer. You must have an existing Print Audit 6 database and Database Communicator running on the network before selecting this type of installation. Create a Network Install recommended for advanced users who wish to prepare Print Audit 6 for network deployment. This setting does not install any active code on the machine; it creates a network installation folder which contains files necessary for network deployment. You will be taken through a wizard interface to select options that will take effect on machines deployed using this installation configuration. Software download Print Audit 6 setup can be downloaded at latest version of the setup program. The website always includes the 49
50 Step by Step Walkthrough The Step by Step Walkthrough method is intended for network installations where multiple computers will communicate with a central database. It is also useful if you wish to decide which components will be installed. Step 1: Greeting The installation welcomes you to Print Audit 6. Press "Next" to continue. You can abort the installation process at any point by selecting "Cancel". Step 2: License Agreement This screen will present you with the Print Audit 6 End User License Agreement. You will need to select "I accept the terms in the license agreement" before the setup process can continue. Press " Next" once you have read the agreement and selected the appropriate checkbox. 50
51 Step 3: Installation Type Select the "Step by Step Walkthrough" installation type. Press "Next" to continue. If you wish to perform a Trial Installation or prepare network installation files, please see the appropriate sections for the type of install you are interested in. Step 4: Select Destination Folder This step lets you choose the folder you want to install Print Audit 6 to. If you would like to use the default folder, press "Next" to continue. 51
52 Step 5: Select Database Type Print Audit 6 can use two types of databases; Microsoft SQL Server (SQL Server 2005, 2008, 2008 R2 and 2012 Full or Express Edition) or Microsoft Access. Microsoft Access is easier to configure while SQL Server is more robust and handles large user bases better. Microsoft Access does not need to be installed in order to use Microsoft Access for database storage. Select the type of database you wish to use and press "Next" to continue. Step 6: Create New Database? Print Audit 6 requires a Print Audit 6 compatible database to exist before it can store information in it. 52


53 If you have not yet created a database for Print Audit 6, choose "Yes Create a new database". If you previously created a database, choose "No Do not create a new database, I already created one". Press "Next" to continue. If you previously selected to create a SQL Server database, you will see the following window. It is used to inform you that the database will be created after Print Audit 6 setup finishes. Press "OK" to dismiss this information window. If you see this window, proceed directly to step 7 in the instructions. Step 7: Select Database Location (Microsoft Access Only) This screen allows you to select where the Microsoft Access database will be created. You can accept the default location (the My Documents folder for the current user) or press "Change" to select a new location. You can also choose to automatically share the newly created database on the network. If you plan on running reports from multiple computers, it is recommended you share the database by selecting "Share this folder across the local network". Optionally you can select what name you wish this folder to be visible as on the network by typing in the desired name in the "Share Name" field. Press "Next" to continue. 53


54 Step 8: Install Database Communicator Print Audit 6 uses a component called the Database Communicator to facilitate communication between the database and Client component installed on workstation computers. Usually only one Database Communicator should be installed on a network. It is also highly recommended to install the database and Database Communicator on the same computer. If you have not yet installed a Database Communicator, select "Yes Install the Database Communicator". If you already have a Database Communicator installed on your network, choose " No Do not install, I already installed one". Press "Next" to continue. 54

55 Step 9: Database Communicator Settings The Database Communicator allows for two settings to be modified; location and port. The location is the name of the machine on which the Database Communicator has been installed to. Since we are installing the Database Communicator to this machine, the field is grayed out as Print Audit 6 automatically defaults the entry to the name of your computer. The port field is defaulted to In most situations this default port will work perfectly. If you are aware of another application on your network using port 17520, you may change the communication port to one that is not used on your network. Press "Next" to continue. Step 10: Install Copy Audit Users may track photocopy expenses by purchasing a hardware device called a Copy Audit. The Copy Audit device is connected to a photocopier and records copy information to the same database as Print Audit 6. This data can be used to generate reports for both printing and copying expenses. If you have one or more Copy Audit devices on your network, select "Yes Install the Copy Audit Communicator on this machine". If you do not have a Copy Audit device on your network or have already installed the Copy Audit Communicator onto another machine, select "No Do not install the Copy Audit Communicator on this machine". Press "Next" to continue. 55


56 Step 11: Select Components Print Audit 6 now gives you the opportunity to select which optional components will be installed to this machine. If this is the first machine you are installing to, it is recommended that you install all components. Select components you wish to install and press "Next" to continue. Step 12: Ready to Install Print Audit 6 now has enough information to proceed with installation. If you wish to make changes to any previously entered settings, you can use the "Back" button to return to the appropriate screen. If you are happy with your selections, press the "Install" button to install Print Audit 6. 56


57 Step 13: Installation Complete Print Audit 6 will inform you when the installation has completed. In some circumstances, if system files need to be updated during installation, Print Audit 6 may need to reboot the computer. If that is the case, you will be prompted to reboot your computer. If you selected to use a Microsoft Access database, the installation is now complete, however, if you selected to use a SQL Server database, the next steps will review how to create a database, create users and set up all necessary permissions for the database. Step 14: Enter Database Login Information (SQL Server Only) After the installation of Print Audit 6 has completed, you will be prompted with the screen below. 57

58 Print Audit 6 will attempt to create a database on your SQL Server, however, it needs "sa" credentials before it can do so. Enter your server name along with "sa" login and password into the appropriate fields. The "sa" user account will only be used to create the database and will not be stored on your system. Print Audit 6 automatically creates a user during installation with only enough permissions to function correctly. More information on the "PrintAudit" user account can be found in step 16. Optionally, you can use Windows authentication to create the database. Your user account will need necessary permission to create a database, otherwise creation will fail. On some networks a " Network Provider" has to be specified before Print Audit 6 can connect to your SQL Server. If you know of a specific network provider that is required for your network, enter it in the "Network provider" field. Click "Next" to continue. Step 15: Enter Database Name (SQL Server Only) Enter the name of the database you wish to create on your SQL Server. Print Audit 6 will automatically create all necessary tables and structures in this database. Make sure the database name you are specifying does not already exist on your SQL Server. Press "Next" to continue. 58


59 Step 16: Select Password for PrintAudit User (SQL Server Only) Print Audit 6 automatically creates a user named "PrintAudit" and gives that user permissions to the Print Audit 6 database. The user permissions are limited to what is necessary for Clients to be able to connect to the database. You should use this user account to connect to the Print Audit 6 database. The window below allows you to set the password for the "PrintAudit" user. If a password is not entered, it will default to "password". Press "Next" once you have set a password for the "PrintAudit " user account. Step 17: Ready to Create Database (SQL Server Only) The Maintenance Wizard will now show you the summary of options you selected. If there is anything you wish to change, press the "Back" button and make any required changes. If you are satisfied with the settings, press "Create" to create a Print Audit 6 database. 59

 After installation is completed, the Print Audit 6 Database Communicator is automatically started.")
60 Step 18: Database Creation Complete (SQL Server Only) You will see the screen below if the desired database has been successfully created. If the database could not be created, Print Audit 6 will inform you of the errors and give you a chance to modify your settings. Press "Done" to complete the Print Audit 6 installation. If you selected to install the Database Communicator during this installation, proceed to step 19, otherwise you are ready to capture print information with Print Audit 6. Step 19: Client Run for the First Time (SQL Server Only) After installation is completed, the Print Audit 6 Database Communicator is automatically started. At this point you will see the error message below. It indicates that Print Audit 6 could not detect your database settings. This is normal behavior as we have not told the Database Communicator which account to use to connect to the Print Audit 6 database. Press "OK" to dismiss this dialog and proceed to the SQL Server Login screen in step


61 Step 20: Enter SQL Server Login Information (SQL Server Only) You will be presented with a SQL Server Login screen. The following information needs to be entered before we can connect to the database; server, database, user and password. The "server" field is usually the name of your SQL Server. If you have multiple instances of SQL Server, then the server name needs to be entered in the following format "SERVERNAME\ INSTANCENAME". In the "database" field, enter the name of the database you created for Print Audit 6 in step 15. In the "user' and "password" fields, enter the "PrintAudit" username and the password you set in step 16. If you are using NT authentication, press the "Advanced" button to see advanced setting, otherwise press "Login" to have the Print Audit 6 Database Communicator connect to your SQL Server and the Print Audit 6 database. 61
62 To use NT authentication, check the "Use NT authentication" checkbox. Check the "remember password" option if you do not wish to have to re-enter the password when the Database Communicator is restarted. In the "Network provider" field enter the same information you used in step 14. The default for "Connection timeout" is 5 seconds. If you have a slow or congested network, you may want to raise this value. This timeout determines how long Print Audit 6 waits before giving up attempting to establish a connection to your SQL Server. The "Query timeout" field defaults to 60 seconds. This is the time Print Audit 6 will wait for a response from the SQL Server after it has been sent a query. Press "Login" to have the Print Audit 6 Database Communicator connect to your SQL Server and the Print Audit 6 database. Congratulations! You are now ready to start tracking your print jobs with Print Audit 6. 62
63 Network Installation The Create a Network Install method is meant to prepare Print Audit 6 for mass deployment. We suggest running this type of install only after the database has been created and the Database Communicator is running on one of the computers. If you have not created a database or do not have a computer that is running the Database Communicator component, please see the Trial Install or Step by Step Walkthrough documentation before creating a network installation folder. The result of going through "Create a Network Install" will be a folder with batch files useful for deploying using login scripts, MSI files that can be used with Active Directory deployment using group policy, a CFG file that can be used to modify which components are installed and a copy of the installer. Step 1: Greeting Our new installer welcomes you to Print Audit 6. Press "Next" to continue. You can abort the installation process at any point by selecting "Cancel". Step 2: License Agreement This screen will present you with the Print Audit 6 End User License Agreement. You will need to select "I accept the terms in the license agreement" before the setup process can continue. Press " Next" once you have read the agreement and selected the appropriate checkbox. 63
64 64

65 Step 3: Installation Type Select the "Create a Network Install" installation type. Press "Next" to continue. If you wish to install select components or perform a Trial Install, please see the appropriate sections for the type of install you are interested in. Step 4: Network Installation Setup The following screen explains what to expect from this type of installation. Press "Next" to proceed with creating a network installation folder. 65

66 Step 5: Select Network Install Folder Location Files created during the "Create a Network Install" process must be placed into a folder. The window below will allow you specify where this folder is created. Additionally, when using login scripts to deploy, this folder will need to be shared across the network. The Print Audit 6 installer gives you the chance to automatically create a network share. Select "Do not share this folder across the local network" if you do not wish to automatically share this folder, of "Share the folder across the local network" if you are planning on using login scripts to deploy Print Audit 6. If you will be sharing out this folder, enter the desired name for the network share in the "Share Name" field. Press "Next" to continue. S tep 6: Select Database Type Print Audit 6 can use two types of databases; Microsoft SQL Server (SQL Server 2005, 2008, 2008 R2 and 2012 Full or Express Edition) or Microsoft Access. Microsoft Access is easier to configure while SQL Server are more robust and handle large user bases better. Microsoft Access does not need to be installed in order to use Microsoft Access for database storage. Select the type of database you wish to use and press "Next" to continue. 66

67 67
68 Step 7: Select Components In this step, select which components you wish to have installed on all machines that this network installation will be used to deploy to. By default, the Client component will be selected. The Client component must be installed on every machine you wish to track. The "Administration" and "Job Editing and Reporting" components can be pushed out to the entire network; however we highly recommend they only be installed on a few machines. Select components you wish to install and press "Next" to continue. Step 8: Database Communicator Connection Settings The Print Audit 6 Client component needs to connect to the Database Communicator in order to communicate with the database. This is done by entering the location and port of the Database Communicator. Enter the name or IP address of the machine running the Database Communicator in the "Location" field. Enter the port number on which the Database Communicator is listening on in the "port" field. Press "Next" to continue 68
69 69

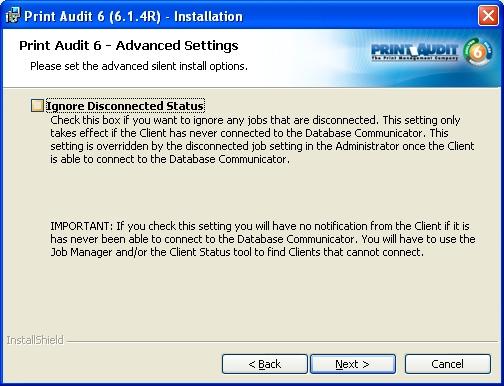
70 Step 9: Advanced Settings There are advanced settings that can be set during network installation. Suppress Reboots In certain environments, it is desired not to show any signs of new software being installed. In those kinds of environments, the Print Audit 6 installer can be configured not to reboot upon completion (even if a reboot is requested by the operating system). Notice that Print Audit 6 may not function correctly until computers deployed to are rebooted. Do Not Create Uninstall If you do not wish to see an uninstall entry for Print Audit 6 in the Windows Control Panel under Add/Remove Programs, check this setting. Notice that this will make it more difficult to uninstall the software by both users and network administrators. Do Not Create Start Menu Icons In an environment where you wish to have very little indication that Print Audit 6 is installed, turning this option on will prevent Print Audit 6 from creating start menu items. Note that this will make it more difficult to launch Print Audit 6 components such as Help. Select desired options and press the "Next" button to continue. Ignore Disconnected Status Check this box if you want to ignore any jobs that are disconnected when the Client has never connected to the Database Communicator. Once the Client has connected to the Database Communicator, the Disconnected Jobs option in the Print Audit Administrator will override this.please note: If you select this option, there will be no notification from the Client that it has never connected to the Database Communicator. 70
71 71

72 Step 10: Ready to Install Print Audit 6 now has enough information to proceed with creation of the network install folder. If you wish to make changes to any previously entered settings, you can use the "Back" button to return to the appropriate screen. If you are happy with your selections, press the "Install" button to create the network install folder for Print Audit 6. Step 11: Installation Complete When Print Audit 6 finishes creating the network install folder, you will be presented with the InstallShield Wizard Completed window. Press "Finish" to complete the installation. Congratulations! You have successfully created a network installation folder for Print Audit 6. The contents of this folder will help you deploy Print Audit 6 using login scripts, Active Directory and many more mass deployment tools. 72

73 Client Only Installation The Client Only Install method is meant for tracking additional computers. This means the database has already been created and there is a computer running the Database Communicator. If you have not created a database or do not have a computer that is running the Database Communicator component, please see the Trial Install or Step by Step Walkthrough Install documentation before proceeding with the Client Only Install. Step 1: Greeting Our new installer welcomes you to Print Audit 6. Press "Next" to continue. You can abort the installation process at any point by selecting "Cancel". Step 2: License Agreement This screen will present you with the Print Audit 6 End User License Agreement. You will need to select "I accept the terms in the license agreement" before the setup process can continue. Press " Next" once you have read the agreement and selected the appropriate checkbox. 73

74 Step 3: Installation Type Select the "Client Only" installation type. Press "Next" to continue. If you wish to install select components or prepare network installation files, please see the appropriate sections for the type of install you are interested in. Step 4: Database Communicator Settings Print Audit 6 uses a Database Communicator component to read/write to the database. The Client component you are now installing communicates with the Database Communicator. In order for the communication to be successful the Client component needs to know where the Database Communicator is located. We provide this information by entering two fields of information; location and port. The location is the name of the machine on which the Database Communicator has been installed. Enter the name of the machine where you installed the Database Communicator (likely to be the computer that has the database). The port field tells the Client what port number to use to connect to the Database Communicator. Enter the port number that you selected during the Database Communicator installation. If you do not know the port number, the default value of will work in most situations. Press "Next" to continue. 74
75 Step 5: Ready to Install Print Audit 6 now has enough information to proceed with installation. If you wish to make changes to any previously entered settings, use the "Back" button to return to the appropriate screen, otherwise press the "Install" button to install the Print Audit 6 Client now. Step 6: Reboot In some circumstances, if system files need to be updated during installation, Print Audit 6 may need to reboot the computer. If this is the case, you will see the screen below. Save all your work and then press "Finish" to allow the computer to reboot. Congratulations! You are now ready to start tracking your print jobs with Print Audit 6. 75
76 4. Trial Installation Overview The Trial Install method is meant for installation to a single computer, computers not connected to a network or for users wanting to evaluate the software on their local PC. The Trial version provides full access to all Print Audit 6 features and functionality for a period of 15 days. After 15 days, the software will discontinue tracking jobs, but the collected data and reporting tools are still available for evaluation. The Trial version is limited to support up to 5 workstations, one of each embedded license, and one Copy Audit Touch terminal. Step 1: Greeting Our new installer welcomes you to Print Audit 6. Press "Next" to continue. You can abort the installation process at any point by selecting "Cancel". Step 2: License Agreement This screen will present you with the Print Audit 6 End User License Agreement. You will need to select "I accept the terms in the license agreement" before the setup process can continue. Press " Next" once you have read the agreement and selected the appropriate checkbox. 76

77 Step 3: Installation Type Select the "Trial Install" installation type. Press "Next" to continue. If you wish to install select components or prepare network installation files, please see the appropriate sections for the type of install you are interested in. Step 4: Installation Type Confirmation Print Audit 6 will display a summary of options that have been defaulted to during the Trial Install process. Press "Next" to continue the installation. 77

78 Step 5: Ready to Install Print Audit 6 now has enough information to install selected components. If you wish to make changes to installation settings, click the "Back" button. Otherwise, press "Install" to proceed with the installation of Print Audit 6. Step 6: Installation Completed A screen indicating the InstallShield Wizard Completed will be displayed once the installation has completed. Press "Finish" to exit the installation wizard. 78
79 Congratulations! You are now ready to start tracking your print jobs with Print Audit 6. 79
80 5. Novell Environments Following are step by step instructions needed to install Print Audit 6 in a Novell environment. The basic steps for installing Print Audit 6 are the same in any environment. However, if the database will reside on a Novell server and if the Novell user account will be used for print tracking, the instructions below will help to support that environment. Note If you are installing Print Audit 6 in a Novell environment with the database residing on the Windows workstation and will be using the Windows user account for print tracking, you do not need to follow the steps below. Refer the Step by Step Walkthrough. The Print Audit 6 Database Communicator and Administrative tools must be installed on a Windows based computer running Windows Server 2003 or newer. The Print Audit 6 Client can be installed on workstations running Windows 98 or newer or Mac OS X 10.5 or newer. Print Audit 6 is compatible with both Microsoft Access and SQL databases and the database can be located on a Novell share. Please keep in mind that the Database Communicator requires full control permissions to the database. Installing Print Audit 6 using an Access Database 4. Create a folder on the Novell Server where the database files will reside. Run the 'pa6setup.exe' file and select the Step by Step Walkthrough Setup Type. For detailed instructions to complete this step, refer to Step by Step Walkthrough. At the database type screen, select Access. By default the Access database files will be created in the My Documents folder. You can change this location on the next screen of the installation or you can cut the files and paste them into the folder that you created on the Novell server. There are two files created for an Access database: pa6db.mdb and pa6db.mdw. After the installation is complete, verify that the database files have the correct permissions by right clicking on each file and then viewing the Properties. Make sure that Read-only is unchecked and that the Administrator account from the computer that is running the Database Communicator has full control permissions to the files. 5. To ensure that the Database Communicator service has the appropriate permissions to the database files on the Novell Server, open the Windows Services and locate the Print Audit 6 Database Communicator. Open the service and then go to the 'Log on' tab. By default, the 80
81 service will be set to 'Local System account', change this setting to 'This account' and enter in the username and password for the administrator account on the Novell server where the database resides. Stop and Start the service. Installing Print Audit 6 using a SQL Database Install the SQL Server on the Novell server. If you do not have SQL Server already, you can download and install Microsoft SQL Server 2005, 2008, 2008 R2 or 2012 Express Edition. For more information on installing SQL Server Express click here. To ensure that the Database Communicator service has the appropriate permissions to the SQL server on the Novell Server, open the Windows Services and locate the Print Audit 6 Database Communicator. Open the service and then go to the 'Log on' tab. By default, the service will be set to 'Local System account', change this setting to 'This account' and enter in the username and password for the administrator account on the Novell server where the SQL server resides. Stop and Start the service. Configuring Print Audit 6 to use the Novell user account for tracking purposes In order to track print jobs using the Novell user account, the workstations must have the Novell Client installed and Print Audit Network type must be set to Novell. The steps for Print Audit are below: 4. Open the Print Audit Administrator by going to the Start menu, Programs, Print Audit 6 and then select Administrator. Click on the Advanced button located in the lower left-hand corner of the Administrator. Select the Network Authentication tab on the left side. Change the Network type to 'Novell Directory Services'. Note: If the Network Type is set incorrectly, when a user prints they will be prompted by Print Audit 6 to enter a username and password. If this occurs, change the Network Type back to 'Windows Peer to Peer' and try printing again. 81
82 7. Logon Script Deployment A system administrator can use logon scripts to assign tasks that will be automatically performed whenever a user logs on to a particular computer system. These scripts can use system environment variables, and can also call other scripts or executable programs. Logon scripts are frequently used to map network drives, start background processes, initialize user environment variables and to install software. Understanding Logon Scripts A logon script runs automatically whenever a user logs on to a computer running a member of the Windows Server family of operating systems. The script can contain operating system commands, such as those that make network connections or start programs. Logon scripts can also set environment variables to specify information such as the computer search path and the directory for temporary files. A logon script is usually a batch file (.bat or.cmd file name extension), but any executable program can be used. Logon scripts are optional. You can use them to configure user working environments by creating network connections and starting programs. Logon scripts are useful when you want to affect the user work environment without managing all aspects of it. After you create a logon script, you can assign it to one or more local users, sites, domains, or organizational units (OUs). Note Two reboots are required in order for our software to start tracking. The first reboot installs the software onto the computer; the second reboot enables the Client. (You have the option to log off and on the computer twice instead of rebooting) Using Logon Scripts to Install Print Audit 6 The followings items need to be completed before you are ready to deploy Print Audit 6 using logon scripts. Print Audit 6 setup was run, a database was created and the Data Communicator and Administration tools were installed. Print Audit 6 Administrator was run and Print Audit 6 was configured to run as desired. Print Audit 6 installer was run and a Network Install was performed. For more information on Network Installs, see the Network Installation Guide for a detailed guide. 82
83 The network install directory from the previous steps was shared out so that it is available to users on the network. Note The script will deploy all components created in the network install. If, for example, only the client component is to be deployed with the logon script, ensure that only the client component was selected during the network install. If you have not completed one or more of the steps above, please do so before continuing with a logon script deployment. To deploy Print Audit 6 using logon scripts, you will need to make a single call to "pasilent.bat" from the logon script. If you do not have a logon script configured, follow the steps below; otherwise proceed to section "Modifying Logon Script to Install Print Audit 6". To create a logon script, follow these steps on the server computer: Select "Start" then "Run". Type "explorer" (without quotes) and press "OK". Browse to the C:\ drive. On the right-side pane, right click on a blank space and select "New" and then "Text Document" from the popup menu. Name the document "Logonbat". If Windows asks you if you want to change the extension from.txt to.bat, press "Yes" to agree. Right-click on the file we just created and select "Cut". Browse to the "%SystemRoot%\sysvol\sysvol\<domain DNS name>\scripts" folder and select "Edit" and "Paste" from the menu bar. On my machine, this would be the "C:\WINDOWS\ SYSVOL\sysvol\testdomain.local\scripts" folder. Select "Start" then "Run". On a server running Active Directory, type "dsa.msc" (without quotes) and press "OK". Under "Active Directory Users and Computers", expand your domain and go to the "Users" section. Double-click on a user you wish to assign the logon script. Select the "Profile" tab. In the "Logon Script" field, enter the name of the script you wish to execute. In our example, this would be "Logonbat" (without the quotes). 14. Press "OK" to apply the settings. 83
84 15. Repeat steps 11 through 14 for every user you wish to assign this script to. Modifying Logon Script to Install Print Audit 6 4. Select "Start" then "Run". Enter the path to your logon script and press "OK". On my computer the path would be "C:\ WINDOWS\SYSVOL\sysvol\testdomain.local\scripts". A Windows Explorer window should launch listing your logon script. Right-click on your logon script and select "Edit". Enter the following two lines into your logon script (replace <SERVERNAME> with your server name and <PAINSTALLPATH> with the share name of the network installation folder that was created during the Print Audit 6installation): a. b. SET PAINSTPATH=\\<SERVERNAME>\<PAINSTALLPATH> CALL %PAINSTPATH%\pasilent.bat 5. Select "File" then "Save" to commit changes. The next time a workstation logs into the server, the logon script will be executed and Print Audit 6 will be installed to this workstation. 84
85 8. Upgrading from Print Audit 5 Due to added features and functionality in Print Audit 6, upgrading from Print Audit 5 requires preparation, planning, and resource allocation in order to complete a successful upgrade. Print Audit 6 includes a new database, information will need to transferred from the Print Audit 5 database The Print Audit 5 Client will not work with Print Audit 6, requiring the Print Audit 6 Client installation for all workstations you want to track printing from If Copy Audit Numeric or Copy Audit Touch are connected to any devices, you will need to add these into the Print Audit 6 Administrator Upgrade Methods There are two ways to upgrade from Print Audit 5 to Print Audit 6. Use the Print Audit 6 Database Migration Wizard. You must be licensed to use this tool. a. b. c. d. e. Stop and disable the Client Communicator and Copy Audit Communicator (only if you are using Copy Audit Numeric) Install and configure Print Audit 6 Transfer data from the Print Audit 5 database to the Print Audit 6 database with the Database Migration Wizard Create the Print Audit 6 Client installation package Verify that the Client was deployed and successfully tracking print jobs Export Users and Custom Fields out of Print Audit 5 and import them into Print Audit 6. a. b. c. d. e. Stop and disable the Client Communicator and Copy Audit Communicator (only if you are using Copy Audit Numeric) Install and configure Print Audit 6 Export the Users and Client Custom Fields from the Print Audit 5 database Import the Users and Client Custom Fields into the Print Audit 6 database Create the Print Audit 6 Client installation package f. Verify that the Client was deployed and successfully tracking print jobs 85
86 Using the Database Migration Wizard Step 1 Stop and Disable Client and Copy Audit Communicators Open Microsoft Services and double click on the Print Audit 5 Client Communicator. Set the " Startup type" to Manual and click the Stop button. Click Apply and then Ok. If you are using Copy Audit Numeric, double click on the Print Audit 5 Copy Audit Communicator. Set the "Startup Type" to Manual and click the Stop button. Click Apply and then Ok. Step 2 Install and Configure Print Audit Please refer to the Step by Step Walkthrough installation instructions. Note: Please note that you must create a new database as the Print Audit 5 database is not compatible with Print Audit 6. Open the Print Audit 6 Administrator and enter your Print Audit 6 license information. Under System Settings, set the number decimal places you want to use for costs. Configure the Notification settings. Choose how you want to handle Disconnect Jobs. Step 3 Transfer data from Print Audit 5 to Print Audit 6 Start the Database Migration Wizard by going to Start -> Programs -> Print Audit 6 -> Advanced Tools -> Database Migration. Choose the database type and action you want and click Next. Select the database you want to migrate from. 86


87 4. Select the database you want to migrate to. 5. Choose to migrate no jobs, all job or only jobs printed after a certain time. 87

88 6. Start the migration by clicking on the Migrate button. 7. Click Yes to confirm that you want to continue with the migration. 8. The Database Migration Wizard will transfer the data from the Print Audit 5 to the Print Audit 6 database. Note The time required for the migration can vary depending whether or not you transferring job information, and the size of the database. The Wizard will run with progress bars showing the status of the transfer. When it has completed you will receive a confirmation message. Step 4 - Create the Print Audit 6 Client installation Package Create a new Client package by running the Print Audit 6 pa6setup.exe file and choosing Create a Network Install. a. A new folder will be created that has the Client Only installation of just 3MB, although you will still be able to push out the entire Print Audit 6 program if you want to. Push the Client out to the workstations by whatever method the IT department uses. The new Print Audit 6 Client will disable the Print Audit 5 Client but will not remove it. Step 5 Verify the Installation Start the Administrator and verify that Users, Printers and Profiles have transferred properly. Send some test print jobs and verify in the Job manager. 88
89 If you are running Copy Audit, test that it is tracking copy jobs. Exporting from Print Audit 5 and Importing into Print Audit 6 Step 1 Stop and Disable Client and Copy Audit Communicators Open Microsoft Services and double click on the Print Audit 5 Client Communicator. Set the " Startup type" to Manual and click the Stop button. Click Apply and then Ok. If you are using Copy Audit Numeric, double click on the Print Audit 5 Copy Audit Communicator. Set the "Startup Type" to Manual and click the Stop button. Click Apply and then Ok. 89

90 Step 2 Install and Configure Print Audit 6 Please refer to the Step by Step Walkthrough installation instructions. Note Please note that you must create a new database as the Print Audit 5 database is not compatible with Print Audit Open the Print Audit 6 Administrator and enter your Print Audit 6 license information. Under System Settings, set the number decimal places you want to use for costs. Configure the Notification settings. Choose how you want to handle Disconnect Jobs. Step 3 Export Users and Client Custom Fields Out of Print Audit 5 4. Open the Print Audit 5 Administrator. Click on the Client Custom Fields icon (only if using the Recovery module). Click the Custom Field that you would like to export so it is highlighted blue. Click the Export button. 5. Select the location where you want to this file to be created, and enter a name for this file. 90
91 Click the Save button. You will receive a message saying how many values were successfully exported. Click Ok on the popup. Follow the steps above for the remaining Custom Fields. Once you have finished exporting all the Client Custom Fields, click on the Users icon. Click on the Export button. Click the browse button to select the location where you want this file to be created, and enter a name for the file. Click the Save button. You will receive a message saying how many users were successfully exported. Click Ok, and then Close. Step 4 Import Users and Client Custom Fields into Print Audit Open the Print Audit 6 Administrator. Click on the Client Custom Fields icon (only if using the Recovery module). Double click on a blank line in the grid at the top. Enter the name for the Custom Field (i.e. Job Number) Select the appropriate field type; this should be the same as Print Audit 5. Highlight the Client Custom Field that you want to import values into. Click on the "Import" button at the top of the screen. An "Import Values" screen should appear. From the "Import type" drop down, select Print Audit 5 Values File. Use the Import Tab to select the file that contains the values you want to import into the Client Custom Field. You can type the name of the file directly or use the button to browse to the file's location. Use the Advanced Tab to set advanced functionality for the import: a. Select "Only add new values adds values only if they don't already exist in the database" Click the Import button. You will receive a message saying the number of values that were successfully imported. Click the Ok button. Click on the Users icon. Click the Import button. From the "Import type" drop down, select Print Audit 5 Values File. 17. Browse to the file users file that you exported from Print Audit 5. 91
92 18. Select the "Track profile" you want assigned to these users. Note Note: If these users will be assigned to a User Profile other than the default "Track" profile, you will need to create the profile first Select the appropriate Security profile for these users. If you had PIN Codes set up in Print Audit 5 and would like to use these in Print Audit 6, select "Assign from file" from the Import option drop down on the PIN's tab. If you would like to assign these users to a group that was used in Print Audit 5, select " Assign from file" from the Import option drop down on the Grouping tab. Click the Import button. You will receive a message showing the number of users that were successfully imported. Ensure you have at least one User that has their security profile to Administrator. To change this, double click on a User name and Select "Administrator" from the "Security" drop down. Step 5 - Create the Print Audit 6 Client installation Package Create a new Client package by running the Print Audit 6 pa6setup.exe file and choosing Create a Network Install. a. A new folder will be created that has the Client Only installation of just 3MB, although you will still be able to push out the entire Print Audit 6 program if you want to. Push the Client out to the workstations by whatever method the IT department uses. The new Print Audit 6 Client will disable the Print Audit 5 Client but will not remove it. Step 6 Verify the Installation Start the Administrator and verify that Users, Printers and Profiles have transferred properly. Send some test print jobs and verify in the Job manager. If you are running Copy Audit, test that it is tracking copy jobs. 92
93 Macintosh Installation IMPORTANT UNINSTALLATION NOTE You cannot uninstall Print Audit 6 by simply dragging it to the Trash. When Print Audit 6 is installed, it integrates with part of the printing system on your Macintosh in order to track printing. If you want to uninstall Print Audit 6 from your computer, you must run the Print Audit 6 Uninstaller first. After successfully running the uninstaller, it is safe to drag Print Audit 6 to the Trash. The Print Audit 6 Uninstaller is always installed along with Print Audit 6, in the Print Audit 6 Applications folder (Applications/Print Audit 6). System Requirements Print Audit 6 requires Mac OS X 10.6 (Snow Leopard) or later. You need to update any computers running Mac OS X 10.5 or older to 10.6 before installing Print Audit 6. Computers running Mac OS X 10.5 do not require any updates. To determine which version of Mac OS X is running on your Macintosh, click on "About this Mac" in the Apple menu. Print Audit 6 also requires one (1) Windows-based PC running Windows98 or newer to host the Print Audit 6 database and administrative software. It is not possible to install Print Audit 6 to a network which does not have at least one Windows computer. Upgrading from Print Audit 5 Mac If you are upgrading from Print Audit 5 Mac, you must completely uninstall Print Audit 5 from your Macintosh before installing Print Audit 6 on it. The Print Audit 6 installer will display an error message and prevent you from installing if Print Audit 5 is found on your Macintosh. Prerequisite: Installation to a Windows PC, for Networks not yet running Print Audit 6 For new installations of Print Audit 6, you need to install to at least one Windows computer before installing to your Macintosh computers. The database and administrative tools required to use Print Audit 6 only run on Windows-based computers. If you already have Print Audit 6 configured and running on one or more Windows PCs, skip to the next section. The basic steps required to set up Print Audit 6 on a Windows computer are outlined below. 93
94 Install Print Audit 6 to at least one computer running Windows 98 or newer. This installs the administrative and reporting tools along with the Client Communicator and a Windows Print Audit 6 Client you can use for testing. We recommend using the "Quick Install" option in the Print Audit 6 installation. Configure Print Audit 6 using the Administrator. This allows you to setup how you want the Macintosh client to behave and what information you want users to enter before they can print. Test the configuration, using the Print Audit 6 client you installed in Step Ensure that printing is tracked correctly and that you configured the software to your specifications. See the Print Audit 6 Installation Guides for more information on installing Print Audit 6 to a Windows PC. Also, consult the Print Audit 6 Manual for information on configuring Print Audit 6 to meet your needs: 94
95 Installing Print Audit 6 to a Macintosh Computer If you previously installed and configured Print Audit 6 on your Windows computers or just installed it as described above, you can now install Print Audit 6 to the Macintosh computers on your network. Ensure you are logged into an account with administrator privileges. Download the latest version of the Print Audit 6 Macintosh software from the Print Audit web site at or insert the Print Audit 6 CD in the Mac's optical drive. a. b. If you have downloaded Print Audit 6, double-click on the downloaded Disk Image (. dmg) file to open it in the finder. If you inserted the Print Audit 6 CD, browse to the /Installers/Macintosh folder on the CD using the Finder Double-click on the Print Audit 6 Installer package to start the installation. The installer now walks you through the steps of viewing the Read Me file, accepting the License Agreement, and picking the location on your hard disk where you want to install Print Audit 6. The installer asks for the login and password of a user account with administrative privileges. If your account has administrative privileges for the Mac, use your password. The Print Audit 6 installer requires administrative privileges in order to integrate with the printing system software included with your Mac. IMPORTANT: During the final phase of the installation Print Audit displays the Print Audit 6 Client Configuration Utility. You must enter either the hostname or IP address of the Client Communicator you installed when you set up Print Audit 6 on your Windows computers. The other default settings are usually correct. When complete, click the Save Settings button. If you configure Print Audit 6 incorrectly, it will not track printing. To re-configure Print Audit 6 at any time you can log-in as an administrator and double-click the Print Audit 6 Client Configuration application in the Print Audit 6 application folder. Installing Print Audit 6 to a network of Macintosh computers Once everything is working correctly on one computer you may want to install Print Audit 6 to all of your Macs. If you have only a few Macintosh computers you can install the software on each computer individually. For networks of more than a few Macs, you may want to use a product like Apple Remote Desktop to remotely install Print Audit 6 to all of your computers. Refer to the Print Audit 6 Mac OSX Network Installation Guide for more information. 95
96 OS X Network Installation Important! Print Audit 6 is supported only on computers running Mac OS X 10.6 or later. You will need to update computers running OS X versions older than Mac OS X 10.6 (Snow Leopard). Click on About this Mac in the Apple menu, to determine which version of Mac OS X is running on your Macintosh. We recommend that you use Apple Remote Desktop to deploy Print Audit 6 to a network of computers running Mac OS X. You can remotely install, upgrade and uninstall Print Audit 6 using Apple Remote Desktop. However since the installer package is a standard Mac OS installer package, you can also roll out Print Audit 6 using any other Macintosh network deployment tool that supports this standard. Apple Remote Desktop is network management software created and sold by Apple. To obtain Apple Remote Desktop, contact your Apple reseller or order it directly from Apple. This document assumes you are familiar with the basic operation of Apple Remote Desktop. For more information on Apple Remote Desktop, consult Apple s web site at remotedesktop/ or read the Administrator s Guide at ARD3_AdminGuide.pdf Installing or Upgrading Print Audit 6 using Apple Remote Desktop There are two steps to install or upgrade Print Audit 6. First, you have to configure the Print Audit 6 installer so it can do a silent install; then you use Apple Remote Desktop to install Print Audit 6 to the networked computers. Additional information on the second step can be found in Chapter 3 of the Apple Remote Desktop Administrator s Guide. Configure the Print Audit 6 installer a. b. c. d. Download the latest release of Print Audit 6 for Mac OS X from the Print Audit web site at Double-click the Disk Image (.dmg file) to mount it. A Finder window is displayed showing the contents. Copy the pa6install.conf file from the Additional Files folder to a folder on the hard disk. Edit pa6install.conf using a text editor such as TextEdit. e. Change the configuration settings in pa6install.conf as appropriate for your network. In particular, you must configure the Database Communicator location. pa6install.conf has explanations of the other optional settings. 96
97 f. Save pa6install.conf. Use Apple Remote Desktop to deploy pa6install.conf to /tmp folder a. b. c. d. e. Choose a computer list in Apple Remote Desktop. Choose one or more computers in the list. Choose Manage > Copy items Add the modified pa6install.conf file to the list Select /tmp as the copy destination. The Print Audit installer will look in the /tmp folder for the pa6install.conf file. Use Apple Remote Desktop to deploy Print Audit 6 a. b. c. d. e. Choose a computer list in Apple Remote Desktop. Choose one or more computers in the list. Choose Manage > Install Package from the menu. Select Print Audit 6 Installer.mpkg. Click Install. Uninstalling Print Audit 6 using Apple Remote Desktop The Print Audit 6 Uninstaller will stop job tracking and remove the application in one step. More details on using Apple Remote Desktop for these tasks can be found in Chapter 3 of the Apple Remote Desktop Administrator s Guide. 4. Choose a computer list in Apple Remote Desktop. Choose one or more computers in the list. Choose Manage > Send Unix Command from the menu The UNIX Command you want to send is sudo /Applications/Print Audit 6/Print Audit 6 Uninstaller.app/Contents/MacOS/uninstall This assumes Print Audit 6 was installed to /Applications. Note that the quotes are important. Mac OS X Network Installation This document describes how to deploy Print Audit 6 to a network of Mac OS X computers. IMPORTANT! 97
98 Print Audit 6 works only on computers running Mac OS X 10.5 or later. You need to update any computers running Mac OS X 10.4 (Tiger) to 10.5 or newer before installing Print Audit 6. Computers running Mac OS X 10.5 (Leopard) do not require any updates. To determine which version of Mac OS X is running on your Macintosh, click on "About this Mac" in the Apple menu. We recommend that you use Apple Remote Desktop to deploy Print Audit 6 to a network of computers running Mac OS X. You can remotely install, upgrade and uninstall Print Audit 6 using Apple Remote Desktop. However since the installer package is a standard Mac OS installer package, you can also roll out Print Audit 6 using any other Macintosh network deployment tool that supports this standard. Apple Remote Desktop is network management software created and sold by Apple. To obtain Apple Remote Desktop, contact your Apple reseller or order it directly from Apple. The rest of this document assumes you are familiar with the basic operation of Apple Remote Desktop. For more information on Apple Remote Desktop, consult Apple's web site at or read the Administrator's Guide at remotedesktop/pdf/ard_admin_guide2pdf 98
99 Installing or Upgrading Print Audit 6 using Apple Remote Desktop There are two steps to install or upgrade Print Audit 6. Configure the Print Audit 6 installer so it can do a silent install; Use Apple Remote Desktop to install Print Audit 6 to the networked computers. Additional information on this step can be found in Chapter 3 of the Apple Remote Desktop Administrator's Guide. Configure the Print Audit 6 installer a. b. c. d. e. f. g. h. i. j. Download the latest release of Print Audit 6 for Mac OS X from the Print Audit web site at Double-click the Disk Image (.dmg file) to mount it. A Finder window is displayed showing the contents. Copy the Print Audit 6 Installer.mpkg file from the disk image to the hard drive. Control-click on Print Audit 6 Installer.pkg, and select "Show Package Contents". Navigate to Contents/Packages inside the installer package. Control-click on printaudit6.pkg, and select "Show Package Contents". Navigate to Contents/Resources inside the installer package. Edit pa6install.conf using a text editor such as TextEdit. Change the configuration settings in pa6install.conf as appropriate for your network. In particular, you must configure the Database Communicator location. Pa6install.conf has explanations of the other optional settings. Save pa6install.conf. Use Apple Remote Desktop to install Print Audit 6 a. b. c. d. e. Choose a computer list in Apple Remote Desktop. Choose one or more computers in the list. Choose Manage > Install Package from the menu. Select Print Audit 6 Installer.mpkg. Click Install. Uninstalling Print Audit 6 using Apple Remote Desktop There are two steps to uninstall Print Audit 6. 99
100 Command Print Audit 6 to stop tracking print jobs a. b. c. d. Choose a computer list in Apple Remote Desktop. Choose one or more computers in the list. Choose Manage > Send Unix Command from the menu The UNIX Command you want to send is sudo "/Applications/Print Audit 6/Print Audit 6 Uninstaller.app/Contents/MacOS/uninstall" This assumes Print Audit 6 was installed to /Applications. Note that the quotes are important. Delete the Print Audit 6 application files from the computer. More details on using Apple Remote Desktop for these tasks can be found in Chapter 3 of the Apple Remote Desktop Administrator's Guide. a. b. c. d. Choose a computer list in Apple Remote Desktop. Choose one or more computers in the list. Choose Report > File Search from the menu. Search for the Print Audit 6 folder. By default, it is installed in /Applications. e. Select the Print Audit 6 folder, and click Delete in the report window. 100
101 Print Audit 6 Manual This document provides instructions and tips to help you configure all areas of Print Audit 6. Use the links below to jump to a specific section: Administration 1-1 System Settings 1-2 Client Settings 1-3 Custom Rules 1-4 Client Custom Fields 1-5 User Profiles 1-6 Users 1-7 Printer Profiles 1-8 Printers 1-9 Printer Paper Sizes 1-10 Applications 1-11 Network Settings and Authentication Analysis Reporting 2-1 Grouping and Filtering 2-2 Reports Job Manager 3-1 Finding, Viewing and Editing Jobs 3-2 Job Reporting 3-3 Advanced 4. Job Merge Wizard 4-1 Importing 4-2 Exporting 101
102 5. Database Maintenance Tool 5-1 Microsoft Access 5-2 SQL Server 6. Database Migration Wizard 102

103 Administration The Print Audit 6 Administration tool is used to configure all aspects of Print Audit 6. The tool consists of several sections; each one focuses on a different aspect of Print Audit 6. You may not need to use all the sections in Print Audit depending on your business needs, but you should familiarize yourself with all of them to fully understand what Print Audit offers. Please note that you may not have access to all that Print Audit has to offer depending on the type of licensing you purchased. You can begin using Print Audit immediately with little to no configuration, but we recommend you read the following topics to get an idea of what the product can offer to your organization: Pricing in Print Audit Custom Rules Printing Limits and Redirection Allowances and Balances 103
104 Print Audit Licensing For evaluation purposes you can request a trial license. The trial lasts for 15-days and works on up to 5 computers in your organization. Once your trial ends, you must purchase a license to continue using the software. To start a trial: 4. When the Administration tool starts and you have no license, the License Activation dialog appears. Click the Request a trial license option and click the Activate button. The Registration window appears. Please enter information for all of the fields in the Registration window. We use this information so we can support you in your use of the trial. Click the Submit button. Print Audit contacts our licensing server and activates your trial. NOTE: Once you start a trial, you cannot request another one. If you need to extend your trial, or have any questions about the software, please contact Print Audit support. To purchase a new license: Please contact Print Audit directly, or an authorized Print Audit dealer. They will take your customer information and supply you with a Print Audit license key along with the company name recorded for your purchase. To activate a license: If the License dialog does not appear when you start the Administration tool, go to the Tools- >View/Change License menu item. The Licensing dialog appears. Click the Activate License button. The Activation dialog appears. Click the Activate existing license option. Enter in your customer information and license key as required. Click the Activate button. The Registration window appears. Please enter information for all of the fields in the Registration window. We use this information so we can support you in the use of the software. Click the Submit button. Print Audit contacts our license server and activates your key. NOTE: Print Audit 6 requires internet access in order to activate your license key. 104
105 Changing Your Database If you have several different Print Audit databases you may need to point the Administration tool to one or the other. When you change databases Print Audit asks you for any authentication information before you can use the new database. If you do not have rights to the new database, or Print Audit encounters some other problem, the Administration tool continues to use your existing database selection. To change your database: Click the Tools->Set Database menu. A dialog appears asking you to select your new database. Select the new database. For Access databases simply select the new database file. For SQL Server databases please enter the new SQL information. Accept the information. Print Audit attempts to log in to the new database. Clearing Pending Jobs Print Audit creates pending jobs when a user either chooses to snooze a job, or when the Print Audit Client sends jobs that were tracked when it was disconnected from the Client Communicator to the database. Only jobs that required pop up information from the user are stored as pending jobs. In some rare cases, a user could have too many pending jobs to comfortably enter information for. This could happen if their Client was unable to communicate with the Client Communicator for an extended period of time due to a configuration error for example. If you want to clear pending jobs for all users from the database, you can use the Clear Pending Jobs command. Only users who have the rights to edit and delete jobs can clear pending jobs. To clear pending jobs: Click the Tools->Clear Pending Jobs menu. A dialog appears asking you if you are sure you want to clear the pending jobs. Click the Yes button to have Print Audit clear all jobs. NOTE: Once jobs are cleared you cannot get them back. 105
106 1-1 System Settings This section of the Administration tool allows you to define settings that affect the overall operation of Print Audit 6. These settings include things such as how many decimal places to use for costs and reporting, as well as the settings Print Audit should use when sending . General Settings Decimal Places for Costs - You can use from two to four decimal places for costs you assign to printers, users and applications. This setting applies to both data entry and is the default for reporting, however you can choose to override this setting when creating reports. Percentage Modifier Option - This setting affects how Print Audit handles job cost calculations when multiple cost percentage modifiers are encountered. Click here for more information on job costing in Print Audit 6. The options are as follows: Apply Each - This option applies each percentage modifier to the cost in the order that it was encountered. For example, if there is a 50% modifier, then another 25%, the final job cost reduced by half, and then by a quarter. Legacy - This option calculates percentage modifiers the same way as past versions of Print Audit. Provided for backwards compatibility only, we highly recommend you choose one of the other options. Use Highest - This option uses only the highest modifier encountered. For example, if you had a 50% cost modifier and a 200% cost modifier both applicable for the job, only the 200% modifier is taken into account. Use Lowest -This option uses only the lowest modifier encountered. For example, if you had a 50% cost modifier and a 200% cost modifier both applicable for the job, only the 50% modifier is taken into account. Notifications You can configure Print Audit 6 to send for things like license violations, scheduled reports and in response to certain conditions using custom rules. Before Print Audit 6 can send s, you must properly set the following options: SMTP Server - The name or IP address of the SMTP server in your organization to use for sending s. SMTP Login - The login to use if your SMTP server requires authentication. If it does not, you can leave this blank. SMTP Password - The password to use if your SMTP server requires authentication. If it does not, you can leave this blank. 106
107 Address - Enter the address of the person you want notified in case of licensing issues. Generally you should enter the address of the person in your organization responsible for administering Print Audit. Send to Print Audit - Select "Yes" to have Print Audit send an to our licensing department in case of licensing issues. Print Audit sends no private information, simply your licensing information and the nature of the problem. We use this information to then contact you and help you with your problem. Select "No" (the default) if you do not want to notify us of licensing issues. If selected, no information is sent to us. 107
108 Client Settings This section of the Administration tool allows you to set general information about how the Print Audit Client behaves on the desktop. It controls things such as if you want to allow the user to shutdown the Client, whether or not it supports batching and how users have to authenticate before they can print. Listed below are all the options you can set in this section: General Settings This section controls in general how the Client behaves on the Windows desktop. Display Tray Icon - If set to Yes a tray icon displays in the Windows task bar area when the Client is running. Wait for Page Count (Recovery only) - If set to Yes, the Client does not display the Popup window until it has the page count. This can cause a delay before the Popup window appears. If set to No, the Client does not display the final job cost or final number of pages on the Popup window. NOTE: If you have Reduction only, this setting gets changed automatically when you add printer limits. Shutdown the Client - If set to Yes the user can shutdown the Client. Enter Comments (Recovery only) - If set to Yes the user can enter comments on the Popup window when it displays. Use Last Entries (Recovery only) - If set to Yes Print Audit automatically populates the Client Popup window with the same entries they used on the last print job. Client Logo Settings (Only in Recovery Module) You can choose to set a custom logo to display on the Client popup window when a user prints. The logo must be 474x88 pixels. Batch Settings (Only in Recovery Module) This section controls how the Print Audit Client controls batching. Batching is how Print Audit handles multiple print jobs when you want to re-use the same Popup Window entries as a previous job automatically. Please note that these settings have no effect if you configure the Client to not display a popup window when printing. Batching Type - There are three types of batching. None: The Client displays a popup on every print. 108
109 Automatic: The Client automatically re-uses the same popup window entries for all jobs that you print within the batch timeout from the same program. Manual: The Client allows you to enter the number of jobs you want to batch on the popup. Print Audit automatically re-uses the popup settings for the number of jobs you indicated or until the time-out expires. Maximum Batch Size - This displays only for the Manual batch type. You enter the maximum number of jobs you want the user to batch here. Batch Time-out - Use this to enter the number of seconds Print Audit waits before cancelling a batch. This indicates the time-out between jobs, not overall. For example, if you enter 60 seconds for the time-out and set the batch size to twenty jobs, the Client automatically cancels the batch if more than a minute elapses before it detects the start of the second job in the batch. Authentication This section controls how Print Audit authenticates users. Print Audit determines who the user is before allowing access to the Print Audit tools and before it allows them to print. Client Authentication - This controls how the Client determines who the user is. Use the drop-down box to choose an authentication type. There are three authentication types. They are as follows: Logged in User - The Client uses the current Windows or Novell login information to identify the user. PIN - The Client requires the user to enter their Print Audit PIN code to identify the user. PIN and Password - The Client requires the user to enter their Print Audit PIN and a separate password to identify the user. Network - The Client requires the user to re-enter their Windows or Novell login information to identify the user. The Client does not store or transmit this information anywhere. Please note that this type of authentication may not work properly on Windows 95, Windows 98 and Windows Millennium depending on your network configuration. Tools Authentication - This controls how the Print Audit Administration, Job Manager and other tools determine who the user is. Use the drop-down box to choose an authentication type. The authentication options for both Client and Tools are identical. You can set Client Authentication per computer, and choose to report the users as Windows NT, Active Directory or Novell Directory Services. For more information on these advanced settings, please see the Network and Authentication settings section. 109
110 Disconnected Jobs This section allows you to configure how Print Audit deals with print jobs that occur when the Client cannot connect to the Database Communicator. Disconnected Job Option - This controls exactly what Print Audit does when it detects a print job, but no connection to the Database Communicator. Options are: Track normally - The jobs are tracked and stored on the local computer. When the Client can connect to the Database Communicator it uploads all of the locally tracked jobs to the database. If the jobs require more information, the Client requests more information from the user. Track silently - The same as above, except that the user is never asked for further information, the jobs are stored in the database the same as if they were set to "Track with no popup". Ignore Jobs - Any jobs printed in a disconnected state are not tracked. Disallow jobs - The Client cancels the job, and displays a message to the user. Ignore old jobs - Same as Track Normally, except that any jobs older than the specified number of days are ignored. Disconnected Disallowed Message - This is the message that displays to the user if their job was disallowed due to no connection to the Database Communicator. This is only available if "Disallow jobs" is set for the disconnected job option. Number of Days Until Old - This is the number of days old the job must be before it is ignored. Only available if "Ignore old jobs" is set for the disconnected job option. Note It is possible to specify the disconnected job settings per desktop computer. 110
111 1-3 Custom Rules Custom Rules allow you to handle almost any printing control needs within your organization. Using Custom Rules you can select one or more conditions that trigger one or more actions to take place within the software. For example, you could allow free printing after a certain time of day, send an to people if jobs of a certain size are printed, display messages to users, etc. You can also define rules that depend on other rules being triggered, so the possibilities are endless. For most printing needs, such as basic limits and pricing, you can use our User Profiles, Applications or Printer Profiles for your needs, but for complex printing situations and environments Custom Rules may be required. When you define a Custom Rule, the behavior you define in the rule overrides any other settings that you may have made in other areas of the application. Rules work by evaluating one or more conditions you define, and if those conditions are met the rule triggers one or more actions you define. It is very simple to define rules, but given the combinations of actions and conditions you can create rules to handle very complex situations. For ease of administering rules, you can create and manage user and printer rule groups. You can define groups for departments for example, and set rules to run only for those departments. These groups are separate from reporting groups you can define in the Job Manager and Analysis Reporting. You can do the following with Custom Rules section of the Administrator: Adding, Editing and Deleting Custom Rules Add, Edit and Delete Rule Groups Adding, Editing and Deleting Custom Rules You use the Custom Rules section of the Administration tool to add, edit and delete custom rules. Please follow the steps in the sections below. To add a new custom rule: Click on the Advanced header on the left hand side of the Administration window. The list of advanced sections of the Administration tool display. Click on the Custom Rules button on the left hand side of the Administration window. The list of custom rules appears in the right hand side. Double-click on an empty row in the list in the Custom Rules section or click the New button on the toolbar. The Custom Rules window appears. Enter the rule information as applicable. Click the Add button. The custom rule saves to the database and the window closes. To edit an existing custom rule: 111
112 4. 5. Click on the Advanced header on the left hand side of the Administration window. The list of advanced sections of the Administration tool display. Click on the Custom Rules button on the left hand side of the Administration window. The list of custom rules appears in the right hand side. Double-click on the custom rule you want to edit in the list in the Custom Rules section. The Custom Rules window appears. Make your changes as appropriate. Click the Save button. The Custom Rules window closes and you see your changes displayed in the list. To delete existing custom rule: Click on the Advanced header on the left hand side of the Administration window. The list of advanced sections of the Administration tool display. Click on the Custom Rules button on the left hand side of the Administration window. The list of custom rules appears in the right hand side. Click on the custom rule you want to delete. The row appears highlighted. Click the Delete key on the toolbar at the top of the Administration window. A message appears asking you to confirm you want to delete the rule. Click the Yes button on the message box to delete the rule. The list refreshes to show the rule was deleted. Rule Conditions You can define a rule with one or more of the following conditions: User - The user who is printing is or is not a Print Audit user you select. User Profile - The user who is printing belongs to, or does not belong to the User Profile you select. Printer - The printer you are printing to is or is not a printer you select. Printer Profile - The printer you are printing to belongs to, or does not belong to the Printer Profile you select. Computer name - The name of the computer you are printing from matches fully or partially the computer name you enter. Time of day - The user is printing the job before or after a defined time, or is being printed between or outside of a range of time. Total page count - The total page count of the job the user is printing is a certain size, within a certain range, or is greater than or less than a value you enter. 112
113 Total color page count - The total number of color pages in the job the user is printing is a certain size, within a certain range, or is greater than or less than a value you enter. Total mono page count - The total number of black and white pages in the job the user is printing is a certain size, within a certain range, or is greater than or less than a value you enter. Total units in the job - The total number of units in the job, taking into account Pricing Option, is a certain number, within a certain range or is greater than or less than a value you enter. Total color units in the job - The total number of color units in the job, taking into account Pricing Option, is a certain number, within a certain range or is greater than or less than a value you enter. Total mono units in the job - The total number of black and white units in the job, taking into account Pricing Option, is a certain number, within a certain range or is greater than or less than a value you enter. Total job cost - The total cost of the job, after the user completes the Client Popup, is equal to, less than or greater than or within a range of values you enter. Job duplex setting - The job the user printed was printed duplex or not. Job n-up setting - The job the user printed was printed was printed using n-up, with, greater than, less than or within a range of the number you specify. Job origin - The print job came from, or did not come from a specific environment. Job type - The type of job is or is not of a specific type (print, plot, etc.) Job was printed to file - If the job was printed to file or not. Document title - The title of the document being printed equals, does not equal or partially matches what you enter. Printer group - The printer the user is printing to does or does not belong to a specific printer rule group. User group - The user printing does or does not belong to a specific user rule group. Driver color mode - The color mode we detect from the driver is black and white or color. Application name - The process name of the application printing is, is not or partially matches the value you enter. The application does not need to be in your Applications list. Job satisfies rule - The job satisfies or does not satisfy the conditions of another rule you created. Base job cost - The cost of the job before the Client Popup is shown is, is not, or is within a range of a value you enter. Day of the week - The job was or was not printed on a selected day. 113
114 Number of Copies - The number of copies in the job is, is not, or is within a range of a value you enter. Rule Actions You can define a rule with one or more of the following actions: Set track option to - Set the overall tracking option for the job to the specified value. Set authentication type to - Set the Client authentication to the selected value. Display message and cancel the job - Displays a message to the user printing, and cancels the job. You can define the title of the message, as well as the text. You can use message variables in the text to provide a message targeted for the user and situation. Display message and present option to cancel the job - Displays a message to the user printing, and allows them to decide if they want to cancel the job or not. You can define the title of the message as well as the text. You can use message variables in the text to provide a message targeted for the user and situation. Display message and continue the job - Displays a message to the user printing, and once they acknowledge, the message continues. You can define the title of the message as well as the text. You can use message variables in the text to provide a message targeted for the user and situation. Send an message - Sends an message. You can define the address it appears to come from, the list of users who it is to, a subject and text. You can use message variables in the text to provide a message targeted for the user and situation. You can specify multiple addresses in the To and CC fields, separated by a comma. NOTE: To properly send s, you must configure the settings in the System Settings section of the Administrator. Do not deduct job cost from user balance - The jobs cost will not be deducted from any user balances. Set the cost profile - You can define detailed pricing for the rule. Please see the Printer Profile Window topic for a description of the pricing fields. Ask for custom fields - Require the user to enter the custom fields you select on the Client Popup before they can print. If you clear all of the fields, the user does not need to enter any custom fields. Ignore all printing limits - Ignore any printing limits defined in the User Profile, Application or Printer Profile. However, any limits on cost or pages you setup in other custom rules may still apply. 114
115 Rule Groups Print Audit 6 allows you to create user and printer rule groups. You can use these groups to make administering your rules even easier. For example, you could define rule groups based on department or responsibility, add users to rule groups, and then create rules whose action list requires membership in one or more groups. While similar in implementation, rule groups are not related to the reporting groups you can create in the Job Manager and Analysis Reporting tools. To add, edit and delete user rule groups: Click on the Advanced header on the left hand side of the Administration window. The list of advanced sections of the Administration tool display. Click on the Custom Rules button on the left hand side of the Administration window. The list of custom rules appears in the right hand side. Click the Groups->Edit User Groups menu item at the top of the Administration Window. The Edit User Groups window appears. Click Add to create a new group, or click an existing group to highlight it and click the Edit button. The Edit Group window appears. Add or Remove members from the group, and click the Save button on the Edit Group window. Repeat steps 4 and 5 to modify more groups. If you want to delete an existing group, click an existing group to highlight it and click the Delete button. A message displays asking if you are sure you want to delete the group. Click Yes to continue. Click Close on the Edit User Groups window. To add, edit and delete printer rule groups: 4. Click on the Advanced header on the left hand side of the Administration window. The list of advanced sections of the Administration tool display. Click on the Custom Rules button on the left hand side of the Administration window. The list of custom rules appears in the right hand side. Click the Groups->Edit Printer Groups menu item at the top of the Administration Window. The Edit Printer Groups window appears. Click Add to create a new group, or click an existing group to highlight it and click the Edit button. The Edit Group window appears. 5. Add or Remove members from the group, and click the Save button on the Edit Group window. 115
116 Repeat steps 4 and 5 to modify more groups. If you want to delete an existing group, click an existing group to highlight it and click the Delete button. A message displays asking if you are sure you want to delete the group. Click Yes to continue. Click Close on the Edit User Groups window. 116
117 1-4 Client Custom Fields Print Audit 6 allows you to define up to five custom fields the user must enter information for before they can print. Each one of these custom fields can have completely different values and types, allowing you to gather from your users valuable business information for each print job. For all types of custom fields except for non-validated, your users must enter information on the Client Popup in order to print. The Client Custom Fields section consists of two to three main grids. The top grid contains a list of all the custom fields you define. The bottom grid contains a list of all the values you enter for a specific field. To see values for a field, click on the field in the top grid to select it. All of the values automatically display in the values grid below. For linked custom field types there are two values grids. The top values grid contains all of the main codes, the bottom values grid contains sub codes for the main code. You can use this section to do several things. Adding, Editing and Deleting Custom Fields Adding, Editing and Deleting Custom Field Values Importing and Exporting Custom Field Values Linked Custom Fields You can configure Print Audit to display different custom fields depending on user, printer and/or application. Custom Field Types When you create a custom field you can choose from one of seven custom field types. The field types you can choose from are as follows: Searchable - This field type uses a separate popup search window for searching on values from the Client. It keeps track of the last ten used values and supports an unlimited number of values. This field type also supports adding new values from the Print Audit Client. Searchable Drop down - This field type uses a type-ahead drop down box search so the user does not need to use a separate search window. It keeps track of the last ten used values, but only supports fields that have up to one thousand values. This field type supports adding new values from the Client. Simple Drop down - This field type is not searchable, a user simply selects an entry from the drop down. It does not keep track of the last ten used values, and only supports fields that have up to one hundred values. It does not support adding new values from the Client. This field works best for a small set of selectable items for a print job, such as added materials needed like binding or shipping. 117
118 Option - Not searchable, displays a pair of option buttons for the field. It supports only two values. Used generally for "yes, no" options like Billable and Non-Billable for example. Non-Validated - This is a free format entry field. No validation is done on what a user enters here. Linked Searchable - This field acts as two separate fields and allows the user to choose a main code followed by a sub code. The main code is a searchable type field, the sub code is a searchable drop down. Linked Drop down - This field acts as two separate fields and allows the user to choose a main code followed by a sub code. Both the main code and sub code fields act as searchable drop downs. Adding, Editing and Deleting Custom Fields You use the Client Custom Fields section of the Administration tool to add, edit and delete custom fields. You can also change the order in which the custom fields appear on the Client Popup window. Please follow the steps in the sections below. To add a new custom field: Click on the Client Custom Fields button on the left hand side of the Administration window. The Client Custom Fields section appears in the right hand side. Double-click on an empty row in the top list in the Client Custom fields section or click in the top list and then click the New button on the toolbar. The Adding New Field window appears. Enter the name of the field in the Name text field. This name depends on your business, but examples are Project, Client, Account, etc. You must enter a unique name for each custom field. Select the type of field from the Type drop down. Click the Save button. The Adding New Field window closes and you should see your new field listed in the top list. To edit an existing custom field: Click on the Client Custom Fields button on the left hand side of the Administration window. The Client Custom Fields section appears in the right hand side. Double-click on the field you want to edit in the top list in the Client Custom fields section. The Editing Field window appears. Make your changes as appropriate. See the above section to see the fields you can change. 4. Click the Save button. The Editing Field window closes and you see your changes displayed in the top list. 118
119 To change the order of a custom field: Click on the Client Custom Fields button on the left hand side of the Administration window. The Client Custom Fields section appears in the right hand side. Click on the field you want to move in the top list in the Client Custom fields section. The row containing the field is highlighted. Click the Up or the Down arrow buttons on the toolbar at the top of the Administration window to change the order of the custom field. To delete an existing custom field: 4. Click on the Client Custom Fields button on the left hand side of the Administration window. The Client Custom Fields section appears in the right hand side. Click on the field you want to delete in the top list in the Client Custom fields section. The row containing the field is highlighted. Click the Delete key on the toolbar at the top of the Administration window. A message appears asking you to confirm you want to delete the field. Click the Yes button on the message box to delete the field. The top list refreshes to show the field was deleted. Note You cannot delete a custom field if it is referenced in a database print job. Linked Custom Fields New to Print Audit are linked custom fields. This feature allows you to specify a main and a sub code for a custom field. The main code a user selects determines which sub codes are available for entry. For example, you could define a linked custom field with "Customer" as the main field, "Project" as the sub field. You could then enter all of your customers into the Customer values list, and for each customer, enter the valid projects. When a user prints, they can first select the Customer and then see a list of only those projects for that customer. For the most part, using Linked Custom Fields is very simple, and similar to how normal custom fields work in Print Director Print Audit. However, there are some differences. They are as follows: You cannot specify cost modifiers or budgets for main codes, only sub codes. When importing values for linked custom fields, you must use the proper import format. When adding or editing custom field values for linked fields, the process is different. 119
120 Adding, Editing and Deleting Custom Field Values You use the Client Custom Fields section of the Administration tool to add, edit and delete custom values for a field. Please follow the steps in the sections below. To add a new custom value: Click on the Client Custom Fields button on the left hand side of the Administration window. The Client Custom Fields section appears in the right hand side. Click on the field you want to add values for in the top list. A list of all values for that field appear below. If you are editing a linked custom field type, there are two lists of values. The top list contains the main code values, the bottom list contains the sub code values. Selecting a value in the main code list shows the child codes for that value in the bottom list. Double-click on an empty row in the bottom list in the Client Custom fields section, or click in the bottom list and click the New button on the toolbar. The Adding New Value window appears. Enter the information for the new value. Click the Add button. The value saves to the database and the window sets up to add the next value. Click the Close button if you are done adding values. This will close the window and refresh the values. You can also continue steps 4 through 5 to continue adding values. To add a new custom value from the Popup window: Double-click on the custom field for which you want to add a value on the Client Popup window. A dialog appears asking you for the code and description. Enter the new code and description and click Add button. The new value gets added to the database. NOTE: A user can only add codes for the Searchable and Searchable drop down field types. A user must also have permission to add codes from the Popup. To edit an existing custom value: Click on the Client Custom Fields button on the left hand side of the Administration window. The Client Custom Fields section appears in the right hand side. Click on the field you want to edit values for in the top list. A list of all values for that field appear in the bottom list. If you are editing a linked custom field type, there are two lists of values. The top list contains the main code values, the bottom list contains the sub code values. Selecting a value in the main code list shows the child codes for that value in the bottom list. 120
121 Double-click on the value you want to edit in the bottom list in the Client Custom fields section. The Editing Value window appears. Make your changes as appropriate. Click the Save button. The Editing Value window closes and you see your changes displayed in the top list. To edit multiple custom values at once: Click on the Client Custom Fields button on the left hand side of the Administration window. The Client Custom Fields section appears in the right hand side. Click on the field you want to edit values for in the top list. A list of all values for that field appear in the bottom list. Use a combination of CTRL-CLICK and SHIFT-CLICK to select the list of values you want to edit. NOTE: You cannot edit multiple parent values at the same time if using a linked custom field type. You can edit multiple child values at the same time however. Click the Edit button on the toolbar. The Editing Value window appears. Please note that not all fields are editable when making changes to multiple values at once. Make your changes as appropriate. Click the Save button. The Editing Value window closes and you see your changes displayed in the top list. To delete existing custom values: Click on the Client Custom Fields button on the left hand side of the Administration window. The Client Custom Fields section appears in the right hand side. Click on the field you want to delete values for in the top list. A list of all values for that field appear in the bottom list. If you are editing a linked custom field type, there are two lists of values. The top list contains the main code values, the bottom list contains the sub code values. Selecting a value in the main code list shows the child codes for that value in the bottom list. Use a combination of CTRL-CLICK and SHIFT-CLICK to select the list of values you want to delete. If you want to delete only one value, you can simply click on it. Click the Delete key on the toolbar at the top of the Administration window. A message appears asking you to confirm you want to delete the value(s). Click the Yes button on the message box to delete the values. The bottom list refreshes to show the values were deleted. Note 121
122 You cannot delete a custom field value if it is referenced in a database print job. If you delete a main code in a linked custom field, it deletes all child values. Importing Custom Field Values Print Audit allows you to import custom field values from a comma-delimited file on a one time or scheduled basis. This allows you to keep your master list of values in an accounting package or other piece of software and easily synchronize them with the codes in Print Audit. You can also import values from a generic flat file. To import values into a field: Click on the Client Custom Fields button on the left hand side of the Administration window. The Client Custom Fields section appears in the right hand side. Click on the field for which you want to import values in the top grid. The field row is highlighted. Click the Import button on the toolbar at the top of the Administration window. The Import Values window appears. Select the Import Type using the drop down on the window Import Values window. See Custom Value Import Formats for a description of the different import formats. On the Import tab, select the file containing the values you want to import. Please note that this file must be in the format specified by the import format you selected in step 4. Check the Advanced tab to ensure settings are appropriate for what you want to do. See the Import Values window help for more information on the Advanced tab. Click the Import button. Print Audit begins to import the values from the file. Once the import is complete, a message displays indicating whether or not the import was successful. The import window closes and the list refreshes. To run the import on a scheduled basis: To run scheduled, simply follow the steps 1-6 in the above section. Then: Check the scheduling settings on the Scheduling tab on the Import Values window. Ensure the settings reflect the type of schedule you want. Click the Schedule button to add the task to the Windows Task Scheduler. You can schedule a separate import for each custom field you define. To remove a scheduled import: Click on the Client Custom Fields button on the left hand side of the Administration window. The Client Custom Fields section appears in the right hand side. 122
123 4. Click on the field for which you want to cancel the import in the top grid. The field row is highlighted. Click the Import button on the toolbar at the top of the Administration window. The Import Values window appears. Click the Remove Schedule button to remove the task from the Windows Task Scheduler. OR Remove the task from the Windows Task Scheduler using its interface. Custom Field Value Import Formats The custom value importers require that the file you want to import is in a specific format. Below are the types of importers and their format requirements. Comma-Delimited (Flat File) This importer uses a comma-delimited file format. The columns are in the following order: Code - The code for the value. Must be unique for the field. This is the only required column. Description - A user friendly description for the value. If omitted, the Administrator leaves the description of the value blank. Cost Modifier - The cost modifier. If omitted assumes zero for cost modifier types, 100 for percentage modifier types. This type is used for both b/w and color unit costs if a unit modifier. If you need to specify separate b/w and color modifiers, please use the Print Audit 6 format. Modifier Type - A number indicating the type of modifier. 0 - Unit cost, 1 - Unit percentage, 2 - Job cost, 3 - Job percentage. If blank, Print Audit assumes unit percentage. Use Budget - Whether or not this value uses a budget. 0 - Not using a budget, 1 - Using a budget. Budget - The amount in the budget for this value. Active - Whether or not the code is currently active. A value of 0 means inactive, 1 means active. If blank, the Administrator assumes active. Print Audit 4 This importer uses the same format as the Validated Value importing/exporting from Print Audit 4. The format is a comma-delimited file in the following order: Code - The code for the value. Must be unique for the field. This is the only required column. Description - A user friendly description for the value. If omitted, the Administrator leaves the description of the value blank. 123
124 Cost Modifier - A unit percentage modifier. If omitted, the Administrator uses a default of 100. The same modifier is applied for both color and b/w unit percentages. Active - Whether or not the code is currently active. A value of 0 means inactive, 1 means active. If blank, the Administrator assumes active. Print Audit 5 This importer uses a comma-delimited file format. The columns are in the following order: Code - The code for the value. Must be unique for the field. This is the only required column. Description - A user friendly description for the value. If omitted, the Administrator leaves the description of the value blank. Cost Modifier - The cost modifier. If omitted assumes zero for cost modifier types, 100 for percentage modifier types. This modifier type is used for both b/w and color unit costs if it is a unit modifier type. Modifier Type - A number indicating the type of modifier. 0 - Unit cost, 1 - Unit percentage, 2 - Job cost, 3 - Job percentage. If blank, the Administrator assumes unit percentage. Use Budget - Whether or not this value uses a budget. 0 - Not using a budget, 1 - Using a budget. Budget - The amount in the budget for this value. Active - Whether or not the code is currently active. A value of 0 means inactive, 1 means active. If blank, the Administrator assumes active. Print Audit 6 This importer uses a comma-delimited file format. The columns are in the following order: Code - The code for the value. Must be unique for the field. This is the only required column. Description - A user friendly description for the value. If omitted, the Administrator leaves the description of the value blank. Cost Modifier - The cost modifier for b/w unit costs or percentages if a unit type modifier. If a job type modifier this is the value for the job. If omitted assumes zero for cost modifier types, 100 for percentage modifier types. Color Cost Modifier - The cost modifier for color costs or percentages. It has no effect for job type modifiers. If omitted, assumes zero for cost modifier types, 100 for percentage modifier types. Modifier Type - A number indicating the type of modifier. 0 - Unit cost, 1 - Unit percentage, 2 - Job cost, 3 - Job percentage. If blank, the Administrator assumes unit percentage. Use Budget - Whether or not this value uses a budget. 0 - Not using a budget, 1 - Using a budget. Budget - The amount in the budget for this value. 124
125 Active - Whether or not the code is currently active. A value of 0 means inactive, 1 means active. If blank, the Administrator assumes active. Print Audit 6 Linked Values This import format is the only valid format for importing custom values into Linked type custom fields. It is as follows: Parent Code - The code for the main code in the linked pair. Required. Parent Description - The description for the main code in the linked pair. If blank, the description is left blank. Child Code - The child code for the value. Required. The combination of parent code and child code must be unique. Child Description - A user friendly description for the child value. If omitted, the Administrator leaves the description of the value blank. Cost Modifier - The cost modifier for b/w unit costs or percentages if a unit type modifier. If a job type modifier this is the value for the job. If omitted assumes zero for cost modifier types, 100 for percentage modifier types. Color Cost Modifier - The cost modifier for color costs or percentages. It has no effect for job type modifiers. If omitted, assumes zero for cost modifier types, 100 for percentage modifier types. Modifier Type - A number indicating the type of modifier. 0 - Unit cost, 1 - Unit percentage, 2 - Job cost, 3 - Job percentage. If blank, the Administrator assumes unit percentage. Use Budget - Whether or not this value uses a budget. 0 - Not using a budget, 1 - Using a budget. Budget - The amount in the budget for this value. Active - Whether or not the code is currently active. A value of 0 means inactive, 1 means active. If blank, the Administrator assumes active. Exporting Custom Field Values You can export the custom values for a field to a comma-delimited file. You can then use this file for importing into other programs that may need the value list. Print Audit uses two slightly different formats depending on whether you are exporting a linked or a non-linked custom field. For non-linked custom fields, the format is as follows: Code, Description, BW Cost Modifier, Color Cost Modifier, Modifier Type, Use Budget, Budget, Active For linked custom fields, the format is as follows: Parent Code, Parent Description, Child Code, Child Description, BW Cost Modifier, Color Cost Modifier, Modifier Type, Use Budget, Budget, Active 125
126 To export custom field values from a field: Click on the Client Custom Fields button on the left hand side of the Administration window. The Client Custom Fields section appears in the right hand side. Click on the field for which you want to export values in the top grid. The field row is highlighted. Click the Export button on the toolbar at the top of the Administration window. A standard Windows dialog appears. Use the dialog to select a file to export the information to and click the Save button. The information starts to export. After the export completes a message box appears letting you know how many values were exported. Note For custom field values that use percentage modifier types, the Color Cost Modifier column is ignored, and the BW Cost Modifier column contains the overall percentage modifier. 126
127 1-5 User Profiles Print Audit allows you to assign tracking and security options to users with user profiles. There are two types of user profiles: Tracking Profiles and Security Profiles. You can assign the same profile to multiple users, allowing you to quickly set up how you want users to behave in Print Audit. Tracking Profiles control how Print Audit tracks printing from the user. This includes things such as how jobs are tracked, what options they have on the Client Popup Window, if they have custom pricing, printing limits or cost/page allowances. Security Profiles control what the user can do in the Print Audit tools. For example you can assign the "Administrator" profile to a user to give them full access to configure Print Audit. You can set individual Print Audit policies to control things such as user management, printer management and job exporting. Print Audit assigns all users to the "Administrator" profile by default. It does this to ensure you do not lock yourself out of the database accidentally when you first install. If you want new users to have other profiles than "Administrator", you can use this section to assign different defaults. You MUST have one user at all times as the Print Audit Administrator. Print Audit does try to protect you from removing the last administrator. If you somehow do remove the last Administrator you will not be able to use the Administration tool at all. Print Audit ships with some standard profiles already defined. You can modify these profiles to suit your business needs, or create new profiles to assign. We recommend you do not modify the Print Audit Administrator security profile. You can do the following in this section: Set the default Tracking Profile Add, edit and delete Tracking Profiles Define Allowances Reset user balances. Set the default Security Profile Add, edit and delete Security Profiles Allowances and Balances Print Audit 6 allows you to set define cost or page balances for users. Whenever a user prints a job, its value is automatically deducted from the user's balance until none is remaining. If the user runs out, they can no longer print. To view an individual user's current balances, you can view the individual user in the Users section of the Administrator. There are three major pieces that tie into user balances: 127
128 Allowances An allowance is the default balance assigned to a user. You set up allowances on the User Tracking Profile, and whenever a user is assigned to the profile their balances get set to the allowance you define. The types of allowances are as follows: Total Pages - The total number of pages a user can print before they run out. Counts both b /w and color pages. B/W Pages - The total number of b/w pages a user can print before they run out. Allows unlimited color printing. Color Pages - The total number of color pages a user can print before they run out. Allows unlimited b/w printing. B/W and Color Pages - The total number of b/w and color pages they can print. If either allowance runs out, the user won't be able to print any more pages of that type. Cost - The total cost of print jobs the user is allowed to print before the allowance runs out. You can set allowance balances to auto-reset periodically. For example, you could define an allowance of 50 total pages that resets the first of every month. At any point you can manually reset a user's balance. Additional Balances In some cases, you may want to have a separate balance for a user that does not reset when their allowance does. For example, in an educational institution a student may purchase extra printing outside of their normal allowance. This balance never automatically resets, although you can choose to manually reset it. The additional balance is of the same type as the allowance, so it is not possible to have an allowance of total pages and an additional balance of cost for example. If additional balances are enabled, printing is taken first from any remaining allowance, and then taken from the additional if the allowance runs out. Overdraft In some cases, you may want to allow users to be able to still print even if their balance is negative. In this case, you can assign an overdraft amount to the User Profile. For example, if you have a 50 page allowance you could set a 5 page overdraft to give a bit of leeway to your users. 128
129 Setting the Default User Tracking Profile Print Audit uses a Tracking Profile you select as the "default" profile. Print Audit automatically assigns this default profile to users the first time they print. You can change the default Tracking Profile at any time. When you change the default it only affects new users it does not change existing users in the User list. To set the default Tracking Profile: Click on the User Profiles button on the left hand side of the Administration window. The User Profiles section appears in the right hand side. Click the Tracking Profiles Tab in the User Profiles section. A list of all defined Tracking Profiles appears. Use the Default Profile drop down box located at the top of the tab to select the new profile to use as the default. Print Audit now assigns the profile you selected to any new users that appear in the Users section Adding, Editing and Deleting Tracking Profiles You use the User Profiles section of the Administration tool to add, edit and delete Tracking Profiles. Please follow the steps in the sections below. To add a new tracking profile: Click on the User Profiles button on the left hand side of the Administration window. The User Profiles section appears in the right hand side. Click the Tracking Profiles Tab in the User Profiles section. A list of all defined Tracking Profiles appears. Double-click on an empty row in the Tracking Profiles list, or click the New button on the toolbar. The Tracking Profile window appears. Enter the information for the new profile. Click here for details on the Tracking Profile window. Click the Add button. The value saves to the database and the window sets up to add the next profile. Click the Close button if you are done adding profiles. This will close the window and refresh the profiles. You can also continue steps 3 through 4 to continue adding profiles. To edit an existing tracking profile: Click on the User Profiles button on the left hand side of the Administration window. The User Profiles section appears in the right hand side. 129
130 4. 5. Click the Tracking Profiles Tab in the User Profiles section. A list of all defined Tracking Profiles appears. Double-click on the Profile you want to edit in the profile list. The Tracking Profile window appears. Make your changes as appropriate. Click here for details on the Tracking Profile window. Click the Save button. The Tracking Profile window closes and you see your changes displayed in the list. Please note that if you change the balance information Print Audit asks you if you want to reset your balances. To delete existing tracking profiles: Click on the User Profiles button on the left hand side of the Administration window. The User Profiles section appears in the right hand side. Click the Tracking Profiles Tab in the User Profiles section. A list of all defined Tracking Profiles appears. Use a combination of CTRL-CLICK and SHIFT-CLICK to select the list of profiles you want to delete. If you want to delete only one profile, you can simply click on it. Click the Delete key on the toolbar at the top of the Administration window. A message appears asking you to confirm you want to delete the profiles(s). Click the Yes button on the message box to delete the profiles. The list refreshes to show the profiles were deleted. Note You can only delete a tracking profile if no users exist that use it. Resetting User Balances You can easily reset the balances for every user in a Tracking Profile. You may want to reset the balances at the start of every month, or using some other criteria that makes sense for your business. Please note that Print Audit automatically asks you if you want to reset user balances when you change the starting balance on the profile window. You can also setup automatic balance resetting. To reset user balances: Click on the User Profiles button on the left hand side of the Administration window. The User Profiles section appears in the right hand side. 130
131 Click the Tracking Profiles Tab in the User Profiles section. A list of all defined Tracking Profiles appears. Double-click on the Profile you want to reset balances for in the profile list. The Tracking Profile window appears. Make sure the allowance values on the Allowances tab on the Tracking Profile window contains the value you want. Click the Reset User Balances button. The Reset Balances window appears. Click the option corresponding to the balance option you want. Check the Set additional balances to zero box if you want to reset additional balances along with the allowance balances. Click the Update button. A message appears asking you to confirm you want to update the balances. Click Yes to set the balances of all users that use the profile. Setting the Default User Security Profile Print Audit uses a Security Profile you select as the "default" profile. Print Audit automatically assigns this default profile to users the first time they print. You can change the default Security Profile at any time. When you change the default it only affects new users it does not change existing users in the User list. To set the default Security Profile: Click on the User Profiles button on the left hand side of the Administration window. The User Profiles section appears in the right hand side. Click the Security Profiles Tab in the User Profiles section. A list of all defined Security Profiles appears. Use the Default Profile drop down box located at the top of the tab to select the new profile to use as the default. Print Audit now assigns the profile you selected to any new users that appear in the Users section. Adding, Editing and Deleting Security Profiles You use the User Profiles section of the Administration tool to add, edit and delete Security Profiles. Please follow the steps in the sections below. To add a new security profile: Click on the User Profiles button on the left hand side of the Administration window. The User Profiles section appears in the right hand side. 131
132 Click the Security Profiles Tab in the User Profiles section. A list of all defined Security Profiles appears. Double-click on an empty row in the Security Profiles list, or click the New button on the toolbar. The Security Profile window appears. Enter the information for the new profile. Click the Add button. The value saves to the database and the window sets up to add the next profile. Click the Close button if you are done adding profiles. This will close the window and refresh the profiles. You can also continue steps 3 through 4 to continue adding profiles. To edit an existing security profile: Click on the User Profiles button on the left hand side of the Administration window. The User Profiles section appears in the right hand side. Click the Security Profiles Tab in the User Profiles section. A list of all defined Security Profiles appears. Double-click on the Profile you want to edit in the profile list. The Security Profile window appears. NOTE: We recommend you do not edit the Administrator security profile. Make your changes as appropriate. Click the Save button. The Security Profile window closes and you see your changes displayed in the list. To delete existing security profiles: Click on the User Profiles button on the left hand side of the Administration window. The User Profiles section appears in the right hand side. Click the Security Profiles Tab in the User Profiles section. A list of all defined Security Profiles appears. Use a combination of CTRL-CLICK and SHIFT-CLICK to select the list of profiles you want to delete. If you want to delete only one profile, you can simply click on it. Click the Delete key on the toolbar at the top of the Administration window. A message appears asking you to confirm you want to delete the profiles(s). Click the Yes button on the message box to delete the profiles. The list refreshes to show the profiles were deleted. Note You can only delete a security profile if no users exist that use it. 132
133 133
134 1-6 Users Print Audit automatically adds every user it detects to the user list. Over time this list contains every user in your organization that has printed. You use this list to assign tracking and security profiles, assign users to report groups, set PIN codes and/or passwords as well as check and set user balances. You can do the following with the users section: Editing Users Adding and Deleting Users (Advanced) Importing and Exporting Users Adding and Deleting Users (Advanced) You can use Print Audit to add users to and delete users from the Users list. Print Audit automatically adds users to the list when they print, so you only need to add/delete users if you have advanced requirements. Note that if you delete a user, it may re-appear as soon as they print. To add a new user: Click on the Users button on the left hand side of the Administration window. The Users section appears in the right hand side. A list of all users Print Audit has tracked displays in the section. Double-click on an empty row in the list or click the New button in the toolbar. The User window appears. Enter information for the user as applicable. Click the Add button. The user saves to the database and the window sets up to add the next user. Click the Close button if you are done adding users. This closes the window and refreshes the users. You can also continue steps 3 through 4 to continue adding users. To delete a user: Click on the Users button on the left hand side of the Administration window. The Users section appears in the right hand side. A list of all users Print Audit has tracked displays in the section. Click on the user you want to delete in the user list. The user highlights. Click the Delete button on the toolbar at the top of the Administration tool. A message appears asking you to confirm that you want to delete. 134
135 4. Click the Yes button to continue deleting the user. The user list refreshes to show that Print Audit deleted the user. Note You can not delete users if they have print jobs in the database. Editing Your Users You may need to edit your users for several reasons. You edit users to add/change PIN codes, reset their user balances and assign them to different reporting groups. You also need to edit users to assign them to different tracking or security profiles. To edit a user: 4. Click on the Users button on the left hand side of the Administration window. The Users section appears in the right hand side. A list of all users Print Audit has tracked displays in the section. Double-click on the user you want to edit. The User window appears. Change the information as appropriate. Click the Save button. The User window closes and you should see changes reflected in the list. To edit multiple users at once: Click on the Users button on the left hand side of the Administration window. The Users section appears in the right hand side. A list of all users Print Audit has tracked displays in the section. Use a combination of CTRL-CLICK and SHIFT-CLICK to select the list of users you want to edit. Click the Edit button on the toolbar. The Update Multiple Users window appears. Make your changes as appropriate. Please note that you can only change the tracking profile, security profile, balance and reporting group when editing multiple users. Click the Update button. The Update Multiple Users window closes and you see your changes displayed in the list. To change/create PIN codes for multiple users at once: 135
136 Click on the Users button on the left hand side of the Administration window. The Users section appears in the right hand side. A list of all users Print Audit has tracked displays in the section. Use a combination of CTRL-CLICK and SHIFT-CLICK to select the list of users whose PIN codes you want to change. Click the Edit->Generate PIN Codes menu item. The Generate PIN Codes window appears. Enter the length of the PIN code you want to generate. Check the Numeric only box if you want to generate numeric only PIN codes. Check the Overwrite existing box if you want to overwrite PIN codes if they already exist. If unchecked Print Audit creates new PIN codes but does not overwrite existing PIN codes. Click the Generate button. Print Audit generates new PIN codes for the users. To see a list of PIN codes for the users you can export the users to a flat file. Note Resetting a PIN code for the user does not reset their PIN password. Importing Users Print Audit allows you to import a user list from a generic comma-delimited format, a Print Audit 4 format flat file, a Print Audit 5 format flat file, a Print Audit 6 format flat file and from a domain. Please note that you can only import Windows users if you run the Administration tool on a Windows NT based computer. You can also schedule user imports to run whenever you like, keeping the users up to date. IMPORTANT! You do NOT need to import users. Print Audit automatically adds users to the database as they print. Only import users if you want to assign PIN codes to a large number of users at once, set their balances or groups. When importing users you can adjust several settings that affect how PIN codes, Balances and Groups are set for newly imported users. The options available are dependent on the type of import you are doing. Note 136
137 For advanced users the Network Type setting in the Network and Authentication Settings section controls which type of domain Print Audit attempts to import from; a Windows NT, Active Directory or Novell NDS domain. To import users: Click on the Users button on the left hand side of the Administration window. The Users section appears in the right hand side. A list of all users Print Audit has tracked displays in the section. Click the Import button on the toolbar at the top of the Administration window. The Import Users window appears. Select the Import Type using the drop down on the window Import Users window. See User Import Types for a description of the different types of user imports. Select the file you want to import for a Print Audit 4/5 import, or enter the domain you want to import users from for a Domain type import. Please note that the file you choose for a file-based import must be in the correct format. Enter an organizational unit (OU) to limit the import to. This option is only available for Domain type imports, and if your Network Type is Active Directory or Novell NDS. Select the tracking profile, security profile for the import. Select your options for PIN, PIN Password, Balances and Grouping. Click the Import button. Print Audit begins to import the users. Once the import is complete, a message displays indicating whether or not the import was successful. The import window closes and the list refreshes. If you generate PIN codes for users you can export the users to get a list of all assigned PIN codes. To schedule user imports: Set up the import using the same steps 1-7 above. Click on the Scheduling tab. Use the Run Import drop down to select how often to run the import. Choices are Daily, Weekly or Monthly. Use the On drop down to select the day on which to run the import. This is only effective for Weekly or Monthly schedules. Use the At selector to select the time of day at which to run the import. We recommend using a time outside of regular business hours. 6. Click the Schedule button. Print Audit creates an entry in the Windows task scheduler that when run imports users using the settings you defined. 137
138 To unschedule user imports: Click on the Users button on the left hand side of the Administration window. The Users section appears in the right hand side. A list of all users Print Audit has tracked displays in the section. Click the Import button on the toolbar at the top of the Administration window. The Import Users window appears. Click the Unschedule button. If not enabled, you have no imports scheduled. You can also manually delete the task using the Windows Task Scheduler. Exporting Users You can export the Print Audit user list to a comma-delimited file. Print Audit exports all user PIN codes so it is important to make sure you keep track of this file for security purposes. Print Audit creates a comma-delimited file, with the columns in the following order: PIN code, Display Name, Unique Name, Network Name, Domain, B/W Allowance Balance, B/W Additional Balance, Color Allowance Balance, Color Additional Balance, Account. To export users: 4. Click on the Users button on the left hand side of the Administration window. The Users section appears in the right hand side. A list of all users Print Audit has tracked displays in the section. Click the Export button on the toolbar at the top of the Administration window. The Export Users To File window appears. Type in the file to export to, or use the browse button to select a file. Click the Export button on the window to export the users to the selected file. 138
139 1-7 Printer Profiles Overview Print Audit 6 allows you to assign tracking and print cost information to printers through Printer Profiles. For example you use Printer Profiles to set whether Print Audit tracks printing from a printer, if it should track printing in pages, square footage, etc., as well as any printing limits you want to place on your printing device. You only need to create different Printer Profiles if you need to have different tracking or pricing options for different devices. You can set multiple printers to use the same Printer Profile. New to Print Audit 6 is the ability to determine which custom fields should display on the Popup based on printer, as well as extended job options when printing. Click here for more information on the new options. Print Audit ships with two profiles already created, one for standard tracking one for ignoring printing. It sets the default profile to the tracking profile. You can use this section to do the following: Set the default Printer Profile Add, edit and delete Printer Profiles Printer Profiles do not take effect until assigned to one or more printers. Setting the Default Printer Profile Print Audit uses a Printer Profile you select as the "default" profile. Print Audit automatically assigns this default profile to printers as it adds them to the Printers list. You can change the default Printer Profile at any time. When you change the default it only affects new printers it does not change printers that already exist in the Printer List. To set the default Printer Profile: Click on the Printer Profiles button on the left hand side of the Administration window. The Printer Profiles section appears in the right hand side. A list of all existing Printer Profiles displays in the list. Use the Default Profile drop down box located just above the Printer Profiles list to select the new profile to use as the default. Print Audit now assigns the profile you selected to any new printers that appear in the Printers section. Adding, Editing and Deleting Printer Profiles You use the Printer Profiles section of the Administration tool to add, edit and delete Printer Profiles. Please follow the steps in the sections below. To add a new printer profile: 139
140 4. 5. Click on the Printer Profiles button on the left hand side of the Administration window. The Printer Profiles section appears in the right hand side. A list of all existing Printer Profiles displays in the list. Double-click on an empty row in the Printer Profiles list, or click the New button on the toolbar. The Adding New Printer Profile window appears. Enter the information for the new profile. Click the Add button. The profile saves to the database and the window sets up to add the next profile. Click the Close button if you are done adding profiles. This will close the window and refresh the profiles. You can also continue steps 3 through 4 to continue adding profiles. To edit an existing printer profile: 4. Click on the Printer Profiles button on the left hand side of the Administration window. The Printer Profiles section appears in the right hand side. A list of all existing Printer Profiles displays in the list. Double-click on the Profile you want to edit in the profile list. The Editing Printer Profile window appears. Make your changes as appropriate. Click the Save button. The Editing Printer Profile window closes and you see your changes displayed in the list. To add a printing limit to a printer profile: Follow the steps above to add a new profile or edit an existing profile. Click the Printing Limits tab on the Printer Profile window. Click the Add button on the Printer Profile window. The Printing Limit window appears. Select the type of limit you want. Enter the value you want for the limit. Enter the message you want displayed to the user if they exceed the limit. You can use message variables in the message. Check the Stop Job check box if you want Print Audit to stop the job from going to the printer if the job exceeds the limit. Click the Ok button to accept the changes to the limit. The window closes and you are back at the Printer Profile window. Repeat steps 3 to 8 to add more limits. Click the Add/Save button on the Printer Profile window to save the changes. 140
141 Note When you add a limit Print Audit automatically changes to "wait for page count" mode. This mode causes Print Audit to wait until all pages are spooled before it displays the Popup window or any warnings. To delete existing printer profiles: Click on the Printer Profiles button on the left hand side of the Administration window. The Printer Profiles section appears in the right hand side. A list of all existing Printer Profiles displays in the list. Use a combination of CTRL-CLICK and SHIFT-CLICK to select the list of profiles you want to delete. If you want to delete only one profile, you can simply click on it. Click the Delete key on the toolbar at the top of the Administration window. A message appears asking you to confirm you want to delete the profiles(s). Click the Yes button on the message box to delete the profiles. The list refreshes to show the profiles were deleted. Note You can only delete a profile if no printers exist that use it. Printing Limits and Redirection In Print Audit you can setup multiple limit thresholds for Applications, Printer Profiles or User Track Profiles. You can use these limits to require users to print large jobs to more cost effective printers, limit the amount of color printing they can do to individual printers, limit the number of pages they can print from a website, and so on. Once a limit is hit, you can define the message that displays to the user, and either make the job cancel and have the user re-print the job to a different printer if needed, or just warn them about their behavior. Print Audit supports several types of limits. They are as follows: Total pages - The total number of pages allowed. B/W pages - The total number of b/w pages allowed. Color pages - The total number of color pages allowed. Total cost - The total cost of the job, after the Popup has been completed. 141
142 Base cost - The total cost of the job before the Popup displays. Since it is possible to have limits defined in several different areas of the software, Print Audit processes limits as follows: "Stop" limits are processed before "Warn" limits. Limits are processed in order of Application, User, Printer. So if you have defined a limit for an Application and a similar limit in Printer, the message you entered for the Application limit will display. You can choose, for any individual Application, User Profile or Printer Profile to ignore any defined limits. So for example you could set limits at an Application level, but allow users that belong to a User Profile to print without triggering those limits. 142
143 1-8 Printers Printers Print Audit 6 automatically adds printers to your printers list. Print Audit adds the printer the first time it detects a print job going to the printer. Over time this list contains every printing device in your organization. You use this list to assign profiles to printers as well as maintain device specific information. You can do the following with the Printers section: Editing your Printers Adding and Deleting Printers (Advanced) One of the most important topics when using Print Audit discusses how the software uses printer matching. The printer matching systems determine how Print Audit determines if the printer someone prints to from the Windows desktop matches one that already exists in the database. The systems are as follows: Normal Printer Device Matching Automatic Merging (Advanced) Manual Merging (Advanced) The Printer Profiles section and the Printer Paper Sizes section work with the Printers section to determine how jobs are tracked and charged. Click the links to see more information on those sections. Adding and Deleting Printers (Advanced) You can use Print Audit to add printers to and delete printers from the Printers list. Print Audit automatically adds printers to the list when printing, so you only need to add/delete printers if you have advanced requirements such as specialized printer matching. Note that if you delete a printer, it may re-appear as soon as someone prints to it. To add a new printer: Click on the Printers button on the left hand side of the Administration window. The Printers section appears in the right hand side. A list of all printers Print Audit has tracked displays in the section. Double-click on an empty row in the list or click the New button in the toolbar. The Printer window appears. Enter information for the printer as applicable. 143
144 4. Click the Add button. The Adding New Printer window closes and the new printer adds to the list. To delete a printer: 4. Click on the Printers button on the left hand side of the Administration window. The Printers section appears in the right hand side. A list of all printers Print Audit has tracked displays in the section. Click on the printer you want to delete in the printer list. The printer highlights. Click the Delete button on the toolbar at the top of the Administration tool. A message appears asking you to confirm that you want to delete. Click the Yes button to continue deleting the printer. The printer list refreshes to show that Print Audit deleted the printer. NOTE: You cannot delete printers if they have print jobs in the database. Editing Your Printers You may need to edit printers from time to time, mainly to change the Printer Profile assigned to the printer, or to assign the printer to a different reporting group. You can also edit multiple printers at once. To edit a printer: 4. Click on the Printers button on the left hand side of the Administration window. The Printers section appears in the right hand side. A list of all printers Print Audit has tracked displays in the section. Double-click on the printer you want to edit. The Editing Printer window appears. Change the information as appropriate. Click the Save button. The Editing printer window closes and you should see changes reflected in the list. To edit multiple printers at once: Click on the Printers button on the left hand side of the Administration window. The Printers section appears in the right hand side. A list of all printers Print Audit has tracked displays in the section. Use a combination of CTRL-CLICK and SHIFT-CLICK to select the list of printers you want to edit. Click the Edit button on the toolbar. The Update Multiple Printers window appears. 144
145 4. 5. Make your changes as appropriate. Please note that you can only change the tracking profile and reporting group when editing multiple printers. Click the Update button. The Update Multiple Printers window closes and you see your changes displayed in the list. Manual Printer Merging Print Audit supports manual printer merging. This allows you to take any set of print devices listed in the Printers List in the Administrator and merge the devices and all their jobs into one printer device. Print Audit remembers manual merges and automatically merges all future jobs accordingly. NOTE: This is intended for advanced users only. You should only use manual printer merging if you are sure the printer devices you are merging should be reporting as only one device. If you merge devices there is no way to separate the job information back to the original printers. At any point you can "un-merge" a printer to remove all merging information. This does NOT restore the jobs to the separate printers but future print jobs are assigned to the separate devices. To view merged printers: Click on the Printers button on the left hand side of the Administration window. The Printers section appears in the right hand side. A list of all printers Print Audit has tracked displays in the section. Printers that have other printers merged into them have a "plus" symbol to the left of their name. Click this symbol to expand the printers list to show all printers merged into that device. To manually merge printers: 4. Click on the Printers button on the left hand side of the Administration window. The Printers section appears in the right hand side. A list of all printers Print Audit has tracked displays in the section. Use CTRL-CLICK or SHIFT-CLICK to select the printers you want to merge. IMPORTANT: The first printer you select is the one Print Audit merges the rest of the printers into. So, for example, if you select printers A, B, C and D in that order, Print Audit merges all of B, C and D's jobs into printer A, and deletes printers B, C and D. Click the Advanced->Merge Printers menu. A window appears asking you if you are sure you want to merge these printers. Click the Yes button. Print Audit merges the printers and the jobs and refreshes the printer list. To un-merge a printer: 145
146 4. Click on the Printers button on the left hand side of the Administration window. The Printers section appears in the right hand side. A list of all printers Print Audit has tracked displays in the section. Printers that have others merged into them have a "plus" symbol to the left of their name. Click this symbol to expand the printers list to show all printers merged into that device. Click on the merged printer you want to un-merge, and click the Delete button on the toolbar. A window appears asking if you are sure you want to delete the merge. Click the Yes button. The merged printer now disappears from the list. It will be added as its own separate printer again the next time a user prints to it, but the previously merged jobs will not separate. NOTE: If the merged printer appears gray in the list, it is an automatically merged device and cannot be deleted. 146
147 1-9 Printer Paper Sizes Print Audit 6 allows you to charge for print jobs based on the size of paper used to print the job. For example, you could set a cost of $0.10 per page for Letter sized pages, and $0.15 for Legal sizes. For very large paper sizes used in plotting of large drawings, you may want to use square footage or square meter tracking instead. To use paper size costing you need to ensure the paper sizes you use in your day to day business are included on the paper sizes list. You also need to set pricing in a User Profile, Printer Profile or Application to use "per paper size" as the print option and assign that profile to your printers. Print Audit ships with many of the standard paper sizes, you can add or modify them to suit your needs. You may want to look at each paper size and ensure the cost per page is correct for your business. Adding, Editing and Deleting Paper Sizes You use the Printer Paper Sizes section to add, edit and delete paper sizes. Printer Profiles use these paper sizes if you set the pricing option to "per paper size". To add a new paper size: Click on the Printer Paper Sizes button on the left hand side of the Administration window. The Printer Paper Sizes section appears in the right hand side. Double-click on an empty row in the bottom list in the Printer Paper Sizes section, or click the New button on the toolbar. The Adding New Paper Size window appears. Enter the information for the new paper size. Click the Add button. The paper size saves to the database and the window sets up to add the next size. Click the Close button if you are done adding paper sizes. This will close the window and refresh the sizes. You can also continue steps 3 through 4 to continue adding sizes. To edit an existing paper size: 4. Click on the Printer Paper Sizes button on the left hand side of the Administration window. The Printer Paper Sizes section appears in the right hand side. Double-click on the paper size you want to edit in the paper size list. The Paper Size window appears. Make your changes as appropriate. Click the Save button. The Paper Size window closes and you see your changes displayed in the top list. To edit multiple paper sizes at once: 147
148 4. 5. Click on the Printer Paper Sizes button on the left hand side of the Administration window. The Printer Paper Sizes section appears in the right hand side. Use a combination of CTRL-CLICK and SHIFT-CLICK to select the list of paper sizes you want to edit. Click the Edit button on the toolbar. The Update Paper Sizes Cost window appears. Enter the new costs you want to assign to the paper sizes. Click the Update button. The Update Paper Sizes Cost window closes and you see your changes displayed in the list. To delete existing paper sizes: Click on the Printer Paper Sizes button on the left hand side of the Administration window. The Printer Paper Sizes section appears in the right hand side. Use a combination of CTRL-CLICK and SHIFT-CLICK to select the list of paper sizes you want to delete. If you want to delete only one paper size, you can simply click on it. Click the Delete key on the toolbar at the top of the Administration window. A message appears asking you to confirm you want to delete the paper size(s). 4. Click the Yes button on the message box to delete the paper sizes. The list refreshes to show the paper sizes were deleted. 148
149 1-10 Applications Overview Print Audit 6 can determine whether or not to track printing from an application. By default, all applications are watched for print jobs. However you may have instances where you want to track printing from only one application, or you want to track printing from all applications except one. You may also have instances where you do not want users to be able to print information from an application. It is possible to define printing limits, job rules, custom pricing and specify which custom fields are used for the user at an application level. You DO NOT need to add every application you want to track to this list. Only add applications to the list if you have special tracking needs. Please note that unlike the Users and Printers list, Print Audit does not automatically add every application it detects printing from to the list. The Applications section in the Administration tool allows you to do the following: Add, edit and delete applications Limit the number of tracked applications Adding, Editing and Deleting Applications You use the Applications section of the Administration tool to add, edit and delete applications. Please follow the steps in the sections below. To add a new application: Click on the Advanced header on the left hand side of the Administration window. The list of advanced sections of the Administration tool display. Click on the Applications button on the left hand side of the Administration window. The list of applications appears in the right hand side. Double-click on an empty row in the list in the Applications section or click the New button on the toolbar. The Applications window appears. Enter the application information as applicable. Click the Add button. The application saves to the database and the window sets up to add the next application. Click the Close button if you are done adding applications. This will close the window and refresh the applications. You can also continue steps 4 through 5 to continue adding applications. To edit an existing application: 149
150 4. 5. Click on the Advanced header on the left hand side of the Administration window. The list of advanced sections of the Administration tool display. Click on the Applications button on the left hand side of the Administration window. The list of applications appears in the right hand side. Double-click on the application you want to edit in the list in the Applications section. The Applications window appears. Make your changes as appropriate. Click the Save button. The Applications window closes and you see your changes displayed in the list. To delete existing applications: Click on the Advanced header on the left hand side of the Administration window. The list of advanced sections of the Administration tool display. Click on the Applications button on the left hand side of the Administration window. The list of applications appears in the right hand side. Use a combination of CTRL-CLICK and SHIFT-CLICK to select the list of applications you want to delete. If you want to delete only one application, you can simply click on it. Click the Delete key on the toolbar at the top of the Administration window. A message appears asking you to confirm you want to delete the application(s). Click the Yes button on the message box to delete the applications. The bottom list refreshes to show the applications were deleted. Limiting the Number of Tracked Applications Print Audit 6 provides an extremely quick and easy way to have Print Audit limit tracking to only a few applications in your organization. For example, you can set Print Audit to track printing only from Microsoft Word without having to add every other application to the Applications list. To limit the number of applications you want tracked: Add the applications you do want tracked to the Applications list and set their tracking options appropriately. Check the Track only the applications in the list button. This causes Print Audit to ignore printing from any application not in the Applications list. 150
151 1-11 Network Settings and Authentication Network Settings Print Audit 6 allows you to gather network user information from several different types of networks. Print Audit supports Novell NDS networks, Windows NT 4.0 based networks, Active Directory networks and peer to peer Windows networks. You can also configure Print Audit to require users to authenticate before they can print or use Print Audit tools. You can choose authentication with PIN codes, use existing login information or require the user to re-enter their login information. You can even choose to have a user authenticate differently for printing depending on the computer they are printing from. Your network settings control how user information appears in Print Audit when users are added and imported. Please note that we recommend changing these settings only if you are an advanced user with an understanding of networks and how your network is implemented. You can do the following with this section: Change your network type Change how users authenticate Change the PIN and PIN Password labels Set the Disconnected job option per computer Change the TCP/IP port the Client listens on Changing Your Network Type Print Audit supports several different network types. Your network type controls how Print Audit reports user information as well as how it imports users. Your network type also controls how Print Audit does network authentication. To change your network type: Click on the Advanced header on the left hand side of the Administration window. The left hand list switches to the list of advanced sections. Click on the Network and Authentication button on the left hand side of the Administration window. The section appears with the list of computers that have printed. Use the Network Type drop down to select the type of network in your organization. 4. Click the Save button on the toolbar at the top of the Administration window to save the changes. 151
152 Please note that the network type changes the information of new users as they print, it does not affect existing users. If you change the network type when you have existing users, the next time they print they get added to the list with the new network information and Print Audit treats them as different users. Please be aware that when these new users are added Print Audit uses your default tracking and security profiles. This can end up with a user under one network type having different rights and tracking behavior than the user under the new network type. For these reasons we highly recommend that you set the network type as early as possible in your Print Audit configuration and only change it if absolutely necessary. Changing How Users Authenticate Print Audit allows several different methods of authentication. You can configure Print Audit to require users to authenticate before they can print and authenticate before they can use the Print Audit tools. You can set Print Audit to require different authentication methods for printing (Client Authentication ) and access to the tools (Tools Authentication). For example, you may want Print Audit to use the logged in user for tracking printing but require a PIN code to get into the Print Audit tools. Please note that the default Client Authentication and Tools Authentication settings are the same as those in the Client Settings section of the Administration tool. We provide them there as well for ease of use. To change the default client authentication: Click on the Advanced header on the left hand side of the Administration window. The left hand list switches to the advanced sections. Click on the Network and Authentication button on the left hand side of the Administration window. The section appears with the list of computers that have printed. Use the Default client authentication drop down to select the type of Client Authentication you want to do by default. Click the Save button on the toolbar at the top of the Administration window to save the changes. A message appears asking if you want to change all existing computers to use the new default. Click Yes to set all computers to the new defaults, or click No set the new default, but leave existing computers with their current authentication settings. NOTE: If you leave existing computers to "Network" authentication and you are using the Windows Peer to Peer network setting then the Client uses PIN code authentication instead. To change the client authentication for a computer: Click on the Advanced header on the left hand side of the Administration window. The left hand list switches to the advanced sections. 152
153 4. 5. Click on the Network and Authentication button on the left hand side of the Administration window. The section appears with the list of computers that have printed. Double-click on the computer that you want to change authentication for. The Computer window appears. Use the Authentication drop down box to select the authentication type. Click the Save button on the Computer window. The Computer window closes and the computer list refreshes to show the changes. To change the tools authentication: 4. Click on the Advanced header on the left hand side of the Administration window. The left hand list switches to the advanced sections. Click on the Network and Authentication button on the left hand side of the Administration window. The section appears with the list of computers that have printed. Use the Tools authentication drop down to select the type of Tools Authentication you want. Click the Save button on the toolbar at the top of the Administration window to save the changes. Network Login Authentication For advanced users Print Audit supports network login authentication. This allows you to have your users enter their Windows or Novell network login information before they print or use the Print Audit tools. Using this setting on a Windows operating system has the issues that you need to be aware of: You cannot use this setting in combination with the "Windows Peer to Peer" Print Audit network type. Windows 98, ME computers cannot authenticate with network settings unless they are configured to use user-level sharing. You need to change this in the network settings of your Windows 9x based operating systems. If you have NT based computers that are not on the domain they may not be able to successfully authenticate. This is because they authenticate to their local user database and report the domain as the computer name. For these reasons we recommend you only use this setting if you are running a Novell network or if your Windows network consists of Windows NT/Active Directory based operating systems that connect/authenticate to a domain. If you have a mixed environment we recommend using PIN code security instead. 153

154 Analysis Reporting Print Audit Analysis Reporting is used to produce pre-prepared reports for your printing volumes and costs. You can use these reports to determine your highest volume printers, distribution of job sizes, percentage of color vs black and white printing, etc. Analysis Reporting also allows you to create Composite Reports. These reports are a combination of several other reports with a title page and table of contents. Understanding the Analysis Reporting Tool You can use the Analysis Reporting tool in two different modes. The normal mode and a "simple" mode. Simple mode in Analysis Reporting supports all of the same reports as the normal mode, but in simple mode you do not have access to complex printer and user grouping. The Analysis Reporting tool consists of two main areas, the toolbar and the tabbed display area. You use the toolbar to manipulate tabbed information or even create new tabs. The tabs themselves display your printer and user groups along with any created reports. Printer and user groups are not displayed in simple mode. There are only two tabs visible when you first run the Analysis Reporting tool in normal mode. They are the Printer Grouping and Filtering tab and the User Grouping and Filtering tab. 154
155 The Printer Grouping and Filtering tab displays all printers in your database. You use this tab to arrange printers into reporting groups as well as selecting which printers/groups you want to include in your reports. You can also use this tab to enter an estimated cost per page for the printer. Generally, Analysis Reporting uses the actual recorded cost of the print job to calculate total costs when you are doing reports. If you choose, you can use the estimated cost per page you enter to calculate costs. IMPORTANT! Actual costs in Print Audit include several things such as unit type, cost modifiers, etc. Estimated cost per page only takes into account the reported page count. The User Grouping and Filtering tab displays all users in your database. You can use this tab to group your users any way that makes sense for your organization. You could group them by last name, or by department, etc. Once you have your groups defined you can create reports based on your data. After you create a report you can then print it or export it in different formats. 155
156 2-1 Grouping and Filtering Analysis Grouping Information The Print Audit Reporting Analysis tool allows you to group your printer and user information together. Grouping information has two main purposes: Grouping allows you to organize your printers and users in ways that make sense for your organization. Grouping allows you to focus on high level reporting issues rather than individual printers. The last point is the most important. The main function of grouping is to allow you to create groups that you can display on different reports. For example, you may have several printers on one floor of your office. You can combine those printers into a group called "4 th floor" and generate reports based only on those printers. You could also create user groups so you can report on printing costs based on internal departments. These groups are kept separate from reporting groups you can setup using Simple mode and the Job Manager users to give you complete flexibility in how you define groupings for analysis. However you can import your simple groups into the Analysis Reporting tool. To create a group: Expand the <INDIVIDUAL> group or another group you have created to view the contents. Click on one or more items to select them. You can use CTRL-click to select multiple individual items or use SHIFT-click to select a range of items. You can select items from more than one group at once. Click the Create/Add to Group button on the tool bar. The Create/Add to Group window appears. Select the option to either create a new group or move the selected items to an existing group. Enter your new group name or select the existing group. Click the OK button. This moves the selected items to the group you specified. To import Administrator groups: Click the Groups->Import Simple Groups menu item. Print Audit imports the reporting groups from the Administrator and automatically associates your users and printers to those groups. If users or printers exist in multiple groups, they will only be associated with the first group they appear in. NOTE: This overwrites any other groups you have created. 156
157 To delete a group: Click on the group you want to delete. You cannot delete the <INDIVIDUAL> group. Click the Delete Group button on the toolbar. A message box appears asking if you are sure you want to delete the group. Click Yes on the message box. The Analysis tool removes the group and moves any items in that group to the <INDIVIDUAL> group. To rename a group: Click on the group you want to rename. You cannot rename the <INDIVIDUAL> group. Click in the column that contains the name of the group. This is the Printer column for the Printer Information tab, the Name column for the User Information tab. Type the name of the new group. Using the Printer Grouping and Filtering Tab This tab shows all of the printers in the database. You use this tab to decide whether or not printers or groups of printers are included in reports. To view the contents of a printer group: Click the "plus/minus sign" at the left of the group name to expand/collapse the group. When expanded you can see all of the unique printers included in the group. To group printers: Expand the <INDIVIDUAL> group or another group you have created to view the contents. Click on one or more printers to select them. You can use CTRL-click to select multiple individual printers or use SHIFT-click to select a range of printers. You can select printers from more than one group at once. Click the Create/Add to Group button on the tool bar. The Create/Add to Group window appears. Select the option to either create a new group or move the selected printers to an existing group. Enter your new group name or select the existing group. Click the OK button. This moves the selected printers to the group you specified. To include/exclude printers and groups from reports: Expand the <INDIVIDUAL> group or another group you have created to view the contents. 157
158 Select the users or groups of printers you want to include/exclude. Click on the Include column or hit the SPACEBAR key to toggle the selection. Printer Grouping and Filtering Tab Columns Include This column indicates whether or not you want to include the printer or printer group in any reports. Printer This column contains the name of the printer or printer group. Host This column contains the host computer for the printer. The host is the computer which controls the printer. Port This column contains the port of the printer. For groups this is blank. Est. Cost Per BW Page - This column contains an estimated black and white cost per page for the individual printer or group. Analysis Reporting uses this estimated cost when you create estimated cost reports. Est. Cost Per Color Page - This column contains an estimated color cost per page for the individual printer or group. Analysis Reporting uses this estimated cost when you create estimated cost reports. Connection - How the printer is connected to the computer/network. Model The model name of the printer. Color - Whether or not the printer supports color printing. Duplex - Whether or not the printer supports duplex printing. Company - The name of the merged company that owns this printer. Only displays if you have merged data in your database Using the User Grouping and Filtering Tab This tab shows all users in the database. You use this tab to decide whether or not users or groups of users are included in reports. To view the contents of a user group: Click the "plus/minus sign" at the left of the group name to expand/collapse the group. When expanded you can see all of the unique users included in the group. To group users: Expand the <INDIVIDUAL> group or another group you have created to view the contents. Click on one or more users to select them. You can use CTRL-click to select multiple individual users or use SHIFT-click to select a range of users. You can select users from more than one group at once. 158
159 Click the Create/Add to Group button on the tool bar. The Create/Add to Group window appears. Select the option to either create a new group or move the selected users to an existing group. Enter your new group name or select the existing group. Click the OK button. This moves the selected users to the group you specified. To include/exclude users and groups from reports: Expand the <INDIVIDUAL> group or another group you have created to view the contents. Select the users or groups of users you want to include/exclude. Click on the Include column or hit the SPACEBAR key to toggle the selection. User Grouping and Filtering Tab Columns Include This column indicates whether or not you want to include the user or user group in any reports. Name This column contains the name of the user or user group. Domain This column contains the name of the domain the user belongs to. Saving and Loading Groups Once you have setup your groups for your printers and users you can choose to save them to a file so you can share them with others and to make sure you do not have to recreate them all again. You can also setup several different grouping schemes and load in whatever one you need for any given situation. To save your grouping information: Click the Save Groups button. A dialog appears asking you for the file name and path. Use the dialog to choose where you want to save the group information file and choose a name. Click the Save button on the dialog to save the groups. To load your grouping information: Click the Open Groups button. A dialog appears asking you for the location of the grouping file you want to load. Use the dialog to find the grouping file you want to load. Click the Open button on the dialog to load the groups into memory. 159
160 Note Analysis Reporting automatically saves the groups you were working with in the Analysis tool when you close it down. It saves them in a file called "lastused.grp" in your My Documents directory. 160
161 2-2 Reports Creating and Removing Reports The Analysis Reporting tool comes with several different reports for both user and printer reporting which help you to analyze the large amounts of data that Print Audit collects. Each report when it displays has an information cover page. This page is there to remind you of what you chose when you created the report. You can disable this feature at any time. To create a report: Create any groups you want for printers and users. In normal mode, make sure to include only those groups you want on the report. Click the Create Report button on the toolbar. The Create or Open a Print Audit 6 Report window appears. Click on the Create a New Report button, or click on a previously saved report. Click the Ok button. If you selected a previously saved report, the report displays in a new tab. If you chose to create a new report, the Create a Report Wizard appears. The rest of these steps assume you selected to create a new report. Click on the type of the report you want in the reports list. The report highlights and a brief description of the report displays on the right. If running in simple mode, click the Next button to select a reporting group for printers and users. Click the Next button to select your parameters. The Parameters tab appears. Enter in the report parameters. There are several standard parameters, some reports have custom parameters. Click the Next button to enter your report titles. The Titles tab appears. Enter in any title and sub-title you want displayed on the report. Click the Build button. The wizard closes and the new report displays in a tab in the main reporting window. To create and save a report: You can save reports that you build so you can use the same report again and again. Follow steps 1-9 above. Click the Build and Save button. A window appears asking you for a name and description you want to give to the report. 4. Enter in the name and description for the report. 161
162 5. Click the Save button. The window closes and your report appears in a tab in the main reporting window. It is also available to select the next time you create a report. To remove a report: Click the tab of the report you want to remove from the display. Click the Remove Report button on the toolbar. A message box asks you if you are sure you want to remove the report. Click the Yes button. Print Audit removes the report. To enable/disable information cover page: Click the Reports->Create Cover Page menu item. If checked, the cover page is printed, if not the cover page is not printed. Creating Composite Reports Print Audit allows you to create Composite reports. These are reports that contain several other individual reports along with a title page and table of contents. You can build and save composite reports to quickly generate any combination of reports that meet your business needs. For example you may want to generate Executive Summary, Printer Volumes and User Volumes report for month end reporting. Using Composite reports you can build this once and generate all three reports with one click of the mouse. To create a Composite report: Create any groups you want for printers and users. Make sure to include only those groups you want on the report. Click the Create Report button on the toolbar. The Create or Open a Single or Composite Report window appears. Click on the Create a New Composite Report button, or click on a previously saved report. Click the Ok button. If you selected a previously saved report, the report displays in a new tab. If you chose to create a new report, the Create a Composite Report Wizard appears. The rest of these steps assume you selected to create a new report. Enter the general Report information on the Report Information tab. This includes the title you want for the report, who prepared it, the date range, etc. Click the Next button to go to the Select Reports tab. 7. Select the reports you want in the Composite report on the Select Reports tab. Print Audit sets a default list of some of the more popular reports. You can add and remove reports to meet your needs. The order that reports appear in the Selected list is the order they will appear in the finished report. 162
163 If in simple mode, click the Next button to go to the Groups tab. Select the groups you want to use for the report. Click the Next button to go to the Options tab. Select the overall report options. These options apply to every individual report within the Composite report. Click the Build button. The wizard closes and the new report displays in a tab in the main reporting window. To create and save a Composite report: You can save Composite reports that you build so you can use the same report again and again. Follow steps 1-10 above. Click the Build and Save button. A window appears asking you for a name and description you want to give to the report. Enter in the name and description for the report. Click the Save button. The window closes and your report appears in a tab in the main reporting window. It is also available to select the next time you create a report. To remove a report: Click the tab of the report you want to remove from the display. Click the Remove Report button on the toolbar. A message box asks you if you are sure you want to remove the report. Click the Yes button. Print Audit removes the report. To enable/disable information cover page: Click the Reports->Create Cover Page menu item. If checked, the cover page is printed, if not the cover page is not printed. This setting affects all reports in the Composite report. Report Parameters When you create a report there are several standard options you can select. They are as follows: Normal Mode Only Filter report data - If checked Analysis Reporting includes only those groups and individuals that you selected on the grouping tabs. If unchecked Analysis Reporting includes all groups and individuals regardless of your selection. 163
164 Group report data - If checked Analysis Reporting uses the groups you selected on the grouping tabs to display information. If unchecked Analysis Reporting does not use the groups and reports each user and printer individually. Use Est. Costs - Use the estimated costs instead of actual costs on the report. If checked Analysis Reporting uses the estimated cost per page on the Printer Grouping and Filtering tab to calculate costs instead of the costs recorded in the database. If disabled then the selected support does not allow you to use estimated costs. Both Simple and Normal Mode Sorting - You can choose to sort some reports in different orders. For example you can sort some reports by descending total page count. If disabled the report does not support custom sorting. NOTE: This parameter option is not available for Composite Reports. Decimal places - You can enter the number of decimal places to use in costs for the report. Defaults to the number of decimal places configured in the Administrator. The Parameters section contains parameters that are specific to the report you selected. The most common parameter is the date range of the report. You can use the drop-down to select a standard date type or enter a complete custom date for the report. Printing and Exporting Reports Once you create the report you want you can choose to print it to your printer or export it to one of our supported formats. To print a report: 4. Click on the tab of the report you want to print. If you have not created any reports, see Creating and Removing Reports. Click the Print Report button on the toolbar. A dialog appears that allows you to select the printer. Select the printer to which you want to print the report. Click the Print button. The report will print to your printer. To export a report: Click on the tab of the report you want to export. If you have not created any reports, see Creating and Removing Reports. Click the Export Report button on the toolbar. A dialog appears that allows you to select the export format and the path for the exported file. Use the Save as type drop down box to select the type. 4. Use the dialog to select the directory where you want to export the file, and type the name. 164
165 5. Click the Save button. The analysis tool creates the report in the format you chose. Scheduling and ing Reports Using Analysis Reporting you can schedule report creation and automatically a PDF of the report to one or more recipients. IMPORTANT: Before Print Audit can a report, you must properly configure the settings in the Global Settings section of the Administration tool. To schedule a report: 4. Create a new or run an previously saved report. Click the Schedule Report button on the toolbar. The Schedule a Report Window appears. Set how often you want the report to run, and set who you want to the report to. Click the Schedule button. Analysis Reporting creates an entry in the Windows Task Scheduler for the report. To edit scheduled reports: Click the View Scheduled Reports button on the toolbar. The Scheduled Reports Window appears. A list of all scheduled reports displays, giving scheduling information and the last time the report was successfully run. Click on the report you want to edit in the list, and click the Edit button. The Schedule a Report Window appears. Make your changes, and click the Schedule button. The Schedule a Report Window closes. Click the Close button on the Scheduled Reports Window. To delete scheduled reports: Click the View Scheduled Reports button on the toolbar. The Scheduled Reports Window appears. A list of all scheduled reports displays, giving scheduling information and the last time the report was successfully run. Click on the report you want to delete in the list, and click the Delete button. A message appears asking you to confirm that you want to delete the scheduled report. NOTE: Deleting a scheduled report only deletes the scheduling, it does not delete a saved report definition. Click the Yes button to delete the scheduled report. Click the Close button on the Scheduled Reports Window. 165
166 Report Exports Analysis Reporting supports several different formats to which you can export your reports. They are as follows: Text File This exports the report to a flat text file. Columns are tab-delimited which can be imported into Excel. HTML Page This exports the report to an HTML (web page) format you can then put on a website. PDF File This exports the report to an Adobe PDF file format to send to others. Raw Data This exports the underlying data of the report to a comma-delimited file. NOTE: The information exported may not correspond exactly to what you see in the report. For example, some totals and other calculations may not be in the data. This is due to the fact that some sub totaling and translation take place in the reporting engine. 166

167 Job Manager The Print Audit 6 Job Manager is used to manage your detailed print job information. You can search for jobs using several different pieces of search criteria. Once you find the jobs you want you can edit the jobs, build reports based on the job details and export the job information. You can also use the Job Manager to schedule exports of your job information to a file format that your accounting program can read. 3-1 Finding, Viewing and Editing Jobs Searching for Print Jobs One of the first steps in using the Job Manager is to find the job or jobs you want to act on. Print Audit allows you to search for jobs based on a combination of criteria. We highly recommend that you narrow your search as much as possible. Print Audit can track thousands of print jobs per day depending on the printing volumes in your organization. You can search for jobs based on the following: Date Printed - You can specify the date range in which the jobs you want were printed. You can select from one of the standard date ranges, or select Custom from the drop-down to enter your own custom date. Print Audit always uses a date range for the search. 167
168 User who printed - Use the drop down to select the user you want to search on. You can also type the first few characters of the user name to have Print Audit find all matching users. Click the Match on Reporting group option to have Print Audit match on a reporting group you select rather than a user name. Click here for more information on reporting groups. If you leave this blank, Print Audit finds jobs for all users. Please note that you can only select users if you have access to view all print job data. Printer used - Use the drop down to select the printer you want to search on. You can also type the first few characters of the printer name to have Print Audit find all matching printers. Click the Match on Reporting group option to have Print Audit match on a reporting group you select rather than a printer name. Click here for more information on reporting groups. If you leave this blank, Print Audit finds jobs for all printers. Custom Fields (Recovery only) - If you have defined custom fields to display on the Client Popup window, then you can search on specific custom field values for each custom field you defined. To search for print jobs: Enter your criteria as described above. Click the Find Jobs button on the toolbar. A list of all matching jobs displays in a list below the search criteria. Once you have a list of jobs, you can do several things. Click the links below for more information: Create reports Edit jobs Export jobs Changing Your Data View The Print Audit Job Manager allows you to configure the way you view the columns of information in the job results lists. You can show and hide individual columns, re-arrange the columns and sort on the column information. Once you get the columns arranged to suit your needs, you can save the configuration and give it a name. You can create multiple configurations this way and easily switch between them. Please note that you must have searched for and found jobs before you can adjust a view. To show and hide columns: Right-click on any column header. The Columns in View window appears. Check the box to the left of a column name to display the column, or clear the check box to hide the column. 168
169 Click the OK button once you have the arrangement you want. The Columns in View window closes and the list updates. To re-size a column: Move the mouse cursor until it is on the right-hand edge of the column header for the column you want to resize. The cursor changes to resize mode. Click and hold the left mouse button and drag the column edge to the left to make the column smaller or to the right to make it larger. Release the mouse button once column is the size you want. The column resizes to the new size. To re-size all columns to fit: Click the Edit->Size Columns To Fit menu item. Print Audit resizes all displayed columns to fit the data displayed in the columns. Please note that this can take several seconds depending on the number of jobs in the list. To move a column: Click and hold the left mouse button on the column header of the column you want to move. Move the mouse right to move the column to the right, left to move the column to the left. You should see an outline showing you where the column will end up. Release the mouse button once the column is in the position you want. The column moves to the new position. To sort on a column: Click on the column header of the column you want to sort. An arrow appears in the column header indicating the sort order. Click again to change the sort order. To save your data view: Click the Save Data View button on the toolbar. A dialog appears asking you to enter the name of the new view. Enter the name you want to call the view. Click the OK button on the dialog. The dialog closes and the new view appears in the Views drop down in the toolbar. Please note that if you enter the same name as an already existing view Print Audit overwrites the old view. To select a previously saved data view: Click on the Views drop down in the toolbar. A list of all previously saved views appears. 169
170 Click on the view you want. The results view changes to the new view. To delete a previously saved data view: Select the data view you want to delete as described in the previous section. Click the Delete View button on the toolbar. Print Audit deletes the view and switches to the default view. Editing and Deleting Jobs Use Print Audit 6 to edit existing print jobs. Once you print a job you may want to adjust the job costs, view the detailed job information or delete the jobs. You can control who has permission to edit and delete jobs. To edit/view a print job: 4. Search for the job you want to edit. Double-click on the job you want to edit. The Print Job Window appears. Make changes to the job if appropriate. Please note that not all fields are editable. Click the Save button to exit and save any changes or click the Cancel button to close the window. To delete individual print jobs: 4. Search for the job you want to delete. Click on the job you want to delete. The job highlights. Click the Delete Current Job on the toolbar to delete the highlighted job. A dialog appears asking if you are sure you want to delete the job. Click Yes to delete the job from the database. The list refreshes to show the results. To delete an entire list of jobs: Search for the jobs you want to delete. Click the Edit->Delete All Jobs in List menu item. A dialog appears asking you to confirm that you want to delete all the jobs in the list. Click Yes to delete all the jobs in the list. 170
171 3-2 Job Reporting The Print Audit 6 Job Manager allows you to quickly build custom reports based on the jobs in your database. Once you design a report you like you can save the report definition so you can easily create it again. You can also schedule and your reports to other users. You can only create reports that deal with the specifics of your print job information. For reports designed for in-depth analysis of your printing information you can use the Print Audit Analysis Reporting tool. You can use the Job Manager to create three types of reports: Summary Report - This report allows you to report on total job costs and volumes, including grand totals. Full Report - This report allows you to report detailed information along with a breakdown of total job costs and volumes, including grand totals. Detail Report - This report allows you to report detailed print job information in a sorted format but with no totaling. Once you create the report you want it displays in its own tab in the Job Manager window. You can then print it to a printer or export it to PDF or HTML formats. After you are done viewing, printing or exporting your report you can click on the Remove Report button on the toolbar to close it. Creating Reports Please follow the steps below to quickly create reports based on your print jobs. To create a Summary report: Search for the jobs you want to include on the report. Click the Create a new Report button on the toolbar. The Build a Report wizard appears. Click on Summary (Totals Only) in the reports list on the left. A description of the report appears on the right. Verify that the number of decimal places you want for the report is correct. Click the Next button. The wizard changes to the Total By tab. Select the columns to total on. You can select up to three columns to total on. For example, you could select User, Printer and Color to get totals for each user broken down by printer and color. Click the Next button. The wizard changes to the Totals and Breaks tab. 8. Select the unit type you want to display for the unit totals. 171
172 Check the Show job cost totals to display cost totals on the report, broken down by your Total By selection. Check the Show job count totals to display the total number of jobs on the report, broken down by your Total By selection. Check the Subtotal and Page break check boxes to set or clear subtotaling and page breaks by level. Click the Next button. The wizard changes to the Titles tab. Enter in an optional title and sub-title you want displayed at the top of each page in the report. If you want to display the From and To date used in the title when the report prints, you can enter the %from and %to placeholders in the title. For example: "My report with data from % from to %to". Click the Build button to build and display the report. If you want to keep this report definition to re-run later, you can click Save and Build to enter a name and description for your new report definition. If you save a report definition it displays in the list of available reports the next time you run the Build a Report wizard. To create a Full report: Search for the jobs you want to include on the report. Click the Create a new Report button on the toolbar. The Build a Report wizard appears. Click on Full (Details and Totals) in the reports list on the left. A description of the report appears on the right. Verify that the number of decimal places you want for the report is correct. Click the Next button. The wizard changes to the Fields tab. Select up to five fields to display in the report. These fields appear as columns on the finished report. Click the Next button. The wizard changes to the Total By tab. Select the columns to total on. You can select up to three column to total on. For example, you could select User, Printer and Color to get totals for each user broken down by printer and color. Click the Next button. The wizard changes to the Totals and Breaks tab. Select the unit type you want to display for the unit totals. Check the Show job cost totals to display cost totals on the report, broken down by your Total By selection. Check the Show job count totals to display the total number of jobs on the report, broken down by your Total By selection. 172
173 Check the Subtotal and Page break check boxes to set or clear subtotaling and page breaks by level. Click the Next button. The wizard changes to the Titles tab. Enter in an optional title and sub-title you want displayed at the top of each page in the report. If you want to display the From and To date used in the title when the report prints, you can enter the %from and %to placeholders in the title. For example: "My report with data from % from to %to". Click the Build button to build and display the report. If you want to keep this report definition to re-run later, you can click Save and Build to enter a name and description for your new report definition. If you save a report definition it displays in the list of available reports the next time you run the Build a Report wizard. To create a Details Only report: Search for the jobs you want to include on the report. Click the Create a new Report button on the toolbar. The Build a Report wizard appears. Click on Details Only in the reports list on the left. A description of the report appears on the right. Verify that the number of decimal places you want for the report is correct. Click the Next button. The wizard changes to the Fields tab. Select up to five fields to display in the report. These fields appear as columns on the finished report. Click the Next button. The wizard changes to the Sort By tab. Select the columns to sort. You can select up to three column to sort by. Please note that you must have selected these columns on the Fields tab. Click the Next button. The wizard changes to the Titles tab. Enter in an optional title and sub-title you want displayed at the top of each page in the report. If you want to display the From and To date used in the title when the report prints, you can enter the %from and %to placeholders in the title. For example: "My report with data from % from to %to". Click the Build button to build and display the report. If you want to keep this report definition to re-run later, you can click Save and Build to enter a name and description for your new report definition. If you save a report definition it displays in the list of available reports the next time you run the Build a Report wizard. 173
174 Printing and Exporting Reports Once you create a report you can either print the report or export it to a different file format. Please follow the steps below to print and export your reports. To print a report: Create the report you want. If already created, click on the tab containing the report you want to print. Click the Print Report button on the toolbar. A dialog appears asking you to select your printer. Select the printer and click the Print button. The dialog closes and Print Audit sends your report to the printer. To export a report: 4. Create the report you want. If already created, click on the tab containing the report you want to print. Click the Export Report button on the toolbar. A dialog appears asking you to select the export type and the file name. Use the Save as type drop down box on the dialog to select the export type. You can select from PDF and HTML formats. Click the Save button. Print Audit saves the report to the file you specified. Scheduling and ing Reports Using the Job Manager you can schedule report creation and automatically a PDF of the report to one or more recipients. IMPORTANT: Before Print Audit can a report, you must properly configure the settings in the Global Settings section of the Administration tool. To schedule a report: 4. Create a new or run a previously saved report. NOTE: You cannot schedule reports based on the "All" date range. You must choose a different option. Click the Schedule Report button on the toolbar. The Schedule a Report Window appears. Set how often you want the report to run, and set who you want to the report to. Click the Schedule button. Analysis Reporting creates an entry in the Windows Task Scheduler for the report. To edit scheduled reports: Click the View Scheduled Reports button on the toolbar. The Scheduled Reports Window appears. 174
175 4. 5. A list of all scheduled reports displays, giving scheduling information and the last time the report was successfully run. Click on the report you want to edit in the list, and click the Edit button. The Schedule a Report Window appears. Make your changes, and click the Schedule button. The Schedule a Report Window closes. Click the Close button on the Scheduled Reports Window. To delete scheduled reports: Click the View Scheduled Reports button on the toolbar. The Scheduled Reports Window appears. A list of all scheduled reports displays, giving scheduling information and the last time the report was successfully run. Click on the report you want to delete in the list, and click the Delete button. A message appears asking you to confirm that you want to delete the scheduled report. NOTE: Deleting a scheduled report only deletes the scheduling, it does not delete a saved report definition. Click the Yes button to delete the scheduled report. Click the Close button on the Scheduled Reports Window. How to Create a Billing Statement To create a billing statement style report in the Job Manager you first need to search for the jobs you want to bill for, and then generate the report. This example leads you through creating a detailed billing statement for the previous month. The example also assumes that you have a custom field called "Client" that contains codes used that correspond to the client you are billing. See detailed steps below Open the Print Audit 6 Job Manager. Use the Date Printed drop-down box to select a date range for the jobs you want to bill for. For this example select "Last Month" from the drop-down. You can choose to narrow down the report to one specific "Client" or all clients in the database. If you want to narrow down the client select the appropriate one from the Client drop-down. Please remember that we are assuming you have a "Client" custom field defined for this example, you can choose to narrow down the search based on any custom field you define. Click the Find Jobs button on the toolbar. A list of jobs that match your search criteria appear. Click on the Create Report button on the toolbar. The Build a Report wizard appears. 175
176 Select the level of detail you want in the report. Since we want to produce a detailed billing statement, click the "Full (Details and Totals" option. Click the Next button. The wizard moves to the Fields tab. Double-click the fields in the left hand list you want to include on the report. They move to the right hand side. For this example include Document name, Date Printed, Total Units and Total Cost. Click the Next button. The wizard moves to the Total By tab. Use the 1st choice, 2nd choice and 3rd choice drop down boxes to select fields you want to total on. For this example select your "Client" custom field for the first choice and "Color" for your second choice. Leave the third choice blank. This will calculate totals on the report for each client and further break it down by color vs black and white jobs. Click the Next button. The wizard moves to the Totals and Breaks tab. Use the Unit Totals drop down to select "Pages". This will show all totals in pages. Check the Show job cost totals box to display a sub-total of job costs for each client. Click the Next button. The wizard moves to the Titles tab. Enter in an appropriate title and sub-title. For this example a title of "Monthly Billing Statement" may be appropriate. Click the Build or the Build and Save button. Both will build the report, but Build and Save also saves this report definition so that you can re-run the exact report any time you want. Once Print Audit builds the report it appears in a tab in the main Job Manager window. Use the Print Report button on the toolbar to print your new report or Export Report button to save the report in different formats. Job Exporting Exporting Jobs The Job Manager allows you to export your print jobs to several different formats. You can then use this file in third-party accounting or reporting tools to give you even more job processing options. For example, you could export your jobs to a standard comma-delimited format to allow you to open the jobs in Microsoft Excel for detailed analysis. When you export jobs you generally need to select an export type and an export configuration. The export type determines how Print Audit will export the jobs. For example, the Flat File export type exports your information to a standard text file. The export configuration determines the format and options of the export type. For example you could create a Flat File export that only exports five columns of data in a tab-delimited format. You can export jobs in one of three ways. Click on the links below for more information: 176
177 Export Current Results - This allows you to choose the export type and configuration you want to use to export all jobs in your current results list. Export Current View - This allows you to quickly export all jobs in your current results list to a comma-delimited file that mirrors how you have constructed your current data view. Run Accounting - This allows you to choose the export type and configuration you want to use to export all jobs in your database if they have not already been exported for accounting. This export type does not take into account any of your job search criteria. Print Audit currently supports only Flat File exports. Accounting Job Type Account Codes Print Audit 6 allows you to define custom account codes for different job/transaction types. For example you could assign a different accounting code to Print jobs versus Copy jobs. You can then choose to export these account codes with your other job information to make integration into your accounting data easier. To setup transaction codes: Click the Accounting->Edit Job Type Account Codes menu item. The Edit Job Type Account Codes window appears. Click in the Code column for the job type you want to change. Type the new account code in the column. Repeat 2-3 to change codes for all the transaction types. Click the Save button. The Edit Job Type Account Codes window closes. Running Accounting Exports This export type allows you to export any non-accounted jobs to an export type you specify. To export for accounting: Click the Accounting->Run Accounting menu item. The Export Jobs window appears. Select the type of export you want to do from the Export type drop down box. Currently your options may only include a Flat File Export. New types of exports may be available in the future. Select the configuration you want from the Configuration drop down. If you have not defined a custom configuration you only have the <Default> configuration. 4. Click the Export button to export your information. Depending on your export configuration you may have to select a file name or enter other information. Once done Print Audit exports your jobs for accounting. 177
178 You can also have Print Audit run an export on a scheduled basis. You may also need to re-do accounting runs. Clearing Accounting Runs In some cases you may need to clear previous accounting runs. For example a file could get lost, or some error could occur with your accounting system that requires you to re-export jobs for accounting. The Job Manager allows you to clear any accounting run. To clear an accounting run: 4. Click the Accounting->Accounting Runs menu item. The Clear Accounting Runs window appears. Click on the accounting run you want to clear in the list. Click the Clear button. A dialog displays asking you if you are sure you want to clear the run. Click the Yes button. Print Audit marks all the jobs in the run as ready to export. The next time you run accounting all jobs that were in the cleared run will export. Scheduling Accounting Exports Using the Job Manager you can schedule accounting exports to run daily, weekly or monthly. You can use this functionality to automate the importing of your print job information into an accounting system. Print Audit integrates with the Microsoft Windows Task Scheduler. Advanced users can use the task scheduler directly to further customize how the export runs. IMPORTANT: Before you can schedule an accounting run you must create a Print Audit user with rights to run accounting and assign them a PIN code.. To schedule an accounting export: Click the Accounting->Run Accounting menu item. The Export Jobs window appears. Select the type of export you want to do from the Export type drop down box. Currently your options may only include a Flat File Export. New types of exports may be available in the future. Select the configuration you want from the Configuration drop down. If you have not defined a custom configuration you only have the <Default> configuration. Use the Run Export drop down to select how often to run the export. Choices are Daily, Weekly or Monthly. Use the On drop down to select the day on which to run the export. This is only effective for Weekly or Monthly schedules. Use the At selector to select the time of day at which to run the export. We recommend using a time outside of regular business hours. Click the Schedule button. The Accounting Run PIN Code window appears. 178
179 8. 9. Enter the Print Audit PIN code of someone authorized to export all job information. Click the OK button. If the PIN code is valid Print Audit stores the settings you entered and creates the task. To un-schedule an accounting export: 4. Click the Accounting->Run Accounting menu item. The Export Jobs window appears. Select the type of export you want to do from the Export type drop down box. Currently your options may only include a Flat File Export. New types of exports may be available in the future. Select the configuration you want to remove from the Configuration drop down. Click the Unschedule button to remove the task. You can also use the Windows Task Scheduler interface directly to remove scheduled runs. 179
180 3-3 Advanced Job Manager and Merged Jobs You can use the Job Manager to view jobs from a merged Print Audit database. Print Audit 6 allows you to merge jobs from multiple companies into one database. For more information on how to merge jobs, please see the documentation on the Print Audit Job Merge Wizard. If you have jobs from multiple companies in the database you can choose to view any one of the company's data or view all companies at once. To change the company: Click the Company drop down in the toolbar. A list of all available companies appears. Select the company you want to view. The Job Manager clears any existing job results and any reports. Search for the jobs you want for the new selection. Note When exporting for accounting, Print Audit exports jobs from ALL companies regardless of any company selection in the Job Manager. Securing the Job Manager Print Audit allows you to define several different levels of security for the Job Manager. You can also choose to have users enter a PIN code or their network login information before they can use the Job Manager. Before you can schedule accounting exports you must enter the PIN code of a user who has the rights to run accounting. Print Audit needs this to ensure that your job information is secure as possible. You can choose to enter a PIN code of an existing user or use the Administration tool to create a new user that has run accounting rights. All security settings in Print Audit are controlled through the Print Audit 6 Administration tool. Please see the topics on Security Profiles and Authentication in the Administration help for more information on security. Here is a list of the policies you can set in the Security Profile that affect the Job Manager: User can view their own print job data - A user with this policy can view, export and print only their print job information. User can view all print job data - A user with this policy can view, export and print all print job information. 180
181 User can edit existing print jobs - A user with this policy can edit jobs in the Job Manager. User can run accounting - A user with this policy can run and clear accounting exports. If a user does not have any of these policies in their security profile then they cannot use the Print Audit Job Manager. 181

182 4. Job Merge Wizard The Print Audit 6 Job Merge Wizard is used to merge data from multiple databases into one database. You can report on this data by individual sites that you have merged, or on a global basis. Job merging is a two step process. First you use the Job Merge Wizard to export the jobs from one database to a file on your computer. Then you can use the Job Merge Wizard to import that file into another database. This capability is useful for deployments to large organizations with multiple sites. You can export job data from satellite sites, and imported it into a centralized database. This makes centralized reporting possible. The Job Merge Wizard is not meant as a database backup tool, or as a tool to copy databases. Print Audit supports this database merging through the use of "companies". Each database starts with one and only one "company", the one that corresponds to your organization. As you merge separate sites in you need to assign each to a separate company. This way you can easily keep track of which information came from where, and you do not impact your own data. 182
183 Requirements To use the Job Merge Wizard the user must have Print Audit Administration rights. There are additional requirements to setup scheduled imports and scheduled exports: The Windows Scheduling Service must be running. This service is included as part of Windows98 and newer operating systems. You must have administrative privileges on the computer where the Wizard is being run. Before you can schedule job exporting and importing you must create a Print Audit user with Print Audit Administrator rights and assign them a PIN code. You are asked for this PIN code during the final step of the wizard. Before You Begin Merge Codes Print Audit uses merge codes to allow you to import data from a large number of databases. The merge codes uniquely identify jobs and custom field values so you can keep track of where the merged data came from. You should decide on your merge codes before using the tool for the first time. When exporting data from your database you need to enter an export merge code. You can choose any code you find easy to remember. You enter this code as the "Job Merge Code" when exporting data or setting up a scheduled export. When importing the data (or setting up scheduled imports) you need to create a company that has the same merge code that was used when the data was exported. All the data imported with this merge code will be entered in the database under this company. When exporting and importing custom field values you can specify a merge code for each field. The merge codes on the import side must match merge codes on the export side for everything to import correctly. For example: Suppose you have two offices using Print Audit. Your office is the "head" office. The other office is a "branch" office. You do not want to import custom fields. If you want to merge the branch office data into Print Audit you would need to do the following steps: Choose a merge code for your branch office data. For this example use "branch001". At the branch office, export the data using the Job Merge Wizard. Make sure to use the "branch001" code as the merge code. Send the job file created in step 2 to the head office. You can send the file via , ftp, WAN or any other way that makes sense for your organization. 183
184 4. 5. At the head office, import the data using the Job Merge Wizard. Make sure you create a company with the "branch001" code on the Merge Codes tab of the import. Import the data. All of the branch office data is now in the same database as the head office. You can use the Print Audit Job Manager and other tools to view and report on the data. Performance We recommend using SQL Server if importing jobs into your database. SQL Server can handle much larger volumes of data than Microsoft Access and can do so much more efficiently. You can export from Microsoft Access and SQL Server, but if dealing with large volumes of data we highly recommend SQL Server. If you do not have SQL Server in your organization you can also use Microsoft's SQL Express. Please go to Microsoft's website for more information on SQL Express. General Usage The Job Merge Wizard user interface guides you through the process of importing or exporting Print Audit 6 job data. At the top of the window for each step in the wizard is a help note. This note gives you a brief description of the information you need to provide. Immediately below the help reminder is a list of tabs. This list grows as you use the wizard and contains all the steps that you have already completed along with the current and next steps. At any time you can click on a tab to view its contents and change any of the information. Some changes can cause the list of tabs to change. Each tab contains information you need to complete before you can proceed to the next step. Along the bottom of window are four buttons. The back and next buttons move you to the previous and next step in the process, respectively. Once you complete the final step, you use the Finish button to complete the Wizard. At any time, you can click the Cancel button to exit the Wizard without completing it. If cancelled, no data is imported or exported. 4-1 Importing Importing Job Data To import data, the Wizard guides you through the following 5 steps. Step 1: Start Select Import Jobs Now and click Next. The wizard moves to the Database tab. Step 2: Import Into Database Review the currently selected database. Print Audit imports the jobs into this database. If you want to import data into a different database, click Change Database. Once you are satisfied with your database selection, click Next. The wizard moves to the Import Settings tab. 184
185 Step 3: Job Import Settings Choose Import Jobs Only to ignore any custom field values in the import file, or click Import Jobs and Custom Fields to import custom field information along with the job information. NOTE: For the custom fields to import correctly the merge codes for the custom fields in the import file MUST MATCH the merge codes for your custom fields. Choose Duplicate records overwrite existing records to overwrite a job in your database if it exists in both the file and the database. Choose Duplicate records are ignored if you want to ignore jobs that exist in both the file and the database. Enter a company name to use for non-imported print jobs. This can simply be your company name, or something like "Head Office". This allows you to easily distinguish between imported jobs and those jobs Print Audit tracked directly to the database. In Step 4 you will set up company names for the data you are importing. Once you have decided and made the appropriate selections, click Next. The wizard moves to the Merge Codes tab. Step 4: Merge Codes You use this tab to add or update the merge codes. The Job Wizard uses merge codes to properly match jobs with companies and to match custom fields. At minimum you must set up a company and corresponding merge code. Double-click an empty row in the Companies grid, and enter in the name of the company and the merge code. The merge code you enter MUST MATCH the merge code used when the jobs you are importing were exported. The company name you enter displays when reporting on the data. You can create as many companies as you need. Generally you need to create one company for each database you import data from. If you do regular imports of data from two other databases you need to set up two companies, each with a different merge code. If you choose to import custom field values in the previous step you also need to set up merge codes for the custom fields at this time. Enter in merge codes for custom fields that you want to import data into. These merge codes must match merge codes specified for the custom fields when the data was exported. Note that unlike job data, imported custom field data becomes a direct part of the database. New custom field values that were imported will show up as options for Print Audit Clients which report directly to this database. Once you have provided the merge codes, click Next. The wizard moves to the Import From File tab. Step 5: Import from File Choose the file you wish to import data from. This file will normally have a.jbs extension. Choose the file and click Finish. Print Audit starts importing your data. Please note that this can take several minutes depending on the amount of data being imported. 185
186 Setting up Scheduled Imports To set up scheduled imports, the wizard guides you through the following 5 steps. Please note that there are additional requirements to set scheduled imports and exports. Step 1: Start Select Setup Scheduled Import and click Next. The wizard moves to the Database tab. Step 2: Import Into Database Review the currently selected database. Print Audit imports the jobs into this database. If you want to import data into a different database, click Change Database. Once you are satisfied with your database selection, click Next. The wizard moves to the Import Settings tab. Step 3: Job Import Settings Choose Import Jobs Only to ignore any custom field values in the import file, or click Import Jobs and Custom Fields to import custom field information along with the job information. NOTE: For the custom fields to import correctly the merge codes for the custom fields in the import file MUST MATCH the merge codes for your custom fields. Choose Duplicate records overwrite existing records to overwrite a job in your database if it exists in both the file and the database. Choose Duplicate records are ignored if you want to ignore jobs that exist in both the file and the database. Enter a company name to use for non-imported print jobs. This can simply be your company name, or something like "Head Office". This allows you to easily distinguish between imported jobs and those jobs Print Audit tracked directly to the database. In Step 4 you will set up company names for the data you are importing. Once you have decided and made the appropriate selections, click Next. The wizard moves to the Merge Codes tab. Step 4: Merge Codes You use this tab to add or update the merge codes. The Job Wizard uses merge codes to properly match jobs with companies and to match custom fields. At minimum you must set up a company and corresponding merge code. Double-click an empty row in the Companies grid, and enter in the name of the company and the merge code. The merge code you enter MUST MATCH the merge code used when the jobs you are importing were exported. The company name you enter displays when reporting on the data. You can create as many companies as you need. Generally you need to create one company for each database you import data from. If you do regular imports of data from two other databases you need to set up two companies, each with a different merge code. If you chose to import custom field values in the previous step you also need to set up merge codes for the custom fields at this time. Enter in merge codes for custom fields that you want to import data into. These merge codes must match merge codes specified for the custom fields when the data was exported. 186
187 Note that unlike job data, imported custom field data becomes a direct part of the database. New custom field values that were imported will show up as options for Print Audit Clients which report directly to this database. Once you have provided the merge codes, click Next. The wizard moves to the Scheduling tab. Step 5: Job Import Schedule Set up either a daily, weekly, or monthly import schedule using the controls at the top of the tab. Enter a Print Audit PIN code that has Print Audit Administration privileges. Finally select the directory that contains the files to import. Every time the schedule executes Print Audit imports all newly exported data files. Files already imported are ignored. The schedule simply controls how often Print Audit checks the directory. When you are satisfied with your schedule, click the Finish button. At this time Print Audit confirms your PIN code and saves the schedule. If your PIN code is incorrect, you will be prompted to change it. 187
188 4-2 Exporting Exporting Job Data To export data, the Wizard guides you through the following 5 steps. Step 1: Start Select Export Jobs Now and click Next. The wizard moves to the Database tab. Step 2: Export From Database Review the currently selected database. The Wizard exports the jobs from this database. If you want to export data from a different database, click Change Database. Once you are satisfied with your database selection click Next. The wizard moves to the Export Settings tab. Step 3: Job Export Settings Click Export Jobs Only to export only job data from the database or click Export Jobs and Custom Fields to export job and custom field information. Click Export New Jobs to export jobs printed since the last time you exported jobs or click Export All Jobs in Database to export all of the jobs. Once you have made your choices, click Next. The wizard moves to the Merge codes tab. Step 4: Merge Codes You use this tab to add or update the merge codes. The Job Wizard uses merge codes to properly match jobs with companies and to match custom fields. You must specify a merge code for the jobs you export. When these jobs are exported this merge code matches to one entered on the import side. If you are including custom field values in your export, set up merge codes for the custom fields you wish to export. Double click on the Custom Field Merge Codes grid to the right of the custom field name to enter in a merge code. If you leave the merge code for a field blank, it will not be exported. Once you enter the merge codes click Next. The wizard moves to the Export tab. Step 5: Export to File Choose a location and name for the file you are going to export to. The file normally has a.jbs extension. Once you have chosen a file, click Finish, and the data will be exported. Once Print Audit creates the exported file you can move it and copy it like any other file. You can it to someone, upload it to an FTP site, or copy it to another computer on your network. Setting up Scheduled Exports To set up scheduled imports, the wizard guides you through the following 5 steps. Please note that there are additional requirements to set scheduled imports and exports. 188
189 Step 1: Start Select Setup Scheduled Exports and click Next. The wizard moves to the Database tab. Step 2: Export From Database Review the currently selected database. The Wizard exports the jobs from this database. If you want to export data from a different database, click Change Database. Once you are satisfied with your database selection click Next. The wizard moves to the Export Settings tab. Step 3: Job Export Settings Click Export Jobs Only to export only job data from the database or click Export Jobs and Custom Fields to export job and custom field information. Click Export New Jobs to export jobs printed since the last time you exported jobs or click Export All Jobs in Database to export all of the jobs. Once you have made your choices, click Next. The wizard moves to the Merge codes tab. Step 4: Merge Codes You use this tab to add or update the merge codes. The Job Wizard uses merge codes to properly match jobs with companies and to match custom fields. You must specify a merge code for the jobs you export. When these jobs are exported this merge code matches to one entered on the import side. If you are including custom field values in your export, set up merge codes for the custom fields you wish to export. Double click on the Custom Field Merge Codes grid to the right of the custom field name to enter in a merge code. If you leave the merge code for a field blank, it will not be exported. Once you enter the merge codes click Next. The wizard moves to the Export tab. Step 5: Job Export Schedule Set up either a daily, weekly, or monthly import schedule using the controls at the top of the tab. Enter a Print Audit PIN code that has Print Audit Administration privileges. Finally select the directory that contains the directory to export to. Every time the schedule executes Print Audit exports the jobs to the directory you specify. The new job file name corresponds to the date and time Print Audit exported the data. When you are satisfied with your schedule, click the Finish button. At this time Print Audit confirms your PIN code and saves the schedule. If your PIN code is incorrect, you will be prompted to change it. 189
190 5. Database Maintenance Tool The Print Audit 6 Database Maintenance Tool allows you to perform routine maintenance on your Print Audit database. It leads you through each task in an easy to use wizard style interface so you can quickly perform each task, even if you know nothing about databases. The tool presents you with different options depending on whether you are using a Microsoft Access or Microsoft SQL Server database as a back-end. You chose which one you wanted to use when you installed Print Audit. The tool automatically detects which version you installed and displays the appropriate screens. 5-1 Microsoft Access Microsoft Access is Print Audit's default database. Print Audit uses a database to store all configuration and print job information. We highly recommend that you use this tool on a scheduled basis to compact your database. Regularly scheduled compacting of the database greatly reduces the risk of database corruption and other issues. It also decreases the size of your database and speeds up database operations. The following is a list of the tasks you can accomplish using this tool against a Microsoft Access database. Compacting your Print Audit Database Changing the Read-Only Database Password Compacting your Print Audit Database 190
191 Compacting your Print Audit database is critical to long-term trouble free operation of Print Audit. Print Audit uses Microsoft Access as its database by default. The benefits of using a Microsoft Access database are that it is free, easy to backup and easy to install. The downside is that it requires periodic maintenance to ensure trouble free operation, and it does not perform well in large environments. You perform this periodic maintenance through compacting. Compacting does several technical things to your database, but the most important thing from your perspective is that it reduces the size of the database, increases the speed of data access and reduces the chance of database corruption. Print Audit provides two methods of compacting the database. The first is to use the wizard screens to go through and compact. The second is to compact the database from a DOS command-line. The second method allows you to create a batch file that you can then schedule to automatically compact the database periodically. To compact the database using the wizard: Start the Print Audit Database Maintenance tool. The tool starts on the Select Database Task screen. Click the Compact your Database option. Click the Next button. The wizard moves to the Select your Print Audit Database screen. Enter the Print Audit database you want to compact. The wizard detects what the current database is on this computer. If you want to pick a different database, either type the full path to the database in or select it using the browse button. Click the Next button. The wizard moves to the Ready to Compact screen and gives you a chance to go back and change things before you compact. Click the Next button. The wizard starts to compact your database. When finished, it moves to the Finished screen and you are done. To compact the database from the command line: 4. Ensure that no one is running the Print Audit Administration or Job Manager programs. These "lock" the database. If locked you cannot compact. The Print Audit Client only locks the database if writing a print job so you should not need to shutdown every client. Start an MS-DOS session. Type the full path to the database maintenance tool, followed by a space, /c, another space and the full path to the database you want to compact. If you do not include the path to the database then Print Audit compacts the currently setup database. Press the Enter key. Print Audit compacts the database. 191
192 For example, if you could type the following (X corresponds to the drive where you placed the database): c:\program files\print audit inc\print audit 6\admin\pa6dbmnt.exe /c X:\printaudit.mdb You can use this method of compacting within a batch file that you can schedule to run periodically from any number of scheduling tools. Select the Database Task This part of the wizard allows you to select which task you want to perform on your Print Audit database. The options are as follows: Compact your database Click this option to compact your Print Audit database. Compacting your database reduces size, increases speed and reduces the risk of corruption. Also choose this option if your database has become corrupted and Print Audit will attempt to repair it. Change the read-only password Click this option to change the password for the PAReadOnly account. Every Print Audit database has this account with a default password of "password". If you are concerned about security you should change this password. Select your Print Audit Database This part of the wizard allows you to select the Print Audit database on which you want to perform the task you selected. Print Audit automatically chooses the Print Audit database set on this computer. If Print Audit could not find a database, the box is blank. This screen displays the following information: Database Use this box to type in the path to the database on which you want to perform the task. You can also click the Open button to the right of the box to bring up a standard Windows browse dialog so you can search for the database you want. Click the Next button when you are done to move on to the next screen. Ready to Compact This part of the wizard allows you to start compacting your database. If you are not sure you want to compact the database you selected on the previous screen, click Back to select a different one. As you compact, the status of the operation displays in the rectangular box. Click the Compact button when you are ready to start the compacting process. Changing the Read-Only Password For your convenience Print Audit provides a read-only login into your Print Audit database so you can use third party programs to access your data. For example you may need to take the print job data and bring it in to another database in your organization for proper accounting. Print Audit gives you this functionality through a Microsoft Access database account called " PAReadOnly". When you install a new Print Audit database the password for this account is " password". We highly recommend you change this password if you have any concerns about someone using tools other than Print Audit to view your data. 192
193 To change the read-only password: Start the Print Audit Database Maintenance tool. The tool starts on the Select Database Task screen. Click the Change the read-only password option. Click the Next button. The wizard moves to the Select your Print Audit Database screen. Enter the Print Audit database you want to change. The wizard detects what the current database is on this computer. If you want to pick a different database, either type the full path to the database in or select it using the browse button. Click the Next button. The wizard moves to the Change your Print Audit Read-Only Password screen. Type in your old password, new password and new password again to confirm. Please note that if this is the first time you are changing the password, the value you should enter in the Old Password box is "password". Click the Change button. Print Audit changes the password and moves to the Finish screen. Please store the new password in a safe place. If you lose it there is no way to recover it. Select the Database Task This part of the wizard allows you to select which task you want to perform on your Print Audit database. The options are as follows: Compact your database Click this option to compact your Print Audit database. Compacting your database reduces size, increases speed and reduces the risk of corruption. Also choose this option if your database has become corrupted and Print Audit will attempt to repair it. Change the read-only password Click this option to change the password for the PAReadOnly account. Every Print Audit database has this account with a default password of "password". If you are concerned about security you should change this password. Change your Print Audit Read-Only Password This part of the wizard allows you to enter your old and new Print Audit read-only passwords. Please remember to store the new password you enter in a safe place. If you lose the new password you will not be able to access the PAReadOnly account for your database. This screen displays the following information: Old password Please enter your existing read-only account password here. If you have never changed the password before, the password is "password". New password Please enter your new password in this box. Do not forget this password. Confirm password Please re-enter the password you put in the New password box here. This is just to ensure you entered the password you want. 193
194 Click the Change button to change the password. 194
195 5-2 SQL Server Print Audit 6 fully supports Microsoft SQL Server as a back-end database. Print Audit uses this database to store configuration information as well as print job information. This SQL Maintenance tool provides you with simple SQL Server maintenance functionality. The following is a list of the SQL Server tasks you can accomplish with this tool: Creating a Print Audit Database Changing the Print Audit Login Password Changing the System Administrator Login Password Running a SQL Script Creating a New Database The main reason to use the Print Audit Database Maintenance tool is to create a new Print Audit database on the SQL Server. The wizard leads you through the steps to creating the database. If you need specific information about each of the wizard screens, click the Help button at the bottom left of every wizard screen. Below is a general description of how to use the wizard to create a new Print Audit database. To create a Print Audit database: Start the Print Audit SQL Server Maintenance tool. The wizard starts on the Enter SQL Server Login Information screen. Enter the old SQL Server administration login password and click the Next button. The Select the SQL Server Task screen appears. Click the Create a new database option. Click the Next button. The Enter the Print Audit Database screen appears. Enter the name of the new Print Audit database name in the text box or you can just use the default. Click the Next button. If the Print Audit SQL Server login already exists the Ready to Create screen appears, otherwise the Enter the Print Audit Login Password screen appears. If the Ready to Create screen appears, skip to step 9. Enter the new the Print Audit login password. Click the Next button. The Ready to Create screen appears. Review the information on the Ready to Create screen. 10. Click the Create button to start creating the new Print Audit database. The SQL Maintenance tool starts to create the database. This can take a couple of minutes. 195
196 1 If Print Audit detects that it is necessary to change the SQL administrator (sa) password, the Changing the System Administrator Login Password screen appears. Otherwise you are done. Enter SQL Server Login Information This part of the wizard requires you to enter your SQL Server login information. Print Audit uses this information to connect to the SQL Server so it can perform operations on the Print Audit database. This login must have the appropriate permissions to create and modify databases and logins. The wizard screen contains the following fields: Server Please type the name of the SQL server to which you want to connect. This field defaults to "(local)" which means the SQL Server installed on the computer you are using. If you know the name of another server that you want to install the Print Audit database on, please enter that information here. Login Please enter the login name for a SQL Server login that has system administrator privileges. This is typically the "sa" account. Password Please enter the password for the SQL Server login you specified above. Use Windows authentication Check this box if your SQL Server is setup to allow Windows authentication only. This option disables the Login and Password boxes and uses your Windows login and password to attempt connection to the database. Network Provider You may need to enter an alternative SQL Server network library dll name in this box if you have troubles connecting to the SQL database. If blank, it uses the default network library as defined on the system. The name you enter here must be the name of the dll minus the extension and the path to the dll. So for example if you want to force Print Audit to use SQL Server's TCP/IP connectivity, you would enter DBMSSOCN or DBNETLIB. NOTE: This is for advanced SQL Server installations only. Click the Next button when you are ready to move to the next step. If Print Audit cannot find the server, or the login and passwords are incorrect, an error message will display. You must enter the proper information before you can continue Enter the Print Audit Database Name Use this part of the wizard to enter the name for the Print Audit database. You can name this anything you want or just accept the default. If a database with the same name already exists on the server the wizard warns you and allows you to choose if you want to overwrite it. If you decide you want to overwrite it all of the old information will be lost. Please remember the name you enter here, as you may need to enter it into Print Audit when you connect to the database for the first time. The wizard screen contains the following fields: 196
197 Database Enter the name of the new Print Audit database here. You can also leave the default. Click the Next button to move to the next step of the wizard. Enter the Print Audit Login Password This part of the wizard asks you to enter the Print Audit login password. By default the Database Maintenance tool creates a login account called "PrintAudit" on the SQL Server. This is the account that the other products in the Print Audit suite use to connect to your database. NOTE: You only get this wizard screen while creating a database if the "PrintAudit" login account does not already exist on the server. The fields on this screen are: Name This field displays the login name for the Print Audit login account. You cannot change this value. Password This field allows you to enter a password for the Print Audit login account. All Print Audit applications will use this password to connect to your database. You may want to keep this password private if you are worried about users going into the database using means other than Print Audit. Click the Next button to move on to the next part of the installation. Ready to Create This part of the wizard provides you with a checkpoint to confirm all of the information you have entered so far. You should write this information down somewhere, as you may need it later to connect to the Print Audit database. If the information on this screen is not correct, you must go back to the previous wizard screens to change it. This screen displays the following information: Server This is the server name that the wizard is going to create the new database on. You entered this server name on the first screen of the wizard. A value of "(local)" means that the wizard will create the database on the SQL server installed on this computer. Database This is the name of the database the wizard will create. If "(Overwrite)" is appended to the database name it means that the wizard will replace any existing database with the same name. Login This is the name of the Print Audit database login account. This login name cannot be changed. Print Audit will use this login name to connect to the database. Password This is the password for the Print Audit login account. A value of "<Password previously set>" for the password means that the Print Audit login account already exists on the SQL Server and will not be changed. 197
198 Click the Create button to have the Print Audit wizard create the database. Click the Back button to go back in the wizard and change any information that is incorrect. Change the System Administrator Password This part of the wizard allows you to change the SQL Server "sa" login password. The "sa" account is the main SQL Server account. If you leave it open and unsecured anyone with SQL tools can access and change your server. NOTE: You only get to this screen while creating a new database if the initial login account was "sa " and the password was blank. The fields on this screen are: New password Enter the new password for the "sa" login. Please record this password somewhere. If you forget the password you will have to reinstall the SQL Server. Click the Change button to change the password. Finished Using the Wizard This part of the wizard displays a summary of the task you just accomplished. Congratulations! Click the Done button to exit the wizard. Changing the Print Audit Login Password Changing the Print Audit Login Password You can use the Print Audit Database Maintenance tool to change the Print Audit login password. This is the password that all Print Audit users use to connect to the database. To change the Print Audit login password: Start the Print Audit Database Maintenance tool. The wizard starts on the Enter SQL Server Login Information screen. Enter the SQL Server administration login password and click the Next button. The Select the SQL Server Task screen appears. Click the Change the Print Audit User Password option. Click the Next button. The Change the Print Audit User Password screen appears. Enter the new password for the Print Audit user login. Click the Change button to change the password. Enter SQL Server Login Information This part of the wizard requires you to enter your SQL Server login information. Print Audit uses this information to connect to the SQL Server so it can perform operations on the Print Audit database. This login must have the appropriate permissions to create and modify databases and logins. The wizard screen contains the following fields: 198
199 Server Please type the name of the SQL server to which you want to connect. This field defaults to "(local)" which means the SQL Server installed on the computer you are using. If you know the name of another server that you want to install the Print Audit database on, please enter that information here. Login Please enter the login name for a SQL Server login that has system administrator privileges. This is typically the "sa" account. Password Please enter the password for the SQL Server login you specified above. Use Windows authentication Check this box if your SQL Server is setup to allow Windows authentication only. This option disables the Login and Password boxes and uses your Windows login and password to attempt connection to the database. Network Provider You may need to enter an alternative SQL Server network library dll name in this box if you have troubles connecting to the SQL database. If blank, it uses the default network library as defined on the system. The name you enter here must be the name of the dll minus the extension and the path to the dll. So for example if you want to force Print Audit to use SQL Server's TCP/IP connectivity, you would enter DBMSSOCN or DBNETLIB. NOTE: This is for advanced SQL Server installations only. Click the Next button when you are ready to move to the next step. If Print Audit cannot find the server or the login and passwords are incorrect an error message will display. You must enter the proper information before you can continue. Change the Print Audit User Password This part of the wizard allows you to change the Print Audit login password. This is the account that the other products in the Print Audit suite use to connect to your database. You only need to change the password if you have forgotten the old one or if you are concerned about security. The fields on this screen are: Name This field displays the login name for the Print Audit login account. You cannot change this value. New password Enter the new password for the Print Audit login account here. Please note that everyone using Print Audit tools will now have to use this new password to get into your database. Click the Change button to change the password. Finished Using the Wizard This part of the wizard displays a summary of the task you just accomplished. Congratulations! Click the Done button to exit the wizard. 199
200 Changing the System Administrator Password You can use the Print Audit Database Maintenance tool to change the system administrator login password. This is the password for the SQL Server "sa" account. This is a special account in SQL Server that has full power to change anything on a SQL Server. This password is blank by default when you install SQL Server, so you want to change it as soon as possible. To change the system administrator login password: Start the Print Audit Database Maintenance tool. The wizard starts on the Enter SQL Server Login Information screen. Enter the old SQL Server administration login password and click the Next button. The Select the SQL Server Task screen appears. Click the Change the system administrator (sa) password option. Click the Next button. The Change the System Administrator Password screen appears. Enter the new password for the system administrator. Click the Change button to change the password. NOTE: The wizard also allows you to change the system administrator password at the end of the Create Database process. Enter SQL Server Login Information This part of the wizard requires you to enter your SQL Server login information. Print Audit uses this information to connect to the SQL Server so it can perform operations on the Print Audit database. This login must have the appropriate permissions to create and modify databases and logins. The wizard screen contains the following fields: Server Please type the name of the SQL server to which you want to connect. This field defaults to "(local)" which means the SQL Server installed on the computer you are using. If you know the name of another server that you want to install the Print Audit database on, please enter that information here. Login Please enter the login name for a SQL Server login that has system administrator privileges. This is typically the "sa" account. Password Please enter the password for the SQL Server login you specified above. Use Windows authentication Check this box if your SQL Server is setup to allow Windows authentication only. This option disables the Login and Password boxes and uses your Windows login and password to attempt connection to the database. 200
201 Network Provider You may need to enter an alternative SQL Server network library dll name in this box if you have troubles connecting to the SQL database. If blank, it uses the default network library as defined on the system. The name you enter here must be the name of the dll minus the extension and the path to the dll. So for example if you want to force Print Audit to use SQL Server's TCP/IP connectivity, you would enter DBMSSOCN or DBNETLIB. NOTE: This is for advanced SQL Server installations only. Click the Next button when you are ready to move to the next step. If Print Audit cannot find the server or the login and passwords are incorrect an error message will display. You must enter the proper information before you can continue. Change the System Administrator Password This part of the wizard allows you to change the SQL Server "sa" login password. The "sa" account is the main SQL Server account. If you leave it open and unsecured anyone with SQL tools can access and change your server. NOTE: You only get to this screen while creating a new database if the initial login account was "sa " and the password was blank. The fields on this screen are: New password Enter the new password for the "sa" login. Please record this password somewhere. If you forget the password you will have to reinstall the SQL Server. Click the Change button to change the password. Finished Using the Wizard This part of the wizard displays a summary of the task you just accomplished. Congratulations! Click the Done button to exit the wizard. Running a SQL Script Running a SQL Script You can use the Print Audit Database Maintenance tool to run any sql script against the Print Audit database. You may need to run scripts to repair accidentally damaged databases, or to perform different database maintenance tasks. NOTE: Print Audit is not responsible for any damage or loss of data that occurs when running scripts against your database that you have not received directly from Print Audit. You should only use this functionality if Print Audit directs you to, or if you are an advanced SQL user. To run a sql script: Start the Print Audit Database Maintenance tool. The wizard starts on the Enter SQL Server Login Information screen. Enter the SQL Server administration login password and click the Next button. The Select the SQL Server Task screen appears. 201
202 Click the Run a sql script file option. Click the Next button. The Enter the Print Audit Database Name screen appears. Enter the name of the Print Audit database you want to run the script against. Click the Next button. The Select a SQL Script File screen appears. Type the path to the script file, or click the Browse button to open a standard dialog so you can look for the file. Click the Run button to run the script. After the script has completed the Summary screen appears. Enter SQL Server Login Information This part of the wizard requires you to enter your SQL Server login information. Print Audit uses this information to connect to the SQL Server so it can perform operations on the Print Audit database. This login must have the appropriate permissions to create and modify databases and logins. The wizard screen contains the following fields: Server Please type the name of the SQL server to which you want to connect. This field defaults to "(local)" which means the SQL Server installed on the computer you are using. If you know the name of another server that you want to install the Print Audit database on, please enter that information here. Login Please enter the login name for a SQL Server login that has system administrator privileges. This is typically the "sa" account. Password Please enter the password for the SQL Server login you specified above. Use Windows authentication Check this box if your SQL Server is setup to allow Windows authentication only. This option disables the Login and Password boxes and uses your Windows login and password to attempt connection to the database. Network Provider You may need to enter an alternative SQL Server network library dll name in this box if you have troubles connecting to the SQL database. If blank, it uses the default network library as defined on the system. The name you enter here must be the name of the dll minus the extension and the path to the dll. So for example if you want to force Print Audit to use SQL Server's TCP/IP connectivity, you would enter DBMSSOCN or DBNETLIB. NOTE: This is for advanced SQL Server installations only. Click the Next button when you are ready to move to the next step. If Print Audit cannot find the server or the login and passwords are incorrect an error message will display. You must enter the proper information before you can continue. Enter the Print Audit Database Name Use this part of the wizard to enter the name of the Print Audit database you want to run the script against. If the database does not exist, Print Audit does not allow you to continue. 202
203 The wizard screen contains the following fields: Database Enter the name of the Print Audit database here. Click the Next button to move to the next step of the wizard. Select a SQL Script File This part of the wizard allows you to select the SQL script file you want to run against the database. Please note that Print Audit is not responsible for any loss of or damage to your Print Audit data when running a script not approved by Print Audit. You should not use this functionality unless Print Audit instructs you to or unless you are an advanced SQL user. This screen displays the following information: Script Type the full path and name of the sql script file you want to run here. You can also click the Browse button to open a standard Windows dialog so you can find the file you want to run. Click the Run button to run the script. 203
204 6. Database Migration Wizard The Print Audit Database Migration Wizard allows you to upgrade Print Audit 5 databases to Print Audit 6 databases, as well as migrate Print Audit 6 MSAccess databases to Microsoft's SQL Server. To migrate your database: Start the Print Audit Database Migration Wizard. The wizard starts on the Select the Migration Type screen. Choose the migration type. Click the Next button. Depending on the migration type, select either the MSAccess or SQL Server database to migrate from. Click the Next button. Depending on the migration type, select either the MSAccess or SQL Server database to migrate to. Click the Next button to continue. Select your job migration options. Click the Next button to continue. Start migrating the data. Once the data migration has completed you can click the Close button to close the wizard. 204
205 205
206 Print Audit 6 Security Overview Database Microsoft Access databases are password protected and cannot be opened in Microsoft Access without the password. SQL databases are password protected by default and can utilize all of the security features of the Microsoft SQL Server platform if desired (including Windows/Integrated security). Network Communication between the clients and the Database Communicator occurs on a single TCP port (17520 by default). This port number can be changed if desired. Strong encryption is used for all data transmissions between the client and Database Communicator. Print Audit Applications The Administrator includes the ability to create different user security profiles. Some users can be granted full access to the system, others read-only access (for reporting), and others can be denied access except the ability to track their printing. Users can be prompted to enter either a secure PIN code or their network password to gain access to the administrator and reporting tools. Users can be prompted to enter either a secure PIN code or their network password for validation in order to print. PIN codes are stored in the database in encrypted form, never in clear text. Internet-Based License Activation Privacy Normally, Print Audit 6 licenses are activated via our secure licensing server using the HTTPS protocol. If it is not possible or desirable to activate over the Internet, the license can be activated manually. No data is transmitted to third parties. Print Audit can be configured to not track the document names and / or user names for each print job. Users can be authenticated against an Active Directory or Novell NDS server if desired. 206
207 Data All data is stored in the SQL or Microsoft Access database. The data is as secure as the network / server on which it resides. 207
208 Print Audit 6 Technical Overview Print Audit 6 is the most accurate and powerful suite of print tracking and print management products available. It is used to analyze, reduce and recover costs along with the resources associated with printing and plotting to all networked, local, and direct to IP printers. The Print Audit 6 suite is comprised of the following components: Print Audit Analysis is an inexpensive tool that is used to collect print volume information on all printing devices. It allows companies to get an accurate picture of their print volumes utilizing Print Audit 6 Analysis' comprehensive reporting capabilities. This information can then be used to optimize their printing fleet. Print Audit Rules allows enterprises to restrict color usage, enforce printing limits and redirect expensive print jobs to the most efficient printing device. Print Audit Recovery allows organizations to accurately bill their clients or users for their printing and copying costs. Recovery automates every step of the chargeback process. Its bullet-proof security and unique capture method ensures that 100% of printing and plotting costs are recaptured. These three components can be purchased a variety of configurations depending on the needs of your organization. Technology Print Audit 6 uses a client-based architecture. This has an important advantage over server-based tracking systems in that it allows tracking of all local as well as network printing by printer port and IP address identification, without utilizing valuable network bandwidth. Another equally important advantage is that the Print Audit system is safe and easy to install, without any alteration of the existing network whatsoever. System Requirements Operating System requirements Database Communicator, Database and Administrative tools Windows 2000 Windows Server 2003 Windows XP 208
209 Windows Vista Windows Server 2008 Windows Server 2008 R2 Windows 7 Windows 8 Windows Server 2012 Windows Server 2012 R2 Client Windows 98 Windows ME Windows 2000 Windows Server 2003 Windows XP Windows Vista Windows Server 2008 Windows 7 Windows 8 with the exception of Metro Apps and Surface R/T ** Contact our Support team at support@printaudit.com for more information Mac OS X 10.6 or newer. CPU and RAM requirements are the same as those of the operating system on which the solution is running. 209
210 Installation Requirements A full installation, including the Database Communicator and the database will require approximately 60 MB of disk space. A full installation, NOT including the Database Communicator and the database will require approximately 50 MB of disk space. When using a deployment method such as logon scripts or Active Directory to deploy components to workstations, only the components you choose to install with the installation wizard will be copied to each workstation. The hard drive space used is dependent on which components are installed. Note The total amount of disk space used is dependent on the method that you use to do the actual installation. The figures stated above are estimates as JET or MDAC may need to be installed as well. When using a deployment method, the network traffic created during the installation will be between 3 and 60 MB s per workstation, depending on the components you choose to install. Database Requirements Support for Access and SQL Server 2005 or newer (Full or Express) database back-ends. The amount of disk space used by the database is dependent on the type of database back-end as well as the amount of data being tracked. Approximately 1MB of disk space per 2000 print jobs will be used. Database Communicator Memory Usage The Database Communicator is a service and will use up to 10 MB of memory when running but decreases the longer it is in use. The amount of memory used decreases as certain components of the communicator are never used and eventually the memory for those components will be swapped out to other processes. Client Installation Requirements and Memory Usage The Client will require approximately 2 MB of disk space. The Client will use approximately 1 MB of memory on the system and will increase to approximately 5 MB when tracking a print job. 210
211 Networking requirements TCP/IP networking (by default, port is used for communication between the Database Communicator and the Client) Print Audit does not create any network traffic until a print job is initiated. Once a print job has been sent to the printer, 10 to 20 KB of bidirectional network traffic is created per print job, regardless of the print job size. Technical Advantages Workstation-based Print Audit 6 tracks from the workstation which enables it to track every print job. This also allows it to retrieve more information about each print job, such as the name of the program or the web site address. Also, tracking from the workstation, rather than the print server, requires less network bandwidth since port monitoring is not required to capture all locally connected and direct to IP devices. Simple installation and setup Print Audit 6 does not require any modification of the local network or print servers to track 100% of the printing activity. Print Audit 6 installs easily to each workstation from a central location on the network. Tracks everything Print Audit 6 is the only print tracking software solution that tracks all print devices out of the box. Whether a print job goes through a print server, directly to a printer with its own IP address or to a local printer, Print Audit 6 captures it. Print Audit 6 creates an inventory of all print devices in use on the network, regardless of whether those devices are known to exist by the network administrator. Controls printing costs Print Audit 6 Rules can either suggest or force users to print to a more efficient printer based on wide variety of factors such as the number of pages in the print job. Rules can control color costs by limiting color usage by the user, computer, printer, number of pages, application and much more. Print Audit 6 also helps organizations reduce their environmental impact by forcing users to print on both sides of the page. Flexible reporting Print Audit 6 includes two reporting tools that allow customers to decide on what data they would like to view. Users can design customized reports and export files according to the exact specifications required by their existing accounting and reporting systems. All in one solution Server-based solutions by their nature have to be broken up into various costly components that are needed to perform tasks, such as capturing, analyzing, and recovering costs. Organizations can take full advantage of Print Audit 6's cost analysis, reduction and recovery capabilities right out of the box. Installation 211
212 Print Audit 6 provides a simple, easy to use system of configuration files and batch files to allow organizations to quickly rollout the software to their network. Print Audit 6 can be easily installed to thousands of workstations from a central location on the network using your existing deployment method such as Active Directory, login scripts, MSI Packages, or any mass installation tool. Detailed installation and mass deployment guides can be found here: Print Audit 6 Installation Information. Print Audit 6 Installed Files The following is a list of files Print Audit 6 installs. Some files in this list are duplicated as they can be installed with one or more of the Print Audit pieces. Note that system files are NEVER replaced if they are newer than the ones we install. Administrator Files Installed to [Install Dir]\admin pa6admin.exe Administrator executable pa6admcm.dll Administrator library pa6dbmnt.exe Database maintenance tool pa6clist.exe Client Status/Push Install tool pa6intfc.exe Support app for Client Status/Push tool pa6jbmrg.exe Job Merge Wizard Installed to [Install Dir]\help pa6admin.chm Admin help file pa6clist.chm Client Status/Deployment Tool help file pa6cpaud.chm Copy Audit Numeric help file pa6dbmnt.chm Database Maintenance Tool help file. pa6jbman.chm Job Manager help file. pa6jbmrg.chm Job Merge Wizard help file. pa6main.chm Print Audit 6 help file. pa6reprt.chm Analysis Reporting help file. Installed to [Install Dir]\admin\plugins admappls.dll Applications section plugin admcacfg.dll Copy Audit plugin admfield.dll Custom fields plugin admglbst.dll Global settings plugin 212
213 admnetwk.dll Network settings plugin admpaper.dll Paper size plugin admprint.dll Printers plugin admpripf.dll Printer profiles plugin admrules.dll Rules plugin admsetng.dll General settings plugin admusepf.dll User profiles plugin admusers.dll Users plugin pa6ivpa6.dll Flat file value importer plugin Installed to [system32] IGTabs40.ocx Third party "tabs" control library. IGToolbars50.ocx Third party "toolbars" control library. PVOutlookBar.ocx Third party "outlook frame" control library. vsflex8.ocx Third party "grid" control library mscomctl.ocx Microsoft common control library mscomctocx Microsoft common control library mswinsck.ocx - Microsoft Windows sockets support library Job Manager Files Installed to [Install Dir]\jbmanage pa6jbman.exe Job Manager executable pa6jeflt.dll Job exporter plugin pa6expinf.dll Job exporter interface. Installed to [Install Dir]\help pa6jbman.chm Job manager help file. Installed to [system32] IGTabs40.ocx Third party "tabs" control library. IGToolbars50.ocx Third party "toolbars" control library. vsflex8.ocx Third party "grid" control library mscomctl.ocx Microsoft common control library mscomctocx Microsoft common control library vsprint8.ocx Third party printing library vsrpt8.ocx Third party reporting library vspdf8.ocx - Third party PDF generation library. chilkatmail_v7_9.dll - Third party library. 213
214 Reporting Files Installed to [Install Dir]\report pa6reprt.exe Analysis Reporting executable Installed to [Install Dir]\report\reports topvolprinters.rpt topvolmodels.rpt topvolcolorusers.rpt topvolcolorprinters.rpt topvolcolormodels.rpt topvolbwusers.rpt topvolbwprinters.rpt topvolbwmodels.rpt top10workpages.rpt top10workjobs.rpt top10userpages.rpt top10userjobs.rpt top10printpages.rpt top10printjobs.rpt printervolume.rpt printeruserprinting.rpt printerroirpt printerinventory.rpt printercosts.rpt printeraverages.rpt peakprintergraph.rpt pagevoluser.rpt modelvolume.rpt modelinventory.rpt jobsizemodel.rpt execsummary.rpt colorpagevoluser.rpt bwpagevoluser.rpt avgpagesperhour.rpt avgpagesperday.rpt titlepage.prp tbcontents.prp 214
215 Installed to [Install Dir]\help pa6reprt.chm Analysis Reporting help file. Installed to [system32] IGTabs40.ocx Third party "tabs" control library. IGToolbars50.ocx Third party "toolbars" control library. vsflex8.ocx Third party "grid" control library mscomctl.ocx Microsoft common control library mscomctocx Microsoft common control library vsprint8.ocx Third party printing library vsrpt8.ocx Third party reporting library Chart FX.ClientServer.Core.dll - Third party chart/graph library. ChilkatMail_v7_9.dll - Third party library vspdf8.ocx - Third party PDF generation library. Microsoft Libraries Microsoft GDI+ library - Only installed on Windows Client Files Installed to [Install Dir]\client pa6clint.exe Client executable pa6wtrak.dll Windows tracking dll pa6hook.dll Windows tracking dll pa6ccutl.exe Client configuration tool Installed to [Install Dir]client\plugins paac2000.arx AutoCAD 2000/2000i plugin paac200arx AutoCAD 2002 plugin paac2004.arx AutoCAD 2004/2005 plugin paac2006.arx AutoCAD 2006 plugin pa6ac07.arx AutoCAD 2007 plugin pa6ac10.arx - AutoCAD 2010 plugin pa6mtrak.dll Microstation support library pa6mv7ma Microstation/J plugin pa6mv8.ma Microstation 8 plugin 215
216 Installed to [system32] snmpapi.dll Microsoft SNMP support library (Only installed on Win98 if not present) Database Communicator Files Installed to [Install Dir]\data pa6clcom.exe Database Communicator executable pa6clcfg.exe Database Communicator configuration tool Copy Audit Numeric Files Installed to [Install Dir]\cpaudit pa6cacom.exe Copy Audit Numeric communicator executable Installed to [Install Dir]\admin\plugins admcacfg.dll Copy Audit Numeric administrator plugin Installed to [Install Dir]\help pa6cpaud.chm Copy Audit Numeric help file Installed to [system32] mswinsck.ocx Microsoft Windows sockets support library Database Files Installed only if you choose to create an Access database. Installed to selected database directory: pa6db.mdb The Print Audit Access database. pa6db.mdw The Print Audit Access security file. Common Files These files are ALWAYS installed, regardless of what else is being installed. 216
217 Installed to [Install Dir]\common pa6cminf.dll Common interface library pa6data.dll Data communication library pa6logvw.exe - Print Audit 6 log viewer pa6utils.dll - General utility library pa516cal.dll - 16-bit support library pa532cal.dll - 32-bit support library Installed to [system32] msvcrt.dll Microsoft common C runtime library Data Access Layer/VB Support These files are installed if you install the Administrator, Database Communicator, Copy Audit Communicator, Job Manager or Analysis Reporting Tool. Installed to [Install Dir]\common pa6data.dll The Print Audit data access library. Installed to [Install Dir]\help pa6main.chm Intro help file, links to all other help files. Installed to [system 32] comcat.dll Microsoft VB/COM support library. asycfilt.dll Microsoft VB/COM support library. oleaut3dll Microsoft VB/COM support library. olepro3dll Microsoft VB/COM support library. stdoletlb Microsoft VB/COM support library. advpack.dll Microsoft VB/COM support library. msvbvm60.dll Microsoft VB runtime library. Microsoft Libraries MDAC 8 Microsoft ADO library version 8 MSJet4 SP3 Microsoft JET library, version 4 service pack 217
218 Print Audit Tools The Print Audit 6 suite consists of several tools. These tools help you install, configure and report on your print tracking. Please note that you may not be able to use all of the features and tools described depending on your licensing. Client The Print Audit Client tracks all printing from a user's desktop. You must install the Client on any computer from which you want to track printing. The Client can also gather custom information from your users at print time. Database Communicator The Database Communicator handles all communication between the Print Audit Client and the Print Audit database. You generally only need to install one Database Communicator in your organization. Administrator You use the Administrator tool to configure all aspects of Print Audit 6. You use it to setup printer profiles, user profiles and any custom field information. You also use the Administrator to configure printing limits and other Rules features. Job Manager You use the Job Manager to view, edit and delete your print job information. You can also use the job manager to report detailed job information and export your jobs to other tools. Analysis Reporting You use the Analysis Reporting tool to generate sophisticated reports that you can use to report on volumes and calculate ROI on your information. Print Audit Database The Print Audit Database stores all of your print job, user and printer information. You can use a Microsoft Access based database or Microsoft SQL Server. For larger organizations we highly recommend SQL Server. Support Tools Client Status/Deployment You use this tool to monitor the status of Print Audit Clients on your network. You can also use the tool to deploy the client to Windows NT and above computers in your organization. Job Merge Wizard You can use this tool to merge jobs from one Print Audit database to another. For example you may have several satellite offices and want all of the information merged into a head office database. Database Maintenance Tool You can use this tool to create SQL databases, compact Access databases and change database passwords. Data Migration Wizard This tool allows you to upgrade Print Audit 5 databases to Print Audit 6 databases, as well as migrate Print Audit 6 Access databases to Microsoft's SQL Server. ADMINISTRATOR 218

219 Once the installation of Print Audit 6 is complete, you use the Print Audit 6 Administrator tool to configure all aspects of Print Audit 6. Print Audit 6 can be configured centrally from any workstation that has the Administrator module installed to it. Any changes to the programs configuration, made in the Administrator, are written to the central database and recognized network wide as each client (workstation) reads from, and writes to, that same database. SECURITY Print Audit 6 includes powerful security features that ensure the program cannot be overridden and that 100% of the print jobs are captured. The Print Audit Client can be configured so that even users with administrator rights cannot shut it down. Click here to view the Print Audit 6 Security Overview for more information. REPORTING The full Print Audit 6 suite includes two reporting tools, known as the Job Manager and Analysis Reporting. 219

220 The Job Manager is used to view and manage detailed print job information. You can search for jobs using several different pieces of search criteria. Once you find the jobs you want you can edit the jobs, build reports based on the job details and export the job information. You can also use the Job Manager to schedule exports of your job information to a file format that your accounting program can read. The Analysis Reporting tool can be used to produce pre-prepared reports for your printing volumes and costs. You can use these reports to determine your highest volume printers, distribution of job sizes, percentage of color vs black and white printing, etc. Analysis Reporting also allows you to create Composite Reports. These reports are a combination of several other reports with a title page and table of contents. Print Audit 6 Features Excerpt Page not found The page: PA6 Features was not found. Please check/update the page name used in the 'multiexcerpt-include macro. Print Audit 6 Features Comparison Excerpt Page not found The page: PA6 Features Comparison was not found. Please check/ update the page name used in the 'multiexcerpt-include macro. 220
Print Audit 5 - Step by Step Walkthrough
 Print Audit 5 - Step by Step Walkthrough IMPORTANT: READ THIS BEFORE PERFORMING A PRINT AUDIT 5 INSTALLATION Print Audit 5 is a desktop application that you must install on every computer where you want
Print Audit 6. Database Documentation Dec :21. Version: Date:
 Print Audit 6 Version: Date: 8 03-Dec-2018 16:21 Table of Contents Browse Documents:..................................................... 3 Moving Print Audit 6 and an SQL Database to a New Server....................
Print Audit 5 - How to Move Print Audit 5 and a SQL Server 2005 Express Database to a New Server
 Print Audit 5 - How to Move Print Audit 5 and a SQL Server 2005 Express Database to a New Server Overview This document includes the steps to move Print Audit 5 and a SQL Server 2005 Express database to
Print Audit 5 Client Only Installation Guide
 Print Audit 5 Client Only Installation Guide IMPORTANT: READ THIS BEFORE PERFORMING A PRINT AUDIT 5 INSTALLATION Print Audit 5 is a desktop application that you must install on every computer where you
10ZiG Technology. Thin Desktop Quick Start Guide
 10ZiG Technology Thin Desktop Quick Start Guide 2010 05 20 Introduction This document is intended as a quick start guide for installing Thin Desktop. After reading this document, you will know how to:
STS INSTALLATION GUIDE
 STS INSTALLATION GUIDE STS INSTALLATION GUIDE This document walks through the steps necessary for installing the program. FIRST STEPS: Must have administrator Rights on local computer for install If using
Important notice regarding accounts used for installation and configuration
 System Requirements Operating System Nintex Reporting 2008 can be installed on Microsoft Windows Server 2003 or 2008 (32 and 64 bit supported for both OS versions). Browser Client Microsoft Internet Explorer
HORTICOPIA Professional
 HORTICOPIA Professional Networking User Guide Horticopia, Inc. www.horticopia.com October 2017 Table of Contents I. Quick Start 2 II. System Requirements 3 III. Installing HORTICOPIA Professional 4 1.
Jonas Activity Management Technical Deployment Guide
 Jonas Activity Management Technical Deployment Guide [] Software for Life Jonas Activity Management Technical Deployment Guide, Jonas, Jonas Software, Software for Life, and Gary Jonas Computing are registered
Installing Intellicus DotNet Client on Windows. Version: 16.0
 Installing Intellicus DotNet Client on Windows Version: 16.0 Copyright 2015 Intellicus Technologies This document and its content is copyrighted material of Intellicus Technologies. The content may not
Sage Residential Management Versions 9.5 through Installation Guide
 Sage Residential Management Versions 9.5 through 14.1 Installation Guide This is a publication of Sage Software, Inc. Copyright 2014. Sage Software, Inc. All rights reserved. Sage, the Sage logos, and
DOCUMENT TRACKING INSTALLATION GUIDE
 DOCUMENT TRACKING INSTALLATION GUIDE DOCUMENT TRACKING INSTALLATION GUIDE This document walks through the steps necessary for installing the program. TO INSTALL DTS: You should have administrator rights
Installation Guide Version May 2017
 Installation Guide Version 2017 5 May 2017 GeoCue Group, Inc 9668 Madison Blvd. Suite 202 Madison, AL 35758 1-256-461-8289 www.geocue.com NOTICES The material in GeoCue Group, Inc. documents is protected
ASSET TRACKING SYSTEM INSTALLATION GUIDE
 ASSET TRACKING SYSTEM INSTALLATION GUIDE 1 ASSET TRACKING SYSTEM INSTALLATION GUIDE This document walks through the steps necessary for installing the program. TO INSTALL ATS: You should have administrator
Immotec Systems, Inc. SQL Server 2008 Installation Document
 SQL Server Installation Guide 1. From the Visor 360 installation CD\USB Key, open the Access folder and install the Access Database Engine. 2. Open Visor 360 V2.0 folder and double click on Setup. Visor
APPENDIX B: INSTALLATION AND SETUP
 APPENDIX B: INSTALLATION AND SETUP Page A. Overview... B:1 How do I install and setup ICMS?... B:1 Do I need special security rights to install ICMS?... B:1 Installation Basics... B:1 How do I get a quick
UC for Enterprise (UCE) NEC Centralized Authentication Service (NEC CAS)
 NEC Centralized Authentication Service (NEC CAS)") UC for Enterprise (UCE) NEC Centralized Authentication Service (NEC CAS) Installation Guide NEC NEC Corporation October 2010 NDA-30362, Revision 15 Liability Disclaimer NEC Corporation reserves the right
UC for Enterprise (UCE) NEC Centralized Authentication Service (NEC CAS) Installation Guide NEC NEC Corporation October 2010 NDA-30362, Revision 15 Liability Disclaimer NEC Corporation reserves the right
InventoryControl Quick Start Guide
 InventoryControl Quick Start Guide Copyright 2013 Wasp Barcode Technologies 1400 10 th St. Plano, TX 75074 All Rights Reserved STATEMENTS IN THIS DOCUMENT REGARDING THIRD PARTY PRODUCTS OR SERVICES ARE
Status Web Evaluator s Guide Software Pursuits, Inc.
 Status Web Evaluator s Guide 2018 Table of Contents Introduction... 2 System Requirements... 2 Contact Information... 2 Installing Microsoft IIS... 2 Verifying Microsoft IIS Features... 9 Installing the
CONTENTS. p r e m i u m e d i t i o n 2008
 Install Guide CONTENTS Basics... 1 Server Install... 3 Workstation Install... 9 Workstation Offline Components Install... 11 Appendix: Installing Runtime SQL Server 2005...14 p r e m i u m e d i t i o
Pension System/Windows. Installation Guide
 Pension System/Windows Installation Guide Updated for Microsoft SQL Server 2014 & MS SQL Express 2014 DATAIR Employee Benefit Systems, Inc. 735 N. Cass Ave. Westmont, IL 60559-1100 V: (630) 325-2600 F:
IQSweb Installation Instructions Version 5.0
 IQSweb Installation Instructions Version 5.0 Contents Additional References... 3 IQSweb ROSS Connection... 3 IQSweb V5.0 Install/Upgrade Scenarios... 4 IQSweb Configuration Options... 5 A. Single Computer/Server
KYOCERA Net Admin Installation Guide
 KYOCERA Net Admin Guide Legal Notes Unauthorized reproduction of all or part of this guide is prohibited. The information in this guide is subject to change without notice. We cannot be held liable for
Installation Manual. Fleet Maintenance Software. Version 6.4
 Fleet Maintenance Software Installation Manual Version 6.4 6 Terri Lane, Suite 700 Burlington, NJ 08016 (609) 747-8800 Fax (609) 747-8801 Dossier@dossiersystemsinc.com www.dossiersystemsinc.com Copyright
INSTALL GUIDE. Basics. Contents. Evaluation and licensing
 INSTALL GUIDE Contents Basics... 1 Server Install... 3 Workstation Install... 8 Workstation Offline Install... 10 Appendix: Installing Runtime SQL Server 2008 R2... 12 Who should use this Guide: Firms
Installing Sage POS and SQL
 Installing Sage POS and SQL Table of Content Hover over the heading and select the topic you are interested in, you will be directed to the topic. Download Procedures Server Installation Workstation Installation
Partner Integration Portal (PIP) Installation Guide
 Installation Guide") Partner Integration Portal (PIP) Installation Guide Last Update: 12/3/13 Digital Gateway, Inc. All rights reserved Page 1 TABLE OF CONTENTS INSTALLING PARTNER INTEGRATION PORTAL (PIP)... 3 DOWNLOADING
Partner Integration Portal (PIP) Installation Guide Last Update: 12/3/13 Digital Gateway, Inc. All rights reserved Page 1 TABLE OF CONTENTS INSTALLING PARTNER INTEGRATION PORTAL (PIP)... 3 DOWNLOADING
Abila MIP. Installation Guide
 This is a publication of Abila, Inc. Version 2018.1.0 2017 Abila, Inc. and its affiliated entities. All rights reserved. Abila, the Abila logos, and the Abila product and service names mentioned herein
Immotec Systems, Inc. SQL Server 2008 Installation Document
 SQL Server Installation Guide 1. From the Visor 360 installation CD\USB Key, open the Access folder and install the Access Database Engine. 2. Open Visor 360 V2.0 folder and double click on Setup. Visor
Deployment Guide Installing WhatsUp Gold Distributed Edition to Central and Remote Sites
 Deployment Guide Installing WhatsUp Gold Distributed Edition to Central and Remote Sites This guide provides information about installing and configuring WhatsUp Gold Central and Remote Sites. Contents
Installation Guide. EventTracker Enterprise. Install Guide Centre Park Drive Publication Date: Aug 03, U.S. Toll Free:
 EventTracker Enterprise Install Guide 8815 Centre Park Drive Publication Date: Aug 03, 2010 Columbia MD 21045 U.S. Toll Free: 877.333.1433 Abstract The purpose of this document is to help users install
LT Auditor Installation Guide
 LT Auditor+ 2013 Installation Guide Intellectual Property Copyright 2007-2012 Blue Lance, LT Auditor+, and the Report Generator are registered trademarks of Blue Lance, Inc. Microsoft, Windows 2003, Window
ControlPoint. Advanced Installation Guide. September 07,
 ControlPoint Advanced Installation Guide September 07, 2017 www.metalogix.com info@metalogix.com 202.609.9100 Copyright International GmbH., 2008-2017 All rights reserved. No part or section of the contents
Millennium Expert/Enterprise Installation Guide Version Table of Contents
 Millennium Expert/Enterprise Installation Guide Version 5.0.3599 Table of Contents Section Page Installing Microsoft SQL Server 2 Installing Millennium Server software 9 Installing Millennium Databases
Configuring the WebDAV Folder for Adding Multiple Files to the Content Collection and Editing Them
 Configuring the WebDAV Folder for Adding Multiple Files to the Content Collection and Editing Them The Content Collection should be the repository for all of the files used in Blackboard. The Content Collection
ProviderLink Virtual Print Solution (VPS) Installation Guide
 Installation Guide") Virtual Print Solution ProviderLink Virtual Print Solution (VPS) Installation Guide Customer Service Compuware-Covisint 280 Mangum Street, Suite 540 Durham, NC 27701 919.425.0555 All rights reserved 2008
Virtual Print Solution ProviderLink Virtual Print Solution (VPS) Installation Guide Customer Service Compuware-Covisint 280 Mangum Street, Suite 540 Durham, NC 27701 919.425.0555 All rights reserved 2008
Administrator s Guide
 Administrator s Guide 1995 2011 Open Systems Holdings Corp. All rights reserved. No part of this manual may be reproduced by any means without the written permission of Open Systems, Inc. OPEN SYSTEMS
Galileo Desktop SM 2.1. Installation Guide
 Galileo Desktop SM 2.1 Installation Guide Galileo Desktop SM 2.0 Installation Guide, January 2007 i 2008 Galileo International, L.L.C. All rights reserved. Information in this document is subject to change
Silk Performance Manager Installation and Setup Help
 Silk Performance Manager 18.5 Installation and Setup Help Micro Focus The Lawn 22-30 Old Bath Road Newbury, Berkshire RG14 1QN UK http://www.microfocus.com Copyright 2004-2017 Micro Focus. All rights reserved.
Quick KVM 1.1. User s Guide. ClearCube Technology, Inc.
 Quick KVM 1.1 User s Guide ClearCube Technology, Inc. Copyright 2005, ClearCube Technology, Inc. All rights reserved. Under copyright laws, this publication may not be reproduced or transmitted in any
Accops HyWorks v3.0. Installation Guide
 Accops HyWorks v3.0 Installation Guide Last Update: 4/25/2017 2017 Accops Technologies Pvt. Ltd. All rights reserved. The information contained in this document represents the current view of Propalms
LepideAuditor for File Server. Installation and Configuration Guide
 LepideAuditor for File Server Installation and Configuration Guide Table of Contents 1. Introduction... 4 2. Requirements and Prerequisites... 4 2.1 Basic System Requirements... 4 2.2 Supported Servers
Xactimate 25 Demo Request
 1 Xactimate 25 Demo Request PREFACE: This document has been created with the intent to teach an adjuster how to request a demo from Xactware in preparation of Amcat training. This is a prerequisite that
How to Install Microsoft SQL Express 2016 ANSWER:
 How to Install Microsoft SQL Express 2016 ANSWER: IMPORTANT DISCLAIMER: We are providing the information in this article as a courtesy to our Abila customers. Assistance with installation or troubleshooting
Print Manager Plus 2010 Workgroup Print Tracking and Control
 INTRODUCTION: This is intended to assist in the initial installation or evaluation of Print Manager Plus 2010 Workgroup Edition. This will guide you through tracking your printing whether your workgroup
MegaTrack. Quick Start Guide
 MegaTrack Quick Start Guide MegaTrack Quick Start Guide This document will help you quickly install and test the MegaTrack software. For additional information regarding the operation and configuration
EventMaster PLUS! Version 4 Installation and Upgrade Guide. Enterprise Deployment Microsoft SQL Server
 EventMaster PLUS! Version 4 Installation and Upgrade Guide Deployment Microsoft SQL Server EventMaster4 PLUS! EventMaster4 PLUS! EventMaster4 PLUS! EventMaster4 PLUS! Please send any comments regarding
LiNC-NXG for Windows 8 Professional, Windows 7 Professional, Vista Business Edition and XP Professional
 LiNC-NXG for Windows 8 Professional, Windows 7 Professional, Vista Business Edition and XP Professional Installation Guide for LiNC-NXG 33-10067-001 REV: C PCSC 3541 Challenger Street Torrance, CA 90503
Installing and Setting Up SiteMaster 200 v4 What you need to know.
 Installing and Setting Up SiteMaster 200 v4 What you need to know. Table of Contents Important Information 1 System Requirements 2 Installing SiteMaster 200 v4 2 When You First Run SiteMaster 200 v4 4
EventMaster PLUS! Version 4 Installation and Upgrade Guide. Workgroup Deployment Microsoft MSDE 2000
 EventMaster PLUS! Version 4 Installation and Upgrade Guide Deployment Microsoft MSDE 2000 EventMaster4 PLUS! EventMaster4 PLUS! EventMaster4 PLUS! EventMaster4 PLUS! Please send any comments regarding
Supervisor Insight. Installation Guide.
 Supervisor Insight Installation Guide www.monitorbm.com Supervisor Insight Installation Guide Copyright 2014 Monitor Business Machines Ltd The software contains proprietary information of Monitor Business
Junxure Code Upgrade Instructions
 Junxure Code Upgrade Instructions If at any time you run into an issue with the following process, call or email Junxure Support (866-586-9873, opt 1 or support@junxure.com) and we will assist you with
User Manual. Active Directory Change Tracker
 User Manual Active Directory Change Tracker Last Updated: March 2018 Copyright 2018 Vyapin Software Systems Private Ltd. All rights reserved. This document is being furnished by Vyapin Software Systems
9936A LogWare III. User s Guide. Revision
 9936A LogWare III User s Guide Revision 850701 Table of Contents 1 Introduction...1 1.1 Symbols Used... 1 1.2 Conventions... 1 1.3 What is LogWare?... 1 1.4 License Agreement... 2 1.5 Requirements...
PerTrac Analytical Platform. SQL Version Setup Guide
 SQL Version Setup Guide PerTrac Analytical Platform SQL Version Setup Guide Version 7.3.x March 21, 2013 TABLE OF CONTENTS SECTION 1: INSTALLATION OVERVIEW 3 SECTION 2: SINGLE USER INSTALLATION LAYOUTS
M i c r o s o f t S Q L S e r v e r I n s t a l l a t i o n G u i d e for A D S S S e r v e r
 M i c r o s o f t S Q L S e r v e r I n s t a l l a t i o n G u i d e for A D S S S e r v e r A S C E R T I A LTD S E P T E M B E R 2 0 1 8 D o c u m e n t V e r s i o n - 5.9. 0. 1 Ascertia Limited. All
LABEL ARCHIVE Administrator s Guide
 LABEL ARCHIVE Administrator s Guide DOC-LAS2015_25/05/2015 The information in this manual is not binding and may be modified without prior notice. Supply of the software described in this manual is subject
Setting up EntraPass Card Gateway with SQL Server 2008
 Setting up EntraPass Card Gateway with SQL Server 2008 The EntraPass Card Gateway is designed to interface with the Oracle or the SQL Server Database Engine. Unfortunately the interface has not been updated
Installation Guide. for. Print Audit Embedded
 Installation Guide for Print Audit Embedded June 2009 Welcome Welcome to Print Audit Embedded for Sharp. Embedded for Sharp integrates directly with the touch screen on compatible Sharp MFPs and tracks
Installation on Windows Server 2008
 USER GUIDE MADCAP PULSE 4 Installation on Windows Server 2008 Copyright 2018 MadCap Software. All rights reserved. Information in this document is subject to change without notice. The software described
Pension System/Windows. Installation Guide
 Pension System/Windows Installation Guide Updated for Microsoft SQL Server 2008 R2 & MS SQL Express DATAIR Employee Benefit Systems, Inc. 735 N. Cass Ave. Westmont, IL 60559-1100 V: (630) 325-2600 F: (630)
1. ECI Hosted Clients Installing Release 6.3 for the First Time (ECI Hosted) Upgrading to Release 6.3SP2 (ECI Hosted)
 Upgrading to Release 6.3SP2 (ECI Hosted)") 1. ECI Hosted Clients........................................................................................... 2 1.1 Installing Release 6.3 for the First Time (ECI Hosted)...........................................................
1. ECI Hosted Clients........................................................................................... 2 1.1 Installing Release 6.3 for the First Time (ECI Hosted)...........................................................
Dynamic Work Order System (DWOS) Installation Guide
 Installation Guide") Dynamic Work Order System (DWOS) Installation Guide The Future of Job Shop Software 4506 Hwy. 20 Suite 200 Niceville, FL 32578 Phone (800) 725-7304 Support@ds2corp.com www.getdwos.com Copyright Notice
Dynamic Work Order System (DWOS) Installation Guide The Future of Job Shop Software 4506 Hwy. 20 Suite 200 Niceville, FL 32578 Phone (800) 725-7304 Support@ds2corp.com www.getdwos.com Copyright Notice
Installing the PC-Kits SQL Database
 1 Installing the PC-Kits SQL Database The Network edition of VHI PC-Kits uses a SQL database. Microsoft SQL is a database engine that allows multiple users to connect to the same database. This document
Jetico Central Manager. Administrator Guide
 Jetico Central Manager Administrator Guide Introduction Deployment, updating and control of client software can be a time consuming and expensive task for companies and organizations because of the number
CABC Installation Guide Maximizer CRM 12 Entrepreneur Edition
 CABC Installation Guide Maximizer CRM 12 Entrepreneur Edition CABC Ltd PO Box 162 Newbury Berkshire RG14 1AS 01635 570970 Document Version: 1.2 Dated: 05/04/2012 Purpose of this Document This document
This document details the procedure for installing Layer8 software agents and reporting dashboards.
 Quick Start Guide This document details the procedure for installing Layer8 software agents and reporting dashboards. Deployment to data analysis takes approximately 15 minutes. If you wish to deploy via
Workstation Configuration
 Workstation Configuration December 15, 2017 - Version 9.3 - - - - - - - - - - - - - - - - - - - - - - - - - - - - - - - - - - - - - - - - - - - - - - - - - - - - - - - - - - - - - - - - - - - - - - - -
Installing Switched-On Schoolhouse 2007
 1 Installation & Setup Installing Switched-On Schoolhouse 2007 Switched-On Schoolhouse 2007 (SOS) is easy to install on your computer because most of the installation components install themselves. Before
SQL 2012 Installation
 This document will go through a basic SQL Server 2012 installation. For installation requirements, support and download information please visit the following Microsoft websites. Before you start, you
AVG Business Edition Remote Administration
 AVG Business Edition Remote Administration User Manual Document revision AVG.02 (1/7/2018) Copyright AVG Technologies CZ, s.r.o. All rights reserved. All other trademarks are the property of their respective
A0. Special Considerations for Windows Vista a) Consideration during installation b) Runtime considerations
 Consideration during installation b) Runtime considerations") Table of Contents A0. Special Considerations for Windows Vista a) Consideration during installation b) Runtime considerations A1. SELECT XM License a) Standalone workstations b) Networked workstations
Table of Contents A0. Special Considerations for Windows Vista a) Consideration during installation b) Runtime considerations A1. SELECT XM License a) Standalone workstations b) Networked workstations
BLUEPRINT TEAM REPOSITORY. For Requirements Center & Requirements Center Test Definition
 BLUEPRINT TEAM REPOSITORY Installation Guide for Windows For Requirements Center & Requirements Center Test Definition Table Of Contents Contents Table of Contents Getting Started... 3 About the Blueprint
CABC Installation Guide Maximizer CRM 11 Team Edition
 CABC Installation Guide Maximizer CRM 11 Team Edition CABC Ltd PO Box 162 Newbury Berkshire RG14 1AS 01635 570970 Document Version: 1.0 Dated: 01/07/2010 Purpose of this Document This document has been
Aretics T7 Installation Manual
 Aretics T7 Installation Manual 1(24) Aretics T7 Installation Manual This document describes how to manage Aretics T7 in your IT environment. Here you will find information about installing the system,
MassTransit Server Installation Guide for Windows
 MassTransit 6.1.1 Server Installation Guide for Windows November 24, 2009 Group Logic, Inc. 1100 North Glebe Road, Suite 800 Arlington, VA 22201 Phone: 703-528-1555 Fax: 703-528-3296 E-mail: info@grouplogic.com
Privileged Identity App Launcher and Session Recording
 Privileged Identity App Launcher and Session Recording 2018 Bomgar Corporation. All rights reserved worldwide. BOMGAR and the BOMGAR logo are trademarks of Bomgar Corporation; other trademarks shown are
WINDOWS HOST GUIDE. Remote Support & Management PC Mac Tablet Smartphone Embedded device. WiseMo Host module on your PC or Server
 WINDOWS HOST GUIDE Remote Support & Management PC Mac Tablet Smartphone Embedded device WiseMo Guest module for example on your Windows PC WiseMo Host module on your PC or Server WiseMo develops software
Tagprint 3.0. Single User and Network Installation Instructions
 Tagprint 3.0 Single User and Network Installation Instructions System Requirements TagPrint Pro Standalone/TagPrint Pro Client PC running Microsoft Windows XP SP3, Vista SP1 or later, Windows 7 The single
Centra Workbench (V3.12 onwards)
") Workbench Installation Guide Centra Workbench (V3.12 onwards) Create and Customize User Interfaces for Router Control snellgroup.com Introduction Description This guide describes the system requirements
Workbench Installation Guide Centra Workbench (V3.12 onwards) Create and Customize User Interfaces for Router Control snellgroup.com Introduction Description This guide describes the system requirements
Contents. Getting Started...1. Managing Your Drives...9. Backing Up & Restoring Folders Synchronizing Folders...52
 Contents Getting Started.....................................................1 Installing the Software...........................................1 Using the Maxtor System Tray Icon................................6
Storage Center. Enterprise Manager 5.5. Installation and Setup Guide
 Storage Center Enterprise Manager 5.5 Installation and Setup Guide Enterprise Manager 5.5 Installation and Setup Guide 680-028-010 Revision Date Description A March 2011 Initial release. B April 2011 Updated
INSTALL GUIDE: Upgrading from an Earlier Version of
 INSTALL GUIDE: Upgrading from an Earlier Version of Premium Edition Contents Basics... 1 Server and Amicus Preparation... 3 Server Upgrade... 5 Workstation Upgrade... 10 Workstation Offline Install...
Upgrading from Call Center Reporting to Reporting for Call Center
 Upgrading from Call Center Reporting to Reporting for Call Center www.nortelnetworks.com 2003 Nortel Networks i Table of Contents Table of Contents Change History...1 How to use this guide...2 Introduction...
Batch Eligibility Long Term Care claims
 DXC Technology Provider Electronic Solutions software lets Connecticut Medical Assistance Program providers verify patient s eligibility and submit and correct claims for services all electronically. The
EventTracker v8.2. Install Guide for EventTracker Log Manager. EventTracker 8815 Centre Park Drive Columbia MD
 EventTracker v8.2 Install Guide for EventTracker Log Manager Publication Date: Jun. 10, 2016 EventTracker 8815 Centre Park Drive Columbia MD 21045 www.eventtracker.com Abstract This guide will help the
SAFETICA INSTALLATION MANUAL
 SAFETICA INSTALLATION MANUAL SAFETICA INSTALLATION MANUAL for Safetica version 8.0.x Author: Safetica Technologies s.r.o. Safetica was developed by Safetica Technologies s.r.o. All rights reserved. No
ROCK-POND REPORTING 2.1
 ROCK-POND REPORTING 2.1 Installation and Setup Guide Revised on 09/25/2014 TABLE OF CONTENTS ROCK-POND REPORTING 2.1... 1 SUPPORT FROM ROCK-POND SOLUTIONS... 2 ROCK-POND REPORTING OVERVIEW... 2 INFRASTRUCTURE
SolidWorks Enterprise PDM Installation Guide
 SolidWorks Enterprise PDM Installation Guide Contents Legal Notices...vi 1 SolidWorks Enterprise PDM Installation Guide...7 2 Installation Overview...8 Required Installation Components...8 Optional Installation
Eclipse 6.2 Conversion
 1 Eclipse 6.2 Conversion 1) Determine your Eclipse Workstation & Server Location Complete the steps below before you continue, they will be used in future conversion steps. You are responsible for knowing
ProSystem fx Engagement
 ProSystem fx Engagement Guide November 2008 Copyright 2008 CCH INCORPORATED. A Wolters Kluwer Business. All Rights Reserved. Material in this publication may not be reproduced or transmitted, in any form
Comodo LoginPro Software Version 1.0
 Comodo LoginPro Software Version 1.0 User Guide Guide Version 1.0.102512 Comodo Security Solutions 1255 Broad Street STE 100 Clifton, NJ 07013 Table of Contents 1.Introduction to Comodo LoginPro... 3 1.1.System
RWT Network System Installation Guide
 RWT Network System Installation Guide Copyright 2003, Talking Fingers, Inc. Page 1 of 48 This document is Copyright 2003 by Talking Fingers, Inc. All rights are reserved. This document may not be copied
DirectoryAnalyzer 4.12
 DirectoryAnalyzer 4.12 Installation Guide 2011 Quest Software, Inc. ALL RIGHTS RESERVED. This guide contains proprietary information protected by copyright. The software described in this guide is furnished
Fleet Manager 2002 Professional Network Configuration Guide
 Handling a complex world. Fleet Manager 2002 Professional Network Configuration Guide Overview The VDO Fleet Manager Professional utilises an advanced three-tier client-server model and is designed to
SQL Data Export for PS/PSS
 Version 3.0.6 USER MANUAL (M98232701-03-18A) CIRCUTOR, SA INDEX 1.- SQL DATA EXPORT SOFTWARE INSTALLATION... 3 1.1.- ENABLE REMOTE CONNECTIONS OF THE SQL SERVER... 15 1.2.- UNINSTALL SQL SERVER... 17 2.-
Sage X3 Intelligence Financial Reporting. Installation and Upgrade Guide
 Financial Reporting Installation and Upgrade Guide The software described in this document is protected by copyright, and may not be copied on any medium except as specifically authorized in the license
December P Xerox FreeFlow Core Installation Guide
 5.1.0.0 December 2017 702P06246 2017 Xerox Corporation. All rights reserved. Xerox, Xerox and Design, and FreeFlow are trademarks of Xerox Corporation in the United States and/or other countries. This
Client Loading Instructions For ProHelp EPM, Release 7.7
 Client Loading Instructions For ProHelp EPM, Release 7.7 This application note describes the steps necessary to install the ProHelp EPM, Release 7.7, client software on a workstation computer. It presumes
Symantec Backup Exec Quick Installation Guide
 Symantec Backup Exec 2010 Quick Installation Guide 20047221 Installing Backup Exec This document includes the following topics: System requirements Before you install About the Backup Exec service account