ETERNUS SF Express V14.2. User's Guide. Windows
|
|
|
- Arleen Howard
- 6 years ago
- Views:
Transcription


1 ETERNUS SF Express V14.2 User's Guide Windows B1FN ENZ0(00) June 2011
2 Preface Purpose This manual gives an overview of ETERNUS SF Express (hereafter referred to as Express). This manual describes the Express product features. Reader This manual is intended for people who are considering installing Express or who want an overall understanding of the product. Readers will gain an understanding of the Express functions from this manual. Organization This manual consists of the following chapters: Chapter 1 Overview This chapter gives an overview of the Express. Chapter 2 Required Environment This chapter explains the environment required by a storage system including Express. Chapter 3 Flow from Installation to Operation This chapter explains the workflow from installing to operating a storage system. Chapter 4 List of Setting Items for Express This chapter explains the information managed by Express. Chapter 5 Installing This chapter explains the steps to install a storage system using Express. Chapter 6 Operation This chapter explains how to operate a storage system using Express. Chapter 7 Maintenance This chapter explains the maintenance of Express. Appendix A Configuration Information for Express This appendix explains the information to be specified to Express. Appendix B Advanced Copy Function This appendix explains Advanced Copy function. Appendix C Installing and Uninstalling Express This appendix explains installing and uninstalling Express. Appendix D Commands This appendix explains commands. Appendix E Messages This appendix explains the messages output from Express. Appendix F Detail Error Messages of ETERNUS This appendix explains the details of error messages for ETERNUS. Appendix G Events This appendix explains the events output from Express. - i -
3 Appendix H Main Changes from Express V14.1 This appendix explains main changes from Express V14.1. Notation The names, abbreviations, and symbols shown below are used in this manual. Product abbreviations The following table shows how product names are abbreviated in this manual: Abbreviation Option Products ETERNUS Disk storage system FibreCAT SX Disk storage system Windows Server 2003 Windows Server 2008 Windows Formal name ETERNUS SF Express Snap/Clone License ETERNUS SF Express Remote Copy License ETERNUS DX60 ETERNUS DX80/DX80 S2 ETERNUS DX90/DX90 S2 FibreCAT SX60 FibreCAT SX80 FibreCAT SX80 iscsi FibreCAT SX88 FibreCAT SX100 Microsoft(R) Windows Server(R) 2003, Standard Edition Microsoft(R) Windows Server(R) 2003, Enterprise Edition Microsoft(R) Windows Server(R) 2003, Standard x64 Edition Microsoft(R) Windows Server(R) 2003, Enterprise x64 Edition Microsoft(R) Windows Server(R) 2003 R2, Standard Edition Microsoft(R) Windows Server(R) 2003 R2, Enterprise Edition Microsoft(R) Windows Server(R) 2003 R2, Standard x64 Edition Microsoft(R) Windows Server(R) 2003 R2, Enterprise x64 Edition Microsoft(R) Windows Server(R) 2008 Standard(32-bit)(64-bit) Microsoft(R) Windows Server(R) 2008 Standard SP2(32-bit)(64-bit) Microsoft(R) Windows Server(R) 2008 Enterprise(32-bit)(64-bit) Microsoft(R) Windows Server(R) 2008 Enterprise SP2(32-bit)(64-bit) Microsoft(R) Windows Server(R) 2008 Datacenter(64-bit) Microsoft(R) Windows Server(R) 2008 Datacenter SP2(64-bit) Microsoft(R) Windows Server(R) 2008 Standard without Hyper-V(TM) (32-bit)(64-bit) Microsoft(R) Windows Server(R) 2008 Standard without Hyper-V(TM) SP2(32-bit)(64-bit) Microsoft(R) Windows Server(R) 2008 Enterprise without Hyper- V(TM)(32-bit)(64-bit) Microsoft(R) Windows Server(R) 2008 Enterprise without Hyper- V(TM) SP2(32-bit)(64-bit) Microsoft(R) Windows Server(R) 2008 Datacenter without Hyper- V(TM)(64-bit) Microsoft(R) Windows Server(R) 2008 Datacenter without Hyper- V(TM) SP2(64-bit) Microsoft(R) Windows Server(R) 2008 R2 Standard(64-bit) Microsoft(R) Windows Server(R) 2008 R2 Enterprise(64-bit) Microsoft(R) Windows Server(R) 2008 R2 Datacenter(64-bit) Microsoft(R) Windows Server(R) 2003, Standard Edition Microsoft(R) Windows Server(R) 2003, Enterprise Edition Microsoft(R) Windows Server(R) 2003, Standard x64 Edition Microsoft(R) Windows Server(R) 2003, Enterprise x64 Edition Microsoft(R) Windows Server(R) 2003 R2, Standard Edition - ii -
4 Abbreviation Formal name Microsoft(R) Windows Server(R) 2003 R2, Enterprise Edition Microsoft(R) Windows Server(R) 2003 R2, Standard x64 Edition Microsoft(R) Windows Server(R) 2003 R2, Enterprise x64 Edition Microsoft(R) Windows Server(R) 2008 Standard(32-bit)(64-bit) Microsoft(R) Windows Server(R) 2008 Standard SP2(32-bit)(64-bit) Microsoft(R) Windows Server(R) 2008 Enterprise(32-bit)(64-bit) Microsoft(R) Windows Server(R) 2008 Enterprise SP2(32-bit)(64-bit) Microsoft(R) Windows Server(R) 2008 Datacenter(64-bit) Microsoft(R) Windows Server(R) 2008 Datacenter SP2(64-bit) Microsoft(R) Windows Server(R) 2008 Standard without Hyper-V(TM) (32-bit)(64-bit) Microsoft(R) Windows Server(R) 2008 Standard without Hyper-V(TM) SP2(32-bit)(64-bit) Microsoft(R) Windows Server(R) 2008 Enterprise without Hyper- V(TM)(32-bit)(64-bit) Microsoft(R) Windows Server(R) 2008 Enterprise without Hyper- V(TM) SP2(32-bit)(64-bit) Microsoft(R) Windows Server(R) 2008 Datacenter without Hyper- V(TM)(64-bit) Microsoft(R) Windows Server(R) 2008 Datacenter without Hyper- V(TM) SP2(64-bit) Microsoft(R) Windows Server(R) 2008 R2 Standard(64-bit) Microsoft(R) Windows Server(R) 2008 R2 Enterprise(64-bit) Microsoft(R) Windows Server(R) 2008 R2 Datacenter(64-bit) Command Prompt Command prompt is shown as ">" and the command format is described as follows. > Command name The command path is omitted. If the product is installed the standard directory, add C:\Program Files (x86)\eternus SF\Express \Manager\bin\ to the command if necessary. The following path is used for the above command. C:\Program Files (x86)\eternus SF\Express\Manager\bin\Command name Symbols Notations in the following formats are used to indicate matters that must be noted and reference information: Note This is important information which must be read and carefully noted. Point This is information which is useful to know. See This describes related reference items and where they are located. - iii -
5 Information This is reference information related to using the product. Example This is an example that is useful as a reference. Export Administration Regulation Declaration This document may contain specific technologies that are covered by International Exchange and International Trade Control Laws. In the event that such technology is contained, when exporting or providing the document to non-residents, authorization based on the relevant laws is required. Trademarks - Microsoft, Windows, Windows Server and Internet Explorer are trademarks or registered trademarks of Microsoft Corporation in the United States and other countries. - Systemwalker is a trademark or registered trademark of Fujitsu Limited. - All other trademarks and product names are the property of their respective owners. These names in this manual are not necessarily followed by a trademark notation (TM or (R)). Shipment date and revision history September 2010 First Edition June 2011 Second Edition Use in High Risk Environments This Product is designed and developed as contemplated for general use, including without limitation, general office use, personal use, household use, and ordinary industrial use, but is not designed or developed for use in areas where grave dangers that could lead directly to death or bodily injury are encountered (hereinafter "High Risk Environment"), including without limitation, nuclear power core control, airplane control, air traffic control, mass transport operation control, life support, and weapon launching control, unless extremely high levels of safety are deployed. The Customer shall not use the Product without meeting the safety requirements for the High Risk Environments. Contact your Fujitsu business department if this product is to be used for any purpose in a High Risk Environment. Note - No part of this manual may be reproduced without permission. - This manual is subject to change without advance notice. Copyright Copyright FUJITSU LIMITED iv -
6 Contents Chapter 1 Overview Overview of a storage system Overview of Express Overview of Express Configuration of Express...4 Chapter 2 Required Environment Hardware conditions Software conditions...9 Chapter 3 Flow from Installation to Operation...11 Chapter 4 List of Setting Items for Express...13 Chapter 5 Installing Installing Express Manager Registering User Information Configuring the Network Environment Registering Disk Storage Systems Storage Configuration Wizard Registering Servers Creating RAID Groups Creating Volumes Assigning Volumes to a server Registering Advanced Copy license Advanced Copy Configuration Wizard Remote Advanced Copy Configuration Wizard Settings of Information Managed with Express Settings of various information Specifying contact information for trouble occurrence Event notification test Procedure for SNMP Trap reception test Procedure for send test...50 Chapter 6 Operation Starting the Express Web GUI Performance Monitoring Starting collection of Performance information Stopping collection of Performance information Showing the Performance information Displaying Performance information in a graph Detecting trouble Identifying the trouble condition Trouble analysis Trouble response Executing Advanced Copy Setting Advanced Copy Access Path Settings Creating copy pairs Creating copy groups Executing Clone Copy Executing Advanced Copy Executing clone copy (OPC) Executing clone copy (QuickOPC) Executing clone copy (EC) Executing Snapshot copy v -
7 Executing Advanced Copy Executing remote copy (HA configuration) Executing Advanced Copy Operational procedure for fault occurrence on the ETERNUS Disk storage system Executing Remote copy (DR configuration) Executing Advanced Copy Exporting/Importing copy group definition Exporting copy group definition Importing copy group definition Operational procedure for fault occurrence on the ETERNUS Disk storage system Checking copy status Command line operation Setting PATH environment variables Setting access paths Registering ETRNUS Disk storage system Creating copy groups Adding copy pairs Executing copy Changing configuration Changing the contact addresses for trouble occurrence Changing Advanced Copy function Changing the settings of Advanced Copy Changing the settings of Remote Advanced Copy Changing the Host Interface Information Changing various information Diagnostic Tool Operation Notices Chapter 7 Maintenance Backing up Express Manager Environment Restoring Express Manager Environment Changing Express Manager Environment Changing port numbers Changing the IP address Changing Server Information Additionally registering servers Displaying server information Changing server information Changing HBA information Deleting servers Changing Disk Storage System Information Additionally registering disk storage system Changing disk storage system name Changing the IP address Changing the SNMP community name Changing the User Name or Password Deleting disk storage systems Changing Volume Information Additionally registering volumes Assign volumes Deleting volumes Changing RAID Group Information Additionally registering RAID groups Deleting RAID groups Appendix A Configuration Information for Express A.1 Server Information A.2 Disk Storage System Information vi -
8 A.3 Volume Information A.4 RAID Group Information A.5 Information on Advanced Copy Function A.6 Information A.7 Host Interface Information A.8 Various Information Appendix B Advanced Copy Function B.1 Overview of Advanced Copy Function B.1.1 What is Advanced Copy Function? B.1.2 What is Remote Advanced Copy? B.1.3 Technical terms B.1.4 Advanced Copy license B.2 Configuration of Advanced Copy Function B.2.1 Configuration common in all copy methods B.2.2 Configuration of clone copy B.2.3 Configuration of snapshot copy B.2.4 Configuration for remote copy B.3 Clone (EC) B.3.1 How to work B.3.2 Restore B.4 Clone (OPC) B.4.1 How to work B.4.2 Restore B.5 Clone copy (QuickOPC) B.5.1 How to work B.5.2 Restore B.6 Snapshot copy (SnapOPC+) B.6.1 How to work B.6.2 Restore B.6.3 SDV operations B.6.4 SDP operation B.7 Remote Advanced Copy (REC) B.7.1 How to work B.7.2 Transfer buffer operations B.7.3 Restore B.8 Combinations of Advanced Copy B.8.1 Multiple copy B.8.2 Cascade copy B.9 ECO mode B.10 Note on Backup and Restore by Express B.11 Troubleshooting Appendix C Installing and Uninstalling Express C.1 Installing C.2 Uninstalling C.3 Upgrade installation procedure Appendix D Commands D.1 Commands for Advanced Copy function D.1.1 acarray add (Command for resgistering ETERNUS Disk storage system) D.1.2 acarray change (Command for changing ETERNUS Disk storage system name and access path) D.1.3 acarray list (Command for displaying information about ETERNUS Disk storage systems) D.1.4 acarray detail (Command for displaying detailed information about ETERNUS Disk storage systems) D.1.5 acarray pathscan (Command for automatically setting access paths) D.1.6 acarray remove (Command for removing registration information for ETERNUS Disk storage systems) D.1.7 acinq lv (Command for displaying logical volume information) D.1.8 acinq lunmap (Command for displaying LUN Mapping information) vii -
9 D.1.9 acinq ag (Command for displaying a list of affinity groups) D.1.10 acinq hostag (Command for displaying a list of host affinity) D.1.11 acinhibit set (Command for setting volume protection) D.1.12 acinhibit unset (Command for unsetting volume protection) D.1.13 acrecbuff set (Command for setting REC buffers) D.1.14 acrecbuff stat (Command for displaying REC buffer status) D.1.15 acgroup create (Command for creating copy groups) D.1.16 acgroup list (Command for displaying copy groups) D.1.17 acgroup detail (Command for displaying detailed information about copy groups) D.1.18 acgroup remove (Command for removing copy groups) D.1.19 acpair add (Command for adding copy pairs) D.1.20 acpair remove (Command for removing copy pairs) D.1.21 acopc start (Command for starting OPC or QuickOPC copy) D.1.22 acopc query (Command for displaying the status of OPC or QuickOPC copy) D.1.23 acopc cancel (Command for canceling OPC or QuickOPC copy) D.1.24 acsnap start (Command for starting SnapOPC+ copy) D.1.25 acsnap query (Command for displaying the status of SnapOPC+ copy) D.1.26 acsnap cancel (Command for canceling SnapOPC+ copy) D.1.27 acec start (Command for starting synchronous high speed copy) D.1.28 acec query (Command for displaying the status of synchronous high speed copy) D.1.29 acec suspend (Command for suspending synchronous high speed copy) D.1.30 acec resume (Command for resuming synchronous high speed copy) D.1.31 acec reverse (Command for reversing synchronous high speed copy) D.1.32 acec change (Command for changing the mode of synchronous high speed copy) D.1.33 acec cancel (Command for cancelling synchronous high speed copy) D.1.34 acsdv init (Command for initializing Snap Data Volume) D.1.35 acsdv stat (Command for dispaying the status of Snap Data Volume) D.1.36 acsdv poolstat (Command for displaying the status of Snap Data Pool) D.1.37 acutil devs (Command for displaying logical volume information) D.1.38 acgetvolinfo (Command for displaying logical volume information) D.1.39 acutil refresh (Command for refreshing partition table) D.1.40 acmcapture (Command for collecting analysis data) D.2 XML output format for Advanced Copy function D.2.1 List of commands for supporting the XML output function D.2.2 XML output format D.3 storageadm perfdata (Command for managing performance information) D.4 express_managersnap (Collecting Express Manager troubleshooting information) D.5 express_diag(diagnosis of Express Manager environment) Appendix E Messages E.1 Message Format E.2 Messages output at installation or uninstallation E.3 Message output from Manager E.3.1 Messages Explanations E.3.2 Detailed messages E.4 Message output when Advanced Copy is executed E.5 Message output from Command E.5.1 Messages for "storageadm perfdata" command E.5.2 Messages for "express_managersnap" command E.5.3 Messages for "express_diag" command E.5.4 Message for upgrade tool E.6 Message output from Copy Control Module E.6.1 Message Explanations E.6.2 Detailed Messages E.7 Error Messages on Troubleshooting Data Collection Command Appendix F Detail Error Messages of ETERNUS viii -
10 Appendix G Detailed messages of events G.1 Detailed messages of events related to event notification G.2 Detailed messages of events related to Disk storage system configuration change G.3 Detailed messages of events related to changing the IP address G.4 Detailed messages of events related to performance monitoring G.5 Event related to device polling function Appendix H Main Changes from Express V H.1 Copy Operation H.2 Message H.3 Commands for Advanced Copy Functions H.4 Messages output from Copy Control Module H.5 SNMP trap reception program Glossary Index ix -
11 Chapter 1 Overview This chapter gives an overview of Express. 1.1 Overview of a storage system A storage system refers to the overall configuration of a system including servers that perform daily transactions and storage that holds data. Figure 1.1 Overview image of a storage system 1.2 Overview of Express Express is a kind of software designed to use the ETERNUS Disk storage system and FibreCAT SX Disk storage system more easily by using the GUI Overview of Express Express makes it easy to manage ETERNUS Disk storage systems using ETERNUS functions such as Snapshots, Cloning or Remote copies. Multiple storage management Multiple ETERNUS Disk storage systems can be managed and monitored with 1 console. In addition, FibreCAT SX Disk storage system can be monitored

12 Construction of the ETERNUS Disk storage system ETERNUS SF Express provides a storage construction feature for ETERNUS Disk storage system. You can create RAID Groups and LUNs, and assign LUNs to server with a simple operation. Health and status overview The internal configurations of Disk storage systems, such as volumes and RAID groups are displayed in a list, so that they can easily be checked. Besides, the integrated management of multiple storage systems makes it easy to detect any error occurrence even if you do not pay attention to each individual storage system. Advanced Copy setting wizard Using a wizard makes it easier to set up Advanced Copy to hardware. This setting should be done before using Advanced Copy functions of the ETERNUS Disk storage system

13 Advanced Copy functions Advanced Copy functions offered by ETERNUS Disk storage systems can be set with ease by using the Express Web GUI. Also, using the command line interface for Express enables a series of copy operations, so that the above functions are available for purposes of making scripts to work together with other programs and executing copy periodically using an OS scheduler
14 Types of Advanced Copy are as follows. - Advanced Copy - Clone copy (EC) - Clone copy (OPC) - Clone copy (Quick OPC) - Snapshot copy (SnapOPC+) - Remote Advanced Copy - Remote Copy (REC) - Synchronous mode - Consistency mode - Stack mode Note A maximum of 8 snapshot copy sessions can be processed simultaneously. When processing 9 or more snapshot sessions simultaneously or when executing clone copy or remote copy, option products are required. In addition, Advanced Copy License for ETERNUS Disk storage system is also required. Performance management The use of the GUI makes it possible to display in a graph the 24-hour performance information of the ETERNUS Disk storage system. In addition, the command line operation makes it possible to output 1-hour or 24-hour performance information of the ETERNUS Disk storage system into a CSV file Configuration of Express Express is comprised of the following components

15 Figure 1.2 Configuration of Express Express Web GUI The following is the overview of the Express Web GUI. When using the Express Web GUI, refer to it
.")
16 Figure 1.3 Overview of Express Web GUI Table 1.1 Icons displayed on the Express Web GUI Icon Express installed server (management server). Express used server (business server). Disk storage system managed by Express. Volume in disk storage system
17 Chapter 2 Required Environment This chapter describes the environments required for a storage system including Express. When you use the Advanced Copy function (except for Snapshot copy (SnapOPC+) within 8 sessions), you need to get a proper Advanced Copy License key in advance. 2.1 Hardware conditions A storage system including Express requires the following hardware. Table 2.1 Storage hardware conditions Series name Model name Firmware version number ETERNUS DX FibreCAT SX DX60 DX80 DX90 DX80 S2 DX90 S2 SX60 SX80 SX80 iscsi SX88 SX100 V10L31 or later V10L10 or later J200P30 or later J200P30 or later J210P04 or later J200P30 or later K100P11 or later Note - For Remote Advanced Copy between DX90 and DX90 S2, the DX90 firmware must be updated to V10L60 or later. - For FibreCAT SX Disk storage system, only monitoring is supported. Table 2.2 Server hardware conditions Series name PRIMERGY Note PRIMERGY high reliability HA model and PRIMERGY high reliability FT model are unsupported. Table 2.3 Capacities required for servers on which to install Express Type of Express Memory requirement (Unit : MB) Disk space requirement (Unit : MB) Remarks Express Manager (A) See "Repository"
, the required capacity given below becomes necessary. (2) * (240 + (1.2 + 0.3 * number of DEs + 0.")
18 Repository When performance management is being performed, based on the type of target (ETERNUS DX60, DX80/DX80 S2, DX90/DX90 S2), the number of logical units involved, and the number of DE (Disk Enclosure), the required capacity given below becomes necessary. (2) * (240 + ( * number of DEs * (number of LUs + number of RAIDGroups[*1])) * (86400 / 60) + (95 * number of DEs) + (50 * (number of LUs + number of RAIDGroups[*1]))) / * ( * (86400 / 60)) / 1024 [*1] The "number of RAIDGroups" is the number of RAIDGroups created from the LUs. Example When performing performance management of the ETERNUS DX80 system with 512 logical units, the following capacity is required. (2 * (240 + ( * * ( )) * (86400 / 60) + (95 * 2) + (50 * ( ))) / 1024) + (9 * ( * (86400 / 60)) / 1024) = MB Table 2.4 Recommended specs of PC that starts Express Web GUI Type of Express CPU requirement (Unit : GHz) Memory requirement (Unit : MB) Express Web GUI 2.0 or more 1024 or more Figure 2.1 Schematic view showing hardware conditions - 8 -
19 Point - Number of Disk storage systems to be managed Express is recommended to manage less than 10 Disk storage systems. - Connecting servers and Disk storage systems in any of the following methods - FC - iscsi - SAS 2.2 Software conditions Software conditions required for Express and software unavailable with Express are as follows. Software conditions required for Express Table 2.5 Software conditions for Express Manager Service name - SNMP Trap Service (for Windows Server 2003) - SNMP Trap (for Windows Server 2008) Comment Windows SNMP standard trap reception service. Included in OS installed media. Table 2.6 Software conditions for Express Manager Microsoft(R) Windows Server(R) 2003, Standard Edition SP1,SP2 Microsoft(R) Windows Server(R) 2003, Enterprise Edition SP1,SP2 Microsoft(R) Windows Server(R) 2003, Standard x64 Edition Microsoft(R) Windows Server(R) 2003, Standard x64 Edition SP2 Microsoft(R) Windows Server(R) 2003, Enterprise x64 Edition Microsoft(R) Windows Server(R) 2003, Enterprise x64 Edition SP2 Microsoft(R) Windows Server(R) 2003 R2, Standard Edition Microsoft(R) Windows Server(R) 2003 R2, Standard Edition SP2 Microsoft(R) Windows Server(R) 2003 R2, Enterprise Edition Microsoft(R) Windows Server(R) 2003 R2, Enterprise Edition SP2 Microsoft(R) Windows Server(R) 2003 R2, Standard x64 Edition Microsoft(R) Windows Server(R) 2003 R2, Standard x64 Edition SP2 Microsoft(R) Windows Server(R) 2003 R2, Enterprise x64 Edition Microsoft(R) Windows Server(R) 2003 R2, Enterprise x64 Edition SP2 OS Microsoft(R) Windows Server(R) 2008 Standard(32-bit)(64-bit) Microsoft(R) Windows Server(R) 2008 Standard SP2(32-bit)(64-bit) Microsoft(R) Windows Server(R) 2008 Enterprise(32-bit)(64-bit) Microsoft(R) Windows Server(R) 2008 Enterprise SP2(32-bit)(64-bit) Microsoft(R) Windows Server(R) 2008 Datacenter(64-bit) Microsoft(R) Windows Server(R) 2008 Datacenter SP2(64-bit) Microsoft(R) Windows Server(R) 2008 Standard without Hyper-V(TM)(32-bit) (64-bit) Microsoft(R) Windows Server(R) 2008 Standard without Hyper-V(TM) SP2(32-bit)(64-bit) Microsoft(R) Windows Server(R) 2008 Enterprise without Hyper-V(TM)(32- bit)(64-bit) Microsoft(R) Windows Server(R) 2008 Enterprise without Hyper-V(TM) SP2(32-bit)(64-bit) Comment X64 supports only 32 bit compatibility mode (WOW64). - (64 bit) supports only 32 bit compatibility mode (WOW64). - Server Core installation option is unsupported. - Guest OS in Hyper-V(TM) environment is unsupported
20 OS Microsoft(R) Windows Server(R) 2008 Datacenter without Hyper-V(TM)(64- bit) Microsoft(R) Windows Server(R) 2008 Datacenter without Hyper-V(TM) SP2(64-bit) Microsoft(R) Windows Server(R) 2008 R2 Standard(64-bit) Microsoft(R) Windows Server(R) 2008 R2 Standard(64-bit) SP1 Microsoft(R) Windows Server(R) 2008 R2 Enterprise(64-bit) Microsoft(R) Windows Server(R) 2008 R2 Enterprise(64-bit) SP1 Microsoft(R) Windows Server(R) 2008 R2 Datacenter(64-bit) Microsoft(R) Windows Server(R) 2008 R2 Datacenter(64-bit) SP1 Comment Table 2.7 Software conditions for Express Web GUI Web browser Microsoft(R) Internet Explorer(R) 7 Microsoft(R) Internet Explorer(R) 8 Mozilla(R) Firefox(R) 3.5 or later Screen Resolution 1024 * 786 pixels or more recommended Exclusive software Express is not available for a server on which any of the following software is installed. - ETERNUS SF Storage Cruiser - Softek Storage Cruiser - Systemwalker Resource Coordinator

21 Chapter 3 Flow from Installation to Operation This chapter describes the flow from installation of a storage system to its operation. Figure 3.1 Flow from installing to operating a storage system Express defines the role of each administrator for installing and operating a storage system as follows
22 Table 3.1 Roles of administrators Administrator System administrator Business administrator Hardware administrator Task Manages design through operation of storage systems. Handles all the tasks required to operate storage systems. Manages business operations performed on servers. Performs backup and restore of business data and handles failures affecting managed business operations. Manages storage system hardware. Handles hardware failures. Information Administrator to be registered and required privileges To use Express, it is necessary to register Administrator user information on the server on which to install Express. System administrator must be registered. Register Business administrator and Hardware administrator as required. For privileges given to each administrator, refer to "5.2 Registering User Information"
23 Chapter 4 List of Setting Items for Express This chapter describes the information specified to Express to install and operate a storage system. The following is the information specified to Express. Table 4.1 List of information specified to Express Information specified to Express Item For installation During operation "A.1 Server Information" Name A B Alias B B HBA Type A C Host ID1 (Note1) A B Host ID2 (Note1) B B "A.2 Disk Storage System Information" Name C B Alias B B IP address or FQDN A B SNMP Community Name A B Username A B Password A B Encryption Mode B B "A.3 Volume Information" (Note2) Name A C Alias B C Size A C Type A C Source Volume Size B C Number of Volumes A C Encryption B C RAID Level B C "A.4 RAID Group Information" (Note2) Name A C RAID Level A C Assigned CM A C Disk Selection A C Number of Disks A C "A.5 Information on Advanced Copy Function" Configuration of Advanced Copy A B Configuration of Remote Advanced Copy B B "A.6 Information" SMTP server A B Mail Sender A B SMTP Port A B Person in Charge A B Phone A B A B Send Event Notification B B
24 Information specified to Express Item For installation During operation "A.7 Host Interface Information" For FC connection Connection B B For iscsi connection For SAS connection Loop ID B B Transfer Rate B B Host Affinity B B Host Response B B IP Address A B Subnet Mask B B Default Gateway B B iscsi Name A B Alias Name B B Host Affinity B B Host Response B B Host Affinity B B Host Response B B "A.8 Various Information" Events B B A : Item that is required. B : Item that can be added/changed. C : Item that cannot be changed. Note 1 : "Host ID1" and "Host ID2" are changed by the "HBA Type". - When "HBA Type" is FC or SAS: - HBA#1WWN - HBA#2WWN - When "HBA Type" is iscsi: - HBA#1iSCSI Name - HBA#1IP Address - HBA#2iSCSI Name - HBA#2IP Address Login/Logout History B B Configuration Change History B B Screen Refresh Interval B B Note 2 : Volumes and RAID groups, can be created and deleted during operation, however these settings can not be changed after creating the volumes and the RAID groups
25 Chapter 5 Installing This chapter describes the procedure to install a disk storage system using Express. 5.1 Installing Express Manager To use a server on which Express is installed, install Express Manager (hereinafter referred to as "Express Manager") into a PC server. Refer to "C.1 Installing" for the installation method. In addition, the PC server on which Express Manager is installed is referred to as "Management server". 5.2 Registering User Information Register Express users before using a disk storage system. With reference to the table below create user accounts of system administrator and business administrator on the management server. Table 5.1 Privileges given to administrator user account Administrator System administrator Business administrator Privileges User that is registered to the management server operating system and has administrator privileges User registered to the management server operating system, who manages business operation and should have administrator privileges. Note Any user with privileges described in "Table 5.1 Privileges given to administrator user account" can use Express. Create user accounts used only for Express to prevent unexpected users from using it. In addition, user's login history can be checked by [event] pane - [Login History] tab in the Express Web GUI. Information Refer to "Chapter 3 Flow from Installation to Operation" for the roles of system administrator and business administrator. 5.3 Configuring the Network Environment Express uses SNMP to register disk storage systems. Therefore, before registering devices, it is required to start SNMP Agent. Those disk storage systems that have not SNMP Agent started cannot be registered. Check the network environment, access privileges and settings of communication mode between management server and disk storage system. If either communication mode of the management server or the disk storage system is set to "Full (full duplex)", do not set the other to "Auto Negotiation". Refer to the manual for each disk storage system and check the network environment settings. If the network environment configurations are insufficient, set up them with the ETERNUS Web GUI or FibreCAT SX WBI (web-browser interface). If a firewall is placed, set the following port numbers to the firewall
26 Table 5.2 Setting up a firewall between the management server and the ETERNUS Disk storage system Port Number Protocol Communication Start Direction 23 tcp Communication from management server to ETERNUS Disk storage system. 161 udp Communication from management server to ETERNUS Disk storage system. 162 udp Communication from ETERNUS Disk storage system to management server tcp Communication from management server to ETERNUS Disk storage system. Note The telnet connection and the Maintenance connection should be available in setting up interface on the ETERNUS Disk storage system. Table 5.3 Setting up a firewall between the management server and the FibreCAT SX Disk storage system Port Number Protocol Communication Start Direction 161 udp From management server to FibreCAT SX Disk storage systems. 162 udp From FibreCAT SX Disk storage systems to management server. Table 5.4 Setting up a firewall between the management server and the PC using Express (or server) Port Number Protocol Communication Start Direction 9855 tcp Communication from PC or server using Express to management server. Note Notes in combination with products using the SNMP trap reception function As with ServerView AlarmService, Express use OS standard SNMP trap reception service for fault management with SNMP Trap reception. Therefore, if any of the following products is mixed, take the same setting procedure as ServerView AlarmService is mixed. - Systemwalker Centric Manager For specific setting method, refer to each product's manual. 5.4 Registering Disk Storage Systems Using the Express Web GUI, take the following procedure to register disk storage systems to be managed using Express. This procedure should be taken by the system administrator. 1. Execute the following preparations to discover the storage system for the Express. - For ETERNUS Disk storage system Please set by ETERNUS Web GUI following item, refer to the ETERNUS Web GUI manuals for more information. - Check the IP address of the management server. Check this IP address with IP address list of permitted MNT ports on the "Setup Network Environment Screen". - Enable the SNMP function of MNT port on the "Setup SNMP Agent (Basic Interface) Screen". - Check the ETERNUS Disk storage system names displayed in the "Name" column on the "Modify Storage System Name Screen"

27 When using Advanced Copy functions, specify 16 or less alphanumeric characters for ETERNUS Disk storage system name. - When you connect iscsi, specify "Enable" the use of isns server in the target port. For ETERNUS DX80 S2/DX90 S2, in addition to the above, please execute the following settings: - In the ETERNUS Web GUI "Create SSH Server Key", create a new SSH server key. The number of bits for the key is at your discretion. - In the ETERNUS Web GUI "Setup User Account", create a Software Role Account with the account information created at the step 6 of this procedure. - If an SNMP community name is not already set for the ETERNUS Disk storage system, create the SNMP community name in the "Setup SNMP Community" of the ETERNUS Web GUI. - For FibreCAT SX Disk storage system Please set by FibreCAT SX WBI according to the following procedures, refer to FibreCAT SX Series Administrator's Guide for more information. - Make the SNMP function effective at "Services Security" page. 2. Start the Express Web GUI. To start the Express Web GUI, see "6.1 Starting the Express Web GUI". 3. Select a management server from [Monitoring] pane - [Storage] tab. 4. Select [Disk Array] - [Add] in [Action] pane and specify the IP address, Administrator ID and password for the disk storage system
28 5. Specify an IP address and a SNMP community name. Also, you can specify FQDN(Fully Qualified Domain Name) instead of IP address. Note If the ETERNUS Disk storage system whose IP address is set to 2 CMs respectively is added by [Disk Array] - [Add], it is necessary to specify "Master IP" in the wizard. 6. Specify Administrator ID and password. (ETERNUS Disk storage system Only) - For ETERNUS DX60/DX80/DX90 Specify a user account with ETERNUS disk storage system administrator privileges

29 - For ETERNUS DX80 S2/DX90 S2 Specify a user account with the ETERNUS disk storage system Software Role assigned. 7. Confirm displayed current configuration information is correct. 8. Set up Encryption mode. (ETERNUS Disk storage system Only)
30 9. Input Advanced Copy License. (ETERNUS Disk storage system Only) Displays Advanced Copy license status. If the Advanced Copy license is not registered, input the license key. Point To utilize Advanced Copy functions or Remote Advanced Copy functions, the corresponding Advanced Copy licenses are required. However, up to 8 SnapOPC+ sessions can be run by Express without license. - In case of ETERNUS DX60/DX80:
31 - In case of ETERNUS DX90: 10. Set up Advanced Copy functions when you need to use it. (ETERNUS Disk storage system Only)
![Note To delete registered disk storage systems, select a disk storage system to be deleted on the Express Web GUI and click [Disk Array] - [Delete] in [Action] pane. 5.](/docs-images/76/73074827/images/32-0.jpg "5 Storage Configuration Wizard Assign volumes to a new server from registered ETERNUS disk storage system using the Storage Configuration Wizard. 1.")
32 Note To delete registered disk storage systems, select a disk storage system to be deleted on the Express Web GUI and click [Disk Array] - [Delete] in [Action] pane. 5.5 Storage Configuration Wizard Assign volumes to a new server from registered ETERNUS disk storage system using the Storage Configuration Wizard. 1. Check server WWPN (World Wide Port Name), iscsi or SAS addresses from the business server. 2. Start the Express Web GUI. 3. Select [Wizard] - [Storage Conf] in [Action] pane in the Express Web GUI to start the Storage Configuration Wizard
33 4. Confirm the procedure for registering servers. 5. Specify server information. When a disk storage system is connected to a server, the server WWPN can automatically be specified. Click the [Discover] button on the following screen to select checked step 1 information from a list

34 For more information about items to be specified, see "A.1 Server Information". When specifying manually, enter each item of checked step 1 information manually
35 6. Select a disk storage system. Select a disk storage system used by the registered server. 7. Create a RAID Group to the disk storage system. (arbitrarily) For more information about items to be specified, see "A.4 RAID Group Information"

![When you use other disk storage system on the registered server, click the [Yes] button and repeat the above step 6 to step 9. 5.](/docs-images/76/73074827/images/36-1.jpg "6 Registering Servers Register a server used for storage system to Express. This function is for ETERNUS Disk storage system only. 1.")
36 8. Create new volumes to the disk storage system.(arbitrarily) For more information about items to be specified, see "A.3 Volume Information". 9. Assign volumes to the server. For more information about items to be specified, see "7.6.2 Assign volumes". 10. Specify other disk storage system. When you use other disk storage system on the registered server, click the [Yes] button and repeat the above step 6 to step Registering Servers Register a server used for storage system to Express. This function is for ETERNUS Disk storage system only. 1. Check server WWPN (World Wide Port Name), iscsi or SAS addresses from the business server. 2. Start the Express Web GUI
![3. Click [Monitoring] pane - [Server] tab. 4. Click [Manager] - [Add Server] in [Action] pane. 5.](/docs-images/76/73074827/images/37-0.jpg "Specify server information.")
37 3. Click [Monitoring] pane - [Server] tab. 4. Click [Manager] - [Add Server] in [Action] pane. 5. Specify server information. When a disk storage system is connected to a server, the server WWPN can automatically be specified
![Click the [Discover] button on the following screen to select checked step 1 information from a list. For more information about items to be specified, see "A.](/docs-images/76/73074827/images/38-1.jpg "1 Server Information\". When specifying manually, enter each item of checked step 1 information manually. 6.")
38 Click the [Discover] button on the following screen to select checked step 1 information from a list. For more information about items to be specified, see "A.1 Server Information". When specifying manually, enter each item of checked step 1 information manually. 6. Click the [Yes] button in the Confirmation dialog box and register the server
39 5.7 Creating RAID Groups Creating RAID groups on a disk storage system. This function is for ETERNUS Disk storage system only. 1. Start the Express Web GUI. 2. Select a disk storage system to which to create RAID groups, from [Storage] tab in [Monitoring] pane
40 3. Select [RAID Group] - [Create] in [Action] pane. 4. Create a RAID group. For more information about each item, refer to "A.4 RAID Group Information". 5. Click the [Yes] button in the Confirmation dialog box and create a RAID group
41 5.8 Creating Volumes Creating volumes on a disk storage system. This function is for ETERNUS Disk storage system only. 1. Select a storage system to which to create volumes, from [Storage] tab in [Monitoring] pane
42 2. Select [Volume] - [Create] in [Action] pane. 3. Enter created volumes information and click [OK] button. For more information about items to be specified, see "A.3 Volume Information"
43 Note The number of volumes that can be created at one time is as follows. - OPEN or SDV 100 or less - SDPV 10 or less 4. Click the [Yes] button in the Confirmation dialog box and create volumes. 5.9 Assigning Volumes to a server Specifying volumes to be assigned to a server. This function is for ETERNUS Disk storage system only. 1. Select a storage system to which to assign the volumes, from [Storage] tab in [Monitoring] pane
![2. Click [Volume] - [Assign] in [Action] pane. 3.](/docs-images/76/73074827/images/44-1.jpg "Select a server to which to add the volumes, from a list.")
44 2. Click [Volume] - [Assign] in [Action] pane. 3. Select a server to which to add the volumes, from a list

45 4. Set a host affinity. Click the [Connection] button and the Host Affinity Settings dialog box is displayed. Select a server used host affinity from a list in the dialog box, and click [OK] button

46 5. Select a host response from the list. For more information about items to be specified, see "A.7 Host Interface Information"
47 6. Set up LUN mapping. From the volume list, click the check boxes for volumes to be assigned to the server and click [Add] button. The LUN of volume is numbered from 0 automatically. If you deselect the volumes already assigned to the server, select a volume you want to deselect from the list and click [Delete] button. 7. Click [Yes] button on the Confirmation dialog box, and the volumes are assigned to the server. The volumes deselected from the list in step 6 are removed from LUN mapping. Note Please stop access to the port that is connected from the volume when changing or removing mapping of volume, or removing volume. To stop access, it is necessary that the server connected from affected volumes are stopped or the volumes are unmounted. To confirm affected volumes, follow the following procedures. 1. Select [LUN Mapping] in [Storage] tab of [Monitoring]. 2. Select a entry in [List of Affinity Groups] screen. [Affinity Group Details] window will show up. 3. When the volume that to be changed or to be deleted exists in the volume list displayed on [Affinity Group Details] window, it is necessary to unmount from all the volumes in the same affinity group. 4. Repeat step2 to step3, and unmount all volume in the affinity group exists where volume that changing or removing. Point Mount is standard function of OS. Refer to manual of OS for details
48 5.10 Registering Advanced Copy license Register Advanced Copy license or Remote Advanced Copy license before using a disk storage system. This function is for ETERNUS Disk storage system only. 1. Select a disk storage system to which to register Advanced Copy license or Remote Advanced Copy license, from [Storage] tab in [Monitoring] pane. Click [Advanced Copy] - [License] in [Action] pane
49 2. Specify Copy License key, and click [OK] button. - In case of ETERNUS DX60/DX80: - In case of ETERNUS DX90:
50 5.11 Advanced Copy Configuration Wizard A system administrator will follow the steps below to set up Advanced Copy using the Advanced Copy Configuration Wizard. This function is for ETERNUS Disk storage system only. 1. Select [Advanced Copy] - [Set ] in [Action] pane in the Express Web GUI to start the Advanced Copy Configuration Wizard. 2. Set Advanced Copy parameters Remote Advanced Copy Configuration Wizard A system administrator will follow the steps below to set up Remote Advanced Copy using the Remote Advanced Copy Configuration Wizard. This function is for ETERNUS Disk storage system only. 1. Connect. Ask a hardware administrator to connect between remote adapter ports
![2. Select [Advanced Copy] - [Remote Copy] from [Action] pane in the Express Web GUI to start the](/docs-images/76/73074827/images/51-1.jpg "Remote Advanced Copy Configuration Wizard. 3. Confirm the procedures to set Remote Advanced Copy.")
51 2. Select [Advanced Copy] - [Remote Copy] from [Action] pane in the Express Web GUI to start the Remote Advanced Copy Configuration Wizard. 3. Confirm the procedures to set Remote Advanced Copy
52 4. Select a copy destination disk storage system. Select a copy destination disk storage system excluding the copy source disk storage system
53 5. Set up parameters of Remote Advanced Copy. Customize the parameters of a copy source and destination disk storage systems to proper values

54 6. Set up a Remote Advanced Copy path. Select a port used for Remote Advanced Copy in the disk storage system. Change connection type between ETERNUS Disk storage systems as needed. Note When remote is selected, the line speed and the compression ratio between ETERNUS Disk storage systems are specified for the connection type. Please specify "0" for the compression ratio when either or both of the ETERNUS Disk storage systems for remote advanced copy are DX90 S2. 7. Set up REC buffer. When using REC Consistency mode, set up REC buffer. If the Consistency mode is not used, REC buffer is not needed to be set up

55 REC buffer is set up for both ETERNUS Disk storage systems of a REC pair. 8. Check the specified content on the Confirmation screen. If the specified content is proper, click the [Finish] button and terminate Remote Advanced Copy settings. If not, return to each settings screen to perform settings again
56 5.13 Settings of Information Managed with Express This section describes how to specify the information managed with Express Settings of various information Click [Misc] - [Preferences] in toolbar. Set the following information. For more information about items to be specified, see "A.8 Various Information". - Events - Login/Logout History - Configuration Change History - Screen Refresh interval
57 Specifying contact information for trouble occurrence Click [Misc] - [Contacts] in toolbar

58 Specify the information for, , business administrator, system administrator, and hardware administrator Event notification test This section describes the procedure for SNMP Trap reception test and send test Procedure for SNMP Trap reception test Take the following procedure to perform a SNMP Trap reception test. - For ETERNUS Disk storage system 1. Check SNMP Trap from the disk storage systems displayed on the Express Web GUI. SNMP Trap destination is automatically specified
![2. Click the [Send] button on the "Perform SNMP Trap Test" screen of the ETERNUS Web GUI. For more information, see the ETERNUS Web GUI manual. 3.](/docs-images/76/73074827/images/59-0.jpg "Check \"Message\" in the [Events] pane of the Express Web GUI.")
59 2. Click the [Send] button on the "Perform SNMP Trap Test" screen of the ETERNUS Web GUI. For more information, see the ETERNUS Web GUI manual. 3. Check "Message" in the [Events] pane of the Express Web GUI. SNMP Trap Test has been completed successfully if the message including the character string of "SNMP Trap Test" is displayed in the body of the message. In this case, no action is necessary even if "Contact the hardware administrator." is displayed

60 - For FibreCAT SX Disk storage system Refer to the manual of disk storage system to send SNMP trap Procedure for send test Check whether can be received at the specified address or SMTP server IP address. Take the following procedure to send a test
61 1. Select [Misc] - [Contacts] in toolbar to check the destination address. 2. Check that the test can be received at the destination address. Note If an event notification destination address has been set in the "A.6 Information", a test is sent to the destination address whether or not an event notification has been set to send
62 Chapter 6 Operation This chapter describes the procedure to operate the disk storage system using Express. 6.1 Starting the Express Web GUI This section describes the procedure to start the Express Web GUI. Note Since the ETERNUS Web GUI and the ETERNUS CLI have a higher authority over ETERNUS configuration change functions than the Express Web GUI. Therefore, if you use the former two with the Express Web GUI at the same time, the Express Web GUI may terminate abnormally. For example, while a configuration is being changed with the ETERNUS Web GUI, you cannot execute "6.5 Changing configuration" with the Express Web GUI. Therefore, when you use the Express Web GUI, do not use the ETERNUS Web GUI and the ETERNUS CLI. 1. Make sure whether the Computer Browser service is started. (Only when the computer is joined to a Windows domain) If the computer is joined to the Windows domain, the Computer Browser service should be started on the management server in order to use the Express Web GUI. For this reason, make sure that the [Status] of the Computer Browser service is [Started] by clicking on [Control Panel] > [Administrative Tools] > [Services]. Point The Computer Browser service on Windows Server 2008 is stopped by default. 2. Start the Express Web GUI. 1. Start the Web browser. 2. Use HTTPS communication and a port number, connect to Express Manager. At this time, specify 9855 for the port number. Example 3. Login. Enter your username and password to log into the Express Web GUI. In each environment, the following usernames are specified. - Local server: Local user - Domain member server: Local user and Domain user - Domain controller server (PDC/BDC): Domain user Note When specifying a domain user, specify it in "Domain-name\user-name" format
63 Note When a large number of volumes or copy pairs are created at one time, a timeout error may occur. If a timeout error should occur, take some time before updating the screen. If the volumes or copy pairs have been properly created after screen update, no action is required. If not, reduce the number of volumes or copy pairs to be created at one time and re-execute the operation. 6.2 Performance Monitoring Express supports function of performance management for Disk storage systems. This function enables users to get details about the operation and load status of disk storage systems. However, Express does not support function of performance management about SDV and SDPV of ETERNUS Disk storage system. When a user gives an instruction for performance management of a disk storage system from the Express Web GUI, the performance management device issues SNMP Trap periodically through a LAN to the disk storage system to obtain performance information, and it saves the information as performance data on the Express Manager server. On the Express Web GUI, 24-hour performance information can be output and with "D.3 storageadm perfdata (Command for managing performance information)", one-hour or 24-hour performance information can be output. Using them can manage disk storage systems. To conduct performance monitoring, sufficient disk space is required on the management server for performance data storage. Make sure that sufficient disk space is ensured referring to "2.1 Hardware conditions". This function is for ETERNUS Disk storage system only. Note - Do not execute performance monitoring for a single server from more than one management server(*) at the same time. * Any of Express Manager server, ETERNUS SF Storage Cruiser administrative server, or Systemwalker Resource Coordinator server. - The performance management functionality always starts up when the Express Manager server starts up. For disk storage systems, in which performance management settings have been configured, performance information collection starts in the background. Accordingly, performance information is collected regardless of whether the Express Web GUI is displayed. To stop performance information collection, stop performance management processing Starting collection of Performance information When you click [Performance] - [Start] in [Action] pane in Express Web GUI, an instruction to collect performance information is issued to the performance management device, and the performance management device collects performance information of a disk storage system through the LAN and saves it as performance data. Since the performance management device is started as a daemon of the Express Manager server, it continues collecting performance information while the Express Manager server is active, even if no Express Web GUI window is displayed. The logical configuration of the disk storage device is recognized, and the collecting of performance information starts. At the start of collecting performance information of the selected storage system, an amount of time (tens of seconds to several minutes) is spent to collect the logical configuration before any performance information is actually obtained. When performance monitoring starts, "Monitoring" is displayed in "Perf. Data" as a status of the performance monitoring. The table below lists values of "Perf. Data" row and their corresponding statuses and actions to be taken. The values may differ from that of the current status. Select [Disk Array] - [Reload Conf] in [Action] pane in Express Web GUI to check the latest status. Value of "Perf. Data" row Status Appropriate action Monitoring Performance is being monitored. (Normal) Performance is being monitored
64 Value of "Perf. Data" row Status Appropriate action Recovering Error Stop Performance monitoring is being recovered (e.g. device time-out). Performance monitoring error (e.g. device time-out, writing to the performance information file failed.) Performance monitoring has stopped. (Normal) The Express manager server cannot communicate with a disk storage system. Check the network status and the disk storage status. Log off, when ETERNUS Web GUI is in a login state. The Express manager server cannot communicate with a disk storage system. Check the network status and the disk storage system status. Log off, when ETERNUS Web GUI is in a login state. Check the write permission to the file and the capacity of the file system. Then, select [Performance] - [Stop] in [Action] pane in Express Web GUI. Performance monitoring has stopped Stopping collection of Performance information Select [Performance] - [Stop] in [Action] pane to stop collection of Performance information

65 6.2.3 Showing the Performance information The performance information can be output to the CSV format file by using "D.3 storageadm perfdata (Command for managing performance information)". The following information can be managed. Performance information (Unit) LUN Logical Volume RAID Group Disk drive CM CM Port Read/Write count (IOPS) Read/Write data transfer rate (MB/S) Read/Write response time (msec) Read/Pre-fetch/Write cache hit rate (%) Disk busy rate (%) Load (CPU usage) rate (%) Copy remaining amount (GB) Read/Write count (IOPS) Read/Write data transfer rate (MB/S)
66 Performance information (Unit) Device Number of active disks (Disk) Power consumption (W) Temperature (C) Note - Performance information about SDV and SDPV of ETERNUS Disk storage system is not supported, and performance information values for RAID Group cannot be collected. - Performance information about SAS port and FCoE port are not supported. - In the case of ETERNUS DX60/DX80, performance information of FC-CA port or iscsi-ca port is displayed. - In the case of ETERNUS DX90, performance information of FC-CA port or FC-RA port is displayed. - In the case of ETERNUS DX80 S2/DX90 S2, performance information of FC-CA port, FC-RA port, iscsi-ca port and iscsi-ra port are displayed. - Performance information of the port that is executing REC is displayed as shown below: - If the FC-RA port is set as sender (Initiator), performance information is displayed as Read performance information. - If the FC-RA port is set as receiver (Target), performance information is displayed as Write performance information Displaying Performance information in a graph Using the Express Web GUI can display performance information in a graph
67 1. Select [Performance] - [Charts] in [Action] pane to open the Performance Type screen. 2. Click an item you want to display, and the graph is displayed
68 6.3 Detecting trouble The following is a description of the procedure to be taken if trouble should occur during Disk storage system operations. Trouble occurrence is detected in the following way. - An of error or warning level trouble occurrence is sent from Express. - Trouble occurrence is notified by a user. The following is a flow from trouble detection to its response

69 Figure 6.1 Flow from trouble detection to its response Identifying the trouble condition If trouble should occur, start the Express Web GUI. Since the Express Web GUI displays the status of each device with icons or messages, it is easy to identify the trouble condition
\" or \"Warning( )\" icon is displayed at the trouble-occurring area.")
70 In addition, since the storage status can be checked from the viewpoint of a disk storage system, you can identify which server is impacted by a failure that occurred on the disk storage system. Figure 6.2 Express Web GUI in trouble occurrences If trouble is occurring, check the following points. - Icon "Error( )" or "Warning( )" icon is displayed at the trouble-occurring area. If these icons are displayed, it is highly possible that business operations are affected. Therefore, identify the contents of the trouble to take responses. - Message A message of trouble occurrence is displayed at "Event" along with an icon. Point In the following cases, the status icon of the storage system displayed in the [Monitoring] pane is renewed. - When there is an event notification more than the warning level from the storage system. - When you execute "6.5 Changing configuration" with Express Web GUI Trouble analysis There are other methods to analyze the effects of the trouble besides "6.3.1 Identifying the trouble condition". Use those methods as required. In addition, for hardware troubles, contact the hardware administrator when needed

71 - Trouble information collection This is used when collecting detailed information about the trouble, which can be collected via the Express Web GUI or a command. For trouble information collection, refer to "How to collect trouble information". - Display of configuration information details You can check every server operation and disk configuration information managed in storage in a list. Selecting the Express Web GUI will display configuration information details. - Diagnosis of Express Manager environment Express Use diagnostic tools when some trouble occurrence is suspected, for example, that the Express Web GUI does not work normally. For diagnostic tools, refer to "6.10 Diagnostic Tool". How to collect trouble information 1. Select [Troubleshooting] - [Collect Troubleshooting Information] in toolbar in the Express Web GUI. 2. Select the required item to click the [OK] button. Figure 6.3 Collect Troubleshooting Information See Checking / changing the address set up for the system administrator When you check and/or change the contact address set up for the system administrator, refer to the "6.6 Changing the contact addresses for trouble occurrence". When using a command, see the "D.4 express_managersnap (Collecting Express Manager troubleshooting information)" Trouble response After identifying the trouble condition as shown in the "6.3.1 Identifying the trouble condition" or by "6.3.2 Trouble analysis", contact a system administrator or a hardware administrator, referring to the message and trouble information. After resolving the trouble, reload the configuration as shown in "6.5 Changing configuration" to acquire information again up to date. [Refresh] button on the Express Web GUI only acquires information on the Express manager server, and doesn't update information on the manager
72 Latest information is displayed by select [Refresh] button about [Events] pane information in [Disk Array Information]. Reload the configuration as shown in the above-mentioned when you want to display latest information about other information. Note Contact to the hardware administrator If a message output in a trouble occurrence says "Contact the hardware administrator", the system administrator contact to the hardware administrator. 6.4 Executing Advanced Copy This section explains the procedures for executing Advanced Copy. This function is for ETERNUS Disk storage system only. Express can execute the following advanced copies. - Clone copy (OPC) - Clone copy (QuickOPC) - Clone copy (EC) - Snapshot copy (SnapOPC+) - Remote copy (REC) See Refer to "Appendix B Advanced Copy Function" for details of Advanced Copy. When you use Advanced Copy function, to assure data consistency, please confirm that there isn't any access to a business volume. However, for more secure consistency, it is recommended to stop the server connected to the business volume. When you can't stop the business server, unmount the business volume by the server's OS command and reflect the data from the file cache and stop the access to file cache. For the unmount command, refer to each OS's manual Setting Advanced Copy This section explains how to set up Advanced Copy function. The setup procedure is shown below

73 Access Path Settings To issue Advanced Copy instruction from a management server to ETERNUS Disk storage system, a path to connect the management server with ETERNUS Disk storage system on Express manager. This path is called an "access path". The settings procedures for the access path are explained below. 1. Allocate to the server a volume in the ETERNUS disk storage system to be set up as the access path. The allocated volume is recognized as a disk. 2. Initialize the disk in MBR (DOS format) or GPT disk format. 3. Create a partition, and allocate a drive letter Creating copy pairs Before executing Advanced Copy, create a copy source volume and a copy destination volume. The following is the procedure to create a copy pair
![1. Select volumes to make a pair from [Monitoring] pane.](/docs-images/76/73074827/images/74-0.jpg "Select [Copy Pair Configuration] - [Create Copy Pair] in [Action]")
74 1. Select volumes to make a pair from [Monitoring] pane. Select [Copy Pair Configuration] - [Create Copy Pair] in [Action] pane

75 2. The Create Copy Pair wizard is displayed. Enter copy type and copy destination volume according to the wizard. - In the case of ETERNUS DX60, DX80/DX80 S2:
![- In the case of ETERNUS DX90/DX90 S2: If you want to create a new copy destination volume, select [New].](/docs-images/76/73074827/images/76-0.jpg "If you want to select from existing volumes, select [Exist].")
76 - In the case of ETERNUS DX90/DX90 S2: If you want to create a new copy destination volume, select [New]. If you want to select from existing volumes, select [Exist]. For remote copy, specify the ETERNUS Disk storage system at a remote site

77 3. Specify a copy destination volume. - When creating a new copy destination volume by clone copy: Specify the copy destination volume and a RAID group to which to create the volume

78 - When creating a new copy destination volume by Snapshot copy: Specify the volume name of a copy destination SDV (Snap Data Volume), RAID group to which to create the volume, capacity assigned to the volume and number of generation. Note ETERNUS DX80 S2 and DX90 S2 ignoress the value of capacity
, enter nothing.")
79 As required, create SDPV(Snap Data Pool Volume). Point If you do not create SDPV(Snap Data Pool Volume), enter nothing. Click the [Next] button to go to the next step. Note ETERNUS DX80 S2 and DX90 S2 need one or more SDPV
80 - When creating a new copy destination volume by Remote copy: Specify the copy destination volume name and the RAID group to which to create the volume. Point When creating a new RAID group, click the [New] button on each screen. A table is displayed to enter or select the following information required to create a RAID group. - RAID group name - RAID Level - Physical disk information making up a RAID group. See For RAID group creation, see the "5.7 Creating RAID Groups"

81 - When selecting a copy destination volume from existing volumes: Select a copy destination volume from a displayed volume list. Point - The number of concurrent copy sessions of 1 source volume is up to 8. Its destination volumes should be respectively different ones. - Multiple source volumes cannot be concurrently copied to 1 destination volume
82 4. Specify a copy group to which to register a copy pair. Select a copy group. Copy pair is used when operating mulitple copy pairs simultaneously, for example, for the reason that one data base space is configured with multiple voluems. - Default copy group Register a copy pair to default copy group managed by Express. The relationship between copy type and default copy group name is as follows. Copy type Clone copy (OPC) Clone copy (QuickOPC) Clone copy (EC) Snapshot copy (SnapOPC+) Remote copy (REC) Copy group name EXP_Unique number to identify EXP serve_eternus disk storage system serial number_o. EXP_Unique number to identify EXP server_eternus disk storage system serial number_q. EXP_Unique number to identify EXP server._eternus disk storage system serial number_e. EXP_Unique number to identify EXP server_eternus disk storage system serial number_s. EXP_Unique number to identify EXP server_eternus disk storage serial number that copy source volume exists_eternus disk storage system serial number that copy destination volume exists_r. Point - When operating only via Express Web GUI, you do not need to be conscious of default copy group name

83 - You can create copy groups by using Express Manager. For copy group creation using Express Manager, see "6.4.2 Creating copy groups". - Existing copy group Register a copy pair to the existing copy group. Select a copy group from a pulldown list. - New copy group Create a new copy group and register a copy pair to the created copy group. Point Specify for copy group name, 64 or less alphanumeric characters including hyphen (-), underscore (_), pound (#) and period (.). The first character is an alphabet. 5. The Confirmation screen is displayed. After confirmation, click the [Confirm] button and a copy pair is created Creating copy groups When operating multiple copy pairs, create a copy group. The advantages of copy group are as follows. - Data base space configured with multiple volumes can be copied with consistency secure. - Multiple volumes associated with business operation can be copied with consistency secured. The following is the procedure to create a copy group. 1. Select a copy group type to be created from [Server] tab in [Monitoring] pane. Select [Copy Group Configuration] - [Create Copy Group] in [Action] pane


84 2. The Create Copy Group wizard is displayed. Select a copy pair according to the wizard. - In the case of ETERNUS DX60, DX80/DX80 S2: - In the case of ETERNUS DX90/DX90 S2:

85 3. Enter the copy group name. Point Specify for copy group name 64 or less alphanumeric characters including hyphen (-), underscore (_), hash (#) and period. The first character must be an alphabetical letter. 4. The Confirmation screen is displayed. After confirmation, click the [Confirm] button and a copy pair is created Executing Clone Copy Advanced Copy has the following three types of clone copies. - Clone copy (OPC)] This is a copy method to execute OPC (One Point Copy) of the ETERNUS disk storage system. OPC copies one volume. If copy source volume is accessed, it can copy the volume. When the OPC command is invoked, ETERNUS creates a point in time snapshot of the source volume and then immediately returns a notification to the operator that the backup is complete, before any physical copying has even occurred. This allows for access to be returned to the transaction or source volume with little or no interruption while the copy is performed as a background process at the hardware level in the ETERNUS. Clone copy (OPC) is highly effective for the following applications: - Generation backups where continuous uptime is critical such as internet business applications - Restore from backups where OPC can be used regardless of the backup copy method and minimizing downtime. - Case where minimizing server I/O load is critical to overall business application performance
![The following diagram represents the process of clone copy (OPC)]. Figure 6.](/docs-images/76/73074827/images/86-0.jpg "4 Clone copy (OPC) - Clone copy (Quick OPC) This is a copy method to execute QuickOPC (Quick One Point Copy) of the ETERNUS Disk storage system.")
86 The following diagram represents the process of clone copy (OPC)]. Figure 6.4 Clone copy (OPC) - Clone copy (Quick OPC) This is a copy method to execute QuickOPC (Quick One Point Copy) of the ETERNUS Disk storage system. When the QuickOPC command is invoked, it will determine if an initial copy exists, then will copy only updated blocks of data that have been tracked since the initial copy was created to the backup volume for that specific QuickOPC session. If QuickOPC detects that an initial copy does not exist, it will create the initial copy using OPC. The differential copy method used in QuickOPC significantly reduces the time required for physical data copying in order to create a Point in Time snapshot while minimizing the I/O load on the storage system host server. Clone copy (QuickOPC)] is highly effective for the following applications : - Backup to disk where uptime is critical - Frequent restore point creation and frequent backups
 - Clone copy (EC) This is a copy method to execute EC (Equivalent Copy) of the ETERNUS disk storage system.")
87 The following diagram represents the differential copy process used in QuickOPC copy after an initial copy has been created. Figure 6.5 Clone copy (Quick OPC) - Clone copy (EC) This is a copy method to execute EC (Equivalent Copy) of the ETERNUS disk storage system. The Equivalent Copy feature invokes a process of synchronization between source and destination volumes to create a synchronized copy of the source volume. The purpose of the synchronization is to reach and maintain a state of equivalence with the source volume in order to create a temporary copy or archival backup. The source volume remains available and accessible as there is no need to stop or suspend access to the source volume while the copy is built using the synchronization process. When a state of equivalence with the source volume has been attained, the destination volume continues to be maintained as an image of the source volume. At any subsequent point while the source volume and the destination copy are in this state of equivalence, the destination copy can be split from the source, thus creating a backup with history or a replica copy as at that point in time. Clone copy (EC) is highly effective for the following applications: - Making backups much more quickly than with conventional backup processes, because backup data can be collected in parallel with ordinary transactions
 Execute clone copy (OPC). Open the Clone(One Time) [OPC] tab.")
88 - Reducing processing time and costs by means of distributed processing using copy data. Figure 6.6 Clone copy (EC) Executing Advanced Copy Executing clone copy (OPC) Execute clone copy (OPC). Open the Clone(One Time) [OPC] tab. Select [Advanced Copy] - [Start Forward] in [Action] pane and execute clone copy (OPC)
89 When executing backward copy, select [Advanced Copy] - [Start Backward] Executing clone copy (QuickOPC) Execute copy (QuickOPC). 1. Execute a first copy Open (Recurring) [QuickOPC] tab. Select [Advanced Copy] - [Start Forward] in [Action] pane to execute clone copy (QuickOPC). If you execute backward copy, select [Advanced Copy] - [Start Backward]. 2. Execute a second and later copies. Open the Clone(Recurring) [QuickOPC] tab. Select [Advanced Copy] - [Start Forward] in [Action] pane to execute clone copy (QuickOPC)
90 Executing clone copy (EC) Execute clone copy (EC). The following is the procedure to execute clone copy (EC). 1. Start copy. Select [Advanced Copy] - [Start Forward] in [Action] pane of the Clone(Split mirror) [EC] tab to execute clone copy (EC). If you execute backward copy, select [Advanced Copy] - [Start Backward]


91 2. Wait for the status to be equivalent. Make sure that [Phase] is changed to "Paired" from "Copying". 3. Suspend the copy. Select [Advanced Copy] - [Suspend] in [Action] pane of the Clone(Split mirror) [EC] tab to suspend clone copy (EC)
92 4. Resume the copy. Select [Advanced Copy] - [Resume] in [Action] pane of the Clone(Split mirror) [EC] tab to resume clone copy (EC). Repeat steps 2 to Executing Snapshot copy This is a copy method to execute SnapOPC+ of the ETERNUS Disk storage system. SnapOPC+ uses the Copy-On-Write method to create a pre-update copy source volume. SnapOPC+ can save pre-update data on the copy source volume on a per snap generation (unit of volume replication) basis. SnapOPC+ is designed in view of its mechanism and features to be used as backups for recovery from software failures such as operation mistake and software error. if a copy source volume becomes inaccessible due to any hardware failure, the relevant session will become an error, thus making it impossible to properly read the data on the copy destination volume. To provide for such critical hardware failures, it is recommended to make a complete copy of data using clone copy (OPC/QuickOPC/ EC) or remote copy (REC) as well as SnapOPC+. Snapshot copy (SnapOPC+) is effectively available for: - Backups of temporary files used for cascade copy to alternate media such as tape. - Backups of file servers and other data less frequently updated
 Note ETERNUS DX80 S2 and DX90")

93 Figure 6.7 Snapshot copy (SnapOPC+) Note ETERNUS DX80 S2 and DX90 S2 need one or more SDPV Executing Advanced Copy Execute snapshot copy (SnapOPC+). The following is the procedure to execute snapshot copy (SnapOPC+)
![1. Execute a first copy. Select [Advanced Copy] - [Start Forward] in [Action] pane for "Copy Group" to execute snapshot copy (SnapOPC+). 2. Execute a second copy.](/docs-images/76/73074827/images/94-0.jpg "Select again [Advanced Copy] - [Start Forward] in [Action] pane for \"Copy Group\" to execute snapshot copy (SnapOPC+).")
94 1. Execute a first copy. Select [Advanced Copy] - [Start Forward] in [Action] pane for "Copy Group" to execute snapshot copy (SnapOPC+). 2. Execute a second copy. Select again [Advanced Copy] - [Start Forward] in [Action] pane for "Copy Group" to execute snapshot copy (SnapOPC+). When the second copy is executed, [Status] of the previously created copy is changed to "Copy On Write(Inactive)" from "Copy On Write(Active)" Executing remote copy (HA configuration) This section describes Remote copy in a HA (High Availability) configuration. Remote copy in a HA configuration executes copy between the following ETERNUS Disk storage systems within LAN. - Between two ETERNUS DX

95 - Between two ETERNUS DX90 S2 - Between ETERNUS DX90 and ETERNUS DX90 S2 Even if any failure should occur in one ETERNUS Disk storage system, the other ETERNUS Disk storage system continues the operation. Remote Copy has three types of operation modes. Select an operation mode according to the operation form. For more specific information about operation mode, see "B.7 Remote Advanced Copy (REC)". It is required to consider Recovery Point Objective (RPO) and Recovery Time Objective (RTO). For HA configuration, synchronous transfer mode remote copy is recommended to reduce the Recovery Point Objective. Figure 6.8 HA configuration diagram Executing Advanced Copy Execute remote copy (REC)
96 The following is the procedure to execute synchronous transfer mode remote copy (REC). 1. Start copy. Open the "Remote[REC]" tab. Select [Advanced Copy] - [Start Forward] in [Action] pane to execute remote copy (REC). Specify the operation mode of remote copy from below. - Transfer mode - Split mode

97 - Recovery mode If you execute backward copy, select [Advanced Copy] - [Start Backward]
98 2. Wait for [Status] to become equivalent. Make sure that [Phase] becomes "Paired" and [Progress] becomes "100%". 3. Suspend the copy. Select [Advanced Copy] - [Suspend] in [Action] pane for "Copy Group" to suspend the copy
99 4. Resume the copy. Select [Advanced Copy] - [Resume] in [Action] pane for "Copy Group" to resume the copy. Repeat steps 2 to Operational procedure for fault occurrence on the ETERNUS Disk storage system If Advanced Copy cannot be continued due to some hardware fault, the ETERNUS Disk storage system automatically suspends Advanced Copy. In addition, remote copy sessions automatically turn to "Error Suspend" or "Hardware Suspend". - In the event that "Hardware Suspend" occurs: 1. If the following statuses are met, execute "Suspend" operation to suspend remote copy sessions. - Transfer mode is "Synchronous". - Copy status is equivalent. - Split mode is "Manual Split". 2. Remove the error. 3. If Recovery mode is "Manual Recovery", execute "Suspend" operation to suspend the operation. After that, execute "Resume" operation to recover the remote copy sessions. Point If Recovery mode is "Automatic Recovery", remote copy sessions are automatically recovered, so that no operation is required. - If an ETRNUS Disk storage system in which an copy source volume exists causes "Error Suspend". 1. Execute "Suspend" operation to suspend the remote copy sessions. Or, execute "Cancel" operation to cancel the remote copy sessions. 2. Change the volume accessed by the business server to copy destination volume
100 3. Make sure that the ETERNUS Disk storage system in which the copy source volume exists has been recovered and then restore the copy destination volume to the source volume. In the event that the ETERNUS Disk storage system has been recovered: 1. When the copy sessions have been suspended by "Suspend" operation, execute "Reverse" and "Resume" operation to restore data from the copy destination volume to the source volume. When the copy sessions have been stopped by "Cancel" operation, execute "Start Backward Copy" operation to restore data from the copy destination volume to the source volume. 2. On completion of restore, stop business server access to the copy destination volume. 3. Execute "Suspend" operation to suspend the remote copy sessions. 4. Execute "Reverse" operation to change the copy direction to the copy destination volume from the source volume. 5. Execute "Resume" operation to resume the remote copy sessions. 6. Return the volume accessed by the business server to the source volume. In the event that the ETERNUS Disk storage system has been replaced: 1. Execute "Cancel" operation to cancel all remote copy sessions. 2. Delete the pre-replacement ETERNUS Disk storage system from Express. 3. Register the post-replacement ETERNUS Disk storage system to Express. 4. Create a copy pair and a copy group. 5. Execute "Start Backward" operation to start remote copy session. 6. Execute steps 2 to 6 described in the above-mentioned "In the event that the ETERNUS Disk storage system has been recovered". - In the event that the ETERNUS Disk storage system in which the copy destination volume exists causes "Error Suspend": 1. Recover the ETERNUS Disk storage system in which the copy destination exists. 2. Execute "Resume" operation to recover the remote copy sessions Executing Remote copy (DR configuration) This section describes Remote copy (or Extended Remote Advanced Copy) in a DR (Disaster Recovery) system configuration. Against disasters, Remote copy in a DR configuration executes copy between DX90 or DX90 S2 at the active site and DX90 or DX90 S2 at the standby site. In the event that a disaster occurs, the active site DX90 or DX90 S2 is switched to the standby site DX90 or DX90 S2 to continue the system operation. Remote Copy has three types of operation modes. Select an operation mode according to the operation form. For more specific information about operation mode, see "B.7 Remote Advanced Copy (REC)". In a configuration that data transfer length is long or a configuration that transfer path includes WAN, data transfer time could be long. In synchronous transfer mode, response to input/output request from the business server could not be returned within response time. Using the asynchronous transfer mode can reduce the effect of delaying response to input/output request from the business server. For DR configuration, asynchronous transfer mode is recommended


101 Figure 6.9 DR system configuration diagram DR The following is the procedure to execute Remote copy Executing Advanced Copy Execute Remote copy (REC). For DR configuration, asynchronous transfer method is recommended. The following is the procedure to execute asynchronous transfer mode (stack) remote copy (REC)
![1. Start copy. Open the "Remote[REC]" tab.](/docs-images/76/73074827/images/102-0.jpg "Select [Advanced Copy] - [Start Forward] in [Action] pane to execute Remote copy (REC).")
102 1. Start copy. Open the "Remote[REC]" tab. Select [Advanced Copy] - [Start Forward] in [Action] pane to execute Remote copy (REC). Specify the operation mode for Remote copy from below. - Transfer mode - Split mode
103 - Recovery mode For transfer mode, Stack (Stack mode) or Consistent (Consistency mode), which are asynchronous transfer mode, is recommended. If you start backward copy, select [Advanced Copy] - [Start Backward]
![2. Wait until [Progress] turns to "100%".](/docs-images/76/73074827/images/104-0.jpg "Make sure that [Progress] has become \"100%\".")
104 2. Wait until [Progress] turns to "100%". Make sure that [Progress] has become "100%"
105 3. Change the mode. Select [Advanced Copy] - [Change Mode] in [Action] pane to change the transfer mode to Through (Through mode)
106 4. Wait for [Status] becomes equivalent. Make sure that [Phase] has turned to "Paired" and [Progress] to "100%". 5. Suspend the copy. Select [Advanced Copy] - [Suspend] in [Action] pane to suspend the copy
107 6. Change the mode. Select [Advanced Copy] - [Change Mode] in [Action] pane to return the transfer mode to Stack (Stack mode) or Consist (Consistency mode). 7. Resume the copy. Select [Advanced Copy] - [Resume] in [Action] pane to resume the copy. As required, repeat step 2 to

108 Exporting/Importing copy group definition If a local site disk storage system is harmed, a remote site disk storage system continues the operation. You can export the definition of local site copy groups beforehand and import it into the Express Manager server placed at a remote site Exporting copy group definition Take the following procedure to export copy group definition. This operation is performed at a local site. Note The copy group you can export is as follows: - ETERNUS Disk storage system is DX90 or DX90 S2, and also the copy group type is Remote[REC]. 1. Select the Express Web GUI to display the copy group, from [Server] tab in [Monitoring] pane. 2. Select the ETRNUS Disk storage system from which to export a copy group. Select [Disk Array] - [Export Copy Group] in [Action] pane
109 3. Select the copy group whose destination is exported from a list of copy groups. Click the [Export] button and the Select File dialog box is displayed. Specify the download destination. Note If the "Select File" dialog box does not appear when using Internet Explorer, take the following procedure to appear the "Select File" dialog box. 1. Select the [Internet Options] and open the "Internet Options" screen. 2. Select the [Security] tab. 3. Choose [Custom level] of the zone to which the manager server belongs, and open the "Security Settings" screen. 4. Make sure the [Automatic prompting for file downloads] and [File download] are enabled Importing copy group definition Take the following procedure to import the definition of copy group that has been exported. This operation is performed at a remote site. Note - Importing copy group definition is performed with respect to DX90 or DX90 S2 registered to a remote site. A disk storage system into which to the copy group definition can be imported is the disk storage system from which a copy group was exported. - If any copy group with the same name exists in the Express Manager server at a remote site, it is not displayed in the list of copy groups. 1. Select the Express Web GUI to display the copy group, from [Server] tab in [Monitoring] pane
110 2. Select the exported ETERNUS Disk storage system. Select [Advanced Copy] - [Import Copy Group] in [Action] pane. 3. Specify the file name downloaded in " Exporting copy group definition"
111 4. Select the copy group into which to import the copy group definition, from a list of copy groups. Click the [Import] button Operational procedure for fault occurrence on the ETERNUS Disk storage system If Advanced Copy cannot be continued due to hardware fault, the ETERNUS Disk storage system automatically suspends Advanced Copy. In addition, remote copy sessions are automatically turned to "Error Suspend" or "Hardware Suspend". - In the event that "Hardware Suspend" occurs: 1. If all the following statuses are met, execute "Suspend" operation to suspend the remote copy session. - Transfer mode is "Synchronous". - Copy status is equivalent. - Split mode is "Manual Split". 2. Remove the error. 3. If Recovery mode is "Manual Recovery", execute "Suspend" operation to suspend the copy session. After that, execute "Resume" operation to recover the remote copy session. Point If Recovery mode is "Automatic Recovery", remote copy sessions are automatically recovered, so that no operation is required. - In the event that an ETERNUS Disk storage system at a local site causes "Error Suspend": 1. Specify the access path to DX90 or DX90 S2 which is in the remote site from the Express Manager server. 2. Click [Server] tab in [Monitoring] pane in the Express Web GUI to display a list of volumes
112 3. Take the following procedure to change the site information contained in Copy Control Module. 1. Select the local-site DX90 or DX90 S2. Select [Disk Array] - [Change Location for CCM] in [Action] pane to change the site information from local site to remote site. 2. Select the remote-site DX90 or DX90 S2. Select [Disk Array] - [Change Location for CCM] in [Action] pane to change the site information from remote site to local site. Note If the message "esfmgr10836 The location of the storage was not switched. StorageName=<storage name>" is displayed, an access path to DX90 or DX90 S2 from the Express Manager server is not set up. Using "D.1.1 acarray add (Command for resgistering ETERNUS Disk storage system)", set up an access path. 4. Execute "Suspend" operation to suspend the remote copy session or execute "Cancel" operation to cancel the remote copy session. As a result business servers can access volumes. 5. Change the volume accessed by the business server to the copy destination volume. 6. Make sure that the ETERNUS Disk storage system in which the copy source volume exists has been recovered, restore the copy destination volume to the copy source volume. In the event that the ETERNUS Disk storage system has been recovered: 1. When the copy sessions have been suspended by "Suspend" operation, execute "Reverse" and "Resume" operation to restore data from the copy destination volume to the source volume. When the copy sessions have been stopped by "Cancel" operation, execute "Start Backward Copy" operation to restore data from the copy destination volume to the source volume. 2. On completion of restore, stop the business server access to the copy destination volume. 3. Execute "Suspend" operation to suspend the remote copy session. 4. Execute "Reverse" operation to change the copy direction from the source volume to the destination volume. 5. Execute "Resume" operation to resume the remote copy session. 6. Return the volume accessed by the business server to the source volume. In the event that the ETERNUS Disk storage system has been replaced: 1. Execute "Cancel" operation to cancel all remote copy sessions. 2. Delete the pre-replacement ETERNUS Disk storage system from Express. 3. Register the post-replacement ETERNUS Disk storage system to Express. 4. Create a copy pair and a copy group. 5. Execute "Start Backward" operation to start the remote copy session. 6. Execute steps 2 to 6 described in the above-mentioned "In the event that the ETERNUS Disk storage system has been recovered". - In the event that the remote-site ETERNUS Disk storage system causes "Error Suspend": 1. Recover the ETERNUS Disk storage system in which the copy destination volume exists. 2. Execute "Resume" operation to recover the remote copy session Checking copy status You can check the status of Advanced Copy in "Copy Control", the "Status" field of each copy type or the "Phase" field
\". If the access path is wrong, see the \"6.4.1.1 Access Path Settings\" to set a proper access path. 6.")
113 Note If "???" or "Unknown" is displayed in the "Status" or "Phase" field, it is possible that an access path is wrong. Check the access path with "D.1.4 acarray detail (Command for displaying detailed information about ETERNUS Disk storage systems)". If the access path is wrong, see the " Access Path Settings" to set a proper access path Command line operation When using Advanced Copy functions with commands, the procedure is different from that on the ETERNUS Web GUI. For command description, see the "D.1 Commands for Advanced Copy function"

114 Setting PATH environment variables When using the Copy Control Module command, add the bin directory of Express Copy Control Module to Path environment variables. The following is the procedure in the case of Windows Server 2008 R2. 1. Click [Start] and right-click [My Computer] to select [Property]. 2. Select [Advanced system settings]. 3. Select the [Advanced] tab from system "Property" and click the [Environment variable] button. 4. Add the following value to PATH variable. <Express Manager installed destination directory>\advancedcopy Manager Copy Control Module \bin Information Default of the Express Manager installed destination directory is "C:\Program Files\ETERNUS SF" or "C:\Program Files (x86)\eternus SF". Point - When listing multiple directories, separate them with semicolons (;). - When using Advance Copy functions alone on the Express Web GUI, this operation is not required
115 Setting access paths Create a volume to the ETERNUS Disk storage system and assign it to the Express Manager server. Refer to the " Access Path Settings" to assign the volume Registering ETRNUS Disk storage system Using "D.1.1 acarray add (Command for resgistering ETERNUS Disk storage system)", register an ETERNUS Disk storage system. Note For ETERNUS Disk storage system name specified with -a option of "D.1.1 acarray add (Command for resgistering ETERNUS Disk storage system)", specify an ETERNUS Disk storage system name registered to Express. If a different name is registered, Advance Copy using the Express Web GUI is not available Creating copy groups Using "D.1.15 acgroup create (Command for creating copy groups)", create a copy group. Note The following format copy group names may be used on the Express Web GUI as default copy groups. Avoid using them. - EXP_number_number_O (English capital letter O) - EXP_number_number_Q - EXP_number_number E - EXP_number_number S - EXP_number_number_number_R Adding copy pairs Using "D.1.19 acpair add (Command for adding copy pairs)", add a copy pair to a copy group Executing copy Using various commands shown in "Table D.6 List of commands for Advanced Copy" to execute copy. Note - "???" is displayed in "Copy" or "SID", it is possible that an access path is wrong. Using "D.1.4 acarray detail (Command for displaying detailed information about ETERNUS Disk storage systems)", check access paths. If any access path is wrong, see " Access Path Settings" to set a proper access path. - When changing the copy mode of Remote copy (REC), suspend the copy with "D.1.29 acec suspend (Command for suspending synchronous high speed copy)" and then execute "D.1.32 acec change (Command for changing the mode of synchronous high speed copy)"
116 6.5 Changing configuration This section explains the procedure to change the configuration of storage systems. When changing the configuration of storage systems, use the Express Web GUI, ETERNUS Web GUI or FibreCAT SX WBI (web-browser interface). Note Only a system administrator is allowed to change the configuration. Take the following procedure to change the configuration. 1. Select [Disk Array] - [Reload Conf] in [Action] pane in the Express Web GUI. Apply the configuration created on the Express Web GUI or the ETERNUS Web GUI. 2. Click [Refresh] button on the Express Web GUI. Updated information is obtained by Express Manager. Express Manager does not update information automatically. The latest information is displayed by click the [Refresh] button. If you want to display the latest information about other information, update the information in the above-mentioned method. 6.6 Changing the contact addresses for trouble occurrence Change the contact addresses of administrators and addresses at which to receive a notification of [Misc] - [Contacts] in toolbar in the Express Web GUI. In addition, after having changed the addresses at which to receive a notification of trouble occurrence, refer to the " Procedure for send test" to check whether the test can be received at the specified addresses. 6.7 Changing Advanced Copy function This section explains the procedure to change the settings of Advanced Copy functions an Advanced Copy function. Advanced Copy function is for ETERNUS Disk storage system only Changing the settings of Advanced Copy Take the following procedure to change the settings of Advanced Copy. 1. Select [Advanced Copy] - [Set ] in [Action] pane and the Advanced Copy Configuration Wizard will be displayed. 2. Set again Advanced Copy according to the Advanced Copy Configuration Wizard. Note To operate Remote Advanced Copy correctly, set values for [Table Size] and [Resolution] of the Advanced Copy parameters in both ETERNUS Disk storage systems remotely connected as follows: - The same values other than
117 See Refer to "5.11 Advanced Copy Configuration Wizard" on the details of Advanced Copy Changing the settings of Remote Advanced Copy Follow the procedure below to reload configuration. 1. Select [Advanced Copy] - [Remote Copy] in [Action] pane and the Remote Advanced Copy Configuration Wizard will be displayed. 2. Set again the Remote Advanced Copy along the wizard. Note To operate Remote Advanced Copy correctly, set values for [Table Size] and [Resolution] of the Advanced Copy parameters in both ETERNUS Disk storage systems remotely connected as follows: - The same values other than 0. See Refer to "5.12 Remote Advanced Copy Configuration Wizard" on the details of a Remote Advanced Copy function. 6.8 Changing the Host Interface Information This section explains the procedure change the host interface information specified to ETERNUS Disk storage system. Follow the procedure below to change the host interface information. 1. Start the Express Web GUI. 2. Select a disk storage system whose host interface is changed, from [Monitoring] pane - [Storage] tab
118 3. Select [Host I/F] - [Change] in [Action] pane. See Refer to "A.7 Host Interface Information" for details of Host Interface Information. 6.9 Changing various information This section explains the procedure for how to change various information specified to Express. Select [Misc] - [Contacts] in toolbar. Reloads the Express various information changed by Express Web GUI. Point When changing the IP address of the SMTP server After having changed the SMTP server IP address, refer to the " Procedure for send test" to make sure whether the test can be received using the specified SMTP server IP address. See For details of various information, refer to "A.8 Various Information"
119 6.10 Diagnostic Tool This section describes a diagnostic tool used when any trouble is suspected in an Express Manager environment, for example, that the Express Web GUI does not work properly. The following is the procedure to use the diagnostic tool. 1. Login to Express Manager with administrator privileges. 2. Execute the "D.5 express_diag(diagnosis of Express Manager environment)" command from the command prompt Operation Notices In case that the following failure occurs during settings on the Express Web GUI, the management server may not be accessible again from the Express Web GUI. - Network failure The network is disconnected between a client PC and the management server, or between the management server and disk storage systems. If any failure occurs, terminate the Express Web GUI and restart the Express Web GUI after recovery
120 Chapter 7 Maintenance This chapter describes the maintenance of Express Manager. 7.1 Backing up Express Manager Environment It is required to back up Express Manager environment against failures in a server on which Express Manager is installed. Take the following procedure to back up Express Manager environment. All operations are performed on the Management server. Information About description in the procedure - $BAK_DIR means a backup destination directory. - $INS_DIR means a directory in which Express Manager is installed. 1. Stop services. Open Service Control Manager to stop the following four services. - ETERNUS SF Express Manager - ETERNUS SF Express Apache Service - ETERNUS SF Express Tomcat Service - ETERNUS SF Storage Cruiser Manager 2. Back up various settings information. Using Explorer, create the following backup directories: - $BAK_DIR\Express\Manager\etc - $BAK_DIR\Express\Manager\etc\db Copy the subdirectories and files in the following source directory to the backup destination directory. Source directory $INS_DIR\Express\Manager\etc\db Destination directory $BAK_DIR\Express\Manager\etc\db Copy the following backup source file to the backup destination directory. Source file $INS_DIR\Express\Manager\etc\express_manager.ini Destination directory $BAK_DIR\Express\Manager\etc 3. Back up the management information for disk storage system. Using Explorer, create the following backup directory: - $BAK_DIR\Storage Cruiser\Manager\etc\opt\FJSVssmgr\current - $BAK_DIR\Storage Cruiser\Manager\var\opt\FJSVssmgr\current\opencimom\logr Copy the subdirectories and files in the following source directory to the backup destination directory. Source directory $INS_DIR\Storage Cruiser\Manager\var\opt\FJSVssmgr \current\opencimom\logr Destination directory $BAK_DIR\Storage Cruiser\Manager\var\opt\FJSVssmgr \current\opencimom\logr
121 Copy the following backup source file to the backup destination directory. Source file $INS_DIR\Storage Cruiser\Manager\etc\opt\FJSVssmgr \current\sanma.conf Destination directory $BAK_DIR\Storage Cruiser\Manager\etc\opt\FJSVssmgr \current 4. Back up essential files. Using Explorer, create the following backup directories. - $BAK_DIR\Storage Cruiser\Manager\etc\opt\FJSVtrccb\2.0 - $BAK_DIR\Storage Cruiser\Manager\var\opt\FJSVtrccb\2.0\ac - $BAK_DIR\Storage Cruiser\Manager\var\opt\FJSVtrccb\2.0\db - $BAK_DIR\Storage Cruiser\Manager\var\opt\FJSVtrccb\2.0\sr - $BAK_DIR\Storage Cruiser\Manager\var\opt\FJSVssmgr\current - $BAK_DIR\Storage Cruiser\Manager\var\opt\FJSVssmgr\current\vsccompose Copy the subdirectories and files in the following source directories to the backup destination directories If any subdirectory or file does not exist, backup is not needed. Source directory $INS_DIR\Storage Cruiser\Manager\etc\opt\FJSVtrccb\2.0 $INS_DIR\Storage Cruiser\Manager\var\opt\FJSVtrccb \2.0\ac $INS_DIR\Storage Cruiser\Manager\var\opt\FJSVtrccb \2.0\db $INS_DIR\Storage Cruiser\Manager\var\opt\FJSVtrccb\2.0\sr $INS_DIR\Storage Cruiser\Manager\var\opt\FJSVssmgr \current\vsccompose Destination directory $BAK_DIR\Storage Cruiser\Manager\etc\opt\FJSVtrccb\2.0 $BAK_DIR\Storage Cruiser\Manager\var\opt\FJSVtrccb \2.0\ac $BAK_DIR\Storage Cruiser\Manager\var\opt\FJSVtrccb \2.0\db $BAK_DIR\Storage Cruiser\Manager\var\opt\FJSVtrccb \2.0\sr $BAK_DIR\Storage Cruiser\Manager\var\opt\FJSVssmgr \current\vsccompose Copy the following backup source file to the backup destination directory. Source file $INS_DIR\Storage Cruiser\Manager\var\opt\FJSVssmgr \current\systemevent.csv Destination directory $BAK_DIR\Storage Cruiser\Manager\var\opt\FJSVssmgr \current 5. Back up files that are related to the performance management function. If you are using the performance management function, this step is unnecessary. Using Explorer, create the following backup directory. - $BAK_DIR\Storage Cruiser\Manager\var\opt\FJSVssmgr\current\perf Copy the subdirectories and files in the following source directory to the backup destination directory. Source directory $INS_DIR\Storage Cruiser\Manager\var\opt\FJSVssmgr \current\perf Destination directory $BAK_DIR\Storage Cruiser\Manager\var\opt\FJSVssmgr \current\perf 6. If Advanced Copy function is used, back up the files associated with definition of copy group and copy pair. Using Explorer, create the following backup directories. - $BAK_DIR\AdvancedCopy Manager Copy Control Module\etc - $BAK_DIR\AdvancedCopy Manager Copy Control Module\etc\db
122 - $BAK_DIR\AdvancedCopy Manager Copy Control Module\etc\db\cg - $BAK_DIR\AdvancedCopy Manager Copy Control Module\etc\prop - $BAK_DIR\AdvancedCopy Manager Copy Control Module\var\micc\database Copy the following backup source files to the backup destination directory. Source file $INS_DIR\AdvancedCopy Manager Copy Control Module \etc\db\eternus.xml $INS_DIR\AdvancedCopy Manager Copy Control Module \var\micc\database\devicereglist.xml Destination directory $BAK_DIR\AdvancedCopy Manager Copy Control Module \etc\db $BAK_DIR\AdvancedCopy Manager Copy Control Module \var\micc\database If it exists, copy the following backup source files to the backup destination directory. Source file $INS_DIR\AdvancedCopy Manager Copy Control Module \etc\prop\user.properties $INS_DIR\AdvancedCopy Manager Copy Control Module \etc\stxc.alias $INS_DIR\AdvancedCopy Manager Copy Control Module \etc\stxcvolinf Destination directory $BAK_DIR\AdvancedCopy Manager Copy Control Module \etc\prop $BAK_DIR\AdvancedCopy Manager Copy Control Module \etc $BAK_DIR\AdvancedCopy Manager Copy Control Module \etc Copy the subdirectories and files in the following backup source directory to the backup destination directory. Source directory $INS_DIR\AdvancedCopy Manager Copy Control Module \etc\db\cg Destination directory $BAK_DIR\AdvancedCopy Manager Copy Control Module \etc\db\cg 7. If the license information was being registered, save files about the definition of the license information. Using Explorer, create the following backup directory: - $BAK_DIR\License Manager\var Copy the Source the subdirectories and files in the following backup source directory to the backup destination directory. Source directory $INS_DIR\License Manager\var Destination directory $BAK_DIR\License Manager\var 8. Restart the services Open Service Control Manager to start the following four services. - ETERNUS SF Express Manager - ETERNUS SF Express Apache Service - ETERNUS SF Express Tomcat Service - ETERNUS SF Storage Cruiser Manager 7.2 Restoring Express Manager Environment If any failure occurs in the Management server, take the following procedure to restore Management server environment. All operations are performed on the Management server
123 Information About description in the procedure - $BAK_DIR means a backup destination directory. - $INS_DIR means a directory in which ETERNUS Express Manager is installed. 1. Install Express Manager. Refer to the "C.1 Installing" to reinstall Express Manager. 2. Stop the services. Open Service Control Manager to stop the following four services. - ETERNUS SF Express Manager - ETERNUS SF Express Apache Service - ETERNUS SF Express Tomcat Service - ETERNUS SF Storage Cruiser Manager 3. Restore various settings information. Using Explorer, create the following directories, if they do not exist. - $INS_DIR\Express\Manager\etc - $INS_DIR\Express\Manager\etc\db Copy the subdirectories and files in the following backup source directory to the backup destination directory. Source directory $BAK_DIR\Express\Manager\etc\db Destination directory $INS_DIR\Express\Manager\etc\db Copy the following file from the backup source to the restore destination directory. Source file $BAK_DIR\Express\Manager\etc\express_manager.ini Destination directory $INS_DIR\Express\Manager\etc 4. Restore the management information for disk storage system. By using Explorer, delete the subdirectories and files in the restore destination directory shown below. Do not delete the restore destination directory itself. If that directory does not exist, create it. - $INS_DIR\Storage Cruiser\Manager\var\opt\FJSVssmgr\current\opencimom\logr By using Explorer, delete the file in the restore desitination directory shown below. - $INS_DIR\Storage Cruiser\Manager\etc\opt\FJSVssmgr\current\sanma.conf Copy the subdirectories and files in the following backup source directory to the restore destination directory. Source directory $BAK_DIR\Storage Cruiser\Manager\var\opt\FJSVssmgr \current\opencimom\logr Destination directory $INS_DIR\Storage Cruiser\Manager\var\opt\FJSVssmgr \current\opencimom\logr Copy the following file from the backup source to the restore destination directory. Source file $BAK_DIR\Storage Cruiser\Manager\etc\opt\FJSVssmgr \current\sanma.conf Destination directory $INS_DIR\Storage Cruiser\Manager\etc\opt\FJSVssmgr \current
124 5. Restore essential files. By using Explorer, delete the subdirectories and files in the restore destination directories shown below. Do not delete the restore destination directories themselves. If these directories do not exist, create them. - $INS_DIR\Storage Cruiser\Manager\etc\opt\FJSVtrccb\2.0 - $INS_DIR\Storage Cruiser\Manager\var\opt\FJSVtrccb\2.0\ac - $INS_DIR\Storage Cruiser\Manager\var\opt\FJSVtrccb\2.0\db - $INS_DIR\Storage Cruiser\Manager\var\opt\FJSVtrccb\2.0\sr - $INS_DIR\Storage Cruiser\Manager\var\opt\FJSVssmgr\current\vsccompose Delete the following file. - $INS_DIR\Storage Cruiser\Manager\var\opt\FJSVssmgr\current\systemevent.csv Copy the subdirectories and files in the following backup source directories to the restore destination directories. If no subdirectory or file exists, restore is unneeded. Source directory $BAK_DIR\Storage Cruiser\Manager\etc\opt\FJSVtrccb\2.0 $BAK_DIR\Storage Cruiser\Manager\var\opt\FJSVtrccb \2.0\ac $BAK_DIR\Storage Cruiser\Manager\var\opt\FJSVtrccb \2.0\db $BAK_DIR\Storage Cruiser\Manager\var\opt\FJSVtrccb\2.0\sr $BAK_DIR\Storage Cruiser\Manager\var\opt\FJSVssmgr \current\vsccompose Destination directory $INS_DIR\Storage Cruiser\Manager\etc\opt\FJSVtrccb\2.0 $INS_DIR\Storage Cruiser\Manager\var\opt\FJSVtrccb \2.0\ac $INS_DIR\Storage Cruiser\Manager\var\opt\FJSVtrccb \2.0\db $INS_DIR\Storage Cruiser\Manager\var\opt\FJSVtrccb \2.0\sr $INS_DIR\Storage Cruiser\Manager\var\opt\FJSVssmgr \current\vsccompose Copy the following file from the backup source to the restore destination directory. Source file $BAK_DIR\Storage Cruiser\Manager\var\opt\FJSVssmgr \current\systemevent.csv Destination directory $INS_DIR\Storage Cruiser\Manager\var\opt\FJSVssmgr \current 6. Restore files that are related to the performance management function. If you are not using the performance management function, this step is unnecessary. By using Explorer, delete the subdirectories and files in the restore destination directory shown below. Do not delete the restore destination directory itself. If that restore destination directory does not exist, create it. - $INS_DIR\Storage Cruiser\Manager\var\opt\FJSVssmgr\current\perf Copy the subdirectories and files in the following directory from the backup source to the restore destination directory. Source directory $BAK_DIR\Storage Cruiser\Manager\var\opt\FJSVssmgr \current\perf Destination directory $INS_DIR\Storage Cruiser\Manager\var\opt\FJSVssmgr \current\perf 7. If Advanced Copy function is used, restore the files associated with definition of copy group and copy pair. By using Explorer, delete the subdirectories and files in the restore destination directories shown below. Do not delete the restore destination directories themselves. If these directories do not exist, create them. - Subdirectories and files other than "cg" directory under $INS_DIR\AdvancedCopy Manager Copy Control Module\etc\db - $INS_DIR\AdvancedCopy Manager Copy Control Module\etc\db\cg
125 - $INS_DIR\AdvancedCopy Manager Copy Control Module\var\micc\database Delete following files only if it exists. Do not delete directories. - $INS_DIR\AdvancedCopy Manager Copy Control Module\etc\prop\user.properties - $INS_DIR\AdvancedCopy Manager Copy Control Module\etc\stxc.alias - $INS_DIR\AdvancedCopy Manager Copy Control Module\etc\stxcvolinf Copy the following files from the backup source to the restore destination directories. Source file $BAK_DIR\AdvancedCopy Manager Copy Control Module \etc\db\eternus.xml $BAK_DIR\AdvancedCopy Manager Copy Control Module \var\micc\database\devicereglist.xml Destination directory $INS_DIR\AdvancedCopy Manager Copy Control Module \etc\db $INS_DIR\AdvancedCopy Manager Copy Control Module \var\micc\database If it exists, copy the following files from the backup source to the restore destination directories. Source file $BAK_DIR\AdvancedCopy Manager Copy Control Module \etc\prop\user.properties $BAK_DIR\AdvancedCopy Manager Copy Control Module \etc\stxc.alias $BAK_DIR\AdvancedCopy Manager Copy Control Module \etc\stxcvolinf Destination directory $INS_DIR\AdvancedCopy Manager Copy Control Module \etc\prop $INS_DIR\AdvancedCopy Manager Copy Control Module \etc $INS_DIR\AdvancedCopy Manager Copy Control Module \etc Copy the subdirectories and files in the following backup source directory to the restore destination directory. Source directory $BAK_DIR\AdvancedCopy Manager Copy Control Module\etc \db\cg Destination directory $INS_DIR\AdvancedCopy Manager Copy Control Module \etc\db\cg 8. If the license information was being registered, restore the files about the definition of the license information. Copy the subdirectories and files in the following backup source directory to the restore destination directory. Source directory $BAK_DIR\License Manager\var Destination directory $INS_DIR\License Manager\var 9. Restart the service. Open Service Control Manager to start the following four services. - ETERNUS SF Express Manager - ETERNUS SF Express Apache Service - ETERNUS SF Express Tomcat Service - ETERNUS SF Storage Cruiser Manager 7.3 Changing Express Manager Environment Changing port numbers Express uses the following four port numbers
126 port number service name protocol Note 9853 esfexpressmgr tcp Express Manager service 9855 esfexpressweb tcp Express Web GUI service 4917 sscruisera tcp Port number used inside Express nfport tcp Port number used inside Express Those port numbers are defined in the services file of the system. Take the following procedure to change the port numbers used by Express. 1. Open the file "%SystemRoot%\system32\drivers\etc\services" with a notepad. 2. Pick out the entry of a service name to be changed to change its entry port number. A port number can be entered between 1024 and However, if you want to change a port number, a number from 5001 or more to or less is recommended. # <service name> <port number>/<protocol> [aliases...] [#<comment>] # esfexpressmgr 9853/tcp esfexpressweb 9855/tcp nfport 23456/tcp sscruisera 4917/tcp 3. Save the "%SystemRoot%\system32\drivers\etc\services" file to close. 4. Edit httpd.conf file. 1. Open the "$INS_DIR\Express\Manager\sys\apache\conf\httpd.conf" file with text editor. 2. Change the port number listed immediately after the Listen directive. 3. Save the "$INS_DIR\Express\Manager\sys\apache\conf\httpd.conf" file and close it. 5. Restart the Management server. The Express Web GUI uses the following ports internally. port number protocol Note 8005 tcp Port number used inside Express 8009 tcp Port number used inside Express 8080 tcp Port number used inside Express 8443 tcp Port number used inside Express If the above port numbers are used by other applications, the Express Web GUI can not start. In this case, change the port numbers according to the following steps. 1. Open Service Control Manager in the Manager Server to stop the following services in the order given below. 1. ETERNUS SF Express Tomcat Service 2. ETERNUS SF Express Apache Service 2. Open the following files with Text Editor. - $INS_DIR\ETERNUS SF\Express\Manager\sys\tomcat\conf\server.xml - $INS_DIR\ETERNUS SF\Express\Manager\sys\apache\conf\httpd.conf

127 3. Change the port numbers (8005, 8009, 8080, 8443) in the following parts of server.xml and httpd.conf to other numbers. - server.xml Line 18 Line httpd.conf Line Save and close these files. 5. Start the following services in the order given below by Service Control Manager. 1. ETERNUS SF Express Apache Service 2. ETERNUS SF Express Tomcat Service Changing the IP address The following is the procedure to change the IP address for a Management server. 1. Stop the service Open Service Control Manager to stop the following four services. - ETERNUS SF Express Manager - ETERNUS SF Express Apache Service - ETERNUS SF Express Tomcat Service - ETERNUS SF Storage Cruiser Manager 2. Change the IP address of a Management server. 3. Stop the Management server. 4. If the IP address of the Management server is specified for SNMP Trap destination, change the specified IP address using the ETERNUS Web GUI. Take the following procedure to change the IP address of the Express Manager server

128 1. Change the specified SNMP Trap destination using the ETERNUS Web GUI. The SNMP Trap destination is displayed in the "Trap" screen in "Setup SNMP Agent". 2. Delete the pre-change IP address and specify the post-change IP address and community name. 3. Click the [Add New Destination] button to add the new destination. 5. Restart the Management server. 6. Restart the Express Web GUI and connect to Management server running on the server whose IP address has been changed. 7.4 Changing Server Information Add/change/delete the server information managed with Express. Then, follow the procedure for "6.5 Changing configuration" Additionally registering servers Additionally register a server to Express. Follow the procedure for "5.6 Registering Servers" Displaying server information Display the server information registered to Express. You can check the following information with the information registered in "A.1 Server Information". - Disk storage system name that identifies Host ID1. - Disk storage system name that identifies Host ID2. - Volume name connected to a server
129 Take the following procedure to check server information. 1. Start the Express Web GUI. 2. Select a target server from [Storage] tab in [Monitoring] pane Changing server information Change the server information registered to Express. Take the following procedure to change the server information. 1. Select a server whose information is changed from [Storage] tab in [Monitoring] pane. 2. Click [Change Server] in [Action] pane. 3. Update the server information on the displayed screen Changing HBA information Change the HBA information of business server registered to Express. When HBA of the server is replaced, it is necessary to update HBA information by this operation. Take the following procedure to change the server information. 1. Select a server whose information is changed from [Storage] tab in [Monitoring] pane. 2. Click [Change Server] in [Action] pane. 3. Update the HBA information on the displayed screen. For more information about items to be specified, see "A.1 Server Information" Deleting servers Delete the servers registered to Express. Take the following procedure to delete the servers. 1. Select a server to be deleted from [Storage] tab in [Monitoring] pane. 2. Click [Server] - [Delete] in [Action] pane. 3. Check the content of the displayed screen and click the [OK] button to delete the server. 7.5 Changing Disk Storage System Information Add/change/delete the information for disk storage systems manged with Express. Take the procedure described in "6.5 Changing configuration" Additionally registering disk storage system Additionally add a disk storage system to Express. Refer to the "5.4 Registering Disk Storage Systems" to additionally add a disk storage system
130 7.5.2 Changing disk storage system name Take the following procedure to change disk storage system names. 1. Use the ETERNUS Web GUI or FibreCAT SX WBI (web-browser interface) whose name is changed to change the disk storage system name. 2. Start the Express Web GUI. 3. Select a management server from [Storage] tab in [Monitoring] pane. 4. Select a disk storage system whose name is changed from [Disk Array] menu. 5. Select [Disk Array] - [Change] in [Action] pane. 6. Change the name field to what has been specified in the disk storage system side to edit it, and click [Save] button. 7. Click the [Refresh] button to reload the device information, and make sure that change has been properly done Changing the IP address The following is the procedure to change the IP address for disk storage system. 1. Use the ETERNUS Web GUI or FibreCAT SX WBI (web-browser interface) whose IP address is changed to change the IP address. 2. Start the Express Web GUI. 3. Select a management server from [Storage] tab in [Monitoring] pane. 4. Select a disk storage system whose IP address is changed from [Disk Array] menu. 5. Select [Disk Array] - [Change] in [Action] pane. 6. Change the IP address field to a new IP address that has been specified for the disk storage system side or re-enter the FQDN that was registered on the DNS server and edit it, and click [Save] button. Note Even if the IP address of the disk storage system is registered by the FQDN, Express is managed by the IP address. If the IP address of the disk storage system registered on the DNS server has been changed, enter the FQDN registered again to change the registered information. 7. Click the [Refresh] button to reload the device information, and make sure that change has been properly done Changing the SNMP community name Take the following procedure to change the SNMP community name of a disk storage system. 1. Use the ETERNUS Web GUI or FibreCAT SX WBI (web-browser interface) whose SNMP community name is changed to change the SNMP community name. 2. Start the Express Web GUI. 3. Select a management server from [Storage] tab in [Monitoring] pane. 4. Select a disk storage system whose SNMP community name is changed from [Disk Array] menu. 5. Select [Disk Array] - [Change] in [Action] pane. 6. Change the SNMP community name field to what has been specified in the disk storage system side to edit it, and click [Save] button. 7. Click the [Refresh] button to reload the device information, and make sure that change has been properly done
131 7.5.5 Changing the User Name or Password The following is the procedure to change the User Name or Password to access a disk storage system. 1. Start the Express Web GUI. 2. Select a management server from [Storage] tab in [Monitoring] pane. 3. Select a disk storage system whose user name or password is changed from [Disk Array] menu. 4. Select [Disk Array] - [Reset password] in [Action] pane. 5. Change the user name or password, and click [OK] button. 6. Click the [Refresh] button to reload the device information, and make sure that change has been properly done Deleting disk storage systems Take the following procedure to delete disk storage systems. 1. Start the Express Web GUI. 2. Select a management server from [Storage] tab in [Monitoring] pane. 3. Select a disk storage system to be deleted from [Disk Array] menu. 4. Click [Disk Array] - [Delete] in [Action] pane. A dialog box to confirm a disk storage system is deleted, is displayed
132 5. To delete the selected disk storage system, click the [Yes] button, and to cancel deletion, click the [No] button. To delete a disk storage system on which copying is in progress, click the [Force] checkbox. Point If the [Force] checkbox is clicked while copying is in progress, the process varies with the status of the checkbox of [Force]. - If [Force] checkbox is checked: Copy is canceled and the disk storage system is deleted. - If [Force] checkbox is not checked: The disk storage system is deleted with copying in progress. 7.6 Changing Volume Information Add/change/delete the volume information managed with Express. Then, follow the procedure described in the "6.5 Changing configuration". This function is for ETERNUS Disk storage system only Additionally registering volumes Additionally register a volume to a server or a disk storage system. Refer to the "5.8 Creating Volumes" to additionally register a volume Assign volumes Assign the information on a volume used on a server. Take the following procedure to assign volume. 1. Select one disk storage system from [Storage] tab in [Monitoring] pane to display detail information
![2. Select [Volume] - [Assign] in [Action] pane, and the "Assign volume" screen is displayed. 3. Select a server. 4.](/docs-images/76/73074827/images/133-0.jpg "Add a new volume assigned to the server from disk storage system or delete it from a list of volumes to cancel assignment. 5. Click the [OK] button to assign volume.")
133 2. Select [Volume] - [Assign] in [Action] pane, and the "Assign volume" screen is displayed. 3. Select a server. 4. Add a new volume assigned to the server from disk storage system or delete it from a list of volumes to cancel assignment. 5. Click the [OK] button to assign volume. Note Please stop access to the port that is connected from the volume when changing or removing mapping of volume, or removing volume. To stop access, it is necessary that the server connected from affected volumes are stopped or the volumes are unmounted. To confirm affected volumes, follow the following procedures. 1. Select [LUN Mapping] in [Storage] tab in [Monitoring] pane. 2. Select a entry in "List of Affinity Groups" screen. "Affinity Group Details" screen will show up. 3. When the volume that to be changed or to be deleted exists in the volume list displayed on "Affinity Group Details" screen, it is necessary to unmount from all the volumes in the same affinity group. 4. Repeat step2 to step3, and unmount all volume in the affinity group exists where volume that changing or removing. Point Mount is standard function of OS. Refer to manual of OS for details Deleting volumes Delete a volume used on a disk storage system

134 Take the following procedure to delete a volume. 1. Cancel assignment of a volume to be deleted from server. Refer to the "7.6.2 Assign volumes" to cancel assignment. 2. Select one disk storage system form the storage tree to display detail information. 3. Select [Volume] - [Delete] in [Action] pane, and the "Delete volume" screen is displayed. 4. Select a volume to be deleted from a list of volumes to check the checkbox. 5. Click the [OK] button to delete the volume. Note Please stop access to the port that is connected from the volume when changing or removing mapping of volume, or removing volume. To stop access, it is necessary that the server connected from affected volumes are stopped or the volumes are unmounted. To confirm affected volumes, follow the following procedures. 1. Select [LUN Mapping] in [Storage] tab in [Monitoring] pane. 2. Select a entry in "List of Affinity Groups" screen. "Affinity Group Details" screen will show up. 3. When the volume that to be changed or to be deleted exists in the volume list displayed on "Affinity Group Details" screen, it is necessary to unmount from all the volumes in the same affinity group. 4. Repeat step2 to step3, and unmount all volume in the affinity group exists where volume that changing or removing. Point Mount is standard function of OS. Refer to manual of OS for details
135 7.7 Changing RAID Group Information Add/delete RAID group information managed with Express. This function is for ETERNUS Disk storage system only Additionally registering RAID groups Additionally register a disk storage system to a RAID. Refer to the "5.7 Creating RAID Groups" to additionally register a RAID group Deleting RAID groups Delete a RAID group used on a disk storage system. Take the following procedure to delete a RAID group. 1. Select a disk storage system from which to delete a RAID group, from [Storage] tab in [Monitoring] pane. 2. Execute [RAID Group] - [Delete] in [Action] pane. Note Any RAID group to which volumes are created cannot be deleted
136 Appendix A Configuration Information for Express This appendix explains the information to be specified to Express. Note When the host response of the same name has already been registered in ETERNUS, Express does not re-register it. See For the required items for Express installation or operation, refer to "Chapter 4 List of Setting Items for Express". A.1 Server Information The following is specified for Express as server information. This information is for ETERNUS Disk storage system only. Table A.1 Server configuration information Name Alias HBA Type Item This is a server name. You can enter a maximum of 16 one-byte alphanumeric characters and symbols. However, the symbols of percent (%) at the head of a name, backslash (\), question (?) and comma (,) are unusable. Server host name and computer name should be unique within a storage system. Apart from server name, this is a name easy to understand "what operation is in progress on this server". You can enter a maximum of 16 one-byte alphanumeric characters and symbols. However, the symbols of percent (%) at the head of a name, backslash (\), question (?) and comma (,) are unusable. This is a HBA type of server and disk storage system. Select any of the following. - FC - iscsi - SAS However, use the same HBA type within 1 server. Host ID1 Host ID2 This is a host identifier of HBA, which is any of the following. - host WWN(World Wide Name) - iscsi name and IP address - SAS address Select the Host ID from a list displayed by Express when the [Discover] button is pressed, or enter it manually. To find the Host ID, refer to HBA manuals. - For FC connection: Select host WWN(World Wide Name) name. - For iscsi connection:
137 Item Select iscsi name and IP address. IP address can be omitted. - For SAS connection: Select SAS address. Host ID 2 is not a required item. Enter it only when you use 2 HBAs. Note When Host ID of iscsi is selected from the pull-down list, isns server setting is required in advance. To set isns server, please refer to manual of the disk storage system. When registering HBA information for a server iscsi connection in Express, IP address must be entered manually in the case of an ETERNUS DX60/DX80 with a firmware version prior to V10L40. When the server's HBA IP address is changed, please update the HBA information in Express. For an ETERNUS DX60/DX80 with a firmware version V10L40 or later or for an ETERNUS DX80 S2/DX90 S2, input of the IP address can be omitted. When IP address is omitted, though it will not be necessary to set again even if IP address of the server HBA is changed, only 1 group of volumes (Affinity Group) can be connected for the iscsi Name of the HBA. Moreover, please do not input the IP address of the server's HBA information when all of the following conditions are met: 1. The Disk storage system to be managed with Express is an ETERNUS DX60/DX80 with a firmware version V10L40 or later. 2. Express manages the system that with the ETERNUS Disk storage system of iscsi model has already been composed. 3. IP address of the host information that is registered on the ETERNUS Disk storage system of 2) is omitted (It is displayed as "*"). 4. The host information of 3) is equivalent to HBA information of the server that is registered on Express. If it is corresponding to all the above-mentioned conditions, and if IP address is entered, volume information that is connected with the server will not be correctly displayed. Please check the host setting of ETERNUS Disk storage system using ETERNUS Web GUI in advance. A.2 Disk Storage System Information The following information is specified for Express as disk storage system information. Table A.2 Configuration information for disk storage system Name Alias Item IP Address or FQDN This is a name of disk storage system. You can enter a maximum of 16 one-byte alphanumeric characters and symbols. However, the symbols of percent (%) at the head of a name, backslash (\), question (?) and comma (,) are unusable. Default is "ETERNUS****"(**** is a serial number). Apart from disk storage system name, this is a name easy to understand "what operation is in progress on this disk storage system". You can enter a maximum of 16 one-byte alphanumeric characters and symbols. However, the symbols of percent (%) at the head of a name, backslash (\), question (?) and comma (,) are unusable. It can be omitted. This is an IP address or FQDN(Full Qualified Domain Name) of disk storage system. When using an IP address, enter IPv4 address. When assigning IP address to a master CM and a slave CM respectively, enter an IP address (or FQDN) of the master CM
138 Item SNMP Community Name This is a SNMP community name required to receive SNMP Trap. You can enter a maximum of 50 one-byte alphanumeric characters, space and symbols below. '#', '$', '%'(except that it is the head character), '&', '_', '+', '-', '*', '/' Default is "public". Username User name for the ETERNUS storage system manager - For ETERNUS DX60/DX80/DX90 User name with ETERNUS storage system administrator privileges. - For ETERNUS DX80 S2/DX90 S2 User name with ETERNUS storage system Software Role assigned. Password Password for the ETERNUS storage system manager - For ETERNUS DX60/DX80/DX90 User password with ETERNUS storage system administrator privileges. - For ETERNUS DX80 S2/DX90 S2 User password with ETERNUS storage system Software Role assigned. Encryption Mode "Disable" or "Enable" Encryption Mode of ETERNUS Disk storage system. Note If the encryption mode is changed to "Disable", there are the following conditions. - ETERNUS Disk storage system must reboot after the change. - All the Encryption volume must be removed. See Refer to "A.5 Information on Advanced Copy Function" for Advanced Copy License and Advanced Copy Parameter. A.3 Volume Information The following is specified for Expess as volume information. This information is for ETERNUS Disk storage system only. Table A.3 Volume configuration information Name Alias Item This is a volume name. Volume name should be unique for each server. You can enter a maximum of 16 one-byte alphanumeric characters and symbols. However, the symbols of backslash (\), question (?) and comma (,) are unusable. And the symbol of percent (%) at the head of a name is unusable. The maximum number of characters for specifiable volume names changes depending on the number of volumes made at the same time. Apart from volume name, this is a name easy to understand "what operation is in progress on this volume". You can enter a maximum of 16 one-byte alphanumeric characters and symbols
139 Size Type Item The maximum number of characters for specifiable volume aliases changes depending on the number of volumes made at the same time. This is an available size on volume. This can be specified in MB, GB, or TB as follows. - OPEN or SDV - ETERNUS DX60/DX80/DX90 - MB Specifiable up to 24MB to MB per MB. - GB Specifiable up to 1GB to 8191GB per GB. - TB Specifiable up to 1MB to 7TB per TB. - ETERNUS DX80 S2/DX90 S2 - SDPV - GB - MB Specifiable up to 24MB to MB per MB. - GB Specifiable up to 1GB to GB per GB. - TB Specifiable up to 1MB to 128TB per TB. Specifiable up to 1GB to 2048GB per GB. - TB Specifiable up to 1TB to 2TB per TB. This is a volume type. Any of the following is selectable. - OPEN - SDV - SDPV Source Volume Size This is a source volume size of SDV, which can be specified only when a volume type is SDV. This can be specified in MB, GB, or TB as follows. - ETERNUS DX60/DX80/DX90 - MB Specifiable up to 64MB to MB per MB. - GB Specifiable up to 1GB to 8191GB per GB. - TB Specifiable up to 1MB to 7TB per TB. - ETERNUS DX80 S2/DX90 S2 - MB Specifiable up to 64MB to MB per MB. - GB Specifiable up to 1GB to GB per GB
140 Item Number of Volumes - TB Specifiable up to 1MB to 128TB per TB. This is the number of volumes to be created. The number of volumes that can be created at one time is as follows: - OPEN or SDV 100 or less - SDPV 10 or less Encrypt Whether or not to encrypt a volume. Either of the following is selectable. - Enable - Disable Default is "Disable". RAID Level This is a parameter to specify a RAID group in the list of "RAID group" of the screen. Select "Allocation", which is the number of volumes to be allocated in a "RAID group". Select "All" when you want to make all RAID groups displayed. Default is "All". Note - In the case of creating two or more volumes at the same time, "_ x"(x is a digit) is given behind the specified volume name and the volume alias. The larger the number of volumes to be created at the same time is, the smaller the maximum number of characters specifiable for the volume name and the volume alias are. - For 1 volume: VOLUME-NAME (The maximum number of specifiable characters 16.) - For 2-10 volumes: VOLUME-NAME_x (The maximum number of specifiable characters 14.) - For 11 or more volumes: VOLUME-NAME_xx (The maximum number of specifiable characters 13.) - Specified Size value is ignored, when the SDV on ETERNUS DX80 S2 and DX90 S2 is specified. - When using snapshot copy (SnapOPC+) on ETERNUS DX60, DX80 and DX90, it is recommended to specify at least one SDPV to each CM of an ETERNUS Disk storage system. Also, when using snapshot copy (SnapOPC+) on ETERNUS DX80 S2 and DX90 S2, each CM of the ETERNUS Disk storage needs at least one SDPV. In addition, if any encrypted OPEN volume exists, an encrypted SDPV is required apart from a normal SDPV. It is needed to encrypt copy destination volume, if copy source volume is encrypted when Advanced Copy is used. - If multiple volumes are created in RAID groups, it may not be able to create them up to maximum user capacity. To create volumes efficiently without waste of user capacity, set the volume size to multiples of base size (stripe size). Base size for each RAID Level is as follows. RAID Level (*1) RAID1 1D+1M 1 (MB) RAID1+0 2D+2M 1 (MB) 3D+3M Base size(*2)(mb integer conversion) 3 (MB)
141 RAID Level (*1) Base size(*2)(mb integer conversion) 4D+4M 1 (MB) 5D+5M 5 (MB) 6D+6M 3 (MB) 7D+7M 7 (MB) 8D+8M 1 (MB) 9D+9M 9 (MB) 10D+10M 5 (MB) 11D+11M 11 (MB) 12D+12M 3 (MB) 13D+13M 13(MB) 14D+14M 7 (MB) 15D+15M 15 (MB) 16D+16M 1 (MB) RAID5 2D+1P 1 (MB) 3D+1P 3 (MB) 4D+1P 1 (MB) 5D+1P 5 (MB) 6D+1P 3 (MB) 7D+1P 7 (MB) 8D+1P 1 (MB) 9D+1P 9 (MB) 10D+1P 5 (MB) 11D+1P 11 (MB) 12D+1P 3 (MB) 13D+1P 13 (MB) 14D+1P 7 (MB) 15D+1P 15 (MB) RAID5+0 (2D+1P)*2 1 (MB) (3D+1P)*2 3 (MB) (4D+1P)*2 1 (MB) (5D+1P)*2 5 (MB) (6D+1P)*2 3 (MB) (7D+1P)*2 7 (MB) (8D+1P)*2 1 (MB) (9D+1P)*2 9 (MB) (10D+1P)*2 5 (MB) (11D+1P)*2 11 (MB) (12D+1P)*2 3 (MB) (13D+1P)*2 13 (MB)
142 RAID Level (*1) (14D+1P)*2 (15D+1P)*2 Base size(*2)(mb integer conversion) 7 (MB) 15 (MB) RAID6 3D+2P 3 (MB) 4D+2P 5D+2P 6D+2P 7D+2P 8D+2P 9D+2P 10D+2P 11D+2P 12D+2P 13D+2P 14D+2P *1 : D is Data,M is Mirror,P is Parity *2 : Base size at volume creation 1 (MB) 5 (MB) 3 (MB) 7 (MB) 1 (MB) 9 (MB) 5 (MB) 11 (MB) 3 (MB) 13 (MB) 7 (MB) ETERNUS DX60, DX80/DX80 S2, DX90/DX90 S2 manage the size of volume as base size unit. Therefore, it may be remained unused area in RAID group if the size of volume is not multiple of the base size. Base size is not depending on disk drive capacity. Following are the image of volume size in multiple of base size and not multiple of base size. A.4 RAID Group Information The following is specified for Express as RAID group information
143 This information is for ETERNUS Disk storage system only. Table A.4 RAID group configuration information Name RAID Level Item This is a RAID group name. You can enter a maximum of 16 one-byte alphanumeric characters and symbols. However, the symbols of percent (%) at the head of a name, backslash (\), question (?) and comma (,) are unusable. This is a RAID level. Select any of the following according to purposes. - RAID0 - RAID1 - RAID1+0 - RAID5 - RAID5+0 - RAID6 Assigned CM This is a disk storage system CM number used for disk. Check the CM number of a disk storage system to be connected and select any of the following. - Auto - CM#0 - CM#1 Default is "Auto". Disk Selection Select either of the following to specify disks that make up a RAID group. - Automatic - Manual When "Manual" is selected, a list of disks is displayed. Select disks to be used from it. Default is "Automatic". Number of Disks This is the number of disks that make up a RAID group. Only when you select "Automatic" in "Disk Selection", select the number of disks here. Point When the above items are specified, the capacity of a RAID group to be created is displayed in the "Raw Capacity" column. A.5 Information on Advanced Copy Function For Express is specified the following information for disk storage system (ETERNUS Disk storage system) that uses Advanced Copy functions. This function is for ETERNUS Disk storage system only
144 Table A.5 Information on Advanced Copy functions Item Advanced Copy configuration Advanced Copy configuration information is as follows. - Registration status of Advanced Copy License - Table Size - Resolution Remote Advanced Copy configuration Remote Advanced Copy configuration information is as follows. - Connection Type - Line speed - Compression ratio - REC Buffer Note For the information that is not described above, specify it using the ETERNUS Web GUI. See For Advanced Copy functions, see "Appendix B Advanced Copy Function". A.6 Information For Express, the following information is specified as an administrator and its contact address to inform to when any trouble occurs in a storage system. Point Be sure to specify contact information for system administrator when installing or using Express. You can enter the contact information for business administrator and hardware administrator as you choose when installing or using Express. When receiving a notification about trouble occurrence or when sending by the information collected in "How to collect trouble information", specify the contact information for each administrator. Table A.6 Information (mail configuration information) SMTP Server Mail Sender SMTP Port Item SMTP server address (IP address or FQDN) for receiving notification mail at event occurrence. It is not necessary to set if not receiving the notification mails or not sending collected information at "How to collect trouble information". Mail address for sending notification mail at event occurrence. This mail address is the sender of the notification mail. Port number used by SMTP server at receiving notification mails at event occurrence. (Default is 25)
145 With Express, the following contact information is managed on a per administrator basis. For roles of administrators, see "Chapter 3 Flow from Installation to Operation". Table A.7 Information (mail destination information) Item Person in Charge Phone Send Event Notification Administrator name. When managing a storage system with multiple administrator names, specify the representative name. You can enter alphanumeric characters and symbols. However, the symbols of percent (%) at the head of a name, backslash (\), question (?) and comma (,) are unusable. Administrator's phone number. address at which to receive a notification about trouble occurrence. A trouble in a storage system that was notified to Express Manager is notified via SNMP Trap. Select whether or not to send a notification about trouble occurrence if any trouble occurs when a storage system is in use. Selectable as to system administrator and business administrator. When a notification about trouble occurrence is received at multiple names, specify mailing list in "Mail address". Note When notifying any trouble occurrence to a hardware administrator, contact from a system administrator or a business administrator. A.7 Host Interface Information Express specifies the following information as host interface information. Note When the host response of the same name has already been registered in ETERNUS disk storage system, Express does not re-register it. Point For the information that is not described following, specify it using the ETERNUS Web GUI. Table A.8 Host interface configuration information (For FC connection) Connection Set Loop ID Loop ID Item Transfer Rate (Gbit/s) Select the topology of a target port from "Fabric" or "FC-AL". It is necessary to allocate loop ID to the target port for "FC-AL". When "FC-AL" is selected, set this item. Select either from "Manual" or "Auto". When "FC-AL" is selected, set this item. If "Auto" is selected in "Set Loop ID", "Ascending" is automatically specified. If "Manual" is selected in "Set Loop ID", enter loop ID in hexadecimal. The input range is between 0x00 and 0x7D in hexadecimal. Specify the transfer rate of the target port as follows
146 Item - 4Gbit/s Model - Automatically Gbit/s Model - Automatically Host Affinity Host Response For host affinity of the target port, select "enable" or "disable". When "disable" is selected for Host Affinity, select a host response specified for the target port. - 0:Default (ETERNUS DX60/DX80/DX90) - 0:Others (ETERNUS DX80 S2/DX90 S2) Initial value. - windowsmsdsm Recommended value to connect to the Windows host in which Microsoft Device Specific Module (DSM) is installed. - linuxdevmap Recommended value to connect the Linux host in which device-mapper-multipath is installed. - SolarisMPxIO Recommended value to connect to the Solaris host in which MPxIO is installed. - ESX4 Recommended value to connect to the VMware host in which VMware vsphere 4 (ESX 4.0) is installed. - ESX35 Recommended value to connect to the VMware host in which VMware Infrastructure 3 (ESX 3.5 or ESXi 3.5) is installed. - EgeneraPAN Recommended value to connect to the Egenera host in which PAN manager is installed. Table A.9 Host interface configuration information (For iscsi connection) Item IP Address IP address of a target port. The specifiable value is to Subnet Mask Subnet mask of a target port. The specifiable value is to Default Gateway IP address of a default gateway. The specifiable value is to
147 Item iscsi Name Alias Name Host Affinity Host Response Input the iscsi name of a target port in 1 to 233 one-byte alphanumeric characters and symbols (hyphen (-), colon (:), period (.)). Input the alias name of a target port in 1 to 31 one-byte alphanumeric characters, symbols and spaces. An iscsi name is an official name to specify a target iscsi port while an alias name is used as a nickname. For host affinity of the target port, select "enable" or "disable". When "disable" is selected for Host Affinity, select a host response specified for the target port. - 0:Default (ETERNUS DX60/DX80/DX90) - 0:Others (ETERNUS DX80 S2/DX90 S2) Initial value. - windowsmsdsm Recommended value to connect to the Windows host in which Microsoft Device Specific Module (DSM) is installed. - linuxdevmap Recommended value to connect the Linux host in which device-mapper-multipath is installed. - SolarisMPxIO Recommended value to connect to the Solaris host in which MPxIO is installed. - ESX4 Recommended value to connect to the VMware host in which VMware vsphere 4 (ESX 4.0) is installed. - ESX35 Recommended value to connect to the VMware host in which VMware Infrastructure 3 (ESX 3.5 or ESXi 3.5) is installed. - EgeneraPAN Recommended value to connect to the Egenera host in which PAN manager is installed. Table A.10 Host interface configuration information (For SAS connection) Item Host Affinity For host affinity of the target port, select "enable" or "disable". Host Response When "disable" is selected for Host Affinity, host response specified for the target port. - 0:Default (ETERNUS DX60/DX80/DX90) - 0:Others (ETERNUS DX80 S2/DX90 S2) A.8 Various Information For Express, the following information is specified besides the information described in "A.1 Server Information" through "A.6 Information"
148 Table A.11 Various information History information (Note 1) Screen Refresh Interval Events Item Login/Logout History Configuration Change History Number of days kept File Size Number of days kept File Size Number of days kept File Size Number of days to retain event history. The specifiable number is 1 to 365. (default is 30) Capacity to retain event history. A unit is KB. The specifiable value is 1 to (default is 512) Number of days to retain login and logout history. The specifiable number is 1 to 365. (default is 60) Capacity to retain login and logout history. A unit is KB. The specifiable number is 1 to (default is 512) Number of days to retain history of configuration change. The specifiable number is 1 to 365. (default is 60) Capacity to retain the history of configuration change. A unit is KB. The specifiable number is 1 to (default is 512) Update interval of the display screen on Express Web GUI on a per minute basis. The specifiable number is 0 to (default is 5) This value is recommended by greater than the default number. If you set it to 0, Auto Screen Refresh is disabled. When updating Express GUI manually, click the [Refresh] button on the Express Web GUI title bar, and the information from Express Manager is obtained and displayed on Express Web GUI. Configuration information or status of disk storage system cannot be updated. For updating configuration information and status, execute what is described in "6.5 Changing configuration" to obtain them. Note 1: As for each history, either of "Number of days kept" or "File Size" can be specified as an upper limit of history
149 Appendix B Advanced Copy Function This appendix explains the Advanced Copy function. Advanced Copy function is for ETERNUS Disk storage system only. B.1 Overview of Advanced Copy Function B.1.1 What is Advanced Copy Function? The Advanced Copy functions allow the Disk storage system to carry out high-speed copying operations itself, with no need to draw on server CPU resources. With Advanced Copy functions, at any point in time a business data volume can be copied to a separate copy volume, quickly and within the Disk storage system. Once the copy is complete, the copy volume can be separated from the business volume ensuring no further updates to the business volume are applied to the copy volume. This allows the copy volume data to be backed up to a tape device, as a point in time copy of the business data, while normal operations continue. Advanced Copy methods Advanced Copy functions provide three clone functions (EC, OPC, QuickOPC) and one snapshot function (SnapOPC+). - Clone is a full (real) copy of the original data. - Snapshot is a virtual copy of the original data. EC (Equivalent Copy) A function that always creates a synchronized copy of a business data volume on a copy volume (Mirroring method). The business volume and copy volume are synchronized but can be separated at any required time (mirror suspend). The copy volume can then be backed up to a tape device while business operations continue on the business volume. Suspend/Resume functions can be used to re-establish the mirror by copying only updated data since the mirror was suspended. OPC (One Point Copy) A function that creates a copy of the business data volume at any point in time (Background Copy). Data on the business volume is copied logically to a copy volume, quickly, as and when required. The copy volume can be used for backup operation, to a tape device, without waiting for physical copy completion, while business operations can continue on the business volume. QuickOPC A function that creates a copy of all the business data volume and subsequently only copies updated data (Background Copy). This suits large database operation where backup times must be reduced. SnapOPC+ A function that creates a copy of the data prior to it being updated (Copy-on-Write). As requires less copy volume capacity compared with clone, SnapOPC+ is ideal for copy operations for systems with relatively few updates such as file servers

150 These copy methods all copy the data as it exists at a specific point in time, but there are different features, advantages and disadvantages to each method as detailed below: Copy type Clone copy Snapshot copy Function name EC OPC QuickOPC SnapOPC+ Copy method Timing of actual copy load Effect on access to the copy source while copy is running Effect on access to the copy source after copy has "finished" Lifetime of copy session Size of copy destination area Copy action during restore Best used for... Mirror breaking method Before "mirror breaking" Background copy method After the copy command is issued Background copy method After the copy command is issued N/A Minor Minor Yes N/A Until the Equivalent state is stopped Same as the copy source (Clone) - Copy back all the data by OPC - EC Reverse (Suspend Reverse Resume) only copies updated areas - Backup to disk - Creation of testing data Slight during background copy Until background copy is completed Same as the copy source (Clone) If OPC is active, copy back only the already copied data - Backup to disk - Creation of testing data - Restoring from backup disk Slight during background copy Until session is stopped and copy is completed Same as the copy source (Clone) Copy back only the already copied data - Backup to disk - Creation of testing data - Recovery from physical disk failure when data Copy-on-write method Yes - Until session is stopped Sufficient for changed areas (Snapshot) Restore operation is not available (use OS tools to copy whole files instead) - Temporary backup area for backup to tape - Backup to disk for file server and other low modification rate data

151 Copy type Clone copy Snapshot copy Function name EC OPC QuickOPC SnapOPC+ modification rate is low (generational management is available) Note These are generic observations based on the mechanisms involved. Actual effect on servers will depend on the specifics of the usage environment. B.1.2 What is Remote Advanced Copy? Remote Advanced Copy provides a server-less remote mirroring function which ensures fast recovery when the primary site Disk storage system becomes unusable because of a disaster, such as fire, earthquake or malicious damage. Remote Advanced Copy method Remote Advanced Copy By using Fibre Channel interfaces, Remote Advanced Copy can provide lower cost remote site support up to a maximum distance of 10km between a primary storage device and a secondary device. Figure B.1 Remote Advanced Copy connection Extended Remote Advanced Copy Extended Remote Advanced Copy uses a combination of a Fibre Channel switch and WAN converter to support very long distances over WAN. Replicated data can be located at a remote site hundreds of kilometers away from the primary site. This provides high security for the protection of critical data from both man-made and natural disasters

152 Figure B.2 Extended Remote Advanced Copy connection (via FC-RA) B.1.3 Technical terms Sessions For Advanced Copy, each copying action is called a "session". Different copy source areas, copy destination areas and copy types can be specified for each session. B.1.4 Advanced Copy license To utilize Advanced Copy functions or Remote Advanced Copy functions, Advanced Copy License should be registered to an ETERNUS disk storage system. Using the ETERNUS Web GUI, confirm that Advanced Copy License has been registered to an appropriate ETERNUS disk storage system. In addition, even if Advanced Copy License is not registered to the ETERNUS disk storage system, snapshot copy (SnapOPC+) can be executed up to 8 sessions. B.2 Configuration of Advanced Copy Function B.2.1 Configuration common in all copy methods Parameter settings Specify the parameters required to use (Remote) Advanced Copy. These parameters can be set by ETERNUS Web GUI/ETERNUS CLI or Express. - Resolution is the value that determines the amount of data each bit in the copy bitmap represents. The allowed resolution settings of "1 (standard)", "2", "4", "8", and "16" respectively give 8KB, 16KB, 32KB, 64KB, and 128KB regions of data per bitmap bit. The same value is used in the ETERNUS Disk storage system. The smallest possible resolution value should be set, to reduce the internal process overhead. - Table size is the dedicated memory area required for Advanced Copy management. The table size and resolution settings are determined by the copy capacity and the number of sessions (volumes) that will be run simultaneously. B.2.2 Configuration of clone copy
153 Creating copy destination volumes When creating copy destination volumes for clone, note the following: - The type of a copy destination volume must be OPEN. SDV (Snap Data Volume) or SDPV (Snap Data Pool Volume) can not be used as a copy destination volume for clone. - The size of a copy destination volume must be the same as that of copy source volume (the original volume). - To create OPEN volume, use ETERNUS Web GUI/ETERNUS CLI because Express does not offer the feature to create OPEN volumes. B.2.3 Configuration of snapshot copy Creating copy destination volumes When creating copy destination volumes for snapshot, note the following: - The type of a copy destination volume must be SDV. OPEN or SDPV can not be used as a copy destination for snapshot. - The size of a copy destination volume must be the same as that of copy source volume (the original volume). - When creating an SDV, set the appropriate capacity. Creating Snap Data Pool (SDP) Snap Data Pool (SDP) is used for SnapOPC+. By registering standby storage areas in the SDP, it is possible to supply extra storage areas (SDPE: Snap Data Pool Elements) from the SDP whenever the amount of updates exceeds the capacity of the copy destination SDV, allowing the copy session to continue without failing. ETERNUS DX80 S2 and DX90 S2 needs SDPV. - If storage area capacity runs short in an SDV, extra storage area (SDPE) is automatically supplied from the SDP. - Once the copy session is completed, all extra storage area (SDPE) supplied to the SDV is returned to the SDP. (The SDPE is also returned to the SDP if the copy session fails.)

154 Figure B.3 SDP concept When creating copy destination volumes for snapshot, note the following: - One SDP can be created per ETERNUS Disk storage system. - SDP becomes available upon creating a dedicated SDPV. After creation, the SDPV is automatically allocated to the SDP. - If the SDV is encrypted, make sure the SDPV is also encrypted. - If the ETERNUS Disk storage system contains both encrypted and non-encrypted SDVs, then both encrypted and non-encrypted SDPVs will be needed. - Estimate the update amounts expected for each copy source volume, then decide the SDV and SDP capacities. If estimation is difficult, try setting up the SDV and SDP with a total capacity of 50% of that of the copy source (note that this is just a rule-of-thumb value and that different operating configurations will require different SDP capacities). Figure B.4 Construction of SDP
155 B.2.4 Configuration for remote copy Creating copy destination volumes When creating copy destination volumes for remote copy, note the following: - The type of a copy destination volume must be OPEN. SDV or SDPV can not be used as a copy destination volume for remote copy. - The size of a copy destination volume must be the same as that of copy source volume (the original volume). - To create OPEN volume, use ETERNUS Web GUI/ETERNUS CLI because Express does not offer the feature to create OPEN volumes. Setting of FC-RA ports FC-RA (Fibre Channel Remote Adapter) ports are required for REC. Change any FC-CA port to an FC-RA port. Setting of FC-RA paths Create a data transmission path by combination of FC-RA ports. This setting is required for all storage systems that perform REC. Setting of REC buffers When using the Consistency mode, REC buffers are used. Up to four REC buffers can be set in the ETERNUS DX90. Set the REC buffer size for both data transmission and reception units. You can use a single buffer for unidirectional data transfer only. Therefore, if you use the bidirectional data transfer, you must also set the buffer for reverse directional data transfer
156 B.3 Clone (EC) B.3.1 How to work Figure B.5 State transition diagram
157 Table B.1 Relationship between session operation and Express function Session operation Express function Start acec start Suspend acec suspend Resume acec resume Reverse acec reverse Stop acec cancel Start When the EC session is started, the whole area of data specified by the source parameters is copied. - If data copying has been completed for a given area and a write operation is applied to that area, the write data is also transferred to the destination area. - After all data in the specified area has been copied over, the data in source and destination areas will be kept in almost the same state by the EC function. This is called the Equivalent state. In the Equivalent state, if source data is changed, the same data is transferred to the destination area to maintain the Equivalent state. - Until the EC session reaches to the Equivalent state, copy destination volume are neither readable nor writable. If EC session is in the Equivalent state, copy destination volume are not writable but readable. Suspend When the EC session is suspended, both the copy source volume and the copy destination volume are accessible as independent volumes (copy destination volume becomes readable and writable). The Suspend operation can only be executed when the EC session is in the Equivalent state. Unlike the Stop operation, changes to the source and destination volumes continue to be recorded while the Suspend state applies. Resume When the EC session is resumed, data is copied over from the source to the destination so as to catch up on all the changes that were made after the Suspend operation was performed and recover the Equivalent state. As the amount of data that thus needs to be transferred is much less than would be required if the whole source area were to be recopied, the time required to recover the Equivalent state is also greatly reduced. If the source is changed under the Suspend state (when copying is temporarily interrupted by the Suspend operation), the changes are sent to the destination after the Resume operation is performed (when the copy is restarted). However, any changes made at the destination while under the Suspend state will be rolled-back (overwritten from the source data). Consequently, any and all changes made to the destination during the Suspend state are discarded and lost following the Resume operation. Concurrent Suspend Multiple EC sessions can be suspended using the Concurrent Suspend operation. This allows consistent copies of multi-volume dataobjects, such as databases, to be easily acquired
158 Reverse When the EC session is reversed, the copy direction is reversed. The Reverse operation can only be executed when the EC session data is in the Suspend state. Stop When the EC session is stopped, it terminates. If the EC session in one of the following statuses is stopped, the copy destination volume should not be used because the mirroring is incomplete. - Initial copy state - Error suspend state If the EC session in one of the following statuses is stopped, the copy destination volume can be used because the mirroring has been complete. - Equivalent state - Suspend state B.3.2 Restore Restoration can be performed by the Reverse function of EC or by OPC. Restore by reversing EC The Reverse operation of EC allows high-speed restoration of the pre-update data saved in the secondary destination back to the updated areas of the primary volume. (The Suspended copy session is reversed and then resumed.)

159 Restore by OPC To perform restoration by OPC, start the OPC session in the reverse direction after stopping the EC session. The method using OPC has no advantage over the method using the EC reverse function in that a full copy is required. However, it has the benefit that the original volume can be used immediately after the logical copy has completed
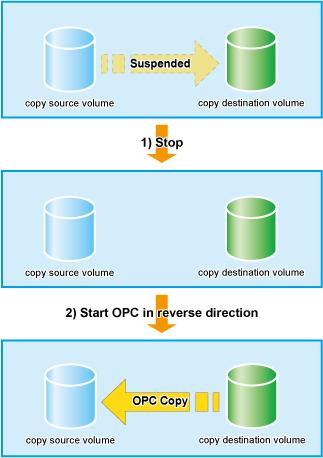
160

161 B.4 Clone (OPC) B.4.1 How to work Figure B.6 State transition diagram Table B.2 Relationship between OPC operation and Express function Session operation Express function Start acopc start Stop acopc cancel Start When the OPC session is started, the logical copy completes immediately and returns a "copied" response before any actual (physical) copying occurs. The actual physical copy process starts after the logical copy has finished. This is an internal ETERNUS Disk storage system background process that is not visible to the server. After the logical copy has completed, the copy destination area becomes accessible. When the physical copy has completed, the session automatically terminates. Stop When the OPC session is stopped, it terminates. The copy destination volume can not be used because the physical copy is incomplete. B.4.2 Restore Restore can be done by executing OPC in the reverse direction. Especially, restoration with a background physical copy is possible

162 B.5 Clone copy (QuickOPC) B.5.1 How to work Figure B.7 State transition diagram Table B.3 Relationship between QuickOPC operation and Express function Session operation Express function Start acopc start
 copying occurs.")
163 Session operation Differential copy start Stop acopc start -diff acopc cancel Express function Start When the QuickOPC session is started, the logical copy completes immediately and returns a "copied" response before any actual (physical) copying occurs. The actual physical copy process and tracking process start after the logical copy has finished (the tracking process keeps track of data which is modified for copy source and copy destination volumes after the logical copy). These two processes are internal ETERNUS Disk storage system background processes that are not visible to the server. After the logical copy has completed, the copy destination area becomes accessible. Even if the physical copy has finished, the session remains because the tracking process is still active. Point The QuickOPC function allows hardware to record updates that occur on copy source/destination after logical copy has been finished. The state that hardware is recording the updated point is referred to as "Tracking state". Differential copy start When the QuickOPC session is restarted, then instead of the initial full copy, only the data areas recorded by the tracking process are copied over from the source to the destination. While less data needs to be copied, this copy is similar to the initial copy in that a logical copy step precedes the actual physical copy, and the copy destination becomes read/write accessible as soon as the logical copy has completed. The tracking process also starts recording subsequent updates again at this stage. If the source is changed after the previous logical copy, the changes are sent to the destination after the Restart operation is performed (when the copy is restarted). However, any changes made at the destination after the previous logical copy will be rolled-back (overwritten from the source data). Consequently, any and all changes made to the destination after the previous logical copy are discarded and lost following the Restart operation

164 Stop When the QuickOPC session is stopped, it terminates. If the QuickOPC session which is in the Physical copy and Tracking state is stopped, the copy destination volume can not be used because the physical copy is incomplete. If the QuickOPC session in the Tracking state is stopped, the copy destination volume can be used because the physical copy has completed. B.5.2 Restore Restore can be done by reversing the copy direction of QuickOPC and executing OPC. Although a restore is executed with OPC, only the data that has been updated since the previous QuickOPC is copied. Therefore, in copy using QuickOPC, not only a physical backup but also restore is completed in a short period of time. By performing OPC for restore, any changes made at the primary volume after the previous logical copy will be rolled-back (overwritten from the secondary volume data). Consequently, any and all changes made to the primary volume after the previous logical copy are discarded and lost following OPC for restoration
 SnapOPC+ Figure B.")
165 B.6 Snapshot copy (SnapOPC+) B.6.1 How to work Figure B.8 State transition for (normal) SnapOPC+ Figure B.9 State transition diagram for dummy SnapOPC

166 Table B.4 Relationship between session operation and Express function Session operation Express function Start normal SnapOPC+ acsnap start Start dummy SnapOPC+ acsnap start -estimate Stop acsnap cancel Start When the SnapOPC+ session is started, the copy-on-write process starts. When a write I/O is requested from the server, the copy-on-write process copies the old data to the copy destination before writing the new data to the copy source. This process is an internal ETERNUS Disk storage system background process that are not visible to the server. After the SnapOPC+ session has been started, the copy destination area becomes accessible. - Unlike Clone (OPC, QuickOPC, EC), as the physical copy destination only needs to be large enough to contain updated areas, size requirements are usually small. - While the referencing of unmodified areas of the SnapOPC+ "copy" directly from the original data on the copy source volume reduces the copy load, this dependence on the copy source volume means that SnapOPC+ is not suited to persistent or long-term data backup/ recovery use. - Multiple SnapOPC+ sessions per one copy source can be set. - For ETERNUS DX60/DX80/DX90 Up to 8 SnapOPC+ sessions can be set. - For ETERNUS DX80 S2/DX90 S2 Up to 256 SnapOPC+ sessions can be set. Since multiple SnapOPC+ sessions for one copy source are managed in generations, multiple copy operation can be performed with less disk capacity
167 Stop When the SnapOPC+ session is stopped, the copy-on-write process terminates and all the data saved in SDV are lost. If there are older SnapOPC+ sessions than the SnapOPC+ session to stop, it cannot be stopped. Such a SnapOPC+ session can be stopped by using the force option. However, the Stop operation with the force option stops not only the specified SnapOPC+ session but also all the older SnapOPC+ sessions. B.6.2 Restore Restoration requires the SnapOPC+ copy destination be mounted by the OS and the target data restored using normal file copying. Note Restoration by the reverse OPC cannot be performed for ETERNUS DX60, DX80/DX80 S2, DX90/DX90 S2. B.6.3 SDV operations Table B.5 Relationship between SDV operation and Express function SDV operation Express function Monitoring SDV capacity acsdv stat Initialize SDV acsdv init Monitoring SDV capacity If an SDP is not used, the SDV should be monitored on a periodic basis to ensure that adequate remaining capacity leeway is maintained. Initializing SDV - Even if no copy sessions are running, programs may write data to SDV. If SDV capacity becomes large, the "Initialize SDV" operation should be performed with ETERNUS Web GUI or ETERNUS CLI. - When copy session is running, space for SDV or SDP used by the copy session is decreased. In this case, amount of maintaining data may be decreased. Note that when a Snap Data Volume is initialized, any existing data on it will become inaccessible, so this data should be backed up beforehand, using OS commands. B.6.4 SDP operation Table B.6 Relationship between SDP operation and Express function SDP operation Express function Monitoring SDP capacity acsdv poolstat Monitoring SDP capacity If an SDP is used, the SDP should be monitored on a periodic basis to ensure that adequate remaining capacity leeway is maintained. If the allocatable SDP capacity runs short, this is indicated by /snmp Trap notification
168 B.7 Remote Advanced Copy (REC) Remote Equivalent Copy (REC) is used for both Remote Advanced Copy and Extended Remote Advanced Copy. Whereas EC is an internal cabinet copy function, REC is the equivalent copy function for use between cabinets

169 B.7.1 How to work Figure B.10 Session state and state transition Table B.7 Relationship between session operation and Express function Session operation Express function Start acec start Suspend acec suspend
170 Session operation Resume Reverse Mode change Stop acec resume acec reverse acec change acec cancel Express function Start When the REC session is started, the whole area of data specified by the source parameters is copied. - If data copying has been completed for a given area and a write operation is applied to that area, the write data is also transferred to the destination area. - After all data in the specified area has been copied over, the data in source and destination areas will be kept in almost the same state by the REC function. This is called the Equivalent state. In the Equivalent state, if source data is changed, the same data is transferred to the destination area to maintain the Equivalent state. - Until the REC session reaches to the Equivalent state, copy destination volume are neither readable nor writable. If REC session is in the Equivalent state, copy destination volumes are not writable but readable. Unlike EC, the following operation modes need to be specified at the start of REC sessions. REC operation mode REC function has the following three types of copy modes. You can specify the best copy mode fitted to the operation. - Transfer mode - Split mode - Recovery mode Transfer mode This mode is concerned with data transfer of REC. Transfer method Mode Explanation Synchronous transfer Asynchronous transfer Synchronous Stack Consistency Through On the Write request from the server, data is written onto a copy source volume and copy is done to the destination volume to return the completed one to the server. Writing to the source volume and copying to the destination volume are synchronized. Therefore, on completion of copy, both data on the copy source and destination volumes are guaranteed. Since an impact of Write access from the server is great, this is fitted for REC in a short-delay site. Since only updated block points are recorded and after that completion is returned to the server, response impacts to the server are reduced. Using independent transfer engine, transfer the recorded block data. Even if the band width of the line is small, copy can be executed. However, data that is not transferred may be accumulated in large amount. To copy destination ETERNUS Disk storage system, transfer order between copy sessions is guaranteed. This is fitted for mirroring of copy made up of multiple areas, such as database. This mode uses part of cache memory as a REC buffer. Store all data to REC buffer for sending and copy to REC buffer for receiving and transfer to the destination. This is a mode to transfer the data that is not transferred when suspending or stopping Stack mode and Consistency mode

171 Split mode This mode is concerned with how REC sessions behave when the line paths are disconnected by a disaster or line error. Split Mode Automatic Split Manual Split If the communication has failed due to certain reasons during REC execution, the REC session is disconnected automatically so that data can be updated at the source location. If the communication has failed due to certain reasons during REC execution, the operator is asked whether or not to disconnect the REC session or not in the Manual Split mode. Though the Manual Split mode does reduce availability somewhat, it also helps keep the copy source data and copy destination data better synchronized, resulting in much lower data losses in the event of a disaster. If data copying has failed due to the disconnection of all paths or other reasons, the server becomes unable to update the data in this mode. Therefore, applications that require the data be updated by the server cannot continue if all REC paths become disconnected, or the backup center or backup ETERNUS Disk storage system fails. Recovery mode This mode is concerned with how REC sessions are recovered after the line that was disconnected by the transmission error has recovered. Recovery Mode Automatic Recovery Manual Recovery REC sessions are automatically resumed as soon as the line that was disconnected by the transmission error has recovered. REC sessions must be manually resumed after the line that was disconnected by the transmission error has recovered. Suspend When the REC session is suspended, both the copy source volume and the copy destination volume are accessible as independent volumes (copy destination volume becomes readable and writable). The Suspend operation can only be executed when the REC session is in the Equivalent state. Unlike the Stop operation, changes to the source and destination volumes continue to be recorded while the Suspend state applies. The procedure to suspend the REC session varies depending on REC Transmission mode. Synchronous mode In this case, the procedure is the same as that of EC. Figure B.11 Suspend and resume work flow in Synchronous mode

172 Stack mode or Consistency mode In order to suspend the REC session in these modes, the Transmission mode must be changed to through mode. However, the Transmission mode is not required to be changed if the REC session in Consistency mode is suspended by Concurrent Suspend. Figure B.12 Suspend and resume work flow in Stack or Consistency mode Concurrent Suspend As EC, multiple REC sessions can be suspended using the Concurrent Suspend operation. This allows consistent copies of multi-volume data-objects, such as databases, to be easily acquired


173 The Concurrent Suspend operation can be performed only if the transfer mode is Synchronous mode or Consistency mode. Figure B.13 Concurrent Suspend and resume work flow in Synchronous or Consistency mode Resume When the REC session is resumed, data is copied over from the source to the destination so as to catch up on all the changes that were made after the Suspend operation was performed and recover the Equivalent state. As the amount of data that thus needs to be transferred is much less than would be required if the whole source area were to be recopied, the time required to recover the Equivalent state is also greatly reduced. If the source is changed under the Suspend state (when copying is temporarily interrupted by the Suspend operation), the changes are sent to the destination after the Resume operation is performed (when the copy is restarted). However, any changes made at the destination while under the Suspend state will be rolled-back (overwritten from the source data). Consequently, any and all changes made to the destination during the Suspend state are discarded and lost following the Resume operation. The operation modes of REC are not changed by the Resume operation. Reverse When the REC session is reversed, the copy direction is reversed. The Reverse operation can only be executed when the REC session data is in the Suspend state. Mode change When the REC session is in the Suspend state, the operation modes can be changed by the "Mode Change" operation
174 Stop When the REC session is stopped, it terminates. If the REC session in one of the following statuses is stopped, the copy destination volume should not be used because the mirroring is incomplete. - Initial copy state - Error suspend state - Halt state which occurred when the REC session was in the Initial copy state If the REC session in one of the following statuses is stopped, the copy destination volume can be used because the mirroring has been complete. - Equivalent state - Suspend state - Halt state which occurred when the REC session was in the Equivalent state B.7.2 Transfer buffer operations Table B.8 Relationship between session operation and Express function Session operation Express function Change buffer role acrecbuff set Monitor buffer usage acrecbuff stat Change buffer role The Set operation can change the use of REC buffer from SEND to RECV and vice versa. Monitor buffer usage The transfer buffer usage can be checked using the "Monitoring buffer" operation. Monitor buffer usage regularly while REC sessions in Consistency mode are running. A "Rate" of 100% means the transfer buffer is in high-load state. B.7.3 Restore Restoration can be performed by the Reverse function of REC. The procedure for restoration is the same as EC. B.8 Combinations of Advanced Copy B.8.1 Multiple copy Multiple copy is a method that copies the same copy source area to multiple copy destinations. Multiple copy destinations may be specified to obtain more than one copy of the original data at a time. This allows copies of the same data for different purposes, such as backup and testing


175 Figure B.14 Multiple copy Note Following copy type combination selection rules when using multiple copy. - For multiple copy with EC only, REC only, or both EC and REC, the start and end points of all copy sessions must be the same. - For remote copy, REC (Consistency mode) cannot be used for multiple copy destination volumes in the same copy destination device. B.8.2 Cascade copy Cascade copy is a method that adds copy sessions end-to-end, with an existing copy destination volume becoming the copy source for a new copy session, or vice versa. Figure B.15 Cascade copy B.9 ECO mode The ETERNUS Disk storage system offers the eco-mode (power-saving) function based on the MAID (Massive Array of Idle Disks) technology. The spindle rotation of the disk drive can be turned on and off by using this function. Express offers the eco support tools to control whether spindle rotation of the disk drive is on or off

176 Used in combination with the copy operations of Express, the eco support tools allow the spindle rotation the disk drive to be turned off when it is not used for a long period, thus reducing the power consumption of the ETERNUS Disk storage system. B.10 Note on Backup and Restore by Express Express performs backup and restoration regardless of the state of the server to be backed up. Therefore, make sure that both copy source and destination volumes are inaccessible in order to ensure consistency of backup data. For absolute assurance of data consistency, we highly recommend to stop the target server before executing backups and restorations. If the server can not be suspended, dismount a target volume using the OS function to prevent data within a file cache from being reflected and inhibit access to the target volume. B.11 Troubleshooting The following figure shows the flow of troubleshooting tasks if a hardware or similar fault occurs. Figure B.16 Troubleshooting flow Hardware error When a hardware error occurs in a source or destination volume, perform the repair work on the error according to the following procedures. 1. Use copy management software (e.g. Express) to stop the session in which the error occurred. If the session cannot be stopped by using copy management software, use ETERNUS Web GUI to stop it. 2. Iron out the hardware error. 3. If required, for copy management software, redefine copy source and destination volumes. 4. Re-start the session in which the error occurred. Remote copy data transfer error If the Recovery mode of the REC session is Manual Recover mode, the session need to be recovered manually after the transmission error has recovered. The procedure to do this is as follows. 1. Suspend the REC session with force option to change the halt status to the Suspend state. 2. Resume the REC sessions

177 Appendix C Installing and Uninstalling Express This appendix explains the procedure for installing and uninstalling Express. C.1 Installing The following is a flow of installation. Take the following procedure to install Express. 1. Login to the system. Login to the Express Manager server with a user account having Administrator privileges
178 2. Insert the Express CD-ROM into the CD-ROM drive and the following initial screen is displayed. Click [Install Express Manager V14.2]. 3. Select a language to be used during installation. Select a language to be used during installation and click the [OK] button. The selected language is available only during installation
![4. At the following window, check the displayed contents, and then click the [Next] button. Note When the window of Install Shield is minimized, please maximize it by using the task manager.](/docs-images/76/73074827/images/179-1.jpg "The procedure is as follows. 1. Push the [Ctrl] + [Alt] + [Del] key and start the task manager. 2. Select task manager's [Applications] tab. 3.")
179 4. At the following window, check the displayed contents, and then click the [Next] button. Note When the window of Install Shield is minimized, please maximize it by using the task manager. The procedure is as follows. 1. Push the [Ctrl] + [Alt] + [Del] key and start the task manager. 2. Select task manager's [Applications] tab. 3. Select this installer application from the list of the task, and click [Switch To] button
![5. Sign license agreement. Confirm the contract detail displayed on the "License Agreement" screen and click the [Yes] button. When printing the contract, click the [Print] button. 6.](/docs-images/76/73074827/images/180-0.jpg "Specify an installation destination directory. Confirm the displayed installation destination directory and click the [Next] button.")
180 5. Sign license agreement. Confirm the contract detail displayed on the "License Agreement" screen and click the [Yes] button. When printing the contract, click the [Print] button. 6. Specify an installation destination directory. Confirm the displayed installation destination directory and click the [Next] button. If necessary to install the products into other directory than the directory displayed by default, click the [Change] button to change the installation destination directory. However, there are following limits to a specified installation destination directory. - 2 byte characters, Japanese and 1 byte symbols [ " : *? /. < >, % & ^ =! ; ] are not available. - The length of installation path should be 4 to 81 characters. - A drive that is not fixed cannot be specified


181 - If the capacity of the installation destination is 500MB or less, it cannot be specified. 7. Set a port number assigned to service on the "The registration of the port number" screen. Normally, default port numbers are set onto the "The registration of the port number" screen. If any service other than Express is using the same port number, change it to a proper port number that does not overlap with other service. A port number between 1024 and can be entered. In addition, when changing a port number, a number between 5001 and is recommended
182 Table C.1 Port number list Port number Service name Comment 9853 esfexpressmgr Express Manager service Unnecessary to add this to the Windows Firewall exception list esfexpressweb Express Web GUI service 4917 sscruisera Port number used inside Express Unnecessary to add this to the Windows Firewall exception list nfport Port number used inside Express Unnecessary to add this to the Windows Firewall exception list. Information Make sure that the above-mentioned port numbers are not in use for currently used services. Service files are in the "%SystemRoot%\system32\drivers\etc" directory. "%SystemRoot%" is a directory in which Windows operating systems are installed. OS Windows Server 2003 Windows Server 2008 Absolute path name for service files (default) C:\Windows\system32\drivers\etc\services Note Express uses the following port numbers besides the above-mentioned /tcp /tcp /tcp /tcp Make sure that the above-mentioned port numbers are not in use for other applications. If they are used, change them to other ports according to "7.3.1 Changing port numbers" after installing Express. 8. Confirm the installed content on the "Start Copying Files" screen. If the settings are correct, click the [Next] button to start installing
![When changing the setting, click the [Back] button to correct the settings. 9. Copy is started.](/docs-images/76/73074827/images/183-0.jpg "When copy is in progress, the file transfer status is displayed on the \"Setup status\" screen.")
183 When changing the setting, click the [Back] button to correct the settings. 9. Copy is started. When copy is in progress, the file transfer status is displayed on the "Setup status" screen
184 10. System configuration is updated. Wait for system configuration to be finished. 11. Installation is finished. Click the [Finish] button to finish the installation process. After installation, reboot the computer. C.2 Uninstalling This section explains the procedure for uninstalling Express Manager. Note After uninstalling Express Manager, all the contents of the "<Express Manager installed destination directory>\express\manager", which is a destination directory in which Express Manager is installed, are deleted. (The default directory name of Express Manager program is "C:\Program Files\ETERNUS SF" or "C:\Program Files (x86)\eternus SF".) Do not put your own files under the folder. If necessary, backup Express Manager environment as shown in "7.1 Backing up Express Manager Environment" before uninstall. 1. Login to the system. Login to a server from which to uninstall Express Manager with the user who has the Administrator's authority on the system where Express will be uninstalled
![2. Open the [Start] > [All programs] > [ETERNUS SF Express Manager] menu and then execute "Uninstall".](/docs-images/76/73074827/images/185-0.jpg "Or open the window that can add or remove programs, and delete the \"ETERNUS SF Express Manager\" program.")
185 2. Open the [Start] > [All programs] > [ETERNUS SF Express Manager] menu and then execute "Uninstall". Or open the window that can add or remove programs, and delete the "ETERNUS SF Express Manager" program. The name of window that can add or remove programs and the method to open its window are as follows. OS Name of window Method to open window Windows Server 2003 Add or Remove Programs - When "Start menu" is used: [Start] > [Control Panel] > [Add or Remove Programs] - When "Classic Start menu" is used: [Start] > [Settings] > [Control Panel] > [Add or Remove Programs] Windows Server 2008 Programs and Features - When "Start menu" is used: [Start] > [Control Panel] > [Programs and Features] - When "Classic Start menu" is used: [Start] > [Settings] > [Control Panel] > [Programs and Features] 3. Start the preparation of uninstallation. When you want to quit the Express uninstallation, click the [Cancel] button. 4. Delete of the system configuration. Wait for the delete completion of the system configuration
![5. Start the uninstall. The file transfer in progress can be viewed on the [Setup Status] window. 6.](/docs-images/76/73074827/images/186-1.jpg "When the uninstallation is completed, the following confirmation window will be displayed.")
186 5. Start the uninstall. The file transfer in progress can be viewed on the [Setup Status] window. 6. When the uninstallation is completed, the following confirmation window will be displayed. Click the [Finish] button, and reboot the computer
 on the same server in the future, please uninstall \"ETERNUS SF License Manager\" from \"[Add or Remove Programs]\" or \"Programs and")

187 Point If the licenses for ETERNUS SF products have been registered, these licenses will remain on the management server even after having uninstalled Express Manager. If you do not use ETERNUS SF products (do not use their licenses) on the same server in the future, please uninstall "ETERNUS SF License Manager" from "[Add or Remove Programs]" or "Programs and Features". C.3 Upgrade installation procedure Take the following procedure to execute Express Manager upgrade installation. 1. Login to the system. Login as the user who has the Administrator's authority on the system where Express will be installed. 2. Insert the Express CD-ROM into the drive and an initial window will be displayed. Click [Install ETERNUS SF Express Manager V14.2]. 3. Select a language to be used during installation. Select a language to be used during installation and click the [OK] button. The selected language is available only during installation

188 4. Upgrade installation confirmation screen. If Express V14.1 is already installed, the following dialog box is displayed. If you execute upgrade installation, click [Yes] button

![Click the [OK] button to exit the installer and then take the upgrade installation procedure to upgrade the version. 7. Execution of the pre-upgrade setup tool.](/docs-images/76/73074827/images/189-1.jpg "Execute the pre-upgrade setup tool to back up configuration information. This tool is available only when Express V14.1 is installed.")
189 5. Display of upgrade installation procedure. The following dialog box is displayed. 6. Upgrade installation startup screen. Selecting [Yes] button in "Upgrade procedure" will display the following dialog box. Click the [OK] button to exit the installer and then take the upgrade installation procedure to upgrade the version. 7. Execution of the pre-upgrade setup tool. Execute the pre-upgrade setup tool to back up configuration information. This tool is available only when Express V14.1 is installed. Take the following procedure to execute the pre-upgrade setup tool. a. The pre-upgrade setup tool is stored in the following directory on the Express V14.2 CD-ROM. <CD-ROM drive>\express Upgrade\ExpVupPreparation.exe b. Create a working directory and copy ExpVupPreparation.exe. In this material, the working directory is defined as follows. C:\tmp\expvup
190 c. Start the command prompt and specify the pre-upgrade setup tool with an absolute or relative path to execute. For parameters, specify a backup directory for Express V14.1 management information files with an absolute path. As an example, the backup directory is described as C:\tmp\expdir. C:\tmp\expvup> ExpVupPreparation.exe "C:\tmp\expdir" d. When the tool is normally terminated, the following message is displayed at the end. esfcmd77000 : The preparation for upgrade install has been completed. If the tool execution has failed, error message is displayed and the tool is abnormally terminated. Remove the cause according to the message to re-execute the tool. For more detailed message, see "List of Setup Tool Messages". 8. Uninstallation of Express V14.1. Uninstall Express Manager V14.1 according to "Uninstallation of Express Manager" in the "Express V14.1 User's Guide". 9. Installation of Express V14.2. Install Express V14.2 according to "C.1 Installing". 10. Execution of the post-upgrade setup tool. Restore the configuration information backed up with the pre-upgrade setup tool using the post-upgrade setup tool. This tool is available only when Express V14.2 is installed. Take the following procedure to execute the post-upgrade setup tool. a. The post-upgrade setup tool is stored in the following directory on the Express V14.2 CD-ROM. <CD-ROM drive>\express Upgrade\ExpVupMaintenance.exe b. Create a working directory and copy ExpVupMaintenance.exe. In the following procedure, the working directory is defined as C:\tmp\expvup as an example. c. Start the command prompt and specify the post-upgrade setup tool with an absolute or relative path to execute. For parameters, specify with an absolute path the backup directory specified in step 7. As an example, the backup directory is described as C:\tmp\expdir. C:\tmp\expvup> ExpVupMaintenance.exe "C:\tmp\expdir" d. When the tool is normally terminated, the following message is displayed at the end. esfcmd77001 : The maintenance for upgrade install has been completed. If the tool execution has failed, error message is displayed and the tool is abnormally terminated. Remove the cause according to the message to re-execute the tool. For more detailed message, see "List of Setup Tool Messages". Note - If you uninstall ETERNUS SF Express Manager V14.1 from the environment in which the following products are installed, SystemWalker MpWksttr may be uninstalled (in the event that ETERNUS SF Express Manager has been installed before these products). In this case, after uninstalling ETERNUS SF Express Manager, refer to the manuals for the following products to reinstall SystemWalker MpWksttr. - Systemwalker Centric Manager - Systemwalker Resource Coordinator Virtual server Edition
191 - ServerView Resource Coordinator VE to After ETERNUS SF Express Manager has been upgraded to V14.2, ETERNUS SF Express Client V14.1 is not used. If you uninstall ETERNUS SF Express Client V14.1, refer to "Uninstallation of Express Client" in the "ETERNUS SF Express V14.1 User's Guide". - When Express Web GUI is started for the first time after upgrade installation of Express, it requires a user name and password for the storage system that is registered with Express. According to a displayed message, enter the user name and password. - When the SNMP community name was not specified as default ("public") before the execution of upgrade installation of ETERNUS SF Express, modify the configuration file according to the following procedures before starting Express Web GUI. 1. Open Service Control Manager to stop the following four services. - ETERNUS SF Express Manager - ETERNUS SF Express Apache Service - ETERNUS SF Express Tomcat Service - ETERNUS SF Storage Cruiser Manager 2. Open the following files with Text Editor. $INS_DIR\Storage Cruiser\Manager\etc\opt\FJSVssmgr\current\sanma.conf $INS_DIR means a directory in which Express Manager is installed. 3. Add the following line. Add plural lines when the Express Manager manage plural devices. SNMP_COMMUNITY_NAME_FOR_IP="<DiskArray IP Address> <SNMP Community Name>"; <DiskArray IP Address> means a IP address of registered disk array <SNMP Community Name> means a SNMP community name of disk array which was specified before upgrade installation. Example: SNMP_COMMUNITY_NAME_FOR_IP=" snmp_name"; 4. Save and close these files. 5. Open Service Control Manager to start the following four services. - ETERNUS SF Express Manager - ETERNUS SF Express Apache Service - ETERNUS SF Express Tomcat Service - ETERNUS SF Storage Cruiser Manager
192 Appendix D Commands This appendix explains the various commands that are used with Express. D.1 Commands for Advanced Copy function This section explains the commands for Advanced Copy function. Point If using commands, refer to " Setting PATH environment variables ". The Advanced Copy commands can be classified as follows. Environment definition commands Table D.1 List of commands for controlling ETERNUS Disk storage systems Function Command Explanation D.1.1 acarray add (Command for resgistering ETERNUS Disk storage system) D.1.2 acarray change (Command for changing ETERNUS Disk storage system name and access path) D.1.3 acarray list (Command for displaying information about ETERNUS Disk storage systems) D.1.4 acarray detail (Command for displaying detailed information about ETERNUS Disk storage systems) D.1.5 acarray pathscan (Command for automatically setting access paths) D.1.6 acarray remove (Command for removing registration information for ETERNUS Disk storage systems) acarray add acarray change acarray list acarray detail acarray pathscan acarray remove Registers ETERNUS Disk storage systems. Changes the access paths and ETERNUS names for ETERNUS Disk storage systems. Displays information about ETERNUS Disk storage systems. Displays detailed information about ETERNUS Disk storage systems. Searches ETERNUS Disk storage systems to automatically set access paths. Removes registration information about ETERNUS Disk storage systems. Table D.2 List of commands for displaying information relating to ETERNUS Disk storage systems Function Command Explanation D.1.7 acinq lv (Command for displaying logical volume information) D.1.8 acinq lunmap (Command for displaying LUN Mapping information) D.1.9 acinq ag (Command for displaying a list of affinity groups) D.1.10 acinq hostag (Command for displaying a list of host affinity) acinq lv acinq lunmap acinq ag acinq hostag Displays information about logical volumes. Displays LUN mapping information. Displays affinity groups for ETERNUS Disk storage systems. Displays host affinity for ETERNUS Disk storage systems. Table D.3 List of commands for controlling logical volumes Function Command Explanation D.1.11 acinhibit set (Command for setting volume protection) D.1.12 acinhibit unset (Command for unsetting volume protection) acinhibit set acinhibit unset Sets volume protection. Unsets volume protection
193 Table D.4 List of commands for controlling REC buffer Function Command Explanation D.1.13 acrecbuff set (Command for setting REC buffers) acrecbuff set Setting REC buffers. D.1.14 acrecbuff stat (Command for displaying REC buffer status) acrecbuff stat Displaying REC buffer status. Table D.5 List of commands for setting up copy groups Function Command Explanation D.1.15 acgroup create (Command for creating copy groups) acgroup create Creates a copy group. D.1.16 acgroup list (Command for displaying copy groups) acgroup list Displays the copy groups that have been set up. D.1.17 acgroup detail (Command for displaying detailed information about copy groups) D.1.18 acgroup remove (Command for removing copy groups) acgroup detail acgroup remove Displays the copy pairs that have been set up in copy groups. Removes copy groups. D.1.19 acpair add (Command for adding copy pairs) acpair add Adds copy pairs to copy groups. D.1.20 acpair remove (Command for removing copy pairs) acpair remove Removes copy pairs from copy groups. Operation commands Table D.6 List of commands for Advanced Copy D.1.21 acopc start (Command for starting OPC or QuickOPC copy) Function Command Explanation D.1.22 acopc query (Command for displaying the status of OPC or QuickOPC copy) D.1.23 acopc cancel (Command for canceling OPC or QuickOPC copy) D.1.24 acsnap start (Command for starting SnapOPC+ copy) D.1.25 acsnap query (Command for displaying the status of SnapOPC+ copy) D.1.26 acsnap cancel (Command for canceling SnapOPC+ copy) D.1.27 acec start (Command for starting synchronous high speed copy) D.1.28 acec query (Command for displaying the status of synchronous high speed copy) D.1.29 acec suspend (Command for suspending synchronous high speed copy) D.1.30 acec resume (Command for resuming synchronous high speed copy) D.1.31 acec reverse (Command for reversing synchronous high speed copy) D.1.32 acec change (Command for changing the mode of synchronous high speed copy) acopc start acopc query acopc cancel acsnap start acsnap query acsnap cancel acec start acec query acec suspend acec resume acec reverse acec change Starts OPC or QuickOPC copy. Displays the status of OPC or QuickOPC copy. Cancels OPC or QuickOPC copy. Starts SnapOPC+ copy. Displays the status of SnapOPC+ copy. Cancels SnapOPC+ copy. Starts synchronous high speed copy. Displays the status of Synchronous high speed copy Suspends synchronous high speed copy. Resumes suspended synchronous high speed copy. Reverses synchronous high speed copy. Changes the mode of synchronous high speed copy. (only REC)
194 Function Command Explanation D.1.33 acec cancel (Command for cancelling synchronous high speed copy) acec cancel Cancels Synchronous high speed copy. Utility command Table D.7 List of commands for Snap data volume and Snap data pool Function Command Explanation D.1.34 acsdv init (Command for initializing Snap Data Volume) D.1.35 acsdv stat (Command for dispaying the status of Snap Data Volume) D.1.36 acsdv poolstat (Command for displaying the status of Snap Data Pool) acsdv init acsdv stat acsdv poolstat Initializes a snap data volume. Displays the status of a snap data volume. Displays the status of a snap data pool. Table D.8 List of utility commands Function Command Explanation D.1.37 acutil devs (Command for displaying logical volume information) D.1.38 acgetvolinfo (Command for displaying logical volume information) D.1.39 acutil refresh (Command for refreshing partition table) acutil devs acgetvolinfo acutil refresh Displays logical volume information. Displays logical volume information. Refreshes disk partition table. Command for collecting analysis material Table D.9 List of commands for collecting analysis material Function Command Explanation D.1.40 acmcapture (Command for collecting analysis data) acmcapture Collects data for bug analysis. D.1.1 acarray add (Command for resgistering ETERNUS Disk storage system) NAME acarray add - Registration of ETERNUS Disk storage systems. SYNOPSIS - For ETERNUS Disk storage system in the local site acarray add -a DISKARRAY-NAME -ip DISKARRAY-IP -user USER -password PASSWORD -path ACCESSPATH [- xml] - For ETERNUS Disk storage system in a remote site acarray add -a DISKARRAY-NAME -boxid BOX-ID -remote [-xml] DESCRIPTION This command registers ETERNUS Disk storage systems
195 OPTIONS -a DISKARRAY-NAME This option specifies an ETERNUS Disk storage system name that is used by Express. Specify it in 16 or less alphanumeric characters. -ip DISKARRAY-IP This option specifies the IP address of the ETERNUS Disk storage system. An error will occur when an attempt is made to register an ETERNUS Disk storage system with the same IP address as an ETERNUS Disk storage system that has already been registered. -user USER This option specifies a following user name. - When using ETERNUS DX60/DX80/DX90: The user name with Administrator authorization for target storage device - When using ETERNUS DX80 S2/DX90 S2: The user name with Software role for target storage device Specify the user name using a string that is between 4 and 16 characters long. Refer to the ETERNUS Web GUI manual for more information about ETERNUS Web GUI. -password PASSWORD This option specifies the password for the user name specified with -user option. -path ACCESSPATH This option specifies an access path in the logical volume within the ETERNUS Disk storage system that was specified with the "-a" option. This is skippable. Specify a drive letter. Example: X: -box-id BOX-ID This option specifies the BOX-ID of the ETERNUS Disk storage system. An error will occur when an attempt is made to register an ETERNUS Disk storage system with the same BOX-ID as an ETERNUS Disk storage system that has already been registered. Refer to the ETERNUS Web GUI manual for more information. -remote -xml This option specifies when registering the ETERNUS Disk storage system which is in a remote site. This option displays execution results in XML format. EXIT STATUS =0: Terminate normally >0: Terminate abnormally EXAMPLES > acarray add -a DX80 -ip user root -password root -path X: Successful completion
196 D.1.2 acarray change (Command for changing ETERNUS Disk storage system name and access path) NAME acarray change - Change of ETERNUS Disk storage system name and access path. SYNOPSIS - When changing ETERNUS Disk storage system name and access path at a local site: acarray change -a DISKARRAY-NAME {-path ACCESSPATH -new NEW-DISKARRAY-NAME} [-xml] - When changing ETERNUS Disk storage system name and access path at a remote site: acarray change -a DISKARRAY-NAME -new NEW-DISKARRAY-NAME -remote [-xml] DESCRIPTION This command changes ETERNUS Disk storage system name and access paths.. OPTIONS -a DISKARRAY-NAME This option specifies an ETERNUS Disk storage whose name or access path is to be changed. -path ACCESSPATH This option specifies an access path for ETERNUS Disk storage system. Specify a drive letter. Example: Y: -new NEW-DISKARRAY-NAME This option specifies a new ETERNUS Disk storage system name to be set for the ETERNUS Disk storage system. -remote -xml This option is specified when changing an ETERNUS Disk storage system at a remote site. This option specifies execution results in XML format. EXIT STATUS =0: Terminate normally >0: Terminate abnormally EXAMPLES > acarray change -a DX80 path Y: Successful completion. D.1.3 acarray list (Command for displaying information about ETERNUS Disk storage systems) NAME acarray list - Display of information on the ETERNUS Disk storage system
197 SYNOPSIS acarray list [-remote] [-xml] DESCRIPTION This command displays a list of ETERNUS Disk storage systems that have been registered. OPTIONS -remote -xml This option is specified when displaying the information about a device registered as remote-site ETERNUS Disk storage system. This option displays execution results in the XML format. EXIT STATUS =0: Terminate normally >0: Terminate abnormally EXAMPLES - Displaying ETERNUS Disk storage systems which are in a local site: > acarray list Name BOX-ID IP Address DX80 00ETERNUSDXL##ET08E21A####LN ## DX80B 00ETERNUSDXL##ET08F22A####JP ## The following table shows the meanings of displayed information. Title Name BOX-ID IP Address Explanation Displays ETERNUS Disk storage system name. Displays the BOX ID for the ETERNUS Disk storage system. Displays the IP address for the ETERNUS Disk storage system. - Displaying ETERNUS Disk storage systems which are in a remote site: > acarray list -remote Name BOX-ID DX80 00ETERNUSDXL##ET08E21A####LN ## DX80B 00ETERNUSDXL##ET08F22A####JP ## The following table shows the meanings of displayed information. Name BOX-ID Title Explanation Displays ETERNUS Disk storage system name. Displays the BOX ID for the ETERNUS Disk storage system. D.1.4 acarray detail (Command for displaying detailed information about ETERNUS Disk storage systems)
198 NAME acarray detail - Display of detailed information on the ETERNUS Disk storage system. SYNOPSIS acarray detail -a DISKARRAY-NAME [-xml] DESCRIPTION This command displays a list of the ETERNUS Disk storage systems that have been registered. OPTIONS -a DISKARRAY-NAME This option specifies an ETERNUS Disk storage system name. -xml This option dislays execution results in the XML format. EXIT STATUS =0: Terminate normally >0: Terminate abnormally EXAMPLES - Displaying an ETERNUS Disk storage system which is at a local site: > acarray detail -a DX80 Disk Array Name : DX80 BOX-ID : 00ETERNUSDXL##ET08E21A####LN ## IP Address : Admin User : root Access Path : X: The following table shows the meanings of displayed information. Title Disk Array Name BOX-ID IP Address Admin User Explanation Displays ETERNUS Disk storage system name. Displays the BOX ID for the ETERNUS Disk storage system. Displays the IP address for the ETERNUS Disk storage system. (NOTE) Displays the user name for ETERNUS Disk storage system. (NOTE) - When using ETERNUS DX60/DX80/DX90: The user name with Administrator authorization for target storage device - When using ETERNUS DX80 S2/DX90 S2: The user name with Software role for target storage device Access Path Displays the access path set up for the ETERNUS Disk storage system. (NOTE) NOTE: If the specified ETERNUS Disk storage system exists at a remote site, a hyphen (-) is displayed. D.1.5 acarray pathscan (Command for automatically setting access paths)
199 NAME acarray pathscan - Automatic settings of access paths. SYNOPSIS acarray pathscan -a DISKARRAY-NAME [-xml] DESCRIPTION This command searches ETERNUS Disk storage systems to automatically set up access paths. OPTIONS -a DISKARRAY-NAME -xml This option specifies an ETERNUS Disk storage system name. This option is specified when displaying the result of the command execution in the XML format. EXIT STATUS =0: Terminate normally >0: Terminate abnormally EXAMPLES > acarray pathscan -a DX80 Successful completion. D.1.6 acarray remove (Command for removing registration information for ETERNUS Disk storage systems) NAME acarray remove - Removing registered information for ETERNUS Disk storage systems. SYNOPSIS acarray remove -a DISKARRAY-NAME [-xml] DESCRIPTION This command removes ETERNUS Disk storage systems. OPTIONS -a DISKARRAY-NAME This option specifies an ETERNUS Disk storage system name. -xml This option is specified when displaying the result of the command execution in the XML format. EXIT STATUS =0: Terminate normally >0: Terminate abnormally
200 EXAMPLES > acarray remove -a DX80 Successful completion. D.1.7 acinq lv (Command for displaying logical volume information) NAME acinq lv - Display of logical volume information. SYNOPSIS acinq lv -a DISKARRAY-NAME [-free] [-l] [-xml] DESCRIPTION This command displays a list of logical volumes for ETERNUS Disk storage system. This information can be displayed when the logical volume type is as follows. - Open - SDV - Thin Provisioning Volume OPTIONS -a DISKARRAY-NAME -free -l -xml This option specifies an ETERNUS Disk storage system name. This option displays a list of logical volumes that meet the following requirements. - Not registered to an affinity group. - Not used by LUN Mapping settings if the affinity function is disabled. This option specifies the display of extended format. For items displayed when this option is specified, refer to the list of execution examples. In addition, the items displayed when this option is specified could possibly be added to support new functions provided in future version. This option is specified when displaying the result of command execution in the XML format. EXIT STATUS =0: Terminate normally >0: Terminate abnormally EXAMPLES - [When you specify the option -free] > acinq lv -a DX80 -free LV No LV Name LV Size LV Type RG No Encrypt
201 x0023 vol M Open [When you do not specify the option -free] > acinq lv -a DX80 LV No LV Name LV Size LV Type RG No Encrypt x0010 vol M Open 4-0x0011 vol M Open 4-0x0012 vol M Open 4-0x0013 vol M Open 2-0x0014 vol M Open 2-0x0023 vol M Open [When you specify the option -l] > acinq lv -a DX80 -l LV No LV Name LV Size LV Type RG No Encrypt Virtual Size Copy Inhibit x M Open Yes 0x M Open Yes 0x M Open Yes 0x M SDV M - 0x M TPV The following table shows the meanings of displayed information. LV No LV Name LV Size LV Type RG No Encrypt Title Explanation Displays logical volume number in hexadecimal. Displays logical volume alias (0 to 16 characters). (Only ETERNUS Disk storage system where an alias is put to a logical volume.) Displays logical volume size in Megabytes. Displays logical volume type. - Open: This refers to an "Open Volume", which means a normal volume that can be used for open systems. - SDV: This refers to a "Snap Data Volume", which means a volume that can be used as a copy destination for SnapOPC/SnapOPC+. The volume of this type cannot be used as a copy destination for OPC/QuickOPC/EC/REC. - TPV: This refers to a "Thin Provisioning Volume", which means a virtual volume that can be used for open systems. Displays RAID group number. Hyphen (-) is displayed if "TPV" is displayed in the "LV Type" field. Displays logical volume encrypted status. - -: Indicates an unencrypted volume. - Yes: Indicates an encrypted volume. Virtual Size Copy Inhibit Displays a virtual size of Snap data volume in MB. If a logical volume type is other than "SDV", hyphen (-) is displayed. Displays volume protection status, which is displayed only when the -l option is specified. - -: Volume is not protected. - Yes: Volume is protected
202 Title Explanation If the type of a logical volume is "SDV" or as for a device that does not support the volume protection function, hyphen (-) is displayed. NOTES This command is not available for ETERNUS Disk storage systems registered as remote ETERNUS Disk storage systems. D.1.8 acinq lunmap (Command for displaying LUN Mapping information) NAME acinq lunmap - Display of LUN Mapping information. SYNOPSIS acinq lunmap -a DISKARRAY-NAME -agno AFFINITY-GROUP-NO [-xml] DESCRIPTION This command displays LUN Mapping information for affinity groups. This command cannot be used for connecting affinity groups. OPTIONS -a DISKARRAY-NAME This option specifies an ETERNUS Disk storage system. -agno AFFINITY-GROUP-NO -xml This option specifies an affinity group number. This option is specified when displaying the result of command execution in the XML format. EXIT STATUS =0: Terminate normally >0: Terminate abnormally EXAMPLES > acinq lunmap -a DX80 -agno 0x004 LUN LV No LV Name x0000 0x0003 vol03 0x0001 0x0004 vol04 0x0002 0x0005 vol05 The following table shows the meanings of displayed information. Title LUN LV No LV Name Explanation Displays logical unit number in hexadecimal. Displays logical volume number in hexadecimal. Displays logical volume alias (0 to 16 characters)
203 Title Explanation (Only ETERNUS Disk storage system where an alias is put to a logical volume) NOTES This command is not available for ETERNUS Disk storage systems registered as remote ETERNUS Disk storage systems. D.1.9 acinq ag (Command for displaying a list of affinity groups) NAME acinq ag - Display of a list of affinity groups. SYNOPSIS acinq ag -a DISKARRAY-NAME [-xml] DESCRIPTION This command displays a list of affinity groups for ETERNUS Disk storage systems. "Affinity groups" are management information on ETERNUS Disk storage systems that indicate the relationship between logical unit numbers (LUN), which can be recognized by the host, and logical volume numbers, which are managed within ETERNUS Disk storage systems. OPTIONS -a DISKARRAY-NAME -xml This option specifies an ETERNUS Disk storage system name. This option is specified when displaying the result of command execution in the XML format. EXIT STATUS =0: Terminate normally >0: Terminate abnormally EXAMPLES > acinq ag -a DX80 AG No AG Name x000 win_78 0x001 x86_76 The following table shows the meanings of the information displayed. AG No AG Name Title Explanation Displays affinity group number in hexadecimal. Displays affinity group name. NOTES This command is not available for ETERNUS Disk storage systems registered as remote ETERNUS Disk storage systems
204 D.1.10 acinq hostag (Command for displaying a list of host affinity) NAME acinq hostag - Display of a list of host affinity. SYNOPSIS acinq hostag -a DISKARRAY-NAME [-xml] DESCRIPTION This command displays host affinity for ETERNUS Disk storage systems. "Host affinity" are management information on ETERNUS Disk storage systems that indicate the relationship between the world wide name (WWN) for the host and its affinity groups. Disks that connect to the host can be specified as host affinity. OPTIONS -a DISKARRAY-NAME -xml This option specifies an ETERNUS name. This option is specified when displaying the result of execution command in the XML format. EXIT STATUS =0: Terminate normally >0: Terminate abnormally EXAMPLES > acinq hostag -a DX80 Host Name Port Type Address AG No AG Name win_78_1 FC A5A 0x002 win_78 win_78_2 FC AC340DA34F 0x003 win_78 x86_76 FC AA2C45GG 0x004 x86_76 The following table shows the meanings of the information displayed. Title Host Name Port Type Address AG No Explanation Displays the host name or alias name. The host name is displayed for the FC-CA or the Serial Attached SCSI. The alias name is displayed for the iscsi. Displays the data transfer method. FC: fibre channel connection iscsi: iscsi connection SAS: Serial Attached SCSI connection Displays the WWN for the connection destination. The WWN is displayed for the FC-CA. The iscsi address is displayed for the iscsi. The SAS address is displayed for the Serial Attached SCSI. Displays affinity group number in hexadecimal
205 Title AG Name Displays affinity group name. Explanation NOTES This command is not available for ETERNUS Disk storage systems registered as remote devices. D.1.11 acinhibit set (Command for setting volume protection) NAME acinhibit set - Volume protection settings. SYNOPSIS acinhibit set -v Volume-Name [-xml] DESCRIPTION This command sets volume protection in order to prevent a business volume from being destroyed due to operation mistakes and others using Advanced Copy. The following type of logical volume can be specified. - Open(including thin provisioning) OPTIONS -v Volume-Name This option specifies a logical volume. The following is a format example to specify a logical volume. - (1) ETERNUS Disk storage system name - (2) Logical volume number Extent start position and extent size cannot be specified. -xml This option is specified when displaying the result of command execution in the XML format. EXIT STATUS =0: Terminate normally >0: Terminated abnormally EXAMPLES > acinhibit set -v DX80/0x1 Successful completion NOTES For the following cases, the copy volume protection function is not available
206 - Logical volumes within remote ETERNUS Disk storage system - Copy destination logical volume on which REC session exists. D.1.12 acinhibit unset (Command for unsetting volume protection) NAME acinhibit unset - Volume protection unsetting. SYNOPSIS acinhibit unset -v Volume-Name [-xml] DESCRIPTION This command unsets volume protection. The following type of logical volume can be specified. - Open (including thin provisioning) OPTIONS -v Volume-Name This option specifies a logical volume. The following is a format example to specify a logical volume. - (1) ETERNUS Disk storage system name - (2) Logical volume number Extent start position and extent size cannot be specified. -xml This option is specified when displaying the result of command execution in the XML format. EXIT STATUS =0: Terminate normally >0: Terminated abnormally EXAMPLES > acinhibit unset -v DX80/0x1 Successful completion NOTES For the following case, the copy volume protection function is not available. - Logical volume within remote ETERNUS Disk storage system
207 D.1.13 acrecbuff set (Command for setting REC buffers) NAME acrecbuff set - REC buffer settings. SYNOPSIS acrecbuff set -a DISKARRAY-NAME -id BUFFER-ID -use {SEND RECV} [-xml] DESCRIPTION The settings of buffers used in an ETERNUS Disk storage system are changed. To execute this command, it is required that the REC buffers have been already set. OPTIONS -a DISKARRAY-NAME This option specifies an ETERNUS Disk storage system name. -id BUFFER-ID This option specifies a transfer buffer ID. -use {SEND RECV} This option specifies the application of the buffer. - SEND : For sending - RECV : For receiving -xml This option is specified when displaying the result of the command execution in the XML format. EXIT STATUS =0: Terminate normally >0: Terminated abnormally EXAMPLES > acrecbuff set -a DX90 -id 1 -use SEND Successful completion NOTES - Set up buffers while no session exists in asynchronous Consistency mode, which is in ACTIVE or ERROR SUSPEND status. - It takes tens of seconds to change buffer settings. Since transfer buffers are not available while their settings are changed, do not execute REC operations. - This command is not available for ETERNUS Disk storage systems registered as remote disk storage systems. D.1.14 acrecbuff stat (Command for displaying REC buffer status) NAME acrcsbuff stat - Display of REC buffer status
208 SYNOPSIS acrecbuff stat -a DISKARRAY-NAME [-disk] [-xml] DESCRIPTION This command displays the status of buffers used in an ETERNUS Disk storage system. OPTIONS -a DISKARRAY-NAME -disk -xml This option specifies an ETERNUS Disk storage system name. This option displays the information for REC Disk buffer. This option is specified when displaying the result of command execution in the XML format. EXIT STATUS =0: Terminate normally >0: Terminate abnormally EXAMPLES - [When you specify the option -disk] > acrecbuff stat -a DX90 -disk ID Use Rate RemoteBoxID DiskBuff DiskRate SEND 12% 00ETERNUSDXL##ET09E24AG###NP ## "active" 30% 2 RECV 0% 00ETERNUSDXL##ET09E24AG###NP ## "----" [When you do not specify the option -disk] >acrecbuff stat -a DX90 ID Use Rate RemoteBoxID SEND 12% 00ETERNUSDXL##ET09E24AG###NP ## 2 RECV 0% 00ETERNUSDXL##ET09E24AG###NP ## The following table shows the meanings of the information displayed. ID Use Rate Title Displays transfer buffer ID. Displays the transfer buffer attribute (application). - SEND: for sending - RECV: for receiving Displays the buffer usage as a percentage. When the REC buffer is not available, "----" is displayed. - For sending: Displays the buffer usage as a percentage. Even if REC in asynchronous Consistency mode is not executed, the usage does not become 0 %. - For receiving: "0 %" is displayed at all times. RemoteBoxID Displays the BOX ID for REC ETERNUS Disk storage system
209 DiskBuff DiskRate Title Displays REC Disk buffer status only when -disk option is specified : Reception transfer buffer - active : REC Disk buffer is available. - invalid : REC Disk buffer is not valid. - warnning(code=xx) : REC Disk buffer is available but there is failure in a disk. - Either of the following codes is entered in code=xx : Under recovery such as rebuild. (REC Disk buffer is available) - 08 : RAID making up a REC Disk buffer. Some have no redundancy. - in active(code=xx) : REC Disk buffer is not available : RAID making up a REC Disk buffer is in error status : RAID group of a REC Disk buffer is being formatted : Copy destination does not support REC Disk buffer. - not support : REC Disk buffer is unsupported. If REC Disk buffer is in active or warning status, the usage is displayed as percentage, which is displayed only when -disk option is specified. If REC Disk buffer is not in use, "0%" is displayed. For other cases than the above mentioned, "---"is displayed. NOTES This command is not available for ETERNUS Disk storage systems registered as remote disk storage systems. D.1.15 acgroup create (Command for creating copy groups) NAME acgroup create - Creation of copy groups. SYNOPSIS acgroup create -g COPY-GROUP -type { OPC QuickOPC SnapOPCP EC REC } -a DISKARRAY-NAME [-remote REMOTE-DISKARRAY-NAME] [-xml] DESCRIPTION This command creates a copy group. OPTIONS -g COPY-GROUP This option specifies a copy group name. The copy group name is an alias for the copy group that can be used with Express. Specify copy group names using up to 64 alphanumeric characters, hyphens (-), underscores (_), hashes (#) or periods (.). The first character must be an alphanumeric character. An error will occur when an attempt is made to create a copy group with the same name as a copy group that has already been registered
210 -type { OPC QuickOPC SnapOPCP EC REC } This option specifies a copy type. Specify one of the following copy types: - OPC - QuickOPC - SnapOPCP - EC - REC -a DISKARRAY-NAME This option specifies an ETERNUS Disk storage system name. For REC, the access path of the ETERNUS Disk storage system specified here is used. -remote REMOTE-DISKARRAY-NAME -xml For REC, this option specifies other ETERNUS Disk storage system name than the ETERNUS Disk storage system specified with the -a option. The access path of the ETERNUS Disk storage system specified with the -a option is used, instead of the access path of the ETERNUS Disk storage system specified here. This option displays the result of the command execution in the XML format. EXIT STATUS =0: Terminate normally >0: Terminate abnormally EXAMPLES > acgroup create -g group01 -type OPC -a DX80 Successful completion. D.1.16 acgroup list (Command for displaying copy groups) NAME acgroup list - Display of copy groups. SYNOPSIS acgroup list [-xml] DESCRIPTION This command displays a list of copy groups. OPTIONS -xml This option displays the result of the command execution in the XML format
211 EXIT STATUS =0: Terminate normally >0: Terminate abnormally EXAMPLES > acgroup list CG Name Group01 Group02 The following table shows the meaning of the information displayed. Title CG Name Displays copy group name. Explanation D.1.17 acgroup detail (Command for displaying detailed information about copy groups) NAME acgroup detail - Detailed display of copy groups. SYNOPSIS acgroup detail -g COPY-GROUP [-xml] DESCRIPTION This command displays the copy pairs that have been set up to copy groups. OPTIONS -g COPY-GROUP This option specifies a copy group name. -xml This option displays the result of the command execution in the XML format. EXIT STATUS =0: Terminate normally >0: Terminate abnormally EXAMPLES - For OPC, QuickOPC, SnapOPCP and EC > acgroup detail -g group01 Copy Group Name : group01 Copy Group Type : OPC Disk Array Name : DX80 (00ETERNUSDXL##ET08E21A####LN ##) Pair
212 DX80/0x1:DX80/0x6 DX80/0x2:DX80/0x7 DX80/0x3:DX80/0x8 The displayed content is shown next. Title Copy Group Name Copy Group Type Disk Array Name Pair Displays a copy group name. Displays the copy type set to the copy group. Explanation Displays ETERNUS Disk storage system name and its Box ID that were specified with the "-a" option of acgroup create (Command for creating copy groups). Displays the copy pair that was set up. - For REC > acgroup detail -g group01 Copy Group Name : group01 Copy Group Type : REC Disk Array Name : DX90P (00ETERNUSDXL##ET09E24AG###NP ##) Remote Disk Array Name : DX90S (00ETERNUSDXL##ET09E24AG###NP ##) Pair DX90P/0x1:DX90S/0x1 DX90P/0x2:DX90S/0x2 DX90P/0x3:DX90S/0x3 The following table shows the meanings of the information displayed. Title Copy Group Name Copy Group Type Disk Array Name Remote Disk Array Name Pair Displays a copy group name. Explanation Displays the copy type set in the copy group. Displays the ETERNUS Disk storage system name and its Box ID that were specified with the "-a" option of acgroup create (Command for creating copy groups). Displays the ETERNUS Disk storage system name and its Box ID that were specified with the "-remote" option of acgroup create (Command for creating copy groups). Displays the copy pairs that have been set up. D.1.18 acgroup remove (Command for removing copy groups) NAME acgroup remove - Removing copy groups. SYNOPSIS acgroup remove -g COPY-GROUP [-xml] DESCRIPTION This command removes copy groups
213 OPTIONS -g COPY-GROUP -xml This option specifies a copy group name. This option displays the result of the command execution in the XML format. EXIT STATUS =0: Terminate normally >0: Terminated abnormally EXAMPLES > acgroup remove -g group01 Successful completion. NOTES - Even if a copy group contains a pair, it is removed. - Regardless of the Advanced Copy status of the pair, the copy group is removed. Therefore, check the Advanced Copy status and then remove the copy group. If you remove it accidentally, stop Advanced Copy of the pair registered in the group on ETERNUS Web GUI or create the same copy group once again to add it and then stop Advanced Copy. D.1.19 acpair add (Command for adding copy pairs) NAME acpair add - Addition of copy pairs. SYNOPSIS acpair add -g COPY-GROUP -p PAIR [-xml] DESCRIPTION This command adds copy pairs to copy groups. OPTIONS -g COPY-GROUP This option specifies a copy group name. -p PAIR This option specifies the copy pair to be added. The following example shows the format for specifying copy pairs. - (1) ETERNUS Disk storage system name for the copy source - (2) Logical volume number for the copy source - (3) ETERNUS Disk storage system name for the copy destination
214 - (4) Logical volume number for the copy destination In addition, you can specify in LU to Partition format, as well. The following is an example of LU to Partition format. - (1) ETERNUS Disk storage system name for the copy source - (2) Logical volume number for the copy source - (3) Extent start position of the copy source (per block) - (4) Extent size of the copy source (number of blocks) - (5) ETERNUS Disk storage system name for the copy source - (6) Logical volume number for the copy source - (7) Extent start position of the copy destination (per block) Point If it starts with "0x", it is a hexadecimal number. -xml This option displays the result of the command execution in the XML format. EXIT STATUS =0: Terminate normally >0: Terminate abnormally EXAMPLES > acpair add -g group01 -p DX80/0x1:DX80/0x6 Successful completion. The following is an example of registering a copy pair in LU to Partition format. > acpair add -g group01 -p DX80/0x1[addr=0x0,size=0x10000]:DX80/0x6[addr=0x80] Successful completion. NOTES - Make sure that the logical volumes specified for the copy source and the copy destination are of the same size. - If the copy type is OPC, QuickOPC or EC: - Specify the ETERNUS Disk storage system name that was specified with the -a option of acgroup create (Command for creating copy groups). - When specifying a pair of ETERNUS Disk storage systems, specify the same ETERNUS Disk storage systems as those specified with the -a option when creating a copy group. - If the copy type is SnapOPCP: - For a pair of ETERNUS Disk storage systems to be specified, specify the same ETERNUS Disk storage systems as those specified with the -a option when creating the copy group

215 - If the number of copy destination volumes for the copy source volume of a specified pair exceeds the maximum number of sessions of Snapshot type Advanced Copy copies, this command ends abnormally. - If the copy destination for the specified pair is not SDV, this command ends abnormally. - If the copy type is REC: - Specify the ETERNUS Disk storage system name that was specified with either the -a or the -remote option of acgroup create (Command for creating copy groups). - Specify different ETERNUS names for the copy source and the copy destination. - The copy source ETERNUS Disk storage system name and the copy destination ETERNUS Disk storage system name for the copy pair being added must be the same as the copy source ETERNUS Disk storage system name and copy destination ETERNUS Disk storage system name for any copy pairs that have already been added to the copy group. - When specifying a pair of ETERNUS Disk storage systems, specify the same ETERNUS Disk storage systems as those specified with the -a or -remote option when creating a copy group. - For paired ETERNUS Disk storage systems names, specify different names for copy source and copy destination. e.g.: - OK: DX90P/0x50:DX90S/0x51 - NG: DX90P/0x50:DX90P/0x51 - The copy source and destination ETERNUS names for a specified pair should be the same as those for already added pair. - If any pair in the same string exists in the group, it cannot be newly added. Specify the same-size logical volumes for a pair you want to specify. If you specify any logical volumes of different sizes and perform copy operation, it leads to the following results. 1. In the case of a copy-source logical volume size being larger than a copy-destination logical volume, when copy operation is executed, it will end abnormally. 2. In the case of a copy-source logical volume size being smaller than a copy-destination logical volume size, the copy will be the size of the copy-source logical volume
216 D.1.20 acpair remove (Command for removing copy pairs) NAME acpair remove - Removing copy pairs. SYNOPSIS acpair remove -g COPY-GROUP -p PAIR [-xml] DESCRIPTION This command removes copy pairs from copy groups. OPTIONS -g COPY-GROUP This option specifies the copy group name. -p PAIR -xml This option specifies a copy pair to be deleted. This option displays the result of the command execution in the XML format. EXIT STATUS =0: Terminate normally >0: Terminate abnormally EXAMPLES > acpair remove -g group01 -p DX80/0x1:DX80/0x6 Successful completion. Example of removing a copy pair in LU to Partition format. > acpair remove -g group01 -p DX80/0x1[addr=0x0,size=0x10000]:DX80/0x6[addr=0x80] Successful completion NOTES Since pairs are deleted regardless of their Advanced Copy statuses, check the Advanced Copy status and then delete them. If you delete a pair accidentally, stop Advanced Copy of the pair registered on ETERNUS Web GUI or create the same pair once again and then stop Advanced Copy. D.1.21 acopc start (Command for starting OPC or QuickOPC copy) NAME acopc start - Start of OPC or QuickOPC copy. SYNOPSIS - [For OPC copy group] acopc start -g COPY-GROUP [-p PAIR] [-r] [-xml]
217 - [For QuickOPC copy group] acopc start -g COPY-GROUP [-p PAIR] [-diff -r] [-xml] DESCRIPTION This command performs OPC or QuickOPC copy to s specified copy group or copy pair. OPTIONS -g COPY-GROUP This option specifies a copy group name. -p PAIR This option specifies a copy pair. -diff This option starts a differential copy. If the -diff option is not specified, a full copy is started. -r This option performs a copy in the reverse direction to the direction that has been specified. If the copy type is QuickOPC, OPC will be executed. -xml This option displays the result of the command execution in the XML format. EXIT STATUS =0: Terminate normally >0: Terminate abnormally EXAMPLES > acopc start -g group01 DX80/0x1:DX80/0x6 # DATE : 2008/06/24 16:28:00 - << OPC Started >> # From:BoxID= d b /Olu=1/ Adr_high=0/Adr_low=0/size_high=0/size_low=0 # To :BoxID= d b /Olu=6/ Adr_high=0/Adr_low=0 DX80/0x2:DX80/0x7 # DATE : 2008/06/24 16:28:00 - << OPC Started >> # From:BoxID= d b /Olu=2/ Adr_high=0/Adr_low=0/size_high=0/size_low=0 # To :BoxID= d b /Olu=7/ Adr_high=0/Adr_low=0 DX80/0x3:DX80/0x8 # DATE : 2008/06/24 16:28:00 - << OPC Started >> # From:BoxID= d b /Olu=3/ Adr_high=0/Adr_low=0/size_high=0/size_low=0 # To :BoxID= d b /Olu=8/ Adr_high=0/Adr_low=0 Succeeded : 3 Failed :
218 NOTES - If the destination logical volume of a specified copy group or pair is protected by acinhibit set (Command for setting volume protection), this command terminates abnormally. D.1.22 acopc query (Command for displaying the status of OPC or QuickOPC copy) NAME acopc query - Display of the status of OPC or QuickOPC copy. SYNOPSIS acopc query -g COPY-GROUP [-p PAIR] [-r] [-progress] [-xml] DESCRIPTION This command displays the status of OPC or QuickOPC copy for a specified copy group. OPTIONS -g COPY-GROUP This option specifies a copy group name. -p PAIR This option specifies a copy pair. -r This option displays the status of a copy in the reverse direction to the direction that has been specified. -progress Displays the progress of copy processes. -xml This option displays the result of the command execution in the XML format. EXIT STATUS =0: Terminate normally >0: Terminate abnormally EXAMPLES - For OPC - When the -progress option is not specified: > acopc query -g Group01 Copy Group Name : Group01 Copy Group Type : OPC Disk Array Name : DX80 (00ETERNUSDXL##ET08E21A####LN ##) Source <=> Target SID OPC Status Copy Phase Copied Block DX80/0x1 ==> DX80/0x3 0x21 "OPC Executing" "Copying" 0 DX80/0x2 ==> DX80/0x4 0x22 "OPC Executing" "Copying"
219 - When the -progress option is specified: > acopc query -g Group01 -progress Copy Group Name : Group01 Copy Group Type : OPC Disk Array Name : DX80 (00ETERNUSDXL##ET08E21A####LN ##) Source <=> Target Progress Copied Block Total Block DX80/0x1 ==> DX80/0x3 0% DX80/0x2 ==> DX80/0x4 45% For QuickOPC - When the -progress option is not specified: > acopc query -g Group01 Copy Group Name : Group01 Copy Group Type : QuickOPC Disk Array Name : DX80 (00ETERNUSDXL##ET08E21A####LN ##) Source <=> Target SID OPC Status Copy Phase Copied Block DX80/0x1 ==> DX80/0x3 0x21 "OPC Executing" "Tracking" DX80/0x2 ==> DX80/0x4 0x22 "OPC Executing" "Tracking" When the -progress option is specified: > acopc query -g Group01 -progress Copy Group Name : Group01 Copy Group Type : QuickOPC Disk Array Name : DX80 (00ETERNUSDXL##ET08E21A####LN ##) Source <=> Target Progress Copied Block Total Block DX80/0x1 ==> DX80/0x3 0% DX80/0x2 ==> DX80/0x4 45% The following table shows the meanings of the information displayed. Table D.10 When the -progress option is not specified Title Copy Group Name Copy Group Type Disk Array Name Source Displays the copy group name. Explanation Displays the type of copy that has been set up for the copy group. Displays the Box ID and the ETERNUS name that was specified with the "-a" option of acgroup create (Command for creating copy groups). Displays the logical volume for the copy source. <=> Displays the copy direction. - N/A: No copying is performed. - ==>: Copying from the source to the target. - <==: Copying from the target to the source. Target SID OPC Status Displays the logical volume for the copy destination. Displays the session ID for the copy source. Displays the execution status of the OPC
220 Title - OPC Starting: The OPC is starting up. Explanation - OPC Executing: The OPC is executing. - OPC action not startup: The specified session does not exist. - OPC Error Suspend: An error has occurred, preventing the copy process from continuing. Copy Phase Displays the current phase. - Copying: Copy processing is executing. - Tracking: Copy processing has completed, and tracking is in progress. - Copying/Tracking: Both copy processing and tracking are in progress. - Not set: Copy processing has not been performed. Copied Block Displays the number of blocks that have been copied. Table D.11 When the -progress option is specified Title Copy Group Name Copy Group Type Disk Array Name Source Displays the copy group name. Explanation Displays the type of copy that has been set up for the copy group. Displays the Box ID and the ETERNUS name that was specified with the "-a" option of the acgroup create (Command for creating copy groups). Displays the logical volume for the copy source. <=> Displays the copy direction. - N/A: No copying is performed. - ==>: Copying from the source to the target - <==: Copying from the target to the source Target Progress Displays the logical volume for the copy destination. Displays the progress of copy processes as a percentage. The "N/A" is displayed when the copy process is not executed. If the progress of copy process is unclear, "???" is displayed. Copied Block Displays the number of blocks that have been copied. The "N/A" is displayed when the copy process is not executed. If the number of copied blocks is unclear, "???" is displayed. Total Block Displays the number of total blocks. If the entire copy block size is unclear, "???" is displayed. NOTES - Information such as Copy direction data and SID data may be displayed as "???". It is possible that the access path is incorrect. Therefore, check it using acarray detail (Command for displaying detailed information about ETERNUS Disk storage systems). For details on how to correctly set the access path, refer to " Access Path Settings". - If the copy type of a copy group is EC, REC or SnapOPCP, this command ends abnormally
221 D.1.23 acopc cancel (Command for canceling OPC or QuickOPC copy) NAME acopc cancel - Cancellation of OPC or QuickOPC copy. SYNOPSIS - [For OPC copy group] acopc cancel -g COPY-GROUP [-p PAIR] [-r] [-xml] - [For QuickOPC copy group] acopc cancel -g COPY-GROUP [-p PAIR] [-r] [-force] [-xml] DESCRIPTION This command cancels OPC or QuickOPC to a specified copy group or copy pari. OPTIONS -g COPY-GROUP This option specifies a copy group name. -p PAIR -r -force -xml This option specifies a copy pair. This option stops copying. This option stops physical copying and tracking. If this option is not specified, only tracking is stopped. The physical copying currently being executed is continued. This option displays the result of the command execution in the XML format. EXIT STATUS =0: Terminate normally >0: Terminate abnormally EXAMPLES > acopc cancel -g group01 DX80/0x1:DX80/0x6 # DATE : 2008/06/24 16:28:00 - << OPC Disconnected >> DX80/0x2:DX80/0x7 # DATE : 2008/06/24 16:28:00 - << OPC Disconnected >> DX80/0x3:DX80/0x8 # DATE : 2008/06/24 16:28:00 - << OPC Disconnected >> Succeeded : 3 Failed :
222 D.1.24 acsnap start (Command for starting SnapOPC+ copy) NAME acsnap start - Start of SnapOPC+ copy. SYNOPSIS acsnap start -g COPY-GROUP [-p PAIR -v VOLUME-NAME] [-r] [-xml] [When starting the estimation of the amount of snap data volume updates:] acsnap start -estimate -v VOLUME-NAME [-xml] DESCRIPTION This command starts SnapOPC+ copy to a specified copy group or copy pair. It also can start to estimate the number of updated blocks generated for the copy source volume. 1. If the -p option is not specified, a copy destination is automatically selected and Snapshot type copy is started. If all copy destination volumes are generation-managed, the oldest snap generation is cancelled and selected as a copy destination. 2. If the -p option is specified, Snapshot type copy is started onto a specified copy destination. If a past snap generation (excluding the oldest snap generation) is specified as a copy destination, this command ends abnormally. 3. If the -v option is specified, a copy destination for the specified copy source is automatically selected. OPTIONS -g COPY-GROUP This option specifies a copy group name. -p PAIR This option specifies a copy pair. -r This option performs a copy in the reverse direction to the direction that has been specified. The latest snap generation is selected as a copy source when a copy pair is not specified. -v VOLUME-NAME This option specifies a copy source logical volume. The copy destination is automatically selected. Also when starting to estimate the amount of snap data volume updates, specify a copy-source logical volume. The following is an example of a format to specify a logical volume. - (1) ETERNUS Disk storage system name - (2) Logical volume number In addition, you can specify extent start position and extent size, as well
223 - (1) ETERNUS Disk storage system name - (2) Logical volume number - (3) Extent start position (per block) - (4) Extent size (number of blocks) A string starting with "0x" represents a hexadecimal number. -estimate This option estimates the amount of snap data volume updates. -xml This option displays the result of the command execution in the XML format. EXIT STATUS =0: Terminate normally >0: Terminate abnormally EXAMPLES > acsnap start -g group01 DX80/0x1:DX80/0x6 # DATE : 2008/06/24 16:28:00 - << SnapOPCP Started >> DX80/0x2:DX80/0x7 # DATE : 2008/06/24 16:28:00 - << SnapOPCP Started >> DX80/0x3:DX80/0x8 # DATE : 2008/06/24 16:28:00 - << SnapOPCP Started >> Succeeded : 3 Failed : 0 [When starting to estimate the amount of snap data volume updates:] > acsnap start -estimate -v DX80/0x1 Successful completion NOTES - When the copy type of a copy group is OPC, QuickOPC, EC or REC, this command ends abnormally. - This command is not available for ETERNUS Disk storage systems registered as remote disk storage systems. - If the destination logical volume of a specified copy group or copy pair is protected by acinhibit set (Command for setting volume protection), this command terminates abnormally. D.1.25 acsnap query (Command for displaying the status of SnapOPC+ copy) NAME acsnap query - Display of the status of SnapOPC+ copy. SYNOPSIS acsnap query -g COPY-GROUP [-p PAIR] [-r] [-xml]
224 [When referring the estimation of the amount of snap data volume updates:] acsnap query -estimate -v VOLUME-NAME [-xml] DESCRIPTION This command displays the status of a specified copy group or copy pair. You can also refer to the number of updated blocks generated for the copy-source volume. OPTIONS -g COPY-GROUP -p PAIR -r - This option specifies a copy group name. This option specifies a copy pair. This option displays the status of a copy in the reverse direction to the direction that has been specified. -estimate This option estimates the amount of snap data volume updates. -v VOLUME-NAME When referring to the estimation of the amount of snap data volume updates, specify a copy-source logical volume. The following is an example of a format to specify a logical volume. - (1) ETERNUS Disk storage system name - (2) Logical volume number In addition, you can specify extent start position and extent size, as well. - (1) ETERNUS Disk storage system name - (2) Logical volume number - (3) Extent start position (per block) - (4) Extent size (number of blocks) A string starting with "0x" represents a hexadecimal number. -xml This option displays the result of the command execution in the XML format. EXIT STATUS =0: Terminate normally >0: Terminate abnormally
225 EXAMPLES C:\>acsnap query -g Group01 Copy Group Name : Group01 Copy Group Type : SnapOPCP Disk Array Name : DX80 (00ETERNUSDXL##ET08E21A####LN ##) Source <=> Target SID Snap Status Gen Date Copied Block DX80/0x1 ==> DX80/0x5 0x23 "Copy On Write(Active)" 3 10minute DX80/0x1 ==> DX80/0x4 0x22 "Copy On Write(Inactive)" 2 3hour DX80/0x1 ==> DX80/0x3 0x21 "Copy On Write(Inactive)" 1 1day The following table shows the meanings of the information displayed. Source Title Displays a copy-source logical volume. Explanation <=> Displays a copy direction. The following information is displayed. - N/A: No copy process is executed. - ==>: Copy process from source to target. - <==: Copy process from target to source. Target SID Snap Status Displays a copy-destination logical volume. Displays a copy source session ID. Displays Snapshot type executed status. Snap execution statuses are as follows. * If the -r option is specified, no information is displayed here. - Snap action not startup: No specified session exists. - Copy On Write(Active): Snapshot type is in process. (Latest snap generation). - Copy On Write(Inactive): Snapshot type is in process. (Past snap generations). - Snap Error Suspend: Error that cannot continue copy process occurred. OPC Status Displays OPC executed status. OPC execution statuses are as follows. * Only when -r option is specified, this information is displayed. - OPC action not startup: No specified session exists. - OPC Starting: OPC is being started. (OPC logical copy is in boot process.) - OPC Executing: OPC is in process. (OPC logical copy completed, physical copy being in process.) - OPC Error Suspend: Error that cannot continue copy process occurred. Copy Phase Displays the current phase. * If the -r option is specified, no information is displayed here. - No set: No copy process is executed. - Copying: Copy is in process. Date Displays the elapsed time of Snapshot type copy execution. * If the -r option is specified, no information is displayed here. The output format is as follows. - N/A: No copy process is being executed. - Less than 1H: Displayed on a per minute basis. - Less than 24H: Displayed on a per hour basis
226 Title - 24H or more: Displayed on a per day basis. Explanation * If below one minute, it is displayed as "0minute". Gen Displays snap generation numbers. * If the -r option is specified, no information is displayed here. For snap generation numbers, 1 is the oldest and as the number is larger, it shows more new generations. * If no copy process is executed, it is displayed as "N/A". Copied Block Displays the number of copied blocks. * If no copy process is executed, it is displayed as "N/A". [When referring to the amount of snap data volume updates:] C:\>acsnap query -estimate -v DX80/0x1 Update M If the number of copied blocks is unclear, "???" is displayed. The following table shows the meanings of the information displayed. Update Title Explanation Displays the amount of snap data volume updates in MB. NOTES - Information such as Copy direction data and SID data may display as "???". It is possible that the copy-source logical volume size and copy-destination logical volume size are different or the access path is incorrect. Check the size of their logical volumes. If it is different, register the copy pair that the copy-source logical volume size and copydestination logical volume size are same. And, check the access path using D.1.4 acarray detail (Command for displaying detailed information about ETERNUS Disk storage systems)r details on how to correctly set the access path, refer to " Access Path Settings". - If the copy group type is OPC, QuickOPC, EC or REC, this command ends abnormally. This command is not available for ETERNUS Disk storage systems registered as remote disk storage system. - Copy-source logical volumes and snap generation numbers are sorted when displayed. (However, a pair that has no session is displayed at the bottom of the sort column.) D.1.26 acsnap cancel (Command for canceling SnapOPC+ copy) NAME acsnap cancel - Cancellation of SnapOPC+ copy. SYNOPSIS acsnap cancel -g COPY-GROUP [-p PAIR -v VOLUME-NAME] [-r -force] [-xml] [When cancelling the estimation of the amount of snap data volume updates:] acsnap cancel -estimate -v VOLUME-NAME [-xml] DESCRIPTION This command cancels SnapOPC+ copy for a specified copy group or copy pair
227 It is also possible to cancel the estimation of the number of updated blocks generated for the copy-source volume. OPTIONS -g COPY-GROUP This option specifies a copy group name. -p PAIR This option specifies a copy pair. - If neither a pair nor the -force option is specified, the copy process of the oldest snap generation is cancelled. - If a pair is not specified but the -force option is specified, the copy process of the latest snap generation is cancelled. If -p option is specified at restore with -r option of the acsnap start command, specify also -p option at cancellation with this command. -v VOLUME-NAME The copy process of a specified logical volume is cancelled. - If the -force option is not specified, the copy process of the oldest snap generation is cancelled. - If the -force option is specified, the copy process of the latest snap generation is cancelled. - If the -r option is specified, the restore process of the latest snap generation is cancelled. Also, when cancelling the estimation of the amount of snap data volume updates, specify a copy-source logical volume. The following is an example of a format to specify a logical volume. - (1) ETERNUS Disk storage system name - (2) Logical volume number In addition, you can specify extent start position and extent size, as well. - (1) ETERNUS Disk storage system name - (2) Logical volume number - (3) Extent start position (per block) - (4) Extent size (number of blocks) A string starting with "0x" represents a hexadecimal number. -r This option stops copying in the reverse direction to the direction that has been specified. -force This option forcibly stops SnapOPC+ session. Alll the snap generations of a specified copy pair are stopped. If no pair is specified, SnapOPC+ copy is forcibly cancelled for the latest snap generation, so that all snap generations are stopped. This option is specifiable even if there is only one snap generation
228 -estimate This option estimates the amount of snap data volume updates. -xml This option displays the result of the command execution in the XML format. EXIT STATUS =0: Terminate normally >0: Terminate abnormally EXAMPLES > acsnap cancel -g group01 DX80/0x1:DX80/0x6 # DATE : 2008/06/24 16:28:00 - << SnapOPCP Disconnected >> DX80/0x2:DX80/0x7 # DATE : 2008/06/24 16:28:00 - << SnapOPCP Disconnected >> DX80/0x3:DX80/0x8 # DATE : 2008/06/24 16:28:00 - << SnapOPCP Disconnected >> Succeeded : 3 Failed : 0 [When cancelling the estimation of the amount of snap data volume updates:] > acsnap cancel -v DX80/0x1 Successful completion NOTES - If the copy type of a copy group is OPC, QuickOPC, EC or REC, this command ends abnormally. - This command is not available for ETERNUS Disk storage systems registered as remote disk storage systems. - When specifying a pair of the past snap generations (excluding the oldest snap generation) with the -p option, specify the -force option. - If the -p option and the -r option are specified when starting copy with "acsnap start (Command for starting SnapOPC+ copy)", specify only the -p option at cancellation with this command. D.1.27 acec start (Command for starting synchronous high speed copy) NAME acec start - Start of synchronous high speed copy. SYNOPSIS - [When the copy type set in the copy group is EC] acec start -g COPY-GROUP [-p PAIR] [-r] [-xml] - [When the copy type set in the copy group is REC] acec start -g COPY-GROUP [-p PAIR] [-r] [-transfer {sync[-split {auto manual}] through consist stack}] [-recovery {auto manual}] [-skip] [-xml]
229 DESCRIPTION This command starts synchronous high speed copy to a specified copy group or copy pair. OPTIONS -g COPY-GROUP This option specifies a copy group name. -p PAIR -r This option specifies a copy pair. This option performs a copy in the reverse direction to the direction that has been specified. -transfer {sync [-split {auto manual}] through consist stack} This option specifies a transfer mode. (Only for REC) The default mode is "stack". - sync: Synchronous mode This option specifies the split mode when sync was specified with the "-transfer" option. (Only for REC) -split The default mode is "auto". - auto: Automatic Split - manual: Manual Split - through: Through mode - consist: Consistency mode - stack: Stack mode -recovery {auto manual} This option specifies recovery mode. (Only for REC) The default mode is "auto". - auto: Automatic Recovery - manual: Manual Recovery See Refer to "Recovery mode" for details of each mode. -skip -xml This option is specified when the synchronous process is suspended by using the initial copy skip function. This option is effective only when the synchronous high-speed copy for intra-box is started. This option displays the result of the command execution in the XML format. EXIT STATUS =0: Terminate normally >0: Terminate abnormally
230 EXAMPLES > acec start -g group01 DX80/0x1:DX80/0x6 # DATE : 2008/06/24 16:28:00 - << EC Started >> # From:BoxID= d b /Olu=1/ Adr_high=0/Adr_low=0/size_high=0/size_low=0 # To :BoxID= d b /Olu=6/ Adr_high=0/Adr_low=0 DX80/0x2:DX80/0x7 # DATE : 2008/06/24 16:28:00 - << EC Started >> # From:BoxID= d b /Olu=2/ Adr_high=0/Adr_low=0/size_high=0/size_low=0 # To :BoxID= d b /Olu=7/ Adr_high=0/Adr_low=0 DX80/0x3:DX80/0x8 # DATE : 2008/06/24 16:28:00 - << EC Started >> # From:BoxID= d b /Olu=3/ Adr_high=0/Adr_low=0/size_high=0/size_low=0 # To :BoxID= d b /Olu=8/ Adr_high=0/Adr_low=0 Succeeded : 3 Failed : 0 NOTES If the destination logical volume of a specified copy group or pair is protected by acinhibit set (Command for setting volume protection), this command terminates abnormally. D.1.28 acec query (Command for displaying the status of synchronous high speed copy) NAME acec query - Display of the status of synchronous high speed copy. SYNOPSIS acec query -g COPY-GROUP [-p PAIR] [-progress] [-r] [-xml] DESCRIPTION This command displays the status of synchronous high speed copy of a specified copy group or copy pair. OPTIONS -g COPY-GROUP This option specifies a copy group name. -p PAIR This option specifies a copy pair. -progress This option displays the progress of copy processes
231 -r -xml This option displays the status of a copy in the reverse direction to the direction that has been specified. This option displays the result of the command execution in the XML format. EXIT STATUS =0: Terminate normally >0: Terminate abnormally EXAMPLES - For EC - When the -progress option is not specified: > acec query -g ECGroup Copy Group Name : ECGroup Copy Group Type : EC Disk Array Name : DX80 (00ETERNUSDXL##ET08E21A####LN ##) Source <=> Target SID EC Status Copy Phase Copied Block DX80/0x1 N/A DX80/0x3 N/A "EC action not startup" "Not set" 0 DX80/0x2 ==> DX80/0x4 0x41 "EC Executing" "Copying" The following table shows the meanings of the information displayed. Title Copy Group Name Copy Group Type Disk Array Name Source Displays the copy group name. Explanation Displays the type of copy that has been set up for the copy group. Displays the Box ID and ETERNUS name that was specified the "-a" option of the acgroup create (Command for creating copy groups). Displays the logical volume for the copy source. <=> Displays the copy direction. - N/A: No copying is performed. - ==>: Copying from the source to the target. - <==: Copying from the target to the source. Target SID EC Status Displays the logical volume for the copy destination. Displays the session ID. Displays the execution status of the EC. - EC Starting: The EC is starting up. - EC Executing: The EC is executing. - EC Suspend: The EC is suspended. - EC action not startup: The specified session does not exist. - EC Error Suspend: An error has occurred, preventing the copy process from continuing. Copy Phase Displays the current phase. - Copying: Copy processing is executing
232 Title Explanation - Paired: The copy is in an equivalency maintenance state. - Not set: Either the specified session does not exist, or the copy process is not running. Copied Block Displays the number of blocks that have been copied. - When the -progress option is specified: > acec query -g ECGroup -progress Copy Group Name : ECGroup Copy Group Type : EC Disk Array Name : DX80 (00ETERNUSDXL##ET08E21A####LN ##) Source <=> Target Progress Copied Block Total Block DX80/0x1 N/A DX80/0x3 N/A N/A N/A DX80/0x2 ==> DX80/0x4 45% The following table shows the meanings of the information displayed. Title Copy Group Name Copy Group Type Disk Array Name Source Displays the copy group name. Explanation Displays the type of copy that has been set up for the copy group. Displays the Box ID and ETERNUS name that was specified the "-a" option of acgroup create (Command for creating copy groups). Displays the logical volume for the copy source. <=> Displays the copy direction. - N/A: No copying is performed. - ==>: Copying from the source to the target. - <==: Copying from the target to the source. Target Progress Copied Block Total Block Displays the logical volume for the copy destination. Displays the progress of copy processes as a percentage. The "N/A" is displayed when the copy process is not executed. If the progress of copy process is unclear, "???" is displayed. Displays the number of blocks that have been copied. The "N/A" is displayed when the copy process is not executed. If the number of copied blocks is unclear, "???" is displayed. Displays the number of total blocks. If the entire copy block size is unclear, "???" is displayed. - For REC - When the -progress option is not specified: > acec query -g RECGroup Copy Group Name : RECGroup Copy Group Type : REC Disk Array Name : DX90P (00ETERNUSDXL##ET09E24AG###NP ##) Remote Disk Array Name : DX90S (00ETERNUSDXL##ET09E24AG###NP ##) Source <=> Target SID(RSID) EC Status Copy Phase Copied Block Rcv Split Xfer
233 DX90P/0x1 N/A DX90S/0x6 N/A "EC action not startup" "Not set" DX90P/0x2 ==> DX90S/0x7 0x4A(0x11) "EC Executing" "Copying" 0 auto ---- through DX90P/0x3 ==> DX90S/0x8 0x4C(0x13) "EC Suspend" "Paired" auto ---- through The following table shows the meanings of the information displayed. Title Copy Group Name Copy Group Type Disk Array Name Remote Disk Array Name Source Displays the copy group name. Explanation Displays the type of copy that has been set up for the copy group. Displays the Box ID and ETERNUS name that was specified with the "-a" option of acgroup create (Command for creating copy groups). Displays the Box ID and ETERNUS name that was specified with the "-remote" option of acgroup create (Command for creating copy groups). Displays the logical volume for the copy source. <=> Displays the copy direction. - N/A: No copying is performed. - ==>: Copying from the source to the target. - <==: Copying from the target to the source. Target SID(RSID) EC Status Displays the logical volume for the copy destination. Displays the Session ID of the ETERNUS Disk storage system (i.e. the Disk Array Name) and the Session ID of the Remote ETERNUS Disk storage system (i.e. the Remote Disk Array Name). Displays the execution status of the EC. - EC Starting: The EC is starting up. - EC Executing: The EC is executing. - EC Suspend: The EC is suspended - EC action not startup: The specified session does not exist. - EC Error Suspend: An error has occurred, preventing the copy process from continuing. - EC Hardware Suspend: The EC has paused because of a hardware error, such as a problem with the path between hardware devices. - EC Hardware Suspend(Use REC DISK): REC DISK buffer is in use due to a path error between hardware devices. Copy Phase Displays the current phase. - Copying: Copy processing is executing. - Paired: The copy is in an equivalency maintenance state. - Not set: Either the specified session does not exist, or the copy process is not running. Copied Block Rcv Displays the number of blocks that have been copied. Displays the recovery mode for REC copies. - auto: Indicates that the recovery mode is "Automatic". - manual: Indicates that the recovery mode is "Manual"
234 Split Xfer Title Explanation : Indicates that a REC copy is not being performed. Displays the split mode for REC copies. - auto: Indicates that the split mode is "Automatic". - manual: Indicates that the split mode is "Manual" : Indicates that either a REC copy is not being performed or that the mode is not synchronous mode. Displays the transfer mode for REC copies. - sync: Indicates that the transfer mode is "synchronous". - through: Indicates that the transfer mode is "through". - consist: Indicates that the transfer mode is "consistency". - stack: Indicates that the transfer mode is "stack" : a REC copy is not being performed. - When the -progress option is specified: > acec query -g RECGroup -progress Copy Group Name : RECGroup Copy Group Type : REC Disk Array Name : DX90P (00ETERNUSDXL##ET09E24AG###NP ##) Remote Disk Array Name : DX90S (00ETERNUSDXL##ET09E24AG###NP ##) Source <=> Target Progress Copied Block Total Block DX90P/0x1 N/A DX90S/0x6 N/A N/A N/A DX90P/0x2 ==> DX90S/0x7 45% DX90P/0x3 ==> DX90S/0x8 100% The following table shows the meanings of the information displayed. Title Copy Group Name Copy Group Type Disk Array Name Remote Disk Array Name Source Displays the copy group name. Explanation Displays the type of copy that has been set up for the copy group. Displays the Box ID and ETERNUS name that was specified with the "-a" option of acgroup create (Command for creating copy groups). Displays the Box ID and ETERNUS name that was specified with the "-remote" option of acgroup create (Command for creating copy groups). Displays the logical volume for the copy source. <=> Displays the copy direction. - N/A: No copying is performed - ==>: Copying from the source to the target - <==: Copying from the target to the source Target Progress Displays the logical volume for the copy destination. Displays the progress of copy processes as a percentage. The "N/A" is displayed when the copy process is not executed. If the progress of copy process is unclear, "???" is displayed
235 Title Copied Block Total Block Explanation Displays the number of blocks that have been copied. The "N/A" is displayed when the copy process is not executed. If the number of copied blocks is unclear, "???" is displayed. Displays the number of total blocks. If the entire copy block size is unclear, "???" is displayed. NOTES - Information such as Copy direction data and SID data may be displayed as "???". It is possible that the access path is incorrect. Therefore, check it using acarray detail (Command for displaying detailed information about ETERNUS Disk storage systems). For details on how to correctly set the access path, refer to " Access Path Settings". - If the copy type of a copy group is OPC, QuickOPC or SnapOPCP, this command ends abnormally. D.1.29 acec suspend (Command for suspending synchronous high speed copy) NAME acec suspend - Suspending synchronous high speed copy. SYNOPSIS - [For EC copy group] acec suspend -g COPY-GROUP [-p PAIR -concur] [-r] [-xml] - [For REC copy group] acec suspend -g COPY-GROUP [-p PAIR] [-r] [-force] [-xml] acec suspend -g COPY-GROUP -concur [-r] [-xml] DESCRIPTION This command suspends synchronous high speed copy of a specified copy group or copy pair. OPTIONS -g COPY-GROUP This option specifies a copy group. -p PAIR This option specifies a copy pair. -r This option temporarily suspends copying in the direction opposite to the specified one. -force This option forcibly and temporarily suspends the REC session
236 -concur -xml This option suspends synchronous high-speed copy using the Concurrent suspension function. When the copy type of the copy group is REC, this option can be specified only if the transfer mode is not Stack mode and an ETERNUS Disk storage system specified as an access path is copy-source. This option displays the result of the command execution in the XML format. EXIT STATUS =0: Terminate normally >0: Terminate abnormally EXAMPLES - Suspending synchronous high-speed copy (no using the Concurrent suspension function) > acec suspend -g group01 DX80/0x1:DX80/0x6 # DATE : 2008/06/24 16:28:00 - << EC Suspended >> DX80/0x2:DX80/0x7 # DATE : 2008/06/24 16:28:00 - << EC Suspended >> DX80/0x3:DX80/0x8 # DATE : 2008/06/24 16:28:00 - << EC Suspended >> Succeeded : 3 Failed : 0 - Suspending synchronous high-speed copy using the Concurrent suspension function > acec suspend -g group01 -concur Successful completion. NOTES - The following message may be displayed when this command is executed by specifying -concur option for the REC copy group. ccm5004 Operation failed. function=stxcec.suspend.concur, message=stxc1002 ERROR Invalid logical volume name. Volume name=(0xa@00eternusdxl##et09e24ag###np ##). Check that an ETERNUS Disk storage system of the copy source is not registered as a remote device, if the above message is displayed. When an ETERNUS Disk storage system of the copy source is not registered as a remote device, execute the command again after the re-registration the ETERNUS Disk storage system of the copy source. - If the copy type of a copy group is OPC, QuickOPC or SnapOPCP, this command ends abnormally. D.1.30 acec resume (Command for resuming synchronous high speed copy) NAME acec resume - Resuming synchronous high speed copy
237 SYNOPSIS - [For EC copy groups] acec resume -g COPY-GROUP [-p PAIR] [-r] [-xml] - [For REC copy groups] acec resume -g COPY-GROUP [-p PAIR] [-r] [-remain] [-xml] DESCRIPTION This command resumes synchronous high speed copy of a specified copy group or copy pair. OPTIONS -g COPY-GROUP This option specifies a copy group name. -p PAIR This option specifies a copy pair. -r This option resumes copying in the reverse direction to the direction that has been specified. -remain This option resumes synchronous high-speed copy for the copy group or copy pair suspended by using the initial copy skip function. -xml This option displays the result of the command execution in the XML format. EXIT STATUS =0: Terminate normally >0: Terminate abnormally EXAMPLES > acec resume -g group01 DX80/0x1:DX80/0x6 # DATE : 2008/06/24 16:28:00 - << EC Resumed >> DX80/0x2:DX80/0x7 # DATE : 2008/06/24 16:28:00 - << EC Resumed >> DX80/0x3:DX80/0x8 # DATE : 2008/06/24 16:28:00 - << EC Resumed >> Succeeded : 3 Failed : 0 NOTES - If the destination logical volume of a specified copy group or pair is protected by acinhibit set (Command for setting volume protection), this command terminates abnormally
238 D.1.31 acec reverse (Command for reversing synchronous high speed copy) NAME acec reverse - Reversing synchronous high speed copy. SYNOPSIS acec reverse -g COPY-GROUP [-p PAIR] [-r] [-xml] DESCRIPTION This command reverses the direction of synchronous high speed copy of a specified copy group or copy pair. OPTIONS -g COPY-GROUP This option specifies a copy group name. Only the following types of copy set to the copy group can be specified: - EC -p PAIR -r -xml - REC This option specifies a copy pair. This option reverses the copying in the reverse direction to the direction that has been specified, so that the copy direction becomes the direction that has been specified. This option displays the result of the command execution in the XML format. EXIT STATUS =0: Terminate normally >0: Terminate abnormally EXAMPLES > acec reverse -g group01 DX80/0x1:DX80/0x6 # DATE : 2008/06/24 16:28:00 - << EC Change >> DX80/0x2:DX80/0x7 # DATE : 2008/06/24 16:28:00 - << EC Change >> DX80/0x3:DX80/0x8 # DATE : 2008/06/24 16:28:00 - << EC Change >> Succeeded : 3 Failed :
239 D.1.32 acec change (Command for changing the mode of synchronous high speed copy) NAME acec change - Change of the mode of synchronous high speed copy. SYNOPSIS acec change -g COPY-GROUP [-p PAIR] [-r] [-transfer {sync[-split {auto manual}] through consist stack}] [-recovery {auto manual}] [-xml] DESCRIPTION This command changes the mode of synchronous high speed copy of a specified copy group or copy pair. This command is only enabled when the copy type set to the copy group is REC. OPTIONS -g COPY-GROUP This option specifies a copy group. -p PAIR This option specifies a copy pair. -r This option changes the mode tor reverse-direction copy. -transfer {sync [-split {auto manual}] through consist stack} This option specifies a transfer mode. - sync: Synchronous mode This option specifies Split mode when sync was specified with the "-transfer" option. -split - auto: Automatic Split - manual: Manual Split - through: Through mode - consist: Consistency mode - stack: Stack mode -recovery This option specifies Recovery mode. - auto: Automatic Recovery - manual: Manual Recovery See Refer to "Recovery mode" for details of each mode. -xml This option displays the result of the command execution in the XML format
240 EXIT STATUS =0: Terminate normally >0: Terminated abnormally EXAMPLES > acec change -g group01 -transfer sync DX90P/0x1:DX90S/0x1 # DATE : 2008/06/24 16:28:00 - << EC Change >> DX90P/0x2:DX90S/0x2 # DATE : 2008/06/24 16:28:00 - << EC Change >> DX90P/0x3:DX90S/0x3 # DATE : 2008/06/24 16:28:00 - << EC Change >> Succeeded : 3 Failed : 0 NOTE - If the transfer mode of REC is Consistency mode or Stack mode, specify the -force option for acec suspend (Command for suspending synchronousn high speed copy) to suspend REC session forcibly and then execute this command. D.1.33 acec cancel (Command for cancelling synchronous high speed copy) NAME acec cancel - Canceling synchronous high speed copy. SYNOPSIS acec cancel -g COPY-GROUP [-p PAIR] [-r] [-force] [-xml] DESCRIPTION This command cancels synchronous high speed copy of a specified copy group or copy pair. OPTIONS -g COPY-GROUP This option specifies a copy group name. -p PAIR This option specifies a copy pair. -r This option cancels copying in the reverse direction to the direction that has been specified. -force This option forcibly stops the session. -xml This option displays the result of the command execution in the XML format
241 EXIT STATUS =0: Terminate normally >0: Terminate abnormally EXAMPLES > acec cancel -g group01 DX80/0x1:DX80/0x6 # DATE : 2008/06/24 16:28:00 - << EC Disconnected >> DX80/0x2:DX80/0x7 # DATE : 2008/06/24 16:28:00 - << EC Disconnected >> DX80/0x3:DX80/0x8 # DATE : 2008/06/24 16:28:00 - << EC Disconnected >> Succeeded : 3 Failed : 0 D.1.34 acsdv init (Command for initializing Snap Data Volume) NAME acsdv init - Initialization of snap data volume. SYNOPSIS acsdv init -v VOLUME-NAME [-xml] DESCRIPTION This command initializes Snap Data Volume. Initialization of snap data volume is suspended when Snapshot type processes are in progress. OPTIONS -v VOLUME-NAME This option specifies a logical volume. The following is an example of a format to specify a logical volume. - (1) ETERNUS Disk storage system name - (2) Logical volume number -xml This option displays the result of the command execution in the XML format. EXIT STATUS =0: Terminate normally >0: Terminate abnormally
242 EXAMPLES > acsdv init -v DX80/0x1 Successful completion NOTES This command is not available for ETERNUS Disk storage systems registered as remote disk storage systems. D.1.35 acsdv stat (Command for dispaying the status of Snap Data Volume) NAME acsdv stat - Display of the status of a snap data volume. SYNOPSIS acsdv stat -v VOLUME-NAME [-xml] DESCRIPTION This command displays the status of a snap data volume. OPTIONS -v VOLUME-NAME This option specifies a logical volume. The following is an example of a format to specify a logical volume. - (1) ETERNUS Disk storage system name - (2) Logical volume number -xml This option displays the result of the command execution in the XML format. EXIT STATUS =0: Terminate normally >0: Terminate abnormally EXAMPLES > acsdv stat -v DX80/0x1 Rate Logical Physical Used Copy Host Pool % The following table shows the meanings of the information displayed
243 Title Rate Logical Physical Used Copy Host Pool Explanation Displays the usage of a snap data volume as a percentage. Displays the logical capacity of a snap data volume in blocks. Displays the physical capacity of a snap data volume in blocks. Displays the capacity of a snap data volume used area in blocks. Displays the sum capacity of copy usage and host usage. Displays the copy usage out of snap data volume used capacity in blocks. Displays the host usage out of snap data volume used capacity in blocks. Displays the usage of a snap data pool allocated to a snap data volume in blocks. - Copy usage: Usage of updates performed during Snapshot type execution. - Host usage: Usage of snap data volume updates performed when Snapshot type is not executed. NOTES This command is not available for ETERNUS Disk storage systems registered as remote disk storage systems. D.1.36 acsdv poolstat (Command for displaying the status of Snap Data Pool) NAME acsdv poolstat - Display of the status of snap data pool. SYNOPSIS acsdv poolstat -a DISKARRAY-NAME [-xml] DESCRIPTION This command displays the status of snap data pool. OPTIONS -a DISKARRAY-NAME -xml This option specifies an ETERNUS Disk storage system name. This option displays the result of the command execution in the XML format. EXIT STATUS =0: Terminate normally >0: Terminate abnormally EXAMPLES > acsdv poolstat -a DX80 Pool-Type Rate Total Used Copy Host Free Normal 10% Encrypted 0% The following table shows the meanings of the information displayed
244 Title Pool-Type Displays the type of a snap data pool. - Normal: Normal (unencrypted) - Encrypted: Encrypted Explanation Rate Total Used Copy Host Free Displays the usage of a snap data pool as a percentage. Displays the total capacity of a snap data pool in blocks. Displays the capacity of a snap data pool used area in blocks. Displays the sum capacity of copy usage and host usage. Displays the copy usage out of snap data pool used capacity in blocks. Displays the host usage out of snap data pool used capacity in blocks. Displays the capacity of snap data pool unused area in blocks. - Copy usage: Usage of updates performed during Snapshot type execution. - Host usage: Usage of snap data volume updates performed when Snapshot type is not executed. NOTES This command is not available for ETERNUS Disk storage systems registered as remote disk storage systems. D.1.37 acutil devs (Command for displaying logical volume information) NAME acutil devs - Display of logical volume information. SYNOPSIS acutil devs DESCRIPTION This command displays logical volume information for ETERNUS Disk storage systems. EXIT STATUS =0: Terminate normally >0: Terminate abnormally EXAMPLES > acutil devs Device BOX-ID LV No Size PHYSICALDRIVE4 00ETERNUSDXL##ET08E21A####LN ## 0x PHYSICALDRIVE5 00ETERNUSDXL##ET08E21A####LN ## 0x PHYSICALDRIVE6 00ETERNUSDXL##ET08E21A####LN ## 0x The following table shows the meanings of the information displayed
245 Title Device BOX-ID LV No Size Explanation Displays the name of the physical device using the following format: "PHYSICALDRIVE[disk number]". This is the same value as the "Disk #" displayed in the [Disk Management] window displayed by selecting [Administrative Tools], [Computer Management] and then [Disk Management] from the [Start] menu. Displays the BOX ID for the ETERNUS Disk storage system. Displays the logical volume number in hexadecimal. Displays the size (in blocks) of the logical volume in decimal. D.1.38 acgetvolinfo (Command for displaying logical volume information) NAME acgetvolinfo - Display of logical volume information. SYNOPSIS acgetvolinfo DEVICE-NAME DESCRIPTION This command displays logical volume information for ETERNUS Disk storage system. OPERANDS DEVICE-NAME Specify a drive letter. Example: X: EXIT STATUS =0: Terminate normally >0: Terminate abnormally EXAMPLES > acgetvolinfo X: BOX-ID,LV No,Address,Size 00ETERNUSDXL##ET08E21A####LN ##,0x040,0x0,0x The following table shows the meanings of the information displayed. Title BOX-ID LV No Address Size Explanation Displays the BOX ID for the ETERNUS Disk storage system. Displays the logical volume number in hexadecimal. Extent start position (per block) is displayed in hexadecimal. Extent size (number of blocks) is output in hexadecimal. D.1.39 acutil refresh (Command for refreshing partition table)
246 NAME acutil refresh - Refresh of partition table. SYNOPSIS acutil refresh -d DEVICE-NAME DESCRIPTION This command refreshes the partition table to update partition information for a specified disk. OPTIONS -d DEVICE-NAME This option displays disk storage system name in the format of "PhysicalDrive [disk number]". This is the same value as "Disk #" or "disk?" of AdvancedCopy Manager block device name displayed in the [Disk Management] window displayed by selecting [Administrative Tools], [Computer Management] and then [Disk Management]from the [Start] menu. EXIT STATUS =0: Terminate normally >0: Terminate abnormally EXAMPLES > acutil refresh -d PhysicalDrive2 Successful completion. D.1.40 acmcapture (Command for collecting analysis data) NAME acmcapture - Collection of Express analysis data. SYNOPSIS <Express program directory>\advancedcopy Manager Copy Control Module\bin\acmcapture dirname DESCRIPTION This command collects Express analysis data. Data is collected for all Express components installed on the server where this command is executed. [Format of the filename or directory name for analysis data] The collected data is stored in a directory with the "acmcapture_hostname_yyyymmdd_ttmmss" format under the directory specified for "dirname". The name of the host where the command is executed is used for HOSTNAME. If characters other than alphanumerics and hyphens are used in the host name, then "NOHOSTNAME" is used as the host name. Values are truncated to 15 characters. - For YYYYMMDD, YYYY is the year, MM is the month, and DD is the day. - For ttmmss, tt is the hour, mm is minutes, and ss is seconds. OPERANDS dirname For dirname, specify a director in which to store analysis data
247 Specify a directory with plenty free space - 500MB or more is recommended. Regard 500MB as a rough guide, since the size of analysis data will vary depending on the system environment and conditions. If there is not enough free space, then this command will terminate abnormally without collecting analysis data. Specify an existing directory, otherwise this command will terminate abnormally without collecting analysis data. EXIT STATUS =0: Terminate normally >0: Terminate abnormally EXAMPLES Collect data to the C:\temp directory. > acmcapture C:\temp Executing... Completed. OUTPUT=C:\temp\acmcapture_srv01_ _ NOTES Execute this command when other Express commands are canceled. Data collection may not be performed correctly if other Express commands are running. D.2 XML output format for Advanced Copy function This section explains the XML output format for Advanced Copy function. D.2.1 List of commands for supporting the XML output function The following commands support the XML output function. Table D.12 Command that support the XML output function Command name Command type Display type Execution type acarray add - YES acarray change - YES acarray list YES - acarray detail YES - acarray pathscan - YES acarray remove - YES acinq lv YES - acinq lunmap YES - acinq ag YES - acinq hostag YES - acinhibit set - YES acinhibit unset - YES acgroup create - YES
248 Command name Command type Display type Execution type acgroup list YES - acgroup detail YES - acgroup remove - YES acpair add - YES acpair remove - YES acopc start - YES acopc query YES - acopc cancel - YES acsnap start - YES acsnap query YES - acsnap cancel - YES acsdv init - YES acsdv stat YES - acsdv poolstat YES - acec start - YES acec query YES - acec suspend - YES acec resume - YES acec reverse - YES acec change - YES acec cancel - YES acrecbuff set - YES acrecbuff stat YES - acutil devs YES - acutil refresh - YES See The XML output format differs between the display type command and the execution type command. Refer to "XML output format of display type command" or "XML output format of execution type command" for each XML output format. D.2.2 XML output format XML output format of display type command The XML output format of display type command is as follows: - Displays lists only. - Displays tables only. - Displays lists and tables
249 The display example of each XML format is as follows. Display of lists only - Without -xml option > acarray detail -a DX80 Disk Array Name : DX80 BOX-ID : 00ETERNUSDXL##ET08E21A####LN ## IP Address : Admin User : root Access Path : X: - With -xml option > acarray detail -a DX80 -xml <?xml version="1.0" encoding="utf-8"?> <Response> <ReturnCode>0</ReturnCode> <Message></Message> <List> <Data id="disk Array Name">DX80</Data> <Data id="box-id">00eternusdxl##et08e21a####ln ##</data> <Data id="ip Address"> </Data> <Data id="admin User">root</Data> <Data id="access Path">X:</Data> </List> </Response> Display of tables only - Without -xml option > acarray list Name BOX-ID IP Address DX80 00ETERNUSDXL##ET08E21A####LN ## DX80B 00ETERNUSDXL##ET08F22A####JP ## With -xml option > acarray list -xml <?xml version="1.0" encoding="utf-8"?> <Response> <ReturnCode>0</ReturnCode> <Message></Message> <Table> <Row> <Data id="name">dx80</data> <Data id="box-id">00eternusdxl##et08e21a####ln ##</data> <Data id="ip Address"> </Data> </Row> <Row> <Data id="name">dx80b</data> <Data id="box-id">00eternusdxl##et08f22a####jp ##</data> <Data id="ip Address"> </Data> </Row> </Table> </Response> Displays of lists and tables
250 - Without -xml option > acec query -g ECGroup Copy Group Name : ECGroup Copy Group Type : EC Disk Array Name : DX80 (00ETERNUSDXL##ET08E21A####LN ##) Source <=> Target SID EC Status Copy Phase Copied Block DX80/0x1 N/A DX80/0x3 N/A "EC action not startup" "Not set" N/A DX80/0x2 ==> DX80/0x4 0x41 "EC Executing" "Copying" With -xml option > acec query -g ECGroup -xml <?xml version="1.0" encoding="utf-8"?> <Response> <ReturnCode>0</ReturnCode> <Message></Message> <List> <Data id="copy Group Name">ECGroup</Data> <Data id="copy Group Type">EC</Data> <Data id="disk Array Name">DX80 (00ETERNUSDXL##ET08E21A####LN ##)</Data> </List> <Table> <Row> <Data id="source">dx80/0x1</data> <Data id="<=>">n/a</data> <Data id="target">dx80/0x3</data> <Data id="sid">n/a</data> <Data id="ec Status">"EC action not startup"</data> <Data id="copy Phase">"Not set"</data> <Data id="copied Block">N/A</Data> </Row> <Row> <Data id="source">dx80/0x2</data> <Data id="<=>">==></data> <Data id="target">dx80/0x4</data> <Data id="sid">0x41</data> <Data id="ec Status">"EC Executing"</Data> <Data id="copy Phase">"Copying"</Data> <Data id="copied Block"> </Data> </Row> </Table> </Response> Information If the error occurs when the command is executed (e.g. parameter error), the command outputs the error information like as follows. Without -xml option > acarray detail -a DX80 ccm8003 Could not open the file. file=c:\program Files\AdvancedCopy Manager Copy Control Module\etc \db\eternus.xml.lck With -xml option > acarray detail -a DX80 -xml <?xml version="1.0" encoding="utf-8"?> <Response> <ReturnCode>8</ReturnCode> <Message>ccm8003 Could not open the file. file=c:\program Files\AdvancedCopy Manager Copy Control
251 Module\etc\db\eternus.xml.lck</Message> </Response> XML output format of execution type command The XML format of execution type command is follows: - Displays only execution result messages only - Displays execution results including detail information The display example for each XML format is as follows. Display example of execution result message only - Without -xml option > acgroup create -g group01 -type OPC -a DX80 Successful completion. - With -xml option > acgroup create -g group01 -type OPC -a DX80 -xml <?xml version="1.0" encoding="utf-8"?> <Response> <ReturnCode>0</ReturnCode> <Message>Successful completion.</message> </Response> Display example of execution result including detail information - Without -xml option > acec start -g ECGroup DX80/0x1: DX80/0x6 # DATE : 2008/06/24 16:28:00 - << EC Started >> # From:BoxID= d b / Olu=1/Adr_high=0/Adr_low=0/size_high=0/size_low=0 # To :BoxID= d b / Olu=6/Adr_high=0/Adr_low=0 DX80/0x2:DX80/0x7 ccm5004 Operation failed. function=stxcopyec.start, message=invalid BoxID. Succeeded : 1 Failed : 1 - With -xml option > acec start -g ECGroup -xml <?xml version="1.0" encoding="utf-8"?> <Response> <ReturnCode>6</ReturnCode> <Message></Message> <ResultList> <Result> <Object>DX80/0x1:DX80/0x6</Object> <Status>Succeeded</Status> <Message></Message> <Detail>DATE : 2008/06/24 16:28:00 - << EC Started >> From:BoxID= d b / Olu=1/Adr_high=0/Adr_low=0/size_high=0/size_low=0 To :BoxID= d b /Olu=6/
252 Adr_high=0/Adr_low=0</Detail> </Result> <Result> <Object>DX80/0x2:DX80/0x7</Object> <Status>Failed</Status> <Message>ccm5004 Operation failed. function=stxcopyec.start, message=invalid BoxID.</Message> <Detail></Detail> </Result> </ResultList> </Response> Information If any error occurs when the command is executed (e.g. parameter error), the command outputs the error information as follows. Without -xml option > acec start -g ccm1001 Input parameter is illegal. Usage: acec start -g COPY-GROUP(EC) [-p PAIR] [-r] [-xml] acec start -g COPY-GROUP(REC) [-p PAIR] [-r] [-transfer {sync [-split {auto manual}] through consist stack}] [-recovery {auto manual}] [-skip] [-xml] With -xml option > acec start -g -xml <?xml version="1.0" encoding="utf-8"?> <Response> <ReturnCode>1</ReturnCode> <Message>ccm1001 Input parameter is illegal.</message> </Response> If a warning message is output when the command is executed, the command outputs the error information as follows. Without -xml option > acec reverse -g group01 DX80/0x1:DX80/0x6 # DATE : 2008/06/24 16:28:00 - << EC Change >> Warning:ccm7001 The target logical volume is write protected. target logical volume=dx80/0x1 DX80/0x2:DX80/0x7 # DATE : 2008/06/24 16:28:00 - << EC Change >> Succeeded : 2 Failed : 0 With -xml option > acec reverse -g group01 -xml <?xml version="1.0" encoding="utf-8"?> <Response> <ReturnCode>0</ReturnCode> <Message>Successful completion.</message> <ResultList> <Result> <Object>DX80/0x1:DX80/0x6</Object> <Status>Succeeded</Status> <Message>Warning:ccm7001 The target logical volume is write protected. target logical
253 volume=dx80/0x1</message> <Detail>DATE : 2008/06/24 16:28:00 - << EC Change >></Detail> </Result> <Result> <Object>DX80/0x2:DX80/0x7</Object> <Status>Succeeded</Status> <Message></Message> <Detail>DATE : 2008/06/24 16:28:00 - << EC Change >></Detail> </Result> </ResultList> </Response> D.3 storageadm perfdata (Command for managing performance information) This section explains the command for managing the operating environment. NAME storageadm perfdata - Management of performance information. SYNOPSIS $INS_DIR\Express\Manager\bin\storageadm perfdata export outdirname -ipaddr ipaddr [-recent 24] ($INS_DIR means "Program Directory" specified at the Express Manager installation.) DESCRIPTION This command outputs one-hour or 24-hour performance information for disk storage system before the command is executed. By specifying the IP address of a disk storage system whose performance information is output and the time in the command operand, the disk storage system performance information is output in CSV format. A target disk storage system must be managed by Express and performance monitoring is either still running or already completed. The details of CSV files are as follows. Table D.13 CM performance information for disk storage system Items File name CM.csv Explanation Header line Date, CM0xXX:CPUX - CPU Use Rate, CM0xXX:CPUX - Copy Remain,... Data line date,cm00u,cm00r,...,cmnnu,cmnnr The following information is output for each field. (After date, the information is repeated for the actual number of CMs.) date : Performance Information Acquisition Time. (YYYY/MM/DD hh:mm:ss format) CM00u : CM0x00:CPU0 (*1) CPU Load at date (Decimal notation. The unit is %.) CM00r : CM0x00:CPU0 (*1) CM Copy remaining amount at date. (Decimal notation. The unit is GB.) CMNNu : CM0xNN:CPUN (*1) CPU Load at date. (Decimal notation. The unit is %.) CMNNr : CM0xNN:CPUN (*1) CM Copy remaining amount at date. (Decimal notation. The unit is GB.)
254 Table D.14 LogicalVolume performance information for disk storage system Items File name Header line Data line Explanation LogicalVolume/nnnn.csv (nnnn indicates the LogicalVolume number by hexadecimal notation.) Date, LogicalVolume0xXXXX - Read IOPS, LogicalVolume0xXXXX - Write IOPS, LogicalVolume0xXXXX - Read Throughput, LogicalVolume0xXXXX - Write Throughput, LogicalVolume0xXXXX - Read Response Time, LogicalVolume0xXXXX - Write Response Time, LogicalVolume0xXXXX - Read Cache Hit Rate, LogicalVolume0xXXXX - Write Cache Hit Rate, LogicalVolume0xXXXX - Prefetch Cache Hit Rate. date,read,write,through-r,through-w,resp-r,resp-w,hit-r,hit-w,fetch The following information is output for each field. date : Performance Information Acquisition Time. (YYYY/MM/DD hh:mm:ss format) read : Read Count at date. (Decimal notation. The unit is IOPS.) write : Write Count at date. (Decimal notation. The unit is IOPS.) through-r : Read data transfer rate at date. (Decimal notation. The unit is MB/S.) through-w : Write data transfer rate at date. (Decimal notation. The unit is MB/S.) resp-r : Read Response Time at date. (Decimal notation. The unit is msec.) resp-w : Write Response Time at date. (Decimal notation. The unit is msec.) hit-r : Read Cache Hit Rate at date. (Decimal notation. The unit is %.) hit-w : Write Cache Hit Rate at date. (Decimal notation. The unit is %.) fetch : Read Pre-fetch Cache Hit Rate at date. (Decimal notation. The unit is %.) Table D.15 RAID Group performance information for disk storage system Items File name Header line Data line Explanation RAID Group/nnnn.csv (nnnn indicates the RAID Group number by hexadecimal notation.) Date, RAID Group0x0xXXXX - Read IOPS, RAID Group0x0xXXXX - Write IOPS, RAID Group0x0xXXXX - Read Throughput, RAID Group0x0xXXXX- Write Throughput, RAID Group0x0xXXXX - Read Response Time, RAID Group0x0xXXXX - Write Response Time, RAID Group0x0xXXXX - Read Cache Hit Rate, RAID Group0x0xXXXX - Write Cache Hit Rate, RAID Group0x0xXXXX - Prefetch Cache Hit Rate. date,read,write,through-r,through-w,resp-r,resp-w,hit-r,hit-w,fetch The following information is output for each field. date : Performance Information Acquisition Time. (YYYY/MM/DD hh:mm:ss format) read : Read Count at date. (Decimal notation. The unit is IOPS.) write : Write Count at date. (Decimal notation. The unit is IOPS.) through-r : Read data transfer rate at date. (Decimal notation. The unit is MB/S.) through-w : Write data transfer rate at date. (Decimal notation. The unit is MB/S.) resp-r : Read Response Time at date. (Decimal notation. The unit is msec.) resp-w : Write Response Time at date. (Decimal notation. The unit is msec.) hit-r : Read Cache Hit Rate at date. (Decimal notation. The unit is %.) hit-w : Write Cache Hit Rate at date. (Decimal notation. The unit is %.) fetch : Read Pre-fetch Cache Hit Rate at date. (Decimal notation. The unit is %.) Table D.16 Disk performance information for disk storage system Items File name Explanation Disk/nnnn.csv (nnnn indicates the DE number by hexadecimal notation.) Header line Date, DE0xXX:SlotX - busy time,... Data line date,disk0,...,diskn
255 Items Explanation The following information is output for each field. (After date, the information is repeated for the actual number of Disks.) date : Performance Information Acquisition Time. (YYYY/MM/DD hh:mm:ss format) Disk0 : Disk0 Disk busy rate at date. (Decimal notation. The unit is %.) DiskN : DiskN Disk busy rate at date. (Decimal notation. The unit is %.) Table D.17 CA/CM Port performance information for dis storage system Items File name Header line Explanation Port/nnnn.csv (nnnn indicates the CA/CM Port number by hexadecimal notation. CA/CM port numbers are assigned in ascending order, starting with 0000 for the lowest CA/CM port number in the device. CM0x0 CA0x0 Port0 is 0000, CM0x0 CA0x0 Port1 is 0001, : CM0x7 CA0x3 Port2 is 007E, CM0x7 CA0x3 Port3 is 007F.) - Case of CA Port Date, CM0xX:CA0xX:PortX - Read IOPS, CM0xX:CA0xX:PortX - Write IOPS, CM0xX:CA0xX:PortX - Read Throughput, CM0xX:CA0xX:PortX - Write Throughput - Case of CM Port Date, CM0xX:PortX - Read IOPS, CM0xX:PortX - Write IOPS, CM0xX:PortX - Read Throughput, CM0xX:PortX - Write Throughput Data line date,read,write,through-r,through-w The following information is output for each field. date : Performance Information Acquisition Time. (YYYY/MM/DD hh:mm:ss format) read : Read Count at date. (Decimal notation. The unit is IOPS.) write : Write Count at date. (Decimal notation. The unit is IOPS.) through-r : Read data transfer rate at date. (Decimal notation. The unit is MB/S.) through-w : Write data transfer rate at date. (Decimal notation. The unit is MB/S.) Table D.18 Performance information for disk storage system active disks Items File name Header line Data line ACTIVE_DISK.csv Date, Total Disks, Active Disks date,total,active Explanation The following information is output for each field. date : Performance Information Acquisition Time. (YYYY/MM/DD hh:mm:ss format) total : Overall number of loaded disk devices at date. (Decimal notation. The unit is Disk.) active : Overall number of active disk devices at date. (Decimal notation. The unit is Disk.) Table D.19 Power consumption performance information for disk storage system Items File name Header line Data line SYSTEM_POWER_CONSUMPTION.csv Date, System Power Consumption date, power Explanation The following information is output for each field. date : Performance Information Acquisition Time. (YYYY/MM/DD hh:mm:ss format) power: Power used by the device as a whole at date. (Decimal notation. The unit is W.)
256 Table D.20 Temperature performance information for disk storage system Items File name Header line Data line SYSTEM_TEMPERATURE.csv Date, System Temperature date, temperature Explanation The following information is output for each field. date : Performance Information Acquisition Time. (YYYY/MM/DD hh:mm:ss format) temperature: Air intake temperature at device at date. (Decimal notation. The unit is degrees Centigrade.) OPERANDS export Outputs performance information for the specified time in CSV format. outdirname Specify the directory that outputs performance information. Performance information is output to the outdirname directory based on the following configuration. The following free space is required for this directory. ((( * installed DEs * installed CM ports * (LUs + RAID grous)) * (86400 / 60)) + ( * installed DEs *installed CM ports * (LUs + RAID groups))) / 1024 OPTIONS -ipaddr ipaddr This option specifies the IP address of the device that outputs performance information. The output target device must satisfy the following conditions: - Storage devices output performance information must be registered in this software
257 For the settings of performance monitoring, refer to "Performance management". -recent 24 This option collects the latest 24-hour performance data. If this option is skipped, the latest 1-hour performance data is collected. EXAMPLES Output of performance information for a device with IP address to the c:\work directory: > storageadm perfdata export "C:\work" -ipaddr NOTES The full path of an existing directory must be specified in outdirname. D.4 express_managersnap (Collecting Express Manager troubleshooting information) This section explains the commands for collecting Express Manager troubleshooting information. NAME express_managersnap - Collection of Express Manager troubleshooting information SYNOPSIS $INS_DIR\Express\Manager\bin\express_managersnap -dir dirname [-all] ($INS_DIR means "Program Directory" specified at the Express Manager installation.) DESCRIPTION This command collects Express Manager server information. Only user of OS administrative group can execute this command. This command collects information on the Express Manager server if any trouble occurs. Submit the information collected with this command to a Fujitsu system engineer. OPTIONS -dir dirname Corrects the troubleshooting information on dirname directory. Specify the full path name that starts from the drive letter for dirname. The maximum length that can be specified for dirname is 100 bytes. The collected information is gathered in the directory that its name "EXyyyymmddhhmm.zip". Before executing this command, please confirm that dirname directory has the following free space. Collected information Initial investigation information All troubleshooting information more than 1MB more than 15 MB Required free space
258 -all Collects all troubleshooting information on servers. Data includes lots of information, which will increase the size of the data. This option is not necessary for initial investigation. EXAMPLES Collecting the troubleshooting information for initial investigation on D:\temp directory. > express_managersnap -dir D:\temp D.5 express_diag(diagnosis of Express Manager environment) This section explains the command for diagnosing Express Manager environment. NAME express_diag - Diagnosis of Express Manager environment. SYNOPSIS $INS_DIR\Express\Manager\bin\express_diag ($INS_DIR means "Program Directory" specified at the Express Manager installation.) DESCRIPTION Express Manager environment is diagnosed and the result is output to stdout. To execute the command, operating system administrator privileges are required. The output format is as follows. Component test name : result test name : result... Component test name : result test name : result... The following table shows the meanings of the information displayed. Component Title Explanation Displays a component name. Any of the following names is displayed. Express Web GUI - Express Manager - Storage Cruiser Manager test name Displays a test name. Either of the following test names is displayed. - <service name> service/daemon test Checks whether service/daemon of <service name> is booted. - <file name> file test
259 result Title Explanation Checks whether the file of <file name> exists. Displays a test result. Either of the following results is displayed. - Passed Indicates that the test has been passed. - Failed Indicates that the test has not been passed or has failed for some reason. - In the event that the test result of service is "Failed": Open [Control panel] - [Management tool] - [Service] to check the service displayed in <service name>. - In the event that the service of <service name> is stopped: Start the service. - In the event that the service of <service name> is not displayed: Express Manager environment may have been destroyed. Collect the required material to solve the trouble from the output results of this diagnostic tool and "D.4 express_managersnap (Collecting Express Manager troubleshooting information)"and then contact a Fujitsu system engineer (SE). - In the event that the test result of file is "Failed": There is the case that a test result becomes "Failed" of the file by just after the installation of Express Manager or a function to use. - contact.db When setting of 'specifying contact information for trouble occurrence' is not considered to be it, this file is not made. - property.db When setting of 'Information Managed with Express' is not considered to be it, this file is not made. - History information (Number of days kept, File Size) - Screen update information - Information (mail configuration information, mail destination information) - array.db - manager.db - alias.db 'ETERNUS SF Express Manager' service never stops, and non-registration a disk storage system, these files are not made. - user.db When non-registration a disk storage system, this file is not made. - server.db When not additional server information, this file is not made. - ConfigurationChangeDB.xml When operation to become the save object of 'Configuration change history' is not performed, this file is not made. - History information (Number of days kept, File Size) - Screen update information - Information (mail configuration information, mail destination information) - Registering Disk Storage Systems - Registering server information
260 - LoginLogoutDB.xml When login to Express Web GUI is never performed, this file is not made. - EventDB.xml When not receiving SNMP Trap from disk storage system, and when not executing Copy Control Module by Express Web GUI, this file is not made. When use a function, but the test result of the file becomes "Failed", Express Manager environment may have been destroyed. In the event that the trouble is still not solved despite of some actions or some trouble is occurring though no failure is not detected by this diagnostic tool, collect the required material to solve the trouble from "D.4 express_managersnap (Collecting Express Manager troubleshooting information)" and then contact a Fujitsu system engineer (SE). EXAMPLES > express_diag Express Web GUI 'ETERNUS SF Express Apache Service' service/daemon test : Passed 'ETERNUS SF Express Tomcat Service' service/daemon test : Passed 'httpd.conf' file test : Passed 'express.xml' file test : Passed Express Manager 'ETERNUS SF Express Manager' service/daemon test : Passed 'contact.db' file test : Passed 'property.db' file test : Passed 'array.db' file test : Passed 'manager.db' file test : Passed 'user.db' file test : Passed 'alias.db' file test : Passed 'server.db' file test : Failed 'ConfigurationChangeDB.xml' file test : Passed 'LoginLogoutDB.xml' file test : Failed 'EventDB.xml' file test : Passed Storage Cruiser Manager 'ETERNUS SF Storage Cruiser Manager' service/daemon test : Passed 'SNMP Trap Service' service/daemon test : Passed '1_3_6_1_4_1_211_4_1_1_126_1_60.xml' file test : Passed '1_3_6_1_4_1_211_4_1_3_21_1.xml' file test : Passed '1_3_6_1_4_1_211_4_1_3_21_3.xml' file test : Passed '1_3_6_1_4_1_347.xml' file test : Passed 'Trap.bat' file test : Passed
261 Appendix E Messages This appendix explains the messages output from Express. E.1 Message Format Messages consist of a message ID and message text. Each message is explained according to the sections described in the following table. Table E.1 Message format Message text Item Shows how the message is displayed. Explains the reason why the message is displayed, or the conditions under which the message is displayed. Explains the meanings of parameters if included in the messages. Explains what action the system takes when the message is displayed. This section explains the actions that the administrator should take in response to the message. E.2 Messages output at installation or uninstallation This appendix explains the messages output at installation or uninstallation. Point Messages are displayed in Japanese when you select Japanese in language selection dialog of installer and the server can display Japanese. In other cases, messages are displayed in English. esfinst00401 This program requires administrator privileges. Install again via a user with administrator privileges. An user who doesn't belong to Administrators group executed installation. Login with user in Administrators group and install again. Contact a Fujitsu system engineer if the trouble is still not solved. esfinst00402 Internal error (internal component installation) - Error Code:{0} Essential component installation failed
262 {0} : error code Uninstall essential component and install again. Contact a Fujitsu system engineer to notify of the error code if the trouble is still not solved. esfinst00404 Processing has stopped. Code:{0} Configuration of definition file failed. {0} : error code Contact a Fujitsu system engineer to notify of the error code. esfinst00405 System Update Failed. Uninstall before re-installation. Code:{0} System updating failed. {0} : error code Execute uninstallation and install again. Contact a Fujitsu system engineer to notify of the error code if the trouble is still not solved. esfinst00406 Since {0} exists, ETERNUS SF Express cannot be installed. Express can not be installed because exclusive software is already installed. {0} : Exclusive software
263 Uninstall the exclusive software and Install Express. esfinst00407 Processing has stopped. (runtime installation) Installation of runtime library failed. Contact a Fujitsu system engineer. esfinst00408 The service names of this product can not be registered. The service names have been used by other product or have other aliases. (these have alias) The service can not be registered by following reasons. - The service name of this product has been used as an alias of the other product. - The service name of this product has the other alias. After taking the following actions, install again. - Change the alias name which is the same name as the service name of this product. - Remove the alias of this product. esfinst00409 The operating system is not supported. (does not support) Check the operating system. Can't install because of unsupported OS. Install on supported OS. esfinst00410 Processing has stopped. Code:{0} Internal error occurred due to system error
264 {0} : error code Execute uninstallation and install again. Contact a Fujitsu system engineer if the trouble is still not solved. esfinst00412 A port number could not be set. Configuration of the port failed. Execute uninstallation and install again. Contact a Fujitsu system engineer if the trouble is still not solved. esfinst00413 The service could not be registered. Service Name: {0} Service registration failed. {0} : service name Execute uninstallation and install again. Contact a Fujitsu system engineer if the trouble is still not solved. esfinst00414 {0} older than ETERNUS SF Express is installed. Please install again, after install the even or newer {0}. This product can't be installed because the following lower version product than this product is installed. - ETERNUS SF AdvancedCopy Manager Copy Control Module {0} : following product - ETERNUS SF AdvancedCopy Manager Copy Control Module - ETERNUS SF License Manager
265 Upgrade the displayed product to the same level of this product and install this product again. esfinst00415 The even or newer ETERNUS SF Express Manager is already installed. The even or newer this product is already installed. None esfinst00417 This system can not display Japanese. Please install again, after choosing suitable language on Choose Setup Language dialog. Japanese is selected on Choose Setup Language dialog on the server which can not display Japanese. Select available language. esfinst00501 Either no port number was specified or an invalid value was entered. Enter a value between 1204 and as the port number. Either no port number was specified or an invalid value was entered. Display the "Enter Port Number" screen again. Enter available port number according to the message. esfinst00502 {0} is being used by other service. Use another port number. The port number used by the other service was specified. {0} : port number
266 Display the "Enter Port Number" screen again. Enter the other port number. esfinst00503 Do not input the same port number. The same number is specified in multiple enter fields. Display the "Enter Port Number" screen again. Specify different port numbers to enter fields. esfinst00504 System Update Failed. Please contact Fujitsu Technical Support Service. Uninstallation will be completed. System updating failed. Uninstallation is continued. Uninstallation is continued. None esfinst00505 Specify installation directory name using any printable ASCII characters other than the following symbols. " : *? /. < >, %% & ^ =! ; Invalid character as a directory name was used. The "Specify Installation destination" screen is displayed again. Specify valid directory name. esfinst00506 The length of specified directory name is inadequate length. The length of directory name is not adequate. The processing is terminated. The "Specify installation destination" screen is displayed again
267 Directory name should be alphanumeric and the lengths should be more than 4 characters and less than 81 characters. esfinst00507 Disk ({0}) has an insufficient free space. Install this product on another disk. Disk capacity is insufficient. {0} : disk name The "Specify installation destination" screen is displayed again. Specify the disk which has more than 500 MB free space. esfinst00508 A removable drive was specified. Specify a fixed drive for the installation destination. Can't install on unfixed drive. The "Specify installation destination" screen is displayed again. Specify fixed drive as installation target. esfinst00509 Specified directory name is invalid. Format of directory name is not adequate. The "Specify installation destination" screen is displayed again. Specify a directory name with adequate format. esfinst00511 The service could not be deleted. Service Name: {0} Removal of the service failed. {0} : Service name
268 Uninstallation is continued. When following services are remained after uninstallation, remove them manually. - ETERNUS SF Express Manager - ETERNUS SF Express Apache Service - ETERNUS SF Express Tomcat Service - ETERNUS SF Storage Cruiser Manager esfinst00512 A port number could not be deleted. Removal of the port failed. Uninstallation is continued. After uninstallation, check the services file. If port is still remained, remove it manually, confirm the removal. - services file name C:\Windows\System32\drivers\etc\services - service name - esfexpressmgr - esfexpressweb - sscruisera - nfport esfinst00513 The bundlesoft could not be uninstalled. (internal component uninstallation) - Code:{0:1} Uninstallation of components was stopped. {0:1} : component name: error number Uninstallation is continued. After uninstallation, open [Add or Remove Programs] and remove components displayed in the message. esfinst00514 System Update Failed. Please collect this message and contact Fujitsu Technical Support Service. Uninstallation will be completed. code={0}
269 Updating system failed. {0} : error code Uninstallation is continued. Contact a Fujitsu system engineer to notify of the error code. E.3 Message output from Manager This appendix explains the messages that are issued by Express Manager. E.3.1 Messages Explanations esfmgr00001 Internal error has occurred. Internal error has occurred in the Manager processing. Collect this message and troubleshooting information and contact a Fujitsu SE, if the problem persists. Collect the troubleshooting information as shown in "6.3.2 Trouble analysis". esfmgr00101 TCP Port registration for the service ({0}) is not found. TCP Port registration for the service is failed. {0} : Name of the service Take the following procedure to check the port registration. 1. Open the file shown below by text editor. [Windows System Folder]\drivers\etc\services 2. Check whether there is expected TCP port in the file. If there is not the Port in the file, add the port. Collect the troubleshooting information as shown in "6.3.2 Trouble analysis"
270 esfmgr01001 User name or password of the management server is invalid. The user name or password to log in the manager is invalid. Input the valid user name and password. Collect the troubleshooting information as shown in "6.3.2 Trouble analysis". esfmgr01002 The specified user does not have an administrative privilege. The specified user does not have an administrative privilege. Input the user name and password for the user having administrative privileges. Collect the troubleshooting information as shown in "6.3.2 Trouble analysis". esfmgr01003 Computer Browser service is not started. Computer Browser service is not started. Make sure whether the Computer Browser service is started. (Only when the computer belongs to a Windows domain) If the computer belongs to a Windows domain, it is required that the Computer Browser service has been started in order to use the ETERNUS Web GUI. For this reason, make sure that the [Status] of the Computer Browser service is [Started] by clicking on [Control Panel] > [Administrative Tools] > [Services]. esfmgr02001 Specified disk array ({0}) is being configured or its status is being updated. Please wait for a while and retry. Configuration of specified device is being changed or update processing of status is operating. {0} : IP Address / FQDN / Serial Number
271 The processing is terminated. Wait for a while and retry. If the Express Web GUI can not be started, collect this message and troubleshooting information as shown in express_managersnap (Collecting Express Manager troubleshooting information). esfmgr02002 Specified disk array ({0}) is being configured from other client({1}) or its status is being updated. Please wait for a while and retry. Configuration of specified device is being changed by other client or update processing of status is operating. - {0} : IP Address / FQDN / Serial Number - {1} : Information of the client The processing is terminated. Wait for a while and retry. If the Express Web GUI can not be started, collect this message and troubleshooting information as shown in express_managersnap (Collecting Express Manager troubleshooting information). esfmgr10001 Failed to communicate with the disk array ({0}). Failed to communicate with the Disk storage system. {0} : IP address of the Disk storage system. An error may have occurred on the communication destination Disk storage system or network. Check the connection between the server that the Manager is installed and the Disk storage system. esfmgr10002 Specified disk array ({0}) is already registered on this software. The specified Disk storage system has already been registered in this software. {0} : Specified IP address
272 To reload the configuration of the registered Disk storage system, select the [Reload conf]. Collect this message and troubleshooting information and contact a Fujitsu SE, if the problem persists. Collect the troubleshooting information as shown in "6.3.2 Trouble analysis". esfmgr10003 Specified disk array ({0}) is already registered with a different IP address ({1}) on this software. The specified Disk storage system is already registered with a different IP address. - {0} : Specified IP address - {1} : IP address of the registered Disk storage system Check the followings. - If the Disk storage system's IP address has been changed, register the Disk storage system again as shown in "Chapter 6 Operation". - Although the Disk storage system has multiple IP addresses, registration for the Disk storage system is required with only one IP address. When you want to change the Disk storage system's IP address, register the Disk storage system again as shown in "Chapter 6 Operation". Collect this message and troubleshooting information and contact a Fujitsu SE, if the problem persists. Collect the troubleshooting information as shown in "6.3.2 Trouble analysis". esfmgr10004 Specified IP address ({0}) or SNMP community name ({1}) is incorrect. The disk array could not be detected. The Disk storage system was not able to be detected because specified IP address or SNMP Community Name is not the one of the Disk storage system. - {0} : Specified IP address - {1} : Specified SNMP community name Check the following procedure. - Make sure correct SNMP Community Name and IP address are input. - Check the Disk storage system's power supply and connection state
273 Collect this message and troubleshooting information and contact a Fujitsu SE, if the problem persists. Collect the troubleshooting information as shown in "6.3.2 Trouble analysis". esfmgr10005 Specified IP address ({0}) is not an IP address ({1}) for master CM. The disk array could not be detected. Because it was not the IP address of master CM, specified IP address was not able to detect the Disk storage system. - {0} : Specified IP address - {1} : The IP address for master CM There is a possibility that the IP address of slave CM has been specified. Make sure IP address of master CM is input. esfmgr10006 Specified device ({0}) is not supported by this software. The specified device is not supported by this software. {0} : Indicates the specified IP address Specify the IP address of the device to be supported. Collect this message and troubleshooting information and contact a Fujitsu SE, if the problem persists. Collect the troubleshooting information as shown in "6.3.2 Trouble analysis". esfmgr10007 Firmware version of specified device is not supported. {0} or higher is required. The firmware version is not supported by this software. {0} : Indicates lowest supported firmware version. Update the firmware version of the specified ETERNUS Disk storage system to supported version or higher. Collect this message and troubleshooting information and contact a Fujitsu SE, if the problem persists
274 Collect the troubleshooting information as shown in "6.3.2 Trouble analysis". esfmgr10008 The serial number of specified disk array ({0}) is already registered. Registration of the specified ETERNUS Disk storage system failed. {0} : Specified Serial Number Collect this message and troubleshooting information and contact a Fujitsu SE. Collect the troubleshooting information as shown in "6.3.2 Trouble analysis". esfmgr10009 Specified user({1}) account of the disk array ({0}) does not have Software User Role. Specified user does not have Software user role. - {0} : IP address or FQDN of the Disk storage system - {1} : Specified user name Check role of the user and retry with correct user name and password. Collect this message and troubleshooting information and contact a Fujitsu SE, if the problem persists. Collect the troubleshooting information as shown in "6.3.2 Trouble analysis". esfmgr10021 Failed to delete the disk array ({0}). The deletion of the Disk storage system failed. {0} : Specified Disk storage system name Select [Disk Array] - [Delete] in [Action] pane to retry. Collect this message and troubleshooting information and contact a Fujitsu SE, if the problem persists
275 Collect the troubleshooting information as shown in "6.3.2 Trouble analysis". esfmgr10031 Specified address ({0}) is not the one of the registered disk array. Failed in the update of information on the Disk storage system because a different IP address or FQDN had been specified. {0} : Specified IP address or FQDN Make sure correct IP address or FQDN are input. Collect this message and troubleshooting information and contact a Fujitsu SE, if the problem persists. Collect the troubleshooting information as shown in "6.3.2 Trouble analysis". esfmgr10032 Specified name is not the one of the registered disk array. Failed in the update of information on the Disk storage system because a different Disk storage system name had been specified. {0} : Specified Disk storage system name Make sure correct Disk storage system name is input. Collect this message and troubleshooting information and contact a Fujitsu SE, if the problem persists. Collect the troubleshooting information as shown in "6.3.2 Trouble analysis". esfmgr10033 Changing account of the disk array ({0}) is failed. An error occured in changing account. {0} : IP address or FQDN of the Disk storage system Check the network status, remove the disk array and re-register it. Then, try again. Collect this message and troubleshooting information and contact a Fujitsu SE, if the problem persists
276 Collect the troubleshooting information as shown in "6.3.2 Trouble analysis". esfmgr10101 The one different from the registered disk array ({0}) was detected. Detected Disk storage system is different from the registered Disk storage system. {0} : Registered IP address There is a possibility that the Disk storage system's IP address has been changed. Select [Disk Array] - [Delete] in [Action] pane to delete the Disk storage system and add it. Collect this message and troubleshooting information and contact a Fujitsu SE, if the problem persists. Collect the troubleshooting information as shown in "6.3.2 Trouble analysis". esfmgr10022 Failed to configure disk array ({0}) or obtain its information. Command={1} Detail message={2} An error occurred in configuring Disk storage system or obtaining its information. Parameter - {0} : Specified IP address - {1} : Command - {2} : Detail message Check the following procedure. 1. Confirm the Command and detail message. 2. Refer to"e.6 Message output from Copy Control Module", and confirm the content corresponding to described message ID Collect this message and troubleshooting information and contact a Fujitsu SE, if the problem persists. Collect the troubleshooting information as shown in "6.3.2 Trouble analysis". esfmgr10023 There are AdvancedCopy sessions running at the specified disk array ({0}). Failed to delete registration of the specified ETERNUS Disk Storage system because there are Advanced Copy sessions. {0} : Specified IP address
277 Check the Advanced Copy sessions and remove it. *NOTICE* There is the possibility that the volume is broken if Advanced Copy sessions are deleted in physical copy progress. Collect this message and troubleshooting information and contact a Fujitsu SE, if the problem persists. Collect the troubleshooting information as shown in "6.3.2 Trouble analysis". esfmgr10024 Failed to check of the copy session. disk array({0}) Failed to check the specified ETERNUS Disk Storage system because there are Advanced Copy sessions. {0} : Specified IP address Check the Advanced Copy sessions and remove it. *NOTICE* There is the possibility that the volume is broken if Advanced Copy sessions are deleted in physical copy progress. Collect this message and troubleshooting information and contact a Fujitsu SE, if the problem persists. Collect the troubleshooting information as shown in "6.3.2 Trouble analysis". esfmgr10901 Failed to configure disk array({0}) or obtain its information. Detail message={1} An error occurred in configuring Disk storage system or obtaining its information. Parameter - {0} : Specified Disk storage system name - {1} : Detail message Check the following procedure. 1. Confirm the message number (the part of E**** of "Error: E****") of detail message. 2. According to the message number of detail message perform the following: - "Error: E0060 Resource locked." Check the other user is not processing the Disk storage system setting with other tools when detail message is "Error: E0060 Resource locked". Or, wait for a while and retry
278 - Other than "Error: E0060 Resource locked." Refer to the "Error Messages" of "ETERNUS DX60/DX80/DX90 Command Line Interface (CLI) User's Guide" or "ETERNUS CLI User's Guide -ETERNUS DX80 S2/DX90 S2, ETERNUS DX410 S2/DX440 S2-" and check "Message Countermeasure for the error" corresponding to abovementioned message number. Or, wait for a while and retry. Collect this message and troubleshooting information and contact a Fujitsu SE, if the problem persists. Collect the troubleshooting information as shown in "6.3.2 Trouble analysis". esfmgr10902 Communication failed. The disk array with specified IP address({0}) could not be detected. The Disk storage system was not able to be detected because of the Telnet communication failure. {0} : Specified IP address Check the following procedure. - Check the Disk storage system's power supply and connection state. - Make sure that the telnet communication of the Disk storage system is enabled. Collect this message and troubleshooting information and contact a Fujitsu SE, if the problem persists. Collect the troubleshooting information as shown in "6.3.2 Trouble analysis". esfmgr10903 Specified user name or password of the disk array is invalid. Specified user name or password of the Disk storage system is invalid. Check the user name and password and retry with correct user name and password. Collect this message and troubleshooting information and contact a Fujitsu SE, if the problem persists. Collect the troubleshooting information as shown in "6.3.2 Trouble analysis". esfmgr10904 Failed to register license. There is a possibility that specified license key is invalid. Failed to register license
279 Check the license key and input valid license key. Collect this message and troubleshooting information and contact a Fujitsu SE, if the problem persists. Collect the troubleshooting information as shown in "6.3.2 Trouble analysis". esfmgr10905 It is not supported to register or to refer to the license by this edition. Failed to register or to refer to license. The processing is terminated. This function is not supported by the installed edition of ETERNUS SF Express. Collect this message and troubleshooting information and contact a Fujitsu SE, if the problem persists. Collect the troubleshooting information as shown in "6.3.2 Trouble analysis". esfmgr10999 Loading disk array configuration is in process. Wait for a while to retry. Loading Disk storage system configuration is in process. Wait for a while to retry. Wait for a while, and retry. Collect this message and troubleshooting information and contact a Fujitsu SE, if the problem persists. Collect the troubleshooting information as shown in "6.3.2 Trouble analysis". esfmgr12000 Failed to start the performance monitor. Failed to start the performance monitor. Check the device status and network, then try again. Collect this message and troubleshooting information and contact a Fujitsu SE, if the problem persists. Collect the troubleshooting information as shown in "6.3.2 Trouble analysis". esfmgr12001 Failed to stop the performance monitor
280 Failed to stop the performance monitor. Check the device status and network, then try again. Collect this message and troubleshooting information and contact a Fujitsu SE, if the problem persists. Collect the troubleshooting information as shown in "6.3.2 Trouble analysis". esfmgr12002 Failed to obtain the status of performance monitor. Failed to obtain the status of performance monitor. Check the device status and network, then try again. Collect this message and troubleshooting information and contact a Fujitsu SE. Collect the troubleshooting information as shown in "6.3.2 Trouble analysis". esfmgr12003 Network error occurred in monitoring performance. Network error occurred in monitoring performance. Usually, even if an error occurs in monitoring performance, the processing is retried. Check the device or network. Collect this message and troubleshooting information and contact a Fujitsu SE, if the problem persists. Collect the troubleshooting information as shown in "6.3.2 Trouble analysis". esfmgr12004 Unable to access a file of performance monitor. Unable to access a file of performance monitor
281 Check whether the file system is not write-protection or check whether there is enough free space in the file system. Collect this message and troubleshooting information and contact a Fujitsu SE, if the problem persists. Collect the troubleshooting information as shown in "6.3.2 Trouble analysis". esfmgr12005 Internal error has occurred at performance monitor. Internal error has occurred at performance monitor. Collect this message and troubleshooting information and contact a Fujitsu SE, if the problem persists. Collect the troubleshooting information as shown in "6.3.2 Trouble analysis". esfmgr12006 The LogicalVolume does not exist. The logical volume does not exist. The performance monitoring of the Disk storage system where logical volume is not defined cannot be executed. Please execute it again after defining logical volume in the Disk storage system. esfmgr12007 Unable to login a device. This message indicates that an attempt was made to login to the target device to set performance monitoring for the device or to read the configuration information but failed because another user has already logged into the device. The processing is terminated. Log out the process that logged into the target device and then re-execute the processing. esfmgr30001 Failed to communicate with the disk array ({0}). Failed to communicate with the Disk storage system. {0} : Specified IP address
282 Check the network status between the management server and the Disk storage system and retry. Collect this message and troubleshooting information and contact a Fujitsu SE, if the problem persists. Collect the troubleshooting information as shown in "6.3.2 Trouble analysis". esfmgr30002 Required service has not been started. Required service has not been started. Restart the management server, and retry. Collect this message and troubleshooting information and contact a Fujitsu SE, if the problem persists. Collect the troubleshooting information as shown in "6.3.2 Trouble analysis". esfmgr30003 The device is not registered or eco mode setting failed. The device is not registered or eco mode setting failed. The processing is terminated. Collect this message and troubleshooting information and contact a Fujitsu SE, if the problem persists. Collect the troubleshooting information as shown in "6.3.2 Trouble analysis". esfmgr30011 Failed to configure disk array({0}) or obtain its information. Message ID ={1} Detail message={2} An error occurred in configuring Disk storage system or obtaining its information. Parameter - {0} : Specified IP address - {1} : Message ID - {2} : Detail message
283 Check the following procedure. 1. Confirm the message ID and Detail message. 2. Refer to "E.3.2 Detailed messages", and confirm the content corresponding to described message ID. Collect this message and troubleshooting information and contact a Fujitsu SE, if the problem persists. Collect the troubleshooting information as shown in "6.3.2 Trouble analysis". esfmgr55001 Specified server does not exist. Specified server does not exist. The processing is terminated. There is a possibility that other users have already removed the specified server. Please cancel once and confirm list of servers on [Monitoring] pane - [Server] tab, and confirm specified server is exist. Collect this message and troubleshooting information and contact a Fujitsu SE, if the problem persists. Collect the troubleshooting information as shown in "6.3.2 Trouble analysis". esfmgr55002 Server Name is not correct. The input server name cannot be registered. Please confirm the server name, and input it again. Server name should be 16 characters or less Alphanumeric character and the following signs can be used for server name. Also, the server name that has already been registered cannot be registered. Available signs:! " # $ % & ' ( ) * + -. / : ; < = [ ] ^ _ ` { } ~ esfmgr55003 Alias is not correct. The input alias cannot be registered
284 Please confirm the alias, and input it again. Alias should be 16 characters or less. Alphanumeric character and the following signs can be used for server name. esfmgr55004 Host interface type is not correct. Registering server information failed. Collect this message and troubleshooting information and contact a Fujitsu SE. Collect the troubleshooting information as shown in "6.3.2 Trouble analysis". esfmgr55005 Input "WWN" or "iscsi Name and IP Address" or "SAS Address" are not correct. Specified parameter cannot be registered. Please confirm input "WWN" or "iscsi Name and IP Address" or "SAS Address". The input rule is as follows. - WWN : Hexadecimal number of 16 characters - iscsi Name : Character string within 223 characters starts by character string of "iqn." or "eui." - IP Address : nnn.nnn.nnn.nnn - SAS Address : Hexadecimal number of 16 characters Also, the one that has already been registered cannot be registered. esfmgr55101 Disk Array configuration information has been changed. There is a configuration change of the disk storage system that Express Manager doesn't detect. The processing is terminated after refreshing configuration of the disk storage system. There was a configuration change of the disk storage system that Express Manager doesn't detect. Information has been updated automatically. Please check configuration of the disk storage system
285 esfmgr55102 Specified parameter is invalid. An error occurred in configuring Disk storage system or obtaining its information. Confirm that 2 or more disks are specified when creating a RAID group. If only 1 disk is specified, specify 2 or more disks and re-create a RAID group. If there is any trouble though 2 or more disks are specified, collect this message and troubleshooting information and contact a Fujitsu SE. Collect the troubleshooting information as shown in "6.3.2 Trouble analysis". esfmgr55103 This function does not support FibreCAT. An invalid function was executed for FibreCAT. Collect this message and troubleshooting information and contact a Fujitsu SE. Collect the troubleshooting information as shown in "6.3.2 Trouble analysis". esfmgr sending failed. Administrators could not receive event notification s. Check address in Contacts, Details and SMTP server settings. Collect the troubleshooting information as shown in "6.3.2 Trouble analysis". esfmgr60001 Internal Error (File I/O Error) occurred during collect troubleshooting information. Internal Error (File I/O Error) occurred while collecting troubleshooting information
286 Confirm that there is no access to the installation folder, and retry. Contact a Fujitsu SE, if the problem persists. esfmgr60002 Collect troubleshooting information is still running. Troubleshooting information collection is still running. Confirm other users who are executing this function do not exist. Wait for a while, and retry. Contact a Fujitsu SE, if the problem persists. E.3.2 Detailed messages This chapter explains detail messages displayed on parameter of esfmgr30011, "Messages beginning with STXS", "Messages beginning with ssmgr", and "Messages beginning with swsag". When messages other than explaining by the following are displayed, see "6.3.2 Trouble analysis", collect that message and troubleshooting information, and contact a Fujitsu SE. Messages beginning with STXS - Message output format The message output format is as follows: Message code Error level Body The following table shows error levels: INFO Error level ERROR Display end of the process. No special action is required. Fatal error occurred. Refer to [Action]. STXS1011 ERROR The format of the specified parameter is invalid. [parameter name="{0}", value="{1}"] Specified parameter format is invalid. - {0} : Parameter - {1} : Specified value Please confirm the input value. Collect this message and troubleshooting information and contact a Fujitsu SE, if the problem persists
287 Collect the troubleshooting information as shown in "6.3.2 Trouble analysis". STXS1012 ERROR The parameter name has been duplicated. [parameter name="{0}"] Same parameter has been set more than one time. {0} : Parameter Please confirm the input value. Collect this message and troubleshooting information and contact a Fujitsu SE, if the problem persists. Collect the troubleshooting information as shown in "6.3.2 Trouble analysis". STXS1016 ERROR The specified parameter name does not exist. [parameter name="{0}"] Specified parameter name does not exist. {0} : Parameter Collect this message and troubleshooting information and contact a Fujitsu SE, if the problem persists. Collect the troubleshooting information as shown in "6.3.2 Trouble analysis". STXS1025 ERROR The parameter has been duplicated. [parameter name="{0}", parameter value="{1}"] Multiple values have been set for the same parameter. - {0} : Parameter - {1} : Specified value Check the parameter values and try again. STXS1027 ERROR The specified parameter is invalid. [parameter name="{0}", parameter value="{1}"] Specified parameter is invalid
288 - {0} : Parameter - {1} : Specified value Check the parameter to execute and try again. STXS1032 ERROR The specified function parameter format is invalid. [function parameter name="{0}", function parameter value="{1}"] Format of the function parameter is invalid. - {0} : Function parameter - {1} : Specified value Check the parameter and try again. STXS1033 ERROR The number of comma-delimited parameters exceeds the maximum number allowed. [parameter name="{0}", parameter value="{1}"] The number of comma-delimited parameter values exceeds the maximum number allowed. - {0} : Parameter - {1} : Specified value Check the parameter values and try again. STXS1034 ERROR The number of parameters specified with a colon exceeds the maximum number allowed. [parameter name="{0}", parameter value="{1}"] The number of parameters specified with a colon exceeds the maximum number allowed. - {0} : Parameter - {1} : Specified value
289 Check the number of parameters specified and try again. STXS1039 ERROR The parameters cannot be simultaneously specified. [parameter name1="{0}", parameter name2="{1}"] - When setting a FC port The Loop ID cannot be specified if a connection method other than "loop" is specified. The host response number cannot be specified if "on" is selected for the Affinity functions. - When executing other functions More than one parameter has been specified. However, only specification of one parameter is possible. - {0} : Parameter number 1 - {1} : Parameter number 2 Check the parameter by [] to execute and try again. STXS3006 ERROR Failed to write file. [file name="{0}"] Failed to write the file. {0} : File name Check if the operation management server file system is write-protected or file system capacity is insufficient. If the problem remains, collect this message and troubleshooting information and contact a Fujitsu SE, if the problem persists. Collect the troubleshooting information as shown in "6.3.2 Trouble analysis". STXS4000 ERROR The device is under maintenance. [status: "{0}"] The command cannot be executed since the ETERNUS Disk storage system is undergoing maintenance work. Or, there is a possibility that abnormality occurred in the ETERNUS Disk storage system after executing the function. {0} : Device status
290 Try again after maintenance work completes. If the problem remains, collect this message and troubleshooting information and contact a Fujitsu SE, if the problem persists. Collect the troubleshooting information as shown in "6.3.2 Trouble analysis". STXS4002 ERROR The device is not supported. [IP address="{0}", model="{1}", type="{2}"] The ETERNUS Disk storage system is not supported. Or, command access to the support device failed. - {0} : IP address - {1} : Device model - {2} : Device type Not supported, this ETERNUS Disk storage system cannot be used. Use ETERNUS Web GUI to perform maintenance work for the ETERNUS Disk storage system. Refer to the action of STXS5002 ERROR Failed to access the device. [code="{0}", result="{1}"] for the support device. "Device type" may not be output. STXS4015 ERROR The device has been locked. [ipaddress="{0}"] The ETERNUS Disk storage system is being used by another user. {0} : IP address If another user is using the ETERNUS Disk storage system, execute the command after the user finishes using the ETERNUS Disk storage system. If the ETERNUS Disk storage system remains in use due to command abnormal end, cancel the maintenance state of the ETERNUS Disk storage system. STXS4017 ERROR Firmware does not support this operation. [IP address="{0}"] The function cannot be used since the firmware version does not support it. {0} : IP address
291 To use the function, the firmware needs to be upgraded. Contact a Fujitsu engineer. STXS4018 ERROR The specified RAID group has not been registered. [RAID group number="{0}"] The specified RAID group has not been created in the ETERNUS Disk storage system. {0} : RAID group number Check the RAID groups in the ETERNUS Disk storage system and try again. STXS4028 ERROR The specified RAID group number is already being used for a temporary RAID group. [RAID group number="{0}"] The specified RAID group cannot be operated since it is a working RAID group. {0} : RAID group number Check the RAID groups in the ETERNUS Disk storage system and try again. STXS4030 ERROR The specified RAID group is a Mainframe RAID group. [RAID group number="{0}"] The specified RAID group cannot be operated since mainframe volume or MVV volume is created in the RAID group. {0} : RAID group number Check the RAID groups in the ETERNUS Disk storage system and specify a RAID group with no mainframe volume or MVV volume and try again. STXS4031 ERROR The parameter cannot be used for this device. [parameter name="{0}"] The specified parameter cannot be used in the specified ETERNUS Disk storage system model or firmware
292 {0} : Parameter Collect this message and troubleshooting information and contact a Fujitsu SE, if the problem persists. Collect the troubleshooting information as shown in "6.3.2 Trouble analysis". STXS4032 ERROR The number of created RAID groups has reached the maximum number allowed. [IP address="{0}"] The specified number of RAID groups exceeds the maximum number allowed in the ETERNUS Disk storage system. {0} : IP address Check the number of RAID groups. Refer to the "ETERNUS Web GUI User Guide" for the maximum number of RAID groups per ETERNUS Disk storage system. STXS4033 ERROR The specified disk cannot be used. [disk number="{0}"] The disk that is not data disk has been specified. {0} : Disk number Refer to the "ETERNUS Web GUI User Guide" for disk configuration for each RAID Level. Specify a valid disk and try again. STXS4034 ERROR A different type of disk drive exists when creating a RAID. Mixed types of disks have been specified. Refer to the "ETERNUS Web GUI User Guide" for disk configuration in each RAID Level. Specify correct disks and try again. STXS4035 ERROR The number of specified disk drives ("{0}") for "{1}" is invalid
293 The specified number of disks exceeds the number of disks allowed in each RAID Level. - {0} : Range of disks to be specified - {1} : RAID Level Refer to the "ETERNUS Web GUI User Guide" for disk configuration in each RAID Level. Specify the correct number of disks and try again. STXS4036 ERROR The combination of disk drives that were specified for "{0}" is invalid. (invalid FC- Loop) Installation locations of the specified disks cause invalid RAID Level combination (invalid FC-Loop). {0} : RAID Level Refer to the "ETERNUS Web GUI User Guide" for disk configuration in each RAID Level. Correct disk installation locations and try again. STXS4037 ERROR The combination of disk drives that were specified for RAID5 is invalid. (invalid pair BRT) The specified disk combination in RAID5 is not configured with disks belonging to the same BRT pair. Refer to the "ETERNUS Web GUI User Guide" for disk configuration in each RAID Level. Specify correct disks and try again. STXS4038 ERROR The number of specified disk drives is not an even number. The specified number of disks is not an even number. Refer to the "ETERNUS Web GUI User Guide" for disk configuration in each RAID Level. Specify an even number of disks and try again
294 STXS4039 ERROR CM has not been installed in the specified device. [IP address="{0}"] CM (CPU) has not been installed in the device. {0} : IP address Install CM (CPU) using ETERNUS Web GUI. Check that CM (CPU) has been installed successfully and try again. STXS4040 ERROR The CM whose status is not Online exists in the specified device. [IP address="{0}"] There is a CM whose status is not online in the device. {0} : IP address Change the CM status to online using ETERNUS Web GUI. Check that the status of all CMs are online and try again. STXS4041 ERROR The specified CM has not been installed. [CM="{0}"] The specified CM is not installed in the device. {0} : CM number Check the CM using ETERNUS Web GUI and try again. STXS4042 ERROR The specified volume has not been registered. [volume number="{0}"] The specified volume number is not registered in the device. {0} : Volume number
295 Check the volume number and try again. STXS4043 ERROR The specified type of volume is not supported. [volume number="{0}"] An unsupported volume has been selected. {0} : Volume number Check the volume type, and try again. STXS4044 ERROR The number of created affinity groups has reached the maximum number allowed. [IP address="{0}"] The number of affinity groups exceeds the maximum number allowed per device. {0} : IP address Refer to the "ETERNUS Web GUI User Guide" for the maximum number of affinity groups allowed per device. Check the number of affinity groups and try again. STXS4045 ERROR The specified alias name has already been registered in the device. [name="{0}"] The specified name has already been registered in the device. While adding LUN Mapping, this message may be output if an alias name is not specified. {0} : Specified name Specify the name not registered and try again. STXS4046 ERROR The specified affinity group has not been registered. [affinity group number="{0}"] The specified affinity group number is not registered in the device. {0} : Affinity group number
296 Check the affinity group number and try again. STXS4047 ERROR The specified affinity group has been concatenated. [affinity group number="{0}"] A concatenated affinity group number has been specified. {0} : Affinity group number A concatenated affinity group is unsupported and cannot be specified. Operate a concatenated affinity group using ETERNUS Web GUI. STXS4048 ERROR The volume in which LUN has been mapped has been specified. [volume number=" {0}"] A volume in which a LUN has been mapped has been specified. {0} : Volume number Check the LUN mapping of the specified affinity group or port, and try again. STXS4049 ERROR The affinity group in which host affinity is set has been specified. [affinity group number="{0}"] An affinity group number associated with host affinity has been specified. Delete the affinity group number after canceling host affinity set in the affinity group. {0} : Affinity group number Delete the specified affinity group number from the associated host affinity. Then, delete the specified affinity group number again
297 STXS4050 ERROR The specified WWN has already been registered in the device. [WWN="{0}"] The specified WWN has already been registered in the device. {0} : WWN Specify an unregistered WWN and try again. STXS4051 ERROR The number of created WWNs has reached the maximum number allowed. [IP address="{0}"] The number of WWNs exceeds the maximum number of WWNs that can be created per device. {0} : IP address Refer to the "ETERNUS Web GUI User Guide" for the maximum number of WWNs per device. Check the number of WWNs and try again. STXS4052 ERROR The specified host response has not been registered. [host response number="{0}"] The specified host response number is not registered in the device. {0} : Host response number Check the host response number and try again. STXS4053 ERROR The specified host number has not been registered. [host number="{0}"] The specified host number is not registered in the device. {0} : Host number
298 Check the host number and try again. STXS4054 ERROR The specified host number has been associated with an affinity group. [host number="{0}"] A host number associated with host affinity has been specified. Delete the host number after canceling host affinity set in the host. {0} : Host number Delete the specified host number from the associated host affinity. Then, delete the specified host number again. STXS4055 ERROR A volume in which LUN has not been mapped has been specified. [volume number=" {0}"] A volume to which LUN has not been mapped has been specified. {0} : Volume number Check the LUN mapping of the specified affinity group number and try again. STXS4056 ERROR A LUN that has not been mapped in the volume has been specified. [LUN="{0}"] LUN which has not been mapped to any volume has been specified. {0} : LUN Check the LUN mapping of the specified affinity group or port, and try again. STXS4058 ERROR All LUNs cannot be deleted. [affinity group number="{0}"] All LUNs cannot be deleted. The affinity group should define one or more LUN mappings
299 {0} : Affinity group number Check the number of LUN mappings defined in the specified affinity group number and try again. Delete the affinity group to delete all LUN mappings. STXS4059 ERROR The port specified by the identification number is not supported. [port identification number="{0}"] The specified port cannot be operated. {0} : Port identification number Check the port and try again. STXS4060 ERROR Affinity mode of the port specified by the identification number is not ON. [port identification number="{0}"] Affinity mode is off for the specified port. {0} : Port identification number Turn on affinity mode for the specified port and try again. STXS4061 ERROR The specified host number has already been registered in the host affinity. [host number=" {0}"] The specified host number has already been registered in the host affinity. {0} : Host number Check the host number that has not been registered in the host affinity and retry again
300 STXS4062 ERROR The host specified by the host number is not registered in "{0}". [host number="{1}"] The specified host is unavailable host (HostWWN, iscsi, or SAS address) because it is not registered. - {0} : HostWWN, iscsi, or SAS address - {1} : Host number Check the host number and try again. STXS4063 ERROR The concatenated destination affinity group has been specified. [affinity group number="{0}"] A concatenation destination affinity group number has been specified. {0} : Affinity group number A concatenation destination affinity group cannot be specified to host affinity. Check the affinity group that are not concatenation destination affinity group and try again. STXS4064 ERROR The concatenated affinity group cannot be set in a host response mode for which a host number has been specified. [host number="{0}"] A concatenated affinity group cannot be set with the host specific mode set to the host response number associated with the specified host number. {0} : Host number Refer to the "ETERNUS Web GUI User Guide" for details about host specific mode and concatenated affinity groups. Check host specific mode of the associated host response number and try again. STXS4065 ERROR The number of created host affinities in the port has reached the maximum number allowed. [port identification number="{0}"] More than maximum number of host affinities that can be created has been specified for the port
301 {0} : Port identification number Refer to the "ETERNUS Web GUI User Guide" for details about the maximum number of host affinities that can be set per port. Check the number of host affinities specified for the port. STXS4066 ERROR The specified host number has not been registered in the host affinity. [host number="{0}"] The specified host number is not registered in the host affinity. {0} : Host number Check the host number and try again. STXS4067 ERROR The number of volumes to be created exceeds the maximum number allowed for the specified RAID group. [RAID group number="{0}"] The total number of volumes that has been specified and volumes that has been created in the RAID group so far exceeds the maximum number of volumes allowed. {0} : RAID group number Refer to the "ETERNUS Web GUI User Guide" for details about the maximum number of volumes for each RAID group. Check the number of volumes already created in the RAID group and try again. If there are two or more specified size volumes, reduce the number. STXS4068 ERROR The operation cannot be performed in the specified RAID group status. [RAID group number="{0}" status="{1}"] The specified RAID group status is abnormal. - {0} : RAID group number - {1} : RAID group status
302 Return "Available" the status of the RAID group and try again. If status does not return to normal, collect this message and troubleshooting information and contact a Fujitsu SE, if the problem persists. Collect the troubleshooting information as shown in "6.3.2 Trouble analysis". STXS4069 ERROR Volumes cannot be created due to a capacity shortage in the specified RAID group. [RAID group number="{0}"] The total size of the specified volumes exceeds free space in the RAID group. {0} : RAID group number Check free space in the RAID group and adjust the size of the volume to be created. STXS4070 ERROR The number of volumes to be created exceeds the maximum number allowed for the device. [IP address="{0}"] The total number of volumes that have been specified and volumes that have been created in the device so far exceeds the maximum number of volumes allowed. {0} : IP address Refer to the "ETERNUS Web GUI User Guide" for details about the maximum number of volumes for each device. Check the number of volumes already created in the device and try again. If there are two or more specified size volumes, reduce the number. STXS4071 ERROR The specified RAID group is in the process of LDE. [RAID group number="{0}"] The specified RAID group is in the process of LDE(Logical Device Expansion). {0} : RAID group number
303 Try again after RAID group LDE is completed. STXS4072 ERROR The volume has been defined in the specified RAID group. [RAID group number="{0} "] The volume has been defined in the specified RAID group. {0} : RAID group number Delete defined volume by deleting RAID groups. STXS4073 ERROR The specified disk is not installed in the device. [disk number="{0}"] The specified disk is not installed in the device. {0} : Disk number Check the disk and try again. STXS4074 ERROR The specified volume is in the process of advanced copy. [volume number="{0}"] The specified volume is in the process of advanced copy. {0} : Volume number Try again after advanced copy of the volume is completed. STXS4075 ERROR The target firmware does not support RAID6. [IP address="{0}"] An attempt to create RAID6 has been made for firmware that does not support RAID6. {0} : IP address
304 Firmware that does support RAID6 and try again. STXS4076 ERROR The specified disk is not available. [disk number="{0}" status="{1}"] Disk can be used, when the following status. - Present or Available - {0} : Disk number - {1} : Status Wait until disk status returns to normal and try again. If status does not return to normal, collect this message and troubleshooting information and contact a Fujitsu SE, if the problem persists. Collect the troubleshooting information as shown in "6.3.2 Trouble analysis". STXS4077 ERROR The specified disk has been assigned to another RAID group. [disk number="{0}"] The specified disk has already been assigned to another RAID group. {0} : Disk number Check the disk and try again. STXS4078 ERROR The disk that has this capacity cannot be used. [disk number="{0}"] 9GB and 18GB disks cannot be used. {0} : Disk number Specify disks other than 9GB and 18GB disks and try again
305 STXS4087 ERROR The specified WWN is invalid. [WWN="{0}"] The specified WWN is invalid. A string of the same characters (000, fff, or FFF) has been specified for WWN. {0} : WWN Please assign right WWN. STXS4088 ERROR The specified volume type cannot be deleted. [volume number="{0}"] An unsupported volume has been specified. {0} : Volume number Specify a volume to be supported to execute deletion again. STXS4089 ERROR The specified volume is in the progress of RAID migration. [volume number="{0}"] The specified volume is undergoing RAID migration. {0} : Volume number Try again after the volume RAID migration is completed. STXS4095 ERROR The RAID group that includes the specified volume is in the process of LDE. [volume number="{0}"] The RAID group that includes the specified volume is in the process of LDE(Logical Device Expansion). {0} : Volume number
306 Try again after RAID group LDE is completed. STXS4096 ERROR The specified LUN is being used. [LUN="{0}"] The specified LUN has already been used for LUN mapping. {0} : LUN Specify the LUN that has not been used for LUN mapping and try again. STXS4098 ERROR The specified LUN is out of the range that can be registered. [LUN="{0}"] The specified number of logical units is out of the range that can be registered. {0} : LUN Specify a LUN within the range that can be registered, and try again. The maximum number of mappings that can be created for one affinity group or port varies depending on host specific mode set in the host response list. Refer to the "ETERNUS Web GUI User Guide" for the maximum number of mappings that can be created for one affinity group. STXS4099 ERROR The specified RAID group has been blocked. [RAID group number="{0}"] The specified RAID group has been blocked. {0} : RAID group number Wait until RAID group status returns to normal and try again. If status does not return to normal, collect this message and troubleshooting information and contact a Fujitsu SE, if the problem persists. Collect the troubleshooting information as shown in "6.3.2 Trouble analysis". STXS4100 ERROR The number of specified volumes exceeds the maximum number allowed for LUN mapping
307 The specified number of volumes exceeds the maximum number of volumes that can be mapped. Check the number of mapped volumes. The maximum number of mappings that can be created for one affinity group or port varies depending on host specific mode set in the host response list. Refer to the "ETERNUS Web GUI User Guide" for the maximum number of mappings that can be created for one affinity group or port. STXS4101 ERROR The specified disk is a system disk. [disk number="{0}"] A system disk has been specified in the RAID group. {0} : Disk number Specify a disk that is not a system disk and try again. STXS4102 ERROR The specified port has not been installed. [port identification number="{0}"] The specified port is not installed in the device. {0} : Port identification number Specify an installed port to the ETERNUS Disk storage system and try again. STXS4103 ERROR The specified number has been registered. [parameter name="{0}", parameter value="{1}"] The specified number has already been registered. - {0} : Parameter - {1} : Specified value
308 Check the number and try again. STXS4104 ERROR The specified number is out of the range that can be registered. [parameter name=" {0}", parameter value="{1}"] The specified number is out of the range of number that can be registered. - {0} : Parameter - {1} : Specified value After checking the number, try again. For the numbers that can be registered, refer to "ETERNUS Web GUI User Guide". STXS4105 ERROR The maximum number that can be created per device has already been exceeded. The maximum number that can be created per device has already been exceeded. For the maximum number that can be created per device, refer to "ETERNUS Web GUI User Guide". Check the maximum number that can be created in the device, and try again. STXS4106 ERROR The host response cannot be changed to the specified host specific mode. [hostresponse number="{0}", host specific mode="{1}"] The specified host response cannot be changed because its status is either of the following. - There is mapping for LUN#255 onwards for the port in which the specified host response is set. - The host in which the specified host response is set is associated with a concatenated affinity group. - {0} : Host response number - {1} : Host specific mode Check the associated host, and try again. STXS4107 ERROR The specified host response has been used with another function. [parameter name=" {0}", parameter value="{1}"]
309 The host response which is set for the port or host has been specified. Cancel the host response from the port or host before deleting it. - {0} : Parameter - {1} : Specified value Delete the specified host response from the set port or host. Then, try to delete the specified host response again. STXS4108 ERROR The specified number has not been registered. [parameter name="{0}", parameter value="{1}"] The specified number has not been registered. - {0} : Parameter - {1} : Specified value Check the number and try again. STXS4110 ERROR The default host response cannot be deleted. [parameter name="{0}", parameter value="{1}"] The specified host response cannot be deleted because it is the default host response. - {0} : Parameter - {1} : Specified value No action is required. STXS4112 ERROR The parameter name cannot be specified for the default host response. [parameter name="{0}"] The specified parameter cannot be set for the default host response
310 The following parameter cannot be specified for the default host response. - name {0} : Parameter No action is required. STXS4113 ERROR Could not acquire information from device. Information could not be acquired from the ETERNUS Disk storage system. No information exists in the ETERNUS Disk storage system, or the information is being updated. Wait for a while, then try again. STXS4114 ERROR The Function cannot be specified in the device. [Function="{0}"] A Function unsupported by the device has been specified. {0} : Function Check the functions supported by the command, and try again. STXS4119 ERROR The capacity that can be created in the device exceeds the maximum capacity. The capacity that can be created in the ETERNUS Disk storage system exceeds the maximum capacity. Check the maximum capacity that can be created in the ETERNUS Disk storage system, and try again. For the maximum capacity that can be created in the ETERNUS Disk storage system, refer to "ETERNUS Web GUI User Guide". STXS4121 ERROR Device functions are disabled. [Device function="{0}"] - When canceling the daylight saving time settings The daylight saving settings was canceled when daylight saving time settings are disabled
311 - When canceling the NTP server settings The NTP server settings was canceled when time settings by the NTP server are disabled. - When executing other functions The device functions are disabled. {0} : Function name - When adding disk storage system There is possibility that Free License have not been registered. Register it using ETERNUS Web GUI. - When canceling the daylight saving time/ntp server settings No action is required. - When executing other functions Use ETERNUS Web GUI to enable the functions, and try again. STXS4122 ERROR Specified volume is being encrypted. [Volume number="{0}"] The specified volume is being encrypted. {0} : Volume Number Try again after the volume encryption has been completed. STXS4129 ERROR Cannot change configuration as function is in operation. - When Advanced Copy table size setting is processed Copy table size cannot be changed because Advanced Copy is being processed. - When enabling the Advanced Copy function The Advanced Copy function cannot be enabled because Advanced Copy is in progress. Try again after the function behavior has been finished. STXS4130 ERROR The affinity mode is not off for the port of the specified port identification number. [port identification number="{0}"]
312 Affinity mode is ON for the specified port. {0} : Port identification Number Set the affinity mode to OFF for the specified port, and try again. STXS4132 ERROR Specified password does not match the password that has been set in the device. The specified password is different from the password that has been set in the device. Specify the correct password, and try again. STXS4133 ERROR Specified password does not match the confirmation password. The specified password is different from the confirmation password. Specify the same password for password and confirmation password, and try again. STXS4134 ERROR Specified value has already been registered. [parameter name="{0}", parameter value="{1}"] The specified value has already been registered in the device. - {0} : Parameter name - {1} : Parameter value Specify a value that is not registered, and try again. STXS4135 ERROR Specified combination of values has been already registered. [parameter name1="{0} ", parameter value1="{1}", parameter name2="{2}", parameter value2="{3}"]
313 The specified combination of values has already been registered in the device. - {0} : Parameter name1 - {1} : Parameter value1 - {2} : Parameter name2 - {3} : Parameter value2 Specify a combination of values that is not registered, and try again. STXS4136 ERROR Specified IP address is not usable. [address type="{0}", IP address="{1}", subnet mask="{2}"] - When setting USER port or REMCS port The following addresses cannot be used. - Network address - Broadcast address - IP address for the USER port or REMCS port that is same as that of gateway - IP address for the USER port or REMCS port that is in a different subnet from that of gateway - IP address for the USER port that is the same as that of the REMCS port - IP addresses for the USER port and REMCS port that are of the same subnet - IP address for the USER port or REMCS port that is same as the destination network address - IP address for the USER port or REMCS port that is in the same subnet as the destination network address - IP address for the USER port or REMCS port that is the same as that of the Slave CM IP - IP address for the USER port or REMCS port, and a Slave CM IP address that is of a different subnet - IP address for the Slave CM IP that is the same as that of gateway - IP address for the Slave CM IP that is the same as that of the primary DNS - IP address for the Slave CM IP that is the same as that of the secondary DNS - Slave CM IP address for the USER port that is the same as the Slave CM IP address of the REMCS port - When setting destination information for the USER port or REMCS port The following addresses cannot be used. - Broadcast address - IP address of the USER port or REMCS port that is same as the destination network address - IP address of the USER port or REMCS port that is in the same subnet as the destination network address - When setting the NTP server for managing the date and time The following addresses cannot be used for the NTP server. - Broadcast address of the used LAN (USER/REMCS) port
314 - Network address of the used LAN (USER/REMCS) port - IP address of the used LAN (USER/REMCS) port - When setting the iscsi-ca port or iscsi-ra port The following addresses cannot be used. - Network address - Broadcast address - IP address for iscsi-ca port or iscsi-ra port that is the same as that of gateway - IP address for iscsi-ca port or iscsi-ra port, and an IP address for gateway that is of a different subnet - {0} : Address type - {1} : IP address - {2} : Subnet mask Check the network configuration, and try again. STXS4137 ERROR Necessary settings are not performed. [parameter name="{0}"] - When setting a FC port - The Loop ID cannot be specified if the connection method for the target port is not set to FC-AL connection. - The host response number cannot be specified if the Affinity functions of the target port are enabled. - When setting USER port or REMCS port - The Primary DNS must be set when setting the Secondary DNS. - The gateway must be set when setting the Primary/Secondary DNS on a different subnet from the IP address of the port. - If the connection destination network address is set, the gateway cannot be disabled. - When setting destination information for the USER port or REMCS port - The gateway must be set when setting the destination network address. - When the USER port or REMCS port is disabled, the destination network address cannot be set. {0} : Parameter name - When setting a FC port No action is required. - When using other functions Set the necessary parameters, and try again
315 STXS4138 ERROR Operation cannot be performed with the specified disk. [disk number="{0}"] - When registering a hot spare One of the following disks is specified. - system disk - disk other than a data disk - disk whose status is abnormal - disk that configures a RAID group - disk whose type is different from that of the specified RAID group - disk whose capacity is smaller than the minimum capacity disk that configures the specified RAID group - When canceling a hot spare registration One of the following disks is specified. - disk other than a hot spare disk - disk whose status is abnormal (including specified disks that are currently in use) - disk that configures a RAID group {0} : Disk number Refer to the "ETERNUS Web GUI User Guide". Specify a valid disk, and try again. STXS4139 ERROR Specified device has an error. The specified device has an error. Wait a while for the device status to be normal, and try again. If the problem remains, collect this message and troubleshooting information and contact a Fujitsu SE, if the problem persists. Collect the troubleshooting information as shown in "6.3.2 Trouble analysis". STXS4140 ERROR Operation cannot be performed on the specified volume. a. The capacity of the specified volume is less than the minimum capacity (1024MB). b. The disk type of the RAID group to which the specified volume belongs is not the same as that of the specified RAID group. c. The status of the specified volume is abnormal
316 a. Specify a volume that has a capacity of 1024MB or more, and try again. b. Specify a volume and RAID group with disks of the same type, and try again. c. Wait for a while, and when the volume status changes to normal, try again. If the volume status does not change to normal, collect this message and troubleshooting information and contact a Fujitsu SE, if the problem persists. Collect the troubleshooting information as shown in "6.3.2 Trouble analysis". STXS4141 ERROR Limit of concatenation has been reached. As a result of concatenation, the status is as one of the following. - The volume capacity is above the volume maximum capacity (32TB). - The number of volumes that were concatenated is above the maximum (16). Check the concatenation configuration, and try again. STXS4154 ERROR Specified information is not registered. [parameter name="{0}", parameter value="{1}"] The specified information is not registered. - {0} : Parameter name - {1} : Parameter value Remove registered disk array and re-register it then try again. Collect this message and troubleshooting information and contact a Fujitsu SE, if the problem persists. Collect the troubleshooting information as shown in "6.3.2 Trouble analysis". STXS4156 ERROR The format of the specified parameter is invalid for this device. [parameter name ="{0}"] The format of the parameter is invalid for the specified ETERNUS Disk storage system model or firmware. {0} : Parameter
317 Refer to the description of operands for the operation to be performed, check the parameters, and then try again. STXS5001 ERROR Failed to check the progress of device operation. [code="{0}"] Progress check command has been interrupted due to the device. {0} : Command code Collect this message and troubleshooting information and contact a Fujitsu SE, if the problem persists. Collect the troubleshooting information as shown in "6.3.2 Trouble analysis". STXS5002 ERROR Failed to access the device. [code="{0}", result="{1}"] Command access to the device failed. - {0} : Command code - {1} : Result The following are possible causes: - ETERNUS Disk storage system status is abnormal - ETERNUS Disk storage system component failed - Network environment is invalid - LAN connection status is invalid - Number of disks used exceeds the number of disks that can be installed Check the above causes and if the problem remains, collect this message and troubleshooting information and contact a Fujitsu SE, if the problem persists. Collect the troubleshooting information as shown in "6.3.2 Trouble analysis". STXS8002 ERROR The values of the parameter exceed the range allowed. [parameter name="{0}", parameter value="{1}"] The parameter values exceed the range allowed
318 - {0} : Parameter name - {1} : Parameter value Collect this message and troubleshooting information and contact a Fujitsu SE, if the problem persists. Collect the troubleshooting information as shown in "6.3.2 Trouble analysis". STXS8005 ERROR The combination of parameters is not correct. [parameter name="{0}", parameter value="{1}"] The combination of parameters is not correct. - {0} : Parameter name - {1} : Parameter value Collect this message and troubleshooting information and contact a Fujitsu SE, if the problem persists. Collect the troubleshooting information as shown in "6.3.2 Trouble analysis". STXS8006 ERROR The specified status for the parameter is invalid. [parameter name="{0}", parameter value="{1}"] The specified status for the parameter is invalid. - {0} : Parameter name - {1} : Parameter value Collect this message and troubleshooting information and contact a Fujitsu SE, if the problem persists. Collect the troubleshooting information as shown in "6.3.2 Trouble analysis". STXS8007 ERROR The specified parameter is invalid. [parameter name="{0}", parameter value="{1}"] The specified parameter is invalid. - {0} : Parameter name
319 - {1} : Parameter value Collect this message and troubleshooting information and contact a Fujitsu SE, if the problem persists. Collect the troubleshooting information as shown in "6.3.2 Trouble analysis". STXS8008 ERROR The specified size is invalid. [parameter name="{0}", parameter value="{1}"] The specified size is invalid. - {0} : Parameter name - {1} : Parameter value Collect this message and troubleshooting information and contact a Fujitsu SE, if the problem persists. Collect the troubleshooting information as shown in "6.3.2 Trouble analysis". STXS8042 ERROR The password is invalid. [parameter name="{0}", parameter value="{1}"] The password is invalid. - {0} : Parameter name - {1} : Parameter value Re-register user information according to "7.5.5 Changing the User Name or Password" and try again. Collect this message and troubleshooting information and contact a Fujitsu SE, if the problem persists. Collect the troubleshooting information as shown in "6.3.2 Trouble analysis". STXS8070 ERROR The resource is being used. [parameter name="{0}", parameter value={1}"] The resource is being used. - {0} : Parameter name - {1} : Parameter value
320 Stop the use of the resource or wait for a while, and then try again. STXS8071 ERROR The specified resource is being used by another function or configuration. [parameter name="{0}", parameter value="{1}"] The specified resource is being used by another function or configuration. - {0} : Parameter name - {1} : Parameter value Select [Disk Array] - [Reload Conf] in [Action] pane in Express web GUI and refresh the disk array information. Then try again. Collect this message and troubleshooting information and contact a Fujitsu SE, if the problem persists. Collect the troubleshooting information as shown in "6.3.2 Trouble analysis". STXS8080 ERROR The specified capacity or number has reached the limit. [parameter name="{0}", parameter value="{1}"] The specified capacity or number has reached the limit. - {0} : Parameter name - {1} : Parameter value Collect this message and troubleshooting information and contact a Fujitsu SE. Collect the troubleshooting information as shown in "6.3.2 Trouble analysis". STXS8081 ERROR There are no more usable disks. [parameter name="{0}", parameter value="{1}"] There are no more usable disks. - {0} : Parameter name - {1} : Parameter value
321 Prepare the required number of usable disks and try again. STXS8090 ERROR The specified parameter cannot be used in the current state of the ETERNUS Disk storage system. [parameter name="{0}", parameter value="{1}"] The specified parameter cannot be used in the current state of the ETERNUS Disk storage system. - {0} : Parameter name - {1} : Parameter value Check the status of the ETERNUS Disk storage system and try again. STXS8093 ERROR The specified parameter cannot be used for the host affinity mode. [parameter name="{0}", parameter value="{1}"] The specified parameter cannot be used for the host affinity mode. - {0} : Parameter name - {1} : Parameter value Check the host affinity mode and try again. STXS8094 ERROR The specified parameter cannot be used for the encryption mode. [parameter name="{0}", parameter value="{1}"] The specified parameter cannot be used for the encryption mode. - {0} : Parameter name - {1} : Parameter value Check the encryption mode of the ETERNUS Disk storage system and try again. STXS8110 ERROR The specified target does not exist. [parameter name="{0}", parameter value="{1}"]
322 The specified target does not exist. - {0} : Parameter name - {1} : Parameter value Select [Disk Array] - [Reload Conf] in [Action] pane in Express web GUI and refresh the disk array information. Then try again. Collect this message and troubleshooting information and contact a Fujitsu SE, if the problem persists. Collect the troubleshooting information as shown in "6.3.2 Trouble analysis". STXS8120 ERROR The specified value has already been registered. [parameter name="{0}", parameter value="{1}"] The specified value has already been registered. - {0} : Parameter name - {1} : Parameter value Select [Disk Array] - [Reload Conf] in [Action] pane in Express web GUI and refresh the disk array information. Then try again. Collect this message and troubleshooting information and contact a Fujitsu SE, if the problem persists. Collect the troubleshooting information as shown in "6.3.2 Trouble analysis". STXS8156 ERROR LDE is currently being performed. [parameter name="{0}", parameter value="{1}"] LDE is currently being performed. - {0} : Parameter name - {1} : Parameter value Wait for LDE to complete and then try again. STXSD010 ERROR The volume that is configured with SEDs is specified to be encrypted. [parameter name="{0}", parameter value="{1}"]
323 The volume that is configured with SEDs is specified to be encrypted. - {0} : Parameter name - {1} : Parameter value Specify a volume that is not configured with SEDs for encryption. Messages beginning with ssmgr ssmgr3021 Username or password is incorrect for device. Failed to login to device because username or password is incorrect. When this message is displayed by registering device, enter the correct username and password, and register again. When this message is displayed for the registered device, refer to "7.5.5 Changing the User Name or Password". ssmgr3022 Another user has logged in to device. Logout and run function again. The target device: {0}:{1} The Manager could not login to the device because another user has already logged into the device. - {0} : Indicates device name that is set for the device to which login failed. - {1} : Indicates the IP address of the device to which login failed. Log out the process logged into the target device, and then re-execute. Collect this message and troubleshooting information and contact a Fujitsu SE, if the problem persists. Collect the troubleshooting information as shown in "6.3.2 Trouble analysis". ssmgr3317 Failed to modify the iscsi Port
324 Failed to set the iscsi port. Collect this message and troubleshooting information and contact a Fujitsu SE, if the problem persists. Collect the troubleshooting information as shown in "6.3.2 Trouble analysis". ssmgr3318 Failed to obtain the iscsi Port. Failed to obtain the iscsi port. Collect this message and troubleshooting information and contact a Fujitsu SE, if the problem persists. Collect the troubleshooting information as shown in "6.3.2 Trouble analysis". ssmgr3377 Specified iscsi PortID ({0}) is not found in the specified storage device ({1}). The specified port ID does not exist in the specified storage device. - {0} : Port ID specified - {1} : IP address specified for the storage device Possible responses are: - If the port ID specified is invalid: Specify a valid port ID, and then re-execute. - If the IP address specified for the storage device is invalid: Specify a valid IP address for the storage device, and then re-execute. ssmgr3403 Specified storage device ({0}) could not be found. An error occurred during the storage device settings or the management information could not be obtained
325 {0} : IP address Check that the specified storage device is supported. Collect this message and troubleshooting information and contact a Fujitsu SE, if the problem persists. Collect the troubleshooting information as shown in "6.3.2 Trouble analysis". ssmgr3405 The operation cannot be executed, because the fatal inconsistent data was detected in the database of this software. The fatal inconsistent data was detected in the database of this software. Settings for the storage device have been made, but these settings have not been successfully reflected in the database for this software. Collect this message and troubleshooting information and contact a Fujitsu SE, if the problem persists. Collect the troubleshooting information as shown in "6.3.2 Trouble analysis". ssmgr3410 Specified RAID group ({0}) does not exist. The specified RAID group number does not exist. {0} : Indicates the RAID group number Specify the correct RAID group number, and then re-execute. If this does not solve the problem, then collect this message and troubleshooting information and contact a Fujitsu SE, if the problem persists. Collect the troubleshooting information as shown in "6.3.2 Trouble analysis". ssmgr3413 Because the number of RAID groups reaches the upper bound, it is not possible to make it. The RAID group could not be created because the maximum number of RAID groups for the storage device has been reached
326 Check the number of RAID groups that have been registered with the device. To create a new RAID group, an existing RAID will need to be deleted. ssmgr3414 The RAID group cannot be made by combining specified disks ({0}). Processing has terminated because the specified combination of disks is incorrect. {0} : Indicates the disk number The problem may be due to one of the following. Check the disk and then execute the processing again. - An invalid combination of disks may have been specified when the RAID group was created - A disk that is already being used by another RAID group may have been specified - Disks with different types may have been specified - The specified disk may not exist - The reason for failure to create the RAID group may be because the status of the specified disk is "error" - The disk numbers unsuitable for the RAID Level If this does not solve the problem, then collect this message and troubleshooting information and contact a Fujitsu SE, if the problem persists. Collect the troubleshooting information as shown in "6.3.2 Trouble analysis". ssmgr3415 The value of assign CM({0}) specified when the RAID group is made is wrong. Processing has terminated because the value of the CM (that was assigned when the RAID group was created) was incorrect. {0} : Indicates the assigned CM Specify the correct assigned CM number, and then re-execute. If this does not solve the problem, then collect this message and troubleshooting information and contact a Fujitsu SE, if the problem persists. Collect the troubleshooting information as shown in "6.3.2 Trouble analysis". ssmgr3417 The type of specified volume ({0}) is a unsupport
327 Processing has terminated because the type of volume specified is not supported by the command. The only types of volumes that the command supports are OLU volumes that are not LUN concatenated. {0} : Indicates the volume number Specify the correct volume number, and then re-execute. If this does not solve the problem, then collect this message and troubleshooting information and contact a Fujitsu SE, if the problem persists. Collect the troubleshooting information as shown in "6.3.2 Trouble analysis". ssmgr3420 Specified AffinityGroup({0}) does not exist. The specified affinity group does not exist. {0} : Indicates the affinity group number Specify the correct affinity group number, and then re-execute. ssmgr3422 As for specified volume ({0}), the LUN mapping is done. LUN mapping for the specified volume number is complete. {0} : Indicates the volume number Specify the correct volume number, and then re-execute. If this does not solve the problem, then collect this message and troubleshooting information and contact a Fujitsu SE, if the problem persists. Collect the troubleshooting information as shown in "6.3.2 Trouble analysis". ssmgr3427 Because the number of volumes that can be made in RAID group ({0}) exceeds the upper bound, the volume cannot be made
328 Processing has terminated because the number of volumes exceeds the maximum number of volumes that can be created within a RAID group. {0} : Indicates the RAID group number Check the number of volumes in the RAID groups that have been registered with the device. To create a new volume, either specify a different RAID group, or delete an existing volume. If this does not solve the problem, then collect this message and troubleshooting information and contact a Fujitsu SE, if the problem persists. Collect the troubleshooting information as shown in "6.3.2 Trouble analysis". ssmgr3428 The status of specified RAID group ({0}) is abnormal. Processing has terminated because the status of the specified RAID group prevents processing from being performed. {0} : Indicates the RAID group number Check the status of the RAID group. Execute the processing again after the status returns to "normal". If this does not solve the problem, then collect this message and troubleshooting information and contact a Fujitsu SE, if the problem persists. Collect the troubleshooting information as shown in "6.3.2 Trouble analysis". ssmgr3429 Because the capacity of specified RAID group ({0}) is insufficient, the volume cannot be made. The volume cannot be created because the RAID group does not have enough capacity. {0} : Indicates the RAID group number Check the capacity of the RAID group, specify the correct volume capacity and re-execute. If this does not solve the problem, then collect this message and troubleshooting information and contact a Fujitsu SE, if the problem persists
329 Collect the troubleshooting information as shown in "6.3.2 Trouble analysis". ssmgr3430 Because the number of volumes that can be made exceeds the upper bound, it is not possible to make it. Processing has terminated because the number of volumes exceeds the maximum number of volumes that can be registered with the device. Check the number of volumes that have been registered with the device. To create a new volume, an existing volume will need to be deleted. If this does not solve the problem, then collect this message and troubleshooting information and contact a Fujitsu SE, if the problem persists. Collect the troubleshooting information as shown in "6.3.2 Trouble analysis". ssmgr3431 The volume exists in specified RAID group ({0}). Processing has terminated because an attempt was made to delete the RAID group where the volume is located. {0} : Indicates the RAID group number RAID groups that contain volumes cannot be deleted. To delete RAID groups, please delete the volumes in the RAID group before deleting the RAID group. If this does not solve the problem, then collect this message and troubleshooting information and contact a Fujitsu SE, if the problem persists. Collect the troubleshooting information as shown in "6.3.2 Trouble analysis". ssmgr3436 The RAID group where specified volume ({0}) is included cannot operate it because of the LDE. Operations cannot be performed on the volume because Logical Device Expansion (LDE) is being performed for the RAID group that includes the specified volume. {0} : Indicates the volume number
330 Execute the processing again after the Logical Device Expansion for the RAID group finishes. If this does not solve the problem, then collect this message and troubleshooting information and contact a Fujitsu SE, if the problem persists. Collect the troubleshooting information as shown in "6.3.2 Trouble analysis". ssmgr3440 The RAID group to make the specified volume does not exist. There are no RAID groups where a volume can be created. Specify the correct RAID group number, and then re-execute. If this does not solve the problem, then collect this message and troubleshooting information and contact a Fujitsu SE, if the problem persists. Collect the troubleshooting information as shown in "6.3.2 Trouble analysis". ssmgr3441 The specified RAID group cannot register the volume. The volume could not be registered in the RAID group. Check the RAID group, and then re-execute. Volumes cannot be specified as open volumes if any volumes other than open volumes, SDV volumes or SDPV volumes have been registered with the RAID group. If this does not solve the problem, then collect this message and troubleshooting information and contact a Fujitsu SE, if the problem persists. Collect the troubleshooting information as shown in "6.3.2 Trouble analysis". ssmgr3454 The specified port({0}) cannot set the HostReponse. The HostReponse number was specified for a port for which the affinity mode is ON. {0} : Port ID
331 Check that the port that was specified is valid, and then re-execute. If the problem is not resolved, then collect this message and troubleshooting information and contact a Fujitsu SE, if the problem persists. Collect the troubleshooting information as shown in "6.3.2 Trouble analysis". ssmgr3455 Specified HostResponse({0}) does not exist. The specified HostResponse does not exist. {0} : HostResponse number Specify a valid HostResponse number, and then re-execute. If the problem is not resolved, then collect this message and troubleshooting information and contact a Fujitsu SE, if the problem persists. Collect the troubleshooting information as shown in "6.3.2 Trouble analysis". ssmgr3458 The specified port({0}) is a unsupport. The specified port is unsupported. {0} : Port ID Specify a valid port ID, and then re-execute. If the problem is not resolved, collect this message and troubleshooting information and contact a Fujitsu SE, if the problem persists. Collect the troubleshooting information as shown in "6.3.2 Trouble analysis". ssmgr3462 The specified port({0}) is wrong. The specified port is invalid. {0} : Port ID
332 Specify a valid port, and then re-execute. If the problem is not resolved, then collect this message and troubleshooting information and contact a Fujitsu SE, if the problem persists. Collect the troubleshooting information as shown in "6.3.2 Trouble analysis". ssmgr3464 The specified HostResponse({0}) cannot used. The specified Host Specific Mode for the HostResponse cannot be set. {0} : HostResponse number LUN#256 or greater has been used for port LUN mapping, therefore the Host Specific Mode for the HostResponse must be one of AIX Mode (Extended Address), HP-UX Mode (SCC), or Linux/NR1000V Mode (Extended Address). Check the Host Specific Mode for the HostResponse, and then re-execute. If the problem is not resolved, then collect this message and troubleshooting information and contact a Fujitsu SE, if the problem persists. Collect the troubleshooting information as shown in "6.3.2 Trouble analysis". ssmgr3465 The specified value is used with other {0}. A value already used with another function was specified. {0} : Function name The iscsi port, iscsi host IP address, iscsi name, iscsi alias name, and iscsi host name cannot be duplicated with another iscsi port or iscsi host and registered. Check the settings, and then re-execute. If the problem is not resolved, then collect this message and troubleshooting information and contact a Fujitsu SE, if the problem persists. Collect the troubleshooting information as shown in "6.3.2 Trouble analysis". ssmgr3467 Network setting of {0} is wrong
333 The network setting is invalid. {0} : Function name The following settings cannot be specified for the iscsi port IP address, subnet, or gateway: - Network address - Broadcast address - The IP address and gateway IP address cannot be the same - The IP address and gateway IP address cannot have different subnets Check the settings, and then re-execute. If the problem is not resolved, collect this message and troubleshooting information and contact a Fujitsu SE, if the problem persists. Collect the troubleshooting information as shown in "6.3.2 Trouble analysis". ssmgr3486 The resource of the device ({0}) is insufficient. The maximum of capacity in which the format was enforceable was exceeded at the same time. {0} : IP address of storage device. Execute it again after completing the format executing it now. Collect this message and troubleshooting information and contact a Fujitsu SE, if the problem persists. Collect the troubleshooting information as shown in "6.3.2 Trouble analysis". ssmgr3490 The function is disabled for the device ({0}) The operation cannot be performed because the license for one of the following functions has not been registered or the function is disabled. - Thin provisioning function - Encryption function - Advanced Copy function {0} : IP address
334 Register the corresponding license or enable the function and try again. Collect this message and troubleshooting information and contact a Fujitsu SE, if the problem persists. Collect the troubleshooting information as shown in "6.3.2 Trouble analysis". ssmgr3491 The status of device ({0}) is abnormal. The specified operation cannot be performed because the status of the device is "error". {0} : IP address of storage device. Check the status of the device, and execute the processing again after the status returns to "normal". Collect this message and troubleshooting information and contact a Fujitsu SE, if the problem persists. Collect the troubleshooting information as shown in "6.3.2 Trouble analysis". ssmgr3502 The specified value is out of range. The value specified for one of the following items is out of range: - Disk - RAID group - Thin provisioning pool - Volume - Volume capacity - Host response - Port - Host WWN - iscsi host - SAS address - Affinity group - LUN - REC buffer - REC path
335 Check the value entered and the storage device status and try again. Collect this message and troubleshooting information and contact a Fujitsu SE, if the problem persists. Collect the troubleshooting information as shown in "6.3.2 Trouble analysis". ssmgr3503 The status of specified value is abnormal. The operation cannot be performed because the status of one the following items is abnormal: - Disk - RAID group - Thin provisioning pool - Volume - CM - Port Check that the specified item has resumed a normal status and try again. Collect this message and troubleshooting information and contact a Fujitsu SE, if the problem persists. Collect the troubleshooting information as shown in "6.3.2 Trouble analysis". ssmgr3504 The specified value cannot be used. Any of the following specified values cannot be used. - disk - RAID group - volume - host response - port - affinity group Execute it again after confirming the state of the specified value. Collect this message and troubleshooting information and contact a Fujitsu SE, if the problem persists
336 Collect the troubleshooting information as shown in "6.3.2 Trouble analysis". ssmgr3506 The specified value is in use. Any of the following specified values being used, it is not possible to operate it. - disk - volume - affinity group - port Execute it again after confirming the specified value or the state of the storage device. Collect this message and troubleshooting information and contact a Fujitsu SE, if the problem persists. Collect the troubleshooting information as shown in "6.3.2 Trouble analysis". ssmgr3508 The number of disk reaches the upper bound. It reaches upper bounds of the number of disks that can be operated at a time, it is not possible to operate it. Execute it again after confirming the specified number of disks. Collect this message and troubleshooting information and contact a Fujitsu SE, if the problem persists. Collect the troubleshooting information as shown in "6.3.2 Trouble analysis". ssmgr3513 The specified value is not registered. One of the following specified items is not registered: - Disk - RAID group - Thin provisioning pool - Volume - Host response - Host WWN - iscsi host - SAS address
337 - Affinity group - LUN - Eco-mode schedule - REC buffer - REC path Check the specified item and the status of the storage device and try again. Collect this message and troubleshooting information and contact a Fujitsu SE, if the problem persists. Collect the troubleshooting information as shown in "6.3.2 Trouble analysis". ssmgr3514 The specified value has already been registered. One of the following specified items has already been registered: - Disk - RAID group - Thin provisioning pool - Volume - Volume capacity - Host response - Host WWN - iscsi host - SAS address - Affinity group - LUN - RAID group name - Thin provisioning pool name - Volume name - Host response name - Host name - Affinity group name - REC buffer - REC path
338 Check the specified item and the storage device and try again. Collect this message and troubleshooting information and contact a Fujitsu SE, if the problem persists. Collect the troubleshooting information as shown in "6.3.2 Trouble analysis". ssmgr3515 Encrypted volume exists. The operation cannot be performed because an encrypted volume exists. Check the status of the storage device and try again. Collect this message and troubleshooting information and contact a Fujitsu SE, if the problem persists. Collect the troubleshooting information as shown in "6.3.2 Trouble analysis". ssmgr3517 The device ({0}) is boot up or shutdown. It is not possible to operate it while being cutting the power supply of the storage device or turning on the power supply. {0} : IP address of storage device. Execute it again after completing the start of the storage device. Collect this message and troubleshooting information and contact a Fujitsu SE, if the problem persists. Collect the troubleshooting information as shown in "6.3.2 Trouble analysis". ssmgr3518 Volume is formating. The operation cannot be performed because a volume is currently formatting. Try again after the volume formatting has ended. Collect this message and troubleshooting information and contact a Fujitsu SE, if the problem persists. Collect the troubleshooting information as shown in "6.3.2 Trouble analysis"
339 ssmgr3519 Volume is encrypting or decrypting. The operation cannot be performed because a volume is currently encrypting or decrypting. Try again after the volume has finished encrypting or decrypting. Collect this message and troubleshooting information and contact a Fujitsu SE, if the problem persists. Collect the troubleshooting information as shown in "6.3.2 Trouble analysis". ssmgr3520 Advanced Copy is processing. The operation cannot be performed because an Advanced Copy is under way. Try again after the Advanced Copy has ended. Collect this message and troubleshooting information and contact a Fujitsu SE, if the problem persists. Collect the troubleshooting information as shown in "6.3.2 Trouble analysis". ssmgr3521 RAID migration is processing. The operation cannot be performed because a RAID migration is under way. Try again after the RAID migration has ended. Collect this message and troubleshooting information and contact a Fujitsu SE, if the problem persists. Collect the troubleshooting information as shown in "6.3.2 Trouble analysis". ssmgr3522 LDE is processing. The operation cannot be performed because a Logical Device Expansion is under way
340 Try again after the Logical Device Expansion has ended. Collect this message and troubleshooting information and contact a Fujitsu SE, if the problem persists. Collect the troubleshooting information as shown in "6.3.2 Trouble analysis". ssmgr3523 REC session exists. The operation cannot be performed because a REC session exists. Try again after the REC session has ended. Collect this message and troubleshooting information and contact a Fujitsu SE, if the problem persists. Collect the troubleshooting information as shown in "6.3.2 Trouble analysis". ssmgr3524 The device ({0}) is updating the controller firmware. The operation cannot be performed because a controller firmware update is under way for the specified device. {0}: IP address Try again after the controller firmware update has ended. Collect this message and troubleshooting information and contact a Fujitsu SE, if the problem persists. Collect the troubleshooting information as shown in "6.3.2 Trouble analysis". ssmgr3525 The device ({0}) is remote maintenance processing. The operation cannot be performed because the specified device is under remote maintenance. {0}: IP address Try again after the remote maintenance has ended
341 Collect this message and troubleshooting information and contact a Fujitsu SE, if the problem persists. Collect the troubleshooting information as shown in "6.3.2 Trouble analysis". ssmgr3527 The specified value reaches the upper bound. The maximum possible number has been reached for one of the following settings: - Number of registered RAID groups - Number of registered thin provisioning pools - Number of registered volumes - Number of registered host WWNs - Number of registered iscsi hosts - Number of registered SAS addresses - Number of registered affinity groups - Advanced Copy table size - REC buffer size - REC path Check the configuration regarding the specified registered item in the Storage device. If a new configuration is necessary, the current configuration must be deleted. Collect this message and troubleshooting information and contact a Fujitsu SE, if the problem persists. Collect the troubleshooting information as shown in "6.3.2 Trouble analysis". ssmgr3531 The specified combination cannot be used. The specified combination can not be set. Collect this message and troubleshooting information and contact a Fujitsu SE. Collect the troubleshooting information as shown in "6.3.2 Trouble analysis". ssmgr3533 The specified value cannot be used for specified storage device ({0}). The problem can be one of the following: - An alias was set for a device that can not use aliases
342 - Encryption was enabled for a volume that does not support encryption. - Encryption was enabled for a thin provisioning pool that does not support encryption. - An unsupported value was set for the specified device when configuring a thin provisioning pool. - An unsupported value was set for the specified device when expanding the capacity of a thin provisioning pool. - A dedicated hot spare was set for a device that cannot use dedicated hot spares. - A RAID migration to a thin provisioning pool operation was started on a system that does not support this type of operation. - A REC disk backup size was set on the specified device where this setting is not supported. {0} : IP address Check the device or the firmware version and try again. If the firmware version is old, upgrade the firmware and try again. Collect this message and troubleshooting information and contact a Fujitsu SE, if the problem persists. Collect the troubleshooting information as shown in "6.3.2 Trouble analysis". ssmgr3537 The type of specified Port ({0}) is different. The specified port type is different. {0} : Port ID Set the correct port type and try again. Collect this message and troubleshooting information and contact a Fujitsu SE, if the problem persists. Collect the troubleshooting information as shown in "6.3.2 Trouble analysis". ssmgr3538 Failed to obtain the information for the remote device ({0}). detail message={1} The information for the remote device could not be obtained. {0} : IP address for the remote device {1} : detailed message
343 Check the status of the remote device and try again. Collect this message and troubleshooting information and contact a Fujitsu SE, if the problem persists. Collect the troubleshooting information as shown in "6.3.2 Trouble analysis". ssmgr3539 Failed to measure the round trip time. The problem can be one of the following: - REC path connection type is set to direct. - REC path status is abnormal. Check the connection and the REC path and try again. Collect this message and troubleshooting information and contact a Fujitsu SE, if the problem persists. Collect the troubleshooting information as shown in "6.3.2 Trouble analysis". ssmgr3540 REC path setting is wrong. The problem can be one of the following: - The status of the device where the REC path is set and the specified REC path status do not match. - The specified REC path setting is wrong. Check the REC path settings and try again. Collect this message and troubleshooting information and contact a Fujitsu SE, if the problem persists. Collect the troubleshooting information as shown in "6.3.2 Trouble analysis". ssmgr3548 The device ({0}) not managed in this software is set to the REC path. A device not managed by this software has been attached to the REC path. {0} : BOX ID
344 Register the corresponding device in the software and try again. Collect this message and troubleshooting information and contact a Fujitsu SE, if the problem persists. Collect the troubleshooting information as shown in "6.3.2 Trouble analysis". ssmgr3549 The specified REC path ({0}) does not exist. The specified REC path does not exist. {0} : Combination of the connection source port and the connection destination port Correct the REC path setting and try again. Collect this message and troubleshooting information and contact a Fujitsu SE, if the problem persists. Collect the troubleshooting information as shown in "6.3.2 Trouble analysis". ssmgr3555 The PIN data exists in specified volume ({0}). Processing ended because the PIN data existed in the specified volume. The volume where the PIN data exists cannot be formatted. {0} : Number of volume. Execute it again after confirming the volume. Collect this message and troubleshooting information and contact a Fujitsu SE, if the problem persists. Collect the troubleshooting information as shown in "6.3.2 Trouble analysis". ssmgr3558 The specified value is functionally wrong. The specified value is functionally wrong
345 Collect this message and troubleshooting information and contact a Fujitsu SE, if the problem persists. Collect the troubleshooting information as shown in "6.3.2 Trouble analysis". ssmgr3559 CHAP setting is unsupported The problem can be one of the following: - CHAP certification has been set for the specified iscsi port - CHAP certification has been set for the source device iscsi port of the REC path - The CHAP certified user name set for the source device iscsi port of the REC path contains a "?" character. - The CHAP certified password set for the source device iscsi port of the REC path contains a "?" character. Check the CHAP certification setting and try again. Collect this message and troubleshooting information and contact a Fujitsu SE, if the problem persists. Collect the troubleshooting information as shown in "6.3.2 Trouble analysis". ssmgr3733 Failed to obtain the encryption mode information. The encryption information could not be obtained. Collect this message and troubleshooting information and contact a Fujitsu SE. Collect the troubleshooting information as shown in "6.3.2 Trouble analysis". ssmgr3737 Failed to create the REC path. The REC path creation failed. Collect this message and troubleshooting information and contact a Fujitsu SE. Collect the troubleshooting information as shown in "6.3.2 Trouble analysis"
346 ssmgr3738 Failed to delete the REC path. The REC path deletion failed. Collect this message and troubleshooting information and contact a Fujitsu SE. Collect the troubleshooting information as shown in "6.3.2 Trouble analysis". ssmgr3739 Failed to obtain the REC path information. The REC path information could not be obtained. Collect this message and troubleshooting information and contact a Fujitsu SE. Collect the troubleshooting information as shown in "6.3.2 Trouble analysis". ssmgr3740 Failed to set the Round Trip Time. The Round Trip Time could not be set. Collect this message and troubleshooting information and contact a Fujitsu SE. Collect the troubleshooting information as shown in "6.3.2 Trouble analysis". ssmgr3743 Failed to obtain the REC buffer information. REC buffer information could not be obtained. Collect this message and troubleshooting information and contact a Fujitsu SE. Collect the troubleshooting information as shown in "6.3.2 Trouble analysis"
347 Messages beginning with swsag swsag0209 Network I/O Error on storage communication. An I/O error occurred during communication with the storage. Check the LAN environment for problems. swsag0294 It failed in the setting or the information acquisition of the storage device. It failed in the setting or the information acquisition of the storage device. Confirm whether to find hard abnormality in the storage device. Collect this message and troubleshooting information and contact a Fujitsu SE, if the problem persists. Collect the troubleshooting information as shown in "6.3.2 Trouble analysis". swsag0295 A communication error occurred with the storage device. It failed in the setting or the information acquisition of the storage device. Confirm whether there is problem in the environment of LAN. Collect this message and troubleshooting information and contact a Fujitsu SE, if the problem persists. Collect the troubleshooting information as shown in "6.3.2 Trouble analysis". E.4 Message output when Advanced Copy is executed This chapter explains the messages output when Advance Copy is executed using the Express Web GUI. esfmgr10801 The copy started. {SourceVolume=Source_Volume_name CopyGroup=Copy_Group_name} [,SourceServer=Source_Server_name1,[Source_Server_name2[,...]]_] [,SourceStorage=Source_Storage_name]
348 [,DestinationVolume=Destination_Volume_name] [,DestinationServer=Destination_Server_name] [,DestinationStorage=Destination_Storage_name], CopyType=Copy_Type, Direction=Direction Copy started. - Source_Volume_name : Volume name specified to copy source - Copy_Group_name : Copy group name - Source_Server_name : Server name specified to copy source - Source_Storage_name : Storage system name specified to copy source - Destination_Volume_name : Volume name specified to copy destination - Destination_Server_name : Server name specified to copy destination - Destination_Storage_name : Storage system name specified to copy destination - Copy_Type : Copy type - Clone(One Time) [OPC] - Clone(Recurring) [QuickOPC] - Clone(Split mirror) [EC] - Snapshot [SnapOPC+] - Remote [REC] - Direction : Copy direction - Forward - Backward None. None. esfmgr10802 The copy accepted. {SourceVolume=Source_Volume_name CopyGroup=Copy_Group_name} [,SourceServer=Source_Server_name1[,Source_Server_name2[,...]]] [,SourceStorage=Source_Storage_name] [,DestinationVolume=Destination_Volume_name] [,DestinationServer=Destination_Server_name] [,DestinationStorage=Destination_Storage_name], CopyType=Copy_Type, Direction=Direction Copy was accepted. (Logical copy has finished) - Copy_Group_name : Copy group name - Source_Server_name : Server name specified to copy source - Source_Storage_name : Storage system name specified to copy source - Destination_Volume_name : Volume name specified to copy destination - Destination_Server_name : Server name specified to copy destination
349 - Destination_Storage_name : Storage system name specified to copy destination - Copy_Type : Copy type - Clone(One Time) [OPC] - Clone(Recurring) [QuickOPC] - Clone(Split mirror) [EC] - Snapshot [SnapOPC+] - Remote [REC] - Direction : Copy direction - Forward - Backward None. None. esfmgr10803 The copy was stoped. {SourceVolume=Source_Volume_name CopyGroup=Copy_Group_name} [,SourceServer=Source_Server_name1[,Source_Server_name2[,...]]] [,SourceStorage=Source_Storage_name] [,DestinationVolume=Destination_Volume_name] [,DestinationServer=Destination_Server_name] [,DestinationStorage=Destination_Storage_name], CopyType=Copy_Type, Direction=Direction Copy was stopped. - Source_Volume_name : Volume name specified to copy source - Copy_Group_name : Copy group name - Source_Server_name : Server name specified to copy source - Source_Storage_name : Storage system name specified to copy source - Destination_Volume_name : Volume name specified to copy destination - Destination_Server_name : Server name specified to copy destination - Destination_Storage_name : Storage system name specified to copy destination - Copy_Type : Copy type - Clone(One Time) [OPC] - Clone(Recurring) [QuickOPC] - Clone(Split mirror) [EC] - Snapshot [SnapOPC+] - Remote [REC] - Direction : Copy direction - Forward - Backward
350 None. None. esfmgr10804 The copy was suspended. {SourceVolume=Source_Volume_name CopyGroup=Copy_Group_name} [,SourceServer=Source_Server_name] [,SourceStorage=Source_Storage_name],DestinationVolume=Destination_Volume_name [,DestinationServer=Destination_Server_name] [,DestinationStorage=Destination_Storage_name], CopyType=Copy_Type, Direction=Direction Copy was suspended. - Source_Volume_name : Volume name specified to copy source - Copy_Group_name : Copy group name - Source_Server_name : Server name specified to copy source - Source_Storage_name : Storage system name specified to copy source - Destination_Volume_name : Volume name specified to copy destination - Destination_Server_name : Server name specified to copy destination - Destination_Storage_name : Storage system name specified to copy destination - Copy_Type : - Clone(Split mirror) [EC] - Remote [REC] - Direction : Copy direction - Forward - Backward None. None. esfmgr10805 The copy was resumed. {SourceVolume=Source_Volume_name CopyGroup=Copy_Group_name} [,SourceServer=Source_Server_name1[,Source_Server_name2[,...]]] [,SourceStorage=Source_Storage_name] [,DestinationVolume=Destination_Volume_name] [,DestinationServer=Destination_Server_name] [,DestinationStorage=Destination_Storage_name], CopyType=Copy_Type, Direction=Direction Copy was resumed. - Source_Volume_name : Volume name specified to copy source - Copy_Group_name : Copy group name
351 - Source_Server_name : Server name specified to copy source - Source_Storage_name : Storage system name specified to copy source - Destination_Volume_name : Volume name specified to copy destination - Destination_Server_name : Server name specified to copy destination - Destination_Storage_name : Storage system name specified to copy destination - Copy_Type : Copy type - Clone(Split mirror) [EC] - Remote [REC] - Direction : Copy direction - Forward - Backward None. None. esfmgr10806 The copy was reversed. {SourceVolume=Source_Volume_name CopyGroup=Copy_Group_name} [,SourceServer=Source_Server_name1[,Source_Server_name2[,...]]] [,SourceStorage=Source_Storage_name] [,DestinationVolume=Destination_Volume_name] [,DestinationServer=Destination_Server_name] [,DestinationStorage=Destination_Storage_name],CopyType=Copy_Type, Direction=Direction Copy direction was reversed. - Source_Volume_name : Volume name specified to copy source - Copy_Group_name : Copy group name - Source_Server_name : Server name specified to copy source - Source_Storage_name : Storage system name specified to copy source - Destination_Volume_name : Volume name specified to copy destination - Destination_Server_name : Server name specified to copy destination - Destination_Storage_name : Storage system name specified to copy destination - Copy_Type : Copy type - Clone(Split mirror) [EC] - Remote [REC] - Direction : Copy direction - Forward - Backward None
352 None. esfmgr10807 The copy mode was changed. CopyMode=Copy_Mode,{SourceVolume=Source_Volume_name CopyGroup=Copy_Group_name} [,SourceServer=Source_Server_name1[,Source_Server_name2[,...]]] [,SourceStorage=Source_Storage_name] [,DestinationVolume=Destination_Volume_name] [,DestinationServer=Destination_Server_name] [,DestinationStorage=Destination_Storage_name], CopyType=Copy_Type, Direction=Direction Copy mode was changed. - Copy_Mode : Copy mode - Sync : Synchronous mode - Stack : Asynchronous mode - Consistency : Consistency mode - Through : Through mode - Source_Volume_name : Volume name specified to copy source - Copy_Group_name : Copy group name - Source_Server_name : Server name specified to copy source - Source_Storage_name : Storage system name specified to copy source - Destination_Volume_name : Volume name specified to copy destination - Destination_Server_name : Server name specified to copy destination - Destination_Storage_name : Storage system name specified to copy destination - Copy_Type : Copy type - Remote [REC] - Direction : Copy direction - Forward - Backward None. None. esfmgr10811 The copy was not started. {SourceVolume=Source_Volume_name CopyGroup=Copy_Group_name} [,SourceServer=Source_Server_name1[,Source_Server_name2[,...]]] [,SourceStorage=Source_Storage_name] [,DestinationVolume=Destination_Volume_name] [,DestinationServer=Destination_Server_name] [,DestinationStorage=Destination_Storage_name], CopyType=Copy_Type, Direction=Direction Copy cannot be started
353 - Source_Volume_name : Volume name specified to copy source - Copy_Group_name : Copy group name - Source_Server_name : Server name specified to copy source - Source_Storage_name : Storage system name specified to copy source - Destination_Volume_name: Volume name specified to copy destination - Destination_Server_name : Server name specified to copy destination - Destination_Storage_name : Storage system name specified to copy destination - Copy_Type : Copy type - Clone(One Time) [OPC] - Clone(Recurring) [QuickOPC] - Clone(Split mirror) [EC] - Snapshot [SnapOPC+] - Remote [REC] - Direction : Copy direction - Forward - Backward The process is suspended. If the message prefix "ccm" is displayed, refer to "E.6.1 Message Explanations" to take action according to "" for the relevant message. If it is not displayed, the copy pair or the copy group has been deleted, therefore anything is not done. esfmgr10812 The copy was canceled. {SourceVolume=Source_Volume_name CopyGroup=Copy_Group_name} [,SourceServer=Source_Server_name1[,Source_Server_name2[,...]]] [,SourceStorage=Source_Storage_name] [,DestinationVolume=Destination_Volume_name] [,DestinationServer=Destination_Server_name] [,DestinationStorage=Destination_Storage_name],CopyType=Copy_Type,Direction=Direction Copy was forcibly canceled. - Source_Volume_name : Volume name specified to copy source - Copy_Group_name : Copy group name - Source_Server_name : Server name specified to copy source - Source_Storage_name : Storage system name specified to copy source - Destination_Volume_name : Volume name specified to copy destination - Destination_Server_name : Server name specified to copy destination - Destination_Storage_name : Storage system name specified to copy destination
354 - Copy_Type : Copy type - Clone(One Time) [OPC] - Clone(Recurring) [QuickOPC] - Clone(Split mirror) [EC] - Snapshot [SnapOPC+] - Remote [REC] - Direction : Copy direction - Forward - Backward None. Check the copy destination volume. Re-execute copy as required. esfmgr10813 The cancel operation failed. {SourceVolume=Source_Volume_name CopyGroup=Copy_Group_name} [,SourceServer=Source_Server_name1[,Source_Server_name2[,...]]] [,SourceStorage=Source_Storage_name] [,DestinationVolume=Destination_Volume_name] [,DestinationServer=Destination_Server_name] [,DestinationStorage=Destination_Storage_name],CopyType=Copy_Type,Direction=Direction Copy Stop operation failed. - Source_Volume_name : Volume name specified to copy source - Copy_Group_name : Copy group name - Source_Server_name : Server name specified to copy source - Source_Storage_name : Storage system name specified to copy source - Destination_Volume_name : Volume name specified to copy destination - Destination_Server_name : Server name specified to copy destination - Destination_Storage_name : Storage system name specified to copy destination - Copy_Type : Copy type - Clone(One Time) [OPC] - Clone(Recurring) [QuickOPC] - Clone(Split mirror) [EC] - Snapshot [SnapOPC+] - Remote [REC] - Direction : Copy direction - Forward - Backward
355 The process is suspended. If the message prefix "ccm" is displayed, refer to "E.6.1 Message Explanations" to take action according to "" for the relevant message. If it is not displayed, anything is not done because the status is as follows. - The executed copy of the copy pair or the copy group has finished. - The copy pair or the copy group has been deleted. esfmgr10814 The suspending operation failed. {SourceVolume=Source_Volume_name CopyGroup=Copy_Group_name} [,SourceServer=Source_Server_name1[,Source_Server_name2[,...]]] [,SourceStorage=Source_Storage_name] [,DestinationVolume=Destination_Volume_name] [,DestinationServer=Destination_Server_name] [,DestinationStorage=Destination_Storage_name],CopyType=Copy_Type,Direction=Direction Copy Suspend operation failed. - Source_Volume_name : volume name specified to copy source - Copy_Group_name : Copy group name - Source_Server_name : Server name specified to copy source - Source_Storage_name : Storage system name specified to copy source - Destination_Volume_name : Volume name specified to copy destination - Destination_Server_name : Server name specified to copy destination - Destination_Storage_name : Storage system name specified to copy destination - Copy_Type : Copy type - Clone(Split mirror) [EC] - Remote [REC] - Direction : Copy direction - Forward - Backward The process is suspended. If the message prefix "ccm" is displayed, refer to "E.6.1 Message Explanations" to take action according to "" for the relevant message. If it is not displayed, the copy pair or the copy group has been deleted, therefore anything is not done. esfmgr10815 The resuming operation faild. {SourceVolume=Source_Volume_name CopyGroup=Copy_Group_name} [,SourceServer=Source_Server_name1[,Source_Server_name2[,...]]] [,SourceStorage=Source_Storage_name] [,DestinationVolume=Destination_Volume_name] [,DestinationServer=Destination_Server_name] [,DestinationStorage=Destination_Storage_name],CopyType=Copy_Type,Direction=Direction
356 Copy Resume operation failed. - Source_Volume_name : Volume name specified to copy source - Copy_Group_name : Copy group name - Source_Server_name : Server name specified to copy source - Source_Storage_name : Storage system name specified to copy source - Destination_Volume_name : Volume name specified to copy destination - Destination_Server_name : Server name specified to copy destination - Destination_Storage_name : Storage system name specified to copy destination - Copy_Type : Copy type - Clone(Split mirror) [EC] - Remote [REC] - Direction : Copy direction - Forward - Backward The process is suspended. If the message prefix "ccm" is displayed, refer to "E.6.1 Message Explanations" to take action according to "" for the relevant message. If it is not displayed, the copy pair or the copy group has been deleted, therefore anything is not done. esfmgr10816 The copy was not reversed. {SourceVolume=Source_Volume_name CopyGroup=Copy_Group_name} [,SourceServer=Source_Server_name1[,Source_Server_name2[,...]]] [,SourceStorage=Source_Storage_name] [,DestinationVolume=Destination_Volume_name] [,DestinationServer=Destination_Server_name] [,DestinationStorage=Destination_Storage_name],CopyType=Copy_Type,Direction=Direction Copy direction cannot be reversed. - Source_Volume_name : Volume name specified to copy source - Copy_Group_name : Copy group name - Source_Server_name : Server name specified to copy source - Source_Storage_name : storage system name specified to copy source - Destination_Volume_name : Volume name specified to copy destination - Destination_Server_name : Server name specified to copy destination - Destination_Storage_name : Storage system name specified to copy destination - Copy_Type : Copy type - Clone(Split mirror) [EC]
357 - Remote [REC] - Direction : Pre-reverse copy direction - Forward - Backward The process is suspended. If the message prefix "ccm" is displayed, refer to "E.6.1 Message Explanations" to take action according to "" for the relevant message. If it is not displayed, the copy pair or the copy group has been deleted, therefore anything is not done. esfmgr10817 The change mode operation failed. CopyMode=Copy_Mode, {SourceVolume=Source_Volume_name CopyGroup=Copy_Group_name} [,SourceServer=Source_Server_name1[,Source_Server_name2[,...]]] [,SourceStorage=Source_Storage_name] [,DestinationVolume=Destination_Volume_name] [,DestinationServer=Destination_Server_name] [,DestinationStorage=Destination_Storage_name],CopyType=Copy_Type,Direction=Direction Copy mode cannot be changed. - Copy_Mode : Copy mode - Sync : Synchronous mode - Stack : Asynchronous mode - Consistency : Consistency mode - Through : Through mode - Source_Volume_name : Volume name specified to copy source - Copy_Group_name : Copy group name - Source_Server_name : Server name specified to copy source - Source_Storage_name : Storage system name specified to copy source - Destination_Volume_name : Volume name specified to copy destination - Destination_Server_name : Server name specified to copy destination - Destination_Storage_name : Storage system name specified to copy destination - Copy_Type : Copy type - Remote [REC] - Direction : Copy direction - Forward - Backward The process is suspended
358 If the message prefix "ccm" is displayed, refer to "E.6.1 Message Explanations" to take action according to "" for the relevant message. If it is not displayed, the copy pair or the copy group has been deleted, therefore anything is not done. esfmgr10821 The copy pair was created. SourceVolume=Source_Volume_name, SourceStorage=Source_Storage_name [,SourceServer=Source_Server_name1[,Source_Server_name2[,...]]],DestinationVolume=Destination_Volume_name [,DestinationStorage=Destination_Source_Storage_name] [,DestinationServer=Destination_Server_name], CopyType=Copy_Type, CopyGroup=Copy_Group_name Copy pair was created. - Source_Volume_name : Volume name specified to copy source - Source_Storage_name : Storage system name specified to copy source - Source_Server_name : Server name specified to copy source - Destination_Volume_name : Volume name specified to copy destination - Destination_Storage_name : Storage system name specified to copy destination - Destination_Server_name : Server name specified to copy destination - Copy_Type : Copy type - Clone(One Time) [OPC] - Clone(Recurring) [QuickOPC] - Clone(Split mirror) [EC] - Snapshot [SnapOPC+] - Remote [REC] - Copy_Group_name : Copy group name None. None. esfmgr10822 The copy pair was not created. SourceVolume=Source_Volume_name, SourceStorage=Source_Storage_name [,SourceServer=Source_Server_name1[,Source_Server_name2[,...]]],DestinationVolume=Destination_Volume_name [,DestinationStorage=Destination_Storage_name] [,DestinationServer=Destination_Server_name], CopyType=Copy_Type, CopyGroup=Copy_Group_name Copy pair cannot be created. - Source_Volume_name : Volume name specified to copy source - Source_Storage_name : Storage system name specified to copy source
359 - Source_Server_name : Server name specified to copy source - Destination_Volume_name : Volume name specified to copy destination - Destination_Storage_name : Storage system name specified to copy destination - Destination_Server_name : Server name specified to copy destination - Copy_Type : Copy type - Clone(One Time) [OPC] - Clone(Recurring) [QuickOPC] - Clone(Split mirror) [EC] - Snapshot [SnapOPC+] - Remote [REC] - Copy_Group_name : Copy group name The process is suspended. Refer to "E.6.1 Message Explanations" to take action according to "" for the relevant message. esfmgr10823 The copy pair was removed. SourceVolume=Source_Volume_name, SourceStorage=Source_Storage_name [,SourceServer=Source_Server_name1[,Source_Server_name2[,...]]],DestinationVolume=Destination_Volume_name [,DestinationStorage=Destination_Source_Storage_name] [,DestinationServer=Destination_Server_name], CopyType=Copy_Type, CopyGroup=Copy_Group_name Copy pair was deleted. - Source_Volume_name : Volume name specified to copy source - Source_Storage_name : Storage system name specified to copy source - Source_Server_name : Server name specified to copy source - Destination_Volume_name : Volume name specified to copy destination - Destination_Storage_name : Storage system name specified to copy destination - Destination_Server_name : Server name specified to copy destination - Copy_Type : Copy type - Clone(One Time) [OPC] - Clone(Recurring) [QuickOPC] - Clone(Split mirror) [EC] - Snapshot [SnapOPC+] - Remote [REC] - Copy_Group_name : Copy group name None
360 None. esfmgr10824 The copy pair was not removed. SourceVolume=Source_Volume_name, SourceStorage=Source_Storage_name [,SourceServer=Source_Server_name1[,Source_Server_name2[,...]]], DestinationVolume=Destination_Volume_name [,DestinationStorage=Destination_Storage_name] [,DestinationServer=Destination_Server_name], CopyType=Copy_Type, CopyGroup=Copy_Group_name Copy pair cannot be deleted. - Source_Volume_name : Volume name specified to copy source - Source_Storage_name : Storage system name specified to copy source - Source_Server_name : Server name specified to copy source - Destination_Volume_name : Volume name specified to copy destination - Destination_Storage_name : Storage system name specified to copy destination - Destination_Server_name : Server name specified to copy destination - Copy_Type : Copy type - Clone(One Time) [OPC] - Clone(Recurring) [QuickOPC] - Clone(Split mirror) [EC] - Snapshot [SnapOPC+] - Remote [REC] - Copy_Group_name : Copy group name The process is suspended. If the message prefix "ccm" is displayed, refer to "E.6.1 Message Explanations" to take action according to "" for the relevant message. If it is not displayed, the copy pair has been deleted, therefore anything is not done. esfmgr10825 The copy group was created. CopyType=Copy_Type, CopyGroup=Copy_Group_name Copy group was created. - Copy_Type : Copy type - Clone(One Time) [OPC] - Clone(Recurring) [QuickOPC] - Clone(Split mirror) [EC]
361 - Snapshot [SnapOPC+] - Remote [REC] - Copy_Group_name : Copy group name None. None. esfmgr10826 The copy group was not created. CopyType=Copy_Type, CopyGroup=Copy_Group_name Copy group cannot be created. - Copy_Type : Copy type - Clone(One Time) [OPC] - Clone(Recurring) [QuickOPC] - Clone(Split mirror) [EC] - Snapshot [SnapOPC+] - Remote [REC] - Copy_Group_name : Copy group name The process is suspended. Refer to "E.6.1 Message Explanations" to take action according to "" for the relevant message. esfmgr10827 The copy group was modified. CopyType=Copy_Type, CopyGroup=Copy_Group_name Copy group was changed. - Copy_Type : Copy type - Clone(One Time) [OPC] - Clone(Recurring) [QuickOPC] - Clone(Split mirror) [EC] - Snapshot [SnapOPC+] - Remote [REC] - Copy_Group_name : Copy group name
362 None. None. esfmgr10828 The copy group was not modified. CopyType=Copy_Type, CopyGroup=Copy_Group_name Copy group cannot be changed. - Copy_Type : Copy type - Clone(One Time) [OPC] - Clone(Recurring) [QuickOPC] - Clone(Split mirror) [EC] - Snapshot [SnapOPC+] - Remote [REC] - Copy_Group_name : Copy group name The process is suspended. If the message prefix "ccm" is displayed, refer to "E.6.1 Message Explanations" to take action according to "" for the relevant message. If it is not displayed, the copy group has been deleted, therefore anything is not done. esfmgr10829 The copy group was deleted. CopyType=Copy_Type, CopyGroup=Copy_Group_name Copy group was deleted. - Copy_Type : Copy type - Clone(One Time) [OPC] - Clone(Recurring) [QuickOPC] - Clone(Split mirror) [EC] - Snapshot [SnapOPC+] - Remote [REC] - Copy_Group_name : Copy group name None
363 None. esfmgr10830 The copy group was not deleted. CopyType=Copy_Type, CopyGroup=Copy_Group_name Copy group cannot be deleted. - Copy_Type : Copy type - Clone(One Time) [OPC] - Clone(Recurring) [QuickOPC] - Clone(Split mirror) [EC] - Snapshot [SnapOPC+] - Remote [REC] - Copy_Group_name : Copy group name The process is suspended. If the message prefix "ccm" is displayed, refer to "E.6.1 Message Explanations" to take action according to "" for the relevant message. If it is not displayed, the copy group has been deleted, therefore anything is not done. esfmgr10831 The storage name was changed. OldStorageName=Old_Storage_Name, NewStorageName=New_Storage_Name Disk storage system name was changed. - Old_Storage_Name : Pre-change disk storage system name - New_Storage_Name : Post-change disk storage system name None. None. esfmgr10832 The storage name was not changed. OldStorageName=Old_Storage_Name, NewStorageName=New_Storage_Name Disk storage system name cannot be changed. - Old_Storage_Name : Pre-change disk storage system name
364 - New_Storage_Name : Post-change disk storage system name The process is suspended. If the message prefix "ccm" is displayed, refer to "E.6.1 Message Explanations" to take action according to "" for the relevant message. If it is not displayed, the disk storage system has been deleted, therefore anything is not done. esfmgr10833 The access path was changed. OldAccessPath=Old_Access_Path, NewAccessPath=New_Access_Path, StorageName=Storage_Name Access path was changed. - Old_Access_Path : Pre-change access path or pre-change physical drive device name - New_Access_Path : Post-change access path or post-change physical drive device name - Storage_Name : Disk storage system name None. None. esfmgr10834 The access path was not changed. OldAccessPath=Old_Access_Path, NewAccessPath=New_Access_Path, StorageName=Storage_Name Access path cannot be changed. - Old_Access_Path : Pre-change access path or pre-change physical drive device name - New_Access_Path : Post-change access path or post-change physical drive device name - Storage_Name : Disk storage system name The process is suspended. If the message prefix "ccm" is displayed, refer to "E.6.1 Message Explanations" to take action according to "" for the relevant message. If it is not displayed, the disk storage system has been deleted, therefore anything is not done. esfmgr10835 The storage switched its location. StorageName=Storage_Name
365 Disk storage system location was changed. Storage_Name : Disk storage system name None. None. esfmgr10836 The location of the storage was not switched. StorageName=Storage_Name Disk storage system location cannot be changed. The following factor is possible. - There is not an access path to the ETERNUS Disk storage system from the management server. Storage_Name : Disk storage system name The process is suspended. Make sure from the management server that there is an access path to the ETERNUS Disk storage system. If no access path exists, set up an access path. If the message prefix "ccm" is displayed, refer to "E.6.1 Message Explanations" to take action according to "" for the relevant message. If it is not displayed, the disk storage system has been deleted, therefore anything is not done. esfmgr10841 The storage name was registered. StorageName=Storage_Name Disk storage system was registered. Storage_Name : Disk storage system name None. None. esfmgr10842 The storage name was not registered. StorageName=Storage_Name
366 Disk storage system cannot be registered. The following factor is possible. - There is not an access path to the disk storage system from the management server. Storage_Name : Disk storage system name The process is suspended. Make sure from the management server that there is no access path to the ETERNUS Disk storage system. If no access path exists, set up an access path. If a message with "ccm" put at its head is displayed, refer to "E.6.1 Message Explanations" to take action according to "Administrator response" for the relevant message. esfmgr10843 The IP address of the storage name was changed. OldIPAddress=Old_IP_Address, NewIPAddress=New_IP_Address, StorageName=Storage_Name Disk storage system IP address was changed. - Old_IP_Address : Pre-change IP address - New_IP_Address : Post-change IP address - Storage_Name : Disk storage system name None. None. esfmgr10844 The IP address of the storage name was not changed. OldIPAddress=Old_IP_Address, NewIPAddress=New_IP_Address, StorageName=Storage_Name Disk storage system IP address cannot be changed. - Old_IP_Address : Pre-change IP address - New_IP_Address : Post-change IP address - Storage_Name : Disk storage system name The process is suspended
367 Refer to "E.6.1 Message Explanations" to take action according to "" for the relevant message. esfmgr10845 The user name and/or password were changed. StorageName=Storage_Name User name and password specified to disk storage system were change. Storage_Name : Disk storage system name None. None. esfmgr10846 The user name and/or password were not changed. StorageName=Storage_Name User name and password specified to disk storage system cannot be changed. Storage_Name : Disk storage system name The process is suspended. Refer to "E.6.1 Message Explanations" to take action according to "" for the relevant message. esfmgr10851 The copy group definitions were exported. StorageName=Storage_Name Copy group definition was exported. Storage_Name : Disk storage system name None. None. esfmgr10852 The copy group definitions were not exported. StorageName=Storage_Name
368 Copy group definition cannot be exported. Storage_Name : Disk storage system name The process is suspended. If the message prefix "ccm" is displayed, refer to "E.6.1 Message Explanations" to take action according to "" for the relevant message. If it is not displayed, the copy group has been deleted, therefore anything is not done. esfmgr10853 The copy group definitions were imported. StorageName=Storage_Name Copy group definition was imported. Storage_Name : Disk storage system name None. None. esfmgr10854 The copy group definitions were not imported. StorageName=Storage_Name Copy group definition cannot be imported. The following factor is possible. - The file exported from other ETERNUS Disk storage system was specified. Storage_Name : Disk storage system name The process is suspended. Specify the file from which ETERNUS Disk storage system copy group definition was exported. If a message with "ccm" put at its head is displayed, refer to "E.6.1 Message Explanations" to take action according to "Administrator response" for the relevant message
369 E.5 Message output from Command This section explains the messages output from CLI. E.5.1 Messages for "storageadm perfdata" command esfcmd67101 storageadm.exe:not privileged The command was executed without OS administrator privileges. Execute using OS administrator privileges. esfcmd67170 There is no performance watch target device in specified FQDN. There is no performance monitored device in specified FQDN. Confirm command syntax. ssmgr7010 The Performance Monitoring is not set. Please confirm the Performance Monitoring setting. The Performance Monitoring is not set. Set the Performance Monitoring, and then re-execute. swsag0001 Command terminated normally. The command was executed successfully. The command terminates normally. None
370 swsag0172 Internal Program Error occurred. [DETAIL] An internal error was detected in the program. DETAIL: Detailed information for the error. Collect the troubleshooting information as shown in "6.3.2 Trouble analysis". swsag0345 Unexpected error has occurred. An unexpected event occurred. Collect the troubleshooting information as shown in "6.3.2 Trouble analysis". swsag0491 syntax error. detail=[detail] The command syntax is invalid. "usage" is displayed. DETAIL : One of the following is displayed: - If the command was not specified : command is not specified. - If the specified command [value] is invalid : command [value] is invalid. - If the specified parameter is invalid : parameter is invalid. - If the specified option [value] is invalid : option [value] is invalid. - If the format of the option [value] or the value of the option [value] is invalid : [value] is invalid value or format. The system displays "usage" and interrupts the processing
371 The system administrator reviews the command syntax and then re-executes the operation. E.5.2 Messages for "express_managersnap" command esfcmd67100 express_managersnap:[obj]:failed to create file or directory The specified file or directory cannot be created. OBJ : The specified file or directory The processing is terminated. Check the following, remove the cause of the problem, and execute the command again. - Check the directory permission. - Check that there is enough disk area available. esfcmd67101 express_managersnap:not privileged The command was executed without OS administrator privileges. The processing is terminated. Execute using OS administrator privileges. esfcmd67102 express_managersnap:[option]:illegal option The option is invalid, usage is displayed. OPTION : The specified option The processing is terminated. Check the command then execute it again
372 esfcmd67126 express_managersnap:[obj]:no such directory The directory specified was not found. OBJ : The specified file or directory The processing is terminated. Specify the correct directory. esfcmd67129 express_managersnap:syntax error A command syntax error has occurred. Usage is displayed. The processing is terminated. Check the command then execute it again. esfcmd67130 express_managersnap:[option]:option requires an argument An argument was not specified for the option. Usage is displayed. OPTION : Required option The processing is terminated. Check the command then execute it again. esfcmd67131 express_managersnap:[option]: argument too long The option argument specified is too long. OPTION : Required option The processing is terminated
373 Correct the attribute of the option then execute the command again. esfcmd67162 express_managersnap:[option]:is required The option argument must be specified. OPTION : Required option The processing is terminated. Correct the option parameter, and then re-execute the command. esfcmd67820 express_managersnap:[command] process is still running. The process command is running. COMMAND : The command in running The processing is terminated. After the process finishes, re-execute the command. E.5.3 Messages for "express_diag" command esfcmd67101 express_diag:not privileged The command was executed without administrative privileges. The processing is terminated. Execute this command with administrative privileges. esfcmd67129 express_diag:syntax error
374 Syntax error has occurred. Usage is displayed. The processing is terminated. Confirm command syntax. esfcmd67210 express_diag:internal Program Error occurred. [DETAIL] An internal error occured. DETAIL : Detail message The processing is terminated. Collect the troubleshooting information as shown in "6.3.2 Trouble analysis". esfcmd67220 express_diag:abnormal data exists in the configuration file. An abnormal data was detected in the configuration file. The processing is continued. An abnormal data is not processed. Collect the troubleshooting information as shown in "6.3.2 Trouble analysis". E.5.4 Message for upgrade tool esfcmd77000 The preparation for upgrade install has been completed. The command was normally executed. The command is normally executed
375 None esfcmd77001 The maintenance for upgrade install has been completed. The command was normally executed. The command is normally executed. None esfcmd77101 The parameter is required. File backup destination is not specified. Specify a backup destination. esfcmd77301 The operation user does not belong to the administrators group. The user who tries to execute the command has no execution privileges. Processes are suspended. Login with a user account with Administrator privileges and re-execute the command. esfcmd77302 Unable to stop ETERNUS SF Express Manager. Stopping services failed. Processes are suspended. Stop ETERNUS SF Express Manager services and re-execute the command. esfcmd77303 Unable to start the ETERNUS SF Express Manager
376 Starting services failed. Processes are terminated. Restart ETERNUS SF Express Manager to check that it is actually started. esfcmd77304 The ETERNUS SF Express Manager is not installed. ETERNUS SF Express Manager is not installed. Processes are suspended. After installing ETERNUS SF Express Manager, re-execute the command. esfcmd77305 The backup files are not found in [DirName]. Files are not present in the specified directory. DirName: Specified directory Processes are suspended. Specify a proper backup destination and re-execute the command. esfcmd77306 Unable to copy. File copy failed. Processes are suspended. Check the following points, remove the trouble cause and re-execute the command. - Directory privileges - Disk capacity esfcmd77307 Unable to get the information of ETERNUS SF Express Manager
377 Product information about ETERNUS SF Express Manager could not be obtained. Processes are suspended. Collect information to contact a Fujitsu system engineer. esfcmd77308 The upgrade tool has been failed. Setup for upgrade failed. Processes are suspended. Collect information to contact a Fujitsu system engineer. esfcmd77309 Unable to create log file. Log file creation failed. Processes are suspended. After checking the TEMP environment variable, re-execute the command. esfcmd77310 The specified directory [DirName] is not found. The specified directory does not exist. DirName : Specified directory Processes are suspended. Specify a proper backup destination and re-execute the command. esfcmd77311 The specified directory [DirName] is too long
378 The directory is specified in too many characters. DirName : Specified directory Processes are suspended. Specify the directory in 150 or less characters and re-execute the command. esfcmd77312 The ETERNUS SF Express Manager that this tool is not supported is installed. ETERNUS SF Express whose version is not supported by this tool is installed. Processes are suspended. Since ETERNUS SF Express whose version is not supported by this tool is installed, the command is not executable. Check the version of the tool with that of installed ETERNUS SF Express and re-execute the command. esfcmd77313 The specified directory [DirName] is not full path. The specified directory is not an absolute path. DirName : Specified directory Processes are suspended. Specify an absolute path for a backup directory to re-execute the command. esfcmd77314 The backup files or directory are found in [DirName]. A file or directory already exists in the backup destination. DirName : Specified directory Processes are suspended
379 Specify a location in which there is no directory or file with the name of "ETERNUS SF" and re-execute the command. esfcmd77315 The even or newer ETERNUS SF Express Manager is already installed. The same or newer version of ETERNUS SF Express has already been installed. Processes are suspended. Since the same or newer version of ETERNUS SF Express has been installed, the pre-upgrade setup tool is not needed to be used. E.6 Message output from Copy Control Module This section explains the messages output from Copy Control Module. E.6.1 Message Explanations ccm1001 An invalid argument was specified. An invalid argument has been specified. Check the valid values for the argument, and then execute the command again. ccm1002 An invalid option was specified. option=[option] An invalid option has been specified. OPTION : The specified option Check the valid values for the option, and then execute the command again. ccm1003 An invalid parameter was specified. option=[option], parameter=[param]
380 An invalid parameter has been specified. - OPTION : The specified option - PARAM : The specified parameter Check the valid values for the parameter, and then execute the command again. ccm1004 An invalid option was specified for the copy type. copy group=[group], copy type=[type], option=[option] An invalid option has been specified for a copy group. - GROUP : Copy group - TYPE : Copy type - OPTION : The specified option Check the valid values for the copy type, and then execute the command again. ccm2001 This command requires operating system's administrative privileges. This command can only be executed with Administrator privileges. Execute the command as a user with Administrator privileges. ccm2002 The license is not registered. The license has not been registered yet. System response
381 Register the license, and then execute the command again. ccm3001 The specified disk array is already registered. disk array=[diskarray] Information for the specified ETERNUS Disk storage system has already been registered. DISKARRAY : ETERNUS name or ETERNUS Disk storage system IP address Use acarray list (Command for displaying information about ETERNUS Disk storage systems) to confirm the existing ETERNUS disk storage systems information (ETERNUS name, Box ID and IP address of ETERNUS disk storage systems). ccm3002 The specified copy group is already registered. copy group=[group] The copy group has already been registered. GROUP : Copy group name Execute the command again, specifying a copy group name that has not been registered yet. ccm3003 The specified copy pair already registered. copy group=[group], pair=[pair] The copy pair has already been registered. - GROUP : Copy group name - PAIR : Copy pair name Execute the command again, specifying a copy pair name that has not been registered yet
382 ccm3004 An invalid copy pair was specified. pair=[pair], detail=[detail] An invalid copy pair has been specified. - PAIR : Copy pair name - DETAIL : Detailed information about the cause of the error The DETAIL is will be one of the following strings: Strings indicated in DETAIL invalid format invalid disk array same disk array invalid copy direction invalid Snap Data Volume old disk array info The format of the copy pair is incorrect. Cause of error The specified ETERNUS Disk storage systems have not been set up for the copy group. The same ETERNUS Disk storage systems have been specified for both the copy source and the copy destination. The copy direction is not the same as the other copy pairs that have already been added to the copy group. The copy-destination logical volume of the specified copy pair is not Snap Data Volume. The ETERNUS Disk storage system was not re-registered when the version upgrade was done. The action required depends on the DETAIL string, as described below: Strings indicated in DETAIL invalid format invalid disk array same disk array invalid copy direction invalid Snap Data Volume old disk array info Appropriate action Execute the command again, specifying a correct format for the copy pair. Execute the command again, specifying the ETERNUS Disk storage systems that has been set up for the copy group. Execute the command again, specifying different ETERNUS Disk storage systems for the copy source and the copy destination. Execute the command again, using the same copy direction as for the other copy pairs that have already been added to the copy group. Execute the command again, specifying the Snap Data Volume for the copydestination logical volume. Execute the command again, after the re-registration of ETERNUS Disk storage system. ccm3005 An invalid volume is specified. volume=[volume], detail=[detail] An invalid logical volume has been specified
383 - VOLUME : Logical volume name - DETAIL : Detailed information about the cause of the error The DETAIL is will be one of the following strings: Strings indicated in DETAIL invalid format Cause of error The format of the logical volume is incorrect. The action required depends on the DETAIL string, as described below: Strings indicated in DETAIL invalid format Appropriate action Confirm the format of logical volume. And then execute the command again, specifying a correct format. ccm3006 The number of generation is exceeded the registerable number. Maximum Number of Generation=[NUMBER] The number of generations registerable to a copy group is exceeded. NUMBER : Maximum number of generation that can be registered Check whether the number of copy pairs that have the same copy-source logical volume is exceeded the maximum number or not. ccm3007 The REC buffer could not be found. ID=[ID] The specified buffer ID does not exist. ID : ID of the REC buffer Execute the command again, specifying the correct ID. ccm3008 An invalid access path is specified. access path=[path], detail=[detail]
384 An invalid access path has been specified. - PATH : Access path - DETAIL : Detailed information about the cause of the error The DETAIL is will be one of the following strings: Strings indicated in DETAIL invalid access path The access path is incorrect. Cause of error The action required depends on the DETAIL string, as described below: Strings indicated in DETAIL invalid access path Appropriate action Execute the command again, specifying the access path of the specifying ETERNUS Disk storage systems. ccm3009 The remote ETERNUS disk storage system is defined in the specified copygroup. remote disk storage system= [DISKARRAY] The remote ETERNUS disk storage system is defined for the specified copy group. DISKARRAY : The name of ETERNUS disk storage systems System response Interrupt the processing. Check that the specified ETERNUS disk storage systems are not remote ETERNUS disk storage systems. To display the list of remote ETERNUS disk storage systems, execute the acarray list (Command for displaying information about ETERNUS Disk storage systems) with -remote option. ccm4001 The specified disk array does not exist. disk array=[diskarray] There is no information for the specified ETERNUS Disk storage system. DISKARRAY : The name of ETERNUS disk storage systems
385 Use acarray list (Command for displaying information about ETERNUS Disk storage systems) to check whether the specified ETERNUS name is correct. ccm4002 The specified disk array does not exist. disk array=[boxid] There is no information for the specified ETERNUS Disk storage system. BOXID : The box ID of ETERNUS Disk storage systems The information for the ETERNUS Disk storage system specified by the BOXID has been deleted. Register the same box ID information for the specified ETERNUS Disk storage system again, and then execute the command again. ccm4003 The specified copy group was not found. copy group=[group] The specified copy group has not been set up. GROUP : Copy group name Use acgroup list (Command for displaying copy groups) to check whether the specified copy group name is correct. ccm4004 No copy pair was found for the specified copy group. copy group=[group] The copy pair has not been set up for the specified copy group. GROUP : Copy group name Set up the copy pair for the specified copy group, and then execute the command again. ccm4005 The specified copy pair was not found. copy group=[group], pair=[pair]
386 The specified copy pair has not been set up for the copy group. - GROUP : Copy group name - PAIR : Copy pair name Set up the specified copy pair for the copy group, and then execute the command again. ccm4006 The specified logical volume was not found. logical volume=[volume] The specified logical volume does not exist. VOLUME : Logical volume name Execute the command again, specifying an existing logical volume. ccm4007 An invalid copy group was specified. copy group=[group], copy type=[type] The operation that the user is trying to execute cannot be performed on the specified copy group. - GROUP : The specified copy group - TYPE : The copy type set in the copy group Check the copy type that has been set up for the specified copy group. ccm4008 The logical volume is not found. copy group=[group], logical volume=[volume] There is no logical volume
387 - GROUP : The specified copy group - VOLUME : Logical volume name Execute the command again, specifying an existing copy source logical volume in the specified copy group. ccm4009 Remote ETERNUS Disk storage system cannot be specified. disk array=[diskarray] The remote ETERNUS Disk storage systems cannot be specified. DISKARRAY : The name of ETERNUS Disk storage systems Confirm the specified ETERNUS Disk storage system is not a remote ETERNUS Disk storage system. Use acarray list (Command for displaying information about ETERNUS Disk storage systems) with the remote option to check whether the specified ETERNUS name is correct. ccm4010 An access path could not be found. disk storage system=[diskarray] An access path could not be found. DISKARRAY : The name of ETERNUS Disk storage systems System response Confirm that the specified ETERNUS disk storage system has a valid access path. ccm4011 The directory could not be found. directory=[directory NAME] The specified directory is not found. DIRECTORY NAME : Directory name
388 System response Confirm that the directory actually exists, or check whether the directory name is correct, and then execute the command again. ccm5001 Operation aborted. The configuration file is in use. Processing was interrupted because a CCM configuration file was being updated by one of the commands listed below: - acarray add - acarray change - acarray remove - acgroup create - acgroup remove - acpair add - acpair remove Wait for the conflicting command to finish, and then execute the command again. ccm5002 Operation failed. function=[func], message=[msg] The process has failed. - FUNC : Process name - MSG : Message Take the appropriate action according to the error message. ccm5003 Operation failed. function=[func], message=[msg] The process has failed. - FUNC : Process name
389 - MSG : Message Take the appropriate action indicated by "E.6.2 Detailed Messages" displayed in the MSG section. ccm5004 Operation failed. function=[func], message=[msg] The process has failed. - FUNC : Process name - MSG : Message Take the appropriate action indicated by "E.6.2 Detailed Messages" displayed in the MSG section. If a message not listed in "E.6.2 Detailed Messages" is displayed, then please refer to "Appendix F Detail Error Messages of ETERNUS". ccm5005 An invalid mount point was specified. mount point=[mntp] An invalid mount point or drive letter has been specified. MNTP : The mount point or drive letter Check the mount point or drive letter, and then execute the command again. For details on how to check mount points and drive letters, refer to acgetvolinfo (Command for displaying logical volume information). ccm5006 An invalid device was specified. device=[device] An invalid device has been specified. DEVICE : Device
390 Devices must be specified using the following format: "PhysicalDrive [device number]". Execute the command again, specifying a valid format for the device. ccm5007 The target logical volume is write protected. target logical volume=[volume] The copy destination logical volume is protected. VOLUME : Copy destination logical volume System response Cancel the copy destination logical volume protection settings, and then execute the command again. ccm7001 The target logical volume is write protected. target logical volume=[volume] The copy destination logical volume is protected. VOLUME : Copy destination logical volume System response Continues the processing. No response is required. ccm8001 A general system function failed. function=[func], error=[error] The execution of a system function has failed. - FUNC : System function - ERROR : Error content
391 Refer to acmcapture (Command for collecting analysis data) to collect the data necessary for troubleshooting by acmcapture command, and then contact a Fujitsu SE ccm8002 Could not open the registry. registry key=[key] Opening a registry has failed. KEY : Name of the registry key Refer to acmcapture (Command for collecting analysis data) to collect the data necessary for troubleshooting by acmcapture command, and then contact a Fujitsu SE ccm8003 Could not open the file. file=[file] Opening a file has failed. FILE : File name Check the status of the file system. Refer to acmcapture (Command for collecting analysis data) to collect the data necessary for troubleshooting by acmcapture command, and then contact a Fujitsu SE ccm8004 Could not write the file. file=[file] Writing to a file has failed. FILE : File name Check the status of the file system
392 Refer to acmcapture (Command for collecting analysis data) to collect the data necessary for troubleshooting by acmcapture command, and then contact a Fujitsu SE ccm8005 Could not delete the file. file=[file] Deleting a file has failed. FILE : File name Check the status of the file system. Refer to acmcapture (Command for collecting analysis data) to collect the data necessary for troubleshooting by acmcapture command, and then contact a Fujitsu SE ccm8006 Could not start Java VM. Starting the Java VM has failed. Refer to acmcapture (Command for collecting analysis data) to collect the data necessary for troubleshooting by acmcapture command, and then contact a Fujitsu SE ccm8007 A memory allocation failed. Allocating a memory area has failed. Check the memory usage status. - If there is not enough memory, then increase it. - Refer to acmcapture (Command for collecting analysis data) to collect the data necessary for troubleshooting by acmcapture command, and then contact a Fujitsu SE ccm8008 Could not read the file. file=[file]
393 Reading a file has failed. FILE : File name Check the status of the file system. Refer to acmcapture (Command for collecting analysis data) to collect the data necessary for troubleshooting by acmcapture command, and then contact a Fujitsu SE ccm8009 License Manager is not installed. License Manager has not been installed. System response Install License Manager and register the license. And then execute the command again. ccm9001 The configuration file has an invalid format. file=[file] The content of the configuration file is invalid. FILE : File name Refer to acmcapture (Command for collecting analysis data) to collect the data necessary for troubleshooting by acmcapture command, and then contact a Fujitsu SE ccm9002 An error occurred in accessing the Java property file. property=[property] Java property is not referable. PROPERTY : Property name
394 Refer to acmcapture (Command for collecting analysis data) to collect the data necessary for troubleshooting by acmcapture command, and then contact a Fujitsu SE ccm9003 An unexpected error occurred. A system error has occurred. Refer to acmcapture (Command for collecting analysis data) to collect the data necessary for troubleshooting by acmcapture command, and then contact a Fujitsu SE E.6.2 Detailed Messages no such session. There is no session for the specified copy pair. Operations cannot be executed on copy pairs for which there is no copy session. Check the session status using either acopc query (Command for displaying the status of OPC or QuickOPC copy) or acec query (Command for displaying the status of synchronous high speed copy). invalid logical volume name. Either the access path specified at ETERNUS Disk storage system registration time or the device name specified using a command is invalid. Check that the specified device name is correct. Or, check the drive letter or device name specified in the access path. STXC0100 ERROR Specified command parameter is incorrect. Parameter=(PARAM) The specified parameter is not correct
395 PARAM : Parameter Correct the parameter and try again. If "No parameter" is displayed in PARAM, specify a parameter for the command and try again. STXC1000 ERROR Insufficient Snap Data Pool. Required capacity=(capacity). Snap Data Pool area is insufficient and command cannot be executed. CAPACITY : Capacity Secure free Snap Data Pool capacity that is larger than the capacity notified by the message and try again. STXC1002 ERROR Invalid logical volume name. Volume name=(volname). The specified logical volume name is not valid. VOLNAME : Logical volume name Check the logical volume name specified by the parameter and try again. STXC1003 ERROR Logical volume is already defined in another copy operation. The specified logical volume has already been defined as the copy source or copy destination for another copy session. Review the specification for the logical volume of the copy source or copy destination and try again. STXC1004 ERROR Maximum session reached. Copying cannot start because the number of sessions simultaneously operatable on the ETERNUS Disk storage system has already reached maximum. Check the sessions, delete the unneeded ones among them, and try again. STXC1005 ERROR Another copy has already started. For the specified logical volume, a copy operation of another type is already running. Review the specification for the logical volume name. STXC1006 ERROR Target volume is already defined in another copy operation
396 The specified copy destination logical volume has already been defined as the copy destination for another copy session. Review the specification for the copy destination logical volume name. STXC1007 ERROR Logical volume is already reserved. The logical volume has already been reserved by another user. Wait for a few seconds and try again. STXC1009 ERROR Logical volume is busy. The logical volume is being used by another user. Wait for a few seconds and try again. STXC1010 ERROR Specified option is invalid. The specified option is invalid. Correct the processing option setting and try again. STXC1011 ERROR Invalid parameter. Parameter=(PARAM). The parameter is incorrect. PARAM : Parameter The parameter value is incorrect. Correct the parameter and try again. STXC1013 ERROR Target volume size mismatch. Copying cannot execute because the size of the copy destination logical volume is inappropriate. For the copy destination, specify a logical volume that is equal in size to the copy source logical volume. STXC1014 ERROR Target volume overlap source volume. Copy destination logical volume and copy source logical volume area are overlapped. Change the copy destination or copy source logical volume setting
397 STXC1016 ERROR The group file of the form not permitted was specified. Operation cannot be performed because the specified format of the group file is not permitted. One of the cases indicated below can be assumed. Re-specify the group file, and try again. - A group file which describes copy pairs may have been specified in a logical volume operation. - A group file which describes logical volumes may have been specified in a copy pair operation. STXC1017 ERROR The option that cannot be used for copy session is specified. An option that cannot operate a copy session is specified. One of the cases indicated below can be assumed. Re-specify the option. - The transfer mode specified at the copy operation start is not the same as the transfer mode specified at copy restart (recovery). STXC1100 ERROR Session does not exist. No session exists between the specified logical volumes. Check that the logical volume specification is correct and try again. STXC1102 ERROR Invalid Snap Data Volume. The specification for Snap Data Volume is invalid. One of the cases indicated below can be assumed. Review the specification for the logical volume and try again. - The copy destination logical volume specified when starting SnapOPC+ copying is not Snap Data Volume. - The copy source logical volume specified when starting SnapOPC+ copying is Snap Data Volume. - Either the copy source logical volume name specified or the copy destination volume when starting EC/OPC/QuickOPC copying is Snap Data Volume. STXC1104 ERROR Operation sequence error. The current status cannot execute the specified operation. Check the copy status for any of the following cases: - Suspend was executed for the session that is not in equivalence status. - Stop was executed for the session in Error Suspend status or Halt status. - Initialization was executed for the Snap Data Volume for which a SnapOPC+ session was running. - Start of SnapOPC+ was executed for the Snap Data Volume that is being initialized
398 - Suspend was executed for the session in Suspend status. - Copy stop, copy resume, or copy direction reversal was executed for the session that is not in Suspend status. STXC1106 ERROR Insufficient memory. Memory shortage occurred. Execute the following and try again. - Shut down unnecessary programs. STXC1107 ERROR Alias is not defined. The ETERNUS Disk storage system alias that is specified as the copy source or copy destination has not been defined. Check that the ETERNUS Disk storage system alias has been registered. If the alias is not registered, register the path information and try again. STXC1108 ERROR The specification of physical information is incorrect. The specified physical information is incorrect. One of the cases indicated below can be assumed. Correct the physical information description. - A start location or copy size that exceeds 2TB was specified for a copy operation to an ETERNUS Disk storage system which does not support copy operations above 2TB. - Other than "0" is specified for the start location, but "0" is specified for the copy size. - A size that is larger than actual capacity is specified for the copy size. STXC1109 ERROR ETERNUS cannot be recognized. The ETERNUS Disk storage system specified by alias name cannot be recognized. One of the cases indicated below can be assumed. Correct the physical information description. - Disk information was reconfigured after the path information was set. In this case, retry after setting the path information. - Path connection between ETERNUS Disk storage systems is not established (for REC). STXC1200 ERROR Unexpected error. An unexpected error occurred. Collect the troubleshooting information as shown in "6.3.2 Trouble analysis"
399 STXC1201 ERROR Internal inconsistency. Internal inconsistency occurred. Collect the troubleshooting information as shown in "6.3.2 Trouble analysis". STXC1202 ERROR Unsupported function. An unsupported function was called. Check the version of the ETERNUS Disk storage system firmware. STXC1203 ERROR The operation is not permitted. User does not posses required root privilege to perform copy operation. Perform copy operations with root privilege. STXC1204 ERROR SCSI error detected. Error=(ERROR). An error was detected through the SCSI command. ERROR : Error information Check the connection status of the device and try again. If this error persists, contact Fujitsu technical staff (CE). STXC1208 ERROR Specified logical volume is not ETERNUS. The specified logical volume is not an ETERNUS Disk storage system. Specify an ETERNUS Disk storage system logical volume and try again. STXC1209 ERROR Insufficient resource in ETERNUS. The command is not executable due to ETERNUS Disk storage system resource shortage. Take any of the following actions: - Check/set the Advanced Copy option license. - Check/set the device resources for such errors as "Table size not set" and "Table size not enough". STXC1212 ERROR Disk drive off by the ECO mode
400 The disk drive is stopped due to the Eco-mode. Try again when the disk drive is activated. STXC1213 ERROR Invalid file system. The file system is invalid. The file system is unsupported. Check the file configuration and try again. STXC1214 ERROR Preconditions for copy operation are not satisfied. The preconditions for the copy operation are not satisfied. Check for the following causes, and check the copy status. - Tried to start SnapOPC+ session for a copy pair for which a SnapOPC+ session already exists. - Tried to restore SnapOPC+ session that does not exist for the copy pair. - Tried to suspend EC session for a copy pair for which no EC exists. - Tried to suspend EC session without waiting. - A group configuration that cannot be simultaneously operated is specified. - Retried to suspend a copy session without resolving the error. STXC1220 ERROR Change mode operation failed because of communication error. Cause=(DETAIL). Communication error or ETERNUS Disk storage system error occurred and changing session mode failed. DETAIL : Detailed information - When DETAIL is "NOT_CHANGED" Check the device connection status and try again. - When DETAIL is "CROSS" Check the device connection status and try again. If this error occurs again, contact Fujitsu technical engineer (CE). STXC1222 ERROR ETERNUS unit inconsistency. The copy source and copy destination ETERNUS Disk storage systems settings disagree and remote copy cannot be executed. Check that the bitmap ratio of the ETERNUS Disk storage system advanced copy table size for the copy source and copy destination is not the same. STXC1223 ERROR The copy operation with ETERNUS is incorrect
401 The copy operation with ETERNUS Disk storage system is not correct. Take any of the following actions: - Check ETERNUS Disk storage system firmware version between cabinets. Contact Fujitsu system engineer (SE) when ETERNUS Disk storage system firmware version cannot be confirmed. - Check whether the size of the copy source volume and the copy destination volume is the same. - Check the server is connected to the ETERNUS Disk storage system of the copy source volume at the suspend processing by the Concurrent suspend mode operation. Moreover, check the path information settings is executed to the ETERNUS Disk storage system of the copy source volume. STXC1224 ERROR Communication error occurred. Communication error occurred between the ETERNUS Disk storage systems and remote copy operation cannot be performed. Check the device connection status and try again. STXC1225 ERROR MPHD environment is incorrect. The multipath driver environment is incorrect. Correct the multipath driver settings. STXC1226 ERROR GDS environment is incorrect. The GDS environment is incorrect. Correct the GDS environment settings. STXC1250 ERROR Specified LUN_V Number is invalid. The specified LUN_V number is incorrect. One of the cases indicated below can be assumed. Check the parameter settings and the status of the ETERNUS Disk storage system, and try again. - A LUN_V number that does not exist or cannot be accessed is specified. - Tried to start copy between an encrypted volume and non-encrypted volume. - Specify the volume which contains bad sector. STXC1252 ERROR Operation is not supported. Operation cannot be performed as operation is not supported
402 One of the cases indicated below can be assumed. Correct the parameter settings, and try again. - Tried to execute a copy operation of a size that exceeds 2TB. (For Linux) STXC1300 ERROR Time out detected. Timeout was detected while Suspend was being executed. Try to execute the command again. Or, correct any mistakes with the timeout monitoring frequency and interval specified in the parameters. STXC1301 WARNING The operation was accepted. The copy operation was accepted, but the process is not completed. Check the copy status to confirm whether the copy operation is completed. If this message appears when the copy operation is suspended, correct any mistakes with the timeout monitoring frequency and interval specified in the parameters. STXC1400 ERROR File open error. File name=(file). Cause=(CAUSE). Failed to open the file. FILE : File name CAUSE : Cause code Check file status by referring to the cause code and the file name sent by the message. STXC1401 ERROR The file name of ACCC can not be acquired. Cause=(CAUSE). Files required for operation of ACCC cannot be obtained. CAUSE : Cause code The ACCC operating environment may be corrupted. Check that the following files exist in the sub directory (etc) of the install directory. - stxc.ini - trcdef.ini - stxcvolinf (for Solaris/Linux) - stxc.alias (for Solaris/Linux) STXC1402 ERROR ACCC parameter name is not defined. Parameter=(PARAM)
403 Invalid parameter name is set in the ACCC predefinition file. PARAM : Parameter name Correct the ACCC predefinition file and try again. STXC1403 ERROR ACCC parameter value is not allowed. Parameter=(PARAM). Invalid parameter value is set in the ACCC predefinition file. PARAM : Parameter name Correct the ACCC predefinition file and try again. STXC1404 ERROR ACCC parameter value is out of range. Parameter=(PARAM). A parameter value that is out of the range is set in the ACCC predefinition file. PARAM : Parameter name Specify a parameter value in the ACCC predefinition file that is within the definable range. STXC1405 ERROR The combination of ACCC parameters is incorrect. The parameter combination defined in the ACCC predefinition file is incorrect. Correct the ACCC predefinition file and try again. STXC1406 ERROR Waiting time cannot be set. The monitoring time for suspendable status cannot be set. The following may have occurred. Check and correct parameters or the predefinition file. - Accumulated monitoring interval and monitoring count values exceed their respective permissible values. - The monitoring count is specified but the monitoring interval is not set (or set to 0). STXC1407 ERROR ACCC parameter is not defined. Parameter=(PARAM). necessary for ACCC operation are not set in the ACCC predefinition file
404 PARAM : Parameter name Set the parameters displayed in the message in the ACCC predefinition file. STXC1409 ERROR ACCC (PARAM) parameter is already defined. Defined parameter has been defined twice in the ACCC predefinition file. PARAM : Parameter name Correct the ACCC predefinition file and try again. STXC1410 ERROR Alias number reached the maximum. The ETERNUS Disk storage system alias reached the maximum number that can be managed by ACCC and path information cannot be set. Check alias definition status and if there are unnecessary alias names, delete them. STXC1411 ERROR Alias is already defined. The ETERNUS Disk storage system alias has already been registered. Specify another alias and try again. STXC1412 ERROR Alias identifier does not exist. An ETERNUS Disk storage system alias with the specified ID does not exist. Check the alias definition status and ID, and try again. STXC1500 ERROR Error occurred recognition of ETERNUS management file. Cause=(CAUSE). The ETERNUS Disk storage system management file cannot be obtained. CAUSE : Cause code The following may be causes. Take an action based on the CAUSE (cause code). - When the CAUSE is -1 or -2: MICC is not installed or registry is rewritten
405 - When the CAUSE is -3: The file used for setting ETERNUS Disk storage system registration information is corrupted or deleted. STXC1600 ERROR ETERNUS is not registered on ETERNUS management file. The ETERNUS Disk storage system has not been registered in the management file. Register the ETERNUS Disk storage system and try again. STXC1700 ERROR Alias management file access error. Cause=(CAUSE). An error occurred when the ETERNUS Disk storage system alias management file was accessed. CAUSE : Cause code The following may be causes. Take an action based on the CAUSE (cause code). - Registry key acquisition, reference - File read/write - File cannot be created STXC1801 ERROR Group_file does not exist. The group file does not exist. Check the group file name specified in the parameter, and try again. STXC1802 ERROR Syntax error was detected in Group File.line=(LINE). There is a syntax error in the group file description. LINE : Line number of the line in which the syntax error was detected Check the contents of the group file specified in the parameter, and try again. STXC1803 ERROR There is no volume name in Copy Group File. The copy information is not registered in the group file. Check the contents of the group file specified in the parameter, and try again. STXC1804 ERROR Error occurred with copy operation described in group file. VOLINFO. Error message=(msg)
406 An error occurred with the copy operation described in the group file. - VOLINFO : Name of the logical volume in which the error occurred. - "Source=(copy source logical volume name).target=(copy destination logical volume name)" is for copy pairs. - "Volume=(Logical volume name)" is for logical volumes. - MSG : Message text Deal with the error according to the MSG. STXC1805 ERROR The number of the copy pairs or logical volumes described in the group file exceeds the maximum number. The copy operation cannot be performed, as the number of copy pairs or logical volumes described in the group file exceeds the maximum number. Take any of the following actions: - Divide the group - Change the max_grouping_ses parameter value in the predefinition file. STXS1027 The specified parameter is invalid. [parameter name=[name], parameter value=[value]] An incorrect affinity group number has been specified. - NAME : Parameter name - VALUE : Parameter value Use acinq ag (Command for displaying a list of affinity groups) to check the specified affinity group number. STXS2001 The specified user name and password have not been registered in the device. [user=[user]] The user name and password have not been registered on the ETERNUS Disk storage system. USER : User name
407 Check whether the user name and password are correct. STXS2002 The specified user does not have privileges greater than that of an administrator. [user=[user]] The user does not have Administrator privileges. USER : User name Use ETERNUS Web GUI to check the user privileges. STXS2008 The registered user and password are not registered in the current device. [IP address=[ipaddr], user=[user]] The user name and password have not been registered on the ETERNUS Disk storage system. - IPADDR : IP address - USER : User name The ETERNUS Web GUI user account has either been changed or deleted. Change the registration information for the ETERNUS Disk storage system by referring to "6.5 Changing configuration". STXS2009 The operation cannot be performed with the user privileges when registering the device. [IP address=[ipaddr], user=[user]] The user does not have Administrator privileges. - IPADDR : IP address - USER : User name The user account privileges for ETERNUS Web GUI have been changed. Use ETERNUS Web GUI to check the user privileges
408 STXS4002 The device is not supported. [IP address=[ipaddr], model=[model], type=[type]] The specified ETERNUS Disk storage system is not supported. - IPADDR : IP address - MODEL : ETERNUS Disk storage systems model - TYPE : ETERNUS Disk storage systems type Check that the ETERNUS Disk storage system meets the "2.1 Hardware conditions". STXS4046 The specified affinity group has not been registered. [affinity group number=[group]] The specified affinity group has not been registered. GROUP : Affinity group number Use acinq ag (Command for displaying a list of affinity groups) to check the specified affinity group number. STXS4047 The specified affinity group has been concatenated. [affinity group number=[group]] A concatenated affinity group has been specified. GROUP : Affinity group number Concatenated affinity groups cannot be specified. STXS7004 Failed to communicate with the device. [IP address=[ipaddr]]
409 Communications with the ETERNUS Disk storage system have failed. IPADDR : IP address It is not possible to communicate with the ETERNUS Disk storage system. Refer to "5.3 Configuring the Network Environment" to check the status of the network, and then execute the command again. E.7 Error Messages on Troubleshooting Data Collection Command This section explains the error messages output when the troubleshooting data collection command is executed. Table E.2 Error Messages on Troubleshooting Data Collection Command Item number Error Message Explanation Action 1 An invalid argument was specified. An invalid argument was specified. 2 The specified directory does not exist. The specified directory does not exist. 3 The operation was interrupted. The operation was interrupted for one of the following reasons: 1. A user without permission executed the command. 2. There is insufficient disk space (capacity). Check the specification method of the argument specified in the option. Specify the correct argument and reexecute. Specify an existing directory and re-execute. 1. Check the permissions of the user who executed the command and reexecute. 2. Secure sufficient disk space (capacity), then re-execute
410 Appendix F Detail Error Messages of ETERNUS This appendix describes the detailed error messages output by the ETERNUS Disk storage system, which were inserted into the messages. If an error message not shown in this table appears, a hardware failure may have occurred. In such an event, contact your Fujitsu customer engineer (CE). Table F.1 Detail Error Messages of ETERNUS No. Error message Explanation Corrective action 1 invalid logical volume name. The specified copy source or destination device is not found. 2 invalid extent number. An internal conflict occurred. (The number of extents is invalid (STXGetVolmuInfo)) 3 invalid source BoxID. An internal conflict occurred. (The copy source box identifier was invalid.) 4 invalid destination BoxID. An internal conflict occurred. (The copy destination box identifier was invalid.) 5 invalid source OLU. The specified copy source or destination device is not found. 6 invalid destination OLU. The specified copy source or destination device is not found. 7 invalid extent. The copy source or destination device does not exist. 8 invalid source extent size. An internal conflict occurred. (Not entire volume copy but copy size is 0.) 9 invalid copy interval. The specified copy interval is invalid. 10 invalid option flag. An internal conflict occurred. (The operation specification flag is invalid.) 11 invalid MPHD environment. An MPHD path name was specified for the logical volume name when MPHD was not installed. 12 invalid SynfinityDISK environment. SynfinityDISK resource is not supported. 13 invalid GDHD environment. A GDHD path name was specified for the logical volume name when GDHD was not installed. Check that the slice information exists on the copy source or destination device. Ask a Fujitsu systems engineer (SE) to collect the data necessary for troubleshooting. (NOTE) Check the partition information for the copy source device. Check the partition information for the copy destination device. Check the slice information on the copy source or destination device. Ask a Fujitsu systems engineer (SE) to collect the data necessary for troubleshooting. (NOTE) Check whether MPHD is installed. Specify a resource other than SynfinityDISK. Check whether GDHD is installed. 14 memory allocation error. Dynamic memory allocation failed. Allocate sufficient memory or a swap area, or terminate any other programs that are being executed. 15 not STX. The copy source or destination device does not exist. 16 SCSI command busy. One of the following events occurred. Check the slice information on the copy source or destination device. Take the applicable action as follows: - The specified OPC/EC copy source or target device is already being used for another OPC/EC copy target or source. - The specified OPC/EC copy target device is already being used for another OPC/EC copy target. - Ensure that the OPC/EC copy source or target device is not used for another copy source or target. - Ensure that the OPC/EC copy source is not used for another copy source
411 No. Error message Explanation Corrective action - The maximum number of OPC/EC that can run concurrently in the disk array has already been reached. - BUSY was detected in the SCSI path. - The copy that is not managed by AdvancedCopy Manager is done. - The upper limit for the number that can operate simultaneously for each LUN has already been reached. 17 SCSI command conflict. A SCSI error (a command conflict) was detected. 18 SCSI queue full. A SCSI error (queue full) was detected. 19 Not support. The specified copy function is not supported. 20 hardware error requiring CE- CALL. A SCSI error (CheckCondition) was detected. 21 SCSI condition met. A SCSI error (Condition met) was detected. 22 unexpected SCSI error. A SCSI error (abnormal status) was detected. 23 invalid OLU. The specified copy source or destination device is invalid because: - The same device is specified for the copy source or copy destination in "Copy all volumes". - The specified device cannot be used. - Consistency mode was specified for the RAID consolidation volume. - A non-existent OLU was specified when the volume status was displayed. - Wait until the OPC/EC of the device specified by the backup execution status display command ends, and then re-execute processing. - Wait for about five seconds and then re-execute processing. - Confirm the status of the copy by using ETERNUS Web GUI. For other cases, contact a Fujitsu customer engineer (CE). Check the device connection status and then retry. If this fails to solve the problem, contact a Fujitsu customer engineer (CE). Contact a Fujitsu customer engineer (CE). Check the device connection status and then retry. If this fails to solve the problem, contact a Fujitsu customer engineer (CE). Check the device that is the copy source or the device partition information of the copy destination, and retry the function. If this fails to solve the problem, collect the data necessary for troubleshooting, and then contact a Fujitsu systems engineer (SE). (NOTE) 24 invalid BoxID. The specified remote cabinet identifier is invalid. 25 invalid role. The specified Remote Advanced Copy direction is invalid. 26 setup is inadequate The copy settings are not sufficient for normal operation. One of the following events occurred: Check the connection conditions between cabinets, and retry. If this fails to solve the problem, then contact a Fujitsu customer engineer (CE). Contact a Fujitsu customer engineer (CE) and systems engineer (SE). - The license has not been set with the Advanced Copy option. - There are not enough device resources (e.g., "table size not set", "table size not enough", "REC buffer size not set"). 27 bit map resolution disagree. The bitmap resolution between cabinets is inconsistent
412 No. Error message Explanation Corrective action 28 communication interrupted. An error occurred in communication between cases. 29 another partner is not supported. The version of firmware of one cabinet is not supported. 30 the session mode was not changed. An attempt to switch the session mode has failed. (But the original status remains as is.) 31 the session mode crosses. An attempt to switch the session mode has failed. (Information between cabinets is inconsistent.) 32 the operation of SnapOPC was failed. One of the following has occurred: - An error has occurred accessing a Snap Data volume. - Reverse copy was implemented when there was not a SnapOPC session. Check the connection state between the cabinets, and retry processing. If this fails to solve the problem, contact a Fujitsu customer engineer (CE). Contact a Fujitsu customer engineer (CE). Check the connection status between cabinets and then retry. If this fails to solve the problem, contact a Fujitsu customer engineer (CE) and systems engineer (SE). Take one of the following actions: - Check the partition information for the copy destination disk, and then rerun the command. - Check the SnapOPC session status, and then rerun the command. If this fails to solve the problem, contact a Fujitsu customer engineer (CE) and systems engineer (SE). 33 the operation of REC buffer was failed. 34 the operation of concurrent suspend was failed. An attempt to either display information or change the settings for the REC buffer has failed. A concurrent suspension operation has failed. (But the original status remains as is.) 35 invalid Snap Data volume. A Snap Data volume specification error has been detected. - SnapOPC/SnapOPC+ has been specified but the copy destination is not a Snap Data volume. - SnapOPC/SnapOPC+ has been specified but the copy source is a Snap Data volume. Check the settings status of the REC buffer and then rerun the command. If this fails to solve the problem, contact a Fujitsu customer engineer (CE) and systems engineer (SE). Check the status of all sessions, and then rerun the command. For HP-UX and AIX editions, check that the copy destination volume is the same size or larger than the copy source volume. If this fails to solve the problem, contact a Fujitsu systems engineer (SE). Check the partition information for the copy source or copy destination device, and then rerun the command. If this fails to solve the problem, contact a Fujitsu customer engineer (CE) and systems engineer (SE). - OPC/ROPC/QuickOPC or EC/REC was specified but either the copy source or the copy destination is a Snap Data volume. - A volume other than a Snap Data volume was specified for Snap Data volume initialization
413 No. Error message Explanation Corrective action 36 out of sequence. One of the following occurred: - The status does not allow execution of this command. - Invalid status or invalid phase detected for the SCSI access. - Replication cancellation was executed to a SnapOPC+ generation other than the oldest generation. Take one of the following actions: - Check the processing status, and then try again. - Check the session status, and then try again. - Check the Snap generation number, and then try again. If this fails to solve the problem, contact a Fujitsu systems engineer (SE). NOTE: Refer to the following, collect the data necessary for troubleshooting. acmcapture (troubleshooting data collection command)
414 Appendix G Detailed messages of events This appendix explains detailed messages of events that are output from Express according to the following table. Detailed messages are displayed at "Event Details" window. Table G.1 Event format Item Event text Shows how the event is displayed. Explains the reason why the event is displayed, or the conditions under which the event is displayed. Explains the meanings of parameters if included in the events. This section explains the actions that the administrator should take in response to the message. See Please refer to the hardware manual for meanings and corrective actions of events reported from the device. G.1 Detailed messages of events related to event notification This section explains detailed messages of events related to event notification . Sending has failed. ( address : [TOADDRESS] SMTP server : [SMTPSERVER] Detail code : [DETAILCODE]) This is warning message. Event notification s sending failure. Administrators cannot receive event notification s. - TOADDRESS: Destination of address - SMTPSERVER: Name of SMTP server - DETAILCODE: Detail code number Contact the system administrator. Check addresses in [Contacts] and SMTP server settings in [Preferences]. G.2 Detailed messages of events related to Disk storage system configuration change This section explains detailed messages of events related to Disk storage system configuration change. [KEYNAME] has been removed
415 This is Information message. Disk storage system configuration has been changed (deletion from Disk storage system). For example, in case of removing volume 1, "Volume - No.1 has been removed" is displayed. KEYNAME: Indicates removed part. Point When the type is the FibreCAT SX Disk storage system, only "Disk Array Information" is displayed. None. The value of [VALUENAME] of [KEYNAME] has been changed from [ORIGINALVALUE] [UNIT] to [CURRENTVALUE] [UNIT]. This is Information message. Disk storage system configuration change (changing value of Disk storage system). For example, in case of changing free capacity from 1000MB to 500MB of the RAID group 1, "The value of Free Capacity of Raid Group - No.1 has been changed from 1000(MB) to 500(MB)." is displayed. - VALUENAME: Indicates name of value. - KEYNAME: Indicates changed part. Point When the type is the FibreCAT SX Disk storage system, only "Disk Array Information" is displayed. - ORIGINALVALUE: Indicates value before it changes. - CURRENTVALUE: Indicates present value. - UNIT: Unit of changed information. (Example (MB)) When the unit is unnecessary, it is not displayed. None. [KEYNAME] has been added. This is Information message. Disk storage system configuration change (addition to Disk storage system). KEYNAME: Indicates added part
416 Point When the type is the FibreCAT SX Disk storage system, only "Disk Array Information" is displayed. None. G.3 Detailed messages of events related to changing the IP address This section explains the events related to changing the IP address for the server that is running Express Manager. IP address of the operation management server was changed from [OLD-IP ADDRESS] to [NEW-IP ADDRESS]. Set new destination of SNMP Trap to storage devices. This is warning message. Change the IP address for the server that is running Express Manager. - OLD-IP ADDRESS: Old IP address. - NEW-IP ADDRESS: New IP address. Please correct the SNMP Trap destination to a new IP address. - For ETERNUS Disk storage system Please correct it by ETERNUS Web GUI. - For FibreCAT SX Disk storage system Please correct it by FibreCAT SX WBI. G.4 Detailed messages of events related to performance monitoring This section explains detailed messages of events related to performance monitoring. Performance data collecting failure. This is error message. Failure in performance data collection. Please confirm the device and the LAN state with the IP address shown in the event message. Performance date re-collecting start
417 This is Information message. Start of performance data re-collection. None. Performance date re-collecting success. This is Information message. Success in performance data re-collection. None. G.5 Event related to device polling function This section explains the events related to device polling function. When the device polling function of Express detects the change of the device state, display it in the event as follows. Connection Timeout. This is warning message. The state has been changed to connection timeout. Please confirm whether the LAN between Manager and the device is operating normally. Please confirm whether the state of each device is proper and whether, processes of network communication such as SNMP are operating normally. If the community name of a device that uses SNMP for communication is changed, change SNMP community name by referring to "7.5.4 Changing the SNMP community name"


418 Appendix H Main Changes from Express V14.1 This appendix explains main changes from Express V14.1. H.1 Copy Operation Express V14.2 is used via the Web browser. Express V14.1displayed an operation list with right click and let users select a desired operation. In V14.2, you can select a desired operation from the [Action] pane. - Express V Express V
ETERNUS SF Express V14.1. User's Guide. Windows
 ETERNUS SF Express V14.1 User's Guide Windows B1FN-5955-01ENZ0(00) January 2010 Preface Purpose This manual gives an overview of the ETERNUS SF Express (hereafter referred to as Express). This manual describes
ETERNUS SF Express V15.0. Operation Guide. Windows/Linux
 ETERNUS SF Express V15.0 Operation Guide Windows/Linux B1FW-5962-01ENZ0(02) March 2012 Preface Purpose This manual gives an overview of ETERNUS SF Express. ETERNUS SF Express is part of the following Storage
ETERNUS SF AdvancedCopy Manager SRA Version 2.4. User's Guide. Windows(64)
") ETERNUS SF AdvancedCopy Manager SRA Version 2.4 User's Guide Windows(64) B1WS-0994-04ENZ0(03) June 2017 Preface Purpose This manual explains how to install and customize ETERNUS SF AdvancedCopy Manager
ETERNUS SF AdvancedCopy Manager SRA Version 2.4 User's Guide Windows(64) B1WS-0994-04ENZ0(03) June 2017 Preface Purpose This manual explains how to install and customize ETERNUS SF AdvancedCopy Manager
Operation Guide for Copy Control Module
 ETERNUS SF Express V15.3/ AdvancedCopy Manager V15.3 Operation Guide for Copy Control Module Windows/Solaris/Linux B1FW-5959-05ENZ0(01) April 2014 Preface Purpose This manual describes the how to use the
Operation Guide for Copy Control Module
 FUJITSU Storage ETERNUS SF AdvancedCopy Manager V16.2 Operation Guide for Copy Control Module Windows/Solaris/Linux B1FW-6015-03ENZ0(02) July 2015 Preface Purpose This manual describes the how to deliver
ETERNUS SF Express V15.1/ Storage Cruiser V15.1/ AdvancedCopy Manager V15.1. Migration Guide
 ETERNUS SF Express V15.1/ Storage Cruiser V15.1/ AdvancedCopy Manager V15.1 Migration Guide B1FW-5958-03ENZ0(00) August 2012 Preface Purpose This manual describes how to upgrade to this version from the
ETERNUS SF Express V15.0/ Storage Cruiser V15.0/ AdvancedCopy Manager V15.0. Migration Guide
 ETERNUS SF Express V15.0/ Storage Cruiser V15.0/ AdvancedCopy Manager V15.0 Migration Guide B1FW-5958-02ENZ0(01) May 2012 Preface Purpose This manual describes how to upgrade to this version from the previous
ETERNUS SF Express V15.3/ Storage Cruiser V15.3/ AdvancedCopy Manager V15.3. Migration Guide
 ETERNUS SF Express V15.3/ Storage Cruiser V15.3/ AdvancedCopy Manager V15.3 Migration Guide B1FW-5958-06ENZ0(00) June 2013 Preface Purpose This manual describes how to upgrade to this version from the
ETERNUS SF AdvancedCopy Manager V15.0. Quick Reference
 ETERNUS SF AdvancedCopy Manager V15.0 Quick Reference B1FW-5967-02ENZ0(00) April 2012 Preface Purpose This manual describes the pre-installation requirements, installation procedure, configuration procedure,
FUJITSU Storage ETERNUS SF Express V16.1 / Storage Cruiser V16.1 / AdvancedCopy Manager V16.1. Installation and Setup Guide
 FUJITSU Storage ETERNUS SF Express V16.1 / Storage Cruiser V16.1 / AdvancedCopy Manager V16.1 Installation and Setup Guide B1FW-5999-02ENZ0(00) June 2014 Preface Purpose This manual provides information
FUJITSU Storage ETERNUS SF Express V16.5 / Storage Cruiser V16.5 / AdvancedCopy Manager V16.5. Migration Guide
 FUJITSU Storage ETERNUS SF Express V16.5 / Storage Cruiser V16.5 / AdvancedCopy Manager V16.5 Migration Guide B1FW-6000-06ENZ0(01) June 2017 Preface Purpose This manual describes how to upgrade to this
Setup Guide. FUJITSU Software. Serverview Infrastructure Manager Plug-in for. Microsoft System Center. Virtual Machine Manager 1.2
 FUJITSU Software Serverview Infrastructure Manager Plug-in for Microsoft System Center Virtual Machine Manager 1.2 Setup Guide For Windows Server 2016 CA92344-2184-01 Dec, 2017 Preface Purpose This Setup
FUJITSU Storage ETERNUS SF Express V16.3 / Storage Cruiser V16.3 / AdvancedCopy Manager V16.3. Migration Guide
 FUJITSU Storage ETERNUS SF Express V16.3 / Storage Cruiser V16.3 / AdvancedCopy Manager V16.3 Migration Guide B1FW-6000-04ENZ0(00) October 2015 Preface Purpose This manual describes how to upgrade to this
ETERNUS SF Express V15.2/ Storage Cruiser V15.2/ AdvancedCopy Manager V15.2. Web Console Guide. Windows
 ETERNUS SF Express V15.2/ Storage Cruiser V15.2/ AdvancedCopy Manager V15.2 Web Console Guide Windows B1FW-5955-04ENZ0(01) February 2013 Preface Purpose This Manual describes the ETERNUS SF Web Console
ETERNUS SF AdvancedCopy Manager Overview
 ETERNUS SF AdvancedCopy Manager 14.2 Overview J2X1-7443-04ENZ0(00) June 2011 Preface Purpose This manual provides an overview of the ETERNUS SF AdvancedCopy Manager. This manual describes the ETERNUS SF
FUJITSU Software. Serverview Infrastructure Manager Plug-in for. Microsoft System Center. Operations Manager 1.2. Setup Guide. For Windows Server 2016
 FUJITSU Software Serverview Infrastructure Manager Plug-in for Microsoft System Center Operations Manager 1.2 Setup Guide For Windows Server 2016 CA92344-2182-01 Dec, 2017 1 Preface Purpose This Setup
FUJITSU Storage ETERNUS SF AdvancedCopy Manager V16.1. Overview
 FUJITSU Storage ETERNUS SF AdvancedCopy Manager V16.1 Overview B1FW-6009-02ENZ0(00) June 2014 Preface Purpose This manual provides an overview for understanding the FUJITSU Storage ETERNUS SF AdvancedCopy
FUJITSU Storage ETERNUS SF AdvancedCopy Manager V16.0. Overview
 FUJITSU Storage ETERNUS SF AdvancedCopy Manager V16.0 Overview B1FW-6009-01ENZ0(01) May 2014 Preface Purpose This manual provides an overview for understanding the FUJITSU Storage ETERNUS SF AdvancedCopy
FUJITSU Storage ETERNUS SF Express V16.2 / Storage Cruiser V16.2 / AdvancedCopy Manager V16.2. Installation and Setup Guide
 FUJITSU Storage ETERNUS SF Express V16.2 / Storage Cruiser V16.2 / AdvancedCopy Manager V16.2 Installation and Setup Guide B1FW-5999-03ENZ0(02) July 2015 Preface Purpose This manual provides information
ETERNUS SF AdvancedCopy Manager Glossary
 ETERNUS SF AdvancedCopy Manager 14.1 Glossary J2X1-7455-02ENZ0(00) January 2010 Preface Purpose This manual describes the terminology used in the ETERNUS SF AdvancedCopy Manager manuals. Intended Readers
FUJITSU Storage ETERNUS SF Storage Cruiser V16.5 / AdvancedCopy Manager V16.5. Cluster Environment Setup Guide
 FUJITSU Storage ETERNUS SF Storage Cruiser V16.5 / AdvancedCopy Manager V16.5 Cluster Environment Setup Guide B1FW-6006-06ENZ0(00) May 2017 Preface Purpose This manual provides information on installation
FUJITSU Storage ETERNUS SF AdvancedCopy Manager V16.5. Overview
 FUJITSU Storage ETERNUS SF AdvancedCopy Manager V16.5 Overview B1FW-6009-06ENZ0(00) May 2017 Preface Purpose This manual provides an overview for understanding FUJITSU Storage ETERNUS SF AdvancedCopy Manager
FUJITSU Storage ETERNUS SF Storage Cruiser V16.3 / AdvancedCopy Manager V16.3. Cluster Environment Setup Guide
 FUJITSU Storage ETERNUS SF Storage Cruiser V16.3 / AdvancedCopy Manager V16.3 Cluster Environment Setup Guide B1FW-6006-04ENZ0(00) October 2015 Preface Purpose This manual provides information on installation
FUJITSU Software. Infrastructure Manager Plug-in for Microsoft. System Center. Operations Manager 1.2. Setup Guide. For Windows Server 2016 / 2019
 FUJITSU Software Infrastructure Manager Plug-in for Microsoft System Center Operations Manager 1.2 Setup Guide For Windows Server 2016 / 2019 CA92344-2546-02 October, 2018 1 Contents Preface... 3 Purpose...
ETERNUS SF AdvancedCopy Manager GUI User's Guide
 ETERNUS SF AdvancedCopy Manager 14.1 GUI User's Guide J2X1-7450-02ENZ0(00) January 2010 Preface Purpose of the User's Guide The AdvancedCopy Manager GUI User's Guide provides detailed information relating
User's Guide for Infrastructure Administrators (Resource Management)
") ServerView Resource Orchestrator Cloud Edition V3.0.0 User's Guide for Infrastructure Administrators (Resource Management) Windows/Linux J2X1-7612-01ENZ0(05) April 2012 Preface Purpose This manual provides
ServerView Resource Orchestrator Cloud Edition V3.0.0 User's Guide for Infrastructure Administrators (Resource Management) Windows/Linux J2X1-7612-01ENZ0(05) April 2012 Preface Purpose This manual provides
FUJITSU Software. ServerView Infrastructure Manager Plug-in for. VMware vcenter Server 1.1. Setup Guide. For vcenter Server 6.0
 FUJITSU Software ServerView Infrastructure Manager Plug-in for VMware vcenter Server 1.1 Setup Guide For vcenter Server 6.0 CA92344-2178-01 Dec, 2017 1 Preface Purpose This Setup Guide describes the installation
FUJITSU Software PRIMECLUSTER GLS for Windows. GLS Setup Guide for Cluster Systems 4.4
 FUJITSU Software PRIMECLUSTER GLS for Windows GLS Setup Guide for Cluster Systems 4.4 B1FN-5996-01ENZ0(00) January 2017 Preface Purpose of this Manual This manual is intended to explain installation procedures
FUJITSU Storage ETERNUS SF Express V16.5 / Storage Cruiser V16.5 / AdvancedCopy Manager V16.5. Installation and Setup Guide
 FUJITSU Storage ETERNUS SF Express V16.5 / Storage Cruiser V16.5 / AdvancedCopy Manager V16.5 Installation and Setup Guide B1FW-5999-06ENZ0(00) May 2017 Preface Purpose This manual provides information
ETERNUS Veritas Operations Manager Storage Insight Plug-in 1.0 User s Guide P2X ENZ0
 ETERNUS Veritas Operations Manager Storage Insight Plug-in 1.0 User s Guide This page is intentionally left blank. Preface This manual explains how to use and operate the ETERNUS Veritas Operations Manager
FUJITSU Storage ETERNUS SF Storage Cruiser V16.6 / AdvancedCopy Manager V16.6. Operation Guide for VMware vsphere Virtual Volumes
 FUJITSU Storage ETERNUS SF Storage Cruiser V16.6 / AdvancedCopy Manager V16.6 Operation Guide for VMware vsphere Virtual Volumes B1FW-6020-05ENZ0(00) December 2017 Preface Purpose This manual explains
ETERNUS SF Storage Cruiser V15.0. Quick Reference
 ETERNUS SF Storage Cruiser V15.0 Quick Reference B1FW-5963-02ENZ0(00) April 2012 Preface Purpose This manual describes the pre-installation requirements, installation procedure, configuration procedure,
FUJITSU Storage ETERNUS SF Storage Cruiser V16.2 / AdvancedCopy Manager V16.2. Operation Guide for VMware vsphere Virtual Volumes
 FUJITSU Storage ETERNUS SF Storage Cruiser V16.2 / AdvancedCopy Manager V16.2 Operation Guide for VMware vsphere Virtual Volumes B1FW-6020-01ENZ0(02) July 2015 Preface Purpose This manual explains the
Systemwalker Software Configuration Manager. Technical Guide. Windows/Linux
 Systemwalker Software Configuration Manager Technical Guide Windows/Linux B1X1-0126-04ENZ0(00) January 2013 Preface Purpose of this Document This document explains the functions of Systemwalker Software
ETERNUS Web GUI User's Guide (Operation)
") ETERNUS Web GUI User's Guide (Operation) FUJITSU Storage ETERNUS DX100 S3/DX200 S3, ETERNUS DX500 S3/DX600 S3 Disk storage systems, ETERNUS DX200F All Flash Array This page is intentionally left blank.
ETERNUS Web GUI User's Guide (Operation) FUJITSU Storage ETERNUS DX100 S3/DX200 S3, ETERNUS DX500 S3/DX600 S3 Disk storage systems, ETERNUS DX200F All Flash Array This page is intentionally left blank.
ETERNUS SF AdvancedCopy Manager GUI User's Guide
 ETERNUS SF AdvancedCopy Manager 14.0 GUI User's Guide J2X1-7450-01ENZ0(00) July 2009 Preface Purpose of the User's Guide The AdvancedCopy Manager GUI User's Guide provides detailed information relating
FUJITSU Storage ETERNUS SF Storage Cruiser V16.1. Operation Guide
 FUJITSU Storage ETERNUS SF Storage Cruiser V16.1 Operation Guide B1FW-6007-02ENZ0(01) July 2014 Preface Purpose This manual describes the FUJITSU Storage ETERNUS SF Storage Cruiser used by the following
FUJITSU Storage ETERNUS DX60 S2 Disk storage system. Read Me First
 FUJITSU Storage ETERNUS DX60 S2 Disk storage system Read Me First Fujitsu would like to thank you for purchasing our ETERNUS DX60 S2 Disk storage system (hereinafter referred to as "ETERNUS DX Disk storage
A698HKBH9-E-I RFID Data Management Pro for Fixed Readers Installation Guide. June 2017 Version 2.40
 A698HKBH9-E-I-0240 RFID Data Management Pro for Fixed Readers Installation Guide June 2017 Version 2.40 -i- Preface This document explains the procedure of the installation and the Confirmation of RFID
FUJITSU Storage ETERNUS SF Express V16.3 / Storage Cruiser V16.3 / AdvancedCopy Manager V16.3. Web Console Guide. Windows
 FUJITSU Storage ETERNUS SF Express V16.3 / Storage Cruiser V16.3 / AdvancedCopy Manager V16.3 Web Console Guide Windows B1FW-6001-04ENZ0(04) June 2016 Preface Purpose This manual describes the ETERNUS
FUJITSU Storage ETERNUS SF Express V16.4 / Storage Cruiser V16.4 / AdvancedCopy Manager V16.4. Web Console Guide. Windows
 FUJITSU Storage ETERNUS SF Express V16.4 / Storage Cruiser V16.4 / AdvancedCopy Manager V16.4 Web Console Guide Windows B1FW-6001-05ENZ0(00) October 2016 Preface Purpose This manual describes the ETERNUS
FUJITSU Software ServerView Infrastructure Manager V2.1. Operating Procedures
 FUJITSU Software ServerView Infrastructure Manager V2.1 Operating Procedures CA92344-1718-02 August 2017 Preface Purpose This manual describes overviews of the initial settings and the operating procedures
ETERNUS VSS Hardware Provider Installation Information
 ETERNUS VSS Hardware Provider Installation Information May 2017 Contents Abbreviations... 3 About ETERNUS VSS Hardware Provider... 3 Operating System Versions... 4 s... 5 ETERNUS DX60, ETERNUS DX80, ETERNUS
FUJITSU Storage ETERNUS SF Storage Cruiser V16.5. Operation Guide
 FUJITSU Storage ETERNUS SF Storage Cruiser V16.5 Operation Guide B1FW-6007-06ENZ0(00) May 2017 Preface Purpose This manual describes how to use FUJITSU Storage ETERNUS SF Storage Cruiser (hereafter abbreviated
Structure and Overview of Manuals
 FUJITSU Software Systemwalker Operation Manager Structure and Overview of Manuals UNIX/Windows(R) J2X1-6900-08ENZ0(00) May 2015 Introduction Purpose of This Document Please ensure that you read this document
User's Guide (Systemwalker User Management and Single Sign-On Edition)
") Systemwalker Service Quality Coordinator User's Guide (Systemwalker User Management and Single Sign-On Edition) Windows/Solaris/Linux J2X1-7665-02ENZ0(00) January 2013 Preface Purpose of this manual This
Systemwalker Service Quality Coordinator User's Guide (Systemwalker User Management and Single Sign-On Edition) Windows/Solaris/Linux J2X1-7665-02ENZ0(00) January 2013 Preface Purpose of this manual This
FUJITSU Software. ServerView Infrastructure Manager Plug-in for. VMware vcenter Server Appliance 1.1. Setup Guide. For vcenter Server Appliance 6.
 FUJITSU Software ServerView Infrastructure Manager Plug-in for VMware vcenter Server Appliance 1.1 Setup Guide For vcenter Server Appliance 6.0 CA92344-1949-01 Aug, 2017 1 Preface Purpose This Setup Guide
ETERNUS SF AdvancedCopy Manager Operator's Guide for Tape Server Option
 ETERNUS SF AdvancedCopy Manager 14.0 Operator's Guide for Tape Server Option J2X1-7453-01ENZ0(00) July 2009 Preface Purpose This manual describes the functionality of ETERNUS SF AdvancedCopy Manager for
User's Guide - Master Schedule Management
 FUJITSU Software Systemwalker Operation Manager User's Guide - Master Schedule Management UNIX/Windows(R) J2X1-3170-14ENZ0(00) May 2015 Preface Purpose of This Document This document describes the Master
FUJITSU Storage ETERNUS SF Express V16.1 / Storage Cruiser V16.1 / AdvancedCopy Manager V16.1. Web Console Guide. Windows
 FUJITSU Storage ETERNUS SF Express V16.1 / Storage Cruiser V16.1 / AdvancedCopy Manager V16.1 Web Console Guide Windows B1FW-6001-02ENZ0(01) July 2014 Preface Purpose This manual describes the ETERNUS
ETERNUS SF AdvancedCopy Manager V13.2 Operator's Guide (Linux)
") J2UZ-8170-03ENZ0(A) ETERNUS SF AdvancedCopy Manager V13.2 Operator's Guide (Linux) ii Preface ++ Purpose This manual describes the operations available on ETERNUS SF AdvancedCopy Manager. ++ Intended Readers
J2UZ-8170-03ENZ0(A) ETERNUS SF AdvancedCopy Manager V13.2 Operator's Guide (Linux) ii Preface ++ Purpose This manual describes the operations available on ETERNUS SF AdvancedCopy Manager. ++ Intended Readers
PRIMECLUSTER GLS for Windows. User's Guide 4.3
 PRIMECLUSTER GLS for Windows User's Guide 4.3 B1FN-5851-02ENZ0(02) March 2012 Preface Purpose of this Manual This manual is intended to explain how to install, operate, and administer PRIMECLUSTER GLS
FUJITSU Software Systemwalker Software Configuration Manager. Operator's Guide. Windows/Linux
 FUJITSU Software Systemwalker Software Configuration Manager Operator's Guide Windows/Linux B1X1-0129-04ENZ0(00) March 2014 Preface Purpose of this Document This document explains patch management procedures
17 In big Data Centers it may be practical to collect event and error messages to a central syslog server.
 Slide 0 Welcome to this Web-Based-Training session providing you an introduction to the Initial Setup of the ETERNUS DX80 S2, DX90 S2, DX410 S2 and DX440 S2. 1 In this first chapter we will look at the
ServerView Resource Orchestrator V User's Guide. Windows/Linux
 ServerView Resource Orchestrator V2.2.1 User's Guide Windows/Linux J2X1-7526-01ENZ0(01) November 2010 Preface Purpose This manual provides an outline of ServerView Resource Orchestrator (hereinafter Resource
RFID Label Design and Encoding Management Pro (Utility Only) Installation Guide. October 2015 Version 1.21 A698HKV99-E-I-0121
 Installation Guide. October 2015 Version 1.21 A698HKV99-E-I-0121") A698HKV99-E-I-0121 RFID Label Design and Encoding Management Pro (Utility Only) Installation Guide October 2015 Version 1.21 -i- Preface This document explains the procedure of the installation and the
A698HKV99-E-I-0121 RFID Label Design and Encoding Management Pro (Utility Only) Installation Guide October 2015 Version 1.21 -i- Preface This document explains the procedure of the installation and the
ServerView Resource Coordinator VE. Installation Guide. Windows/Linux
 ServerView Resource Coordinator VE Installation Guide Windows/Linux J2X1-7458-03ENZ0(00) February 2010 Preface Purpose This manual explains how to install ServerView Resource Coordinator VE (hereinafter
PRIMECLUSTER GLS for Windows. User's Guide 4.3
 PRIMECLUSTER GLS for Windows User's Guide 4.3 B1FN-5851-03ENZ0(01) August 2012 Preface Purpose of this Manual This manual is intended to explain how to install, operate, and administer PRIMECLUSTER GLS
Printer Driver. Installation Guide. November 2014 Version Copyright FUJITSU LIMITED
 Printer Driver Installation Guide November 2014 Version 1.00 -i- Preface This document explains the procedure of the installation and the Confirmation of ZXP-7 Driver (Hereafter, it is written, "This
ETERNUS SF Storage Cruiser Message Guide. Windows/Solaris/Linux
 ETERNUS SF Storage Cruiser 14.0 Message Guide Windows/Solaris/Linux J2S2-1548-01ENZ0(00) July 2009 Preface Purpose This manual explains the output messages related to storage management of ETERNUS SF Storage
Systemwalker Service Quality Coordinator. Technical Guide. Windows/Solaris/Linux
 Systemwalker Service Quality Coordinator Technical Guide Windows/Solaris/Linux J2X1-6800-02ENZ0(00) November 2010 Preface Purpose of this manual This manual explains the functions and usage of Systemwalker
Systemwalker Service Quality Coordinator. Technical Guide. Windows/Solaris/Linux
 Systemwalker Service Quality Coordinator Technical Guide Windows/Solaris/Linux J2X1-6800-03ENZ0(00) May 2011 Preface Purpose of this manual This manual explains the functions and usage of Systemwalker
FUJITSU Software Systemwalker Software Configuration Manager. Release Notes. Windows/Linux
 FUJITSU Software Systemwalker Software Configuration Manager Release Notes B1X1-0125-05ENZ0(00) August 2014 Preface Purpose of this Document This document presents an overview of the functions that have
FUJITSU Software Interstage Studio V11.1. Installation Guide
 FUJITSU Software Interstage Studio V11.1 Installation Guide B1WD-3159-02ENZ0(00) November 2013 Preface Purpose This manual, the Interstage Studio Installation Guide, explains how to setup Interstage Studio.
Data Protection Guide
 SnapCenter Software 4.0 Data Protection Guide For Custom Plug-ins March 2018 215-12932_C0 doccomments@netapp.com Table of Contents 3 Contents Deciding on whether to read the SnapCenter Data Protection
Operation Guide for Optimization Option
 ETERNUS SF Storage Cruiser V15.0 Operation Guide for Optimization Option Windows/Solaris/Linux B1FW-5965-02ENZ0(00) April 2012 Preface Purpose This manual describes Optimization Option, the optional product
FUJITSU Software ServerView Infrastructure Manager V2.1. Start Guide
 FUJITSU Software ServerView Infrastructure Manager V2.1 Start Guide CA92344-1717-02 August 2017 Preface Purpose This manual describes overviews of the functions and installation procedures, and describes
KYOCERA Net Admin User Guide
 KYOCERA Net Admin User Guide Legal Notes Unauthorized reproduction of all or part of this guide is prohibited. The information in this guide is subject to change without notice. We cannot be held liable
ETERNUS SF Storage Cruiser Message Guide. Windows/Solaris/Linux
 ETERNUS SF Storage Cruiser 14.2 Message Guide Windows/Solaris/Linux J2S2-1548-03ENZ0(00) June 2010 Preface Purpose This manual explains the output messages related to storage management of ETERNUS SF Storage
FUJITSU Storage ETERNUS AF series and ETERNUS DX S4/S3 series
 Utilizing VMware vsphere Virtual Volumes (VVOL) with the FUJITSU Storage ETERNUS AF series and ETERNUS DX S4/S3 series Reference Architecture for Virtual Platforms (15VM/iSCSI) The ETERNUS AF series and
ServerView Resource Orchestrator V User's Guide. Windows/Linux
 ServerView Resource Orchestrator V2.3.0 User's Guide Windows/Linux J2X1-7530-01ENZ0(02) July 2011 Preface Purpose This manual provides an outline of ServerView Resource Orchestrator (hereinafter Resource
White Paper The Storage System Best Suited for OpenStack FUJITSU Storage ETERNUS DX S4/S3 series and ETERNUS AF series
 White Paper The Storage System Best Suited for OpenStack FUJITSU Storage ETERNUS DX S4/S3 series and ETERNUS AF series When designing a system that uses OpenStack, the FUJITSU Storage ETERNUS DX S4/S3
Data Protection Guide
 SnapCenter Software 4.0 Data Protection Guide For Microsoft Exchange Server March 2018 215-12936_C0 doccomments@netapp.com Table of Contents 3 Contents Deciding whether to read the SnapCenter Data Protection
FUJITSU Software Systemwalker Desktop Patrol. Reference Manual. Windows
 FUJITSU Software Systemwalker Desktop Patrol Reference Manual Windows B1WD-3290-08ENZ0(00) March 2018 Preface Purpose of this guide This guide explains commands, CSV input/output file formats, and output
iscsi Storage Appliance Getting Started Guide
 iscsi Storage Appliance Getting Started Guide 2 Copyright 2007 Adaptec, Inc. All rights reserved. No part of this publication may be reproduced, stored in a retrieval system, or transmitted in any form
Microsoft Windows NT Microsoft Windows Softek AdvancedCopy Manager Operator's Guide V10.0L30
 Microsoft Windows NT Microsoft Windows 2000 Softek AdvancedCopy Manager Operator's Guide V10.0L30 Preface ++ Purpose This manual describes the operations on Softek AdvancedCopy Manager. ++ Intended Readers
EMC CLARiiON Server Support Products for Windows INSTALLATION GUIDE P/N REV A05
 EMC CLARiiON Server Support Products for Windows INSTALLATION GUIDE P/N 300-002-038 REV A05 EMC Corporation Corporate Headquarters: Hopkinton, MA 01748-9103 1-508-435-1000 www.emc.com Copyright 2004-2006
Guide for Secure File Transfers Using the Storage Function
 FUJITSU Storage ETERNUS DX series and ETERNUS AF series ETERNUS SF AdvancedCopy Manager Guide for Secure File Transfers Using the Storage Function Using the ETERNUS DX series or the ETERNUS AF series in
ServerView Resource Orchestrator Cloud Edition V Setup Guide. Windows/Linux
 ServerView Resource Orchestrator Cloud Edition V3.1.0 Setup Guide Windows/Linux J2X1-7610-02ENZ0(00) July 2012 Preface Resource Orchestrator Documentation Road Map The documentation road map for Resource
ServerView Resource Coordinator VE. Installation Guide. Windows
 ServerView Resource Coordinator VE Installation Guide Windows B1WD-2748-01ENZ0(01) August 2009 Preface Purpose This manual explains how to install ServerView Resource Coordinator VE (hereinafter Resource
ETERNUS SF AdvancedCopy Manager V13.3 Message Guide
 B1WW-8881-05ENZ0 (00) ETERNUS SF AdvancedCopy Manager V13.3 Message Guide ii Preface About This Manual This manual explains the messages output by ETERNUS SF AdvancedCopy Manager. Intended Reader This
LifeSize Control Installation Guide
 LifeSize Control Installation Guide January 2009 Copyright Notice 2005-2009 LifeSize Communications Inc, and its licensors. All rights reserved. LifeSize Communications has made every effort to ensure
A698HL6BT-E-P RFID Label Design and Encoding Management Pro. Program Update Guide. May 2017 Version 1.11
 A698HL6BT-E-P-0111 RFID Label Design and Encoding Management Pro Program Update Guide May 2017 Version 1.11 Preface This document explains how to update the RFID Label Design and Encoding Management Pro
Data Protection Guide
 SnapCenter Software 4.0 Data Protection Guide For VMs and Datastores using the SnapCenter Plug-in for VMware vsphere March 2018 215-12931_C0 doccomments@netapp.com Table of Contents 3 Contents Deciding
FUJITSU Storage ETERNUS SF AdvancedCopy Manager V16.3. Operation Guide AIX
 FUJITSU Storage ETERNUS SF AdvancedCopy Manager V16.3 Operation Guide AIX B1FW-6014-04ENZ0(00) October 2015 Preface Purpose This manual describes the functionality of FUJITSU Storage ETERNUS SF AdvancedCopy
FUJITSU Software ServerView Resource Orchestrator Cloud Edition V Quick Start Guide. Windows/Linux
 FUJITSU Software ServerView Resource Orchestrator Cloud Edition V3.1.2 Quick Start Guide Windows/Linux J2X1-7622-06ENZ0(01) June 2014 Preface Purpose of This Document This manual explains the flow of installation
NexentaStor VVOL
 NexentaStor 5.1.1 VVOL Admin Guide Date: January, 2018 Software Version: NexentaStor 5.1.1 VVOL Part Number: 3000-VVOL-5.1.1-000065-A Table of Contents Preface... 3 Intended Audience 3 References 3 Document
Operation Guide: for Clients
 FUJITSU Software Systemwalker Desktop Patrol Operation Guide: for Clients Windows B1WD-3289-07ENZ0(00) March 2018 Preface Purpose of this guide This guide explains the necessary installation settings and
Base Configuration Wizard
 User Guide - English FUJITSU Software ServerView Suite Base Configuration Wizard ServerView Operations Manager V7.20 Edition August 2017 Comments Suggestions Corrections The User Documentation Department
PageScope Enterprise Suite Ver. 3.1 Installation Guide
 PageScope Enterprise Suite Ver. 3.1 Installation Guide Enterprise Suite Contents 1 Summary 1.1 Introduction...1-1 1.1.1 About Device Manager...1-1 Basic functions... 1-1 1.1. Add-on (extension) applications...1-1.1.3
FUJITSU Software ServerView Cloud Monitoring Manager V1.0. Overview
 FUJITSU Software ServerView Cloud Monitoring Manager V1.0 Overview J2UL-2073-01ENZ0(00) November 2015 Trademarks Copyright FUJITSU LIMITED 2015 LINUX is a registered trademark of Linus Torvalds. The OpenStack
ETERNUS SMI-S Server version Release Notes. December 2010 FUJITSU LIMITED
 ETERNUS SMI-S Server version 2.1.1.0 Release Notes December 2010 FUJITSU LIMITED Copyright 2010 FUJITSU LIMITED Preface This document explains ETERNUS SMI-S Server. 5th Edition December 2010 Microsoft,
FUJITSU Storage ETERNUS SF Express V16 / Storage Cruiser V16 / AdvancedCopy Manager V16. Troubleshooting Guide
 FUJITSU Storage ETERNUS SF Express V16 / Storage Cruiser V16 / AdvancedCopy Manager V16 Guide ESF16-Troubleshoot-12EN April 2018 Preface Purpose This document describes how to deal with troubles produced
ServerView Resource Orchestrator Virtual Edition V User's Guide. Windows/Linux
 ServerView Resource Orchestrator Virtual Edition V3.0.0 User's Guide Windows/Linux J2X1-7606-01ENZ0(05) April 2012 Preface Purpose This manual provides an outline of ServerView Resource Orchestrator (hereinafter
Legal Notes. Regarding Trademarks KYOCERA MITA Corporation
 Legal Notes Unauthorized reproduction of all or part of this guide is prohibited. The information in this guide is subject to change without notice. We cannot be held liable for any problems arising from
Design Guide (Basic) FUJITSU Storage ETERNUS DX100 S4/DX200 S4, ETERNUS DX100 S3/DX200 S3 Hybrid Storage Systems. System configuration design
 FUJITSU Storage ETERNUS DX100 S4/DX200 S4, ETERNUS DX100 S3/DX200 S3 Hybrid Storage Systems. System configuration design") FUJITSU Storage ETERNUS DX100 S4/DX200 S4, ETERNUS DX100 S3/DX200 S3 Hybrid Storage Systems Design Guide (Basic) System configuration design Table of Contents 1. Function Overview 14 2. Basic Functions
FUJITSU Storage ETERNUS DX100 S4/DX200 S4, ETERNUS DX100 S3/DX200 S3 Hybrid Storage Systems Design Guide (Basic) System configuration design Table of Contents 1. Function Overview 14 2. Basic Functions
RFID Label Design and Encoding Management Pro User s Guide
 A698HL6BT-E-U-0130 RFID Label Design and Encoding Management Pro User s Guide Batch Commissioning March 2017 Version 1.30 Preface This document explains how to use the Batch Commissioning (hereafter referred
Copyright PFU LIMITED
 -------------------------------------------------------- Fujitsu ScandAll PRO V1.8.1 Update8 README -------------------------------------------------------- Copyright PFU LIMITED 2007-2013 This file contains
PaperStream NX Manager 1.1 User's Guide
 P2WW-3940-02ENZ2 PaperStream NX Manager 1.1 User's Guide Contents Introduction 6 Manuals... 6 Trademarks... 8 Manufacturer... 8 Use in High-Safety Applications... 8 Abbreviations Used in This Manual...
ETERNUS DX60 and DX80
 Highlights Low environmental impact Highly scalable & versatile connectivity User friendly management systems Outstanding reliability 1 Overview (1) are designed to meet the needs of all environments from