elan-rf-003 Manual / rev.5 Page 1 of 13
|
|
|
- Nathan Stevens
- 6 years ago
- Views:
Transcription

1 Page 1 of 13
2 1. Introduction Installing the elan-rf-003, IP address Logging in to the web interface elan-rf Settings... 5 Configuration panel... 6 Description of functions... 7 Adding RF actuators to the floorplan RF control actuators Starting up scenes Page 2 of 13
3 1. Introduction Congratulations on purchasing the Smart RF box elan-rf-003 control unit, an element of the RF Control wireless system. The smart RF box enables you to control your electrical installation by smartphone, tablet or SMART TV. It transmits and receives commands of up to 40 units, and it processes set programs for automatic control, (you can gradually expand installation from 1 unit inels RF Control). Thanks to bi-directional communication, it visualizes the current status of individual units. The smart RF box elan-rf-003 is connected by network cable LAN to the home network (router) and communicates with your smart phone. The intuitive application environment offers central control from one place. Function of application ihc-marf / ihc-mirf: - control of hot water or electric underfloor heating - measuring temperature by wireless sensors - switching appliances (garage door, blinds, fan, sprinklers, sockets, etc.) - dimming lights (LED, energy-saving, halogen or classic lamps) - time switching (delayed switching off of light when leaving room) - video camera integration - scenes (make multiple commands at once with a single press). If you don t have a fixed IP address, the Smart RF box will obtain it from DHCP server automatically. Power is supplied to the Smart RF box via adapter 10-27V DC (included in the supply) or PoE by power source (router) 24V DC. By connecting two Smart RF boxes by LAN cable, you avoid the problem of lack of signal range. Option of setting via web interface or directly in the application ihc-marf (Android) / ihc-mirf (iphone). The package includes an internal antenna AN-I, in case the Smart RF box is located in a metal switchboard, you can use the external antenna AN-E for better signal reception.* Range up to 100 m (in open space), if the signal is insufficient between the Smart RF box and unit, use the signal repeater RFRP-20. Communication frequency with bidirectional protocol inels RF Control. * Max Tightening Torque for antenna connector is 0.56 Nm. Attention: The minimum distance between the controller (system unit) and the actuator must not be less than one centimeter. Before you begin The instruction manual provides information on installing and operating the device. The instruction manual is always a part of the supply. Only perform installation after becoming thoroughly familiar with this User Guide and device functions. Problem-free function of the device also depends on the way it was shipped, stored and handled. If you notice any signs of damage, deformation, malfunction or a missing part, do not install this product and return it to the point of sale. At the end of its service life, the product and its parts must be treated as electronic waste. Before starting the installation, make sure that all wires and connected parts are not under voltage. When assembling and performing maintenance, you must uphold safety regulations, standards, directives and special provisions for working with electrical equipment. Page 3 of 13
 assigns the elan-rf-003 its IP address. Dynamic IP address assignment (DHCP) is enabled by default.")

4 2. Installing the elan-rf-003, IP address Connect the elan-rf-003 to the power source, connect it to your local network via Ethernet cable. Your local network (router) assigns the elan-rf-003 its IP address. Dynamic IP address assignment (DHCP) is enabled by default. Install the application in your smartphone: for mobile telephone with OS Android: download the current version at Google Play (under the name ihc-marf). for mobile telephones with IOS: download the current version under the name ihc-mirf in the app store. In the installed application, in the Settings menu, select elan Settings. Press the icon - search. Discovered elan-rf-003 units appear that are found in your network to which you are currently connected by phone (home network) as well as their IP addresses. Here you will find the IP address assigned to the given elan-rf Logging in to the web interface elan-rf-003 Run the web browser. In the Internet browser in the panel Address add the IP address of your elan-rf-003. After confirming the entered IP address, the web server's login page will come up. The factory settings for signing in as administrator are: Name: admin Password: elkoep Page 4 of 13
, but each uses his/her own name and password. Confirm the log in by pressing: Login.")
5 It is possible to log into the elan-rf-003 web interface either as: administrator (admin) with full access to controls and settings user (user) has the option of controlling the device Both users log into the same dialog field (Login, Password), but each uses his/her own name and password. Confirm the log in by pressing: Login. Note: Perform RESET of the elan-rf-003 unit by a long press of the button on the device front panel until the yellow LED starts flashing. Reset ends after the LED shuts off. The IP address and login data return to factory settings and obtaining an IP address automatically (DHCP) is selected. The factory setting of the password for logging in as admin and user is: elkoep 4. Settings After logging in, you will see a large window used to display assigned RF-elements (actuators). On the right you will see a configuration panel with all functions of the web server elan-rf-003. Page 5 of 13
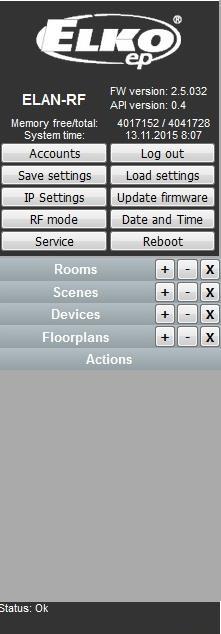


6 Configuration panel Page 6 of 13


.")

, to log into the elan-rf-003 you must use the")

7 Description of functions By pressing the button Accounts, you will display a window for changing login data. By pressing Log out, you will log out of the web interface elan-rf-003. By pressing the button Save settings, you can save the current settings of your elan-rf- 003 including network settings. By pressing the button Load settings, you can restore your stored settings, which you have already stored in your PC (the file has the extension.bin). The button IP Settings is to configure network settings that you can change any time based on your network. Note: If you change the IP address (setup a static IP address), to log into the elan-rf-003 you must use the new IP address. If the new IP address that you entered is not in the same subnetwork, the connection will not work if settings are not changed in the connected device (PC, imm Client) to the same subnetwork. Page 7 of 13


8 The button Update firmware is used to update the firmware in your elan-rf-003. When updating the elan-rf-003, proceed according to the following instructions: 1. Download the latest firmware version from the website 2. Click on the button Update firmware, select the downloaded file (the update file must always include the extension *.bin), and click on it. After confirming by pressing OK, the update of your firmware in your elan-rf-003 automatically starts. Note: do not turn off device or use the Reset button when updating the firmware. the elan-rf-003 restarts after updating. After the firmware update, all settings will remain preserved. This means that the set IP, login data, visualization panel will remain the same as with the FW version prior to the update. The button RF mode is used to switch the mode of your elan-rf-003. Repeater The Repeater function is an independent function of elan-rf-003 and is used to increase range between RF controllers (system elements) and RF elements. Page 8 of 13

9 Use: an elan-rf-003 device configured for a repeater can only be connected to the supply voltage, and it will then function just the same as the RFRP-20. This means if it receives a command from the RF controller or RF detector, it resends it to a designated RF element and vice-versa. Oasis Compatible Enables the repeater function to serve unidirectionally communicating units (RF Key, RFWB, RFIM, detectors, etc.). RF Touch compatible Enables the repeater function to serve bidirectionally communicating units (RF Touch, RF Pilot, etc.). List of addresses Repeated address settings - write into the list of addresses those elements with which you want the elan RF. If you set the elans to the Router mode, the same addresses must be set for both elans After setting the function Repeater, elan restarts. Router The Router function is used to extend the distance and control of RF elements by connecting two elans into the LAN network. The first elan (so-called Master) must be set during configuration in the Router function, it receives all RF commands of controllers via an RF signal. It assess the limitations and permissions of addresses. The second elan (so-called Slave) assess all commands from the elan Master determined for sending by RF signal. It sends valid messages by RF signal to controlled elements. If a response comes from an element, it sends it to the elan Master. It is necessary to enter into the settings the LAN parameters of the second elan - Slave (IP address, login data). The second elan Slave can be configured in two ways. Active function Repeater this receives commands via the Ethernet network and via the RF network. Example: elan Slave catches the RF signal of the RF controller, saves it as Repeater (signal repeater), and sends the RF signal further along. Active function Router elan is in its basic setting. elan only receives commands from the Ethernet network, and ignores all RF signals. Oasis Compatible - the sames as with the Repeater function. RF Touch Compatible - the sames as with the Repeater function. Page 9 of 13


 you can remove all added rooms.")

![automatically generated. Here you can only use the characters [0-9A-Za-z_-]. 2.](/docs-images/76/73132926/images/10-17.jpg "Label gives an arbitrary name to the room (you can use diacritical marks, gaps")
10 List of addresses - the sames as with the Repeater function. The same addresses must be set for both elans. After setting the function Router, elan restarts. Button Date & Time Here the IP address of the NTP server is set by default, which determines for the elan the precise time via the Internet. You can also set the time zone in which the elan is located. By selecting Daylight Saving Time, you can manually set the daylight saving time. If you do not have the elan-rf-003 connected to an Internet network: set the current date and time manually using the button Manual. In the event of a power outage, this information is deleted from the elan memory. Button Reboot to restart the device elan-rf-003. Panel Rooms displays created rooms. By pressing the button (+), you can add a new room, by pressing ( ) you can delete any selected room and by pressing (x) you can remove all added rooms. If you click on the button (+), a table is displayed in which you fill in: 1. ID *of the room "optional data", if you do not enter it - a number is automatically generated. Here you can only use the characters [0-9A-Za-z_-]. 2. Label gives an arbitrary name to the room (you can use diacritical marks, gaps and others...) 3. Type here you select the type of room or type of icon that you will then display after entering the floorplan on the desktop. 4. Floorplan here select the floorplan (image) that you added before in the tab Floorplans. Page 10 of 13


. 2.")

 add an RF element, ( )")


11 Panel Scenes Here any scenes are created based on user requirements. It is possible to create scenes only after you add rooms and actuators. Button (+) - add a new scene: 1. ID* - name of room (not required). 2. Label - enter any name of the scene (you can use diacritical marks and spaces in between ). 3. Actions - (+) add an RF element, ( ) delete the selected element, (x) delete all RF elements. When adding an actuator, its function-action is set switching, dimming, etc.). If for an actuator, you select the function ON, you must still confirm this function by its precise status in the table Choose value, e.g. true for switching on or false switching off. After adding all actuators and their required functions, click on Create, thereby saving the entire scene. Page 11 of 13
 - add a new RF element: 1.")

. 3. Window ID* - name of element (not required). 4.")


 - remove all elements Panel Floorplans here you")
 - add a new floorplan: 1.")
12 The panel Devices is used for adding RF actuators to the elan-rf-003. Button (+) - add a new RF element: 1. Product Type select RF element 2. Address enter the address of the RF element that is listed right on the box of the added EF element (six-character code). 3. Window ID* - name of element (not required). 4. Label - any naming of the element, e.g. "Kitchen light". 5. Type - select the type of icon (e.g. light), which will be displayed on the floorplan. Create you will store the RF actuator in the elan-rf-003. Button ( ) - deleting the selected element. Button (X) - remove all elements Panel Floorplans here you can add floorplans (images, layouts.). Button (+) - add a new floorplan: 1. Select the required image for the floorplan (stored in your PC). 2. ID enter the name of the floorplan. Confirm by pressing OK. Page 12 of 13
13 The number of floorplans is limited by the memory size of the elan-rf-003. Find out the memory status in the top of the configuration panel. The panel Action - displays options for control of the currently highlighted RF actuator on the floorplan. Adding RF actuators to the floorplan Click on the room in the Rooms panel into which you want to add the required RF actuator, and a floorplan will then appear on the desktop (not necessary however - a white space may remain as the floorplan), double-click anywhere on the desktop, and the addition of RF actors will be activated by a red boundary, and the Devices panel will open. Then double-click on individual RF actuators to add the RF actuators that you require on the floorplan. You have the option of removing the actuator by right-clicking the mouse. If you do not use any of your added floorplans, you cannot move the icons; if you have an assigned floorplan in the room, you can move the icons anywhere using the mouse and distribute them on the floorplan. Once you add everything, the same as at the start, double-click anywhere on the desktop (floorplan) to save all you've done. RF control actuators And now after clicking on one of the icons, you can control the RF actuators. You can do this either by double-clicking directly on them, or after a single click on them the offer Action appears in the lower right corner, in which you double-click to start the required action of the given RF actuator. Between the individual commands must be an interval of at least 1s. Starting up scenes Startup is performed in a similar manner, where after clicking on the panel Scenes, you select the required scene and then double click on it. Page 13 of 13
elan-rs485/ /2017 / rev.0 Page 1 of 19
 Page 1 of 19 Introduction... 4 Device description... 4 Examples connection... 5 Installing, IP address... 6 Logging to the web interface... 7 Settings... 8 Settings description of functions... 9 Devices
Installation Manual ihc-mirf Installation Manual for the Application ihc-mirf
 Installation Manual for the Application ihc-mirf Rev.:200214 Page 1 of 14 Contents 1. Introduction... 3 2. Installing the application on a mobile phone... 3 3. Basic settings... 4 4. Control... 12 Rev.:200214
INSTALLATION MANUAL for the Application ihc-mirf
 INSTALLATION MANUAL for the Application ihc-mirf Contents Introduction 3 Installing the application on a mobile phone 3 Settings 4 Control 12 Introduction The applications ihc-mirf (for mobile phones with
AirGateway. Návod / rev.0. Strana 1 z 9
 Strana 1 z 9 1. Introduction... 3 2. Setting AirGateway a station (client) to connect to your WiFi network... 4 3. Settings... 5 Strana 2 z 9 1. Introduction Congratulations on purchasing the AirGateway
Installation manual ihc-mairf
 rev.: 6 02-215 / 2016 1 / 46 Contents Contents...1...3...4 3. Installing the application on a smartphone with OS Android...5 4. The initial launch of the application - Setup Guide...6 4.1 elan...7 4.2
Wiring Accessories for a Smarter Home
 For the full interactive experience use Adobe PDF Reader on your smart device Quick Install Guide Control Menu Wiring Accessories for a Smarter Home Smart Box & Application Installation & Control Manual
SVT-WIFI Video Intercom System C
 SVT-WIFI Video Intercom System C User Manual Please read this user manual prior to installing the system, and keep it well for future use. CONTENTS 1. Parts and Functions... 1 2. Terminal Descriptions...
Mobile Phone Smartphone WIFI Controller 8 Channel Relay Output
 Mobile Phone Smartphone WIFI Controller 8 Channel Relay Output Package Include: 1 x WIFI controller with antenna (WF-8-1R) 1 x DC 9V Power Adapter 1 x User manual Feature: WIFI interface, control via WIFI
Version 1.1 March 2018
 Manual Version 1.1 March 2018 2018 xxter bv. All rights reserved. Apple, ipad, ipad Air, iphone, and ipod touch are trademarks of Apple Inc., registered in the U.S. and other countries. HomeKit is a trademark
ST-HD-CVR4CH ST-HD-CVR8CH ST-HD-CVR16CH. Professional Digital Video Recorders QUICK START GUIDE
 ST-HD-CVR4CH ST-HD-CVR8CH ST-HD-CVR16CH Professional Digital Video Recorders QUICK START GUIDE 1 Thank you for your purchase of this SecurityTronix HD-COAXINATOR Video Recorder (CVR). Documentation for
Table of Contents. Chapter 1 Introduction Chapter 2 Quick Install... 7
 AVA-88 WELCOME Congratulations on purchasing the AVA-88. The AVA-88 integrates multiple complicated control, automation and internet protocols into one simple plug-and-play device. It is a central controller
Cockpit Main Gateway Ordering Code: CKNOAD1
 Cockpit Main Gateway Ordering Code: CKNOAD1 Table of contents 1. IMPORTANT SAFETY INFORMATION... 4 2. DEVICE DESCRIPTION... 5 3. INSTALATION OF THE COCKPIT GATEWAY... 6 3.1. WIFI CONFIGURATION OF THE
2017 xxter bv. All rights reserved. Alexa and Amazon Echo are trademarks of Amazon.com, Inc. More information can be found at
 Manual Version 1.0 October 2017 2017 xxter bv. All rights reserved. Apple, ipad, ipad Air, iphone, and ipod touch are trademarks of Apple Inc., registered in the U.S. and other countries. HomeKit is a
Installation manual ihc-miirf
 rev.: 5 02-1/2017 1 / 43 Contents Contents...1 1....3...4 3. The initial launch of the application - Setup Guide...5 3.1 elan...6 3.2 Rooms...7 3.3 Units...8 3.4 Scenes...9 3.5 Cameras...10 3.6 Intercom...11
Home Automation Gateway HA102
 USER MANUAL Home Automation Gateway HA102 TABLE OF CONTENTS 1. IMPORTANT SAFETY INFORMATION... 4 2. DEVICE DESCRIPTION... 5 3. INSTALLATION OF THE SCHWAIGER GATEWAY... 6 3.1 WIFI CONFIGURATION OF THE
ST-HVR8704 ST-HVR8708 ST-HVR8716. Professional Digital Video Recorders QUICK START GUIDE
 ST-HVR8704 ST-HVR8708 ST-HVR8716 Professional Digital Video Recorders QUICK START GUIDE 1 Thank you for purchasing this SecurityTronix Hybrid Video Recorder! The documentation for this HVR comes in 2 formats;
JOOAN Wireless Network Camera
 JOOAN Wireless Network Camera Quick Installation Guide Dear Customer, we thank you very much for purchasing this product. Please read this manual carefully and keep it for future reference. 1. Installation
Aimetis A10D Thin Client 2.1
 Aimetis A10D Thin Client 2.1 Disclaimers and Legal Information Copyright 2016 Aimetis Inc. All rights reserved. This material is for informational purposes only. AIMETIS MAKES NO WARRANTIES, EXPRESS,
1 Hardware Installation
 1 Hardware Installation 1.1 Choosing the Best Location for Wireless Operation Many environmental factors may affect the effective wireless function of the DSL Router. If this is the first time that you
Quick Installation Guide
 V50.02 Model: FI8918W Quick Installation Guide Indoor Pan/Tilt Wireless IP Camera Black White For Windows OS ------- Page 1 For MAC OS ------- Page 14 Quick Installation Guide For Windows OS Package Contents
Aimetis Thin Client 2.7. User Guide
 Aimetis Thin Client 2.7 User Guide Disclaimers and Legal Information Copyright 2016 Aimetis Inc. All rights reserved. This material is for informational purposes only. AIMETIS MAKES NO WARRANTIES, EXPRESS,
Version /13/2014. User Manual. mydlink Home Smart Plug DSP-W215
 Version 2.00 08/13/2014 User Manual mydlink Home Smart Plug DSP-W215 Preface D-Link reserves the right to revise this publication and to make changes in the content hereof without obligation to notify
HSPA+ WiFi Router with Voice
 NETCOMM LIBERTY SERIES HSPA+ WiFi Router with Voice 3G22WV Quick Start Guide This router has been designed to be placed on a desktop. All of the cables exit from the rear for better organization. The LED
Network Camera Firmware Upgrade Quick Guide
 Network Camera Firmware Upgrade Quick Guide 09-2018 / v1.0 1 CONTENTS I Introduction... 3 II How to Upgrade Firmware for Network Camera... 4 III Download App... 11 2 I Introduction To strengthen the security
Installation and operating manual
 HEATING CONTROL PACK GATEWAY ENERGY MONITOR Installation and operating manual 1 Version 1.0 Index Introduction... 3 Preliminary considerations... 4 SmartCommand System Elements... 5 Installation instructions...
Welcome Contents Diagram
 Welcome Congratulations on your purchase of our GBF PL960 Series of IP Doorbells. Our factory engineers were the first to enable viewing of multiple security cameras through your handheld smart device,
Smile Room Connect System Installation Instructions
 Smile Room Connect System Installation Instructions MU1H-0635GE51 R1016 Smile Room Connect SRC-10 Installation Instructions EN Table of Contents 1 Safety instructions... 4 1.1 Intended use... 4 1.2 Electric
INNOV.NET PTY LTD. User guide
 User guide Version1 2016 0 Contents Compatibility... 1 What s in the package?... 1 Setup the RM Pro... 1 Meaning of the LED indicators... 2 Setup e-control on your smartphone... 2 Can I program a remote
Aimetis A10D Thin Client
 Aimetis A10D Thin Client Disclaimers and Legal Information Copyright 2015 Aimetis Inc. All rights reserved. This material is for informational purposes only. AIMETIS MAKES NO WARRANTIES, EXPRESS, IMPLIED
WiFi Camera (V380) Installation Manual. iphone IOS Android. PC Client available on
 Installation Manual. iphone IOS Android. PC Client available on") WiFi Camera (V380) Installation Manual iphone IOS Android PC Client available on www.av380.cn/index-en.html iphone IOS Smart Phone Installation WiFi smart link installation (with WiFi Network) 1. Open
WiFi Camera (V380) Installation Manual iphone IOS Android PC Client available on www.av380.cn/index-en.html iphone IOS Smart Phone Installation WiFi smart link installation (with WiFi Network) 1. Open
Amcrest 650 TVL DVR Quick Start Guide
 Amcrest 650 TVL DVR Quick Start Guide Version 1.0.2 Revised May 9 th, 2016 Welcome Thank you for purchasing our Amcrest 650 TVL DVR! This quick start guide will help you become familiar with our DVR in
BIPAC-5100 / 5100W (Wireless) ADSL Router
 ADSL Router") BIPAC-5100 / 5100W (Wireless) ADSL Router Quick Start Guide Billion BIPAC-5100 / 5100W ADSL Router For more detailed instructions on configuring and using the (Wireless) ADSL Firewall Router, please refer
BIPAC-5100 / 5100W (Wireless) ADSL Router Quick Start Guide Billion BIPAC-5100 / 5100W ADSL Router For more detailed instructions on configuring and using the (Wireless) ADSL Firewall Router, please refer
TECHNICAL SPECIFICATION
 TECHNICAL SPECIFICATION WIRELESS SMART SWITCH Functions: One channel wireless ON/OF switch Control is done from anywhere with IOS or Android mobile application Control electrical devices over Wi-Fi Control
Valet AV (Audio/Video)
") Valet AV (Audio/Video) Congratulations on your decision to control your audio and video equipment from your iphone, ipad, Android phone, or tablet using our Valet Home Control app. We are certain you will
Valet AV (Audio/Video) Congratulations on your decision to control your audio and video equipment from your iphone, ipad, Android phone, or tablet using our Valet Home Control app. We are certain you will
LK Webserver ICS.2. Design. User interface, functions. Menu tab Thermostats. Basic functions
 LK Webserver ICS.2 Design LK Webserver ICS.2 is used to access and control LK Room Temperature Control ICS.2 from your mobile phone, tablet or computer. An intuitive interface makes it easy to monitor,
Zavio P5111/ P5116/ P5210 Quick Installation Guide
 86085M2000010 Zavio P5111/ P5116/ P5210 Quick Installation Guide Installation Steps Please follow the installation steps below to set up your P5111 / P5116/ P5210 Day/Night Pan/Tilt IP Camera. Check the
Amcrest 960H DVR Quick Start Guide
 Amcrest 960H DVR Quick Start Guide Version 2.0.2 Revised July 22, 2015 Welcome Thank you for purchasing our Amcrest 960H DVR! This quick start guide will help you become familiar with our DVR in a very
BiPAC 5200 Series. (802.11g) ADSL2+ Modem/Router. Quick Start Guide
 ADSL2+ Modem/Router. Quick Start Guide") BiPAC 5200 Series (802.11g) ADSL2+ Modem/Router Quick Start Guide Billion BiPAC 5200 Series ADSL2+ Modem/Router For more detailed instructions on configuring and using the (802.11g) ADSL2+ Modem/Router,
BiPAC 5200 Series (802.11g) ADSL2+ Modem/Router Quick Start Guide Billion BiPAC 5200 Series ADSL2+ Modem/Router For more detailed instructions on configuring and using the (802.11g) ADSL2+ Modem/Router,
CirrusSense Router Quick Start Guide. Connect your router. Configure your router for internet access
 CirrusSense Router Quick Start Guide by Transducers Direct Connect your router 1) First, if you re going to connect to the internet via a wired connection, connect an Ethernet cable to the Ethernet port
IpAlarm Module Set Up VirtuAlarm model
 Page 1 IpAlarm Module Set Up VirtuAlarm model Note: This device is shipped configured for Ethernet connectivity. To use in this mode, connect the BLUE Jack (marked WAN) to your router and wait at least
3G/4G Wireless N150 Router m2
 NETCOMM LIBERTY SERIES 3G/4G Wireless N150 Router m2 3GM2WN Quick Start Guide The router has been designed to be placed on a desktop. All of the cables exit from the rear for better organization. The LED
mcamview HD for ipad User Manual
 mcamview HD for ipad User Manual Seeing the video from anywhere 1. INSTALL AND STARTUP MCAMVIEW HD... 4 2. THE LAYOUT OF MCAMVIEW HD... 5 3. MANAGE MCAMVIEW HD IP CAMERAS... 6 3.1 NEW CAMERA... 6 3.2.
BiPAC 8501/8521. SHDSL.bis (VPN) Firewall Bridge/Router. Quick Start Guide
 Firewall Bridge/Router. Quick Start Guide") BiPAC 8501/8521 SHDSL.bis (VPN) Firewall Bridge/Router Quick Start Guide Quick Start Guide Chapter 1: Introduction 2 Billion BiPAC 8501/8521 SHDSL.bis (VPN) Firewall Bridge/ Router For more detailed instructions
BiPAC 8501/8521 SHDSL.bis (VPN) Firewall Bridge/Router Quick Start Guide Quick Start Guide Chapter 1: Introduction 2 Billion BiPAC 8501/8521 SHDSL.bis (VPN) Firewall Bridge/ Router For more detailed instructions
User Guide. DOCSIS 3.0 High Speed Cable Modem TC7650 REV
 User Guide DOCSIS 3.0 High Speed Cable Modem TC7650 REV1.1.0 1910011895 Contents About This Guide..................................................... 1 Chapter 1. Get to Know Your Modem................................
Samsung SmartThins Wifi ET-WV525. Samsung SmartTings Wifi Pro ET-WV535. User Manual
 Samsung SmartThins Wifi ET-WV525 Samsung SmartTings Wifi Pro ET-WV535 User Manual English (USA). 02/2018. Rev.1.0 www.samsung.com Table of Contents Getting started 3 Read me first 4 About SAMSUNG Connect
WIRELESS ROUTER N150. User Manual. F9K1009v1 8820zb01125 Rev.B00
 WIRELESS ROUTER N150 User Manual F9K1009v1 8820zb01125 Rev.B00 TABLE OF CONTENTS Getting Started... 1 What s in the Box...1 Initial Setup...1 How to Set It UP...2 Adding Computers to Your Network...3 Manually
Create A Scene Outdoors!
 iport Operating Manual & Installation Guide Model: LS30970PORT Create A Scene Outdoors! Section 1 Index Section 1 - Installation Introduction 3 Installation 4 Installation Location 5 Section 2 - Setup
802.11g Wireless Access Point
 802.11g Wireless Access Point WAP-4036 Quick Installation Guide Table of Contents Package Content... 3 Hardware Installation... 4 Initial Configuration... 5 Further Configuration... 8 Package Content 1
INNOV.NET PTY LTD. User guide
 User guide 0 Contents Compatibility... 1 What s in the package?... 1 Add device... 2 Legend... 2 Meaning of the LED indicators... 2 Setup the RM Mini 3... 3 Setup e-control on your smartphone... 3 How
Installation and operating manual
 HEATING CONTROL PACK GATEWAY ENERGY MONITOR Installation and operating manual 1 Version 1.0 Index Introduction... 3 Preliminary considerations... 4 SmartCommand System Elements... 5 Installation instructions...
Contents. 1. Verify the package contents
 Bullet VERSION 1.3 This installation guide provides basic instructions for installing the PLC-325PW/ PLC-335PW on your network and then configure Android, ios App and PC software to view the camera. For
User manual. tel.+ (48)
") ilock User manual system User manual contact@ilocksystems.com www.ilocksystems.com tel.+ (48) 61 669 06 87 e-mail: contact@ilocksystems.com www.ilocksystems.com technical support: support@ilocksystems.com
ilock User manual system User manual contact@ilocksystems.com www.ilocksystems.com tel.+ (48) 61 669 06 87 e-mail: contact@ilocksystems.com www.ilocksystems.com technical support: support@ilocksystems.com
SNMP Web Management. User s Manual
 SNMP Web Management User s Manual Suitable Product: SNMP Web Card SNMP Web Box Management Software for Uninterruptible Power Supply Systems Table of Contents 1. Overview... 1 1.1 Introduction... 1 1.2
User Manual. Microdigital IP cameras with built-in Ivideon software
 User Manual Microdigital IP cameras with built-in Ivideon software Table of Contents Introduction to Ivideon... What is Ivideon about?... Why use an IP camera with built-in Ivideon software?... How to
HD IP CAMERA USER GUIDE
 HD IP CAMERA USER GUIDE Support US: support@onwote.com EU: eusupport@onwote.com AU: ausupport@onwote.com Feature Lists 7x24 hours online live HD video preview Remote access via multiple web browsers(ie/firefox,
skylinkhome.com Setup Guide HU-318
 skylinkhome.com Setup Guide HU-38 CONTENTS. Setup HU-38. Obtain the IP address of HU-38... 3. Login HU-38 Main Page... 4.3 HU-38 Network Setting... 5.4 Setup Portforward...6. Setup App. App Download...
BIPAC-6500 / 6500W (Wireless) Broadband VPN Firewall Router with 4-port 10/100M Switch Quick Start Guide
 Broadband VPN Firewall Router with 4-port 10/100M Switch Quick Start Guide") BIPAC-6500 / 6500W (Wireless) Broadband VPN Firewall Router with 4-port 10/100M Switch Quick Start Guide Billion BIPAC-6500 / 6500W (Wireless) Broadband VPN Firewall Router For more detailed instructions
BIPAC-6500 / 6500W (Wireless) Broadband VPN Firewall Router with 4-port 10/100M Switch Quick Start Guide Billion BIPAC-6500 / 6500W (Wireless) Broadband VPN Firewall Router For more detailed instructions
MigmaIntersection TM for detecting pedestrians at intersection crossings
 Monitor Connection Connect the VGA and USB connectors of MigmaMonitor to the SBC. Close both programs (two screens with yellow prints) by clicking on the exit button (X) on top of each DOS window. Now
GAME OF LIGHTS KIT FOR CONTROLLING LIGHTS VIA SMARTPHONE PERFECT LIGHT ATMOSPHERE FOR EVERY OCCASION AND MOOD. User s manual 2.
 GAME OF LIGHTS KIT FOR CONTROLLING LIGHTS VIA SMARTPHONE SAVING ENERGY COLOR SCENES YEARS GUARANTEE PERFECT LIGHT ATMOSPHERE FOR EVERY OCCASION AND MOOD. www.inels.com/kits User s manual 2.0 GAME OF LIGHTS
F3102 / F3107 / F3110 / F3115 / F3210 / F3215 PN: 86085K K
 F3102 / F3107 / F3110 / F3115 / F3210 / F3215 0 86085K3000020 PN: 86085K3000020 Zavio F3102/F3107/F3110/F3115/F3210/F3215 Quick Installation Guide Please follow the installation steps below to set up
ArtNet-LED-Dimmer 4 MK2
 ArtNet-LED-Dimmer 4 MK2 User manual Art-Net Designed by and Copyright Artistic Licence Holdings Ltd. ArtNet-LED-Dimmer 4 MK2 2 Description The ArtNet-LED-Dimmer 4 MK2 is a compact LED-Dimmer controlling
State of the art hyper-optimized video management platform designed for ease, speed and efficiency. Blackjack BOLT-LX
 Quick Start Guide State of the art hyper-optimized video management platform designed for ease, speed and efficiency. Blackjack BOLT Up to 16 2.1MP Cameras (1080p True HD Resolution) Blackjack BOLT-LX
Procedure to Upgrade Verizon FiOS Router and Configure Xbox 360 to connect with Microsoft USB WiFi Adapter
 FiOS TV & Internet Verizon DSL FAQ s Wireless Verizon Bundles Verizon Support Procedure to Upgrade Verizon FiOS Router and Configure Xbox 360 to connect with Microsoft USB WiFi Adapter Overview The current
Energy Client. Version Feb Electrocom Rødeledsvej 95 DK-5700 Svendborg Denmark Tel:
 Energy Client Version 2.0.806 3. Feb. 2014 Electrocom Rødeledsvej 95 DK-5700 Svendborg Denmark Tel: +45 88 80 75 80 www.electrocom.dk p. 2 Introduction... 3 Installation... 4 LED, Switches and Reset...
WiFi TV Plug User Guide
 WiFi TV Plug User Guide CONTENTS Safety precautions What s in the box Product diagram Setting up the WiFi TV Plug ipod touch, iphone & ipad Android Apple Mac Windows Frequently Asked Questions Product
BiPAC 6404VP/VGP. VoIP/(802.11g) Broadband Firewall Router. Quick Start Guide
 Broadband Firewall Router. Quick Start Guide") BiPAC 6404VP/VGP VoIP/(802.11g) Broadband Firewall Router Quick Start Guide VoIP/(802.11g) Broadband Firewall Router For more detailed instructions on configuring and using the VoIP/(802.11g) Broadband
BiPAC 6404VP/VGP VoIP/(802.11g) Broadband Firewall Router Quick Start Guide VoIP/(802.11g) Broadband Firewall Router For more detailed instructions on configuring and using the VoIP/(802.11g) Broadband
Smart Home Controller 2.2
 Release Notes Smart Home Controller 2.2 Contents Release Notes... 1 Eaton-SHC-7.5-2.2.x... 3 Features and Enhancements... 3 New xcomfort Room Controller Touch support... 3 Climate Function Update... 3
WiFi Smart Converter User Manual WiFi Smart Plug SH330W
 WiFi Smart Converter User Manual WiFi Smart Plug SH330W About This Guide This guide provides a brief introduction to Smart Plug and the Smart Life app, as well as regulatory information. Please note that
Z CAM K1 Pro. User Manual (Draft) v1.0
 v1.0") Z CAM K1 Pro User Manual (Draft) v1.0 1. INTRODUCTION Camera Introduction Display Information LED Indicator Status Green: When the camera is turned on with SD card in the slot. Red: When the camera is
Z CAM K1 Pro User Manual (Draft) v1.0 1. INTRODUCTION Camera Introduction Display Information LED Indicator Status Green: When the camera is turned on with SD card in the slot. Red: When the camera is
Package Contents. Minimum Requirements. Antenna Orientation. Network Requirements: An Ethernet-based broadband modem
 Package Contents DIR-895L AC5300 Ultra Wi-Fi Router Wi-Fi Configuration Card Power Adapter Quick Install Guide Ethernet Cable If any of the above items are missing, please contact your reseller. Minimum
QUICK START GUIDE QT IP CAMERA & NVR BUNDLE ENGLISH
 QUICK START GUIDE QT IP CAMERA & NVR BUNDLE ENGLISH Table of Contents Welcome What s Included...3 Understanding your NVR...4 Get Connected Registration...5 Connect Your Cameras...5 Connect NVR to Display...6
Quick Installation Guide DAP N300 Wi-Fi Range Extender
 N300 Wi-Fi Range Extender BEFORE YOU BEGIN Delivery Package Extender (brochure). If any of the items are missing, please contact your reseller. The User Manual and documents are available on D-Link website
Studio NDI. User Guide 1.0d
 Studio NDI User Guide 1.0d Release Rev 1.0d 2 BirdDog Studio NDI Release 1.0 Getting to know Studio NDI... 4 Physical connectors... 4 Powering Studio NDI... 4 PoE (Power over Ethernet)... 4 DC/D-Tap...
BiPAC 7300(G) (802.11g) ADSL2+ Router. Quick Start Guide
 (802.11g) ADSL2+ Router. Quick Start Guide") BiPAC 7300(G) (802.11g) ADSL2+ Router Quick Start Guide Billion BiPAC 7300(G) ADSL2+ Router For more detailed instructions on configuring and using the (802.11g) ADSL2+ Router, please refer to the on-line
BiPAC 7300(G) (802.11g) ADSL2+ Router Quick Start Guide Billion BiPAC 7300(G) ADSL2+ Router For more detailed instructions on configuring and using the (802.11g) ADSL2+ Router, please refer to the on-line
COMELIT AUDIO PLAYER ART
 COMELIT AUDIO PLAYER ART. 20004500-20004501 - 20004502 1 2 TABLE OF CONTENTS 1 INTRODUCTION... 4 1.1 OVERVIEW OF FUNCTIONS... 4 1.2 FUNCTIONAL PRINCIPLE... 4 2 COMELIT AUDIO PLAYER... 5 2.1 SERVER AND
Brother HL-5370DW Configuration
 Brother HL-5370DW Configuration Importance of Static IP Address for Printers When a printer is first installed to a computer, its IP address is noted. If that address changes, the computer will be unable
It is a Plug & Play Solution It is a bundle, containing an HP5100S and an NHP5010
 Note: The following Quick Installation Guide has been designed for the Addon NHP5010BD1 bundle, but it can be used for all other bundles. Powerline Adapter (also called Homeplug) is a device that carries
Innovative Electronics for a Changing World INDEX
 Innovative Electronics for a Changing World INDEX 1. SYSTEM DESCRIPTION 2. BOARD CONNECTIONS terminals and indicators 3. CONNECTION DIAGRAM 4. START UP GUIDE and passwords 5. HOME PAGE 6. STATUS PAGE 7.
ShareLink 200 N Setup Guide
 ShareLink 00 N Setup Guide This guide provides instructions for installing and connecting the Extron ShareLink 00 N Collaboration Gateway Network Version. The ShareLink 00 N allows anyone to present content
Admin account. You can create your own fixtures in our internet pages and then configure the eblue units according to that.
 Admin account The eblue units are delivered with the standard DALI stand-alone configuration. It is possible to change the configuration and other details with Casambi admin account and Utility app. You
User Manual RecoMedia Presentation made easy
 KN-5YHW User Manual RecoMedia Presentation made easy Thank you for purchasing this product. To receive latest update, please visit website www.recomedia.co FEATURES FEATURES Wireless Presentation RecoMedia
DP-502 User s Guide Harware Descriptions Software Installation ETM 3.0
 DP-502 User s Guide This DP-502 (the device ) based system allows multiple devices to connect to a server and automatically update audio contents on a daily basis. The device is loaded with up to 13 sound
Product Manual. Version PROMISE Technology, Inc. All Rights Reserved.
 Product Manual Version 2.0 2016 PROMISE Technology, Inc. All Rights Reserved. Contents Table of Contents Introduction 1 Unpacking 1 Requirements for Apollo setup and use 1 Back of Apollo 2 Front of Apollo
SEAVDOMUS User guide. Index
 Index Introduction... 2 1. Installing SEAV DOMUS... 4 1.1 Activating DomusBox... 4 1.2 Drawing the environments in DomusWeb... 5 1.3 Connecting DomusBox to the devices... 10 1.4 Configuration of a new
Software Installation Guide. Version 1.1
 Software Installation Guide Version 1.1 Thank you for choosing an Airtopia product You are advised to read this manual carefully; it contains all the information you need about the right conditions for
Smart Door Lock (SDL-ML110) MANUAL
 MANUAL") Smart Door Lock (SDL-ML110) MANUAL Functions and design of this product are able to change for quality improvement without prior notice. CONTENTS INTRO... 03 Components... 04 Product Specification...05
Smart Door Lock (SDL-ML110) MANUAL Functions and design of this product are able to change for quality improvement without prior notice. CONTENTS INTRO... 03 Components... 04 Product Specification...05
WELCOME. For customer support or any inquiries, please visit our web site at or contact us at
 WELCOME Congratulations on purchasing the GBF Smart Four Wire Intercom System. Our factory engineers were the first to enable multiple security cameras being monitored through a smart mobile device and
Smart heating system. with wireless thermostats & smartphone control for every room. Get the most out of any water based underfloor heating
 Smart heating system with wireless thermostats & smartphone control for every room Get the most out of any water based underfloor heating DETAILED OVERVIEW Control the heating in your home from anywhere.
Quick Installation Guide DAP AC1200 Wi-Fi Range Extender
 AC1200 Wi-Fi Range Extender BEFORE YOU BEGIN Delivery Package Extender (brochure). If any of the items are missing, please contact your reseller. The User Manual and documents are available on D-Link website
LEGUANG N900 Wireless Router Configuration Guide
 LEGUANG N900 Wireless Router Configuration Guide ActForNet Technologies Inc. February 2014 Contents 1. What is included... 3 2. Installation Guide... 3 2.1 How to connect... 3 2.2 How to reset... 4 2.3
1 WiPG-1600 User s Manual. WiPG User's Manual. version: 2.01
 1 WiPG-1600 User s Manual WiPG-1000 User's Manual version: 2.01 2 WiPG-1600 User s Manual Table of Contents 1 Overview... 3 2 Package Contents... 4 3 USB Token Contents... 4 4 Physical Details... 5 5 What
Setting Up The HikVision Villa IP Intercom for The First Time
 Setting Up The HikVision Villa IP Intercom for The First Time Introduction This tech note will step you though the steps to setting up the HikVision Villa IP Intercom for the first time as a hardwired
JUNG Smart Control. How to connect the IP camera
 JUNG Smart Control How to connect the IP camera JUNG SMART CONTROL AND IP CAMERA 2 1. Introduction This quick start guide is applicable for the SC7, SC10, SC15 and SC19 devices. The adjacent illustration
Wireless Presentation System
 Wireless Presentation System User's Manual For QConnect-1700 (Nov 2017) Version: 1.0 1 Table of Contents 1 Overview... 3 2 Package Contents... 5 3 USB Token Contents... 5 4 Physical Details... 6 5 What
BiPAC 7300VP/ 7300VGP
 BiPAC 7300VP/ 7300VGP VoIP/(802.11g) ADSL2+ Router Quick Start Guide Billion BiPAC 7300VGP Series ADSL2+ Router For more detailed instructions on configuring and using the VoIP/802.11g ADSL2+ Router,
NISTA DEVICES GmbH 2013 All Rights Reserved. Door Access Control with the VoIP interface IP epcr Release 1.02
 NISTA DEICES GmbH 2013 All Rights Reserved Door Access Control with the oip interface IP 39-60 epcr Release 1.02 1 NISTA DEICES GmbH 2013 All Rights Reserved IP Door Phones IP 39-60ePCR Quick Installation
Setup Guide for Hard-Wire Ethernet Connected TP-Link TL-WR841N 300 Mbps Wireless N Router AARP Foundation Tax-Aide Colorado Technology Specialist
 Setup Guide for Hard-Wire Ethernet Connected TP-Link TL-WR841N 300 Mbps Wireless N Router AARP Foundation Tax-Aide Colorado Technology Specialist Summary This document explains how to configure the TP-Link
APP Setup Guide. Connect to your home or business from anywhere in the world. RINS1721-3
 APP Setup Guide Connect to your home or business from anywhere in the world. RINS1721-3 Contents Introduction... 3 Connect to your home or business from anywhere in the world... 3 Get your Control Panel
Quick Installation Guide
 Quick Installation Guide NEXTAV TM Cloud Hub - Table of Contents Product Features... 1 Ways to Connect... 1 Hardware and Accessories... 2 Product Parameters... 2 Minimum Hardware Requirements... 2 Product
Zavio F3100 / F3105 Quick Installation Guide
 Zavio F3100 / F3105 Quick Installation Guide Please follow the installation steps below to set up F3100 / F3105 IP Camera. Check the package contents against the list below. See P.1 Physical overview.