FuelForce Software. FuelForce Server and SQL Server. Multiforce Systems
|
|
|
- Baldwin Moody
- 6 years ago
- Views:
Transcription


1 FuelForce Software FuelForce Server and SQL Server Multiforce Systems
2 FuelForce Fuel Management Systems The Software How To. Quick Guide How to create a vehicle record How to disable a vehicle record How to restrict products for a vehicle How to view vehicle fueling records How to create a driver record How to disable a driver record How to view driver fueling records How to view inventory levels by site and product How to establish and update the vehicle and department relationship How to view site specific fueling transactions: issues, and deliveries How to display the real time inventory levels by site and product How to display a system message at the fuel island How to create and display a vehicle specific message at the island How to correct meter readings How to correct a fuel transaction to the appropriate vehicle How to update the fuel delivery quantity How to update the fuel prices How the find the reason for the alarm notification How to poll the fuel transactions from the sites How to run standard reports o Fuel consumption by site and product o Fuel consumption by department/agency o Fuel Deliveries by site and product o Site alarms with reason How to export fuel transactions (example shown for fleet management software, i.e. CCG FASTER, ) For more information call (609) , Sales@FuelForce.com or visit us at 1

3 VEHICLES Choosing Vehicles from the Database menu bar accesses the FuelForce Vehicles Entry Form shown below. Vehicles Entry Form This form adds or changes records in the Vehicle_Master Table. A vehicle record contains data required to authorize fuel at Site Control Processor. ADDING A VEHICLE 1. Click New or New Carry on the toolbar to add a record to the data table. The Vehicle field becomes active. Enter the desired ten (10) character Vehicle code. This code must be unique and cannot be modified once the record has been saved. <Tab> to the next field. 2. Enter the Tank type. Most vehicles have fuel tanks containing fuel for the vehicle to consume. Some vehicles actually represent transfer tanks. Eventually, fuel in a transfer vehicle transfers to another vehicle. The driver enters the same information at the RIT. 3. Enter the vehicle s Department. Press <F2> for a list of department codes. 4. Enter the vehicle s Site Group. Press <F2> for a list of site group codes. 5. Enter the vehicle s Spec Group. Press <F2> for a list of spec group codes. 6. Enter the vehicle s Products Group. Press <F2> for a list of product group codes. 7. Enter the vehicle s ten (10) character Meter Type. Enter the measurement units for the vehicle s meter. This is a free form field. Press <F2> for a list of previous meter type entries. 8. Enter the vehicle s Privileges. FuelForce compares the vehicle s privilege code with a driver s privilege code at time of fueling. Fuel will only be authorized when both codes match. A question mark (?) acts as wild card that matches any other character. The privilege code???????? permits authorization to fuel any driver. Press <F2> for a list of privilege codes. 9. Check Status to activate the vehicle. Changing the status to inactive prevents the vehicle from getting authorization in any manner. 2
4 10. Check Keypad to enable the driver to enter the vehicle code via the keypad. Disabling the keypad prevents authorization from occurring when the driver enters this vehicle code via the keypad. The driver, however, may use an alias vehicle code or other input device such as a card. 11. Enter the vehicle s fuel Capacity. This represents the total tank capacity of the vehicle. 12. Enter the vehicle s Minimum Delta traveled between fuel issues. The SCP adds this value to the previous meter reading to calculate the minimum allowable range. A positive value prevents a user from entering the same meter reading repeatedly to get authorization. A negative value can also be entered to minimize the effect of the tens or hundreds digits. Usually it is set to zero (0). 13. Enter the vehicle s Maximum Delta traveled between fuel issues. The SCP adds this value to the previous meter reading to calculate the absolute maximum allowable range. Usually it is set to a value equal to 3 times the range of a vehicle on a full tank. A value less than 1000 will also prevent errors due to fat fingers. 14. Check Short or Long for the fueling Timeouts. Set the hook and pulser timeout values in the Site_master. Choose Long if the vehicle requires more time to access the fuel tank or has saddle tanks. 15. Enter the vehicle s Maximum Range/Hr, Minimum Range/Hr and Range/Hr. The SCP multiplies the Range/Hr value by the number of hours since the last known meter reading. This is added to the previous meter reading to calculate the maximum allowable range. FuelForce adjusts this value according to the vehicle's usage patterns. The maximum and minimum values limit the adjustments to account for seasonal usage. 16. Select the Messages to appear when this vehicle gets authorization at the site. 17. Click on the Properties page. This reveals the properties sheet for the vehicle. See Properties for configuring the properties sheet. 18. Click Save on the toolbar to save the record. If you modify a record and forget to save before performing another task, FuelForce will prompt you to save your changes. 3


5 VEIWING TRANSACTIONS To view a vehicles transactions click on the transactions tab PRODUCT GROUPS Choosing Product Groups from the Database menu bar accesses the FuelForce Product Groups Entry Form shown below. Product Groups Entry Form This form adds or changes records in the Prodgrp_Master Table. A Product Group references a list of fueling parameters that are assigned to a vehicle. 4
6 ADDING A PRODUCT GROUP 1. Click New or New Carry on the toolbar to add a record to the data table. The Group Code field becomes active. Enter the desired four (4) character Group Code. <Tab> to the next field. 2. Enter a forty (40) character Description. 3. Enter the allowed Product codes. For each product you want to include, highlight the field, press F2 to view the Pop-up list and make a selection. 4. Check the Validate box to require odometer readings is validated. If the meter is validated, you may choose to only do this during Business Hours. 5. Check the Cut-Off box to limit the product quantity delivered to a vehicle to the capacity of that vehicle over a two hour period. This prevents this vehicle code from being used to fill multiple vehicles. 6. Click Save on the toolbar to save the record. If you modify a record and forget to save before performing another task, FuelForce will prompt you to save your changes. 5

7 DRIVERS Choosing Drivers from the Database menu bar accesses the FuelForce Drivers Entry Form shown below. Drivers Entry Form This form adds or changes records in the Driver_Master Table. A driver record contains data require to authorize fuel at Site Control Processor. ADDING A DRIVER 1. Click New or New Carry on the toolbar to add a record to the data table. The Driver field becomes active. Enter the desired ten (10) character Driver code. <Tab> to the next field. 2. Enter the driver s First Name, Middle Initial and Last Name. <Tab> to the next field. 3. Enter the driver s Department. Press <F2> for a list of department codes. 4. Enter the driver s Site Group. Press <F2> for a list of site group codes. 5. Enter the driver s Privileges. FuelForce compares the driver s privilege code with a vehicle s privilege code at time of fueling. FuelForce will only authorize when both codes match. A question mark (?) acts as wild card that matches any other character. The privilege code???????? permits authorization to fuel any vehicle. Press <F2> for a list of privilege codes. 6. Check Status to activate the driver. Changing the status to inactive prevents the driver from getting authorization in any manner. 7. Check Keypad to enable the driver to enter the driver code via the keypad. Disabling the keypad prevents authorization from occurring when the driver presses <Enter> to begin a transaction. The driver, however, may use an alias driver code or other input device such as a card. 8. Enter the driver s Supervisor. Enter the driver code of the supervising person. You can leave this field blank. Press <F2> for a list of supervisor codes. 9. Enter the driver s Phone number. Use this field to indicate a number to call for information or in case of emergency. 10. Select the Messages to appear when this driver gets authorization at the site. 6

8 11. When using encrypted pin codes, enter the driver s Epin. The pin code is a 1-4 digit code appended to the end of the driver code (maximum 10 characters). e.g. A 4 digit pin means only 6 characters are available for the visible portion of the driver code. This adds security to the driver code. You can change a driver s Epin any time the driver wants. 12. Click Save on the toolbar to save the record. If you modify a record and forget to save before performing another task, FuelForce will prompt you to save your changes. VEIWING TRANSACTIONS To view a drivers transactions click on the transactions tab 7

9 1. Go to Database Tanks 2. Click on the INVENTORY tab HOW TO VIEW INVENTORY LEVELS 8

10 DEPARTMENTS Choosing Departments from the Database menu bar accesses the FuelForce Departments Entry Form shown below. Departments Entry Form This form adds or changes records in the Department_Master table. You assign Vehicles, Drivers and Sites to departments for analysis, billing and security. This table must be complete before attempting to import vehicles, drivers or sites. ADDING A DEPARTMENT 1. Click New or New Carry on the toolbar to add a record to the data table. The department field becomes active. Enter the desired 10 character Department code. This code must be unique and cannot be modified once the record has been saved. <Tab> to the next field. 2. Enter a Description and any Notes regarding the department. 3. Click Save on the toolbar to save the record. If you modify a record and forget to save before performing another task, FuelForce will prompt you to save your changes. 9

11 HOW TO VIEW SITE SPECIFIC TRANSACTIONS 1. Go to DATABASE SITES 2. Click on the LIST tab and highlight the site you are interested in 3. Click on the TRANSACTIONS tab 10
 2.")

12 HOW TO DISPLAY A MESSAGE AT THE FUEL ISLAND This will explain how to display a message at the fuel island for a vehicle or driver 1. Go to Database Vehicles (or Drivers) 2. Click on the dropdown next to message 1 or 2 3. Choose the message you wish to send to the island 4. Click on the SAVE button 5. The updated information will go to the island with the next poll cycle 11

13 HOW TO CORRECT METER READINGS This will explain how to correct a bad meter reading 1. Go to Database Vehicles 2. Use the SEARCH button to locate the vehicle with the bad odometer reading 3. Highlight the existing meter reading and delete it 4. Put the correct meter reading in the box and tab out of the box 5. Click on the SAVE button The corrected meter reading will get to the fuel island during the next scheduled poll 12


14 CORRECTING FUEL TRANSACTIONS You can correct the vehicle number, the vehicle meter, the driver, the quantity, and the unit price of a fuel transaction. 1. Determine the vehicle number of the transaction that needs correcting. 2. Go to UTILITIES FUEL LOG ALL 3. After the fuel log loads click on the LIST tab 4. Double click on the VEHICLE column header 5. Click on the SEARCH button 6. Put the Vehicle number in the box and click on the SEARCH button 7. Locate and highlight the transaction you are correcting 8. Click on the DATA ENTRY tab 9. Click on the UNLOCK button 13
15 10. Place your mouse in the location that needs correction 11. Delete the bad information and replace it with the correct information 12. Click on the SAVE button These corrections need to be done before the transactions are uploaded to your fleet management system. If they are made after the original transactions have been uploaded then you should also do the correction in the fleet management system. 14

16 FUEL DELIVERY SHEET Choosing Deliveries from the Manual Data Entry option of the Database menu bar accesses the FuelForce Fuel Delivery Sheet Entry Form shown below. Fuel Delivery Sheet Entry Form This form adds or changes records in the Fuel_Sheet Table. You can enter manual deliveries through this form. Manual deliveries result whenever a tank is refilled. ADDING A MANUAL FUEL DELIVERY 1. Click New or New Carry on the toolbar to add a record to the data table. The Site Code field becomes active. 2. Enter the three (3) digit Site code. Press <F2> for a list of site codes. 3. Enter the eight (8) digit Tank code. Press <F2> for a list of tank codes. 4. Enter the ten (10) character Driver code. Press <F2> for a list of driver codes. 5. Enter the dip Quantity. 6. Enter the Unit Price. The unti price will update the tank unit price if the tank s Price Factor property has been set. 7. Enter when the issue Occurred. 8. Enter the Invoice and/or Vendor information (Required). 9. Enter the Purchase Order number (Required). 15

17 10. Click Save on the toolbar to save the record. If you modify a record and forget to save before performing another task, FuelForce will prompt you to save your changes. 11. Repeat steps 1-10 until you enter all of the manual fuel dips. 12. Click Process on the toolbar to process the fuel deliveries. FuelForce will prompt you to save your changes. Clicking <Yes> converts the current fuel sheet transactions into a file. FuelForce processes this file like any file received from a site. FuelForce discards transactions if you close the Fuel Delivery Sheet form before processing them. REMOVING A MANUAL FUEL DELIVERY 1. If you make a mistake entering a transaction, modify them before processing them. Simply correct the error and click Save. 2. If you enter a transaction twice, delete the duplicate entry by choosing File Delete. You also can save the next transaction over the duplicate record and continue entering more records. 16

18 HOW TO UPDATE FUEL PRICES This section will explain how to update fuel prices. Fuel prices are kept in the tank record and typically will change each time you get a fuel delivery. Because the prices are for each individual tank you can charge different prices at different sites depending how often each site gets a fuel delivery. If you wish to keep your fuel prices the same for all of your sites you will need to update all of the tanks at the same time. If you are adding a markup to your fuel and billing it from FuelForce this is when you will add your markup 1. Go to DATABASE TANKS 2. Place your mouse in the UNIT PRICE box 3. Highlight and delete the existing price 4. Input the new price delivery price or delivery price plus markup depending on how you bill for your fuel. 5. Click on the SAVE button 6. Repeat for each tank that you need to update 17

19 FINDING THE REASON FOR SYSTEM ALARMS This section explains how to view the alarm log to see if there are any problems 1. Go to the menu bar and click on the ALARM CLOCK icon or go to UTILITIES ALARM LOG 2. The alarm log will be displayed with the most recent entry at the bottom of the page Most of the entries are for information only and do not need any further attention. Contact your Customer Support Representative for further information. 18

 and click on the sites you want to poll. The sites will be highlighted when they are selected. Click <Poll> to initiate the poll.")
20 SITE POLLING Any changes that are made to the database will be transferred to the site at the next scheduled poll. If, however, you want the changes to be sent to the site more immediately by manually polling the site. Choose Poll SCP(s) from the View menu or click on the yellow phone to open the Poll Remote Sites dialog. Poll Remote Sites Dialog (Sites Selected) Select the site to poll from the list. To select multiple site, hold the control key (Ctrl) and click on the sites you want to poll. The sites will be highlighted when they are selected. Click <Poll> to initiate the poll. The form will close. To monitor the polling status, open the Poll Remote Sites dialog again. The sites that are going to be polled will show Pending. The status line at the bottom of the form will display the current status of the communications application. When a site poll is completed, the Pending text will be replaced with the time and date of the last poll request. Poll Remote Sites Dialog (Polling in Progress) 19

21 REPORTS All of the FuelForce reports are accessed the same way 1. Go to FILE PRINT REPORTS 2. Click on the LIST tab 3. Scroll through the list and highlight the report you want to run 4. Click on the DATA ENTRY tab 5. Tab to the PERIOD box and use the dropdown to choose the reporting period. Your choices are ALL all transactions in the database YTD current year to date LAST N DAYS last (N) number of days backwards from today MONTHLY fuel report for a specific month 1 st of the month to 1 st of the following month USER SPECIFIED user can choose the start time and date and the end time and date for the report AUDIT N used to create and audit report or look at a previously created audit report 6. Choose the type of report you want detail or summary 7. The OUTPUT box is used if you wish to create a file instead of looking at the report on the screen or creating a hard copy. Your output choices include TXT text file ASC ascii type file used to create files to be imported into other applications such as a fleet management or billing application TAB tab delimited file WKS Microsoft Works spreadsheet file XLS Microsoft Excel file XLS Microsoft Excel File (preferred format for OFFICE 2003 and above) 8. Click on the CRITERIA tab. The criteria area is where you can set any filters that you want for your report. Typical Criteria selections are: Department Vehicle 20

22 Driver Product Spec Code Site Tank Hose Property Property Value 9. After you have selected your criteria you are ready to run the report. Click on the button at the bottom of the report box that will give you the output that you want VIEW Puts the report on your screen for viewing PRINT Left click with your mouse to send the report to your default printer. Right click with your mouse to choose any printer installed on your computer. FILE If you have chosen an output method such as an ascii file or excel spreadsheet this will create the file. BROWSE Will display the query results in a grid. 21
23 SAMPLE REPORTS Fuel by Site Detail Fuel by Site Summary Fuel by Department Detail Fuel by Department Summary Fuel Deliveries Alarms 22
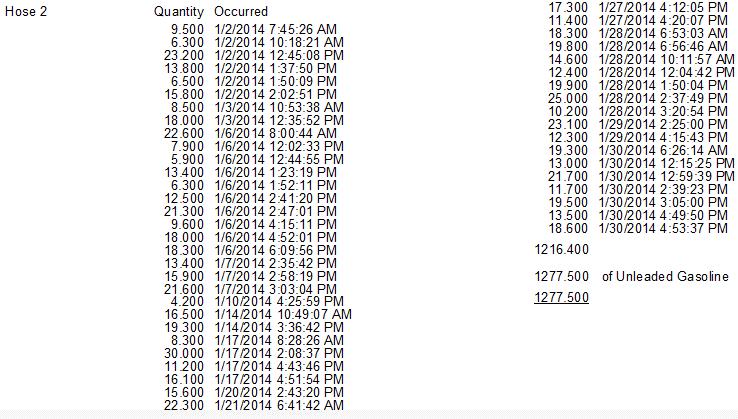
24 23
25 24


26 Vehicle Dept Desc Meter Occurred Prod Quantity Price Driver 25
27 26
28 27
29 28

30 EXPORT TRANSACTIONS TO YOUR EXISTING SOFTWARE PACKAGE (EXAMPLE SHOWN FOR FASTER FLEET) The FF2FASTER report will create the file that is needed to get the fuel transactions in to the FASTER fleet management program. 1 Go to FILE PRINT REPORTS 2 Locate the FF2FASTER report and select it. 3 Make sure that the report period is AUDIT N 4 Make sure that the output mode for the report is ASC 5 Make sure the N box has the correct number this will be set up with the initial Fuelforce install 6 Click on the FILE button 7 When the SELECT AUDIT box appears click NOW and OK 8 Click YES to the warning box 29


31 9. When the file has been created you will get an acknowledgment box that will give you the location of the file. 10. Go to your FASTER program and run the Fuel Import Module using the file you just created. Document # FSHT-0417 For more information call (609) , Sales@FuelForce.com or visit us at 30
Table of Contents ProFuel User Manual
 Table of Contents ProFuel Reference Manual Version 3.0 Page 2 Table of Contents Table of Contents INTRODUCTION...6 System Requirements...8 Loading and Initialization...8 Registration...8 Installing on
.txt - Exporting and Importing. Table of Contents
 .txt - Exporting and Importing Table of Contents Export... 2 Using Add Skip... 3 Delimiter... 3 Other Options... 4 Saving Templates of Options Chosen... 4 Editing Information in the lower Grid... 5 Import...
Records Center Training Guide
 WEB MODULE Updated June 2013 Records Center Training Guide Florida State Records Center Division of Library and Information Services This page intentionally left blank. Total Recall Web Module Records
Table of Contents. Contents. 1 Introduction. 2 The Main Menu Step #2 - PM Schedule. 8 Notification Popups. 9 Service Calendar
 Contents I Table of Contents 1 Introduction...1 2 The Main Menu...1 3 The Equipment...3 Manager...6 4 Step #1 - Establishing Locations/Categories...6 5 Step #2 - PM Schedule Setup...9 6 Step #3 - Adding
University of North Dakota PeopleSoft Finance Tip Sheets. Utilizing the Query Download Feature
 There is a custom feature available in Query Viewer that allows files to be created from queries and copied to a user s PC. This feature doesn t have the same size limitations as running a query to HTML
MaintScape Training Course Table of Contents
 MaintScape Training Course Table of Contents Table of Contents... 1 Training Course Requirements... 3 Overview and Main Modules... 3 Search Window... 4 Reports are produced from the Search Window... 6
JK Archives Web Portal Reference Guide
 JK Archives Web Portal Reference Guide 44077 Mercure Circle Sterling, VA 20166 703 754 6735 request@jkmoving.com 1 P age JK Archives Web User s Guide JK Archives uses the Total Recall SQL Records Management
Logging Into ipart Enter the Store ID
 Logging Into ipart Enter the Store ID Using your computers web browser, navigate to the ipart homepage URL: https://ipart.amador.ca which will look similar to the image above. Enter the Store ID requested
Utility Cashier System
 Utility Cashier System CASHIER MANUAL July 29, 2012 Version 1.2 1 System Account Overview Logging into Utili.Ca$h Logging Out of Utili.Ca$h Changing your Utili.Ca$h Password Cashier Daily Processes Cash
This document describes the various enhancements and modifications to DRM Windows that occurred between versions and
 This document describes the various enhancements and modifications to DRM Windows that occurred between versions 8.3.260 and 9.1.270. New Feature: Customer Mapping The mapping feature lets you interact
Topics Covered. Web Address / Popup Blockers. How to Sign On. Main Toolbar Overview. Order Guides / Placing Orders. Confirmations.
 Topics Covered Web Address / Popup Blockers How to Sign On Main Toolbar Overview Order Guides / Placing Orders Confirmations Reports User / Admin Options Custom Order Guides Web Address What is the web
Catalog Management Tool (CMT) Reference Guide
 Reference Guide") Catalog Management Tool (CMT) Reference Guide The Catalog Management Tool (CMT) provides data on items listed on the Portal s e-catalog. The CMT offers contracted vendors advanced item submission and catalog
Catalog Management Tool (CMT) Reference Guide The Catalog Management Tool (CMT) provides data on items listed on the Portal s e-catalog. The CMT offers contracted vendors advanced item submission and catalog
New BoundTree.com User Guide Fall Version 6
 New BoundTree.com User Guide Fall 2016 Version 6 Table of Contents Overview Navigating the Home Page Creating an Account Logging into an Existing Account Forgot Your Password? Reviewing Your Account Editing
MaineStreet Financials 8.4
 MaineStreet Financials 8.4 General Ledger Excel Journal Entry 1 Overview A Journal Entry is used to update the General Ledger for many types of transactions, including cash receipts, transfers of revenue
 Contents I Table of Contents 1 Introduction...1 2 The Main Menu...1 3 The Equipment...2 Manager...5 4 Step #1 - Establishing Locations/Categories...6 5 Step #2 - Defining your PM Schedules...9 6 Step #3
RONA e-billing User Guide
 RONA e-billing Contractor Self-Service Portal User Guide RONA e-billing User Guide 2015-03-10 Table of Contents Welcome to RONA e-billing What is RONA e-billing?... i RONA e-billing system requirements...
Job Aid. Enter bid Using XML Upload Functionality
 Enter bid Using XML Upload Functionality Scenario: You need to respond to a bid using the XML upload functionality. The XML functionality allows your responses to be transferred automatically from an Excel
Making EXCEL Work for YOU!
 Tracking and analyzing numerical data is a large component of the daily activity in today s workplace. Microsoft Excel 2003 is a popular choice among individuals and companies for organizing, analyzing,
Table of Contents. Contents. 1 Introduction. 2 The Main Menu Notification Popups. 9 Service Calendar. 12 Generating Reports ...
 Contents I Table of Contents 1 Introduction...1 2 The Main Menu...1 3 The Equipment...3 Manager...6 4 Step #1 - Establishing Locations/Categories...6 5 Step #2 - Defining Your PM schedules...9 6 Step #3
Quick Guide for Suppliers - Catalogs Supplier Portal (October 2012)
") Quick Guide for Suppliers - Catalogs Supplier Portal (October 2012) Copyright 1999-2012 Basware Corporation. All rights reserved. About Basware Supplier Portal Documentation The following documentation
Quick Guide for Suppliers - Catalogs Supplier Portal (October 2012) Copyright 1999-2012 Basware Corporation. All rights reserved. About Basware Supplier Portal Documentation The following documentation
Model Alemite, LLC 167 Roweland Drive, Johnson City, Tennessee Copyright 2016 by Alemite, LLC FORM: Original
 343537 SERVICE GUIDE AFCS Enterprise manager manual Model 343537 Alemite, LLC 167 Roweland Drive, Johnson City, Tennessee 37601 www.alemite.com Copyright 2016 by Alemite, LLC FORM: 671106 Original SER
Manual Version 5. STIHL Service Communication. STIHL SC
 STIHL Service Communication Manual Version 5 STIHL SC STIHL Service Communication www.stihl.com Contents 1 System requirements... 4 1.1 Hardware... 4 1.2 Operating system... 4 1.3 Additional software required...
University of North Carolina User Guide
 University of North Carolina User Guide June 2006 The software described in this document is furnished under a license agreement. The software may be used or copied only in accordance with the terms of
Item Management. SIMMS Inventory Management Software October 20, 2011
 Item Management SIMMS Inventory Management Software 2012 October 20, 2011 Contents Item Management.................. 1 Adding an Item s Profile................ 1 Add an Item s Basic Profile Details..........
USER MANUAL. > analyze. reduce. recover
 USER MANUAL > analyze > reduce > recover Table of Contents COPY AUDIT... 1 OVERVIEW... 1 IMPORTANT NOTES FOR PRINT AUDIT 4 CUSTOMERS... 1 COMMUNICATOR TECHNICAL NOTES... 2 COPY AUDIT SOFTWARE... 2 INSTALLING
Fuel and Odometer Report Catalog
 Fuel and Odometer Report Catalog Fuel and Odometer Report Catalog 1 Introduction... 4 Terminology... 5 Reports Detail Listing Report... 7 Summary Listing Report... 9 MPG Report... 11 Latest Odometer Report...
Job Aid. Remote Access BAIRS Printing and Saving a Report. Table of Contents
 Remote Access BAIRS Printing and Saving a Report Table of Contents Remote Access BAIRS Printing a Report PDF HTML... 2 Remote Access BAIRS Printing a Report Export to PDF Interactive Reporting... 3 Remote
Contents. Table of Contents Introduction. The Main Menu...1 The Fleet Manager...2. Viewing the Maintenance...16 Generating Reports...
 Contents I Table of Contents 1 2 3 4 5 6 7 8 9 10 Introduction...1 The Main Menu...1 The Fleet Manager...2 Step #1 - Establishing...6 Locations/Departments Step #2 - Defining...8 your PM Schedules Step
3.B. Manually Uploading Electricity, Gas, and Water Data
 3.B. Manually Uploading Electricity, Gas, and Water Data NOTE: The approach outlined in this Section is for customers who already have access to whole-building electricity, gas, and water data including
Welcome to the Goddess Purchasing Portal!
 Goddess Purchasing Portal Quick Reference Guide Welcome to the Goddess Purchasing Portal! URL http://www.goddessproductsinc.com/arkansas.html Login Password Your State of Arkansas Email Address Welcome1
SMU Financials Created on April 29, 2011
 Created on April 29, 2011 Notice 2011, Southern Methodist University. All Rights Reserved. Published 2011. The information contained in this document is proprietary to Southern Methodist University. This
Telecom Systems Billing Application User Guide
 Michigan State University Telecom Systems, Physical Plant Division Document updated: 9/6/07 Table of Contents: About the Telecom Billing Application...3 Gaining access to the Telecom Billing Application...3
USER S GUIDE (Fleets and mobile workforce)
") (Fleets and mobile workforce) Summary Contacts Module... 3 Vehicle Module... 5 Odometer update... 7 Trip Module... 8 Expense Module... 14 Management and tax reports Module... 16 Management Reports... 17
(Fleets and mobile workforce) Summary Contacts Module... 3 Vehicle Module... 5 Odometer update... 7 Trip Module... 8 Expense Module... 14 Management and tax reports Module... 16 Management Reports... 17
MS Access Let s begin by looking at the toolbar and menu of Access.
 MS Access 2003 Access is a database program that allows you to store, retrieve, analyze, and print information. Individuals use databases for various purposes. Businesses use databases to manage customer
2. create the workbook file
 2. create the workbook file Excel documents are called workbook files. A workbook can include multiple sheets of information. Excel supports two kinds of sheets for working with data: Worksheets, which
Supplier SAP SNC User Guide
 Supplier SAP SNC User Guide Version 1.0 July 29, 2014 AGCO Corporation Page 1 1 Introduction AGCO has chosen SAP Supplier Network Collaboration (SNC) to improve visibility and capability in North America
Banner 9 Training Guide
 South Dakota Board of Regents Student Information System/Financial Aid Human Resources/Finance Information System Banner 9 Training Guide Date 9/26/2018 This training assumes that the user has completed
Asset and Work Order Maintenance Management Suite Training Manual for Technicians
 Asset and Work Order Maintenance Management Suite Training Manual for Technicians Welcome! Welcome to the erportal Asset and Work Order Maintenance Management Software Suite erportal is a powerful software
Storefront Ordering System Demonstration Guide. Powered by
 Storefront Ordering System Demonstration Guide Powered by Welcome to CMYK s Storefront Ordering System (SOS) The following pages will guide you through our Demo Site. We will show you many options available
Version Operator Orientation. TIMMS Client. A guide to using the TIMMS System. Training & Navigation Notes
 Version 7.2.4 Operator Orientation TIMMS Client A guide to using the TIMMS System Training & Navigation Notes Disprax Pty Ltd 2015 WHAT IS TIMMS? TIMMS Stands for: Total Industry Management and Marketing
The simplified diagram below illustrates how a PM reminder functions. Display the Reminder as DUE. Reminder Due? Reminder Completed?
 Overview FLEETMATE provides several different ways to setup reminders. Reminders are most often used to help ensure that preventive maintenance tasks are completed on time. These are considered PM type
CASH MANAGEMENT HOW-TO
 Vision Municipal Solutions CASH MANAGEMENT How-To Guide Contents Set-Up... 4 Changing Your Default Period... 4 How to Change Your Default Period... 4 Payment Centers... 4 Adding a Payment Center... 4 Drawers...
FileBRIDGE Records User Guide
 Overview FileBRIDGE Records is a faster, smarter client web interface for customers to use when accessing, updating or viewing their inventory. Search features in FileBRIDGE Records provide an easy way
Quick Reference Guide Welcome to the SUNY TierOne Diversity Site
 Quick Reference Guide Welcome to the SUNY TierOne Diversity Site HOMEPAGE CONTRACT Select Contract from your location dropdown to shop SUNY Pre-approved items. NON-CONTRACT Select NonContract from your
Welcome to Fleet Management
 Welcome to Fleet Management iworq is designed so you can customize the software to meet your Fleet Management needs. This guide was created to help you start performing common tasks in the Fleet Management
Astra Schedule User Guide Scheduler
 Astra Schedule User Guide 7.5.12 Scheduler 1 P a g e ASTRA SCHEDULE USER GUIDE 7.5.12... 1 LOGGING INTO ASTRA SCHEDULE... 3 LOGIN CREDENTIALS... 3 WORKING WITH CALENDARS... 4 CHOOSING A CALENDAR AND FILTER...
Setting Up & Using the HNI (HON, Gunlocke, Paoli ) PSN
 PSN") the HNI (HON, Gunlocke, Paoli ) PSN Updated May 2016 Contents Setting Up the HNI PSN...3 Receiving Authorization...3 Contacting Your HNI Vendor...3 Setting Up the Vendor Database...3 Setting Up Salesperson
the HNI (HON, Gunlocke, Paoli ) PSN Updated May 2016 Contents Setting Up the HNI PSN...3 Receiving Authorization...3 Contacting Your HNI Vendor...3 Setting Up the Vendor Database...3 Setting Up Salesperson
Canadian National Account Doc Type M
 How to Process a Canadian National Account Delivery Receipt Transaction: First, make sure you have all pertinent information gathered according to the National Account you are billing. If you re not sure
Munis. Using Munis Version For more information, visit
 Munis Using Munis Version 10.1 For more information, visit www.tylertech.com. TABLE OF CONTENTS Using Munis... 3 Permissions and Security... 3 Munis Menus... 3 Standard Screen Features... 4 Help, Settings,
LOGON. Citizens Bank CentreSuite Website for Multiple Cardholders. Navigate to Citizens Bank s CentreSuite website at
 Navigate to Citizens Bank s CentreSuite website at http://www.centresuite.com. LOGON Enter your User ID and Password as provided to you by the Purchasing Department and click on Log On to proceed. Please
esupplier - A User Guide for 3M s Vendors
 esupplier - A User Guide for 3M s Vendors Lesson 1 Getting Started...2 Main Menu / Home Page...2 Opening a New Window...2 Expanding and Collapsing the Screen...3 Downloading into Excel...4 Signing Out...4
Using Microsoft Excel
 Using Microsoft Excel Excel contains numerous tools that are intended to meet a wide range of requirements. Some of the more specialised tools are useful to people in certain situations while others have
LOGON. Citizens Bank CentreSuite Website for Single Cardholders. Navigate to Citizens Bank s CentreSuite website at
 Navigate to Citizens Bank s CentreSuite website at http://www.centresuite.com. LOGON Enter your User ID and Password as provided to you by the Purchasing Department and click on Log On to proceed. Please
ebilling Training g g For the Vendor
 ebilling Training g g For the Vendor All Users Log In 1. Click Cc the LAUNCH APPLICATION buo button. 2. Enter your User ID and Password 3. Click the LOGIN button. 4. If you do not have a User ID please
InterAct User. InterAct User (01/2011) Page 1
 Page 1") InterAct's Energy & Cost Analysis module provides users with a set of analytical reporting tools: Load Analysis Usage and Variance Analysis Trending Baseline Analysis Energy & Cost Benchmark What If Analysis
InterAct's Energy & Cost Analysis module provides users with a set of analytical reporting tools: Load Analysis Usage and Variance Analysis Trending Baseline Analysis Energy & Cost Benchmark What If Analysis
Distributor Extranet User Manual. Contact Us:
 Page 1 of 41 Distributor Extranet User Manual http://www.vikingrange.com/extranet/distributor Contact Us: customercare@vikingrange.com Page 2 of 41 Table of Contents 1. The Login Process p. 3 a. Manage
Welcome to Cole On-line Help system!
 Welcome to Cole On-line Help system! Cole Online is an Internet based information directory that allows fast and efficient access to demographic information about residences and businesses. You can search
Unit 12. Electronic Spreadsheets - Microsoft Excel. Desired Outcomes
 Unit 12 Electronic Spreadsheets - Microsoft Excel Desired Outcomes Student understands Excel workbooks and worksheets Student can navigate in an Excel workbook and worksheet Student can use toolbars and
Service Minder Plus Features/Helpful Hints
 Service Minder Plus Features/Helpful Hints NOTE: These items will be addressed during the training sessions. This document is meant to be an overview resource for after completion of training. General
Electronic Owner s Manual User Guide
 Electronic Owner s Manual User Guide I. Getting Started.... 1 Logging In.... 2 Additional Information... 2 II. Searching for an Existing EOM Form... 5 III. Creating a New EOM Form.. 5 IV. Modifying an
ADVANTAGE Financial System User Guide County Manager David Hankerson
 ADVANTAGE Financial System User Guide September 2015 ADVANTAGE Financial System User Guide County Manager David Hankerson 2 *This page is fully linked. Please click the page you wish to view. Table of
Table of Contents General Information Table Maintenance Top Ten Reports
 Table of Contents General Information 1 Windows Print Manager 1 Print Button for Documents 1 Print Spooling 1 Print Spool Buttons 2 Report Destination 2 Single document 3 All Documents 3 Delete 3 Clear
Once you click on the Enterprise Icon found on your desktop you will be asked for your password. This Default Code Is
 Once you click on the Enterprise Icon found on your desktop you will be asked for your password. This Default Code Is You should now see the main screen which is called the main screen or menu screen.
Setting Up and Using Delivery Manifests
 Updated June 2017 Contents About...3 Before You Begin...3 Importing Sales Orders and Customers...3 Setting Delivery Manifest Parameters...3 Setting General Parameters...4 Setting Route Parameters...5 Setting
TMW Asset Maintenance. TMW AMS - SQL Road Calls Guide
 TMW Asset Maintenance TMW AMS - SQL Guide Table of Contents Introduction... 2 Setting Road Call Options... 3 Starting the Module... 5 Changing Shops... 5 Searching... 5 Road Call Options... 7 Enter Road
Microsoft Access 2010
 Microsoft Access 2010 Chapter 2 Querying a Database Objectives Create queries using Design view Include fields in the design grid Use text and numeric data in criteria Save a query and use the saved query
Calendar & Buttons Dashboard Menu Features My Profile My Favorites Watch List Adding a New Request...
 remitview User Guide 1 TABLE OF CONTENTS INTRODUCTION... 3 Calendar & Buttons... 3 GETTING STARTED.... 5 Dashboard.... 7 Menu Features... 8 PROFILE.... 10 My Profile... 10 My Favorites... 12 Watch List...
TungSpot User Manual Last Update 5/20/2013
 TungSpot User Manual Last Update 5/20/2013 TungSpot User Manual 1. Introduction... 2 1.1 Overview... 2 1.2 Login... 2 1.3 Navigation Tools... 3 2. Homepage... 4 2.1 Overview of Home Page... 4 2.2 My Purchases...
Microsoft Access 2010
 www.jwalkonline.org/main michael@jwalkonline.org @MichaelJWalk Microsoft Access 2010 Part 3 Michael J. Walk It's about control: use advanced features of Access to control data entry, automate processes,
Item Number Change for Sage Accpac ERP
 SAGE ACCPAC Sage Accpac Options Item Number Change for Sage Accpac ERP User Guide 2008 Sage Software, Inc. All rights reserved. Sage Software, Sage Software logos, and all Sage Accpac product and service
8.1 OVERVIEW OF THE INVENTORY MODULE ADDING NEW ITEMS...
 Chapter Module The module is used to record and track inventory and storeroom information. This Chapter describes how to use the Web Work module. Table of Contents 8.1 OVERVIEW OF THE INVENTORY MODULE...
New Finance Officer & Staff Training
 New Finance Officer & Staff Training Overview MUNIS includes many programs and tools to allow for the management of the District financials. As newer finance officers and staff, you are charged with understanding,
MultiSite Suite: General Ledger
 MultiSite Suite: General Ledger User s Manual version 2.2.97 Copyright & Trademarks Copyright Notice and Trademarks 2003 by Brent Lawrence, LLC. All rights reserved. Reprinted and edited by MultiSite Systems,
REPORT WRITER MANUAL (Version 10)
") REPORT WRITER MANUAL (Version 10) 2 Report Writer - Navigation You may access Report Writer by choosing view from your toolbar and selecting Report Writer or by choosing the Report Writer option when you
REPORT WRITER MANUAL (Version 10) 2 Report Writer - Navigation You may access Report Writer by choosing view from your toolbar and selecting Report Writer or by choosing the Report Writer option when you
PowerLink Views and Subsets. What do they do and how can they help me? John Grindley
 PowerLink Views and Subsets What do they do and how can they help me? John Grindley John.Grindley@cistech.net Power Link Views What are they? View considerations Agenda for Today Code files value, alias,
1. About AP Invoice Wizard
 1. About AP Invoice Wizard Welcome to AP Invoice Wizard. We have developed this tool in response to demand from Oracle Payables users for a user friendly and robust spreadsheet tool to load AP Invoices
NorthClark Computing, Inc. Cost Estimating. User Guide
 ERP Consulting Web Development Custom Programming Solutions Desktop & Web Applications for Manfact Cost Estimating User Guide Web and Desktop Applications for Manfact by Epicor July 1, 2007 2007 All Rights
OM Marketplace. October, 2017
 OM Marketplace October, 2017 1 CONTENTS Contents Page # OM Marketplace Basics 3 About OM Marketplace 4 Login 5 User Preferences 8 Order Management 17 Place An Order 18 Quick Key 27 Upload Order 29 View
Setting Up Your Account:
 College of DuPage Print Center Online Instructions for using the system UPDATED: May. 2018 Setting Up Your Account: 1. From your internet browser, type in the following URL: printcenter.cod.edu 2. Enter
Contents GENERAL OVERVIEW 3. User Profile and Permissions... 3 Regional Manager... 3 Manager... 3 User... 4 Security... 4
 SYNERGY USER GUIDE Contents GENERAL OVERVIEW 3 User Profile and Permissions... 3 Regional Manager... 3 Manager... 3 User... 4 Security... 4 Budgets... 4 Spending Limits... 5 PO Hold Review... 5 Regional
CalPlan. Creating a Unit Plan Navigating CalPlan Workbook 1/25/18
 CalPlan Creating a Unit Plan Workbook 1/25/18 Table of Contents Exercise 1: Log into the Workspace & Run a CalPlan Report... 3 Exercise 2: Launching CalPlan and Setting Your Entity... 10 Exercise 3: Actualized
CrossPointe Asset Management
 CrossPointe Asset Management User s Manual revised July 2018 Table of Contents Page Access to Asset Management--------------------- 1 6 Search for Assets------------------------------------ 7 14 Update
Microsoft Access 2013
 Microsoft Access 2013 Chapter 2 Querying a Database Objectives Create queries using Design view Include fields in the design grid Use text and numeric data in criteria Save a query and use the saved query
Microsoft Access 2013
 Microsoft Access 2013 Chapter 2 Querying a Database Objectives Create queries using Design view Include fields in the design grid Use text and numeric data in criteria Save a query and use the saved query
Electronic Appraisal Delivery (EAD) Portal. FHA EAD General User Guide
 Portal. FHA EAD General User Guide") Electronic Appraisal Delivery (EAD) Portal FHA EAD General User Guide Last Updated: October 2015 FHA EAD General User Guide Page 2 of 87 Version 1.3.1 TABLE OF CONTENTS INTRODUCTION... 6 WHAT IS THE ELECTRONIC
Electronic Appraisal Delivery (EAD) Portal FHA EAD General User Guide Last Updated: October 2015 FHA EAD General User Guide Page 2 of 87 Version 1.3.1 TABLE OF CONTENTS INTRODUCTION... 6 WHAT IS THE ELECTRONIC
BTA Billing Online Support Statement File Reference Guide
 BTA Billing Online Support Statement File Reference Guide BTA Billing Support File Reference Guide Table of Contents Step 1:-- Download the file from American Express @ Work...3 Step 2:-- Saving the Billing
Overview NOTE: Listing Overview. User Profile. Language Selection. Asset(s) View. Asset(s) Details. Editing Mode
 View. Asset(s) Details. Editing Mode") Overview Listing Overview User Profile Language Selection Asset(s) View Asset(s) Details Editing Mode NOTE: Some functions may not be available to all users depending on permissions granted. Some of the
Overview Listing Overview User Profile Language Selection Asset(s) View Asset(s) Details Editing Mode NOTE: Some functions may not be available to all users depending on permissions granted. Some of the
Quick Reference Guide
 Quick Reference Guide Release 2015 Disclaimer This document is provided as-is. Information and views expressed in this document, including URL and other Internet Web site references, may change without
0Acknowledgement. This application has been developed with the cooperation of the Inter-agency Group for Child Mortality Estimation.
 r4 0Acknowledgement This application has been developed with the cooperation of the Inter-agency Group for Child Mortality Estimation. 1Contents Introduction... 6 User Levels... 6 Learning CME Info...
Generating a Custom Bill of Materials
 Generating a Custom Bill of Materials Old Content - visit altium.com/documentation Modified by on 6-Nov-2013 This tutorial describes how to use the Report Manager to set up a Bill of Materials (BOM) report.
WORKFLOW MANAGER RELEASE NOTES NEW FEATURES * OPEN ISSUES * ADDRESSED ISSUES RELEASE DATE: MAY 17, 2013 CS.THOMSONREUTERS.COM
 WORKFLOW MANAGER RELEASE NOTES NEW FEATURES * OPEN ISSUES * ADDRESSED ISSUES RELEASE DATE: MAY 17, 2013 CS.THOMSONREUTERS.COM Proprietary Materials No use of these Proprietary materials is permitted without
Enhancements Guide. Applied Business Services, Inc. 900 Wind River Lane Suite 102 Gaithersburg, MD General Phone: (800)
") Enhancements Guide Applied Business Services, Inc. 900 Wind River Lane Suite 102 Gaithersburg, MD 20878 General Phone: (800) 451-7447 Support Telephone: (800) 451-7447 Ext. 2 Support Email: support@clientaccess.com
Enhancements Guide Applied Business Services, Inc. 900 Wind River Lane Suite 102 Gaithersburg, MD 20878 General Phone: (800) 451-7447 Support Telephone: (800) 451-7447 Ext. 2 Support Email: support@clientaccess.com
Inventory Module & Wireless Device. User Quick Start Guide
 Inventory Module & Wireless Device User Quick Start Guide Published on: 3/14/2007 Copyright and Disclaimer Copyright 2007 Pace Systems Group, Inc., 1902 2 nd Avenue North, Jacksonville Beach, Florida,
Copyright 2015 Integrated Environmental Solutions Limited. All rights reserved.
 Tabular Room Data User Guide IES Virtual Environment Copyright 2015 Integrated Environmental Solutions Limited. All rights reserved. No part of the manual is to be copied or reproduced in any form without
OneSource Concierge eprocurement
 OneSource Concierge eprocurement CREATE A PURCHASE ORDER - UTILIZING ORDER GUIDES Instructional Guide: Create a Purchase Order - Utilizing Order Guides Submit a Purchase Order Order Confirmation Technical
Argos Creating Labels with Word
 Argos Creating Labels with Word This document explains how create mailing labels using Argos. For information about Argos, refer to the document, Argos for Typical Users. There are two (2) basic steps
User s Guide. (Virtual Terminal Edition)
") User s Guide (Virtual Terminal Edition) Table of Contents Home Page... 4 Receivables Summary... 4 Past 30 Day Payment Summary... 4 Last 10 Customer Transactions... 4 View Payment Information... 4 Customers
User s Guide (Virtual Terminal Edition) Table of Contents Home Page... 4 Receivables Summary... 4 Past 30 Day Payment Summary... 4 Last 10 Customer Transactions... 4 View Payment Information... 4 Customers
Colleague UI4.3 Documentation
 Colleague UI4.3 Documentation Table of Contents Getting Started... 2 Add the Shortcuts to your Desktop... 2 Searching for and Using Forms... 3 Begin Your Form Search... 3 Form Search Results... 3 The Navigation
Migrating Call Intelligence Settings for New CTC Clients
 Information Bulletin CDK Global, LLC. 1950 Hassell Road Hoffman Estates, IL 60169-6308 Migrating Call Intelligence Settings for New CTC Clients Converting to a New Phone System... 2 Overview of Important
Microsoft Dynamics GP is a robust accounting package that can meet
 In This Chapter Chapter 1 What Microsoft Dynamics GP Does Best Familiarizing yourself with the Microsoft Dynamics GP window Understanding Dynamics GP terms Knowing how Dynamics GP keeps your CPA happy