Treasurer s Financial System
|
|
|
- Jeffrey Palmer
- 6 years ago
- Views:
Transcription
1 COMPUTER ARTS, INC. Treasurer s Financial System USER S MANUAL Computer Arts, Inc. 320 SW 5th Ave. Meridian, ID gocai.com 1
2 TABLE OF CONTENTS CHAPTER ONE Introduction to the Treasurer s Financial System... 8 Screen Terminology... 9 Menu Bars... 9 Toolbars... 9 Scroll Bars... 9 Changing Column Widths Using Search Fields Error Message CHAPTER TWO Working with Auditor s Certificates Listing and Displaying A/C Deposits Displaying and Printing an A/C Deposit List Positioning the A/C Deposits List Searching for AC Deposits Including Memo Entries on A/C Deposits CHAPTER THREE Working with Warrant Redemptions Listing Warrant Redemption Batches Displaying a Warrant Redemption Batch Positioning the Warrant Redemption Batch List Searching for Warrant Redemption Batches
3 Redeeming Warrants Redeeming Warrants with Multiple Checks CHAPTER FOUR Deposit Listings Listing Previous Deposit Listings Searching Deposit Listings Searching Deposit Listing Detail Displaying and Printing a Deposit Listing Adding a New Deposit Listing Changing a Deposit Listing DELETING A DEPOSIT LISTING CHAPTER FIVE Working with Inquiry Windows Understanding Inquiry Windows Using Equals and Contains Fields Using the Account Information Inquiry Displaying Online History Inquiry Using the Warrant/Check Inquiry Listing Warrants or Checks Displaying Warrants or Checks Positioning the Warrants/Checks List Searching for Warrants or Checks Using the AC Inquiry Listing Auditor s Certificates
4 Displaying and Printing Auditor s Certificates Positioning the Auditor s Certificate List Searching for Auditor s Certificates Summing a Group of AC s Searching for AC Addendums Using the JE Inquiry Listing Journal Entries Displaying a Journal Entry Positioning the Journal Entry List Searching for Journal Entries Using the Vendor Inquiry Listing Vendor Names Displaying and Printing a Vendor Record Displaying and Printing Vendor Payments Positioning the Vendor List Searching for Vendors Using the Online History Inquiry Displaying a History Record Displaying Transaction Account History Changing a Transaction Unclearing a Transaction Positioning the Treasurer s History List
5 CHAPTER SIX Working with Bank Listing and Displaying Banks Displaying a Bank Record Positioning the Bank List Searching for Banks Adding a New Bank Changing an Existing Bank Copy an Existing Bank CHAPTER SEVEN Working with Bank Accounts Adding a Bank Account Changing a Bank Account Closing a Bank Account Deleting a Bank Account Searching for Bank Accounts Displaying Account Information Displaying Account History Searching for a Bank Account Transaction Displaying Deposit Listings for an Account Working with Bank Account Transactions Listing Miscellaneous Transactions Adding a Miscellaneous Transaction Changing an Account Transaction Deleting an Account Transaction
6 Working with Account Transfers Listing Transfer Information Adding an Account Transfer Changing an Account Transfer Voiding Unused Checks Working with Memo Entries Entering Memo Entries Turning Over Memo Entries Displaying and Updating Account Notes Displaying an Account Balance Summary Reconciling a Bank Account CHAPTER EIGHT Working with investment accounts Listing Investment Accounts Adding Investment Accounts Changing an Investment Account Renewing an Investment Recording Interest on an Investment CHAPTER NINE Printing Reports Selecting Reports to Print Using the Report Selection Window Using Report Filters Using Default Report filters
7 User-Defined Report Filters Displaying Reports on the Screen Changing Display Magnification Printing a Displayed Report Exporting Report Files Export a report into Excel Printing a List of Available Reports Report Troubleshooting CHAPTER TEN Working with the Treasurer s Control File Maintaining the Treasurer s Control File Unlock the Redemption/Clearing Process Maintaining Transaction Codes Updating Transaction Codes Copying Transaction Codes Deleting Transaction Codes Maintaining Currency Types Adding Currency Types Updating Currency Types Deleting Currency Types Maintaining Reports CHAPTER ELEVEN Technical Support Getting Help
8 CHAPTER ONE INTRODUCTION TO THE TREASURER S FINANCIAL SYSTEM Before you begin to use the Treasurer s Financial System ( Treasurer s System ), it is important to become familiar with its functions and understand the terminology and standards used in this manual. Chapter One contains a number of topics which will help you to better understand and use the Treasurer s System. The Treasurer s Financial System has been designed and developed to enable county governments to effectively track and maintain the financial activities of the County Treasurer s Office. The system provides features which include handling AC deposits, redeeming warrants, managing bank and investment accounts, and tracking transaction histories. This version of the Treasurer s System offers some great features including a friendly Windows-based user interface, powerful reporting functionality, and online help files. Computer Arts, Inc. provides technical assistance on the Treasurer s Financial System. For more information on these technical services, see the Technical Support chapter on page

9 SCREEN TERMINOLOGY MENU BARS The primary display screens throughout the Treasurer s System use both menu commands and toolbar buttons. Menus are displayed by placing the mouse pointer on one of the commands on the menu bar and clicking once. When a menu is selected, a number of menu options will be shown in the drop-down menu. Clicking on a particular menu option will perform that function. TOOLBARS Treasurer s System functions can also be performed by clicking on one of the toolbar buttons. Many of the functions for these buttons are specific to a particular screen and are described throughout this manual. Buttons that are used on the main toolbars are described in the Shortcuts section below. SCROLL BARS Scroll bars are used to move through the displayed records allowing you to see information that doesn t fit on a single screen. Clicking on the arrows at the top and bottom of the vertical scroll bar moves you up and down through the rows of information (or records). The horizontal scroll bar lets you display additional columns (or fields) of information for the displayed records. 9

10 CHANGING COLUMN WIDTHS List Windows, such as List Treasurer s Redemption Batch window, display data in a series of columns and rows. You can use your mouse pointer to change the width of the columns if desired. To change the width of a column, first locate the column separator to the right of the column to be changed. While you move your mouse pointer to the column separator, it will change to a cross symbol with arrows pointing out toward the sides. Press and hold the left mouse button and drag the mouse pointer to the right to expand the column or to the left to narrow the column. USING SEARCH FIELDS Certain fields, such as Bank, Transaction Code, etc. require you to enter a value or code that is validated by the system. When a valid code is required, search fields allow you to display and select from a set of codes. You can identify search fields on the screen by the three periods following the field s name. ( Bank for example). To search on one of these fields, do the following: 1. Position your curser on the desired field and press the F4 key or double-click on the field. 2. From the displayed window, locate the desired code or number. You can use the vertical scroll bar to page through the codes, if needed. 3. Click on the desired code and then click the Select button. You can also double click on the code itself. The code will be automatically entered on the Add or Update window. 10

11 ERROR MESSAGE To ensure accuracy and consistency, the Treasurer s System automatically validates information when you add or update records. If required data is missing or if the data is entered incorrectly, you will receive error messages to alert you. Error messages are typically displayed in two parts. The first is the error message itself. This lets you know that one or more problems have been found with the data entered. The second part, the message log, lists each error detected by the system. When you receive an error message, it will never instruct you to review other messages. Click the OK button to close this window and refer to the message log and other error messages. After reviewing the listed messages in the message log, click on the Close button in the top right corner to close this window. Close any additional error messages by clicking the OK button and return to your entry or update window. Data fields with errors will typically be displayed in red. Correct any errors and continue with your data entry. 11

12 CHAPTER TWO WORKING WITH AUDITOR S CERTIFICATES LISTING AND DISPLAYING A/C DEPOSITS To display a list of Auditor s Certificates (A/C) Deposits, click on the A/C Deposits toolbar button. This will display the List A/C Deposits window showing all A/C deposits that have been entered. From this screen you can perform such functions as entering new A/C deposits, searching for and displaying A/C deposits already entered. DISPLAYING AND PRINTING AN A/C DEPOSIT LIST 1. From the List A/C Deposits window, select the A/C deposit to be displayed by clicking on the desired row. 2. Click the Display button, press the F8 key, or double click on the row. You can also right click on the desired row and select the Display AC Deposit option. 3. To see a list of deposits from a specific date enter the date in date field and press Enter. 12


13 4. To print an A/C Deposit Report for this deposit, click the Print button to display the Report Selection window. 5. Select any report option, fill in required fields (Bank Code, Account, etc.) and click OK to create the report. 6. To display details for a particular A/C in the deposit, click on the desired A/C in the list and then click the Display button. The Display Auditor s Certificate window will be displayed. 13

14 7. If you wish to see more information on one of the transactions listed for this A/C, double click on the desired transaction or right click on the row and select the Display Transaction option from the pop up menu. This will bring up the Display History Transaction window. 8. Click the Done button on any displayed window to close the window and return to the List A/C Deposits window. POSITIONING THE A/C DEPOSITS LIST 1. From the List A/C Deposits window, click the Search button or press the F4 key. The Search A/C Deposits window will be displayed. 2. Enter the deposit number of the A/C deposit you wish to find in the Deposit # field and click the Process button. The List AC Deposits window will be displayed with the A/C deposit number at the top of the list. 3. Click the Refresh button or press the F5 key to restore the List A/C Deposits window to show the most recent A/C deposit at the top of the list. - SEARCHING FOR AC DEPOSITS 1. From the List A/C Deposits window, click the Search button or press the F4 key. The Search A/C Deposits window will be displayed. 2. If you know the description of the desired A/C deposit, enter part of it in the Description field. To search for an A/C deposit by amount, enter the exact amount you are looking for in the Checks Currency, Deposit Total or Pre-Deposited fields. 14


15 3. Click the Process button to start the search. The List A/C Deposits window will be displayed showing only A/C deposited that match your search information. Note: The Pre-Deposited field will only be displayed if the Use Memo Entries option is selected in the Control File as shown below. 15

16 4. For each A/C to be included on this deposit, enter the A/C information as described below and click the Add button. The A/C will be shown in the list with those already entered and the A/C amount will be added to the Detail Total Amount. If Memo Entries are to be added to the A/C, refer to Including Memo Entries on A/C Deposits on page 20 for instructions. Note: You can enter an A/C as a grand total or enter it in parts at whatever level of detail you wish. If you enter an A/C using multiple detail entries, the total amount of all entries must equal the total of the A/C before you can process the deposit. A/C Number Description The fiscal year and A/C number to be added to the deposit (required). Enter the four digit fiscal year in the first field and the A/C number in the second. To search for an A/C number, enter the appropriate fiscal year and then double click on the A/C umber field. The description (up to 40 characters) of the A/C being added to the deposit (required). If the Auto A/C Description option is selected in the Control File, the system will automatically enter the description of the AC as you enter a fiscal year and A/C number. This description can be changed if necessary. 16

17 Ref Type Amt Bank /Act The reference number for this transaction, if applicable. This field can contain any desired information including a check number, a bank document number or another number related to the transaction. Enter a currency type code for this detail item. To view and select from a list of currency type codes, position your cursor on this field and press F4 or double click on the field. Enter the amount of the A/C or the part of the A/C being entered. If this A/C is being deposited into a bank account that is different from the account entered at the top of the window, enter the bank and account codes for this AC. To view and select from lists of codes, position your cursor on either of these fields and press F4 or just double click on the fields. 5. To change an A/C entered in error, click on the A/C in the list and then click the Change button. The information for the A/C will be displayed in the Enter Details section of the Add A/C Deposits window. Change any necessary information and click the Add button to add the A/C to the deposit. 17

18 To remove an A/C from this deposit, click on the desired row and then click the Delete button. A message will appear warning you that you are removing an A/C from the deposit. Click the Yes button to remove the A/C or click the No or Cancel button to close the message window without removing the AC. 6. When all A/C s for this deposit have been added, click the Process button to save the deposit. A window will be displayed telling you that the batch is in balance and asking you if you wish to continue. Click the Yes button to process the batch or click the No or Cancel to exit this window without processing. Note: The total of the A/C s entered must equal the amount displayed in the Deposit Total field. If these numbers don t balance, the Detail Total field will be displayed in red and the system will not allow you to process the deposit. Also, if the total for the Deposit Detail Records entered for any A/C do not equal the amount of the A/C, a message will be displayed. You must make any necessary corrections before you can process the deposit. 7. After processing the A/C deposit, you will be returned to the List A/C Deposits window. If the A/C Deposits Reporting Option has been selected in the Control File, an A/C DEPOSIT REPORT will print automatically after processing has completed (see Maintaining the Treasurer s Control File beginning on page 120 for information on printing options). 18

19 INCLUDING MEMO ENTRIES ON A/C DEPOSITS While adding A/C s to an A/C deposit, you may wish to include Memo Entries on an A/C. The following instructions outline the process for doing this. See Working with Memo Entries on page 94 for more information on Memo Entries. 1. Add an A/C to the deposit as described in step 4 of the section above. When entering the A/C, make sure to enter the total amount of the Memo Entries to be included on this A/C in the Amt field. 2. After adding the AC, select it from the list by clicking on the appropriate row. 3. Click the Memos button. The Add A/C Deposits window will be changed to display available memo entries that can be included on the A/C deposit. 4. Select the memo entries to be included on this A/C. To select an entry, double click on the desired row or right click on the row and select the Select Memo option from the pop up menu. The amount of the item will be added to the amount in the Total Selected field. Selected entries will appear in gray and the A/C number will appear in the selected row. To deselect an entry, right click on the row and select the Remove Memo option from the pop up menu. 5. After selecting all entries to be included on the A/C, click the Process button. The Add A/C Deposits window will be redisplayed to allow you to enter additional A/C s. 19
20 Note: The total amount of the selected memo entries (shown in the Total Selected field) must equal the amount entered for the A/C (Shown in the Amount field in the AC Detail Record Information section of the window). 20
21 CHAPTER THREE WORKING WITH WARRANT REDEMPTIONS LISTING WARRANT REDEMPTION BATCHES To display a list of warrant redemption batches, click the Redeem Warrants button from the Treasurer s Main Menu. The List Treasurer s Redemption Batch window will be displayed showing warrant redemption batches already entered in to the system. DISPLAYING A WARRANT REDEMPTION BATCH 1. From the List Treasurer s Redemption Batch window, select the warrant redemption batch you wish to display on the desired row. 2. Click on the Display button, press F8, or select the Display option from the Select menu. You can also right-click on the row and select this option from the pop up menu or simply double click on the row. The Display Redemption Batch window will be displayed. 3. To display details for a particular warrant in the redemption batch, click on the desired warrant in the list and then click the Warrant button. You can also right click on the desired row and select the Display Warrant option from the pop up menu. The Display Warrant/Check window will be displayed. 4. To display information on the check or checks used to redeem warrants for this batch, click the Checks button. The list Treasurer s Checks window will be displayed showing check information for this warrant redemption. 5. Click the Done button on any displayed windows to close them and return to the List Treasurer s Redemption Batch window. 21

22 POSITIONING THE WARRANT REDEMPTION BATCH LIST 1. From the List Treasurer s Batch window, click the Search button or press the F4 key. The Search Batch window will be displayed. 2. Enter the number of the warrant redemption batch you wish to find in the Redemption Batch field and click the OK button or press Enter. The List Treasurer s Redemption Batch window will be displayed with the redemption batch number you entered at the top of the list. 3. Click the Refresh button or press F5 to restore the List Treasurer s Redemption Batch window to show the most recent warrant redemption batch at the top of the list. 22

23 SEARCHING FOR WARRANT REDEMPTION BATCHES 1. From the List Treasurer s Batch window, click the Search button or press the F4 key. The Search Batch window will be displayed. 2. If you know the description for the redemption batch you wish to find, enter part of it in the Description field. To search for a redemption batch by date or amount, enter the desired date or amount in the Redemption Date or Total Amount field. 3. Click the OK button to process the search. The List Treasurer s Redemption Batch window will be displayed showing only redemption batches matching your search data. 4. Click the Refresh button or press F5 to restore the List Treasurer s Redemption Batch window to show all warrant redemption batches with the most recent at the top of the list. REDEEMING WARRANTS 1. From the Treasurer s Main Menu, click the Redeem Warrants button or select the Redeem Warrants option from the Select menu. The List Treasurer s Redemption Batch window will be displayed. 2. Click the Add button, press the F6 key or the Add option from the Process menu. The Redeem Warrants window will be displayed. For each warrant, enter data here and click the Add button. 3. Enter the information for this warrant redemption. Descriptions for each data field are show below: Redemption Date The date which this warrant batch is being redeemed (required). If a batch of warrants will be redeemed over multiple days, be sure to use 23
24 the same date each time you open this window to redeem warrants for the batch. Total Amount Enter the total amount of the warrants to be redeemed for this batch (required). Description Enter a description for this redemption batch, if desired. Bank If a single check or sweep account is being used to redeem this batch of warrants, enter the code for the bank from which this warrant batch is being redeemed. To view and select from a list of bank codes, position your cursor on this field and press F4 or double click on the field. Account If a single check or sweep account is being used to redeem this batch of warrants, enter the code for the bank account from which this warrant batch is being redeemed. To view and select from a list of accounts, position your cursor on this field and press F4 or double click on the field. Check Number If a single check is being used to redeem this batch of warrants, enter the check number here. If you are using more than one check to redeem this batch, see Redeeming Warrants with Multiple Checks on page 28 below. 24

25 4. For each warrant being redeemed in this batch, enter information in the Enter Check section and click the Add button. Descriptions of these data fields are shown below. When you click the Add button, the warrant information enter will be listed below with all others already entered. Bank Account The code for the bank for which you want to display detail records. To view and select from a list of bank codes, position your cursor on this field and press F4 or just double click the field. The code for the bank account for which you want to display detail records. To view and select from a list of accounts, position your cursor on this field and presf4 or just double click on the field. Check Number Enter the warrant number to be added to this batch. To view and select from a list of warrants for the fiscal year entered above, click on this field and press the F4 key or double click on the field. 25

26 Amount Enter the amount of the warrant being added to this batch. If you prompt and select the warrant using the F4 key as described above, the amount will be added by the system automatically. 5. If a warrant has been added to this redemption batch in error, you can remove it by clicking on the warrant in the list and then clicking the Delete Check button. You can also right-click on the desired row and select the Delete Check option from the pop up menu. When the warning message is displayed, click the Yes button to remove the warrant from the batch or click the No or Cancel button to close the warning window without removing the warrant. Note: The only time a warrant can be deleted within this process is when they are being added to the redemption batch in the Display Redemption Batch window. To display detailed information on a warrant in this batch, click on the desired row from the List Treasurer s Redemption Batch window and then click the Display button or right-click on the row and select the Display Warrant option from the pop up menu. The Display 26

27 Warrant/Check window will be displayed. Click the Done button to close this window and return to the Redeem Warrants window. 6. When all warrants have been entered for this batch, click the Process button to process the redemption. A message window will be displayed showing that the batch is in balance and asking you if you wish to continue. Click the Yes button to complete the warrant redemption or click the No or Cancel button to close this window without processing. Note: The total of all the warrants entered must equal the total amount for this batch in order to be processed. If these totals do not match, you must change the Total Amount field or the warrants entered on the batch before you can process the batch. 7. After processing the warrant redemption batch, you will be returned to the List Treasurer s Redemption Batch window. If the Warrant Redemption Reporting option has been selected 27
28 in the Control File, a REDEEMED WARRANTS REPORT (TRB857) will automatically print after processing the redemption batch. REDEEMING WARRANTS WITH MULTIPLE CHECKS 1. Display the Redeem Warrants window and fill in the Redemption Date, Total Amount and Description fields as described in steps 1-3 above. Leave the Bank, Account and Check Number field blank. 2. Click the Mult Checks button. The Redeem Warrants window will change to allow entry of multiple checks. 3. For each check to be used to redeem this batch of warrants, enter check information as outlined below and click the Add Check button. The check will be added to the list of those already entered. Note: If the check number entered is not the next in line for a particular bank account, you will receive a warning message telling you that the check number entered is out of sequence. Click the Yes button to reenter the check number. 4. Continue adding checks as described above. To remove a check added in error, click on the check and then click the Delete Check button. When the warning message is displayed, click the Yes button to remove the check from the list or click the No or Cancel button to close the window without removing the check. 28
29 When all checks have been entered for this warrant redemption batch, click the Process button. The original Redeem Warrants window will be displayed showing the total amount of the checks entered as outlined in step 4 of the above section. 29
30 CHAPTER FOUR DEPOSIT LISTINGS LISTING PREVIOUS DEPOSIT LISTINGS A Deposit Listing allows you to record detailed information to be included with a bank deposit. The Deposit Listing does not store data within the system and does not have an effect on the deposit. To display a list of display listings entered into the system, click the Deposit Listings toolbar button from the Treasurer s Main menu. The List Deposit Listings window will be displayed. To show only deposit listings entered on a particular date, enter the date in the Deposit Listings For field. You can also limit this window to show only deposit listings for a single bank or bank account by entering the desired codes in the Bank or Account fields. These are fields that allow you to view and select from a list of codes by positioning your cursor on one of the fields and pressing F4 or by double clicking on the field. Click the Refresh button to restore the list to show deposit listings for all banks and accounts. SEARCHING DEPOSIT LISTINGS The deposit listing search allows you to find deposit listings by total amount or description. The following section contains instructions on locating deposit listings based on information in the detail items. 1. From the List Deposit Listings window, click the Search button or press the F4 key. The Search Deposit Listings window will be displayed. 2. To locate a deposit listing by amount, enter the total amount of the desired deposit in the Amount field. To locate a listing by description, enter all or part of the description you wish in the Description field. 3. Click the OK button or press the Enter key. The List Deposit Listings window will be displayed showing only deposit listings matching the search information you entered. 4. To reset the list of displayed deposit listings, click the Refresh button or press the F5 key. 30
31 SEARCHING DEPOSIT LISTING DETAIL This function allows you to search for deposit listings based on information contained in the deposit detail records. 1. From the List Deposit Listings window, click the Search Deposit Listing Detail button or select the Search Deposit Listing Detail option from the Select menu. The Search Deposit Listing Detail window will be displayed showing the detail records from the deposit listings entered in the system. 2. Enter the information you wish to use for the search. Descriptions for each field are shown below. Bank Account Deposit Date Amount Check Number Currency Description Deposit # The code for the bank for which you want to display detail records. To view and select from a list of bank codes, position your cursor on this field and press F4 or just double click the field. The code for the bank account for which you want to display detail records. To view and select from a list of accounts, position your cursor on this field and presf4 or just double click on the field. The date of the deposit listing for the detail items you want to locate. The dollar amount of the detail item you want to find. The check number of the detail item you want to find. The currency type code for the detail items you want to find. To view and select from a list of codes, position your cursor on this field and press F4 or double click on the field. All or part of the description for the detail items you want to find. The deposit number relating to the detail items you want to find. 31
32 3. Click the Search button or press the Enter key to process the search. Then the search is completed and the window will show only detail records matching the search information you entered. 4. To display the deposit listing for a particular detail records, click on the desired row and then click the Deposit button or double click on the row. You can also right-click on the row and select the Display Deposit option from the pop up menu. The Display Deposit Listings window will be displayed showing the deposit listing related to the selected detail item. If there is an A/C related to a detail item, you can display the A/C by clicking on the NC button. You can also right-click on the row and select the Display NC option from the pop up menu. The Display Auditor s Certificate window will be displayed. 5. Click the Refresh button or press the F5 key to clear the search fields and restore the list to show all detail records. 6. Click the Done button to close the detail window and return to the List Deposit Listings window. DISPLAYING AND PRINTING A DEPOSIT LISTING 1. From the Treasurer s Main Menu, click the Deposit Listings toolbar button. The List Deposit Listings window will be displayed. 2. Select the deposit listing to be displayed or printed by clicking on the desired row. 3. Click the Display button, press F5 or select the Display option from the Select menu. You can also right-click on the row and select the Deposit Display Listing option from the pop up menu or double-click on the row. The Display Deposit Listings will be displayed. 4. To print the deposit listing, click the Print button. The Report Selection window will be displayed showing only the DETAIL DEPOSIT LISTING REPORT. Select the desired Report Destination option and click Print. The report will be printed and you will be returned to the Display Deposit Listings window. 32

33 From the Display Deposit Listings window, you can display the A/C relating to a detail item by clicking on the row and then clicking the Display A/C button. You can also right-click on the row and select the Display A/C option from the pop up menu. The Display Auditor s Certificate window will be displayed. 5. Click the Done button to close the display window and return to the List Deposit Listings window. ADDING A NEW DEPOSIT LISTING 1. From the Treasurer s Main Menu, click the Deposit Listings toolbar button. The List Deposit Listings window will be displayed. 2. Click the Add button, press F6, or select the Add option from the Process menu. You can also right click anywhere in the list and select the Add Deposit Listing option from the pop up menu. The Add Treasurer s Deposit Listing window will be displayed. 3. Enter the information for this deposit listing. Descriptions for each data field are shown below. Bank Enter the bank code for this deposit listing (required). To view and select from a list of bank codes, position your cursor on this field and press F4 or just double click on the field. Account Enter the bank account for this deposit listing (required). To view and select from a list of accounts, position your cursor on this field and press F4 or just double click on the field. 33
34 Deposit Date Deposit # Deposit Total Enter the date for this deposit listing. Enter a deposit number to identify this deposit listing (required). This number can be entered using letters and numbers and can be up to ten characters in length. This field is automatically calculated when you enter detail items for the deposit listing. Description Enter a description for this deposit listing, if desired, up to 40 characters in length. 4. For each detail item on the deposit listing, enter the information as outlined below and click the Add button or press the Enter key. The detail item will be added to the list of detail items. Desc Check# Type Amount A/C Enter a description for the detail item up to 40 characters in length (required). Enter a check number for this detail item, if applicable. Enter a currency type code for this detail item (required). To view and select from a list of currency codes, position your cursor on this field and press F4 or double-click on the field. Enter the amount for this detail item (required). If this detail item refers to an A/C, enter the fiscal year and number of A/C here. 5. To change a detail item on the Deposit listing, click on the item in the detail list and click the Change button. You can also right-click on the item and select the Change button also rightclick on the item and select the Change Detail option from the pop up menu. The information for the item will appear in the Detail Information section of the window. Make any necessary changes to the item and click the Add button to replace the item in the list. If an item has been entered in error, you can remove it from the deposit listing by clicking on the item and then clicking on the Delete button. You can also right-click on the item and select 34
35 the Delete Detail option from the pop up menu. When the warning message is displayed, click the Yes button to remove the item from the deposit listing or click the No or Cancel button to close the warning message window without removing the item. 6. When all detail items have been entered for this deposit listing, click the Process button to save the deposit information. You will be returned to the List Deposit Listings window. CHANGING A DEPOSIT LISTING 1. From the Treasurer s Main Menu, click the Deposit Listings toolbar button. The List Deposit Listings window will be displayed. 2. Select the deposit listing to be changed by clicking on the desired row. 3. Click the Change button, press F7, or select the Change option from the Process menu. You can also right-click on the row and select the Change Deposit Listing option from the pop up menu. The Enter Password for Update will be displayed. 4. Enter the password authorizing the updating of deposit listings and click the OK button or press Enter. The Change Treasurer s Deposit Listings window will be displayed. Note: The password required to update a deposit listing is recorded in the Control File. See Maintaining the Treasurer s Control File beginning on page 120 for information on setting up the password. 5. Make any necessary changes or addition to the deposit listing. Refer to Adding a New Deposit Listing beginning on page 33 for description of data fields and instructions on entering and changed detail information. 6. Click the Change button to save any modifications to the deposit listing. You will be returned to the List Deposit Listings window. DELETING A DEPOSIT LISTING 1. From the Treasurer s Main Menu, click the Deposit Listings toolbar button. The List Deposit Listings window will be displayed. 2. Select the deposit listing to be deleted by clicking on the desired row. 3. Click the Delete button or select the Delete option from the Process menu. You can also right click on the row and select the Delete Deposit Listing option from the pop up menu. The Enter Password for Update Listings window will be displayed. 4. Enter the password to authorize the deletion of the deposit listing and click the OK button or press Enter. The Delete Treasurer s Deposit Listings window will be displayed with the data entry fields displayed in red. 35
36 5. Click the Delete button to complete the deletion of the deposit listing or click the Cancel button to close this window without deleting the deposit listing. You will be returned to the List Deposit Listings window. 36
37 CHAPTER FIVE WORKING WITH INQUIRY WINDOWS UNDERSTANDING INQUIRY WINDOWS Inquiry windows allow you to list and display varied information in the Treasurer s System. The inquiry windows in the system include the following: Account Information/Inquiry (page 38) Warrant/Check Inquiry (page 40) Auditor s Certificate (AC) Inquiry (page 44) Journal Entry (JE) Inquiry (page 51) Vendor Inquiry (page 54) On-Line Treasurer s History Inquiry (page 57) Most inquiry windows provide searches that allow you to locate specific records or groups of records using equals and contains type search fields. USING EQUALS AND CONTAINS FIELDS Data fields used in searching for information from an inquiry window are defined as either equals fields or contains fields. These different types of fields will typically be displayed in two separate sections of a search window. When you use an equals type field, the search will return only records with an exact match to the data entered on the search window. For example, if you enter a date in an equals type date field on a search window, the search will find only records that match exactly the date entered. A contains field is used for wildcard-type searches. When you this type of field, the search will return all records that contain your search data anywhere in the field used. For example, entering John in a name search field, the system will find both the names John Smith and Sam Johnson. 37
38 USING THE ACCOUNT INFORMATION INQUIRY The Account Information Inquiry feature in the Treasurer s System allows you to view historical information on any account listed in the chart of accounts. 1. From the Treasurer s Main Menu, click the Account Information button. The Account Inquiry window will be displayed. 2. Enter the information to be used for the account information inquiry. The description for inquiry fields are shown below. Fund Department Account Sub Fiscal Year From/To Show Totals Enter the chart of account fund number to use for the inquiry. To view and select from a list of funds, position our cursor on this field and press F4 or double click on the field. Enter the department number to use for the inquiry. To view and select from a list of departments, position your cursor on this field and press F4 or double click on the field. Enter the account number to use for this inquiry. To view and select from a list of account, position your cursor on this field and press F4 or double click on the field. Enter the sub-account number to use for this inquiry. Click the Fiscal Year button to view and select a different fiscal year for this inquiry if desired. If you wish to look for account history for a given date range, enter the beginning and ending dates in these fields. Clicking on this box will cause the list of displayed accounts to include information on account budgets, expenditures and balances. Note: The loading of data into this window will take some time with this option selected. This is because information for each of the displayed accounts in order to display total amounts. 38
39 Account Type If you wish to display a certain type of account, select the desired fund and department as described above and click on one of these radio buttons before clicking the Load button or pressing F5. 3. Click the Load button or press the F5 key. This will load the window with account information based on the inquiry data you entered. DISPLAYING ONLINE HISTORY INQUIRY 1. Display the Online History Inquiry window and locate the desired account as outlined above. 2. Select the account for which you to display history by clicking on the desired row. 3. Click the Account History button, press the F8 key, or select the Display option from the Process menu. You can also right-click on the desired row and select the Display History option from the pop up menu or double-click on the row. The Display Account History window will be displayed. 4. From this window, you can perform any of the following functions: a. To display outstanding payment records for the selected account, click the Outstanding Payments radio button in the Grid to Display section. b. To display only debit (Dr) or Credit (Cr) records, click on the appropriate radio button in the Records to Display section. c. To display detailed information about a listed account record, click on the desired row and then click the Display History Details button. The Display GL History Record window will be displayed. d. If there is a journal entry or auditor s certificate related to a given account record, details on the IE or A/C can be displayed by clicking on the desired record and then clicking the Display Document button. 5. Click the Done button to close this window and return to the Account Inquiry window. 39

40 USING THE WARRANT/CHECK INQUIRY LISTING WARRANTS OR CHECKS From the Treasurer s Main Menu, click the Warrant/Check Inquiry toolbar button to display the List Checks window. This window shows all warrants with the most recent at the top of the list. The number field for warrants or check that have been redeemed or cleared will be displayed in green and voided warrant numbers will be displayed in red. Numbers for outstanding warrants or checks are shown in white. You can select the type and status of warrants or checks to display by clicking on the radio buttons at the top of the list. From this window, you can also search for a particular warrant or group of warrants or position the list to a particular warrant number. To display warrants for a different fiscal year, click the Different Fiscal Year button to display the Select Fiscal Year window. To select one of the listed fiscal years, click on the desired row and click the Select button or just double click on the row. 40
41 DISPLAYING WARRANTS OR CHECKS 1. Display the List Warrants window as described above. 2. Click on the desired row and then click the Display button, press F8 key or select the Display option from the Process menu. You can also double click on the selected row. The Display Warrant/Check window will be displayed. 3. To display an individual payment record, click on one of the rows in the Payment Records section of the window and press the F8 key or just double click on the desired row. Click the Print button if you would like to print detailed information reports. You can print either a CHECK/WARRANT DETAIL REPORT or a REMITTANCE REPORT from the Report Selection window displayed. 4. When finished, click the Done button on the Display Warrant/Check window. You will be returned to the List Warrants window. POSITIONING THE WARRANTS/CHECKS LIST 1. From the List Warrants window, click the Search button or press the F4 key. The Search Warrants/Checks window will be displayed. 2. Enter the desired warrant number in the Position To Number field and click the OK button or press the Enter key. The List Warrants window will be displayed with the entered warrant number shown at the top. 3. Click the Refresh button to restore the List Warrants window to show the most recent warrant at the top of the list. 41

42 SEARCHING FOR WARRANTS OR CHECKS 1. From the List Warrant window, click the Search button or press the F4 key. The Search Warrants/Checks window will be displayed. 2. Enter the information you want to use for searching warrants or checks. Descriptions for each search field are shown below. Number Preprinted Number Name Address1/Address2 City/State/Zip Date The number of the next check to be printed. If the checks have preprinted numbers on them, enter the number here. Enter all or part of the name of the payee for the warrant(s) you wish to find. Enter all or part of the address of the payees listed on the warrant(s) you want to find. Enter all or part of the city, state, and zip code of the payee for the warrant you wish to search for. You can enter information in all of these fields or any one of them. Enter the issue date for the warrants you wish to find. 42
43 Vendor Amount Fund Enter the vendor number of the payee for the warrants you wish to find. To view and select from a list of vendors, click on this field and press the F4 key or just double click on the field. Enter the exact amount of the warrant you wish to find. If you enter an amount in this field, the search will find all warrants with this amount. Enter a fund number to find all warrants paid out of a particular fund. To view and select from a list of funds, click on this field and press the F4 key or just double click on the field. 3. Click the OK button to process the search. The List Warrants window will be displayed showing only warrants matching your search data. 4. Click the Refresh button to restore the List Warrants window to show all warrants with the most recent at the top of the list. 43

44 USING THE AC INQUIRY LISTING AUDITOR S CERTIFICATES From the Treasurer s Main Menu, click the A/C Inquiry toolbar button. The List Auditor s Certificate window will be displayed. A/C s which have already been posted to the Treasurer s history will be displayed in gray. Unposted A/C s will be shown in white. From this window, you can position the list of A/C s to a particular number or search for a particular A/C or group of A/C s. To display A/C Deposits for a different fiscal year, click the Different Fiscal Year button to display the Select Fiscal Year window. To select one of the listed fiscal years, click on the desired row and click the Select button or double-click on the row. 44

45 DISPLAYING AND PRINTING AUDITOR S CERTIFICATES 1. From the List Auditor s Certificates window, click on the A/C deposit you want to display. 2. Click the Display button, press the F8 key, or you can double click on the selected row. The Display Auditor s Certificate window will be displayed. 3. To display only debit or credit amounts, click either the Dr or Cr radio buttons in the Account Information section of the window. Click the Addendum button to display the addendum for this AC, if any, or click the Referenced JE button to display information on a journal entry referenced to this AC. 4. When finished, click the Done button to close this window and return to the List Auditor s Certificates window. 45

46 POSITIONING THE AUDITOR S CERTIFICATE LIST 1. From the List Auditor s Certificates window, click the Search button or press the F4 key. The Search AC Master window will be displayed. 2. Enter the desired A/C number in the AC Number field and click the OK button or press the Enter key. The List Auditor s Certificates window will be displayed with the entered A/C number shown at the top Click the Refresh button to restore the List Auditor s Certificates window to show the most recent A/C at the top of the list. 46
47 SEARCHING FOR AUDITOR S CERTIFICATES 1. From the List Auditor s Certificates window, click the Search button or press the F4 key. The Search AC Master window will be displayed. 2. Enter the information you want to use for searching AC s. Descriptions for each search files are shown below. Name/Source Purpose Enter all or part of the name or source listed on the AC s you want to find. Enter all or part of the purpose described on the AC s you want to find. Date Enter the date of the AC s you wish to find. 47
48 Ref JE# Records to Search Enter the fiscal year and number of the journal entry related to the AC you want to locate. To view and select from a list of journal entries, enter the fiscal year and press the F4 key or double click on the field. This field will default to 500. If you want the system to search through more records, enter the desired number here. 3. Click the OK button to process the search. The List Auditor s Certificates window will be displayed showing only those AC s that match your search information. 4. Click the Refresh button or press F?? to restore the List Auditor s Certificates window to show the most recent AC at the top of the list. SUMMING A GROUP OF AC S 1. From the List Auditor s Certificates window, select the AC s you wish to sum. You can select a continuous range of AC s by clicking on the first AC and then pressing Shift key and clicking on the last AC in the desired range. To select a group of AC s which are not listed next to one another, click on the first AC to be selected. Then press and hold the Ctrl key and click on the additional AC s. 2. After selecting the desired group of AC s, click the Sum Selected Rows button on the toolbar. A small window will be displayed showing the total amount for the group of AC s. 48

49 3. Click the Cancel button to close the sum window and return to the List Auditor s Certificate windows. 49

50 SEARCHING FOR AC ADDENDUMS 1. From the List Auditor s Certificates window, click the Search Addendums button. The Search AC Addendums window will be displayed. 2. Enter the information you want to use for searching AC Addendums. Descriptions for each search field are shown below. Amount Money Type Reference Name/Source Enter the amount for the AC addendum item you want to find. Click on the down arrow to the right of the field and select the money type for the AC addendums you wish to find. Enter all or part of the name or source listed on the AC addendums you want to find. Enter all or part of the name or source listed on the AC addendums you want to find. 3. Click the Search button to process the search. The Search AC Addendums window will be redisplayed showing only AC addendums matching the search data entered. 50

51 4. When you are finished with your search, click the Done button to close this window and return to the List Auditor s Certificates window. USING THE JE INQUIRY LISTING JOURNAL ENTRIES From the Treasurer s Main Menu, click the JE inquiry button. The List Journal Entries window will be displayed. This window shows all journal entries by the Clerk s office. To display JE s for a different fiscal year, click the Different Fiscal Year button to display the Select Fiscal Year window and select a new fiscal year. If you want to display journal entries of a particular type, click the appropriate radio button in the Type section of the window. 51
52 DISPLAYING A JOURNAL ENTRY 1. From the List Journal Entries Affecting Cash window, click on the journal entry you wish to display. 2. Click the Display button, press the F8 key, or select the Display option from the Process menu. You can also right click on the desired row and select the Display option form the pop up menu or just double click on the row. The Display Journal Entry window will be displayed. 3. To display details for a particular journal entry item, double click on the desired item. The Display GL History Record window will be displayed showing details for the selected item. If an AC, JE or Warrant/Check is referenced by this JE, these numbers will be displayed in the Reference section of this window. To display one of these referenced documents, click on the appropriate button. 4. After reviewing all the desired information, click the Done button to close this window and return to the List Journal Entries Affecting Cash window. POSITIONING THE JOURNAL ENTRY LIST 1. From the List Cash JE window, click the Search button or press the F4 key. The Search JE Master will be displayed. 2. Enter the desired journal entry number in the JE Number field and click the OK button or press Enter. The List Journal Entries Affecting Cash window will be redisplayed with the entered journal entry number shown at the top. 3. Click the Refresh button to restore the List Journal Entry Affecting Cash window to show the most recent journal entry at the top of the list. SEARCHING FOR JOURNAL ENTRIES 1. From the List Journal Entries Affecting Cash window. Click the Search button or press the F4 key. The Search JE Master window will be displayed. 2. Enter the information you want to use for searching JE s. Descriptions for each data field is outlined below. 52
53 Description Date AC# JE# Warr/Check# Total Cash Enter all or part of the description for the journal entries you want to find. Enter the date of the journal entries you wish to find. Enter the fiscal year and number of an AC referenced to the journal entry you wish to find. Enter the fiscal year and number of a JE referenced to the journal entry you wish to find. Enter the fiscal year and number of a warrant or check referenced to the journal entry you wish to find. Enter the amount of the journal entry or entries you want to find. 3. Click the OK button or press the Enter key to process the search. The List Journal Entries Affecting Cash window will be displayed showing only journal entries matching the search information entered. 4. Click the Refresh button or press the F5 key to restore the List Journal Entries Affecting Cash window showing all journal entries with the most recent at the top of the list. 53
54 USING THE VENDOR INQUIRY LISTING VENDOR NAMES From the Treasurer s Main Menu, click the Vendor inquiry button. The List Vendor window will be displayed showing the names of all vendors entered into the system. To display only a particular type of vendor, click the appropriate radio button in the Type section of the window. To display only active or inactive vendor records, click the Active or Inactive radio button in the Status section. DISPLAYING AND PRINTING A VENDOR RECORD 1. From the List Vendor window, click on the vendor record you wish to display. 2. Click the Display button, press the F8 key or select the Display option from the Select menu. You can also right click on the desired row and select the Display option from the pop up menu or just double click on the row. The Display Vendor window will be displayed. 3. To print a detail report for the vendor, click the Print button to display the Report Selection window. Select the Vendor Detail report and output options and click the Print button to produce the report. If you wish to see details on vendor payments, click the Payments button. This will display the List Vendor Payments window showing all payments made to this vendor. 4. After reviewing and printing the desired information for this vendor, click the Done button to close this window and return to the List Vendor window. DISPLAYING AND PRINTING VENDOR PAYMENTS 1. From the List Vendor window, click on the vendor record you wish to display payment information. 2. Click the Vendor Payment button or select the Vendor Payments option from the Select menu. You can also right click on the desired row and select the Vendor Payments option from the pop up menu. The list Vendor Payments window will be displayed. 3. To display details for a particular payment record, double click on the desired row. You can also click on the row and press the F?? key or click the Display Payment button. If a related warrant 54
55 or check exists for a given payment record, you can display detailed warrant/check information for the payment by clicking on the row and then clicking the Display Warrant/Check button. To display detailed information about the vendor, click the Display Vendor button. To display information about related vendors, click the Referencing Vendors button. If you would like a report showing payments for the vendor, click the Done button to close this window and return to the List Vendor window. POSITIONING THE VENDOR LIST 1. From the List Vendor window, click the Search button, press the F4 key, or select the Search option from the View menu. The Search Vendor window will be displayed. 2. Enter the first few letters of the name of the vendor you wish to find in the Name field and click the OK button or press Enter. The List Vendor window will be displayed showing the name of the vendor matching the letters at the top. 3. Click the Refresh button or press the F5 key to restore the List Vendor window back to the top of the alphabetical list. 55

56 SEARCHING FOR VENDORS 1. From the List Vendor window, click the Search button, press the F4 key or select the Search option from the View menu. The Search Vendor window will be displayed. 2. Enter the information you want to use to search for vendors. Descriptions for each data field are shown below. Number Tax ID# SSN Address Enter the ID number of the vendor you want to find. Enter the tax identification number for the vendor you wish to find. Enter the social security number of the vendor you wish to find. Enter all or part of the first or second lines of the address for the vendor or vendors you wish to find. 56
 name for the vendor(s).")
57 City/State/Zip DBA Contact Enter all or part of the city, state, or zip code of the address for the vendor or vendors you wish to find. The state should be entered using the two character postal abbreviations. Enter all or part of the DBA ( Doing Business As ) name for the vendor(s). Enter all or part of the name of the contact for the vendor(s). 3. Click the OK button or press the Enter key to process the search. The List Vendor window will be redisplayed showing only vendor records that match the search information entered. 4. Click the Refresh button or press the F5 key to restore the List Vendor window showing all vendor records listed alphabetically. USING THE ONLINE HISTORY INQUIRY The Online History Inquiry feature in the Treasurer s System allows you to display and search through all information in the Treasurer s history. To display the online history from the Treasurer s Main Menu, click the Online History Inquiry toolbar button or select the Online History Inquiry option from the Select menu. 57

58 DISPLAYING A HISTORY RECORD 1. From the Online History Inquiry window, select the history record to be displayed by clicking on the desired row. 2. Click the Display button, press the F8 key, or select the Display option from the Process menu. You can also right click on the row and select the Display Transaction option from the pop up menu or just double click on the row. One of the following windows will be displayed: If the record is for a transfer, investment, or other miscellaneous transaction, the Display history Transaction window will be displayed showing details about the history record. If the transaction involves an AC deposit, the Display AC Deposits window will be displayed showing all records related to that AC deposit. 58


59 For warrant redemption transactions, the Display Redemption Batch window will be displayed showing warrants redeemed in that redemption batch. 59

60 3. Click the Done button on any of the displayed windows to return to the Online History Inquiry window. DISPLAYING TRANSACTION ACCOUNT HISTORY 1. To display history information for the bank account associated with a particular transaction, first click on the desired record from the Online History Inquiry window. 2. Click the Account History button or select the Account History option from the Process menu. You can also right click on the desired row and select the Account History option from the pop up menu. The List Account Transactions Window will be displayed showing history for the bank account associated with the selected transactions. 60

61 3. For detailed instructions on using the List Account Transactions window, refer to the section on Displaying Account History beginning on page Click the Done button to close this window and return to the Online History Inquiry window. CHANGING A TRANSACTION 1. From the Online History Inquiry window, select the history record to be changed by clicking on the desired row. 2. Click the Change button, press the F7 key, or select the Change option from the Process menu. You can also right click on the row and select the change option from the pop up menu. The Change History Transaction window will be displayed. Note: Transaction records that cannot be changed will be shown in a display window that will not allow data entry. 3. Make any necessary changes to the transaction data. See instructions on Adding a Miscellaneous Transaction beginning on page 85 for descriptions for each data field. 4. Click the Change button to save any modifications to the transaction or click the Cancel button to exit this window without saving. You will be returned to the Online History Inquiry window. 61

62 UNCLEARING A TRANSACTION 1. To unclear a cleared transaction from the Online History Inquiry window, first click on the transaction record to be uncleared. 2. Click the Unclear Transaction window or select the Unclear Transaction option from the Process menu. You can also right click on the desired row and select the Unclear Transaction option from the pop up menu. The Enter Password for Update window will be displayed. 3. Enter the required password to unclear the transaction and press the OK button or press Enter. The cleared date will be removed from the transaction. Note: The required password used here is the same one used to change a deposit listing and is set up through the control file. 62

63 POSITIONING THE TREASURER S HISTORY LIST 1. From the Online History Inquiry window, click the Search button, press the F4 key, or select the Search option from the View menu. The Search History Transactions window will be displayed. 2. Enter the information you want to use to search the Treasurer s history. Descriptions for each data field are shown below. Explanation Payee Bank Code Enter all or part of the description or explanation of the history record or records you want to find. Enter all or part of the name of the payee listed in the history record(s) that you want to find. Enter the bank code for the record(s) you want to find. To view and select from a list of bank codes, position your cursor on this field and press the F4 key or double click on the field. 63
64 Account Reference Number Treasurer Check# Transaction Code Amount AC Batch Number AC Number JE Number Enter the bank account code for the record(s) you wish to find. To view and select from a list of account codes, position your cursor on this field and press the F4 key or double click on the field. Enter the reference number listed on the transaction record you want to find. Enter the Treasurer s check number listed on the transaction record you want to find. Enter the transaction code for the record(s). To view and select from a list of transaction codes, position your cursor on this field and press the F4 key or double click on the field. Enter the amount of the transaction record you want to find. Enter the AC deposit batch number for the transaction record(s) you want to find. Enter the fiscal year and number for the AC related to the record(s) you want to find. To view and select from a list of ACs, enter the fiscal year and press the F4 key or double click on the field. Enter the fiscal year and number for the journal entry related to the record(s) you want to find. To view and select from a list of JEs, enter the fiscal year and press the F4 key or double click on the field. 3. Click the OK button or press the Enter key to process the search. The Online History Inquiry window will be redisplay showing only history transaction records that match the search information entered. 4. Click the Refresh key to restore the list to show all history records with the most current transaction at the top of the list. 64

65 CHAPTER SIX WORKING WITH BANKS LISTING AND DISPLAYING BANKS To display a list of banks, click the Bank Management button or select the Bank Management option from the Select menu on the Treasurer s Main Menu. The List Bank window will be displayed. You can display only active banks or all banks by selecting the appropriate radio button at the top of the list. You can also display accounts for a given bank by double clicking on the desired bank. See the chapter on Working with Bank Accounts on page 73 for more information. 65

66 DISPLAYING A BANK RECORD 1. From the List Bank window, select the bank you wish to display by clicking on the desired row. 2. Click the Display button, press F8, or select the Display option from the Process menu. You can also right click on the desired row and select the Display Bank option from the pop up menu. The Display Bank window will be displayed. 3. Click the OK or Cancel button to close this window and return to the List Bank window. 66


67 POSITIONING THE BANK LIST 1. From the Bank List window, click the Search button or press the F4 key. The Search Banks window will be displayed. 2. Enter the first few letters of the bank code you want to locate in the Bank Code field and click the OK button or press Enter. The List Bank window will be displayed with the bank code you entered at the top of the list. 3. Click the Refresh button or F5 key to return the List Bank window to the top of the list. 67

68 SEARCHING FOR BANKS 1. From the List Bank window, click the Search button or press the F4 key. The Search Bank window will be displayed. 2. Enter all or part of the name of the bank you want to locate in the Name field and click the OK button or press Enter. The List Bank window will be displayed showing only banks with names matching the search text you entered. 3. Click the Refresh button to restore the List Bank window to show all banks. 68

. This code can be entered using both letters and numbers and can be up to 10 characters in length.")
69 ADDING A NEW BANK 1. From the Treasurer s Main Menu, click the Bank Management button or select the Bank Management option from the Select menu. The List Bank window will be displayed. 2. Click the Add button, or press F6 or select the Add option from the Process menu. You can also right click anywhere in the list of banks and select the Add Bank option from the pop up menu. The Add Bank window will be displayed. 3. On the Add Bank window, enter the information for the new bank record. Descriptions for each data field are shown below. Bank Code Name The unique number of code used to identify this bank (required). This code can be entered using both letters and numbers and can be up to 10 characters in length. The name of the bank or branch you are adding (required). 69
70 Address1 Address2 City/State/Zip Contact Phone/Fax Status The first line of the address of the bank. This line is typically used to enter a street address. The second line of the address of the bank. This line normally contains a post office box, if applicable. The city, state, and zip code of the bank. The state should be entered using the two-character postal code. The zip code can be entered using either five or nine characters. The name of the primary bank contact. You can also enter a title after the name, if desired. The telephone and fax numbers (including area code) for the bank branch you are adding. The status of the bank (required). This field defaults to Active but can be changed to Inactive if you no longer use this bank. 4. Click the Add button to save the information for this bank. You will be returned to the List Bank window. 70

71 CHANGING AN EXISTING BANK 1. From the Treasurer s Main Menu, click the Bank Management button or select the Bank Management option from the Select menu. The List Bank window will be displayed. 2. Select the bank record you want to change by clicking on the desired row. 3. Click the Change button, press F7, or select the Change option from the Process menu. You can also right click on the desired row and select the Change Bank option from the pop up menu. The Change Bank window will be displayed. 4. Make any necessary changes to the bank information. Descriptions for the data field on this window can be found in the Adding a New Bank section beginning on page Click the Change button to save any modifications to this bank or click the Cancel button to close this window without saving changes. You will be returned to the List Bank window. 71

72 COPY AN EXISTING BANK 1. From the Treasurer s Main Menu, click the Bank Management button or select the Bank Management option from the Select menu. The List Bank window will be displayed. 2. Select the bank record to be copied by clicking on the desired row. 3. Click the Copy button or select the Copy option from the Process menu. You can also right click on the desired tow and select the Copy Bank option from the pop up menu. The Add Bank window will be displayed. 4. Make any necessary changes to the bank information. Description for the data fields on this window can be found in the Adding a New Bank section beginning on page Click the Add button to save the new bank information or click the Cancel button to close this window without saving changes. You will be returned to the List Bank window. 72

73 CHAPTER SEVEN WORKING WITH BANK ACCOUNTS To display a list of bank accounts, click the Account Management toolbar icon or choose the Account Management option from the Select menu on the Treasurer s Main window. This will display the List Bank Accounts window. If you wish to see a list of accounts for a single bank, enter the desired bank code in the Bank Accounts For field and press the Tab key or Enter key. You can view and select from a list of bank code by double clicking on this fields. To list account of only one status or type, click on the appropriate button at the top of the list. You can sort the account list to display in any order by clicking on the appropriate column header. For example, to sort the list by account code, click on the Account column header. ADDING A BANK ACCOUNT 1. From the Treasurer s Main Menu, click the Account Management button or choose the Account Management option from the Select menu. The List Bank Accounts window will be displayed. 2. Click the Add button, press the F6 key, or select the Add option from the Process menu. You can also right click anywhere in the list of bank accounts and select the Add Account option from the pop up menu. The Add Bank Accounts window will be displayed. 73
74 3. On the Add Bank Accounts window, enter the information for the new bank account. Descriptions for each data field are shown below. Note: If Investment is chosen as the account type, additional data entry field will be displayed. Refer to adding an Investment Account on page 102 for instruction on entering this type of account. Bank Code Account Code Status Date Opened Description Type Account # Interest Rate Maturity Date The code for the bank in which the account will be opened (required). To view and select from a list of banks, position your cursor on this field and press F4 or double click on the field. The unique code that will be used to identify this bank account (required). This code can be entered using both letters and numbers and can be up to 10 characters in length. The status of the bank account (required). This is set to Active when adding an account but can later be changed to Inactive or Closed. The date on which the bank account was opened. This defaults to the current date but can be changed if necessary. A description of the bank account (required) up to 50 characters in length. The type of the account. This field is entered when the account is added and cannot be changed here. The account number assigned by the bank to this investment account. For Investment type accounts only. The interest rate paid by the bank or financial institution on the account. For Investment type accounts only; the date of maturity for the investment. 4. Click the Add button to save the information entered for this bank account. You will be returned to the List Bank Account window which will now include the account just entered. 74

75 CHANGING A BANK ACCOUNT 1. From the Treasurer s Main Menu. Click the Account Management button or choose the Account Management option from the Select menu. The List Bank Accounts window will be displayed. 2. Select the bank account to be changed by clicking on the desired row. 3. Click the Change button, press F7, or select the Change option from the Process menu. You can also right click on the desired row and select the Change Account option from the pop up menu. The Change Bank Account window will be displayed. Note: This window will be different if the account being changed is an investment account. Refer to Changing an Investment Account on page 104 for more information. 4. Change any necessary information for the account as described below. Status Description Account # The status of the bank account (required). You can select Active, Inactive or Closed. To change the status, click on the arrow to the right of the field and select the applicable status. Note: An account cannot be changed to Inactive or Closed if it has a current balance. A description of the bank account (required) up to 50 characters in length. The account number assigned by the bank to this account. 75
76 Date Opened Date Closed Last Check # Locked for Rec. Locked By The date on which the bank account was opened. The date on which the account was closed. If you enter a date here, be sure to change the status of the account to Closed or Inactive. The number of the last check written from the account. This number is used to determine the next check number in sequence for the account. If this box is checked, it indicates that this account is currently being reconciled by another user and had been locked by the system. Note: An account can only be reconciled by one user at a time The name of the user currently reconciling this account (if the account is locked). 5. Click the Change button to save any modifications made to the account. You will be returned to the List Bank Accounts window. CLOSING A BANK ACCOUNT 1. Before closing an account, determine any outstanding balance for the account to be closed. You can use the Account Balance Summary feature to find a balance for the account. Refer to Displaying an Account Balance Summary on page 98 for instructions on this. 2. Transfer any remaining balance for the account to another bank account. See Working with Account Transfers on page 89 for more information. 3. Change the bank account record to indicate that the account has been closed. Follow instructions outlined in the Changing a Bank Account section on page 75, making sure that the Closed option is selected in the Status field. 76
77 DELETING A BANK ACCOUNT 1. From the Treasurer s Main Menu, click the Account Management button or choose the Account Management option from the Select menu. The List Bank Accounts window will be displayed. 2. Click the bank account to be deleted by clicking on the desired row. 3. Click the Delete button or select the Delete option from the Process menu. You can also right click on the row and select the Delete Account option from the pop up menu. The Delete Bank Accounts window will be displayed with all data fields in red. 4. On the Delete Bank Accounts window, click the Delete button to complete the removal of the bank account or click the Cancel button to close this window without deleting the account. You will be returned to the List Bank Accounts window. SEARCHING FOR BANK ACCOUNTS 1. From the List Bank Accounts window, click the Search button or press the F4 key. The Search Bank Accounts window will be displayed. 2. To position the list of bank accounts to a particular account, enter the code for the desired bank account and account in the Bank Code and Account fields. These are search fields so you can view and select from a list of valid codes by clicking on them and pressing F4 or double click the fields. To search for one or more accounts by description, enter all or part of the description you want to find in the Description field. To search by account number, enter the exact account number you are looking for in the Account# field. 77

78 3. Click the OK button to process the search. The List Bank Accounts window will be displayed showing only those accounts that match the search information you entered. 4. Click the Refresh button to clear the search fields and restore the List Bank Accounts window to showing all bank accounts. 78

79 DISPLAYING ACCOUNT INFORMATION DISPLAYING ACCOUNT HISTORY 1. From the Treasurer s Main Menu, click the Account Management button or choose the Account Management option from the Select menu. The List Bank Accounts window will be displayed. 2. Select the bank account for which you want to display account history be clicking on the desired row. 3. Click the Account History button or select Account Options Account History option from the Select menu. You can also right click on the row and select the Account History option from the pop up menu or double click on the row. The List Account Transactions window will be displayed. Transactions which have been cleared will appear in gray and negative amounts will be displayed in red. For instructions on locating a specific transaction, see Searching for a Transaction on page

80 4. From the List Account Transactions window, you can click on one of the listed transaction records and do any of the following:. Click the Change button to display a window allowing you to change information for the selected transaction record. Click the Display button or double click on the row to display detailed information about the selected transaction. Click the Display A/C or Display JE button to display any auditor s certificates or journal entries associated with the selected transaction. Click the Display Batch to display warrant redemption details for check s used to redeem warrants. Note: In order to add or delete a transaction record, the Miscellaneous, Transfer, or Void radio button must be selected in the Record Type to Display section. For more instruction, see Working with Account Transaction on page 84, Working with Account Transfers on page 89 or Voiding Unused Checks on page Click the Done button to close this window and return to the List Bank Accounts window. 80

81 SEARCHING FOR A BANK ACCOUNT TRANSACTION 1. From the Treasurer s Main Menu, click the Account Management button or choose the Account Management option from the Select menu. The List Bank Accounts window will be displayed. 2. Double-click the specified account to view transactions. 3. Enter the information to be used in finding the desired transactions as follows: Date Code Type The date of the transactions you wish to find. The transaction code for the transactions you want to find. To view and select from a list of valid codes, position your cursor on this field and press F4 or double click the field. The type of transactions you want to find. To view and select from a list of transaction types, click on the down arrow to the right of this field. You can select Check, Investment, Charge, Deposit, or Transfer. 81
82 Amount Desc ACNumber JENumber The amount of the transaction you want to find. All or part of the explanation for the transaction you want to find. The fiscal year and number of the A/C related to the transactions you want to find. The fiscal year and number of the journal entry related to the transactions you want to find. 2. Click the Search button to process the search. The List Account Transactions window will be redisplayed showing only transactions matching the search data entered. 3. Click the Refresh button or press F5 to clear the search fields and restore the window to showing all account transactions. 82

83 DISPLAYING DEPOSIT LISTINGS FOR AN ACCOUNT 1. From the Treasurer s Main Menu, click the Account Management button or choose the Account Management option from the Select menu. The List Bank Accounts window will be displayed. 2. Select the bank account for which you want to display deposit listings by clicking on the desired row. 3. Click the Deposit Listings button or select the Deposit Listings option from the Select menu. You can also right click on the desired account and select the Deposit Listings option from the pop up menu. The List Treasurer s Deposit Listings window will be displayed showing all deposit listings for the selected account. 4. From this window you can click the Add button to enter a new deposit listing for this account or select one of the deposit listings shown and display, change, or delete it by clicking the appropriate button. See the Deposit Listings chapter on page 30 for more information on working with deposit listings. 5. When you are finished working with deposit listings for this account, click the Done button to close this window and return to the List Bank Accounts window. 83
84 WORKING WITH BANK ACCOUNT TRANSACTIONS LISTING MISCELLANEOUS TRANSACTIONS 1. From the Treasurer s Main Menu, click the Account Management button to choose the Account Management option from the Select menu. The List Bank Accounts window will be displayed. 2. Select the bank account for which you want to display miscellaneous transactions by clicking on the desired row. 3. Click the Miscellaneous Transactions button or select the Account Options Miscellaneous Transactions option from the Select menu. You can also right click on the row and select the Miscellaneous Transactions option from the pop up menu. The List Account Transactions window will be displayed showing all miscellaneous transactions for the selected account. 4. Refer to the following sections for instructions on adding or changing account transactions. When finished, click the Done button to close this window and return to the List Bank Accounts window. 84

85 ADDING A MISCELLANEOUS TRANSACTION 1. Display the List Account Transactions window showing the miscellaneous transactions for the desired account as outlined above. Make sure that the Miscellaneous radio button is selected. 2. Click the Add button or press the F6 key to display the Add History Transaction window. 3. Enter information for the miscellaneous transaction. Descriptions for each data field are shown below. Treasurer Date Date Cleared The date of the transaction being entered (required). The date on which the transaction was cleared for reconciliation, if applicable. 85
86 Turnover Date Memo Entry? Returned on AC? Transaction Code Treasurer s Check # Reference Number AC Number JE Number Amount Payee Explanation The date on which the transaction was turned over to the clerk, if applicable. This field applies only to memo entry transactions and will not be displayed if memo entries are not used by the county. Check this box to indicate that the transaction is a memo entry if a date was entered in the Turnover Date field. Tis field will only be displayed if memo entries are used in the county. Check this box if this transaction is a memo entry that has already been turned over to the Clerk and returned to the Treasurer s office on an auditor s certificate. This field will only be displayed if memo entries are used in the county. The transaction code for this transaction (required). To view and select from a list of valid transaction codes, position your cursor on this field and press the F4 key or double click on the field. Enter a check number if the transaction involves a Treasurer s check. The reference number for this transaction, if applicable. This field can contain any desired information including a bank document number or another number related to the transaction. The AC number related to this transaction, if applicable. To view and select from a list of ACs, enter the fiscal year and press the F4 key. The journal entry number related to this transaction, if applicable. To view and select from a list of journal entries, enter the fiscal year and press the F4 key. The amount of this transaction. This can be entered as a positive or negative amount. The name of the person to whom the transaction was paid, if applicable. The reason why the transaction is being entered (required). 4. Click the Add button to save the transaction. You will be returned to the List Account Transactions window. 86

87 CHANGING AN ACCOUNT TRANSACTION 1. Display the List Account Transactions window showing the transactions for the desired account as outlined above. Make sure that you have selected the Miscellaneous, Transfer, or Void radio button. 2. From the list of transaction, select the transaction to be changed by clicking on the desired row. 3. Click the Change button or right click on the row and select the Change Transaction option from the pop up menu. The Change History Transaction window will be displayed. 4. Change any necessary information for the transaction (see descriptions for each data field in the Adding a Miscellaneous section above). 5. Click the Change button to save any modifications made to the transaction. You will be returned to the List Account Transactions window. 87

88 DELETING AN ACCOUNT TRANSACTION 1. Display the List Account Transaction window showing the transactions for the desired account as outlined above. Make sure that you have selected the Miscellaneous, Transfer, or Void radio button. 2. From the list of transactions, select the transaction displayed in red. 3. The Delete History Transaction window will open as a confirmation to delete the chosen account transaction. 4. Click the Delete button to complete the removal of the transaction or click the Cancel button to close this window without deleting. You will be returned to the List Account Transactions window. 88

89 WORKING WITH ACCOUNT TRANSFERS LISTING TRANSFER INFORMATION 1. From the Treasurer s Main Menu, click the Account Management button or choose the Account Management option from the Select menu. The List Bank Accounts window will be displayed. 2. Select the bank account for which you want to display account transfer information by clicking on the desired row. 3. Click the Transfers button or select the Account Options Transfers option from the Select menu. You can also right click on the row and select the Transfers option from the pop up menu. The List Account Transactions window will be displayed showing all transfers for the selected account. 4. Refer to the following section to display, add, or delete an account transfer. When finished, click the Done button to close this window and return to the List Bank Accounts window. 89
90 ADDING AN ACCOUNT TRANSFER 1. Display the List Account Transactions window showing the transfer information for the desired account as outlined above. Make sure that the Transfers radio button is selected. 2. Click the Add button or press the F6 key to display the Add History Transaction window. 3. Enter information for the transfer. Descriptions for each data field are shown below. Treasurer Date To: Bank To: Account Transaction Code Treasurer s Check # Reference Number Amount Explanation The date of the transfer being entered (required). The code for the bank that the transfer is being made. To view and select from a list of bank codes, click on this field and press the F4 key or double click the field. The code for the bank account to which the transfer is being made. To view and select from a list of account codes, click on this field and press the F4 key or double click the field. The transaction code for this transfer (required). To view and select from a list of valid transaction codes, position your cursor on this field and press the F4 key or double click the field. Enter a check number if the transfer involves the use of a Treasure s Check. The reference number for this transaction, if applicable. This field can contain a bank document number or any other number related to this transaction. The amount being transferred to the bank account entered above (required). The explanation of why the transfer is being entered (required). 90

91 4. Click the Add button to process the transfer. You will be returned to the List Account Transactions window. 91

92 CHANGING AN ACCOUNT TRANSFER 1. Display the List Account Transactions window showing the transfer information for the desired account as outlined above. Make sure that the Transfers radio button is selected. 2. From the list of transactions, select the transfer record to be changed by clicking on the desired row. 3. Click the Change button or right click on the row and select the Change Transaction option from the pop up menu. The Change History Transaction window will be displayed. 4. Change any necessary information for the transfer. For data field descriptions, see Adding a Miscellaneous Transaction section on page 85 above. 5. Click the Change button to save any modifications made to this transfer record. You will be returned to the List Account Transactions window. 92
93 VOIDING UNUSED CHECKS 1. From the Treasurer s Main Menu, click the Account Management button or choose the Account management option from the Select menu. The List Bank Accounts window will be displayed. 2. Select the bank account for which you want to void unused checks by clicking on the desired row. 3. Click the Void Unused Checks button or select the Account Options Void Unused Checks option from the Select menu. You can also right lick on the row and select the Void Unused Checks option from the pop up menu. The List Account Transactions window will be displayed showing all voided check records for the selected account. 4. Click the Add button to display the Void Unused Checks window. 5. Enter information for the checks to be voided. Descriptions for each data field are shown below. Void Date Explanation From Check # To Check # The date on which the checks are being voided (required). The explanation of why the checks are being voided (required). The first check number being voided (required). The last check number being voided (required). 6. Click the Process button. The voided checks will be processed and you will be returned to the List Account Transactions window. 93

94 WORKING WITH MEMO ENTRIES Memo entries are transactions recorded on the Treasurer s accounts which have not yet been recorded by the Clerk s office. An example of a memo entry would be an interest amount credited to a Treasurer s account on a financial statement from a bank. Recording the interest payment as a memo entry will cause the interest amount to be included on reports used to balance with banks but not on reports used to balance with the Clerk s office. Memo entries are turned over to the Clerk by way of a memorandum produced by the Treasure s System and returned to the Treasurer s Office as an A/C. Note: Most options relating to memo entries will only be displayed if the Use Memo Entries check box is selected in the Treasurer s Control File. See the section Maintaining the Treasurer s Control file beginning on page 120 for additional information. ENTERING MEMO ENTRIES A memo entry is entered as a miscellaneous transaction to an account. When you add a memo entry transaction, make sure that the Memo Entry check box is selected. See Adding a Miscellaneous Transaction beginning on page 85 for more information on entering a transaction to an account. 94

95 TURNING OVER MEMO ENTRIES 1. From the Treasurer s Main Menu, click the Turnover Memo Transactions button or select the Turnover Memo Transaction option from the Select menu. The Turnover Memo Transactions window will be displayed showing all memo entries that have not yet been turned over. 2. Enter the desired bank account codes and click the Reload button or press the F5 key to display memo entries for only one bank or account. 3. Enter the transaction date for turning over the memo entries in the Turn Over Date field. 4. For each memo entry to be turned over, click on the entry and then click the Turn Over button or double click on the row. You can also right click on the row and select the Turn Over Item option from the pop up menu. The record will be displayed in gray and the check box in the Turnover column will show a check mark. If you have selected an entry you do not want to turn over, you can deselect it by double clicking on the entry or by clicking on the entry and again clicking the Turn Over button. 95
96 Alternatively, you can right click on the row and select the Turn Over Item option from the pop up menu to deselect the item. 5. After selecting all memo entries to turn over, click the Process button. A message will appear asking you to confirm the turning over of the selected entries. Click the Yes button to continue. The entries will be processed and you will be returned to the Treasurer s Main Menu. Note: If the Memo Entries Reporting Option in the Treasurer s Control File has been selected, a memorandum for reporting the selected memo entries to the Clerk will automatically be printed. If this report does not print automatically, you can print it manually by clicking the Print Reports toolbar button and selecting the TURNOVER TRANS MEMO Report. 96

97 DISPLAYING AND UPDATING ACCOUNT NOTES 1. From the Treasurer s Main Menu, click the Account Management button or choose the Account Management option from the Select menu. The List Bank Accounts window will be displayed. 2. Select the bank account for which you want to display account notes by clicking on the desired row. 3. Click the Account Notes button or select Account Notes option from the Select menu. You can also right click on the row and select the Account Notes option from the pop up menu. The Edit Notes for Bank Accounts window will be displayed. 4. To add or edit account notes, click on one of the text rows and enter the desired information. Use the scroll bar or arrow key to page up or down through the notes. 5. Click the Done button to save any changes made to the notes and close this window. You will be returned to the List Bank Accounts window. 97

98 DISPLAYING AN ACCOUNT BALANCE SUMMARY 1. From the Treasurer s Main Menu, click the Account Management button or choose the Account Management option from the Select menu. The List Bank Accounts window will be displayed. 2. Select the bank account for which you want to display a balance summary by clicking on the desired row. 3. Click the Balance Summary button or select Account Options Balance Summary option from the Select menu. You can also right click on the row and select the Balance Summary option from the pop up menu. The Account Balance Summary window will be displayed. 4. Enter the desired Balance As of Date for which you want to calculate balances and click the Calculate button. The system will calculate the balance summary figures and display them on the window. 5. To print a copy of the balance summary information, click the Print button. 6. Click the Done button to close this window and return to the List Bank Accounts window. 98

99 RECONCILING A BANK ACCOUNT 1. From the Treasurer s main Menu, click the Account Management button or choose the Account Management option from the Select menu. The List Bank Accounts window will be displayed. 2. Select the bank account you want to reconcile by clicking on the desired row. 3. Click the Reconciliation button or select the Account Options Reconciliation option from the Select menu. You can also right click on the row and select the Reconciliation option from the pop up menu. The Account Reconciliation window will be displayed. 4. Enter the date of the bank statement in the Bank Statement Date field and the balance amount in the Bank Statement Balance field. 5. Click the Reconcile button or press the Enter key. The Reconcile Bank Account window will be displayed showing all records for the account that have not cleared. 6. To display only one particular type of record, click the appropriate radio button in the Records to Display section of the window. 7. To select a detail record to be cleared, click on the desired row and then click the Clear/Unclear button or double click on the row. The row will be displayed in gray and a check mark will appear in the Clear column for that row. To Unclear a record, double click again on the row or click on the row and then click the Clear/Unclear button. 99


100 If you wish to see more information on a particular record, click on the desired row and then click the Display button or right click on the row and select the Display Transaction option from the pop up menu. 100
101 8. After marking all appropriate records, click the Process button to complete the reconciliation. If the Reconciliation Reporting Option has been selected in the Control File, a report filter will be displayed allowing you to enter information to print a TREASURER S RECONCILIATION Report. For more information on Using Secondary Report Filters see page

102 CHAPTER EIGHT WORKING WITH INVESTMENT ACCOUNTS LISTING INVESTMENT ACCOUNTS To display a list of investment account, click the Account Management button or select the Account Management option from the Select menu on the Treasurer s Main Menu. The List Bank Account window will be displayed. In the Account Type section of the window, select the Investment radio button. This will display all investment accounts in the system. ADDING INVESTMENT ACCOUNTS 1. From the Treasurer s Main menu, click the Account Management button or choose the Account Management option from the Select menu. The List Bank Accounts window will be displayed. 2. Click the Add button, press the F6 key, or select the Add option from the Process menu. You can also right click anywhere in the list of bank accounts and select the Add Account option from the pop up menu. The Add Bank Accounts window will be displayed. 3. Click on the arrow to the right of the Type field and select Investment as the type of account to add. This will display the additional Interest Rate and Maturity Date fields on the window. 102
.")
103 4. Enter the information for the new investment account. Descriptions for each data field are shown below. Bank Code Account Code Date Opened Description Type Account # Interest Rate Maturity Date The code for the bank in which the account will be opened (required). To view and select from a list of banks, position your cursor on this field and press F4 or double click on the field. The unique code that will be used to identify this bank account (required). This code can be entered using both letters and numbers and can be up to 10 characters in length. The date on which the bank account was opened. This defaults to the current date but can be changed if necessary. A description of the bank account (required) up to 50 characters in length. The type for this account. Select the investment option for this field. The account number assigned by the bank to this account. The interest rate paid by the bank or financial institution on the account. The date of maturity for the investment. 103
104 5. Click the Add button to save the information entered for this investment account. You will be returned to the List Bank Accounts window which will now include the account just entered. CHANGING AN INVESTMENT ACCOUNT 1. From the Treasurer s Main Menu, click the Account Management button or choose the Account management option from the Select menu. The List Bank Accounts window will be displayed. 2. Select the investment account to be changed or renewed by clicking on the desired row. 3. Click the Change button, press F7 or select the Change option from the Process menu. You can also right click on the desired row and select the Change Account option from the pop up menu. The Change Bank Accounts window will be displayed (see the window shown in Renewing an Investment, below). 4. Change the description or status of the investment account, if necessary. Note: The status cannot be changed to Inactive or Closed if a current balance still exists for the investment. Transfer any remaining balance to another account before closing the investment. 5. To make changes to an item listed in the Investment History section of the window, click on the desired item and then click the Update button to display the Change Treasurer s Investment window. On this window, make any necessary changes to the record and click the Change button. 6. After making changes to the investment or investment history records, click the Change button on the Change Bank Accounts window. You will be returned to the List Bank Accounts window. 104

105 RENEWING AN INVESTMENT 1. From the Treasurer s Main Menu, click the Account Management button or choose the Account Management option from the Select menu. The List Bank Accounts window will be displayed. 2. Select the investment account to be changed or renewed by clicking on the desired row. 3. Click the Change button, press F7, or select the Change option from the Process menu. You can also right click on the desired row and select the Change Account option from the pop up menu. The Change Bank Accounts window will be displayed. 4. Click the Renew button to display the Renew Investment window and enter renewal information as follow: Interest Gained The amount of interest earned on the investment since the last time it was renewed. 105
106 Description Account Number Interest Rate Open Date Maturity Date The description for the investment. This may be changed at the time of renewal if necessary. The new account number for the investment if it has been change for renewal. The interest paid by the bank or financial institution on the investment. The date the investment account was opened. The expected date for the investment. 5. Click the Renew button to complete the renewal o the investment. An investment history record will be written to record the renewal and you will be returned to the Change Bank Accounts window. RECORDING INTEREST ON AN INVESTMENT 1. From the Treasurer s Mai Menu, click the Account Management button or choose the Account Management option from the Select menu. The List Bank Accounts window will be displayed. 2. Select the investment account for which you want to record interest by clicking on the desired row. 3. Click the Miscellaneous Transactions button or select the Account Options Miscellaneous Transactions option from the Select menu. You can also right click on the row and select the Miscellaneous Transactions option from the pop up menu. The List Account Transactions window will be displayed showing all miscellaneous transactions for the selected account. 4. Click the Add button to display the Add History Transaction window. If the Add button is not available on this window, make sure that the Miscellaneous radio button has been selected. 5. Enter the information for the interest being recorded. For descriptions of each data field on this window, refer to Adding a Miscellaneous Transaction beginning on page Click the Add button to save the information entered. You will be returned to the List Account Transactions window. 106
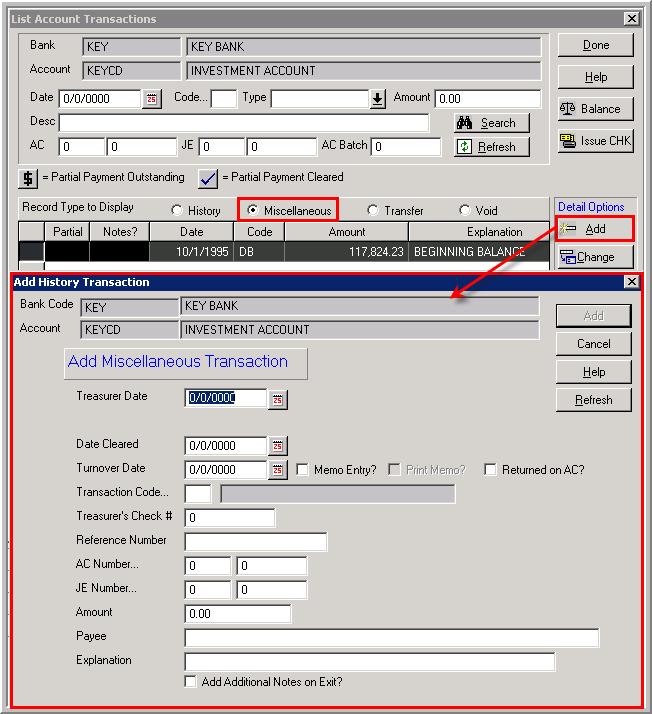
107 107
108 CHAPTER NINE PRINTING REPORTS A number of printed reports can be produced from the Treasurer s System. You can print different reports from nearly all of the main menus and list windows in the system. The reports available will differ depending on the menu or window you are on, but the process of selecting and printing is identical regardless of which report you want. SELECTING REPORTS TO PRINT Most Treasurers System reports are printed using the Select Reports button on the toolbar. This button is available from the toolbars on all of the main list windows. Printing reports form the Treasurer s System typically involves the following steps: 1. Click the Select Reports button on the toolbar to display the Report Selection window. 2. Select the report to be printed from those listed on the Report Selection window. See Using the Report Selection Window below for additional instructions. 3. Enter the desired report information on the report filter and secondary filter, if applicable. Refer to the section on Using Report Filters beginning on page 110 for more information on report filters. 4. Click the OK button on the report filter and/or secondary filter to print the reports. As indicated, instruction for selecting reports and using report filters are outlined below. 108

109 USING THE REPORT SELECTION WINDOW The Report Selection window is displayed when you click the Select Reports button from the toolbar. To select a report, click on the name of the report you wish to print. You can select more than one report by pressing and holding the Ctrl key on your keyboard and clicking on additional reports. If you don t see the report you want, enter the first few letters of the report title in the Position To Report field to move to that report. After selecting the report or reports you want to run, you need to select the destination and filtering option. Under Report Destination, you can tell the system to send the report to either your screen or to a printer and select number of copies you want to print. For many reports, you use the Filtering options to decide whether to use a filter to select only certain records for the report or to include all records. Instructions on displaying and filtering reports are outlined below. 109

110 USING REPORT FILTERS Many of the reports in the Treasurer s System use filters which allow you to select what types of records or date ranges will be included on a report. The filters differ depending on which report you are printing. Instructions on using report filter are provided below. USING DEFAULT REPORT FILTERS Default filters are displayed when the Default radio button is selected on the Report Selection window. These windows are relatively self-explanatory and include different data fields and radio buttons that also you to select the information that will be included on the selected reports. Examples of default report filters are shown below. Most default report filters require a date range of dates. On these filters enter the date or date range you want to use for the report by entering the month, day, and four-digit year. On many of these filters, you can leave the date field blank ( 00/00/0000 ) to include all records. Many default filters allow you to select a particular bank, bank account, or transaction type for a report by entering the appropriate code. Where a code is required, the field will typically be a search field (denoted by three periods following the field name, such as Bank ). You can view and select from a list of valid codes for these fields by positioning your cursor on the field and pressing F4 or by double clicking on the field. Note: For most filters requiring a code, leaving the code field blank will select all records for the report. 110


111 Some default report filter use radio buttons that allow you to select the type of records to be included on a report. To select a particular record type, click the radio button next to the desired type description. Some default filters include a field titled Report to Run that provides a list of reports that can be printed from the filter. To select a report to print, click on the down arrow to the right of this field and click on one of the listed reports. After entering all desired information on a default report filter, click the OK button to continue printing the report. For some reports, a secondary filter will be displayed requiring additional data for the report. Refer to the following section for instructions on using secondary report filters. 111

112 USER-DEFINED REPORT FILTERS User-define report filters are available for some reports in the Treasurer s System. These filters are very flexible and allow you to specify what information you wish to include on a particular report. A userdefined filter will be displayed if the User Defined radio button is selected in the Filtering section of the Report Selection window. Using a user-defined filter involves defining a query containing one or more comparisons that the system uses to determine which records to include on a report. For example, when running a CHART OF ACCOUNTS report, you may want to include only A Budget accounts from Fund 01. Follow the steps below to define comparisons for a report (the step numbers correspond to the numbers shown on the figure above). 112

113 1. Select the column (or field) you want to use in the comparison. For example, if you are running a CHART OF ACCOUNTS REPORT and want to include only accounts for a given fund, select the Fund Number field. When you select a column, the window will display the data type of the column as well as whether the column is enumerated. If a column in enumerated, it has a set of preset values that can be selected for the query. 2. For non-enumerated fields, select the comparison you want to use in the How to Compare section of the window. You can select from Equal, Greater Than, Greater Than or Equal To, Less Than or Equal To. Click the Test for a Range of Values check box if you wish to check for values in the selected column within a given range. You can also click the Compare Against Other Column check box if you want to compare the contents of the selected column against the contents of another column in the record. 3. Enter the value or values to be used for the comparison. If the field selected is enumerated, select one of the values listed in the Values to Compare section. Otherwise enter the value or range of values you want to use for the comparison. If you selected the Compare Against Other Column check box, select the column name to be used in the comparison. 4. Click the Add to Query button to add the comparison to the query. The comparison will be shown in the Select Rows Where section of the window. Follow steps 1 through 4 to enter additional comparisons to the query. 113

114 5. To remove a comparison from the report query, click on the comparison in the Select Rows Where section of the window and click the Remove button. To remove all comparisons, click the Remove All button. 6. When all comparisons have been added to the query, click the Run Report button to print the report. To close this window without printing, click the Cancel button. DISPLAYING REPORTS ON THE SCREEN When selecting a report, you have the option of printing a report to a printer or to your screen under the Report Destination options. If you select the Window option, your report will print to the screen and appear just as it would on paper. You can click the Close button at any time to exit the Report Display window and return to the report selection.. 114
115 Once the report is displayed on the report display window, you can page through the report, increase or decrease the magnification (zoom), and print the report to paper or export it to another application. To page through a report that you have displayed on your screen, you can use your keyboard Page Up or Page Down keys, the scroll bars on the screen, and the paging toolbar icons listed below. Returns you to the first page of the report. Takes you to the previous page of the report. Takes you to the next page of the report. Takes you to the last page of the report. Stops report processing. Search report data. CHANGING DISPLAY MAGNIFICATION You can change the magnification of a displayed report or zoom in or out, to make the report easier to read and review. To increase or decrease the magnification, click on the arrow to the right of the report magnification field and select the desired value. You can select a value from 25% to 400% or enter a specific magnification value in the field and press the Tab key. PRINTING A DISPLAYED REPORT To print a report after displaying it on the screen, click the Print button at the top of the Report Display window. This will display the Print window and allow you to select the pages you wish to print as well as the number of copies. Click on the OK button on this window to print the report. 115


116 EXPORTING REPORT FILES EXPORT A REPORT INTO EXCEL 1. From the report window click the Export Report icon. 2. In the Export window, choose MS Excel as the format: 3. Then select Application as the destination: 4. Click Ok. 5. The report will export into Excel: 116

117 PRINTING A LIST OF AVAILABLE REPORTS You can find out what reports are available in the Treasurer s System by printing a list of all reports. 1. Click the Select Reports button on the main toolbar. 2. Click on the report entitled REPORTS LIST and select your Report Destination options. 3. Click the Print button to print the report. REPORT TROUBLESHOOTING You may occasionally run across trouble when printing reports. Printing problems can be caused by a wide variety of factors. This section covers a number of the most common problems and their solutions. If the suggestions out lined in this section don t solve your problem or answer your questions, contract your System Administrator or Computer Arts Service Rep. If they are not readily available, please call the Computer Arts, Inc. Help Desk at (800) When I launch a report, I get an error message. Computer Arts makes every effort to prevent printing errors. However, due to the complexity of the system, you may occasionally encounter error messages in the form of popup windows. Some 117
118 messages are relatively simple while others can be lengthy and contain somewhat cryptic symbols or abbreviations. Here s what you can do if you run into this: Write down the message as completely as possible. Better yet, press Alt + PrtScn on your keyboard to copy the window, paste it to a word processing or Notepad document and save. If you receive more than one error window, do this for each message. The exact wording of the messages are important in troubleshooting the exact cause. Try to recall your steps before receiving the error. In order to find the cause of the problem, it is important to be able to duplicate it, if possible. This will assist Computer Arts personnel in their troubleshooting. If necessary, try to write down the names of the windows displayed and options selected before you received the error message. Contact the Computer Arts Help Desk (800) The Help Desk technicians can help resolve the problem or refer you to another CAI employee to help you. It is important that you have the text of the error messages you received in front of you when you call. When I launch a report, nothing comes out of the printer or nothing happens at all. The causes of problems like this can range from slow printing performance to incorrect printer installation. Here s what to look for: Consider the size and length of the report. Every effort is made by Computer Arts to optimize report processing and performance. However, many reports have to process a great deal of information and may take some time to print or display on your screen. If reports are taking a very long time to print, contact your Computer Arts Service Rep or the Computer Arts Help Desk at (800) Check the status of your printer. Problems of this type can results from a printer being offline or disconnected from the server. Sometimes, error messages will be displayed on the printer itself. Check to make sure the printer is online and, if any errors are displayed, look them up in our printer documentation or help file to determine the cause. Check your printer installation. This kind of a problem can also be caused by an incorrect installation of a printer driver on your pc. To check this, click on your Windows Start button and select Control Panel>Devices and Printers. This will display all of the printers installed on your PC. Right click on the con for your printer you sent your report to and select the Properties option. Click the Print Test page button and check the printer to make sure the page printed correctly. If so, the problem is not with your printer installation or connection. Contact your System Administrator or CAI Service Rep. If none of the above suggestions solve the problem, further investigation into the printer configuration or connection may be necessary. If your 118
119 System Administrator or Service Rep is not available, contact the Computer Arts Help Desk (800) When I print a report, some fields are cut off along the margins. Reports designed with the Crystal Reports tool used in the Treasurer s System may print differently based on various printers and printer drivers used. While every effort is made to reduce these differences, you may encounter a report where certain fields or even the entire report seems to be cut off along one or more of the margins. If you encounter this problem, contact the Computer Arts Help Desk at (800) for assistance in checking the compatibility of your printer or determining whether the report needs to be updated. I exported a report to an Excel or Word file to disk, but the person I sent it to can t open the file. This problem generally occurs when the PC being used to open the file does not have MS Excel or MS Word installed. If this is the case, the software will need to be installed on the PC. Alternatively, another PC that has the software installed can be used to open the file. When I export a report to Excel or Word, I lose some of the report formatting. Because of the many different methods used by software programs to format documents and spreadsheets, it is not unusual to lose some design and formatting features when exporting reports to other software. Some of the most common formatting features lost during export include heading, lines, boxes and page headers. The best way to avoid the loss of formatting in exported documents is to ensure that the format used to export the file is compatible with that used by the software that will open the file. When exporting MS Excel files, use the XLS extended formats. It may also be helpful to experiment with different formats to find those that best preserve your report formatting. 119

120 CHAPTER TEN WORKING WITH THE TREASURER S CONTROL FILE The Treasurer s Control File contains a number of tools and settings to allow you to maintain codes and other system information as well as define many aspects of how the system works overall. CAUTION!!! Certain parts of the Control File contain settings and codes that affect the entire Treasurer s System or prevents it from working entirely. If you have any questions or doubts about making changes, contact Computer Arts, Inc., prior to doing so. MAINTAINING THE TREASURER S CONTROL FILE From the Treasurer s Main Menu, click the Control File button on the toolbar Treasurer s Control File window. to open the 120
Accounting Table of Contents
 Accounting Table of Contents Accounting Table of Contents 1 About Church Windows Accounting 4 Chart of Accounts Setup 6 Adding and Removing Accounts 7 Managing the Chart of Accounts 9 Detail tab 9 Balance
User's Guide. Alpha Five Accounting. Accounting Made Easy. Version 3.0. Copyright BetaSoft LLC - All Rights Reserved
 User's Guide Alpha Five Accounting Copyright 1995-2002 BetaSoft LLC - All Rights Reserved Accounting Made Easy Version 3.0 Alpha Five is a trademark of Alpha Software Corp. i ii Table of Contents INTRODUCTION...1
Subsidiary Ledger Report. Click on the Financials menu and select: A. General Ledger Menu D. End of Period C. Subsidiary Ledgers
 Subsidiary Ledger Report Click on the Financials menu and select: A. General Ledger Menu D. End of Period C. Subsidiary Ledgers 1 Subsidiary Ledger Report The screen should appear like below: 2 Subsidiary
General Ledger Updated December 2017
 Updated December 2017 Contents About General Ledger...4 Navigating General Ledger...4 Setting Up General Ledger for First-Time Use...4 Setting Up G/L Parameters...5 Setting the G/L Parameters...6 Setting
User Documentation for School Activity Funds Accounting
 User Documentation for School Activity Funds Accounting By: Applied Business Services, Inc. 800 S. Frederick Avenue, Suite 101 Gaithersburg, MD 20877 1-800-451-7447 ext. 130 www.appliedbusinessservices.com
MultiSite Suite: General Ledger
 MultiSite Suite: General Ledger User s Manual version 2.2.97 Copyright & Trademarks Copyright Notice and Trademarks 2003 by Brent Lawrence, LLC. All rights reserved. Reprinted and edited by MultiSite Systems,
RG Connect 2015 Microsoft Dynamics GP Tips and Tricks October Prepared by Sheri Carney
 RG Connect 2015 Microsoft Dynamics GP Tips and Tricks October.23.2015 Prepared by Sheri Carney 600 SW 39 th Street, Suite 250 Renton, WA 98057 425.277.4760 www.resgroup.com Contents GLOBAL TIPS... 4 1.
COUNTY OF MENDOCINO. MUNIS Finance System Cash Receipt Guide. Created by: Auditor-Controller May 2013 v3
 COUNTY OF MENDOCINO MUNIS Finance System Cash Receipt Guide Created by: Auditor-Controller May 2013 v3 This is an updated version of a comprehensive guide containing instructions, tips, policies and suggestions
Representative Payee Manager User Guide
 Representative Payee Manager User Guide Version 5.0.9 Copyright 1997-2018 Complete Computer Solutions, Inc. Table of Contents Contents... 1 System Navigation... 2 Ribbon Menu... 5 Logon to the System...
Accounts Payable MODULE USER S GUIDE
 Accounts Payable MODULE USER S GUIDE INTEGRATED SOFTWARE SERIES Accounts Payable MODULE USER S GUIDE Version 3.1 Copyright 2005 2009, Interactive Financial Solutions, Inc. All Rights Reserved. Integrated
State of Oklahoma COR121 Deposit Entry Manual Revised: October 1, 2007
 State of Oklahoma COR121 Deposit Entry Manual Authorized by: [_CORE_] Original Issue: [11/01/2003] Maintained by: [ General Ledger Lead ] Current Version: [10/01/2007] Review Date: [01/31/2008] COR121
Microsoft Dynamics GP. RapidStart Services
 Microsoft Dynamics GP RapidStart Services January 31, 2013 Copyright Copyright 2013 Microsoft. All rights reserved. Limitation of liability This document is provided as-is. Information and views expressed
Downloading General Ledger Transactions to Excel
 SAN MATEO COUNTY OFFICE OF EDUCATION CECC Financial System Procedures This document provides instructions on how to download the transactions listed on an HP 3000 GLD110 report into Excel using a GLD110
QUICKBOOKS PRO 2008 AN INTRODUCTION TO QUICKBOOKS PRO
 QUICKBOOKS PRO 2008 AN INTRODUCTION TO QUICKBOOKS PRO Opening a Company Database 1. To change the open company in QuickBooks, click File on the main menu and select Open or Restore Company. When the next
CALCASIEU PARISH SCHOOL BOARD SCHOOL ACTIVITY FUNDS EPES ACCOUNTING PROCEDURES MANUAL
 CALCASIEU PARISH SCHOOL BOARD SCHOOL ACTIVITY FUNDS EPES ACCOUNTING PROCEDURES MANUAL START UP 4 Log in 4 Main Screen 5 Exit 5 UTILITIES 5 Preferences 5 Change Password 7 Year End Closing 7 View Prior
TheFinancialEdge. Configuration Guide for Cash Receipts
 TheFinancialEdge Configuration Guide for Cash Receipts 102711 2011 Blackbaud, Inc. This publication, or any part thereof, may not be reproduced or transmitted in any form or by any means, electronic, or
Financial Report Guide
 Financial Report Guide 2008 Washington University All rights reserved. For RAPS Support, send an e-mail message to RAPS@wustl.edu, or call 935-3890. Last Modified: 09/16/08 This page is intentionally left
General Ledger Table of Contents
 General Ledger Table of Contents Return to Cover page 1 Getting Started... 4 2 The Maintenance Menu Column... 6 2.1 Creating accounts...6 2.2 Creating budgets...10 2.3 Formatting financial statements...11
MultiSite Suite: Accounts Payable
 MultiSite Suite: Accounts Payable User s Manual version 6 Copyright & Trademarks Copyright Notice and Trademarks 2010 MultiSite Systems, All rights reserved. Microsoft, Windows, Excel, and Outlook are
Disassembly of the CertiflexDimension software is also expressly prohibited.
 All content included in CertiflexDimension programs, manuals and materials generated by the programs are the property of The Versatile Group Inc. (TVG) and are protected by United States and International
ClubConnect General Ledger Financials with Budgets, Ratios, and Memo Accounts
 Financials with Budgets, Ratios, and Memo Accounts Webinar Topics Budget Information on Financials... 3 Assign Budget Versions to the Financials... 3 Select Budget Formats for Financials... 4 Ratios...
Financial Information System (FIS) Web Client End User Training
 Web Client End User Training") FIS - JD Edwards EnterpriseOne Common Foundations Workshop Financial Information System (FIS) Web Client End User Training 1 Logging On 1. Open Internet Explorer 2. Go to www.uwindsor.ca/fis 3. Save web
FIS - JD Edwards EnterpriseOne Common Foundations Workshop Financial Information System (FIS) Web Client End User Training 1 Logging On 1. Open Internet Explorer 2. Go to www.uwindsor.ca/fis 3. Save web
Solomon 4.5 General Ledger Manual
 Campus Crusade for Christ International Financial Management Solomon 4.5 General Ledger Manual written for use by CCC ministries worldwide International Financial Management 100 Lake Hart Dr. 2800 Orlando,
Microsoft Dynamics GP. Localization Chile
 Microsoft Dynamics GP Localization Chile Copyright Copyright 2010 Microsoft. All rights reserved. Limitation of liability This document is provided as-is. Information and views expressed in this document,
ShelbyNext Financials: Accounts Payable Best Practices (Course #N210)
") ShelbyNext Financials: Accounts Payable Best Practices (Course #N210) Presented by: Carmen Dea, Shelby Consultant 2017 Shelby Systems, Inc. Other brand and product names are trademarks or registered trademarks
ShelbyNext Financials: Accounts Payable Best Practices (Course #N210) Presented by: Carmen Dea, Shelby Consultant 2017 Shelby Systems, Inc. Other brand and product names are trademarks or registered trademarks
Institutional Reporting and Analysis (IRA) For help, blitz "Financial Reports", or
 For help, blitz Financial Reports, or") Institutional Reporting and Analysis (IRA) 1 Training Agenda Introduction to the IRA Reporting Tool Logging onto the system (4-5) Navigating the Dashboard (6-10) Running Reports (11-12) Working with Reports
Institutional Reporting and Analysis (IRA) 1 Training Agenda Introduction to the IRA Reporting Tool Logging onto the system (4-5) Navigating the Dashboard (6-10) Running Reports (11-12) Working with Reports
NorthStar Club Management System
 NorthStar Club Management System The Version 3.2.0 GL- 03252008 March 25, 2008 CONTENTS OVERVIEW OF THE GL (GENERAL LEDGER) MODULE... 5 ACCESSING THE GL MODULE... 6 GL INTRODUCTION:... 8 Inquiry... 8 Admin...
Key-School Budget User Meeting October 26, 2018 Daleville, IN Presented by : Joy Watson
 Key-School Budget User Meeting October 26, 2018 Daleville, IN Presented by : Joy Watson Keystone Software Systems Inc 9401 Innovation Drive, Suite 400 P O Box 669 Daleville IN 47334-0669 Key School Budget
Accounts Receivable WalkThrough
 PRACTICE CS Accounts Receivable WalkThrough Version 2014.x.x TL 30465 9/8/16 Copyright Information Text copyright 2004-2016 by Thomson Reuters. All rights reserved. Video display images copyright 2004-2016
Unit 12. Electronic Spreadsheets - Microsoft Excel. Desired Outcomes
 Unit 12 Electronic Spreadsheets - Microsoft Excel Desired Outcomes Student understands Excel workbooks and worksheets Student can navigate in an Excel workbook and worksheet Student can use toolbars and
Nexsure Training Manual - Accounting. Chapter 7
 Nexsure Training Manual - Accounting Vendor Entries In This Chapter Vendor Entries at the Organization and Territory Level Vendor Entity Definition Disbursements to Vendors Line Item Distribution Receiving
This Page Left Blank Intentionally
 Chapter 2 Receipts This Page Left Blank Intentionally CTAS User Manual 2-1 Receipts: Introduction Issuing the receipt is the first step in the collection of payments. This should be done immediately upon
Bank Statement Reconciliation
 Bank Statement Reconciliation Updated March 2016 Contents About Bank Reconciliation...3 Reconciling Your Account...3 Importing Users into SQL...3 Creating a Bank Account...4 Editing a Bank Account...5
View Only Access. Galaxy. This document contains step-by-step instructions for View Only Users in the Galaxy system.
 Riverside County Office of Education Galaxy View Only Access This document contains step-by-step instructions for View Only Users in the Galaxy system. 2 INTRODUCTION... 4 INSTALLING GALAXY ON YOUR DESKTOP...
Check Writing. User Guide
 Check Writing User Guide Copyright (c) 2001 Jenzabar, Inc. All rights reserved. You may print any part or the whole of this documentation to support installations of Jenzabar software. Where the documentation
New Finance Officer & Staff Training
 New Finance Officer & Staff Training Overview MUNIS includes many programs and tools to allow for the management of the District financials. As newer finance officers and staff, you are charged with understanding,
Welcome to ExACCT! Getting Started
 Please Note: To navigate through the ExACCT User Guide easily, please use the Books or Thumbnails available in the navigation pane. To show these navigation links, click on the button Show/Hide Navigation
Chapter 2 Receipts June 2012
 Chapter 2 Receipts This Page Left Blank Intentionally CTAS User Manual 2-1 Receipts: Introduction Issuing the receipt is the first step in the recording of receipts and should be done immediately upon
Steps: 1. Log in to the Dmitri application through the following website URL, as appropriate:
 Dmitri Suite Getting Started Logging In and Logging Out Logging In Use the following steps to log in to the Dmitri application. Steps: 1. Log in to the Dmitri application through the following website
Banking in QuickBooks Online
 QuickBooks Online Student Guide Chapter 6 Banking in QuickBooks Online Chapter 2 Chapter 6 The Banking page is where you connect your accounts and download transactions. This is sometimes known as bank
Navigating Viewpoint V6 Working with Grids
 Navigating Viewpoint V6 Working with Grids Table of Contents About this Course 3 Introduction to Grids 4 Hiding Grid Columns 4 Column Widths 5 Column Order 6 Show All Type Columns 7 Filter Bar 8 Grouping
PATRONAGE / EQUITY USER'S GUIDE
 PATRONAGE / EQUITY USER'S GUIDE This document is non-technical and explains the operation of the Patronage / Equity programs. It is intended for both accounting staff and operators. COPYRIGHT 2017 AgTrax
Tabs3, PracticeMaster, and the pinwheel symbol ( trademarks of Software Technology, Inc. Portions copyright Microsoft Corporation
 Tabs3 General Ledger Software Reseller/User Tutorial Version 16.1 for November 2011 Sample Data Copyright 1983-2013 Software Technology, Inc. 1621 Cushman Drive Lincoln, NE 68512 (402) 423-1440 http://www.tabs3.com
CYMA IV. Accounting for Windows. System Manager Training Guide. Training Guide Series
 CYMA IV Accounting for Windows Training Guide Series System Manager Training Guide December 2015 CYMA Systems, Inc. 2330 West University Drive, Suite 4 Tempe, AZ 85281 (800) 292-2962 Fax: (480) 303-2969
Integrating Word with Excel
 Integrating Word with Excel MICROSOFT OFFICE Microsoft Office contains a group of software programs sold together in one package. The programs in Office are designed to work independently and in conjunction
Navigation Reference Guide
 FISCAL AFFAIRS FINANCIAL MANAGEMENT SYSTEM (FMS) Navigation Reference Guide June 2004 Table of Contents Introduction to Financial Management System... ii Navigation Reference Guide... ii Overview...ii
1. Understanding efinanceplus Basics
 1. Understanding efinanceplus Basics To understand the procedures described later in this guide, you will first need some background on the efinanceplus environment. Whether adding, searching for, viewing,
2.1 Logging on to FieldManager Software
 2 Getting Started The main window displays all statewide contracts. Please note that you have access to ALL contracts and functionality is based on permission level. These contracts are imported into FieldManager
CLERK S FINANCIAL ODYSSEY
 CLERK S FINANCIAL ODYSSEY INTRODUCTION: This is intended for existing Clerk s Financial users who are familiar with processing claims. Computer Arts, Inc. has implemented the necessary features in the
PCGENESIS FINANCIAL ACCOUNTING AND REPORTING (FAR) SYSTEM OPERATIONS GUIDE
 SYSTEM OPERATIONS GUIDE") PCGENESIS FINANCIAL ACCOUNTING AND REPORTING (FAR) SYSTEM OPERATIONS GUIDE 12/15/2008 Section L: General Ledger Processing [Topic 2: Journal Voucher Processing, V2.1] Revision History Date Version Description
PCGENESIS FINANCIAL ACCOUNTING AND REPORTING (FAR) SYSTEM OPERATIONS GUIDE 12/15/2008 Section L: General Ledger Processing [Topic 2: Journal Voucher Processing, V2.1] Revision History Date Version Description
Brandon s Cabinet Shop
 Brandon s Cabinet Shop Module 1 Transactions For June 3-9 Page 1 Begin Brandon s Cabinet Shop Record the transactions When you have: (1) carefully read the Introduction, (2) a good understanding of the
Working with Excel involves two basic tasks: building a spreadsheet and then manipulating the
 Working with Excel You use Microsoft Excel to create spreadsheets, which are documents that enable you to manipulate numbers and formulas to create powerful mathematical, financial, and statistical models
Microsoft Office 2010: Introductory Q&As Access Chapter 2
 Microsoft Office 2010: Introductory Q&As Access Chapter 2 Is it necessary to close the Navigation Pane? (AC 78) No. It gives you more room for the query, however, so it is usually a good practice to hide
Working with Excel CHAPTER 1
 CHAPTER 1 Working with Excel You use Microsoft Excel to create spreadsheets, which are documents that enable you to manipulate numbers and formulas to quickly create powerful mathematical, financial, and
MS Excel Henrico County Public Library. I. Tour of the Excel Window
 MS Excel 2013 I. Tour of the Excel Window Start Excel by double-clicking on the Excel icon on the desktop. Excel may also be opened by clicking on the Start button>all Programs>Microsoft Office>Excel.
Daily Revenue. the daily balances as well as the standard monthly account balances.
 Daily Revenue Overview The concept of the Daily Revenue feature is to track actual and budget dollars and statistics on a daily basis. When posting to the General Ledger on a given day, the same amounts
1. AUTO CORRECT. To auto correct a text in MS Word the text manipulation includes following step.
 1. AUTO CORRECT - To auto correct a text in MS Word the text manipulation includes following step. - STEP 1: Click on office button STEP 2:- Select the word option button in the list. STEP 3:- In the word
User Guide #PeopleFirst
 ADVANCED BUSINESS ONLINE BANKING User Guide #PeopleFirst TABLE OF CONTENTS LOGIN Login Instructions 3 ACCOUNT BALANCES AND TRANSACTION DETAILS Balance Snapshot 4 Important Account Balances 4 Recent Transactions
3-8 Sage 300 CRE: Office Connector Overview/Roundtable
 3-8 Sage 300 CRE: Office Connector Overview/Roundtable Presented By: Don Bannister Biltmore Construction Co, Inc. 3-8 Sage 300 CRE: Office Connector Overview/Roundtable - 1 Review Office Connector Launch
SMU Financials Created on April 29, 2011
 Created on April 29, 2011 Notice 2011, Southern Methodist University. All Rights Reserved. Published 2011. The information contained in this document is proprietary to Southern Methodist University. This
CASH MANAGEMENT HOW-TO
 Vision Municipal Solutions CASH MANAGEMENT How-To Guide Contents Set-Up... 4 Changing Your Default Period... 4 How to Change Your Default Period... 4 Payment Centers... 4 Adding a Payment Center... 4 Drawers...
Enhancements Guide. Applied Business Services, Inc. 900 Wind River Lane Suite 102 Gaithersburg, MD General Phone: (800)
") Enhancements Guide Applied Business Services, Inc. 900 Wind River Lane Suite 102 Gaithersburg, MD 20878 General Phone: (800) 451-7447 Support Telephone: (800) 451-7447 Ext. 2 Support Email: support@clientaccess.com
Enhancements Guide Applied Business Services, Inc. 900 Wind River Lane Suite 102 Gaithersburg, MD 20878 General Phone: (800) 451-7447 Support Telephone: (800) 451-7447 Ext. 2 Support Email: support@clientaccess.com
PHILIPPINE NATIONAL BANK
 PHILIPPINE NATIONAL BANK INTERNET BANKING USER GUIDE 1 CONTENTS Enrollment...3 Login...8 Add Other Deposit and Credit Card Accounts...9 Account Inquiry... 13 Funds Transfer... 16 Bills Payment... 22 Manage
Auto / Account Reconciler 2016 Build Notes
 Auto / Account Reconciler 2016 Build Notes ENCORE BUSINESS SOLUTIONS www.encorebusiness.com twitter.com/encorebusiness.com encore@encorebusiness.com Copyright Build Notes copyright 2018 Encore Business
LEDGERSYNC TRANSACTION RECONCILIATION PROCESS
 GETTING STARTED: LEDGERSYNC TRANSACTION RECONCILIATION PROCESS The following guide presents a suggested monthly workflow based utilizing Ledgersync with your accounting software. While the demonstration
The chances are excellent that your company will
 Set Up Chart of Accounts and Start Dates The chances are excellent that your company will have been operating, if only for a short time, prior to the time you start using QuickBooks. To produce accurate
Bank Reconciliation Documentation
 Bank Reconciliation Documentation Table of Contents MCSJ v4.2 Changes... 2 Highlights of Bank Reconciliation... 2 Preparing to Reconcile... 3 Cash Receipts Batch... 3 Budget (Expenditure) Batch... 4 Reporting...
RG Connect Sheri s Tips and Tricks. October Prepared by Sheri Carney
 RG Connect 2012 Sheri s Tips and Tricks October.11.2012 Prepared by Sheri Carney 1400 Talbot Road South, Suite 301 Renton, WA 98055 425.277.4760 www.resgroup.com Contents GLOBAL TIPS... 4 1. Automatic
Munis General Journal Entry/Proof
 Munis General Journal Entry/Proof Procedural Documentation For more information, visit www.tylertech.com. General Journal Entry/Proof Objective This document provides instructions on how to enter a manual
ECA Risk Report User Guide August 19, 2015 Table of Contents Introduction... 1 Getting Started... 1 User Names and Passwords... 2 Preparing to Enter
 ECA Risk Report User Guide August 19, 2015 Table of Contents Introduction... 1 Getting Started... 1 User Names and Passwords... 2 Preparing to Enter Data... 3 Accessing the ECA Risk Report... 3 Logging
G/L Journal Entry New Features for 2012:
 G/L Journal Entry New Features for 2012: o On the fly addition of new accounts o Mouse and Hot Key support o One click sorting o Drop down lists for Properties and Accounts. o Row Move o Copy & Paste o
Microsoft Excel Microsoft Excel
 Excel 101 Microsoft Excel is a spreadsheet program that can be used to organize data, perform calculations, and create charts and graphs. Spreadsheets or graphs created with Microsoft Excel can be imported
Procedures Oracle FLEXCUBE Universal Banking Release 12.0 [May] [2012] Oracle Part Number E
![Procedures Oracle FLEXCUBE Universal Banking Release 12.0 [May] [2012] Oracle Part Number E](/thumbs/82/86805977.jpg "Procedures Oracle FLEXCUBE Universal Banking Release 12.0 [May] [2012] Oracle Part Number E") Procedures Oracle FLEXCUBE Universal Banking Release 12.0 [May] [2012] Oracle Part Number E51527-01 Table of Contents Procedures 1. ABOUT THIS MANUAL... 1-1 1.1 INTRODUCTION... 1-1 1.2 AUDIENCE... 1-1
Procedures Oracle FLEXCUBE Universal Banking Release 12.0 [May] [2012] Oracle Part Number E51527-01 Table of Contents Procedures 1. ABOUT THIS MANUAL... 1-1 1.1 INTRODUCTION... 1-1 1.2 AUDIENCE... 1-1
Nextgen. Bank Reconciliation Menu. NG FM - Bank Reconciliation 3/29/2016. Resource Financial Management. Bank Reconciliation
 NG FM - 3/29/2016 Nextgen Resource 2016 Menu Financial Management Import Bank Statements Bank Account Transactions Export Checks Import Bank Statement Allows you to import a reconciliation file from the
KASBO Fall 2014 Session 4T Excel for Munis Accounts Payable and Purchase Orders (Lab) Presenter: Sheila Miller, KDE Business Analyst
 Presenter: Sheila Miller, KDE Business Analyst") KASBO Fall 2014 Session 4T Excel for Munis Accounts Payable and Purchase Orders (Lab) Presenter: Sheila Miller, KDE Business Analyst Session Prerequisites 1. You will be accessing Munis so make sure you
KASBO Fall 2014 Session 4T Excel for Munis Accounts Payable and Purchase Orders (Lab) Presenter: Sheila Miller, KDE Business Analyst Session Prerequisites 1. You will be accessing Munis so make sure you
Microsoft Dynamics GP is a robust accounting package that can meet
 In This Chapter Chapter 1 What Microsoft Dynamics GP Does Best Familiarizing yourself with the Microsoft Dynamics GP window Understanding Dynamics GP terms Knowing how Dynamics GP keeps your CPA happy
Journal Entry. Slide 1. Revised November People Soft 8.8. Journal Entry
 Slide 1 People Soft 8.8 Journal Entry Revised November 2005 1 Slide 2 Learning Objectives How to Get to the Journal Entry Screen How to Create a New Journal Entry How to View an Existing Journal How to
1) Merge the cells that contain the title and center the title
 Merge the cells that contain the title and center the title") Supplies: You will need a storage location to save your spreadsheet for use in Session 2. You will need the 2 handouts pertaining to Session 1 Instructions: Follow the directions below to create a budget
Supplies: You will need a storage location to save your spreadsheet for use in Session 2. You will need the 2 handouts pertaining to Session 1 Instructions: Follow the directions below to create a budget
View Payments. User Guide. Online Merchant Services
 View Payments User Guide Online Merchant Services Copyright Statement Copyright 2010-2011 by American Express Company. All rights reserved. No part of this document may be reproduced in any form or by
Client-Account Receivable
 Nexsure Training Manual - Accounting Client-Account Receivable In This Chapter Client Accounts Receivable Entity Definition Receive Payments from Clients Relating to Policies Allocation of Payment Leave
AFN-ProjectsandGrantsGuide
 011602 2002 Blackbaud, Inc. This publication, or any part thereof, may not be reproduced or transmitted in any form or by any means, electronic, or mechanical, including photocopying, recording, storage
Basic tasks in Excel 2013
 Basic tasks in Excel 2013 Excel is an incredibly powerful tool for getting meaning out of vast amounts of data. But it also works really well for simple calculations and tracking almost any kind of information.
1-Step Appraisals Personal Property Appraisal Software
 User Guide for 1-Step Appraisals Personal Property Appraisal Software Home & Business Software for Windows Page Table of Contents Getting Started... Page 3 Image Preferences... Page 4 Adding Business/Company
KCCU Online Banking - For Members Use
 KCCU Online Banking - For Members Use KCCU s online financial services facility allows members to access their current financial data and perform a limited transaction set in the comfort of their home
ShipRite s Account Receivable Instructions
 ShipRite s Account Receivable Instructions Setting up a new account Click on the POS button Enter the existing customer s PHONE number here. If they are in the database, their information will appear at
PEACHTREE COMPLETE 2008 AN INTRODUCTION TO PEACHTREE COMPLETE ACCOUNTING
 PEACHTREE COMPLETE 2008 AN INTRODUCTION TO PEACHTREE COMPLETE ACCOUNTING Opening a Company Database To change the open company in Peachtree, click File on the main menu and select Open Company. If the
Bank Reconciliation September 2016 P R E F A C E. This is the Bank Reconciliation reference guide for IQ Business & IQ Enterprise software systems.
 BANK RECONCILIATION P R E F A C E This is the Bank Reconciliation reference guide for IQ Business & IQ Enterprise software systems. The document will aid in understanding and configuration of the Bank
MS Excel Henrico County Public Library. I. Tour of the Excel Window
 MS Excel 2013 I. Tour of the Excel Window Start Excel by double-clicking on the Excel icon on the desktop. Excel may also be opened by clicking on the Start button>all Programs>Microsoft Office>Excel.
IRA Basic Running Financial Reports
 IRA Basic Running Financial Reports Updated 6-7-2013 1 Training Index Part I Introduction to the IRA Reporting Tool IRA Resources (3) Logging onto the system (4) Navigating the Dashboard (5-9) Running
Voiding Transactions
 County Accounting Manual Voiding Transactions Contents: Void Transaction After Closing Date Prepare Memo Configure Reports Adjustments To void a transaction for a prior year where the closing date was
Keying Misc Receipts into MAP AR
 Keying Misc Receipts into MAP AR PURPOSE This procedure describes how to enter Miscellaneous Receipts into MAP Accounts Receivable. The purpose of this procedure is to ensure that these payments are posted
First Financial Bank Transaction Management System User Guide
 First Financial Bank Transaction Management System User Guide Please note: The options available to you in the Transaction Management System (TMS) depend upon your product configuration. This modular approach
Banner 9 Training Guide
 South Dakota Board of Regents Student Information System/Financial Aid Human Resources/Finance Information System Banner 9 Training Guide Date 9/26/2018 This training assumes that the user has completed
What's New in General Ledger Munis - Financials: General Ledger
 [MU-FN-4-F] [MU-FN-10-E] What's New in General Ledger Munis - Financials: General Ledger CLASS DESCRIPTION This session will highlight some of the new functionality available in the version 11.2 of the
v.5 General Ledger: Best Practices (Course #V221)
") v.5 General Ledger: Best Practices (Course #V221) Presented by: Mark Fisher Shelby Consultant 2017 Shelby Systems, Inc. Other brand and product names are trademarks or registered trademarks of the respective
v.5 General Ledger: Best Practices (Course #V221) Presented by: Mark Fisher Shelby Consultant 2017 Shelby Systems, Inc. Other brand and product names are trademarks or registered trademarks of the respective
OFX Server Frequently Asked Questions
 OFX Server Frequently Asked Questions This list of Frequently Asked Questions (FAQ's) should help you quickly find answers to common questions and problems regarding Qualstar Credit Union OFX Server and
2018 User Meeting. presented by Ragan Dalton. Keystone Software Systems 9401 Innovation Blvd, Suite 400 P O Box 669 Daleville IN
 2018 User Meeting Key-Fund presented by Ragan Dalton Keystone Software Systems 9401 Innovation Blvd, Suite 400 P O Box 669 Daleville IN 47334-0669 2 Table of Contents Foreword 0 Part I AR Customer 5 1
Learning Worksheet Fundamentals
 1.1 LESSON 1 Learning Worksheet Fundamentals After completing this lesson, you will be able to: Create a workbook. Create a workbook from a template. Understand Microsoft Excel window elements. Select
Citibank Online Demo
 Citibank Online Demo Click on your desired function below to view the steps a. Payment & Transfer 2 5 11 13 16 18 21 c. Citi Alerts 24 26 d. E-Statements/E-Advice 27 29 31 33 The screens and information
Online Banking Overview. Frequently Asked Questions & Common Support Topics
 Online Banking Overview Frequently Asked Questions & Common Support Topics Please use the bookmarks to the left to navigate this document, or CTRL+F to search using a keyword pertaining to your question.