Getting Started with Deployment Console to Deploy Clients per PXE using MAC Address Identification
|
|
|
- Frederica Perkins
- 6 years ago
- Views:
Transcription

1 PARAGON Technologie GmbH, Systemprogrammierung Heinrich-von-Stephan-Str. 5c Freiburg, Germany Tel. +49 (0) Fax +49 (0) Internet Getting Started with Deployment Console to Deploy Clients per PXE using MAC Address Identification Quick Guide


2 2 Introduction This document is designed to help you quickly get started in deploying images with Paragon s Deployment Console. It should be noted that there are several ways of deploying images with the Deployment Console like creating a bootable CD for the clients to be deployed using the Boot Media Builder (supplied with the installation package) but for the purposes of this document it will primarily focus in on deploying the clients per PXE network booting and the clients network card MAC address. Also for the purposes of this document, it is assumed that the deployment network is isolated and there are no DHCP servers available. Installing the Deployment Console components on the server The first thing that you will need to do is to install the Deployment Console on a computer with a fixed IP address for example, net-mask This will be the computer that will act as the server for all components. The following will now walk through the install process step by step. 1. Begin by running the supplied installation package. 2. When prompted what to install, enable the PXE Server component and click Next 3. When prompted if you want to install a DHCP server, click Yes to install a DHCP server and then click Next. 4. Now you will be prompted for the range of IP addresses for your DHCP server. Here you will need to adjust this to fit your network. For example, like in the image below. 5. Now you will need to select a folder where you will place your backup images. This is the folder that the Infrastructure server will use as a centralized storage point. If you do not already have a folder to use for your image storage you can go ahead now and create this folder using the Microsoft Explorer. In this example a folder named C:\ImageStorage will be created and used for this purpose.

3 6. Now you will click next to install the components and when prompted restart the computer to complete the installation When the system comes back up you should have two windows open, one for the Infrastructure server and one for the DHCP/PXE server. You should leave these windows open in order for the Deployment Console to function properly. When the windows are open the system is running, you can now continue on to the next section of introducing the client to the Deployment Console in order to deploy using the clients network card hardware MAC address. Creating a master image for deployment Naturally before you can start deploying your clients you will need a backup image to deploy. Although there are many different ways to create your images, for example booting a Recovery CD and imaging to an external hard drive or a CD/DVD, this section will focus in primarily on creating your master image by booting your master client per PXE network boot to the Paragon Infrastructure Server (which was installed in the previous section) and loading the client Deployment Console options which include Paragon Hard Disk Manager for imaging and saving your image to a network share. The following will now cover this in detail. 1. Begin by creating a network share which will be used for saving your master image to. In this example, the same folder and server that was created when installing the Deployment Console components (C:\ImageStorage) will also be used for this purpose. It should be noted that this network share is needed only for storing the images to, it is not necessary to share this folder for the Infrastructure server to deploy the images from. 2. Once the network share is created you can now boot the client PC up and enter into the boot menu in order to select the network card as the boot device. On many systems this is the ESC key or F12 when the system is booting up but this depends on the BIOS of your system. Below is an example of a boot menu.
4 4 3. Once you have selected the network boot device the system should then boot up connecting to the Deployment Console s DHCP and then loading the boot image from the PXE server. 4. When the client is finally started you should then have a window like the one below with listing the client options. At this point you should select the Network Configurator so that you can connect to the share you created in the previous steps. 5. Once you have entered into the Network Configurator you can then select Next and then Next again to select the default config file. At this point you should now be at the Autodetection of Network Devices dialog box as shown below and your network adapter should be displayed. If this is the case you can now click on Configure Selected to configure your IP address as shown below.


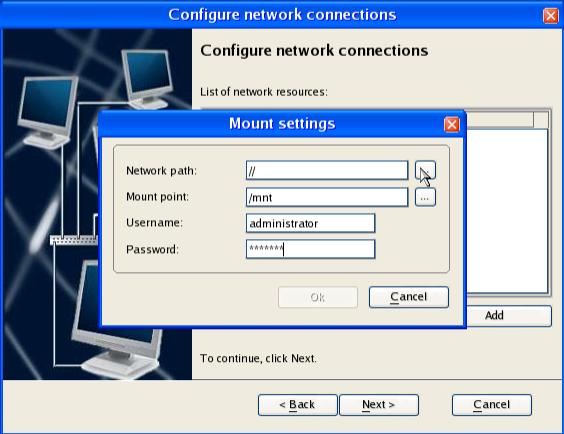
5 5 6. For the purpose of this example you should leave the settings at the default by choosing to obtain the IP address automatically since you have already installed a DHCP when installing the Deployment Console components. At this point you can then click Restart Network which will bring you to a page like the one below allowing you to add your network share. 7. Now you can then click Add to browse your network and choose the network share created earlier. First you will need to supply your username and password required to attach to the network share and then you can click on the Network Path button to choose your computer and share that you need to connect to. The below images show this step by step.

6 6

7 7 8. At this point you can now select your network share and then click on Next and then Finish to complete the operation of connecting your network share. 9. Now that you have attached your share and you now have a network place to store your backup image for deployment you can now begin to create your image by selecting Manual Mode and then Hard Disk Manager.

8 8 10. Now once you are in the Hard Disk Manager you can now begin to create an image to the network share created earlier. For the purposes of this example an image of hard disk 0 partition 0 will be created for deployment. To create an image of the partition click on the partition you would like to image and then right mouse click to choose the option Create an image of partition. 11. Once you have selected the Create an image of partition option you can now select the backup destination by clicking on the Archive Name button as shown below.
 to your server and the")
.")
9 9 12. Now you can navigate under the Mounted Resources folder (/mnt) to your server and the network share which you have created (c:\imagestorage). This is also demonstrated step by step below.


10 Finally you can now save this new backup image to this share and then click on Backup and then Apply to start the backup operation.


11 That s it. Once the backup is completed you are now ready to continue on to the next section of deploying this image per PXE. Introducing the clients to the Deployment Console Introducing the clients to the console is as easy as booting the client PC per PXE network boot. The following will now cover this. 1. Boot the client PC up and enter into the boot menu in order to select the network card as the boot device. On many systems this is the ESC key or F12 when the system is booting up but this depends on the BIOS of your system. Below is an example of a boot menu.


12 12 2. Once you have selected the network boot device the system should then boot up connecting to the Deployment Console s DHCP and then loading the boot image from the PXE server. 3. When the client is finally started you should then have a window like the one below saying that the computer is waiting for server commands. 4. When that is complete and the client is waiting we can now go back to the Deployment Server to create a session to deploy the client per its MAC address. Creating a session to deploy the clients per their MAC address Once the clients are up and waiting for server commands it will now be possible to create a session or template for deploying these clients using their MAC address. Although it is also possible to create a template for the deployment so that is can be used in the future this document will only focus in on creating a one time session for the clients to be deployed. The following will now demonstrate this. 1. First start by opening up the Deployment Console from the start menu. The path from the start menu is as follows: Start\Program Files\Paragon Deployment Manager\Deployment Console\Deployment Console.

.")
13 13 2. Once the Deployment Console is up and running you can now create a new session for deploying the client as viewed from below. 3. Choose New Session and then select Next. You will then be prompted to select your image you wish to deploy. This is the image you have copied to the Server Storage folder which was created before the Deployment Console install. This is also the folder that was selected as the Server Storage folder from the Deployment Manager installation (for example, C:\ImageStorage). Here you can select Browse and a window like the one below should show up with your image to select. 4. Once you have selected your image, you can then give your session a name and then click Next.


14 14 5. Once you have clicked next you will now be asked how you would like to deploy the clients. Here you will choose Clients to deploy are defined by MAC address and then click Next. 6. Now you will be asked to define targets to deploy by selecting their MAC address from the left pane and adding them to the right pane for deployment. If there is more than one client waiting for server commands than they will also show up in this window. For the purposes of this document there is only one client to deploy in this example. Now you can choose these clients and then click Next.


15 15 7. Once your clients are chosen and you have clicked Next you will then be asked for Session Parameters. Here you can leave everything at the default settings for the purpose of this test and then click Next. 8. Now you will be asked for Post-Config Options. Although it is possible to run commands at the end of the deployment process for the purposes of this document you will leave this empty and click Next. 9. The next step is to set up a scheduled job for this session. For now please just select a Run Once job leaving the time and date settings at the current time and date and then click Next.


16 That is it! Your job should now start to run and the client should now start to deploy. The first screen below is the Deployment Console and the second screen below is from the client side. Deployment Console Server Computer: Client Computer:
Getting Started with the Deployment Console and Deploying the Clients Per PXE Network Booting using their MAC address. Quick Guide
 Getting Started with the Deployment Console and Deploying the Clients Per PXE Network Booting using their MAC address Quick Guide Deployment Manager 2 Quick Guide 1 Introduction...3 1.1 Installing the
PARAGON SYSTEM BACKUP 2009
 PARAGON Technologie GmbH, Systemprogrammierung Heinrich-von-Stephan-Str. 5c DE-193384581 Freiburg, Germany Tel. +49 (0) 761 59018201 Fax +49 (0) 761 59018130 Internet www.paragon-software.com Email sales@paragon-software.com
PARAGON EXCHANGE GRANULAR RECOVERY CASE STUDY
 PARAGON Technologie GmbH, Systemprogrammierung Heinrich-von-Stephan-Str. 5c 79100 Freiburg, Germany Tel. +49 (0) 761 59018201 Fax +49 (0) 761 59018130 Internet www.paragon-software.com Email sales@paragon-software.com
How to make your system mobile with Paragon Drive Copy 10 and VMware Player
 PARAGON Technologie GmbH, Systemprogrammierung Heinrich-von-Stephan-Str. 5c 79100 Freiburg, Germany Tel. +49 (0) 761 59018201 Fax +49 (0) 761 59018130 Internet www.paragon-software.com Email sales@paragon-software.com
PARAGON INFRASTRUCTURE PACKAGE
 PARAGON Technologie GmbH, Systemprogrammierung Heinrich-von-Stephan-Str. 5c 79100 Freiburg, Germany Tel. +49 (0) 761 59018201 Fax +49 (0) 761 59018130 Internet www.paragon-software.com E-mail sales@paragon-software.com
Adaptive Restore 2010
 PARAGON Technologie GmbH, Systemprogrammierung Heinrich-von-Stephan-Str. 5c 79100 Freiburg, Germany Tel. +49 (0) 761 59018201 Fax +49 (0) 761 59018130 Internet www.paragon-software.com Email sales@paragon-software.com
PARAGON SYSTEM UPGRADE UTILITIES 2010 SUITE
 PARAGON Technologie GmbH, Systemprogrammierung Heinrich-von-Stephan-Str. 5c 79100 Freiburg, Germany Tel. +49 (0) 761 59018201 Fax +49 (0) 761 59018130 Internet www.paragon-software.com Email sales@paragon-software.com
Paragon CampTune X Beta
 PARAGON Technologie GmbH, Systemprogrammierung Heinrich-von-Stephan-Str. 5c 79100 Freiburg, Germany Tel. +49 (0) 761 59018201 Fax +49 (0) 761 59018130 Internet www.paragon-software.com E-mail sales@paragon-software.com
PARAGON ADAPTIVE RESTORE
 PARAGON Technologie GmbH, Systemprogrammierung Heinrich-von-Stephan-Str. 5c 79100 Freiburg, Germany Tel. +49 (0) 761 59018201 Fax +49 (0) 761 59018130 Internet www.paragon-software.com Email sales@paragon-software.com
Paragon Exchange Granular Recovery
 PARAGON Technologie GmbH, Systemprogrammierung Heinrich-von-Stephan-Str. 5c 79100 Freiburg, Germany Tel. +49 (0) 761 59018201 Fax +49 (0) 761 59018130 Internet www.paragon-software.com Email sales@paragonsoftware.com
Backup challenge for Home Users
 PARAGON Technologie GmbH, Systemprogrammierung Heinrich-von-Stephan-Str. 5c 79100 Freiburg, Germany Tel. +49 (0) 761 59018201 Fax +49 (0) 761 59018130 Internet www.paragon-software.com Email sales@paragon-software.com
How to install the software of ZNS8022
 How to install the software of ZNS8022 1. Please connect ZNS8022 to your PC after finished assembly. 2. Insert Installation CD to your CD-ROM drive and initiate the auto-run program. The wizard will run
Paragon Deployment Manager
 PARAGON Technologie GmbH, Systemprogrammierung Heinrich-von-Stephan-Str. 5c 79100 Freiburg, Germany Tel. +49 (0) 761 59018201 Fax +49 (0) 761 59018130 Internet www.paragon-software.com E-mail sales@paragon-software.com
Paragon Protect & Restore
 Paragon Function overview and Edition Comparison of extended backup and disaster recovery solution for virtual and physical IT infrastructures Functions Protection Agentless backup of guests Agentless
Paragon Migrate OS to SSD 3.0
 PARAGON Software GmbH Heinrich-von-Stephan-Str. 5c 79100 Freiburg, Germany Tel. +49 (0) 761 59018201 Fax +49 (0) 761 59018130 Internet www.paragon-software.com Email sales@paragon-software.com Paragon
Farstone TotalDeploy User Guide
 Farstone TotalDeploy User Guide 1 Introduction to TotalDeploy...3 1.1 Overview...3 1.1.1 What is TotalDeploy...3 1.1.2 Who needs TotalDeploy?...3 1.1.3 TotalDeploy infrastructure...3 1.2 What you can do
Free HFS+ for Windows
 PARAGON Free HFS+ for Windows User Manual Paragon Technologie GmbH Systemprogrammierung Leo-Wohleb-Straße 8 79098 Freiburg, Germany Tel. +49 (0) 761 59018201 Fax +49 (0) 761 59018130 Web www.paragon-software.com
Paragon Deployment Manager
 PARAGON Software GmbH Heinrich-von-Stephan-Str. 5c 79100 Freiburg, Germany Tel. +49 (0) 761 59018201 Fax +49 (0) 761 59018130 Internet www.paragon-software.com Email sales@paragon-software.com Paragon
Paragon NTFS for Mac OS X
 PARAGON Software GmbH Heinrich-von-Stephan-Str. 5c 79100 Freiburg, Germany Tel. +49 (0) 761 59018201 Fax +49 (0) 761 59018130 Internet www.paragon-software.com E-mail sales@paragon-software.com Paragon
AOMEI Image Deploy User Manual
 AOMEI Image Deploy User Manual AOMEI Image Deploy Overview Sometimes we need to deploy/restore Windows image files to multiple computers or clone system disk to multiple computers in a same LAN to install
Paragon Exchange Protection
 PARAGON Technologie GmbH, Systemprogrammierung Heinrich-von-Stephan-Str. 5c 79100 Freiburg, Germany Tel. +49 (0) 761 59018201 Fax +49 (0) 761 59018130 Internet www.paragon-software.com Email sales@paragon-software.com
v5: How to recover your PC using the Linux Rescue CD
 The Linux CD is a compact and efficient rescue environment to restore all Windows operating systems. It will only enable your to restore your imaged partitions to exactly the same size and position as
Paragon Deployment Manager. User Manual
 Paragon Deployment Manager User Manual Deployment Manager 2 User Manual CONTENTS 1 Introduction... 4 2 Key Features... 5 3 Installation and Package Contents... 5 3.1 Package Contents...5 3.2 Minimum System
Linux File Systems for Windows
 PARAGON Linux File Systems for Windows User Manual Paragon Technologie GmbH Systemprogrammierung Leo-Wohleb-Straße 8 79098 Freiburg, Germany Tel. +49 (0) 761 59018201 Fax +49 (0) 761 59018130 Web www.paragon-software.com
Paragon Alignment Tool 4.0 Professional
 PARAGON Software GmbH Heinrich-von-Stephan-Str. 5c 79100 Freiburg, Germany Tel. +49 (0) 761 59018201 Fax +49 (0) 761 59018130 Internet www.paragon-software.com Email sales@paragon-software.com Paragon
Installing and Upgrading Cisco Network Registrar Virtual Appliance
 CHAPTER 3 Installing and Upgrading Cisco Network Registrar Virtual Appliance The Cisco Network Registrar virtual appliance includes all the functionality available in a version of Cisco Network Registrar
Installing the Operating System or Hypervisor
 If you purchased E-Series Server or NCE Option 1 (E-Series Server or NCE without a preinstalled operating system or hypervisor), you must install an operating system or hypervisor. This chapter includes
Parallels Virtuozzo Containers 4.6 for Windows
 Parallels Parallels Virtuozzo Containers 4.6 for Windows Deploying Microsoft Clusters Copyright 1999-2010 Parallels Holdings, Ltd. and its affiliates. All rights reserved. Parallels Holdings, Ltd. c/o
Cisco VDS Service Broker Software Installation Guide for UCS Platforms
 Cisco VDS Service Broker 1.0.1 Software Installation Guide for UCS Platforms Revised: May 2013 This document provides detailed instructions for installing the Cisco Videoscape Distribution Suite Service
Deploying Windows 7 Using MDT UDI
 The Microsoft Deployment Toolkit (MDT) supports three types of deployments Zero Touch Installation (ZTI), Lite Touch Installation (LTI), and User Driven Installation (UDI). However each deployment type
How to Integrate SmartDeploy Enterprise with Windows Deployment Services
 How to Integrate SmartDeploy Enterprise with Windows Deployment Services Prowess Consulting, LLC Published: March, 2010 Abstract Integrating custom Windows Imaging Format (WIM) images into Windows Deployment
Paragon Software Group
 Paragon Software Group Paragon Software Group (PSG) was founded in 1994 to develop and provide players in the IT market with high-quality system utilities. In the years since Paragon Software Group achieved
Paragon Migrate OS to SSD 5.0
 Paragon Technologie GmbH Systemprogrammierung Leo-Wohleb-Straße 8 79098 Freiburg, Germany Tel. +49 (0) 761 59018201 Fax +49 (0) 761 59018130 Internet www.paragon-software.com Email sales@paragon-software.com
Automating the Windows 2000 Installation
 Chapter 2 Automating the Windows 2000 Installation MICROSOFT EXAM OBJECTIVES COVERED IN THIS CHAPTER Perform an unattended installation of Windows 2000 Professional. Install Windows 2000 Professional by
Configuring Virtual Blades
 CHAPTER 14 This chapter describes how to configure virtual blades, which are computer emulators that reside in a WAE or WAVE device. A virtual blade allows you to allocate WAE system resources for use
DUAL OS INSTALLATION
 Ex.No:15 Date: DUAL OS INSTALLATION Aim: To install and configure Ubuntu OS alongside Windows as installing dual OS. PROCEDURE: 1. Backup your Windows partition To open the Dell Backup and Recovery software
As the system boots press Shift and F10 to enter the DASH Setup.
 The following guide explains how to setup and use the DASH enabled Pegatron IPMSB-DA with SyAM Software, System Client and System Area Manager for performing the DASH out of band management functions.
3 INSTALLING WINDOWS XP PROFESSIONAL
 INSTALLING WINDOWS XP PROFESSIONAL.1 Preparing for installation Objectives.1.1 Windows XP Professional Hardware Requirements.1.2 Hardware Compatibility List (HCL) check.1. Hard Disk Partition.1.4 Required
Gnostice StarDocs On-Premises API Virtual Appliance
 Gnostice StarDocs On-Premises API Virtual Appliance Deployment Instructions For VMware vsphere 2 For Oracle VirtualBox 4 For VMware Fusion (on Mac OS) 6 For VMware vsphere Note that the instructions below
SWP-0037 Capturing the AFHCAN Telehealth Cart Image to a Backup Capsule. Revision: 1. Effective Date: 1/6/2011
 Software Procedure SWP-0037 Capturing the AFHCAN Telehealth Cart Image to a Backup Capsule Revision: 1 Effective Date: 1/6/2011 Alaska Native Tribal Health Consortium Division of Health Information & Technology
SWP-0036 AFHCAN Telehealth Cart Imaging and Software Configuration. Revision: 1. Effective Date: 1/4/2011
 Software Procedure SWP-0036 AFHCAN Telehealth Cart Imaging and Software Configuration Revision: 1 Effective Date: 1/4/2011 Alaska Native Tribal Health Consortium Division of Health Information & Technology
Deploying Cisco UCS Central
 This chapter includes the following sections: Obtaining the Cisco UCS Central Software from Cisco, page 1 Using the Cisco UCS Central OVA File, page 2 Using the Cisco UCS Central ISO File, page 4 Logging
Paragon Exchange Protection
 PARAGON Technologie GmbH, Systemprogrammierung Heinrich-von-Stephan-Str. 5c 79100 Freiburg, Germany Tel. +49 (0) 761 59018201 Fax +49 (0) 761 59018130 Internet www.paragon-software.com Email sales@paragon-software.com
Matrix42 Matrix42 OS Deployment with WinPE - HowTo
 Matrix42 Matrix42 OS Deployment with WinPE - HowTo Version 1.0.0 18. October 2017 Table of Contents 1. About this document 3 1.1. Prerequisites 3 1.2. Current functionality 3 1.3. Limitations 3 2. Step
Acronis Backup & Recovery 10 Advanced Editions
 Acronis Backup & Recovery 10 Advanced Editions Quick Start Guide This document describes how to install and start using any of the following editions of Acronis Backup & Recovery 10: Acronis Backup & Recovery
HDM 2010 Workstation
 Features HDM 2010 Workstation HDM 2010 Server HDM for Virtual Server Drive Partitioning Create Partition Express Create Partition Format Partition Delete Partition Undelete Partition Move/Resize Partition
Send the Ctrl-Alt-Delete key sequence to the Guest OS one of two ways: Key sequence: Ctlr-Alt-Ins Menu Sequence: VM / Guest / Send Ctrl-Alt-Delete
 CIS 231 Windows 2008 Server Install Lab #1 (Virtual Machines) Keys to Remember when using the vsphere client. Send the Ctrl-Alt-Delete key sequence to the Guest OS one of two ways: Key sequence: Ctlr-Alt-Ins
Restoring the Server to Bare Metal
 Restoring the Server to Bare Metal Figure 19 below shows a virtual machine named Bare Metal System. As you can see, when we try to boot the system the boot fails because there is no operating system installed
Read This First *P *
 Dear Tektronix Customer, Thank you for your order and congratulations on the delivery of your new Tektronix oscilloscope. If your instrument did not ship with an operating system restore DVD, use the following
1) Use either Chrome of Firefox to access the VMware vsphere web Client. https://vweb.bristolcc.edu. FireFox
 Use either Chrome of Firefox to access the VMware vsphere web Client. https://vweb.bristolcc.edu. FireFox") CIS 231 Windows 7 Install Lab #2 1) Use either Chrome of Firefox to access the VMware vsphere web Client. https://vweb.bristolcc.edu CHROME At the your connection is not private message, click Advanced
CIS 231 Windows 7 Install Lab #2 1) Use either Chrome of Firefox to access the VMware vsphere web Client. https://vweb.bristolcc.edu CHROME At the your connection is not private message, click Advanced
CIS 231 Windows 7 Install Lab #2
 CIS 231 Windows 7 Install Lab #2 1) To avoid certain problems later in the lab, use Chrome as your browser: open this url: https://vweb.bristolcc.edu 2) Here again, to avoid certain problems later in the
KEMP 360 Central for vsphere. Installation Guide
 KEMP 360 Central for vsphere Installation Guide UPDATED: 09 October 2018 Copyright Notices Copyright 2002-2018 KEMP Technologies, Inc. All rights reserved. KEMP Technologies and the KEMP Technologies logo
Configuring the SMA 500v Virtual Appliance
 Using the SMA 500v Virtual Appliance Configuring the SMA 500v Virtual Appliance Registering Your Appliance Using the 30-day Trial Version Upgrading Your Appliance Configuring the SMA 500v Virtual Appliance
Image Backup and Recovery Procedures For Windows 7
 Image Backup and Recovery Procedures For Windows 7 Thank you for purchasing a Fujitsu computer. Fujitsu is committed to bringing you the best computing experience with your new system. It is very important
Veritas System Recovery Disk Help
 Veritas System Recovery Disk Help About recovering a computer If Windows fails to start or does not run normally, you can still recover your computer. You can use the Veritas System Recovery Disk and an
Cisco Business Edition 7000 Installation Guide, Release 10.6
 First Published: July 08, 2015 Americas Headquarters Cisco Systems, Inc. 170 West Tasman Drive San Jose, CA 95134-1706 USA http://www.cisco.com Tel: 408 526-4000 800 553-NETS (6387) Fax: 408 527-0883 Text
Parallels Containers for Windows 6.0
 Parallels Containers for Windows 6.0 Deploying Microsoft Clusters June 10, 2014 Copyright 1999-2014 Parallels IP Holdings GmbH and its affiliates. All rights reserved. Parallels IP Holdings GmbH Vordergasse
Dell Flexible Computing Solutions: Deploying On-Demand Desktop Streaming
 Dell Flexible Computing Solutions: Deploying On-Demand Desktop Streaming Product Group November 2007 Dell White Paper November 2007 Contents Introduction... 3 Overview... 4 Planning the Deployment... 5
Test Lab Introduction to the Test Lab Linux Cluster Environment
 Test Lab 1.0 - Introduction to the Test Lab Linux Cluster Environment Test lab is a set of three disposable cluster environments that can be used for systems research. All three environments are accessible
Version S Cincinnati, Suite 105 Tulsa, OK (918) Fax (918)
 Fax (918)") Version 1.0 We pride ourselves in producing good stuff. If you have any questions, problems, or suggestions regarding this product, please contact us at: 810 S Cincinnati, Suite 105 Tulsa, OK 74119 (918)
Version 1.0 We pride ourselves in producing good stuff. If you have any questions, problems, or suggestions regarding this product, please contact us at: 810 S Cincinnati, Suite 105 Tulsa, OK 74119 (918)
Managing Windows-based Dell Wyse Thin Clients using System Center Configuration Manager Administrator s Guide
 Managing Windows-based Dell Wyse Thin Clients using System Center Configuration Manager 2016 Administrator s Guide Notes, cautions, and warnings NOTE: A NOTE indicates important information that helps
Getting Started with ESX Server 3i Installable Update 2 and later for ESX Server 3i version 3.5 Installable and VirtualCenter 2.5
 Getting Started with ESX Server 3i Installable Update 2 and later for ESX Server 3i version 3.5 Installable and VirtualCenter 2.5 Getting Started with ESX Server 3i Installable Revision: 20090313 Item:
Kaseya 2. User Guide. Version 1.0
 Kaseya 2 Imaging & Deployment User Guide Version 1.0 August 16, 2011 About Kaseya Kaseya is a global provider of IT automation software for IT Solution Providers and Public and Private Sector IT organizations.
Applied ICT Skills MS Windows
 Applied ICT Skills MS Windows Lesson 1 - How to install an operating system into computer? Windows 7 is perhaps the best Microsoft operating system and is very easy to install compared to other windows.
Installation of Cisco Business Edition 6000H/M
 Installation Overview, page 1 Installation Task Flow of Cisco Business Edition 6000H/M, page 2 Installation Overview This chapter describes the tasks that you must perform to install software on your Business
1) Use either Chrome of Firefox to access the VMware vsphere web Client. FireFox
 Use either Chrome of Firefox to access the VMware vsphere web Client. FireFox") CIS 231 Windows 7 Install Lab #2 1) Use either Chrome of Firefox to access the VMware vsphere web Client. https://vweb.bristolcc.edu CHROME At the your connection is not private message, click Advanced
CIS 231 Windows 7 Install Lab #2 1) Use either Chrome of Firefox to access the VMware vsphere web Client. https://vweb.bristolcc.edu CHROME At the your connection is not private message, click Advanced
Print Server. User s Manual. Rev. 01 (April, 2004) Made In Taiwan
 Made In Taiwan") Print Server User s Manual Rev. 01 (April, 2004) Made In Taiwan TABLE OF CONTENTS ABOUT THIS GUIDE... 4 INTRODUCTION... 5 PACKAGE CONTENTS... 6 SYSTEM REQUIREMENTS... 6 GENERAL FEATURES... 7 PRODUCT VIEW...
Print Server User s Manual Rev. 01 (April, 2004) Made In Taiwan TABLE OF CONTENTS ABOUT THIS GUIDE... 4 INTRODUCTION... 5 PACKAGE CONTENTS... 6 SYSTEM REQUIREMENTS... 6 GENERAL FEATURES... 7 PRODUCT VIEW...
Backup and Restore System
 Disaster Backup and Recovery, page 1 Short-Term Backup and Recovery, page 4 Disaster Backup and Recovery To minimize the effects of a disaster, you must create a disaster recovery plan to minimize downtime
Installation Guide for Cisco Business Edition 6000S
 First Published: November 16, 2015 Americas Headquarters Cisco Systems, Inc. 170 West Tasman Drive San Jose, CA 95134-1706 USA http://www.cisco.com Tel: 408 526-4000 800 553-NETS (6387) Fax: 408 527-0883
KACE K2000 System Deployment Appliance Demo Guide
 KACE K2000 System Deployment Appliance Demo Guide Product Domain: Cloud Client Computing Author: Dan Coleman Version: 1.01 Table of Contents 1 Product Overview... 3 1.1 Lab Preparation Considerations and
Paragon Exact Image. User Manual CONTENTS. Introduction. Key Features. Installation. Package Contents. Minimum System Requirements.
 Paragon Exact Image User Manual CONTENTS Introduction Key Features Installation Package Contents Minimum System Requirements Basic Concepts Backup Operations Scheduling Interface Overview General Layout
Fairfield University Using Xythos for File Storage
 Fairfield University Using Xythos for File Storage Version 7.0 Table of Contents I: Accessing your Account...2 II: Uploading Files via the Web...2 III: Manage your Folders and Files via the Web...4 IV:
AOEMI Backupper V4.0
 AOEMI Backupper V4.0 Contents Install AOEMI Backupper V4.0... 1 Launch AOEMI Backupper... 4 Create Bootable Media... 5 Create a Full Backup... 11 Create Incremental Backup... 13 Restore from Backup...
The Ip address / Name value should be: srvvcenter-cis
 CIS133 Installation Lab #1 - DESKTOP CLIENT OpenSUSE Install. Before beginning the installation, create a virtual machine in which you will install the operating system. 1) Open the VMware vsphere Client.
Veritas System Recovery Disk Help
 Veritas System Recovery Disk Help About recovering a computer If Windows fails to start or does not run normally, you can still recover your computer. You can use the Veritas System Recovery Disk and an
CIS 231 Windows XP (SP3) Install Lab #3 Virtual Machines
 Install Lab #3 Virtual Machines") CIS 231 Windows XP (SP3) Install Lab #3 Virtual Machines Before beginning the installation, create a virtual machine in which you will install the operating system. 1) Open the VMware vsphere Client. Be
CIS 231 Windows XP (SP3) Install Lab #3 Virtual Machines Before beginning the installation, create a virtual machine in which you will install the operating system. 1) Open the VMware vsphere Client. Be
Install and Manage Windows Nano Server 2016 Step by Step
 Complete Lab (V2.0) Ahmed Abdelwahed Microsoft Certified Trainer Ahmed_abdulwahed@outlook.com Table of Contents Lab Objective... 3 Windows Nano Server 2016 overview... 3 Current infrastructure environment...
EML10 Best Practces for Implementing Deployment Solution Hands-On Lab
 EML10 Best Practces for Implementing Deployment Solution Hands-On Lab Description This hands-on lab demonstrates the steps necessary to configure and use the latest version of Deployment Solution. You
Restoration onto different Hardware. Quick and easy system restore with O&O DiskImage
 Restoration onto different Hardware Quick and easy system restore with O&O DiskImage Table of contents System restoration using boot media... 1 Restoration onto different hardware... 2 Limitations when
Dell Lifecycle Controller Integration Version 2.2 For Microsoft System Center Configuration Manager User's Guide
 Dell Lifecycle Controller Integration Version 2.2 For Microsoft System Center Configuration Manager User's Guide Notes, Cautions, and Warnings NOTE: A NOTE indicates important information that helps you
Dell EqualLogic Red Hat Enterprise Linux 6.2 Boot from SAN
 Dell EqualLogic Red Hat Enterprise Linux 6.2 Boot from SAN A Dell EqualLogic best practices technical white paper Storage Infrastructure and Solutions Engineering Dell Product Group November 2012 2012
Step 2. Brun Windows Password Recovery Enterprise to
 How to use Windows Password Recovery Enterprise? Windows Password Recovery Enterprise 6.0 is an easy-to-use tool designed for resetting local administrator or domain administrator passwords on any Windows
The Ip address / Name value should be: srvvcenter-cis
 CIS133 Installation Lab #1 - DESKTOP CLIENT OpenSUSE Install. Before beginning the installation, create a virtual machine in which you will install the operating system. 1) Open the VMware vsphere Client.
dctrack Quick Setup Guide Virtual Machine Requirements Requirements Requirements Preparing to Install dctrack
 dctrack Quick Setup Guide This Quick Setup Guide explains how to install and configure dctrack. For additional information on any aspect of dctrack, see the accompanying dctrack Help in other its online
PARAGON PARTITION MANAGER
 PARAGON PARTITION MANAGER 12 Corporate Line Maximize utilization of storages within Windows environments! Corporate editions of Partition Manager 12 include our latest technologies in managing physical
8 MANAGING SHARED FOLDERS & DATA
 MANAGING SHARED FOLDERS & DATA STORAGE.1 Introduction to Windows XP File Structure.1.1 File.1.2 Folder.1.3 Drives.2 Windows XP files and folders Sharing.2.1 Simple File Sharing.2.2 Levels of access to
If possible before restoring a RipNAS copy the music files (and other personal data) to an external drive.
 to an external drive.") (1) - Preparation If possible before restoring a RipNAS copy the music files (and other personal data) to an external drive. Connect the RipNAS to a monitor, keyboard and mouse. Insert the RipNAS Rescue
(1) - Preparation If possible before restoring a RipNAS copy the music files (and other personal data) to an external drive. Connect the RipNAS to a monitor, keyboard and mouse. Insert the RipNAS Rescue
akkadian Provisioning Manager Express
 akkadian Provisioning Manager Express Version 4.11.04 Release Notes September 14 th, 2017 Copyright and Trademarks: I. Copyright: This website and its content is copyright 2017 Akkadian Labs, LLC. All
How To Fix Regedit Windows Xp Installation >>>CLICK HERE<<<
 How To Fix Regedit Windows Xp Installation Bootable Usb Drive If Windows is able to boot, use System File Checker and icacls.exe to repair To put Windows XP installation media onto a bootable USB drive
Acronis Snap Deploy 5 Update 3 USER GUIDE
 Acronis Snap Deploy 5 Update 3 USER GUIDE Copyright Statement Copyright Acronis International GmbH, 2002-2017. All rights reserved. Acronis and Acronis Secure Zone are registered trademarks of Acronis
Dell Lifecycle Controller Integration Version 3.0 For Microsoft System Center Configuration Manager User's Guide
 Dell Lifecycle Controller Integration Version 3.0 For Microsoft System Center Configuration Manager User's Guide Notes, Cautions, and Warnings NOTE: A NOTE indicates important information that helps you
v5: How to restore a backup image
 This article describes how to restore a backup image Restoring a backup image is very simple using Macrium Reflect. If the image contains only data, it is a matter of restoring it back to its original
Create a pfsense router for your private lab network template
 Create a pfsense router for your private lab network template Some labs will require a private network where you can deploy services like DHCP. Here are instructions for setting up an uplink router for
VIRTUALIZATION MANAGER ENTERPRISE EDITION GETTING STARTED GUIDE. Product: Virtual Iron Virtualization Manager Version: 4.2
 VIRTUALIZATION MANAGER ENTERPRISE EDITION GETTING STARTED GUIDE This manual provides a quick introduction to Virtual Iron software, and explains how to use Virtual Iron Virtualization Manager to configure
VIRTUALIZATION MANAGER ENTERPRISE EDITION GETTING STARTED GUIDE
 VIRTUALIZATION MANAGER ENTERPRISE EDITION GETTING STARTED GUIDE This manual provides a quick introduction to Virtual Iron software, and explains how to use Virtual Iron Virtualization Manager to configure
Cisco UCS Director Baremetal Agent Installation and Configuration Guide, Release 5.2
 UCS Director Baremetal Agent Installation The purpose to this document is to illustrate the steps to install the UCS Director Baremetal Agent (PXE Server) which can be used to write/use workflows that
Infinova SS200T3R Embedded VMS Box
 Infinova SS200T3R Embedded VMS Box WARNING Embedded VMS advanced maintenance is special activity and it is highly recommended that only trained engineers operate the maintenance procedures. Incorrect configuration
Understanding UCS Server Configuration Utility User Interface
 CHAPTER 3 Understanding UCS Server Configuration Utility User Interface The UCS-SCU GUI is a web-based management interface that allows you to perform tasks such as operating system installation, RAID
Laplink DiskImage : Server Edition
 1 Laplink DiskImage : Server Edition Laplink Software, Inc. Customer Service/Technical Support: Web: http://www.laplink.com/help E-mail: CustomerService@laplink.com Laplink Software, Inc. Bellevue Corporate
Application Notes for Ardence Desktop Edition with Avaya Interaction Center Issue 1.0
 . Avaya Solution & Interoperability Test Lab Application Notes for Ardence Desktop Edition with Avaya Interaction Center Issue 1.0 Abstract These Application Notes describe the configuration steps required