Jenzabar EX 4.5. Getting Started Guide for Administrators and Users
|
|
|
- Ophelia Dennis
- 6 years ago
- Views:
Transcription


1 Getting Started Guide for Administrators and Users October 24, 2012
2 2012, Jenzabar, Inc. 101 Huntington Avenue Suite 2205 Boston, MA This document is confidential and contains proprietary information. The use of this document is subject to the license agreement that governs usage of the associated software. No part of this document may be photocopied, reproduced, stored in a retrieval system, transmitted in any form or by any means, or translated into another language without the prior written consent of Jenzabar, Inc. This document may contain errors, omissions, or typographical errors and does not represent any commitment or guarantee by Jenzabar. The information herein is subject to change with or without notice. Jenzabar disclaims any liability from the use of information herein. Please refer to the most current product release notes for updated information. All rights reserved. Trademarks and Attributions 2012 Jenzabar, Inc. All rights reserved. Jenzabar is a registered trademark of Jenzabar, Inc. Jenzabar's Internet Campus Solution, ERA, and the Jenzabar logo are trademarks of Jenzabar, Inc. All other trademarks not owned by Jenzabar are used for identification purposes and are trademarks of their respective owners.
3 Table of Contents Introducing Enhanced Applicant Tracking in Human Resources (HR)... 4 New Processes... 5 New Hiring Officer Roles... 8 Applicant Tracking Setup Checklist... 9 New EX Configuration Options New Standard Features New Windows in EX EX Enhancements New Portlets in CRM Staff Enhancements and Resolved Issues for Admissions Accounts Payable Accounts Receivable (AR) Advising Budget and Budget Portlet Common CRM Common CRM Constituent CRM Faculty CRM Parent CRM Staff CRM Student Customized Reports and Forms Database Development Fixed Assets General Ledger Financial Aid Manager Human Resources JICS My Workspace Notepad Payroll Personnel Purchasing Registration Appendix: New and Changed Tasklist Functions
4 Introducing Enhanced Applicant Tracking in Human Resources (HR) EX and JICS 4.5 introduce the following enhancements to EX Human Resources (HR) and CRM Staff to provide collaborative tools for requesting and filling positions at your organization. Enhanced applicant tracking allows you to: Utilize three new scalable processes for requesting and filling a position. Assign users to new HR Hiring Officer roles to determine their responsibility within the processes including creating approval committees to review, approve, or deny position requests or applicants using the new Manage Hiring Officers window. Allow select hiring officers to create, define, and request an entirely new position or quickly begin the position requisition process by utilizing an existing position. The position requisition status can then be monitored to determine where a request is within the process. Allow applicants to search and apply for posted positions using CRM Staff. Determine if applicants can submit documents such as resumes and cover letters. Automatically generate a login for applicants to allow them to log into CRM Staff and review positions to which they have applied, check on the status of a current application, and apply for additional open positions. Allow select hiring officers to review and accept or deny position requests and applicants using EX and CRM Staff. Create and update drop-down pick list options on the fly for select pick lists. Use the expanded Organization Position window in EX to view, enter, and update all organization position information on one window. New collapsible panels make it easy to quickly view as little or as much information as needed. View, enter, and update all applicant information including all the positions the applicant has applied to on the expanded Applicant Master window. Maintain standard competencies using the new Organization Standard Competencies window. These competencies can be further tailored to a specific position using the Organization Positions window. Define lines of responsibility for positions to create an organizational hierarchy. Associate select positions with the new Human Resources Hiring Administrator or Position Administrator roles so any user in the position automatically has the ability to work within the position request and hiring processes. View position event logs to see when the position s status changed or when notifications were sent. Within EX windows, quickly identify where information exists and when unsaved updates have been made using new icons. Utilize EX Notepad (Communication Management) to track and facilitate communication between your organization and job applicants. Quickly onboard an applicant to a newly hired employee minimizing data entry time and potential duplication. 4

5 Utilize automatic notifications for position requisition and applicant hiring events to keep selected user groups informed. Add and access important attachments throughout the position requisition and hiring processes to provide easy collaboration and communication between users. New Processes Applicant tracking in HR now provides position request, hiring, and applicant processes to allow you to create a planned approach for requesting and filling a position within your organization. The processes are scalable to best suit your organization s needs. 5


6 Position Requisition Process The position requisition process identifies personnel needs and communicates information pertaining to the position request. HR Position Administrators and Position Administrators can create, define, and request entirely new positions or quickly begin the position requisition process by utilizing an existing position using EX and CRM Staff. Administrators and the Approval Committee can approve or deny the request and determine if and when the hiring process can begin. The position requisition status can be used to quickly identify where a request is within the process. Hiring Process The hiring process outlines the steps involved in hiring a new employee at your organization. HR Hiring Administrators can prepare the position, post it on CRM Staff and with the Hiring Committee start evaluating applications and setting up interviews. A final candidate is selected and an offer is made. Depending upon the applicant s decision to accept or refuse the offer, the position is filled or other candidates are considered. The hiring status can be used to quickly identify where a position is within the process. 6

7 Applicant Process The applicant process allows potential candidates to search and apply to open positions and view the positions to which they have applied. Applicants can also see where their application is within the hiring process. 7
8 New Hiring Officer Roles EX and CRM Staff use hiring officer roles to provide the HR module manager the ability to control and assign what users can and cannot do within the position requisition and hiring processes. Each role performs a set of pre-defined tasks or capabilities that define the user's responsibilities within the process. Users assigned to a role automatically have access to those capabilities from EX and CRM Staff. All users assigned to the HR Hiring Administrator role can prepare and and post an approved position for applicants. When assigning users to roles, it is important to consider the level of capability you want them to have within a process. The module manager may not want to allow a Department Chair requesting a position for the English department to be able to make an applicant the final offer. Roles can have multiple users assigned to them and a user can belong to multiple roles. Roles are assigned on the new Manage Hiring Officers window. Position R equest R oles HR Position Administrator facilitates the flow of the position requisition process. Users in this role can request a position as well as review, withdraw, and approve or deny a requested position. HR Position Administrators are responsible for assigning hiring officers to the Position Approval and Hiring Committees. HR Hiring Administrators can also offer an applicant the position and end the position request process. Consider giving this role to a user who needs to be in charge of the entire position requisition process. Position Administrator requests, reviews, withdraws, and approves or denies a requested position. Users in this role assign the appropriate hiring officers to the position approval committee. This role also allows users to review applicants, remove applicants from consideration, and handle rejected offers from applicants. Position Approval Committee reviews and approves or denies submitted position requests. Pos ition Hiring R oles HR Hiring Administrator prepares, posts, and closes requested positions. Users in this role assign the requested positions to the appropriate Hiring Committee members, accept and review initial applications, approve selected applicants for interviews, and remove applications from consideration. This role also allows users to offer the position to an applicant, handle accepted and rejected offers from applicants, and end the position hiring process. Hiring Committee reviews and determines if applicants should be considered for a specific position. 8
9 Applicant Tracking Setup Checklist Verify or create an EX ID Number and User Login (Name Entity and Users windows in EX). A CRM Staff only user does not need to log into EX; however, the ID Number is required to assign the user to the appropriate user group and allow them to receive notifications. Verify or create the appropriate JICS roles (Role Definition window in EX). Jenzabar automatically provides the Staff and Staff Admin JICS roles, but your organization may want to create roles tailored to your organization. Verify or assign the user(s) to the appropriate JICS role membership to control their level of JICS access (Role Membership window in EX). Verify or assign the user group(s) privileges to information and notification processing allowing them to handle JICS information submitted to EX (Assign Processing and Notification Rights window in EX). Verify or assign the user group(s) access to select information panels associated with positions or applicants accessed from the Organization Positions and Applicant Master windows (Group Permissions window, Functions tab in EX). Verify or assign the user group(s) access to the Organization Standard Competencies window where users can create and maintain all competencies for your organization so they can be associated with a position (Group Permissions window, Functions tab in EX). Verify or assign the user group(s) access to the Make File Extensions Available for HR Module window where users can determine what file types are acceptable attachments (Group Permissions window, Functions tab in EX). Establish allowed file extensions in HR (HR Configure Human Resources in Personnel or HR Configure Human Resources in Payroll windows, Make File Extensions Available for Attachment in Human Resources link in EX). Verify or configure JICS BASE and JICS STAF to Y (Maintain Config Table window in EX). Create a JICS login and password for the CRM Staff user(s) (Maintain Web Access Code window in EX). Add the Employment Position Application, Employment Position Management, and Account Notification portlets to CRM Staff (Add a Portlet page in JICS). Grant the appropriate JICS role(s) access to CRM Staff. This grants all users assigned to that JICS role access to the page(s). (Depending upon your JICS layout, this may be done from the Customize page screen, Permissions tab.) To utilize event notifications, the following configurations must be established: Verify or configure the SMTP relay and mail scheduler to allow users to receive notifications. For more information, see the Notification System information in the Common Online help. 9
10 Verify or create the notification(s) (HR Configure Human Resources in Personnel or HR Configure Human Resources in Payroll windows, Configure Human Resources Notification Messages link in EX). Verify or enter address(es) for the user(s) (Name Entity or Maintain Addresses windows in EX). Verify or select the Notification Enabled? check box(es) for the user(s) (Name Entity or Maintain Addresses windows in EX). To utilize internet submission notifications, the following configurations must be established: Verify or select the Must Notify check box (Internet Submissions window, click Assign Processing and Notification Rights button to access the Assign Processing and Notification Rights window in EX.) Employment Position Application Portlet Configurations Verify or assign the user(s) to the appropriate JICS role(s) to allow access to the portlet and determine levels of capability (Group Membership window in EX). Grant select JICS role(s) access to the portlet and determine their level of capabilities (Site Settings, Global Operations page in JICS (may vary according to your JICS setup)). TIP: Verify or ensure the Everyone role is selected to allow potential applicants not assigned to JICS roles access. Grant select CRM Staff role(s) permission to activate employment applications (Customize Portlet page, Permissions tab in JICS (may vary according to your JICS setup)). Employment Position Management Portlet Configurations Verify or assign the user(s) to the appropriate JICS role(s) to allow access to the portlet and determine levels of capability (Group Membership window in EX). Grant select JICS role(s) global access to the portlet and determine their level of capabilities (Site Settings, Global Operations page in JICS (may vary according to your JICS setup)). Establish the address to automatically receive from potential applications for a position without a designated contact (Configuration settings page, Configure Some Settings link from the Employment Position Management portlet in JICS). Enter a general introduction about your organization for potential applications to read in the About Us section (Configuration settings page, Configure Some Settings link from the Employment Position Management portlet in JICS). Account Notification Portlet Grant select JICS role(s) global access to the portlet and determine their level of capabilities (Site Settings, Global Operations page in JICS (may vary according to your JICS setup)). Verify or define the message and method used to deliver the message to online applicants (Setup page, Setup link from the Account Notification 10
11 portlet in JICS). Grant select JICS role(s) permission to set up the portlet, cancel notifications, create and update the templates, update the status, and send s. (Permissions tab, Customize portlet page, Customize icon, Account Notification portlet in JICS). Determine how active and held accounts are to be sorted in the portlet (Preferences tab, Customize portlet page, Customize icon, Account Notification portlet in JICS). *Applicant notifications are handled using Communication Management (Notepad). 11

12 New EX Configuration Options The Configure Human Resources via Payroll and HR Configure Human Resources via Personnel windows have the following updates: New Make File Extensions Available for Attachment in Human Resources option New Configure Human Resources Notification Message option Archive Media options removed New configuration options allow you to establish notification messages and determine what file attachments will be allowed. Allowed Attachments Attachments and comments can now be added to provide feedback throughout the new position request and position hiring processes to communicate position descriptions, interview notes, budget information impacting position requisitions, detail decision-making, etc. Before users can add attachments, the types of file extensions that will be allowed must be defined using the new Make File Extensions Available for Attachment in Human Resources option on the Configure Human Resources via Payroll and HR Configure Human Resources via Personnel windows. When establishing the allowed files, consider the applications your HR employees use and the type of attachments they want to make. Attachments become a permanent part of the position requisition process and can be referenced later as an artifact. 12


13 Select where you want to use attachments: throughout the hiring process, throughout the position requisition process, or throughout HR. Select the types of file attachments users can add. If there is a file type you would like to allow that isn t listed, click the Create New File Extension link. Notification Messages Notification messages can now be sent throughout the new position request and position hiring processes. Notifications can be used to keep specific groups informed about the status of the processes. You can set up who receives HR notification messages, when they receive them, and what the notification messages convey using the new Configure Human Resources Notification Message option provided on the Configure Human Resources via Payroll and HR Configure Human Resources via Personnel windows. Step 1: Select the processes that will generate a notification to be sent. Step 2: Verify notifications are on. Step 3: Select who will receive the notification. 13

14 Step 4: Define the details of the notification such as the message to be sent, return address to be used, and automatic message copies to be sent for the event. Click the Placeholder icons to include automatically updated information related to the event. Step 5: Determine if HTML format will be used and if related comments and attachments will be included with the notification. New Standard Features The following new features have been included with new windows and added to existing windows in EX and screens in CRM Staff to facilitate the position requisition and hiring processes. Feedback such as comments and attachments can now be reviewed and added throughout the processes. Event logs are now available to show what happened and when in order to track updates and changes to the status process. Access to the Maintain Definitions window from select drop-down pick lists is available allowing you to quickly add and update selection options if you have the appropriate permissions. Feedback Feedback can be added throughout the position request and hiring processes to easily communicate position descriptions, interview notes, budget information impacting position requisitions, detail decision-making, etc. Feedback can be made as an attachment or comment and is accessed from the new Feedback icons: To add a comment or attachment, click the new Add Feedback icon. To review an existing comment or attachment and provide additional feedback, click the new Review Feedback icon. 14

15 Enter a comment and click the Add button. Click the Add Attachment icon to add file attachments to the item. To print comments, click the Print button. 15

16 Event Log The Event Log can be used to review the actions that have occurred for the status of position requests and applicant processing. To access the Event Log window, click the Event Log EX. icons on the Review Position Request or Applicant Master windows in Quickly identify what transpired, who made the change and when. Maintain Definitions The new Maintain Definitions window can be used to add, update, and delete options available from select drop-down pick lists. You can also determine what definitions are active and available for use within EX and JICS. An employee recently completed specialized certification and you are adding it to the Achievements tab of the HR Employee Master via Personnel window. As you go to select the Education Type, there is no option that best describes the certification. If you have the appropriate permissions, you can create a new education type for the certifications by right-clicking from the Education Type column and selecting Maintain Definitions. The Maintain Definitions window is accessed from the following windows: Organization Positions window, Department column HR Employee Master via Personnel and HR Employee Master via Payroll windows, Department, Education Type column 16

17 HR Positions via Personnel and HR Positions Available via Payroll windows Department column Applicant Master window, Military Status, Authorization Type, Where Heard From, and Education Type columns In order to add, update, and delete definitions, you must have the appropriate permissions. For more information, contact your Module Manager or IT Department. Definitions created here and made active are available from the select drop-down pick list. 17

18 New Windows in EX To facilitate the new position request and hiring processes the following windows were added to EX: Organization Standard Competencies was added to Personnel and Payroll Manage Hiring Officers was added to Personnel and Payroll Review Position Requests was added to Personnel Organization Standard Competencies When defining organization positions, you can assign desired or required standard competencies for employees filling the position. These standard competencies available to be associated with a position are defined and maintained using the new Organization Standard Competencies window. Select Active to make the competency available to assign to positions. Select Active and Show on Web? to make it available via CRM Staff. To create new Competency Categories and Types on the fly, right-click from the column and select Maintenance Screen. 18

19 Manage Hiring Officers The Manage Hiring Officer window allows you to assign, change, and remove users to hiring officer roles. Hiring officers play different roles in the position request and position hiring processes as detailed in the New Hiring Officer Roles section. Depending upon your organization s hiring process, each position request should have at least one hiring officer assigned to it. Hiring officer roles can have multiple users assigned to them and a hiring officer can belong to multiple roles. Roles must be assigned to each position request individually. Step 1: Select the position request to which you are assigning hiring officers. Easily contact a user by clicking on their hyperlinked name or the Contact Info icon. Step 2: Select the role(s) you want to assign to the position. Step 3: Select the users you want to assign to the roles. Step 4: Click the Assign button. Select from these options to review, assign, change, and remove hiring officers from a selected position. Users can also automatically be designated HR Position Administrators and/or HR Hiring Administrators if the position to which they are assigned is associated to those role(s). Positions are associated with roles on the Organization Positions window. 19
20 Review Position Requests The new Review Position Requests window allows you to: Request a position. Review, accept, and approve or deny position requests submitted using EX and the Employment Position Management portlet. Quickly access the Manage Hiring Managers window to assign users to the position. Easily distinguish between inactive requests and requests currently being processed. Update a position request status and view all events related to the status. Select posting, start, and closing dates to determine when a position is posted and when applications can be received. Determine the line of responsibility for the position. Add and review feedback associated with a position request. Use new icons to identify existing information and unsaved updates: Information Exists icon Information Does Not Exist icon Unsaved Updates icon Use the Calendar icons to quickly select the appropriate start, posting, and closing dates for the proposed position. The Request Status can be updated by the user or automatically updated when an event related to the position request occurs. The following statuses reflect where the position request is within the position request process: Submitted indicates the HR Position Administrator or Position Administrator has submitted a position request. The request can be based upon an existing position or as proposed new position. Depending upon your configurations, the HR Position Administrator and/or Position Administrator is notified when the position request is submitted. Accepted indicates the HR Position Administrator or Position Administrator has received the submitted position request and updated the request status to Accepted on the Review Position Requests window. In Progress indicates the HR Position Administrator, Position Administrator, or a designated Position Approval Committee is reviewing the position request to determine if the request will be approved or denied. When a position request is in progress, the HR Position Administrator and/or Position Administrator may assign hiring officers and form a Hiring Committee. During this stage of the position requisition process, the designated reviewers may collaborate and consult with one another using comments and attachments. Depending upon your configurations, the Position Approval Committee is notified when the position request is in progress. Approved indicates the HR Position Administrator, Position Administrator, or Position Approval Committee has reviewed and approved the position request. Once a position 20
21 request is approved, the hiring process can begin. Depending upon your configurations, the Position Approval Committee is notified when the position request is in progress. Denied indicates the HR Position Administrator, Position Administrator, or Position Approval Committee has reviewed and denied the position request. Comments and attachments can be used to justify why the position request is denied. Depending upon your configurations, the HR Position Administrator and/or Position Administrator is notified when the position request is in progress. Withdrawn indicates the HR Position Administrator or Position Administrator has withdrawn the original request. Comments and attachments can be used to justify why the position request is withdrawn. Depending upon your configurations, the Position Approval Committee is notified when the position request is withdrawn. The Hiring Status can be updated by the user or automatically updated when an event related to the hiring process occurs. The following statuses reflect where the things are in the hiring process: Hold indicates the hiring process is on hold. This is the initial hiring status for a position request, which remains the case until the position is approved. Once a position request has been approved, then the hiring process can move beyond the Hold status. Prepared indicates the HR Hiring Administrator can define position details such as what days the position will be posted, a proposed start date, what documents applicants may submit as a part of their application, and if the position reports to another position. In turn the HR Hiring Administrator prepares the employment application using Form Builder 2.0. When applicable, Hiring Committee members are usually assigned at this time Posted indicates HR Hiring Admin has created the online application using Form Builder 2.0 and made it available to applicants via the Employment Position Application portlet. In Progress indicates the HR Hiring Administrator and/or Hiring Committee are accepting and reviewing submitted applications. Reviewers determine which applicants are denied further consideration or are approved for an interview. The reviewers may collaborate and consult with one another using comments and attachments. Offered indicates the HR Hiring Administrator and/or Hiring Committee have selected a final candidate for the position. The HR Hiring Administrator or Position Administrator presents a job offer to the final candidate. Depending upon your configurations, the HR Hiring Administrator, Position Administrator, and/or Hiring Committee is notified when the position has been offered to an applicant. Filled indicates a candidate has accepted the position and applications are no longer accepted. The position is no longer available for candidates to apply to; however applicants that previously applied can view its status. Depending upon your configurations, the HR Hiring Administrator, Position Administrator, and/or Hiring Committee is notified when the position has been accepted by an applicant. Closed indicates the position is no longer open and accepting applications. A position may be closed for number of reasons including because it has been filled, there were not enough qualified applicants, or a change in the budget that impacted position funding. Withdrawn indicates the HR Hiring Administrator or Position Administrator has withdrawn the position request from the hiring process. Comments and attachments can be used to justify why the position request is withdrawn. Depending upon your configurations, the Hiring Committee is notified when the position request is withdrawn. 21

22 The Feedback icon allows you to add and view comments/attachments and the Assign Hiring Officers icon allows you to assign hiring officers to the position. Hyperlinked lists allow you to quickly view and access requested positions. View and update the position request and hiring status. Click the Event Log icon to view any event details related to the status. 22


23 EX Enhancements To facilitate the new position requisition and hiring processes, several enhancements were made to the Organization Jobs, Organization Positions, Applicant Master, HR Positions via Personnel, HR Positions via Payroll, HR Employee Master via Personnel, HR Employee Master via Payroll, Transfer New-Hire to Employee, and Purge Expired Applicants windows. Organization Jobs The Organization Jobs window previously consisted of two tabs that allowed you to add jobs and define applicant requirements. The window has been modified to: Display all job information clearly in one place. Allow you to add or review feedback associated with an organization job. Assign desired or required competencies to an organization job from the new Assign Job Competency Categories window. Click the new Feedback icon to add or review comments and attachments. Click the new Competencies icon to review or add competencies for the job. Formerly called Requirements, job competency categories are now assigned by clicking the new Competencies icon. Once clicked, the new Assign Job Competency Categories window appears. Competencies can now be filtered by category when an organization job code is assigned to an organization position. Select the competency categories to be associated with the job and click the OK button. TIP: Competency categories available here are defined on the Organization Standard Competencies window. 23
24 Organization Positions The Organization Positions window previously consisted of three tabs that allowed you to add positions, define applicant requirements, and define contract text. The window has been expanded to: Display all position information clearly in one place. Limit user group access to selected panels from the Group Permissions window. Use the new Select Position icon to quickly access and select a position from the new Select Position Code window. Define the line of responsibility for the position using the new Reports To section. This section can also be used to determine if it will be included in the position request approval process. Select and refine competencies using the new Competency Information section. Add or review feedback associated with an organization position. Automatically associate a position with the HR administrative roles. An employee assigned to the designated position can automatically act as an Administrator. Create or update Department pick-list options by right-clicking on the column and selecting Maintain Definitions if you have the appropriate permissions. Utilize collapsible panels to easily display as much information as needed. The organization position statuses have not been updated, but can now be automatically updated when an event related to the organization status occurs: Requested for an existing position, indicates a related position request has been submitted and its status has been changed to Accepted by the HR Position Administrator or Position Administrator. Under Review indicates a related position request status has been changed to Denied or Withdrawn. Open indicates a related position request status has been changed to Approved. Filled indicates a related position request hiring status has been changed to Filled. 24

25 To quickly select a position, click the new Select Position icon. To add or review comments/attachments, click the new Feedback icon. New check boxes allow you to automatically designate all employees assigned to this position as HR Hiring or HR Position Administrators. New collapsible panels allow you to view or hide as much position as you want. Previously the Requirements tab, the new Competency Information panel allows you to select and refine position competencies. Previously the Contract Text tab, the new Contract Information panel also provides access to the Select Placeholder window where you can select automatically updated details. The new Reports To Information panel allows you to define a line of responsibility for a position and if it is a part of the position request process.. 25
26 Applicant Master The Applicant Master window previously consisted of seven tabs that allowed you to review and enter applicant information. The window has been expanded to: Display all applicant information clearly in one place. Limit user group access to selected panels from the Group Permissions window. View all positions within your organization to which the applicant has applied in the new Positions Applied section. Enter or review applicant s previous work experience, education history, and affiliations in the new Employment History, Education, and Affiliations panels. Use the new Event Log icon to access and view all events related to the application position to which the applicant has applied from the new Event Log window. Add or review external communication with the applicant through Communication Manager (Notepad). Select any competencies an applicant may have using the new Competencies section. Add or review feedback associated with an applicant. Use new icons to identify existing information and unsaved updates: Information Exists icon Information Does Not Exist icon Unsaved Updates icon Use the Calendar icons to quickly select the appropriate application, available, and offer dates for the proposed applicant. Access the Address Master and Biograph Master windows by clicking on the new Additional Details icon. Access the Name Entity window by clicking on the new Name Detail button. The Application Status can be updated by the user or automatically updated when an event related to the applicant process occurs. The following statuses reflect where the things are in the applicant process: Submitted indicates an application has been submitted for the position. Once HR has accepted the online submission, the applicant receives a temporary login that allows them to log in and review the positions to which they have applied and the current status of their application. In turn HR determines the viability of the applicant, before they are placed under consideration for the position to which they applied. This allows HR to filter out applicants prior to their being considered by the Hiring Committee. In Progress indicates the HR Hiring Administrator and/or Hiring Committee are reviewing a submitted application. The reviewers may collaborate and consult with 26
27 one another using comments and attachments. Once an application has been reviewed, the HR Hiring Administrator or Hiring Committee determine if the applicant is denied further consideration or granted an interview. Depending upon your configurations, the HR Hiring Administrator and/or Hiring Committee is notified when an application is moved to in progress. Interview indicates the HR Hiring Administrator or Hiring Committee has reviewed a candidate s application and determined they are qualified for the position, and are eligible for an interview. During this stage, the reviewer(s) may collaborate and consult with one another using comments and attachments. Depending upon your configurations, the HR Hiring Administrator and/or Hiring Committee is notified when an application has been approved for an interview. Denied After Review indicates the HR Hiring Administrator or Hiring Committee has reviewed a candidate s application and determined they are not qualified for the position, and are not eligible for an interview. During this stage, the reviewer(s) may justify their decision using comments and attachments. Offered indicates a HR Hiring Administrator has made an offer of employment to the final candidate. The Position Request Hiring Status is updated to Offered. Depending upon your configurations, the HR Hiring Administrator, Position Administrator, and/or Hiring Committee is notified when the position has been offered to an applicant. Accepted indicates the candidate has accepted the employment offer. The Position Request Hiring Status is updated to Filled. Depending upon your configurations, the HR Hiring Administrator and/or Hiring Committee is notified when the applicant has accepted the position offer. Not Accepted indicates the candidate has refused the employment offer. Additional candidates are considered until another offer is made and the position is filled. Depending upon your configurations, the HR Hiring Administrator and/or Hiring Committee is notified when the applicant has refused the position offer. Withdrawn indicates a candidate that previously applied for the position, no longer wishes to be considered for it. Depending upon your configurations, the HR Hiring Administrator, Position Administrator, and/or Hiring Committee is notified when an applicant withdraws their application from consideration 27


28 Communication Management icon allows you to add and review external communication. Update the applicant s status using the drop-down pick list and view associated events by clicking the Event Log icon. New Employment History panel allows you to review or enter details about an applicant s previous jobs. Formerly the Qualifications tab, the new Competencies panel allows you to review or select a candidate s capabilities. New icons quickly identify if a panel has information. Expanded reference information. New panels allow you to view or enter detailed candidate education and affiliations information. New Feedback icons allow you to add and view comments and attachments. 28

29 HR Positions via Payroll and HR Positions via Personnel The HR Positions via Payroll and HR Positions via Personnel windows have been updated to: Include collapsible panels allowing you to easily distinguish between an employee s active and inactive positions. Automatically display the most recent and active positions first. Include a new Department pick list where you can select the department with which an employee s position(s) are associated. If you have the appropriate permissions, you can create or update Department pick-list options by right-clicking on the column and selecting Maintain Definitions. Use new icons to identify existing information and unsaved updates: Information Exists icon Information Does Not Exist icon Unsaved Updates icon Use the Calendar icons to quickly select the appropriate dates a position starts and ends. New hyperlinked lists allow you to quickly view and access all the positions an employee works at your organization. New expandable/collapsible panels clearly distinguish between current active positions an employee works at your organization and previously held now inactive positions. 29

30 HR Employee Master via Payroll and HR Employee Master via Personnel The HR Employee Master via Payroll and HR Employee Master via Personnel windows now include the Communication Manager (Notepad) icon allowing you to easily add or review notes regarding communication with a select employee. The Positions and Achievements tabs on these windows have also been updated. Positions Tab The Positions tab was expanded to: Include active and inactive collapsible panels allowing you to easily distinguish between an employee s active and inactive positions. Provide the new Department pick list allowing you to select the department with which an employee s position(s) are associated. If you have the appropriate permissions, create or update Department pick-list options by right-clicking on the column and selecting Maintain Definitions. Use new icons to identify existing information and unsaved updates: Information Exists icon Information Does Not Exist icon Unsaved Updates icon Use the Calendar icons to quickly select the appropriate dates a position starts and ends. New hyperlinked lists allow you to quickly view and access all the positions an employee works at your organization. New expandable/collapsible panels clearly distinguish between current active positions an employee works at your organization and previously held now inactive positions. 30
31 Achievements Tab The Achievements tab was expanded to: Utilize collapsible panels allowing you to easily view an employee s different achievements such as Education and Affiliations. Include the following new columns to provide greater detail about an employee s education and affiliations: Country and full Address where an educational institution is located. Education Type pick list to define the type of education received. If the type isn t listed and you have the appropriate permissions, you can right-click and select Maintain Definitions to open the Maintain Definitions window where you can add, update, activate, and remove available types of education. Description option where a brief definition of the education received can be entered. Graduated and With Honors check boxes to designate whether the employee graduated and if they did so with honors. Major and Minor columns where up to two majors and minors an employee may have received can be entered. Years Completed and Completed When to indicate the number of years the employee took to earn the education and the date they completed their education. License # and Date Expired options to enter a license earned number and the date their license ends. Affiliation To and From dates to indicate when the employee joined the affiliation and when their affiliation ended. Include the new Feedback icon allowing you to view and add comments and attachments. Use new icons to identify existing information and unsaved updates: Information Exists icon Information Does Not Exist icon Unsaved Updates icon Provide Calendar icons to allow you to quickly select the appropriate date a license expires and the dates an employee has been involved with a select affiliation. 31


32 Added columns allow you to create a more detailed record of an employee s educational experience and affiliations. New Feedback icons allow you to add and view comments and attachments. New expandable/collapsible panels distinguish between Education and Affiliations. These panels utilize hyperlinks to quickly view and access all entered information. Transfer New-Hire to Employee The Transfer New-Hire to Employee window now includes the Group Code, Subgroup Code, and Group Description columns. The Group Code and Subgroup Code determine which groups a new-hire will belong to as an employee. You must select from these pick lists in order to transfer applicant information to employee information. The new Group Code and SubGroup Code must be selected in order to transfer applicant information to employee information. 32

33 Purge Expired Applicants The Purge Expired Applicants window now provides: A Calendar icon to quickly select the date to be used when removing no longer needed applicant information. All applicants received before the entered date are purged. A Query option to determine what applicant information is to be purged. You can select: Original to automatically purge all applicants received before the current or entered date. A previously customized purge query from the drop-down options. OR Click the Customize button to tailor a purge query to best suit your needs. Be sure to save the report using Save As in order to maintain the original query's format. The new Calendar icon allows you to quickly select a date from the Calendar pop-up window. New Query options allow you to select specific applicant information to be purged. 33
34 New Portlets in CRM Staff EX 4.5 introduces two new portlets to CRM Staff to work in conjunction with EX throughout the position requisition and hiring processes. Employment Position Application allows applicants to apply for open positions posted online Employment Position Management allows select user groups to enter and submit position requisitions, create the online application using Form Builder 2.0, communicate with other users involved in the processes, review the status of a position request, approve requisitioned positions, post openings, review submitted applications, and approve an applicant for an interview. The Account Notification portlet is used in conjunction with the Employment Position Application portlet to send a new applicant a user account that allows them to log in and view the positions to which they have applied, the status of the current application, and apply for additional positions. Employment Position Management The Employment Position Management portlet allows select user groups to: Enter and submit position requisitions Communicate with other users involved in the processes Review the status of a position request Approve requisitioned positions Create and update online application forms using Form Builder 2.0 Post openings Review submitted applications Approve or reject an applicant for an interview 34


35 Users Pending position requests assigned to you for review automatically appear when you log into CRM Staff. Click the new position listing link to create a new position request. Position Request To base the position request upon a position that already exists at your organization, search for it. To create an entirely new position, click the Request an all-new position link. 35

36 If you are creating an all-new position, you can define it from the Request New Position screen. Use the available options to define the position being requested. You can add files, select a desired start date, detail why you are requesting the position and enter any specific instructions for the HR office. To add required and desired competencies, click the Add a required competency and/or Add a desired competency links. The Add a desired competency window appears where you can select the appropriate competency. 36

37 If you have requested a position, you can click the View your recent position requests link from the Main portlet page to view a quick overview of the current request status. Click the position title hyperlink to view detailed position request information. You can view the status of position requests you have submitted as well as link to a detailed description of the request. Position Request Review When considering a position request, you can review the request details and collaborate with other administrators or committee members using correspondence, comments, and file attachments. To add feedback on a position request, click the Add a comment and Add a file links. Once you have decided to approve or deny a position request, click the Add my approval or Reject this request buttons. If you are still undecided, click the No decision yet link. You can view other committee member(s) decisions and they can view yours. 37

38 Working with Approved Positions Use these options to review and update the position listing, update the online application form potential candidates complete, and view/contact members of the hiring committee. This section displays the candidates who have applied to the position, when they applied, your decision regarding the applicant, and the committee s decision regarding the applicant. To review a candidate s application, click on their name hyperlink. This section displays administrator and committee member feedback on the position. You can add a comment, attach a file, and edit and delete your own comments. To comment, click Add a comment. To include a file attachment, click Add a file. 38

39 Administrators and committee members can view applicants, other committee member decisions, and existing comments and attachments. They can also add feedback, approve or deny an applicant for an interview, and other committee members. Use back arrows and the Next applicant link to scroll between different candidate s applications. Once you have approved or denied an applicant for an interview, click on the appropriate link. You can review other committee members decisions as well. 39

40 Administrators Administrators can establish the address to be used for receiving s from potential applicants and enter or update a description of your organization that will appear to applicants on the main page of the Employee Position Application portlet. Administrators can enter and format information about your organization that will appear to potential applicants as well as determine what address will be used to receive s from applicants. 40
41 Employment Position Application The Employment Position Application portlet allows applicants to: Search for available positions. View detailed position information. Submit applications. Contact your organization. See where an application is within the process. View all positions to which they have applied. Applicants Search Applicants can search for all open positions or selected positions using several search options. 41


42 Search Results and Detailed Position Information When the applicant clicks on a position link, a detailed position description appears along with an Apply Now option. Application Process Once an applicant clicks Apply Now, they can fill out the online application or complete a previously started application using a temporary key provided when they first started the application process. Applicants click a link to begin the online application process. If an applicant saves their application to complete later, they are ed a login key that allows them to return to the application and complete the process. 42

43 The online application form is created using Form Builder 2.0 in the Employee Management portlet and varies according to the position and your organization s needs. Applicants can save and complete the application at a later date and/or access the next step in application process. When an application is submitted, individuals responsible for processing application submissions are notified and can process it using the Process Internet Submissions window in EX. Once the online application form has been completed, the applicant can upload other supporting documents including a cover letter, resume, and references. Applicants can also choose to enter the information in directly as text, typing or copying and pasting. Once the application is submitted and initially processed by HR, the applicant receives an e- mail with an account login and password. The applicant can log in to review the position(s) to which they have applied and check the status of their application(s). 43
44 Review Recent Applications Applicants can quickly view a list of all the positions they have applied to and search for additional open positions using the search options. Applicants approved for an interview are noted here and can be contacted using Communication Manager (Notepad). Administrators Administrators can create a general introduction that appears to potential applicants using the Settings page. Administrators can enter and format content that will appear to potential applicants on the Search for a Position page. Administrators can choose to use hyperlinks and images. 44
45 Enhancements and Resolved Issues for 4.5 Admissions Resolved Issues Customizing an EX report with a column name containing 'OP' sometimes generates an error message If criteria is added that uses a column that contains "op" in it (as in stop_all_mail) when customizing an EX report with the tree on the right side that rebuilds the SQL, the "op" is seen as a placeholder for an operator which generates an error message. Accounts Payable Resolved Issues Printer Selection window will now display in the Select Invoices for Payment window upon clicking Print button ACH file for electronic payments contain negative sign for credit invoices causing banks to reject it When printing the list of invoices from the Select Invoices for Payment window, the Windows Printer Selection window will now pop up for the user to be able to select which printer they want to be able to send the list to as well as selecting the number of copies. Previously, it defaulted to the "last used printer" or the default printer, depending on whether the user had printed something prior to the invoice list. This way, the user can decide where they want to print the list, avoiding possible printing on actual check stock, etc. Some banks are rejecting the ACH File created during the Electronic Payment processing in Accounts Payable when there are credit memos/invoices within the batch being processed. Other banks have applied that amount as a deposit to the vendor's account which doubled up their payment. The reason is because the credit invoices display with a negative/minus sign in the actual file. We have reworked this process so that the ACH file will now only contain one record for each vendor/student with a summation of their invoices being paid in the payment run, rather than each individual invoice line item. This way, when a vendor or student has multiple invoices being paid in a batch only one record will be created with the total amount which will never be a negative amount since the system will not process a payment with a net total of less than zero. 45

46 39538 Unpaid Invoices by Bank Account Report did not include a report title when no data was returned Navigation: Reports - Accounts Payable activity center, Unpaid Invoices by Bank Account Report When no data is selected for the Unpaid Invoices by Bank Account Report is ran, the report does not include the report title that was entered on the prompt window. This has been changed so that if a report title was input on the prompt window, the title will print on the report even when no data was retrieved. Accounts Receivable (AR) Enhancements Receipt Entry EX 4.5 introduces several enhancements to the Receipt Entry Detail window to provide more information to the cashier/user. Users can now access the Subsidiaries and A/R Inquiry windows to view detailed student s balance and hold information. Depending upon their permissions, they can also access the Student Holds and Current Student FERPA Permissions windows. Navigation: Process Student Payments/Receipts, Receipt Entry Click the new Holds icon or View/Add Additional Holds button to access the new Student Holds window where depending upon your permissions, you can view detailed information about a hold and/or add a hold. Click the new FERPA icon to access the Current Student FERPA Permissions window where you can view detailed information about a student s FERPA permissions. The balance reflects a student s posted balance for subsidiaries selected on the Subsidiary Definition window plus any preliminary or unposted transactions (depending upon how you have configured A/R). To more easily view how much a student owes when entering a receipt, you can now click the new Subsidiaries icon to access the Subsidiaries window and the new A/R Inquiry icon to access the A/R Inquiry Detail window. 46

47 Configuration Settings To include any preliminary or unposted transactions, A/R must be configured to include them. To verify or update A/R configurations, access the A/R Configuration window. If all three configuration items are selected, the balance is the sum of their posted balance from all subsidiaries plus any preliminary financial aid, preliminary charges, suspended, and unposted transactions. If Display Unposted Items Online? is not selected but the other boxes are selected, the balance is the sum of the posted balance plus any preliminary financial aid, preliminary charges as well as any suspended transactions but would not include any unposted transactions. 47

48 Receipt Entry Detail Window Displaying Details To help verify the correct account number and student name/id are being displayed, the Account Description column was added and is located to the right of the Account Code column and the Name column was added and is located to the right of the ID Number column. You can update column order by dragging columns to a new location then right-clicking and selecting Save Column Display Order. Automatic Cursor Focus Previously, when starting a new receipt, the cursor automatically went to the Group Num column. Now the cursor automatically starts with the ID Number column. New Sent to Collections Notification When a cashier accesses an ID Number for a student with an account that has been sent to collections, a new caution message appears. This message appears for new and edited receipts. Updated Transaction Description The transaction description now matches the receipt code s description when the AutoGenerate Rows from Subsidiary Master option is used. Edited Receipts Now Verify the Transaction Detail Amount Edited receipts now verify the sum of the transaction detail line item amounts does not exceed the Cash Tendered amount upon editing an existing receipt. This previously existed when entering new receipts but not edited receipts. Empty Detail Rows Now Automatically Deleted When the AutoGenerate Rows from Subsidiary Master? option was selected, a blank detail row was automatically inserted. Users had to delete the blank row before saving. This blank row is now automatically deleted. 48

49 Third Party Payment Check Box Remains Selected Previously when a user went to edit a third party payment, the Third party payment check box was no longer selected even if it had been selected when the receipt was saved. This made it appear as though the receipt had not been properly flagged. This has been corrected to ensure the Third party payment check box remains selected on an edited receipt unless a user unselects it. Student Information Impacting Charges Window If you have been granted permissions, the Business Office Flag column displays the Student Master Hold Code 1. If you have permissions to the Student Holds window, the View/Add Additional Holds button ( ) is available. You may click on the button to open the Student Holds window where you can add Holds or view existing Holds for the selected ID Number. Resolved Issues "AutoGenerate Rows from Subsidiary Master" option in Receipt Entry is adding unapplied aid instead of subtracting it Occasionally, when charges is ran online or within EX, an batch header is created when no charges are created, causing gaps in batch numbers When using the "AutoGenerate Rows from Subsidiary Master" option in the Receipt Entry Detail window, the unapplied financial aid (@F) is being added incorrectly. It should instead be subtracted from the balance since it is a credit amount. This has been corrected. In certain scenarios, when a student clicked on My Account Balances, an empty charge (@C/CG) was created even when no charges were generated for that student. The same thing occurred when the Student Charges process was run from within EX and no charges were generated; an empty batch was still created. These would need to be manually delete; however, when they were deleted, it caused gaps in the batch numbers. This issue has been corrected so that when the charges process is executed either from JICS or from within EX and if no charges are created, then 49
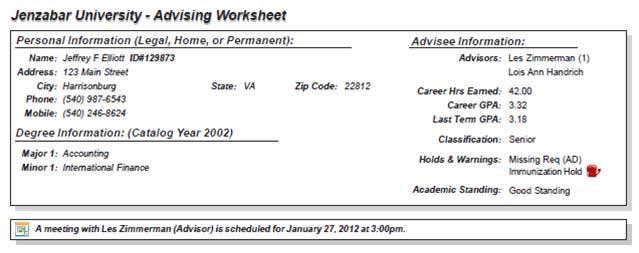
50 no batch header is created Create Vendor Invoices window in AR module now responds faster to many actions a user performs in the Details tab Transaction description on receipt entry detail line items changed to match the description on the receipt code when using "AutoGenerate Rows from Subsidiary Master" option A/R Inquiry Details window not displaying some options for Open Items customers The Create Vendor Invoices window in AR module was slow in adding rows and editing and saving data in the Details tab. Necessary changes were made to this window to speed up the noted operations. This window now responds significantly faster. The description that is stamped on the receipt detail transaction now reflects the same description as the receipt code description for receipt detail rows created from using the "AutoGenerate Rows from Subsidiary Master" option. Previously, the description that was used was the description on the subsidiary. Some of the options on the A/R Inquiry Details window were not displaying. Missing options were "Display by Item?", "Display Detail?", "Open", "Closed", "Both". These options that are only visible for Open Items customers are now being displayed. Advising Enhancements EX 4.5 offers four significant updates for Advising (AV): Updated the Advising Worksheet Redesigned the Advising Engine for When MET then MET Added a filter to the ARC drop-down when applying a Substitution Added preventative measures to help eliminate the Unable to Retrieve Parent Handle error Updated Advising Worksheet The Advising Worksheet was updated with a number of new features including an improved layout, full color icons, requirement text for Roots and Courses (in addition to Groups), and text for course codes instead of ARCs and descriptions. The updated Advising Worksheet provides an easy-to-read format and is a more effective tool for everyone involved in advising students. The new worksheet is designed to help Advisors and Advisees work more efficiently both together and independently. More information is available while striving to maintain a report that is easy to read and highly effective. 50
51 51

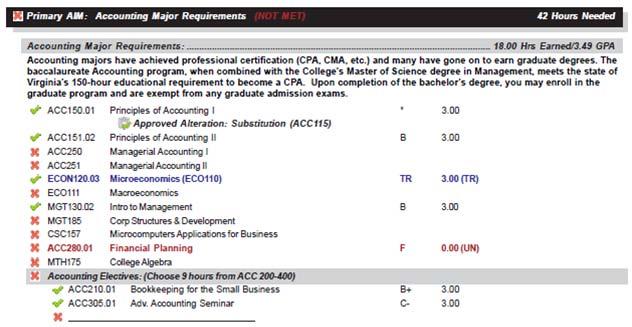
52 Requirement Text now stretches across the entire page and can be applied to Roots & Courses (as well as Groups). Every row has a Status icon of MET, Not Met, or In-Progress. All currently scheduled Advisee Meetings shows on the report. All Groups are highlighted in gray so that each layer clearly stands out. As each Group cascades down (Groups embedded in a Group, embedded in a Group, etc ) the gradient increases in darkness. The new report shows Course # and Title from Course History in lieu of ARC & Description. Color is used strategically to make specific items pop. Transfer Courses and Alterations list the ARC representing the original requirement. Meeting Notes show for the students as they have traditionally; however, all notes applied to the student s record shows for every advisor and not just the notes from the Advisor looking at the report. Redesigned the Advising Engine for When MET then MET Clients are now able to build trees without concerns for aesthetic max caps or other strategies to control Group and Course behaviors. Once a Root or Group is MET, the Advising Engine closes off the requirement and automatically redirects a course that would have been otherwise applied to another location in the AIMs or to the *Free Bucket. This default behavior represents 80%-90% of the desired behavior users are looking for in their trees. However, because there are times when your curriculum will warrant the ability to continually add courses/hours to a Group that has been MET, a configurable off/on switch was added to allow you to continue to place courses already MET in a Group. When utilizing When MET then MET, the Compute Student Progress engine loads ARCs in the specific order in which the student took them, which means it will no longer load ARCs alpha/numerically by ARC but rather load by Year/Term/Registration Sequence Order. This 52
, the engine not only places the ARC but determines whether or not the Groups above (the")
53 is an essential change as it represents the most logical order to determine when Groups should be closed off as they become MET. As each ARC loads in the student s Requirement Trees (and in addition to the new order in which ARCs load), the engine not only places the ARC but determines whether or not the Groups above (the ancestry string) should be MET and subsequently closed. It may seem like that would make Compute Student Progress slower and more cumbersome. In reality, as Groups begin to close off, there are fewer places for the engine to look to place ARCs resulting in much more efficient and effective placement of ARCs from Student Course History. Follow the steps below to turn on the new When MET then MET functionality. 1. Open the Advising Configuration window (Activity Center: Settings Advising). 2. Locate the row entitled Would you like to utilize When MET then MET? 3. Ensure the configuration value is Y. A value of N indicates that you do not want to use the When MET then MET functionality. As mentioned earlier, there will be times where you have a curriculum moment for which the When MET then MET process creates a problem. Some Groups need to be built to allow more courses to load even though the Group is already MET and closed off to other courses. you may have a Group for which 6.00 hours is the minimum needed, but a student could apply as many as 9.00 hours. In that case the default functionality in When MET then MET would close off the Group after 6.00, and the student may need to apply 3.00 more hours. In this case, you can actually build the Group to be MET at 6 hours, but continue to load until the student hits the Max of 9 hours. Just check the When MET, load courses until Max checkbox and the Group will say MET at 6.00, but continue to load until the 9.00 hour Max is reached. 53


54 In making sure that the When MET then MET functionality is working for you, please make sure you test all of your trees in a PLAY environment to ensure that the new engine will process your requirements correctly. New Filter on ARCs when applying a Substitution Currently when applying an Alteration for which Reference is Required (almost always a Substitution), the drop-down list is simply a list of all ARCs on the ARC Table, which makes it difficult to find the appropriate ARC for the specific student in question. With EX 4.5 the system now defaults to displaying only the ARCs from Student Course History for the student to whom you are applying the alteration. For users who want to project Substitutions for students who have not yet taken an applicable course, the new functionality also allows the flexibility to view all ARCs representing courses in lieu of filtering by ID Number. Simply select the Show All Course Requirements check box (highlighted below), and the all ARCs representing Courses (Course & Cumulative Course) will be available. 54

55 This new functionality will add both quickness and flexibility to the Manual Alterations process. Added Restriction on changing the ARC Type of an embedded requirement When loading Institutional Requirements in the Tree Table, the Unable to Retrieve Parent Handle error indicates that the Ancestry String of a tree has been interrupted and cannot be assembled correctly. Usually this error occurs because a user has changed the ARC Type/Cluster Code for a Root or Group in the ARC Table, which broke EX s ability to retrieve trees intact. In 4.5, once a Root or Group has been embedded in a tree, a user will no longer be able to change ARC Type without removing the ARC from the tree and starting the building process over. It has always been important to have a firm grasp of the design of your trees and strong communication among users making changes and updates. This new functionality places a continued premium on design and reinforces the need for communication among tree-builders at each institution. Resolved Issues A System error occurs when the user clicked OK on the Copy Institutional Requirements Tree window Free electives are not showing up on the Advising Worksheet from JICS When users wee copying AV Trees from one year to the next whether year by year or tree by tree, they got a system error that indicated the process was not executing its task correctly. However, the process was running effectively despite the error indicating otherwise. This issue has been resolved so that you do not get this error when copying. At times, the *Free Buckets on the JICS and EX sides may have been out of sync for the same student. The Advising Worksheet was programmed to call a certain aspect of EX data that was not present in the JICS database. Depending on specific situations, users were finding that a student s *Free 55
56 Buckets were out of sync depending on the environment from which the AV Worksheet was run. This issue has been addressed, and both environments will now generate the same results for the *Free Bucket. Budget and Budget Portlet Resolved Issues Minor cosmetic issues in Copy Master Budget window Confirmation pop up did not appear if Budget Warnings and Errors check box rows have more than one budget designated Text and formatting changed on Make Budget Modification and Transfer windows New worksheet name is not updated in the worksheet grid on the Setup Worksheet tab Account being duplicated after merging on a parent worksheet Added text to Feedback window when no comments/attachments exist Removing certain default users from Assign Budget Officer tab in Setup and Manage Budget Several small text and format changes were made to the Copy Master Budget window. The application was allowing a user to make more than one approved budget the budget checking one. Small text and format changes were made to the Make Budget Modification and Make Budget Transfer windows. A new worksheet name was not immediately updated on the worksheet heading in the top right of the setup worksheet tab. When exporting to Excel the old name or default name was being used. This issue has been resolved. Related to issue # A line item that existed on a child worksheet was being merged with a separate account on the parent worksheet. It was still residing on the child worksheet as unmerged and thus being duplicated. This issue is now resolved. When a line item or worksheet that does not have any comments/attachment is selected, then the following text will be displayed in grey in the center of the Comment area: "No comments or attachments made." Certain Jenzabar supplied user (ex. CMDSPGMR and JENZABARDEFAULT) where removed from the Select a Budget Officer data window on the Assign Budget Officer tab in the Setup and Manage Budget activity. 56
57 41841 Amounts entered in the Worksheet status tab where not refreshing in the Enter Budget tab New worksheet added in Setup Worksheet tab are not properly sorted New worksheet name is not updated in the worksheet grid on the Setup Worksheet tab Information message pop-up text for Export to Excel missing on some windows in EX Export to Excel fatal error occurred when attempting to export budget data Budget Calculator not properly handling zero amounts Proposed Budget Total column is displayed twice for budgets with a term equal to a year New columns added from Column Selector do not have Search/Sort functionality enabled Changes to Create Budget Profile icons When a user entered amounts in the proposed budget columns from the Worksheet status tab on the Setup and Manage Budget activity the Enter Budget tab on the same window was not showing the changes. This has not been corrected and a refresh will happen when the entered data is saved. When worksheets are added to the tree view the newest worksheet is in the top of the list and all previous worksheets are pushed down the list by one position. The sort order needs to be refreshed to sort alphabetically after the worksheet is added and named. A new worksheet name was not immediately updated on the worksheet heading in the top right of the setup worksheet tab. When exporting to Excel the old name or default name was being used. This issue has been resolved. The information message pop-up text for Export to Excel was missing on some windows in EX. A database error occurred sporadically when exporting to Excel using long worksheet names or paths. During testing, this error was determined to be a very infrequent real-life scenario and considered a non-issue at this point. Although the input box for the Budget Calculator window defaults to.00, it requires that a user enter a zero if they will be using zero in their calculation. This issue has now been resolved. The Proposed Budget total column on the Enter Budget tab of the Setup and Manage Master Budget window (Setup and Manage Budget activity center) is duplicated when the budget term is equal to a year. This has now been resolved. Search/Sort functionality on the Enter Budget tab of the Setup and Manage Master Budget window (Setup and Manage Budget activity center) was not enabled when new columns were added from the Column Selector. Icons were changed icons to reflect green for add and red for remove similar to the Setup Worksheet tab in the Setup and Manage Budgets window. 57
58 42262 Received error due to improper file name when adding attachment to link Total Proposed Budget displayed on Worksheets Status window for Monthly and Quarterly budgets Certain characters in a file attachment name are being rejected. Specifically, a name containing a dash (-) will be rejected because you cannot use quotation marks (' ) in the file name. This has now been resolved. The total proposed budget column should display when a worksheet UI is opened from the Worksheet status tab. This would apply to worksheets where the budget term is month or quarter. This has now been fixed Status Column in Approve Budget window was truncated and cut off Worksheet status Comments made on the Approve Budget Worksheets window were not included in messages when the worksheet was approved or returned Line item description blank for merged accounts on Setup Worksheet tab The status was truncated in the Approve Budget window when the user clicked on the All Worksheets radio button. The most recent comment made from the Approve Budget Worksheets window was not included in the comment thread that was attached to the message. It was saved and would display when another comment was made on the same feedback chain. The line item description was allowed to remain empty when accounts were merged. This has been resolved to force the user to enter a description for the new line item Budget Reports % Budget Used Threshold issue Deleted budget erroneously displayed deleted information on Summary tab of Setup and Manage Master Budget window Inconsistent Budget Method text on windows Notification Attachment e- mail messages were not sent Line item is displaying in multiple worksheets error The % Budget Used Threshold on Budget reports (Reports Budget activity center) did not highlight percentages greater than 100%. When a budget is deleted, the user will still see the deleted budget information on all tabs except the Summary tab of the Setup and Manage Master Budget window (Setup and Manage Budget activity center). The Budget Method radio button text on the Summary tab of the Setup and Manage Master Budget window (Setup and Manage Budget activity center) did not match the same radio button on the Copy Master Budget window. Attachment notification messages were not being sent for all users assigned to a role on a worksheet. On the Setup and Manage Budget - Setup Worksheet tab, the system was allowing a user to move a line item among worksheets but was not removing it from the original worksheet and then throwing a duplication error. 58
59 45071 Text edited on report prompt Text was edited on the Budget to Actual Report prompt to read "Select Budgets With These Statuses." Also, an issue with remembering the user s default custom report was fixed Budget Profile Groups not sorted properly on the Enter Budget tab in the Setup and Manage Budget window When a budget profile was selected on the Enter Budget tab in the Setup and Manage Budget window and the Details radian button was selected, the displayed line items were not sorting by budget profile group. The profile groups are now sorted alphabetically Grammatical changes made to text on Setup Notification window Redirection error when entering transfer amount and clicking suggest a transfer link System was not allowing user to move a budget from Under Preparation to Under Board Review status Budget Calculator allowed user to input incorrect values which generated an error message Approved/Submitted worksheets were not showing up in Pending and Complete Worksheets section in the Budget portlet The title of the Setup Notifications window was changed to "Set Up Notification." The label on the first subtab was changed to "Who Gets Notified." When entering a transfer amount and clicking the Suggest a Transfer link, the following message was displayed: "You have been redirected to this page because you attempted to navigate using your browser's Back or Refresh button. To avoid this in the future, make sure you navigate using the links and buttons that are part of the Portal interface." The system was not allowing a user to move a budget from Under Preparation to Under Board Review status. Instead, a database error message was displayed that forced the user to move the budget back to Under Preparation status. The trigger has been updated, and the status changes are working properly. The Column and Group radio buttons were allowing users to input alphanumeric values in the corresponding drop-down list box and then generating a non-descriptive error message when Apply All was selected. A descriptive message that directs users to select an appropriate value from the drop-down list box now appears when a user enters alphanumeric values. Users who had submitted or approved a worksheet were not seeing their action and related worksheet in the Pending and Complete Worksheets section of the portlet. Additionally, when a user's submitted worksheet was approved, they were not seeing this in the Pending and Complete Worksheets section. Users should now be able to track their worksheets through the Budget Creation process. 59
60 45317 Error message when moving line items and then attempting to merge in the Setup Worksheets tab on Setup and Manage Budgets window Switching Available GL Account and Line Items error displayed on Setup Worksheet tab on Setup and Manage Budgets window When entering budget in Budget portlet, the Allocating Budget Evenly function was not properly working Denied Adjustment not displaying in Budget Adjustment History in Budget portlet When a user removed a line item and then attempted to merge all/some in the Setup Worksheets tab on the Setup and Manage Budgets window, a database error was displayed. When removing line items from a worksheet and switching the Available GL Account and Line Items radio button, the removed items were not being saved. The "Evenly" allocation function on the Budget portlet was not properly allocating amounts to monthly and quarterly periods. It was rounding up values which made the summation of all the period values different from the total amount entered by the user. Any amounts that do not evenly allocate will have a one added to the initial and subsequent periods (month or quarter) until the amount has been properly allocated. An adjustment that was denied was not displaying on the Budget Adjustment History screen in the Budget portlet. It is now reflected in the history similar to adjustment approvals Issue with accessing future year budgets in JICS Transfers greater than original budget not allowed The system was not allowing a user the ability to access a budget that had a start date 2 years greater than the GL config value. The user was allowed to log on to the portlet; however, once the future year budget was selected, an error was displayed. Users should now be able to access these future year budgets. The system was not allowing user to transfer amount greater than original budget even though the current budget had enough funds EX was requiring that a JICS user have access to the BG client functions Assigned missing activities to JEX_BGManager and JEX_BGUser groups EX was requiring that a user must be in a group that is associated with at least one BG function as defined in the Groups Permission window. Since some users will only use the Budget portlet and thus will not require access to functions on the client side of the budget application, this constraint was removed. These default budget groups did not have the appropriate activities assigned to them via default data. 60
61 45885 Enhancement to Budget Reports Transfers processed from Budget portlet were not updating the current budget amount Enhanced performance for Budget Reports The Budget Reports are using a new database view (GL_MASTER_SECURITY_ALT_VIEW) to obtain secured account and transaction data and to improve report performance. The enhanced reports are Budget to Actual Worksheet Report and Budget to Actual Profile Report. Additionally, a user will still have the option to generate transaction level details but not via the report prompt. Instead, a user can either (1) drill down to the transaction for each line item in the report preview form or (2) select the Transaction Level radio button in the Show Detail section of the preview prompt. Transfers amounts processed via the Budget portlet were not being reflected on the Adjustment column of the Monitor Budget window. This was impacting the Current Budget amount, which, in turn, impacted the Available Budget amount. The Budget to Actual Worksheet and Budget to Actual Profile reports were enhanced to reduce the run time for each report Notifications were not being created by the Requisition Entry portlet Notifications were not being created by the Requisition Entry portlet. Now notifications and applications alerts are created when requisitions are submitted through JICS or EX Copied budget not displaying new line items Copy Budget function allowed the creation of budgets with duplicate names New line items added to a future year budget created via the Copy process were not being displayed in the Enter Budget and Worksheet Status tabs on the Setup and Manage Budgets window. The Copy Budget process now automatically adds a number incremented by 1 to the copied budget name to prevent duplicate names. Common Enhancements Process Internet Submissions Window The Process Internet Submissions window now includes a new Payment Status column that allows users to quickly identify if a completed payment is associated with a submission. The Payment Status column can consist of one of the following: N/A: Payment is not required 61
62 Waiver: This submission was submitted with a waiver code. Cancelled: This submission was received successfully, but the user did not complete their payment. More specifically, there is no online payment row for the submission and therefore the user most likely cancelled out of the Payments portlet prior to completing the payment. Successful: The payment for this submission has been approved and a corresponding transaction created. Approved: The payment for this submission has been approved, but no corresponding transaction was created for this payment. Unsuccessful: The payment for this submission was not approved by the payment vendor. Unprocessed: The payment for this submission has not yet been processed by the payment vendor. In addition to the new Payment Status column, the New Status drop-down and the Change Status button are enabled for submissions with an 'Incomplete,' 'Partially Complete,' and/or 'All Active' status. Users can move a submission in one of these statuses to either an 'Incomplete' or 'History' status. If a candidate accidentally submits their application two times, the second application can simply be updated to a History status without having to process it first. Another example may be in the case where a candidate did not complete the payment for their application, and therefore the submission needs to be updated to an Incomplete status. EX Plugin for Form Builder Submissions Update Perviously, Form Builder 2.0 forms in JICS allowed a user to complete and submit a form that includes a payment component without actually completing the payment process. In these cases, the submissions should be considered 'Incomplete' since they were missing the payment. Updates have been made to the EX plug-in to do the following when a JICS user submits a form: If the submission does not include a payment component (i.e., a payment is NOT required or marked as optional for the form), then the submission is placed into a 'Complete' status when it is saved to the EX database. If the submission includes a payment component (i.e., a payment is either required or optional), and a waiver code is submitted, then the submission is placed into a 'Complete' status when it is saved to the EX database. If the submission includes a payment component (i.e., a payment is either required or optional), and a waiver code is NOT submitted, then the submission is placed into an 'Incomplete' status when it is saved to the EX database. If the user who submitted the form with the payment component continues through the payment process, completes the payment, and the payment has been marked as processed by the payment vendor's application, then the submission is updated with a 'Complete' status. This update ensures that submissions requiring a payment that have not been completely paid will be considered 'Incomplete' submissions, and will therefore unavailable for processing using the Process Internet Submissions window. If a school wishes to process an incomplete submission even though the payment is missing, the user can utilize 62
63 the New Status drop-down and the Change Status button to move the submission to a Complete status so that it can be processed. Users can Now Update the Start and End Dates for FERPA Permissions Users can now update the start and end dates for existing FERPA Permissions using the FERPA Permissions window in EX. Any user with edit permissions to the 'Change Dates' tasklist permission (MODULE_FUNCTION.FUNCTION_ID = 21317) that is a child function of the 'FERPA Permissions' window tasklist permission (MODULE_FUNCTION.FUNCTION_ID = 21315), will now see the Start Date and End Date columns on the FERPA Permissions window as editable. These users can change the start and end dates for any existing FERPA permission row. A user can be given permission to 'Change Dates, which enables the 'Change Dates' button on the FERPA Permissions window and the edit capabilities of the start and end dates for existing FERPA Permission rows, but not be given access to the ' FERPA Default Start and End Dates' window (MODULE_FUNCTION.FUNCTION_ID = 21318), which is accessed when a user clicks the Change Dates button and allows the user to change the default start and end dates for new FERPA Permission rows. Additional Updates The following outlines several general updates included with EX 4.5. Updates include several new columns on existing tables as well as a number of new mapping columns and updates to validation rules for existing mapping columns used in online submissions. New EX Database Columns EX Table Name New Column Name Description AD_ORG_TRACKING SELF_REPORTED_GRAD_YR Column to allow schools to enter in either a self-reported grad year or grad date; displayed on the Additional Info tab for the Org Tracking window/tab AD_SCHOLARSHIP USER_NAME, JOB_NAME, JOB_TIME Adding the logging columns for better tracking of updates ALTERNATE_IDENTIFIER SEQ_NUM Added a new column to serve as part of the primary key for the table; does not affect the display in EX CANDIDATE HIGHLY_DESIRABLE Flag indicating if the candidate is highly desirable; displayed on the Additional Info sub-tab of the Candidate tab on the Maintain Candidacy window ATHLETIC_PROSPECT Flag indicating if the candidate is an athletic prospect; displayed on the Additional Info subtab of the Candidate tab on the Maintain Candidacy window IDENTIFIER_TYPE_DEF JENZABAR_REQUIRED Flag indicates if the Identifier Type row is required for Jenzabar processes (users cannot delete required rows); 63

64 EX Table Name New Column Name Description displayed on the Identifier Types definition window EX Window Changes Identifier Types Window The new Jenzabar Required check box is automatically selected when default identifier types from Jenzabar are required. Users cannot select the check box and when it is selected, they cannot delete required identifier information. TIP: Newly added identifiers do not automatically have the check box selected. Alternate Identifiers Window The Alternate Identifiers window now allows you to add multiple rows for the same ID Number using the same Identifier Type. However, information added for the ID and Identifier Type cannot have overlapping dates. Therefore, you must ensure that the new row s start date is after the original row s end date for two rows with the same Identifier Type. 64


65 Organization Tracking for Student Window/Tab A new self-reported Graduation Year column has been added to the Organizations tab, Additional Info sub-tab. You can use the new self-reported column instead of, or in conjunction with, the self-reported Graduation Date. Maintain Candidacy Window A new Additional Recruiting Information section has been added to the Candidate tab, Additional Info sub-tab. This section provides Highly Desirable and Athletic Prospect check boxes that allow you to indicate if a candidate is highly desirable and/or if they are an athletic prospect. Additionally, the Scholarships sub-tab on the Candidacy tab now updates the new USER_NAME, JOB_NAME, and JOB_TIME columns that have been added to the AD_SCHOLARSHIP table. 65
. These new columns are available for mapping in online forms.")
66 Review Internet Submission Window The Review Internet Submission window now includes: The new self-reported Graduation Year on the Organization tab. The new Additional Recruiting Information check boxes on the Candidate tab (see above for details about these new columns). These new columns are available for mapping in online forms. In addition, changes have been made to allow schools to use and process information that previously existed within EX, but was not available for mapping use in online submissions. The Alternate Identifiers tab has been added and the Candidacy tab has been updated to allow for the submission of Fee and Scholarship information. The Candidate tab now handles the submission of a Counselor. Additionally, new information is available for capture about test scores, organizations, and a related person/organization. (See the Online Submission [i.e., Form Builder 2.0] Mapping Changes section of this document for details about the columns now available for mapping.) Although the processing of these new mapping columns is consistent with how the rest of the mapped data on the tab is processed, there are several things noted below of which you should be aware. Alternate Identifiers Tab There is a new ALTERNATE_IDENTIFIER mapping table available that allows schools to include an identification question on a form to identify the student. Submitted information is displayed on the new Alternate Identifiers tab of the Review Internet Submission window. The Star icon appears if information has been submitted for the ALTERNATE_IDENTIFIER mapping table. Submitted information appears in the grid after any existing information and is identified with the Star icon. Information for submitted information can be edited until it is saved, after which all of the columns are disabled except for the date columns. Attachments Tab A Creation Date column is now available for the CANDIDACY_ATTACHMENT mapping table. If a creation date is supplied on the submission, it is used as the attachment creation date instead of the date of the submission. 66

67 Candidate Tab Starting in EX 4.5, you can map data into the HIGH_SCHOOL, LAST_ORG_ATTEND, and GRAD_YR_LAST_ORG columns on the CANDIDATE table. Be very cautious about using these mapping columns if you are also mapping data to the ORG_TRACKING mapping table's columns. There is a tie in the EX code between the data stored in the CANDIDATE table and the AD_ORG_TRACKING table in the database. For example, if a change is made in one window (i.e., the Candidate tab of the Maintain Candidacy window) for the last high school or the last organization, the corresponding column(s) in the other location (i.e., the Organizations tab of the Maintain Candidacy window) is updated to ensure that the two tables stay in sync. Additionally, the Graduation Year column on the Candidate tab of the Maintain Candidacy window may be updated from the submitted organization information depending upon the Candidate Grad Year configuration (established using the Configure Function window). Therefore, if information from a form is mapped to both sets of mapping columns, it is possible it may become out of sync or that one may overwrite the other. Jenzabar recommends that you consistently use the mapping columns for one of the tables rather than using both mapping tables in the same form. Candidacy Tab To view any submitted Fee or Scholarship information, select a submission from the Candidacy tab top grid and then select the Fees or Scholarships sub-tab (exemplified above). If the submitted candidacy information is used to create a new candidacy row for the ID Number, any submitted Fee and Scholarship information is automatically associated with the new candidacy row. Likewise, if the submitted candidacy information is associated with an existing candidacy row, the submitted Fee and Scholarship information is automatically associated with the existing candidacy row and can be compared against any existing information. Information submitted using the Fees sub-tab is informational only. It is not tied to or updated with payment information submitted with the form. 67
68 Organizations Tab In previous versions, self-reported columns were available for mapping with shortened column names because it was assumed that only the self-reported columns would need to be available for mapping. With this version of EX; however, many of the non-self-reported columns are now available for mapping and the existing self-reported columns have been renamed to be more exact. This may cause issues with your defined forms. Please see the 'Online Submission (i.e., Form Builder 2.0) Mapping Changes' section of this document for details about what changes may need to be made to your forms. Additionally, with the new non-self-reported mapping columns available, it is possible (although not recommended) for a form to contain both the self-reported and the non-selfreported data. The Organizations tab now displays existing non-self-reported information or self-reported information in the Submitted Organization Information panel. Lastly, please review the note for the Candidate tab in the Review Internet Submission window to ensure that information on the Organizations tab is not inadvertently overwritten by information submitted to new Candidate mapping columns. Relationship Tab Most of the new RELATED_PERSON mapping columns refer to the related person (including prefix and address), although some refer to the relationship between the submitter and the related person or organization, such as the relationship dates. Test Scores Tab In previous versions of EX, the TEST_SCORES.SELF_REPORTED column was always set to 'Y' for submitted test scores. However, that column is now available for mapping and the Review Internet Submissions window no longer establishes this value. Any forms that request test score information need to be reviewed and the SELF_REPORTED flag set accordingly (most likely as Custom Text, but a variety of alternatives are available). Additionally, the Total Composite Score column is now available for mapping. If information is submitted, the function within EX that calculates the total from the individual element scores does not execute. It is possible for the submitter to submit a total test score value that does not equal the total value that would have been calculated from the element scores. 68
69 Online Submission (i.e., Form Builder 2.0) Mapping Changes New Mapping Tables Mapping Table Name Available Submission Types ALTERNATE_IDENTIFIER 320, 330, 520, 530 AD_SCHOLARSHIP 320, 330 Renamed Mapping Columns Several 'self-reported' mapping columns on the ORG_TRACKING mapping table were renamed to better indicate to where the information is saved in EX. This also allowed us to add new, non-self-reported mapping columns to the ORG_TRACKING table, some of which have the same name as the original mapping columns. These renamed mapping columns (and their non-selfreported counterparts) are available in the Make an Inquiry and Apply Online portlets. This strictly modifies the appearance when viewing the names of the mapping columns in EX. You can continue to use the existing forms in JICS as is without any changes to the mappings for these columns because EX relies on the ERPID value sent from JICS when saving the submitted data to the EX tables. However, JICS uses the table name and column name stored in the FRM_Mapping table (rather than the ERPID key value) to indicate to the user which questions are mapped to which columns in the Mapping: Set Up Mapping page. Therefore, you may want to adjust the form's mappings so there is no confusion if someone later reviews the mappings for the 'self-reported' questions. There are new RANK, DEGREE and GPA mapping columns for non-self-reported data. If you click on the Mapped link for a question mapped to a rank or GPA question, the Mapping: Set Up Mapping page appears. You can update the RANK mapping column to the No Change/Default Value option and change the SELF_REPORTED_RANK mapping column to point to the rank question. Repeat these steps for the GPA and SELF_REPORTED_GPA mapping columns. The original GRAD_DATE, HAS_GRADUATED, CREDITS_EARNED and SIZE mapping columns do not have a new mapping column with the same name. If you click on the Mapped link for a graduation date or class size question, you do not see the selected question displayed in the Mapped Value column for any mapping column. You need to click the Remove Mapping link at the top of the page and then confirm the delete. This removes the mapping for the selected question and returns you to the list of mapping tables. Select the ORG_TRACKING mapping table, select the appropriate row, and then map the selected question to the SELF_REPORTED_GRADUATION_DTE or SELF_REPORTED_CLASS_SIZE mapping column as required. Repeat these steps for any graduation date or class size questions. 69
70 Mapping Table Name Original Column Name New Column Name ORG_TRACKING CREDITS_EARNED SELF_REPORTED_CREDITS_EARNED DEGREE SELF_REPORTED_DEGREE GPA SELF_REPORTED_GPA GRAD_DATE SELF_REPORTED_GRADUATION_DTE HAS_GRADUATED SELF_REPORTED_HAS_GRADUATED RANK SELF_REPORTED_RANK SIZE SELF_REPORTED_CLASS_SIZE New Mapping Columns Mapping Table Name Column Name Available Submission Types AD_SCHOLARSHIP AMOUNT_PER_SEMESTER 320, 330 AMOUNT_PER_YEAR 320, 330 DATE_SCHOLARSHIP_ACCEPTED 320, 330 DATE_SCHOLARSHIP_AWARDED 320, 330 DATE_SCHOLARSHIP_REVIEWED 320, 330 SCHOLARSHIP_AMOUNT 320, 330 SCHOLARSHIP_TYPE 320, 330 TRANSFERRED_TO_PF 320, 330 ALTERNATE_IDENTIFIER BEGIN_DTE 320, 330, 520, 530 END_DTE 320, 330, 520, 530 IDENTIFIER 320, 330, 520, 530 IDENTIFIER_TYPE 320, 330, 520, 530 CANDIDACY AD_RELEASE 320, 330 APP_FEE_AMT 320, 330 APP_FEE_DTE 320, 330 APP_FEE_TYPE 320, 330 ENROLL_DEP_AMT 320,
71 Mapping Table Name Column Name Available Submission Types ENROLL_DEP_DTE 320, 330 ENROLL_FEE_TYPE 320, 330 CANDIDATE ATHLETIC_PROSPECT 320, 330 COUNSELOR_INITIALS 320, 330 GRAD_YR_LAST_ORG * 320, 330 HIGH_SCHOOL * 320, 330 HIGHLY_DESIREABLE 320, 330 LAST_ORG_ATTEND * 320, 330 ORG_TRACKING COUNTRY 320, 330, 530 DTE_FIN_TRANS_RCV 320, 330, 530 DTE_TRANSCR_RCV 320, 330, 530 GPA (note that this is not the self-reported GPA column) 320, 330, 530 RANK (note that this is not the self-reported Rank column) 320, 330, 530 SELF_REPORTED_GRAD_YR 320, 330, 530 SIZE_OF_CLASS (note that this is not the self-reported Class Size column) 320, 330, 530 YR_OF_GRADUATION (note that this is not the self-reported Grad Yr column) 320, 330, 530 DEGREE (note that this is not the self-reported Degree column) 320, 330, 530 TOTAL_INST_CREDITS (note that this is not the self-reported Credits Earned column) 320, 330, 530 RELATED_PERSON ATTITUDE_CDE 320, 330, 530 BEGIN_DTE_OF_REL 320, 330, 530 DEATH_DTE 320, 330, 530 DECEASED 320, 330, 530 _ADDRESS 320, 330, 530 END_DTE_OF_REL 320, 330, 530 GENDER 320, 330, 530 MOBILE_PHONE 320, 330, 530 NOTATION 320, 330,
72 Mapping Table Name Column Name Available Submission Types PREFIX 320, 330, 530 SUFFIX 320, 330, 530 TEST_SCORES SELF_REPORTED ** 320, 330, 530 TEST_ELEM_PERCENT_1 320, 330, 530 TEST_ELEM_PERCENT_2 320, 330, 530 TEST_ELEM_PERCENT_3 320, 330, 530 TEST_ELEM_PERCENT_4 320, 330, 530 TEST_ELEM_PERCENT_5 320, 330, 530 TEST_ELEM_PERCENT_6 320, 330, 530 TEST_ELEM_PERCENT_7 320, 330, 530 TEST_ELEM_PERCENT_8 320, 330, 530 TEST_ELEM_PERCENT_9 320, 330, 530 TEST_ELEM_PERCENT_10 320, 330, 530 TOTAL_COMPOS_SCORE ** 320, 330, 530 * Please review the information in the Candidate tab section of this document for the Review Internet Submission window for specific notes to be aware of for the new mapping columns on the CANDIDATE mapping table and how they might impact the Organizations tab. ** Please review the information in the Test Score tab section of this document for the Review Internet Submission window for specific notes to be aware of for the new mapping columns on the TEST_SCORES mapping table. New Form Validation Rules Note: Some of these validation rules are for the new mapping columns, while others are updates for existing mapping columns. Mapping Table Name Column Name Validation Rule AD_SCHOLARSHIP AMOUNT_PER_SEMESTER Allowed question type is 'Text Field' AMOUNT_PER_YEAR DATE_SCHOLARSHIP_ACCEPTED DATE_SCHOLARHIP_AWARDED Allowed question type is 'Text Field' Allowed question type is 'Text Field' Allowed question type is 'Text Field' 72
73 Mapping Table Name Column Name Validation Rule DATE_SCHOLARSHIP_REVIEWED SCHOLARSHIP_AMOUNT SCHOLARSHIP_TYPE TRANSFERRED_TO_PF Allowed question type is 'Text Field' Allowed question type is 'Text Field' Allowed question types are 'Drop Down Menu', 'Multiple Choice Radio Buttons', 'Hidden Data' and 'Custom Text' Allowed question types are 'Drop Down Menu', 'Multiple Choice Radio Buttons', 'Hidden Data' and 'Custom Text' ALTERNATE_IDENTIFIER BEGIN_DTE Allowed question types are 'Text Field', 'Hidden Data' and 'Custom Text' END_DTE IDENTIFIER IDENTIFIER_TYPE Allowed question types are 'Text Field', 'Hidden Data' and 'Custom Text' Allowed question types are 'Text Field', 'Hidden Data' and 'Custom Text' Allowed question types are 'Drop Down Menu', 'Multiple Choice Radio Buttons', 'Hidden Data' and 'Custom Text' ATTRIBUTE_TRANS ATTRIB_BEGIN_DTE Can now be mapped as 'Hidden Data' and 'Custom Text' ATTRIB_END_DTE Can now be mapped as 'Hidden Data' and 'Custom Text' BIOGRAPH_MASTER CITIZEN_OF Can now be mapped as 'Hidden Data' and 'Custom Text' CITIZENSHIP_STS Can now be mapped as 'Hidden Data' and 'Custom Text' CANDIDACY AD_RELEASE Allowed question types are 'Drop Down Menu', 'Multiple Choice Radio Buttons', 'Hidden Data' and 'Custom Text' APP_FEE_AMT APP_FEE_DTE APP_FEE_TYPE ENROLL_DEP_AMT ENROLL_DEP_DTE ENROLL_FEE_TYPE Allowed question types are 'Text Field', 'Hidden Data' and 'Custom Text' Allowed question types are 'Text Field', 'Hidden Data' and 'Custom Text' Allowed question types are 'Drop Down Menu', 'Multiple Choice Radio Buttons', 'Hidden Data' and 'Custom Text' Allowed question types are 'Text Field', 'Hidden Data' and 'Custom Text' Allowed question types are 'Text Field', 'Hidden Data' and 'Custom Text' Allowed question types are 'Drop Down Menu', 'Multiple Choice Radio Buttons', 'Hidden Data' and 'Custom Text' CANDIDATE ATHLETIC_PROSPECT Allowed question types are 'Drop Down Menu', 'Multiple Choice Radio Buttons', 'Hidden Data' and 'Custom Text' COUNSELOR_INITIALS GRAD_YR_LAST_ORG Allowed question types are 'Text Field', 'Drop Down Menu', 'Multiple Choice Radio Buttons', 'Hidden Data' and 'Custom Text' Allowed question types are 'Drop Down Menu', 'Multiple Choice - Radio Buttons' and 'Text Field' 73
74 Mapping Table Name Column Name Validation Rule HIGH_SCHOOL Allowed question types are 'Drop Down Menu' and 'Text Field' The associated question can be defined as a Lookup type of question Note: If the selected question type is 'Text Field', then the question must be set up as a Lookup type of question in order to return an ID Number in the submission to EX; the submission processing window cannot handle a full organization name HIGHLY_DESIRABLE Allowed question types are 'Drop Down Menu', 'Multiple Choice Radio Buttons', 'Hidden Data' and 'Custom Text' HOUSING_CDE Can now be mapped as 'Hidden Data' and 'Custom Text' LAST_ORG_ATTEND Allowed question types are 'Drop Down Menu' and 'Text Field' The associated question can be defined as a Lookup type of question Note: If the selected question type is 'Text Field', then the question must be set up as a Lookup type of question in order to return an ID Number in the submission to EX; the submission processing window cannot handle a full organization name ORG_TRACKING COUNTRY Allowed question type is 'Drop Down Menu' DTE_FIN_TRANS_RCV Allowed question type is 'Text Field' DTE_TRANSC_RCV Allowed question type is 'Text Field' GPA Allowed question type is 'Text Field' ORG_NAME The associated question can now be defined as a Lookup type of question RANK Allowed question type is 'Text Field' SELF_REPORTED_GRAD_YR Allowed question type is 'Drop Down Menu' SIZE_OF_CLASS Allowed question type is 'Text Field' YR_OF_GRADUATION Allowed question type is 'Drop Down Menu' DEGREE Allowed question types are 'Drop Down Menu', 'Multiple Choice Radio Buttons', 'Hidden Data' and 'Custom Text' TOTAL_INST_CREDITS Allowed question type is 'Text Field' RELATED_PERSON ATTITUDE_CDE Allowed question types are 'Drop Down Menu' and 'Multiple Choice Radio Buttons' BEGIN_DTE_OF_REL Allowed question types are 'Text Field', 'Hidden Data' and 'Custom Text' DEATH_DTE Allowed question type is 'Text Field' 74
75 Mapping Table Name Column Name Validation Rule DECEASED Allowed question types are 'Drop Down Menu' and 'Multiple Choice Radio Buttons' _ADDRESS Allowed question type is 'Text Field' END_DTE_OF_REL Allowed question types are 'Text Field', 'Hidden Data' and 'Custom Text' GENDER Allowed question types are 'Drop Down Menu' and 'Multiple Choice Radio Buttons' MOBILE_PHONE Allowed question type is 'Text Field' NOTATION Allowed question type is 'Text Field' PREFIX Allowed question types are 'Drop Down Menu' and 'Multiple Choice Radio Buttons' SUFFIX Allowed question types are 'Drop Down Menu' and 'Multiple Choice Radio Buttons' TEST_SCORES REQUESTED_SCORES_BE_SENT Can now be mapped as 'Hidden Data' and 'Custom Text' SELF_REPORTED Allowed question types are 'Drop Down Menu', 'Multiple Choice Radio Buttons', 'Hidden Data' and 'Custom Text' TEST_ELEM_PERCENT_1 Allowed question type is 'Text Field' TEST_ELEM_PERCENT_2 Allowed question type is 'Text Field' TEST_ELEM_PERCENT_3 Allowed question type is 'Text Field' TEST_ELEM_PERCENT_4 Allowed question type is 'Text Field' TEST_ELEM_PERCENT_5 Allowed question type is 'Text Field' TEST_ELEM_PERCENT_6 Allowed question type is 'Text Field' TEST_ELEM_PERCENT_7 Allowed question type is 'Text Field' TEST_ELEM_PERCENT_8 Allowed question type is 'Text Field' TEST_ELEM_PERCENT_9 Allowed question type is 'Text Field' TEST_ELEM_PERCENT_10 Allowed question type is 'Text Field' TOTAL_COMPOS_SCORE Allowed question type is 'Text Field' 75
76 Resolved Issues Online submission sometimes was assigned the same ID as another new candidate Updated FIPS and ISO Country Codes Users now allowed to change the start and end dates for an existing FERPA permissions row When processing a submission without an ID in the Process Internet Submissions window, the Review Internet Submissions window opened with only the Name tab enabled and the user had to click Save in order to generate the new ID. During the ID generation process for the window, it should get the next ID value to use from SEQ_NUM_KEYS and then run a query to ensure that it does not exist already. This is true for the Maintain Candidacy window as well. Under certain circumstances, both the Review Internet Submission and Maintain Candidacy windows happened to get the same next ID value. The Maintain Candidacy window was successful at using the ID to create a new NAME_MASTER record, and the Review Internet Submission window produced an error. Although the Review Internet Submission window recognized that there was an error inserting the submitted data with the generated ID number, it updated the SUBMISSION table with that ID number when the user exited out of the Review Internet Submission window. Therefore, when the user attempted to process the same submission again, it used the incorrect ID number for the submission data. The 'country', 'country_fips' and 'citizen_of' options in TABLE_DETAIL were not up to date. These options have been corrected so that 'country' and 'citizen_of' rows match the current ISO 3166 standards while the 'country_fips' data meets the current FIPS 10-4 standards. Currently, users cannot change the start or end dates for an existing FERPA permissions row. See the Getting Started document for more information about a change that has been made to allow authorized users the ability to change the start and end dates for existing permissions rows Name Search Results updated to Exclude ID's with Negative ID Numbers The search results screen no longer displays ID's that match the entered search criteria where the ID Number is less than zero (0). 76
77 40154 Process Internet Submissions window opened record for wrong ID_NUM if the window was sorted by name User without security to an Attribute Code could manually type in the attribute code and use it to create a new row If a user has permissions to the Change Database User button for Additional Reports or a My Workspace link, report pauses until either the Retrieve or Change User button is clicked When the user opened the Process Internet Submissions window, immediately sorted the rows alphabetically by name, selected the first one in the list to process, and then clicked the Process button, the information displayed on the Review Internet Submission window was not for the selected name but was instead for the name that had been selected as the first in the list prior to the list being sorted. If a user logged in and opened the Attributes window or tab for an ID and added a new row, they were able to manually type in an attribute code (rather than selecting one from the drop-down) to which they had not been granted security and save the new attribute row. However, the next time the user viewed the attributes for the ID, they did not see the one they added due to the attribute security on the attribute code. Now users cannot type in an attribute code to which they have not been granted access. The following is true for users accessing reports via Additional Reports or an InfoMaker report link in My Workspace: If a user has permission to the tables used in a report but not to the Change Database User button, then an Additional Reports report or InfoMaker report link runs without prompting. If the user has permissions to the tables used in a report and to the Change Database User button, then the Additional Reports report or InfoMaker report link pauses and waits for the user to click either the Retrieve button or the Change User button. If the user does not have permission to all the tables used in a report and does not have permissions to the Change Database User button, then the Additional Reports or InfoMaker report link generates an error message about not having permission. If the user does not have permission to all the tables used in a report and does have permissions to the Change Database User button, then the Additional Reports report or InfoMaker report link pauses and waits for the user to click either the Retrieve button or the Change User Button; and if the Retrieve Button is clicked, then the Additional Reports or InfoMaker report link generates an error message about not having permissions to a needed table. If the user clicks the Change User Button and logs in as a user with permissions to all the tables in the report, then the report runs successfully. When a report has been run, clicking the Retrieve button will rerun the report. 77
78 45676 More payment information provided to user from Process Internet Submissions window More details need to be available to the user about payment information for online submissions. See the Getting Started document for more information about a change that has been made to help provide these details to the user Notepad s did not get the appropriate module code noted for rows inserted into the application log. Prior to EX 4.5, Notepad s sent via Daily Procedure were being recorded in the application log with a 'CM' module code rather than the module code noted on the document definition window. This made it difficult for users to review the details about an run in the Application Log File window (accessed from the Tools menu). An update was made to check for the existence of a module code on the document definition used to send the . However, the Notepad module codes are defined using the Maintain Table Values window and can be customized for each school's needs, while the Application Log File window only recognizes a subset of the standard EX modules. Therefore, to record a Daily Procedure run in the application log with a meaningful module code, you must associate each defined Notepad module code with one of the valid EX module codes (AD, AR, AV, BU, CM, DE, RE, SA) by putting one of these EX module codes into the Alternate Value 1 column on the Maintain Table Values window for the 'access_to_module' column name. The following logic is used to identify the module code to use when the run details are saved to the application log: If the module code of the document definition is null, then the 'CM' module code is used. If the module code of the document definition is not null, then look up TBL_VALUE_ALT1 in TABLE_DETAIL where COLUMN_NAME = 'access_to_module' and TABLE_VALUE = [the module code for the document definition] and TBL_VALUE_ALT1 in ('AD','AR','AV','BU','CM','DE','RE','SA'). If the above query returns a value, then the retrieved value is used as the module code in the inserted application log rows for the run. If the query does not return a value, then the 'CM' module code is used. 78
79 CRM Common Resolved Issues Three new columns added to the ONLINE_PAYMENT table Updated EX plugins to better handle Form Builder submissions without a payment Source code, group number and transaction line number columns were added to the ONLINE_PAYMENT table to help with reconciliation of the payments coming in from JICS (both online application fee payments as well as student payments in the Payments prtlet) and being able to easily tie the payment transaction (RC source code) to the appropriate row on the ONLINE_PAYMENT table. Currently, Form Builder forms in JICS allow for a user to complete and submit a form without completing the payment process. In these cases, the submissions should not be marked complete since they are still missing the payment. See the Getting Started document for more information about a change that has been made to ensure that submissions without a required payment are not marked complete. CRM Constituent Resolved Issues Searching for constituents by Major did not work as expected under specific conditions For the Relationship Management and Constituent Search portlets, searching on Major and Class Year data is dependent upon the 'education_display' setting (defined in the Internet Configuration window for a module code of 'DJ, DE Module Access (JICS Configurations Only)'). The setting defines if the search should be done against DEV_PERSON or DEGREE_HISTORY or both tables. The DEGREE_HISTORY table uses values from MAJOR_MINOR_DEF to store the major for the ID. The DEV_PERSON table uses values from TABLE_DETAIL to store the major for the ID. However, the Major drop-down for both portlets is always populated by values in the MAJOR_MINOR_DEF table. Therefore, this caused confusion, for example, when the 'education_display' setting was defined to show major information from DEV_PERSON. 79
80 CRM Faculty Resolved Issues In Faculty Course Control, Web Grading Rights of noninstructors were ignored When a user logs into JICS and goes to the Faculty Course Control portlet, on the default screen, that user will see both courses for which the logged in user is an instructor and to which he/she has Faculty Course Control access in the EX Courses window, Faculty tab, Instructor? column. The rights of the logged in user for each course to which the user has access are honored when the user selects an option for the course. 80
81 CRM Parent Resolved Issues Large number of defined FERPA Permissions caused display issues on the Set FERPA Permissions portlet If there were a large number of permissions defined in the FERPA Permissions definition window, all of the data did not fit on the View Permissions screen that is displayed on the Set FERPA Permissions portlet. This caused usability issues. CRM Staff Enhancement Timecard and Timecard Approval portlets To more precisely account for time worked, hourly employees can now use an online real time clock to clock in and clock out. Administrators To enable employees to clock in and out in real time, select the new Real time check box configuration from the Timecard Format Selection screen in the Timecard Approval portlet. In order to use the clock in/clock out feature, the pay group s timecard format must be hourly. You can change the format for an existing pay group to hourly; however, employees will lose any time already saved for the selected period. When you change from a more specific to less specific format, there is no impact to the employees recorded hours. 81

82 When you log into CRM Staff, access Timecard Approval and select the hourly pay group you want to enable employees to clock in and clock out in real time. 82


83 To implement the clock in and clock out feature and change the pay group to hourly, if needed, click the Change link. Select the Real time check box and click the Save Format button to allow employees to clock in and clock out. 83


84 When real time recording is being used, employees cannot make any changes to their hours. Only their timecard approvers can make updates. Once an employee's time entries are modified, the employee can no longer enter other time entries for that pay period. Additional time entry changes have to be made by the approver. To update an hourly employee s timecard, click the Edit All Regular Hours link and select the employee being updated. Make the appropriate updates. 84

85 Employees When the employee logs into CRM Staff and accesses the Timecard portlet, they can click the date and the clock in or clock out button to record their time worked in real time. Employees can only clock in for the current day. To clock in, the employee clicks the day for which they are clocking in and clicks the Clock In button. Select the type of hours being worked from the drop-down pick list (i.e., overtime hours). If the employee needs to add comments, they can enter them and click the Save Comments button. For example, explaining why they were late. Resolved Issues In the Timecard Approval portlet, Administration of Alternate Approvers, the last name is now included when a preferred first name is specified In the Timecard Approval portlet, Administration of Alternate Approvers, the last name is now included when a preferred first name is specified. Originally, if a preferred name was defined in JICS, only the first name of the individual was displayed in the Alternate Approvers screens. 85
86 49838 In the Timecard Approval portlet, Pay Periods were displaying conflicting Overdue messages when they were closed CRM Staff Timecards - Pay period dates need to be relabeled to reflect what each date accurately represents. In the Timecard Approval portlet, Pay Periods were displaying conflicting Overdue messages when they were closed. The portlet will now only display the Overdue message when timecards have been entered for the pay period and at least one timecard has not been submitted to payroll. This issue has been addressed with enhanced applicant tracking updates. CRM Student Resolved Issues Clicking on pencil icon to edit an existing textbook on in the Faculty Course Control portlet gives the following error: "Root Element is missing error." CRM Student portlets fail if school does not define a "Section" component Catalog Master Extension window was not available in EX Faculty are now able to edit textbook information without receiving the error message. Unofficial Transcript, Grade Report, and GPA Projection portlets display an 'Input string was not in a correct format.' error if the school has not identified a component to be the Section component. This issue has been fixed because there are schools that do not use sections as a part of their course code. The window was removed when EX no longer supported the previous Campus Web product. This removal should not have occurred since the JICS Course Schedules portlet will display a Catalog URL in the Course Details screen. The Catalog Master Extension window is needed to allow users to associate URLs with the Catalog Master records. 86
87 Customized Reports and Forms Below is a listing of report and form objects that are either new or modified in the EX Versions 4.3.x (after 4.3.0) or 4.5. There was no EX 4.4 release. They are listed by module along with the pbl and object name. If the datasource has changed with a change in table structure, change in arguments, change in the Select statement, etc., you may need to re-customize the report or form starting with the <Original> model version of the report or form. If the datasource has not changed, then you will need to test your customized report or form to determine if it still works. If not, you will need to re-customize it. If it does still work, then you may continue to use it but any changes that have been made to the model version will not be available. Check the charts in each section for information about which reports or forms have changed and details about some of the changes. New and Changed Reports You can examine the changes in these reports when the report is customized. Selecting the <Original> report and clicking the Customize button copies the updated report into the module report pbl. You can then compare the updated report with your previously customized version and decide if you want to re-customize from the original or modify your version with the same changes. Note 1: Changes were made to support a newly formatted version of the Advising Worksheet. Note 2: Length of data elements changed therefore SQL had to be refreshed. To refresh your customized version, go to the Datasource to see the SQL, click somewhere in the Where tab at the end of a line and type a space. Return to Design mode and Save. 87
88 Release Module Report PBL Report Name Post reports New/ Changed / Retired What Changed? Recustomize? BG bgreport.pbl r_budget_to_actual_worksheet Changed Query rewritten to improve performance Yes Query rewritten to improve performance, BG bgreport.pbl r_budget_to_actual_profile Changed report changed to include nested report Yes BG bgreport.pbl r_nr_budget_to_actual_profile_grp New HR pereport.pbl r_cupa_4yrf_survey New HR pereport.pbl r_cupa_adm_survey New HR pereport.pbl r_cupa_prf_survey New HR pereport.pbl r_ipeds_fall_staff_notenure_part_h New HR pereport.pbl r_ipeds_fall_staff_part_h_nonisnt_1 New HR pereport.pbl r_ipeds_fall_staff_part_h_nonisnt_2 New HR pereport.pbl r_ipeds_fall_staff_part_h_nonisnt_3 New HR pereport.pbl r_ipeds_fall_staff_tenure_part_h New HR pereport.pbl r_ipeds_fulltime_comp New r_ipeds_instruct_staff_notenure_part_ HR pereport.pbl a New HR pereport.pbl r_ipeds_instruct_staff_part_a New HR pereport.pbl r_ipeds_instruct_staff_ranknotenure_p art New HR pereport.pbl r_ipeds_instruct_staff_ranktenure_part _a New HR pereport.pbl r_ipeds_instruct_staff_tenure_part_a New HR pereport.pbl r_ipeds_instruct_staff_total_part_a New HR pereport.pbl r_ipeds_newhire_comp New HR pereport.pbl r_ipeds_noninst_staff_occ_part_b_d_1 New HR pereport.pbl r_ipeds_noninst_staff_occ_part_b_d_2 New HR pereport.pbl r_ipeds_noninst_staff_occ_part_b_d_3 New HR pereport.pbl r_ipeds_noninst_staff_occ_part_b_d_4 New HR pereport.pbl r_ipeds_noninst_staff_occ_part_d_5 New HR pereport.pbl r_ipeds_noninst_staff_tenure_part_b New HR pereport.pbl r_ipeds_noninst_staff_tenure_part_e New 88
89 Release Module Report PBL Report Name Reports HR pereport.pbl r_ipeds_noninst_staff_total_part_b_e New HR pereport.pbl r_ipeds_parttime_comp New HR pereport.pbl r_ipeds_salaries_part_g_con_len New HR pereport.pbl r_ipeds_salaries_part_g_inst New HR pereport.pbl r_ipeds_salaries_part_g_noninst New HR pereport.pbl r_ipeds_salary_comp New HR pereport.pbl r_ipeds_staff_part_e New HR pereport.pbl r_ipeds_staff_total_part_c New HR pereport.pbl r_ipeds_staff_total_part_f New HR pereport.pbl r_ir_employee_positions_reg Changed RE rereport.pbl r_ipeds_12month_enrollment_part_b Changed New/ Changed / Retired What Changed? Recustomize? Added validation to check for inactive IPEDS and CUPA codes 1)12 Month Enrollment report, Part B needs to break up the data displayed for Graduate students. It needs to show credit hours for all Graduate Students that are NOT award level 18 (Doctors Degree - Professional Practice) and show FTEs for Grtaduate Students that ARE award level 18 (Doctors Degree - Professional Practice.) 2) Change the collection process to count all credit hours in the IPEDS reporting period that the course started. Based on student_crs_hist.begin_dte. RE rereport.pbl r_ipeds_completions_part_a Changed Combined Part A and B into one report Yes RE rereport.pbl r_ipeds_completions_part_c New RE rereport.pbl r_ipeds_completions_part_d New AV avreport.pbl nr_advising_worksheet_acad_standing Changed See Note 1 above Yes nr_advising_worksheet_acad_standing AV avreport.pbl _hold New AV avreport.pbl nr_advising_worksheet_advisor Changed See Note 1 above Yes AV avreport.pbl nr_advising_worksheet_alteration New AV avreport.pbl nr_advising_worksheet_course_req_txt New Yes Yes 89
90 Release Module Report PBL Report Name nr_advising_worksheet_course_total_ai AV avreport.pbl m New/ Changed / Retired What Changed? Recustomize? New AV avreport.pbl nr_advising_worksheet_degree_history New AV avreport.pbl nr_advising_worksheet_free_electives Changed See Note 1 above Yes AV avreport.pbl nr_advising_worksheet_header New AV avreport.pbl nr_advising_worksheet_lines2_mss Changed See Note 1 above Yes nr_advising_worksheet_mtg_notes_ms AV avreport.pbl s Changed See Note 1 above Yes AV avreport.pbl nr_advising_worksheet_next_meeting New AV avreport.pbl nr_advising_worksheet_notepad_mss Changed See Note 1 above Yes AV avreport.pbl nr_advising_worksheet_requirement_d etail Changed See Note 1 above Yes AV avreport.pbl r_advising_worksheet Changed This is a newly formatted version of the Advising Worksheet Yes, if you want the new formatting and the new met/unmet functionality. BU fxreport.pbl r_disposition_of_asset Changed Added the prev_depr_amt to the Book Value computed object Only if want to have the changes BU fxreport.pbl r_fixed_asset_information_report Changed Added previous depreciation, accumulated depreciation, total depreciation and book value. Added Asset, Depreciation and Liability accounts. Added Assigned to info if it exists, depreciation type, begin date and end date. Moved Last depreciation run date. Added depreciation expense allocation accounts and percentages. Modified formatting. Only if want to have the changes BU fxreport.pbl r_gl_accum_depr_summary_report Changed Added asset cost and previous depreciation, highlighted accumulated depreciation and added the total deprecation and book value objects. Modified formatting. Only if want to have the changes BU fxreport.pbl r_gl_cip_summary_report Changed Added invoice account and modified formatting. BU fxreport.pbl r_gl_depr_expense_summary_report Changed Modified formatting. No Only if want to have the changes 90
91 Release Module Report PBL Report Name BU fxreport.pbl r_gl_fixed_asset_summary_report Changed CM cmreport.pbl d_q_hold_report_rpt_student_select New CM cmreport.pbl r_hold_code_rpt New CM cmreport.pbl r_hold_types_rpt New CM cmreport.pbl r_student_hold_rpt New New/ Changed / Retired What Changed? Recustomize? Highlighted asset cost, added the previous depreciation, accumulated depreciation, total depreciation and book value. Modified formatting. HR pareport.pbl d_ind_pos_hist_rep Changed See Note 2 above Yes HR pareport.pbl d_new_position Changed See Note 2 above Yes Only if want to have the changes HR pareport.pbl d_time_card_edit_rpt Changed See Note 2 above Yes HR pareport.pbl nr_pay_by_position Changed See Note 2 above Yes. Note that this is used in the SQL paycheck. HR pareport.pbl nr_pay_by_type Changed See Note 2 above Yes. Note that this is used in the SQL paycheck. HR pereport.pbl d_after_interview Changed See Note 2 above Yes HR pereport.pbl d_contract_error_report Changed See Note 2 above Yes HR pereport.pbl d_ds_purge_applicants_report Changed See Note 2 above Yes HR pereport.pbl d_ipeds_audit_rpt Retired No. Retired, see new versions. HR pereport.pbl d_ipeds_employees_by_assigned_posit ion Retired No. Retired, see new versions. HR pereport.pbl d_ipeds_error Retired No. Retired, see new versions. HR pereport.pbl d_ipeds_error_rpt Retired No. Retired, see new versions. HR pereport.pbl d_ipeds_pt_a_eap_med Retired No. Retired, see new versions. HR pereport.pbl d_ipeds_pt_a_eap_nonmed Retired No. Retired, see new versions. HR pereport.pbl d_ipeds_pt_b_eap_med Retired No. Retired, see new versions. HR pereport.pbl d_ipeds_pt_b_eap_nonmed Retired No. Retired, see new versions. HR pereport.pbl d_ipeds_pt_c_eap Retired No. Retired, see new versions. 91
92 Release Module Report PBL Report Name New/ Changed / Retired What Changed? Recustomize? HR pereport.pbl d_ipeds_pt_d_salaries Retired No. Retired, see new versions. HR pereport.pbl d_ipeds_pt_e_salaries Retired No. Retired, see new versions. HR pereport.pbl d_ipeds_pt_f_fringes Retired No. Retired, see new versions. HR pereport.pbl d_ipeds_pt_g_fall_staff Retired No. Retired, see new versions. HR pereport.pbl d_ipeds_pt_h_fall_staff Retired No. Retired, see new versions. HR pereport.pbl d_ipeds_pt_i_fall_staff Retired No. Retired, see new versions. HR pereport.pbl d_ipeds_pt_j_fall_staff Retired No. Retired, see new versions. HR pereport.pbl d_ipeds_pt_k_fall_staff Retired No. Retired, see new versions. HR pereport.pbl d_ipeds_pt_l_fall_staff Retired No. Retired, see new versions. HR pereport.pbl d_ipeds_s_part_a Retired No. Retired, see new versions. HR pereport.pbl d_ipeds_s_part_b Retired No. Retired, see new versions. HR pereport.pbl d_ipeds_s_part_d Retired No. Retired, see new versions. HR pereport.pbl d_ipeds_s_part_f Retired No. Retired, see new versions. HR pereport.pbl d_ipeds_s_part_g Retired No. Retired, see new versions. HR pereport.pbl d_ipeds_sa_part_a Retired No. Retired, see new versions. HR pereport.pbl d_job_by_indv_org_pos_mast Changed See Note 2 above. Also, reworked to use new position requistion numbers Yes HR pereport.pbl d_position_filled Changed See Note 2 above Yes HR pereport.pbl d_q_generate_contract_from_payroll Changed See Note 2 above Yes HR pereport.pbl d_q_import_contract_info_to_payroll Changed See Note 2 above Yes HR pereport.pbl d_rejected Changed See Note 2 above Yes HR pereport.pbl d_rpt_appl_pos Changed See Note 2 above Yes HR pereport.pbl d_rpt_pos_interviewees Changed See Note 2 above Yes HR pereport.pbl nr_contract_error_report_positions Changed See Note 2 above Yes 92
93 Release Module Report PBL Report Name New/ Changed / Retired What Changed? Recustomize? HR pereport.pbl nr_ipeds_sa_part_a_11to12 Retired No. Retired, see new versions. HR pereport.pbl nr_ipeds_sa_part_a_9to10 Retired No. Retired, see new versions. HR pereport.pbl nr_ipeds_sa_part_a_less9 Retired No. Retired, see new versions. HR pereport.pbl nr_ipeds_sa_part_a_total Retired No. Retired, see new versions. HR pereport.pbl r_applicant_diversity_age_bracket Changed See Note 2 above Yes HR pereport.pbl r_applicant_diversity_age_bracket_all Changed See Note 2 above Yes HR pereport.pbl r_applicant_diversity_citizen_of Changed See Note 2 above Yes HR pereport.pbl r_applicant_diversity_citizen_of_all Changed See Note 2 above Yes HR pereport.pbl r_applicant_diversity_disability Changed See Note 2 above Yes HR pereport.pbl r_applicant_diversity_disability_all Changed See Note 2 above Yes HR pereport.pbl r_applicant_diversity_ethnicity Changed See Note 2 above Yes HR pereport.pbl r_applicant_diversity_ethnicity_all Changed See Note 2 above Yes HR pereport.pbl r_applicant_diversity_gender Changed See Note 2 above Yes HR pereport.pbl r_applicant_diversity_gender_all Changed See Note 2 above Yes HR pereport.pbl r_applicant_diversity_health Changed See Note 2 above Yes HR pereport.pbl r_applicant_diversity_health_all Changed See Note 2 above Yes HR pereport.pbl r_applicant_diversity_religion Changed See Note 2 above Yes HR pereport.pbl r_applicant_diversity_religion_all Changed See Note 2 above Yes HR pereport.pbl r_applicant_diversity_veteran Changed See Note 2 above Yes HR pereport.pbl r_applicant_diversity_veteran_all Changed See Note 2 above Yes HR pereport.pbl r_applicant_diversity_visa_type Changed See Note 2 above Yes HR pereport.pbl r_applicant_diversity_visa_type_all Changed See Note 2 above Yes HR pereport.pbl r_cupa_4yrf_survey New HR pereport.pbl r_cupa_adm_survey New HR pereport.pbl r_cupa_midlevel_sc_survey Retired HR pereport.pbl r_cupa_midlevel_survey Retired No. Retired, see new versions. No. Retired, see new versions. 93
94 Release Module Report PBL Report Name New/ Changed / Retired What Changed? Recustomize? HR pereport.pbl r_cupa_nfs_survey Retired No. Retired, see new versions. HR pereport.pbl r_cupa_prf_survey New HR pereport.pbl r_ipeds_fall_staff_part_h_nonisnt_2 New HR pereport.pbl r_ipeds_noninst_staff_occ_part_b_d_1 New HR pereport.pbl r_ipeds_noninst_staff_occ_part_b_d_2 New HR pereport.pbl r_ipeds_noninst_staff_occ_part_b_d_3 New HR pereport.pbl r_ipeds_noninst_staff_occ_part_b_d_4 New HR pereport.pbl r_ipeds_noninst_staff_tenure_part_e New HR pereport.pbl r_ipeds_staff_total_part_f Changed See Note 2 above Yes HR pereport.pbl r_ir_emp_multi_primary_positions Changed See Note 2 above Yes HR pereport.pbl r_ir_emp_no_primary_positions Changed See Note 2 above Yes HR pereport.pbl r_ir_employee_positions_reg Changed See Note 2 above Yes HR pereport.pbl r_ir_org_positions_reg Changed See Note 2 above Yes HR pereport.pbl r_sal_stats_error Changed See Note 2 above Yes HR pereport.pbl r_sal_stats_num_of_emps_d Changed See Note 2 above Yes HR pereport.pbl r_sal_stats_num_of_emps_s Changed See Note 2 above Yes HR pereport.pbl r_sal_stats_pct_of_range_d Changed See Note 2 above Yes HR pereport.pbl r_sal_stats_pct_of_range_s Changed See Note 2 above Yes HR pereport.pbl r_salary_standards_update_rpt Changed See Note 2 above Yes RE rereport.pbl d_classlist_rpt Changed Includes new broader holds functionality Yes, if you want the broader holds functionality RE rereport.pbl d_gradelist_rpt Changed Includes new broader holds functionality Yes, if you want the broader holds functionality Yes, if you have customized this nested report in the transcript and want the extra RE rereport.pbl r_nr_id_ptr_div_degree Changed Added major4, minor4, and certification4 columns. 94
95 Release Module Report PBL Report Name New/ Changed / Retired What Changed? Recustomize? RE rereport.pbl r_nr_id_tr_div_degree Changed Added major4, minor4, and certification4 Yes, if you have customized this nested report in the transcript and want the extra columns. RE rereport.pbl r_stud_reg_stu_reg_log Changed Formatted application log data for better readability Yes, if you want the new formatting. 95
96 New and Changed Forms Original Forms are stored differently because the original versions of EX forms are not stored in EX code the way the reports are and the name of a customized form must remain the same as the original. The following provides more detail. Reference Forms The Jenzabar-created versions of all customizable form PBL files are installed to an Original Forms folder. You can always find the current Original version of the form if you have customized these forms. The Original Forms folder is created by the installer within the EX 4\Programs folder on the machine from which the Custom folder is being updated. These represent Jenzabar's model versions of these files and are not intended to be customized. Do NOT modify these files. Using InfoMaker, you may copy any PBLs or forms within the PBLs from this folder to the Custom folder. Custom Forms The form PBL files that EX uses and that are actually customized reside in the Custom folder. The EX update process will never modify or delete the contents of a customer's forms PBL files. When a service pack contains new customizable forms, the current custom forms PBL files will be renamed as backup copies in the same Custom folder by appending the word "Backup" and the date and time to the name and a new PBL file will be created with the original name, containing any previous forms (unchanged), customized or not, and the new forms. It may be necessary to reassign the permissions after the update because the Custom Forms Update process renames the existing PBL file and merges the contents to a new file. The updated PBL files inherit the permissions of the Custom folder (not the permissions of the previous file). Jenzabar recommends that you check the permissions of the form PBLs after the update. When a service pack contains modified customizable forms PBL files, the modified versions will be placed in the Original Forms folder only. It is your responsibility to update the actual Custom form PBL files. 1. If you have never customized that form, you may copy the modified form, using InfoMaker, from the modified form PBL file in the Original Forms folder to the same form PBL file in your Custom folder, overwriting your prior form. 2. If you have customized that form, then, using InfoMaker, compare your customized form to the modified model form and decide whether it is easier to copy the modified model form into your form PBL file and re-customize or to make the same modifications to your customized form. See the list below for information about what has changed in a form. 96
97 Network Custom Install Notes The EX installer has the ability to detect whether a custom forms PBL file has already been updated to the current version and will avoid performing this update again. Most of the installer runs with elevated privileges, which may allow it to update files that the current user could not otherwise modify, such as the contents of the Program Files folder. The forms update process, however, runs with the privileges of the current Windows user. Jenzabar recommends that someone logged in as a user who has permissions to update the Custom forms files run the installer first. Once these shared files are updated, installing the update on subsequent computers will not attempt to repeat the update process. This is because the installer, when it first performs the PBL modification process, marks that PBL so that, for every other installation done at the customer site, this form update process does not execute and therefore will not provide an error for a user without elevated privileges. If the service pack is first installed by a user who does not have permissions to update the Custom form files, that user will receive a warning message communicating the fact that the custom forms have not yet been updated to the version that matches this service pack. If you use a silent install process on all other client machines, the INSTALL_CUSTOM_FORMS=0 silent install parameter accomplishes the same result. However, by doing the step above, you have removed the need to include the INSTALL_CUSTOM_FORMS=0 silent install parameter but you still may continue to use it. If you are not doing a silent installation, then the update of the network forms will not continue to happen because the installer can see that the form(s) have been updated and will therefore skip that step. You must remember that you MUST install EX on one machine first to accomplish the network PBL update or you will not receive those updates. Note 3: Length of data elements changed, SQL had to be refreshed. To refresh your customized version, go to the Datasource to see the SQL, click somewhere in the Where tab at the end of a line and type a space. Return to Design mode and Save. 97
98 Release Module Form PBL Form Name New/ Changed What changed? Recustomize? Forms HR hrform.pbl d_appl_refs_userdata New HR hrform.pbl d_edu_earn_hist_userdata New HR hrform.pbl d_empl_prof_affil_userdata New HR hrform.pbl d_ind_pos_hist_userdata Changed See Note 3 above Yes HR hrform.pbl d_org_job_def_userdata New HR hrform.pbl d_org_pos_mast_userdata Changed See Note 3 above Yes HR hrform.pbl d_pos_appl_userdata New HR hrform.pbl udef_appl_refs_udf New HR hrform.pbl udef_edu_earn_hist_udf New HR hrform.pbl udef_empl_prof_affil_udf New HR hrform.pbl udef_external_empl_hist_udf New HR hrform.pbl udef_ind_pos_hist_udf Changed See Note 3 above Yes HR hrform.pbl udef_org_job_def_udf New HR hrform.pbl udef_org_pos_mast_udf Changed See Note 3 above Yes HR hrform.pbl udef_org_pos_req_hist_udf New HR hrform.pbl udef_pos_appl_udf New HR peform.pbl udef_appl_master_udf New DE deform.pbl d_edu_earn_hist_userdata_de New DE deform.pbl d_empl_prof_affil_userdata_de New DE deform.pbl udef_edu_earn_hist_udf_de New DE deform.pbl udef_empl_prof_affil_udf_de New DE deform.pbl udef_external_empl_hist_udf_de New 98
99 New and Changed Additional Reports The Original versions of Additional Reports are installed to an Original Additional Reports subfolder of the EX program folder and are copied from there to the location specified by the install. In an update, only any completely new PBL files are copied to the specified Additional Reports location from the EX program folder location. If you modify an Additional Reports PBL but later have a need to view or revert back to the original version, it can be found in the subfolder of the EX programs folder. In the event that we make a change to an Additional Reports PBL, the modified version will be available in the subfolder of the EX programs folder. There are no new or changed Additional Reports in EX 4.5. Database Enhancements Updated FIPS and ISO Country Codes Country Code Updates Changes were made to default data to ensure that COUNTRY, COUNTRY_FIPS, and CITIZEN_OF country codes meet the current ISO 3166 and FIPS 10-4 standards. Following is a list of the changes. COUNTRY Several codes were changed for each of the data sets below. These changes may affect existing data. Please run the Old_Country_Codes_Search.sql script provided with the release to identify if any of your existing data references the old codes. If any are found, they will need to be updated to use the new code values as noted below. Many default data rows were added and updated in TABLE_DETAIL where COLUMN_NAME = 'country' in order to bring the data up to the current ISO 3166 standards. New COUNTRY Rows The following country rows were added to TABLE_DETAIL. Country Code AX BL BQ CW Country Description ÅLAND ISLANDS SAINT BARTHÉLEMY BONAIRE, SINT EUSTATIUS AND SABA CURAÇAO 99
100 GG IM JE ME MF RS SS SX GUERNSEY ISLE OF MAN JERSEY MONTENEGRO SAINT MARTIN (FRENCH PART) SERBIA SOUTH SUDAN SINT MAARTEN (DUTCH PART) Updated COUNTRY Descriptions The following country rows have had their country description updated to match the descriptions in the current ISO 3166 documentation. Country Code Old Country Description New Country Description BO BOLIVIA BOLIVIA, PLURINATIONAL STATE OF BS BAHAMAS, THE BAHAMAS CN CHINA, PEOPLES REPUBLIC CHINA FM MICRONESIA, FEDERATED ST MICRONESIA, FEDERATED STATES OF IO BRITISH INDIAN OCEAN TER BRITISH INDIAN OCEAN TERRITORY KP KOREA,DEMOCR.PEOPLES REP KOREA, DEMOCRATIC PEOPLE'S REPUBLIC OF LA LAO PEOPLES DEMOCR. REPU LAO PEOPLE'S DEMOCRATIC REPUBLIC LC ST. LUCIA SAINT LUCIA LY LIBYAN ARAB JAMAHIRIYA LIBYA MO MACAU MACAO PM ST. PIERRE & MIQUELON SAINT PIERRE AND MIQUELON PN PITCAIRN ISLANDS PITCAIRN SH ST. HELENA SAINT HELENA, ASCENSION AND TRISTAN DA CUNHA SJ SVALBARD & JAN MAYEN ISL SVALBARD AND JAN MAYEN TL EAST TIMOR TIMOR-LESTE TW TAIWAN TAIWAN, PROVINCE OF CHINA TZ TANZANIA, UNITED REPUB TANZANIA, UNITED REPUBLIC OF UM UNITED STATES MINOR OUT UNITED STATES MINOR OUTLYING ISLANDS VA VATICAN CITY HOLY SEE (VATICAN CITY STATE) VC ST. VINCENT & THE GRENAD SAINT VINCENT AND THE GRENADINES VE VENEZUELA VENEZUELA, BOLIVARIAN REPUBLIC OF VI VIRGIN ISLANDS OF THE US VIRGIN ISLANDS, U.S. VN VIETNAM VIET NAM 100
101 Retired COUNTRY Rows The following country rows are no longer included in the ISO 3166 standard. Jenzabar is leaving these country codes in the default data for historical purposes. However, the country descriptions will be preceded with '(retired).' Country Code AN FX YU Updated Country Description (retired) NETHERLANDS ANTILLES (retired) France, Metropolitan (retired) Yugoslavia Updated COUNTRY Codes Requiring Additional Manual Updates The following table lists several additional country updates that require special attention by each school. Original Country Code OC Default Data changes and Subsequent Required Data Updates The country code 'OC' was defined as 'UNKNOWN or UNSPECIFIED'. Because the 'OC' country code is reserved for use by ISO 3166, Jenzabar changed the code from 'OC' to 'ZZ' ('ZZ' is available as a user-definable code value). Therefore, you will need to identify which data values for an ID Number, if any, currently refer to the 'OC' code and manually change them to use the 'ZZ' code. CITIZEN_OF Many default data rows were added and updated in TABLE_DETAIL where COLUMN_NAME = 'citizen_of' in order to bring the data up to the current ISO 3166 standards. New CITIZEN_OF Rows The following citizen_of rows were added to TABLE_DETAIL. Citizen Of Code AM AX AZ BA BQ CD CW CZ EE Country Description ARMENIA ÅLAND ISLANDS AZERBAIJAN BOSNIA AND HERZEGOVINA BONAIRE, SINT EUSTATIUS AND SABA CONGO, THE DEMOCRATIC REPUBLIC OF THE CURAÇAO CZECH REPUBLIC ESTONIA 101
102 Citizen Of Code ER GE GG GS IM JE KG KZ LT MD ME MF MK PS RS SK SS SX TJ TL UA UZ Country Description ERITREA GEORGIA GUERNSEY SOUTH GEORGIA AND THE SOUTH SANDWICH ISLANDS ISLE OF MAN JERSEY KYRGYZSTAN KAZAKHSTAN LITHUANIA MOLDOVA, REPUBLIC OF MONTENEGRO SAINT MARTIN (FRENCH PART) MACEDONIA, THE FORMER YUGOSLAV REPUBLIC OF PALESTINIAN TERRITORY, OCCUPIED SERBIA SLOVAKIA SOUTH SUDAN SINT MAARTEN (DUTCH PART) TAJIKISTAN TIMOR-LESTE UKRAINE UZBEKISTAN Updated CITIZEN_OF Descriptions The following citizen_of rows have had their country description updated to match the descriptions in the current ISO 3166 documentation. Citizen of Code Old Country Description New Country Description BO BOLIVIA BOLIVIA, PLURINATIONAL STATE OF BS BAHAMAS, THE BAHAMAS CI IVORY COAST CÔTE D'IVOIRE CN CHINA, PEOPLES REPUBLIC CHINA FK FALKLAND ISLANDS FALKLAND ISLANDS (MALVINAS) FM MICRONESIA, FEDERATED ST MICRONESIA, FEDERATED STATES OF HM HEARD ISLAND & MCDONALD HEARD ISLAND AND MCDONALD ISLANDS IO BRITISH INDIAN OCEAN TER BRITISH INDIAN OCEAN TERRITORY IR IRAN IRAN, ISLAMIC REPUBLIC OF KN ST. CHRISTOPHER & NEVIS SAINT KITTS AND NEVIS KP KOREA,DEMOCR.PEOPLES KOREA, DEMOCRATIC PEOPLE'S 102
103 Citizen of Code Old Country Description REP New Country Description REPUBLIC OF LA LAO PEOPLES DEMOCR. REPU LAO PEOPLE'S DEMOCRATIC REPUBLIC LC ST. LUCIA SAINT LUCIA MO MACAU MACAO PM ST. PIERRE & MIQUELON SAINT PIERRE AND MIQUELON PN PITCAIRN ISLANDS PITCAIRN RU RUSSIA RUSSIAN FEDERATION SH ST. HELENA SAINT HELENA, ASCENSION AND TRISTAN DA CUNHA SJ SVALBARD & JAN MAYEN ISL SVALBARD AND JAN MAYEN TC TURKS & CAICOS ISLANDS TURKS AND CAICOS ISLANDS TF FRENCH SO. & ARTIC LANDS FRENCH SOUTHERN TERRITORIES TW TAIWAN TAIWAN, PROVINCE OF CHINA TZ TANZANIA, UNITED REPUB TANZANIA, UNITED REPUBLIC OF UM UNITED STATES MINOR OUT UNITED STATES MINOR OUTLYING ISLANDS VA VATICAN CITY HOLY SEE (VATICAN CITY STATE) VC ST. VINCENT & THE GRENAD SAINT VINCENT AND THE GRENADINES VE VENEZUELA VENEZUELA, BOLIVARIAN REPUBLIC OF VG BRITISH VIRGIN ISLANDS VIRGIN ISLANDS, BRITISH VI VIRGIN ISLANDS OF THE US VIRGIN ISLANDS, U.S. VN VIETNAM VIET NAM WS WESTERN SAMOA SAMOA Retired CITIZEN_OF Rows The following citizen_of rows are no longer included in the ISO 3166 standard. Jenzabar is leaving these citizen_of codes in the default data for historical purposes. However, the country descriptions will be preceded with '(retired)'. Two of the below noted rows are for 'US Permanent Resident' and 'Visa Status'. Because there are other columns on BIOGRAPH_MASTER to contain this information and because they are not included in the ISO 3166 standard, they will be marked as '(retired)' in addition to the countries that are no longer included in the standard. Citizen of Code AN CS DD NT Updated Country Description (retired) NETHERLANDS ANTILLES (retired) CZECHOSLAVAKIA (retired) GERMAN DEMOCRATIC REPUB. (retired) IRAQ-SAUDI ARABIA 103
104 PI SU UPR VS YD YU ZR (retired) PARACEL ISLANDS (retired) UNION OF SOVIET SOCIALIS (retired) US PERMANENT RESIDENT (retired) VISA STATUS (retired) YEMEN,PEOPLES DEMOC REP (retired) Yugoslavia (retired) ZAIRE Updated CITIZEN_OF Codes Requiring Additional Manual Updates The table below lists several additional citizen_of updates that have been made that require special attention by each school. Original Citizen of Code BL BU CT IC SI Default Data changes and Subsequent Required Data Updates The old code for Belarus is 'BL'. It has now been changed to 'BY'. Therefore, you will need to identify which data values for an ID Number, if any, currently refer to the 'BL' code and manually change them to use the 'BY' code. Additionally, the 'BL' code is now used as a reference for 'SAINT BARTHÉLEMY', so a new row with a 'BL' code has been added to the default data for 'SAINT BARTHÉLEMY'. Burma (with a code of 'BU') has been renamed to 'Myanmar', and its code has been changed to 'MM'. The 'BU' default data row has been updated to use the new code value and country description. You will need to identify which data values for an ID Number, if any, currently refer to the 'BU' code and manually change them to use the 'MM' code. The old code for Croatia is 'CT'. It has now been changed to 'HR'. Therefore, you will need to identify which data values for an ID Number, if any, currently refer to the 'CT' code and manually change them to use the 'HR' code. In the original EX data, both the 'IC' and 'CI' codes refer to the Ivory Coast, which is also known as CÔTE D'IVOIRE. ISO 3166 currently uses the 'CI' code for this country, so the 'IC' code is being retired [i.e., its description has been prefixed with '(retired)']. Therefore, you will need to identify which data values for an ID Number, if any, currently refer to the 'IC' code and manually change them to use the 'CI' code. In the original EX data, the 'SI' code refers to the Spratly Islands. However, there is no longer a code for the Spratly Islands. Therefore, you will need to identify which data values for an ID Number, if any, currently refer to the 'SI' code and manually change them to use another code (possibly 'ZZ' for 'UNKNOWN or UNSPECIFIED'). Additionally, the 'SI' code now refers to Slovenia, so a new default data row with a 'SI' code has been added for 'SLOVENIA'. 104
105 COUNTRY_FIPS Many default data rows were added and updated in TABLE_DETAIL where COLUMN_NAME = 'country_fips' in order to bring the data up to the current FIPS 10-4 standards. New COUNTRY_FIPS Rows The following country_fips rows were added to TABLE_DETAIL. Country FIPS Code AQ AX CQ DX GQ KV MJ NN OD PJ RI RN TB UC VQ Country Description American Samoa Akrotiri Northern Mariana Islands Dhekelia Guam Kosovo Montenegro Sint Maarten South Sudan Etorofu, Habomai, Kunashiri, and Shikotan Islands Serbia Saint Martin Saint Barthelemy Curacao U.S. Virgin Islands Updated Country FIPS Descriptions The following country_fips rows have had their country description updated to match the descriptions in the current FIPS 10-4 documentation. Country Old Country Description New Country Description FIPS Code BF The Bahamas Bahamas, The GA The Gambia Gambia, The IM Man, Isle of Isle of Man MK Macedonia, The Republic of Macedonia SH Saint Helena Saint Helena, Ascension, and Tristan da Cunha SX South Georgia and the Islands South Georgia and the South Sandwich Islands TT East Timor Timor-Leste 105
106 Country FIPS Code Old Country Description VT Holy See (Vatican City) Vatican City New Country Description Retired COUNTRY_FIPS Rows The following country_fips rows are no longer included in the FIPS 10-4 standard. Jenzabar is leaving these country codes in the default data for historical purposes. However, the country descriptions are preceded with '(retired)'. Country FIPS Updated Country Description Code IY (retired) Iraq-Saudi Arabia Neutral zone NT (retired) Netherlands Antilles YI (retired) Yugoslavia Updated COUNTRY_FIPS Codes Requiring Additional Manual Updates The table below lists several additional country_fips updates that require special attention by each school. Original Country Default Data changes and Subsequent Required Data Updates FIPS Code KP The old code for Kiribati is 'KP'. It has now been changed to 'KR'. Therefore, you will need to identify which data values for an ID Number, if any, currently refer to the 'KP' code and manually change them to use the 'KR' code. OC The country code 'OC' was defined as 'UNKNOWN or UNSPECIFIED'. Because the 'OC' country code was not consistent with the COUNTRY and CITIZEN_OF codes for 'UNKNOWN or UNSPECIFIED', Jenzabar changed the code from 'OC' to 'ZZ' for consistency. Therefore, you will need to identify which data values for an ID Number, if any, currently refer to the 'OC' code and manually change them to use the 'ZZ' code. TC The old code for United Arab Emirates is 'TC'. It has now been changed to 'AE'. Therefore, you will need to identify which data values for an ID Number, if any, currently refer to the 'TC' code and manually change them to use the 'AE' code. 106
107 Resolved Issues Cascading referential integrity and logging columns added to the UDF tables Currently, there are a number of UDF tables that do not have cascading referential integrity defined between the UDF table and its parent table. This prevents a user from deleting a row in the parent table if there is a corresponding child row in the UDF table. Additionally, many of the UDF tables were not created with the logging/audit columns (USER_NAME, JOB_NAME and JOB_TIME). Therefore, the cascading referential integrity and the logging columns were added for consistency and ease of deleting a parent row GL_MASTER_SECURITY_VIE W Performance Improved Default JEX_* groups need to include Notepad functions Reports launched by My Workspace report links or Additional Reports that use UserAuthToGroupMembershi pv or views built with it or the Budget secured views did not return the correct rows The performance of the GL_MASTER_SECURITY_VIEW was improved. The SQL code was reduced from 15 UNION'ed SQL statements to 5 without changing the functionality. Starting with EX 4.0, the default user groups in EX (i.e. those starting with 'JEX_') have a pre-defined list of functions available via default data. These default groups are locked down so that users can be added to the groups, but functions cannot be added or deleted. However, many of the default groups were not given access to Notepad related functions as part of the default data. Therefore, users in the default JEX_ groups cannot utilize much of the Notepad functionality. Reports that used GLMasterSecV, HOLD_TRAN_SEC_V or the Budget secured views did not return the correct rows when run from a My Workspace report link or from Additional Reports. An additional test was added to the UserAuthToGroupMembershipV and the WorksheetSecV views to fit the Additional Reports/Report Link connection scenarios. These reports will now return the rows that a user is authorized to see based on GL Security, Holds Security, or Budget Security. Results should now equal the results returned when running the reports via InfoMaker or EX. 107
108 Development Enhancement Biographical Data Window Update An Achievements tab has been added to the Biographical Data window that includes collapsible panels where a constituent s Education History, Employment History, and Affiliations can be viewed, entered, or updated. Employment History panel lists all of the organizations at which the selected constituent has been employed. Employers are listed in the opposite order in which they were entered, which typically puts the most recent employer at the top of the list. When an employer from the list is selected, the details about the employer appear on the right side of the window. A selected employer has a light yellow highlight and bolded name. Although multiple employers are shown in the list on the left side of the panel at one time, only one employer's information is displayed at a time in the right area of the panel. You can click through the items in the list on the left or use the scrollbar for the panel to view information for other employers. Employers can be identified via selecting an ID Number in the EX database (only ID's defined as an organization, i.e. are included in the ORG_MASTER table, will be available for selection), or by entering in the employer name and contact information. If an ID Number is selected, the organization name and contact information are automatically populated and those columns are disabled. If a name is entered, the ID Number column is disabled, and the user may manually enter the contact for the employer. The remainder of the employment data, such as title, duties and dates of employment can be entered as available. Education Panel lists all of the educational institutions the selected constituent attended. The educational institutions are listed in the opposite order in which they were entered, which typically puts the most recently attended school at the top of the list. When an institution is selected from the list, the details about the education from that school appear. The selected institution has a light yellow highlight and the bolded name. Although multiple educational institutions are shown in the list on the left side of the panel at one time, only one school s information is displayed at a time in the right area of the panel. You can click through the items in the list on the left or use the scrollbar for the panel to view information for other institutions. Educational institutions can be identified via selecting an ID Number in the EX database (only ID's defined as an organization, i.e. are included in the ORG_MASTER table, will be available for selection), or by entering in the institution name and address information. If an ID Number is selected, the organization name and address information are automatically populated and those columns are disabled. If a name is entered, the ID Number column is disabled, and the user may manually enter the address for the school. The Education Type must also be entered in addition to the institution name or ID Number. The remainder of the education data, such as education received, majors, and graduation data can be entered as available. 108

109 Affiliations Panel lists all of the affiliations with which the selected constituent is associated. The affiliations are listed in the opposite order in which they were entered, which typically puts the most recent affiliation at the top of the list. When an affiliation is selected from the list, the details about the affiliation are displayed on the right side of the window. The selected affiliation has a light yellow highlight and bolded name. Up to four affiliations are shown in the list on the left side of the panel at one time, while a maximum of three affiliation detail rows are shown in the right area of the panel. You can click through the items in the list on the left or use the scrollbar for the panel to view information for other affiliations. The entry of an Affiliation requires that an affiliation name be entered. The From and To dates can be entered or selected as available. New expandable/collapsible panels distinguish between Employment History, Education, and Affiliations. These panels utilize hyperlinks to quickly view and access all entered information. The Feedback icon allows you to add and view comments and attachments. New icons quickly identify if a panel has information. This new data is currently available to Human Resource windows for employment applicants and employees and may made available through other modules in the future. Therefore, the new definitions used in drop-downs on these windows need to be coordinated between all of the offices that access this information. Additionally, any new columns added to the user defined table will be available for use by both the Development and Human Resources offices, although each office can pick and choose which custom columns to include on the user defined forms accessed by each office. 109
110 Database Information ED_OFFERING_DEF new table containing the list of Educational Offerings shown in the Education Type column for the Education collapsible panel EDU_EARN_HIST existing table containing an ID's education information that has been made available to offices outside of HR EDU_EARN_HIST_UDF new table to allow schools to add their own educationrelated custom columns EXTERNAL_EMPLOYMENT_HIST new table to store an ID's employment history EXTERNAL_EMPLOYMENT_HIST_NON_HR_V new view over the EXTERNAL_EMPLOYMENT_HIST table that hides sensitive employment information to which only HR needs access EXTERNAL_EMPLOYMENT_HIST_UDF new table to allow schools to add their own employment-related custom columns EMPL_PROF_AFFIL existing table to hold an ID's affiliations that has been made available to offices outside of HR EMPL_PROF_AFFIL_UDF - new table to allow schools to add their own affiliationrelated custom columns Window Details To expand any collapsed panels, click the Expand All button. To collapse a panel, click on the panel header. New icons indicate existing information and unsaved updates: Information Exists icon Information Does Not Exist icon Unsaved Updates icon appears when updates have been made and not yet saved Click the User Defined button at the top of the window to access the user defined forms. The Employment panel only allows for customized columns on the EXTERNAL_EMPLOYMENT_HIST_UDF table. The Education panel allows users to utilize user defined columns on both EDU_EARN_HIST and EDU_EARN_HIST_UDF. The Affiliations panel allows users to view and edit user defined columns on EMPL_PROF_AFFIL and EMPL_PROF_AFFIL_UDF. 110
111 Fixed Assets Resolved Issues Depreciation expense not being calculated correctly when an asset without prior depreciation follows another asset that has a value in the Prior Depreciation field Fixed Asset reports did not include the previous depreciation; this along with other columns and modified formatting were added to several reports This issue only impacts the Depreciation engine in certain situations where an asset with no prior depreciation follows an asset with prior depreciation. If this situation occurs, then the asset depreciation expense calculated will not be correct. G L Fixed Asset Summary Report Highlighted asset cost Added the previous depreciation, accumulated depreciation, total depreciation and book value Modified formatting GL Depreciation Expense Summary Report Modified formatting GL Accumulated Depreciation Summary Report Added asset cost and previous depreciation Highlighted accumulated depreciation Added the total depreciation and book value objects Modified formatting GL Construction in Progress Summary Report Added invoice account and modified formatting Disposition of Assets Report See Bug Fixed Assets Information Report Added previous depreciation, accumulated depreciation, total depreciation and book value Added Asset, Depreciation and Liability accounts Added Assigned to info (if it exists), depreciation type, begin date and end date Moved Last depreciation run date Added depreciation expense allocation accounts and percentages Modified formatting. 111
112 General Ledger Resolved Issues Year and Term code columns added to the Display Transaction Details window New triggers on the GeneralLedger table caused errors when adding a new G/L Account containing all 6 components EX was inserting empty string in Acct Comp on GL Security table Year and Term code columns (CHG_YR_TRAN_HIST, CHG_TRM_TRAN_HIST) were added to the Display Transaction Details window. These are editable columns that will allow the user to add/edit/remove this information on any type of transaction from where this window can be opened (i.e., A/R Inquiry, G/L Inquiry). This will help at year end time when processing 1098T's if there are transactions that are missing this key information. In EX 4.3, a couple of new triggers were added to populate a new table, GeneralLedger. These triggers were added to improve performance of EX windows that check G/L account security and fire when a new account number is added. When adding an account containing all 6 components, those triggers would fail, causing errors. This has been modified to handle a full 6 component account number. EX was updating the acct_cmp_* columns in GL_SECURITY with an empty string and not a NULL. One impact to this was the Budget module where no accounts were being shown for a user with group that had an empty string. Financial Aid Manager Resolved Issues PHEAA terms no longer delivered in TERM_DEF as part of default data Since Jenzabar EX no longer supports PHEAA as part of EX, this default data is no longer delivered with EX 4.5 or thereafter TEACH History window returns an error The TEACH History sub-window accessible from TEACH Grant Details returns the following error message when you actually do have access to the window: "You have not been granted access to this window or function." The correct window name is now correctly set in the module_function row for the window. 112
113 48492 Anticipated Aid may not create transactions as expected Schools that assign a subsidiary account to both the credit and debit accounts of a financial aid fund will experience issues with Anticipated Aid not generating transactions for eligible awards after the initial Anticipated Aid run. Assigning a subsidiary account as the credit account is expected, but assigning a subsidiary account as the debit account creates a situation where both sides of a financial aid transaction have the OFFSET_FLAG = R and are both considered receivables. The TRANS_HIST_EXT_PF table was created for EX to hold data specific to financial aid transactions like the POE of the award from PowerFAIDS. It was designed to hold only the receivable side of the transaction (where OFFSET_FLAG = R ). The logic to remove data rows expected only the credit side of the transaction; but, in these cases where both sides of the transactions are stored there, problems have occurred in removing transactions correctly which then stops Anticipated Aid from continuing to process new records. To resolve this situation, the TRANS_HIST_EXT_PF table will now store both sides of any anticipated aid transaction where the source code Disbursements & Adjustments to Student Accounts and CommonLine Loan Disbursements will not be changed. The Financial Aid Transaction Entry window (accessible from the Transaction Groups window in Business Office) was updated to accommodate the need to save both sides of any anticipated aid transactions. Please let your Business Office know about this change. They will now be required to enter both the Fund Code and POE for each transaction row in order to save a batch where source code After installing this fix and prior to running Anticipated Aid, you must first clear all existing Anticipated Aid transactions. This must be done whether or not you assign subsidiary accounts to both sides of your financial aid funds. If you need the instructions for clearing Anticipated Aid, please download them from MyJenzabar using the following link: Clearing Anticipated Aid 113
114 Human Resources Resolved Issues Employee Master - A database error occurred when adding a new employee and the "temporary database" warning message box was displayed At rollover time during the accrual process, the carryover amount was not being properly reduced to reflect the correct amount When adding a new employee, a database error occurred and the "temporary database" warning message box was displayed. Adding a new employee master will now correctly save without error. At rollover time during the accrual process, the carryover amount was not being properly reduced to reflect the correct amount. Additionally, there was a rounding error when the carryover limit was not a whole number. JICS Resolved Issues Requisitions created in JICS not being displayed in EX or JICS Approval tracks were not being assigned under automatic method for requisitions created in JICS Requisitions that were processed using the Requisition Entry portlet were not displaying requisitions in the Check Requisition Status or Approve Requisitions windows in EX. Also, the same requisitions were not displayed in the Item Approval portlet. This was all related to logic the application was using as part of the feedback component of requisitions that was updated in this release. Requisitions that were created using the Requisition Entry portlet were not assigned to a valid approval track. The user submitting the requisition received an informational message indicating that the requisition could not be matched to any Reviewers. The requisitions were not displayed in the Approve Requisitions window nor the Item Approval portlet. Requisitions were displayed in the Check Requisition Status window and the Check Requisition Status portlet with an incorrect status of 'Approved (Not a PO)'. The underlying cause was related to the handling of the document_id field value necessary for the feedback functionality. 114
115 My Workspace Resolved Issue Date/Time Formatting - The calendar icon may incorrectly display the day, month, and year depending on the date and time format selected For the mm/dd/yyyy format, the calendar icon defaulted to the correct year, month, and date and displayed it as the current date. For other date formats, the calendar icon defaulted to the wrong year, month, and date and displayed it as the current date. However, upon clicking the 'Today' button, the date that auto-fills on the user's input window will be the correct current date. So even though the end result was correct, the calendar display appeared incorrectly. The impact is global throughout EX. Notepad Resolved Issues Entering a Days to Wait value for the last action defined in an action list returned an error in Daily Procedure Notepad messages did not get the appropriate module code noted for rows inserted into the Application Log An error was displayed when updating Action Lists via the Daily Procedure window if the last action in the action list had a value in the Days to Wait column. Therefore, validation was added to the Action List Details window to ensure that the user had not defined a value in the Days to Wait column for the last action in an action list. Notepad messages sent via Daily Procedure were being recorded in the Application Log with a 'CM' module code rather than the module code noted on the Document Definition window. Therefore, a change was made in the code to check for the existence of a module code on the document definition used to send the message. If the module code is null, then the 'CM' module code will be used. Otherwise, it will use the specified module code. However, since the Notepad module codes can be customized in TABLE_DETAIL, the code will check for any specified value in the TBL_VALUE_ALT1 column for the identified Notepad module code. If the TBL_VALUE_ALT1 value matches one of the following EX modules, it will use the EX module code when inserting the rows into the application log: 'AD', 'AP', 'AR', 'AV', 'BG', 'BU', 'CM', 'DE', 'FX', 'GL', 'HR', 'PA', 'PE', 'PF', 'PO', 'RE', 'SA'). If the TBL_VALUE_ALT1 column is empty or does not 115

116 match one of these EX module codes, then the application log will use a module code of 'CM'. Payroll Enhancements View Pay Statements Pay statements can now be viewed within the Employee Information portlet and the Pay Inquiry window. Select the new Create Pay Statement Images check box and ensure the Use SQL Based Checks and Deposits check box is selected on the Configure Payroll window to view the pay statements. Configure Payroll This new check box option allows you to create paystubs that can be viewed via CRM Staff and the Pay Inquiry window, but must be selected in conjunction with the Use SQL based Checks and Direct Deposits check box. 116


117 Pay Inquiry Click on the new View Pay Stub icon to view a pay statement. The pay statement appears in PDF format in a separate window where it can be reviewed and/or printed. 117
.")
118 CRM Staff, Employee Information Portlet Administrator Before the employee can view their pay stubs from the Employee Information portlet, the Administrator must select the Display Pay Statement check box on the Global Operations page (Site Manager link, Global Portlet Operations Edit link, Employee Information link). 118


119 From the CRM Staff, Employee Information portlet, click the new Review your pay statements hyperlink. From the Pay Statements Summary, select the year for which you want to view the pay statements then click on the new Pay Date hyperlink to view a pay statement. This new check box option allows you to create paystubs that can be viewed via CRM Staff and the Pay Inquiry window, but must be selected in conjunction with the Use SQL based Checks and Direct Deposits check box. Resolved Issue Timecard Entry window blank when initially opened The Timecard Entry window was blank when it was initially opened. This issue was introduced in EX 4.3. The window will now open and properly display the "Batch" tab and its associated data. Personnel Resolved Issues Issues in Applicant Master This issue has been addressed with enhanced applicant tracking updates In PE, the Position This issue has been addressed with enhanced applicant 119
120 Interviewee Report Preview window needs scroll bars Purge Expired Applications process does not work correctly Process button is not processing all rows in Transfer New-Hire to Employee window Need more room in the Comments field on the Applicant Master table for the purpose of entering comments on references Position Type on Positions tab of Employee Master as well as the stand alone Positions window should be required Need destination field in Purge Applicant Data The Transfer New Hire Process in Personnel does not assign a Group or Subgroup to Employee Master record Viewing references on an applicant missing the scroll bar Add time to the Interview Dates window Incorporate Notepad into Payroll and Personnel Add new column for department to Organization Positions window along with Position window/tab Remove archive media options from Configure HR window Purge Expired Applicants needs customizable query. tracking updates. This issue has been addressed with enhanced applicant tracking updates. This issue has been addressed with enhanced applicant tracking updates. This issue has been addressed with enhanced applicant tracking updates. This issue has been addressed with enhanced applicant tracking updates. This issue has been addressed with enhanced applicant tracking updates. This issue has been addressed with enhanced applicant tracking updates. This issue has been addressed with enhanced applicant tracking updates. This issue has been addressed with enhanced applicant tracking updates. This issue has been addressed with enhanced applicant tracking updates. This issue has been addressed with enhanced applicant tracking updates. This issue has been addressed with enhanced applicant tracking updates. This issue has been addressed with enhanced applicant tracking updates. 120
121 27559 Add applicant status to the Applicant Master, Applications tab of "Application Received." Add an "Application Received" Follow-up Letter Add ability to attach an electronic resume to the Applicant master Modify the way qualifications work Add column for fuller job description for job descriptions Allow or level logic for job qualifications Need to add more followup letters or a status for rejection Add list of interviewees to Interview Dates window and to Positions window Applicant Master window - A system error is generated when a Position is selected from the Applications tab. This issue has been addressed with enhanced applicant tracking updates. This issue has been addressed with enhanced applicant tracking updates. This issue has been addressed with enhanced applicant tracking updates. This issue has been addressed with enhanced applicant tracking updates. This issue has been addressed with enhanced applicant tracking updates. This issue has been addressed with enhanced applicant tracking updates. This issue has been addressed with enhanced applicant tracking updates. This issue has been addressed with enhanced applicant tracking updates. This issue has been addressed with enhanced applicant tracking updates. Purchasing Resolved Issues Open Purchase Orders Not Invoiced Report Window generated a foreign key violation error The Open Purchase Orders Not Invoiced Report window will not unencumber a purchase order when the Unencumber all Purchase Orders check box is selected. After clicking the Ok button, the process will run but then will generate the following error: "EX Foreign key violation. Cannot delete or insert rows that do not conform to foreign key rules. The open purchase orders on the report will not be unencumbered." 121
122 38486 Cannot add an attachment to a requisition with more than one line item Registration Enhancements The following changes were made to EX: A new Hold Setup window combines the existing Holds Definition window with two additional tabs. The three tabs on the window are: Hold Types, Hold Type Access, and Hold Definition. Hold Type and Hold Type Access allow schools to determine which Tasklist Groups may have access to which type of holds. It functions very similarly to Attribute Access. The DSU will copy the existing Tasklist security for the Holds Definition window to the Hold Setup window. See the Holds Definition window topic for more information. Columns were added to the Holds Definition table that allow more control for how Holds display in the CRMs for Students, Parents, and Faculty. You may associate any of the Hold Codes with one Hold Type. If no Hold Type is selected on a Hold Code row, then all users who have access to view student holds will be able to view those holds. The existing six Student Master Hold columns are still available in EX 4.5. However, a new table, HOLD_TRAN (Holds Transaction), was added to store all holds. Triggers will keep data in sync between the STUDENT_MASTER and HOLD_TRAN tables. The advantage of doing this is that schools will continue to be able to use reports that reference the Student Master Hold columns but will also be able to apply more than six holds to a student. A new Student Holds window displays data in the new Holds Transaction table and will track when holds are added and removed and who took those actions. Using this table in addition to the six Student Master Hold columns allows users to add additional holds if desired. In windows in which the user selects a student, icons may be displayed beside the ID Number/Name. If the user is in a group that has Tasklist permissions to the Student Holds window and selects an ID Number that has one or more Holds, the is displayed. Each time the user logs into EX and the first time the user selects an ID Number with Holds, a window that shows the Holds is briefly displayed. 122

123 Hover over the icon to display a short description of the Holds. Click the icon to open the Student Holds window. If the user is in a group that has Tasklist permissions to the Student FERPA Permissions window and selects an ID Number who is a student, the icon or icon is displayed. The is displayed if the student has granted FERPA permissions that are active. The is displayed if the student has granted no FERPA permissions that are active. Click the icon to open the Student FERPA Permissions window to see the FERPA permissions the student has granted. The following windows were updated with the View/Add Additional Holds button that allows the user to open the Student Holds window: Student Information Student Information Impacting Charges Receipt Entry Detail Financial Aid Inquiry The following windows were updated to display Holds (if they exist) from the Student Holds window: The Grade Report window displays only Grade Report Holds. The Transcript Report window displays only Transcript Holds and Warnings. The Student Registration window displays only Registration Holds and Warnings. 123
124 The Financial Aid Inquiry window shows all Holds and uses the Hold Type security. The Add/View Additional Holds button is also available. The Student Information Impacting Charges window displays the AR Hold column and the Hold icon using the Hold Type security. The Add/View Additional Holds button is also available. The Receipt Entry Detail window displays the AR Hold column and the Hold icon using the Hold Type security. The Add/View Additional Holds button is also available. The Registration Object was changed to look at the Hold Transaction table for active holds. The getstudentholds plugin was changed to display active holds from the Student Holds window. Active records are based on the Start and End Dates, and these dates are displayed in the CRM portlets. The Show on Web flag is honored. The new Display Text for Students is displayed in the CRMs rather than the Hold Code and Description. Tasklist Security The following Tasklist security needs to be assigned for the Hold Setup window, the Student Holds window, and the six Hold columns on the Student Information window. Hold Setup window Hold Setup Function ID Hold Setup (Hold Type TAB) Function ID Hold Setup (Hold Type Access TAB) Function ID Hold Setup (Hold Definition TAB) Function ID Student Holds window Student Hold Function ID Student Information window Hold Code 1 (Student Information) Function ID Hold Code 2 (Student Information) Function ID Hold Code 3 (Student Information) Function ID Hold Code 4 (Student Information) Function ID Hold Code 5 (Student Information) Function ID Hold Code 6 (Student Information) Function ID
125 Database Information The following new tables were added to support Holds: HOLDS_TYPE_DEF HOLD_GROUP_ACCESS HOLD_TRAN The following new columns were added to the HOLDS_DEF table: DFLT_DISPLAY_TEXT SHOW_ON_WEB HOLD_TYPE TO_RESOLVE_HOLD ACTIVE ADD_ACTION_CDE ADD_ACTION_LIST_CDE REMOVE_ACTION_CDE REMOVE_ACTION_LIST_CDE The following new triggers were added: tu_student_master trigger on STUDENT_MASTER Tu_hold_tran_trigger on HOLD_TRAN The following new views were added: HOLD_TRAN_SEC_V You should give users access to this view rather than to HOLD_TRAN. The view honors Hold Type Access allowing users to access only holds for a student to which they have been granted access. STUDENT_WITH_HOLDS_V The Class List Report and the Grade List Report have been modified to use this view. The Registration Configuration window allows you to indicate whether or not the Class List Report and the Grade List Report should Include Student with Holds. Since EX is now looking at the HOLD_TRAN table for all holds, the join needed to be changed. Because there is security associated with holds based on Hold Type Access, this view was created to honor security. New default data rows are delivered to govern security for the New Holds and FERPA-related controls/windows. New app_messages rows are delivered. Holds Definition Window The Holds Definition window was removed from Tasklist Security, Activity Centers, and EX as the data on the Holds Definition window is now on the Hold Definition tab in the new Hold Setup window. 125

126 The Tasklist security for Holds Definition (FUNCTION_ID = 40013) for Jenzabar-defined group has been deleted from the following tables. WORKSPACE_USER_FUNCT_ASSIGN ACTIVITY_CENTER_FUNCTION FUNCTION_SECURITY MODULE_FUNCTION Hold Setup Window This new window contains three tabs that take the user through the process of defining Hold Types, setting Tasklist group access to each Hold Type, and defining Hold Codes and associating them with a Hold Type. Permissions to the window and/or the tabs are established using the Group Permissions window. Hold Types Tab Use this tab to define Hold Type codes and descriptions that are used to define access to Holds. When you make a Hold Type Active/Inactive after groups have been assigned to the Hold Type, the following message is displayed: 126


127 Hold Type Access Tab Use this tab to view a user group s access to hold information. This is very similar to the Attribute User Access functionality. When the user selects the Tasklist Groups radio button and then selects a Tasklist Group in the list on the left, information on the right displays the Hold Types and Access Level columns. The Access Level column can be updated. Hold Types can be deleted. If the user has permissions for the Hold Type Access tab, the Add Hold Type Access button is available. When the user selects the Hold Types radio button and then selects a Hold Type in the list on the left, information on the right displays the Groups and Access Level columns. 127
128 The Access Level column can be updated. Hold Types can be deleted. If the user has permissions for the Hold Type Access tab, the Add Hold Type Access button is available. When the user selects the Users radio button, the following columns are displayed: Users, Groups, Hold Types, and Access Level columns. These columns cannot be updated. The Access Level drop-down list has the following options: View (the user is able to view Holds with the selected Hold Type) Add (the user is able to view and add Holds with the selected Hold Type) Add and Remove (the user is able to view, add, and remove Holds with the selected Hold Type) Removing a Hold means that the user can remove the Hold from a student by putting an End Date on it, thus making the Hold no longer active for that student. Admin (the user is able to view, add, remove, and delete Holds with the selected Hold Type) Hold Definition Tab Use this tab to define Holds that can be assigned to students on the Student tab of the Student Information window or on the Student Holds window. Users may define Holds that impact the Registration process, view or print Transcripts, and view or print Grade Reports. Users may define additional Holds that do not impact EX or CRM functionality but serve as warning to users in EX; to Advisors in the Advisee Roster portlet; and to the student in Course Schedules, Unofficial Transcript, Course History, Grade Report, and My Info portlet. In the Registration Permissions window, permissions related to the Holds for EX processes are set for user groups. Groups may be granted rights to: Override Warnings Override Holds Override both Holds and Warnings 128


129 The following table details Hold processes for which you can set controls. Hold Process Hold Control Description Default Description for Students Instruction to Resolve Hold Show on Web This is the default information that displays to the student, advisor, or parent in JICS portlets. If you wish to embed an html link in this description, use this type syntax: Click this link to <A HREF=" TARGET="_blank">Open Google in new window.</a> This is the default information that displays in the Student Holds window to the EX user who does not have access to actually view a given hold. This information also displays in the Student Holds window to the EX user who does have access to view the hold. This information displays in some of the JICS portlets. You may also add a link to this information as described above. This is the default Show on Web check box for a 129
130 Hold Process Hold Control Description Active Hold Registration Hold Warning Allow Web Registration hold. If you wish the student, advisor, or parent to see this hold, then select the Show on Web check box. The default is selected. If the Active check box is selected, then the hold is displayed in the Add Hold drop-down list if the user belongs to a group that has been granted access to the Hold Type associated with the hold. Student cannot register online. EX users can register a student with this Hold only if the user has permissions to override Holds. Student may not register online unless the Allow Web Registration check box is selected. EX users can register a student with this Hold only if the user has permissions to override Warnings. If the Hold is flagged as a Registration Warning, then this check box may be selected to allow the student to register online but see the warning when they are registering. Hold Transcript Hold Students may not view the Unofficial Transcript online unless the View Unofficial Transcript Online check box is selected. EX users cannot print an Official Transcript for a student with this Hold. EX users can print an Official Transcript for a student with this Hold only if the user has permissions to override Holds. Warning View Unofficial Transcript Online Students may not view the Unofficial Transcript online unless the View Unofficial Transcript Online check box is selected. EX users can print an Official Transcript for a student with this Hold only if the user has permissions to override Warnings. If the Hold is flagged as a Transcript Warning, then this check box may be selected to allow the student to view the portlets online and to see the warning when they access the portlets. 130
131 Hold Process Hold Control Description Hold Grade Reports Actions and Action Lists Hold View Grades Online Students cannot view the following online: Unofficial Transcript Grade Report Grades in the Course History portlet EX users can print a Grade Report for a student with this Hold only if the user has permissions to override Holds. This check box may be selected to allow the student to view the portlets online and to see the warning when they access the portlets. For each Hold, users may select an Action or an Action List that defaults in the Add Holds window when the user adds that Hold for a student. The Action or Action List is saved in Notepad. For each Hold for which you have added a default Add Action or Add Action List, you have the option to select a default Remove Action or Remove Action List. If you populate these options and then Remove a Hold from a student, then a stop will be put on the Action or Action List on the selected Remove Action or Remove Action List. Add Hold Type Access Window Use this window to associate Groups with Hold Types in order to provide users with Access to Hold Codes. View is the Access Level when the user opens the window; however, the user can select one of the other defaults. The Access Level can also be changed on the Hold Type Access tab in the Hold Setup window for individual group/hold type combinations. 4. Select one or more Groups. 5. Select one or more Hold Types. 6. Make sure you have selected the desired Default Access Level. 7. Click the Save button. 8. Repeat the process to define Hold Type Access for additional Groups. 131


132 Student Tab (Student Information Window) The Holds 1-6 columns previously displayed Holds based on whether the user had permissions to override the hold error. This tab now displays the Holds for the selected student in the Holds 1-6 columns dependent on the Hold Code definition and the Access Level granted the user in the Hold Setup window for active Holds. In addition, there is Tasklist security on each of the six (6) hold columns. 132

133 The new available. button opens the Student Holds window may also be These Holds 1-6 columns can be updated depending on the user s Tasklist permissions to each of the six columns and depending on the user s Access Level to existing Hold Codes. If the user edits a column(s) and saves, the Hold Transaction table is updated for each column that is changed. Student Holds Window Navigation: From the Student Information window click the button. From the Student Information Impacting Charges window, click the button. From the Financial Aid Inquiry window, click the button. From the ID Number column, click. The window may also be accessed from the following Activity Centers: Register Students, Work with Courses, and Work with NT Courses. Use this window to view information about changes that have been made to the Hold Codes for a particular ID Number and to view and print various reports. 133

134 Student Holds Tab Depending on the Access Level assigned to the logged-in user, the user may be able to Add Hold, Remove Hold, Update Hold, Delete Hold, open the Notepad window, and Add/View Comments or Attachments on the Student Holds tab. Details The right side of the screen displays details about the Hold you have selected from the Hold List. The following information is available if you have access to view the hold: Column Hold For Student Master Holds Column Description Show on Web Notepad button Use Name of the student to whom the Hold has been applied If the Hold is also stored on one of the six (6) Student Master Hold Columns, indicates which of the 6 hold columns is being used; column is always display only on this window. Hold Code and Description Column default based on the Hold Definition row Button opens the Notepad window for the selected student 134
135 Column Start Date End Date or Add Date Added by Remove Date Removed by Description for Students How to Resolve the Hold Holds Sequence Number Hold Type Use Date and time when this hold will become active; if hold is associated with a Student Master column, the current date/time that defaults is not editable (this was necessary to manage adding and removing holds for the 6 Student Master Hold columns) Date and time when this hold will become inactive; if hold is associated with a Student Master column, the current date/time that defaults when you remove the hold is not editable. Feedback icons open the Review/Add Comments and Attachments window. Date the user added this hold to the student; editable only if the user has Admin Access Level The EX user who added this hold to the student (app_user.user_id and description); user s name is an e- mail link; column is editable only if the user has Admin Access Level Date the user removed this hold from the student; column is editable only if the user has Admin Access Level The EX user who removed this hold from the student (app_user.user_id and description); user s name is an e- mail link; column is editable only if the user has Admin Access Level Hold information that will display to the student and his/her advisors in the CRM portlets; text defaults from the Hold Definition row but is editable here if the user has more than View Access Level Information that allows you to provide information that the EX user can provide to the student about what office or person to contact about the hold; Even if the user does not have rights to view the hold, they see this column so it should be populated with that in mind Key to this hold; available to you if you are a user who has access to using SQL Always display only to allow users with at least View Access Level to see which Hold Type the Hold Code is associated with 135


136 If the user does not have permissions to the Student Hold panel on the Student Holds window, the following is displayed in the panel: If the user has Add, Add and Remove, or Admin access to at least one active hold code, the Add Hold button is available. Click the button to open the Add Hold window. Use this window to add a new Hold that will be displayed in the Student Holds window. If a value is selected in the Student Master Holds Column, the new Hold will be added to the Student Master table and the Start Date column is not editable. If the user has Add and Remove or Admin access to the selected hold, the Remove Hold button is available. Click the button to open the Remove Hold window. Use this window to remove a Hold. The user must supply an End Date for the Student Hold. This date may be a date earlier than today or in the future. The End Date column is not editable if the Hold is associated with a Student Master column. Click the Save button to update the Hold Transactions table. 136

137 If the selected hold is associated with one of the 6 Student Master Hold Columns and you have Add and Remove or Admin access for the selected hold, the Update Hold button is available. Click the button to open the Update Hold for Student Master Column window. Read carefully the text on the window. Click the Save button to update the Hold Transactions table. If you have Admin access for the selected hold, the Delete Hold button is available. When the user clicks the Delete Hold button, the row is deleted from the database. You should give Admin access judiciously. Reports Tab Use the Reports tab to view and print reports by Students, Holds, and Hold Types. There are three (3) reports, and you can customize any one of them. Report By Student By Hold By Hold Type Description Report displays Holds grouped by Student Report displays Holds grouped by Hold Codes Report displays Holds grouped by Hold Type, then by Hold code, and then by Student 137

138 You must populate the Selected Items box with students before you can preview or print any of the reports. The user has the following options by which to select students: ID Number individual students Criteria basic query to which the WHERE criteria is added if based on Student Master Query Can customize the query to select students ID Number Column Two icons may be displayed beside the ID Number column in every window if the selected student has Holds and/or FERPA permissions granted and the user has access to see them. If the user has rights to the Student Holds window and the student has any Holds, then the Holds icon ( ) displays to the right of the Name of the selected ID Number and bubble text containing the appropriate Holds information displays for 3-10 seconds. Click this icon to open the Student Holds window. If the ID Number has current FERPA permissions defined, then one of two FERPA icons ( or ) is displayed to the right of the Name of the selected ID Number. 138

139 The is displayed if the student has active FERPA Permissions defined. Click this icon to open the Current Student/Parent FERPA Permissions window. The is displayed if the student has NO active FERPA Permissions defined. If the ID Number is not a student or if the user does not have access to the FERPA Permissions icon, neither icon is displayed. Current Student/Parent FERPA Permissions Window To access this window, click the beside the selected ID Number on various windows. Current FERPA Permissions for the selected Student are displayed and cannot be edited. 139

140 Override Registration Holds Window When you are using the Student Registration window and the selected student has one or more Registration Holds, the Override Registration Holds window is displayed. Use this window to allow a Hold to be overridden if permissions have been granted to the user. Read carefully the text at the bottom of the window. Click the Override button to override multiple errors or Prompt Later to be prompted to override the Hold for each new registration. 140

141 Transcript Report Window If there are students with Transcript Holds when you generate the Transcript Report and click Print, the Printing Transcript Reports: Student Transcript Holds window appears. You may have the option to Print Transcript for Students with Holds or Print Transcript for Students with Warnings. Click Continue or Print Report or Cancel. If you have rights in the Registration Permissions window to override holds and or warnings, you will be able to print an Official Transcript. 141

142 Grade Report Window If there are students with Grade Holds when you generate the Grade Report and click Print, the Printing Grade Reports: Student Grade Report Holds window is displayed. You have the option to Print Grade Reports only for Students with Holds or Print Grade Reports for all Students, including Students with Holds. Click Continue or Print Report or Cancel. If you have rights in the Registration Permissions window to override grade holds, you will be able to print Grade Reports for students with grade holds. 142
 is available.")
143 Financial Aid Inquiry Window If you have been granted permissions, the General Info tab on the Financial Aid Inquiry window displays Student Master Holds 1-6 from the Student Master table. If you have permissions to the Student Holds window, the View/Add Additional Holds button ( ) is available. You may click on the button to open the Student Holds window where you can add Holds or view existing Holds for the selected ID Number. CRM Portlets If the Show on Web check box is selected on the Student Holds window for the selected ID Number, the Hold(s) or Instructions to Resolve for the selected ID Number is displayed in the following portlets: Advisee Roster Course History Grade Report My Info 143


144 Unofficial Transcript Course Schedules View My Students In many of the portlets, the holds have been enhanced to display Begin and End Dates for the hold. The portlets also display the new Display Text for Students and the How to Resolve the Hold columns stored on each hold. The Advisee Roster portlet displays the holds as shown below: The Advisor can click the + to view the Display Text for Students and the How to Resolve the Hold column. In the Unofficial Transcript, Grade Report, and Course History portlets, the student views this display of the holds: The other portlets do not display as much detail as those shown above. 144
User Guide. Form Builder 2.0 for Jenzabar EX
 User Guide Form Builder 2.0 for Jenzabar EX October 2010 2010, Jenzabar, Inc. 101 Huntington Ave., Suite 2205 Boston, MA 02199 1.877.535.0222 www.jenzabar.net This document is confidential and contains
How to use People Admin Creating Staff Postings. How to Create Staff Postings How to Select Applicants for interview 25 26
 How to use People Admin Creating Staff Postings Index Page How to Create Staff Postings 2 24 How to Select Applicants for interview 25 26 How to Recommend a Candidate for Hire 27 How to Complete Hiring
Oracle Taleo Cloud for Midsize (Taleo Business Edition)
") Oracle Taleo Cloud for Midsize (Taleo Business Edition) Release 18B What s New TABLE OF CONTENTS REVISION HISTORY... 3 OVERVIEW... 4 RELEASE FEATURE SUMMARY... 4 PLATFORM ENHANCEMENTS... 5 Password Settings...
Oracle Taleo Cloud for Midsize (Taleo Business Edition) Release 18B What s New TABLE OF CONTENTS REVISION HISTORY... 3 OVERVIEW... 4 RELEASE FEATURE SUMMARY... 4 PLATFORM ENHANCEMENTS... 5 Password Settings...
Administrator Guide. Position Manager 11 Effective 4/9/2018
 Administrator Guide Position Manager 11 Effective 4/9/2018 Contents System Administration 4 Career Site 6 Acknowledgement Text 6 Career Site Settings: Acknowledgement Text Detail 6 Adding an Acknowledgement
Administrator Manual
 Administrator Manual CURA Technical Support Email: cura_support@mindscope.com Phone: 1.888.322.2362 x 55 Administrator Manual Page 1 Table of Contents The Setup Module... 3 Skills... 3 Adding or Modifying
TrainingFinder Real-time Affiliate Integrated Network (TRAIN) Administrator Handbook. Version 3.2 (3/26/08) Public Health Foundation
 Administrator Handbook. Version 3.2 (3/26/08) Public Health Foundation") TrainingFinder Real-time Affiliate Integrated Network (TRAIN) Administrator Handbook Version 3.2 (3/26/08) Public Health Foundation Table of Contents About This Handbook 5 TRAIN Administrative Basics 6
TrainingFinder Real-time Affiliate Integrated Network (TRAIN) Administrator Handbook Version 3.2 (3/26/08) Public Health Foundation Table of Contents About This Handbook 5 TRAIN Administrative Basics 6
Arkansas State Jobs Training Manual
 Arkansas State Jobs Training Manual Table of Contents Arkansas State Jobs Home Page Screen Shot..2 Active Jobs Page Screen Shot.3 Applicant Page Screen Shot.4 Preferences Section..7 E-mail Response Templates.8
FUNDING FORM NAVIGATION INITIATOR S GUIDE
 FUNDING FORM NAVIGATION INITIATOR S GUIDE TABLE OF CONTENTS INTRODUCTION... 1 ACCESS FUNDING FORM IN PEOPLESOFT HR... 2 INITIATE A FUNDING FORM... 2 ENTERING SEARCH CRITERIA TO START FORM... 3 FUNDING
DREXELJOBS AND DREXELMEDJOBS USER S GUIDE. Drexel University and Drexel University College of Medicine Hiring System
 DREXELJOBS AND DREXELMEDJOBS USER S GUIDE Drexel University and Drexel University College of Medicine Hiring System TABLE OF CONTENTS INTRODUCTION... 3 GETTING STARTED... 4 CREATING A REQUISITION... 6
ADP Vantage HCM. Navigation for Practitioners
 ADP Vantage HCM Navigation for Practitioners Introduction This is a high-level look at the various navigation features associated with ADP Vantage HCM. The features available are dependent upon your job
PEOPLEADMIN USER S GUIDE. Sam Houston State University
 PEOPLEADMIN USER S GUIDE Sam Houston State University Revised 05/2015 PeopleAdmin, Inc. 816 Congress Avenue Suite 1800 Austin, TX 78701 TABLE OF CONTENTS INTRODUCTION... 5 GETTING STARTED... 6 SYSTEM
Talent Acquisition Cloud Implementing Scheduling Center 19A
 19A 19A Part Number: F12214-01 Copyright 2019, Oracle and/or its affiliates. All rights reserved Authors: OTAC Information Development Team This software and related documentation are provided under a
SEARCH & APPLY FOR TEMPORARY HIRE APPLICANT POOL
 SEARCH & APPLY FOR TEMPORARY HIRE APPLICANT POOL Overview This step-by-step guide demonstrates how to apply for the Temporary Hire Applicant Pool as an external applicant. External Applicants are individuals
PEOPLE ADMIN USER GUIDE
 PEOPLE ADMIN USER GUIDE Office of Human Resources PeopleAdmin User Guide People Admin User Guide Creating a Staff/Union position for posting:... 2 Creating a Faculty posting:... 10 Search Committee Tips...
ELECTRONIC PROJECT MONITORING INFORMATION SYSTEM FOR KENYA
 ELECTRONIC PROJECT MONITORING INFORMATION SYSTEM FOR KENYA (e-promis Kenya) ANALYTICAL INTERFACE USER MANUAL Version 3.1 COPYRIGHT 2001-2015 SYNERGY INTERNATIONAL SYSTEMS INC ALL RIGHTS RESERVED e-promis
Development Application Online. HowTo guide for applicants
 Development Application Online HowTo guide for applicants Disclaimer While every reasonable effort has been made to ensure that this document is correct at the time of printing, the State of NSW, its agents
HIRING MANAGER S USER S GUIDE
 HIRING MANAGER S USER S GUIDE Drexel University Hiring System PeopleAdmin, Inc. 1717 W. 6 th Street Austin, TX 78703 512-997-2500 TABLE OF CONTENTS INTRODUCTION... 3 GETTING STARTED... 4 CREATING A REQUISITION...
User Guide. Version
 User Guide Version 0.19 2-11-2008 StormPro Max User Guide Page 1 of 69 5/10/2008 Table of Contents 1. Overview... 4 1.1 Definition of StormPro Max Terms... 4 2. Accessing StormPro Max... 5 3. Navigating
CA IdentityMinder. Glossary
 CA IdentityMinder Glossary 12.6.3 This Documentation, which includes embedded help systems and electronically distributed materials, (hereinafter referred to as the Documentation ) is for your informational
When you are logged into My Siena, you cannot use the Browser s Back and Forward buttons to navigate from one area to another. You need to use the
 When you are logged into My Siena, you cannot use the Browser s Back and Forward buttons to navigate from one area to another. You need to use the tabs at the top of the My Siena page or the links directly
2.9 New Features Guide
 2.9 New Features Guide 042111 Enterprise CRM, version 2.9 US 2011 Blackbaud, Inc. This publication, or any part thereof, may not be reproduced or transmitted in any form or by any means, electronic, or
NECHOadmin 7.5. Walkthrough Series. A Day in the Life of an Administrator
 NECHOadmin 7.5 Walkthrough Series A Day in the Life of an Administrator (c) Copyright 2006 - CyberShift, Inc. ALL RIGHTS RESERVED by CyberShift, Inc. This material contains valuable confidential information,
Siebel Project and Resource Management Administration Guide. Siebel Innovation Pack 2013 Version 8.1/8.2 September 2013
 Siebel Project and Resource Management Administration Guide Siebel Innovation Pack 2013 Version 8.1/ September 2013 Copyright 2005, 2013 Oracle and/or its affiliates. All rights reserved. This software
HIRING MANAGER S USER S GUIDE
 HIRING MANAGER S USER S GUIDE Northern Kentucky University Hiring System PeopleAdmin, Inc. 1717 W. 6 th Street Austin, TX 78703 512-997-2500 TABLE OF CONTENTS INTRODUCTION... 3 GETTING STARTED... 4 jobs.nku.edu/hr...
Contents. Add a Form Element to a Group Box Add a Field to a Form... 22
 Workflow Design Guide Version 17 November 2017 Contents About This Guide... 7 Workflows and Forms Overview... 7 Security Permissions for Workflows and Forms... 8 Search for a Workflow Design, Workflow
SAP Business All-in-One Getting Started
 User Manual Getting Started Date: October 2013 Copyright 2013 Supernova Consulting Ltd. All rights reserved. The current version of the copyrights, trademarks, and disclaimers at www.supernova-consulting.com/files/supernova_disclaimer.pdf
Jenzabar Internet Campus Solution. JICS version Release Notes
 Jenzabar Internet Campus Solution JICS version 8.4.2 Release Notes July 2016 Legal Disclaimer 2010-16, Jenzabar, Inc. All rights reserved. This document is confidential and contains proprietary information.
EMPLOYEE SPACE. INSTRUCTIONS for EMPLOYEES. Hurley Medical Center Department of Human Resources
 EMPLOYEE SPACE INSTRUCTIONS for EMPLOYEES Hurley Medical Center Department of Human Resources Updated 3/1/2016 Table of Contents Table of Contents... i Introduction... 1 Accessing Employee Space... 2 Employee
ADP Vantage HCM: Navigation for Time Managers
 ADP Vantage HCM: General Navigation 2 Login Page 2 Basic User Interface 3 Privacy, Legal, Feedback, Copyright 3 Preferences, Support, Logout 4 Menus and Activity Options 8 Messages, Calendar, My Profile
Western PageUp. Search Chair Quick Reference Guide
 Western PageUp Search Chair Quick Reference Guide This user guide is intended for the search chair and search coordinator. Use this guide to manage applicants, add dispositions, request candidates to interview,
Agilent Partner Central
 User Guide for Partners 6/1/2010 For External Partners/US_Canada Version Author: Betsy Savarese/Trish Kohrt/Tamie LeBar/CEG Version: 1.0 Partner Central Training for Partners June 7 th through June 11
HPHConnect for Employers User s Guide
 HPHConnect for Employers User s Guide Copyright 2017 Harvard Pilgrim Health Care, Inc. All rights reserved. Harvard Pilgrim Health Care and the Harvard Pilgrim Health Care logo are trademarks of Harvard
Manual: Managing Applicants. Revised: 2/14/2018
 Manual: Managing Applicants Revised: 2/14/2018 Getting Started Log in to the ipaws site at https://www.ugajobsearch.com/hr/. When you get to the homepage, look at the top right corner to ensure APPLICANT
Oracle. Engagement Cloud Using Service Request Management. Release 12
 Oracle Engagement Cloud Release 12 Oracle Engagement Cloud Part Number E73284-05 Copyright 2011-2017, Oracle and/or its affiliates. All rights reserved. Author: Joseph Kolb This software and related documentation
Table of Contents COURSE OBJECTIVES... 2 LESSON 1: ADVISING SELF SERVICE... 4 NOTE: NOTIFY BUTTON LESSON 2: STUDENT ADVISOR...
 Table of Contents COURSE OBJECTIVES... 2 LESSON 1: ADVISING SELF SERVICE... 4 DISCUSSION... 4 INTRODUCTION TO THE ADVISING SELF SERVICE... 5 STUDENT CENTER TAB... 8 GENERAL INFO TAB... 19 TRANSFER CREDIT
Get Started in the. Cisco Partner Ecosystem. Introduction. Get Cisco.com ID. Become a Cisco Partner. Manage Company Information.
 Get Started in the Introduction Ecosystem April 2017 Welcome to the Ecosystem 2 Thank you for accepting our invitation. We re excited to have you join our ecosystem of trusted partners. This guide incudes
Oracle Taleo Cloud for Midsize (Taleo Business Edition) Release 17B2. What s New
 Release 17B2. What s New") Oracle Taleo Cloud for Midsize (Taleo Business Edition) Release 17B2 What s New TABLE OF CONTENTS REVISION HISTORY... 3 OVERVIEW... 4 RELEASE FEATURE SUMMARY... 4 TALENT CENTER ENHANCEMENTS... 5 My Offer
Oracle Taleo Cloud for Midsize (Taleo Business Edition) Release 17B2 What s New TABLE OF CONTENTS REVISION HISTORY... 3 OVERVIEW... 4 RELEASE FEATURE SUMMARY... 4 TALENT CENTER ENHANCEMENTS... 5 My Offer
Rapid Recovery License Portal Version User Guide
 Rapid Recovery License Portal Version 6.1.0 User Guide 2017 Quest Software Inc. ALL RIGHTS RESERVED. This guide contains proprietary information protected by copyright. The software described in this guide
Contents. How to register with the University of Edinburgh s jobs website. UoE Employees only How to gain access to internal vacancies
 Applicant Guidance Contents Section How to register with the University of Edinburgh s jobs website UoE Employees only How to gain access to internal vacancies How to log into the University s jobs website
Table of Contents 1. ABOUT THE GIS PANGEA SYSTEM 5 2. HOME DASHBOARD OVERVIEW MANAGER DASHBOARD OVERVIEW 66
 Table of Contents 1. ABOUT THE GIS PANGEA SYSTEM 5 PANGEA SYSTEM REQUIREMENTS 5 PANGEA MOBILE COMPATIBILITY 6 LOGGING IN TO PANGEA 6 MANAGING USER ACCOUNT SECURITY AND DELEGATE INFORMATION 13 ABOUT SESSION
User Home Screen Quick Reference Guide
 User Home Screen USER HOME The User Home screen is the hub by which you can access all the features of UNCG Jobsearch. SHORTCUTS Quick access for commonly used tasks. MY LINKS Links to relevant info such
WELCOME TO IRECRUIT. Contents: Step 1: How to Register.3. Step 2: Search for Jobs Step 3: Apply for a Job..23
 WELCOME TO IRECRUIT irecruit is our online job search and application system. Use irecruit to search and apply for advertised UTS jobs. You can also use irecruit to set up job alerts tailored to your job
Online CDC service. HowTo guide for applicants
 Online CDC service HowTo guide for applicants Disclaimer While every reasonable effort has been made to ensure that this document is correct at the time of printing, the State of NSW, its agents and employees,
HUMAN RESOURCES USER S GUIDE
 HUMAN RESOURCES USER S GUIDE for the Rensselaer Polytechnic Institute Hiring System PeopleAdmin, Inc. 816 Congress Avenue Suite 1800 Austin, TX 78701-2482 512-997-2500 Copyright 2003 PeopleAdmin, Inc.
One Identity Manager 8.0. IT Shop Administration Guide
 One Identity Manager 8.0 IT Shop Administration Guide Copyright 2017 One Identity LLC. ALL RIGHTS RESERVED. This guide contains proprietary information protected by copyright. The software described in
TEKLYNX LABEL ARCHIVE
 TEKLYNX LABEL ARCHIVE U S E R G U I D E LABEL ARCHIVE User Guide DOC-LAS2012-QSM-US-2007013 The information in this manual is not binding and may be modified without prior notice. Supply of the software
Automated Background Check System (ABCS)- Requesting Access Guide. April 2018
- Requesting Access Guide. April 2018") Automated Background Check System (ABCS)- Requesting Access Guide April 2018 How do I access ABCS? Complete Background Check Request Access to HHS Enterprise Portal Request Access to ABCS Use ABCS There
Automated Background Check System (ABCS)- Requesting Access Guide April 2018 How do I access ABCS? Complete Background Check Request Access to HHS Enterprise Portal Request Access to ABCS Use ABCS There
RHS INFORMATION SERVICES TECHNOLOGY GUIDE. PeopleAdmin User Guide
 RHS INFORMATION SERVICES TECHNOLOGY GUIDE PeopleAdmin User Guide Overview The RHS People Admin system offers a paperless, centralized method whereby applicants can apply for RHS jobs online and RHS hiring
Contents. Properties: Field Area Fields Add a Table to a Form... 23
 Workflow Design Guide Version 18 February 2018 Contents About This Guide... 7 Workflows and Forms Overview... 7 Security Permissions for Workflows and Forms... 8 Search for a Workflow Design, Workflow
PRISM-FHF The Fred Hollows Foundation
 PRISM-FHF The Fred Hollows Foundation SECURITY ADMINISTRATOR S GUIDE Version 1.2 TABLE OF CONTENTS INTRODUCTION... 4 OVERVIEW... 4 SECURITY CONSOLE... 6 ACCESSING THE SECURITY CONSOLE... 6 VIEWING THE
CERTIFIED HIRING MANAGER USER GUIDE
 CERTIFIED HIRING MANAGER USER GUIDE University of California Santa Cruz Recruitment Management System 12/21/12 TABLE OF CONTENTS INTRODUCTION... 3 BEFORE YOU GET STARTED... 4 Your Web Browser... 4 Web
Reference Card for ORSP
 Reference Card for ORSP https://eresearch.umich.edu Log in from eresearch Homepage 1. Go to https://eresearch.umich.edu. 2. Click Login in the Proposal Management box. 3. Enter your Login ID (uniqname)
TE.0X0 SUPPLIER GUIDE Oracle NAC Subcontractor Staffing Tool (SST)
") OUM TE.0X0 SUPPLIER GUIDE Oracle NAC Subcontractor Staffing Tool (SST) Author: Adrienne Little Creation Date: May 6, 2012 Last Updated: September 5, 2012 Version: 1.0 1 DOCUMENT CONTROL 1.1 Change Record
OUM TE.0X0 SUPPLIER GUIDE Oracle NAC Subcontractor Staffing Tool (SST) Author: Adrienne Little Creation Date: May 6, 2012 Last Updated: September 5, 2012 Version: 1.0 1 DOCUMENT CONTROL 1.1 Change Record
Supplier Reference Guide (QRG) Table of Contents
 Table of Contents") Supplier Onboarding Supplier Reference Guide (QRG) Table of Contents Supplier Checklist... 2 New Supplier Onboarding Steps... 3 Introduction... 4 Registration... 6 Certification... 16 Acceptance... 35
Supplier Onboarding Supplier Reference Guide (QRG) Table of Contents Supplier Checklist... 2 New Supplier Onboarding Steps... 3 Introduction... 4 Registration... 6 Certification... 16 Acceptance... 35
Handshake Guide For Supervisors
 Handshake Guide For Supervisors Table of Contents 2 Section I: Posting a Student Job in Handshake P. 3-10 1. Logging in to Handshake P. 3 2. Creating a New Job in Handshake P. 4-8 3. Reposting a Job in
Purpose This document defines the overall policy, principles, and requirements that govern the mybyu Portal.
 mybyu Portal Policy 1.0 Status Draft Approval Date Pending Next Review Date 9/--/2010 Owner CIO Purpose This document defines the overall policy, principles, and requirements that govern the mybyu Portal.
VERSION 7 JUNE Union Benefits. Employer User Guide Data Collection Tool
 VERSION 7 JUNE 2018 Union Benefits Employer User Guide Data Collection Tool About this guide This document is intended to provide an overview of the main sections of the Data Collection Tool ( DCT ) for
MySCCO.Edu portal. Overview
 MySCCO.Edu portal Overview Once you have logged in to the MySCCO Portal you will see a screen similar to the following. The Tabs that you see across the top will depend on the permissions you have based
Training Guide for Arkansas Law Enforcement Officers and Licensing Board Representatives
 Training Guide for Arkansas Law Enforcement Officers and Licensing Board Representatives Arkansas Department of Health Prescription Monitoring Program March 2016 Contents Contents 1 Document Overview...
Monash University Policy Management. User Guide
 Monash University Policy Management User Guide 1 Table of Contents 1. GENERAL NAVIGATION... 4 1.1. Logging In to Compliance 360 - Single Sign On... 4 1.2. Help... 4 1.2.1. The University Policy Bank...
ADP Workforce Now Setting Up Company Policies
 ADP Workforce Now Setting Up Company Policies Version 11 ADP Trademarks The ADP logo, ADP and ADP Workforce Now are registered trademarks of ADP, LLC. ADP A more human resource. is a service mark of ADP,
Electronic Grants Administration & Management System - EGrAMS
 Electronic Grants Administration & Management System - EGrAMS Introduction EGrAMS is an enterprise-wide web-based scalable, configurable, business rule driven and workflow based end-to-end electronic grants
(epaf) Training Guide
 Training Guide") 2017-2018 Electronic Personnel Form (epaf) University of Massachusetts Boston Human Resources Department Revised September 2017 epaf (Electronic Personal Form) Electronic personnel action form (epaf) is
2017-2018 Electronic Personnel Form (epaf) University of Massachusetts Boston Human Resources Department Revised September 2017 epaf (Electronic Personal Form) Electronic personnel action form (epaf) is
Development System (UL CSDS)
") UL Collaborative Standards Development System (UL CSDS) s UL CSDS Basics What is UL CSDS? The UL Collaborative Standards Development System (CSDS) was created to further enhance the maintenance of UL's
UL Collaborative Standards Development System (UL CSDS) s UL CSDS Basics What is UL CSDS? The UL Collaborative Standards Development System (CSDS) was created to further enhance the maintenance of UL's
HPE Intelligent Management Center v7.3
 HPE Intelligent Management Center v7.3 Service Operation Manager Administrator Guide Abstract This guide contains comprehensive conceptual information for network administrators and other personnel who
MyGrad Program Authorization System > Tutorial
 MyGrad Program Authorization System > Tutorial System Launch Date: June 26, 2017 AGENDA > How to request access to MGP (slides 5-14) > Review of MGP access types (suites) (15-20) > How to review and approve
PRISM - FHF The Fred Hollows Foundation
 PRISM - FHF The Fred Hollows Foundation MY WORKSPACE USER MANUAL Version 1.2 TABLE OF CONTENTS INTRODUCTION... 4 OVERVIEW... 4 THE FHF-PRISM LOGIN SCREEN... 6 LOGGING INTO THE FHF-PRISM... 6 RECOVERING
erecruitment Recruiter User Manual
 erecruitment How to access the erecruitment system... 2 How to accept applications into the Back office - submit an application... 4 How to Un-submit an application... 7 How to delete an application...
Client Portal Training Manual
 Nexsure Training Manual Client Portal Training Manual Version 2.1.3 Page Nexsure Training Manual 2011 XDimensional Technologies, Inc. All rights reserved. No part of this documentation shall be reproduced,
Administration Guide. Release
 Administration Guide Release 13.3.00 This Documentation, which includes embedded help systems and electronically distributed materials, (hereinafter referred to as the Documentation ) is for your informational
Uploading a Resume are individuals not currently employed in a regular full or part-time position at Fresno State University.
 SEARCH & APPLY FOR TEMPORARY HIRE APPLICANT POOL Overview This step-by-step guide demonstrates how to apply for the Temporary Hire Applicant Pool as an internal applicant. Internal Applicants are current
Oracle. Service Cloud Knowledge Advanced User Guide
 Oracle Service Cloud Release November 2016 Oracle Service Cloud Part Number: E80589-02 Copyright 2015, 2016, Oracle and/or its affiliates. All rights reserved Authors: The Knowledge Information Development
PeopleAdmin 7 User s Guide. Applicant Tracking System - Faculty Positions -
 PeopleAdmin 7 User s Guide Applicant Tracking System - Faculty Positions - - Table of Contents Introduction... Getting Started... User Roles Logging Into Your Account Home Page Posting a Position... Creating
MMS Parent and Student Portals version
 MMS Parent and Student Portals version 3.0.08 MMS Web Portal System Computer Resources, LLC www.cri-mms.com Sales: 888-665-4046 Support: 888-641-9922 Training: 888-641-9925 About MMS The Modular Management
AvePoint Online Services for Partners 2
 AvePoint Online Services for Partners 2 User Guide Service Pack 1 Issued June 2017 Table of Contents What s New in this Guide...4 About...5 Submitting Documentation Feedback to AvePoint...6 Browser Support
MiraCosta CurricUNET User Manual
 MiraCosta CurricUNET User Manual Building the Worldwide Curriculum Network Page 1 Contents Log In... 5 Courses... 6 Programs... 9 Create Proposal... 10 Deactivate Credit Course... 11 Deactivate Noncredit
Application Status. Is Sent to Applicant?
 Application Statuses Application Status Application Submitted- User does not see applicants in this status Incomplete- User does not see applicants in this status New **Does t Meet Minimum Qualifications
ACT Test Accessibility and Accommodations System (TAA) User Guide
 User Guide") ACT Test Accessibility and Accommodations System (TAA) User Guide www.act.org ACT Test Accessibility and Accommodations System (TAA) User Guide Table of Contents Overview... 2 Introduction to the Test
ACT Test Accessibility and Accommodations System (TAA) User Guide www.act.org ACT Test Accessibility and Accommodations System (TAA) User Guide Table of Contents Overview... 2 Introduction to the Test
IIT Cognos Portal Librarian Guide
 IIT Cognos Portal Librarian Guide 1.0 About the Cognos Portal The IIT Cognos Portal allows users to access reports and perform analysis based on data stored in the SunGard Banner Operation Data Store (ODS)
Manual: Create a Faculty Search Posting Manager/Supervisor
 Manual: Create a Faculty Search Posting Manager/Supervisor Revised: 7-11-2017 Introduction The University of Georgia has implemented a new online faculty applicant tracking system, FacultyJobs@UGA. The
HIRING MANAGER S USER S GUIDE
 HIRING MANAGER S USER S GUIDE Old Dominion University On-Line Hiring System Date of Distribution: 8/07/2003 Revised 9/10/10 PeopleAdmin, Inc. 1717 W. 6 th Street Austin, TX 78703 512-997-2500 TABLE OF
META Admin User Guide
 META Admin User Guide Version 3.0, October 2018 Welcome to the META Admin User Guide... 4 Administer Site... 4 Navigating the Administrative Area... 5 Navigating and Sorting Tables 5 Using Filter Conditions
6. To view a listing of Frequently Asked Questions, information on. 7. When completing the online application, you have the option to
 Application Instructions External (Non-Employee) Applicants Note: Current FSU Employees MUST USE OMNI Self Service > Recruiting Activities > Careers, to apply for FSU jobs. Refer to the Job Aid for Internal
ESHARP for SIS Data Stewards Created on 8/15/2012
 Created on 8/15/2012 COPYRIGHT & TRADEMARKS Copyright 1998, 2009, Oracle and/or its affiliates. All rights reserved. Oracle is a registered trademark of Oracle Corporation and/or its affiliates. Other
Aprimo Marketing Studio Configuration Mover Guide
 Aprimo Marketing Studio 9.0.1 Configuration Mover Guide The product or products described in this book are licensed products of Teradata Corporation or its affiliates. Aprimo and Teradata are registered
FACULTY Creating a Faculty Job Posting By Position Type
 This document will explain how to create a Faculty Job Posting by Position Type. Contents Logging in and Selecting a User Role 2 Getting Started 3 Navigation 4 Position Details Tab 4 Duties and Responsibilities
SAP E-RECRUITING USER GUIDE
 EQUATE PETROCHEMICAL COMPANY SAP E-RECRUITING USER GUIDE SAP E-Recruiting User Guide CONTENTS Using this guide... 3 Browse vacancies/search for a position... 4 How to register online... 8 Hints for registered
How to Process a Work List Transaction
 Business Process Guide How to Process a Work List Transaction A guide for approving, returning and canceling a workflow transaction HR Data Management Contacts Please refer to the Data Management staff
EMPLOYERS RESOURCE GUIDE
 EMPLOYERS RESOURCE GUIDE Table of Content ABOUT HANDSHAKE... 1 UNDERSTANDING THE HANDSHAKE NAVIGATION TOOLBAR... 2 ACCESSING HANDSHAKE... 3 HOW TO POST A JOB IN HANDSHAKE... 7 ON-CAMPUS EMPLOYERS... 7
Recruitment Standard Operating Procedures Profile Management and Job Application for External Candidates
 Recruitment Standard Operating Procedures Profile Management and Job Application for External Candidates HRMD - PARTNERING WITH YOU TOWARDS EXCELLENCE Register African Union Login Access the Login screen
Exempt/Faculty Applicant Workflow Training
 Exempt/Faculty Applicant Workflow Training Go to http://jobs.usu.edu and click on For USU Departments and Search Committee You will login to the jobs website through the USU Login portal with your A- Number
Learning Management System (LMS) Administrator Guide
 Administrator Guide") Learning Management System (LMS) Administrator Guide 1 P a g e Learning Management System (LMS): Administrative Guide Copyright 2016 NAVEX Global All rights reserved. Information contained herein may change
Learning Management System (LMS) Administrator Guide 1 P a g e Learning Management System (LMS): Administrative Guide Copyright 2016 NAVEX Global All rights reserved. Information contained herein may change
Working with Groups, Roles, and Users. Selectica, Inc. Selectica Contract Performance Management System
 Selectica, Inc. Selectica Contract Performance Management System Copyright 2008 Selectica, Inc. 1740 Technology Drive, Suite 450 San Jose, CA 95110 http://www.selectica.com World rights reserved. You cannot
Volume Licensing Service Center User Guide MICROSOFT VOLUME LICENSING
 Volume Licensing Service Center User Guide MICROSOFT VOLUME LICENSING Contents Overview of the Volume Licensing Service Center... 3 Registering to the Volume Licensing Service Center... 3 Signing New Open
Content Modeling for Administrators
 Content Modeling for Administrators Getting Started Guide ImageNow Version: 6.7.x Written by: Product Documentation, R&D Date: September 2016 2014 Perceptive Software. All rights reserved CaptureNow, ImageNow,
Banner Communication Management User Guide. Release 9.3 May 2017
 Banner Communication Management User Guide Release 9.3 May 2017 Notices Notices 2015-2017 Ellucian. Contains confidential and proprietary information of Ellucian and its subsidiaries. Use of these materials
DOF HIRING MANAGER S USER S GUIDE
 DOF HIRING MANAGER S USER S GUIDE Princeton University Jobs at Princeton Hiring System Using the system for searches and openings for the faculty, professional researchers, professional specialists, and
External Applicant User Guide
 External Applicant User Guide Contact Us Recruitment Services www.csun.edu/jobs (818) 677-2101 applications@csun.edu California State University, Northridge Office of Human Resources, Recruitment Services
umtech & The Center for Teaching & Learning
 Banner Navigation Version 9 Center for Teaching and Learning (CTL) 100 Administration Bldg., Memphis, TN 38152 Phone: 901.678.8888 Email: itstrainers@memphis.edu Center for Teaching and Learning Website
RDS Employee Access Module User Guide
 RDS Employee Access Module User Guide This manual is designed to help you set up your Employee Access account. Create New Account - As Employee Disclaimer of Warranties and Limitation of Liabilities Regional