idirect Technical Note 1. INTRODUCTION 2. DIFFERENCES BETWEEN INFINITI AND NETMODEM II+ SERIES
|
|
|
- Dominic Randall
- 6 years ago
- Views:
Transcription
1 idirect Technical Note Subject: Recovering infiniti Remotes Date: March 10, 2006 Applies To: Version and Later 1. INTRODUCTION This technical note contains information and procedures pertaining to: The Differences Between infiniti and NetModem II+ Series Required Procedures Before Attempting to Recover infiniti Remotes Reloading The Options File, which contains procedures for reloading an options file based on your IP connectivity. Reloading the Image Package. Recovering a Linux Password. Appendix A, which contains the procedure for establishing a NetModem/Satellite Router Console connection Appendix B, which contains the procedure for gaining IP connectivity to the NetModem. 2. DIFFERENCES BETWEEN INFINITI AND NETMODEM II+ SERIES There are several distinct differences between the infiniti series and the II+ series images and options files, which require different procedures. Unlike the NetModem II+ Series which uses a boot loader to load the software and the options file, the infiniti Series runs on a custom built Linux operating system, so breaking into the boot loader no longer applies. When the infiniti remote boots up, it first loads the Linux operating system which requires a login. The factory default login is set to: User Name: root Password: idirect Once you log into the Linux prompt, you can access the idirect application console by typing telnet 0, which results in another login prompt. The factory login for the application from this prompt is the username of admin and the 1
2 password of idirect. Once there, most of the known console commands are available. The idirect application runs as a service (similarly to the NMS servers and the Protocol Processor server) called idirect_falcon. The service can be started/stopped/restarted using the command: service idirect_falcon <command> where: command = start, stop, or restart For example, to start the service, enter: service idirect_falcon start If you are unable to access the application using telnet 0, the service is not running and you may need to reload the images/options file. The following procedures explain how to perform these reload processes. 3. REQUIRED PROCEDURES BEFORE ATTEMPTING TO RECOVER INFINITI REMOTES The following tasks must be completed before you begin to recover a remote: 1. Ensure you have a good options file. The options file MUST match the Serial Number of the modem you are trying to recover. 2. Locate the IP address of the infiniti Remote (using the console login). Refer to Appendix A, Establishing a NetModem/Satellite Router Console Connection. 3. Configure/change the PC IP address if necessary. Refer to Appendix B, Gaining IP Connectivity to the NetModem. 4. Install WinSCP. WinSCP is an open source SFTP client for Windows that offers secure file transfer between a local computer and a remote computer. You can load this application by accessing: Note: When transferring an options file, click the check box to select the Text option in the Transfer Mode field. 4. RELOADING THE OPTIONS FILE Depending on whether you have IP connectivity between your PC and the NetModem, this section contains procedures for reloading the options file. RELOADING THE OPTIONS FILE WHEN THERE IS IP CONNECTIVITY BETWEEN YOUR PC AND THE NETMODEM You are now ready to begin reloading your options file. You need to perform one of the following procedures depending on whether you have IP connectivity. 2
3 To reload your options file with IP connectivity, invoke the ssh daemon on the infiniti and transfer the options file to the remote (this procedure bypasses isite so that you are able to load the options file). Perform the following steps when you have IP connectivity to invoke the ssh daemon and transfer the options file to the remote: 1. Rename the good options file on your local PC to: falcon.opt 2. Connect to the infiniti via the console cable and login using: User Name: root Password: idirect Note: Do not telnet 0, and make sure you stay at the Linux prompt. 3. Turn on the ssh daemon by entering the command: service sshd start 4. Secure Copy the falcon.opt options file (you renamed in step 1) to the following location in the remote: /etc/idirect/falcon/ Note: In order to transfer the options file, use the WinSCP application. 5. Restart Falcon by entering the command: service idirect_falcon restart RELOADING THE OPTIONS FILE WHEN YOU CANNOT GAIN IP CONNECTIVITY TO YOUR NETMODEM If you do not have IP connectivity to your NetModem, you can reload your options file by performing the following procedure. Perform the following steps to reload the options file when you cannot gain IP connectivity to your modem: 1. Open a known good options file in a text editor (i.e., NotePad) and copy all of the text to the Windows clipboard. The options file MUST match the Serial Number of the modem you are trying to install or recover. 2. From the console, change your location to the options file directory by entering the command: cd /etc/idirect/falcon/ 3. Rename the current options file by entering the following command: mv falcon.opt falcon.opt.old 4. Type the following command: 3
4 cat > falcon.opt 5. Paste the text that you previously copied (in step 1) to the console session, by right-clicking the mouse button and pasting to the Host. 6. Press the Enter key once, then press Ctrl-D to exit. 7. Examine the contents of falcon.opt file to ensure there are no extra characters by entering: cat falcon.opt 8. Restart falcon by entering the command: service idirect_falcon restart 5. RELOADING THE IMAGE PACKAGE The following procedure describes how to reload an Image Package. This procedure requires IP connectivity between your PC and the NetModem. If you do not have IP connectivity, refer to the procedures in Appendix A and B before performing this procedure. Perform the following steps to reload your Image Package: Using WinSCP: 1. Connect to the infiniti via the console cable and login using the following: User Name: root Password: idirect Note: Do not telnet 0, and make sure you stay at the Linux prompt. 2. Turn on the ssh daemon by entering the command: service sshd start 3. Secure Copy the Package file named: remote-6.n.n.pkg to /tmp/ Where: n_n = the software release string that displays when you enter the ls al command (see example on the next page). Note: In order to transfer the image package, use the WinSCP application. 4. In the console connection, type cd /tmp and press Enter. Note: Ensure that you are at the / directory and not in the /root directory, and it is highly recommended that you make a backup copy of your options file before you start the package installation (to make a backup copy, you can use the following command and filename: cp falcon.opt to falcon.opt-bu) 5. In the console, type ls al and press Enter. 4
5 6. Type each of the following commands exactly as shown, and press Enter after each command entry (if it is not exact, the install fails): Note: package -mx -a remote -6_n_n.pkg rm -f remote-6_n_n.pkg chmod 744 package_install.sh./package_install.sh service idirect_falcon restart Where: n_n = the software release string that displays when you enter the ls al command (see example on the next page). The syntax of the package name MUST be identical to what is shown by Linux after executing the ls al command. See the example below. Example input for reloading the image package: # pwd /tmp # ls -al drwxrwxrwt 2 root root 60 Jan 1 04:53 drwxr-xr-x 1 root root 0 Jan 1 01:07 -rw root root Dec remote -6_0_9.pkg # package -mx -a remote-6_0_9.pkg # rm -f remote-6_0_9.pkg # chmod 744 package_install.sh #./package_install.sh ******Package installation script for falcon starts HERE****** # cp falcon.opt-bu falcon.opt # service idirect_falcon restart 5
6 7. Once the installation is complete, copy the BU options file to the Options.opt file. LOADING IMAGES USING THE TFTP SERVER Perform the following steps to load the images using the TFTP server: 1. Open isite and, from the File menu, select TFTP. A pop-up window displays prompting you to the TFTP server local folder. 2. Browse and select the folder in which the remote package resides. 3. Open a console session to the infiniti unit and login to the Linux prompt using: User Name: root Password: idirect 4. Type the following command, then press Enter to stop the idirect application: service idirect_falcon stop 5. Type the following command, then press Enter: tftp_package.sh <IP address of TFTP server> <package name> For example, if the IP address of your PC is and you are loading the release remote package, the command is: tftp_package.sh remote-6_0_9.pkg Installation starts automatically. 6. Once installation is complete, type the following command and press Enter: idirect_falcon restart 6. RECOVERING A LINUX PASSWORD You may be required to recover your Linux password (this process applies to the infiniti series). The following procedure explains how you can recover a Linux password. Perform the following steps to recover the root password for the infiniti series: 1. Connect a PC to the modem via the console port. You can use Hyper Terminal or Tera-Term for this operation. 2. Reboot the infiniti NetModem. 6
7 The message DRAM Test Successful displays. 3. Press the Spacebar 3-4 times. The Redboot> prompt displays. 4. Type: fis load Linux The Redboot> prompt re-displays. 5. Type: exec -c root=/dev/mtdblock2 console=ttys1,9600 single The /# prompt displays. This indicates that you logged in without a password. 6. Enter the command: passwd You are then prompted to enter a new password. 7. Enter a new password. 8. When prompted, type the new password again to confirm. 9. Once you are successfully logged in, reset the infiniti remote. You can now log into the infiniti remote. 7. APPENDICES This section contains two appendices, including: A. Establishing a NetModem/Satellite Router Console Connection, which outlines the procedure for establishing this type of connection. B. Gaining IP Connectivity To The NetModem, which explains how to gain IP connectivity from your PC to your NetModem. A. ESTABLISHING A NETMODEM/SATELLITE ROUTER CONSOLE CONNECTION You can use any terminal emulator to connect to the NetModem console. The HyperTerm application comes pre-installed on all Windows 2000 and XP machines. In addition to the NetModem Console Table cable, you will need an RJ-45 to DB-9 adapter. The pin outs for a NetModem console cable are as follows: Table 3: DB-9 to RJ-45 Adapter Pinouts 7
8 DB-9 to RJ-45 Adapter Pin-Out RJ-45 Color Code DB-9 1 Blue 8 2 Orange 6 3 Black 2 4 Red 5 5 Green N.C. 6 Yellow 3 7 Brown 4 8 White/Gray 7 Complete the following procedure to set up and save a Hyper Terminal session: 1. Connect the RJ-45 to DB-9 adapter to the COM1 port of your laptop. 2. Plug the other end of the cable into the Console port of the idirect NetModem or Satellite Router 3. In the Windows Start menu, select Programs, select Accessories, select Communications, and then select HyperTerminal. 4. You may have to answer some questions about your area code and provide dialing information. (The information that you enter here isn t important, but you must enter something.) 5. In the Connection Description dialog box, enter a name for the connection, such as NetModem Console. (You may also select an icon other than the default icon 6. Select COM1 in the Connect To dialog box 8


9 7. Using the default variables in the COM1 Properties dialog box below, enter the session properties. Be certain that your settings exactly match these settings. 9

10 8. Click Enter a few times to see if you can generate a response from the NetModem. If you are successful, you will see the NetModem console prompt. If you are unable to generate a response from the NetModem, reexamine your settings to be certain that they are correct. 10
11 B. GAINING IP CONNECTIVITY TO THE NETMODEM The purpose of this procedure is to gain IP connectivity to your NetModem. MANDATORY CONDITIONS Establishing IP connectivity to the NetModem from your laptop computer requires the following conditions to exist: 1. Your computer must be connected directly to the NetModem via a LAN crossover cable, or indirectly via an external switch or router 2. Your computer s IP address must be in the range of addresses specified by the NetModem s IP address and subnet mask 3. Your subnet mask must match the NetModem s subnet mask. DETERMINING THE NETMODEM S IP ADDRESS AND SUBNET MASK 1. The easiest way to determine the NetModem s IP address is to establish a console session and type the appropriate console command 2. Open a console session to the 0NetModem. (See Appendix A for details.) Note: Use the ifconfig command to find out the currently-configured IP address. 11

12 3. At the Linux prompt, type the following command: (for 3000 series, type: ifconfig ixp0) Note: ifconfig ixp1 ixp1 for a 5000 or 7000 series Satellite Router to determine the Satellite Router s IP address. Type: ifconfig ixp0 for 3000 series 12

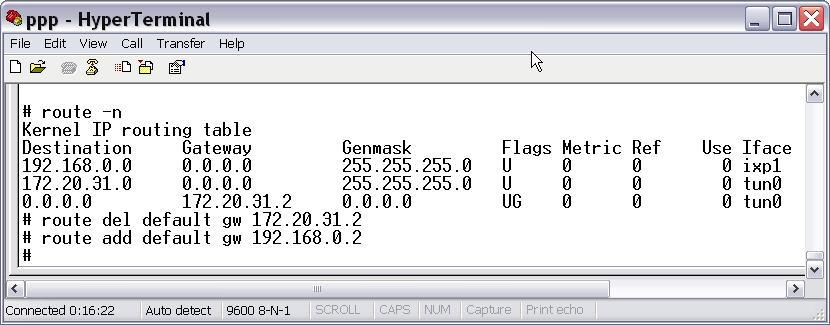
13 4. Check the IP address and subnet mask of the Satellite Router. 5. Configure your laptop s IP address to be in the same subnet as the Satellite Router s interface. 6. Use the following commands to change the default gateway of the Satellite Router to be the same as your laptop s IP address by entering the following commands: route n route del default gw route add default gw 13
14 14
How Do I Recover infiniti Remotes and Line Cards?
 How Do I Recover infiniti Remotes and Line Cards? Date: June 26, 2008 Overview This FAQ contains the following information and procedures pertaining to ids Release 6.0.1 and later: Before Attempting to
Upgrade 6081RC Firmware
 6081RC Upgrade procedure for firmware and CoMon bootloader Date Action Sign-off 1/22/2009 Write initial upgrade procedure for firmware & CoMon bootloader Nathan Meyer 1/27/2009 Edit to simplify procedure
Lab Working with Linux Command Line
 Introduction In this lab, you will use the Linux command line to manage files and folders and perform some basic administrative tasks. Recommended Equipment A computer with a Linux OS, either installed
48-Port 10/100/1000Base-T with 4 Shared SFP. Managed Gigabit Switch WGSW Quick Installation Guide
 48-Port 10/100/1000Base-T with 4 Shared SFP Managed Gigabit Switch WGSW-48000 Quick Installation Guide Table of Contents 1. Package Content... 3 2. Requirements... 4 3. Terminal Setup... 5 4. Logon to
Management Security Switch SGSD-1022 / SGSD-1022P SGSW-2840 / SGSW-2840P. Quick Installation Guide
 Management Security Switch SGSD-1022 / SGSD-1022P SGSW-2840 / SGSW-2840P Quick Installation Guide Table of Contents 1. Package Content... 3 2. Requirements... 4 3. Terminal Setup... 5 4. Logon to the Console...
Lab Router Configuration Using Setup Instructor Version 2500
 Lab 2.2.1 Router Configuration Using Setup Instructor Version 2500 Objective Use the System Configuration dialog (setup). Establish some basic router configurations. Background/Preparation A new router
ITEC451 Network Design & Analysis Laboratory Guide: Appendix
 Linux Guide Accessing the command prompt Before you can access the command prompt, you must login to the system. The administrative user on Linux machines is named root. On most Linux distributions, you
UPGRADING ARCTIC CONTROL S FIRMWARE
 Viola Systems Ltd. tel +358-(0)201-226 226 Lemminkäisenkatu 14-18A fax +358-(0)201-226 220 FIN-20520, Turku e-mail support@violasystems.com Finland APPLICATION NOTE VA-10-1-2 UPGRADING ARCTIC CONTROL S
CS 326e Lab 2, Edmondson-Yurkanan, Spring 2004 Router Configuration, Routing and Access Lists
 CS 326e Lab 2, Edmondson-Yurkanan, Spring 2004 Router Configuration, Routing and Access Lists Name: In this lab you will learn: PartA Cisco 2600 Router Configuration Static Routing PartB 20 min Dynamic
48-Port 10/100Mbps + 4 Gigabit TP / 2 SFP. Managed Switch WGSW Quick Installation Guide
 48-Port 10/100Mbps + 4 Gigabit TP / 2 SFP Managed Switch WGSW-5242 Quick Installation Guide Table of Contents 1. Package Content... 3 2. Requirements... 4 3. Terminal Setup... 5 4. Logon to the Console...
Troubleshooting 1240AG Series Autonomous Access Points
 CHAPTER 3 Troubleshooting 1240AG Series Autonomous Access Points This chapter provides troubleshooting procedures for basic problems with the 1240AG series autonomous access point (AIR-AP1242AG or AIR-AP1242G).
GE-DSH-73/82 and 82-POE Managed Switch Installation Sheet
 GE Security GE-DSH-73/82 and 82-POE Managed Switch Installation Sheet Package Contents Thank you for purchasing the GE Security 7/8-Port Fast Ethernet + 2/3-Port Gigabit TP/SFP Combo Managed Switch. The
Configuring Host Router and Cisco Analog Video Gateway Module Interfaces
 Configuring Host Router and Cisco Analog Video Gateway Module Interfaces Last Updated: August 17, 2009 To configure the Cisco Analog Video Gateway network module after it is installed in your host Cisco
28-Port 10/100/1000Mbps with. 4 Shared SFP Managed Gigabit Switch WGSW / WGSW-28040P. Quick Installation Guide
 28-Port 10/100/1000Mbps with 4 Shared SFP Managed Gigabit Switch WGSW-28040 / WGSW-28040P Quick Installation Guide Table of Contents 1. Package Content... 3 2. Requirements... 4 3. Terminal Setup... 5
Troubleshooting Autonomous Access Points
 CHAPTER 3 This chapter provides troubleshooting procedures for basic problems with the autonomous access point (model: AIR-AP1131AG or AIR-AP1131G). For the most up-to-date, detailed troubleshooting information,
24-Port 10/100/1000Mbps with. 4 Shared SFP Managed Gigabit Switch
 24-Port 10/100/1000Mbps with 4 Shared SFP Managed Gigabit Switch WGSW-24040 / WGSW-24040R SGSW-24040 / SGSW-24040R SGSW-24040P / SGSW-24040P4 SGSW-24240 / SGSW-24240R SGSW-24040HP Quick Installation Guide
Upgrading the Software
 APPENDIX B Upgrading the Software You can upgrade your software in the following ways: From the Cisco IOS command-line interface (CLI) From the ROM monitor Cisco recommends upgrading your software from
Brother HL-5370DW Configuration
 Brother HL-5370DW Configuration Importance of Static IP Address for Printers When a printer is first installed to a computer, its IP address is noted. If that address changes, the computer will be unable
CS 386M Lab 1 Router Configuration and Routing
 CS 386M Lab 1 Router Configuration and Routing In this lab you will learn: PartA Cisco 2600 Router Configuration Static Routing PartB 30 min Dynamic Routing PartC 40 min Explore! Components used in this
Configuring the Switch with the CLI-Based Setup Program
 Configuring the Switch with the CLI-Based Setup Program This appendix contains these topics: Accessing the CLI Through Express Setup, page 1 Accessing the CLI Through the Console Port, page 1 Entering
F5 WANJet 200. Quick Start Guide. Quick Start Overview
 F5 WANJet 200 Quick Start Guide Quick Start Overview Following is a high level overview of the steps required to successfully install and configure your F5 WANJet 200 appliance. For detailed instructions
Deploy a Customer Site
 Local Administration, on page 1 Run Port Check Tool, on page 4, on page 4 Add Cisco Wireless IP Phone 8821 to the Wireless LAN, on page 6 Provision the Phone, on page 7 Local Administration You can connect
Programming through Web browser:
 Connection Details Digital Inputs: There are 8 isolated digital inputs. Digital inputs will work from 5V to 24V DC. Every input has LED indications on top. LED will be ON when proper input is provided.
Gateworks_Avila/Cambria_Installation. Please note: The details in these instructions apply specifically to the GW board.
 Please note: The details in these instructions apply specifically to the GW2348-4 board. If you are using a GW2348-2 or GW2347 there are subtle but important differences in the flashing commands you must
This document is exclusive property of Cisco Systems, Inc. Permission is granted to print and copy this document for non-commercial distribution and
 This document is exclusive property of Cisco Systems, Inc. Permission is granted to print and copy this document for non-commercial distribution and exclusive use by instructors in the CCNA Exploration:
How to Upgrade or Recover the Firmware of the UC-7400 Series Embedded Computers
 How to Upgrade or Recover the Firmware of the UC-7400 Series Embedded Computers Bruce Chen, Project Supervisor, Moxa Technical Support Dept. Moxa offers the boot loader utility for firmware upgrade or
Before you start the lab exercises see the lab administrator or EEE3080F tutor to get assigned to your routers.
 EEE00F Lab Basics of the Network Lab Student Lab Manual Before you start the lab exercises see the lab administrator or EEE00F tutor to get assigned to your routers. Contents. Resources used in the labs...
Chapter-3. Introduction to Unix: Fundamental Commands
 Chapter-3 Introduction to Unix: Fundamental Commands What You Will Learn The fundamental commands of the Unix operating system. Everything told for Unix here is applicable to the Linux operating system
DIL/NetPC ADNP/1520 Board Revision 2.1 Installing an SSH Connection User Manual
 DIL/NetPC ADNP/1520 Board Revision 2.1 Installing an SSH Connection User Manual SSV Embedded Systems Heisterbergallee 72 D-30453 Hannover Phone: +49-(0)511-40 000-0 Fax: +49-(0)511-40 000-40 E-mail: sales@ist1.de
Industrial 4G LTE Cellular Gateway ICG-2420-LTE
 Industrial 4G LTE Cellular Gateway ICG-2420-LTE Quick Installation Guide Table of Contents 1. Package Contents... 3 2. Requirements... 4 3. Starting Web Management... 5 4. Terminal Setup... 8 4.1. Logon
PreLab for CS356 Lab NIL (Lam) (To be submitted when you come for the lab)
 (To be submitted when you come for the lab)") PreLab for CS356 Lab NIL (Lam) (To be submitted when you come for the lab) Name: UT EID: 1. Differentiate between Routers, Switches, and Hubs. 2. Explain subnet masks. 3. For this lab, where is subnet
PreLab for CS356 Lab NIL (Lam) (To be submitted when you come for the lab) Name: UT EID: 1. Differentiate between Routers, Switches, and Hubs. 2. Explain subnet masks. 3. For this lab, where is subnet
Configurations for the Layer 3 Switch Router
 CHAPTER 3 This chapter describes the initial configuration of the Layer 3 switch router and contains the following major sections: Starting Up the Layer 3 Switch Router, page 3-1 Using the Console and
Author A.Kishore/Sachin WinSCP
 WinSCP WinSCP is a freeware windows client for the SCP (secure copy protocol), a way to transfer files across the network using the ssh (secure shell) encrypted protocol. It replaces other FTP programs
Configuring the Switch with the CLI-Based Setup Program
 Configuring the Switch with the CLI-Based Setup Program Accessing the CLI Through Express Setup, page 1 Accessing the CLI Through the Console Port, page 1 Entering the Initial Configuration Information,
Introduction to the Linux Command Line
 Introduction to the Linux Command Line May, 2015 How to Connect (securely) ssh sftp scp Basic Unix or Linux Commands Files & directories Environment variables Not necessarily in this order.? Getting Connected
Troubleshooting CHAPTER
 21 CHAPTER This chapter provides troubleshooting procedures for basic problems with the wireless device. For the most up-to-date, detailed troubleshooting information, refer to the Cisco TAC website at
Lab 3: Basic Device Configuration
 Lab 3: Basic Device Configuration University of Jordan Faculty of Engineering & Technology Computer Engineering Department Computer Networks Laboratory 907528 2 Lab 3: Basic Device Configuration **Given
Performing Administrative Tasks
 This chapter describes how to perform administrative tasks using Cisco CMX. Users who are assigned administration privileges can perform administrative tasks. Cisco CMX User Accounts, page 1 Backing Up
Configuration Guide. Upgrading AOS Firmware L1-29.1D July 2011
 61200990L1-29.1D July 2011 Configuration Guide This configuration guide explains how to update your ADTRAN Operating System (AOS) firmware using the AOS Web-based graphical user interface (GUI) with Trivial
SSL VPN Reinstallation
 SSL VPN Reinstallation This software reinstallation procedure describes how to reinstall the software onto a previously formatted and programmed hard disk drive (HDD) on the Contivity SSL VPN 1000 card.
Cisco 4000 Series Virtual Configuration Register
 APPENDIX D Cisco 4000 Series Virtual Configuration Register This appendix describes the Cisco 4000 series virtual configuration register, the factory-default settings, and the procedures for changing those
DIL/NetPC DNP/9200 Board Revision 1.1 Installing an SSH Connection User Manual
 DIL/NetPC DNP/9200 Board Revision 1.1 Installing an SSH Connection User Manual SSV Embedded Systems Heisterbergallee 72 D-30453 Hannover Phone: +49 (0)511/40 000-0 Fax: +49 (0)511/40 000-40 E-mail: sales@ist1.de
Restoring an SP Boot Image
 AX100-Series Restoring an SP Boot Image Revision A01 June 9, 2004 This document explains how to restore an SP s boot image. Read it when an SP does not start properly and its fault light blinks four times
ROM Monitor. Using ROM Monitor APPENDIX
 APPENDIX A ROM Monitor This appendix describes the Cisco 805 router ROM monitor. The ROM monitor runs when the router is powered up or reset and helps to initialize the processor hardware and boot the
Industrial 24-Port 10/100/1000Mbps Managed Gigabit. Switch (-40~75 degrees C) with 4 Shared SFP Ports IGSW-24040T. Quick Installation Guide
 with 4 Shared SFP Ports IGSW-24040T. Quick Installation Guide") Industrial 24-Port 10/100/1000Mbps Managed Gigabit Switch (-40~75 degrees C) with 4 Shared SFP Ports IGSW-24040T Quick Installation Guide Table of Contents 1. Package Contents... 3 2. Requirements... 4
Industrial 24-Port 10/100/1000Mbps Managed Gigabit Switch (-40~75 degrees C) with 4 Shared SFP Ports IGSW-24040T Quick Installation Guide Table of Contents 1. Package Contents... 3 2. Requirements... 4
Manual PBX IP Version: 1.0
 Manual PBX IP 2008 Version: 1.0 Content CONTACT ATCOM... 3 CHAPTER 1 THE INTRODUCTION OF PBX-IP 2008... 4 CHAPTER 2 ACCESS TO THE PBX-IP 2008... 7 2.1 WEB PAGE ACCESS BY BROWSER... 7 2.2 SSH ACCESS BY
L2+ Managed Gigabit Switch WGSW series
 L2+ Managed Gigabit Switch WGSW-24040 series Quick Installation Guide Table of Contents 1 Package Contents... 3 2. Requirements... 4 3. Terminal Setup... 5 3.1 Logon to Console... 6 3.2 Configuring IP
ilo MP Utilities ilo MP
 The Integrated Lights-Out Management Processor () offers remote server management through an independent management processor (MP). It provides a way for you to connect to a server and perform administration
Lab Capturing and Analyzing Network Traffic
 Lab 1.2.2 Capturing and Analyzing Network Traffic Host Name IP Address Fa0/0 Subnet Mask IP Address S0/0/0 Subnet Mask Default Gateway RouterA 172.17.0.1 255.255.0.0 192.168.1.1 (DCE) 255.255.255.0 N/A
TTWin 4 Quick Start Guide
 Host connectivity for Windows TTWin 4 Quick Start Guide TTWin 4 is the latest evolution of Turbosoft s premier Terminal Emulation package - a fast, accurate, reliable and powerful connectivity tool for
8-Port 10/100Mbps + 2G TP/SFP Combo. Managed Industrial Switch ISW-1022M / ISW-1022MT / ISW-1022MP / ISW-1022MPT / ISW-1033MT
 8-Port 10/100Mbps + 2G TP/SFP Combo Managed Industrial Switch ISW-1022M / ISW-1022MT / ISW-1022MP / ISW-1022MPT / ISW-1033MT Quick Installation Guide Table of Contents 1. Package Content... 3 2. Requirements...
Lab Selecting the Root Bridge
 Lab 7.2.4 Selecting the Root Bridge Objective Create a basic switch configuration and verify it. Determine which switch is selected as the root switch with the factory default settings. Force the other
Configuring the Switch with the CLI Setup Program
 APPENDIXC Configuring the Switch with the CLI Setup Program This appendix provides a command-line interface (CLI) setup procedure for a standalone switch. To set up the switch by using Express Setup, see
Access Server: User's and Developer's Guide <<< Previous Next >>>
 1 of 14 12/9/2008 10:18 AM Access Server: User's and Developer's Guide > Chapter 2. Getting Started with Access Server Access Server can be controlled in three ways: by using the WWW
16/24/48-Port 10/100/1000T + 2/4-Port 100/1000X SFP Managed Switch GS T2S/GS T2S/GS T4S. Quick Installation Guide
 16/24/48-Port 10/100/1000T + 2/4-Port 100/1000X SFP Managed Switch GS-4210-16T2S/GS-4210-24T2S/GS-4210-48T4S Quick Installation Guide Table of Contents 1. Package Contents... 3 2. Requirements... 4 3.
Hochschule Bremen Networking Lab
 Hochschule Bremen Networking Lab User Manual Welcome to the Hochschule Bremen networking lab. This manual will give you a brief introduction on how to use the PCs and networking hardware in the lab. The
16/24-Port 10/100/1000T 802.3at PoE + 2-Port 100/1000X SFP Managed Switch GS P2S GS P2S. Quick Installation Guide
 16/24-Port 10/100/1000T 802.3at PoE + 2-Port 100/1000X SFP Managed Switch GS-4210-16P2S GS-4210-24P2S Quick Installation Guide Table of Contents 1. Package Contents... 3 2. Requirements... 4 3. Terminal
DX System Operating Guide
 DX System Operating Guide Supported by: Technology Corporation Rackit Technology Corporation 274 Madison Avenue, New York, NY 10016 Tel: (212) 679-0050 Fax: (212) 679-0040 1. 8 0 0. 6 3 6. 3 4 3 4 w International
Express Setup. System Requirements. Express Setup CHAPTER
 3 CHAPTER You access the switch module via the host CGR 2010 router. For more information, see Accessing the Switch Module, page 4-2. To exchange and monitor control messages between the switch module
202 Lab Introduction Connecting to the Lab Environment
 202 Lab Introduction Connecting to the Lab Environment Objectives During this v7.1 Deployment lab, each student (from the Blue group or Green group) must verify access (and permissions) to their assigned
GW1000 User s Guide. Revision 1.04 Mar 30, 2008
 GW1000 User s Guide Revision 1.04 Mar 30, 2008 Website: www.datalink-networks.com Tel : (604) 632-4278 / (866) 709-6390 Table of Contents 1.0 GW1000 General Operation & Applications... 3 2.0 Hardware Specifications...
Using the Cisco NCS Command-Line Interface
 CHAPTER 2 This chapter provides helpful tips for understanding and configuring the Cisco Prime Network Control System (NCS) from the command-line interface (CLI). The Cisco NCS can be deployed for small,
EAN-Network Configuration
 EAN-Network Configuration PN: EAN-Network-Configuration 1/25/2018 SightLine Applications, Inc. Contact: Web: sightlineapplications.com Sales: sales@sightlineapplications.com Support: support@sightlineapplications.com
XLink Kai Raspberry Pi Beginners Tutorial
 XLink-Kai-Raspberry-Pi-Beginners-Tutorial.md XLink Kai Raspberry Pi Beginners Tutorial Hi! This tutorial will guide you through setting up XLink Kai on a Raspberry Pi to play multiplayer system link Xbox
Welcome to getting started with Ubuntu Server. This System Administrator Manual. guide to be simple to follow, with step by step instructions
 Welcome to getting started with Ubuntu 12.04 Server. This System Administrator Manual guide to be simple to follow, with step by step instructions with screenshots INDEX 1.Installation of Ubuntu 12.04
Installing + Configuring
 Installing + Configuring Install and Recover with TFTP Introduction This document is designed to help you install the Commotion software if the Install on a Ubiquiti Device instructions did not work, or
NetVanta Series (with 56K/64K Network Interface Module)
") VPN WAN LAN PWR STAT TD RD TD RD TD RD VPN WAN LAN PWR STAT TD RD TD RD TD RD NetVanta 3200 NetVanta 3200 NetVanta Series (with 56K/64K Network Interface Module) Quick Configuration Guide 64200861L1-42A
VPN WAN LAN PWR STAT TD RD TD RD TD RD VPN WAN LAN PWR STAT TD RD TD RD TD RD NetVanta 3200 NetVanta 3200 NetVanta Series (with 56K/64K Network Interface Module) Quick Configuration Guide 64200861L1-42A
Troubleshooting 1240AG Series Lightweight Access Points
 CHAPTER 4 Troubleshooting 1240AG Series Lightweight Access Points This chapter provides troubleshooting procedures for basic problems with the 1240AG series lightweight access point (AIR-LAP1242AG or AIR-LAP1242G).
WinSCP. Author A.Kishore/Sachin
 WinSCP WinSCP is a freeware windows client for the SCP (secure copy protocol), a way to transfer files across the network using the ssh (secure shell) encrypted protocol. It replaces other FTP programs
Nova series update F/W & Boot code from Boot Utility
 Nova series update F/W & Boot code from Boot Utility Purpose: Update firmware/boot code from Boot Utility Product Affect: Nova 20S, Nova 20R, Nova 26S, Nova 26R, Nova 27S, Nova 29S, Nova 30S, Nova 30R,
Product Family: Networking Hardware Number: AN-NH-012
 APPLICATION NOTE THIS INFORMATION PROVIDED BY AUTOMATIONDIRECT.COM TECHNICAL SUPPORT These documents are provided by our technical support department to assist others. We do not guarantee that the data
ATCOM IPPBX IP01 Product Guide Version: VoIPon Tel: +44 (0) Fax: +44 (0)
 Fax: +44 (0)") Figure: ATCOM IPPBX IP01 ATCOM IPPBX IP01 Product Guide Version: 1.0 2010-05-10 Content CONTACT ATCOM... 3 CHAPTER 1 THE INTRODUCTION OF IP01... 4 CHAPTER 2 ACCESS TO THE IP01... 6 2.1 WEB PAGE ACCESS
Figure: ATCOM IPPBX IP01 ATCOM IPPBX IP01 Product Guide Version: 1.0 2010-05-10 Content CONTACT ATCOM... 3 CHAPTER 1 THE INTRODUCTION OF IP01... 4 CHAPTER 2 ACCESS TO THE IP01... 6 2.1 WEB PAGE ACCESS
N30 Supervisory Controller Quick Start
 Issue Date June 30, 2004 TECHNICAL BULLETIN N30 Supervisory Controller Quick Start N30 Supervisory Controller Quick Start...2 Introduction... 2 Key Concepts... 3 Using This Document... 3 Related Information...
CS356 Lab NIL (Lam) In this lab you will learn: Cisco 2600 Router Configuration Static Routing PartB 20 min Access Control Lists PartC 30 min Explore!
 In this lab you will learn: Cisco 2600 Router Configuration Static Routing PartB 20 min Access Control Lists PartC 30 min Explore!") CS356 Lab NIL (Lam) In this lab you will learn: PartA Time: 2 hrs 40 min Cisco 2600 Router Configuration Static Routing PartB 20 min Access Control Lists PartC 30 min Explore! Components used: 2 computers
CS356 Lab NIL (Lam) In this lab you will learn: PartA Time: 2 hrs 40 min Cisco 2600 Router Configuration Static Routing PartB 20 min Access Control Lists PartC 30 min Explore! Components used: 2 computers
Cisco UCS Director Baremetal Agent Installation and Configuration Guide, Release 5.2
 UCS Director Baremetal Agent Installation The purpose to this document is to illustrate the steps to install the UCS Director Baremetal Agent (PXE Server) which can be used to write/use workflows that
User Manual. DIL/NetPC DNP/2110 Installing an SSH Connection
 DIL/NetPC DNP/2110 Installing an SSH Connection User Manual SSV Embedded Systems Heisterbergallee 72 D-30453 Hannover Phone: +49-(0)511-40 000-0 Fax: +49-(0)511-40 000-40 E-mail: sales@ist1.de Manual Revision:
How to upgrade firmware in DSL-xxx series router
 How to upgrade firmware in DSL-xxx series router WARNING: DO NOT upgrade the firmware through a wireless connection. You may damage the router. Note that you will have to reconfigure the router after upgrading.
DS Series Manual DATA SWITCH. DS62-MD4 Host-Modem Module QUICK START. BayTech Manual Publication
 DS Series Manual DATA SWITCH DS62-MD4 Host-Modem Module QUICK START BayTech Manual Publication Revision May 2008 Copyright 2007 by Bay Technical Associates, Inc. BayTech, is a registered trademarks of
System Manager Unit (SMU) Hardware Reference
 Hardware Reference") System Manager Unit (SMU) Hardware Reference MK-92HNAS065-02 Notices and Disclaimer Copyright 2015 Hitachi Data Systems Corporation. All rights reserved. The performance data contained herein was obtained
System Manager Unit (SMU) Hardware Reference MK-92HNAS065-02 Notices and Disclaimer Copyright 2015 Hitachi Data Systems Corporation. All rights reserved. The performance data contained herein was obtained
LevelOne Broadband Routers
 LevelOne Broadband Routers FBR-1100TX FBR-1400TX FBR-1401TX FBR-1700TX User's Guide TABLE OF CONTENTS CHAPTER 1 INTRODUCTION... 1 Features of your LevelOne Broadband Router... 1 Package Contents... 4
Initial Configuration on ML-Series Card
 CHAPTER 3 This chapter describes the initial configuration of the ML-Series card and contains the following major sections: Hardware Installation, page 3-1 Cisco IOS on the ML-Series Card, page 3-2 Startup
3 Connection, Shell Serial Connection over Console Port SSH Connection Internet Connection... 5
 Contents 1 Description 2 2 Supported Devices 3 3 Connection, Shell 4 3.1 Serial Connection over Console Port...................... 4 3.2 SSH Connection................................. 4 3.3 Internet Connection...............................
Session 1: Accessing MUGrid and Command Line Basics
 Session 1: Accessing MUGrid and Command Line Basics Craig A. Struble, Ph.D. July 14, 2010 1 Introduction The Marquette University Grid (MUGrid) is a collection of dedicated and opportunistic resources
Mega 100WR ADSL 2+ Router - Easy Start
 Mega 100WR ADSL 2+ Router - Easy Start Mega 100WR ADSL 2+ Router - Easy Start Chapter 1 Introduction Thank you for purchasing a Mega 100WR Router. This Easy start guide is a complete guide to configuring
Lab Command Line Fundamentals Instructor Version 2500
 Lab 2.2.9 Command Line Fundamentals Instructor Version 2500 Objective Log into a router and go to the user and privileged modes. Use several basic router commands to determine how the router is configured.
DGS-3630-Series Switches
 DGS-3630-Series Switches Switch Management Interfaces Adding Administrator Account Enabling Remote Management (SSH) Changing Switch IP Address Saving Configuration Resetting to Factory Defaults Switch
ZyWALL 10W. Internet Security Gateway. Quick Start Guide Version 3.62 December 2003
 Internet Security Gateway Quick Start Guide Version 3.62 December 2003 Introducing the ZyWALL The is the ideal secure gateway for all data passing between the Internet and the LAN. By integrating NAT,
IP Power 9258 HP User Manual Firmware Version: 1.1 Date Released: 09/16/2009
 IP Power 9258 HP User Manual Firmware Version: 1.1 Date Released: 09/16/2009-1 - Warning: Any changes made to this equipment without permission may cause damages to the device! IMPORTANT NOTICE 1. IP Power
Hardware Installation Guide Installation (x3350)
") Title page Nortel Application Gateway 2000 Nortel Application Gateway Release 6.3 Hardware Installation Guide Installation (x3350) Document Number: NN42400-300 Document Release: Standard 04.03 Date: January
Title page Nortel Application Gateway 2000 Nortel Application Gateway Release 6.3 Hardware Installation Guide Installation (x3350) Document Number: NN42400-300 Document Release: Standard 04.03 Date: January
EasyIO 30P Firmware Flashing and Upgrading. Firmware Flashing and Upgrading
 Firmware Flashing and Upgrading Document Change Log 01 st Jan 2011 Document created. 18 th April 2011 Added in FwTool v1.10.exe to document 23 th Aug 2011 Update the FwTool v1.11.exe 21 st Oct 2011 Added
Using the Web-Browser and CLI Interfaces
 CHAPTER 2 This chapter describes the web-browser and CLI interfaces that you use to configure the controller. It contains these sections: Using the Web-Browser Interface, page 2-2 Using the CLI, page 2-7
24-Port Gigabit with 4 Optional 10G Slots. Layer 3 Managed Stackable Switch XGS Quick Installation Guide
 24-Port Gigabit with 4 Optional 10G Slots Layer 3 Managed Stackable Switch XGS3-24040 Quick Installation Guide Table of Contents 1. Package Content... 3 2. Switch Management... 4 3. Requirements... 5 4.
NET+Works with GNU Tools Getting Started Guide
 NET+Works with GNU Tools Getting Started Guide NET+Works with GNU Tools Getting Started Guide Operating system/version: 6.3 Part number/version: 90000718_C Release date: March 2006 www.digi.com 2006 Digi
Lab Spanning-Tree Recalculation
 Lab 7.2.6 Spanning-Tree Recalculation Objective Create a basic switch configuration and verify it. Observe the behavior of spanning-tree algorithm in presence of switched network topology changes. Background/Preparation
Bridge Cable User s Guide
 Bridge Cable User s Guide Table of Contents Overview -------------------------------------------------------------------- 2 Driver Installation --------------------------------------------------------
Lab - Examining Telnet and SSH in Wireshark
 Topology Addressing Table Objectives Device Interface IP Address Subnet Mask Default Gateway R1 G0/1 192.168.1.1 255.255.255.0 N/A PC-A NIC 192.168.1.3 255.255.255.0 192.168.1.1 Part 1: Configure the Devices
RBS 6000 Commissioning Procedure
 RBS 6000 Commissioning Procedure 1 Introduction This document describes step-by-step instructions for integration of a RBS 6000 series. 2 Objective This document serves the purpose of describing the procedure
Maintaining the System Software
 CHAPTER 2 This chapter covers the tasks required for maintaining a Content Engine. Upgrading the System Software, page 2-1 Recovering the System Software, page 2-2 Maintaining the Hard Disk Storage, page
Getting Started With UNIX Lab Exercises
 Getting Started With UNIX Lab Exercises This is the lab exercise handout for the Getting Started with UNIX tutorial. The exercises provide hands-on experience with the topics discussed in the tutorial.
Bring-up the Router. Boot the Router
 After installing the hardware, boot the router. Connect to the XR console port and power on the router. The router completes the boot process using the pre-installed operating system (OS) image. If no