Logging into your online campus:
|
|
|
- Alban Carpenter
- 6 years ago
- Views:
Transcription


1 2018
2 TABLE OF CONTENTS Logging into your Online Campus... 3 Home, Training & Administration Tabs... 4 Training Tab... 4 Taking a course... 5 Administration Tab Managing User Accounts... 6 Adding a New User... 6 Deleting Users Deactivating Users Reactivating Users Editing users Assigning Training Choose the Training to Assign Choose who needs the training Setup Training Schedule Manage Assignments Edit an Assignment Unassign Assignments Preview Courses View Activities within a Qualification Create a Custom Qualification Create a Competency Create a Qualification Reports Activity Exception Report Select the Activities Select the Users Certificate of Completion Report Automated Reporting Features Manage Individual Completion Records How to Assign the Administration Role Notifications Online Campus Support
 3. Click the green Login icon.")
3 Logging into your online campus: 1. Visit your login page at 2. Enter your username and password in the appropriate fields. Note: (passwords are case sensitive usernames are not) 3. Click the green Login icon. Note: If you or any of your employees forget their password, you can use the link directly below the green Login button to reset your password. The system will send a new password to the that is entered into the user s account. If there is not an in this user account then please contact IPCed directly: Phone: Help Desk: help@ipced.com Account Management Team: clientcare@ipced.com 3
4 Home, Training & Administration Tabs Upon logging into the system, one is taken directly to the Training Page. This is because the site defaults on the Training tab in the upper right of the screen. Notice these 5 tabs: 1. Home: where a general user can go to view/edit their own profile Note: Administrators will spend little-to-no time in the Home tab since all those aspects are available in the Administration tab, thus we will not cover the Home tab in this Manual. 2. Training: where assigned training is displayed. 3. Electives: where catalog/electives are displayed. 4. Administration: where users with administrative access go to assign training, manage user accounts, select/preview courses, track user progress, etc. To have access to the Administration tab, one must be assigned the Administration Role. As administrators, this has usually already been set up for you by the IPCed Client Care team. Once you have access to the Administration tab, you have the ability to assign out the Administration role to other users. For these instructions, please reach out to IPCed s Client Care team at clientcare@ipced.com General, non-administrative users will only see the Home and Training tabs when they are logged in. Training Tab: This page displays the training that has been assigned to a user to complete. If no training has been assigned, the message shown in the screen shot below will 4
 Taking a course: To enter into a training course, the user will click the green Launch icon to whichever course they")

5 appear. This simply indicates that training has not been assigned yet. Training is assigned in the Administration tab (4) Taking a course: To enter into a training course, the user will click the green Launch icon to whichever course they wish to complete (see below). next The user will be prompted to complete an end-of-lesson quiz following the majority of our course presentations. For a more in-depth guide to taking courses, consult your User Guide for general, non-administrative users. Administration Tab: Administrative tasks that are conducted in the Administration tab include (but certainly not limited to) the following: Assign training Select/preview courses 5

6 Manage user accounts Track user progress Those individuals who are set up with the Administration Role access will see the Administration tab. Managing User Accounts The most basic tasks needed to manage user accounts include the following: Adding new users Editing existing users Deleting Users Deactivating users Reactivating users Adding a New User: 1. Click the Administration tab in the upper right. 2. Click the Organization tab from the menu on the left side of the screen. 6
.")
.")
7 3. From the sub-menu that pops down, click the Users tab (see screen shot above). Clicking this takes you to a page with a list of all the active users in your online campus (see screen shot below). 4. Click the blue + New icon located in the upper left of the screen (see arrow in screen shot above). This will take you to a Create User page with a number of data entry fields (see screen shot below). On this Create User page, only the fields in red are required. 7
. Clicking this takes you to a list of Teams in your online campus (see screen shot below). 6.")

8 5. Team: In the top Team field, click the green selector icon to the right of the blue text Click here to select (see screen shot below). Clicking this takes you to a list of Teams in your online campus (see screen shot below). 6. Select the Team you want the new user to be added onto by doing one of the 2 actions: Double click the Team you want to add the user onto. OR Click to highlight the desired Team then click the blue Select icon in the upper left (see arrow in screen shot below). 8


9 After selecting the team, you will be taken back to the Create User page. The top Team field will now read the name of the Team chosen in step 6. In this example, the Caregiving Team was selected. 7. Username: Create a username that is easy to remember and unique in the system. To check if it is unique in the system, click the green checkmark to the right of the username field (see screenshot above). 8. Password: Create a password that is 7 characters with at least 1 number and 1 letter. We suggest the password password1 as it satisfies these requirements. 9. First Name & Last Name: Please enter in their formal name (such as the one on their driver s license or passport) because these are the names that appear on their Certificates of Completion. Although it is not one of the required fields in red, it is highly recommended to include s as they are necessary to receive automated messages and notifications (such as their log in information, password resets, when training has been assigned, etc.). 9


10 10. After the fields in red have been correctly entered, click the blue Save icon in the upper left (see screenshot below). 10

11 Clicking Save will eventually prompt a message briefly in the upper right of the screen that says, Changes Saved (see screenshot below). 11. Click the blue Close icon in the upper right of the screen. Clicking Close will take you back to the Users page. The new user should appear among the other users in the online campus. DONE! Note: If you ever have more than 5 users to add at a time, simply contact the IPCed Client Care Team (ClientCare@ipced.com). They will send you an Excel Template to add in the users you need to import in bulk. Deleting Users: To remove users from the active user list, you can either delete or deactivate a user. Those actions both result in freeing up a space on the active user list, but differ in the following ways: 11

12 Deleting a user: Removes all records of that user, including completion records. Deactivating a user: moves the user to the inactive user list from the active user. When inactive, a user s account information and completion records remain intact; however, they are unable to log in or access training. In addition, they can be reactivated as if the user never left. The following steps detail how to delete 1. Begin on the Users page. (To get here, follow steps 1-3 on pages 6 & 7). 2. Click the red Delete icon next to the name of the user you wish to delete. 2. Click to highlight whichever user to wish to deactivate. Clicking Delete will prompt the message shown in the screen shot below. Click to continue. 12
.")
13 DONE! Deactivating Users: The system is designed to deactivate former employees instead of deleting them entirely. This is a safeguard measure to ensure that past employee records remain in the system (for example, if you need to access their records for an audit or if you choose to re-hire this individual). This is why the grey Delete button next to the green Edit button does not work. 1. Begin on the Users page. (To get here, follow steps 1-3 on pages 6 & 7). 2. Click to highlight whichever user to wish to deactivate. 3. Click the Other Actions menu. From the drop-down menu, click Deactivate Users. 13

14 4. The message Users successfully deactivated will appear. Click OK. The deactivated user will disappear from the list of Active users on the Users page. This deactivated user has been moved to the Inactive user list. Here, their completion records and user account information remain intact, even though they are in an inactive state. 14
15 Viewing Inactive Users: When you need to view any users that have been previously deactivated and not deleted. (Usually former users that have their records still saved in the system i.e. temporary staff that work part-time) 1. Begin on the Users page. (To get here, follow steps 1-3 on pages 6 & 7). 2. Click the Other Actions drop down menu and select SHOW INACTIVE USERS. 3. This will display all inactive users so you can select an inactive user to be reactivated. 15
. 4. Click the Other Actions drop down menu and select SHOW INACTIVE USERS. 5.")
16 Reactivating Users: When you need to reactivate users that have been deactivated, such as when you re-hire a former employee, their records and user account information remain intact from before they were deactivated. 3. Begin on the Users page. (To get here, follow steps 1-3 on pages 6 & 7). 4. Click the Other Actions drop down menu and select SHOW INACTIVE USERS. 5. Clicking this will display a list of Inactive users. This inactive state is indicated with the circular red cross badge in the Active column (see screen shot below). 6. Click to highlight whichever user to wish to reactivate. 7. Click the Other Actions menu. From the drop-down menu, click Activate Users. 16


17 The message Users successfully activated will appear. Click OK. The reactivated user will disappear from the list of Inactive users on the Users page. To view the Active users again, simply reverse your steps by clicking the Other Actions menu and then Show Active Users. The Reactivated user now appears among the other Active users list. Editing users: To edit aspects of your profile (such as username, password, , etc.) you will need to go into the Edit User page. 17


18 1. Begin on the Users page. (To get here, follow steps 1-3 on pages 6 & 7). 2. Click the blue Edit icon next to the username of the user whose account you wish to edit. This will take you into the user s profile (screen shot below). This is a useful function for changing a user s team, username, password, names, , etc. 3. Make the changes in the appropriate fields. 4. Click Save in the upper left of the screen. Eventually, a message appears for a moment in the upper right of the screen that says, Changes 18
19 Saved (see screenshot below). After this, click the blue Close icon in the upper right of the screen. This will take you back to the Manage Users page. DONE! Assigning Training Assigning training is a 2-step process with an optional 3 rd step: Choosing the training to assign Choosing who needs the training The training in the online campus is connected to the following terminology: An Activity is an individual course. A Qualification is a bundle of courses ( Activities ). 1. Click the Administration tab in the upper right. 2. Click the Assignments tab from the menu on the left side of the screen. 19


20 3. From the sub-menu that pops down, click the Assign Training tab. Clicking this takes you to the Assign Training page, which shows a three step process (see screen shot below). Choose the Training to Assign: 1. Click the green selector icon to the right of the white box underneath Step 1: Choose the Training (See arrow in screenshot below). 20
. The page defaults on a list of Qualifications.")

21 Clicking this selector icon will take you to a screen with the available courses (Activities and Qualifications) in your online campus from which to choose (see screen shot below). The page defaults on a list of Qualifications. To change the list to view Activities, follow these steps: a. Locate the drop-down menu above the list of Qualifications where it says Look for: and to the right in the white box it says Qualification (see arrows indicating in screen shot below). 21
, the selection process is the same. In the following example, training will be assigned as Activities. 2.")
22 b. Click where it says Qualification to generate a drop-down menu. c. Click Activity within this drop-down menu to change the course list from Qualifications to Activities. Whether you decide to assign Qualifications or Activities (or both), the selection process is the same. In the following example, training will be assigned as Activities. 2. Select the Activities you would like to assign by moving them into the Selected Records box to right (see screen shot below). Do this in one of several ways: a. Double click the Activity OR b. Click to highlight the desired Activity, then click the top green arrow that points toward the Selected Records box (see arrow in screen shot below). OR c. By clicking the green double arrows, all of the items will transfer to the Selected Records box. Note: To move Activities out of the Selected Records box, simply follow step b. (above), only click the 2 nd green arrow that points away from the Selected Records box. 22


23 Page size: Click Page Size at the bottom of the screen to allow a view of every Activity in your online campus. 3. Once the desired Activities are in the Selected Records box, click the blue Select icon in the upper left of your screen (see below). 23
.")

24 This will take you back to the Assign Training page with the three-step process (see screen shot below). Notice now that the names of the Activities that were selected now appear in the white box underneath Step 1: Choose the Training Choose who needs the training: 1. To the right of the white box underneath Step 2: Choose Who Needs Training click the green selector icon (see arrow in screenshot below). 24

. b. Click where it says Team to generate a drop-down menu. c.")
25 Clicking this green selector icon will take you to a screen with the Teams in your online campus (see screen shot below). You can change the list to view other user groupings, such as an individual user. To change the list to view, follow these steps: a. Locate the drop-down menu above the list of Teams where it says, Look for: and to the right in the white box it says Team (see arrows indicating in screen shot below). b. Click where it says Team to generate a drop-down menu. c. Click User within this drop-down menu to change the list from Teams to User. 25
.")
26 Whether you decide to assign training to a Team, User, Group, etc., the selection process is the same. In the following example, training will be assigned to individual Users. In the following example, users will be assigned training. 2. Select the users would like to assign by moving them to the Selected Records box to right (see screen shot below). Do this in one of several ways: a. Double click the user. OR b. Click to highlight the desired user then click the top green arrow that points toward the Selected Records box (see arrow in screen shot below). OR c. By clicking the green double arrows, all of the users will transfer to the Selected Records box. Note: To move users out of the Selected Records box, simply follow step b. (above), only click the 2 nd green arrow that points away from the Selected Records box. 26
.")
.")

27 3. Once the desired users are in the Selected Records box, click the blue Select Icon in the upper left of your screen (see below). This will take you back to the Assign Training page with the three-step process (see screen shot below). Notice now that the names of the users that were selected now appear in the white box underneath Step 2: Choose Who Needs Training (see screen shot below). 27
.")
. Click the green Close icon.")
28 At this point in the assign training process, the required steps have been completed: Choose the Training to Assign Choose Who Needs the Training To learn about the optional Assignment Dates (such as a Due Date, Start Date, End Date, read Setup Training Schedule (p 29). If you do not wish to impose Assignment Dates, proceed to step 4 below: 4. Click the blue Save in the upper left of the screen. 5. The message Training Assignments Saved with Next steps in the box will appear (see screenshot below). Click the green Close icon. Clicking Close simply generates a fresh Assign Training page. The assignment has been created. If you would like to view a record of the assignment or make 28

.")
29 editions to the assignments (such as choosing to attach an Assignment Date), move on to Manage Assignments (p 30). DONE! Setup Training Schedule: a. Assignment Start Date is the date that the training first appears on the Training page. This can be useful for assigning future assignments. b. Assignment Due Date is the date that the completion status of an assignment changes from Incomplete to Overdue (see example in screen shot below). After a due date, a user can still launch the Activity and complete the assignment. c. Assignment End Date is the date that the training disappears from the Training page altogether. After Dates have been entered in, remember to click the blue Save icon in the upper left of the screen (see step 4. on p 28). 29

30 Manage Assignments When you need to view a record of the assignment or make editions to the assignments (such as adding in an Assignment Due Date) you will go to the Manage Assignments page. 1. Click the Administration tab in the upper right. 2. Click the Activities and Electives tab from the menu on the left side of the screen. 3. From the sub-menu that pops down, click the Manage Assignments tab (see screen shot above). Clicking this takes you to the Manage Assignments page (see screen shot below). 30

31 The Manage Assignments page shows the following: Assigned Activities The username (or Team, Group, etc.) that was assigned the training The date the training was assigned. These three categories are indicated with arrows in the screenshot below: Edit an Assignment: The changes that can be made to an assignment include the following: Adding in an Assignment Date Changing who receives the assignment One can NOT change the training in the assignment itself. Making changes to any assignments you have created. To make either of these changes to an assignment, follow these steps: 1. Locate the assignment you wish to edit: 31


32 2. Click the blue Edit icon next to the assignment. Clicking Edit takes you to the Edit Training Assignment page (see screen shot below). For information on adding an Assignment Date, go to Setup Training Schedule (p 29). For information on changing who receives the training, go to Choose who Needs the Training (p 27). 32

.")
33 Unassign Assignments: Unassigning an assignment will delete the assignment. Do so in the following steps: 1. Locate the assignment you wish to delete. 2. Click the red Delete icon next to the assignment. 3. The Confirm Delete message will appear (see screen shot below). Click the green Yes icon. 33
 of an Activity you will go to the Activities page. 1.")
34 4. Click the green OK when the Delete message appears with the statement Bulk assignments were unassigned. The assignment will disappear from the Manage Assignments page. DONE! Preview Courses When you need to preview or view the course details (such as estimated time duration) of an Activity you will go to the Activities page. 1. Click the Administration tab in the upper right. 34
.")

35 2. Click the Activities tab from the menu on the left side of the screen. 3. From the sub-menu that pops down, click the Activities tab (see screen shot above). Clicking this takes you to the Manage Activities page, which shows a list of all the Activities (individual courses in the site) you have access to. Preview a course: Click the green triangle its content. next to the Activity to preview Searching: Click on the Search icon above the list of courses (see image below). Enter what you are searching for and you can use the filters to narrow down your search (Activity Name, Activity Type, etc. - see image below) 35


36 View: Click the blue View icon next to any course to access a description about the Activity (including its course Description, Estimated Duration and course Type). The example below shows the course description for the course CARE121 Nutrition and Hydration. 36

37 View the Activities within a Qualification Make sure you know the following terms before proceeding: Activity: An individual course Qualification: A group of courses To view the Activities within a Qualification, follow these steps: 1. Click the Administration tab in the upper right. 2. Click the Qualifications tab from the menu on the left side of the screen. 37


38 3. From the sub-menu that pops down, click the Qualifications tab (see screen shot above). Clicking this takes you to the Manage Qualifications page, which shows a list of all the Qualifications you have access to. 4. Locate the Qualification that you want to investigate. 5. Location the grey ribbon icon within the column titled Competencies (see below). Click the number next to that tiny ribbon icon. Clicking this will take you to the Manage Competencies page shown below. 6. Locate the grey book icon under the column titled Activities. This number next to the icon is the number of Activities within that Qualification (in the example below, there are 3 Activities). Click the number to view the Activities. 38

39 Clicking this grey book icon takes you to the Mange Activities page for the Activities that exist in the Qualification you selected in step 1. The example below shows the 2 Activities within the Qualification, CA-CARE121 Managing Nutritional Status Malnutrition and Dehydration Note: to preview or view course details of these courses, refer to Preview Courses (p 34-36). 39
40 Create a Custom Qualification The training in the online campus is connected to the following terminology: An Activity is an individual course. A Qualification is a bundle of courses ( Activities ). A Competency is a package of Activities within a Qualification. To create a custom Qualification, you will do the following: Create a Competency: Select which Activities will go into you Qualification Adjust parameters for order and requirements for completion Create a Qualification: Select the Competency that contains the Activities. Adjust parameters for order and requirements for completion Create a Competency: 1. Click the Administration tab in the upper right. 2. Click the Qualifications tab from the menu on the left side of the screen. 40

.")
41 3. From the sub-menu that pops down, click the Competencies tab (see screen shot above). Clicking this takes you to the Manage Competencies page, which shows a list of all the Competencies you have access to. 4. Click the blue + New icon located in the upper left of the screen (see arrow in screen shot above). This will take you to a Create Competence page with a number of data entry fields (see screen shot below). 41


42 5. Name: Choose the name of the Competence. It is advised to make it the same as the name of the Qualification you plan on creating. 42

. 7.")
43 6. Select the Activities: Click the selector icon to the right of the white box under Which Activities should be included? Clicking this selector icon will take you to a screen with the available courses (Activities) in your online campus from which to choose (see screen shot below). 7. Select the Activities you would like to assign by moving them into the Selected Records box to right (see screen shot below). Do this in one of several ways: a. Double click the Activity OR 43
. Note: To move Activities out of the Selected Records box, simply follow step b.")

44 b. Click to highlight the desired Activity, then click the top green arrow that points toward the Selected Records box (see arrow in screen shot below). Note: To move Activities out of the Selected Records box, simply follow step b. (above), only click the 2 nd green arrow that points away from the Selected Records box. Page size: Click Page Size at the bottom of the screen to allow a view of every Activity in your online campus. 8. Once the desired Activities are in the Selected Records box, click the blue Select icon in the upper left of your screen (see below). 44
. 10.")
45 This will take you back to the Create Competence page. Notice now that the names of the Activities that were selected now appear in the white box underneath Which Activities should be included? 9. Choose the order the Activities are to be completed (see below). 10. Choose the requirements in regards to the number of Activities that need to be completed in order to meet the Qualification requirements for completion. 11. Click the blue Save in the upper left of the screen. 45


46 Create a Qualification: 1. After your Competence has saved, click Qualifications under Qualifications in the menu on the left (see screen shot below). Clicking this takes you to the Manage Qualifications page, which shows a list of all the Qualifications you have access to. 46
.")

47 2. Click the blue + New icon located in the upper left of the screen (see arrow in screen shot above). Clicking this will take you to a Create Qualification page with a number of data entry fields (see screen shot below). 47

48 3. Name: enter in the name of the Qualification. This is the name that you will display in your online campus. 4. Select your Competency: Click on the selector icon to the right of the white box under where it says, Which Competencies should be included? (See screen shot below). 48
. 6.")

49 Clicking this selector icon will take you to a screen with the available Competencies in your online campus from which to choose (see screen shot below). 5. Locate your Competency by searching for it in the search field to the right of where it says, Look for: and Competence (see screen shot below). 6. Once you have located your Competency in the list below, bring it into the Selected Records box it in one of the following ways: a. Double click the Competency OR b. Click to highlight the desired Competency, then click the top green arrow that points toward the Selected Records box (see arrow in screen shot below). 49
, only click the 2 nd green arrow that points away from the Selected Records box. 7.")

50 Note: To move Competency out of the Selected Records box, simply follow step b. (above), only click the 2 nd green arrow that points away from the Selected Records box. 7. Once the desired Competency are in the Selected Records box, click the blue Select icon in the upper left of your screen (see below). This will take you back to the Create Qualification page. Notice now that the name of the Competency that was selected now appears in the white box underneath Which Competencies should be included? (see screen shot below). 50


51 8. Choose the order the Competencies are to be completed (see below). If you only have 1 competency, you will likely select Any order. 9. Choose the requirements in regard to the number of Competencies that need to be completed in order to meet the Qualification requirements. If you only have 1 competency, you will likely select Users must complete all Competencies above. 51


52 10. Click the blue Save in the upper left of the screen. Clicking this will create the Qualification. A message in the upper right of the screen will briefly appear that says, Changes Saved (see screen shot below). Now, this Qualification will appear among the others in the Assign Training process (see screen shot below). It will also appear among the Qualifications on the Manage Qualifications page. 52

53 DONE! Reports To track user progress and completion status as well as generate Certificates of Completion, run reports on the Frequently Used Reports page. 1. Click the Administration tab in the upper right. 2. Click the Reports tab from the menu on the left side of the screen. 53


54 3. From the sub-menu that pops down, click the Frequently Used tab (see screen shot above). Clicking this takes you to the Frequently Used Reports page shows the following: Names of Reports (see screen shot below) Descriptions of Reports (see screen shot below) The two reports that will be covered in this Manual are Activity Exception Report and the Certificate of Completion Report (described below): 54

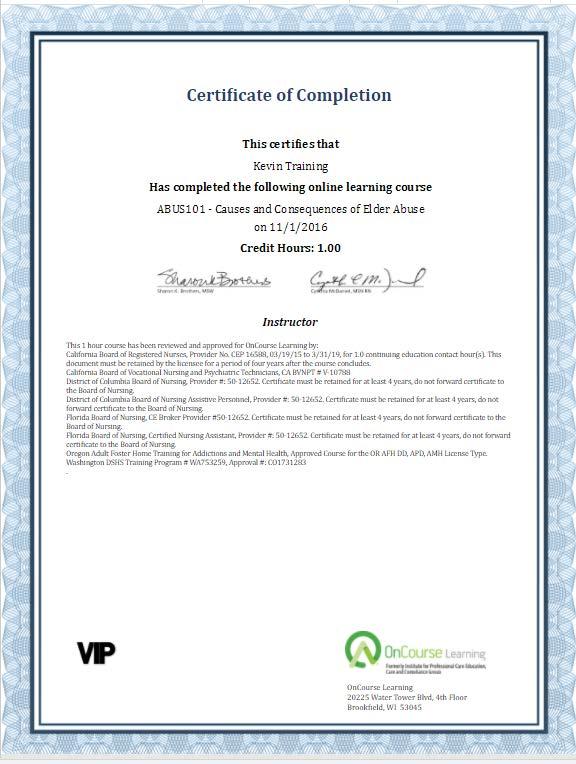
55 Activity Exception Report: Run a report on the status (Expired, completed, in progress, incomplete) for selected Users on selected Activities. Certificate of Completion Report: Generate certificates of completion for selected Users on selected Activities. These certificates include instructor signatures, company logos, approval information, etc. Activity Exception Report: Run a report on the status (Expired, completed, in progress, incomplete) for selected Users on selected Activities 1. Begin on the Frequently Used Reports page. (To get here, follow steps 1-3 on pages 53 & 54). 2. Locate the Activity Exception Report among the list of Reports (see arrow in screen shot below). 3. Click the blue View icon to the left of the Activity Exception Report. 55


56 Clicking this will take you to the Activity Exception Report page (see screen shot below). 4. Click the green selector icon to the right of where it says, Activities 0 items (see arrow in screen shot below). 56
. Do this in one of several ways: a.")
57 Clicking this selector icon will take you to a screen with the available Activities in your online campus from which to choose (see screen shot below). The page defaults on a list of Activities. Select the Activities: 1. Select the Activities you would like to run the report on by moving them into the Selected Records box to right (see screen shot below). Do this in one of several ways: a. Double click the Activity OR b. Click to highlight the desired Activity, then click the top green arrow that points toward the Selected Records box (see arrow in screen shot below). OR c. By clicking the green double arrows, all of the items will transfer to the Selected Records box. Note: To move Activities out of the Selected Records box, simply follow step b. (Above), only click the 2 nd green arrow that points away from the Selected Records box. 57
.")
58 2. Once the desired Activities are in the Selected Records box, click the blue Select icon in the upper left of your screen (see below). 3. This will take you back to the Activity Exception Report page (see screen shot below). Notice now that the number to the right of where it says Activities now has the number of Activities that were selected in the previous steps. 58


59 Select the Users: 1. Click the green selector icon to the right of where it says, Users 0 items (see arrow in screen shot below). Clicking this selector icon will take you to a screen with the available Users in your online campus from which to choose (see screen shot below). The page defaults on a list of Users. 59


60 2. Select the Users you would like to run the report on by moving them into the Selected Records box to right (see screen shot below). Do this in one of several ways: a. Double click the User OR b. Click to highlight the desired user, then click the top green arrow that points toward the Selected Records box (see arrow in screen shot below). OR c. By clicking the green double arrows, all of the items will transfer to the Selected Records box. Note: To move user out of the Selected Records box, simply follow step b. (Above), only click the 2 nd green arrow that points away from the Selected Records box. 60
. b. Click where it says Team to generate a drop-down menu.")
61 Note: To run the report on ever user in the online campus, Change the list from Users to Users in Teams in the following steps: a. Locate the drop-down menu above the list of Users where it says, Look for: and to the right in the white box it says User (see arrows indicating in screen shot below). b. Click where it says Team to generate a drop-down menu. c. Click User within this drop-down menu to change the list from User to Users in Teams. d. Now the list should display the Teams. Select all the teams and bring them into the selected records box. You can click the green double arrows, to move all the Teams will to the Selected Records box. Once the desired Users are in the Selected Records box, click the blue Select icon in the upper left of your screen (see below). 61
 that were selected in the previous steps.")
62 This will take you back to the Activity Exception Report page (see screen shot below). Notice now that the number to the right of where it says Users now has the number of Users (or Teams) that were selected in the previous steps. Status Type: Click the black drop-down menu to the right of where it says, Status Type. Select the assignment Statuses that you would like to view in your report. 62

 and select the Activities ) have been")
63 Cover Page: Deselect Cover Page. If you appreciate a good Cover Page and leave this field check-marked, be note that the Report will begin on page 2 (see screen shot below). View Report: Once the required steps ( Select the users (p 58 & 59) and select the Activities ) have been completed, you can now click green View Report icon to the left (see screen shot below). Doing this will generate a report like the one in the screen shot below. 63
 format by clicking floppy disc icon and then clicking Excel from the drop-down menu.")
64 Note: After generating the report, you can convert it in the following ways: a. Print out a copy using the printer icon in the upper left of the screen. b. Convert this Report to a different digital format (such as an Excel document) format by clicking floppy disc icon and then clicking Excel from the drop-down menu. Save this Excel version to your preferred location. Certificate of Completion Report: DONE! Run a report on to generate certificates of completion for selected Users on selected Activities. These certificates include instructor signatures, company logos, approval information, etc. 1. Begin on the Frequently Used Reports page. (To get here, follow steps 1-3 on pages 53 & 54). 2. Locate the Certificate of Completion Report among the list of Reports (see arrow in screen shot below). 3. Click the blue View icon to the left of the Certificate of Completion Report. 64
. 4.")

65 Clicking this will take you to the Certificate of Completion Report page (see screen shot below). 4. Select a date range by entering in dates that capture the time the Activity was completed. To do this, click the calendar icon next to where it says, Start Date and End Date. 65
 7.")
.")
66 5. Select the Activities by following steps (p 57 & 58). 6. Select the Users by referring to following steps 1-3 (p 59-61) 7. View Report: Once the required steps ( Select the users and select the Activities ) have been completed, you can now click green View Report icon to the left (see screen shot below). Doing this will generate a report like the one in the screen shot below. 66
 format by clicking floppy disc icon and then clicking PDF from the drop-down menu.")
67 *Note: After generating the certificate, you can convert it in the following ways: a. Print out a copy using the printer icon in the upper left of the screen. b. convert this certificate to a different digital format (such as a PDF document) format by clicking floppy disc icon and then clicking PDF from the drop-down menu. Save this PDF version to your preferred location. Note: By scrolling down, you will notice that the following: o Instructor signatures o VIP Golden Gals Senior Care and OnCourse Learning logos o Approval information 67
68 DONE! 68
69 Automated Reporting Options: The system has the ability to automatically generate and you Reports and Certificates. These can be sent on a daily, weekly or monthly basis at specified times. Please reach out to IPCed s Client Care team at clientcare@ipced.com to have them show you how to set up these reports. Manage Individual Completion Records To quickly view completion status without running a Report, go to the Manage Completion Records page: 1. Click the Administration tab in the upper right. 2. Click the Tracking and Completions tab from the menu on the left side of the screen. 3. From the sub-menu that pops down, click the Completion Records tab. 69


70 Clicking this takes you to a page with a list of all the completion records in your online campus (see screen shot below). Notice the following: Username of the person who completed the Activity Activity that was completed by the user Date of completion 70

71 How to Assign the Administration Role Assigning the Administration role to a user will give a general user access to the Administration tab in the upper right of their online campus. IN this tab, one can assign training, run reports, manage user accounts, etc. To provide this tab to another user, follow the instructions below. 1.. Click the Administration tab in the upper right. 2. Click the Security tab in the menu on the left (see image below). After the sub menu pops down, click Assign Roles. 71


72 3. Clicking this will take you to the Assign Roles page shown in the image above. To the right of the white box underneath Step 1: Choose the Roles, click the selector icon. 4. Clicking the selector icon will take you to the page shown in the image below. Select the IPCed Express Administrator by double clicking it. 72

73 1. Double clicking this role will bring the Express Administrator role into the Selected Records box to the right (see image below). 2. Now that the role is in the selected records box, click the blue Select icon on the upper left. 3. Clicking Select will take you back to the Assign Roles page. Now, the name of the role ( Express Administrator ) will be contained in the white box underneath Step 1: Choose the Roles. See image below. 73


74 4. Click the Selector Icon to the right of the white box underneath Step 2: Choose Users. Clicking this will take you to a page with a list of users in your online campus (see screen shot below). 74
75 5. Select the user(s) you want to assign the role to by bringing their names into the Selected Records box. This can be done in one of several ways: a. Double click the User OR b. Click to highlight the desired user, then click the top green arrow that points toward the Selected Records box (see arrow in screen shot below). OR c. By clicking the green double arrows, all of the items will transfer to the Selected Records box. Note: To move user out of the Selected Records box, simply follow step b. (Above), only click the 2 nd green arrow that points away from the Selected Records box. 6. Once you have selected the user(s) that you wish to assign the administration role to, click the blue Select icon on the upper left. Clicking the blue Select icon will be take you back to the Assign Roles page. Now, the name of the user should appear in the white box below Step 2: Choose the Users. 75

76 5. Lastly, click the blue Save icon in the upper left. A small message will briefly appear in the upper right of the screen that says Assigned. DONE! 76
77 Notifications The system is set up to send notifications to the that is entered into the user s account. If no is in the field of a user s account, notifications will not be received. To learn to how enter in s, refer to page 7 of this manual. The following notifications are set up for your online campus: New user created: log in credentials and link of where to log in will be sent to the user. New training Assigned: when training has been assigned to user Training due soon: to be sent when a due date is approaching Training completed: a notification that states when an Activity has been completed. Online Campus Support For support for your online campus, please utilize the following resources: Phone: Help Desk: help@ipced.com Account Management Team: clientcare@ipced.com Help and Learning Center: We offer instructional videos that walk you through how to complete all administrative tasks in the system at our Learning Center website. You can access our Learning Center at any time by visiting The Institute for Professional Care Education would like to thank Senior Helpers for your demonstrated commitment to providing training for your employees and, in turn, providing the greatest possible quality of care to your residents and all of the individuals you serve. Thank you! 77
78 78
79
Logging in & Taking a Course
 Logging in & Taking a Course The image to the right is an image of our Log in page. To access your training Log in to your account by visiting https://training.ipced.com/ and entering in your username
How to book a place for a face to face course
 How to book a place for a face to face course To book a face to face course please click on the self registration link, this will take you to the next screen shot Please click register if you are a new
EMS Walk. Browse Events: Events in University Housing Space
 EMS Walk This guide explains the various components of University Housing s Event Management System (EMS) and provides step-by-step instructions for new users. EMS Web App Home Page (formerly Virtual EMS)
EMPLOYEE SPACE. INSTRUCTIONS for EMPLOYEES. Hurley Medical Center Department of Human Resources
 EMPLOYEE SPACE INSTRUCTIONS for EMPLOYEES Hurley Medical Center Department of Human Resources Updated 3/1/2016 Table of Contents Table of Contents... i Introduction... 1 Accessing Employee Space... 2 Employee
User Manual: Manager
 Learning Management System ( LMS ) User Manual: Manager V NLFMG-03092017-1 Disclaimer and Warranty Information Limits of Liability / Disclaimer of Warranty The information contained within this manual
UCC ESS Online Leave Requests Manager Dashboard
 University College Cork UCC ESS Online Leave Requests Manager Dashboard Version 2.1 Contents How to Access UCC Employee Self Service (ESS)... 1 Manager Dashboard... 2 My Team... 2 My Approvals... 4 Additional
Administrator Quick Guide
 1 Administrator Quick Guide Login Screen The first page employees will see when visiting their training site is the login screen. This is where employees must enter their username and password to access
Eukleia LMS Tenant administrator guide
 Eukleia LMS Tenant administrator guide Version 1.1 Date published 4 January 2017 This guide will occasionally be updated. It is advisable not to download a copy, and instead access it from the LMS each
Frequently asked questions
 Frequently asked questions In order to assist you further, we have grouped our questions into sections below: Section 1: Technical specifications Section 2: Login Section 3: Registration Section 4: Rules
Online Demo Scheduling Tool: User Guide
 Unrestricted Internal Use - Carestream Health, 2013 1 Online Demo Scheduling Tool: User Guide This document provides step by step instructions on how to successful use the Online Demo Scheduling tool for
ClientNet Admin Guide. Boundary Defense for
 ClientNet Admin Guide Boundary Defense for Email DOCUMENT REVISION DATE: Feb 2012 ClientNet Admin Guide / Table of Contents Page 2 of 36 Table of Contents OVERVIEW... 3 1 INTRODUCTION... 3 1.1. AUDIENCE
Astra Schedule User Guide Scheduler
 Astra Schedule User Guide 7.5.12 Scheduler 1 P a g e ASTRA SCHEDULE USER GUIDE 7.5.12... 1 LOGGING INTO ASTRA SCHEDULE... 3 LOGIN CREDENTIALS... 3 WORKING WITH CALENDARS... 4 CHOOSING A CALENDAR AND FILTER...
Production Assistance for Cellular Therapies (PACT) PACT Application System User s Guide
 PACT Application System User s Guide") Production Assistance for Cellular Therapies (PACT) PACT Application System User s Guide Version 1.0 February 9, 2017 Version 1.0 TABLE OF CONTENTS 1.0 Getting Started... 1 1.1 Access to the Internet...
Production Assistance for Cellular Therapies (PACT) PACT Application System User s Guide Version 1.0 February 9, 2017 Version 1.0 TABLE OF CONTENTS 1.0 Getting Started... 1 1.1 Access to the Internet...
Administrator Manual
 Administrator Manual CURA Technical Support Email: cura_support@mindscope.com Phone: 1.888.322.2362 x 55 Administrator Manual Page 1 Table of Contents The Setup Module... 3 Skills... 3 Adding or Modifying
Your Guide to Merchant Online
 Your Guide to Merchant Online Merchant Online User Guide Contents 1 Introduction... 2 2 Using the Merchant Online Portal... 2 2.1 Signing In for the First Time... 2 2.2 Updating Your Information... 4 2.2.1
Investigator Site OC RDC PDF User Guide
 Investigator Site OC RDC PDF User Guide Version 1.0 Page 1 of 40 TABLE OF CONTENTS Accessing OC RDC Steps for Access 3 Logging On 4 Change Password 4 Laptop and System Security 5 Change Study 5 Navigating
My Courses: Displays courses the user has self-enrolled in as well as courses that have been assigned to the user when available.
 LOGGING IN To log in go to https://gbateam.redvector.com and enter your Login /Username and Password. If you have forgotten your password, click on the Forgot your password link. 1. Enter the primary email
PLAR e-portfolio Instructions. This is easier and faster than it looks! To create your e-portfolio, you will need to move through the following steps.
 PLAR e-portfolio Instructions This is easier and faster than it looks! To create your e-portfolio, you will need to move through the following steps. First, here is a big picture overview of what you are
GSA QMAC. Transportation Service Provider (TSP) TransPort Integrator User Guide. TransPort Integrator Service. Version 3.0
 TransPort Integrator User Guide. TransPort Integrator Service. Version 3.0") GSA QMAC TransPort Integrator Service Transportation Service Provider (TSP) TransPort Integrator User Guide Version 3.0 Change Log Version # Date of Change Section Description of Change Changed By 1.0
GSA QMAC TransPort Integrator Service Transportation Service Provider (TSP) TransPort Integrator User Guide Version 3.0 Change Log Version # Date of Change Section Description of Change Changed By 1.0
Switched-On Schoolhouse 2014 User Guide Reports & Application Functions
 Switched-On Schoolhouse 2014 User Guide Reports & Application Functions MMVI Alpha Omega Publications, Inc. Switched-On Schoolhouse 2014, Switched-On Schoolhouse. Switched-On, and their logos are registered
Technical support:
 Technical support: support@cadel.com 866-868-4625 1 ECOMMERCE.CADEL.CA The Cadel online ordering website is very informative and offers great flexibility VERY INFORMATIVE: The search engine helps you find
Connecting to ehoundnet-fsa
 Connecting to ehoundnet-fsa Encrypted Wi-Fi at Loyola for Faculty, Administrators, Staff, & other Employees Contents Connecting with a Loyola-Issued PC... 2 Connecting with a Non-Loyola Issued PC... 4
Legal Library. In this guide we will review how to download and use our Legal Library tool. Commercial Brokers Association May 2018
 Legal Library In this guide we will review how to download and use our Legal Library tool Commercial Brokers Association May 2018 Downloading Legal Library The Legal Library provides both fast and easy
Visit:
 Walton Conference Hub Event Management System Welcome to the Walton Conference Hub Event Management user guide. This guide is intended to help you schedule your event in the right place at the right time.
ORACLE RDC ONSITE RESEARCH COORDINATOR TRAINING
 ORACLE RDC ONSITE RESEARCH COORDINATOR TRAINING TRAINING REQUIREMENTS RDC system training is designed and conducted for access to OnSite. Additional RDC training will be provided on a per study basis by
SIS Modernization Faculty Portal Training Guide
 SIS Modernization Faculty Portal Training Guide Created May 2017 Table of Contents Introduction to the New Faculty Portal... 1 Logging into the Faculty Portal... 1 Navigating the Faculty Portal... 6 Using
Online Reporting and Information Management System (ORIMS) Manage Financial Returns User Guide for Banks & Trust Companies
 Manage Financial Returns User Guide for Banks & Trust Companies") (ORIMS) Manage Financial Returns User Guide for Banks & Trust Companies March 31, 2015 Version 1.0 Version History Version Changes Date 1.0 Original release March 31, 2015 2 Table of Contents 1. Introduction...
(ORIMS) Manage Financial Returns User Guide for Banks & Trust Companies March 31, 2015 Version 1.0 Version History Version Changes Date 1.0 Original release March 31, 2015 2 Table of Contents 1. Introduction...
CRA OC RDC Classic User Guide
 CRA OC RDC Classic User Guide Version 1.0 Page 1 of 37 TABLE OF CONTENTS Accessing OC RDC Steps for Access 3 Logging On 3 Change Password 5 Change Study 5 Laptop and System Security 6 Navigating OC RDC
Simplifi 797. CriticalPoint Manual 8/30/2013 1:12 PM
 Simplifi 797 CriticalPoint Manual 8/30/2013 1:12 PM Simplifi 797 IP CriticalPoint Manual Copyright 2013 by Pharmacy OneSource, Inc. Printed in the United States of America All rights reserved. No part
WHAT IS MY WAY? Metropolitan Community College 1 07/18/16
 WHAT IS MY WAY? MCC My Way is the web portal at MCC. The portal provides single sign-on access by automatically logging into My Services, Microsoft Outlook Calendar, Student Planning, Office 365, and Blackboard
Microsoft Windows Software Manual for FITstep Stream Version 3
 Thank you for purchasing this product from Gopher. If you are not satisfied with any Gopher purchase for any reason at any time, contact us and we will replace the product, credit your account, or refund
IMPORTANT INFORMATION
 1 2 IMPORTANT INFORMATION Follow these simple steps to apply for a job with the Person County Government. You must have a valid personal email account BEFORE you begin. This guide may be used by new applicants
Terra Dotta Manual for Reviewers
 Terra Dotta Manual for Reviewers Table of Contents Accessing the OSU GO Application System... 3 Defining Terminology... 3 Phases of the Application vs. Statuses... 4 Application Statuses... 4 Application
Non-exempt and Hourly Applicant Workflow Training
 Non-exempt and Hourly Applicant Workflow Training Go to http://jobs.usu.edu and click on For USU Departments and Search Committee Click on Jobs posted after April 1, 2015 to access the new system. You
ORACLE RDC ONSITE RESEARCH COORDINATOR TRAINING
 ORACLE RDC ONSITE RESEARCH COORDINATOR TRAINING TRAINING REQUIREMENTS RDC system training is designed and conducted for access to OnSite. Additional RDC training will be provided on a per study basis by
Disclosure Online Scotland Guide Applicant Manager Guidance Notes
 Disclosure Online Scotland Guide Applicant Manager Guidance Notes Applicant Manager Guidance Notes Section A Applicant Manager guidance notes Online Disclosure Scotland checks can be completed by accessing
Guide for Researchers: Online Human Ethics Application Form
 Guide for Researchers: Online Human Ethics Application Form What is Quest Quest is our comprehensive research management system used to administer and support research activity at Victoria University.
How to Activate Student Log in to the student Registration system (also known as My Community Education or Banner ).
.") How to Activate Student E-Mail 1. Log in to the student Registration system (also known as My Community Education or Banner ). 2. The new account notice shows at the top of the screen once signed in. Click
How to Activate Student E-Mail 1. Log in to the student Registration system (also known as My Community Education or Banner ). 2. The new account notice shows at the top of the screen once signed in. Click
AGENCYCORE MOBILE ios MANUAL
 1 AGENCYCORE MOBILE ios MANUAL 2 Table of Contents DOWNLOADING APP... 3 HOME PAGE... 8 MY MESSAGES... 9 Common Icons & Buttons Messages... 9 Compose New Message:... 12 MY SCHEDULE... 13 Visit Information...
Frequently Asked Questions
 Frequently Asked Questions ACCESS AND NAVIGATION 1. Can I change my password? 2. What are the guidelines for a new password? 3. What types of information will I get in RDC news? 4. I closed RDC Onsite
Training Manual for HR Managers ( Business Unit Admin level)
") UK Umbrella Service Ltd online DBS applications Training Manual for HR Managers ( Business Unit Admin level) UK Umbrella Service Ltd Page 1 of 12 1 Accessing the system: From the Log In page: https://ukdbschecks.employmentcheck.org.uk/user_login.php
UK Umbrella Service Ltd online DBS applications Training Manual for HR Managers ( Business Unit Admin level) UK Umbrella Service Ltd Page 1 of 12 1 Accessing the system: From the Log In page: https://ukdbschecks.employmentcheck.org.uk/user_login.php
National Geographic Learning Social Studies Courses Teacher s User Guide
 Table of Contents Logging in to the System... Using the Header Bar... Resources... 5 Navigating the Teacher s Edition... 6 Content Tools... 7 Assignments Assigning Reading and Tests... 9 Using the Gradebook...
How to set up a Default Printer
 How to set up a Default Printer 1. Click on the Start Menu 2. Select the Devices and Printers icon Start menu window 3. The Devices and Printers window will show you all the installed printers you have
Set-Up Guide for Lightning Experience of Salesforce.com
 Set-Up Guide for Lightning Experience of Salesforce.com MultiMatch for Professional, Enterprise and Unlimited editions This guide is for those with email hosting at Office 365 (without Global Admin role),
Getting Started With the Cisco PAM Desktop Software
 CHAPTER 3 Getting Started With the Cisco PAM Desktop Software This chapter describes how to install the Cisco PAM desktop client software, log on to Cisco PAM, and begin configuring access control features
Social Media Managers Course - Navigation Guide
 Defense Information School Strength Through Truth Social Media Managers Course - Navigation Guide Log In Visit dinfos-lms.goaclc.com and enter your username and password. Click the Login Button. Note:
From the User Profile section of your employer account, select User Profile and enter your new password.
 Signing Into The Employer User Account On the ApplyToEducation Homepage (www.applytoeducation.com) sign in using your assigned username and password. If you forgot your username and/or password, click
Logging In to MultiTrans 2 The Main Screen 3 My Flow 4. Tasks 11
 Logging In to MultiTrans 2 The Main Screen 3 My Flow 4 The General Tab 4 The Profile Tab 5 The Availability Tab 6 Invoice Configuration 10 Terms and Conditions 10 Tasks 11 Task List 11 Overview 11 Reviewing
CPD Essentials User Guide
 CPD Essentials User Guide A practical introduction cii.co.uk/cpdessentials 2 Contents 3 Glossary and terminology 4 The home page 5 My Training Plan 6 Editing time spent on activities 7 Recording and managing
BBVA Compass Spend Net Payables
 User Guide BBVA Compass Spend Net Payables User Guide Vault Services Table of Contents Introduction 2 Technical Requirements 2 Getting started 3 Sign In 3 General Navigation 4 Upload/Create Payment 5
Referral Training Exercise 4: Auditing a Certificate and Issuing Disposition Letters
 Referral Training Exercise 4: Auditing a Certificate and Issuing Disposition Letters Now that you have completed the online portion of training for Referral, it is time to log into the Stage environment
Version 5. Recruiting Manager / Administrator
 Version 5 Recruiting Manager / Administrator 1 Contents 1.0 Introduction... 4 2.0 Recruitment at a Glance... 6 3.0 Viewing Applicant Numbers... 8 4.0 Activities After Closing Date... 10 5.0 Shortlisting...
DBS Online Disclosure Guide (e-bulk) Primary Applicant Manager Guidance Notes
 Primary Applicant Manager Guidance Notes") DBS Online Disclosure Guide (e-bulk) Primary Applicant Manager Guidance Notes Section A PRIMARY APPLICANT MANAGER GUIDANCE NOTES E-Bulk online Disclosure and Barring Service (DBS) checks can be completed
DBS Online Disclosure Guide (e-bulk) Primary Applicant Manager Guidance Notes Section A PRIMARY APPLICANT MANAGER GUIDANCE NOTES E-Bulk online Disclosure and Barring Service (DBS) checks can be completed
ecampus 9.2 Faculty Homepage
 1 I. ecampus Features In ecampus 9.2, the ecampus Faculty Homepage features three (3) tiles. The tiles have all the functionalities found on the previous ecampus Faculty Homepage. ecampus 9.2 Faculty Homepage
web po user guide Supplier
 web po user guide Supplier web po user guide table of contents supplier section 1 before you begin section 2 getting started and the basics section 3 Web PO Supplier Administration section 4 Viewing Purchase
HUMAN RESOURCES USER S GUIDE
 HUMAN RESOURCES USER S GUIDE University System of New Hampshire PeopleAdmin, Inc. 816 Congress Avenue Suite 1800 Austin, TX 78701 Copyright 2007 PeopleAdmin, Inc. All Rights Reserved. TABLE OF CONTENTS
USING PERFORMANCE PRO An Appraiser s Quickstart Guide. Hrperformancesolutions.net 9/2015 v. 3.4
 USING PERFORMANCE PRO An Appraiser s Quickstart Guide Hrperformancesolutions.net 9/2015 v. 3.4 Appraiser Quickstart Guide Employee appraisals can be completed easily and quickly. The steps outlined below
Peralta Community College District CurricUNET User Manual
 Peralta Community College District CurricUNET User Manual Page 1 Contents Log in... 8 Changing Your Password... 9 Viewing Courses... 11 Viewing programs... 14 Create Proposal... 15 New Course Proposal...
Welcome To Account Manager 2.0
 Account Manager 2.0 Manage Unlimited FileMaker Servers, Databases, Privileges, and Users Effortlessly! The ultimate tool for FileMaker Database Administrators. Welcome To Account Manager 2.0 What Is Account
InformationTechnology
 dvanced Calling Features One of the benefits of running University voice service to Skype for Business is the opportunity to manage calls through a PC or laptop using the Skype application with a compatible
Section 1: Navigation Procedures
 Section 1: Navigation Procedures This section will assist in navigating and becoming familiar with the menus, views, icons, and the functionality of Yardi Voyager. In This Section Logging in to Yardi Voyager
IBM Emptoris User Guide
 This document includes instructions to help you with most actions you need to do in Emptoris. If you have any questions, please contact your IBM Representative. For more Information and Help material,
MiraCosta CurricUNET User Manual
 MiraCosta CurricUNET User Manual Building the Worldwide Curriculum Network Page 1 Contents Log In... 5 Courses... 6 Programs... 9 Create Proposal... 10 Deactivate Credit Course... 11 Deactivate Noncredit
NYRA /Puridiom User Manual
 The New York Racing Association, Inc. NYRA /Puridiom User Manual CHRIMS, Inc. 3/15/2013 Revision 1.1 1. Introduction...4 About This Manual...4 Log in Procedure...5 The Navigation Bar...6 User Navigation
InForm Training Exercises For Data Managers
 InForm 4.6 for CTC Studies TM InForm Training Exercises For Data Managers Version 1.0 15 May 2013 Copyright NHMRC Clinical Trials Centre Page 1 of 42 List of Exercises InForm Training Exercises for Data
Passport Acceptance Agent Training System Student Guide
 Passport Acceptance Agent Training System Student Guide Welcome to the Passport Acceptance Agent Training System (PAATS). This document is intended to guide you through the technical requirements and functionality
Shelley Academy Room Booking System. User Guide
 Shelley Academy Room Booking System User Guide Contents Purpose of this guide:... 2 Frequently Asked Questions... 3 Getting Started... 3 Opening the System:... 4 Closing the System:... 5 Booking Checker:...
e-recruitment Guide Hiring Selection
 e-recruitment Guide Hiring Selection 1 Contents Page 3 Page 4 Page 5 Page 4 Page 6 Page 7 Page 8 Page 9 Page 10 Page 11 Page 12 Page 13 Page 14 Job Requisition Process Flow Chart Hiring Process Flow Chart
User Reference Guide
 LEARNING CENTRE http://lms.toyota.com.au User Reference Guide Page 1 Learning Centre User Overview Reference Guide Last Modified 23/07/10 2010 Toyota Institute Australia. All rights reserved. All brand
Guide for Candidates: Online Progress Reports
 Guide for Candidates: Online Progress Reports What is Quest Quest is our comprehensive research management system used to administer and support research activity at Victoria University. All Progress Reports
Getting Started Guide
 Getting Started Guide Welcome to the new Contact Management. The login process has changed from classic Contact Management to the new. This guide will walk you through those changes and help you begin
SIS Modernization Faculty (Instructor) Portal Training Guide
 Portal Training Guide") Faculty (Instructor) Portal Training Guide Created on August 2017 Table of Contents Introduction to the New Faculty Portal... 1 Logging into the Faculty Portal... 1 Navigating the Faculty Portal... 5 Using
Faculty (Instructor) Portal Training Guide Created on August 2017 Table of Contents Introduction to the New Faculty Portal... 1 Logging into the Faculty Portal... 1 Navigating the Faculty Portal... 5 Using
User Manual. perfectionlearning.com/technical-support
 User Manual perfectionlearning.com/technical-support 1 User Manual Accessing Math X... 3 Login... 3 Forgotten Password... 3 Navigation Menu... 4 Logout... 4 Admin... 5 Creating Classes and Students...
Center for Faculty Development and Support. Google Docs Tutorial
 Center for Faculty Development and Support Google Docs Tutorial Table of Contents Overview... 3 Learning Objectives... 3 Access Google Drive... 3 Introduction... 4 Create a Google Document... 4 Upload
Outlook 2016 for Mac: Basics
 Outlook 2016 for Mac: Basics FINAL 2015. All Rights Reserved. California State University, Bakersfield June 24, 2015 REVISION CONTROL Document Title: Author: File Reference: O2016 Outlook Mac Basics Staff
SCOUT SUSPENSE TRACKER Version 10.0
 SCOUT SUSPENSE TRACKER Version 10.0 USER S MANUAL For Civilian Personnel Management Service (CPMS) HPC-COM LLC Help Desk 800-795-1902 Updated: February 2011 Table of Contents SCOUT Suspense Tracker V10.0
Learning Management System (LMS) Student Instructions
 Student Instructions") Learning Management System (LMS) Student Instructions CLUB LEARNING INSTITUTE Page 1 of 16 Table of Contents How do I login to the learning management system (LMS)?... 3 Navigation Panel... 4 How do I
Learning Management System (LMS) Student Instructions CLUB LEARNING INSTITUTE Page 1 of 16 Table of Contents How do I login to the learning management system (LMS)?... 3 Navigation Panel... 4 How do I
SkillPort Quick Start Guide 7.3 (Modified for CSU Administrators and Users)
") SkillPort Quick Start Guide 7.3 (Modified for CSU Administrators and Users) www.skillsoft.com i Table of Contents SkillPort Quick Start Guide Table of Contents How Do I Log Into Skillport?...3 MY PLAN...3
SkillPort Quick Start Guide 7.3 (Modified for CSU Administrators and Users) www.skillsoft.com i Table of Contents SkillPort Quick Start Guide Table of Contents How Do I Log Into Skillport?...3 MY PLAN...3
Minimum System Requirements The following are the minimum system requirements needed to run and install Premium Pro Enterprise:
 Overview Premium Pro Enterprise is the next generation of the Premium Pro family of applications. It is a Javabased application that houses multiple products and tax years in a single interface. It requires
Onboarding Process External Candidates
 Onboarding Process External Candidates Reference Guide Overview Once you receive and accept the offer, you are required to provide personal information as part of the pre-hire process. After you complete
I N F O R M A T I O N S E C U R I T Y AccessONE 7.0. User Guide
 I N F O R M A T I O N S E C U R I T Y AccessONE 7.0 User Guide AccessONE User Guide Table of Contents Welcome... 4 General Information... 4 Getting to AccessONE... 5 New User Account Activation (Only for
STUDENT RECORDS FACULTY ON-LINE GRADING INSTRUCTIONS
 STUDENT RECORDS FACULTY ON-LINE GRADING INSTRUCTIONS Login to the Cal Poly Portal: Launch Internet Explorer (IE) or Mozilla Firefox for PC users or Safari for Mac users. For full access pop-up blockers
Guidelines on Dormant Accounts Web Reporting System
 The Central Bank of The Bahamas Guidelines on Dormant Accounts Web Reporting System January, 2009 Page 1 Introduction The Central Bank of The Bahamas Dormant Accounts Reporting System (CBOB DARS) is a
Creating a profile in the Global Personnel Recruitment System
 Creating a profile in the Global Personnel Recruitment System CONTENTS I. Registration... 2 II. Personal details... 4 III. Education... 7 IV. Experience... 10 V. Languages... 14 VI. Other... 17 VII. Skills...
Approving the Outside Interests Disclosure Form Without Conflicts. Supervisor Level. IRIS Mobile through the Web
 Approving the Outside Interests Disclosure Form Without Conflicts Supervisor Level IRIS Mobile through the Web The Outside Interests Disclosure Form is for the University of Tennessee faculty and staff
How Do I Setup an Android Device to Connect Citrix to Outagamie County
 In order to connect an android device you must first load the Citrix certificate. Use your device to connect to the Outagamie County FTP site. (ftp://ftp.outagamie.org) You cannot email these files, but
AgentWorks Administrator and Manager User Guide - Release 12.5
 AgentWorks Administrator and Manager User Guide - Release 12.5 March 21, 2013 2012 MoneyGram InternationalAll rights reserved. Table of Contents Registration Overview... 2 1. Initial Log In AgentWorks
User Guide. RACER Date 09/29/17
 User Guide RACER Date 09/29/17 1 Table of Contents Table of Contents... 2 RACER... 4 Home Page...5 RACER Requester... 6 Basic Information...6 Location Information...7 Change Information...8 Review and
Getting Started Guide For Users
 Getting Started Guide For Users August 2017 Table of Contents Overview 3 Create Your Account How to Log into the System Resetting Your Password Updating your User Profile Adding a picture The Learner Dashboard
Microsoft Windows Software Manual for FITstep Pro Version 3
 Thank you for purchasing this product from Gopher. If you are not satisfied with any Gopher purchase for any reason at any time, contact us and we will replace the product, credit your account, or refund
Referral Training Exercise 4: Auditing a Certificate and Issuing Disposition Letters
 Referral Training Exercise 4: Auditing a Certificate and Issuing Disposition Letters Now that you have completed the online portion of training for Referral, it is time to log into the Stage environment
Pennsylvania. Special Olympics Pennsylvania - Vsys Software User Manual
 Pennsylvania Special Olympics Pennsylvania - Vsys Software User Manual Applicable to all Vsys software programs including Terminal Service, Vsys One, Vsys Anywhere, and the Online Volunteer Portal Created
STEP-BY-STEP HOW TO GUIDE
 STEP-BY-STEP HOW TO GUIDE for Kensington Register & Retrieve For HP Locks www.hplockregistration.kensington.com www.hplockregistration.kensington.com i ii Contents A. Create an Administrator Account.......................................
Campus PORTAL INSTRUCTIONAL PACKET for FCE Leads. August 23, 2016
 Campus PORTAL INSTRUCTIONAL PACKET for FCE Leads August 23, 2016 Table of Contents Contents TABLE OF CONTENTS... 2 SECTION 1 ACCESSING INFINITE CAMPUS... 3 PARENT PORTAL LETTER... 3 ACCOUNT ACTIVATION...
INSERVICE. Version 5.5. InService Easily schedule and monitor attendance for your training programs, even at remote locations.
 INSERVICE Version 5.5 InService Easily schedule and monitor attendance for your training programs, even at remote locations. 5/15/2014 Page 0 of 11 Table of Contents 1.1 Logging In... 2 1.2 Navigation...
Lloyds Bank Commercial Cards CCDM User Guide
 Lloyds Bank Commercial Cards CCDM User Guide Expense Management for Approvers Version 1.1, 22082017 Please note that this document is for guidance only and as such not all screenshots will mirror your
User Guide Site Administrator User Guide
 Site Administrator User Guide TABLE OF CONTENTS COVER PAGE... 1 TABLE OF CONTENTS... 2 Welcome to Workplace Management Systems Inc. Online Training Program... 3 Workplace Management Home Page... 4 Information
PEP: How to Login and use Practice Environment Profile Date Written 6 th June 2018 Date Updated
 PEP: How to Login and use Practice Environment Profile Date Written 6 th June 2018 Date Updated 2018-07-03 How to login to PEP... 2 How to view students allocated to your placement host... 5 How to update
2015 Optima Healthcare Solutions Page 2
 Viewing Documents Logging into Rehab Optima 1. To log onto Rehab Optima, go to www.rehaboptima.com. To place an icon on your desktop for future use, right click in the light blue box and choose create
Exempt/Faculty Applicant Workflow Training
 Exempt/Faculty Applicant Workflow Training Go to http://jobs.usu.edu and click on For USU Departments and Search Committee You will login to the jobs website through the USU Login portal with your A- Number