Clearspan Device Management Configuration Guide
|
|
|
- Terence Lang
- 5 years ago
- Views:
Transcription
1 Clearspan Device Management Configuration Guide RELEASE 20.0 JUNE 2016
2 NOTICE The information contained in this document is believed to be accurate in all respects but is not warranted by Mitel Communications, Inc. (MITEL ). The information is subject to change without notice and should not be construed in any way as a commitment by Mitel or any of its affiliates or subsidiaries. Mitel and its affiliates and subsidiaries assume no responsibility for any errors or omissions in this document. Revisions of this document or new editions of it may be issued to incorporate such changes. No part of this document can be reproduced or transmitted in any form or by any means - electronic or mechanical - for any purpose without written permission from Mitel Communications, Inc. TRADEMARKS The trademarks, service marks, logos and graphics (collectively "Trademarks") appearing on Mitel's Internet sites or in its publications are registered and unregistered trademarks of Mitel Networks Corporation (MNC) or its subsidiaries (collectively "Mitel") or others. Use of the Trademarks is prohibited without the express consent from Mitel. Please contact our legal department at legal@mitel.com for additional information. For a list of the worldwide Mitel Networks Corporation registered trademarks, please refer to the website: Clearspan Device Management Configuration Guide Release # June 2016, Trademark of Mitel Communications, Inc. Copyright 2016 Mitel Communications, Inc. All rights reserved
3 Table of Contents REVISION HISTORY... 1 INTRODUCTION... 2 UNDERSTANDING DEVICE MANAGEMENT ON CLEARSPAN... 3 Overview... 3 Access Profiles... 3 Configuration Profiles... 4 Service Integration... 4 Resource Management... 5 Inventory Management... 6 Data Model... 6 INSTALLING MITEL (AASTRA) PHONES USING DEVICE MANAGEMENT... 9 Introduction... 9 Overview of Device Management... 9 Device Management Files Device Credentials Preparation Option 66 with DHCP Clearspan Device Profile Type Set up a Clearspan Device Profile Type Set up Files and Authentication for the Clearspan Device Profile Type Mitel (Aastra) Phone Device Profile Types Add a Device Profile Type for each Mitel (Aastra) Phone Type Set up Files and Authentication for the Device Specific Profile Type Mitel (Aastra) Phone Device Custom Phone Firmware Update Firmware via Extra Settings for a Single Device Update Firmware at a Group, Enterprise, or System Level Mitel (Aastra) Phone Installation Final Remarks INSTALLING POLYCOM PHONES USING DEVICE MANAGEMENT Introduction Overview of Device Management Device Management Files iii Mitel
4 Device Credentials User Name Guidelines Password Guidelines Preparation DHCP and Option Add Clearspan Device Profile Type Files and Authentication Add File cfg Add File provisioning.cfg Add File qsetup.cfg Add Firmware and Boot Rom Loader Files Add Polycom Phone Device Profile Types Profile Services Files and Authentication Custom Phone Firmware Update Firmware for a Group (Example) Update Firmware for a Single Device (Example) OpEasy Setup for Polycom Phones Polycom Phone Installation Final Remarks INSTALLING AUDIOCODES MEDIAPACK DEVICES USING DEVICE MANAGEMENT Introduction Overview of Device Management Device Management Files Preparation Configuration on Clearspan Add a Device Profile Type for each AUdioCodes MediaPack Type Set up Files and Authentication for A Device Profile Type Configuration on OpEasy Map Clearspan Device Type to OpEasy Device Type Configure Global Settings for AudioCodes Create Templates Create User Profiles Create Devices and Users Custom MediaPack Firmware and Call Progress Tones Update Firmware via Extra Settings for a Single Device Update Call Progress Tones via Extra Settings for a Single Device iv Mitel
5 Audiocodes Device Installation Media Pack Report Final Remarks INSTALLING MITEL MIVOICE CONFERENCE PHONES USING DEVICE MANAGEMENT Introduction Preparation Option 66 with DHCP Clearspan Device Profile Type Add File to the Clearspan Device Profile Type Set up Files and Authentication for the Clearspan Device Profile Type Mitel MIVOICE Conference Phone Device Profile Type Add a Device Profile Type for the Mitel MiVoice Conference Phone Type Set up Files and Authentication for the Device Specific Profile Type Mitel Mivoice conference Phone Device Mitel Mivoice conference Phone installation Access the Mitel Mivoice Phone Directly Upgrade firmware for an Existing Device in the Field New Deployments Final Remarks v Mitel
6 REVISION HISTORY REVISION NUMBER DATE COMPLETED POINT OF CONTACT DESCRIPTION /2015 Mitel Technical Publications, Velvet Moore /2015 Mitel Technical Publications, Velvet Moore /2016 Mitel Technical Publications, Velvet Moore /2016 Mitel Technical Publications, Velvet Moore Initial publication for R20 Updated for OpEasy 4.3 Updated for OpEasy 4.4 Updated for OpEasy 4.5
7 INTRODUCTION In the customer network, access devices (phones, analog terminal adapters, soft clients, and integrated access devices) must be configured to bind to the correct line and the service profile, and to enable a set of local features that interact properly with the services being delivered in the network. Similarly, hosted applications in the operator s network must be provisioned to recognize authorized access devices and deliver services in a manner that is compatible with the capabilities of each device. Even after devices have been successfully deployed, operators face an ongoing maintenance challenge, as access devices may need to have their firmware upgraded to enable new features or patches to address any issues discovered in the field. The process of configuring access devices and provisioning the Application Servers can involve a number of steps that must be done in concert with the addition of new users to the network. The rollout of new firmware can also involve a number of coordinated steps that must be automated to minimize the opportunity for human error. Also, prior to release R19, Clearspan only supported the configuration of phones and other devices using either two or three configuration files, where the configuration file for a specific phone device was accessed using the phone s MAC address. Clearspan now provides a number of integrated Device Management features that are designed to address these challenges. The result is faster time to market, lower operating expenses, and better customer satisfaction. Once Device Management has been set up, it hides the complexity of installing and deploying new devices, and ultimately accelerates turning up new users in the network. Figure 1 Simplified Deployment Model 2 Mitel

8 UNDERSTANDING DEVICE MANAGEMENT ON CLEARSPAN OVERVIEW Clearspan Device Management is a comprehensive solution for simplifying the integration, deployment, and maintenance of access devices in the operator s network. The key areas of functionality provided by Device Management on Clearspan are: Access profiles Configuration profiles Service integration Resource management Inventory management The following subsections provide an overview of each of these areas of functionality. ACCESS PROFILES Figure 2 Clearspan Device Management Overview Before an access device can connect to Clearspan, a corresponding access profile must be defined for that device. An access profile specifies the signaling and media capabilities of the device. This allows Clearspan to tailor service delivery to match the specific capabilities of each device in the network. For instance, one device may support dynamic registration, while another may need to have its contact address provisioned statically. One device may support multiple call appearances, while another may require waiting calls to be managed in the network. By defining unique access profiles for each of these device types, Clearspan can adjust the way it signals to each device accordingly. 3 Mitel
9 CONFIGURATION PROFILES To simplify deployment, Clearspan allows configuration profiles to be defined for each device it is managing. A configuration profile defines all the attributes and settings required for the device to connect to the network and deliver service. Configuration profiles are optional. If Clearspan is not responsible for the configuration profile of the device, then this part of Device Management can be disabled. Mitel (Aastra) and Polycom phones will have configuration profiles/files. When enabled, Clearspan uses the configuration profile to generate configuration files. When Clearspan is configured to use the integrated configuration repository, the Profile Server (PS) and the Xtended Services Platform (Xsp) must be deployed. The Clearspan Application Server uses HTTP to deposit all generated configuration files onto the Profile Server. The Profile Server provides geographically redundant, highly available, scalable storage for all generated configuration files. Access devices request files through the Xtended Services Platform, either through HTTPS or HTTP GET requests or TFTP RRQ (Read Request). This is shown in the following figure. Figure 3 Integrated Clearspan Configuration Repository Note that the integrated configuration repository through the Profile Server and the secure access through the Xtended Services Platform are based on HTTPS and HTTP transports. SERVICE INTEGRATION One of the most powerful features of Device Management on Clearspan is the ability to easily integrate Clearspan user services with features on the access device. This is most applicable in a hosted PBX application offering, where advanced business services, such as Shared Call Appearances and Busy Lamp Field (BLF), require attribute values to be set in both Clearspan and the access device before the service operates properly. For instance, the Busy Lamp Field service on Clearspan requires the use of the Session Initiation Protocol (SIP) dialog event package. To access the service, the device must SUBSCRIBE to a specific SIP URI representing the specific user s Busy Lamp Field state. This SIP URI must be provisioned on both the user s service profile 4 Mitel
10 as well as any device they wish to use to access the service. When using Device Management, the provisioning system only needs to set this value once on the user s service profile. RESOURCE MANAGEMENT Figure 4 Busy Lamp Field Service Integration In addition to configuration files, an access device may require one or more resource files before it can deliver service. Resources files can be bitmaps, audio files, and contact directory files. However, the most common type of resource that must be managed is the firmware files that represent the current version of software embedded in the access device. Device Management provides methods and procedures that can be used to manage which device uses which version of a resource file. This allows operators to easily control which version of firmware is deployed in the network, and to easily roll out new versions of firmware in a controlled and predictable manner. 5 Mitel
11 INVENTORY MANAGEMENT Figure 5 Managing Firmware Resources Clearspan maintains a list of all devices that are provisioned in the network. This is integrated into the same database that manages all users, lines, and services in the network. This means Clearspan can easily track relationships between devices, the ports that are free, the ports that are in use, and the corresponding users who are associated with each port on the device. DATA MODEL To use Device Management, it is important to first understand a few key concepts and how they apply to the overall Clearspan system. This section describes the Clearspan data model as it relates to Device Management, and then describes the key concepts that must be understood to be able to deploy and use Clearspan Device Management in a hosted service offering. Clearspan uses three key concepts for delivering services and managing devices: Device Profile Type Device Profile User All of these concepts are modeled directly in the Clearspan Application Server database. 6 Mitel

12 Figure 6 Key Data Model Concepts Device Profile Type The device profile type is the foundation for Device Management. While device profiles represent the devices themselves, device profile types are the templates for device profiles. A typical deployment usually includes only a handful of device profile types and hundreds of thousands of device profiles (as many as one per user in the system). Properly defining the device profile type also requires intimate technical knowledge of the device itself. Clearspan Device Management divides device profile type definition into two primary steps: Defining the default access profile attributes Defining the default configuration profile attributes The device profile type allows the operator to define default access and configuration settings for all devices of a given make, model, and application in the network, and then easily reuse those settings for a given group of devices. Whenever a new type of device must be introduced into the network, the operator must define a new device profile type to model the characteristics of that device. Device Profile When a new device is added to the network, a new device profile must be created on Clearspan to manage that device. The device profile models the actual instance of a device in the network. Every device profile must be created from a given device profile type. This gives the device profile a predefined set of default settings that are consistent with other devices of the same type in the network. User A device profile maintains a list of ports. The maximum number of ports is set at the device profile type. Each port on the device profile can be mapped to one line/port address on a user in Clearspan. This association between ports on devices and line/ports on users creates an important relationship between devices and users. For some device types, a device may only have one user associated with it at a time. For other device types, many users may need to be associated with it. Figure 7 shows one user per phone device relationship. 7 Mitel
13 Device Profile User Device Profile Type Sales Associate Sue Phone 1 Device Profile Sue User Polycom 650 Sales Associate Phone Sales Associate Jane Phone 2 Device Profile Jane User Sales Associate Kate Phone 3 Kate Figure 7 One User per Phone Device Relationship Figure 8 shows multiple users per phone device relationship. User Device Profile Monique Assistant Monique Phone 4 User Device Profile Type Exec Mike Polycom 650 Assistant Phone User Device Profile Laurie Assistant Laurie Phone 5 User Exec Bob Figure 8 Multiple Users per Phone Device Relationship 8 Mitel
14 INSTALLING MITEL (AASTRA) PHONES USING DEVICE MANAGEMENT INTRODUCTION This section describes the implementation of Mitel (Aastra) phones in a new Clearspan installation, using Device Management along with Clearspan Auto Install to manage the configuration of the Mitel phones, where the Mitel phones use the Auto Install Device ID and device-specific credentials for identification within the network. The use of Device Management is intended for a Clearspan system using release R19 or later and OpEasy or later. All of the Mitel phone types that Mitel supports have been tested using Device Management with exception of the Mitel 9143i and 9480i. OVERVIEW OF DEVICE MANAGEMENT The use of the MAC address in phone configuration is problematic during large phone deployments because it requires an installer to identify the phone with a specific MAC address from dozens or hundreds of boxes before placing it in the appropriate user location. However, the Clearspan Auto Install capability supports the assignment of a system-wide unique Auto Install Device ID that is used as the MAC address until an installer is prompted by Auto Install for that ID when setting up a new phone. With the implementation of Clearspan release R19, the Device Management functionality was available. Device Management supports: Multiple configuration files for a single phone device type. Accessing the configuration file for a specific phone device using the credentials for that device in addition to the MAC address. The credentials consist of a user name unique to a device and a corresponding password. The use of credentials provides a higher level of security than just using the MAC address. Obtaining configuration files from the Clearspan Profile Server, which is not directly accessible to the public. The Profile Server is instead accessed through a secure connection to the Clearspan XSP server. This provides a level of security to prevent unauthorized access to the configuration files. With Device Management, the management and provisioning of Mitel (Aastra) phones and other devices within Clearspan employs elements of OpEasy Provisioning, Clearspan Auto Install, and the BroadWorks Device Management functionality in conjunction with self-provisioning features built into Mitel phones. Operationally, Device Management works as follows to allow a phone device to obtain its configuration: 1. A phone is connected in the user environment and is provided with an IP address and the configuration server URL from the local DHCP server option Mitel
15 2. The phone uses the configuration server URL to connect to a Clearspan XSP. The URL path points Clearspan to a default set of configuration files. 3. The default set of configuration files provides the phone with a new device type-specific configuration URL and runs Clearspan Auto Install that prompts the installer for the Auto Install Device ID. 4. Clearspan Auto Install prompts the installer to enter and confirm the Auto Install Device ID. The Auto Install application updates the Clearspan device associated with the Auto Install Device ID with the MAC address of the phone being installed. In addition, it sets up the device credentials and reports those credentials to the phone for subsequent use. 5. The credentials and MAC address are matched to the Clearspan device previously provisioned (and modified by Auto Install) to provide the phone with its final configuration. DEVICE MANAGEMENT FILES One or more configuration files can be set up for each Device Profile Type created using Device Management. On the Clearspan web portal, under the System Resources Identity/Device 10 Mitel
16 Profile Types Files and Authentication for a specific Device Profile Type, the following files can be accessed: Access File Downloads the configuration file that the device will actually download. Identifies and uses the path that the device uses to get the file. Any credentials are prompted by the server. Repository File Downloads the configuration file that the device will actually download. Directly downloads the file from the repository. No credentials will be prompted. Template File Downloads the template file which Clearspan used to create the file in the repository for the specific device. The template file often contains tags that are substituted by Clearspan when creating the repository file for a specific device. DEVICE CREDENTIALS When a phone device type is set up to use Device Management with device access credentials, those credentials are used to associate a physical phone device to the corresponding configuration of that device within Clearspan after Auto Install has saved the credentials to the device. The credentials consist of a user name and a corresponding password. However, Clearspan Auto Install automatically creates these credentials. This eliminates the need for the credentials to be provisioned within OpEasy or entered by the installer. Furthermore, OpEasy completely hides the device credentials so they are also not displayed. PREPARATION Follow these steps prior to configuring Clearspan for installation of Mitel (Aastra) phones: 1. Determine the types of Mitel phones that will be used on the Clearspan system. The following lists the Mitel phone models currently supported by OpEasy. 6731i 6735i 6737i 6739i 6753i (53i) 6755i (55i) 6757i (57i) 6757i CT (57i CT) 6863i 6865i 6867i 6869i 6873i 9143i 9480i (480i) 9480i CT (480i CT) From this list, you can choose to support all of the above Mitel phone types or just those Mitel phone types that you know will be used for this Clearspan system. If you choose not to support a specific Mitel phone type, that Mitel phone type will not appear in drop-down lists of Device Types and no phones of that type can be created on Clearspan. If you choose a sub-set of this list and then find you need others from this list, those types may be added later. 11 Mitel
17 2. Determine the type of network connection the Mitel phones should use to access the phone configuration files: HTTPS HTTPS is a secure connection, preventing the viewing of the configuration files. This is the best type of connection to use because of the security. However, it makes troubleshooting phone installation problems more difficult. HTTP HTTP is not a secure connection, permitting anyone having access to the network to view the configuration files, including the phone Authentication Password and any other passwords in the configuration files. HTTPS is typically used. 3. Create a new directory named SystemConfigFiles on your PC and upload the configuration files that will be modified and downloaded to the Clearspan XSP server during the installation procedure (discussed later in this document). The configuration files to be uploaded are on the EMS server at /opt/aastra/ SNMPManager/SystemConfigFiles/Mitel/Aastra. 4. If this is an existing installation of OpEasy, retain the existing settings in the aastra.cfg file by uploading the current aastra.cfg file from directory /var/aastra/config/cleartext on either EMS server to the new SystemConfigFiles directory on your PC. 5. Modify the following files that were uploaded to the SystemConfigFiles directory on your PC as follows. aastra.cfg a. Modify the system-wide default settings used by all Mitel phones as needed or desired for your particular system. If this is NOT a new install of OpEasy, the aastra.cfg file should be your existing aastra.cfg. b. Modify the aastra.cfg file to insert the following line at the end of the file (if it doesn t already exist): action uri startup: Per the preceding line: Change yourems.yourcompany.com to the URL of the EMS server that processes the Auto Install phone application requests If access to this system s EMS is via HTTPS (instead of HTTP), change http to https An example of the line is highlighted in red as follows: ######## # Aastra.cfg for Clearspan Version # dated 3/16/2009 ######## * * ############: # Action URI Settings ######## 12 Mitel
18 action uri startup: Note: The aastra.cfg is further customized when used for phone-specific device types. Those instructions are included when adding the aastra.cfg file format in the Installing Mitel (Aastra) Phones Using Device Management Mitel (Aastra) Phone Device Profile Types Set up Files and Authentication for the Device Specific Profile Type section of this document. c. If the IP Phone UI and the Mitel Web UI need to display a language other than English at a system level, modify aastra.cfg to set parameters for language pack selection and webpage language selection. For example, if this system uses the French language, add the following entries in aastra.cfg to download the French language pack and to set the webpage to French respectively. language 1: lang_fr.txt language: 1 As a second example, if this system uses French as the default language, but needs to allow users to change their preferred language (via the Phone UI or via the Web UI) to either English, German, Italian or Spanish, add the following entries in the aastra.cfg to download each language pack and to set the webpage to French. language 1: lang_fr.txt language 2: lang_de.txt language 3: lang_it.txt language 4: lang_es.txt language: 1 Notes: Specifying a parameter to download the English language pack is not required because English is inherent to the system. If no language selection parameter is provided, English is used as default. A maximum of four language packs may be downloaded. Mitel Phone Type-Specific Files a. The SystemConfigFiles directory contains a separate Mitel phone type file for each of the Mitel phones that are supported (i.e. 6731i.cfg, 6735i.cfg, etc.). You determined the Mitel phone types that will be supported for this installation in step 1 of this section. You may delete from your SystemConfigFiles directory, the phone type files that your installation will not support. b. Prior to OpEasy 4.2.0, the Mitel phone type files did not specify the https client method, http server, and http path. Beginning with OpEasy 4.2.0, the Mitel phone type files include these definitions. Following is the 6731i.cfg file (from OpEasy version 4.2.0) that is used for an Mitel 6731i phone; the added definitions are highlighted. 13 Mitel
19 ######################### # # Default 6731i.cfg file # ########################## ^dhcp config option override: -1 ^download protocol: HTTPS ^https client method: TLS 1.0 ^https server: yourxsp.yourcompany.com ^https path: dms/mitel_6731i_dms ^http server: yourxsp.yourcompany.com ^http path: dms/mitel_6731i_dms ^http digest force login: 0 If your OpEasy version is prior to 4.2.0, add these lines, specifying the server and path in the same manner as specified for the https server and path. The remainder of this procedure assumes you are using the latest Mitel phone type files. c. If HTTP was previously selected as the type of network connection when retrieving phone configuration files, modify each Mitel phone type file to replace HTTPS with HTTP in the download protocol line: Example before: ^dhcp config option override: -1 ^download protocol: HTTPS ^https client method: TLS 1.0 ^https server: yourxsp.yourcompany.com ^https path: dms/mitel_6731i_dms ^http server: yourxsp.yourcompany.com ^http path: dms/mitel_6731i_dms ^http digest force login: 0 Example after: ^dhcp config option override: -1 ^download protocol: HTTP ^https client method: TLS 1.0 ^https server: yourxsp.yourcompany.com ^https path: dms/mitel_6731i_dms ^http server: yourxsp.yourcompany.com ^http path: dms/mitel_6731i_dms ^http digest force login: 0 If HTTPS was selected as the type of network connection, no modification is needed. d. If there is a single network path to the Clearspan XSP server for this installation, modify each Mitel phone type file to replace yourxsp.yourcompany.com in both the https server and http server lines with the address of your Clearspan XSP server in the line: ^https server: yourxsp.yourcompany.com ^http server: yourxsp.yourcompany.com Caution: When using HTTPS, the value you supply for yourxsp.yourcompany.com must match the name associated with the SSL Certificate on the XSP. 14 Mitel
20 Example before: ^https server: yourxsp.yourcompany.com ^https path: dms/mitel_6731i_dms ^http server: yourxsp.yourcompany.com ^http path: dms/mitel_6731i_dms Example after: ^https server: tb20ews1.mitel.com ^https path: dms/mitel_6731i_dms ^http server: tb20ews1.mitel.com ^http path: dms/mitel_6731i_dms If there are multiple network paths to the Clearspan XSP server for this installation, then choose one of your network paths and modify each Mitel phone type file to include the first path. 6. Replace yourxsp.yourcompany.com in both the https server and http server lines with the address of your first Clearspan XSP server in the line: ^https server: yourxsp.yourcompany.com ^http server: yourxsp.yourcompany.com Caution: When using HTTPS, the value you supply for yourxsp.yourcompany.com must match the name associated with the SSL Certificate on the XSP. 7. Adjust both the https path and http path lines by replacing _dms with _nnnn where nnnn is a descriptor for this network location. ^https path: dms/mitel_xxxxi_dms ^http path: dms/mitel_xxxxi_dms Example before: ^https server: yourxsp.yourcompany.com ^https path: dms/mitel_6731i_dms ^http server: yourxsp.yourcompany.com ^http path: dms/mitel_6731i_dms Example after: ^https server: tb20ews1.mitel.com ^https path: dms/mitel_6731i_public ^http server: tb20ews1.mitel.com ^http path: dms/mitel_6731i_public 8. After you have modified each.cfg file with the appropriate server and path for the first network path, repeat the process creating a second set of.cfg files with the server and path for the second network path. Create a third set if a third network path exists, etc. Mitel Default Configuration File The %BWMACADDRESS%.cfg file in your SystemConfigFiles directory does not need modification. It will be assigned as the initial default template for the Device Profile Types created for the Mitel phones. This system-wide device type default template is available for selection as the <Default> template when building OpEasy-created phones but usually the administrator will have created an OpEasy-generated <Default> template or a specific OpEasy custom template that is then assigned to phone devices by the OpEasy Administrator. 15 Mitel
21 The system-wide device type default template is also available for use by devices created via the Clearspan web portal. If needed, this system-wide default template can be replaced with a modified version per phone type. 9. Upload the latest Mitel phone firmware files and language packs into the new directory MitelFirmware on your PC. If needed, unzip the files. These files will be downloaded to the phones during phone configuration. Record the versions of the firmware per phone type; this information will be needed in section Add Mitel (Aastra) Phone Firmware File Format. Also, record the version of the language packs; this will be needed in section Add Language Pack File Format. Note: Firmware files and language packs are retrievable via Galaxy by following the path: Mitel Corporate Internet Engineering Engineering Home ATI R&D Website GA Firmware. OPTION 66 WITH DHCP When a new phone is plugged into the network, a DHCP server assigns it an IP address. The phone then gets the configuration URL via Option 66. The corporate DHCP server used by the new phone must be configured with Option 66 pointing to the URL of the Clearspan Device Profile Type. The path to the Clearspan device type is defined via the Device Profile Type, and has the following general format: When using HTTPS: When using HTTP: XSP Server>:443/dms/clearspan XSP Server>:80/dms/clearspan An example of the path when using HTTPS is: In this example, the <Clearspan XSP Server> is tb20ews1.mitel.com, which is the name of the SSL certificate on the XSP. CLEARSPAN DEVICE PROFILE TYPE SET UP A CLEARSPAN DEVICE PROFILE TYPE Via the Clearspan web portal, navigate to System Resources Identity/Device Profile Types and create a profile type called Clearspan. This is the entry point that all phone devices hit on initial install using the DHCP server. The following list describes changes to make and the screen capture shows how the profile must look. Those areas that require change are circled. For Identity/Device Profile Type, enter Clearspan. If there are multiple network paths to the XSP server, then multiple Clearspan profile types may be needed. If so, use a label to identify each profile type via the Identity/Device Profile Type name. For example, names such as Clearspan (PUB), Clearspan (PVT) and Clearspan (CMN) may be used. For Signaling Address Type, enter Intelligent Proxy Addressing For Device Configuration Options, select Device Management 16 Mitel
22 Under the Device Management section: - For Device Access Protocol, choose https or http, depending on the type of network connection previously selected. - For Device Access FQDN, enter the address of the Clearspan XSP server which is addressable within the DHCP location. - Set Device Access Port, to 443 if the Device Access Protocol is https. Set this field to 80 if the protocol is http. - For Device Access Context Name, enter dms. - For Device Access URI, enter clearspan. Note: The five fields beginning with the Device Access Protocol comprise the path to the Clearspan Device Profile Type. This path (e.g. when using HTTPS and when using HTTP) is the one that must be set in DHCP Option Mitel
23 18 Mitel

24 Note: The option for Device Configuration Tags (within the Device Management section) shows Use Default System Tag Set Only selected. This is appropriate for a site that uses Mitel phones only. However, if a site also uses Polycom phones then the appropriate selection is Use Default System Tag Set and Tag Set with a value of Polycom Tags in the drop-down box. SET UP FILES AND AUTHENTICATION FOR THE CLEARSPAN DEVICE PROFILE TYPE After the Identity/Device Profile Type is saved, perform an edit on this Profile Type and click on the Files and Authentication tab. 19 Mitel
25 Add aastra.cfg File Format Add a file entry for the aastra.cfg file format. The list that follows describes the setup, and the screen capture that follows provides an example with the fields that require change circled in red. Note that the final step in this procedure is to upload the aastra.cfg file. However, before the aastra.cfg file can be uploaded, it must be modified to add a device-specific parameter to the csinstall.php call. The modification to make per device type is described in the first bulleted step below. Obtain the aastra.cfg file, that was previously prepared and is now in the directory SystemConfigFiles on your PC, to use as the initial version for your modifications. Modify the action uri startup parameter in the aastra.cfg file (normally the last line in the file) to append?dt=<device Access URI> to the csinstall.php call where <Device Access URI> matches the Device Access URI of the device type you are currently configuring. A reference to the Device Access URIs per device type is included under the Mitel (Aastra) Phone Device Profile Types section of this document. An example of the appended text for a 6731i device type is shown in red font below. action uri startup: Save this version of the aastra.cfg file to your PC. Back at the Clearspan web portal, on the Identity/Device Profile Type File Add page, set Device Access File Format to aastra.cfg. Set Repository File Format to aastra-%bwtimestamp%.cfg. Set File Category to Dynamic Per-Device. Set File Customization to Administrator. Under the Assign File section, select Custom and click Browse. Then browse to the aastra.cfg file that you just modified. Make sure the version you select contains the?dt parameter that references the appropriate Device Access URI for the device type you are currently configuring. 20 Mitel

26 Add Mitel (Aastra) Phone Firmware File Format Firmware for Mitel (Aastra) phone types are placed at the Clearspan Device Profile level. With a set of known good firmware at this level, new Mitel phone installations retrieve this version rather than unknown versions that come from the factory. Add a file entry for Mitel firmware for each device type that is supported. Set the Device Access File Format using the following table. These names match those you have downloaded to the MitelFirmware folder on your PC. 21 Mitel
27 Set the Repository File Format using the following table. This name contains an identifier for firmware version. The firmware version is available on download and was recorded via the Preparation section. DEVICE TYPE DEVICE ACCESS FILE FORMAT 6700i and 9000i series of phones REPOSITORY FILE FORMAT WHERE X.X.X.X IS THE VERSION EXAMPLE OF REPOSITORY FILE FORMAT VALUE 6753i 53i.st 53i.x.x.x.x.st 53i st 6755i 55i.st 55i.x.x.x.x.st 55i st 6757i 57i.st 6757i.x.x.x.x.st 6757i st 6731i 6731i.st 6731i.x.x.x.x.st 6731i st 6739i 6739i.st 6739i.x.x.x.x.st 6739i st 9143i 9143i.st 9143i.x.x.x.x.st 9143i st 9480i 9480i.st 9480i.x.x.x.x.st 9480i st 6735i & 6737i phones 6735i 6735i.st 6735i.x.x.x.x.st 6735i st 6737i 6737i.st 6737i.x.x.x.x.st 6737i st 6800i series of phones 6863i 6863i.st 6863.x.x.x.x.st 6863i st 6865i 6865i.st 6865i.x.x.x.x.st 6865i st 6867i 6867i.st 6867i.x.x.x.x.st 6867i st 6869i 6869i.st 6869i.x.x.x.x.st 6869i st 6873i 6873i.st 6873i.x.x.x.x.st 6873i st Old 6700i and 9000i phones no new firmware is being released for these 6757i CT 6757iCT.st 6757iCT.x.x.x.x.st 6757iCT st 9480i CT 9480iCT.st 9480iCT.x.x.x.x.st 9480iCT st For File Customization, select Administrator. Under the Assign File section, select Custom and click Browse. Then browse to directory MitelFirmware on your PC and select the associated.st file. 22 Mitel
 phones and you have set the language selection parameters in the aastra.")
28 Continue adding files until firmware for all supported device types is in place. Add Language Pack File Format If languages other than English are supported at a system level on the Mitel (Aastra) phones and you have set the language selection parameters in the aastra.cfg file (per the preparation steps), then add file entries for the desired language pack(s). Set the Device Access File Format to match the name of the language pack text file you downloaded to the MitelFirmware folder on your PC. Set the Repository File Format using the name of the language pack text file along with an identifier for the language pack version. The language pack version is available on download and was recorded via the Preparation section. Under the Assign File section, select Custom and click Browse. Then browse to directory MitelFirmware on your PC and select the language pack file of your choice. 23 Mitel
 Phone Type.cfg File Formats Add a separate.cfg file entry for each Mitel (Aastra) phone device type that will be supported on the system.")
29 In the example that follows, the language pack is Spanish (designated by es in the filename). Note that the Repository File Format contains the version associated with this language pack. Add Mitel (Aastra) Phone Type.cfg File Formats Add a separate.cfg file entry for each Mitel (Aastra) phone device type that will be supported on the system. You should have already determined the list of supported phones and modified the corresponding Mitel phone type specific files in your SystemConfigFiles directory as explained in the Preparation section. The list that follows describes the setup, and the screen capture that follows provides an example with the fields that require change circled in red. 24 Mitel

30 Set Device Access File Format to xxxxi.cfg where xxxx identifies the phone type (e.g. 6757). Set Repository File Format to the same name as the Device Access File Format. (e.g. 6757i.cfg). Set File Customization to Administrator. Under the Assign File section, select Custom and click Browse. Then browse to directory SystemConfigFiles on your PC and select the.cfg file associated with the file you are adding. Repeat this step for each phone type that will be supported on the system. 25 Mitel
31 MITEL (AASTRA) PHONE DEVICE PROFILE TYPES ADD A DEVICE PROFILE TYPE FOR EACH MITEL (AASTRA) PHONE TYPE Add a Device Profile Type for each Mitel (Aastra) phone type that will be supported on the system. The convention to use for Identity/Device Profile Type name is Vendor + Model + Label where the components are separated with a space. The following table includes all Mitel Phone Types that are supported within OpEasy. The following table identifies the name that is to be used when building the Profile Types along with the number of ports and the value of the Device Access URI. Note: DMS and dms are part of the naming convention. DMS stands for Device Management System. It is used when an installation has a single network path to its XSP. If an installation has more than one network path to its XSP, then DMS will be replaced with text that identifies the network location. For example, at one particular site, references to DMS are replaced by Public, Private and Common and three sets of Identify / Device Profile Types are created to allow for these multiple networks. Using the Clearspan web portal, navigate to System Resources Identity/Device Profile Types and create a profile type for each of the supported Mitel Phone Types on the system using the following table as reference. PHONE TYPE IDENTIFY/DEVICE PROFILE TYPE NAME NUMBER OF PORTS DEVICE ACCESS URI 6731i Mitel 6731i (DMS) Limited to 6 Mitel_6731i_dms 6735i Mitel 6735i (DMS) Limited to 9 Mitel_6735i_dms 6737i Mitel 6737i (DMS) Limited to 9 Mitel_6737i_dms 6739i Mitel 6739i (DMS) Limited to 9 Mitel_6739i_dms 6753i (53i) Mitel 6753i (DMS) Limited to 9 Mitel_6753i_dms 6755i (55i) Mitel 6755i (DMS) Limited to 9 Mitel_6755i_dms 6757i (57i) Mitel 6757i (DMS) Limited to 9 Mitel_6757i_dms 6757i CT (57i CT) Mitel 6757iCT (DMS) Limited to 9 Mitel_6757iCT_dms 6863i Mitel 6863i (DMS) Limited to 2 Mitel_6863i_dms 6865i Mitel 6865i (DMS) Limited to 24 Mitel_6865i_dms 6867i Mitel 6867i (DMS) Limited to 24 Mitel_6867i_dms 6869i Mitel 6869i (DMS) Limited to 24 Mitel_6869i_dms 6873i Mitel 6873i (DMS) Limited to 24 Mitel_6873i_dms 9143i Mitel 9143i (DMS) Limited to 9 Mitel_9143i_dms 9480i (480i) Mitel 9480i (DMS) Limited to 9 Mitel_9480i_dms 9480i CT (480i CT) Mitel 9480iCT (DMS) Limited to 9 Mitel_9480iCT_dms 26 Mitel
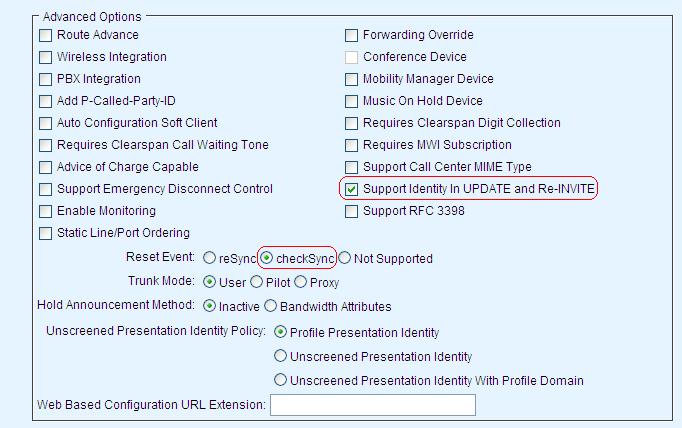
32 The Identity/Device Profile Type must be entered per the preceding table for the first of the supported phone types. With exception, if the installation has more than one network path to its XSP, replace DMS with the identifier for the first location. For Signaling Address Type, select Intelligent Proxy Addressing. Under the Standard Options section: - Set Number of Ports to the value shown in the preceding table (e.g. Limited to 6 for the 6737i) - For Ringback Tone/Early Media Support, select Local Ringback No Early Media - Check the box for Registration Capable Under the Advanced Options section: - Check the box for Support Identity in UPDATE and Re-INVITE - For Reset Event, select checksync For Device Configuration Options, select Device Management Under the Device Management section: - For Device Configuration Tags, select Use Default System Tag Set Only - Check the box for Allow Identity/Device Profiles to Configure Custom Tags - Check the box for Allow Groups to Configure Custom Tags - For Device Access Protocol, choose https or http, depending on the type of network connection previously determined. - For the Device Access FQDN, enter the address of the Clearspan XSP server which is addressable within the DHCP location. - Set Device Access Port, to 443 if the Device Access Protocol is https. Set this field to 80 if the protocol is http. - For Device Access Context Name, enter dms. - For Device Access URI, enter per the preceding table. With exception, if the installation has more than one network path to its XSP, replace dms with the identifier for the first location. Note: If the installation has more than one network path to its XSP, after creating the first set of Device Profile Types (e.g. using identifier pub ), create a second set using the identifier for the second location (e.g. using identifier pvt ). Repeat if a third location exists (e.g. using identifier cmn ), etc. The screen captures that follow illustrate creation of the 6757i profile type for a site that has one network path to its XSP; those areas that require change are circled. 27 Mitel
33 28 Mitel

34 SET UP FILES AND AUTHENTICATION FOR THE DEVICE SPECIFIC PROFILE TYPE After the Identity/Device Profile Type is saved, perform an edit of this Profile Type and click on the Files and Authentication tab. Add entries for the necessary file formats. The following screen capture shows the file formats that must be defined for each of the phone device profile types. The remainder of this section describes how to add each. 29 Mitel

35 Add %BWMACADDRESS%.cfg File Format The %BWMACADDRESS%.cfg file must be built to contain the configuration specific to a phone device. The list that follows describes the setup, and the screen capture that follows provides an example with the fields that require change circled in red. Set Device Access File Format to %BWMACADDRESS.cfg. Set Repository File Format to %BWFQDEVICEID%.cfg. Set File Category to Dynamic Per-Device. Set File Customization to Administrator. Under the Assign File section, select Custom and click Browse. Then browse to directory SystemConfigFiles on your PC and select the %BWMACADDRESS%.cfg file. Under the File Authentication section - For Authentication Mode, check User Name and Password. - For Device Access HTTP Authentication, select Digest. 30 Mitel
36 Add Mitel (Aastra) Phone Type.cfg File Format Add an Mitel (Aastra) phone.cfg file entry (such as 6757i.cfg for the 6757i phone) for the Mitel Phone Device Profile Type that is currently being built. The full set of.cfg files were previously modified in the Preparation section and were included as files under the Clearspan Device Profile Type. The list that follows describes the setup, and the screen capture that follows provides an example with the fields that require change circled in red. Set Device Access File Format to xxxxi.cfg where xxxx identifies the phone type (e.g. 6757). The name used must match the filename in the SystemConfigFiles directory. For example, for the 6757i phone type, the phone-type specific file is 6757i.cfg. Set Repository File Format to the same name as the Device Access File Format. (e.g. 6757i.cfg). 31 Mitel
37 Set File Category to Dynamic Per-Type. Set File Customization to Administrator. Under the Assign File section, select Custom and click Browse. Then browse to directory SystemConfigFiles on your PC and select the.cfg file associated with the file you are adding. Add aastra.cfg File Format Add a file entry for the aastra.cfg file format. The text that follows describes the setup, and the screen capture that follows provides an example, with the fields that require change, circled in red. Note that the final step in this procedure is to upload the aastra.cfg file. However, before the aastra.cfg file can be uploaded, it must be modified to add a device-specific parameter to the 32 Mitel
38 csinstall.php call. The modification to make per device type is described in the first bulleted step below. Obtain the aastra.cfg file, that was previously prepared and is now in the directory SystemConfigFiles on your PC, to use as the initial version for your modifications. Modify the action uri startup parameter in the aastra.cfg file (normally the last line in the file) to append?dt=<device Access URI> to the csinstall.php call where <Device Access URI> matches the Device Access URI of the device type you are currently configuring. A reference to the Device Access URIs per device type is included under the Mitel (Aastra) Phone Device Profile Types section of this document. An example of the appended text for a 6731i device type is shown in red font below. action uri startup: Save this version of the aastra.cfg file to your PC. Back at the Clearspan web portal, on the Identity/Device Profile Type File Add page, set Device Access File Format to aastra.cfg. Set Repository File Format to aastra-%bwtimestamp%.cfg. Set File Category to Dynamic Per-Device. Set File Customization to Administrator. Under the Assign File section, select Custom and click Browse. Then browse to the aastra.cfg file that you just modified. Make sure the version you select contains the?dt parameter that references the appropriate Device Access URI for the device type you are currently configuring. 33 Mitel
39 Mitel (Aastra) Phone Firmware and Language Packs Firmware and Language Packs are not put in place for the Mitel (Aastra) Phone Type Specific Device Profile Types. Rather, a known good version of firmware with language packs is placed at the Clearspan Device Profile level for newly installed phones. Also, Mitel Support places new firmware and makes reference to its location via the Global Settings or Extra Settings within Template Provisioning. See Section Custom Phone Firmware for more details. MITEL (AASTRA) PHONE DEVICE To make use of the new Device Profiles that use Device Management on OpEasy, first build new templates that use the new device types (i.e., the (DMS) device types). The following shows a template that has been built for the Mitel 6867i (DMS) Device Type. 34 Mitel
 The example that follows shows the Phone page of a new User Add operation.")
40 Next, build new Users/Devices that specify the new (DMS) device types along with the new (DMS) templates. Also, enter an Auto Install Device ID into the MAC Address field. The MAC Address must be unique system-wide. (Typically, the user s extension is used as the Auto Install Device ID.) The example that follows shows the Phone page of a new User Add operation. The Device Type chosen reflects the new DMS device type, the Template chosen is created for the new DMS device type, and the MAC Address is provided as required. 35 Mitel
 phone is started up or when an existing Mitel phone is")
41 Be cautious when updating a device to include the MAC Address because login will fail if the wrong MAC address is used. CUSTOM PHONE FIRMWARE The firmware files that are placed in the Clearspan Device Profile Type are only referenced when a new Mitel (Aastra) phone is started up or when an existing Mitel phone is started up from factory default. The firmware under this Device Profile Type is rarely updated. When new Mitel phone firmware is introduced, the new firmware is typically put in place for a single group or a few Mitel phones before upgrading all phones in the system. These sections provide a few examples of putting new firmware in place. 36 Mitel

42 UPDATE FIRMWARE VIA EXTRA SETTINGS FOR A SINGLE DEVICE To put new firmware in place for a single device, use OpEasy to navigate to Phone Templates specifying the template used by the phone device. Note whether this template is used for more than a single device. If it is used for multiple devices and you do not wish to update all devices associated, copy the template and assign the copied template to the single device. Then edit the template. Click the Extra Settings tab within the template and make an entry to point to the new firmware. Save the changes and restart the phone to install the new firmware. The preceding example shows an entry has been added on the Extra Settings tab for the template named Standard 1 Line which is associated with Device Type Mitel 6757i (DMS). The entry specifies the parameter firmware server: followed by the path and filename of the new firmware. Mitel Support personnel are responsible for making the entries in Extra Settings and for putting the firmware in the location that is specified. UPDATE FIRMWARE AT A GROUP, ENTERPRISE, OR SYSTEM LEVEL To put new firmware in place for a Group, for an Enterprise, or for the entire System, use OpEasy to navigate to Global Settings under Phone Templates. To affect a change at the Group level, specify the Enterprise and Group on the Global Configuration File Settings page. Then make an entry in the text box under the Group header that specifies the new firmware. To affect a change at the Enterprise level, specify the Enterprise (and optionally a Group), then make an entry in the text box under the Enterprise header that specifies the new firmware. To affect a change at the System level, make an entry within the text box under the System header that specifies the new firmware. When making Global Setting changes, remember that a change made at the System Level is overridden if the same parameter is changed at the Enterprise or Group levels. Likewise, a change made at the Enterprise Level is overridden if the same parameter is changed at the Group level. Also, a change made via Extra Settings for a template overrides an entry of the same that exists at the Group, Enterprise, or System level. 37 Mitel

43 The preceding example shows an entry has been added via the Group Global settings for the deskphone_users group under the Alpha enterprise. This will affect all device types under this group. The entry specifies the parameter firmware server: followed by the path and filename of the new firmware. Mitel Support personnel are responsible for making the entries in Global Settings and for putting the firmware in the location that is specified. MITEL (AASTRA) PHONE INSTALLATION Once the DHCP server and device profile types have been set up, the phone installer needs to only plug in the new Mitel (Aastra) phone. The new phone obtains its IP address from DHCP, along with the path to the Clearspan XSP server and Clearspan device profile type. 38 Mitel
44 After phone boot processing finishes, a screen appears to ask for the Auto Install Device ID. Enter the Device ID using the dial pad, and then press the button labeled Done. A confirmation screen appears containing information on the phone device identified by the Device ID. If that is the correct Clearspan device, press OK. Auto Install creates credentials for the phone and updates the Clearspan device with both the MAC address of the phone and the new credentials. Auto Install then restarts the phone to complete the Auto Install process. Once restart processing completes, the Mitel phone is ready for use. FINAL REMARKS If your installation has a single network path to the XSP, you should end up with a single Clearspan Device Profile Type and a set of (DMS) Device Profile Types to match the list of supported devices on your system. If your installation has multiple network paths to the XSP, you should end up with a set of Clearspan Device Profile Types to match the number of paths to the XSP and a set of Device Profile Types for each path (e.g. (pvt), (pub) and (cmn)). 39 Mitel
45 INSTALLING POLYCOM PHONES USING DEVICE MANAGEMENT INTRODUCTION This section describes the implementation of Polycom phones in a Clearspan installation, using Device Management to manage the configuration of the Polycom phones, where the Polycom phones use device-specific credentials for identification within the network. The use of Device Management is intended for a Clearspan system using at minimum BroadWorks release R19 and OpEasy version OVERVIEW OF DEVICE MANAGEMENT Prior to BroadWorks release R19, Clearspan only supported the configuration of phones and other devices using either two or three configuration files, where the configuration file for a specific phone device was accessed using the phone s MAC address. This is the legacy device configuration method. The use of the MAC address in phone configuration is problematic during large phone deployments because it requires an installer to identify the phone with a specific MAC address from dozens or hundreds of boxes before placing it in the appropriate user location. With the implementation of BroadWorks release R19, the Device Management functionality is available. Device Management supports: Multiple configuration files for a single phone device type Accessing the configuration file for a specific phone device using the credentials for that device in addition to the MAC address. The credentials consist of a user name unique to a device and a corresponding password. The use of credentials provides a higher level of security than just using the MAC address. Obtaining configuration files from the Clearspan Profile Server, which is not directly accessible to the public. The Profile Server is instead accessed through a secure connection to the Clearspan XSP server. This provides a level of security to prevent unauthorized access to the configuration files. With Device Management, the management and provisioning of Polycom phones within Clearspan employs elements of OpEasy Provisioning and the BroadWorks Device Management functionality in conjunction with self-provisioning features built in to Polycom phones. Operationally, Device Management works as follows to allow a phone device to obtain its configuration: 1. A phone is connected in the user environment and is provided with an IP address and the configuration server URL from the local DHCP server option The phone uses the configuration server URL to connect to a Clearspan XSP. The URL path points Clearspan to a default set of configuration files. 40 Mitel
46 3. The default set of configuration files provides the phone with a new device type-specific configuration URL and enables an installer interactive mode to prompt the installer for the device credentials. 4. The installer uses the phone s interactive mode to enter the device credentials. 5. The credentials are matched to the Clearspan device previously provisioned and the phone is provided with its final configuration, which also disables the interactive configuration mode. DEVICE MANAGEMENT FILES One or more configuration files can be set up for each Device Profile Type created using Device Management. On the Clearspan web portal, under the System Resources Identity/Device Profile Types Files and Authentication for a specific Device Profile Type, the following files can be accessed: Access File Downloads the configuration file that the device will actually download. Identifies and uses the path that the device uses to get the file. Any credentials are prompted by the server. 41 Mitel
47 Repository File Downloads the configuration file that the device will actually download. Directly downloads the file from the repository. No credentials will be prompted. Template File Downloads the template file which BroadWorks used to create the file in the repository for the specific device. The template file often contains tags that are substituted by BroadWorks when creating the repository file for a specific device. DEVICE CREDENTIALS When a phone device type is set up to use Device Management with device access credentials, those credentials are used to associate a physical phone device to the corresponding configuration of that device within Clearspan. The credentials consist of a user name and a corresponding password. USER NAME GUIDELINES The user name must be unique for each device. It can be from 1 to 161 characters, consisting of alphanumeric characters, blanks, and any of the special characters -_.,!@$%&*+/=?^{ }~. The user name does not need to meet any specific format, just be unique per device. However, the user name should be of a format that allows the user name to be unique by device but also easily understood by the phone installer because the installer will need to enter the user name. The following are some possible choices for the format of the user name: User s Name Credentials user name as follows: - <User First Name> <User Last Name> - <User Last Name>, <User First Name> Phone Number Credentials user name as follows: - <PhoneNumber> - User has a phone number assigned; this phone is the user s primary phone. - <PhoneNumber><SCA ID Number> - User has a phone number assigned; this phone is created as an SCA for the user. Extension Credentials user name as follows: - <Extension><Group-Unique ID> - User only has an extension assigned (no phone number); this phone is the user s primary phone. - <Extension><Group-Unique ID><SCA ID Number> - User only has an extension assigned (no phone number); this phone is created as an SCA for the user. Device Name Credentials user name is set to the device name, which is unique within the system. <SCA ID Number> is the xx of the SCAxx SCA ID, where xx is the number identifying the user s SCA for this phone. <Group-Unique ID> is a 4-digit number that is unique for the Enterprise and Group. 42 Mitel
48 PASSWORD GUIDELINES The password can be from 3 to 60 characters, consisting of alphanumeric characters and the special characters -_.,!@$%&*+/=?^{ }~. However, the password must meet the password rules as configured within the Clearspan web portal under the Utilities / Device Profile Authentication Password Rules for the enterprise in which the device exists. Typically, the Enterprise-level rules simply use the System-wide rules under System / Utilities / Device Profile Authentication Password Rules. These rules may require the password be a minimum of 3 to 40 characters, have a minimum of 1 to 10 digits, have a minimum of 1 to 10 uppercase alpha characters, have a minimum of 1 to 10 lowercase alpha characters, and/or have a minimum of 1 to 10 nonalphanumeric characters. Aside from the password rules, there is no specific format for the password. However, you may use a format for the password that can be easily used by the phone installer or a single password could be used (although a single password would not be very secure). PREPARATION Prior to configuring Clearspan for installation of Polycom phones: 1. Determine the types of Polycom phones that will be used on the Clearspan system. The following lists the Polycom phone models currently supported by OpEasy: SoundPoint IP 321 SoundPoint IP 331 SoundPoint IP 450 SoundPoint IP 550 SoundPoint IP 560 SoundPoint IP 650 SoundStation IP 5000 SoundStation IP 6000 SoundStation IP 7000 VVX 101 VVX 201 VVX 300 VVX 301 VVX 310 VVX 311 VVX 400 VVX 401 VVX 410 VVX 411 VVX 500 VVX 501 VVX 600 VVX 601 From this list, you can choose to support all of the Polycom phone types or just those types that you know will be used for this Clearspan system. If you choose not to support a specific Polycom phone type, that phone type does not appear in drop-down lists of Device Types and no phones of that type can be created on Clearspan. If you choose a sub-set of this list and later find you need others from this list, those types may be added later. 43 Mitel
49 2. Determine the type of network connection the Polycom phones should use to access the phone configuration files: HTTPS HTTPS is a secure connection, preventing the viewing of the configuration files. This is the best type of connection to use because of the security. However, it makes troubleshooting phone installation problems more difficult. HTTP HTTP is not a secure connection, permitting anyone having access to the network to view the configuration files, including the phone Authentication Password and any other passwords in the configuration files. HTTPS is typically used. 3. Create a new directory named PolycomSystemConfigFiles along with subdirectories named ClearspanDeviceType and PhoneDeviceType on your PC and upload the configuration files that will be modified and downloaded to the Clearspan XSP server during the installation procedure (discussed later in this document). The configuration files to be uploaded are on the EMS server at location /opt/aastra/ SNMPManager/ SystemConfigFiles/Polycom 4. The files provided are used as is with exception to the provisioning.cfg file. Make modifications to the provisioning.cfg, which is in the ClearspanDeviceType folder, as indicated. a. This file references the https protocol and port 443. If http protocol is desired, modify the file to change the protocol type to http and the port to 80. For example, to change to http protocol, where https and 443 appear: <device.prov device.prov.servername.vvx300= Replace the protocol and port as follows: <device.prov device.prov.servername.vvx300= BWDEVICEACCESSFQDN%:80/dms/Polycom_VVX300/> b. Update the imbedded %BWDEVICEACCESSFQDN% tags to the system s XSP cluster address. From the previous example, change %BWDEVICEACCESSFQDN% to the name of your XSP (e.g. tb20ews1.mitel.com) as follows: <device.prov device.prov.servername.vvx300= 5. Create a new directory named PolycomFirmware on your PC and upload the latest Polycom phone firmware files. Note that firmware files are retrievable via the internet (search for Polycom software matrix ). Retrieve the Split version rather than the Combined version because the split version breaks out the individual firmware files for each model of Polycom phone. Also, retrieve firmware for both VVX and SoundPoint IP/SoundStation IP phones if both are supported on your system. A subset of these files will be used when downloading files to the Device Profile Types. 6. When retrieving firmware, note the version of the firmware for the SoundPoint IP, the SoundStation IP and the VVX phone types. This information is needed when creating the Polycom Tag Set. 44 Mitel
50 7. Obtain Boot Rom Loader files and place them in the PolycomFirmware folder on your PC. These files are available via links from the Polycom Software Matrix but are also available in folder L:\Dept\PSE\Clearspan\Products\Polycom\Applications and Upgrades\4.4.0B_Upgrader. Note that the VVX phones do not require Boot Rom Loader files. 8. Create the Polycom Tag Set. Browse to System Resources Device Management Tag Sets and (if Polycom-Tags is not already present) select Add to add a new tag set. Configure the tag set name as Polycom-Tags. Add the tags in the following table to the device tag set. If the tag set already exists, make sure that the tags in the following table have been defined. Note that additional tags may be added as needed. Also note that the Tag Value examples are current as of the creation of this document. Use the versions that correspond to what you have downloaded (per step 6). TAG NAME TAG VALUE EXAMPLE DESCRIPTION %APP_VERSION% Set to the currently supported version of Polycom VVX firmware (unless VVX is not used). %APP_VERSION_SPIP % Set to the latest supported version of Polycom firmware for SoundPoint IP 321 and 331 phones. %APP_VERSION_SPIP-450% Set to the latest supported version of Polycom firmware for SoundPoint IP 450 phones. %APP_VERSION_SPIP % Set to the latest supported version of Polycom firmware for SoundPoint IP 550 and 560 phones. %APP_VERSION_SPIP-650% Set to the latest supported version of Polycom firmware for SoundPoint IP 650 phones. %APP_VERSION_SSIP-5000% Set to the latest supported version of Polycom firmware for SoundStation IP 5000 phones. %APP_VERSION_SSIP-6000% Set to the latest supported version of Polycom firmware for SoundStation IP 6000 phones. %APP_VERSION_SSIP-7000% Set to the latest supported version of Polycom firmware for SoundStation IP 7000 phones. %APP_VERSION_VVX % Set to the latest supported version of Polycom firmware for VVX 101 and VVX 201 phones. %APP_VERSION_VVX % Set to the latest supported version of Polycom firmware for VVX 300/301/310/311 and VVX 400/401/410/411 phones. %APP_VERSION_VVX % Set to the latest supported version of Polycom firmware for VVX 500/501 and VVX 600/601 phones. DHCP AND OPTION 66 When a new phone is plugged into the network, a DHCP server assigns it an IP address. The phone then gets the configuration URL via Option 66. The corporate DHCP server used by the new phone must be configured with Option 66 pointing to the URL of the Clearspan Device Profile Type. The path to the Clearspan device type is defined via the Device Profile Type, and has the following general format: When using HTTPS: XSP Server>:443/dms/clearspan When using HTTP: XSP Server>:80/dms/clearspan 45 Mitel
51 An example of the path when using HTTPS is: In this example, the <Clearspan XSP Server> is tb20ews1.mitel.com, which is the name of the SSL certificate on the XSP. Caution: When using HTTPS, the value you supply for yourxsp.yourcompany.com must match the name associated with the SSL Certificate on the XSP. The SSL Certificate on the XSP cannot be a wildcard certificate (it cannot contain wildcard characters). ADD CLEARSPAN DEVICE PROFILE TYPE Using the Clearspan web portal, navigate to System Resources Identity/Device Profile Types and add a profile type called Clearspan. This is the entry point that all phone devices hit on initial install using the DHCP server. The following list describes changes to make, and the screen capture illustrates how the profile must look where red circles designate the changes. Note: This profile type may already exist if Device Management is in place for Mitel (Aastra) phones. The only variant when using. Polycom phones is that the Polycom-Tags set must be specified if using Polycom. For Identity/Device Profile Type, enter Clearspan. If there are multiple network paths to the XSP server, then multiple Clearspan profile types may be needed. If so, use a label to identify each profile type via the Identity/Device Profile Type name. For example, names such as Clearspan (PUB), Clearspan (PVT) and Clearspan (CMN) may be used. For Signaling Address Type, enter Intelligent Proxy Addressing. For Device Configuration Options, select Device Management. Under the Device Management section: - For Device Configuration Tags, select Use Default System Tag Set and Tag Set and use the drop-down box to select Polycom-Tags. - For Device Access Protocol, choose https or http, depending on the type of network connection previously selected. - For Device Access FQDN, enter the address of the Clearspan XSP server which is addressable within the DHCP location. - Set Device Access Port, to 443 if the Device Access Protocol is https. Set this field to 80 if the protocol is http. - For Device Access Context Name, enter dms. - For Device Access URI, enter clearspan. Note: The five fields beginning with Device Access Protocol comprise the path to the Clearspan Device Profile Type. This path (e.g. when using HTTPS and when using HTTP) is the one that must be set in DHCP Option Mitel
52 47 Mitel


53 FILES AND AUTHENTICATION After the Identity/Device Profile Type is saved, perform an edit on this Profile Type and click on the Files and Authentication tab. The following screen appears. 48 Mitel
54 ADD FILE CFG Add a file entry for the cfg file format. The list that follows describes the setup, and the screen capture that follows shows the changes which are circled in red. For Device Access File Format, enter cfg (enter 12 zeros for the filename). Set Repository File Format to polycomdefaultzero.cfg. Set File Customization to Administrator. Under the Assign File section, select Custom and click Browse. Then browse to the directory PolycomSystemConfigFiles and sub-directory ClearspanDeviceType on your PC and select the cfg file. 49 Mitel
55 ADD FILE PROVISIONING.CFG Add a file entry for the provisioning.cfg file format. The list that follows describes the setup, and the screen capture that follows shows the changes which are circled in red. For Device Access File Format, enter provisioning.cfg. For Repository File Format, enter provisioning-%bwtimestamp%.cfg. For File Customization, select Administrator. Under the Assign File section, select Custom and click Browse. Then browse to the directory PolycomSystemConfigFiles and sub-directory ClearspanDeviceType on your PC and select the provisioning.cfg file. 50 Mitel
56 ADD FILE QSETUP.CFG Add a file entry for the qsetup.cfg file format. The list that follows describes the setup, and the screen capture that follows shows the changes which are circled in red. For Device Access File Format, enter qsetup.cfg. For Repository File Format, enter qsetup-%bwtimestamp%.cfg. For File Customization, select Administrator. Under the Assign File section, select Custom and click Browse. Then browse to the directory PolycomSystemConfigFiles and sub-directory ClearspanDeviceType on your PC and select the qsetup.cfg file. ADD FIRMWARE AND BOOT ROM LOADER FILES Firmware for Polycom phones and associated Boot Rom loader files are placed at the Clearspan Device Profile level. With a set of known good firmware at this level, new Polycom phone installations retrieve this version rather than unknown versions that come from the factory. When 51 Mitel
57 versions of firmware prior to 4.x exist on Polycom SoundPoint IP and Sound Station IP phones, Boot Rom Loader files are required for a successful upgrade to the 4.x firmware. Firmware Set the Device Access File Format and Repository File Format using the following table for the first supported device type on your system (e.g sip.ld). The names in the table match those you downloaded to the PolycomFirmware folder on your PC with the exception that you imbed the firmware version in the name. The firmware versions specified here must match the versions that you downloaded and that you used when creating the Polycom-Tags set (via the Preparation section). POLYCOM PHONE DEVICE DEVICE ACCESS FILE FORMAT NAME AND REPOSITORY FILE FORMAT NAME (WHERE X.X.X IDENTIFIES THE VERSION) DEVICE ACCESS FILE FORMAT AND REPOSITORY FILE FORMAT NAMES BASED ON CURRENT FIRMWARE VERSIONS SoundPoint IP x.x.x sip.ld sip.ld SoundPoint IP x.x.x.sip.ld sip.ld SoundPoint IP x.x.x.sip.ld sip.ld SoundPoint IP x.x.x.sip.ld sip.ld SoundPoint IP x.x.x.sip.ld sip.ld SoundPoint IP x.x.x.sip.ld sip.ld SoundStation IP x.x.x.sip.ld sip.ld SoundStation IP x.x.x.sip.ld sip.ld SoundStation IP x.x.x.sip.ld sip.ld VVX x.x.x.sip.ld sip.ld VVX x.x.x.sip.ld sip.ld VVX x.x.x.sip.ld sip.ld VVX x.x.x.sip.ld sip.ld VVX x.x.x.sip.ld sip.ld VVX x.x.x.sip.ld sip.ld VVX x.x.x.sip.ld sip.ld VVX x.x.x.sip.ld sip.ld VVX x.x.x.sip.ld sip.ld VVX x.x.x.sip.ld sip.ld VVX x.x.x.sip.ld sip.ld VVX x.x.x.sip.ld sip.ld VVX x.x.x.sip.ld sip.ld VVX x.x.x.sip.ld sip.ld Under the Assign File section, select Custom and click Browse. Then browse to the directory PolycomFirmware on your PC and select the firmware file that matches the Device Access File Format name. The following screen capture provides an example where the firmware file is for the VVX 300 (see the firmware name reference in the preceding table) and the firmware version is Mitel
58 Repeat this step until firmware files are in place for all supported device types that appear in the table. 53 Mitel
59 Boot Rom Loader Add file entries for Boot Rom Loader files that correspond to the supported devices on your system. Set the Device Access File Format and the Repository File Format using the following table for the first supported device type on your system (e.g bootrom.ld). Create a file entry for the first entry in the following table. The Device Access File Format / Repository File Format name matches a file that you downloaded to the PolycomFirmware folder on your PC. POLYCOM PHONE DEVICE SoundPoint IP 321 SoundPoint IP 331 SoundPoint IP 450 SoundPoint IP 550 SoundPoint IP 560 SoundPoint IP 650 SoundStation IP 5000 SoundStation IP 6000 SoundStation IP 7000 DEVICE ACCESS FILE FORMAT NAME AND REPOSITORY FILE FORMAT NAME bootrom.ld bootrom.ld bootrom.ld bootrom.ld bootrom.ld bootrom.ld bootrom.ld bootrom.ld bootrom.ld Under the Assign File section, select Custom and click Browse. Then browse to the directory PolycomFirmware on your PC and select the Boot Rom Loader file that matches the Device Access File Format name. The following screen capture provides an example where the boot rom loader file is for the SoundStation IP 5000 (see reference to the file name in the preceding table). 54 Mitel

60 Repeat this step until files are in place for all supported device types that appear in the table. Note: This step is associated with SoundPoint IP and SoundStation IP phones only; there are no Boot Rom Loader files for VVX phones. ADD POLYCOM PHONE DEVICE PROFILE TYPES PROFILE Add a Device Profile Type for each Polycom phone type that will be supported on the system. The convention to use for Identity/Device Profile Type name is Vendor + Model + Label where the components are separated with a space. The following table includes all Polycom Phone Types that are supported within OpEasy. The table identifies the name that is to be used when building the Profile Types along with the number of ports, whether the phone is video capable and the value of the Device Access URI. Note that DMS and dms are part of the naming convention. DMS stands for Device Management System. It is used when an installation has a single network path to its XSP. If an installation has more than one network path to its XSP, then DMS will be replaced with text that 55 Mitel
61 identifies the network location. For example, at one particular site, references to DMS are replaced by Public, Private and Common and three sets of Identify / Device Profile Types are created to allow for these multiple networks. Via the Clearspan web portal, navigate to System Resources Identity/Device Profile Types and Add a profile type for each Polycom device that will be supported on your system using the table as reference. IDENTITY/DEVICE PROFILE TYPE NUMBER OF PORTS: VIDEO CAPABLE: DEVICE ACCESS URI: Polycom SoundPoint IP 321 (DMS) 2 No Polycom_SPIP321_dms Polycom SoundPoint IP 331 (DMS) 2 No Polycom_SPIP331_dms Polycom SoundPoint IP 450 (DMS) 3 No Polycom_SPIP450_dms Polycom SoundPoint IP 550 (DMS) 4 No Polycom_SPIP550_dms Polycom SoundPoint IP 560 (DMS) 4 No Polycom_SPIP560_dms Polycom SoundPoint IP 650 (DMS) 6 No Polycom_SPIP650_dms Polycom SoundStation IP 5000 (DMS) 1 No Polycom_SSIP5000_dms Polycom SoundStation IP 6000 (DMS) 1 No Polycom_SSIP6000_dms Polycom SoundStation IP 7000 (DMS) 1 No Polycom_SSIP7000_dms Polycom VVX 101 (DMS) 1 No Polycom_VVX101_dms Polycom VVX 201 (DMS) 2 No Polycom_VVX201_dms Polycom VVX 300 (DMS) Limited to 34 No Polycom_VVX300_dms Polycom VVX 301 (DMS) Limited to 34 No Polycom_VVX301_dms Polycom VVX 310 (DMS) Limited to 34 No Polycom_VVX310_dms Polycom VVX 311 (DMS) Limited to 34 No Polycom_VVX311_dms Polycom VVX 400 (DMS) Limited to 34 No Polycom_VVX400_dms Polycom VVX 401 (DMS) Limited to 34 No Polycom_VVX401_dms Polycom VVX 410 (DMS) Limited to 34 No Polycom_VVX410_dms Polycom VVX 411 (DMS) Limited to 34 No Polycom_VVX411_dms Polycom VVX 500 (DMS) Limited to 34 Yes Polycom_VVX500_dms Polycom VVX 501 (DMS) Limited to 34 Yes Polycom_VVX501_dms Polycom VVX 600 (DMS) Limited to 34 Yes Polycom_VVX600_dms Polycom VVX 601 (DMS) Limited to 34 Yes Polycom_VVX601_dms The Identity/Device Profile Type must be entered per the preceding table for the supported phone types. With exception, if the installation has more than one network path to its XSP, replace DMS with the identifier of the first location. For Signaling Address Type, select Intelligent Proxy Addressing. Under the Standard Options section: Set Number of Ports to the value shown per the table (e.g. 12 for the VVX 500). For Ringback Tone/Early Media Support, select Local Ringback No Early Media. 56 Mitel
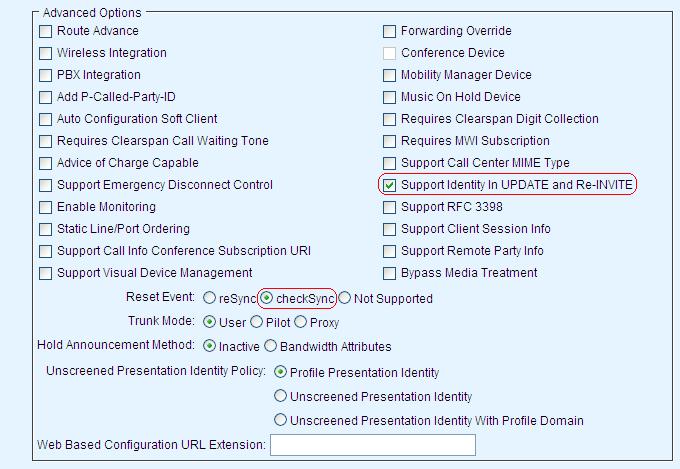
62 Check the box for Registration Capable. Check the Video Capable box if applicable; see the table for reference. Under the Advanced Options section: Check the box for Support Identity in UPDATE and Re-INVITE. For Reset Event, select checksync. For Device Configuration Options, select Device Management. Under the Device Management section: For Device Configuration Tags, select Use Default System Tag Set and Tag Set and use the drop-down box to select Polycom-Tags. Check Allow Identity/Device Profiles to Configure Custom Tags. Check Allow Groups to Configure Custom Tags. For Device Access Protocol, choose https or http, depending on the type of network connection previously selected. For Device Access FQDN, enter the address of the Clearspan XSP server which is addressable within the DHCP location (in the following example, the XSP server is tb20ews1.mitel.com ). Set Device Access Port, to 443 if the Device Access Protocol is https. Set this field to 80 if the protocol is http. For Device Access Context Name, enter dms. Enter Device Access URI as shown in the preceding table (e.g. Polycom_VVX500_dms). Note: The five fields beginning with Device Access Protocol comprise the path to the Clearspan Device Profile Type. This path (e.g. when using HTTPS and when using HTTP) is the one that must be set in DHCP Option Mitel

63 Reminder: the Video Capable setting only applies to certain phone types; see the preceding table. 58 Mitel

64 59 Mitel


65 SERVICES After the Profile Type has been saved, edit the Polycom Device Profile Type which brings up the Identity/Device Profile Type page. Select Services. From the Identity/ Device Profile Type Services page, check Supports the Polycom Phone Services as shown. FILES AND AUTHENTICATION From the Identity/Device Profile Type page, select Files and Authentication. The Identity/Device Profile Type Files page appears. Select Add to add files as shown in the following illustration. 60 Mitel

66 %BWMACADDRESS%-directory.xml This file was added when you checked the box under Services to Support the Polycom Phone Service. Add File %BWMACADDRESS%.cfg Add a file entry for the %BWMACADDRESS%.cfg file format. The list that follows describes the setup, and the screen capture that follows shows the changes which are circled in red. For Device Access File Format, enter %BWMACADDRESS%.cfg. For Repository File Format, enter %BWFQDEVICEID%.cfg. For File Category, select Dynamic Per Device. For File Customization, select Administrator. Under the Assign File section, select Custom and click Browse. Then browse to the directory PolycomSystemConfigFiles and sub-directory PhoneDeviceType on your PC and select the %BWMACADDRESS%.cfg file. Under the File Authentication section - For Authentication Mode, select User Name and Password. - For Device Access HTTP Authentication, select Digest. 61 Mitel
.")
67 Add File cfg Add a file entry for the cfg file format. The list that follows describes the setup, and the screen capture that follows shows the changes which are circled in red. For Device Access File Format, enter cfg (filename is 12 zeros). For Repository File Format, enter PolycomZero.cfg. For File Category, enter Dynamic Per Type. For File Customization, enter Administrator. Under the Assign File section, select Custom and click Browse. Then browse to the directory PolycomSystemConfigFiles and sub-directory PhoneDeviceType on your PC and select the cfg file. 62 Mitel
68 Add File phone%bwdeviceid%.cfg Add a file entry for the phone%bwdeviceid%.cfg file format. The list that follows describes the setup, and the screen capture that follows shows the changes which are circled in red. For Device Access File Format, enter phone%bwdeviceid%.cfg. For Repository File Format, enter phone%bwdeviceid%.cfg. For File Category, select Dynamic Per Device. For File Customization, select Administrator. Under the Assign File section, select Custom and click Browse. Then browse to the directory PolycomSystemConfigFiles and sub-directory PhoneDeviceType on your PC and select the file that matches your particular phone device type using the following table. 63 Mitel
69 FILE phone%bwdeviceid%_spip321_spip331.cfg phone%bwdeviceid%_spip450.cfg phone%bwdeviceid%_spip550_spip560.cfg phone%bwdeviceid%_spip650.cfg POLYCOM PHONE DEVICE For SoundPoint 321 and 331 devices For SoundPoint 450 devices For SoundPoint 550 and 560 devices For SoundPoint 650 devices phone%bwdeviceid%_ssip5000_ssip6000_ssip7000.cfg For SoundStation 5000, 6000 and 7000 devices phone%bwdeviceid%_vvx101.cfg phone%bwdeviceid%_vvx201.cfg phone%bwdeviceid%_vvx300.cfg For VVX 101 devices For VVX 201 devices For VVX 300/301/310/311 devices phone%bwdeviceid%_vvx400_vvx500.cfg For VVX 400/401/410/411 and VVX 500/501 devices phone%bwdeviceid%_vvx600.cfg For VVX 600/601 devices Under the File Authentication section - For Authentication Mode, select User Name and Password. - For Device Access HTTP Authentication, select Digest. 64 Mitel
70 Add File qsetup.cfg Add a file entry for the qsetup.cfg file format. The list that follows describes the setup, and the screen capture that follows shows the changes which are circled in red. For Device Access File Format, enter qsetup.cfg. For Repository File Format, enter qsetup-%bwtimestamp%.cfg. For File Category, select Dynamic Per Type. For File Customization, select Administrator. Under the Assign File section, select Custom and click Browse. Then browse to the directory PolycomSystemConfigFiles and sub-directory PhoneDeviceType on your PC and select the qsetup.cfg file. 65 Mitel

71 Add File sys.cfg Add a file entry for the sys.cfg file format. The list that follows describes the setup, and the screen capture that follows shows the changes which are circled in red. For Device Access File Format, enter sys.cfg. For Repository File Format, enter sys-%bwtimestamp%.cfg. For File Category, select Dynamic Per Type. For File Customization, select Administrator. Under the Assign File section, select Custom and click Browse. Then browse to the directory PolycomSystemConfigFiles and sub-directory PhoneDeviceType on your PC and select the sys.cfg file. 66 Mitel
72 Add Polycom Phone Firmware The same set of Polycom firmware used at the Clearspan device profile level is re-used at the phone-specific device profile level. Note: If a newer version of firmware is needed at the group or device level, that versioned firmware is put at the phone-specific device level also. Set the Device Access File Format and Repository File Format using the following table for the first of the supported Polycom devices on your system. The names match those you have downloaded to the PolycomFirmware folder on your PC with exception that you are to imbed the firmware version in the name. The firmware versions specified here will be the same as what was used when adding to the Clearspan device type. 67 Mitel
73 POLYCOM PHONE DEVICE DEVICE ACCESS FILE FORMAT NAME AND REPOSITORY FILE FORMAT NAME (WHERE X.X.X IDENTIFIES THE VERSION) DEVICE ACCESS FILE FORMAT AND REPOSITORY FILE FORMAT NAME EXAMPLES BASED ON CURRENT VERSIONS SoundPoint IP x.x.x sip.ld sip.ld SoundPoint IP x.x.x.sip.ld sip.ld SoundPoint IP x.x.x.sip.ld sip.ld SoundPoint IP x.x.x.sip.ld sip.ld SoundPoint IP x.x.x.sip.ld sip.ld SoundPoint IP x.x.x.sip.ld sip.ld SoundStation IP x.x.x.sip.ld sip.ld SoundStation IP x.x.x.sip.ld sip.ld SoundStation IP x.x.x.sip.ld sip.ld VVX x.x.x.sip.ld sip.ld VVX x.x.x.sip.ld sip.ld VVX x.x.x.sip.ld sip.ld VVX x.x.x.sip.ld sip.ld VVX x.x.x.sip.ld sip.ld VVX x.x.x.sip.ld sip.ld VVX x.x.x.sip.ld sip.ld VVX x.x.x.sip.ld sip.ld VVX x.x.x.sip.ld sip.ld VVX x.x.x.sip.ld sip.ld VVX x.x.x.sip.ld sip.ld VVX x.x.x.sip.ld sip.ld VVX x.x.x.sip.ld sip.ld VVX x.x.x.sip.ld sip.ld Set File Category to Dynamic Per-Type. Set File Customization to Administrator. Under the Assign File section, select Custom and click Browse. Then browse to the directory PolycomFirmware on your PC and select the firmware file that matches the Device Access File Format name. The following screen capture provides an example where the firmware file is for the VVX 300 (see reference in the preceding table) and the firmware version is Mitel
74 Repeat section Add Polycom Phone Device Profile Types for each Polycom device that your site supports. CUSTOM PHONE FIRMWARE A known good version of firmware is placed at the Clearspan Device Profile level and at the Phone-Specific Device Profile level. If you need to put firmware in place but not system-wide, you must add the firmware at the Phone-Specific Device Profile level. Follow the same procedure for putting the firmware files in place as documented in the previous section making sure to use the new version in the Device Access and Repository File Format names. In order for the Group or the Device to pick up the new firmware, Custom Tags must be updated at the Group and/or Device levels. Examples follow. 69 Mitel


75 UPDATE FIRMWARE FOR A GROUP (EXAMPLE) If you wanted to update the Polycom firmware for the Sound Point IP 321 to the level, you would follow these steps: 1. On Clearspan, navigate to the group you wish to manipulate (e.g. Group_G in the Bulk Provisioning enterprise), and then select Utilities. On the Utilities page, select Device Configuration. On the Device Configuration page, select/edit the device that you wish to apply new firmware to. Note that at least one of these devices must exist in the group before it will appear in the list. 70 Mitel
 and the new version (i.e. 4.1.")

76 On the Device Configuration Files page, note that the original version (i.e ) and the new version (i.e ) are both in place per the circled items under the File Format header. Select Custom Tags. On the Device Configuration Custom Tag Add screen, select Add to add the first of two tags. The Tag Name is APP_VERSION. The Tag Value is the new version. 71 Mitel


77 Select Add again to add the second tag. The second tag is dependent on the phone type. Because we are adding a tag for a SoundPoint IP 321, the Tag Name is APP_VERSION_SPIP The Tag Value is the new version. Note: Both of these tags are included in the %BWMACADDRESS%.cfg file so you may open that file to cut and paste the appropriate Tag Names. Both tags appear in the list when complete. Any device of the specified device type in the specified group will use the version of firmware entered here. 72 Mitel

78 UPDATE FIRMWARE FOR A SINGLE DEVICE (EXAMPLE) If you want to update the Polycom firmware to level for a specific Sound Point IP 321 device, the procedure is the same as described in section Update Firmware for a Group with exception to the way you get to the Custom Tags. Navigate to the specific device you wish to manipulate and select the Custom Tags button. On the Identify/Device Profile Custom Tag Add screen, select Add to add the first of two tags. The Tag Name is APP_VERSION. The Tag Value is the new version. 73 Mitel


79 Select Add again to add the second tag. The second tag is dependent on the phone type. Because we are adding a tag for a SoundPoint IP 321, the Tag Name is APP_VERSION_SPIP The Tag Value is the new version. Note: Both of these tags are included in the %BWMACADDRESS%.cfg file so you may open that file to cut and paste the appropriate Tag Names. Both tags appear in the list when complete. The specific device will use the version of firmware entered here. 74 Mitel

80 OPEASY SETUP FOR POLYCOM PHONES Refer to online help that is available within OpEasy for information on using OpEasy to create Polycom phone templates and users/devices. POLYCOM PHONE INSTALLATION The installation requires the following be available to the phone installer: Physical Polycom phones to be installed of the correct types. Physical locations to install each of the phones along with the type of Polycom phone to install. Device access User Name and Password corresponding to each physical location / Polycom phone type. These device credentials must already have been configured for the phones. Once the DHCP server and device profile types have been set up and user/devices have been built, the phone installer needs to plug in the new, factory-defaulted phone. The new phone must be the same type of Polycom phone as was configured for the user. The new phone obtains its IP address from DHCP, along with the path to the Clearspan XSP server and Clearspan device profile type. The phone then reboots a number of times while loading its configuration and any new phone firmware. After phone boot processing finishes, a QSetup soft key appears on the new phone. Press the QSetup soft key to be prompted for the device credentials. Supply the User ID and Password that were defined via the Device Access User Name and Password fields of the phone. Manually enter and replace the default Server User with the device s User Name that was configured on Clearspan for the user s Polycom phone. Likewise, replace the default Server Password with the device s Password that was also configured on Clearspan for the user s phone. The Quick Setup screen also displays and prompts for the following additional fields: Server Address, Server Type, Boot Server, Boot Srv Opt, and Boot Srv Type. These fields should already be set up correctly for your Clearspan and network configuration. The fields normally do not need to be changed. 75 Mitel

81 The following image shows the first few fields that can be entered or changed on the Quick Setup screen. Note that the Server Address and Server Type on the Quick Setup screen will not match the following image, which only shows the default values for those fields. Once the Server User and Server Password are set to the device s User Name and Password, respectively, press the Exit soft key to exit quick setup. Then, you will need to manually initiate a reboot of the Polycom phone to complete the setup. The phone reboots one or more times to load the configuration specific to the user. Once boot processing finishes, if the proper User Name and Password were entered, the phone displays an idle screen (as set up for the user). In addition, the QSetup soft key no longer appears on the phone. The phone is now ready for use. If the phone still shows the QSetup soft key after completion of boot processing, the phone was not able to find and load the configuration using the entered User Name and Password. Re-enter a valid User Name and Password for the phone device of the user being set up. In addition, make sure the type of Polycom phone being set up matches the phone device configured for the user. For example, you will NOT be able to setup a Polycom VVX 600 phone using the User Name and Password of a Polycom VVX 410 phone configured within Clearspan for the user. Instead, you would need to install a Polycom VVX 410 phone to match the user s Polycom VVX 410 phone. FINAL REMARKS If your installation has a single network path to the XSP, you should end up with a single Clearspan Device Profile Type and a set of Polycom (DMS) Device Profile Types to match the list of supported devices on your system. If your installation has multiple network paths to the XSP, you should end up with a set of Clearspan Device Profile Types to match the number of paths to the XSP and a set of Device Profile Types for each path (e.g. (PVT), (PUB) and (CMN)). 76 Mitel
82 INSTALLING AUDIOCODES MEDIAPACK DEVICES USING DEVICE MANAGEMENT INTRODUCTION This document describes the implementation of AudioCodes MediaPack devices in a new Clearspan installation using Device Management to manage the configuration of the MediaPack devices, where the devices use the MAC address for identification within the network. The use of Device Management with AudioCodes MediaPack devices is intended for a Clearspan system using release R19 or later and OpEasy 4.3 or later. Note that Mitel Support personnel are responsible for setting up Device Management on the Clearspan system. Once the device types are in place and the devices have been initially configured, OpEasy Administrators are responsible for creating templates, users and devices that use the new device types. OVERVIEW OF DEVICE MANAGEMENT With the implementation of Clearspan release R19, the Device Management functionality is available. Device Management supports: Multiple configuration files for a single device type. Accessing the configuration file for a specific device using the MAC address for that device. Access using credentials for a device (consisting of a user name unique to a device and a corresponding password) is allowed and used for phone devices, but for MediaPack devices, only MAC address is used. Obtaining configuration files from the Clearspan Profile Server, which is not directly accessible to the public. The Profile Server is instead accessed through a secure connection to the Clearspan XSP server. This provides a level of security to prevent unauthorized access to the configuration files. With Device Management, the management and provisioning of AudioCodes MediaPack devices within Clearspan employ elements of OpEasy Provisioning and BroadWorks Device Management functionality in conjunction with self-provisioning features built into the MediaPack devices. Operationally, Device Management works as follows to allow an AudioCodes MediaPack device to obtain its configuration: A MediaPack device is connected in the user environment and is manually provided with an IP address and the configuration server URL. The device uses the configuration server URL to connect to a Clearspan XSP. The URL path points Clearspan to a set of configuration files. The MAC address of the MediaPack device is matched to the Clearspan device previously provisioned with OpEasy to provide the device its configuration. 77 Mitel

83 DEVICE MANAGEMENT FILES One or more configuration files can be set up for each Device Profile Type created using Device Management. On the Clearspan web portal, under the System Resources Identity/Device Profile Types Files and Authentication for a specific Device Profile Type, the following files can be accessed: Access File Downloads the configuration file that the device will actually download. Identifies and uses the path that the device uses to get the file. Any credentials are prompted by the server. Repository File Downloads the configuration file that the device will actually download. Directly downloads the file from the repository. No credentials will be prompted. Template File Downloads the template file which Clearspan used to create the file in the repository for the specific device. The template file often contains tags that are substituted by Clearspan when creating the repository file for a specific device. PREPARATION Follow these steps before configuring Clearspan for installation of AudioCodes MediaPack devices: 1. The OpEasy license for Media Pack Templates, which is available as of OpEasy version 4.3, must be enabled. To confirm, from the OpEasy main page, navigate to Administrative Tools Licensing System and then page through the list of System Licenses looking for Provisioning: Media Pack Templates. If the license does not appear in this list, ask your system licensing manager that it be enabled. 2. Determine the types of devices that will be used on the Clearspan system. The following lists the AudioCodes models currently supported by OpEasy: MediaPack 112 FXS MediaPack 114 FXS MediaPack 114 FXO MediaPack 114 FXS/FXO MediaPack 118 FXS MediaPack 118 FXO 78 Mitel
84 MediaPack 118 FXS/FXO MediaPack 124 FXS From this list, you can choose to support all of the above devices or just those that you know will be used for this Clearspan system. If you choose not to support a specific device, that device will not appear in drop-down lists of Device Types and no devices of that type can be created on Clearspan. If you choose a sub-set of this list and then find you need others from this list, those types may be added later. 3. Determine the type of network connection the devices should use to access the configuration files: HTTPS HTTPS is a secure connection, preventing the viewing of the configuration files. This is the best type of connection to use because of the security. However, it makes troubleshooting phone installation problems more difficult. HTTP HTTP is not a secure connection, permitting anyone having access to the network to view the configuration files, including the phone Authentication Password and any other passwords in the configuration files. 4. Retrieve the %BWMACADDRESS%.ini configuration file created by Mitel and store it locally. This file is uploaded to the Clearspan Profile Server during the installation procedure and is available on the EMS server when using OpEasy 4.3 or later at location: /opt/aastra/ SNMPManager/SystemConfigFiles/AudioCodes 5. If access to this system s XSP is via HTTPS protocol (instead of HTTP), change http to https within the %BWMACADDRESS%.ini configuration file (that was retrieved in the previous step). An example of the %BWMACADDRESS%.ini file contents with the protocol highlighted in red follows: ;########## ;# Clearspan Device: %BWDEVICEID% ;# Device Profile Name: %BWDEVICEID% ;# Group: ;# Enterprise: ;# Device Type: Any AudioCodes Device Type ;# Level: Group ;########## ;########## ;# System Settings ;########## ;########### ;# Enterprise Settings ;########## ;########## ;# Group Settings ;########## [SYSTEM Params] IniFileURL= 79 Mitel
85 This file is used as the system-wide, default template for the MediaPack device types and is available for selection as the <Default> template when building OpEasy-created MediaPack devices. However, the OpEasy administrator has the ability to replace this template with an OpEasy-generated <Default> template or to create an OpEasygenerated Custom template either of which may then be assigned to a MediaPack device. The system-wide, default template is also available for use by MediaPack devices created via the Clearspan web portal. If needed, this system-wide default template can be replaced with a modified version per device type. CONFIGURATION ON CLEARSPAN ADD A DEVICE PROFILE TYPE FOR EACH AUDIOCODES MEDIAPACK TYPE Add a Device Profile Type for each AudioCodes MediaPack device type that will be supported on the system. The convention to use for Identity/Device Profile Type name is Vendor + Model + Label where the components are separated with a space. The following table includes all AudioCodes MediaPack Device Types that are supported within OpEasy along with the name that is to be used when building the Profile Type, the number of ports and the value of the Device Access URI. Note: DMS and dms are part of the naming convention. DMS stands for Device Management System. It is used when an installation has a single network path to its XSP. If an installation has more than one network path to its XSP, then DMS will be replaced with text that identifies the network location. For example, at one particular site, references to DMS are replaced by Public, Private and Common and three sets of Identify / Device Profile Types are created to allow for these multiple networks. Using the Clearspan web portal, navigate to System Resources Identity/Device Profile Types and add a profile type for each of the supported AudioCodes MediaPack Types on the system using the following table as reference. DEVICE TYPE IDENTIFY/DEVICE PROFILE TYPE NAME NUMBER OF PORTS DEVICE ACCESS URI MP112 FXS AudioCodes MP112FXS (DMS) Limited to 2 AudioCodes_MP112FXS_dms MP114 FXS AudioCodes MP114FXS (DMS) Limited to 4 AudioCodes_MP114FXS_dms MP114 FXO AudioCodes MP114FXO (DMS) Limited to 4 AudioCodes_MP114FXO_dms MP114 FXS/FXO AudioCodes MP114FXSFXO (DMS) Limited to 4 AudioCodes_MP114FXSFXO_dms MP118 FXS AudioCodes MP118FXS (DMS) Limited to 8 AudioCodes_MP118FXS_dms MP118 FXO AudioCodes MP118FXO (DMS) Limited to 8 AudioCodes_MP118FXO_dms MP118 FXS/FXO AudioCodes MP118FXSFXO (DMS) Limited to 8 AudioCodes_MP118FXSFXO_dms MP124 FXS AudioCodes MP124FXS (DMS) Limited to 24 AudioCodes_MP124FXS_dms 1. For Identity/Device Profile Type, enter the name per the preceding table for the first of the supported device types. With exception, if the installation has more than one network path to its XSP, replace DMS with the identifier for the first location. 80 Mitel
86 2. For Signaling Address Type, select Intelligent Proxy Addressing 3. Under the Standard Options section: Set Number of Ports to the value shown in the preceding table (e.g. Limited to 2 for the MP 112) For Ringback Tone/Early Media Support, select Local Ringback No Early Media Check the box for Registration Capable 4. Under the Advanced Options section: Check the box for PBX Integration Check the box for Support RFC 3398 Check the box for Static Line/Port Ordering For Reset Event, select checksync 5. For Device Configuration Options, select Device Management 6. Under the Device Management section: For Device Configuration Tags, select Use Default System Tag Set Only check the box for Allow Identity/Device Profiles to Configure Custom Tags check the box for Allow Groups to Configure Custom Tags For Device Access Protocol, choose https or http, depending on the type of network connection previously determined For Device Access FQDN, enter the address of the Clearspan XSP server which is addressable within the DHCP location For Device Access Port, enter 443 or 80 depending on whether the Device Access Protocol is https or http respectively For Device Access Context Name, enter dms For Device Access URI, enter per the preceding table. With exception, if the installation has more than one network path to its XSP, replace dms with the identifier for the first location 7. Click OK to save the Identity/Device Profile Type. Note: If the installation has more than one network path to its XSP, after creating the first set of Device Profile Types (e.g. using identifier pub ), create a second set using the identifier for the second location (e.g. using identifier pvt ). Repeat if a third location exists (e.g. using identifier cmn ), etc. The screen capture that follows illustrates creation of the AudioCodes MP 114 profile type for a site that has one network path to its XSP and that uses http protocol; those areas that require change are circled. 81 Mitel
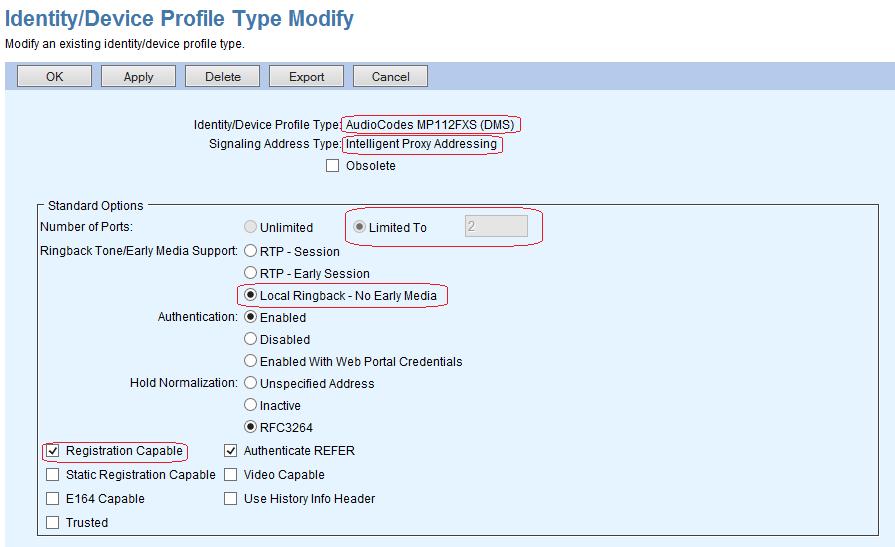


87 82 Mitel

88 SET UP FILES AND AUTHENTICATION FOR A DEVICE PROFILE TYPE After the Identity/Device Profile Type is saved, perform an edit of this Device Profile Type and click on the Files and Authentication tab. From the Identify/Device Profile Type Files screen, click Add to add a file format. Add files for %BWMACADDRESS%.ini, firmware and call progress tones as described below. Add %BWMACADDRESS%.ini File Format From the File Add page: Set Device Access File Format to %BWMACADDRESS.ini Set Repository File Format to %BWFQDEVICEID%.ini Set File Category to Dynamic Per-Device Set File Customization to Administrator Under the Assign File section, select Custom and click Browse. Then browse to the %BWMACADDRESS%.ini file that you retrieved and stored locally per the Preparation steps of this document. Under the File Authentication section - For Authentication Mode, check MAC-Based - For Device Access HTTP Authentication, select Digest Click OK to save. The screen capture that follows shows the File Add page for the %BWMACADDRESS%.ini; those areas that require change are circled. 83 Mitel

89 Add AudioCodes MediaPack Device Firmware Files Use the table below as reference when adding the firmware files per MediaPack type. DEVICE TYPE DEVICE ACCESS FILE FORMAT WHERE XXX IS THE VERSION AudioCodes MediaPack 11x Devices REPOSITORY FILE FORMAT WHERE XXX IS THE VERSION EXAMPLE OF REPOSITORY FILE FORMAT VALUE MP112 MP112_SIP_xxx.cmp MP112_SIP_xxx.cmp MP112_SIP_F6.60a cmp MP114 MP114_SIP_xxx.cmp MP114_SIP_xxx.cmp MP114_SIP_F6.60a cmp MP118 MP118_SIP_xxx.cmp MP118_SIP_xxx.cmp MP118_SIP_F6.60a cmp AudioCodes MediaPack 124 Devices MP124 MP124_SIP_xxx.cmp MP124_SIP_xxx.cmp MP124_SIP_F6.60A cmp From the File Add page: 84 Mitel

90 Set Device Access File Format to match the name of the firmware file (see preceding table). Set Repository File Format to match the name of the firmware file (see preceding table). Under the Assign File section, select Custom and click Browse. Then browse to the firmware file that you retrieved and stored locally per the Preparation steps of this document. Click OK to save. Note: The current firmware files and Call Progress Tone files are retrievable via sharedat:\company\product Life Cycle\Clearspan Product Releases\AudioCodes The screen capture that follows shows an example of the File Add page for a firmware file; those areas that require change are circled. Add AudioCodes MediaPack Device Call Progress Tone Files Add a file entry for AudioCodes Call Progress Tone files for each device type that is supported. 85 Mitel

91 Currently there are two tone files available for use with any of the AudioCodes MediaPack device types. The tone files are named usa_tones_13.dat and usa_tones_13-20hz.dat. Contact Mitel Support if you are unsure of which to use for your installation. From the File Add page: Note: The current tone files are retrievable via sharedat:\company\product Life Cycle\Clearspan Product Releases\AudioCodes\Tone Files Set Device Access File Format to match the name of the tone file (i.e. usa_tones_13 or usa_tones_13-20hz.dat). Set Repository File Format to match the name of the tone file. Under the Assign File section, select Custom and click Browse. Then browse to the call progress tones file that you retrieved per the note above. Click OK to save. The screen capture that follows shows an example of the File Add page for a tone file; those areas that require change are circled. 86 Mitel

92 CONFIGURATION ON OPEASY MAP CLEARSPAN DEVICE TYPE TO OPEASY DEVICE TYPE To make use of the new AudioCodes MediaPack Device Profile Types on OpEasy, each MediaPack device type created on Clearspan must be mapped to the corresponding OpEasy supported analog device type. To map a Clearspan Device Type to its corresponding OpEasy Device Type, on OpEasy, navigate to Administrative Tools Media Packs and click Add. The Analog Phone Media Packs page appears and a new row appears at the top of the list as shown. To map a new device, first select the Clearspan Device Type from the drop down list; this is the name of the device type as it is defined on Clearspan. Next, select the corresponding Analog Media Gateway Model from the drop down list; this list contains all OpEasy supported analog device types. Finally, click Apply to save. Note: The list of OpEasy supported analog device types includes: AudioCodes MP-112 FXS AudioCodes MP-114 FXS AudioCodes MP-114 FXO AudioCodes MP-114 FXS/FXO AudioCodes MP-118 FXS AudioCodes MP-118 FXO AudioCodes MP-118 FXS/FXO AudioCodes MP-124D FXS Generic Analog After the save, this entry remains on the list (in alphabetic order). The Delete button is available in case there is a need to delete the mapping. Repeat this process for each of the AudioCodes MediaPack device types that the system supports. After mapping is performed, the Clearspan Device Types appear in OpEasy drop down selections. 87 Mitel
93 CONFIGURE GLOBAL SETTINGS FOR AUDIOCODES AudioCodes settings can be configured at the System, Enterprise and/or Group level. To access these settings, on OpEasy navigate to Provisioning Phone Templates Global Settings. From the Global Configuration File Settings page: Set Enterprise and Group to the associated enterprise and group Set Phone Manufacturer to AudioCodes Enter settings in the text boxes at the System, Enterprise and/or Group level as desired and select the buttons for System, Enterprise and/or Group AudioCodes Settings to access SIP Settings, Stand-Alone Survivability Settings, Time Settings, Device Settings, Voice Codecs and Quality Monitoring settings. A discussion of these options is included in the Clearspan OpEasy Advanced Provisioning User Guide. 88 Mitel

 Device Type, navigate to Provisioning Phone Templates Definitions.")
94 CREATE TEMPLATES To make use of the new AudioCodes Device Types that use Device Management, build new templates for the new device types. For example, to build a template for the AudioCodes MediaPack 114 FXS/FXO (DMS) Device Type, navigate to Provisioning Phone Templates Definitions. 89 Mitel
.")

95 Select the Enterprise, Group and Device Type from the drop down lists Select a level from the New Template Level drop down list, enter a New Template Name and click Add Template The Template is created and opens to the General tab. Customize the template by making adjustments on each of the tabs (i.e., General, Ports and Groups). A discussion of the options on these tabs is included in the Clearspan OpEasy Advanced Provisioning User Guide. On the Extra Settings tab, make entries for selection of the firmware and call progress tone files by setting the CmpFileURL and CptFileURL parameters to the appropriate filename paths. An example follows. 90 Mitel

96 When the template settings are set as desired, click OK to save. CREATE USER PROFILES Optionally, create a User Profile. Use of User Profiles simplifies the provisioning process when many users and devices of the same device type are to be created. To create a User Profile, using OpEasy, navigate to Provisioning User Profiles and click Add which brings up the User Profile Add page. Select Enterprise and Group and enter a User Profile Name. Set the options as desired but pay particular attention to the Primary Phone Device section. This is where specification of the AudioCodes MediaPack Device Type and associated Template are specified as shown. 91 Mitel


97 CREATE DEVICES AND USERS Next, build new Users/Devices that optionally use the User Profile. The creation of users on an AudioCodes MediaPack device type requires Advanced user mode, so before selecting the Add button, make sure Advanced is selected for user mode as shown below. The example that follows will make use of the User Profile that was previously created. Select Add on the Users page and the Advanced: User Add page is presented. Select the previously created User Profile (which was created to specify theaudiocodes Device Type and Template). 92 Mitel


98 Enter the desired user information on this page. Then press the Phones tab and the User: Primary Phone Device page is presented. Note on this page that the Device Type and Template fields are pre-populated with the selections made via the User Profile. Enter the MAC Address for the MediaPack device. This step is critical so make sure the MAC Address entered is correct based on the device that is used. If the template that is used specifies Stand-Alone Survivablity (SAS) is enabled, the fields for SAS Registrar and SASDefault Gateway must be filled. 93 Mitel

99 Caution: Be cautious when updating a MediaPack device to include the MAC Address; download of the configuration files will fail if the wrong MAC is used. Submitting this User Add request results in one user and one MediaPack device being built. Multiple users may be assigned to a MediaPack, so in this case, the same User Add process can be repeated with exception on the User: Primary Phone Device Add page, using the Phone Device drop down, select the AudioCodes MediaPack device that was created by the original User Add request. This results in two users being created for this single MediaPack 112. Note: When using Advanced Import to add users and devices for an AudioCodes MediaPack, the command, AddUserDevice, is useful. If, for example, you want to provision 24 users for an AudioCodes MP124, you would enter 24 AddUserDevice commands. The first command builds the first user and the MediaPack device; the subsequent 23 commands build the remaining 23 users and assignment is made to the original AudioCodes MP124 device. CUSTOM MEDIAPACK FIRMWARE AND CALL PROGRESS TONES The firmware files that are placed on the Profile Server per Device Type are only referenced when the %BWMACADDRESS%.ini file includes a CmpFileURL entry that specifies a path to the firmware file. When new AudioCodes MediaPack firmware is introduced, the new firmware is typically put in place for a single group or a small number of AudioCodes devices before upgrading all devices in the system. These sections provide a few examples of putting new firmware in place. UPDATE FIRMWARE VIA EXTRA SETTINGS FOR A SINGLE DEVICE To put new firmware in place for a single device, use OpEasy to navigate to Provisioning Phone Templates specifying the template used by the MediaPack device. Note whether this template is used for more than a single device. If it is used for multiple devices and you do not wish to update all devices associated, copy the template and assign the copied template to the single device. Then edit the template. Click the Extra Settings tab within the template and modify the CmpFileURL entry to point to the new firmware. Check the box to Restart Phones then click Apply or OK to save the changes which invokes a restart of the device which installs the new firmware. 94 Mitel
100 The preceding example shows that for Device Type AudioCodes MP114FXSFXO (DMS), the Extra Settings tab is selected which allows entry in the text box below. An entry already exists for firmware as expected and the version that is currently being used is version MP114_SIP_F6.60A cmp. This version must be updated to reflect the new firmware that is to be used. (Mitel Support personnel are responsible for putting the firmware in the location that is specified.) The Restart Phone checkbox must be checked to invoke a restart of the device(s) using this template. Clicking Apply or OK invokes the restart. UPDATE CALL PROGRESS TONES VIA EXTRA SETTINGS FOR A SINGLE DEVICE The process for putting a new Call Progress Tones file in place for a new device is the same as for updating firmware. With exception, it is the CptFileURL that must be updated to reflect the new filename of the tones file. 95 Mitel

101 The preceding example shows that for Device Type AudioCodes MP114FXSFXO (DMS), the Extra Settings tab is selected which allows entry in the text box below. An entry already exists for Call Progress Tones as expected and the version that is currently being used is version usa_tones_13.dat. This version must be updated to reflect the new tones file that is to be used. (Mitel Support personnel are responsible for putting the tones file in the location that is specified.) The Restart Phone checkbox must be checked to invoke a restart of the device(s) using this template. Clicking Apply or OK invokes the restart. AUDIOCODES DEVICE INSTALLATION When configuring the AudioCodes device during initial setup the following must be done in this order: 1. Assign a static IP address to the device 2. Change the admin password of the device 3. Remove access to the User account 4. Save to flash These steps must be completed before the AudioCodes device is set to auto update mode, because the save to flash operation will remove the device from auto update mode. Next, via the AudioCode device s Admin Page, supply Parameter Names and Values for the IniFileURL and the AUPDCheckIfIniChanged. Specifically: 1. Set the IniFileURL value to the path of the <MAC>.ini file for this device type. 2. Set the AUPDCheckIfIniChanged parameter to 1. This results in the entries appearing in the Output Window as shown below. 96 Mitel


, OpEasy recreates the.")

102 With these parameters in place, after restart of the device, the files that were put in place for the device type are downloaded to the MediaPack. The MediaPack is now ready for use. As subsequent changes occur (i.e., new users are added or the template changes), OpEasy recreates the.ini file and issues a reset as requested. Resets can be issued via the User Modify page or via the Template Modify page. MEDIA PACK REPORT The Advanced Export Media Pack Report tab presents the Media Packs and associated User Ids and Line/Ports. An example follows. 97 Mitel

103 FINAL REMARKS If your installation has a single network path to the XSP, you should end up with a single Clearspan Device Profile Type and a set of (DMS) Device Profile Types to match the list of supported devices on your system. If your installation has multiple network paths to the XSP, you should end up with a set of Clearspan Device Profile Types to match the number of paths to the XSP and a set of Device Profile Types for each path (e.g. (pvt), (pub) and (cmn)). 98 Mitel
104 INSTALLING MITEL MIVOICE CONFERENCE PHONES USING DEVICE MANAGEMENT INTRODUCTION This section describes the implementation of Mitel MiVoice Conference phones in a Clearspan installation, using Device Management to manage the configuration of the phones. Note that the Mitel MiVoice Conference phone is sometimes referred to as the UC 360. The use of Device Management with the Mitel MiVoice Conference phones is intended for a Clearspan system using release R20 or later, OpEasy 4.4 or later and MiVoice phone firmware or later. This particular phone type is unique in that it does not use the Auto Install utility at startup and it does not use device access credentials as the Mitel (Aastra) phones do. The setup of the phone specific device type and the files assigned for this device type are unique, as well. For these reasons, this separate section is dedicated to the Mitel MiVoice Conference phone type. PREPARATION Follow these steps prior to configuring Clearspan for installation of Mitel MiVoice Conference phones: a. Determine the type of network connection the phones should use to access the phone configuration files: HTTPS HTTPS is a secure connection, preventing the viewing of the configuration files. This is the best type of connection to use because of the security. However, it makes troubleshooting phone installation problems more difficult. HTTP HTTP is not a secure connection, permitting anyone having access to the network to view the configuration files, including the phone Authentication Password and any other passwords in the configuration files. HTTPS is typically used. b. Two of the files needed to configure this phone type are stored on the EMS at /opt/aastra/ SNMPManager/SystemConfigFiles/Mitel/MiVoice. Upload the files listed below to your PC, storing them in a directory named SystemConfigFiles. MN_Generic.cfg MN_%BWMACADDRESS%.cfg c. Modify the MN_Generic.cfg file that was uploaded to your PC as follows. Update this file to specify the FQDN of the XSP server used for this installation If the type of network connection is HTTP, modify this file to replace HTTPS and 443 with HTTP and 80 respectively Contents of the MN_Generic.cfg file appear below. The FQDN of the XSP appears in red font; the protocol related information appears in blue font. 99 Mitel
105 <?xml version='1.0' encoding='utf-8' standalone='yes'?> <Parameter Model="UC360"> <http_download> <http_port></http_port> <https_swupgrade_trust_all_hosts>0</https_swupgrade_trust_all_hosts> <http_upgrade>2</http_upgrade> <http_upgrade_user_confirm>0</http_upgrade_user_confirm> <http_cfg ServerUrl=" TrustAllHosts="1"></http_cfg> </Parameter> Note that this configuration requires that the certificate provided by the XSP is trusted. When this is the case, specification of an FQDN and setting the TrustAllHosts parameter to 1 within the MN_Generic.cfg file are required and provide the most security for phone configuration downloads. When the certificate provided by the XSP is self-signed, the IP address may be used in place of the FQDN and the TrustAllHosts parameter can be set to 0 to allow phone configuration downloads, but this is a less secure configuration. d. Modification of the MN_%BWMACADDRESS%.cfg is not needed. It will be assigned as the initial default template for the Device Profile Type created for the MiVoice Conference phones. OPTION 66 WITH DHCP When a new phone is plugged into the network, a DHCP server assigns it an IP address. The phone then gets the configuration URL via Option 66. If Option 66 is not yet setup on your system, see the INSTALLING MITEL (AASTRA) PHONES USING DEVICE MANAGEMENT section, OPTION 66 WITH DHCP sub-section for setup instructions. CLEARSPAN DEVICE PROFILE TYPE ADD FILE TO THE CLEARSPAN DEVICE PROFILE TYPE If the Clearspan Device Profile Type does not exist on your system, see the INSTALLING MITEL (AASTRA) PHONES USING DEVICE MANAGEMENT section, CLEARSPAN DEVICE PROFILE TYPE sub-section for setup instructions. With the Clearspan device profile type in place, the file MN_Generic.cfg must be added to support the MiVoice Conference phone. Instructions follow. SET UP FILES AND AUTHENTICATION FOR THE CLEARSPAN DEVICE PROFILE TYPE Via the Clearspan web portal, navigate to System Resources Identity/Device Profile Types and select to edit the Clearspan profile type. Click on the Files and Authentication tab. 100 Mitel
106 Add MN_Generic.cfg File Format Add a file entry for the MN_Generic.cfg file format. The list that follows describes the setup, and the screen capture that follows shows the changes which are circled in red. For Device Access File Format, enter MN_Generic.cfg For Repository File Format, enter MN_Generic_Clearspan.cfg For File Category, select Dynamic Per Type For File Customization, select Administrator Under the Assign File section, select Custom and click Browse. Then browse to directory SystemConfigFiles on your PC and select the MN_Generic.cfg file, which you retrieved and modified in the Preparation section. 101 Mitel
107 MITEL MIVOICE CONFERENCE PHONE DEVICE PROFILE TYPE ADD A DEVICE PROFILE TYPE FOR THE MITEL MIVOICE CONFERENCE PHONE TYPE Using the Clearspan web portal, navigate to System Resources Identity/Device Profile Types and create a profile type for the Mitel MiVoice Conference phone type using the following table as reference. 102 Mitel
108 PHONE TYPE IDENTIFY/DEVICE PROFILE TYPE NAME NUMBER OF PORTS DEVICE ACCESS URI UC-360 Mitel MiVoice Conference (DMS) Limited to 1 Mitel_MiVoice_Conference_dms The following list describes changes to make when adding the device type. The Identity/Device Profile Type name must be entered per the preceding table. With exception, if the installation has more than one network path to its XSP, replace DMS with the identifier for the first location. For Signaling Address Type, select Intelligent Proxy Addressing. Under the Standard Options section: - Set Number of Ports to 1 - For Ringback Tone/Early Media Support, select Local Ringback No Early Media - Check the box for Registration Capable Under the Advanced Options section: - Check the box for Support Identity in UPDATE and Re-INVITE For Device Configuration Options, select Device Management Under the Device Management section: - For Device Configuration Tags, select Use Default System Tag Set Only - Check the box for Allow Identity/Device Profiles to Configure Custom Tags - Check the box for Allow Groups to Configure Custom Tags - For Device Access Protocol, choose https or http, depending on the type of network connection previously determined. - For the Device Access FQDN, enter the address of the Clearspan XSP server which is addressable within the DHCP location. - Set Device Access Port, to 443 if the Device Access Protocol is https. Set this field to 80 if the protocol is http. - For Device Access Context Name, enter dms. - For Device Access URI, enter per the preceding table. With exception, if the installation has more than one network path to its XSP, replace dms with the identifier for the first location. Note: If the installation has more than one network path to its XSP, after creating the first set of Device Profile Types (e.g. using identifier pub ), create a second set using the identifier for the second location (e.g. using identifier pvt ). Repeat if a third location exists (e.g. using identifier cmn ), etc. The screen captures that follow illustrate creation of the Mitel MiVoice Conference profile type for a site that has one network path to its XSP; those areas that require change are circled in red. 103 Mitel


109 104 Mitel


110 SET UP FILES AND AUTHENTICATION FOR THE DEVICE SPECIFIC PROFILE TYPE After the Identity/Device Profile Type is saved, perform an edit of this Profile Type and click on the Files and Authentication tab. The following screen capture shows the file formats that must be defined for this device profile type. The remainder of this section describes how to add these. 105 Mitel

111 Add MN_%BWMACADDRESS%.cfg File Format Add a file entry for the MN_%BWMACADDRESS%.cfg file format. The list that follows describes the setup, and the screen capture that follows provides an example with the fields that require change circled in red. For Device Access File Format, enter MN_%BWMACADDRESS%.cfg Set Repository File Format to MN%BWMACADDRESS%.cfg Set File Category to Dynamic Per-Device Set File Customization to Administrator and User Under the Assign File section, select Custom and click Browse. Then browse to directory SystemConfigFiles on your PC and select the MN_%BWMACADDRESS%.cfg file. Under the File Authentication section - For Authentication Mode, check MAC-Based - For Device Access HTTP Authentication, select Digest 106 Mitel

112 Add uc360_x.zip File Format Add a file entry for the uc360_x.zip file format, where x is the firmware version. Note that multiple firmware loads can be added to the device profile. The list that follows describes the setup, and the screen capture that follows provides an example with the fields that require change circled in red. For Device Access File Format, enter uc360_x.zip where x is the firmware version Set Repository File Format to uc360_x.zip where x is the firmware version Set File Customization to Administrator Under the Assign File section, select Custom and click Browse. Then browse to directory L:\COMPANY Product Life Cycle\Clearspan Product Releases\Mitel UC360\<firmware version>\software and Firmware\uc360_<firmware version>.zip (where the most current firmware that has been validated by engineering is version at the time of this document release) 107 Mitel

113 Add upgrade.xml File Format Add a file entry for the upgrade.xml file format. The list that follows describes the setup, and the screen capture that follows provides an example with the fields that require change circled in red. For Device Access File Format, enter upgrade.xml Set Repository File Format to upgrade.xml Set File Category to Dynamic Per-Device Set File Customization to Administrator and User Under the Assign File section, select Custom and click Browse. Then browse to directory L:\COMPANY Product Life Cycle\Clearspan Product Releases\Mitel UC360\x.x.x.x\Software and Firmware\Device Profile and select the upgrade xml file (where x.x.x.x refers to the most current version that has been validated by engineering, which is version at the time of this document release) 108 Mitel
114 Contents of the upgrade.xml file appear below. Note that the firmware file name, that appears in red font, contains a tag named %UC360_version%. <?xml version="1.0" encoding="utf-8"?> <upgrade_profile> <set_type name="uc360"> <platform> <ver>"l27.inc p1"</ver> <ver>"l27.inc1.13.1"</ver> <load> <upgrade_type>system</upgrade_type> <version>%uc360_version%</version> <load_name> <!-- this segment can have multiple files --> 109 Mitel


115 <file type="zip">uc360_%uc360_version%.zip</file> </load_name> <reboot>yes</reboot> </load> </platform> </set_type> </upgrade_profile> For a new installation, create this tag at the group and/or enterprise levels, as appropriate, and set the Tag Value to match the version of the firmware you put in place per the previous step. For example: MITEL MIVOICE CONFERENCE PHONE DEVICE To make use of this new Device Profile Type that uses Device Management, first build templates that use the new device type. The following shows that a template exists for the Mitel MiVoice Conference (DMS) Device Type. Next, build Users/Devices that specify the new (DMS) device type along with the new (DMS) template(s). Keep the following in mind: 110 Mitel
116 Enter the phone s actual MAC Address into the MAC Address field because Auto install is not used for this phone type Keep the name portion of the line/port to 20 characters or less. If a User Profile is used, the line/port is auto-generated to be the phone number with characters appended to designate the number as primary or an SCA. This results in an acceptable length. Keep the Auththentication name and password to 20 characters or less. If a User Profile is used, the authentication name and password can be set to Generate Unique ID and Generate Random Password, respectively, which will generate values that exceed the recommended limit. If these fields are autogenerated and result in lenghty character counts, shorten them to the acceptable length. Note: In our testing, if the total characters comprising the name portion of the line/port, the authentication name and the authentication password exceeds 77 characters when using or firmware, the phone does not register. Therefore, the preceeding guidelines on length are recommended to avoid hitting this limit. The example that follows shows the Phone Device Add page of a User Add operation. The Device Type chosen reflects the new DMS device type, the Template chosen is created for the new DMS device type, and the MAC Address is provided as required. Note that the Line / Port name is under 20 characters, which meets the length requirement. 111 Mitel

117 Be cautious when specifying the MAC Address for a device because the device cannot retrieve its configuration if the wrong MAC address is used. MITEL MIVOICE CONFERENCE PHONE INSTALLATION Once the DHCP server and the device profile type have been set up and the user/device is provisioned, the phone installer connects the new Mitel MiVoice Conference phone to the network. The phone then obtains its IP address and its path to the Clearspan device profile type via option 66. The phone reads the MN_Generic.cfg which re-directs the phone to the phone-specific device type where the phone obtains its firmware and configuration files. There is no Auto Install process for this phone type, so it is because the phone is provisioned initially with specification of its MAC address, that the phone is able to obtain its configuration file. After a series of restarts, the phone is ready for use. The information following provides instruction on accessing the phone and steps to take when upgrading firmware and when initially deploying this phone. 112 Mitel


118 ACCESS THE MITEL MIVOICE PHONE DIRECTLY Steps: 1. Click on a rectangular symbol, the second symbol from the left. 2. Choose Settings. 3. Choose Advanced. 4. Enter the unit s password in the empty field. The default password is admin. UPGRADE FIRMWARE FOR AN EXISTING DEVICE IN THE FIELD Steps: 1. If not already present, add the file format for the new firmware to the Mitel MiVoice Conference (DMS) profile type. For example, version has been added below, in addition to the previously existing version. 2. Update the value of the tag, %UC360_version%, to reflect the firmware version you wish to upgrade to. This tag can be defined using OpEasy at the Enterprise, Group and/or Device level. If the tag exists at the enterprise level, update the tag via the Enterprise Device Type Tags feature in OpEasy as follows. 3. To define a software upgrade path for a MiVoice phone, follow the below path: System Settings > Upgrade system S/W > Software HTTP Server Address 113 Mitel
Clearspan Device Management Configuration Guide
 Clearspan Device Management Configuration Guide RELEASE 20.0 JUNE 2015 NOTICE The information contained in this document is believed to be accurate in all respects but is not warranted by Mitel Communications,
Clearspan OpEasy Basic Provisioning Guide
 Clearspan OpEasy Basic Provisioning Guide APRIL 2018 Release 4.10 2827-016 NOTICE The information contained in this document is believed to be accurate in all respects but is not warranted by Mitel Communications,
Clearspan OpEasy Basic Provisioning Guide NOVEMBER Release
 Clearspan OpEasy Basic Provisioning Guide NOVEMBER 2016 Release 4.6 2827-012 NOTICE The information contained in this document is believed to be accurate in all respects but is not warranted by Mitel Communications,
Clearspan OpEasy Advanced Provisioning User Guide APRIL Release
 Clearspan OpEasy Advanced Provisioning User Guide APRIL 2016 Release 4.4 2877-011 NOTICE The information contained in this document is believed to be accurate in all respects but is not warranted by Mitel
Clearspan OpEasy Advanced Provisioning Guide NOVEMBER Release
 Clearspan OpEasy Advanced Provisioning Guide NOVEMBER 2016 Release 4.6 2877-013 NOTICE The information contained in this document is believed to be accurate in all respects but is not warranted by Mitel
Clearspan OpEasy Basic Provisioning User Guide MAY Release
 Clearspan OpEasy Basic Provisioning User Guide MAY 2015 Release 4.2 2827-008 NOTICE The information contained in this document is believed to be accurate in all respects but is not warranted by Mitel Communications,
OpEasy Advanced Provisioning User Guide Release
 OpEasy Advanced Provisioning User Guide Release 4.0 2877-007 2811 Internet Blvd Frisco, Texas 75034-1851 Tel +1 469 365 3000 Tel +1 800 468 3266 www.aastrausa.com 2014 Clearspan is a Registered Trademark
IP Phones Deployment Guide for BroadWorks Environment
 IP Phones Deployment Guide for BroadWorks Environment I II About This Guide BroadSoft UC-One is a complete Unified Communications solution, providing a comprehensive suite of services meeting both business
Clearspan Hosted Thin Call Center R Release Notes JANUARY 2019 RELEASE NOTES
 Clearspan Hosted Thin Call Center R22.0.39 Release Notes JANUARY 2019 RELEASE NOTES NOTICE The information contained in this document is believed to be accurate in all respects but is not warranted by
Mitel 6735i and 6737i SIP Phones RN REV SERVICE PACK 5 RELEASE NOTES
 Mitel 6735i and 6737i SIP Phones RN-001037-03 REV39 3.3.1 SERVICE PACK 5 RELEASE NOTES NOTICE The information contained in this document is believed to be accurate in all respects but is not warranted
MiCollab ACD SIP Softphone Agent Integration Guide
 MiCollab ACD SIP Softphone Agent Integration DECEMBER 2018 NOTICE The information contained in this document is believed to be accurate in all respects but is not warranted by Mitel Networks Corporation
Mitel MiContact Center Enterprise WEB APPLICATIONS CONFIGURATION GUIDE. Release 9.2
 Mitel MiContact Center Enterprise WEB APPLICATIONS CONFIGURATION GUIDE Release 9.2 NOTICE The information contained in this document is believed to be accurate in all respects but is not warranted by Mitel
Phone Manager Application Support - Microsoft Office 365 DECEMBER 2016 DOCUMENT RELEASE 5.0 APPLICATION SUPPORT
 Phone Manager Application Support - Microsoft Office 365 DECEMBER 2016 DOCUMENT RELEASE 5.0 APPLICATION SUPPORT Microsoft Office 365 NOTICE The information contained in this document is believed to be
MIVOICE BORDER GATEWAY PLATFORM
 MITEL MIVOICE BORDER GATEWAY PLATFORM MiVoice Border Gateway Remote Phone Configuration Guide JANUARY, 2017 RELEASE 9.4 MBG - Remote IP Phone Configuration Guide NOTICE The information contained in this
OBIHAI OBI 302 (ATA) CONFIGURATION GUIDE 1 ST JUNE 2016
 CONFIGURATION GUIDE 1 ST JUNE 2016") OBIHAI OBI 302 (ATA) CONFIGURATION GUIDE 1 ST JUNE 2016 Vocus Communications ABN 96 084 115 499 vocus.com.au Vocus House, Level 1, 189 Miller Street, North Sydney, NSW 2060 DOCUMENT CONTROL PREPARATION
OBIHAI OBI 302 (ATA) CONFIGURATION GUIDE 1 ST JUNE 2016 Vocus Communications ABN 96 084 115 499 vocus.com.au Vocus House, Level 1, 189 Miller Street, North Sydney, NSW 2060 DOCUMENT CONTROL PREPARATION
Clearspan Web Interface Getting Started Guide
 Clearspan Web Interface Getting Started Guide RELEASE 22 March 2018 NOTICE The information contained in this document is believed to be accurate in all respects but is not warranted by Mitel Networks Corporation
Phone Manager Mobile Quick Reference Guide DECEMBER 2016 DOCUMENT RELEASE 5.0 QUICK REFERENCE GUIDE
 Phone Manager Mobile Quick Reference Guide DECEMBER 2016 DOCUMENT RELEASE 5.0 QUICK REFERENCE GUIDE NOTICE The information contained in this document is believed to be accurate in all respects but is not
MiCloud CRM Integrations USER GUIDE
 MiCloud CRM Integrations USER GUIDE Release 4.0 Document Release 1.0 January 2018 NOTICE The information contained in this document is believed to be accurate in all respects but is not warranted by Mitel
MiContact Center Business Important Product Information for Customer GDPR Compliance Initiatives
 MiContact Center Business Important Product Information for Customer GDPR Compliance Initiatives MITEL SOLUTIONS ENGINEERING MiContact Center Business Release 9.0 Version 1 May 2018 NOTICE The information
IP Phones Deployment Guide for BroadWorks Environment
 About This Guide I IP Phones Deployment Guide for BroadWorks Environment II About This Guide BroadSoft UC-One is a complete Unified Communications solution, providing a comprehensive suite of services
Clearspan Application Server Group Web Interface Admin Guide Part 1 RELEASE 22
 Clearspan Application Server Group Web Interface Admin Guide Part 1 RELEASE 22 March 2018 NOTICE The information contained in this document is believed to be accurate in all respects but is not warranted
OpEasy Basic Provisioning User Guide Release
 fm OpEasy Basic Provisioning User Guide Release 4.0 2827-006 2811 Internet Blvd Frisco, Texas 75034-1851 Tel +1 469 365 3000 Tel +1 800 468 3266 www.aastrausa.com 2014 Clearspan is a Registered Trademark
IP Phones Deployment Guide for BroadWorks Environment
 IP Phones Deployment Guide for BroadWorks Environment ii About This Guide About This Guide BroadSoft UC-One is a complete Unified Communications solution, providing a comprehensive suite of services meeting
Phone Manager Application Support - Sage CRM DECEMBER 2016 DOCUMENT RELEASE 5.0 APPLICATION SUPPORT
 Phone Manager Application Support - Sage CRM DECEMBER 2016 DOCUMENT RELEASE 5.0 APPLICATION SUPPORT Sage CRM NOTICE The information contained in this document is believed to be accurate in all respects
Clearspan s OpEasy Release Notes Current GA load: Version
 Clearspan s OpEasy Release Notes Current GA load: Version 4.0.0.6522 2811 Internet Blvd Frisco, Texas 75034-1851 Tel +1 469 365 3000 Lobby Tel +1 800 729 1872 ACTS www.aastrausa.com Page 1 Table of Contents
Phone Manager Application Support APRIL 2016 DOCUMENT RELEASE 4.3 APPLICATION SUPPORT
 Phone Manager Application Support APRIL 2016 DOCUMENT RELEASE 4.3 APPLICATION SUPPORT Goldmine NOTICE The information contained in this document is believed to be accurate in all respects but is not warranted
Technical Configuration Notes
 MITEL SIP CoE Technical Configuration Notes Configure Mitel 6863/6865 SIP Phone to use with MiVoice Business 8.0 SP2 FEBRUARY 2018 SIP COE HO2459 TECHNICAL CONFIGURATION NOTES NOTICE The information contained
IP Phones Deployment Guide for BroadWorks Environment
 IP Phones Deployment Guide for BroadWorks Environment ii About This Guide About This Guide BroadSoft UC-One is a complete Unified Communications solution, providing a comprehensive suite of services meeting
Clearspan OpEasy Management Suite Release 4.5 JULY 2016 RELEASE NOTES
 Clearspan OpEasy Management Suite Release 4.5 JULY 2016 RELEASE NOTES The information conveyed in this document is confidential and proprietary to Mitel and is intended solely for Mitel employees and members
BroadSoft Partner Configuration Guide
 BroadSoft Partner Configuration Guide Grandstream GXV31xx IP Multimedia Phone GXP21xx/GXP14xx Enterprise IP Phone March 2011 Document Version 1.4 1297 Beacon Street, 2nd Floor Brookline, MA 02446 USA Voice:
Phone Manager Application Support APRIL 2016 DOCUMENT RELEASE 4.3 APPLICATION SUPPORT
 Phone Manager Application Support APRIL 2016 DOCUMENT RELEASE 4.3 APPLICATION SUPPORT ZohoCRM NOTICE The information contained in this document is believed to be accurate in all respects but is not warranted
VOCUS HOSTED PBX USER PROFILE SET-UP WITH POLYCOM DEVICE
 VOCUS HOSTED PBX USER PROFILE SET-UP WITH POLYCOM DEVICE QUICK REFERENCE GUIDE This document provides step by step instructions on how to provision a new Hosted PBX user profile for a Polycom handset.
MiCollab What s New in This Release JANUARY 2017 RELEASE 7.3
 MiCollab What s New in This Release JANUARY 2017 RELEASE 7.3 NOTICE The information contained in this document is believed to be accurate in all respects but is not warranted by Mitel Networks Corporation
Mitel MiContact Center Enterprise Tenanting. Description RELEASE 9.1
 Mitel MiContact Center Enterprise Tenanting Description RELEASE 9.1 NOTICE The information contained in this document is believed to be accurate in all respects but is not warranted by Mitel Networks Corporation
Clearspan OpEasy Reporting Guide
 Clearspan OpEasy Reporting Guide JANUARY 2018 Release 4.9 2875-014 NOTICE The information contained in this document is believed to be accurate in all respects but is not warranted by Mitel Communications,
Clearspan Communicator User Guide for ios Tablets
 Clearspan Communicator User Guide for ios Tablets RELEASE# 20.1.1 JULY 2015 NOTICE The information contained in this document is believed to be accurate in all respects but is not warranted by Mitel Communications,
Mitel Open Integration Gateway DEVELOPER GUIDE SESSION MANAGEMENT SERVICE
 Mitel Open Integration Gateway DEVELOPER GUIDE SESSION MANAGEMENT SERVICE Release 3.0 November 2015 NOTICE The information contained in this document is believed to be accurate in all respects but is not
Table of Contents. iii
 Table of Contents iii Table of Contents Table of Contents Table of Contents... iii Summary of Changes... 1 Changes for Release 81, Guide Version 81.70... 1 Introduction... 1 Getting Started... 3 Obtaining
Mitel 6800/6900 Series SIP Phones
 Mitel 6800/6900 Series SIP Phones 58015318 REV03 5.0.0 Service Pack 1 Release Notes NOTICE The information contained in this document is believed to be accurate in all respects but is not warranted by
Mitel MiContact Center Enterprise SMS GATEWAY USER GUIDE. Release 9.2
 Mitel MiContact Center Enterprise SMS GATEWAY USER GUIDE Release 9.2 NOTICE The information contained in this document is believed to be accurate in all respects but is not warranted by Mitel Networks
2811 Internet Blvd Frisco, Texas Tel Tel SERVICE GUIDE Release 20.
 2811 Internet Blvd Frisco, Texas 75034-1851 Tel +1 469 365 3000 Tel +1 800 468 3266 www.aastrausa.com SERVICE GUIDE 2824-006 Release 20.0 CS Service Guide R19.0 Aastra - 2824-006 2013 Clearspan is a Registered
Clearspan Communicator Desktop R20.2.2
 Clearspan Communicator Desktop R20.2.2 UPGRADE INSTRUCTIONS APRIL 2015 Table of Contents Overview... 3 Upgrading (Windows 7 or above, Mac OS 10.6 or above)... 3 Recording Your Settings (Windows and Mac
Table of Contents. iii
 Table of Contents iii Table of Contents Table of Contents Table of Contents... iii Summary of Changes... 1 Changes for Release 81, Guide Version 81.72... 1 Changes for Release 81, Guide Version 81.71...
Polycom IP Phone Configuration Guides. Yeastar Technology Co., Ltd.
 Polycom IP Phone Configuration Guides Yeastar Technology Co., Ltd. Table of Contents 1 For wireless server 300... 3 1.1 Register with MyPBX... 3 2 For soundpoint & SoundStationn... 8 2.1 Register with
MITEL PERFORMANCE ANALYTICS
 MITEL PERFORMANCE ANALYTICS RELEASE 2.3 UPGRADE GUIDE NOTICE The information contained in this document is believed to be accurate in all respects but is not warranted by Mitel Networks Corporation (MITEL
Technical Configuration Notes
 MITEL SIP CoE Technical Configuration Notes Configure to use with MiVoice Business 8.0 SP3 FEBRUARY 2018 SIP COE HO883 TECHNICAL CONFIGURATION NOTES NOTICE The information contained in this document is
BroadSoft Partner Configuration Guide
 BroadSoft Partner Configuration Guide Toshiba Strata CIX July 2011 Document Version 1.8 9740 Irvine Boulevard Irvine, California, 92618 949-583-3500 www.toshiba.com BroadWorks Guide Copyright tice Trademarks
Managing Modular Infrastructure by using OpenManage Essentials (OME)
") Managing Modular Infrastructure by using OpenManage Essentials (OME) This technical white paper describes how to manage the modular infrastructure by using Dell EMC OME. Dell Engineering June 2017 A Dell
Managing Modular Infrastructure by using OpenManage Essentials (OME) This technical white paper describes how to manage the modular infrastructure by using Dell EMC OME. Dell Engineering June 2017 A Dell
Phone Manager Quick Reference Guide DECEMBER 2016 DOCUMENT RELEASE 5.0 QUICK REFERENCE GUIDE
 Phone Manager Quick Reference Guide DECEMBER 2016 DOCUMENT RELEASE 5.0 QUICK REFERENCE GUIDE NOTICE The information contained in this document is believed to be accurate in all respects but is not warranted
About MiTeam. MiTeam Stream. MiTeam on MiCollab for PC, MAC Client, and Web Client. MiTeam Stream tabs. Create a Stream.
 QMiTeam for Enterprise Quick Reference Guide About MiTeam MiTeam is a work stream communications and collaboration tool that provides a highly collaborative and persistent workspace for team-meetings,
Mitel Technical Configuration Notes HO858
 TelNet Worldwide, Inc. telnetww.com 1-833-4TELNET Mitel Technical Configuration Notes HO858 rev. 2018-12-12 Configure MiVoice Business 9.0 for use with TelNet Worldwide SIP Trunking Description: This document
HP Database and Middleware Automation
 HP Database and Middleware Automation For Windows Software Version: 10.10 SQL Server Database Refresh User Guide Document Release Date: June 2013 Software Release Date: June 2013 Legal Notices Warranty
MITEL. Live Content Suite. Mitel Live Content Suite Installation and Administrator Guide Release 1.1
 MITEL Live Content Suite Mitel Live Content Suite Installation and Administrator Guide Release 1.1 NOTICE The information contained in this document is believed to be accurate in all respects but is not
Edge Device Manager Quick Start Guide. Version R15
 Edge Device Manager Quick Start Guide Version R15 Notes, cautions, and warnings NOTE: A NOTE indicates important information that helps you make better use of your product. CAUTION: A CAUTION indicates
MiCollab Engineering Guidelines OCTOBER 2016 RELEASE 7.2.2
 MiCollab Engineering Guidelines OCTOBER 2016 RELEASE 7.2.2 NOTICE The information contained in this document is believed to be accurate in all respects but is not warranted by Mitel Networks Corporation
Clearspan OpEasy Reporting Guide NOVEMBER Release
 Clearspan OpEasy Reporting Guide NOVEMBER 2016 Release 4.6 2875-011 NOTICE The information contained in this document is believed to be accurate in all respects but is not warranted by Mitel Communications,
Configuring MediaPack 1288 Analog Gateway as Third-Party SIP Device (Advanced) in Cisco Unified Communications Manager Ver
 in Cisco Unified Communications Manager Ver") Configuration Note AudioCodes Professional Services Interoperability Lab Configuring MediaPack 1288 Analog Gateway as Third-Party SIP Device (Advanced) in Cisco Unified Communications Manager Ver. 10.0.1
Configuration Note AudioCodes Professional Services Interoperability Lab Configuring MediaPack 1288 Analog Gateway as Third-Party SIP Device (Advanced) in Cisco Unified Communications Manager Ver. 10.0.1
Unified Communicator Advanced
 MITEL Unified Communicator Advanced UC Advanced Mobile for BlackBerry User Guide NOTICE The information contained in this document is believed to be accurate in all respects but is not warranted by Mitel
Phone Manager Quick Reference Guide APRIL 2016 DOCUMENT RELEASE 4.3 QUICK REFERENCE GUIDE
 Phone Manager Quick Reference Guide APRIL 2016 DOCUMENT RELEASE 4.3 QUICK REFERENCE GUIDE Quick Start Guide NOTICE The information contained in this document is believed to be accurate in all respects
Best Practices for Security Certificates w/ Connect
 Application Note AN17038 MT AppNote 17038 (AN 17038) September 2017 Best Practices for Security Certificates w/ Connect Description: This Application Note describes the process and best practices for using
MiVoice Office User Guide. MiVoice Office User Guide JANUARY 2019 DOCUMENT RELEASE USER GUIDE. Page 1
 MiVoice Office 250-6900 User Guide MiVoice Office 250 6900 User Guide JANUARY 2019 DOCUMENT RELEASE 5.1 6900 USER GUIDE Page 1 MiVoice Office 250-6900 s NOTICE The information contained in this document
Configuring Avaya 12x0 Series IP Phones
 SCS 4.0 Configuring Avaya 12x0 Series IP Phones Task Based Guide Copyright 2010 Avaya Inc. All Rights Reserved. Notices While reasonable efforts have been made to ensure that the information in this document
Manual Firmware Update Guide
 Manual Firmware Update Guide Mitel Desk Phone 6800 Series for MiCloud Office May 8, 2017 REVISION INFORMATION Issue Date Change Summary Updated By 1.1 May 3, 2017 Initial Version Chen-Hui Lee 1.2 May 8,
Clearspan Hosted Thin Receptionist User Guide RELEASE
 Clearspan Hosted Thin Receptionist User Guide RELEASE 21.0.33 November 2016 NOTICE The information contained in this document is believed to be accurate in all respects but is not warranted by Mitel Networks
GIGABIT COLOR IP PHONE
 GIGABIT COLOR IP PHONE USER GUIDE UC842 Version:1.0.3.59 Nanjing Hanlong Technology Co., Ltd 86-25-84608050 support@hanlongtek.com Notices Information Notices Information Copyright Copyright 2005-2013
BlackBerry Developer Summit. A02: Rapid Development Leveraging BEMS Services and the AppKinetics Framework
 BlackBerry Developer Summit A02: Rapid Development Leveraging BEMS Services and the AppKinetics Framework Page 2 of 21 Table of Contents 1. Workbook Scope... 4 2. Compatibility... 4 3. Source code download
HPE Security Fortify WebInspect Enterprise Software Version: Windows operating systems. Installation and Implementation Guide
 HPE Security Fortify WebInspect Enterprise Software Version: 17.10 Windows operating systems Installation and Implementation Guide Document Release Date: May 2017 Software Release Date: April 2017 Legal
SonicWall Secure Mobile Access SMA 500v Virtual Appliance 8.6. Getting Started Guide
 SonicWall Secure Mobile Access SMA 500v Virtual Appliance 8.6 Getting Started Guide Copyright 2017 SonicWall Inc. All rights reserved. SonicWall is a trademark or registered trademark of SonicWall Inc.
Connecting IP-PBX to BroadSoft's BroadCloud SIP Trunk using AudioCodes Mediant SBC
 Quick Guide AudioCodes Mediant Session Border Controllers (SBC) Connecting IP-PBX to BroadSoft's BroadCloud SIP Trunk using AudioCodes Mediant SBC Version 7.2 Introduction See Chapter 1 Obtain Software
Preparing to Deploy Cisco IP Communicator
 CHAPTER 2 Revised: 1/19/11 This chapter describes the required and recommended tasks for deploying Cisco IP Communicator. It also provides instructions for adding Cisco IP Communicator devices to the Cisco
Phone Manager Application Support APRIL 2016 DOCUMENT RELEASE 4.3 APPLICATION SUPPORT
 Phone Manager Application Support APRIL 2016 DOCUMENT RELEASE 4.3 APPLICATION SUPPORT Microsoft Dynamics CRM NOTICE The information contained in this document is believed to be accurate in all respects
Mitel Phone Manager Outbound Quick Start Guide DECEMBER 2017 DOCUMENT RELEASE 5.1 QUICK START GUIDE
 Mitel Phone Manager Outbound Quick Start Guide DECEMBER 2017 DOCUMENT RELEASE 5.1 QUICK START GUIDE NOTICE The information contained in this document is believed to be accurate in all respects but is not
Xcalibur Global Version Rev. 2 Administrator s Guide Document Version 1.0
 Xcalibur Global Version 1.1 - Rev. 2 Administrator s Guide Document Version 1.0 September 2006 COPYRIGHT NOTICE 2006 Chip PC Inc., Chip PC (Israel) Ltd., Chip PC (UK) Ltd. All rights reserved. This product
MITEL SIP CoE. Technical. Configuration Notes. Configure Ascom IP-DECT for use with MiVoice Office. SIP CoE
 MITEL SIP CoE Technical Configuration Notes Configure Ascom IP-DECT for use with MiVoice Office SIP CoE 14-4940-00311 NOTICE The information contained in this document is believed to be accurate in all
Administrator s Guide for the Polycom Video Control Application (VCA)
") Administrator s Guide for the Polycom Video Control Application (VCA) Version 1.0 July 2007 Edition 3725-26448-002/A Trademark Information Polycom and the Polycom logo design are registered trademarks
Administrator s Guide for the Polycom Video Control Application (VCA) Version 1.0 July 2007 Edition 3725-26448-002/A Trademark Information Polycom and the Polycom logo design are registered trademarks
Dell Wyse Management Suite. Version 1.2 Administrator s Guide
 Dell Wyse Management Suite Version 1.2 Administrator s Guide Notes, cautions, and warnings NOTE: A NOTE indicates important information that helps you make better use of your product. CAUTION: A CAUTION
INSTALLATION GUIDE Spring 2017
 INSTALLATION GUIDE Spring 2017 Copyright and Disclaimer This document, as well as the software described in it, is furnished under license of the Instant Technologies Software Evaluation Agreement and
Cisco Extension Mobility
 CHAPTER 9 allows users to temporarily access their Cisco Unified IP Phone configuration such as line appearances, services, and speed dials from other Cisco Unified IP Phones. Extension mobility functionality
MiVoice Office Call Reporter Quick Reference Guide APRIL 2017 DOCUMENT RELEASE 5.0 QUICK REFERENCE GUIDE
 MiVoice Office Call Reporter Quick Reference Guide APRIL 2017 DOCUMENT RELEASE 5.0 QUICK REFERENCE GUIDE Quick Reference Guide NOTICE The information contained in this document is believed to be accurate
Using the Horizon vrealize Orchestrator Plug-In
 Using the Horizon vrealize Orchestrator Plug-In VMware Horizon 6 version 6.2.3, VMware Horizon 7 versions 7.0.3 and later Modified on 4 JAN 2018 VMware Horizon 7 7.4 You can find the most up-to-date technical
MiCollab Engineering Guidelines
 MiCollab Engineering Guidelines MiVoice Office 250 MiVoice Business MiVoice Office 400 MiVoice MX-ONE MiVoice 5000 MARCH 2018 RELEASE 8.0 SP2 NOTICE The information contained in this document is believed
Clearspan 911/E911 Overview RELEASE 22
 Clearspan 911/E911 Overview RELEASE 22 March 2018 NOTICE The information contained in this document is believed to be accurate in all respects but is not warranted by Mitel Networks Corporation (MITEL
GXP1610/1615/1620/1625/1628/1630 Firmware Release Notes IMPORTANT UPGRADING NOTE
 GXP1610/1615/1620/1625/1628/1630 Firmware Release Notes IMPORTANT UPGRADING NOTE Starting from firmware version 1.0.2.21, downgrading to version 1.0.2.4 or lower requires a matched protocol for upgrading
MOVEit Transfer on Azure Marketplace Quickstart Guide. How to deploy and use MOVEit Transfer from Microsoft Azure Marketplace
 MOVEit Transfer on Azure Marketplace Quickstart Guide How to deploy and use MOVEit Transfer from Microsoft Azure Marketplace Copyright Notice 1991-2017 Ipswitch, Inc. All rights reserved. This document,
Mitel Open Integration Gateway DEVELOPER GUIDE - FUNDAMENTALS
 Mitel Open Integration Gateway DEVELOPER GUIDE - FUNDAMENTALS Release 3.0 November 2015 NOTICE The information contained in this document is believed to be accurate in all respects but is not warranted
DMP 128 Plus C V DMP 128 Plus C V AT. Avaya Aura Configuration Guide REVISION: 1.1 DATE: SEPTEMBER 1 ST 2017
 DMP 128 Plus C V DMP 128 Plus C V AT Avaya Aura Configuration Guide REVISION: 1.1 DATE: SEPTEMBER 1 ST 2017 Revision Log Date Version Notes August 6 th 2017 1.0 First Release. Applies to Firmware 1.01.0004.002
MIVOICE OFFICE 400 VOICE MAIL SYSTEM USER GUIDE
 MIVOICE OFFICE 400 VOICE MAIL SYSTEM USER GUIDE eud-1739_en / 1.1 R5.0 05.2017 NOTICE The information contained in this document is believed to be accurate in all respects but is not warranted by Mitel
ForeScout Extended Module for ServiceNow
 ForeScout Extended Module for ServiceNow Version 1.1.0 Table of Contents About this Integration... 4 Use Cases... 4 Asset Identification... 4 Asset Inventory True-up... 5 Additional ServiceNow Documentation...
Using the Horizon vcenter Orchestrator Plug-In. VMware Horizon 6 6.0
 Using the Horizon vcenter Orchestrator Plug-In VMware Horizon 6 6.0 You can find the most up-to-date technical documentation on the VMware Web site at: https://docs.vmware.com/ The VMware Web site also
SRA Virtual Appliance Getting Started Guide
 SRA Virtual Appliance Getting Started Guide 1 Notes, Cautions, and Warnings NOTE: A NOTE indicates important information that helps you make better use of your system. CAUTION: A CAUTION indicates potential
Cisco IP Communicator Deployment Preparation
 This chapter describes the required and recommended tasks for deploying Cisco IP Communicator. It also provides instructions for adding Cisco IP Communicator devices to the Cisco Unified Communications
HT801/HT802 Firmware Release Note IMPORTANT UPGRADING NOTE
 HT801/HT802 Firmware Release Note IMPORTANT UPGRADING NOTE Once HT801/HT802 is upgraded to 1.0.5.7 or above, downgrading to 1.0.2.x firmware version or lower is not supported. Once HT801/HT802 is upgraded
Dell Wyse Management Suite 1.2 Release Notes
 Rev. A00 2018-06 Dell recommends applying this update during your next scheduled release cycle. The update contains feature enhancements or changes that will help keep your system software current and
Phone Manager Application Support - Swiftpage Act! DECEMBER 2016 DOCUMENT RELEASE 5.0 APPLICATION SUPPORT
 Phone Manager Application Support - Swiftpage Act! DECEMBER 2016 DOCUMENT RELEASE 5.0 APPLICATION SUPPORT Swiftpage Act! NOTICE The information contained in this document is believed to be accurate in
Deploying Devices. Cisco Prime Infrastructure 3.1. Job Aid
 Deploying Devices Cisco Prime Infrastructure 3.1 Job Aid Copyright Page THE SPECIFICATIONS AND INFORMATION REGARDING THE PRODUCTS IN THIS MANUAL ARE SUBJECT TO CHANGE WITHOUT NOTICE. ALL STATEMENTS, INFORMATION,
MiTeam Stream. Launch MiTeam. MiTeam Stream tabs. QMiTeam for Enterprise Quick Reference Guide
 QMiTeam for Enterprise Quick Reference Guide MiTeam is a workstream communications and collaboration tool that provides a highly collaborative, persistent workspace for team-based meetings, conversations,
Chime for Lync High Availability Setup
 Chime for Lync High Availability Setup Spring 2017 Copyright and Disclaimer This document, as well as the software described in it, is furnished under license of the Instant Technologies Software Evaluation
MiVoice Office Real-Time Dashboard
 MiVoice Office Real-Time Dashboard MiVoice Office Real-Time Dashboard Quick Reference Guide APRIL 2018 DOCUMENT RELEASE 5.1 QUICK REFERENCE GUIDE Page 1 Quick Reference Guide NOTICE The information contained
Polycom Updater Release Notes
 RELEASE NOTES Updater 5.0.5 January 2014 3804-11069-505 Polycom Updater 5.0.5 Release Notes Applies to Polycom SoundStation IP 6000 and SoundStation IP 7000 Phones Polycom, Inc. 1 Polycom Updater 5.0.5
ForeScout Extended Module for HPE ArcSight
 ForeScout Extended Module for HPE ArcSight Version 2.7.1 Table of Contents About the HPE ArcSight Integration... 4 Use Cases... 4 Send Endpoint Status, Compliance, or Property Changes from CounterACT to