Controller DMX DC-192
|
|
|
- Alfred Melvyn McCarthy
- 5 years ago
- Views:
Transcription

1 Manual Controller DMX DC-192
2 Table of contents 1. Safety instructions FOR SAFE AND EFFICIENT OPERATION Overview Front view Rear view Joystick setup Assign joystick Assign Joystick Reverse (PAN / TILT invert) Delete Joystick PAN / TILT Assignment Delete PAN / TILT Joystick settings for selected fixtures Delete PAN / TILT Joystick settings for all fixtures Manual control Scenes Recording scenes Edit Scenes Copy a scene Delete a scene Delete all scenes Scene Playback Manual trigger Auto trigger Audio trigger Chases Recording chases Recording a bank of scenes to a chase Editing chases Add a chase step Deleting chase steps Delete a chase Delete all chases Chase playback Manual trigger Auto trigger Audio trigger Bank and fixtures copy Bank Copy Fixture copy Fade time MIDI Set MIDI channel Data transfer Data Transfer to Computer from DMX Operator DC-192 (ULink) Data Transfer to DMX Operator DC-192 from Computer (ULink) Data transfer to memory stick from DMX operator DC-192 (USB MEM Stick) Store memory file to computer from USB MEM Stick Reload memory file to USB MEM stick from computer Delete and format files in memory stick Data Transfer to DMX operator DC-192 from USB MEM stick Technical data / 23

3 1. Safety instructions Read the safety instructions and also this manual carefully. Keep the manual. Observe all red flags. Observe the manual. To prevent fire or electric shocks, protect the device against rain and humidity Pull the plug before opening the housing. To prevent an electric shock you should not remove the cover. Do not operate the device in the near of water. Use only a dry cloth for cleaning FOR SAFE AND EFFICIENT OPERATION Be careful with heat and extreme temperature Avoid exposing it to direct rays of the sun or near a heating appliance. Not put it in a temperature bellow 41 F /5 C, or exceeding 95 F /35 C. To avoid placing on un-stable location Select a level and stable location to avoid vibration. Do not use chemicals or volatile liquids for cleaning Use a clean dry cloth to wipe off the dust, or a wet soft cloth for stubborn dirt. Pull the plug before cleaning. If out of work, contact sales agency immediately Any troubles arose, remove the power plug soon, and contact with an engineer for repairing, do not open the cabinet by yourself, it might result a danger of electric shock. Take care with the power cable Never pull the power cable to remove the plug from the receptacle, be sure to hold the plug. When not using the device for an extended period of time, be sure to disconnect the plug from the receptacle. Ventilation It is not allowed cover fans and air in and outlets. 3 / 23
4 Safety Do not remove the grounding. It is for your safety. If you remove the grounding it can cause electric shocks. Accessory Please use only the accessory which is set by the manufacturer. Important Damages caused by the disregard of this user manual are not subject to warranty. The dealer will not accept liability for any resulting defects or problems. Make sure the electrical connection is carried out by qualified personnel. All electrical and mechanical connections have to be carried out according to the European safety standards. 4 / 23
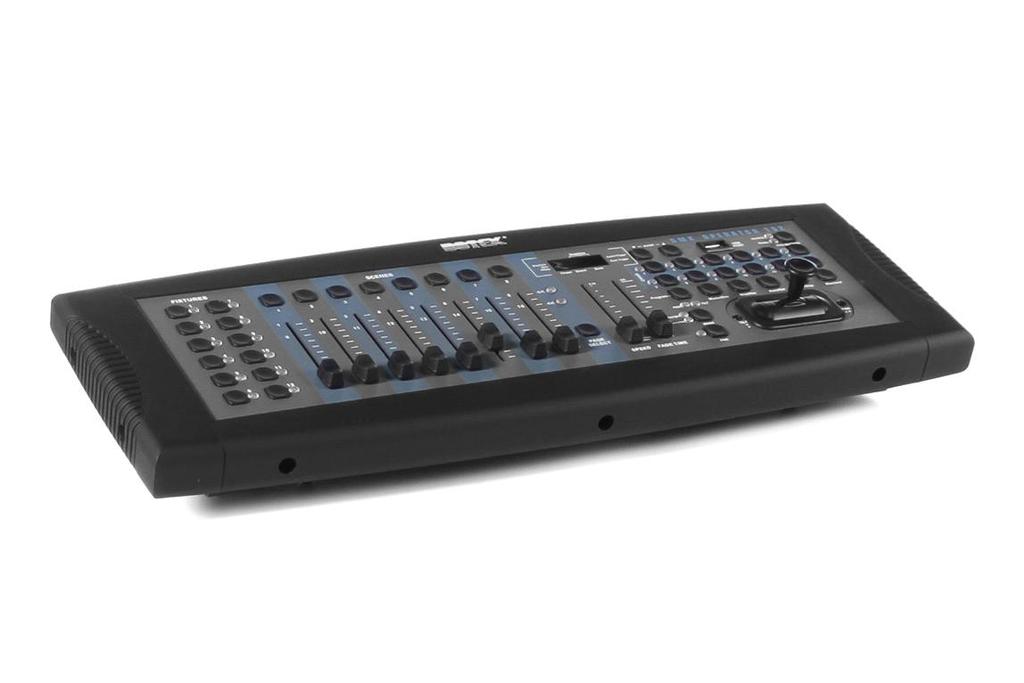
5 2. Overview 2.1. Front view 1. Fixture buttons(1-12) These buttons are used to select the relevant fixtures for control. 2. Channel Fader (1-8) These faders are used to control the output of each corresponding fixture channel. 3. Page Select This button is used to switch between the channels 1 8 and Speed Fader This fader is used to adjust the chase speed (range is 0.1 second to 10 minutes per step) 5. Fade Time-Fader This fader is used to adjust the fade time (range is 0 to 30 seconds) 6. FINE button This button is used in conjunction with the joystick. When the FINE button is engaged, adjusting the joystick will be more precise when needing to hit a specific area with a scanner or moving head. 7. MODE button This is a multifunctional button that is used when assigning the joystick and Fade setting. 8. Joystick It is normaly used to adjust the X/Y channel of a moving light. 9. Scene buttons (1-8) This buttons are used when storing or playing programmed scenes. Also used when backing up data to a USB MEM stick or through an ULink cable. 10. LED Display The LED display shows you relevant information depending on current operation. 11. Bank Up / Down buttons This buttons are used to select a scene bank or a chase step. They are also used to view files in memory stick. 5 / 23

6 12. USB Input This input is used for data backup to USB MEM Stick or ULink cable. You can also use it for USB work light. 13. Fog machine button This button is used to trigger fog machine which should be connected to rear of console. 14. Chase buttons (1-12) These buttons are used when storing or playing back a relevant scene. 15. Program button This button is used to enter and exit record mode when programming. 16. Music/Bkc button This button is used to engage audio mode for chase synchronization and to copy a bank of scenes to another. 17. Midi/Rec button This button is used to record scenes and chase steps. It is also used to setup midi operation. 18. Auto/Del button This button is used to enter auto mode for automatic scene bank sequence or to delete a scene or chase. 19. Tap/Disp button This button is used to tap sync chase playback and to change display view operation. 20. Blackout Taste This button is used to bring all current output down to zero Rear view 1. USB Connector 2. Audio Input To connect line level input for audio trigger. (0.1V 1Vp-p) 3. DB-9 Connector Use this input to connect an optional external chase step controller. 4. MIDI IN This input is used to receive MIDI information from a midi sequencer or compatible device. 5. MIDI Out This output is used to connect a midi device. 6. Fog machine connector Use this connector to connect a compatible fog machine. 6 / 23
7 7. 3-Pin (female) XLR Connect it to the first device in the DMX line. 8. DC INPUT: Here you can connect the included power supply (DC9V~15V, 500mA Min.) 9. Power switch Turn on / off the device 3. Joystick setup 3.1. Assign joystick 1.) Press and hold down the PROGRAM button for approximately 2 seconds or until the PROG you may release the program button. 2.) Press and hold down the MODE button and then tap the FINE button. The Assign and Pan LEDs should illuminate. 3.) Select the fixtures that you wish to assign the Pan for by pressing the FIXTURES buttons 1-12, so the selected fixture LEDs illuminate. 4.) Press the TAP / DISP button to switch between PL.XX, PH.XX. PL.XX represents the low byte or fine channel, generally listed as the PAN fine channel and PH.XX represents the high byte or coarse channel, generally listed as the PAN fine channel. Set it to PH.XX and press and hold down the MODE button and then tap the SCENE button that corresponds to the PAN channel of your fixture. For example if your fixtures PAN channel is 1 then you did press the SCENE 1 button. Please refer to the fixtures DMX chart. If your fixture includes a PAN fine channel, press the TAP / DISP button so the display reads PL.XX. Press and hold down the MODE button and then tap the SCENE button that corresponds to the PAN fine channel of your fixture. For example, if your fixtures PAN fine channel is 2 then you d press the SCENE 2 button. 5.) Press the BANK UP or BANK DOWN buttons to switch between TL:XX and TH.XX. TL:XX represents the low byte or fine channel, generally listed as the TILT fine channel and TH.XX represents the high byte or coarse channel, generally listed as the TILT channel. Set it to TH.XX and press and hold down the MODE button and then tap the SCENE button that corresponds to the TILT channel of your fixture. For example, if your fixtures TILT channel is 3 then you did press the SCENE 3 button. Please refer to the fixtures DMX chart. If your fixture includes a TILT fine channel press the TAP / DISP button so the display reads TL.XX. Press and hold down the MODE button and then tap the SCENE button that corresponds to the TILT fine channel of your fixture. For example, if your fixtures PAN fine channel is 2 then you did press the SCENE 4 button. 7 / 23
8 6.) Press and hold down the PROGRAM button for approximately 2 seconds or until the PROG indicator in the display stops flashing. A flashing BLACKOUT indicator in the display confirms that the controller is out of program mode Assign Joystick Reverse (PAN / TILT invert) 1.) Press and hold down the PROGRAM button for approximately 2 seconds or until the PROG you may release the Program mode. 2.) Press and hold down the MODE button and then tap the Fine button. The Assign and Pan LEDs illuminate. 3.) Once again, press and hold down the MODE button and then tap the FINE button. The REVERSE LED should illuminate. 4.) Select the fixtures that you wish to assign the PAN reverse and TILT reverse for by pressing the FIXTURES buttons 1-12, so the selected fixture LEDs illuminate. Ideally, you should assign opposite fixtures for PAN / TILT reverse. For example, fixtures 1,3,5,7, should be assigned normal as describes in the previous section and fixtures 2,4,6,, should be assigned reversed so that when moving the joystick around, fixtures movements are reversed from one another. This feature is normally referred to as PAN/TILT invert. 5.) Press the TAP / DISP button to switch between PL.XX, PH.XX. PL.XX represents the low byte or fine channel, generally listed as the PAN fine channel and PH.XX represents the high byte or coarse channel, generally listed as the PAN fine channel. Set it to PH.XX and press and hold down the MODE button and then tap the SCENE button that corresponds to the PAN channel of your fixture. For example if your fixtures PAN channel is 1 then you did press the SCENE 1 button. Please refer to the fixtures DMX chart. If your fixture includes a PAN fine channel, press the TAP / DISP button so the display reads PL.XX. Press and hold down the MODE button and then tap the SCENE button that corresponds to the PAN fine channel of your fixture. For example, if your fixtures PAN fine channel is 2 then you d press the SCENE 2 button. 6.) Press the BANK UP or BANK DOWN buttons to switch between TL:XX and TH.XX. TL:XX represents the low byte or fine channel, generally listed as the TILT fine channel and TH.XX represents the high byte or coarse channel, generally listed as the TILT channel. Set it to TH.XX and press and hold down the MODE button and then tap the SCENE button that corresponds to the TILT channel of your fixture. For example, if your fixtures TILT channel is 3 then you did press the SCENE 3 button. Please refer to the fixtures DMX chart. If your fixture includes a TILT fine channel press the Tap / Disp button so the display reads TL.XX. Press and hold down the MODE button and then tap the SCENE button that corresponds to the TILT fine channel of your fixture. For example, if your fixtures PAN fine channel is 2 then you did press the SCENE 4 button. 8 / 23
9 7.) Press and hold down the PROGRAM button for approximately 2 seconds or until the PROG indicator in the display stops flashing. A flashing BLACKOUT indicator in the display confirms that the controller is out of program mode Delete Joystick PAN / TILT Assignment Delete PAN / TILT Joystick settings for selected fixtures 1.) Press and hold down the PROGRAM button for approximately 2 seconds or until the PROG you may release the PROGRAM button. 2.) Press and hold down the MODE button and then tap the FINE button. The ASSIGN and PAN LEDs should illuminate. 3.) Select the fixtures that you wish to delete the joystick Pan / Tilt settings for by pressing the relevant FIXTURES buttons 1-12, so the relevant LEDs illuminate. 4.) Press and hold down the MODE button, and then tap the AUTO / DEL button to delete the settings for the selected fixtures. All LEDs will flash three times to confirm that the settings were erased. 5.) Press and hold down the PROGRAM button for approximately 2 seconds or until the PROG indicator in the display stops flashing. A flashing BLACKOUT indicator in the display confirms that the controller is out of program mode Delete PAN / TILT Joystick settings for all fixtures 1.) Flip the power switch OFF which is located on the rear of the unit. 2.) Simultaneously, press and hold down the AUTO / DEL and MODE buttons and flip the power switch ON. All LEDs will flash three times to confirm that the PAN / TILT settings were erased. 4. Manual control When powered ON, this console defaults to Manual / Blackout mode. All output will be in a blackout state until the Blackout button is deselected. To determine blackout status there is an indicator light in the display that flashes when engaged and OFF when disengaged. To gain manual control, disengage blackout, select the fixtures that you wish to control by selecting the relevant FIXTURE buttons on the left then use the eight channel faders, joystick and the PAGE SELECT button to manually control the fixtures. Note: In most cases, for the joystick to work, you must first assign it. Please the Assign Joystick section of this manual. 9 / 23
10 5. Scenes 5.1. Recording scenes 1.) Press and hold down the Program button for approximately 2 seconds or until the PROG you may release the Program button. 2.) Select the fixtures that you wish to include into your scene by pressing the FIXTURES buttons So the selected fixture LEDs illuminate. 3.) Set your scene by using the eight CHANNEL faders, joystick and PAGE SELECT button if needed. The PAGE SELECT button should be used to switch between channel 1-8 and ) Once you are satisfied with the look of your scene, press the MIDI / REC button to record it. 5.) Use the BANK UP / DOWN buttons to select a scene bank to store to. There are 30 available scene banks and you can view them in the display by referring to the furthest two digits to the right. 6.) Press a SCENE button 1-8, to store to. Once pressed, all LEDs will flash indicating that your scene was stored. There are 8 SCENE buttons to store for each bank. Make sure you selected a different scene button each time you store a scene so you do not record over something that you wanted to keep. 7.) To record additional scenes, repeat steps 2 to 6. 8.) Once you have stored all of your scenes, press and hold down the PROGRAM button for approximately 2 seconds to exit. A flashing BLACKOUT indicator in the display indicative that you are out of program mode Edit Scenes 1.) Press and hold down the PROGRAM button for approximately 2 seconds or until the PROG you may release the PROGRAM button. 2.) Use the UP / DOWN Bank button to select the bank that contains the scene that you want to edit. You can view the active bank in the display. 3.) Press the SCENE button 1-8, that you want to edit so the scene comes on. 4.) Select the fixtures or fixtures that you wish to change settings for in the current scene by pressing the relevant FIXTURE buttons The selected fixture LEDs should illuminate. 5.) Make your changes by using the faders or joystick. 6.) Press the MIDI / REC button and then press the SCENE button that you are editing. ALL LEDs will flash three times to confirm that your new settings were saved. 7.) Press and hold down the PROGRAM button for approximately 2 seconds to exit. A flashing BLACKOUT indicator, in the display, is indicative that you are out of program mode. 10 / 23
11 5.3. Copy a scene 1.) Press and hold down the PROGRAM button for approximately 2 seconds or until the PROG you may release the PROGRAM button. 2.) Select with BANK UP / DOWN buttons the bank that contains the scene you want to copy. 3.) Select with the SCENE buttons 1-8, the scene you want to copy. 4.) Use the UP /DOWN BANK buttons to change the scene bank if desired. 5.) Press the MIDI / REC button followed by the SCENE button 1-8, that you want to copy the scene to. All LEDs should flash three times to confirm and save the settings. 6.) Press and hold down the PROGRAM button for approximately 2 seconds or until the PROG indicator in the display stops flashing. A flashing BLACKOUT indicator, in the display, is indicative that you are out of programs mode Delete a scene 1.) Press and hold down the PROGRAM button for approximately 2 seconds or until the PROG you may release the PROGRAM button. 2.) Select with BANK UP / DOWN buttons the bank that contains the scene you want to copy. 3.) Simultaneously, press the AUTO / DEL button then press the SCENE button 1-8, that you want to delete. All LEDs should flash three times to confirm that the scene was deleted. 4.) Repeat steps 2 and 3 to delete additional scenes. 5.) Press and hold down the PROGRAM button for approximately 2 seconds or until the PROG indicator in the display stops flashing. A flashing BLACKOUT indicator, in the display, is indicative that you are out of programs mode Delete all scenes 1.) Flip the power switch OFF which is located at the rear of the unit. 2.) Simultaneously, press and hold down the PROGRAM and BANK DOWN buttons and the power switch ON. All LEDs will flash three times to confirm that all scenes were deleted. 11 / 23
12 5.6. Scene Playback Manual trigger 1.) When powered ON, this console defaults to Manual / Blackout mode. All output will be in blackout state until the BLACKOUT button is deselected. To determine blackout status, there is an indicator light in the display that flashes when engaged and OFF when disengaged. Press the BLACKOUT button so the indicator stops flashing. 2.) Press the BANK UP / DOWN buttons to select the scene bank that contains the scene you want to playback. 3.) Press the SCENE button 1-8, that you want to playback. The selected scene will engage. Press the same SCENE button again to disable the scene or the BLACKOUT button to bring all output to a blackout state. 4.) Repeat steps 2 and 3 to manually playback additional scenes Auto trigger 1.) Press the AUTO / DEL button, the AUTO TRIGGER indicator will illuminate in the display. This indicates that you are in the auto trigger mode. 2.) Press the BANK UP / DOWN buttons to select a desired scene bank 1-30, for automatic playback. All eight scenes in the selected bank will sequence. 3.) At any time, you can adjust the SPEED and the FADE fader to adjust your scene sequence playback state. You can also press the TAP / DISP button twice to establish a sequence rate. The rate will be determined by the tempo at which you press the TAP / DISP buttons. Pressing the AUTO / DEL button again will disengage automatic playback Audio trigger 1.) Press the MUSIC / REC button, the AUDIO TRIGGER indicator light will illuminate in the display. This indicates that you are in the audio trigger mode. 2.) Press the BANK UP / DOWN buttons to select a desired scene bank 1-30, or a CHASE button The selected scene bank or chase will trigger to audio via the internal microphone or line level input if connected. Pressing the MUSIC / REC button again will disengage audio mode. 12 / 23
13 6. Chases 6.1. Recording chases This product has 12 programmable chases. Each of this can store up to 240 scenes 7 steps. Please see the below constructions for chase setting. 1.) Press and hold down the PROGRAM button for approximately 2 seconds or until the PROG you may release the PROGRAM button. 2.) Select a CHASE button 1-12, that you wish to record to. The relevant CHASE LED should illuminate. 3.) Use the BANK UP / DOWN buttons to select the bank 1-30 that contains the scene you want added to your chase. You can view the scene banks in the LED display by referring to the furthest two digits to the right. You can also set your scene by using the eight CHANNEL faders or joystick and PAGE SELECT button on the fly if desired. The PAGE SELECT button should be used to switch between channel 1-8 and ) Press the MIDI /REC button to record the chase step. ALL LEDs will flash three times to confirm that the chase step was recorded. 5.) Repeat steps 3 and 4 to record additional steps. 6.) Once you have recorded all of your steps, press and hold down the PROGRAM button for approximately 2 seconds to exit. A flashing BLACKOUT indicator, in the display indicative that you are out of program mode Recording a bank of scenes to a chase 1.) Press and hold down the PROGRAM button for approximately 2 seconds or until the PROG you may release the PROGRAM button. 2.) Select a CHASE button 1-12, that you wish to record to. The relevant CHASE LED should illuminate. 3.) Use the BANK UP / DOWN buttons to select the bank 1-30 that you want add to you chase. You can view the scene banks in the display by referring the furthest two digits to the right. 4.) Simultaneously press the MUSIC / BKC and MIDI / REC buttons to record the entire scene bank. ALL LEDs will flash three times to confirm that the scene bank was recorded. Scenes will record in the exact same sequence as stored in the bank. 5.) Repeat steps 3 and 4 to record additional scene banks. 6.) Once you have recorded all of your steps, press and hold down the PROGRAM button for approximately 2 seconds to exit. A flashing BLACKOUT indicator, in the display indicative that you are out of program mode. 13 / 23
14 6.3. Editing chases Add a chase step 1.) Press and hold down the PROGRAM button for approximately 2 seconds or until the PROG you may release the PROGRAM button. 2.) Select the CHASE button 1-12, that you wish to add a step to. The relevant CHASE LED should illuminate. 3.) Press the TAP /DISP button, the STEP indicator light should illuminate in the display. 4.) Press the BANK UP / DOWN buttons to step manually through the chase steps. Find the chase step that you wish to add a step after. 5.) Press the TAP / DISP button to disengage the step mode. The STEP indicator in the display should be OFF. 6.) Use the BANK UP / DOWN buttons to select the scene bank 1-30 that contains the scene you want to add. You can view the scene banks in the display referring to the furthest two digits to the right. 7.) Press the MIDI / REC button to record the step into your chase. All LEDs should flash three times to confirm that the chase step was added. 8.) Repeat steps 3 to 7 to add additional steps. 9.) Press and hold down PROGRAM button for approximately 2 seconds to exit. A flashing BLACKOUT indicator, in the display, is indicative that you are out of program mode Deleting chase steps 1. Press and hold down the PROGRAM button for approximately 2 seconds or until the PROG you may release the PROGRAM button. 2. Select the CHASE button 1-12, that you wish to add a step to. The relevant CHASE LED should illuminate. 3. Press the TAP / DISP button, the STEP indicator light should illuminate in the display. 4. Press the BANK UP / DOWN buttons to step manually through the chase steps. Find the chase step you want to delete. 5. Press the AUTO / DEL button to delete the chase step. All LEDs should flash three times to confirm that the chase step was deleted. 6. Repeat steps 4 and 5 to delete additional steps. 7. Press and hold down PROGRAM button for approximately 2 seconds to exit. A flashing BLACKOUT indicator, in the display, is indicative that you are out of program mode. 14 / 23
15 Delete a chase 1. Press and hold down the PROGRAM button for approximately 2 seconds or until the PROG you may release the PROGRAM button. 2. Select the CHASE button 1-12 that you want to delete. 3. Simultaneously, press AUTO / DEL button then press the same CHASE button that you have selected in step 2. All LEDs will flash three to confirm that the chase was deleted. 4. Repeat steps 2 and 3 to delete additional steps. 5. Press and hold down PROGRAM button for approximately 2 seconds to exit. A flashing BLACKOUT indicator, in the display, is indicative that you are out of program mode Delete all chases 1.) Flip the power switch OFF which is located at the rear of the unit. 2.) Simultaneously, press and hold down the AUTO / DEL and BANK DOWN button and flip the power switch ON. All LEDs will flash three times to confirm that all chases were deleted Chase playback Manual trigger 1.) When powered ON, this console defaults to Manual / Blackout mode. All output will be in blackout state until the BLACKOUT button is deselected. To determine blackout status, there is an indicator light in the display that flashes when engaged and OFF when disengaged. Press the BLACKOUT button so the indicator stops flashing. 2.) Press the CHASE button 1-12 that you want to playback. The selected CHASE LED should illuminate. 3.) Press the BANK UP / DOWN buttons, as desired, to manual step through your chase steps. You can also manually FADE TIME fader if you wish to incorporate a crossfade between steps. 4.) Repeat step 2 and 3 to manually playback additional chases Auto trigger 1.) Press the AUTO / DEL button, the AUTO TRIGGER indicator light will illuminate in the display. This indicates that you are in the auto trigger mode. 2.) Press the CHASE button 1-12, that you wish to playback. The selected CHASE LED should illuminate and begin to play. You can select more than one CHASE button at a time to create a chase sequence. 15 / 23
16 3.) At any time, you can adjust SPEED and FADE fader to set your chase playback state. You can also press the TAP / DISP button twice to establish a chase rate. The rate will be determined by the tempo at which you press the TAP / DISP button Audio trigger 1.) Press the MUSIC / REC button, the AUDIO TRIGGER indicator light will illuminate in the display. This indicates that you are in the audio trigger mode. 2.) Press the CHASE button 1-12 that you want to playback. The selected CHASE LED should illuminate and engage. The selected chase will trigger to sound via the internal microphone or to audio via the line level input if connected. Pressing the MUSIC / REC button will disengage audio mode. 7. Bank and fixtures copy 7.1. Bank Copy 1.) Enter the program mode. 2.) Use the BANK UP / DOWN buttons to select the bank to be copied. 3.) Tap the MIDI / REC button and then use the BANK UP / DOWN buttons to select the bank that you want to copy to. 4.) Tap the MUSIC / BKC button. All LEDs will flash three times to confirm your bank copy operation Fixture copy 1.) Enter the program mode. 2.) Press the FIXTURE button 1-12 that you wish to copy. 3.) Use the CHANNEL faders 1-8 or joystick to set your look for the light. 4.) Press and hold down the same FIXTURE button, then tap the FIXTURE button that you want to copy the same settings to. 8. Fade time 1.) Press and hold down the MODE button, then tap the TAP / DISP button. The display will show ONLY or ALL, for 3 seconds, depending on the current setting. ONLY indicates that the PAN / TILT channel will only be affected by the FADE TIME fader while ALL indicates that all channel will be affected by the FADE TIME fader. 2.) To change this setting, tap the TAP /DISP button while pressing and holding down the MODE button. Doing so, should switch between ONLY and ALL options. 16 / 23
17 9. MIDI 9.1. Set MIDI channel 1.) Press and hold down the MIDI button for 2 seconds or until the display shows In:XX. XX represents the current set midi channel. 2.) Use BANK UP / DOWN buttons to set your desired midi channel from ) Press and hold down the MIDI button for 2 seconds or until all LEDs flash three times to save your settings. MIDI Control: This unit can receive MIDI data to trigger or activate Banks 1-30, chase 1-12 and the blackout function. See MIDI chart below. MIDI Function 0 11 On/Off Chase Turn On/Off Scene Select Bank Enable / Disable Audio 51 Enable 7 Disable Auto 52 Enable / Disable Blackout 17 / 23
18 10. Data transfer Data Transfer to Computer from DMX Operator DC-192 (ULink) This operation will allow you to transfer data from your controller to standard PC or laptop. You must first install the Usave application and a USB driver that was supplied with your ULink cable. If you have not done so then proceed to step 1 below. 1.) Connect the end with LED indicator into a USB port on your computer and the opposite end into the USB port on your DMX operator DC ) Flip the DMX operator power switch OFF which is located on the rear of the DMX operator DC ) On the operator DC-192, simultaneously press and hold down the FIXTURE 2, FIXTURE 3 and SCENE 1 buttons and power ON. The display will continually flash READ (ready). This means that the unit is ready to send data. 4.) On your computer, open the Usave program by clicking START on the windows taskbar, then click PROGRAMS or ALL PROGRAMS and click Usave. 5.) On your computer, click SELECT ULINK in the upper right hand corner on the Usave program. 6.) On your computer, click RECEIVE FILE. A send window will pop up. Select a destination to save your data to and type a name that you want your data saved as. (A message should appear in the lower right hand corner that reads WAITING RECEIVE DATA) 7.) On the DMX operator DC-192, simultaneously press the SCENE 7 and SCENE 8 buttons. The transfer will begin immediately. The controllers display should flash OUT during the transfer. When the transfer is complete, the display should read 101 and your file will have been successfully stored to the computer. (During this process, you can press SCENE 1 button to restart the data transfer.) Data Transfer to DMX Operator DC-192 from Computer (ULink) This operation will allow you to transfer previously stored data from your computer back into your DMX Operator DC-192. You must first install the Usave application software and USB driver that was supplied with your ULink cable. If you are using the same computer that you used when storing the data to your computer, then you should already have the Usave program installed. If you are using a different computer or uninstalled the Usave program, then you will have to install it at this time. Proceed to step 1 below when you have confirmed that the Usave program is installed and ready for use. 1.) Connect the end with the LED indicator into a USB port on your computer and the opposite end into the USB port on your DMX operator DC ) Flip the DMX operator power switch OFF which is located on the rear of the console. 18 / 23
19 3.) On the DMX operator DC-192, simultaneously press and hold down the FIXTURE 2, FIXTURE 3 and SCENE 2 buttons and power ON. The display will continually flash READ (ready). This means that the unit is ready to receive data. 4.) On your computer, open the Usave program by clicking START on the Windows taskbar, then click PROGRAMS or ALL PROGRAMS and click Usave. 5.) On your computer, click SELECT ULink in the upper right hand corner of the Usave program. 6.) On your computer, click SEND FILE. A send file window will pop up. Select the file that you want to transfer into the DMX operator DC-192. Once selected, the transfer begins immediately. During the transfer, your controllers display will read RECE (receiving). When the transfer is complete, the display should read 101 and your file will have been successfully uploaded into your controller Data transfer to memory stick from DMX operator DC-192 (USB MEM Stick) This operation will allow you to transfer data from your controller to your USB Memory Stick. There are 8 large folders to store to- total 128MB. You must first install the Usave application software and USB driver that was supplied with your USB Memory stick. If you have not done so please do so now then proceed to step 1 below. 1.) Install the USB MEM Stick into the USB port on your DMX operator DC ) Flip the DMC operator power switch OFF which is located on the rear of the DMX operator DC-192. On the DMX operator DC-192, simultaneously press and hold down the FIXTURE 8, FIXTURE 9 and SCENE 1 buttons and power ON. If FAIL appears in the controllers display, it means that the memory stick was not installed properly. Please repeat steps 1 and 2 and try again (Note: If nop appears it means that there are no files currently stored in the memory stick. You can store to any of the eight available folders. If FL0X appears, X represents file number 1-8 within the memory stick, it means files are already stored to that folder and you can use the BANK UP / DOWN buttons to access other occupied folders currently on the stick at this time. If a specific folder number does not come up, then it is empty and can be used at this time. If you have used up all 8 folders within the memory stick, you will have to overwrite one of them. Make sure you have a copy of it in your computer before proceeding to overwrite it if you wish to use it later.) 3.) Simultaneously press PROGRAM button and SCENE button that corresponds with the folder that you wish to store to within the memory stick. For example, if you want to store to folder 4 then you did simultaneously press the PROGRAM button and SCENE button 4. (Scene buttons 1-8 correspond with memory stick folders 1-8). The controllers display will flash data during the transfer. When the transfer is complete, the display should read 101 and your file will have been successfully stored to the USB stick. 19 / 23
20 10.4. Store memory file to computer from USB MEM Stick This operation will allow you to store your memory files from your USB memory stick to your computer. You must first install the Usave application software and USB driver that was supplied with your USB MEM stick. If you have not done so, please do so now then proceed to step 1. 1.) Install the USB MEM stick into a USB port o your computer. 2.) Open the Usave program by clicking START on the windows taskbar, then click PROGRAMS or ALL PROGRAMS and click Usave. 3.) Click SELECT USTICK in the upper left hand corner of the Usave program. 4.) Click DITORY. A list of files currently on the memory stick will appear in the UStick option box. 5.) Highlight the file that you wish to store to your computer by clicking on it once. Click READ. A send file window will pop up and automatically assign a file name. It is very important that you do not change the file name. Otherwise, you will have problems reloading the file back to the controller later. 6.) Select a destination for your file such as DESKTOP and click OPEN. The transfer will begin immediately. Once complete, you will return to the main Usave screen. To store additional files to your computer, repeat steps 5, 6 and Reload memory file to USB MEM stick from computer This operation will allow you to reload memory files from your computer to your USB MEM stick. You must first install the Usave application software and USB driver that was supplied with your USB MEM stick. If you have not done so, please do so now, then proceed to step 1 below. 1.) Plug in the USB MEM stick into a USB port on your computer. 2.) Open the Usave program by clicking START on the Windows taskbar, then click PROGRAMS or ALL PROGRAMS and click Usave. 3.) Click SELECT Usave in the upper left hand corner of the Usave program. 4.) Click WRIT. A send file window will pop up. 5.) Select the destination and click on the file that you wish to load into the memory stick. The file name should consist of FL01 through FL08. 6.) Repeat step 4 and 5 to load additional files to your memory stick. 20 / 23
21 10.6. Delete and format files in memory stick This operation will allow you to individually delete files from your memory stick and format the entire memory stick all at once which erases all files in one shot. You must first install the Usave application software and USB driver that was supplied with your USB MEM stick. If you have not done so, please do so now, after this proceed to step 1 below. 1.) Plug in the USB MEM stick into a USB port on your computer. 2.) Open the Usave program by clicking START on the Windows taskbar, then click PROGRAMS or ALL PROGRAMS and click Usave. 3.) Click SELECT Usave in the upper left hand corner of the Usave program. 4.) Click DITORY. A list of files currently on the memory stick will appear in the Ustick option box. Warning! The following procedure will format the entire memory stick. If you wish to delete files one at a time, proceed to step 5. To format (delete) all files in one shot, click FORMAT now. All files will immediately erase from the memory stick. 5.) Highlight the file that you wish to delete by clicking on it once. 6.) Click DEL. The file will delete immediately. To delete additional files repeat steps 5 and Data Transfer to DMX operator DC-192 from USB MEM stick This operation will allow you to transfer data from your USB memory stick to the DMX operator DC You must first install the Usave application software and USB driver that was supplied with your USB MEM stick. If you have not done so do so now, after this proceed to step 1 below. 1.) Plug in the USB MEM stick into the USB port on your DMX operator DC ) Flip the DMX operator power switch OFF which is located on the rear of the DMX operator DC ) On the DMX operator DC-192, simultaneously press and hold down the FIXTURE 8, FIXTURE 9 and SCENE 2 button and power ON. If FAIL appears in the controllers display, it means that the memory stick was not installed properly. (Note: If nop appears, it means that there are no files currently stored in the memory stick. You must first write your file to the memory stick by using the Usave software program. If FL0X appears, X represents file number 1-8 within the memory stick, it means files are already stored to that folder and you can use BANK UP / DOWN buttons to access other folder currently on the stick this time.) Select the folder you wish to upload into the controller. For example, if you have your programs stored in folder FL01 then leave it set on the folder and proceed to the next step. 4.) Simultaneously press the PROGRAM button and the SCENE button that corresponds with the folder that you wish to store to within the memory stick. For example if you want to store folder 4 then simultaneously press the PROGRAM button and SCENE button 4. (SCENE buttons 21 / 23
22 1-8 correspond with memory stick folders 1-8.) The controllers display will flash data during the transfer. When the transfer is complete, the display should read 101 and you file will have been successfully stored to the computer. 11. Technical data Power supply Voltage 9-15 V DC, 500 ma min. Connections XLR in/out Input 1 3pol Midi in/out Controlling Sound-to-Light DMX512 Yes Yes Number of DMX channels Up to 192 Softpatch No Number of Cues 240 Hardware Dimensions Weight 529 x 170 x 120 mm 2,80 kg 22 / 23

23 Importer: B & K Braun GmbH Industriestraße 1 D Karlsbad info@bkbraun.com 23 / 23
User's Manual DMX OPERATOR 192. Technical Specifications.
 Technical Specifications Power Input...DC9~15V, 500mA Internal Fuse...500mA 250V, 5x20mm MIDI IN...5Pin MIDI connector DMX OUT...3Pin XLR (female) DMX connector SOUND INPUT...RCA connector EXT STEP CONTROL...DB-9
Recorder DMX DR-Pro Rack
 Manual Recorder DMX DR-Pro Rack Inhaltsverzeichnis 1. Safety instructions... 3 1.1. FOR SAFE AND EFFICIENT OPERATION... 3 2. Overview... 5 2.1. Front view... 5 2.2. Rear view... 6 3. Control... 7 3.1.
Manual. Dimmer DMD-12-2
 Manual Dimmer DMD-12-2 Table of contents 1. Safety instructions... 3 1.1. For safe and efficient operation... 3 2. Overview... 5 2.1. Front view... 5 2.2. Rear view... 6 2.3. Termination... 6 3. Operating
Dimmer DPX terminal
 Manual Dimmer DPX-620-3 terminal Table of contents 1. Safety instructions... 3 1.1. FOR SAFE AND EFFICIENT OPERATION... 3 2. Overview... 5 2.1. Front view... 5 2.2. Rear view... 6 2.3. Wiring Diagram...
Controller LED ADT MP3-20
 Manual Controller LED ADT MP3-20 Table of contents 1. Safety instructions... 3 1.1. For safe and efficient operation... 3 2. Introduction... 4 3. Key functions... 4 4. Technical data... 5 5. Dimensions...
192-CHANNEL DMX CONTROLLER WITH JOYSTICK AND USB PORT PILOT - 192PRO USER GUIDE July 2008 Version 2.0
 192-CHANNEL DMX CONTROLLER WITH JOYSTICK AND USB PORT PILOT - 192PRO USER GUIDE 9073 - July 2008 Version 2.0 English PILOT-192PRO - 192-channel DMX controller with joystick and USB port 1 - Safety information
Manual. DP-6 S Dimmer Pack
 Manual DP-6 S Dimmer Pack Table of contents 1. Safety instructions... 3 1.1. For safe and efficient operation... 3 2. Product overview... 5 2.1. Front view... 5 2.2. Rear view... 6 3. Wiring diagram...
Table of contents 2 / 19
 User manual ADT-48 Table of contents 1. Safety instructions... 3 1.1. FOR SAFE AND EFFICIENT OPERATION... 3 2. Introduction... 4 3. Key Features... 4 4. Control Panel and Functions... 5 5. Connector Configuration...
Set Compact system JAM
 Manual Set Compact system JAM Table of contents 1. Safety instructions... 3 1.1. For safe and efficient operation... 3 2. Designated use... 4 3. Introduction... 5 3.1. Product overview... 5 3.1.1. Speaker
LED Accu Penta 9x12W RGBWAU
 Manual LED Accu Penta 9x12W RGBWAU Table of contents 1. Safety instructions... 3 1.1. FOR SAFE AND EFFICIENT OPERATION... 3 1.2. Additional Information for safety... 4 2. Introduction... 5 2.1. Statement...
User s manual. Giga Bar II
 User s manual Giga Bar II Table of content 1. Safety instructions... 3 2. Unpacking:... 4 3. Introduction:... 4 3.1. Features... 4 4. System Menu... 5 4.1. DMX control mode... 6 4.1.1. DMX Channel and
User s manual. Easy Scan XT3 LED
 User s manual Easy Scan XT3 LED Table of content 1. Safety instructions... 3 2. Before you begin... 4 2.1. What is included... 4 2.2. AC Power... 4 3. Introduction... 4 3.1. Features... 4 4. Product overview...
U S E R M A N U A L Mini n St S udi d o o Pa P r 7 x 4W RG R B G W
 U S E R M AN U A L Mini Studio Par 7 x 4W RGBW Table of contents 1. Safety instructions... 3 1.1. FOR SAFE AND EFFICIENT OPERATION... 3 2. Technical Information... 4 3. DMX Mode... 4 3.1. DMX Table...
Table of contents 2 / 8
 Manual Speaker SM5A Table of contents 1. Safety instructions... 3 1.1. Instructions for a safe and efficient operation... 3 1.2. Further safety instructions... 4 1.3. Designated use... 4 2. Introduction...
Elation Professional Los Angeles, Ca
 DMX Partner USER MANUAL Version 1.0 24-004-1631 Elation Professional Los Angeles, Ca 90058 www.elationlighting.com Table of contents 1. General Introduction...3 2. Safety Information & Maintenance...3
Cobra Dimmer Master DMX Controller User Manual
 Cobra Dimmer Master DMX Controller User Manual User Manual Dimmer Master Dear Customer, Thank you for purchasing the Dimmer Master DMX controller. With decades of experience in design and production, we
User Instructions. Rev. 3/04
 User Instructions Rev. 3/04 Improvement and changes to specifications, design and this manual, may be made at any time without prior notice. All rights reserved. Contents Features 1 General Instructions
LED Commander 16/2 DMX controller. user manual
 LED Commander 16/2 DMX controller user manual Musikhaus Thomann Thomann GmbH Hans-Thomann-Strasse 1 96138 Burgebrach Germany Telephone: +49 (0) 9546 9223-0 E-mail: info@thomann.de Internet: www.thomann.de
LED Easy Move Double Spot Unlimited
 Manual LED Easy Move Double Spot Unlimited Table of contents 1. Safety instructions... 3 1.1. For safe and efficient operation... 3 2. Designated use... 4 2.1. Overhead installation... 5 3. Introduction...
240 Channel DMX Controller
 Page 01 wdmlighting.com Features: A. 240 DMX channels. B. 12 scanners of 16 DMX channels. C. 30 banks of 8 programmable scenes. D. 6 chases of 240 programmed scenes from 30 banks E. 8 faders for manual
U S E R M A N U A L. Version Rev 1.0. ADJ Los Angeles, Ca
 MAGIC-260 U S E R M A N U A L Version 04-06 Rev 1.0 ADJ Los Angeles, Ca 90058 www.adj.com MAGIC-260 Sections: Table of Contents 1 : General Introduction...3 2 : Safety Information & Maintenance...4 3 :
LED Mini Matrix 5x5 white 2700K
 Manual LED Mini Matrix 5x5 white 2700K Table of contents 1. Safety instructions... 3 1.1. For safe and efficient operation... 3 2. Designated use... 4 2.1. Overhead installation... 5 3. Introduction...
DMX MASTER. Professional Lighting Technology CA-2416W. User Guide Please read these instructions carefully before use
 DMX MASTER Professional Lighting Technology CA-2416W User Guide Please read these instructions carefully before use CONTENTS 1. Features 2 Page 2.General Instructions 3 Page 3.Overview. 2 Page 3-1.Front
Wireless DMX Control. Show Performer DMX Controller. Stage Desk 48 DMX Controller
 Wireless DMX Control SRC-260 Each unit is a transmitter and receiver based on its Dip settings. Connect a DMX 512 standard controller to the SRC-260 and set another SRC-260 set in receivers mode down range
Show Designer 1. Software Revision 3.11
 Show Designer 1 Software Revision 3.11 OVERVIEW The Show Designer 1 is a lighting controller based on the successful and simple to use Show Designer. The Show Designer 1 adds to the existing features of
DM-X Channel DMX Controller. Item ref: UK User Manual. Version 2.0
 DM-X10 192 Channel DMX Controller Item ref: 154.091UK User Manual Version 2.0 Caution: Please read this manual carefully before operating Damage caused by misuse is not covered by the warranty Contents
LED Mini Studio Par 7x3W
 Manual LED Mini Studio Par 7x3W RGB Table of contents 1. Safety instructions... 3 1.1. For safe and efficient operation... 3 2. Designated use... 4 2.1. Overhead installation... 5 3. Introduction... 7
User manual DMX CONTROL 512. Table of contents
 User manual DMX CONTROL 512 Table of contents 1. SAFETY INSTRUCTIONS... 4 2. OPERATING DETERMINATIONS... 4 3.OVERVIEW... 6 3.1.REAR PANEL CONNECTIONS... 6 3.2.FRONT PANEL... 6 4.MENU... 6 4.1.CHOOSE FIXTURES...
SCENE PROGRAMMING (STEPS)
") DMX 5 CONTROLLER SERIES DMX-3B Version:. Feb 9 This product manual contains important information about the safe installation and use of this projector. Please read and follow these instructions carefully
DMX 5 CONTROLLER SERIES DMX-3B Version:. Feb 9 This product manual contains important information about the safe installation and use of this projector. Please read and follow these instructions carefully
Showdesigner 512 ORDERCODE 50721
 Showdesigner 512 ORDERCODE 50721 Congratulations! You have bought a great, innovative product from Showtec. The Showtec Showdesigner 512 brings excitement to any venue. Whether you want simple plug-&-play
Manual. Speaker S612A
 Manual Speaker S612A Table of contents 1. Safety instructions... 3 1.1. Instructions for a safe and efficient operation... 3 1.2. Further safety instructions... 4 1.3. Designated use... 4 1.4. Overhead
DC USER MANUAL I. GENERAL DESCRIPTIONS
 DC 24-48 USER MANUAL I. GENERAL DESCRIPTIONS Thank you for purchasing our products again. To optimize the performance of this unit, please read these operating instructions carefully to familiarize yourself
DUAL LASER PACK & CONTROLLER USERS MANUAL
 DUAL LASER PACK & CONTROLLER USERS MANUAL www.venuelightingeffects.com 89.0 Venue PP laser Instr.indd 5//08 6:09:5 PM SAFETY INFORMATION Never operate this unit if it has a damaged cord or plug. Keep the
48CH DMX DIMMER CONSOLE
 Introduction Thank you for choosing our 48 channel dimmer console. This console is provided with microprocessor control system and it is full compatible with international DMX512 and MIDI standards. The
USER'S MANUAL. English. Please read this manual carefully before use! CHASE / SCENE MEMORY DOWN SCENE RECORD AUDIO/DEL 10 SPEED FADE TIME
 MASTER SLAVE 1 SLAVE 2 DMX IN English R USER'S MANUAL CHASE / SCENE 1 2 3 4 5 6 7 8 9 10 11 12 13 14 15 16 10 0 17 18 19 20 21 22 23 24 8 2 25 26 27 28 29 30 31 32 UP DOWN 6 4 4 6 33 34 35 36 37 38 39
Junior Controller JC Rev1.2
 Junior Controller JC-1 www.prolight.co.uk sales@prolight.co.uk 24-004-1115-00 Rev1.2 1 INRTODUCTION Welcome! You made the right decision by choosing this sophisticated and intelligent product. Every unit
DMX OPERATOR. User Instructions MIDI CAPABLE DMX-512
 DMX OPERATOR DMX-512 MIDI CAPABLE User Instructions 2018 ADJ Products, LLC all rights reserved. Information, specifications, diagrams, images, and instructions herein are subject to change without notice.
TourPro RGBAW Stagebar USER MANUAL
 TourPro RGBAW Stagebar USER MANUAL Introduction Unpacking: Thank you for purchasing TourPro. Every unit has been thoroughly tested and shipped in perfect condition. Carefully check the shipping carton
Strobe Xenon 1500DMX
 Manual Strobe Xenon 1500DMX Inhaltsverzeichnis 1. Safety instructions... 3 1.1. FOR SAFE AND EFFICIENT OPERATION... 3 1.2. Further safety instructions... 4 2. Introduction... 9 3. Connections... 9 3.1.
DMX-Master I, DMX-Master MK II ENC DMX controller. user manual
 DMX-Master I, DMX-Master MK II ENC DMX controller user manual Musikhaus Thomann Thomann GmbH Hans-Thomann-Straße 1 96138 Burgebrach Germany Telephone: +49 (0) 9546 9223-0 E-mail: info@thomann.de Internet:
LED MOVING HEAD FLEX BEAM K8 RGBW. User Manual. Please read the instruction carefully before use
 LED MOVING HEAD FLEX BEAM K8 RGBW 1 User Manual Please read the instruction carefully before use CONTENTS 1. Safety Instructions... 3 2. Technical Specifications... 4 3. How To Set The Unit... 5 3.1 Front
LED W RGBA User Manual
 LED- 245-1W RGBA User Manual Please read the instructions carefully before use CONTENTS 1. Safety Instructions...2 2. Technical Specifications...3 3. How To Set The Unit...4 3.1 Control Panel...4 3.2 Main
PROFESSIONAL SHOW LIGHT
 Instruction Manual PROFESSIONAL SHOW LIGHT Beast 280(Beam+Spot) ------------------------------ 2014 Ver8.11----------------------------------- Unpacking: Thank you for purchasing Beast280(Beam+Spot). Every
Professional DMX Controller
 Professional DMX Controller DMX-4840 Order Number 38.5960 INSTRUCTION MANUAL ELECTRONICS FOR SPECIALISTS ELECTRONICS FOR SPECIALISTS ELECTRONICS FOR SPECIALISTS ELECTRONICS FOR SPECIALISTS CONTENTS 1.
User Manual Rev
 User Manual EN Rev. 170201 Contents DMX Player 5 Improvement and changes to specifications, design and this manual, may be made at any time without prior notice. All Rights Reserved! Features 1 General
User Instructions. American DJ
 Introduction Unpacking: Thank you for purchasing the by American DJ. Every has been thoroughly tested and has been shipped in perfect operating condition. Carefully check the shipping carton for damage
Ostar Eye K18. Beam and Kaleido Effects. User manual. 6. Fixture Cleaning. Please read the instructions carefully before use
 6. Fixture Cleaning The cleaning of internal and external optical lenses and/or mirrors must be carried out periodically to optimize light output. Cleaning frequency depends on the Ostar Eye K18 Beam and
LED Colour Invader II RGB
 MANUAL LED Colour Invader II RGB Table of contents LED COLOR INVADER II RGB 1. SAFETY INSTRUCTION... 3 1.1. FOR SAFE INSTALLATION AND EFFICIENT OPERATION... 3 1.1.1. Use of the item as intended... 3 1.1.2.
DMX Invader 2420 DMX controller. user manual
 DMX Invader 2420 DMX controller user manual Musikhaus Thomann e.k. Treppendorf 30 96138 Burgebrach Germany Telephone: +49 (0) 9546 9223-0 E-mail: info@thomann.de Internet: www.thomann.de 18.01.2013 Table
DR-PRO RACK. User s Manual USB SD CARD SMPTE MEMORY MIDI DMX OUT DMX IN DMX RECORDER
 DR-PRO RACK USB SD CARD SMPTE MIDI DMX OUT MEMORY 1 2 3 4 5 6 7 8 PLAY PAUSE STOP BLACK OUT DR-PRO RACK DMX RECORDER DMX IN User s Manual Safety Precaution Note Please read this entire manual to fully
SUBWOOFER SYSTEM YST-MSW10
 ACTIVE SERVO PROCESSING SUBWOOFER SYSTEM YST-MSW10 Active Servo SUBWOOFER SYSTEM YST-MSW10 Active Servo HIGH CUT HIGH LOW OWNER S MANUAL MANUAL DE INSTRUCCIONES CAUTION RISK OF ELECTRIC SHOCK DO NPT OPEN
Order code: EQLED53 User manual
 www.prolight.co.uk Order code: EQLED53 User manual Safety WARNING FOR YOUR OWN SAFETY, PLEASE READ THIS USER MANUAL CAREFULLY BEFORE YOUR INITIAL START-UP! CAUTION! Keep this equipment away from rain,
DMX-Master 3-FX DMX controller. user manual
 DMX-Master 3-FX DMX controller user manual Musikhaus Thomann e.k. Treppendorf 30 96138 Burgebrach Deutschland Telephone: +49 (0) 9546 9223-0 E-mail: info@thomann.de Internet: www.thomann.de 08.02.2013
Software Revision 1.13
 Software Revision 1.13 OVERVIEW...1 REAR PANEL CONNECTIONS...1 TOP PANEL...1 MENU AND SETUP FUNCTIONS...3 CHOOSE FIXTURES...3 PATCH FIXTURES...4 PATCH CONVENTIONAL DIMMERS...4 COPY FIXTURE...5 LOAD FIXTURE
EasiLED 4 DMX Controller
 EasiLED 4 DMX Controller User Manual CHASES 2 3 4 5 6 2 9 FADER/ PRESET EasiLED 4 MASTER BLACKOUT 6 6 6 USER/ BANK 2 3 4 5 6 2 9 SCENES FADE/SOUND SENS TAP/TEMPO AUTO SOUND SPOT SPOT 2 SPOT 3 SPOT 4 SAVE/DELETE
Light Brick ORDERCODE 50370
 Light Brick ORDERCODE 50370 Congratulations! You have bought a great, innovative product from Showtec. The Showtec Light Brick brings excitement to any venue. Whether you want simple plug-&-play action
4-CHANNEL DMX WALL-MOUNTED CONTROLLER
 4-CHANNEL DMX WALL-MOUNTED CONTROLLER USER GUIDE 9584 - Sept 2011 - Version 2 English CTLTAPE - 4-channel DMX wall-mounted controller Page 2 CTLTAPE - 4-channel DMX wall-mounted controller English 1 -
Robot Light V2. User Manual
 Robot Light V2 User Manual 2 Please read over this manual before operating the light. Introduction Unpacking: Thank you for purchasing the Robot Light V2. Every Robot Light V2 has been thoroughly tested
SAMURAI SCAN 50 LED-SC50D. User Guide. Innovation, Quality, Performance. Professional Entertainment Technology 19-
 SAMURAI SCAN 50 LED-SC50D Innovation, Quality, Performance User Guide Professional Entertainment Technology 19- EC Declaration of Conformity We declare that our products (lighting equipments) comply with
Ostar Eye K6. Beam and Kaleido Effects. User manual. Please read the instructions carefully before use
 Ostar Eye K6 Beam and Kaleido Effects User manual Please read the instructions carefully before use TABLE OF CONTENTS 1. Safety Instructions... 2 2. Technical Specifications... 4 3. How To Control The
FUSION SPOT MKII EQUINOX. Contents. User Manual. Order codes: Black housing - EQLED Safety Instructions. 2. Features & Specifications
 EQUINOX FUSION SPOT MKII Contents 1. Safety Instructions 2. Features & Specifications 3. How To Set The Unit 4. Troubleshooting User Manual 5. Fixture Cleaning Order codes: Black housing - EQLED008 1.
YST-SW20 SUBWOOFER SYSTEM OWNER S MANUAL. Active Servo Technology
 CAUTION SUBWOOFER SYSTEM Active Servo RISK OF ELECTRIC SHOCK DO NOT OPEN CAUTION: TO REDUCE THE RISK OF ELECTRIC SHOCK DO NOT REMOVE COVER (OR BACK). NO USER-SERVICEABLE PARTS SIDE. REFER SERVICG TO QUALIFIED
LED DANCING FLOOR User Manual
 LED DANCING FLOOR User Manual Introduction Unpacking: Thank you for purchasing the LED DANCING FLOOR. Every LED DANCING FLOOR has been thoroughly tested and has been shipped in perfect operating condition.
Professional Entertainment Technology. imove 50SR. Innovation, Quality, Performance 21-
 Innovation, Quality, Performance 21- imove 50SR User Guide Professional Entertainment Technology EC Declaration of Conformity We declare that our products (lighting equipments) comply with the following
Octostrip ORDERCODE 42220
 Octostrip ORDERCODE 42220 Congratulations! You have bought a great, innovative product from Showtec. The Showtec LED Octostrip brings excitement to any venue. Whether you want simple plug-&-play action
Strobe Xenon 3000DMX
 Manual Strobe Xenon DMX Table of contents. Safety instructions..... Instructions for a safe and efficient operation..... Further safety instructions.... Introduction.... Connections..... Electrical connections.....
LED Master 64. Manual. Please read these instructions carefully before use. Order code: BOTE04
 In the box: 1 x LED Master 64 DMX Controller 1 x Power adaptor 1 x USB gooseneck lamp 1 x Pair of 19 rack ears 1 x Manual Contents 1. Features...2 2. General Instructions...3 3. Overview 3.1 Front View...4
LED PAR56 Order Code: P56-151
 LED PAR56 Order Code: P56-151 www.cobrainternational.com User Manual COBRA P56-151 Dear Customer, Thank you for purchasing the COBRA P56-151. Cobra is one of the leading manufacturers of professional equipment
GLX LED STAGE 4 MANUAL GLS-4 LED STAGE 4. owners manual
 GLS-4 LED STAGE 4 owners manual 1 Thanks for choosing the GLX LED STAGE 4 lighting system. In order to make the best use of your LED SYSTEM, please read the following carefully. Important notes 1. Read
12X3W UV LEDS PROJECTOR LED- 12 USER GUIDE
 12X3W UV LEDS PROJECTOR LED- 12 USER GUIDE 10288 - Version / 12-2014 English LED-UV12-12x3W UV LEDs projector 1 - Safety information Important safety information This unit is intended for indoor use only.
FLEX BEAM V8. User Manual Please read the instruction carefully before use
 FLEX BEAM V8 User Manual Please read the instruction carefully before use CONTENTS 1. Safety Instructions... 3 2. Technical Specifications... 4 3. How To Set The Unit... 5 3.1 Rear Panel... 5 3.2 Main
Beam Stage Light (RGBW)
") 40-Watt MOVING LED Beam Stage Light (RGBW) USER S MANUAL www.monoprice.com TABLE OF CONTENTS SAFETY WARNINGS AND GUIDELINES... 3 INTRODUCTION... 4 PACKAGE CONTENTS... 4 FEATURES... 4 PRODUCT OVERVIEW...
40-Watt MOVING LED Beam Stage Light (RGBW) USER S MANUAL www.monoprice.com TABLE OF CONTENTS SAFETY WARNINGS AND GUIDELINES... 3 INTRODUCTION... 4 PACKAGE CONTENTS... 4 FEATURES... 4 PRODUCT OVERVIEW...
Fusion Saber. User Manual. Order code: EQLED070
 Fusion Saber User Manual Order code: EQLED070 Safety advice WARNING FOR YOUR OWN SAFETY, PLEASE READ THIS USER MANUAL CAREFULLY BEFORE YOUR INITIAL START-UP! Before your initial start-up, please make sure
C - K US U E S R
 CK-5 USER MANUAL I. PRODUCT DESCRIPTIONS Thank you for using our company the CK-5. To optimize the performance of this product, please read these operating instructions carefully to familiarize yourself
Please read the instructions carefully before use LED PYRAMID LED-904D. Innovation, Quality, Performance 15-
 Innovation, Quality, Performance 15- LED PYRAMID LED-904D User Manual Please read the instructions carefully before use Innovation, Quality, Performance 15- LED PYRAMID LED-904D User Manual Please read
DMX-Master 3-FX DMX-controller. user manual
 DMX-Master 3-FX DMX-controller user manual Musikhaus Thomann e.k. Treppendorf 30 96138 Burgebrach Germany Telephone: +49 (0) 9546 9223-0 E-mail: info@thomann.de Internet: www.thomann.de 13.08.2013 Table
ALO Duo Roll DMX LED barrel scanner with dual light source
 ALO Duo Roll DMX LED barrel scanner with dual light source User manual Safety instructions WARNING! Always keep this device away from moisture and rain! Hazardous electrical shocks may occur! WARNING!
X-3 LED. Owner s Manual ROBOHEAD
 X-3 LED Owner s Manual ROBOHEAD Thanks a lot for purchasing our LED robohead. Please read this user manual carefully and follow the instructions to avoid danger or damage to the unit due to mishandling.
Fog machine PT Users Manual
 Fog machine PT-1500 Users Manual Table of content 1. Safety instructions... 3 1.1. For safe and efficient operation... 3 2. Intended use of the device... 4 2.1. Overhead installation... 5 2.2. Electrical
LED BEAM MOVING HEAD FL x3W User Manual
 LED BEAM MOVING HEAD FL-101 36x3W User Manual www.flash-butrym.pl Page 1 1. Preface 1.1 Packing list Product name moving head light Power -line User manual quantity 1 pcs 1 base 1 pcs 1.2 Unpacking instructions
LED PANEL. User Manual Please read the instructions carefully before use LED-7TC. Innovation, Quality, Performance 15-
 LED PANEL LED-7TC Innovation, Quality, Performance User Manual Please read the instructions carefully before use 15- 9. Fixture Cleaning TABLE OF CONTENTS 1. Safety Instructions 2. Technical Specifications
SPOT MOVING HEAD M1S150W USER MANUAL. For safety, please read this user manual carefully before initial use.
 SPOT MOVING HEAD M1S150W USER MANUAL For safety, please read this user manual carefully before initial use. Event Lighting reserves the right to revise the manual at any time. Information and specifications
Order code: EQLED60 USER MANUAL
 Order code: EQLED60 USER MANUAL Safety WARNING FOR YOUR OWN SAFETY, PLEASE READ THIS USER MANUAL CAREFULLY BEFORE YOUR INITIAL START-UP! CAUTION! Keep this equipment away from rain, moisture and liquids.
LED BEAM 300 LED-MB50. User. Guide. Professional Entertainment Technology
 LED BEAM 300 LED-MB50 Guide User Professional Entertainment Technology TABLE OF CONTENTS 1. Safety Instruction 2. Technical Specification 3. How To Set The Unit 4. How To Control The Unit 5. Troubleshooting
Professional Entertainment Technology LED BEAM 300 LED-MB50. Innovation, Quality, Performance 23-
 Innovation, Quality, Performance 23- LED BEAM 300 LED-MB50 User Guide Professional Entertainment Technology EC Declaration of Conformity We declare that our products (lighting equipments) comply with the
LED PANEL. User Manual Please read the instructions carefully before use LED-212RGB TABLE OF CONTENTS. 1. Safety Instructions
 TABLE OF CONTENTS LED PANEL 1. Safety Instructions 2. Technical Specifications 3. Installation 4. How to set the unit 5. How to control the fixture 6. DMX512 Configuration 7. DMX512 Connections 8. Troubleshooting
User Manual. CV-401 / 801 / U Rackmount PS/2 KVM Switch
 User Manual CV-401 / 801 / 1601 1U Rackmount PS/2 KVM Switch 1. Table Of Content 1. Table of Content P.1 2. Introduction P.2 3. Features P.2 4. Package Content P.3 5. Optional Accessories P.4 6. Peripheral
LIGHT AND EASY LED User Guide Please read these instructions carefully before use
 LIGHT AND EASY LED-0808 User Guide Please read these instructions carefully before use CONTENTS 1. Features...3 2. General Instruction...4 3. Overview...5 3.1 Front View...5 3.2 Rear View...6 4. Operation
LED Giga Bar 4. User Manual
 LED Giga Bar 4 User Manual Index LED Giga Bar 4... 1 1. Safety instructions... 3 1.1. Hints for safe and faultless use... 3 2. Introduction... 4 3. Installation (for rigging)... 4 4. Unpacking... 4 5.
Ares. Modular Audiophile System. by Thrax Audio. Operating Manual. Manual issued 15/03/2018 CAUTION
 Ares Modular Audiophile System by Thrax Audio Operating Manual Manual issued 15/03/2018 CAUTION THE UNIT CONTAINS NO USER SERVICEABLE PARTS. DO NOT REMOVE THE COVERS. LETHAL VOLTAGES ARE PRESENT WITHIN
MATRIX LED LED User Manual Please read the instructions carefully before use
 MATRIX LED LED-7871 User Manual Please read the instructions carefully before use 1- 1. Safety Introductions TABLE OF CONTENTS WARNING Please read the instructions carefully which includes important information
MICRON DJ Booth System with Overhead Kit & CW Starcloth
 MICRON DJ Booth System with Overhead Kit & CW Starcloth User Manual Order code: EQLED014K Safety advice & product overview WARNING FOR YOUR OWN SAFETY, PLEASE READ THIS USER MANUAL CAREFULLY BEFORE YOUR
LED Par 64 Short DMX ORDERCODE 42431
 LED Par 64 Short DMX ORDERCODE 42431 Congratulations! You have bought a great, innovative product from Showtec. The Showtec LED Par 64 brings excitement to any venue. Whether you want simple plug-&-play
Professional Entertainment Technology LED BEAM 300 LED-MB50. User. Guide
 Professional Entertainment Technology LED BEAM 300 LED-MB50 Guide User 1- 1. Safety Instruction WARNING Please read carefully the instruction, which includes important information about the installation,
MICRON DJ Booth Tri-colour Starcloth
 MICRON DJ Booth Tri-colour Starcloth User Manual Order code: EQLED014C Safety advice WARNING FOR YOUR OWN SAFETY, PLEASE READ THIS USER MANUAL CAREFULLY BEFORE YOUR INITIAL START-UP! Before your initial
FT-20 Fire Training Fog Machine User Manual English
 FT-20 Fire Training Fog Machine User Manual English 2017 Antari Lighting and Effects Ltd. 1 User Manual - English Safety Information Please read the following safety information carefully before operating
DMX-Master 3-FX DMX controller. user manual
 DMX-Master 3-FX DMX controller user manual Musikhaus Thomann Thomann GmbH Hans-Thomann-Straße 1 96138 Burgebrach Germany Telephone: +49 (0) 9546 9223-0 E-mail: info@thomann.de Internet: www.thomann.de
User Manual Equinox 2m Flight Cased DMX LED Flame Machine Order code: FLAM12
 www.prolight.co.uk User Manual Equinox 2m Flight Cased DMX LED Flame Machine Order code: FLAM12 Safety Safety IMPORTANT: The manufacturer will not accept liability for any resulting damages caused by the
Power LED Beam 56 Narrow
 Power LED Beam 56 Narrow owners manual 2 Thanks for choosing the GLX LIGHTING PLB-56N. The PLB-56N is a full RGB color mix par can DMX- 512 controllable, made up of highly efficient and bright LED s measuring
STAGE TRI-PAR 18TC CP-18TC. User Manual. Please read the instructions carefully before use
 STAGE TRI-PAR 18TC CP-18TC User Manual Please read the instructions carefully before use TABLE OF CONTENTS 1. Safety Instructions 2. Technical Specifications 3. How to Set the Fixture 4. How to Control