Installing the IBM InfoSphere MDM version 11.4 Fix Pack 2 Manually
|
|
|
- Muriel Atkinson
- 5 years ago
- Views:
Transcription
1 Installing the IBM InfoSphere MDM version 11.4 Fix Pack 2 Manually Use this document if you are applying the fix pack manually instead of running the madconfig target Apply_Fixpack. IMPORTANT: Before proceeding make sure you applied fix pack through Installation manager. Once you apply the fix pack on InfoSphere MDM version 11.4, two directories (backup and updates) are created in the <MDM_HOME> directory. Updates directory contains all the details regarding the fix pack, like template for this and files needed for this fix pack. The backup directory contains a directory with fix pack number. For example, if you apply fix pack 02 there will be a directory and a property file named MDM_FixpackDetails.properties. The following components are changed for InfosSphere MDM version 11.4 Fix Pack 2 1. OSGI related changes to Bundles, CBA, and EBA changes 2. Native Engine Changes redeploying the native.ear file 3. Native WebService EAR Changes redeploying the MDM-web-services-virtual-<MDM-App-Name>.ear 4. Static Changes 5. Broker Changes 6. Inspector User Interface Changes 7. WebReports User Interface Changes 8. Database Changes OSGi related changes to Bundles, CBA, and EBA files: These are the bundle names that have been updated for InfoSphere MDM version 11.4 Fix Pack 2 com.ibm.mdm.server.dwlcommonservices com.ibm.mdm.server.dwlcommonservices.ejb com.ibm.mdm.server.extrules.default com.ibm.mdm.mds.job.manager com.ibm.mdm.server.asi com.ibm.mdm.server.linguistics com.ibm.mdm.server.ws.restful com.ibm.mdm.server.party com.ibm.mdm.server.thirdpartyadapters You can find these bundles and CBAs under in the folder <MDM_HOME>/updates/<FIXPACK_NUMBER>/com.ibm.mdm.advanced.fix/bundles All bundles are appended with the fix pack version. I. Add bundles to WebSphere Application Server Internal bundle repository: 1. Log in to the WebSphere Application Server Administrative Console. 2. Navigate to Environment OSGI bundle repositories Internal bundle repository.


2 3. Select a bundle; for example "com.ibm.mdm.mds.composite.handler". Repeat step I for all bundles and CBAs. II. Once the bundles and CBAs are added to the internal bundle repository, you must update the latest bundles in Assets by taking the following steps: 1. Navigate to Applications Application Types Assets. 2. Select the Asset named "com.ibm.mdm.hub.server.app-<mdm-app-name>.eba.


3 3. Click on "Update bundle versions in this application" link on the right side. 4. View the displayed bundles for this EBA and the version numbers that are currently used for each bundles: 5. View the version. By default, bundles will have only one version "11.4.FP00IF000_ ", which comes with base version of InfoSphere MDM. If you already applied fixpack 1, then this version will be different.

4 6. You can see 2 version numbers for the bundles which were added in step I. 7. For example, take "com.ibm.mdm.mds.composite.handler", for which you can see 2 versions for this bundle. If you have applied fixpack 1, then there will be 3 versions for this bundle. 8. You must select latest fix pack version for the bundles. The version number for Fix Pack 2 is "11.4.FP02IF000_201503xx-xxxx" 9. Update the version numbers for all bundles and CBAs that you selected in step I. You can find CBAs at the end. 10. Click the "Preview" button after updating all bundles and CBAs with the latest version of fix pack. 11. Confirm that you can see the differences between the "Deployed Version" and the "New version" for all bundles and CBAs. Make sure under "New Version" you can see "11.4.FP03IF000_201503xx-xxxx" for all the bundles and CBA's which were added in Step I. 12. Once confirmed, go to down and click the "Create" button. 13. Click "Save".


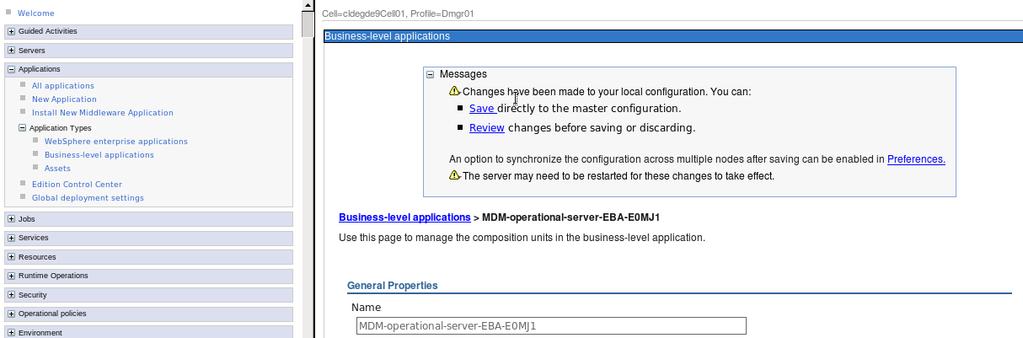
5 III. 1. Navigate to Applications Application Types Business-level applications. 2. Select "MDM-operational-server-EBA-<MDM-App-Name>". 3. Select "com.ibm.mdm.hub.server.app.<mdm-app-name>_0001.eba

6 4. Click "Update to latest deployment..."


7 5. Verify that you can see the preview of all bundles and CBAs with the new fixpack 2 version number, then click "OK". 6. Click the "Next" button on the following two pages without performing any modifications.


8 7. Click "Finish", then click Save". 8. Click "OK", then click Save".

9
10 Native Engine Changes Redeploying the native.ear file IMPORTANT: Before applying the fix pack for the native engine, you must create backups of the following folders, which will be overwritten by the fix pack: - MDM_INSTALL_HOME/mds/conf - WAS_PROFILE_HOME/InstalledApps/CELL_NAME/MDM-native-APP_NAME.ear/native.war/conf There are two steps to updating the native.ear file: I. Modify the file changes for this fix pack based on the operating system. II. Redeploy the native.ear file. I. There are a number of files that must be modified based on operating system. New files for native engine are located at <MDM_HOME>/updates/<FIXPACK_NUMBER>/com.ibm.mdm.advanced.fix/engine/com.ibm.mdm.build.engine/installer You can find five ZIP files each for a different operating system: com.ibm.mdm.mds-aix64.zip com.ibm.mdm.mds-linux64.zip com.ibm.mdm.mds-sunos64.zip com.ibm.mdm.mds-win64_amd64.zip com.ibm.mdm.mds-zlinux64.zip Extract the ZIP file that corresponds to the operating where InfoSphere MDM is installed. This depend on which Operating system you running this on. For example, if you are running it from Linux enviroment then do the following : back up the contents of the <MDM_HOME>/linux and <MDM_HOME>/mds directories, extract the contents of com.ibm.mdm.mdslinux64.zip, and replace the following files in the <MDM_HOME>/linux and <MDM_HOME>/mds directories. lib/libmad.so conf/mdsbroadcast.xsd NOTE : the same changes applies to other OS, change the <linux> on above example to the first argument and the extracting content refers to 2nd argument below, <YOUR OS> = 1st arguement, 2nd arguement AIX = aix, com.ibm.mdm.mds-aix64.zip Solaris = solaris, com.ibm.mdm.mds-sunos64.zip Windows64 = win64,com.ibm.mdm.mds-win64_amd64.zip


11 II. Reinstall the native.ear file A). 1. Navigate to Applications All applications. 2. Select the checkbox for "MDM-native-<MDM-App-Name>", change the action from "start" to "stop", then click "Submit Action". This will stop "MDM-native-<MDM-App-Name>". 3. Select the checkbox for "MDM-native-<MDM-App-Name>" and click "Remove", which will remove this application from WebSphere Application Server. Click "OK" and then click "Save".


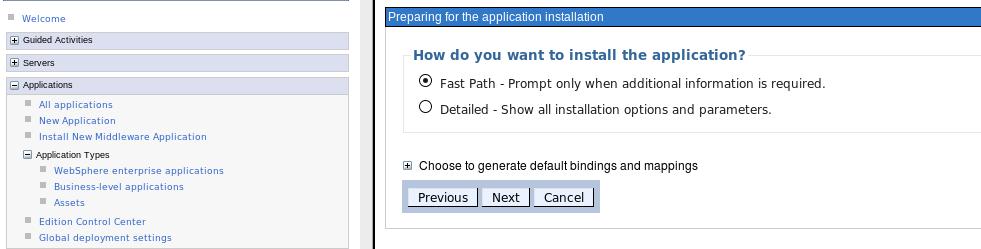
12 B). 1. Navigate to <MDM_HOME>/<YOUR_Operating_System_FOLDER>. In the case of Linux, the value in <YOUR_Operating_System_FOLDER> linux under <MDM_HOME>. In the case of AIX, the value in <YOUR_Operating_System_FOLDER> will be aix under <MDM_HOME>. 2. Locate the build.xml file. 3. Open a command terminal, then run cd <MDM_HOME>/<YOUR_Operating_System_FOLDER> 4. Make sure ANT is in the path. 5. Verify that native.war and native.ear files exist under <MDM_HOME>/InstallableApps, and rename them if they exist. 6. Run "ant -buildfile build.xml". This will invoke target name "all", which is a default target name in this XML file. 7. Verify that a new native.ear file has been created under <MDM_HOME>/InstallableApps. 8. Open the WebSphere Application Server Administrative Console. 9. Navigate to Applications All applications, click "Add" to deploy the new native.ear file, then click Next. 10. Provide the path to the location of the native.ear file that you want to deploy (for example, <MDM_HOME>/InstallableApps/native.ear), then click "Next". 11. Select the default installation options and click "Next". 12. Replace the default "Application name" to MDM-native-<MDM-App-Name>, then click "Next".


13 13. Specify where you want to deploy native.ear by selecting the server or cluster based on your requirements, select the corresponding check-box, then click the "Apply" next to the server details, and then click "Next". 14. Click "Next" with the default values selected. 15. Finally, click "Finish" and then click "Save". 16. Verify that your MDM-native-<MDM-App-Name> is deployed under Applications All applications.


14


15 C). 1. Open a command terminal and run cd <MDM_HOME>/<YOUR_Operating_System_FOLDER>. 2. Copy build-install-config.xml from this location and paste it to <WAS_PROFILE_HOME>/installedApps/<CELL_NAME>/MDMnative-<MDM-App-Name>.ear/native.war. For <WAS_PROFILE_HOME> go forward to step 6. This value is same as USER_INSTALL_ROOT. 3. Open a command terminal and run cd <WAS_PROFILE_HOME>/installedApps/<CELL_NAME>/MDM-native-<MDM-AppName>.ear/native.war.
16 4. Create a property file named install.properties under <WAS_PROFILE_HOME>/installedApps/<CELL_NAME>/MDM-native<MDM-App-Name>.ear/native.war. IMPORTANT: take note of this information you will need it again when you reach part III, step 1 of the Native WebService EAR Changes topic (on page 23). 5. Add below key value pairs in this file. mds.was.profile.home=<user_install_root> mds.ear.install.dir=<app_install_root>/<cell_name>/mdm-native-<mdm-appname>.ear/native.war mds.root.dir=<app_install_root>/<cell_name>/mdm-native-<mdm-app-name>.ear/native.war mds.db.type=<user.db.type> mds.db.host=<user.db.host> mds.db.port=<user.db.port> mds.db.name=<user.db.name> mds.db.dsn=<user.db.name>_<user.instance.identifier> mds.db.user=<user.db.user> mds.db.password=enter DB PASSWORD, this is not available in any property files. You must enter it manually. mds.instance.id=<user.instance.identifier> mds.code.lang.list=<user.code.lang.list.mds> mds.db.auth.native=<user.db.auth.native> mds.db.schema=<user.db.schema> mds.db.service.name=( Leave this with empty value, If Oracle RAC is used then enter RAC service name here.) user.db.ssl.enabled=false user.db.ssl.file.path=none user.db.ssl.password=none mds.db.password.ecd=null dbpwdencrypted=null 6. Enter a value for mds.db.schema if your database type is either DB2 or DB2 for z/os, otherwise leave it empty. If your database type is DB2 or DB2 for z/os, the key/value will be: mds.db.schema=<user.db.schema> ( get user.db.schema from <MDM_HOME>/backup/<FIXPACK_NUMBER>/properties/MDM_Fixpack.properties ) If your database type is Oracle or SQLServer, the key/value will be: mds.db.schema= Keys will be common and values will change according to where the InfoSphere MDM instance is installed. You can find values of USER_INSTALL_ROOT and APP_INSTALL_ROOT in the WebSphere Application Server Administrative Console as follows: Open <MDM_HOME>/backup/<FIXPACK_NUMBER>/properties/MDM_Fixpack.properties. From this file you can get the values of user.db.type, user.db.host, user.db.port etc...


17 Replace the place holders in install.properties with the values that exist in <MDM_HOME>/backup/<FIXPACK_NUMBER>/properties/MDM_Fixpack.properties. Open the WebSphere Application Server Administrative Console and Navigate to Environment WebSphere variables, get the values for APP_INSTALL_ROOT and USER_INSTALL_ROOT. For example it'll be something like the following: APP_INSTALL_ROOT = ${USER_INSTALL_ROOT}/installedApps USER_INSTALL_ROOT = /opt/ibm/websphere/appserver/profiles/appsrv01 You can find two values for USER_INSTALL_ROOT, if it's WebSphere Application Server ND: USER_INSTALL_ROOT = /opt/ibm/websphere/appserver/profiles/appsrv01 USER_INSTALL_ROOT = /opt/ibm/websphere/appserver/profiles/dmgr01 Use the first USER_INSTALL_ROOT to update the value in install.properties. NOTE: you will use the second USER_INSTALL_ROOT in step 9. Now replace the value of USER_INSTALL_ROOT in APP_INSTALL_ROOT. The new values are: APP_INSTALL_ROOT = /opt/ibm/websphere/appserver/profiles/appsrv01/installedapps USER_INSTALL_ROOT = /opt/ibm/websphere/appserver/profiles/appsrv01
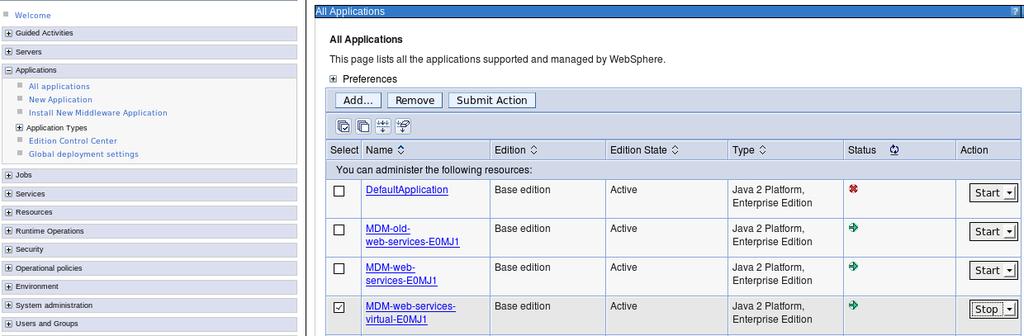
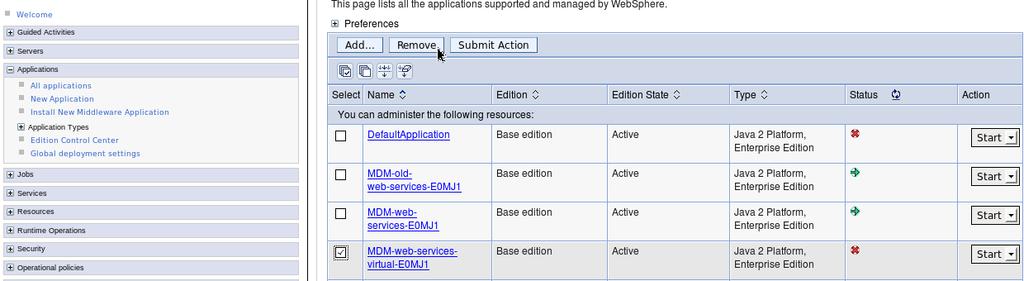
18 7. Open a command terminal and go to <WAS_PROFILE_HOME>/installedApps/<CELL_NAME>, then run chmod u+x MDM-native<MDM-App-Name>.ear. 8. Go to <WAS_PROFILE_HOME>/installedApps/<CELL_NAME>/MDM-native-<MDM-App-Name>.ear/native.war/scripts and run chmod 755 madconfig.sh. 9. Open madconfig.env, and replace this with the USER_INSTALL_ROOT value you got in step Make sure ANT is in the path. 11. Go to <WAS_PROFILE_HOME>/installedApps/<CELL_NAME>/MDM-native-<MDM-App-Name>.ear/native.war and check if build-install-config.xml file exists in this location, otherwise copy it from the <WAS_PROFILE_HOME>/installedApps/<CELL_NAME>/MDM-native-<MDM-App-Name>.ear/native.war/scripts folder. 12. Run ant -buildfile build-install-config.xml to invoke target name "install", which is a default target name in this xml file. 13. Ensure that the *.cfg and odbc.ini files have been created under <WAS_PROFILE_HOME>/installedApps/<CELL_NAME>/MDMnative-<MDM-App-Name>.ear/native.war/conf. Native WebService EAR Changes redeploying MDM-web-services-virtual-<MDM-App-Name>.ear IMPORTANT: Before starting this, make a backup of <MDM_HOME>/mds/lib/sdk/ibminitiatews.ear. There is a change in the Native WebService EAR file, so you must uninstall the existing MDM-web-services-virtual-<MDM-AppName>.ear file and then redeploy it using the following steps. : I. Stop and remove the MDM-web-services-virtual-<MDM-App-Name> application. II. Install the MDM-web-services-virtual-<MDM-App-Name>.ear. III. Create an install.properties file for the MDM-web-services-virtual-<MDM-App-Name>.ear. I. Stop and remove the MDM-web-services-virtual-<MDM-App-Name> application. 1. Log in to the WebSphere Application Server Administrative Console. 2. Navigate to Applications All applications. 3. Select the check-box for "MDM-web-services-virtual-<MDM-App-Name>" and change the action from "start" to "stop", then click "Submit Action". This will stop "MDM-web-services-virtual-<MDM-App-Name>". 4. Select the check-box for "MDM-web-services-virtual-<MDM-App-Name>" and press "Remove", which will remove this application from WebSphere Application Server. Click "OK" and "Save". 5. Ensure that "MDM-web-services-virtual-<MDM-App-Name>" is removed from WebSphere Application Server Administrative Console.


19


20 II. Install the MDM-web-services-virtual-<MDM-App-Name>.ear. 1. Copy <MDM_HOME>/mds/lib/sdk/ibminitiatews.war to a directory, for example /opt/mdm_temp, and move ibminitiatews.war to this directory. Create META-INF folder in the new /opt/mdm_temp folder, then copy <MDM_HOME>/mds/lib/sdk/application.xml to the /opt/mdm_temp/meta-inf folder. 2. Open a command terminal and run "cd /opt/mdm_temp". 3. Run "jar -cvf ibminitiatews.ear ibminitiatews.war. 4. Run "jar -uvf ibminitiatews.ear META-INF/application.xml". 5. Make sure ibminitiatews.ear is created in the /opt/mdm_temp folder. 6. Open WebSphere Application Server Administrative Console. 7. Navigate to Applications All applications. 8. Click the "Add" button to deploy the new native.ear file, then click Next. 9. Provide the path to the location of the native.ear file that you want to deploy (for example, /opt/mdm_temp/ibminitiatews.ear), then click "Next". 10. Select the default installation options and click "Next". 11. Change the default "Application name" from "ibminitiatews" to MDM-web-services-virtual-<MDM-App-Name>, then click "Next".


21 12. Select where you want to deploy MDM-web-services-virtual-<MDM-App-Name>, select the check box associated with the server or cluster based on your requirements, click the "Apply" button next to server details, then press "Next". 13. Press "Next" with the default values selected. 14. Finally, click "Finish" and then Save. 15. Verify your MDM-web-services-virtual-<MDM-App-Name> is deployed under Applications All applications.

22 III. Create an install.properties file for the MDM-web-services-virtual-<MDM-App-Name>.ear 1. Verify that you created install.properties under <WAS_PROFILE_HOME>/installedApps/<CELL_NAME>/MDMnative-<MDM-App-Name>.ear/native.war following the instructions for making native engine changes II --> section C --> step 4 (on page 17). 2. Add some extra key/value parameters to the run target (install_ws_prop), as follow: mds.ws.api.installed.path=<app_install_root>/<cell_name>/mdm-web-services-virtual-<mdmapp-name>.ear/ibminitiatews.war mds.http.port=<user.was.application.http.port> mdm.admin.user=<user.l2.was.admin.user> mdm.admin.password=enter MDM PASSWORD note that this is not a WebSphere Application Server password, nor is it available in any property files; instead, you must enter this value manually. 3. Make sure ANT is in the path 4. Go to <WAS_PROFILE_HOME>/installedApps/<CELL_NAME>/MDM-native-<MDM-App-Name>.ear/native.war, copy the build-install-config.xml and install.properties files from this location to <WAS_PROFILE_HOME>/temp, then navigate to <WAS_PROFILE_HOME>/temp and proceed to step Run "ant -buildfile build-install-config.xml install_ws_prop, which will invoke the target name "install_ws_prop". 6. Ensure that the ibminitiatews.properties file is created under <WAS_PROFILE_HOME>/installedApps/<CELL_NAME>/MDM-web-services-virtual-<MDM-AppName>.ear/ibminitiatews.war/WEB-INF/classes User Interface Changes Inspector User Interface Changes Important: the following process will redeploy Inspector User Interface, so you must create a backup of the existing Inspector User Interface EAR, which you can find at <MDM_HOME>/InstallableApps/ear/inspector.ear
23 The new files for User Interfaces are located at <MDM_HOME>/updates/<FIXPACK_NUMBER>/com.ibm.mdm.advanced.fix/userinterface/com.ibm.mdm.build.we bapps/installer. You can find inspector.zip file there. Extract that ZIP file in that location only. I. 1. Log in to the WebSphere Application Server Administrative Console. 2. Navigate to Applications All applications. 3. Select the check-box for "inspector-<mdm-app-name>" or "Inspector", change the action from "start" to "stop", then click "Submit Action". This will stop "inspector-<mdm-app-name>" or "Inspector" application. 4. Select the check-box for "inspector-<mdm-app-name>" or "Inspector" and click "Remove", which will remove this application from WebSphere Application Server. Click "OK", then click "Save". 5. Make sure "inspector-<mdm-app-name>" or "Inspector" is removed from the WebSphere Application Server Administrative Console. II. 1. Create a temporary directory "/opt/tempinspector" under this folder. 3. Extract <MDM_HOME>/updates/<FIXPACK_NUMBER>/com.ibm.mdm.advanced.fix/userinterface/com.ibm.mdm.build.we bapps/installer/inspector.ear to the "/opt/tempinspector" folder. 4. Create one more temporary directory named inspector under the "/opt/tempinspector". 5. Extract inspector.war to the "/opt/tempinspector/inspector" folder. 6. Create a directory named "classes" under the "/opt/tempinspector/inspector/web-inf" folder. 7. Create a property file named "inspector.properties" under the "/opt/tempinspector/inspector/webinf/classes" folder. 8. Add the following key/value pairs to "inspector.properties" file: HostName=<user.was.application.host> HostPort=<user.was.application.http.port> UserName=<user.L2.was.admin.user> Password=ENTER MDM PASSWORD note that this is not a WebSphere Application Server password, nor is it available in any property files; instead, you must enter this value manually. UseSSL=<user.use.ssl.inspector> InitContext="5" MaxContext="10" TimeOut="30" KeepAlive="false"
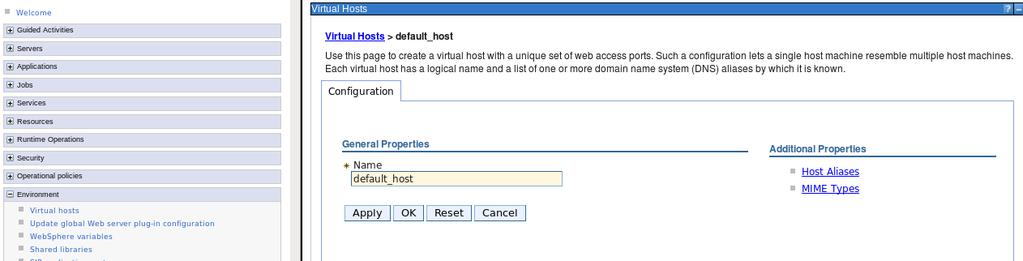
24 9. Open <MDM_HOME>/backup/<FIXPACK_NUMBER>/properties/MDM_Fixpack.properties. From this file you can get the values of user.was.application.host, user.l2.was.admin.user, user.use.ssl.inspector, and so forth. Replace the place holders in inspector.properties with the values in <MDM_HOME>/backup/<FIXPACK_NUMBER>/properties/MDM_Fixpack.properties. 10. Verify the Encoding Password value in "inspector.properties" file. 11. Open a command terminal and go to <WAS_HOME>/bin. You can locate the <WAS_HOME> value from key user.l1.was.home from <MDM_HOME>/backup/<FIXPACK_NUMBER>/properties/MDM_Fixpack.properties. 12. Run PropFilePasswordEncoder.sh or PropFilePasswordEncoder.bat by passing arguments as /opt/tempinspector/inspector/web-inf/classes/inspector.properties and Password. For example, /opt/ibm/websphere/appserver/bin, go to this location in terminal and enter:./propfilepasswordencoder.sh /opt/tempinspector/inspector/webinf/classes/inspector.properties Password 13. Open /opt/tempinspector/inspector/web-inf/classes/inspector.properties and verify the value for Password. It should be in encryption format. 14. Copy /opt/tempinspector/inspector/web-inf/classes/inspector.properties file to <MDM_HOME>/InstallableApps/properties. 15. Delete inspector.war and inspector.ear if it exists under /opt/tempinspector. 16. Open a command terminal and go to /opt/tempinspector/inspector, then run "jar cvf inspector.war". 17. Copy inspector.war from /opt/tempinspector/inspector to /opt/tempinspector. 18. Delete the Inspector folder under /opt/tempinspector. 19. In the command terminal, go to /opt/tempinspector and run "jar -cvf inspector.ear inspector.war". 20. Run "jar -uvf inspector.ear META-INF/application.xml". 21. Run "jar -uvf inspector.ear META-INF/ibmconfig". 22. Make sure inspector.ear is created under /opt/tempinspector. 23. Delete inspector.ear from <MDM_HOME>/InstallableApps/ear if it exists in that folder. 24. Copy /opt/tempinspector/inspector.ear to <MDM_HOME>/InstallableApps/ear. 25. Delete TempInspector folder from /opt. III. 1. Open WebSphere Application Server Administrative Console. 2. Navigate to Servers All servers. 3. Select the Inspector User Interface server; for example, "UIS2". 4. Click the "Ports" link and get the values for "WC_defaulthost" and "WC_defaulthost_secure". 5. Navigate to Environment Virtual hosts. 6. Click "default_host" and then click "HostAliases". 7. Verify the values that you got in step number 4 exist here. If they do, you don't need to do anything.


25 8. If the port number doesn't exist, click "New" and provide the values manually.


26


27 IV). 1. Open the WebSphere Application Server Administration Console. 2. Navigate to Servers All servers. 3. Select User Interface server; for example, "UIS2". 4. In right hand side under "Container Settings", locate "Container Services" and expand it. 5. Select "ORB service". Locate "Custom properties" in the right hand side and select it. 6. Search for "com.ibm.corba.requesttimeout" property. If it's there check the value. 7. If the value is 720, then you don't need to do anything. 8. If "com.ibm.corba.requesttimeout" property doesn't exist, add it with a value of 720, then click "OK" and "Save". If your Inspector User Interface is deployed to a single server, this will be enough. If your Inspector User Interface is deployed on a cluster, you must repeat steps 4 through 8 for each member of the cluster.
 and click \"Next\". 6.")

28 V). 1. Open WebSphere Application Server Administrative Console. 2. Navigate to Applications All applications. 3. Click "Add" to deploy the new inspector.ear file. 4. Select "Next" button. You are asked to give location of inspector.ear that you want to deploy. 5. Provide the path (<MDM_HOME>/InstallableApps/inspector.ear) and click "Next". 6. When asked for installation options, select the defaults and click "Next". 7. In "Application name", change the default "inspector" to inspector-<mdm-app-name>, then click "Next". 8. Select where you want to deploy inspector-<mdm-app-name>, select the server or cluster based on your requirements. Select the check box that corresponds to the server you want, click "Apply", and then click "Next" 9. Click "Next" with the default values selected. 10. To finish deploying inspector.ear, click "Finish", then click "Save".
29 11. Verify your inspector-<mdm-app-name> is deployed under Applications All applications. Broker Changes Important: Before applying the fix pack for Broker, create a backup of the files that you will be are modifying. Your operating system determines which files will be modified. New files for native engine are located at <MDM_HOME>/updates/<FIXPACK_NUMBER>/com.ibm.mdm.advanced.fix/brokers/com.ibm.mdm.build.brokers/installer You can find four ZIP files, each for different operating system. com.ibm.mdm.mds.brokers-aix64.zip com.ibm.mdm.mds.brokers-linux64.zip com.ibm.mdm.mds.brokers-sunos64.zip com.ibm.mdm.mds.brokers-win64_amd64.zip Extract the ZIP file appropriate to the operating system where InfoSphere MDM is installed. If InfoSphere MDM is installed on a machine with the AIX operating system, back up the contents of <MDM_HOME>/MessageBrokerSuite directory, extract the com.ibm.mdm.mds.brokers-aix64.zip file, and replace the following files in the <MDM_HOME>/MessageBrokerSuite directory: bin/msgreader bin/msgsender bin/querybroker bin/openssl lib/libmicommon.so lib/libcrypto.so lib/libssl.so lib/libmicommon_routingbroker.so proxy/lib/libmicommon.so proxy/lib/libcrypto.so proxy/lib/libssl.so scripts/build-utils-brokers.xml If InfoSphere MDM is installed on a machine with the Linux operating system, back up the contents of <MDM_HOME>/MessageBrokerSuite directory, extract the com.ibm.mdm.mds.brokers-linux64.zip file, and replace the following files in the <MDM_HOME>/MessageBrokerSuite directory: bin/msgreader bin/msgsender bin/querybroker bin/openssl lib/libmicommon.so
30 lib/libcrypto.so lib/libssl.so lib/libmicommon_routingbroker.so proxy/lib/libmicommon.so proxy/lib/libcrypto.so proxy/lib/libssl.so scripts/build-utils-brokers.xml If InfoSphere MDM is installed on a machine with the Oracle operating system, back up the contents of <MDM_HOME>/MessageBrokerSuite directory, extract the com.ibm.mdm.mds.brokers-sunos64.zip file, and replace the following files in the <MDM_HOME>/MessageBrokerSuite directory: bin/msgreader bin/msgsender bin/querybroker bin/openssl lib/libmicommon.so lib/libcrypto.so lib/libssl.so lib/libmicommon_routingbroker.so proxy/lib/libmicommon.so proxy/lib/libcrypto.so proxy/lib/libssl.so scripts/build-utils-brokers.xml If InfoSphere MDM is installed on a machine with the Windows 64 operating system, back up the contents of <MDM_HOME>/MessageBrokerSuite directory, extract the com.ibm.mdm.mds.brokers-win64_amd64.zip file, and replace all of the files under bin, lib, proxy/lib folders and the file build-utils-brokers.xml under the scripts folder.. Static Changes 1. New files for static changes are located at <MDM_HOME>/updates/<FIXPACK_NUMBER>/com.ibm.mdm.advanced.fix/staticcontent/com.ibm.mdm.build.clientapps /installer 2. Extract the zip file com.ibm.mdm.batch.framework.jar in the same location. 3. There is a single file change named com.ibm.mdm.batch.framework.jar under BatchProcessor/lib. 4. First, create a backup of <MDM_HOME>/BatchProcessor/lib/com.ibm.mdm.batch.framework.jar before replacing the new file.
31 5. Copy <MDM_HOME>/updates/<FIXPACK_NUMBER>/com.ibm.mdm.advanced.fix/staticcontent/com.ibm.mdm.build.clientapps /installer/batchprocessor/lib/com.ibm.mdm.batch.framework.jar to <MDM_HOME>/BatchProcessor/lib Database changes The new files for database changes are located at <MDM_HOME>/updates/<FIXPACK_NUMBER>/com.ibm.mdm.advanced.fix/database/com.ibm.mdm.build.dat abase/installer. 1. Extract com.ibm.mdm.db.domain.zip at this location only. 2. Locate the update corresponding with your database. There are database updates for DB2, Oracle, and z/os: 3. For DB2, you can find the scripts under <MDM_HOME>/updates/<FIXPACK_NUMBER>/com.ibm.mdm.advanced.fix/database/com.ibm.mdm.build.database/installer/Fixpack/DB2/Standard/ddl. There you will find two SQL scripts. Open and replace <SCHEMA> name inside the SQL files. For DB2ZOS, you can find the scripts under <MDM_HOME>/updates/<FIXPACK_NUMBER>/com.ibm.mdm.advanced.fix/database/com.ibm.mdm.build.database/installer/Fixpack/DB2/ZOS/ddl. There you will find two SQL scripts. Open and replace <USER ACCOUNT> name inside the SQL files. For ORACLE, you can find the scripts under <MDM_HOME>/updates/<FIXPACK_NUMBER>/com.ibm.mdm.advanced.fix/database/com.ibm.mdm.build.database/installer/Fixpack/Oracle/Standard/ddl, where you can locate two SQL scripts. Open a terminal and connect to database. Execute Upgradedb_fp1.sql sql file.
Installing the InfoSphere MDM Standard and Advanced Edition version 11.0 Fix Pack 3 Manually
 Installing the InfoSphere MDM Standard and Advanced Edition version 10 Fix Pack 3 Manually This document helps you in applying the fix pack manually instead of running the madconfig target Apply_Fixpack.
Manual roll back of OSGi bundles and CBA files: Applications Application Types Assets Note: FP00IF000 Additional Properties
 Rollback of MDM fix pack and interim fixes is a two step process: 1. Roll back the configurations manually. 2. Roll back using IBM Installation Manager. For bundle and CBA changes you must use the WebSphere
IBM InfoSphere Master Data Management Version 11 Release 5. Upgrade Guide IBM GI
 IBM InfoSphere Master Data Management Version 11 Release 5 Upgrade Guide IBM GI13-2670-03 IBM InfoSphere Master Data Management Version 11 Release 5 Upgrade Guide IBM GI13-2670-03 Note Before using this
IBM InfoSphere Master Data Management Standard and Advanced Editions Version 11 Release 5. Installation Guide IBM GC
 IBM InfoSphere Master Data Management Standard and Advanced Editions Version 11 Release 5 Installation Guide IBM GC27-6717-01 IBM InfoSphere Master Data Management Standard and Advanced Editions Version
Leverage Rational Application Developer v8 to develop OSGi application and test with Websphere Application Server v8
 Leverage Rational Application Developer v8 to develop OSGi application and test with Websphere Application Server v8 Author: Ying Liu cdlliuy@cn.ibm.com Date: June,29 2011 2010 IBM Corporation THE INFORMATION
Websphere Force Uninstall Application Server 8 Linux Install
 Websphere Force Uninstall Application Server 8 Linux Install Use IBM Installation Manager to install the application server product on AIX, HP-UX, Linux, Solaris, (AIX Solaris HP-UX Linux Windows) You
Websphere Force Uninstall Application Server 8 Linux Installing
 Websphere Force Uninstall Application Server 8 Linux Installing Use IBM Installation Manager to install the application server product on AIX, HP-UX, Linux, Solaris, (AIX Solaris HP-UX Linux Windows) You
APAR PO06620 Installation Instructions
 IBM Corporation APAR PO06620 Installation Instructions IBM Counter Fraud Management 1.5.0.5 IBM Counter Fraud Development 3-31-2017 Table of Contents 1 Fix readme... 1 2 Abstract... 1 3 Contents... 1 4
IBM InfoSphere Master Data Management Custom Domain Hub Version 11 Release 3. Installation Guide GI
 IBM InfoSphere Master Data Management Custom Domain Hub Version 11 Release 3 Installation Guide GI13-2659-01 IBM InfoSphere Master Data Management Custom Domain Hub Version 11 Release 3 Installation Guide
Websphere Force Uninstall Application Server 7 Linux Installation
 Websphere Force Uninstall Application Server 7 Linux Installation You also use Installation Manager to easily uninstall the packages that it installed. Linux Intel, os=linux,arch=x86, Linux Intel 32 bit
Platform SDK Deployment Guide. Platform SDK 8.1.2
 Platform SDK Deployment Guide Platform SDK 8.1.2 1/1/2018 Table of Contents Overview 3 New in this Release 4 Planning Your Platform SDK Deployment 6 Installing Platform SDK 8 Verifying Deployment 10 Overview
IBM Maximo Anywhere Version 7 Release 6. Planning, installation, and deployment IBM
 IBM Maximo Anywhere Version 7 Release 6 Planning, installation, and deployment IBM Note Before using this information and the product it supports, read the information in Notices on page 65. This edition
Service Level Build Level CF
 Service Level 6.1.0.24 - Build Level CF240910.19 ++ HOLD(UK31229) SYS FMID(JIWO610) REASON(ACTION) DATE(09061) Pack for WebServices on z/os at Fix Pack Level 6.1.0.13 must be Level 6.1.0.13. IBM WebSphere
Contents Overview... 5 Downloading Primavera Gateway... 5 Primavera Gateway On-Premises Installation Prerequisites... 6
 Gateway Installation and Configuration Guide for On-Premises Version 17 September 2017 Contents Overview... 5 Downloading Primavera Gateway... 5 Primavera Gateway On-Premises Installation Prerequisites...
Contents Overview... 5 Upgrading Primavera Gateway... 7 Using Gateway Configuration Utilities... 9
 Gateway Upgrade Guide for On-Premises Version 17 August 2017 Contents Overview... 5 Downloading Primavera Gateway... 5 Upgrading Primavera Gateway... 7 Prerequisites... 7 Upgrading Existing Gateway Database...
B. Assets are shared-by-copy by default; convert the library into *.jar and configure it as a shared library on the server runtime.
 Volume A~B: 114 Questions Volume A 1. Which component type must an integration solution developer define for a non-sca component such as a Servlet that invokes a service component interface? A. Export
SSO Plugin. Integrating Business Objects with BMC ITSM and HP Service Manager. J System Solutions. Version 5.
 SSO Plugin Integrating Business Objects with BMC ITSM and HP Service Manager J System Solutions Version 5.0 JSS SSO Plugin Integrating Business Objects with BMC ITSM and HP Service Manager Introduction...
Verify that your system configuration (product version and release level, platform) exactly matches what is specified in the Readme.
 exactly matches what is specified in the Readme.") Oracle Hyperion Provider Services Release 9.3.3.0.00 Readme To view the most recent version of this Readme, see the 9.3.x documentation library on Oracle Technology Network (OTN) at http://www.oracle.com/technology/documentation/epm.html.
Oracle Hyperion Provider Services Release 9.3.3.0.00 Readme To view the most recent version of this Readme, see the 9.3.x documentation library on Oracle Technology Network (OTN) at http://www.oracle.com/technology/documentation/epm.html.
IBM Maximo Anywhere Version 7 Release 6. Planning, installation, and deployment IBM
 IBM Maximo Anywhere Version 7 Release 6 Planning, installation, and deployment IBM Note Before using this information and the product it supports, read the information in Notices on page 71. This edition
IBM. Planning and Installation. IBM Tivoli Workload Scheduler. Version 9 Release 1 SC
 IBM Tivoli Workload Scheduler IBM Planning and Installation Version 9 Release 1 SC32-1273-13 IBM Tivoli Workload Scheduler IBM Planning and Installation Version 9 Release 1 SC32-1273-13 Note Before using
Lotus Learning Management System R1
 Lotus Learning Management System R1 Version 1.0.4 March 2004 Quick Install Guide G210-1793-00 Disclaimer THE INFORMATION CONTAINED IN THIS DOCUMENTATION IS PROVIDED FOR INFORMATIONAL PURPOSES ONLY. WHILE
KonaKart Portlet Installation for Liferay. 2 nd January DS Data Systems (UK) Ltd., 9 Little Meadow Loughton, Milton Keynes Bucks MK5 8EH UK
 Ltd., 9 Little Meadow Loughton, Milton Keynes Bucks MK5 8EH UK") KonaKart Portlet Installation for Liferay 2 nd January 2018 DS Data Systems (UK) Ltd., 9 Little Meadow Loughton, Milton Keynes Bucks MK5 8EH UK 1 Table of Contents KonaKart Portlets... 3 Supported Versions
KonaKart Portlet Installation for Liferay 2 nd January 2018 DS Data Systems (UK) Ltd., 9 Little Meadow Loughton, Milton Keynes Bucks MK5 8EH UK 1 Table of Contents KonaKart Portlets... 3 Supported Versions
Maximo Upgrade. April 2016
 Maximo Upgrade April 2016 Agenda Maximo Upgrade Why Upgrade Upgrade Requirements Upgrade Planning Upgrade Process Overview Upgrade Process Notes Upgrade Notes Maximo 7.6 Installation and Configuration
Installing ITDS WebAdmin Tool into WebSphere Application Server Network Deployment V7.0
 Installing ITDS WebAdmin Tool into WebSphere Application Server Network Deployment V7.0 This document provides the procedure to install ITDS WebAdmin Tool into a Full WebSphere Application Server Network
Installing MCA Services on WebSphere 5.1
 Installing MCA Services on WebSphere 5.1 Version 2004.5, Rev. A December 2004 Siebel Systems, Inc., 2207 Bridgepointe Parkway, San Mateo, CA 94404 Copyright 2005 Siebel Systems, Inc. All rights reserved.
IBM. Planning and Installation. IBM Workload Scheduler. Version 9 Release 4
 IBM Workload Scheduler IBM Planning and Installation Version 9 Release 4 IBM Workload Scheduler IBM Planning and Installation Version 9 Release 4 Note Before using this information and the product it
Deployment Scenario: WebSphere Portal Mashup integration and page builder
 Deployment Scenario: WebSphere Portal 6.1.5 Mashup integration and page builder Deployment Scenario: WebSphere Portal 6.1.5 Mashup integration and page builder...1 Abstract...2 Portal Mashup integration
Note: Any references in the documentation to the Hyperion Download Center pertain if your site has access.
 Hyperion System 9 Performance Scorecard Release 9.2.1 Readme Readme File This file contains the following sections: Performance Scorecard 9.2.1... 1 New Features... 2 Defects Fixed... 2 Known Issues...
Version 2 Release 2. IBM i2 Enterprise Insight Analysis Upgrade Guide IBM SC
 Version 2 Release 2 IBM i2 Enterprise Insight Analysis Upgrade Guide IBM SC27-5091-00 Note Before using this information and the product it supports, read the information in Notices on page 35. This edition
Oracle Fusion Middleware
 Oracle Fusion Middleware Creating Domains Using the Configuration Wizard 11g Release 1 (10.3.4) E14140-04 January 2011 This document describes how to use the Configuration Wizard to create, update, and
Oracle Fusion Middleware
 Oracle Fusion Middleware Quick Installation Guide for Oracle Identity Management 11g Release 1 (11.1.1) E10033-01 May 2009 This guide is designed to help you quickly install the most common Oracle Identity
Oracle Fusion Middleware
 Oracle Fusion Middleware Configuration Guide for IBM WebSphere Application Server 11g Release 1 (11.1.1) E17764-01 January 2011 This document describes how to use the Oracle Fusion Middleware Configuration
EVALUATION ONLY. WA2097 WebSphere Application Server 8.5 Administration on Linux. Student Labs. Web Age Solutions Inc.
 WA2097 WebSphere Application Server 8.5 Administration on Linux Student Labs Web Age Solutions Inc. Copyright 2013 Web Age Solutions Inc. 1 Table of Contents Directory Paths Used in Labs...3 Lab Notes...4
Migrating from JRules to Operational Decision Manager
 IBM Software Group Migrating from JRules to Operational Decision Manager Laurent de Clermont-Tonnerre (lclermont@us.ibm.com) Business Rules L2 Support 31 January 2013 WebSphere Support Technical Exchange
Installing the fix pack
 Installing the fix pack To install the fix pack, complete the following tasks: 1. Installing the new and changed files 2. Installing the updated BPF Explorer 3. Updating your BPF Web application configuration
Portal Application Deployment Scripting
 Portal Application Deployment Scripting Graham Harper, IBM ISSL Senior Application Architect Contents Deployment scripting in context What is a portal application? Portal application components Applying
Deploying Intellicus Portal on IBM WebSphere. Version: 7.3
 Deploying Intellicus Portal on IBM WebSphere Version: 7.3 Copyright 2015 Intellicus Technologies This document and its content is copyrighted material of Intellicus Technologies. The content may not be
NetBackup Deployment Template User Guide for System Center Configuration Manager (SCCM)
") NetBackup Deployment Template User Guide for System Center Configuration Manager (SCCM) September 25, 2017 Third-party mass-deployment tools like System Center Configuration Manager (SCCM) and Chef are
NetBackup Deployment Template User Guide for System Center Configuration Manager (SCCM) September 25, 2017 Third-party mass-deployment tools like System Center Configuration Manager (SCCM) and Chef are
IBM Unica Interact Version Publication Date: July 14, Installation Guide
 IBM Unica Interact Version 8.5.0 Publication Date: July 14, 2011 Installation Guide Copyright Copyright IBM 2011 IBM Corporation Reservoir Place North 170 Tracer Lane Waltham, MA 02451-1379 All software
Deploying Intellicus Portal on IBM WebSphere
 Deploying Intellicus Portal on IBM WebSphere Intellicus Enterprise Reporting and BI Platform Intellicus Technologies info@intellicus.com www.intellicus.com Copyright 2010 Intellicus Technologies This document
Directory structure and development environment set up
 Directory structure and development environment set up 1. Install ANT: Download & unzip (or untar) the ant zip file - jakarta-ant-1.5.1-bin.zip to a directory say ANT_HOME (any directory is fine) Add the
IBM InfoSphere Master Data Management Standard and Advanced Editions Version 11 Release 6. Installation Guide IBM
 IBM InfoSphere Master Data Management Standard and Adanced Editions Version 11 Release 6 Installation Guide IBM IBM InfoSphere Master Data Management Standard and Adanced Editions Version 11 Release 6
IBM Marketing Operations Version 9 Release 1.1 November 26, Installation Guide
 IBM Marketing Operations Version 9 Release 1.1 November 26, 2014 Installation Guide Note Before using this information and the product it supports, read the information in Notices on page 97. This edition
Connector for CA Unicenter Service Desk & CA Software Change Manager for Distributed Product Guide. Service Pack
 Connector for CA Unicenter Service Desk & CA Software Change Manager for Distributed Product Guide Service Pack 02.0.1 This Documentation, which includes embedded help systems and electronically distributed
Version 11 Release 0 May 31, IBM Contact Optimization Installation Guide IBM
 Version 11 Release 0 May 31, 2018 IBM Contact Optimization Installation Guide IBM Note Before using this information and the product it supports, read the information in Notices on page 39. This edition
2017, IBM Corporation Liberty z/os Good Practices. WebSphere Liberty z/os Applications and Application Deployment
 WebSphere Liberty z/os Applications and Application Deployment 1 Objective of this Presentation Provide an understanding of the application types supported by Liberty Provide a general understanding of
Akana API Platform: Upgrade Guide
 Akana API Platform: Upgrade Guide Version 8.0 to 8.2 Akana API Platform Upgrade Guide Version 8.0 to 8.2 November, 2016 (update v2) Copyright Copyright 2016 Akana, Inc. All rights reserved. Trademarks
IBM SmartCloud Control Desk Version 7 Release 5.1. Planning for Deployment Guide
 IBM SmartCloud Control Desk Version 7 Release 5.1 Planning for Deployment Guide Note Before using this information and the product it supports, read the information in Notices on page 55. Contents Chapter
Installation Cookbook: DB2, WebSphere MQ, and WebSphere Cluster
 IBM InfoSphere Master Data Management Version 11.3 Installation Cookbook: DB2, WebSphere MQ, and WebSphere Cluster GI13-2676-00 IBM InfoSphere Master Data Management Version 11.3 Installation Cookbook:
IBM Lotus Quickr STEW Technical Overview
 Lotus Worldwide Technical Sales IBM Lotus Quickr STEW Technical Overview 2007 IBM Corporation Agenda Section 1 Installing Quickr Services for Lotus Domino Configuring Quickr Services for Lotus Domino Section
WA2031 WebSphere Application Server 8.0 Administration on Windows. Student Labs. Web Age Solutions Inc. Copyright 2012 Web Age Solutions Inc.
 WA2031 WebSphere Application Server 8.0 Administration on Windows Student Labs Web Age Solutions Inc. Copyright 2012 Web Age Solutions Inc. 1 Table of Contents Directory Paths Used in Labs...3 Lab Notes...4
Oracle Financial Services Behavior Detection Applications Pack
 Oracle Financial Services Behavior Detection Applications Pack Installation Guide Release 8.0.2.0.0 E70893-01 February 2016 Installation Guide, Release 8.0.2.0.0 E70893-01 Copyright 2016, Oracle and/or
Deploying Cisco Nexus Data Broker
 This chapter contains the following sections: Installing Cisco Nexus Data Broker, page 1 Installing Cisco Nexus Data Broker Installing or Upgrading the Cisco Nexus Data Broker Software Important There
Oracle Financial Services Data Management Application Pack
 Oracle Financial Services Data Management Application Pack Installation Guide Version 8.0.2.0.0 Table of Contents TABLE OF CONTENTS Preface... 3 Audience... 3 Prerequisites for the Audience... 3 How this
CA Output Management Web Viewer
 CA Output Management Web Viewer Installation Guide Release 12.1.00 This Documentation, which includes embedded help systems and electronically distributed materials, (hereinafter referred to as the Documentation
Gunes EROL-http://heliosguneserol.wordpress.com/
 1 Reference: Upgrading to the Latest OracleAS 10g 10.1.3.x Patch Set in Oracle E-Business Suite Release 12 [ID 454811.1] In This Article; I try to explain upgrade the OracleAS 10g Release 3 (10.1.3) to
NoCOUG. Extending Oracle 10g Grid Control Using Management Plug-Ins Randy Arseneau VP, Product Marketing BEZ Systems, Inc.
 Extending Oracle 10g Grid Control Using Management Plug-Ins NoCOUG 08.17.06 Randy Arseneau VP, Product Marketing BEZ Systems, Inc. AGENDA OEM 10g Overview OEM 10g Grid Control Data Collection Options for
Extended Search Administration
 IBM Lotus Extended Search Extended Search Administration Version 4 Release 0.1 SC27-1404-02 IBM Lotus Extended Search Extended Search Administration Version 4 Release 0.1 SC27-1404-02 Note! Before using
INSTALLING AND DEPLOYING ADOBE EXPERIENCE MANAGER FORMS ON JEE FOR WEBSPHERE
 INSTALLING AND DEPLOYING ADOBE EXPERIENCE MANAGER FORMS ON JEE FOR WEBSPHERE Legal notices Legal notices For legal notices, see http://help.adobe.com/en_us/legalnotices/index.html. iii Contents Chapter
Installing Portal Server in a cluster environment
 IBM WebSphere Portal for Multiplatforms Version 4.1 28 June, 2002 Second Edition Abstract Because Portal Server runs as an application server within WebSphere Application Server, you can take advantage
IBM. Harshit Kumar Agrawal & Chethan Chandrashekar 3/5/2014
 IBM Installing and Configuring IBM Case Manager 5.2 with FileNet P8 5.2.0 on single server An in-depth guide for users to setup an IBM Case Management environment using CMPIT 5.2.0 on a single server.
Hyperion Shared Services TM. Readme. Release Service Pack 1 ( )
") Hyperion Shared Services TM Release 9.3.1 Service Pack 1 (9.3.1.1.00) Readme [Skip Navigation Links] About This Service Pack...2 What is in the Service Pack?... 2 New Features...2 Enhancement to Infrastructure
Hyperion Shared Services TM Release 9.3.1 Service Pack 1 (9.3.1.1.00) Readme [Skip Navigation Links] About This Service Pack...2 What is in the Service Pack?... 2 New Features...2 Enhancement to Infrastructure
Oracle Communications Order and Service Management
 Oracle Communications Order and Service Management Release Notes Release 7.3.5 E79211-02 June 2017 This document provides release notes for Oracle Communications Order and Service Management (OSM) release
HP-UX for the Itanium Processor Family Architecture. 215 MB Approx
 README Search Interface to SAS Content 1.5 Prerequisites Platform Microsoft Windows Microsoft Windows for x64 HP-UX HP-UX for the Itanium Processor Family Architecture Linux for x64 Solaris Solaris for
BEA BEA WebLogic ERP Adapter Installation and Configuration Version For WebLogic Server 9.1
 BEA BEA WebLogic ERP Adapter Installation and Configuration Version 5.5.011 For WebLogic Server 9.1 DN3501550.0306 March 9, 2006 EDA, EDA/SQL, FIDEL, FOCCALC, FOCUS, FOCUS Fusion, FOCUS Vision, Hospital-Trac,
Customizing Oracle Identity Governance: Populating Request Attributes
 Customizing Oracle Identity Governance: Populating Request Attributes Page 1 of 29 Customizing Oracle Identity Governance : Populating Request Attributes Overview When creating requests for application
Vendor: IBM. Exam Code: A Exam Name: Assessment: IBM WebSphere Appl Server ND V8.0, Core Admin. Version: Demo
 Vendor: IBM Exam Code: A2180-317 Exam Name: Assessment: IBM WebSphere Appl Server ND V8.0, Core Admin Version: Demo QUESTION: 1 A system administrator has successfully installed the WebSphere Application
Siebel Installation Guide for Microsoft Windows. Siebel Innovation Pack 2016, Rev. A July 2016
 Siebel Installation Guide for Microsoft Windows Siebel Innovation Pack 2016, July 2016 Copyright 2005, 2016 Oracle and/or its affiliates. All rights reserved. This software and related documentation are
Oracle Weblogic products are available at
 1 Chapter 1 Installing Oracle Weblogic Server In this chapter we will move our first steps with Oracle Weblogic Server by learning how to install it using the guided wizard installation or the compacted
Best Practices for WebSphere Application Server Product Updates
 IBM Software Group Best Practices for WebSphere Application Server Product Updates Joe Mertzlufft WebSphere Support Technical Exchange Agenda Overview of the update process Choosing and obtaining the correct
IBM SmartCloud Control Desk Version 7 Release 5. Planning for Deployment Guide
 IBM SmartCloud Control Desk Version 7 Release 5 Planning for Deployment Guide Note Before using this information and the product it supports, read the information in Notices on page 55. Contents Chapter
Demo Package Guide. OpenL Tablets BRMS Release 5.19
 Demo Package Guide OpenL Tablets BRMS Release 5.19 Document number: TP_OpenL_DPG_1.2_LSh Revised: 06-04-2018 OpenL Tablets Documentation is licensed under a Creative Commons Attribution 3.0 United States
ORACLE USER PRODUCTIVITY KIT UPGRADE RELEASE SERVICE PACK 2 PART NO. E
 ORACLE USER PRODUCTIVITY KIT UPGRADE RELEASE 3.6.1 SERVICE PACK 2 PART NO. E17977-01 JUNE 2010 COPYRIGHT Copyright 1998, 2010, Oracle and/or its affiliates. All rights reserved. Part No. E17977-01 Oracle
BEAWebLogic. Portal. MobileAware Interaction Server Installation Guide
 BEAWebLogic Portal MobileAware Interaction Server Installation Guide Version 8.1 with Service Pack 3 (MobileAware Version 1.0) Document Revised: September 2004 Copyright Copyright 2004 BEA Systems, Inc.
Creating Domain Templates Using the Domain Template Builder 11g Release 1 (10.3.6)
") [1]Oracle Fusion Middleware Creating Domain Templates Using the Domain Template Builder 11g Release 1 (10.3.6) E14139-06 April 2015 This document describes how to use the Domain Template Builder to create
[1]Oracle Fusion Middleware Creating Domain Templates Using the Domain Template Builder 11g Release 1 (10.3.6) E14139-06 April 2015 This document describes how to use the Domain Template Builder to create
Maintenance Pack Installation Instructions. Vendavo 8.2 on NetWeaver
 Maintenance Pack Installation Instructions Vendavo 8.2 on NetWeaver Vendavo 8.2 on NetWeaver Release: 8.2 Document Revision: 1 Publication Date: December 2015 If you have questions or comments about Vendavo
IBM Telecom Operations Content Pack ifix JR33078, Readme
 IBM Telecom Operations Content Pack 6.2.0 ifix JR33078, Readme 1.0 Purpose of this ifix 2.0 Contents of this ifix 3.0 Prerequisites for using the ifix 4.0 Using the IBM Telecom Operations Content Pack
DB2 for z/os Stored Procedure support in Data Server Manager
 DB2 for z/os Stored Procedure support in Data Server Manager This short tutorial walks you step-by-step, through a scenario where a DB2 for z/os application developer creates a query, explains and tunes
Oracle Financial Services Regulatory Reporting for US Federal Reserve Lombard Risk Integration Pack
 Oracle Financial Services Regulatory Reporting for US Federal Reserve Lombard Risk Integration Pack Installation Guide Release 8.0.4.1.0 July 2017 Executive Summary This document includes the necessary
INSTALLATION GUIDE Online Collection Software for European Citizens' Initiatives
 INSTALLATION GUIDE Online Collection Software for European Citizens' Initiatives 1. Application database preparation... 2 1.1. Oracle Database 11g... 2 1.2. MySQL 5.5+... 2 2. System initialisation...
CA Mediation Manager and CA Mediation Manager for Infrastructure Management
 CA Mediation Manager and CA Mediation Manager for Infrastructure Management Installation Guide CA Mediation Manager Release 2.2.3 / CA Mediation Manager for Infrastructure Management 2.0, Release 2.2.3
Micro Focus VisiBroker Installation Guide
 Micro Focus VisiBroker 8.5.5 Installation Guide Micro Focus The Lawn 22-30 Old Bath Road Newbury, Berkshire RG14 1QN UK http://www.microfocus.com Copyright Micro Focus 2009-2018 All rights reserved. MICRO
INSTALLING AND DEPLOYING ADOBE EXPERIENCE MANAGER FORMS ON JEE FOR JBOSS
 INSTALLING AND DEPLOYING ADOBE EXPERIENCE MANAGER FORMS ON JEE FOR JBOSS Legal notices Legal notices For legal notices, see http://help.adobe.com/en_us/legalnotices/index.html. iii Contents Chapter 1:
Archivists Toolkit Internal Database
 Archivists Toolkit Internal Database The Archivists Toolkit now includes (AT 2.0, update 9 and later), support for an internal database based on HyperSQL 2.0 (HSQLDB). HyperSQL is a small, reliable, high
Topaz for Java Performance Installation Guide. Release 16.03
 Topaz for Java Performance Installation Guide Release 16.03 ii Topaz for Java Performance Installation Guide Please direct questions about Topaz for Java Performance or comments on this document to: Topaz
SOA Software Policy Manager Agent v6.1 for WebSphere Application Server Installation Guide
 SOA Software Policy Manager Agent v6.1 for WebSphere Application Server Installation Guide Trademarks SOA Software and the SOA Software logo are either trademarks or registered trademarks of SOA Software,
ECP. Installation Guide V4.2.0
 Unicorn 2016 Unicorn Systems a.s. Jankovcova 1037/49, CZ 170 00 Prague 7 Project: Project Subject: Document Title: ECP Date: Author: 1.11.2016 Jakub Eliáš, Aleš Holý, Zdeněk Pospíšil, Josef Brož, Jiří
Tasktop Sync - Cheat Sheet
 Tasktop Sync - Cheat Sheet 1 Table of Contents Tasktop Sync Server Application Maintenance... 4 Basic Installation... 4 Upgrading Sync... 4 Upgrading an Endpoint... 5 Moving a Workspace... 5 Same Machine...
INSTALLING AND DEPLOYING ADOBE LIVECYCLE ES4 FOR WEBSPHERE
 INSTALLING AND DEPLOYING ADOBE LIVECYCLE ES4 FOR WEBSPHERE Legal notices Legal notices For legal notices, see http://help.adobe.com/en_us/legalnotices/index.html. iii Contents Chapter 1: About This Document
Upgrading Maximo to CCMDB
 Upgrading Maximo 6.2.4 to CCMDB 7.1.1.5 ii Upgrading Maximo 6.2.4 to CCMDB 7.1.1.5 Contents CCMDB Upgrade Overview...... 1 Upgrading CCMDB............ 2 Using the conflictchecker tool........ 15 iii iv
Oracle Enterprise Manager. 1 Introduction. System Monitoring Plug-in for Oracle Enterprise Manager Ops Center Guide 11g Release 1 (
 Oracle Enterprise Manager System Monitoring Plug-in for Oracle Enterprise Manager Ops Center Guide 11g Release 1 (11.1.3.0.0) E18950-03 November 2011 This document provides describes the System Monitoring
Installing or Upgrading the Cisco Nexus Data Broker Software in Centralized Mode
 Installing or Upgrading the Cisco Nexus Data Broker Software in Centralized Mode This chapter contains the following sections: Installing Cisco Nexus Data Broker in Centralized Mode, page 1 Installing
SOA Software Intermediary for Microsoft : Install Guide
 SOA Software Intermediary for Microsoft : Install Guide SOA Software Intermediary for Microsoft Install Guide SOAIM_60 August 2013 Copyright Copyright 2013 SOA Software, Inc. All rights reserved. Trademarks
INSTALLING AND DEPLOYING ADOBE EXPERIENCE MANAGER FORMS ON JEE FOR WEBLOGIC
 INSTALLING AND DEPLOYING ADOBE EXPERIENCE MANAGER FORMS ON JEE FOR WEBLOGIC Legal notices Legal notices For legal notices, see http://help.adobe.com/en_us/legalnotices/index.html. iii Contents Chapter
IBM Maximo for Utilities and IBM Maximo Spatial Asset Management. Release 6.3. Installation Guide GC
 IBM Maximo for Utilities and IBM Maximo Spatial Asset Management Release 6.3 Installation Guide GC23-8744-00 Note Before using this information and the product it supports, read the information in Notices
Installation Instructions for Hot Fix A5T006
 Installation Instructions for Hot Fix A5T006 Hot fix A5T006 addresses the issue(s) in Compliance Solutions 7.1 as documented in the Issue(s) Addressed section of the hot fix download page: http://ftp.sas.com/techsup/download/hotfix/hf2/a5t.html#a5t006
Inside WebSphere Application Server
 Inside WebSphere Application Server The anatomy of WebSphere Application Server is quite detailed so, for now, let's briefly outline some of the more important parts. The following diagram shows the basic
IBM. Migration Cookbook. Migrating from License Metric Tool and Tivoli Asset Discovery for Distributed 7.5 to License Metric Tool 9.
 IBM License Metric Tool 9.x Migration Cookbook Migrating from License Metric Tool and Tivoli Asset Discovery for Distributed 7.5 to License Metric Tool 9.x IBM IBM License Metric Tool 9.x Migration Cookbook
Apparo Fast Edit. Installation Guide 3.1
 Apparo Fast Edit Installation Guide 3.1 Linux & IBM AIX / Standalone version [1] Table of content 1 Prior to Installation 4 1.1 Hardware requirements... 4 1.2 Supported operating systems... 4 1.3 Supported
Upgrade to IBM Connections 5.5 CR2 from IBM Connections 5.5 CR1 With Connections Content Manager (CCM)
") Upgrade to IBM Connections 5.5 CR2 from IBM Connections 5.5 CR1 With Connections Content Manager (CCM) 2016-12-19 12/19/2016 Page 1 Summary Upgrade to IBM Connections 5.5 CR2 (with CCM) 1 Introduction...
Upgrade to IBM Connections 5.5 CR2 from IBM Connections 5.5 CR1 With Connections Content Manager (CCM) 2016-12-19 12/19/2016 Page 1 Summary Upgrade to IBM Connections 5.5 CR2 (with CCM) 1 Introduction...