ENJOY Introduction. Software Installation* Hardware. Calibration Settings. Print test. Appendex. Install print S/W Driver Install
|
|
|
- Darleen Robertson
- 5 years ago
- Views:
Transcription

1 Quick Start Manual


2 1 ENJOY Introduction C O N T E N T S 6 5 Appendex 4 Print test 3 2 Hardware Calibration Settings Software Installation* Install print S/W Driver Install Hardware Intro Cable installation Power and Trans cable install Setup and connection Extruder Calibration Print bed Calebration Load 3D object Adjust print object Slice and G-Code Start print

3 PART 1 ENJOY Introduction Rear Panel Feeding Tube LED Panel Extruder Gearbox X Y Stepper Motor Unload button Z screw Bed adjust knob Print Bed Front view Rear view
4 PART 2 Software Installation Install print S/W Driver Install


5 S/W-Print software install (1/6) Download 86DuinoRepetierHost file from following to your computer: Double click the setup file icon Setup icon Select the language you prefer and click OK

6 S/W-Print software install (2/6) Click Next on Setup Wizard : Read the License Agreement and if in agreement, Select I accept the agreement and then click Next.

7 S/W-Print software install (3/6) 4 5 Click Next if you like to put it under Program Files or you can choose your preferred location by clicking Browse then click Next (default setting)

8 S/W-Print software install (4/6) Click Next if you like to put the shortcut in 86Duino Repetier-Host folder or you can click Browse to choose a different folder. If you would like to create a desktop icon, check off, Create a desktop icon and then click Next.
 9 Click")

9 S/W-Print software install (5/6) 9 Click Install to start the installation. Software Installation


10 S/W-Print software install (6/6) After installation is complete, you can choose whether to continue to install the driver. If the previous driver has been installed, you can skip the "Driver Installation" teaching content. If you do not execute software now and then, can be performed by clicking "RepetierHost.exe" file Lanch 86Duino Repetier-Host Install serial driver Duino Repetier-Host Icon Installation completion

11 PART 2 Software Installation Install print S/W Driver Install


12 S/W-Driver install (1/3) If you choose to print software installation to continue after the completion of driver installation, the following installation screen will appear, please follow the instructions to complete the installation: 1 Driver extract confirmation screen Driver extracting screen

13 S/W-Driver install (2/3) Click Next for Setup Wizard : Read the License Agreement and if in agreement, Select I accept the agreement and then click Next.
 55.")

14 S/W-Driver install (2/3) 55. Install screen Installation completion screen
15 PART 3 Hardware Assembly Hardware Intro Cable installation Power and Trans cable install


16 Hardware Intro /Description ENJOY Printer Accessories ENJOY includes the following items at the box: Power Adapter Printing board(include Clips) Test print micro USB cable Filament holder Extruderpositioned tested
17 PART 3 Hardware Assembly Hardware Intro Cable Installation Power and Trans cable install


18 Cable Installation (1/5) Mounted filament holder on the rear of the printer: 1. Counterclockwise direction of the mounting holder ENJOY rear view Filament holder mounting holes 2. Place the Filament hanging on the holder (note direction) Holder Direction


19 Cable Installation (2/5) Prior to each use, remove the harden/used end of the filament by cutting off 2 inch from the end to be loaded into the extruder. 4. feed the filament into the Feeder 3. Cutting Feeder Thread


20 Cable Installation (3/5) Push up on the spring to the left while feeding the filament up into the tube. 5. Push up on the spring 6. gears will be moved to the right, to generate the space Feeder Feeder
21 Cable Installation (4/5) Continue to feed the filament up into the extruder until you feel there is NO room for more filament. 7. Feed the filament up into the feeder 8. until you feel there is NO room for more filament. Feeder Feeder
22 Cable Installation (5/5) When you feel there is NO room for more filament. Release the spring. The filament is now loaded. 9. Release the spring 10. The filament is now loaded Feeder

23 PART 3 Hardware Assembly Hardware Intro Cable Installation Power and Trans cable install

")

24 Connect Enjoy Printer (1/2) With the Power switch in the OFF position, connect the provided power supply to an AC ( V) source and the USB cable to a computer. Panel Power micro USB cable Direction

 Cable")
25 Connect Enjoy Printer (2/2) If you are worried of cables may affect the filament rotates, the entire line can be used to secure the wire loop: Panel Complete Installation Reference Cable ring(before) Cable ring(after) Direction
26 Calibration Settings Setup and connection Extruder Calibration Print bed Calebration PART 4
 Power")


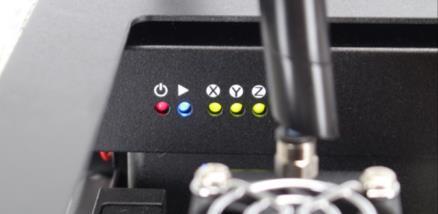
27 Software setup and connection (1/7) Power on, then all LED on the panel lights blink once after leaving Red lighted. 1. Power adapter 2. Switch power on 3. all LED on the panel lights blink once after leaving Red lighted.
")


28 Software setup and connection (2/7) Enjoy Printer via micro USB cable to the PC, then the PC will automatically install the driver. 4. Micro USB Cable connect to PC 5. Driver installed 6. Device manager confirmed
")

29 Software setup and connection (3/7) Run 86Duino-Repetier-Host (RH) program, and check printer status: 1. Start screen 2. click "Printer Setup" button
 3. Select Connection tab and click Port tab 4.")
30 Software setup and connection (4/7) Printer Setup-If cannot connect the Enjoy printer to PC(default Auto does not work) 3. Select Connection tab and click Port tab 4. Manually select the port
 5.")

31 Software setup and Connection (5/7) Printer Setup - Printer and setting (default) 5. Select "Printer" tab, the default setting as shown 6. Select Extruder" tab, the default setting as shown


32 Software setup and Connection (6/7) Printer Setup - Printer and setting (default) 7. Select "Printer Shape" tab, the default setting as shown 8. Click ok and Exit
33 Software setup and Connection (7/7) 9. Confirm the printer power on and micro USB cable connected PC, press the top left "Connect" button 10. The Enjoy Printer will emote a short 3-beep pepping sound and the red Connect" icon will turn green
34 Calibration Settings Setup and connection Extruder Calibration Print bed Calebration PART 4
 2.")

35 Leveling the Platform Extruder Correction(1/10) Extruder home position operation cm 2cm 2cm 2cm 1. The object is placed on the tray to print bed (Attention the direction) 2. The clips sandwiched around object tray, the tray will be fixed on the print bed, clips should be noted from the level of about 2 cm above the knob, so as not to affect the follow-up bed horizontal adjustment.

36 Leveling the Platform Extruder Correction(2/10) Extruder home position operation 3. Click the "Manual Control tab on the right side 4. then click on the Home icon, then the printer begins to move the extruder and print bed to home position *note! Make sure to dismount the cable ties and other protective components of the fixed printer after this operation to avoid motor damage.

37 Leveling the Platform Extruder Correction(3/10) Extruder home position operation X Y Z X Z 5. Extruder and print bed will move to home position 6. The extruder and print bed will reposition then stop. The X and Y LED will light up green, but NOT the Z LED
 Extruder home position")


38 Leveling the Platform Extruder Correction(4/10) Extruder home position operation Using a Philips screwdriver, turn the screw (shown in the picture below) counter clockwise until the Z LED lights up green 8. Then, turn the screw back, clockwise, half a turn or until the Z LED turns off again. 9. In this case, please re-clockwise about a quarter turn more, let extruder in good position
 Extruder Z offset")

39 Leveling the Platform Extruder Correction(5/10) Extruder Z offset Click the SD Card tab 2. then double click on the Probe Z offset folder


40 Leveling the Platform Extruder Correction(6/10) Extruder Z offset Click the Z Probe gcode 4. Click the Start icon at the top 5. The head will reposition and stop at the center of the platform/bed, status windows also show adjustment result.
 Extruder Z offset Too High")

41 Leveling the Platform Extruder Correction(7/10) Extruder Z offset Too High 6 Paper Head Bed 6. Using a strip of test paper (e.g., using a regular A4 sized paper,), try to insert the test paper between the head and the bed: If you can insert the test paper between head and bed, but feel no resistant as you move the test paper around, the gap between the head and the bed is too large. You will need to click on Decreasing_the_gap If you can NOT insert the test paper between the head and bed, the gap between the head and the bed is too small. You will need to click on Increasing_the_gap

42 Leveling the Platform Extruder Correction(8/10) Extruder trimming 2 Option Decreasing_the_gap_0.05mm Decreasing_the_gap_0.1mm Decreasing_the_gap_0.2mm Note 0.05 mm 0.10 mm 0.20 mm 1 Increasing_the_gap_0.05mm Increasing_the_gap_0.1mm Increasing_the_gap_0.2mm 0.05 mm 0.10 mm 0.20 mm 1. Select Decreasing or Increasing option 2. click the Start icon at the top of the screen. The head and bed will re-calibrate 3. Repeat the above two steps until you can insert the test paper between the head and bed, and feel resistance when you move the test paper around

 to go back to the previous manual * Do not turn off the Printer")
43 Leveling the Platform Extruder Correction(9/10) SAVE Extruder trimming Now you can click SAVE gcode 2. Click on the icon at the top of the screen 3. Status Windows will show SAVE success* 4. Double click on the folder icon(#4) to go back to the previous manual * Do not turn off the Printer before the save completed or disconnect the connection, otherwise it will cause serious damage to the system!
44 Leveling the Platform Extruder Correction(10/10) After the completion of the extruder correction and save, you do not need to do correction every time, but if the following situations occur, recommended do extruder correction again: 1. Printers have moved 2. Extruder collision with objects 3. Object will not stick to build plate 4. Objects warping

45 Calibration Settings Setup and connection Extruder Calibration Print bed Calebration PART 4

 at the top.")


46 Leveling the Bed(1/3) Double click on the Bed Adjustment folder 2. Click on Bed_Adjustment.gcode 3. click on the Start icon (#2) at the top. The head will do a 9 point test. Wait until the head has stopped completely 4. Review the Log window at the bottom left, scrolling down/up if needed, to see the following result


47 Leveling the Bed(2/3) Bottom Left Bottom Right Position Knob Note The upper left corner: Pass passed and do not need any adjusting The upper right corner: Pass passed and do not need any adjusting Upper Left Upper Right The bottom left corner: Please Turn CW 0.20 Turn Turn the adjustment knob Clockwise 0.20 of a turn. The bottom right corner: Please Turn CCW 0.09 Turn Turn the adjustment knob Counterclockwise 0.09 of a turn. Bottom Left Bottom Right 5. Knob Position


48 Leveling the Bed(3/3) CW CCW Go back to step again and repeat the step until you see all four corner are Pass. Now you have completed the leveling of the platform.
49 Print Test Load 3D object Adjust print object Slice and G-Code Start print PART 5


 4.")
50 Load 3D object (1/2) Load Object Click the object replacement tab 2. Click Add object 3. *Select 3D print file you are going to Print (*.STL) 4. Click on to load the file

51 Load 3D object (1/2) You can review the file/image with some options on the left side tool bar: Press and hold the left mouse button and move mouse, can change the viewing angle Press and hole scroll wheel and move the mouse horizontally movable perspective Up / down scroll wheel to zoom in / wide view Right-click on the object and hold and move the mouse, the position of the movable object
52 Print Test Load 3D object Adjust print object Slice and G-Code Start print PART 5


53 Adjust the print object - rotate object Click Rotate object icon 2. by the X, Y, Z axis input rotation angle, you can see the result of the rotation 3. Reset Rotation button to reset the rotation 4. Click on "Lay Flat" button, you can automatically rotate the object closest to the bottom Before After


54 Adjust the print object - rotate object Click Rotate object icon 2. by the X, Y, Z axis input rotation angle, you can see the result of the rotation 3. Reset Rotation button to reset the rotation 4. Click on "Lay Flat" button, you can automatically rotate the object closest to the bottom Before After
55 Print Test Load 3D object Adjust print object Slice and G-Code Start print PART 5
 None:None 2) Brim:Thin layer on the bottom")
56 Slice and G-Code Slice with CuraEngine 1. Click Slice Tab 2. Click Adhesion Type menu,setting Adhesion type: 1) None:None 2) Brim:Thin layer on the bottom 3) Raft:Thick layer on the bottom
57 Slice and G-Code Slice with CuraEngine 3. Click the "Quality" menu, set * print thickness, have 0.1 mm and 0.2 mm options 4. Click on "Support Type" menu, set the object support mode: None:No support Touching Bed:only the bottom portion of the floating object and generate support layer Everywhere:All objects floating parts are produced support layer 5. Click the Slice with CuraEngine" produce print codes (G-Code)


58 Slice and G-Code Slice with CuraEngine 6. The Show Print code generation progress, to cancel code generation can click Kill Slicing" button 7. Print code completion, it will automatically jump to "Print Preview" tab to display the estimated time to print, number of layers and the estimated length of the filament length, and is ready to begin printing
:Excellent with support Excellent:Excellent without support Fast (Support) :Fast with support Fast :Fast without support Regular (Support) :Regular with")
59 Slice and G-Code Slice with Silc3r 1. Print quality setting Excellent(Support):Excellent with support Excellent:Excellent without support Fast (Support) :Fast with support Fast :Fast without support Regular (Support) :Regular with support Regular:Regular without support 2. Extrusion quality (Extruder 1) : Excellent Fast Regular 3. Override Slic3r Settings:this option is reserved for advanced users, no need to checked

60 Print Test Load 3D object Adjust print object Slice and G-Code Start print PART 5


61 Start Print Before After 1. Click on "Save to File" button, you can save code is as "*.gcode" type file 2. Slider the First layer" and Last layer" or set the number, you can watch the print path between the layers

62 Start Print 3 4. Click on "Print" button to start printing 5. At this time will automatically jump to "manual control" tab, and displays the status of print 6. Will first heated extruder before the start of printing, wait a few minutes 7. After the extruder to be heated to a preset temperature will begin to print

 9.")
63 Start Print At the same time printing, software will continue to transmit the code to the printer to print 8. "Manual control" tab will show "Code Transmission" remaining time (note! Non-print time remaining) 9. During the printing process if you need to stop the printing, for whatever reason, click on Emergency Stop button on the top right.

64 PART 6 A p p e n d i x

65 Appendix-A Unload Filament 1. Within a short time when you will not use printer, suggest unload filament from the extruder, so as to avoid filament solidification leads to clogged extruder. 2. Turn the power on, press and hold the rear red button after three seconds unload release, then the system will issue a warning sound, the system will begin to filament unloading automatically. 3. Unloading takes about three minutes or so, at same time also cleanup extruder when unload filament
Dreamer Series User Manual
 Dreamer Series User Manual Welcome to the world of the Dreamer. To ensure that you have the best possible user experience, it s important that you follow this user manual. Let s get started! In Parts I
UP! Quick Start Guide
 Personal Portable 3D Printer UP! www.pp3dp.com 1. Assemble Printer Open the box, take out the printer and accessories. Assemble the parts contained in the box as following procedure: 1. Unscrew the M4
A GUIDE TO GETTING STARTED
 Florida Public Library Printing A GUIDE TO GETTING STARTED Prepared for the Florida Public Library by Robert Persing Table of Contents Section-A. Download the software... 3 Section-B. Install the software...
ideamaker Manual
 ideamaker Manual Using ideamaker... 2 Basic information... 2 What is ideamaker?... 2 Where to download ideamaker?... 2 Install ideamaker... 3 Let s Print!... 6 How to use ideamaker?... 23 Interface...
Instruction Manual. RS 3D Printer
 Instruction Manual RS 3D Printer 1) GENERAL This instruction manual contains important information regarding the installation, operation, maintenance and storage for RS 3D Printer. Please read these instructions
Geeetech Duplicator 5 3D printer. User Manual
 Geeetech Duplicator 5 3D printer User Manual Contents Safety Instructions... 4 1.Software Resources... 5 1.1 Repetier-Host... 5 1.2 Driver... 5 1.3 Arduino IDE... 6 2.Connect the Printer... 6 3.Printer
Cura - DUET Dual Extrusion Setup
 SeeMeCNC Guides Written By: SeeMeCNC 2018 seemecnc.dozuki.com/ Page 1 of 15 INTRODUCTION Please note that dual extrusion is for advanced users. You should have some advanced knowledge on some G-Code and
Panowin F1. User Manual
 Panowin F1 User Manual 1 PANOWIN TECHNOLOGIES CO.,LTD. WARNING power outlet. CAUTION: In case of emergency unplug the Panowin F1 from the WARNING: Carefully monitor the Panowin F1 during operation. Do
Product User Manual. IdeaWerk 3D Printer WT150
 Product User Manual IdeaWerk 3D Printer WT150 Contents Contents 1. Unpack and checking... 1 1.1 Check the Machine... 1 1.2 Check the Accessories... 3 2. Brief Introduction... 3 2.1 Precautions and Safety...
Dremel Idea Builder 3D40. Various infill options are available from Simplify 3D software. Varies dependent on the infill and size of your object.
 Guide for Dremel Printing General information The Dremel Idea Builder 3D printer extrudes PLA plastic along a tool path to create layers much like our higher end Dimension. The Dremel however does not
USER S GUIDE. Documentation Version 1.0.0
 Documentation version 1.0.0 tt USER S GUIDE INTRODUCTION 2 INTRODUCTION INTRODUCTION / 3 INTRODUCTION Target : Provide a visual guide of the different steps required to use an I3 Metal Motion 3D printer.
USER MANUAL Resolution 0.02mm Speed 300mm/second Software: Wanhao Maker
 1 Duplicator 5S & 5S MINI Desktop 3D Printers USER MANUAL Resolution 0.02mm Speed 300mm/second Software: Wanhao Maker 2014/2015 Wanhao USA 3 Table of Contents Welcome 1 Printer Specifications 2 Unboxing
SHENZHEN GETECH TECHNOLOGY CO LTD. Geeetech A10M 3D Printer. User Manual (v2.0)
") Geeetech A10M 3D Printer User Manual (v2.0) 1 Content 1 Attention... 3 1.1 Safety instructions... 3 1.2 Factory test before delivery... 3 2 Printer display... 4 3 Assembling... 7 3.1 Assembling the main
Geeetech A10M 3D Printer User Manual (v2.0) 1 Content 1 Attention... 3 1.1 Safety instructions... 3 1.2 Factory test before delivery... 3 2 Printer display... 4 3 Assembling... 7 3.1 Assembling the main
Technical Support: CUBE USER MANUAL
 CUBE THE DESKTOP 3D PRINTER USER MANUAL 2012-12-05 1 Contents 1 Installing software...3 1.1 Installing Python... 3 1.2 Installing ReplicatorG... 5 2 Pre-print checks...9 2.1 Power up...9 2.2 Connect to
SHENZHEN GETECH TECHNOLOGY CO., LTD. Geeetech A10 3D Printer. User Manual (V2.0)
") Geeetech A10 3D Printer User Manual (V2.0) 1 Content 1 Attention... 3 1.1 Safety instruction... 3 1.2 Factory test before delivery... 3 2 Printer display... 4 3 Assembling... 7 3.1 Assembling the main
Geeetech A10 3D Printer User Manual (V2.0) 1 Content 1 Attention... 3 1.1 Safety instruction... 3 1.2 Factory test before delivery... 3 2 Printer display... 4 3 Assembling... 7 3.1 Assembling the main
ZHEJIANG FLASHFORGE 3D TECHNOLOGY CO., LTD. Creator Pro Start-up Guide
 www.ff3dp.com ZHEJIANG FLASHFORGE 3D TECHNOLOGY CO., LTD. Creator Pro Start-up Guide www.ff3dp.com Contents 1 What's Included in the Box? 2 2 Un-boxing 2 3 Initial Hardware Installation 6 4 Software Installation
Geeetech Aluminum Prusa I3. User Manual
 Geeetech Aluminum Prusa I3 User Manual 1 Safety Instructions Building the printer will require a certain amount of physical dexterity, common sense and a thorough understanding of what you are doing. We
Software Manual. Revision 1.3
 Software Manual Revision 1.3 Copyright 2015 by Kudo3D. This material may be distributed only subject to the terms and conditions set forth in the Creative Commons Attribution-NonCommercial-NoDerivatives
4. Using Cura to Set Up Your Auto-Leveling Probe and Create Your First Print
 4. Using Cura to Set Up Your Auto-Leveling Probe and Create Your First Print Give a short summary. Written By: Printrbot Support INTRODUCTION Outline what you are going to teach someone how to do. 2015
Portabee GO. Mobile 3D Printer. Portabee 3D. Romscraj. Software & Support. Manufacturing & Engineering.
 Portabee GO Mobile 3D Printer Portabee 3D Software & Support http://portabee3d.com support@portabee3d.com Romscraj Manufacturing & Engineering http://romscraj.com contact@romscraj.com A. Software Package
Documentation version Prusa i3 Rework USER GUIDE REV 1.5. Document Version 1.1.8
 Documentation version 1.1.8 Prusa i3 Rework USER GUIDE REV 1.5 2 INTRODUCTION Target : Prupose a visual guide of the differents steps to build and use a Prusa i3 Rework. Authors of this document : emotion
da Vinci Jr.1.0 April 2016 da Vinci Junior 1.0w 3D Printer da Vinci Jr.1.0w Quick Guide HD23F1JW0N1
 da Vinci Junior 1.0w 3D Printer w Quick Guide P 1 Product Overview A: Filament movement area B: Feed module C: Detector D: Extruder E: Filament F: Print bed G G: SD card port (Storage format: FAT32) H:
da Vinci 1.0 Pro Quick Guide
 US da Vinci 1.0 Pro Quick Guide Product Description Print Parameters Description Support Details Product Model: da Vinci 1.0 Professional da Vinci 1.0 Pro Product Description Product Overview Cartridge
DIY PRINTER INSTALLATION AND OPERATION INSTRUCTION
 CTC DIY I3 PRINTER INSTALLATION AND OPERATION INSTRUCTIONS Thank you for buying and using DIY 3D printer produced by CTC Please read the installation and operation instruction carefully before use Company
Quick Start Guide. including AutoMaker. Version 1.0
 Quick Start Guide including AutoMaker Version 1.0 NOT FOR MEDICAL USE Version 1.0 Welcome Package Contents Check your product package for the following items. 2m USB A-B Cable IEC C5 Power Cable Robox
Agenda. Breaking the Ice Physical Setup Walkthrough of REPETREL First Print
 T1 Training Session Agenda Breaking the Ice Physical Setup Walkthrough of REPETREL First Print Breaking the Ice SYSTEM 30M ENGINE Breaking the Ice Protected build environment Slightly larger build area
Repetier-Host Documentation for use with Kora Pro 3D PC
 Repetier-Host Documentation for use with Kora Pro 3D PC Installation Prerequisites Before you start with the installation, you should check if your computer meets the requirements. Currently available
JGAURORA 3D PRINTER MODEL: A-4 USER GUIDE
 JGAURORA 3D PRINTER MODEL: A-4 USER GUIDE 1 Contents 1. Preface...3 1.1 Introduction...3 1.2 Safety matters... 3 1.3 Filament requirements...3 1.4 Environmental requirements...3 2. About A-4... 4 2.1 Basic
Repetier-Host Documentation
 Repetier-Host Documentation Installation Prerequisites Before you start with the installation, you should check if your computer meets the requirements. Currently available computers should have no problems
ideamaker Manual
 ideamaker Manual www.raise3d.com 1 Using ideamaker... 3 1.1 What is ideamaker?... 3 1.2 Where to download ideamaker?... 3 2 Install ideamaker... 4 3 Let s Print!... 9 3.1 Import.STL files... 9 3.2 Slice
ideamaker Manual
 ideamaker Manual www.raise3d.com 1 Using ideamaker... 3 1.1 What is ideamaker?... 3 1.2 Where to download ideamaker?... 3 2 Install ideamaker... 4 3 Let s Print!... 9 3.1 Import.STL files... 9 3.2 Slice
3D Printing Getting Started!
 ARCHITECTURE & LANDSCAPE ARCHITECTURE 3D Printing Getting Started! White filament is free to students for academic use. Where do I buy filament? NORTH DAKOTA STATE UNIVERSITY www.makerbot.com/store www.ultimachine.com/pla
Repetier-Host Documentation
 Repetier-Host Documentation Installation Prerequisites Before you start with the installation, you should check if your computer meets the requirements. Currently available computers should have no problems
3D BIO-PRINTER. USER MANUAL Version D Cultures
 3D BIO-PRINTER 3D Cultures USER MANUAL Version 2.0 Product pictures are for reference only. Color(s), size, parts, and interface may vary. Preheating is not recommend with the use of cells. This manual
English. Quick Guide
 English Quick Guide Specification Product Overview Button and Indicator light Unpacking Accessory Checklist Important Safety Notes Extruder module installation Accessory installation XYZware operation
3d Printing with the Prusa I3 Operation & Printing via a USB Cable
 3d Printing with the Prusa I3 Operation & Printing via a USB Cable Instructions for: Prusa I3 Printer Set-up Slic3r Software Use Pronterface Software Use Prusa I3 - Parts Identification Prusa I3 Printer
Cura (Documentation for version )
") Cura (Documentation for version 15.04.06) Getting Started Installation To start the installation of Cura, download it first. After downloading, open the installer and run the installation wizard to complete
Cura (Documentation for version 15.04.06) Getting Started Installation To start the installation of Cura, download it first. After downloading, open the installer and run the installation wizard to complete
think big, print huge
 think big, print huge quick start guide Table of Contents a Receiving and uncrating 5 b bed level & z home 11 c Loading filament 19 d SOFTWARE 23 e Setup 23 f preparing a print 26 g printing on gigabot
Written By: Josef Prusa
 6. Preflight check The last things you should check before the first print Written By: Josef Prusa 2018 manual.prusa3d.com/ Page 1 of 13 Step 1 P.I.N.D.A. adjustment, phase 1 Ensure the printer is turned
USER S GUIDE. Documentation Version 1.2.6
 Documentation version 1.2.6 USER S GUIDE INTRODUCTION 2 INTRODUCTION INTRODUCTION / 3 INTRODUCTION Objective: Provide a visual guide of the different steps to set-up and get started using the MicroDelta
Bondtech QR Installation guide for the BCN3D Sigma
 Bondtech QR Installation guide for the BCN3D Sigma 1 Contents Introduction... 3 List of tool required... 3 Mechanical & Electrical Installation... 4 Adjustment of steps/mm...12 Change Log: 1) Added comment
DeltaMaker 3D Printer Getting Started
 DeltaMaker 3D Printer Getting Started Last Updated: December 2014 Table of Contents TABLE OF CONTENTS 2 WELCOME 3 SECTION 1: UNPACKING/SETUP 4 REMOVING THE PRINTER FROM THE BOX 4 INSTALLING THE FILAMENT
Runtime Environment: Relative Humidity: 30%~90% Temperature Ranges : 5 ~35
 Product Data sheet IdeaWerk 3D Printer ENGLISH Runtime Environment: Relative Humidity: 30%~90% Temperature Ranges : 5 ~35 Technical Parameters: 1. Electrical Parameters Power Input: AC 100-240V 47/ 63Hz
Geeetech Rostock mini G2 & G2s pro Quick Starter Manual
 Geeetech Rostock mini G2 & G2s pro Quick Starter Manual Please DO NOT rush to start your first printing after assembly, as this is a DIY kit, some parameters of the printer may be different from each other,
Select Mini 3D Printer V2
 Select Mini 3D Printer V2 P/N 15365, 21711, 21872, 24166 User's Manual CONTENTS SAFETY WARNINGS AND GUIDELINES... 3 INTRODUCTION... 4 FEATURES... 4 CUSTOMER SERVICE... 5 PACKAGE CONTENTS... 5 PRODUCT OVERVIEW...
PowerSpec Ultra 3D Printer Start-up Guide Table of Contents
 PowerSpec Ultra 3D Printer Start-up Guide Table of Contents 1 What's Included in the Box?...Page 3 2 Un-boxing.Page 4 3 Initial Hardware Installation Page 6 4 Software Instruction.Page 8 5 Filament Page
Quickstart Guide Kora Pro 3D PC Printer
 Quickstart Guide Kora Pro 3D PC Printer 1 Rev001/01/2018 Kora Pro PC General Precautions and Advice Only use original accessories from or approved by the manufacturer Always read the manual before initial
Written By: Jakub Dolezal
 5. Preflight check Written By: Jakub Dolezal 2018 manual.prusa3d.com/ Page 1 of 17 Step 1 P.I.N.D.A. adjustment (part 1) Ensure the printer is turned off and not plugged in. Note your extruder is slightly
3-7. Set Materials (Touch Screen) Set Materials (Software) Material Weight adjustment (grams) Current material weight. Increase.
 Set Materials (Software) Material Weight adjustment (grams) Current material weight. Increase.") Set Materials (Touch Screen) 3-7 Decrease Material Weight adjustment (grams) Increase Current material weight Save current settings Stop extrusion and heating Back withdraw material change material extrude
Set Materials (Touch Screen) 3-7 Decrease Material Weight adjustment (grams) Increase Current material weight Save current settings Stop extrusion and heating Back withdraw material change material extrude
Easy use of Repetier-Host software
 Easy use of Repetier-Host software Examples base on version Repetier-Host 1.06 1. Repetier-Host overview Repetier Host is an easy to use software for 3D printing. The main functions include manual debugging
USING YOUR BIGBOT. 1/18/2017 V0.1
 USING YOUR BIGBOT www.bigbot-3d.com 1/18/2017 V0.1 FOREWORD: YOUR PRINTER IS REPRAP, WHICH STANDS FOR "REPLICATING RAPID PROTOTYPERS". THIS MEANS IT CAN PRINT THE PARTS THAT ARE CUSTOM FOR THIS MACHINE,
QUICK START GUIDE. Android or Windows Tablet. 1 Tower PC. Mount the RazorGage to your Own Table. Assembling the RazorGage ST with RazorGage Table
 QUICK START GUIDE Android or Windows Tablet If you have a Tablet Style Interface (PC or Android) then skip this step. 1 Mount monitor and attach legs to control tower using hardware provided and place
Figure 1: The excel document used to personalize a race car by changing the values of 5 parameters
 How to Make a Personalized Race Car 1. Open the excel document entitled Parametric Flexitop Car Parameters.xlsx. 2. The excel document should be on the Sliders tab as seen in Figure 1. If not, click on
Dremel Digilab 3D Slicer Software
 Dremel Digilab 3D Slicer Software Dremel Digilab 3D Slicer prepares your model for 3D printing. For novices, it makes it easy to get great results. For experts, there are over 200 settings to adjust to
Removal and Installation 8
 Removal and Installation 8 8 Introduction 8-2 Service Calibration Guide to Removal and Installation 8-4 Window 8-8 Covers and Trims 8-12 Rear Tray 8-31 Rear Cover 8-32 Media Lever 8-33 Media Lever Position
GEEETECH. Me Creator2 printers contain heated moving parts. Never reach inside the printer while it is in operation or before it has cooled down.
 ME CREATOR 2 SAFETY INSTRUCTION Do read all the instructions and cautionary markings in this manual before operating your Me Creator. Me Creator2 printers contain heated moving parts. Never reach inside
Quick Installation Guide Direct and Transfer Thermal Printer
 Quick Installation Guide Direct and Transfer Thermal Printer Overview The enclosed printer is currently comprised of two models: 203dpi (dots per inch) model 300dpi (dots per inch) model Unpacking 1. Remove
3D SYSTEMS University CubeX 3D Printer
 3D SYSTEMS University CubeX 3D Printer Lesson Leveling the Print Pad and Print Tips, Setting the Z-Gap Revision date: 10/22/13 1 1 2016 年 6 月 14 日 Objectives After completing this lesson you will: Be able
3-Axis Stabilized Handheld Gimbal for Smartphone. Instructions. Guilin Feiyu Technology Incorporated Company. User Manual EN V1.0
 -Axis Stabilized Handheld Gimbal for Smartphone Instructions Guilin Feiyu Technology Incorporated Company User Manual EN V.0 Catalogue. SPG Overview. Quick Start Guide. Charging 5 4. Function operation
MostFun Sail Getting Started V Chengdu MostFun S&T Co.,Ltd.
 MostFun Sail Getting Started V0.96.3 Chengdu MostFun S&T Co.,Ltd. Catalog Product introduction... 2 Parameter...2 The first use of the machine...3 Unboxing... 3 Driver installation... 5 Installing driver
Removal and Installation8
 8 Screw Types 8-4 Top Cover Assembly 8-5 Left Hand Cover 8-6 Right Hand Cover 8-10 Front Panel Assembly 8-14 Left Rear Cover 8-15 Right Rear Cover 8-16 Extension Cover (60" Model only) 8-17 Media Lever
Bondtech QR Installation guide for the BCN3D Sigma
 Bondtech QR Installation guide for the BCN3D Sigma 1 Contents Introduction...3 List of tool required...3 Mechanical & Electrical Installation...4 Adjustment of steps/mm...12 2 Introduction This guide shows
CAM-KIT6. User Manual. Connects2Vision. Mirror with DVR & Rear Camera PRODUCT FEATURES:
 User Manual CAM-KIT6 Mirror with DVR & Rear Camera PRODUCT FEATURES: Display: 5 inch Speaker: Built in MIC: Built in Mini USB: 5V 2A Micro SD Card Support: 32G max (not supplied) Rear Camera Input: 2.5mm
3D Prototyping X1 3D Printer. User Manual V1.3
 3D Printer User Manual V1.3 COPYRIGHT This document is copyrighted and contains proprietary information that is the property of 3D Prototyping Pty Ltd. The user does not have the right to copy, reproduce,
Geeetech A10. Desktop 3D Printer USER MANUAL
 Geeetech A10 Desktop 3D Printer USER MANUAL Terms Please be advised of the following terms (the Terms ) regarding this User Manual (this Manual ): All information in this Manual is subject to change at
SOFTWARE SETUP Pronterface...2 Cura BED CALIBRATION Using Pronterface...11 Using LCD...13
 USER MANUAL TABLE OF CONTENTS SOFTWARE SETUP Pronterface...2 Cura 15.04...3 BED CALIBRATION Using Pronterface...11 Using LCD...13 LOAD/UNLOAD FILAMENT Using LCD (extruder 0 only)...14 Using PRONTERFACE...15
User s Guide. Creative Desktop Wireless 8000
 User s Guide Creative Desktop Wireless 8000 Information in this document is subject to change without notice and does not represent a commitment on the part of Creative Technology Ltd. No part of this
Use the To. 4 Keypad Enter numbers, letters, or symbols on the printer. Stop all printer activity. 6 Indicator light Check the status of the printer.
 Quick Reference Learning about the printer Using the control panel Use the To 4 Keypad Enter numbers, letters, or symbols on the printer. 5 Stop or Cancel button Stop all printer activity. 6 Indicator
Assembly & Installation Guide ULTIMAKER 2.85/3.0
 Assembly & Installation Guide ULTIMAKER 2.85/3.0 The Bondtech QR Extruder for 2.85/3.0 mm filament for use as a Bowden or a direct Extruder. The extruder uses high-quality industrial pneumatic push-fit
MP Education Guider II 3D Printer
 MP Education Guider II 3D Printer P/N 30527 User's Manual CONTENTS SAFETY WARNINGS AND GUIDELINES... 5 CUSTOMER SERVICE... 6 PACKAGE CONTENTS... 6 PRODUCT OVERVIEW... 8 Front View... 8 Top View... 8 Right
EGX-400/600 ADA Hardware and Software Setup Guide v1.0
 EGX-400/600 ADA Hardware and Software Setup Guide v1.0 EGX-400/600 ADA Hardware and Software Setup Guide This guide covers configuration of the Raster TM Braille Dot cutter and Character cutter. NOTES:
User Guide Dreamer Desktop 3D Printer
 User Guide Dreamer Desktop 3D Printer Dreamer User Guide www.ff3dp.com 1 Dreamer User Guide www.ff3dp.com 2 CONTENTS WELCOME TO FLASHFORGE DREAMER A. How to use this manual B. The FlashForge Experience
BFB Axon software manual
 Contents Install BFB Axon on your computer from the website for the latest version: www.bitsfrombytes.com > Downloads> Software. (Or from the SD card if supplied). If you are using Vista or windows 7,
CHEMINSTRUMENTS HIGH SPEED RELEASE TESTER MODEL HSR-1000 OPERATING INSTRUCTIONS
 CHEMINSTRUMENTS HIGH SPEED RELEASE TESTER MODEL HSR-1000 OPERATING INSTRUCTIONS PRODUCT DESCRIPTION...2 UNPACKING...3 ASSEMBLY...4 KEY COMPONENTS...5 OPERATION...6 SAMPLE PREPARATION...8 EZ LAB SOFTWARE...9
The Nureva Span ideation system. Installation guide. Single panoramic system
 The Nureva Span ideation system Installation guide Single panoramic system Important SAFETY WARNINGS Prior to the installation of this product, the installation instructions should be completely read and
USER GUIDE. UniFoilPrinter. for. User Guide for UniFoilPrinter
 1 USER GUIDE for UniFoilPrinter Version 2.9 March 2014 (UniFoilPrinter PC Tool version. 1.0.0.57, Firmware version 2.13, Hardware version 001) 2 TABLE OF CONTENTS 1 ABOUT THIS MANUAL... 6 2 ABOUT UNIFOILPRINTER...
2014 Simplify3D. Quick Start Guide
 Quick Start Guide Preparation Installing Simplify3D Software 3 The Configuration Assistant 4 The Interface Layout 5 3D Printing Workflow Import Process Settings Preview Print! Import 7 Process Settings
KLIC-N-PRINT 3D User Manual
 KLIC-N-PRINT 3D User Manual http://knp3d.com/ September 29, 2016 1 Table of Contents 1. Introduction... 6 1.01 User Manual Options... 6 1.02 Safety... 7 1.03 Warranty... 7 1.04 Support... 7 1.05 Unpacking...
M2 3D Printer V4 M2 3D Printer
 M2 3D Printer V4 Contents 2 Important Safeguards 3 Welcome 4 M2 Features 6 Other products included with your printer 7 Set up 9 Slicing.STL or.obj files 10 Maintenance and Support 11 Warranty 12 About
Operation Instruction
 JGAURORA 3D Printer Model:Z-603S Operation Instruction www.jgaurora3d.com Read it carefully before printing and keep it properly. - 0 - - 1 - Z- 603S model is designed FDM 3d printer by Shenzhen Aurora
LABEL MATRIX TEKLYNX V E R S I O N 8 Q U I C K S T A R T G U I D E
 TEKLYNX LABEL MATRIX V E R S I O N 8 Q U I C K S T A R T G U I D E Note Quick Start Guide The information in this manual is not binding and may be modified without prior notice. Supply of the software
Instruction Manual. Model RBA18
 Instruction Manual Model RBA18 The Robo-Arm Kit for Arduino is designed to teach the following: 1. How to build a mechanical arm, piece-by-piece. 2. Basic workings of mechanical arm 3. Coding and control
Cutter Option Installation Instructions
 This kit includes the parts and documentation necessary to install the cutter option on the Zebra XiII, XiIII, and XiIIIPlus-Series printers. NOTE: The Cutter Option is not available for the 96XiIII. Adding
da Vinci Super Quick Guide da Vinci Super Safety Precautions Product instructions Unboxing and Installation Product specification
 September. 2017 da Vinci Super Quick Guide ENG Safety Precautions Product instructions Unboxing and Installation Product specification Function Operation and Instructions Setting Print Supporting information
Witbox. Slic3r Manual. Witbox
 Slic3r Manual Slic3r Manual English CONTENTS 3 Generating a gcode file to print an object 6 Modifying Parameters in Slic3r 2 English Slic3r Manual GENERATING A GCODE FILE TO PRINT AN OBJECT In order for
AL-1633/1644 Online Manual Start
 AL-6/6 Online Manual Start Click this "Start" button. Introduction This manual describes the printer and scanner functions of the AL-6/6 digital multifunctional system. For information on the following
DP200/DP201/DP102 Series. Slicer Program Manual
 DP200/DP201/DP102 Series Slicer Program Manual Read the User Manual before operating the product, and keep the manual at a convenient place near the product. Contents 1. Slicer Program Manual-----------------------------------------------------------------------------------------------------3
User Guide Creator Pro Desktop 3D Printer
 www.ff3dp.com User Guide Creator Pro Desktop 3D Printer i 1 www.ff3dp.com Contents Acknowledgment...3 Commitment... 4 PRECAUTIONS...5 Chapter 1: What s in the Box?...6 Chapter 2: Unpacking...7 Chapter
Xi4 Quick Reference Guide
 Xi4 Quick Reference Guide Use this guide to operate your printer on a daily basis. For more detailed information, refer to the User Guide. Printer Components Figure shows the components inside the media
Autodesk Inventor Design Exercise 2: F1 Team Challenge Car Developed by Tim Varner Synergis Technologies
 Autodesk Inventor Design Exercise 2: F1 Team Challenge Car Developed by Tim Varner Synergis Technologies Tim Varner - 2004 The Inventor User Interface Command Panel Lists the commands that are currently
Portable Qi Charger. Created by Ruiz Brothers. Last updated on :20:38 AM UTC
 Portable Qi Charger Created by Ruiz Brothers Last updated on 2017-12-05 01:20:38 AM UTC Guide Contents Guide Contents Overview Prerequisite Guides Parts, Tool & Supplies Universal Qi Wireless Charging
1. 3DWOX add-in program user manual
 . 3DWOX add-in program user manual Install Guide When 3DWOX add-in installation is complete, 3DWOX add-in tab will appear. While SolidWorks model is open, click Print 3D on the 3DWOX tab. 2 Solidworks
ImageScan Pro 800ix Series High-Speed ADF Scanner. Installation and Setup Guide. Installation and Setup Guide
 ImageScan Pro 800ix Series High-Speed ADF Scanner Installation and Setup Guide Installation and Setup Guide Box Contents: 1. Scanner 2. USB Cable 3. AC Adapter 4. Stacker Tray 5. Installation Guide 6.
MP Education Inventor II 3D Printer
 MP Education Inventor II 3D Printer P/N 30525 User's Manual CONTENTS SAFETY WARNINGS AND GUIDELINES... 5 CUSTOMER SERVICE... 6 PACKAGE CONTENTS... 6 PRODUCT OVERVIEW... 8 Front View... 8 Top View... 8
Create a 3D Printing Project. New Project-set part on Tray 13,0600,1489,1616(SP6)
") Create a 3D Printing Project New Project-set part on Tray 13,0600,1489,1616(SP6) In this exercise, we will learn to create New Project-set part on Tray. To create a new project and set the tray we need
Create a 3D Printing Project New Project-set part on Tray 13,0600,1489,1616(SP6) In this exercise, we will learn to create New Project-set part on Tray. To create a new project and set the tray we need
QUICK START GUIDE ENTER AN ENVIRONMENT OF PROFESSIONAL 3D PRINTING
 QUICK START GUIDE ENTER AN ENVIRONMENT OF PROFESSIONAL 3D PRINTING MEET THE ZORTRAX M200 Zortrax M200 3D printer transforms virtual projects into three-dimensional reality. It is used to prototype and
Working in Print Studio
 Working in Print Studio Print Studio is Autodesk's print preparation software. Print Studio keeps your production moving by analyzing, fixing and preparing your 3D files in minutes. Rotate, size, and position
NUREVA SPAN SYSTEM INSTALLATION GUIDE
 NUREVA SPAN SYSTEM INSTALLATION GUIDE February 2017 Important SAFETY WARNINGS Prior to installing this product, ensure you fully read and understand the installation instructions. Failure to do so could
Advanced Printing. This article will take you to get to know the advanced printing skills.
 Advanced Printing This article will take you to get to know the advanced printing skills. There are two modes are available for users, one is Basic Mode and the other is Expert Mode. Expert Mode grants
UNIT 11: Revolved and Extruded Shapes
 UNIT 11: Revolved and Extruded Shapes In addition to basic geometric shapes and importing of three-dimensional STL files, SOLIDCast allows you to create three-dimensional shapes that are formed by revolving