Contents. Operating Manual. p/n LIT
|
|
|
- Silvester Hunt
- 5 years ago
- Views:
Transcription

1 Contents Operating Manual p/n LIT

2 Table of Contents Overview 3 Identify the Parts 4 Prep Work 6 Basic Assembly 10 Pan Cable 14 Balance the Spar 16 Operating and Practice 18 Cases and Packing 20 NEW! Go to tiffen.com/steadicam_tango_video.html for the Tango Quick Start Video by Garrett Brown. Overview Tango assembly and balancing: The Tango rig must be attached to a Tango -ready Steadicam sled such as the Zephyr or Archer 2. Tools required: Screwdriver (for mounting the cameras to the dovetails), two (or more!) spirit levels, and many small zip ties with snips. Some key concepts: It s very important to make the main spar and the tie-rods the same length, so that the master and slave sled posts are perfectly parallel to each other. Balance the slave sled laterally and as neutrally as possible top to bottom. Add or remove weights as necessary. The Tango rig works best if the slave camera is both light and has low inertia (i.e., it is compact). Heavier cameras make balancing harder, and more inert (spread out) cameras may slip out of registration when panning rapidly. Don t over-tension the pan cable as this increases friction. These instructions assume you have lots of experience balancing and operating a Steadicam stabilizer but please read through the entire set of instructions first as there are a few not-so-obvious steps and tricks that will make setting up and using the Tango rig easier. Glossary: Boom the same action as with a regular Steadicam sled, but it isn t the sled that lifts up and down, it s the center of the spar. Elevation tilting the spar up and down using the handle. Ideally this is combined with a boom move, to get maximum lens height. STEADICAM TANGO Operating Manual The Tiffen Company 90 Oser Avenue Hauppauge, New York fax steadicam@tiffen.com Traverse sweeping the spar laterally using the handle. In close quarters, this can provide ultra-smooth mini-tracking moves since your feet can stay in one place. Tilt the same action as with a regular sled, but it is limited to ±90 Pan the same action as with a regular sled... limited to ± two turns depending on the cable wraps at each end. STEADICAM, Steadicam Tango, Zephyr, Archer 2, and are trademarks of the Tiffen Company, LLC. Technical Support ext.7917 Manufactured in the United States of America The Tiffen Company, LLC, written by J. Holway & L. Hayball The Tiffen Company, 90 Oser Avenue, Hauppauge, NY Tiffen Steadicam Operations, Glendale, CA


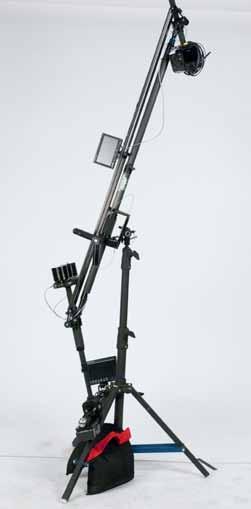
3 Identify the Parts Large weights Secondary monitor Small weights Pulley tree Pulley tree Slave sled weights Master fishmouth connector Active gimbal Telescoping spar Slave fishmouth connector Tango dock Primary monitor Slave sled Master sled Slave stage Pan cable (3 lengths) Pulley tree idler Tie-rod and pulley tree assembly A Tango -ready Steadicam sled such as this Zephyr serves as the master sled. 4 5


 with all accessories on board. Try to get the camera s c.g. directly in line with the centerpost.")


4 Prep Work Where to Start: Prep Work There are several preliminary steps that can be done in any order. Master sled Before assembling the Tango components, it s best to balance the master sled, both statically and dynamically. Since the camera will be on the slave sled, we need to add weights, a weight cage, or a dummy camera to the master sled. With any separated lens/chip and CCU camera, such as the SI2K, use the CCU/computer and any other ancillary gear, such as microwave transmitters, lens-control receivers, etc., as part of the dummy camera weight. If the camera is self-contained, like a DSLR, use the large weights as shown. Slave sled Attach the camera (typically in low mode) with all accessories on board. Try to get the camera s c.g. directly in line with the centerpost. You may find it easier to mount the camera upside down (as shown) and flip the image in post production. Balance normally: set inertia, post length, monitor position, etc. In general, a slightly longer sled, with a larger than normal gimbal to camera distance, works better. Placing the gimbal in the center of the stage and base optimizes the clearance to the tie-rods. Dynamically balance as well. After the master sled is balanced normally, remove the curved portion of the gimbal handle from your sled and set it aside. The handle unscrews via a knurled blue knob. Place the gimbal in the center of the centerpost. Add the slave weights - the smaller diameter ones - and, holding the gimbal yoke by hand, balance the sled neutrally top to bottom. Roughly pre-balance side to side and fore-aft as well. Soon the slave sled will be coupled to the master sled, so you don t need to be too precise with your balancing at this point. Docking mount Attach the Tango docking mount to a heavy-duty stand with plenty of sandbags. If you do not have two stands, set up and balance the master sled first, put the master sled aside, then set up the docking mount. 6 7


5 Prep Work Telescoping spar The active gimbal s clamp should be installed with the clamp towards the center of the spar (towards the slave end). Feed the proper cables for your camera through the fishmouth aperture at the slave end, and pull them free at the master end of the spar. Do not secure them yet. Gimbal handle docked for regular side operating Gimbal handle set up for regular operating If necessary, set the spar gimbal handle to the proper side for regular or goofy operating. Remove the four screws as shown below to flip the handle. Do not flip the orientation of the active gimbal on the spar; just flip the handle. Here we are threading the combination power and video cable through the spar. You may need special cables for your camera, or have to thread several cables through the spar. It s easiest to do this before adding the slave or master sleds. Set the spar length: short, normal, or long. Use the witness marks and line the sections up as best you can, nice and square. You will test for squareness again later. Gimbal handle docked for goofy operating Gimbal handle set up for goofy operating Flipping the handle for goofy: 8 9


.")


6 Basic Assembly Putting the parts together Secure the Tango spar in the stand with the fishmouth openings facing down. Reverse the direction of the spar if operating goofy; i.e., the spar must dock with the gimbal handle facing towards you. Attach the master sled After the slave sled is secured, attach the master sled to the master end fishmouth as shown. Regular operating Rebalance the sled now, but remember that it is not free in one axis. You must pan the slave sled 90 degrees to balance both fore-aft and side to side. Adjust the top to bottom balance to nearly neutral (i.e., use a very long drop time). Attach the slave sled First, insert the slave sled into the slave end fishmouth. Notches will register the spar with the gimbal yoke. Screw the parts together using the large blue knurled knob. Be sure the parts are square so you don t cross the threads. To insure the connection is secure, the additional setscrews can be tightened also. Goofy operating Balancing fore and aft: Balancing side to side: Testing the drop time of the slave sled before adding cables or tie-rods: Check that you have sufficient clearance above and below the slave gimbal to avoid collisions at extreme spar elevations. As necessary, add or subtract the small weights for balancing. These weights will not hit the tie-rods at extreme elevations of the spar
.")


.")


7 Basic Assembly Tie-rods Set the tie-rods to the same length as the spar (short, normal, or long). Pulley tree idlers Attach the two pulley tree idlers to the master and slave pulley trees as shown. Slide them gently upwards so the rollers just contact the centerpost. Spin each of the sleds to be sure they still pan freely. Add the pulley trees to both the slave and master sleds using the three thumbscrews. Cables Important: You must adjust the tie-rod length to exactly match the spar length. Have your assistant hold or secure the master sled vertical use your spirit levels. Extend or contract the tie-rods or the main spar so the slave sled is also vertical. Attach and secure the electrical cables. Like any cable, these cables will have an effect on operating and balance, so it s best to have flexible cables properly laced and secured. Start at the slave end. Plug in all connectors, wind the cables up a couple of turns, and secure to the yoke and fishmouth with small zip ties. Remove the excess slack and secure the cables to the pulley tree and yoke, leaving a small loop as shown (right). Be sure the cables will not contact the Vectran pan cable. It is best to wind the cables so that panning in one direction winds the cables on the master sled while unwinding the cables on the slave sled. In this way, the force to wind one cable is cancelled out by the other end unwinding. One and a half to two turns are sufficient for most work. At the master end, thread the cables through the pulley tree as shown above and loosely secure them with the cable ties. Wind the cable around the post and plug in all connectors. If you can, plug in all cables to the top of the sled


8 Pan Cable Monitor If you have one, secure the additional monitor to the desired attachment point and plug in its cables. Turn everything on and be sure it all works!! Register the slave camera and sled to the master sled Aim the slave camera directly along the spar. Hold the pan cable fast to a tie-rod with your finger. Rotate the master sled until it is in line with the slave sled. Lace the pan cable around the pulleys There are three lengths of Vectran pan cable, short, medium, and long. Choose the one that is matched to your setup. Start with the loop end roughly in the middle of the tie-rods it s easy to secure this end on the crosspiece. Re-trim with the master sled. Remember, one axis is not free while the Tango rig is docked, so rotate the master sled 90 degrees to trim both axes and set your normal drop time. If you did your prep work carefully, there should only be minor tweaking of the trim at this point. Keeping light tension on the line, follow the pulley path until you return to the starting point. Remove the loop from the cross piece, slip the end with the tensioner through the fixed loop, and secure the tensioner back on the line as shown. Note that while operating, the pan cable may slip and the slave sled will go out of registration with the master sled. For instance, it might happen if you bump the camera against an object of the set, or if the cable is too loose and you execute a fast whip pan. This lining up procedure will become second nature to you and can be done easily while operating. 14 Do not overtighten the loop. Double check that the line has not slipped off any pulley. Panning the master sled should now pan the slave sled. 15


9 Balance the Spar Balancing the Tango spar This is best done the first few times with an assistant. With one arm, cradle the sled. Test the system on the balancing stud While on the balancing stud, elevate or crane the rig up and down. You want to check clearances at the extremes of elevation, and how the electrical cables behave as you move the rig around. With your free hand, grab the active gimbal handle as shown. Do not spin the docking mount or the Tango rig around, but lift and carry the unit straight back and secure the spar gimbal handle on the balancing stud. The Tango spar is now ready to balance. Keeping the spar horizontal, unclamp the active gimbal. Pan the sled slowly. It should feel just like your normal Steadicam sled. If it is sluggish, there is too much tension in the pan cable. If it feels nice and free, try a couple of back and forth whip pans with hard stops. If the slave camera slips, you need to add more tension to the pan cable. Pan cable tension will always be a compromise between these two concerns friction and registration. Decide what s most important for the shot. Note that the pan cable was chosen as the means for pan connection for it s minimal added friction. Again, smaller, lighter, and less inert (more compact) cameras work best with the slave sled as they require the least tension to hold registration. Re-dock the Tango rig in its dock. Again, use the cradle method. Slide the gimbal until the Tango rig is neutrally balanced along the spar. Re-clamp the gimbal

 where things collide, when to look at each monitor, etc.")

")


10 Operating Mounting the sled on the arm Put on your vest and arm and lift the Tango rig out of the cradle. Operating and Practice A large part of learning to use the Tango rig well is discovering what positions you can get into (and out of!) where things collide, when to look at each monitor, etc. One big choice is where to place the system c.g. vs. the master sled some ops want the c.g. closer to the normal position of a sled, with the master sled more to the rear. Others may opt for the master sled being in the same position as a regular sled, but with the c.g. further forward. Experiment. Set the arm tension to carry the load. Typically you will work in the Missionary position with the Tango spar at an angle (see photos) across your body, but there are many new choices (see the operating section). As you operate, and change lenses, filters, etc. you will have to tweak your balance, just as you would on a regular Steadicam system but this time you have three sleds to adjust. If you change something on the slave end, slip the pan cable off a pulley and rebalance the slave sled as you did originally. Lace the pan cable again, re-tension and re-register the pan angle. Tweak the balance with the master sled again, remember that one axis is not free. When you pick the Tango rig up to operate, slide the spar gimbal to reset neutral balance as necessary. If you make changes to the master sled, you do not have to slip off the pan cable to rebalance. Just tweak the balance with the master sled. When you pick the Tango rig up to operate, slide the spar gimbal to reset neutral balance as necessary. Aside from the new lens heights, explore the Tango rig s ability to traverse or sweep across space horizontally, noting that it back pans perfectly. Practice moving your body so that the arm sweeps along a straight line, not just in a big arc. It s a whole new line dance! One exercise we like is booming from the lowest lens height to the highest while near someone and tilting radically to hold headroom. Do it slow, do it faster, and get closer to the subject to make the move more radical. Stops and starts are just as important as in regular operating. We find that starting and ending a move spatially (kissing it off) works for Tango operating just as it does for regular operating. For instance, a big boom and tilt typically works best by booming first, then elevating and tilting, then ending the tilt and elevation, then finishing the boom to kiss off and lock the frame. Going through doors and around corners can be tricky, so practice these moves a lot


11 Rest positions Operating More vertical docking Docking the system vertically saves space on set, avoid collisions, etc. when not using the Tango rig


12 Packing in the cases Cases & Packing 22 Disclaimer: There is no implied or expressed warranty regarding this material. Specifications, accessories, etc.are subject to change without notice. The Tiffen Company, 90 Oser Avenue, Hauppauge, NY Tiffen Steadicam Operations, Burbank, CA
 801-7920-01 Merlin Middle weights (4x) 801-7920-02 Vehicle Kit, Flyer 078-7410-03")

 Video")


13 Accessories Optional Accessories The Steadicam Operator s LIT Handbook Dovetail plate assembly Low Mode Kit Video Low Mode Cage F-bracket for Low mode Merlin Start weights (4x) Merlin Middle weights (4x) Vehicle Kit, Flyer Steadistand Flyer mounting block Thumb screws for block Long straps for vest Cable, 12V power, spare Cable, 3 ft video /4-20 camera screws /8-16 camera screws Adaptor, Phono-BNC JCK Adaptor, BNC-RCA JCK Tool pouch Saddle Bag-Sand bag/portfolio Cap, Steadicam Trolley for system Soft Case FFR FFR FFR DAA-22B Also Recommended: Wireless follow focus system and brackets Video transmitting and receiving system Wired zoom control system Camera specific low mode brackets Inertial augmentation (Antlers or Gyros) Video recording system Cases & packing When repacking the sled into the case, make sure the gear gets wiped down and not put away wet. The batteries are removed. Don t leave any loose components in the case as they may work their way over to the monitor and scratch the display. The arm should be packed inside the vest to keep things compact. Most operators have several other cases for their accessories, tools, low mode brackets, video recorders, video transmitters, diversity receivers, remote focus equipment, etc. Batteries PowerCube TM Battery FFR PowerCube 2+2 Starter Kit* FFR IDX VL-4S battery charger FFR PowerCube battery hard case Anton Bauer Dionic 90 FFR (Li-Ion) battery Anton Bauer Hytron 50 FGS (NiMH) battery Anton Bauer Dual charger, FGS Titan Twin Anton Bauer Quad charger FGS with LCD display Zephyr system shown with the optional low mode kit. Disclaimer: There is no implied or expressed warranty regarding this material. Specifications, accessories, etc.are subject to change without notice. 24 Visit for a complete list of Steadicam accessories. The Tiffen Company, 90 Oser Avenue, Hauppauge, NY Tiffen Steadicam Operations, Glendale, CA
QuickStart Guide. Contents
 Contents QuickStart Guide The Tiffen Company, 90 Oser Avenue, Hauppauge, New York 11788 631-273-2500 800-645-2522 www.tiffen.com Tiffen Steadicam Operations, Glendale, CA 818-843-4600 1-800-593-3331 www.steadicam.com
Contents. QuickStart Guide. p/n LIT
 Contents QuickStart Guide p/n LIT-804000 Camera mounting plate loose Co-Pilot 3.5 monitor and AA battery pack All four screws must be loose to free the camera mounting plate. tight Make sure to tighten
Steadicam camera stabilizing systems. Accessories and replacement parts
 Steadicam camera stabilizing systems. Accessories and replacement parts Genuine replacements and additions for your Steadicam system. Our mission is to design and produce the very best Steadicam Camera
Instruction Manuall. Flowcam Series. Professional dual-arm Camera Stabilizer System 5-15 lbs
 Flowcam Series Professional dual-arm Camera Stabilizer System 5-15 lbs Instruction Manuall Please read the instruction manual thoroughly before operating your aviator stabilizer for the first time to avoid
A Dynamic Balance Primer
 A Dynamic Balance Primer by Jerry Holway 2003 v.4.1.2003 Table of Contents Overview 2 Definitions 2 Why is dynamic balance important? 3 Dynamic balance fundamentals 3 The physics and the mathathematics
FlowPod Stabilizer / MonoPod / Low Mode
 FlowPod Stabilizer / MonoPod / Low Mode FlowPod Operating Manual Thank you for purchasing the versatile FlowPod, our patented stabilizer/support. The FlowPod offers several shooting options that will help
DSLR NANO Camera Steadycam
 DSLR NANO Camera Steadycam MF-DSLR-NANO-QR I N S T R U C T I O N M A N U A L Copyright Flyboyfilms NV. All rights Reserved Green Hill I Hoge Wei 16 I 1930 Zaventem I Belgium info@movofilms.be I www.movofilms.be
DSLR Nano Handheld Steadycam (DSLR-NANO-QR-BL)
") DSLR Nano Handheld Steadycam (DSLR-NANO-QR-BL) INSTRUCTION MANUAL All rights reserved No part of this document may be reproduced, stored in a retrieval system, or transmitted by any form or by any means,
DSLR Nano Handheld Steadycam (DSLR-NANO-QR-BL) INSTRUCTION MANUAL All rights reserved No part of this document may be reproduced, stored in a retrieval system, or transmitted by any form or by any means,
3500 Series Tripod Kit
 3500 Series Tripod Kit You re on steady ground 1 INTRODUCTION Thank You for choosing Oben! This versatile and durable Oben tripod and ballhead is a compact and lightweight kit that sets up quickly, folds
DSLR Nano HD Camera Stabilizer (FLCM-DN-HD-QT)
") DSLR Nano HD Camera Stabilizer (FLCM-DN-HD-QT) I NSTRUC TI ON MANUA L For Demonstration Only All rights reserved No part of this document may be reproduced, stored in a retrieval system, or transmitted
DSLR Nano HD Camera Stabilizer (FLCM-DN-HD-QT) I NSTRUC TI ON MANUA L For Demonstration Only All rights reserved No part of this document may be reproduced, stored in a retrieval system, or transmitted
Setup Information Panosaurus May 3, 2011
 Setup Information Panosaurus 2.0 www.gregwired.com May 3, 2011 Please take the time to read all of the setup information to ensure success and ease of use of this tripod head. Much of the setup is a one
Further Information can be found at
 Below is a step by step guide to assembling the Hurricane-Rig. Remember that this is a precision optical instrument. Excessive force can bend critical parts. If treated well it should give many years of
artemis Cine Broadcast
 1 artemis Cine Broadcast USER MANUAL Date 29. Jan. 2018 2 Imprint Imprint Copyright 2018 Arnold & Richter Cine Technik GmbH & Co. Betriebs KG. All rights reserved. No parts of this document may be reproduced
Handheld Video Stabilizer
 Handheld Video Stabilizer INSTRUCTION MANUAL For Demonstration only All rights reserved No part of this document may be reproduced, stored in a retrieval system, or transmitted by any form or by any means,
DOWNLOADING THE APP FOR APPLE PHONES: DOWNLOADING THE APP FOR ANDROID PHONES: For Android Phones go to Google Play or the Android Store.
 DOWNLOADING THE APP FOR APPLE PHONES: DOWNLOADING THE APP FOR ANDROID PHONES: For Android Phones go to Google Play or the Android Store. For Apple Phones go to the app store and click GET. Make sure your
25 Sport Scope Instruction Manual
 25 Sport Scope Instruction Manual Dear Customer, We appreciate your business and value your support for our product. At Sport Scope, we strive to provide our customers with quality, easy to use, and affordable
Quick Start Guide. Basic set-up for your Axis360 system
 Quick Start Guide Basic set-up for your Axis360 system Table of Contents 1 Setting up Slide slider assembly attach belt to cart attach ballhead to cart connect motor to controller attach slider to tripod(s)
Zero Gravity Rig Operating Instructions
 Welcome to our new top-of-the-line shoulder support system for cameras up to 15 lbs - the ZG Rig. In addition to its totally unique vertical balancing mechanism, this system is designed to be configurable
Power Series Camera Support
 Power Series Camera Support Power Jib Power Column Power Dolly Power Series Camera Support Equipment Assembly Manual Remark: Before assemble the jib, please check the inventory and read this manual carefully
Boxer HD-2X Motorized Pan Tilt Head (P-BXR-HD-2X)
") Boxer HD-2X Motorized Pan Tilt Head (P-BXR-HD-2X) I N STR UC TI ON MANUAL All rights reserved No part of this document may be reproduced, stored in a retrieval system, or transmitted by any form or by
Boxer HD-2X Motorized Pan Tilt Head (P-BXR-HD-2X) I N STR UC TI ON MANUAL All rights reserved No part of this document may be reproduced, stored in a retrieval system, or transmitted by any form or by
Product Overview. Features
 APCF1 Model Tripod Product Overview The Ravelli APCF1 is a Professional Quality Carbon Fiber Tripod providing a solid base for high-end photographic equipment. This model is a mix of carbon fiber and magnesium
V40 Videoboom MAIN OPERATING INSTRUCTIONS INDEX 5. SPECIFICATIONS V40 1. INTRODUCTION 2. LIST OF FUNCTIONS AND PARTS
 MAIN OPERATING INSTRUCTIONS V40 Videoboom INDEX 1. INTRODUCTION 2. LIST OF FUNCTIONS AND PARTS 3. INSTRUCTIONS V40 3.1 ASSEMBLY & SETTING UP 3.2 WEIGHT SYSTEM 3.3 MOUNTING THE VIDEO CAMERA 4. USING THE
AVT Model Tripod.
 AVT Model Tripod www.ravelliphoto.com Product Overview: The Ravelli AVT professional tripod is a high performance, fluid drag tripod that provides smooth continuous drag control and operates on both pan
9ft Jib Arm with Tripod (P-9-TS)
") 9ft Jib Arm with Tripod (P-9-TS) I NSTRUC TI ON MANUA L All rights reserved. No part of this document may be reproduced, stored in a retrieval system, or transmitted by any form or by any means, electronic,
9ft Jib Arm with Tripod (P-9-TS) I NSTRUC TI ON MANUA L All rights reserved. No part of this document may be reproduced, stored in a retrieval system, or transmitted by any form or by any means, electronic,
GH-50. Gimbal Head. You re on steady ground
 GH-50 Gimbal Head You re on steady ground 1 INTRODUCTION Thank You for choosing Oben! The Oben GH-50 is a gimbal-type tripod head designed to balance a lens along its vertical and horizontal axes. Ideal
MANUAL. Set-up and Operations Guide Glidecam Industries, Inc. 23 Joseph Street, Kingston, MA Customer Service Line
 MANUAL Set-up and Operations Guide Glidecam Industries, Inc. 23 Joseph Street, Kingston, MA 02364 Customer Service Line 1-781-585-7900 Manufactured in the U.S.A. COPYRIGHT 2015 GLIDECAM INDUSTRIES,Inc.
Galaxy Stabilizer Arm & Vest with HD-3000 Steadycam System (GLXY-AV-HD-3 )
") Galaxy Stabilizer Arm & Vest with HD-3000 Steadycam System (GLXY-AV-HD-3 ) INSTRUCTION MANUAL All rights reserved. No part of this document may be reproduced, stored in a retrieval system, or transmitted
Galaxy Stabilizer Arm & Vest with HD-3000 Steadycam System (GLXY-AV-HD-3 ) INSTRUCTION MANUAL All rights reserved. No part of this document may be reproduced, stored in a retrieval system, or transmitted
NBS-2X NIMBUS STABILIZER QUICK-START GUIDE
 NBS-2X NIMBUS STABILIZER QUICK-START GUIDE PREC AUTIONS Please read and follow these instructions and keep this manual in a safe place. Keep this product away from children. Make sure everything is secure
TDM To MiniMech conversion ProceDure
 TDM To MiniMech conversion ProceDure (Model 9100 ATM) TDN 07102-00079 Apr 1 2009 CorporATe HeAdquArTers: 522 E. Railroad Street Long Beach, MS 39560 PHONE: (228) 868-1317 FAX: (228) 868-0437 COPYRIGHT
FG-02 FG-02 LR PICTURED
 FG-02 Fluid-Gimbal Head FG-02 LR PICTURED FG-02 Fluid-Gimbal Head VERTICAL ARM HORIZONTAL BAR SPECIFICATIONS: FG-02 Load Capacity...50 pounds (23kg) Damped Load Capacity...15 pounds (6.8kg) Pan & Tilt
DUAL-ARM MONITOR MOUNT For in. ( cm) desktop computer monitors
 desktop computer monitors") LeviTouch DM-502 DUAL-ARM MONITOR MOUNT For 15 27 in. (38.1 68.6 cm) desktop computer monitors User Manual Thank you for choosing Gabor. The Gabor Dual-Arm Desktop Mount can securely support two monitors
LeviTouch DM-502 DUAL-ARM MONITOR MOUNT For 15 27 in. (38.1 68.6 cm) desktop computer monitors User Manual Thank you for choosing Gabor. The Gabor Dual-Arm Desktop Mount can securely support two monitors
Handheld Video Stabilizer
 Handheld Video Stabilizer INSTRUCTION MANUAL For Demonstration only All rights reserved No part of this document may be reproduced, stored in a retrieval system, or transmitted by any form or by any means,
Instruction Manual. Gold Pan Tilt Head with 12V Joystick Control Box (PT-GOLD)
") Instruction Manual Gold Pan Tilt Head with 12V Joystick Control Box (PT-GOLD) All rights reserved No part of this document may be reproduced, stored in a retrieval system, or transmitted by any form or
Instruction Manual Gold Pan Tilt Head with 12V Joystick Control Box (PT-GOLD) All rights reserved No part of this document may be reproduced, stored in a retrieval system, or transmitted by any form or
STEDDIEPOD. Instruction Booklet
 STEDDIEPOD Instruction Booklet The STEDDIEPOD is easy to setup and use, this booklet is your guide to help you get started so you can get those fantastic shots right now! Ph. 818-982-7775 BarberTVP.com
Flycam Buddy Mini Gimbal Camera Stabilizer (FLCM-BDY-MINI) 2
 2") Flycam Buddy Mini Gimbal Camera Stabilizer (FLCM-BDY-MINI) 2 At FLYCAM, our goal is to ensure 100% Customer satisfaction in all that we do. We back our sales with a 6-months warranty from the date of purchase
Flycam Buddy Mini Gimbal Camera Stabilizer (FLCM-BDY-MINI) 2 At FLYCAM, our goal is to ensure 100% Customer satisfaction in all that we do. We back our sales with a 6-months warranty from the date of purchase
VZ-SnapCrane-12 Professional Modular Camera Crane Instruction Manuall
 VZ-SnapCrane-12 Professional Modular Camera Crane Instruction Manuall WEIGHTS NOT INCLUDED STANDARD 1 -HOLE BARBELL WEIGHTS ARE AVAILABLE AT MOST SPORTING GOODS STORES For a video tutorial SnapCrane Build,
VZ-SnapCrane-16 Professional Modular Camera Crane Instruction Manuall
 VZ-SnapCrane-16 Professional Modular Camera Crane Instruction Manuall WEIGHTS NOT INCLUDED STANDARD 1 -HOLE BARBELL WEIGHTS ARE AVAILABLE AT MOST SPORTING GOODS STORES For a video tutorial SnapCrane Build,
Breeze Film Shooting Equipment (P-W5P-BRZ) I N STR UC TI ON MANUAL
 I N STR UC TI ON MANUAL") Breeze Film Shooting Equipment (P-W5P-BRZ) I N STR UC TI ON MANUAL All rights reserved No part of this document may be reproduced, stored in a retrieval system, or transmitted by any form or by any means,
Breeze Film Shooting Equipment (P-W5P-BRZ) I N STR UC TI ON MANUAL All rights reserved No part of this document may be reproduced, stored in a retrieval system, or transmitted by any form or by any means,
GLIDECAM~ GOLD SLEDTM
 GLIDECAM~ GOLD SLEDTM MANUAL Setup and Operations Guide GLIDECAM INDUSTRIES, INC., 23 Joseph Street, Kingston, MA 02364 Customer Service Line 1-781-585-7900 Manufactured in the U.S.A. COPYRIGHT 2006-2009
PRO. GPI PRO Systems Inc Anza Drive Unit B Valencia, CA (661) Fax (661) OWNER S MANUAL
 Fax (661) OWNER S MANUAL") PRO OWNER S MANUAL GPI PRO Systems Inc 25026 Anza Drive Unit B Valencia, CA 91355 (661)257-5771 Fax (661)257-5775 1 TABLE OF CONTENTS 2012 PAGE 4 PAGE 7 PAGE 8 PAGE 9 PAGE 11 PAGE 12 PAGE 14 PAGE 16 PAGE
PRO OWNER S MANUAL GPI PRO Systems Inc 25026 Anza Drive Unit B Valencia, CA 91355 (661)257-5771 Fax (661)257-5775 1 TABLE OF CONTENTS 2012 PAGE 4 PAGE 7 PAGE 8 PAGE 9 PAGE 11 PAGE 12 PAGE 14 PAGE 16 PAGE
PROAIM KITE-22 POPULAR PACKAGE 2 NOTE :
 PROAIM KITE-22 POPULAR PACKAGE 2 IT IS IMPORTANT THAT YOU READ AND UNDERSTAND THIS GUIDE BEFORE ATTEMPTING TO ASSEMBLE OR USE YOUR PROAIM KITE-22 POPULAR PACKAGE. SHOULD YOU NEED ADDITIONAL INFORMATION,
Camera support for DSLR cameras and handheld camcorders
 Camera Support Camera support for DSLR cameras and handheld camcorders > Provides stability, balance and support > Distributes the weight of the camera set-up evenly across the body > Reduces fatigue on
Winthrop University - Using the Video Camera for your edtpa Folio
 Prior to Filming Check out a Video Camera and Other Items for your edtpa Video from the Instructional Technology Center (ITC) in 307 Withers Purchase a 16 GB SD Card from the ITC. SD Card will cost about
EDUCATIONAL SPECTROPHOTOMETER ACCESSORY KIT AND EDUCATIONAL SPECTROPHOTOMETER SYSTEM
 GAIN 0 Instruction Manual and Experiment Guide for the PASCO scientific Model OS-8537 and OS-8539 02-06575A 3/98 EDUCATIONAL SPECTROPHOTOMETER ACCESSORY KIT AND EDUCATIONAL SPECTROPHOTOMETER SYSTEM CI-6604A
STEP-BY-STEP INSTRUCTIONS FOR BUILDING A MICHELSON INTERFEROMETER. TECHSPEC Optical Cage System
 STEP-BY-STEP INSTRUCTIONS FOR BUILDING A MICHELSON INTERFEROMETER TECHSPEC Optical Cage System INTRODUCTION 2 What is a Michelson Interferometer? A Michelson Interferometer is a simple interferometric
Jr. Pan Tilt Head (PT-JR) Instruction Manual
 Instruction Manual") 1 Jr. Pan Tilt Head (PT-JR) Instruction Manual 2 At Proaim, our goal is to ensure 100% Customer Satisfaction in all that we do. We back our sales with a 1 year warranty from the date of purchase and work
1 Jr. Pan Tilt Head (PT-JR) Instruction Manual 2 At Proaim, our goal is to ensure 100% Customer Satisfaction in all that we do. We back our sales with a 1 year warranty from the date of purchase and work
2 x Dynamic Arms on 135 Post with C-Clamp
 Installation Guide AWMS-2-D13-C 2 x Dynamic Arms on 135 Post with C-Clamp COMPONENT CHECKLIST RANGE A AWM-LC Post Clamp B AWM-AD Dynamic Arm (x2) C AWM-P13 135 Post D AWM-FC C-Clamp CONTENTS C-Clamp Page
Sony NEX-7 Screen Replacement
 Sony NEX-7 Screen Replacement If your camera's screen is broken or non functioning, this guide will show you how you can replace the screen. Written By: Jay Miley ifixit CC BY-NC-SA www.ifixit.com Page
MD-BSL15W / SPRING-LOADED TWIN-ARM. For ( cm) LCD desktop computer. User Manual
 LCD desktop computer. User Manual") MD-BSL15W / SPRING-LOADED TWIN-ARM MONITOR mount For 15 27 (38.1 68.6 cm) LCD desktop computer User Manual Thank you for choosing Gabor. The Gabor MD-BSL15W mounts two 15 27 (38.1 68.6 cm) LCD computer
MD-BSL15W / SPRING-LOADED TWIN-ARM MONITOR mount For 15 27 (38.1 68.6 cm) LCD desktop computer User Manual Thank you for choosing Gabor. The Gabor MD-BSL15W mounts two 15 27 (38.1 68.6 cm) LCD computer
HQuad500 Frame Assembly Guide
 HQuad500 Frame Assembly Guide V1.0 June 2015 1 What s Included Kit Content Hardware Bag Content 2 HQuad500 Assembly 2.1 Arm & Motor Mount Sub Assembly 2.2 Landing Gear Step 1 2.3 Center Plates Sub Assembly
INSTALLATION INSTRUCTIONS
 INSTALLATION INSTRUCTIONS 19 20 21 01 07 22 23 13 10 12 08 17 18 11 02 14 15 04 03 16 WELCOME PARTS LIST Thank you for purchasing this HealthPoint Technology Cabinet from Humanscale! Before you begin installing
ASSEMBLY ASSEMBLY INSTRUCTIONS ASSEMBLY INSTRUCTIONS
 ASSEMBLY ASSEMBLY INSTRUCTIONS INSTRUCTIONS ASSEMBLY INSTRUCTIONS VOX INFINITY L-SHAPE 7230 DESK Workstations, WORKSTATIONS, desks, DESKS, AND and TABLES tables WITH with POWERED powered ADJUSTMENT adjustment
PROMS PORTABLE RAPID-DEPLOYMENT OBSERVATION AND MONITORING SYSTEM. INSTRUCTIONS FOR USE BS EN BS EN BS EN
 PROMS PORTABLE RAPID-DEPLOYMENT OBSERVATION AND MONITORING SYSTEM. INSTRUCTIONS FOR USE BS EN 55103-1 BS EN 55103-2 BS EN 60555-2 Note: The battery supplied with this equipment is a sealed lead acid cell.
CTT Section Carbon-Fiber Tabletop Tripod. You re on steady ground 1
 CTT-1000 3-Section Carbon-Fiber Tabletop Tripod You re on steady ground 1 INTRODUCTION Thank you for choosing Oben! The Oben CTT tripod is a sturdy and high-quality carbon-fiber tabletop tripod that provides
STEP 1: MODULE MOUNTING / WIRING:
 VER1.0 PINOUT DIAGRAM: PORT 1 - INPUT 1 (S.BUS, PWM, PPM INPUT) PORT 2 - INPUT 2 (PWM MODE INPUT OR AUX OUTPUT DEFINED IN SOFTWARE) PORT 3 - OUTPUT 1 (S.BUS OUTPUT) PORT 4 - OUTPUT 2 (SERVO OUTPUT) PORT
 Photography tripod Why do I Need a Tripod? http://www.bhphotovideo.com/explora/video/buying-guides/what-look-when-you-are-looking-videotripod Tripod Tricks? http://vimeo.com/videoschool/lesson/110/tripod-tricks
MAIN OPERATING INSTRUCTIONS
 MAIN OPERATING INSTRUCTIONS MPT-9 Mechanical Pan Tilt Unit 1. INTRODUCTION You have bought an MPT-9 Mechanical Pan Tilt Unit out of the wide range of Cambo Video products. We expect that you will achieve
imac Intel 21.5" EMC 2389 Stand Replacement
 imac Intel 21.5" EMC 2389 Stand Replacement Replace a broken or cosmetically unappealing stand on the imac 2389 21.5 Written By: Aaron Cooke ifixit CC BY-NC-SA www.ifixit.com Page 1 of 30 INTRODUCTION
Millenium Transformer Bundle. Instruction Manual
 Millenium Transformer Bundle Instruction Manual 1 Taking Care of Your Digital Drum Set Thank you for purchasing this digital drum module. The drum module has been developed to act and play like a drum
Operators Guide. Vision 3 Pan & Tilt Head. Vinten Camera Control Solutions
 Operators Guide Vision 3 Pan & Tilt Head Vinten Camera Control Solutions Vision 3 Pan and Tilt Head Publication Part No. 3543-8 Issue 4 Copyright Vinten Broadcast Limited 2004 All rights reserved throughout
INTRODUCTION. Key Features
 INTRODUCTION Thank you for purchasing the GH-13 Gimbal Tripod Head from Rob Pleas Photography. To get the most out of your tripod head, please read this user's manual thoroughly before use. This user's
Vacuum Maintenance Manual (EXCERPT Tim Benedict)
") 1. Position a ladder, scaffold, or work stand, on the right side of Vacuum Skid where the blower motors are installed. 2. Locate the six (6) vacuum hoses connecting the blower motors to the HEPA housings
1. Position a ladder, scaffold, or work stand, on the right side of Vacuum Skid where the blower motors are installed. 2. Locate the six (6) vacuum hoses connecting the blower motors to the HEPA housings
GLIDECAM CAMCRANE 200TM. Set-up and Operations Guide
 GLIDECAM CAMCRANE 200TM Set-up and Operations Guide Glidecam Industries, Inc. 23 Joseph Street, Kingston, MA 02364 Customer Service Line (781) 585-7900 Manufactured in the U.S.A. COPYRIGHT 2000-2008 GLIDECAM
Operators Guide. Vision 11 Pan & Tilt Head. Vinten Camera Control Solutions
 Operators Guide Vision 11 Pan & Tilt Head Vinten Camera Control Solutions Vision 11 Pan and Tilt Head Publication Part No. 3442-8 Issue 1 Copyright Vinten Broadcast Limited 2001 All rights reserved throughout
3-Axis Stabilized Handheld Gimbal for Camera. Instructions. Guilin Feiyu Technology Incorporated Company
 3-Axis Stabilized Handheld Gimbal for Camera Instructions Guilin Feiyu Technology Incorporated Company User Manual E N V. 0 Catalogue. G6 Plus Overview 2. Quick Start Guide 3 3. Balance the Gimbal 4 Balance
DUTCH LITE. April 03. If you are missing any of the following items, please contact Stanton Video immediately (602)
") DUTCH LITE April 0 If you are missing any of the following items, please contact Stanton Video immediately (602) 49-9505 1. Dutch Axis Assembly 1. Dutch Lite Motor Assembly 1. Motor Controller MAXIMUM
DUTCH LITE April 0 If you are missing any of the following items, please contact Stanton Video immediately (602) 49-9505 1. Dutch Axis Assembly 1. Dutch Lite Motor Assembly 1. Motor Controller MAXIMUM
MBX INSTRUCTION MANUAL. Please read this manual carefully before using the MBX! Mid-range studio stand
 MBX Mid-range studio stand INSTRUCTION MANUAL EN Please read this manual carefully before using the MBX! CAMBO Thank you for purchasing a Cambo product. This new classed Mid-range studio stand will suit
Microscopic Imaging Research Station (MIRS) Assembly Guide. Version 1.0.0
 Assembly Guide. Version 1.0.0") Microscopic Imaging Research Station (MIRS) Assembly Guide www.adsyscontrols.com Adsys Controls, Inc.2012 Version 1.0.0 I. Assembly of the Adsys Controls MIRS system This document explains the assembly
Microscopic Imaging Research Station (MIRS) Assembly Guide www.adsyscontrols.com Adsys Controls, Inc.2012 Version 1.0.0 I. Assembly of the Adsys Controls MIRS system This document explains the assembly
Independent Review - Haida 150mm Filter System By Daniel Gangur
 Independent Review - Haida 150mm Filter System By Daniel Gangur www.gippslandimages.com.au Over the past couple of months I have been using Haida s 150mm filter system, these optical glass filters are
Features and Controls
 Fluid Head OPERATOR S MANUAL 1090 Compassx 2 Fluid Head 1092 Compassx 6 Fluid Head 1093 Compassx 8 Fluid Head 1096 Compassx 10 Fluid Head 1098 Compassx 18 Fluid Head Features and Controls Spare Camera
GH-30. Gimbal Head. You re on steady ground
 GH-30 Gimbal Head You re on steady ground 1 INTRODUCTION Thank You for choosing Oben! The Oben GH-30 is a gimbal-type tripod head designed to balance a lens along its vertical and horizontal axes. The
Operators Guide. Vision 100 Pan & Tilt Head. Vinten Camera Control Solutions
 Operators Guide Vision 100 Pan & Tilt Head Vinten Camera Control Solutions Vision 100 Pan and Tilt Head Publication Part No. 3431-8 Issue 3 Copyright Vinten Broadcast Limited 2004 All rights reserved throughout
User Manual THALES SIMPLICITY II
 User Manual THALES SIMPLICITY II Dear user Thank you for using the THALES SIMPLICITY II. This tonearm is designed differently than all other tonearms. If you follow this manual accurately the most precise
List Price (GBP) 545 1,345
 545 1,345") SYRP-0030-0001 Syrp Genie motion control Syrp Genie Motion Control Time-Lapse Device. The Genie is a simple, portable solution for motion control Time-lapse Real-time video. Designed to be part of your
SYRP-0030-0001 Syrp Genie motion control Syrp Genie Motion Control Time-Lapse Device. The Genie is a simple, portable solution for motion control Time-lapse Real-time video. Designed to be part of your
Rob Pleas Photography. GH-13r Gimbal Head. User s Manual
 Rob Pleas Photography GH-13r Gimbal Head ----------------------------- User s Manual INTRODUCTION Thank you for purchasing the GH-13r "retrofit" Gimbal Tripod Head from Rob Pleas Photography. This model
JIB EPT USER MANUAL. Please read this manual carefully before using the Alphatron JIB ETP unit! JIB & MOTORISED PAN AND TILT UNIT
 JIB EPT JIB & MOTORISED PAN AND TILT UNIT USER MANUAL EN Please read this manual carefully before using the Alphatron JIB ETP unit! Thank you for purchasing a Alphatron product The EPT head is developed
Operation Manual. Imara S100 & S60 DMX. Imara S100 DMX Yoke Mount. Imara S100 DMX Pole-Op
 Operation Manual Imara S100 & S60 DMX Imara S100 DMX Yoke Mount Imara S100 DMX Pole-Op Part No. 3100083 Rev A 03-02-2015 Imara DMX Yoke Mount Imara Fixtures IMR-S100-120U Imara S100 DMX Yoke Mount, Univ
Handheld Video Stabilizer
 Handheld Video Stabilizer INSTRUCTION MANUAL For Demonstration only All rights reserved No part of this document may be reproduced, stored in a retrieval system, or transmitted by any form or by any means,
Davis & Sanford Support Systems
 Support Systems Take a firm stand. Anywhere. Comprehensive line of well-engineered support systems Unbeatable 10-year warranty Complete line of accessories Professional Tripods These rugged tripods offer
Advanced Camcorder Support System. Instruction Manual
 Advanced Camcorder Support System Instruction Manual PAG ORBITOR Advanced Camcorder Support System Instruction Manual CONTENTS SECTION PAGE 1 SAFETY 2 2 ASSEMBLY & OPERATION 3 3 PARTS AND ASSEMBLIES 9
ED80Sf ED100Sf Vixen Optics a Division of MrStarGuy, Inc.
 ED80Sf ED100Sf Vixen Optics a Division of MrStarGuy, Inc. www.vixenoptics.com Page 1 PREFACE Thank you very much for your purchase of a Vixen astronomical telescope This manual applies to the ED80Sf and
Dell Inspiron Screen Replacement
 Must know how to remove the battery, hard drive, and cooling fan. Learn how to remove the screen from your laptop and replace it with a new one. Written By: Austin Navarro ifixit CC BY-NC-SA www.ifixit.com
C-pan arm USERS INSTRUCTIONS
 C-pan arm USERS INSTRUCTIONS Designed 1 of 12 and made in Denmark Thanks for purchasing a 9.Solutions product. With great passion, we design our products to be as versatile as possible. We hope that our
EPILOG LASER Table Mountain Parkway Golden, Colorado Phone FAX
 EPILOG LASER 16371 Table Mountain Parkway Golden, Colorado 80403 Phone 303-277-1188 - FAX 303-277-9669 www.epiloglaser.com Procedure Title: Replacing the Optics in your FiberMark Laser Engraver Tools Needed:
Design and Manufacture of Video Pipeline Inspection Systems A Full Service Company
 Design and Manufacture of Video Pipeline Inspection Systems A Full Service Company www.rstechserv.com Omni Star LED Pan and Tilt Zoom Color Camera Modell 10-1660 INSTALLATION MANUAL Made in USA IMPORTANT
TABLE OF CONTENTS SECTION 1 TABLETOP CONFIGURATION SECTION 2 TABLETOP CONFIGURATION ACCESSORIES SECTION 3 SLIDE CONFIGURATION
 S6 USER S MANUAL TABLE OF CONTENTS SECTION 1 TABLETOP CONFIGURATION SECTION 2 TABLETOP CONFIGURATION ACCESSORIES SECTION 3 SLIDE CONFIGURATION SECTION 4 SLIDE CONFIGURATION ACCESSORIES SECTION 5 RACK MOUNT
GYRO-ASSIST SETUP MANUAL
 GYRO-ASSIST SETUP MANUAL Tyler Middle Mount II Gyro-Assist for Film or Video cameras. PLEASE RETURN THIS MANUAL WITH EQUIPMENT $50.00 CHARGE FOR MANUAL IF NOT RETURNED. CAN BE DOWNLOADED FROM www.strattoncamera.com
UCIT LIVE HD 4 Camera DVR. Installation Manual. 10/17 Version 2.0
 UCIT LIVE HD 4 Camera DVR Installation Manual 10/17 Version 2.0 This is a step by step guide that will walk you through installing the UCIT LIVE HD 4 Channel Camera System. Basic wiring experience and
Operators Guide. Vision 8 Pan & Tilt Head. Vinten Camera Control Solutions
 Operators Guide Vision 8 Pan & Tilt Head Vinten Camera Control Solutions Vision 8 Pan and Tilt Head Publication Part No. 3441-8 Issue 4 Copyright Vinten Broadcast Limited 2004 All rights reserved throughout
VPC-64/ VPX-64 VIDEO POLE CAMERA OPERATION MANUAL
 VPC-64/ VPX-64 VIDEO POLE CAMERA OPERATION MANUAL RESEARCH ELECTRONICS INTERNATIONAL 455 Security Drive Algood, TN 38506 U.S.A. +1 931-537-6032 http://www.reiusa.net/ COPYRIGHT RESEARCH ELECTRONICS INTERNATIONAL
FAQ. (frequently asked questions)
") CONTROL modes FAQ (frequently asked questions) When will the MōVI M10, MōVI MR, MōVI M5 ship? The MōVI M10 and MR ships next day and the MōVI M5 will begin shipping in the end of the first quarter of
CONTROL modes FAQ (frequently asked questions) When will the MōVI M10, MōVI MR, MōVI M5 ship? The MōVI M10 and MR ships next day and the MōVI M5 will begin shipping in the end of the first quarter of
Formulate Designer Series 20 Backwall - Kit 11
 Formulate Designer Series 20 Backwall - Kit 11 FMLT-DS-20-11 Formulate Designer Series 20ft displays have unique stylistic features and shapes, are portable and easy to assemble. The aluminum tube frame
BC Series. Dual Action Ballhead. You re on steady ground
 BC Series Dual Action Ballhead You re on steady ground 1 Introduction Thank You for choosing Oben! This sturdy Oben BC Series Dual-Action ballhead provides smooth, precise operation. Two locks provide
OLPC XO-4 Touch Mouse Buttons Controller Replacement
 OLPC XO-4 Touch Mouse Buttons Controller Replacement This guide will show you how to replace the mouse buttons controller. Written By: Michael Kellerman ifixit CC BY-NC-SA www.ifixit.com Page 1 of 12 INTRODUCTION
Upgrading LVDS Cables Instruction Sheet
 Upgrading LVDS Cables Instruction Sheet INTRODUCTION Use the following instructions to replace the LVDS cables in CP2000-M/MR projectors. The new cables are slightly longer in length and allow for better
DS5/DS10/DS20 Fluid Head Operator s Manual. #180 DS5 Fluid Head #182 DS10 Fluid Head #184 DS20 Fluid Head
 DS5/DS10/DS20 Fluid Head Operator s Manual #180 DS5 Fluid Head #182 DS10 Fluid Head #184 DS20 Fluid Head Features and Controls 1/4 and pin carriage Sliding camera plate Slide lock Tilt lock Tilt drag Pan
Kalahari and Quick Click Manual
 Kalahari and Quick Click Manual www.bushman-panoramic.com 1 INDEX : 1. PRESENTATION 3 a. Elements 3 b. Bag 4 2. ASSEMBLING 4 a. Opening 4 b. Assembling elements 5 c. Rings 6 Unmounting rings 6 Mounting
Planar Model A480-PL Professional Grade Home Cinema Conversion Lens System
 AKPro system with ATH1 transport shown Planar Model A480-PL Professional Grade Home Cinema Conversion Lens System USER MANUAL AND INSTALLATION GUIDE Including the UH480 Lens, ATH1 Transport and AKPro Projector
Removing and Replacing Parts
 Removing and Replacing Parts Preparing to Work Inside the Computer Recommended Tools Screw Identification System Components Hard Drive Fixed Optical Drive Media Bay Devices Memory Modules Mini PCI Card
DSLR Camera Cage Shoulder Rig Kit (FC-03)
") FILMCITY DSLR Camera Cage Shoulder Rig Kit 1 DSLR Camera Cage Shoulder Rig Kit (FC-03) I N S T R U C T I O N M A N U A L All rights reserved. No part of this document may be reproduced, stored in a retrieval
FILMCITY DSLR Camera Cage Shoulder Rig Kit 1 DSLR Camera Cage Shoulder Rig Kit (FC-03) I N S T R U C T I O N M A N U A L All rights reserved. No part of this document may be reproduced, stored in a retrieval