Caustics - Mental Ray
|
|
|
- Kristian Hood
- 5 years ago
- Views:
Transcription

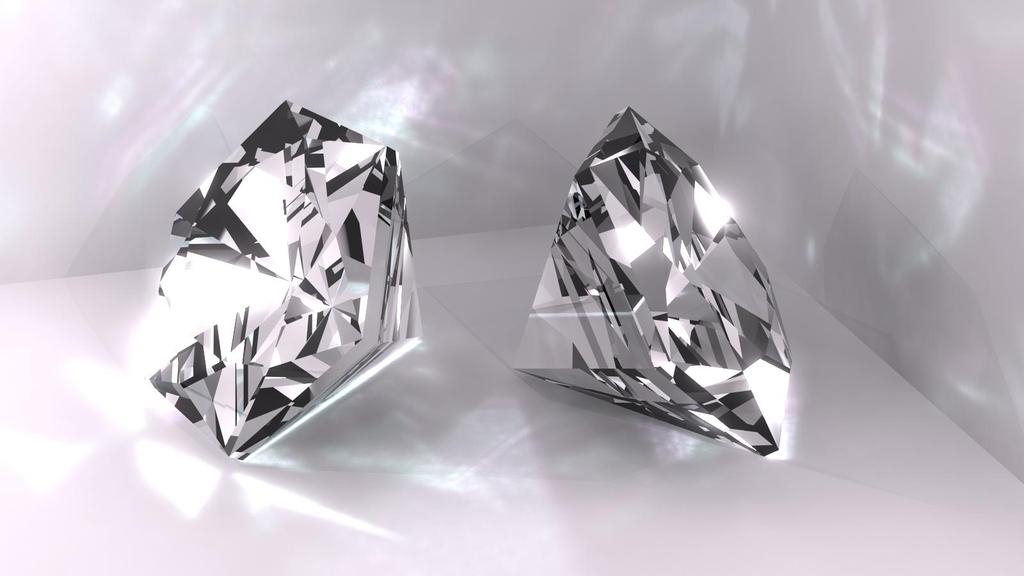
1 Caustics - Mental Ray (Working with real caustic generation) In this tutorial we are going to go over some advanced lighting techniques for creating realistic caustic effects. Caustics are the bent reflections of light after it has gone through a surface like water, glass, or gemstones. For example, dancing shapes on the bottom of a swimming pool. We can use mental ray to accomplish realistic caustics and bend the light from our scene to reflect this great dancing shapes like the below image: We will experiment with these lighting effects by creating something called a water box. Water boxes are simple scenes set up for the express purpose of creating and modifying caustics so that when you get to your real scene you can just plug in the data. 1


2 As it states in the name, lets create a box in our top viewport, Length and Width of 150, and Height of 100. Simple rooms that are more than boxes work just fine as well, if you are going to have recessed lighting, or anything casting shadows in the scene, etc. Caustics need surfaces to bounce off of and reflect on. We could add a shell modifier and make this a realistic room and zoom our cameras inside, but in order to really test our caustics above and below the surface of the water we are going to use a different trick. Select your box, and then right click on it and select Convert To: ---> Editable Poly. Then go to your Modify tab, and select the Element sub-object selection. ---> Once you are in the Element sub object, click on your box. The entire thing should turn bright red letting you know you have the element selected. 2

3 Scroll down in your tools under the Element tools until you find the Edit Elements Rollout. Under this rollout is a button labeled Flip. Click it: <--- Flip works on the normals of an object's polygons. It inverts them so that the facing is going in the opposite direction. When we first created our box the normals were facing out and away from the box which allows us to perceive it as a solid object. Once we selected the element (all the polygons of our object) and flipped them, they are now facing inwards. So the solid surface is actually shown facing inside the box towards each other instead of out and away from each other. Unselect the Element sub object button so you can again edit your scene. Your box was initially a random color generated by 3DS Max and should now be jet black. This is because unless you specifically tell 3DS Max to render both sides of its polygons it will save computer power by only rendering the side where the normals are facing. 3


4 Right click on your box to bring up the quad menu, and find Object Properties: This will bring up a large dialogue box with all the options for displaying and working with this object. In the Display Properties area, find and check the box that says "Backface Cull" This will make it so that instead of showing our opposite side of our polygons as jet black, it will instead make them see through so we can actually look into the box without removing a wall or zooming inside of it. Once this is checked, click on the OK button. 4
 Our stage is set, now we need the second portion of our Waterbox. The Water!")

5 This display allows us to see inside the box, and all the opposite walls as we turn around it in our scene. It's like we suddenly have Super X-Ray vision! Good job super heroes!... (or villains?) Our stage is set, now we need the second portion of our Waterbox. The Water! We'll make this really easy on ourselves, with your box selected go to your Modify tab and select the Polygon sub-object selection set. Mark the box that says "Ignore Backfacing" this will prevent us from selecting the polygons that are now Xray see through for us. Then go back to your box and click on the polygon that makes up our floor. 5

6 The Floor should highlight bright red and should be the only part of our room we have selected. We are going to clone this polygon and make it a new shape which will be the surface of our water. It's the exact same size and shape as our room so this is the easiest way to create a new plane object. Once your floor is highlighted red, get your move tool and hold down your shift key. Drag up on the blue Z axis arrow in your perspective view and you should see a new polygon rise up with it: When you have it at the height you want your water to fill the room with, let go of the mouse button. The clone dialogue box will open up. Mark the radial button that says Clone to Object: and give it a name like the one above. 6

7 When you have done that click the OK button on the dialogue box, and then make sure to unselect your polygon subobject selection in your modify tab. You should now have 2 objects, he box, and the surface of our water. Our next step is to give our water and our box a texture so they actually resemble what they are supposed to be. Open your material editor (M) and we'll make a couple of quick textures. Select an empty texture slot. <---- You can click this checkered button to turn on the rainbow background if you want to see that your opacity changes take effect. Give it a name if you wish. Then in the Basic Parameters change the Diffuse color swatch to black, change the Opacity level down to 15 or so (anything low depending on whether or not you want your water to be perfectly clear or have a hint of color to it.) Then change the specular level to about 150, and the glossyness to about 50 give or take a few. We can see the first texture slot change as we do this, and we have a nice mostly clear shiny material. However, water has some reflective and refractive properties in the real world and is never just see through. When you put a stick into a pool, you'll notice that it appears as though the water is pending the angle of the stick. This effect is called refraction and will help us make our water look and feel thicker and more realistic. 7

 map from the reflection button to the None button just below it marked for Refraction.")
8 In your material settings, scroll down and open the rollout that says Maps: Find the entry for Reflection, and click on the large button on the right side that says None. This will open a large list of maps, scroll through the list until you find the one that says "Raytrace" select it and then hit the OK button to apply it to the Reflection map. It will take you into the raytrace map settings, but we don't have to change anything here. So just click on the Go To Parent button between the settings and the texture slots. <---- Go To Parent button. Back under your Maps, click and drag the Map#1 (Raytrace) map from the reflection button to the None button just below it marked for Refraction. When the dialogue box pops up just tell it to be a copy. Then modify the amount of reflection and refraction like the image above. Next we will need to give our water some ripples and waves. In order to do this we will apply a simple Bump map. 8


9 Click on the none button next to the Bump selection in your Maps rollout: The maps list will open up again, scroll down until you find "Noise" and select it and then hit the OK button. It will take you to the settings for the noise. We are just going to reduce the size in the Noise Parameters to 5.0 and then click on the go to parent button to return to our top layer: 9


10 Back in the Maps: rollout give the bump a bit more in the Amount, I put mine at 60 and then take a look at your texture and what it is doing to the light and objects behind it. Our water is looking pretty good, click and drag it from the spheroid texture slot, and drop it on the surface of our water to apply the texture. Good, now we'll make one for the room so that our colors match and in my case are something other than bright pink. 10

11 Select another empty texture slot in your material editor. Click on the Diffuse: color swatch and give your texture any color you like. I gave mine kind of a warm peachy orange color for no other reason than I was feeling peachy and wanted a warmer inviting room. Then click and drag it to the Box in our scene just like we did the water. Our scene is set, and now all we need to add is a light. Then we can turn our caustics on and watch the magic happen. 11


12 On your create tab, find the lights button and in the drop down menu find Standard Lights. We will use a "mr Area Omni" for this one. The mr stands for Mental Ray of course! Click the button to turn it on and then click in the middle of your box in your top viewport to create the light. It will automatically put the light at the zero point on your Z axis so you will have to then grab your move tool and simply move it up by clicking on the axis arrow pointing up and dragging the light towards the ceiling of our box in either the front or left viewports. Let's change a few settings on our light to get the most out of this little bugger. With your light selected go to your modify tab and scroll down the settings list until you find the Area Light Parameters rollout. 12

13 Here we can change the shape of our light to get the most out of our caustics scene. Check the box that says show Icon in renderer. This will let us see the light when we render and will give us something more to reflect in our water. Change the Type: to Cylinder (think florescent tube) and then change its Height to about 65 or so. This can be done with any type of light, I have chosen this one to get a longer range of light for our caustics. If you watch the light icon in your scene as you changed the height number you will notice that it is going up and down and filling our room from top to bottom. This needs to be rotated so that the light runs across our ceiling instead. So with your light selected, grab your rotation tool and head down to the bottom of your 3DS Max window to find the XYZ coordinates. Type 90 in the X: field and hit enter. This will rotate our light exactly 90 degrees so that it runs along the length of our ceiling instead of top to bottom. 13

 rollout and open it up.")
14 If you click on the lights height adjustment number you can see it going in the correct direction now. We have a box, some water, and a light! We are ready to turn on Caustics and see the result of all our hard work. Go to your render setup (F10) and click on the Tab at the top of the dialogue box that says Indirect Illumination. Scroll down until you see the Caustics and Global Illumination (GI) rollout and open it up. Check the box that says Enable to turn the caustics generation on like the image above. 14


15 Then scroll down in your settings a bit more until you see the Light Properties area. We are doing a caustics Waterbox test so in the Average Caustic Photons per Light: add a couple zeros to the end of the default 20,000. Make it 2,000,000 so we have lots and lots of photons to work with! You can make this number really huge if you want super realistic caustics. Your render will take longer than you probably have life left to render it however, so we fake it with a couple million. Our next number down is the Decay: This number dictates how thick our caustic light shapes will be. If you are ever having trouble seeing your caustics in a scene, it is probably because this number is too high. The lower the number the bigger the dancing light shapes. I like to reduce this just slightly so we can get some really defined caustic shapes. Reduce it from the default of 2.0 to about 1.8 Lastly since we want all of the objects in our scene to work with our caustics check the box that says "All Objects Generate & Receive GI and Caustics". In a scene though just remember that you can leave this unchecked and by right clicking on lights and objects and going to the Object properties dialogue box, on the Mental Ray tab you can set only specific objects to generate and receive caustics as well, like the image below: 15

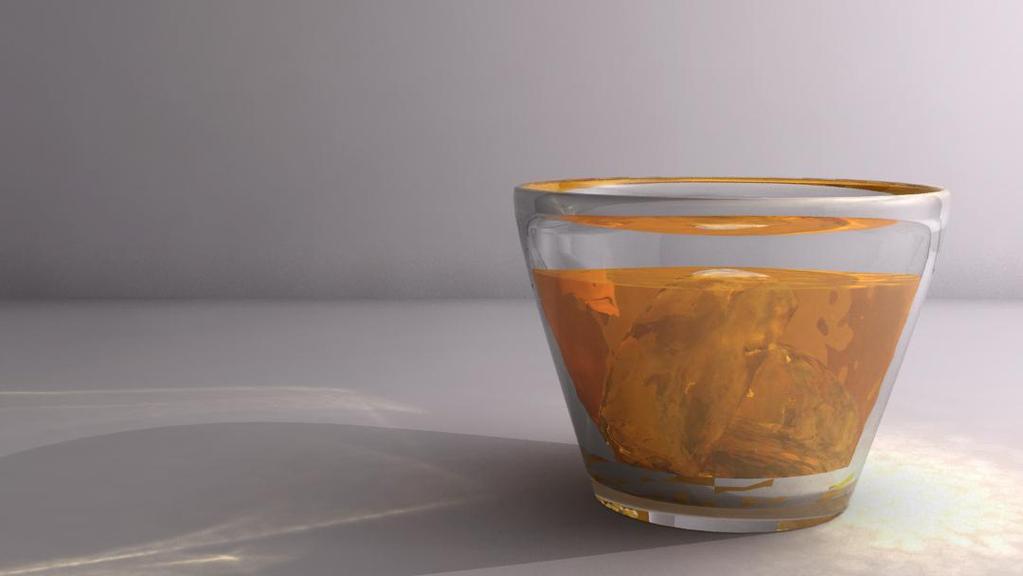
16 Since we checked the All Objects button in our render setup however, it should automatically turn everything in our scene on to generate caustics. Now adjust your Perspective window to get a good view into your box, and click the Render button to see the results! Notice the differences between the caustic shapes that are generated above the surface of our water and below. Mental Ray automatically calculates the reflective light shapes for your and can seriously add some nice depth to anything from an ocean scene, to a pool, or a glass with liquid and ice in it! Pretty much anything that reflects and refracts light from gemstones to liquids. 16
17 17
Submerge Camera Shader
 Submerge Camera Shader In this tutorial we are going to take a look at a simple scene with a swimming pool and a teapot and we will use the Mental Ray Camera shader called "Submerge" to change the look
Caustics - Mental Ray
 Caustics - Mental Ray In this tutorial we are going to go over some advanced lighting techniques for creating realistic caustic effects. Caustics are the focused patterns of light which form after light
Tangents. In this tutorial we are going to take a look at how tangents can affect an animation.
 Tangents In this tutorial we are going to take a look at how tangents can affect an animation. One of the 12 Principles of Animation is called Slow In and Slow Out. This refers to the spacing of the in
Polygon Modeling Basics Chapter 1 - Vertices
 Polygon Modeling Basics Chapter 1 - Vertices In this tutorial we will cover the basic tools necessary for Polygon Modeling using the Vertex sub-object selection. It is less of a how to tutorial and more
Ambient Occlusion Pass
 Ambient Occlusion Pass (Soft Shadows in the Nooks and Crannies to Replicate Photorealistic Lighting) In this tutorial we are going to go over some advanced lighting techniques for an Ambient Occlusion
Max scene used to generate the image from the second pdf in this tutorial.
 Tutorial covers creating vector drawings from a 3ds max scene and methods for compositing these drawings back into a rendering. Rendering set up is based of the lighting set up from the mental ray/skylight/mr
Ok, so to get started we will take a look at the settings in the Render setup. If we were to take a render right now this is what we would see...
 Caustics - V-Ray In this tutorial we are going to go over some advanced lighting techniques for creating realistic caustic effects using the V-Ray renderer. Caustics function in V-Ray much like they function
3ds Max Cottage Step 1. Always start out by setting up units: We re going with this setup as we will round everything off to one inch.
 3ds Max Cottage Step 1 Always start out by setting up units: We re going with this setup as we will round everything off to one inch. File/Import the CAD drawing Be sure Files of Type is set to all formats
MITOCW MIT6_172_F10_lec18_300k-mp4
 MITOCW MIT6_172_F10_lec18_300k-mp4 The following content is provided under a Creative Commons license. Your support will help MIT OpenCourseWare continue to offer high quality educational resources for
Chapter 11. Caustics and Global Illumination
 11 and Global Illumination Chapter 11 Direct illumination occurs when a light source directly illuminates an object or objects in a scene. Indirect illumination occurs if light illuminates objects by reflection
MR Shaders Dielectric Materials Rendering Glass and Simple Caustics
 Dielectric Material This shader is a physically based material shader that can be used to simulate dielectric media such as glass, water, and other liquids. The shader uses Fresnel's formulas for dielectric
Animation Basics. Learning Objectives
 Animation Basics Learning Objectives After completing this chapter, you will be able to: Work with the time slider Understand animation playback controls Understand animation and time controls Morph compound
Autodesk Fusion 360: Render. Overview
 Overview Rendering is the process of generating an image by combining geometry, camera, texture, lighting and shading (also called materials) information using a computer program. Before an image can be
Dissolving Models with Particle Flow and Animated Opacity Map
 Dissolving Models with Particle Flow and Animated Opacity Map In this tutorial we are going to start taking a look at Particle Flow, and one of its uses in digital effects of making a model look as though
Brief 3ds max Shaping Tutorial
 Brief 3ds max Shaping Tutorial Part1: Power Key Axe Shaft Written by Maestro 1. Creation: Go to top view, create a 6 sided cylinder, 0.1 radius this is the perfect shaft thickness to fit in the hand, so
Burning Laser. In this tutorial we are going to use particle flow to create a laser beam that shoots off sparks and leaves a burn mark on a surface!
 Burning Laser In this tutorial we are going to use particle flow to create a laser beam that shoots off sparks and leaves a burn mark on a surface! In order to save time on things you should already know
Introduction to Digital Modelling and Animation in Design week 4 Textures
 Introduction to Digital Modelling and Animation in Design week 4 Textures Thaleia Deniozou - - - - - - - - - - - - - - - - - - - - - - - - - - - - - - - - - - - - - - - - - - - - - - - - - - - - - - -
V-RAY MATERIAL SETTINGS
 V-RAY MATERIAL SETTINGS author: Wouter Wynen brought to you by: 2006 VisMasters. All rights reserved. VisMasters and the VisMasters logo are trademarks of ArchVision, Inc. All other trademarks belong to
Flames in Particle Flow
 Flames in Particle Flow In this tutorial we are going to take a look at creating some licking flames in Particle Flow. I warn you however, is that this method of fire creation is very processor intensive.
How to start your Texture Box Project!
 How to start your Texture Box Project! Shapes, naming surfaces, and textures. Lightwave 11.5 Part One: Create Your Shape Choose Start, Programs, New Tek, Lightwave and Modelor (the orange one). 1.In one
This lesson introduces Blender, covering the tools and concepts necessary to set up a minimal scene in virtual 3D space.
 3D Modeling with Blender: 01. Blender Basics Overview This lesson introduces Blender, covering the tools and concepts necessary to set up a minimal scene in virtual 3D space. Concepts Covered Blender s
Carrara Tutorial: Undersea Effects with Light Cones and Gels in Carrara. Carl E. Schou. January 31, 2004
 Carrara Tutorial: Undersea Effects with Light Cones and Gels in Carrara Carl E. Schou January 31, 2004 MorningStar Ascension There are many different ways to get underwater effects in computer graphics.
Lighting Techniques 1
 STEP 1: open your Class-05 Max fi le _ main menu / Customize / Units Setup _ set Display Unit Scale as shown in Image 1 _ set Lighting Units to: American STEP 2: select Daylight.01 _ command panel / modify
SolidWorks Intro Part 1b
 SolidWorks Intro Part 1b Dave Touretzky and Susan Finger 1. Create a new part We ll create a CAD model of the 2 ½ D key fob below to make on the laser cutter. Select File New Templates IPSpart If the SolidWorks
Full Screen Layout. Main Menu Property-specific Options. Object Tools ( t ) Outliner. Object Properties ( n ) Properties Buttons
 Outliner. Object Properties ( n ) Properties Buttons") Object Tools ( t ) Full Screen Layout Main Menu Property-specific Options Object Properties ( n ) Properties Buttons Outliner 1 Animation Controls The Create and Add Menus 2 The Coordinate and Viewing
Object Tools ( t ) Full Screen Layout Main Menu Property-specific Options Object Properties ( n ) Properties Buttons Outliner 1 Animation Controls The Create and Add Menus 2 The Coordinate and Viewing
Textures and UV Mapping in Blender
 Textures and UV Mapping in Blender Categories : Uncategorised Date : 21st November 2017 1 / 25 (See below for an introduction to UV maps and unwrapping) Jim s Notes regarding Blender objects, the UV Editor
4) Finish the spline here. To complete the spline, double click the last point or select the spline tool again.
 Finish the spline here. To complete the spline, double click the last point or select the spline tool again.") 1) Select the line tool 3) Move the cursor along the X direction (be careful to stay on the X axis alignment so that the line is perpendicular) and click for the second point of the line. Type 0.5 for
1) Select the line tool 3) Move the cursor along the X direction (be careful to stay on the X axis alignment so that the line is perpendicular) and click for the second point of the line. Type 0.5 for
Rock Tutorial: Creating A Rock Like Seen In Gears Of War With A Focus On Normal
 http://www.icantbelieveitsnothighpoly.com/tutorials_new.html To view finished product 360 degrees around Instructions // Download: Video (Rotation of Final Mesh)/// (Right click and save) This is an advanced
SolidWorks 2½D Parts
 SolidWorks 2½D Parts IDeATe Laser Micro Part 1b Dave Touretzky and Susan Finger 1. Create a new part In this lab, you ll create a CAD model of the 2 ½ D key fob below to make on the laser cutter. Select
lundi 7 janvier 2002 Blender: tutorial: Building a Castle Page: 1
 lundi 7 janvier 2002 Blender: tutorial: Building a Castle Page: 1 www.blender.nl this document is online at http://www.blender.nl/showitem.php?id=4 Building a Castle 2000 07 19 Bart Veldhuizen id4 Introduction
Extrude. Taper. STEP 04: Ctrl +V _ select Copy from the clone window _ name the copy: Slabs Mesh _ click OK
 Extrude STEP 01: open the class-08 3ds Max file _ select the ellipse _ command panel / modifier list _ select Extrude _ set the extrusion Amount: 400 _ STEP 02: with the perspective viewport current press
Where to get Blender. Go to Download the latest version
 Basic Building in Where to get Blender Go to www.blender.org Download the latest version Heads up! If using Linux the Software Center's safe version is out of date and doesn't do all that the new one does,
Select, Move, Rotate and Scale
 Select, Move, Rotate and Scale In this tutorial we will cover the basic tools necessary for navigating, moving, and manipulating objects in 3DS Max. It is less of a how to tutorial and more of a guide
Chapter 4- Blender Render Engines
 Chapter 4- Render Engines What is a Render Engine? As you make your 3D models in, your goal will probably be to generate (render) an image or a movie as a final result. The software that determines how
AR-media TUTORIALS IMPROVING REALISM AMBIENT OCCLUSION. (June, 2011)
") AR-media TUTORIALS IMPROVING REALISM AMBIENT OCCLUSION (June, 2011) Copyright Copyright 2008/2011 Inglobe Technologies S.r.l. All rights reserved. No part of this publication may be reproduced, transmitted,
AR-media TUTORIALS IMPROVING REALISM AMBIENT OCCLUSION (June, 2011) Copyright Copyright 2008/2011 Inglobe Technologies S.r.l. All rights reserved. No part of this publication may be reproduced, transmitted,
Raycast Rendering Maya 2013
 2000 2012 Michael O'Rourke Raycast Rendering Maya 2013 (See also the Intro to Lights and Rendering tutorial for an introduction to the basics of rendering an image) Concept There are several algorithms
3D Space is one of the most rewarding areas
 Lesson 8 206 3D Space Add a new dimension to your animations. In This Lesson 207 enabling layers for 3D 208 moving and rotating layers in 3D space 210 multiplaning effects 212 3D motion paths 213 multiple
Mastering Truspace 7
 How to move your Truespace models in Dark Basic Pro by Vickie Eagle Welcome Dark Basic Users to the Vickie Eagle Truspace Tutorials, In this first tutorial we are going to build some basic landscape models
Photo Studio Optimizer
 CATIA V5 Training Foils Photo Studio Optimizer Version 5 Release 19 September 008 EDU_CAT_EN_PSO_FF_V5R19 Photo Studio Optimizer Objectives of the course Upon completion of this course you will be able
Editing Polygons. Adding material/volume: Extrude. Learning objectives
 Learning objectives Be able to: use the Extrude tool to add volume to a polygon know what edge loops are and how to insert edge loops in a polygon cut edges in a polygon know multiple methods of sewing
 Page 1 of 10 Creating Cigarette Smoke In this tutorial, you use a particle system to create a stream of cigarette smoke trailing from an ashtray. The animation relies on space warps to affect the movement
Chapter 23- UV Texture Mapping
 Chapter 23- UV Texture Mapping Since games need to be able to process operations as fast as possible, traditional rendering techniques (specular, ray tracing reflections and refractions) cannot typically
UV Mapping to avoid texture flaws and enable proper shading
 UV Mapping to avoid texture flaws and enable proper shading Foreword: Throughout this tutorial I am going to be using Maya s built in UV Mapping utility, which I am going to base my projections on individual
Tutorial 4: Texture Mapping Techniques
 Tutorial 4: Texture Mapping Techniques Completion time 40 minutes In the previous tutorial we learned how to create materials, and how to assign texture maps to those materials. In this tutorial we will
3ds Max certification prep
 3ds Max certification prep Study online at quizlet.com/_25oorz 1. 24 Frames per second 2. 25 Frames per second, Europe 3. 30 Frames per second, Americas and Japan 4. Absolute mode, off set mode 5. How
Chapter 17: The Truth about Normals
 Chapter 17: The Truth about Normals What are Normals? When I first started with Blender I read about normals everywhere, but all I knew about them was: If there are weird black spots on your object, go
Modeling Level Design
 Summary This tutorial has introduced you to several of the tools you can use to make a low-polygon model with editable poly functionality. These tools can be adapted to the task of modeling any low-polygon
An Approach to Content Creation for Trainz
 An Approach to Content Creation for Trainz Paul Hobbs Part 6 GMax Basics (Updates and sample files available from http://www.44090digitalmodels.de) Page 1 of 18 Version 3 Index Foreward... 3 The Interface...
Blender Notes. Introduction to Digital Modelling and Animation in Design Blender Tutorial - week 1 The Blender Interface and Basic Shapes
 Blender Notes Introduction to Digital Modelling and Animation in Design Blender Tutorial - week 1 The Blender Interface and Basic Shapes Introduction Blender is a powerful modeling, animation and rendering
Pd Iray Shader Kit 2 - User s Guide
 Pd Iray Shader Kit 2 - User s Guide Introduction Pd Iray Shader Kit 2 is a do-it-yourself shader kit for Iray rendering. All of the shader presets are based off the Daz Iray Uber Base. You can create 1000's
COS 116 The Computational Universe Laboratory 10: Computer Graphics
 COS 116 The Computational Universe Laboratory 10: Computer Graphics As mentioned in lecture, computer graphics has four major parts: imaging, rendering, modeling, and animation. In this lab you will learn
Lightning Strikes. In this tutorial we are going to take a look at a method of creating some electricity zapper effects using Particle Flow.
 Lightning Strikes In this tutorial we are going to take a look at a method of creating some electricity zapper effects using Particle Flow. Open a new scene in 3DS Max and press 6 to open particle view.
Reference Image. Source:
 Mesh Modeling By Immer Baldos This document is a tutorial on mesh modeling using Blender version 2.49b. The goal is to create a model of an elevator. This tutorial will tackle creating the elevator cart,
Interior space in daylight Elsevier Inc. All rights reserved.
 Interior space in daylight Bonus Chapter 1 Day Lighting an Interior Space 1.1 Introduction In this chapter, you will learn about lighting an interior scene while you work on the lighting for the living
Chapter 9- Ray-Tracing
 Ray-tracing is used to produce mirrored and reflective surfaces. It is also being used to create transparency and refraction (bending of images through transparent surfaceslike a magnifying glass or a
A Quick Introduction to POV-Ray
 A Quick Introduction to POV-Ray POV-Ray, the Persistence of Vision ray tracer, is open source software available from www.povray.org. This is good, highly functional software that you might enjoy playing
BRYCE 5 Mini Tutorial
 BRYCE 5 Mini Tutorial How to create Panoramic Caverns by David Brinnen January 2006 HTML Version by Hans-Rudolf Wernli Cavern (above) and Pano-Cavern (below) > Start up Bryce, select «Create» and click
Blender Lesson Ceramic Bowl
 Blender Lesson Ceramic Bowl This lesson is going to show you how to create a ceramic looking bowl using the free program Blender. You will learn how to change the view, add, delete, scale and edit objects
COS 116 The Computational Universe Laboratory 10: Computer Graphics
 COS 116 The Computational Universe Laboratory 10: Computer Graphics As mentioned in lecture, computer graphics has four major parts: imaging, rendering, modeling, and animation. In this lab you will learn
ImageVis3D User's Manual
 ImageVis3D User's Manual 1 1. The current state of ImageVis3D Remember : 1. If ImageVis3D causes any kind of trouble, please report this to us! 2. We are still in the process of adding features to the
In this tutorial, you will create the model of a chair, as shown in the image below, using the extended primitives and modifiers.
 Office Chair In this tutorial, you will create the model of a chair, as shown in the image below, using the extended primitives and modifiers. Creating the Project Folder Create a new project folder with
Ray-Tracing. Misha Kazhdan
 Ray-Tracing Misha Kazhdan Ray-Tracing In graphics, we often represent the surface of a 3D shape by a set of triangles. Goal: Ray-Tracing Take a collection of triangles representing a 3D scene and render
TUTORIAL 7: Global Illumination & Ambient Occlusion
 TUTORIAL 7: Global Illumination & Ambient Occlusion The goal of this short tutorial is to introduce a few select aspects of mental ray so that you may consider incorporating them in your projects if appropriate.
Houdini Light, Shade, Render
 Houdini Light, Shade, Render M06: Creating a Light Rig Ari Danesh ari@sidefx.com Agenda More Managing Desktop (A Diversion) Looking at Existing Light Rig Digital Assets (Three Point Light) Creating our
Chapter 12- NURBS & Meta Shape Basics
 Chapter 12- NURBS & Meta Shape Basics When you press Shift-A for Add, you will notice other object types beside meshes, cameras and lights that can be created. Two types of objects that can be created
Low Poly Game Plants
 Low Poly Game Plants In this tutorial we are going to create some very simple low poly plants like the kind you find in video games all over the place. If you don t need to know the photoshop steps, or
Rendering Engines - Specific tools may depend on "Rendering Engine"
 Week 5 3DS Max, Cameras, Lighting and Materials Rendering - Process of turning geometry into pixels Rendering Engines - Specific tools may depend on "Rendering Engine" 1. Internal (3DS MAX) ART (Autodesk
Create a Swirly Lollipop Using the Spiral Tool Philip Christie on Jun 13th 2012 with 12 Comments
 Advertise Here Create a Swirly Lollipop Using the Spiral Tool Philip Christie on Jun 13th 2012 with 12 Comments Tutorial Details Program: Adobe Illustrator CS5 Difficulty: Beginner Es timated Completion
Glass Gambit: Chess set and shader presets for DAZ Studio
 Glass Gambit: Chess set and shader presets for DAZ Studio This product includes a beautiful glass chess set, 70 faceted glass shader presets and a 360 degree prop with 5 material files. Some people find
1st Point. 2nd Point. hold shift & drag along Y. Splines
 Splines STEP 1: open 3DS Max _ from the Command Panel under the Create tab click on Shapes (note: shapes are really Splines) _ under Object Type click on Ellipse STEP 2: Expand the Keyboard Entry tab type
IBL/GI & GLASS. Getting Realistic Results By Yon Resch. The Three Types of GI lighting and Glass
 IBL/GI & GLASS Getting Realistic Results By Yon Resch Glass and other transparent materials are some of the hardest materials to render realistically. This has mainly to do with the number of additional
Turn your movie file into the homework folder on the server called Lights, Camera, Action.
 CS32 W11 Homework 3: Due MONDAY, APRIL 18 Now let s put the ball in a world of your making and have some fun. Create a simple AND WE MEAN SIMPLE environment for one of your ball bounces. You will assign
Quick Start Tutorial
 Tutorial Tutorial: Build an Apple Welcome to Design 3D CX 7. This is a quick tutorial to get you started. In this tutorial you ll learn how to import an Adobe Illustrator file, Lathe it into a 3D object,
Problem Set 4 Part 1 CMSC 427 Distributed: Thursday, November 1, 2007 Due: Tuesday, November 20, 2007
 Problem Set 4 Part 1 CMSC 427 Distributed: Thursday, November 1, 2007 Due: Tuesday, November 20, 2007 Programming For this assignment you will write a simple ray tracer. It will be written in C++ without
Chapter 12 Notes: Optics
 Chapter 12 Notes: Optics How can the paths traveled by light rays be rearranged in order to form images? In this chapter we will consider just one form of electromagnetic wave: visible light. We will be
HOW TO. In this section, you will find. miscellaneous handouts that explain. HOW TO do various things.
 In this section, you will find miscellaneous handouts that explain do various things. 140 SAVING Introduction Every time you do something, you should save it on the DESKTOP. Click Save and then click on
Assignment 6: Ray Tracing
 Assignment 6: Ray Tracing Programming Lab Due: Monday, April 20 (midnight) 1 Introduction Throughout this semester you have written code that manipulated shapes and cameras to prepare a scene for rendering.
L15 POV-Ray - Part 1
 Geophysical Computing L15-1 L15 POV-Ray - Part 1 1. What is POV-Ray? POV-Ray stands for the Persistance of Vision Raytracer. POV-Ray belongs to a class of programs called ray tracers. For you seismologists
Basic Rendering Techniques Part B
 Basic Rendering Techniques Part B Using Materials in 3d Max The simplest method for changing g the default gray color of a 3d object is to apply hue to the object using the diffuse color feature. The physical
REU Modeling Course Day 1 pt2 AutoDesk Maya - More Modeling
 REU Modeling Course Day 1 pt2 AutoDesk Maya - More Modeling Maggie Iglesias Pena iglesias@iastate.edu Workshop Workflow Let s Review last session Creating & Applying Materials Rendering Today s mini goal
Texture Mapping. Images from 3D Creative Magazine
 Texture Mapping Images from 3D Creative Magazine Contents Introduction Definitions Light And Colour Surface Attributes Surface Attributes: Colour Surface Attributes: Shininess Surface Attributes: Specularity
Basic Texturing Tutorial by Gary Wu
 Basic Texturing Tutorial by Gary Wu This tutorial will teach you how to use basic shaders as textures on your models. In this example, we will be using a pumpkin model. The first step assumes you have
Lecture 18: Primer on Ray Tracing Techniques
 Lecture 18: Primer on Ray Tracing Techniques 6.172: Performance Engineering of Software Systems Joshua Slocum November 16, 2010 A Little Background Image rendering technique Simulate rays of light - ray
Mastering Autodesk 3ds Max 2013
 Mastering Autodesk 3ds Max 2013 Harper, J ISBN-13: 9781118129715 Table of Contents Introduction? xxi Chapter 1? Getting to Know Autodesk? 3ds Max? 2013??? 1 Introducing the New 3ds Max 2013 Features????
Cognex Machine Vision & Mitsubishi Robot Interface/Setup Tutorial Nicholas Bozzelli & Quentin Kilgore Millersville University October 2017
 Cognex Machine Vision & Mitsubishi Robot Interface/Setup Tutorial Nicholas Bozzelli & Quentin Kilgore Millersville University October 2017 Part I: Cognex Set-Up Overview: Using the Cognex vision system,
Materials in Kerkythea ~ a beginners guide
 Materials in Kerkythea ~ a beginners guide I started using Kerkythea as a way of rendering SketchUP models. I quickly found that I needed to be able to create and work with materials. I read Patrick Nieborg
LOOSE FITTING CLOTHES
 LOOSE FITTING CLOTHES Begin by opening the basic box modeled figure 0-BasicFigure.blend. He s at https://users.soe.ucsc. edu/~yonge/05_homework_resources/. This exercise uses some retopology techniques
3D Studio Max Lesson 1.1: A Basic Overview of 3DSMax's Main Tool Bar
 3D Studio Max Lesson 1.1: A Basic Overview of 3DSMax's Main Tool Bar Introduction In this tutorial, we'll just be taking a look at parts of the environment of 3D Studio Max version 4.26, and helping you
Introduction to 3D Concepts
 PART I Introduction to 3D Concepts Chapter 1 Scene... 3 Chapter 2 Rendering: OpenGL (OGL) and Adobe Ray Tracer (ART)...19 1 CHAPTER 1 Scene s0010 1.1. The 3D Scene p0010 A typical 3D scene has several
Chapter 4- Materials and Textures
 Chapter 4- Materials and Textures Materials and textures are what change your model from being gray to brilliant. You can add color, make things glow, become transparent like glass or make them look like
ImageVis3D "Hands On"-Session
 ImageVis3D "Hands On"-Session Center for Integrative Biomedical Computing 2009 Workshop, Northeastern University 1 1. The current state of ImageVis3D Remember : 1. If you find any problems in ImageVis3D,
First Animated Model Yellow Submarine
 Course: 3D Design Title: First Animated Model Yellow Submarine Blender: Version 2.6X Level: Beginning Author; Neal Hirsig (May 2012) First Animated Model Yellow Submarine Most of you are perhaps too young
Animated Modifiers (Morphing Teapot) Richard J Lapidus
 Richard J Lapidus") Animated Modifiers (Morphing Teapot) Richard J Lapidus Learning Objectives After completing this chapter, you will be able to: Add and adjust a wide range of modifiers. Work in both object and world space
Animated Modifiers (Morphing Teapot) Richard J Lapidus Learning Objectives After completing this chapter, you will be able to: Add and adjust a wide range of modifiers. Work in both object and world space
EXERCISE 6: AEC OBJECTS
 EXERCISE 6: AEC OBJECTS ASSIGNMENT: In this exercise you will create a small pavilion using AEC extended objects, Doors, Windows and Stairs LEARNING OBJECTIVES: Modeling with AEC Objects Using Door, Windows,
Lesson 11. Polygonal Spaceship
 11 Polygonal Spaceship In this lesson, you will build and texture map a polygonal spaceship. Starting with a polygonal cube, you will extrude facets until you have a completed ship. You will then be able
Creating a Double IK Chain in Lightwave
 Creating a Double IK Chain in Lightwave By: Jake Stewart, Stewart864@live.missouristate.edu Introduction: This tutorial is provide some helpful (hopefully) instructions on creating a double IK chain in
CREATING AND USING NORMAL MAPS - A Tutorial
 CREATING AND USING NORMAL MAPS - A Tutorial Introduction In the last 10 years or so we ve seen lots of video games released that use low poly count models for the game play and then tell the story using
Pong in Unity a basic Intro
 This tutorial recreates the classic game Pong, for those unfamiliar with the game, shame on you what have you been doing, living under a rock?! Go google it. Go on. For those that now know the game, this
diffuse diffuse reflection refraction diffuse mapping diffuse reflection reflection filter mapping mapping reflection
 Matières 1 2 3 mapping diffuse reflection diffuse transparency reflection refraction diffuse mapping diffuse reflection diffuse reflection filter mapping bump mapping mapping mapping diffuse reflection
Quick Start Guide to using Light Converse along with Pangolin LD2000 and BEYOND
 Quick Start Guide to using Light Converse along with Pangolin LD2000 and BEYOND First Steps Regardless of when or from whom you purchased Light Converse, we recommend you do the following steps before