Titanium Bedienungsanleitung Operating instructions ( ) / Rev 07.
|
|
|
- Lee Morgan
- 5 years ago
- Views:
Transcription

1 ( ) / Rev D GB Bedienungsanleitung Operating instructions
2 2
3 Professional rotary laser of extremely rugged design. Horizontal and vertical levelling even under the toughest conditions Automatic self-levelling through electronic vials and servomotors assisted by temperature stable sensors, horizontal and vertical. This unit is equipped with all important laser functions and due to the extreme rugged housing works reliable even under toughest conditions. Dust- and waterproof IP66, precision 1 mm / 10 m, self-levelling range 5. Horizontal slopes can be adjusted. The included remote control can control all functions. Titanium Red Laser Class 2. The green laser of the Titanium Green is much more visible than the red. This allows applications over longer distances and working under very bright ambient light conditions. Titanium Green Laser Class 3R. General safety instructions Caution: Do not look directly into the beam. Lasers must be kept out of Laser light! Do not stare into the beam or view directly with magnifiers. Class 3R laser EN : reach of children. Never intentionally aim the device at people. This is a quality laser measuring device and is 100% factory adjusted within the stated tolerance. For reasons of product liability, we must also draw your attention to the following: Regularly check the calibration before use, after transport and after extended periods of storage. We also wish to point out that absolute calibration is only possible in a specialist workshop. Calibration by yourself is only approximate and the accuracy of the calibration will depend on the care with which you proceed. Note: i This product is a precision instrument that must be handled and treated with care. Avoid shocks and impact. Always keep and carry in the case! Switch laser off. For cleaning, use a soft cloth and glass cleaner. Warranty The warranty period is 2 years from the date of purchase. The warranty covers all material or manufacturing defects occurring during this time. The following are excluded from warranty: Damage due to improper use (e.g. operation with wrong type of current/voltage, connection to unsuitable power source, fall onto hard surface, etc.) or improper storage, normal wear and tear, and defects which only insignificantly impair the value or suitability for use. Any tampering by unauthorised persons will render this warranty void. In the event that you need to claim warranty, please take the complete device together with all information and the invoice to one of our dealers or send it in to Umarex-Laserliner. ENGLISH 15
4 Sensor Automatic The Titanium is of the self-levelling kind. After it has been put in the required basic position, fine adjustment is being effected automatically. Horizontal and vertical orthogonal adjustments are effected by the self-levelling system (SLS), while the X-, Y- and the Y-axis are scanned by two electronic measuring sensors. The working angle is ± 5. Anti-Drift-System (ADS) The Anti-drift system (ADS) prevents mismeasurements. Its principle of function: 30 seconds after ADS has been activated, the laser is permanently being checked for its correct adjustment. In case the instrument has been moved by external influences or the laser has lost its frequency, the system switches itself automatically off and the "tilt"-led shows a permanent light. After the instrument has been switched on, the ADS is not active. In order to protect the instrument from position changes caused by external influences, the ADS has to be activated by pressing the push-button "tilt"(j). Should the instrument be moved by external influences, then the laser is switched off and the "tilt"-led (K) shows a permanent light. The instrument has to be switched off and -on again if work is to be commenced. This is a simple and reliable prevention of misreadings. Attention: The ADS-function will iswitch on the control of the laser 10 sec. after the laser has completely been levelled (adjustment phase). Tilt display (K) emits long blink signals during the adjustment phase and short blink signals when ADS is activated. ADS-function: ON Rotation begins after 10 sec., short blink signals in tilt display (K). The laser switches itself off for safety reasons, the "tilt"- LED shows a ON permanent light. Adjustment phase Sensor Automatic Acticate ADS: Press tilt button (D), long blink signals in tilt display (K). External influence 16 ENGLISH
 D Control panel E Battery compartment F")

 T Battery charge display ENGLISH")
5 A B C P O Vertical operation Q Titanium D N E F G K J L M R H I S T A Reference laser outlet B Prism head C Receiver diode for remote control (4x) D Control panel E Battery compartment F auto/man button G ON / OFF button H Anzeigen X, Y und Z-Achsen I J Operating / Battery display Tilt button K Tilt display L 5/8 tripod adapter for vertical use M Vertical holder (screw adjustment) N Adjusting screws O Centric point (with hinge) P Quick sighting Q 5/8 thread R Vertical vial for pre-adjustment S Charger socket (DC 6V) T Battery charge display ENGLISH Deutsch 17 1


6 Key pads and symbols LCD-Display Commader 50 SensoCommander SensoLite (Volume only) 14 Speed / Angle range / Adjusting axis at auto/man mode / Volume at Hand receiver mode 15 Position 16 Rotations-Modus 17 Scan mode 18 Hand receiver mode 19 Calibration mode: Switch X-, Y,-axis 20 Calibration mode: Adjusting axis 21 Calibration mode: Saving the new calibration. 22 Display measuring range selection 23 Hand receiver above laser level 24 Precisely on laser level 25 Hand receiver below laser level 26 Acoustic signal display 27 Low battery display 28 Hand receiver mode / Switch: Precision range Free-hand range Note: i The laser receiver has two tolerance settings: Precision and free-hand setting. On the SensoCommander 120, the settings are indicated by LEDs: precision setting: green; free-hand setting: orange. ENGLISH 19
. Reclose the battery compartment.")
.")
 and insert the batteries as shown by the installation symbol, ensuring that the polarity is correct.")

7 Operation of the Titanium Charging the batteries Before using the divice, fully charge th batteries Open the battery compartment (E), insert the batteries and connect the plugs to the sockets. The plugs fit in the sockets in one position only (see pictures on right). Reclose the battery compartment. Connect the battery charger/mains unit to a mains source and plug into the socket (S). Please only use the charger/mains unit supplied with the device. If a different one is used, the warranty will become void. The device can also be operated with standard alkali batteries (4 x type D). Insert the batteries as shown by the installation symbols. Ensure the polarity is correct. If the LED (T) blinks constantly, either the batteries must be exchanged or recharged. Insertion of batteries in the SensoLite and SensoCommander: Remove the battery cover (9) and insert the batteries as shown by the installation symbol, ensuring that the polarity is correct. Then replace the cover. To extend battery life, the receiver switches off automatically after about 5 minutes if not used. Note: i Do not expose batteries to excessive heat such as sunshine, fire, etc. Dry batteries must not be recharged. Used batteries must not be disposed of as household waste. Please take them to a collection point for used batteries or for special waste. Ask your local authority for further details. Batteries with the recycling symbol can also be returned to our dealerships or to our Technical Service. 20 Deutsch 1 ENGLISH
8 Horizontal and vertical use Setting up: Horizontal: Position the device on a level surface or on a tripod. Vertical - fix vertical holder (M), unfold centric point (O) and position unit in vertical mode. Pre-adjust unit with vertical vial (R) and adjusting screws (N). The sensor then adjusts the unit automatically. For use on tripods remove vertical holder (M) and screw-on tripod holder (L). PRESS THE "ON/OFF" SWITCH (G). The device automatically levels itself within a range of ± 5. When levelling has been completed, the laser rotates at maximum speed. The operating display (I) is lit up and the rotary laser is in the hand receiver mode. Switch on the laser receiver with the button (18), the button (18) and the laser beam is recognised. Note: If the device is too far off ithe horizontal (more than 5 ), a warning signal will sound and the rotor head will stop. In this case, the device must be repositioned on a more level surface. Turn the vertical plane: In vertical use the laser plane can exactly be turned. Press auto/man button (F). The vertical plane (+ 5 ) can now be changed with the Commander 50 or SensoCommander. To do this press buttons (14) Manual Slope function: Titanium The Sensor-Automatic adjusts the X and Y axes. However, if it is intended to project an incline, Sensor-Automatic must be switched off. To project an aincline, press the auto/man (F) button. The X axis can now be adjusted, and the X axis display (H) lights up. To adjust the inclination of the Y axis, press the tilt button (J); the Y axis display (H) lights up. Adjustment of the X and Y axes is done using the Commander 50 or SensoCommander. To do this, press buttons (15). In 1 plane In 2 planes ENGLISH 21

. Rotary mode Use button (16) to set the desired speed of rotation: 0, 150, 500 rpm.")
.")
9 Laser modes The following modes can be controlled with the Commander 50 up to a maximum distance of 50 m. Open battery compartment and insert battery according to picture on the right, ensure polarity is correct and close battery compartment. The rotating laser can also be controlled with the SensoCommander. Point mode To establish point mode, press button (16) repeatedly until the laser no longer rotates. The laser can then be precisely positioned to the measuring level with the direction buttons (15). Rotary mode Use button (16) to set the desired speed of rotation: 0, 150, 500 rpm. Scan mode Button (17) can be used to activate and set an intensive light segment with one of 4 different widths. The segment can be positioned with the direction buttons (15). Hand receiver mode Working with the optional laser receiver: Switch on the SensoLite laser receiver with the botton (18). With the Commander 50 and SensoCommander you could set the maximum rotary speed, 500 rpm. It is able to detect the laser beam at a great distance now. Move the SensoLite up and down through the laser beam until the middle indicator (24) appears. Mark the measured height at the perimeter marking groove. SpotLite Marking: The projected light beam at the height of the laser beam simplifies precise marking and prevents parallax error. 22 ENGLISH
 is always recommended when measuring from floor heights. It also allows you to determine heights directly without any need for calculation.")
10 Universal mount (optional): The laser receiver can be installed on levelling staffs with the aid of the universal mount. The Flexi measuring staff (Art. No ) is always recommended when measuring from floor heights. It also allows you to determine heights directly without any need for calculation. Titanium Titanium Green (Laser class 3R) The distance at which a laser is visible to the naked eye depends on its colour i.e. wavelength. This is because of the human eye's physiology green appears brighter to us than red. Depending on ambient light, green lasers are therefore many times more visible than red lasers; in indoor areas this is as much as 12 times brighter. This permits applications on dark surfaces, over longer distances and work in very bright ambient light. A red laser with a 635 nm wavelength is used as a reference value for brightness differentiation. In contrast to red lasers, green laser light can only be produced indirectly. This is a source of potential characteristic fluctuations: The optimal operating temperature is 20 C. Outside of the operating temperature range of C green lasers become darker. IMPORTANT: Allow the unit enough time to adapt to the ambient temperature before switching the unit on. Laser brightness may vary somewhat from one unit to another. This is a natural phenomena and excluded from warranty claims. Green Laser will only work with certain Receivers. The maximum range of the Receiver is shorter, please refer to technical details. Additional safety recommendations for Laser Class 3R. The laser must never be allowed to shine into people s eyes, whether intentionally or accidentally. Always keep the eyes at least 15 cm away from the reflection of the laser beam on a surface. Never point the laser at reflecting surfaces. Never look at the laser beam through optical devices (magnifying glass, microscope, binoculars,...). If possible, shield off the pathway of the laser beam, e.g. by screens or other devices. Mark off the work area by cordons and warning signs. If possible, the laser beam should not run at eye level (1.60 m m). ENGLISH 23
11 Preparing the calibration check It is possible for you to check the calibration of the laser. To do this, position the device midway between 2 walls, which must be at least 5 metres apart. Switch the device on. The best calibration results are achieved if the device is mounted on a tripod. 1. Mark point A1 on the wall. (Use spot mode.) 2. Turn the device through 180 and mark point A2. You now have a horizontal reference between points A1 and A2. 1. A1 2. A1 A2 Performing the calibration check: 3. Position the device as near as possible to the wall at the height of point A1. Now adjust the device in the X axis. 4. Turn the device through 180 and mark point A3. The difference between points A2 and A3 is the tolerance for the X axis. 5. To check the Y and Z axis, repeat steps 3 and A1 4. < 1 mm / 10 m = OK A2 A3 A2 A2 A3 Note: i If points A2 and A3 are more than 1 mm / 10 m apart on either the X, Y or Z axis, the device is in need of calibration. Contact your authorised dealer or else the UMAREX-LASERLINER Service Department. 24 ENGLISH
12 Recalibration Titanium 1. During calibration, pay attention to the alignment of the DuraMax and the displays for the X and Y axes (H). Always calibrate both axes. You can switch between axes with button (19) of the additional remote control. Alternatively the X- and Y-Axis can be changed with the button (SensoCommander). In vertical mode the Z-Axis is automatically switched on. 2. Set the device to calibration mode: Switch off the Titanium, and then, with the auto/man button (F) depressed, switch on again, briefly press ON/OFF button (G). Keep the auto/man button (F) depressed until the tilt display (K) lights up. When auto this happens, the auto/man button (F) can be released. man 3. Correcting calibration: Mit Using the buttons (20) of the Commander 50 or the buttons (15) of the SensoCommander, move the laser from its present position to the height of reference point A2. 4. Ending calibration: Cancel: By switching off the DuraMax, the entire calibration is rejected and the previous status restored. Save: The new calibration can be saved by pressing button (21) of the additional remote control or SensoCommander. Alternatively the new calibration can be saved with the button (SensoCommander). Note: i Regularly check the calibration before use, after transport and after extended periods of storage. Always make sure to control all axes. X- / Y- / Z-Axis Y Z X ENGLISH 25
13 (Subject to technical alterations) Titanium red / green Self-levelling range + 5 Precision + 1 mm / 10 m Horizontal / vertical levelling Automatic with electronic sensors and servo motors Self-levelling alignment time ca. 30 s Vertical reference beams 90 to rotation plane Rotation speed 0, 150, 500 RPM Remote control Infrared IR Laser wavelengths, green / red 635 nm / 532 nm Laser class red / green 2 / 3R (EN : ) Laser output rating < 1 mw / < 5 mw Protection class IP 66 Rechargeable battery life red / green approx. 24 h / 16 h Non-rechargeable battery life red / green approx. 35 h / 24 h (4 x type D) Battery recharging time approx. 14 h Working temperature range red / green -10 C C / 0 C C Weight 3,3 kg Remote control, laser receiver (optional) Batteries: Commander 50 / SensoLite 310 / SensoCommander 310 SensoLite 300 / SensoLite 120 Battery life Remote control range Commander 50 SensoCommander 310 Laser reception range SensoLite 310 / SensoLite 120 SensoLite 300 / SensoCommander 310 Laser reception range SensoLite 310 / SensoLite x 9V Block / 1 x 9V Block / 1 x 9V Block 4 x type AA / 2 x type AAA approx. 70 h (Mischbetrieb) max. 50 m max. 15 m Titanium red 310 m / 120 m 300 m / 310 m Titanium green 200 m / 120 m Temperature range, operating / storage -10 C C / -10 C C 26 ENGLISH
 E Accesorios (opcional) GB Accessories (optional) I Accessori (optional) NL")
 Art.-Nr: 035.00.A (Titanium Green) Art.")
14 D Zubehör (optional) E Accesorios (opcional) GB Accessories (optional) I Accessori (optional) NL Accessoires (optioneel) PL Akcesoria (opcja) DK F Tilbehør (flere typer) Accessoires (en option) FIN P Lisämahdollisuuksia valinnaisvarusteilla Acessórios (opcional) Art.-Nr: A (Titanium Green) Art.-Nr: Art.-Nr: (Titanium Green) Art.-Nr: (8m) Art.-Nr: (5m) Art.-Nr:
LSL250. Laser light! Do not stare into the beam or view directly with magnifiers. Class 2 laser EN :
 Lufkin LSL250 Professional rotary laser in extremely rugged design horizontal levelling even under tough conditions. Automatic rotary laser 635 nm, self-levelling range ± 5 horizontal, accuracy 1 mm /
Greenline-Laser 1 Pro
 036.00.00A / Rev 09.06 D GB NL DK F E I PL FIN P Bedienungsanleitung Operating instructions Gebruiksaanwijzing Betjeningsvejledning Mode d emploi Instrucciones para su uso Istruzioni d'uso Instrukcja Obsługi
MultiBeam-Laser MBL 5
 060.020A / Rev 0305 D GB NL DK F E I PL FI Bedienungsanleitung Operating instructions Gebruiksaanwijzing Betjeningsvejledning Mode d emploi Instrucciones para su uso Istruzioni d'uso Instrukcja Obsługi
Greenline-Laser 3P / 5P
 Greenline-Laser 3P / 5P DE 02 10 NL 18 FR 26 FI 34 Laser 532-650 nm Greenline- Laser 3P Greenline- Laser 5P Read the operating instructions and the enclosed brochure Guarantee and additional notices completely.
Laserliner. Innovation in Tools. MultiBeam-Laser MBL 3. Bedienungsanleitung Operating instructions Gebruiksaanwijzing
 060.010A / Rev 0305 GB NL Bedienungsanleitung Operating instructions Gebruiksaanwijzing 3-6 7-10 11-14 K Betjeningsvejledning 15-18 F Mode d emploi 19-22 E Instrucciones para su uso 23-26 Laserliner Innovation
AutoCross-Laser ACL 4C / ACL 4C RX
 8.031.96.11.1 / Rev.1208 DE GB NL DK FR ES IT PL FI PT Bedienungsanleitung 3-8 Operating instructions 9-14 Gebruiksaanwijzing 15-20 Betjeningsvejledning 21-26 Mode d emploi 27-32 Instrucciones para su
AutoCross-Laser 7C PowerBright
 8.049.96.01.1 / Rev.0509 3H 4V 1D DE GB NL DK FR ES IT PL FI PT Bedienungsanleitung Operating instructions Gebruiksaanwijzing Betjeningsvejledning Mode d emploi Instrucciones para su uso Istruzioni d uso
Instructions. Remote Controlled Rotator RCR
 LIMITED 1 YEAR WARRANTY Zircon Corporation, ("Zircon") warrants this product to be free from defects in materials and workmanship for one year from the date of purchase. Any in-warranty defective product
DigiLevel Pro 30/60/120 Laser 650 nm
 DE 04 GB 08 NL 12 DK 16 FR 20 ES 24 IT 28 PL 32 FI PT SE NO TR RU Laser UA CZ EE 300 LV 610 LT 1250 RO BG GR Pointlaser ON / OFF Pointlaser 30 mm 02 03 Digital electronic spirit level with vertical and
TEL: / FAX:
 Self-leveling Rotary Laser FRE-211 Operating Manual P.R.Engineering Ltd UK www.laser-level.co.uk TEL: 01246 269 777 / FAX: 01246 260 007 SAFETY PRECAUTIONS: During instrument operation, be careful not
Operating Manual. AdirPro HV8RL Red Beam Horizontal/Vertical Laser level
 Operating Manual AdirPro HV8RL Red Beam Horizontal/Vertical Laser level Maintenance and Safety The HV8RL is a class II laser according to 21CFR1040. Be careful not to expose your eyes to the laser beam.
Instruction Manual. Electronic Horizontal & Vertical Self-Leveling Rotary Laser Level Model Nos , ,
 4411H-English_Manuals 3/11/11 1:13 PM Page 1 Electronic Horizontal & Vertical Self-Leveling Rotary Laser Level Model Nos. 40-6526, 40-6529, 40-6544 Instruction Manual Congratulations on your choice of
Auto-leveling Rotating Laser (RL430G)
") Auto-leveling Rotating Laser (RL430G) Congratulations on your choice of this Auto-leveling Rotating Laser. For the purpose of long-term use of this instrument, we suggest you to read this instruction manual
Auto-leveling Rotating Laser (RL430G) Congratulations on your choice of this Auto-leveling Rotating Laser. For the purpose of long-term use of this instrument, we suggest you to read this instruction manual
ECOLINE EL 515 PLUS EL 515 PLUS SET
 DE FR ECOLINE EL 55 PLUS EL 55 PLUS SET BEDIUNGSANLEITUNG USER MANUAL MODE D EMPLOI EXACTLY WHAT YOU NEED. Rotating laser EL 55 Plus is available as laser unit with standard accessories as well as rotating
MultiLine Please read these instructions before operating the product. 5 - Beam Self-Leveling Multi-Line Laser
 5 - Beam Self-Leveling Multi-Line Laser MultiLine 77-122 Please read these instructions before operating the product Self-Leveling GB D F I E PT NL DK SE FIN NO PL GR CZ RU HU SK SI BG RO EE LV LT Contents
Dear user, Thank you very much for purchasing LS533H rotary laser. Please read this instruction manual before operating it.
 Dear user, Thank you very much for purchasing LS533H rotary laser. Please read this instruction manual before operating it. Contents 1. Features and Functions 2. User Safety 3. Nomenclature 4. Operation
LA 90L / LA 180L. Operating instructions
 L 90L / L 80L en Operating instructions L 80L 7 3a 5 6 4 3b 8 d b c b a a C L 80 L L 90 L D D >,8m > ft 90 Y Y m 3 3 ft E E E3 F Y D ± 5 D X D3 G,8m ft G G3 S > 5 m > 6 3 ft G4 G5 3 3 en Operating instructions
Mk II 3DR MULTI-LINE LASER INSTRUCTION MANUAL
 Mk II 3DR MULTI-LINE LASER INSTRUCTION MANUAL SAFETY Read the following safety instructions before attempting to operate this product. Keep these instructions in a safe place or store in the carry case
Rotary laser for outdoor areas
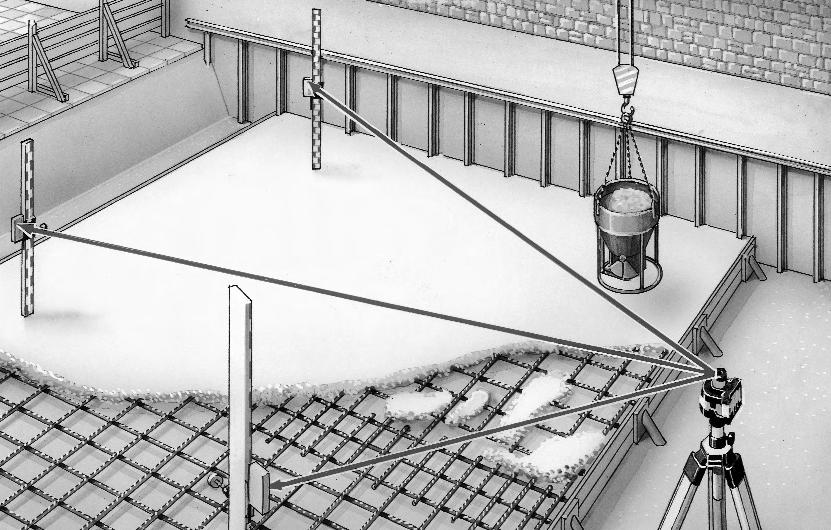
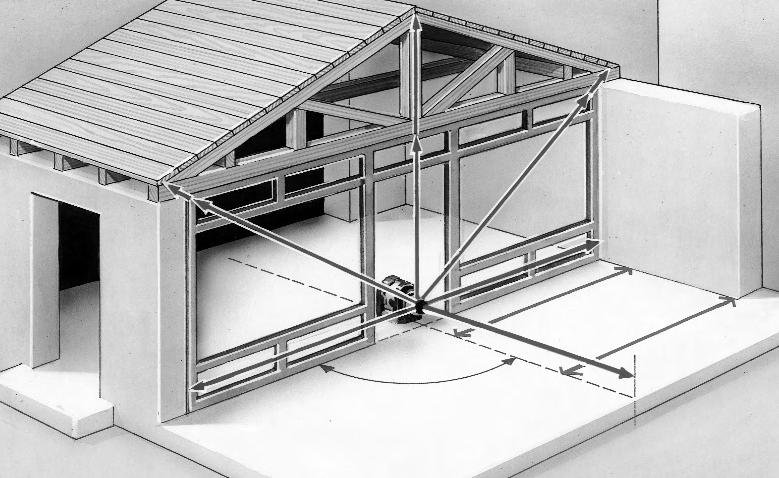
 78 Rotary laser for outdoor areas ABOVE AND BELOW GROUND CONSTRUCTION Rotary lasers are used in above and below ground construction for the most diverse types of survey work. Their primary purposes involve
Instruction Manual. Electronic Self-Leveling Dual Grade Horizontal / Vertical Rotary Laser Model No
 6274H-1_Manuals 9/26/12 10:44 AM Page 1 Electronic Self-Leveling Dual Grade Horizontal / Vertical Rotary Laser Model No. 40-6582 Instruction Manual Congratulations on your choice of this Electronic Self-Leveling
CLLi Please read these instructions before operating the product. 2 - Beam Self-Leveling Cross Line Laser
 - Beam Self-Leveling Cross Line Laser CLLi 77-117 Please read these instructions before operating the product Self-Leveling GB D F I E PT NL DK SE FIN NO PL GR CZ RU HU SK SI BG RO EE LV LT Contents Safety
LDM M LASER DISTANCE MEASURER
 LDM120 120M LASER DISTANCE MEASURER INSTRUCTION MANUAL SAFETY Read the following safety instructions before attempting to operate this product. SAVE ALL WARNINGS AND INSTRUCTIONS FOR FUTURE REFERENCE.!
Thank you very much for purchasing LAISAI LS686 line laser, please read this instruction manual before operating it. Content
 Dear User: Thank you very much for purchasing LAISAI LS686 line laser, please read this instruction manual before operating it. Content 1. Features and functions 2. User safety 3. Instrument nomenclature.
Geo3X HP BEDIENUNGSANLEITUNG USER MANUAL MODE D EMPLOI
 DE EN FR Geo3X HP BEDIENUNGSANLEITUNG USER MANUAL MODE D EMPLOI www.geo-fennel.de www.geo-fennel.com www.geo-fennel.fr Dear Customer, Thank you for your confidence in us, having purchased a geo-fennel
Self-Leveling Cross Line Laser Level with 3 Vertical Lines Model No Instruction Manual
 1676H-English 10/3/08 10:46 AM Page 1 Self-Leveling Cross Line Laser Level with 3 Vertical Lines Model No. 40-6602 Instruction Manual Congratulations on your choice of this Self-Leveling Cross Line Laser
from P.R.Engineering Ltd Tel:
 Quick Start FRE-205 INSTRUCTIONS from P.R.Engineering Ltd www.laser-level.co.uk Tel: 01246 269 777 Thank you for purchasing the FRE-205 Auto Rotary laser level kit. These instructions are intended to explain
Receiver REC 300 Digital. Operating instructions
 Receiver REC 300 Digital GB Operating instructions Operating instructions GB The STABILA REC 300 Digital is a simple-to-use receiver for the rapid capture of rotating lasers. The REC 300 Digital receiver
IMPORTANT SAFETY INSTRUCTIONS Do not use the product before you have studied the Safety instructions and the User Manual.
 CONTENTS Important safety instructions... Specifi ed Conditions of Use... Error Code Table... Overview... Change batteries...4 Corner Pin...4 Belt Clip...4 Function Switch, Measuring Reference, Pythagoras...5
DE EN FR. S-Digit multi + BEDIENUNGSANLEITUNG USER MANUAL MODE D EMPLOI
 DE FR S-Digit multi + BEDIUNGSANLEITUNG USER MANUAL MODE D EMPLOI www.geo-fennel.de www.geo-fennel.com www.geo-fennel.fr Dear customer, Thank you for your confidence in us having purchased a geo-fnel instrument.
LS516/LSG516 Self-leveling Rotating Laser Instruction Manual ( )
") LS516/LSG516 Self-leveling Rotating Laser Instruction Manual (2009-8-14) Contents 1. Features and Functions 2. User Safety 3. Nomenclature 4. Operation Instruction 5. Self-check and calibration 6. Application
LS516/LSG516 Self-leveling Rotating Laser Instruction Manual (2009-8-14) Contents 1. Features and Functions 2. User Safety 3. Nomenclature 4. Operation Instruction 5. Self-check and calibration 6. Application
IMPORTANT SAFETY INSTRUCTIONS
 CONTENTS Important safety instructions... Specified Conditions of Use... Error Code Table... Overview... Change batteries...4 Corner Pin...4 Belt Clip...4 Function Switch, Pythagoras, Measuring Reference...5
Manual. Infrared cameras. Contour M
 Manual Infrared cameras Contour M Content Content... 2 Safety requirements... 3 About... 4 Operation... 5 The Maintenance instruction... 7 Spectral sensitivity... 7 Power density... 8 Technical information...
Overview 2. Technical data 3. Instrument Set-up 4. Operations 7. Message Codes 9. Accuracy Check 10. Care 13. Warranty 14. Safety instructions 15
 Leica Lino L4P1 Overview 2 Technical data 3 Instrument Set-up 4 Operations 7 Message Codes 9 Accuracy Check 10 Care 13 Warranty 14 Safety instructions 15 Leica Lino L4P1 1 Overview Ov e rv ie w The Leica
Self-leveling Laser Marker (4V1HXL)
") Self-leveling Laser Marker (4V1HXL) Congratulations on your choice of this Self-leveling Laser Marker. For the purpose of long-term use of this instrument, we suggest you to read this instruction manual
Self-leveling Laser Marker (4V1HXL) Congratulations on your choice of this Self-leveling Laser Marker. For the purpose of long-term use of this instrument, we suggest you to read this instruction manual
Operating Instructions TPL 50 HV
 Operating Instructions TPL 50 HV Serial No: Owner: Delivered by: Introduction The laser, TPL 50 HV, featuring a visible laser beam, is a product from the THEIS PROFI LASER family. A beam splitter provides
Instruction Manual EN
 Instruction Manual EN Contents Introduction... 3 Keyboard /Display... 4 1. Horizontal Operation... 5 2. Vertical Operation/Alignment Mode... 5 3. Rotation Speed... 6 4. Slope in Manual Mode... 6 5. Mask
Digital Night Vision Device Digital+ Series NV-440D3/NV-650D3/NV-760D3
 Digital Night Vision Device Digital+ Series NV-440D3/NV-650D3/NV-760D3 Instruction Manual Digital Night Vision Device Digital Series NV-440D3 / NV-650D3 / NV-760D3 Before using the device for the first
Laser Operations Guide
 Laser Operations Guide Laser excellence since 1991 You now own the Pro Shot Alpha, a high accuracy, ultra rugged servo leveled automatic laser for your most demanding leveling or grading operations. Please
Instruction Manual EN
 Instruction Manual EN Contents Introduction... 3 Keyboard /Display... 4 1. Horizontal Operation... 5 2. Vertical Operation/Alignment Mode... 5 3. Rotation Speed... 6 4. Slope... 6 5. Slope in Vertical
Receiver REC D FIN DK S TR SLO. Οδηγίες χειρισϝού. Инструкция по обслуживанию EST RUS KOR CHN. Návod k použití. Bedienungsanleitung
 Receiver REC D Bedienungsanleitung CZ Návod k použití GB Operating instructions PL Instrukcja obsæugi F Mode d'emploi SLO Navodila za uporabo I Istruzioni per l'uso H Használati utasitás E Instrucciones
Operating instructions
 www.lehmann-locks.com GB L033-A01 L033-A02 M300 L033-A01 / -A02 Operating instructions Contents Page General description / Technical data / Safety instructions... 2 Care and maintenance / Factory settings
LAR 350 rotation laser: Tough DUAL SLOPE laser kit Made in Germany. World s first MOTION CONTROL
 LAR 350 rotation laser: Tough DUAL SLOPE laser kit Made in Germany World s first MOTION CONTROL LAR 350 rotating laser with MOTION CONTROL: Welcome to the new age of laser control For serious professionals:
VERTICAL CONTROL LASER OWNERS MANUAL
 Rev: 4.5.18 VERTICAL CONTROL LASER OWNERS MANUAL P/N 3003-1041 1810 SE First Street, Suite H, Redmond, OR 97756 Phone: 541-548-0882 Fax: 541-548-0892 Email: laserline@laserline.net Website: www.laserlinemfg.com
Robot Light V2. User Manual
 Robot Light V2 User Manual 2 Please read over this manual before operating the light. Introduction Unpacking: Thank you for purchasing the Robot Light V2. Every Robot Light V2 has been thoroughly tested
Line Laser Module LLM01. User Manual. JENOPTIK Group.
 Line Laser Module LLM01 User Manual JENOPTIK Group. Dear User You are advised to carefully read this User Manual before you start working with the LLM01 Line Laser Module. This is necessary to help you
User's Guide. Model RPM10 Laser Photo / Contact Tachometer with IR Thermometer
 User's Guide Model RPM10 Laser Photo / Contact Tachometer with IR Thermometer Introduction Congratulations on your purchase of Extech's Laser Photo/Contact Tachometer with Non-Contact IR Thermometer, Model
Bedienungsanleitung Users Manual Mode d emploi. IR-Thermometer Pocket Thermomètre digital FIRT 550-Pocket
 Bedienungsanleitung Users Manual Mode d emploi IR-Thermometer Pocket Thermomètre digital FIRT 550-Pocket 1 2 FRONT PANEL 1) IR Sensor 2) LCD display 3) button / laser pointer 4) button / illumination 5)
Blue Weapon Laser. User manual UK. Version 1.0
 Blue Weapon Laser User manual 152.754UK Version 1.0 CAUTION 15. Disposal : Please disposal of the unserviceable device according to the current statutory requirements. Please read this manual fully before
* When purchased as baby monitor set A , only one manual and warranty card is included. English 16
 Congratulations on the purchase of your video monitoring system»mona«. You have chosen highly modern and reliable devices, which will provide valuable service for your home. Please read this manual thoroughly
ITA100 MKII 100mW green DMX laser
 ITA100 MKII 100mW green DMX laser User manual Safety instructions WARNING! Always keep this device away from moisture and rain! Hazardous electrical shocks may occur! WARNING! Only connect this device
Stanley TLM 130i.book Page 1 Tuesday, February 5, :00 PM
 Stanley TLM 130i.book Page 1 Tuesday, February 5, 2008 5:00 PM Stanley TLM 130i.book Page 2 Tuesday, February 5, 2008 5:00 PM A B C D E F Stanley TLM 130i.book Page 9 Tuesday, February 5, 2008 5:00 PM
BORESCOPE INSTRUCTIONS INSPECTION CAMERA RANGE RBS100 RBS200 RBS300. Retain these instructions for future reference
 BORESCOPE INSPECTION CAMERA RANGE RBS100 RBS200 RBS300 INSTRUCTIONS Retain these instructions for future reference www.ringautomotive.co.uk 1 Instructions for Ring Automotive Borescope Inspection Camera
ENVIRONMENTAL PROTECTION
 ENVIRONMENTAL PROTECTION Do not dispose of this product with the normal household waste at the end of its life cycle. Return it to a collection point for the recycling of electrical and electronic devices.
LaserLyte-Flex Red & Green Alignment System
 LaserLyte-Flex Red & Green Alignment System LaserLyte-Flex The LaserLyte-Flex is an entry-level laser alignment system. It uses interchangeable optics and a semiconductor laser diode to project a highly
Leica Lino ML90, ML180
 Leica Lino ML90, ML180 User Manual Version 785880b English Congratulations on your purchase of the Leica Lino ML Series. Before starting up the instrument for the first time, please read through the entire
Instruction Manual. 24" and 48" Waterproof Electronic Digital Level Model Nos &
 7640H-English_Manuals 12/11/13 4:18 PM Page 1 24" and 48" Waterproof Electronic Digital Level Model Nos. 1880-2400 & 1880-4800 Instruction Manual Congratulations on your choice of this Digital Level. We
X-Beam Waterproof Action Camera Light USER GUIDE
 X-Beam Waterproof Action Camera Light USER GUIDE EN Join the social movement and follow us on #ChallengeYourself Share your footage with us on our social media Need help? www.kaiserbaas.com/support To
1. Safety instructions
 AX-904 1. Safety instructions Failure to follow the instructions listed below may cause personal injury. Read and understand all instructions prior to any operation. Do not remove any label from the tool.
RF-Link 2.4GHz Digital Wireless Color Security/Baby Monitor. Model: ABM-4161 User's Manual
 RF-Link 2.4GHz Digital Wireless Color Security/Baby Monitor Model: ABM-4161 User's Manual 1 Package Content Camera x 1 Monitor x 1 Power Adapters x 2 Battery for Monitor ( 3.7V 1000mAH Li-ion ) x 1 User's
QUAD 1000 OWNERS MANUAL OPERATION GUIDE
 QUAD 1000 OWNERS MANUAL OPERATION GUIDE Built in Redmond Oregon USA COMPONENTS 4001-0000 Quad 1000 5 arc second zenith laser featuring electronic servo self-leveling with variable temperature compensation
CONTENTS. Model no: NT-013
 1 CONTENTS Model no: NT-013 1. Product Overview... 2 2. How This Product Works..... 2 3. Product Features... 5 4. Package Contents... 6 5. Safety Precautions......6 6. Identifying Parts and their Functions...
LED-Illumination with Control Unit Ident.-No
 A HAAG-STREIT COMPANY MÖLLER-WEDEL OPTICAL GmbH, Rosengarten 10, D-22880 Wedel with Control Unit Ident.-No. 773 190 01 Valid from Hardware / Software Rev. / SN 1.0 IDENT.-NO. 217 321 09 Document Version
Green Rotary Laser Level
 Owner s Manual Green Rotary Laser Level Model No. 320. XXXXX CAUTION: Before using this product, read this manual and follow all its Safety Rules and Operating Instructions. Safety Operation Maintenance
Spectrum Laser. User manual UK. Version 1.0
 Spectrum Laser User manual 152.753UK Version 1.0 CAUTION 15. Disposal : Please disposal of the unserviceable device according to the current statutory requirements. Please read this manual fully before
Optical laser distance sensors. Dimensioned drawing
 Optical laser distance sensors Dimensioned drawing We reserve the right to make changes DS_ODSL96BMLTOFS12_en_50117984-01.fm en 03-2013/01 50117984-01 18-30 V DC 0.3 10m Measurement range up to 10000mm
INSPECTION CAMERA MODEL NO: CIC2410 OPERATION & SAFETY INSTRUCTIONS PART NO: GC0116
 INSPECTION CAMERA MODEL NO: CIC2410 PART NO: 6470385 OPERATION & SAFETY INSTRUCTIONS GC0116 INTRODUCTION Thank you for purchasing this CLARKE Inspection Camera. Before attempting to use this product, please
Owner s Manual & Safety Instructions
 Owner s Manual & Safety Instructions Save This Manual Keep this manual for the safety warnings and precautions, assembly, operating, inspection, maintenance and cleaning procedures. Write the product s
Primus-H. Primus-HV. Primus-HVA. Precise surveying and measuring. Made in Germany
 T h e f a m i l o f s e l f - l e v e l l i n g r o t a t i n g l a s e r s Primus-H Primus-HV Primus-HVA Precise surveing and measuring Made in German Self-levelling rotating lasers: The Nedo -Famil The
1. PRECAUTIONS. Thank you for choosing RUIDE theodolite Disteo 23. Please read this manual carefully before use.
 Thank you for choosing RUIDE theodolite Disteo 23. Please read this manual carefully before use. 1. PRECAUTIONS a. Do not collimate the objective lens directly to the sunlight without a filter. b. Do not
LRF400 LRF600 LRF1000. Laser Range Finder Laser Range Finder Laser Range Finder
 LRF400 Laser Range Finder 2.1301 LRF600 Laser Range Finder 2.1302 LRF1000 Laser Range Finder 2.1303 Operating instructions 3-9 Bedienungsanleitung 10-16 Mode d emploi 17-23 Manual de instrucciones 24-30
Cross Line Laser kit. User Manual for EK-226P
 Cross Line Laser kit User Manual for EK-226P 1 1. Class & Function Remark: R model: With remote control(wireless & infrared red) & 360 motorized rotation. Number of lines Class Horizon tallaser Verticallaser
Rotary Laser Service Manual
 Rotary Laser Service Manual Content 1.0 Instruments & Accessories (3) 1.1 Operations (3) 1.2 Key functions (4) 2.0 Structure (6) 2.1Housing set (7) 2.2Underpan set (8) 2.3Pendulum (10) 2.4PCB (13) 2.5
Use the ML830 Smart laser System only as directed.
 I. INTRODUCTION This manual provides operators with step-by-step instructions for use, precautions, warnings, care. and maintenance procedures. Please read this manual thoroughly and familiarize yourself
3D OBJECTS RGB LASER. Order ref: UK User Manual
 TECHNICAL SPECIFICATION Voltage : 230Vac, 50/60Hz Blue : 300mW 455nm Fuse : 2A Slow blow DMX Channels : 20 Dimensions : 220 x 176 x 99mm Laser Class : 3B Red Laser: 100mW 638nm Power Consumption : 45W
USER MANUAL. LED IP Ribbon. ~Horizontal~ Keep this manual for future needs! Copyright Reproduction prohibited!
 USER MANUAL LED IP Ribbon ~Horizontal~ Keep this manual for future needs! Copyright Reproduction prohibited! MULTI-LANGUAGE-INSTRUCTIONS Inhaltsverzeichnis Table of contents INTRODUCTION... 7 SAFETY INSTRUCTIONS...
DEUTSCH ENGLISH NEDERLANDS FRANÇAIS NORSK ITALANIO ČEŠTINA Hersteller DAB650SI
 DEUTSCH NEDERLANDS NORSK ČEŠTINA ENGLISH FRANÇAIS ITALANIO Hersteller Wörlein GmbH Tel.: +49 9103/71670 Gewerbestrasse 12 Fax.: +49 9103/716712 D 90556 Cadolzburg Email. info@woerlein.com GERMANY Web:
Instruction Manual. 24" and 48" Electronic Digital Level Model Nos &
 7123H_Manuals 8/6/13 11:51 AM Page 1 24" and 48" Electronic Digital Level Model Nos. 1876-2400 & 1876-4800 Instruction Manual Congratulations on your choice of this Digital Level. We suggest you read this
Operation Manual Locator Wöhler L 200
 Operation Manual Locator Wöhler L 200 Best.-Nr. 22849 2014-12-18. Contents Contents 1 General Information... 3 1.1 Operation Manual Information... 3 1.2 Notes in this manual... 3 1.3 Proper use... 3 1.4
ENVIRONMENTAL PROTECTION
 ENVIRONMENTAL PROTECTION Do not dispose of this product with the normal household waste at the end of its life cycle. Return it to a collection point for the recycling of electrical and electronic devices.
USER MANUAL MINI WILDLIFE CAMERA
 USER MANUAL MINI WILDLIFE CAMERA INTRODUCTION Thank you for purchasing our mini wildlife camera. This device is a special camera designed specifically for recording and observing wildlife. These easy to
LED FOLDING WORKLIGHT TM
 LED FOLDING WORKLIGHT TM LED LIGHT POWERSTRIP USB CHARGING ITM. / ART. 689211 Model: LM55812 CARE & USE INSTRUCTIONS IMPORTANT, RETAIN FOR FUTURE REFERENCE: READ CAREFULLY For assistance with assembly
Complete Barrel Measuring and Inspection System. PS Series. User s manual
 Complete Barrel Measuring and Inspection System PS Series User s manual SAFETY PRECAUTIONS... 3 ELECTROMAGNETIC COMPATIBILITY... 3 LASER SAFETY... 3 GENERAL INFORMATION... 3 BASIC DATA AND PERFORMANCE
V /06/ Velleman nv
 DC LAB POWER SUPPLY WITH DUAL LED DISPLAY DC-LABVOEDING - DUBBELE LED-DISPLAY ALIMENTATION DE LABORATOIRE DC À DOUBLE AFFICHEUR LED ALIMENTACIÓN DC PARA LABORATORIO CON DOBLE DISPLAY LED DC-LABORNETZGERÄT
FengMi Wemax One Laser Projection TV
 FengMi Wemax One Laser Projection TV User`s Manual About electrical ground Transportation Use this device only with a compulsory grounding condition. It is recommended that you use the original packaging
 OPERATING MANUAL H A W K E Y E Portable Digital Slit Lamp 1 INDEX Turning HAWK EYE ON and OFF... p. 3 Automatic shut down... p. 3 Adjusting the illumination intensity... p. 3 Taking pictures... p. 4 Playing
Table of Contents. Federal Communications Commission (FCC) Statement...2
 Statement...2") Contents Table of Contents Federal Communications Commission (FCC) Statement...2 Important Safety Instructions...3 Chapter 1 Introduction Features...6 Package Contents...7 Front View and Controls...8 Installing
Contents Table of Contents Federal Communications Commission (FCC) Statement...2 Important Safety Instructions...3 Chapter 1 Introduction Features...6 Package Contents...7 Front View and Controls...8 Installing
862 PROLASER CROSS LINE LASER
 L A S E R S 862 PROLASER CROSS LINE LASER Indoor red cross-line laser Magnet Hanging hole Velcro strip V-Groove Magnet Battery cover opening Tripod thread 1/4" 4.5cm (1.77") On/Off switch 10.5cm (4.15")
Contents. - i - Ver.:2
 Contents 1 Accessories of D-Point 2... 2 2 Connecting Projector to PC... 4 3 Pen Action... 4 4 Driver Installation... 5 5 Configuration Setting... 8 6 D-Point 2 Pull-up Menu... 12 7 DT02 Multi-touch Interactive
LAR 350. Operating Instructions.
 Operating Instructions www.stabila.com Contts Section Page 1. Intded Use 3 2. Safety Information 4 3. Before First Use 4 4.1 System Elemts 5 4.2 Remote Control Unit Elemts 6 5. Battery Insertion/Replacemt
KI6501 Optical CWDM Power Meter. User Manual. KI6501 series Optical CWDM Power Meter
 User Manual KI6501 series Optical CWDM Power Meter Warranty: Information in this manual is given in good faith for the benefit of the user. It cannot be used as the basis for claims against Kingfisher
Bedienungsanleitung User Manual Mode d'emploi Istruzioni d'uso Manual de instrucciones Gebruiksaanwijzing Betjeningsvejledning Bruksanvisning
 Bedienungsanleitung User Manual Mode d'emploi Istruzioni d'uso Manual de instrucciones Gebruiksaanwijzing Betjeningsvejledning Bruksanvisning Käyttöopas Instrukcja obsługi Návod k obsluze - 3 - English
IMPORTANT SAFETY INFORMATION
 Bluetooth Speaker CONTENTS Important safety information......................... 3 Product set up........................................ 4 What s in the box?.................................... 4 Where
DuoFern Multiple Wall Controller
 DuoFern Multiple Wall Controller 9494-1 Instruction manual for the electrical connection and for commissioning Item no. 3250 19 74 / Type: 9494-1 (surface-mounted with battery) VBD 663-2 (12.16) Dear Customer,
KI Channel Optical CWDM Power Meter. User Manual. KI6503 series 48-Channel Optical DWDM Power Meter
 User Manual KI6503 series 48-Channel Optical DWDM Power Meter Warranty: Information in this manual is given in good faith for the benefit of the user. It cannot be used as the basis for claims against
PL1500M LCD Monitor USER'S GUIDE.
 PL1500M LCD Monitor USER'S GUIDE www.planar.com Content Operation Instructions...1 Safety Precautions...2 First Setup...3 Front View of the Product...4 Rear View of the Product...5 Quick Installation...6
Action-Sports Camera User Manual. Please read through the complete User Manual before using your JAKD
 Action-Sports Camera 9903 User Manual Please read through the complete User Manual before using your JAKD Action-Sports Camera, and hold onto the manual for future use. Please operate the camera on basis
AB x 1 HDMI switch with 3D and 4K support
 AB7816 4 x 1 HDMI switch with 3D and 4K support EMXXX Product Title from CMS 2 ENGLISH Table of contents 1.0 Introduction... 2 1.1 Packing contents... 2 2.0 Panel description... 3 3.0 Frequently Asked
NE-S110N. 11 Inch Headrest TFT-LCD Monitor OPERATION MANUAL
 NE-S110N 11 Inch Headrest TFT-LCD Monitor OPERATION MANUAL Specifications Power Requirements Power Consumption Screen Size Screen Format Resolution Pixel A/V Inputs Dimensions Compatible video standard
TOP - 1. Instruction Manual. Version 1.0 Produced in Jan. 2004
 Version 1.0 Produced in Jan. 2004 Instruction Manual LCD monitor IV-08MP Thank you for purchasing the SHARP IV-08MP LCD monitor. Read this introductory instruction manual carefully to thoroughly familiarize
ACCESSORIES FOR SAFETY DEVICES
 ACCESSORIES FOR SAFETY DEVICES - SE-DM: series: deviating mirrors - SE-LP: series: laser pointer - SE-S: series: floor stand - SE-SR2 series: safety relay - SE-SRT series: connection box INSTALLATION SE-DM