Icon Instructions... 6 LED Instructions
|
|
|
- Neal Owen
- 5 years ago
- Views:
Transcription


1
2 Icon Instructions... 6 LED Instructions Backlight... 8 Language... 8 Time and Date Volume Ring Tones Directory Local Directory Placing Calls from Local Directory Placing Calls from Call History Answering when not in another call Answering when in another call Multiple calls on Hold Static Forwarding Dynamic Forwarding... 23
3 Busy Greetings No Answer Greetings Extended Away Greetings... 28
4 If this is the first time you are using the iinet BizPhone Standard T42S handset, please refer first to the iinet BizPhone T42S Quick Startup Guide to assemble and start up your handset. The BizPhone Quick Startup Guide is available on the BizPhone Resources page at The topics covered in the Quick Startup Guide include: Packaging Contents Assembling the Phone Starting up the Phone Basic Handset Settings Basic Call Features If you require additional assistance with your new handset, please contact your System Administrator.

 Missed call text or second incoming caller information Prompt text")


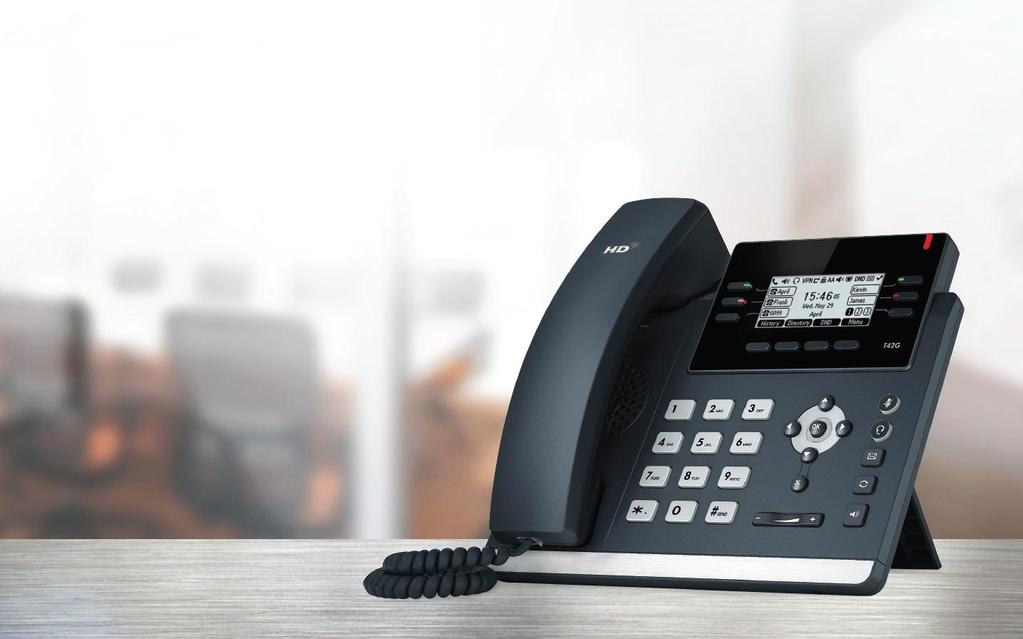
5 The image below shows the main hardware for the BizPhone Standard T42S IP Phone, including the LCD screen and the keypad. Hardware component instructions for the BizPhone Standard T42S IP phone are: LCD Screen Power Indicator LED Line Keys Mute Key Headset Key Message Key Redial Key Speakerphone Key Volume Key Keypad Shows information about call, messages, soft keys, time, date and other relevant data: Call information Caller ID, Call Duration Icons (for example, DND) Missed call text or second incoming caller information Prompt text (for example, Saving config file! ) Time and date Indicates phone power and some feature statuses. Use these keys to activate up to three accounts and assign various features. Toggles and indicates mute feature. Toggles and indicates the headset mode. Accesses voice mails. Redials a previously dialled number. Toggles the hands-free speakerphone mode. Adjusts the volume of the handset, headset, speaker and ringer. Provides the digits, letters, and special characters in context-sensitive applications. Scroll through the displayed information. Confirms actions or answers incoming calls.
6 Soft Keys Confirms or rejects incoming calls Label automatically to identify their context-sensitive features. Icon Instructions Below are descriptions of the icons that may appear on the LCD screen: Network is unavailable Registered successfully Register failed Registering Hands-free speakerphone mode Handset mode Headset mode Voice Mail Auto Answer Do Not Disturb Call Hold Call Mute Ringer Volume is 0 Keypad lock Alphanumeric input mode Numeric input mode Multi-lingual lowercase letters input mode Multi-lingual uppercase letters input mode Multi-lingual uppercase and lowercase letters input mode Call Forward/Forwarded Calls Missed Calls
7 Received Calls Place Calls LED Instructions Power Indicator LED Solid Red Fast Flashing Red Slow Flashing Red Off The phone is initialising The phone is ringing The phone has received a voic The phone is powered off or idle Line Key LED Solid Green Fast Flashing Green Slow Flashing Green Off The line is seized The line is in conversation The line is receiving an incoming call The call is placed on hold The line is inactive Line Key LED (configured as BLF key) Solid Green Fast Flashing Green (200ms) Slow Flashing Green (500ms) Slow Flashing Green (1s) Off The monitored user is idle The monitored user is receiving an incoming call The monitored user is dialing The monitored user is talking The monitored user s conversation is placed on hold The call is parked against the monitored user s phone number The monitored user does not exist
. To configure the backlight on your phone: 1.")

8 Backlight You can configure the backlight to adjust the brightness of the LCD screen. Backlight on the LCD screen can be configured with the following options: Always On: backlight is on permanently. 15s, 30s, 120s, 300s, 600s or 1800s: Backlight is turned off when the phone is inactive after the designed time (in seconds). To configure the backlight on your phone: 1. Press Menu Settings Basic Settings Display Backlight 2. Press or, or the Switch soft key to select the desired value from the Backlight Time field. 3. Press the Save soft key to accept the change or Back to cancel. Language The default language of the phone user interface is English. To change the language on your phone: 1. Press Menu Settings Basic Settings Language 2. Press or to select the desired language. 3. Press the Save soft key to accept the change. Text displayed on the phone user interface will change to the selected language.

 from the Time Format field 3.")
9 Time and Date The time and date are displayed on the LCD screen when the phone is idle. You can configure the time manually via the phone interface. To configure the time and date manually on your phone: 1. Press Menu -> Settings -> Basic Settings -> Time & Date -> Manual Settings. 2. Enter the specific time and date. 3. Press the Save soft key to accept the change. The time and date displayed on the LCD screen will change accordingly. To configure the time and date format on your phone: 1. Press Menu -> Settings -> Basic Settings -> Time & Date -> Time & Date Format. 2. Press or, or the Switch soft key to select the desired time format (12 Hour or 24 Hour) from the Time Format field 3. Press or, or the Switch soft key to select the desired date format from the Date Format field. 4. Press the Save soft key to accept the change or Back to cancel. There are 7 available date formats:
 when")


10 Volume You can press the volume key to adjust the ringer volume when the phone is idle. You can also press the volume key to adjust the receiver volume of currently engaged audio devices (handset, speakerphone or headset) when the phone is in use. me. To adjust the volume when the phone is idle: Press to adjust the To adjust the volume when the phone is during a call: Press currently engaged audio device (handset, speakerphone or headset). to adjust the volume of Ring Tones Ring tones are used to indicate incoming calls. You can select different ring tones to distinguish your phone from your neighbour s. To select a ring tone for your phone: 1. Press Menu -> Settings -> Basic Settings -> Sound -> Ring Tones -> Common. 2. Press or to select the desired ring tone. 3. Press the Save soft key to accept the change or Back soft key to cancel.


11 Directory To view the directory on your phone: Press the Directory soft key when the phone is idle. The LCD screen displays the enabled list(s) in the directory. If there is only one list in the directory, press the Directory soft key to enter this list directly. Local Directory Adding Groups To add a group to a Local Directory: 1. Press the Directory soft key. The IP Phone enters the local directory directly as there is only Local Directory enabled in the directory by default. If the Local Directory is removed from the directory, press Menu Directory Local Directory to enter the Local Directory. 2. Press the Add soft key. 3. Enter the desired group name in the Name field. 4. Press or, or the Switch soft key to select the desired ring tone from the Ring field. If Auto is selected, this group will use the ring tone specified for the contact. 5. Press the Add soft key to accept the change or Back soft key to cancel.

12 Editing Groups To edit the group in the local directory: 1. Press the Directory soft key. The IP Phone enters the local directory directly as there is only Local Directory enabled in the directory by default. If the Local Directory is removed from the directory, press Menu Directory Local Directory to enter the Local Directory. 2. Select the desired contact group. 3. Press the Option soft key and then select Detail from the prompt list. 4. Press or to highlight the group information and then edit. 5. Press the Save soft key to accept the change or the Back soft key to cancel. Deleting Groups To delete a group from the local directory: 1. Press the Directory soft key. The IP Phone enters the local directory directly as there is only Local Directory enabled in the directory by default. If the Local Directory is removed from the directory, press Menu Directory Local Directory to enter the Local Directory. 2. Select the desired contact group. 3. Press the Option soft key and then select Delete from the prompt list. The LCD screen prompts the following warning. 4. Press the OK soft key to confirm the deletion or the Cancel soft key to cancel. You can also delete all groups from the local directory by pressing the Option soft key and then selecting Delete All.

13 Adding Contacts Adding Contacts Manually To add a contact to a local directory manually: 1. Press the Directory soft key. The IP Phone enters the local directory directly as there is only Local Directory enabled in the directory by default. If the Local Directory is removed from the directory, press Menu Directory Local Directory to enter the Local Directory. 2. Select the desired contact group and press the Enter soft key. 3. Press the Add soft key. 4. Enter the name and the office, mobile or other numbers in the corresponding fields. 5. Press the Add soft key to accept the change or the Back soft key to cancel. Note: If the contact already exists in the directory, the LCD screen will prompt Contact name existed! Adding Contacts from Call History To add a contact to a local directory from Call History: 1. Press the History soft key. 2. Press or to highlight the desired entry. 3. Press the Option soft key, and then select Add to Contacts from the prompt list. 4. Enter the contact name. 5. Press the Save soft key to accept the change.

14 Editing Contacts To edit a contact in the local directory: 1. Press the Directory soft key. The IP Phone enters the local directory directly as there is only Local Directory enabled in the directory by default. If the Local Directory is removed from the directory, press Menu Directory Local Directory to enter the Local Directory. 2. Select the desired contact group and press the Enter soft key 3. Press or to highlight the desired contact. 4. Press the Option soft key, and then select Detail from the prompt list. 5. Press or to highlight the contact information and then edit. 6. Press the Save soft key to accept the change or the Back soft key to cancel. Deleting Contacts 1. Press the Directory soft key. The IP Phone enters the local directory directly as there is only Local Directory enabled in the directory by default. If the Local Directory is removed from the directory, press Menu Directory Local Directory to enter the Local Directory. 2. Select the desired contact group and press the Enter soft key. 3. Press or to highlight the desired contact. 4. Press the Option soft key, and then select Delete from the prompt list. The LCD screen prompts the following warning: 5. Press the OK soft key to confirm the deletion or the Cancel soft key to cancel. You can also delete all contacts by pressing the Option soft key, and then select Delete All.

15 The built-in phone directory can store names and phone numbers for a blacklist. You can store up to 30 contacts and add, edit, delete or even call a contact in the blacklist directory. Incoming calls from blacklist directory contacts will be rejected automatically. To add a contact to the blacklist directory manually: 1. Press Menu Directory Blacklist. 2. Press the Add soft key, 3. Enter the name and the office, mobile or other numbers in the corresponding fields. 4. Press the Add soft key to accept the change or the Back soft key to cancel. To add a contact to the blacklist directory from the local directory: 1. Press the Directory soft key. The IP Phone enters the local directory directly as there is only Local Directory enabled in the directory by default. If the Local Directory is removed from the directory, press Menu Directory Local Directory to enter the Local Directory. 2. Select the desired contact group and press the Enter soft key. 3. Press or to highlight the desired contact. 4. Press the Option soft key, and then select Add to Blacklist from the prompt list. The LCD screen prompts the following warning: 5. Press the OK soft key to confirm the setting.

16 The T42S IP phone maintains call history lists of Placed Calls, Received Calls, Missed Calls and Forwarded Calls. Call history lists support up to 400 entries. You can view call history, place a call, add a contact or delete an entry from the call history list. The call history feature is enabled by default. To view Call history: 1. Press the History soft key. The LCD displays all call records. 2. Press or to switch between all placed, received, missed and forward call lists. 3. Press or to select the desired entry. 4. Press the Option soft key, and then select Detail from the prompt list. The detailed information of the entry appears on the LCD screen. To add a contact to the Local Directory (or Blacklist) from the Call History list: 1. Press the History soft key. The LCD displays all call records. 2. Press or to switch between all placed, received, missed and forward call lists. 3. Press or to select the desired entry. 4. Press the Option soft key, and then select Add to Contacts (or Add to Blacklist) from the prompt list. 5. Enter the desired values in the corresponding fields. 6. Press the Save soft key to accept the change. To delete an entry from the Call History list: 1. Press the History soft key. 2. Press or to switch between all placed, received, missed and forward call lists. 3. Press or to select the desired entry. 4. Press the Delete soft key. To delete all entries from the Call History list: 1. Press the History soft key. 2. Press or to switch between all placed, received, missed and forward call lists. 3. Press the Option soft key, and then select Delete All from the prompt list. 4. Press the OK soft key. The LCD screen prompts Delete all the call records?
17 You can place a call in three ways using your Standard T42S IP phone: Using the handset. Using the speakerphone. Using the headset. You can place a call by dialling the number first, or search and dial from call history or local directory. During a call, you can alternate between handset, speakerphone or headset mode by picking up the handset or pressing the speakerphone or the headset key. To place a call using the handset: 1. Pick up the handset. 2. Enter the desired number using the keypad. 3. Press or the SEND soft key. To place a call using the speakerphone: 1. With the handset on-hook, press to obtain a dial tone. 2. Enter the desired number using the keypad. 3. Press or the SEND soft key. OR 1. With the handset on-hook, enter the desired number using the keypad. 2. Press, or the SEND soft key. To place a call using the headset: 1. With the optional headset connected, press to activate the headset mode. 2. Press the line key to obtain a dial tone. 3. Enter the desired number using the keypad. 4. Press or the SEND soft key. The call duration is visible on the LCD screen.
18 Placing Calls from Local Directory To place a call to a contact from the local directory: 1. Press the Directory soft key. The IP Phone enters the local directory directly as there is only Local Directory enabled in the directory by default. If the Local Directory is removed from the directory, press Menu Directory Local Directory to enter the Local Directory. 2. Select the desired contact group and press the Enter soft key 3. Press or to highlight the desired contact. 4. Do one of the following: a. If only one number for the contact is stored in the local directory, press the Send soft key to dial out the number. b. If multiple numbers for the contact are stored in the local directory, press the Send soft key to display a list of numbers. Press or to highlight the desired number. Press the Send soft key to dial out the number. Placing Calls from Call History To place a call from the Call History list: 1. Press the History soft key. 2. Press or to switch between all placed, received, missed and forward call lists. 3. Press or to select the desired entries. 4. Press the Send soft key.
19 Answering when not in another call You can answer a call in three ways when you are not in another call using your Standard T42S IP phone: Using the handset. Using the speakerphone. Using the headset. To answer the call using the handset: Pick up the handset. To place a call using the speakerphone: Do one of the following: 1. Press. 2. With the handset on-hook and the headset mode deactivated, press the Answer soft key. OR 3. With the handset-on hook and the headset mode deactivated, press the line key (the line key LED flashes green. To answer a call using the headset: 1. Press to activate the headset mode. 2. With the headset mode activated, press the Answer soft key. OR 3. With the headset mode activated, press the line key (the line key LED flashes green). Answering when in another call If you have an active call, and an incoming call arrives on your phone, do one of the following: 1. Press the Answer soft key. The incoming call is answered and the original call is placed on hold. 2. Press to access the new call. 3. Press or the Answer soft key. The incoming call is answered and the original call is placed on hold. Note: You can reject incoming calls by pressing the Reject soft key. Call Duration for the active call will always appear on the LCD screen.


20 To end a call: If you are using the handset, press the End Call soft key or hang up the handset. If you are using the headset, press the End Call soft key. If you are using the speakerphone, press or press the End Call soft key. Note: When a call is placed on hold, you need to press the Resume soft key to resume the call and press to end the call. To redial the last dialled number from your phone: Press number is attempted. twice. A call to your last dialled To redial a previously dialled number from your phone: 1. Press when the phone is idle. 2. Press or to select the desired entry from the placed callslist. 3. Press or the Send soft key. You can mute the microphone of the active audio device (handset, headset and speakerphone) during an active call so that the other party cannot hear you. To mute a call: Press during an active call. The LCD screen indicates that the call is now muted. The mute key LED illuminates solid red when the call is muted. To un-mute a call: Press again to un-mute the call. The mute key LED goes out.


21 You can place an active call on hold. Only one active call can be in progress at any time. Other calls can be made and received while placing the original caller on hold. When you place a call on hold, your BizPhone service may play music to the other party while waiting. To place a call on Hold: Press the Hold soft key during a call. The line key LED flashes green. The LCD screen indicates that the call is on hold. Note: the phone will beep softly every 30 seconds to remind you that you still have a call on hold. To resume a held call: Press the Resume soft key. Multiple calls on Hold If multiple calls are placed on hold: do one of the following: Press or to switch between the calls, and then press the Resume soft key to retrieve the desired call. Press the corresponding line key to retrieve the call. You can use DND to reject incoming calls automatically on the phone. All calls you receive while DND is enabled are logged to your missed calls list. To activate DND on your phone: Press the DND soft key when the phone is idle. The DND icon on the idle screen indicates that DND is enabled. Incoming calls will be rejected automatically and the prompt message n New Missed Call(s) ( n indicated the number of missed calls) will appear on the LCD screen and callers will receive a busy message. Note: Do Not Disturb is local to the phone, and may be overridden by the admin settings. For more information, contact your system administrator.

22 You can configure your phone to forward incoming calls to another party through static forwarding. You can also forward incoming calls while your phone is ringing (dynamic forwarding). Static Forwarding There are 3 types of Static Forwarding: Always Forward: Incoming calls are immediately forwarded. Busy Forward: Incoming calls are immediately forward if the phone is busy. No Answer Forward: Incoming calls are forwarded if not answered after a period of time. To enable Call Forward on your phone: 1. Press Menu Features Call Forward. 2. Press or to select the desired forwarding type. 3. Press the Enter soft key. 4. Depending on your selection: a. If you select Always Forward: i. Press or, or the Switch soft key to select Enabled from the Always Forward field. ii. Enter the destination number you want to forward all incoming calls to in the Forward to field. iii. (Optional) Enter the always forward on or off code respectively in the On Code or Off Code field. b. If you select Busy Forward: i. Press or, or the Switch soft key to select Enabled from the Busy Forward field. ii. Enter the destination number you want to forward all incoming calls to when the phone is busy in the Forward to field. iii. (Optional) Enter the busy forward on or off code respectively in the On Code or Off Code field.

23 c. If you select No Answer Forward: i. Press or, or the Switch soft key to select Enabled from the No Answer Forward field. ii. Enter the destination number you want to forward all unanswered incoming calls to in the Forward to field. iii. (Optional) Enter the busy forward on or off code respectively in the On Code or Off Code field. 5. Press the Save soft key to accept the change or the Back soft key to cancel. The icon on the idle screen indicates that the call forward is enabled. Dynamic Forwarding To forward all incoming calls to another party: 1. When the phone is ringing, press the Forward soft key. 2. Enter the number you want to forward the incoming call to. 3. Press or the Send soft key. The LCD prompts a call forward message.
24 You can transfer a call to another party in one of three ways: Blind Transfer: Transfer a call directly to another party without consulting. Semi-Attended Transfer: Transfer a call when the target phone is ringing. Attended Transfer: Transfer a call with prior consulting. To perform a blind transfer: 1. Press the Transfer soft key during a call. 2. Enter the number you want to transfer the call to. 3. Press the Transfer soft key to complete the transfer. Then the call is connected to the number to which you are transferring. To perform a semi-attended transfer: 1. Press the Transfer soft key during a call. 2. Do one of the following: a. Enter the number you want to transfer the call to. b. Press the Directory soft key, and then select Local Directory. Select the desired group and search for the contact. c. Press the Directory soft key, and then select History. Select the desired list and then press or to select the entry. 3. Press to dial out. 4. Press the Transfer soft key to complete transfer when receiving ring back. To perform an attended transfer: 1. Press the Transfer soft key during a call. 2. Do one of the following: a. Enter the number you want to transfer the call to. b. Press the Directory soft key, and then select Local Directory. Select the desired group and search for the contact. c. Press the Directory soft key, and then select History. Select the desired list and then press or to select the entry. 3. Press to dial out. 4. After the party answers the call, press the Transfer soft key to complete the transfer. If you are using a handset, the transfer can be completed by hanging up the handset. You can cancel the transfer before the call is connected by pressing the Cancel soft key. To perform an attended transfer using the Busy Lamp Field (BLF) buttons: 1. Press the Hold soft key during a call. 2. Press the New Call soft key. 3. Press the BLF button that corresponds to the party you wish to transfer the call to. 4. After the party answers the call, press the Transfer soft key and then select the on-hold call you wish to transfer from the list to complete the transfer.

25 You can enable or disable a call waiting on the phone. If the call waiting is enabled, you can receive another call while there is already an active call on the phone. Otherwise, another incoming call is automatically rejected by the phone with a busy message when there is an active call on the phone. You can also enable or disable the phone to play a warning tone when receiving another call. To configure call waiting on your phone: 1. Press Menu Features Call Waiting. 2. Press or, or the Switch soft key to select Enabled from the Call Waiting field. 3. Press or, or the Switch soft key to select Enabled from the Play Tone field. 4. (Optional) Enter the call waiting on code or off code respectively in the On Code or Off Code field. 5. Press the Save soft key to accept the change or the Back soft key to cancel. Note: Call Waiting is local to the phone, and may be overridden by the admin settings. For more information, contact your system administrator.

26 The T42S IP phone supports up to 3 parties (including yourself) in a conference call. To set up a conference call: 1. Place a call to the first party. 2. When the first party answers the call, press the Conf soft key to place a new call. The active call is placed on hold. 3. Enter the number of the second party and press, or the Send soft key. 4. When the second party answers the call, press the Conf soft key again to join all parties in the conference. During the conference calls, you can perform the following actions: - Press the Hold soft key to place the conference on hold. - Press the Split soft key to split the conference call into two individual calls on hold. - Press the Manage soft key, and then press or to select the desired party. - Press the Far Mute soft key to forbid the party from speaking. The muted party can hear everyone, but no one can hear the muted party. - Press the Remove soft key to remove the party from the conference call. - Press the New Call soft key to place a new call. - Press the Back soft key to return to the previous interface. - Press to Mute the conference call. - Press the End Call soft key to drop the conference call.


.")
27 Your Voice Mail is pre-configured and ready to use as soon as you receive your T42S handset. You can listen to voice mails that are stored in your voice mailbox. When receiving a new voice mail, the phone will play a warning tone, and the power indicator LED will slow flash red. The LCD screen will prompt that the phone received a new voice message and display an icon. To listen to Voice Mail: 1. When the LCD screen prompts that the phone received a new voice mail and the power indicator LED slow flashes red, press to dial the Voice Portal. 2. Enter your Voice Portal passcode. Follow the voice prompt to listen to your Voice Mail. Note: Your Voice Portal passcode is ed to you with your BizPhone Service Completion Advice. If you do not receive a Voice Mail access code, please contact you system administrator. 3. Press 1 to enter your Voice Mail box, and then press 1 again to listen to your message(s). Busy Greetings Busy Greetings are the greetings that callers will hear if you have the Do Not Disturb feature activated or if you are on a call and do not have Call Waiting activated. To record your Busy Greetings: 1. Press to dial the Voice Portal and enter your Voice Portal passcode. Note: Your Voice Portal passcode is ed to you with your BizPhone Service Completion Advice. If you do not receive a Voice Mail access code, please contact you system administrator. 2. Press 1 to enter your Voice Mail box, followed by 2 to access your Busy Greetings, and then press 1 to record your Busy Greetings. 3. Follow the voice prompt and record your Busy Greetings.
28 No Answer Greetings No Answer Greetings are the greetings that callers will hear if you do not answer their calls. To record your No Answer Greetings: 1. Press to dial the Voice Portal and enter your Voice Portal passcode. Note: Your Voice Portal passcode is ed to you with your BizPhone Service Completion Advice. If you do not receive a Voice Mail access code, please contact you system administrator. 2. Press 1 to enter your Voice Mail box, followed by 3 to access your No Answer Greetings, and then press 1 to record your No Answer Greetings. 3. Follow the voice prompt and record your No Answer Greetings. Extended Away Greetings Extended Away Greetings are the greetings that callers will hear if you plan to be away from your desk for an extended amount of time. You are required to activate and deactivate these greetings manually. To record your Extended Away Greetings: 1. Press to dial the Voice Portal and enter your Voice Portal passcode. Note: Your Voice Portal passcode is ed to you with your BizPhone Service Completion Advice. If you do not receive a Voice Mail access code, please contact you system administrator. 2. Press 1 to enter your Voice Mail box, followed by 4 to access your Extended Away Greetings, and then press 3 to record your Extended Away Greetings. 3. Follow the voice prompt and record your Extended Away Greetings. 4. After you record your Extended Away Greetings, you are required to activate the greetings by pressing 1. Once you have the greetings activated, you will be reminded each time you log in to listen to messages that the greetings are activated. To de-activate Extended Away Greetings, follow steps 1-2 above and press 2. Note: When the Extended Away Greetings are activated, the calls are not able to leave a voice message. Once it is de-activated, voice mail collection is turned back on.
29 212mm (W) x 189mm (D) x 175mm (H) * 54mm (T) HD voice: HD handset, HD speaker Wideband codec: G.722 Narrowband coded: G.711 (A/µ), G.723.1, G.729AB, G.726, ilbc DTMF: In-band, Out-of-band (RFC 2833) and SIP INFO Full-duplex hands-free speakerphone with AEC VAD, CNG, AEC, PLC, AJB, AGC 192x64-pixel graphical LCD with backlight LED for call and message waiting indication Dual colour (red or green) illuminated LEDs for line status information Dual-port Gigabit Ethernet 1xRJ9 (4P4C) handset port 1xRJ9 (4P4C) handset port 1xRJ12 (6P6C) EHS port Power over Ethernet (IEEE 802.3af), Class 2 External universal AC adapter: AC V input and DC 5V/1.2A output Power consumption (PSU): W Power consumption (Power over Ethernet_: W SIP v1 (RFC2543), v2 (RFC3261) NAT transverse: STUN mode Proxy mode and peer-to-peer SIP link mode IP assignment: static/dhcp HTTP/HTTPS web server Time and date synchronisation using SNTP UDP/TCP/DNS-SRV (RFC 3263) QoS: 802.1p/Q tagging (VLAN), Layer 3 ToS DSCP SRTP for Voice Transport Layer Security (TLS) HTTPS certificate manager AES encryption for configuration file Digest authentication using MD5/MD5-sess OpenVPN, IEEE802.1X IPv6
TPGBizPhone. Standard T42G IP Phone User Guide
 TPGBizPhone Standard T42G IP Phone User Guide Contents Overview... 5 Hardware Component Instructions... 5 Icon Instructions... 6 LED Instructions... 7 Customising Your Phone... 8 General Settings... 8
Icon Instructions LED Instructions Touch Screen Display Navigating Menus and Fields Entering Data and Editing Fields
 ... 4... 5... 5 Icon Instructions... 6 LED Instructions... 7 Touch Screen Display... 8 Navigating Menus and Fields... 10 Entering Data and Editing Fields... 11... 12 General Settings... 12 Backlight...
TPG BizPhone. Premium T48G IP Phone User Guide
 TPG BizPhone Premium T48G IP Phone User Guide Contents Overview... 5 Hardware Component Instructions... 5 Icon Instructions... 6 LED Instructions... 7 Touch Screen Display... 8 Navigating Menu and Fields...
TPGBizPhone. CPE860 IP Conference Phone User Guide
 TPGBizPhone CPE860 IP Conference Phone User Guide Contents Overview... 5 Hardware Component Instructions... 5 Icon Instructions... 7 LED Instructions... 8 Customising Your Phone... 9 General Settings...
YEALINK T41G DESCRIPTION
 YEALINK T41G THE SIP-T41P IS A FEATURE-RICH SIP PHONE FOR BUSINESS. THE 3-LINE IPPHONE HAS BEEN DESIGNED BY PURSUING EASE OF USE IN EVEN THE TINIESTDETAILS. DELIVERING A SUPERB SOUND QUALITY AS WELL AS
Displaying Information on LCD screen... 6 Icon Instructions... 7
 ... 4... 5... 5 Displaying Information on LCD screen... 6 Icon Instructions... 7... 8... 8 Turning handset On/Off... 8 Locking/Unlocking Keypad... 8 Backlight... 8 Language... 8 Time and Date... 9... 10
TPGBizPhone. Cordless W52P IP DECT Phone User Guide
 TPGBizPhone Cordless W52P IP DECT Phone User Guide Contents Overview... 5 Hardware Component Instructions... 5 Displaying information on LCD screen... 6 Icon Instructions... 7 Customising Your Phone...
TPGBizPhone. Cordless W56P IP DECT Phone User Guide
 TPGBizPhone Cordless W56P IP DECT Phone User Guide Contents Overview... 5 Hardware Component Instructions... 5 Displaying information on LCD screen... 6 LED Instructions... 7 Icon Instructions... 7 Customising
SIP Communicator Spitfire S300 User Guide
 SIP Communicator Spitfire S300 User Guide 1 TABLE OF CONTENTS Handset Description Page 3 Keypad Lock Page 6 Directory Page 6 Adding an Entry. Page 6 Edit or Delete an Entry Page 7 Black List Page 7 Dialing
Yealink Gigabit IP Phone SIP-T46G
 Yealink Gigabit IP Phone SIP-T46G Quick Reference Guide Applied to firmware version 72.1 or later. CONTENTS Basic Call Features Page 2-5 02 Placing a Call Answering a Call Ending a Call 03 Redial Call
Packaging Contents. The following components are included in your W52P/W52H IP DECT phone packages
 W52P User Guide Packaging Contents The following components are included in your W52P/W52H IP DECT phone packages W52P Package! 1 Base Station! 1 Handset! 1 Charge Cradle! 2 Power Adapters (one for the
Yealink SIP-T42G IP Phone
 Yealink SIP-T42G IP Phone User Guide Version 1 E Mark Warning This device is marked with the CE mark in compliance with EC Directives 2014/35/EU and 2014/30/EU. Part 15 FCC Rules Any Changes or modifications
Quickstart Guide Polycom VVX 400/410
 Quickstart Guide Polycom VVX 400/410 Polycom VVX 300/310 Features Message Indicator Line Keys Line Keys Soft Keys Speaker Transfer Messages Hold Dialpad Home/Lines key Navigation keys/ Select key Headset
Polycom VVX User Guide
 Polycom VVX 500-600 User Guide Polycom VVX 500-600 Features USB port for external video camera Message waiting indicator Home/Lines key Speaker Dialpad Security slot (on side) Colour touchscreen display
Vox Centrex Yealink T29 UserGuide
 Vox Centrex Yealink T29 UserGuide Monique Verto Supreme November 2015 TABLE OF CONTENTS Handset Description Page 2 Keypad Lock Page 5 Directory Page 5 Adding an Entry. Page 5 Edit or Delete an Entry..
Yealink 46G. A Complete Overview for Conversation Users
 Yealink 46G A Complete Overview for Conversation Users Contents Hardware... 3 Soft Keys... 4 Answering a Call... 6 Making a Call... 7 Actions Performed While in a Call... 7 Muting a Call... 7 Placing a
Polycom Soundpoint 650 IP Phone User Guide
 20 19 18 17 16 1 2 15 14 13 12 This guide will help you to understand and operate your new IP Phone. Please print this guide and keep it handy! 3 11 For additional information go to: http://www.bullseyetelecom.com/learning-center
Reference Guide. IP Phone/Calling Features Voic . Dialing. Your Phone Calling Features. Phone Views. To dial phone number or extension.
 TelNet OfficeEdge Complete Polycom VVX400 Series IP Phone. Reference Guide. IP Phone/Calling Features Voicemail Dialing Your Phone Calling Features To dial phone number or extension Lift your handset and
Polycom VVX410. Full user guide
 Polycom VVX410 Full user guide Contents Contents... 2 Introduction... 4 How to set up the Polycom VVX410... 5 Phone Keys and Hardware... 6 Using your phone... 7 Home view... 7 Lines View... 7 Calls View...
SNOM 360 USER GUIDE TABLE OF CONTENTS
 SNOM 360 USER GUIDE TABLE OF CONTENTS Keypad 2 &3 Dialling a phone number 4 Incoming calls 4 Accepting a call 4 Denying/ Blocking a call 5 Hold and Resume 5 Transfer: 6 Direct Transfer 6 Transfer to voicemail
HKBN Unified Communications T61P SIP Phone User Guide
 HKBN Unified Communications T61P SIP Phone User Guide Contents Getting Start of Phone... 2 Phone Package... 2 Assembling the phone... 2 SIP Phone Button... 4 SIP Phone Screen Display... 5 Icon Instruction...
Polycom SoundPoint IP 450
 Polycom SoundPoint IP 450 User Guide For training/documentation, please visit us @ http://customertraining.verizonbusiness.com or call 1 800 662 1049 2009 Verizon. All Rights Reserved. The Verizon and
Quickstart Guide. Polycom VVX 500/600
 Quickstart Guide Polycom VVX 500/600 Polycom VVX 500/600 Features USB port for external video camera Message waiting indicator Home/Lines key Speaker Dialpad Security slot (on side) Colour touchscreen
Polycom 450 IP Phone User Training. Advancing Technology with Personal Commitment
 Polycom 450 IP Phone User Training Advancing Technology with Personal Commitment Overview of IP 450 Phone Programming and Using the IP Phone Placing a Call Answering a Call Ending a Call Redialing a Number
Claranet Hosted Voice v Yealink W60P... Error! Bookmark not defined. Phone Installation... Error! Bookmark not defined.
 Claranet Hosted Voice V2 Yealink T46S User Guide All Rights Reserved 2010 Claranet Contents Claranet Hosted Voice v2 Claranet Hosted Voice v2... 1... 1 Yealink W60P... Error! Bookmark not defined. Phone
Reference Guide. IP Phone/Calling Features Voic Dialing. Your Phone Calling Features. Phone Views. To dial phone number or extension.
 TelNet OfficeEdge Complete Polycom VVX300 / 310 IP Phone. Reference Guide. IP Phone/Calling Features Voicemail Dialing Your Phone Calling Features To dial phone number or extension Lift your handset and
ACC-1143 PUG. Polycom 4 and 6-Line Desk Phone Quick Reference Guide
 ACC-1143 PUG Polycom 4 and 6-Line Desk Phone Quick Reference Guide Table of Contents INTRODUCTION TO YOUR POLYCOM 4 OR 6-LINE DESK PHONE... 2 WELCOME... 2 DESK PHONE... 2 HOW TO USE YOUR VERTICAL 4-LINE
Telstra VVX410 Phone Guide
 Select Save Config to Save the Config Your phone will automatically reboot Note 1: Restarting the phone may take a few minutes Note 2: If your phone has been preconfigured the QSetup soft key will not
Telstra IP Telephony 450/550/560/650/670 Handset Features Guide
 If you are required to initially configure you IP phone you will be advised of the Username and Password. This information only needs to be entered once via the QSetup soft key. This is only required for
Telstra IP Telephony - Telstra IP Video Phone Feature Guide
 1. The Touch screen Your phone has a touch-sensitive screen. To access features or obtain information, tap the menu items, arrow keys, soft keys (the keys along the bottom of the touch screen) and field
Ultra-elegant Gigabit IP Phone SIP-T46S
 Ultra-elegant Gigabit IP Phone SIP-T46S Quick Start Guide(V8410) wwwyealinkcom Applies to firmware version 6684010 later Assembling the Phone 1 Attach the stand, as shown below: A 40 B Desk Mount Method
Polycom VVX500 Series IP Phone Reference Guide Dialing Your Phone Calling Features To dial phone number or extension Phone Views Speakerphone
 TelNet OfficeEdge Complete Polycom VVX500 Series IP Phone. Reference Guide IP Phone/Calling Features Voicemail. Dialing Your Phone Calling Features To dial phone number or extension Lift handset and dial
Yealink T46 IP phone. A guide to using your phone with Cloud Voice
 Yealink T46 IP phone A guide to using your phone with Cloud Voice 2 What s in this guide General info Need help? If you have any problems with your phone, call us on 0800 389 0537 and we ll be happy to
Yealink Gigabit IP Phone SIP-T48G
 Yealink Gigabit IP Phone SIP-T48G Quick Reference Guide Applied to firmware version 72.1 or later. CONTENTS Using your Phone Page 2 02 Navigating the Touch Screen Basic Call Features Page 3-6 03 Placing
Yealink SIP-T46G IP Phone
 Yealink SIP-T46G IP Phone User Guide Version 1 Table of Contents CE Mark Warning This device is marked with the CE mark in compliance with EC Directives 2014/35/EU, 2014/30/EU. Part 15 FCC Rules Any Changes
Polycom VVX 500/600 Features
 Polycom VVX 500/600 Features USB port for external video camera Message waiting indicator Home/Lines key Speaker Dialpad Security slot (on side) Colour touchscreen display Headset key Speakerphone key
Yealink SIP-T48S Gigabit VoIP Desktop Phone with 7-inch Touch-Screen
 Yealink SIP-T48S Gigabit VoIP Desktop Phone with 7-inch Touch-Screen The SIP-T48S IP Phone is a dynamic business communications solution for executives and professionals. This phone offers a large touch
Vertical 2-Line Desk Phone Quick Reference Guide
 Contact your Sales Representative for more information. Table of Contents Introduction to your Xcelerator Desk Phone... 3 How to use your Xcelerator Desk Phone... 3 Answering and making calls... 3 Handling
Setup & Information Guide Zultys 37G VoIP Phones
 Setup & Information Guide Zultys 37G VoIP Phones Contents Phone Installation... 3 Prerequisites... 3 Assembling Your Phone... 3 Connecting Your Phone... 4 First Phone Setup... 5 Understanding Your Phone...
SNOM M3 USER GUIDE TABLE OF CONTENTS
 SNOM M3 USER GUIDE TABLE OF CONTENTS Handset 2 &3 Dialling a phone number 4 Incoming calls 4 Accepting a call 4 Denying/ Blocking a call 4 Hold and Resume 4 Multiple Call Handling 5 Transfer: 5 Direct
Telephone User Instructions
 Telephone User Instructions Telephone User Guide 1 Contents Contents 1. Key Panel... 3 1. Making and Receiving calls... 5 1.1 Incoming calls... 5 1.2 Outgoing calls... 5 1.3 Re-dial... 5 1.4 Callers List...
Operating Your Phone. This section describes how to operate your Cisco IP Phone and includes information on soft keys and phone features.
 This section describes how to operate your Cisco IP Phone and includes information on soft keys and phone features. Note Because there are differences in phone and site configurations, not all features
First Communications Cloud IP PBX User Guide (Polycom)
") First Communications Cloud IP PBX User Guide (Polycom) 2017 Property of First Communications Contents Introduction... 3 General Phone Operations... 4 Polycom VVX 300 Series... 4 Polycom VVX 300 Series
First Communications Cloud IP PBX User Guide (Polycom) 2017 Property of First Communications Contents Introduction... 3 General Phone Operations... 4 Polycom VVX 300 Series... 4 Polycom VVX 300 Series
Cisco 504G, 514G, 508G, and 303G Initial Setup
 Cisco 504G, 514G, 508G, and 303G Initial Setup 1 Handset 2 Message Waiting Indicator 3 LCD Screen 4 Line keys 5 Softkey buttons 6 Navigation button 7 Messages button 8 Hold button 9 Setup button 10 Mute
Yealink T48 IP phone. A guide to using your phone with Cloud Voice
 Yealink T48 IP phone A guide to using your phone with Cloud Voice 2 What s in this guide General info Need help? If you have any problems with your phone, call us on 0800 389 0537 and we ll be happy to
User Guide. Infinite Voice (Polycom VVX 300/400)
") User Guide Infinite Voice (Polycom VVX 300/400) August 2016 Table of Contents 1. Phone Keys and Views... 2 1.1 Phone Keys and Views... 2 1.1.1 Home View... 2 1.1.2 Lines View... 3 1.1.3 Calls View... 3
User Guide Infinite Voice (Polycom VVX 300/400) August 2016 Table of Contents 1. Phone Keys and Views... 2 1.1 Phone Keys and Views... 2 1.1.1 Home View... 2 1.1.2 Lines View... 3 1.1.3 Calls View... 3
Yealink SIP-T46G, T42G, and T41P Enterprise IP Phones Quick User Guide
 Yealink SIP-T46G, T42G, and T41P Enterprise IP Phones Quick User Guide Quick User Guide for 8x8 Virtual Office This guide provides information you need to begin using your phone quickly. Phone Views There
CALNET 3: AT&T Voice DNA Polycom SoundPoint IP 321 / 331
 CALNET 3: AT&T Voice DNA Polycom SoundPoint IP 321 / 331 Version 1.2 2018 AT&T Intellectual Property. All rights reserved. AT&T, Globe logo, Mobilizing Your World and DIRECTV are registered trademarks
CALNET 3: AT&T Voice DNA : Quick reference guide
 CALNET 3: AT&T Voice DNA: Quick reference guide Polycom SoundPoint IP 321 / 331 CALNET 3: AT&T Voice DNA : Quick reference guide Polycom SoundPoint IP 321 / 331 Version 1.2 Page 2 AT&T Voice DNA : Quick
8 line Professional 5.8G WiFi IP Phone WS620 PEGV4 Datasheet
 Ultrative Communications 8 line Professional 5.8G WiFi IP Phone WS620 PEGV4 Datasheet WS620 PEGv4 is a big screen based wireless IP phone, it has fashion and technological appearance, excellent voice quality,
UCx Feature Guide for Infinity phones
 UCx Feature Guide for Infinity phones Date: 23 August 2018 Version: 1.4 System: UCx Release: 6.0 Phone models: E-MetroTel will provide support for the following Infinity IP phones, as long as the phones
Polycom VVX500 and VVX600
 Polycom VVX500 and VVX600 Full user guide Contents Contents... 2 Introduction... 4 How to set up the Polycom VVX500 and VVX600... 5 Phone Keys and Hardware... 6 Using your phone... 7 Home view... 7 Lines
Yealink BASIC PHONE GUIDE T48G POWERED BY XCHANGE TELECOM
 POWERED BY XCHANGE TELECOM UNDERSTANDING THE KEYS ON YOUR The Hard keys may display a fixed function, may be programmed to display extensions or other frequently used functions like Speed Dial. The Soft
Press the More key at anytime to scroll across if the feature you need is not visible.
 Display Features The display on your phone is very interactive. As you use the phone the information will change and different features and functions will appear on the display. The 6 buttons above the
Ultra-elegant Gigabit IP Phone
 Ultra-elegant Gigabit IP Phone SIP-T42G Quick Start Guide(V73.40) www.yealink.com Applies to firmware version 29.73.0.40 or later. EHS36 Packaging Contents The following items are included in your package.
Polycom SoundPoint IP 320/330
 Polycom SoundPoint IP 320/330 User Guide For training/documentation, please visit us @ http://customertraining.verizonbusiness.com or call 1 800 662 1049 2009 Verizon. All Rights Reserved. The Verizon
Verizon One Talk DECT IP Phone
 Quick reference guide Verizon One Talk DECT IP Phone W60B Base Station and W56HV Handset verizonwireless.com/support/one-talk/ 10660898_One_Talk_W60B_Quick_Reference_Guide_f1a_sb.indd 1 Basic call features
Yealink CP860 HD IP Conference Phone Quick User Guide
 Yealink CP860 HD IP Conference Phone Quick User Guide Quick User Guide for 8x8 Virtual Office This guide provides information you need to begin using your phone quickly. Phone Views There are three main
ANSWERING CALLS USING PHONE FEATURE KEYS
 DT820 - Desi Less Quick User Guide for DT820 phones controlled by SIP@Net For detailed information please consult the comprehensive User Guide available at : www.nec-enterprise.com. NEC Nederland B.V.
AVAYA 9601 SIP DESKPHONE INSTRUCTIONS
 AVAYA 9601 SIP DESKPHONE INSTRUCTIONS The following table provides button/feature descriptions for the 9601 deskphone. Name Description 1 Message Waiting Indicator An illuminated red light in the upper
Avaya IP Office Phone Manual
 Avaya IP Office Phone Manual Contents 1 PHONES... 3 1.1 Overview of the 5402... 3 1.2 Overview of the 5410... 5 1.3 Overview of the 5420... 7 1.4 Overview of the 1403 / 1603... 9 1.5 Overview of the 1408
Polycom VVX201. Owner s Manual. Version 2
 Polycom VVX201 Owner s Manual Version 2 TABLE OF CONTENTS Before You Begin... 6 Who Should Read this Guide?...6 Typographic Conventions...6 Get Started... 7 View Your Phone Keys and Hardware...7 VVX 201
ImpactConnect Hosted PBX Phone Guide - Polycom Soundpoint IP 335
 Phone Guide - Contacts Customer suppt: @ 855-997-6353 customersuppt@impacttelecom.com myaccount.impacttelecom.com www.impacttelecom.com VERSION 1.3 FEBRUARY 2015 NAVIGATION Scrolling Step in/out of menus,
Polycom SoundPoint IP Phones
 Polycom SoundPoint IP Phones Polycom phones offer a high quality communications experience, combining an intuitive, easy to navigate interface with great audio quality. The purpose of this guide is to
IP 530 User Manual Document No. 099 Version No. V5.51/1210/1. Copyright SpliceCom Ltd
 IP 530 User Manual Document No. 099 Version No. V5.51/1210/1 Copyright SpliceCom Ltd SpliceCom Ltd The Hall Business Centre, Berry Lane Chorleywood, Herts WD3 5EX Tel: 01923 287700 Website: www.splicecom.com
Centrex Phone Instructions
 Centrex Phone Instructions Making a Call To Make a Call: Using the Handset - Lift the handset and dial Using the Speakerphone- Press the Speaker button and dial. To Dial: An internal extension - Dial the
Polycom VVX 410 Customer User Guide
 USER GUIDE Software 4.1.4 March 2013 1725-49090-001 Rev A Polycom VVX 410 Customer User Guide 0 P a g e Phone Keys and Hardware The following figure shows the important phone features, which are described
Reference Guide. IP Phone/Calling Features Voice Mail Personal Assistant Toolbar. Dialing. Your Phone Calling Features.
 TelNet OfficeEdge Complete Polycom SoundPoint 550 IP Phone. Reference Guide IP Phone/Calling Features Voice Mail Personal Assistant Toolbar Dialing To dial phone number or extension Lift your handset and
Getting Started 3. Using this Guide 3 Connecting Your Phone 4
 Table of Contents Getting Started 3 Using this Guide 3 Connecting Your Phone 4 Adjusting the Footstand / Handset Rest 5 Signing In to Your Phone 5 Choosing the Proper Headset 5 An Overview of Your Phone
SELF-HELP GUIDe ENTERPRISE IP PHONE SIP-T20P. Meet the future. Today.
 SELF-HELP GUIDe ENTERPRISE IP PHONE SIP-T20P Meet the future. Today. Voice Message The Message Waiting Indicator on the idle screen indicates that you have new voice messages waiting. The Message key LED
LG Ericsson IP Phone IP 8802A
 LG Ericsson IP Phone IP 8802A 1 1 Message LED 2 3 8 4 9 5 6 7 10 11 12 13 Programmable Keys 14 2 Keys 1 Description of keys Navigation Controls: Left: Use to go to the previous menu in the settings menu.
Cisco 7965G Basic Handset User Guide
 Cisco 7965G Basic Handset User Guide Table of Contents 1 Getting Started:... 2 2 An Overview of your Phone:... 3 3 Understanding Lines and Calls:... 6 4 Understanding Phone Screen Features:... 7 5 Basic
SNOM 820 USER GUIDE TABLE OF CONTENTS
 SNOM 820 USER GUIDE TABLE OF CONTENTS Buttons & LED s 2 Dialling a phone number 5 Redial Incoming calls 5 Accepting a call 5 Denying/ Blocking a call 6 Hold and Resume 6 Transfer: 6 Direct Transfer 6 Transfer
Content. Contact CQ Simple Contact Sales Overview of CQ Interface Hardware Software...
 CQ400 User Guide Content Contents Contact CQ Simple... 4 Contact Sales... 4 1. Overview of CQ400... 5 1.1 Interface... 6 1.2 Hardware... 6 1.3 Software... 6 1.4 Network... 7 1.5 Management and Maintenance...
This device is marked with the CE mark in compliance with EC Directives 2006/95/EC and 2004/108/EC.
 Copyright 2014 YEALINK NETWORK TECHNOLOGY CO., LTD. Copyright 2014 Yealink Network Technology CO., LTD. All rights reserved. No parts of this publication may be reproduced or transmitted in any form or
AVAYA 9608 IP Phone QUICK REFERENCE GUIDE
 AVAYA 9608 IP Phone QUICK REFERENCE GUIDE The phone supports 24 programmable call appearance/feature buttons. The labels for these are displayed in the main display and can be controlled by the adjacent
Voic Guide. Access internally Access your mailbox by pressing the Messages/Msgs/MSG key or by dialing Enter your password.
 Voicemail Guide Access internally Access your mailbox by pressing the Messages/Msgs/MSG key or by dialing 1000. Enter your password. Access externally (if configured on your system) i.e. An option on your
Hosted Phone Quick Start Guide. Get the most out of our Hosted Phone service with these handy instructions for the Polycom VVX phone.
 Hosted Phone Quick Start Guide Get the most out of our Hosted Phone service with these handy instructions for the Polycom VVX 300-310 phone. 1 Contents Equipment......................................................................
Polycom VVX Series. Table of Contents. Business Media Phone User Guide
 Table of Contents Getting Started...2 Phone Keys, Hardware and Features...3 Phone Views...5 Phone Icons and Status Indicators...8 Navigation, Fields, and Data Entry...9 Cleaning the Touchscreen (VVX501)...13
BUSINESS. QUICK START GUIDE Polycom VVX 410. Business Media Phone INTEGRATED COMMUNICATIONS SOLUTION
 BUSINESS INTEGRATED COMMUNICATIONS SOLUTION QUICK START GUIDE Polycom VVX 410 Business Media Phone With Business+ you now have access to the latest phone service. Get ready to experience the power of Business+.
CALNET 3: AT&T Voice DNA Polycom SoundPoint IP 650 / 670
 CALNET 3: AT&T Voice DNA Polycom SoundPoint IP 650 / 670 Version 1.4 2018 AT&T Intellectual Property. All rights reserved. AT&T, Globe logo, Mobilizing Your World and DIRECTV are registered trademarks
USER MANUAL Grandstream GXP1400/1405
 USER MANUAL Grandstream GXP1400/1405 astervox sdn bhd (1066828-D) 7 Jalan Derumun, Damansara Heights 50490 Kuala Lumpur, Malaysia Tel: +603 2035 5888 sales@astervox.com www.astervox.com June 2014 astervox
This is the first edition based on firmware version 61. The topics provided in this guide include: Chapter 1 Overview. Chapter 2 Getting Started
 About This Guide Thank you for choosing the SIP-T65P IP phone, an exquisitely designed SIP IP phone. This unit provides business telephony features such as Call Hold, Call Transfer, Busy Lamp Field, Shared
AiTech. Polycom VVX 300 / 400 / End User Training
 AiTech Polycom VVX 300 / 400 / 500 - End User Training Goals Instill Basic Knowledge Alleviate Anxiety Provide Hands-on Experience Touch on Advanced Features Button Basics - VVX 300/400 Polycom VVX 300
Yealink SIP-T48G and T49G Enterprise IP Phones Quick User Guide
 Yealink SIP-T48G and T49G Enterprise IP Phones Quick User Guide Quick User Guide for 8x8 Virtual Office This guide provides information you need to begin using your phone quickly. Phone Views There are
Polycom IP 5000 User Guide
 Polycom IP 5000 User Guide 1 Contents 1.0 Basic Phone Features... 3 Placing Calls... 3 Answering Calls... 3 Ending Calls... 3 Redialling Numbers... 3 Muting the Microphone... 3 Holding and Resuming Calls...
Cisco IP Phone 7906G and 7911G Basic User Guide
 CISCO IP PHONE 790G AND 7911G Hold Places the active call on hold, resumes a call on hold, and switches between an active call and an incoming call or an active call and a call on hold. 7 Keypad Works
Datasharp Optimum Connect Cisco IP Phone SPA504 basic user guide
 Datasharp Optimum Connect Cisco IP Phone SPA504 basic user guide Phone components 1. Handset Pick up to answer or place calls. 2. Speaker Speaker for phone. 3. Message Waiting Indicator When lit: i. Red
GIGABIT COLOR IP PHONE
 GIGABIT COLOR IP PHONE USER GUIDE UC842 Version:1.0.3.59 Nanjing Hanlong Technology Co., Ltd 86-25-84608050 support@hanlongtek.com Notices Information Notices Information Copyright Copyright 2005-2013
Quick Start Guide. Intermedia Hosted PBX Yealink W52 Wireless DECT Phone
 Quick Start Guide Intermedia Hosted PBX Yealink W52 Wireless DECT Phone 2 Welcome to your Hosted PBX Service. What s in the box? Yealink W52 Wireless DECT Phone W52 Base Parts A. 1 Base Station B. 1 Power
Cisco Unified IP Phone 7965G 17 16
 Cisco Unified IP Phone 7965G 17 16 1 2 3 4 5 7 9 6 8 15 14 13 12 11 10 186422 Cisco Unified IP Phone 7965G and 7945G Phone Guide for Cisco Unified Communications Manager 7.0 9 Cisco Unified IP Phone 7945G
Phone Information. IP2061 Quick Reference Guide. ICON Voice Networks REV 1.0. ICON Voice Networks
 Phone Information Extension Number: Passcode / Voice Mail Access Code: IP Address: MAC Address: Serial Number: REV 1.0 IP2061 Quick Reference Guide ICON Voice Networks 8001 Jetstar Drive Irving, TX 75063
Cisco Unified IP Phone User Guide for Cisco Unified Communications Manager 8.6 (SCCP and SIP)
") Common Phone Tasks View online help on phone Place a call Redial a number Switch to handset during a call Switch to speaker or headset during a call Press?. Cisco and the Cisco Logo are trademarks of Cisco
Common Phone Tasks View online help on phone Place a call Redial a number Switch to handset during a call Switch to speaker or headset during a call Press?. Cisco and the Cisco Logo are trademarks of Cisco
IP Office 9621 Telephone Quick Reference Guide
 9621 Telephone Quick Reference Guide Your 9621 Telephone The supports the 9621 telephone. The phone supports 24 programmable call appearance/feature buttons. The labels for these are displayed in the main
Ultra-elegant Gigabit IP Phone SIP-T48S
 Ultra-elegant Gigabit IP Phone SIP-T48S Quick Start Guide (V8220) wwwyealinkcom Applies to firmware version 6682010 or later Packaging Contents The following items are included in your package If you find
Features Model SIP VP -T49G. General Executive. Video. Audio. Connections. Picture 2GB. Flash memory 2GB. DDR3 memory
 Features Model SIP VP -T49G General Executive Picture Operating System Flash memory DDR3 memory Dimension (W*D*H*T; handset on cradle,stand attached) Operating temperature Linux Based 2GB 2GB 273mm*226mm*285mm*42
Guide to using your CISCO IP 6961 phone at Imperial College London
 Cisco IP Phone 6961 Cisco IP 6961 Phone Screen 1. Header Displays date, time and extension number 2. Extension details and other phone information - During a call, displays detai ls for the active line.
NEC NEAX 2000 IPS USER GUIDE
 NEC NEAX 2000 IPS USER GUIDE Phone Features and Functions ANSWERING A CALL: 1.) To answer a ringing call, lift the handset or press . PLACING AN INTERNAL CALL 1.) Lift the handset or press .
Yealink T20P IP User Guide
 Yealink T20P IP User Guide 1 Introducing your Yealink T20P IP Phone The T20P features a 2 line LCD display and 5 functions, where basic business feature requirements are the main requirements. An Overview
Quickstart Guide. Polycom VVX 400/410
 Quickstart Guide Polycom VVX 400/410 Polycom VVX 400/410 Features Message Indicator Line Keys Line Keys Soft Keys Speaker Home/Lines key Navigation keys / Select key Transfer Messages Hold Headset key