-PAGE INTENTIONALLY LEFT BLANK-
|
|
|
- Gordon Alexander
- 6 years ago
- Views:
Transcription
1 Allworx Phone Guide
2 -PAGE INTENTIONALLY LEFT BLANK-
3 Table of Contents 1 GETTING STARTED WHAT IS IN THE BOX? CONNECTING THE PHONE ADJUSTING YOUR PHONE ADJUST THE ANGLE OF THE PHONE CHANGE THE LABELS FOR PFK (PROGRAMMABLE FUNCTION KEY) VOLUME INTRODUCTION TO YOUR ALLWORX PHONE BUTTON OPERATION MESSAGES TRANSFER CONFERENCE INTERCOM RELEASE INFO SPEAKER MUTE/DND HOLD PHONE OPERATION ANSWERING / PLACING A CALL ENDING A CALL HEADSET DIRECTORY DIALING REDIAL A NUMBER MISSED CALLS IGNORE AND SILENCE SOFT KEYS PROGRAMMABLE FUNCTION KEYS PHONE FEATURES OPERATOR USER EXTENSIONS RESOURCE EXTENSIONS LEAVE A USER A VOIC BUSINESS SPEED DIAL AUTO ATTENDANT OVERHEAD PAGING ACTIVE DOOR RELAY DO NOT DISTURB CALL QUEUES CALL FORWARDING...16 Page i
4 6.12 PAGING ZONES CONFERENCE CENTER ALLWORX MESSAGE CENTER ANSWER RINGING PHONE USING ANOTHER HANDSET PARKING CALL MONITORS BUSY LAMP FUNCTION (BLF) ADVANCED TOPICS PHONE CONFIGURATION MENU PERSONAL SPEED DIAL PREFERENCES REBOOT THE PHONE CLEAR CALL HISTORY REFRESH DIRECTORY CHECK THE NETWORK SETTINGS CURRENT STATUS / INFO CHECK STATISTICS SAVE CHANGES TO YOUR SETTINGS RESET THE PHONE TO ITS FACTORY DEFAULTS ADDITIONAL INFORMATION WALL MOUNTING (OPTIONAL) REGULATORY NOTICES ABBREVIATIONS...30 Page ii
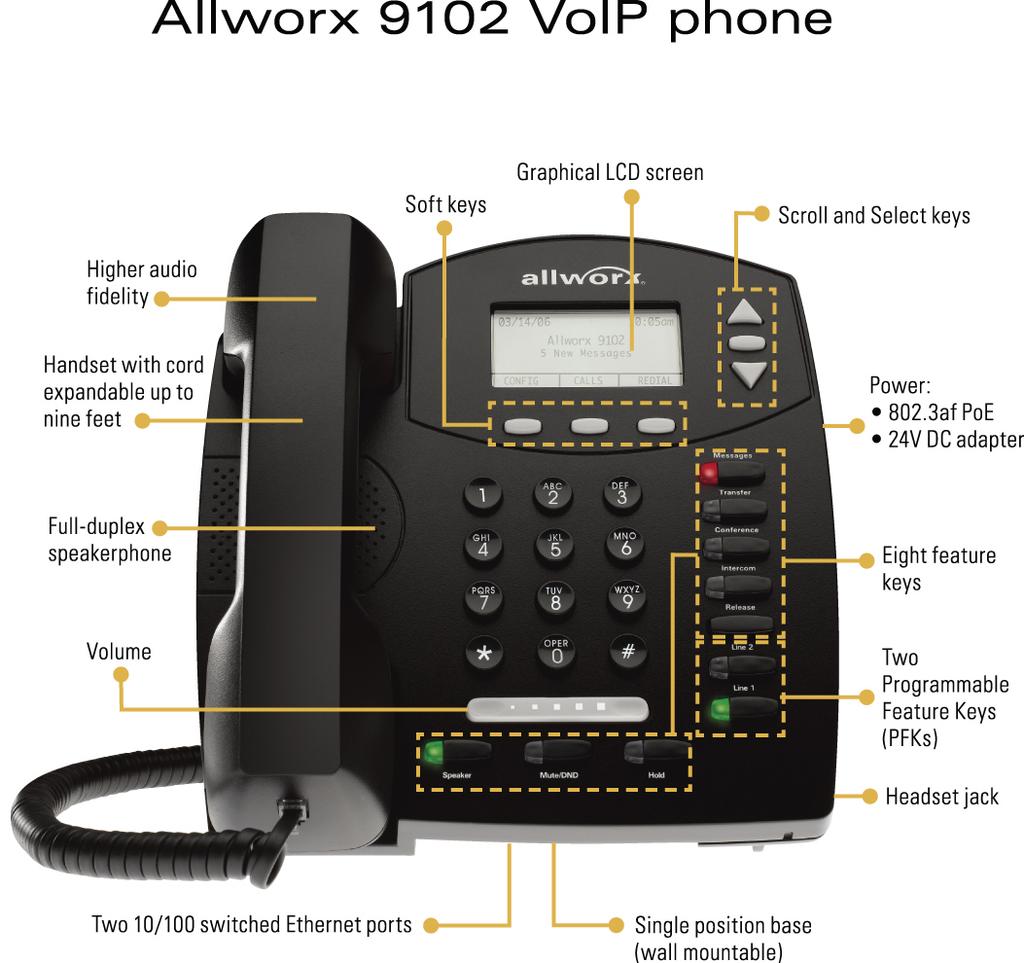
5 Congratulations! You re the new owner of an Allworx 9102 or 9112 VoIP phone. This phone will make it easy for you to place and receive calls when using the Allworx System. 1 Getting Started 1.1 What is in the box? Check out the contents of the box your phone came in. You should have: Allworx 9102 or 9112 phone Power supply Handset with cord Not included, but will also need: Ethernet cable to connect the phone to the network 1.2 Connecting the Phone We ve taken all the challenge out of connecting your phone properly. Follow these steps to connect: 1. Plug one end of the Ethernet cable into the Network jack on the back of the phone. Plug the other end into your Ethernet jack on the wall. WARNING: Do not connect to an analog phone line. 2. The phone contains a PC jack. A computer may be connected to the network through the phone s Computer port. 3. If you re using Power over Ethernet (PoE), the power to the phone was supplied when you connected the Ethernet cable. If this is the case, skip to step If you re not using PoE, connect the power cable into the phone, then plug the other end into an outlet. It s a good idea to use a surge protector. 5. After applying power, the phone will initialize itself. You can watch its progress on the phone s screen. A normal sequence would include: a. Allworx Logo appears. b. Starting network. c. Loading configuration files. d. Station Init complete. e. After successful startup, the phone will display date, time, your presence, your name, and extension. f. If the phone does not follow this sequence or displays an error, contact your System Administrator. Page 1
6 2 Adjusting Your Phone 2.1 Adjust the Angle of the Phone Allworx 9112 Phone You can adjust the Allworx 9112 phone on its base, so that it is easy to use and easy to read the screen. 1. Grasp the phone and the base separately. 2. Press the locking tab on the base. 3. Tilt the phone up or back in its base. 4. Pull up on the locking tab to insure the position of the phone is locked. Allworx 9102 Phone You must set up the support arm on the back of the Allworx 9102 phone, so that it is easy to use and easy to read the screen. 1. Grasp the phone with one hand and grasp the wall-mount base with the other hand. 2. Depress the two tabs on either side of the wall-mount base. 3. While holding the phone upright, swing the base out until the support arms are released. 4. Locate the slots on the back of the phone in the middle on each side. 5. Grasp each support arm at the same time and gently insert them into the slots until they snap in. 2.2 Change the Labels for PFK (Programmable Function Key) Make sure you keep your PFKs labeled correctly to prevent misdialing. The PFK labels are only available on the Allworx 9112 phone. To change a label: 1. Remove the paper from beneath the plastic label cover by pulling the plastic cover forwards. 2. Update the PFK setting on the label. 3. Place the label back under the cover. A word template can be obtained at our website ( select the Documentation link). 2.3 Volume You can adjust the volume of the incoming ring, handset speaker, speakerphone, and the headset. The volume will be adjusted for the device that you are currently using. To adjust the Volume: Page 2
7 You can adjust the incoming ring by pressing the Volume bar on the left (decrease) or right (increase) for desired audio level. Do not lift the handset. To adjust other volumes, pick up the handset, turn on the speakerphone or headset, and press the Volume bar on the left (decrease) or right (increase) for desired audio level. The screen shows the device for which you are adjusting the volume. Page 3
8 3 Introduction to your Allworx Phone Your new Allworx phone supports two modes of operation: PBX (Private Branch Exchange) Mode and Key System Mode. Your system administrator has pre-configured the phone for one of these two modes. Each programmable button on the phone will function differently depending on the mode of the phone. This guide caters to the PBX Mode. Page 4
9 Page 5
10 4 Button Operation Phone Guide Button Light Purpose Keypad None Use the keypad to dial numbers in order to place a call. Messages Transfer Solid red if new messages are present. Solid red until the call is transferred. Access the Message Center. Transfer a call to another extension using a Blind or an Attended Transfer. Conference Blinking green while making connections Solid red when in use. Talk to 3 parties at a time using the 3-Way Conference functionality. Intercom Solid green when in use. Use the phone as an intercom. Release None Disconnect with the call you are on currently. Info (9112 only) Speaker Mute/DND Hold Solid green when in use. Solid green when in use. Solid red when Mute. Solid amber in Do not Disturb mode. Flashing amber. Solid red if the call is on hold. View functionality of all the buttons on the phone: Feature Keys, Programmable Function Keys (PFK), Scroll Keys, Selection Keys, and Keypad. Use the phone as a speaker phone or activates a headset. Turn off the microphone in handset, speaker phone, or headset. Prevent incoming calls (Do Not Disturb). Indicate Presence other than In Office Place a call on hold. Navigation None Use the up arrow to move up on the LCD screen. Use the down arrow to move down. Use the button in the center to Select and Save settings. Soft key Selection None Use the buttons below the display to select a soft key. Page 6
11 4.1 Messages Phone Guide If the Messages button is red, you have a new message in your voic box. The number of new messages appears on the screen. To listen to your voice mail, press the Messages button. You ll need to enter your password to access your messages. Note: The Allworx Message Center can also be reached by dialing 6 then the primary extension (61##) from any handset or from the Auto Attendant. 4.2 Transfer Blind Transfer 1. Press the Transfer button. The current call is placed on hold. 2. At the dial tone, dial the extension to where you want to transfer the call. 3. The call will automatically be transferred. If the recipient does not answer, the call will follow the recipient s call route. Attended Transfer To talk to the person to whom you are transferring the call to before the transfer goes through. 1. Press the Transfer button. 2. Select a second Call Appearance PFK. 3. Dial the extension to where you want to transfer the call. 4. Talk to the new recipient. 5. Press the Transfer button again. The two parties will now be connected. 6. If you want to cancel the transfer, press the Release button. To return to the original caller, press the Call Appearance PFK where the call is currently being held. 4.3 Conference After connecting to the first person you want on the conference call, follow these steps: 1. Press the Hold button. 2. Select another Call Appearance PFK and call the second person you want on the conference call. 3. Press the Conference button. 4. Press the Call Appearance PFK where the first person is on hold. 5. All three callers are now able to conference. The Conference button will be illuminated solid red. 6. One party may exit the conference by hanging up; the remaining two parties will continue to be connected. Page 7
12 7. If you desire to have a private conversation with one of the parties, you may split the conference using the following steps: a. Use the Up / Down navigation arrows, to select the Call Appearance PFK of the person you wish to put on hold and then press the Hold button. (The display will show the two parties involved in the conference). b. You may now talk to the remaining party. c. The Call Appearance PFK for the person on hold will be flashing. To have the person re-join the conference, press Conference, then select the flashing Call Appearance PFK. The three-way conference is then re-established. 4.4 Intercom 1. Press the Intercom button, and then dial the extension of the person you would like to talk to. 2. The call is connected when the LCD screen displays Active Call. 3. Start talking. The person you called will hear you over their speaker. 4. To deny an incoming Intercom request, press the Ignore soft key. 5. Press the Intercom or Speaker button to end the call. 4.5 Release The Release button is used to hang-up an active call or to abort a new call setup, such as the middle of a transfer operation. 4.6 Info The Info button is only available on the Allworx 9112 phone. The button is used to get information regarding the other buttons on your phone. For example, you can use the Info button to determine the numbers that have been programmed for each speed-dial button. To use this feature: 1. Press the Info button. 2. Press any of the other buttons on the phone. 3. A screen will be displayed with a brief description of the selected button. 4. Press the Info button a second time or let the screen time-out to exit the description screen. 4.7 Speaker Press the Speaker button for hands-free use of the phone. If you re already using the handset, you can: Page 8
13 Press the Speaker button, then place the handset on the hook. Take the handset off the hook to continue using it again. When you are finished with the call, press the Speaker button to hang up. Press the Speaker button, then place the handset on the desk. To switch back to using the handset, just press the Speaker button. Note: If you re using a headset, you will use Speaker to activate it. You will not be able to use the speakerphone while using a headset (Section 5.3). 4.8 Mute/DND Mute a Call During a call, you can press the Mute/DND button to turn off the microphone in the handset, speakerphone, or headset. The light on the Mute/DND button is red when the phone is muted. Prevent Incoming Calls using Do Not Disturb (DND) 1. With the handset on the hook, press the Mute/DND button. 2. The light on the Mute/DND button will appear amber. 3. With Do Not Disturb enabled, your phone will not ring. All calls targeted for you will follow the next step in your active call route. 4. Press Mute/DND to turn Do Not Disturb off your phone. The light on the Mute/DND button will turn off. Change Presence State The Mute/DND button can also be used to change your Presence setting directly from the phone. The Presence states are: In Office, At a Meeting, On Vacation, On Business Trip, At Home, Away, and Busy. 1. Press and hold the Mute/DND button to display the Presence states. 2. Using the Up / Down navigation arrows, scroll to the desired Presence. 3. Use the Select button to save the Presence state. The Mute/DND button will flash amber when you are in any state other than In Office. 4.9 Hold The caller will hear music while on Hold, if Music on Hold is enabled for your company s system. To place a call on hold: Press the Hold button. o The Hold button will blink red once. Page 9
14 Place the handset on the hook. o The Call Appearance PFK for the call that is on hold will blink green until the call is picked up again. To take the caller off hold: Pick up the handset. o When the handset is picked up, the most recent call is connected. Press Speaker button (for hands-free). The caller ID of the call picked up will appear on the display. To pick up a different call on hold: Press the flashing PFK for that call or use the Up / Down navigation arrows to display the call on the screen, and then pick up the handset. If you have a call on hold and a new call comes in, the new call will be answered when the handset is lifted. The caller will hear music during the hold time, if Music on Hold is enabled for your company s system. Page 10
15 5 Phone Operation Phone Guide 5.1 Answering / Placing a Call Lift the handset off the hook. Press the Speaker button to put the phone in hands-free mode or headset mode, if the headset is connected. Using the keypad without lifting the handset will place the phone in speakerphone mode. PFKs that can be used to answer incoming calls (if flashing) or make outgoing calls: o Call Appearance Can be used to either place an extension-to-extension call, or to obtain an outside line by first dialing 9. o Line Appearance Do not have to dial 9 to obtain outside line. o Call Monitor o Call Queue o Speed Dial Automatically dials the programmed number Note: Unless configured otherwise, incoming calls to your phone will ring the audible indicator, flash the Allworx visual indicator (only applies to the 9112), and flash one of the Call Appearance PFKs. 5.2 Ending a Call If you re using the handset, place receiver back on the hook. If you re using the speakerphone, make sure the handset is on hook, then press the Speaker button. If you re using a headset, press the Speaker button. Pressing another PFK will end the call. o If a second call is coming in on another PFK, by pressing that PFK your current call will end and the incoming call will be answered. Press the Release button to end a call and start a new call. 5.3 Headset 1. Plug the cable for the headset into its receptacle on the right side of the phone. 2. Press the Speaker button. (You cannot use the speakerphone and headset at the same time). 3. When you are finished with the call, press the Speaker button to disconnect. Page 11
16 A PFK can be created to activate the headset instead of using the Speaker button. The PFK has to be setup by a System Administrator. 5.4 Directory Dialing 1. Press the Up / Down navigation arrows to view a list of all User Extensions, System Extensions, and Speed Dial numbers by Name or Description. 2. Use the Down Arrow button to highlight the Name (or Description) and Extension. Alternately, you may also press an alpha key on the keypad to jump to the desired section of the directory. 3. Press the Select button to dial the number. 5.5 Redial a Number On the phone s display screen, you can automatically dial the last number called by selecting the REDIAL soft key. Select the CALLS soft key, using the Up / Down navigation arrows highlight the desired number, and press the Select button. A PFK can also be programmed by your System Administrator to redial the last number called. 5.6 Missed Calls If a call is missed, a message will appear on the phone s display. Use the following steps to see details of the missed calls: 1. Select the CALLS soft key. 2. Use the Up / Down navigation arrows to view your missed calls. 3. Select the DETAIL soft key to view the date and time of the missed calls. 4. Press the Select button to call the number. 5.7 Ignore and Silence Soft keys While the call is ringing, the Silence and Ignore soft key options appear. Pressing the Ignore soft key stops the audible ringing and returns you to the Active Call screen, however the PFK that the call is coming in on will continue to flash until the call is answered or the caller hangs up. Pressing the Silence soft key stops the audible ringing, however the incoming call will still be present on the phone s display and the PFK that the call is coming in on will continue to flash until the call is answered or the caller hangs up. Page 12
17 5.8 Programmable Function Keys The following features can be programmed by your System Administrator into the 12 PFKs on the 9112 model or the 2 PFKs on the 9102 model (suggest to leave one PFK as a Call Appearance): Busy Lamp Field (BLF) Call Appearance Call Monitor Headset Park Personal Speed Dial Redial Line Appearance Parking Orbit Queue Appearance Speed Dial Page 13
18 6 Phone Features 6.1 Operator Phone Guide Dialing (or transferring to) 0 from any phone will initiate a call to the operator. 6.2 User Extensions Dialing (or transferring to) any 1## extension will connect a call to another user, if that user s extension exists. 6.3 Resource Extensions Dialing (or transferring to) any 2## extension will connect a call to a call route set up by the System Administrator and assigned to that extension. 6.4 Leave a User a Voic Dialing (or transferring to) any 31## or 32## extension will connect a call to a particular user s voic . Note: 32## only works if extension 2## routes directly to a user s voic Business Speed Dial The System Administrator can specify extensions or to ring particular numbers. The System Administrator can program the extensions to a phone s PFK. 6.6 Auto Attendant Dialing (or transferring) to extension 400 or 431 from any phone will go to the default Auto Attendant. Dialing (or transferring) to extension from any phone will go to a specific Auto Attendant set up by the System Administrator. 6.7 Overhead Paging Dialing extension 402 activates the overhead paging system. Once activated users can make an announcement from the handset that is transmitted to the overhead paging system. Note: An overhead paging system is a 3 rd party product attached to the Allworx. 6.8 Active Door Relay Dialing extension 403 activates the Door Relay, if the system is configured and connected to a Door Relay. 6.9 Do Not Disturb Dialing extension 420 enables Do Not Disturb on the phone. Page 14
19 Dialing extension 421 disables Do Not Disturb on the phone. Note: The Mute/DND button will not be lit Call Queues The caller will hear music while waiting in the Queue, if Music on Hold is enabled for your company s system. Logging in/out of a Queue To login to a Queue: 1. Press the Queue PFK on your phone corresponding to the Queue to be logged into. 2. Hold down the PFK for at least 1.5 seconds. 3. The button will change color from red to either off (no calls in queue) or flashing green (if a call is waiting in the Queue). Note: By default, the phone will automatically be logged into the Queue. To logout Queue: 1. Press the Queue PFK on your phone corresponding to the Queue to be logged out of. 2. Hold down the PFK for at least 1.5 seconds. 3. The button will change color to solid red (logged out of Queue). Placing a Call in a Queue Calls can be put in a Queue either by dialing a 2## extension routed to a Queue from an Auto Attendant or by the following steps: To place a call in a Queue: 1. Press the Transfer button. 2. Dial 440# (# representing Queues 0 through 9) or a 2## extension that is routed to a Queue. Retrieving a Call from a Queue Call Queues are created and programmed by your System Administrator. There are two ways to retrieve a call from a Queue: Dial extension 441# (# representing Queues 0 through 9). The System Administrator can define the PFKs on your Allworx phone as Queue Appearances for one or more Call Queues: The Queue PFK may be in one of several states: o Red means you are currently logged out of the Queue. o Off (not lit) means you are logged into the Queue but there are no calls waiting in the Queue. Page 15
20 o Flashing green means there is at least one call in the Queue and will flash on all phones that are logged in. When the Queue PFK light is flashing, you will be able to pick up the call by pressing the PFK or Speakerphone button for hands-free mode, or by using your handset or headset and pressing the PFK Call Forwarding Dialing 451## or 452## will forward any calls that come into the phone to extension 1## or 2##. To disable Call Forwarding for the phone, dial extension Paging Zones Dialing 46# (# representing a Paging Zones 0 through 9) on the phone will broadcast audio to any other phones that are members of the Paging Zone. Note: Paging Zones are set up by the System Administrator Conference Center There are four Conferences Bridges on the 24x and one Conference Bridge on the 6x that support up to 8 callers. A Conference can be scheduled using the directory page or be used without scheduling ahead of time. Users can join a Conference by dialing extension 408 from the Auto Attendant, any phone on the network, or by being transferred to the extension by another user. An Auto Attendant shortcut my also be setup by the System Administrator to access the Conference Center. A Conference ID and password are required in order to enter the conference. Note: For more information refer to the Allworx Conference Center Guide found on the website at The 24x supports up to 4 simultaneous conferences while the 6x supports only one conference. Default Conference IDs and Pins for unscheduled conferences are shown in the table below: Server Conference ID Password 6x, 24x x x x Note: The 10x does not support N-Way Conferencing. Page 16
21 6.14 Allworx Message Center The Allworx Message Center can be reached by dialing 61## (1## is a user s extension) or pressing the Messages button on any Allworx phone. If calling from an outside line, the Allworx Message Center can be reached through the Auto Attendant by dialing 61##. The Allworx Message Center allows the user to: Listen to new and saved voic s Send a message to another user Change presence setting Change name recording Manage message greetings Change password Note: For more information refer to the Allworx Message Center Guide found on the website at Answer Ringing Phone Using Another Handset A user can answer another user s ringing phone from their handset by selecting 7 and the ringing phone s extension Parking The caller will hear music while parked, if Music on Hold is enabled for your company s system. Calls waiting in a parking orbit will time-out after 10 minutes causing the call disconnect. Using Hold button Answer an incoming call. Park the call by pressing down the Hold button until it starts flashing red. o The phone display can show the extension ( ) where the call is parked, if Parking Orbit Popups are enabled (Section 7.3). Using the Intercom button, you can announce the call and extension. o Someone else will then be able to pick up the call by dialing the Parking Orbit extension. Attended Park A call may be parked by making an Attended Transfer to extension 700. Page 17
22 Note: Do not Blind Transfer to 700, as the call will be disconnected. 1. Press the Transfer button. 2. Select a second Call Appearance PFK. 3. Dial extension The parking location will be announced ( ). 5. Press the Transfer button again. The call is now parked in the announced location. Blind Park A call may be parked by making a Blind Transfer to extension Press the Transfer button. 2. Dial extension 740. Park PFK A System Administrator can set a PFK on a phone to Park calls. To park an active call, press the Park PFK. o The parking location will not be announced. The phone display can show the extension ( ) where the call is parked, if Parking Orbit Popups are enabled (Section 7.3). Note: When a Park PFK is defined, the Hold button only ever operates as Hold. The current user preference setting for Hold Button Operation (Section 7.3) is ignored and Park is not available using the Hold button. Park a Call using a Line Appearance PFK An incoming call on a Line Appearance PFK can be parked using the Hold button. Note: The Phone must be programmed for Key System Behavior. 1. Answer the incoming call using the Line Appearance PFK. 2. Press the Hold button, and the call will be parked. a. Any other phone that is monitoring the same outside line will be flashing red and can pick up the call. To perform a Privacy Hold, continue to press the Hold button past the time it takes to Park the call. The call will be on Privacy Hold for that particular phone. Any other phone that is monitoring the same outside line will be solid red and cannot pick up the call. If the Hold button is held, it will toggle back and forth between Park and Hold. Parking a Call from the Hold Screen Page 18
23 Calls can be parked from the Hold Screen using an Attended Park, Blink Park, and Park PFK. The call does not need to be retrieved once placed on Hold before Parking. Note: A call cannot be Parked by holding down the Hold button while the call is currently on Hold. Retrieving A Parked Call Your System Administrator can define one of the PFKs on your Allworx phone as a Parking Orbit PFK for one or more of the parking extensions. Your System Administrator can also set a reminder to ring the handset when the call has been parked for a specified elapse of time. The Parking Orbit PFK may be in one of several states: Off (not lit) means the Parking Orbit is idle, no incoming call. Amber PFK means a call has been parked by that particular handset within the last five seconds. After five seconds, the button will turn to slow flashing green. Slow flashing green means a call has been parked using this handset for more that five seconds. Slow flashing red means a call has been parked on this Parking Orbit, but not by that handset. When the Parking Orbit PFK light is flashing, you will be able to pick up a call in the Parking Orbit. You will be able to pick up the call by pressing the PFK or Speakerphone button for hands-free mode, or by using your handset or headset and pressing the PFK. Note: Parked calls can be answered without a designated Parking Orbit PFK by dialing from any handset Call Monitors Call Monitors are created and programmed by your System Administrator. The System Administrator can define the PFKs on your Allworx phone for one or more Call Monitors. The Call Monitor PFK may be in one of several states: Off (not lit) means the Call Monitor is idle, no incoming call. Fast flashing green means there is an incoming call (with the handset is set to ring). Green means there is an active call on this handset. Fast flashing red means there is an incoming call (with the handset is set not to ring). Slow flashing green means an active call is on hold by this handset. When the Monitor PFK light is flashing, you will be able to pick up the call by pressing the PFK or Speakerphone button for hands-free mode, or by using your handset or headset and pressing the PFK Busy Lamp Function (BLF) Another user s phone can be linked to a PFK on your phone. The PFK will automatically dial the user s extension when pressed. The BLF PFK will flash red when the user has an incoming call coming and it will become solid red when the user is on the phone. Note: This requires the phone to be programmed in PBX Behavior by your System Administrator. Page 19
24 7 Advanced Topics Phone Guide Depending on the configuration of your Allworx system, you may be able to see information about the configuration of your phone. In some instances, you can make changes. Caution: Check with your System Administrator before making any changes. 7.1 Phone Configuration Menu You can view / change the following by selecting the CONFIG soft key: Personal Speed Dial Preferences Reboot Phone Clear Call History Refresh Directory Network Settings Current Status / Info Statistics Save Settings Set Factory Defaults 7.2 Personal Speed Dial You can program your frequently called numbers and dial them with the touch of a button. Setting up a Personal Speed Dial 1. Press the CONFIG soft key. 2. A menu will appear, the first option should be Personal Speed Dial, press the Select button. 3. Use the Up / Down navigation arrows to choose a desired speed dial number, press the Select button. 4. Use the keypad to enter the phone number or extension. 5. Press the Select button, and use the keypad to enter a name for the speed dial. Note: # puts a space between characters and the Up / Down navigation arrows serve has as a backspace. Using a Personal Speed Dial 1. Pick up a line. 2. Press the SPDIAL soft key. Page 20
25 3. Choose the desired number on the keypad of the saved speed dial. The System Administrator can set up a PFK to serve as a speed dial. The top most PFK will be associated to speed dial 0, the next PFK will be associated to speed dial 1, etc. 7.3 Preferences 1. Press the CONFIG soft key button. 2. Press the Down arrow button to select Preferences. Press the Select button. 3. Select from the following list using the Up / Down navigation arrows to make the changes: a. LCD Contrast Controls the brightness of the display. Use the Volume bar or Up / Down arrows to adjust. b. Call History Size Number of calls kept in History (Default: 99). c. Clock Mode Time Display for LCD Screen. i. Off ii. 12 Hour (Default) iii. 24 Hour d. Hold Reminder Mode How the hold reminder should act. i. No Reminder ii. On Hook iii. Timer (Default) iv. On Hook and Timer e. Redial Memory To have the last number dialed stored in the phone. i. Enabled (Default) ii. Disabled iii. Timed f. Audible Dialing Tones are heard when a key is pressed. i. Enabled (Default) ii. Disabled g. Call Timer Display Displays the length of time during a call. i. Enabled (Default) ii. Disabled h. Intercom Auto Answer When a call is placed to a phone using the Intercom button, the phone receiving the call will automatically answer using Intercom/Speakerphone. i. Enabled (Default) ii. Disabled Page 21
26 i. On Hook Dialing Speakerphone mode will be enabled when a number on the keypad is pressed. Allows numbers to be dialed without pressing the Speaker button first. i. Enabled (Default) ii. Disabled j. Visual Ringing The Allworx visual ring indicator for the 9112 phone will flash red with an incoming call. i. Enabled (Default) ii. Disabled k. Paging Enable Mode If the phone is to allow pages to be heard. i. Never ii. Always (Default) iii. On Hook l. Off Hook Ringing The phone will ring when a new call is received while in use. i. Enabled (Default) ii. Disabled m. Auto on Hold When another call comes in on a free Call / Line Appearance PFK while on an active call, if the PFK for the new call is pressed, the first call is automatically put on hold instead of ended. i. Enabled (Default) ii. Disabled n. Auto Retrieve Calls When the phone is on hook and a call is on hold, if handset is taken off hook, the call on hold is automatically retrieved. i. Enabled (Default) ii. Disabled o. Missed Call Tracking Can choose what types of Appearances to track. i. Call Appearances Only (Default) ii. All Appearance Types p. Parking Orbit Popups Displays the Parking Orbit after call has been parked. i. Popup Enabled (Default) ii. Popup Disabled q. Hold Button Operation Set the Hold button functions. i. Hold then Park ii. Park then Hold iii. Hold Calls Park Lines (Default) Page 22
27 4. After making changes to the preferences listed above, press the Select button. 5. Press the EXIT soft key twice. 6. Select the YES soft key to save any changes OR select NO to cancel changes made. 7.4 Reboot the Phone 1. Select the CONFIG soft key. 2. Highlight Reboot Phone. 3. Press the Select button. 4. If you have any unsaved changes, you ll be asked if you want to save them before rebooting. Select the YES soft key to save any changes OR select NO to cancel changes made. 5. Select the YES soft key on the next prompt to confirm the phone reboot. 7.5 Clear Call History The Allworx phone retains the history of your calls up to 99 calls. You can clear your call history by using the following steps: 1. Select the CONFIG soft key. 2. Scroll down and highlight Clear Call History. 3. Press the Select button. 4. Select the YES soft key to clear call history OR select NO to cancel. 7.6 Refresh Directory 1. Select the CONFIG soft key. 2. Scroll down and highlight Refresh Directory. 3. Press the Select button. 4. Select the Exit soft key to exit the Refreshing the Directory screen. 7.7 Check the Network Settings Warning: Do not make any changes to your network settings unless instructed by your System Administrator. 1. Select the CONFIG soft key. 2. Scroll down and highlight Network Settings. 3. Press the Select button. a. DHCP Allows the phone to extract its configuration from the server. Page 23
28 i. Enabled (Default) ii. Disabled b. VLAN Allows the phone to stay on the same network without any hardware reconfiguration. i. Enabled ii. Hub Debug Mode (Default) iii. Disabled c. Remote Plug n Play Key used to set up a remote phone. See the System Administrator. d. Edit Time Server IP Option to change the Time Server the phone is logged into. e. Edit Boot Server IP The WAN IP address the server is using for the setup of a remote phone. f. Edit Phone Server IP Option will appear if DHCP is disabled. Allows the manual entry of the phone s IP. g. Edit Netmask IP Option will appear if DHCP is disabled. Allows the manual entry of the Netmask IP. h. Edit Gateway IP Option will appear if DHCP is disabled. Allows the manual entry of the Gateway IP. i. Phone VLAN Settings Option will appear if VLAN is enabled. i. Enter VLAN ID 2 (Default) ii. Enter VLAN Priority 7 (Default) j. PC VLAN Settings Option will appear if VLAN is enabled. 4. Select the EXIT soft key. i. Enter VLAN ID 1 (Default) ii. Enter VLAN Priority 0 (Default) 5. Select the YES soft key to save any changes OR select NO to cancel changes made. 7.8 Current Status / Info 1. Select the CONFIG soft key. 2. Highlight Current Status/Info. 3. Press the Select button. 4. The following information is listed: DHCP Lease Time (if DHCP is enabled) SNTP Time Server IP Boot Server IP Phone IP Page 24
29 Subnet IP Gateway IP Boot Configuration success or failure MAC Address Model Name Software Version LAN Connection Info PC Connection Info 5. Use the Up / Down navigation arrows to move through the list. 6. When finished, press the EXIT soft key. 7.9 Check Statistics 1. Select the CONFIG soft key. 2. Highlight Statistics. 3. Press the Select button. 4. The following information is listed: Audio Packet Stats - RCV - XMT - Missed - Avg Jitter - Min Delay - Max Delay SIP Call Stats - Incoming OK - Outgoing OK - Bad Address - Refused Busy 5. Use the Up / Down navigation arrows to move through the list. 6. When finished, press the EXIT soft key. Page 25
30 7.10 Save Changes to Your Settings Normally, you are prompted to save the changes you have made. You may, however, manually want to save the changes. 1. Select the soft key that corresponds to CONFIG on the screen. 2. Highlight Save Settings. 3. Press the Select button. 4. Select the YES soft key to save any changes OR select NO to cancel changes made. 5. Press the Exit soft key Reset the Phone to Its Factory Defaults Warning: Do not reset your phone to its factory defaults unless instructed by your System Administrator. 1. Select the soft key that corresponds to CONFIG on the screen. 2. Highlight Set Factory Defaults. 3. Press the Select button. 4. Select the YES soft key to restore the factory defaults OR select NO to keep the Configuration as is. 5. Phone automatically reboots. Page 26
31 8 Additional Information Your business directory, including the conference scheduling page, company phone list, distribution lists, phone features chart, and shared folders are available using a browser and entering: This will either be the IP address of your server on your local area network or the host name of the server. Your System Administrator can give you this address and it is included on your Allworx welcome summary sheet. Page 27

32 9 Wall Mounting (Optional) Your phone is wall mountable and requires a wall mounting plate. The mounting plates are available from your local telephone company or your local retailer. Caution: If using a standard telephone wall mounting plate, DO NOT make any connection to the RJ 11 jack. This connection is intended for an analog phone and may cause damage to the Allworx phone, voiding your warranty. The mounting plate, similar to the one shown below, has mounting studs to receive the telephone base and is positioned to secure the Allworx telephone flush to wall surface. Collapse the Allworx phone base to the horizontal position and mount the phone over the mounting plate studs. All power and RJ 45 cable connections should exit between the phone body and the phone base and then be routed to the network connection and/or a power connection. Standard Telephone Wall Mounting Plate Page 28
33 10 Regulatory Notices Phone Guide This equipment has been tested and found to comply with the limits for a Class B digital device, pursuant to Part 15 of the FCC rules. These limits are designed to provide reasonable protection against harmful interference in a residential installation. This equipment generates, uses, and can radiate radio frequency energy and, if not installed and used in accordance with the instructions, may cause harmful interference to radio communications. There is no guarantee, however, that interference will not occur in a particular installation. If this equipment causes harmful interference to radio or television reception, which can be determined by turning the equipment off and on, the user is encouraged to try to correct the interference by one or more of the following measures: Reorient or relocate the receiving antenna. Increase the separation between the equipment and the receiver. Connect the equipment into an outlet on a circuit different from that to which the receiver is connected. Consult the dealer or an experienced radio/tv technician for help. You may also find helpful the following booklet, prepared by the FCC: "How to Identify and Resolve Radio-TV Interference Problems." This booklet is available from the U.S. Government Printing Office, Washington D.C Changes and Modification not expressly approved by the manufacturer or registrant of this equipment can void your authority to operate this equipment under Federal Communications Commissions rules. The Power Supply is a plug-in Class 2 transformer. It is model no. WD Input voltage is 120VAC, 60Hz 16W. Output voltage is 24VDC 400mA. UL listed. The product was made in China. This product adheres to the IEEE 802.3af standard for Power over Ethernet (PoE). Page 29
34 11 Abbreviations Phone Guide PoE Power over Ethernet VoIP Voice over Internet Protocol PBX Private Branch Exchange PFK Programmable Function Key DND Do Not Disturb BLF Busy Lamp Function Page 30
Allworx Phone Guide 9212
 Allworx Phone Guide 9212 No part of this publication may be reproduced, stored in a retrieval system, or transmitted, in any form or by any means, electronic, mechanical, photocopy, recording, or otherwise
Allworx Phone Guide 9224
 Allworx Phone Guide 9224 No part of this publication may be reproduced, stored in a retrieval system, or transmitted, in any form or by any means, electronic, mechanical, photocopy, recording, or otherwise
Allworx Phone Guide 9212/9212L
 Allworx Phone Guide 9212/9212L No part of this publication may be reproduced, stored in a retrieval system, or transmitted, in any form or by any means, electronic, mechanical, photocopy, recording, or
Allworx Phone Guide 9202E
 Allworx Phone Guide 9202E No part of this publication may be reproduced, stored in a retrieval system, or transmitted in any form or by any means, electronic, mechanical, photocopy, recording, or otherwise
Allworx Phone Guide 9204/9204G. Updated April 16, 2013
 Allworx Phone Guide 9204/9204G Updated April 16, 2013 2013 Allworx Corp, a Windstream company. All rights reserved. No part of this publication may be reproduced, stored in a retrieval system, or transmitted,
Allworx Phone Model 9204/9204G User Guide
 Allworx Phone Model 9204/9204G User Guide Version: H Updated March 2, 2017 Allworx Phone Model 9204/9204G User Guide Copyright Documentation 2017 Allworx Corp, a Windstream company. All rights reserved.
Enterprise IP Phone SIP-T19 E2 & T19P E2
 Enterprise IP Phone SIP-T19 E2 & T19P E2 Quick Start Guide(V80.10) www.yealink.com Applies to firmware version 53.80.0.10 or later. Packaging Contents The following items are included in your package.
Vertical 2-Line Desk Phone Quick Reference Guide
 Contact your Sales Representative for more information. Table of Contents Introduction to your Xcelerator Desk Phone... 3 How to use your Xcelerator Desk Phone... 3 Answering and making calls... 3 Handling
TPGBizPhone. Standard T42G IP Phone User Guide
 TPGBizPhone Standard T42G IP Phone User Guide Contents Overview... 5 Hardware Component Instructions... 5 Icon Instructions... 6 LED Instructions... 7 Customising Your Phone... 8 General Settings... 8
Reference Guide. IP Phone/Calling Features Voic . Dialing. Your Phone Calling Features. Phone Views. To dial phone number or extension.
 TelNet OfficeEdge Complete Polycom VVX400 Series IP Phone. Reference Guide. IP Phone/Calling Features Voicemail Dialing Your Phone Calling Features To dial phone number or extension Lift your handset and
Gigabit Business IP Phone
 Gigabit Business IP Phone ZIP 47G ZIP 47G Quick Start Guide WWW.ZULTYS.COM Packaging Contents The following items are included in your package. If you find anything missing, contact your system administrator.
Cisco 504G, 514G, 508G, and 303G Initial Setup
 Cisco 504G, 514G, 508G, and 303G Initial Setup 1 Handset 2 Message Waiting Indicator 3 LCD Screen 4 Line keys 5 Softkey buttons 6 Navigation button 7 Messages button 8 Hold button 9 Setup button 10 Mute
Getting Started 3. Using this Guide 3 Connecting Your Phone 4
 Table of Contents Getting Started 3 Using this Guide 3 Connecting Your Phone 4 Adjusting the Footstand / Handset Rest 5 Signing In to Your Phone 5 Choosing the Proper Headset 5 An Overview of Your Phone
ACC-1143 PUG. Polycom 4 and 6-Line Desk Phone Quick Reference Guide
 ACC-1143 PUG Polycom 4 and 6-Line Desk Phone Quick Reference Guide Table of Contents INTRODUCTION TO YOUR POLYCOM 4 OR 6-LINE DESK PHONE... 2 WELCOME... 2 DESK PHONE... 2 HOW TO USE YOUR VERTICAL 4-LINE
Reference Guide. IP Phone/Calling Features Voic Dialing. Your Phone Calling Features. Phone Views. To dial phone number or extension.
 TelNet OfficeEdge Complete Polycom VVX300 / 310 IP Phone. Reference Guide. IP Phone/Calling Features Voicemail Dialing Your Phone Calling Features To dial phone number or extension Lift your handset and
Icon Instructions LED Instructions Touch Screen Display Navigating Menus and Fields Entering Data and Editing Fields
 ... 4... 5... 5 Icon Instructions... 6 LED Instructions... 7 Touch Screen Display... 8 Navigating Menus and Fields... 10 Entering Data and Editing Fields... 11... 12 General Settings... 12 Backlight...
SIP Communicator Spitfire S300 User Guide
 SIP Communicator Spitfire S300 User Guide 1 TABLE OF CONTENTS Handset Description Page 3 Keypad Lock Page 6 Directory Page 6 Adding an Entry. Page 6 Edit or Delete an Entry Page 7 Black List Page 7 Dialing
CALNET 3: AT&T Voice DNA : Quick reference guide
 CALNET 3: AT&T Voice DNA: Quick reference guide Polycom SoundPoint IP 321 / 331 CALNET 3: AT&T Voice DNA : Quick reference guide Polycom SoundPoint IP 321 / 331 Version 1.2 Page 2 AT&T Voice DNA : Quick
Cisco Model SPA 303 Quick Start Guide
 Cisco Model SPA 303 Quick Start Guide Welcome Thank you for choosing the Cisco Small Business IP phone. This guide describes how to install your phone and how to perform some basic tasks. 1 Installing
2757 VoIP Phone Users Guide
 2757 VoIP Phone Users Guide Rev. 1.0 Table of Contents 1 Introduction... 5 1.1 Package Contents... 5 1.2 Features... 5 1.3 Basic Setup... 6 2 Network Setup... 8 2.1 Static IP Address... 8 2-2 PPPoE...11
Polycom VVX500 Series IP Phone Reference Guide Dialing Your Phone Calling Features To dial phone number or extension Phone Views Speakerphone
 TelNet OfficeEdge Complete Polycom VVX500 Series IP Phone. Reference Guide IP Phone/Calling Features Voicemail. Dialing Your Phone Calling Features To dial phone number or extension Lift handset and dial
Polycom SoundPoint IP 450
 Polycom SoundPoint IP 450 User Guide For training/documentation, please visit us @ http://customertraining.verizonbusiness.com or call 1 800 662 1049 2009 Verizon. All Rights Reserved. The Verizon and
AVAYA 9608 IP Phone QUICK REFERENCE GUIDE
 AVAYA 9608 IP Phone QUICK REFERENCE GUIDE The phone supports 24 programmable call appearance/feature buttons. The labels for these are displayed in the main display and can be controlled by the adjacent
Polycom SoundPoint IP 320/330
 Polycom SoundPoint IP 320/330 User Guide For training/documentation, please visit us @ http://customertraining.verizonbusiness.com or call 1 800 662 1049 2009 Verizon. All Rights Reserved. The Verizon
TPG BizPhone. Premium T48G IP Phone User Guide
 TPG BizPhone Premium T48G IP Phone User Guide Contents Overview... 5 Hardware Component Instructions... 5 Icon Instructions... 6 LED Instructions... 7 Touch Screen Display... 8 Navigating Menu and Fields...
Press the More key at anytime to scroll across if the feature you need is not visible.
 Display Features The display on your phone is very interactive. As you use the phone the information will change and different features and functions will appear on the display. The 6 buttons above the
Cisco Unified IP Phone User Guide for Cisco Unified Communications Manager 8.5 (SCCP and SIP)
") Cisco Unified IP Phone User Guide for Cisco Unified Communications Manager 8.5 (SCCP and SIP) For Cisco Unified IP Phone 8941 and 8945 Americas Headquarters Cisco Systems, Inc. 170 West Tasman Drive San
Cisco Unified IP Phone User Guide for Cisco Unified Communications Manager 8.5 (SCCP and SIP) For Cisco Unified IP Phone 8941 and 8945 Americas Headquarters Cisco Systems, Inc. 170 West Tasman Drive San
9417CW Installation and User Guide
 9417CW Installation and User Guide 9417CW Telephone Important Tips Wait for at least two rings to allow the phone to identify a caller and display the caller s name and/or number. You will have to subscribe
Polycom Soundpoint 650 IP Phone User Guide
 20 19 18 17 16 1 2 15 14 13 12 This guide will help you to understand and operate your new IP Phone. Please print this guide and keep it handy! 3 11 For additional information go to: http://www.bullseyetelecom.com/learning-center
Cisco IP Phones. Quick Start Guide SPA303. Tel Woodley Ave., Van Nuys, CA USA
 Cisco IP Phones SPA303 Quick Start Guide 2 SPA303 3 Welcome Thank you for choosing the Cisco Small Business IP phone. This guide describes how to install your phone and how to perform some basic tasks.
Voic Guide. Access internally Access your mailbox by pressing the Messages/Msgs/MSG key or by dialing Enter your password.
 Voicemail Guide Access internally Access your mailbox by pressing the Messages/Msgs/MSG key or by dialing 1000. Enter your password. Access externally (if configured on your system) i.e. An option on your
AVAYA 9601 SIP DESKPHONE INSTRUCTIONS
 AVAYA 9601 SIP DESKPHONE INSTRUCTIONS The following table provides button/feature descriptions for the 9601 deskphone. Name Description 1 Message Waiting Indicator An illuminated red light in the upper
AC1200M/MS. User Manual
 AC1200M/MS User Manual Table of Contents User Manual... 1 1 Preface... 1 2 LED Indicators and Connectors... 1 2.1 LED Indicators... 1 2.2 Hardware Installation... 2 3 Voice Prompt (AC1200MS)... 2 4 User
GIGABIT COLOR IP PHONE
 GIGABIT COLOR IP PHONE USER GUIDE UC842 Version:1.0.3.59 Nanjing Hanlong Technology Co., Ltd 86-25-84608050 support@hanlongtek.com Notices Information Notices Information Copyright Copyright 2005-2013
Reference Guide. IP Phone/Calling Features Voice Mail Personal Assistant Toolbar. Dialing. Your Phone Calling Features.
 TelNet OfficeEdge Complete Polycom SoundPoint 550 IP Phone. Reference Guide IP Phone/Calling Features Voice Mail Personal Assistant Toolbar Dialing To dial phone number or extension Lift your handset and
Allworx Tx 92/24 Telephone Expander Installation Guide
 Allworx Tx 92/24 Telephone Expander Installation Guide No part of this publication may be reproduced, stored in a retrieval system, or transmitted, in any form or by any means, electronic, mechanical,
User Guide: Polycom SoundPoint IP335 Phone
 User Guide: Polycom SoundPoint IP335 Phone User Guide Contents: User Guide Contents:... 2 IP335 Button Diagram... 3 Telephone Feature Overview... 4 IP335 Features... 4 Reading the Display... 4 How to Use
User Guide: Panasonic KX-UT113
 User Guide: Panasonic KX-UT113 User Guide Contents: User Guide Contents:... 2 KX-UT113 Button Diagram... 3 Telephone Feature Overview... 4 KX-UT113 Features... 4 Reading the Display... 4 How to Use your
Cisco SPA50x User Manual
 Cisco SPA50x User Manual Table of Contents: Phone operation 2 Claricom System Star Codes 65 Claricom User Voicemail 66 USER GUIDE Cisco Small Business Cisco SPA50X and SPA51X SIP IP Phones Models SPA501G,
Allworx. Verge IP Phone Series. User Guide
 Allworx Verge IP Phone Series User Guide Version: C Updated April 13, 2017 Allworx Verge IP Phone Series User Guide Allworx Verge IP Phone Series User Guide Copyright Documentation 2017 Allworx Corp,
Cisco Model SPA 525G Quick Start Guide
 Cisco Model SPA 525G Quick Start Guide Welcome Thank you for choosing the Cisco Small Business IP phone. This guide describes how to install your phone and how to perform some basic tasks. 1 Installing
Product Release Notice Synapse 3.0 Software
 Product Release Notice Synapse 3.0 Software Release Date: September 17 th, 2012 This document contains the release notes for AT&T Synapse version 3.0. This is a major release with many new features. Users
Pocket User Guide 480i Phone. for Sphericall
 Pocket User Guide 480i Phone for Sphericall 480i for Sphericall User Guide Revised: May 12, 2004 Sayson Technologies Ltd. will not accept liability for any damages and/or long distance charges, which result
SNOM 360 USER GUIDE TABLE OF CONTENTS
 SNOM 360 USER GUIDE TABLE OF CONTENTS Keypad 2 &3 Dialling a phone number 4 Incoming calls 4 Accepting a call 4 Denying/ Blocking a call 5 Hold and Resume 5 Transfer: 6 Direct Transfer 6 Transfer to voicemail
Allworx User s Guide (Release x)
") Allworx User s Guide (Release 6.8.1.x) -PAGE INTENTIONALLY LEFT BLANK- Table of Contents 1 VOICEMAIL...1 1.1 ACCESSING YOUR MESSAGE CENTER INBOX...1 1.2 LISTENING TO YOUR VOICEMAIL...2 1.3 SENDING VOICEMAIL
Allworx User s Guide (Release 6.8.1.x) -PAGE INTENTIONALLY LEFT BLANK- Table of Contents 1 VOICEMAIL...1 1.1 ACCESSING YOUR MESSAGE CENTER INBOX...1 1.2 LISTENING TO YOUR VOICEMAIL...2 1.3 SENDING VOICEMAIL
Quick start guide. MS Line Small Business Deskset
 Quick start guide MS2015 4-Line Small Business Deskset Parts checklist Your telephone package contains the following items. Save your sales receipt and original packaging in the event warranty service
Icon Instructions... 6 LED Instructions
 ... 4... 5... 5 Icon Instructions... 6 LED Instructions... 7... 8... 8 Backlight... 8 Language... 8 Time and Date... 9... 10 Volume... 10 Ring Tones... 10... 11 Directory... 11 Local Directory... 11...
Telstra VVX410 Phone Guide
 Select Save Config to Save the Config Your phone will automatically reboot Note 1: Restarting the phone may take a few minutes Note 2: If your phone has been preconfigured the QSetup soft key will not
Phone Information. IP2061 Quick Reference Guide. ICON Voice Networks REV 1.0. ICON Voice Networks
 Phone Information Extension Number: Passcode / Voice Mail Access Code: IP Address: MAC Address: Serial Number: REV 1.0 IP2061 Quick Reference Guide ICON Voice Networks 8001 Jetstar Drive Irving, TX 75063
Allworx User s Guide. (Release 7.3)
") Allworx User s Guide (Release 7.3) No part of this publication may be reproduced, stored in a retrieval system, or transmitted, in any form or by any means, electronic, mechanical, photocopy, recording,
Allworx User s Guide (Release 7.3) No part of this publication may be reproduced, stored in a retrieval system, or transmitted, in any form or by any means, electronic, mechanical, photocopy, recording,
Telephone User Instructions
 Telephone User Instructions Telephone User Guide 1 Contents Contents 1. Key Panel... 3 1. Making and Receiving calls... 5 1.1 Incoming calls... 5 1.2 Outgoing calls... 5 1.3 Re-dial... 5 1.4 Callers List...
Yealink BASIC PHONE GUIDE T48G POWERED BY XCHANGE TELECOM
 POWERED BY XCHANGE TELECOM UNDERSTANDING THE KEYS ON YOUR The Hard keys may display a fixed function, may be programmed to display extensions or other frequently used functions like Speed Dial. The Soft
CISCO IP PHONE MODEL 7970 & UNITY VOIC INCLUDES IPMA FOR MANAGERS & CONFERENCE CONNECTION. Getting Started Manual
 CISCO IP PHONE MODEL 7970 & UNITY VOICEMAIL INCLUDES IPMA FOR MANAGERS & CONFERENCE CONNECTION Getting Started Manual Getting Started... 3 Using LCD Icons... 3 Using the IP Phone Configuration Utility...
Setting up Polycom VVX phones on the Cloud PBX
 Setting up Polycom VVX phones on the Cloud PBX This document outlines the set-up and use of Polycom VVX termninals on the Cloud PBX Contents List of Polycom phones that are auto provisioned and tightly
900 MHz Digital Two-Line Cordless Speakerphone with Answering System 9452 with Caller ID/Call Waiting
 USER S MANUAL Part 2 900 MHz Digital Two-Line Cordless Speakerphone with Answering System 9452 with Caller ID/Call Waiting Please also read Part 1 Important Product Information AT&T and the globe symbol
Cisco Small Business Model SPA 303g
 Cisco Small Business Model SPA 303g User Guide Version 1 Table of Contents Getting Started... 6 About This Document... 6 Organization... 7 Overview of the Cisco Small Business 300 Series IP Phones... 8
Telephone User Guide NEC SV9100
 ! Telephone User Guide NEC SV9100 V1 5/2/16 Quick Reference Guide NEC SV9100 Function GREEN LED RED LED SOLID RED OR GREEN SLOW FLASHING LED FAST FLASHING LED Function Description Your Call Somewhere else
Setup & Information Guide Zultys 37G VoIP Phones
 Setup & Information Guide Zultys 37G VoIP Phones Contents Phone Installation... 3 Prerequisites... 3 Assembling Your Phone... 3 Connecting Your Phone... 4 First Phone Setup... 5 Understanding Your Phone...
FX INSTRUCTION MANUAL
 FX - 1 INSTRUCTION MANUAL FX - 1 Feature Telephone Exchange System KCE Technology Corporation Contents Information To User... 1 Installation... System Connection... Wall Mounting... System Conventions...
Panasonic User Guide (Panasonic KX-DT 333/343 Series Phones)
") Panasonic User Guide (Panasonic KX-DT 333/343 Series Phones) DISPLAY FEATURES: (4 soft keys) 573-874-0101 PROG Used to program keys RING Volume of the Ring Tone INFO Date/Time/Day of Week MENU Personal/System/
Panasonic User Guide (Panasonic KX-DT 333/343 Series Phones) DISPLAY FEATURES: (4 soft keys) 573-874-0101 PROG Used to program keys RING Volume of the Ring Tone INFO Date/Time/Day of Week MENU Personal/System/
Version
 Version 1.03 5.30.12 Table of contents Introduction... 3 Welcome... 3 Installing the Cisco IP Phone... 4 Installing the Phone and Connecting to the Network... 4 Connecting Your Phone... 5 Using the Cisco
Yealink SIP-T42G IP Phone
 Yealink SIP-T42G IP Phone User Guide Version 1 E Mark Warning This device is marked with the CE mark in compliance with EC Directives 2014/35/EU and 2014/30/EU. Part 15 FCC Rules Any Changes or modifications
Cisco Small Business Model SPA 504g
 Cisco Small Business Model SPA 504g User Guide Version 1 Table of Contents Getting Started... 1 About This Document... 1 Organization... 1 Overview of the Cisco Small Business IP Phones... 3 Understanding
Hosted Phone Quick Start Guide. Get the most out of our Hosted Phone service with these handy instructions for the Polycom VVX phone.
 Hosted Phone Quick Start Guide Get the most out of our Hosted Phone service with these handy instructions for the Polycom VVX 300-310 phone. 1 Contents Equipment......................................................................
Yealink 46G. A Complete Overview for Conversation Users
 Yealink 46G A Complete Overview for Conversation Users Contents Hardware... 3 Soft Keys... 4 Answering a Call... 6 Making a Call... 7 Actions Performed While in a Call... 7 Muting a Call... 7 Placing a
This is the first edition based on firmware version 61. The topics provided in this guide include: Chapter 1 Overview. Chapter 2 Getting Started
 About This Guide Thank you for choosing the SIP-T65P IP phone, an exquisitely designed SIP IP phone. This unit provides business telephony features such as Call Hold, Call Transfer, Busy Lamp Field, Shared
InnoMedia ipbx-400. Quick Install Guide.
 InnoMedia ipbx-400 Quick Install Guide www.innomedia.com Table of Contents Introduction 2 Package Contents 2 Installation 3 Wall-Mounting Instructions 5 Troubleshooting 6 Appendix A. LED Status Summary
Polycom VVX 300 Series
 wowforbusiness.com Polycom VVX 300 Series Phone User Guide Basic Phone Functions Table of Contents Placing a Call...2 Ending a Call...3 Local Directory...3 Hold and Resume..4 Answering an Incoming Call....4
Accessibility Features for the Cisco Unified SIP Phone 3905
 s for the Cisco Unified SIP Phone 3905 First Published: 2012-10-28 Last Modified: 2017-08-09 The Cisco Unified SIP Phone 3905 provides accessibility features for the blind, and the visually, hearing, and
Centrex Phone Instructions
 Centrex Phone Instructions Making a Call To Make a Call: Using the Handset - Lift the handset and dial Using the Speakerphone- Press the Speaker button and dial. To Dial: An internal extension - Dial the
Table of Contents. Phone Configuration
 User Manual 3.60 Table of Contents Phone Configuration... 1-5 Buttons... 1 Placing a Call... 1 Answering a Call... 2 DND... 2 Redial... 2 Call List / Callers... 2 Contacts... 2 Paging... 3 Transferring
M6310 Featurephone. User Guide
 M6310 Featurephone User Guide Introduction The M6310 Featurephone is a practical and convenient way to use a wide range of business telephone features, including Call Forward, Conference Calling, and
CALNET 3: AT&T Voice DNA Polycom SoundPoint IP 321 / 331
 CALNET 3: AT&T Voice DNA Polycom SoundPoint IP 321 / 331 Version 1.2 2018 AT&T Intellectual Property. All rights reserved. AT&T, Globe logo, Mobilizing Your World and DIRECTV are registered trademarks
Panasonic DT543/546 Training
 Panasonic DT543/546 Training Page 1 of 9 Page 2 of 9 ANSWERING/PLACING A CALL Answer a call: When your phone is ringing: Lift handset or press SP-PHONE for hands free Place an outside call: Lift handset
Cisco IP Phone 7906G and 7911G Basic User Guide
 CISCO IP PHONE 790G AND 7911G Hold Places the active call on hold, resumes a call on hold, and switches between an active call and an incoming call or an active call and a call on hold. 7 Keypad Works
This device is marked with the CE mark in compliance with EC Directives 2006/95/EC and 2004/108/EC.
 Copyright 2015 YEALINK NETWORK TECHNOLOGY CO., LTD. Copyright 2015 Yealink Network Technology CO., LTD. All rights reserved. No parts of this publication may be reproduced or transmitted in any form or
Cisco SPA 504G Setup and User Guide
 Cisco SPA 504G Setup and User Guide Version 1.0 Created: April 2012 Last Updated: Copyright Copyright 2005, 2006, 2007, 2011, 2012 MyPhones Ltd. Information in this document is subject to change without
Yealink W60 IP DECT phone. A guide to using your phone with Cloud Voice
 Yealink W60 IP DECT phone A guide to using your phone with Cloud Voice 2 What can this guide help you with? Make sure you can successfully call emergency services 3 1. Check out everything in the box What
User Guide. Infinite Voice (Polycom VVX 300/400)
") User Guide Infinite Voice (Polycom VVX 300/400) August 2016 Table of Contents 1. Phone Keys and Views... 2 1.1 Phone Keys and Views... 2 1.1.1 Home View... 2 1.1.2 Lines View... 3 1.1.3 Calls View... 3
User Guide Infinite Voice (Polycom VVX 300/400) August 2016 Table of Contents 1. Phone Keys and Views... 2 1.1 Phone Keys and Views... 2 1.1.1 Home View... 2 1.1.2 Lines View... 3 1.1.3 Calls View... 3
SAMSUNG HANDSET USER GUIDE FOR DS-5007S / DS-5014S / DS-5038S / DS-5014D / DS-5021D ITP-5107 / ITP-5114D / ITP5121D
 SAMSUNG HANDSET USER GUIDE FOR DS-5007S / DS-5014S / DS-5038S / DS-5014D / DS-5021D ITP-5107 / ITP-5114D / ITP5121D FOR TECHNICAL TIPS PLEASE VISIT OUR WEBSITE www.conversetelecom.com 2 Table of Contents
Wave 5.0. Edge IP 9800 Series Phone. User Guide
 Wave 5.0 Edge IP 9800 Series Phone User Guide 2015 by Vertical Communications, Inc. All rights reserved. Vertical Communications and the Vertical Communications logo and combinations thereof and Applications
IP Office Platform 11.0
 9600 Series Telephone User Guide Issue 13a - (Monday, August 20, 2018) Contents 1. Introduction 1.1 Important Safety... Information 6 1.2 Button Modules... 7 1.3 Phone Keys... 8 1.4 Call Soft Key... Options
Model SPA 504G Quick Start Guide
 mydatavo Model SPA 504G Quick Start Guide Welcome Thank you for choosing Datavo as your business solutions provider. This guide describes how to install your phone and how to perform some basic tasks.
AVAYA J129 IP Phone QUICK REFERENCE GUIDE
 AVAYA J129 IP Phone QUICK REFERENCE GUIDE The Avaya J129 IP Phone is a SIP-based phone intended to be used for basic business communications. The phone supports two-call appearances with a single-line
Quick Start Guide AT&T SB67020 Deskset
 Quick Start Guide AT&T SB67020 Deskset Deskset Overview This page identifies and describes the main display and key groups for the Synapse SB67020 Deskset. See the User s Guide at www.telephones.att.com/synapseguides
CBV Support CBV Telephone. User Guide. For Cisco 7900 Series IP Phones
 CBV Support 312-416-5142 CBV Telephone User Guide For Cisco 7900 Series IP Phones Contents INTRODUCING YOUR PHONE...4 Getting to Know Your Phone...4 Using Softkeys...6 Navigating Menus...6 Entering Text
Vox Centrex Yealink T29 UserGuide
 Vox Centrex Yealink T29 UserGuide Monique Verto Supreme November 2015 TABLE OF CONTENTS Handset Description Page 2 Keypad Lock Page 5 Directory Page 5 Adding an Entry. Page 5 Edit or Delete an Entry..
Quick Start Guide. Intermedia Hosted PBX Yealink W52 Wireless DECT Phone
 Quick Start Guide Intermedia Hosted PBX Yealink W52 Wireless DECT Phone 2 Welcome to your Hosted PBX Service. What s in the box? Yealink W52 Wireless DECT Phone W52 Base Parts A. 1 Base Station B. 1 Power
User Guide. Model 8500 Digital Phone
 User Guide Model 8500 Digital Phone AXXESS MODEL 8000 SERIES QUICK REFERENCE GUIDE TO FREQUENTLY USED FEATURES These are the basic instructions for the most frequently used telephone system and voice
Polycom SoundPoint IP Phones
 Polycom SoundPoint IP Phones Polycom phones offer a high quality communications experience, combining an intuitive, easy to navigate interface with great audio quality. The purpose of this guide is to
Operating Your Phone. This section describes how to operate your Cisco IP Phone and includes information on soft keys and phone features.
 This section describes how to operate your Cisco IP Phone and includes information on soft keys and phone features. Note Because there are differences in phone and site configurations, not all features
Telstra IP Telephony 450/550/560/650/670 Handset Features Guide
 If you are required to initially configure you IP phone you will be advised of the Username and Password. This information only needs to be entered once via the QSetup soft key. This is only required for
Telstra IP Telephony - Telstra IP Video Phone Feature Guide
 1. The Touch screen Your phone has a touch-sensitive screen. To access features or obtain information, tap the menu items, arrow keys, soft keys (the keys along the bottom of the touch screen) and field
Yealink T20P IP User Guide
 Yealink T20P IP User Guide 1 Introducing your Yealink T20P IP Phone The T20P features a 2 line LCD display and 5 functions, where basic business feature requirements are the main requirements. An Overview
Avaya IP Office Phone Manual
 Avaya IP Office Phone Manual Contents 1 PHONES... 3 1.1 Overview of the 5402... 3 1.2 Overview of the 5410... 5 1.3 Overview of the 5420... 7 1.4 Overview of the 1403 / 1603... 9 1.5 Overview of the 1408
AVAYA 9608/9611G SIP DESKPHONE INSTRUCTIONS
 AVAYA 9608/9611G SIP DESKPHONE INSTRUCTIONS MESSAGE WAITING INDICATOR PHONE DISPLAY NAVIGATION ARROWS and the OK BUTTON PHONE BUTTON MESSAGE BUTTON CONTACTS HISTORY HOME HEADSET SPEAKER VOLUME BUTTON MUTE
Avaya Campus PBX MICHIGAN STATE UNIVERSITY. Telecommunication Systems. Avaya 2420 User Guide
 Avaya Campus PBX MICHIGAN STATE UNIVERSITY Telecommunication Systems Avaya 2420 User Guide MICHIGAN STATE UNIVERSITY Avaya 2420 Telephone User Guide Michigan State University Telecommunication Systems
Two-Line Speakerphone with Caller ID/Call Waiting 992
 0992_CIB_1ATT_FINAL_022105 2/22/04 4:46 PM Page II User's Manual Part 2 Two-Line Speakerphone with Caller ID/Call Waiting 992 In case of difficulty, visit our Service Center at www.telephones.att.com or
Avaya 9640 IP Telephone End User Guide
 Avaya 9640 IP Telephone End User Guide 9640 IP Telephone End User Guide 1 P age Table of Contents About Your Telephone... 3 9640 IP Telephone Button/Feature Descriptions... 3 Scrolling and Navigation...
IP3032-E Standard IP Deskphone Quick User Guide
 IP3032-E Standard IP Deskphone Quick User Guide Copyright 2013, All Rights Reserved. Ver: A D/C: 102-0812 FCC Statement This equipment has been tested and found to comply with the limits for a Class B