Version /01/2013. User Manual. DAP-1665 Wireless AC1200 Dual Band Access Point DAP-1665
|
|
|
- Annice May
- 5 years ago
- Views:
Transcription


1 Version /01/2013 User Manual DAP-1665 Wireless AC1200 Dual Band Access Point DAP-1665
2 Table of Contents Product Overview... 4 Package Contents... 4 System Requirements... 5 Introduction... 6 Features... 7 Hardware Overview... 8 Connections... 8 LEDs... 9 WPS Button...10 Installation...11 Operation Modes...11 Access Point Mode...12 Wireless Client Mode...13 Repeater Mode...14 Bridge Mode...15 Bridge with AP Mode...16 Wireless Installation Considerations...17 Configuration...18 Web-based Configuration Utility...18 Wireless Setup Wizard...19 Access Point Mode...20 Wireless Client Mode...22 Repeater Mode...26 Manual Configuration...30 Table of Contents Wireless Settings...30 Access Point Mode...31 Wireless Client Mode...34 Bridge Mode...35 Bridge with AP Mode...36 Repeater Mode...40 Configuring Wireless Security...45 LAN Setup...48 Advanced...52 Access Point Mode...52 Access Control...52 Advanced Wireless...53 Wi-Fi Protected Setup...55 User Limit...56 Wireless Client Mode...57 Advanced Wireless...57 Bridge Mode...58 Access Control...58 Bridge with AP Mode...59 Advanced Wireless...59 Repeater Mode...61 Access Control...61 Advanced Wireless...62 Wi-Fi Protected Setup...63 User Limit...64 ii
3 Table of Contents Maintenance...65 Admin...65 System...66 Firmware...67 Time...68 System Check...69 Schedules...70 Status...71 Device Info...71 Logs...72 Statistics...73 Wireless...74 Help...75 Wireless Security...76 What is WEP?...76 What is WPS?...76 What is WPA?...77 Connect to a Wireless Network...78 Windows Windows Windows Vista...83 WPA/WPA WPS/WCN Using Windows XP...87 Configure WPA-PSK...88 Troubleshooting...90 Networking Basics...94 Check your IP address...94 Statically Assign an IP address...95 Technical Specifications...96 Compliance Statements...97 iii
4 Section 1 - Product Overview Product Overview Package Contents DAP-1665 Wireless AC1200 Dual Band Access Point Ethernet Cable Two Detachable Antennas 1 Power Adapter CD-ROM with Manual Note: Using a power supply with a different voltage rating than the one included with the DAP-1665 will cause damage and void the warranty for this product. 1 The appearance of the external antennas may vary depending on region. 4
5 Section 1 - Product Overview System Requirements Network Requirements Web-based Configuration Utility Requirements An Ethernet-based Network IEEE ac/n/g/b/a wireless clients (AP/Repeater Mode) IEEE ac/n/g/b/a wireless network (Client/Bridge/Repeater Mode) 10/100/1000 Ethernet Computer with the following: Windows, Macintosh, or Linux-based operating system An installed Ethernet adapter Browser Requirements: Internet Explorer 7.0 or higher Mozilla Firefox 12.0 or higher Google Chrome 20.0 or higher Apple Safari 4.0 or higher Windows Users: Make sure you have the latest version of Java installed. Visit to download the latest version. 5
6 Section 1 - Product Overview Introduction D-Link, an industry leader in networking, introduces the new D-Link DAP-1665 Wireless AC1200 Dual Band Access Point. With the ability to transfer files with a maximum combined wireless signal rate of up to 1200 Mbps 1, the DAP-1665 gives you highspeed wireless network access for your home or office. The DAP-1665 is compliant with the latest draft IEEE ac standard, meaning that it can connect and inter-operate with other ac compatible wireless client devices. The DAP-1665 is also backwards compatible with b/g/n devices. It can be flexibly configured to operate in 5 different modes: Access Point, Wireless Client, Bridge, Bridge with AP, and Repeater. With its setup wizard, the DAP-1665 ensures that you will be up and running on a wireless network in just a matter of minutes. The DAP-1665 features Wi-Fi Protected Access (WPA-PSK/WPA2-PSK) to provide an enhanced level of security for wireless data communications. The DAP-1665 also includes additional security features to keep your wireless connection safe from unauthorized access. The DAP-1665 also supports Wi-Fi Protected Setup (WPS), repeater and wireless client operation modes each capable of being conveniently set up by using the PIN or Push Button methods. 1 Maximum wireless signal rate derived from draft ac specifications. Actual data throughput will vary. Network conditions and environmental factors, including volume of network traffic, building materials and construction, and network overhead, lower actual data throughput rate. Environmental factors will adversely affect wireless signal range. Wireless range and speed rates are D-Link RELATIVE performance measurements based on the wireless range and speed rates of a standard Wireless N product from D-Link. 6
7 Section 1 - Product Overview Features Faster Wireless Networking - The DAP-1665 provides combined wireless speeds of up to 1200 Mbps 1. This capability allows users to participate in real-time activities online, such as video streaming, online gaming, and real-time audio. Flexible Operation Modes - The DAP-1665 can operate as an Access Point, Repeater, Wireless Client, Bridge and Bridge with AP, meaning that you can customize its operation to suit your specific networking requirements. Gigabit Ethernet Port - The built-in Gigabit Ethernet port facilitates a wired connection of upto 1 Gbps, meaning that wired devices can also take advantage of the DAP-1665 s high-speed wireless capabilities. Compatible with IEEE n/g/b/a Devices - The DAP-1665 is still fully compatible with the n/g/b/a standards, so it can connect with existing wireless adapters found on older devices. Robust Security - Use WPS (Wi-Fi Protected Setup) to create a secure connection to new devices in a matter of seconds by simply pushing a button or entering a PIN. There s also WPA/WPA2 security encryption, allowing you to customize your network s security. User-friendly Setup Wizard - Through its easy-to-use web-based user interface, the DAP-1665 lets you control what information is accessible to those on the wireless network, whether from the Internet or from your company s server. Configure your access point to your specific settings within minutes. 1 Maximum wireless signal rate derived from draft ac specifications. Actual data throughput will vary. Network conditions and environmental factors, including volume of network traffic, building materials and construction, and network overhead, lower actual data throughput rate. Environmental factors will adversely affect wireless signal range. Wireless range and speed rates are D-Link RELATIVE performance measurements based on the wireless range and speed rates of a standard Wireless N product from D-Link. 7


8 Section 1 - Product Overview Hardware Overview Connections Reset Button Pressing the Reset button restores the access point to its original factory default settings. 2 LAN Port Connect 10/100/1000 Ethernet devices such as computers, switches, and hubs. 3 Power Switch Press to turn power to the unit on or off. 4 Power Receptor Receptor for the supplied power adapter. 8


9 Section 1 - Product Overview Hardware Overview LEDs Power LED A solid green light indicates a proper connection to the power supply GHz Wireless A solid green light indicates that the 2.4 GHz wireless band is active. 3 5 GHz Wireless A solid green light indicates that the 5 GHz wireless band is active. 4 LAN LED A solid green light indicates the LAN port connection is active. 9

10 Section 1 - Product Overview Hardware Overview WPS Button WPS Button Press this button to use WPS to establish a secure connection with other wireless devices. 2 Kensington Slot Connect a Kensington lock device to protect your access point against theft. 10
11 Section 2 - Installation Installation Please configure the DAP-1665 with a computer connected directly to the device. The following pages will explain the different operational modes you can use. Operation Modes The DAP-1665 features a number of operation modes, enabling you to customize it to your networking requirements. Please refer to the following sections to determine which mode is most suitable for your network. Access Point mode - page 12 Wireless Client mode - page 13 Repeater mode - page 14 Bridge mode - page 15 Bridge with AP mode - page 16 11
12 Section 2 - Installation Access Point Mode Access Point (AP) mode adds wireless capability to your existing wired network. The DAP-1665 acts as a central connection point for any computer (client) that has an ac or backwards compatible n/g/b/a wireless network interface and is within range of the access point. Clients must connect to the network name (SSID) broadcast by the access point in order to wirelessly access the network. If wireless security is enabled on the access point, the client will need to enter a password to connect. In Access Point mode, multiple clients can connect wirelessly to the network at the same time. AP Mode Internet Router DAP-1665 Wireless Devices 12
13 Section 2 - Installation Wireless Client Mode In Wireless Client mode, the DAP-1665 acts as a wireless network adapter for your Ethernet-enabled device (such as a game console or a TV set-top box). Connect your Ethernet-enabled device to the access point using an Ethernet cable, and enjoy wired speeds of up to 1000 Mbps. If you are going to connect several Ethernet-enabled devices to your DAP-1665, connect the LAN port of the DAP-1665 to an Ethernet switch, then connect your devices to this switch. Example: Connect a gaming console using an Ethernet cable to the DAP The unit is set to Wireless Client mode which will wirelessly connect to a wireless router on your network. Client Mode DAP-1665 Internet Wireless Router Gaming console 13
14 Section 2 - Installation Repeater Mode In Repeater mode, the DAP-1665 extends the range of your existing wireless network by repeating the wireless signal of another access point or wireless router. The DAP-1665 and wireless router (if used) must be within range of each other. The extended wireless network can use the same SSID and security settings as the existing network, or you can choose to specify a new network name and security method. Repeater Mode Internet Wireless Router DAP-1665 Wireless Devices 14
15 Section 2 - Installation Bridge Mode In Bridge mode, the DAP-1665 creates a wireless link between two existing networks, enabling data to be shared between the two networks without the need for a physical connection. The two networks must be within wireless reach of one another in order for bridge mode to be effective. Note: Bridge mode is not specified in the Wi-Fi or IEEE standards. This mode will only work using two DAP-1665 units. Compatibility with other APs (even other D-Link APs) is not guaranteed. Bridge Mode Internet Router/ DAP-1665 DAP-1665 Router/ Switch Switch 15
16 Section 2 - Installation Bridge with AP Mode Bridge with AP mode has the same features of Bridge mode, but adds the functionality of Access Point mode, meaning that wireless clients can connect to one of the DAP-1665s and have access to both networks via the wireless bridge. Note: The Bridge with AP mode is not specified in the Wi-Fi or IEEE standards. This mode will only work using two DAP-1665 units. Compatibility with other APs (even other D-Link APs) is not guaranteed. Bridge with AP Mode Internet Router/ DAP-1665 DAP-1665 Router/ Switch Switch Wireless Devices Wireless Devices 16
17 Section 2 - Installation Wireless Installation Considerations The DAP-1665 wireless access point lets you access your network using a wireless connection from virtually anywhere within the operating range of the device. Keep in mind, however, that the number, thickness and location of walls, ceilings, or other objects that the wireless signals must pass through, may limit the range. Typical ranges vary depending on the types of materials and background RF (radio frequency) noise in your home or business. The key to maximizing wireless range is to follow these basic guidelines: 1. Keep the number of walls and ceilings between the D-Link access point and other network devices to a minimum. Each wall or ceiling can reduce your adapter s range from 3-90 feet (1-30 meters.) Position your devices so that the number of walls or ceilings is minimized. 2. Be aware of the direct line between network devices. A wall that is 1.5 feet thick (.5 meters), at a 45-degree angle appears to be almost 3 feet (1 meter) thick. At a 2-degree angle it appears over 42 feet (14 meters) thick! Position devices so that the signal will travel straight through a wall or ceiling (instead of at an angle) for better reception. 3. Building materials make a difference. A solid metal door or aluminum studs may have a negative effect on range. Try to position access points, wireless routers, and computers so that the signal passes through drywall or open doorways. Materials and objects such as glass, steel, metal, walls with insulation, water (fish tanks), mirrors, file cabinets, brick, and concrete will degrade your wireless signal. 4. Keep your product away (at least 3-6 feet or 1-2 meters) from electrical devices or appliances that generate RF noise. 5. If you are using 2.4 GHz cordless phones or X-10 (wireless products such as ceiling fans, lights, and home security systems), your wireless connection may also be affected. Make sure your 2.4 GHz phone base is as far away from your wireless devices as possible. The base transmits a signal even if the phone is not in use. 17

18 Configuration This section will show you how to configure your D-Link wireless access point using the web-based configuration utility. Web-based Configuration Utility If you wish to change the default settings or adjust the configuration of the DAP-1665, you may use the web-based configuration utility. To access the configuration utility, open a web browser such as Internet Explorer and enter in the address field. Select Admin from the drop-down menu and then enter your password. Leave the password blank by default. If you get a Page Cannot be Displayed error, please refer to Troubleshooting on page 90 for assistance. 18


19 Click Launch Wireless Setup Wizard to configure your access point. If you want to configure the access point manually without running the wizard, skip to Manual Configuration on page 30. Wireless Setup Wizard Click Next to continue. 19
20 Access Point Mode This wizard is designed to assist you in configuring your DAP-1665 as an access point. Select Access Point from the drop-down menu. Then, click Next to continue. This screen will help you to set a network name (SSID) and security password for your wireless network. Specify an SSID for both the 2.4 GHz and 5 GHz bands (these names must not be the same). If you wish to use the same wireless security password for both networks, check the box and enter your desired password in the field provided. If you wish to use a different password for each network, uncheck the box and enter the desired passwords in the 2.4 GHz Wi-Fi Password and 5 GHz Wi-Fi Password fields. Click Next to continue. 20
21 A summary page will be displayed, showing the current settings for your 2.4 GHz and 5 GHz wireless networks. It is recommended that you make a note of this information for future reference. Click Save to save your network settings. In order for your network settings to take effect AP will reboot automatically. When the device has finished rebooting the main screen will display. A dialog box will appear asking if you wish to save the address for the web-based configuration utility in your browser s bookmarks. Click OK to save and you will be taken to your browser s bookmark settings to save the address. Click Cancel to continue without saving a bookmark. In order for your network settings to take effect AP will reboot automatically. When the device has finished rebooting the main screen will display. 21
. For Manual setup, skip to page 24. Click Next to continue.")
22 Wireless Client Mode This wizard is designed to assist you in configuring your DAP-1665 as a wireless client. Select Wireless Client from the drop-down menu. Select WPS as the configuration method only if your wireless device supports Wi-Fi Protected Setup (WPS). For Manual setup, skip to page 24. Click Next to continue. Press the WPS Push Button on your existing wireless router with 120 seconds to complete the WPS setup process. 22
23 If a connection has been successfully made, click Finish on the following screen to complete the setup process. If the connection was not successful, click Retry to try again, or Cancel to abort the setup process. 23
24 Select Manual configuration to setup your network manually. Click Next to continue. Locate the SSID of the wireless network that you wish to connect to from the list. Select it by clicking on the radio button in the far right column. Click Connect at the bottom of the page to continue. If you do not see your network in the list, click Rescan to search again. If the existing wireless network uses wireless security, enter the Wi-Fi Password in the field provided. Click Next to continue. 24
25 A dialog box will appear asking if you wish to save the address for the web-based configuration utility in your browser s bookmarks. Click OK to save and you will be taken to your browser s bookmark settings to save the address. Click Cancel to continue without saving a bookmark. In order for your network settings to take effect AP will reboot automatically. When the device has finished rebooting the main screen will display. 25
. For Manual setup, skip to page 28. Click Next to continue.")
26 This wizard is designed to assist you in configuring your DAP-1665 as a repeater to extend the range of your existing wireless network. Select Repeater from the drop-down menu. Repeater Mode Select WPS as the configuration method only if your wireless device supports Wi-Fi Protected Setup (WPS). For Manual setup, skip to page 28. Click Next to continue. Press the WPS Push Button on your existing wireless router with 120 seconds to complete the WPS setup process. 26


27 If a connection has been successfully made, click Finish on the following screen to complete the setup process. If the connection was not successful, click Retry to try again, or Cancel to abort the setup process. 27

28 Select Manual configuration to setup your network manually. Click Next to continue. The wizard will then scan for available wireless networks within range of the DAP Find the SSID of the router or access point you wish to extend and click the radio button in the Select column. Click Connect at the bottom of the page to continue. If you do not see your network in the list, click Rescan to search again. If the existing wireless network uses wireless security, enter the Wi-Fi Password in the field provided. Click Next to continue. 28
29 By default, the Wireless Network Name (SSID) field will display the same network name as the source network. If you wish to specify a different name for the extended network, enter it in the field provided. If you wish to use the same network name, check the box below. The security password will be the same as that of the source network, regardless of whether the network name is the same or not. Click Next to continue. A summary page will be displayed showing the network name and Wi-Fi password for the extended network. It is recommended that you make a record of this information for future reference. Click Save to save the configuration. 29
30 Manual Configuration Wireless Settings You may also manually configure your DAP-1665 instead of running the setup wizard. Please refer to the following pages for detailed instructions on how to manually configure the DAP-1665 for your desired operation mode. Access Point mode - page 31 Wireless Client mode - page 34 Bridge mode - page 35 Bridge with AP mode - page 36 Repeater mode - page 40 30

31 Access Point Mode 2.4 GHz Band Wireless Mode: Enable Wireless: Wireless Network Name: Mode: Wireless Channel: Enable Auto Channel Scan: Channel Width: Select Access Point from the drop-down menu. Check the box to enable the wireless function for the 2.4 GHz band. If you do not want to use wireless, uncheck the box to disable all wireless functions. You may also set up a specific time range (schedule). Select a schedule from the drop-down menu or click Add New to create a new schedule. By default, the schedule is set to Always. Specify a network name (SSID) to identify the 2.4 GHz network. This is the network name that wireless clients will search for when connecting to your wireless network. Select one of the following: n Only - Select if you are only using n wireless clients. Mixed n and g - Select if you are using a mix of n and g wireless clients. Mixed n, g and b - Select if you are using a mix of n, g, and b wireless clients. Indicates the channel setting for the DAP The Channel can be changed to fit the channel setting for an existing wireless network or to reduce interference in congested areas. If you enable Auto Channel Scan, this option will not be available. The Auto Channel Scan setting can be selected to allow the DAP-1665 to automatically choose the channel with the least amount of interference. Select the Channel Width: Auto 20/40 - Select if you are using both n and non n wireless devices. 20 MHz - Select if you are not using any n wireless clients. 31

32 Visibility Status: Security Mode: Select whether you would like the network name (SSID) of your wireless network to be Visible or Invisible to wireless clients. If Invisible, the SSID of the DAP-1665 will not be seen by site survey utilities, so wireless clients will have to manually enter the SSID of your wireless network in order to connect to it. For information on how to set up wireless security, please refer to Configuring Wireless Security on page GHz Band Enable Wireless: Wireless Network Name: Check the box to enable the wireless function for the 5 GHz band. If you do not want to use wireless, uncheck the box to disable all wireless functions. You may also set up a specific time range (schedule). Select a schedule from the drop-down menu or click Add New to create a new schedule. By default, the schedule is set to Always. Specify a network name (SSID) to identify the 5 GHz network. This is the network name that wireless clients will search for when connecting to your wireless network. This name should be different to that of the 2.4 GHz network configured above. 32
33 Mode: Wireless Channel: Enable Auto Channel Scan: Channel Width: Visibility Status: Select one of the following: a Only - Select if you are only using a wireless clients n Only - Select if you are only using n wireless clients. Mixed n and a - Select if you are using a mix of n and a wireless clients ac Only - Select if you are only using ac wireless clients. Mixed ac and n - Select if you are using a mix of ac and n wireless clients. Mixed ac, n and a - Select if you are using a mix of ac, n, and a wireless clients. Indicates the channel setting for the DAP The channel can be changed to fit the channel setting for an existing wireless network or to reduce interference in congested areas. If you enable Auto Channel Scan, this option will not be available. The Auto Channel Scan setting can be selected to allow the DAP-1665 to automatically choose the channel with the least amount of interference. Select the Channel Width: Auto 20/40/80 - Select this option if you are using a combination of ac, n, and other wireless devices. Auto 20/40 - Select if you are using both n and non n wireless devices. 20 MHz - Select if you are not using any n wireless clients. Select whether you would like the network name (SSID) of your wireless network to be Visible or Invisible to wireless clients. If Invisible, the SSID of the DAP-1665 will not be seen by site survey utilities, so wireless clients will have to manually enter the SSID of your wireless network in order to connect to it. Click Save Settings at the top of the page to save the current configuration. 33

34 Wireless Client Mode Wireless Mode: Site Survey: Wireless Network Name: Band: Channel Width: Security Mode: Wireless MAC Clone: Wi-Fi Protected Setup: Current PIN: Select Wireless Client Mode from the drop-down menu. Click Site Survey to display a list of wireless networks in your area. To select a wireless network, click the radio button in the far right column of the scan page. Click Connect at the bottom of the scan page to confirm the selection. The wireless network name will automatically appear in the Wireless Network Name field below. Enter the SSID of the wireless network that you wish to connect to. If you do not know for sure, click Site Survey and select it from the list, if available. Select the wireless band of the wireless network that you wish to connect to. You can only be connected to one wireless band at any one time. Select the channel width that you wish to use when connecting to the wireless network. Select the wireless security mode and relevant settings used by the network you are connecting to. For more information regarding wireless security, please refer to Configuring Wireless Security on page 45. Check Enable to enable the cloning of another device s MAC address by the DAP Check Enable if you wish to enable the use of the PIN method for Wi-Fi Protected Setup (WPS). Displays the current PIN which can be used to connect to the router using the WPS-PIN method. Click Reset PIN to Default to reset the PIN number to the factory default setting. Click Generate New PIN to randomly generate a new PIN for WPS connection. Click Process WPS to commence the WPS Push-Button setup process. Click Save Settings to save the current configuration. 34

35 Bridge Mode Wireless Mode: WDS Band: Mode: Wireless Channel: Channel Width: Remote AP MAC: Bridge Security: Select Bridge from the drop-down menu. Select the wireless band that you wish to use for the wireless bridge: 2.4 GHz - The bridge can function using n, g, or g. 5 GHz - The bridge can function using ac, n, or a. Select the appropriate mode depending on which standard you want the bridge to use. Select the wireless channel that you want the bridge to use. All APs on the bridge must be using the same wireless channel. Select the appropriate channel width between 20MHz or Auto 20/40MHz from the drop-down menu. If you are using the 5 GHz band, an additional Auto 20/40/80 option will be available. Enter the MAC addresses of the APs in your network that will serve as bridges to wirelessly connect multiple networks. Select the desired wireless security method from the dropdown menu. If you select WEP, you should also select an encryption method from the subsequent drop-down menu, and enter the WEP key in the field provided. If you select WPA, you should enter a pre-shared key (password) in the field provided. Regardless of the security mode selected, the settings should be the same on all access points within the bridge. For further information regarding wireless security, please refer to Configuring Wireless Security on page 45. Click Save Settings at the top of the page to save the current configuration. Note: The Bridge mode is not completely specified in the Wi-Fi or IEEE standards. This mode will work with other DAP-1665 units. Communication with other APs (even other D-Link APs) is not guaranteed. 35

36 Bridge with AP Mode Wireless Mode: WDS Band: Mode: Wireless Channel: Channel Width: Remote AP MAC: Bridge Security: Select Bridge from the drop-down menu. Select the wireless band that you wish to use for the wireless bridge: 2.4 GHz - The bridge can function using n, g, or g. 5 GHz - The bridge can function using ac, n, or a. Select the appropriate mode depending on which standard you want the bridge to use. Select the wireless channel that you want the bridge to use. All APs on the bridge must be using the same wireless channel. Select the appropriate channel width between 20MHz or Auto 20/40MHz from the drop-down menu. If you are using the 5 GHz band, an additional Auto 20/40/80 option will be available. Enter the MAC addresses of the APs in your network that will serve as bridges to wirelessly connect multiple networks. Select the desired wireless security method from the dropdown menu. If you select WEP, you should also select an encryption method from the subsequent drop-down menu, and enter the WEP key in the field provided. If you select WPA, you should enter a pre-shared key (password) in the field provided. Regardless of the security mode selected, the settings should be the same on all access points within the bridge. For further information regarding wireless security, please refer to Configuring Wireless Security on page 45. Click Save Settings at the top of the page to save the current configuration. Note: The Bridge with AP mode is not completely specified in the Wi-Fi or IEEE standards. This mode will work with other DAP-1665 units. Communication with other APs (even other D-Link APs) is not guaranteed. 36
.")
37 2.4 GHz Band Enable Wireless: Wireless Network Name: Mode: Wireless Channel: Enable Auto Channel Scan: Channel Width: Visibility Status: Check the box to enable the wireless function for the 2.4 GHz band. If you do not want to use wireless, uncheck the box to disable all wireless functions. You may also set up a specific time range (schedule). Select a schedule from the drop-down menu or click Add New to create a new schedule. By default, the schedule is set to Always. Specify a network name (SSID) to identify the 2.4 GHz network. This is the network name that wireless clients will search for when connecting to your wireless network. Select one of the following: n Only - Select if you are only using n wireless clients. Mixed n and g - Select if you are using a mix of n and g wireless clients. Mixed n, g and b - Select if you are using a mix of n, g, and b wireless clients. Indicates the channel setting for the DAP The Channel can be changed to fit the channel setting for an existing wireless network or to reduce interference in congested areas. If you enable Auto Channel Scan, this option will not be available. The Auto Channel Scan setting can be selected to allow the DAP-1665 to automatically choose the channel with the least amount of interference. Select the Channel Width: Auto 20/40 MHz - Select if you are using both n and non n wireless devices. 20 MHz - Select if you are not using any n wireless clients. Select whether you would like the network name (SSID) of your wireless network to be Visible or Invisible to wireless clients. If Invisible, the SSID of the DAP-1665 will not be seen by site survey utilities, so wireless clients will have to manually enter the SSID of your wireless network in order to connect to it. 37

38 Security Mode: For information on how to set up wireless security, please refer to Configuring Wireless Security on page 45. Click Save Settings at the top of the page to save the current configuration. 5 GHz Band Enable Wireless: Wireless Network Name: Check the box to enable the wireless function for the 5 GHz band. If you do not want to use wireless, uncheck the box to disable all wireless functions. You may also set up a specific time range (schedule). Select a schedule from the drop-down menu or click Add New to create a new schedule. By default, the schedule is set to Always. Specify a network name (SSID) to identify the 5 GHz network. This is the network name that wireless clients will search for when connecting to your wireless network. This name should be different to that of the 2.4 GHz network configured above. 38
39 Mode: Wireless Channel: Enable Auto Channel Scan: Channel Width: Visibility Status: Security Mode: Select one of the following: a Only - Select if you are only using a wireless clients n Only - Select if you are only using n wireless clients. Mixed n and a - Select if you are using a mix of n and a wireless clients ac Only - Select if you are only using ac wireless clients. Mixed ac and n - Select if you are using a mix of ac and n wireless clients. Mixed ac, n and a - Select if you are using a mix of ac, n, and a wireless clients. Indicates the channel setting for the DAP The Channel can be changed to fit the channel setting for an existing wireless network or to reduce interference in congested areas. If you enable Auto Channel Scan, this option will not be available. The Auto Channel Scan setting can be selected to allow the DAP-1665 to automatically choose the channel with the least amount of interference. Select the Channel Width: Auto 20/40/80 MHz - Select this option if you are using a combination of ac, n, and other wireless devices. Auto 20/40 MHz - Select if you are using both n and non n wireless devices. 20 MHz - Select if you are not using any n wireless clients. Select whether you would like the network name (SSID) of your wireless network to be Visible or Invisible to wireless clients. If Invisible, the SSID of the DAP-1665 will not be seen by site survey utilities, so wireless clients will have to manually enter the SSID of your wireless network in order to connect to it. For information on how to set up wireless security, please refer to Configuring Wireless Security on page 45. Click Save Settings at the top of the page to save the current configuration. 39

40 Repeater Mode Repeater mode re-broadcasts the wireless signal of an existing network to increase coverage. The existing wireless signal can be repeated by the DAP-1665 using both the 2.4 GHz and 5 GHz bands. Wireless Mode: Site Survey: Repeater Network Name: Repeater Network Band: Channel Width: Enable Wireless: Repeater Network Name: Select Repeater from the drop-down menu. Click Site Survey to display a list of wireless networks in your area. To select a wireless network, click on the radio button in the far right column, and click Connect at the bottom of the page to continue. The wireless network name will automatically appear in the Repeater Network Name field below, and the Repeater Network Band and Channel Width will automatically be detected. If you have not used the Site Survey button above, enter the SSID of the access point you want to repeat the signal of. If you have not used the Site Survey button above, select the wireless band of the repeater network. If you have not used the Site Survey button above, select the channel width to be used for communication with the repeater network. Check the box to enable the 2.4 GHz wireless band. By default, the schedule is set to Always, however you can select a schedule from the drop-down menu, or click Add New to create a new schedule. Displays the name of the network to be repeated. 2.4 GHz Band Local Wi-Fi Network Name: Choose how you would like to name the DAP-1665 s extended network using the radio buttons: Same as Repeater Name - The extended network will have the same name (SSID) as the repeater network. Create a New Wi-Fi Network Name - Enter a new name (SSID) for the extended network in the field below. 40

41 Mode: Wireless Channel: Enable Auto Channel Scan: Select one of the following: n Only - Select if you are only using n wireless clients. Mixed n and g - Select if you are using a mix of n and g wireless clients. Mixed n, g and b - Select if you are using a mix of n, g, and b wireless clients. Indicates the channel setting for the DAP The channel can be changed to fit the channel setting for an existing wireless network or to reduce interference in congested areas. If you enable Auto Channel Scan, this option will not be available. The Auto Channel Scan setting can be selected to allow the DAP-1665 to automatically choose the channel with the least amount of interference. Channel Width: Visibility Status: Security Mode: Select the appropriate channel width between 20MHz or Auto 20/40MHz from the drop-down menu. Select whether you want the wireless network name (SSID) of the 2.4 GHz band to be Visible or Invisible. If Invisible, the SSID of the DAP-1665 will not be seen by site survey utilities, so wireless clients will have to manually enter the SSID of your wireless network in order to connect to it. For information on how to set up wireless security, please refer to Configuring Wireless Security on page
42 5 GHz Band Enable Wireless: Repeater Network Name: Local Wi-Fi Network Name: Mode: Wireless Channel: Enable Auto Channel Scan: Check the box to enable the 5 GHz wireless band. If you do not want to use wireless, uncheck the box to disable all wireless functions. You may also set up a specific time range (schedule). Select a schedule from the drop-down menu or click Add New to create a new schedule. By default, the schedule is set to Always. Displays the name of the network which is to be repeated. Choose how you would like to name the DAP-1665 s extended network using the radio buttons: Same as Repeater Name - The extended network will have the same name (SSID) as the repeater network. Create a New Wi-Fi Network Name - Enter a new name (SSID) for the extended network in the field below. Select one of the following: a Only - Select if you are only using a wireless clients n Only - Select if you are only using n wireless clients. Mixed n and a - Select if you are using a mix of n and a wireless clients ac Only - Select if you are only using ac wireless clients. Mixed ac and n - Select if you are using a mix of ac and n wireless clients. Mixed ac, n and a - Select if you are using a mix of ac, n, and a wireless clients. Indicates the channel setting for the DAP The channel can be changed to fit the channel setting for an existing wireless network or to reduce interference in congested areas. If you enable Auto Channel Scan, this option will not be available. The Auto Channel Scan setting can be selected to allow the DAP-1665 to automatically choose the channel with the least amount of interference. 42
43 Channel Width: Visibility Status: Security Mode: Select the Channel Width: Auto 20/40/80 MHz - Select this option if you are using a combination of ac, n, and other wireless devices. Auto 20/40 MHz - Select if you are using both n and non n wireless devices. 20 MHz - Select if you are not using any n wireless clients. Select whether you want the wireless network name (SSID) of the 2.4 GHz band to be Visible or Invisible. If Invisible, the SSID of the DAP-1665 will not be seen by site survey utilities, so wireless clients will have to manually enter the SSID of your wireless network in order to connect to it. For information on how to set up wireless security, please refer to Configuring Wireless Security on page 45. Click Save Settings at the top of the page to save the current configuration. 43

44 Using WPS Enable: Current PIN: Reset PIN to Default: Generate New PIN: Process WPS: Check the box to enable wireless devices to connect to the access point using WPS. Displays the current PIN to be used by clients connecting using the WPS-PIN method. Click to reset the access point s WPS PIN to the factory default. Click to generate a new WPS PIN. Click to commence the WPS-PBC (Push Button) setup process. 44
, and Wi-Fi Protected Access (WPA).")
45 Configuring Wireless Security Wireless security encryption prevents unauthorized users from accessing your wireless network. The DAP-1665 features two methods of wireless security encryption: Wired Equivalent Privacy (WEP), and Wi-Fi Protected Access (WPA). It is recommended that you use WPA security if your wireless devices support this standard, as it is more secure than the older WEP standard. For more details of wireless security standards, please refer to Wireless Security on page 76. Note: Unless otherwise specified, the security configuration process is the same for both the 2.4 GHz and 5 GHz bands. WEP Security Mode: WEP Encryption: WEP Key 1: Authentication: Select WEP from the drop-down menu. The WEP standard offers two levels of encryption: 64-bit and 128-bit. Each level has the option of a key (password) consisting of either HEX digits or ASCII characters: 64Bit (10 hex digits) - Uses a key consisting of 10 hex digits (0-9, A-F). 64Bit (5 ascii characters) - Uses a key consisting of 5 ASCII characters (0-9, A-Z, plus symbols). 128Bit (26 hex digits) - Uses a key consisting of 26 hex digits (0-9, A-F). 128bit (13 ascii characters) - Uses a key consisting of 13 ASCII characters (0-9, A-Z, plus symbols). Enter the desired WEP key (password) for your wireless network. The key should adhere to the requirements of WEP Encryption method specified above. Select an authentication method from the drop-down menu Click Save Settings at the top of the page to save the current configuration. 45
 so that the WPA2 version will be used if connecting wireless clients support it. Choose a cipher type from the drop-down menu.")
46 WPA-Personal Security Mode: WPA Mode: Cipher Type: Pre-Shared Key: Select WPA-Personal from the drop-down menu. There are two versions of WPA supported by the DAP-1665: WPA and WPA2. It is recommended that you use Auto(WPA or WPA2) so that the WPA2 version will be used if connecting wireless clients support it. Choose a cipher type from the drop-down menu. Enter the desired pre-shared key (password) for the wireless network. Wireless clients will need this key in order to connect to your wireless network. Click Save Settings at the top of the page to save the current configuration. WPA-Enterprise WPA-Enterprise uses a RADIUS authentication server to provide centralized authentication for wireless access. If you are missing any of the information required for this setup, please contact your network administrator. Security Mode: WPA Mode: Cipher Type: RADIUS Server IP Address: Pre-Shared Key: Radius Server Shared Secret: Select WPA-Enterprise from the drop-down menu. There are two versions of WPA supported by the DAP-1665; WPA and WPA2. It is recommended that you use Auto(WPA or WPA2) so that the WPA2 version will be used if connecting wireless clients support it. Choose a cipher type from the drop-down menu. Enter the IP address for your network s RADIUS authentication server. Enter the port for the RADIUS authentication server. Enter the shared secret required by the RADIUS authentication server. 46
47 Advanced: Second RADIUS Server IP Address: Second Pre- Shared Key: Second Radius Server Shared Secret: Click on the Advanced button to display the setup options for an optional backup RADIUS server configuration. Enter the IP address for your network s backup RADIUS authentication server. Enter the port for the backup RADIUS authentication server. Enter the shared secret required by the backup RADIUS authentication server. Click Save Settings at the top of the page to save the current configuration. 47

48 LAN Setup The LAN Setup page enables you to configure the Local Area Network (LAN) settings for the access point. From this page you can adjust your local network s IP address settings, and configure IPv6. Dynamic/Static IP Device Name: My LAN Connection is: IP Address: Subnet Mask: Gateway Address: Primary DNS Server: Secondary DNS Server: You can change the name of your access point to make it easier to identify. Enter a name for the access point in the field provided. If you change the device name, you should use this name in your web browser address bar when trying to access the web-based configuration utility. Example: Select how you would like to configure the access point s IP address settings from the drop-down menu: Dynamic IP(DHCP) - The access point will request an IP address from the DHCP server that it is connected to. Static IP - You can manually specify the IP address settings for the access point. Enter the IP address that you want to specify for the access point (Static IP only). Enter the subnet mask to be used by the access point (Static IP only). Enter the default gateway address to be used by the access point (Static IP only). Enter the primary DNS server address to be used by the access point (Static IP only). Enter the secondary DNS server address to be used by the access point (Static IP only). Click Save Settings at the top of the page to save the current configuration. 48

49 DHCP Server The access point has a built-in Dynamic Host Control Protocol (DHCP) server which can automatically assign IP addresses to connected clients that request them. The DHCP server function will only be available when Static IP Address mode is used. Enable DHCP Server: DHCP IP Address Range: Always Broadcast: Gateway: WINS: DNS: DHCP Lease Time: Dynamic DHCP Client List: Check the box to enable the DHCP server function. Enter the range of the DHCP address pool from which requesting clients can be assigned addresses. You should ensure that the access point s static IP address is outside of this range in order to avoid any IP address conflicts. Check the box to have the DHCP server always broadcast its response to clients. This can help to avoid problems when clients fail to obtain an IP address from the DHCP server. The gateway address which will be sent to requesting clients. Enter the WINS server address which will be sent to requesting clients. Enter the DNS server address which will be sent to requesting clients. Select the desired DHCP address lease length time from the drop-down menu. This table will show details of clients which are currently receiving a DHCP address from the DHCP server. Click Save Settings at the top of the page to save the current configuration. 49


50 IPv6 The DAP-1665 can be configured to operate using the IPv6 protocol. If you are connecting the access point to a network which is using IPv6, you should adjust the appropriate settings in this section. My IPv6 Connection is: LAN IPv6 Link- Local Address: Select Link-Local Only from the drop-down menu. This will set the access point s local IPv6 address. The router s local IPv6 address will be displayed here. This address should be used to access the web-based configuration utility through the IPv6 protocol. Click Save Settings at the top of the page to save the current configuration. My IPv6 Connection is: LAN IPv6 Address: Subnet Prefix Length: Default Gateway: Primary DNS Server: Secondary DNS Server: Select Static IPv6 from the drop-down menu. This will allow you to assign a static IPv6 address to the access point. The router s local IPv6 address will be displayed here. This address should be used to access the web-based configuration utility through the IPv6 protocol. Enter the prefix length for IPv6 IP addresses on your network. Enter the default IPv6 gateway address for your network. Enter the primary IPv6 DNS server address for your network. Enter the secondary IPv6 DNS server address for your network. Click Save Settings at the top of the page to save the current configuration. 50

51 My IPv6 Connection is: IPv6 DNS Settings: Primary DNS Server: Secondary DNS Server: Select Autoconfiguration (SLAAC/DHCPv6) from the dropdown menu. The access point will request IPv6 settings from a DHCPv6 server on your network. You can select to have the access point automatically obtain DNS server settings from the DHCP server, or you can specify IPv6 DNS server settings to be used. If you select Obtain IPv6 DNS automatically, no further configuration is required. Enter the primary IPv6 DNS server address to be used. Enter the secondary IPv6 DNS server address to be used. Click Save Settings at the top of the page to save the current configuration. 51
52 Advanced This section allows you to configure the advanced parameters of your DAP There will be different advanced features available for configuration based on the mode in which your device is operating. The instructions below are listed according to operation mode. Access Point Mode Access Control Mac filtering allows you to control wireless access to your network according to clients MAC addresses. Configure MAC Filtering: Checkbox: MAC Address: Use the drop-down menu to select your desired MAC filtering method: Turn MAC Filtering OFF - No MAC filtering will be implemented. Turn MAC Filtering ON and ALLOW - MAC filtering will be turned on, and only MAC addresses listed in the table below will be allowed access. Turn MAC Filtering ON and DENY - MAC filtering will be turned on, and only MAC addresses listed in the table below will be denied access. Check the box to include this MAC address in the MAC filtering rules. Enter the MAC address of the client that you wish to filter. If the client is currently connected to the access point, you can select it from the Client List drop-down menu, and click << to automatically populate the field. Click Clear to clear all fields. Click Save Settings at the top of the page to save the current configuration. 52
53 Advanced Wireless On this page, you can adjust the advanced wireless settings for both the 2.4 GHz band, and the 5 GHz band. 2.4 GHz Band Transmit Power: WMM Enable: Short GI: IGMP Snooping: WLAN Partition: HT 20/40 Coexistance: Select the desired transmission power of the wireless radio from the drop-down menu. Check the box to enable Wireless Multimedia (WMM), a QoS engine which can help to reduce lag and latency when transmitting multimedia over your wireless connection. Enabling a short Guard Interval (GI) can increase throughput. However, it can also increase error rate in some installations, due to increased sensitivity to radio-frequency reflections. Select the option that works best for your installation. Enabling this option allows the access point to listen for Internet Group Management Protocol (IGMP) traffic, which can help to detect clients which require multicast streams. Enabling this option means that connection wireless clients will not be able to communicate with one another, but will still have access to network resources such as the Internet. Enable this option to reduce interference from other wireless networks in your area. If the channel width is operating at 40 MHz and there is another wireless network s channel overlapping and causing interference, the router will automatically change to 20 MHz. Click Save Settings at the top of the page to save the current configuration. 53
54 5 GHz Band Transmit Power: WMM Enable: Short GI: IGMP Snooping: WLAN Partition: Select the desired transmission power of the wireless radio from the drop-down menu. Check the box to enable Wireless Multimedia (WMM), a QoS engine which can help to reduce lag and latency when transmitting multimedia over your wireless connection. Enabling a short Guard Interval (GI) can increase throughput. However, it can also increase error rate in some installations, due to increased sensitivity to radio-frequency reflections. Select the option that works best for your installation. Enabling this option allows the access point to listen for Internet Group Management Protocol (IGMP) traffic, which can help to detect clients which require multicast streams. Enabling this option means that connection wireless clients will not be able to communicate with one another, but will still have access to network resources such as the Internet. Click Save Settings at the top of the page to save the current configuration. 54
55 Wi-Fi Protected Setup This section allows you to configure how the DAP-1665 uses Wi-Fi Protected Setup (WPS) to create a secure wireless connection. Enable: Disable WPS-PIN Method: Current PIN: Add Wireless Station: Check the box to enable WPS. Check the box to disable WPS using the PIN method. If this option is selected, wireless clients will only be able to use the WPS-PBC (Push-button Connection) method. Displays the current PIN which can be used by wireless clients to connect to the access point. Click Reset PIN to Default to return the PIN to its factory default. Click Generate New PIN to randomly generate a new PIN. Click Add Wireless Device With WPS to activate the WPS-PBC (Push-button) method. You will then have 120 seconds to press the WPS button on the new device that you wish to connect. Click Save Settings at the top of the page to save the current configuration. 55
56 User Limit Here, you can set a maximum number of users that can be connected to the access point at any one time. Enable User Limit: User Limit: Check the box to enable the user limit function. Enter a number of users (between 1-32). Click Save Settings at the top of the page to save the current configuration. 56
57 Wireless Client Mode Advanced Wireless 2.4 GHz Band Transmit Power: HT 20/40 Coexistance: Select the desired transmission power of the wireless radio from the drop-down menu. Enable this option to reduce interference from other wireless networks in your area. If the channel width is operating at 40 MHz and there is another wireless network s channel overlapping and causing interference, the router will automatically change to 20 MHz. Click Save Settings at the top of the page to save the current configuration. 5 GHz Band Transmit Power: Select the desired transmission power of the wireless radio from the drop-down menu. Click Save Settings at the top of the page to save the current configuration. 57

58 Bridge Mode Access Control Mac filtering allows you to control wireless access to your network according to clients MAC addresses. Configure MAC Filtering: Checkbox: MAC Address: Use the drop-down menu to select your desired MAC filtering method: Turn MAC Filtering OFF - No MAC filtering will be implemented. Turn MAC Filtering ON and ALLOW - MAC filtering will be turned on, and only MAC addresses listed in the table below will be allowed access. Turn MAC Filtering ON and DENY - MAC filtering will be turned on, and only MAC addresses listed in the table below will be denied access. Check the box to include this MAC address in the MAC filtering rules. Enter the MAC address of the client that you wish to filter. If the client is currently connected to the access point, you can select it from the Client List drop-down menu, and click << to automatically populate the field. Click Clear to clear all fields. Click Save Settings at the top of the page to save the current configuration. 58

59 Bridge with AP Mode Advanced Wireless On this page, you can adjust the advanced wireless settings for both the 2.4 GHz band, and the 5 GHz band. 2.4 GHz Band Transmit Power: WMM Enable: Short GI: IGMP Snooping: WLAN Partition: HT 20/40 Coexistance: Select the desired transmission power of the wireless radio from the drop-down menu. Check the box to enable Wireless Multimedia (WMM), a QoS engine which can help to reduce lag and latency when transmitting multimedia over your wireless connection. Enabling a short Guard Interval (GI) can increase throughput. However, it can also increase error rate in some installations, due to increased sensitivity to radio-frequency reflections. Select the option that works best for your installation. Enabling this option allows the access point to listen for Internet Group Management Protocol (IGMP) traffic, which can help to detect clients which require multicast streams. Enabling this option means that connection wireless clients will not be able to communicate with one another, but will still have access to network resources such as the Internet. Enable this option to reduce interference from other wireless networks in your area. If the channel width is operating at 40 MHz and there is another wireless network s channel overlapping and causing interference, the router will automatically change to 20 MHz. Click Save Settings at the top of the page to save the current configuration. 59
, a QoS engine which can help to reduce lag and latency when transmitting multimedia over your wireless connection.")
60 5 GHz Band Transmit Power: WMM Enable: Short GI: IGMP Snooping: WLAN Partition: Select the desired transmission power of the wireless radio from the drop-down menu. Check the box to enable Wireless Multimedia (WMM), a QoS engine which can help to reduce lag and latency when transmitting multimedia over your wireless connection. Enabling a short Guard Interval (GI) can increase throughput. However, it can also increase error rate in some installations, due to increased sensitivity to radio-frequency reflections. Select the option that works best for your installation. Enabling this option allows the access point to listen for Internet Group Management Protocol (IGMP) traffic, which can help to detect clients which require multicast streams. Enabling this option means that connection wireless clients will not be able to communicate with one another, but will still have access to network resources such as the Internet. Click Save Settings at the top of the page to save the current configuration. 60

61 Repeater Mode Access Control Mac filtering allows you to control wireless access to your network according to clients MAC addresses. Configure MAC Filtering: Checkbox: MAC Address: Use the drop-down menu to select your desired MAC filtering method: Turn MAC Filtering OFF - No MAC filtering will be implemented. Turn MAC Filtering ON and ALLOW - MAC filtering will be turned on, and only MAC addresses listed in the table below will be allowed access. Turn MAC Filtering ON and DENY - MAC filtering will be turned on, and only MAC addresses listed in the table below will be denied access. Check the box to include this MAC address in the MAC filtering rules. Enter the MAC address of the client that you wish to filter. If the client is currently connected to the access point, you can select it from the Client List drop-down menu, and click << to automatically populate the field. Click Clear to clear all fields. Click Save Settings at the top of the page to save the current configuration. 61
62 On this page, you can adjust the advanced wireless settings. Advanced Wireless Transmit Power: WMM Enable: Short GI: IGMP Snooping: WLAN Partition: HT 20/40 Coexistance: Select the desired transmission power of the wireless radio from the drop-down menu. Check the box to enable Wireless Multimedia (WMM), a QoS engine which can help to reduce lag and latency when transmitting multimedia over your wireless connection. Enabling a short Guard Interval (GI) can increase throughput. However, it can also increase error rate in some installations, due to increased sensitivity to radio-frequency reflections. Select the option that works best for your installation. Enabling this option allows the access point to listen for Internet Group Management Protocol (IGMP) traffic, which can help to detect clients which require multicast streams. Enabling this option means that connection wireless clients will not be able to communicate with one another, but will still have access to network resources such as the Internet. Enable this option to reduce interference from other wireless networks in your area. If the channel width is operating at 40 MHz and there is another wireless network s channel overlapping and causing interference, the router will automatically change to 20 MHz. Click Save Settings at the top of the page to save the current configuration. 62

63 Wi-Fi Protected Setup This section allows you to configure how the DAP-1665 uses Wi-Fi Protected Setup (WPS) to create a secure wireless connection. Enable: Disable WPS-PIN Method: Current PIN: Check the box to enable WPS. Check the box to disable WPS using the PIN method. If this option is selected, wireless clients will only be able to use the WPS-PBC (Push-button Connection) method. Displays the current PIN which can be used by wireless clients to connect to the access point. Click Reset PIN to Default to return the PIN to its factory default. Click Generate New PIN to randomly generate a new PIN. Click Add Wireless Device With WPS to activate the WPS-PBC (Push-button) method. You will then have 120 seconds to press the WPS button on the new device that you wish to connect. Click Save Settings at the top of the page to save the current configuration. 63
64 User Limit Here, you can set a maximum number of users that can be connected to the access point at any one time. Enable User Limit: User Limit: Check the box to enable the user limit function. Enter a number of users (between 1-32). Click Save Settings at the top of the page to save the current configuration. 64

65 Maintenance The Maintenance section allows you to adjust the administrative settings of the router such as time and date, administrator password, and update the device s firmware. Admin New Password: Confirm Password: Enable Graphical Authentication: To change the password for the web-based configuration utility s Admin account, enter a new password in the field provided. Re-enter the new password in this field. Check the box to enable graphical authentication. Graphical authentication uses a challenge-response test to prevent unauthorized users from gaining access to the configuration utility through automated means. Click Save Settings at the top of the page to save the current configuration. 65

66 System The System page can be used to save and restore the device s configuration, as well as restore the factory default settings. Save Settings to Local Hard Drive: Load Settings From Local Hard Drive: Restore to Factory Default Settings: Reboot the Device: Click Save to save the access point s current configuration to a file on your local computer. After clicking, a Save File dialog will appear, prompting you to save the configuration file on your computer. Click Browse to locate a previously saved configuration file on your local computer. Once the file has been located, click Upload Settings to apply the configuration in the file to the access point. Note: This will overwrite any current configuration. Click Restore Device to reset the DAP-1665 s settings to the factory defaults. Warning: This will erase all current settings and cannot be undone. Click Reboot to reboot the device. You will need to log in to the device again once the reboot has been completed. 66

67 Firmware Use the Firmware page to update the device s firmware, and add or remove language packs. Firmware Information: Check the Latest Firmware and Language Pack Versions: Firmware Upgrade: Language Pack Upgrade: This section displays information about the device s current firmware and language pack. Click Remove to remove any currently installed language packs. Click Check Now to check for new firmware or language pack versions. Note: The access point must have an active Internet connected to check for firmware and language pack updates. If the above check for firmware and language packs detected updates, the details will displayed here. Click Download to download the update files to your computer. Click Browse to locate a firmware file on your computer. Once located, click Upload to commence the firmware upgrade process. It is recommended that you save your current router configuration using the System page before you begin a firmware upgrade. Warning: You must use a wired connection to the access point to update the firmware. Click Browse to locate a language pack file on your computer. Once located, click Upload to commence the language pack upgrade process. 67
 server.")
68 Time Use the Time page to configure the time and date settings of the access point. You can also configure daylight saving adjustments and synchronize the access point s clock and calendar with an Internet-based Network Time Protocol (NTP) server. Time: Time Zone: Enable Daylight Saving: Daylight Saving Offset: Daylight Saving Dates: Enable NTP Server: NTP Server Used: Date and Time: Displays the access point s current time and date. Select your time zone from the drop-down menu. Check the box to have the access point automatically adjust the clock for daylight saving. Select the offset for beginning daylight saving from the dropdown menu. Use the drop-down menus to set the Start and End dates for daylight saving time. Check the box to have the access point automatically synchronize its clock and calendar with an online NTP server. Type the address of the NTP server you would like to use in the field provided, or choose a pre-determined server from the drop-down menu and click << to populate the field. Use the drop-down menus to manually configure the time and date. This option will not be available if Enable NTP Server is selected above. Click Save Settings at the top of the page to save the current configuration. 68

69 System Check Host Name or IP Address: Ping Result: Enter the host name or IP address for which you wish to conduct a ping test. Displays results of the ping test above. 69

70 Schedules Use the Schedules page to create new schedule rules for various access point functions. Schedules created here will be available for selection from schedule selection drop-down menus throughout the configuration utility. Name: Day(s): All Day-24 hrs: Time format: Start Time: End Time: Enter a name to identity the new schedule rule. Select All Week to make the rule active for all days of the week. Select Select Day(s) to determine specific days on which to activate the rule. Days can be selected by checking the boxes below. Check the box to make the rule active all day for the days selected above. Select whether you would like to use 24-hour or 12-hour time format. Enter the time for the rule to become active on each of the days selected above. Enter the time for the rule to become inactive on each of the days selected above. Click Add to add the rule to the Schedule Rules List. Click Clear to clear all fields. Schedule Rules List. This table displays a summary of all current schedule rules. Click on the Edit icon to edit the rule, or click on the Delete icon to delete the rule from the list. 70
 IP settings for the access point.")
71 Status Device Info This page displays the current information for the DAP-1665, such as LAN and wireless LAN information and statistics. General: LAN: Wireless LAN: Wireless LAN 2: Displays the access point s time and firmware version. Displays the MAC address and the private (local) IP settings for the access point. Displays the wireless MAC address and wireless settings such as SSID and channel for the 2.4 GHz wireless band. Displays the wireless MAC address and wireless settings such as SSID and channel for the 5 GHz wireless band. 71

72 Logs TheDAP-1665 keeps a running log of events and activities occurring on the access point. If the device is rebooted, the logs will automatically be cleared. Log Options: First Page: Last Page: Previous Page: Next Page: Clear Log: Save Log: Refresh: There are several types of logs that can be viewed: System Activity, Debug Information, Attacks, Dropped Packets, and Notice. Check the boxes to display log items of each type. Click Apply Log Settings Now to update the log options. This button directs you to the first page of the log. This button directs you to the last page of the log. This button directs you to the previous page of the log. This button directs you to the next page of the log. This button clears all current log content. This button allows you to save the current log to a file on your local computer. This button refreshes the log. 72

73 Statistics The DAP-1665 keeps statistics of the traffic that passes through it. You can view the amount of packets that pass through the LAN and wireless portions of the network. The traffic counter will reset if the access point is rebooted. Use the buttons at the top of the page to Refresh or Clear the statistics. 73

74 Wireless The wireless section allows you to view the wireless clients that are connected to your wireless access point. Connection Time: MAC Address: Displays the amount of time the wireless client has been connected to the access point. The Ethernet ID (MAC address) of the wireless client. 74
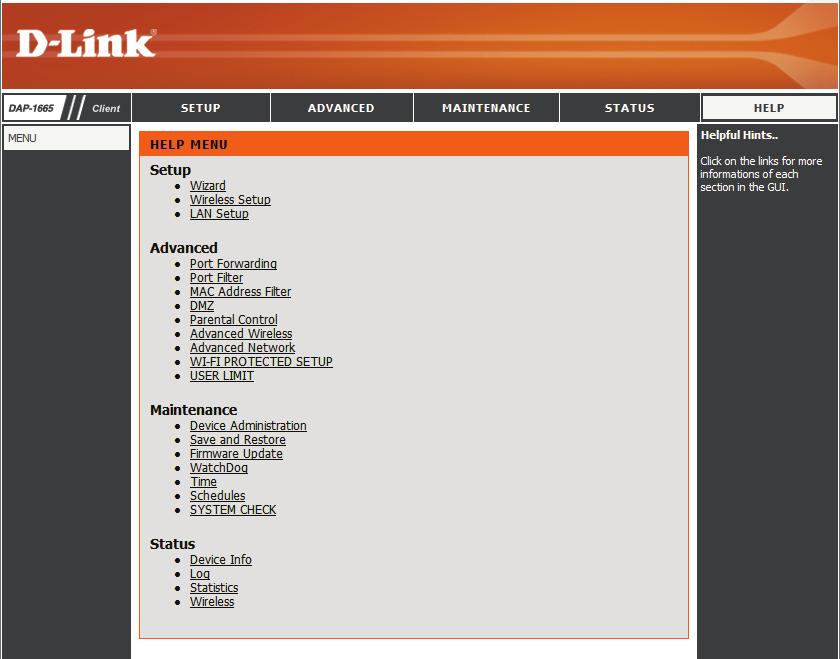
75 Help 75
76 Section 4 - Security Wireless Security This section will explain the different types of security you can use to protect your wireless network from intruders. Please note that some security methods may not be available for all operation modes. The DAP-1665 offers the following types of security: Wired Equivalent Privacy (WEP) Wi-Fi Protected Setup (WPS) Wi-Fi Protected Access (WPA/WPA2) --WPA - Personal --WPA - Enterprise What is WEP? Wired Equivalent Privacy (WEP) is an older form of wireless encryption which operates only in g legacy mode. WEP uses hex digits to create an authentication key, and is considered to be less secure than the newer WPA/WPA2 security standards. It is recommended that you only use this security mode if your wireless clients do not support WPA/WPA2. What is WPS? Wi-Fi Protected Setup (WPS) allows you to quickly and easily create a secure wireless connection between devices using a push-button or a PIN code. This method alleviates the need for users to change settings on their wireless devices, or remember security passwords. Many wireless devices have a physical push-button located somewhere on the exterior casing, while others may have a software button located within the device s configuration software. Please refer to your wireless device s documentation for further information on how to connect to the DAP-1665 using WPS. 76
77 Section 4 - Security What is WPA? WPA, or Wi-Fi Protected Access, is a Wi-Fi standard that was designed to improve the security features of WEP (Wired Equivalent Privacy). The 2 major improvements over WEP: Improved data encryption through the Temporal Key Integrity Protocol (TKIP). TKIP scrambles the keys using a hashing algorithm and, by adding an integrity-checking feature, ensures that the keys haven t been tampered with. WPA2 is based on i and uses Advanced Encryption Standard (AES) instead of TKIP. User authentication, which is generally missing in WEP, through the extensible authentication protocol (EAP). WEP regulates access to a wireless network based on a computer s hardware-specific MAC address, which is relatively simple to be sniffed out and stolen. EAP is built on a more secure public-key encryption system to ensure that only authorized network users can access the network. WPA-PSK/WPA2-PSK uses a passphrase or key to authenticate your wireless connection. The key is an alpha-numeric password between 8 and 63 characters long. The password can include symbols (!?*&_) and spaces. This key must be the exact same key entered on your wireless bridge or access point. WPA/WPA2 incorporates user authentication through the Extensible Authentication Protocol (EAP). EAP is built on a more secure public key encryption system to ensure that only authorized network users can access the network. WPA/WPA2 has two main security levels; Personal, and Enterprise: WPA/WPA2 - Personal is sufficient for most home networks and uses a pre-shared key as described above to authenticate users and encrypt data. WPA/WPA2 - Enterprise is designed for medium-to-large scale networking environments and uses a centralized RADIUS server for authentication. Users must be registered and authorized by the RADIUS server in order to access the wireless network. 77
 being used.")
78 Section 5 - Connecting to a Wireless Network Connect to a Wireless Network Windows 8 It is recommended to enable wireless security (WPA/WPA2) on your wireless router or access point before configuring your wireless adapter. If you are joining an existing network, you will need to know the security key (Wi-Fi password) being used. To join an existing network, locate the wireless network icon in the taskbar, next to the time display. Wireless Icon Clicking on this icon will display a list of wireless networks which are within connecting proximity of your computer. Select the desired network by clicking on the network name. 78
79 Section 5 - Connecting to a Wireless Network You will then be prompted to enter the network security key (Wi-Fi password) for the wireless network. Enter the password into the box and click Next. If you wish to use Wi-Fi Protected Setup (WPS) to connect to the router, you can also press the WPS button on your router at this point to enable the WPS function. When you have established a successful connection to a wireless network, the word Connected will appear next to the name of the network to which you are connected. 79

. Wireless Icon 2.")
80 Section 5 - Connecting to a Wireless Network Windows 7 It is recommended to enable wireless security (WPA/WPA2) on your wireless router or access point before configuring your wireless adapter. If you are joining an existing network, you will need to know the security key or passphrase being used. 1. Click on the wireless icon in your system tray (lower-right corner). Wireless Icon 2. The utility will display any available wireless networks in your area. 80
 you would like to connect to and click the Connect button.")

81 Section 5 - Connecting to a Wireless Network 3. Highlight the wireless network (SSID) you would like to connect to and click the Connect button. If you get a good signal but cannot access the Internet, check your TCP/IP settings for your wireless adapter. Refer to the Networking Basics section in this manual for more information. 4. The following window appears while your computer tries to connect to the router. 81

82 Section 5 - Connecting to a Wireless Network 5. Enter the same security key or passphrase that is on your router and click Connect. You can also connect by pushing the WPS button on the router. It may take seconds to connect to the wireless network. If the connection fails, please verify that the security settings are correct. The key or passphrase must be exactly the same as on the wireless router. 82
83 Section 5 - Connecting to a Wireless Network Windows Vista Windows Vista users may use the built-in wireless utility. If you are using another company s utility, please refer to the user manual of your wireless adapter for help with connecting to a wireless network. Most utilities will have a site survey option similar to the Windows Vista utility as seen below. If you receive the Wireless Networks Detected bubble, click on the center of the bubble to access the utility. or Right-click on the wireless computer icon in your system tray (lower-right corner next to the time). Select Connect to a network. The utility will display any available wireless networks in your area. Click on a network (displayed using the SSID) and click the Connect button. If you get a good signal but cannot access the Internet, check your TCP/ IP settings of your wireless adapter. Refer to the Networking Basics section in this manual for more information. 83
84 Section 5 - Connecting to a Wireless Network WPA/WPA2 It is recommended to enable wireless security (WPA/WPA2) on your wireless router or access point before configuring your wireless adapter. If you are joining an existing network, you will need to know the security key or passphrase being used. 1. Open the Windows Vista Wireless Utility by right-clicking on the wireless computer icon in your system tray (lower right corner of screen). Select Connect to a network. 2. Highlight the Wi-Fi name (SSID) you would like to connect to and click Connect. 84

85 Section 5 - Connecting to a Wireless Network 3. Enter the same security key or passphrase (Wi-Fi password) that is on your router and click Connect. It may take seconds to connect to the wireless network. If the connection fails, please verify that the security settings are correct. The key or passphrase must be exactly the same as on the wireless router. 85
86 Section 5 - Connecting to a Wireless Network WPS/WCN 2.0 The router supports Wi-Fi protection, referred to as WCN 2.0 in Windows Vista. The following instructions for setting this up depends on whether you are using Windows Vista to configure the router or third party software. When you first set up the router, Wi-Fi protection is disabled and unconfigured. To enjoy the benefits of Wi-Fi protection, the router must be both enabled and configured. There are three basic methods to accomplish this: use Windows Vista s built-in support for WCN 2.0, use software provided by a third party, or manually configure. If you are running Windows Vista, log into the router and click the Enable checkbox in the Basic > Wireless section. Use the Current PIN that is displayed on the Advanced > Wi-Fi Protected Setup section or choose to click the Generate New PIN button or Reset PIN to Default button. If you are using third party software to set up Wi-Fi Protection, carefully follow the directions. When you are finished, proceed to the next section to set up the newly-configured router. 86

87 Section 5 - Connecting to a Wireless Network Using Windows XP Windows XP users may use the built-in wireless utility (Zero Configuration Utility). The following instructions are for Service Pack 2 users. If you are using another company s utility or Windows 2000, please refer to the user manual of your wireless adapter for help with connecting to a wireless network. Most utilities will have a site survey option similar to the Windows XP utility as seen below. If you receive the Wireless Networks Detected bubble, click on the center of the bubble to access the utility. or Right-click on the wireless computer icon in your system tray (lowerright corner next to the time). Select View Available Wireless Networks. The utility will display any available wireless networks in your area. Click on a network (displayed using the SSID) and click the Connect button. If you get a good signal but cannot access the Internet, check the TCP/ IP settings of your wireless adapter. Refer to the Networking Basics section in this manual for more information. 87
88 Section 5 - Connecting to a Wireless Network Configure WPA-PSK It is recommended to enable WEP on your wireless router or access point before configuring your wireless adapter. If you are joining an existing network, you will need to know the WEP key being used. 1. Open the Windows XP Wireless Utility by right-clicking on the wireless computer icon in your system tray (lower-right corner of screen). Select View Available Wireless Networks. 2. Highlight the wireless network (SSID) you would like to connect to and click Connect. 88

89 Section 5 - Connecting to a Wireless Network 3. The Wireless Network Connection box will appear. Enter the WPA- PSK passphrase and click Connect. It may take seconds to connect to the wireless network. If the connection fails, please verify that the WPA-PSK settings are correct. The WPA-PSK passphrase must be exactly the same as on the wireless router. 89
90 Section 6 - Troubleshooting Troubleshooting This chapter provides solutions to problems that can occur during the installation and operation of the DAP Read the following descriptions if you are having problems. 1. Why can t I access the web-based configuration utility? When entering the name or IP address of the D-Link access point ( for example), you are not connecting to a website on the Internet or have to be connected to the Internet. The device has the utility built-in to a ROM chip in the device itself. Your computer must be on the same IP subnet to connect to the web-based utility. Make sure you have an updated Java-enabled web browser. We recommend the following: Microsoft Internet Explorer 7.0 or higher Mozilla Firefox 12.0 or higher Google Chrome 20.0 or higher Apple Safari 4.0 or higher Verify physical connectivity by checking for solid link lights on the device. If you do not get a solid link light, try using a different cable. If the computer is turned off, the link light may not be on. Disable any Internet security software running on the computer. Software firewalls such as ZoneAlarm, BlackICE, Sygate, Norton Personal Firewall, and Windows XP firewall may block access to the configuration pages. Check the help files included with your firewall software for more information on disabling or configuring it. 90
91 Section 6 - Troubleshooting Configure your Internet settings: Go to Start > Settings > Control Panel. Double-click the Internet Options Icon. From the Security tab, click the button to restore the settings to their defaults. Click the Connection tab and set the dial-up option to Never Dial a Connection. Click the LAN Settings button. Make sure nothing is checked. Click OK. Go to the Advanced tab and click the button to restore these settings to their defaults. Click OK three times. Close your web browser (if open) and open it. Access the web management. Open your web browser and enter the IP address of your D-Link access point in the address bar. This should open the login page for your the web management. If you still cannot access the configuration, unplug the power to the access point for 10 seconds and plug back in. Wait about 30 seconds and try accessing the configuration. If you have multiple computers, try connecting using a different computer. 2. What can I do if I forgot my password? If you forgot your password, you must reset your access point. Unfortunately this process will change all your settings back to the factory defaults. To reset the access point, locate the reset button (hole) on the rear panel of the unit. With the access point powered on, use a paperclip to hold the button down for 10 seconds. Release the button and the access point will go through its reboot process. Wait about 30 seconds to access the access point. The default IP address is When logging in, the username is Admin and leave the password box empty. 91

92 Section 6 - Troubleshooting 3. Why can t I connect to certain sites or send and receive s when connecting through my access point? If you are having a problem sending or receiving , or connecting to secure sites such as ebay, banking sites, and Hotmail, we suggest lowering the MTU in increments of ten (Ex. 1492, 1482, 1472, etc). Note: AOL DSL+ users must use MTU of To find the proper MTU Size, you ll have to do a special ping of the destination you re trying to go to. A destination could be another computer, or a URL. Click on Start and then click Run. Windows 95, 98, and ME users type in command (Windows NT, 2000, and XP users type in cmd) and press Enter (or click OK). Once the window opens, you ll need to do a special ping. Use the following syntax: ping [url] [-f] [-l] [MTU value] Example: ping yahoo.com -f -l
93 Section 6 - Troubleshooting You should start at 1472 and work your way down by 10 each time. Once you get a reply, go up by 2 until you get a fragmented packet. Take that value and add 28 to the value to account for the various TCP/IP headers. For example, lets say that 1452 was the proper value, the actual MTU size would be 1480, which is the optimum for the network we re working with ( =1480). Once you find your MTU, you can now configure your access point with the proper MTU size. To change the MTU rate on your access point follow the steps below: Open your browser, enter the IP address of your access point ( ) and click OK. Enter your username (Admin) and password (blank by default). Click OK to enter the web configuration page for the device. Click on Setup and then click Manual Configure. To change the MTU enter the number in the MTU field and click Save Settings to save your settings. Test your . If changing the MTU does not resolve the problem, continue changing the MTU in increments of ten. 93
94 Appendix A - Networking Basics Networking Basics Check your IP address After you install your adapter, by default, the TCP/IP settings should be set to obtain an IP address from a DHCP server (i.e. wireless router) automatically. To verify your IP address, please follow the steps below. Click on Start > Run. In the run box type cmd and click OK. (Windows 7/Vista users type cmd in the Start Search box.) At the prompt, type ipconfig and press Enter. This will display the IP address, subnet mask, and the default gateway of your adapter. If the address is , check your adapter installation, security settings, and the settings on your router. Some firewall software programs may block a DHCP request on newly installed adapters. 94

95 Appendix A - Networking Basics Statically Assign an IP address If you are not using a DHCP capable gateway/router, or you need to assign a static IP address, please follow the steps below: Step 1 Windows 7 - Click on Start > Control Panel > Network and Internet > Network and Sharing Center > Change Adapter Setting. Windows Vista - Click on Start > Control Panel > Network and Internet > Network and Sharing Center > Manage Network Connections. Windows XP - Click on Start > Control Panel > Network Connections. Windows From the desktop, right-click My Network Places > Properties. Step 2 Right-click on the Local Area Connection which represents your network adapter and select Properties. Step 3 Highlight Internet Protocol (TCP/IP) and click Properties. Step 4 Click Use the following IP address and enter an IP address that is on the same subnet as your network or the LAN IP address on your router. Example: If the router s LAN IP address is , make your IP address X where X is a number between 2 and 99. Make sure that the number you choose is not in use on the network. Set Default Gateway the same as the LAN IP address of your router ( ). Set Primary DNS the same as the LAN IP address of your router ( ). The Secondary DNS is not needed or you may enter a DNS server from your ISP. Step 5 Click OK twice to save your settings. 95
Version /25/2017. User Manual. DAP-1665 AC1200 Wi-Fi Range Extender/Access Point DAP-1665
 Version 2.00 01/25/2017 User Manual DAP-1665 AC1200 Wi-Fi Range Extender/Access Point DAP-1665 D-Link reserves the right to revise this publication and to make changes in the content hereof without obligation
Table of Contents. Table of Contents
 Table of Contents Product Overview... 4 Package Contents... 4 System Requirements... 5 Introduction... 6 Features... 8 Hardware Overview... 9 Connections... 9 LEDs...10 WPS LED/Button...11 Installation...12
Version /03/2016. User Manual. Wireless N300 Access Point DAP-2020
 Version 1.0 11/03/2016 User Manual Wireless N300 Access Point DAP-2020 Table of Contents Package Contents... 4 System Requirements... 5 Introduction... 6 Features... 8 Hardware Overview... 9 Connections...
Table of Contents. Table of Contents
 Table of Contents Table of Contents Product Overview...4 Package Contents... 4 System Requirements... 4 Features... 5 Hardware Overview... 6 Connections... 6 LEDs... 7 Wireless Installation Considerations...
Table of Contents. Installation... 9 Before you Begin... 9 Wireless Installation Considerations AP/Bridge/Auto Mode...11
 Table of Contents Product Overview... 4 Package Contents... 4 System Requirements... 4 Introduction... 5 Features... 6 Hardware Overview... 7 Connections... 7 LEDs... 8 Installation... 9 Before you Begin...
Version 1.00 May 02, User Manual. Wi-Fi AC600 Dual Band Mini Router DIR-516
 Version 1.00 May 02, 2014 User Manual Wi-Fi AC600 Dual Band Mini Router DIR-516 Preface D-Link reserves the right to revise this publication and to make changes in the content hereof without obligation
Table of Contents. Installation...9 Before you Begin...9 Wireless Installation Considerations AP/Bridge/Auto Mode...11
 Table of Contents Product Overview...4 Package Contents...4 System Requirements... 4 Introduction...5 Features... 6 Hardware Overview...7 Connections... 7 LEDs... 8 Installation...9 Before you Begin...9
Preface. Manual Revisions. Trademarks
 Preface D-Link reserves the right to revise this publication and to make changes in the content hereof without obligation to notify any person or organization of such revisions or changes. Manual Revisions
D-Link AirPlus G DWL-G700AP
 TM D-Link AirPlus G DWL-G700AP 2.4GHz Wireless Access Point Manual Building Networks for People Contents Package Contents...3 Introduction...4 Wireless Basics...6 Getting Started...8 Using the Configuration
802.11ac Wireless Access Point Model WAC104
 Point Model WAC104 User Manual October 2016 202-11698-01 350 E. Plumeria Drive San Jose, CA 95134 USA Support Thank you for purchasing this NETGEAR product. You can visit www.netgear.com/support to register
Version /19/2017. User Manual. Wireless AC1200 4G LTE Router DWR-961
 Version 0.01 09/19/2017 User Manual Wireless AC1200 4G LTE Router DWR-961 Section 1 - Product Overview Product Overview Package Contents DWR-961 Wireless AC1200 4G LTE Router Power Adapter 4G Antennas
Wireless AC1200 Concurrent Dual Band PoE Access Point
 DAP-2660 Version 1.00 AirPremier Wireless AC1200 Concurrent Dual Band PoE Access Point Product Overview...5 Introduction... 5 Features... 6 Package Contents... 7 System Requirements... 7 Hardware Overview...8
Version /04/2016. User Manual. Wireless AC750 Dual Band Router DIR-819
 Version 1.01 11/04/2016 User Manual Wireless AC750 Dual Band Router DIR-819 Preface D-Link reserves the right to revise this publication and to make changes in the content hereof without obligation to
Table of Contents. Product Overview...4 Package Contents...4 System Requirements... 4 Introduction...5 Features... 7
 Table of Contents Table of Contents Product Overview...4 Package Contents...4 System Requirements... 4 Introduction...5 Features... 7 Wireless Basics...8 Standards-Based Technology... 9 Wireless Installation
Version 1.0 April 19, User Manual. Wireless AC1200 Dual Band Cloud Router DIR-850L
 Version 1.0 April 19, 2013 User Manual Wireless AC1200 Dual Band Cloud Router DIR-850L Preface D-Link reserves the right to revise this publication and to make changes in the content hereof without obligation
Preface. Manual Revisions. Trademarks
 DIR-815 Preface D-Link reserves the right to revise this publication and to make changes in the content hereof without obligation to notify any person or organization of such revisions or changes. Manual
Preface. Manual Revisions. Revision Date Description 1.0 March 3, 2009 DAP-3520 Revision A1 with firmware version Trademarks
 Preface D-Link reserves the right to revise this publication and to make changes in the content hereof without obligation to notify any person or organization of such revisions or changes. Manual Revisions
Preface. Manual Revisions. Revision Date Description 1.0 June 30, 2010 Initial Release. 2.0 March 15, 2012 Updated for Revision B1.
 Preface D-Link reserves the right to revise this publication and to make changes in the content hereof without obligation to notify any person or organization of such revisions or changes. Manual Revisions
Version /15/2012. User Manual. Wireless N Quadband Home Router
 Version 3.01 6/15/2012 User Manual Wireless N Quadband Home Router Preface D-Link reserves the right to revise this publication and to make changes in the content hereof without obligation to notify any
Version 1.0 April 5, User Manual. Wireless AC1200 Dual Band Cloud Router DIR-850L
 Version 1.0 April 5, 2013 User Manual Wireless AC1200 Dual Band Cloud Router DIR-850L Preface D-Link reserves the right to revise this publication and to make changes in the content hereof without obligation
Version /04/2013. User Manual. Wireless AC1200 Dual Band Gigabit Cloud Router DIR-850L
 Version 1.0 02/04/2013 User Manual Wireless AC1200 Dual Band Gigabit Cloud Router DIR-850L Preface D-Link reserves the right to revise this publication and to make changes in the content hereof without
Version 1.0 May 9, User Manual. Wireless AC750 Dual Band Cloud Router DIR-810L
 Version 1.0 May 9, 2013 User Manual Wireless AC750 Dual Band Cloud Router DIR-810L Preface D-Link reserves the right to revise this publication and to make changes in the content hereof without obligation
D-Link AirPlus G DI-524
 D-Link AirPlus G DI-524 802.11g/ 2.4 GHz Wireless Router TM Manual Building Networks for People Contents Package Contents... 3 Introduction... 4 Wireless Basics... 8 Getting Started...11 Using the Configuration
Table of Contents. Product Overview...4 Package Contents...4 System Requirements...4 Introduction...5 Features...7
 Table of Contents Table of Contents Product Overview...4 Package Contents...4 System Requirements...4 Introduction...5 Features...7 Wireless Basics...8 Standards-Based Technology...9 Wireless Installation
Preface. Manual Revisions. Trademarks
 Preface D-Link reserves the right to revise this publication and to make changes in the content hereof without obligation to notify any person or organization of such revisions or changes. Manual Revisions
Table of Contents. Table of Contents
 Table of Contents Product Overview... 4 Package Contents... 4 System Requirements... 4 Introduction... 5 Features and Benefits... 6 Wireless Basics... 7 Four Operational Modes... 10 Getting Started...
Version /06/03. User Manual. AC1900 Wi-Fi Router DIR-879
 Version 1.01 2016/06/03 User Manual AC1900 Wi-Fi Router DIR-879 Preface D-Link reserves the right to revise this publication and to make changes in the content hereof without obligation to notify any person
Version /03/10. User Manual. N300 Wi-Fi Range Extender DAP-1325
 Version 1.00 2017/03/10 User Manual N300 Wi-Fi Range Extender DAP-1325 Preface D-Link reserves the right to revise this publication and to make changes in the content hereof without obligation to notify
Preface. Manual Revisions. Trademarks
 Preface D-Link reserves the right to revise this publication and to make changes in the content hereof without obligation to notify any person or organization of such revisions or changes. Manual Revisions
Preface. Manual Revisions. Trademarks
 Preface D-Link reserves the right to revise this publication and to make changes in the content hereof without obligation to notify any person or organization of such revisions or changes. Manual Revisions
Version /05/05. User Manual. AC2600 Wi-Fi Range Extender DAP-1860
 Version 1.02 2016/05/05 User Manual AC2600 Wi-Fi Range Extender DAP-1860 Preface D-Link reserves the right to revise this publication and to make changes in the content hereof without obligation to notify
WF-2402 Quick Installation Guide
 WF-2402 Quick Installation Guide Netis 150Mbps Wireless-N Broadband Router 1. Check Your Package Contents The following items should be found in your package: 150Mbps Wireless-N Broadband Router Power
User Guide. 450Mbps/300Mbps Wireless N Access Point TL-WA901ND/TL-WA801ND REV
 User Guide 450Mbps/300Mbps Wireless N Access Point TL-WA901ND/TL-WA801ND REV4.0.0 1910011930 Contents About This Guide...1 Chapter 1. Get to Know About Your Access Point.................... 2 1. 1. Product
Preface. Manual Revisions. Trademarks
 Preface D-Link reserves the right to revise this publication and to make changes in the content hereof without obligation to notify any person or organization of such revisions or changes. Manual Revisions
Version /22/2013. User Manual. Wireless AC1200 Dual Band Gigabit Router DIR-860L
 Version 1.0 03/22/2013 User Manual Wireless AC1200 Dual Band Gigabit Router DIR-860L Preface D-Link reserves the right to revise this publication and to make changes in the content hereof without obligation
High Power Wireless N. 600mW Smart Repeater LP 9698SR
 High Power Wireless N 600mW Smart Repeater LP 9698SR INTRODUCTION...4 GETTING STARTED...5 Package Contents...5 LED Indicators...6 Back Panel Description...7 SETUP GUIDE...8 Find a Setup Location...8 Connect
Preface. Manual Revisions. Trademarks
 Preface D-Link reserves the right to revise this publication and to make changes in the content hereof without obligation to notify any person or organization of such revisions or changes. Manual Revisions
Premiertek AP Mbps Wireless-N Broadband Router Quick Installation Guide
 Premiertek AP2402 150Mbps Wireless-N Broadband Router Quick Installation Guide V1.0.8.11 1. Check Your Package Contents The following items should be found in your package: 150Mbps Wireless-N Broadband
Version /13/2014. User Manual. mydlink Home Smart Plug DSP-W215
 Version 2.00 08/13/2014 User Manual mydlink Home Smart Plug DSP-W215 Preface D-Link reserves the right to revise this publication and to make changes in the content hereof without obligation to notify
Wireless N 150 PCI Desktop Adapter
 Wireless N 150 PCI Desktop Adapter Table of Contents Product Overview... 3 Package Contents... 3 System Requirements... 3 Introduction... 4 Features... 5 Hardware Overview... 6 LEDs... 6 Installation...
Document Created by Nick Schuster
 Document Created by Nick Schuster Table of Contents Product Overview... 4 Introduction... 4 Features... 5 Package Contents... 6 System Requirements... 6 Hardware Overview... 7 LEDs... 7 Connections...
Table of Contents. Installation...9 Wireless Installation Considerations... 10
 Table of Contents Table of Contents Product Overview...4 Package Contents...4 System Requirements...4 Introduction...5 Features... 6 Hardware Overview...7 Connections...7 LEDs...8 Installation...9 Wireless
WRE6606. User s Guide. Quick Start Guide. Dual-Band Wireless AC1300 Access Point. Default Login Details. Version 1.00 (ABDU.0) Edition 1, 10/2016
 Edition 1, 10/2016") WRE6606 Dual-Band Wireless AC1300 Access Point Version 1.00 (ABDU.0) Edition 1, 10/2016 Quick Start Guide User s Guide Default Login Details Web Address http://zyxelsetup http://dhcp-assigned IP www.zyxel.comhttp://192.168.1.2
WRE6606 Dual-Band Wireless AC1300 Access Point Version 1.00 (ABDU.0) Edition 1, 10/2016 Quick Start Guide User s Guide Default Login Details Web Address http://zyxelsetup http://dhcp-assigned IP www.zyxel.comhttp://192.168.1.2
Table of Contents. Table of Contents
 Table of Contents Product Overview... 4 Package Contents...4 System Requirements...4 Introduction...5 Features and Benefits...6 Wireless Basics...7 Installation... 9 Installation Considerations...9 Four
WAP3205 v2. User s Guide. Quick Start Guide. Wireless N300 Access Point. Default Login Details. Version 1.00 Edition 2, 12/2012
 WAP3205 v2 Wireless N300 Access Point Version 1.00 Edition 2, 12/2012 Quick Start Guide User s Guide Default Login Details LAN IP Address http://192.168.1.2 Password 1234 www.zyxel.com Copyright 2012 ZyXEL
Preface. Manual Revisions. Trademarks
 Preface D-Link reserves the right to revise this publication and to make changes in the content hereof without obligation to notify any person or organization of such revisions or changes. Manual Revisions
Version /19/2017. User Manual. Wireless AC1200 4G LTE Router DWR-961
 Version 0.01 09/19/2017 User Manual Wireless AC1200 4G LTE Router DWR-961 Section 1 - Product Overview Product Overview Package Contents DWR-961 Wireless AC1200 4G LTE Router Power Adapter 4G Antennas
Version /25/2014. User Manual. Wireless AC600 Dual Band High-Gain USB Adapter DWA-172
 Version 1.0 02/25/2014 User Manual Wireless AC600 Dual Band High-Gain USB Adapter DWA-172 Preface D-Link reserves the right to revise this publication and to make changes in the content hereof without
WRE2206. User s Guide. Quick Start Guide. Wireless N300 Range Extender. Default Details. Version 1.00 Edition 1, 01/2015
 WRE2206 Wireless N300 Range Extender Version 1.00 Edition 1, 01/2015 Quick Start Guide User s Guide Default Details Web Address http://zyxelsetup OR http://192.168.1.2 www.zyxel.com User Name admin Password
User Manual DIR-850L. Wireless AC1200 Dual Band Gigabit Router.
 User Manual DIR-850L Wireless AC1200 Dual Band Gigabit Router USER MANUAL: DIR-850L Wireless AC1200 Dual Band Gigabit Router SYSTEM REQUIREMENTS Network Requirements Web-based Configuration Utility Requirements
Table of Contents. What is WEP?...33 What is WPA?...34 Configure WEP Using the D-Link Wireless Connection Manager.. 50
 Table of Contents Product Overview...3 Package Contents...3 System Requirements...3 Introduction...4 Features...5 Hardware Overview...6 LEDs...6 Installation...7 Getting Started...7 Remove Existing Installations...
Version /22/2016. User Manual. Wireless N 150 Home Router DIR-608
 Version 1.0 07/22/2016 User Manual Wireless N 150 Home Router DIR-608 D-Link reserves the right to revise this publication and to make changes in the content hereof without obligation to notify any person
Version /06/03. User Manual. AC1900 MU-MIMO Wi-Fi Gigabit Router DIR-878
 Version 1.01 2016/06/03 User Manual AC1900 MU-MIMO Wi-Fi Gigabit Router DIR-878 Preface D-Link reserves the right to revise this publication and to make changes in the content hereof without obligation
Preface. Manual Revisions. Revision Date Description 8.0 November 08, 2010 Updated for revision H1. Trademarks
 Preface D-Link reserves the right to revise this publication and to make changes in the content hereof without obligation to notify any person or organization of such revisions or changes. Manual Revisions
WRE6505 v2. User s Guide. Quick Start Guide. Wireless AC750 Range Extender. Default Login Details. Version 1.00 Edition 1, 10/2016
 WRE6505 v2 Wireless AC750 Range Extender Version 1.00 Edition 1, 10/2016 Quick Start Guide User s Guide Default Login Details Web Address http://zyxelsetup http://dhcp-assigned IP www.zyxel.comhttp://192.168.1.2
Version /05/15. User Manual. AC1750 Wi-Fi Router DIR-869
 Version 1.02 2017/05/15 User Manual AC1750 Wi-Fi Router DIR-869 Preface D-Link reserves the right to revise this publication and to make changes in the content hereof without obligation to notify any person
Version /13/2016. User Manual. AC5300 Ultra Wi-Fi Router DIR-895L
 Version 1.10 10/13/2016 User Manual AC5300 Ultra Wi-Fi Router DIR-895L Preface D-Link reserves the right to revise this publication and to make changes in the content hereof without obligation to notify
Document Created by Nick Schuster
 Document Created by Nick Schuster Product Overview...4 Introduction... 4 Features... 5 Package Contents... 6 System Requirements... 6 Hardware Overview...7 LEDs... 7 Connections... 7 Basic Installation...8
Preface. Manual Revisions. Trademarks
 Preface D-Link reserves the right to revise this publication and to make changes in the content hereof without obligation to notify any person or organization of such revisions or changes. Manual Revisions
Version /29/2014. User Manual. Wireless N Nano USB Adapter DWA-131
 Version 5.0 10/29/2014 User Manual Wireless N Nano USB Adapter DWA-131 Table of Contents Product Overview... 3 Package Contents... 3 System Requirements... 3 Introduction... 4 Features... 5 Hardware Overview...
Version /11/2017. User Manual. Wireless N 300 Router DIR-615
 Version 1.10 07/11/2017 User Manual Wireless N 300 Router DIR-615 Preface D-Link reserves the right to revise this publication and to make changes in the content hereof without obligation to notify any
LevelOne. User Manual. WAP Mbps PoE Wireless AP V3.0.0
 LevelOne WAP-0005 108Mbps PoE Wireless AP User Manual V3.0.0 i TABLE OF CONTENTS CHAPTER 1 INTRODUCTION... 1 FIGURE 1: WIRELESS ACCESS POINT... 1 FEATURES OF YOUR WIRELESS ACCESS POINT... 1 Security Features...
Chapter 3 Wireless Configuration
 Chapter 3 Wireless Configuration This chapter describes how to configure the wireless features of your WNR854T router. In planning your wireless network, you should consider the level of security required.
Table of Contents. Getting Started...12 Connecting to a Power over Ethernet Network...13
 Table of Contents Product Overview...5 Package Contents...5 System Requirements...6 Introduction...7 Features...8 Wireless Basics...9 Standards-based Technology...10 Wireless Installation Considerations...11
Version /05/17. User Manual. AC1900 MU-MIMO Wi-Fi Gigabit Router DIR-878
 Version 1.00 2017/05/17 User Manual AC1900 MU-MIMO Wi-Fi Gigabit Router DIR-878 Preface D-Link reserves the right to revise this publication and to make changes in the content hereof without obligation
Version 1.00 December 15, User Manual. AC3150 Ultra Wi-Fi Router DIR-885L
 Version 1.00 December 15, 2015 User Manual AC3150 Ultra Wi-Fi Router DIR-885L D-Link reserves the right to revise this publication and to make changes in the content hereof without obligation to notify
Version /04/2015. User Manual. Wireless N 150 Micro USB Adapter DWA-121
 Version 1.20 28/04/2015 User Manual Wireless N 150 Micro USB Adapter DWA-121 Preface D-Link reserves the right to revise this publication and to make changes in the content hereof without obligation to
WAP3205 v3. User s Guide. Quick Start Guide. Wireless N300 Access Point. Default Login Details. Version 1.0 Edition 1, 05/2016
 WAP3205 v3 Wireless N300 Access Point Version 1.0 Edition 1, 05/2016 Quick Start Guide User s Guide Default Login Details LAN IP Address http://192.168.1.2 User Name www.zyxel.com admin Password 1234 Copyright
Version /25/2016. User Manual. Wireless AC750 Dual Band Range Extender DAP-1520
 Version 1.02 04/25/2016 User Manual Wireless AC750 Dual Band Range Extender DAP-1520 Preface D-Link reserves the right to revise this publication and to make changes in the content hereof without obligation
Table of Contents Package Contents Introduction Features and Benefits Wireless Basics Four Operational Modes...
 User s Manual Table of Contents Table of Contents Table of Contents... 2 Package Contents... 3 Introduction... 4 Features and Benefits... 6 Wireless Basics... 7 Four Operational Modes... 10 Getting Started...
Table of Contents. Product Overview...3 Package Contents...3 System Requirements...3 Introduction...4 Features... 5 Hardware Overview...
 Table of Contents Product Overview...3 Package Contents...3 System Requirements...3 Introduction...4 Features... 5 Hardware Overview...6 Table of Contents Manager...26 Using the Windows XP Utility...28
802.11N Wireless Broadband Router
 802.11N Wireless Broadband Router Pre-N Wireless Access Point Broadband Internet Access WPS 4-Port Switching Hub User's Guide Table of Contents CHAPTER 1 INTRODUCTION... 1 Wireless Router Features... 1
Preface. Manual Revisions. Trademarks
 Preface D-Link reserves the right to revise this publication and to make changes in the content hereof without obligation to notify any person or organization of such revisions or changes. Manual Revisions
Version /9/2015. User Manual. AC1200 Wi-Fi Router DIR-822
 Version 3.00 12/9/2015 User Manual AC1200 Wi-Fi Router DIR-822 Preface D-Link reserves the right to revise this publication and to make changes in the content hereof without obligation to notify any person
TRENDnet User s Guide. Cover Page
 Cover Page Table of Contents Product Overview... 1 Package Contents... 1 Features... 2 Product Hardware Features... 3 Application Diagram... 4 Router Setup... 5 Creating a Home Network... 5 Router Installation...
Table of Contents Product Overview...3 Configure WEP...32 Installation...7 Configure WPA /WPA2 -Personal...38
 Table of Contents Product Overview...3 Package Contents...3 System Requirements...3 Introduction...4 Features... 5 Hardware Overview...6 Installation...7 Getting Started...7 Remove Existing Installations...7
Wireless N USB Adapter. User Guide
 Wireless N USB Adapter User Guide Part#: PL-18N Model: Hermes V. 0613 Contents Chapter 1 Getting Start...3 Chapter 2 Installation Guide...5 Installing the Drivers for Mac OS X...10 Uninstall the Drivers
Wireless Access Point
 802.11g / 802.11b / WPA Wireless Access Point User's Guide TABLE OF CONTENTS CHAPTER 1 INTRODUCTION... 1 Features of your Wireless Access Point... 1 Package Contents... 4 Physical Details... 4 CHAPTER
Version /19/2013. User Manual. Wireless N Exterior Access Point DAP-3310
 Version 2.00 08/19/2013 User Manual Wireless N Exterior Access Point DAP-3310 Table of Contents Table of Contents Package Contents... 4 System Requirements... 5 Introduction... 6 Features... 8 Hardware
TRENDnet User s Guide. Cover Page
 Cover Page Contents Product Overview... 3 Package Contents... 3 Features... 3 Product Hardware Features... 4 Application Diagram... 6 Creating a Network... 6 Wireless Performance Considerations... 7 Getting
Preface. Manual Revisions
 Preface D-Link reserves the right to revise this publication and to make changes in the content hereof without obligation to notify any person or organization of such revisions or changes. Manual Revisions
450Mbps Wireless N Access Point
 450Mbps Wireless N Access Point Easy Network Expansion with N450 Wi-Fi 450Mbps 2.4GHz Passive PoE 5dBi Antennas Highlights 450Mbps, the Best Choice on 2.4GHz Passive PoE Supported With the use of 3 3 MIMO
Preface. Manual Revisions. Trademarks
 Preface D-Link reserves the right to revise this publication and to make changes in the content hereof without obligation to notify any person or organization of such revisions or changes. Manual Revisions
Document Created by Nick Schuster
 Document Created by Nick Schuster Table of Contents Product Overview... 4 Introduction... 4 Features... 5 Package Contents... 6 System Requirements... 6 Hardware Overview... 7 LEDs... 7 Connections...
IEEE a/b/g/n Wireless LAN Access Point. AT-MWS AP series. Reference Manual
 IEEE 802.11a/b/g/n Wireless LAN Access Point AT-MWS AP series Reference Manual Table of Contents 1 Before You Begin 5 1.1 Considerations for Wireless Installation...6 Computer Settings...6 Hardware Installation...9
Table of Contents. Chapter 1 Product Overview Features Package Contents LED Indicator and Panel Description...
 Copyright Statement is the registered trademark of Monoprice. All the products and product names mentioned herein are the trademarks or registered trademarks of their respective holders. Copyright of the
N300 Wireless Router WNR2200 Setup Manual
 N300 Wireless Router WNR2200 Setup Manual NETGEAR, Inc. 350 E. Plumeria Drive San Jose, CA 95134 USA July 2010 208-10641-01 v1.0 Trademarks NETGEAR and the NETGEAR logo are registered trademarks, and Smart
Grandstream Networks, Inc. GWN76xx Wi-Fi Access Points Master/Slave Architecture Guide
 Grandstream Networks, Inc. GWN76xx Wi-Fi Access Points Master/Slave Architecture Guide Table of Contents INTRODUCTION... 4 DISCOVER AND PAIR GWN76XX ACCESS POINTS... 5 Discover GWN76xx... 5 Method 1: Discover
Wireless 11n Smart Repeater AP (1T1R)
") (1T1R) 2014 Table of Contents 1. Introduction...3 1.1 Package contents... 3 1.2 Product Features... 3 1.3 Front Panel Description... 4 1.4 Rear Panel Description... 5 2. Installation...6 2.1 Hardware Installation...
(1T1R) 2014 Table of Contents 1. Introduction...3 1.1 Package contents... 3 1.2 Product Features... 3 1.3 Front Panel Description... 4 1.4 Rear Panel Description... 5 2. Installation...6 2.1 Hardware Installation...
Version /10/19. User Manual. AC2600 MU-MIMO Wi-Fi Gigabit Router DIR-882
 Version 1.01 2018/10/19 User Manual AC2600 MU-MIMO Wi-Fi Gigabit Router DIR-882 D-Link reserves the right to revise this publication and to make changes in the content hereof without obligation to notify
AC WiFi Business Access Point WAC510 User Manual
 AC WiFi Business Access Point WAC510 User Manual with NETGEAR Insight app for easy management December 2016 202-11686-01 350 E. Plumeria Drive San Jose, CA 95134 USA Support Thank you for purchasing this
Version 3.01 June 30, User Manual. Wireless AC1200 Dual Band Router with High-Gain Antennas DIR-822-US
 Version 3.01 June 30, 2017 User Manual Wireless AC1200 Dual Band Router with High-Gain Antennas DIR-822-US Preface D-Link reserves the right to revise this publication and to make changes in the content
Table of Contents. Product Overview...3 Package Contents...3 System Requirements...3 Introduction...4 Features...5 Hardware Overview...6 LEDs...
 Table of Contents Table of Contents Product Overview...3 Package Contents...3 System Requirements...3 Introduction...4 Features...5 Hardware Overview...6 LEDs...6 Installation...7 Getting Started...7 Remove
Wireless USB 600AC USER MANUAL. Dual Band USB Adapter. HNW600ACU Rev
 Wireless USB 600AC Dual Band USB Adapter USER MANUAL HNW600ACU Rev. 2.0 www.hamletcom.com Table of Contents 1. Introduction... 4 1.1 Product Features... 4 1.2 Package contents... 4 2. Wireless USB Adapter
Dual Band Wireless Access Point
 User s Guide 2.4GHz 5GHzLAN PWR Dual Band Wireless Access Point Table of Contents Product Overview...5 Features...5 Package Content...5 Hardware Overview...6 Front View...6 Rear View...6 Wireless Considerations...7
N150 WiFi DSL Modem Router Essentials Edition. N300 WiFi DSL Modem Router Essentials Edition
 N150 WiFi DSL Modem Router Essentials Edition Model D500 N300 WiFi DSL Modem Router Essentials Edition Model D1500 User Manual May 2018 202-11390-02 350 East Plumeria Drive San Jose, CA 95134 USA Support
300Mbps Wireless N Access Point
 300Mbps Wireless N Access Point East Network Expansion with N300 Wi-Fi 300Mbps 2.4GHz Passive PoE 5dBi Antennas Highlights Reliable Wi-Fi for Home Entertainment Passive PoE Supported With the use of 2
Quick Installation Guide TEW-637AP 3.01
 Quick Installation Guide TEW-637AP 3.01 Table of Contents English 1 1. Before You Start 1 2. Hardware Installation 2 Troubleshooting 7 Version 04.19.2011 1. Before You Start Package Contents ŸTEW-637AP
AC750 Wireless Dual-Band Router CR2. User Manual
 AC750 Wireless Dual-Band Router CR2 User Manual Version 1.0 4/25/2014 Table of Content Chapter 1 Introduction... 3 1.1 Features... 3 1.2 System Requirement... 3 1.3 Package Contents... 4 Chapter 2 Hardware
Table of Contents Package Contents Introduction Features and Benefits Wireless Basics Three Operational Modes...
 Table of Contents Table of Contents Table of Contents... 2 Package Contents... 3 Introduction... 4 Features and Benefits... 6 Wireless Basics... 7 Three Operational Modes... 10 Getting Started... 11 Using