CONFIGURATION MANUAL. English version
|
|
|
- Jordan Gilmore
- 6 years ago
- Views:
Transcription

1 CONFIGURATION MANUAL English version
2 Frama F-Link Configuration Manual (EN) All rights reserved. Frama Group. The right to make changes in this Installation Guide is reserved. Frama Ltd also reserves the right to change and/or adapt parts of this Installation Guide and/or the product at any time without prior notice. The shown postal rates and other only partly valid information serve solely as examples and represent no claim to being up to date. 2
3 Safety precautions and warnings Thank you for deciding to use the Frama F-Link. The information in this guide is intended to support you during the configuration of the Frama F-Link unit. This networking unit meets currently valid safety regulations. Inappropriate use, however, can lead to personal injury or damage to property. With this in mind, please first read this guide before you put the unit into service. By doing so, you will protect yourself and avoid damaging the unit. Store this guide carefully and pass it along to any subsequent owner. Symbols used This configuration guide uses the following symbols: Danger! This symbol points to dangers and safety risks when handling, operating or servicing the F-Link unit which could result in personal injury. Note! This symbol points to valuable guidelines and instructions for handling the F-Link unit which can eliminate the risk of damage to the F-Link, the franking system, the mail items or the immediate surroundings. Tip! Interesting notes and tips for efficient handling of the F-Link. 3
4 Table of Contents 1 INTRODUCTION F-LINK SPECIFICATIONS... 5 CONNECTION / PROTOCOLS SYSTEM REQUIREMENTS CONFIGURATIONS VARIANTS WIRED OPERATION DHCP MODE DHCP MODE WITH PROXY SERVER IDENTIFYING THE DYNAMIC IP ADDRESS (DHCP) OF AN F-LINK DEVICE STATIC MODE WIRELESS OPERATION CONFIGURATION PAGE FEATURES LOGIN CONFIGURATION PAGE MANAGEMENT MODEM S91 SETTING (ONLY APPLICABLE TO F-LINK A/B VERSIONS) CONFIGURATION PAGE LAN SETTINGS DHCP HOSTNAME PROXY SETTINGS CONFIGURATION PAGE WIRELESS SETTINGS CONFIGURATION PAGE SITE SURVEY CONFIGURATION PAGE ADMINISTRATION STATUS CONFIGURATION PAGE ADMINISTRATION SYSTEM LOG CONFIGURATION PAGE ADMINISTRATION EVENT LOG CONFIGURATION PAGE ADMINISTRATION F-LINK LOG TROUBLESHOOTING NO ACCESS TO THE CONFIGURATION PAGES OLD CONFIGURATION PAGE VALUES F-LINK LED STATUS NO ACCESS TO FRAMA FO2 BACKEND SERVER RESET THE CONFIGURATION CONNECTING F-LINK TO ANOTHER FRANKING SYSTEM SUPPORTED SPECIAL CHARACTERS STATUS MESSAGES APPENDIX IP CONFIGURATION QUESTIONNAIRE
5 1 Introduction This manual describes the configuration of the device F-Link for the operation with a Frama franking system. To install the F-Link on a Frama franking system the installation manual shipped with the device. [F-Link Installation Manual, Order-Nr: ] shall be used. The F-Link can be configured via the configuration page. For configuration tasks an additional PC with internet web browser is needed. The F-Link configuration pages are supported by the following internet web browsers: Mozilla Firefox 13.0 and newer Microsoft Internet Explorer 9.0 and newer Google Chrome 20.0 and newer Apple Safari and newer This version of the configuration manual is based on the screenshots and features of firmware release version F-Link / Image F-Link Specifications Connection / Protocols IPv4 (only) Security standard TLS 1.2 SHA-II (wired) 100 Base-T (10/100Mbsp RJ45) (wireless) IEEE n/g or b WLAN security: WPA2, WPA-PSK (AES, TKIP, TKIPAES)/Mixed Mode, WEP (64/128bit) DHCP Standard, Forward Proxy 3 System Requirements In order to connect your Franking System via F-Link with the FramaOnline2 system, you require the following. Firewall Port 443 open Port 53 open if the DNS is located outside the network the F-Link is connected to Infrastructure: An Ethernet network socket that connects to the Internet The F-Link must be able to access DNS via TCP port 53 The F-Link must be able to communicate via TCP port 443 (https / TLS) to the URL fo2.frama.com Proxy server The F-Link supports connection via an http proxy server with basic authentication or without authentication. Note! Communication via Proxy Server with SSL/TLS Interception is not supported! Due to security requirements, the F-Link cannot connect through an https proxy server that intercepts the TLS v1.2 encrypted communication. 5
6 Tip! Proxy servers using SSL/TLS-interception require a specific rule in order to allow transparent communication (Franking System via F-Link to FramaOnline) via https port 443. The specific rule grants correct identification of FramaOnline2 (https certificate) for the F-Link. 4 Configurations Variants DHCP (see chapt ) The F-Link is preconfigured for wired operation in a LAN network with a DHCP server. In this case, normally no additional configuration is required. Static IP (see chapt ) Fix IP setting requires full information about the Network configuration. With Proxy or without Proxy server With basic authentication or without authentication Wireless (see chapt. 4.2) The F-Link device can also operate with a wireless network. Refer to chapt. 2.2 Wireless Operation about installing the F-Link for wireless operation. Note! Configuration in environment with open access points To prevent an automatic connection with open access points dismount the WI-FI antenna until the F-Link has been set to WI-FI function. Note! During first connection to the Frama FO2 backend system, the F-Link will be configured (e.g. country code, language, time ) automatically. Thus the very first connection takes longer time than subsequent ones. Alias IP (factory default) From factory the F-Link is configured with the Alias IP address The F-Link Alias IP address in no longer accessible, once the device was used with any other static or DHCP IP address. The Alias IP address can be re-established with a Reset function. Reset the F-Link configuration (set back to factory default) Status: Ready LED must be permanently lit Disconnect LAN cable Press the reset button for a minimum of 10 seconds Wait until the Ready LED is permanently lit again Connect LAN cable. 6

7 4.1 Wired operation The F-Link supports operation with dynamic IP address assigned by a DHCP server or with a static IP address configured via configuration page DHCP Mode The factory default LAN connection type is DHCP (auto configuration). The F-Link can be connected to the network with an active DHCP server as described in the installation manual. After powering-up the F-Link gets an IP address from the DHCP server in the LAN network. In most cases no additional configuration is required and the F-Link operates with the franking system DHCP Mode with Proxy Server If the internet connection is handled via proxy server, the proxy configuration has to be setup first. For connecting to the configuration pages of the F-Link device, the dynamic assigned IP address has to be known. Chapter outlines, how this IP address can be identified. The determined IP address can now be typed into the browsers address field to access the F-Link configuration page. See Chapter 3 for further details Identifying the dynamic IP address (DHCP) of an F-Link device Identifying this address can be done in several ways: A) With franking system displayed Error message The IP address is shown as a part of the error message on the franking system. If the F-Link device is not able to connect with the Frama FO2 server, a corresponding error message will be displayed. Several messages show a hint for configuring of the F-Link. This hint includes the current IP address of the device! B) Search over ARP table The IP address can be find out by consulting a listing (e.g. arp table) which shows the assignments between MAC and IP addresses inside a DHCP network. The MAC address of the F-Link can be found at the sticker at the bottom of the device. C) Frama AG IP Finder Tool Search in your Network for the DHCP IP address of the F-Link with the IP Finder tool. Download the Frama F-Link IP Finder tool, from to your PC. (Only Windows operating systems like Windows XP, Windows 7 are supported) Start the Frama F-Link IP Finder tool Enter the MAC address of the F-Link which can be found at the sticker at the bottom of the device. Choose MAC for LAN (cable) or WLAN (WI-FI). Press the Search button The Frama F-Link IP Finder tool scans all IP addresses in your network. If an F-Link was found with this MAC address an entry will be showed in the result list. The F-Link configuration page can be opened now with the default internet web browser on your PC by clicking on the IP address in the list 7
8 4.1.4 Static Mode The F-Link device can operate with a static IP address. The factory default LAN connection type is DHCP (auto configuration). Note! If the F-Link was used with LAN connection type DHCP or STATIC before for connections, the access to the F-Link configuration page by the Alias IP address and a direct LAN cable is only possible after a reset of F-Link. Changing to a static IP address over Alias IP address : 1. Connect the F-Link device directly with a LAN cable to a PC (A cross-wired LAN cable is needed if the PC doesn t support auto-mdix). 2. Note the PC LAN network settings for later use. Set the PC LAN network settings as follow: IP address: Subnet mask: Turn on the F-Link and wait until the Ready LED of the F-Link is permanently on. 4. Open internet web browser on PC. 5. Insert the F-Link default IP into address field. 6. Login with username and password. (Default username: admin and password: admin ). 7. Open configuration page LAN Settings. 8. Change LAN connection type to STATIC (fixed IP). 8
 10. Turn off F-Link. 11. Disconnect direct LAN network cable between F-Link and PC. 12.")
9 9. Enter the IP settings for F-Link accordingly to your network. Example: Press button Apply. -> F-Link reboots. Wait until Ready LED of the F-Link is on again. (The execution of the command may need to be confirmed in the internet web browser) 10. Turn off F-Link. 11. Disconnect direct LAN network cable between F-Link and PC. 12. Set the LAN network settings of the PC back to the previous values (refer to your notes). 13. Connect the F-Link device to the LAN network for the operation with the franking system. 14. Turn on the franking system and the F-Link. 15. Execute business processes on the franking system when the Ready LED of the F-Link is on. It s also possible to change to a static IP address when F-Link uses currently a DHCP IP address. In this case the dynamic assigned IP address has to be entered into the browser address field. Processes for finding out this address are described in Chapter
10 4.2 Wireless operation The F-Link device can also operate with a wireless network. By default the F-Link is configured to operate with a wired connection. Refer to the install manual for information about installing the F-Link on the franking system for wireless operation. Access Point Note! If the F-Link was used with LAN connection type DHCP or STATIC before for connections, the access to the F-Link configuration page by the default IP address and a direct LAN cable is only possible after a reset of F-Link. Configuring the F-Link for wireless operation over Alias IP address : 1. Connect the F-Link device directly with a LAN cable to a PC (A cross-wired LAN cable is needed when the PC doesn t support auto-mdix). 2. Note the PC LAN network settings for later use. Set the PC LAN network settings as follows: IP address: Subnet mask: Note! Configuration in environment with open access points To prevent an automatic connection with open access points dismount the WI-FI antenna until the F-Link has been set to WI-FI function. 3. Turn on the F-Link and wait until the Ready LED of the F-Link is on. 4. Open internet web browser on PC. 5. Insert the F-Link default IP into address field. 6. Login with username and password. (Default username: admin and password: admin ). 7. Open configuration page Wireless Settings. 10


11 Press button Wireless ON -> Please wait. The wireless function will be enabled. (The execution of the command may need to be confirmed in the internet web browser) 8. Wait until Ready LED of the F-Link is switched on again. Wait until home site is displayed again. Open configuration page Site Survey 9. Press button Scan AP 10. Select the wireless network which shall be used. Press button Next. If your wireless network uses Hidden-SSID then press button Next without selecting a wireless network. 11. Select the channel 1, security mode and encryption type for your wireless network. Insert the passphrase / security keys for your wireless network. Insert also the SSID of your wireless network even if it uses Hidden-SSID. 1 F-Link V2: Selection field for the Wi-Fi channel does not exists. 11
12 12. Press button Apply. -> Please wait. The wireless network will be connected. (The execution of the command may need to be confirmed in the internet web browser) 13. Wait until Ready LED of the F-Link is switched on again. 14. When F-Link is able to build-up a wireless connection to your access point, the connection over the LAN port (cable) will be closed. The F-Link configuration page can therefore not be opened again by default IP and a direct LAN cable connection. If the configuration page was reloaded in your internet web browser with the default IP the F-Link has no access to your wireless network. Check the wireless signal strength at the F-Link position and the wireless settings of F-Link (SSID, pass phrase, key, channel, ) 15. Disconnect direct LAN network cable between F-Link and PC. 16. Set the LAN network settings of the PC back to the previous values. 17. Execute business processes on the franking system. Access to F-Link configuration page under wireless operation mode: 1. The F-Link configuration page can now only opened by an access via wireless network and the assigned DHCP IP address for F-Link. For identifying the DHCP IP address of the F-Link see chapter Open internet web browser on a PC that is also connected to the same wireless network as the F-Link. Enter the DHCP IP address of F-Link into the address field of the internet web browser. 12

13 3. Open configuration page Administration Status. Check if F-Link gets the correct IP settings from the wireless network. 4. Check the F-Link status. Must be Ready To Connect. 5. Execute business processes on the franking system. Don t enable the wireless function, when F-Link is connected to a LAN network with DHCP server! Connect the F-Link device directly to a PC for configuring it for wireless operation. Note! After enabling the wireless function the F-Link still uses the default IP on the LAN connection as long as the wireless network connection was not successfully builds up. 13
 Press button OK.")

14 5 Configuration Page Features 5.1 Login Enter the IP address of the F-Link into the address field of the internet web browser. Enter the username and the password into the login window: (Default username: admin and password: admin ) Press button OK. Now you are on the home screen. Over the configuration page you can change the settings of the F- Link, display the actual status and the logged data. Use the menu on the left side to navigate. All changes on the configuration page are stored only when you press the Apply button below the settings fields. 14
15 5.2 Configuration Page Management On the configuration page Management you can set your own administrator username and password for the access to the F-Link configuration page Modem S91 setting (only applicable to F-Link a/b versions) The modem S91 setting changes the attenuation of the internal modem in F-Link. This option is only relevant for Frama franking systems of the Matrix F series range. The attenuation can be switched between two values: S91 OFF S91 ON default attenuation higher attenuation The higher attenuation / S91 ON is only recommended if you experience problems with the modem communication between F-Link and the Matrix F series franking system (frequently no answer / no connection build up or connection lost during communication). The first pressing of the S91 ON button after a reset of F-Link initializes this feature internally only. Press the S91 ON button a second time to change the value. The current status shows the actually state of the modem S91 setting. If the modem S91 setting was changed try multiple connections before estimate the effect. In special cases also a decreasing of the modem speed on the Matrix F series franking system might also help to get a more stable communication performance. 15

16 5.3 Configuration Page LAN Settings On the configuration page LAN Settings you can change the LAN connection type, set values for the LAN connection type and set the proxy settings for F-Link. The usage of the connection type is descibed in chapter DHCP hostname An optional hostname for the F-Link can be set on DHCP mode into the field Hostname, e.g. FLINK. 16

17 5.4 Proxy Settings When F-Link is forced to use a proxy server without authentication then set the proxy method to Proxy Without Authentication. Enter the IP address of the proxy server into the field Proxy Host. Enter the port number of the proxy server into the field Proxy Port. When F-Link is forced to use a proxy server with authentication then set the proxy method to Proxy With Basic Authentication. Enter the IP address of the proxy server into the field Proxy Host. Enter the port number of the proxy server into the field Proxy Port. Enter the proxy username into the field Proxy User and the proxy user password into the field Proxy Password. Consider also chapter

18 5.5 Configuration Page Wireless Settings Enable or disable the wireless function over the configuration page Wireless Settings. 5.6 Configuration Page Site Survey When the wireless function is enabled you may scan for access points using the configuration page Site Survey. The value RRSI show the signal level of the wireless network. If this value is too low, no stable network connection is possible. Try to find a better position for F-Link where the signal level is higher. When you have selected a wireless network and have pressed the button Next the additional configuration page for the wireless network will be shown. Select the right channel 2, security mode and encryption type for your wireless network. Normally you must only enter the pass phrase or security key for your wireless network here. The other settings should be left to the automatically detected values. 2 F-Link V2: Selection field for the Wi-Fi channel does not exists. 18

19 5.7 Configuration Page Administration Status The status of F-Link is showed on the configuration page Administration Status 3. F-Link state: Ready To Connect Connected Ready No Internet HTTP Error Description: F-Link is in operation. A connection to the FO2 backend system can be started. F-Link is connected to the FO2 backend system and transfers data. F-Link is in operation, but has no connection to the internet via the wired or wireless network. F-Link is in operation, but a HTTP error has occurred when F-Link connected to the FO2 backend system. 3 The firmware version name of F-Link V2 (2nd hardware generation) starts with F-Link2. At all other device naming on the website the F-Link version (hardware generation) is not distinguished. 19


20 5.8 Configuration Page Administration System Log The F-Link writes a log file of the system (Linux). You can display the log entries when you open the configuration page Administration System Log and press the button Refresh. 5.9 Configuration Page Administration Event Log The F-Link writes an event log file. You can display the log entries when you open the configuration page Administration Event Log and press the button Refresh. There you can see the events and results of business processes of the franking system. 20

21 5.10 Configuration Page Administration F-Link Log The F-Link writes an operation log file. You can display the log entries when you open the configuration page Administration F-Link Log and press the button Refresh. 21
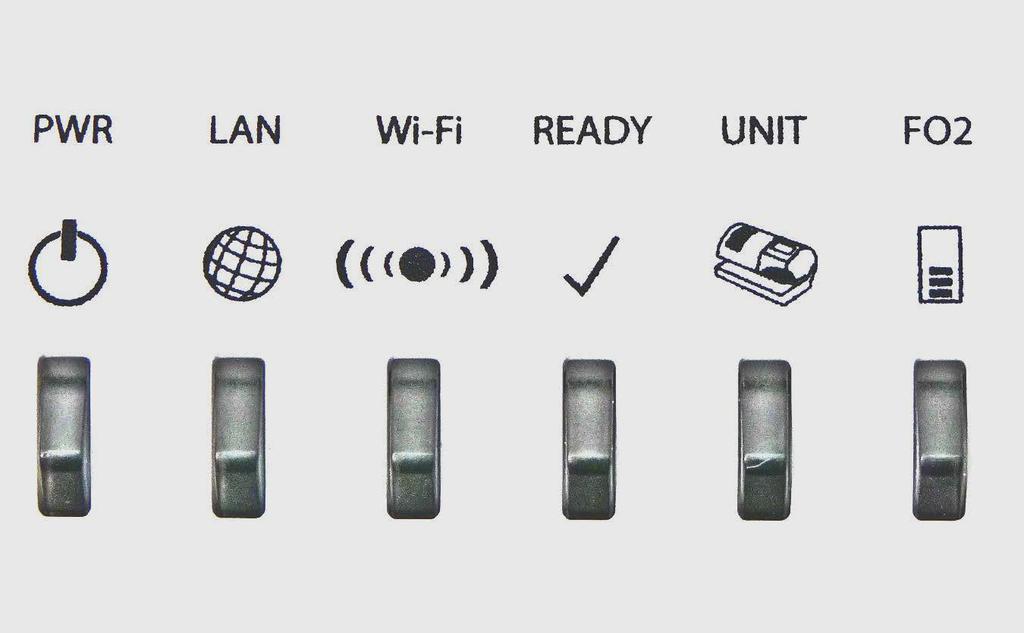
22 6 Troubleshooting 6.1 No access to the configuration pages When the access to the configuration pages is not possible then different reasons are possible. 1. Network errors Are you sure that you use the right IP address for the F-Link? Try a ping to the IP address of the F-Link from the console of a PC in the same network (if ping is working in your network). When you get no answer from the F-Link then check your network. 2. Proxy configuration errors It is possible that you use a Proxy server in your network for internet browsing. You must configure the proxy settings of your PC that the local IP address of F-Link is bypassed / excluded by the proxy server. 3. Login fails / lost login values If you don t know the username and password for the F-Link configuration page access anymore, you can reset the F-Link. After the reset the administrator username and password are on the default values username: admin and password: admin. 4. No access by default IP If the F-Link was used before for connections with LAN connection type DHCP or STATIC the access over the default IP address is not possible. Perform a reset of F-Link without a connected network cable (see chapter 4.5). The default IP is now active again for a configuration by a direct LAN cable connection. 5. Configuration page disappears after set to WI-FI ON The F-Link possibly has automatically connected to an open Access Point. Remove the antenna, reset the device and repeat the WI-FI configuration. 6.2 Old configuration page values Internet web browsers store data from web pages for offline mode and caches data to show web pages faster. It is possible that not the actual data are displayed on a configuration page of F-Link. You can clear the offline and cached data of your browser normally over a menu entry of the browser. Restart the browser after you clear the offline and cached data and try again. 6.3 F-Link LED status The different statuses of the LED s from F-Link are described in the installation manual [F-Link Installation Manual, Order-Nr: ]. 6.4 No access to Frama FO2 backend server For a successful connection to the FramaOnline2, the following network configurations are required: Open firewall ports: 53 DNS 443 HTTPS Allow access to URL fo2.frama.com The IP address of the URL fo2.frama.com can be found either by using the ping command ping fo2.frama.com in a command line window (if ping is allowed in your network) or by a DNS lookup service in the internet. 22
23 Proxy servers using SSL-interception require a specific rule in order to allow transparent communication (franking system via F-Link to FramaOnline2) via https port 443. The specific rule grants correct identification of FramaOnline2 (https certificate) for the franking system. 6.5 Reset the configuration The configuration of the F-Link can be reset. Disconnect the LAN cable from F-Link. Press the RESET switch at the back of the device for a minimum of 10 seconds. After this process the F-Link restores the factory configuration (IP ) and all previous configuration settings will be lost. After the reset, the F-Link reboots and is ready to be reconfigured when the Ready LED is on again. 6.6 Connecting F-Link to another franking system Interchange of F-Link from one to another Franking System requires the following points: same language same configuration in network same Franking System type Ignoring this may lead to wrong configuration settings and prevent the franking system from successful connection to FramaOnline2. In such case we recommend to reset the F-Link. 6.7 Supported special characters The F-Link does not support all kind of characters as values in the input fields on the configuration page. The following special characters can be used in all input fields:! # $ % ( ) * + -. / [ ] ^ _ ` { } ~ 23
24 6.8 Status Messages In case of operation errors the F-Link shows a status message on the display of the franking system. Status Message on franking system Description / Troubleshooting F001 F002 F003 F004 F005 F006 No WAN (internet) available. Check network or settings using a web browser on {ipaddress} Refer to manual for further info. No DHCP IP address assigned. Change network settings using a browser on {ipaddress} Refer to manual for further info. No WAN (internet) available. Check local network /-settings. Please refer to manual for further info. FramaOnline2 (fo2.frama.com) is temporarily unavailable. Please try again later. Please refer to manual for further information. FramaOnline2 (fo2.frama.com) is temporarily unavailable. Please try again later. Please refer to manual for further information. FramaOnline2 (fo2.frama.com) is temporarily unavailable. Please try again later. Please refer to manual for further information. F-Link is connected to the network and gets a valid IP address in the network. F-Link is unable to access the internet and the FO2 backend server. Please check your internet access with another device in the same network and check the network settings of F- Link over the configuration page. The network configuration of F-Link is invalid. F-Link changes the settings back to the default values. Please configure the F-Link network settings properly. To set the configuration you can access to the F-Link configuration page over the default IP address F-Link cannot open the network communication. Please configure the F-Link network settings properly, check the cable connection and try to connect to your network with another device in the same network. The FO2 backend server cannot handle the request of F- Link at the moment. The response on the request is HTTP error code 503 Service unavailable. Try again later. This message is triggered when the FO2 backend server is busy or is shut down for maintenance. If this error stays on for longer time call the FramaOnline2 hotline. The request of F-Link was responded with a HTTP error code (more codes are possible). The HTTP error code can be found in the event log of F-Link. Try again later. This message is triggered when the FO2 backend server is busy or is shut down for maintenance. If this error stays on for longer time call the FramaOnline2 hotline. F-Link gets no answer from the FO2 backend server on its request. Possible cause is a loss of the network connection while a connection to the FO2 backend server was running. Try again later. If this error stays on for longer time call the FramaOnline2 hotline. 24
25 F007 F008 FramaOnline2 (fo2.frama.com) is temporarily unavailable. Please try again later. Please refer to manual for further information. F-Link Status: F008 F-Link updates the firmware! DO NOT SWITCH OFF F-Link! Wait until READY LED is switched on again and retry! F-Link is connected to the network and has got a valid IP from the network. F-Link has access to the internet. But F-Link has no access to the FO2 backend server. Try again later. If this error stays on for longer time call the FramaOnline2 hotline. F-Link updates its firmware instead of processing your operation (inspection, credit loading). After the complete download of the firmware from the FO2 backend server the installation of the firmware is running and this message is displayed on the franking system. Do not switch of the F-Link is this state. F-Link reboots automatically to startup with the new firmware. Wait until the Ready LED is light up stable again. Then please repeat your operation. F009 F010 No answer from DHCP server Change F-Link DHCP settings on {ipaddress} Please refer to manual for further information. Proxy error. Change F-Link Proxy settings on {ipaddress} or update Proxy Server. Refer to manual for further info. F-Link checks for a firmware upgrade on each call to the FO2 backend server. F-Link is configured to get a dynamically IP address from a DHCP server in your network. But F-Link gets no dynamically IP address from a DHCP server. Please configure the F-Link network settings properly. To set the configuration you may access the F-Link configuration pages over the displayed IP address. Please check the operation of the DHCP server in your network. The request of F-link is responded with a HTTP error code (more codes are possible) of local proxy server. The HTTP error code can be found in the event log of F-Link. Please configure the F-Link proxy settings properly. To set the configuration you may access the F-Link configuration pages over the displayed IP address. Possible cause for HTTP error code 305 Use Proxy: The internet is only accessible over the local proxy server. Possible cause for HTTP error code 407 Proxy Authentication Required: The username and password for access to the local proxy server is wrong. Possible cause for HTTP error code 502 Bad Gateway: The proxy server cannot communicate with the FO2 backend server. 25
26 F011 F-Link Status: F011 Currently no WAN (internet). Check local DNS, local firewall and local Proxy-Server. Refer to manual for further info. F-Link is connected to the network and has got a valid IP address in the network. F-Link had access to the internet and to the FO2 backend server in the past. Currently, F- Link has no access to the internet and to the FO2 backend server. Please check your internet access with another device in the same network and try again. 26
27 7 Appendix 7.1 IP Configuration Questionnaire This questionnaire may be used to get the information from your IT personnel. Addressing Mode DHCP Static IP Address Proxy Server o IP-Address:... Format: nnn.nnn.nnn.nnn, nnn <= 255 Example: o Subnet-Mask:... Format: nnn.nnn.nnn.nnn, nnn <= 255 Example: o Default Gateway:... Format: nnn.nnn.nnn.nnn, nnn <= 255 Example: o DNS-Server:... Format: nnn.nnn.nnn.nnn, nnn <= 255 Example: No local Proxy required. A local Proxy is required to be used o Proxy IP-Address:... Format: nnn.nnn.nnn.nnn, nnn <= 255 Example: o Port Number: Format: nnnnn <= Example: 8080 Proxy Server Authentication Mode (only applicable if proxy server must be used) No authentication required on proxy server Basic authentication is required for proxy server o Username: o Password: 27
28 WLAN No WLAN WLAN o SSID: o Security Mode: Open Shared WPAPSK WPA2PSK o Encryption Type: AES TKIP o Pre-Shared Key: Basic authentication Note! Make sure that the IP address values and related configurations respect the syntax and semantic rules. Your IT personnel will be able to give you more information on this topic. 28
29 Frama AG CH-3438 Lauperswil Switzerland F-Link R02.00/
Click on Close button to close Network Connection Details. You are back to the Local Area Connection Status window.
 How to configure EW-7228APn/EW-7416APn as a Repeater to extend wireless range This article can apply on EW-7228APn and EW-7416APn. We used screen shots of EW-7416APn in this instruction. We recommend you
User Manual DIR-850L. Wireless AC1200 Dual Band Gigabit Router.
 User Manual DIR-850L Wireless AC1200 Dual Band Gigabit Router USER MANUAL: DIR-850L Wireless AC1200 Dual Band Gigabit Router SYSTEM REQUIREMENTS Network Requirements Web-based Configuration Utility Requirements
802.11ac Wireless Access Point Model WAC104
 Point Model WAC104 User Manual October 2016 202-11698-01 350 E. Plumeria Drive San Jose, CA 95134 USA Support Thank you for purchasing this NETGEAR product. You can visit www.netgear.com/support to register
AirCruiser G Wireless Router GN-BR01G
 AirCruiser G Wireless Router GN-BR01G User s Guide i Contents Chapter 1 Introduction... 1 Overview...1 Features...1 Package Contents...2 AirCruiser G Wireless Router Rear Panel...2 AirCruiser G Wireless
LevelOne WBR User s Manual. 11g Wireless ADSL VPN Router. Ver
 LevelOne WBR-3407 11g Wireless ADSL VPN Router User s Manual Ver 1.00-0510 Table of Contents CHAPTER 1 INTRODUCTION... 1 Wireless ADSL Router Features... 1 Package Contents... 5 Physical Details... 6 CHAPTER
IP806GA/GB Wireless ADSL Router
 IP806GA/GB Wireless ADSL Router 802.11g/802.11b Wireless Access Point ADSL Modem NAT Router 4-Port Switching Hub User's Guide Table of Contents CHAPTER 1 INTRODUCTION... 1 Wireless ADSL Router Features...
Table of Contents. Page ii
 Table of Contents Chapter 1 Introduction 1 Features... 1 Safety Instructions... 1 Package Contents... 2 Physical Details... 3 Chapter 2 Setup 5 Overview... 5 Using the Windows Wizard... 5 Chapter 3 Web-Based
Security SSID Selection: Broadcast SSID:
 69 Security SSID Selection: Broadcast SSID: WMM: Encryption: Select the SSID that the security settings will apply to. If Disabled, then the device will not be broadcasting the SSID. Therefore it will
802.11N Wireless Broadband Router
 802.11N Wireless Broadband Router Pre-N Wireless Access Point Broadband Internet Access WPS 4-Port Switching Hub User's Guide Table of Contents CHAPTER 1 INTRODUCTION... 1 Wireless Router Features... 1
User Guide. 450Mbps/300Mbps Wireless N Access Point TL-WA901ND/TL-WA801ND REV
 User Guide 450Mbps/300Mbps Wireless N Access Point TL-WA901ND/TL-WA801ND REV4.0.0 1910011930 Contents About This Guide...1 Chapter 1. Get to Know About Your Access Point.................... 2 1. 1. Product
English version. Introduction. Contents of the box. LW050/LW050UK Sweex Wireless Broadband Router 54 Mbps
 LW050/LW050UK Sweex Wireless Broadband Router 54 Mbps Introduction First of all, many thanks for purchasing this Sweex Wireless Broadband Router 54 Mbps. The Sweex Wireless Broadband Router 54 Mbps enables
DRG600-WIFI USER GUIDE
 DRG600-WIFI USER GUIDE P/N: DFB601CW Copyright 2008. All Rights Reserved. Printed May 15, 2008 All trademarks and trade names are the properties of their respective owners. Page 2 of 104 Contents INTRODUCTION...
Light Mesh AP. User s Guide. 2009/2/20 v1.0 draft
 Light Mesh AP User s Guide 2009/2/20 v1.0 draft i FCC Certifications This equipment has been tested and found to comply with the limits for a Class B digital device, pursuant to Part 15 of the FCC Rules.
PePWave Mesh Connector User Manual
 PePWave Mesh Connector User Manual Document Rev. 1.0 Jun-07 COPYRIGHT & TRADEMARKS Specifications are subject to change without notice. Copyright 1999-2007 PePWave Ltd. All Rights Reserved. PePWave and
How to manually set up EW-7228APn to extender wireless range
 How to manually set up EW-7228APn to extender wireless range 1. Find out the IP address of your computer. Have your computer get on Internet as normally, without EW-7228APn turning on. If you use a Windows
User Manual of 5.8G Outdoor CPE
 User Manual of 5.8G Outdoor CPE Version V1.2 Thank you for purchasing Enterprise High Gain Outdoor CPE. This manual will instruct you how to configure and manage this CPE, enable you to use it in a perfect
WAP6405. User s Guide. Quick Start Guide. 5GHz AC1750 Gigabit Wireless Bridge. Default Login Details. Version 1.00 Edition 1, 06/2016
 WAP6405 5GHz AC1750 Gigabit Wireless Bridge Version 1.00 Edition 1, 06/2016 Quick Start Guide User s Guide Default Login Details LAN IP Address http://192.168.1.2 (AP Mode) http://192.168.1.5 (Repeater
WAP3205 v2. User s Guide. Quick Start Guide. Wireless N300 Access Point. Default Login Details. Version 1.00 Edition 2, 12/2012
 WAP3205 v2 Wireless N300 Access Point Version 1.00 Edition 2, 12/2012 Quick Start Guide User s Guide Default Login Details LAN IP Address http://192.168.1.2 Password 1234 www.zyxel.com Copyright 2012 ZyXEL
Wireless USB Port Multi-Functional Printer Server. Model # AMPS240W. User s Manual. Ver. 1A
 Wireless USB 2.0 1-Port Multi-Functional Printer Server Model # AMPS240W User s Manual Ver. 1A Table of Contents 1 Introduction...3 1.1 Package Contents... 3 1.2 System Requirements... 3 2 Multi-Functional
Quick Installation Guide
 V50.02 Model: FI8918W Quick Installation Guide Indoor Pan/Tilt Wireless IP Camera Black White For Windows OS ------- Page 1 For MAC OS ------- Page 14 Quick Installation Guide For Windows OS Package Contents
Content 1 OVERVIEW HARDWARE DESCRIPTION HARDWARE INSTALLATION PC CONFIGURATION GUIDE... 5 WEB-BASED MANAGEMENT GUIDE...
 Content 1 OVERVIEW...1 1.1FEATURES...1 1.2 PACKETCONTENTS...3 1.3 SYSTEM REQUIREMENTS... 1.4 FACTORY DEFAULTS...4 1.5 WARNINGS AND CAUTIONS...4 2 HARDWARE DESCRIPTION... 6 3 HARDWARE INSTALLATION...8 4
WF-2402 Quick Installation Guide
 WF-2402 Quick Installation Guide Netis 150Mbps Wireless-N Broadband Router 1. Check Your Package Contents The following items should be found in your package: 150Mbps Wireless-N Broadband Router Power
User Manual. Rev:
 Default Login Details Login Address: www.mykasda.com Login Password: Set up by users Default Wi-Fi SSID: Kasda xxxx KW6516 (Printed on product label) Default Wi-Fi Password: 12345678 www.kasdanet.com Rev:
300M Wireless-N Broadband Router User Manual
 300M Wireless-N Broadband Router Model No.: ib-wrb314n User Manual Ver.: 1.0.0 Contents...Error! Bookmark not defined. Chapter 1 Product Overview... 3 Package Contents 3 Conventions....4 Panel Overview...
WRE2206. User s Guide. Quick Start Guide. Wireless N300 Range Extender. Default Details. Version 1.00 Edition 1, 01/2015
 WRE2206 Wireless N300 Range Extender Version 1.00 Edition 1, 01/2015 Quick Start Guide User s Guide Default Details Web Address http://zyxelsetup OR http://192.168.1.2 www.zyxel.com User Name admin Password
CHAPTER 7 ADVANCED ADMINISTRATION PC
 ii Table of Contents CHAPTER 1 INTRODUCTION... 1 Broadband ADSL Router Features... 1 Package Contents... 3 Physical Details... 4 CHAPTER 2 INSTALLATION... 6 Requirements... 6 Procedure... 6 CHAPTER 3 SETUP...
WRE6606. User s Guide. Quick Start Guide. Dual-Band Wireless AC1300 Access Point. Default Login Details. Version 1.00 (ABDU.0) Edition 1, 10/2016
 Edition 1, 10/2016") WRE6606 Dual-Band Wireless AC1300 Access Point Version 1.00 (ABDU.0) Edition 1, 10/2016 Quick Start Guide User s Guide Default Login Details Web Address http://zyxelsetup http://dhcp-assigned IP www.zyxel.comhttp://192.168.1.2
WRE6606 Dual-Band Wireless AC1300 Access Point Version 1.00 (ABDU.0) Edition 1, 10/2016 Quick Start Guide User s Guide Default Login Details Web Address http://zyxelsetup http://dhcp-assigned IP www.zyxel.comhttp://192.168.1.2
54Mbps Pocket Wireless Access Point (WL-330g)
") 54Mbps Pocket Wireless Access Point (WL-330g) Copyright 2004 ASUSTeK COMPUTER INC. All Rights Reserved. Contents Conventions... 2 Welcome!... 3 Package contents... 3 System requirements... 3 Device installation...
54Mbps Pocket Wireless Access Point (WL-330g) Copyright 2004 ASUSTeK COMPUTER INC. All Rights Reserved. Contents Conventions... 2 Welcome!... 3 Package contents... 3 System requirements... 3 Device installation...
Quick Setup Guide. for Standalone Omada Access Points. EAP110 / EAP115 / EAP225 / EAP245 / EAP320 / EAP330 / EAP115-Wall
 Quick Setup Guide for Standalone Omada Access Points EAP110 / EAP115 / EAP225 / EAP245 / EAP320 / EAP330 / EAP115-Wall EAP110-Outdoor / EAP225-Outdoor / EAP225-Wall 1910012420 REV1.0.1 May 2018 Omada EAP
XL-PB350CA. EoC bridge slave. User manual
 XL-PB350CA EoC bridge slave User manual Content 1. Equipment Connection... 6 2. Set Accessed PC... 6 3.WIFI WEB Configuration... 8 3.1 Login WEB Interface... 8 3.2 WAN Configuration... 10 3.2.1 PPPO E
LevelOne. User Manual. WAP Mbps PoE Wireless AP V3.0.0
 LevelOne WAP-0005 108Mbps PoE Wireless AP User Manual V3.0.0 i TABLE OF CONTENTS CHAPTER 1 INTRODUCTION... 1 FIGURE 1: WIRELESS ACCESS POINT... 1 FEATURES OF YOUR WIRELESS ACCESS POINT... 1 Security Features...
Radiolabs Bridge in a Box Setup
 Radiolabs Bridge in a Box Setup This manual will guide you through creating a point-to-point bridge using your Radiolabs equipment. Step 1: Preparing for setup. To set the bridge up, start by unboxing
Contents. Table of Contents
 Table of Contents Contents 1. Web Interface Configuration... 2 1.1 Login Information... 3 1.2 Saving Configuration Changes... 4 1.3 Status Page... 5 1.4 Log... 6 1.4.1 Log Settings... 6 1.4.2 Syslog...
A5500 Configuration Guide
 A5500 Configuration Guide Sri Ram Kishore February 2012 Table of contents Gateway Configuration... 3 Accessing your gateway configuration tool... 3 Configuring your broadband Internet access... 3 Configuring
Chapter 1 Introduction
 Copyright Statement is the registered trademark of Zonet Technology Inc. All the products and product names mentioned herein are the trademarks or registered trademarks of their respective holders. Copyright
Wireless Access Point
 802.11g / 802.11b / WPA Wireless Access Point User's Guide TABLE OF CONTENTS CHAPTER 1 INTRODUCTION... 1 Features of your Wireless Access Point... 1 Package Contents... 4 Physical Details... 4 CHAPTER
Broadband Router DC-202. User's Guide
 Broadband Router DC-202 User's Guide Table of Contents CHAPTER 1 INTRODUCTION... 1 Broadband Router Features... 1 Package Contents... 3 Physical Details...3 CHAPTER 2 INSTALLATION... 5 Requirements...
Installation & Setup of your Access Networks Ruckus Wireless System
 Installation & Setup of your Access Networks Ruckus Wireless System accessca.com 310. 453. 1800 support@accessca.com Table of Contents Ruckus best practices access point placement...1 How to install your
3GWIFIMRD. 3.5G plus WLAN Desktop Server Router. Quick Setup Guide. 1 Version 1.0
 3GWIFIMRD 3.5G plus WLAN Desktop Server Router Quick Setup Guide 1 Version 1.0 Declaration of Conformity Marking by the above symbol indicates compliance with the Essential Requirements of the R&TTE Directive
WRE6505 v2. User s Guide. Quick Start Guide. Wireless AC750 Range Extender. Default Login Details. Version 1.00 Edition 1, 10/2016
 WRE6505 v2 Wireless AC750 Range Extender Version 1.00 Edition 1, 10/2016 Quick Start Guide User s Guide Default Login Details Web Address http://zyxelsetup http://dhcp-assigned IP www.zyxel.comhttp://192.168.1.2
Different Application Scenarios to use the TP-Link dual band range extender
 Different Application Scenarios to use the TP-Link dual band range extender A dual band range extender, it can extend 2.4Ghz and 5Ghz networks at the same time.the settings are configured slight differently
Dolphin-M. User s Manual
 IEEE 802.11g 54Mbps Wireless Bridge Dolphin-M User s Manual V1.0.0 Copyright There is no any clear or implicit assurance in the user's manual of our company, including the assurance of selling or installing
Premiertek AP Mbps Wireless-N Broadband Router Quick Installation Guide
 Premiertek AP2402 150Mbps Wireless-N Broadband Router Quick Installation Guide V1.0.8.11 1. Check Your Package Contents The following items should be found in your package: 150Mbps Wireless-N Broadband
On the left hand side of the screen, click on Setup Wizard and go through the Wizard.
 Q: How do I configure the TEW-435/504BRM (b1) to a DSL, PPPoE connection? A: Step 1 Open your web browser and type the IP address of the TEW-435/504BRM in the address bar. The default IP address is 192.168.0.1.
EnGenius Quick Start Guide
 T he operates seamlessly in the 2.4 GHz frequency spectrum supporting the 802.11b (2.4GHz, 11Mbps) and the newer, faster 802.11g (2.4GHz, 54Mbpswireless standard. High output power and high sensitivity
802.11N Wireless ADSL Router
 802.11N Wireless ADSL Router Pre-N Wireless Access Point ADSL Modem NAT Router WPS 4-Port Switching Hub User's Guide Table of Contents CHAPTER 1 INTRODUCTION...1 Wireless ADSL Router Features...1 Package
NETWORK USER S GUIDE. Multi-Protocol On-board Ethernet Multi-function Print Server and Wireless Ethernet Multi-function Print Server
 Multi-Protocol On-board Ethernet Multi-function Print Server and Wireless Ethernet Multi-function Print Server NETWORK USER S GUIDE This Network User's Guide provides useful information of wired and wireless
Deploy a Customer Site
 Local Administration, on page 1 Run Port Check Tool, on page 4, on page 4 Add Cisco Wireless IP Phone 8821 to the Wireless LAN, on page 6 Provision the Phone, on page 7 Local Administration You can connect
LevelOne. Quick Installation Guide. WHG series Secure WLAN Controller. Introduction. Getting Started. Hardware Installation
 Introduction LevelOne WHG series Secure WLAN Controller LevelOne Secure WLAN Controller is the most advanced yet simple deployment and cost-effective wireless solution; it is an ideal security solution
7. Server Configuration Introduction Search for All Available MFP Server Status of MFP Server
 Copyright by Edimax Technology Co, LTD. all rights reserved. No part of this publication may be reproduced, transmitted, transcribed, stored in a retrieval system, or translated into any language or computer
Wireless Setup Instructions for Windows
 Wireless Setup Instructions for Windows NOTE: For successful wireless setup, you will need to have a network cable for a temporary connection to your wireless router or access point, and you must know
A Division of Cisco Systems, Inc. GHz 2, g. Wireless-G. User Guide. Access Point WIRELESS WAP54G (EU/LA/UK) Model No.
 Model No.") A Division of Cisco Systems, Inc. GHz 2,4 802.11g WIRELESS Wireless-G Access Point User Guide Model No. WAP54G (EU/LA/UK) Copyright and Trademarks Specifications are subject to change without notice. Linksys
A Division of Cisco Systems, Inc. GHz 2,4 802.11g WIRELESS Wireless-G Access Point User Guide Model No. WAP54G (EU/LA/UK) Copyright and Trademarks Specifications are subject to change without notice. Linksys
CHAPTER 7 ADVANCED ADMINISTRATION PC
 Table of Contents CHAPTER 1 INTRODUCTION... 1 54Mbps 802.11g ADSL Firewall Modem Router Features... 2 Package Contents... 4 Physical Details... 5 CHAPTER 2 INSTALLATION... 7 Requirements... 7 Procedure...
LevelOne User Manual WBR g Wireless ADSL2+ Router
 LevelOne User Manual WBR-3600 11g Wireless ADSL2+ Router V1.0.1-0809 1 FCC Statement This equipment has been tested and found to comply with the limits for a Class B digital device, pursuant to Part 15
HP Deskjet 6800 series
 HP Deskjet 6800 series Network Guide 網路指南 English English Edition 1 May 2004 Copyright 2004 Hewlett-Packard Development Company, L.P. Notice Reproduction, adaptation, or translation without prior written
LiteStation2 LiteStation5 User s Guide
 LiteStation2 LiteStation5 User s Guide Contents Contents... 2 Introduction... 3 Quick Setup Guide... 4 Configuration Guide... 8 Main Settings... 9 Link Setup... 10 Basic Wireless Settings... 10 Wireless
Quick Installation Guide
 Model: FI8916W Quick Installation Guide Indoor Pan/Tilt Wireless IP Camera Black White For Windows OS ------- Page 1 For MAC OS ------- Page 16 ShenZhen Foscam Intelligent Technology Co., Ltd Quick Installation
1. Press "Speed Test" to find out your actual uplink and downlink speed.
 ASRock G10 Gaming Router 6.4 QoS Settings QoS Add Gaming Boost web page. Gaming Boost: Enable or disable the Gaming Boost. Bandwidth The router supports Gaming Boost natively, which identifies and intelligently
IP819VGA g ADSL VoIP Gateway
 IP819VGA 802.11g ADSL VoIP Gateway 802.11g/802.11b Access Point ADSL Modem NAT Router VoIP Gateway User's Guide Table of Contents CHAPTER 1 INTRODUCTION... 1 802.11g ADSL VoIP Gateway Features... 1 Package
Oct Wi-Fi Concierge Web Portal User Guide - English
 Oct 2017 Wi-Fi Concierge Web Portal User Guide - English Table of Contents 1 Overview of Wi-Fi Concierge Web Portal... 3 2 Access Wi-Fi Concierge Web Portal... 3 3 Language Settings... 4 4 Register a New
AXIS T8705 Video Decoder. User Manual
 User Manual Table of Contents Solution overview........................................... 3 Product overview........................................... 4 How to access the product....................................
Quick Install & Troubleshooting Guide. WAP223NC Cloud Managed Wireless N Access Point
 Quick Install & Troubleshooting Guide WAP223NC Cloud Managed Wireless N Access Point Package Contents 1 x WAP223NC Indoor access point powered by CloudCommand 1 x wall and ceiling mounts 1 x 24V PoE power
Settings Settings
 ... 2 Overview... 2 WLAN & WAN Information... 3 Advanced... 4 Changing Security... 20 Internet Connectivity... 21 Overview Activating SoftBank 007Z Utility Use SoftBank 007Z Utility to change network settings,
NM6000 User's guide v1.2
 USER S GUIDE NM6000 WLAN Clientt http://www.wiznet.co.kr Copyright 2004 WIZNET Inc. All Rights Reserved. 1 Table of Contents 1 INSTALLATION...3 1.1 POINTS TO REMEMBER BEFORE INSTALLATION...3 1.2 ACCESSING
Access Connections 5.1 for Windows Vista: User Guide
 Access Connections 5.1 for Windows Vista: User Guide Access Connections 5.1 for Windows Vista: User Guide Note Before using this information and the product it supports, read the general information in
Web UI Guide. Overview 5-2 Activating Web UI 5-2 Status Screen 5-3 Main Menu 5-3
 5 Web UI Guide Overview 52 Activating Web UI 52 Status Screen 53 Main Menu 53 Verification/Changing of Settings 54 Home 54 WiFi 55 Firewall 59 Connection 512 System 515 Help 518 Overview Web UI is a function
NBG-416N. Wireless N-lite Home Router. Default Login Details. IMPORTANT! READ CAREFULLY BEFORE USE.
 NBG-416N Wireless N-lite Home Router IMPORTANT! Default Login Details LAN IP https://192.168.1.1 Address User Name admin Password 1234 READ CAREFULLY BEFORE USE. KEEP THIS GUIDE FOR FUTURE REFERENCE. IMPORTANT!
CLEAR MODEM (SERIES G) USER GUIDE
 USER GUIDE") CLEAR MODEM (SERIES G) USER GUIDE GET TO KNOW YOUR CLEAR MODEM (SERIES G) 3 WHAT S IN THE BOX? 3 INFORMATIVE LED INDICATORS 3 USE WITH CARE 3 SET UP THE MODEM 4 PLACE THE MODEM ON A FLAT, STABLE SURFACE
CLEAR MODEM (SERIES G) USER GUIDE GET TO KNOW YOUR CLEAR MODEM (SERIES G) 3 WHAT S IN THE BOX? 3 INFORMATIVE LED INDICATORS 3 USE WITH CARE 3 SET UP THE MODEM 4 PLACE THE MODEM ON A FLAT, STABLE SURFACE
Contents. Table of Contents
 Table of Contents Contents 1. Web Interface Configuration... 2 1.1 Login Information... 2 1.2 Saving Configuration Changes... 3 1.3 Status Page... 4 1.4 Log... 4 1.4.1 Log Settings... 4 1.5 System... 5
Quick Installation Guide
 Quick Installation Guide DL-200 Cellular Data logger V1.2_201610 TABLE OF CONTENTS CHAPTER 1 INTRODUCTION... 4 1.1 CONTENTS LIST... 5 1.2 HARDWARE INSTALLATION... 6 1.2.1 WARNING... 6 1.2.2 SYSTEM REQUIREMENTS...
SOHO 6 Wireless Installation Procedure Windows XP with Internet Explorer 5.x & 6.0
 SOHO 6 Wireless Installation Procedure Windows XP with Internet Explorer 5.x & 6.0 Before you Begin Before you install the SOHO 6 Wireless, you must have: A computer with a 10/100BaseT Ethernet card installed
Wireless Security Setup Guide
 Wireless Security Setup Guide NF10WV FAQs Wireless Security Overview To guard your home network against attack and prevent unauthorised access, it is very important that you follow this guide to secure
A Division of Cisco Systems, Inc. GHz g. Wireless-G. User Guide. Access Point WIRELESS. WAP54G v2. Model No.
 A Division of Cisco Systems, Inc. GHz 2.4 802.11g WIRELESS Wireless-G Access Point User Guide Model No. WAP54G v2 Copyright and Trademarks Specifications are subject to change without notice. Linksys is
AXIS M1065-LW Network Camera. User Manual
 User Manual Table of Contents Product overview........................................... 3 How to connect the camera to a wireless network................ 4 How to manually configure the wireless network......................
Network User s Guide
 Network User s Guide Multi-Protocol On-board Ethernet Print Server and Wireless Print Server This Network User's Guide provides useful information on wired and wireless network settings and security settings
power port make sure the ac adapter is plugged into the correct port Make sure to include at the beginning.
 Quickstart Guide If you have a blank SD card, you may insert it into the camera. To set up your camera for use on the network, connect the camera's wired network port to a router. Connect the AC adapter
The Administration Tab - Diagnostics
 The Administration Tab - Diagnostics The diagnostic tests (Ping and Traceroute) allow you to check the connections of your network components. Ping Test. The Ping test will check the status of a connection.
Quick Installation Guide DAP N300 Wi-Fi Range Extender
 N300 Wi-Fi Range Extender BEFORE YOU BEGIN Delivery Package Extender (brochure). If any of the items are missing, please contact your reseller. The User Manual and documents are available on D-Link website
airhaul Nexus sb3010
 u n w i r i n g o u r w o r l d TM airhaul Nexus sb3010 User Configuration Guide Version 1.3 Copyright smartbridges Pte Ltd. All Rights Reserved. About This Document This Software Configuration Guide is
Wireless LAN Access Point
 Wireless LAN Access Point IEEE 802.11b 11Mbps User s Manual Table of Contents Chapter 1 Introduction... 1 1.1 Package Contents... 2 1.2 Features... 2 1.3 Specifications... 2 1.4 Physical Description...
User Manual DIR-615. Wireless Router with Built-in 4-port Switch
 DIR-615 Wireless Router with Built-in 4-port Switch December 2011 Contents Chapter 1. Introduction...4 Contents and Audience...4 Conventions...4 Document Structure...4 Chapter 2. Overview...5 General Information...5
802.11b/g Mesh Outdoor AP User Guide
 Mesh51 802.11b/g Mesh Outdoor AP User Guide Contents Introduction......3 Features........ 4 Mesh51 Management Software.........5 Configure Mesh51....... 21 Set Mesh51 IP....... 58 Set Login Password......
DCP585CW Windows Network Connection Repair Instructions
 Difficulty printing from your PC can occur for various reasons. The most common reason a networked Brother machine may stop printing, is because the connection between the computer and the Brother machine
QUICK START GUIDE. Pepwave Express. Quick Start Guide. Pepwave Express. Nov Pepwave
 Quick Start Guide Nov-12 http://www.pepwave.com 1 Copyright @ 2012 Pepwave First Time Setup 1. Default Configuration IP: 192.168.0.1 Subnet Mask: 255.255.255.0 2. Network Configuration acts as a CPE bridge
Multi-Function Wireless A/P Router User s Guide
 Multi-Function Wireless A/P Router User s Guide Model CNWR-811P Wireless Access Point Router W / Printer Sharing TABLE OF CONTENTS CHAPTER 1 INTRODUCTION...1 CNWR-811P Features...1 Package Contents...3
Quick Start Guide. NP290W Turbo Wireless HomePlug
 Quick Start Guide Turbo Wireless HomePlug Contents Chapter 1 Introduction... 3 1.1 Minimum Requirements... 3 1.2 Typical Turbo Wireless HomePlug Connection... 3 1.3 Package Contents... 3 Chapter 2 Turbo
WiFi-Repeater User Manual. Quick Installation Guide(Q.I.G.) REV.1.2
 REV.1.2") WiFi-Repeater User Manual Quick Installation Guide(Q.I.G.) REV.1.2 Introduction: The WiFi Repeater is a combined wired/wireless network connection device designed specifically for small business, office,
WiFi-Repeater User Manual Quick Installation Guide(Q.I.G.) REV.1.2 Introduction: The WiFi Repeater is a combined wired/wireless network connection device designed specifically for small business, office,
JNR1010v2 N150 Wireless Router User Manual
 User Manual January 2014 202-11340-02 350 East Plumeria Drive San Jose, CA 95134 USA Support Thank you for selecting NETGEAR products. After installing your device, locate the serial number on the label
User Guide. DOCSIS 3.0 High Speed Cable Modem TC7650 REV
 User Guide DOCSIS 3.0 High Speed Cable Modem TC7650 REV1.1.0 1910011895 Contents About This Guide..................................................... 1 Chapter 1. Get to Know Your Modem................................
Installing driver over the network
 Installing driver over the network Command- line Definition Description Command- line Definition Description /a or /A /n or /N /nd or /ND Specifies
How to upgrade the firmware
 How to upgrade the firmware This document will detail how to update the firmware on DAP-1150. Ensuring the firmware remains up to date can assist with functionality / improved performances as well as adding
WL5041 Router User Manual
 TECOM WL5041 Router User Manual TECOM CO., LTD. March 2003 2003 by TECOM CO., LTD. All rights reserved. Printed in Taiwan Table of contents Package Contents--------------------------------------- 2 Installing
MF10 3G Wireless Router
 MF10 3G Wireless Router Fixed Wireless Adapter Quick Setup Guide Contents Contents... 2 Description:... 3 Features:... 3 LED Indicator... 3 Interface Description... 4 Installation... 5 Inserting the (U)SIM
Configuration of Access Points and Clients. Training materials for wireless trainers
 Configuration of Access Points and Clients Training materials for wireless trainers Goals To provide a simple procedure for the basic configuration of WiFi Access Points (and clients) To review the main
PMS 138 C Moto Black spine width spine width 100% 100%
 Series MOTOROLA and the Stylized M Logo are registered in the US Patent & Trademark Office. All other product or service names are the property of their respective owners. 2009 Motorola, Inc. Table of
IN-SESSION ROOM SCHEDULER
 SETUP GUIDE: COMMON SETTINGS RS-TOUCH SERIES IN-SESSION ROOM SCHEDULER 24/7 AT OR BLACKBOX.COM TABLE OF CONTENTS 1. INTRODUCTION... 3 1.1 Description... 3 1.2 Network Infrastructure Requirements... 3 1.3
Quick Installation Guide
 V47.01 Model: FI8909W Quick Installation Guide Indoor Wireless IP Camera Black White For Windows OS ------- Page 1 For MAC OS ------- Page 16 ShenZhen Foscam Intelligent Technology Co., Ltd Quick Installation
Using the EN-2000 s Management System
 EN-2000 Reference Manual Document 2 Using the EN-2000 s Management System T he EN-2000 provides wireless and wired connections to a local area network (LAN), to a wide area network (WAN, and to peripheral
Network Controller 3500 Quick Start Guide
 Network Controller 3500 Quick Start Guide Firmware Version 1.00.82 1. Configuring the Controller 1.1. Connect to the Controller: The default LAN IP Address of the Controller is: IP: 192.168.1.1 Set you
FinIntrusion Kit / Release Notes. FINFISHER: FinIntrusion Kit 4.0 Release Notes
 1 FINFISHER: FinIntrusion Kit 4.0 Release Notes 2 Copyright 2013 by Gamma Group International, UK Date 2013-07-12 Release information Version Date Author Remarks 1.0 2010-06-29 ht Initial version 2.0 2011-05-26