Copyright 2015 by EnGenius Technologies. All Rights Reserved.
|
|
|
- Audrey Clark
- 5 years ago
- Views:
Transcription

1 Copyright 2015 by EnGenius Technologies. All Rights Reserved.
2 Table of contents Introduction...4 Overview...4 ezmaster Software...4 Deployment Scenario...4 Installing ezmaster...5 Firewall Ports to be opened for ezmaster...5 Server System Requirements...5 Before you begin...5 Installing and setting up VMware Player...5 Installing and setting up ezmaster...7 Logging into ezmaster...9 Getting Started Connecting devices to ezmaster Registering ezmaster to ezregistration Server Adding devices to ezmaster Device Inventory Manually redirecting devices to ezmaster Managing Access Points Working with ezmaster Main Dashboard Projects Global Settings Device Inventory Working with Projects Device Control Summary Device Config Group Access Control Visualization Topology View Map View Floor View Update Bulk Upgrade Hotspot Service Captive Portal Guest Account Monitoring Active Clients Event Logs Access Point Configuration General Settings Wireless Radio Settings WLAN Settings / 44
3 Guest Network Advanced Settings / 44

4 Introduction Overview EnGenius ezmaster is a powerful and scalable enterprise-class centralized network management system that manages EnGenius Neutron Series products for building and managing enterprise grade Wi-Fi infrastructures for all sizes of businesses from a single console. Through an intuitive user interface, Neutron devices are managed based on projects, enabling simplified WLAN configuration, firmware upgrades, centralized monitoring and much more, making managing thousands of devices as easy as managing a single device. ezmaster Software ezmaster is packaged as a VMware image for quick and easy deployments. It can be launched using the free VMware Player or other commercial VMware. Deployment Scenario 4 / 44
 TCP destination port 433 (HTTPS) Description CAPWAP protocol For captive portal splash page redirect For captive portal splash page")
5 Installing ezmaster Firewall Ports to be opened for ezmaster The table below lists the ports that must be opened for ezmaster to function properly. Port UDP destination port 1234 TCP destination port 80 (HTTP) TCP destination port 433 (HTTPS) Description CAPWAP protocol For captive portal splash page redirect For captive portal splash page redirect Server System Requirements Recommended environment for managing up to 1000 APs CPU: Intel i3 3.5GHz dual core or above RAM: 4GB minimum HDD: 500GB (actual requirement depending on log size) OS: Microsoft Windows 7 or later + VMware Player or later Before you begin For ezmaster to manage an AP or switch, the device must be able to communicate with the ezmaster server. Make sure that the ezmaster server, EWS AP and EWS switch can all be reachable via HTTP/HTTPS from outside your internal network. Installing and setting up VMware Player 1. Download VMware Player (7.0.0 or later) from the link below: 2. After successfully installing VMware Player, start the program and click on Open a Virtual Machine 5 / 44


6 3. Locate and select the ezmaster image file. 4. Once the ezmaster image has been mounted, select: Player > Manage > Virtual Machine Settings 6 / 44

. Choose only one wired LAN adapter.")
7 5. Under the Hardware tab, click on Network Adapter and select Bridged: Connect directly to the physical network. 6. If your PC has more than one network adapter, click on Configure Adapters and choose the network adapter that your computer uses to connect to the Internet (WAN). Choose only one wired LAN adapter. DO NOT select a Wireless LAN adapter or other virtual adapters. 7. Click on OK to save apply settings. 7 / 44


8 Installing and setting up ezmaster 1. After setting up your network adapter, select Play Virtual Machine to launch the ezmaster image. 2. When prompted to choose whether the image was moved or copied, select I Copied It. 3. Once the installation script finishes running, you will be prompted to enter a login id and password for ezmaster. Enter admin/password. Tip: Use Ctrl + Alt to return to Windows desktop 8 / 44
 a)")

 b) Enter ezmaster Server gateway: config")
9 4. When the command prompt appears, assign the ezmaster Server URL. (Tip: use Network Adapter Properties to check the info of your network adapter) a) Enter ezmaster Server IP and netmask: config ip eth (eg. LAN Adapter IP is so I choose to use an unused IP Address is chosen to be used as ezmaster IP) b) Enter ezmaster Server gateway: config gateway c) Enter ezmaster DNS Server: config dns You have completed installing ezmaster. 9 / 44

10 Logging into ezmaster 1. Open a web browser and type the IP address of the ezmaster server. 2. Once the log in screen appears, enter the username and password to log in. The default is admin/password. 10 / 44
 will be automatically detected and ready for management in the Pending Approval list under Device Config in each project.")
11 Getting Started Connecting devices to ezmaster With ezmaster, you'll be able to manage both local and remote access points. The table below lists the methods of how access points are managed. Access Point Local Remote Remote Details All local devices (in same subnet) will be automatically detected and ready for management in the Pending Approval list under Device Config in each project. (Note: ezmaster does not need to be registered to the ezregistration server if you are only managing local access points) Register ezmaster to the ezregistration server. Then claim your access points to add them to ezmaster s Device Inventory. Devices successfully claimed will automatically be listed in the Pending Approval list under Device Config in each project. Manually assign the ezmaster server URL from the access point s user interface (under Management > Controller Settings). If configured successfully, the access point will connect directly the the ezmaster and it will be automatically detected and ready for management in the Pending Approval list under Device Config in each project. (Note: ezmaster does not need to be registered to the ezregistration server if you are managing access points using this method). 11 / 44

12 Registering ezmaster to ezregistration Server To manage remote device using ezmaster, you must first register ezmaster to the ezregistration server. You may skip this section if you are managing only local devices or if you are manually redirecting each AP to ezmaster. 1. In the ezmaster user interface, click on the Global Settings menu. 2. Under Account Setting, fill in your and assign a password, then click Apply to register with the ezregistration server. 12 / 44

 to separate each field.eg. MAC Address;Check Code;Description To register more than one device at the same time, enter the information of one device per row by pressing Enter.")
13 Adding devices to ezmaster Device Inventory Before managing a remote AP/switch, you must first bind the AP to ezmaster's Device Inventory by registering the device. Skip this section if you are managing only local devices or if you are manually redirecting each AP to ezmaster. 1. Once ezmaster has been registered with the ezregistration server, you can start registering your APs and adding them to ezmaster s device inventory by clicking on the Device Inventory icon. 2. Next, click on the Device Registration button on the side menu. 3. Enter the MAC Address, Check Code and Description of your AP/Switch using a semi-colon (;) to separate each field.eg. MAC Address;Check Code;Description To register more than one device at the same time, enter the information of one device per row by pressing Enter. Click Register once you are done. Note: The 'check code' of the AP can be found in the AP's user interface under the "Management" menu > "Controller Settings". *In the future (official release), the check code will be printed on the device label at the bottom of each AP. The check code will also be displayed in the "Device" menu in the EWS Switch user interface. 13 / 44

14 4. The message below will be displayed upon successfully claiming an AP and you will see the AP under the Device List. Manually redirecting devices to ezmaster From the AP's web user interface, select 'Management'. Under Controller Settings, fill in the IP Address of the ezmaster server you wish to redirect to AP to. The 'Test' button can be used to test whether the AP can successfully connect with the ezmaster server. Click on Apply to save settings. 14 / 44
15 Managing Access Points Same as on the EWS Switch, EWS Access Points will have to be added to the Managed AP list in order to configure and monitor the APs. 1. Click on the Project icon to create a new project. A Project is similar to a profile which can be used to classify/represent different sites or floors of your deployment. 2. Click on Create New Project and enter a project name and description. Click on Apply when you are done. 3. You'll be automatically redirected to the Device Pending Approval list after successfully creating a profile. The Pending Approval list will display a list of AP/switches in your local network (same network as ezmaster) and also remote AP/switches claimed by ezmaster. 4. Select the AP(s) you wish to add to your profile by selecting the checkbox and click on the Add button. 5. You'll be automatically redirected to the device page. Once the AP is online (green), to configure your AP, click on the Device Name of your AP to bring up the configuration menu. 15 / 44
16 16 / 44

17 Working with ezmaster Main Dashboard After logging in to the ezmaster web interface, the Dashboard is the first page that appears. The Dashboard provides a quick summary of the ezmaster system displaying information such as system status, system information and software version. The main menu on the upper left consist of 4 tabs: Home: Return to dashboard Project: Create/manage a project Global Settings: ezmaster related system settings Device Inventory: Allows you to claim remote devices you wish to manage 17 / 44

18 Projects A project is concept similar to a 'profile' which can be used to classify/represent different floors or sites of your deployment. On this page, you'll be able to manage existing projects as well as create new projects. 18 / 44

19 Global Settings This page contains ezmaster related settings. < 待補 > 19 / 44

20 Device Inventory In order to manage devices which are in a different network from ezmaster, you must first register these devices into ezmaster's device inventory. Once added to your inventory, you will be able to manage these devices from your projects. Note: Local devices (devices in the same network as ezmaster) can be managed without registering to ezmaster inventory and will appear automatically under the Pending Approval List. 20 / 44

21 Working with Projects A project is concept similar to a 'profile' which can be used to classify/represent different floors or sites of your deployment. Device Control Summary The Summary page provides a quick overview of the selected project. 21 / 44

22 Device Config This page displays the status of all devices that are currently being managed by the selected project. From the menu on the left, you can select whether to display the list of managed APs or switches, and also display a list of devices that are currently pending approval. Use this page to add new EWS Access Points and EWS Switches to your project. Dashboard The Dashboard on the upper right shows the current number of devices that is being managed by the selected project. Remove AP The Remove button removes selected Access Point(s) from list. Access Points removed will be automatically set to standalone mode with all settings restored to their factory default settings, and will appear in the Pending Approval list. Reboot AP The Reboot button will reboot the selected Access Point(s). Search Bar Use the Search Bar to search for managed Access Points using the following criteria: Status, model name, MAC Address, Device name, IP address, Firmware Version, Group. Status This indicates the current status of the managed Access Point. Status Online Provisioning Applying Change Connecting Offline Resetting Firmware Upgrading Invalid IP Incompatible Version Checking Certificate Explanation AP is connected and managed by EWS Switch. AP is currently in the process of connecting to the EWS Switch. AP is currently applying system changes. AP is currently connecting to EWS Switch. AP is currently offline. AP is resetting. AP is currently undergoing firmware upgrade process. The subnet of managed AP s IP address is not the same as the EWS Switch. Please remove AP and reconfigure AP to the correct setting. AP firmware is not compatible with EWS Switch. EWS Switch is checking the SSL Certificate of AP. Model Name Shows the model name of the managed Access Point. MAC Address 22 / 44

23 Shows the MAC address of the managed Access Point. Device Name Displays the device name of the managed Access Point. When the AP is not configured to a Group, click on this field and you ll be redirected to the configuration page where you can edit settings such as device name, IP Address, Wireless Radio settings. When the AP is configured to a Group, click on this field to configure settings for individual Access Points by overriding the cluster settings. IP Address Shows the IP address of the managed Access Point. Firmware Version Shows the firmware version of the managed Access Point. Last Update Display the time the Access Point was last detected and the information was last updated. Uptime: Displays the number of days, hours, and minutes since the AP last restarted. Group Displays the Group the Access Point is currently assigned to. Column Filter Shows or hides fields in the Access Point list. Group Access Point groups can be used to define configuration options and applying these settings to multiple APs at once without having to modify each AP s settings individually. If your wireless network covers a large physical environment and you want to provide wireless services with different settings and policies to different areas of your environment, you can use AP Groups to do this instead of having to modify the settings of each AP individually. For example, if your wireless network covers two floors and you need to provide wireless access to visitors on the 1st Floor, you can simply setup two different AP Groups with different settings and policies to suit your application. Group settings can be overridden by individual AP settings. For example, if you want to set the transmit power to a lower setting for only a few specific APs, under the Device Config screen click on the Device Name field of the Access Point (which is already in a group) you wish to configure and you will be directed to a screen where you can configure override settings for the selected Access Point. 23 / 44

24 Access Control This page displays the list of wireless clients previously blocked from your network (using the Ban function from the Active Clients list). If for any reason, you need to block a client device from your network, you can do so from this page by creating a new rule and entering the client's MAC address. Blocking a Specific Client Device Follow the steps below to permanently block a specific client device from the network. 1. Click the Add button to create a new block rule. 2. Enter the MAC Address and Description of the wireless client device you wish to block. 3. Click on Apply to create a new rule. 4. Click on the Apply button on the upper right to save settings made on this page. Unblocking a Previously Blocked Client Device 1. Click on the Delete button on the client device you wish to unblock. 2. Click on the Apply button on the upper right to save settings made on this page. 24 / 44

25 Visualization Topology View If you have an EWS Switch deployed in your network, you will be able to see a visual view of the topology of all supported devices in the network. The EWS Switch will automatically maps your network deployment and displays the device relationships across your network infrastructure. An essential feature for troubleshooting network issues that would otherwise require manual mapping, overlay monitoring software, or manually keeping track of MAC address tables. Use the directional pad and the plus or minus buttons to navigate your view of the network. You can also search Access Points in the network via their IP or MAC address. Check the Show Port Info box to show whether you wish the search query to show port information. AP Status Online Offline Busy Unmanaged Topology Change Description The managed AP is currently online The managed AP is currently offline The managed AP is currently busy (applying new configuration settings) The AP is not managed by the controller There is a change in topology for this device Navigating Tips Use to scroll up, down, left, or right. Use to Zoom in/out. Alternatively, you can use the mouse to navigate by clicking and dragging the left mouse button. Use the mouse wheel to zoom in/out. Mouse over a device to show information about the device. 25 / 44
26 Left click on the Switch bring up a menu where you can redirect to switch or collapse topology tree. Left click on the Access Point to bring up a menu where you can configure AP settings, remove AP from management list, reboot AP, redirect to the Active Clients page or redirect to troubleshooting page. You can search for an Access Point using the IP Address or MAC address. Click on to show or hide port information on the Controller. Click on for the Controller to save the current network topology. Changes will be displayed upon detecting a topology change. Note: The EWS Switch can only generate topologies with EnGenius L2 Series switches. Non-EnGenius switches will be marked as Uncontrollable LAN Switches in the generated topology. 26 / 44


27 Map View From here, you can view a geographical representation of Access Points in the network. Click AP List to display the list of Access Points managed by the selected project then simply click-and-drag the AP marker to the desired location on the map. AP Status Online Offline Busy Description The managed AP is currently online The managed AP is currently offline The managed AP is currently busy (applying new configuration settings) Navigating Tips Use to scroll up, down, left, or right. Use the slider bar to Zoom in/out. Alternatively, you can use the mouse to navigate by clicking and dragging the left mouse button. Use the mouse wheel to zoom in/out. Use the Search box to search for locations by typing an address or the name of a landmark. Use the Locate button to pinpoint the map to your current location. Note that the location provided is calculated based on your IP address and results might be inaccurate. Left click on the Access Point marker to bring up a menu where you can configure AP settings, remove AP from management list, reboot AP, redirect to the Active Clients page or redirect to troubleshooting page. Click on for the settings to take effect. 27 / 44


28 Floor View After importing your floor plan image, you can distribute markers that represent the APs to the correct locations by clicking on AP List and dragging each marker icon to its correct location on the floor plan. Also, Wireless Coverage Display can be toggled on to indicate the coverage range of each AP, assisting IT managers to easily and accurately plan and deploy wireless networks in any indoor environment. Click on Save Plan when you're done to save settings. Settings AP Info AP Information: Select to toggle on/off AP detailed information to be shown on your floor plan. 2.4GHz / 5GHz: Select whether to display signal coverage of 2.4GHz or 5GHz radio. The wireless coverage displayed will be based on the transmit power settings of the Access Point. Scaling Tool: Use the scaling tool to determine the exact distance on the floorplan. Signal Indicator: The colored indicator displays the reference signal strength covered. RF Coverage Enable: Select to display wireless coverage on your floor plan. RSSI Value: Adjust RSSI value to emulate using the slider bar. Calibration Offset: Use the slider bar to adjust the offset value based on the deployment. RSSI Range Simulate: Check the RSSI Simulate box to display RSSI reference on your floor plan. Adjust RSSI coverage range to emulate using the slider bar. 28 / 44

29 Navigating Tips Use to scroll up, down, left, or right. Use to Zoom in/out. Alternatively, you can use the mouse to navigate by clicking and dragging the left mouse button. Use the mouse wheel to zoom in/out. Mouse over a device to show information about the device. AP List: Click to reveal a list of APs that the EWS Switch is currently managing. The number in the marker represents the number of wireless clients that are currently connected to the Access Point. Left click on the Access Point marker to bring up a menu where you can configure AP settings, remove AP from management list, reboot AP, redirect to the Active Clients page or redirect to troubleshooting page. Click on for the settings to take effect. 29 / 44

30 Update Bulk Upgrade The Bulk Upgrade feature allows administrators to upgrade the firmware of multiple Access Points at the same time. After uploading the firmware of an AP, the system will automatically display a list of Access Points the system is currently managing that the uploaded firmware is for. To upgrade, please follow the steps below: 1. Click on Upload New File to mount AP firmware onto ezmaster's flash. 2. Once the Access Point firmware is uploaded successfully, a list of Access Points that the uploaded firmware is for will appear in the Device List. 3. Select the Access Points you wish to upgrade and click Add to Upgrade to start the firmware upgrading process. NOTE: Upgrading APs will temporarily disconnect them (and any associated clients) from the network. To minimize network disruption, we recommend performing the firmware upgrading procedure at an off-peak time. 30 / 44
31 Hotspot Service Captive Portal 31 / 44
32 Captive portal provides registered users with network access while containing unregistered users. Users will need to enter a valid user name and password before they are allowed access to the Internet through the hotspot. Once a Captive Portal Profile is created, the administrator can apply this profile to multiple Guest Networks SSIDs. Profile Name: Enter a name for this captive portal profile. Description: Enter a brief description for this captive portal profile. Authentication Type: defines the mechanism by which a wireless client gains access to the network after the client has associated to the SSID. Splash & Go Local Database External RADIUS Server Cloud4Wi The wireless client is granted network access without any further authentication as soon as it is associates to the SSID. The wireless client is authenticated using ezmaster's Local Database (from the Guest Account page). The wireless client is authenticated using an external RADIUS server. The wireless client is authenticated using a third party Hotspot Management platform: Cloud4Wi. For more information, visit Note: In the beta release, this feature is still under development and does not work. Splash Page: A splash page is the web page which prompts the user to log in with a user name and password, or accept a network use policy once the client has associated to the SSID. ezmaster supports both local and external splash page. Local Splash Page External Splash Page Use the splash page hosted locally by ezmaster server. The local splash page enable administrators to eliminate the need to set up a local web server. Customizations like displaying a corporate logo, custom message and term of use is available. External splash page enables the administrator to host their own the splash page web server, rather than having it hosted by ezmaster. Redirect Behavior: Configure where users will be redirected after successful login. You could redirect them to the page that they want to visit, or you could set a different page where users will be redirected. Redirect to the URL the user was trying to visit Redirect to a different URL Select this option for ezmaster to cache the initial website from the client during the authentication process and then forward it to the originally targeted web server after the user successfully authenticates. Select this option to redirect users to a specific URL after users successfully authenticates. 32 / 44

33 User Session: Configure session timeout and ideal timeout period. Session Timeout Idle Timeout Specify a time limit after which users will be disconnected and required to log in again Specify a time limit for an idle client after which users will be disconnected and required to log in again Walled Garden: This option allows users to define network destinations that users can access before authentication. For example, your company's website. Guest Account On the Access Control page, an administrator can create, edit, and remove user accounts used for captive portal's local database authentication. 33 / 44

34 Monitoring Active Clients From here, you can view information, temporarily disconnect and permanently block the wireless clients that are associated with the Access Points. ezmaster is able to identify client devices by their Operating System, device type and host name, if available. If multiple Access Points are connected to the network, use the search bar to find an Access Point by its name. Kick Client Use this function to temporarily disconnect a wireless client from the network. The disconnected client can simply reconnect manually if they wish to. Ban Client Use this function to permanently block a wireless client from the network. Go to Device Management > Access Control to unblock the wireless client. Search Bar Use the Search Bar to search for Wireless Clients managed by the EWS Switch using the following criteria: Client Name, Client IP, Client MAC Address, Client OS, AP Device Name, AP MAC Address, Model Name, SSID, Band, TX Traffic, RX Traffic. Client Name Client IP Client MAC Address Client OS AP Device Name AP MAC Address Model Name SSID Displays the name of the wireless client connected to the Access Point. Displays the IP address of the wireless client connected to the Access Point. Displays the MAC address of the wireless client connected to the Access Point. Displays the type of operating system the wireless client connected to the Access Point is running on. Displays the name of the Access Point which the client is connected to. Displays the MAC address of the Access Point which the client is connected to. Displays the model name of the Access Point which the client is connected to. Displays the SSID of the Access Point which the client is connected to. 34 / 44

35 Band TX Traffic (KB) RX Traffic (KB) RSSI (dbm) Displays whether the wireless client is connected to the 2.4GHz or 5GHz radio. Displays the total traffic transmitted to the Wireless Client. Displays the total traffic received from the Wireless Client. Displays the received signal strength indicator in terms of dbm. Event Logs The Event Log is designed to monitor the operation of ezmaster by recording the event messages it generates during normal operation. These events may provide vital information about system activity that can help in the identification and solutions of system problems. This page displays the most recent records. Log entries are listed in reverse chronological order (with the latest logs at the top of the list). Click a column header to sort the contents by that category. 35 / 44

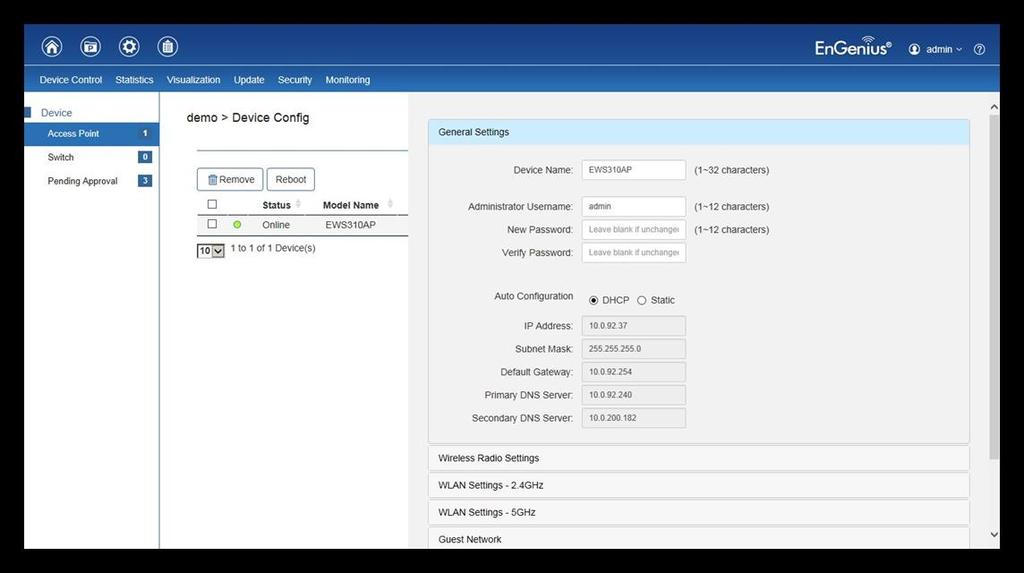
36 Access Point Configuration On this page, you can edit the AP's name and password, manually assign an IP address, or change the channel selection, transmit power and other wireless settings of a managed Access Point. General Settings Device Name: The device name of the Access Point. Users can enter a custom name for the Access Point if they wish. Administrator Username: Displays the current administrator login username for the Access Point. Enter a new Administrator username for the Access Point if you wish to change the username. The default username is: admin. New Password: Enter a new password of between 1~12 alphanumeric characters. Verify Password: Enter the password again for confirmation. Auto Configuration: Select whether the device IP address will use the static IP address specified in the IP Address field or be obtained automatically when the device connects to a DHCP server. IP Address: Enter the IP address for the Access Point. Subnet Mask: Enter the Subnet Mask for the Access Point. Default Gateway: Enter the default Gateway for the Access Point. Primary/Secondary DNS Server: Enter the Primary/Secondary DNS server name. 36 / 44

37 Wireless Radio Settings Country: Select a Country/Region to conform to local regulations. Different regions have different rules that govern which channels can be used for wireless communications. Wireless Mode: Select from the drop-down menu to set the wireless mode for the Access Point. Channel HT Mode: Use the drop-down menu to select the channel width for 2.4GHz. A wider channel improves the performance, but some legacy devices operate only on either 20MHz or 40 MHz. This option is only available for n modes. Extension Channel: Use the drop-down menu to set the Extension Channel as Upper or Lower channel. An extension channel is a secondary channel used to bond with the primary channel to increase this range to 40MHz allowing for greater bandwidth. This option is only available when Wireless Mode is n and Channel HT Mode is 20/40MHz or 40MHz. Channel: Select Auto or manually assign a channel for the 2.4GHz or 5GHz radio. Transmit Power: Allows you to manually set the transmit power on 2.4GHz or 5GHz radios. Optimizing channel assignments reduces channel interference and channel utilization for the network, thereby improving overall network performance and increasing the network s client capacity. The list of available channels that can be assigned to radios is determined based on which country the Access Points are deployed in. Client Limits: Limit the total number of clients that can associate with this Access Point. Data Rate: Use the drop-down list to set the available transmit data rates permitted for wireless clients. The data rate affects the throughput of the access point. The lower the data rate, the lower the throughput, but the longer transmission distance. RTS/CTS Threshold: Enter a Request to Send (RTS) Threshold value between 1~2346. Use RTS/CTS to reduce data collisions on the wireless network if you have wireless clients that are associated with the same Access Point. Changing the RTS threshold can help control traffic flow through the Access Point. If you specify a lower threshold value, RTS packets will be sent more frequently. This will consume more bandwidth and reduce the throughput of the Access Point. Sending out more RTS packets can help the 37 / 44
38 network recover from interference or collisions which might occur on a busy network or on a network experiencing electromagnetic interference. Aggregation: Select whether to enable or disable Aggregation for the Access Point. This function merges data packets into one packet, reducing the number of packets. This also increases the packet sizes, so please keep this in mind. Aggregation is useful for increasing bandwidth throughput in environments that are prone to high error rates. This mode is only available for n modes. Fill in the frame rate limit you wish to use. The range is from 1~32. Next, fill in the max byte limit. The range is from 2304~ / 44

39 WLAN Settings Basic Setting Enable SSID: Select to enable or disable the SSID broadcasting. SSID: Enter the SSID for the current profile. This is the name that is visible to wireless clients on the network. Hidden SSID: Enable this option if you do not want to broadcast this SSID. This can help to discourage wireless users from connecting to a particular SSID. Client Isolation: When enabled, all communication between wireless clients connected to the same AP will be blocked. L2 Isolation: When enabled, wireless client traffic from all hosts and clients on the same subnet will be blocked. VLAN Isolation: When enabled, all communications between wireless clients and any other devices on different VLANs will be blocked. All frames from wireless clients connected to this SSID will be tagged a corresponded 802.1Q VLAN tag when going out from Ethernet port. VLAN ID: Enter the VLAN ID for the SSID profile. The range is from 1~4094. When VLAN tagging is configured per SSID, all data traffic from wireless users associated to that SSID is tagged with the configured VLAN ID. Multiple SSIDs also can be configured to use the same VLAN tag. For instance, a 39 / 44
40 single VLAN ID could be used to identify all wireless traffic traversing the network, regardless of the SSID. When the AP receives VLAN-tagged traffic from the upstream switch or router, it forwards that traffic to the correct SSID. The AP drops all packets with VLAN IDs that are not associated to the SSID. Traffic Shaping: Traffic Shaping regulates the allowed maximum downloading/uploading throughput per SSID. Select to enable or disable Wireless Traffic Shaping for the SSID. Download Limit: Specifies the allowed maximum throughput for downloading. Upload Limit: Specifies the allowed maximum throughput for uploading. Fast Roaming: This feature uses protocols defined in r to allow continuous connectivity for wireless devices in motion, with fast and secure roaming from one AP to another. Coupled with k, wireless devices are able to quickly identify nearby APs that are available for roaming and once the signal strength of the current AP weakens and your device needs to roam to a new AP, it will already know which AP is the best to connect with. Note that not every wireless client supports k and r. Both the SSID and security options must be the same for this fast roaming to work. Fast Roaming is available when the following security methods are well configured: WPA2-Enterprise WPA-Mixed Enterprise WPA2-PSK WPA-Mixed RADIUS server required No RADIUS server required Security: Select encryption method (WEP, WEP / WPA2 Enterprise, WPA-PSK / WPA2-PSK, or none) and encryption algorithm (AES or TKIP). WEP: Wired Equivalent Privacy (WEP) is a data encryption protocol for wireless networks which scrambles all data packets transmitted between the Access Point and 40 / 44
41 the wireless clients associated with it. Both the Access Point and the wireless client must use the same WEP key for data encryption and decryption. o Mode: Select Open System or Shared Key. o WEP Key: Select the WEP Key you wish to use. o Input Type: ASCII: Regular Text or HEX. Select the key type. Your available options are ASCII and HEX. ASCII Key: You can choose upper and lower case alphanumeric characters and special symbols such and #. HEX Key: You can choose to use digits from 0~9 and letters from A~F. Select the bitlength of the encryption key to be used in the WEP connection. Your available options are: 64, 128, and 152-bit password lengths. o Key Length: Select the desired option and ensure the wireless clients use the same setting. Your choices are: 64, 128, and 152-bit password lengths. o Key1/2/3/4: Enter the Key value or values you wish to use. WPA / WPA2 Enterprise: WPA and WPA2 are Wi-Fi Alliance IEEE i standards, which include AES and TKIP mechanisms. o Type: Select the WPA type to use. Available options are Mixed, WPA and WPA2. Choose Mixed if your network has a mixture of older clients that only support WPA and TKIP, and newer client devices that support WPA2 and AES. o Encryption: Select the WPA encryption type you would like. Your available options are: Both, TKIP(Temporal Key Integrity Protocol) and AES(Advanced Encryption Standard). Note: Since TKIP is not permitted for n-based transmissions, setting the encryption algorithm to TKIP when you are using an n or ac AP will cause the network to operate in g mode. o RADIUS Server: Enter the IP address of the RADIUS server. o RADIUS Port: Enter the port number used for connections to the RADIUS server. o RADIUS Secret: Enter the secret required to connect to the Radius server. o Update Interval: Specify how often, in seconds, the group key changes. Select 0 to disable. o RADIUS Accounting: Enables or disables the accounting feature. o RADIUS Accounting Server: Enter the IP address of the RADIUS accounting server. o RADIUS Accounting Port: Enter the port number used for connections to the RADIUS accounting server. o RADIUS Accounting Secret: Enter the secret required to connect to the RADIUS accounting server. o Accounting Group Key Update Interval: Specify how often, in seconds, the accounting data sends. The range is from 60~600 seconds. WPA-PSK / WPA2-PSK: WPA with PSK (Pre-shared key / Personal mode), designed for home and small office networks that don't require the complexity of an 802.1X authentication server. o Type: Select the WPA-PSK type to use. Available options are Mixed, WPA-PSK and WPA2- PSK. Choose Mixed if your network has a mixture of older clients that only support WPA and TKIP, and newer client devices that support WPA2 and AES. o Encryption: Select the WPA encryption type you would like. Your available options are: Both, TKIP(Temporal Key Integrity Protocol) and AES(Advanced Encryption Standard). Note: Since TKIP is not permitted for n-based transmissions, setting the encryption algorithm to TKIP when you are using an n or ac AP will cause the network to operate in g mode. o WPA Passphrase: Enter the Passphrase you wish to use. If you are using the ASCII format, the Key must be between 8~64 characters in length. o Group Key Update Interval: Specify how often, in seconds, the Group Key changes. 41 / 44

42 Guest Network Guest Network: The Guest Network feature allows administrators to grant Internet connectivity to visitors or guests while keeping other networking devices and sensitive personal or company information private and secure. Basic Setting Enable SSID: Select to enable or disable the SSID broadcasting. SSID: Enter the SSID for the current profile. This is the name that is visible to wireless clients on the network. Hidden SSID: Enable this option if you do not want to broadcast this SSID. This can help to discourage wireless users from connecting to a particular SSID. Client Isolation: When enabled, all communication between wireless clients connected to the same AP will be blocked. 42 / 44
, designed for home and small office networks that don't require the complexity of an 802.1X authentication server.")

43 Security: Select encryption method (WPA-PSK / WPA2-PSK, or none) and encryption algorithm (AES or TKIP). WPA-PSK / WPA2-PSK: WPA with PSK (Pre-shared key / Personal mode), designed for home and small office networks that don't require the complexity of an 802.1X authentication server. o Type: Select the WPA-PSK type to use. Available options are Mixed, WPA-PSK and WPA2- PSK. Choose Mixed if your network has a mixture of older clients that only support WPA and TKIP, and newer client devices that support WPA2 and AES. o Encryption: Select the WPA encryption type you would like. Your available options are: Both, TKIP(Temporal Key Integrity Protocol) and AES(Advanced Encryption Standard). Note: Since TKIP is not permitted for n-based transmissions, setting the encryption algorithm to TKIP when you are using an n or ac AP will cause the network to operate in g mode. o WPA Passphrase: Enter the Passphrase you wish to use. If you are using the ASCII format, the Key must be between 8~64 characters in length. o Group Key Update Interval: Specify how often, in seconds, the Group Key changes. Captive Portal: Enable/disable Captive Portal for Guest Network. Refer to Section: Hotspot Service > Captive Portal for more information. Profile: Select to apply an existing Captive Portal Profile to the Guest Network or Create a New Captive Portal Profile. Manual IP Settings IP Address: Enter the IP address for the default gateway of clients associated to the Guest Network. Subnet Mask: Enter the Subnet mask for the Guest Network. Automatic DHCP Server Settings Starting IP Address/Ending IP Address: Enter the pool range of IP addresses available for assignment. WINS Server IP: Specify the Windows Internet Naming Service (WINS) server address for the wireless network. WINS is a system that determines the IP address of a network computer with a dynamically assigned IP address, if applicable. 43 / 44

44 Advanced Settings LED Control: In some environments, the blinking LEDs are not welcomed. This option allows you to enable or disable the devices LED indicators. Note that only indoor models support this feature. Band Steering: When enabled, the AP detects whether or not the wireless client is dual-band capable, and if it is, it will force the client to connect to the less congested 5GHz network to relieve congestion and overcrowding on the mainstream 2.4GHz frequency. It does this by actively blocking the client's attempts to associate with the 2.4GHz network. Note: Both 2.4GHz and 5GHz SSIDs must have the same security settings. RSSI Threshold: With this feature enabled, in order to minimize the time the wireless client spends to passively scanning for a new AP to connect to, the AP will send a disassociation request to the wireless client upon detecting the wireless client's RSSI value lower than specified. The RSSI value can be adjusted to allow for more clients to stay associated to this Access Point. Note that setting the RSSI value too low may cause wireless clients to reconnect frequently. It is recommended to disable this feature unless you deem it absolutely necessary. 44 / 44
Neutron Series OCTOBER 2015
 Neutron Series OCTOBER 2015 This document provides guidelines and procedures for installing and operating ezmaster. Table of contents Before You Begin... 3 System Requirements... 3 Firewall Configuration...
Grandstream Networks, Inc. GWN76xx Wi-Fi Access Points Master/Slave Architecture Guide
 Grandstream Networks, Inc. GWN76xx Wi-Fi Access Points Master/Slave Architecture Guide Table of Contents INTRODUCTION... 4 DISCOVER AND PAIR GWN76XX ACCESS POINTS... 5 Discover GWN76xx... 5 Method 1: Discover
User Manual. EWS Switch c1.6.x. v1.00. Copyright 2015 by EnGenius Networks. All Rights Reserved.
 User Manual EWS Switch c1.6.x v1.00 Copyright 2015 by EnGenius Networks. All Rights Reserved. Table of contents Product Overview... 3 Package Contents... 4 Technical Specifications... 5 EWS2910P... 5 EWS5912FP...
LevelOne. User Manual. WAP Mbps PoE Wireless AP V3.0.0
 LevelOne WAP-0005 108Mbps PoE Wireless AP User Manual V3.0.0 i TABLE OF CONTENTS CHAPTER 1 INTRODUCTION... 1 FIGURE 1: WIRELESS ACCESS POINT... 1 FEATURES OF YOUR WIRELESS ACCESS POINT... 1 Security Features...
IEEE a/b/g/n Wireless LAN Access Point. AT-MWS AP series. Reference Manual
 IEEE 802.11a/b/g/n Wireless LAN Access Point AT-MWS AP series Reference Manual Table of Contents 1 Before You Begin 5 1.1 Considerations for Wireless Installation...6 Computer Settings...6 Hardware Installation...9
WisCloud Access Controller V /6/9
 WISNETWORKS User Manual WisCloud Access Controller V 2.0 2017/6/9 Software Version 3.05.20 Table of contents WISNETWORKS... 1 Chapter 1 Overview... 3 1.1 Access Point...3 1.2 Online Use... 3 1.3 Interferences...3
The Neutron Series Distributed Network Management Solution
 Datasheet The Neutron Series Distributed Network ment Solution Flexible, Scalable, Enterprise-Class ment for Networks Both Large and Small Today s networks must be flexible, robust and as effective as
LiteStation2 LiteStation5 User s Guide
 LiteStation2 LiteStation5 User s Guide Contents Contents... 2 Introduction... 3 Quick Setup Guide... 4 Configuration Guide... 8 Main Settings... 9 Link Setup... 10 Basic Wireless Settings... 10 Wireless
NXC Series. Handbook. NXC Controllers NXC 2500/ Default Login Details. Firmware Version 5.00 Edition 19, 5/
 NXC Series NXC 2500/ 5500 NXC Controllers Firmware Version 5.00 Edition 19, 5/2017 Handbook Default Login Details LAN Port IP Address https://192.168.1.1 User Name admin Password 1234 Copyright 2017 ZyXEL
Grandstream Networks, Inc.
 Grandstream Networks, Inc. GWN Cloud Cloud based Access Points Controller User Guide COPYRIGHT 2018 Grandstream Networks, Inc. http://www.grandstream.com All rights reserved. Information in this document
Wireless Access Point
 802.11g / 802.11b / WPA Wireless Access Point User's Guide TABLE OF CONTENTS CHAPTER 1 INTRODUCTION... 1 Features of your Wireless Access Point... 1 Package Contents... 4 Physical Details... 4 CHAPTER
User Guide. Omada Controller Software
 User Guide Omada Controller Software 1910012506 REV 3.2.0 March 2019 CONTENTS 1 Quick Start... 1 1.1 Determine the Network Topology...2 1.1.1 Management on the local Network... 2 1.1.2 Management via Cloud
AirCruiser G Wireless Router GN-BR01G
 AirCruiser G Wireless Router GN-BR01G User s Guide i Contents Chapter 1 Introduction... 1 Overview...1 Features...1 Package Contents...2 AirCruiser G Wireless Router Rear Panel...2 AirCruiser G Wireless
Chapter 1 Introduction
 Copyright Statement is the registered trademark of Zonet Technology Inc. All the products and product names mentioned herein are the trademarks or registered trademarks of their respective holders. Copyright
802.11ac Wireless Access Point Model WAC104
 Point Model WAC104 User Manual October 2016 202-11698-01 350 E. Plumeria Drive San Jose, CA 95134 USA Support Thank you for purchasing this NETGEAR product. You can visit www.netgear.com/support to register
WAP9112/9114 Quick Start Guide
 WAP9112/9114 Quick Start Guide Release 7.6 NN47252-308 Issue 02.01 March 2016 Contents Chapter 1: Introduction... 3 Chapter 2: Required Software Components... 4 Chapter 3: Installing or Upgrading Wireless
Quick Install & Troubleshooting Guide. WAP223NC Cloud Managed Wireless N Access Point
 Quick Install & Troubleshooting Guide WAP223NC Cloud Managed Wireless N Access Point Package Contents 1 x WAP223NC Indoor access point powered by CloudCommand 1 x wall and ceiling mounts 1 x 24V PoE power
Configuring a VAP on the WAP351, WAP131, and WAP371
 Article ID: 5072 Configuring a VAP on the WAP351, WAP131, and WAP371 Objective Virtual Access Points (VAPs) segment the wireless LAN into multiple broadcast domains that are the wireless equivalent of
DWS-4000 Series DWL-3600AP DWL-6600AP
 Unified Wired & Wireless Access System Configuration Guide Product Model: Release 1.0 DWS-4000 Series DWL-8600AP DWL-6600AP DWL-3600AP Page 1 Table of Contents 1. Scenario 1 - Basic L2 Edge Setup: 1 Unified
WISNETWORKS. WisOS 11ac V /3/21. Software version WisOS 11ac
 WISNETWORKS User Manual V1.1 2016/3/21 Software version 1.0.0021 Table of contents 1. Setup& WMI... 3 1.1 Hardware Setup... 3 1.2 Web Management Interface... 3 2. Status... 4 2.1 Overview... 4 2.1.1 System...
AC WiFi Business Access Point WAC510 User Manual
 AC WiFi Business Access Point WAC510 User Manual with NETGEAR Insight app for easy management December 2016 202-11686-01 350 E. Plumeria Drive San Jose, CA 95134 USA Support Thank you for purchasing this
Add a Wireless Network to an Existing Wired Network using a Wireless Access Point (WAP)
") Add a Wireless Network to an Existing Wired Network using a Wireless Access Point (WAP) Objective A Wireless Access Point (WAP) is a networking device that allows wireless-capable devices to connect to
Add a Wireless Network to an Existing Wired Network using a Wireless Access Point (WAP) Objective A Wireless Access Point (WAP) is a networking device that allows wireless-capable devices to connect to
NMS USER MANUAL. WAP-EN Series Wireless Access Points. Version 1.2, June 2017
 NMS USER MANUAL WAP-EN Series Wireless Access Points Version 1.2, June 2017 Copyright Copyright 2017 Comtrend Corporation. All rights reserved. The information contained herein is proprietary to Comtrend
User Guide. Omada Controller Software
 User Guide Omada Controller Software 1910012394 REV 2.7.0 July 2018 CONTENTS 1 Quick Start... 1 1.1 Determine the Network Topology...2 1.1.1 Management in the Same Subnet... 2 1.1.2 Management in Different
Wireless Access Point
 802.11g / 802.11b / WPA Wireless Access Point User Guide TABLE OF CONTENTS CHAPTER 1 INTRODUCTION... 1 Features of your Wireless Access Point... 1 Package Contents... 4 Physical Details... 4 CHAPTER 2
Wireless AC1200 Concurrent Dual Band PoE Access Point
 DAP-2660 Version 1.00 AirPremier Wireless AC1200 Concurrent Dual Band PoE Access Point Product Overview...5 Introduction... 5 Features... 6 Package Contents... 7 System Requirements... 7 Hardware Overview...8
User Guide. Omada Controller Software
 User Guide Omada Controller Software 1910012370 REV 2.6.0 March 2018 CONTENTS 1 Quick Start... 1 1.1 Determine the Network Topology...2 1.1.1 Management in the Same Subnet... 2 1.1.2 Management in Different
User Guide. 450Mbps/300Mbps Wireless N Access Point TL-WA901ND/TL-WA801ND REV
 User Guide 450Mbps/300Mbps Wireless N Access Point TL-WA901ND/TL-WA801ND REV4.0.0 1910011930 Contents About This Guide...1 Chapter 1. Get to Know About Your Access Point.................... 2 1. 1. Product
PowerStation2 LiteStation2 LiteStation5 User s Guide
 PowerStation2 LiteStation2 LiteStation5 User s Guide Copyright 2007 Ubiquiti Networks Inc. All rights reserved. Contents INTRODUCTION...2 QUICK SETUP GUIDE...3 CONFIGURATION GUIDE...7 Main Settings...8
CWA-854HT 54 Mbps Wireless-G High Transmission Access Point User s Guide
 CWA-854HT 54 Mbps Wireless-G High Transmission Access Point User s Guide May 2006 Version 1.00 1 Table of Contents Table of Contents... 2 List of Figures... 4 List of Tables... 6 Chapter 1. Introduction...
Insight Managed Smart Cloud Wireless Access Point User Manual
 Insight Managed Smart Cloud Wireless Access Point User Manual Model WAC505 February 2018 202-11757-03 350 E. Plumeria Drive San Jose, CA 95134 USA Support Thank you for purchasing this NETGEAR product.
Configuring the EAPs Globally via Omada Controller
 Configuring the EAPs Globally via Omada Controller CHAPTERS 1. Wireless Network 2. Access Control 3. 4. Free Authentication Policy 5. MAC Filter 6. Scheduler 7. QoS 8. System This guide applies to: Omada
High Power Wireless N. 600mW Smart Repeater LP 9698SR
 High Power Wireless N 600mW Smart Repeater LP 9698SR INTRODUCTION...4 GETTING STARTED...5 Package Contents...5 LED Indicators...6 Back Panel Description...7 SETUP GUIDE...8 Find a Setup Location...8 Connect
Wireless LAN Access Point
 Wireless LAN Access Point IEEE 802.11b 11Mbps User s Manual Table of Contents Chapter 1 Introduction... 1 1.1 Package Contents... 2 1.2 Features... 2 1.3 Specifications... 2 1.4 Physical Description...
Light Mesh AP. User s Guide. 2009/2/20 v1.0 draft
 Light Mesh AP User s Guide 2009/2/20 v1.0 draft i FCC Certifications This equipment has been tested and found to comply with the limits for a Class B digital device, pursuant to Part 15 of the FCC Rules.
WRE6505 v2. User s Guide. Quick Start Guide. Wireless AC750 Range Extender. Default Login Details. Version 1.00 Edition 1, 10/2016
 WRE6505 v2 Wireless AC750 Range Extender Version 1.00 Edition 1, 10/2016 Quick Start Guide User s Guide Default Login Details Web Address http://zyxelsetup http://dhcp-assigned IP www.zyxel.comhttp://192.168.1.2
Insight Managed Smart Cloud Wireless Access Point User Manual
 Insight Managed Smart Cloud Wireless Access Point User Manual Model WAC510 September 2017 202-11840-01 350 E. Plumeria Drive San Jose, CA 95134 USA Support Thank you for purchasing this NETGEAR product.
Web UI Guide. Overview 5-2 Activating Web UI 5-2 Status Screen 5-3 Main Menu 5-3
 5 Web UI Guide Overview 52 Activating Web UI 52 Status Screen 53 Main Menu 53 Verification/Changing of Settings 54 Home 54 WiFi 55 Firewall 59 Connection 512 System 515 Help 518 Overview Web UI is a function
User Guide. EAP Controller Software REV
 User Guide EAP Controller Software REV 2.0.0 1910011446 Content 1 Quick Start...1 1.1 Determine the Network Topology... 2 Manage EAPs in the LAN...2 Manage EAPs in Different Network Segment...2 1.2 Install
Business Central Wireless Manager 2.0 Application Quick Start Guide
 Business Central Wireless Manager 2.0 Application Quick Start Guide March 2016 202-11632-01 350 E. Plumeria Drive San Jose, CA 95134 USA Support Thank you for purchasing this NETGEAR product.you can visit
Security SSID Selection: Broadcast SSID:
 69 Security SSID Selection: Broadcast SSID: WMM: Encryption: Select the SSID that the security settings will apply to. If Disabled, then the device will not be broadcasting the SSID. Therefore it will
WRE2206. User s Guide. Quick Start Guide. Wireless N300 Range Extender. Default Details. Version 1.00 Edition 1, 01/2015
 WRE2206 Wireless N300 Range Extender Version 1.00 Edition 1, 01/2015 Quick Start Guide User s Guide Default Details Web Address http://zyxelsetup OR http://192.168.1.2 www.zyxel.com User Name admin Password
Grandstream Networks, Inc. WP820 Wi-Fi Roaming Application Note
 Grandstream Networks, Inc. WP820 Wi-Fi Roaming Application Note Table of Contents OVERVIEW... 7 WP820 WI-FI FREQUENCY AND CHANNEL... 7 WP820 WI-FI ROAMING... 7 DEPLOYMENT REQUIREMENTS... 8 IMPORTANT WI-FI
WRE6606. User s Guide. Quick Start Guide. Dual-Band Wireless AC1300 Access Point. Default Login Details. Version 1.00 (ABDU.0) Edition 1, 10/2016
 Edition 1, 10/2016") WRE6606 Dual-Band Wireless AC1300 Access Point Version 1.00 (ABDU.0) Edition 1, 10/2016 Quick Start Guide User s Guide Default Login Details Web Address http://zyxelsetup http://dhcp-assigned IP www.zyxel.comhttp://192.168.1.2
WRE6606 Dual-Band Wireless AC1300 Access Point Version 1.00 (ABDU.0) Edition 1, 10/2016 Quick Start Guide User s Guide Default Login Details Web Address http://zyxelsetup http://dhcp-assigned IP www.zyxel.comhttp://192.168.1.2
A5500 Configuration Guide
 A5500 Configuration Guide Sri Ram Kishore February 2012 Table of contents Gateway Configuration... 3 Accessing your gateway configuration tool... 3 Configuring your broadband Internet access... 3 Configuring
MIMO Wireless Broadband Route r User s Manual 1
 MIMO Wireless Broadband Router User s Manual 1 Introduction...4 Features...4 Minimum Requirements...4 Package Content...4 Note...4 Get to know the Broadband Router...5 Back Panel...5 Front Panel...6 Setup
Table of Contents. Chapter 1Introduction Package Contents Features Specifications Physical Description...
 Table of Contents Chapter 1Introduction... 3 1.1 Package Contents... 3 1.2 Features... 3 1.3 Specifications... 3 1.4 Physical Description... 4 Chapter 2Wireless LAN Access Point Connection... 5 Chapter
EnGenius Quick Start Guide
 T he operates seamlessly in the 2.4 GHz frequency spectrum supporting the 802.11b (2.4GHz, 11Mbps) and the newer, faster 802.11g (2.4GHz, 54Mbpswireless standard. High output power and high sensitivity
Grandstream Networks, Inc. GWN76xx Wi-Fi Access Points Standalone Guide
 Grandstream Networks, Inc. GWN76xx Wi-Fi Access Points Standalone Guide Table of Content INTRODUCTION... 3 USING DEFAULT SSID... 4 USING CUSTOM SSID... 5 Discover GWN76xx... 5 Method 1: Discover GWN76xx
Wireless Broadband Router
 LW6005A-R2 Wireless Broadband Router Manual 1 Introduction... 4 Features... 4 Minimum Requirements... 4 Package Content... 4 Note... 4 Get to know the Broadband Router... 5 Back Panel... 5 Front Panel...
WISNETWORKS. WisOS 11ac V /3/21. Software version WisOS 11ac
 WISNETWORKS User Manual V1.1 2016/3/21 Software version 1.0.0021 Table of contents 1. Setup& WMI... 3 1.1 Hardware Setup... 3 1.2 Web Management Interface... 3 2. Status... 4 2.1 Overview... 4 2.1.1 System...
802.11N Wireless Broadband Router
 802.11N Wireless Broadband Router Pre-N Wireless Access Point Broadband Internet Access WPS 4-Port Switching Hub User's Guide Table of Contents CHAPTER 1 INTRODUCTION... 1 Wireless Router Features... 1
PePWave Mesh Connector User Manual
 PePWave Mesh Connector User Manual Document Rev. 1.0 Jun-07 COPYRIGHT & TRADEMARKS Specifications are subject to change without notice. Copyright 1999-2007 PePWave Ltd. All Rights Reserved. PePWave and
Installation & Setup of your Access Networks Ruckus Wireless System
 Installation & Setup of your Access Networks Ruckus Wireless System accessca.com 310. 453. 1800 support@accessca.com Table of Contents Ruckus best practices access point placement...1 How to install your
Siemens HiPath Wireless: Configuration and Deployment Guide
 Siemens HiPath Wireless System Configuration and Deployment Guide SpectraLink's Voice Interoperability for Enterprise Wireless (VIEW) Certification Program is designed to ensure interoperability and high
A Division of Cisco Systems, Inc. GHz 2, g. Wireless-G. User Guide. Access Point WIRELESS WAP54G (EU/LA/UK) Model No.
 Model No.") A Division of Cisco Systems, Inc. GHz 2,4 802.11g WIRELESS Wireless-G Access Point User Guide Model No. WAP54G (EU/LA/UK) Copyright and Trademarks Specifications are subject to change without notice. Linksys
A Division of Cisco Systems, Inc. GHz 2,4 802.11g WIRELESS Wireless-G Access Point User Guide Model No. WAP54G (EU/LA/UK) Copyright and Trademarks Specifications are subject to change without notice. Linksys
EnGenius M2000 Wireless Outdoor Access Point / Client Bridge / Mesh User Manual Version: 1.0
 EnGenius M2000 Wireless Outdoor Access Point / Client Bridge / Mesh User Manual Version: 1.0 Table of Contents 1 INTRODUCTION... 6 1.1 FEATURES... 6 1.2 PACKAGE CONTENTS... 7 1.3 SYSTEM REQUIREMENTS...
Extreme Networks Summit WM-Series Wireless Controller and Altitude APs Configuration and Deployment Guide
 Extreme Networks Summit WM-Series Wireless Controller and Altitude 350-2 APs Configuration and Deployment Guide SpectraLink's Voice Interoperability for Enterprise Wireless (VIEW) Certification Program
Insight Managed Smart Cloud Wireless Access Point User Manual
 Insight Managed Smart Cloud Wireless Access Point User Manual Model WAC510 February 2018 202-11840-03 350 E. Plumeria Drive San Jose, CA 95134 USA Support Thank you for purchasing this NETGEAR product.
CAP1750. User Manual / v1.1
 CAP1750 User Manual 12-2015 / v1.1 CONTENTS I. Product Information...2 I-1. Package Contents... 2 I-2. System Requirements... 3 I-3. Hardware Overview... 3 I-4. LED Status... 4 I-5. Reset... 4 I-6. Safety
User Guide. EAP Controller Software
 User Guide EAP Controller Software 1910012206 REV 2.4.8 July 2017 CONTENTS 1 Quick Start... 1 1.1 Determine the Network Topology...2 1.1.1 Management in the Same Subnet... 2 1.1.2 Management in Different
Configuring OfficeExtend Access Points
 Information About OfficeExtend Access Points, page 1 OEAP 600 Series Access Points, page 2 OEAP in Local Mode, page 3 Supported WLAN Settings for 600 Series OfficeExtend Access Point, page 3 WLAN Security
User Guide. For TP-Link Auranet Access Points
 User Guide For TP-Link Auranet Access Points EAP110 / EAP115 / EAP225 / EAP245 / EAP320 / EAP330 / EAP115-Wall / EAP110-Outdoor 1910012276 REV 2.0.2 October 2017 CONTENTS About this User Guide... 1 Overview...
Siemens HiPath Wireless: Configuration and Deployment Guide
 Siemens HiPath Wireless System Configuration and Deployment Guide SpectraLink's Voice Interoperability for Enterprise Wireless (VIEW) Certification Program is designed to ensure interoperability and high
Grandstream Networks, Inc.
 Grandstream Networks, Inc. GWN.Cloud Cloud based Access Points Controller User Guide COPYRIGHT 2018 Grandstream Networks, Inc. http://www.grandstream.com All rights reserved. Information in this document
Document Created by Nick Schuster
 Document Created by Nick Schuster Table of Contents Product Overview... 4 Introduction... 4 Features... 5 Package Contents... 6 System Requirements... 6 Hardware Overview... 7 LEDs... 7 Connections...
CONFIGURATION MANUAL. English version
 CONFIGURATION MANUAL English version Frama F-Link Configuration Manual (EN) All rights reserved. Frama Group. The right to make changes in this Installation Guide is reserved. Frama Ltd also reserves the
WL-5420AP. User s Guide
 WL-5420AP User s Guide Table of contents INTRODUCTION... 1 About the Operation Modes...2 LED Indicators...5 Solid...5 Ports on the Rear Panel...7 GETTING CONNECTED... 8 WPA AP -CONFIGURATION VIA WEB...
Prestige 660HW Series. Prestige 660H Series. Quick Start Guide
 Prestige 660HW Series ADSL 2+ 4-Port Gateway with 802.11g Wireless Prestige 660H Series ADSL 2+ 4-Port Gateway Quick Start Guide Version 3.40 01/2005 Table of Contents Introducing the Prestige... 3 1 Hardware
Oct 2007 Version 1.01
 Oct 2007 Version 1.01 Table of Contents Introduction...4 System Requirement...4 Getting Started...4 Installing the Smart WLAN Manager...5 Discovering the Switch and AP...9 Understanding the Screen Layout...12
WAP3205 v2. User s Guide. Quick Start Guide. Wireless N300 Access Point. Default Login Details. Version 1.00 Edition 2, 12/2012
 WAP3205 v2 Wireless N300 Access Point Version 1.00 Edition 2, 12/2012 Quick Start Guide User s Guide Default Login Details LAN IP Address http://192.168.1.2 Password 1234 www.zyxel.com Copyright 2012 ZyXEL
Hardware overview. Package contents V-M200, documentation, three antennas, and power supply.
 The HP V-M200 is a Wi-Fi Alliance authorized Wi-Fi CERTIFIED 802.11a/b/g and 802.11n product. The Wi-Fi CERTIFIED Logo is a certification mark of the Wi-Fi Alliance. In HP V-M200 802.11n Access Point Quickstart
User Guide. EAP Controller Software REV1.0.0
 User Guide EAP Controller Software REV1.0.0 1910011273 Contents CONTENTS Chapter 1 System Setup... 1 1.1 System Requirements... 1 1.2 Network Topology... 1 1.3 Software Installation... 2 1.4 Quick Setup...
Basic Wireless Settings on the CVR100W VPN Router
 Basic Wireless Settings on the CVR100W VPN Router Objective A Wireless Local Area Network (WLAN) utilizes radio communication to connect wireless devices to a LAN. An example is a Wi-Fi hotspot at a cafe.
Outdoor WiFi System. Model: UAP-Outdoor
 Outdoor WiFi System Model: UAP-Outdoor UniFi AP-Mini User Guide Table of Contents Table of Contents Chapter 1: Product Overview...1 Package Contents...1 System Requirements...1 Network Topology Requirements...1
IEEE a/ac/n/b/g Outdoor Stand-Alone Access Point. Management Guide. ECWO Series. Software Release v1.0.1.
 IEEE 802.11a/ac/n/b/g Outdoor Stand-Alone Access Point ECWO Series Management Guide Software Release v1.0.1.1 www.edge-core.com Management Guide ECWO Series Outdoor Stand-Alone Access Points 2.4 GHz, 5
802.11N Wireless ADSL Router
 802.11N Wireless ADSL Router Pre-N Wireless Access Point ADSL Modem NAT Router WPS 4-Port Switching Hub User's Guide Table of Contents CHAPTER 1 INTRODUCTION...1 Wireless ADSL Router Features...1 Package
D-Link Central WiFiManager Configuration Guide
 Table of Contents D-Link Central WiFiManager Configuration Guide Introduction... 3 System Requirements... 3 Access Point Requirement... 3 Latest CWM Modules... 3 Scenario 1 - Basic Setup... 4 1.1. Install
802.11a/b/g Outdoor Dual Radio Concurrent AP/Bridge/Repeater EOA7530 User Manual Version : 1.1
 802.11a/b/g Outdoor Dual Radio Concurrent AP/Bridge/Repeater EOA7530 User Manual Version : 1.1 Table of Contents CHAPTER 1 PRODUCT OVERVIEW...4 1.1 FEATURES... 4 1.2 BENEFITS... 5 1.3 PACKAGE CONTENTS...
Wireless LAN Access Point
 Wireless LAN Access Point IEEE 802.11b/g 54Mbps 501903 User s Manual Table of Contents Chapter 1 Introduction... 1 1.1 Package Contents... 2 1.2 Features... 2 1.3 Specifications... 2 1.4 Physical Description...
Linksys EA-Series Routers
 Routers Table of Contents Table of Contents Product overview EA2700/EA3500 Back view Bottom view EA4500 Top view Back view Setting Up Your EA-Series Router Where to find more help How to set up your router
User Guide. EAP Controller Software
 User Guide EAP Controller Software 1910012227 REV 2.5.3 November 2017 CONTENTS 1 Quick Start... 1 1.1 Determine the Network Topology...2 1.1.1 Management in the Same Subnet... 2 1.1.2 Management in Different
IP806GA/GB Wireless ADSL Router
 IP806GA/GB Wireless ADSL Router 802.11g/802.11b Wireless Access Point ADSL Modem NAT Router 4-Port Switching Hub User's Guide Table of Contents CHAPTER 1 INTRODUCTION... 1 Wireless ADSL Router Features...
LevelOne WBR User s Manual. 11g Wireless ADSL VPN Router. Ver
 LevelOne WBR-3407 11g Wireless ADSL VPN Router User s Manual Ver 1.00-0510 Table of Contents CHAPTER 1 INTRODUCTION... 1 Wireless ADSL Router Features... 1 Package Contents... 5 Physical Details... 6 CHAPTER
Configuring Hybrid REAP
 13 CHAPTER This chapter describes hybrid REAP and explains how to configure this feature on controllers and access points. It contains the following sections: Information About Hybrid REAP, page 13-1,
Document Created by Nick Schuster
 Document Created by Nick Schuster Table of Contents Product Overview... 4 Introduction... 4 Features... 5 Package Contents... 6 System Requirements... 6 Hardware Overview... 7 LEDs... 7 Connections...
Document Created by Nick Schuster
 Document Created by Nick Schuster Product Overview...4 Introduction... 4 Features... 5 Package Contents... 6 System Requirements... 6 Hardware Overview...7 LEDs... 7 Connections... 7 Basic Installation...8
Version /01/2013. User Manual. DAP-1665 Wireless AC1200 Dual Band Access Point DAP-1665
 Version 1.0 10/01/2013 User Manual DAP-1665 Wireless AC1200 Dual Band Access Point DAP-1665 Table of Contents Product Overview... 4 Package Contents... 4 System Requirements... 5 Introduction... 6 Features...
Table of contents
 1 GD-GEO20-TP 2 Table of contents 1 Conventions Used in this Document... 4 Abbreviation List... 4 2 Packing list... 6 3 Introduction... 7 3.1 Deployment Scenarios... 7 3.1.1 HotSpot... 7 3.1.2 Point to
WL5041 Router User Manual
 TECOM WL5041 Router User Manual TECOM CO., LTD. March 2003 2003 by TECOM CO., LTD. All rights reserved. Printed in Taiwan Table of contents Package Contents--------------------------------------- 2 Installing
Quick Start Guide for Standalone EAP
 Quick Start Guide for Standalone EAP CHAPTERS 1. Determine the Management Method 2. Build the Network Topology 3. Log In to the EAP 4. Edit the SSID 5. Configure and Manage the EAP This guide applies to:
3.3.2 Example to Add Profile in Profile Step 1: Click Add in Profile function
 Network Type: There are two types, infrastructure and 802.11 Ad-Hoc mode. Under Ad-Hoc mode, user can also choose the preamble type, the available preamble type includes auto and long. In addition to that
Outdoor High Power Wireless N Access Point
 Outdoor High Power Wireless N Access Point Model WND930 User Manual December 2017 202-11483-02 350 East Plumeria Drive San Jose, CA 95134 USA Support Thank you for purchasing this NETGEAR product. You
A Division of Cisco Systems, Inc. GHz g. Wireless-G. User Guide. Exterior Access Point WIRELESS WAP54GPE. Model No.
 A Division of Cisco Systems, Inc. GHz 2.4 802.11g WIRELESS Wireless-G Exterior Access Point User Guide Model No. WAP54GPE Copyright and Trademarks Specifications are subject to change without notice. Linksys
USER GUIDE. Dual band Access Point a/b/g/n.
 USER GUIDE Dual band Access Point 802.11a/b/g/n www.legrand.fr Contents 1.1 / HOW TO ACCESS THE WEB-BASED INTERFACE p. 4 1.2 / ENTERING THE CONFIGURATION PASSWORD p. 5 1.3 / CONFIGURATION WIZARD p. 6 1.4
LAPAC1200. AC1200 Dual Band Access Point. User's Guide
 LAPAC1200 AC1200 Dual Band Access Point User's Guide TABLE OF CONTENTS CHAPTER 1 QUICK START GUIDE... 1 Package Contents... 1 Physical Details... 1 Mounting Guide... 3 CHAPTER 2 ACCESS POINT SETUP...
Table of Contents. Chapter 1 Product Overview Features Package Contents LED Indicator and Panel Description...
 Copyright Statement is the registered trademark of Monoprice. All the products and product names mentioned herein are the trademarks or registered trademarks of their respective holders. Copyright of the
Change NETGEAR USB Control Center Settings
 Change NETGEAR USB Control Center Settings You can stop the NETGEAR USB Control Center from starting automatically when you log in to Windows. You can also change the language and specify the time-out
802.11b+g Wireless LAN USB Adapter. User Manual
 802.11b+g Wireless LAN USB Adapter User Manual REGULATORY STATEMENTS FCC Certification The United States Federal Communication Commission (FCC) and the Canadian Department of Communications have established
User Guide LAPN300. Wireless-N300. Access Point with POE. Model # LAPN300
 User Guide LAPN300 Wireless-N300 Access Point with POE Model # LAPN300 1 Contents Chapter 1 Quick Start Guide... 5 Mounting Guide... 6 Wall Installation... 6 Ceiling Installation... 6 Chapter 2 Access