Lab 01 Arduino 程式設計實驗. Essential Arduino Programming and Digital Signal Process
|
|
|
- Samson Boone
- 5 years ago
- Views:
Transcription

1 Lab 01 Arduino 程式設計實驗 Essential Arduino Programming and Digital Signal Process
2 Arduino Arduino is an open-source electronics prototyping platform based on flexible, easy-to-use hardware and software. It's intended for engineering, prototype designer, artists, designers, hobbyists, and anyone interested in creating interactive objects or environments. 2
3 Arduino Arduino can sense the environment by receiving input from a variety of sensors and can affect its surroundings by controlling lights, motors, and other actuators. The microcontroller on the board is programmed using the Arduino programming language (based on Wiring) and the Arduino development environment (based on Processing). 3
4 Arduino Arduino projects can be stand-alone or they can communicate with software on running on a computer (e.g. Flash, Processing, MaxMSP). 4
5 Arduino resources Download the latest version from the page: Taiwan Arduino website: 5

6 What is Arduino? The word Arduino can mean 3 things A physical piece of hardware A programming environment A community & philosophy 6
7 Arduino Philosophy & Community Open Source Physical Computing Platform open source hardware open source: free to inspect & modify physical computing. what? ubiquitous computing, pervasive computing, ambient intelligence, calm computing, smart objects... Community-built Examples wiki (the playground ) editable by anyone Forums with lots of helpful people 7
 but cheaper, faster, & open")

8 Arduino Hardware Similar to 8051 (if you know of it) but cheaper, faster, & open Uses AVR ATmega168/328 microcontroller chip chip was designed to be used with C language 8


9 LilyPad (for clothing) Arduino Hardware Variety USB DIY Boarduino Kit Bluetooth Stamp -sized many different variations to suite your needs 9
10 Arduino Capabilities 16 kbytes of Flash program memory 1 kbyte of RAM 16 MHz (Apple II: 1 MHz) Inputs and Outputs 13 digital input/output pins 5 analog input pins 6 analog output pins* Completely stand-alone: doesn t need a computer once programmed 10
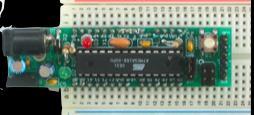
11 test LED on pin 13 Arduino Diecimila Board digital input/output pins power LED USB interface TX/RX LEDs ATmega168 2 reset button 2.7 analog input pins 11
12 Arduino Terminology sketch a program you write to run on an Arduino board pin an input or output connected to something.»e.g. output to an LED, input from a knob. digital value is either HIGH or LOW.»(aka on/off, one/zero) e.g. switch state analog value ranges, usually from »e.g. LED brightness, motor speed, etc. 12
13 Basics In the Arduino environment programs are referred to as sketches
14 Basics Comments /* * Blink * * The basic Arduino example. Turns on an LED on for one second, * then off for one second, and so on... We use pin 13 because, * depending on your Arduino board, it has either a builtin LED * or a built-in resistor so that you need only an LED. * * */ // LED connected to digital pin 13 14
15 Digital / Analog 15
16 Power The Arduino Duemilanove can be powered via the USB connection or with an external power supply. The power source is selected automatically. The Arduino Diecimila requires the user to select the power option with a jumper External (non-usb) power can come either from an AC-to- DC adapter (wall-wart) or battery. The adapter can be connected by plugging a 2.1 mm center-positive plug into the board's power jack. Leads from a battery can be inserted in the Gnd and Vin pin headers of the POWER connector 16
17 Power The board can operate on an external supply of 6 to 20 volts. If supplied with less than 7 V, however, the 5 V pin may supply less than five volts and the board may be unstable. If using more than 12 V, the voltage regulator may overheat and damage the board. The recommended range is 7 to 12 volts. 17
.")
18 18 Arduino Microcontroller Boards The power pins are as follows: Vin. The input voltage to the Arduino board when it's using an external power source (as opposed to 5 volts from the USB connection or other regulated power source). You can supply voltage through this pin, or, if supplying voltage via the power jack, access it through this pin. 5V. The regulated power supply used to power the microcontroller and other components on the board. This can come either from Vin via an on-board regulator, or be supplied by USB or another regulated 5V supply. 3V3. A 3.3 volt supply generated by the on-board FTDI chip. Maximum current draw is 50 ma. GND. Ground pins. USB connector Power connector 3V3 output 5V output Vin 18
19 Arduino Microcontroller Boards 19 Microcontroller ATmega328 Operating Voltage 5 V Input Voltage (recommended) 7-12 V Input Voltage (limits) 6-20 V Digital I/O Pins 14 (of which 6 provide PWM output) Analog Input Pins 6 DC Current per I/O Pin 40 ma DC Current for 3.3V Pin 50 ma Flash Memory 32 KB (ATmega328) of which 2 KB used by bootloader SRAM 2 KB (ATmega328) EEPROM 1 KB (ATmega328) Clock Speed 16 MHz 19

20 Arduino Software Like a text editor View/write/edit sketches But then you program them into hardware 20
21 Installing Arduino The Steps 1. Get the Arduino software & unzip it 2. Plug in Arduino board 3. Install the driver 4. Reboot 5. Run the Arduino program 6. Tell Arduino (program) about Arduino (board) 21

22 Getting and Unpacking On the thumbdrives arduino-0022-win.zip for Windows On Windows, right-click Use Extract All... Find the drivers directory inside 22


23 Plug in Arduino board quick blink from test LED Power LED should stay on 23


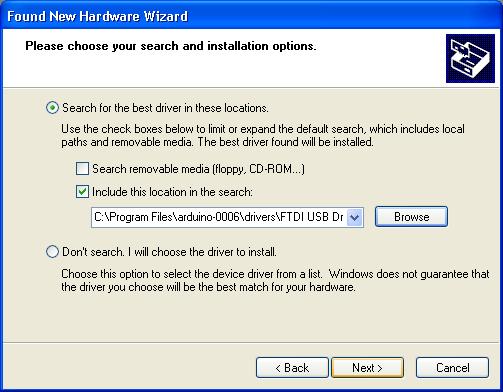
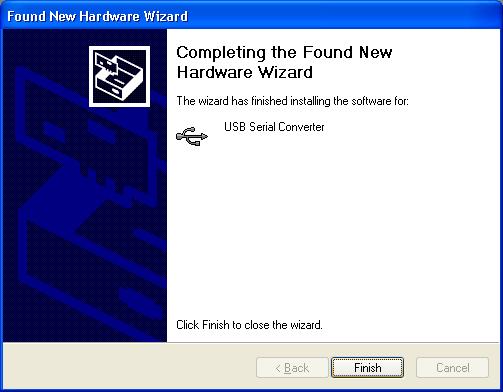
24 Windows Driver Install 24


25 Selecting Location & Type usually highest-numbered port pick Diecimila 25
26 Arduino Software compile (verify) upload to board status area 26

27 Write your sketch Using Arduino Press Compile button (to check for errors) Press Upload button to program Arduino board with your sketch compile Try it out with the Blink sketch! Load File/Sketchbook/Examples/Digital/Blink upload TX/RX flash sketch runs 27

28 Status Messages Size depends on complexity of your sketch Uploading worked Wrong serial port selected Wrong board selected nerdy cryptic error messages 28
29 Troubleshooting Most common problem is incorrect serial port setting If you ever have any weird errors from the Arduino environment, just try again. The red text at the bottom is debugging output in case there may be a problem Status area shows summary of what s wrong 29
30 I made an LED blink, so what? Most actuators are switched on and off with a digital output The digitalwrite() command is the software portion of being able to control just about anything LEDs are easy, motors come in a bit Arduino has up to 13 digital outputs, and you easily can add more with helper chips 30

31 Development Cycle Make as many changes as you want Not like most web programming: edit run Edit compile upload run edit compile upload run done! 31

32 Lots of Built-in Examples And more here: 32
33 Arduino Language Language is standard C (but made easy) Lots of useful functions pinmode() set a pin as input or output digitalwrite() set a digital pin high/low digitalread() read a digital pin s state analogread() read an analog pin analogwrite() write an analog value delay() wait an amount of time millis() get the current time And many others. And libraries add more. 33
34 Sketch structure Declare variables at top Initialize setup() run once at beginning, set pins Running loop() run repeatedly, after setup() 34
35 Basic Programming /* * Hello World! * This is the Hello World! for Arduino. * It shows how to send data to the computer */ void setup() { } Serial.begin(9600); // run once, when the sketch starts // set up Serial library at 9600 bps Serial.println("Is anybody out there?"); // prints phrase with void loop() { // do nothing! } //ending line break // run over and over again // After sending program to the Arduino, press Reset button on the board and watch Serial monitor 35
36 Basic Programming The pinmode() function configures a pin as either an input or an output. To use it: You pass it the number of the pin to configure and the constant INPUT or OUTPUT. pinmode(11, INPUT); pinmode(13, OUTPUT); When configured as an input, a pin can detect the state of a sensor like a pushbutton. As an output, it can drive an actuator like an LED. 36
37 Basic Programming The digitalwrite() functions outputs a value on a pin. Possible values are: LOW (0 V)or HIGH (5 V) For example: digitalwrite(13, HIGH); digitalwrite(11, LOW); 37
38 Basic Programming The delay() causes the Arduino to wait for the specified number of milliseconds before continuing on to the next line. There are 1000 milliseconds in a second, so the line: delay(1000); creates a delay of one second. 38
39 // The setup() method runs once, when the sketch starts void setup() { // initialize the digital pin as an output: pinmode(13, OUTPUT); } // the loop() method runs over and over again, // as long as the Arduino has power void loop() { digitalwrite(13, HIGH); // set the LED on delay(1000); // wait for a second digitalwrite(13, LOW); // set the LED off delay(1000); // wait for a second } 39
40 Variables You can use variables in a similar way as they are used in math or physics All variables have to be declared before they are used, and optionally, set an initial value (initializing the variable). 40
41 int Integers are your primary datatype for number storage, and store a 2 byte value. This yields a range of -32,768 to 32,767 (minimum value of -2^15 and a maximum value of (2^15) - 1). Int's store negative numbers with a technique called 2's complement math. The highest bit, sometimes refered to as the "sign" bit, flags the number as a negative number. The rest of the bits are inverted and 1 is added. 41
42 int Example int ledpin = 13; Syntax int var = val; Syntax int var; // value will be assign later 42
43 Example : Blink This example shows the simplest thing you can do with an Arduino to see physical output: it blinks an LED. Hardware Required Arduino Board LED 43
 to ground.")
44 Example : Blink Circuit To build the circuit, get an LED and attach its long, positive leg (called the anode) to pin 13. Attach the short negative leg (called the anode) to ground. Then plug your Arduino board into your computer, start the Arduino program, and enter the code below. 44
45 Explain to the Blink Code In the program below, the first thing you do is to initialize pin 13 as an output pin with the line pinmode(13, OUTPUT); In the main loop, you turn the LED on with the line: digitalwrite(13, HIGH); This supplies 5 volts to pin 13. That creates a voltage difference across the pins of the LED, and lights it up. Then you turn it off with the line: digitalwrite(13, LOW); That takes pin 13 back to 0 volts, and turns the LED off. In between the on and the off, you want enough time for a person to see the change, so the delay() commands tell the Arduino to do nothing for 1000 milliseconds, or one second. When you use the delay() command, nothing else happens for that amount of time. Once you've understood the basic examples, check out the BlinkWithoutDelay example to learn how to create a delay while doing other things. 45
46 Blink example code /* Blink Turns on an LED on for one second, then off for one second, repeatedly. This example code is in the public domain. */ void setup() { // initialize the digital pin as an output. // Pin 13 has an LED connected on most Arduino boards: pinmode(13, OUTPUT); } void loop() { digitalwrite(13, HIGH); // set the LED on delay(1000); // wait for a second digitalwrite(13, LOW); // set the LED off delay(1000); // wait for a second } 46
47 char A data type that takes up 1 byte of memory that stores a character value. Character literals are written in single quotes, like this: 'A' (for multiple characters - strings - use double quotes: "ABC"). Characters are stored as numbers however. You can see the specific encoding in the ASCII chart. 47

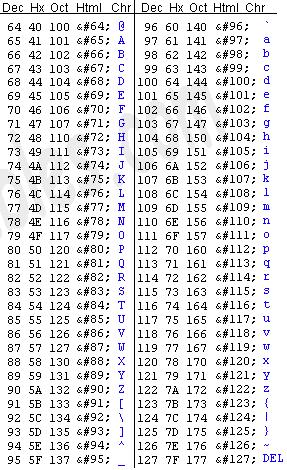
48 ASCII Table 48
49 char The char datatype is a signed type, meaning that it encodes numbers from -128 to 127. For an unsigned, one-byte (8 bit) data type, use the byte data type. Example char mychar = 'A'; char mychar = 65; // both are equivalent 49
50 char It is possible to do arithmetic on characters, in which the ASCII value of the character is used (e.g. 'A' + 1 has the value 66, since the ASCII value of the capital letter A is 65). See Serial.println reference for more on how characters are translated to numbers. 50
51 byte A byte stores an 8-bit unsigned number, from 0 to 255. Example byte b = B10010; // "B" is the binary formatter (B10010 = 18 decimal) 51
52 unsigned int Unsigned ints (unsigned integers) are the same as ints in that they store a 2 byte value. Instead of storing negative numbers however they only store positive values, yielding a useful range of 0 to 65,535 (2^16) - 1). 52
53 unsigned int Example unsigned int ledpin = 13; Syntax unsigned int var = val; var - your unsigned int variable name val - the value you assign to that variable 53
54 long long long variables are extended size variables for number storage, and store 32 bits (4 bytes), from 2,147,483,648 to 2,147,483,647. unsigned long unsigned long variables are extended size variables for number storage, and store 32 bits (4 bytes). Unlike standard longs unsigned longs won't store negative numbers, making their range from 0 to 4,294,967,295 54
55 float / double 7. float datatype for floating-point numbers, a number that has a decimal point. They are often used to approximate analog and continuous values because they have greater resolution than integers. Floating-point numbers can be as large as E+38 and as low as E+38. They are stored as 32 bits (4 bytes) of information. 8. double double precision floating point number. Occupies 4 bytes. The double implementation on the Arduino is currently exactly the same as the float, with no gain in precision. 55
56 Lots of useful functions Functions pinmode() set a pin as input or output digitalwrite() set a digital pin high/low digitalread() read a digital pin s state analogread() read an analog pin analogwrite() write an analog PWM value delay() wait an amount of time (ms) millis() get the current time 56

57 The classroom exercise Build the traffic light control the Visual BreadBoard 4.01 (VBB) or in your real Arduino Board 57
Introduction to Arduino
 Introduction to Arduino Paco Abad May 20 th, 2011 WGM #21 Outline What is Arduino? Where to start Types Shields Alternatives Know your board Installing and using the IDE Digital output Serial communication
keyestudio Keyestudio MEGA 2560 R3 Board
 Keyestudio MEGA 2560 R3 Board Introduction: Keyestudio Mega 2560 R3 is a microcontroller board based on the ATMEGA2560-16AU, fully compatible with ARDUINO MEGA 2560 REV3. It has 54 digital input/output
TANGIBLE MEDIA & PHYSICAL COMPUTING INTRODUCTION TO ARDUINO
 TANGIBLE MEDIA & PHYSICAL COMPUTING INTRODUCTION TO ARDUINO AGENDA ARDUINO HARDWARE THE IDE & SETUP BASIC PROGRAMMING CONCEPTS DEBUGGING & HELLO WORLD INPUTS AND OUTPUTS DEMOS ARDUINO HISTORY IN 2003 HERNANDO
Arduino 101 AN INTRODUCTION TO ARDUINO BY WOMEN IN ENGINEERING FT T I NA A ND AW E S O ME ME NTO R S
 Arduino 101 AN INTRODUCTION TO ARDUINO BY WOMEN IN ENGINEERING FT T I NA A ND AW E S O ME ME NTO R S Overview Motivation Circuit Design and Arduino Architecture Projects Blink the LED Switch Night Lamp
Arduino ADK Rev.3 Board A000069
 Arduino ADK Rev.3 Board A000069 Overview The Arduino ADK is a microcontroller board based on the ATmega2560 (datasheet). It has a USB host interface to connect with Android based phones, based on the MAX3421e
Note. The above image and many others are courtesy of - this is a wonderful resource for designing circuits.
 Robotics and Electronics Unit 2. Arduino Objectives. Students will understand the basic characteristics of an Arduino Uno microcontroller. understand the basic structure of an Arduino program. know how
Introduction to Arduino. Wilson Wingston Sharon
 Introduction to Arduino Wilson Wingston Sharon cto@workshopindia.com Physical computing Developing solutions that implement a software to interact with elements in the physical universe. 1. Sensors convert
Arduino Prof. Dr. Magdy M. Abdelhameed
 Course Code: MDP 454, Course Name:, Second Semester 2014 Arduino What is Arduino? Microcontroller Platform Okay but what s a Microcontroller? Tiny, self-contained computers in an IC Often contain peripherals
Arduino Uno. Arduino Uno R3 Front. Arduino Uno R2 Front
 Arduino Uno Arduino Uno R3 Front Arduino Uno R2 Front Arduino Uno SMD Arduino Uno R3 Back Arduino Uno Front Arduino Uno Back Overview The Arduino Uno is a microcontroller board based on the ATmega328 (datasheet).
ARDUINO MEGA 2560 REV3 Code: A000067
 ARDUINO MEGA 2560 REV3 Code: A000067 The MEGA 2560 is designed for more complex projects. With 54 digital I/O pins, 16 analog inputs and a larger space for your sketch it is the recommended board for 3D
ARDUINO MEGA ADK REV3 Code: A000069
 ARDUINO MEGA ADK REV3 Code: A000069 OVERVIEW The Arduino MEGA ADK is a microcontroller board based on the ATmega2560. It has a USB host interface to connect with Android based phones, based on the MAX3421e
ARDUINO UNO REV3 Code: A000066
 ARDUINO UNO REV3 Code: A000066 The UNO is the best board to get started with electronics and coding. If this is your first experience tinkering with the platform, the UNO is the most robust board you can
ARDUINO LEONARDO WITH HEADERS Code: A000057
 ARDUINO LEONARDO WITH HEADERS Code: A000057 Similar to an Arduino UNO, can be recognized by computer as a mouse or keyboard. The Arduino Leonardo is a microcontroller board based on the ATmega32u4 (datasheet).
Alessandra de Vitis. Arduino
 Alessandra de Vitis Arduino Arduino types Alessandra de Vitis 2 Interfacing Interfacing represents the link between devices that operate with different physical quantities. Interface board or simply or
ARDUINO LEONARDO ETH Code: A000022
 ARDUINO LEONARDO ETH Code: A000022 All the fun of a Leonardo, plus an Ethernet port to extend your project to the IoT world. You can control sensors and actuators via the internet as a client or server.
ARDUINO UNO REV3 SMD Code: A The board everybody gets started with, based on the ATmega328 (SMD).
.") ARDUINO UNO REV3 SMD Code: A000073 The board everybody gets started with, based on the ATmega328 (SMD). The Arduino Uno SMD R3 is a microcontroller board based on the ATmega328. It has 14 digital input/output
ARDUINO UNO REV3 SMD Code: A000073 The board everybody gets started with, based on the ATmega328 (SMD). The Arduino Uno SMD R3 is a microcontroller board based on the ATmega328. It has 14 digital input/output
IME-100 Interdisciplinary Design and Manufacturing
 IME-100 Interdisciplinary Design and Manufacturing Introduction Arduino and Programming Topics: 1. Introduction to Microprocessors/Microcontrollers 2. Introduction to Arduino 3. Arduino Programming Basics
IME-100 ECE. Lab 3. Electrical and Computer Engineering Department Kettering University. G. Tewolde, IME100-ECE,
 IME-100 ECE Lab 3 Electrical and Computer Engineering Department Kettering University 3-1 1. Laboratory Computers Getting Started i. Log-in with User Name: Kettering Student (no password required) ii.
IDUINO for maker s life. User Manual. For IDUINO development Board.
 User Manual For IDUINO development Board 1.Overview 1.1 what is Arduino? Arduino is an open-source prototyping platform based on easy-to-use hardware and software. Arduino boards are able to read inputs
Robotics/Electronics Review for the Final Exam
 Robotics/Electronics Review for the Final Exam Unit 1 Review. 1. The battery is 12V, R1 is 400 ohms, and the current through R1 is 20 ma. How many ohms is R2? ohms What is the voltage drop across R1? V
StenBOT Robot Kit. Stensat Group LLC, Copyright 2018
 StenBOT Robot Kit 1 Stensat Group LLC, Copyright 2018 Legal Stuff Stensat Group LLC assumes no responsibility and/or liability for the use of the kit and documentation. There is a 90 day warranty for the
Arduino Programming and Interfacing
 Arduino Programming and Interfacing Stensat Group LLC, Copyright 2017 1 Robotic Arm Experimenters Kit 2 Legal Stuff Stensat Group LLC assumes no responsibility and/or liability for the use of the kit and
Serial.begin ( ); Serial.println( ); analogread ( ); map ( );
; Serial.println( ); analogread ( ); map ( );") Control and Serial.begin ( ); Serial.println( ); analogread ( ); map ( ); A system output can be changed through the use of knobs, motion, or environmental conditions. Many electronic systems in our world
Control and Serial.begin ( ); Serial.println( ); analogread ( ); map ( ); A system output can be changed through the use of knobs, motion, or environmental conditions. Many electronic systems in our world
IDUINO for maker s life. User Manual. For IDUINO Mega2560 Board(ST1026)
") User Manual For IDUINO Mega2560 Board(ST1026) 1.Overview 1.1 what is Arduino? Arduino is an open-source prototyping platform based on easy-to-use hardware and software. Arduino boards are able to read
User Manual For IDUINO Mega2560 Board(ST1026) 1.Overview 1.1 what is Arduino? Arduino is an open-source prototyping platform based on easy-to-use hardware and software. Arduino boards are able to read
ARDUINO M0 PRO Code: A000111
 ARDUINO M0 PRO Code: A000111 The Arduino M0 Pro is an Arduino M0 with a step by step debugger With the new Arduino M0 Pro board, the more creative individual will have the potential to create one s most
University of Portland EE 271 Electrical Circuits Laboratory. Experiment: Arduino
 University of Portland EE 271 Electrical Circuits Laboratory Experiment: Arduino I. Objective The objective of this experiment is to learn how to use the Arduino microcontroller to monitor switches and
Freeduino USB 1.0. Arduino Compatible Development Board Starter Guide. 1. Overview
 Freeduino USB 1.0 Arduino Compatible Development Board Starter Guide 1. Overview 1 Arduino is an open source embedded development platform consisting of a simple development board based on Atmel s AVR
Introduction To Arduino
 Introduction To Arduino What is Arduino? Hardware Boards / microcontrollers Shields Software Arduino IDE Simplified C Community Tutorials Forums Sample projects Arduino Uno Power: 5v (7-12v input) Digital
How to Use an Arduino
 How to Use an Arduino By Vivian Law Introduction The first microcontroller, TMS-1802-NC, was built in 1971 by Texas Instruments. It owed its existence to the innovation and versatility of silicon and the
Arduino provides a standard form factor that breaks the functions of the micro-controller into a more accessible package.
 About the Tutorial Arduino is a prototype platform (open-source) based on an easy-to-use hardware and software. It consists of a circuit board, which can be programed (referred to as a microcontroller)
Bionic Arduino. Class 1. Introduction to Microcontrollers with Arduino. 11 Nov machineproject - Tod E. Kurt
 Bionic Arduino Introduction to Microcontrollers with Arduino Class 1 11 Nov 2007 - machineproject - Tod E. Kurt Class Info Thumbdrive is being passed around, with: PDF version of these notes Arduino software
FUNCTIONS For controlling the Arduino board and performing computations.
 d i g i t a l R e a d ( ) [Digital I/O] Reads the value from a specified digital pin, either HIGH or LOW. digitalread(pin) pin: the number of the digital pin you want to read HIGH or LOW Sets pin 13 to
ARDUINO MICRO WITHOUT HEADERS Code: A000093
 ARDUINO MICRO WITHOUT HEADERS Code: A000093 Arduino Micro is the smallest board of the family, easy to integrate it in everyday objects to make them interactive. The Micro is based on the ATmega32U4 microcontroller
Goal: We want to build an autonomous vehicle (robot)
") Goal: We want to build an autonomous vehicle (robot) This means it will have to think for itself, its going to need a brain Our robot s brain will be a tiny computer called a microcontroller Specifically
Goal: We want to build an autonomous vehicle (robot) This means it will have to think for itself, its going to need a brain Our robot s brain will be a tiny computer called a microcontroller Specifically
ARDUINO MINI 05 Code: A000087
 ARDUINO MINI 05 Code: A000087 The Arduino Mini is a very compact version of the Arduino Nano without an on board USB to Serial connection The Arduino Mini 05 is a small microcontroller board originally
Introduction to Arduino
 Introduction to Arduino Mobile Computing, aa. 2016/2017 May 12, 2017 Daniele Ronzani - Ph.D student in Computer Science dronzani@math.unipd.it What are Microcontrollers Very small and simple computers
Laboratory 1 Introduction to the Arduino boards
 Laboratory 1 Introduction to the Arduino boards The set of Arduino development tools include µc (microcontroller) boards, accessories (peripheral modules, components etc.) and open source software tools
Lesson 5 Arduino Prototype Development Platforms. Chapter-8 L05: "Internet of Things ", Raj Kamal, Publs.: McGraw-Hill Education
 Lesson 5 Arduino Prototype Development Platforms 1 Arduino Boards, Modules And Shields Popular AVR MCU based products Each board has clear markings on the connection pins, sockets and in-circuit connections
USER MANUAL ARDUINO I/O EXPANSION SHIELD
 USER MANUAL ARDUINO I/O EXPANSION SHIELD Description: Sometimes Arduino Uno users run short of pins because there s a lot of projects that requires more than 20 signal pins. The only option they are left
Introduction to Microcontrollers Using Arduino. PhilRobotics
 Introduction to Microcontrollers Using Arduino PhilRobotics Objectives Know what is a microcontroller Learn the capabilities of a microcontroller Understand how microcontroller execute instructions Objectives
The Arduino Briefing. The Arduino Briefing
 Mr. Yee Choon Seng Email : csyee@simtech.a-star.edu.sg Design Project resources http://guppy.mpe.nus.edu.sg/me3design.html One-Stop robotics shop A-Main Objectives Pte Ltd, Block 1 Rochor Road, #02-608,
Arduino Uno Microcontroller Overview
 Innovation Fellows Program Arduino Uno Microcontroller Overview, http://saliterman.umn.edu/ Department of Biomedical Engineering, University of Minnesota Arduino Uno Power & Interface Reset Button USB
More Arduino Programming
 Introductory Medical Device Prototyping Arduino Part 2, http://saliterman.umn.edu/ Department of Biomedical Engineering, University of Minnesota More Arduino Programming Digital I/O (Read/Write) Analog
Procedure: Determine the polarity of the LED. Use the following image to help:
 Section 2: Lab Activity Section 2.1 Getting started: LED Blink Purpose: To understand how to upload a program to the Arduino and to understand the function of each line of code in a simple program. This
Arduino Part 2. Introductory Medical Device Prototyping
 Introductory Medical Device Prototyping Arduino Part 2, http://saliterman.umn.edu/ Department of Biomedical Engineering, University of Minnesota More Arduino Programming Digital I/O (Read/Write) Analog
ARDUINO YÚN MINI Code: A000108
 ARDUINO YÚN MINI Code: A000108 The Arduino Yún Mini is a compact version of the Arduino YUN OVERVIEW: Arduino Yún Mini is a breadboard PCB developed with ATmega 32u4 MCU and QCA MIPS 24K SoC CPU operating
ARDUINO YÚN Code: A000008
 ARDUINO YÚN Code: A000008 Arduino YÚN is the perfect board to use when designing connected devices and, more in general, Internet of Things projects. It combines the power of Linux with the ease of use
Halloween Pumpkinusing. Wednesday, October 17, 12
 Halloween Pumpkinusing Blink LED 1 What you will need: 1 MSP-EXP430G2 1 3 x 2 Breadboard 3 560 Ohm Resistors 3 LED s (in Red Color Range) 3 Male to female jumper wires 1 Double AA BatteryPack 2 AA Batteries
LAMPIRAN I (LISTING PROGRAM)
") LAMPIRAN I (LISTING PROGRAM) #include LiquidCrystal lcd(8, 9, 4, 5, 6, 7); const int numreadings = 10; int readings[numreadings]; // the readings from the analog input int readindex =
LAMPIRAN I (LISTING PROGRAM) #include LiquidCrystal lcd(8, 9, 4, 5, 6, 7); const int numreadings = 10; int readings[numreadings]; // the readings from the analog input int readindex =
EXPERIMENT 7 Please visit https://www.arduino.cc/en/reference/homepage to learn all features of arduino before you start the experiments
 EXPERIMENT 7 Please visit https://www.arduino.cc/en/reference/homepage to learn all features of arduino before you start the experiments TEMPERATURE MEASUREMENT AND CONTROL USING LM35 Purpose: To measure
An FTDI connection: The ATtiny microcontrollers don t have a hardware UART External Crystal header pins for an optional crystal
 Getting Started with the T-Board The T-Board modules were designed to speed up your AVR prototyping. This guide will show you just how quickly you can get up and running with the Hello World for microcontrollers
ArdOS The Arduino Operating System Quick Start Guide and Examples
 ArdOS The Arduino Operating System Quick Start Guide and Examples Contents 1. Introduction... 1 2. Obtaining ArdOS... 2 3. Installing ArdOS... 2 a. Arduino IDE Versions 1.0.4 and Prior... 2 b. Arduino
Smart Objects. SAPIENZA Università di Roma, M.Sc. in Product Design Fabio Patrizi
 Smart Objects SAPIENZA Università di Roma, M.Sc. in Product Design Fabio Patrizi 1 What is a Smart Object? Essentially, an object that: Senses Thinks Acts 2 Example 1 https://www.youtube.com/watch?v=6bncjd8eke0
2SKILL. Variables Lesson 6. Remembering numbers (and other stuff)...
...") Remembering numbers (and other stuff)... Let s talk about one of the most important things in any programming language. It s called a variable. Don t let the name scare you. What it does is really simple.
Remembering numbers (and other stuff)... Let s talk about one of the most important things in any programming language. It s called a variable. Don t let the name scare you. What it does is really simple.
ARDUINO INDUSTRIAL 1 01 Code: A000126
 ARDUINO INDUSTRIAL 1 01 Code: A000126 The Industrial 101 is a small form-factor YUN designed for product integration. OVERVIEW: Arduino Industrial 101 is an Evaluation board for Arduino 101 LGA module.
Adapted from a lab originally written by Simon Hastings and Bill Ashmanskas
 Physics 364 Arduino Lab 1 Adapted from a lab originally written by Simon Hastings and Bill Ashmanskas Vithayathil/Kroll Introduction Last revised: 2014-11-12 This lab introduces you to an electronic development
Lab 2 - Powering the Fubarino. Fubarino,, Intro to Serial, Functions and Variables
 Lab 2 - Powering the Fubarino Fubarino,, Intro to Serial, Functions and Variables Part 1 - Powering the Fubarino SD The Fubarino SD is a 56 pin device. Each pin on a chipkit device falls broadly into one
Lab 2.2 Ohm s Law and Introduction to Arduinos
 Lab 2.2 Ohm s Law and Introduction to Arduinos Objectives: Get experience using an Arduino Learn to use a multimeter to measure Potential units of volts (V) Current units of amps (A) Resistance units of
Arduino Ethernet. Arduino Ethernet Rev. 2 board front view with optional PoE module. (http://arduino.cc/en/uploads/main/arduinoethernetfrontpoe.
 Arduino - ArduinoBoardEthernet Page 1 of 10 Arduino Ethernet (http://arduino.cc/en/uploads/main/arduinoethernetfront.jpg) Arduino Ethernet Rev. 3 board front view (http://arduino.cc/en/uploads/main/arduinoethernetback.jpg)
Arduino Uno. Power & Interface. Arduino Part 1. Introductory Medical Device Prototyping. Digital I/O Pins. Reset Button. USB Interface.
 Introductory Medical Device Prototyping Arduino Part 1, http://saliterman.umn.edu/ Department of Biomedical Engineering, University of Minnesota Arduino Uno Power & Interface Reset Button USB Interface
CTEC 1802 Embedded Programming Labs
 CTEC 1802 Embedded Programming Labs This document is intended to get you started using the Arduino and our I/O board in the laboratory - and at home! Many of the lab sessions this year will involve 'embedded
Prototyping & Engineering Electronics Kits Basic Kit Guide
 Prototyping & Engineering Electronics Kits Basic Kit Guide odysseyboard.com Please refer to www.odysseyboard.com for a PDF updated version of this guide. Guide version 1.0, February, 2018. Copyright Odyssey
Sten-SLATE ESP Kit. Description and Programming
 Sten-SLATE ESP Kit Description and Programming Stensat Group LLC, Copyright 2016 Overview In this section, you will be introduced to the processor board electronics and the arduino software. At the end
CARTOOINO Projects Book
 1 CARTOOINO Projects Book Acknowledgement Acknowledgement This Cartooino Projects Book is a cartoon based adaptation of the Arduino Projects Book. The Cartooino Project Book was developed by the GreenLab
Lab-3: LCDs Serial Communication Analog Inputs Temperature Measurement System
 Mechatronics Engineering and Automation Faculty of Engineering, Ain Shams University MCT-151, Spring 2015 Lab-3: LCDs Serial Communication Analog Inputs Temperature Measurement System Ahmed Okasha okasha1st@gmail.com
Electronic Brick Starter Kit
 Electronic Brick Starter Kit Getting Started Guide v1.0 by Introduction Hello and thank you for purchasing the Electronic Brick Starter Pack from Little Bird Electronics. We hope that you will find learning
IME-100 ECE. Lab 4. Electrical and Computer Engineering Department Kettering University. G. Tewolde, IME100-ECE,
 IME-100 ECE Lab 4 Electrical and Computer Engineering Department Kettering University 4-1 1. Laboratory Computers Getting Started i. Log-in with User Name: Kettering Student (no password required) ii.
EEG 101L INTRODUCTION TO ENGINEERING EXPERIENCE
 EEG 101L INTRODUCTION TO ENGINEERING EXPERIENCE LABORATORY 1: INTRODUCTION TO ARDUINO IDE AND PROGRAMMING DEPARTMENT OF ELECTRICAL AND COMPUTER ENGINEERING UNIVERSITY OF NEVADA, LAS VEGAS 1. FYS KIT COMPONENTS
Digital Pins and Constants
 Lesson Lesson : Digital Pins and Constants Digital Pins and Constants The Big Idea: This lesson is the first step toward learning to connect the Arduino to its surrounding world. You will connect lights
ARDUINO PRIMO. Code: A000135
 ARDUINO PRIMO Code: A000135 Primo combines the processing power from the Nordic nrf52 processor, an Espressif ESP8266 for WiFi, as well as several onboard sensors and a battery charger. The nrf52 includes
Introduction to Microcontrollers
 Introduction to Microcontrollers June 2017 Scott A. Theis W2LW Rev 5 ( 0 8 / 0 2 / 2 0 1 7 ) What s it all about How to get started What are some of the common controller options General introduction to
Seeeduino LoRaWAN. Description
 Seeeduino LoRaWAN SKU 102010128 LoRaWAN Class A/C Ultra long range communication Ultra low power consumption Arduino programming (based on Arduino Zero bootloader) Embeded with lithim battery management
Arduino Programming. Arduino UNO & Innoesys Educational Shield
 Arduino Programming Arduino UNO & Innoesys Educational Shield www.devobox.com Electronic Components & Prototyping Tools 79 Leandrou, 10443, Athens +30 210 51 55 513, info@devobox.com ARDUINO UNO... 3 INNOESYS
Arduino - DigitalReadSerial
 arduino.cc Arduino - DigitalReadSerial 5-6 minutes Digital Read Serial This example shows you how to monitor the state of a switch by establishing serial communication between your Arduino or Genuino and
cs281: Introduction to Computer Systems Lab03 K-Map Simplification for an LED-based Circuit Decimal Input LED Result LED3 LED2 LED1 LED3 LED2 1, 2
 cs28: Introduction to Computer Systems Lab3 K-Map Simplification for an LED-based Circuit Overview In this lab, we will build a more complex combinational circuit than the mux or sum bit of a full adder
FUNCTIONS USED IN CODING pinmode()
") FUNCTIONS USED IN CODING pinmode() Configures the specified pin to behave either as an input or an output. See the description of digital pins for details on the functionality of the pins. As of Arduino
FUNCTIONS USED IN CODING pinmode() Configures the specified pin to behave either as an input or an output. See the description of digital pins for details on the functionality of the pins. As of Arduino
University of Hull Department of Computer Science C4DI Interfacing with Arduinos
 Introduction Welcome to our Arduino hardware sessions. University of Hull Department of Computer Science C4DI Interfacing with Arduinos Vsn. 1.0 Rob Miles 2014 Please follow the instructions carefully.
PDF of this portion of workshop notes:
 PDF of this portion of workshop notes: http://goo.gl/jfpeym Teaching Engineering Design with Student-Owned Digital and Analog Lab Equipment John B. Schneider Washington State University June 15, 2015 Overview
SPDM Level 2 Smart Electronics Unit, Level 2
 SPDM Level 2 Smart Electronics Unit, Level 2 Evidence Folder John Johns Form 3b RSA Tipton 1.1 describe the purpose of circuit components and symbols. The candidate can describe the purpose of a range
Introducting Itsy Bitsy 32u4
 Introducting Itsy Bitsy 32u4 Created by lady ada Last updated on 2018-01-03 05:47:20 AM UTC Guide Contents Guide Contents Overview Pinouts Which do you have? Power Pins Adafruit Pro Trinket LiIon/LiPoly
Adafruit Metro Mini. Created by lady ada. Last updated on :12:28 PM UTC
 Adafruit Metro Mini Created by lady ada Last updated on 2018-01-24 08:12:28 PM UTC Guide Contents Guide Contents Overview Pinouts USB & Serial converter Microcontroller & Crystal LEDs Power Pins & Regulators
1/Build a Mintronics: MintDuino
 1/Build a Mintronics: The is perfect for anyone interested in learning (or teaching) the fundamentals of how micro controllers work. It will have you building your own micro controller from scratch on
User Guide v1.0. v1.0 Oct 1, This guide is only available in English Ce manuel est seulement disponible en Anglais
 ROVER ShiELD User Guide v1.0 v1.0 Oct 1, 2014 This guide is only available in English Ce manuel est seulement disponible en Anglais Description The DFRobotShop Rover Shield is the ideal all in one shield
Blinking an LED 1 PARTS: Circuit 2 LED. Wire. 330Ω Resistor
 Circuit PIN 3 RedBoard Blinking an LED LED (Light-Emitting Diode) Resistor (33 ohm) (Orange-Orange-Brown) LEDs (light-emitting diodes) are small, powerful lights that are used in many different applications.
3. The circuit is composed of 1 set of Relay circuit.
 Part Number : Product Name : FK-FA1420 ONE CHANNEL 12V RELAY MODULE This is the experimental module for a relay controller as the fundamental controlling programming. It is adaptable or is able to upgrade
Specification. 1.Power Supply direct from Microcontroller Board. 2.The circuit can be used with Microcontroller Board such as Arduino UNO R3.
 Part Number : Product Name : FK-FA1410 12-LED AND 3-BOTTON SHIELD This is the experimental board for receiving and transmitting data from the port of microcontroller. The function of FK-FA1401 is fundamental
ESPino - Specifications
 ESPino - Specifications Summary Microcontroller ESP8266 (32-bit RISC) WiFi 802.11 (station, access point, P2P) Operating Voltage 3.3V Input Voltage 4.4-15V Digital I/O Pins 9 Analog Input Pins 1 (10-bit
Sanguino TSB. Introduction: Features:
 Sanguino TSB Introduction: Atmega644 is being used as CNC machine driver for a while. In 2012, Kristian Sloth Lauszus from Denmark developed a hardware add-on of Atmega644 for the popular Arduino IDE and
ARDUINO. By Kiran Tiwari BCT 2072 CoTS.
 ARDUINO By Kiran Tiwari BCT 2072 CoTS www.kirantiwari.com.np SO What is an Arduino? WELL!! Arduino is an open-source prototyping platform based on easy-to-use hardware and software. Why Arduino? Simplifies
Lesson 8: Digital Input, If Else
 Lesson 8 Lesson 8: Digital Input, If Else Digital Input, If Else The Big Idea: This lesson adds the ability of an Arduino sketch to respond to its environment, taking different actions for different situations.
Lab 2 - Powering the Fubarino, Intro to Serial, Functions and Variables
 Lab 2 - Powering the Fubarino, Intro to Serial, Functions and Variables Part 1 - Powering the Fubarino SD The Fubarino SD is a 56 pin device. Each pin on a chipkit device falls broadly into one of 9 categories:
Arduino. part A. slides rel. 4.3 free documentation. Renato Conte Arduino - 1 /82 -
 Arduino part A slides rel. 4.3 free documentation 2015 Renato Conte Arduino - 1 /82 - Part A Contents What is Arduino? What is an embedded system? The microcontroller Atmega168 / 328 The Arduino board
Bluno Mega 2560 (SKU:DFR0323)
") Bluno Mega 2560 (SKU:DFR0323) From Robot Wiki Contents 1 Introduction 2 Specification 3 Pin Out 4 Supported Android Devices 5 Supported Apple Devices 6 Tutorial o 6.1 More advantages o 6.2 The serial port
Bluno Mega 2560 (SKU:DFR0323) From Robot Wiki Contents 1 Introduction 2 Specification 3 Pin Out 4 Supported Android Devices 5 Supported Apple Devices 6 Tutorial o 6.1 More advantages o 6.2 The serial port
Introduction to Programming. Writing an Arduino Program
 Introduction to Programming Writing an Arduino Program What is an Arduino? It s an open-source electronics prototyping platform. Say, what!? Let s Define It Word By Word Open-source: Resources that can
TANGIBLE MEDIA & PHYSICAL COMPUTING MORE ARDUINO
 TANGIBLE MEDIA & PHYSICAL COMPUTING MORE ARDUINO AGENDA RECAP ALGORITHMIC APPROACHES TIMERS RECAP: LAST WEEK WE DID: ARDUINO IDE INTRO MAKE SURE BOARD AND USB PORT SELECTED UPLOAD PROCESS COVERED DATATYPES
BASIC ARDUINO WORKSHOP. Mr. Aldwin and Mr. Bernardo
 BASIC ARDUINO WORKSHOP Mr. Aldwin and Mr. Bernardo 1 BASIC ARDUINO WORKSHOP Course Goals Introduce Arduino Hardware and Understand Input Software and Output Create simple project 2 Arduino Open-source
A Hacker s Introduction to the Nokia N900
 A Hacker s Introduction to the Nokia N900 Introduction Welcome to the Hacker s Introduction to the Nokia N900. This guide is intended to help you begin connecting the N900 s builtin capabilities to information
Intro to Arduino. Zero to Prototyping in a Flash! Material designed by Linz Craig and Brian Huang
 Intro to Arduino Zero to Prototyping in a Flash! Material designed by Linz Craig and Brian Huang Overview of Class Getting Started: Installation, Applications and Materials Electrical: Components, Ohm's
Arduino For Amateur Radio
 Arduino For Amateur Radio Introduction to Arduino Micro controller vs. a PI Arduino Models, Books and Add-Ons Amateur Radio Applications Arduino Uno/Pro Micro Introduction to Arduino Programming More on
Arduino: The Novel by nanowrirobot.pl Created in November of 2010
 Arduino: The Novel by nanowrirobot.pl Created in November of 2010 Inexperienced sending Bring range simplify buy Rather. Included programmers GPL against step-by-step PCB steps. Output source While beyond