ACS75, ACS75D, ACS85 & ACS85D BTE Overview. GTO September 2006 / May 2007
|
|
|
- Clarence Johns
- 5 years ago
- Views:
Transcription
1 ACS75, ACS75D, ACS85 & ACS85D BTE Overview GTO September 2006 / May 2007

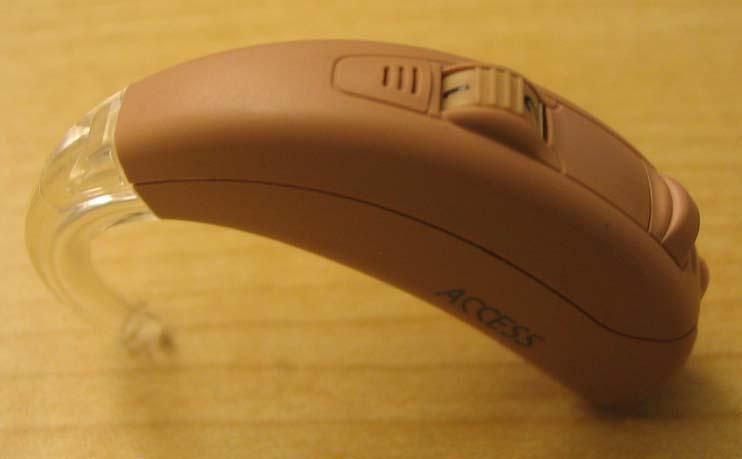
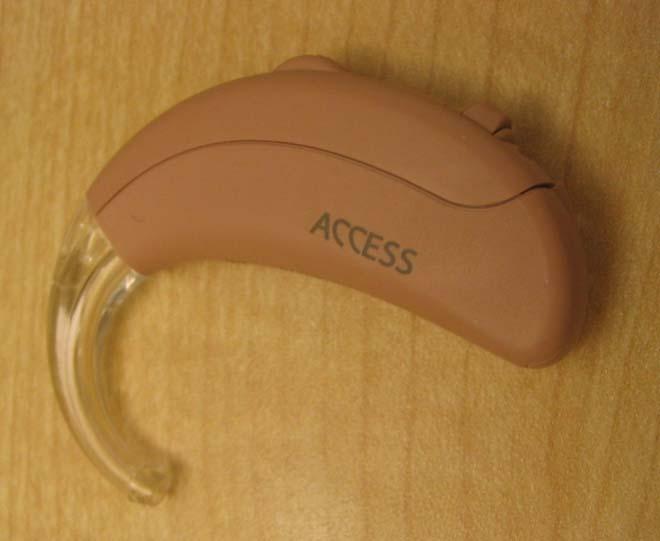
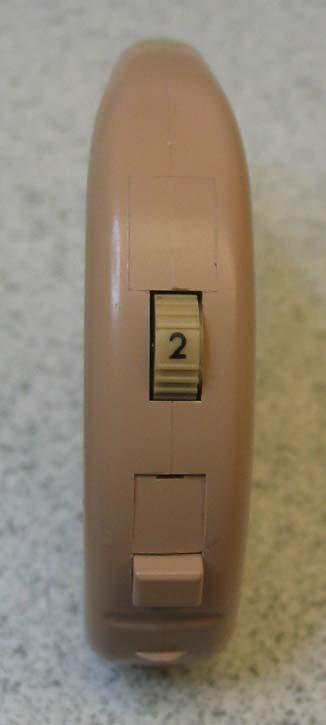
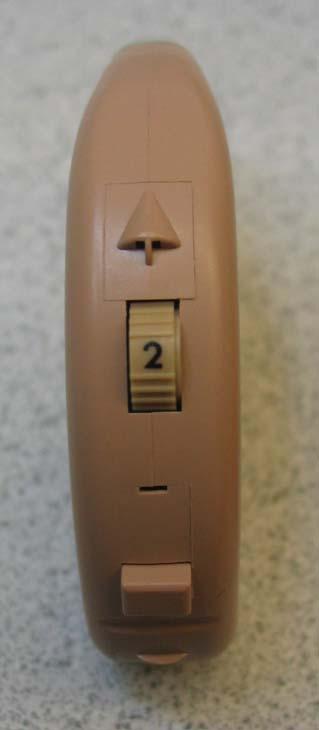
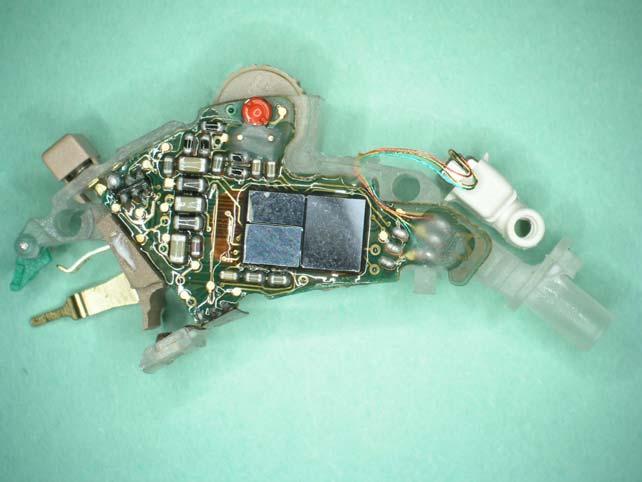
2 ACS75 & ACS75D ACS75 ACS75D
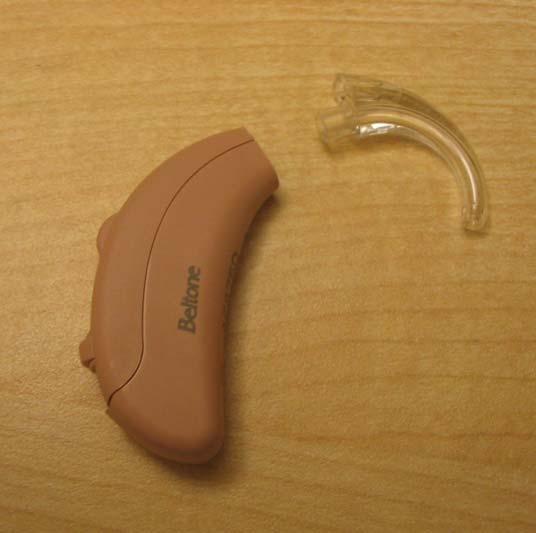
3 Disassembly Pull out the soundhook from the BTE housing.


4 Disassembly Squeeze to grip Open the battery door about halfway. Hold and grip the door tight on both sides and lift off door from the device.


5 Disassembly Push the small plastic part as shown. This will release the housing from its locked position. Slowly separate the housing.


6 Disassembly Battery door lock When separating the housing the battery door lock may come off. Be careful not to loose this plastic part.

7 Disassembly Carefully separate the housing apart.

8 Receiver Replacement De-solder the Receiver connection as shown and replace with whole Receiver assembly. Receiver assembly Note: Always apply EGC-1700 after soldering.


9 Microphone(s) Replacement Remove mic(s) and the amplifier assembly from top housing.


 for replacement.")
10 Microphone(s) Replacement Front mic Rear mic De-solder mic connections as shown. Remember to connect the mic wiring to its designated PCB location. See picture as reference. Front mic assembly Rear mic assembly Use microphone complete assembly (with boot) for replacement. Note: Always apply EGC-1700 after soldering.

11 VC Replacement Disassemble the device and remove the PCB. Remove solder from VC contact pins as shown, to exchange the VC. Apply lacquer p/n on the nut, and coating p/n on the solder joints after replacing the Volume Control.

12 Telecoil Replacement Disassemble the device and remove the PCB. Remove defective tele-coil and replace new coil onto white frame as shown. Use silicon RTV734 to keep it in place. Solder wires onto the PCB Apply coating p/n on the solder joints after replacing Telecoil.

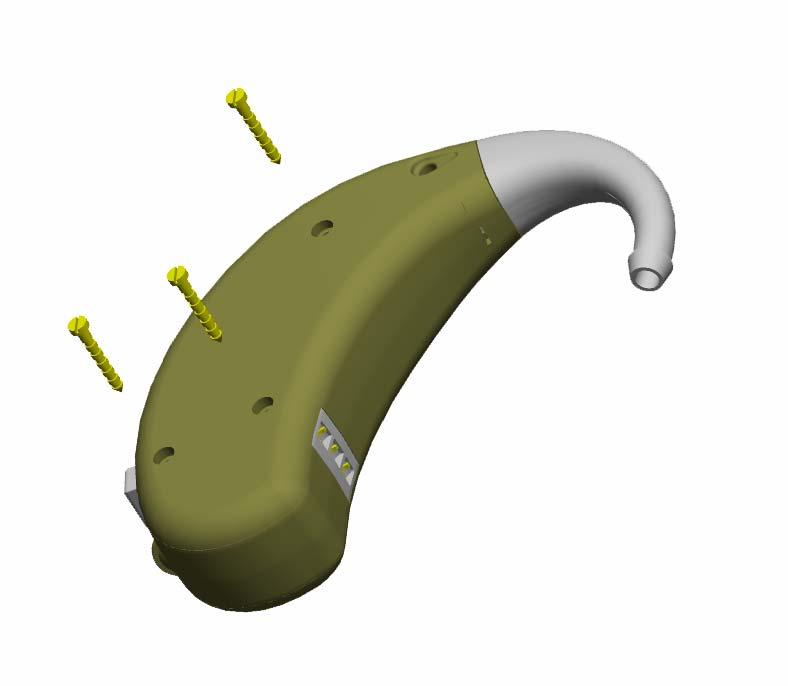
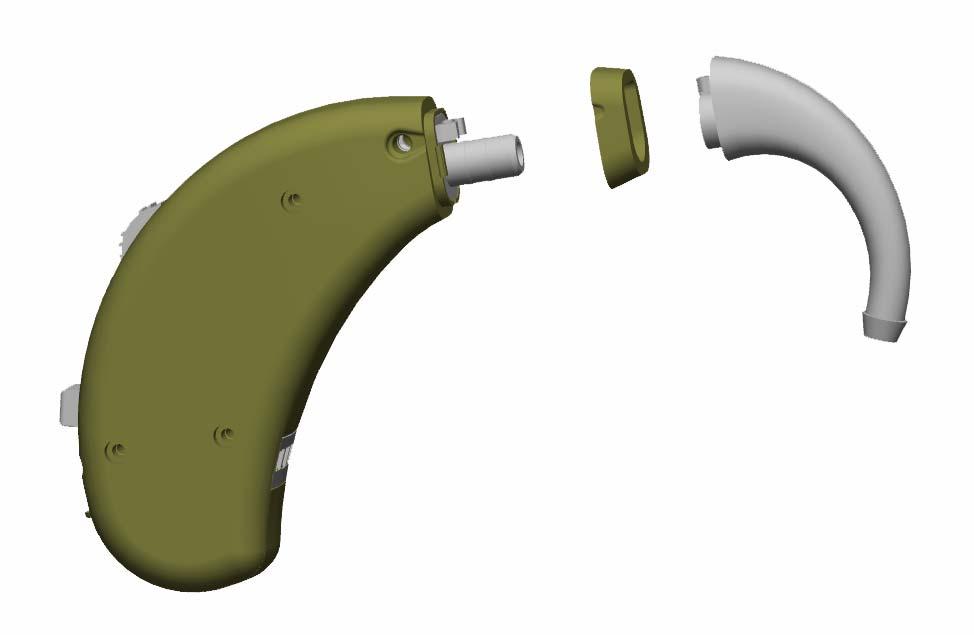
13 ACS85 & ACS85D ACS85 ACS85D
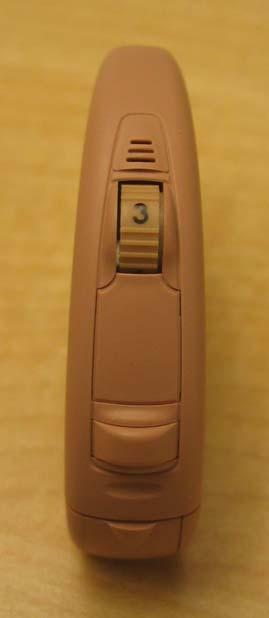
14 Key Features High Power BTE C.3.0 Hybrid Single Microphone or Dual Microphone Direct Audio Input (DAI) shoe Telecoil Program selector (push-button) Analogue Volume Control with visible cues Colored side indicator ON/OFF through battery door Baby tone tube Spectacle adaptor Colors available: - beige - grey and - dark brown

15 Exploded view
16 Disassembly instructions

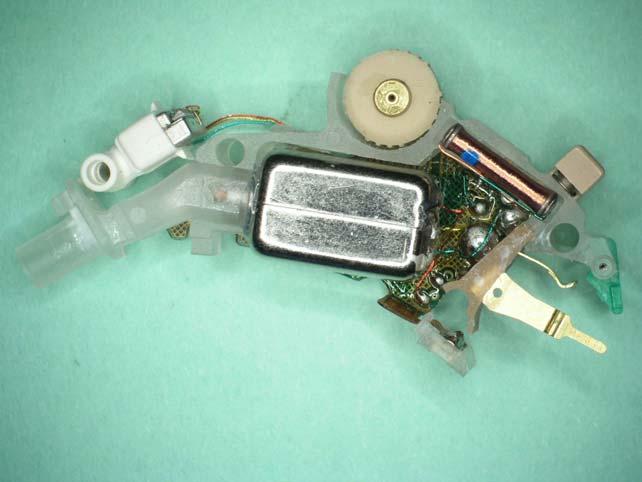
17 Amplifier Single Mic
18 Amplifier complete Amplifier complete includes: PCB hybrid C.3.0 Push-button Volume control Telecoil AI-module Battery spring module Chassis complete Programming pins On/off lock
 Ensure wires a routed properly and fixated to the chassis.")
19 Replace Microphone(s) Disassemble device Remove coating material and replace Microphone. (use mic. complete as spare part) Ensure wires a routed properly and fixated to the chassis. Wire lengths: - Red 20mm - Green 18mm - Amber 20mm Note: Always apply EGC-1700 after soldering.


20 Replace Receiver Disassemble the device and remove the PCB. Remove the Receiver unit to access wires for Receiver unit. Apply silicone glue on the Receiver stud before attaching nose block. Wire lengths: - Red 11mm - Green 11mm - Amber 11mm Note: Always apply EGC-1700 after soldering.

21 Replace AI-module Disassemble the device and remove the PCB. Remove solder from PCB as shown, to exchange the AI-module. Note: Always apply EGC-1700 after soldering.

22 Replace Volume Control Disassemble the device and remove the PCB. Remove solder from VC contact pins as shown, to exchange the VC. Apply lacquer p/n on the nut, and coating p/n on the solder joints after replacing the Volume Control.

23 Replace Telecoil Disassemble the device and remove the PCB. Remove the Receiver unit to access the wires for Telecoil. Add double faced tape to fixate the Telecoil. Apply coating p/n on the solder joints after replacing Telecoil. Wire lengths - Red 9mm - Green 12mm
24 Other repair instructions Use spare part Chassis Complete to replace, on/off spring and programming pins. No service tool, therefore its recommended to replace amplifier if the push-button is defect. Not a standard push-button To replace battery springs use Battery contact module. Apply molycote on the springs


25 Test equipment Use standard test equipment for AUDIOmaster test systems: 2cc coupler CS44 programming cable


26 Test instructions Place device in test chamber as shown on the picture. Ensure correct positioning T-coil Run the AUDIOmaster test script.
Technical Manual INT START BTE. Global Technical Operations gto.gnresound.com Lautrubjerg 7 DK-2750 Ballerup Denmark
 Technical Manual INT START BTE Global Technical Operations gto.gnresound.com Lautrubjerg 7 DK-2750 Ballerup Denmark E-Mail: Service@gnresound.dk Table of Contents SA70 & SA70-D: Page Description... 3 Part
Technical Manual ReSound Metrix MX70-D/DI/DV/DVI/ MX80-DVI BTE
 Technical Manual ReSound Metrix MX70-D/DI/DV/DVI/ MX80-DVI BTE GN ReSound as Global Technical Operations gto.gnresound.com Lautrupbjerg 9 DK-2750 Ballerup Denmark E-mail: Service@gnresound.dk Table of
Technical Manual Beltone Paris Platform BTE
 Technical Manual Beltone Paris Platform BTE Global Technical Operations gto.gnresound.com Lautrupbjerg 7 DK-2750 Ballerup Denmark E-Mail: Service@Beltone.com Table of Contents Form-Factor-Matrix...3 Colour
Technical Manual Pixel Mini BTE PL60-DI
 Technical Manual Pixel Mini BTE PL60-DI GN ReSound as Global Technical Operations gto.gnresound.com Lautrupbjerg 7-11 DK-2750 Ballerup Denmark Phone: + 45 45 75 23 16 E-mail: Service@gnresound.dk Table
Technical Manual ReSound Match ITC. GN ReSound as Global Technical Operations Lautrupbjerg 7 DK-2750 Ballerup Denmark
 Technical Manual ReSound Match ITC GN ReSound as Global Technical Operations Lautrupbjerg 7 DK-2750 Ballerup Denmark E-Mail: Service@gnresound.dk Table of contents Subject Page Matrix... 3 Spare Part List...
Technical Manual ReSound Match ITE. GN ReSound as Global Technical Operations Lautrupbjerg 7 DK-2750 Ballerup Denmark
 Technical Manual ReSound Match ITE GN ReSound as Global Technical Operations Lautrupbjerg 7 DK-2750 Ballerup Denmark E-Mail: Service@gnresound.dk Table of contents Subject Page Matrix... 3 Spare Part List...
Technical Manual Beltone MARQ. Global Technical Operations gto.gnresound.com Lautrupbjerg 9 DK-2750 Ballerup Denmark
 Technical Manual Beltone MARQ Global Technical Operations gto.gnresound.com Lautrupbjerg 9 DK-2750 Ballerup Denmark E-Mail: Service@Beltone.com Table of Contents Description...3 Matrix & product information...4
Technical Manual Canta 770-D/470-D & 270/270-D
 Technical Manual Canta 770-D/470-D & 270/270-D (including 770-D & 470-D Open BTE features) GN ReSound as Global Technical Operations gto.gnresound.com Lautrupbjerg 9 DK-2750 Ballerup Denmark Phone: + 45
Beltone A/S Global Technical Operations Lautrupbjerg 7 DK-2750 Ballerup Denmark. Technical Manual Beltone DELHI Platform
 Beltone A/S Global Technical Operations http://gto.gnresound.com Lautrupbjerg 7 DK-2750 Ballerup Denmark Technical Manual Beltone DELHI Platform Table of Contents Form-Factor-Matrix & Product information...
UNCONTROLLED COPY IF PRINTED. Service Information
 Service Information This document has been produced for the service departments of the Unitron Hearing group companies and agents. It is reserved for Unitron Hearing Service Centers and for trained, authorized
Technical Manual ReSound TrimFlex ITC
 Technical Manual ReSound TrimFlex ITC GN ReSound as Global Technical Operations gto.gnresound.com Lautrupbjerg 7 DK-2750 Ballerup Denmark E-Mail: Service@gnresound.dk Table of Contents Description...3
Technical Manual Canta 730/ /230 VC & Canta 730-OC/430-OC 730-D ITC
 Technical Manual Canta 730/430 230/230 VC & Canta 730-OC/430-OC 730-D ITC GN ReSound as Global Technical Operations gto.gnresound.com Lautrupbjerg 9 DK-2750 Ballerup Denmark Phone: + 45 45 75 23 16 E-Mail:
Technical Manual EDGE E65 Mini-BTE
 Technical Manual EDGE E65 Mini-BTE Global Technical Operations gto.gnresound.com Lautrupbjerg 7 DK-2750 Ballerup Denmark Phone: + 45 45 75 2 6 E-Mail: Service@Beltone.com Table of contents Description...
Insignia Flex 10.1 Microphone Replacement
 Replace the microphone in your Insignia Flex 10.1 tablet. Written By: Richard ifixit CC BY-NC-SA www.ifixit.com Page 1 of 10 INTRODUCTION The microphone in the Insignia Flex 10.1 is used during audio and
Welch Allyn Connex Vital Signs Monitor 6000 Power Supply Replacement
 Welch Allyn Connex Vital Signs Monitor 6000 Power Supply Replacement Replace the power supply in a 6000 series Welch Allyn Connex Vital Signs Monitor. Written By: Sam Lionheart ifixit CC BY-NC-SA www.ifixit.com
MCH WIRE HARNESS WITH QUICK DISCONNECT REPLACEMENT Initial Release 1/31/2013
 1. Table of Contents 1. Table of Contents Page 1 2. Remove Failed MCH-103.2 Page 1 3. Install MCH-103.2 to MCH-102NW Page 2 4. Install NC3FX-HD to MCH-103.2 Page 3 5. Install MCH-103.2 Battery Terminal
Megatouch FORCE Monitor Chassis Board Replacement
 Megatouch FORCE Monitor Chassis Board Replacement Visit the Merit Industries, Inc. Web site http://www.meritind.com merit industries, inc. PM0337-01 Rev C Table of Contents FORCE Classic Monitor Chassis
Elecraft W1 SWR/Wattmeter Enclosure by W8FGU
 Elecraft W1 SWR/Wattmeter Enclosure by W8FGU The W1 enclosure is made of Lexan, a polycarbonate, which is very strong. It also has a UV blocking coating on one side and was assembled carefully with this
Sharper Image ipulse SI325 Auxiliary Input Replacement
 Sharper Image ipulse SI325 Auxiliary Input Replacement Use this guide to replace the auxiliary input of the Sharper Image ipulse SI325. Written By: Melissa Pasa ifixit CC BY-NC-SA www.ifixit.com Page 1
ipod Classic Headphone Jack & Hold Switch Replacement
 ipod Classic Headphone Jack & Hold Switch Replacement Replace Headphone Jack & Hold Switch to fix no audio and/or no unlock Written By: irobot ifixit CC BY-NC-SA www.ifixit.com Page 1 of 22 INTRODUCTION
Contents. Communications, Modular (excludes 17B, 17C, MK 21 and KMB BandMasks ) 1.1 Daily Maintenance. 1.2 Monthly Maintenance (or
 1.1 Daily Maintenance. 1.2 Monthly Maintenance (or") Communications, Modular (excludes 17B, 17C, MK 21 and KMB BandMasks ) Daily Maintenance Communications, Modular (excludes 17B, 17C, MK 21 and KMB BandMasks ) Contents COM-1 COM-1 1.1 Daily Maintenance
Communications, Modular (excludes 17B, 17C, MK 21 and KMB BandMasks ) Daily Maintenance Communications, Modular (excludes 17B, 17C, MK 21 and KMB BandMasks ) Contents COM-1 COM-1 1.1 Daily Maintenance
Service Manual. Gigaset 4010 Micro. up to Level 2.5
 Service Manual Gigaset 4010 Micro up to Level 2.5 1 Table of contents 1 TABLE OF CONTENTS...2 2 FOREWORD...3 3 SERVICE PROCEDURES...4 3.1 SERVICE PROCEDURES FOR GIGASET 4000 MICRO...4 3.2 SERVICE PROCEDURES
Canon Powershot A720 IS Motherboard Replacement
 Canon Powershot A720 IS Motherboard Replacement This guide will show how to replace the motherboard. Written By: Jamie ifixit CC BY-NC-SA www.ifixit.com Page 1 of 16 INTRODUCTION This guide will allow
Canon EOS Rebel T2i Top Cover Replacement
 Canon EOS Rebel T2i Top Cover Replacement Replacing the top piece of a Canon T2i (550D). In my case, I had a broken hot-shoe, but as most controls on this camera are built into the same part, this repair
CONEC Industrial Ethernet Circular Sealed RJ45 Connector System consists of a RJ45 Plug Kit, a Receptacle Kit and a Protective Cover Assembly.
 Revised Sept-28-2009 Sealed Industrial Ethernet Circular IP67 Cat. 5e RJ45 Connector System Instructions CONEC Industrial Ethernet Circular Sealed RJ45 Connector System consists of a RJ45 Plug Kit, a Kit
Assembling of the CD-Player CD-Two MKII Part 1: PCB s and interconnections
 Assembling of the CD-Player CD-Two MKII Part 1: PCB s and interconnections 1. Please check if you have all parts: Overview of mechanical parts: bottom panel with drilling s Outer bottom panel made of Acrylic
Removal and Installation8
 8 Screw Types 8-4 Top Cover Assembly 8-5 Left Hand Cover 8-6 Right Hand Cover 8-10 Front Panel Assembly 8-14 Left Rear Cover 8-15 Right Rear Cover 8-16 Extension Cover (60" Model only) 8-17 Media Lever
SP-100. Service Manual Aug. 02
 SP-100 Service 2004. Aug. 02 1. Caution for maintenance and Service. Please take care below points when you do Service and Maintenance. (1) Service and Maintenance should be done under safety condition.
Nikon D610 Flash Capacitor Replacement
 Nikon D610 Flash Capacitor Replacement This guide will help to show you how to replace the D610's Flash Capacitor. Written By: Daniel Eagan ifixit CC BY-NC-SA www.ifixit.com Page 1 of 10 INTRODUCTION In
Canon Powershot SD550 Zoom Lens Assembly Replacement
 Canon Powershot SD550 Zoom Lens Assembly Replacement This repair guide will show you how to take apart the PowerShot SD550 and replace the zoom lens. Written By: Matthew Theiss ifixit CC BY-NC-SA www.ifixit.com
Written By: Andreas Holl
 Philips DPM8000 Microphone Replacement Replace a defective speaker to fix issues with bad recording. Written By: Andreas Holl ifixit CC BY-NC-SA www.ifixit.com Page 1 of 12 INTRODUCTION Ensure to have
MacBook Pro 15" Core Duo Model A1150 ExpressCard Cage Replacement
 MacBook Pro 15" Core Duo Model A1150 ExpressCard Cage Replacement Written By: irobot ifixit CC BY-NC-SA www.ifixit.com Page 1 of 17 INTRODUCTION You can again use ExpressCard accessories by replacing a
Written By: Sydney Dye
 Disassembling Panasonic LUMIX DMC-LX100 This guide will show you how to take apart your entire Panasonic LUMIX DMC-LX100. Written By: Sydney Dye ifixit CC BY-NC-SA www.ifixit.com Page 1 of 15 INTRODUCTION
Toshiba Satellite A105-S4011 Touchpad
 Toshiba Satellite A105-S4011 Touchpad Replacement This guide will instruct you on how to remove the current touchpad from this laptop and how to reinstall another. This is a straightforward process and
Motorola Droid X Motherboard Replacement
 Motorola Droid X Motherboard Replacement Written By: Yong hoon choun ifixit CC BY-NC-SA www.ifixit.com Page 1 of 19 TOOLS: ifixit Opening Tools (1) ifixit CC BY-NC-SA www.ifixit.com Page 2 of 19 Motorola
Motorola Droid X Camera Replacement
 Motorola Droid X Camera Replacement Written By: Gage ifixit CC BY-NC-SA www.ifixit.com Page 1 of 24 TOOLS: 64 Bit Driver Kit (1) ifixit Opening Tools (1) ifixit CC BY-NC-SA www.ifixit.com Page 2 of 24
Service & Maintenance
 Service & Maintenance Internal Amplifier External (Peavey) Amplifier Core & HDD Monitor UPS Dollar Bill Acceptor Coin Mechanism Cleaning Fans & Filter G1-1 Internal Amplifier Amplifier Removal 1. Disconnect
UNCONTROLLED COPY IF PRINTED. Service Instruction. Shine Rev M
 Service Instruction Document Number: This document is produced and reserved for Unitron service centers and for trained authorized service departments exclusively. : Electrostatic discharge sensitive devices
Motorola Atrix 4G Bottom Speaker
 Motorola Atrix 4G Bottom Speaker Replacement This guide will show you how to access the Motorola Atrix 4Gs bottom speaker for repair or replacement. Written By: Jake ifixit CC BY-NC-SA www.ifixit.com Page
OnePlus 5 Screen and Digitizer Assembly Replacement
 OnePlus 5 Screen and Digitizer Assembly Replacement Follow this guide to replace the screen and digitizer for the OnePlus 5. This replaces the screen as well as the frame it is attached to. Written By:
RM-937, RM-938, RM-939, RM-940 (AT&T)
") Service Manual for L1 and L2 Nokia Lumia 1520 RM-937, RM-938, RM-939, RM-940 (AT&T) Key features 5.98" ClearBlack display 2GB RAM 32 GB Internal mass memory (16 GB AT&T) 20 MP camera Wireless charging
Service Manual for L1 and L2 Nokia Lumia 1520 RM-937, RM-938, RM-939, RM-940 (AT&T) Key features 5.98" ClearBlack display 2GB RAM 32 GB Internal mass memory (16 GB AT&T) 20 MP camera Wireless charging
ASUS D550MA-DS01 Motherboard
 ASUS D550MA-DS01 Motherboard Replacement This guide will show you how to remove the motherboard from the laptop. Steps included in this process are removing the screws, disconnecting cables, and removing
Installation Guide for Mazak Mazatrol M - Plus, M-2, M32, T-Plus, T2
 1 Installation Guide for Mazak Mazatrol M - Plus, M-2, M32, T-Plus, T2 Tsubis Part Number: LCD12-0046 Power Down 1. Power down the controller. 2. Power down the complete machine by turning off the rear
Macintosh PowerBook 165c Motherboard Replacement
 Macintosh PowerBook 165c Motherboard Replacement This guide will demonstrate how to replace the Macintosh PowerBook 165c Motherboard. Written By: John ifixit CC BY-NC-SA www.ifixit.com Page 1 of 15 INTRODUCTION
CINTENNA ANTENNA REPAIR GUIDE
 The Cintenna is a great tool when looking to transmit WIRELESS DMX data over obstacles or hard to reach places. Wireless DMX can have its issues when not having a good line of sight between the transmitter
DualShock 4 Analog Stick Covers Replacement
 DualShock 4 Analog Stick Covers Replacement Replace analog stick covers on the Dualshock 4 controller. Written By: Maaz Hussaini ifixit CC BY-NC-SA www.ifixit.com Page 1 of 9 INTRODUCTION Use this guide
Technical Manual RS UNITE Wireless Accessories
 Technical Manual RS UNITE Wireless Accessories GN ReSound as Global Technical Operations http://gto.gnresound.com Lautrupbjerg 7 DK-2750 Ballerup Denmark Table of Contents Product information...3 Part
Replacement Keyswitch Assembly
 Installation Instructions Replacement Keyswitch Assembly (Catalog No. 2711E-NKSW1) Applicable Terminals Use this replacement keyswitch with PanelView Terminals 2711-KA1, -KC1, -TA1, -TC1, -TA4, -TC4 and
EZ-9000 Tape Dispenser, EZ-9000-RP Tape Dispenser Part Number / MAY 2012 REV 1.0
 PLEASE NOTE Some of the part numbers are now different depending on when the unit was manufactured. The drawing will note where the appearance is different and the parts list will give you the correct
How to assemble and disassemble Anafi
 How to assemble and disassemble Anafi Prerequisites The best way to repair ANAFI is to use Parrot official drones repair kit. You will need the cruciform as well as the Torx 5 (T5) in order to carry out
Written By: Brittany K
 Nintendo DS Lite Motherboard Replacement Written By: Brittany K ifixit CC BY-NC-SA www.ifixit.com Page 1 of 11 INTRODUCTION This guide has been updated by ifixit staff! Read the new, official guide here.
Insignia Flex 10.1 Motherboard Replacement
 Replace the motherboard of your Insignia Flex 10.1 tablet. Written By: William Boyden ifixit CC BY-NC-SA www.ifixit.com Page 1 of 9 INTRODUCTION This guide shows how to replace the motherboard of your
Written By: Jonathan Wear
 JBL Flip 2 MicroUSB Port Replacement This guide will walk you through replacing the microusb port for this device. Written By: Jonathan Wear ifixit CC BY-NC-SA www.ifixit.com Page 1 of 12 INTRODUCTION
CALRAD 70 series - telephone accessories
 CALRAD S NEW TELEPHONE HEADSETS HANDS FREE TELEPHONE HEADSETS Calrad s telephone headsets help reduce phone fatigue and provides hands-free convenience for working on computer data entry, taking notes,
Written By: Walter Galan
 Microsoft Zune HD OLED Display Replacement Written By: Walter Galan ifixit CC BY-NC-SA www.ifixit.com Page 1 of 15 INTRODUCTION Is your display cracked or faulty? No worries, you can replace it. TOOLS:
TDM To MiniMech conversion ProceDure
 TDM To MiniMech conversion ProceDure (Model 9100 ATM) TDN 07102-00079 Apr 1 2009 CorporATe HeAdquArTers: 522 E. Railroad Street Long Beach, MS 39560 PHONE: (228) 868-1317 FAX: (228) 868-0437 COPYRIGHT
Elecraft K3 KPA3 Power Connector Replacement Revision B, June 30, 2017 Copyright 2017, Elecraft, Inc. All Rights Reserved
 Introduction Elecraft K3 KPA3 Power Connector Replacement Revision B, June 30, 2017 Copyright 2017, Elecraft, Inc. All Rights Reserved The connectors furnishing high current to the KPA3 module have failed
Product End-of-Life Disassembly Instructions
 Product End-of-Life Disassembly Instructions Product Category: Personal Computers Marketing Name / Model [List multiple models if applicable.] HP Compaq 8200 Elite USDT Business PC Name / Model #2 Name
HTC RE Companion Handheld camera
 HTC RE Companion Handheld camera disassemby HTC RE Companion camera disassembly starting point. This will get the camera open with minimal damage, and give you some options to repair. Written By: Mike
Fitting range
 P R O D U C T I N F O R M A T I O N Fitting range HL - 0 CIC/MIC ITC ITE/ITE D ITE P (312) BTE/BTED/ ITE P (13) BTE P 125Hz 2 0 0 00 00 00 Product Concept Atlas Plus offers a full family of high quality
DualShock 4 Touch Pad Replacement. Remove the touchpad on the Dualshock 4 controller. Rédigé par: Mark. ifixit CC BY-NC-SA fr.ifixit.
 DualShock 4 Touch Pad Replacement Remove the touchpad on the Dualshock 4 controller. Rédigé par: Mark ifixit CC BY-NC-SA fr.ifixit.com Page 1 de 9 INTRODUCTION Use this guide to remove a defective touchpad
Go Pro rationale The world s most well known rationale NAL-NL1 is implemented in Go Pro.
 PRODUCT INFORMATION Go Pro sets a new standard for basic hearing care. A strong feature set makes Go Pro the most straight forward hearing instrument at an affordable price. The wide range of styles, features
Written By: Margarita
 Sonos Play 1 Motherboard Replacement This guide will demonstrate how to deconstruct and remove the motherboard from the device( requires driver kit, tweezers, plastic opening tools, and metal spudger)
Dark Energy Survey Detector Head Electronics Crate Disassembly & Modular Replacement Instructions For Type 2 DAQ & Heater Crates
 Dark Energy Survey Detector Head Electronics Crate Disassembly & Modular Replacement Instructions For Type 2 DAQ & Heater Crates University of Illinois at Urbana-Champaign Todd Moore Vaidas Simaitis Allison
Introduction 1. Liquid crystal display (16 characters by 2 rows) Contrast dial: turn the dial to adjust the contrast of the display (see page 5)
 Contrast dial: turn the dial to adjust the contrast of the display (see page 5)") Welcome to the GENIE Serial LCD module. Introduction 1 The GENIE Serial LCD module allows GENIE-based projects to display messages on a 16 character by 2 row liquid crystal display (LCD). This worksheet
Welcome to the GENIE Serial LCD module. Introduction 1 The GENIE Serial LCD module allows GENIE-based projects to display messages on a 16 character by 2 row liquid crystal display (LCD). This worksheet
Solarlok PV BAR Junction Box Assemblies
 Application Specification 114-137167 8 October 2018 Rev. C Solarlok PV BAR Junction Box Assemblies Application Specification 1. Introduction This specification covers the installation of the TE Connectivity
Sony MDR-IF33K Teardown
 Sony MDR-IF33K Teardown Written By: bac ifixit CC BY-NC-SA www.ifixit.com Page 1 of 15 INTRODUCTION Here's a Sony wireless stereo earphone system consisting of an infrared transmitter and receiver pair,
ASSET LGA1366 Top-side Probe
 ASSET LGA1366 Top-side Probe (Manual version 1.1) For gaining test access to the debug port of Intel processors that are designed for use in LGA1366 Sockets (Socket B). These include the Intel Core i7
Packard Bell. EasyNote BU Series. Disassembly Guide
 Packard Bell EasyNote BU Series Disassembly Guide Table of Contents Overview...3 Technician Notes...3 Disassembly Instructions...3 Reassembly Instructions...3 Required Tools...3 Battery...4 Memory...4
TD-700 FLUOROMETER SERVICE MANUAL
 TD-700 FLUOROMETER SERVICE MANUAL July 1996 CONTENTS Page Section 1 INTRODUCTION 2 Section 2 PRELIMINARY CHECKS 3 Section 3 TROUBLESHOOTING GUIDE 5 A. Lamp (Fluorescent) 5 B. Lamp Heater 7 C. Fan 8 D.
Ematic eglide 4 Screen Replacement
 This guide will help you remove the screen from the Emetic eglide 4. Written By: Bailey Hughes ifixit CC BY-NC-SA www.ifixit.com Page 1 of 11 INTRODUCTION This replacement guide will help you replace a
INSTRUCTIONS FOR THE INSTALLATION OF THE INFINITY "L" DISPLAY HOOD (INTO PREVIOUSLY INSTALLED INFINITY "L" SYSTEMS)
") Doc. 6001025 Rev B INSTRUCTIONS FOR THE INSTALLATION OF THE INFINITY "L" DISPLAY HOOD (INTO PREVIOUSLY INSTALLED INFINITY "L" SYSTEMS) Rev. B Doc. 6001025 Page 1 of 13 IMPORTANT NOTICE This document covers
Doc. 6001025 Rev B INSTRUCTIONS FOR THE INSTALLATION OF THE INFINITY "L" DISPLAY HOOD (INTO PREVIOUSLY INSTALLED INFINITY "L" SYSTEMS) Rev. B Doc. 6001025 Page 1 of 13 IMPORTANT NOTICE This document covers
MacBook Pro 15" Core 2 Duo Models A1226 and A1260 ExpressCard Cage Replacement
 MacBook Pro 15" Core 2 Duo Models A1226 and A1260 ExpressCard Cage Replacement Written By: Walter Galan ifixit CC BY-NC-SA www.ifixit.com Page 1 of 15 INTRODUCTION You can again use ExpressCard accessories
MacBook Pro 15" Core 2 Duo Model A1211 ExpressCard Cage Replacement
 MacBook Pro 15" Core 2 Duo Model A1211 ExpressCard Cage Replacement Written By: irobot ifixit CC BY-NC-SA www.ifixit.com Page 1 of 16 INTRODUCTION You can again use ExpressCard accessories by replacing
HP Envy 15-J120SG Display Panel Replacement
 HP Envy 15-J120SG Display Panel Replacement Replacing the Display Panel of the HP ENVY 15-J120SG Laptop. Written By: Christian ifixit CC BY-NC-SA www.ifixit.com Page 1 of 10 INTRODUCTION The left third
LG Optimus 3D Max LCD Replacement
 LG Optimus 3D Max LCD Replacement LG Optimus 3D Max LCD Replacement Written By: Kon ifixit CC BY-NC-SA www.ifixit.com Page 1 of 14 INTRODUCTION Although similar to the P920, it is hard to find information
Apple 3.5 Drive External Floppy Drive
 Apple 3.5 Drive External Floppy Drive Teardown This guide will show the disassembly down to the bare internal drive and other components of the Apple 3.5 Drive. Written By: rockinkat ifixit CC BY-NC-SA
SPARE PARTS & HOW TO HANDLE. μ-icc 2.45 compact. - Instructions - S/N: A01-PG10-SPE Version No.: 0 V
 SPARE PARTS & HOW TO HANDLE μ-icc 2.45 compact - Instructions - S/N: A01-PG10-SPE Version No.: 0 V1 2010-08-27 1 Introduction... 2 2 Safety instructions... 2 3 Open the housing... 3 4 Constituent parts
Installing the Server into a Rack
 Installing the Server into a Rack Note These instructions apply to multiple models; illustrations may vary slightly. Rack Mount Kit Inventory Before installing the chassis on a standard 4-post rack, make
Product End-of-Life Disassembly Instructions Product Category: Personal Computers
 Product End-of-Life Disassembly Instructions Product Category: Personal Computers Marketing Name / Model [List multiple models if applicable.] OMEN X by HP Desktop PC 900 Purpose: The document is intended
Nintendo DS Lite Rear Display Bezel Replacement
 Nintendo DS Lite Rear Display Bezel Replacement Replacement of the Nintendo DS Lite rear display bezel. Written By: Matt Newsom ifixit CC BY-NC-SA www.ifixit.com Page 1 of 17 INTRODUCTION Replace the rear
MacBook Core 2 Duo Display Replacement
 MacBook Core 2 Duo Display Replacement Written By: irobot ifixit CC BY-NC-SA www.ifixit.com Page 1 of 23 INTRODUCTION Change out the entire display assembly, including the inverter, Airport antennas, hinges
Dell Inspiron 1525 Upper Case Replacement
 Dell Inspiron 1525 Upper Case Replacement Replace the upper case on a Dell Inspiron 1525. Written By: Miroslav Djuric ifixit CC BY-NC-SA www.ifixit.com Page 1 of 13 INTRODUCTION Use this guide to help
Plasma Panel Replacement Guide DU-42PX12X
 Plasma Panel Replacement Guide DU-42PX12X Panel Replacement: At this point, the panel has been determined to be defective and replacement is necessary. Upon receiving the replacement panel, it must be
HP C8000 Workstation Disassembly Procedures
 HP C8000 Workstation Disassembly Procedures 410892-001 November, 2005 Edition 1 PRODUCT END-OF-LIFE DISASSEMBLY INSTRUCTIONS... 2 1.1 Product Identification...2 1.2 Purpose...2 1.3 Removal Items...2 1.4
Instruction Manual Winnie The Pooh Highchair
 Instruction Manual Winnie The Pooh Highchair IMPORTANT PLEASE READ THESE INSTRUCTIONS CAREFULLY BEFORE USING THIS PRODUCT KEEP FOR FUTURE REFERENCE 2 Safety Warnings Getting to know your Highchair 3 Thank
MCS 50. Discussion Control Unit. 1 of 7
 Discussion Control Unit FEATURES One microphone line for a maximum of 32 microphone units Integrated power supply unit with control for up to 32 microphone units Can be expanded to 64 microphone units
Canon EOS 70D Camera Motherboard
 Canon EOS 70D Camera Motherboard Replacement This guide will show you how to replace the main motherboard on a EOS 70D. Written By: Tyler Baker ifixit CC BY-NC-SA www.ifixit.com Page 1 of 11 INTRODUCTION
PATCH PANEL Easy Patch INSTRUCTION MANUAL
 Page 1 BDA90-1 PATCH PANEL Easy Patch 96 Bantam (TT) Jacks EDAC 56-pin termination NPPA-TT-E56 INSTUCTION MANUAL Easy Patch NPPA-TT-E56 INSTUCTION MANUAL Page 2 BDA90-1 Index 1. Electrical configuration...
REMOTE HEAD ADAPTER INSTALLATION GUIDE
 REMOTE HEAD ADAPTER INSTALLATION GUIDE The Remote Head adapter is a valuable accessory for the Uniden BC-780, 785 and 796 scanners. It allows the scanner's control panel to be removed from the radio and
ASUS D550MA-DS01 Screen Replacement
 ASUS D550MA-DS01 Screen Replacement This guide will show you how to replace your laptop screen. Written By: Calvin Wieczorek ifixit CC BY-NC-SA www.ifixit.com Page 1 of 12 INTRODUCTION Many people will
Qty items in product. Printed Circuit Boards (PCB) or Printed Circuit Assemblies (PCA)
 or Printed Circuit Assemblies (PCA)") Appendix 3 Product End-of-Life Disassembly instructions rev a Product Identification: Marketing Name / Model Description HP Compaq Business Desktop dc5000 series - SFF Small Form Factor chassis Purpose:
Appendix 3 Product End-of-Life Disassembly instructions rev a Product Identification: Marketing Name / Model Description HP Compaq Business Desktop dc5000 series - SFF Small Form Factor chassis Purpose:
Redigido por: Sam Lionheart
 ipad Mini 2 Wi-Fi Microphone Replacement Replace the dual microphone in the ipad Mini 2 Wi-Fi. Redigido por: Sam Lionheart ifixit CC BY-NC-SA pt.ifixit.com Página 1 de 36 INTRODUÇÃO Use this guide to remove
Instructions to Install Retrofit Kit 6/7000 Machine
 Instructions to Install Retrofit Kit 6/7000 Machine **TURN POWER OFF OF MACHINE BEFORE INSTALLATION** READ ALL INSTRUCTIONS BEFORE STARTING INSTALLATION Retrofit kit contents: PART NAME QUANTITY PART NUMBER
Technical Manual. RS LONDON Platform. ReSound A/S Global Technical Operations Lautrupbjerg 7 DK-2750 Ballerup Denmark
 Technical Manual RS LONDON Platform ReSound A/S Global Technical Operations http://gto.gnresound.com Lautrupbjerg 7 DK-2750 Ballerup Denmark Table of Contents Form-Factor-Matrix & Product Information...
LumaRail Free Stand Bed Assist Rail with IntelliBrite LED Night Light
 LumaRail Free Stand Bed Assist Rail with IntelliBrite LED Night Light Assembly and Operation Instructions Thank you for investing in this premium Platinum Health product. Please carefully follow the assembly
Nvidia Shield Tablet K1 Micro USB Port Replacement
 Nvidia Shield Tablet K1 Micro USB Port Replacement This is a guide for the removal and replacement of the Micro USB Port. Written By: Ryan Butler ifixit CC BY-NC-SA www.ifixit.com Page 1 of 14 INTRODUCTION
imac Intel 20" EMC 2133 and 2210 Optical Drive Data Cable Replacement
 imac Intel 20" EMC 2133 and 2210 Optical Drive Data Cable Replacement Scritto Da: Walter Galan ifixit CC BY-NC-SA it.ifixit.com Pagina 1 di 24 INTRODUZIONE Replace a broken optical drive data cable to
Sony SLT Alpha-65V Flash Capacitor
 Sony SLT Alpha-65V Flash Capacitor Replacement How to replace the flash capacitor located on the left side of the camera. Written By: Dima Kyle ifixit CC BY-NC-SA www.ifixit.com Page 1 of 11 INTRODUCTION
DualShock 4 Touch Pad Replacement. Remove the touchpad on the Dualshock 4 controller. Scritto Da: Mark. ifixit CC BY-NC-SA it.ifixit.
 DualShock 4 Touch Pad Replacement Remove the touchpad on the Dualshock 4 controller. Scritto Da: Mark ifixit CC BY-NC-SA it.ifixit.com Pagina 1 di 9 INTRODUZIONE Use this guide to remove a defective touchpad