Model 3001KL-AM/3001KL-AMX Antimicrobial Digital Platform Scale
|
|
|
- Lesley Sherman
- 5 years ago
- Views:
Transcription

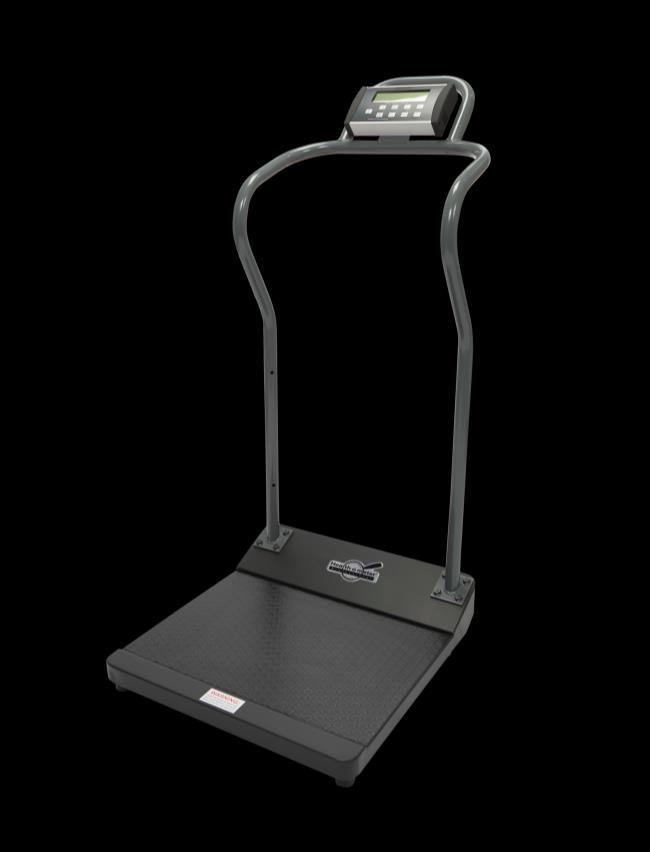


1 Model 3001KL-AM/3001KL-AMX Antimicrobial Digital Platform Scale User Instructions P/N UM3001KL-AM/3001KL-AMX Rev

2 Model 3001KL-AM/3001KL-AMX Thank you for your purchase of this Health o meter Professional product. Please read this manual carefully, and keep it for easy reference or training. TABLE OF CONTENTS Cautions and Warnings... 3 Specifications... 4 Certifications / Connectivity / Disposal... 5 Assembly Instructions... 6 Set-up Instructions Operating Instructions Maintenance Calibration Troubleshooting.17 Warranty...18 Note: This scale has been factory calibrated, and does not require calibration prior to use. Please register your scale for warranty coverage at: For User Instructions updates and revisions please go to: 2
3 CAUTIONS AND WARNINGS To prevent injury and damage to your scale, please follow these instructions very carefully. Assemble and operate the scale per the enclosed user instructions. Do not transport the scale with any weight on the platform. Do not exceed weight limit of 1000 lb / 454 kg for this scale. For accurate weighing, this scale must be placed on a flat, stable surface. For accurate weighing, verify before each use the proper operation according to the procedure described in this manual. Do not use in the presence of flammable or explosive materials. For accurate weighing, if the Lo batt indicator activates, replace the batteries or switch to the AC adapter as soon as possible. When replacing / inserting batteries, be sure to use all new batteries. To prevent patient injury, the patient must be attended throughout the entire weighing event. Patient should wear socks or other form of lightweight foot covering during weighing event. Using the Scale with the Optional AC Adapter Operate this scale exclusively with the AC adapter provided by Health o meter Professional. Use of an unspecified adapter will void the warranty and can pose a serious safety hazard. Operating this scale at voltages and frequencies other than specified can damage the equipment and will void the warranty. Prior to using this scale, inspect the AC adapter cord for cracking / fraying, and for broken / bent plug prongs. Prior to using this scale, ensure that the AC adapter is plugged into an outlet with the rated voltage appropriate for operation. Ensure that the AC adapter outlet is wired to a circuit breaker or other protected power source. Unplug the AC adapter, and carefully store both the adapter and adapter cord before moving the scale. Ensure that the AC adapter and scale do not come in contact with liquids, excessive temperature, or excessive humidity. If the scale is being connected to another medical device, the power adapter must not be used. Disconnect the power adapter from the scale and use only the battery power. 3
4 SPECIFICATIONS General Model 3001KL-AM/3001KL-AMX digital scales use highly sophisticated microprocessor technology. Each precision scale is designed to provide accurate, reliable and repeatable weight measurements. This scale uses motion-sensing weighing technology in order to determine the actual weight of a moving patient. Although the patient s weight can be displayed in either pounds (LB) or kilograms (KG), the scale can be locked such that the user cannot change the displayed Unit of Measurement (UOM). Note: The scale is shipped from the factory locked in KG mode. Refer to Page 12 to learn more about configuring the scale. Antimicrobial Powder Coating Unique to the 3001KL-AM/3001KL-AMX scales, the handrails and transport handle have been fabricated with a permanent, antimicrobial powder coating. The antimicrobial coating utilizes silver ionic technology to inhibit the growth of microbes. Scale Specifications Capacity and Resolution Power Requirements Environmental Platform Dimensions 1000 lb x 0.2 lb (454 kg x 0.1 kg) VAC, 50-60Hz to 9V DC Adapter, ADPT30, (not included) or 6 AA batteries (included) Operating temperatures: 50 F to 95 F (10 C to 35 C) Storage temperatures: 30 F to 125 F (0 C to 50 C) Maximum Humidity: 85% RH Length: 15 3/4 (46 cm) Width: 22 (56 cm) Height: 2 5/8 (6 cm) 4

5 CERTIFICATIONS / CONNECTIVITY / DISPOSAL Certification Descriptions Pelstar, LLC has been officially certified as the manufacturer of Health o meter Professional medical devices. The Pelstar, LLC quality assurance system covers the development, production, sales and service of medical scales and measuring systems. This product is tested to and meets the requirements of: 1. UL First Edition: Safety for Medical Electrical Equipment 2. CSA C22.2 No M90: Medical Electrical Equipment Connectivity Information To enable reliable transmission of weight, height, and Body Mass Index (BMI) data, this scale is designed to connect to a computer, monitor, or other electronic device via a built-in USB port. This connectivity helps minimize transcription errors when recording patient data. This scale is EMR-EHR compatible. For more information regarding how to connect this scale to other electronic devices, please contact Health o meter Professional Scales Technical Support, available during normal business hours at Scale Disposal This Health o meter Professional scale must be disposed of properly as electronic waste. Follow the national, regional or local regulations which apply to you for disposal of electronic waste or batteries. Do not dispose of this device in the domestic waste stream. 5

6 ASSEMBLY INSTRUCTIONS *If you have received your scale already assembled, skip to Set Up Instructions on page 10. Before Assembly Carefully inspect the carton for shipping damage before unpacking. If damage is found, contact your shipper or a Health o meter Professional representative immediately at Claims must be filed with the shipper as soon as possible after receipt of the package. The following information details what you will find inside the main carton as you unpack the parts for assembly. To prevent scratching any components, carefully remove each assembly from the carton and unwrap the packing materials. Set the carton aside for storage. To avoid damaging the scale parts when unpacking, do not use a box cutter, knife, scissors, or any sharp object to open the protective inner packaging. Parts List (1) Scale platform (1) Handrail (with load cell connector cable inside) (1) Display Head (1) AC Adapter Holder (4) Feet (8) M8x20 bolts (4) Machine screws (2) Sheet metal screws Tools Required 13 mm box wrench, Phillips head screwdriver Note: Assembly photos in this User Instruction manual depict the gray handrails on scale model 3001KL-AM. Assembly instructions are the same for scale model 3001KL-AMX. Handrails for the 3001KL-AMX are the white handrails depicted below. 3001KL-AMX Handrails 3001KL-AM Handrails 6

 feet into the underside of the platform.")


7 ASSEMBLY INSTRUCTIONS Health o meter Professional Scales recommends that assembly is performed by two people. Warning: Do not drop scale, as this can permanently damage the load cells. 1. Remove the scale platform from the carton and place scale platform on a flat, level, and dry surface with the bottom facing up. Thread the (4) feet into the underside of the platform. Each foot should be completely hand tightened. 2. Turn the platform over so it is facing up. Locate the handrail and untie the load cell cable connector. Position the handrail over the handrail supports on the platform and feed the cable through the ring shaped hole located on the right handrail support. 3. Holding the handrail in place, tip the platform forward to be able to access the underside of the platform. Pull the cable through the ring shaped hole behind the wheel then feed the cable through the metal shield as shown. Pull cable through circle hole Feed cable through shield 7
 included M8x20 bolts (4 bolts per each handrail support).")


8 ASSEMBLY INSTRUCTIONS 4. Tip the platform and handrails back to an upright position. Fasten the handrail to the platform using the (8) included M8x20 bolts (4 bolts per each handrail support). Use the included 13mm box wrench to tighten the bolts. 5. Carefully tilt the scale forward to access the underside of the platform. Plug the load cell connector cable into the port. 6. Carefully tilt the scale back to an upright position. Obtain the display head and align the four holes on the back of the display head with the four mounting holes on the display support. Fasten the display head onto the metal display support by using the (4) included pan head M3 screws. Use a Phillips head screwdriver to tighten the screws. Load cell connector cable port 8

 included sheet metal screws.")
9 ASSEMBLY INSTRUCTIONS 7. Plug the load cell connector cable into the load cell port on the rear of the display head. 8. Attach the adapter holder to the handrail using the (2) included sheet metal screws. Use a Phillips head screwdriver to tighten the screws. The scale is now assembled. See Powering the Scale on page 10 for battery/ac adapter instructions. 9
. 3. Carefully remove the batteries that are wrapped in bubble wrap and attached to the handrail.")
10 SET-UP INSTRUCTIONS For Pre-Assembled Scales 1. Remove the fully assembled scale by carefully lifting it out from the carton and place scale platform on a flat, level, and dry surface. 2. Remove the protective plastic film covering the display head (the film is printed FACTORY CALIBRATED ). 3. Carefully remove the batteries that are wrapped in bubble wrap and attached to the handrail. See Powering the Scale or Battery Installation, below, for battery and AC adapter instructions. Powering the Scale 1. Plug the AC adapter into the power adapter jack (the jack is located on the rear of the display head), then plug the scale s AC adapter into the power source. Warning: To avoid a safety hazard, do not use an unspecified AC adapter. Only use the Health o meter Professional AC adapter model ADPT30 designed for this scale. Power Adapter Jack 2. For battery operation, see Battery Installation below. Battery Installation 1. If connected, unplug the AC adapter from the power source. 2. Use a Phillips head screwdriver to remove the battery cover on the side of the display head by unscrewing the (2) battery cover screws. 3. Replace or install fresh batteries, making sure to install them in the proper direction. Health o meter Professional recommends using an alkaline or lithium battery, rated for 130 F (54 C) operation. Do not use Zinc-Carbon batteries. 4. Re-attach the battery cover to the display head. Warning: If the scale will not be used for some time, remove the batteries to avoid a safety hazard. Disposal of batteries must be performed in accordance with the prevailing national, regional or local regulations that apply to you. 10

11 OPERATING INSTRUCTIONS Keypad Function ON/OFF ZERO HOLD/RELEASE BMI RECALL TARE/PRETARE UNIT/ REWEIGH ENTER Powers scale on and off. Description Zeros the scale prior to a weighing. Holds the weight value of the patient on the display until the button is pressed again to clear the value. Also moves the cursor from left to right on the display for entering height and pretare value. Prompts entry of height data to calculate patient s Body Mass Index (BMI). Recalls the previous weight. TARE-Deducts the weight of an object on the platform. PRETARE-Prompts entry of a weight value that will be deducted from the weight on the platform. Also releases tare weight (returns display to zero). Toggles between pounds and kilograms. Also used to increment height value and pretare value. Allows repeated weighing of the patient without stepping off the scale. Used to accept height value in BMI mode, and tare value in PRETARE mode. Also releases the RECALL value and BMI value. 11
12 OPERATING INSTRUCTIONS (CONT) Unit of Measure Configuration The scale ships from the factory locked in KG mode. In this configuration, the scale will power up and exclusively display the patient s weight in kilograms. Depressing the UNIT button will not change the Unit of Measure (UOM). 1. To unlock the UOM, turn the scale on and wait until 0.0 KG is displayed. Press and hold the UNIT button for approximately 30 seconds. When the display beeps and KG begins to flash on the display, release the UNIT button. 2. The UNIT button is now active. Pressing the UNIT button will change the UOM from KG to LB and back to KG. 3. To re-configure the scale and lock back into KG mode, press the UNIT button and set the unit of measure to 0.0 KG. Press and hold the UNIT button for approximately 30 seconds. When the display beeps and KG begins to flash on the display, release the UNIT button. The UNIT button is now disabled, and the scale is now locked in KG mode. 4. The scale can also be locked into LB mode by following the instructions in step 3. Before holding down the UNIT button, the UOM must be set to LB mode. Weighing a Patient 1. Make sure there is nothing on the weighing platform. 2. Press the ON/OFF button to turn on the scale. 3. Wait until the 0.0 LB or 0.0 KG appears on the display. 4. Ask the patient to step on the scale. The scale will begin to display the patient s weight and will lock on the patient s weight when completed. Depending on the movement of the patient on the scale, it may take several seconds for the scale to lock onto the weight. 5. The weight may be held on the display by pressing the HOLD/RELEASE button. The scale will continue to display the patient s weight after they step off the scale and will remain on the display until released or the scale is powered off. To release, press the HOLD/RELEASE button again. Note: If Auto Off is enabled, the scale will not power off if a weight is being held on the display. 6. After recording the weight, have the patient step off the scale. 7. Press the ON/OFF button to power the scale off. BMI Function Note: The scale will not calculate BMI for a patient weighing less than 24 pounds (12 kg). If a height is not entered for the patient within 30 seconds of pressing the BMI button, the scale will return to normal weighing mode. 1. Make sure there is nothing on the weighing platform. 2. Press the ON/OFF button to turn on the scale. 3. Wait until the 0.0 LB or 0.0 KG appears on the display. 4. Ask the patient to step on the scale. The scale will begin to display the patient s weight and will lock on the patient s weight when completed. Depending on the 12
13 OPERATING INSTRUCTIONS (CONT) movement of the patient on the scale, it may take several seconds for the scale to lock onto the weight. 5. After obtaining the patient s weight, and with the patient remaining on the scale, press the BMI button. 6. The scale will prompt entry of the patient s height. Use the keypad and buttons to enter the patient s height. Note: When weighing in pounds, the height is displayed in inches. When weighing in kilograms, the height is displayed in centimeters. 7. Once height is keyed in, press the ENTER button. 8. The display will show the patient s BMI. 9. Press the ENTER button to return to the normal weighing mode. Weight Recall The last weight reading on the scale can be recalled by pressing the RECALL button. The last weight reading can be recalled after the scale has automatically or manually powered off. To clear the display of the recalled weight, press the ENTER button. Tare Function When using this scale, the weight of an object, such as a cane, can be subtracted from the total weight in order to determine the weight of the patient alone. The Tare Function automatically performs this subtraction. The scale allows a tared weight to be entered manually by using the keypad, or automatically, as outlined in this section. Tare 1. With all weight off the scale, press the ON/OFF button to turn on the scale. 2. Wait until the 0.0 LB or 0.0 KG appears on the display. 3. Place the object to be tared on the scale. The display will show the object s weight. 4. Press the TARE button. The scale will zero out, and the word TARE will appear at the bottom center of the display, indicating that there is a tare value for the object. 5. Remove the object from the scale. Once the object is removed from the scale, the display will show a negative weight, equal to the weight of the object. 6. Place the patient and the object back on the scale. The scale will automatically deduct the tare weight of the object from the gross weight of the patient and object together. 7. The display will show the patient s weight. 8. With no weight on the scale, the tare value will remain on the display until changed, cleared, or until the scale is powered off. 9. To remove the Tare, press the TARE button. The word TARE will disappear from the bottom of the display, and the tare value will be cleared from the display. The scale will resume normal operation. To Tare with a Known Weight / Pre-Tare (Limit 200 lb / 91kg) 1. Make sure that there is nothing on the scale. 2. Press the ON/OFF button to turn on the scale. 3. Wait until the 0.0 LB or 0.0 KG appears on the display. 13
14 OPERATING INSTRUCTIONS (CONT) 4. Press the TARE button for 3 to 5 seconds. The word TARE will appear at the bottom center of the display, prompting the user to enter the tare value. 5. Use the keypad and buttons to enter the weight of the object. Press the ENTER button when finished. 6. The value entered will show as a negative value on the display. 7. Place the patient and the object on the scale. The scale will automatically deduct the tare weight entered from the gross weight of the patient and the object. 8. The display will show the patient s weight. 9. With no weight on the scale, the tare value will remain on the display until changed, cleared, or until the scale is powered off. 10. To remove the Tare, press the TARE button again. The word TARE will disappear from the display and the tare value will be cleared from the display. The scale will resume normal operation. Parent/Child Function The Parent/Child function on Health o meter Professional scales provides the convenience of weighing a small child or infant while being held by a parent. Follow these simple steps to subtract the parent s weight from the total so only the child s weight is displayed. 1. With all weight off the scale, press the ON/OFF button to turn the scale on. 2. Wait until 0.0 LB or 0.0 KG appears on the display. 3. Ask the parent to step onto the scale without the child. The display will show a value for the parent s weight. 4. Press the TARE button. The scale will zero out, and the word TARE will appear at the bottom center of the display, indicating that there is a tare value for the parent s weight 5. Ask the parent to step off of the scale. Once the parent is off of the scale, the display will show a negative weight, equal to the parent s weight. 6. Ask the parent to step back onto the scale while holding the child. The scale will automatically deduct the weight of the parent and only display the child s weight. 7. With no weight on the scale, the tare value will remain on the display until changed, cleared, or until the scale is powered off. 8. To remove the Tare, press the TARE button. The word TARE will disappear from the bottom of the display, and the tare value will be cleared from the display. The scale will return to normal weighing mode. Deactivating the Auto-Off Feature The scale is shipped with the Auto Off feature enabled. To deactivate the Auto Off feature, while the scale is off, press and hold down the TARE button. While holding down the TARE button power on the scale by pressing the ON/OFF button. START will briefly appear on the display followed by AOF=0. The Auto-Off feature has now been deactivated and the scale will remain on until manually powered off. Activating Auto Off Feature While the scale is off, press and hold down the TARE button. While holding down the TARE button power on the scale by pressing the ON/OFF button. START will briefly appear on the display followed by AOF=1. The Auto-Off feature has now been enabled and the scale will shut off after 2-3 minutes of inactivity. 14
15 MAINTENANCE Maintenance The following pages provide instructions for maintenance, cleaning, calibration, and troubleshooting for the 3001KL-AM/3001KL-AMX scales. Maintenance operations other than those described in this manual should be performed by qualified service personnel. Caution: Before first use, or after long periods of non-use, check the scale for proper operation and function. If the scale does not operate correctly, refer to qualified service personnel. 1. Check the overall appearance of the scale for obvious damage, wear, and tear. 2. If applicable, inspect the AC adapter for cord cracking, fraying, and for broken/bent prongs. Cleaning Proper care and cleaning is essential to ensure a long life of accurate and effective weighing. Caution: Disconnect the scale from the AC adapter power source prior to cleaning the unit. Note: Routine cleaning does not affect the antimicrobial properties of the handrail coating. 1. Clean all external surfaces with a clean damp cloth or tissue. Dry with a clean soft cloth. 2. Do not immerse the scale into cleaning or other liquid solutions. 3. Do not use Isopropyl Alcohol or other solutions to clean the display surface. 4. Do not use abrasive cleaners. Replacement Parts Part # Description B PLASTIC FOOT ASSEMBLY DISPLAY1100 DISPLAY HEAD LKIT1100 ELECTRONICS KIT 15
16 CALIBRATION This scale has been factory calibrated, and does not require calibration prior to use. Calibration of your 3001KL-AM/3001KL-AMX scale can be performed using calibrated kilogram (kg) or pound (lb) weight standards. The required calibration standard will be the Unit of Measure (UOM) for which the scale is configured. Because the scale is shipped from the factory in KG mode, the requested UOM for calibration will be the KG standard (e.g., 400kg). If the unit is to be calibrated with LB weight standards, the scale must first be configured to the LB UOM. Refer to the Unit of Measure Configuration section on page 12 for configuration details. Note: Only weights certified and traceable to national standards are to be used for calibration. Warning: Always ensure that the scale is returned to the correct UOM after scale calibration. Operator Action 1. Ensure the display is powered off, then press and hold the HOLD/RELEASE and ZERO button while pressing the ON/OFF button. (Two alphanumeric characters will appear next to U followed by 4-5 characters.) Display U XX followed by a 4-5 digit idle scale count number. 2. Press the ENTER button. CAL. 3. Make sure there is nothing on the scale, then press the ENTER button. 4. Use the and buttons to set the calibration weight to a value other than the default weight. The calibration weight should be as high as possible, with 270 KG/400 LB as a minimum calibration weight. 5. Press the ENTER button. 6. Load the scale with the required weight. 7. Without touching or shaking the scale, allow the display to stabilize, then press the ENTER button. 8. If the calibration is successful, the display will show SUCC and power off. If the calibration is not successful, the display will show Err1 and power off. Contact customer service for an Err1 display ( ). Clear followed by "400.0 KG" (in KG mode) or LB (in LB mode) Shows "400.0 KG" (in KG mode) or LB (in LB mode) or entered calibration weight. Displays Load followed by "400.0 KG" (in KG mode) or LB (in LB mode) Display increments showing raw weight data. SUCC or Err
17 TROUBLESHOOTING Troubleshooting Before contacting service personnel, refer to the following instructions to check and to correct any failures. Symptom Possible Cause Corrective Action Scale does not power on 1. Dead Battery 2. Faulty electrical outlet 3. Bad power supply 1. Replace batteries 2. Use a different outlet 3. Replace AC adapter Questionable weight or the scale does not zero Weighing is performed but the weighing process takes too long and the weight does not lock on the display The display shows Over message The display shows Lo batt message 1. External object interfering with the scale 2. The display did not show 0.0 before weighing 3. Scale is not placed on a level floor or feet are not properly balanced. 4. Scale is out of calibration 5. Improper Tare The patient is not sitting or standing still The load on the scale exceeds the capacity (1000 lb / 454 kg) The batteries are depleted 1. Remove interfering object from the scale 2. Ask the patient to get off the scale, zero the scale and begin weighing process again 3. Place the scale on a level floor. Tighten the feet on the underside of the platform to ensure all 4 feet are properly balanced 4. Check weight with known weight value 5. Place the item to be tared on the scale. Press REWEIGH. Once the weight of the item is displayed, press TARE. Place the patient and the tared item back on the scale. Press REWEIGH again Ask the patient to stand or sit still Remove the excess weight and use the scale according to its limits Replace batteries according to instructions on page 10 17
18 WARRANTY Limited Warranty What does the Warranty Cover? This Health o meter Professional scale is warranted from date of purchase against defects of materials or in workmanship for a period of two (2) years. If product fails to function properly, return the product, freight prepaid and properly packed to Pelstar, LLC (see To Get Warranty Service, below, for instructions). If the manufacturer determines that a defect of material or in workmanship exists, the customer s sole remedy will be replacement of the scale at no charge. Replacement will be made with a new or remanufactured product or component. If the product is no longer available, replacement may be made with a similar product of equal or greater value. All replaced parts are covered only for the original warranty period. Who is Covered? The original purchaser of the product must have proof of purchase to receive warranty service. Please save your invoice or receipt. Pelstar dealers or retail stores selling Pelstar products do not have the right to alter, or modify or any way change the terms and conditions of this warranty. What is Excluded? Your warranty does not cover normal wear of parts or damage resulting from any of the following: negligent use or misuse of the product, use on improper voltage or current, use contrary to the operating instructions, abuse including tampering, damage in transit, or unauthorized repair or alternations. Further, the warranty does not cover natural disasters, such as fire, flood, hurricanes and tornadoes. This warranty gives you specific legal rights, and you may also have other rights that vary from country to country, state to state, province to province or jurisdiction to jurisdiction. To get Warranty Service make sure you keep your sales receipt or document showing proof of purchase. Call (+1) or (+1) to receive a return authorization (RA) number, which must be included on the return label. Attach your proof of purchase to your defective product along with your name, address, daytime telephone number and description of the problem. Carefully package the product and send with shipping and insurance prepaid to: Pelstar, LLC Attention R/A# Return Department 9500 West 55 th Street McCook, IL PELSTAR, LLC 9500 West 55 th Street McCook, IL USA or PLEASE REGISTER YOUR SCALE FOR WARRANTY COVERAGE AT: Health o meter is a registered trademark of Sunbeam Products, Inc. used under license. Health o meter Professional products are manufactured, designed, and owned by Pelstar, LLC. We reserve the right to improve, enhance, or modify Health o meter Professional product features or specifications without notice. Pelstar, LLC 2017 P/N UM3001KL-AM/3001KL-AMX Rev
MODEL C-HOMWA-1 CONNECTIVITY KIT, CONNEX (USB)
") MODEL C-HOMWA-1 CONNECTIVITY KIT, CONNEX (USB) User Instructions P/N UMC_HOMWA_1 Rev20170810 1 Model C-HOMWA-1 Thank you for your purchase of this Health o meter Professional product. Please read this
MODEL C-HOMWA-1 CONNECTIVITY KIT, CONNEX (USB) User Instructions P/N UMC_HOMWA_1 Rev20170810 1 Model C-HOMWA-1 Thank you for your purchase of this Health o meter Professional product. Please read this
Model 1100KL Digital Handrail Scale User Instructions
 Model 1100KL Digital Handrail Scale User Instructions P/N UM1100KL Rev 20170921_EngOnly 1 Model 1100KL Thank you for your purchase of this Health o meter Professional product. Please read this manual carefully,
Model 498KL Remote Display Digital Scale User Instructions
 Model 498KL Remote Display Digital Scale User Instructions P/N UM498KL Rev 1-032612 1 Model 498KL Thank you for your purchase of this Health o meter Professional product. Please read this manual carefully,
Model 2500KL / 2500CKL / 2600KL Digital Patient Wheelchair Scales
 Model 2500KL / 2500CKL / 2600KL Digital Patient Wheelchair Scales User Instructions P/N UM2500KL / 2500CKL / 2600KL Rev 20170921_EngOnly 1 Model 2500KL / 2500CKL / 2600KL Thank you for your purchase of
600KL-BT Heavy Duty Eye Level Digital Scale With Integral Digital Height Rod
 Mlb 600KL-BT Heavy Duty Eye Level Digital Scale With Integral Digital Height Rod Patent: D667323 USER INSTRUCTIONS P/N UM600KL-BT Rev20161103 1 Thank you for your purchase of this Health o meter Professional
User s Manual. Digital Baby Scales. Hopkins Featherweight Baby Scale # Hopkins Featherweight XL Baby Scale # # #688340
 Max=44s/2kg d=.1s/5g RECALL Digital Baby Scales User s Manual Hopkins Featherweight Baby Scale # Hopkins Featherweight XL Baby Scale #68834 Max=44s/2kg d=.1s/5g # ON/TARE LB/KG #68834 Table of Contents
BLUETOOTH Wireless Communication Set Up Instructions for BT Model Scales
 BLUETOOTH Wireless Communication Set Up Instructions for BT Model Scales TABLE OF CONTENTS PRODUCT OVERVIEW... 2 HARDWARE SET UP FOR WELCH ALLYN CONNEX DEVICE... 4 HARDWARE/DRIVER SET UP FOR WINDOWS PC...
WH-1061 INSTRUCTION MANUAL. High Capacity Weight + Height Scale. Professional Scales. Befour, Inc. 102 Progress Drive Saukville, WI 53080
 Professional Scales WH-1061 High Capacity Weight + Height Scale Befour, Inc. 102 Progress Drive Saukville, WI 53080 Phone: 262-284-5150 Toll Free: 1-800-367-7109 Fax: 262-284-5966 Email: mail@befour.com
Model SRV945-BT 24 X 36 Platform Scale App-Enabled Operating and Service Manual Part No.: MAN945-BT_ Page 1 of 16.
 Part No.: MAN945-BT_180417 Page 1 of 16 S by S Instruments, Inc. Model SRV945-BT Portable Platform Scale App Enabled Wireless Operating and Service Manual Part No.: MAN945-BT_180417 Page 2 of 16 TABLE
WH-1070 INSTRUCTION MANUAL. High Capacity Weight + Height Handrail Scale. Professional Scales. Befour, Inc. 102 Progress Drive Saukville, WI 53080
 Professional Scales WH-1070 High Capacity Weight + Height Handrail Scale Befour, Inc. 102 Progress Drive Saukville, WI 53080 Phone: 262-284-5150 Toll Free: 1-800-367-7109 Fax: 262-284-5966 Email: mail@befour.com
It s a Better Way to Weigh!
 Midmark Way Platform Scale It s a Better Way to Weigh! Table of Contents Pre-Installation......................... 2 Specifications... 2 Parts Identification... 3 Assembly & Installation... 3-4 Post Mounted
Operation Instructions
 RL150-10-7 Digital Floor Level Scale 150-10-7 Software Revision 11439 Operation Instructions 131994 - Rev A Contents 1.0 Introduction... 1 2.0 Safety... 2 2.1 Safety Signals...................................................................
User Instructions. Copyright 2017 Valhalla Scientific, Inc Kirkham Road, Poway, CA Rev 1.06
 User Instructions Copyright 2017 Valhalla Scientific, Inc. 12127 Kirkham Road, Poway, CA 92064 Rev 1.06 2 Table of Contents Section I - Installation... 5 Caution and Warnings... 5 Scale Specifications...
User Guide. Control Box. RoscoLED TM.
 RoscoLED TM Control Box User Guide This guide applies to the following RoscoLED Control Box models: RoscoLED Control Box 300W/Static White (293 22250 0000) RoscoLED Control Box 400W/VariWhite (293 22260
Operating and Service Manual
 Part No. MAN7000i-KG_MICROBAN_180731 Page 1 of 14 S by S Instruments, Inc. Model SR 7000i-KG Wall Mount Platform Scale Operating and Service Manual Part No. MAN7000i-KG_MICROBAN_180731 Page 2 of 14 TABLE
Vortex Series 2-leg Desk Assembly Guide
 ELECTRIC HEIGHT-ADJUSTED SIT TO STAND DESK Vortex Series 2-leg Desk Assembly Guide For desk with underframe Model No. AL4628-XX REV-1509A Table of Contents IMPORTANT SAFETY INSTRUCTIONS... 3 CAUTION, USE
OV1000 Part No OV1000 HEIGHT ADJUSTABLE TABLE USER GUIDE
 OV1000 Part No. 23624 OV1000 HEIGHT ADJUSTABLE TABLE USER GUIDE PRODUCT OVERVIEW User Guide: OV1000 OV1000 HEIGHT ADJUSTABLE TABLE A healthier work environment starts with the option to sit or stand throughout
Model SR411i-KG Patient Floor Scale Service Manual Part No. MAN411i-KG_ Page 1 of 16. Patient Floor Scale. Operating and Service Manual
 Part No. MAN411i-KG_181212 Page 1 of 16 S by S Instruments, Inc. SR411i-KG Series Patient Floor Scale Operating and Service Manual Part No. MAN411i-KG_181212 Page 2 of 16 TABLE OF CONTENTS TABLE OF FIGURES...2
Digital Scale Bluetooth Wireless Solutions
 Digital Scale Bluetooth Wireless Solutions BLUETOOTHONE/BLUETOOTHONEWA/ BLUETOOTHONEWA-L User Instructions Correction of Errors and Inaccuracies. The Content may contain typographical errors or other errors
Model SRV411i Small Animal Floor Scale Service Manual Part No. MANSRV411i_ Page 1 of 16. Small Animal Floor Scale. Operating and Service Manual
 Part No. MANSRV411i_171114 Page 1 of 16 S by S Instruments, Inc. SRV411i Small Animal Floor Scale Operating and Service Manual Part No. MANSRV411i_171114 Page 2 of 16 TABLE OF CONTENTS TABLE OF FIGURES...2
EPS Power Supply
 EPS - 600 Power Supply Installation and Operation Manual Version 1.0 *This instrument is intended for laboratory use only Index A. Important Notice ----------------------------------------------------------------
OV1001 Part No OV1001 HEIGHT ADJUSTABLE TABLE USER GUIDE
 OV1001 Part No. 23620 OV1001 HEIGHT ADJUSTABLE TABLE USER GUIDE PRODUCT OVERVIEW User Guide: OV1001 OV1001 HEIGHT ADJUSTABLE TABLE A healthier work environment starts with the option to sit or stand throughout
Model SR565i-H Bariatric Stand-On Scale Operating and Service Manual Part No. MAN565i-H MICROBAN_ Page 1 of 20.
 Part No. MAN565i-H MICROBAN_180104 Page 1 of 20 S by S Instruments, Inc. Model SR565i-H Bariatric Stand-On Scale Operating and Service Manual Part No. MAN565i-H MICROBAN_180104 Page 2 of 20 TABLE OF CONTENTS
Operation Manual. Concorde 600 Power Supply. *This instrument is intended for laboratory use only.
 Concorde 600 Power Supply Operation Manual Cat.no. R10-1001011 *This instrument is intended for laboratory use only http://www.recenttec.com E-mail : support@recenttec.com Version 1.1 Packing List x 1
Model SR755i Wheelchair Scale Operating and Service Manual - S/N Part No. MAN755i_ Page 1 of 18. Model SR755i.
 Part No. MAN755i_130314 Page 1 of 18 S by S Instruments, Inc. Model SR755i Wheelchair Scale Operating and Service Manual Serial Numbers: 1000 + Part No. MAN755i_130314 Page 2 of 18 TABLE OF CONTENTS TABLE
FT-20 Fire Training Fog Machine User Manual English
 FT-20 Fire Training Fog Machine User Manual English 2018 Antari Lighting and Effects Ltd. 1 User Manual - English Safety Information Please read the following safety information carefully before operating
Installation Job Aid for Ethernet Routing Switch 3600 Series
 Installation Job Aid for Ethernet Routing Switch 3600 Series Notices NN47213-303 Issue 03.01 November 2017 Notice paragraphs alert you about issues that require your attention. Following are descriptions
Power Supply (48Vdc, 2.5A)
") Telecommunications Group Section 855-180-201 Equipment Issue 1 Fourth Printing, September 2006 8551-80 Power Supply (48Vdc, 2.5A) Compliant with UL Standard 60950, Second Edition* CONTENTS PAGE Part 1.
Telecommunications Group Section 855-180-201 Equipment Issue 1 Fourth Printing, September 2006 8551-80 Power Supply (48Vdc, 2.5A) Compliant with UL Standard 60950, Second Edition* CONTENTS PAGE Part 1.
DCS200/DCS200-09/DCS DCS300/DCS300-09/DCS355
 THE SEEKER 200 SERIES & THE SEEKER 300 SERIES VIDEO INSPECTION SYSTEMS DCS200 (shown) DCS300 (shown) DCS200/DCS200-09/DCS200-05 DCS300/DCS300-09/DCS355 USER S MANUAL Please read this manual carefully and
CMSA-100 Manual. Cinema Media Server Automation
 CMSA-100 Manual Cinema Media Server Automation 181 Bonetti Drive San Luis Obispo, CA 93401-7397 USA Phone: +1 805 549 0161 Fax: +1 805 549 0163 www.uslinc.com Table of Contents 1. Safety Notice... 3 2.
Basketball Shot Clock Set LX2180 Manual
 Basketball Shot Clock Set LX2180 Manual 72 Industrial Boulevard Wrightsville, GA 31096 Phone: (800) 445-7843 Fax: (800) 864-0212 www.electro-mech.com LX2180 Revision 5 February 8, 2013 Table of Contents
Omnitron Systems Technology, Inc. 1. iconverter. 19-Module Managed Power Chassis User s Manual
 Omnitron Systems Technology, Inc. 1 iconverter 19-Module Managed Power Chassis User s Manual 27 Mauchly, #201, Irvine, CA 92618 Phone: (949) 250-6510; Fax: (949) 250-6514 2 Omnitron Systems Technology,
PLATINUM PRO1001DXP DIGITAL COUNTERTOP / PORTABLE BALANCE
 PLATINUM PRO1001DXP PROFESSIONAL SERIES DIGITAL COUNTERTOP / PORTABLE BALANCE IMPORTANT PRINT FUNCTION LIMITATIONS Your GemOro Platinum PRO1001DXP precision balance features a useful, but limited print
Welch Allyn Masted Scales
 Welch Allyn Masted Scales Directions for use Models 5002, 5122, 5702, 6002 2016 Welch Allyn. All rights are reserved. To support the intended use of the product described in this publication, the purchaser
MOBILE CONNECTOR - GEN 2 OWNER'S MANUAL
 MOBILE CONNECTOR - GEN 2 OWNER'S MANUAL UNITED STATES Contents Safety Information... 2 Save These Important Safety Instructions... 2 Warnings...2 Cautions...3 General Information... 4 Mobile Connector
DIGITAL PEDIATRIC SCALE MODEL 524KL BALANCE PEDIATRIQUE NUMERIQUE MODELE 524KL BALANZA PEDIATRICA DIGITAL MODELO 524KL
 www.homscales.com DIGITAL PEDIATRIC SCALE MODEL 4KL BALANCE PEDIATRIQUE NUMERIQUE MODELE 4KL BALANZA PEDIATRICA DIGITAL MODELO 4KL 0-0lb / 0. oz 0-0lb / 0. oz 0-9kg / g 9-3kg / 10g 4KL US PATENT No.D6446
Broadband Automatic Disconnect Switch. User Manual
 Reset/Test Primary/ Primary Broadband Automatic Disconnect Switch User Manual Local Power Remote Pwer Local 63V Fault Secondary Select Secondary 220V Normal 990-1929 09/2004 Introduction Introduction
1.0 Description. 2.0 Unpacking. 3.0 Installation
 ES-H, ES-HA Series Precision Balance Thank you for purchasing the Model ES-H and ES-HA precision balance. Please read all operating instructions carefully before using and note the following items to ensure
Service Manual. Operators Manual. Ultegra Health Scale by Fairbanks Scales, Inc All rights reserved Revision 7 04/17
 Service Manual Operators Manual Ultegra Health Scale 2009-2017 by Fairbanks Scales, Inc. 50735 All rights reserved Revision 7 04/17 Amendment Record Ultegra Health Scale 50735 Manufactured by Fairbanks
Net-Ritef Continuity and Wiremap Tester Trace-Ritef Tone Generator and Amplified Tone Tracer User's Guide.
 Net-Ritef Continuity and Wiremap Tester Trace-Ritef Tone Generator and Amplified Tone Tracer User's Guide www.jdsu.com/know Voltage Probe Tracer/Power Button Volume Up/Down Indicator LED Power/Tone Type
FT-20 Fire Training Fog Machine User Manual English
 FT-20 Fire Training Fog Machine User Manual English 2017 Antari Lighting and Effects Ltd. 1 User Manual - English Safety Information Please read the following safety information carefully before operating
DUAL-ARM MONITOR MOUNT For in. ( cm) desktop computer monitors
 desktop computer monitors") LeviTouch DM-502 DUAL-ARM MONITOR MOUNT For 15 27 in. (38.1 68.6 cm) desktop computer monitors User Manual Thank you for choosing Gabor. The Gabor Dual-Arm Desktop Mount can securely support two monitors
LeviTouch DM-502 DUAL-ARM MONITOR MOUNT For 15 27 in. (38.1 68.6 cm) desktop computer monitors User Manual Thank you for choosing Gabor. The Gabor Dual-Arm Desktop Mount can securely support two monitors
YJ Carat and Gold Scales
 99 Washington Street Melrose, MA 02176 Phone 781-665-1400 Toll Free 1-800-517-8431 Visit us at www.testequipmentdepot.com YJ Carat and Gold Scales Instruction Manual EN-2 YJ Series YJ Scale Mark Standard
PLATINUM PRO1001V DIGITAL COUNTERTOP / PORTABLE BALANCE
 PLATINUM PRO1001V DIGITAL COUNTERTOP / PORTABLE BALANCE C ongratulations on your purchase of the Professional Series model Platinum PRO1001V precision countertop / portable balance by GemOro Superior Instruments,
PD100 PD200 PD300 PD300DHR
 ProDoc Series Digital Physician Scale PD100 PD200 PD300 PD300DHR (Digital Height Rod) and PD300MHR (Mechanical Height Rod) Owner s Manual CARDINAL SCALE MFG. CO. 0044-M340-O1 Rev D PO Box 151 Webb City,
Ultegra Bench Scale SCB-R U USB Powered
 Service Manual Ultegra Bench Scale SCB-R9000-14U USB Powered 2009 by Fairbanks Scales Inc. All rights reserved 51221 Revision 1 09/09 Amendment Record Ultegra Bench Scale SCB-R9000-14U USB Powered 51221
icore Kiosk system Installation Guide
 icore Kiosk system Installation Guide The reproduction, transmission or use of this document or its contents is not permitted without express authority. Offenders will be liable for damages. All rights,
PREFACE. Thank you for choosing Zen Space Desks. We hope your desk helps you find your zen when being used. Zen Space Desks Team
 INSTRUCTION MANUAL PREFACE We are thrilled that you have chosen Zen Space. Congratulations, you have selected one of the most advanced and sophisticated Power Adjustable Workstations available today. Our
Cisco CRS 3-Phase AC Power Distribution Unit Installation Guide 2. Cisco CRS 3-Phase AC Power Distribution Unit 2
 Cisco CRS 3-Phase AC Power Distribution Unit Installation Guide Cisco CRS 3-Phase AC Power Distribution Unit Installation Guide 2 Cisco CRS 3-Phase AC Power Distribution Unit 2 Revised: November 18, 2016,
Installation & Operation Instructions
 Installation & Operation Instructions Deluxe Spot & Flood Light 405620-3 To avoid the risk of accidents or damage to this product, it is essential to read these instructions thoroughly before this product
Obtaining Documentation and Submitting a Service Request, page xvii Safety Warnings, page xvii Safety Guidelines, page xx
 Preface Obtaining Documentation and Submitting a Service Request, page xvii Safety s, page xvii Safety Guidelines, page xx Obtaining Documentation and Submitting a Service Request For information on obtaining
Instruction Manual. Read this manual carefully before using your weigh scale D3812
 HORZONXL I Instruction Manual Read this manual carefully before using your weigh scale D3812 2 Contents Getting Started 4 Operation 5 Setup Menu 6 Installation 8 Horizon Browser 9 Tips 12 Care, maintenance
LitePad Vector User s Guide
 LitePad Vector User s Guide www.rosco.com (rev.1 July 2015) Copyright Rosco TABLE OF CONTENTS Introduction... 3 Important Safeguards... 3 Unpacking... 5 Controls... 6 Operation... 6 Powering On... 6 Manual
Residential/Light Commercial Remote Control System
 MODULAR CONTROLLER REMOTE CONTROL Residential/Light Commercial Remote Control System OWNER S MANUAL AND INSTALLATION INSTRUCTIONS CONTENTS INTRODUCTION 2 SYSTEM COMPONENTS - REMOTE 3 SYSTEM COMPONENTS
Lotus DX. sit-stand workstation. assembly and operation instructions. MODEL # s: LOTUS-DX-BLK LOTUS-DX-WHT
 Lotus DX assembly and operation instructions sit-stand workstation MODEL # s: LOTUS-DX-BLK LOTUS-DX-WHT safety warnings 13.6 Kg 30 lbs. 2.2 Kg 5 lbs. safety instructions/warning Read and follow all instructions
Model DS100 Scale Indicator
 Model DS100 Scale Indicator Operator s Manual Doran Scales, Inc. 1315 Paramount Pkwy Batavia, IL 60510 1 800 262 6844 www.doranscales.com MAN0247 Manual Revision 0.1 i Section 1. Unpacking and Installation...1
SmartBoom PRO PHS-SB100-4F, PHS-SB100-5M, PHS-SB100-U, PHS-SB200-4F, PHS-SB200-5M, PHS-SB200-U. Operating Manual
 SmartBoom Operating Manual PRO PHS-SB100-4F, PHS-SB100-5M, PHS-SB100-U, PHS-SB200-4F, PHS-SB200-5M, PHS-SB200-U Thank You We at Pliant Technologies, LLC want to thank you for purchasing the SmartBoom PRO
IGB Series. Operation Manual. Platform Scale. Kg/Lb Specification IMPORTANT
 Platform Scale IGX/ Kg/Lb Specification Operation Manual IMPORTANT Do not carry out installation, operation, service, or maintenance until thoroughly understanding the contents of this manual. Keep this
OLS Series Light Sources, OPM Series Optical Power Meters, and Related Test Kits User s Guide
 OLS Series Light Sources, OPM Series Optical Power Meters, and Related Test Kits User s Guide 2004-2009, AFL Telecommunications, all rights reserved. COM4-00-1001 Revision E, 2009-06-16 Specifications
PLATINUM PRO6000 PROFESSIONAL SERIES DIGITAL COUNTERTOP / PORTABLE BALANCE
 PLATINUM PRO6000 PROFESSIONAL SERIES DIGITAL COUNTERTOP / PORTABLE BALANCE ongratulations on your purchase of the CProfessional Series model Platinum PRO6000 precision countertop/portable balance by GemOro
Secured Series: Hub Plus Kit Single Door Controller Package Installation Manual
 Secured Series: Hub Plus Kit Single Door Controller Package Installation Manual This package is designed to simplify the connections to our Secured Series Hub Plus Controller. This will translate into
impact INSTRUCTIONS LiteTrek 4.0 Monolight lighting equipment and accessories
 impact lighting equipment and accessories LiteTrek 4.0 Monolight INSTRUCTIONS Congratulations on your purchase of the Impact LiteTrek 4.0 Portable Monolight. Enjoy the many benefits of a portable strobe
Digital Physician Scales Heavy Duty
 Digital Physician Scales Primary Fitness Professional Home Health Key Features 498KL 499KL 500KL 349KLX WEIGHT CAPACITY 500 lb / 0 kg 400 lb / 80 kg RESOLUTION 0. lb / 0. kg 0. lb / 0. kg PLATFORM SIZE
tracer Operating Manual Non-Contact AC Voltage Detector U.S. Patent No. 9,091,707
 tracer Non-Contact AC Voltage Detector Operating Manual U.S. Patent No. 9,091,707 Form No. tracer-3-om, Rev 08/16 Form No. tracer-3-om, Rev 08/16 1 Table of Contents Topic Page 1. Warnings and Cautions...........................4
Flex Pro Series Assembly Guide
 ELECTRIC HEIGHT-ADJUSTED SIT TO STAND DESK Table of Contents CAUTION, USE & LIABILITY... 2 PARTS & HARDWARE LIST... 3 PARTS / COMPONENT DIAGRAMS... 3 ASSEMBLY INSTRUCTIONS... 5 BLUETOOTH... 10 TROUBLESHOOTING...
User Manual GBS-1269BT. Body Scale 4.0. version:1.0. Distributed by: Informed Clinical Sciences Corporation 1 Joy Street, Boston, USA MA 02108
 version:1.0 User Manual GBS-1269BT Body Scale 103 lbs Thank you very much for selecting the IC Sciences WeighWise Body Scale GBS-1269BT. TM 4.0 Please read the user manual carefully and thoroughly to ensure
Zonit μats TM Users Guide μats1-lv Version 1.2
 Zonit μats TM Users Guide μats1-lv Version 1.2 Table of Contents Product Overview...2 Pre-Installation Considerations...2 Product Features...3 Installation...4 Optional Accessories...4 μats TM Operational
User's Guide. Extech AM A AC Analog Clamp Meter
 User's Guide Extech AM300 300A AC Analog Clamp Meter Introduction Congratulations on your purchase of the Extech AM300 Analog Clamp Meter. This device measure AC Voltage and Current, DC Voltage, and Resistance.
Rack Power Distribution Unit AP7530, AP7540
 Rack Power Distribution Unit AP7530, AP7540 Description This booklet provides information on installing and operating the singlephase Rack Power Distribution Units (PDUs) AP7530 and AP7540. AP7530 AP7540
MP3 Speaker USER GUIDE
 MP3 Speaker USER GUIDE Jazwares, Inc. 2012 CONTENTS Please read the instructions along with the Speaker carefully before you use it, so that you can operate it conveniently. WELCOME, Warnings & Safety
LED FOLDING WORKLIGHT TM
 LED FOLDING WORKLIGHT TM LED LIGHT POWERSTRIP USB CHARGING ITM. / ART. 689211 Model: LM55812 CARE & USE INSTRUCTIONS IMPORTANT, RETAIN FOR FUTURE REFERENCE: READ CAREFULLY For assistance with assembly
Bluetooth Ceiling Fan Control with App Owner's Manual
 READ AND SAVE THESE INSTRUCTIONS 0 Model Number RCBT00 Bluetooth Ceiling Fan Control with App Owner's Manual -Speed Hand Held Transmitter Single Light Supplied with Receiver Includes Light Dimming Selection
RoscoLED Tape VariWhite Gaffer Kit
 User Guide PLEASE READ & SAVE THESE ORIGINAL INSTRUCTIONS RoscoLED Tape VariWhite Gaffer Kit Specifications Part No.: 2932200BICLR RoscoLED VariWhite Gaffer Kit External Dimensions: 14 L x 12 W x 5.4 H
Model PC-400 Portion Control Scale
 Model PC-400 Portion Control Scale Technical Manual Doran Scales, Inc. 1315 Paramount Pkwy Batavia, IL 60510 1-800-262-6844 www.doranscales.com MAN0231 Revision 3.2 i Table of Contents Section 1. Unpacking
User's Guide. MiniTec TM Series Model MN25 MultiMeter
 User's Guide MiniTec TM Series Model MN25 MultiMeter Warranty EXTECH INSTRUMENTS CORPORATION warrants this instrument to be free of defects in parts and workmanship for one year from date of shipment (a
LINE VOLTAGE TESTER CT101 USER S MANUAL. Please read this manual carefully and thoroughly before using this product.
 LINE VOLTAGE TESTER USER S MANUAL CT101 Please read this manual carefully and thoroughly before using this product. KEY FEATURES Visual indication of AC or DC voltage Easy to use approved Safe for CAT
ipad Charge & Sync Cart Model MCC2 ipad Cart 430-MCC2-User Manual-010 Is a Registered Trademark of Apple Inc. ipad
 ipad Charge & Sync Cart Model MCC2 ipad Cart ipad Is a Registered Trademark of Apple Inc. 430-MCC2-User Manual-010 1. ipad Cart Specifications MCC2 Mobile Charge & Sync Cart Extra Drawer Reserved space
CUBE Micro Station User Guide
 CUBE Micro Station User Guide Models TVS10AC CUBE Micro Station - User Guide 1 of 23 How To Use This Guide This User Guide is a resource to provide you guidelines and best practices as you begin using
Living. Keyfree Connected Smart Lock Manual. smart. The smarter way to protect your home
 smart Living Keyfree Connected Smart Lock Manual Please read the intructions before fitting and using the Keyfree Connected lock. The functions and design of this product can be changed without prior notice
with External Springs
 Two-Section Broadcast Arm with External Springs Owner s Manual Introduction Thank you for choosing the Auray two-section broadcast arm with external springs. This versatile and sturdy broadcast arm is
Operation Manual MODEL 2TX. 2-wire Isolated ph/orp Transmitter
 Operation Manual MODEL 2TX 2-wire Isolated ph/orp Transmitter 0 2TX CONTENTS INITIAL INSPECTION.....2 INTRODUCTION......2 ASSEMBLY...3 PREPARATION....4 CONNECTING THE ELECTRODE...4 CONNECTING THE TEMPERATURE
TOT Series Manual. North American and International Models - without optional faceplate. Receptacle Panel of International Models, CE model shown
 TOT Series Manual North American and International Models - without optional faceplate Receptacle Panel of International Models, CE model shown North American Models Table of Content 1. Important Safety
PORTABLE WIRELESS PA SYSTEM WITH LITHIUM -ION RECHARGEABLE BATTERY AWP6042 OWNER S MANUAL. Handheld Microphone Headset Transmitter
 PORTABLE WIRELESS PA SYSTEM WITH LITHIUM -ION RECHARGEABLE BATTERY AWP6042 OWNER S MANUAL X1 Headset Microphone AWX6042H VHF Wireless Headset Transmitter Handheld Microphone Headset Transmitter Thank you
Owner s Instruction Manual
 Owner s Instruction Manual Advanced Healthcare Telephone Model 5150 Contents IMPORTANT SAFETY INSTRUCTIONS...3 BOX CONTENTS...4 FEATURES...4 ON/OFF SWITCH...4 DIAL BUTTONS...4 RECEIVER VOLUME CONTROL...4
3.5 TFT LCD CCTV Service Viewer with Wristband LCD35SV
 User Manual 3.5 TFT LCD CCTV Service Viewer with Wristband LCD35SV LCD35SV is a type of product that summarizes views of first-line safety engineers and it is developed specially for technical personnel
60M HDMI+USB KVM Extender
 60M HDMI+USB KVM Extender Operating Instructions Dear Customer Thank you for purchasing this product. For optimum performance and safety, please read these instructions carefully before connecting, operating
FREEWAVE STRYKER LIGHTNING/MOTION TRIGGER. User Manual
 FREEWAVE STRYKER LIGHTNING/MOTION TRIGGER User Manual THANK YOU FOR CHOOSING VELLO The Vello FreeWave Stryker for Canon and Nikon is a 2-in-1 solution for intense light and infrared (IR) image triggering.
Digital Contact Tachometer
 Digital Contact Tachometer Item 66400 Read this material before using this product. Failure to do so can result in serious injury. SAVE THIS MANUAL. When unpacking, make sure that the product is intact
CA846 THERMO-HYGROMETER ENGLISH. User Manual. 99 Washington Street Melrose, MA Phone Toll Free
 THERMO-HYGROMETER CA846 99 Washington Street Melrose, MA 02176 Phone 781-665-1400 Toll Free 1-800-517-8431 Visit us at www.testequipmentdepot.com ENGLISH User Manual Statement of Compliance Chauvin Arnoux,
MANUAL ENGLISH PSA-63A4C. Ordercode: Highlite International B.V. Vestastraat EX Kerkrade the Netherlands
 MANUAL ENGLISH PSA-63A4C V1 Highlite International B.V. Vestastraat 2 6468 EX Kerkrade the Netherlands Table of contents Warning... 2 Safety Instructions... 2 Operating Determinations... 4 Connection with
Owner's Manual. True RMS Multimeter. Model No Safety Operation Maintenance Español
 Owner's Manual True RMS Multimeter Model No. 82023 CAUTION: Read, understand and follow Safety Rules and Operating Instructions in this manual before using this product. Safety Operation Maintenance Español
PS8 - II. Professional Power Sequencer. User s Manual
 PS8 - II Professional Power Sequencer User s Manual IMPORTANT SAFETY INSTRUCTIONS READ FIRST This symbol, whenever it appears, alerts you to the presence of uninsulated dangerous voltage inside the enclosure.
MD-BD13B / DUAL SEGMENT TWIN-ARM. For (33-69 cm) LCD desktop computer monitors. User Manual
 LCD desktop computer monitors. User Manual") MD-BD13B / DUAL SEGMENT TWIN-ARM MONITOR mount For 13 27 (33-69 cm) LCD desktop computer monitors User Manual Thank you for choosing Gabor. The Gabor MD-BD13B mounts two 13 27 (33 69 cm) LCD computer monitors
MD-BD13B / DUAL SEGMENT TWIN-ARM MONITOR mount For 13 27 (33-69 cm) LCD desktop computer monitors User Manual Thank you for choosing Gabor. The Gabor MD-BD13B mounts two 13 27 (33 69 cm) LCD computer monitors
TOT Series Manual. North American CE and UK Models. CE Models. UK Models. North American Models
 TOT Series Manual North American CE and UK Models CE Models UK Models North American Models Table of Content 1. Important Safety Instructions 2. Description Shipping Carton & Packing Material Placement
Elapsed Timer Control Panel
 Installation Manual V6.2 Elapsed Timer Control Panel Current as of August 2017 The Sapling Company, Inc. Elapsed Timer Control Panel Table of Contents Table of Contents 2 Important Safety Instructions
D-Pack 6 Classic ORDERCODE 50315
 D-Pack 6 Classic ORDERCODE 50315 Congratulations! You have bought a great, innovative product from Showtec. The Showtec D-Pack 6 Classic brings excitement to any venue. Whether you want simple plug-&-play
actilib Library 2U Quick Start Guide
 actilib Library 2U Quick Start Guide September, 2009 1 Contents 1 Contents...2 2 Warnings and symbols...3 2.1 Precautions...4 2.2 Product Warranty Caution...4 2.3 Rack stability...4 3 Unpacking the tape
Operations Manual EcoSense ph100
 Operations Manual EcoSense ph100 Portable ph, mv and Temperature Instrument English Français Español Deutsch Italiano WARRANTY The EcoSense ph100 Instrument is warranted for one year from date of purchase
solo Digital Clinical Scale Operation Manual
 solo Digital Clinical Scale Operation Manual CARDINAL SCALE MFG. CO. 0044-0391-0M Rev C 203 E. Daugherty, Webb City, MO 64870 USA 02/18 Ph: 417-673-4631 Fax: 417-673-2153 www.detecto.com Technical Support:
Installation Job Aid for VSP 4450GTX-HT- PWR+
 Installation Job Aid for VSP 4450GTX-HT- PWR+ Notices Release 6.1.0.0 NN46251-305 Issue 02.01 November 2017 Notice paragraphs alert you about issues that require your attention. The following paragraphs