QUICK-START GUIDE X.200
|
|
|
- Ruby Cunningham
- 6 years ago
- Views:
Transcription
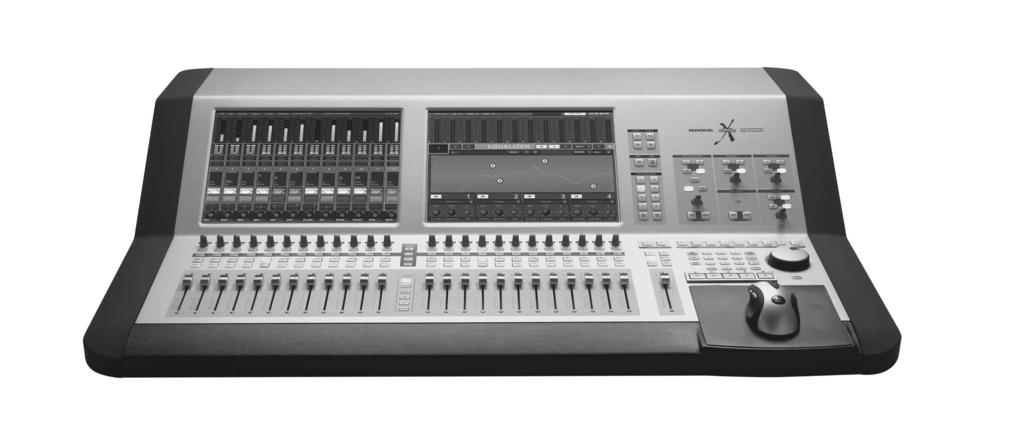
1 QUICK-START GUIDE X.00
2 Digital X Bus Table of Contents Introduction... Getting Started... Connections... Cards.... MIC/LE CARD.... MIC/LE CARD.... LE CARD AES/EBU CARD.... FIREWIRE CARD.... MIX CARD.... SYNC CARD... Other Connections FOOT SWITCH and SERIAL 9 P.... MIDI and.... ETHERNET.... USB.... IEC Power Receptacle.... Power Switch... More Connections.... Mouse.... Keyboard.... USB... Operational Basics... Turning on the Digital X Bus... About Fader Banks... About V-Pot Controls... Touchscreens... Keyboard and Mouse... Getting Sound Happening... 9 Hookup Diagrams... Don t forget to visit our website at for more information about this and other Mackie products. Part No. 000 Rev. 0/0 00 LOUD Technologies Inc. All Rights Reserved. X.00
3 Introduction Thank you for choosing a Mackie Digital X Bus for your next-generation digital recording console. The Digital X Bus offers you the flexibility to configure it for virtually any recording application through its extended card cage and routing options. It was designed with the ability to upgrade as advancements are made in digital recording technology. But with -bit floating point processing, you have more power than just about any other digital mixing console in its class. We know you want to get started right away, so this is designed to help you get up and running quickly. If you have any experience using a digital mixing console, like our DB, you ll find that using the Digital X Bus is very similar and you ll be mixing away in no time. If this is your first experience with digital mixing, we ll run you through some of the unique aspects of using a digital mixing console. You will find that once you ve learned these differences and the incredible flexibility that digital mixing has to offer, you will have a very short learning curve, and wonder how you have lived without the power of digital mixing for so long. Note: As new software releases become available, they can be downloaded from the Mackie website by going to the Digital X Bus webpage at: You will need a USB flash drive (a.k.a. thumbdrive) to transfer the installer package from your computer to the Digital X Bus. Installation instructions are also available on the website. HOW TO USE THIS MANUAL We know that many of you can t wait to get your new Digital X Bus hooked up, and you re probably not going to read the manual first (sigh!). So this will help you get the mixer set up fast so you can start using it right away. After the "Getting Started" section, we have included some hook-up diagrams that show typical connections for tracking, mixdown, and using the Digital X Bus with a DAW (Digital Audio Workstation). Then, when you have time, read the owner's manual. It describes every knob, button, and slider on the console, and all the menus and windows on the touchscreens. Please write your serial number here for future reference (i.e., insurance claims, tech support, return authorization, etc.) Purchased at: Date of purchase:
4 Digital X Bus Getting Started Once you ve unpacked your new Digital X Bus, you ll want to position it where you can sit comfortably and reach the touchscreens and controls, and have relatively easy access to the rear panel, in case you need to make any changes to the connections. Typically, once you ve set it up and made the connections, you won t have to make any changes unless you change your external equipment. Connections The Digital X Bus comes with a Mix Out card (control room card) and a Sync card already installed in the card cage in the rear panel. There are also connections for a USB mouse and keyboard (see More Connections for PS/-style mouse and keyboard connections). While not required to operate the Digital X Bus, they can be handy for quickly entering data or when clicking is easier than touching (the touchscreen). Beyond that, we have a variety of analog and digital cards, not included with the base model, that you can install in the card cage to suit your application. This allows you to match the connections on your Digital X Bus with the connections provided on the other equipment in your studio. Here s a quick run-down of what we offer: Cards. MIC/LE CARD This card has four female XLR balanced microphone inputs, and four /" TRS balanced/unbalanced line-level inputs, for a total of eight analog inputs. Note that this card does not provide any outputs.. MIC/LE CARD The Mic/Line card has two DB connectors, one for inputs and one for outputs. The input connector accepts eight balanced mic/line-level inputs. The output connector provides eight balanced linelevel outputs. These DB connectors use the TAS- CAM standard pinout for analog signal connections (the same standard used on the analog cards for the Mackie DB and Hard Disk Recorder). If you are connecting these to another device using the same DB standard, you can use a DB-to-DB audio cable. Otherwise, you will need to use DB cables that breakout to XLR, /" TRS, or TT connectors.. LE CARD The Line card has two DB connectors. One provides eight balanced line-level inputs, and the other provides eight balanced line-level outputs. They use the TASCAM standard pinout for analog signal connections (the same standard used on the analog cards for the Mackie DB and Hard Disk Recorder). If you are connecting these to another device using the same DB standard, you can use a DB-to-DB audio cable. Otherwise, you will need to use DB cables that breakout to XLR, /" TRS, or TT connectors. Refer to Appendix B in the Digital X Bus X.00 Owner's Manual for a wiring diagram of these connectors. D SLOT SYNC C SLOTS B SLOTS A SLOTS SYNC CARD MIX CARD FIRE CARD AES CARD LE CARD LE CARD MIC/LE CARD MIC/LE CARD MIC/LE CARD WORD CLOCK AES/EBU SPDIF SMPTE A L SPEAKERS R A B L R B PHONES A B L MIX R X.00
5 . This card provides eight channels of digital in two formats; on a DB connector and ADAT optical on four TOSLK connectors. At./ khz sample rates, each optical TOSLK connector provides either eight inputs or eight outputs of digital audio. At./9 khz sample rates, the S/MUX protocol is used to provide channels - on the A connectors, and channels - on the B connectors. At./9 khz sample rates, the S/MUX II protocol is used to provide channels - on the A connectors and channels - on the B connectors, for a total of four inputs and outputs.. AES/EBU CARD The AES/EBU card has one DB connector, providing eight channels of digital in the AES/EBU format. The original AES/EBU specification (IEC9 Type ) provides for carrying two channels of digital audio at resolutions up to -bit at khz. When higher sampling rates became possible, two methods were developed to transmit digital audio at the higher sample rates double-fast and double-wide. The double-fast method (also called single-wire) clocks the digital port at twice the speed to get twice the information through, providing support for resolutions up to -bit at 9 khz. The double-wide method (also called dual-wire) transmits one channel of digital audio instead of two channels through a single digital port, again providing support for resolutions up to -bit at 9 khz. The AES/EBU card currently uses the double-fast method, so eight channels of digital are supported up to 9 khz. At sampling rates up to khz, two channels of digital audio are transmitted on a single wire (one -pin XLR) at normal speed as specified by the AES/EBU standard. At sampling rates of./9 khz, two channels of digital audio are transmitted on a single wire (one -pin XLR) at twice the normal speed (x). At sampling rates of./9 khz, two channels of digital audio are transmitted on a single wire (one -pin XLR) at four times the normal speed (x). Note: Check the owner s manual for the device you are connecting to the AES/EBU card, to find out if it supports the double-fast (or single-wire) method.. FIREWIRE CARD The FireWire card uses the IEEE-9 protocol for connecting digital devices. It currently provides inputs and outputs of digital audio at khz, and inputs and outputs at 9 khz (with room for improvement as driver technology improves). It supports OS X Core Audio applications on the Macintosh, and Windows XP ASIO applications on the PC.. MIX CARD This provides several outputs (with the addition of an AES/EBU and S/PDIF input), typically used for control room, headphones, and main outputs. AES/EBU and These are XLR connectors that accept and send standard AES/EBU two-channel digital signals. S/PDIF and These are RCA-type connectors that accept and send standard S/PDIF two-channel digital signals. SPEAKERS A and B These are two sets of stereo monitoring outputs using /" TRS jacks. They produce a line-level analog signal that you can connect to the inputs of the amplifier powering your control room monitors (or the inputs to your active studio monitors). You might use one pair (A) for near-field monitor speakers and the other pair (B) for your main monitor speakers. These are assigned to the Control Room Left and Right outputs by default, but can be reassigned to virtually any input or output source. The Control Room source is selected in the CONTROOOM section of the console (press the SETUP button in the CONTROOOM section for more setup options). PHONES and These are stereo /" TRS jacks that provide a stereo output for headphones, or for connecting to a headphone distribution box. These are assigned to the Phones and Phones outputs by default, but can be reassigned to virtually any input or output source. The Phones and sources are selected in the PHONES or PHONES section on the console (press the SETUP button in the PHONES section for more setup options). MIX These are balanced /" TRS jacks that provide a line-level analog signal. These are assigned to the left and right mix outputs by default, but can be reassigned to virtually any input or output source. Connect these outputs to the inputs of a -track recorder for mixdown, or to the inputs of a power amplifier to drive a pair of speakers for the studio or whatever.
6 Digital X Bus. SYNC CARD The Sync card provides the digital word clock in and out on a pair of BNC connectors, and SMPTE time code in and out on a pair of /" jacks. Sync data is also transmitted through the ADAT lightpipe and AES/EBU connections. The Sync card just provides another means to transmit and receive the word clock. This is particularly useful when you want the Digital X Bus to be the master clock for your digital audio system. Time code is also provided through MIDI time code (MTC). SMPTE time code is more commonly used in motion picture and broadcast applications. Other Connections In addition to the cards in the card slots, there are more connections you can make on the rear panel. 9. FOOT SWITCH and These two /" TS jacks are provided for footswitch control of various functions. These functions are assignable in the Windows > Setup window, and include Talkback, Play/Stop, Next Marker, Previous Marker, and New Marker. 0. SERIAL 9 P This DB9 connector is an RS- port that supports the Sony 9-Pin device protocol. It is configured to operate as a controller, so it should be connected to a device (DEV) that is configured to be controlled by a controller (CONT). This is used primarily to transmit tape transport commands from the Digital X Bus to a recorder.. MIDI and These standard MIDI connectors (female -pin D) can be used to send or receive MIDI Time Code (MTC) and MIDI Machine Control (MMC) when connecting to equipment with transport controls and a position display. The MIDI connectors can also be used to control your DAW application when the MIDI fader bank is selected (DAW Bank). You can turn MTC on and off in the Sync Card setup window (Windows > Configuration and touch the Sync card) by clicking the Generate MTC box. You can select MTC as the time code source in the same setup window by clicking the Time Code Source dropdown box and selecting MIDI (MTC).. ETHERNET The Ethernet connector is reserved for future upgrades.. USB The two USB ports on the Digital X Bus can be used to connect a USB equipped mouse, keyboard, or USB memory stick (USB flash drive). See More Connections on the next page to see how to connect more USB devices, and a PS/-style keyboard and mouse with a -pin minid connector.. IEC Power Receptacle There are two power receptacles on the Digital X Bus, one to provide power to the Digital X Bus and the other to connect to another device and provide power to it. These are standard -prong IEC power connectors. Connect the detachable linecord (included with your Digital X Bus) to the male power receptacle, and plug the other end of the linecord into an AC outlet with the correct voltage for your particular Digital X Bus. To connect another device to the female IEC power receptacle, you need a power cord with a male IEC power connector on one end, and a female IEC power connector on the other end. These can be purchased at most electronic supply stores. MIDI MIDI USB ETHERNET SERIAL 9-P FOOT SWITCH V 9amp 0Hz 0V.amp 0Hz 00W Max X.00
7 . Power Switch This one is self-explanatory. When the POWER switch is turned ON, power is supplied to the Digital X Bus and it boots up. When turning off the Digital X Bus, you should select Shutdown from the File menu. At the end of the shutdown procedure, the touchscreens go blank, indicating that it is okay to turn off the power switch. More Connections There are even more connections available behind the removable panel on the back of the Digital X Bus, which we call the Motherboard Access Area. These are connections to the motherboard, and include four additional USB connections, and the PS/-style mouse and keyboard connections. To access the connectors:. First, turn off the Digital X Bus (select File > Shutdown and then turn off the power switch).. Use a Phillips screwdriver to remove the eight screws securing the panel to the chassis.. Mouse This -pin minid connector is used to connect a PS/-style mouse.. Keyboard This -pin minid connector is used to connect a PS/-style keyboard.. USB These are four additional USB ports for connecting more USB devices to the Digital X Bus. If you are connecting a USB CD-ROM drive, use one of these ports rather than the USB ports on the rear panel (). MOUSE KEYBOARD USB PORTS
8 Digital X Bus Operational Basics Are you ready to get started? Let s turn on the Digital X Bus and go over some of the general operational features before we start passing audio through it. Turning on the Digital X Bus Connect the supplied power cord to the male IEC connector on the rear panel. Plug the other end of the power cord into an outlet properly configured for the voltage indicated on your particular model. Turn on the power switch. The faders start moving and the Digital X Bus loads its software into memory. This may take up to 0 seconds. When the screens display the channels strips, you re ready to go. About Fader Banks If you have used a digital console before, then you are probably familiar with the concept of fader banks. Unlike an analog board, a digital mixing console can reassign a channel strip to route any input to any output. This can be done on an individual channel basis, or globally, by switching banks and reassigning all channel strips at once. You can think of each bank as a separate layer of controls, stacked one on top of each other. The X.00 has six banks: MASTERS GROUPS MIDI Thus, channels strips suddenly become channels ( channels x banks = channels)! The first three banks, channels -, provide a x channel matrix. With nine cards installed, you can have individual inputs and outputs ( inputs/outputs x 9 cards = inputs/outputs). The MASTERS bank is used for the Aux Send masters, Bus masters, and the L/R mix master. The GROUPS bank has the controls for Groups -, and for MIDI channels. The MIDI bank is used to convert the Digital X Bus into a control surface for any DAW that supports the Mackie Control Universal protocol. You can select the DAW you are using from an emulation mode box to configure the MIDI bank to work with your particular DAW via the MIDI / connectors. X GROUPS MSTRS MIDI About V-Pot Controls Just below the touchscreens are a row of rotary controls called V-Pots, which is short for virtual potentiometer. Again, unlike an analog console where a rotary pot can control one function, a digital console allows you to assign a V-Pot to many different functions. Using the buttons to the right of the touchscreens, you can assign the V-Pots to control the following functions: PAN L/R (Left/Right) PAN F/B (Front/Back, for surround sound) AUX - Send AUX 9/0 and / Send AUX 9/0 and / PAN Digital TRIM LEVEL TO TAPE When one of the above buttons is selected (lit), all V-Pots control that function for each of the channels in the selected bank. What would take controls on an analog console can be done with controls and buttons on the Digital X Bus! In addition, windows that contain adjustable parameters, like the Dynamics and EQ windows, have their controls situated above the channel V-Pots, which temporarily become controls for the parameters in the window, overriding the V-Pot Assign selection. As soon as the window is closed, V-Pot control returns to whatever is selected in the V-Pot Assign section. Touchscreens Although using the touchscreens may seem unfamiliar at first, the touchscreen interface will quickly become second-nature to you. The dual " TFT touchscreens not only give you a detailed, high-definition view of what is happening with the Digital X Bus, but they also give you almost instant access to alternate screens, settings, and controls. As you become familiar with navigating the touchscreen interface, you will find yourself accessing screens and controls with increasing speed and efficiency. Keyboard and Mouse CUE CUE In addition to the touchscreens, you can use a keyboard and mouse to select and change controls on the Digital X Bus. Use a keyboard to enter keyboard shortcuts (hot keys), or to enter letters and numbers whenever a keyboard graphic appears on-screen. Use the mouse to click on-screen where you would otherwise touch to open, close, or select something. PAN MIC TRIM LE POT CONTROLS PAN L/R PAN LEVEL TO TAPE PAN F/B


.")
9 GITAL CARD F O CAL A B UT A UT B A B A B A B A B MIC/LE CARD MIC/LE CARD MIC/LE CARD Getting Sound Happening The following procedure demonstrates how to connect a microphone to an input and get sound out of the Digital X Bus. Here s what you ll need: stereo power amplifier pair of monitor speakers (you can substitute a pair of powered monitors for the power amplifier/monitor speaker combo, or a set of stereo headphones) microphone Appropriate cable to connect the microphone to your particular input card Cables to connect the speaker outputs to the amplifier or powered monitor speakers Here's what you do:. Turn on the Digital X Bus.. Connect a microphone to Input. If you are using a MIC/LE card, use a DB-to-XLR female breakout cable to connect the microphone to Input. If you are using a MIC/LE card, you can plug the XLR microphone cable directly into the card. S MIC/LE CARDS. Make sure channel has Input assigned to it. Open the Assign window (Windows > Assign). Under the Input Src drop-down box select Mic Line In... If the microphone requires phantom power, select the V button in the Assign window to turn on phantom power. Leave the 0 db pad off when using a microphone.. Talk or sing into the microphone and adjust the Gain control using the V-Pot on channel so the meter indicates between and. B SLOTS A SLOTS. Press the Bank button (-) in the Banks section of the console (just above the Master fader).. In the Assign window, make sure L-R is selected under Bus Assigns MSTRS GROUPS MIDI. Press the SELECT button on channel. SELECT 9
 from the Mix Out card to the inputs of your stereo power amplifier (or powered monitor speakers).")
10 WORD CLOCK SYNC CARD SMPTE L L MIX CARD SPEAKERS SPDIF A B PHONES L MIX AES/EBU R R R LE CARD A B A B A B A B A B A B MIC/LE CARD MIC/LE CARD MIC/LE CARD Digital X Bus 9. Connect the Left and Right Speaker Outs (A) from the Mix Out card to the inputs of your stereo power amplifier (or powered monitor speakers). These outputs are balanced when using a TRS (tip-ring-sleeve) connector, or unbalanced when using a TS (tip-sleeve) connector. Use instrument/line-level cable for this connection. If using a stereo power amplifier/speaker combo, connect the amplifier outputs to the monitor speakers using appropriate speaker cable. 0. If you don t have an amplifier and speakers handy, you can connect a pair of headphones to the Phones output on the Mix Out Card. D SLOT SYNC C SLOTS B SLOTS A SLOTS Headphones Powered Studio Monitors for Control Room ONE LE CARD S MIC/LE CARDS. In the CONTROOOM section on the right side of the console, turn the level control all the way down (counterclockwise), and select L-R for the source and NEAR (Speaker Out A) for the output.. If you are using headphones instead of speakers, turn the Phones level control all the way down in the PHONES section on the right side of the console. Make sure L-R is selected as the source in the CONTROOOM section, and C/R is selected as the source in the PHONES section.. Press the MSTRS button in the Banks section of the console. Set the Mix L and Mix R faders to unity (U). These two faders are stereo-linked by default.. Set channel fader to unity (U).. Set the Master fader to unity (U).. Turn on the power amplifier (or powered monitor speakers). Set the level controls on the power amplifier to the manufacturers recommended setting.. Talk or sing into the microphone while slowly turning up the level control in the CONTROOOM section. You should hear sound in the speakers and see the L/R meters at the top of the touchscreen display levels.. If you are using headphones, turn the level control in the CON- TROOOM section up about halfway, then SLOWLY turn up the level control in the PHONES section. You should hear sound in the headphones. To patch an effect into the signal path: 9. Open the Effects Rack (Windows > Effects Rack). 0. Click the New Plugin button and select Reverb in the NEW PLUG window, then click OK. CONTROOOM PHONES SUR L - R SETUP C/R MONO NEAR MA DIM SETUP 0 X.00


11 . In the Reverb panel, click the Src L drop-down box and select Channel Post Insert > Ch. Post. This places the reverb in the post-insert loop on channel.. Select the WRITE button in the ASSIGN BUT- TON SETUP section of the console. Press the ASSIGN button on channel. ASSIGN BUTTON SETUP REC L - R READ WRITE. Start running time code by pressing the PLAY button in the Transport section of the console. You can see the time code in the upper-right corner of the screen. EDIT START 9 LOOP START END STOP. Adjust the reverb parameters using the V-Pots at the bottom of the Effects Rack. You should see the Left Input and Output meters move as you talk or sing into the microphone. Note: A more typical use for an effect in the Effects Rack might be to route several channels to an Aux Send; for example, all the background vocals to Aux Send. Route Aux Send to the input of the effect in the Effects Rack by selecting it in the Src (Source) drop-down box. The Aux master fader (Masters Fader Bank) is used to control the amount of signal being sent to the effect. Return the effects signal to the signal path by selecting the effect's output for the input of an unused channel. To write some basic automation:. In the AUTOMATION MODES section of the console, select FADER and MUTE. Turn off the BYPASS button. SNAP SHOT LOCATE STORE 0 SET ENTER REWD FAST FWD STOP PLAY RECORD. Move the channel fader up and down a few times and press the mute button on channel. SCRUB. Press the STOP button in the Transport section and press REWD to return the time code to zero.. Press the PLAY button and the fader moves and mute will playback from automation. 9. You can open the Mix Editor (Windows > Mix Editor) to see the automation moves. Select Channels > Ch. in the Show drop-down box at the top of the Mix Editor to see the recorded fader moves and mute action relative to the time code. ON AUTOMATION MODES TRIM FADER MUTE PAN ALL BYPASS
12 Digital X Bus Hookup Diagrams One of the primary applications for the X.00 is multitrack recording. This involves tracking and monitoring, bouncing, overdubbing, and mixdown. A typical application might involve inputs for tracking and outputs to a multitrack recorder or DAW (Digital Audio Workstation). In this case, you might have three MIC/LE CARDS installed in slots - (A SLOTS) for analog inputs, and three S installed in slots - (B SLOTS) for digital outputs. By assigning the Output Source for the digital outputs to Channels -, you can record each input channel to an individual track on the multitrack recorder. The hookup diagrams in this section demonstrate how the connections are made with the Digital X Bus X.00 for tracking and mixdown, mixdown to surround sound, and using a DAW. X.00
13 TRACKG and MIXDOWN Multi Effect Processor Vocal Enhancer Reverb CAUTION RISK OF ELECTRIC SHOCK DO NOT OPEN REPLACE WITH THE SAME TYPE FUSE AND RATG. DISCONNECT SUPPLY CORD BEFORE CHANGG FUSE WARNG: TO REDUCE THE RISK OF FIRE OR ELECTRIC SHOCK, DO NOT EXPOSE THIS EQUIPMENT TO RA OR MOISTURE. DO NOT REMOVE COVER. NO USER SERVICEABLE PARTS SIDE. REFER SERVICG TO QUALIFIED PERSONNEL. AVIS: RISQUE DE CHOC ELECTRIQUE NE PAS OUVRIR UTILISE UN FUSIBLE DE RECHANGE DE MÊME TYPE. DEBRANCHER AVANT DE REMPLACER LE FUSIBLE SERIAL NUMBER MANUF. DATE ENGEERED BY MIDI MIDI USB ETHERNET SERIAL 9-P FOOT SWITCH DESIGNED D BY MAC ACKOIDS WOODVILLE, WA USA MANUFACTUR URED USA COPYRIGHT 00 THE FOLLOWG ARE TRADEMARKS OR REGISTERED TRADEMARKS OF LOUD TECH. C.: "TA TAPCO", "MACKIE", ", AND THE "RUNNG MAN" FIGURE PAT ATENT T PENDG high-definition digital console V 9amp 0Hz 0V.amp 0Hz 00W Max MIDI (MTC and MMC) SELECT SELECT SELECT SELECT Digital Multitrack Hard Disk Recorder This diagram demonstrates how to use three MIC/LE cards, providing up to microphone and instrument inputs ( Mic/Line inputs and Line inputs). Three DIGITAL cards provide output tracks to a hard disk recorder via ADAT optical connections (and Fader Bank ) and input tracks via ADAT optical connections (and Fader Bank ) from the hard disk recorder for mixdown. The MIDI /s provide MMC (MIDI Machine Control) to the hard disk recorder and MTC (MIDI Time Code) to the Digital X Bus. An AES card provides digital sends and returns for external effects so you can keep the signal in the digital domain, and the MIX card provides two stereo line-level control room outputs (=NEAR; =MA [not shown]) and two stereo headphone outputs for monitoring the input sources. Reverb ONE AES CARD S MIC/LE CARDS D SLOT SYNC C SLOTS B SLOTS A SLOTS SYNC CARD MIX CARD AES CARD MIC/LE CARD MIC/LE CARD MIC/LE CARD WORD AES/EBU CLOCK SPDIF SMPTE A A A SPEAKERS B B B A A A PHONES B B B MIX Word Clock -Tracks (to Optical Inputs) -Tracks (from Optical Outputs) Headphones Headphones Stereo Guitar Effects Powered Studio Monitors for Control Room Vocal Mics Direct Box Electric Guitar Bass Guitar A B
14 SURROUND MIXDOWN Left Front Left Center Matching Powered Studio Monitors Center Right Center Right Front Left Rear Powered Right Rear Subwoofer Bus Outputs ONE LE CARD S MIC/LE CARDS CAUTION RISK OF ELECTRIC SHOCK DO NOT OPEN REPLACE WITH THE SAME TYPE FUSE AND RATG. DISCONNECT SUPPLY CORD BEFORE CHANGG FUSE WARNG: TO REDUCE THE RISK OF FIRE OR ELECTRIC SHOCK, DO NOT EXPOSE THIS EQUIPMENT TO RA OR MOISTURE. DO NOT REMOVE COVER. NO USER SERVICEABLE PARTS SIDE. REFER SERVICG TO QUALIFIED PERSONNEL. AVIS: RISQUE DE CHOC ELECTRIQUE NE PAS OUVRIR UTILISE UN FUSIBLE DE RECHANGE DE MÊME TYPE. DEBRANCHER AVANT DE REMPLACER LE FUSIBLE SERIAL NUMBER MANUF. DATE ENGEERED BY MIDI MIDI USB ETHERNET SERIAL 9-P FOOT SWITCH D SLOT SYNC C SLOTS B SLOTS A SLOTS DESIGNED D BY MAC ACKOIDS WOODVILLE, WA USA MANUFACTUR URED USA COPYRIGHT 00 THE FOLLOWG ARE TRADEMARKS OR REGISTERED TRADEMARKS OF LOUD TECH. C.: "TA TAPCO", "MACKIE", ", AND THE "RUNNG MAN" FIGURE PAT ATENT T PENDG SYNC CARD MIX CARD LE CARD MIC/LE CARD MIC/LE CARD MIC/LE CARD high-definition digital console WORD AES/EBU CLOCK SPDIF SMPTE A A A SPEAKERS B B B A A A PHONES B B B MIX V 9amp 0Hz 0V.amp 0Hz 00W Max After getting your tracks down, the three DIGITAL cards provide inputs for -tracks from the hard disk recorder via ADAT optical connections. The MIDI /s provide MMC (MIDI Machine Control) to the hard disk recorder and MTC (MIDI Time Code) to the Digital X Bus. A LE card provides up to eight line-level sends for monitoring the mixdown in either stereo (L/R Mix) or surround sound. You can use the AES/EBU or S/PDIF outputs (or the analog MIX ) from the MIX card to record a stereo mixdown, or one of the ADAT optical outputs to record the surround stems to a digital multitrack recorder. MIDI SELECT SELECT SELECT SELECT Word Clock -Tracks Surround Stems Digital X Bus SELECT SELECT SELECT SELECT A B X.00
15 SYNC CARD MIX CARD LE CARD AES CARD AES CARD AES CARD MIC/LE CARD MIC/LE CARD MIC/LE CARD WORD AES/EBU CLOCK SPDIF SMPTE SPEAKERS PHONES MIX A B Internal Effects Rack To any Channel Input Source, Channel Inserts, or Master Inserts From Aux Sends, Channel Inserts, or Master Inserts Returns CAUTION RISK OF ELECTRIC SHOCK DO NOT OPEN REPLACE WITH THE SAME TYPE FUSE AND RATG. DISCONNECT SUPPLY CORD BEFORE CHANGG FUSE WARNG: TO REDUCE THE RISK OF FIRE OR ELECTRIC SHOCK, DO NOT EXPOSE THIS EQUIPMENT TO RA OR MOISTURE. DO NOT REMOVE COVER. NO USER SERVICEABLE PARTS SIDE. REFER SERVICG TO QUALIFIED PERSONNEL. AVIS: RISQUE DE CHOC ELECTRIQUE NE PAS OUVRIR UTILISE UN FUSIBLE DE RECHANGE DE MÊME TYPE. DEBRANCHER AVANT DE REMPLACER LE FUSIBLE SERIAL NUMBER MANUF. DATE ENGEERED BY MIDI MIDI USB ETHERNET SERIAL 9-P DESIGNED D BY MAC ACKOIDS WOODVILLE, WA USA MANUFACTUR URED USA COPYRIGHT 00 THE FOLLOWG ARE TRADEMARKS OR REGISTERED TRADEMARKS OF LOUD TECH. C.: "TA TAPCO", "MACKIE", ", AND THE "RUNNG MAN" FIGURE PAT ATENT T PENDG high-definition digital console V 9amp 0Hz 0V.amp 0Hz 00W Max FOOT SWITCH Vocal Enhancer Reverb Aux Sends, Channel Inserts, or Master Inserts Vocal Mics D SLOT SYNC C SLOTS B SLOTS A SLOTS Direct Box Electric Guitar Bass Guitar Stereo Guitar Effects N/C N/C N/C N/C N/C N/C DIGITAL AUDIO WORKSTATION (DAW) USB MIDI Interface SMPTE MIDI Interface USB To Desktop or Laptop Computer Digital for Workstation Multi Effect Processor This example demonstrates how to use the Digital X Bus with a digital audio workstation (DAW). Three MIC/LE cards provide up to microphone and instrument inputs ( Mic/Line inputs and Line inputs). Three AES cards provide output tracks to the DAW s audio interface via -pin AES/EBU connections. The SMPTE /s on the SYNC card provide time code for the DAW. Two MIDI interfaces are used to achieve full - channels of MIDI communication between the Digital X Bus and the DAW via the USB. A LE card provides line-level sends and returns for external effects, or better yet, use the Internal Effects Rack in the Digital X Bus loaded with VST effects and eliminate the need for expensive external signal processors. The MIX card provides a stereo line-level control room output and two stereo headphone outputs for monitoring the input sources. ONE LE CARD AES CARDS MIC/LE CARDS -Tracks Headphones Headphones Powered Studio Monitors for Control Room
16 0 Wood-Red Road NE Woodinville, WA 90 USA United States and Canada: Europe, Asia, Central and South America:.. Fax:.. Middle East and Africa:
Fast Track C600 User Guide
 Fast Track C600 User Guide Legal Notices This guide is copyrighted 2011 by Avid Technology, Inc., with all rights reserved. Under copyright laws, this guide may not be duplicated in whole or in part without
DL32R. 32-Channel Wireless Digital Live Sound Mixer with ipad Control
 DLR Sound Mixer with ipad Control FEATURES: -Channel wireless digital mixer Onyx recallable mic pres with wireless control 14 fully-assignable XLR outputs Stereo AES digital output Total recall of all
PXR 1506 / WATT MIXER AMPLIFIER
 PXR 1506 / 1508 150-WATT MIXER AMPLIFIER Operating Manual www.peavey.com ENGLISH PXR 1506 / 1508 150-Watt, 8-Channel Mixer Amplifier Designed with the latest Peavey technology, the PXR 1506 / 1508 powered
PMXU83BT. PMXU43BT - PMXU63BT - PMXU83BT Wireless BT Streaming Studio Mixer DJ Controller Audio Mixing Console System
 PMXUBT PMXU6BT PMXU8BT PMXUBT - PMXU6BT - PMXU8BT Wireless BT Streaming Studio Mixer DJ Controller Audio Mixing Console System TABLE OF CONTENTS Important Safety Instructions 1. Introduction General mixing
The Engineers. Quick Start Guide
 The Engineers Quick Start Guide Powered by 16 XLR Outputs, individually assignable to any mix bus or direct output 32 MIDAS Designed Programmable Mic Preamps with individually selectable phantom power
CalArts Film/Video Sound Quick Start for Sound Devices 744T Time Code Hard Drive Field Recorder:
 CalArts Film/Video Sound Quick Start for Sound Devices 744T Time Code Hard Drive Field Recorder: Front Panel Descriptions 1) Digital Input LEDs! Indicates the presence of digital signal on the respective
TPM4200FX MKII V2 24- BIT EFFECTS PROCESSOR MAIN MID LOW FOOT SW FX RETURN FX SEND OUT. 12KHz. 2.5KHz USB PLAYER CH4 OFF COMP./LIM.
 .5KHz TPM400FX MKII V KHz MID LOW 80Hz CH4 OFF COMP./LIM. 88 FOOT SW PHANTOM FX RETURN FX SEND MAIN 4- BIT EFFECTS PROCESSOR MAIN OUT MONITOR OUT 9 . INTRODUCTION...4. FEATURES...4. USEFULL DATA...4 4.CONTROL
Introduction. 3. What s in the Box?. 3. About the ProFire 2626 FireWire Audio Interface. 4. ProFire 2626 Features. 5. System Requirements.
 User Guide User Guide Introduction. 3 What s in the Box?. 3 About the ProFire 2626 FireWire Audio Interface. 4 ProFire 2626 Features. 5 System Requirements. 6 Minimum System Requirements/Specifications.
IMPORTANT SAFETY INSTRUCTIONS
 IMPORTANT SAFETY INSTRUCTIONS When using this electronic device, basic precautions should always be taken, including the following: 1. Read all instructions before using the product. 2. Do not use this
1 Mic-In / 1 Guitar-In, 2-Out Professional vocal recording USB Interface. User manual
 1 Mic-In / 1 Guitar-In, 2-Out Professional vocal recording USB Interface User manual Important Safety Instructions 1. Read this manual thoroughly before using this unit. 2. Keep this manual for future
PMX402M 4 CHANNELS PMX602M 6 CHANNELS PMX802M 8 CHANNELS
 Owner s Manual PMX402M 4 CHANNELS PMX602M 6 CHANNELS PMX802M 8 CHANNELS www.pyleaudio.com FEATURES Balanced microphone inputs, high impedance microphone/line Inputs and Tape/CD inputs. All may be used
CM-series compact mixing consoles. User Manual
 CM-series compact mixing consoles CM4-LIVE (170.800) CM4-STUDIO (170.810) CM6-LIVE (170.801) CM8-LIVE (170.802) CM8-STUDIO (170.812) CM10-LIVE (170.803) User Manual Features: 4 LIVE models with USB/SD
USER S GUIDE TC FX II. Renowned M2000 Reverb Algorithms. Plug-in for Mackie Digital Mixers
 USER S GUIDE TC FX II Renowned M2000 Reverb Algorithms Plug-in for Mackie Digital Mixers Iconography This icon identifies a description of how to perform an action with the mouse. This icon identifies
System Interface Unit SIU-100/100T
 System Interface Unit /100T Since its introduction, the Digital Mixer has opened up an entirely new set of opportunities for affordable PA and sound-recording applications. Recognizing the ever-increasing
DL806. Digital Live Sound Mixer with ipad Control
 The 8-channel Mackie DL806 brings the power of digital mixing and wireless ipad control to more users and applications than ever before. This gives you the mobile freedom to control the mix with powerful
OWNER S MANUAL GEQ 131/ 131LF GEQ 215/ 215LF GEQ 231. Single Channel 31 Band Graphic Equalizer. 2 Channel 15 Band Graphic Equalizer
 20 25 31.5 40 50 63 80 0 125 160 200 250 315 400 500 630 800 1K 1.25K 1.6K 2K 2.5K 3.15K 4K 5K 6.3K 8K K 12.5K 16K 20K +12 +6 +3 0-3 GEQ 131LF 5 31 BAND GRAPHIC EQUALIZER 15 40 60 7K 15K 22K BYPASS RANGE
SC100. Item ref: UK. Version 1.0
 SC100 Suitcase PA Item ref: 178.192UK User Manual Version 1.0 Caution: Please read this manual carefully before operating Damage caused by misuse is not covered by the warranty Introduction Thank you for
QUICKSTART GUIDE ENGLISH ( 3 9 ) MANUAL DE INICIO RÁPIDO ESPAÑOL ( ) GUIDE D UTILISATION RAPIDE FRANÇAIS ( )
 MANUAL DE INICIO RÁPIDO ESPAÑOL ( ) GUIDE D UTILISATION RAPIDE FRANÇAIS ( )") QUICKSTART GUIDE ENGLISH ( 3 ) MANUAL DE INICIO RÁPIDO ESPAÑOL ( 11 17 ) GUIDE D UTILISATION RAPIDE FRANÇAIS ( 1 25 ) MANUALE RAPIDO DI UTILIZZAZIONE ITALIANO ( 27 33 ) KURZANLEITUNG DEUTSCH ( 35 41 )
QUICKSTART GUIDE ENGLISH ( 3 ) MANUAL DE INICIO RÁPIDO ESPAÑOL ( 11 17 ) GUIDE D UTILISATION RAPIDE FRANÇAIS ( 1 25 ) MANUALE RAPIDO DI UTILIZZAZIONE ITALIANO ( 27 33 ) KURZANLEITUNG DEUTSCH ( 35 41 )
Users Manual. Pronomic TAS-18 Active Touring System
 Users Manual Pronomic TAS-18 Active Touring System Version 01/2012 IMPORTANT SAFETY INSTRUCTIONS The apparatus shall not be exposed to dripping or splashing and that no objects filled with liquids, such
M-1264 M-1212E STEREO MIXERS. TOA Corporation OPERATING INSTRUCTIONS. TOA 1000 series CAUTION
 OPERATING INSTRUCTIONS STEREO MIXERS M-1264 M-1212E TOA 1000 series CAUTION TO REDUCE THE RISK OF ELECTRICAL SHOCK, DO NOT REMOVE COVER. NO USER SERVICEABLE PARTS INSIDE. REFER SERVICING TO QUALIFIED SERVICE
DL1608 DL1608. Digital Live Sound Mixer with ipad Control
 Nearly 25 years ago, Mackie revolutionized the pro audio world by unleashing the CR1604 16-channel mixer. Today, Mackie redefines live mixing by combining the power of a digital mixer with the ease and
CM SERIES. Compact Live and Studio Mixers. Item ref: UK, UK, UK, UK, UK, UK User Manual
 CM SERIES Compact Live and Studio Mixers Item ref: 170.800UK, 170.801UK, 170.802UK, 170.803UK, 170.810UK, 170.812UK User Manual Caution: Please read this manual carefully before operating Damage caused
STUDIO RECORDING PREAMP with 192kHz FIREWIRE INTERFACE O W N E R S M A N U A L
 STUDIO RECORDG PREAMP with 192kHz FIREWIRE TERFACE O W N E R S M A N U A L ONYX 1200F Important Safety Instructions 1. Read these instructions. 2. Keep these instructions. 3. Heed all warnings. 4. Follow
MASELEC MTC-6 master transfer and monitor system
 MASELEC MTC-6 master transfer and monitor system http://www.maselec.com/ Mases Electronics Ltd. Bishopswood, Cannon Hill Close, Bray, Berks SL6 2DH, England. Tel/Fax: +44 (0) 1628-770 104. E-mail: leif@maselec.com
LTD East 5th Street Superior, WI USA tel: fax:
 OPERATOR'S MANUAL Version (-0.55) rough data LTD. 2117 East 5th Street Superior, WI 54880 USA tel: 715-398-3627 fax: 715-398-3279 www.cranesong.com 2004 Crane Song, LTD. Subject to change without notice.
Owner s Manual.
 Owner s Manual PMX402M PMX602M PMX802M 4 CHANNELS 6 CHANNELS 8 CHANNELS www.pyleaudio.com FEATURES Rugged and easy to operate, PMX402m/602m/802m offers great features and performance at an extremely affordable
Quick Guide. You must read the Usage and Safety Precautions before use.
 Quick Guide You must read the Usage and Safety Precautions before use. The Operation Manual can be downloaded from the ZOOM website (https://www.zoom.jp/docs/l-0). 018 ZOOM CORPORATION Copying or reprinting
MaXiO System Manual INDEX 1. Introduction Hardware Installation... 15
 INDEX 1. Introduction... 3 1.1 About this manual... 3 1.2 What s in the Box?... 4 1.3 Key Features... 4 1.3.1 PCI host card... 4 1.3.2 EX8000 2U Rack... 4 1.3.3 032 breakout box... 5 2.1 PCI host card...
X32. Digital Mixers. Flagship 32 Channel Digital Mixing Console for Live FOH, Monitor and Recording Applications.
 Digital Mixers Flagship 32 Channel Digital Mixing Console for Live FOH, Monitor and Recording Applications. 32 High-End programmable Mic Preamps and 16 balanced XLR Outputs, plus balanced Control Room
TOA ELECTRIC CO., LTD.
 Operating Instruction Manual TOA MIXING CONSOLE Model RX-31C TOA ELECTRIC CO., LTD. KOBE, JAPAN Contents General Description...2 Features...2 Front Panel...3 Rear Panel...4 Rack Mounting Instructions...5
USB AUDIO INTERFACE. Steinberg Web Site C.S.G., Pro Audio Division 2012 Yamaha Corporation 209MW-A0
 USB AUDIO INTERFACE EN DE FR ES IT ZH JA Steinberg Web Site http://www.steinberg.net C.S.G., Pro Audio Division 2012 Yamaha Corporation 209MW-A0 Contents Contents Contents...2 A Message From the Development
IN 2 USB 2.0 COMPUTER AUDIO INTERFACE OWNER S MANUAL
 IN 2 USB 2.0 COMPUTER AUDIO INTERFACE OWNER S MANUAL IN2 Safety Declarations CAUTION: For protection against electric shock, do not remove the cover. No user serviceable parts inside. WARNING: This equipment
Specifications. It s the sound.
 This guide will help you hook up the Artis/Artis7 to your sound system and MIDI system, give you a quick overview, and show you how to start playing music with the Artis. A full manual for the Artis can
MADI-PC MADI RECORDING SYSTEM
 MADI-PC MADI RECORDING SYSTEM USER MANUAL V1.0 1 P a g e Table of Contents INTRODUCTION... 3 IMPORTANT SAFETLY PRECAUTIONS... 4 General Safety... 4 Caution... 4 Power Safety... 5 Installation Notes...
Sono 61. English User Guide
 Sono 61 English User Guide 1 Introduction.............................................................. 3 ProKeys Sono 61 Features............................................... 4 What s in the Box?.......................................................
4-in/6-out USB Recording Interface. User s Guide
 4-in/6-out USB Recording Interface User s Guide - Copyright 2007 Revision 1, June 2007 www.esi-audio.com INDEX 1. Introduction... 4 1.1 What s in the box... 4 1.2 Key Features... 4 2. Description of U46
Overview. Features. Technical Data Sheet 1 / 6. Mixing Console AG06
 Overview AG6 is a multi-purpose mixer with USB audio interface, especially optimized for webcasting. Rear Panel Features Input channels: 6 Line Inputs (2 mono, 2 stereo), 2 Mic Inputs with 48V phantom
Overview. Features. Technical Data Sheet 1 / 6. Digital Mixing Console TF1
 Overview The intuitive TouchFlow Operation interface is optimized for touchpanel control and provides an easy-to-use digital mixing console environment for a broad spectrum of users and uses. The TF1 Digital
18-in/8-out USB 2.0 Hi-Speed External Recording Interface. User s Guide
 18-in/8-out USB 2.0 Hi-Speed External Recording Interface User s Guide - Copyright 2007 Revision 1, November 2007 www.esi-audio.com INDEX 1. Introduction... 4 1.1 What s in the box... 4 1.2 Key Features...
Accompanying documentation Fireface UFX Class Compliant Mode Technical background, mode of operation, practical use
 Accompanying documentation Fireface UFX Class Compliant Mode Technical background, mode of operation, practical use Background information on Class Compliant operation of the Fireface UFX 1. General remarks
3. This unit should not be exposed to dripping, splashing or excessive moisture or objects filled with liquid.
 Before using your new speaker system please review all information and instruction found in this user manual for the safety of the operator and optimum device performance. Caution: To reduce the risk of
Overview. Features. Technical Data Sheet 1 / 6. Mixing Console AG03
 Overview AG03 is a multi-purpose mixer with USB audio interface, especially optimized for webcasting. Rear Panel Features Input channels: 3 Line Inputs (1 mono, 1 stereo), 1 Mic Inputs with 48V phantom
Overview. Features. Technical Data Sheet 1 / 6. Digital Mixer TF-RACK
 Overview The intuitive TouchFlow Operation interface is optimized for touchpanel control and provides an easy-to-use digital mixing console environment for a broad spectrum of users and uses. The TF-RACK
Operation Manual. You must read the Usage and Safety Precautions before use ZOOM CORPORATION
 Operation Manual You must read the Usage and Safety Precautions before use. 2018 ZOOM CORPORATION Copying or reprinting this manual in part or in whole without permission is prohibited. Product names,
USBMIX6. Project Series
 USBMIX6 Six Channel Mic-Inst-Line Mixer - Computer Interface Project Series User s Manual IMPORTANT SAFETY INSTRUCTIONS - READ FIRST This symbol, wherever it appears, alerts you to the presence of uninsulated
USB Audio MIDI Interface with Mic Pre/Mixer REFERENCE MANUAL
 D01268420C US-20x20 USB Audio MIDI Interface with Mic Pre/Mixer REFERENCE MANUAL Before connecting this unit to a computer, you must download and install dedicated software on the computer. Contents 1
Professional 24-bit USB Audio Interface. User s Guide
 Professional 24-bit USB Audio Interface User s Guide - Copyright 2016-2017 Revision 2, May 2017 www.esi-audio.com INDEX 1. Introduction... 4 1.1 Features... 4 2. Installation... 7 2.1 System Recommendation...
4-In / 2-Out with +48V Phantom Power Recording USB Interface. User manual
 4-In / 2-Out with +48V Phantom Power Recording USB Interface User manual Important Safety Instructions 1. Read this manual thoroughly before using this unit. 2. Keep this manual for future reference. 3.
HDx TDM Record/Playback Option Guide
 HDx TDM Record/Playback Option Guide Version 1.0 for D-Show Digidesign 2001 Junipero Serra Boulevard Daly City, CA 94014-3886 USA tel: 650 731 6300 fax: 650 731 6399 Technical Support (USA) tel: 650 731
Check the contents of the package
 Read this first! UA-4FX Owner s Manual Copyright 2005 ROLAND CORPORATION All rights reserved. No part of this publication may be reproduced in any form without the written permission of ROLAND CORPORATION.
R-10/16 Module Pinout Connections
 R-10/1 Module Pinout Connections Chapter Contents GENERAL... -1 MM-10 INPUT MODULE... - Audio Connections... - Dipswitch Controlled Functions... - On-Air Tally Circuit... - SL-10 INPUT MODULE... -4 Audio
PROFESSIONAL EIGHT-CHANNEL AUDIO MIXER WITH USB INTERFACE, BLUETOOTH, AND DSP SOUND EFFECTS AMX7323. eight
 PROFESSIONAL EIGHT-CHANNEL AUDIO MIXER WITH USB INTERFACE, BLUETOOTH, AND DSP SOUND EFFECTS AMX733 eight CONTENTS Warning...- Precautions.........3 Package Contents........ 4 Features...... 4 Functions
Reference Manual Roland Corporation 01
 Reference Manual 2017 Roland Corporation 01 Panel Descriptions Rubix22 Front Panel 1 2 3 2 1 6 7 8 When connecting a guitar or bass, use the INPUT 1L jack. The sound level will be very low if you connect
1604-VLZ 16 CHANNEL MIC/LINE MIXER
 1604-VLZ 16 CHANNEL MIC/LINE MIXER SERVICE MANUAL Contents Pg. Quick Parts 1 Block Diagram 2 Channel Schematic 3 Pod Section Schematics 4-6 Pod Section PCB Layout 7-8 Main Section Schematics 9-14 Main
1 Mic-In / 2-Out Professional Vocal Recording USB Interface. User manual
 1 Mic-In / 2-Out Professional Vocal Recording USB Interface User manual Important Safety Instructions 1. Read this manual thoroughly before using this unit. 2. Keep this manual for future reference. 3.
Ref. No " DUAL CD PLAYER, MIXER AND CASE USER MANUAL
 Ref. No. 170.408 19" DUAL CD PLAYER, MIXER AND CASE USER MANUAL 1 CAUTION RISK OF ELECTRIC SHOCK DO NOT OPEN To prevent electric shock, do not remove top or bottom covers. No user serviceable parts inside.
2 Mic/1-Guitar in, 2 Line out recording USB Interface. User manual
 2 Mic/1-Guitar in, 2 Line out recording USB Interface User manual Important Safety Instructions 1. Read this manual thoroughly before using this unit. 2. Keep this manual for future reference. 3. Take
D3200 Main Features. D3200 Connections and Navigation 2 Modes and Features Tour 3-5
 EasyStart D3200 Main Features 32 track recorder plus a dedicated stereo master track - a total of 272 virtual tracks! Up to 12 track simultaneous recording in both 16 and 24bit Record / playback @ 44.1
Cubase SX3 / DM2000 V2 Setup and Operation
 Cubase SX3 / DM2000 V2 Setup and Operation Page 1 Cubase SX3 / DM2000 V2 Setup and Operation This document describes setup and operation for remote control of Cubase SX from the DM2000 digital mixing console.
1 - TM-D1000 Operations Manual
 1 - TM-D1000 Operations Manual Congratulations on your purchase of the TM-D1000. This high-quality digital mixing console allows you to produce crystal-clear multitrack recordings and to mix them to a
Overview. Features. Technical Data Sheet 1 / 6. Mixing Console MG10. MG10 is a versatile mixer suitable for a wide range of users and applications.
 Overview MG10 is a versatile mixer suitable for a wide range of users and applications. Rear Panel Features Input channels: 10 Line Inputs (4 mono, 3 stereo), 4 Mic Inputs with 48V phantom power and HPH
Using the 01X with Cubase SX 3. To all 01X users thank you for your continued use of the Yamaha 01X Digital Mixing Studio!
 Supplementary Manual Using the 01X with Cubase SX 3 To all 01X users thank you for your continued use of the Yamaha 01X Digital Mixing Studio! Since the 01X was first released, software programs that can
BlueKeeper. Wireless Audio Gateway. User Guide. JK Audio
 BlueKeeper Wireless Audio Gateway User Guide JK Audio Introduction JK Audio combines Bluetooth* Wireless Technology with professional audio electronics in a convenient desktop design. BlueKeeper pairs
HeadAmp6 PROFESSIONAL SIX CHANNEL HEADPHONE AMPLIFIER OPERATION MANUAL
 HeadAmp6 PROFESSIONAL SIX CHANNEL HEADPHONE AMPLIFIER OPERATION MANUAL 1 IMPORTANT SAFETY INSTRUCTIONS READ FIRST This symbol, wherever it appears, alerts you to the presence of uninsulated dangerous voltage
FIREWORKS. POWER: Supports external and FireWire bus power
 FIREWORKS FireWire Audio Interface Module FIREWIRE FEATURES: Two 1394a 400 megabit ports Texas Instruments icelynx with integrated phy, link, and ARM7 processor Multiple channels at up to 19 khz: 1in /
Kogan Bluetooth Karaoke System with Dual Microphones KAKAR2MICA
 Kogan Bluetooth Karaoke System with Dual Microphones KAKAR2MICA K TABLE OF CONTENTS SAFETY & WARNINGS...1 IMPORTANT SAFETY INSTRUCTIONS...1 AC CONNECTION...2 LOCATION OF CONTROLS...3 ASSEMBLY AND CONNECTIONS...4
ZED / Sonar Trouble shooter
 ALLEN&HEATH ZED / Sonar Trouble shooter If your mixer needs servicing, repair or replacement, please contact your supplier. ALLEN&HEATH ZED / Sonar trouble shooter Issue 1 Page 1 of 16 CONTENTS INSTALL
OnAir 2500 Quick Reference
 OnAir 2500 Quick Reference OnAir 2500 Quick Reference... 3 1 What You See Is What You Got... 4 2 Safety Information... 4 3 First Aid... 4 4 Earthing... 5 5 Dimensions... 5 6 Setup of the Fixed-frame Version...
FCC INFORMATION (U.S.A.)
") IMPORTANT NOTICE FOR THE UNITED KINGDOM Connecting the Plug and Cord IMPORTANT. The wires in this mains lead are coloured in accordance with the following code: BLUE : NEUTRAL BROWN : LIVE As the colours
IMPORTANT NOTICE FOR THE UNITED KINGDOM Connecting the Plug and Cord IMPORTANT. The wires in this mains lead are coloured in accordance with the following code: BLUE : NEUTRAL BROWN : LIVE As the colours
OVERVIEW SYSTEM REQUIREMENTS
 USER GUIDE OVERVIEW The AI-1 USB Audio Interface adds studio-quality Input and Output capabilities to your PC or Mac, turning your recording software into a full recording setup. With its high quality
MG12XU Overview Features Technical Data Sheet
 Overview MG12XU is a versatile mixer suitable for a wide range of users and applications. Rear Panel Features Input channels: 12 Line Inputs (4 mono, 4 stereo), 6 Mic Inputs with 48V phantom power and
NUAGE MASTER Ncs500-CT
 CONTROL SURFACE NUAGE MASTER Ncs500-CT Operation Manual Using this manual This operation manual supports keyword searching and linking as follows. Keyword searching Searching for keywords is performed
RMC120 SERIES. Rackmount 100V mixer-amplifier with CD player. Item ref: UK User Manual. Introduction
 RMC120 SERIES Rackmount 100V mixer-amplifier with CD player Item ref: 953.141UK User Manual Introduction Thank you for choosing the Adastra RMC120 rackmount 100V mixer-amplifier with CD player as part
Apogee Quartet. QuickStart Guide
 Apogee Quartet QuickStart Guide V1, September, 2012 Contents Overview! 3 Introduction! 3 Package contents! 4 Quartet panel tour! 5 Display and touchpad tour! 7 Connecting to your Mac! 8 Adjusting Input
MODEL 805 USER MANUAL
 MODEL 805 USER MANUAL All Rights Reserved Page 1 of 12 UNPACKING & INSPECTION Save all packing materials they are required for returns and warranty service. Inspect the 805 and packing materials for any
Model 78 & Model 79. from
 Model 78 & from StudioComm for Surround Once exclusively the domain of major motion picture studios and large production facilities, the recording, mixing, editing, and distribution of multichannel surround
PRE116/126. User Manual.
 PRE116/126 User Manual www.audac.eu ADDITIONAL INFORMATION This manual is put together with much care, and is as complete as could be on the publication date. However, updates on the specifications, functionality
Model 78 Central Controller / Model 79 Control Console
 Model 78 Central Controller / Model 79 Control Console StudioComm for Surround Once exclusively the domain of major motion picture studios and large production facilities, the recording, mixing, editing,
Studio One Standard Mat rix Profile Setup and Quick Start Guide
 Document Version 1.0 Studio One Standard Mat rix Profile Setup and Quick Start Guide Introduction The first part of this tutorial details how to setup Studio One with your SSL Matrix. The second part details
Direct Pro LX6 Specifications, Options, & Components
 Direct Pro LX6 Specifications, Options, & Components O W N E R Direct Pro LX6 Specifications: Converters: THD+N: Dynamic Range: Frequency Response: Sample Rates: Analog Inputs: Analog Outputs: Headphone
FCC INFORMATION (U.S.A.)
") IMPORTANT NOTICE FOR THE UNITED KINGDOM Connecting the Plug and Cord IMPORTANT. The wires in this mains lead are coloured in accordance with the following code: BLUE : NEUTRAL BROWN : LIVE As the colours
IMPORTANT NOTICE FOR THE UNITED KINGDOM Connecting the Plug and Cord IMPORTANT. The wires in this mains lead are coloured in accordance with the following code: BLUE : NEUTRAL BROWN : LIVE As the colours
LapTop. LapTop LAYLA. 24 LAYLA LapTop MONA MONA GINA 24 MIA. Owner s Manual Version 3.0 for Macintosh
 LAYLA 24 LAYLA LapTop LapTop MONA MONA LapTop GINA 24 MIA Owner s Manual Version 3.0 for Macintosh Designed and Manufactured in the U.S. by Echo Corporation Important Safety Instructions 1. Read Instructions
201-USB Play mixer. user manual
 201-USB Play mixer user manual Musikhaus Thomann Thomann GmbH Hans-Thomann-Straße 1 96138 Burgebrach Germany Telephone: +49 (0) 9546 9223-0 E-mail: info@thomann.de Internet: www.thomann.de 19.09.2018,
PPHP898MX. Wireless BT Streaming PA Speaker & Amplifier Mixer System Kit. Dual Loudspeakers, 8-Ch. Audio Mixer, MP3/USB Reader, +48V Mic Phantom Power
 PPHP898MX Wireless BT Streaming PA Speaker & Amplifier Mixer System Kit Dual Loudspeakers, 8-Ch. Audio Mixer, MP3/USB Reader, +48V Mic Phantom Power In order to achieve the best performance of your product,
Cubase SX / 02R96 Setup and Operation V2
 Page 1 Cubase SX / 02R96 Setup and Operation This document describes setup and operation for remote control of Cubase SX from the 02R96 digital mixing console. These instructions apply to 02R96 V2.0 or
16-Track Digital Recorder Quick Loop Sampler Parametric EQ and Dynamics Pro Quality Effects Sound Clip Recorder Optional CD-RW Drive
 16-Track Digital Recorder Quick Loop Sampler Parametric EQ and Dynamics Pro Quality Effects Sound Clip Recorder Optional CD-RW Drive Professional Digital Music Production Made Quick and Easy The AW16G
Matrix K. User's Manual. Version 1.0
 Matrix K User's Manual Version 1.0 FCC INFORMATION (U.S.A) 1. IMPORTANT NOTICE: DO NOT MODIFY THIS UNIT! This product, when installed as indicated in the instructions contained in this manual, meets FCC
VirtualDJ 8 Rane TTM57 MKII 1
 VirtualDJ 8 Rane TTM57 MKII 1 Table of Contents Installation... 3 Connections... 3 Drivers... 4 VirtualDJ 8 Setup... 4 Advanced Setup... 5 VirtualDJ & Hardware Functionality... 6 A. Volume Mixer... 7 B.
Apogee Symphony I/O Mk II
 Apogee Symphony I/O Mk II User s Guide April 2017 Contents Overview... 5 Introduction... 5 Features... 5 Package Contents... 6 Register your product : apogeedigital.com/register... 6 Symphony I/O Mk II
STUDIO RECORDING PREAMP with 192kHz FIREWIRE INTERFACE
 STDIO RECORDG PREAMP with 192kHz FIREWIRE TERFACE O W N E R S M A N A L F Important Safety Instructions 1. Read these instructions. 2. Keep these instructions. 3. Heed all warnings. 4. Follow all instructions..
Word Clock Select. 188 Digital I/O, Setup, and Utilities. Wordclock. 1. Use the [DIGITAL I/O] button to locate the DIGITAL I/O 1/5 page.
![Word Clock Select. 188 Digital I/O, Setup, and Utilities. Wordclock. 1. Use the [DIGITAL I/O] button to locate the DIGITAL I/O 1/5 page.](/thumbs/96/129216804.jpg "Word Clock Select. 188 Digital I/O, Setup, and Utilities. Wordclock. 1. Use the [DIGITAL I/O] button to locate the DIGITAL I/O 1/5 page.") 188 Digital I/O, Setup, and Utilities Word Clock Select 1. Use the [DIGITAL I/O] button to locate the DIGITAL I/O 1/5 page. The 02R processes audio data at 44.1 khz or 48 khz using its internal clock,
188 Digital I/O, Setup, and Utilities Word Clock Select 1. Use the [DIGITAL I/O] button to locate the DIGITAL I/O 1/5 page. The 02R processes audio data at 44.1 khz or 48 khz using its internal clock,
Live mixer with 4 mics + 5 lines + 24-bit DSP, 10 FX and USB port
 Live mixer with 4 mics + 5 lines + 24-bit DSP, 10 FX and USB port USER GUIDE 9558 - September 2009 Version 1.0 English MX822 - Live mixer with 4 mics + 5 lines + 24-bit DSP, 10 FX and USB port Page 2 MX822
Firefly 808 FIREWIRE INTERFACE
 Firefly 808 FIREWIRE INTERFACE IMPORTANT SAFETY INSTRUCTIONS The apparatus shall not be exposed to dripping or splashing and that no objects with liquids, such as vases, shall be placed on the apparatus.
IMPORTANT SAFETY INSTRUCTIONS
 IMPORTANT SAFETY INSTRUCTIONS When using this electronic device, basic precautions should always be taken, including the following: 1. Read all instructions before using the product. 2. Do not use this
Configuring Cockos Reaper with ZED-R16
 This document describes how to configure Cockos Reaper to work with the ZED-R16. The following step by step procedures refer to Reaper 3.75 on both MAC an PC. A similar procedure should apply for other
2 Mic/1-Guitar in, 2 Line out recording USB Interface with DSP effect built-in. User manual
 2 Mic/1-Guitar in, 2 Line out recording USB Interface with DSP effect built-in. User manual Important Safety Instructions 1. Read this manual thoroughly before using this unit. 2. Keep this manual for
USB AUDIO INTERFACE. UR-RT4 / UR-RT2 Operation Manual. Operation Manual
 USB AUDIO INTERFACE UR-RT4 / UR-RT2 Operation Manual EN Operation Manual Contents Contents Panel Controls and Terminals...3 Front Panel UR-RT4...3 Rear Panel UR-RT4...5 Front Panel UR-RT2...6 Rear Panel
DM25, DM40. Compact 100V mixer-amplifiers with Bluetooth. Item ref: UK, UK User Manual
 DM25, DM40 Compact 100V mixer-amplifiers with Bluetooth Item ref: 953.108UK, 953.109UK User Manual Caution: Please read this manual carefully before operating Damage caused by misuse is not covered by
D A FW Professional Control Surface / FireWire Audio-MIDI Interface SETUP GUIDE
 D00756700A» FW-1884 Professional Control Surface / FireWire Audio-MIDI Interface SETUP GUIDE Table of Contents 1 Introduction About the FW-1884...3 COMPUTER surface mode... 3 MIDI CTRL (control) surface
PPHP210AMX. Stage & Studio PA Speaker & DJ Mixer Bundle Kit
 PPHP210AMX Stage & Studio PA Speaker & DJ Mixer Bundle Kit (2) 10 Bluetooth PA Loud-Speakers with Built-in LED Lights, 8-Ch. Audio Mixer, Speaker Stands, Wired Microphone (600 Watt) WARNING! CAUTION: TO